Прежде, чем собирать кубик Рубика 4×4, научитесь собирать классический кубик 3х3, т.к. сборка кубика 4х4 состоит из тех же алгоритмов, что и 3х3, но дополнена несколькими новыми формулами
Шаг 1.
В начале этого этапа кубик полностью разобран.
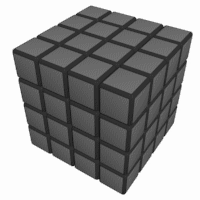
В конце этапа у Вас должны быть собраны все серединки (по 4 кубика одного цвета)
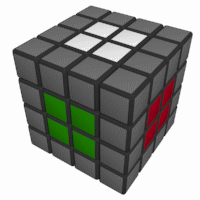
Первое, что нужно учесть, это то, что в кубике 4х4 серединки не зафиксированы как в кубике 3х3, и тут важно правильно расположить цвета серединок.
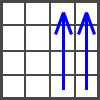
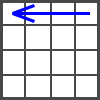
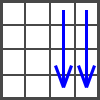
Для того, что бы выполнить этот шаг, Вам нужно переставлять между собой серединные кубики.
Поставьте нужные кубики друг напротив друга, и выполните формулу
>
Поделиcь успехами, будь мужиком!
Поделиcь успехами, будь мужиком!
Настоящие спидкуберы никогда не останавливаются на достигнутом. Научившись собирать классический кубик Рубика 3х3, они загоратся желанием учиться собирать более сложные головоломки, например кубик 4х4.
Ссылки на видео с кратким описанием ниже.
4х4. Первый центр (видео)
4х4. Второй центр (видео)
4х4. Третий центр (видео)
4х4. Четвёртый центр (видео)
4х4. Пятый и шестой центры (видео)
4х4. Рёбра (видео)
4х4. Комбинация «предатель» (видео)
4х4. Комбинация «шпион» (видео)
Пошаговая инструкция — Как собрать кубик 4 на 4. Тут вы найдете ответ на вопрос — как собрать кубик 4 на 4 схема для начинающих самый простой способ.
Головоломки являются хорошим способом занять немного времени с пользой для себя. Решение таких задач увлекательно, и при этом положительно влияет на мозг: улучшается реакция и внимание, развивается тактильная и зрительная память. Одной из самых распространённых головоломок на сегодняшний день является кубик Рубика в различных своих вариациях (размерами 2х2х2, 3х3х3, 4х4х4 ячеек). Хоть эта головоломка и была изобретена несколько десятков лет назад, она снова находится на пике своей популярности.
Собрать кубик Рубика 4 на 4 пошагово схема
В данной статье мы рассмотрим одну из методик сборки кубика размерностью 4х4. Эта пошаговая инструкция прекрасно подойдёт новичкам для освоения азов по сборке головоломки, однако не стоит рассматривать её как единственно правильную – с опытом, вы сможете использовать другие способы и даже разработать свой собственный.Для тех, кто впервые держит кубик Рубика 4х4, может подойти следующий способ сборки: необходимо поочерёдно собрать все слои (ряды) на кубике, начиная с верхнего.
Инструкция по сборке кубика Рубика 4×4
Если вы уже умеете собирать кубик Рубика 3х3х3, то сборка этой версии не покажется вам затруднительной. Вам необходимо выполнить следующие манипуляции:
- Собрать четыре центральные ячейки по своим цветам;
- попарно расположить ячейки возле рёбер куба;
- дальнейшая сборка соответствует сборке кубика 3х3.
Однако стоит отметить, что в модели кубика Рубика 4х4х4 центральные ячейки не фиксированные, что присутствует у более распространённого 3х3. Если вы неправильно собрали центральный участок, то решить головоломку не выйдет. Помните об этом и будьте внимательны к расположению цветов на сторонах куба.
Скоростная сборка кубика Рубика 4х4
Когда вы освоите навык сборки, то начинайте тренировать скорость. Вызывайте более опытных игроков кубика Рубика 4х4 на состязания по скорости сборки и количеству ходов. Не забывайте, что установленный рекорд по сборке головоломки 4х4х4 составляет 9,86 секунд за 23-46 хода. Поставьте себе цель, приблизиться как можно ближе к этому результату! Когда вам надоест играть со своим кубом 4х4, рекомендуем попробовать другие его размерности или формы этой головоломки (существуют подобные змейки, шары, пирамидки). Или же вы можете выбрать головоломку Рубика более элегантного вида, например, изготовленный из кожи, металла, инкрустированный кристаллами Сваровски, деревянный.Кубик Рубика – это прекрасный подарок не только для себя, но и для ваших друзей и близких. Подарите двум-трём своим друзьям по головоломке, и уже скоро вы начнёте состязаться друг с другом. А возможно вам удастся стать участником и состязаний среди профессионалов.
Атеперь рассмотрим подробно — Как собрать кубик 4 на 4.
![]()
Download Article
![]()
Download Article
Solving a standard Rubik’s Cube (3x3x3) can be a daunting task, but solving a Rubik’s Revenge cube (4x4x4) can be even more difficult. This article will show you where to begin with solving them and what to do if you get stuck along the way.
-

1
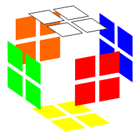
Familiarize yourself with the Rubik’s Cube. Recognize where each of the colors lie on the completed cube.[1]
- Notice (going clockwise) the Red, White, and Blue faces of the cube are on one side and the Green, Orange, and Yellow faces are on another.
- This is the standard setup for newer, standard cubes. If your cube is older or is from another manufacturer than Rubik’ Cube® itself, the setup might be different and you’ll have to take a look at a solved version of your Rubik’s Cube 6n the -an4fact4rer’s website.
- There are four similar center pieces on each face of the cube, four unique corner pieces, and 8 pairs of edge pieces (every two between corners are identical).
- Notice (going clockwise) the Red, White, and Blue faces of the cube are on one side and the Green, Orange, and Yellow faces are on another.
-
2
Learn some notation so certain parts of this article are clear. Each face of the cube has a different letter to show which way you need to face it.[2]
- F = Front
- B = Back
- U = Up
- D = Down
- L = Left
- R = Right
- In an algorithm, each of these next letters in the diagram will represent a different row or column of the cube and by itself it will mean to turn that row or column once clockwise, an apostrophe ( ‘ ) will note to turn that row or column of the cube counter-clockwise once and a 2 ( 2 ) will note to turn the cube clockwise twice. Capital letters denote an outer layer of the cube while lower-case letters are the inner layers.
-
- An example algorithm could be something like F u’ r L2 u. This particular algorithm if spoken would sound like: Turn the outside front layer clockwise once, the inside up layer counter-clockwise once, the inside right layer clockwise once, the outside left layer clockwise twice, and the inside up layer clockwise once.
Advertisement
-
3
Scramble your Rubik’s Cube. Assuming your Rubik’s Cube is brand new, you will need to take it out of the box and scramble it. There is not really a wrong way to do this, but you should spend about 60 seconds to do so.[3]


Advertisement
-
1
Start with the 2×2 centers on each face of the cube. We are going to begin with one side of the cube in this step.[4]
- You will need to solve three faces on one side of the cube consecutively before being able to solve the opposite side, so refer to the cube layout as explained earlier, and choose either the Red, White, and Blue or the Orange, Yellow, and Green.
- Begin with the White center and keep in mind where the Red and Blue centers will need to be in relation to it.
- Now solve the Red center being mindful to not scramble the white center.
- Then, the blue center.
-
2
Solve the opposite side of the cube. For the opposite side of the cube, the solution is a bit trickier and requires more direction.
- The object here is to find an “L-shaped” center. As you can see, to solve one of these, you must temporarily move one of the other solved centers.[5]
- To start, put the corner of the L-shape in the lower right corner of the center.
- Find the last matching color on the other side of the cube and turn it to the lower right corner as well.
- Now follow this algorithm to complete the center: r U r’
- Repeat this process for the remaining two centers and they should turn out the same.
- The object here is to find an “L-shaped” center. As you can see, to solve one of these, you must temporarily move one of the other solved centers.[5]
-
3
Complete each of the edge pairings. There are exactly two of each edge piece and they will fit right next to each other between two corners.[6]
- Begin by finding two of the same edge pieces. Here you will see a Red/Green pairing.
- Situate these two edge pieces on the same face of the cube, on opposite ends of the face, and showing opposite colors. In the next two pictures, the edge pair is highlighted with a white dot on each face.
- Using the Green center as the Front of the cube, follow this algorithm to complete the edge pairing: U u R U’ R’ U’ u’
-
- Repeat this process with other pairs until there are two unmatched pairs left.
-
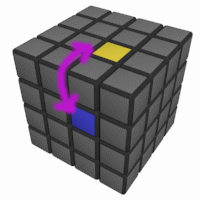
4
Solve for the “edge parity” of the last two pairs that need to be put together on the cube. Because the original edge pairing algorithm will not work, you must use a new algorithm for this step.[7]
- Begin by turning each color of each pair to match, but put them directly across from each other on the same face. In this picture, you’ll see this with the Blue and Yellow squares to the opposite sides of the Green center.
- Now you will need to perform this algorithm: D d R F’ U R’ F D’ d’. Your cube should now have all the edges and centers solved.
- Begin by turning each color of each pair to match, but put them directly across from each other on the same face. In this picture, you’ll see this with the Blue and Yellow squares to the opposite sides of the Green center.


Advertisement
-
1
Use a 3x3x3 Rubik’s Cube strategy to solve. If you are at all familiar with a standard 3x3x3 Rubik’s Cube, you may notice that is exactly what the cube resembles at this point.[8]
- The 4 center pieces on each face represent a single center piece.
- Each pair of 2 adjacent edge pieces represent a single edge piece.
- The corners are all the same as the 3x3x3 cube.
-
2
Solve for a White «cross» section to start.[9]
-
- From here, you will need to add the corners, so find a white corner piece and move it into a position to be joining the White face. Be mindful of the other colors on the corner piece, and be sure they correspond to the other sides once in place. In the picture above you can see three white corner pieces off of the main white face. You cannot force these corners into the white side without disturbing the White cross, so when they are in this exact position, use this algorithm: B’ U’ B U. Repeat this process three more times until you have an entirely White face of the cube complete.
-
-
3
Solve entire center layer of the cube. You should notice at this point you will have four “T-shaped” patterns surrounding the White face.[10]
-
4
Turn the cube around so the white face is facing away from you. Pick a color around the yellow center that is not yellow, and turn the cube so that color is on the side of the cube with the center that it matches. This will make a larger “T-shape”.[11]
-
5
Solve for a Yellow cross-shape. At this point when you turn your cube to the Yellow face you will see one of three possible patterns: an “L-shape”, a “Bar” shape (yellow blocks in a straight line), or just the yellow center.[12]
- For the L-shape, use this algorithm: F U R U’ R’ F’
- For the Bar shape, use this algorithm: F R U R’ U’ F’
- If you have just the yellow center, then choose either of the processes and do it twice.
-
6
Solve for the Yellow corners. You will now have a Yellow cross on the face of the cube and you may have one or more Yellow corners as well. This step is to solve for the rest.
- Find one yellow corner not on the yellow face cube and turn it toward you. Follow this algorithm: R U R’ U R U2 R’. Repeat this until the Yellow face is complete.
-
7
Solve for the last layer. If you have any two corners on the same side matching, turn them to their matching side, and turn that face of the cube away from you for this next part. If you had no matching corners, repeat this step twice.[13]
- Follow this algorithm: R’ F R’ B2 R F’ R’ B2 R2
-
Now, sometimes every side will be solved. However, once in a while, you may get a seemingly unsolvable case, called a parity. Now there are two cases you might run into. First, if the two sides are opposite each other, perform this algorithm: (Rr)2 B2 U2 (Ll) U2 (Rr)’ U2 (Rr) U2 F2 (Rr) F2 (Ll)’ B2 (Rr)2. If the two sides are adjacent to each other, first perform this algorithm: R U R’U’, then perform the above algorithm, and finally, perform this algorithm: U R U’ R’ Your 4x4x4 Rubik’s Cube is now solved!

Advertisement
Add New Question
-
Question
How do you solve it when the blue and the greens are opposite L shape, like all the centers are solve except green and blue, then what do you do?

If you mean that the second layer is solved except for one piece that is opposite what it should, you would simply follow the algorithm to put another random piece into that location and do it again so that the piece is turned the right way.
-
Question
What is the fastest way to solve one of these?
Practice a lot! If you haven’t already, learn the 3 by 3. It can take lots of time to learn, especially with great speed, but it is possible with daily repetition.
-
Question
What is the OLL parity?
Jason Nguyen
Community Answer
The OLL Parity algorithm is Rw U2 x Rw U2 Rw U2 Rw’ U2 Lw U2 Rw’ U2 Rw U2 Rw’ U2 Rw’.

See more answers
Ask a Question
200 characters left
Include your email address to get a message when this question is answered.
Submit
Advertisement
Video
Thanks for submitting a tip for review!
References
About This Article
Article SummaryX
If you’re bored with your 3x3x3 cube, a 4x4x4 Rubik’s cube will definitely make things more challenging! To solve it, start by getting the 2×2 center blocks for white, red, and blue. Then, solve the opposite side of the cube. You’ll also want to work on finding L-shapes of the same color. You may have to move one or more of the solved centers to get these. Once you have these done, you can solve the edge pairs. To learn how to use 3x3x3 strategy to solve the 4x4x4, read on!
Did this summary help you?
Thanks to all authors for creating a page that has been read 230,728 times.