Существует такая примета: если в названии игры или фильма появляется слово «против» — ничего хорошего можно не ждать. Исключения случаются редко, и их можно, пожалуй, пересчитать по пальцам одной руки, да и еще «лишние» пальцы останутся. Пожалуй, это один из самых банальных вариантов названия и почти что самый «заразный» — хуже только написание названия через точки.
Еще одно правило связано с присутствием в игре или фильме оживших мертвецов в качестве главных противников. Больше чем в половине случаев они будут ходить толпами, рычать и пытаться съесть главного героя или героиню. Чего же ждать от игры, которая называется «Растения против зомби»? Естественно — того и другого!
Они приближаются!
На первых порах Plants vs. Zombies может показаться совершенно несложной игрой. Судите сами: справа налево по экрану неспешно хромают один за другим зомби, чья задача предельно проста: пройти по газону до дома, забраться внутрь и употребить его хозяев в пищу, особенно их мозги. Все, как говорится, «в лучших традициях».
Но это не боевик, и потому ни героя, в одиночку отстреливающего неупокоенных, ни даже группы выживших с огнестрельным оружием в руках здесь не будет. Чтобы остановить кровожадных мертвецов, нужно собрать солнечную энергию, которая сама по себе падает с неба. Потом посадить несколько подсолнухов, которые дадут еще больше «солнышек». И уже потом высадить в грунт единственно доступную в начале оборону — «горохострелы».
Именно так: в полном соответствии с названием последней линией обороны между зомби и вашим мозгом станут растения. У каждого из них свои способности, но все они служат для того, чтобы не пропустить нежить к левому краю экрана, где находится дверь в дом.
Но зомби только вначале медлительны и слабы. Уже очень скоро игрок познакомится с мертвецами, надевшими ведро на голову; мертвецами, которые умеют прыгать с шестом; мертвецами, которые читают газету, и даже с целой бобслейной командой мертвецов. Всего их в игре двадцать шесть разновидностей, почти каждая из которых требует особого подхода. Бывает, что из-за одного растения, посаженного не там, приходится начинать уровень с начала.
Но и «зеленая армия» может похвастаться разнообразием — в ней найдутся бойцы на все случаи жизни. Днем или ночью, на суше или в бассейне, на земле или на крыше — горох, грибы, капуста и кукуруза будут стоять на страже мозга тех, кто их посадил.
Сложность игры нарастает постепенно, чтобы даже тот, кто никогда не встречался с играми в жанре Tower Defense, смог разобраться, что здесь вообще делать.
Искусство разбить сад
Задача игрока осложняется тем, что на каждый уровень он может взять ограниченное количество растений. И если вначале это не так важно — разновидностей зомби и защитников немного, — то примерно в середине игры подбор «карт» с защитниками становится делом достаточно сложным и интересным. Перед началом уровня игроку показывают зомби, скучающих за забором. Глядя на них и представляя, что они умеют, нужно выбирать «карты».
Приходится учитывать и то, где именно будет проходить бой: на уровне с бассейном нужно обязательно взять водные растения, а туманной ночью стоит задуматься о том, чтобы включить в свой «отряд» растения-фонари, расширяющие обзор.
И наконец — личные предпочтения. И тут простор для выбора огромен: замедлять зомби, не давая им подойти близко, или выстроить неприступную стену из орехов, которая сдержит волну нападающих? Посадить троих «дешевых» стрелков или за то же количество «солнышек» одного, но сильного? В конце концов, что вам больше по душе — горох или капуста?
Познакомиться поближе со своими друзьями и противниками можно во внутриигровом «альманахе», в который методично заносятся сведения обо всех, кого игрок уже встретил. Из него можно почерпнуть ценнейшие сведения о внутреннем мире Жгучего Перца, привычках Кукурузной Катапульты и даже о спорах зомбологов вокруг Зомбони. Но главное, что «альманах» содержит информацию об особых способностях, живучести зомби или наносимых растением повреждениях.
Что еще можно сделать с зомби?
Основное действие игры разбито на пять больших блоков, каждый из которых — новое поле боя или время суток. Но даже после победы над большим и страшным Зомбоссом игра не заканчивается. Наоборот, настоящее веселье еще только начинается!
По мере прохождения, кроме новых зомби и новых растений, становятся доступны и новые режимы игры. Это и режим «игры на выживание», когда зомби просто не заканчиваются — все идут и идут, и мини-игры с совершенно уникальным, «зомбическим» оттенком. Например, вариация на тему «собери три в ряд»: на лужайке в случайном порядке рассажены растения, и именно из одинаковых растений нужно составить комбинации по вертикали и горизонтали. Всего нужно подобрать семьдесят пять «линий». Вроде бы просто. Но ведь необходимость обороняться от напирающих мертвецов никуда не делась: они все так же мерно хромают и хрипло грозят съесть чьи-нибудь мозги. Так что приходится следить, чтобы зомби не прорвали оборону из-за того, что с поля неожиданно исчезли три гороховых куста.
Если и мини-игр покажется мало, есть еще и режим «головоломок». В одной из них нужно наудачу разбивать вазы, стоящие на газоне, — там может оказаться или растение, или зомби. Мертвец, выпрыгнув из вазы, начинает мерно хромать в сторону дома, чтобы — догадались? — съесть мозги хозяев. Вторая «головоломка» меняет роли: теперь нужно с помощью заданного набора зомби съесть сначала все растения, а потом — совершенно верно! — мозги.
Ну а если вы устанете от стрельбы и оживших мертвецов — добро пожаловать в маленький «дзенский садик», где можно просто передохнуть, поливая цветы. За хороший уход растения щедро отплатят вам монетками, на которые можно будет купить у соседа новые усиленные «карты» или полезные приспособления, которые облегчат противостояние толпам нежити.
Черный зомби, серый зомби
Говорить о графике Plants vs. Zombies сложно. Вы никогда не спутаете одно растение с другим, так же, как и с первого взгляда отличите зомби-футболиста от зомби с лестницей. Все персонажи нарисованы с большой иронией и способны вызвать вполне заслуженную улыбку.
В то же время графика напоминает об играх, написанных на flash: плоские фигурки, рисованный фон… Высоких технологий здесь нет… да на самом деле и не надо. Недостатки техники с лихвой окупаются юмором.
Примерно так же обстоят дела и с музыкой: мелодий в игре немного, но они ненавязчиво звучат именно как «фоновые», не отвлекая внимания от игрового процесса. Озвучен этот процесс тоже достаточно неплохо: по крайней мере, шипящий шепот зомби «Brains-s-s-s…» точно запомнится вам надолго. С растениями немного хуже — ни одно из них особой разговорчивостью не отличается, а звуки выстрелов и прочие эффекты в разгар боя создают такую мешанину, что из-за них порой можно вообще запутаться в происходящем.
В остальном — все на удивление хорошо. Игра свободна от ошибок, управление и интерфейс просты и понятны, а главное — удобны. Чего еще хотеть от игры, которая называется «Растения против зомби»?
• • •
Поводов для того, чтобы сыграть в Plants vs. Zombies, намного больше, чем доводов «против». Много хорошего юмора, отточенный игровой процесс с постепенно нарастающей сложностью, множество возможностей играть так, как нравится именно вам… Огромное количество дополнительных мини-игр, наконец.
Вердикт:
Море юмора, задачки самой разной сложности, различные тактики прохождения. Если вы не знаете, что такое Tower Defense, то это замечательный повод познакомиться. И что особо примечательно — в отличие от многих аналогичных игр, у нее есть лицо. И неважно, что оно мертвое…
[[BREAK]] Подсолнух
Подсолнухи всегда раскачиваются в такт музыке, которую могут слышать только они. Сами они утверждают, что это ритм самой Земли, но другие растения относятся к этому с подозрением.
Ни один бой в игре «Растения против зомби» не обходится без подсолнухов. В конце концов, кто-то же должен снабжать игрока солнечной энергией, чтобы он мог посадить другие растения? Подсолнух справляются с этой ролью на «отлично», время от времени разбрасывая вокруг себя «солнышки».
Дополнительная карта усиления делает подсолнухи сдвоенными, увеличивая и прирост солнечной энергии. Два подсолнуха на месте одного — это же очень антизомбически!
Зомби на дельфине
Эта разновидность живых мертвецов появляется только в бассейне. Они не отличаются особой крепостью, но плывут очень быстро, сближаются с первым рядом вашей обороны и перепрыгивают через него, начиная поедать растения сразу со второго ряда.
Чтобы задержать их, можно высаживать в бассейне на кувшинках специальные высокие ореховые стены, через которые нельзя перепрыгнуть. Но если энергии на эти «орешки» не хватает, можно и просто посадить два пустых листа кувшинок. Дельфин перепрыгнет через первый, а зомби примется есть второй, так и не добравшись до ваших «основных сил».
И да, дельфин — тоже зомби.
<
Кактус
Кактус может быть колючим, и не все способны разглядеть за острыми шипами его мягкое сердце, которое так хочет любить и быть любимым. Впрочем, последние несколько месяцев кактус встречается с броненосцем, и пока что в их отношениях царит гармония.
Для игрока кактус — это единственная возможность обороняться от зомби, которые летают, подвесив себя к воздушному шару. Иглам, которые выстреливает этот зеленый небритый тип, все равно, где их цель — на земле или над землей.
А для зомби это настоящий кактус окончательной смерти.
Зомби с лестницей
Похоже, при жизни этот зомби очень любил устраивать ремонт в своем доме. По крайней мере, приставная лестница в руках, молоток на поясе и карандаш за ухом наводят на такие мысли. Очень жаль, что другие зомби до него добрались, потому что после смерти он стал настоящим кошмаром оборонительного садоводства.
Если он приставит свою лестницу к заградительному ряду орехов, то свободно перебраться через него сможет не только он, но и те зомби, которые идут следом. Если такое случается во время одной из «волн», когда мертвецы ходят десятками, игрок рискует заполучить сразу штук пять-шесть зомби возле незащищенных растений.
Бороться с ним достаточно непросто: передвигается он быстро, да и здоровье неплохое. Единственное, чего он боится по-настоящему, — магнитные грибы, которые могут в момент оставить зомби с лестницей без лестницы.
Сборник мини-игр в Plants vs. Zombies — это почти самостоятельная игра. Некоторые из них настолько меняют игровой процесс, что тут стоит остановиться подробнее и посмотреть, что именно предлагают игрокам разработчики.
Все мини-игры можно условно разделить на три большие группы. В первой изменения происходят с зомби — они получают новые способности, или всю игру нам придется противостоять какому-то одному их типу. Вторая группа — это изменения игрового процесса: новые возможности, но чаще — дополнительные сложности. И наконец, третья — это мини-игры, которые полностью меняют игру.
Разнообразие нападающих
Самая первая игра в этой группе — Zombotany — одновременно одна из самых сложных. Суть ее в том, что вместо обычных оживших мертвецов на поле выходят их гибриды с растениями. Что это значит? А значит это то, что теперь зомби будут отвечать нашим защитникам «огнем» горошин и уничтожать защитников с расстояния.
На память: орехи, которые высаживает игрок, простреливаются только в одну сторону — и это именно та сторона, которая нужна нам. В этой мини-игре хорошо построенная стена орехов — залог победы.
В варианте Zombotany 2 появляются новые «гибридные» зомби, и теперь желательно вообще не подпускать их к своим «грядкам». Добиться этого можно по-разному: или выставив линию скорострельного гороха, перед которым расставить горящие пеньки, или попробовать замедлить зомби горохом-замораживателем.
На заметку: горошина, которую поджег пенек, наносит двойное повреждение. Но замороженная горошина, пролетая сквозь пламя, теряет свое тормозящее действие.
Мини-игры Invisi-ghoul, Big trouble, little zombies и Zombie nimble, zombie quick мало чем отличаются от обычных уровней. В первой из них зомби становятся невидимками, но только для игрока — растения стреляют по ним как обычно, так что первоочередная задача: обеспечить хоть какую-нибудь оборону.
В Bobsled bonanza основную массу нападающих составят «зомбони», прокладывающие ледовые дорожки, и зомби-бобслеисты, которые по этим дорожкам ездят. Лучше всего заранее поставить перед каждой такой «дорожкой» куст шипастой травы, которую очень не любят транспортные средства мертвых.
Проблемы в защите
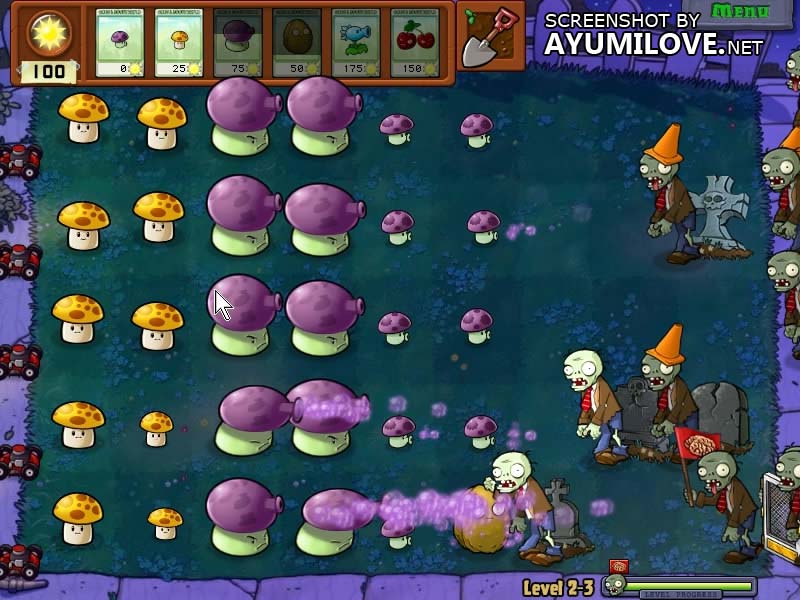
Мини-игры второй группы делают все, чтобы создать нам дополнительные проблемы. Например, в Slot machine нет изначально доступных «карт» с растениями. Оборону придется выстраивать, дергая ручку «однорукого бандита»: выпало два одинаковых рисунка — получите одно растение. Выпало три — можно будет посадить три растения. Каждое вращение барабана обойдется вам в двадцать пять «солнышек», а вращать его придется часто… Защита дома здесь отходит несколько на второй план. Главная задача в этой мини-игре — собрать две тысячи солнечной энергии.
В Wall-nut bowling цели игры остаются без изменений, но вот методы их достижения… Из всех возможных растений вам будут доступны только орехи нескольких типов: от обычных маленьких до взрывающихся и гигантских, которые прокатываются по зомби не хуже катков. И этими орехами нужно сбить как можно больше мертвецов.
На память: обычные орехи здесь хороши тем, что позволяют зарабатывать монетки. Ударившись об зомби, орех отскакивает в сторону, и если он там найдет еще одну цель, то второй удар даст вам две монетки, третий — три, и так далее. Только успевайте собирать!
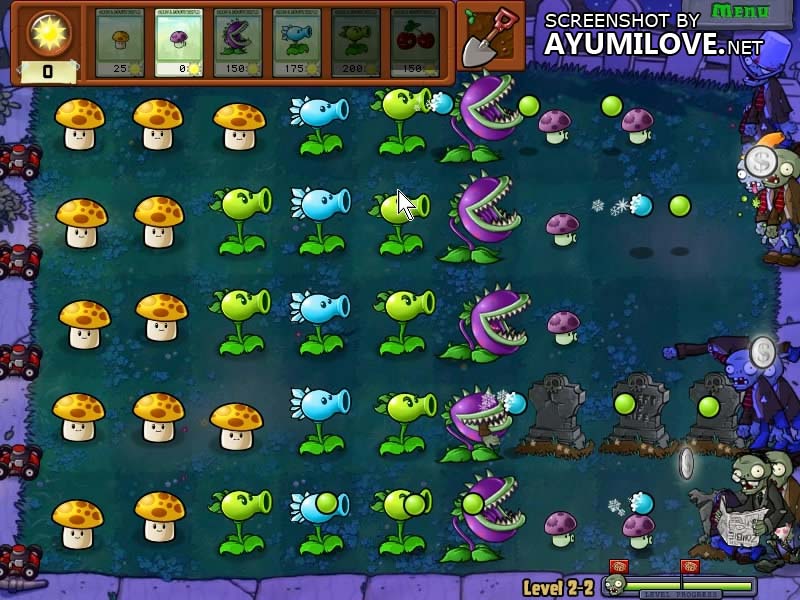
Режим игры Portal combat сложен тем, что на лужайке появляются два портала, сквозь которые можно проходить в обе стороны. То есть с одной стороны в них могут проходить зомби, а с другой — горошины и иглы кактуса прекрасно влетают в один вход и вылетают из другого, поражая зомби, которые собираются войти в портал. Тем не менее разница между «входом» и «выходом» все же есть: хотя порталы и выглядят плоскими, «вход» у них только с одной стороны. Заряды, выпущенные растением с той стороны портала, где «входа» нет, пролетят мимо как ни в чем не бывало.
Last stand — замечательная мини-игра для проверки ваших навыков планирования и экономии. На все расходы игроку выделяется пять тысяч «солнышек». На эту сумму нужно построить оборону, которая сможет выдержать пять волн атак зомби. После каждой волны вы будете получать «премию» в двести пятьдесят единиц солнечной энергии, которой хватит в лучшем случае только на то, чтобы слегка подлатать защитные сооружения.
Случай из практики: можно продержаться пять «волн», почти не меняя растений. Для этого первой линией слева сажаем «трехствольный» горох, перед ним — горящие пеньки, а справа на каждой дорожке, на сколько хватит денег, рассаживаем шипастую траву. Большинство зомби до пеньков не дойдет. Некоторую опасность составляют только зомби-футболисты и зомби-дельфины, но от них мы постепенно защищаемся стеной орехов.
Игра совсем о другом
И наконец, еще несколько мини-игр существуют как бы «сами по себе», не имея почти ничего общего с тем, что можно видеть при игре на прохождение.
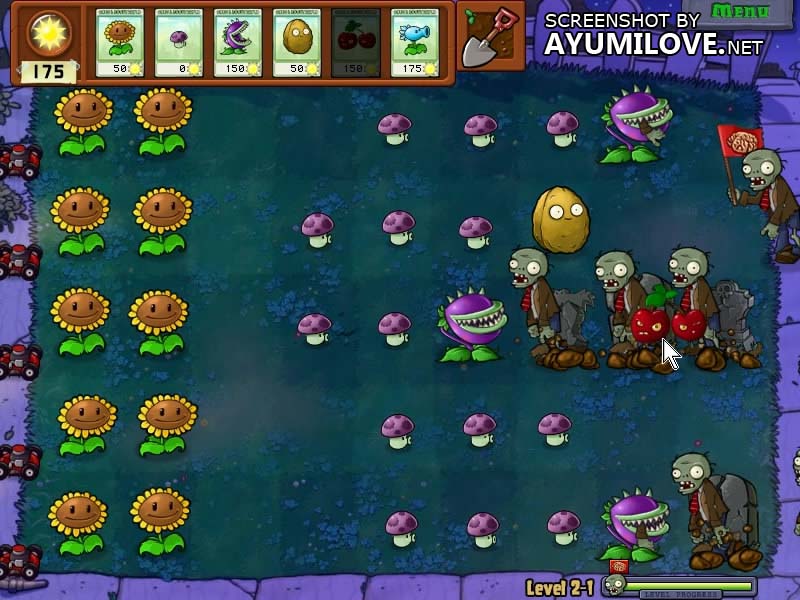
Первая из них — Zombiquarium — передает в распоряжение игрока аквариум с тремя плавающими зомби. Эти «неправильные» мертвецы каким-то образом роняют в воду все те же «солнышки». Цель игры — выкупить «кубок», который стоит тысячу единиц энергии.
Проблема в том, что зомби нужно еще успевать подкармливать. Причем теми же мозгами, которые вы от них так старательно защищали…
Чтобы ускорить процесс, всего за сто «солнышек» можно «покупать» дополнительных водоплавающих зомби в аквариум. Только помните, что больше трех мозгов одновременно в воде быть не может — и попытка прокормить пять-шесть зомби может провалиться.
Whack a zombie оставляет цель игры без изменений — не дать зомби зайти в дом. Но вот в этот раз придется обходиться без растений-помощников. Все, что у вас есть, — тяжелый молоток, могилы и зомби, которые из них лезут. Заталкивать обратно в землю разбушевавшихся мертвяков придется, собственноручно успокаивая каждого молотком по голове. Некоторых — несколькими ударами.
This page is a guide with tips on how to complete the levels in Adventure Mode, with help from other users.
For a more in depth guide, try here.
Number of flags per level
Number of flags (first time):
- Zero flags: 1-1, 2-5, 4-5, 5-10
- One flag: 1-2 to 1-6, 1-8, 2-1, 2-3, 2-6, 2-8, 3-1, 4-1, 4-3, 4-6, 4-8, 5-1
- Two flags: 1-7, 1-9, 1-10, 2-2, 2-4, 2-7, 2-9, 2-10, 3-2, 3-3, 3-5, 3-6, 3-8, 4-2, 4-4, 4-7, 4-9, 4-10, 5-2, 5-3, 5-5, 5-6, 5-8
- Three flags: 3-4, 3-7, 3-9, 3-10, 5-4, 5-7, 5-9
Number of flags (subsequently):
- Two flags: 1-1 to 1-6, 1-8, 1-10, 2-1, 2-3, 2-6, 2-8, 2-10, 3-1, 4-1, 4-3, 4-6, 4-8, 5-1
- Three flags: 1-7, 1-9, 2-2, 2-4, 2-7, 2-9, 3-2, 3-3, 3-5, 3-6, 3-8, 3-10, 4-2, 4-4, 4-7, 4-9, 4-10, 5-2, 5-3, 5-5, 5-6, 5-8
- Four flags: 3-4, 3-7, 3-9, 5-4, 5-7, 5-9
- 1-10, 2-5, 2-10, 3-10, 4-5, and 5-10 remain the same length.
Stage layout
The first and third levels are simplistic. The second and fourth levels expand upon this, with the new zombie and multiple waves, as well as the past zombies to deal with.
The fifth level is always a bonus level, most of which later reappear as mini-games.
The sixth through ninth levels work similarly to the first through fourth. The tenth level is the final level in the stage, and is a conveyor-belt level. In these levels, you do not need to worry about sun. The seed packets come on the conveyor-belt at the top, and stop once they reach the end. You can grab them off of any part of it and plant them. Make sure to keep at least some space on the conveyor-belt clear, though, or there will be no room for new packets to come in.
Stage One: Day
Overview
The levels here are simple. It is daytime, so sun will come from the sky. This is the basic layout. At the beginning of the first few levels, strips of grass will roll out, eventually creating five rows. This acts as a tutorial level, and the first three levels cannot be replayed when completed.
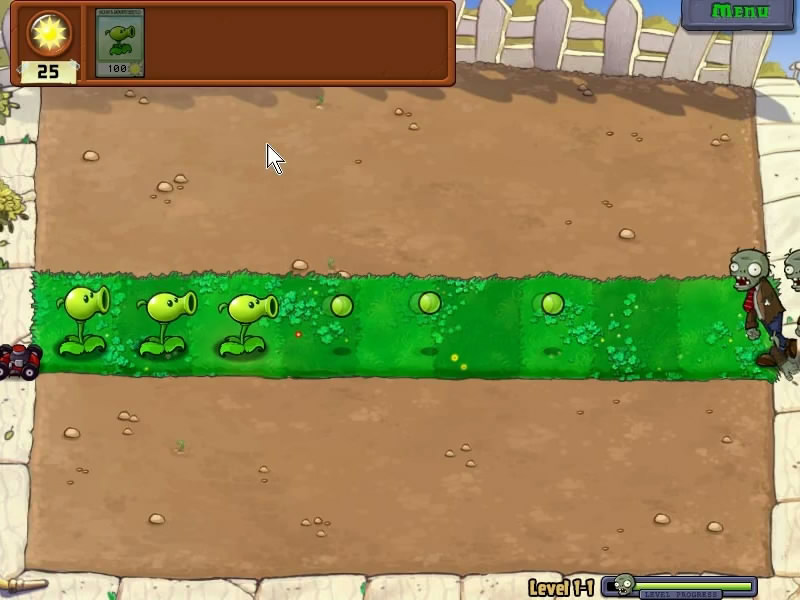
Level 1-1
For the full article, see Level 1-1
By Someone456
Here, there is only one strip of grass. So, plant as many Peashooters as possible. There are only five zombies during this level, and there is not even a «massive» wave of zombies at the end, so two Peashooters are sufficient, although three would be great. This level is, fittingly, the easiest level in the whole game. It is so easy that you can’t even lose the level. No zombies will come until you plant your second Peashooter.
Plants earned: Peashooter, Sunflower
New Zombie: Zombie
Note: When you play this level for the first time, it is impossible to fail. Even if you plant two Peashooters on the extreme right side of the lawn, they would get eaten but the zombies are too slow, so by the time the final wave arrives, the zombies wouldn’t have reached the Lawnmower, which would kill them all and complete the level.
Level 1-2
For the full article, see Level 1-2
Two more strips of grass will roll out here. One on the top, another on the bottom, each above and below the «mid-strip.» Plant three, six or nine Sunflowers in the back, then plant more Peashooters until you get a solid defense. This level is a good candidate for the achievement Sunny Days as no zombies will come until you plant your third Sunflower, making it possible to get maximum sun with only two Sunflowers.
Plant earned: Cherry Bomb
New Zombie: Flag Zombie
Level 1-3
For the full article, see Level 1-3
Same tactic as Level 2. However, if anything gets bad, use a Cherry Bomb. You may want to use it at the final wave. This level is the first to feature Conehead Zombies, which are tougher than the normal variety. If you do not have enough Peashooters, save some Sun so you can bomb them. Also, note that from this point onward, every single level will contain Coneheads, with the exception of Level 2-1. Their inclusion in the level will be omitted from this guide.
Plant earned: Wall-nut
New Zombie: Conehead Zombie
Level 1-4
For the full article, see Level 1-4
By Someone456
Here, you finally get all five lanes of grass, so use them well by planting either five, ten or fifteen Sunflowers. Apply the same tactics here from the previous levels. You may want to add a row of Wall-nuts as well. Again, use a Cherry Bomb if things get tough.
Item earned: Shovel
Level 1-5
For the full article, see Level 1-5
Wall-nut Bowling time!
First, using your trusty new shovel, dig up the three Peashooters, as told by Crazy Dave. Next, when the first zombie comes, place a Wall-nut in its lane and watch. Repeat as necessary. Attempt to achieve as many ricochets as possible, and keep in mind that the Coneheads take two hits, and Zombies take one. Wall-nuts do not roll off the screen when they reach the end of the conveyor-belt. Explode-o-nuts (the red Wall-nuts) are essentially a Cherry Bomb. Save them for emergencies, or use them for groups of zombies.
Plant earned: Potato Mine
Level 1-6
For the full article, see Level 1-6
This is the first actual level you will come up against, featuring the new Pole Vaulting Zombie. Although it is not quite as tough as a Conehead, it does move significantly faster. Stick anything cheap and easily rechargeable e.g. a Sunflower in front of it to slow it down, but if you have at least one Peashooter firing at it, it will go down easily. Other than that, there really is not anything else remarkable about this level.
Plant earned: Snow Pea
New Zombie: Pole Vaulting Zombie
Level 1-7
For the full article, see Level 1-7
This level is the first of many to have multiple waves of zombies (only two), so save some Sun for Cherry Bombs for both waves. You can check your progress at the top or the bottom of the screen. Use the new Snow Peas to defeat the Coneheads and Pole Vaulters with ease. A single one is enough to stop both. Because of their higher Sun cost, though, you may want to use more Sunflowers than normal. Note that there is no added benefit to using multiple Snow Peas in the same row. Once you have a Snow Pea base, the game basically plays itself.
Plant earned: Chomper
Level 1-8
For the full article, see Level 1-8
Moon Snail’s second play strategy, simple and sun conserving
This level introduces Bucketheads, which are tougher than Coneheads and Vaulters. Fortunately, very few appear. A Snow Pea/Peashooter combo is enough to take them out, but feel free to use Cherry Bombs, Potato Mines, or the new Chompers if conventional methods fail. Note that all levels, starting with this one, will limit the plants you can use. Later on, you can get more seed slots, but for now, you’re restricted to six.
Plant earned: Repeater
New Zombie: Buckethead Zombie
Level 1-9
For the full article, see Level 1-9
By Someone456
Pole Vaulters and a lot more Bucketheads appear frequently in this two-wave stage. Use a Snow Pea/Repeater combo to take them out, and pack your instant kill items if you need to take someone out in a pinch. A Wall-nut is also handy if the onslaught gets too unbearable.
Item earned: note
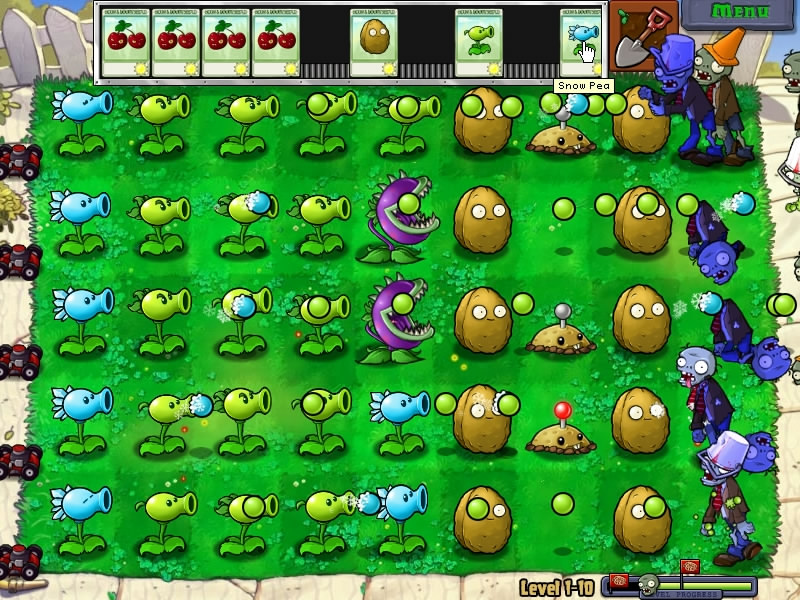
Level 1-10
For the full article, see Level 1-10
By Someone456
This is your second conveyor-belt level, the first being Wall-nut Bowling. Plant your Peashooters as soon as possible, and try to distribute them evenly between the rows. Set up a Wall-nut shield in a later column, with Potato Mines directly behind it. Try to spread out your Snow Peas so you have at least one in every row. Save your Cherry Bombs for clusters of Bucketheads and during any waves. Plant any plants you do not intend to use and dig them up immediately so you can leave space for new seeds on the conveyor-belt. This should be a fairly easy level.
Plant earned: Puff-shroom
Stage Two: Night
Overview
The main difference between Day and Night is that sun does not fall from the sky. This is reflected in that many mushrooms have low sun costs to plant, but it is still recommended that you bring Sun-shrooms (when they are unlocked), planting a column of each in the back. Overkill is not enough on the Night levels. The graves on every level spawn zombies on the final wave, so pay attention and use Grave Busters (again, when unlocked).
Strategy
One strategy to the night levels is that you can use the Sun-shroom instead of a Sunflower. Another one is that you plant a Puff-shroom anywhere, and collect sun. After you have enough sun you can take the Puff-shroom away with the shovel and plant what you want there.
Level 2-1
For the full article, see Level 2-1
By Someone456 Second Adventure — Level 2-1 (by MasaosDragon)
Okay, bring your spanking-new Puff-shrooms for no-cost zombie win and some other low cost plants, such as Potato Mines or Peashooters. It takes only one Puff-shroom to bring down a normal Zombie, though it kills it barely before the Zombie is in range. Newspaper Zombies also appear here, but Bucketheads and Pole Vaulters do not. They speed up when you destroy their newspaper, so plant extra Puff-shrooms when you see them come. This is not difficult in the slightest. It is actually possible to defeat this level with only Puff-shrooms. This is also the first level you get money.
Plant earned: Sun-shroom
New Zombie: Newspaper Zombie
Present: Versus Mode unlocked (if playing the Xbox Live Arcade, DS, or PS3 versions)
Level 2-2
For the full article, see Level 2-2
By Someone456
At this point, Crazy Dave will tell you how much money you have saved. If you have $750, he will attempt to sell you an extra seed slot, which you should definitely accept if you can afford it.
This level, despite being so early in the game, is actually one of the harder levels in the game and could catch you off guard if unprepared. The level itself brings back Bucketheads, so bring Sunflowers or Sun-shrooms to rack up the sun, as well as Wall-nuts, Repeaters, and Snow Peas, and, of course, your Puff-shrooms. Focus on Sun-shrooms in the beginning, planting Sunflowers later on. Snow Peas are very important or else the Bucketheads will plow through your Puff-shrooms. After the first wave, Bucketheads start coming, so make sure you have up Snow Peas, Repeaters, and Wall-nuts to defend against them. Sun production is not an issue with a combo of 1 row of Sunflowers and Sun-shrooms, but the key is continuing to build your defenses until the final wave or it will catch you off guard.
Plant earned: Fume-shroom
Present: Crazy Dave’s Car Key and More Ways to Play (iOS only)
Level 2-3
For the full article, see Level 2-3
This level has the new Screen Door Zombies, which carry around screen doors to protect themselves with. These are about as tough as Bucketheads, so use your new Fume-shrooms to pass through the doors. This level is pretty easy. There’s only one wave, so don’t knock yourself out if you need to use a Lawn Mower.
Plant earned: Grave Buster
New Zombie: Screen Door Zombie
Level 2-4
For the full article, see Level 2-4
Nothing too hard about this. Coneheads, Screen Doors, and Pole Vaulters. Nothing you have not seen before. This level has a lot of graves, so bring Grave Busters to eat them… before they spawn zombies to EAT YOUR BRAINS! Plus, there’s a 90% chance to earn a silver coin. There’s another wave this time, so beef up your Fume-shrooms and Snow Peas. Um… That’s all, I guess.
Item earned: Suburban Almanac
Level 2-5
For the full article, see Level 2-5
It is time to play Whack a Zombie! Click/tap whatever the zombies to kill them as soon as they come out of the graves. Coneheads need to be hit twice, Bucketheads three times. Use your Sun to plant Grave Busters on graves that are closer to your house. The zombies move fairly fast, so, uh, click/tap/whatever faster. Yeah. Just like hunting squirbos. Plant as many Grave-Busters as you can. At the final wave, after all the zombies have emerged from their graves, plant a Cherry Bomb in a group of zombies to make it easier to kill the rest.
Plant earned: Hypno-shroom
Level 2-6
For the full article, see Level 2-6
This is where it gets tough. Football Zombies are as fast as Pole Vaulters and a bit tougher than Bucketheads, so use your new Hypno-shrooms make them fight for you. Fortunately, there’s only one wave and about two Football Zombies.
Plant earned: Scaredy-shroom
New Zombie: Football Zombie
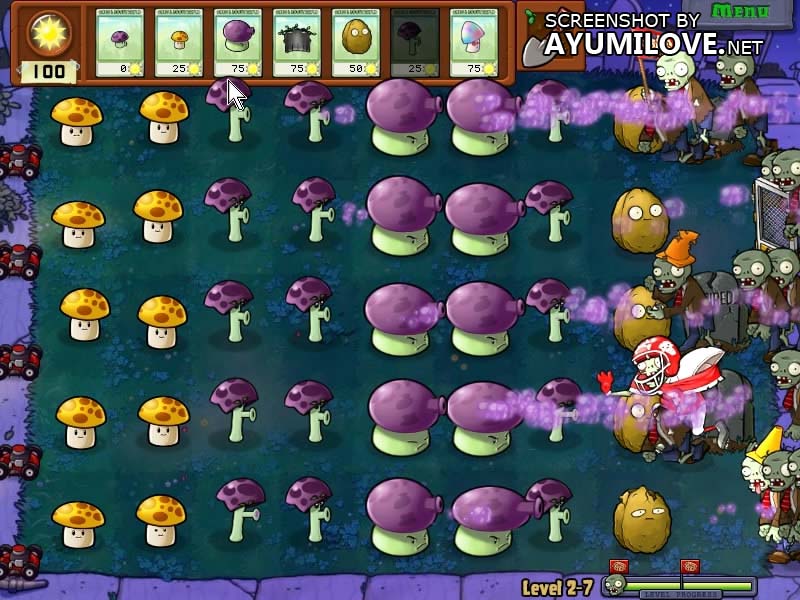
Level 2-7
For the full article, see Level 2-7
By Someone456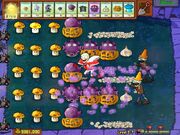
Many graves here. Many, many graves. Bust them up and count your money. Use Scaredy-shrooms like you would use them like Peashooters. Put them near the back, or the Scaredy-shrooms will duck and get eaten. Very few Football Zombies, but Screen Doors make a return, so double up on the Fume-shrooms. Nothing too spectacular here.
Plant earned: Ice-shroom
Level 2-8
For the full article, see Level 2-8
Dancing Zombies appear here. Dancing Zombies are not so bad themselves, but Hypno-shroom or Cherry Bomb them as soon as you see them to make them do your bidding. Only one wave here and very few Dancing Zombies.
Plant earned: Doom-shroom
New Zombies: Dancing Zombies, Backup Dancer
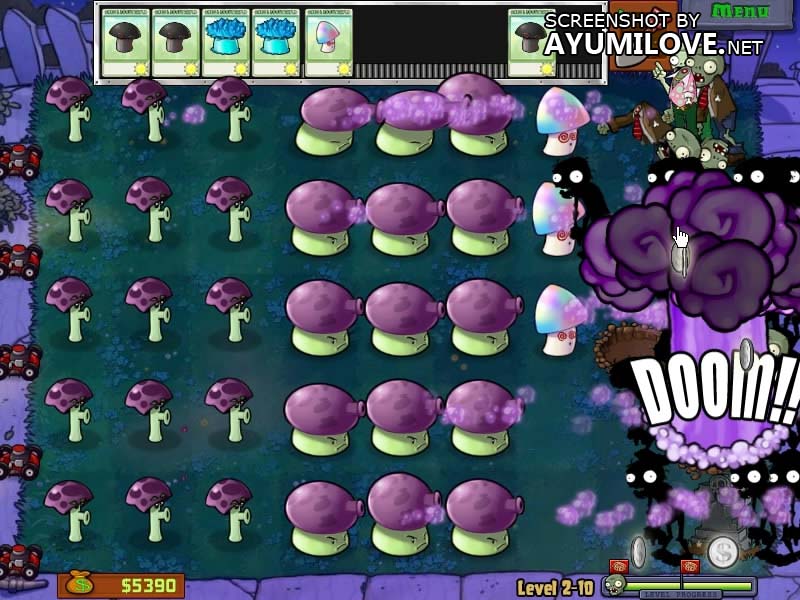
Level 2-9
For the full article, see Level 2-9
More graves and Dancing Zombies this time around. Whatever you have been using before should work here, as well. Screen Door Zombies return, so Fume them to death. If you beat the last level, you can beat this one. If necessary, use your new-found Doom-shroom to end the last wave quickly.
Item earned: note
Level 2-10
For the full article, see Level 2-10
By Someone456
By Someone456
By Someone456
By Someone456
All Night encountered zombies (except Newspaper), as well as those encountered on day (except Buckethead and Pole Vaulting), appear in this level. You get Ice-shrooms, Doom-shrooms, Puff-shrooms, Fume-shrooms, Hypno-shrooms, Scaredy-shrooms and Grave Busters here, so hypnotize the Football Zombies, use Fume-shrooms for Screen Door Zombies, and use Doom-shrooms for Dancing Zombies. Freeze zombies when huge waves come and use the Doom-shroom to destroy zombies that you cannot kill with your projectiles. Spread your Puff-shrooms, Fume-shrooms, and Scaredy-shrooms evenly throughout. Remember to put Scaredy-shrooms at the back so that they won’t be scared. There are a LOT of graves here, so use your Grave Busters wisely.
Plant earned: Lily Pad
Stage Three: Pool
Overview
Pool levels have six rows of zombies to invade, the middle two being the pool. The pool has special plants and zombies that can only be planted/appear there. Your mushrooms from the previous levels will fall asleep here (but that does not mean they are pointless — zombies will still stop to eat them, so Puff-shrooms are actually quite helpful at the beginning), but sun falls from the sky again, and graves do not appear here. Also, Lawn Mowers will sink in the water rows, killing only a single zombie, but you can buy Pool Cleaners. Not too different from the Day Levels, overall.
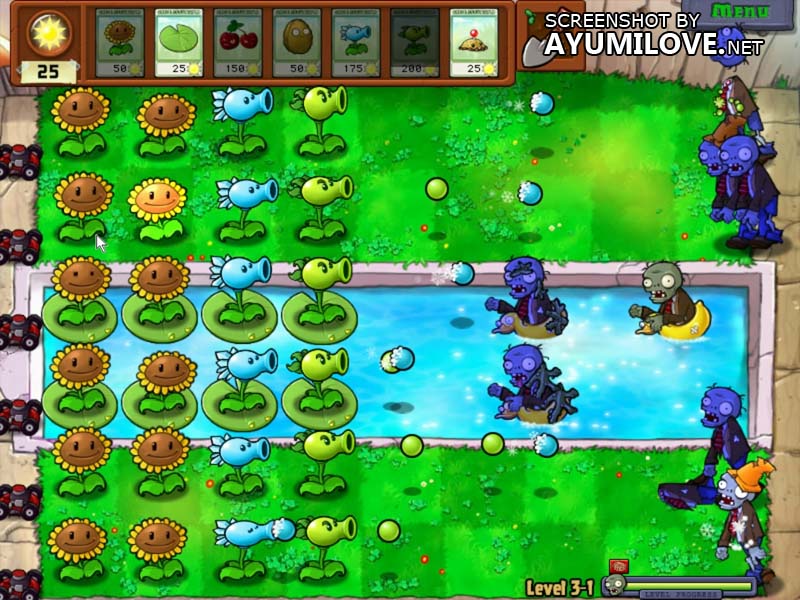
Level 3-1
For the full article, see Level 3-1
Aside from the occasional Conehead, nothing remotely smacking of toughness appears here. Ducky Tubers, the pool-only zombies, appear only during or directly before the wave, giving you plenty of time to prepare. Note that you can use Cherry Bombs to kill the zombies that pop out of the pool during the final wave, somewhat like graves. This level is so easy, you can try to win.
Plant earned: Squash
New Zombie: Ducky Tube Zombie
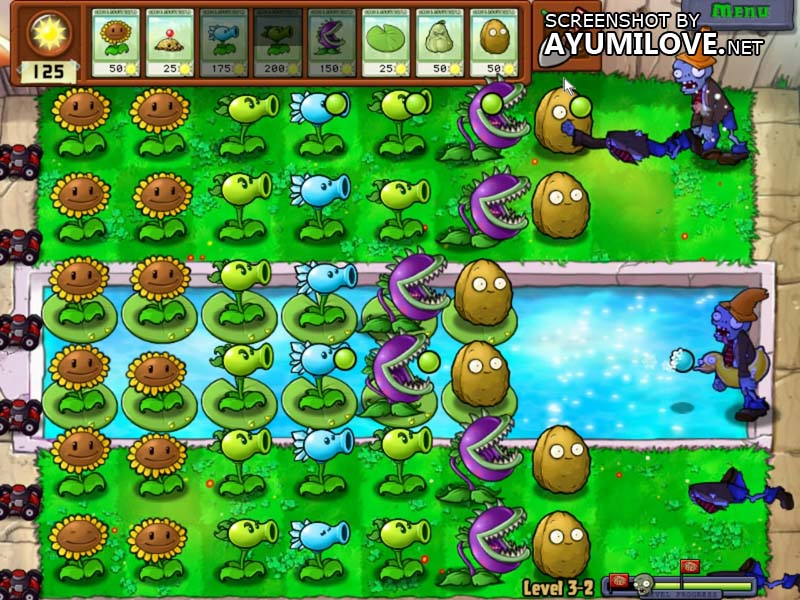
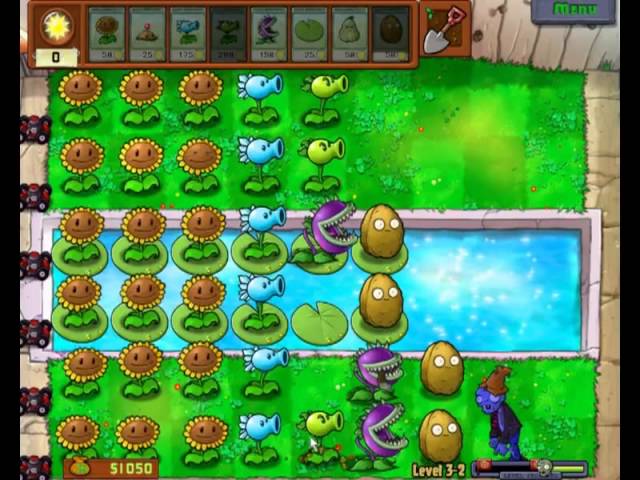
Level 3-2
For the full article, see Level 3-2
By Someone456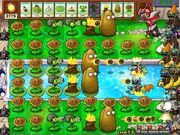
The zombies here have some variety to them, so apply your skills and strategies from earlier levels. Bring Snow Peas as well as your instants, including the new Squash (which is arguably the best instant in the game). Bucketheads appear frequently after the first wave, and both Coneheads and Bucketheads now appear as Ducky Tubers. A single Football Zombie appears at the very end, and Newspaper Zombies are spread throughout. This level isn’t a cakewalk.
Plant earned: Threepeater
Present: Mini-games unlocked
Level 3-3
For the full article, see Level 3-3
This level simplifies things a bit from the previous one, cutting out the Newspaper, Buckethead, and Football Zombies. Instead, this level introduces Snorkel Zombies directly following the first wave. These zombies stay underwater, out of pea’s range, surfacing only to eat your plants. Wall-nuts are practically a necessity on this level. Without Wall-nuts guarding them, Snorkel Zombies will likely eat much of your pool defenses. Given their large numbers, relying on instants is not a valid strategy. Other than that major threat, this level shouldn’t be much of a hassle.
Plant earned: Tangle Kelp
New Zombie: Snorkel Zombie
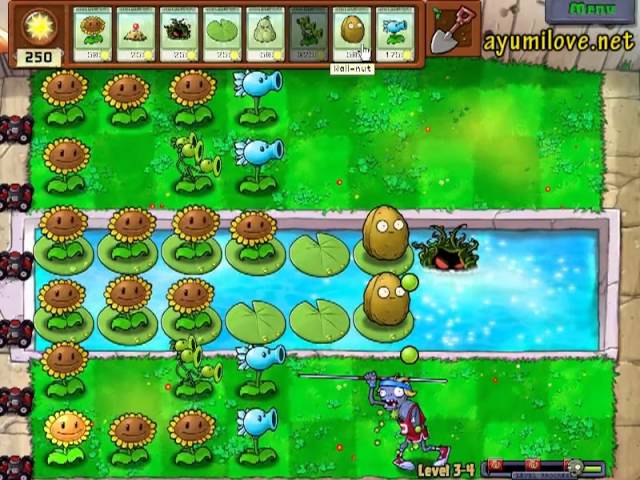
Level 3-4
For the full article, see Level 3-4
By Someone456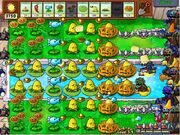
Around this time, if you have been diligent in collecting dropped coins and saving Lawn Mowers, Crazy Dave will ask you if you would like another seed slot (bringing you up to eight) for $5000. Take this deal whenever you can — there is nothing else you can spend money on at this point, and seed slots are always helpful. Anyway, Pole Vaulters reappear here early on, and Snorkel varieties crop up past the first wave. Generous amounts of Bucketheads come at you, so prepare accordingly. There are three flags in this level, so beware. Also, if you are using the free PC version, this will be the last level.
Item earned: Crazy Dave’s Car Key
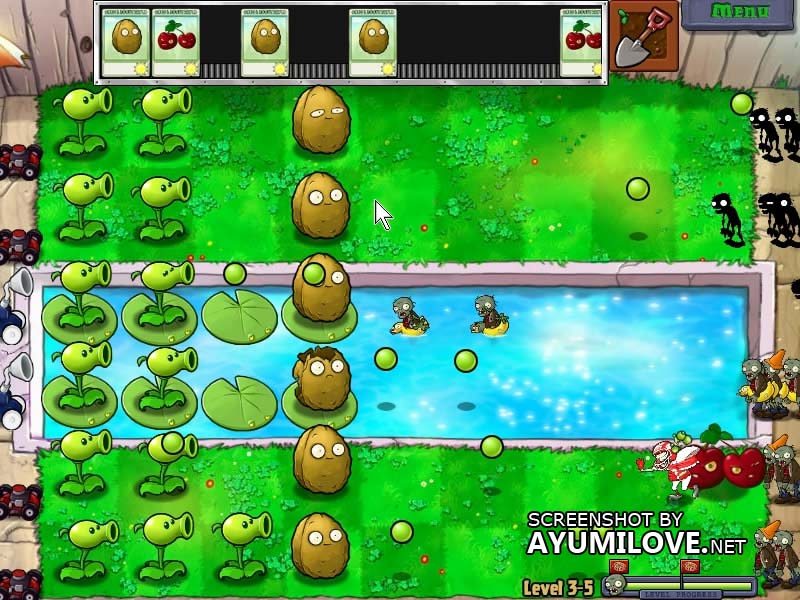
Level 3-5
For the full article, see Level 3-5
Defend your skins! Peashooters, Wall-nuts, Lily Pads, and Cherry Bombs appear through the conveyor-belt. Use Wall-nuts against Snorkels and Footballs. Use Cherry Bombs liberally, and spread your Wall-nuts evenly throughout. Peashooters will be of some help, but the mass of zombies that you fight will force dependency on Wall-nuts and Cherry Bombs.
Plant earned: Jalapeno
Level 3-6
For the full article, see Level 3-6
This level, aside from simple Coneheads and Ducky Tubers, has only one other variant of Zombie, the new Zomboni. The Zomboni has high health, the ability to instantly crush plants, and it leaves behind an ice trail as it drives. Even worse is that they are not slowed down by Snow Peas. As such, try to destroy them with an instant kill as soon as they appear and prevent a Zombie Bobsled Team from appearing. Two waves here, and a Zomboni will appear directly after the first one and during the second one. The new Jalapenos are notable, as they can destroy ice trails left by the Zomboni, as well as the Zomboni itself.
Plant earned: Spikeweed
New Zombies: Zomboni, Zombie Bobsled Team
Level 3-7
For the full article, see Level 3-7
Buckethead Zombies, Snorkel Zombies and the Zomboni come back again. This level has three waves. Zombonis do not appear until during the second wave. Spikeweeds, although they can kill Zombonis when they are run over, are somewhat expensive, and die when run over. As such, it should not be relied upon to kill Zombonis. Snorkel Zombies and Bucketheads are nothing new.
Luis Anton Imperial’s
Plant earned: Torchwood
Level 3-8
For the full article, see Level 3-8
The new Zombie on this level is the Dolphin Rider Zombie, who carries a dolphin into the water, jumps in, and rides it very quickly. Think of it as an aquatic Pole Vaulting Zombie. These zombies appear frequently after the first wave, so plant a Lily Pad in front of them to make them jump. Tangle Kelp is a useful emergency plant for this, as it cannot be vaulted over, but do not rely entirely on it.
Plant earned: Tall-nut
New Zombie: Dolphin Rider Zombie
Level 3-9
For the full article, see Level 3-9
By Someone456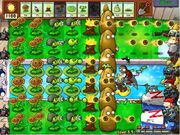
Pole Vaulters, Zombonis, Bucketheads, and Dolphin Riders all assault you in this grueling level. The new Tall-nut is a wonderful counter to Pole Vaulters and Dolphin Riders, as they cannot jump over it. The presence of Zombonis necessitates instant kills (or the Spikeweed), and Bucketheads are… Bucketheads. Zombonis do not appear until after the second wave, so stack your Spikeweeds on land and Tall-nuts in the pool, and you’ll be set. You may want to use a few more Sunflowers than usual for this.
Item earned: note
Level 3-10
For the full article, see Level 3-10
By Someone456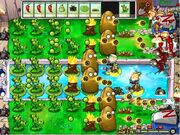
Conveyor-belt time! This level is very Threepeater-centric, and you will have collected tons of them by the third (and last) wave. Jalapenos, Squashes, Lily Pads, Tall-nuts, Spikeweeds, and a few Torchwoods and Tangle Kelps also appear to help beat back the Bucketheads, Dolphin Riders, Snorkelers, and Zombonis. Spikeweed is an instant kill to Zombonis and should be stacked at least two deep in each land row, Tall-nuts should be concentrated in the pool to combat Snorkelers and Dolphin Riders, and Torchwood should be set behind Tall-nuts to make room for your Threepeaters. Easy peasy.
Plant earned: Sea-shroom
Stage Four: Fog
Overview
The Fog levels, basically, are what you get when you combine Night with the Pool. Sun does not fall from the sky, and you need to bring Lily Pads so you do not get invaded through the Pool. Graves do not appear, so the final wave «extras» will pop out of the water in fifth to ninth column. The new thing, if it was not evident by the title of the levels or the fog you see on your screen, is fog. With each level, the Fog gets a little further in. You can kinda see through the Fog to find the zombies, but you may find it a little tricky. Use Scaredy-shrooms in one of the columns closest to you to find the zombies — if the Scaredies are shooting, you have got zombies, though it is a bit tough to tell which kind of zombie it is unless a special sound (such as the sound of a bucket being hit) is present. Good night and good luck — you will need it.
Note that on the DS and iOS versions of the game, a plant dragged onto the lawn will automatically highlight spots where it can be planted, and will remain full color if it cannot be planted on the spot it is dragged over. This works on every level, and will show these highlighted spots over the fog and when it is pitch-black on level 4-10.
")
4-1, PC Air Raid
")
4-7, 4-8, 4-9
")
All other Fog levels
The fog line in iPhone version covers one tile less in other versions.
Level 4-1
For the full article, see Level 4-1
Easy intro level. The new Jack-in-the-Box Zombie appears here, and carries the item of his namesake to destroy your plants when he dies, so try to kill him quickly. HE COULD KILL YOUR SHINS! Play with the volume on so you can hear his jingle when he appears. Other than that, just simple Coneheads and Zombies, and, of course, Ducky Tubers. What were you expecting? Note that you will still need Lily Pads as Sea-shrooms are not enough to hold off all of the Ducky Tubers.
Plant earned: Plantern
New Zombie: Jack-in-the-Box Zombie
Level 4-2
For the full article, see Level 4-2
Football Zombies join the Jack-in-the-Box Zombies this time around, though neither of them will appear at all except directly before and during the final wave. Two waves here, so bring Hypno-shrooms for the Football Zombies, and, um… that is it? If you beat the last level, you have no excuse if you cannot beat this one.
Plant earned: Cactus
Level 4-3
For the full article, see Level 4-3
The new Zombie here is the Balloon Zombie, which can only be killed (at this point, anyway) with the new Cactus (or the explosive plants), so take those along. Nothing else noteworthy here. One wave and about two Balloon Zombies, so you can afford to just use a Lawn Mower/Pool Cleaner to take them out (though doing so reduces your money earned).
Plant earned: Blover
New Zombie: Balloon Zombie
Level 4-4
For the full article, see Level 4-4
Dolphin Riders show up again, with the Balloon Zombies making a return. Similar to before, although you can now use Blovers instead of Cacti if you wish to take out Balloon Zombies. They also clear the fog, which is always nice. Two waves here, but try to do something about the fog (at least in the Pool lanes) so that you can tell where a Dolphin Rider is.
Item earned: Taco
Level 4-5
For the full article, see Level 4-5
Note: it is a Night level instead of Fog.
Before the level starts, Crazy Dave will appear and buy your Magic Taco for $1000. He will also update his shop to include Gloom-shroom and Cattails, which are useful plants, but too expensive sun-wise to be useful right now.
Anyway, this is Vasebreaker, where breaking vases can yield plants or zombies. Do this three times, each time with another column of vases. Green vases always yield plants. Break vases in rows, planting only the plants you’ll need to kill the zombies in that row, and saving the other plants for other rows. Football Zombies, Buckethead Zombies, and Dancing Zombies appear here. You can get Peashooters, Snow Peas, Squashes, and Hypno-shrooms. Counter the zombies as best you can.
Plant earned: Split Pea
Level 4-6
For the full article, see Level 4-6
By Someone456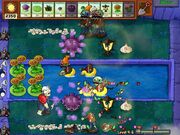
No old Zombies (save Zombies, Ducky Tubers, and Coneheads) and a single wave, but there is a new zombie, the Digger Zombie, two of which appear, one directly before and one during the wave. The new Split Pea is one way to beat them, but instant kills can also work if you can build up enough sun production. Ultimately, not too difficult.
Plant earned: Starfruit
New Zombie: Digger Zombie
Present: Puzzle Mode unlocked
Level 4-7
For the full article, see Level 4-7
By Someone456
Bucketheads, Diggers, and Jack-in-the-Boxes appear here in this two-wave stage, and they appear in larger amounts than usual, making this a very tricky level. Try to conserve your Lawn Mowers and Pool Cleaners, and use instant kills on Diggers and Bucketheads when you can get away with it.
Plant earned: Pumpkin
Level 4-8
For the full article, see Level 4-8
Another easy, one-wave level. The new Pogo Zombie is incapable of jumping over a Tall-nut, so you can use those to stall. However, it should fall fairly easily, so it is not really needed. Not much explanation, but there is not much to explain.
Plant earned: Magnet-shroom
New Zombie: Pogo Zombie
Level 4-9
For the full article, see Level 4-9
By Someone456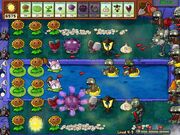
Pogo Zombies return, alongside Bucketheads and Balloon Zombies. The new Magnet-shroom is a miracle plant — it takes away metal objects, including the Buckets and Pogos of the zombies that you encounter on this level. Bring something for the Balloon Zombies, and you are set. Instant kills can be used if your Magnet-shrooms are overwhelmed, though they shouldn’t be.
Item earned: note
Level 4-10
For the full article, see Level 4-10
Yep, another conveyor-belt level. Two waves, and it is pitch-black. You get Cactus, Starfruit, Pumpkins, Lily Pads, Blovers, Sea-shrooms, Split Peas, and Magnet-shrooms. Diggers, Bucketheads, Pogos, Jacks and Ballooners appear. Use Magnet-shrooms to deal with the Diggers and Bucketheads, and spread your plants out as evenly as possible, Pumpkining the ones in front. You know the drill by now.
Plant earned: Cabbage-pult
New Zombie: Zombie Yeti (when replaying Adventure Mode)
Stage Five: Roof
Overview
The Roof is drastically different from any of the levels you have played so far. It consists of five rows, with the five columns closest to your house being sloped. Only plants beyond the three closest columns can fire over the slope. However, lobbed-shot plants can circumvent this. Furthermore, Flower Pots are required to plant anywhere on the roof. Fortunately, some are already planted at the beginning of each level. Lawn Mowers cannot be used at all, and the only last line of defense item usable is the Roof Cleaner, but only once you buy it from Crazy Dave. Finally, as it is day, sun will fall from the sky, and mushrooms will fall asleep.
Stage 5-1
For the full article, see Level 5-1
You start with five columns of Flower Pots here, and although it is recommended that you bring Cabbage-pults, they are unnecessary if you are planting in the fourth or fifth columns from the house. Try not to let any Flower Pots get eaten, as they are irreplaceable at this point. It is possible that the new Bungee Zombie will come from above and attempt to steal a Flower Pot, so plant a Potato Mine or something cheap in that spot to avoid losing it. In the final wave, Zombies dropped by Bungee Zombies arrive. This occurs on every Roof level. Still, only one wave here, so this should be a fairly easy level.
Plant earned: Flower Pot
New Zombie: Bungee Zombie
Stage 5-2
For the full article, see Level 5-2
Before the level begins, Crazy Dave will appear with new items in the shop. If you have $3000, buy the Roof Cleaner (the leftmost object at the top on the first page) — it gives you a last line of defense, akin to Lawn Mowers, and will give you money at the end of a level if unused. Anyhow, Bucketheads and Pole Vaulters strike again on this level. You will notice you have one less column of free Flower Pots, so consider bringing extras — there is not much you can do with the seed slot, anyway. Two flags and not much to worry about, and a Snow Pea in the frontmost Potted column with a Cabbage-pult or two behind is enough to deal with the Bucketheads.
This level is also a good way to earn the Grounded achievement. Do not bring any catapults, but instead, focus on using Chompers, Tall-nuts, and Pumpkins. Use Tall-nuts on the front column and plant two lines of Chompers just in case a zombie gets through. Plant Pumpkins on the first line of Chompers and/or the Tall-nuts and you should be all set for the whole level. Use a Cherry Bomb or Jalapeno if things get a little chaotic. Some people struggle to defeat the Buckethead Zombies with the Cabbage-pults so this method is a good alternative.
Plant earned: Kernel-pult
Stage 5-3
For the full article, see Level 5-3
Ladder Zombie is this level’s new zombie. It is fast, and carries a ladder to climb over (and let other zombies climb over) the first defensive plant in the row. You now only have three rows with Flower Pots to work with, so if you have been avoiding using lobbed-shot plants, you would better start. It is recommended that you plant Cabbage-pults before Kernel-pults, as the former deals damage more reliably than the latter. Two waves here, but do note that the ladder counts as a shield, so planting an extra Flower Pot and Snow Pea will not let you freeze the Ladder Zombie.
Plant earned: Coffee Bean
New Zombie: Ladder Zombie
Stage 5-4
For the full article, see Level 5-4
By Someone456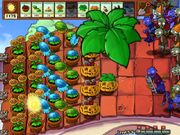
Football Zombies, Pogo Zombies, and Ladder Zombies appear here. Although you may be tempted to bring both the Coffee Bean and the Magnet-shroom to deal with them, instant kills will work better, as they take up one less seed slot, and all of them are cheaper to use, sun-wise. There are three waves to this level, and large amounts of Ladder Zombies come at you after the second, so prepare accordingly. The final wave is a little tricky, but nothing too difficult. Using Chompers as another strategy could also work because of the high number of high-health zombies. Plant two lines of Cabbage-pults and a line of Chompers and then a line of Tall-nuts. The Cabbage-pults could take care of the weaker zombies while the Chompers would take care of the stronger zombies.
Item earned: Watering Can
Stage 5-5
For the full article, see Level 5-5
At the start of this level, Crazy Dave appears and tells it is time for Bungee Blitz with Bungee Zombies. Every zombie on this level gets lowered onto the stage via Bungee Zombie. Two waves of this, and the only plants you get are Chompers, Flower Pots, Pumpkins, and Cherry Bombs.
Plant earned: Garlic
Stage 5-6
For the full article, see Level 5-6
The new zombie for this level is the Catapult Zombie, which drives a machine partway onto the roof, stops, and begins slinging basketballs at the furthest plant in the row (from the zombies). A Jalapeno is a good way to stop it before it destroys your Sunflowers, though other instant kills work as well. Or, you could just let your other plants handle it and replace the Sunflower afterward, as Sunflowers are cheaper than most instant kills (save the Squash and the Potato Mine, the latter of which can’t be used effectively against the Catapult Zombie). Two waves here, and no other notable zombies appear, so it’s a fairly easy level.
This level is another good opportunity to earn the Grounded achievement by using only Chompers, Pumpkins, and plenty of instant kills.
Plant earned: Umbrella Leaf
New Zombie: Catapult Zombie
Stage 5-7
For the full article, see Level 5-7
By Someone456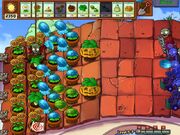
Bungee Zombies, Catapult Zombies, and Ladder Zombies come at you in this three-wave level. Umbrella Leaves are recommended, as they prevent both Bungee Zombies and Catapult Zombies from killing your plants within a 3×3 range. However, they are not necessary to complete the level. Save some sun and instant kills for the final wave, though, as one of each of the above types of zombies appears.
Plant earned: Marigold
Stage 5-8
For the full article, see Level 5-8
Simple level, real easy, two waves, except for… the Gargantuars! These zombies have a gargantuan amount of health, requiring two instant kills to kill. Bring your Jalapeno and Squash to take it out, although with a Cabbage-pult, Kernel-pult, and Snow Pea, one Jalapeno will do fine — it has the added bonus of destroying the Imp the Gargantuar throws. Fairly easy level, as there are only two Gargantuars.
Plant earned: Melon-pult
New Zombies: Gargantuar, Imp
Stage 5-9
For the full article, see Level 5-9
Bucketheads, Ladders, Catapults, Bungees, Jacks and Gargantuars appear here, making this the most diverse level you have seen so far. With three waves, you will get a chance to see all of these. This is by far the most difficult level in the game… so far. Your instants will see lots of use here, so take your Jalapenos and Squashes. If whatever you have been using so far is working, keep it up. Gargantuars only show up around the last wave, so save your Sun and instants for then. You should be able to make it through.
Item earned: note
Stage 5-10 — Dr. Zomboss (Night Roof)
For the full article, see Level 5-10
Plants Vs. Zombies Final Boss Battle Defeating the final boss.
Nighttime conveyor-belt level on the roof, with Cabbage-pults, Kernel-pults, Melon-pults, Flower Pots, Jalapenos, Ice-shrooms on your side, and everything but Flag Zombies, Dancing Zombies, Backup Dancers, Digger Zombies, Balloon Zombies, aquatic zombies, and Zombie Bobsled Teams on his side. Spread your plants out evenly, and keep your Melon-pults in the middle rows — keep them out of zombie range and Catapult Zombie range. Plant an Ice-shroom when he fireballs, and put a Jalapeno in rows with iceballs. Keep spare Flower Pots and plants on hand to counter his camper and Bungee Zombie attacks. Try to avoid planting on the flat part of the roof, as the Zombot will crush any plant planted there. When the Zombot leans its head in, use a chain of Ice-shrooms to give your plants a chance to kill it. Finish it with a Jalapeno or two. You should know how to do a conveyor-belt level, and you know how to deal with the zombies. Once the final blow is done to Dr. Zomboss, he will be defeated, and you will have successfully completed Adventure Mode for the first time.
New Zombie: Dr. Zomboss with his Zombot
Item earned: Silver Sunflower Trophy
New mode: Survival Mode
Other times
If you beat Adventure Mode once, you can play it again. This time, Crazy Dave will chose three seed slots for you. Mushrooms are never chosen for daytime levels, and any plants that would not be wise to use are also not available. Also, an extra wave will be added to most levels, making them a little harder. On Level 4-10, the Zombie Yeti will also appear for the first time.
See also
- Adventure Mode
Plants vs Zombies is a casual tower defense game where you will need to protect your home from invading zombies during daytime and nighttime in different areas of your home, starting with your front yard! There are over 40 unique plants to be soiled into your home garden to defeat 20 types of zombies of all shapes and sizes, especially with some possessing devastating abilities. Grab all 20 achievements and make your own customized Zombie Avatar!
System Requirements
Operating System (OS) : Windows XP/Vista/7
Memory (RAM) : 512+ MB
Processor : 1.2+ Ghz Mhz or faster
DirectX Version : 8.0
Internet : To register both the download and back-up CD-ROM versions of the game.
Plants vs Zombies Level Guide
Daytime Front Yard
Nighttime Front Yard
Daytime Swimming Pool
Nighttime Swimming Pool
Plants vs Zombies Cheat
To activate any of these cheat, type it while playing the game. There are a few cheats that requires your Tree of Wisdom to be on a certain height (in terms of feet). To do so, fertilize Tree of Wisdom to increase its height by purchasing it for $2500.
daisies : Zombies leave small daisies behind when killed (100 feet)
dance : Zombies move by dancing instead of walking (500 feet)
pinata : A shower of candy when a zombie dies (1000 feet)
trickedout : Alternate Lawn Mower appearance
future : Gives zombies futuristic shades
sukhbir : toggles the zombie’s call for brains-sound
Mustache: Zombies Now Have Mustaches
slowboke : Make zombie walk slowly
Stage 1: Daytime Front Yard
This level introduces your very first plant, the ‘Pea Shooter’! It’s peas are capable of bringing down a Zombie if it gets hit by Pea for few times. A basic Zombie will invade your home during daytime via front yard, eating anything in its path that includes your plants and brains! Completing this stage unlocks Sunflower!
Collect ‘Sunlight’ that drops down from the sky. It is an essential energy for produce plants. Soil your ‘Pea Shooter’ far away from the right to avoid Zombies instantly eating your plant up. It takes a few Peas to knock out a Zombie, so having multiple ‘Pea Shooters’ in a row speed up the process of defeating a Zombie quickly.
Zombies: Zombie
Plants: Peashooter
Unlocks: Sunflower (A plant that produces sunlight)
Plants vs Zombies 1-1 Final Layout
Plants vs Zombies 1-1 Playthrough

Plants vs Zombies Stage 1-2 introduces a new plant called ‘Sunflower’! It produces ‘Sunlight’, a vital energy source to create defensive plants around your home. You will need to collect them as how you collect Sunlight that drops from the sky during daytime.
‘Sunflower’ are defenseless on its own so have ‘Pea Shooter’ build in front of them to protect against Zombie attacks. Plant at least 9 Sunflowers to have a steady flow of Sunlight to be used to create other plants like ‘Pea Shooter’.
Completing this stage unlocks ‘Cherry Bomb’! It is a plant that can be only used once, which explodes and destroys all nearby zombies without hurting its fellow plants. Great against mobs of tough enemies such as ‘Conehead Zombies’ that will be introduced in the next stage.
Zombies: Zombie.
Plants: Sunflower, Pea Shooter.
Unlocks: Cherry Bomb.
Final Layout
Video Walkthrough

Plants vs Zombies introduces a new Zombie with an orange hat, a Conehead Zombie! It has more defenses compared to basic Zombie, and it is difficult for 1 Pea Shooter to defeat it. You will need at least 2 Peashooters to take down Conehead Zombies quickly. Plant 3 columns of Sunflower to speed up Sunlight production and plant Peashooter on the row where zombies first appear.
Zombies: Zombie, Conehead Zombie
Plants: Sunflower, Peashooter
Final Layout
Video Walkthrough

Plants vs Zombies opens up 2 extra rows in front yard, exposing your home to 5 possible lanes for Zombie invasion! As usual, plant Peashooter on row that Zombie first appears, and have all 5 rows protected with Peashooter! Conehead zombies can take more Pea punishment than ordinary zombie does. Therefore, plant 3 columns of Peashooter to knockout Conehead Zombies quickly. To overcome Sunlight shortage, plant 2 columns of Sunflowers to raise Sunlight production.
Zombies: Zombie, Conehead
Plants: Sunflower, Peashooter
Unlocks: Shovel (A tool to dig up a plant to make room for other plant)
Final Layout

Video Walkthrough

Plants Vs Zombies Stage 1-5 introduces a Bowling mini game! Instead of gathering sunlight to produce plants, you will be obtaining plant card via conveyor belt. Defeat the invading horde of zombies using rolling walnuts that acts as our Bowling ball. The red walnut will explode on contact with zombie. Completing this stage unlocks Potato Mine.
The trick to win this game easily is to not overspent your walnuts! Reserve them until your conveyor belt is filled or when they are mobs of zombies in your garden. Use your red walnut to defeat mobs of tough zombies such as ‘Conehead Zombie’ and use basic walnut to slow down fast zombies in their tracks.
Zombies: Zombie, Conehead Zombie
Plants: Sunflower, Peashooter
Unlocks: Potato Mine
Final Layout

Video Walkthrough

Plants Vs Zombies Stage 1-6 introduces a new zombie with a pole known as Pole Vaulting Zombie. It can jump over a plant once except for Tallnut. Pole Vault Zombie runs much faster than Conehead Zombie and Ordinary Zombie. Completing this stage unlocks Snow Pea, the ‘Ice Pea Shooter’.
To overcome Pole Vault Zombie, either plant 2 columns of Peashooters to defend your home or plant a Walnut near the entrance where the Pole Vault Zombie appears. Once the pole vaulting zombie jumps over a plant, his running speed decreases to an ordinary zombie speed.
Zombies: Zombie, Conehead Zombie, Pole Vault Zombie
Plants: Sunflower, Potato Mine, Peashooter
Unlocks: Snow Pea
Final Layout
Video Walkthrough

Plants Vs Zombies Stage 1-7 introduces Snow Pea. It looks like a sister of ‘Pea Shooter’ with a unique ability. It shoots Frozen Pea that is capable of slowing down Zombie movements as well as their munching ability, thereby expanding the life expectancy of plants especially Walnuts. Completing this stage unlocks a new purple-colored plant with a big mouth, known as Chomper!
As usual, 3 columns of Sunflowers soiled into your Front Yard with Potato Mine on guard against early Zombie attacks. Plant a column of Snow Pea and support them with Pea Shooter. Having more than one Snow Pea in the same row/lane doesn’t decrease Zombies movement further. Therefore, fill the vacant tiles with Pea Shooter instead after each lane is secured with Snow Pea.
Zombies: Zombie, Conehead Zombie, Pole Vaulting Zombie
Plants: Sunflower, Potato Mine, Peashooter, Snow Pea, Walnut
Unlocks: Chomper
Final Layout

Video Walkthrough
https://www.youtube.com/watch?v=5CoE6jk5x80
Plants Vs Zombies Stage 1-8 introduces a new plant known as the Chomper. Chomper chomps a zombie whole without the victim any opportunity to counterattack!. Once it is devouring that particular Zombie, it becomes defenseless like ‘Sunflower’. Therefore, you will need ‘Pea Shooters’ and/or ‘Walnut’ to protect it. Completing this stage unlocks Repeater, a successor of ‘Pea Shooter’.
Plant 3 columns of Sunflowers to fund costly-sunlight plants. Use ‘Potato Mine’ against early Zombie invasion while amassing Sunflowers. Next plant a column of Snow Peas and fill the vacant front seats with ‘Pea Shooters’. Have a column of Chompers protected by a Walnut in front of it. Chompers are quick and easy solution against tougher Zombies like ‘Buckethead Zombie’.
Zombies: Zombie, Conehead Zombie, Buckethead Zombie
Plants: Sunflower, Potato Mine, Pea Shooter, Snow Pea, Chomper, Walnut
Unlocks: Repeater
Final Layout
Video Walkthrough

Plants vs Zombies Stage 1-9 introduces a new plants known as ‘Repeater’, a successor of ‘Pea Shooter’. ‘Repeater’ shoots two Peas while consuming 1 vacant soil. This allows you to knockdown zombies half the time spent compared to Pea Shooter! Aid Repeaters with Snow Peas as they slow down Zombies movement and the process of Zombies munching down your plants!
Upon completing this stage, you will receive a note left by the Zombies. The message is about Zombies launching an all-out attack on your house!
Zombies: Zombie, Conehead Zombie, Pole Vaulting Zombie, Buckethead Zombie
Plants: Sunflower, Potato Mine, Snow Pea, Repeater, Wallnut
Unlocks: Note from Zombie.
Final Layout

Plants vs Zombies Stage 1-10 is the final front yard battle against Zombies who will launch a full scale attack during daytime! You will be supplied with random plants through a conveyor belt without the need of collecting sunlight.
Plant shooting pea plants in row where the zombies first appear in your lawn. Plant cherry bombs when your peashooters are unable to handle mobs of incoming zombie. Plant wallnuts to stop zombies dead in their tracks and have Potato Mines and Chompers behind them to handle Pole Vaulting Zombies!
Complete this stage to unlock ‘Puff Shroom’! A new plant that is only active during night time. It has a shorter engaging range compared to ‘Pea Shooter’. Best part is it does not cost any Sunlight to grow.
Zombies: Zombie, Conehead Zombie, Pole Vaulting Zombie, Buckethead Zombie
Plants: Peashooter, Snow Pea, Repeater, Cherry Bomb, Potato Mine, Chomper
Unlocks: Puff Shroom.
Final Layout
Plants vs Zombies Stage 2-1
Plants vs Zombies Stage 2-1 introduces ‘Puff Shroom’ that awakes during night time! It does not require any Sunlight, making it very useful against early Zombie invasion especially basic Zombies! However, with its limited range, it could not attack Zombies from afar. It could buy some time to plant more powerful plants against tougher Zombies as the stage progresses. Completing this stage unlocks ‘Sun Shroom’!
Plant 2 columns of Sunflowers while Puff Shroom are planted whenever the first Zombie arrive on that lane. Have at least 2 Puff Shroom guarding each lane to easily take out a basic zombie. This stage introduces ‘Newspaper Zombie’ that uses the paper as a shield against projectiles such as the one shot from ‘Pea Shooter’ and ‘Puff Shroom’. He will grunt and moves double the speed when his newspaper is destroyed. A Chomper can easily devour Newspaper Zombie, leaving basic Zombies for Puff Shroom to battle.
Zombies: Zombie, Newspaper Zombie
Plants: Sunflower, Puff Shroom, Cherry Bomb, Snow Pea, Walnut, Chomper
Unlocks: Sun Shroom
Final Layout
Plants vs Zombies Stage 2-2 introduces Sun-Shroom, a mini plant that produces small amount of sunlight. Once it matured, it produces the same amount of Sunlight as Sunflower. Completing this stage unlocks Puff Shroom brother, Fume Shroom! With Sun Shroom low Sunlight cost, you can fill your front yard with these little guys quickly compared to Sunflower.
Plant 3 columns of Sun Shroom while protecting these defenseless sunlight producers with Puff Shroom. Plant Puff Shroom on the lane where the first Zombie appears. Stack up to 3 Puff Shrooms in a lane to handle ‘Newspaper Zombie’ and ‘Conehead Zombie’.
After amassing Sun Shroom, plant 1 column of Snow Pea, Chomper and Repeater in sequence. Chomper will be sufficient to deal with Buckethead Zombies, while Repeater and Snow Pea will deal with Conehead Zombie and Newspaper Zombie. Dig up Sun Shroom to make space for another column of Repeaters! Use Cherry Bomb to destroy zombies that appear from graveyard to prevent sudden rush of zombies.
Zombies: Zombie, Conehead Zombie, Buckethead Zombie, Newspaper Zombie.
Plants: Sun Shroom, Puff Shroom, Snow Pea, Chomper, Repeater, Cherry Bomb.
Unlocks: Fume Shroom.
Final Layout
Video Walkthrough

Plants vs Zombies Stage 2-3 introduces Fume Shroom that sprays purple bubble fume towards zombies. This fume is capable of hitting multiple zombies and it can penetrate the shield wielded by ‘Screen Door Zombie’. Repeaters nor Snow Pea would be not be any more efficient than Fume Shroom itself, plus its a little more cheaper than the primary attacking plants.
Build 2 columns of Sun Shroom instead of 3 since Fume Shroom cost less Sunlight compared to daytime plants. Next build 2 columns of Fume Shroom, backing up the Puff Shroom that was earlier placed to prevent early zombie invasion.
Zombies: Zombie, Conehead Zombie, Screen Door Zombie.
Plants: Sun Shroom, Puff Shroom, Fume Shroom, Snow Pea, Chomper, Cherry Bomb.
Unlocks: Grave Buster
Final Layout
Video Walkthrough

Plants vs Zombies Stage 2-4 Your neighbor Dave will sell you an extra seed slot for $750 on this stage. Purchase it to allow more seed slot to be used during battle against Zombies!
This stage introduces Grave Buster that has the ability to remove Grave Tombs that appeared in your front yard during nighttime. Busting the grave tombs will reward you some silver coins, and occasionally gold coins. These coins can be use to purchase stuff from Dave such as extra seed slot and plant’s upgrade.
Build 2 columns of Sun Shroom followed by either 4 columns of Fume Shroom or 3 columns of Fume Shroom supported by Snow Pea. You can have Puff Shroom a little closer to the right with 1 vacant tile between your primary plants to force Pole Vault Zombies from ever running too fast to your plants!
Zombies: Zombie, Conehead Zombie, Screen Door Zombie, Pole Vault Zombie.
Plants: Sun Shroom, Puff Shroom, Fume Shroom, Snow Pea, Grave Buster, Cherry Bomb.
Unlocks: Suburban Almanac (Keeps track of all plants and zombies you encounter)
Final Layout

Video Walkthrough

Plants vs Zombies Stage 2-5 introduces another new mini game where you smash zombie heads with a hammer! Occasionally, thees zombies will drop Sunlight or Coins. Removing their grave tombs will also reward you with nice valuable coins. Buy Grave Buster using the Sunlight you scavenged from the dead to remove the Grave Tombs from your front yard, otherwise you will be overwhelm by the number of zombies invading during nighttime!
Zombies: Zombie, Conehead Zombie, Buckethead Zombie.
Plants: Potato Mine, Grave Buster, Cherry Bomb.
Unlocks: Hypno Shroom.
Final Layout

Video Walkthrough

Plants vs Zombies Stage 2-6 introduces a new zombie who loves football! It wears a metal headgear which reduces damage taken from attacking plants! Our Shrooms are no match for these powerful zombies. Therefore, instead of fighting them using brute strength, why not make them as ally instead? That is where Hypno Shroom comes into play! Hypnotize powerful zombies such as Headwear Zombie by allowing them to have a piece of Hypno Shroom. Once eaten, Hypno Shroom vanishes from soil and takes control of the zombie who has eaten him.
As practiced in previous stage, build 3 columns of Sun Shrooms to have extra Sunlight to produce better defenses such as Fume Shroom while funding Grave Buster to remove annoying tombs that pops around your front yard. You can have 2 columns of Sun Shrooms, but it will be much slower to fund these two at the same time.
Zombies: Zombie, Conehead Zombie, Headwear Zombie.
Plants: Sun Shroom, Puff Shroom, Fume Shroom, Grave Buster, Hypno Shroom, Walnut, Cherry Bomb.
Unlocks: Scaredy Shroom.
Final Layout

Video Walkthrough

Plants vs Zombies Stage 2-7 introduces Scaredy Shroom! A Shroom that attacks similarly to a Pea Shooter but burrows halfway underground whenever a zombie approaches really close, making it defenseless like Sunflower. It makes a great combination with either Puff Shroom and Fume Shroom possessing limited attacking range. Have a plant in front of Scaredy Shroom to prevent it from hiding itself into the soil.
Plant 2 columns of Sun Shrooms, followed by 2 columns of Scaredy Shrooms and 1 column of Fume Shroom. Fill in the vacant gaps with Puff Shroom since it does not cost any Sunlight. This setup alone supported with Hypno Shroom is able to win this stage much easily compared to previous stages. There are possibilities that more than 1 tough zombie appears during invasion, so we can’t solely rely on Hypno Shroom. Hold off the zombie mobs with Walnut and knockout zombies with your other attacking Shrooms.
Zombies: Zombie, Conehead Zombie, Screen Door Zombie, Headwear Zombie.
Plants: Sun Shroom, Puff Shroom, Fume Shroom, Grave Buster, Hypno Shroom, Walnut, Scaredy Shroom.
Unlocks: Ice Shroom.
Final Layout
Video Walkthrough
Plants vs Zombies Stage 2-8 introduces a Dancing Zombie, a parody of Michael Jackson (a zombie with black hair and red suit). However, it was change by Pop Cap due to legal reasons that they have to abide by ‘The Estate of Michael Jackson’. This Dancing Zombie has the ability to summon 4 backup dancers into play, which can quickly overwhelm all of your plants unless the ain dancer is being defeated quickly. It would be fairly difficult to get Hypno Shroom on the main dancer unless there is a vacant soil below him.
Plant 2 columns of SunShrooms and use Scaredy Shrooms to aid Puff Shroom. This stage can be cleared quickly without the need of Fume Shroom. Freeze all zombies in your front yard using Ice Shroom to buy some time for Scaredy Shroom to knockout Dancing Zombie and its lackeys.
Zombies: Zombie, Conehead Zombie, Screen Door Zombie, Headwear Zombie.
Plants: Sun Shroom, Puff Shroom, Fume Shroom, Grave Buster, Hypno Shroom, Walnut, Scaredy Shroom.
Unlocks: Ice Shroom.
Final Layout

Video Walkthrough

Plants vs Zombies Stage 2-9 introduces Doom Shroom, a 1 time use plant similarly to Cherry Bomb. It destroys all zombies in a big area, leaving a crater behind. This crater prevents you from placing any plant in that soil until it has been recovered after for some time. Apply the same strategy as before, 2 columns of Sun Shroomoms, Scaredy Shrooms and Fume Shrooms.
Upon completing this stage, you will receive a note from zombie ‘Hello, We wood like to visit for a midnight znack. How does ice cream and brains zound? Sincerely, the zombies. This means its an all-out zombie attack!
Zombies: Zombie, Conehead Zombie, Screen Door Zombie, Headwear Zombie.
Plants: Sun Shroom, Puff Shroom, Fume Shroom, Grave Buster, Hypno Shroom, Doom Shroom, Scaredy Shroom.
Unlocks: Note from Zombie.
Final Layout

Video Walkthrough

Plants vs Zombies Stage 2-10 invites all zombies at nighttime for a full-scale attack! By successfully preventing them here will crush their hope in ever getting into the house through front yard. You will be supplied with random plants through a conveyor-belt, so you are less burden in gathering Sunlight to produce plants.
Plant Scaredy Shroom in the first 3 columns from house, followed by 3 columns of Fume Shroom. Plant Puff Shroom in front of Fume Shroom to protect them. Reserve Hypno Shroom for tougher enemies such as Headgear Zombie (Red Shirt Footballer) or any zombies that are too close for comfort. Finally, spam Doom Shroom on the final wave to complete this stage instantly.
Zombies: Zombie, Conehead Zombie, Screen Door Zombie, Headwear Zombie, Dancing Zombie.
Plants: Puff Shroom, Fume Shroom, Grave Buster, Hypno Shroom, Scaredy Shroom, Doom Shroom.
Unlocks: Lily Pad (plant) + Daytime Backyard (new house area).
Final Layout
Video Walkthrough

Plants vs Zombies Stage 3
Plants vs Zombies Stage 3-1 introduces a new part of your house, the swimming pool! This invites new zombie to the backyard, Ducky Tube Zombie who is able to wear Cone or Metal Bucket to increase its toughness. Use Lily Pad on swimming pool to allow plants to be placed on that tile. However, you can’t plant a Potato Mine on Lily Pad, only on soil!
Zombies: Zombie, Conehead Zombie, Ducky Tube Zombie.
Plants: Sunflower, Lily Pad, Cherry Bomb, Walnut, Repeater, Snow Pea, Potato Mine
Unlocks: Squash (1 time use like Cherry Bomb)
Final Layout
Plants vs Zombies Stage 3-2 introduces Squash which is an instant use plant similar to Cherry Bomb, but does not have carry the cool explosion effect! It is capable of squashing multiple zombies provided they are all stacked up tightly. This can be done by having a Walnut barrier to hold mobs of zombies within a position, and then place a Squash to clear them in a single go.
Before you start this battle, your neighbor Dave will be selling you an upgrade of 8 Seed Slot for $5000. This can happen on any stage provided you have first achieve $5000 cash in hand. I just bought it to be able to carry more variety of Plant Cards.
Zombies: Zombie, Newspaper Zombie, Ducky Tube Zombie, Conehead Zombie, Headgear Zombie
Plants: Sunflower, Potato Mine, Snow Pea, Repeater, Chomper, Lily Pad, Squash, Walnut
Unlocks: Threepeater
Final Layout
Video Walkthrough
Plants vs Zombies Stage 3-3 introduces Threepeater! Its basically a Pea Shooter that shoots a pea in 3 lanes but consumes only 1 vacant soil. Plant Threepeater on row 2 and 5 to cover all zombie lanes. Planting them on Row 1 and 6 waste 1 Pea shot. Support Threepeater with Snow Pea to slow down incoming zombies.
This stage also introduces Snorkel Zombie that submerges in your swimming pool. While submerge, Peas can’t hit it. You will need to have Walnuts on Lily Pad, both stationed at column 6. Reason being, the Walnut will force Snorkel Zombies out of water and chomp its body, buying some time for offensive plants to knock it out. Also, during the final zombie invasion wave, random zombies will appear, at most at 6 column in swimming pool.
Completing this stage unlocks Tangle Kelp, an aquatic plant that pulls zombie underwater to drown them, a solution towards getting rid of Snorkel Zombie instantly!
Zombies: Zombie, Conehead Zombie, Snorkel Zombie.
Plants: Sunflower, Potato Mine, Snow Pea, Threepeater, Lily Pad, Walnut, Squash, Cherry Bomb.
Unlocks: Tangle Kelp
Final Layout

Plants vs Zombies Stage 3-4 introduces Tangle Kelp, an aquatic plant similar to Lily Pad, only can be placed in water which in that case, our swimming pool. I find it awkward to have plants in my swimming pool though. But it could not be help since zombies wants to invade via the pool using Snorkels and Ducky Tubes.
Tangle Kelp is useful in putting zombies out of your house, especially Snorkel Zombies who avoids being targeted by Peas while submerged. Place a few Tangle Kelps nearby your walnut to prevent them from Snorkel Zombies from chomping their hard shell.
Upon completing this stage, you will find Dave’s car key, which will leads you to more buying options! Dave car trunk will have premium upgrades for plants such as 9 Seed Slot upgrade, Pool Cleaner (wipes out all zombies within a single lane when zombies manage to get into your house), Garden Rake (takes out first zombies that steps on it, only lasts for 3 gameplays), Twin Sunflower (double sunlight production) and Gatling Peas (doubles Repeater Pea shot).
Zombies: Zombie, Conehead Zombie, Snorkel Zombie.
Plants: Sunflower, Potato Mine, Snow Pea, Threepeater, Lily Pad, Walnut, Squash, Cherry Bomb.
Unlocks: Tangle Kelp
Final Layout


Video Walkthrough
Plants vs Zombies Stage 3-5 introduces a mini game where your objective is to stop mini zombies from invading into your house! Although tiny in size, they still remain as strong as ever. You will be getting your seed card supply via a conveyor belt.
Plant Walnut on the 4th column starting from the left, while Pea Shooters are planted depending on where the first zombie arrives. Use Cherry Bomb to destroy zombies that are not protected by Pea Shooter or tough zombies such as Headgear Zombie.
Upon completing this stage, you will unlock Jalapeno. It’s a plant which instantly destroys an entire lane of zombie (back and front) the moment when it is planted on to a vacant soil.
Zombies: Zombie, Conehead Zombie, Headgear Zombie, Snorkel Zombie, Ducky Tube Zombie.
Plants: Pea Shooter, Lily Pad, Walnut, Cherry Bomb.
Unlocks: Jalapeno.
Final Layout
Plants vs Zombies Stage 3-6 introduces Zomboni, a zombie that drives an ice truck. The path that is crossed by the ice truck will be covered with ice, preventing you from planting any plants on the vacant soil. This can be undone by melting those ice path using Jalapeno.
Another way is to simply breakdown that truck using many peas shot by Repeaters before it could make its ice path or Chomper with instant kill. Snow Pea has no effect against this truck though. A Potato Mine will also do the trick by destroying Zomboni vehicle! Same goes with Squash, Cherry Bomb and Doom Shrom. Completing this stage unlocks Spike Weed, the solution to Ice Truck encounter.
Zombies: Zombie, Conehead Zombie, Ducky Tube Zombie, Zomboni.
Plants: Sunflower, Potato Mine, Walnut, Snow Pea, Repeater, Lily Pad, Jalepeno, Squash.
Unlocks: Spike Weed.
Final Layout

Plants vs Zombies Stage 3-7 introduces Spike Weed, a plant that pops tires like the ones from Zomboni (Ice Truck) thereby destroying it instantly, but it will sacrifice itself as well. It can also hurt all zombies that walked over it.
Plant Spikeweed after you have your Snow Pea and Repeaters up at the very front garrison where the zombie first appear on that vacant soil. This will allow Spikeweek to poke Zombies feet, hurting them as they pass by. Also, it can destroy Zomboni instantly without having them to freeze the soil. Upon completing this stage, you will unlock Torchwood, a damage amplifier specially made for Peas.
Zombies: Zombie, Conehead Zombie, Ducky Tube Zombie, Zomboni, Buckethead Zombie, Snorkel Zombie.
Plants: Sunflower, Potato Mine, Walnut, Snow Pea, Repeater, Lily Pad, Jalepeno, Spike Weed.
Unlocks: Torchwood.
Final Layout
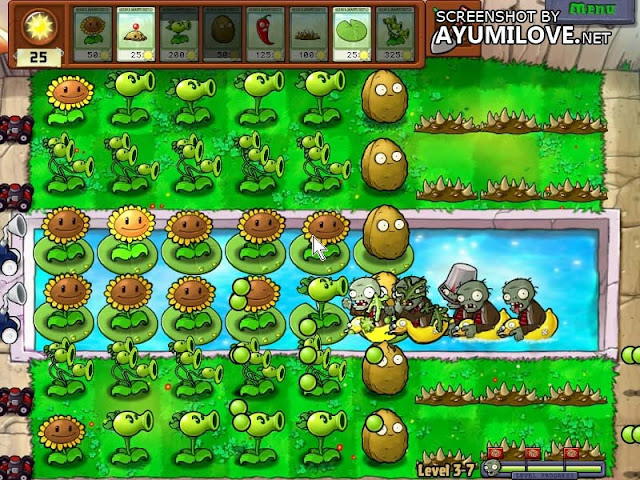
Plants vs Zombies Stage 3-8 introduces Torchwood. It’s a stump with glowing fire on top of its head. This fire engulfs any peas including Snow Pea into Fireballs. Fireballs does splash damage and also removes the slow freezing effect caused by Snow Pea or any plants that curse zombies with freezing effect. So if you are into Fireballs, just go with Pure Repeaters (with Gatling Gun) or Threepeater, without Snow Pea.
This stage also introduces a new zombie, Dolphin Rider Zombie that is capable of jumping over a plant on your swimming pool, similarly to how a Pole Vaulting Zombie jumps over a plant on land. It is pretty fast with the Zombie Dolphin swimming across your swimming pool.
To stop it, plant a Lily Pad to force it to jump over and slow down its movement. Or use Tangle Kelp to drown any water zombies instantly. Completing this stage unlocks a tall walnut, specially made to prevent zombies from leaping over.
Zombies: Zombie, Conehead Zombie, Ducky Tube Zombie, Zomboni, Buckethead Zombie, Snorkel Zombie.
Plants: Sunflower, Potato Mine, Walnut, Snow Pea, Repeater, Lily Pad, Jalepeno, Spike Weed.
Unlocks: Tall-Nut.
Final Layout

Plants vs Zombies Stage 3-9 introduces Tall-nut. It is a successor of Walnut but with a taller sturdier body. With its massive height, it is capable of blocking zombies that has the ability to leap over it. It’s massive size does not seem to bother Lily Pad from keeping it afloat.
Plant Tall-nut at column 4 from the left to prevent random zombies from appearing at the final wave and prevent Dolphin Zombies from charging into your aquatic plants. Plant Torchwood just before Tall-Nut, and serve Peas using Threepeater planted at row 2 and row 5.
Upon completing this stage, you will receive a note left by the Zombies ‘Hello, We herd you were having a pool party. We think that iz fun. Well be rite over. Sincerely, the Zombies. Well that basically means they are going to perform a full-scale attack on your Swimming Pool house on daytime!
Zombies: Zombie, Conehead Zombie, Buckethead Zombie, Pole Vaulting Zombie, Dolphin Rider Zombie, Zomboni, Ducky Tube Zombie.
Plants: Sunflower, Potato Mine, Tall Nut, Threepeater, Torchwood, Spike Weed, Tangle Kelp.
Unlocks: A Note from Zombies.
Final Layout
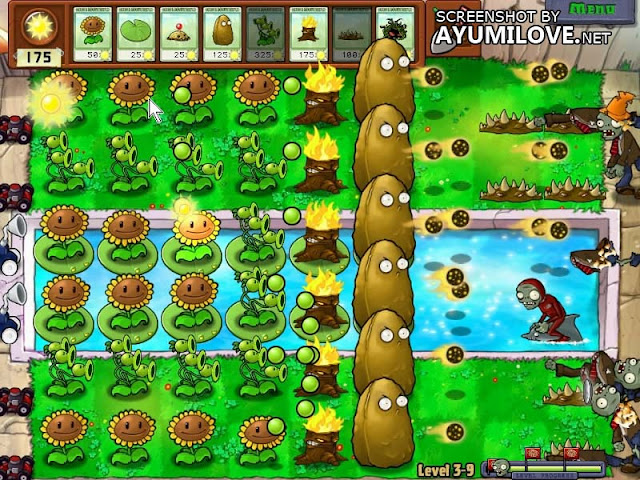
Plants vs Zombies Stage 3-10 is the final battle against zombies on Swimming Pool during daytime. Usually in final battle, conveyor belt will be the one providing random plants to aid with your house defenses! Follow the same layout as Stage 3-9, where Tall Nuts are on 4th column from the left, followed by Torchwood behind it, and populating Threepeater on vacant soil behind Torchwood.
Completing this stage unlocks a new aquatic plant, Sea-Shroom and explore the nighttime of swimming pool area! This is where the Mushrooms starts becoming active in protecting your house from zombie invasion at night.
Zombies: Zombie, Conehead Zombie, Buckethead Zombie, Snorkel Zombie, Dolphin Rider Zombie, Zomboni, Ducky Tube Zombie.
Plants: Threepeater, Torchwood, Tall-Nut, Lily Pad, Jalapeno, Squash, Spikeweed.
Unlocks: Sea-Shroom + Swimming Pool Nighttime.
Final Layout


Daytime Front Yard
Daytime Front Yard (Stage 4-1)
Plants vs Zombies Level 4-1 introduces a new map, nighttime in swimming pool! This is another chance where you get to plant mushrooms to defend your home against zombies. You will have a new ally, the Sea Shroom to help you out with your Swimming Pool defenses! Puff Shroom and Sea Shroom does not cost any Sunlight, so plant them whenever they are available.
Guard the Swimming Pool with 2 Walnuts and have 2 Sea Shroom to support from behind. Although this defense its weak, its capable of handling Ducky Tube Zombies. At the final wave, use Cherry Bomb to wipe all of them out.
Zombies: Zombie, Conehead Zombie, Ducky Tube Zombie, Jack-In-The-Box Zombie.
Plants: Sun Shroom, Puff Shroom, Lily Pad, Walnut, Cherry Bomb, Scardy Shrom, Fume Shroom.
Unlocks: Plantern
Final Layout

Plants vs Zombies Level 4-2 introduces Plantern, a plant that lights up an area, giving you visibility through fog. I wonder how does fog even appear in suburban homes, unless its close to the mountain peak.
Place Plantern on the 2nd column from the right, with Walnut guarding in front to prevent Zombies from eating it. Support these 2 plants with Fume Shroom. Once those areas are secured, moved on to guarding the Swimming Pool with Walnuts on Lily Pad and Fume Shroom defending it from behind. Use Hypno Shroom against Headgear Zombie (the Football/Rugby Zombie).
Zombies: Zombie, Conehead Zombie, Ducky Tube Zombie, Jack-In-The-Box Zombie.
Plants: Sun Shroom, Puff Shroom, Lily Pad, Walnut, Cherry Bomb, Plantern, Fume Shroom, Hypno Shroom.
Final Layout
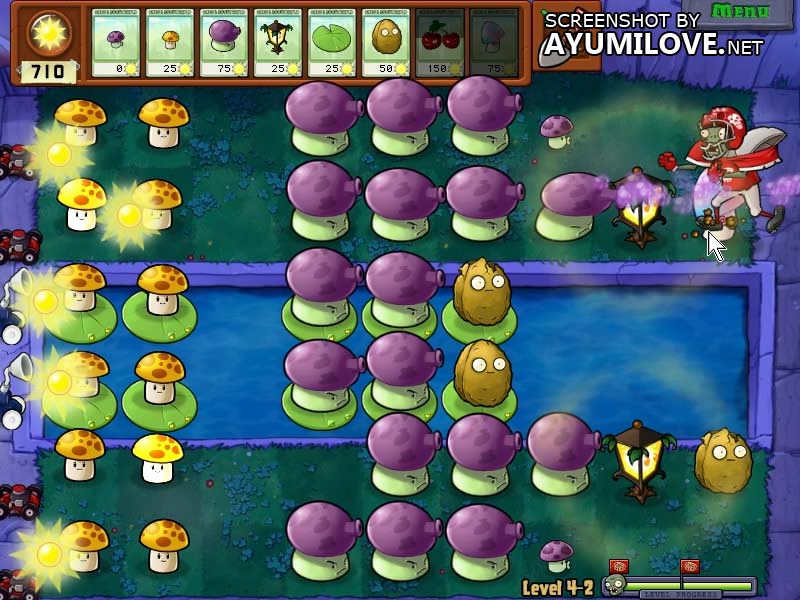
Plants vs Zombies Level 4-3 introduce Balloon Shroom in nighttime Swimming Pool. This is a major headache since the sunlight cost of Cactus is really expensive. Therefore, plant the Cactus when you first spot them with your Plantern (aka Torchlight). Completing this stage unlocks Blover that will greatly help solving the mysterious fog.
Zombies: Zombie, Conehead Zombie, Ducky Tube Zombie, Balloon Zombie.
Plants: Sun Shroom, Puff Shroom, Lily Pad, Walnut, Sea Shroom, Plantern, Fume Shroom, Cactus.
Unlock:Blover
Final Layout
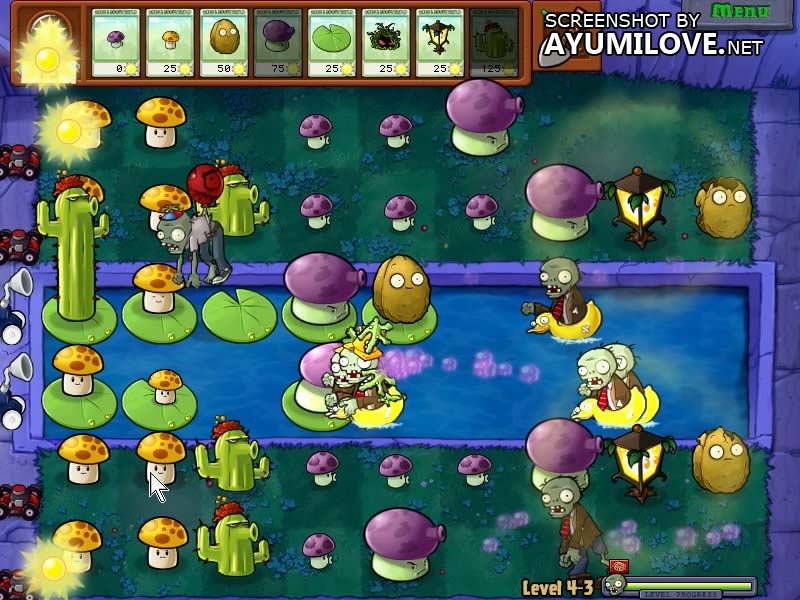
Plants vs Zombies Level 4-4 introduces Blover, a plant that blows away fog and Balloon Zombies. It disappear instantly after performing its special ability similarly to Cherry Bomb does its explosion! Whenever you have many Balloon Zombies invading all together, you can use Blover to get rid of them, reducing the number of zombies that your plants need to take care of.
Blover is a temporary fix against Balloon Zombies, a permanent would be a Plantern that lights up the fog and using Cattail (that can be purchased from Dave’s Shop). Cattail shoots homing spikes that targets any zombies at any location/lane.
Zombies: Zombie, Conehead Zombie, Ducky Tube Zombie, Balloon Zombie, Dolphin Rider Zombie.
Plants: Sun Shroom, Puff Shroom, Fume Shroom, Lily Pad, Squash, Cherry Bomb, Blover, Walnut.
Unlock:Taco (Dave’s Favorite Food – Exchange for $1000)
Final Layout

Plants vs Zombies Level 4-5 introduces a new mini game! You break the vase and this will either pop up a zombie or a random plant card! If you get a zombie, break other vases to gain plant to help defend your home against them! If you feel excited, break all of them together and scramble away with your cards laying on your garden. Completing this stage unlocks Split Pea plant. It is able to shoot pea in 2 directions (forward and backward).
Zombies: Zombie, Buckethead Zombie, Headgear Zombie, Dancing Zombie, Jack-in-the-box Zombie
Plants: Pea Shooter, Snow Pea, Hypno Shroom, Squash.
Unlock: Split Pea
Final Layout

Введение
«Plants vs Zombies» — это популярная компьютерная игра, разработанная и выпущенная компанией PopCap Games. Эта игра комбинирует стратегический стиль с увлекательным геймплеем и забавными персонажами. В этом подробном руководстве мы рассмотрим все секреты первой части игры, чтобы помочь вам стать успешным игроком.
Основы игры
«Plants vs Zombies» — это игра с защитой башен, где вашей целью является защитить свой дом от атаки зомби, используя различные растения. В игре есть несколько уровней, каждый из которых представляет собой сражение на вашем газоне.
Секреты игры
1. Правильное размещение растений
Для создания эффективной стратегии вам необходимо правильно размещать растения на поле боя. Учитывайте их особенности и способности. Например, «peashooter» — это растение, стреляющее горошками, поэтому его следует разместить в начале вашей защитной линии для нанесения урона по приближающимся зомби.
2. Использование солнечных точек
В игре есть солнечные точки, которые генерируют солнечную энергию, необходимую для покупки и размещения растений. Существует несколько способов получить больше солнечных точек: вы можете разбивать цветы на поле боя, использовать «sun-shroom» (растение, которое генерирует солнечные точки), или использовать солнечные цветы.
3. Использование усилений
В игре есть усиления, которые помогут вам в сражении против зомби. Некоторые усиления делают ваши растения более мощными, другие замедляют зомби или даже наносят им урон. Эти усиления могут быть важными в сражении с более сильными зомби, поэтому не забудьте использовать их.
4. Использование дополнительных растений
Помимо стандартных растений, в игре есть специальные растения, которые можно разблокировать и использовать для своей защиты. Например, «chomper» — это растение, которое может съесть целого зомби. Приобретение и использование этих дополнительных растений может значительно улучшить вашу стратегию.
5. Остановка большой волны зомби
Иногда в игре появляются большие волны зомби, которые могут создать проблемы для вашей защиты. В этом случае особенно важно использовать мощные растения и усиления, чтобы справиться с ними. Например, «cherry bomb» — это усиление, которое может уничтожить всех зомби на большой площади.
Заключение
С помощью этого подробного руководства вы теперь знаете все секреты первой части игры «Plants vs Zombies». Используйте эти советы и стратегии, чтобы стать успешным защитником своего дома от атаки зомби. Удачи!
Plants vs. Zombies — Survival: ENDLESS!
Written by Jason Long (evilbob)
Copyright (c)2009 Jason Long. All rights reserved.
This guide may not be reposted, in whole or in part, without my written
permission. The only website that has permission to display this FAQ is
gameFAQs.com. For questions contact me at evilbob65535 at yahoo dot com.
========================================
Searchable Table of Contents
========================================
Copy, Control+F, and Paste the codes in [] to search for something quickly.
1. What This Guide Does [1WTGD]
2. The Theory [2THRY]
3. The Setup [3STUP]
3a. Phase 1 [3PHS1]
3b. Phase 2 [3PHS2]
3c. Phase 3 [3PHS3]
3d. Phase 4 [3PHS4]
3e. Phase 5 [3PHS5]
3e. Final Phases [3FINL]
4. Variations [4VARI]
4a. Variation 1 [4VAR1]
4b. Variation 2 [4VAR2]
4c. Variation 3 [4VAR3]
5. Thanks [5THNK]
========================================
What This Guide Does
========================================
[1WTGD]
This FAQ is not a walkthrough nor is it intended as a general game guide. For
an excellent general guide, please see curby’s FAQ/walkthrough on
gameFAQs.com:
www.gamefaqs.com/computer/doswin/file/959255/565..
This guide deals specifically with one of the final challenges in the game:
Survival: Endless. This challenge is unlocked after completing all other
Survival games (and beating the adventure mode). The purpose is quite simple:
survive for as many flags as possible during a never-ending onslaught of
zombies. It is set on the «pool» level during the day, and almost every
zombie in the game may attack at some point (including normally roof-specific
and night-specific zombies). It is incredibly challenging and can take hours
to play.
This guide has been heavily influenced by curby’s guide and it should be noted
that all credit for the core strategy goes to that guide. curby’s strategy of
using garlic to steer zombies into multiple gloom-shrooms is what inspired me
to create this guide and expand upon these strategies for the special
considerations that happen in Survival: Endless.
Note that this guide will not talk about the basics of the game. It assumes
you have completed the game’s adventure mode, unlocked Survival: Endless, and
purchased all possible plants and seed slots from the game’s store.
========================================
The Theory
========================================
[2THRY]
When it comes to Survival: Endless, many of the well-crafted strategies
presented in curby’s excellent walkthrough just don’t hold up over 20+ flags.
Part of the problem is that just about any kind of zombie can attack (I’ve
even seen yeti zombies), especially bungee zombies, and part of the problem is
that the massive number of gargantuars — and thusly, imps — eventually becomes
a tremendous problem.
Overall, the main strategy theory — which could be called «funnel zombies into
gloom-shroom kill zones with garlic» — is still very sound, thanks to the
area-of-effect and rapid-fire nature of gloom-shrooms and how useful they are
against groups. Add to this the «spikerock row» and using winter melons for
slowing and splash damage and cob cannon to cover everything else, and you
have a very solid base strategy. However, a few new ideas need to be added to
tackle the long-term problems of Survival: Endless.
Basic Principles:
— 6 gloom-shrooms. This is a core part of curby’s strategy and it is here as
well.
— 6 winter melons. These are simply too powerful to use less than 1 per row;
their slowing effect is absolutely critical to survival, even on rows where
garlic is quickly moving zombies to other rows.
— 6 cob cannon. This is really the minimum number needed for a long term
strategy; in later stages, even this won’t be enough, but the space
requirements really preclude any additional cannon.
— 6 magnet-shrooms. You need at least this many: three for the northern two
strips of land and three for the southern two. More would be better, but
space limitations are just too great. (*See below for a way to get more.)
— 6 twinned sunflowers. Six should be running at all times, but again this is
riding the ragged edge: more sunflowers for a longer period of time is
better, so filling in gaps earlier with extra sunflowers helps, even if they
are to be replaced later. Building up a bank of several thousand sun helps
buffer against very bad levels where lots of plants will be destroyed.
— 6 spikerocks. This causes the overall expense to go up, but four are needed
to help stop vehicles and slow gargantuars AND you’ll want one more in each
«kill zone» to help kill zombies faster — and as a bit of insurance for the
most important land rows you have: the ones with your offensive units. If
these rows are breached, it becomes much more difficult to recover, so the
secondary spikerocks are there for extra protection.
— 4 umbrella leaves, 2 empty spaces. No strategy would be well-suited without
taking in some of the slightly rarer but extremely problematic zombies, such
as bungees and flyers. In my own experiments, I have come to the conclusion
that 4 well-placed umbrella plants covering 2/3rds of the field along with an
«emergency umbrella» system generally gives the best possible protection for
the space available. Additionally, leaving at least 2 spaces open on the
field not only allows for quick blover placement (and jalapenos/cherry bombs),
but it also gives you just a little more time to react before your defenses
are compromised. You don’t want to leave much more space than this, however —
you need the plants!
*One trick that can really help on some levels — but costs a decent amount of
sun and seed space — is to swap out two magnet-shrooms for the front line of
umbrella leaves, and vice-versa. Essentially, when you know no bungee zombies
are coming, rebuild magnets; when bungees visit again, replace them with
umbrellas. This can really help on levels with no bungees but that have both
football zombies AND diggers. However, again the cost associated with this is
high, and it can leave you vulnerable.
However, the main difference between this strategy and previous versions is
the placement of flowers. Most specifically, during late-game flags the imp
is actually the most dangerous zombie of them all: its ability to attack
rear-guard plants and destroy them so quickly means that all land-based rows
are extremely vulnerable. So how do we counter this threat? Move the bulk of
our offensive power to the pool. Since cob cannon in particular are one of
the only plants it is impossible to guard with pumpkins, getting them away
from the paths of the imps is absolutely essential. Granted, this leaves some
of our production and threat-reduction plants more exposed, but these are
cheaper and faster to replace, and without a powerful offense clearing the
way, it really isn’t possible to rebuild. Clearing zombies is the most
critical task.
There are a few other key placement differences as well. First, while digger
zombies pose a high threat, they are still slower and easier to defeat than
imps. This means that the first (leftmost) row is actually safer than the
second and third rows. It also means that since imps are so dangerous and
since they can come so quickly, unless you have an attacking plant on the
first row, you are more vulnerable. Thus, winter melons are moved to the
rear, or left-most rows (except for pool lanes).
Here is a general summary of these points along with the basic strategy from
curby’s original FAQ.
Basic assumptions:
— all plants unlocked/purchased; ten seed slots available; rake purchased
— garlic directs zombies into gloom-shroom «kill zones»
— spikerock row gives the best first defense possible
— pumpkins protect all possible plants (except garlic, spikerock, and cannon)
— winter melons on each row
— minimum of 6 cob cannon, twinflowers, and magnets
— need umbrella leaf defenses built into the strategy
Key differences from previous strategy:
— winter melons on back rows (on land) make them vulnerable to miners but they
help so much against imps it’s worth it
— move as many critical plants into the pool as possible to avoid imps
— twin flowers, while bad to lose, are still not as critical as offensive
plants
— extra sunflowers early help build a decent sun bank that can be used on bad
levels
========================================
The Setup
========================================
[3STUP]
The following is a step-by-step setup of how to go about setting up the best
defense. It is organized into «phases» or «levels», which correspond to the
period of time between which you can select new plants. Each phase covers 2
flags at first, then later 3, and so on. It is recommended to read through
the entire plan before starting.
=======
Phase 1
=======
[3PHS1]
Initially, pick the following flowers: sunflower, garlic, pumpkin, lily pad,
coffee bean, puff-shroom, gloom-shroom, kernel-pult, spikeweed, and finally,
potato mine. Be sure you have purchased a rake.
Your goal for the first «level» (this involves several flags or waves) is to
make sure you get several tasks done and plant all you need of certain plants
so you won’t have to select them again. Seed selection becomes the most
important part of the game, so starting early and getting things out of the
way is important. By the end of this level, you shouldn’t need to select the
sunflower, lily pad, puff-shroom, or gloom-shroom again. Also worth noting:
potato mines are the absolute best single-kill plants at the beginning of the
game due to their low cost. However, once you get past the first few zombies,
you’ll never use them again.
I have borrowed curby’s map design and symbols because they are excellent.
Here is a picture of the final look of your yard by the time you can choose
seeds again:
S S S S . . [.] g + Symbol Legend
S S c c S [G] + . + . land G gloom-shroom
S S c o o [G][G] _ _ _ water g garlic
S S c o o [G][G] _ _ S sunflower + spikeweed
S S c c S [G] + . + c kernel-pult o lily pad
S S S S . . [.] g + [ ] pumpkin
Notes:
— Start with sunflowers on land, garlic in rows 1 and 6, and kernel-pults in
rows 2 and 5. Use the rake off the bat and potato mine any cone-wearing
zombies to help get your economy (sunflowers) off the ground. You should have
a full 8 sunflowers on land as fast as possible. Save the water sunflowers
for last.
— Once you get that far, move to gloom-shrooms on the land rows. Be sure to
pumpkin first, then puff-shroom. Throw a kernel-pult or two in the pool to
counter pool zombies as soon as you can, but once you get the first two gloom-
shrooms going and they are backed up by kernel-pults, you shouldn’t have a
problem with anyone getting through.
— Continue to place gloom-shrooms as quickly as the upgrade seed recharges.
In the mean time, build a few more sunflowers and kernel-pults, and be sure
you are laying down pumpkins as fast as they recharge as well. Once you start
getting enough sun to cover everything, put spikeweed down in your «kill» zone
to help protect your gloom-shroom there, and then create the first spikeweed
row on the far column.
— You should make it easily to this point without losing any plants or
mower/cleaners. If you lose any of those, go ahead and start over.
— If you find yourself with plenty of sun left over, go ahead and finish
placing kernel-pults and pumpkins from the next phase. Extra sunflowers never
hurt, either: as long as you collect 3 sun from a sunflower, it was worth
your time.
=======
Phase 2
=======
[3PHS2]
Pick twinflower, garlic, pumpkin, coffee bean, magnet-shroom, kernel-pult (if
necessary), melon-pult, spikerock, and jalapeno. For your last slot, you can
grab squash, or you may want to pick up lily pad, sunflower, or anything else
you still need from phase 1. Alternately, you can skip ahead and grab winter
melon.
Your goal for this level is to upgrade your defenses significantly while
boosting your sun production a tremendous amount. After this level, you
shouldn’t need coffee beans or magnet shrooms (for a while).
S t t t M [M][M] g # Symbol Legend
S S c c [S][G] # . # . land G gloom-shroom
S* S* c c m [G][G] _ _ _ water g garlic
S* S* c c m [G][G] _ _ S sunflower # spikerock
S S c c [S][G] # . # c kernel-pult M magnet-shroom
S t t t M [M][M] g # [ ] pumpkin t twinflower
m melon-pult
Notes:
— You probably didn’t need to replace your garlic in the first phase; get
ready to keep a constant eye on it from now on.
— Pumpkin placement becomes important as you want to make sure no zombies get
past your front line.
— Start with magnet-shrooms and get them up as quickly as possible. Place a
twinflower and spikerock immediately and then you’ll pretty much spend the
entire rest of the level waiting for those two to recharge so you can have 6
total of each.
— Melon-pults will help finalize the pool defense, but they can wait until
other goals are accomplished.
— Squash are a decent, relatively quickly charging one-shot defense.
Jalapenos are much better but are more expensive and take longer to recharge.
Pick your favorite.
— The sunflowers marked with an * are ones you can try to twin if you get a
chance, but it’s not a big deal.
=======
Phase 3
=======
[3PHS3]
Pick garlic, pumpkin, melon-pult, winter melon, kernel-pult, cob cannon,
imitater->pumpkin, jalapeno, and either pick two things you didn’t finish
before OR load up on cherry bomb and squash. Alternately, you can bring
twinflower again and go for a couple of the sunflowers on the pool.
This level is going to be expensive, but you should have the sun to back it
up. After this level you shouldn’t need melons or winter melons again.
[W] t t t [M][M][M] g # Symbol Legend
[W] S c c [S][G] # . # . land G gloom-shroom
S* S* CCCC W [G][G] _ _ _ water g garlic
S* S* CCCC W [G][G] _ _ W winter melon # spikerock
[W] S c c [S][G] # . # c kernel-pult M magnet-shroom
[W] t t t [M][M][M] g # [ ] pumpkin t twinflower
CC cob cannon
Notes:
— Start by winter-meloning your existing melon-pults and then hit another one
each time it recharges. Dig up the back sunflowers and put winter melons
there as well.
— Pumpkin EVERYTHING! Use the imitater->pumpkin** to help you get the back
rows while you use the regular pumpkin to replace defenses. Go ahead and hit
the twinflowers on the top and bottom rows if you get a chance. Don’t neglect
your garlic — the magnets are counting on you!
— Try to save up for cob cannon — you should be able to get two at least. If
you have enough sun, go ahead and hit the other two pairs of kernel-pults.
— If you think it will be cost effective, go ahead and twin the * sunflowers.
Just note that you’ll be digging these up part of the way through the next
phase, so don’t push it. If you can replace them early then it’s probably
still worth it; if the level is about to end it’s probably not.
** Note about the imitater: while the versatility of this plant is amazing,
it sadly has about a half-second delay in deploy time: making it juuuust
barely useless for instants and other plants you need to lay down while
zombies are attacking. It’d be GREAT as a backup cherry bomb; sadly, it will
die before it can explode unless nothing is near it. This, plus the fact that
it cannot duplicate other purchased plants, makes it best used for adding to
defenses.
=======
Phase 4
=======
[3PHS4]
Pick garlic, pumpkin, umbrella leaf, kernel-pult, cob cannon, spikeroot,
spikerock, imitater->pumpkin, jalapeno, and another instant like cherry bomb.
Or, something you left out before, or a blover if balloon zombies are present.
Finally, phase 4, where we see our hard plans come to fruition. This is the
final step in the base strategy. At this point you should have an obscene
amount of sun saved up. Also, since we passed 10 flags, bungee zombies and
loads of vehicles should start coming into the picture. At this point the
types of zombies you face each level is fairly random, but there are a few
more defenses we need to set up first.
[W][t][t][t][M][M][M] g # Symbol Legend
[W][u] CCCC [u][G] # . # . land G gloom-shroom
CCCC CCCC [W][G][G] _ _ _ water g garlic
CCCC CCCC [W][G][G] _ _ W winter melon # spikerock
[W][u] CCCC [u][G] # . # u umbrella leaf M magnet-shroom
[W][t][t][t][M][M][M] g # [ ] pumpkin t twinflower
CC cob cannon
Notes:
— Go ahead and pluck those sunflowers and plant umbrellas. That will cover
2/3rds of the field, and your remaining pieces of land are now your «special»
spots. If you see a bungee zombie targeting anything in the last three
columns, quickly throw an umbrella plant into the appropriate spot to cover it
(it will get eaten immediately but that’s ok). If they target something both
above and below: well, I’m sorry. It’s not a perfect defense.
— Once you have 4 cob cannon, start digging up the remaining sunflowers in the
pool lanes and replacing them with kernel-pults and then cob cannon as well.
Try to wait until the cob cannon has recharged and you have enough sun before
you dig up the sunflowers: the idea is to squeeze as much sun out of them as
possible before they go.
=======
Phase 5
=======
[3PHS5]
Generally, you’ll want:
— garlic, pumpkin, spikeweed, spikerock, jalapeno (all levels)
— imitater->pumpkin, cherry bomb (when you have room)
— umbrella leaf, blover (when facing bungee and balloon zombies, respectively)
— coffee bean, magnet (as necessary; good to take if you have the room and are
facing gargantuars or zombonis as they will likely get a magnet or two)
— kernel-pult, cob cannon (when imps kill your row 2 and 5 cannon)
— whatever else gets killed
At this point, the game is about damage control and wise cob cannon usage (and
to some extent, luck of the draw based on which zombies are attacking each
phase). Your twinflowers are at the top and bottom of the screen (helpful so
you don’t accidentally click a cob cannon and launch it), and they will keep
you afloat — but hopefully you have several thousand sun banked up, because
you’ll need it. (Just wait until you randomly get two gargantuars and a
zomboni on the same level! WHEE!) This almost goes without saying but ALWAYS
go for sun over collecting coins — however, the maximum amount of sun you can
collect is 9990, so once you get that far, just watch your defenses. Keep
your spikerocks as healthy as possible. Eventually, the game will become all
about the spikerock recharge timer, as you’ll be blowing through them
incredibly fast. Try to use cob cannon to ease their load when you can, but
save up enough blasts to both fend off imps, the occasional digger that still
gets through, and kill gargantuars. Ideally, if you fire two cob cannon in
rapid succession at a gargantuar, it won’t get to throw its imp — but zombies
never make things easy. Sometimes you’ll miss, and sometimes you’ll barely
get another gargantuar in the second blast, causing him to throw. Just accept
that it will happen and try to defend as best you can. Jalapenos help a great
deal since they can take out imps and hit things still coming — although they
work best on your «special» spots on rows 2 and 5 — but don’t be shy about
digging up a garlic and using one there if you can do it quickly enough.
Also, don’t be afraid to dig up an umbrella plant and throw a cherry bomb down
if you need to — those are cheap to replace, and if you need one you probably
brought them on this level.
Keep an eye on your pumpkins and on your garlic, especially the pumpkins on
the magnets just behind the garlic. Later levels with dozens of pole-vaulters
or dolphin zombies are merciless on your 2nd-line pumpkins; keep them as
healthy as possible, too. Keep blovers handy for flyers, but note that you
can often wait until the last moment and catch two waves of flyers at the same
time. The nice thing is that you can plant it anywhere and it will clear the
whole field.
============
Final Phases
============
[3FINL]
Once you get past about the 30th flag, the game becomes less about strategy
and more about reflexes. Feel free to pause (space bar) as often as you can
and take a quick look around: see what’s coming, see where your recharge
timers are, and see if anything is conspicuously missing from your lines.
It’s also a matter of how much sun you can throw at a problem: storing up to
9990 sun early isn’t a bad idea, because you will easily use all of it and
still die with no sun left. Try to be more conservative with how you spend
after this point: you are going to run out soon.
Zombonis and gargantuars are your worst nightmares; eventually the spikerock
timer just won’t be able to keep up with them and you’ll be using every trick
you have just to keep them at bay. Fortunately, this strategy does a pretty
decent job at fighting while losing; you can often keep the zombies off for a
good couple of flags past the point where your field is no longer viable,
especially since the worst types of zombies can’t hurt your pool plants.
However, scores of dolphins will seriously mess you up if you start losing
gloom-shrooms, so keep those pumpkins healthy. Sadly, gloom-shrooms end up
being the most difficult plant to replace due to the 3-seed slot cost, so do
what you can to keep them running, as their defeat will signal your impending
loss.
And lastly, just remember that you’re always fighting a losing battle: so
don’t sweat it.  Oh, and one good game can last HOURS, but you can pause
as much as you’d like.
This concludes the primary Survival: Endless strategy — however, this remains
a process under development. My current best is 37 flags using this strategy.
(This typically nets about 30,000 in coins, a couple of plants for the zen
garden, and maxes out my chocolate. You could probably get much more money if
you tried, but it can also take over 3 hours to get that far, so it’s not a
great gold-farming method.) As I can reach phase 4 easily and bank the
maximum amount of sun, any new strategy ideally needs to deal with the massive
numbers of zombies and constant zomboni/gargantuar threat faced once you’ve
reached a flag count in the early 30s. More ideas — new placements, better
plant usage, more efficient builds, etc. — are always welcome.
========================================
Variations
========================================
[4VARI]
Several variations exist on the main strategy, and unfortunately since it
takes roughly 3 hours to test one, not all of these have been tested. Any
data on any of these methods is appreciated.
===========
Variation 1: Melon-pults vs. land-based cob cannon
===========
[4VAR1]
One variation on this strategy that I invariably end up using is replacing my
two land-based cob cannon with pumpkined melon-pults. Imps become a constant
nuisance toward the 30s and two or three at a time can take out a very
expensive cob cannon before I can really react. So, once that happens, I’ll
replace the cannon with two melons and pumpkin them; these hold up MUCH better
against the imps and help your offense to some degree as well. Sadly, the
loss of the cob cannon is felt, but it still seems to work better than
constantly burning the sun to replace them.
This leads me to wonder if planning this idea from the start wouldn’t help. A
setup based around this idea would spread the melons out a bit more so that
they cover all land rows. There’s also the winter melon vs. normal melon
thought, but since a single winter melon does a decent job of keeping
everything slowed and purportedly shoots half as fast, a normal melon-pult
seems the best way to go. Here’s a final strategy based on this variation:
[W][m][t][t][M][M][M] g # Symbol Legend
[W][u][m][t][u][G] # . # . land G gloom-shroom
CCCC CCCC [W][G][G] _ _ _ water g garlic
CCCC CCCC [W][G][G] _ _ W winter melon # spikerock
[W][u][m][t][u][G] # . # u umbrella leaf M magnet-shroom
[W][m][t][t][M][M][M] g # [ ] pumpkin t twinflower
CC cob cannon m melon-pult
===========
Variation 2: Cacti vs. open spaces
===========
[4VAR2]
Another idea is to try to squeeze cacti into the group to deal with balloon
zombies. The advantages are that you aren’t required to leave an open space
to throw down a blover, and you’ll obtain a slight increase in overall
firepower. The disadvantages are that I am not entirely sure if one cactus
per row can handle the sheer number of balloon zombies that appear in later
waves, nor am I sure that the paltry extra firepower is worth the precious
space (especially since you can’t do this AND have 4 extra melon-pults).
Additionally, since the extra spaces also double as emergency umbrella deploy
spots, it leaves a full third of your field exposed to bungee zombies —
although, since they happen so rarely, this is potentially something that can
be recovered from — and you may be able to dig up your garlic to handle it
most of the time. However, they’re also your emergency jalapeno and cherry
bomb deploy spots as well, which can be another issue. The final disadvantage
is that it also impedes your total reaction time to deal with zombonis and
gargantuars before they can destroy things, although having two spikerocks
should help. I’ve never explored this option completely but it remains a
possibility.
Building on Variation 1 (sacking two cob cannon for space) I would guess it
would look something like this:
[W][f][t][t][M][M][M] g # Symbol Legend
[W][u][f][m][u][t][G] # # . land G gloom-shroom
f CCCC CCCC [W][G][G] _ _ water g garlic
f CCCC CCCC [W][G][G] _ W winter melon # spikerock
[W][u][f][m][u][t][G] # # u umbrella leaf M magnet-shroom
[W][f][t][t][M][M][M] g # [ ] pumpkin t twinflower
CC cob cannon m melon-pult
f cactus
The cacti are intentionally near the back so they have the most time to fire
against balloons. It may also be necessary to dig up an umbrella leaf for
emergency blover/jalapeno placement in extreme waves of balloons (or use your
cob cannon), but honestly if you have to throw down a blover then this
variation is flawed from the get-go.
===========
Variation 3: Garlic vs. double the gloom-shrooms
===========
[4VAR3]
Since a double-row of gloom-shrooms are so effective, and since gloom-shrooms
only get more powerful as they are placed near each other, another variation
is to forget the garlic and just gloom-shroom like crazy. Another benefit of
losing garlic is that gives you more space to plant spikerocks, which means
you have double your chances of getting through a level with vehicles intact
and double the chance to slow a gargantuar. On the other hand, it also means
it will take twice as long to recover when they do get through, and you have
less reaction time to deal with them before they get to something vital.
This effectively also reduces the need for magnets, since you should be able
to kill most of the toughest zombies more easily. It still leaves ladder
zombies and diggers as a threat, however — one not easily dealt with. And, as
with variation 2, we still lose the verisimilitude of an open spot on the
field for blovers, although it might be something we could compensate for by
digging up umbrella leaves and replanting them as needed — so long as the
field was well-covered already. But the only spot that can completely cover
the field is in the middle of our offense… So how do we compensate?
[W][m][t][t][t][G][G] # # Symbol Legend
[W][u][m][M][u][G][G] # # . land G gloom-shroom
CCCC CCCC [W][G][u][G] _ _ water g garlic
CCCC CCCC [W][G][u][G] _ W winter melon # spikerock
[W][u][m][M][u][G][G] # # u umbrella leaf M magnet-shroom
[W][m][t][t][t][G][G] # # [ ] pumpkin t twinflower
CC cob cannon m melon-pult
This strategy uses 2 magnets simply as digger defenses and to maybe grab a
ladder once in a while. Cob cannon end up being backup defenses against both
of these, which isn’t good as this keeps the already short number of cannon
busy. (Later digger zombies start coming 4 or 8 at a time, so many will get
through.) Additionally, due to practical requirements, umbrella plants cannot
actually cover the entire field. This leaves your top and bottom rows
particularly exposed, and worse yet, the only plants exposed are the hardest
to replace! Plus, your only defense against flyers is to dig up an umbrella —
but at least the field is covered as well as it can be so you shouldn’t have
much trouble replacing it. This can get particularly troublesome if you need
to lay down a jalapeno, however. Lastly, I am unsure as to how effective the
front-line pool plants will be against normal waves, as pretty much every
zombie will be getting into the pool and chomping on those first pumpkins.
However, it does grant a tremendous defense against vehicles (if you can
replace the spikerock fast enough) and gargantuars, especially as any of these
that appear on rows 2 or 5 may get killed even without a cob cannon (although
without instant kills they will throw their imps). More testing is needed.
========================================
Thanks
========================================
[5THNK]
Thanks to curby for an excellent guide and strategy.
========================================
Plants vs. Zombies — Survival: ENDLESS!
Copyright (c)2000 Jason Long. All rights reserved.
Version 1.00. Last Updated 6-4-2009