-
Page 1
Piranha & QABrowser Reference Manual — English — Version 5.5C RTI article number: 9629050-10… -
Page 2
Welcome to Piranha and the QABrowser The Piranha is an X-ray Analyser/Multimeter for everybody working with Quality Assurance and Service of X-ray systems. -
Page 3
Notice NOTICE RTI Electronics AB reserves all rights to make changes in the Piranha, the QABrowser, and the information in this document without prior notice. RTI Electronics AB assumes no responsibility for any errors or consequential damages that may result from the use or misinterpretation of any information contained in this document. -
Page 4: Intended Use
Intended Use Intended Use of the Piranha System Accessory to diagnostic X-ray equipment to be used as an electrometer. Together with external probes it is to be used for independent service and quality control, as well as measurements of kerma, kerma rate, kVp, tube current, exposure time, luminance, and illuminance within limitations stated below.
-
Page 5: Table Of Contents
………………… 6 Palm OS Computer Requirements ………………… 6 Description of the Piranha ………………..9 Indicators and Connectors ………………… 9 Setting Up the Piranha for the First Time ………………… 12 Setting Up the Piranha ………………… 12 Hardware and Specifications ………………… 13 2.4.1 Piranha internal detector (Internal detector) ………………….13…
-
Page 6
Measurements with the Piranha System Introduction ………………… 88 Radiography ………………… 89 5.2.1 kVp, Time, Dose, and Dose Rate ………………….91 5.2.2 Dose Measurements with Piranha Dose Probe ………………….94 5.2.3 HVL Application ………………….95 5.2.3.1 Introduction 2 ………………….96 5.2.3.2 kVp, Time, Dose, and Dose Rate 2 ………………….97… -
Page 7: Contents
General ………………….113 5.5.2 Setting Up the Piranha for Mammography ………………….114 5.5.3 kVp, Time, and Dose Measurements with the Internal detector ………………….115 5.5.4 Dose Measurements with the Piranha Dose Probe ………………….117 5.5.5 HVL Application ………………….118 5.5.6 Quick-HVL ………………….119 5.5.7 Mammo Compensations and Corrections ………………….119…
-
Page 8
Chapter 1 Introduction… -
Page 9: Introduction
This manual gives a short introduction to handheld computers and enough of information to get started and use it with the Piranha. However, it is advised (if you are going to use a handheld computer) to study the manual that is included with your handheld computer to get familiar with its capabilities.
-
Page 10: Pc Requirements
RTI Electronics Web site at http://www.rti.se. If you have questions, comments, or feel that some functionality is missing, you are welcome to contact us at RTI Electronics at sales@rti.se. You can of course also call or send a fax (see notice section for details).
-
Page 11
1. Introduction Palm OS Computer Requirements RTI Handheld Display or Palm Tungsten E2/TX Bluetooth wireless. 2014-06/5.5C Piranha & QABrowser Reference Manual… -
Page 12
Chapter 2 Description of the Piranha… -
Page 13: Description Of The Piranha
Indicators and Connectors Description of the Piranha Indicators and Connectors The Piranha comes in a lot of different models, the external design is basically the same for all models (except for the External Probe port). Edge: External Probe port (on…
-
Page 14
External Probe port and Opening for filter position viewing Here you attach the external probes that come with some models of the Piranha. The port is marked EXT. Not all models have this port. Piranha & QABrowser Reference Manual… -
Page 15
Piranha to a holder. Attachment for Safety strap The Power switch is used to turn the Piranha on and off. Piranha has several ways of saving power when it is inactive, but must be powered off manually since there is no auto-power off function. -
Page 16: Setting Up The Piranha For The First Time
2. Place the Piranha under the tube or mount the holder and HVL stand for positioning of the Piranha in the X-ray field. The stand allows you to position the Piranha (or the external Dose Probe) and HVL filters in any angle including upside-down. Use the light-field or other help to position the Piranha in the X-ray field.
-
Page 17: Hardware And Specifications
Dose and time values will be given for even shorter exposure times. The estimations of total filtration and Quick-HVL are done from one single exposure using a combination of detector and filters in the Piranha. In situations when the total filtration cannot be automatically estimated, a «standard» HVL measurement may be required.
-
Page 18: Specifications, Piranha
5 h (300 min) 8½ h 32 h Note that other mains power solutions that uses a regular USB cable to connect to the Piranha, will behave like USB in the table. Communication Max 12 Mbit/s (USB v1.1) Bluetooth 115 kbit/s 2.4.1.3…
-
Page 19
2. Description of the Piranha Hardware and Specifications Reference conditions +18 °C to +23 °C Temperature Relative humidity 50 % 101.3 kPa Air pressure Inside the Piranha top panel. X-ray field size Calibration is done with field size typically 5 mm less than the size of the top panel. -
Page 20
2. Description of the Piranha Hardware and Specifications Parameters The average of all samples with compensation for the ripple Tube voltage (kVp) (default method) Irradiation time (Exposure time) Time Measured air kerma (may be called dose or air kerma in this… -
Page 21
Note 2: All kerma and kerma rate ranges, inaccuracy, and resolution figures are valid for product version 2 and higher of the Piranha. Note 3: The Kerma rate is calculated as the Kerma (Dose) divided by the Irradiation time. See… -
Page 22
2. Description of the Piranha Hardware and Specifications Parameter Range Inaccuracy Resolution Quick-HVL Mo / 30 µm Mo 0.19 – 0.47 mm Al ±10 % 3 digits Mo / 25 µm Rh 0.31 – 0.52 mm Al (0.001 mm) Rh / 25 µm Rh 0.33 –… -
Page 23
2. Description of the Piranha Hardware and Specifications Computed Tomography Parameter Range Inaccuracy Resolution kVp (standard) W / 3.0 mm Al 45 – 160 kV ±1.5 % 4 digits (10 or 100 V) W / 3 mm Al + 1.2 mm Ti 75 –… -
Page 24
1 – 65535 pulses, resolution 1 pulse Note 1: Max dose/pulse depends on the pulse length. Note 2: All kerma and kerma rate ranges, inaccuracy, and resolution figures are valid for product version 2 and higher of the Piranha. Waveform recording time 1024 ms (2 kSa/s) -
Page 25: Typical Response, Piranha
2. Description of the Piranha Hardware and Specifications 2.4.1.4 Typical Response, Piranha The table below shows the typical response for the Piranha at standardised radiation qualities. Radiography, Fluoroscopy, and Dental (measured using RTI RQ Code R1, W/Al) Radiation quality Air kerma measurement…
-
Page 26
2. Description of the Piranha Hardware and Specifications Mammography, Mo / 30 µm Mo and 30 µm Mo + 2 mm Al (measured using RTI RQ Code M1) Radiation quality Air kerma measurement Mean energy ISO 4037 Factor kQ air kerma (keV) -
Page 27
2. Description of the Piranha Hardware and Specifications Mammography, Rh / 25 µm Rh (measured using RTI RQ Code M4) Radiation quality Air kerma measurement Mean energy ISO 4037 Factor kQ air kerma (keV) HVL (mm Al) IEC 61267 (Rel. RRV28) -
Page 28: Angular Sensitivity, Piranha
There are two different graphs, depending on the product version of your Piranha. The product version is the version number you can find on the label on the bottom of the Piranha. If the version of your Piranha is 1.X, use the graphs marked v1. For 2.X and higher use graphs marked v2.
-
Page 29
2. Description of the Piranha Hardware and Specifications 2014-06/5.5C Piranha & QABrowser Reference Manual… -
Page 30: Piranha External Probes
Waveforms and Triggers Note 2: The standard calibration for the Piranha External Dose Probe is W/23 mm Al. This calibration was chosen since the main use of the detector is to measure the dose to the image intensifier, after the phantom. However, you can just as well use this probe for measurements of skin dose.
-
Page 31
Please also note that in QABrowser, the waveforms are limited to between 0.32 and 4 seconds. The table below shows the typical response for the Piranha External Dose Probe at standardised radiation qualities. Radiation quality… -
Page 32
±1 pulse 0.5 ms Note 1: When the Piranha internal detector is used simultaneously, the default mode of operation is to use the internal detector for time measurement. Note 2: The tube current is calculated as the tube charge divided by the time. See also… -
Page 33: Standards And Compliances
Equipment (WEEE) places an obligation on manufacturers, distributors, and retailers to take back electronics products at the end of their useful life. The WEEE directive covers all RTI products being sold into the European Union (EU) as of August 13, 2005. Manufacturers, distributors, and retailers are obliged to finance the cost of recovery from municipal collection points, reuse, and recycling of specified percentages per the WEEE requirements.
-
Page 34: Manufacturer’s Declaration Of Conformity
2. Description of the Piranha Standards and Compliances 2.5.2 Manufacturer’s Declaration of Conformity Piranha & QABrowser Reference Manual 2014-06/5.5C…
-
Page 35: Intended Use
2. Description of the Piranha Standards and Compliances 2.5.3 Intended Use 2014-06/5.5C Piranha & QABrowser Reference Manual…
-
Page 36: Fcc Certification
1. First download the latest version of the RTI Updater Setup from RTI Electronics Web site. 2. Unzip the file and run the file «RTI Updater Setup.exe» to install it on your PC. In the end of the installation process you will get the question if you want to run that updater immediately.
-
Page 37
2. Description of the Piranha Maintenance 5. The RTI Updater starts and locates the Piranha automatically if it is connected to an USB port. 6. If the Piranha is found, the window in the figure above is shown. The different modules are checked and after a while the start button is enabled. -
Page 38
2. Description of the Piranha Maintenance If you have any problem with your Piranha after updating, re-install the firmware again before contacting your local distributor or RTI Electronics. To re-install firmware repeat step 1 to 9 above, but before performing step #6 go to the menu Settings and select Always Overwrite. -
Page 39: Managing Detector Calibrations
RTI Detector Manager is a special Windows software that gives an overview of all calibrations for the detectors and probes in your system. You will find the RTI Detector Manager on your Product CD, in the folder SoftwareRTI Detector Manager.,Start the file RTI Detector Manager.exe by double-clicking it.
-
Page 40
Chapter 3 Description of the QABrowser… -
Page 41: Description Of The Qabrowser
The text in this section assumes that you purchased your Handheld Display either directly from RTI or a RTI dealer, which means that QABrowser is already installed and configured on the Handheld Display. If you have purchased your handheld on your own, then you first need to install the QABrowser to the handheld.
-
Page 42: Real-Time Display And Waveforms
Real-time Display and Waveforms This section will show how to make a measurement with the Piranha and the QABrowser. It is illustrated with an example using a radiographic X-ray unit. The operation of the QABrowser has a general structure and the described procedures applies also to other modalities.
-
Page 43
4. The Real-Time Display (RTD) is now shown and you are ready to measure, see figure below. The Piranha is set to the most suitable settings for the selected type of measurement, in this case radiography. The selected kV-range is 45-125 and the radiation quality is W/3mm Al (reference radiation quality). -
Page 44
«R1[4] 45-125». When you make the first exposure, the Piranha will evaluate what kind of waveform it is (DC/HF, 3-phase/12p, 3- phase/6p, or 1-phase) and the total filtration. This is done for all measurement types but Piranha &… -
Page 45
3. Description of the QABrowser Real-time Display and Waveforms mammography. Default values are «DC/HF» and 3.0 mm Al. 8. Make an exposure. Every time the Piranha recognizes an exposure the RTI logo is superimposed on screen for a short while. -
Page 46: Waveforms — Acquiring And Viewing
(kVp) with the Internal detector dose rate with the Internal detector dose rate with the external Dose Probe (available for specific Piranha models). tube current (mA) with the external Dose Probe (available for specific Piranha models). In Continuous update mode you also have the possibility to restart the waveform collection during the measurement.
-
Page 47: Measurement Settings
Piranha is still capturing the waveform. Then you can go back to the RTD and tap Wave again, when the waveform recording time has passed, to get the full waveform.
-
Page 48
Piranha: General settings for the Piranha. Internal detector detector: Specific settings for the Internal detector detector. If your model of Piranha has an external probe that is attached it will also show here. Piranha Shows general settings for the Piranha. You can find… -
Page 49: Settings — Conditions
Conditions — TF and Waveform These are parameters of the X-ray generator which influence the measurements. The Piranha can measure these, or you can set them yourself. Total Filtr. Shows actual total filtration value. Estimate means that a new estimation will be performed at next exposure and the values will be displayed on screen.
-
Page 50
(e.g. ion chamber) is too slow for the Piranha electrometer to detect the pulses. A solid-state detector, like the Piranha Dose Probe, is however fast enough to detect the frequency even for very low-level signals. -
Page 51
The compression paddle will however normally affect the Piranha kV and dose reading. With this check box, all the measured values (kV, dose and HVL) will be corrected according to what the user has selected. The default setting the first time you start the software is without the compression paddle in the field. -
Page 52: Settings — Piranha
Settings — Piranha Here general measurement settings for the Piranha are shown. The post delay time defines how long time the Piranha shall wait Post Delay and «look for more» after detecting what can be considered to be «the end of the exposure». Default value is 250 ms. The post-delay is necessary when measuring on units with some kind of pre-pulse or for pulsed exposures.
-
Page 53
PEAK The end time is the last time the signal goes below TL×S PEAK See example below. This setting defines when Piranha shall send measured Update values to the QABrowser. Four different alternatives are available: After exp., the QABrowser receives a new value when the exposure terminates. -
Page 54: Settings — Internal Detector
The reason for this is that the Piranha needs the waveform from start to be able to accurately calculate the irradiation time.
-
Page 55
The sensitivity can be set to: Low and High. Default value is set according to type of measurement selected. The delay time defines how long time the Piranha shall wait before Delay starting to measure kVp after that radiation has been detected. -
Page 56: Settings — Other Detectors
The first example shows how the accuracy of kVp can be tested using the built-in application Accuracy. The second example shows a multi-parameter Accuracy application. Piranha & QABrowser Reference Manual 2014-06/5.5C…
-
Page 57: The Accuracy Application (Single-Parameter)
The set values (for kVp) are stored in a Set-value list. You can modify the list or individual values. To modify an individual set value tap with the pen on it. In this case tap 60. 2014-06/5.5C Piranha & QABrowser Reference Manual…
-
Page 58
You can always tap a previous row and redo that exposure. Number of exposures and maximum inaccuracy is shown at the lower part of the screen. Tap Graph to show result in a graph. Piranha & QABrowser Reference Manual 2014-06/5.5C… -
Page 59: The Accuracy Application (Multi-Parameter)
2. Available applications for Radiography/All are shown. Choose Accuracy by tapping it with the pen. You can also use the scroll button to highlight Accuracy and then press the button that corresponds to Select (the right-most button). 2014-06/5.5C Piranha & QABrowser Reference Manual…
-
Page 60
You can now change/delete/insert values in the set value list for current application. Use the graffiti area to enter new values. Tap OK to save changes or Cancel to return to the application without changing the list. Piranha & QABrowser Reference Manual 2014-06/5.5C… -
Page 61: Data Logging
Prepare the data log by first entering some basic information about the measurement. Open the pull-down menu and select Setup or go to the Start Screen and tap Setup. From the Setup menu select Log. 2014-06/5.5C Piranha & QABrowser Reference Manual…
-
Page 62
Note that when measuring in an Application, the data will not be stored in the log file until you exit the Application. That means that even if you start the log after you have begun measuring you will still get all the application measurements in the log file. Piranha & QABrowser Reference Manual 2014-06/5.5C… -
Page 63: Favourites
You may give the Favourite a title or use the one suggested by the QABrowser. If you instead select Start Here!, a special Favourite will be created, that gets you right back to this test, the next time you start the QABrowser. 2014-06/5.5C Piranha & QABrowser Reference Manual…
-
Page 64: Getting Started With Favourites
You then selects one of the favourites from the list depending on what they intend to measure with the Piranha. For the next measurement You may select another favourite from the list. If you have any favourites saved, the QABrowser will always start with the Favourites screen.
-
Page 65
The saved favourites can be found in the menu field, tap Options and then Favourites..To start the favourite that you are interested of, you have to mark the favourite and then tap Select, in the bottom right corner. 2014-06/5.5C Piranha & QABrowser Reference Manual… -
Page 66
Palm, the next time you run the HotSync function. See picture below. This PDB file containing favourites can easily be shared between different users. If you have more than one Palm account on your PC, then it is important to choose the Piranha & QABrowser Reference Manual 2014-06/5.5C… -
Page 67: Start Here
Actually, Start Here! is a special case of the Favourites, as described above, and can thus be found there. QABrowser Setup The Piranha Setup is used to define different parameters that control the function of the QABrowser and Piranha. Open the QABrowser main menu and select Setup.
-
Page 68: Regulations Setup
Tap the unit you want to change and tap the desired unit in the list that pops up. When measuring in the RTD you can temporarily change a unit by tapping the unit text with the stylus. Piranha & QABrowser Reference Manual 2014-06/5.5C…
-
Page 69: Log Setup
Lock unit prefixes means that the prefix of a unit is fixed and not auto-ranging. Analyse waveform means that the Piranha automatically analyses and determines the type of waveform. Indicate trig lets you select how a trig event will be presented to you. Can be all combinations of sound and graphics.
-
Page 70: Detector Information
The detector information screen lists all detectors available for the system. For each module you can see the available detectors and probes. 3.7.6 System Info System Info is used to get information about the Piranha system. Serial Number The serial number for the system.
-
Page 71: Battery & Power Status
3. Description of the QABrowser Battery & Power Status Battery & Power Status The battery status for the Piranha and handheld are displayed together on a informative display, as shown below. You access this screen on the menu (tap the icon) by selecting Info — Power Status.
-
Page 72: Indicators And Symbols
Here are measurement information and settings for the Piranha and its detectors found. This menu is accessed when you need to override the default settings of the Piranha that are set by the QABrowser. See topic Settings for more information.
-
Page 73
This symbol indicates that one or more measured value is not displayed with maximum accuracy. This indicator is for example shown when the Piranha is unable to apply a correction/compensation to a measured value. Tap the symbol to get a detailed description of the problem. -
Page 74: Installation Of Palm Os Handheld Computers
#4 below can be ignored. Perform step #6 and answer «Yes». 3. Attach the HotSync cable. 4. Go to Start | RTI Electronics | QABrowser Updater | QAB Updater to start the QABrowser Updater. 5. The QABrowser Updater starts.
-
Page 75
The update/installation of the QABrowser is now completed. Note that when you have updated you QABrowser, you may get an Attention message like one of these. Then you must also update your Piranha firmware, see Updating the Firmware more information. -
Page 76: Uninstalling The Qabrowser
Application Launcher. Removing the QABrowser Updater from your PC This is accomplished by using the Windows Control Panel «Add and Remove Programs» or by choosing Start | RTI Electronics | QABrowser Updater | Uninstall QAB Updater. Piranha & QABrowser Reference Manual…
-
Page 77
Chapter 4 Measurement Principles & Theory… -
Page 78: Measurement Principles & Theory
(ms) (ms) – Radiography Cine/Pulsed exposure 1000 – Fluoroscopy Pulsed Fluoroscopy 1000 – Mammography 1500 – – Dental Panoramic Dental (OPG) – Light Abbreviations: AE=After Exposure, T=Timed, C=Continuous, FR=Free run, WF=Waveform recording time Piranha & QABrowser Reference Manual 2014-06/5.5C…
-
Page 79: Update Modes
Post Delay under Settings | Piranha. Reset time is one second. Continuous, the Piranha is continuously sending data as long as radiation is detected.
-
Page 80: Using Timed Update Mode
Reset time is the time it takes to perform a reset each time you hit Reset. Sample time is the time between individual data point of the waveform. Waveform recording time is the range of user selectable recording times the Piranha allows.
-
Page 81: Using Free Run Update Mode
The function uses a moving average algorithm where the number of seconds is selected by the user. During the reset process the user must make sure that the detector is not exposed to 2014-06/5.5C Piranha & QABrowser Reference Manual…
-
Page 82: Display Messages And Active Messages
In the same way it will take X seconds for the Piranha to show a zero value after the radiation has ended. Great care must be taken into choosing a time constant fitted to the nature of the signal.
-
Page 83
Display Messages and Active Messages High signal One or several detectors have too high signal. Low signal The Piranha detects a signal but it is too low to present a reliable result. High kVp Measured tube voltage is higher than that of the selected kV-range. -
Page 84: Display Messages
Measured tube voltage is higher than that of the selected kV-range. Change to a higher kV-range. Low kVp Measured tube voltage is lower than that of the selected kV- range. Change to a lower kV-range. Piranha & QABrowser Reference Manual 2014-06/5.5C…
-
Page 85
4. Measurement Principles & Theory Display Messages and Active Messages Low Signal The Piranha detects a signal but it is too low to present a reliable result. Increase the mA and/or decrease the distance from X-ray tube to detector or change the sensitivity for the dose parameter to High sensitivity or even Very High sensitivity. -
Page 86: Waveforms And Triggers
This means that for long measurements you may see a change in the rate value (dose rate, etc) when the measurement is finished, if the signal level was changed during the measurement. Piranha & QABrowser Reference Manual 2014-06/5.5C…
-
Page 87: Measurement Principle For The Piranha
The design of the detector package is very important to be able to measure kV and dose correctly in the whole range of 20 to 155 kV. The Piranha design makes it possible to measure small field sizes, less than 3 mm width, and low output levels down to approximately 1 µGy/s. Basically the detector…
-
Page 88
80 kV. The Piranha is also calibrated for the total filtration at this kV. Use a high signal level, i.e. 200 mA during 200 ms to get a stable result. It does not matter if you intend to do measurements at a higher or lower kV than this, this measurement aim to get a correct value of the total filtration. -
Page 89: Linearity
1. Place the detector on the table-top. If patient-equivalent phantom should be used it is recommend to use the Piranha HVL stand to simplify the set up. Use 2 pieces of 10 mm Al filter as «patient -equivalent» filter in the beam.
-
Page 90: Reproducibility
8. Calculate the square of the variance, i.e. the standard deviation, and divide it by the mean value of the n measurements An acceptable value for the coefficient of variation is less than 0.05. Piranha & QABrowser Reference Manual 2014-06/5.5C…
-
Page 91
Chapter 5 Measurements with the Piranha System… -
Page 92: Measurements With The Piranha System
5. Measurements with the Piranha System Introduction Measurements with the Piranha System Introduction The Piranha system can, depending on model, measure up to eight parameters simultaneously plus three waveforms from a single exposure: Dose and dose rate Exposure time Estimated total filtration and determined waveform type…
-
Page 93: Radiography
Setting Up the Piranha Measuring the kVp on a radiographic units is straightforward since the Piranha can automatically detect and compensate for variation in the radiation quality. It is also easy to check that the detector area is fully and uniformly irradiated. Practically this means that the kVp value can be measured in the range 1.0 to 50 mm of total filtration.
-
Page 94
5. Measurements with the Piranha System Radiography If any of the displayed values are not possible to compensate or cannot be measured with full accuracy the symbol is displayed at the top of screen. When the symbol is shown you can tap it, to get more information. -
Page 95: Kvp, Time, Dose, And Dose Rate
5.2.1 kVp, Time, Dose, and Dose Rate To measure on radiographic units: 1. Set up the Piranha and the handheld computer according to the description in Setting Up the Piranha 2. Place the detector on the table at the distance that is clinically relevant.
-
Page 96
7. Make an exposure. The RTI logo flashes to indicate that the Piranha has detected the exposure. The Piranha now first analyses the beam and displays the type of waveform. This is done once for every test. Piranha & QABrowser Reference Manual… -
Page 97
5. Measurements with the Piranha System Radiography Then the estimated total filtration is displayed (estimated in the range of 50 — 150 kV). Depending of the selection of display parameter different display screens may be presented. 8. Tap Wave to study the waveforms. -
Page 98: Dose Measurements With Piranha Dose Probe
5. Measurements with the Piranha System Radiography 5.2.2 Dose Measurements with Piranha Dose Probe 1. Place the Piranha Dose Probe in the field and connect the cable to the Piranha input. 2. Set up the Piranha and the handheld computer according to the description in Setting Up the Piranha 3.
-
Page 99: Hvl Application
HVL & Total Filtration Using the Piranha and the built-in HVL application correct HVL value and total filtration value can be measured and calculated. Set up the system the same way as…
-
Page 100: Introduction 2
It is recommended to use the built-in HVL application (or Ocean) to evaluate HVL. 5.2.3.1 Introduction 2 The Piranha system can, depending on model, measure up to eight parameters simultaneously plus three waveforms from a single exposure: Dose and dose rate…
-
Page 101: Kvp, Time, Dose, And Dose Rate 2
5.2.3.2 kVp, Time, Dose, and Dose Rate 2 To measure on radiographic units: 1. Set up the Piranha and the handheld computer according to the description in Setting Up the Piranha 2. Place the detector on the table at the distance that is clinically relevant.
-
Page 102
Piranha has detected the exposure. The Piranha now first analyses the beam and displays the type of waveform. This is done once for every test. Then the estimated total filtration is displayed (estimated in the range of 50 — 150 kV). -
Page 103: Quick-Hvl And Total Filtration
The following examples very clearly shows the excellent independence of the beam filtration for kV and dose readings. Three exposures were made with 3 mm Al, 6 mm Al, and 12 mm Al. The Piranha was used to measure kVp, exposure time, dose, and dose rate. The pictures are stored when the QABrowser shows estimated total filtration.
-
Page 104
HVL are shown as supplementary information. The HVL is calculated to be 6.42 mm Al. The set kV was changed and the Piranha measured 102.6 kV. The HVL is calculated at 5.70 mm for this kV. The set kV is changed again and a third exposure is made. -
Page 105: Cine/Pulsed Radiography
Piranha. Please consult the next section of the manual if this is the case. For under-table cine measurement turn the Piranha upside-down. An optional detector rod is available that can be used to put the detector in position on the image intensifier without risk for hazardous X-ray exposure when monitoring.
-
Page 106: Kvp, Time, Dose, And Dose Rate
5. Measurements with the Piranha System Cine/Pulsed Radiography 5.3.1 kVp, Time, Dose, and Dose Rate Use the same procedure as for the normal radiography measurement but select the All… parameter. If only Tube voltage is selected: 5.3.2 Pulse Measurements with Piranha Dose Probe Use the same procedure as for the normal radiography measurement.
-
Page 107: Hvl, Quick-Hvl, And Total Filtration
X-ray. The Position Check should be used to confirm the position of the Piranha. When you select fluoroscopy or pulsed fluoroscopy (as type of measurement) the Piranha system automatically changes to continuously updating the display and using the highest possible sensitivity.
-
Page 108: Image Intensifier Input Dose Rate
Use patient equivalent phantom to measure the image intensifier input dose rate according to manufacturer’s specification: 1. Connect the Piranha Dose Probe to the Piranha. 2. Set up the Piranha and the handheld computer according to the description in Setting Up the Piranha 3.
-
Page 109
5. The Select Detector screen is now displayed. Select External. 6. Tap Select. 7. Place the Piranha Dose Probe in front of the image intensifier but outside the measuring field for the mA feedback loop. You may use the optional detector rod that can be attached to Piranha Dose Probe to position the detector without risk for hazardous X-ray exposure. -
Page 110: Kvp And Dose Rate
5. Measurements with the Piranha System Fluoroscopy and Pulsed Fluoroscopy 9. Start the fluoroscopy. A little triangle is displayed, indicating that the Piranha has detected the radiation. 10. The figure to the left shows the real-time display during fluoroscopy. The image…
-
Page 111
Piranha, even on this extremely low level, still makes corrections for the beam filtration. The Piranha can measure both kV and dose rate at very low levels for instance on Mini C-arm systems. Piranha can (as an example) successfully measure the tube voltage as low as 43 kV with a 25 µA tube current. -
Page 112: Hvl, Total Filtration, And Quick-Hvl
Total Filtration and Quick-HVL The total filtration is measured continuously when the Piranha is used under fluoroscopy. The following pictures illustrates this excellent feature for the Piranha and the Internal detector (shown for Barracuda MPD): The fluoro is started and the total filtration is estimated and automatically displayed during two seconds.
-
Page 113
Fluoroscopy and Pulsed Fluoroscopy The displays with measured values are continuously updated every four seconds. Add 10 mm of aluminum. The Piranha will «notice» that the filtration is changed and shows a new total filtration value. The dose rate is now much lower. The added filtration does not affect measured kVp at all. -
Page 114: Pulsed Fluoroscopy
Select type of measurement in similar way as for normal continuously fluoroscopy to setup the system. Piranha is set-up for this application to calculate the number of pulses per second (Hz or pps), the dose/pulse, and pulse dose rate. The picture below explain the difference between the pulse dose rate and the traditional dose rate.
-
Page 115
5. Measurements with the Piranha System Fluoroscopy and Pulsed Fluoroscopy The following pictures illustrates how the Piranha system is used this type of measurement. These pictures describes the check of the output levels in pulse fluoroscopy mode (showing Barracuda MPD). -
Page 116
5. Measurements with the Piranha System Fluoroscopy and Pulsed Fluoroscopy using the Piranha Dose Probe. Hints: Pulsed fluoro screen is very handy to use for several applications and is not restricted to only measure pulsed fluoro. It has application when measuring in Cine mode with heavy filtered beam that make the signal too low to use the Cine mode or when the dose rate is extremely low. -
Page 117: Mammography
Position Check. The mammography kV calibrations available for the Piranha is ranging from 18 to 49 kV. To confirm which range is used the digit 1 or 2 is displayed in square brackets on the bottom left corner of the QABrowser screen, as shown below.
-
Page 118: Setting Up The Piranha For Mammography
Piranha is repositioned. The kV and radiation waveform is always stored together with the RTD values and can be displayed by tapping the Wave button. The kVp calibration for Piranha is made without the compression paddle in place.
-
Page 119: Kvp, Time, And Dose Measurements With The Internal Detector
2. Make sure that the image receptor is positioned at a clinically relevant distance (typically 600 mm). 3. You should place the Piranha flat on the image receptor with its long axis parallel to the chest wall making sure the centre of the detector surface is placed in the centre of the light field, as shown in the pictures above (40 mm distance shown).
-
Page 120
3. Make a Position Check, as shown above. It is recommended to make the check at 28 kV. After the check the Piranha automatically changes back to the previously selected kV range. 4. Set kVp and mAs (or mA/time) to the desired values. -
Page 121: Dose Measurements With The Piranha Dose Probe
5. Measurements with the Piranha System Mammography 5. Make an exposure. The RTI logo flashes to indicate that the Piranha has detected the exposure. 6. Read the values in the RTD. 7. Repeat measurement for other generator set values. There are some mammographic units that are bit peculiar when it comes to kV measurements, for instance The Hologic Selenia and IMS Giotto.
-
Page 122: Hvl Application
8. Repeat the measurement for other generator settings. To get a good HVL value, using the Piranha Dose Probe, you must correct it according to the tables in the Piranha Dose Probe DETECTOR DATA manual. It is often more convenient to measure HVL with the Piranha using the built-in HVL application.
-
Page 123: Quick-Hvl
Quick-HVL Quick-HVL The Piranha is able to measure HVL for mammography in one shot. Quick-HVL is available for measurements with or without compression paddle. If the parameter «All w. HVL» is chosen, the QABrowser will display quick-HVL values for every measurement.
-
Page 124: Corrections For The Compression Paddle
5.5.7.1 Corrections for the Compression Paddle The Piranha is well collimated above its small detector area, and will measure the same whether the compression paddle is placed directly on top of the Piranha or high above. This is NOT true for an ion chamber.
-
Page 125
(at 605 mm SDD). A practical consequence of usage of the normalizing function and scatter factor is that the Piranha can be kept at the same position on the breast support all the time when data is collected for AGD. -
Page 126: Beam Correction Factor
Piranha is placed flat on the breast support. (This assuming that the focal point is situated at the chest wall, which normally is the case.) You can find the product version on the label on the back side of your Piranha. Distance from…
-
Page 127: Average Glandular Dose, Agd (Mgd)
On the other hand, the HVL measurement should be done without any scatter contribution and with good geometry. The Piranha is well collimated above its small detector area. Due to this fact it registers a narrower angle of the X-ray field and thus much less scattered radiation compared to an ion chamber.
-
Page 128: Mammographic Pre-Pulses
1 s and the waveform recording time to a corresponding time. It is important to cover both signals. In this measurement setup, the Piranha will add the dose from both pulses. This is OK if the radiation quality is not changed between the signals.
-
Page 129: Dental And Panoramic Dental
This topic will describe how to measure kVp, dose, and time for a Dental and Panoramic Dental X-ray units using the Piranha only. Set up the Piranha and the handheld computer according to the description in Setting Up the Piranha .
-
Page 130
The challenges instead arise for the mechanical setup needed to position the detector in right position. The small and narrow field is only a few millimetres. The Piranha detector has very narrow detector area and is very thin and a special holder (optional) can be used to position the Piranha without any problem. -
Page 131
The Piranha has addressed these challenges. Since the panoramic scan has an exposure time of about 10 to 20 seconds, the Piranha is set up to continuously update the display during the scan. It is preferable to select a single parameter display and angle the Palm holder, making it easy to read the values during the scan, from a distance. -
Page 132: Kvp, Time, Dose, And Dose Rate
Use the same procedure as for the normal radiography measurement but select Dental instead of radiography and select Tube voltage as parameter. A 200 ms delay is default. 1. Set up the Piranha and the handheld computer according to the description in Setting Up the Piranha .
-
Page 133
3. It is recommended to make a check measurement to confirm that the detector area is uniformed radiated. Select a exposure time of at least 400 ms. The Piranha automatically changes back to the previous selected kV-filter after the check exposure. -
Page 134: Waveforms
5. Measurements with the Piranha System Dental and Panoramic Dental The Piranha now first analyses the beam and displays the type of waveform. This is done once. Then the estimated total filtration is displayed. Read the measured values from the display.
-
Page 135: Panoramic Systems
Use the same procedure as for the normal dental measurement but select Panoramic Dental instead of radiographic and select Tube Voltage as parameter. A 200 ms delay is default. 1. Set up the Piranha and the handheld computer according to the description in Setting Up the Piranha .
-
Page 136
When the system passes the test, you can trust the kV reading. 7. The Piranha changes automatically back to the previous selected kV range after the Position Check. As default this is range 55 — 105 kV, R2[4] as indicated on the QABrowser screen. -
Page 137: Hvl, Total Filtration, And Quick-Hvl
9. Select kV, mA, and scan time. 10. Start the scan. A little triangle in the RTD indicates that the Piranha detects the radiation. It is not needed to use the whole scan for the purpose of measure the kV since the display is continuously updated.
-
Page 138: Ct Kvp
Another problem is to «find» the beam, especially when using a small slice width. All these problems are minimized when using the Piranha since it can «move with the table» through the beam while the tube is in the top position. This is can easily be obtained by measuring while a topogram (scout/pilot image) is taken.
-
Page 139
5. Measurements with the Piranha System 3. Start the QABrowser and select CT from the Select type of measurement menu. 4. Select Tube voltage. 5. The real-time display for tube voltage is now shown. At the bottom of the screen you can select kV range and calibration. -
Page 140: Parameters For Ct Scanner Models
If the Piranha is positioned in a correct way, the position is accepted and the real-time display is shown again. If not check the position of the Piranha and/or increase the slice width if possible.
-
Page 141: Quick-Hvl And Total Filtration
5. Measurements with the Piranha System With the calibration C1 the total filtration can be measured and the Piranha automatically corrects the kV value accordingly. It is optional to set a known total filtration instead, see the table below. To achieve optimal measurements of the total filtration, first perform a measurement at a low kV, preferable 80-100 kV.
-
Page 142: Mas-1, Invasive Mas Probe
This means that the measurement starts when the mAs-probe detects the tube current. The measurement is performed in the same way if you use a multi- parameter display. In that case the default trig is the Piranha and what is said below about false triggering can be ignored.
-
Page 143
1. Connect the MAS-1 probe to the X-ray generator as described in the MAS-1 User’s Manual. 2. Connect the MAS-1 probe to the external probe input. 3. Set up the Piranha and the handheld computer according to the description in Setting Up the Piranha 4. -
Page 144
The MAS-1 probe can also be used for measurement of tube current during fluoroscopy. To measure fluoroscopy tube current with the Piranha MAS-1 Probe 1. Setup the Piranha according to the description earlier in this manual. 2. Connect the MAS-1 probe to the X-ray generator as described in the MAS-1 User’s Manual. -
Page 145: Mas-2, Non-Invasive Mas Probe
Tube Current Probes 5.8.2 MAS-2, Non-invasive mAs Probe This section describes how to measure mAs, using the Piranha in the x-ray beam to trigger the measurement. This means that the measurement starts when the Piranha detects the radiation. The MAS-2 probe uses a current clamp probe to measure mAs and mA non-invasively.
-
Page 146
5. Measurements with the Piranha System Tube Current Probes 7. The figure to the left shows the result from an exposure with 80 kV, 100 ms, and 25 mA. The exposure time is measured with the MAS-2 probe. If you would get a message as shown in the figure to the left, the mAs probe is probably connected in the wrong direction. -
Page 147: Light Measurement
(lx) measurements of ambient light in a room or in front of a CRT. Read the Piranha Light Probe User’s Manual for a detailed description of practical use and explanation of the theory behind the units and quantities of light.
-
Page 148
1. Do as described in step 1 to 8 above. 2. Press and hold the shutter. If the Piranha does not start to measure, lift the Piranha Light Probe and direct it towards a bright spot (with the shutter button pressed). Do not release the shutter button. -
Page 149: Illuminance — Ambient Light (Lx)
8. The real-time display for illuminance is now displayed. Cover the white light-sensitive area of the Piranha Light Probe to shield off all light (you may use the rubber part that comes with the Piranha Light Probe-M if available). It is very important that you shield off all light.
-
Page 150
5. Measurements with the Piranha System Light Measurement 4. Read the result on the display. Piranha & QABrowser Reference Manual 2014-06/5.5C… -
Page 151
Chapter 6 Optional Accessories… -
Page 152: Optional Accessories
Optional accessories and tools available for the Piranha. Holder & HVL Stand Measuring HVL using the classic method? Then the Piranha holder and HVL stand together with a filter kit may be handy. The stand features a camera screw that fits perfectly into the camera thread of the Piranha.
-
Page 153
Magnet or tape position Insert the Piranha in the Holder, lock it with the rubber strap and perform the measurement. The extra magnet may be used for hanging the USB or charger cable «out of the way». -
Page 154
6. Optional Accessories Piranha Panoramic Holder Piranha & QABrowser Reference Manual 2014-06/5.5C… -
Page 155
Chapter 7 Problems and Solutions… -
Page 156: Problems And Solutions
1. Start the QABrowser and run the filter test. (QABrowser: Setup | System Test) 2. Hold the Piranha in you right hand by the cable edge. 3. When the motor is trying to move, tap the Piranha’s left long edge in the palm of your left hand until it comes free.
-
Page 157
Bluetooth only shows «Unknown device» when trying to connect Depending on Palm model it may take a little while for the serial number to appear, the Piranha will appear as «Unknown device». Normally it will show the serial number if you wait a while. -
Page 158: Bluetooth
Bluetooth Bluetooth is a wireless way of communication between your PC/handheld and your meter. The Piranha has built-in support for this, but with the Barracuda you need the Barracuda Serial Bluetooth Module accessory. A Palm OS handheld also has built-in support for Bluetooth but a PC may or may not have built-in support for Bluetooth.
-
Page 159
7. When prompted for a passkey enter 0000. 8. Now launch the QABrowser as described above. If your Piranha/Barracuda hardware does not support multiple Bluetooth devices (see above), and you use Bluetooth (with passkey) with more than one handheld, or if you… -
Page 160: Enable Bluetooth Passkey
3. Select the USB connection. You cannot use a Bluetooth connection when you want to change the Bluetooth configuration. A Bluetooth connection is shown as COMxx. 4. Wait for RTI Updater to finish with the startup procedure. After a while when it is ready the Start button will be enabled.
-
Page 161
Chapter 8 Glossary… -
Page 162: Glossary
Area exposure product Product of the area of a cross-section of a radiation beam and the averaged exposure over that cross-section. SI unit: Gy·m² Attenuation The reduction of radiation intensity upon passage of radiation through matter. Piranha & QABrowser Reference Manual 2014-06/5.5C…
-
Page 163
General: a program that does the job of loading the OS kernel of a computer. Piranha bootloader: Miniature program stored in cabinet and modules which normally just starts the Firmware. It is used more when the Firmware is updated. See Firmware. -
Page 164
Radiation meter intended to measure absorbed dose per unit time. Dosemeter Radiation meter intended to measure absorbed dose. Effective dose equivalent (HE) Quantity used to express the weighted DOSE EQUIVALENT to the whole body when it is irradiated non uniformly or partially. Piranha & QABrowser Reference Manual 2014-06/5.5C… -
Page 165
General: The operating system and software installed on a small device. Sometimes called embedded software. Piranha firmware: Program stored in cabinet and modules which handles all control of measurement electronics. Can be updated, then a special part of the firmware called bootloader, is used. -
Page 166
A radiation source with associated equipment, and the space in which it is located. Interlock A device used to assure proper and safe use of a radiation installation by monitoring (usually by electrical devices) the status, presence or position of various associated Piranha & QABrowser Reference Manual 2014-06/5.5C… -
Page 167
Kilovolt (kV) A unit of electrical potential difference equal to 1000 volts. See Peak tube voltage Lead equivalent The thickness of lead affording the same attenuation, under specified conditions, as the material in question. 2014-06/5.5C Piranha & QABrowser Reference Manual… -
Page 168
Also known as personal monitor. An appropriately sensitive device used to estimate the absorbed dose received by an individual. Peak tube voltage Ûo (kVp) The peak value of the tube voltage (corresponding to the highest available radiation Piranha & QABrowser Reference Manual 2014-06/5.5C… -
Page 169
Radiation receptor Any device that absorbs a portion of the incident radiation energy and converts this portion into another form of energy which can be more easily used to produce desired 2014-06/5.5C Piranha & QABrowser Reference Manual… -
Page 170
A radiographic procedure in which a sequence of radiographs is made rapidly by using an automatic cassette changer, image intensifier/TV chain, etc. Shutter In beam therapy equipment, a device, attached to the X-ray or gamma-ray source Piranha & QABrowser Reference Manual 2014-06/5.5C… -
Page 171
Thickness of a specified substance which, when introduced into the path of a given beam of radiation, reduces the kerma rate to one-tenth of its original rate. Tomography A special technique to show in detail images of structures lying in a predetermined 2014-06/5.5C Piranha & QABrowser Reference Manual… -
Page 172
Evacuated vessel for the production of x-radiation by the bombardment of a target, usually contained in an anode, with electrons accelerated from a cathode by an electric field. Thus: Rotating anode X-ray tube. Double focus X-ray tube. Piranha & QABrowser Reference Manual 2014-06/5.5C… -
Page 173: Index
About Beam Correction Factor 48, 122 Absorbed dose Beam limiting device Absorption Beam quality 38, 89, 113 Accessories Becquerel Piranha holder & HVL stand Blank screen Active display messages Bluetooth 37, 152, 154 Active Messages 65, 78 Indicator Activity Passkey…
-
Page 174
Effective dose equivalent (HE) Data logging Electrometer waveform Dead man switch Enable Bluetooth passkey Declaration of Conformity Entrance Skin Exposure 117, 123 Default settings Entrance Surface Air Kerma 117, 123 Default Unit Equivalent thickness Piranha & QABrowser Reference Manual 2014-06/5.5C… -
Page 175
— G — Play Gantry Trig Geometric unsharpness Warning Good geometry Waveform indicator Inherent filtration Gray (Gy) Initial X-ray tube voltage Input dose rate — H — Installation Intended Use Half Value Layer Interlock Theory 2014-06/5.5C Piranha & QABrowser Reference Manual… -
Page 176
Operating temperature Positioning Piranha Operator Quick-HVL Mammography specifications Optional Accessories Manufacturer’s Declaration of Conformity Orthopantomography 148, 164 Oscilloscope 88, 96 138, 141 Overview of Measurement Modes MAS-1 Probe Specifications MAS-2 Current Probe MAS-2 Probe Specifications Piranha & QABrowser Reference Manual 2014-06/5.5C… -
Page 177
Fluoroscopy Piranha 12, 83 Mammography Cable Radiography Holder — R — Mammography positioning Physical dimensions Piranha holder & HVL stand Radiation (ionizing) Specifications Radiation protection survey Piranha holder Radiation quality 21, 38 Piranha internal detector Radiation receptor Piranha Light Probe… -
Page 178
Power Source Pulse rate Pulse rate Sensitivity 50, 52 Radiography Threshold 50, 52 Size Total Filtration Trig level (time) Waveform recording time 20, 27 Trig source Weight Update mode Spot film Waveform recording time Piranha & QABrowser Reference Manual 2014-06/5.5C… -
Page 179
Waveform indicator 38, 69 Trig Waveform recording time 48, 74, 75 Visual indication Waveform recording time Specifications Trig indicator 20, 27 Trig level (time) Waveform type 45, 91, 97 Trig source Waveforms Trigger WEEE 2014-06/5.5C Piranha & QABrowser Reference Manual… -
Page 180
Index Weight White screen Whole body dose equivalent (Hwb) Window 50, 52, 82 Window time Workload (W) — X — Xeroradiography X-ray tube Piranha & QABrowser Reference Manual 2014-06/5.5C… -
Page 181
Notes Notes 2014-06/5.5C Piranha & QABrowser Reference Manual…
МНОГОФУНКЦИОНАЛЬНЫЙ ПОИСКОВЫЙ ПРИБОР
ST 031 «ПИРАНЬЯ»
РУКОВОДСТВО ПО ЭКСПЛУАТАЦИИ
Санкт-Петербург
2000
Руководство пользователя ST – 031 «Пиранья»
МНОГОФУНКЦИОНАЛЬНЫЙ ПОИСКОВЫЙ ПРИБОР
ST 031 «ПИРАНЬЯ»
РУКОВОДСТВО ПО ЭКСПЛУАТАЦИИ
Перед началом эксплуатации прибора ST 031 «Пиранья» внимательно прочтите, пожалуйста, данное руководство и сохраните его в качестве используемого в дальнейшем справочного пособия.
При необходимости, а также в случае возникновения трудностей и непредвиденных ситуаций, компания «СмерШ Техникс» обеспечивает проведение всесторонних консультаций по порядку подготовки и способам практического применения прибора.
2
Руководство пользователя ST – 031 «Пиранья»
СОДЕРЖАНИЕ
Введение
1.Общая характеристика прибора
1.1.Назначение и основные возможности
1.2.Описание комплекта прибора
1.2.1.Особенности упаковки
1.2.2.Состав комплекта
1.2.3.
Особенности конструкции основного блока управления, обработки и индикации
1.3.Режимы работы прибора
1.3.1.Режим высокочастотного детектора-частотомера
1.3.2.Режим сканирующего анализатора проводных линий
1.3.3.Режим детектора инфракрасных излучений
1.3.4.Режим детектора низкочастотных магнитных полей
1.3.5.Режим виброакустического приёмника
1.3.6.Режим акустического приёмника
1.3.7.Дополнительные возможности
1.4.Питание прибора
1.5.Некоторые ограничения и рекомендации
2.Работа с прибором ST 031 «Пиранья»
2.1.Подготовка прибора к работе
2.2.Проверка работоспособности прибора
2.2.1.
Проверка системы включения прибора и индикации состояния источников питания
2.2.2.
Проверка работоспособности жидкокристаллического дисплея и подсветки его экрана
2.2.3.
Проверка работоспособности системы перевода прибора в основные режимы
2.2.4.
Проверка работоспособности тракта высокочастотного детекторачастотомера
2.2.5.
Проверка работоспособности тракта сканирующего анализатора проводных линий
2.2.6.Проверка работоспособности тракта детектора инфракрасных излучений
2.2.7.
Проверка работоспособности тракта детектора низкочастотных магнитных полей
2.2.8.Проверка работоспособности тракта виброакустического приёмника
2.2.9.Проверка работоспособности тракта акустического приёмника
2.2.10.Проверка работоспособности звукового тракта
2.2.11.Проверка работоспособности встроенного осциллографа
2.2.12.Проверка работоспособности встроенного анализатора спектра
2.2.13.Проверка работоспособности энергонезависимой памяти
2.3.Порядок управления прибором в основных режимах
2.3.1.
Порядок управления прибором в режиме высокочастотного детекторачастотомера
2.3.2.
Порядок управления прибором в режиме сканирующего анализатора проводных линий
2.3.3.
Порядок управления прибором в режиме детектора инфракрасных излучений
2.3.4.
Порядок управления прибором в режиме детектора низкочастотных магнитных полей
2.3.5.Порядок управления прибором в режиме виброакустического приёмника
2.3.6.Порядок управления прибором в режиме акустического приёмника
2.3.7.
Порядок управления встроенным осциллографом, анализатором спектра
и энергонезависимой памятью 2.3.8. Порядок управления подсветкой экрана жидкокристаллического дисплея
3.
Рекомендации по проведению контрольно-поисковых работ с использованием прибора ST 031 «Пиранья»
3
Стр.5. Стр.6. Стр.6. Стр.7. Стр.7. Стр.7. Стр.8.
Стр.10. Стр.11. Стр.11. Стр.12. Стр.12. Стр.12. Стр.12. Стр.13. Стр.14. Стр.14. Стр.16. Стр.16. Стр.16.
Стр.16.
Стр.17.
Стр.17.
Стр.18.
Стр.20.
Стр.23.
Стр.24.
Стр.25. Стр.25. Стр.26. Стр.26. Стр.29. Стр.30. Стр.31.
Стр.32.
Стр.32.
Стр.33.
Стр.33.
Стр.34. Стр.34.
Стр.34.
Стр.36.
Стр.37.
|
Руководство пользователя ST – 031 «Пиранья» |
|||
|
3.1. |
Использование прибора для выявления каналов утечки информации в |
Стр.37. |
|
|
радиочастотном диапазоне |
|||
|
3.1.1. |
Один из практических подходов к классификации радиосигналов |
Стр.37. |
|
|
3.1.2. |
Метода поиска и локализации источников опасных сигналов |
Стр.38. |
|
|
3.1.3. |
Особенности потенциально опасных радиосигналов и их источников |
Стр.38. |
|
|
3.1.3.1. |
Радиомикрофоны |
Стр.39. |
|
|
3.1.3.2. |
Телефонные радиоретрансляторы |
Стр.39. |
|
|
3.1.3.3. |
Другие источники потенциально опасных излучений |
Стр.40. |
|
|
3.1.4. |
Основные правила и приёмы подготовки и проведения контрольно- |
Стр.41. |
|
|
поисковых работ |
|||
|
3.2. |
Использование прибора для выявления каналов утечки информации по |
Стр.46. |
|
|
проводным линиям |
|||
|
3.3. |
Использование прибора для выявления каналов утечки информации в |
Стр.47. |
|
|
инфракрасном диапазоне |
|||
|
3.4. |
Использование прибора для выявления каналов утечки информации по |
Стр.48. |
|
|
низкочастотным магнитным полям |
|||
|
3.5. |
Использование прибора для оценки эффективности виброакустической |
Стр.49. |
|
|
защиты и звукоизоляции помещений |
|||
|
Приложение |
Стр.52. |
4
Руководство пользователя ST – 031 «Пиранья»
ВВЕДЕНИЕ
ST 031 «Пиранья» — это многофункциональный прибор нового поколения российской компании «СмерШ Техникс» (г. Санкт-Петербург) для обнаружения и локализации специальных технических средств негласного добывания информации, а также для решения ряда других задач защиты информации и контроля качества её осуществления.
Конструкция, комплектность, характеристики и возможности ST 031 «Пиранья» позволяют, в сочетании с общим радиомониторингом, физическим поиском и визуальным осмотром, реализовать фактически полную методику выявления специальных технических средств.
Частотно-динамические параметры прибора в целом, рациональный комплект дополнительных устройств (антенны, датчики, микрофон, насадки) дают возможность охватить практически все наиболее опасные физические поля, средства добывания и каналы утечки информации.
Правильная эксплуатация и методически грамотное применение прибора ST 031 «Пиранья» обеспечивают значительное повышение оперативности контрольно-поисковых работ и достоверности получаемых результатов.
Независимость от внешних источников питания определяет автономность, снимает многие ограничения по месту и условиям применения прибора, обеспечивает широкие возможности его целенаправленного перемещения в пределах объекта спецработ.
5
Руководство пользователя ST – 031 «Пиранья»
1. ОБЩАЯ ХАРАКТЕРИСТИКА ПРИБОРА
1.1. Назначение и основные возможности
Многофункциональный поисковый прибор ST 031 «Пиранья» предназначен для проведения мероприятий по обнаружению и локализации специальных технических средств негласного добывания информации, для выявления естественных и искусственно созданных каналов утечки информации, а также для контроля качества защиты информации. Он обеспечивает решение контрольно-поисковых задач только в так называемой «ближней зоне», т.е. в пределах помещения (объекта) или в непосредственной близости к нему.
ST 031 сохраняет работоспособность и соответствие параметров нормам технических условий при напряжении питания не ниже 4.8В, атмосферном давлении от 630 до 800 мм рт.ст., температуре окружающей среды от -5 до +35 С и влажности воздуха, не превышающей 95%.
С использованием прибора ST 031 «Пиранья» возможно решение следующих контрольнопоисковых задач:
а. Выявление факта работы (обнаружение) и локализация местоположения радиоизлучающих специальных технических средств, создающих потенциально опасные, с точки зрения утечки информации, радиоизлучения.
Ктаким средствам, прежде всего, относят:
радиомикрофоны;
телефонные радиоретрансляторы;
радиостетоскопы;
скрытые видеокамеры с радиоканалом передачи информации;
технические средства систем пространственного высокочастотного облучения в радиодиапазоне;
технические средства передачи изображения с монитора ПЭВМ по радиоканалу;
радиомаяки систем слежения за перемещением объектов (людей, транспортных средств, грузов
ит.п.);
несанкционированно включенные радиостанции, радиотелефоны и телефоны с радиоудлинителем;
технические средства обработки информации, работа которых сопровождается возникновением побочных электромагнитных излучений (элементы физической архитектуры ПЭВМ, факсы, ксероксы, некоторые типы телефонных аппаратов и т.п.).
б. Обнаружение и локализация местоположения специальных технических средств,
работающих с излучением в инфракрасном диапазоне.
Ктаким средствам, в первую очередь, относят:
закладные устройства добывания акустической информации из помещений с её последующей передачей по каналу в инфракрасном диапазоне;
технические средства систем пространственного облучения в инфракрасном диапазоне.
в. Обнаружение и локализация местоположения специальных технических средств, использующих для добывания и передачи информации проводные линии различного предназначения, а также технических средств обработки информации, создающих наводки информативных сигналов на рядом расположенные проводные линии или стекание этих сигналов в линии сети электропитания.
Такими средствами могут быть:
закладные устройства, использующие для передачи перехваченной информации линии сети переменного тока 220В и способные работать на частотах до 15МГц;
ПЭВМ и другие технические средства изготовления, размножения и передачи информации;
технические средства систем линейного высокочастотного навязывания, работающие на частотах свыше 150кГц;
закладные устройства, использующие для передачи перехваченной информации абонентские телефонные линии, линии систем пожарной и охранной сигнализации с несущей частотой
свыше 20кГц.
г. Обнаружение и локализация местоположения источников электромагнитных полей с преобладанием (наличием) магнитной составляющей поля, трасс прокладки скрытой (необозначенной) электропроводки. потенциально пригодной для установки закладных устройств,
атакже исследование технических средств, обрабатывающих речевую информацию.
Кчислу таких источников и технических средств принято относить:
выходные трансформаторы усилителей звуковой частоты;
6

Руководство пользователя ST – 031 «Пиранья»
динамические громкоговорители акустических систем;
электродвигатели магнитофонов и диктофонов;
д. Выявление наиболее уязвимых мест, с точки зрения возникновения виброакустических каналов утечки информации, а также оценка эффективности систем виброакустической защиты помещений.
е. Выявление наиболее уязвимых мест, с точки зрения возникновения каналов утечки акустической информации, а также оценка эффективности звукоизоляции помещений.
1.2. Описание комплекта прибора
Комплект прибора ST – 031 «Пиранья» предметно ориентирован на решение названных выше контрольно-поисковых задач, на обеспечение многофункциональности и автономности работы, а также на обеспечение удобства и надежности транспортировки и хранения.
1.2.1. Особенности упаковки
Прибор выполнен в носимом варианте. Для его переноски и хранения используется специальная сумка-упаковка, внешний вид которой показан на рис. 1.
Рис.1. Рис.2.
Для удобства переноски сумка снабжена наплечным ремнем. Ослабление возможного воздействия внешних ударных и нажимных нагрузок обеспечивается за счет усиления боковых стенок металлическими прокладками.
Помимо внутреннего отделения для укладки изделий, входящих в комплект прибора, сумка с внешней стороны имеет три кармана, застегивающихся на замки типа «молния» и приспособленных для размещения изделий комплекта, документации, инструмента и других необходимых принадлежностей. Внутреннее отделение (см. рис. 2) оборудовано специальными местами и приспособлениями для надежной, компактной и удобной укладки изделий комплекта.
1.2.2. Состав комплекта
Изделия, входящие в типовой вариант комплекта прибора ST 031 «Пиранья», показаны на
рис.3. Это:
1.Основной блок управления, обработки и индикации.
2.Адаптер сканирующего анализатора проводных линий с устройством ослабления сигналов и светодиодными индикаторами наличия напряжения в проверяемой линии.
3.Насадки к адаптеру (типа «Игла»).
4.Насадки к адаптеру (типа «220»).
5.Насадки к адаптеру (типа «Крокодил»).
6.Головные телефоны.
7.Магнитная антенна детектора низкочастотных магнитных полей с устройством для обеспечения дифференциального режима работы.
8.Высокочастотная антенна детектора-частотомера.
9.Соединительный кабель для подключения магнитной антенны и инфракрасного датчика.
7
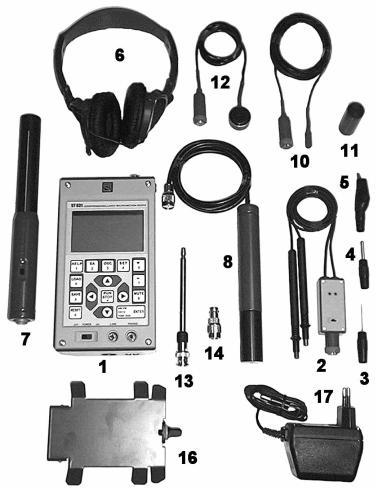
Руководство пользователя ST – 031 «Пиранья»
10.Выносной микрофон акустического приемника.
11.Инфракрасный датчик детектора инфракрасных излучений.
12.Выносной датчик виброакустического приемника.
13.Телескопическая антенна детектора-частотомера
14.Переходник к телескопической антенне
15.Наплечный ремень основного блока.
16.Подставка для основного блока.
17.Блок питания.
18.Батареи типа АА (4шт).
Изделия под № 15, 16 и 18 расположены в переднем кармане сумкиупаковки (См. рис. 1).
Наиболее важным и сложным изделием из состава прибора является основной блок управления, обработки и индикации, особенности конструкции которого характеризуются отдельно.
1.2.3. Особенности конструкции основного блока управления,
обработки и индикации
Эта основная составная часть комплекта прибора ST 031 «Пиранья» конструктивно выполнена в виде малогабаритного переносного моноблока. Представление об особенностях внешнего вида и конструкции дают рисунки 4, 5, 6 и 7.
На рисунке 4 показан внешний вид передней панели основного блока управления, обработки
ииндикации.
Вверхней ее части, строго по центру, размещен логотип изготовителя – компании «СмерШ Техникс». Непосредственно под ним, в пределах окна, которое занимает экран жидкокристаллического дисплея и органы управления, прописаны латинским шрифтом шифр прибора и его общая характеристика «ST 031 COUNTERSURVEILLANCE MULTIFUNCTION DEVICE».
Под экраном дисплея помещена 16-ти кнопочная клавиатура, обеспечивающая управление прибором во всех режимах, с учётом его основных и вспомогательных функций.
8
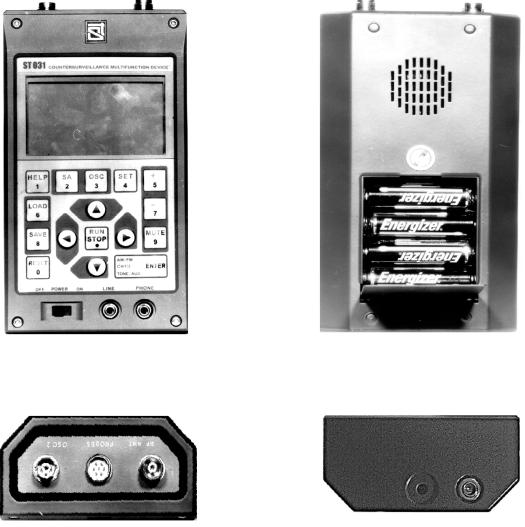
Руководство пользователя ST – 031 «Пиранья»
.
Все кнопки клавиатуры управления являются многофункциональными.
Порядок их задействования и реализуемые при этом функции определяется особенностями работы прибора в каждом из предусмотренных режимов.
Вместе с тем, большинство кнопок управления обеспечивает реализацию первичных функций, общих для всех режимов работы. В частности
кнопка «MUTE» осуществляет включение (выключение) встроенного громкоговорителя;
кнопка «HELP» позволяет получить при работе в любом режиме контекстную экранную помощь с возможностью перемещения текста нажатием кнопок « » и « »;
кнопка «OSC» производит включение осциллографического контроля параметров сигнала в активном (в текущий момент времени) режиме;
кнопка «SA» производит включение спектрального контроля параметров сигнала в активном (в текущий момент времени) режиме;
кнопка «SAVE» обеспечивает запись в энергонезависимую память выведенной на дисплей осциллограммы или спектрограммы с сопутствующими параметрами анализируемого сигнала;
кнопка «LOAD» осуществляет вызов на экран из энергонезависимой памяти ранее сохраненной осциллограммы или спектрограммы;
кнопка «RUN/STOP» производит пуск (остановку) текущих динамических измерений параметров контролируемого сигнала;
кнопка «SET» позволяет осуществлять выбор различных вариантов проведения анализа контролируемого сигнала;
9
Руководство пользователя ST – 031 «Пиранья»
кнопка «ENTER» обеспечивает вывод для слухового контроля либо тонального, либо демодулированного сигнала;
кнопка «RESET» служит, прежде всего, для перезапуска прибора.
Вторые, а в ряде случаев и последующие, функции кнопок управления находятся в прямой зависимости от особенностей применения прибора в различных режимах.
Поэтому они будут охарактеризованы по мере их задействования для обеспечения работы прибора в том или ином режиме.
В нижней части передней панели размещены переключатель питания, гнездо линейного выхода и гнездо подключения головных телефонов, промаркированные, соответственно, как «OFF POWER ON», «LINE» и «PHONE».
На верхней поверхности блока (рис. 6.) размещены три разъема, имеющие четко обозначенное целевое предназначение. Разъем «RF ANT» служит для подключения телескопической (через переходник) либо высокочастотной антенны детектора-частотомера. Через разъем «PROBES» подключаются все остальные дополнительные внешние устройства, входящие в комплект прибора. Разъем «OSС2» предназначен для обеспечения работы встроенных осциллографа и анализатора спектра в двухканальном режиме, а также для реализации возможности работы прибора в качестве обычных низкочастотных одноканальных осциллографа и анализатора спектра.
На задней поверхности прибора (рис. 5), ближе к ее верхней части, размещен встроенный громкоговоритель. Непосредственно под ним находится замок крышки батарейного отсека. Сам батарейный отсек занимает нижнюю часть задней поверхности блока. Его размеры обеспечивают размещение в один ряд 4-х элементов питания (батарей) или аккумуляторов типа АА. На донной части батарейного отсека символами и обозначена правильная полярность установки батарей. На крышке батарейного отсека, с внутренней стороны, нанесена надпись с номером и годом изготовления данного комплекта прибора.
На нижней поверхности основного блока (Рис. 7.) размещен разъем блока питания и резьбовое отверстие для подсоединения подставки для основного блока.
На боковых стенках, в верхней части, размещены резьбовые отверстия для подсоединения наплечного ремня.
1.3.РЕЖИМЫ РАБОТЫ ПРИБОРА
Решение перечисленных в подразделе 1.1. контрольно-поисковых задач обеспечивается многофункциональностью прибора ST 031 «Пиранья», которая, в свою очередь, обусловлена соответствующей его комплектацией и реализуется за счёт возможности использования вполне определённой совокупности режимов его работы.
Системотехническая и программная основа, заложенная в конструкцию и алгоритмы функционирования прибора, позволяет применять его в следующих основных режимах.
высокочастотного детектора-частотомера;
сканирующего анализатора проводных линий;
детектора инфракрасных излучений;
детектора низкочастотных магнитных полей;
виброакустического приёмника;
акустического приёмника.
Перевод прибора ST 031 «Пиранья» в любой из режимов осуществляется автоматически при подключении дополнительных внешних устройств (антенн, адаптера, датчиков, микрофона) к высокочастотному разъёму «RF ANT» или 7-ми штырьковому разъёму «PROBES».
Одновременно прибор может работать только в одном из перечисленных основных режимов. С подключением того или иного дополнительного внешнего устройства происходит инициализация соответствующего ему режима с выводом на экран дисплея сообщений вида: «RADIO-FREQUENCY CHANNEL»; «WIRE LINES ANALYSIS»; «INFRARED CHANNEL»; «VIBRO-ACOUSTIC CHANNEL»; «ACOUSTIC CHANNEL».
ВНИМАНИЕ!
При отсутствии подключённых дополнительных внешних устройств (разъёмы «RF ANT» и «PROBES» свободны) с включением питания в приборе инициализируется режим высокочастотного детектора-частотомера, о чём свидетельствует сообщение на экране дисплея «RADIO-FREQUENCY CHANNEL».
Каждый из режимов работы прибора характеризуется набором только ему присущих свойств и основных, изначально заложенных, возможностей. Ниже приводится их краткое описание.
10
Соседние файлы в папке LAB_ITSZI
- #
- #
- #
- #
- #
- #
- #
- #
-
Contents
-
Table of Contents
-
Troubleshooting
-
Bookmarks
Quick Links
Piranha
&
QABrowser
Reference Manual — English — Version 5.5C
RTI article number: 9629050-10
Related Manuals for RTI Piranha
Summary of Contents for RTI Piranha
-
Page 1
Piranha & QABrowser Reference Manual — English — Version 5.5C RTI article number: 9629050-10… -
Page 2
Welcome to Piranha and the QABrowser The Piranha is an X-ray Analyser/Multimeter for everybody working with Quality Assurance and Service of X-ray systems. -
Page 3
Notice NOTICE RTI Electronics AB reserves all rights to make changes in the Piranha, the QABrowser, and the information in this document without prior notice. RTI Electronics AB assumes no responsibility for any errors or consequential damages that may result from the use or misinterpretation of any information contained in this document. -
Page 4: Intended Use
Intended Use Intended Use of the Piranha System Accessory to diagnostic X-ray equipment to be used as an electrometer. Together with external probes it is to be used for independent service and quality control, as well as measurements of kerma, kerma rate, kVp, tube current, exposure time, luminance, and illuminance within limitations stated below.
-
Page 5: Table Of Contents
………………… 6 Palm OS Computer Requirements ………………… 6 Description of the Piranha ………………..9 Indicators and Connectors ………………… 9 Setting Up the Piranha for the First Time ………………… 12 Setting Up the Piranha ………………… 12 Hardware and Specifications ………………… 13 2.4.1 Piranha internal detector (Internal detector) ………………….13…
-
Page 6
Measurements with the Piranha System Introduction ………………… 88 Radiography ………………… 89 5.2.1 kVp, Time, Dose, and Dose Rate ………………….91 5.2.2 Dose Measurements with Piranha Dose Probe ………………….94 5.2.3 HVL Application ………………….95 5.2.3.1 Introduction 2 ………………….96 5.2.3.2 kVp, Time, Dose, and Dose Rate 2 ………………….97… -
Page 7: Contents
General ………………….113 5.5.2 Setting Up the Piranha for Mammography ………………….114 5.5.3 kVp, Time, and Dose Measurements with the Internal detector ………………….115 5.5.4 Dose Measurements with the Piranha Dose Probe ………………….117 5.5.5 HVL Application ………………….118 5.5.6 Quick-HVL ………………….119 5.5.7 Mammo Compensations and Corrections ………………….119…
-
Page 8
Chapter 1 Introduction… -
Page 9: Introduction
This manual gives a short introduction to handheld computers and enough of information to get started and use it with the Piranha. However, it is advised (if you are going to use a handheld computer) to study the manual that is included with your handheld computer to get familiar with its capabilities.
-
Page 10: Pc Requirements
RTI Electronics Web site at http://www.rti.se. If you have questions, comments, or feel that some functionality is missing, you are welcome to contact us at RTI Electronics at sales@rti.se. You can of course also call or send a fax (see notice section for details).
-
Page 11
1. Introduction Palm OS Computer Requirements RTI Handheld Display or Palm Tungsten E2/TX Bluetooth wireless. 2014-06/5.5C Piranha & QABrowser Reference Manual… -
Page 12
Chapter 2 Description of the Piranha… -
Page 13: Description Of The Piranha
Indicators and Connectors Description of the Piranha Indicators and Connectors The Piranha comes in a lot of different models, the external design is basically the same for all models (except for the External Probe port). Edge: External Probe port (on…
-
Page 14
External Probe port and Opening for filter position viewing Here you attach the external probes that come with some models of the Piranha. The port is marked EXT. Not all models have this port. Piranha & QABrowser Reference Manual… -
Page 15
Piranha to a holder. Attachment for Safety strap The Power switch is used to turn the Piranha on and off. Piranha has several ways of saving power when it is inactive, but must be powered off manually since there is no auto-power off function. -
Page 16: Setting Up The Piranha For The First Time
2. Place the Piranha under the tube or mount the holder and HVL stand for positioning of the Piranha in the X-ray field. The stand allows you to position the Piranha (or the external Dose Probe) and HVL filters in any angle including upside-down. Use the light-field or other help to position the Piranha in the X-ray field.
-
Page 17: Hardware And Specifications
Dose and time values will be given for even shorter exposure times. The estimations of total filtration and Quick-HVL are done from one single exposure using a combination of detector and filters in the Piranha. In situations when the total filtration cannot be automatically estimated, a «standard» HVL measurement may be required.
-
Page 18: Specifications, Piranha
5 h (300 min) 8½ h 32 h Note that other mains power solutions that uses a regular USB cable to connect to the Piranha, will behave like USB in the table. Communication Max 12 Mbit/s (USB v1.1) Bluetooth 115 kbit/s 2.4.1.3…
-
Page 19
2. Description of the Piranha Hardware and Specifications Reference conditions +18 °C to +23 °C Temperature Relative humidity 50 % 101.3 kPa Air pressure Inside the Piranha top panel. X-ray field size Calibration is done with field size typically 5 mm less than the size of the top panel. -
Page 20
2. Description of the Piranha Hardware and Specifications Parameters The average of all samples with compensation for the ripple Tube voltage (kVp) (default method) Irradiation time (Exposure time) Time Measured air kerma (may be called dose or air kerma in this… -
Page 21
Note 2: All kerma and kerma rate ranges, inaccuracy, and resolution figures are valid for product version 2 and higher of the Piranha. Note 3: The Kerma rate is calculated as the Kerma (Dose) divided by the Irradiation time. See… -
Page 22
2. Description of the Piranha Hardware and Specifications Parameter Range Inaccuracy Resolution Quick-HVL Mo / 30 µm Mo 0.19 – 0.47 mm Al ±10 % 3 digits Mo / 25 µm Rh 0.31 – 0.52 mm Al (0.001 mm) Rh / 25 µm Rh 0.33 –… -
Page 23
2. Description of the Piranha Hardware and Specifications Computed Tomography Parameter Range Inaccuracy Resolution kVp (standard) W / 3.0 mm Al 45 – 160 kV ±1.5 % 4 digits (10 or 100 V) W / 3 mm Al + 1.2 mm Ti 75 –… -
Page 24
1 – 65535 pulses, resolution 1 pulse Note 1: Max dose/pulse depends on the pulse length. Note 2: All kerma and kerma rate ranges, inaccuracy, and resolution figures are valid for product version 2 and higher of the Piranha. Waveform recording time 1024 ms (2 kSa/s) -
Page 25: Typical Response, Piranha
2. Description of the Piranha Hardware and Specifications 2.4.1.4 Typical Response, Piranha The table below shows the typical response for the Piranha at standardised radiation qualities. Radiography, Fluoroscopy, and Dental (measured using RTI RQ Code R1, W/Al) Radiation quality Air kerma measurement…
-
Page 26
2. Description of the Piranha Hardware and Specifications Mammography, Mo / 30 µm Mo and 30 µm Mo + 2 mm Al (measured using RTI RQ Code M1) Radiation quality Air kerma measurement Mean energy ISO 4037 Factor kQ air kerma (keV) -
Page 27
2. Description of the Piranha Hardware and Specifications Mammography, Rh / 25 µm Rh (measured using RTI RQ Code M4) Radiation quality Air kerma measurement Mean energy ISO 4037 Factor kQ air kerma (keV) HVL (mm Al) IEC 61267 (Rel. RRV28) -
Page 28: Angular Sensitivity, Piranha
There are two different graphs, depending on the product version of your Piranha. The product version is the version number you can find on the label on the bottom of the Piranha. If the version of your Piranha is 1.X, use the graphs marked v1. For 2.X and higher use graphs marked v2.
-
Page 29
2. Description of the Piranha Hardware and Specifications 2014-06/5.5C Piranha & QABrowser Reference Manual… -
Page 30: Piranha External Probes
Waveforms and Triggers Note 2: The standard calibration for the Piranha External Dose Probe is W/23 mm Al. This calibration was chosen since the main use of the detector is to measure the dose to the image intensifier, after the phantom. However, you can just as well use this probe for measurements of skin dose.
-
Page 31
Please also note that in QABrowser, the waveforms are limited to between 0.32 and 4 seconds. The table below shows the typical response for the Piranha External Dose Probe at standardised radiation qualities. Radiation quality… -
Page 32
±1 pulse 0.5 ms Note 1: When the Piranha internal detector is used simultaneously, the default mode of operation is to use the internal detector for time measurement. Note 2: The tube current is calculated as the tube charge divided by the time. See also… -
Page 33: Standards And Compliances
Equipment (WEEE) places an obligation on manufacturers, distributors, and retailers to take back electronics products at the end of their useful life. The WEEE directive covers all RTI products being sold into the European Union (EU) as of August 13, 2005. Manufacturers, distributors, and retailers are obliged to finance the cost of recovery from municipal collection points, reuse, and recycling of specified percentages per the WEEE requirements.
-
Page 34: Manufacturer’s Declaration Of Conformity
2. Description of the Piranha Standards and Compliances 2.5.2 Manufacturer’s Declaration of Conformity Piranha & QABrowser Reference Manual 2014-06/5.5C…
-
Page 35: Intended Use
2. Description of the Piranha Standards and Compliances 2.5.3 Intended Use 2014-06/5.5C Piranha & QABrowser Reference Manual…
-
Page 36: Fcc Certification
1. First download the latest version of the RTI Updater Setup from RTI Electronics Web site. 2. Unzip the file and run the file «RTI Updater Setup.exe» to install it on your PC. In the end of the installation process you will get the question if you want to run that updater immediately.
-
Page 37
2. Description of the Piranha Maintenance 5. The RTI Updater starts and locates the Piranha automatically if it is connected to an USB port. 6. If the Piranha is found, the window in the figure above is shown. The different modules are checked and after a while the start button is enabled. -
Page 38
2. Description of the Piranha Maintenance If you have any problem with your Piranha after updating, re-install the firmware again before contacting your local distributor or RTI Electronics. To re-install firmware repeat step 1 to 9 above, but before performing step #6 go to the menu Settings and select Always Overwrite. -
Page 39: Managing Detector Calibrations
RTI Detector Manager is a special Windows software that gives an overview of all calibrations for the detectors and probes in your system. You will find the RTI Detector Manager on your Product CD, in the folder \Software\RTI Detector Manager\.,Start the file RTI Detector Manager.exe by double-clicking it.
-
Page 40
Chapter 3 Description of the QABrowser… -
Page 41: Description Of The Qabrowser
The text in this section assumes that you purchased your Handheld Display either directly from RTI or a RTI dealer, which means that QABrowser is already installed and configured on the Handheld Display. If you have purchased your handheld on your own, then you first need to install the QABrowser to the handheld.
-
Page 42: Real-Time Display And Waveforms
Real-time Display and Waveforms This section will show how to make a measurement with the Piranha and the QABrowser. It is illustrated with an example using a radiographic X-ray unit. The operation of the QABrowser has a general structure and the described procedures applies also to other modalities.
-
Page 43
4. The Real-Time Display (RTD) is now shown and you are ready to measure, see figure below. The Piranha is set to the most suitable settings for the selected type of measurement, in this case radiography. The selected kV-range is 45-125 and the radiation quality is W/3mm Al (reference radiation quality). -
Page 44
«R1[4] 45-125». When you make the first exposure, the Piranha will evaluate what kind of waveform it is (DC/HF, 3-phase/12p, 3- phase/6p, or 1-phase) and the total filtration. This is done for all measurement types but Piranha &… -
Page 45
3. Description of the QABrowser Real-time Display and Waveforms mammography. Default values are «DC/HF» and 3.0 mm Al. 8. Make an exposure. Every time the Piranha recognizes an exposure the RTI logo is superimposed on screen for a short while. -
Page 46: Waveforms — Acquiring And Viewing
(kVp) with the Internal detector dose rate with the Internal detector dose rate with the external Dose Probe (available for specific Piranha models). tube current (mA) with the external Dose Probe (available for specific Piranha models). In Continuous update mode you also have the possibility to restart the waveform collection during the measurement.
-
Page 47: Measurement Settings
Piranha is still capturing the waveform. Then you can go back to the RTD and tap Wave again, when the waveform recording time has passed, to get the full waveform.
-
Page 48
Piranha: General settings for the Piranha. Internal detector detector: Specific settings for the Internal detector detector. If your model of Piranha has an external probe that is attached it will also show here. Piranha Shows general settings for the Piranha. You can find… -
Page 49: Settings — Conditions
Conditions — TF and Waveform These are parameters of the X-ray generator which influence the measurements. The Piranha can measure these, or you can set them yourself. Total Filtr. Shows actual total filtration value. Estimate means that a new estimation will be performed at next exposure and the values will be displayed on screen.
-
Page 50
(e.g. ion chamber) is too slow for the Piranha electrometer to detect the pulses. A solid-state detector, like the Piranha Dose Probe, is however fast enough to detect the frequency even for very low-level signals. -
Page 51
The compression paddle will however normally affect the Piranha kV and dose reading. With this check box, all the measured values (kV, dose and HVL) will be corrected according to what the user has selected. The default setting the first time you start the software is without the compression paddle in the field. -
Page 52: Settings — Piranha
Settings — Piranha Here general measurement settings for the Piranha are shown. The post delay time defines how long time the Piranha shall wait Post Delay and «look for more» after detecting what can be considered to be «the end of the exposure». Default value is 250 ms. The post-delay is necessary when measuring on units with some kind of pre-pulse or for pulsed exposures.
-
Page 53
PEAK The end time is the last time the signal goes below TL×S PEAK See example below. This setting defines when Piranha shall send measured Update values to the QABrowser. Four different alternatives are available: After exp., the QABrowser receives a new value when the exposure terminates. -
Page 54: Settings — Internal Detector
The reason for this is that the Piranha needs the waveform from start to be able to accurately calculate the irradiation time.
-
Page 55
The sensitivity can be set to: Low and High. Default value is set according to type of measurement selected. The delay time defines how long time the Piranha shall wait before Delay starting to measure kVp after that radiation has been detected. -
Page 56: Settings — Other Detectors
The first example shows how the accuracy of kVp can be tested using the built-in application Accuracy. The second example shows a multi-parameter Accuracy application. Piranha & QABrowser Reference Manual 2014-06/5.5C…
-
Page 57: The Accuracy Application (Single-Parameter)
The set values (for kVp) are stored in a Set-value list. You can modify the list or individual values. To modify an individual set value tap with the pen on it. In this case tap 60. 2014-06/5.5C Piranha & QABrowser Reference Manual…
-
Page 58
You can always tap a previous row and redo that exposure. Number of exposures and maximum inaccuracy is shown at the lower part of the screen. Tap Graph to show result in a graph. Piranha & QABrowser Reference Manual 2014-06/5.5C… -
Page 59: The Accuracy Application (Multi-Parameter)
2. Available applications for Radiography/All are shown. Choose Accuracy by tapping it with the pen. You can also use the scroll button to highlight Accuracy and then press the button that corresponds to Select (the right-most button). 2014-06/5.5C Piranha & QABrowser Reference Manual…
-
Page 60
You can now change/delete/insert values in the set value list for current application. Use the graffiti area to enter new values. Tap OK to save changes or Cancel to return to the application without changing the list. Piranha & QABrowser Reference Manual 2014-06/5.5C… -
Page 61: Data Logging
Prepare the data log by first entering some basic information about the measurement. Open the pull-down menu and select Setup or go to the Start Screen and tap Setup. From the Setup menu select Log. 2014-06/5.5C Piranha & QABrowser Reference Manual…
-
Page 62
Note that when measuring in an Application, the data will not be stored in the log file until you exit the Application. That means that even if you start the log after you have begun measuring you will still get all the application measurements in the log file. Piranha & QABrowser Reference Manual 2014-06/5.5C… -
Page 63: Favourites
You may give the Favourite a title or use the one suggested by the QABrowser. If you instead select Start Here!, a special Favourite will be created, that gets you right back to this test, the next time you start the QABrowser. 2014-06/5.5C Piranha & QABrowser Reference Manual…
-
Page 64: Getting Started With Favourites
You then selects one of the favourites from the list depending on what they intend to measure with the Piranha. For the next measurement You may select another favourite from the list. If you have any favourites saved, the QABrowser will always start with the Favourites screen.
-
Page 65
The saved favourites can be found in the menu field, tap Options and then Favourites..To start the favourite that you are interested of, you have to mark the favourite and then tap Select, in the bottom right corner. 2014-06/5.5C Piranha & QABrowser Reference Manual… -
Page 66
Palm, the next time you run the HotSync function. See picture below. This PDB file containing favourites can easily be shared between different users. If you have more than one Palm account on your PC, then it is important to choose the Piranha & QABrowser Reference Manual 2014-06/5.5C… -
Page 67: Start Here
Actually, Start Here! is a special case of the Favourites, as described above, and can thus be found there. QABrowser Setup The Piranha Setup is used to define different parameters that control the function of the QABrowser and Piranha. Open the QABrowser main menu and select Setup.
-
Page 68: Regulations Setup
Tap the unit you want to change and tap the desired unit in the list that pops up. When measuring in the RTD you can temporarily change a unit by tapping the unit text with the stylus. Piranha & QABrowser Reference Manual 2014-06/5.5C…
-
Page 69: Log Setup
Lock unit prefixes means that the prefix of a unit is fixed and not auto-ranging. Analyse waveform means that the Piranha automatically analyses and determines the type of waveform. Indicate trig lets you select how a trig event will be presented to you. Can be all combinations of sound and graphics.
-
Page 70: Detector Information
The detector information screen lists all detectors available for the system. For each module you can see the available detectors and probes. 3.7.6 System Info System Info is used to get information about the Piranha system. Serial Number The serial number for the system.
-
Page 71: Battery & Power Status
3. Description of the QABrowser Battery & Power Status Battery & Power Status The battery status for the Piranha and handheld are displayed together on a informative display, as shown below. You access this screen on the menu (tap the icon) by selecting Info — Power Status.
-
Page 72: Indicators And Symbols
Here are measurement information and settings for the Piranha and its detectors found. This menu is accessed when you need to override the default settings of the Piranha that are set by the QABrowser. See topic Settings for more information.
-
Page 73
This symbol indicates that one or more measured value is not displayed with maximum accuracy. This indicator is for example shown when the Piranha is unable to apply a correction/compensation to a measured value. Tap the symbol to get a detailed description of the problem. -
Page 74: Installation Of Palm Os Handheld Computers
#4 below can be ignored. Perform step #6 and answer «Yes». 3. Attach the HotSync cable. 4. Go to Start | RTI Electronics | QABrowser Updater | QAB Updater to start the QABrowser Updater. 5. The QABrowser Updater starts.
-
Page 75
The update/installation of the QABrowser is now completed. Note that when you have updated you QABrowser, you may get an Attention message like one of these. Then you must also update your Piranha firmware, see Updating the Firmware more information. -
Page 76: Uninstalling The Qabrowser
Application Launcher. Removing the QABrowser Updater from your PC This is accomplished by using the Windows Control Panel «Add and Remove Programs» or by choosing Start | RTI Electronics | QABrowser Updater | Uninstall QAB Updater. Piranha & QABrowser Reference Manual…
-
Page 77
Chapter 4 Measurement Principles & Theory… -
Page 78: Measurement Principles & Theory
(ms) (ms) – Radiography Cine/Pulsed exposure 1000 – Fluoroscopy Pulsed Fluoroscopy 1000 – Mammography 1500 – – Dental Panoramic Dental (OPG) – Light Abbreviations: AE=After Exposure, T=Timed, C=Continuous, FR=Free run, WF=Waveform recording time Piranha & QABrowser Reference Manual 2014-06/5.5C…
-
Page 79: Update Modes
Post Delay under Settings | Piranha. Reset time is one second. Continuous, the Piranha is continuously sending data as long as radiation is detected.
-
Page 80: Using Timed Update Mode
Reset time is the time it takes to perform a reset each time you hit Reset. Sample time is the time between individual data point of the waveform. Waveform recording time is the range of user selectable recording times the Piranha allows.
-
Page 81: Using Free Run Update Mode
The function uses a moving average algorithm where the number of seconds is selected by the user. During the reset process the user must make sure that the detector is not exposed to 2014-06/5.5C Piranha & QABrowser Reference Manual…
-
Page 82: Display Messages And Active Messages
In the same way it will take X seconds for the Piranha to show a zero value after the radiation has ended. Great care must be taken into choosing a time constant fitted to the nature of the signal.
-
Page 83
Display Messages and Active Messages High signal One or several detectors have too high signal. Low signal The Piranha detects a signal but it is too low to present a reliable result. High kVp Measured tube voltage is higher than that of the selected kV-range. -
Page 84: Display Messages
Measured tube voltage is higher than that of the selected kV-range. Change to a higher kV-range. Low kVp Measured tube voltage is lower than that of the selected kV- range. Change to a lower kV-range. Piranha & QABrowser Reference Manual 2014-06/5.5C…
-
Page 85
4. Measurement Principles & Theory Display Messages and Active Messages Low Signal The Piranha detects a signal but it is too low to present a reliable result. Increase the mA and/or decrease the distance from X-ray tube to detector or change the sensitivity for the dose parameter to High sensitivity or even Very High sensitivity. -
Page 86: Waveforms And Triggers
This means that for long measurements you may see a change in the rate value (dose rate, etc) when the measurement is finished, if the signal level was changed during the measurement. Piranha & QABrowser Reference Manual 2014-06/5.5C…
-
Page 87: Measurement Principle For The Piranha
The design of the detector package is very important to be able to measure kV and dose correctly in the whole range of 20 to 155 kV. The Piranha design makes it possible to measure small field sizes, less than 3 mm width, and low output levels down to approximately 1 µGy/s. Basically the detector…
-
Page 88
80 kV. The Piranha is also calibrated for the total filtration at this kV. Use a high signal level, i.e. 200 mA during 200 ms to get a stable result. It does not matter if you intend to do measurements at a higher or lower kV than this, this measurement aim to get a correct value of the total filtration. -
Page 89: Linearity
1. Place the detector on the table-top. If patient-equivalent phantom should be used it is recommend to use the Piranha HVL stand to simplify the set up. Use 2 pieces of 10 mm Al filter as «patient -equivalent» filter in the beam.
-
Page 90: Reproducibility
8. Calculate the square of the variance, i.e. the standard deviation, and divide it by the mean value of the n measurements An acceptable value for the coefficient of variation is less than 0.05. Piranha & QABrowser Reference Manual 2014-06/5.5C…
-
Page 91
Chapter 5 Measurements with the Piranha System… -
Page 92: Measurements With The Piranha System
5. Measurements with the Piranha System Introduction Measurements with the Piranha System Introduction The Piranha system can, depending on model, measure up to eight parameters simultaneously plus three waveforms from a single exposure: Dose and dose rate Exposure time Estimated total filtration and determined waveform type…
-
Page 93: Radiography
Setting Up the Piranha Measuring the kVp on a radiographic units is straightforward since the Piranha can automatically detect and compensate for variation in the radiation quality. It is also easy to check that the detector area is fully and uniformly irradiated. Practically this means that the kVp value can be measured in the range 1.0 to 50 mm of total filtration.
-
Page 94
5. Measurements with the Piranha System Radiography If any of the displayed values are not possible to compensate or cannot be measured with full accuracy the symbol is displayed at the top of screen. When the symbol is shown you can tap it, to get more information. -
Page 95: Kvp, Time, Dose, And Dose Rate
5.2.1 kVp, Time, Dose, and Dose Rate To measure on radiographic units: 1. Set up the Piranha and the handheld computer according to the description in Setting Up the Piranha 2. Place the detector on the table at the distance that is clinically relevant.
-
Page 96
7. Make an exposure. The RTI logo flashes to indicate that the Piranha has detected the exposure. The Piranha now first analyses the beam and displays the type of waveform. This is done once for every test. Piranha & QABrowser Reference Manual… -
Page 97
5. Measurements with the Piranha System Radiography Then the estimated total filtration is displayed (estimated in the range of 50 — 150 kV). Depending of the selection of display parameter different display screens may be presented. 8. Tap Wave to study the waveforms. -
Page 98: Dose Measurements With Piranha Dose Probe
5. Measurements with the Piranha System Radiography 5.2.2 Dose Measurements with Piranha Dose Probe 1. Place the Piranha Dose Probe in the field and connect the cable to the Piranha input. 2. Set up the Piranha and the handheld computer according to the description in Setting Up the Piranha 3.
-
Page 99: Hvl Application
HVL & Total Filtration Using the Piranha and the built-in HVL application correct HVL value and total filtration value can be measured and calculated. Set up the system the same way as…
-
Page 100: Introduction 2
It is recommended to use the built-in HVL application (or Ocean) to evaluate HVL. 5.2.3.1 Introduction 2 The Piranha system can, depending on model, measure up to eight parameters simultaneously plus three waveforms from a single exposure: Dose and dose rate…
-
Page 101: Kvp, Time, Dose, And Dose Rate 2
5.2.3.2 kVp, Time, Dose, and Dose Rate 2 To measure on radiographic units: 1. Set up the Piranha and the handheld computer according to the description in Setting Up the Piranha 2. Place the detector on the table at the distance that is clinically relevant.
-
Page 102
Piranha has detected the exposure. The Piranha now first analyses the beam and displays the type of waveform. This is done once for every test. Then the estimated total filtration is displayed (estimated in the range of 50 — 150 kV). -
Page 103: Quick-Hvl And Total Filtration
The following examples very clearly shows the excellent independence of the beam filtration for kV and dose readings. Three exposures were made with 3 mm Al, 6 mm Al, and 12 mm Al. The Piranha was used to measure kVp, exposure time, dose, and dose rate. The pictures are stored when the QABrowser shows estimated total filtration.
-
Page 104
HVL are shown as supplementary information. The HVL is calculated to be 6.42 mm Al. The set kV was changed and the Piranha measured 102.6 kV. The HVL is calculated at 5.70 mm for this kV. The set kV is changed again and a third exposure is made. -
Page 105: Cine/Pulsed Radiography
Piranha. Please consult the next section of the manual if this is the case. For under-table cine measurement turn the Piranha upside-down. An optional detector rod is available that can be used to put the detector in position on the image intensifier without risk for hazardous X-ray exposure when monitoring.
-
Page 106: Kvp, Time, Dose, And Dose Rate
5. Measurements with the Piranha System Cine/Pulsed Radiography 5.3.1 kVp, Time, Dose, and Dose Rate Use the same procedure as for the normal radiography measurement but select the All… parameter. If only Tube voltage is selected: 5.3.2 Pulse Measurements with Piranha Dose Probe Use the same procedure as for the normal radiography measurement.
-
Page 107: Hvl, Quick-Hvl, And Total Filtration
X-ray. The Position Check should be used to confirm the position of the Piranha. When you select fluoroscopy or pulsed fluoroscopy (as type of measurement) the Piranha system automatically changes to continuously updating the display and using the highest possible sensitivity.
-
Page 108: Image Intensifier Input Dose Rate
Use patient equivalent phantom to measure the image intensifier input dose rate according to manufacturer’s specification: 1. Connect the Piranha Dose Probe to the Piranha. 2. Set up the Piranha and the handheld computer according to the description in Setting Up the Piranha 3.
-
Page 109
5. The Select Detector screen is now displayed. Select External. 6. Tap Select. 7. Place the Piranha Dose Probe in front of the image intensifier but outside the measuring field for the mA feedback loop. You may use the optional detector rod that can be attached to Piranha Dose Probe to position the detector without risk for hazardous X-ray exposure. -
Page 110: Kvp And Dose Rate
5. Measurements with the Piranha System Fluoroscopy and Pulsed Fluoroscopy 9. Start the fluoroscopy. A little triangle is displayed, indicating that the Piranha has detected the radiation. 10. The figure to the left shows the real-time display during fluoroscopy. The image…
-
Page 111
Piranha, even on this extremely low level, still makes corrections for the beam filtration. The Piranha can measure both kV and dose rate at very low levels for instance on Mini C-arm systems. Piranha can (as an example) successfully measure the tube voltage as low as 43 kV with a 25 µA tube current. -
Page 112: Hvl, Total Filtration, And Quick-Hvl
Total Filtration and Quick-HVL The total filtration is measured continuously when the Piranha is used under fluoroscopy. The following pictures illustrates this excellent feature for the Piranha and the Internal detector (shown for Barracuda MPD): The fluoro is started and the total filtration is estimated and automatically displayed during two seconds.
-
Page 113
Fluoroscopy and Pulsed Fluoroscopy The displays with measured values are continuously updated every four seconds. Add 10 mm of aluminum. The Piranha will «notice» that the filtration is changed and shows a new total filtration value. The dose rate is now much lower. The added filtration does not affect measured kVp at all. -
Page 114: Pulsed Fluoroscopy
Select type of measurement in similar way as for normal continuously fluoroscopy to setup the system. Piranha is set-up for this application to calculate the number of pulses per second (Hz or pps), the dose/pulse, and pulse dose rate. The picture below explain the difference between the pulse dose rate and the traditional dose rate.
-
Page 115
5. Measurements with the Piranha System Fluoroscopy and Pulsed Fluoroscopy The following pictures illustrates how the Piranha system is used this type of measurement. These pictures describes the check of the output levels in pulse fluoroscopy mode (showing Barracuda MPD). -
Page 116
5. Measurements with the Piranha System Fluoroscopy and Pulsed Fluoroscopy using the Piranha Dose Probe. Hints: Pulsed fluoro screen is very handy to use for several applications and is not restricted to only measure pulsed fluoro. It has application when measuring in Cine mode with heavy filtered beam that make the signal too low to use the Cine mode or when the dose rate is extremely low. -
Page 117: Mammography
Position Check. The mammography kV calibrations available for the Piranha is ranging from 18 to 49 kV. To confirm which range is used the digit 1 or 2 is displayed in square brackets on the bottom left corner of the QABrowser screen, as shown below.
-
Page 118: Setting Up The Piranha For Mammography
Piranha is repositioned. The kV and radiation waveform is always stored together with the RTD values and can be displayed by tapping the Wave button. The kVp calibration for Piranha is made without the compression paddle in place.
-
Page 119: Kvp, Time, And Dose Measurements With The Internal Detector
2. Make sure that the image receptor is positioned at a clinically relevant distance (typically 600 mm). 3. You should place the Piranha flat on the image receptor with its long axis parallel to the chest wall making sure the centre of the detector surface is placed in the centre of the light field, as shown in the pictures above (40 mm distance shown).
-
Page 120
3. Make a Position Check, as shown above. It is recommended to make the check at 28 kV. After the check the Piranha automatically changes back to the previously selected kV range. 4. Set kVp and mAs (or mA/time) to the desired values. -
Page 121: Dose Measurements With The Piranha Dose Probe
5. Measurements with the Piranha System Mammography 5. Make an exposure. The RTI logo flashes to indicate that the Piranha has detected the exposure. 6. Read the values in the RTD. 7. Repeat measurement for other generator set values. There are some mammographic units that are bit peculiar when it comes to kV measurements, for instance The Hologic Selenia and IMS Giotto.
-
Page 122: Hvl Application
8. Repeat the measurement for other generator settings. To get a good HVL value, using the Piranha Dose Probe, you must correct it according to the tables in the Piranha Dose Probe DETECTOR DATA manual. It is often more convenient to measure HVL with the Piranha using the built-in HVL application.
-
Page 123: Quick-Hvl
Quick-HVL Quick-HVL The Piranha is able to measure HVL for mammography in one shot. Quick-HVL is available for measurements with or without compression paddle. If the parameter «All w. HVL» is chosen, the QABrowser will display quick-HVL values for every measurement.
-
Page 124: Corrections For The Compression Paddle
5.5.7.1 Corrections for the Compression Paddle The Piranha is well collimated above its small detector area, and will measure the same whether the compression paddle is placed directly on top of the Piranha or high above. This is NOT true for an ion chamber.
-
Page 125
(at 605 mm SDD). A practical consequence of usage of the normalizing function and scatter factor is that the Piranha can be kept at the same position on the breast support all the time when data is collected for AGD. -
Page 126: Beam Correction Factor
Piranha is placed flat on the breast support. (This assuming that the focal point is situated at the chest wall, which normally is the case.) You can find the product version on the label on the back side of your Piranha. Distance from…
-
Page 127: Average Glandular Dose, Agd (Mgd)
On the other hand, the HVL measurement should be done without any scatter contribution and with good geometry. The Piranha is well collimated above its small detector area. Due to this fact it registers a narrower angle of the X-ray field and thus much less scattered radiation compared to an ion chamber.
-
Page 128: Mammographic Pre-Pulses
1 s and the waveform recording time to a corresponding time. It is important to cover both signals. In this measurement setup, the Piranha will add the dose from both pulses. This is OK if the radiation quality is not changed between the signals.
-
Page 129: Dental And Panoramic Dental
This topic will describe how to measure kVp, dose, and time for a Dental and Panoramic Dental X-ray units using the Piranha only. Set up the Piranha and the handheld computer according to the description in Setting Up the Piranha .
-
Page 130
The challenges instead arise for the mechanical setup needed to position the detector in right position. The small and narrow field is only a few millimetres. The Piranha detector has very narrow detector area and is very thin and a special holder (optional) can be used to position the Piranha without any problem. -
Page 131
The Piranha has addressed these challenges. Since the panoramic scan has an exposure time of about 10 to 20 seconds, the Piranha is set up to continuously update the display during the scan. It is preferable to select a single parameter display and angle the Palm holder, making it easy to read the values during the scan, from a distance. -
Page 132: Kvp, Time, Dose, And Dose Rate
Use the same procedure as for the normal radiography measurement but select Dental instead of radiography and select Tube voltage as parameter. A 200 ms delay is default. 1. Set up the Piranha and the handheld computer according to the description in Setting Up the Piranha .
-
Page 133
3. It is recommended to make a check measurement to confirm that the detector area is uniformed radiated. Select a exposure time of at least 400 ms. The Piranha automatically changes back to the previous selected kV-filter after the check exposure. -
Page 134: Waveforms
5. Measurements with the Piranha System Dental and Panoramic Dental The Piranha now first analyses the beam and displays the type of waveform. This is done once. Then the estimated total filtration is displayed. Read the measured values from the display.
-
Page 135: Panoramic Systems
Use the same procedure as for the normal dental measurement but select Panoramic Dental instead of radiographic and select Tube Voltage as parameter. A 200 ms delay is default. 1. Set up the Piranha and the handheld computer according to the description in Setting Up the Piranha .
-
Page 136
When the system passes the test, you can trust the kV reading. 7. The Piranha changes automatically back to the previous selected kV range after the Position Check. As default this is range 55 — 105 kV, R2[4] as indicated on the QABrowser screen. -
Page 137: Hvl, Total Filtration, And Quick-Hvl
9. Select kV, mA, and scan time. 10. Start the scan. A little triangle in the RTD indicates that the Piranha detects the radiation. It is not needed to use the whole scan for the purpose of measure the kV since the display is continuously updated.
-
Page 138: Ct Kvp
Another problem is to «find» the beam, especially when using a small slice width. All these problems are minimized when using the Piranha since it can «move with the table» through the beam while the tube is in the top position. This is can easily be obtained by measuring while a topogram (scout/pilot image) is taken.
-
Page 139
5. Measurements with the Piranha System 3. Start the QABrowser and select CT from the Select type of measurement menu. 4. Select Tube voltage. 5. The real-time display for tube voltage is now shown. At the bottom of the screen you can select kV range and calibration. -
Page 140: Parameters For Ct Scanner Models
If the Piranha is positioned in a correct way, the position is accepted and the real-time display is shown again. If not check the position of the Piranha and/or increase the slice width if possible.
-
Page 141: Quick-Hvl And Total Filtration
5. Measurements with the Piranha System With the calibration C1 the total filtration can be measured and the Piranha automatically corrects the kV value accordingly. It is optional to set a known total filtration instead, see the table below. To achieve optimal measurements of the total filtration, first perform a measurement at a low kV, preferable 80-100 kV.
-
Page 142: Mas-1, Invasive Mas Probe
This means that the measurement starts when the mAs-probe detects the tube current. The measurement is performed in the same way if you use a multi- parameter display. In that case the default trig is the Piranha and what is said below about false triggering can be ignored.
-
Page 143
1. Connect the MAS-1 probe to the X-ray generator as described in the MAS-1 User’s Manual. 2. Connect the MAS-1 probe to the external probe input. 3. Set up the Piranha and the handheld computer according to the description in Setting Up the Piranha 4. -
Page 144
The MAS-1 probe can also be used for measurement of tube current during fluoroscopy. To measure fluoroscopy tube current with the Piranha MAS-1 Probe 1. Setup the Piranha according to the description earlier in this manual. 2. Connect the MAS-1 probe to the X-ray generator as described in the MAS-1 User’s Manual. -
Page 145: Mas-2, Non-Invasive Mas Probe
Tube Current Probes 5.8.2 MAS-2, Non-invasive mAs Probe This section describes how to measure mAs, using the Piranha in the x-ray beam to trigger the measurement. This means that the measurement starts when the Piranha detects the radiation. The MAS-2 probe uses a current clamp probe to measure mAs and mA non-invasively.
-
Page 146
5. Measurements with the Piranha System Tube Current Probes 7. The figure to the left shows the result from an exposure with 80 kV, 100 ms, and 25 mA. The exposure time is measured with the MAS-2 probe. If you would get a message as shown in the figure to the left, the mAs probe is probably connected in the wrong direction. -
Page 147: Light Measurement
(lx) measurements of ambient light in a room or in front of a CRT. Read the Piranha Light Probe User’s Manual for a detailed description of practical use and explanation of the theory behind the units and quantities of light.
-
Page 148
1. Do as described in step 1 to 8 above. 2. Press and hold the shutter. If the Piranha does not start to measure, lift the Piranha Light Probe and direct it towards a bright spot (with the shutter button pressed). Do not release the shutter button. -
Page 149: Illuminance — Ambient Light (Lx)
8. The real-time display for illuminance is now displayed. Cover the white light-sensitive area of the Piranha Light Probe to shield off all light (you may use the rubber part that comes with the Piranha Light Probe-M if available). It is very important that you shield off all light.
-
Page 150
5. Measurements with the Piranha System Light Measurement 4. Read the result on the display. Piranha & QABrowser Reference Manual 2014-06/5.5C… -
Page 151
Chapter 6 Optional Accessories… -
Page 152: Optional Accessories
Optional accessories and tools available for the Piranha. Holder & HVL Stand Measuring HVL using the classic method? Then the Piranha holder and HVL stand together with a filter kit may be handy. The stand features a camera screw that fits perfectly into the camera thread of the Piranha.
-
Page 153
Magnet or tape position Insert the Piranha in the Holder, lock it with the rubber strap and perform the measurement. The extra magnet may be used for hanging the USB or charger cable «out of the way». -
Page 154
6. Optional Accessories Piranha Panoramic Holder Piranha & QABrowser Reference Manual 2014-06/5.5C… -
Page 155
Chapter 7 Problems and Solutions… -
Page 156: Problems And Solutions
1. Start the QABrowser and run the filter test. (QABrowser: Setup | System Test) 2. Hold the Piranha in you right hand by the cable edge. 3. When the motor is trying to move, tap the Piranha’s left long edge in the palm of your left hand until it comes free.
-
Page 157
Bluetooth only shows «Unknown device» when trying to connect Depending on Palm model it may take a little while for the serial number to appear, the Piranha will appear as «Unknown device». Normally it will show the serial number if you wait a while. -
Page 158: Bluetooth
Bluetooth Bluetooth is a wireless way of communication between your PC/handheld and your meter. The Piranha has built-in support for this, but with the Barracuda you need the Barracuda Serial Bluetooth Module accessory. A Palm OS handheld also has built-in support for Bluetooth but a PC may or may not have built-in support for Bluetooth.
-
Page 159
7. When prompted for a passkey enter 0000. 8. Now launch the QABrowser as described above. If your Piranha/Barracuda hardware does not support multiple Bluetooth devices (see above), and you use Bluetooth (with passkey) with more than one handheld, or if you… -
Page 160: Enable Bluetooth Passkey
3. Select the USB connection. You cannot use a Bluetooth connection when you want to change the Bluetooth configuration. A Bluetooth connection is shown as COMxx. 4. Wait for RTI Updater to finish with the startup procedure. After a while when it is ready the Start button will be enabled.
-
Page 161
Chapter 8 Glossary… -
Page 162: Glossary
Area exposure product Product of the area of a cross-section of a radiation beam and the averaged exposure over that cross-section. SI unit: Gy·m² Attenuation The reduction of radiation intensity upon passage of radiation through matter. Piranha & QABrowser Reference Manual 2014-06/5.5C…
-
Page 163
General: a program that does the job of loading the OS kernel of a computer. Piranha bootloader: Miniature program stored in cabinet and modules which normally just starts the Firmware. It is used more when the Firmware is updated. See Firmware. -
Page 164
Radiation meter intended to measure absorbed dose per unit time. Dosemeter Radiation meter intended to measure absorbed dose. Effective dose equivalent (HE) Quantity used to express the weighted DOSE EQUIVALENT to the whole body when it is irradiated non uniformly or partially. Piranha & QABrowser Reference Manual 2014-06/5.5C… -
Page 165
General: The operating system and software installed on a small device. Sometimes called embedded software. Piranha firmware: Program stored in cabinet and modules which handles all control of measurement electronics. Can be updated, then a special part of the firmware called bootloader, is used. -
Page 166
A radiation source with associated equipment, and the space in which it is located. Interlock A device used to assure proper and safe use of a radiation installation by monitoring (usually by electrical devices) the status, presence or position of various associated Piranha & QABrowser Reference Manual 2014-06/5.5C… -
Page 167
Kilovolt (kV) A unit of electrical potential difference equal to 1000 volts. See Peak tube voltage Lead equivalent The thickness of lead affording the same attenuation, under specified conditions, as the material in question. 2014-06/5.5C Piranha & QABrowser Reference Manual… -
Page 168
Also known as personal monitor. An appropriately sensitive device used to estimate the absorbed dose received by an individual. Peak tube voltage Ûo (kVp) The peak value of the tube voltage (corresponding to the highest available radiation Piranha & QABrowser Reference Manual 2014-06/5.5C… -
Page 169
Radiation receptor Any device that absorbs a portion of the incident radiation energy and converts this portion into another form of energy which can be more easily used to produce desired 2014-06/5.5C Piranha & QABrowser Reference Manual… -
Page 170
A radiographic procedure in which a sequence of radiographs is made rapidly by using an automatic cassette changer, image intensifier/TV chain, etc. Shutter In beam therapy equipment, a device, attached to the X-ray or gamma-ray source Piranha & QABrowser Reference Manual 2014-06/5.5C… -
Page 171
Thickness of a specified substance which, when introduced into the path of a given beam of radiation, reduces the kerma rate to one-tenth of its original rate. Tomography A special technique to show in detail images of structures lying in a predetermined 2014-06/5.5C Piranha & QABrowser Reference Manual… -
Page 172
Evacuated vessel for the production of x-radiation by the bombardment of a target, usually contained in an anode, with electrons accelerated from a cathode by an electric field. Thus: Rotating anode X-ray tube. Double focus X-ray tube. Piranha & QABrowser Reference Manual 2014-06/5.5C… -
Page 173: Index
About Beam Correction Factor 48, 122 Absorbed dose Beam limiting device Absorption Beam quality 38, 89, 113 Accessories Becquerel Piranha holder & HVL stand Blank screen Active display messages Bluetooth 37, 152, 154 Active Messages 65, 78 Indicator Activity Passkey…
-
Page 174
Effective dose equivalent (HE) Data logging Electrometer waveform Dead man switch Enable Bluetooth passkey Declaration of Conformity Entrance Skin Exposure 117, 123 Default settings Entrance Surface Air Kerma 117, 123 Default Unit Equivalent thickness Piranha & QABrowser Reference Manual 2014-06/5.5C… -
Page 175
— G — Play Gantry Trig Geometric unsharpness Warning Good geometry Waveform indicator Inherent filtration Gray (Gy) Initial X-ray tube voltage Input dose rate — H — Installation Intended Use Half Value Layer Interlock Theory 2014-06/5.5C Piranha & QABrowser Reference Manual… -
Page 176
Operating temperature Positioning Piranha Operator Quick-HVL Mammography specifications Optional Accessories Manufacturer’s Declaration of Conformity Orthopantomography 148, 164 Oscilloscope 88, 96 138, 141 Overview of Measurement Modes MAS-1 Probe Specifications MAS-2 Current Probe MAS-2 Probe Specifications Piranha & QABrowser Reference Manual 2014-06/5.5C… -
Page 177
Fluoroscopy Piranha 12, 83 Mammography Cable Radiography Holder — R — Mammography positioning Physical dimensions Piranha holder & HVL stand Radiation (ionizing) Specifications Radiation protection survey Piranha holder Radiation quality 21, 38 Piranha internal detector Radiation receptor Piranha Light Probe… -
Page 178
Power Source Pulse rate Pulse rate Sensitivity 50, 52 Radiography Threshold 50, 52 Size Total Filtration Trig level (time) Waveform recording time 20, 27 Trig source Weight Update mode Spot film Waveform recording time Piranha & QABrowser Reference Manual 2014-06/5.5C… -
Page 179
Waveform indicator 38, 69 Trig Waveform recording time 48, 74, 75 Visual indication Waveform recording time Specifications Trig indicator 20, 27 Trig level (time) Waveform type 45, 91, 97 Trig source Waveforms Trigger WEEE 2014-06/5.5C Piranha & QABrowser Reference Manual… -
Page 180
Index Weight White screen Whole body dose equivalent (Hwb) Window 50, 52, 82 Window time Workload (W) — X — Xeroradiography X-ray tube Piranha & QABrowser Reference Manual 2014-06/5.5C… -
Page 181
Notes Notes 2014-06/5.5C Piranha & QABrowser Reference Manual…
Дозиметры универсальные для контроля характеристик рентгеновских аппаратов Piranha предназначены для измерения: кермы в воздухе; мощности кермы в воздухе; анодного напряжения на рентгеновской трубке; времени экспозиции; количества импульсов; анодного тока; произведения анодного тока на время экспозиции; слоя половинного ослабления (СПО); яркости и освещенности.
Также дозиметры универсальные для контроля характеристик рентгеновских аппаратов Piranha могут использоваться для определения: формы сигналов анодного напряжения, анодного тока и мощности кермы в воздухе; частоты импульсов; длительности импульса; кермы в воздухе и мощности кермы в воздухе за импульс; полной фильтрации; дозового профиля для компьютерной томографии (КТ); ширины дозового профиля на половине высоты (FWHM); индексов дозы КТ (CTDI, CTDI1oo, CTDIW, CTDIvoi); произведения дозы на длину (DLP); индекса рассеяния для КТ.
Принцип работы дозиметров универсальных для контроля характеристик рентгеновских аппаратов Piranha (далее – дозиметры Piranha) основан на регистрации полупроводниковым детектором (внешним или встроенным) воздействующего рентгеновского излучения, преобразовании полученной энергии в электрические импульсы и затем в измеряемую физическую величину.
Дозиметры Piranha применяются для контроля параметров и технического состояния медицинского рентгеновского оборудования в процессе производства, при вводе в эксплуатацию и эксплуатации.
Для контроля параметров различных типов медицинских рентгенодиагностических аппаратов (рентгенографических и рентгеноскопических, маммографических, стоматологических, КТ) дозиметры Piranha имеют модификации, информация о которых приведена в таблице 1. Модификации отличаются друг от друга функциональными возможностями. Метрологические характеристики разных модификаций дозиметра при измерении одной и той же физической величины на одном и том же типе рентгеновских аппаратов одинаковы.
Нормативная база для применения:
- ГОСТ Р 50267.0.3-99 “Изделия медицинские электрические. Часть 1. Общие требования безопасности. 3. Общие требования к защите от излучения в диагностических рентгеновских аппаратах”;
- ГОСТ IEC 60601-2-7-2011 “Изделия медицинские электрические. Часть 2-7. Частные требования безопасности к рентгеновским питающим устройствам диагностических рентгеновских генераторов”;
- СанПиН 2.6.1.1192-03 “Гигиенические требования к устройству и эксплуатации рентгеновских кабинетов, аппаратов и проведению рентгенологических исследований”;
- МУ 2.6.1.2944-11 “Контроль эффективных доз облучения пациентов при проведении медицинских рентгенологических исследований”.
Назначение:
- измерение:
- кермы в воздухе;
- мощности кермы в воздухе;
- анодного напряжения на рентгеновской трубке;
- времени экспозиции;
- количества импульсов;
- анодного тока;
- произведения анодного тока на время экспозиции;
- слоя половинного ослабления (СПО);
- яркости;
- освещенности.
- определение:
- формы сигналов анодного напряжения, анодного тока и мощности кермы в воздухе;
- частоты импульсов;
- длительности импульса;
- кермы в воздухе и мощности кермы в воздухе за импульс;
- полной фильтрации;
- дозового профиля для компьютерной томографии (КТ);
- ширины дозового профиля на половине высоты (FWHM);
- индексов дозы КТ (CTDI, CTDI100, CTDIw, CTDIvol);
- произведения дозы на длину (DLP);
- индекса рассеяния для КТ.
Свойства:
- результаты отображаются на ПЭВМ с помощью уникального программного обеспечения Ocean, позволяющего одновременно наблюдать за всеми результатами измерений и легко экспортировать их в Exel;
- связь дозиметра с ПЭВМ осуществляется с помощью Bluetooth (!) либо USB – кабеля;
- основные детекторы уже находятся внутри корпуса дозиметра;
- простота и удобство в обращении;
- ударостойкость;
- две модификации ПО Ocean для различных нужд;
- дозиметр применим для проведения измерений на любом типе медицинского рентгеновского оборудования: аппаратах для общей диагностики (стационарных и передвижных); маммографических, стоматологических, урологических, ангиографических и хирургических аппаратах; компьютерных томографах и ряде других аппаратов;
- благодаря наличию автоматической компенсации, обеспечиваются измерения в режиме рентгенографии, рентгеноскопии и в импульсных режимах, без подбора фильтра и перенастройки прибора. В результате измерений автоматически вносятся поправки на спектр измерения (по результатам определения СПО);
- возможность интерфейса с планшетного ПК.
Особенности:
- возможность проведения всех основных измерений за одну экспозицию;
- возможность измерения токовых характеристик без необходимости подключения в цепь генератора;
- возможность распознавания типа питающего устройства;
- принципиально новая система для компьютерных томографов, специально рассчитанная для многосрезовых спиральных аппаратов, позволяющая автоматически определять ширину среза с индикацией дозового профиля, профиля чувствительности и автоматическим расчетом индекса дозы (CTDI), DLP и ряда других основных параметров, являющимися необходимыми в рамках контроля безопасности КТ, в соответствии с требованиями ГОСТ IEC 60601-2-44, с использованием обширной библиотеки данных по КТ (моделям);
- все основные детекторы уже находятся внутри корпуса, что позволяет избежать влияния электро-магнитных помех и существенно увеличить точность измерений;
- уникальная возможность измерения полной фильтрации;
- полноценный набор настроек практически на все типы маммографических аппаратов в базовой комплектации;
- широкий выбор программного обеспечения для выполнения любых задач по обработке данных измерений с построением графиков анодного напряжения и дозового профиля;
- возможность регулярного бесплатного обновления ПО через официальный сайт производителя;
- возможность измерения воздушной кермы и мощности воздушной кермы за стандартизированными фантомами (20-25 мм Al; 2,5 мм Cu) для последующего определения квантовой эффективности цифровых приемников изображения, при этом имеется возможность работы как при высоких, так и при низких значениях мощности дозы (с применением дополнительного высокочувствительного детектора Dose Probe, имеющего минимальные размеры, обеспечивающие его размещение под приемником изображения);
- три степени защиты доступа к информации, что соответствует ГОСТ ИСО/МЭК 17025;
- возможность подключения широкого спектра дополнительных детекторов, ионизационных камер;
- возможность формирования протоколов испытаний (Test Reports) непосредственно в ПО Ocean с автоматическим расчетом отклонений в соответствии с нормированным значением;
- отсутствие необходимости наличия пульта, ввиду возможности работы с любым типом ПК (ноутбуком, КПК, планшетом);
- возможность проведения измерений на любых типах аппаратов, в т.ч. сканирующих системах, работающих в режиме томосинтеза;
- существенно более низкие погрешности измерений обеспечиваются возможностью метрологической калибровки при поверке;
- возможность проведение компонентного ремонта на территории РФ.
Технические особенности данного оборудования существенно повышают точность измерений при существенном сокращении времени проведения испытаний
Список сокращений:
- R&F – рентгенография/рентгеноскопия;
- M – маммография;
- CT – компьютерная томография;
- D – стоматология.
Базовый блок Piranha со встроенным детектором
|
Габаритные размеры |
133 × 75 × 26 |
|
Масса |
405 г |
Piranha R&F/M 657* (рентгенография, рентгеноскопия, маммография, компьютерная томография, стоматология)
|
Параметр |
Диапазон |
Погрешность |
|
анодное напряжение (R&F) |
36 ÷ 153 кВ |
± 2,5 % |
|
анодное напряжение (М) |
19 ÷ 48 кВ |
± 2 % |
|
анодное напряжение (CT) |
45 ÷ 153 кВ |
± 2,5 % |
|
анодное напряжение (D) |
36 ÷ 105 кВ |
± 2,5 % |
|
керма в воздухе (R&F, D) |
15 нГр ÷ 1000 Гр |
± 15 % в диапазоне 15 нГр ÷ 1,5 мкГр ± 5 % в диапазоне 1,5 мкГр ÷ 1000 Гр |
|
мощность кермы в воздухе (R&F, D) |
15 нГр/с ÷ 450 мГр/с |
± 5 % |
|
керма в воздухе (M) |
25 нГр ÷ 1500 Гр |
± 5 % |
|
мощность кермы в воздухе (M) |
25 нГр/с ÷ 750 мГр/с |
± 5 % |
|
время экспозиции |
0.1 мс ÷ 2000 с |
± 1 % |
|
количество импульсов (R&F, D, M) |
1 ÷ 65535 |
± 1 импульс |
|
СПО (R&F, D) |
1.2 ÷ 14.0 мм Al |
± 7 % |
|
СПО (M) |
0.19 ÷ 0.7 мм Al |
± 10 % |
|
оценка полной фильтрации (R&F, D) |
1.5 ÷ 38 мм Al |
— |
Детектор для измерения воздушной кермы Piranha Dose Probe
|
Параметр |
Диапазон |
Погрешность |
|
керма в воздухе |
100пГр ÷ 1.5 кГр |
± 5 % |
|
мощность кермы в воздухе |
4 нГр/с ÷ 76 мГр/c |
± 5 % |
|
время экспозиции |
0.1 мс ÷ 34000 с |
± 1 % |
|
количество импульсов |
1 ÷ 65545 |
± 1 имульс |
Детектор дозового профиля для компьютерных томографов CT Dose Profiler
|
Параметр |
Диапазон |
Погрешность |
|
мощность кермы в воздухе |
40 нГр/с ÷ 760 мГр/с |
± 5 % |
Детектор для измерения анодного тока Piranha MAS-1
|
Параметр |
Диапазон |
Погрешность |
|
анодный ток |
0.1 ÷ 3000 мA |
± 1 % |
|
произведение анодного тока на время экспозиции |
0.001 ÷ 9999 мАс |
± 1 % |
Детектор для измерения анодного тока Piranha MAS-2
|
Параметр |
Диапазон |
Погрешность |
|
анодный ток |
10 ÷ 4000 мA |
± 5 % |
|
произведение анодного тока на время экспозиции |
0.1 ÷ 9999 мАс |
± 5 % |
Детектор освещенности и яркости Piranha Light Probe
|
Параметр |
Диапазон |
Погрешность |
|
яркость |
0.003 ÷ 72000 кд/м2 |
± 5 % |
|
освещенность |
0.001 ÷ 24000 лк |
± 5 % |
Бестеневой дозовый детектор T20 Dose Detecor
|
Параметр |
Диапазон |
Погрешность |
|
керма в воздухе |
0.7 нГр ÷ 10 кГр |
± 5 % |
|
мощность кермы в воздухе |
27 нГр/с ÷ 500 мГр/c |
± 5 % |
Детектор для измерения мощности кермы в воздухе Magna 1 cc
|
Параметр |
Диапазон |
Погрешность |
|
мощность кермы в воздухе |
0.25 мГр/с ÷ 2.5 Гр/с |
± 6 % или ±0.025 мГр/с |
|
Осторожно Пиранья! |
||||||
|
||||||
|
||||||
|
||||||
|
||||||
|
||||||
|
||||||
|
||||||
|
||||||
|
||||||
|
||||||
|
||||||
|
||||||
|
||||||
|
||||||
|
||||||
|
||||||
|
||||||
|
||||||
|
||||||
|
||||||
|
||||||
|


