Friedhelm Betz
Antony Dovgal
Nuno Lopes
Hannes Magnusson
Georg Richter
Damien Seguy
Jakub Vrana
2023-09-23
Под редакцией:
Peter Cowburn
от:
Алексей Шеин
Андрей Безруков
Максим Чабан
Александр Москалёв
Борис Клименко
Дмитрий Винярчук
Борис Флейтлих
Алексей Егоров
Юрий Бабиков
Михаил Баранов
Андрей Громов
Алексей Пыльцын
Сергей Пантелеев
Сергей Зорин
Евгений Четвериков
©
1997-2023
Группа документирования PHP
- Авторские права
- Руководство по PHP
- Предисловие
- Приступая к работе
- Введение
- Простой учебник
- Установка и настройка
- Общие инструкции по установке
- Установка на Unix-системы
- Установка на macOS
- Установка в системах Windows
- Установка на платформах Cloud Computing
- Менеджер процессов FastCGI (FPM)
- Установка модулей PECL
- Проблемы?
- Конфигурация времени выполнения
- Справочник языка
- Основы синтаксиса
- Типы
- Переменные
- Константы
- Выражения
- Операторы
- Управляющие конструкции
- Функции
- Классы и объекты
- Пространства имён
- Перечисления
- Ошибки
- Исключения
- Fibers
- Генераторы
- Атрибуты
- Объяснение ссылок
- Предопределённые переменные
- Предопределённые исключения
- Встроенные интерфейсы и классы
- Предопределённые атрибуты
- Контекстные опции и параметры
- Поддерживаемые протоколы и обёртки
- Безопасность
- Вступление
- Общие рассуждения
- Если PHP установлен как CGI
- Если PHP установлен как модуль Apache
- Безопасность сессий
- Безопасность файловой системы
- Безопасность баз данных
- Сообщения об ошибках
- Данные, введённые пользователем
- Сокрытие PHP
- Необходимость обновлений
- Отличительные особенности
- HTTP-аутентификация в PHP
- Cookies
- Сессии
- Работа с XForms
- Загрузка файлов на сервер
- Работа с удалёнными файлами
- Работа с соединениями
- Постоянные соединения с базами данных
- Использование PHP в командной строке
- Сборка мусора
- Динамическая трассировка DTrace
- Справочник функций
- Изменение поведения PHP
- Обработка аудио форматов
- Службы аутентификации
- Модули для работы с командной строкой
- Модули для сжатия и архивации
- Криптографические модули
- Модули для работы с базами данных
- Модули для работы с датой и временем
- Модули для работы с файловой системой
- Поддержка языков и кодировок
- Обработка и генерация изображений
- Модули для работы с почтой
- Математические модули
- Генерация нетекстовых MIME-форматов
- Модули для управления процессами программ
- Другие базовые модули
- Другие службы
- Модули для работы с поисковыми системами
- Модули для работы с серверами
- Модули для работы с сессиями
- Обработка текста
- Модули, относящиеся к переменным и типам
- Веб-сервисы
- Модули только для Windows
- Обработка XML
- Модули для работы с GUI
- ЧАВО — ЧАВО: ЧАсто задаваемые Вопросы и Ответы на них
- Общая информация
- Списки рассылки
- Получение PHP
- Вопросы по базам данных — Вопросы по Базам данных
- Установка
- Проблемы сборки
- Использование PHP
- Хеширование паролей — Безопасное хеширование паролей
- PHP и HTML
- PHP и COM
- Разные вопросы
- Appendices
- История PHP и смежных проектов
- Миграция с PHP 8.1.x на PHP 8.2.x
- Миграция с PHP 8.0.x на PHP 8.1.x
- Миграция с PHP 7.4.x на PHP 8.0.x
- Миграция с PHP 7.3.x на PHP 7.4.x
- Миграция с PHP 7.2.x на PHP 7.3.x
- Миграция с PHP 7.1.x на PHP 7.2.x
- Миграция с PHP 7.0.x на PHP 7.1.x
- Миграция с PHP 5.6.x на PHP 7.0.x
- Миграция с PHP 5.5.x на PHP 5.6.x
- Отладка в PHP
- Опции конфигурации
- Директивы php.ini
- Список/классификация модулей
- Список псевдонимов функций
- Список зарезервированных слов
- Список типов ресурсов
- Список доступных фильтров
- Список поддерживаемых транспортных протоколов
- Таблица сравнения типов в PHP
- Список меток (tokens) парсера
- Руководство по именованию
- Об этом руководстве
- Creative Commons Attribution 3.0
- Алфавитный список
- Список изменений
There are no user contributed notes for this page.
Change language:
Submit a Pull Request
Report a Bug
- Предисловие
+add a note
User Contributed Notes
There are no user contributed notes for this page.
Последнее обновление: 21.12.2022
-
Глава 1. Введение в PHP
-
Общий обзор языка программирования PHP
-
Установка PHP
-
Установка веб-сервера Apache
-
Установка веб-сервера Apache и PHP на Mac OS
-
Первый сайт на PHP
-
-
Глава 2. Основы PHP
-
Основы синтаксиса
-
Переменные
-
Типы данных
-
Операции в PHP
-
Конструкция if..else и тернарная операция
-
Конструкции switch и match
-
Циклы
-
Массивы
-
Ассоциативные массивы
-
Многомерные массивы
-
Функции
-
Параметры функции
-
Возвращение значений и оператор return
-
Анонимные функции
-
Замыкания / Closure
-
Стрелочные функции
-
Генераторы
-
Ссылки
-
Область видимости переменной
-
Константы
-
Проверка существования переменной
-
Получение и установка типа переменной. Преобразование типов
-
Операции с массивами
-
-
Глава 3. Отправка данных на сервер
-
Получение данных из строки запроса. GET-запросы
-
Отправка форм. POST-запросы
-
Безопасность данных
-
Отправка массивов
-
Работа с полями ввода форм
-
Пример обработки форм
-
Отправка файлов на сервер
-
-
Глава 4. Объектно-ориентированное программирование
-
Объекты и классы
-
Конструкторы и деструкторы
-
Анонимные классы
-
Наследование
-
Модификаторы доступа
-
Статические методы и свойства
-
Интерфейсы
-
Абстрактные классы и методы
-
Traits
-
Копирование объектов классов
-
Свойства и классы для чтения
-
-
Глава 5. Базовые возможности PHP
-
Подключение внешних файлов
-
Пространства имен
-
Типизация данных
-
Работа со строками
-
Работа с cookie
-
Сессии
-
-
Глава 6. Обработка исключений
-
Конструкция try catch finally
-
Генерация исключений
-
-
Глава 7. Работа с файловой системой
-
Чтение и запись файлов
-
Управление файлами и каталогами
-
Блокировка файла. Функция flock
-
- Глава 1. Введение в PHP
- Общий обзор языка программирования PHP
- Установка PHP
- Установка веб-сервера Apache
- Установка веб-сервера Apache и PHP на Mac OS
- Первый сайт на PHP
- Глава 2. Основы PHP
- Основы синтаксиса
- Переменные
- Типы данных
- Операции в PHP
- Конструкция if..else и тернарная операция
- Конструкции switch и match
- Циклы
- Массивы
- Ассоциативные массивы
- Многомерные массивы
- Функции
- Параметры функции
- Возвращение значений и оператор return
- Анонимные функции
- Замыкания / Closure
- Стрелочные функции
- Генераторы
- Ссылки
- Область видимости переменной
- Константы
- Проверка существования переменной
- Получение и установка типа переменной. Преобразование типов
- Операции с массивами
- Глава 3. Отправка данных на сервер
- Получение данных из строки запроса. GET-запросы
- Отправка форм. POST-запросы
- Безопасность данных
- Отправка массивов
- Работа с полями ввода форм
- Пример обработки форм
- Отправка файлов на сервер
- Глава 4. Объектно-ориентированное программирование
- Объекты и классы
- Конструкторы и деструкторы
- Анонимные классы
- Наследование
- Модификаторы доступа
- Статические методы и свойства
- Интерфейсы
- Абстрактные классы и методы
- Traits
- Копирование объектов классов
- Свойства и классы для чтения
- Глава 5. Базовые возможности PHP
- Подключение внешних файлов
- Пространства имен
- Типизация данных
- Работа со строками
- Работа с cookie
- Сессии
- Глава 6. Обработка исключений
- Конструкция try catch finally
- Генерация исключений
- Глава 7. Работа с файловой системой
- Чтение и запись файлов
- Управление файлами и каталогами
- Блокировка файла. Функция flock
PHP (от англ. препроцессор гипертекста) – язык программирования общего назначения, широко используемый в веб-разработке. Сценарии PHP можно внедрять непосредственно в код HTML. В этой статье мы пройдемся по основам программирования на PHP: синтаксису, объявлению переменных, массивам, условным операторам, циклам и функциям. Также запустим двумя способами веб-сервер на локальной машине и соберем страничку из нескольких файлов PHP и фреймворка Bootstrap. В конце статьи приведем список литературы и бесплатные курсы по PHP для новичков.
Редакторы кода
Для удобного кодинга нам понадобится редактор кода (IDE). Популярные:
- PhpStorm (платный, пробная версия на 30 дней);
- Atom (бесплатно);
- Visual Studio Code (бесплатно);
- Sublime Text (бесплатно).
Как запустить PHP в Atom
Устанавливать PHP на компьютер и запускать веб-сервер мы будем в конце статьи в разделе «Собираем HTML-страницу». А пока для запуска PHP-сценариев достаточно добавить плагин Script в редакторе Atom.
Установка IDE
Как установить Atom в Ubuntu и Windows читайте в нашем самоучителе по Python.
Чтобы запустить PHP-сценарий в Atom перейдем в закладку Packages → Script → Run Script, либо нажмем на клавиши Ctrl + Shift + B (рис. 1).

1. Синтаксис
Код в PHP заключается в открывающий <?php и закрывающий ?> теги. Согласно стандарту кодирования PSR-12, закрывающий тег должен быть опущен в файлах, содержащих только код PHP. В конце строки ставят разделитель строк – точку с запятой ;. Если забыть поставить разделитель, то следующая строка кода соединится с предыдущей и интерпретатор PHP выдаст ошибку.
Выведем на экран строку Hello World (заключена в кавычки) с помощью команды echo:
        <?php
echo 'Hello, World.'; // Hello, World.
через функцию print:
        <?php
print 'Hello, World.'; // Hello, World.
через функцию printf (выводит отформатированную строку):
        <?php
printf('Hello, World.'); // Hello, World.
или через функцию print_r(), выводящую информацию в удобочитаемом виде:
        <?php
print_r('Hello, World.'); // Hello, World.
Чтобы перенести строку используем символ \n, который работает только в двойных кавычках:
        <?php
print_r("Hello, World.\nHello, Coder.");

/*
Hello, World.
Hello, Coder.
*/
2. Объявление переменной
PHP – язык со слабой типизацией, то есть перед объявлением переменной не нужно задавать ее тип. Чтобы объявить переменную, перед ее именем ставят знак доллара $:
$animal = 'Cat';
Здесь:
переменной animal присвоили значение Сat.
Выведем на экран переменную animal:
        <?php
$animal = 'Cat';
echo $animal; // Cat
Одно значение можно присвоить нескольким переменным:
        <?php
$first_animal = $second_animal = $third_animal = 'Cat';

echo "$first_animal"; // Cat
echo "$second_animal"; // Cat
echo "$third_animal"; // Cat
Комментарии
Однострочный комментарий начинается с двух слешей // или хеш-символа #, а многострочный заключается в /* */:
        <?php
// однострочный комментарий

# однострочный комментарий

/*
многострочный
комментарий
 */
3. Типы данных
3.1. Строки
Строка – набор символов, заключенный в одиночные '' или двойные кавычки "":
        <?php
$first_animal = 'Cat';
$second_animal = "Dog";
Конкатенация строк
Оператор конкатенации точка . соединяет левый и правый аргументы:
        <?php
$first_animal = 'Cat';
$second_animal = 'Dog';
$animals = $first_animal . $second_animal;

echo "$animals"; // CatDog
Оператор присваивания с конкатенацией .= присоединяет правый аргумент к левому:
        <?php
$first_animal = 'Cat';
$second_animal = 'Dog';
$third_animal = 'Giraffe';
$animals = $first_animal;
$animals .= $second_animal;
$animals .= $third_animal;

echo "$animals"; // CatDogGiraffe
Чтобы перенести слово на новую строку воспользуемся символом переноса \n, который работает только в двойных кавычках:
        <?php
$first_animal = "Cat\n";
$second_animal = "Dog\n";
$third_animal = "Giraffe";
$animals = $first_animal;
$animals .= $second_animal;
$animals .= $third_animal;

echo "$animals";


/*
Cat
Dog
Giraffe
 */
3.2. Числа
Целое число (integer) не имеет дробной части:
        <?php
$number_one = 5678; // целое положительное число
$number_two = -5678; // целое отрицательное число
Число с плавающей точкой
Число с плавающей точкой имеет дробную часть и задается следующий образом:
        <?php
$number_one = 1.5678; // 1.5678 – положительное число с плавающей точкой
$number_two = -1.5678; // -1.5678 – отрицательное число с плавающей точкой
$number_three = 1.5678e0; // 1.5678 – положительное число с плавающей точкой
$number_four = 1.5678e2; //  156.78 – положительное число с плавающей точкой
$number_five = 1.5678E-2; // 0.015678 – положительное число с плавающей точкой
Чтобы узнать тип переменной воспользуемся функцией gettype(), а для преобразования числа с плавающей точкой в целое число функцией intval():
        <?php
$number_one = 1.5678; // 1.5678 – положительное число с плавающей точкой

echo gettype($number_one); // double
$number_one = intval($number_one);
echo $number_one; // 1
echo gettype($number_one); // integer
Арифметические операторы
| Оператор | Операция |
| + | Сложение |
| — | Вычитание |
| * | Умножение |
| / | Деление |
| % | Деление по модулю |
| ** | Возведение в степень |
Таблица 1. Арифметические операторы
        <?php
echo 2 + 4; // 6
echo 2 / 4; // 0.5
echo 2 * 4; // 8
echo 2 - 4; // -2
echo 2 % 4; // 2
echo 2 ** 4; // 16
Мы можем сложить два числа через запись $number_one = $number_one + $number_two; или через сокращенную запись $number_one += $number_two;:
        <?php
// полная запись
$number_one = 1;
$number_two = 3;
$number_one =  $number_one + $number_two;
echo $number_one; // 4

// сокращенная запись запись
$number_one = 1;
$number_two = 3;
$number_one += $number_two;
echo $number_one; // 4
Операторы сравнения
Чтобы сравнить значения используют операторы сравнения, которые возвращают true или false:
        <?php
echo 4 > 0; // 1 – true
echo 4 <= 55; // 1 – true
echo 4 != 5; // 1 – true
echo 4 <=> 5; // -1
echo 4 <=> 4; // 0
echo 4 <=> 3; // 1
Если строка не содержит число, то интерпретатор PHP приводит значение строки к 0. Если в строке есть число и оно стоит после буквенных символов, то значение всей строки также приводится к 0. Если число стоит перед буквенными символами, то для сравнении берется только число.
        <?php
echo 0 == 'hello'; // true, так как 0 = 0
echo 0 == 'hello3555'; // true, так как 0 = 0
echo 0 == '3555hello'; // false, так как 0 не равно 3555
echo 3555 == '3555hello'; // true, так как 3555 равно 3555
| Оператор | Значение |
| $n == $m | True, если $n равно $m |
| $n === $m | True, если $n равно $m и имеют одинаковые типы |
| $n! = $m | True, если $n не равна $m |
| $n <> $m | True, если $n не равна $m |
| $n !== $m | True, если отличаются тип или значение переменных |
| $n < $m | True, если $n меньше $m |
| $n > $m | True, если $n больше $m |
| $n <= $m | True, если $n меньше или равна $m |
| $n >= $m | True, если $n больше или равна $m |
| $n <=> $m | Возвращает -1, если $n меньше $m, 0 в случае равенства и 1, если $n больше $m |
Таблица 2. Операторы сравнения
Порядок операций
Сначала считается выражение в скобках:
        <?php
print_r((2 * 4) + 5); // 13
4. Условный оператор if-else
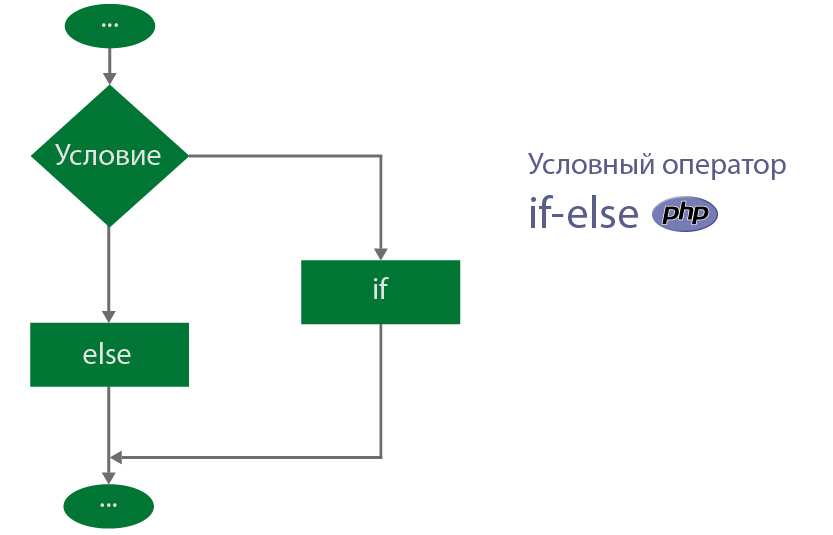
Оператор if выполняет код, если выполняется условие. В противном случае выполняется код после else, который переводится, как «иначе», «в другом случае».
if (условие) выполнить_код else выполнить_другой_код
Напишем несколько условий с оператором if и if-else:
        <?php
if (2 < 5) {
    echo 'true';
}
// true

if (2 > 5) {
    echo 'true';
} else {
    echo 'false';
}
// false
для проверки дополнительных условий используется оператор elseif:
        <?php
$number = 15;

if ($number < 3) {
    echo 'Число меньше трех.';
} elseif ($number > 4 && $number < 10) {
    echo 'Число в промежутке от 4 до 10.';
} else {
    echo 'Число больше 10.';
}
// Число больше 10
Здесь:
&& – логический оператор И. В нашем условии проверяемое число должно быть больше четырех и меньше десяти.
| Оператор | Значение | Результат |
| $n and $m | И | true, если и $n, и $m true |
| $n or $m | Или | true, если или $n, или $m true |
| $n xor $m | Исключающее Или | true, если $n, или $m true |
| ! $n | Отрицание | true, если $n не true |
| $n && $m | И | true, если и $n, и $m true |
| $n || $m | Или | true, если или $n, или $m true |
Таблица 3. Логические операторы
5. Тернарный оператор
Тернарный оператор сокращает запись проверяемого условия и имеет следующий синтаксис:
условие ? выполнить_код_если_истинно : выполнить_код_если_ложно:
Проверим, переменная n больше 10 или нет. Если значение n больше 10, уменьшим значение n на единицу (декремент). В противном случае увеличим на единицу (инкремент).
        <?php
$n = 5;
$n > 10 ? $n-- : $n++;
echo $n; // 6
6. Переключатель switch
Переключатель switch проводит нестрогое сравнение == значений и передает управление соответствующему оператору case. Если значение не совпадает со значением из case, тогда выполняется переход к оператору default.
        switch (переменная) {
    case 'значение1':
           код
        break;
    case 'значение2':
           код
        break;
    default:
           код
        break;
}
Напишем конструкцию из переключателя switch и двух
операторов case:
        <?php
$n = 3;

switch ($n) {
    case 1:
        echo "Число равно двум.";
        break;
    case 2:
        echo "Число равно пяти.";
        break;
    default:
        echo "Значение по умолчанию.";
        break;
}
// Значение по умолчанию.
7. Цикл while
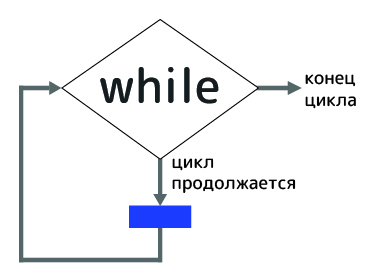
Оператор while выполняет код до тех пор, пока значение условия не станет ложным.
        while (условие) {
    // код
}
Выведем на экран пять раз слово Hello.
        <?php
$m = 0;

while ($m < 4) {
    $m++;
    echo "Hello\n";
}

/*
Hello
Hello
Hello
Hello
*/
Расшифровка:
while – обозначение цикла.
$m = 0 – начальное значение переменной m.
$m < 5 – условие, которое проверяется перед началом цикла.
$m++ – инкрементирование, то есть увеличение переменной на единицу.
echo "Hello\n" – вывод на экран слово Hello каждый раз с новой строки \n.
Другой способ записи с помощью декремента в условии:
        <?php
$m = 4;

while ($m--) {
    echo "Hello\n";
}

/*
Hello
Hello
Hello
Hello
*/
Здесь:
$m-- – декрементация, то есть уменьшение значения переменной на единицу. В это примере знак декремента -- стоит после переменной, поэтому мы получим четыре итерации (от 4 до 0).
Если поставить оператор декремента перед переменной --$m, то мы получим три итерации (от 4 до 1):
        <?php
$m = 4;

while (--$m) {
    echo "Hello\n";
}

/*
Hello
Hello
Hello
*/
8. Цикл do..while
Цикл do..while выполняется минимум один раз, так как условие выполнения цикла проверяется в конце итерации, а не в начале как в цикле while.
        do {
    // код
} while (условие);
Напишем цикл, выводящий на экран четыре раза слово Hello:
        <?php
$a = 0;
do {
    echo "Hello\n";
    $a++;
} while ($a < 4);

/*
Hello
Hello
Hello
Hello
*/
9. Цикл for
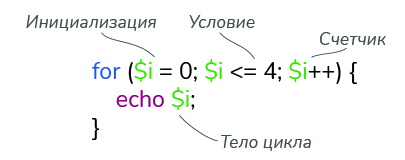
Когда нам известно количество итераций, вместо цикла while лучше использовать цикл for.
        for (инициализация; условие_цикла; счетчик)
    тело_цикла
- Инициализирующее выражение выполняется один раз в начале цикла.
- Проверяется условие. Если оно истинно, то выполняется тело цикла. Если ложно, то выполнение цикла прерывается.
- В конце каждой итерации изменяется счетчик (увеличивается или уменьшается).
Цикл выполняется, до тех пор, пока условие истинно, то есть значение i не станет равным 4:
        <?php
for ($i=0; $i <= 4; $i++) {
    echo $i;
}

// 01234
10. Цикл foreach
Цикл foreach последовательно перебирает элементы массива.
        foreach (массив as переменная) {
  инструкция
}
На каждой итерации переменной присваивается значение текущего элемента последовательности. Переберем все элементы массива и умножим каждый элемент на 3:
        <?php
$array = [1, 2, 3, 4];
foreach ($array as $number) {
    $number *= 3;
    echo $number;
}

// 36912
11. Массивы
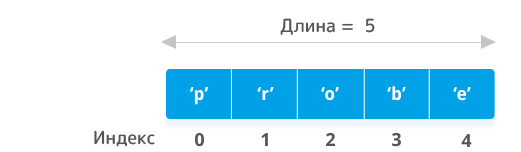
Массивы – упорядоченная коллекция элементов с доступом по индексу или ключу. Индексный массив создается двумя способами:
Через функцию array():
        <?php
$a = array('Cat', 'Dog', 123);
echo $a[1]; // Dog
и через квадратные скобки []:
        <?php
$a = ['Cat', 'Dog', 123];
echo $a[1]; // Dog
Здесь:
echo $a[1] – вывести на экран второй элемент массива.
Нумерация массива начинается с 0. В нашем случаем элементу массива Cat соответствует порядковый номер 0, Dog – 1, 123 – 2. Для обращения к элементу массива используется следующий синтаксис: $имя_массива[индекс_элемента].
Рекомендуется объявлять массив через квадратные скобки, так как эта запись компактнее.
Создадим пустой массив:
        <?php
$a = [];
Добавим в него несколько элементов и выведем на экран его содержимое:
        <?php
$array = [];
$array[] = 'Cat';
$array[] = 'Dog';
$array[] = 123;

print_r($array);

/*
Array
(
    [0] => Cat
    [1] => Dog
    [2] => 123
)
*/
Чтобы добавить новый элемент мы использовали запись $имя_массива[] = новый_элемент. Первый добавленный элемент получает индекс 0. Индексы следующих элементов увеличиваются на 1. Можно задать индекс самостоятельно. Для этого в квадратных скобках укажем нужный нам индекс:
        <?php
$array = [];
$array[100] = 'Cat';
$array[0] = 'Dog';
$array[33] = 123;

print_r($array[0]); // Dog
При добавлении непронумерованного элемента 5000, значение его индекса будет на единицу большего максимального значения индекса в массиве – 101:
        <?php
$array = [];
$array[100] = 'Cat';
$array[0] = 'Dog';
$array[33] = 123;
print_r($array);

/*
Array
(
    [100] => Cat
    [0] => Dog
    [33] => 123
)
*/

$array[] = 5000;
print_r($array);

/*
Array
(
    [100] => Cat
    [0] => Dog
    [33] => 123
    [101] => 5000
)
*/
Для удаления элемента из массива воспользуемся функцией unset():
        <?php
$array = ['Cat', 'Dog', 123];
unset($array[2]);
print_r($array);

/*
Array
(
    [0] => Cat
    [1] => Dog
)
*/
Здесь:
unset($array[2]) – удаление третьего элемента массива.
В качестве индекса также используют строки:
        <?php
$array = [];
$array['animal_one'] = 'Cat';
$array['animal_two'] = 'Dog';
$array['number'] = 123;

print_r($array['animal_two']); // Dog
В таком случае мы получаем что-то напоминающее словари в других языках программирования с ключами и значениями. В PHP такой массив называют ассоциативным.
Ассоциативный массив объявляется через символы =>:
$имя_словаря = ['ключ1' => 'значение1', 'ключ2' => 'значение2']
Создадим ассоциативный массив:
        <?php
$array = ['first_key' => 'Cat', 'second_key' => 5000];
print_r($array);

/*
Array
(
    [first_key] => Cat
    [second_key] => 5000
)
*/
Здесь:
'first_key' – ключ.
'Cat' – значение.
Для поиска ключа по значению используем функцию array_search():
        <?php
$array = ['first_key' => 'Cat', 'second_key' => 5000];
print_r(array_search('Cat' ,$array)); // first_key
Здесь:
array_search('Cat' ,$array) – поиск ключа, соответствующего значению Cat в массиве array.
Чтобы подсчитать количество элементов в массиве воспользуемся функцией count():
        <?php
$array = ['first_key' => 'Cat', 'second_key' => 5000];
print_r(count($array)); // 2
Также можно создать многомерный массив:
        <?php
$array = ['animals' => ['Cat', 'Dog'], 'second_array' => [5000, 33, ['third_array' => ['Hello']]]];
print_r($array['animals'][1]); // Dog
print_r($array['second_array'][2]['third_array'][0]); // Hello
'animals' => ['Cat', 'Dog'] – ключ animals с двумя значениями: Cat и Dog.
'second_array' => [5000, 33, ['third_array' => ['Hello']]] – ключ second_array с тремя значениями: два числа 5000, 33 и массив, но уже со своим ключем third_array и значением Hello.
12. Функции
Функция – подпрограмма, которая на входе принимает аргументы (бывают функции без входных аргументов), выполняет код и возвращает результат. Функциональное программирование упрощает жизнь программиста, так как не нужно копировать и вставлять фрагменты кода снова и снова. Достаточно обратиться к функции когда нужно и сколько угодно раз.
Существуют встроенные и пользовательские функции. Встроенные функции – print(), print_r() и так далее – придумали разработчики. Пользовательские функции программисты пишут самостоятельно.
Как объявить функцию
Синтаксис функции:
        function имяФункции(аргументФункции1, аргументФункции2, ...) {
    код
return результат
}
Здесь:
function – мы говорим интерпретатору, что отсюда начинается функция.
аргументФункции – переменные, которые передаются функции для выполнения кода.
имяФункции – чтобы вызывать функцию, ей нужно присвоить имя.
return – выдает результат работы функции.
Напишем и вызовем функцию, выводящую на экран фразу Hello, World.
        <?php
function helloMessage(){
    return print("Hello, World.");
}

helloMessage(); // Hello, World. – вызов функции
Аргументы функций
До этого мы рассматривали функции без аргументов – переменных, которые функция получает извне. Напишем функцию с аргументами, которая считает сумму трех чисел:
        <?php
function summation($a, $b, $c){
    return print($a + $b + $c);

}

summation(1, 2, 3); // 6
summation(100, 74, 8); // 182
Здесь:
$a, $b, $c – аргументы функции.
13. Собираем HTML-страницу
Чтобы просмотреть HTML-страницу, собранную из нескольких PHP-файлов, установим и запустим веб-сервер, разместим файлы в определенной папке и обратимся к файлу через браузер.
Запуск веб-сервера
Веб-сервер можно запустить несколькими способами:
- Через встроенный в PHP веб-сервер.
- Через сторонние инструменты: XAMPP, Open Server, Winginx.
Встроенный в PHP веб-сервер
Инструкция для Windows:
- Скачаем с официального сайта PHP и распакуем содержимое архива на диск.
- Откроем консоль и перейдем в папку с PHP, используя команду
cd, например,cd php7. - Создадим папку
pageкоманднойmkdir page. В ней будут храниться файлы нашей странички. - Введем в консоли
php -S localhost:8000 -t P:\php7\page\. Флаг-Sозначает, что мы запускаем сервер по адресуlocalhostна8000порту. Флаг-tуказывает путь к корневой директории.
Инструкция для Ubuntu:
- Установим PHP командой
sudo apt install php libapache2-mod-php php-mysql. - Создадим в домашней директории папку
page. - Введем в консоли
php -S localhost:8000 -t /home/USERNAME/page.
Чтобы проверить запущен ли сервер, перейдем по адресу http://localhost:8000/:

Если мы получили ошибку 404, значит сервер запущен.
XAMPP
Скачаем и установим XAMPP. В папке C:\xampp\htdocs\ создадим папку нашей странички page. Запустим веб-сервер Apache, кликнув по кнопке Start. Узнаем версию PHP, введя в консоли (Shell) команду php -v.
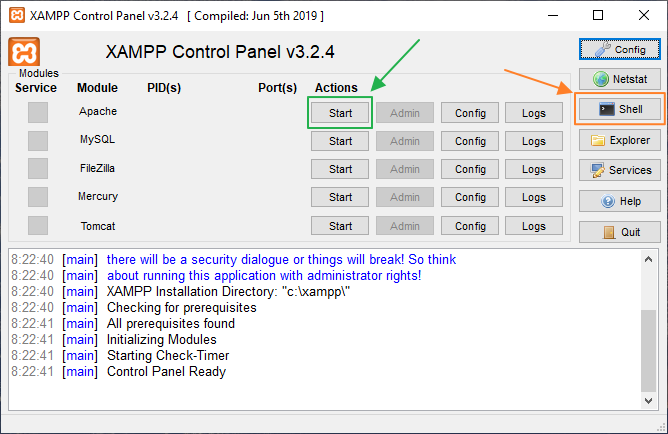
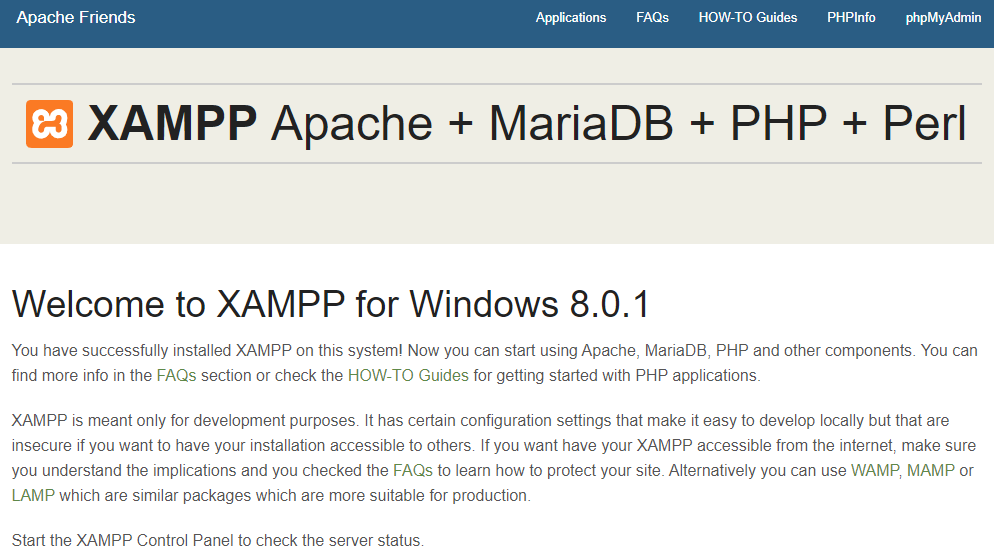
Проверим, запущен ли сервер, перейдя по адресу http://localhost/. Если появилось приветственное сообщение, значит сервер запущен.
14. Собираем страничку
Теперь создадим несколько PHP-файлов, из которых соберем страничку. Перейдем в папку page и создадим четыре файла: index.php, header.php, body.php, footer.php.
Структура простого HTML-документа выглядит следующим образом:
        <!DOCTYPE html>
<html>
 <head>
  <title>First page</title>
 </head>
 <body>
  <header>

  </header>

  <footer>

  </footer>
 </body>
</html>
Воспользуемся фреймворком Bootstrap, чтобы ускорить создание странички. Скачивать ничего не нужно, просто вставим ссылку на Bootstrap в тег <head>:
        <!DOCTYPE html>
<html>
 <head>
  <title>First page</title>
<link href="https://cdn.jsdelivr.net/npm/bootstrap@5.0.0-beta1/dist/css/bootstrap.min.css" rel="stylesheet" integrity="sha384-giJF6kkoqNQ00vy+HMDP7azOuL0xtbfIcaT9wjKHr8RbDVddVHyTfAAsrekwKmP1" crossorigin="anonymous">
 </head>
 <body>
  <header>
  </header>
  <footer>
  </footer>
 </body>
</html>
Откроем файл header.php и вставим в него следующий код:
        <!DOCTYPE html>
<html>

<head>
    <title>First page</title>
    <link href="https://cdn.jsdelivr.net/npm/bootstrap@5.0.0-beta1/dist/css/bootstrap.min.css" rel="stylesheet" integrity="sha384-giJF6kkoqNQ00vy+HMDP7azOuL0xtbfIcaT9wjKHr8RbDVddVHyTfAAsrekwKmP1" crossorigin="anonymous">
</head>

<body>
    <header>
        <ul class="nav justify-content-center">
            <li class="nav-item">
                <a class="nav-link active" aria-current="page" href="#">Active</a>
            </li>
            <li class="nav-item">
                <a class="nav-link" href="#">Ссылка</a>
            </li>
            <li class="nav-item">
                <a class="nav-link" href="#">Ссылка</a>
            </li>
        </ul>
    </header>
в файл body.php:
            <div class="card-group">
        <div class="card">
            <img src="https://upload.wikimedia.org/wikipedia/commons/2/27/PHP-logo.svg" class="card-img-top" alt="...">
            <div class="card-body">
                <h5 class="card-title">Что такое PHP?</h5>
                <p class="card-text">PHP — скриптовый язык общего назначения, интенсивно применяемый для разработки веб-приложений. </p>
                <p class="card-text"><small class="text-muted">Добавлено 5 минут назад</small></p>
            </div>
        </div>
        <div class="card">
            <img src="https://upload.wikimedia.org/wikipedia/commons/2/27/PHP-logo.svg" class="card-img-top" alt="...">
            <div class="card-body">
                <h5 class="card-title">Что такое PHP?</h5>
                <p class="card-text">PHP (англ. PHP: Hypertext Preprocessor — «PHP: препроцессор гипертекста»; первоначально PHP/FI (Personal Home Page / Form Interpreter), а позже названный Personal Home Page Tools</p>
                <p class="card-text"><small class="text-muted">Добавлено 8 минут назад</small></p>
            </div>
        </div>
        <div class="card">
            <img src="https://upload.wikimedia.org/wikipedia/commons/2/27/PHP-logo.svg" class="card-img-top" alt="...">
            <div class="card-body">
                <h5 class="card-title">Что такое PHP?</h5>
                <p class="card-text">В области веб-программирования, в частности серверной части, PHP — один из популярных сценарных языков (наряду с JSP, Perl и языками, используемыми в ASP.NET).</p>
                <p class="card-text"><small class="text-muted">Добавлено 10 минут назад</small></p>
            </div>
        </div>
    </div>
в файл footer.php:
            <footer>
        <nav aria-label="Page navigation example">
            <ul class="pagination">
                <li class="page-item"><a class="page-link" href="#">Назад</a></li>
                <li class="page-item"><a class="page-link" href="#">1</a></li>
                <li class="page-item"><a class="page-link" href="#">2</a></li>
                <li class="page-item"><a class="page-link" href="#">3</a></li>
                <li class="page-item"><a class="page-link" href="#">Вперед</a></li>
            </ul>
        </nav>
    </footer>
    </body>

</html>
в файл index.php:
        <?php

include 'header.php';
include 'body.php' ;
include 'footer.php';
Здесь:
include – инструкция, которая подключает к PHP-сценарию другие сценарии. Также сценарии подключают с помощью инструкций require, include_once и require_once. Они отличаются по реакции на отсутствие подключаемого файла.
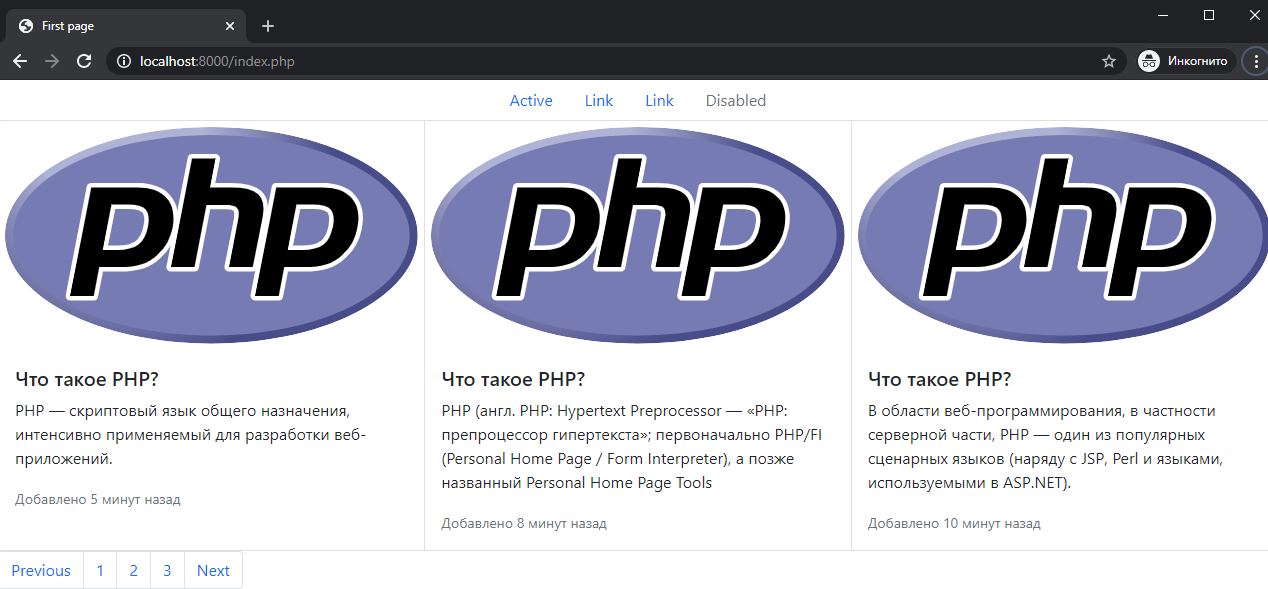
Откроем страницу, перейдя на http://localhost:8000/ или http://localhost/page/. Должно получиться как на рис. 9.
***
Литература
- Робин Никсон. Создаем динамические веб-сайты с помощью PHP, MySQL, JavaScript, CSS и HTML5;
- Котеров, Симдянов. PHP 7;
- Веллинг, Томсон. Разработка веб-приложений с помощью PHP и MySQL;
Остальные книги указаны в нашей статье ТОП-10 книг по PHP: от новичка до профессионала.
Шпаргалки
- Шпаргалка по PHP
- Основы PHP
YouTube-каналы и курсы
Бесплатные курсы на русском языке:
- Основы php с нуля. Новейший курс 2020 – двадцать четыре урока от основ до регулярных выражений и функций;
- Базовый курс по PHP 7 – узнаете про базовые понятия, GET-параметры, методы, функции и ООП;
- Учим PHP за 1 Час – основы за полтора часа;
- Изучение PHP для начинающих – научитесь работать с массивами, подключать файлы, обрабатывать формы, работать с куки и базой данных MySQL;
- Уроки PHP 7 – много уроков по ООП;
- PHP для начинающих – курс на Stepik для начинающих разработчиков, не требует специальных знаний;
- PHP – первое знакомство – азы программирования на PHP (Stepik).
- подписывайтесь на тег PHP, чтобы получать уведомления о новых статьях;
- телеграм-канал «Библиотека пхпшника»;
- книги по программированию в нашем телеграм-канале «Книги для программистов».
***
Итог
- вы познакомились с синтаксисом PHP и типами данных;
- узнали, как работают условные операторы и циклы;
- запустили веб-сервер в Ubuntu и Windows;
- собрали страничку HTML из файлов PHP.
PHP (Hypertext Preprocessor) is a popular open-source programming language that is ideal for web development. It is frequently used in conjunction with other technologies to build dynamic and interactive webpages, such as HTML, CSS, and JavaScript.
This primer will cover the fundamentals of PHP and offer an overview of its essential features and capabilities. We will discuss subjects such as:
- Setting up a development environment
- Basic syntax and data types
- Variables and constants
- Control structures (if/else, loops, etc)
- Functions
- Arrays
- Working with forms and GET/POST data
- Connecting to databases
- Working with files and directories
- Error handling and debugging
- Best practices and security considerations
You will have a strong grasp of PHP and be able to construct simple scripts and web pages by the conclusion of this book. You will find more sophisticated features and capabilities as you continue to study and work with PHP, allowing you to construct more complex and dynamic web apps.
Before diving into PHP, it’s important to set up a development environment that will allow you to run PHP scripts. You can utilize a local development environment or a PHP-compatible hosting service. Following that, you may begin by studying PHP’s fundamental grammar, which includes variables, constants, data types, and control structures.
Next, you will learn about functions, which allow you to group related code together and make it easier to reuse and organize your code. Functions are a crucial element in every programming language for building manageable and reusable code.
Arrays are also an important topic to master when working with PHP. Arrays allow you to store and manipulate multiple values in a single variable. Arrays can be used to store and manipulate data, such as a list of items or a user’s personal information.
Another important aspect of web development is working with forms and GET/POST data. PHP provides several built-in functions that make it easy to access and process data submitted by forms. Connecting to databases and working with files and directories are other key concepts to grasp while working with PHP.
Finally, error handling and debugging are crucial skills to have when working with PHP. PHP provides several built-in functions and constructs that allow you to handle and debug errors and warnings that may occur during the execution of your code.
Furthermore, while dealing with PHP, security is a critical factor. PHP has a number of built-in functions and methods to assist you in securing your online application and protecting it from typical security risks.
To further deepen your understanding of PHP, it’s also important to explore and work with some popular PHP frameworks and libraries. Frameworks like Laravel, CodeIgniter, and Symfony give a set of pre-built methods and classes that can help you speed up development, enhance code organization, and make working with databases and other components simpler.
Additionally, it’s also a good idea to explore and learn how to use popular CMS (Content Management Systems) built on PHP such as WordPress, Joomla, and Drupal. These CMSs have a huge and active community, which means you can find a lot of resources, tutorials and plugins to improve your skills.
Finally, it’s also essential to keep up to date with the latest developments and trends in the PHP community. Follow blogs, forums, and social media accounts that focus on PHP development, and consider attending conferences and meetups to connect with other developers and learn about new tools and techniques.

Another important aspect of PHP development is the use of Object-Oriented Programming (OOP) concepts and design patterns. OOP allows you to represent real-world objects in your code, which can help with code structure and maintainability. It’s also a good idea to study and apply common design patterns like the Model-View-Controller (MVC) and Singleton patterns, which may help you arrange your code more logically and efficiently.
Furthermore, it’s important to understand the basics of web servers and how they work with PHP. Apache and Nginx are the most common web servers used with PHP, and understanding how they work can help you troubleshoot and optimize your PHP code. In order to quickly get started we recommend using XAMPP – which installs Apache, MySQL and PHP for you.
Another significant consideration while dealing with PHP is performance. Because PHP is an interpreted language, it can be slower than compiled languages such as C or C++. However, numerous approaches and technologies, such as caching, opcode caching, and profiling may be utilized to increase the efficiency of PHP code.
To summarize, PHP is a flexible and strong programming language commonly used in web development. This article gives a thorough introduction to PHP, including its essential features and capabilities. To master PHP, it is necessary to investigate frameworks and libraries, work with popular CMSs, stay current on the latest developments and trends in the PHP community, employ OOP concepts and design patterns, comprehend the fundamentals of web servers and how they interact with PHP, and consider performance optimization techniques. It’s also critical to practice and constantly enhance your abilities by constructing and working on projects. When it comes to PHP, whether you’re a newbie or an experienced developer, there’s always something new to learn and improve on.
Setting up a development environment
To set up a development environment for PHP, you will need to install a web server, a database management system, and a PHP runtime.
- Install a web server: The most commonly used web servers for PHP are Apache and Nginx. You can download and install either of these web servers on your local machine.
- Install a database management system: PHP works well with a variety of databases, but MySQL is the most commonly used. You can download and install MySQL on your local machine.
- Install a PHP runtime: PHP is a server-side scripting language, so it needs to be installed on your web server. You can download the latest version of PHP from the official website and install it on your web server.
- Configure the web server: After you have installed the web server, you will need to configure it to work with PHP. This will involve editing the server’s configuration files to add the PHP module and set the correct file associations.
- Test your setup: Once you have completed the above steps, you can test your setup by creating a PHP file with a simple script and accessing it through your web server. If everything is working correctly, you should see the output of the script in your browser.
- (optional) Developing Environment: Some developers prefer to use a development environment such as XAMPP, WAMP, or LAMP. These environments bundle Apache, MySQL, and PHP together and make it easy to set up and run a development server on your local machine.
It’s worth noting that the above steps may vary depending on the operating system and version you are using, you should follow the instructions for your specific system.
Instead of setting up the development environment yourself we recommend to use XAMPP.
Learn exactly how to set everything up by using our step-by-step development environment guide.
Basic syntax and data types
PHP has a syntax that is similar to that of many other programming languages, making it simple to learn for developers with prior familiarity with other languages.
- Basic Syntax:
<?php
  // This is a single-line comment
  /*
  This is a
  multi-line comment
  */
  $x = 5; // this is a variable
  echo "Hello World!"; // this is a statement
?>- PHP code is surrounded by tags, which are intended to differentiate it from other languages such as HTML or JavaScript. The default tags are?php and?>, however if short tags are enabled in your php settings, you can use them instead.
- Comments in PHP are similar to comments in other languages, they start with a double forward slash (//) for single-line comments, or with /* and */ for multi-line comments.
- PHP statements are separated by semicolons (;) and the end of each statement.
- Variables in PHP are denoted by a dollar sign ($), and must start with a letter or underscore and only contain letters, numbers and underscores.
- Data Types:
- PHP supports several data types, including:
- Integers: Whole numbers, such as -5, 0, and 42.
- Floats: Numbers with decimal points, such as 3.14159.
- Strings: Sequences of characters, such as “Hello World!” or “123”.
- Booleans: True or false values.
- Arrays: A collection of values, which can be of any data type.
- Objects: A special data type that represents an instance of a class.
- Resources: A special data type that represents a external resources, like a database connection.
PHP automatically changes data types as needed, but it’s critical to understand and use the different data types effectively to avoid unexpected behavior. To determine the type of a variable, use the functions var dump() or print r().
<?php
  $num = 5;
  $str = "Hello";
  $bool = true;
  $arr = array(1,2,3);
  var_dump($num); // int(5)
  var_dump($str); // string(5) "Hello"
  var_dump($bool); // bool(true)
  var_dump($arr); // array(3) { [0]=> int(1) [1]=> int(2) [2]=> int(3) }
?>
It’s worth noting that strings in PHP may be expressed with single quotes (‘) or double quotes (“), with single quotes being somewhat quicker and requiring less memory. Single quotation marks will not parse escape sequences, however double quotation marks will.
<?php
  $str1 = 'Hello World!';
  $str2 = "Hello World!";
  echo $str1; // Hello World!
  echo $str2; // Hello World!
?>
To summarize, knowing the fundamental syntax and data types in PHP is critical for producing efficient and maintainable code. You can create variables, handle data, and implement fundamental control structures like as loops and conditional statements using this understanding.
Variables and constants
<?php
  $x = 5; // variable x is assigned the value 5
  $y = "Hello"; // variable y is assigned the value "Hello"
  $x += 2; // variable x is now 7
  $y .= " World"; // variable y is now "Hello World"
?>
In addition to variables, PHP supports constants, which are identical to variables but cannot be modified once a value is given to a constant. Constants are defined with the define() function, which takes two arguments: the name of the constant and its value.
<?php
define("PI", 3.14);
echo PI; // Outputs 3.14
define("MY_NAME", "John Doe");
echo MY_NAME; // Outputs John Doe
It’s worth noting that constants are case-sensitive by default, but you can make them case-insensitive by passing the third argument as true in the define function.
<?php
define("MY_NAME", "John Doe", true);
echo my_name; // Outputs John Doe
In conclusion, variables and constants are important notions in every programming language, and they are required for storing and manipulating data in PHP scripts. Variables can have their values reassigned, but constants retain the same value once defined. Constants allow you to declare values that you anticipate to remain constant during the life of your script, making your code more legible and manageable.
Control structures (if/else, loops, etc)
Control structures in PHP are used to control the flow of execution of your code, and include if/else statements, loops, and switch statements.

- If/Else Statements: The most basic control structure is the if statement, which allows you to execute a block of code if a certain condition is met. You can also use the else statement to execute another block of code if the condition is not met.
<?php
  $x = 5;
  if ($x > 0) {
    echo "x is greater than 0";
  } else {
    echo "x is less than or equal to 0";
  }
You can also use the elseif statement to chain multiple conditions together, and the ternary operator ( ?: ) as a shorthand for simple if/else statements.
<?php
  $x = 5;
  $y = 10;
  if ($x > $y) {
    echo "x is greater than y";
  } elseif ($x < $y) {
    echo "x is less than y";
  } else {
    echo "x is equal to y";
  }
echo $x > 0 ? "x is positive" : "x is non-positive";- Loops: There are several types of loops in PHP, including for loops, while loops, and do-while loops. These allow you to repeat a block of code a specific number of times, or until a certain condition is met.
<?php
  for ($i = 0; $i < 5; $i++) {
    echo $i;
  }
  $x = 0;
  while ($x < 5) {
    echo $x;
    $x++;
  }
  $x = 0;
  do {
    echo $x;
    $x++;
} while ($x < 5);- Switch statements: A switch statement allows you to check the value of a variable against multiple cases. When a match is found, the code associated with that case is executed. If no match is found, the default case is executed if it exists.
<?php
  $x = 2;
  switch($x) {
    case 0:
      echo "x is 0";
      break;
    case 1:
      echo "x is 1";
      break;
    case 2:
      echo "x is 2";
      break;
    default:
      echo "x is not 0, 1 or 2";
  }
In summary, control structures in PHP are used to regulate the flow of your code’s execution. If/else statements are used to make conditional judgments, loops to repeat a block of code, and switch statements to compare the value of a variable against various situations. Understanding and appropriately using these control structures can help you build more efficient and maintainable code.
Functions
Functions are a crucial element in every programming language for building manageable and reusable code. In PHP, functions allow you to organize a block of code and name it, which may then be called many times throughout your script.

To define a function in PHP, you use the function keyword, followed by the name of the function, a set of parentheses, and a block of code enclosed in curly braces. The function name must start with a letter or underscore, and only contain letters, numbers, and underscores.
<?php
  function myFunction() {
    echo "Hello World!";
  }
  myFunction(); // Outputs "Hello World!"
Functions can also take one or more arguments as input, which are supplied to the function in parentheses when it is called. Within the function, these arguments can be utilized to do computations or make judgments.
<?php
  function myFunction($x, $y) {
    echo $x + $y;
  }
  myFunction(3, 5); // Outputs 8
Functions can also return a value using the return statement. This can be used to return the result of a calculation or the value of a variable.
<?php
  function myFunction($x, $y) {
    return $x + $y;
  }
  $result = myFunction(3, 5);
  echo $result; // Outputs 8
In PHP, functions can be defined inside or outside of a class, when a function is defined inside a class it’s called a method, and it can access the properties of the class.
Functions can also be used to build a closure, also known as an anonymous function, which can be saved in a variable and then supplied as an argument to another function or returned as a value.
<?php
$my_closure = function($x) { return $x * 2; };
echo $my_closure(5); // Outputs 10
In summary, functions are a powerful tool in PHP that allow you to group a block of code together and name it, which can then be called multiple times throughout your script. Functions also allow you to take input parameters, return values, and create a closure, making it easier to write maintainable and reusable code. Functions can also be written as methods within a class, allowing you to encapsulate a class’s logic and attributes.
Learn more about functions our article Functions in PHP.
Arrays
An array is a data structure in PHP that allows you to store and organize a group of elements. These items can be of many sorts, such as integers, strings, or even other arrays. Each array element is given a unique index, which is used to access and manipulate the element. Arrays in PHP may be formed using the array() method or the square brackets [] syntax. They may also be modified using built-in methods like sort(), count(), and implode() (). Arrays are an integral aspect of every PHP developer’s arsenal for storing and manipulating vast amounts of data.
Read more about arrays in our Ultimate guide to PHP Arrays.
Working with forms and GET/POST data
When working with forms in PHP, the data submitted by the user is typically sent to the server using the GET or POST method. The GET method appends the form data to the end of the URL, while the POST method sends the data as part of the HTTP request body.
The $_GET global variable may be used to obtain data supplied by a form utilizing the GET technique. This variable is an associative array containing the form data’s key-value pairs. For example, if a form includes an input field called “name” and the user inputs “John Smith,” you may get the result by using $_GET[‘name’].
To access the data submitted by a form using the POST method, you can use the $_POST global variable. This variable works in the same way as $_GET, but it is used to access data submitted via the POST method.
It’s important to validate and sanitize the data before using it, to prevent security vulnerabilities such as SQL injection and cross-site scripting (XSS) attacks.
Additionally, you can use $_REQUEST variable to access data submitted by both GET and POST method.
Once you have access to the data, you can use it to perform various actions such as inserting the data into a database, sending an email, or displaying a message to the user.
In conclusion, forms and GET/POST data are critical in PHP web development. Understanding how to communicate with them is a critical component of developing dynamic and interactive online apps.
Connecting to databases
In PHP, there are several ways to connect to a database. One of the most popular ways is to use the MySQLi extension, which stands for MySQL Improved. The MySQLi extension provides an object-oriented interface for working with MySQL databases. To connect to a database using MySQLi, you will need to use the mysqli_connect() function. This function takes three parameters: the hostname of the database server, the username, and the password. Once you have connected to the database, you can use other MySQLi functions to execute queries, fetch data, and so on.

Here is an example of how to connect to a MySQL database using MySQLi in PHP:
<?php
$hostname = "localhost";
$username = "root";
$password = "";

$conn = mysqli_connect($hostname, $username, $password);

if (!$conn) {
    die("Connection failed: " . mysqli_connect_error());
}
echo "Connected successfully";
?>
The PDO (PHP Data Objects) extension is another common technique to connect to a database in PHP. PDO provides a consistent interface for interacting with several database types, such as MySQL, PostgreSQL, and SQLite. You must use the PDO() constructor to connect to a database using PDO. This constructor accepts three parameters: the database’s DSN (data source name), the username, and the password.
<?php
$dsn = "mysql:host=localhost;dbname=testdb";
$username = "root";
$password = "";

try {
    $conn = new PDO($dsn, $username, $password);
    // set the PDO error mode to exception
    $conn->setAttribute(PDO::ATTR_ERRMODE, PDO::ERRMODE_EXCEPTION);
    echo "Connected successfully";
    }
catch(PDOException $e)
    {
    echo "Connection failed: " . $e->getMessage();
    }
?>
It is important to keep in mind that security best practices such as using prepared statements and avoiding SQL injection should always be considered when working with databases in PHP.
Continue reading about MySQL in our Connect to a MySQL database guide.
Working with files and directories
There are various built-in functions in PHP that enable you to operate with files and directories.
To read the contents of a file, you can use the file_get_contents() function. This function takes the path of the file as a parameter and returns the contents of the file as a string. Here is an example of how to read the contents of a file:
<?php
$file = 'example.txt';
$content = file_get_contents($file);
echo $content;
?>
The file put contents() method can be used to write to a file. This function accepts two parameters: the file’s path and the contents to be written to the file. Here’s an example of writing to a file:
<?php
$file = 'example.txt';
$data = "Hello World!";
file_put_contents($file, $data);
?>
To check if a file exists, you can use the file_exists() function. This function takes the path of the file as a parameter and returns TRUE if the file exists and FALSE if it does not. Here is an example of how to check if a file exists:
<?php
$file = 'example.txt';
if (file_exists($file)) {
    echo "The file exists.";
} else {
    echo "The file does not exist.";
}
?>
The mkdir() method can be used to create a new directory. This method accepts the directory path as an argument and creates the directory with that path. Here’s an example of creating a new directory:
<?php
$dir = 'example_dir';
mkdir($dir);
?>
The rmdir() method can be used to delete a directory. This method accepts the directory’s path as an input and deletes the directory with the supplied path. Here’s an example of how to get rid of a directory:
<?php
$dir = 'example_dir';
rmdir($dir);
?>
When interacting with files and directories in PHP, it is critical to remember that suitable error handling should be established to manage any difficulties that may emerge, such as file not found, permission refused, and so on.
Error handling and debugging
The process of recording and dealing with problems that occur during the execution of a PHP script is referred to as error handling in PHP. PHP has various error-handling procedures and structures, such as the try and catch statements for managing exceptions and the trigger error() function for producing user-defined problems.
Debugging in PHP refers to the process of finding and fixing errors in a PHP script. PHP provides several tools for debugging, including the error_reporting() function for controlling the level of error reporting, and the var_dump() and print_r() functions for displaying the contents of variables. Additionally, many integrated development environments (IDEs) and text editors have built-in debugging functionality that can be used to step through code, set breakpoints, and inspect variables.
It’s also worth noting that PHP includes a development web server that may be used to execute and test PHP programs without the need for a full web server. This is particularly handy for debugging since it displays any issues that occur in the browser.
In general, adequate error handling and debugging should be implemented in your PHP programs. This can help you detect and solve errors before they create major problems, as well as making maintaining and updating your code easier.
Best practices and security considerations
There are several best practices and security considerations to keep in mind when working with PHP. Some of the most important include:

- Input validation: It’s important to validate all user input to ensure that it meets the expected format and type. This can help prevent common vulnerabilities such as SQL injection and cross-site scripting (XSS).
- Use prepared statements: When working with databases, it’s important to use prepared statements to protect against SQL injection attacks. Prepared statements allow you to separate data from the SQL query, so that user input is not directly inserted into the query.
- Escape output: When displaying user input on a web page, it’s important to properly escape any special characters to prevent XSS attacks. This can be done using the
htmlspecialchars()function or similar. - Use security functions: PHP has several built-in functions that can help improve security, such as
password_hash()for storing hashed passwords, andrandom_bytes()for generating cryptographically secure random numbers. - Keep software updated: It’s important to keep PHP and any other software used in your application up to date in order to take advantage of security fixes and patches.
- Avoid using global variables: Using global variables can lead to security issues and make the code difficult to understand and maintain. Instead, use function arguments, class properties, and other local variables to pass data around.
- Use a PHP framework: Using a well-established PHP framework can help you improve your code organization and also add more security features like CSRF protection and Input validation.
- Avoid using sensitive information in the codebase: It’s a bad practice to store sensitive information like database credentials and API keys in the codebase. It’s recommended to use environment variables to store them.
By following these best practices and security considerations, you can help protect your PHP application from common vulnerabilities and keep your code maintainable and secure.
Q&A
Q: What is PHP?
A: PHP is an abbreviation for Hypertext Preprocessor. It is a server-side scripting language that is used for creating dynamic web pages. It is often used in combination with HTML, CSS, and JavaScript to create interactive and responsive websites.
Q: What type of websites can be built using PHP?
A: PHP can be used to create a wide range of websites, including e-commerce websites, content management systems, social media platforms, and more. Some popular examples of websites built using PHP include WordPress, Facebook, and Wikipedia.
Q: How does PHP work?
A: PHP code is executed on the server, and the resulting HTML is sent to the client’s web browser to be displayed. When a user requests a page that contains PHP code, the PHP code is executed by the server before the page is sent to the client. This allows for dynamic content to be generated on the fly, based on user input or other conditions.
Q: What are the main features of PHP?
A: Some of the main features of PHP include:
- Support for multiple databases, including MySQL, SQLite, and PostgreSQL.
- Support for object-oriented programming.
- Built-in functions for working with strings, arrays, and other data types.
- Support for file handling, including the ability to read and write files on the server.
- Support for cookies and sessions, which can be used to store data on the client’s web browser.
- Support for sending and receiving email.
Q: How do I install PHP on my computer?
A: The installation process for PHP depends on your operating system. On Windows, you can download a pre-compiled binary version of PHP from the official website and install it like any other software. On Mac and Linux, you can install PHP using a package manager like Homebrew or apt-get. Additionally, you will also need a web server like Apache or Nginx and a database management system like MySQL to run PHP on your computer.
Q: How do I run a PHP script?
A: To run a PHP script, you will need to have a web server installed on your computer. Once you have a web server running, you can place your PHP script in the appropriate directory (usually the “htdocs” or “public_html” folder) and then navigate to the script in your web browser. The server will execute the PHP code and return the resulting HTML to your browser.
Q: How do I debug a PHP script?
A: There are several ways to debug a PHP script. One common method is to use the “echo” statement to print out the values of variables and the results of calculations at various points in the script. Additionally, you can use the “var_dump()” function to print out the contents of an array or object. Other tools for debugging PHP include Xdebug, which provides more advanced features like stack traces and code coverage, and the “error_log()” function, which writes error messages to a log file.
Q: What are the best practices for writing PHP code?
A: Some best practices for writing PHP code include:
- Using proper indentation and whitespace to make the code more readable.
- Using descriptive variable and function names.
- Using comments to explain the purpose of the code and any complex algorithms.
- Using functions to organize your code and make it more reusable.
- Using classes and objects to organize your code and take advantage of object-oriented programming.
- Sanitizing user input to prevent security vulnerabilities like SQL injection.
Q: What are the common mistakes made by PHP developers?
A: Some typical mistakes made by PHP developers are as follows:
- Not properly sanitizing user input, which can lead to security vulnerabilities like SQL injection.
- Not properly handling errors and exceptions, which can lead to unexpected behavior and bugs.
- Not properly closing database connections and file handles, which can lead to resource leaks.
- Not properly organizing code with functions and classes, which can make the code difficult to maintain and understand.
- Not properly testing the code, which can lead to bugs and compatibility issues.
- Not keeping up with the latest version of PHP, which can lead to missing out on new features and security updates.
- Not optimizing the code for performance, which can lead to slow loading times and high resource usage.
Exercises
- How do you set up a development environment for PHP on a Windows machine?
- What is the basic syntax for a PHP script?
- What are the data types available?
- How do you declare and initialize a variable?
- How do you declare a constant?
- How do you use control structures (if, for, while, etc.)?
- How do you create and call a function?
- How do you work with arrays?
- How do you handle GET and POST data?
- How do you connect to a MySQL database?
- How do you work with files and directories?
- How do you handle errors and debug?
Answers:
- To set up a development environment for PHP on a Windows machine, you need to install a web server (such as Apache or IIS), PHP, and a database (such as MySQL or MariaDB). You can use a package like XAMPP or WAMP to easily install all three components.
- The basic syntax for a PHP script is to start with <?php and end with ?>. PHP code is executed on the server and can be embedded within HTML code.
- The data types available in PHP include strings, integers, floats, booleans, arrays, and objects.
- To declare and initialize a variable in PHP, use the $ symbol followed by the variable name, and assign it a value using the assignment operator (=). Example: $name = “John”;
- To declare a constant in PHP, use the define() function. The first parameter is the name of the constant and the second parameter is the value. Example: define(“PI”, 3.14);
- In PHP, control structures include if, else, elseif, for, foreach, while, and do-while. They are used to control the flow of a program, and can include conditions and statements.
- To create a function in PHP, use the function keyword followed by the function name, and include the code to be executed within curly braces. To call a function, use the function name followed by parentheses. Example: function greet() { echo “Hello”; } greet();
- In PHP, arrays can be created using the array() function or by using the square bracket notation. Elements can be accessed using the array name and index number. Array functions such as sort(), count(), and implode() can be used to manipulate arrays.
- GET data is passed through the URL and can be accessed using the $_GET array, while POST data is passed through the request body and can be accessed using the $_POST array.
- To connect to a MySQL database in PHP, use the mysqli or PDO extension. The mysql_connect() function is deprecated as of PHP 7.0.
- To work with files in PHP, you can use functions such as fopen(), fread(), fwrite(), and fclose(). To work with directories, you can use functions such as opendir(), readdir(), and closedir().
- To handle errors in PHP, use the error_reporting() function to control the level of error reporting, and the try-catch block to handle exceptions. To debug your PHP code, use the error_log() function to log errors, and the var_dump() function to print variable information. Additionally, you can use the xdebug extension to get more detailed debugging information.