Чтобы не искать в интернете мы выкладываем полное руководство пользователя квадрокоптерами DJI Phantom 4 и Phantom 4 Pro на русском языке с ответами на часто задаваемые вопросы по эксплуатации.
Если у вас есть дрон, то анализируйте логи DJI онлайн и получайте заказы на съемку с квадрокоптера на Pilothub.ru
Регистрация на сайте
Руководство пользователя Phantom 4 v1.2 2016/03 — скачать в PDF
Инструкция на русском языке DJI Phantom 4 PRO/PRO+
Руководство пользователя Phantom 4 PRO/PRO+ v1.2 2017/01 — скачать в PDF
Популярные вопросы и ответы о Phantom 4 / PRO
Дрон
В чем заключаются основные различия между Phantom 4 и Phantom 4 Pro?
Phantom 4 Pro является новым дронов серии Phantom 4. Его улучшенная камера способна записывать видео в 4К со скоростью 60 кадров/с, а также делать фотографии с разрешением 20 мегапикселей. Летать стало еще безопасней с системой FlightAutonomy, усиленной новыми двойными оптическими сенсорами, расположенными на задней части летательного аппарата, и двумя инфракрасными датчиками. Теперь дрон способен обнаруживать препятствия в 5 направлениях в радиусе 30 м. Встроенная технология передачи сигнала Lightbridge транслирует видео высокого качества на расстоянии до 7 км и позволяет переключаться между двумя каналами: 2,4 и 5,8 ГГц. Появилась возможность приобретения пульта дистанционного управления со встроенным дисплеем. Пользователям предлагаются расширенные возможности функций ActiveTrack и TapFly. Емкость аккумулятора Intelligent Flight Battery увеличена на 520 мАч, что позволяет дрону летать до 30 минут.
В чем заключаются основные различия между Phantom 4 Pro и Phantom 4 Pro Obsidian?
Обе модели обладают одинаковыми характеристиками. Тем не менее, корпус P4P Obsidian имеет матово-черное покрытие.
Какие карты памяти совместимы с дроном?
В настоящее время с дроном совместимы следующие карты памяти Micro SD:
Sandisk Extreme 32 Гбайт UHS-3 V30 MicroSDHC;
Sandisk Extreme 64 Гбайт UHS-3 V30 MicroSDXC;
Panasonic 32 Гбайт UHS-3 MicroSDHC;
Panasonic 64 Гбайт UHS-3 MicroSDXC;
Samsung PRO 32 Гбайт UHS-1 MicroSDHC;
Samsung PRO 64 Гбайт UHS-3 MicroSDXC;
Samsung PRO 128 Гбайт UHS-3 MicroSDXC;
*Не рекомендуется использовать Patriot EPPRO 64 Гбайт MicroSDXC UHS-3.
Комплектующие для Phantom 4 Pro Obsidian тоже матово-черные?
Да, пропеллеры, защита пропеллеров, аккумуляторы и фильтры для камеры P4P Obsidian тоже матово-черные.
Камера
Что нового в камере Phantom 4 Pro?
Камера Phantom 4 Pro оснащена однодюймовой матрицей с разрешением 20 мегапикселей. Появилась возможность изменять значение диафрагмы в диапазоне F2.8-11. Камера поддерживает функцию автофокуса, которую можно активировать, легко надавив на кнопку спуска затвора. Настраивайте фокус перед каждым снимком — объект съемки может поменять положение и «выпасть» из фокуса. Диапазон фокусировки составляет от 1 м до бесконечности. Если объект съемки находится в 30 м от вас, фокусируйтесь на бесконечности. При переключении съемки с ближнего плана на дальний план необходимо проверить точность фокусировки.
Какие преимущества видеосъемки появились у Phantom 4 Pro?
Камера позволяет снимать видео в 4K (4096X2160) со скоростью 60 кадров/с и максимальным битрейтом, равным 100 Мбит/с, при поддержке кодеков H.264 и H.265. Кроме того, пользователи могут снимать фотографии, не прерывая запись видео. Камера Phantom 4 Pro получила более крупную матрицу.
В каком формате и разрешении можно снимать фотографии во время записи видео?
Фотографии будут записаны в JPEG в том же разрешении, что и видео.
В чем заключаются преимущества кодека H.265?
H.265 позволяет сохранять больше деталей за счет более эффективного сжатия (на 50% больше информации по сравнению с H.264).
В чем заключаются преимущества механического затвора?
При съемке динамичных сцен электронный затвор может спровоцировать дефекты изображения, такие как «эффект желе». Механический затвор позволяет избежать искажений, в результате вы получите изображение высокого качества.
Обладает ли Phantom 4 Pro функцией фокусировки?
Да. Для активации фокусировки нажмите на точку на дисплее после переключения от настройки яркости. Еще один способ включить автофокус: легко нажмите кнопку спуска затвора. Диапазон фокуса составляет от 1 метра до бесконечности.
В чем заключаются основные особенности объектива камеры Phantom 4 Pro?
Камера Phantom 4 Pro оснащена широкоугольным объективом, разработанным специально для аэросъемки. Объектив обладает диафрагмой, работающей в диапазоне значений F/2.8-11 и ЭФР, равным 24 мм. Кроме того, были добавлены механический затвор и функция автофокуса.
Система распознавания препятствий
В каких случаях система инфракрасных датчиков работает во время полета?
Только в режиме для начинающих (Beginner) и в режиме штатива (Tripod).
Как работает система инфракрасных датчиков?
Инфракрасные датчики имеют поле обзора, равное 70° (в горизонтальной плоскости) и 20° (в вертикальной плоскости). Обратите внимание, что они работают только в режиме для начинающих (Beginner) и в режиме штатива (Tripod). Данная система работает по принципу измерения промежутка времени, за которое инфракрасный луч, выпущенный одним датчиком, отражается от объекта и попадает на приемник. С помощью этих данных дрон строит трехмерную модель окружающего пространства. Система способна обнаруживать препятствия в радиусе 7 м.
Как была улучшена система распознавания препятствий Phantom 4 Pro?
Диапазон обнаружения препятствий передних датчиков Phantom 4 Pro увеличился до 30 м, к тому же на задней части дрона были добавлены дополнительные датчики, обладающие тем же рабочим диапазоном, что и передние. Кроме того, Phantom 4 Pro был оборудован боковыми инфракрасными датчиками, распознающими объекты в радиусе 7 м.
Есть ли отличия между передней и задней системой распознавания препятствий?
Нет.
Пульт дистанционного управления
Можно ли использовать пульт от Phantom 4 с Phantom 4 Pro и наоборот?
На данный момент — нет.
Что нового в пульте управления для Phantom 4 Pro?
Дроном Phantom 4 Pro можно управлять с помощью стандартного либо дополнительного пульта. Обе модели работают на частоте 2,4 и 5,8 ГГц и максимальном расстоянии 7 км (при выполнении стандарта FCC, на открытом пространстве без помех). Обе модели поддерживают функцию автофокуса (легкое нажатие на кнопку спуска затвора). В набор Phantom 4 Pro + входит пульт со встроенным дисплеем диагональю 5,5 дюйма и разрешением Full HD (1080p), обладающим яркостью 1000 кд/м2 и приложением DJI GO 4. Пульт оборудован выходом HDMI, слотом для карты памяти Micro SD, микрофоном, спикером и модулем Wi-Fi.
Отсоединяется ли дисплей от пульта управления?
Нет.
Можно ли подключить мобильное устройство к пульту из набора Phantom 4 Pro+?
Нет.
Есть ли на пульте из комплекта Phantom 4 Pro+ встроенный микрофон и динамик?
Да.
Чему равно разрешение встроенного дисплея пульта из комплекта Phantom 4 Pro+?
1920*1080
Какие приложения установлены на дисплей пульта из комплекта Phantom 4 Pro+?
Популярные мобильные приложения для общения и DJI GO 4.
На базе какой операционной системе работает пульт из комплекта Phantom 4 Pro+?
Пульт работает на базе специально разработанной ОС DJI.
Каким образом регулируется яркость экрана — автоматически или вручную?
Яркость можно настраивать как автоматически, так и вручную.
Можно ли устанавливать другие приложения на пульт из комплекта Phantom 4 Pro+?
Нет. На данный момент на пульт Phantom 4 Pro+ нельзя устанавливать приложения сторонних разработчиков.
Поддерживает ли пульт из набора Phantom 4 Pro+ интерфейс связи Wi-Fi и Bluetooth?
Он поддерживает Wi-Fi, но не поддерживает Bluetooth.
Интеллектуальные функции
Какие новые интеллектуальные режимы полета появились у Phantom 4 Pro?
AR Route, TapFly Backward, TapFly Free в режиме TapFly, Circle, Profile и Spotlight в ActiveTrack,а также Draw и Gesture Mode. Система также поддерживает функцию Narrow Sensing (усиливает чувствительность системы обнаружения препятствий) и расширенный режим автоматического возврата домой (RTH).
Как был улучшен интеллектуальный возврат домой (Smart Return Home) Phantom 4 Pro?
В режиме интеллектуального возврата домой Phantom 4 Pro строит трехмерную карту окружающего пространства. Phantom 4 Pro выберет обратный маршрут в зависимости от препятствий, обнаруженных им (радиус обнаружения преград равен 300 м). В случае потери связи с пультом управления дрон вернется на исходный маршрут. Как только связь восстановится, летательный аппарат вернется к пользователю по кратчайшему маршруту. Если связь не восстановится в течение одной минуты, летательный аппарат вернется к владельцу по кратчайшему пути.
Как активировать функцию Narrow Sensing?
Задайте кнопке C1 или C2 функцию активации Narrow Sensing. Данная функция подходит для полета в ограниченном пространстве, область зондирования Phantom 4 Pro сужается и скорость полета настраивается таким образом, что дрон способен летать сквозь узкие проходы.
Силовая установка
Можно ли установить пропеллеры Phantom 4 на Phantom 4 Pro?
Да.
Какие улучшения произошли в силовой установке Phantom 4 Pro?
Функция предотвращения столкновений работает на более высокой скорости — при 50 км/ч. Скорость в спортивном режиме осталась прежней.
Система передачи видео
Чем отличаются системы передачи Lightbridge у Phantom 4 и Phantom 4 Pro?
Дрон Phantom 4 Pro обладает новой двухполосной системой передачи изображения Lightbridge. Она работает на расстоянии до 7 км (стандарт FCC, на частоте 5,8 ГГц). Пилоты смогут выбирать между двумя каналами — 2,4 ГГц и 5,8 ГГц** для обхода радиопомех.
Аккумуляторы и зарядное устройство
Подойдут ли аккумуляторы и зарядное устройство Phantom 4 Pro дрону Phantom 4?
Да.
Чему равен объем аккумулятора Phantom 4 Pro? Насколько дольше он летает по сравнению с Phantom 4?
Емкость аккумулятора составляет 5870 мАч. Новый дрон летает на 2 минуты дольше Phantom 4.
Обновление прошивки
Сорвется ли обновление, если в процессе уровень заряда аккумулятора дрона или пульта управления упадет ниже 50%?
Да. Во время обновления прошивки уровень заряда аккумуляторов должен быть выше 50%.
Версия прошивки аккумулятора не совпадает с прошивкой летательного аппарата. Что делать?
Обновите прошивку аккумулятора через приложение DJI GO 4.
Инструкция для других квадроптеров DJI
- Инструкция на русском для квадрокоптера DJI Inspire 2
- Инструкция на русском для квадрокоптера DJI Mavic Air
- Инструкция на русском для квадрокоптера DJI Mavic Pro и Platinum
- Инструкция на русском для квадрокоптера DJI Spark
- Инструкция на русском для квадрокоптера DJI Mavic 2
- Инструкция на русском для квадрокоптера DJI Phantom 4 и Phantom 4 Pro
- Manuals
- Brands
- dji Manuals
- Quadcopters
- PHANTOM 4 PRO
- User manual
-
Contents
-
Table of Contents
-
Bookmarks
Quick Links
Related Manuals for dji PHANTOM 4 PRO
Summary of Contents for dji PHANTOM 4 PRO
-
Page 1
V1.0 User Manual 2016.11… -
Page 2: Download Dji Go 4 App
We recommend that you watch all tutorial videos on the official DJI website and read the Disclaimer before you fly. Prepare for your first flight by reviewing the Phantom 4 Pro / Pro+ Quick Start Guide and refer to the User Manual for more details.
-
Page 3: Table Of Contents
Contents Using this manual Legends Read Before the First Flight Watch the Tutorial Videos Download the DJI GO 4 App Download the DJI Assistant 2 Product Profile Introduction Features Highlights Installing the Aircraft Aircraft Diagram Remote Controller Diagram Aircraft Flight Controller…
-
Page 4
Flight Limits and No-Fly Zones Preflight Checklist Calibrating the Compass Auto Takeoff and Auto Landing Starting/Stopping the Motors Stop the Motor Mid-flight Flight Test Appendix Specifications Upgrading the Firmware Intelligent Flight Mode After-Sales Information Compliance Information © 2016 DJI All Rights Reserved. -
Page 5: Product Profile
Product Profile This section introduces the Phantom 4 Pro / Pro+ and lists the components of the aircraft and remote controller. © 2016 DJI All Rights Reserved.
-
Page 6: Product Profile
Camera and Gimbal: The Phantom 4 Pro / Pro+, shoots at 4K at up to 60 frames per second and captures 20 megapixel photos that look crisper and cleaner than ever thanks to the new 1-inch CMOS sensor. Its mechanical shutter and auto focus create an even better aerial shooting experience.
-
Page 7
Tilt the mobile device holder or the display device on the remote controller to the desired position, then adjust the antennas so they are facing outward. If using the Phantom 4 Pro, follow the steps below to secure tablet or mobile device to the mobile device holder. -
Page 8: Aircraft Diagram
Phantom 4 Pro / Pro+ User Manual Aircraft Diagram [ 1 ] [1] GPS [ 2 ] [ 3 ] [2] Propellers [ 4 ] [ 6 ] [3] Motors [4] Front LEDs [ 5 ] [5] Gimbal and Camera…
-
Page 9
Phantom 4 Pro / Pro+ User Manual Battery Level LEDs RTH LED Displays the battery level of the Remote Circular LED around the RTH button displays Controller. RTH status. Status LED Speaker Displays the Remote Controller’s system status. Audio output. -
Page 10
Press to start recording video. Press again to stop recording. Gimbal Dial [14] Use this dial to control the tilt of the gimbal. USB Port [16] Micro USB Port [15] Connection to mobile device for DJI GO 4 app. Reserved port. © 2016 DJI All Rights Reserved. -
Page 11
Phantom 4 Pro / Pro+ User Manual C1 Button [17] Customizable through the DJI GO 4 app. C2 Button [18] [18] [17] Customizable through the DJI GO 4 app. Power Port [19] Connect to the Charger to charge the battery [19] of the remote controller. -
Page 12
Aircraft This section introduces the Flight Con- troller, Vision System, and the Intelligent Flight Battery. © 2016 DJI All Rights Reserved. -
Page 13: Aircraft
Aircraft Flight Controller The Phantom 4 Pro / Pro+ flight controller features several important upgrades. Safety modes include Failsafe and Return-to-Home. These features ensure the safe return of your aircraft if the control signal is lost. The flight controller can also save critical flight data from each flight to the on-board storage device.
-
Page 14: Flight Status Indicator
Phantom 4 Pro / Pro+ User Manual Flight Status Indicator The Phantom 4 Pro / Pro+ has Front LEDs and Aircraft Status Indicators. The positions of these LEDs are shown in the figure below: Aircraft Status Indicator Front LED The Front LEDs show the orientation of the aircraft. The Front LEDs glow solid red when the aircraft is turned on to indicate the front (or nose) of the aircraft.
-
Page 15: Return-To-Home (Rth)
Failsafe. The aircraft cannot avoid obstruction during Failsafe RTH if Forward Vision System is disabled. It is important to set a suitable Failsafe altitude before each flight. Launch the DJI GO 4 app, enter “Camera” and tap to set the Failsafe Altitude.
-
Page 16
Smart RTH Use the RTH button on the remote controller or tap the RTH button in the DJI GO 4 app and follow the on- screen instructions when GPS is available to initiate Smart RTH. The aircraft will then automatically return to the last recorded Home Point. -
Page 17
The Phantom 4 Pro / Pro+ automatically scans and attempts to match the terrain features underneath during Return to Home. When current terrain matches home point terrain, the Phantom 4 Pro / Pro+ will start landing immediately to achieve precision landing. The DJI GO 4 app will show a terrain feature mismatch prompt if matching fails. -
Page 18
The aircraft cannot avoid obstruction during the Failsafe RTH when the 20米 Forward Vision System is disabled. Therefore, it is important to set a suitable Failsafe altitude before each flight. Launch the DJI GO 4 app, enter “Camera” and tap to set the Failsafe Altitude. -
Page 19: Tapfly
1. Take off and ensure the aircraft is flying at least 6 feet (2 meters) above the ground. 2 meters Auto Hold 2. Launch the DJI GO 4 app and tap , then tap , read and understand the prompts.
-
Page 20
Phantom 4 Pro / Pro+ User Manual 3. Tap once on the target direction and wait for icon to appear. Tap again to confirm the selection and the aircraft will automatically fly towards the target direction. In Flight (GPS) P-GPS 09:29 H 10.0M… -
Page 21: Activetrack
ActiveTrack allows you to mark and track a moving object on your mobile device screen. The aircraft will automatically avoid obstacles in its flight path. No external tracking device is required. The Phantom 4 Pro / Pro+ can automatically identify and trace bikes and other vehicles, people and animals, and use different tracking strategies for each.
-
Page 22
ActiveTrack: 1. Take off and hover at least 6 feet (2 meters) above the ground. 2 meters Auto Hold 2. Launch the DJI GO 4 app and tap , then tap , read and understand the prompts. In Flight… -
Page 23
Phantom 4 Pro / Pro+ User Manual DO NOT select an area containing people, animals, small, fine objects (e.g. tree branches and power lines) or transparent objects (e.g. glass or water surface). Stay clear of obstacles near the flight path, particularly when the aircraft is flying backward. -
Page 24: Draw
Then follow the steps below to use Draw: 1. Take off and hover at least 6 feet (2 meters) above the ground. 2 meters Auto Hold 2. Launch the DJI GO 4 app and tap , then tap , read and understand the prompts. In Flight(GPS)…
-
Page 25
Phantom 4 Pro / Pro+ User Manual In Flight(GPS) P-GPS 09:29 Hide Heading 268m Forward SPEED 11.1 Advanced Setting H 10.0M 10.0 VS 2.0M/S VPS 2.0M DO NOT fly the aircraft towards people, animals, or small/fine objects (e.g. tree branches and power lines) or transparent objects (e.g. glass or water). -
Page 26: Gesture Mode
Tripod Mode Tap the icon in the DJI GO 4 app to enable Tripod Mode. In Tripod Mode, the maximum flight speed is limited to 5.6 mph (9 kph) and the braking distance is reduced to 6.6 ft (2 m). Responsiveness to stick movements is also reduced for smoother more controlled movements.
-
Page 27: Vision System And Infrared Sensing System
GPS signal is not available. The Vision System constantly scans for obstacles, allowing the Phantom 4 Pro / Pro+ to avoid them by going over, around, or hovering. The Infrared Sensing System consists [5] of two 3D infrared modules on both sides of the aircraft. These scan for obstacles on both sides of the aircraft and is active in certain flight modes.
-
Page 28
Forward and Downward Vision Systems cameras installed on the aircraft are calibrated on delivery. However these cameras are vulnerable to excessive impact and will require occasional calibration via DJI Assistant 2 or the DJI GO 4 app. Follow the steps below to calibrate the camera. Point the aircraft toward the screen… -
Page 29
Phantom 4 Pro / Pro+ User Manual Assisted Braking from Obstacle Sensing Powered by the Obstacle Sensing, the aircraft will now be able to actively brake when obstacles are detected around the aircraft. Note that Obstacle Sensing function works best when lighting is adequate and the obstacle is clearly marked or textured. -
Page 30: Flight Recorder
PC through the Micro USB port and launch the DJI Assistant 2. Attaching and Detaching the Propellers Use only DJI approved propellers with your Phantom 4 Pro / Pro+. The grey and black ring on the propeller indicate where they should be attached and in which direction whey should spin.
-
Page 31: Dji Intelligent Flight Battery
Phantom 4 Pro / Pro+ User Manual DJI Intelligent Flight Battery The DJI Intelligent Flight Battery has a capacity of 5870 mAh, a voltage of 15.2 V, and a smart charge/ discharge functionality. It should only be charged using an appropriate DJI approved charger.
-
Page 32
Phantom 4 Pro / Pro+ User Manual Using the Battery LED1 LED2 LED3 LED4 Power Button (Built-in LED) Battery Level Indicators Turning ON/OFF Press the Power Button once, then press again and hold for 2 seconds to turn on. The… -
Page 33
Battery voltage should reach the appropriate level when operating environment with temperatures between -10°C and 5°C. 3. End the flight as soon as the DJI GO 4 app displays the “Low Battery Level Warning” in low temperature environments. 4. Keep the battery indoors to warm it before flying in low temperature environments. -
Page 34
Launch the DJI GO 4 app to check battery levels. Rapid : Fly the Phantom 4 Pro / Pro+ outdoors until there is less than 8% of power left, or until the battery can no longer be turned on. -
Page 35
Remote Controller This section describes the features of the remote controller and includes instructions for controlling the aircraft and the camera. © 2016 DJI All Rights Reserved. -
Page 36: Remote Controller
Turning the Remote Controller On and Off The Phantom 4 Pro / Pro+ remote controller is powered by a 2S rechargeable battery that has a capacity of 6000 mAh. The battery level is indicated via the Battery Level LEDs on the front panel.
-
Page 37
Phantom 4 Pro / Pro+ User Manual Power Outlet Charger Controlling the Camera Shoot videos/photos, and adjust camera settings via the Shutter Button, Record Button, and Camera Set- tings Dial on the remote controller. [1] Camera Settings Dial Turn the dial to adjust camera settings such as ISO, shutter speed, and aperture without letting go of the remote controller. -
Page 38
Pro / Pro+ will maintain its current orientation. The more the stick is pushed away from the center position, the faster the Phantom 4 Pro / Pro+ will rotate. Moving the right stick up and down changes the aircraft’s forward and backward pitch. -
Page 39
The Flight Mode is locked in P Mode by default, regardless of switch position. To switch flight modes, go to Camera view in the DJI GO 4 app, tap and enable “Multiple Flight Modes”. After enabling multiple flight modes, toggle the switch to P and then to S to fly in Sport Mode. -
Page 40: Remote Controller Status Led
USB port on the back of the remote controller. The Remote Controller of the Phantom 4 Pro+ includes a display device optimized for the DJI GO 4 app. No other mobile devices are required.
-
Page 41: Linking The Remote Controller
Follow these steps to link a new remote controller: 1. Turn on the remote controller and connect to the mobile device. Launch the DJI GO 4 app. 2. Turn on the Intelligent Flight Battery.
-
Page 42
Phantom 4 Pro / Pro+ User Manual 4. The remote controller is ready to link. The Remote Controller Status Indicator blinks blue and a beep is emitted. RC Control Setting RC Calibration Stick Mode Searching for aircraft frequency, Default stick mode is Mode 2, changing stick modes alters the way the aircraft is controlled. -
Page 43
Camera and Gimbal This section provides the technical specifications of the camera and explains the gimbal’s operation modes. © 2016 DJI All Rights Reserved. -
Page 44: Camera And Gimbal
To store your photos and videos, insert the Micro SD card into the slot as shown below before turning on the Phantom 4 Pro / Pro+. The Phantom 4 Pro / Pro+ comes with a 16 GB Micro SD card and supports Micro SD cards up to 128 GB.
-
Page 45
Phantom 4 Pro / Pro+ User Manual The aircraft must be turned on before attempting to access the files on the Micro SD card. Camera Operation Use the Shutter and Record buttons on the remote controller to shoot the photos or videos through the DJI GO 4 app. -
Page 46: Gimbal
Two gimbal operation modes are available. Switch between the different operation modes on the camera settings page of the DJI GO 4 app. Note that your mobile device must be connected to the remote controller for changes to take effect. Refer to the table below for details: The angle between the gimbal’s orientation and aircraft’s nose remains…
-
Page 47
DJI GO 4 App This section introduces the four main functions of the DJI GO 4 app. © 2016 DJI All Rights Reserved. -
Page 48: Dji Go 4 App
DJI GO 4 App The DJI GO 4 app is a mobile application designed specifically for DJI equipment. Use this app to control the gimbal, camera, and other aircraft functions. The app features Equipment, Editor, SkyPixel and Me sections, which are used for configuring your aircraft, editing and sharing your photos and videos with others.
-
Page 49
Phantom 4 Pro / Pro+ User Manual 1. System Status : This icon indicates aircraft flight status and various warning messages. READY TO GO (GPS) 2. Obstacles Detection Status : Red bars are displayed when obstacles are close to the aircraft. Orange bars are displayed when obstacles are in detection range. -
Page 50
Phantom 4 Pro / Pro+ User Manual 13. Auto Exposure Lock : Tap to lock the exposure value. 14. Photo/Video Button : Tap to switch between photo and video recording modes. 15. Gimbal Slider : Displays the pitch of the gimbal. -
Page 51: Editor
Find out about our latest events, featured products and trending Skypixel uploads in the SkyPixel page. If you already have a DJI account, you will be able to participate in forum discussions, earn Credits in the DJI Store, and share your artwork with the community.
-
Page 52
Flight This section describes safe flight practices and flight restrictions. © 2016 DJI All Rights Reserved. -
Page 53: Flight
Maximum flight altitude & Radius Limits Maximum flight altitude and radius limits may be changed in the DJI GO 4 app. Be aware that the maximum flight altitude cannot exceed 1640 feet (500 meters). In accordance with these settings, your…
-
Page 54
No-Fly Zones All No-Fly Zones are listed on the DJI official website at http://www.dji.com/flysafe/no-fly. No-Fly Zones are divided into Airports and Restricted Areas. Airports include major airports and flying fields where manned aircraft operate at low altitudes. Restricted Areas include border lines between countries or sensitive institute. -
Page 55
The value of R varies based on the definition of the restricted areas. (3) A “warning zone” has been set around the Restricted Area. When the aircraft approaches within 0.062 miles (100 m) of this zone, a warning message will appear on the DJI GO 4 app. 100 m 100m ©… -
Page 56: Preflight Checklist
3. Micro SD card has been inserted, if necessary. 4. Gimbal is functioning normally. 5. Motors can start and are functioning normally. 6. The DJI GO 4 app is successfully connected to the aircraft. 7. Ensure that the sensors for the Obstacle Sensing System are clean. ©…
-
Page 57: Calibrating The Compass
Phantom 4 Pro / Pro+ User Manual Calibrating the Compass Only calibrate the compass when the DJI GO 4 app or the status indicator prompt you to do so. Observe the following rules when calibrating your compass: DO NOT calibrate your compass where there is a chance of strong magnetic interference, such as magnetite, parking structures, and steel reinforcements underground.
-
Page 58: Auto Takeoff And Auto Landing
If Landing Protection is not operational, the DJI GO 4 app will display a landing prompt when the Phantom 4 Pro / Pro+ descends below 0.3 meters. Pull down on the throttle or use the auto landing slider to land.
-
Page 59: Starting/Stopping The Motors
Stopping the Motors There are two methods to stop the motors. Method 1: When Phantom 4 Pro / Pro+ has landed, push the left stick down , then conduct the same CSC that was used to start the motors, as described above . Motors will stop immediately. Release both sticks once motors stop.
-
Page 60: Flight Test
Video Suggestions and Tips 1. Go through the full pre-flight checklist before each flight. 2. Select the desired gimbal operation mode in the DJI GO 4 app. 3. Only shoot video when flying in P-mode. 4. Always fly in good weather and avoid flying in rain or heavy wind.
-
Page 61
Appendix © 2016 DJI All Rights Reserved. -
Page 62: Appendix
Obstacle Sensory Range 0.6 — 23 ft (0.2 — 7 m) 70°(Horizontal), ±10°(Vertical) Measuring Frequency 10 Hz Surface with diffuse reflection material, and reflectivity > 8% Operating Environment (such as wall, trees, humans, etc.) © 2016 DJI All Rights Reserved.
-
Page 63
Phantom 4 Pro / Pro+ User Manual Camera Sensor 1’’ CMOS; Effective pixels: 20 M FOV (Field of View) 84°, 8.8 mm (35 mm format equivalent: 24 Lens mm), f/2.8 — f/11, auto focus at 1 m — ∞ Video: 100 – 3200 (Auto); 100 — 6400 (Manual) ISO Range Photo:100 — 3200 (Auto);100 — 12800(Manual) -
Page 64: Upgrading The Firmware
Method 2: Using the DJI GO 4 App 1. Ensure the both the aircraft and the remote controller are powered on and connected. 2. For Phantom 4 Pro, connect the Micro USB port of the aircraft to the mobile device with the USB OTG cable.
-
Page 65: Intelligent Flight Mode
Method 1: Using the DJI GO 4 App Power on the remote controller and connect it with the DJI GO 4 app. A prompt will appear if a new firmware upgrade is available. To start upgrading, connect a mobile device to the Internet and follow the on-screen instructions.
-
Page 66: After-Sales Information
Phantom 4 Pro / Pro+ User Manual After-Sales Information Visit the following pages to learn more about After-sales policy and warranty information: 1. After-sales Policy: http://www.dji.com/service 2. Refund Policy: http://www.dji.com/service/refund-return 3. Paid Repair Service: http://www.dji.com/service/repair-service 4. Warranty Service: http://www.dji.com/service/warranty-service Compliance Information FCC Compliance Notice This device complies with Part 15 of the FCC Rules.
-
Page 67
Una copia della dichiarazione di conformità UE è disponibile online all’indirizzo Web www.dji.com/euro- compliance Déclaration de conformité UE : Par la présente, SZ DJI TECHNOLOGY CO., LTD déclare que cet appareil est conforme aux principales exigences et autres clauses pertinentes de la directive européenne 1999/5/ Une copie de la déclaration de conformité… -
Page 68
Phantom 4 Pro / Pro+ User Manual EU-Compliance: Hiermit erklärt SZ DJI TECHNOLOGY CO., LTD., dass dieses Gerät den wesentlichen Anforderungen und anderen einschlägigen Bestimmungen der EU-Richtlinie 1999/5/EC entspricht. Eine Kopie der EU-Konformitätserklärung finden Sie online auf www.dji.com/euro-compliance. EU contact address: DJI GmbH, Industrie Strasse. 12, 97618, Niederlauer, Germany CAUTION: RISK OF EXPLOSION IF BATTERY IS REPLACED BY AN INCORRECT TYPE. -
Page 69
This content is subject to change. Download the latest version from http://www.dji.com/product/phantom-4-pro If you have any questions about this document, please contact DJI by sending a message to DocSupport@dji.com. PHANTOM is a trademark of DJI. Copyright © 2016 DJI All Rights Reserved.
Учебные видеоматериалы
FAQ
Gimbal Camera
Gimbal Camera
Remote Controller
Remote Controller
Video Downlink
Video Downlink
Aircraft
1. What are the differences between the Phantom 4 Pro and the Phantom 4?
Unlike the Phantom 4, the Phantom 4 Pro has a rear-facing obstacle sensing system and left and right infrared obstacle sensors. The gimbal camera has a 1-inch CMOS sensor. A remote controller with a built-in display is also available at an additional charge. For more details, see our Phantom 4 Pro specifications page.
2. In P-mode, can the Phantom 4 Pro avoid obstacles to the rear, front, left and right of the aircraft?
No. In P-mode, the Phantom 4 Pro’s front and rear obstacle sensing system are enabled. Only in Beginner Mode and Tripod Mode, the Phantom 4 Pro’s left and right infrared sensors are enabled.
3. Do the Phantom 4 Pro’s aircraft status LEDs behave differently than the Phantom 4’s?
The Phantom 4 Pro’s aircraft status indicators will blink green when the aircraft brakes within 2 meters with the obstacle.
4. Measured diagonally, how long is the Phantom 4 Pro?
The Phantom 4 Pro is 350 mm long, the same as size the Phantom 4.
5. What propellers does the Phantom 4 Pro use?
The Phantom 4 Pro uses DJI 9450 quick-release propellers.
6. How has the Return to Home (RTH) function improved with the Phantom 4 Pro?
Downward Vision System data is now used to improve RTH accuracy. The aircraft will record visual data for the ground around the home point when ascending at a height of seven meters and use this data to land more precisely. For more details, see the User Manual.
7. What’s the Phantom 4 Professional’s maximum speed?
In S-mode, 20 meters per second.
In P-mode, 14 meters per second.
In A-mode, top speed varies depending on environmental factors.
8. How will the aircraft react when landing automatically?
When the aircraft is landing automatically, the aircraft will detect whether or not the landing surface is flat. If not, the aircraft will stop landing and hover. For more details, see the User Manual.
9. What is the Phantom 4 Pro’s maximum flight time?
The Phantom 4 Pro can fly for up to 30 minutes in ideal conditions. Actual flight time varies based on environmental conditions and operation.
10. Are there new propeller guards designed specifically for the Phantom 4 Pro?
Yes, the Phantom 4 Pro propeller guards are reduced in weight and size compared to the Phantom 4 propeller guards, and they will not block the Forward Vision System.
11. How do I calibrate the Phantom 4 Pro’s Forward, Backward, and Downward Vision Systems?
The Forward, Backward, and Downward Vision Systems can be calibrated with DJI Assistant 2 and DJI GO. If there is an error with the Forward, Backward, or Downward Vision System, a prompt stating that auto calibration for the Vision System is required will pop up in the DJI GO app. Follow the instructions in the DJI GO app to calibrate. For the best results, we recommend calibrating the Forward, Backward, and Downward Vision Systems with DJI Assistant 2. If you don’t have a computer at hand, calibrate them with DJI GO.
Gimbal Camera
1. What are the specifications of the Phantom 4 Pro?
The Phantom 4 Pro uses a 1’’ (CMOS) sensor with 20 million effective pixels, supporting maximum 4K 60p (H.264) and 4K 30p (H.265) video recording with a 100 Mbps maximum video bitrate. The aperture can be adjusted from F/2.8 to F/11. A mode (aperture priority) and S mode (shutter priority) have also been added as camera modes.
2. What kind of SD cards can be used with the Phantom 4 Pro’s camera?
The Phantom 4 Pro comes with a 16GB SD card. SD cards up to 128GB, Class 10 and UHS-1 rating with writing speed faster than 15MByte/s are compatible. Recommended Micro SD cards are listed below:
1. Sandisk Extreme 32GB UHS-3 V30 MicroSDHC.
2. Sandisk Extreme 64GB UHS-3 V30 MicroSDXC.
3. Panasonic 32GB UHS-3 MicroSDHC.
4. Panasonic 64GB UHS-3 MicroSDXC.
5. Samsung PRO 32GB UHS-1 MicroSDHC.
6. Samsung PRO 64GB UHS-3 MicroSDXC.
7. Samsung PRO 128GB UHS-3 MicroSDXC.
3. Can the ND filter for Phantom 4 cameras be used with the Phantom 4 Pro?
No, the cameras are sized differently. Phantom 4 Pro ND filters are available on our online store.
4. Why can’t the gimbal point forward horizontally when I’m flying at top speed in S-mode?
In S-mode, the aircraft can tilt up to 42 degrees while the gimbal can move at most 45 degrees upward and 120 degrees downward. Hence, the gimbal cannot point forward horizontally when the aircraft is flying quickly in S-mode. To solve such issue, move the Pitch of the gimbal downward by at least 12 degrees when flying in S-mode.
5. What’s the Phantom 4 Pro’s maximum video bit rate?
6. Is the gimbal made of plastic?
No, it is made of a magnesium alloy and ceramics.
7. How can I switch from the Phantom 4 Pro’s mechanical shutter to the electronic shutter?
The camera will use the electronic shutter by default when the shutter speed is higher than 1/2000 or when using the burst shooting function. Otherwise, the mechanical shutter will be used to prevent jelloing.
8. Which media players can play H.265 video?
Windows: VLC, PotPlayer, KMPlayer, MilkPlayer.
IOS: Elmedia Player.
Remote Controller
1. What are the differences between the Phantom 4 Pro and Phantom 4 Pro+?
Their remote controllers are different. The Phantom 4 Pro +’s remote controller includes a 5.5-inch, 1080p, 1000 nit built-in display. Its screen can be seen clearly in direct sunlight, it can be used in low-temperature environments, and a mobile device is no longer required. The remote controller also features an HDMI port, a micro-SD card slot, and a built-in microphone and a speaker, which allows for live streaming and video editing anytime, anywhere.
2. Can my remote controller output HDMI signal?
The Phantom 4 Pro’s remote controller can output HDMI signal with the HDMI Module installed and a mobile device. After installing the HDMI Module, upgrade the remote controller’s firmware to the latest version.
The Phantom 4 Pro +‘s remote controller has a built-in HDMI port.
3. How long does it take to fully charge the Phantom 4 Pro/Pro +’s remote controller?
4. Can I switch my remote controller between FCC and CE?
Users cannot switch between FCC and CE manually. The remote controller will enable FCC or CE mode based on your location in accordance with local laws and regulations.
5. How long is the Phantom 4 Pro remote controller’s battery life?
The remote controller without the display can work for 6 hours when fully charged. The controller with the display can work for 5 hours when fully charged.
6. How can I link my remote controller to my Phantom 4 Pro by pressing buttons on the remote controller?
Press the C1, C2 and video recording buttons at the same time. After you hear an alarm “D-DD”, press the camera settings dial, and the remote controller will start linking to your Phantom 4 Pro.
Video Downlink
1. What kind of image transmission technology does Phantom 4 Pro use?
The Phantom 4 Pro is powered by an enhanced version of DJI Lightbridge, and it supports 2.4GHz and 5.8GHz frequency bands.
2. Does the remote controller still work with the 2.4G frequency band?
Yes, but many Wi-Fi and Bluetooth devices also work at the 2.4G frequency band, so interfere is more likely to occur. Currently, the 5.8G frequency band isn’t as widely used, so you’re less likely to encounter interference when using the 5.8G band.
3. What’s the effective transmission distance of the Phantom 4 Pro’s remote controller?
FCC: 7 km, CE: 3.5 km (Unobstructed, free of interference). Actual transmission distance varies depending environmental conditions and operation.
4. What is the transmission latency of the Phantom 4 Pro’s video downlink?
Around 220ms for the remote controller without the display and around 180ms for the one with the display. The actual transmission latency depends on your mobile device’s performance and environmental interference.
5. What’s the maximum resolution of the Phantom 4 Pro’s video downlink?
720P@30FPS. Actual transmission resolution depends on your mobile device’s performance and environmental interference.
6. What should I do if black and white strips are present on screen during image transmission?
In the DJI GO app, tap Menu and disable “Over Exposure Warning”.
Battery
1. What are the specifications of the Phantom 4 Pro’s Intelligent Flight Battery?
2. How long does it take to fully charge the Phantom 4 Pro’s Intelligent Flight Battery?
3. What can I do to protect my Phantom 4 Pro’s Intelligent Flight Battery?
Keep the Intelligent Flight Battery away from water or moisture. Battery level should between 45% and 65% when the Intelligent Flight Battery is to be stored for a long period of time. If the Intelligent Flight Battery is to be stored for more than three months, it should be fully charged and discharged once every three months to prevent over discharging.
4. Is it normal that the display of the battery cells are yellow under Aircraft Battery in the DJI GO app?
Yes, when the voltage of the battery cells is lower than 3.62V, the display turns yellow.
5. What is the wattage of the Phantom 4 Pro’s charger?
6. How do I upgrade the firmware for the Phantom 4 Pro’s Intelligent Flight Battery?
The Intelligent Flight Battery will be upgraded when you upgrade the aircraft firmware. When the firmware for the Intelligent Flight Battery needs to upgraded, an Inconsistent Firmware Found warning will display in the DJI GO app. Slide the slider to the right to update the battery firmware.
7. How should I use the Intelligent Flight Battery in a low temperature environment?
Battery capacity will decrease significantly when the Intelligent Flight Battery is used at low temperatures (below minus 10 degree Celsius). It is recommended to warm up the Intelligent Flight Battery to 20 degrees Celsius before flight.
8. What is the discharge rate of the Phantom 4 Pro’s Intelligent Flight Battery?
The discharge rate of the Phantom 4 Pro’s Intelligent Flight Battery is 5C.
9. Why will the Phantom 4 Pro’s Intelligent Flight Battery emit heat when it has been stored for a long period of time?
When the Intelligent Flight Battery has been stored for a long period of time with over 65% charge, the auto-discharging function will be triggered. The Intelligent Flight Battery will discharge to 65% of the total power automatically while emitting moderate heat.
10. Can I charge the Intelligent Flight Battery and remote controller with the charger at the same time?
The DJI charger can charge the Intelligent Flight Battery and remote controller. But it is not recommended to charge the Intelligent Flight Battery and remote controller at the same time.
Software
1. What should I be aware of when using ActiveTrack Mode?
The subject to be tracked needs to be placed in the middle of the screen for identification. If “GO” is shown on the screen after you drag a box around the subject, the subject has been identified. You can start tracking after tapping “GO”. The tracked subject should not be similar in color or patterning to its surrounding environment. You can track optimally when your Phantom 4 Pro flies at a height between three meters to five meters and five meters to 15 meters from the tracked subject.
The Phantom 4 Pro can also use the new Spotlight and Profile functions in ActiveTrack Mode.
2. What should I be aware of when using TapFly Mode?
You can fly your Phantom 4 Pro in any direction within -25 degrees to + 25 degrees controllable range of the gimbal in TapFly Mode. You can set the speed in TapFly between 1 m/s to 13 m/s in the DJI GO app. When encountering an obstacle, the Phantom 4 Pro will ascend to avoid it. When “Enable Horizontal Obstacle Avoidance” is enabled, the Phantom 4 Pro will generate a route automatically to avoid the obstacles from both sides. If it cannot avoid an obstacle, the Phantom 4 Pro will hover in place.
TapFly for the Phantom 4 Pro can be used in forward mode, backward mode and free mode.
3. In P-mode, can the Phantom 4 Pro with the left and right infrared sensors?
No. In P-mode, only the Phantom 4 Pro’s front and rear vision systems are enabled. In Beginner Mode and tripod mode, the Phantom 4 Pro’s left and right infrared sensors are enabled.
4. What’s the sensing range for the left and right infrared sensors?
5. At what speed does the Phantom 4 Pro’s vision positioning system stop working?
6. What mobile devices are compatible with the DJI GO app?
The DJI GO app can run on both iOS and Android mobile devices. For more details, please see the user manual.
7. What’s the max speed of Phantom 4 Pro in ActiveTrack mode?
14 m/s, the same as the max speed in P mode.
Search for More Information
Связаться с нами
Руководство к квадрокоптеру Phantom 4 очень длинное и не всегда понятное. Поэтому мы собрали для вас базовые знания, которые помогут понять принцип работы дрона и управления им, подготовить его, подключить к телефону и настроить для первых полетов.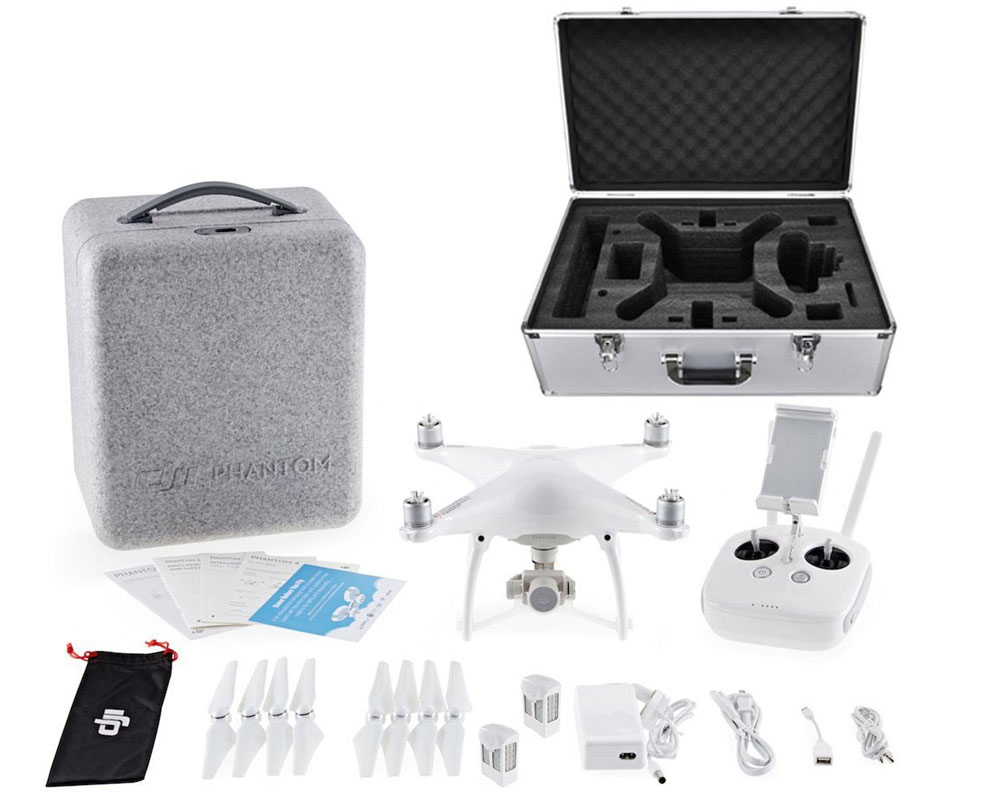
Устройство квадрокоптера
Конструкция Phantom 4 представляет собой четырехлучевую раму, на каждый луч которой надет двигатель и пропеллер. Внутри устройства спрятаны управляющая плата и съемный аккумулятор, а снаружи размещены видеокамера на подвесе, порт micro-USB и слот для карты памяти. Особенностью модели Phantom 4 является наличие разнообразных датчиков и индикаторов, превращающих дрон в умное устройство. В частности, у него есть система обнаружения препятствий, датчики визуального позиционирования и GPS. Первая из них обеспечивает постоянное сканирование местности вокруг и избегание столкновений с препятствиями путем их облета или зависания. Визуальное позиционирование помогает дрону зависать на месте и летать там, где нет возможности ориентироваться на GPS-сигнал. Оно включает в себя ультразвуковые датчики и видеокамеры.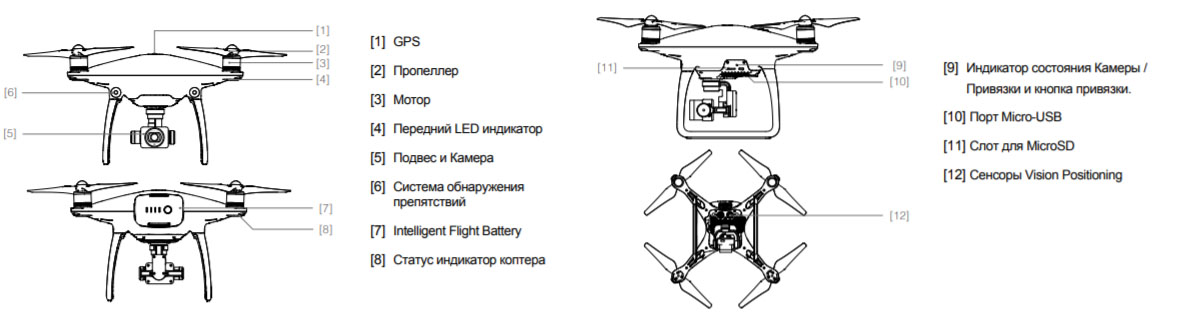
Сборка дрона
У вашего дрона есть видеокамера, закрепленная на подвесе. Перед полетом снимите с него фиксатор, а затем переходите к установке на дрон пропеллеров и аккумулятора. Обратите внимание, что у квадрокоптера есть два пропеллера с черными кольцами. Их нужно поставить на двигатели с черными точками, так как у дрона есть задняя и передняя части. Пропеллеры с серебряными кольцами поставьте на остальные моторы. Для этого надавите на пропеллер вниз и поверните его в направлении изображенного значка замка до фиксации.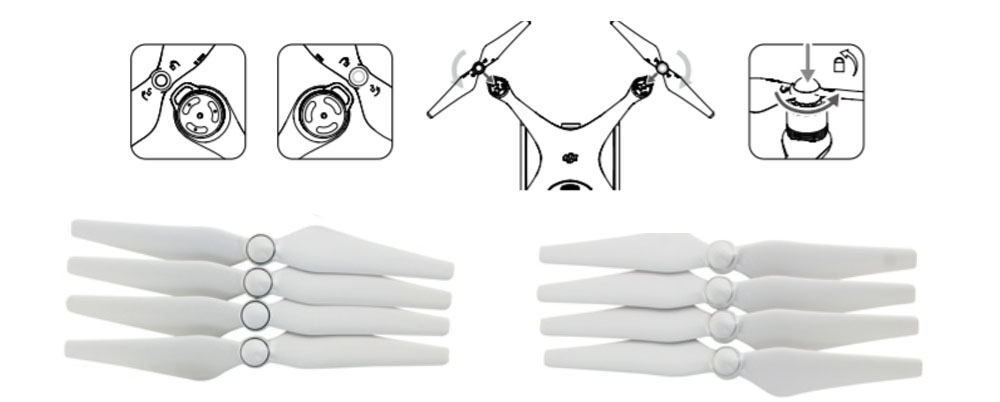
Аккумулятор ставится в специальный отсек согласно изображенной на нем стрелке. Обязательно вставляйте батарею до щелчка, чтобы во время полета дрона с ним не возникло никаких проблем.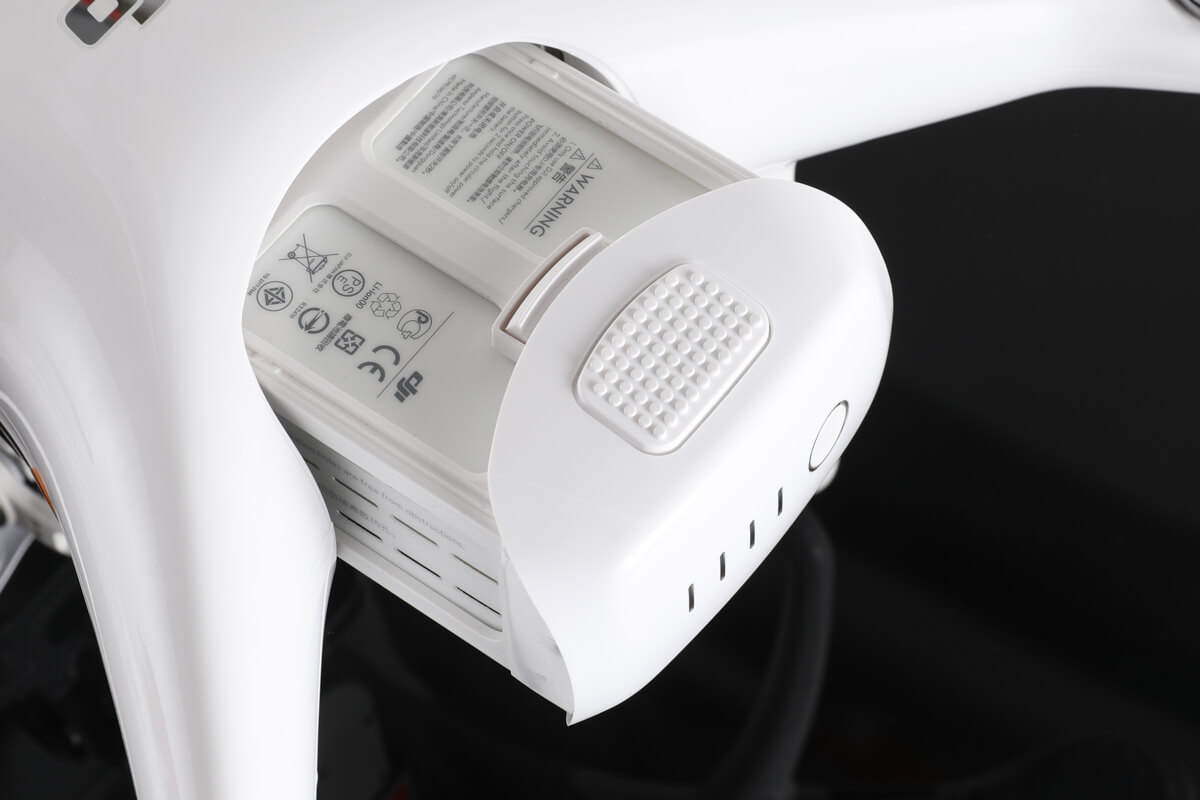
У модели Phantom 4 есть собственное зарядное устройство. Чтобы воспользоваться им, выньте аккумулятор из дрона и подсоедините к нему один из разъемов зарядного устройства. Подключите устройство к сети, убедившись в том, что батарея дрона выключена.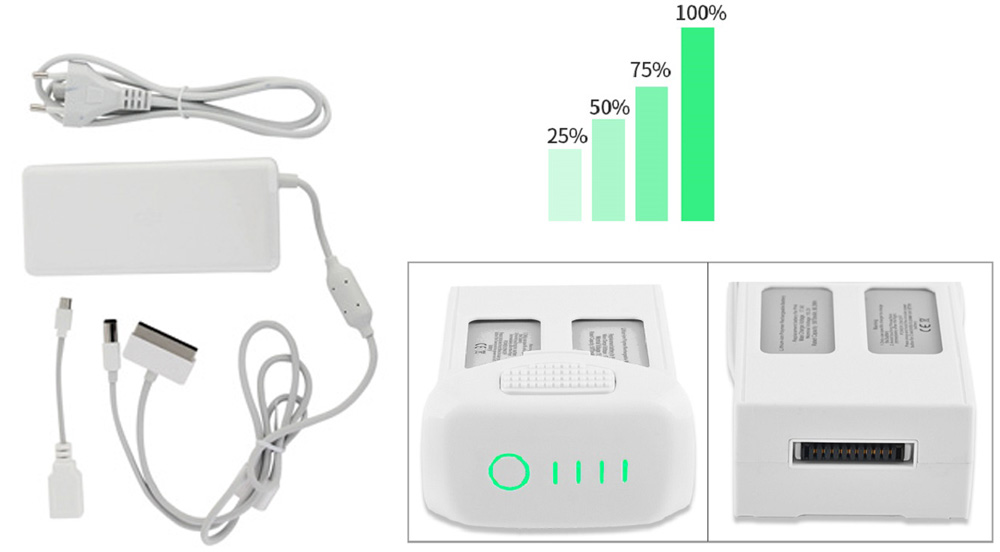
Во время зарядки на батарее квадрокоптера мигают индикаторы. Чем больше лампочек мигает, тем выше уровень заряда. Так, один мигающий индикатор соответствует уровню заряда от 0 до 25%, а четыре — от 75 до 100%. Более точное значение вы можете посмотреть на пульте управления. Когда батарея будет полностью заряжена, все индикаторы погаснут. Когда вы извлекаете или устанавливаете аккумулятор в дрон, он всегда должен быть выключен.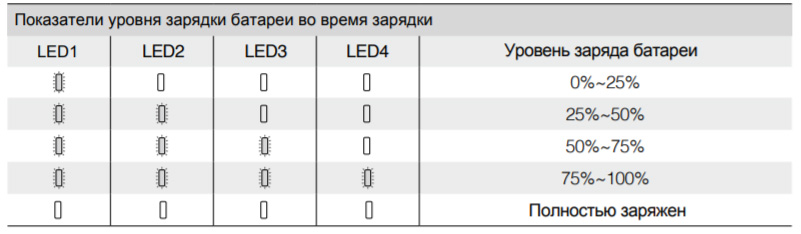
Вы можете посмотреть уровень заряда и без подключения к сетевому устройству. Для этого нажмите кнопку питания на батарее один раз. При этом индикаторы будут гореть, мигать или не гореть. Чем больше их постоянно горит, тем выше уровень заряда батареи (см. таблицу ниже).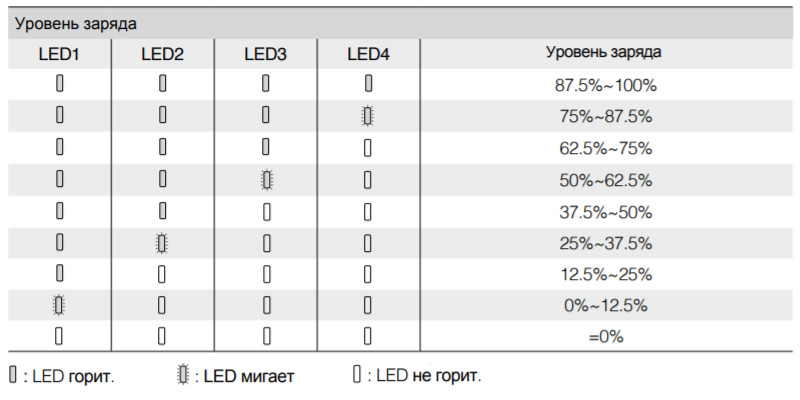
Также по индикаторам вы можете определить и срок службы аккумулятора. Для этого на выключенной батарее нажмите и удерживайте кнопку включения 5 секунд. Чем больше индикаторов горит, тем выше ресурс батареи (см. таблицу ниже).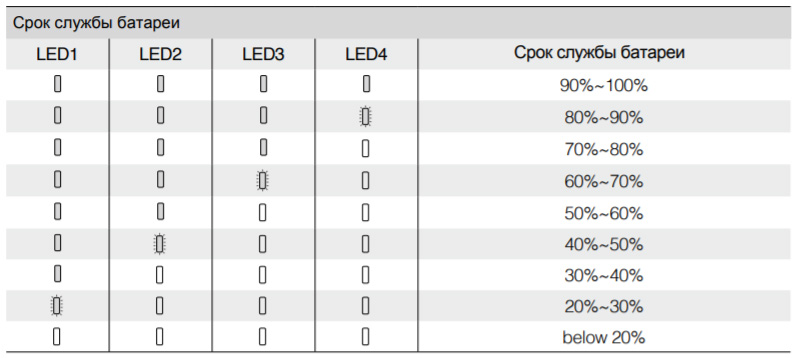
Если мигает только один индикатор (кроме первого), а остальные не горят, это говорит о возникновении проблемы. Это может быть короткое замыкание, превышение тока или напряжения и другие проблемы, отмеченные в таблице ниже. При их возникновении устраните причину сбоя, отключите батарею, отсоедините ее от зарядного устройства и подключите обратно для продолжения зарядки.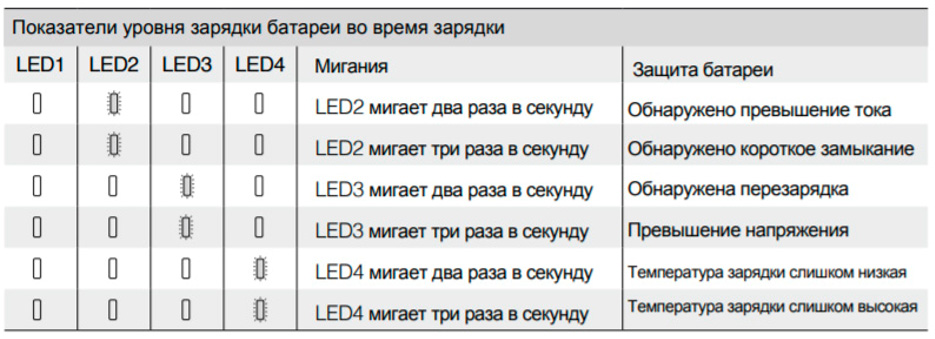
Управление DJI Phantom 4 с помощью пульта
Направлять дрон вам помогут две ручки управления (стики, джойстики). Перевод ручки вверх заставит дрон лететь вверх, вниз — снижаться. Перевод вправо и влево поможет дрону вращаться в данном направлении. При этом чем сильнее вы будете отклонять стик от центрального положения, тем быстрее будет происходить перемещение в заданном направлении. Это же касается и другого стика и остальных направлений.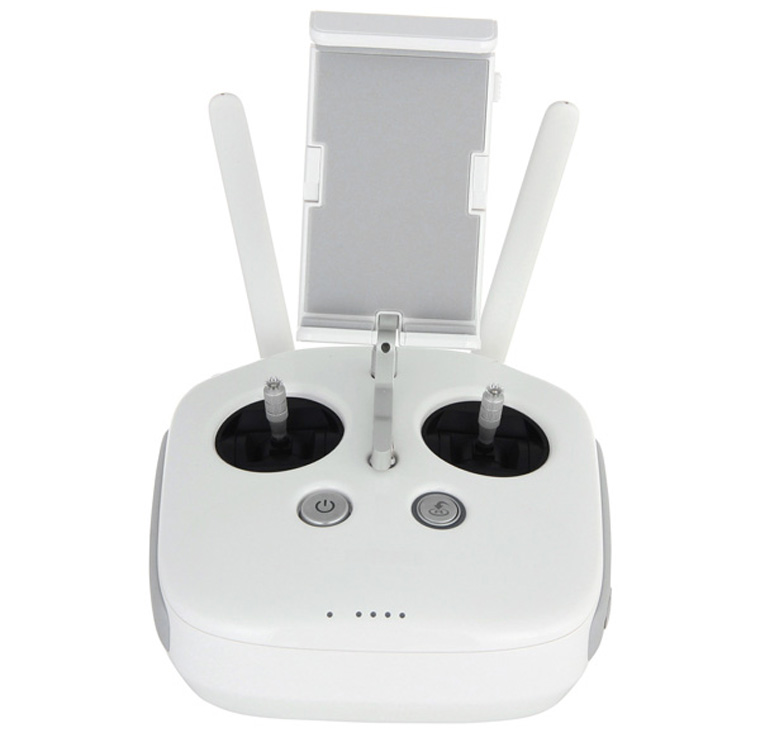
С помощью правого стика вы можете перемещать коптер вперед, назад, влево или вправо. Учитывайте, что дрон летит под углом, поэтому при наибольшем отклонении ручки от центра и угол будет наибольшим (30 градусов). Для запуска двигателей вам нужно свести оба стика в нижние углы друг к другу. Остановка происходит при этом же движении или если вы потяните левый стик вниз и удержите его. Описанные выше действия характерны для режима Mode 2, который выставлен по умолчанию. Но если вы левша, то можете включить режим Mode 1, и тогда назначения ручек поменяются местами (газ будет справа).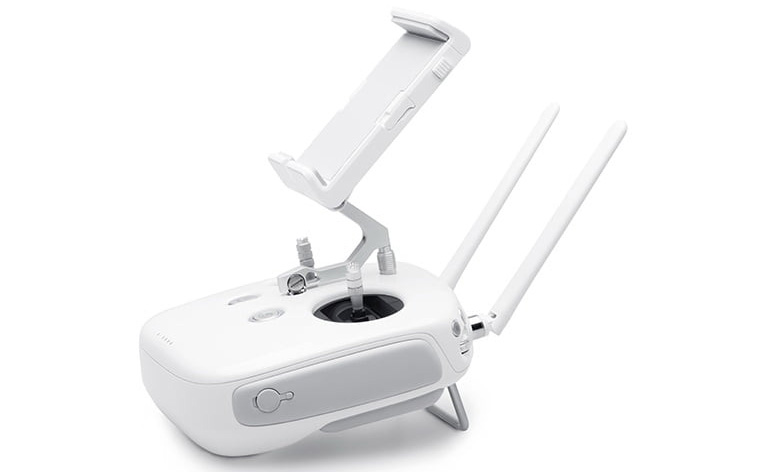
Теперь разберем функциональные кнопки на корпусе пульта. Рядом с ручками управления есть кнопка питания и кнопка возврата домой. Для включения дрона нужно нажать кнопку питания один раз и затем второй раз и удерживать две секунды. Кнопка возврата домой вернет дрон в то место, откуда он стартовал.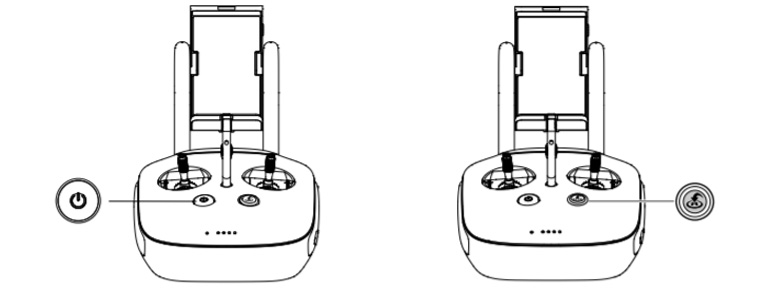
С торца пульта есть два колесика (диска). Передвигая правый диск, вы измените угол наклона подвеса видеокамеры. Поворачивая левый диск, вы зададите различные параметры камеры (при условии использования мобильного приложения DJI GO). Рядом с дисками есть еще несколько кнопок. Справа находится переключатель режима полетов и кнопка записи / остановки записи видео. Слева есть кнопка для создания фото и кнопка паузы, которая позволяет выйти из заданного режима полета.
Снизу пульта расположились еще две кнопки, функции которых вы можете настроить сами при помощи приложения DJI GO. Дополнительно на корпусе есть крепление для смартфона, антенны, USB-разъемы, индикаторы и разъем питания.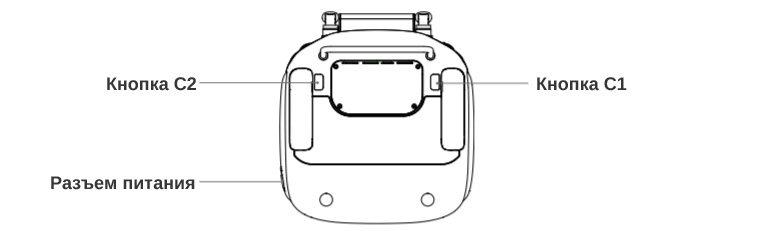
Подключение Phantom 4 телефону
Вначале подключите телефон к пульту управления. Для этого разложите на пульте специальное крепление, нажмите кнопку сбоку для освобождения фиксатора, установите в него телефон и надежно зафиксируйте его. Подсоедините телефон к пульту при помощи USB-провода, идущего от пульта. Один конец этого провода вставьте в телефон, а другой на заднюю панель пульта. Включите дрон и пульт, для чего каждый раз нажимайте кнопку включения дважды: один раз коротко и второй раз с удержанием в две секунды.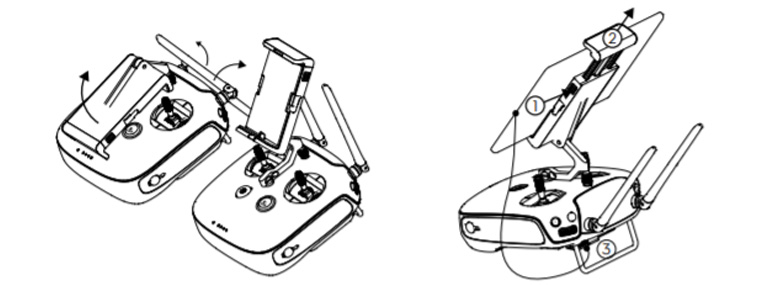
На подключенном телефоне установите и запустите мобильное приложение DJI GO 4, найдя его в своем магазине приложений. После запуска приложения вам нужно дать все запрашиваемые разрешения, подождать разархивации файлов и согласиться с правилами разработчика (кнопки I Agree и Join).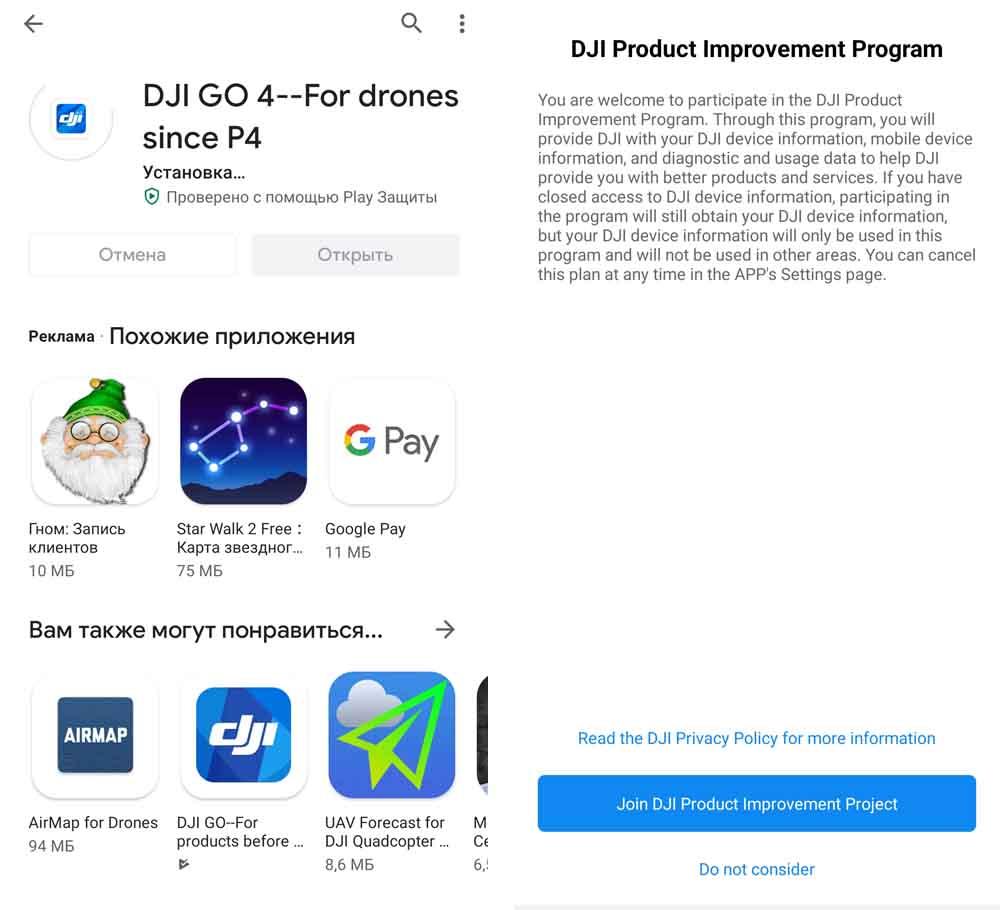
После захода в свой аккаунт вы увидите название вашей модели. Для подключения дрона нажмите кнопку Enter Device и дождитесь сопряжения устройств. Вверху у вас есть список устройств, развернув который вы можете найти свою модель дрона и увидеть в открывшемся меню большой перечень учебных видео именно для этой модели. Правда, видео представлены на английском языке.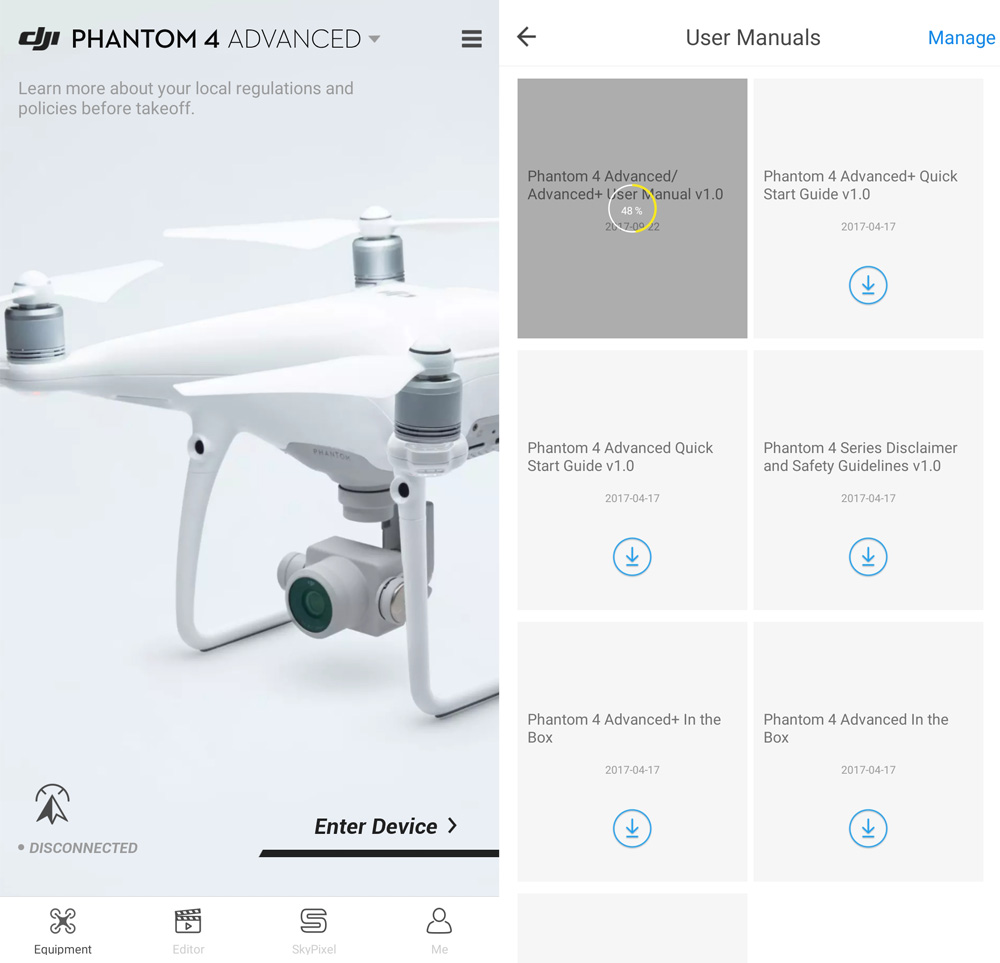
После подключения квадрокоптера к телефону вы попадаете в меню, в котором будете находиться большую часть работы с дроном. Разберем подробнее обозначения этого экрана. В верхней линии слева направо представлены такие значки. Состояние системы показывает, подключен ли дрон, и при необходимости выводит различные предупреждения. Под этим значком находится длинная полоса состояния уровня заряда, а далее идет значок с изображением включенного режима полета, уровень GPS-сигнала, состояние функций систем обзора, состояние Wi-Fi, число оставшегося заряда аккумулятора в процентах и значок основных настроек (см. картинку ниже).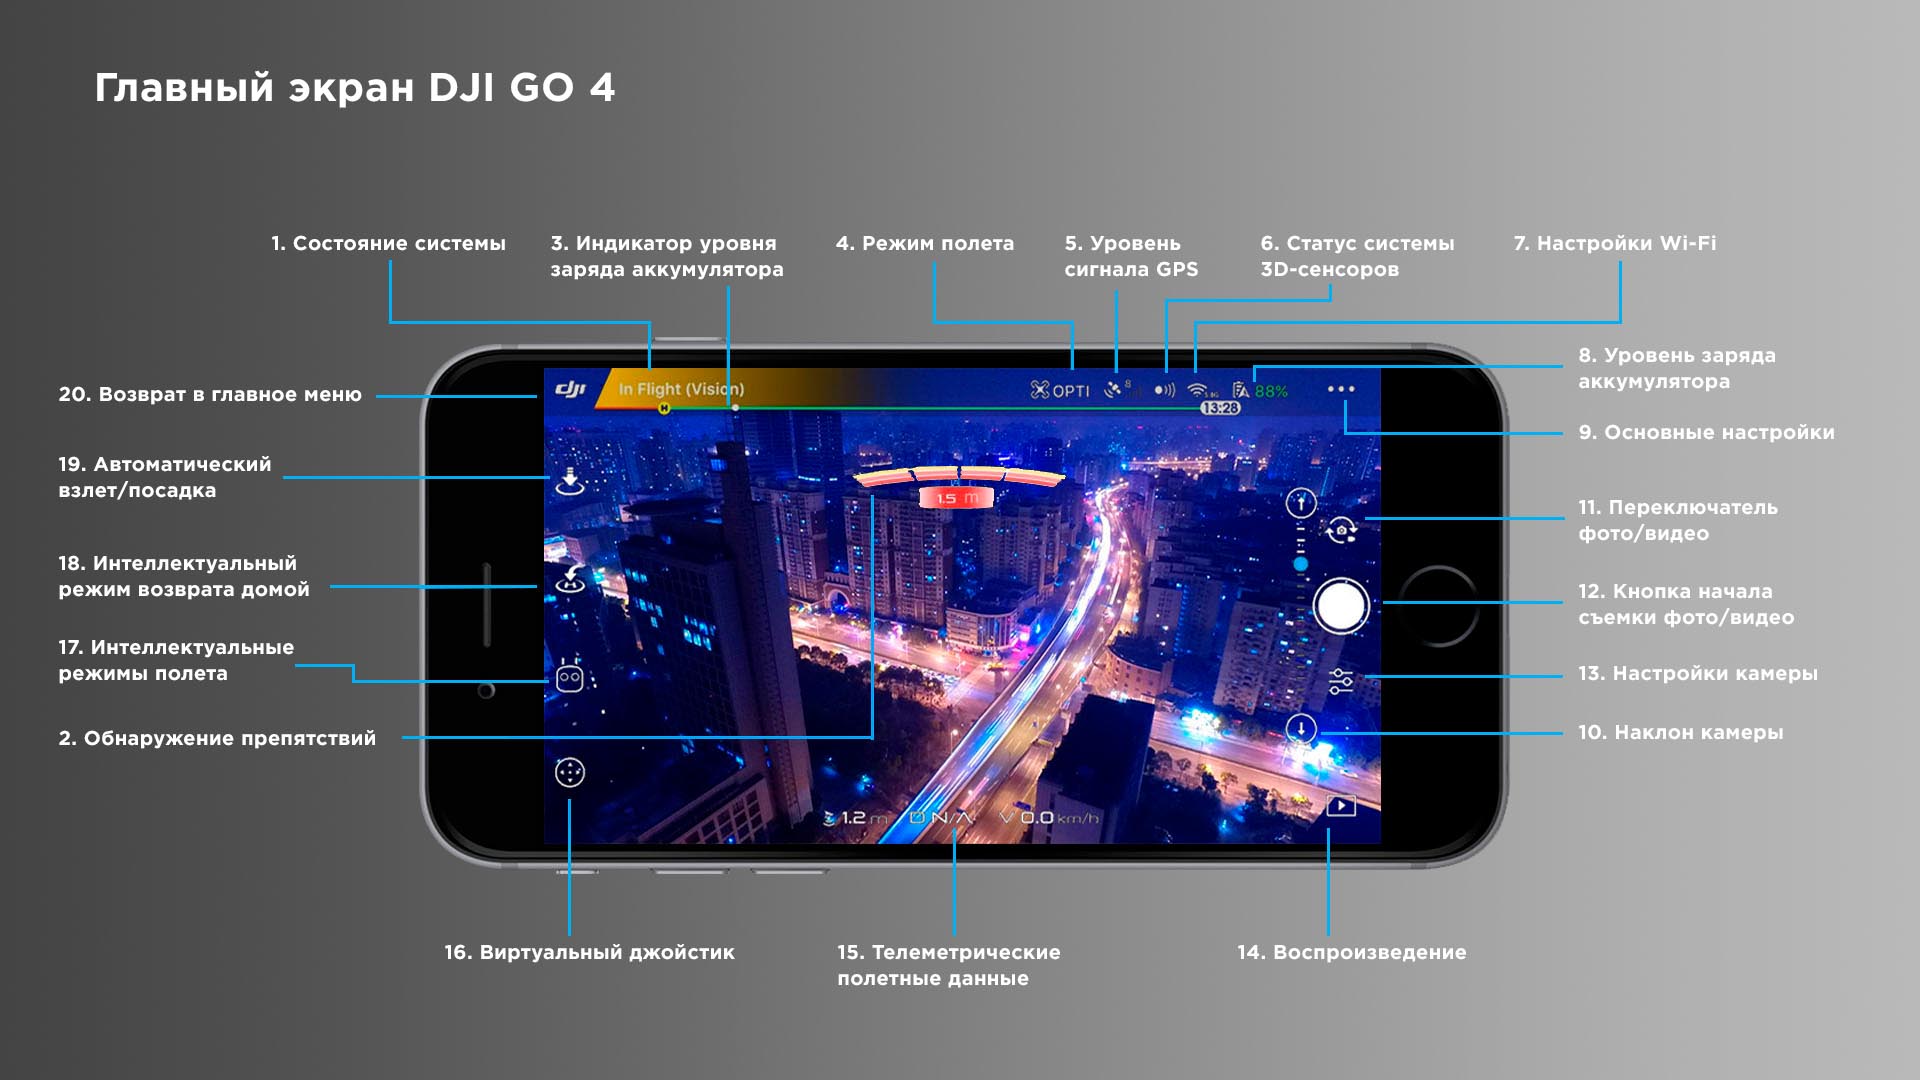
Колонка значков слева посвящена полету и содержит значки автовзлета и автопосадки, нескольких режимов полета. Также в ней есть значок для перехода в главное меню. Колонка значков справа посвящена работе с камерой. На самом экране присутствует информация об обнаруженных препятствиях: при их нахождении на экране загорается красный или оранжевый сигнал и указывается расстояние до преграды. По нажатию на соответствующий значок можно попасть в конкретный раздел, например просмотреть сети Wi-Fi или сменить режим полета. В нижней строке есть возможность переключиться на виртуальный джойстик (на экране телефона) или посмотреть данные полета (скорость, расстояние и пр.).
Настройка DJI Phantom 4
Нажав на указанном выше экране три точки в верхнем углу, вы попадаете в обширное меню настроек дрона. Слева присутствуют значки, которые помогут вам опознавать тот или иной раздел настроек. Так, первый раздел с изображением квадрокоптера посвящен его основным настройкам. В частности, здесь задается точка возврата домой (Home Point Setting). Для ее задания поставьте дрон на площадку, которая будет точкой возврата, нажмите значок со стрелкой и кнопку Ок. Для привязки дрона к пульту нажмите на значок человечка.
В этом же меню отключаются спортивные режимы и устанавливается высота возврата домой (Return-to-Home Altitude). Советуем сразу задать ее в зависимости от вашей местности. Если вы новичок в управлении дронами, включите режим Beginner Mode. Тогда коптер будет летать в заданном радиусе от вас на низкой скорости. Также поставьте максимальную высоту и дистанцию удаления от вас в строках Set Max Flight Altitude и Set Max Flight Distance. Остальные настройки этого раздела предназначены для опытных пользователей.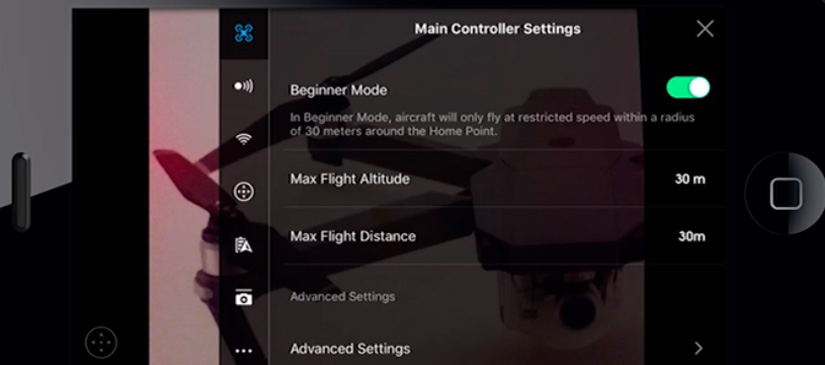
Во втором разделе отключаются визуальные сенсоры, однако новичку такие отключения делать не рекомендуем. Третий раздел посвящен настройкам пульта управления. Первым в нем является калибровка пульта управления, которая выполняется при отключении пульта от дрона. Для ее выполнения нажмите кнопку Calibrate, установите стики в центральное положение, вращайте колесики пульта из одного положения в другое и вращайте стики по кругу, пока у вас не активизируется кнопка Finish. Нажмите на Finish. В этом же разделе вы можете выбрать один из режимов управления пультом и настроить желаемые функции на кнопки С1 и С2.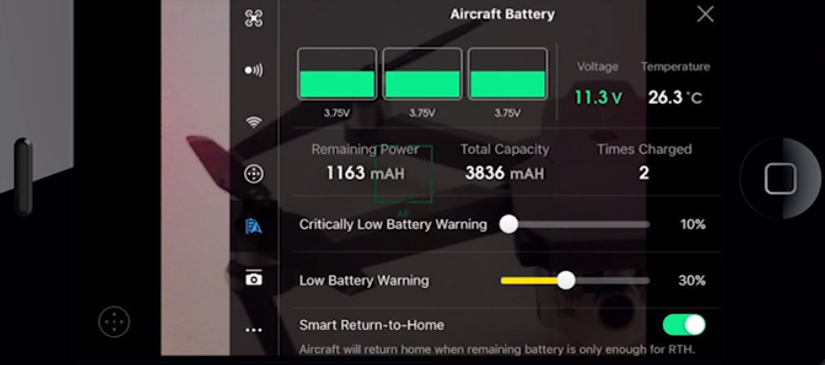
Раздел HD посвящен настройкам передачи видео и на первых порах вам не нужен. Следующий за ним раздел нужен для настроек батареи. В нем вы можете видеть состояние всех элементов батареи, задать минимальный уровень заряда, при котором дрон автоматически вернется домой, и некоторые другие настройки. За ним идет раздел, посвященный подвесу. Здесь интересна настройка Follow или FPV в строке Gimbal Mode. Это режимы съемки, причем Follow снимает в режиме следования (сохраняется плавная съемка), а FPV происходит с фиксацией камеры, что создает ощущение полета от первого лица. За тремя точками скрываются и другие настройки, которые нужны опытным пользователям.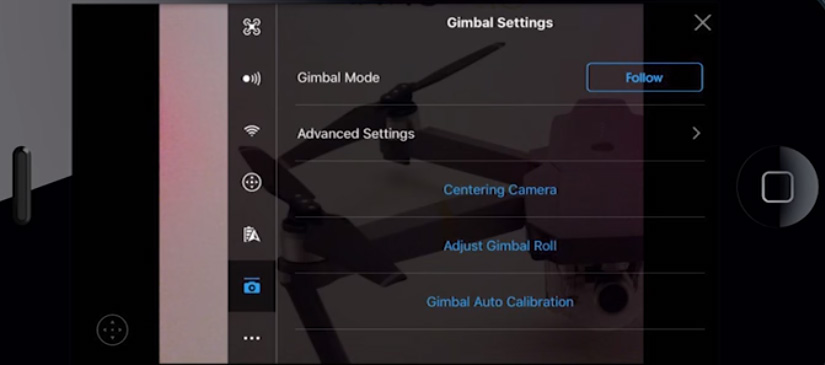
Если у вас уже сложилось общее представление об устройстве Phantom 4 и принципах управления им, самое время перейти к экспериментам на площадке и затем приступить к более детальному изучению возможностей этой умной техники.
Загрузить
Phantom 4 Pro_Pro Plus инструкция.pdf 2016/11 V1.0

8 Голосов
![]() 0
0
Инструкция на русском языке к Phantom 4 Pro Plus