Посмотреть инструкция для Peugeot Expert (2021) бесплатно. Руководство относится к категории автомобили, 1 человек(а) дали ему среднюю оценку 9.3. Руководство доступно на следующих языках: русский. У вас есть вопрос о Peugeot Expert (2021) или вам нужна помощь? Задайте свой вопрос здесь
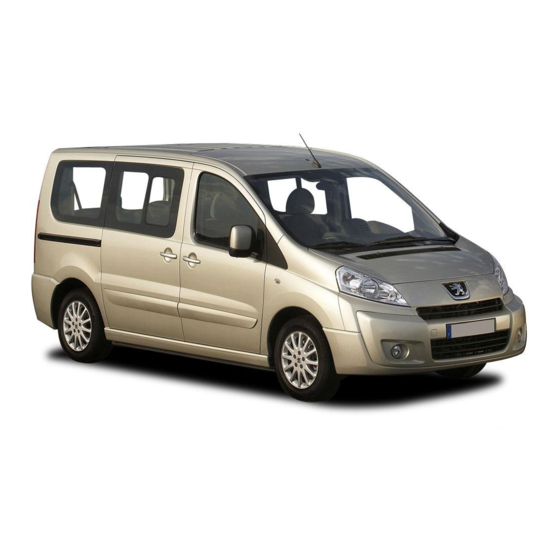
Peugeot Expert (2021) — это легкий коммерческий фургон, выпущенный французским автопроизводителем Peugeot в 2021 году. Он оснащен дизельным двигателем объемом 2,0 литра, что обеспечивает надежную и экономичную езду. Фургон может вместить до трех человек и имеет грузоподъемность около 1 тонны. Кроме того, он оснащен навигационной системой и мультимедийным экраном для удобства водителя.
Peugeot Expert имеет стильный и современный дизайн, который сочетается с высокой функциональностью. Он имеет просторный кузов с возможностью регулировки пола и стенок, а также удобные двери со слайдинговыми механизмами и задними дверями-крышкой. Фургон также оснащен системой помощи при парковке, которая облегчает маневрирование на узких улицах и в городском трафике.
Peugeot Expert (2021) — это надежный и универсальный транспортный средство, которое подходит для многих компаний и предприятий. С комбинацией стильного дизайна, высокой функциональности и приемлемой цены, эта модель выбор многих владельцев бизнеса.
Главная
Не можете найти ответ на свой вопрос в руководстве? Вы можете найти ответ на свой вопрос ниже, в разделе часто задаваемых вопросов о Peugeot Expert (2021).
Как перевести мили в километры?
1 миля равна 1,609344 километрам, а 1 километр — 0,62137119 милям.
Где я могу узнать идентификационный номер транспортного средства Peugeot?
Место размещения идентификационного номера транспортного средства зависит от марки и типа транспортного средства. Номер может быть выбит на раме транспортного средства или указан на номерном знаке. Чтобы узнать место расположения идентификационного номера транспортного средства лучше всего ознакомиться с руководством по эксплуатации Peugeot Expert (2021).
Что такое идентификационный номер транспортного средства (VIN)?
Идентификационный номер транспортного средства — уникальный для каждого транспортного средства идентификационный номер. Аббревиатура VIN расшифровывается как «Vehicle Identification Number» (Идентификационный номер транспортного средства).
Когда транспортному средству Peugeot требуется техническое обслуживание?
Регулярное техническое обслуживание необходимо всем транспортным средствам. С информацией о том, как часто необходимо проходить техническое обслуживание и чему именно стоит уделять особое внимание можно ознакомиться в инструкции по техническому обслуживанию. Как правило, транспортное средство требует технического обслуживания каждые 2 года или 30 000 километров пробега.
Когда следует заменять тормозную жидкость на Peugeot?
Тормозную жидкость рекомендуется менять каждые два года.
В чем разница между топливом E10 и E5?
В топливе E10 содержится до десяти процентов этанола, в то время как в E5 содержится менее пяти процентов. Соответственно, топливо E10 менее вредит окружающей среде.
Одна или несколько дверей не открываются изнутри. Что мне делать?
Скорее всего, замок оснащен защитой от детей и поэтому не может быть открыт изнутри. Процедура открытия замка с защитой от детей зависит от марки и типа замка.
Автомобильный радиоприемник не включается, что делать?
Если автомобильный радиоприемник не включен, на него не будет подаваться питание. Убедитесь, что красный провод подключен к контактному источнику питания, а желтый провод — к источнику питания постоянной мощности.
Инструкция Peugeot Expert (2021) доступно в русский?
Да, руководствоPeugeot Expert (2021) доступно врусский .
Не нашли свой вопрос? Задайте свой вопрос здесь
Сборник инструкций по эксплуатации автомобиля Peugeot Expert 2011-2014 годов выпуска.
- Автор: —
- Издательство: Peugeot
- Год издания: 2011-2014
- Страниц: —
- Формат: PDF
- Размер: 39,8 Mb
Сборник инструкций по эксплуатации автомобиля Peugeot Expert Tepee 2011-2014 годов выпуска.
- Автор: —
- Издательство: Peugeot
- Год издания: 2011-2014
- Страниц: —
- Формат: PDF
- Размер: 41,2 Mb
Руководство по ремонту и эксплуатации автомобилей Citroen Evasion/Jumpy, Peugeot 806/Expert, Fiat Ulysse/Scudo и Lancia Zeta 1994-2001 годов выпуска с бензиновыми и дизельными двигателями.
- Автор: —
- Издательство: Гуси-Лебеди
- Год издания: 2006
- Страниц: 227
- Формат: PDF
- Размер: 27,8 Mb
Руководство по ремонту и эксплуатации автомобилей Citroen Evasion/Jumpy, Peugeot 806/Expert, Fiat Ulysse/Scudo и Lancia Zeta 1994-2001 годов выпуска с бензиновыми и дизельными двигателями.
- Автор: —
- Издательство: Гуси-Лебеди
- Год издания: —
- Страниц: 230
- Формат: PDF
- Размер: —

Руководство по эксплуатации, техническому обслуживанию и ремонту автомобилей Citroen Jumpy, Peugeot Expert и Fiat Scudo 1998-2007 годов выпуска с дизельными двигателями.
- Автор: —
- Издательство: Автомастер
- Год издания: 2010
- Страниц: 323
- Формат: DjVu
- Размер: 13,0 Mb
Руководство по эксплуатации и ремонту автомобилей Citroen Jumpy, Peugeot Expert и Fiat Scudo с 2007 года выпуска с бензиновыми и дизельными двигателями.
- Автор: —
- Издательство: Монолит
- Год издания: —
- Страниц: 438
- Формат: —
- Размер: —

Руководство по эксплуатации и ремонту автомобилей Citroen Jumpy, Peugeot Expert и Fiat Scudo с 2007 года выпуска с бензиновыми и дизельными двигателями.
- Автор: —
- Издательство: Монолит
- Год издания: —
- Страниц: 446
- Формат: —
- Размер: —

Peugeot Expert / Citroen Jumpy / Fiat Scudo с дизельными двигателями: DW8 (WJZ)/ DW8B (WJY) 1.9 л (1868 см³) 69 л.с./51 кВт, XUD9 (D9B)/ XUD9TE 1.9 л (1905 см³) 69-92 л.с./51-68 кВт и DW10 TD/ATED/BTED/CTED (RHY/RHX/RHW/RHZ) 2.0 л (1997 см³) 87-94-109 л.с./64-69-80 кВт; Руководство по эксплуатации, техническому обслуживанию и ремонту. Технические характеристики, электросхемы, устройство, диагностика, особенности конструкции. Производственно-практическое издание лёгкие коммерческие автомобили класса «М» Пежо Эксперт (95-07), Ситроен Джампи (94-07), Фиат Скудо (96-07) с цельнометаллическими несущими кузовами фургон и минивэн (комби) переднеприводные модели первого поколения выпуска с июня 1994 по декабрь 2006 года
ЕСЛИ ВЫ ВИДИТЕ ОШИБКУ 406 Not Acceptable и не видите документ, то скорей всего у Вас IP РФ и его надо сменить, на любой другой страны, с помощью VPN ( Scribd и SlideShare блокируют посетителей с Российским IP).
Видео Peugeot Expert/ Citroën Jumpy/ Fiat Scudo замена сцепления и пыльника внутренней гранаты (ШРУСа)
Peugeot Expert / Citroen Jumpy / Fiat Scudo Mark I общая информация (Пежо Эксперт, Ситроен Джампи, Фиат Скудо 1994-2007)
СЦЕПЛЕНИЕ
В зависимости от комплектации (двигатель + КПП), типа маховика (одинарный или сдвоенный, для двигателей DW-10) и года выпуска (номера RPO) автомобиль может быть оснащен сцеплением двух типов: push-type и pull-type.
Привод выключения сцепления также может быть двух типов: механический (при помощи троса) и гидравлический (посредством двух гидроцилиндров — главного, установленного на педали сцепления, и рабочего, установленного в картере сцепления КПП).
Механический привод применяется на всех рассматриваемых типах КПП, а гидравлический — только на КПП ML5C и ML5T.
Трос привода сцепления
Трос привода сцепления имеет автоматическую регулировку, компенсирующую износ накладок сцепления и укорачивание оплетки троса при сжатии.
Момент затяжки винтов крепления «корзины сцепления» — 20 Нм.
Фирмы-производители: LUK или VALEO.
ВАЛЫ ПРИВОДА КОЛЕС (ПОЛУОСИ)
На данном автомобиле применяются валы двух типов: GLAENZER (GKN) или PSA.
Вал конструктивно может быть сплошным или трубчатым.
Вал идентифицируется по маркировкам или табличкам.
ВАЛЫ ПРИВОДА КОЛЕС (ПОЛУОСИ) типа GLAENZER (GKN)
Со стороны ступицы колеса (А) установлен герметизированный, фиксированный (в осевом направлении) трехшиповой шарнир равных угловых скоростей — ШРУС (типа «Трипод»). Шлицевой наконечник шарнира, входящий в ступицу, закреплен центральной гайкой. Со стороны КПП установлен герметизированный, скользящий (в осевом направлении) трехшиповой шарнир (типа «Трипод»). Шлицевой наконечник шарнира входит в планетарную шестерню дифференциала КПП.
| № | Спецификация / Specs | Данные |
| Габариты (мм/mm) и масса (кг/kg) / Dimensions and Weight | ||
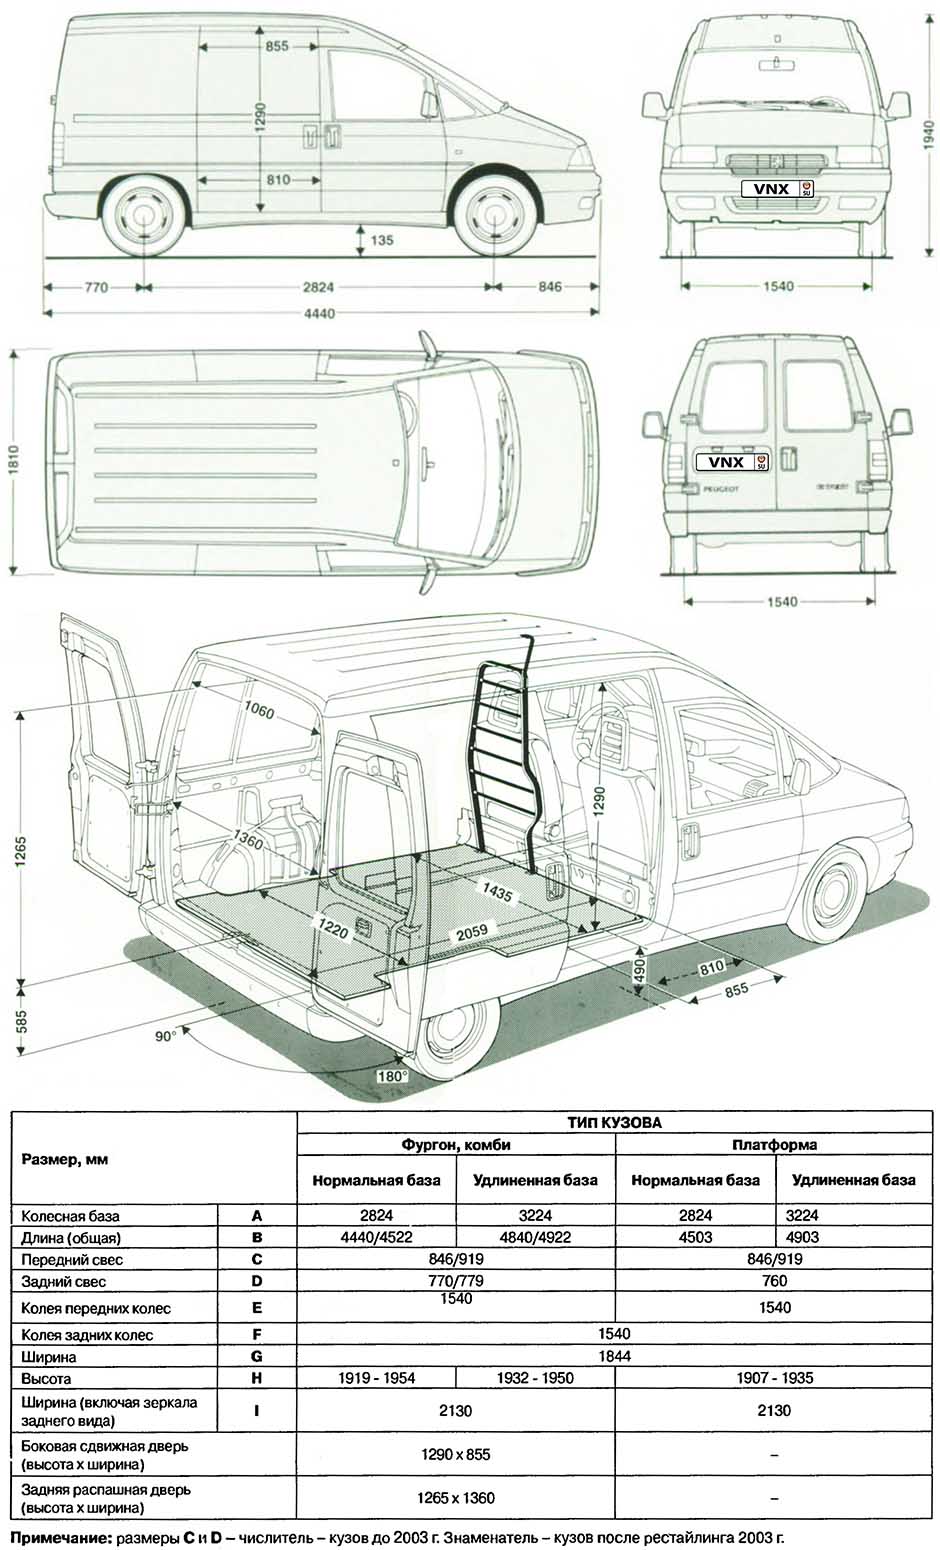
| 1 | Длина / Length | 4440 |
| 2 | Ширина (без/с зеркалами) / Width | 1810-1844/2134 |
| 3 | Высота (загружен/пустой) / Height | 1919-1954 |
| 4 | Колёсная база / Wheelbase | 2824 |
| 5 | Дорожный просвет (клиренс) / Ground clearance | 135 |
| 6 | Снаряжённая масса / Total (curb) weight | 1429 |
| Полная масса / Gross (max.) weight | 2205 | |
|
Двигатель / Engine |
||
| 7 | Тип / Engine Type, Code | Дизельный, жидкостного охлаждения, четырехтактный, DW8 (WJZ) |
| 8 | Количество цилиндров / Cylinder arrangement: Total number of cylinders, of valves | 4-цилиндровый, 8V, рядный, SOHC с верхним расположением одного распределительного вала |
| 9 | Диаметр цилиндра / Bore | 82.2 мм |
| 10 | Ход поршня / Stroke | 88.0 мм |
| 11 | Объём / Engine displacement | 1868 см³ |
| 12 | Система питания / Fuel supply, Aspiration | Непосредственный впрыск топлива форсунками ТНВД LUCAS VARITY DPC или BOSCH VE |
| Турбонаддув и промежуточное охлаждение наддувочного воздуха | ||
| 13 | Степень сжатия / Compression ratio | 23.0:1 |
| 14 | Максимальная мощность / Max. output power kW (HP) at rpm | 51 кВт (69 л.с.) при 4600 об/мин |
| 15 | Максимальный крутящий момент / Max. torque N·m at rpm | 125 Нм при 2500 об/мин |
|
Трансмиссия / Transmission |
||
| 16 | Сцепление / Clutch type | 215 мм Однодисковое, сухое, с диафрагменной нажимной пружиной и гасителем крутильных колебаний, постоянно замкнутого типа |
| 17 | КПП / Transmission type | BE3/BE4R МКПП 5 пятиступенчатая механическая, двухвальная, с синхронизаторами на всех передачах переднего хода |
О Книге
- Название: CITROEN JUMPY, PEUGEOT EXPERT, FIAT SCUDO Руководство по эксплуатации, техническое обслуживание, ремонт, особенности конструкции, электросхемы
- Дизельные двигатели: DW8 (WJZ)/ DW8B (WJY) 1.9 л (1868 см³) 69 л.с./51 кВт, XUD9 (D9B)/ XUD9TE 1.9 л (1905 см³) 69-92 л.с./51-68 кВт и DW10 TD/ATED/BTED/CTED (RHY/RHX/RHW/RHZ) 2.0 л (1997 см³) 87-94-109 л.с./64-69-80 кВт
- Выпуск с 1994 года
- Серия: «Ремонт Автомобилей»
- Год издания: 2010
- Автор: Коллектив авторов
- Издательство: «Ассоциация независимых издателей»
- Формат: PDF
- Страниц в книге: 323
- Размер: 188.32 МБ
- Язык: Русский
- Количество электросхем: 1
-
Contents
-
Table of Contents
-
Bookmarks
Quick Links
Related Manuals for PEUGEOT EXPERT Tepee
Summary of Contents for PEUGEOT EXPERT Tepee
-
Page 1
HANDBOOK… -
Page 2
WELCOME The new Expert Tepee has been designed to satisfy all your Please note the following point: the fitting of electrical equipment requirements in terms of practicality, comfort, safety and or accessories which are not recommended by PEUGEOT aesthetics. In order to get the most out of your vehicle, we suggest that you take a tour, from the cab to the seating area, may result in a failure of your vehicle’s electronic system. -
Page 3
PRESENTATION This handbook has been designed to familiarise you with your Within the chapters, symbols draw your attention to specific new vehicle from the moment you get behind the wheel and to information: describe the operating features. directs you to the chapter and section which contains detailed Reading the handbook is made easy with the content consisting information concerning a function, of 10 identified chapters, which can be located by means of a… -
Page 5
Exterior… -
Page 6
Exterior Partially open the bonnet, lift the safety Secure the stay in one of the two notches, Opening the bonnet catch and raise the bonnet. according to the height required, to hold the Lift the cover at the foot of the left-hand bonnet open. -
Page 7
Interior INSTRUMENTS AND CONTROLS 1. Lighting and direction indicator control stalk. 2. Instrument panel with screen. 3. Wipers, screenwash, trip computer control stalk. 4. Gear lever. 5. Ignition. 6. Audio system controls. 7. Driver’s airbag, horn. 8. Steering wheel height and reach adjustment. -
Page 8: Adjusting The Time
Interior CENTRE CONSOLE AND OVERHEAD STORAGE UNIT 1. Location of controls: — electric child lock, — central locking/unlocking. 2. Heating and/or air conditioning controls. 3. Location of the ticket/card storage or controls: — deactivation of the DSC, — deactivation of the interior protection alarm, alarm LED, — deactivation of the parking sensors.
-
Page 9: Sitting Comfortably
Interior SITTING COMFORTABLY 1. Forwards-backwards adjustment. 2. Backrest angle. Driver’s seat 3. Cushion height. 4. Lumbar. 5. Head restraint height.
-
Page 10
Interior Steering wheel Mirrors Electric windows Adjust the steering wheel for height and Manual adjustments. reach. Electric adjustments, electric folding / Seat belts unfolding. Height adjustment. Fastening. -
Page 11: Seeing Clearly
Interior SEEING CLEARLY Changing bulbs Lighting control stalk Wiper control stalk In bad weather or in winter, check that the lamps are not covered with mud or snow. Lighting off. fast. normal. intermittent. Sidelamps. off. single wipe. Main beam headlamps (blue). AUTO , press the stalk down.
-
Page 12: Driving Safely
PEUGEOT centre. For more information on the use of this Cruise control / Speed limiter PEUGEOT Connect Sound (RD5) system, refer to section 9, «Technology on board». For the cruise control, he vehicle speed must be…
-
Page 13: Cab Fittings
Interior CAB FITTINGS REAR FITTINGS Overhead storage unit Rear seats Glove box Storage compartment Seating area fittings…
-
Page 14: Child Safety
Interior CHILD SAFETY Seat and bench configurations Electric child lock Child surveillance mirror Rear windows Safety anti-pinch Child seats…
-
Page 15
Interior VENTILATION Recommended settings For optimum use of the system, we recommend: If I require… Temperature Air flow distribution recirculation Heating Manual controls Cooling Demisting Defrosting Digital controls, with separate driver At the rear and passenger settings… -
Page 16: Eco-Driving
ECO-DRIVING Eco-driving is a range of everyday practices that allow the motorist to optimise their fuel Remember to make use of equipment consumption and CO emissions. that can help keep the temperature in the passenger compartment down (sunroof Optimise the use of your Drive smoothly and window blinds…).
-
Page 17
Limit the causes of Observe the recommendations excess consumption on maintenance Spread loads throughout the vehicle; place Check the tyre pressures regularly, when When refuelling, do not continue after the the heaviest items in the bottom cold, referring to the label in the door third cut-off of the nozzle to avoid any of the boot, as close as possible to the aperture, driver’s side. -
Page 18: Remote Control
Access Central locking Folding / unfolding the key Press this button to lock your Press this button to release the vehicle, cab and rear doors. key from its housing. The direction indicators flash To fold the key, press the once and the door mirrors fold. chromed button then fold the key into the housing.
-
Page 19: Changing The Battery
Wait at least one minute before using the remote If the remote control does not work after the A PEUGEOT dealer will be able to retrieve control. battery has been changed, reinitialise the the key code and the transponder code so Insert the key in the ignition switch with the buttons remote control.
-
Page 20
LED is on continuously. interior protection: it sounds if PEUGEOT dealer to ensure that the the volume inside the passenger keys in your possession are the only Get out of the vehicle. -
Page 21
LED flashes rapidly. indicates a fault with the siren connection. To switch it off, insert the key and switch Have the system checked by a PEUGEOT on the ignition. dealer or a qualified workshop. When the alarm has been triggered ten… -
Page 22: Sliding Side Door
Access Anti-intrusion protection The system automatically locks SLIDING SIDE DOOR The doors can still be opened from the all of the doors when you reach inside. If fitted on your vehicle, do not open the approximately 6 mph (10 km/h). left-hand side door while filling with fuel as The indicator lamp in the control: you risk damaging the fuel filler flap.
-
Page 23: From The Inside
Access From the outside With the ignition on, press Operation in the event of a battery failure this button, the LED is on Pull the handle towards you then towards accompanied by a message in the Front and side passenger doors the rear.
-
Page 24
Access HINGED REAR DOORS TAILGATE From the outside From the outside If fitted on your vehicle, locking/unlocking is When parked with the rear via the remote control. The two hinged doors open to 90°. doors open to 90°, the doors To open, press the control then raise the To open, pull the handle towards you then mask the rear lamps. -
Page 25: Instrument Panel Screen
Instruments and controls INSTRUMENTS AND CONTROLS Warning lamp and controls in the overhead storage unit INSTRUMENT PANEL Passenger airbag deactivated warning 1. Distance recorder in miles / kilometres. lamp. 2. Screen. Driver / passenger heated seat controls 3. Fuel level, coolant temperature. (version with 2 front seats).
-
Page 26: Adjusting The Time
Instruments and controls Instrument panel without screen ADJUSTING THE TIME Centre console without screen Centre console with screen turn to the right to increase the hours The display — time sequence To adjust the time of the clock (hold the button to the right for rapid is linked according to model on the instrument panel, use the scrolling),…
-
Page 27: Warning Lamps
You must stop as soon as it is safe to do so. Park, STOP lamp and «Coolant temperature», switch off the ignition and call a PEUGEOT dealer or accompanied by «Electronic brake force a qualified workshop. a message in the distribution»…
-
Page 28
Park and switch off the ignition. Change or repair the a deflated or punctured tyre. wheel. Under-inflation detection accompanied Have it checked by a PEUGEOT dealer or a qualified a faulty sensor. by the service workshop. warning lamp. -
Page 29
Instruments and controls Warning lamp indicates Solution-action Have the system checked by a PEUGEOT dealer or a Front / lateral / flashing or failure of an airbag. qualified workshop without delay. Chapter 4, «Airbags» curtain airbag remains on. section. Front… -
Page 30
LED in the system malfunction. E.g.: under- E.g. Check the pressure of the tyres. Have them button (in the inflation of the tyres. checked by a PEUGEOT dealer or a qualified workshop. dashboard) on. -
Page 31
Instruments and controls Warning lamp indicates Solution-action Have the pads replaced by a PEUGEOT dealer or a Brake pads brake pad wear. qualified workshop. manual selection or automatic Turn the lighting stalk to the second position. Dipped beam lighting. headlamps /… -
Page 32: Chapter 6, «Checks» Section
(Diesel additive emissions filter level, risk of clogging, …). Chapter 6, «Checks» section. on and Have the filter bled by a PEUGEOT dealer or a qualified Presence of accompanied by workshop without delay. water in the water in the Diesel filter.
-
Page 33: Fuel Gauge
If the needle remains in the red zone, have turned to the «running» position. zone: normal operation. the system checked by a PEUGEOT dealer The gauge is positioned on: In arduous conditions of use or hot climatic or a qualified workshop.
-
Page 34: Emissions Controls
There is a risk of damage to the catalytic System which automatically checks the increases fuel consumption. converter. Have it checked by a PEUGEOT pressures of the tyres while driving. dealer or a qualified workshop. The system continuously monitors the…
-
Page 35: Operating Fault
(according to equipment), if you have a compressor, the one in Go to a PEUGEOT dealer or a qualified the temporary puncture repair kit for workshop to have the system checked or,…
-
Page 36: Service Indicator
Instruments and controls SERVICE INDICATOR More than 1 000 miles/km before the next A few seconds after the ignition is switched service is due on, the oil level is displayed, then the total This programmes service intervals according Example: 4 800 miles/km remain before distance recorder resumes normal operation to the use of the vehicle.
-
Page 37: Engine Oil Level Indicator
When the lighting indicator. Contact a PEUGEOT dealer or a reaches the minimum (or maximum) setting, qualified workshop. release the button then press it again to increase (or reduce) the brightness.
-
Page 38: Speed Manual Gearbox
Gearboxes and steering wheel Engaging reverse gear 5-SPEED MANUAL GEARBOX 6-SPEED MANUAL GEARBOX Raise the ring under the knob and move Engaging reverse gear Engaging 5 or 6 gear the gear lever to the left then forwards. With clutch pedal fully down, place the …
-
Page 39: Automatic Gearbox
Gearboxes and steering wheel AUTOMATIC GEARBOX Reverse: position of the lever for Drive: position of the lever for reverse gear. driving. Selecting positions To reverse the vehicle. To move the vehicle forwards in automatic mode. Move the lever select a position. Once the position is selected, the Manual: selection of the gears by corresponding indicator lamp appears in…
-
Page 40: Moving Off
Gearboxes and steering wheel Moving off The gearbox always selects the most Reverse gear suitable gear taking account of the following: With the engine running, to move off from Select position R , with the the style of driving, position P . vehicle stationary and the the road profile, engine at idle.
-
Page 41: Manual Mode
You can change from position D position P to another position in the Contact a PEUGEOT dealer or a qualified (automatic mode) to position M event of a battery failure. workshop as soon as possible.
-
Page 42: Gear Shift Indicator
Gearboxes and steering wheel Operation Depending on the driving conditions and the equipment of your vehicle, the system may recommend skipping one or more gears. You can follow this indication without going through the intermediate gears. The gear engagement recommendations should not be considered to be compulsory.
-
Page 43: Starting And Stopping
Starting and stopping Good practice when starting Minimise engine and gearbox wear To ensure the correct operation and long life of your engine and gearbox, when the ambient temperature is below -23°C, it is necessary to leave the engine idling for four minutes.
-
Page 44: Lighting Control
Steering mounted controls Lighting off Automatic illumination of headlamps if your vehicle is fi tted with a sunshine sensor. Sidelamps Dipped beam (green) Main beam (blue) STEERING MOUNTED CONTROLS LIGHTING CONTROL Dipped beam/main beam change Pull the stalk fully towards you. DIRECTION INDICATORS Front and rear lamps (flashing indicators)
-
Page 45: Front And Rear Foglamps
Steering mounted controls Front and rear foglamps Front foglamps (green) Daytime running lamps and rear foglamps (amber, Rotate ring B forwards to switch on and Depending on the country in which the vehicle 2nd rotation of the ring rearwards to switch off. The status is is sold, the vehicle may be equipped with forwards).
-
Page 46: Automatic Illumination Of Headlamps
1 — 5 people. Contact a PEUGEOT dealer or a qualified 2 — 6 to 9 people. Do not cover the sunshine sensor workshop. 3 — Driver + maximum authorised loads.
-
Page 47: Windscreen Wiper Stalk
Steering mounted controls Wash-wipe and headlamp wash Pull the stalk towards you, the wash-wipe is accompanied by a timed sweep of the wipers. The headlamp wash is linked with the wash- wipe, it is triggered if the dipped headlamps are on. To top up the levels, refer to the «Levels»…
-
Page 48: Rear Wiper
Rear screenwash This action enables you to position the Contact a PEUGEOT dealer or a qualified wiper blades for winter parking, cleaning or Turn the ring past the first workshop to have the system checked.
-
Page 49
Steering mounted controls This cruise control shows the function selection status in the instrument panel and displays the programmed speed: Function selected, display of the «Cruise Control» symbol. Function deactivated, OFF . Function activated . CRUISE CONTROL «CRUISE» «This is the speed at which the driver wishes In order for it to be programmed or Vehicle speed above to drive». -
Page 50
Steering mounted controls Selecting the function Temporarily exceeding the speed Reactivation Place the switch in the CRUISE position. It is possible to accelerate and drive Following deactivation of the cruise The cruise control is selected but is momentarily at a speed greater than the control, press this button. -
Page 51: Fixed Speed Limiter
The programmed speed is cleared then replaced by three dashes. Contact a A brief press decreases the speed PEUGEOT dealer or a qualified workshop to by 1 mph (km/h). have the system checked. A maintained press decreases the speed in steps of 5 mph (km/h).
-
Page 52
Steering mounted controls This speed limiter shows the function selection status in the instrument panel and displays the programmed speed: Function selected, displaying of the «Speed Limiter» symbol. Function deactivated, last programmed speed — OFF. Function activated. SPEED LIMITER «LIMIT» «This is the selected speed which the driver However, pressing the pedal beyond this Vehicle speed above,… -
Page 53: Selecting The Function
Steering mounted controls Selecting the function Place the switch in the LIMIT position. The limiter is selected but is not yet active. The screen indicates the last programmed speed. Programming a speed Activation/Deactivation (off) A speed can be programmed without activating Pressing this button once activates the the limiter but with the engine running.
-
Page 54
The last programmed speed remains in the Contact a PEUGEOT dealer or a qualified beyond the point of resistance . memory. workshop to have the system checked. -
Page 55: Air Distribution
Ventilation Air flow The fan speed varies from 1 to the fastest 4. Position 0 switches it off. Remember to adjust this control in order to attain the desired comfort level. Air distribution Air distribution is directed by turning the control towards: the side vents and the central vents,…
-
Page 56: Recirculation Of Interior Air
Ventilation Intake of exterior air Recommended settings The LED in the button is off. This is the preferred operating position. For optimum operation of the manual system, the settings below are recommended: Recirculation of interior air The LED in the button is on. Recirculation temporarily prevents If I require…
-
Page 57
Ventilation DIGITAL AIR CONDITIONING WITH SEPARATE SETTINGS Good practice If your vehicle is fitted with this control On entering the vehicle, the inside panel, it is located on the centre console. temperature may be much colder (or For maximum cooling or heating of the warmer) than is comfortable. -
Page 58: Automatic Operation
Ventilation Automatic operation Driver or passenger side comfort value Do not cover the sunshine sensor, located on the windscreen behind The value indicated on the display AUTO comfort programme the mirror, it is used for regulation of the corresponds to a level of comfort and not a This is the normal air conditioning system air conditioning.
-
Page 59: Manual Operation
Ventilation Manual operation Air flow Intake of exterior air / Recirculation of interior air Press the small fan button to You can, according to your requirements, Press this button to recirculate reduce the flow or the large fan make a different selection from that offered the interior air.
-
Page 60: Air Conditioning
If the system does not produce cold air, do not use it and contact a PEUGEOT dealer or Passenger compartment filter, a qualified workshop. carbon filter Ensure that this fi…
-
Page 61: Demisting And Defrosting
Ventilation DEMISTING AND DEFROSTING Manual mode Turn the control to this air Press the air conditioning button. distribution setting. Turn the control to this Returning to exterior air intake temperature setting. open permits renewal of the air in the passenger compartment (LED off).
-
Page 62
Ventilation Demisting the rear screen and/or Automatic air conditioning: visibility programme mirrors Pressing this button, with the engine The comfort programme (AUTO) may not running, activates the rapid demisting — be sufficient to quickly demist or defrost the defrosting of the rear screen and/or electric windows (humidity, several passengers, ice). -
Page 63: Rear Ventilation
Ventilation REAR VENTILATION Activation / Deactivation Temperature adjustment This button, located on the Control positioned: If your vehicle is fitted with an additional air overhead storage unit, enables conditioning unit, located in the rear of the on the blue, produces cool air, you to activate or deactivate the vehicle.
-
Page 64: Additional Heating
Ventilation ADDITIONAL HEATING Rear ventilation Coolant circuit heater Vehicles fitted with an HDi engine may be fitted with a heater. When the engine is at This is an additional and separate system idle or the vehicle is stationary, it is normal which heats the Diesel engine cooling to notice a high-pitched whistling noise and system to make starting easier.
-
Page 65
To avoid any risk of poisoning or Maintenance and repairs should only be asphyxiation, the heater must not be used, carried out by a PEUGEOT dealer or a even for short periods, in an enclosed space qualified workshop. Use recommended such as a garage or workshop which is not replacement parts only. -
Page 66
The Expert Tepee is treated the rear passengers while driving. by cataphoresis, ensuring perfect protection against corrosion. The anticorrosion… -
Page 67: Front Seats
Seats 2 — Seat back angle adjustment Pull the lever upwards and set the required angle. 3 — Driver’s seat height adjustment Depending on the version and configuration FRONT SEATS of your vehicle, you have either: Depending on the version and configuration a passive adjustment: pull the handle of your vehicle, different front seats are upwards then take your weight off the…
-
Page 68
Seats The adjustment is correct when the upper edge of the head restraint is level with the top of the head. To remove it, set it in the high position, press the tabs and pull upwards and forwards at the same time. an active adjustment: operate the handle To re-install, engage the head restraint rods Adjustable armrest… -
Page 69: Head Restraint
Seats 2-SEAT FRONT BENCH If your vehicle is fitted with this bench seat, it is fixed and has a 3rd seat belt. Head restraint Press the tab to adjust the height of the head restraint. To remove the head restraint, press the tabs and raise the head restraint.
-
Page 70
Seats Writing table If fitted to your vehicle, the back of the centre seat of the bench (Row 1) folds to form a writing table with two cup holder recesses. Pull the handle located at the top of the seat back cushion. -
Page 71: Rear Seats
Seats REAR SEATS The type of rear seats depends on the version and configuration of your vehicle. The individual seat is always located on the right-hand side and the bench on the left- hand side (in the direction of travel).
-
Page 72: Individual Passenger Seat
Seats Individual passenger seat Type 2: an individual seat the back of which Two-seat bench can be folded to the table position then This seat and the 2-seat bench are Three models are offered: raised, facilitating access to the rear space. interdependent.
-
Page 73
Seats Specifications depending on the Seat fitted with this control: the seat back Type 2: two seats with folding seat backs type of seat and seat cushion which can be raised. can be folded and coupled with the raising control. Seat fitted with this control: the seat back can be tilted. -
Page 74
Seats This armrest may be fitted. The seat backs of the centre seats are designed with cup holder and storage recesses. The seat backs of the outer seats are fitted with a storage net. -
Page 75
Seats Handling Folding the seat back to the table position Seat and bench of type 1: (centre seat example) Raise the seat. Enter, exit the vehicle: raise the seat Place the head restraints in the low Always start with the individual seat located position. -
Page 76
Seats Installing the seat Lock the front feet using this handle. For the type 2 seat and the type 2 / 3 bench: fold up the seat back. Always install the bench first. Tilt the seat towards the rear until the rear feet lock. -
Page 77
Seats Precautions Following the various handling operations: do not remove a head restraint without storing it and fix it to a support, check that the seat belts are always accessible to the passenger and easy to fasten, a passenger must not take his seat without adjusting his seat’s head restraint correctly and adjusting and fastening his seat belt. -
Page 78
Seats SEAT AND BENCH CONFIGURATIONS 5 seats 6 seats Examples of various layouts combining comfort and practicality The various operations must be carried out while stationary. Do not fit seats in the 3rd row without first fitting the corresponding seatbelts. 7 seats 8 seats 9 seats… -
Page 79: Sun Visor
Practical information Glove box Storage compartment PRACTICAL INFORMATION This is fitted with a lock, you can lock it CAB FITTINGS using the key. It contains three sockets for the connection Depending on the vehicle’s equipment, the of portable electronic equipment (video various fittings below enhance your cab.
-
Page 80
Practical information Storage tray and bottle holder Ticket storage Ashtray (1.5 L) According to the configuration of the vehicle. 12 volt socket Any liquid carried in an open receptacle The maximum power of the socket, which is (cup or other) may be spilt, with the risk of the cigarette lighter type, is 120 W. -
Page 81
Practical information Overhead storage unit This is located above the sun visors and has two compartments, with or without a cover, for storing a jumper, a file, … Be aware that storing a hard object in direct contact with the compartment may result in noise. -
Page 82
Practical information Front courtesy lamp Rear courtesy lamp Individual reading lamp SEATING AREA COURTESY Front: comes on when one of the If fitted on the vehicle, these are LAMPS switched on and off by means of a front or rear doors is opened. manual switch, with the ignition on. -
Page 83
Practical information Areas for toll cards / car park tickets The athermic windscreen has two non- reflective zones located either side of the base of the interior mirror. They are intended for affixing toll cards and/ or car park tickets. Mat fitting / removal When removing the front mat, push the seats as far back as possible and remove… -
Page 84
Practical information Nets on the back of the outer Fittings / storage compartments Load retaining net fixing seats Raise the flap to gain access to the load Storage tray and bottle holder retaining net fixings. (0.5 L) Coat hooks… -
Page 85: Stowing Rings
Practical information To remove: pull the load space cover towards you to disengage it from its fixings, reinsert the load space cover in its roller, compress it and remove it from its support. Stowing rings Load space cover Use the stowing rings on the rear floor to fix To install: the net, your loads or luggage.
-
Page 86: Rear Suspension
Rear suspension the limit of the authorised values. On board, Deactivation of automatic height correction the increasing or lightening of the load on The control which permits deactivation of the vehicle’s platform is detected by two automatic regulation is located on the right- height sensors.
-
Page 87
2 seconds. If the audible signal persists, contact a Lower: downwards adjustment PEUGEOT dealer or a qualified workshop. 2 — Manual correction of the height of the platform sill of the rear sill Press the control downwards continuously. -
Page 88: Good Practice
Rear suspension Deactivation of manual height correction Good practice Long term parking Avoid parking for a long duration on ground With the vehicle stationary: When stationary and with the ignition key which could present a potential obstacle as press and hold, removed, excessive use of the system your vehicle could lower.
-
Page 89: Heated Mirrors
Mirrors and windows MIRRORS AND WINDOWS Electric folding The folding / unfolding on locking / unlocking can be deactivated. Contact a PEUGEOT If your vehicle is fitted with this function, MIRRORS dealer or a qualified workshop. the mirrors can be folded electrically from…
-
Page 90: Manual Rearview Mirror
Mirrors and windows Manual rear view mirror SURVEILLANCE MIRROR REAR WINDOWS The rear view mirror has two positions: This mirror, placed on top of the central 2nd row side windows day (normal), mirror, enables the driver or front passenger If fitted on your vehicle, the 2nd row side to observe all the rear seats.
-
Page 91: Electric Windows
Mirrors and windows Reinitialisation Following reconnection of the battery, the safety anti-pinch function must be reinitialised. Lower the window fully, then raise it, it will rise in steps of a few centimetres each time the control is pressed. Repeat the operation until the window is fully closed.
-
Page 92: Hazard Warning Lamps
Driving safely DRIVING SAFELY PARKING BRAKE HAZARD WARNING LAMPS There is no advantage in engaging a gear after parking the vehicle, particularly if the vehicle is loaded. Press this button, the direction indicators Applying Pull on the parking brake lever, only with flash.
-
Page 93: Rear Parking Sensors
Engage reverse gear signal and a message in the screen. Contact a PEUGEOT dealer or a qualified workshop. An audible signal confirms the activation of REAR PARKING SENSORS the system by engaging reverse gear.
-
Page 94: Anti-Lock Braking System
Stop as soon as it is safe to do so. hesitate to press the brake pedal firmly, without releasing the pressure, even on a In both cases, contact a PEUGEOT dealer slippery surface, you will then be able to or a qualified workshop.
-
Page 95
Contact a PEUGEOT dealer or a qualified workshop to have the system checked. Operation The warning lamp may also come on if the The warning lamp flashes when tyres are under-inflated. -
Page 96
Driving safely Correct use Your vehicle is designed principally to drive on tarmac roads but it allows you to drive on other less passable terrain occasionally. However, particularly when your vehicle is heavily laden, it does not permit off-road activities such as: crossing and driving on ground which could damage the underbody or tear off components (fuel pipe, fuel cooler, …),… -
Page 97
Driving safely This DSC mode is calibrated for This snow mode allows the This sand mode allows a little a low level of skidding, based vehicle to adapts its strategy wheelspin on the two driving on different conditions of grip to the conditions of grip wheels at the same time to allow encountered on the road. -
Page 98: Seat Belts
Seat belts Good practice The driver must ensure that passengers use the seat belts correctly and that they are all strapped in securely before moving off. Wherever you are seated in the vehicle, always fasten your seat belt, even for short journeys.
-
Page 99: Front Seat Belts
Have the seat belts checked regularly (even front of you with an even movement, after a minor impact) by a PEUGEOT dealer be tightened as close to the body as or a qualified workshop: they must not show possible.
-
Page 100: Safety Systems
Improved safety and security SAFETY SYSTEMS Roll Over Mitigation * In situations of extreme transverse This system, linked with the DSC, supplements the ABS-EBFD, ASR-DSC and acceleration, this module limits the risks EBA braking functions, already covered in of the vehicle rolling over by acting on the this document, to guarantee a high level brakes.
-
Page 101
Airbags Airbags only operate when the ignition is switched on. This equipment only operates once. If a second impact occurs (during the same or a subsequent accident), the airbag will not operate. The deployment of an airbag or airbags is accompanied by a slight discharge of smoke and a noise, due to the activation of the pyrotechnic cartridge incorporated in the… -
Page 102
These will not hinder inflation of the lateral could cause injury to the head when the Wear a correctly adjusted seat belt. airbags. Contact a PEUGEOT dealer or a curtain airbag inflates. Do not leave anything between the qualified workshop. -
Page 103: Lateral Airbags
PEUGEOT dealer or a qualified workshop to have the system checked. The airbags may no longer be deployed in the event of a serious impact.
-
Page 104: Front Airbags
If the two airbag warning lamps are on The front airbag inflates between the front continuously, do not install a «rearward occupant of the vehicle and the dashboard facing» child seat. Contact a PEUGEOT or a to cushion their forward movement. qualified workshop.
-
Page 105
Child safety GENERAL POINTS ON CHILD SEATS Although one of PEUGEOT’s main criteria when designing your vehicle, the safety of your children also depends on you. For maximum safety, please follow these precautions: all children under the age of 12 or less… -
Page 106: Deactivating The Passenger’s Front Airbag
Child safety Installation of a child seat at the rear «Rearward facing» When a «rearward facing» child seat is installed on a rear passenger seat , move the vehicle’s front seat forwards and straighten the backrest so that the «rearward facing»…
-
Page 107
Child safety НИКОГА НЕ инсталирайте детско столче на седалка с АКТИВИРАНА предна ВЪЗДУШНА ВЪЗГЛАВНИЦА. Това можеда причини СМЪРТ или СЕРИОЗНО НАРАНЯВАНЕ на детето. NIKDY neumisťujte dětské zádržné zařízení orientované směrem dozadu na sedadlo chráněné AKTIVOVANÝM čelním AIRBAGEM. Hrozí nebezpečí SMRTI DÍTĚTE nebo VÁŽNÉHO ZRANĚNÍ. Brug aldrig en bagudvendt barnestol på… -
Page 108
Child safety Qatt m’ghandek thalli tifel/tifla marbut f’siggu dahru lejn l-Airbag attiva, ghaliex tista’ tikkawza korriment serju jew anke mewt lit-tifel/tifla Plaats NOOIT een kinderzitje met de rug in de rijrichting op een zitplaats waarvan de AIRBAG is INGESCHAKELD. Bij het afgaan van de airbag kan het KIND ERNSTIG OF DODELIJK GEWOND raken. -
Page 109: «Isofix» Mountings
Child safety The mountings comprise three rings for each Some also have an upper strap which is seat: attached to the rear ring B . two front rings A , located between the To secure the child seat to the Top Tether: vehicle seat backrest and cushion, remove and stow the head restraint indicated by an «ISOFIX»…
-
Page 110
Child safety LOCATIONS FOR ISOFIX CHILD SEATS In line with European legislation, this table indicates the options for the installation of ISOFIX child seats on the vehicle seats fitted with ISOFIX mountings. In the case of the universal and semi-universal ISOFIX child seats, the child seat’s ISOFIX size category, determined by a letter from A to G , is indicated on the child seat next to the ISOFIX logo. -
Page 111
Child safety (a) To install a child seat on a rear seat, IUF: seat suitable for the installation of an Remove and stow the head restraint move the seats in front forward, then I SOFIX U niversal child seat «forward before installing a child seat with straighten the backrest to allow enough facing»… -
Page 112
Child safety INSTALLING CHILD SEATS ATTACHED USING THE SEAT BELT In line with European legislation, this table indicates the options for installing child seats secured using a seat belt and universally approved (a) for the weight of the child and the seat in the vehicle. Weight of the child and indicative age Under 13 kg From 9 to 18 kg… -
Page 113
Child safety (a) Universal child seat: child seat that can (e) To install a child seat on a rear seat, Remove and stow the head restraint be installed in any vehicle using the move the seats in front forward, before installing a child seat with seat belt. -
Page 114: Installing A Booster Seat
Ensure that the head restraint is stowed or destabilise the seat. PEUGEOT recommends the use of a attached securely so that it is not thrown booster seat which has a back, fitted with a…
-
Page 115: Driving Advice
Towing a trailer TOWING A TRAILER, CARAVAN, BOAT, ETC… For more information about weights, Distribution of loads Cooling refer to the administrative documents Distribute the load in the trailer so that the Towing a trailer on a slope increases the (registration document, …) or to the heaviest objects are as close as possible coolant temperature.
-
Page 116: Good Practice
PEUGEOT dealer. Good Practice Brakes If this equipment is not fitted by a PEUGEOT dealer, it is imperative that it is fitted using Towing increases the braking distance. Drive In certain cases of particularly arduous…
-
Page 117: Other Accessories
fi tting of equipment of these families of products Screenwash, replacement fuses, wiper equipment required, which a PEUGEOT mean that the special features of the equipment and its blades, interior and exterior cleaning and dealer is able to provide.
-
Page 118: Opening The Bonnet
Opening the bonnet OPENING THE BONNET From inside: From outside: partially open the bonnet, lift To close the safety catch and raise the bonnet. lift the cover located at the foot of the Lower the bonnet and release it at the end of its front left seat.
-
Page 119
Under the bonnet 7.1 — Engine oil filler cap. If your vehicle is fitted with this oil filler tube, proceed as follows: UNDER THE BONNET A — Remove the oil filler cap. B — Remove the filler tube from its location. DIESEL ENGINES C — Place the filler tube in the filler opening 1 — Screen/headlamp wash reservoir. -
Page 120: Petrol Engine
Under the bonnet PETROL ENGINE 1. Screen/headlamp wash reservoir. 4. Brake and clutch fluid reservoir. 7. Engine oil filler cap. 2. Fusebox. 5. Air filter. 8. Power steering reservoir. 3. Coolant header tank. 6. Engine oil dipstick. 9. Removable towing eye.
-
Page 121: Oil Level
Levels LEVELS These regular maintenance operations will keep your vehicle in good running order. Consult a PEUGEOT dealer or the servicing and warranty booklet enclosed in the handbook pack. If you have to remove / refit the engine style cover, handle it with care to avoid damaging the fixing clips.
-
Page 122: Cooling System
To ensure optimum cleaning and prevent filter, relay noise may be heard under the PEUGEOT dealer or a qualified workshop as freezing, this fluid must not be topped up or dashboard.
-
Page 123
At the start of winter, have your battery by trapping unburnt polluting checked by a PEUGEOT dealer or a Carbon filter and passenger particles. It is controlled qualified workshop. compartment filter completely and automatically by the engine management system. -
Page 124: Manual Gearbox
If this warning lamp comes on, In order to optimise the operation of units as bleed the filter. Otherwise bleed important as the braking system, PEUGEOT regularly each time the engine oil selects and offers specific products. is changed.
-
Page 125: Filling With Fuel
Fuel Filling with fuel It is normal to hear the noise of an inrush of air when the cap is opened as there is a The fuel tank must be filled with the vacuum caused by the sealing of the fuel engine off .
-
Page 126: Fuel Cut-Off
If you should run out of fuel, it is necessary standard EN 15293. to strict application of the special servicing to prime the circuit: conditions. Contact a PEUGEOT dealer or a For Brazil only, special vehicles are fill the fuel tank with at least five litres of qualified workshop.
-
Page 127
Fuel DIESEL PRIMING BUTTON place the two slots in the lugs behind the unclip the protective cover for access to engine to allow the protective cover to the priming push button, If you should run out of fuel, it is necessary be refitted, place the cover to the right of the engine, to prime the system using the priming… -
Page 128
12 V lead-acid battery To start the vehicle from another with special technology and specification, battery for which the involvement of a PEUGEOT Before disconnecting the battery, you must dealer or qualified workshop is required Connect the red cable to the positive (+) wait for 2 minutes after switching off the when replacing or disconnecting the battery. -
Page 129: Economy Mode
Battery ECONOMY MODE After the engine has stopped, with the key in the ignition position, certain functions (windscreen wiper, electric windows, courtesy lamps, audio equipment, etc.) can only be used for a cumulative duration of thirty minutes, to prevent discharging of the battery. Once the thirty minutes are over, the active functions are put on standby and the battery warning lamp flashes accompanied by a…
-
Page 130: Using The Kit
(containing this pressure, the tyre cannot be repaired; a sealant). contact a PEUGEOT dealer or a qualified workshop for roadside assistance. Vehicles supplied with a temporary puncture repair kit do not have a spare…
-
Page 131
After use, do not discard the cartridge into (kilometres)), the environment, take it to a PEUGEOT remove the compressor, then stow the dealer or to a specialised waste complete kit, disposal site. -
Page 132: Parking The Vehicle
2. TOOLS the spare wheel from the carrier. Call a CHANGING A WHEEL PEUGEOT dealer or a qualified workshop. If fitted on your vehicle, open the If your vehicle is equipped with a spare plastic flap located at the rear left of the wheel located underneath the vehicle, follow vehicle.
-
Page 133: Spare Wheel
Changing a wheel Detach the carrier from the hook and 3. SPARE WHEEL Open the cover, located on the sill, to place the spare wheel near the wheel to access the carrier bolt. Gain access to the spare wheel from the be changed.
-
Page 134: Operating Procedure
Changing a wheel 4. OPERATING PROCEDURE Remove the trim pulling it using the Place the jack in contact with the Do not extend the jack until you have towing eye. locating point provided, the one which is started unscrewing the bolts on the closest to the wheel to be changed.
-
Page 135: Fitting The Spare Wheel
Changing a wheel 5. FITTING THE SPARE WHEEL Position the wheel on the hub and start Lower the vehicle completely by folding Secure the carrier on the hook then tightening the wheel bolts by hand. the jack, then remove the jack. raise the carrier using the bolt and the wheel brace.
-
Page 136: Removable Snow Screen
Also, have the original wheel repaired and REMOVABLE SNOW SCREEN FITTING refitted by a PEUGEOT dealer or a qualified workshop as soon as possible. Offer up the snow screen facing its According to country, the removable snow centring pin A on the front bumper.
-
Page 137: Snow Chains
215/60 R16 snow chains are correctly tightened. BRIDGESTONE For more information on snow chains, contact a PEUGEOT dealer or a qualified workshop. Avoid driving on roads that have been cleared of snow, to avoid damaging your vehicle’s tyres and the road surface. It…
-
Page 138
Changing a bulb Type A All glass bulb: pull gently as it is fitted by pressure. Type B Bayonet bulb: press on the bulb then turn it anticlockwise. Type C Halogen bulb: release the retaining spring from its housing. Halogen bulbs must be changed after the headlamp has been off for several CHANGING A BULB minutes (risk of serious burns). -
Page 139: Front Lamps
— Ensure that the cover is refitted Type C , H1 — 55W — Disconnect the electrical connector. correctly all the way round to ensure Contact a PEUGEOT dealer or a qualified — Release the retaining spring. sealing. workshop. — Change the bulb taking care to align the metal part with the slots in the lamp.
-
Page 140: Courtesy Lamps
Changing a bulb High pressure jet washing When using this type of jet washer on stubborn dirt, do not persist on the headlamps, the lamps and their surrounds to avoid damaging their coating and seals. DIRECTION INDICATOR SIDE Front / Rear REPEATER COURTESY LAMPS Type A , WY5W — 5W (amber)
-
Page 141: Rear Lamps
Changing a bulb REAR LAMPS Identify the faulty bulb then open the Move aside the 8 tabs then extract the rear doors to 180°. Refer to the «Access» bulb holder. For more information on bulbs, refer to the section of chapter 2. «Types of bulb».
-
Page 142: Number Plate Lamps
Changing a bulb NUMBER PLATE LAMPS THIRD BRAKE LAMP Type B , P21W — 21W Type A , W5W — 5W Type A , W5W — 5W Lamp located on the inside (tailgate) Lamp located on the outside (hinged doors) Unscrew the two screws using a Torx With tailgate 20 screwdriver.
-
Page 143: Changing A Fuse
The descriptions communicated are only the fuses which can be changed by the user. For any other operations, go to a PEUGEOT dealer or a qualified workshop. For motor trade technicians: for complete fuse and relay information,…
-
Page 144
Changing a fuse Fuses A (amps) Allocation Rear wiper Free Airbag control unit Steering wheel angle sensor, Diagnostic socket, DSC sensor, Manual ventilation, Clutch switch, Headlamp beam height, Particle emission filter pump Electric mirrors, Passenger electric window motor Front electric windows supply Courtesy lamps and glove box lamp Multifunction screen, Anti-theft alarm siren, Audio equipment, Compact disc changer, Audio/telephone, Trailer fusebox… -
Page 145: Passenger Compartment Fuses
Changing a fuse Fuses A (amps) Allocation Heated seats Row 3 12V socket 40/50 Trailer fusebox (accessory) Free Hinged door locks Hinged door locks Hinged door rear wiper Rear ventilation Folding mirrors PASSENGER COMPARTMENT FUSES Unclip the battery compartment cover. Remove the red battery terminal (+).
-
Page 146
Changing a fuse Fuses A (amps) Allocation Engine control unit, Fuel supply and air supply systems, Fan assembly Horn Front and rear screenwash pump Headlamp wash pump Fuel supply system Power steering, Secondary brake pedal switch Braking system (ABS/DSC) Starter motor control Main brake pedal switch Fuel supply and air supply systems, Emissions control FUSES UNDER THE BONNET… -
Page 147: Changing A Wiper Blade
Changing a wiper blade CHANGING A WIPER BLADE Placing the windscreen wiper blades Changing a front wiper blade Changing the rear wiper blade in the special position Lift the wiper arm. Lift the wiper arm, then unclip the blade and remove it. Unclip the blade and remove it.
-
Page 148: Towing The Vehicle
Having your vehicle towed TOWING THE VEHICLE Without lifting (4 wheels on the From the rear Vehicles fitted with a manual ground) gearbox (Diesel version) Unclip the cover using a coin or the flat You should always use a towing bar. part of the towing eye, In the case of vehicles fitted with a manual gearbox, the gear lever must be in the…
-
Page 149: General Recommendations
Having your vehicle towed General recommendations Observe the legislation in force in your country. Ensure that the weight of the towing vehicle is higher than that of the towed vehicle. The driver must remain at the wheel of the towed vehicle and must have a valid driving licence.
-
Page 150
Environment ENVIRONMENT With you, PEUGEOT acts to protect the As the driver, you also can contribute to Refer to information in this handbook environment. protecting the environment by following on eco-driving (at the end of section 1). certain rules: We invite you to visit the www.peugeot.com website. -
Page 151
Dimensions… -
Page 152
Dimensions DIMENSIONS The vehicle is available in 2 lengths (L1, L2) and 1 height (H1), refer to the tables: Overall length 4 805 5 135 Overall height pneumatic / metal suspension 1 895/1 942 Wheelbase 3 000 3 122 Front overhang Rear overhang 1 038 Overall width:… -
Page 153
Dimensions REAR DOORS (mm) Usable height 1 272 Usable width 1 237… -
Page 154
Dimensions SLIDING SIDE DOOR (mm) Height 1 203 Width… -
Page 155
For more information, refer to your registration certificate. In each country, it is imperative that the towed loads permitted by local legislation are complied with. To find out your vehicle’s towing capabilities and its gross train weight, contact a PEUGEOT dealer. Load transfer If the towing vehicle has not reached the GVW, it is possible to transfer this weight to the trailer. -
Page 156
Precautions PRECAUTIONS… -
Page 157
The descriptions and illustrations are this handbook is prohibited without written given without any obligation. Automobiles authorisation from Automobiles PEUGEOT. PEUGEOT reserves the right to modify the technical specifications, equipment and accessories without having to update the current handbook. This document is an integral part of your vehicle. -
Page 158
Anglais AN. 14EXP.0040 www.peugeot.com…
Требуется руководство для вашей Peugeot Expert (2014)? Ниже вы можете просмотреть и загрузить бесплатно руководство в формате PDF. Кроме того, приведены часто задаваемые вопросы, рейтинг изделия и отзывы пользователей, что позволит оптимально использовать ваше изделие. Если это не то руководство, которое вы искали, – свяжитесь с нами.
Ваше устройство неисправно, и в руководстве отсутствует решение? Перейдите в Repair Café для получения бесплатных ремонтных услуг.
Руководство

Рейтинг
Сообщите нам, что вы думаете о Peugeot Expert (2014), оставив оценку продукта. Хотите поделиться вашими впечатлениями от данного изделия или задать вопрос? Вы можете оставить комментарий в нижней части страницы.
Довольны ли вы данным изделием Peugeot?
Да Нет
Будьте первым, кто оценит это изделие
0 голоса
Часто задаваемые вопросы
Наша служба поддержки выполняет поиск полезной информации по изделиям и отвечает на часто задаваемые вопросы. Если вы заметили неточность в наших часто задаваемых вопросах, сообщите нам об этом с помощью нашей контактной формы.
В моей машине есть цепь ГРМ. С каким интервалом ее нужно менять? Проверенный
При нормальной эксплуатации цепь ГРМ должна прослужить весь срок службы автомобиля и не нуждается в замене.
Это было полезно (2409)
Почему я не могу открыть одну или несколько дверей изнутри? Проверенный
Вероятно, в машине активирован детский замок. Обычно его можно разблокировать с помощью механизма в двери.
Это было полезно (761)
Как часто следует менять масло? Проверенный
Практически для каждого автомобиля есть свои точные рекомендации, однако в целом масло разумно менять каждые 10 000–15 000 км пробега или один раз в год. Загрязненное масло может со временем серьезно повредить двигатель.
Это было полезно (643)
Когда следует отключать подушку безопасности сбоку от пассажирского сиденья? Проверенный
При движении с ребенком в автокресле на пассажирском сиденье необходимо выключить подушку безопасности с этой стороны. Это также рекомендуется для детей до 12 лет, которые размещаются на пассажирском сиденье. Это необходимо для предотвращения травм в случае аварии.
Это было полезно (582)
Ключи от машины больше не будут открывать машину на расстоянии, почему? Проверенный
Автомобильные ключи, которые можно разблокировать на расстоянии, обычно работают от аккумулятора. Когда он закончится, ключ перестанет работать. Замените аккумулятор и попробуйте еще раз.
Это было полезно (575)
Приведет ли более низкое давление в шинах к большему сцеплению с дорожным покрытием при езде по снегу? Проверенный
Нет, несмотря на то что при снижении давления пятно контакта шин с дорогой увеличивается, автомобиль становится менее устойчивым. Садитесь за руль, только если в шинах правильное давление!
Это было полезно (330)
Я залил в машину не то топливо, что мне делать? Проверенный
Не садитесь за руль! Неважно, заливаете ли вы дизельное топливо в автомобиль с бензиновым двигателем или бензин в автомобиль с дизельным двигателем. В обоих случаях это может привести к повреждению машины и / или других частей автомобиля. Обратитесь в службу технической поддержки на дорогах.
Это было полезно (219)
Где я могу найти VIN-номер моей машины? Проверенный
Это может варьироваться в зависимости от марки и модели, но на многих автомобилях номер VIN можно найти на дверном косяке, под капотом или на металлическом полу переднего сиденья.
Это было полезно (184)
Как часто нужно менять щетки дворников? Проверенный
Желательно заменять щетки стеклоочистителя не реже одного раза в год. Признаками необходимости замены лезвий являются полосы, дымка, шум или отслоение резины.
Это было полезно (160)
Сколько миль в одном километре? Проверенный
1 километр равен 0,621 мили. 10 километров равны 6,21 мили. 1 миля равна 1,609 километра. 10 миль равны 16,09 километра.
Это было полезно (137)
Какой номер VIN? Проверенный
VIN означает идентификационный номер автомобиля и является уникальным номером, который есть у каждого автомобиля. Это делает автомобиль не идентифицируемым, например, после аварии или в случае отзыва. Это также позволяет идентифицировать автомобиль в случае отсутствия номерных знаков.
Это было полезно (135)
Могу ли я использовать дворники, когда на лобовом стекле обледенел? Проверенный
Нет, это не рекомендуется. Лед острый и может повредить резину на щетках стеклоочистителя.
Это было полезно (132)
Какие модели Peugeot подходят для езды на E10? Проверенный
Peugeot заявляет, что все модели с бензиновым двигателем, построенным в 2000 году или позже, могут ездить на E10.
Это было полезно (35)
