PDF24 Creator – мультифункциональный редактор и просмотрщик цифровых документов формата PDF. Список встроенных возможностей обширен – вставка и перемещение страниц, копирование информации, экспорт данных в выбранном формате с заранее подобранными параметрами качества и детализации.
Особенности:
- Интерфейс предсказуемый, гибко настраиваемый, подробный. При наведении на пункты меню появляются всплывающие подсказки, а рядом с некоторыми кнопками выдаются профессиональные рекомендации.
- В PDF24 Creator предусмотрены инструменты предпросмотра, поверхностного редактирования цифровых документов, включая поворот страниц, извлечение текста из PDF, смену спецификаций.
- Полуавтоматическая склейка разрозненных исходников в единый файл с выбором необходимого качества и настройкой параметров сжатия, если появилось желание сэкономить место на жестком диске.
- Вырезать, а затем экспортировать страницы документов через PDF24 Creator можно в форматах PS, EPS, PNG, JPEG, BMP, TIFF. Дополнительно появилась поддержка PSD-макетов.
- Регулярное обновление программного обеспечения в фоновом режиме перед запуском инструментария или уже после.
- Отправка PDF-файлов по почте, печать на принтере, передача по факсу.
Каждая из функций доведена до совершенства и выведена в главное меню для удобства пользователей.
Содержание
- 1 Установка PDF24 Creator
- 2 Как пользоваться программой
- 2.1 Создание PDF из окна программы
- 2.2 Как объединить PDF в программе PDF24 Creator
- 2.3 Как установить пароль на PDF
- 3 Итоги
- 4 Полезное видео
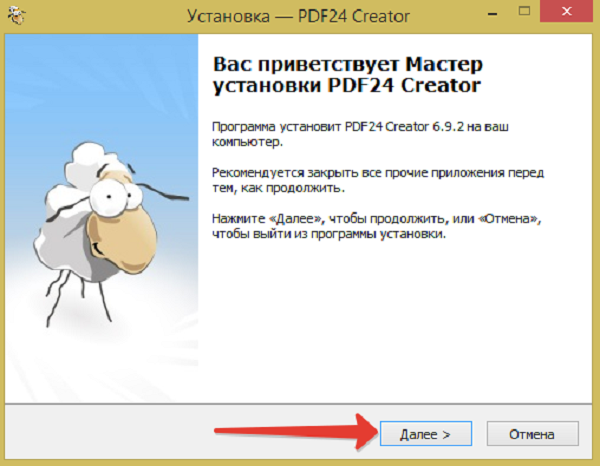
Установка PDF24 Creator
Взаимодействовать с дистрибутивом разработчики из Geek Software GmbH предлагают по стандартному для программного обеспечения сценарию через установочный мастер.
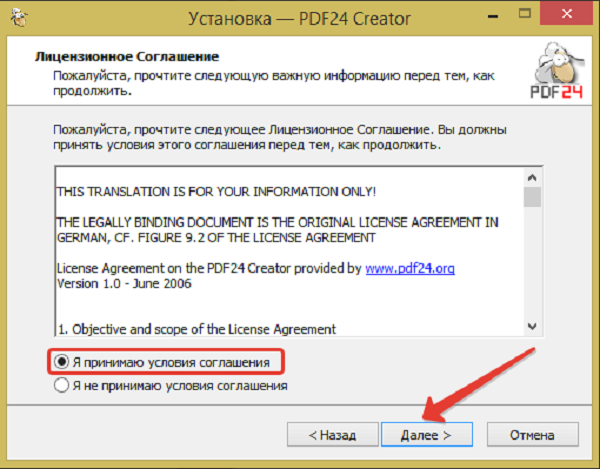
Затем – просмотр лицензионного соглашения, описывающего особенности доступного функционала и нюансы коммерческой реализации подготовленного с помощью PDF24 Creator контента. Для перехода к следующему шагу необходимо поставить галочку напротив пункта с соглашением, а после – нажать на кнопку «Далее».
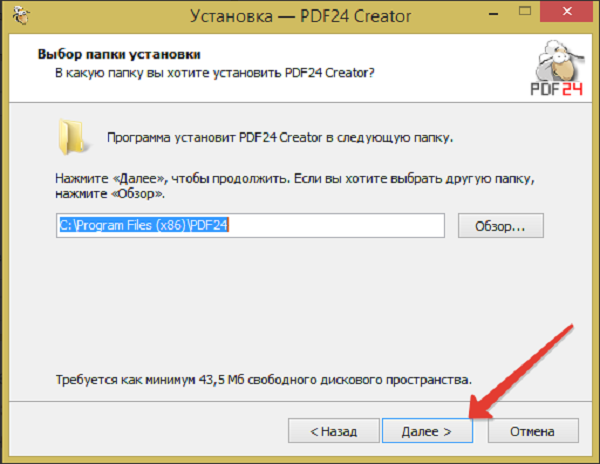
Установщик сразу предложит выбрать каталог для распаковки содержимого. По умолчанию выбран системный диск и, как подсказывает практика, менять путь часто необязательно – так меньше шансов столкнуться с техническими неполадками и вылетами (например, из-за латиницы в названии некоторых папок).
Следующий этап – выбор тех компонентов, которые понадобятся в работе. Вариантов представлено несколько – компактный, полный и выборочный. Разработчики рекомендуют остановиться на полновесном комплекте, иначе после – когда понадобится дополнительный инструментарий – придется искать уже новый дистрибутив и повторять шаги, описанные выше, и терять драгоценное рабочее время.

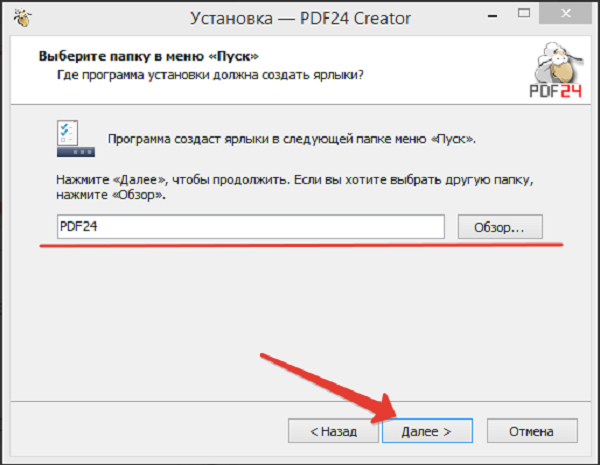
Предпоследний шаг – организация ярлыков на рабочем столе и в меню «Пуск» под выбранным именем. Менять предлагаемое название бессмысленно – комбинация PDF24 узнаваема и едва ли затеряется в меню.
В конце установщик предложит проложить ассоциации между форматом PDF и программой: каждый цифровой документ (в том числе поврежденные, редактируемые и пустые) начнет открываться через PDF24 Creator, а не через браузер или сторонние инструменты.
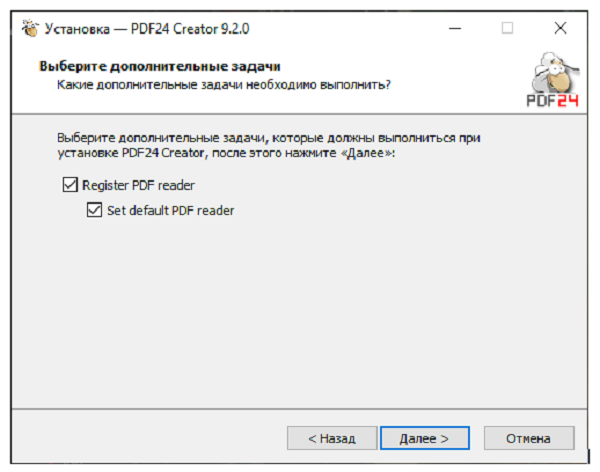
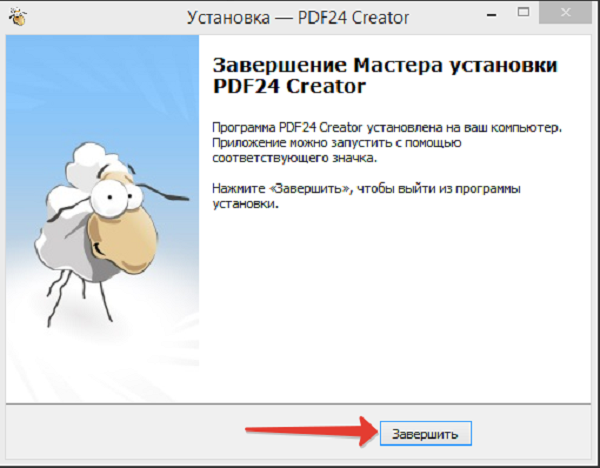
Осторожно! Перед тем, как нажать «Завершить», необходимо проверить – доступно ли место на жестком диске, иначе процедура распаковки прервется на середине.
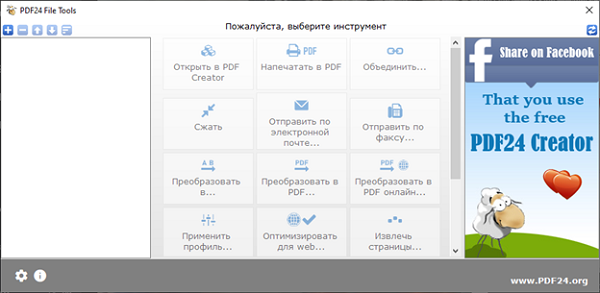
Как пользоваться программой
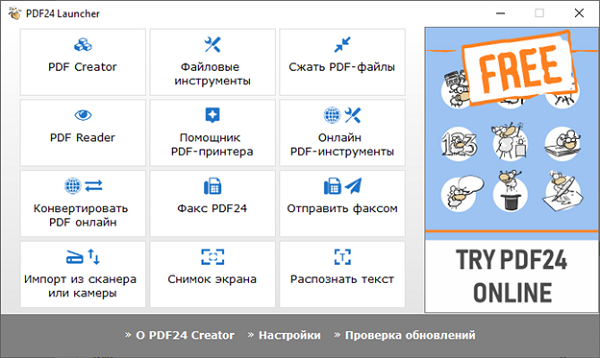
Сразу после запуска PDF24 Creator предстанет в виде схематично оформленного навигационного меню, разделенного на блоки с заготовленными функциями, инструментами и настройками. Зависимо от поставленной задачи придется перемещаться между пунктами, а после – следовать за всплывающими подсказками. Благодаря им, вопросы о том, как пользоваться PDF24, практически не возникают.
Например, если появилась необходимость распознать текст PDF-документа, то выбирать придется одноименный пункт меню, спрятавшийся в правом нижнем углу.
Уже там появится новое меню, куда сначала добавляется исходник, а дальше выставляются настройки снизу. Разработчики предлагают выбрать язык, профиль (помогает определиться с качеством – низкое, среднее, высокое, индивидуально настроенное), количество потоков. Определиться как действовать, если на пути встречаются страницы с текстом, которые распознавать отдельно уже не нужно.
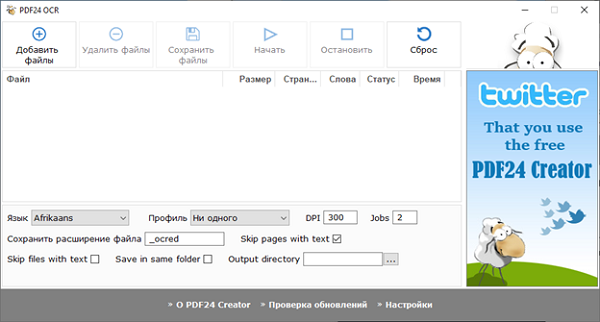
Если параметры выбраны, значит, пора нажимать на кнопку «Начать». Результаты проделанных действий сохраняются через отдельное меню или в тот же каталог рядом с исходником, если установлена галочка напротив пункта Save in same Folder.
Создание PDF из окна программы
Важная часть функционала PDF24 Creator связана с подготовкой новых цифровых документов через меню «Снимок экрана».
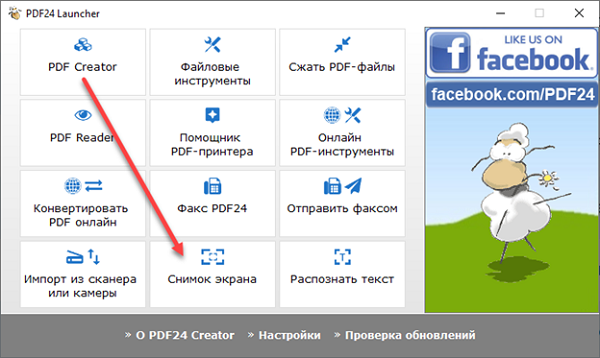
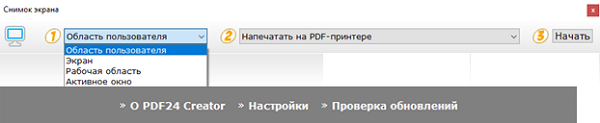
Из каких материалов подготавливать PDF – зависит от желаемого результата, контента под рукой, поставленных целей. Часто разработчики предлагают применять «область пользователя», которая помогает вручную выделить нужный участок на экране компьютера, а после – напечатать на PDF-принтере, скопировать в буфер обмена (в качестве скриншота), открыть через графический редактор.
Альтернативные сценарии действий:
- Экран. Выделяет весь экран целиком до последнего пикселя с «родным» разрешением монитора.
- Рабочая область. Ограничивает небольшой фрагмент, где находится курсор или ведется какая-то практическая деятельность.
- Активное окно. Последний вариант. Предусматривает выбор интерфейса запущенной программы, браузера или редактора. Помогает отсечь лишнее, сосредоточиться на главном.
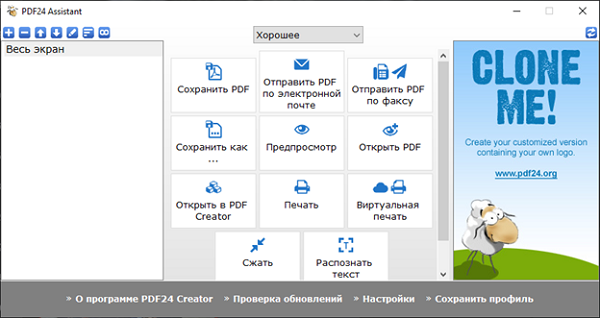
Гибко выбираются и следующие действия, причем через отдельное меню:
- Сохранение в PDF (качество выбирается вручную или настраивается через специальный ползунок), отправка по почте выбранному адресату;
- Передача информации по факсу, предпросмотр, экспорт в нужно формате на жесткий диск;
- Дополнительно предусмотрена опция сжатия, распознавания текста и печати с заданными параметрами;
Внимание! В зависимости от того, какой пункт меню выбран, придется разбираться с дальнейшими действиями: порой выбирать каталог на жестком диске для распаковке, вводить e-mail в текстовое поле или определять то, как и когда подключенный к компьютеру принтер начнет работать.
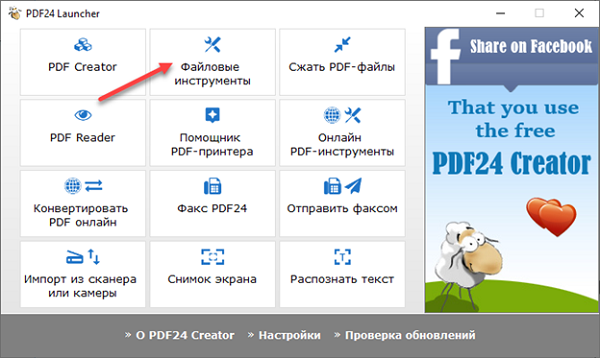
Как объединить PDF в программе PDF24 Creator
Склеить документы вместе программа разрешает через меню тематического раздела «Файловые инструменты».
Интерфейс PDF24 Creator сразу изменится – на экране появится специальное окно слева, куда необходимо добавлять с жесткого диска PDF-документы.
Справка! Если выбран только один исходник, то кнопка «Объединить» останется недоступной для использования. Перейти к склейке можно лишь в том случае, если документов хотя бы два.
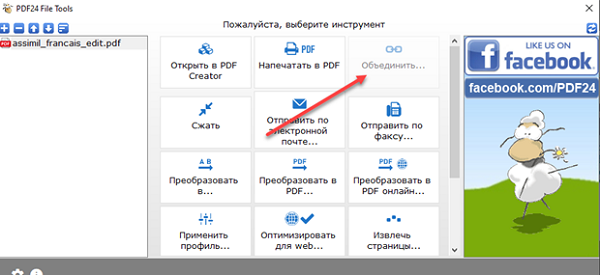
Кроме объединения инструментарий предлагает и альтернативные действия:
- Печать документа в PDF;
- Оптимизация и многоступенчатое сжатие для экономии места на жестком диске или подгонки под лимиты, установленные в почтовых клиентах и мессенджерах (тот же WhatsApp уже давно не разрешает передавать файлы объемом больше, чем 60 мегабайт);
- Отправка по факсу, функция извлечение и экспорта отдельных страниц в выбранном формате;
- Постраничное разделение контента, конвертация, смена качества и применение фильтров.
Как установить пароль на PDF
Базовый инструментарий PDF24 Creator уже давно содержит функции, связанные с защитой файлов, шифрованием и персональными ограничениями. Но еще скрывать документы за паролями и менять параметры прав доступа разработчики предлагают с помощью PDF24 Tools – фирменного дополнения, запускаемого без предварительной установки или распаковки и поддерживаемый как компьютерными операционными системами (Windows, Linux, MacOS), так и мобильными – iPhone, Android.
Защищаются документы в полуавтоматическом режиме: достаточно выбрать файл на жестком диске или на внутренней памяти смартфона или планшета, а после – определиться с паролем, особенностями шифрования. Процедура занимает 2-3 минуты. В результате проделанных действий перед просмотром защищенной информации придется вводить пароль.
Если экспериментировать над дополнительным программным обеспечением некогда, с задачей справится PDF24 Creator: достаточно открыть «Файловые инструменты», а затем – прокрутить список доступных действий вниз и нажать на кнопку «Заблокировать PDF». Рядом доступна кнопка с разблокировкой на случай, если пароль необходимо снять.

Итоги
PDF24 Creator – незаменимый инструмент, облегчающий жизнь тем, кому приходится часто сталкиваться с цифровыми документами, редактировать PDF-файлы, отправлять конфиденциальную информацию по факсу. Предсказуемый интерфейс, частые обновления, продуманный до мельчайших деталей функционал – лишь половина всех преимуществ: остальные раскроются позже – сразу после загрузки программного обеспечения.
Полезное видео
Инструкция по установке и применению программы:
Contents
- 1. Preamble
- 2. EXE installer
- 2.1. Examples of use
- 3. MSI installer
- 3.1. Examples of use:
- 4. Registry Settings
- 4.1. Common registry settings
- 4.2. Registry settings related to Webview2
- 4.3. Registry settings related to PDF24 Assistant
- 4.4. Registry settings related to PDF24 Compress
- 4.5. Registry settings related to PDF24 Creator
- 4.6. Registry settings related to PDF24 Output Profile Manager
- 4.7. Registry settings related to PDF24 OCR
- 4.8. Registry settings related to PDF24 Toolbox
- 4.9. Registry settings related to PDF24 Tray Icon
- 4.10. Registry settings related to PDF24 Reader
- 4.11. Registry settings related to PDF24 DocTool
- 5. Translation of language files
- 6. PDF Printers
- 6.1. Ports
- 7. pdf24-PrinterInstall.exe
- 7.1. Command line
- 8. pdf24.exe
- 8.1. Windows Service
- 9. pdf24-Toolbox.exe
- 9.1. Command line
- 9.2. Notes about the Internet Explorer 11 component used in prior versions
- 9.3. Notes about Windows Server and Citrix
- 10. pdf24-Ocr.exe
- 10.1. Command line
- 10.2. Local installation of all language file
- 11. pdf24-DocTool.exe
- 11.1. Command line
- 12. pdf24-Reader.exe
- 12.1. Command line
- 13. FAQ
- 13.1. The PDF printer is not working properly. Print jobs are stuck in the print queue. What to do?
- 13.2. How to stop/remove the PDF24 autostart entry?
- 13.3. How to update from version 9.x and keep settings?
1. Preamble
The PDF24 Creator is a free and popular PDF solution with many features for Windows. The software brings all PDF24 tools as offline version, so all files stay on your PC and GDPR is not an issue here. The software has been under continuous development since 2006 and has delighted many people and businesses around the world. Companies can also use PDF24 Creator free of charge.
A MAC version is not available. MAC users can use the PDF24 Online Tools, which are also free of charge.
2. EXE installer
The EXE installer is based on Inno Setup. The installation process can be controlled via command line arguments. Besides the arguments Inno Setup supports, there are other PDF24 specific arguments.
-
/SILENTInstalls the PDF24 Creator without user interaction. The installation process is shown.
-
/VERYSILENTInstalls the PDF24 Creator without user interaction. The installation process is not shown.
-
/NOUPDATEInstalls the PDF24 Creator without update checking. No updates are searched and no updates are installed.
-
/NoReaderRegThis switch prevents PDF24 Reader from being registered for PDF files. This switch is useful if, for example, an alternative PDF reader is installed and should be used.
-
/LANG=languageSpecifies the language to use. The placeholder language can be German, English, French, Italian, Russian, Spanish, Portuguese
-
/SAVEINF="filename"
Instructs setup to save installation settings to the specified file. -
/LOADINF="filename"Instructs Setup to load the settings from the specified file after having checked the command line. This file can be prepared using the ‘/SAVEINF=’ command as explained below.
-
/NORESTARTInstructs Setup not to reboot even if it’s necessary.
-
/NOCANCELPrevents the user from cancelling during the installation process, by disabling the Cancel button and ignoring clicks on the close button. Useful along with ‘/SILENT’ or ‘/VERYSILENT’.
/SP-
Disables the «This will install… Do you wish to continue?» prompt at the beginning of Setup.
/COMPONENTS="comma separated list of component names"
Overrides the default component settings. Using this command line parameter causes the setup to automatically select a custom type. Only the specified components will be selected; the rest will be deselected. If a component name is prefixed with a «!» character, the component will be deselected. This parameter does not change the state of components that include the fixed flag.
Currently, the setup contains the following components:
pdfPrinterfaxPrinterghostscriptqpdfjretesseractwebview2— since version 11.10.0
2.1. Examples of use
-
Installs default components silently and disables updates
pdf24-creator.exe /VERYSILENT /NOUPDATE -
Installs default components without user interaction and disables updates
pdf24-creator.exe /SILENT /NOUPDATE -
Installs only PDF printer component silently and disables updates
pdf24-creator.exe /VERYSILENT /NOUPDATE /COMPONENTS=pdfPrinter -
Installs PDF24 silently but does not install Webview2. This makes sense only if you have evergreen Webview2 installed on your system. Otherwise the PDF24 Toolbox will not work.
pdf24-creator.exe /SILENT /COMPONENTS=!webview2
3. MSI installer
PDF24 provides a MSI package of the PDF24 Creator which you can use to distribute the software on computers. The MSI installation can be customized via command line arguments. Currently, the following arguments are available:
AUTOUPDATE=Yes|No
Enables or disables the auto-update feature of the PDF24. Set the public property AUTOUPDATE=No for disabling the auto-update feature. The feature is disabled by default.
DESKTOPICONS=Yes|No
Creates or disables the Windows Desktop icons for PDF24-PDF and PDF24-Fax. Set the public property DESKTOPICONS=No for disabling the Windows Desktop icons. The Windows Desktop icons will be created by default.
FAXPRINTER=Yes|No
Enables or disables the Fax printer feature of PDF24. Set the public property FAXPRINTER=No for disabling the Fax printer feature. The feature is enabled by default.
REGISTERREADER=Yes|No
Enables or disables PDF24 Reader registration. Default value is Yes.
EXTENDSHELLCONTEXTMENU=Yes|No
Extends the shell context menu with the PDF24 entry. The DLL has some advantages and improves productivity. Default value is Yes.
USESHELLEXTENSIONDLL=Yes|No
If set to Yes, then the new shell context menu extension DLL is used instead of a static registry entry. Default value is No. The DLL has some advantages and improves productivity. Updates can be a bit more difficult because the DLL is loaded and blocked by Explorer, so that the Explorer has to be restarted for an update.
Example usage of the MSI properties:
pdf24-creator.msi AUTOUPDATE=[Yes|No] DESKTOPICONS=[Yes|No] FAXPRINTER=[Yes|No] /[qr|qb|qn|...]
The user interface, that installer displays, can be controlled with the /q options:
/qnNo interface/qbBasic interface — just a small progress dialog/qb!Like /qb, but hide the Cancel button/qrReduced interface — display all dialogs that don’t require user interaction (skip all modal dialogs)/qn+Like /qn, but display «Completed» dialog at the end/qb+Like /qb, but display «Completed» dialog at the end
3.1. Examples of use:
- Installs PDF24 but does not install Webview2. This makes sense only if you have evergreen Webview2 installed on your system. Otherwise the PDF24 Toolbox will not work.
msiexec /i pdf24-creator.msi ADDLOCAL=ALL REMOVE=WebView2
4. Registry Settings
The PDF24 Creator stores settings into the Windows registry. Since version 10, the user settings are stored under HKCU\SOFTWARE\PDF24. The application settings and settings that apply to all users are stored under HKLM\SOFTWARE\PDF24. Older versions stored the settings under HKCU\SOFTWARE\PDFPrint and HKLM\SOFTWARE\PDFPrint.
The settings under HKCU overwrite the settings from the HKLM area. There is also an option to give more weight to the settings under HKLM. This can be achieved by putting a ! in front of the key name. Then the value from HKLM is always taken in any case, regardless of what is in HKCU.
Most of the settings can be manipulated by the PDF24 Settings GUI. If you make changes in the GUI then these changes will change the registry values.
4.1. Common registry settings
-
DeletePrintJobsWithError(HKLM, DWORD)Setting to control whether print jobs with an error blocking the PDF printer should be deleted or not. This is disabled by default. The value can be
0or1. -
EmailInterface(HKCU, HKLM, SZ)Setting to specify the used mail interface when using the mail function. Supported values are
mapi,outlook_ole,pdf24. -
InstallDir(HKLM, SZ)The file system path under which the PDF24 Creator is installed.
-
InstallationID(HKLM, SZ)The ID of the installation generated by the installer.
-
UpdateMode(HKLM, DWORD)The update mode. Can be
0for automatic updates,1for notifying if an update is available or2to disable updates. -
Language(HKCU, HKLM, SZ)The language of the app. The value is the name of a language file, e.g.
EnglishorGerman. Language files are stored in thelangdirectory. -
LogoClickUrl(HKLM, SZ)URL which will be opened if someone clicks the banner.
-
PdfSecurityTool(HKCU, HKLM, SZ)The app used to apply PDF security. Can be
gsorqpdf.qpdfis used by default because 256 bit security is supported. No longer supported in version11.7.0. -
Img2PDFJPEGQuality(HKCU, HKLM, DWORD)JPEG image quality used when converting images to PDF. Default value is 100.
-
Img2PDFDPI(HKCU, HKLM, DWORD)DPI value used when convereting images to PDF. Default value is 144.
-
Img2PDFPassThroughJPEGImages(HKCU, HKLM, DWORD)Boolean value to control whether to pass through JPEG images as is. Default value is 1 which means enabled. Set to 0 to disable this behavior. If disabled, JPEG images are re-encoded with the quality value found in
Img2PDFJPEGQuality. -
NoCertManagerAccess(HKCU, HKLM, DWORD)Can be
1to disable access to the cert manager app or0to enable it. The default value is 0. -
NoDelayedToForegroundOnNewFile(HKCU, HKLM, DWORD)Can be
1to disable this behavior or0to enable it. The default value is 0. -
NoEmbeddedBrowser(HKCU, HKLM, DWORD)Can be
1to disable embedded browsers or0to enable it. The default value is 0. -
NoFax(HKCU, HKLM, DWORD)Can be
1to disable PDF24 fax or0to enable it. The default value is 0. -
NoFaxProfile(HKCU, HKLM, DWORD)Can be
1to disable the fax output profile or0to enable it. The default value is 0. -
NoMail(HKCU, HKLM, DWORD)Can be
1to disable the mail function or0to enable it. The default value is 0. -
NoOCR(HKCU, HKLM, DWORD)Can be
1to disable the OCR feature or0to enable it. The default value is 0. -
NoOnlineConverter(HKCU, HKLM, DWORD)Can be
1to disable the usage of the online converter if no local converter is available or0to enable it. The default value is 0. -
NoOnlinePdfTools(HKCU, HKLM, DWORD)Can be
1to disable the online PDF tools links in the app or0to enable it. The default value is 0. -
NoPDF24MailInterface(HKCU, HKLM, DWORD)Can be
1to disable the PDF24 mail interface or0to enable it. The default value is 0. -
NoScreenCapture(HKCU, HKLM, DWORD)Can be
1to disable the screen capture tool or0to enable it. The default value is 0. -
NoSelfSignedCertCreation(HKCU, HKLM, DWORD)Can be
1to disable the creation of self signed certs or0to enable it. The default value is 0. -
NoShellContextMenuExtension(HKCU, HKLM, DWORD)Can be
1to disable shell context menu extensions or0to enable it. The default value is 0. -
NoShellBackgroundContextMenuExtension(HKCU, HKLM, DWORD)Can be
1to disable background shell context menu extensions or0to enable it. The default value is 0. -
NoShellDirectoryContextMenuExtension(HKCU, HKLM, DWORD)Can be
1to disable directory context menu extensions or0to enable it. The default value is 0. -
NoShellFileContextMenuExtension(HKCU, HKLM, DWORD)Can be
1to disable file context menu extensions or0to enable it. The default value is 0. -
NoTrayIcon(HKCU, HKLM, DWORD)Can be
1to disable the tray icon or0to enable it. The default value is 0. -
NoTwainImport(HKCU, HKLM, DWORD)Can be
1to disable the twain import feature or0to enable it. The default value is 0. -
NoReader(HKCU, HKLM, DWORD)Can be
1to disable the PDF24 Reader or0to enable it. The default value is 0. -
NoCompress(HKCU, HKLM, DWORD)Can be
1to disable PDF24 Compress or0to enable it. The default value is 0. -
NoToolbox(HKCU, HKLM, DWORD)Can be
1to disable PDF24 Toolbox or0to enable it. The default value is 0. -
NoUpdateCheckBtns(HKCU, HKLM, DWORD)Can be
1to disable update check buttons or0to enable it. The default value is 0. Option is available since version 10.2.0. -
mergePdfsProvider(HKCU, HKLM, REG_SZ)Can be
qpdfto use QPDF for merging orgsto use Ghostscript. The default value isqpdf. -
joinPdfsProvider(HKCU, HKLM, REG_SZ)Can be
qpdfto use QPDF for joining,gsto use Ghostscript orpdfboxto use PDFBox.pdfboxis vailable since version 11.2.0. The default value ispdfbox.
-
webview2.useEvergreen(HKCU, HKLM, DWORD)Can be
1to use the evergreen version of Webview2 which is installed and updated by Microsoft. Default is0which means that the Webview2 version is used which is installed with the PDF24 Creator. If the Webview2 version installed by PDF24 is not available then PDF24 tries to use the evergreen version. -
webview2.enableContextMenu(HKCU, HKLM, DWORD)This option controls whether the default context menu of Webview2 is enabled or not. A value of
1activates the context menu. This is the default option. A value of0disables the menu. This option is available since version 11.11.0.
-
assistant.closeAfterEmail(HKCU, HKLM, DWORD)Can be
1to close the assistant after using the mail function or0to keep the app open. The default value is 1. -
assistant.closeAfterSave(HKCU, HKLM, DWORD)Can be
1to close the assistant after using the save file function or0to keep the app open. The default value is 1. -
assistant.fixedSaveDir(HKCU, HKLM, SZ)The directory used to initialize the save file dialog box when saving a file.
-
assistant.joinFilesUseFirstName(HKCU, DWORD)Can be
1to use the name of the first file for the joined file or0to disable this. The default value is 0. -
assistant.mailNamePrompt(HKCU, HKLM, DWORD)Can be
1to prompt for email file name or0to disable this. The default value is 1. -
assistant.openPDFAfterSave(HKCU, HKLM, DWORD)Can be
1to open the PDF file after using the save function or0to disable this. The default value is 0. -
assistant.lastProfile(HKCU, SZ)The ID of the last used profile.
-
assistant.lastSaveDir(HKCU, SZ)The last used directory into which a file has been saved.
-
compress.colorModel(HKCU, SZ)The color model used to initialize the settings form.
-
compress.dpi(HKCU, SZ)The DPI value used to initialize the settings form.
-
compress.imageQuality(HKCU, SZ)The image quality value used to initialize the settings form.
-
compress.saveFileSuffix(HKCU, SZ)The save file name suffix used to initialize the settings form.
-
creator.explorerLastDir(HKCU, SZ)The last opened directory in the file explorer of the creator.
-
creator.explorerListViewMode(HKCU, DWORD)The list view mode of the file list of the file explorer.
-
creator.hasExplorer(HKCU, DWORD)Can be
1to enable the file explorer or0to disable it. Default value is 1. -
creator.jobDlgDisplayMode(HKCU, DWORD)The mode job dialogs are disabled.
-
creator.windowPlacement(HKCU, SZ)Stores the last window placement on the screen.
-
creator.thumbResolution(HKCU, HKLM, DWORD)This value sets the DPI used to generate thumbnails in the Creator. The default value is 72. Increasing this value slows thumbnail generation, but increases thumbnail quality. Lower values decrease the quality, but result in faster image generation. If the quality of thumbnails is too low, then you should increase the value.
-
formatOptions.lastProfile(HKCU, SZ)The ID of the last used profile.
-
ocr.dpi(HKCU, SZ)The DPI value used to initialize the settings form.
-
ocr.jobs(HKCU, SZ)The number of jobs processed in parallel used to initialize the settings form.
-
ocr.language(HKCU, SZ)The language code used to initialize the settings form.
-
ocr.outputDir(HKCU, SZ)The output directory used to initialize the settings form.
-
ocr.profile(HKCU, SZ)The ID of a profile used to initialize the settings form.
-
ocr.saveFilesInPlace(HKCU, SZ)The save files in place option value used to initialize the settings form. Can be
trueorfalse. -
ocr.saveFileSuffix(HKCU, SZ)The save file name suffix used to initialize the settings form.
-
ocr.skipFilesWithText(HKCU, SZ)The skip files with text value used to initialize the settings form. Can be
trueorfalse. -
ocr.skipPagesWithText(HKCU, SZ)The skip pages with text value used to initialize the settings form. Can be
trueorfalse.
-
toolbox.showScriptErrors(HKCU, HKLM, DWORD)Can be
1to show script errors if they occur or0to hide them. The default value is 1. Option is available since version 10.0.12. -
feature.toolbox.XXX(HKCU, HKLM, DWORD)These values control whether certain features, tools and functions are visible in the toolbox or not. Each value can be
1or0.1means enabled, shown or available and0means disabled, hidden or unavailable. The default value is 1. The prefixXXXcan be one of the following names:organize,merge,compress,edit,convertToPdf,convertPdfTo,protect,unlock,split,rotatePages,removePages,extractPages,sortPages,imagesToPdf,pdfToImages,extractImages,createJobApplication,ocr,webOptimize,addWatermark,addPageNumbers,overlay,compare,sign,annotate,blacken,crop,flatten,fax,screenCapture,twainImport,removeMetadata,editMetadata,createInvoice,openPdfReader,openCompress,openOcr,openFileTools,openRemotePrintManager,openFax,openOnlinePdfTools,openSettings,openOutputProfilesManager,openAssistant,openCreator,jobMonitorFooter
-
trayIcon.openLauncher(HKCU, HKLM, DWORD)Can be
1to open the Launcher instead of the Toolbox. The default value is 0. Option is available since version 10.0.12. -
trayIcon.openTool(HKCU, HKLM, SZ)Can be
launcher,toolbox,creator. The default value istoolbox. Option is available since version 10.1.0.
The PDF24 Reader also stores settings into the Windows registry. The registry path is HKCU\SOFTWARE\PDF24\PDF24 Reader. The following entries are currently supported by the PDF24 Reader:
-
OpenInExistingInstance(HKCU, DWORD)Can be
1to open files in an existing reader instance if available. The default value is 1. If the value is 0, each file is opened in a seperate instance. -
ShowNavigation(HKCU, DWORD)Can be
1to show the navigation pane of a file or 0 to hide it.
-
docTool.forceWordPrint(HKLM, HKCU, DWORD)Can be
1to force printing Word files to the PDF printer to convert the file to PDF. We used this mode in versions before11.8.0because it was the only available mode. Since version11.8.0we have added a new mode for converting Word files to PDF. The new mode uses the Office Automation APIs to export a PDF directly. This mode gives better results and metadata like links can be exported as well. If this new mode does not work for you, you can disable it with this registry value. Just setdocTool.forceWordPrint=1to force the old mode. -
docTool.forceExcelPrint(HKLM, HKCU, DWORD)Same as
docTool.forceWordPrintbut for Excel files. -
docTool.forcePowerpointPrint(HKLM, HKCU, DWORD)Same as
docTool.forceWordPrintbut for Powerpoint files.
5. Translation of language files
The PDF24 Creator has language files to offer the PDF printer in languages other than German and English. The languages German and English are maintained by the PDF24 team and are made available to every version. If you can translate into another language, we would be pleased if you could translate an existing language file into this language so that we can offer the PDF24 Creator in this language as well.
If you notice an error in one of the existing language files when translating a language file, tell us and we will fix these mistakes.
The language files of the PDF24 Creator can be found in the lang folder in the PDF24 installation directory. The language files end with the extension .lang and can be edited with a text editor. The language files are to be encoded with UTF-8 with BOM. A text editor like Notepad++ recognizes this automatically.
A language file is structured line by line. Lines beginning with # are comments and do not need to be translated. Each line contains the key and the text of a language element. Key and text are separated by a =. Only the text may be translated, the key must remain as it is so that the PDF24 Creator can find a text element. Here is an example:
#
# PDF Quality
#
general/pdf-quality = Quality of PDF
general/quality/low = Low quality
general/quality/medium = Medium quality
general/quality/good = Good quality
In the example above, e.g. general/pdf-quality is a key and Quality of PDF is the text to that key. Only the text Quality of PDF may be translated.
Already translated language files can contain the two characters #! as first characters in a line. This indicates that this line still needs to be translated. If new language elements are added to the PDF24 Creator, we add the missing elements to all language files with the content from the English language file and mark these lines with the characters #!. These lines are not yet translated. Translators can use this method to find elements that have not yet been translated and translate them. After the translation, the #! string must be removed.
Please send your translated or updated language file to team@pdf24.org. We will then integrate your translation into the PDF24 Creator.
6. PDF Printers
The PDF24 Creator is able to manage multiple PDF printers. Each PDF printer can be configured differently. For example, if you want to save a file automatically, you can easily do this with a dedicated PDF printer. To manage PDF printers, use the settings utility. There you can add, remove or configure PDF printers.
6.1. Ports
PDF printers use special ports from the system to receive printer data. The default or first PDF printer created by the installer has the port \\.\pipe\PDFPrint. Additional PDF printers will have ports like \\.\pipe\PDFPrint-1, \\.\pipe\PDFPrint-2 and so on.
If you have problems with your default PDF printer, e.g. if print jobs get stuck in the printer queue, please check the port to which the PDF printer is connected to. Make sure, that the default PDF printer is connected to port \\.\pipe\PDFPrint. If this is not the case, change this manually in the printer properties via the control panel of Windows.
7. pdf24-PrinterInstall.exe
The executable file pdf24-PrinterInstall.exe is used to install PDF printers. The installer uses this process to install the default PDF printer and the settings app uses it to install additional ones.
7.1. Command line
pdf24-PrinterInstall.exe [OPTIONS] ACTIONS
Actions are used to tell the printer installer what to do. See below for supported actions:
-
installPrinterDriverThis action is used to install the PDF24 printer driver which is required for the installation of PDF printers.
-
deletePrinterDriverThis action is used to uninstall the PDF24 printer driver.
-
installPrinterThis action is used to install a PDF printer.
-
installPortThis action is used to install just a local port. This is normally done automatically when the
installPrinteraction is used. -
deletePrinterThis action is used to delete a PDF printer.
-
deletePrinterByPortNameThis action is used to delete a printer by port name. Every printer that uses the specified port is deleted.
-
addServiceThis action is used to add a printer service entry into the registry. PDF24 then uses that information, listens on the port, receives and processes incoming print jobs.
-
printPorts,printPrinters,printPrinterDriversDiese Aktionen listen die Ports, Drucker und Treiber auf.
Options are used to give the actions the necessary information. See below for supported options:
-
-printerName XXXSet the name of the printer for the
installPrinteranddeletePrinteraction. -
-portName XXXSets the name of the port for the
installPrinteranddeletePrinterByPortNameactions. The port name of the default PDF printer is\\.\pipe\PDFPrint. Additional PDF printers are given the port name\\.\pipe\PDFPrint-1,\\.\pipe\PDFPrint-2and so on. -
-serviceName XXXSet the name of the PDF printer service entry for the
addServiceaction. Service names should be unique. -
-upgradeThe upgrade flag can be used with the
installPrinterDriveraction to upgrade the driver if a driver with the same name is already installed.
The PDF24 installer uses the following command to install the PDF printer driver:
pdf24-PrinterInstall.exe -upgrade installPrinterDriver
The PDF24 installer uses the following command to install the default PDF printer:
pdf24-PrinterInstall.exe -printerName PDF24 -portName "\\.\pipe\PDFPrint" installPrinter
8. pdf24.exe
The pdf24.exe file provides backend services that are mainly responsible for listening to PDF printer ports, receiving print jobs, forwarding them to the correct user and opening the frontend application where the user can save the new file.
8.1. Windows Service
The pdf24.exe also provides the Windows service that must be installed and started in order for the PDF printers to receive print jobs. Without this service the PDF printers will not work. The installation/uninstallation is done automatically via the PDF24 installer. The installer runs the folowing commands to install and start the service and to stop and uninstall it:
pdf24.exe -install -start
pdf24.exe -stop -uninstall
If the service is no longer available in Windows, perhaps due to a Windows update, you can use the above command line to reinstall and restart it. The installation can only be performed if you run the command with extended administrator privileges. To do this, you must open a console by clicking «Run as administrator».
The Windows Service is started by the following command line:
pdf24.exe -service
The PDF24 Toolbox currently uses Webview2 to display the GUI. This normally works out of the box and you do not need to setup anything. By default PDF24 uses the WebView2 version which is installed by PDF24. This version is stored in the subfolder WebView2 of the PDF24 installation folder. You can also force the use of the evergreen version of Webview2. You can do this with the registry option webview2.useEvergreen.
9.1. Command line
pdf24-Toolbox.exe [OPTIONS] [FILES]
If you simply run pdf24-Toolbox.exe without options and files, the GUI opens and the start page is displayed where you can choose a function.
If you run pdf24-Toolbox.exe without options but with files, the GUI opens and the start page is displayed where you can select a tool to use with these files. Above the possible tools the files are displayed.
[OPTIONS]
Options are used to tell the Toolbox what to do and to set parameters. See below for supported options:
-
-verb xxxxThe verb can be used to tell the toolbox which tool to open. The verb to page mapping is stored in the file
lib/toolbox/verbToPage.csv. For example,mergeopens the merge PDF tool andcompressopens the PDF compression tool.If you also specify files on command line, then the files are automatically loaded into the file box of the corresponding tool.
9.2. Notes about the Internet Explorer 11 component used in prior versions
In prior version of the PDF24 Toolbox the Internet Explorer 11 component was used to display the GUI. For this to work, settings had to be set correctly:
- Javascript must be enabled
- The URL range pdf24://* must be allowed, because this is how the UI communicates with the installed toolbox.
If Javascript is not active, then you will usually see inactive file boxes and you will not be able to interact with the GUI.
If the URL range pdf24://* is not allowed, then the UI cannot communicate with the app and thus the app will not work as it should.
9.3. Notes about Windows Server and Citrix
If PDF24 Toolbox does not start or displays a blank screen, then there are 2 ways to fix the problem. The entry at CTXHook has the advantage that you don’t need a restart:
Possibility 1:
[HKEY_LOCAL_MACHINE\System\CurrentControlSet\Services\CtxUvi]
UviProcessExcludes = „msedgewebview2“ [REG_SZ]
UviProcessExcludes entries can have a maximum of 14 characters. This works from Windows Server 2016 and requires a restart.
Possibility 2:
[HKEY_LOCAL_MACHINE\Software\Citrix\CTXhook]
ExkludedImageNames = „msedgewebview2.exe“ [REG_SZ]
This works from Windows Server 2008 and does not require a restart.
If the registry value already exists, simply append msedgewebview2.exe or msedgewebview2 to the comma-separated list, e.g. msedge.exe,msedgewebview2.exe.
After restarting the affected system, the misbehavior should no longer occur. Often, it is sufficient to close the affected application completely.
10. pdf24-Ocr.exe
The pdf24-Ocr.exe is an app, that does optical character recognition on files. The app generates PDF files with text layer. Under the hood, the app uses Tesseract for text recognition. The result of tesseract is then combined with the actual file.
10.1. Command line
pdf24-Ocr.exe [OPTIONS] [FILES]
Invoking the application without arguments simply opens a GUI. Invoking the app with files, opens the GUI and loads the files specified on command line.
To apply OCR on a specific file and to save the resulting PDF file with a text layer, invoke the OCR tool like this:
pdf24-Ocr.exe -outputFile output.pdf [-language eng] [-dpi 300] [-applyProfile PROFILE] [-skipFilesWithText] [-skipPagesWithText] [-removeBackground] [-deskew] [-autoRotatePages] "input.pdf"
The -outputFile switch tells the app where to store the produced PDF file with recognized text.
The -language switch sets the language used by the OCR process. Multiple languages can be specified like eng+deu. Open the list of available language codes to see all language codes you can use.
The -dpi switch sets the DPI value used by the OCR process. In common, 300 is the recommended value.
The -applyProfile switch can be used to apply an output profile to the generated PDF file that contains the recognized text.
-skipFilesWithText tells the app to not process files that already contains text.
-skipPagesWithText tells the app to not process pages of a file that already contains text.
-removeBackground tells the app to detect and remove the background of the page.
-deskew tells the app to deskew the pages. This greatly improves the OCR result if the pages are slightly skewed.
-autoRotatePages tells the app to rotate the pages automatically based on the recognized text.
In general, the app downloads language files on demand. Otherwise the installer would be very large and would consume a lot of disk space. If you prefer a local installation of all language files, the read the next chapter.
10.2. Local installation of all language file
To install language files locally and to stop downloading language files from the internet, do the following:
-
Download the language files list for local installation and put the file into the tesseract folder of the PDF24 installation directory. Rename the file to
trainDataList.txt. -
Then download the individual language files specified in the language files list for download on demand into the tessdata folder
INSTALL_DIR/tesseract/tessdata.
You also have to download the osd.traineddata because this file is required for orientation detection. Without the file, the OCR process will fail with a data file error message.
Please make sure that you use the language files that are compatible with Tesseract 4.0. The language files can be downloaded from the tesseract project on GitHub.
Compared to the online list the local list does not contain URLs for download. Please note to rename the file name from local-list.txt to trainDataList.txt.
You can shorten the list if you like. In the list you can only specify the language files that should be displayed in the software.
11.1. Command line
pdf24-DocTool.exe [options] [file1] [file2] ...
[options]
Options are used to tell the DocTool what to do and to set parameters. Below are general options that apply to most commands and are described here.
-
-expandDirsIf an input file is a directory then the DocTool replaces that input file with all the files inside that directory and processes all these files instead.
-
-expandDirsRecursiveSame as «-expandDirs» but also recurses down into subdirectories if there are subdirectories in the directory.
-
-includeFileExtensions extensionsInclude input files by file extension.
extensionsis a comma seperated list of extensions like.txt,.docx,.pptx. This flag is often very helful when used in combination with the-expandDirsor-expandDirsRecursiveswitches. Any input file that does not have one of the specified extensions will be filtered out. Available since version 11.8.0. -
-excludeFileExtensions extensionsExclude input files by file extension.
extensionsis a comma seperated list of extensions like.txt,.docx,.pptx. This flag is often very helful when used in combination with the-expandDirsor-expandDirsRecursiveswitches. Any input file that has one of the specified extensions will be filtered out. Available since version 11.8.0. -
-sortSorts all input files by name.
-
-deleteFilesDelete input files after being processed. Be careful when using this flag.
-
-noProgressTells the DocTool not to use progress windows. Currently, not all commands supports this flag.
-outputDir dir
Optional flag to specifiy an output folder where the DocTool should save generated files. The files are saved under the name of the file inside the specified directory.
-outputFile file
Optional flag to specifiy an output file under which the DocTool should save the generated file(s). If more than one file is specified on the command line to be processed then the DocTool modifies the file name and adds a number.
The output file can be the special «-» one. In that case the DocTool saves the processed files into the same directory like the input files.
[file1] [file2] ...
The DocTool is a file tool and you have to specify one or more files on the command line which are to be processed.
pdf24-DocTool.exe file1 [file2] ...
Converts the files on the command line to PDF and opens an PDF24 assistant to handle the converted files.
file1 [file2] ...
One or more files to process.
pdf24-DocTool.exe -webOptimize [-outputDir dir] [-outputFile file] file1 [file2] ...
Optimizes the files for web. Generates web optimized PDF files.
-webOptimize
The command to tell the DocTool to optimize the input files for web.
[-outputDir dir]
See description of common parameters.
[-outputFile file]
See description of common parameters.
file1 [file2] ...
See description of common parameters.
pdf24-DocTool.exe -applyProfile [-profile profileId] [-profileParam key value] [-outputDir dir] [-outputFile file] file1 [file2] ...
Applies a profile on the specified files. A profile can be specified on command line or can be selected via a profile select dialog.
-applyProfile
The command to tell the DocTool to apply a profile on the input files
[-profile profileId]
Optional flag to specify an ID of a profile to use. The ID of default profiles is like «default/xxx» where xxx is the name of a default profile, e.g. «good» or «best». The ID of user profiles is like «user/yyy» where yyy is the name of a user profile.
[-profileParam key value]
You can override profile values using the -profileParam argument. The [-profileParam key value] switch can be used multiple times to override multiple values. This makes it possible to use a base profile and then overwrite certain parameters of this profile. Available since version 11.7.0.
[-outputDir dir]
See description of common parameters.
[-outputFile file]
See description of common parameters.
file1 [file2] ...
pdf24-DocTool.exe -join [-sort] [-profile profileId] [-outputDir dir] [-outputFile file] file1 [file2] ...
Joins input files to one output file.
-join
Tells the DocTool to join the input files
[-sort]
Optional flag to sort the input files by name before joining.
[-profile profileId]
@see Documentation of «pdf24-DocTool.exe -applyProfile»
[-outputDir dir]
See description of common parameters.
[-outputFile file]
See description of common parameters.
file1 [file2] ...
See description of common parameters.
pdf24-DocTool.exe -extractPages file1 [file2] ...
Opens a page extract dialog for the input files to extract pages from the documents.
-extractPages
Tells the DocTool to open the page extract dialog for the input files
file1 [file2] ...
The file(s) from which to extract
pdf24-DocTool.exe -splitByPage [-outputDir dir] [-outputFile file] file1 [file2] ...
Splits the documents page by page
-splitByPage
Tells the DocTool to split the input files page by page.
[-outputDir dir]
See description of common parameters.
[-outputFile file]
See description of common parameters.
file1 [file2] ...
See description of common parameters.
pdf24-DocTool.exe -autoRotatePages [-outputDir dir] [-outputFile file] file1 [file2] ...
Rotates pages of input pdf files automatically based on page contents. Since version 10.7.2.
-autoRotatePages
Tells the DocTool to rotate pages
[-outputDir dir]
See description of common parameters.
[-outputFile file]
See description of common parameters.
file1 [file2] ...
See description of common parameters.
pdf24-DocTool.exe -convertTo [-outputDir dir] [-outputFile file] file1 [file2] ...
Converts the input files. Opens the Save As dialog where the user can select a file type and where the user can specify specific output file options.
-convertTo
Tells the DoctTool to convert the input files
[-outputDir dir]
See description of common parameters.
[-outputFile file]
See description of common parameters.
file1 [file2] ...
See description of common parameters.
pdf24-DocTool.exe -convertToPDF [-profile profileId] [-outputDir dir] [-outputFile file] file1 [file2] ...
Converts the input files to PDF. The user can select a profile which is used to save the output file.
-convertToPDF
Tells the DoctTool to convert the input files to PDF
[-profile profileId]
@see Documentation of «pdf24-DocTool.exe -applyProfile»
[-outputDir dir]
See description of common parameters.
[-outputFile file]
See description of common parameters.
file1 [file2] ...
See description of common parameters.
pdf24-DocTool.exe -upload -url url file1 [file2] ...
Upload the input files to a web service, extracts the location header of the response and opens a browser window with the URL from the location header.
-upload
Tells the DocTool to upload the input files to a web service.
-url url
Specifies the URL of a web service to which to upload the input files.
file1 [file2] ...
The files to upload.
pdf24-DocTool.exe -sendAsMail [-profile profileId] file1 [file2] ...
Opens the send email dialog and attaches the input files so that the user can send the files as an email.
-sendAsMail
Tells the DocTool to send the input files as an email.
[-profile profileId]
Optional flag to specify an ID of a profile to use. The ID of default profiles is like «default/xxx» where xxx is the name of a default profile, e.g. «good» or «best». The ID of user profiles is like «user/yyy» where yyy is the name of a user profile.
file1 [file2] ...
The files to send.
pdf24-DocTool.exe -sendAsFax file1 [file2] ...
Sends the input files as a fax.
-sendAsFax
Tells th DocTool to send the input files as a fax.
file1 [file2] ...
The files to send.
pdf24-DocTool.exe -shellPrint [-printerName nameOfPrinter] file1 [file2] ...
Prints the input files on a printer. Uses the files print command of the windows shell.
-shellPrint
Tells the DocTool to print the files with the windows shell print command.
[-printerName nameOfPrinter]
Optional flag to print on a specific printer.
file1 [file2] ...
The files to print.
pdf24-DocTool.exe "<clipboard>"
Extract files from the windows clipboard and opens a PDF24 assistant to handle the files.
<clipboard>
Special file to tell the DocTool to import from windows clipboard.
pdf24-DocTool.exe "<twain>"
Imports files from the TWAIN interface (scanner or camery) and opens a PDF24 assistant to handle the files.
<twain>
Special file to tell the DocTool to import from TWAN interface
pdf24-DocTool.exe [-mode MODE] [-target TARGET] "<screen>"
Captures the screen. The capture mode and the target can be specified.
[-mode MODE]
Optional flag to set the capture mode. The mode can be one of the following:
screenTo capture the whole screen. This is the default.screenClientTo capture the screen client area (excludes the windows taskbar)activeWindowTo capture the active windowactiveWindowClientTo capture the client area of the active windowuserDefinedAreaTo capture a user defined areaclipboardTo process a captured image copied to the windows clipboard
[-target TARGET]
Optional flag to specify the target of the capture image. The target can be one of the following options:
defaultOpens a PDF24 assistant to handle the captureclipboardCopies the capture image into the clipboardfileTo store the image into a file
pdf24-DocTool.exe -crop [-left value] [-top value] [-right value] [-bottom value] [-box value] [-outputDir dir] [-outputFile file] file1 [file2] ...
Crops the pages of input PDF files. Available since version 11.6.0.
-crop
The command to tell the DocTool to crop the pags of all input files.
-left value
The value for the left side of the media box. The value is a number and can have a siffix if either mm, inch, pt. If no suffix is specified, mm is used. Examples are 5mm, 0.5inch, 8pt.
-top value
The value for the top side of the media box. See description of -left above for information about the value.
-right value
The value for the right side of the media box. See description of -left above for information about the value.
-bottom value
The value for the bottom side of the media box. See description of -left above for information about the value.
-box value
The PDF box to define. The value can be cropBox or trimBox. If no box is specified, cropBox is used.
-outputDir dir
See description of common parameters.
-outputFile file
See description of common parameters.
file1 [file2] ...
The files whose pages will be cropped.
pdf24-DocTool.exe -compress [-useCompressionParamsDialog] [-dpi value] [-imageQuality value] [-colorModel value] [-outputDir dir] [-outputFile file] file1 [file2] ...
Compresses the files specified on command line and uses specified parameters for the compression function. Available since version 11.11.0.
-compress
The command to tell the DocTool to compress input files.
-dpi value
The DPI (dotts per inch) compression value. Lower values reduce the output file size, but also the quality of embedded images. Default value is 144.
-imageQuality value
The image quality value in % used to compress embedded images. Value range is 1 .. 100. Lower values reduce the output file size, but also the quality of embedded images. Default value is 75.
-colorModel value
The color model. Possible values are an empty string, rgb, cmyk, gray. The default value is an empty string which means not to change the color model.
-useCompressionParamsDialog
Tells the DocTool to show a dialog where the user can change compression params which are then used for the compression function.
-outputDir dir
See description of common parameters.
-outputFile file
See description of common parameters.
file1 [file2] ...
The files to compress.
12. pdf24-Reader.exe
The pdf24-Reader.exe is an application that can open and display PDF files. Internally PDFIUM is used as PDF library. PDF24 Reader is a fast and lightweight PDF reader that integrates well with Windows. A shell preview is available so that other applications like Outlook or Windows Explorer can preview PDF files.
12.1. Command line
pdf24-Reader.exe [OPTIONS] [FILE]
Invoking the application without arguments simply opens a GUI. Invoking the app with a file opens the GUI and loads the file specified on command line. There are switches and flags which can be used to control the behavior of PDF24 Reader. These are explained below:
The /newWindow switch tells the reader to open the specified PDF file in an seperate Window. Normally files are opened as tab in an existing instance.
The /print switch tells the reader to print the specified PDF file using the default printer in Windows.
The /printTo XXX option tells the reader to print the specified PDF file in the printer named XXX.
The /printFlags XXX option can be used to control the print function. XXX is a comma seperated list of flags. Currently the Reader supports forceImagePrint, forceEmfPrint, grayscalePrint. Supported since version 11.8.0.
13. FAQ
13.1. The PDF printer is not working properly. Print jobs are stuck in the print queue. What to do?
Sometimes it can happen, that the PDF printer is not working well. Most of the time it can be fixed by checking the following:
-
Ensure, that the PDF24 Windows service is running. This service is required in order to receive print jobs. The service is provided by the pdf24.exe and runs as
Local Systemuser. The service can be started via command line:net start pdf24. -
Ensure, that there is no bad print job which blocks the printer. Kill these jobs or clear the queue.
-
Ensure, that the PDF printer is connected to the correct port. The default PDF printer is connected to the port
\\.\pipe\PDFPrint. If this is not the case, then change it manually. You can see and change the port and in the printer properties of the printer.- Open the control panel of Windows
- Open Printers
- Right click the PDF24 printer
- Cick printer properties
- Click the ports tab
- Check the printer port there
13.2. How to stop/remove the PDF24 autostart entry?
The PDF24 Autostart entry starts the user process that is used for the PDF printer to receive the print jobs from the PDF printer from the PDF24 Windows service and present them to the user.
In newer versions of the PDF24 Creator, it is possible to remove this autostart entry so that this process no longer starts with Windows. This is now possible because the PDF24 Windows Service tries to start this user process automatically if this process is not running. This makes it possible to start this process only when necessary.
To remove this autostart entry you have to change the Windows registry. Open the Registry Editor, open the path HKLM\SOFTWARE\Microsoft\Windows\CurrentVersion\Run and delete the PDF24 entry. This change prevents Windows from launching PDF24 on Windows startup.
13.3. How to update from version 9.x and keep settings?
In this case you would have to copy/rename the data in the registry, because there was a change in the past.
Versions below 10 used HKLM/Software/PDFPrint and HKCU/Software/PDFPrint to store settings in the registry. This has been changed to HKLM/Software/PDF24 and HKCU/Software/PDF24.
If you want to keep your data, you have to export them before installing the new version. Then update the software. After that, import your exported into the new pathes. This means that you have to update the pathes in the exported file.
HKLM/Software/PDFPrint must be changed to HKLM/Software/PDF24.
HKCU/Software/PDFPrint must be changed to HKCU/Software/PDF24.
If you have a x64 system and if you now install a 64 bit version of PDF24, then you have to rename the following becaue of Wow6432Node redirection:
HKLM/Software/Wow6432Node/PDFPrint must be changed to HKLM/Software/PDF24
Многие пользователи сталкиваются на своих компьютерах с файлами в формате PDF, в которых сохранено большое количество различных данных. Наиболее часто встречающиеся задачи при работе с файлами: просмотр документа, создание файла, копирование, перемещение, преобразование в другой формат и тому подобное.
Для взаимодействия с форматом ПДФ необходима программа на компьютере или помощь веб-приложения в Интернете. В этой статье мы рассмотрим программное обеспечение, устанавливаемое на ПК.
Содержание:
- Для чего нужен PDF24 Creator
- Возможности программы PDF24 Creator
- Инструменты PDF24 Creator
- Как объединить файлы в PDF24 Creator
- Выводы статьи
- PDF24 Creator — инструменты PDF на ПК (видео)
PDF24 Creator — бесплатная программа для выполнения различных действий при работе с файлами в формате PDF. В этом приложении собрано большое количество инструментов, помогающих решать прикладные задачи с файлами данного типа.
PDF (Portable Document Format) — универсальный, широко распространенный формат документов, хранящихся в электронном виде. В этом формате сохраняют инструкции, бланки, формы, техническую литературу, электронные книги и так далее.
Распространенность формата PDF связана с тем, что текущий документ одинаково отображается на различных устройствах: компьютерах, телефонах или планшетах. Файлы ПДФ имеют расширение «*.pdf».
В некоторых случаях, пользователям необходимо создать или объединить PDF, извлечь страницы, сжать или конвертировать ПДФ в другой формат. Для подобных действий необходимо использовать соответствующую программу или онлайн сервис в Интернете.
Для чего нужен PDF24 Creator
Немецкий сервис PDF24 выполняет большое количество операций с форматом PDF. Помимо онлайн версии веб-приложений PDF24 Tools, находящейся по адресу: https://tools.pdf24.org/ru/, для пользователей доступна автономная программа, которой можно пользоваться на компьютере без доступа в Интернет.
PDF24 Creator используется для Windows. Программа работает в операционных системах Windows 11, Windows 10, Windows 8.1, Windows 8, Windows 7. Windows Vista. Для установки в Windows XP нужно скачать версию PDF24 Creator 8.6.1 по этой ссылке.
У бесплатной программы PDF24 Creator имеется русская версия приложения. Войдите на официальный сайт PDF24 Creator, чтобы загрузить приложение для ПК. Обратите внимание на разрядность операционной системы Windows, установленной на вашем устройстве.
PDF24 Creator скачать
Далее установите PDF24 Creator на компьютер. Во время инсталляции вам предложат установить на ПК некоторые компоненты, в том числе, виртуальный принтер.
С помощью функций виртуального принтера работают некоторые инструменты, входящие в состав программы PDF24 Creator. В частности, вы можете создать PDF из файла, имеющего функцию печати, или сохранить в PDF открытую веб-страницу сайта или любой другой нужный документ (Word, Excel, PowerPoint и так далее).
Возможности программы PDF24 Creator
Сейчас мы посмотрим, что за программа PDF24 Creator, какие функции она выполняет. Это многофункциональное приложение, предназначенное для выполнения различных операций с ПДФ файлами.
В состав приложения входит большое количество инструментов, позволяющих решать множество задач по работе с форматом PDF. Основные функции программы PDF24 Creator:
- просмотр содержимого файла;
- объединение или удаление страниц из файла;
- преобразование документов и изображений в формат PDF;
- редактирование содержимого;
- сжатие для уменьшения размера файла;
- добавление, удаление или извлечение изображений;
- функция OCR — оптическое распознавание символов;
- добавление водяного знака;
- сравнение файлов;
- установка или снятие пароля с файла.

Инструменты PDF24 Creator
В главном окне приложения находятся кнопки, которые отвечают за запуск конкретных функций программы. PDF24 Creator прост в использовании: вам нужно нажать на соответствующую кнопку, чтобы перейти к следующему этапу работы, в котором необходимо настроить параметры выполнения требуемой операции.
В программе PDF24 Creator доступны следующие средства:
- Упорядочить PDF файлы — наведение порядка в файлах.
- Объединить PDF — объединение нескольких ПДФ файлов в один документ.
- Сжать PDF — уменьшение размера исходного файла за счет его сжатия.
- Редактировать PDF — редактор ПДФ файлов.
- Преобразовать в PDF — конвертирование исходного файла в ПДФ.
- Конвертировать PDF в … — преобразование файла ПДФ в другой формат.
- Защитить PDF — установка пароля на файл и настройка прав доступа.
- Снять пароль с PDF — удаление запроса пароля с файла, открытие свободного доступа к документу.
- Разделить PDF — разделение файла на отдельные части, создание из них новых PDF файлов.
- Повернуть PDF — поворот страниц в документе.
- Удалить страницы из PDF — удаление отдельных страниц из файла.
- Извлечь страницы из PDF — извлечение отдельных страниц из данного файла.
- Переставить страницы в PDF — изменение порядка последовательности страниц в документе.
- Изображения в PDF — создание ПДФ файла из изображений.
- PDF в изображения — конвертирование ПДФ в изображение.
- Извлечь изображения из PDF — извлечение всех встроенных изображений из файла.
- Создать PDF приложение — создание онлайн приложения в формате ПДФ.
- PDF OCR — распознавание текста через OCR, создание ПДФ файла с возможностью поиска в них.
- Веб-оптимизация PDF файлов — линеаризация PDF, оптимизация файла для просмотра на веб-страницах.
- Добавить водяной знак — установка водяного знака на страницы файла для защиты от копирования.
- Добавить номера страниц — добавление номеров на страницы документа.
- Наложение PDF — совмещение ПДФ с цифровой бумагой.
- Сравнение PDF файлов — сравнение файлов и отображение отличий.
- Подписать PDF — подписать файл.
- Аннотировать PDF — добавление аннотации к файлу.
- Затемнение PDF — затемнение файла.
- Обрезать PDF — обрезка документа по краям.
- Объединить слои в PDF — объединение слоев в документе.
- Отправить факс — отправка факса онлайн.
- Захват экрана — снимок экрана (скриншот) для создания PDF-файла с этим изображением.
- Импорт со сканера или камеры — открытие мастера импорта со сканера или камеры.
Помимо этого, в главном окне приложения доступны дополнительные инструменты:
- Открыть PDF24 Creator — открытие окна приложения для наведения порядка в файлах.
- Открыть PDF24 Reader — открытие окна просмотрщика ПДФ файлов.
- Открыть помощник печати PDF — открытие окна помощника печати.
- Открыть PDF24 Compress — открытие инструмента для уменьшения размера ПДФ файлов.
- Открыть PDF24 OCR — открытие средства OCR для распознавания текста.
- Открыть файловые инструменты — открытие окна для запуска некоторых инструментов PDF24 File Tools.
- Открыть PDF24 Fax — переход на веб-сервис PDF24 Fax.
- Открыть PDF инструменты онлайн — выполнение необходимых операций на сервисе PDF24 Tools.
- Открыть Настройки — настройки программы.
- Управлять профилями ввода — настройка в программе свойств PDF формата.
Сейчас для примера мы решим одну из задач, с которой часто встречаются пользователи при работе с данным форматом файлов.
Как объединить файлы в PDF24 Creator
Нам потребовалось объединить два файла в формате PDF в один документ. На основе нескольких файлов будут создан один PDF-файл.
Выполните несколько шагов:
- В главном окне PDF24 Creator нажмите на кнопку «Объединить PDF».
- В следующем окне перетащите файл с компьютера с помощью мыши в специальную форму, или воспользуйтесь кнопкой «Выбрать файлы».

- По очереди добавьте нужное количество файлов. Для этого щелкните мышкой по специальной области, или нажмите на кнопку «Добавить файлы», расположенную в правом нижнем углу формы.
- В поле «Метод» выберите метод объединения файлов:
- Склеить.
- Сопоставить.
- Страничный режим.
Например, после выбора страничного режима, вы можете отобрать нужные страницы для их добавления в новый файл PDF.

- Нажмите на кнопку «Создать PDF».

- После завершения обработки, откроется окно в котором можно изменить имя созданного файла, или открыть его в программе по умолчанию на компьютере для формата PDF.
- Для сохранения результата нажмите на кнопку «Сохранить».

Выводы статьи
Мы часто сталкиваемся с широко распространенным форматом PDF. В некоторых случаях, пользователю необходимо выполнить различные операции с файлами этого формата: добавить новые страницы, преобразовать в другой формат, разделить или объединить файлы и тому подобное. Решить подобные задачи можно с помощью бесплатной программы PDF24 Creator, в которой имеется много различных инструментов для работы с PDF-файлами.
PDF24 Creator — инструменты PDF на ПК (видео)
Похожие публикации:
- Как сохранить веб-страницу в PDF
- Как вставить PDF в документ Word — 6 способов
- Как сохранить файл в PDF — 3 способа
- Как объединить PDF онлайн — 7 сервисов
- Как сжать PDF онлайн — 6 сервисов
Формат PDF удобен тем, что прекрасно сочетает в себе как текстовую часть, так и графическую без каких-либо конфликтов. В том же Word от Microsoft синергия с изображениями организована из рук вон плохо. Для просмотра и редактирования файлов PDF существуют специальные утилиты.
Родоначальник данного формата компания Adobe предлагает массу инструментов для работы с такими пакетами, но подписка на них обойдётся в круглую сумму. В качестве альтернативы можно использовать бесплатные программы, вроде PDF24 Creator. Естественно, что функционал подобных приложений заметно ограничен, но для рядового потребителя базовых возможностей более чем достаточно.
Пользователи узнают программу по логотипу в виде барашка или овечки.
Содержание
- 1 Что за программа и для чего нужна
- 2 Возможности и функции программы
- 3 Скачать
- 4 Требования системы для установки
- 5 Установка, обновление, удаление
- 6 Скачать бесплатно или купить
- 7 Плюсы и минусы
- 8 Полезное видео
- 9 Заключение
Что за программа и для чего нужна
Утилита предназначена для просмотра и редактирования электронных документов в стандарте PDF. Посредством ПДФ 24 Creator можно удалять, вставлять и перемещать страницы, а также сохранять проекты в графическом формате и вариациях PDF.
Возможности и функции программы
Интерфейс утилиты позволяет объединять несколько документов постранично. Достаточно перетаскивать отдельные листы посредством мыши из одного файла в другой. Также можно удалять и поворачивать страницы в документах.
Встроенные инструменты PDF24 Creator помогут оптимизировать PDF-документы, что заметно уменьшает занимаемое место на жёстком диске. Такой функционал придётся кстати, когда требуется отправить по Сети большое количество файлов при низкой скорости соединения.
Самым популярным текстовым редактором в среде Windows считается Word от Microsoft. Программа PDF24 Creator позволяет конвертировать созданные в «Ворде» документы в формат PDF. После чего продолжить работу с текстом и графикой.
Помимо файлов Word программа способна конвертировать документы в такие форматы как:
- PowerPoint;
- Excel;
- JPG;
- TIFF;
- BMP;
- PNG;
- HTML Document.
Что касается функции редактирования, то у PDF24 Creator она ограничена в сравнении с фирменными приложениями от Adobe. Документ можно разделять, менять порядок страниц, защитить проект посредством пароля и изменить свойства файла. То есть вносить непосредственные изменения в текст или графическую часть, увы, нельзя.
PDF-документы можно объединить в один проект с помощью PDF24 Creator и наоборот – расшить листы. При этом программа сохраняет первоначальное качество источников. Инструмент будет удобен в тех случаях, когда над одним проектом работают несколько человек.
Скачать
| Операционная система: | Windows 7, Windows 8, Windows 8.1, Windows 10 |
| Разработчик: | geek Software GmbH. |
| Русский язык: | Да |
| Цена: | Бесплатная |
Ключевые возможности креатора:
- несколько режимов визуализации и редактирования документов;
- виртуальный принтер;
- поворот страниц с шагом в 90°;
- извлечение текстовых данных из документа;
- удаление, вставка, копирование страниц;
- объединение документов в один проект;
- сохранение файла в выбранном качестве согласно спецификации PDF;
- конвертация в сторонние форматы;
- отправка отдельных страниц или полного проекта по Email и факсу посредством местного интерфейса.
Программа PDF24 Creator грамотно и в полном объёме переведена на русский язык. Для смены последнего следует перейти в «Настройки» (Settings) и в разделе «Основное» (General) выбрать необходимую страну.
Требования системы для установки
Десктопная версия продукта требует наличия операционной системы Windows 7, 8 или 10. Процессор по отдаче не ниже уровня Pentium 3. Для корректной работы программы понадобится как минимум 1 Гб свободной оперативной памяти и около 300 Мб на жёстком диске.
При активной конвертации файлов целесообразнее установить утилиту на винчестер формата SSD. Параметры видеоускорителя некритичны для PDF24 Creator.
Установка, обновление, удаление
Для скачивания дистрибутива необходимо перейти на официальный сайт разработчика софта в соответствующий раздел: tools.pdf24.org/ru/creator/. После чего нажать на кнопку «Скачать» и выбрать версию продукта.
К скачиванию доступны решения для частного и коммерческого использования, работающие как на 64-, так и 32-битной архитектуре. Кликаем на нужном файле и ждём окончания загрузки. Далее находим на жёстком диске дистрибутив и запускаем его.
В появившемся окне принимаем условия лицензионного соглашения. Следующим шагом выбираем место установки: по умолчанию рабочая папка Windows – Program Files. Затем следует определиться с компонентами для загрузки. Если программа будет использоваться исключительно для просмотра PDF-документов, то в выпадающем меню выбираем «Компактная установка». Во всех остальных случаях целесообразнее провести «Полную установку».
Если по клику на файл формата PDF открывается браузер, то можно выбрать программу PDF24 Creator по умолчанию для работы с такими документами. Для этого при установке утилиты необходимо поставить маячок в строчке Set default PDF reader.
Далее нажимаем установить и ждём окончания процедуры. После запуска программы с иконки на рабочем столе откроется окно с набором основных инструментов. Для перехода в интерфейс утилиты следует кликнуть на «Открыть PDF24 Creator».
Обновление программы происходит посредством меню. Переходим в раздел «Помощь» и кликаем по строчке «Проверка обновлений». При этом компьютер должен быть подключён к Сети. Если появилась более поздняя версия утилиты, то в выпадающем окне следует нажать «Обновить». В противном случае система выдаст сообщение «Обновления не найдены».
При необходимости программу можно удалить. Закрываем интерфейс и переходим в параметры ОС Windows (комбинация клавиш Win + I). Кликаем на разделе «Приложения», после чего выбираем из списка PDF24 Creator. Нажимаем кнопку «Удалить» и дожидаемся окончания процедуры.
Полезно также почитать: Soda PDF
Скачать бесплатно или купить
Продукт распространяется онлайн совершенно бесплатно, причём как для личного пользования, так и коммерческого. То есть никаких одноразовых платежей, подписок, ознакомительных версий и прочего разработчиком не предусмотрено.
Единственная оговорка в тексте лицензии – это распространение PDF24 Creator только на территории Европейского союза. Но вместе с тем техническая поддержка заявляет, что преследовать пользователей на официальном уровне за использование программы в других странах разработчик не собирается.
Плюсы и минусы
Один из явных плюсов для отечественных пользователей – это бесплатная лицензия распространения. Подписка на тот же Adobe Reader обойдётся порядка 600 рублей в месяц. Да, последний предлагает широкие функциональные возможности и отзывчивую техподдержку. Но большинству рядовых пользователей такие возможности попросту без надобности. Имеющихся инструментов PDF24 Creator им хватит с головой.
Ещё одно преимущество программы перед аналогами – это конвертер PDF-документов в Word и другие форматы, а также обратная процедура. Утилита работает стабильно, без вылетов и практически не потребляет системные ресурсы даже на слабой технике. В плюсы также можно записать интуитивно понятный интерфейс и грамотную русскоязычную локализацию.
Как таковых минусов у программы нет. Техподдержка откликается с большой задержкой, но всё же отвечает. Конвертация проходит заметно медленнее, чем у платных аналогов. Редактирование документа сильно ограничено. Но на все эти минусы можно закрыть глаза, учитывая условия распространения продукта.
Полезно также почитать: Adobe Acrobat
Полезное видео
Об использовании программы в видео:
Заключение
Утилита PDF24 Creator станет хорошим помощником для тех, кому требуется толковый инструмент для просмотра и компоновки документов в формате PDF. Программа отлично справляется со своей задачей и ведёт себя вполне адекватно даже на слабых машинах. Здесь нет рекламы как в прочих бесплатных решениях, а местный интерфейс не предлагает каждый час купить более продвинутую версию продукта.
Если необходимости в полноценном редактировании PDF-документов нет, то с PDF24 Creator обязательно стоит хотя бы ознакомиться. В любом случае за установку и использование программы разработчик не попросит ни копейки.
PDF24 Creator — это мощное приложение для работы с PDF-документами, которое позволяет создавать и редактировать файлы в формате PDF. Это удобное решение для тех, кто часто сталкивается с необходимостью конвертировать или объединять несколько документов в один.
Настройка PDF24 Creator существенно упрощает работу с файлами в формате PDF. Здесь мы рассмотрим пошаговую инструкцию по настройке приложения, чтобы вы могли легко и удобно использовать все его функции.
Первым шагом является загрузка и установка PDF24 Creator с официального сайта. После установки запустите приложение и вы увидите информационное окно с предложением создать новый проект или открыть существующий файл. Выберите нужную опцию в зависимости от ваших потребностей.
Содержание
- Установка PDF24 Creator
- Запуск программы
- Работа с основными функциями
- 1. Создание PDF-файлов
- 2. Редактирование PDF-файлов
- 3. Преобразование PDF-файлов
- 4. Объединение PDF-файлов
- 5. Разделение PDF-файлов
- Настройка параметров
- Сохранение и экспорт созданных документов
- Сохранение документов
- Экспорт документов
- Советы и рекомендации
Установка PDF24 Creator
PDF24 Creator — это бесплатная программа для создания и редактирования PDF-файлов. Чтобы начать использовать PDF24 Creator, вам необходимо сначала установить его на свой компьютер. В этом разделе мы рассмотрим процесс установки PDF24 Creator.
- Загрузка установочного файла
- Запуск установки
- Соглашение с условиями лицензии
- Выбор целевой папки
- Установка программы
- Завершение установки
Первым шагом является загрузка установочного файла PDF24 Creator с официального веб-сайта. Для этого откройте ваш браузер и перейдите на страницу загрузки PDF24 Creator. Выберите версию для вашей операционной системы (Windows, Mac или Linux) и нажмите на кнопку «Скачать».
Когда загрузка завершится, найдите скачанный файл на вашем компьютере и запустите его. Обычно это файл с расширением .exe для Windows или .dmg для Mac. Дважды щелкните на файле, чтобы запустить установку.
Перед установкой вам могут показаться условия лицензионного соглашения. Ознакомьтесь с ними и, если вы согласны, примите условия, чтобы продолжить установку. Если вы не согласны с условиями, вы не сможете продолжить.
После принятия условий лицензионного соглашения вам будет предложено выбрать папку для установки PDF24 Creator. Вы можете оставить путь по умолчанию или выбрать другую папку на вашем компьютере.
Нажмите кнопку «Установить», чтобы начать процесс установки. Подождите, пока программа установится на ваш компьютер. Это может занять несколько минут, в зависимости от производительности вашего компьютера.
После завершения установки появится окно, сообщающее, что установка была успешно завершена. Нажмите кнопку «Готово» или «Закрыть», чтобы закрыть окно установщика.
Теперь вы устновили PDF24 Creator на свой компьютер и готовы начать использовать его для создания и редактирования PDF-файлов. Убедитесь, что вы ознакомитесь с доступными функциями и настройками PDF24 Creator, чтобы использовать программу максимально эффективно.
Запуск программы
После успешной установки PDF24 Creator нажмите на ярлык программы на рабочем столе или откройте ее через меню «Пуск». При первом запуске программы вас может попросить установить принтер PDF24. Это важно, чтобы PDF24 Creator мог конвертировать документы в формат PDF.
После запуска программы на экране откроется главное окно PDF24 Creator. В верхней части окна находятся основные функции программы, такие как «Создать PDF», «Объединить PDF», «Редактировать PDF» и др. Выберите необходимую функцию и щелкните по ней для перехода к работе с документами.
Главное окно программы также содержит некоторые основные настройки и инструменты, которые можно использовать для манипуляции с файлами PDF. Например, в верхней части окна расположены кнопки «Открыть файл», «Сохранить файл» и «Печать». Кнопки «Открыть файл» и «Сохранить файл» позволяют выбирать и сохранять файлы на вашем компьютере, а кнопка «Печать» позволяет отправить выбранный документ на печать через принтер PDF24.
Также в главном окне есть панель инструментов, где вы можете найти дополнительные функции и инструменты для работы с файлами PDF. Например, вы можете использовать кнопку «Выделить текст» для выделения и копирования текста из PDF-документа, кнопку «Добавить водяной знак» для добавления водяного знака на страницы документа, или кнопку «Сжать PDF» для уменьшения размера файла PDF без потери качества.
Работа с основными функциями
PDF24 Creator предоставляет ряд основных функций, которые позволяют создавать, редактировать и преобразовывать PDF-файлы. В этом разделе мы рассмотрим эти функции более подробно.
1. Создание PDF-файлов
PDF24 Creator предоставляет простой и удобный способ создать PDF-файл из любого типа файлов. Для этого вам нужно выполнить следующие шаги:
- Откройте приложение PDF24 Creator.
- Нажмите на кнопку «Создать новый PDF».
- Выберите файлы, которые вы хотите преобразовать в PDF. Вы можете выбрать один или несколько файлов одновременно.
- Нажмите «Открыть» для загрузки выбранных файлов в приложение.
- Настройте необходимые параметры и нажмите «Сохранить», чтобы создать PDF-файл.
2. Редактирование PDF-файлов
PDF24 Creator также предоставляет возможность редактировать существующие PDF-файлы. С помощью этой функции вы можете добавлять текст, изображения, аннотации и другие элементы в PDF-документ. Для редактирования PDF-файла выполните следующие действия:
- Откройте приложение PDF24 Creator.
- Выберите нужный PDF-файл для редактирования.
- Используйте инструменты редактирования, такие как текстовый редактор, инструменты рисования и т. д., чтобы внести необходимые изменения в файл.
- Сохраните изменения, нажав на кнопку «Сохранить».
3. Преобразование PDF-файлов
PDF24 Creator также предоставляет возможность преобразовывать PDF-файлы в другие форматы, такие как Word, Excel, изображения и т. д. Преобразование PDF-файлов выполняется следующим образом:
- Откройте приложение PDF24 Creator.
- Выберите нужный PDF-файл для преобразования.
- Выберите формат, в который вы хотите преобразовать файл (например, Word или изображение).
- Нажмите «Сохранить», чтобы начать процесс преобразования.
4. Объединение PDF-файлов
PDF24 Creator позволяет объединять несколько PDF-файлов в один. Выполните следующие шаги, чтобы объединить PDF-файлы:
- Откройте приложение PDF24 Creator.
- Нажмите на кнопку «Объединить PDF».
- Выберите файлы, которые вы хотите объединить. Вы можете выбрать один или несколько файлов одновременно.
- Нажмите «Открыть» для загрузки выбранных файлов в приложение.
- Настройте порядок файлов, если необходимо, и нажмите «Объединить», чтобы создать единый PDF-файл.
5. Разделение PDF-файлов
PDF24 Creator также позволяет разделять PDF-файлы на несколько отдельных файлов. Для разделения PDF-файлов выполните следующие действия:
- Откройте приложение PDF24 Creator.
- Выберите нужный PDF-файл для разделения.
- Укажите страницы, которые вы хотите извлечь в отдельные файлы.
- Нажмите «Разделить PDF», чтобы создать отдельные файлы.
С помощью этих основных функций вы сможете эффективно работать с PDF-файлами в приложении PDF24 Creator.
Настройка параметров
После установки PDF24 Creator вы можете настроить его параметры для получения наилучших результатов.
1. Язык интерфейса
PDF24 Creator поддерживает различные языки интерфейса. Чтобы изменить язык, перейдите в меню «Options» (Опции) и выберите желаемый язык из списка доступных вариантов.
2. Качество PDF
PDF24 Creator предлагает несколько уровней качества PDF. Вы можете настроить качество в меню «Options» (Опции) в разделе «PDF» (PDF). Выберите желаемый уровень качества из списка вариантов.
3. Сохранение файла
PDF24 Creator позволяет настроить путь сохранения созданных PDF-файлов. Перейдите в меню «Options» (Опции), выберите раздел «Save» (Сохранение) и укажите путь каталога, в котором вы хотите сохранять файлы.
4. Другие параметры
PDF24 Creator также предлагает другие настраиваемые параметры, такие как настройка цвета фона, настройка дополнительных инструментов и многое другое. Для доступа к этим параметрам перейдите в меню «Options» (Опции) и выберите соответствующий раздел.
Обратите внимание, что настройка параметров может отличаться в зависимости от версии PDF24 Creator. Убедитесь, что вы используете последнюю версию программы для получения наиболее актуальных параметров.
Сохранение и экспорт созданных документов
PDF24 Creator предоставляет несколько способов сохранить и экспортировать созданные документы, чтобы вы могли легко поделиться ими с другими людьми или использовать в других программах.
Сохранение документов
Чтобы сохранить созданный документ в формате PDF, выполните следующие шаги:
- Нажмите на кнопку «Сохранить документ» или выберите в меню «Файл» пункт «Сохранить».
- Выберите путь и название файла, в котором будет сохранен документ.
- Выберите формат файла — PDF.
- Нажмите «Сохранить».
Теперь ваш документ сохранен в формате PDF и готов к использованию.
Экспорт документов
PDF24 Creator также позволяет экспортировать созданные документы в другие форматы, такие как PNG, JPEG, BMP и т. д. Чтобы экспортировать документ:
- Нажмите на кнопку «Сохранить документ» или выберите в меню «Файл» пункт «Сохранить».
- Выберите путь и название файла, в котором будет сохранен документ.
- Выберите нужный формат файла из списка доступных форматов.
- Нажмите «Сохранить».
Теперь ваш документ экспортирован в выбранный формат и готов к использованию.
Советы и рекомендации
- При сохранении документов в формате PDF вы можете выбрать опции компрессии и зашифрования, чтобы уменьшить размер файла и защитить его от несанкционированного доступа.
- Перед экспортом документа в другой формат, убедитесь, что ваш документ имеет подходящий макет и шрифты, чтобы сохранить его визуальное оформление.
- Если вам нужно экспортировать несколько документов, вы можете создать архив и добавить в него все необходимые файлы.
Применяйте эти инструкции, чтобы эффективно сохранять и экспортировать созданные вами документы в PDF24 Creator.