- Manuals
- Brands
- TEFAL Manuals
- Electric Steamer
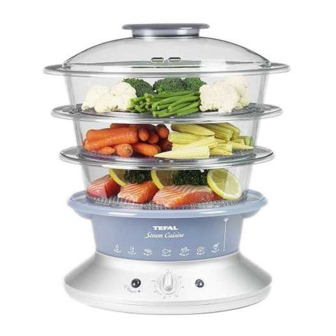
- VITAMIN PLUS
- Manual
-
Bookmarks
Quick Links
3529-5066184 ME VITAMIN M6
22/10/03 10:46
Page C2
REF 5066184
ADHOC’S — 3529
Related Manuals for TEFAL VITAMIN PLUS
Summary of Contents for TEFAL VITAMIN PLUS
-
Page 1
3529-5066184 ME VITAMIN M6 22/10/03 10:46 Page C2 REF 5066184 ADHOC’S — 3529… -
Page 2
3529-5066184 ME VITAMIN M6 22/10/03 10:46 Page C3 Instructions for use… -
Page 3
3529-5066184 ME VITAMIN M6 22/10/03 10:46 Page C4 16 15 VC 7000 — VC 7001 VC 4002 — VC 4003 — VC 4004 * depending on the model… -
Page 4: Protect The Environment
Your appliance is designed for many years use. However, when you decide to replace your appliance, do not forget that you can contribute towards protecting the environment by dis- posing of it at your local waste disposal centre (for appliances fitted with an electronic pro- grammer).
-
Page 5
(“Hr” and “00:00”). Set the time you want with the -/+ buttons. • If the display no longer flashes or to reset the time, press simultaneously on the 0/I and PROG touch pads, then set the time you want with the -/+ buttons. -
Page 6
(fish, asparagus tips, etc…) • Clip the tip of the clip-on handle on the Make sure that base. the handle hooks are • Squeeze the tip of the handle to unclip it. -
Page 7
For best other. results, do not put too much food in the bas- kets. • Put the lid on (the lid fits on all the bas- kets). So as not to scald yourself with the steam from the lid, preferably place… -
Page 8
• Set the timer for the recommended appliance must be cooking times (see table of cooking plugged in. min. min. times). • When the red light is on, the steam min. min. cooking has begun. min. Reduce your cooking time with the «VITAMIN+»… -
Page 9: Steam Cooking
At the end of cooking • A signal sounds. min. • The red in-use light goes out. • To stop the appliance ahead of time, turn min. min. the timer to the O position. min. min.
-
Page 10: Immediate Cooking
3529-5066184 ME VITAMIN M6 22/10/03 10:46 Page 7 Models with electronic programmer For appliances fitted with a timer see page 5. Description of functions Display Clock/Timer (max 45 min.) Stay warm display PROG touchpad: lets you programme O/I touchpad: On/Off…
-
Page 11
• Press the PROG touchpad, the display flashes and shows an indicative cooking time. • Press the — or + touchpad to adjust the length of cooking time. Confirm programming • Press the PROG touchpad to confirm. The display shows Pro until cooking starts. -
Page 12
«VITAMIN+» touchpad light goes out It is not automatically. advisable to press the “Vitamin +” button • After opening the lid (e.g. : if adding more more than once food) you can press the «VITAMIN+» during cooking. touch pad again to quickly return the steamer to the ideal temperature. -
Page 13
If there is not enough water If there is no more water, the applian- • To tell you when there is not enough ce switches off automa- water in the tank, a signal sounds for tically. 2 minutes and the pictogram is dis- played. -
Page 14
For food with different cooking times : place the largest or the food which takes the longest cooking time in the lowest basket, during cooking, add the second or third basket with food that need a shorter cooking time. At the start of cooking, press the “VITAMIN+” touchpad for extra fast cooking and for more vitamins. -
Page 15
• Let it cool completely before cleaning it. • Unplug the appliance. Cleaning the appliance Do not use • Empty the water tank and clean it with a abrasive cleaning damp cloth and warm soapy water. products. • Rinse and dry. -
Page 16
• Position the turbo ring upside down on 8 uses. the heating element. • Fill the inside of the turbo ring with white Do not use vinegar up to the max mark. other scale-removing • Fill the water tank with cold water up to products.
Yes, indeed you can reheat food. Set the timer around 10 minutes (it depends on the food) and make sure that there is enough water in the tank.
Over time, the strong coloured natural juices from foods such as carrots and beetroot may stain the juice collector. This is normal. It may be cleaned with lemon juice straight after cooking.
We recommend that you put the largest pieces of food, requiring the longest cooking time in the lowest basket.
The ingredients are very dense and have a different cooking time: try to prolong the cooking time.
Too many ingredients are cooked together: put the larger sized ingredients and the ingredients with a longer cooking time in the lower bowl.
Try to not overload the steam bowls.
Descale your appliance.
Cut the ingredients into small pieces.
The flavour of food is much better in a steamer and therefore any seasoning should be used sparingly.
If required, you can sprinkle it lightly on the food, or add herbs to the steam water to add flavour to your food.
Yes. You should never leave a small electrical appliance unattended whilst in operation. However, you do not have to watch the steamer all the time. Simply set the timer and the bell will let you know when your food is ready to eat. There are no risks of burning the food and no need to stir it.
Caution: Do not forget to put water in the tank.
All the juices of the steamed food are collected in the juice collector. This can be used as a basic ingredient for stocks and sauces.
If the cooking times are different for the food in each of the bowls, start cooking the food that requires the most time in the lower bowl and then add the upper bowl(s) while cooking is in progress to complete the cooking cycle.
All frozen vegetables can be steamed from frozen.
We only recommend using canned or precooked pulses and beans in the steamer. They should be drained and rinsed and then placed in the steamer basket. They do not need to be soaked or boiled first.
Yes, you can steam them in a steamer. They take the same time as if you were steaming/simmering in a saucepan. Just keep checking the water level and topping it up.
Yes — if your steamer baskets have removal bases, then you will be able to remove the bases from baskets 2 and 3 and place a small whole chicken inside the lower of the steam baskets ready for steam cooking.
Yes, to give meat, chicken and fish a delicious moist flavour you can marinate them a few hours before steaming.
For recipes with a long cooking time you will need to refill the water tank during the cooking period. To refill the water tank, you should use oven gloves to lift the lid and steamer basket. Carefully lift and empty any water that has collected in the juice collector, then refill the water tank using cold untreated tap water.
The cooking time is the same whether you use one or two levels. Please be careful to not pack food too tightly on the first level to ensure that the steam can reach the second level.
You simply place the eggs in the steamer basket. The cooking time is 12 minutes for 6 hard-boiled eggs, 8 minutes for 6 soft-boiled eggs.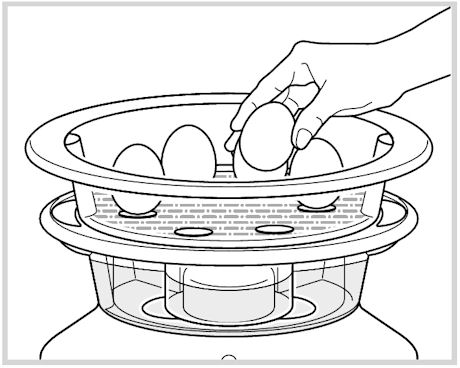
Don’t handle the bowls and verrines during cooking and don’t touch the device when producing steam; always stop it before.
Do not move the appliance when it contains hot liquids or food.
Always use protective gloves to handle the bowls or verrines after cooking.
Try adding fresh herbs, lemon, garlic, oranges or even onion directly to the foods.
To add flavour to chicken, meat and fish made with marinades, use barbecue sauce or spice mixtures.
Yes, especially for recipes with long cooking times.
Also monitor the water level during cooking in case it needs refilling.
Some recipes require the use of cling film for protection, to prevent condensation and protect delicate foods.
Choose a special cling film for cooking, or microwave-safe cling film.
Avoid aluminium foil which tends to increase cooking time.
Put the rice in the rice bowl and fill it with water.
Put the rice bowl in the steam basket or in the largest bowl and start cooking.
Yes, they are dishwasher safe but it is preferable to wash on the lowest heat setting or prewash setting.
Yes, it must be descaled every 7 to 10 uses. To do this, simply fill the water tank with 1/3 white vinegar and 2/3 water.
Leave to act cold for 1 night.
Rinse the inside of the water tank several times with warm water.
Never use abrasive cleaning products.
On average, we recommend descaling your appliance every 7 to 10 uses to maintain an effective flow of steam and extend the life of your appliance.
To do this, simply fill the water tank with 1/3 white vinegar and 2/3 water.
Leave to act cold for 1 night.
Rinse the inside of the water tank several times with warm water.
Never use abrasive cleaning products.
The appliance has not been descaled after 7 to 10 uses: descale it.
[Check 1] Have you put the water in the right place?
Please put the water in the water tank with the grey part in the middle (the heater).
[Check 2] Did you put enough water in the water tank?
If there is not enough water in the water tank, it won’t be able to create steam. Even if just cooking for a short time, you should ensure that the water reaches at least the top of the heater (the grey part). Even if you have put in enough water, it will take some time before it starts steaming.
[Check 3] Is the heater (grey part) dirty?
If there are minerals from the water adhered to the heater, it may not transmit heat correctly and steam may not be created. If there are changes such as discolouration of the heater — brown, black or white — or peeling of the surface, care of the heater will be necessary. Please carry out a descaling.
This is working correctly. The turbo ring surrounds the heater so that the water inside is effectively heated. It is designed so that it doesn’t fit flush and the water from the space in between is used to make the steam. Please make sure that the turbo ring is orientated correctly so the notch is facing down.
The surface of the heater isn’t peeling. It is probably a film that has attached itself to the surface of the heater. Carry out a descaling.
When there’s not enough water in the tank, the device no longer heats.
Fill it again up to the maximum height mark and the device will automatically restart the cooking programme.
Use gloves and be careful not to touch hot surfaces, or foods being cooked, when refilling the tank.
The bowls are equipped with detachable grills, except the drip tray which must always keep its grills.
By removing the grills, you increase the cooking zone to cook bulky foods (whole chickens, artichokes, lobster, cauliflower, broccoli, etc).
To put the grills into position:
• Keep the grill on the correct side (the clip facing down).
• Put the grill into the bowl.
• Press on the clip zone to attach the bowl.
To remove the grills, press on the top of the grill.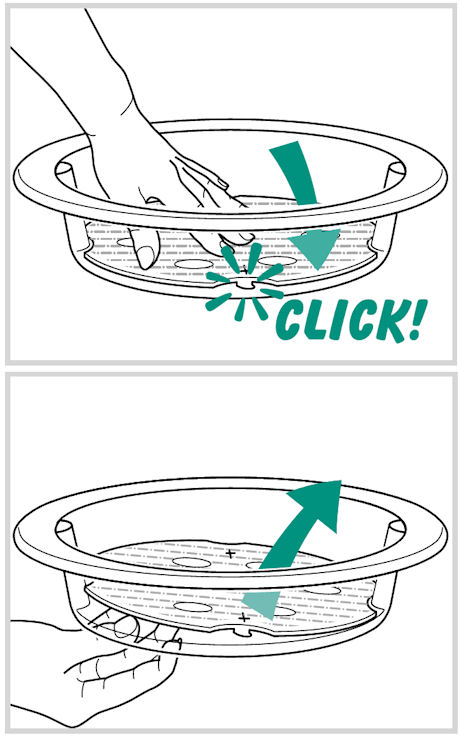
After following the instructions in the user manual for starting the appliance, make sure that your electrical socket is working by plugging another appliance. If it still does not work, do not try to dismantle or repair the appliance yourself, instead, take it to an approved repair centre
Do not use your appliance. To avoid any danger, have it replaced by an approved repair centre.
No, you can steam all types of food: meat, fish, eggs, potatoes, desserts rice, couscous etc.
No, the advantage of steam cooking lies in the fact that the flavours of the vegetables are not transmitted to each other, even when they are mixed.
The steam cooker doesn’t cook under pressure, it instead uses the ambient pressure.
The steam in the steam cooker is water boiling temperature, approximately 100°C.
Yes, but not too often, because this results in a drop in temperature and a loss of steam which can slow down the cooking.
Your appliance contains valuable materials which can be recovered or recycled. Leave it at a local civic waste collection point.
Please go to the “Accessories” section of the website to easily find whatever you need for your product.
Find more detailed information in the Guarantee section of this website.
If you believe that one part is missing, please call Consumer Services Center and we will help you find a suitable solution.
Да, конечно. Установите таймер примерно на 10 минут (это зависит от продукта) и убедитесь, что в резервуаре достаточно воды.
Со временем в емкости для сбора сока могут появиться пятна от насыщенных натуральных соков, например моркови или свеклы. Это нормальное явление. Их можно очистить с помощью лимонного сока сразу после приготовления пищи.
Мы рекомендуем помещать самые большие куски, которые требуют максимального времени приготовления, в нижнюю корзину.
Ингредиенты очень плотные и имеют разное время приготовления. Продлите время приготовления.
Для приготовления введено слишком много ингредиентов. Самые крупные ингредиенты и продукты с максимальным временем приготовления помещайте в нижнюю чашу.
Не перегружайте чаши пароварки.
Удалите накипь в устройстве.
Нарежьте ингредиенты на небольшие кусочки.
Пища, приготавливаемая в пароварке, имеет отличный вкус и аромат, поэтому любую приправу следует добавлять в минимальном количестве.
При необходимости вы можете добавить небольшое количество специй к пище или добавить травы к паровой воде для придания пище приятного вкуса.
Да. Никогда не оставляйте работающий маленький электроприбор без присмотра. Однако вам не обязательно все время смотреть за пароваркой. Просто установите таймер, и звуковой сигнал даст вам знать, когда пища будет готова к употреблению. Продукт не подгорает, и его не нужно перемешивать.
Осторожно! Не забудьте налить воду в резервуар.
В эту емкость стекает весь сок от приготавливаемого на пару продукта. Сок можно использовать как основной ингредиент для бульонов и соусов.
Если время приготовления продуктов, помещенных в чаши, разное, начните с того продукта, который готовится дольше, поместив его в нижнюю чашу. Затем, в процессе варки, закладывайте верхние чаши, чтобы завершить цикл приготовления.
Все замороженные овощи можно готовить на пару.
Мы рекомендуем использовать в пароварке только консервированные или предварительно проваренные бобовые и бобы. Воду необходимо слить, бобовые сполоснуть, затем положить в корзину пароварки. Их не нужно предварительно замачивать или отваривать.
Да, его можно готовить на пару в пароварке. На это потребуется столько же времени, как и на приготовление/варку на медленном огне в кастрюле. Просто проверяйте уровень воды и доливайте ее.
Да — если у корзин пароварки съемное основание, вы сможете снять основание с корзин 2 и 3 и положить в нижнюю корзину пароварки небольшую целую курицу для приготовления на пару.
Да, чтобы приготовить сочное мясо, курицу и рыбу, их можно замариновать за несколько часов до приготовления на пару.
При приготовлении долго готовящегося пудинга необходимо доливать воду в резервуар во время приготовления. Чтобы залить воду в резервуар, используйте варежки-прихватки, чтобы поднять крышку и корзину пароварки. Осторожно слейте воду, скопившуюся в накопителе для сока, затем наполните резервуар холодной необработанной водой из-под крана.
Время приготовления будет одинаковым независимо от того, сколько уровней вы используете. Старайтесь не загружать продукты слишком плотно на первом уровне, чтобы пар мог свободно проникнуть на второй уровень.
Поместите яйца в корзину для приготовления на пару. Чтобы приготовить шесть яиц вкрутую понадобится 12 минут, для приготовления шести яиц всмятку — 8 минут.
Не дотрагивайтесь до емкостей и порционных стаканчиков во время готовки, не дотрагивайтесь до устройства, когда оно производит пар; никогда не дотрагивайтесь до включенного устройства, всегда отключайте его.
Не передвигайте устройство, когда в нем находятся горячие жидкости или пища.
Дотрагиваясь до емкостей и порционных стаканчиков после приготовления пищи, всегда используйте прихватки или защитные рукавицы.
Попробуйте добавить свежие травы, лимон, чеснок, апельсин или лук прямо в приготовляемую пищу.
Чтобы усилить вкус курицы, мяса или рыбы, приготовляемых в маринаде, используйте соус-барбекю или смеси приправ.
Да, особенно если ваш рецепт требует долгого времени готовки.
Продолжайте следить за уровнем воды в процессе готовки, возможно, потребуется долив воды.
Используйте только воду из под крана.
Для приготовления некоторых блюд необходимо использовать пищевую пленку, чтобы избежать образования конденсата и защитить нежные продукты.
Используйте специальную пищевую пленку, предназначенную для использования во время приготовления пищи, или пленку, пригодную для использования в микроволновой печи.
Избегайте использования алюминиевой фольги — она может замедлить процесс приготовления блюда.
Поместите рис в чашу для риса и заполните ее водой.
Поместите чашу для риса в корзинку-пароварку или в самую большую чашу и начните готовить.
Да, но в посудомоечной машине желательно установить самую низкую температуру или режим предварительной промывки.
Да, удалять накипь следует после каждых 7–10 циклов работы. Для этого просто залейте в резервуар для воды 1/3 белого уксуса и 2/3 воды.
Оставьте на 1 ночь, не нагревая.
Промойте резервуар для воды изнутри несколько раз теплой водой.
Никогда не используйте абразивные чистящие средства.
Ориентировочно рекомендуем удалять накипь из прибора через каждые 7–10 циклов работы, чтобы обеспечить эффективность прохождения пара и продлить срок службы прибора.
Для этого просто залейте в резервуар для воды 1/3 белого уксуса и 2/3 воды.
Оставьте на 1 ночь, не нагревая.
Промойте резервуар для воды изнутри несколько раз теплой водой.
Никогда не используйте абразивные чистящие средства.
Из прибора не была удалена накипь после 7–10 циклов работы. Удалите накипь.
[Проверка 1] Правильно ли вы залили воду?
Воду нужно заливать в резервуар с серой частью посередине (нагреватель).
[Проверка 2] Достаточно ли воды вы залили в резервуар?
Если в резервуаре мало воды, пар образовываться не будет. Даже если ваше блюдо требует совсем короткого времени приготовления, воду нужно заливать до верха нагревателя (серой части). И даже если воды в резервуаре достаточно, пар появится только через некоторое время.
[Проверка 3] Не загрязнен ли нагреватель (серая часть)?
Если на нагревателе скопился слой накипи, передача тепла может быть неэффективной, и пара может не быть. При наличии изменений в нагревателе, например, изменения цвета на коричневый, черный или белый, отслоения на поверхности, необходимо выполнить операции по его обслуживанию. Выполните процедуру удаления накипи.
Все правильно. Турбо-кольцо охватывает нагреватель, обеспечивая эффективный нагрев воды внутри. По своей конструкции оно не должно надеваться вровень, и вода в промежуточном пространстве используется для образования пара. Убедитесь, что турбо-кольцо расположено правильно – желобком вниз.
Сама поверхность нагревателя не может расслаиваться. Возможно, это отстает пленка, образовавшаяся на ней. Выполните процедуру удаления накипи.
Когда воды в резервуаре недостаточно, устройство перестает нагреваться.
Долейте воды до отметки максимально допустимого уровня и устройство автоматически возобновит выбранную программу готовки.
Доливая воду в резервуар, используйте прихватки, не дотрагивайтесь до горячих поверхностей и приготовляемой пищи.
Каждая емкость, кроме поддона для сбора капель, оснащена съемной решеткой; решетка поддона всегда должна находится на своем месте.
Снимая решетки, вы увеличиваете объем зоны готовки для крупных продуктов (целой курицы, артишоков, омара, цветной капусты, брокколи и т.д.)
Чтобы установить решетки в правильное положение:
• Следите, чтобы решетка была установлена правильной стороной (зажимом вниз)
• Поместите решетку в емкость.
• Нажмите на зону зажима, чтобы прикрепить емкость.
Чтобы снять решетку, нажмите на нее.
После ознакомления с инструкциями по запуску прибора в руководстве пользователя убедитесь, что электрическая розетка находится в рабочем состоянии, подключив к ней другое устройство. Если прибор не заработал, не пытайтесь разобрать или отремонтировать его. Отнесите прибор в авторизованный центр технического обслуживания.
Не пользуйтесь устройством. Во избежание опасности, замените кабель в центре технического обслуживания.
Нет. Вы можете готовить на пару все виды продуктов: мясо, рыбу, яйца, картофель, десерты, рис, кускус и т. п.
Нет. Преимущество приготовления на пару состоит в том, что ароматы овощей не передаются друг другу, даже если они смешаны.
Пароварочный аппарат не готовит под давлением, вместо этого используется давление окружающей среды.
Температура пара в пароварочном аппарате равна температуре кипения воды, около 100°С.
Да, но не делайте этого слишком часто, поскольку это приводит к понижению температуры и потере пара, а это может привести к замедлению процесса готовки.
В Вашем приборе содержатся ценные материалы, которые могут быть подвергнуты вторичной переработке. Отнесите его на городской пункт сбора отходов.
Пожалуйста, перейдите в раздел «Аксессуары» веб-сайта, чтобы легко найти то, что вам нужно для вашего продукта.
Дополнительные сведения содержатся в разделе «Гарантия» этого веб-сайта.
Если вам кажется, что каких-то частей не хватает, позвоните в центр обслуживания покупателей, и мы поможем вам найти приемлемое решение.
Требуется руководство для вашей Tefal VC400270 Steam Cuisine Vitamin+ Пароварка? Ниже вы можете просмотреть и загрузить бесплатно руководство в формате PDF. Кроме того, приведены часто задаваемые вопросы, рейтинг изделия и отзывы пользователей, что позволит оптимально использовать ваше изделие. Если это не то руководство, которое вы искали, – свяжитесь с нами.
Ваше устройство неисправно, и в руководстве отсутствует решение? Перейдите в Repair Café для получения бесплатных ремонтных услуг.
Руководство

Рейтинг
Сообщите нам, что вы думаете о Tefal VC400270 Steam Cuisine Vitamin+ Пароварка, оставив оценку продукта. Хотите поделиться вашими впечатлениями от данного изделия или задать вопрос? Вы можете оставить комментарий в нижней части страницы.
Довольны ли вы данным изделием Tefal?
Да Нет
17 голоса
Часто задаваемые вопросы
Наша служба поддержки выполняет поиск полезной информации по изделиям и отвечает на часто задаваемые вопросы. Если вы заметили неточность в наших часто задаваемых вопросах, сообщите нам об этом с помощью нашей контактной формы.
Как приготовить рис в пароварке? Проверенный
Это можно сделать, положив рис в миску и поставив миску в пароварку. Некоторые модели поставляются с подходящей чашей. Время приготовления может варьироваться в зависимости от марки и модели.
Это было полезно (317)
(Ocr-Read Summary of Contents of some pages of the TEFAL VITAMIN PLUS Document (Main Content), UPD: 25 July 2023)
-
3, 5 4 6 9 8 10 18 19 12 11 13 14 17 1 2 3 4* 5 4 7 1716* 16 15 VC 7000 — VC 7001 VC 4002 — VC 4003 — VC 4004 * depending on the model 3529-5066184 ME VITAMIN M6 22/10/03 10:46 Page C4
… -
4, TEFAL VITAMIN PLUS 1 This appliance complies with the safety regula- tions and conditions in effect, and with the follo- wing: — EMC directive 89/336/CEE modified by directive 93/68/CEE — Low Voltage Directive 72/23/CEE modified by directive 93/68/CEE. • Check that the power supply voltage corres- ponds to that shown on the appliance (alter- nating current). • Given the diverse standards in effect, if the appliance is used in a country other than that in which it is purchased, have it checked by…
-
5, 2 Do not immerse the water tank in water when cleaning. Keep away from any objects which could be damaged by the steam. The turbo ring must always be in place before filling the tank with water. You must set the clock before programming. Preparation Prior to use • Using warm soapy water, wash all the removable parts and the inside of the water tank. • Rinse and dry. Preparing the steam cooker • Place the cooker on a stable surface. • Place the turbo r…
-
6, 3 Do not put water into the steam conduit. Do not use seasoning or any other liquid other than water in the water tank. Make sure there is water in the tank prior to use. Make sure that the condensation tray is empty before each use. The lower basket is fitted with a fixed base. Only use the clip-on handle on the top basket. When you use the clip-on handle with a basket, do not clip the base into that basket, simply l…
-
7, 4 If steam is coming out of the appliance, check that the baskets are correctly fixed in place and in the right order. For best results, do not put too much food in the bas- kets. So as not to scald yourself with the steam from the lid, preferably place the steam holes towards the back. Preparation Positioning the baskets • Place the food in the basket. • Always place the smallest basket on the juice collector. • Then place t…
-
8, 5 In order to set the timer, the appliance must be plugged in. It is normal to see a small amount of steam coming from the steam vent at the rear of your appliance. Once the “VITAMIN+” touchpad light has come on, you cannot switch it off manually. The light goes out automatically. It is not advisable to press the “VITAMIN+” button more than once during cooking. 10 min. 20 min. 60 min. 30 min. 40 min. 50 min. Steam cooking with the timer Choose the cooking time • Plug the appliance …
-
9, Do not touch the appliance or foods during cooking as they will be hot. Steam cooking During cooking • Check the water level during cooking using the external water level indicator. • If necessary, add more cold water through the water inlets. At the end of cooking • A signal sounds. • The red in-use light goes out. • To stop the appliance ahead of time, turn the timer to the O position. Re-heating • You can reheat food (see the table of cooking times). 6 …
-
10, 7 Models with electronic programmer • Press -/+ or O/I touchpads, the display flashes (0:30). • Adjust the desired cooking time with -/+ touchpads. • To confirm, release the -/+ touchpad and wait for 2 seconds: a signal sounds, the in-use light changes to red. • The «VITAMIN+» touchpad switches on automatically. The touchpad light comes on. For appliances fitted with a timer see …
-
11, 8 Check that the clock has been set correctly. For updating, see page 2. When cooking starts: — the countdown starts automatically. — the in-use light changes to red. — the «VITAMIN+» touchpad comes on automatically. Cooking with delayed start Select the start-time and length of cooking • Press the PROG touchpad, the display flashes and shows the time (e.g. 8:00). • Press the + touchpad to adjust cooking start-time (e.g. 10:…
-
12, 9 It is normal to see a small amount of steam coming from the steam vent at the rear of your appliance. Once the “VITAMIN+” touchpad light has come on, you cannot switch it off manually. The light goes out automatically. It is not advisable to press the “Vitamin +” button more than once during cooking. Do not touch the bowls or foods during cooking as they will be hot. Steam cooking Reduce your cooking time with the «VITAMIN+» touchpa…
-
13, 10 If you wish to keep foods warm for longer, add water. Use oven gloves to handle the baskets, handle and lid. If there is no more water, the applian- ce switches off automa- tically. To suspend cooking (pause for 2 minutes max) • Press the O/I touchpad. • Within 2 minutes, press the O/I touchpad to resume cooking. End of cooking and keeping warm • A signal sounds. • The green keeping warm light turns on. • The pictogram is displayed. • Your steam cooker automati…
-
14, 11 Table of cooking times Cooking times are approximate and may vary depending on the size of the food, the space between the food, the amount of food, individual preferences, and the mains voltage. For food with different cooking times : place the largest or the food which takes the longest cooking time in the lowest basket, during cooking, add the second or third basket with food that need a shorter cooking time. At the start of cooking, press the “VITAMIN+” …
-
15, TEFAL VITAMIN PLUS 12 Use oven gloves to handle the baskets and the lid. Check that the juice collector has cooled sufficiently before removing it. Do not use abrasive cleaning products. Do not immerse the water tank in water. Do not forget to empty and wash your condensation tray. Clean the turbo ring regularly. Always use a prewash or lowest heat setting. Removing the food from the steam baskets • Lift the lid by the handle. • Remove the…
-
16, 13 Helpline: For any problems or queries please telephone: 0845 602 1454 (UK — CALLS CHARGED AT LOCAL RATE) (01) 475 1947 (Ireland) or consult our website: www.tefal.co.uk Descale the appliance after approximately every 8 uses. Do not use other scale-removing products. Over time the strong coloured natural juices from foods such as carrots and beetroot may stain the juice collector. This is normal. It may be cleaned by soaking in mild bleach…