
Сегодня почти у каждой организации есть собственный веб-сайт. Вместе с ростом интернета возрастают и атаки на веб-сайты, становясь все более серьезнее и масштабнее. Однако существует обширный список инструментов, которые могут производить сканирование и находить уязвимости в веб-приложениях. Одним из таких инструментов является сканер уязвимостей под названием OWASP ZAP.
OWASP ZAP — сканер веб-приложений, основанный на методике DAST (Dynamic Application Security Testing). В русском варианте этот метод принято называть методом тестирования «черного ящика». Методика позволяет обнаруживать проблемы безопасности в работающем приложении или веб-сайте при помощи их сканирования на известные уязвимости. К таким уязвимостям можно отнести SQL-инъекции, межсайтовый скриптинг (XSS), Clickjacking и т.д.
OWASP ZAP разработан и поддерживается одноименным проектом под названием OWASP (Open Web Application Security Project) — некоммерческой организацией, которая специализируется на создании статей, материалов, документации, инструментов и технологий, позволяющих разрабатывать приложения безопаснее, а также обеспечивать должный уровень информационной безопасности уже созданных приложений и сайтов.
В качестве преимуществ OWASP ZAP можно выделить:
-
Кроссплатформенность — поддержка всех основных ОС (Windows, Linux, MacOS);
-
Бесплатный проект с открытым исходным кодом;
-
Поддержка плагинов для расширения функциональности;
-
Возможность работы как через графический интерфейс (GUI), так и через интерфейс командной строки;
-
Обширный набор функций — от активного/пассивного сканирования и до сканирования API и AJAX;
-
Простота использования. Идеально подходит и для начинающих специалистов в ИБ и для профессионалов.
Установка
OWASP ZAP является кроссплатформенным ПО и может быть установлен на Windows, Linux и MacOS. Также запуск возможен в контейнере Docker. Для установки и запуска программы на Windows и Linux требуется заранее предустановленная Java версии 11 и выше. Установщик для MacOS уже включает в себя Java. Для запуска в контейнере Docker также заранее не нужна предустановленная Java. На официальном сайте находятся установщики и инструкции для каждой ОС.
Для Docker отдельно представлены образы со следующими тегами:
Stable — стандартная (обычная) версия;
Bare — минимальный версия. Содержит только самые необходимые функции. Идеально подходит для запуска в командной строке;
Weekly — версия, обновления для которой выходят каждую неделю;
Live — бета-версия. Содержит самый последний релиз.
В дистрибутивах Kali Linux до версии 2023.1 OWASP ZAP уже предустановлен в системе (при условии, что на этапе установке ОС в разделе Software selection был выбран пункт default recommended tools или large default selection plus additional tools, в противном случае установить OWASP ZAP необходимо вручную).
В качестве примера будет использоваться последняя актуальная версия 2.12.0 в ОС Kali Linux.
Принцип работы
При сканировании ZAP создает собственный прокси-сервер, через который обрабатываются все запросы на сканирование. ZAP включает в себя специальные поисковые роботы (краулеры), которые выполняют идентификацию уязвимостей. Прокси-сервер располагается между браузером пользователя и конечным веб-приложением. Схема работы изображена ниже.

Обзор основных функций графического интерфейса OWASP ZAP
После запуска программы отображается главное окно, в котором находятся следующие основные параметры:

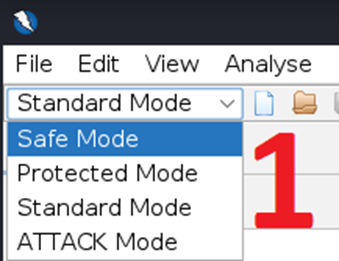
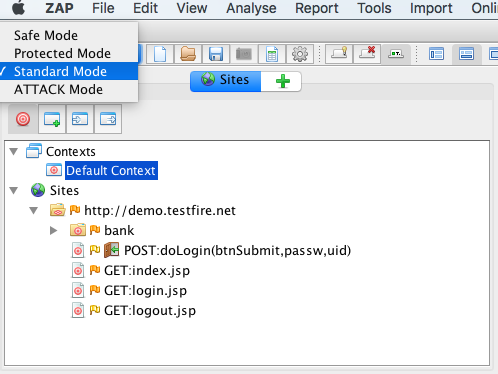
1) Режимы сканирования
В OWASP ZAP существуют 4 режима сканирования:
Standard Mode — обычное сканирование;
Safe Mode — безопасное сканирование, позволяющее выполнять только те действия, которые не смогут навредить системе. В этом режиме не используются атаки на целевой сайт;
Protected Mode — защищенное сканирование, позволяющее имитировать потенциально опасные уязвимости;
ATTACK Mode — режим атаки, позволяющий, помимо сканирования, также выполнять атаки на потенциальный сайт/приложение.
2) Сайты
Здесь отображаются сайты, которые сканируются в данный момент или уже были просканированы. Также в данном разделе отображается полная структура сайта.

3) Раздел со сканированием
Основной раздел, в котором запускается сканирование сайта.

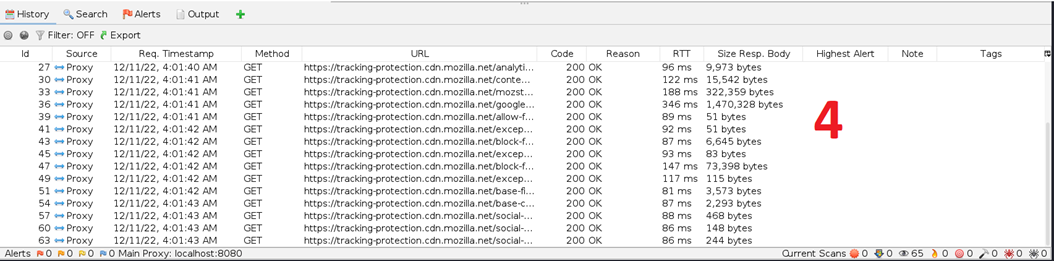
4) Результаты
Раздел с результатами располагается внизу и подразделяется на вкладки History, Search, Alerts, Output.
History — отображает список всех запросов в том порядке, в котором они были отправлены;
Search — позволяет производить поиск при помощи регулярных выражений в URL-адресах, запросах, ответах, заголовках;
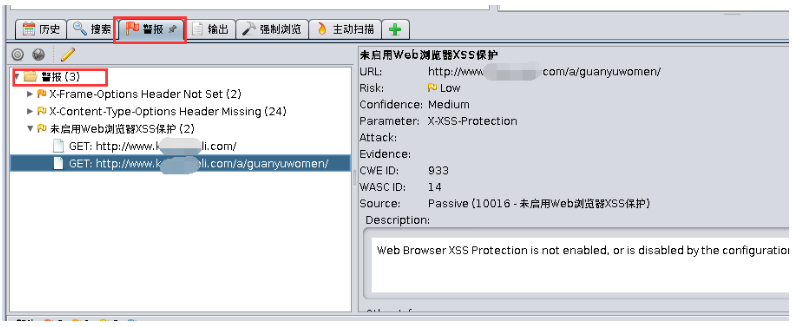
Alerts — отображает найденные уязвимости в сканированном веб-сайте. Уязвимости разбиты на категории. Каждой найденной уязвимости присваивается степень критичности. Описание данного раздела будет рассмотрено далее;
Output — отображает различные информационные сообщения. Например, трассировку стека, ошибки и другую отладочную информацию.
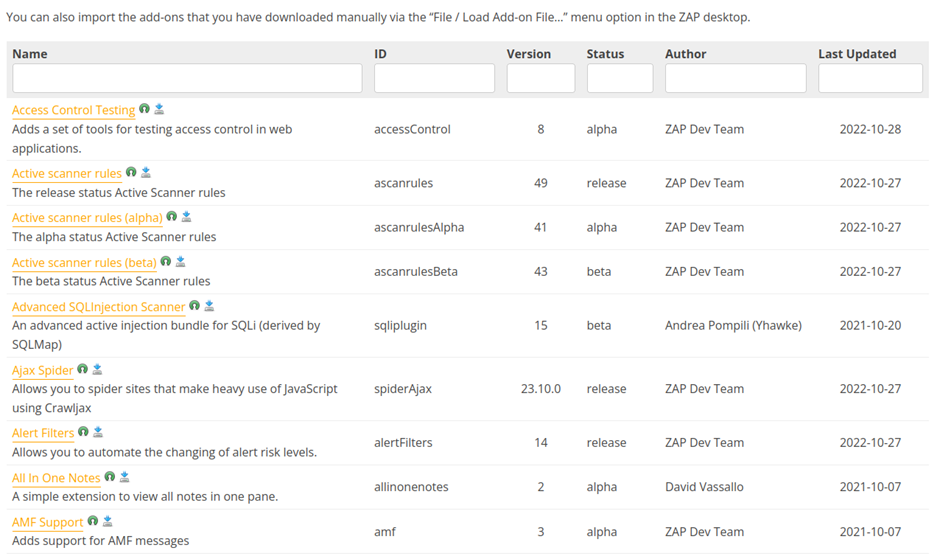
Плагины
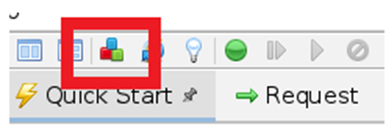
OWASP ZAP поддерживает установку сторонних плагинов, благодаря чему можно существенно расширить функциональность программы. Для перехода в раздел Плагины необходимо щелкнуть по значку с названием Manage Add-ons:
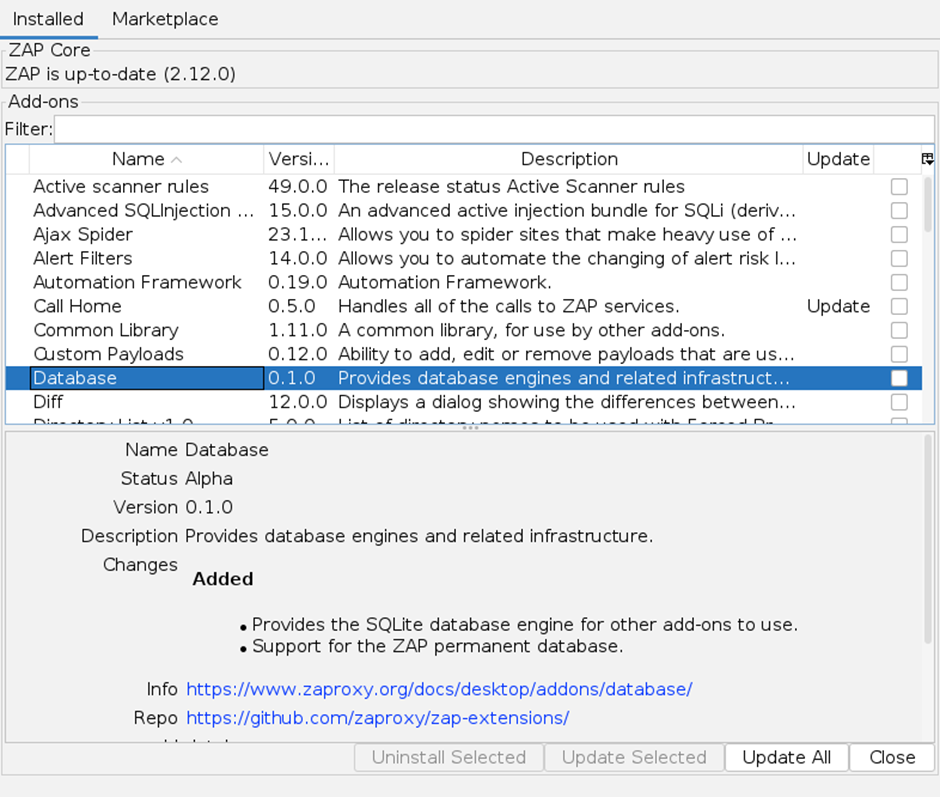
В открывшемся окне будет два раздела — Installed и Marketplace. В разделе Installed отображается список всех установленных плагинов в системе.

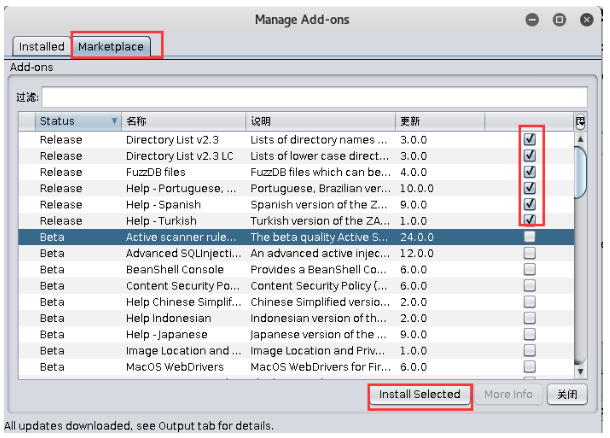
В разделе Marketplace можно находить плагины и устанавливать их.
Если щелкнуть по плагину, то внизу отобразится его имя, статус, версия и описание. Также предусмотрены ссылки на документацию к плагину и на его исходный код на сайте GitHub. Плагины разрабатывает команда OWASP и энтузиасты. У всех плагинов открытый исходный код, и они полностью бесплатны в использовании.
Также для просмотра и поиска необходимых плагинов можно перейти на официальный сайт в раздел плагины:
Сканирование веб-сайтов на наличие уязвимостей
Перейдем к процессу сканирования. В качестве теста возьмем сайт testphp.vulnweb.com, который специально создан для тестирования на безопасность, и в котором уже присутствуют некоторые уязвимости. Тем самым будет наглядно показан процесс сканирования и поиск уязвимостей. Список сайтов, которые содержат уязвимости, можно взять с vulnweb.com.
Для того чтобы запустить сканирование, необходимо перейти в раздел Quick Start. Рассмотрим его параметры:
URL to attack — задается URL сайта, который необходимо просканировать/атаковать.
Use traditional spider — использование стандартного «паука» при сканировании.
В терминологии OWASP ZAP паук — это инструмент, который предназначен для автоматического обнаружения новых URL-адресов на проверяемом сайте. «Паук» анализирует HTML-код страницы для поиска ссылок, далее найденные ссылки добавляются в список и также сканируются на наличие уязвимостей. Если чек-бокс будет проставлен, то будет использоваться стандартный «паук», в противном случае найденные URL на странице сканироваться не будут.
USE ajax spider — использование ajax «паука» при сканировании. Если в сканируемом сайте активно используется технология ajax (Asynchronous Javascript and XML — асинхронный JavaScript и XML), то можно использовать данный параметр. В этом режиме приложение, основанное на ajax, будет обрабатывать легче. Работает медленнее, чем обычный паук.

Для того чтобы начать сканирование/атаку, необходимо нажать на кнопку Attack.

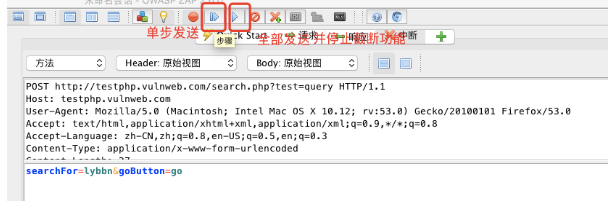
После этого начнется процесс сканирования. Сначала запускается «паук», который ищет все URL, имеющие отношение к сканирующему сайту. В столбце Method отображаются методы, которые используются для получения URL и их статусы (столбец Processed).
Как правило, используются методы GET и POST. Если статус 200, то отображается зеленый кружок, если статусы 404 или 500, то — красный. В зависимости от структуры сайта и его наполнения сканирование на URL может занять длительное время. После того как все URL найдены запускается активное сканирование.
Активное сканирование — сканирование, при котором осуществляется попытка найти потенциальные уязвимости, используя известные атаки.
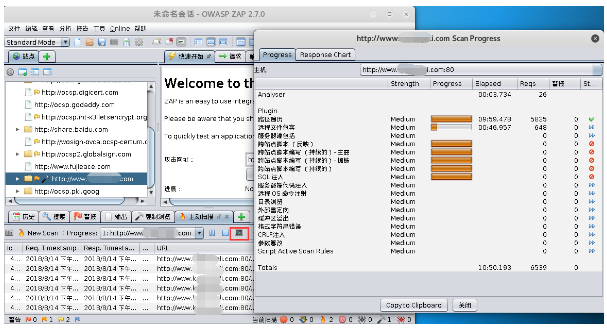
Для просмотра атак, которые используются при активном сканировании, а также для просмотра их прогресс-статуса необходимо нажать на кнопку со значком мониторинга — Show scan progress details:

Название уязвимости отображено в столбце Analyser, прогресс сканирования отображается в столбце Progress. В столбце Elapsed выводится время, которое было затрачено на сканирование данной уязвимости.
В числе атак, которые использует ZAP, можно выделить такие атаки как SQL-инъекции, XSS (Cross-site-scripting), CRLF-инъекции и т.д. Также, помимо атак, происходит сбор информации, включающий в себя версии и названия используемых компонентов — такие как веб-сервер, СУБД.
Так же, как и с поиском ULR, процесс активного сканирования может занять долгое время.

Любую проверку можно пропустить, нажав на кнопку с синей стрелкой — Skip active scanner:

Все найденные уязвимости будут находиться в разделе Alerts. Уязвимости группируются по категориям:

С полным списком всех возможных уязвимостей, которые распознает и использует OWASP ZAP, а также их подробное описание можно найти в соответствующем разделе на официальном сайте ZAP.
Каждой группе уязвимостей присваивается уровень риска, который обозначается своей цветовой гаммой. В OWASP ZAP существует 5 таких категорий:

High — самый высокий (критический) уровень уязвимостей. Сюда относят SQL-инъекции, атаки типа path traversal, LDAP-инъекции, Spring4Shell и другие. Обозначается красным флажком.
Medium — средний уровень критичности найденных уязвимостей. Сюда относят Directory Browsing, HTTPOnly, XSLT-инъекции и другие. Обозначается оранжевым флажком.
Low — низкий уровень найденных уязвимостей. Сюда относят найденную информацию, связанную с отладкой, раскрытие частных IP-адресов (Private IP Disclosure) и другие. Обозначается жёлтым флажком.
Informational — информационный уровень, который сообщает о том, что найдена информация об используемых компонентах веб-сайта, а также о сервере. Сюда относят версии веб-сервера, СУБД, библиотек, фреймворков, а также версии языков программирования и операционных систем. Как правило, уязвимости, относящиеся к данной категории не могут напрямую навредить системе, однако повышают риск сбора информации о сайте и его компонентах. Обозначается синим флажком.
False Positive — ложные срабатывания. В редких случаях ZAP может найти уязвимость, которая не является уязвимостью. Если возникает сомнение, то программа помечает такую «уязвимость» зеленым флажком. Однако пользователь должен сам убедиться и проверить, является ли найденная уязвимость таковой или нет.
После того как сканирование было завершено, в разделе Alerts отобразятся все найденные проблемы безопасности. Если раскрыть группу уязвимости, то отобразятся все URL, в которых были найдены уязвимости данного типа:
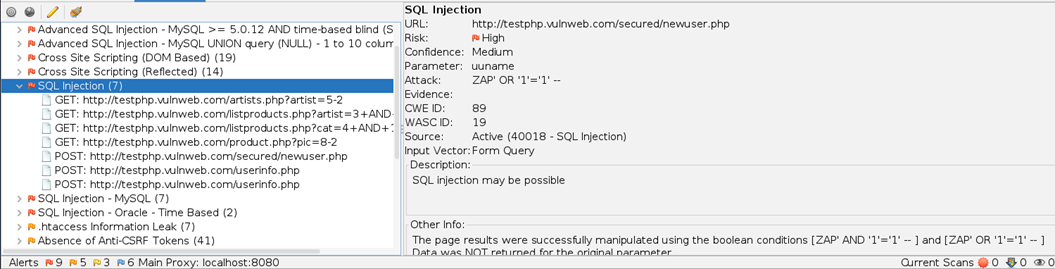
Справа будет отображено полное описание, которые включает в себя тип атаки, риск, CWE номер, WASC номер, описание, а также способ устранения найденной уязвимости. Также отобразить всю подробную информацию можно в отдельном окне путем двойного щелчка левой кнопки мыши по уязвимости:

Если щелкнуть правой кнопкой мыши по уязвимости, то отобразится контекстное меню, в котором доступно большое количество опций, например, можно сразу перейти по URL, где найдена уязвимость (Open URL in Browser), сохранить страницу в формате XML (Save XML) или в «сыром» формате (Save Raw), удалить уязвимость из текущего списка сканирования (Delete) и другие опции:

Если уязвимое место найдено непосредственно в HTML коде или в коде JavaScript, то такой участок будет выделен, чтобы его можно было сразу опознать:

Также отображается HTTP/HTTPS заголовок и его параметры:

Убедимся, что на просканированном сайте действительно найдены уязвимости. В качестве примера возьмем две атаки — SQL-инъекцию и XSS.
В разделе Alerts необходимо раскрыть группу под названием SQL Injection и перейти по найденной ссылке:
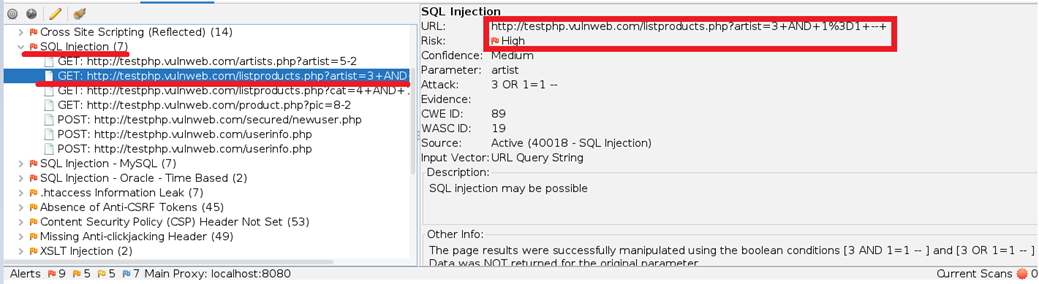
Далее необходимо изменить строку с параметром на другой символ, например на символ одинарной кавычки. URL выглядит так — http://testphp.vulnweb.com/listproducts.php?artist=3+AND+1%3D1+—+
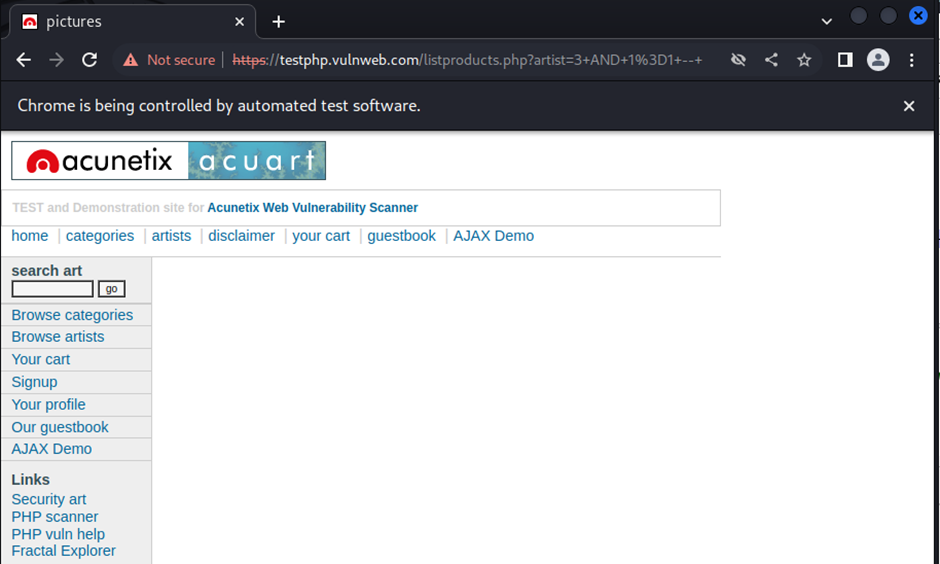
Удаляем все, что написано после символа равно. В данном случае меняем параметр 3+AND+1%3D1+—+ на символ ‘ и переходим по новой ссылке:

Как можно увидеть, появилось сообщение об ошибке в SQL синтаксисе, благодаря которому на данном сайте возможно произвести SQL-инъекцию.
Далее проверим, можно ли произвести XSS атаку. Для этого необходимо раскрыть группу с названием Cross Site Scripting и перейти по ссылке, где была найдена эта уязвимость:

В этом разделе сайта присутствует поле для ввода текста:

Введем в него JavaScript код:
<script>alert("Test!")</script>
Как можно увидеть, сайт принял введенный JavaScript код и отобразил диалоговое окно с текстом Test!
Создание отчета
OWASP ZAP позволяет генерировать отчеты по результатам сканирования. Для того чтобы создать отчет, необходимо перейти в раздел Report, далее выбрать Generate Report:

В открывшемся окне будет предложено изменить отчет перед его созданием. В разделе Scope можно задать базовые настройки — Заголовок отчета (Report Title), имя отчета (Report Name), путь, куда будет сохранен отчет (Report Directory):

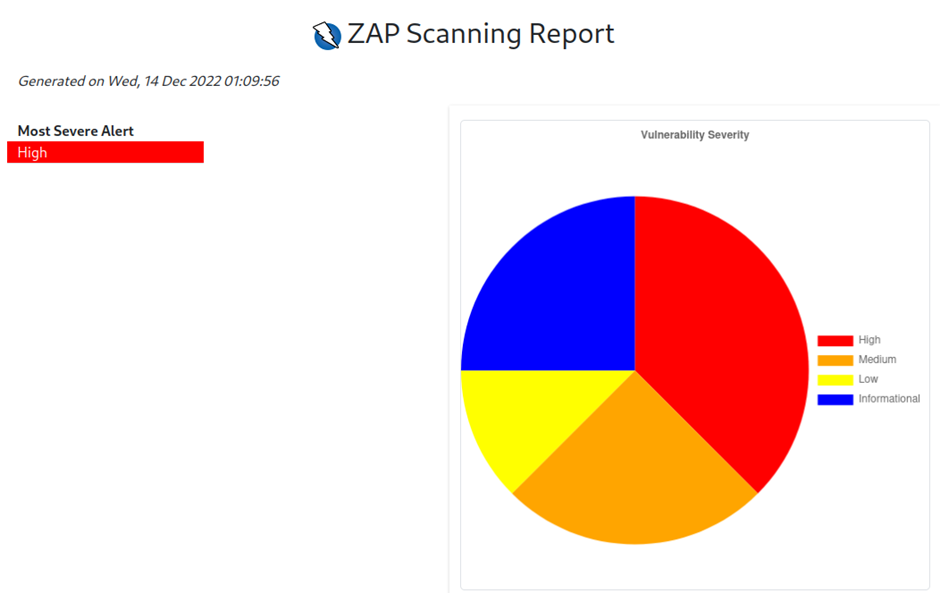
В разделе Template можно выбрать один из предложенных шаблонов для сохранения отчета. Каждый шаблон оформлен по-особенному. В качестве примера сгенерируем отчет при помощи шаблона High Level Report Sample, в котором найденные уязвимости будут отображены в виде круговой диаграммы:

В разделе Filter можно выбрать, какие группы рисков стоит включить или исключить из отчета:

После того как все параметры для генерации заданы, необходимо нажать на кнопку Generate Report. После этого отчет будет сохранен по ранее заданному пути, а также будет открыт автоматически в браузере пользователя:

Подводя итог, можно сказать, что сканер OWASP ZAP является отличным, бесплатным решением для поиска уязвимостей на сайтах и в веб-приложениях. Функциональность программы можно расширить при помощи плагинов. Также имеется обширная документация и подробное описание всех используемых уязвимостей.
НЛО прилетело и оставило здесь промокод для читателей нашего блога:
— 15% на все тарифы VDS (кроме тарифа Прогрев) — HABRFIRSTVDS.
Introduction
In this post, You will learn what iso wasp zap and for the tool is used for and also you will learn how to use the tool 🙌 .
Below is the video format of the post, Check it out 👇
Video
What is OWASP ZAP
The OWASP ZAP is the most widely used web app scanner, In simple a website scanner. ZAP stands for zed attack proxy.
The zap tool is primarily used to find website vulnerabilities and the hidden directories.
ZAP was originally forked from Paros, another pentesting proxy. Simon Bennetts, the project lead, stated in 2014 that only 20% of ZAP’s source code was still from Paros.
Advertisement
How to install OWASP ZAP
To install the tool just follow the below👇
- Click the download button to install zap Fromm official website, If you are installing on linux distribution the click the Linux Installer.
- Once downloaded, Go to downloads.
- Enter chmod o+x <zap downloaded file name here>. chmod o+x ZAP_2_7_0_unix.sh
- ./ZAP_2_7_0_unix.sh
- Now click on next for everything and an application zap will be created in your menus, Click open to start ZAP.
* If you are going to install ZAP on any other platforms the installation process is going to be the same.
How to use OWASP ZAP
It is really very simple to use OWASP ZAP because it is in GUI format and architecture is very good at zaproxy.
If you open zap the interface looks something similar to the below image 👇

Customising OWASP ZAP proxy
Make sure the you run ZAP in an not used port, Well I suggest you to go with localhost port 8080
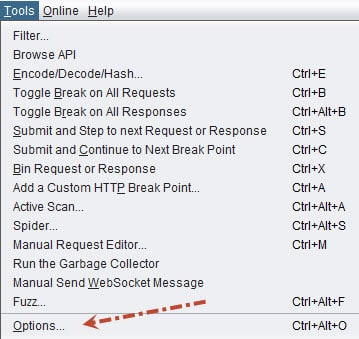
To customise ZAP proxy go to tools > options > local proxies

In the place of address enter localhost and in the place of port enter 8080 and click ok to save you change.
Advertisement
Scanning website using ZAP
There are two ways to scan a website in ZAP,
- Automated scan
- Manual scan
If you want to a manual scan on websites like google.com or bcc.com then it is going to take an eternity.
Where as the automated scan finds all the links, images and whatever files in the website will be scanned and will be displayed.
It depends on the website you are targeting, If it is a small website like techyrick.com then the scan is going to be faster.
Let’s see how to do an automated scan.
Automated scan
To do an automated scan just click on automated scan and enter the target website you want to scan like this 👇

If you click on the Firefox headline you can choose from which web browser you can scan the target from.
You can also select the traditional spider. Which going to grab all the link, mages in the target and will be displayed.
To start the attack just press Attack options.

You could see the results down below and on the left side of the dashboard you could see the sites, If you click on that you could see the post, pages and whatever the zap hash scanned for.

Generate Report
It is really very easy to export the results in .HTML format, Just click on generate report from the top right hand corner and you can customise over there.

Result Dashboard
The result dashboard very organised in ZAP:
- History
- search options (To search a specific url)
- Alerts (Probably found any vulnerability)
- Output
- Spider (We can see all the url from a website)
- Ajax spider
- Active scan (Can find the scanned URL’s)

Alerts
You can click on the Alerts to find probable vulnerable pages and links.

As a result you could see the risk level of the site in the right side dashboard.
Conclusion
This is a post for completion beginners and there is an another post on OWASP ZAP for intermediate and professionals.
Hope you like the post on OWASP ZAP 🥰, If you have any doubt take a look at the YouTube video. See ya in the next post.
Advertisement
Also Read: How to use sqlmap

This article outlines the steps required to set up OWASP ZAP & run web application scans to discover security violations if any present in the application. This article & all content published on this site is for learning / education purposes only
what is DAST ?
Dynamic Application Security Testing (DAST) is a technique used to discover security vulnerabilities in web applications / services during runtime. This phase do not require access to source code. A DAST can be run on a full application or specific application journeys depending on the change / release cycle.
why do we need DAST ?
Well, when we are developing or delivering a application we usually test it to verify if the intended functionality is working. Similarly, to verify if an application is secure, depending on its scope we can apply some security controls. One of the security controls / techniques is DAST.
When do we do DAST ?
It depends but usually whenever there is a new change in the application. You can scan as often & as early as possible to discover the security violations early. All it needs is a stable environment access to run scan on deployed application. By doing early scans, possibly teams can reduce efforts / cost involved for identifying & fixing security flaws.
what is OWASP ZAP ?
OWASP ZAP aka ( Open Web Application Security Project Zed Attack Proxy ) is an intercepting proxy. When configured with client side such as a browser, it can intercept client requests & also intercept responses from the server. It has various useful features & capabilities to run Passive & Active scans.
ZAP has different modes such as safe mode, protected mode which are restricted , meaning we cannot use full ZAP features under these modes.
standard mode is used for accessing full features of the tool & Attack mode is used to scan live inscope applications as soon as (or) as and when they are intercepted
What is Passive Scan ?
It is a phase where the intended applications under assessment are being intercepted by the tool & those requests / responses are observed by the tool to flag security misconfigurations such as missing security headers or cookie settings. The tool doesn’t send any new requests on its own in this phase, it just analyses the intercepted requests / responses.
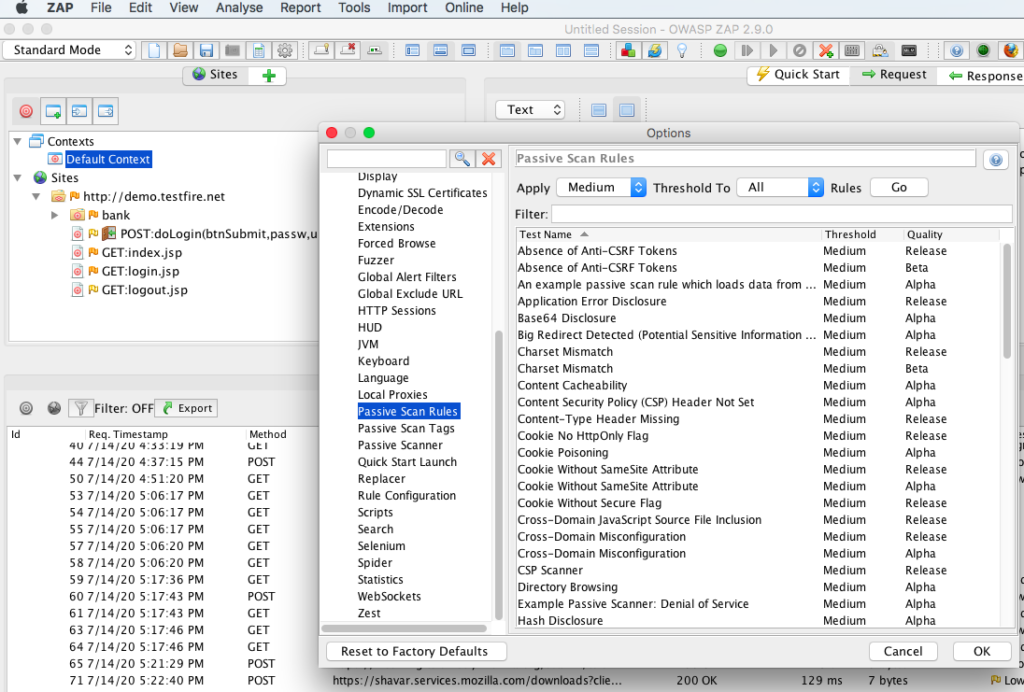
ZAP passive rules can be seen under Tools –> Options –> Passive scan rules
what is Active Scan ?
It is a phase where the intended applications under assessment are attacked by the tool by sending new requests with malicious payloads to discover security violations.The tool flags the violations based on its behaviour / received responses from the server after injecting malicious payloads. These payloads are introduced by the tool after we complete intercepting the application journeys that we want to test so they act as a baseline for the tool to start sending new requests with new payloads.
ZAP active scan rules can be seen under Analyse –> Scan Policy Manager –> Default policy –> Click Modify –> view sections (client browser, injection etc.,)

Pre-requisites to implement DAST using OWASP ZAP ?
To install ZAP, you need to have admin / root access & atleast java version 8 installed as the set up requires java 8+ to run.
ZAP is cross platform & runs on any OS that supports java version 8
once the installation is complete, follow the below sections A,B,C to set the initial configuration settings to intercept client requests & server responses.
Section A, Configure ZAP with Client Side Browser
Before we can begin to use ZAP features, it needs to be configured with client browser.
By defaults ZAP local proxy listener is set to localhost:8080 .
This can be seen under Tools—>Options—>Local Proxies
To set up same local proxy listener in Firefox, go to Tools—>Options—>Advanced—>Network—>Settings—>set Manual proxy Configuration to localhost:8080 & tick the checkbox to use this proxy server for all protocols.
Section B, Import ZAP CA certificate into Browser
This step is required to intercept HTTPS requests / traffic
To export ZAP CA certificate, go to Tools —>Options—>Dynamic SSL Certificates & click save to export the certificate. You can click regenerate the certificate if required & save it.
to install ZAP certificate into Firefox browser, go to Tools—>Options—>Advanced—>certificates tab—>View certificates—>under Authorities—> Import & tick the box to Trust this CA to identify web sites
Section C, Set an Outgoing Proxy Server
This is only required in networks where you use upstream proxy to connect to external networks or internet.
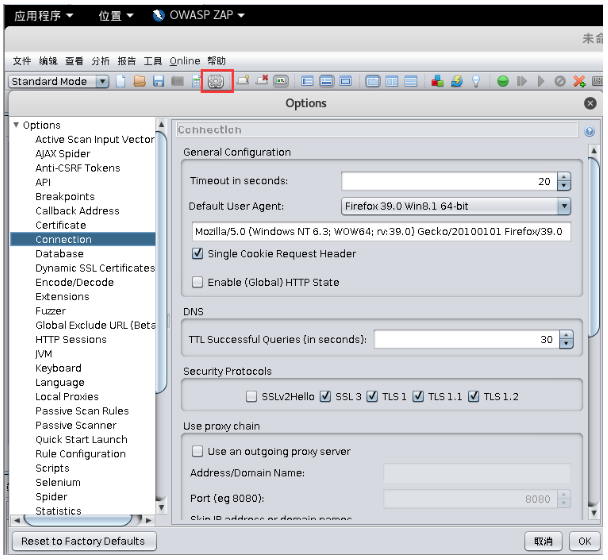
To configure outgoing proxy in ZAP, go to Tools—>Options—>Connection—>use proxy chain—>enable use an outgoing proxy server—>provide proxy IP address and Port —> also provide credentials if the proxy requires authentication.
To verify successful set up, try to access a demo / test site to check if you are able to intercept application requests / responses
If you are unable to intercept requests / responses then recheck the sections A,B or C above to include any missing configuration settings
OWASP ZAP – Points to note
- Default ZAP Scanner do not have coverage for access control related checks such as Privilege escalation / Insecure Direct Object reference / Business Logic Testing etc., those need to be covered in a manual security test phase by an experienced security engineer.
- ZAP do not have much coverage or scan rule checks for API’s / Services & supports only a few API type scans.
- When running a scan on applications, we must always use the context to set inclusions/exclusions for the scope of scanning & avoid scanning unauthorized domains.
- You can access ZAP API’s client side using http://localhost:8080/ , helpful for scripting the api end points for ZAP automation integration.
- For automation set up, revisit sections A,B & C above to check if you need to enable any settings to avoid user intervention. e.g: outgoing proxy set up.
OWASP ZAP Steps to Implement Form Based Authenticated Applications Scan :
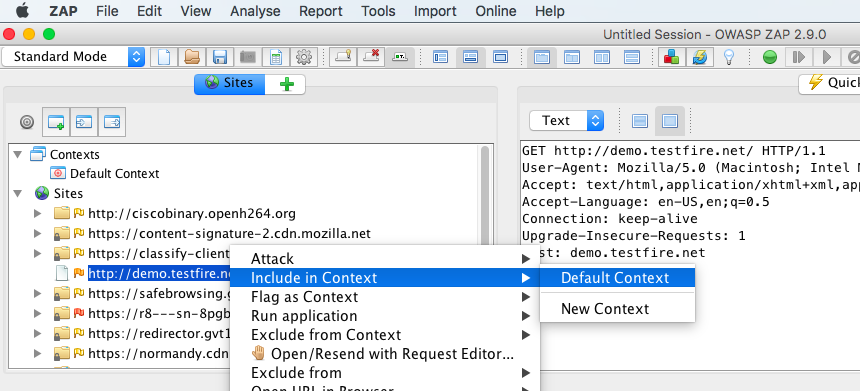
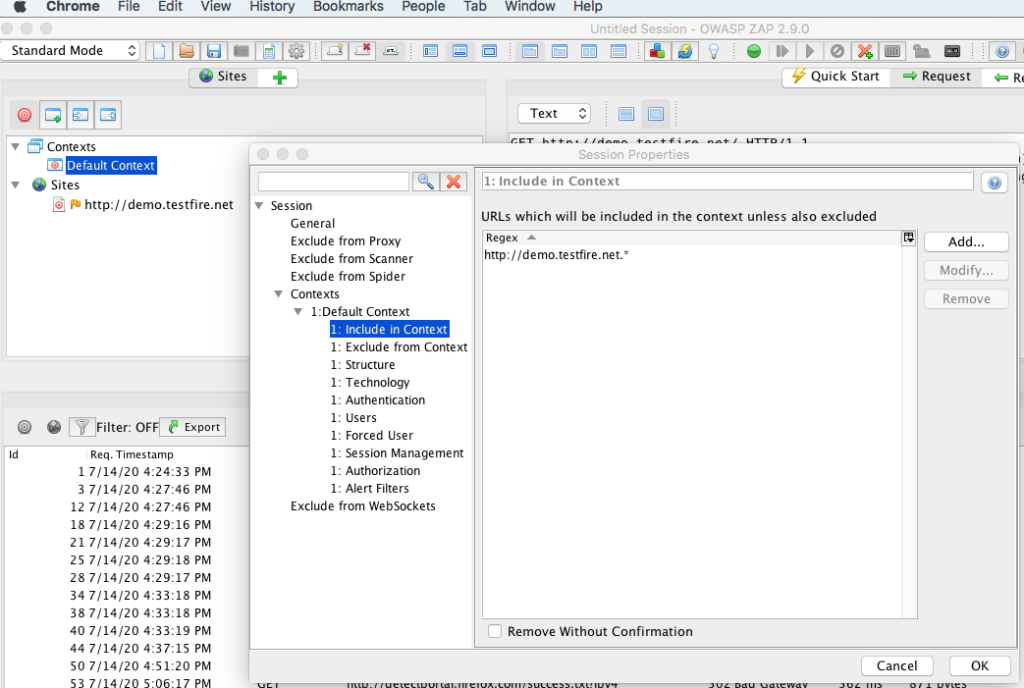
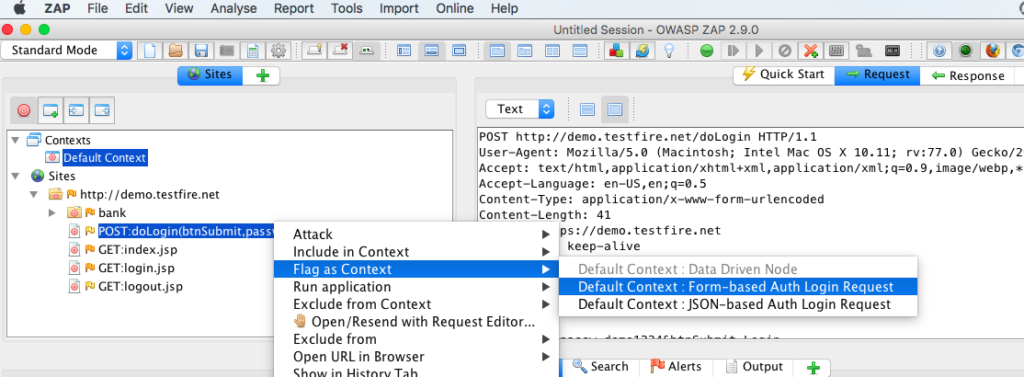
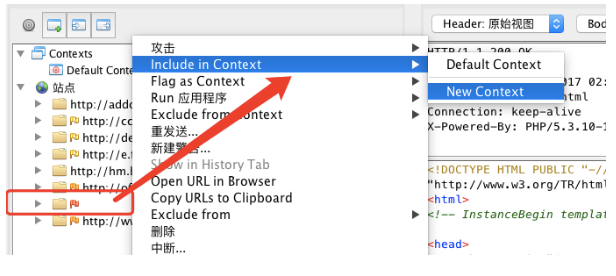
After you are successfully able to intercept the application requests/responses. In ZAP UI under sites, right click the test domain you want to scan & choose to Include in context –> Default context. Here context is nothing but the section that allows us to set the scan scope & various other configuration settings.
Now lets explore each of the sub sections under Default context
Include in Context is used to include test domains which we are going to scan, domains included in context are the one’s considered has in scope for scanning
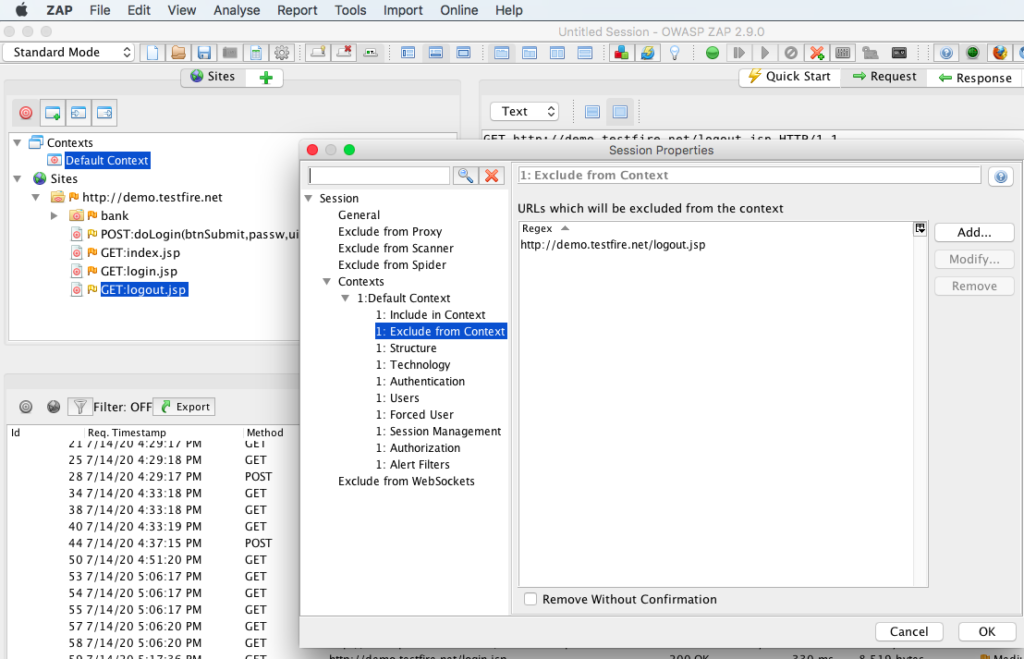
Exclude from context is used to exclude any end points from the in scope application scan phase. Generally, its recommended to exclude logout page to avoid session termination for a full authenticated application scan. Likewise, if there is a account lockout policy you can exclude login page to avoid lockout of test accounts. You can also exclude email triggering or sms triggering end points if there is no rate limit to avoid spamming / sending bulk emails or smses. Consider other exclusions based on your requirements also.
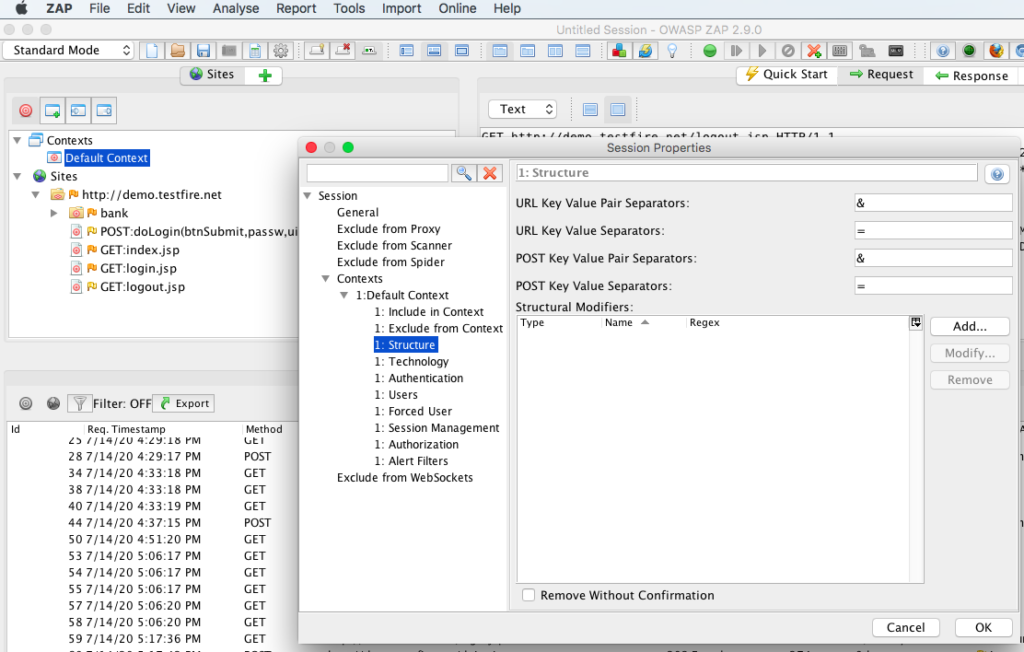
Structure section is good to keep as default unless you have a different requirement for the settings in there.
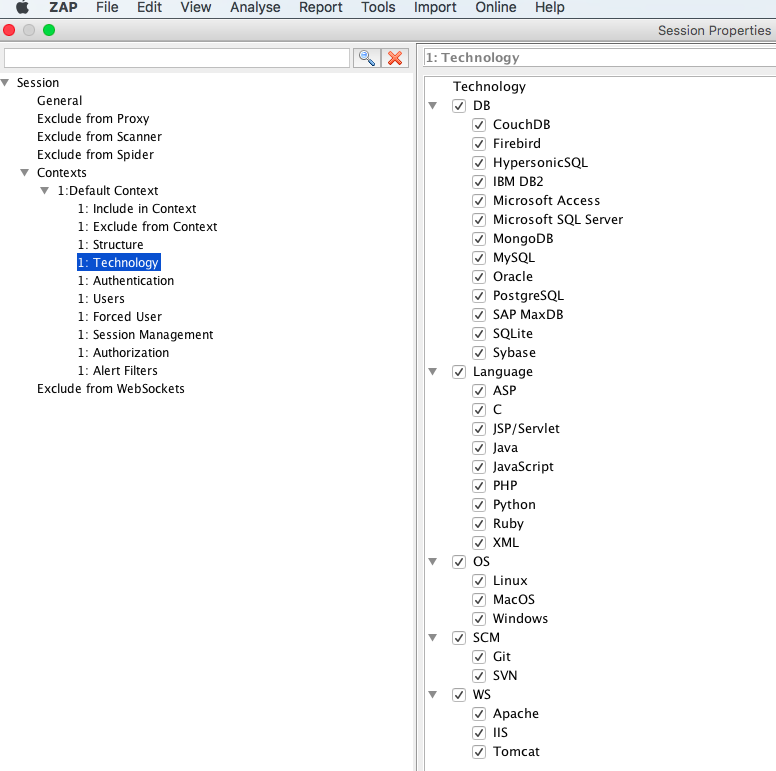
Technology section, here we can choose relevant technologies involved for the test site such as backend Database, web server where the application is deployed , programming languages used for development , source code management systems for code commits / maintenance & operating system / server. If you are unsure then its best to leave it default with all settings enabled.
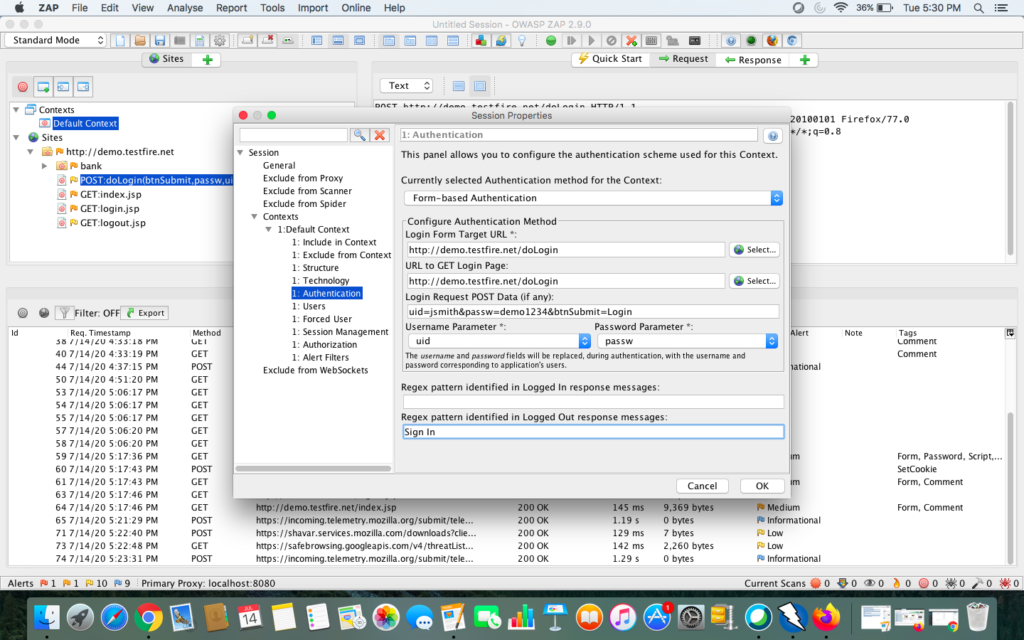
Authentication is used to set the authentication settings required for the application. In this case, the test site is a form based authenticated application, so in ZAP UI, under sites, choose the end point that is used for login, right click that & Flag as context–>Form Based Auth Login Request.
Next we will see a dialog window to set the required settings for authentication. Verify if the login url, username, password parameters & login or logout regex are set correctly. The regex you set should be included in every expected response, like in this case it is Sign In for all unauthenticated / logout responses.
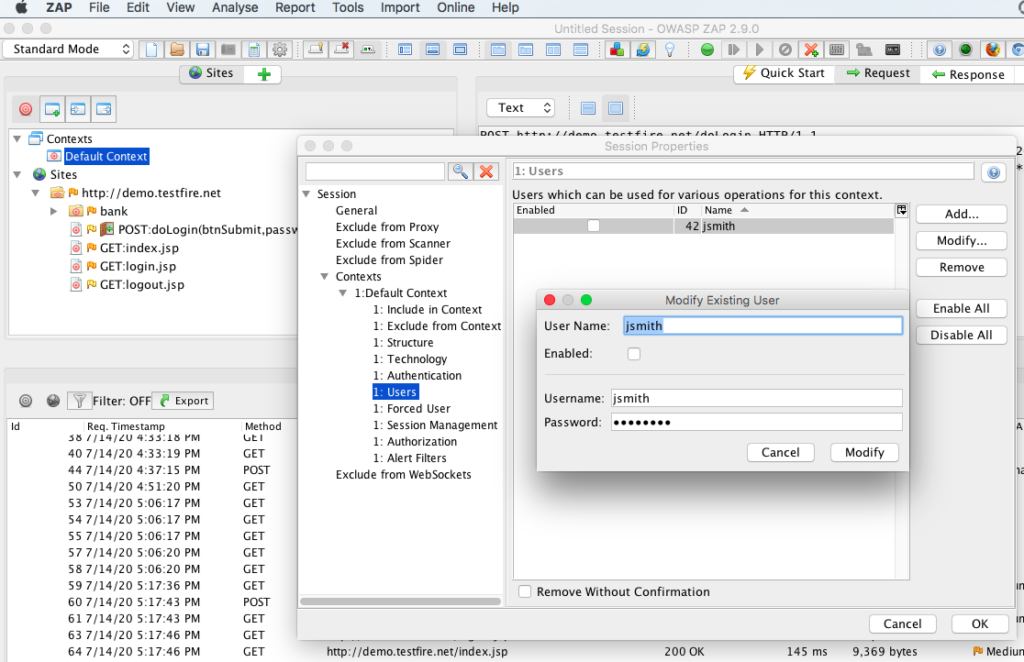
Users in this section we can add the user credentials or the account that we are going to use for scanning the test site. We can probably do the scan using admin account to achieve maximum coverage. Tick the box in this section to enable the user.
Forced User in this section we can choose a added user account to run the scan in the context of the user. Also, in ZAP UI we need to enable the lock with person icon on the top menu bar to enable forced user mode setting
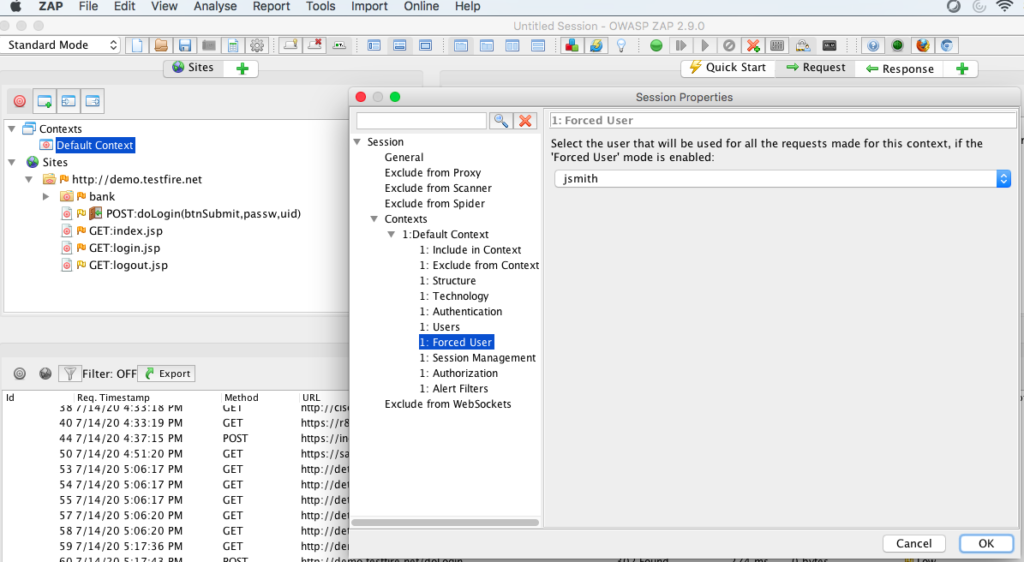
Session Management section, in this case it is a cookie based session management application.

These are all required settings, sufficient to do a form based authenticated scan on a demo or test application. Once all the required settings have been updated, from ZAP UI under sites right click the target test domain & choose Attack –>Active Scan to run active scan on intercepted journeys
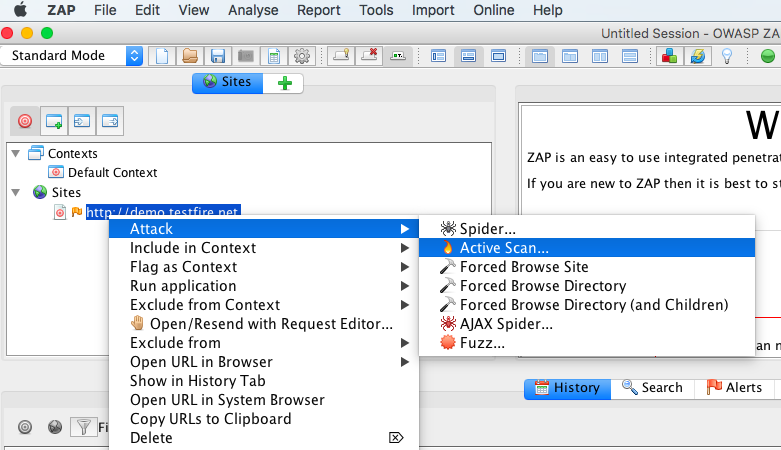
There is also an option to do Attack–>Spider before running the active scan but that option is recommended to be used only when required to do a full application scan or comprehensive scan. In Spider phase the tool will crawl through the application to discover all paths or end points accessible in the application including .js, .css, .html, .jpg, .png, .gif, .php , .jsp & so on
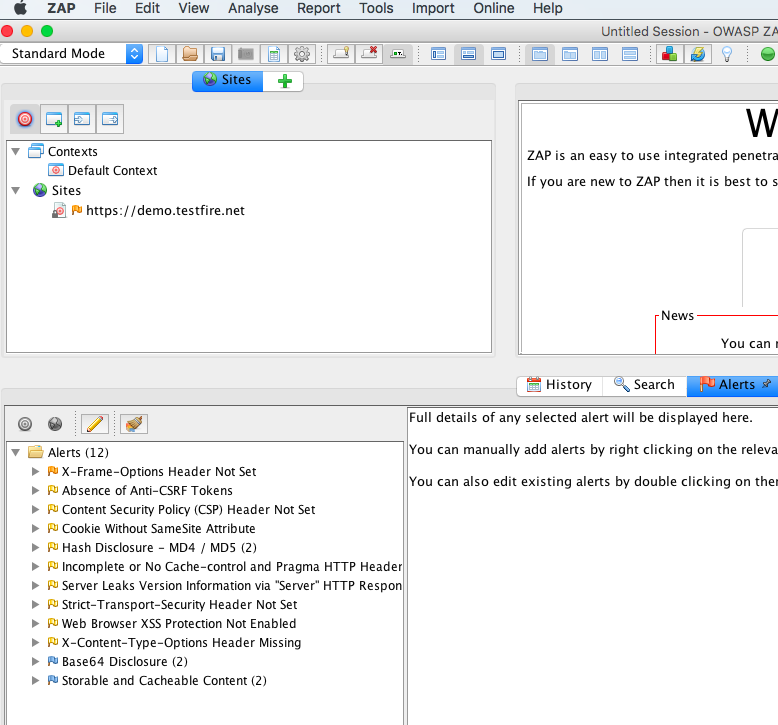
Reporting: All discovered security violations can be seen under the Alerts tab. To generate a html report, go to menu bar option Report –> Generate HTML Report. Likewise you can also generate reports in other available formats – XML , JSON etc.,
We also have other useful features & ZAP docker container which we will add in later. Hope that we have helped you and that you have enjoyed this lesson
In the Security Testing using OWASP ZAP article, I will try to explain basic instructions which will help you to add an automatic step using OWASP ZAP into your Continuous Integration/Continuous Delivery Platform (CI/CDP) systems for security tests.
Bu makalenin Türkçe’si için link’e tıklayınız.
What is OWASP ZAP and What is the Purpose of This Test?
OWASP (Open Source Web Application Security Project) is an online community that produces and shares free publications, methodologies, documents, tools, and technologies in the field of application security. ZAP (Zed Attack Proxy) is one of the most important tools developed by this community. The main purpose of this tool is to do security scanning for web applications.
The purpose of the method that I will describe in this article is not to teach you how to do web security testing and its tricks, also, I will not give all the technical details of ZAP. The aim is here to show you the first steps of security scan operations automatically and leave the improvements to you.
Walkthrough and Operations to be Performed
I used Cucumber and Capybara on Ruby at web automation part for this test but no matter which tool or framework is used, you can perform this procedure with any web automation method such as Selenium, Watir, etc. You can examine the code that I wrote for this test on https://github.com/swtestacademy/zap-security/tree/swtestacademy . Now, Let’s go into details of the way that we will carry out this security test.
Step by Step Instructions
Prerequisites
JAVA (preferably  must be installed on the computer/build agent/container which will perform all these operations. Download ZAP cross-platform version and extract it into the same machine. Please use the latest version when you are reading this article.

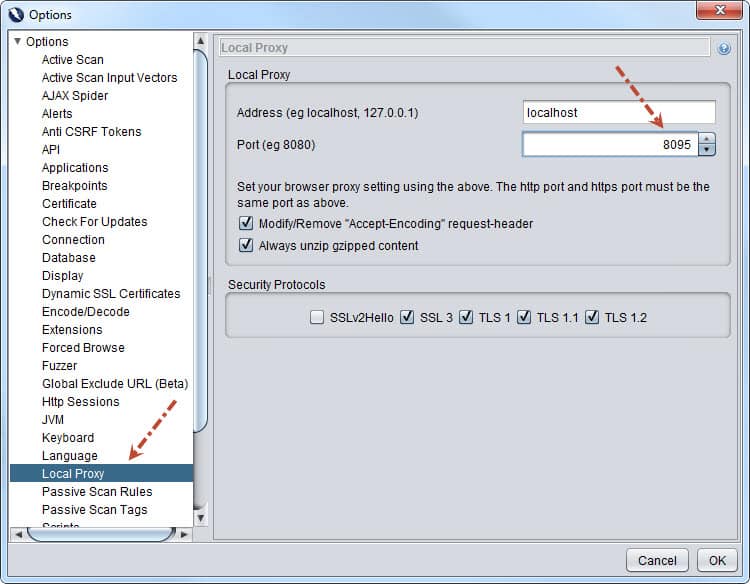
Step-1: Zap Configuration
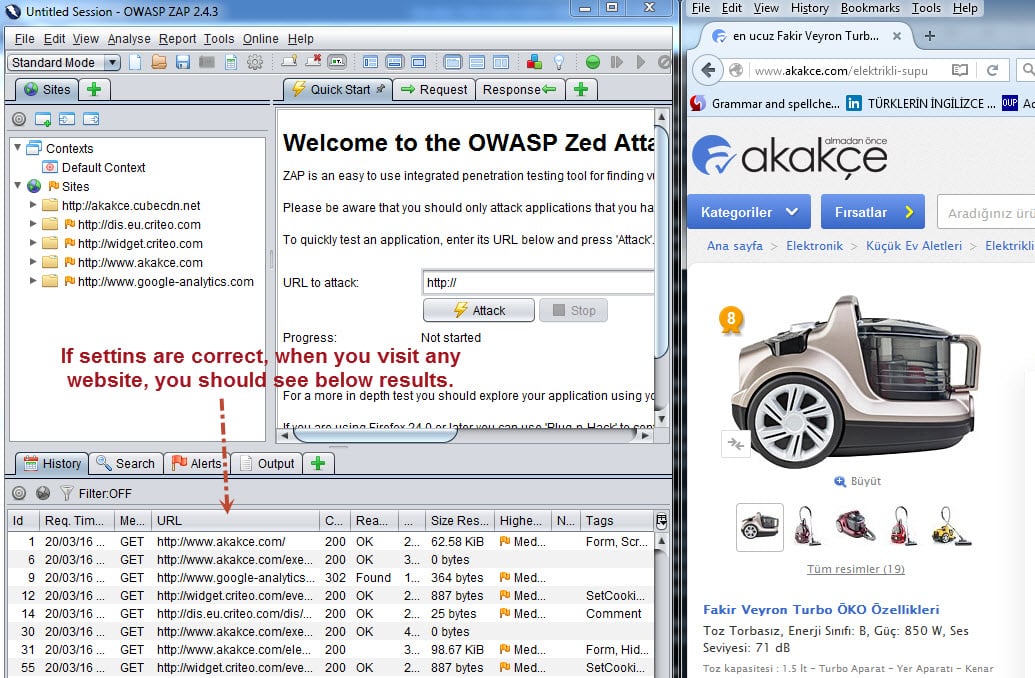
You need to specify which address’s which port will be listened by ZAP. First, open ZAP with “zap.bat” (on Windows) or “zap.sh” (OS X or Linux), then start to modify settings. I used localhost:8095 in my project. You can do this setting on Tools -> Options -> Local Proxy screen. If you connect the internet through a proxy in your company, you can change proxy settings on Tools ->> Options ->> Connection screen. Also, you must select your Operating System and Web Browser on Tools ->> Options ->> Connection screen. These settings are shown below figures.


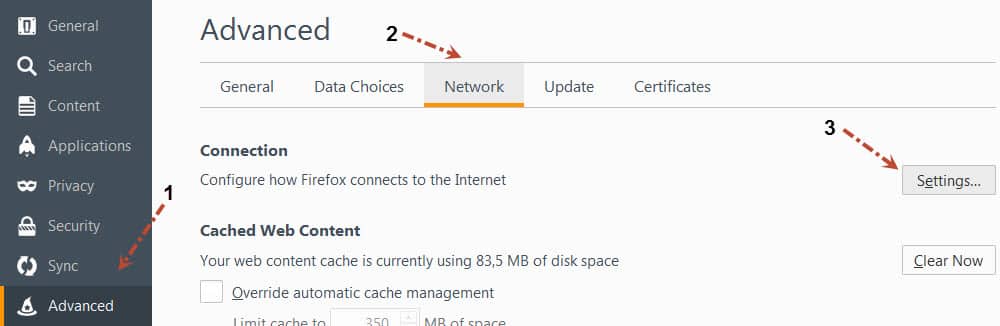
[Optional] Manual Security Test with ZAP and Firefox
You can change Firefox’s proxy settings as shown below. First, go to Tools ->> Options ->> Advanced tab. Then, do the following settings.

After completing these settings, restart ZAP and Firefox, and then when you visit any website you will see HTTP request lines and Alerts in the ZAP console panel as shown below. This is the MANUAL way of performing security tests.
Step-2: Browser Configuration in our Automation Code
As I mentioned earlier, I used Capybara for web automation and Selenium Webdriver as a driver. You should also install RestClient gem.
You can find how to install Ruby, Cucumber, and Capybara configuration in this article.
In this configuration, I chose Firefox as a browser. In order to reach the internet using the Firefox browser through our preferred proxy, we need to add below code in env.rb file.
Capybara.register_driver :selenium do |app|
  profile = Selenium::WebDriver::Firefox::Profile.new
  profile["network.proxy.type"] = 1
  profile["network.proxy.http"] = "localhost"
  profile["network.proxy.http_port"] = 8095
  Capybara::Selenium::Driver.new(app, :profile => profile)
end
Step-3: Start the ZAP in the Code
Before running the tests, we need to start ZAP. To do this, I executed the below line in my Ruby code.
In OS X or Linux:
IO.popen("./zap.sh -daemon")
In Windows :
IO.popen("./zap.bat -daemon")
In Ruby, there are a few different ways to run an external program (kernel, exec, backtik, etc.). However, after running the external program, none of the methods do automatically give the rest of the control to the ruby code.Only “IO.popen” method executes the program you want and then lets the rest of the code continue to operate.
Step-4: Running Web Automation Codes
There are passive and active ways to do security testing on web applications. You can attack the sites with AJAX crawlers inactive methods. In our sample project, we will use a passive method because the site under test doesn’t belong to us. In this method, we will automate some basic journey tests and we will let the ZAP detect security vulnerabilities in the site. If you enrich and diversify your test scenarios, you will also increase the probability of ZAP’s vulnerability detection. In our project, our journey test flow is described below;
- Navigate to www.akakce.com
- Search an item.
- Filter the results according to a certain price range.
- Go to the details of the first filtered result.
The above scenario’s code is shown below:
visit ''
page.driver.browser.manage.window.maximize
find_by_id('q').set 'lg g4'
find('button.grd2').click
find_by_id('PrList').find('div.p', match: :first)
find_by_id('pf1').set '100'
find_by_id('pf2').set '1000'
find('button.grd1').click
find_by_id('PrList').find('li.firstRow', match: :first).find('div.p').click
find('tr.first', match: :first)
sleep 20
At the end of the code, I waited 20 seconds because it takes some time for ZAP to interpret the detected vulnerabilities and send the results to the API. Instead of using static wait, you can implement this wait with status checks that the API provides. I am leaving the details of this work to you.
Step-5: Reading Warnings and Reporting with ZAP
When our tests are finished, we need to interpret the detected warnings, errors, vulnerabilities. We use ZAP API to reach them. While your ZAP instance is alive, if you go to the ZAP’s <listened proxy>/UI address with your browser, you can see all the functions that ZAP API provides us. We used the below code line to reach warnings/errors/vulnerabilities.
RestClient.get "http://#{$zap_proxy}:#{$zap_proxy_port}/json/core/view/alerts"
When we get the results, then we can separate and report them with their vulnerability degrees. When we examine our code, if the high priority vulnerability is found, we print them at first and then break the build with an assertion. You can also prepare a test plan and design your build pipeline based on your criteria.
Test Codes and Test Execution
Folder Structure
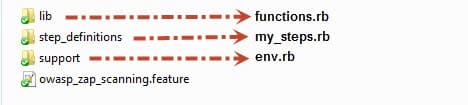
GitHub Page 0f Test Codes
https://github.com/swtestacademy/zap-security/tree/swtestacademy/
Test Files
Feature File (owasp_zap_scanning.feature):
#encoding: UTF-8

Feature: Run an OWASP ZAP screening
  As a user
  I want to run a security screening for my site
  In order to have a secure application

  Scenario: Run security tests
    Given I launch owasp zap for a scan
    When I perform some journeys on my site
    Then I should be able to see security warnings
Steps File (my_steps.rb):
#encoding: UTF-8

#Launch OWASP ZAP using our launch_owasp_zap method in "functions.rb"
Given(/^I launch owasp zap for a scan$/) do
  launch_owasp_zap
end

#Run our test scenario
When(/^I perform some journeys on my site$/) do
  visit ''
  page.driver.browser.manage.window.maximize
  find_by_id('q').set 'lg g4'
  find('button.grd2').click
  find_by_id('PrList').find('div.p', match: :first)
  find_by_id('pf1').set '100'
  find_by_id('pf2').set '1000'
  find('button.grd1').click
  find_by_id('PrList').find('li.firstRow', match: :first).find('div.p').click
  find('tr.first', match: :first)
  sleep 20
end

#Get security warnings then classify and print them
Then(/^I should be able to see security warnings$/) do
  #Get response from via RestClient framework method.
  response = JSON.parse RestClient.get "http://#{$zap_proxy}:#{$zap_proxy_port}/json/core/view/alerts"

  #Classify the alerts
  events = response['alerts']
  high_risks = events.select{|x| x['risk'] == 'High'}
  high_count = high_risks.size
  medium_count = events.select{|x| x['risk'] == 'Medium'}.size
  low_count = events.select{|x| x['risk'] == 'Low'}.size
  informational_count = events.select{|x| x['risk'] == 'Informational'}.size

  #Check high alert count and print them
  if high_count > 0
    high_risks.each { |x| p x['alert'] }
  end

  #Expect high alert count equal to 0
  expect(high_count).to eq 0

  #Print alerts with risk levels
  site = Capybara.app_host
  response = JSON.parse RestClient.get "http://#{$zap_proxy}:#{$zap_proxy_port}/json/core/view/alerts",
      params: { zapapiformat: 'JSON', baseurl: site }
  response['alerts'].each { |x| p "#{x['alert']} risk level: #{x['risk']}"}
end
Functions File (functions.rb):
#encoding: UTF-8
#Launch Owasp ZAP
def launch_owasp_zap
#Set ZAP Path
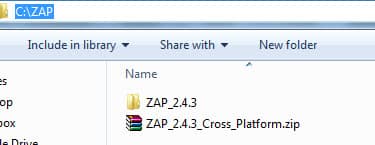
$zap_path = 'C:\ZAP\ZAP_2.4.3'
#Go to ZAP Path
Dir.chdir($zap_path){
#Determine Operating System, kill JAVA instances and Start ZAP in deamon mode.
if determine_os == 'windows'
system("taskkill /im java.exe /f")
system("taskkill /im javaw.exe /f")
IO.popen("zap.bat -daemon")
else
system("pkill java")
IO.popen("./zap.sh -daemon")
end
sleep 5
}
p "Owasp Zap launch completed"
sleep 20
end
#Operating System Determination Method
def determine_os
if (/cygwin|mswin|mingw|bccwin|wince|emx/ =~ RUBY_PLATFORM) != nil
return 'windows'
elsif (/darwin/ =~ RUBY_PLATFORM) != nil
return 'mac'
else
return 'linux'
end
end
Environment File (env.rb):
#encoding: UTF-8
require 'cucumber'
require 'rspec'
require 'selenium-webdriver'
require 'rest-client'
require 'capybara'
require 'capybara/dsl'

#Define global variables
$zap_proxy = "localhost"
$zap_proxy_port = 8095

#Below lines are our driver profile settings to reach internet through a proxy
#You can set security=true as environment variable or declare it on command window
if ENV['security'] == "true"
  Capybara.register_driver :selenium do |app|
    profile = Selenium::WebDriver::Firefox::Profile.new
    profile["network.proxy.type"] = 1
    profile["network.proxy.http"] = $zap_proxy
    profile["network.proxy.http_port"] = $zap_proxy_port
    Capybara::Selenium::Driver.new(app, :profile => profile)
  end
end

#Screenshot operations
$screenshot_counter = 0
Capybara.save_and_open_page_path = File.expand_path(File.join(File.dirname(__FILE__), "../screenshots/"))

#Capybara settings
Capybara.run_server = false
Capybara.default_driver = :selenium #Use Selenium as Driver
Capybara.javascript_driver = :selenium #Use Selenium as JS Driver
Capybara.default_selector = :css #Defatult Selector methos is CSS
Capybara.default_max_wait_time = 15 #Wait time is 15 seconds
Capybara.ignore_hidden_elements = false #Do not ignore hidden elements
Capybara.exact = true #All is expressions match exactly (Exact Match/Ignores substring matches)
Capybara.app_host = 'http://www.akakce.com' #Our test site
World(Capybara::DSL)

ENV['NO_PROXY'] = ENV['no_proxy'] = '127.0.0.1'
if ENV['APP_HOST']
  Capybara.app_host = ENV['APP_HOST']
  if Capybara.app_host.chars.last != '/'
    Capybara.app_host += '/'
  end
end

FIRST_ACCOUNT_SUFFIX = 5001
$delete_enabled = true
$environment = 'qa'
Test Execution
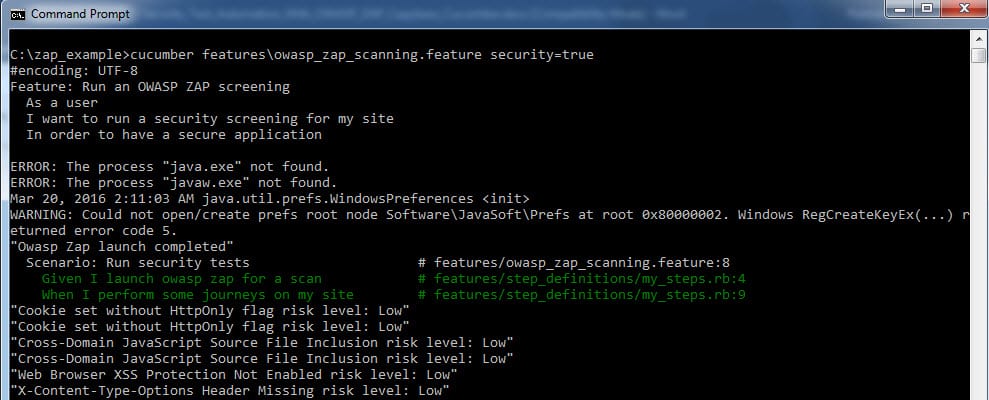
You can go to your test automation project folder and run the below command.
cucumber features\owasp_zap_scanning.feature security=true

and then ZAP will open and you will see the below results.

GitHub Project
https://github.com/swtestacademy/zap-security/tree/swtestacademy
Conclusion
Actually, the method that I tried to explain here is new even to me. There are many improvements that can be made. I hope this article, which aims to explain the security tests that can be done without external human intervention, will be useful to you. Please keep in mind that applying the techniques described here does not mean that you do not need any more security or penetration testing. Security is a very serious issue and it has to be handled by security experts from an engineering point of view. The basic objective of our test here is to give feedback to the development team about the safety of the product from the first iteration and ensure the basic level of security. Also, it can help us to find and eliminate the security vulnerabilities before the extensive and more professional security/penetration testing phases.
[fusion_tagline_box backgroundcolor=”” shadow=”no” shadowopacity=”0.7″ border=”1px” bordercolor=”” highlightposition=”top” content_alignment=”left” link=”” linktarget=”_blank” modal=”” button_size=”” button_shape=”” button_type=”” buttoncolor=”” button=”” title=”About ThoughtWorks and Test Hive” description=”” margin_top=”” margin_bottom=”” animation_type=”0″ animation_direction=”down” animation_speed=”0.1″ class=”” id=””]ThoughtWorks is a software consultancy firm which carries on its operations in 12 countries with 34 offices and more than 3600 consultants since 1993. In software sector, ThoughtWorks is not only a follower and implementer, it produces and discovers new ways with its game changer consultants. Thus, it is located in a very important place in the market. ThougtWorks has been operating for more than two years in Turkey and it has an ambitious mission to change the understanding of software in our country. In order to achieve this goal, it pioneered foundation of many communities and it is also a sponsor of Test Hive group which undertakes the same mission in software testing domain. Test Hive, regularly organizes events to help progress in software testing, shares articles and research papers, organizes trainings and provides environments to the test engineers for information sharing. www.testhive.org[/fusion_tagline_box]

Alper Mermer is graduated from Hacettepe University Computer Engineering Department. He is in software sector for more than 10 years and he has spent the last 8 years by working on software testing actively. He has experience in Finance, Telecommunications, Online Retail sectors. He is also founder and the organizer of Test Hive group. Alper is now working at ThoughtWorks Turkey Office as a Quality Enforcer.
OWASP Zed Attack Proxy (ZAP) is one of free security audit tools on the world’s most popular, by the hundreds of international volunteers * actively maintained. It can help you automatically find security vulnerabilities in Web applications when developing and testing applications. There AWVS similar scanning tool for Web applications, APPSCAN and so on.
It can be said: ZAP is a middleman agent. It allows you to view youAll requests sent by a Web application from which you and all responses received。
That can be used for security professionals, developers, functional testers, and even penetration testing entry personnel. It is also an excellent tool for experienced testers for manual security testing.
Mainly has the following key features:
- Local Agent
- Active scan
- Passive scanning
- Fuzzy
- Brute force
github project: https: //github.com/zaproxy/zaproxy/wiki/Downloads
Two, OWASP ZAP installation
Installation I do not say that it has Windows (64) installer, Windows (32) installer, Linux installer, MacOS installation procedures.
Windows exe is downloaded, double-click on it!
Linuxg downloaded .sh is not tar.gz, this is even more simple.
The only caveat is:
Windows and Linux versions need to run Java 8 or later JDK, MacOS Installer includes Java 8;
For example: Today, when a netizen to download and install the windows start owasp-zap, made the following tips:
The install4j wizard could not find a Java(TM) Runtime Environment on your system. Please locate a suitable 64-bit JRE.(minimun version:1.8)
Chinese translation
install4j Wizard can not find the runtime environment Java (TM) on the system. Please find the appropriate 64-bit JRE. (Minimum Version: 1.8)
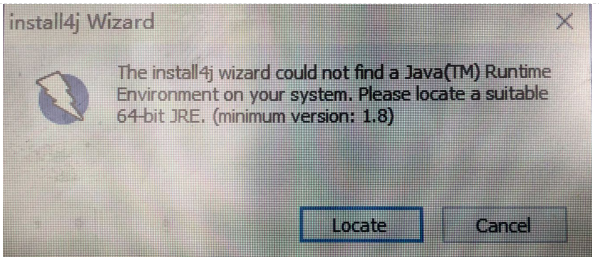
The friends asked me: I downloaded and installed the java8, but do not know why not find java EXE?
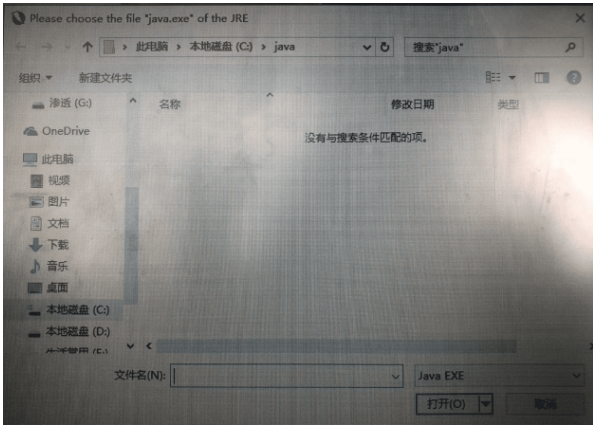
My answer is: java download wrong, or not successfully installed java; be sure to download, installJava JDK。
Sure enough, install JDK successfully resolved!
Three, OWASP ZAP Tutorial (Detailed)
Since Kali Linux inside OWASP ZAP is also integrated tool, I took Kali Linux inside OWASP ZAP example to do it!
1 update
As the official owasp zap zap plugins will be updated from time to time and zap version, we can manually updated as follows:
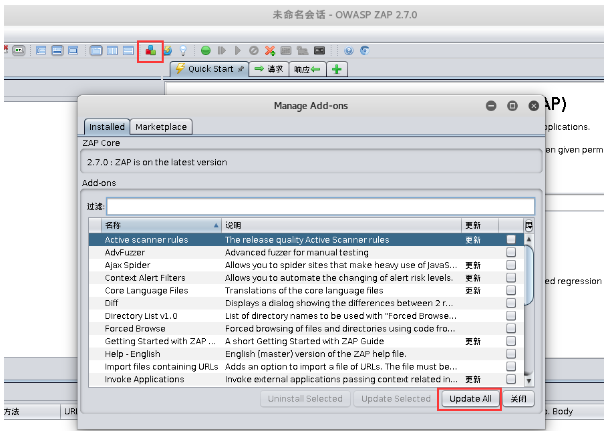
If you want to update a single, you can do: The man behind the words appear if the [update], you can select [update] to update selected!
Marketplace is a plug-in market, is selectively install plug-ins. It is divided into three categories of plug-ins:
- release: as long proven more mature plug-ins
- beta: the test is being tested in the plug-in can be problematic
- alpha: more lower than the beta test version of the plug-in
Recommend release and beta are installed, alpha version of the optional installation!
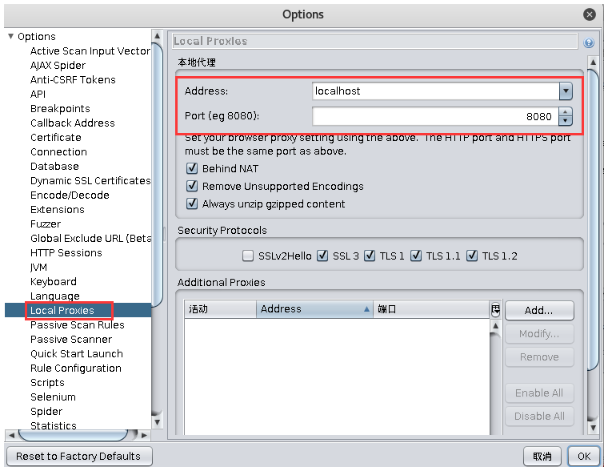
2, the local proxy settings
Firefox browser settings to http proxy (also may be other browsers), owasp zap the default port 8080 open http proxy;
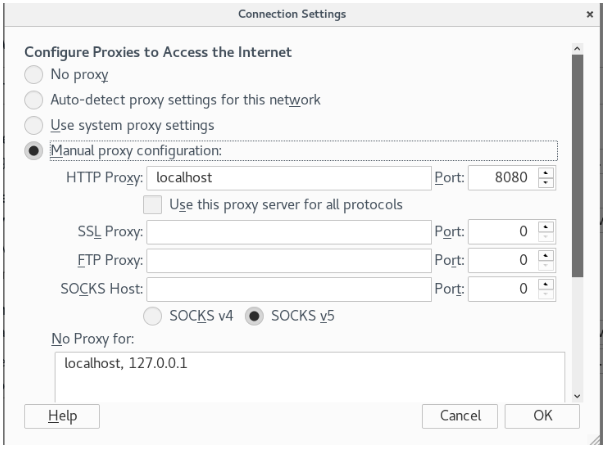
If you want to change the default owasp zap proxy, proxy settings owasp zap can be found in [Tools] — [modified] in the local agent — [options]:
3, simple assault
Then we could freely visit any site on the Firefox browser, you can access the Web site to intercept, in order to achieve the attack.
There is the need to attack the steps of:
First of all: after a manual crawl the site, select the site were forced owsap zap visit the website, browse the directory mandatory, forced browse directory (and children).
owasp zap forced directory browsing choose to use owasp zap own directory-list-1.0.txt catalog dictionary to try crawling (you can also customize the dictionary).
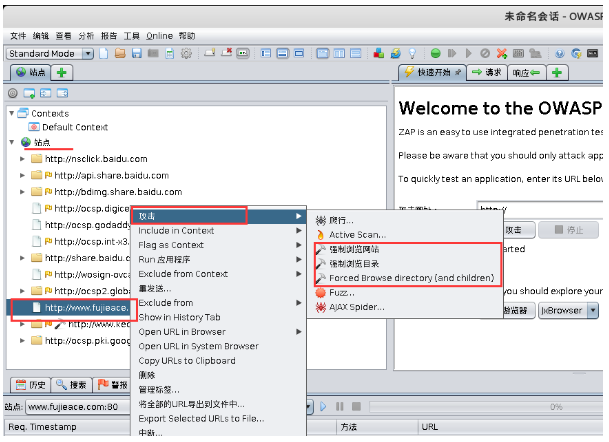
The above objective is to crawl all the links page of the site!
Second: After the above work done, you can choose the site be active scan (active scan)
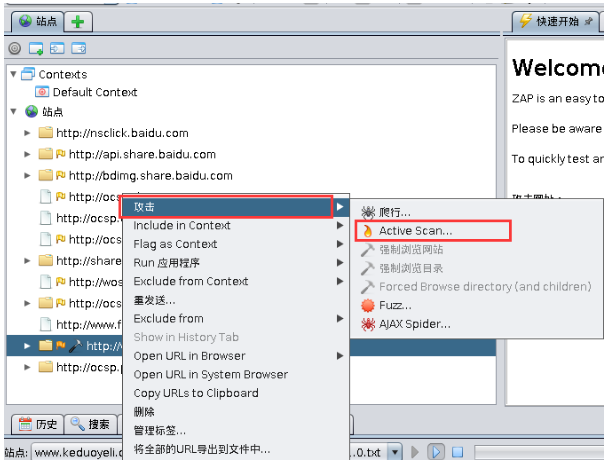
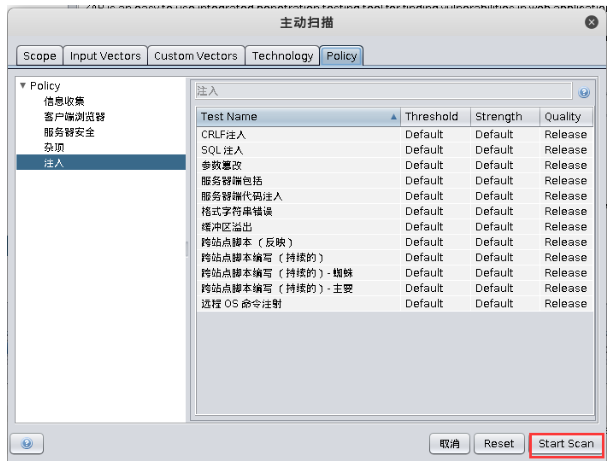
There are some active scan settings above, such as: information collection, customer and supplier, server security, implantation. If you have set up a foundation to go, is not very understanding friends can simply use the default!
Finally: mainly view the scan results, the active scanning for results of the scan [Warning] menu bar to view each item to see if there is a corresponding real problems, mainly to see high-risk and moderate-risk vulnerabilities, see the loopholes and attack the url That statement after the attack result returned by the server.
If you want to verify the true effectiveness of the vulnerability, the vulnerability point you can choose to make the appropriate security tools and then further testing!
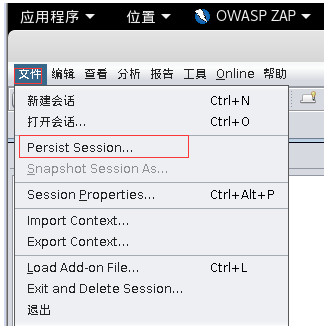
4, persist session results are stored
[File] — [] persist session, the main function Save «analysis of the results of the scan» for next time continue to analyze!
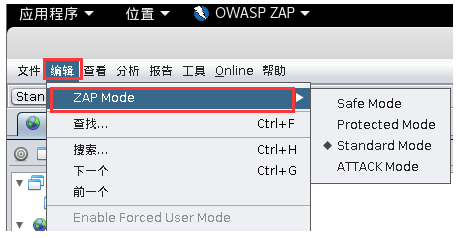
5, scan mode
There are four scan modes: secure mode, protected mode, standard mode, attack mode;
owasp zap default use the standard mode, you can [Edit] in — [ZAP Mode], select the mode you want.
6, scanning policies
There are two places you can add scanning strategy (1) [Analysis] — [] scanning strategy, (2) the Settings button
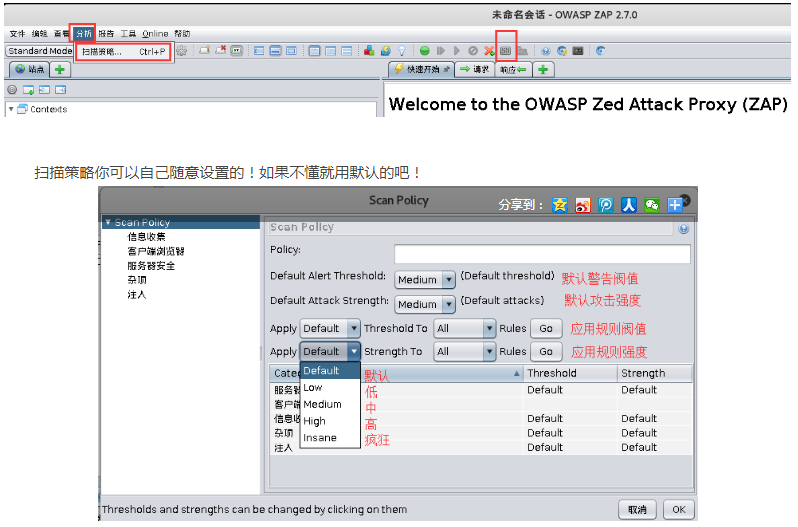
- Policy: scanning policy name, you need to fill in
- Default Alert Threshold: alarm threshold, there are low, less medium, high, higher threshold owasp zap scanning broke several vulnerabilities, the higher the threshold owasp zap it just broke confirmation of high vulnerability.
- Default Attack Strength: attack strength, low, medium,, the higher the high insane, strength, faster scanning
- Apply xx Threshold to All: The value xx alarm valve to scan all plug-ins, click go into effect
- Apply xx Strength to All: xx intensity of the scanning application to scan all plug-ins, click go into effect
7, skip a plug-in scanner when scanning
[Monitor] in the scan, click next to the blue button, you can skip the detection of the plug!
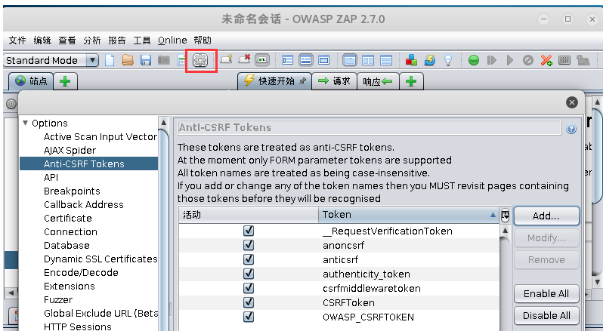
8, CSRF Tokens set
There are some sites to prevent csrf token, can not provide normal token site will redirect you to add a token name of the site by anti csrf tokens function owasp zap inform owasp zap.
In the [Settings] — [Anti CSRF Tokens] in addition.
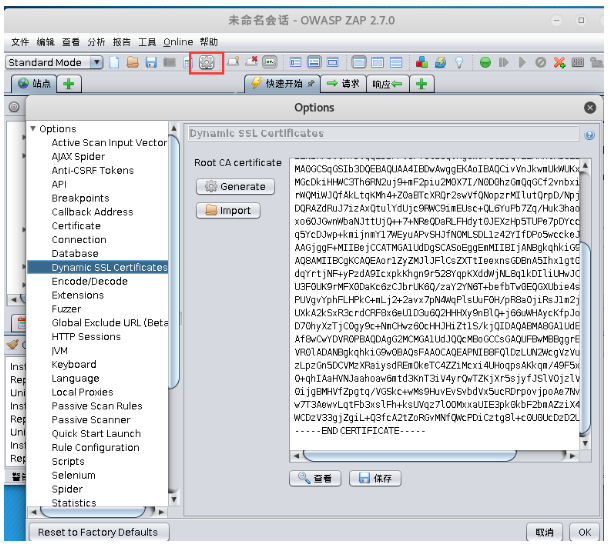
9. After setting proxy, https site’s certificate is not trusted issues
When owasp zap proxy, browser access https site, owasp zap use their own browser certificates and establish ssl connection, due owasp zap certificate is not trusted, and therefore the need to manually owasp zap export certificate (certificate cer format), you can import it into your browser!
Methods to export the certificate owasp zap the [Settings] — [Dynamic SSL Certificates];
10, contexts / scope site filter
This feature can quickly locate the site they are concerned;
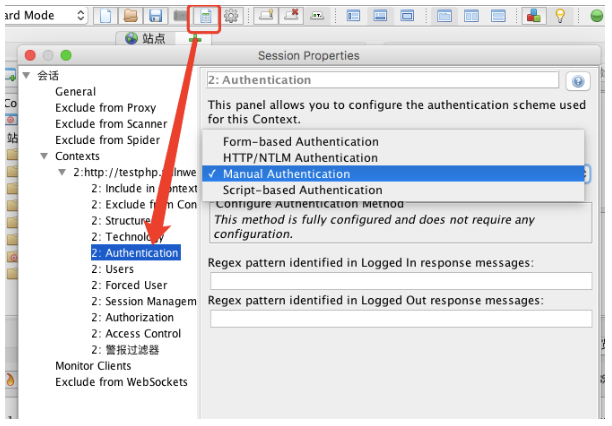
11、session properties
All session results owasp zap scanning sites are stored in the session properties, the default is to record the session manually fill in the account password through a browser;
12、http session
owasp zap has the following default field name, session name if there are other custom Web site, you need to add yourself to come in;
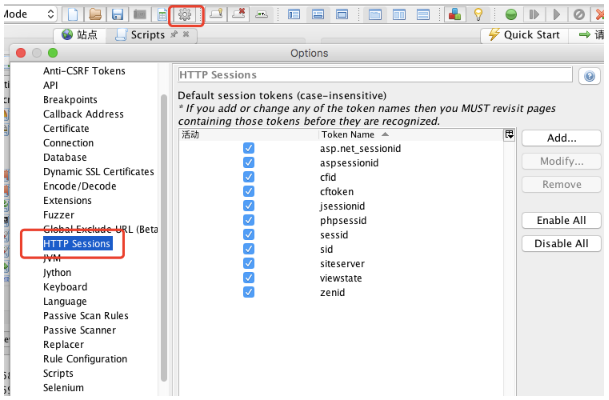
Http session to see the values of;
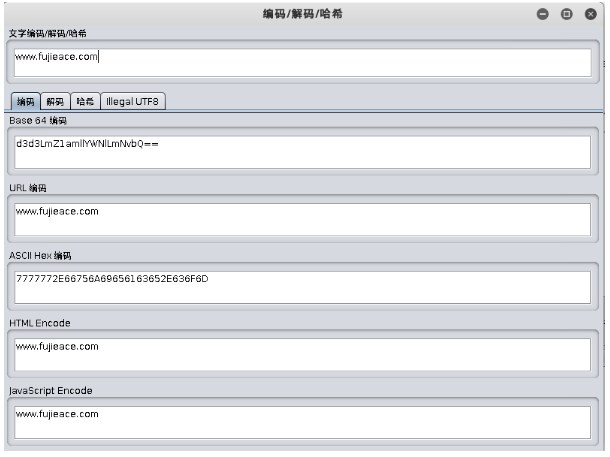
13, codec tools
[Tools] — [codec] hash
14, setting crawling useragent
[Settings] — [connection]
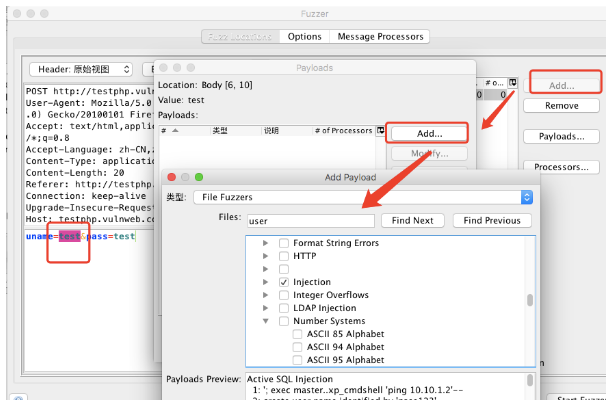
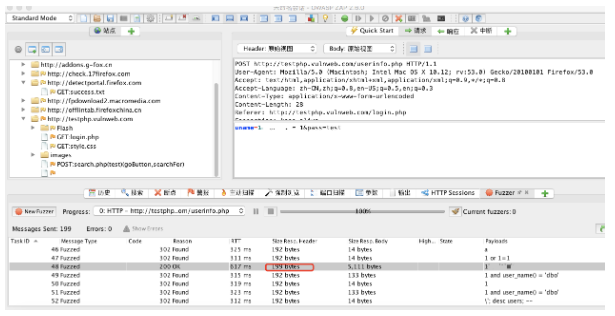
15, fuzzer fuzzing(Vulnerability Assessment Tool)
Right of immediate need fuzzer http package, select fuzzer, select the desired value fuzzer, add the payload;
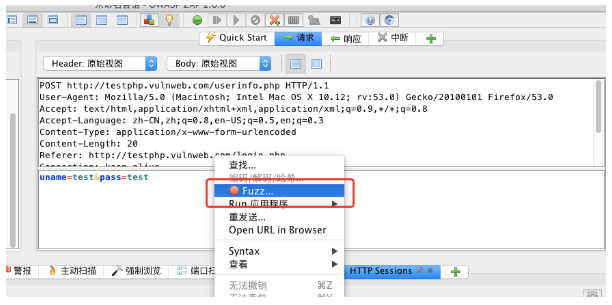
Here fuzzer to sql injection, for example, to select a parameter value, click add, select the type of fuzzer;
View test results fuzzer of;
16, the proxy cut-off
owasp zap default proxy 8080, cut off by default, need to click to start the stage.
owasp zap truncation response is too slow, not burpsuit easy to use!
note:
kali linux new version of OWASP_ZAP if you do not know much about it, maybe your «site» here does not show the site you visited.After OWASP_ZAP set up a proxy, «the site» shows the absence of any website hereSolutions are as follows:
Step one: Start Manual Explore (manually browse)
Step Two: Start your browser, select the «Firefox»; after all, Kali Linux comes with only Firefox browser;
The third step: re-visit the site again, «SITE» launched by the Firefox browser will be displayed here.