- Manuals
- Brands
- Pfaff Manuals
- Sewing Machine
- coverlock 4852
- Owner’s manual
-
Contents
-
Table of Contents
-
Bookmarks
Quick Links
coverlock 4852
Owner´s manual
Related Manuals for Pfaff coverlock 4852
Summary of Contents for Pfaff coverlock 4852
-
Page 1
coverlock 4852 Owner´s manual… -
Page 3: Parts List
Parts of the coverlock 4852 1 Upper needle-thread tension 2 Upper needle-thread tension 3 Carry handle 4 Thread tension/upper looper thread 5 Thread tension/lower looper thread 6 Thread tension/two-thread chainstitch looper/cover stitch looper 7 Looper cover 8 Blade guard 9 Looper disengaging lever 10 Standard presser foot 11 Needle plate 12 Swivel plate…
-
Page 5: Important Safety Instructions
This household sewing machine is designed to comply with IEC/EN 60335-2-28 and UL1594 IMPORTANT SAFETY INSTRUCTIONS When using an electrical appliance, basic safety precautions should always be followed, including the following: Read all instructions before using this household sewing machine. DANGER — To reduce the risk of electric shock: •…
-
Page 7
It is certainly time well spent, and is the best way to fi nd out just what your machine can do and make full use of all its features. If you have any further questions, just ask your authorized PFAFF dealer. Your dealer is happy to be of service with any help or advice. -
Page 8: Table Of Contents
Contents Page Accessories …………………… 6 Accessories, optional ………………..62, 63 Accessory box ………………….6 Adjusting the machine to Prog. 01, 02 …………..34, 35 Changing a spool on a threaded machine …………… 24 Clamp spring ………………….. 29 Cleaning the machine ………………..58 Cone thread adapter ………………..
-
Page 9
Contents Page Sewing problems and their solutions …………..61 Specifi cations ………………….64 Spool dise ……………………10 Spool holder ………………….. 9 Stitch formation correction measures …………..46 — 56 Stitch length adjustment knob …………….. 38 Stitch length, adjusting ………………… 38 Stitch width latch, swivelling ……………… -
Page 10: Accessories
Accessory box Open the accessory box 49 by gently pressing the bottom of the box inwards. The following accessories can be found in the box: Thread nets (5) Overlock needle system EL X 705, cat. no. 2002 Thread unreeling discs (5) Transparent presser foot (F) for cover stitch and two thread chainstitch Clip on thread guide…
-
Page 11: Connecting Foot Control/Master Switch
Connecting the foot control Electrical connection Connect the plug of the foot control to the Connect the foot control cord with the wall connection socket 39 of the machine. The outlet. sewing speed is regulated by activating the foot control. You may also regulate the Foot controls to be used: sewing speed by adjusting the slide on the AE040 — EU…
-
Page 12: Loopercover
Looper cover Push the looper cover 7 fully to the right and then swivel it down. Five types of stitches and their threading paths are portrayed in color on the inside of the looper cover. Note: The electricity supply of the machine is cut off as soon as the looper cover or swivel plate 12 is opened, for safety reasons, i.e.
-
Page 13: Spool Holder
Spool holder Telescopic thread guide Before placing thread cones/spools on Pull the telescopic thread guide 32 upwards machine you must pull the spool holder 34 to its highest position. fully away from the back of machine. To ensure optimum thread feed, turn the telescopic parts slowly until you hear the locking balls fl…
-
Page 14: Cone Thread Adapter
Clip on thread guide Spool disc/cone thread adapter Use the clip on thread guide accessory when It is advantageous to use the spool dise sewing with decorative thread. Clip this onto 37 when sewing with large spools (5,000 the telescoping thread guide 32 and thread 10,000 m).
-
Page 15: Presser Foot
Presserfoot With standard presser foot 10 use setting ”A” on the spring loaded presser foot latch for the cover stitch (Prog. 02), the 2 thread chainstitch (Prog. 01), the 5 thread safety stitch seam (Prog. 09) and the 4 thread safety stitch seam (Prog.
-
Page 16: Needle Position
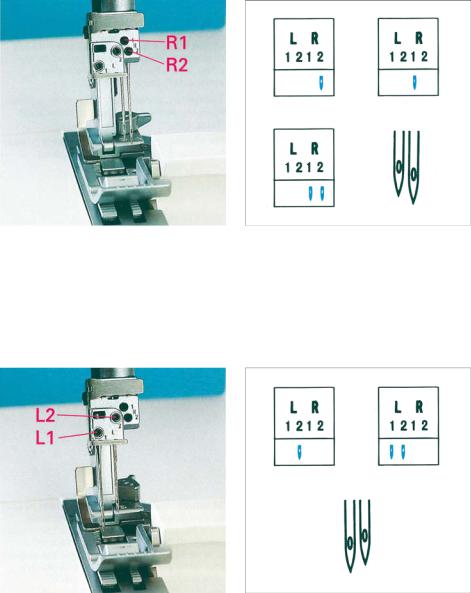
Needle position The different needle positions are depicted in a schematic drawing in the instruction This machine has 4 needle positions and can manual. Also refer to the examples above sew with a maximum of two needles at any and below. Insert the needle(s) as shown on one time.
-
Page 17: Changing The Needle
Changing the needle Switch off the electrical power To remove: Lower the presser foot and move the needle(s) to the highest position by turning the handwheel towards you. Push the needle inserting tool (from the accessory box 49) from below upward fully over the needle.
-
Page 18
Threading the thread guides Place the spools on the spool pins 35. You will fi nd information on the thread net, thread unreeling disc, spool disc and cone thread adapter on pages 9 and 10. Thread through the thread guides 31 from the back to the front following the colored threading paths. -
Page 19: Threading The Upper Overedge Looper (Pink)
Threading the upper overedge looper (pink) Turn the handwheel towards you until the upper overedge looper 18 is in its highest position. Thread in a sequence of 1 to 8. Note: To make this task easier, use the tweezers which can be found behind the swivel plate. Thread through the thread guides 1 to 7, Thread from the front through the eye of the which are marked with a pink dot.
-
Page 20: Threading The Lower Overedge Looper
Threading the lower overedge looper (yellow) Turn the handwheel towards you until the lower overedge looper 19 is on the extreme right. Thread in a sequence of 1 to 10. Note: To make this task easier, use the tweezers which can be found behind the swivel plate.
-
Page 21
Thread through the thread guides 1 to 8, Press lever A downwards and hook the marked yellow. thread into guide B. Please also refer to the drawing below. Note: The lever returns automatically to its position as soon as you start sewing. Thread from the front through the eye of the Pull approximately 4”… -
Page 22
Threading the two thread chainstitch looper and cover stitch looper (violet) for the chainstitch Turn the handwheel towards you until the two thread chainstitch looper 20 is on the extreme right. Thread in a sequence of 1 to 11. Note: To make this task easier, use the tweezers which can be found behind the swivel plate. -
Page 23
Thread the thread guides which are marked Push lever A upward and hook the thread with a violet square in a sequence of 1 to 9. into slot B. Also refer to the drawing below. Note: The lever returns automatically to its position as soon as you start sewing. -
Page 24
Exception: Threading the two-thread chainstitch looper and cover stitch looper for the cover stitch (violet) (Prog. 02) Turn the handwheel towards you until the two thread chainstitch looper 20 is on the extreme right. Thread in a sequence of 1 to 10. Note: To make this task easier, use the tweezers which can be found behind the swivel plate. -
Page 25
Thread the thread guides, as shown in the Press lever A upward and hook the thread diagram, in a sequence of 1 to 8. Some of into slot B. Also refer to the drawing below. the threads guides are marked with a violet square. -
Page 26
Threading the needles Thread in a sequence of 1 to 8. Note: To make this task easier, use the tweezers which can be found behind the swivel plate. The thread must be guided through the Pull approximately 4” (10 cm) of thread lower slot of thread guide 4. -
Page 27
Exception: Threading needle L2 when sewing a 5- thread safety-stitch seam (Prog. 09), a 4- thread safety-stitch seam (Prog. 08) and a 2-thread chainstitch (Prog. 01) Thread in a sequence of 1 to 9. Note: To make this task easier, use the tweezers which can be found behind the swivel plate. -
Page 28: Changing A Spool On A Threaded Machine
Important note on threading If the looper threads break, you must pull the needle threads out of the needle The needle(s) must always be threaded last eye, rethread the loopier thread and then so that the needle threads do not run under rethread the needle threads.
-
Page 29: Needle Threader
Needle threader Move the needle(s) into the highest position and lower the presser foot. Place the thread from right to left in notch A of the needle threader (to be found in the accessory box). One of the two triangles must point upwards.
-
Page 30
Overview of the threading paths and threading sequences Program 01: Program 02: 2-thread chainstitch cover stitch Program 03: Program 04 2-thread fl atlock, narrow 2-thread fl atlock, wide Program 11: 2-thread serging, narrow Program 12: 2-thread rolled hem Program 13: folded 2-thread rolled hem… -
Page 31
Overview of the threading paths and threading sequences Program 05: Program 06: 3-thread overedge. narrow 3-thread overedge, wide Program 14: Program 17: 3-thread rolled hem 3-thread serging, wide Program 15: Program 18: folded 3-thread rolled hem 3-thread fl atlock, wide Program 16 3-thread fl… -
Page 32: Presser Foot Pressure
Overview of the threading paths and threading sequences Program 09: Program 10: 5-thread safety-stitch seam 2-needle 3-thread assembly seam Presser foot pressure The pre-set presser foot pressure on the machine is suitable for medium heavy fabrics. The presser foot pressure does not need to be adjusted for most fabrics.
-
Page 33: Clamp Spring
Thread chain cutter After fi nishing the seam, sew an approx. 6” — 8,1” (15 20 cm) long thread chain. Pull the thread chain from the right to left over the thread chain cutter 33. This will cut off the thread chain.
-
Page 34
Disengaging the upper blade Switch off the electrical power Move the movable upper blade 23 into its highest position by turning the handwheel towards you. Remove the waste container and open the looper cover and the swivel plate. Push the knob for lowering the upper blade 27 fully to the right. -
Page 35
Swiveling stitch width latch For standard overlock seams: The swiveling stitch width latch 22 remains in the basic position when sewing all types of standard overlock seams (exception: Program 01, 02). For rolled hems: Pull knob (A) to the right and swivel the swiveling stitch width latch 22 downwards. -
Page 36
Attaching the converter Position the upper overedge looper 18 right next to the needle by turning the handwheel Switch off the electrical power towards you. The converter 28 must be attached for all two thread seams (exception: Program 01) and the two needle three thread assembly seam. -
Page 37: Eam Width Adjusting Knob
Setting the seam width Illustration A: Should loops project out of The required seam width can be adjusted the workpiece, move the movable upper anywhere between 3.5 and 6 mm by turning blade 23 to the right by turning the seam the adjusting knob for seam width 13.
-
Page 38
Adjusting the machine to the cover stitch (Prog. 02) and two thread chainstitch (Prog. 01) This is only necessary if you do not want to trim the fabric edge. Insert the needle(s) (see page 13) according to the overview of the threading paths and threading sequences (see page 26). -
Page 39: Power Table
Press the power table 50 downwards into the designated slot on the looper cover. Close looper cover. Note: Please ensure that the upper overedge looper is disengaged before attaching the power table 50. To return the machine to its previous settings after sewing with the cover stitch or two thread chainstitch: Open the looper cover and remove the…
-
Page 40
Differential feed The differential feed consists of two feed dogs (A + B), one behind the other, which feed the fabric. The movement of the front feed dog (A) and thus the amount of material to be fed can be regulated using the regulator wheel 41. -
Page 41
Set the regulator wheel for the differential Here you will avoid stretching in the seam feed 41 to 2.0. when working with knitwear, such as jerseys or gathered fabrics. Instead, a smooth seam Here the front feed dog feeds twice as fast (A) will be achieved. -
Page 42: Needle Plate Disengaging Lever
Adjusting the stitch length You can set the desired stitch length between 0.5 mm to 4.0 mm by turning the stitch length adjustment knob (42). Note For the two thread chainstitch, the setting should be 3.0 or higher. Removing the needle plate Raise the presser foot and move the needle(s) to the highest position.
-
Page 43: Setting Thread Tension
Securing the upper blade Switch off the electrical power It is recommended to secure the movable upper blade 23 before sewing heavy fabrics. Raise the needle(s) to its highest position and open the swivel plate. Tighten the screw fully using the Allen key. This screw should always be slightly loosened again after sewing heavy fabrics.
-
Page 44
Needle Stitch Stitch Program Application position length width Program 01 Joining fabric layers where a 2 thread chainstitch traditional pressed open seam is required. Also works well as a basting stitch for test fi tting garments. Program 02 Sewing hems and fancy stitches. Cover stitch Program 03 Serging light fabrics. -
Page 45
Stitch width latch 22 Looper Power table 50 Converter 28 Thread tension ● = with ■ = with ■ = top ® = bottom The value refer to medium-heavy fabrics and normal polyester thread disengaging ° = without ® = without blue green pink yellow violet level 9… -
Page 46
Needle Stitch Stitch Program Application position length width Program 10 Joining and simultaneous serging of light, very stretchy fabrics. 2-needle, 3-thread assambly seam Program 11 Serging light fabrics. 2-thread serging, narrow Program 12 Serging very light fabrics. 2-thread rolled hem Decorative edges. -
Page 47
Stitch width latch 22 Looper Power table 50 Converter 28 Thread tension ● = with ■ = with ■ = top ® = bottom The value refer to medium-heavy fabrics and normal polyester thread disengaging ° = without ® = without blue green pink yellow violet level 9… -
Page 48
Important notes on sewing with the cover Preparing the fabric: stitch When not using the H2 optional accessory The power table is marked with various units guide, it is useful to press under the fabric of measurement. The upper fi gures are in cm. edge before hemming it. -
Page 49: Edge Guide
2. If sewing on a tubular item, i.e. pant or After the second ”click” tum the handwheel sleeve hem: away from you until the needles are in their highest position. Raise the presser foot (this Sew around tubular item, oversewing 4-5 will release the tension on the threads).
-
Page 50: Stitch Formation Correction Measures Cover Stitch
Stitch formation correction measures cover stitch Program 02 When all tensions are correctly set, the needle threads (green and blue) are just slightly visible on the underside of the fabric. The looper thread (violet) is situated loosely in between. The right needle thread (green) is too loose, causing large loops on the underside of the fabric.
-
Page 51
5-thread safety-stitch seam 4-thread safety-stitch seam Program 09 Program 08 Since the 5-thread safety stitch seam con- Since the 4-thread safety stitch seam sists of the 2-thread chainstitch and the 3- consists of the 2-thread chainstitch and thread overedge seam, you can refer to the the 2-thread fl… -
Page 52
4-thread overedge seam The needle threads (blue and green) are too loose, causing larger loops of needle thread Program 07 on the underside of the fabric. When all tensions are correctly set, the loops Set the blue and green thread tension to a of both looper threads (pink and yellow) are higher value. -
Page 53
3-thread overedge seam The needle thread is too loose, causing loops on the underside of the fabric. narrow and wide Set the relevant needle thread tension to a Program 05 and 06 higher value. When all tensions are correctly set, the loops of both looper threads (pink and yellow) are directly on the edge of the fabric. -
Page 54
3-thread fl atlock The needle thread is too tight. Set the needle thread tension (blue) to a narrow and wide lower value. Program 16 and 18 The upper looper thread (pink) appears on The lower looper thread (yellow) is too the underside of the fabric. -
Page 55
2-thread fl atlock narrow and wide Program 03 and 04 When all tensions are correctly set, the loops of both threads are directly on the underside of the fabric. Note: The converter (see page 32) must be attached to sew the 2-thread fl atlock seam. The needle thread is too loose or the lower looper thread (yellow) is too tight. -
Page 56
3-thread rolled hem The upper needle thread (green) is too loose. Program 14 Set the green thread tension to a higher value The upper looper thread (pink) appears on The lower looper thread (yellow) appears on the underside of the fabric. the top side of the fabric. -
Page 57
3-thread rolled hem (folded) The upper needle thread (green) is too loose. Program 15 Set the green thread tension to a higher value. The upper looper thread (pink) only partly The lower looper thread (yellow) appears on loops around the fabric edge. the top side of the fabric. -
Page 58
2-thread rolled hem Program 12 Note: The converter (see page 32) must be attached to sew the 2 thread rolled hem. The upper needle thread (green) is too tight. Set the green thread tension to a lower value and/or the yellow thread tension to a higher value. -
Page 59
2-thread rolled hem (folded) Program 13 Note: The converter (see page 32) must be attached to sew the 2 thread rolled hem. The upper needle thread (green) is too loose. Set the green thread tension to a higher value and/or the yellow thread tension to a lower value. -
Page 60
2-needle 3-thread assembly seam The lower needle thread (blue) is too loose. Program 10 Set the blue thread tension to a higher value. Note: The converter (see page 32) must be attached to sew the 2-needle 3-thread assembly seam. The upper needle thread (green) is too loose. The lower looper thread (yellow) is too tight. -
Page 61: Thread Chart
Thread chart for 2- , 3- and 4-thread overedge seams Fabric Thread Stitch length Light fabrics: Cotton no. 50 — 70 2.0 — 4.0 mm organdy, fi ne knitwear, Synthetic thread no. 70 — 140 taffeta, silk, lining fabrics Medium heavy fabrics: Cotton no.
-
Page 62: Cleaning The Machine
Lubricate the points shown above with the oil provided (located in the accessory box) every time you clean the machine. One or two drops of PFAFF sewing machine oil are suffi cient. All other parts are manufactured from special materials and do…
-
Page 63
Changing the upper blade Switch off the electrical power To remove: Set the adjusting knob for seam width to 3.5 mm. Fasten the upper blade (see page 39) before loosening the fastening screw (A) with the wrench provided in the accessory box. -
Page 64: Sewing Light Cover
Changing the light bulb Switch off the electrical power Using the screw driver in the accessory box loosen the fastening screw to the sewing light cover 16 until the cover can be removed. Push the light bulb fully into its socket. Rotate counter clockwise through half a turn and remove.
-
Page 65
Sewing problems and their solutions This machine has been developed with ease of operation in mind. No diffi cult or tricky set tings need to be made. Sewing problems of the kind described below may occur as a result of minor adjustment and operating errors. -
Page 66
Optional accessories This machine offers a wide range of optional accessories for special serging details. Consult your PFAFF dealer. Optional accessory Order No. Multi-purpose foot M 29 924 993 82-002 Foot, to which guides Hl, H2 and H3 can be attached. -
Page 67
Optional accessory Order No. MuIti-purpose foot C 29 924 993 82-017 For sewing on bands, elastic tape, elastic thread and fi shing line together with the various elastic tape inserts. Elastic tape insert 29 924 993 82-034 For sewing on elastic tape with a width up to 7.5 mm 7.5 mm. -
Page 68: Specifi Cations
Specifi cations Maximum sewing speed 1300 stitches/min. Seam width 1.4 mm — 9.0 mm Cover stitch width 5 mm Stitch length 0.5 mm — 4 mm Presser foot exchangeable Lubrication manual Presser foot height 4.5 mm Overedge stroke 2.0 mm Needle system EL X 705, cat no.
-
Page 69: Intellectual Property
Intellectual property Patents protecting this product are listed on a label positioned underneath the sewing machine. PFAFF and IDT (image) are registered trademarks or trademarks of VSM Group AB.
-
Page 70: Electrical Power Master Switch
Parts of the coverlock 4852 31 Thread guides with color coding 32 Telescoping thread guide 33 Thread chain cutter 34 Thread spool stand 35 Thread spool pin 36 Cone thread adapter 37 Spool disc 38 Electrical power master switch 39 Machine socket, foot control 40 Handwheel 41 Regulator wheel for differential feed 42 Stitch length adjustment knob…
-
Page 72
VSM Group AB • SE-561 84 Huskvarna • SWEDEN www.pfaff.com…
Посмотреть инструкция для Pfaff coverlock 4852 бесплатно. Руководство относится к категории швейные машины, 7 человек(а) дали ему среднюю оценку 7.6. Руководство доступно на следующих языках: английский. У вас есть вопрос о Pfaff coverlock 4852 или вам нужна помощь? Задайте свой вопрос здесь
Не можете найти ответ на свой вопрос в руководстве? Вы можете найти ответ на свой вопрос ниже, в разделе часто задаваемых вопросов о Pfaff coverlock 4852.
Какой размер иглы лучше всего использовать?
Наиболее подходящий размер иглы зависит от используемой толщины ткани. С плотной тканью следует использовать толстую иглу. Подходящие типы тканей указываются на упаковке с иглами.
Какой срок службы у швейной иглы?
Как правило, срок службы швейной иглы составляет от 7 до 9 часов.
Что может повредить иглу при шитье?
Причин повреждения иглы может быть несколько: — Использование неподходящей иглы для определенного типа ткани — Установка иглы слишком низко — Неправильное расположение ткани — Неправильно установленный шпульный колпачок
Инструкция Pfaff coverlock 4852 доступно в русский?
К сожалению, у нас нет руководства для Pfaff coverlock 4852, доступного в русский. Это руководство доступно в английский.
Не нашли свой вопрос? Задайте свой вопрос здесь
(Ocr-Read Summary of Contents of some pages of the Pfaff coverlock 4852 Document (Main Content), UPD: 20 June 2023)
-
25, 2323 Thread the thread guides, as shown in the diagram, in a sequence of 1 to 8. Some of the threads guides are marked with a violet square. Thread from the front through eye C of the two-thread chainstitch looper and the cover stitch looper (= threading point 10). Press lever A upward and hook the thread into slot B. Also refer to the drawing below. Note: The lever returns automatically to its position as…
-
48, 4646 Important notes on sewing with the cover stitch The power table is marked with various units of measurement. The upper fi gures are in cm. The lower fi gures are in inches. Note: The hemmer guide H2 is available as an optional accessory. With this optional accessory you can hem your fabric effortlessly without having to press under the hem edge prior to sewing the cover stitch. Preparing the fabric: When not…
-
40, 3838 Differential feed The differential feed consists of two feed dogs (A + B), one behind the other, which feed the fabric. The movement of the front feed dog (A) and thus the amount of material to be fed can be regulated using the regulator wheel 41. The setting range is between 0.5 and 2.0. The standard setting is 1.0, where the movement of the front feed dog (A) is synchronized with the rear feed dog (B). This means that the front feed dog feeds the same amount of fabric as th…
-
17, Pfaff coverlock 4852 1515 Changing the needle Switch off the electrical power To remove: Lower the presser foot and move the needle(s) to the highest position by turning the handwheel towards you. Push the needle inserting tool (from the accessory box 49) from below upward fully over the needle. Loosen the fastening screw of the needle (without removing it) with the Allen key (behind the swivel plate) and pull the needle down to remove. To insert: Ins…
-
69, Intellectual property Patents protecting this product are listed on a label positioned underneath the sewing machine. PFAFF and IDT (image) are registered trademarks or trademarks of VSM Group AB.
… -
22, 2020 Threading the two thread chainstitch looper and cover stitch looper (violet) for the chainstitch Turn the handwheel towards you until the two thread chainstitch looper 20 is on the extreme right. Thread in a sequence of 1 to 11. Note: To make this task easier, use the tweezers which can be found behind the swivel plate.
… -
32, 3030 Overview of the threading paths and threading sequences Program 09: 5-thread safety-stitch seam Program 10: 2-needle 3-thread assembly seam Presser foot pressure The pre-set presser foot pressure on the machine is suitable for medium heavy fabrics. The presser foot pressure does not need to be adjusted for most fabrics. If you are working with light or heavy fabrics then you may need to adjust the pressure. In this case, 6 setting positi…
-
56, Pfaff coverlock 4852 5454 3-thread rolled hem Program 14 The upper needle thread (green) is too loose. Set the green thread tension to a higher value The upper looper thread (pink) appears on the underside of the fabric. Set the pink thread tension to a higher value and/or the yellow thread tension to a lower value. The lower looper thread (yellow) appears on the top side of the fabric. Set the yellow thread tension to a higher value and/or the pink thread tension to a lower value.
… -
67, 6565 Optional accessory Order No. Use MuIti-purpose foot C 29 924 993 82-017 For sewing on bands, elastic tape, elastic thread and fi shing line together with the various elastic tape inserts. Elastic tape insert 7.5 mm 29 924 993 82-034 For sewing on elastic tape with a width up to 7.5 mm. Elastic tape insert 10 mm 29 924 993 82-035 For sewing on elastic tape with a width from 7.5 mm — 10 mm. Elastic tape insert 13 mm 29 924 993 82…
-
9, 7 Page Sewing problems and their solutions ……………………………………………………………. 61 Specifi cations ……………………………………………………………………………………………….64 Spool dise …………………………………………………………………………………………………….10 Spool holder ……………
-
63, 6161 Changing the upper blade Switch off the electrical power To remove: Set the adjusting knob for seam width to 3.5 mm. Fasten the upper blade (see page 39) before loosening the fastening screw (A) with the wrench provided in the accessory box. Then remove the upper blade. To insert: Attach the new upper blade and gently tighten the fastening screw. Then turn the handwheel until the upper blade is in the lowest position. In this posit…
-
8, 6 Page Accessories …………………………………………………………………………………………………. 6 Accessories, optional …………………………………………………………………………………… 62, 63 Accessory box ……………………………………………………………………………………………….6 Adjusting the ma…
-
68, 6666 Specifi cations Maximum sewing speed 1300 stitches/min. Seam width 1.4 mm — 9.0 mm Cover stitch width 5 mm Stitch length 0.5 mm — 4 mm Presser foot exchangeable Lubrication manual Presser foot height 4.5 mm Overedge stroke 2.0 mm Needle system EL X 705, cat no. 2002 Needle siw 80/12, 90/14 Number of threads 2,3,4,5 Dimensions (width x height x depth) 355 x 290 x 300 mm Weight 8.6 kg Packing contents 1 machine 1…
-
57, 5555 3-thread rolled hem (folded) Program 15 The upper looper thread (pink) only partly loops around the fabric edge. Set the pink thread tension to a lower value and/or the yellow thread tension to a higher value. The upper needle thread (green) is too loose. Set the green thread tension to a higher value. The lower looper thread (yellow) appears on the top side of the fabric. Set the yellow thread tension to a higher value and/or th…
-
53, 5151 3-thread overedge seam narrow and wide Program 05 and 06 When all tensions are correctly set, the loops of both looper threads (pink and yellow) are directly on the edge of the fabric. The upper looper thread (pink) appears on the underside of the fabric. Set the pink thread tension to a higher value and/or the yellow thread tension to a lower value. The needle thread is too loose, causi…
-
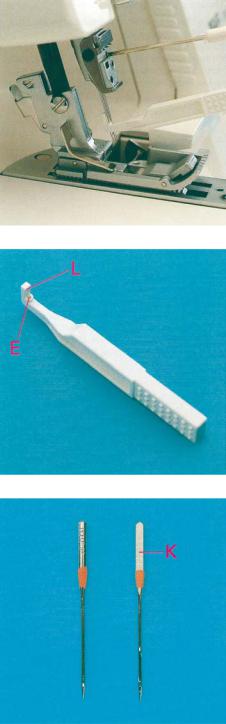
29, Pfaff coverlock 4852 2727 Needle threader Move the needle(s) into the highest position and lower the presser foot. Place the thread from right to left in notch A of the needle threader (to be found in the accessory box). One of the two triangles must point upwards. Place the needle threader onto the front groove of the needle. Slide the needle threader down to the needle eye and press it lightly against the needle. A small metal pin is …
-
44, 4242 Program Application Needle position Stitch length Stitch width Program 01 2 thread chainstitch Joining fabric layers where a traditional pressed open seam is required. Also works well as a basting stitch for test fi tting garments. 3-4 3.5 Program 02 Cover stitch Sewing hems and fancy stitches. 3-4 3.5 Program 03 2-thread fl atlock, narrow Serging light fabrics. Joining stretch fabrics with a fl atiock seam. 2 5.5 Program 04 2-thread fl atlock, wide Serging medium heavy fa…
-
23, 2121 Thread the thread guides which are marked with a violet square in a sequence of 1 to 9. Thread from the front through eye C of the two thread chainstitch looper and the cover stitch looper (= threading point 11). Push lever A upward and hook the thread into slot B. Also refer to the drawing below. Note: The lever returns automatically to its position as soon as you start sewing. Pull approximately 4” (10…
-
66, 6464 Optional accessory Order No. Use Multi-purpose foot M 29 924 993 82-002 Foot, to which guides Hl, H2 and H3 can be attached. Lace and braiding guide Hl 29 924 993 82-003 Guide for applying lace or braiding (to the under side of the fabric). Hemmer guide H2 29 924 993 82-001 Guide for hemming/turns under one inch while serging. Bias tape guide H3 29 924 993 82-004 Guide for applying bias tape as edging. Clear foot N 29 924 993 82-006 Presser foot with groove. It can be use…
![]()
coverlock 4852
Owner´s manual

Parts of the coverlock 4852
1Upper needle-thread tension
2Upper needle-thread tension
3Carry handle
4Thread tension/upper looper thread
5Thread tension/lower looper thread
6Thread tension/two-thread chainstitch looper/cover stitch looper
7Looper cover
8Blade guard
9Looper disengaging lever
10Standard presser foot
11Needle plate
12Swivel plate
13Adjusting knob for seam width
14Seam width viewing window
15Needle holder
16Sewing light cover
17Adjusting knob for presser foot pressure
18Upper overedge looper
19Lower overedge looper
20Two-thread chainstitch looper
21Threading aid for the two-thread chainstitch looper/cover stitch looper
22Swiveling stitch width latch
23Movable upper blade
24Fixed lower blade
25Clamp spring for serging thread chains
26Needle plate disengaging lever
27Handwheel for lowering the upper blade
28Converter
29Tweezers
30Allen key
This household sewing machine is designed to comply with IEC/EN 60335-2-28 and UL1594
IMPORTANT SAFETY INSTRUCTIONS
When using an electrical appliance, basic safety precautions should always be followed, including the following:
Read all instructions before using this household sewing machine.
DANGER — To reduce the risk of electric shock:
•A sewing machine should never be left unattended when plugged in. Always unplug this sewing machine from the electric outlet immediately after using and before cleaning.
•Always unplug before relamping. Replace bulb with same type rated 15 Watt.
WARNING — To reduce the risk of burns, fire, electric shock, or injury to persons:
•Do not allow to be used as a toy. Close attention is necessary when this sewing machine is used by or near children and infirm persons.
•Use this sewing machine only for its intended use as described in this manual. Use only attachments recommended by the manufacturer as contained in this manual.
•Never operate this sewing machine if it has a damaged cord or plug, if it is not working properly, if it has been dropped or damaged, or dropped into water. Return the sewing machine to the nearest authorized dealer or service center for examination, repair, electrical or mechanical adjustment.
•Never operate the sewing machine with any air openings blocked. Keep ventilation openings of the sewing machine and foot controller free from the accumulation of lint, dust, and loose cloth.
•Keep fingers away from all moving parts. Special care is required around the sewing machine needle and blades.
•Always use the proper needle plate. The wrong plate can cause the needle to break.
•Do not use bent needles.
•Do not pull or push fabric while stitching. It may deflect the needle causing it to break.
•Switch the sewing machine off (“0”) when making any adjustment in the needle area, such as threading needle, changing needle, threading bobbin, or changing presser foot, etc.
•Always unplug sewing machine from the electrical outlet when removing covers, lubricating, or when making any other user servicing adjustments mentioned in the instruction manual.
•Never drop or insert any object into any opening.
•Do not use outdoors.
•Do not operate where aerosol (spray) products are being used or where oxygen is being administrated.
•To disconnect, turn all controls to the off (“0”) position, then remove plug from outlet.
•Do not unplug by pulling on cord. To unplug, grasp the plug, not the cord.
SAVE THESE INSTRUCTIONS

Simple, up-to-date sewing
Congratulations! You have bought a high-quality product that provides unique advantages. Your new coverlock 4852 can take any material in its stride and will sew through thick and thin for you.
Your PFAFF coverlock features the very latest in design and technology, and it is just as simple to operate as this instruction manual is to follow.
Before you start sewing, please take the time to read these instructions carefully. It is certainly time well spent, and is the best way to find out just what your machine can do and make full use of all its features.
If you have any further questions, just ask your authorized PFAFF dealer. Your dealer is happy to be of service with any help or advice.
Lets get started! We wish you many enjoyable hours creating your very own fashions and projects!
|
Contents |
|
|
Page |
|
|
Accessories …………………………………………………………………………………………………. |
6 |
|
Accessories, optional …………………………………………………………………………………… |
62, 63 |
|
Accessory box………………………………………………………………………………………………. |
6 |
|
Adjusting the machine to Prog. 01, 02……………………………………………………………. |
34, 35 |
|
Changing a spool on a threaded machine ……………………………………………………… |
24 |
|
Clamp spring………………………………………………………………………………………………… |
29 |
|
Cleaning the machine……………………………………………………………………………………. |
58 |
|
Cone thread adapter……………………………………………………………………………………… |
10 |
|
Converter, attaching ……………………………………………………………………………………… |
32 |
|
Cover stitch, important notes on sewing………………………………………………………… |
44, 45 |
|
Differential feed ……………………………………………………………………………………………. |
36, 37 |
|
Edge guide ………………………………………………………………………………………………….. |
45 |
|
Electrical connection ……………………………………………………………………………………. |
7 |
|
Electrical power master switch ……………………………………………………………………… |
7 |
|
Foot control, connecting ………………………………………………………………………………. |
7 |
|
Light bulb (sewing lamp), changing ……………………………………………………………… |
60 |
|
Loopercover …………………………………………………………………………………………………. |
8 |
|
Lubricating the machine ………………………………………………………………………………. |
58 |
|
Machine cover ……………………………………………………………………………………………… |
6 |
|
Maintenance ………………………………………………………………………………………………… |
58 — 60 |
|
Needle holder ……………………………………………………………………………………………… |
13 |
|
Needle inserting tool ……………………………………………………………………………………. |
13 |
|
Needle plate disengaging lever……………………………………………………………………… |
38 |
|
Needle plate, removing…………………………………………………………………………………. |
38 |
|
Needle position ……………………………………………………………………………………………. |
12 |
|
Needle threader ………………………………………………………………………………………….. |
25 |
|
Needle, changing …………………………………………………………………………………………. |
13 |
|
Power table …………………………………………………………………………………………………. |
35 |
|
Presser foot lifter ………………………………………………………………………………………….. |
10 |
|
Presser foot pressure ……………………………………………………………………………………. |
28 |
|
Presser foot ………………………………………………………………………………………………….. |
11 |
|
Presser foot, changing ………………………………………………………………………………….. |
11 |
|
Program overview ………………………………………………………………………………………… |
40 — 43 |
|
Rubber feet, cleaning ……………………………………………………………………………………. |
58 |
|
Safety instructions………………………………………………………………………………………… |
1, 2 |
|
eam width adjusting knob ……………………………………………………………………………. |
33 |
|
Seam width viewing window ……………………………………………………………………….. |
33 |
|
eam width, setting ……………………………………………………………………………………….. |
33 |
|
Sewing light cover ……………………………………………………………………………………….. |
60 |
6
|
Contents |
|
|
Page |
|
|
Sewing problems and their solutions ……………………………………………………………. |
61 |
|
Specifications ………………………………………………………………………………………………. |
64 |
|
Spool dise ……………………………………………………………………………………………………. |
10 |
|
Spool holder ………………………………………………………………………………………………… |
9 |
|
Stitch formation correction measures …………………………………………………………… |
46 — 56 |
|
Stitch length adjustment knob ……………………………………………………………………… |
38 |
|
Stitch length, adjusting ………………………………………………………………………………… |
38 |
|
Stitch width latch, swivelling ………………………………………………………………………… |
31 |
|
Telescoping thread guide ……………………………………………………………………………… |
9 |
|
Thread chain cutter ………………………………………………………………………………………. |
29 |
|
Thread chart ………………………………………………………………………………………………… |
57 |
|
Thread guide, clip on…………………………………………………………………………………….. |
10 |
|
Thread net ……………………………………………………………………………………………………. |
9 |
|
Thread tensions, setting………………………………………………………………………………… |
39 |
|
Thread unreeling disc……………………………………………………………………………………. |
9 |
|
Threading aid for the 2 thread chain stitch looped/cover stitch looped …………… |
19, 21 |
|
Threading paths/overview ……………………………………………………………………………. |
26 — 28 |
|
Threading the 2 thread chain stitch looped/cover stitch looped (violet) ………….. |
18 — 21 |
|
Threading the lower overedge looper (yellow) ………………………………………………. |
16, 17 |
|
Threading the needle(s) ……………………………………………………………………………….. |
22,23 |
|
Threading the upper overedge looper (pink) ………………………………………………….. |
15 |
|
Threading, important note…………………………………………………………………………….. |
24 |
|
Threading/Thread guides………………………………………………………………………………. |
14 |
|
Upper blade, changing………………………………………………………………………………….. |
59 |
|
Upper blade, disengaging …………………………………………………………………………….. |
30 |
|
Upper blade, securing ………………………………………………………………………………….. |
39 |
|
Waste container …………………………………………………………………………………………… |
8 |
7
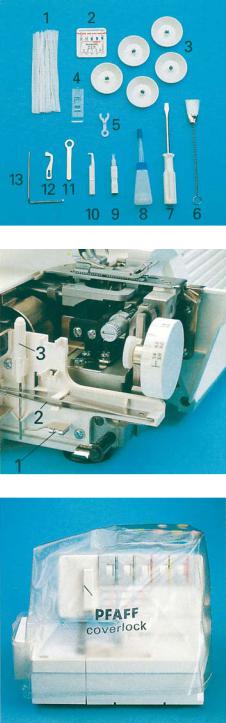
Accessory box
Open the accessory box 49 by gently pressing the bottom of the box inwards. The following accessories can be found in the box:
1Thread nets (5)
2Overlock needle system EL X 705, cat. no. 2002
3Thread unreeling discs (5)
4Transparent presser foot (F) for
cover stitch and two thread chainstitch
5Clip on thread guide
6Cleaning brush
7Screw driver
8Machine oil
9Needlethreader
10Needle inserting tool
11Wrench
12Replacement upper blade
13Edge guide
Further accessories
The following accessories can be found behind the swivel plate 12:
1Converter
2Tweezers
3Allen key
Machine cover
The machine cover protects the machine from dust and dirt. When the sewing process is finished, push the telescopic thread guide 32 together. The spool stand 34 must be pushed to its full extent in to the machine, regardless of whether a spool is attached. Place the cover over the machine.
The accessories should be stored in the accessory box or compartments behind the swivel plate.
8
![]()
Connecting the foot control
Connect the plug of the foot control to the connection socket 39 of the machine. The sewing speed is regulated by activating the foot control. You may also regulate the sewing speed by adjusting the slide on the front side of the foot control.
Setting 3 = half of final speed Setting 8 = full final speed
Electrical connection
Connect the foot control cord with the wall outlet.
Foot controls to be used:
AE040 — EU
AE044 — Australia
AE046 — United Kingdom
AE043 — USA/Canada
For the USA and Canada
This appliance has a polarized plug (one blade wider than the other).
To reduce the risk of electric shock, it is designed to fit into a plorized outlet only one way. If the plug does not fit correctly into the outlet, reverse the plug. If it still does not fit, contact a qualified electrician to install the proper outlet.
Do not modify the plug in any way.
Master switch
When you turn on the master switch 38 the sewing lamp is illuminated. The machine is now operational.
9
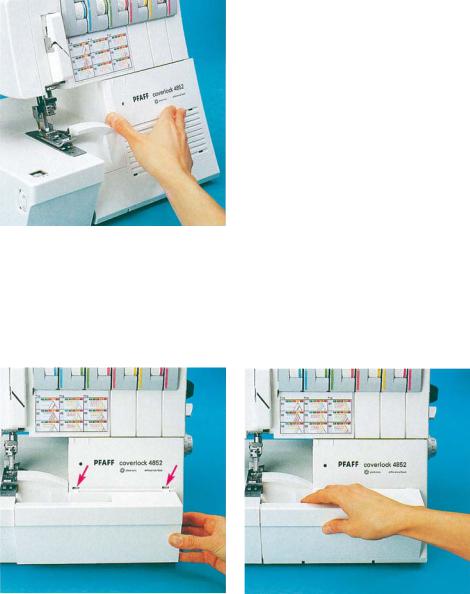
Waste container
Insert the upper latch of the waste container 45 into the upper slot of the looper cover 7.
Apply pressure to the lower part of the container until the lower latches flick into place in the lower slots of the looper cover.
Looper cover
Push the looper cover 7 fully to the right and then swivel it down. Five types of stitches and their threading paths are portrayed in color on the inside of the looper cover.
Note: The electricity supply of the machine is cut off as soon as the looper cover or swivel plate 12 is opened, for safety reasons, i.e. sewing with the machine is no longer possible.
To remove the waste container, repeat this procedure in the reverse order.
10
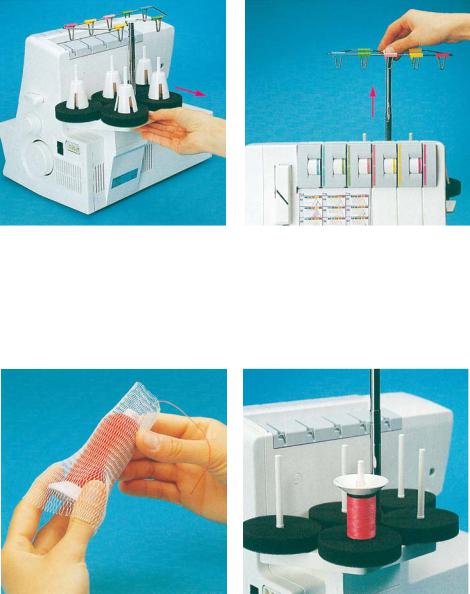
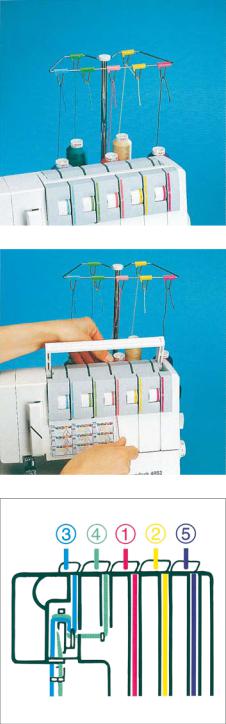
Spool holder
Before placing thread cones/spools on machine you must pull the spool holder 34 fully away from the back of machine.
Thread net
Synthetic threads generally unwind too quickly from the thread spool. Thread nets have been included to allow easy use of these threads. Pull the thread net (located in the accessory box) over the spool from below. Place the spool on the spool holder catching the bottom of the thread net with the spool pin.
Telescopic thread guide
Pull the telescopic thread guide 32 upwards to its highest position.
To ensure optimum thread feed, turn the telescopic parts slowly until you hear the locking balls flick into place.
Thread unreeling disc
The thread unreeling disc (in the accessory box) is used for small spools/spools with notched or rough ends. Place the spool on the spool pin 35. Place the thread unreeling disc on top of the spool. Make sure the spool dise 37 is used under the spool.
11

Spool disc/cone thread adapter
It is advantageous to use the spool dise
37 when sewing with large spools (5,000 10,000 m). To do this, place the cone thread adapter 36 onto the spool pin 35. With synthetic threads, the spool discs help eliminate vibration of the cones/spools aiding in smoother feeding of the threads.
Presser foot lifter
The presser foot can be raised and lowered using the presser foot lifter 43. The maximum vertical lift of 6.5 mm for the presser foot for particularly thick fabrics can be achieved by pressing the presser foot lifter towards the rear.
Clip on thread guide
Use the clip on thread guide accessory when sewing with decorative thread. Clip this onto the telescoping thread guide 32 and thread the machine as shown in the illustration. Use the thread net and/or the thread unreeling disc if needed.
Once an initial thread chain has been created, the presser foot lifter no longer needs to be raised if you continue working with the same thread and presser foot. It is sufficient to gently lift the front part of the presser foot using your thumb. Slide the fabric under the raised part of the presser foot. The fabric is automatically taken up and fed into the machine when you activate the foot control.
12
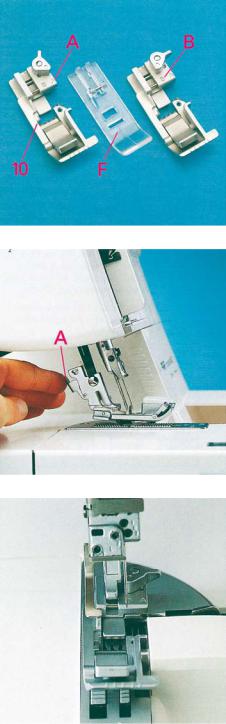
Presserfoot
With standard presser foot 10 use setting ”A” on the spring loaded presser foot latch for the cover stitch (Prog. 02), the 2 thread chainstitch (Prog. 01), the 5 thread safety stitch seam (Prog. 09) and the 4 thread safety stitch seam (Prog. 08).
Transparent presser foot F from the accessories can also be used for the cover stitch (Prog. 02).
For all other programs use standard presser foot 10 and setting ”B” on the springloaded presser foot latch.
Changing the presser foot
Switch off the electrical power
To remove: Raise the needle(s) to the highest position by turning the hand wheel towards you. Raise the presser foot and press lever A at the rear of the presser foot holder. The presser foot will be released automatically from the holder. Pivot the presser foot clockwise until the front half of presser foot clears holder and remove by sliding foot away from you towards back of machine.
To attach: Place the presser foot behind and perpendicular to the presser foot holder. Pivot the presser foot counterclockwise until the pin of the foot is directly under the
presser foot holder clamp. Lower the presser foot lever and press lever A, if necessary, until the foot then clicks into place.
Check: Please lift the presser foot lever to ensure that the presser foot is properly locked into place.
13
Needle position
This machine has 4 needle positions and can sew with a maximum of two needles at any one time. The needle positions are 1 1, L2, R11 and R2. The fastening screw is located directly above the corresponding needle.
Note: If the needles 1 11 and L2 have been inserted, the left needle will be somewhat lower than the right needle.
The different needle positions are depicted in a schematic drawing in the instruction manual. Also refer to the examples above and below. Insert the needle(s) as shown on the program overview (see pages 40-43).
Note: If the needles R2 and 131 have been inserted, the left needle will be somewhat higher than the right needle.
14
Changing the needle
Switch off the electrical power
To remove: Lower the presser foot and move the needle(s) to the highest position by turning the handwheel towards you. Push the needle inserting tool (from the accessory box 49) from below upward fully over the needle. Loosen the fastening screw of the needle (without removing it) with the Allen key (behind the swivel plate) and pull the needle down to remove.
To insert: Insert the needle into hole E of the needle inserting tool, so that the flat needle shank K faces the flat side L of the inserting tool. Insert the needle fully into the holder and tighten the fastening screws. Remove the needle inserting tool.
Overlock needles types EL X 705, cat. no. 2002 are required for this machine.
15
Threading the thread guides
Place the spools on the spool pins 35. You will find information on the thread net, thread unreeling disc, spool disc and cone thread adapter on pages 9 and 10. Thread through the thread guides 31 from the back to the front following the colored threading paths.
Lift the carry handle 3 upwards. Thread through the underside of the carrying handle and through the rear thread guides 44 using both hands to pull the thread down until
it slips under the thread guide. Guide the thread through the tension discs and pull it down until it is positioned firmly between the tension discs. Return the carrying handle to its original position.
Note:
Thread in a sequence of 1 to 5.
16
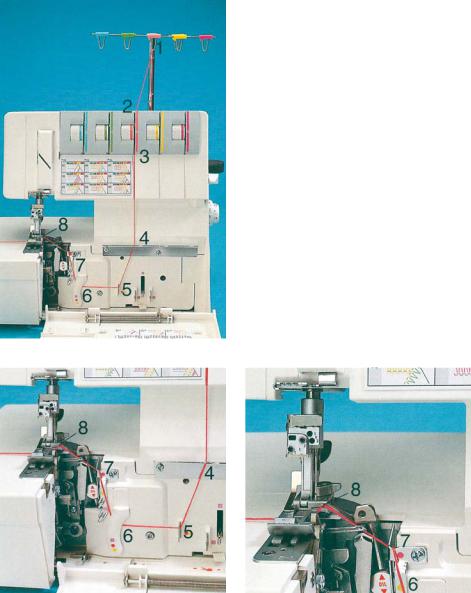
Thread through the thread guides 1 to 7, which are marked with a pink dot.
Threading the upper overedge looper (pink)
Turn the handwheel towards you until the upper overedge looper 18 is in its highest position. Thread in a sequence of 1 to 8.
Note:
To make this task easier, use the tweezers which can be found behind the swivel plate.
Thread from the front through the eye of the upper overedge looper 8. Pull approximately 4” (10 cm) of thread through the looper and place it to the left under the presser foot.
17
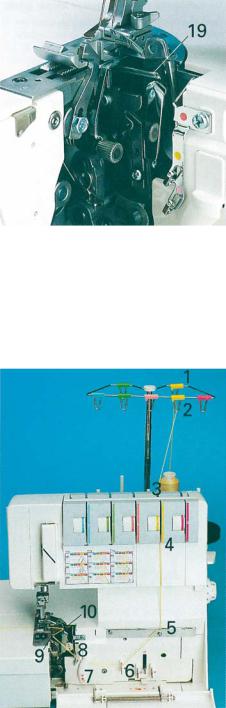
Threading the lower overedge looper
(yellow)
Turn the handwheel towards you until the lower overedge looper 19 is on the extreme right.
Thread in a sequence of 1 to 10.
Note:
To make this task easier, use the tweezers which can be found behind the swivel plate.
18
![]()
Thread through the thread guides 1 to 8, marked yellow.
Thread from the front through the eye of the lower overedge looper C (= threading point
10).
Press lever A downwards and hook the thread into guide B. Please also refer to the drawing below.
Note:
The lever returns automatically to its position as soon as you start sewing.
Pull approximately 4” (10 cm) of thread through the looper and place it to the left under the presser foot.
19
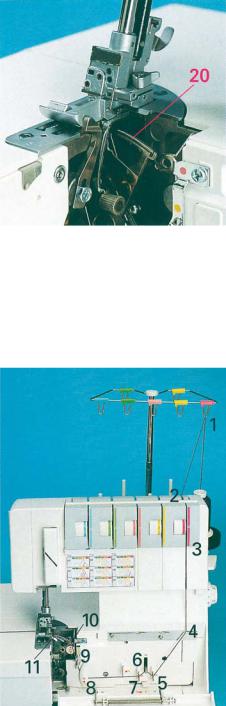
Threading the two thread chainstitch looper and cover stitch looper (violet) for the chainstitch
Turn the handwheel towards you until the two thread chainstitch looper 20 is on the extreme right.
Thread in a sequence of 1 to 11.
Note:
To make this task easier, use the tweezers which can be found behind the swivel plate.
20
 Loading…