-
Page 1
KH4000 Automatic Free-Arm Sewing Machine Operating instructions… -
Page 4: Table Of Contents
Lervia KH 4000 Lervia Automatic Free-Arm Sewing Machine 1. Intended Use 11. Sewing To place the material 2. Technical data To start a seam 3. Package contents To finish off a seam Guiding the material 4. Operating elements Changing the sewing direction 5.
-
Page 5: Lervia Automatic Free-Arm Sewing Machine
Lervia KH 4000 Operating instructions 3. Package contents Lervia Automatic Free-Arm Sewing Machine (see front fold-out page) ● 1 sewing machine 1 blind hem foot 1. Intended Use 1 seam guide 1 zipper foot The sewing machine is intended …
-
Page 6: Safety Instructions
Lervia KH 4000 Safety instructions Warning against injuries and material damages: Like any other electrical device, a sewing machine can cause serious, even life-threatening According to legislation, you as the user of injuries. To avoid this, and in order to work…
-
Page 7: Setting Up
Lervia KH 4000 6. Setting up • Place the sewing machine on a stabile table. • Plug the foot switch into the connection socket of the machine and … • insert the plug into the wall socket. If the worktop is not completely even, you can compensate for slight unevenness as follows: •…
-
Page 8: Threading
Lervia KH 4000 8. Threading Warning: Make sure that the sewing mahine is switched off and the plug has been pulled out of the socket when threading in order to avoid injury if the sewing machine should be accidentally switched on.
-
Page 9: B) Threading The Lower Thread
Lervia KH 4000 b) Threading the lower thread Turn the handwheel in an anti-clockwise direction to fully raise the needle. • Pull the box compartment off to the side, it is only slid on, not firmly attached. “ • Then open the gripper flap situated behind it.
-
Page 10
Lervia KH 4000 • Unwind approximately 10 cm of thread from the spool and slide this into the bobbin case so that the spool unwinds anti-clockwise. • Pull the unwound end of the thread through the gap in the side wall of the bobbin case … -
Page 11
Lervia KH 4000 • Put the bobbin case back on the pin and … ” • turn the bobbin case until the driver catches in the notch. • Lay the excess thread such that it does not bind anywhere … -
Page 12: C) Threading The Upper Thread
Lervia KH 4000 19 a 19 b c) Threading the upper thread To pass in the upper thread, it is not necessary • You can place a felt pad underneath the to open the front of the sewing machine. The spool of thread, so that the bobbin runs illustration is for guidance only.
-
Page 13: D) Retrieving The Lower Thread
Lervia KH 4000 d) Retrieving the lower thread • Turn the handwheel in an anti-clockwise direction to fully raise the needle. • Use the foot lever to raise the needle retainer • With the left hand, firmly hold the end of the upper thread that comes through the eye of the needle.
-
Page 14: Attaching Accessories
Lervia KH 4000 9. Attaching accessories Warning: Make sure that the sewing machine is switched off and the plug has been pulled out of the sok- ket to prevent accidents caused by un-intentional switching on. a) Changing needles • Turn the handwheel…
-
Page 15: C) Changing The Snap-On Foot
Lervia KH 4000 c) Changing the snap-on foot With the sewing machine you are provided with four snap-on-feet, which you can simply use as required: blind hem foot zipper foot buttonhole foot button foot To change the snap-on foot: • Turn the handwheel in an anti-clockwise direction to fully raise the needle.
-
Page 16: Settings
Lervia KH 4000 10. Settings The tension of the upper and lower thread is set correctly if the twining of the two threads cannot be seen on the top or bottom sides of the material after sewing. If even one of the two tensions is not set cor- rectly, an unclean seam will result.
-
Page 17: C) Setting The Presser Foot Pressure
Lervia KH 4000 c) Setting the presser foot pressure Here you can set the pressure with which the material is pressed onto the stitch plate. • Now set the contact pressure on the selector wheel «0» if no pressure is to be applied, for…
-
Page 18: Sewing
Lervia KH 4000 11. Sewing If you have placed the thread and everything is set correctly, as described in the previous — chapters: a) To place the material • Turn the handwheel in an anti-clockwise direction to fully raise the needle.
-
Page 19: D) Guiding The Material
Lervia KH 4000 d) Guiding the material • Only guide normal materials as shown in the diagram. Avoid pulling it, as this can cause the needle to bend or break. • Very fine materials pull inward slightly during sewing. To prevent this, lay a thin paper under the material and sew this in with the material.
-
Page 20: F) Selecting A Stitch Pattern
Lervia KH 4000 f) Selecting a stitch pattern To select a particular pattern, take the following steps: • Select the stitch pattern with the stitch pattern selector • Select the stitch length by means of the selector wheel. • Select the stitch width by means of the selector wheel •…
-
Page 21: I) Stitch Pattern Table
Lervia KH 4000 i) Stitch pattern table Stitch pattern Stitch length Sewing foot Stitch width Straight stitch Zigzag Blind stitch Blind hem Three-step zigzag stitch Slant over edge stitch Single overlock stitch Honeycomb stitch 3-fold zigzag Stretch straight stitch Shell stitch…
-
Page 22: J) Blind Hem
Lervia KH 4000 j) Blind hem • Fold the material as shown. Make the fold as wide as you want the finished seam to be: The lower fold should be inset by about 5 mm. • Use the blind hem foot .
-
Page 23: K) Material-Thread-Needle Table
Lervia KH 4000 k) Material-Thread-Needle Table Please refer to the details for the various materials. Presser foot Material Thread Needle Stitch length Upper thread tension pressure Straight See p. 16 stitch Stitch length selection Cotton Light Nylon Man-made Cotton fibre…
-
Page 24: L) Seam Guide
Lervia KH 4000 l) Seam guide • Use the seam guide for sewing longer hems or seams that should have an even distance to the edge of the material. • Screw the seam guide into the threaded hole on the right of the stitch plate Set the desired seam width, then tighten the knurled screw.
-
Page 25: O) Sewing Buttonholes
Lervia KH 4000 o) Sewing buttonholes • Attach the buttonhole foot , as described in Chapter 9. • Refer to the table for: — the required stitch length — the required stitch pattern — the required method for sewing. • When finished, you can cut the buttonhole in the middle, as shown.
-
Page 26: Q) Sewing On Buttons
Lervia KH 4000 q) Sewing on buttons • Attach the button foot and … • place the darning plate on the existing zigzag stitch plate, as described in Chapter 9. • Lay the button between the button foot and the material and lower the button foot down.
-
Page 27: T) Sewing A Zipper
Lervia KH 4000 t) Sewing a zipper Using the zipper foot you can sew along the right and left-hand edges of the zipper without damaging the zipper or the needle. The zipper foot is also useful for sewing edges or parallel seams.
-
Page 28: U) Sewing With The Twin Needle
Lervia KH 4000 u) Sewing with the twin needle • Insert the twin needle with the flat side toward the back. • Thread the thread as for normal sewing. Both threads are threaded together through the guides – up to the twin needle.
-
Page 29: Care
Lervia KH 4000 12. Care After each use, remove any pieces of thread, material, and fluff. Only in this way will you ensure that the sewing machine continues to work correctly and lasts for a long time. Warning: Make sure that the sewing machine is switched off and the plug has been pulled out of the “…
-
Page 30: C) Clean The Casing
Lervia KH 4000 c) Clean the casing Danger!: Never open any parts of the machine casing ” other than those described in this manual. There are no operating elements inside. Otherwise there is a risk of injury and potentially life-threatening accidents.
-
Page 31: F) Storing
Lervia KH 4000 13. Troubleshooting f) Storing Keep the sewing machine … at a dry location so that no rust forms on If something is not working, you can use the the metal mechanical parts, table below to try and correct the fault. If you…
-
Page 32: Warranty And Service
Lervia KH 4000 The bulb no longer lights? If the bulb is burned out, replace it with an identical one purchsed from a specialised dealer. The designation is «15W — E14». • Use the supplied screwdriver to loosen the screw on the front side of the front cover •…
-
Page 33
Lervia KH 4000 — 32 -… -
Page 34
ID Nr.: KH4000-05/05-V4 Kompernaß GmbH Burgstrasse 21 · D-44867 Bochum www.kompernass.com…
Содержание
- Мини швейная машинка SM-202A с Алиэкспресс
- Качество и функциональность
- В работе
- Мой отзыв
- Это не обман? Реально эта швейная машинка шьет?
- Шаг 1: Подключите блок питания
- Шаг 2: Намотайте нить на шпульку
- Шаг 3: Заправьте верхнюю нить
- Шаг 4: Вставляем нить в иглу
- Шаг 5: Загружаем шпульку в швейную машинку
- Шаг 6: Поднимите шпульную нить
- Шаг 7: Вы готовы шить!
- Совет №1
- Совет №2
- Совет №3
- Швейная машина Aliexpress Electric-mini-sewing-machine-small-household-sartorially-belt-transformer-202-multifunctional-power-supply — отзыв
- Надо ее просто правильно отрегулировать! Отличная машинка за свою цену! + Фото работ!
- Швейная мини-машинка Aliexpress Desktop Portable Mini electric sewing machine Household/Teaching handmade sewing matching tools European standard plug — отзыв
- Шью наволочку и простынь на маленькой машинке. Стоит ли покупать мини швейную машинку SM — 202A?
Мини швейная машинка SM-202A с Алиэкспресс

Заказывала себе мини-швейную машинку из Китая с Алиэкспресс вот на этой странице . Моя модель SM-202А. Доставка заняла менее месяца, стоимость обошлась мне долларов в 16.
Комплектация к машинке шла довольно приличная: ножная педаль, адаптер питания, запасные катушки-шпульки с нитками, запасная игла, нитковдеватель, и непосредственно машинка.
Качество и функциональность

Агрегат миниатюрный, поместится на любом стуле. Корпус целиком выполнен из пластика, как и большинство деталей. Сборка неплохая, детали не скрипят и не шатаются.
Хочу отметить, что идущие в комплекте шпульки не подходят для машин с вертикальным челноком. Они просто не влезут в колпачок.
Сама мини швейная машинка имеет хоть и ограниченное число функций, но даже и этого хватает с головой.
- Первая функция — намотка катушки. Из маховика потребуется выпустить штекер, на которую насаживается шпулька. И в режиме обычного шитья маховик со штекером крутится, а нить на шпульку наматывается. Только перед этим обязательно нужно освободить машинку от верхних и нижних нитей, чтобы они не запутались внутри механизма.
- Вторая функция — встроенный нож для обрезки нитей. Это маленькое лезвие, конечно, не сравнится с ножницами, но иногда выручает. Нитки лучше перерезать по одной.
- Третье: переключение режимов. На передней панели расположены две кнопки. Кнопка слева — переключатель скорости шитья. Можно выбрать либо медленную, либо быструю скорость. Вторая кнопка позволяет использовать машинку без педали. При включении машинка будет шить до тех пор, пока кнопку не вернуть в первоначальное состояние. Иногда я использую этот режим при намотке ниток.
- Четвертое: подача света. Машинка снабжена маленьким светодиодом, который подсвечивает рабочую поверхность, пусть и незначительно. По желанию ее можно выключить с помощью кнопки под рукавом.
- Пятое: регулировка натяжения верхней нити. Осуществляется простым прокручиванием регулятора. Рекомендую не выкручивать его полностью, потому что вставить после этого его непросто.
К сожалению, длина стежка на машинке не регулируется, как и тип стежка. То есть машинка прямострочная. Так же у нее отсутствует реверс. Я приловчилась просто разворачивать изделие несколько раз, проделывая закрепочный шов.
В работе

А теперь я расскажу непосредственно о работе швейной мини-машинки с Алиэкспресс. Педаль работает по типу «включено/выключено». Плавной регулировки хода нет. Нажала — поехали, отпустила — остановились. Но даже на быстром режиме скорость шитья не слишком высокая — в секунду около шести стежков. Во время шитья машинка практически не вибрирует, но при этом слышен звук от движущихся деталей.
Кстати, агрегат может работать не только от сети, но и от аккумуляторов или батареек пальчикового типа «AA». Поэтому на ней можно работать даже в случае, когда нет света.
Кроме шпулек, на машинке можно использовать бобины и катушки любых размеров. Благодаря выдвигающемуся держателю проблема с регулярной перемоткой ниток отпадает. Держателем для верхней шпульки я не пользуюсь совсем.
SM-202A в принципе работает со многими видами тканей. Она берет трикотаж, в том числе и «масло», шифон, креповые ткани. И даже джинсы или брюки можно подшить с этой машинкой.
Но чтобы швы на тонком материале получились ровными и не стянутыми, к каждой ткани придется приспосабливаться, немного растягивая ее с определенной силой. Шов у машинки прямой двуниточный, не цепной, как у большинства мини-машинок. Поэтому у сшитой вещи шов не распускается.
Дополнительно к швейной машине я приобрела столик. С ним пусть ненамного, но удобнее. Материал не свисает, а лежит на столике, да и опора для руки имеется. И столик, и машинка снабжены антискользящими ножками, но дополнительно я еще подкладываю под них прорезиненный коврик. Так машинка практически не сдвигается с места во время работы, не смотря на свой легкий вес.
Мой отзыв

Подводя итоги, могу сказать, что мини швейная машинка SM 202A — это хорошее подспорье. Ее легко собирать, разбирать и хранить, уход и настраивание минимальные, поэтому она идеально подойдет всем, кто не может позволить полногабаритную швейную машину из-за бюджета или нехватки свободного места.
Ещё раз напомню, что покупала данную мини швейную машинку на Алиэкспресс вот тут .
На Алиэкспресс прямо сейчас идёт распродажа! Вот на этой странице вы найдёте особенные скидки!
Источник
Это не обман? Реально эта швейная машинка шьет?
Это руководство для вас, если вы никогда раньше не пользовались мини-швейной машинкой и только начинаете заниматься шитьем. В этом уроке я расскажу вам о достоинствах и недостатках этой швейной машинки, покажу, как заправить нить в швейную машинку и дам несколько советов по шитью.
Эта мини-швейная машинка действительно шьет. Если вы ищете недорогую, портативную и простую швейную машинку, то эта машинка подойдет для вас. Ее можно использовать для подшивки брюк и для других простых работ. Однако вы будете ограничены только одной прямой строчкой. Эта машинка не имеет функции обратного хода, поэтому, чтобы усилить строчку, нужно будет повернуть ткань и прошить по этому месту в обратном направлении еще раз. Эта машинка не занимает много места, она очень маленькая. Она даже может работать от батареек АА.
К концу этого урока вы станете профессионалом и узнаете, как пользоваться этой мини-швейной машинкой!
Итак, что вам понадобится:
- Мини-швейная машинка
- Нитки (я не рекомендую использовать нитки, которые идут в комплекте с машинкой. Только если у вас больше нет никаких)
- Пустая металлическая шпулька
- Нитевдеватель

Как начать работу на мини-швейной машинке:
Шаг 1: Подключите блок питания
Я заменила нитки и ткань, которые шли с этой швейной машинкой на свои.
Подключаем блок питания, либо батарейки (вставляются снизу), подключаем ножную педаль.
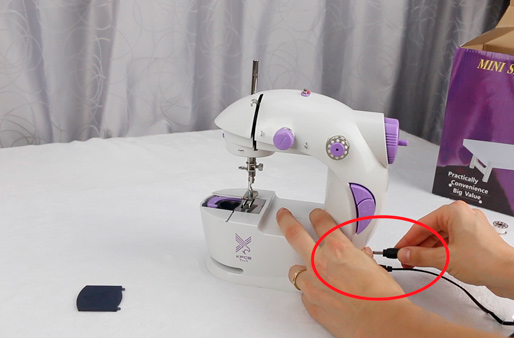
Будьте осторожны! Когда включается питание, машинка включается, если вы случайно нажмете педаль или кнопку включения/выключения, машинка начнет шить.
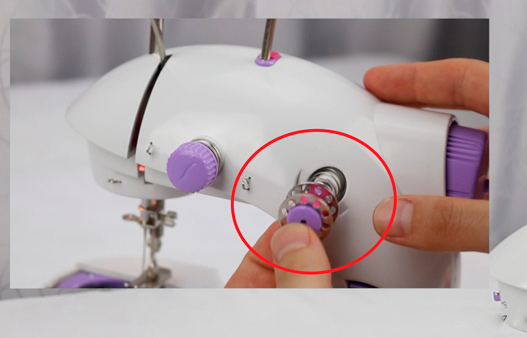
Шаг 2: Намотайте нить на шпульку
Далее вам нужно будет перемотать немного ниток с основной катушки на шпульку. Вам понадобится катушка ниток, которыми вы собираетесь шить и пустая шпулька. Поместите катушку ниток на шпиндель, расположенный в верхней части машинки (он убран, но вытаскивается при необходимости). Освобождаем штифт для намотки шпульки (он находится посередине маховика). Он освобождается путем нажатия указательным пальцем и поворотом против часовой стрелки. Проденьте конец нити через шпульку и наденьте шпульку на стержень для намотки шпульки. Другой рукой удерживайте нить, чтобы обеспечить натяжение нити, пока она наматывается на шпульку.
Нажмите на педаль или нажмите кнопку включения/выключения, чтобы начать намотку.
Остановитесь, когда на шпульку будет намотано нужное количество нити. Снимите шпульку со стержня и обрежьте нить. Вставьте стержень для намотки шпульки на место.
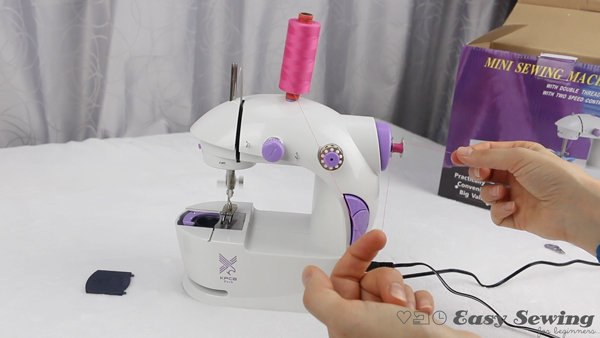
Шаг 3: Заправьте верхнюю нить
Поместите катушку на стержень катушки, расположенную на верхней части машинки (можно также заправить верхнуюю нить со шпульки, которая закрепляется на передней части корпуса машинки (см. фото ниже).
Следуйте нитенаправителям, чтобы заправить нить.
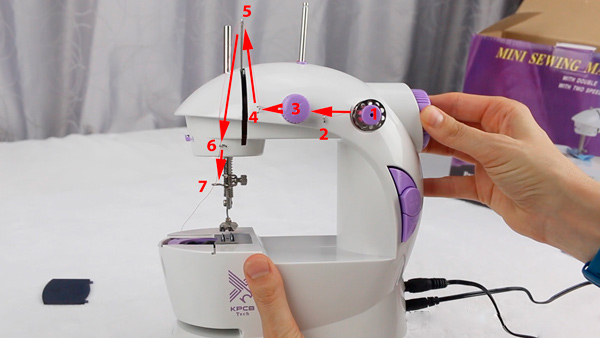
Шаг 4: Вставляем нить в иглу
Чтобы заправить нить в иглу, проденьте конец нити в игольное отверстие слева направо. Я считаю, что заправлять нить в иглу намного проще, если использовать нитевдеватель.
Потяните за нить, чтобы верхняя нить не провисала и оставьте конец нити свободным.
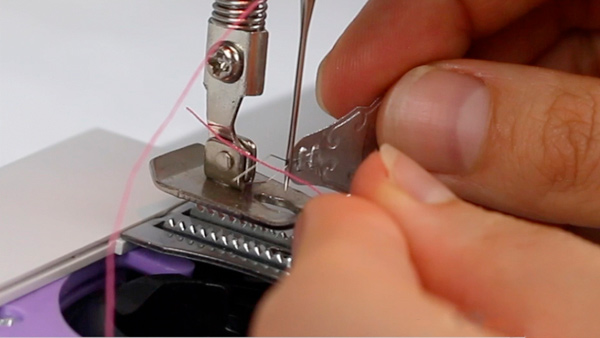
Шаг 5: Загружаем шпульку в швейную машинку
Держите шпульку так, чтобы нить находилась с правой стороны, и нить на шпульку была намотана по часовой стрелке.
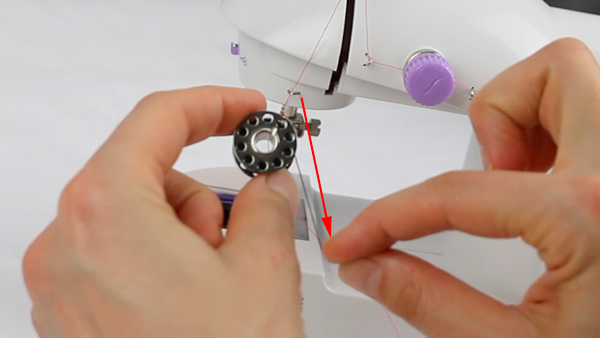
Опустите шпульку в шпульный колпачек так, чтобы она осталась лежать ровно. Поместите нить в предусмотренную канавку.
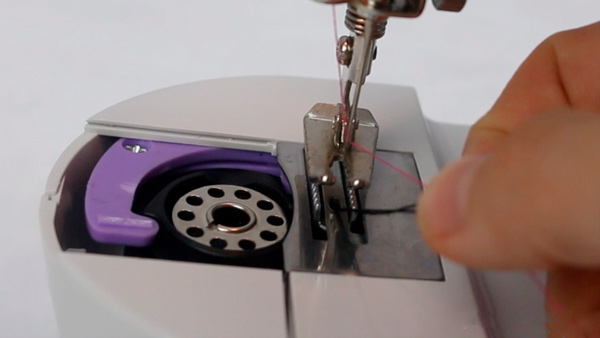
Шаг 6: Поднимите шпульную нить
Чтобы поднять нижнюю нить, держите верхнюю нить в левой руке, слегка тянув на себя. В то де время правой рукой поворачивайте маховик на себя. Это переместит иглу вниз, и вы заметите, что верхняя нить проходит через шпульку. Как только игла полностью опустится и снова поднимется, потяните верхнюю нить на себя, и вы увидите, как нижняя нить поднимается вместе с ней. Возьмите нижнюю нить пальцами или вытяните ее чем-то длинным и тонким.
Поместите концы ниток с задней части машинки. Закройте крышку отверстия для шпульки, и вы готовы к шитью!
Шаг 7: Вы готовы шить!

Дам вам несолько советов, которые помогут вам успешно шить на этой мини-машинке.
Совет №1
Сделайте несколько стежков на ткани с помощью маховика, прежде чем нажимать на педаль и приступить к шитью. Это не даст нити вытягиваться. Это происходило со мной, пока я не приспособилась таким образом.
Совет №2
Эта машинка не имеет функции реверса. Я обычно пользуюсь обратным ходом на большой машинке, чтобы закреплять шов. Если вы хотите закрепить строчку, я рекомендую повернуть ткань, а затем прошить по этим стежкам.
Совет №3
Когда вы дойдете до конца строчки, продолжайте шить, чтобы вытянуть длиннее нить, которую можно обрезать, и оставить достаточно длинный хвостик для следующей строчки. Этой машинке не очень нравится, когда мы тянем нить из нее.
Я надеюсь, что этот урок и дополнительные советы будут полезны для вас. Удачного мини-шитья, увидимся в следующий раз!
Источник
Швейная машина Aliexpress Electric-mini-sewing-machine-small-household-sartorially-belt-transformer-202-multifunctional-power-supply — отзыв

Надо ее просто правильно отрегулировать! Отличная машинка за свою цену! + Фото работ!
Получив посылку с алиэкспресс и попробовав хоть что-то прострочить на этой машинке, я очень сильно расстроилась и уже была готова писать гневные отзывы и на продавца и на машинку. Строчка сверху вроде нормальная, а с другой стороны или сплошная, или еле держится и распарывается. Но решив немного поиграться с регулировкой натянутости нити, я таки добилась своего. Строчка пошла красивая со всех сторон!
А предыстория такова — надоело мне бегать из-за каждой новой пары брюк в ателье, да и подушки у меня 60х40, не во всех комплектах есть мой размер, и вообще захотелось попробовать, получится или нет самой ушивать, подгонять. Ну и заказала на Али.
Пришла машинка на вид детская. И первые попытки оказались неудачными. Но, девочки, у кого не получилось — поиграйтесь с регулировкой. Я так и сделала. И несмотря на то, что моя нить очень сильно натянута, строчка получается отличная со всех сторон. Вот этот регулятор:
Покрутите его и попробуйте несколько раз прострочить, вы обязательно найдете его правильное положение. На следующих фотках джинсы мои и мужа, а также наволочки уже подогнанные. Не судите строго, на звание профессионала не претендую 
В общем, я осталась очень довольна. Машинка конечно не профессиональная, делает только один вид строчки. Но для таких мелких работ как подогнать и ушить, она подходит идеально. По крайней мере у меня получается и джинсы укоротить, и брюки, и наволочки подогнать по размеру.
Уже больше года прошло и все отлично. Желаю и вам подружиться с ней 
Источник
Швейная мини-машинка Aliexpress Desktop Portable Mini electric sewing machine Household/Teaching handmade sewing matching tools European standard plug — отзыв
Шью наволочку и простынь на маленькой машинке. Стоит ли покупать мини швейную машинку SM — 202A?
Всем привет!
Этот год для меня сложный. Я переехала в свой город. И пока перевозила вещи, душа рвалась к творчеству. И на данный момент живу в 1-ной квартире, тут места мало и решила приобрести мини машинку. Швейная машинка Mini Sewing Machine SM — 202A отзывы.
Размеры: 195х125х210
Стоимость: 800 рублей
по баллам бесплатно
Производитель: Китай
Внешне представляет детскую машинку, но она вовсе не детская! Она умещается на ладонь, приблизительно 19 см. Сбоку (с правой стороны) 2-а разъема, для педали и для шнура (оба короткие) приходится использовать удлинитель.
Длина педали — 113 см
☛ Что пишет производитель?
Удобство использование малютки в компактности. Для полноценной работы швее потребуется мало места. Освоить аксессуар для пошива не составит труда. Чтобы провести операцию пошива, домохозяйке достаточно включить машинку в розетку. К дополнительным достоинствам относится возможность устройства функционировать о батареек. Останется только в соответствии с инструкцией заправить нитку и приступить к шитью. Для функционального удобства на теле машинки находятся кнопки управления. При необходимости освободить руки к электроприбору подсоединяется из комплекта. В стандартную комплектацию входит швейный агрегат в прочном корпусе. Поставляется ножная педаль, адаптер питания от сети. Прилагается нитевдеватель, рабочая иголка и пользовательская инструкция. Устройство функционирует от 4 батареек класса АА или подключается к стандартной электрической сети 220 В. Сборными материалами для машинки служат пластиковые и металлические детали.
☛ В комплект входит:
педаль, сетевой шнур, 4 запасных шпульки (еще 2 уже были заряжены в машинку, так что всего их 6), запасная игла и приспособление для вдевания нитки в иглу машинки, а также инструкция, правда полностью на китайском языке
☛ Мини машинка оснащена:
2) Подрезатель нитки. Чтобы не искать ножницы, он прикреплён к машинке.
3) Ножная педаль. Очень удобный и незаменимый гаджет.
4) Кнопка выбора скорости шитья. Два режима: медленно и быстро.
5) Устройство для намотки шпулек. Несколько штук идут в комплекте с машинкой.
6) Держатель для катушки с нитками, чтобы наматывать шпульки.
7) Отсек для пальчиковых батареек или аккумуляторов. Вы можете шить даже если в доме отрубили электричество.
☛ Где купить?
Озон, Валдберрис, Яндекс маркет, Алиэкспресс. и других интернет-ресурсах. Можно на юле и авито.
☛ Стоимость:
В среднем 800 — 1600 рублей (разброс большой). Если у вас есть баллы (когда делаешь покупки, пишешь отзывы начисляются баллы), например на сайте беру (яндекс маркет), то можно заказать бесплатно. Как раз я так сделала.
☛ Мини машинка в деле:
При поиске информации, рукодельницы писали:
Источник
ENGLISH SUOMI NEDERLANDS
ENGLISH «IMPORTANT SAFETY INSTRUCTIONS» «When using an electrical appliance, basic safety precautions should always be followed, including the following.» «Read all instructions before using this sewing machine.» «DANGER- To reduce the risk of electric shock: » 1. «This sewing machine should never
SUOMI ENGLISH TABLE OF CONTENTS 1. KNOWING YOUR MACHINE Identification chart Accessories Setting up your machine Preparation for threading Lint tray, Cutting width gauge Thread cutter, Changing presser feet Changing needle, thread and fabric chart 2. STARTING TO SEW Threading your machine Helpful
ENGLISH 1. KNOWING YOUR MACHINE IDENTIFICATION CHART 1. Foot pressure regulator 2. Sewing light 3. Presser foot lever 4. Thread cutter 5. Needle plate 6. Presser foot 7. Overedge cutting width dial 8. Working table 9. Thread guide pole 10. Left needle thread tension control 11. Right needle thread
SUOMI 1. KONEEN OSAT 22 23 24 25 26 27 20 21 28 WORKING TABLE OPENED SUOJAKOTELO JA ETULEVY AUKI 30 29 30 1. 2. 3. 4. 5. 6. 7. 8. 9. 10. 11. 12. 13. 14. 15. 16. 17. 18. 19. 20. 21. 22. 23. 24. 25. 26. 27. 28. 29. 30. 31. 32. Paininjalan puristuksen säädin Ompeluvalo Paininjalan nostin Lankaleikkuri
ENGLISH ACCESSORIES All parts listed may be obtained from your nearest dealer. 1. 2. 3. 4. 5. 6. 7. 8. 9. 10 11. 12. 13. 14. 15. 16. 17. Two-thread convertor Stitch finger (B) (See page 40) Needle set Needle threader (option) Brush Screw driver (small) Tape measure (option) Machine cover Screw
SUOMI VARUSTEET 1. 2. 3. 4. 5. 6. 7. 8. 9. 10. 11. 12. 13. 14. 15. 16. 17. 2-langan ommelmuunnin Kudontapiikki (B) (Katso sivu 41) Neulat langanpujotin (Lisävaruste) Harja Ruuviavain (pieni) Mitta (Lisävaruste) Koneen huppu Ruuviavain (iso) Öljy Yläterä Kiintoavain Kartiolankaverkko Pinsetit
ENGLISH SETTING UP YOUR MACHINE 1. Wipe off excess oil in the needle plate and bed areas. 2. FOOT CONTROL Push foot control plug into connector socket, and connect the power line plug into power supply outlet. * 3. POWER / LIGHT SWITCH Your machine will not operate unless the power / light switch
SUOMI SUOMI NEDERLANDS KONEEN ASETTAMINEN OMPELUUN 1. Aseta koneesi tukevalle ja tasaiselle pinnalle. Ennen koneen käyttöä pyyhi ylimääräinen öljy pistolevy- alueelta, öljyä on mahdolliseti valunut kuljetuksen aikana. Ompele koneella ilman lankoja kangastilkulle poistaaksesi liian öljyn koneestasi.
ENGLISH PREPARATION FOR THREADING THREAD GUIDE POLE Pull up thread guide pole to the highest point until you hear it click. Place thread spools on pins and draw thread through thread guides on the pole from rear to front. Thread guide of pole can hold thread spools on the spool stand by pulling
SUOMI NEDERLANDS LANKATELINE Vedä lankateline ylimpään asentoon. Aseta lankarullat tappeihin ja vedä langat langanohjaimien läpi takaa eteen. . Säilytyksessä, lankatelineen voi laskea alas ja jättää lankapuolat paikalleen, kuten kuvassa. Kuva * * : Langanohjain : Lankateline . . * * : : 9
ENGLISH SPOOL CAPS FOR DOMESTIC TYPE SPOOLS * * SPOOL DISC AND SPOOL HOLDERS FOR CONE SPOOLS * For large cone spools use the rubber spool holders with the wide end at the top, and for small ones, use the same rubber spool holders but with the narrow end at the top. * * SPOOL NETS * Polyester or
SUOMI LANGANOHJAINHATTU Aseta rullien päälle muovinen langanohjainhattu estämään rullien hyppely. . . LANKARULLAN ALUSTAT JA LANKAPUOLAN PIDIKKEET Ota pois lankapuolan pidikkeet. Aseta sen jälkeen lankarullan alustat tappeihin. Kun käytät suuria puolia, aseta lankapuolan pidikkeen leveämpi puoli
ENGLISH LINT TRAY With the lint tray located in this position, it will collect all your waste material. After completion of work if you then turn tray upwards in direction shown, finger Ref C will locate in slot D and left hand pin will slide into lower hole B. In either position if you gently push
SUOMI NEDERLANDS ROSKAKAUKALON ASETTAMINEN Aseta kaukalo paikalleen työntämällä kaukalossa oleva tappi suojakotelon lukitsijan alla olevaan reikään. Kaukalon yläreunassa oleva koukku menee etulevyssä olevaan koloon. (Katso kuvaa). Kaukalo kerää leikkuujätteen. , ., . KANKAAN OHJAIN Aseta kankaan
ENGLISH CHANGING NEEDLE * Raise needle bar to its highest point by turning hand wheel towards you, but leave presser foot down. Loosen needle clamp screw to remove the needle, and place new needle with Flat side Away From You, into the needle bar as far as it will go, and tighten screw.
SUOMI NEULAN ASETTAMINEN Käännä käsipyörästä neula ylimpään asentoon. Jätä paininjalka alas. Kierrä neulojen kiinnitysruuvi auki. Työnnä neula neulanpitimeen niin pitkälle kuin se menee litteä puoli itsestäsi poispäin. Kiristä ruuvi. Kuva * * : Neulojen kiinnitysruuvi : Litteä puoli itsestäsi
SUOMI ENGLISH NEEDLE, THREAD AND FABRIC CHART NEULAT, LANGAT JA KANKAAT USe HA Käytä HA 1SP, HA 1(130 / 705H) NeedleS. FABRIC COTTON LINEN WOOL SYNTHETIC FIBRE KNIT 16 THREAD Light weight : Organdy, Lawn, Gingham Cotton No. 100 Heavy weight : Oxford, Denim, Cotton Gaberdine PolyeSter No. 60 — 50
: / / , : , 8/6 : , , , : , . , , : , — : , , 100 / 60 — 50 60 / 80 60 / 80 — 60 60 / 60 — 50 60 / 100 — 80 120 — 80 / 60 60 / 80 — 60 80 — 60 / 60 — 50 60 90 (14) 75 (11) 60 — 50 : : . . . , ( ) , 17
ENGLISH 2. STARTING TO SEW THREADING YOUR MACHINE 1 Wrong threading may cause skipped stitches, breaking threads, or other problems. Try to master the correct threading before moving on to test sewing. Threading must be carried out in the sequence of Lower Looper-Upper Looper-Needle. Open the front
SUOMI 2. OMPELUN ALOITTAMINEN LANGOITUS Väärä langoitus voi aiheuttaa hyppytikkiä, langan katkeamisia ym. Opettele langoitus kunnolla ennen ompelemista. , , Langoita seuraavassa järjestyksessä: Alasieppari, yläsieppari ja neulat. Avaa etulevy ja suojakotelo. Nosta neula korkeimpaan asentoonsa
ENGLISH THREADING UPPER LOOPER 1 1. Feed the thread through the thread guide as illustrated. 2. Pull the upper thread through the slot. Holding the thread with your left hand, pull down with right hand firmly. 3. Draw the thread through the thread guide as illustrated. When threading according to
SUOMI YLÄSIEPPARIN LANGOITUS 1. Ohjaa lanka langanohjaimen läpi kuten kuvassa. 2. Vedä lanka langankiristimen uraa pitkin alas, kuten kuvassa. 3. Langoita koneessa olevan langoitusohjeen mukaisesti. Kun langoitus on tehty ohjeen mukaan, yläsiepparin lanka menee langanohjaimeen (A) automaattisesti,
ENGLISH THREADING NEEDLES 1 1. Feed the thread through the thread guide as illustrated. 2. Draw the needle threads through tension slot. Holding the thread with your left hand, pull down with right hand firmly. 3. Draw the thread through the thread guide as illustrated. 4. Thread the needles from
SUOMI NEULOJEN LANGOITUS 1. Ohjaa lankaa langanohjaimien läpi kuten kuvassa. 1. 2. Vedä langat vasemmanpuoleisiin uriin. kuten kuvassa. 2. ( , , 3. Vedä lanka langanohjaimen läpi, kuten kuvassa. 4. Pujota langat neuloihin edestä ja vedä ommeljalan alle taakse ja jätä lankaa n. 10 cm. 3. 10
ENGLISH HELPFUL HINTS REPLACING THREAD SPOOLS When replacing thread spools, the following steps may be helpful for quick changeover. 1. Cut off existing threads near the spools. Tie the cut ends thread from new spools as illustrated (seamen’s knot). 2. Raise presser foot. 3. Lower needle bar to its
SUOMI NEDERLANDS HYÖDYLLISIÄ VINKKEJÄ LANKOJEN VAIHTAMINEN Seuraavalla tavalla opit vaihtamaan nopeasti lankapuolat. 1. Katkaise langat kuvan mukaisesti läheltä puolia. sido langanpäät merimiessolmuilla uusiin rulliin. 2. Nosta paininjalka ylös, jolloin langankireys vapautuu. 3. Pyöritä
ENGLISH TESTING STITCH OVERLOCK STITCHES After threading is completed, use a scrap of fabric that you plan to sew and test to sew in the following order. 1. Gently pulling all the threads to the left, lower the presser foot. Rotate the hand wheel towards you a few times to see if the lock stitches
SUOMI NEDERLANDS OMPELEMINEN Kun olet langoittanut koneen, kokeile ommelta seuraavasti. 1. Vedä kevyesti kaikki langat vasemmalle ja laske paininjalka. Käännä käsipyörää itseesi päin muutamia kertoja ja tarkista pistojen muodostus. . 1. , . 2. Kokeile ommelta samalle kankaalle, jota aiot käytää.
ENGLISH SETTING CHART Number of threadS 4 Overedge cutting width dial -6- 3 6 4- -5- 2 3 4-6 4 6 -6- 4-6 Left and Right Left Right Left and Right Left Right Left Right -4- -4- — 0- — — — — -4- 0- -4- — TenSion Right needle thread control Upper looper thread -4- — -4- — 0- -4- -4- -4- -4- — — -5 -4-
SUOMI KONEEN SÄÄDÖT Lankojen määrä 4 3 6 -6- Leikkuu leveyS 4- -5- 2 3 4 4-6 6 -6- 4-6 VaSen ja oikea VaSen Oikea VaSen ja oikea VaSen Oikea VaSen Oikea VaSen neula -4- -4- — 0- — — — — -4- 0- -4- — Oikea neula -4- — -4- — 0- -4- -4- -4- -4- — — -5 YläSieppari -4- -4- -4- -4 -4 -4- -4- -4- — — — —
4 3 6 -6- 4- 2 3 -5- 4-6 4 -6- 6 4-6 ghfdfz 2- -4- -4- — 0- — — — — -4- 0- -4- — -4- — -4- — 0- -4- -4- -4- -4- — — -5 -4- -4- -4- -4 -4 -4- -4- -4- — — — — -4- -4- -4- 7- 7- 0- -4- -4- 0- -4- 0- 1- 2 — 2.5 -R- -P- 2.5 — 3.5 1 3-5 2.5 — 3.5 2 3 4 38 1. 2. 3. 30 . .( , . 6 51 : : 5 35 4. 5. .41) . .
31
ENGLISH THREE-THREAD OVERLOCK WITH ONE NEEDLE By threading the LEFT needle only a width of 6 mm will be produced and by threading the RIGHT needle only a width of 3.8 mm will be produced. Please keep the unused needle on the needle pad as illustrated. CONVERTING TO TWO-THREAD USE * 1 To convert to
SUOMI 3-LANKA OMMEL Jos käytät vasenta neulaa säädä leikkuuleveys 6 mm ja jos käytät oikeaa neulaa, leveys 3,8 mm. säilytä ylimääräinen neula tyynyssä, joka on koneessa etulevyn takana. (kts. kuvaa). 6 , 3.8 — . . 2-LANGAN OMMELMUUNNIN Avaa etulevy. Nosta neula korkeimpaan kääntämällä käsipyörää
ENGLISH NARROW AND ROLLED HEM, PICOT STITCH * Narrow and rolled edge is ideal for use on thin materials such as georgette crepe, crepe de chine, silk etc. 1 2 Also, picot stitch can be produced particularly when sewing on fine ‘scarflike’ materials. In view of the nature of these hems, they are
SUOMI KAPEA YLILUOTTELU, RULLA PÄÄRME JA SIMPUKKA REUNA » Kapea yliluottelu ja rulla päärme sopivat ohuisiin kankaisiin kuten silkki, kreppi jne. simpukkareuna sopii hyvin «huivimaisiin» kankaisiin. Tämän tyyppiset ompeleet eivät sovi paksuihin tai jäykkiin materiaaleihin. 3. Poista kudontapiikki
ENGLISH ADJUSTING THREAD TENSIONS TWO-THREAD USE Turning tension dial to a higher number gives a tighter thread tension. Turning tension dial to a lower number gives a looser thread tension. The higher the number, the tighter the tension. JuSt right. Lower looper thread pulled to under Side. Needle
SUOMI LANGANKIREYDEN SÄÄTÖ KAHDEN-LANGAN KÄYTTÖ Langankireys lisääntyy, kun käännät säädintä alaspäin ja ylöspäin käännettäessä kireys vähenee. Mitä suurempi numero sitä kireämmällä lanka on. Kokeile aina ommelta sille kangaspalalle, jota aiot käyttää. Oikein AlaSiepparin lanka tulee nurjalle
. «0» » 9 «. . . . , , . 4 Fig. 1 Fig. 3 Fig. 2 . . . Fig. 1 Fig. 2 . 38 . . . Fig. 4 Fig. 3 / . . Fig. 5 .
39
ENGLISH ADJUSTING STITCH LENGTH Turn the stitch length dial until the required length is reguired. The higher the number, the longer the stitch. This dial can adjust the stitch length from 1 to 5 mm. * * ADJUSTING OVEREDGE CUTTING WIDTH Overedge cutting width can be adjusted from 4 to 7 mm by
SUOMI PISTONPITUUDEN SÄÄTÖ Pistonpituuden säädin sijaitsee koneen oikeassa päädyssä. . Mitä suurempi säätimessä näkyvä numero on, sitä pidempi on pistonpituus. Pistonpituuden voit säätää välille 1-5 mm. , NO 1 5 . LEIKKUULEVEYDEN SÄÄTÖ 4 Leikkuuleveyttä voit säätää välille 4-7 mm. Leikkuuleveyttä
ENGLISH DIFFERENTIAL FEED The differential feed has two independent feed dogs, one front (A) and one rear (B). Each feed dog has an individual feed mechanism which enables the feeding of material at a different ratio. B A * POSITIVE DIFFERENTIAL FEED WHEN SET FOR POSITIVE DIFFERENTIAL FEED, the
SUOMI DIFFERENTIAALI- ELI ERIAIKAISSYÖTTÖ Eriaikaissyöttäjässä on kaksi eri syötintä, jotka syöttävät kangasta eri pituisen matkan. syöttäjä tekee yhden täydellisen liikesarjan jokaisen piston muodostamisessa. 2- , , , . RYPYTTÄVÄ SYÖTTÖ Syöttäjän etuosa (A) tekee pidemmän liikkeen kuin takimmainen
ENGLISH SETTING DIFFERENTIAL FEED Set by simply turning the differential feed control dial in the direction desired referring to the chart below. * The adjustment can be made between 0.7 (negative effect) and 2 (Positive effect). These settings give the best ratio of feeding. For normal sewing, the
SUOMI NEDERLANDS DIFFERENTIAALISYÖTÖN SÄÄTÖ Aseta säädin haluttuun kohtaan käyttäen ohjeena alla olevaa taulukkoa. Voit säätää syöttöä 0,7-2,0 välillä. Normaalisyöttö, aseta säädin kohtaan 1. Voit säätää differentiaalisyöttöä myös ompelun aikana. Jos syöttösäädin on asennossa 2, piston pituus ei
ENGLISH BASIC TECHNIQUES TURNING OUTSIDE CORNERS WITHOUT CUTTING THREADS 1. When you reach the fabric edge, stop stitching with the needle above the fabric. 2. Raise the presser foot and gently pull on the thread chain just enough to clear the stitch finger. 3. Turn the fabric, lower the presser
SUOMI NEDERLANDS OMPELEMINEN KÄÄNTYMINEN KULMASSA (LANKOJA EI KATKAISTA) 1. Kun olet tullut kankaan kulmaan, jätä neula yläasentoon. 2. Nosta paininjalkaa ja vedä lankoja kevyesti. 3. Käännä kangas, laske jalka ja aloita kulman toisen sivun ompelu. (Kuva 1). HUOM : Jos saumaat ja leikkaat
ENGLISH CORDED OVERLOCK Corded overlock can be used to strengthen shoulder, sleeve or side seams when joining or making up knitted garments. As a decorative feature you can use knitting yarn of contrasting colours to further enhance your garment. Your machine is equipped with a presser foot which
SUOMI TUKILANGAN KÄYTTÖ Tukilankaa käytetään olka-, hiha- ja sivusaumojen vahvisteena ommeltaessa esim. neuleita sekä rypytyksessä. 1. Kiinnitä tukilanganohjain (1) lankatelineeseen. Kuva 1. . : 1. 4. Aseta kangas normaalisti ja ompele aluksi hitaasti seuraten tukilankaa. 2. OLKAPÄÄT JA HIHOJEN
ENGLISH DECORATIVE EFFECTS In addition to normal overlocking which is fully described in this instruction book, your machine can also be used for a number of decorative applications such as decorative top-stitching, butted seams, pin-tucking or making lengths of decorative braid. see below. Fig. A
SUOMI NEDERLANDS KORISTELU Saumauksen lisäksi koneellasi voi tehdä erilaisia koristetöitä: aplikointia, tilkkutöitä, koristetikkauksia, koristelaskoksia, punosta ym. , , KORISTETIKKAUS / 2-LANKAA tai 3-LANKAA (avattava tasosauma) . ( Taita kangas kaksinkerroin, siitä mihin kohtaan haluat
ENGLISH DIFFERENTIAL FEED APPLICATIONS Please refer to pages 42 — 45 DIFFERENTIAL FEED. Differential feed is designed to minimize puckering and wavering. It is also very effective for gathering. 1. Puckering Puckering tends to occur on woven or sheer fabrics. To obtain pucker-free seams, set the
SUOMI DIFFERENTIAALISYÖTÖN ELI TUPLASYÖTÖN KÄYTTÖMAHDOLLISUUKSIA Katso sivut 42 — 45 differentiaali syöttö. Jos saumauskoneessa ei ole differentiaalisyöttäjää kangas voi rypistyä tai kankaan reuna voi venyä. Differentiaalisyöttöä voi myös käyttää kankaan poimutuksessa. 42 — 45 . . 1. » 1 «. 1.
ENGLISH 3. CARING FOR YOUR MACHINE REPLACING MOVING CUTTER * * Replace a moving cutter if it becomes blunt as follows. A spare cutter will be found in your accessories. NOTE : You should not need to replace fixed cutter, which is made of a special hard alloy material. FIRST REMOVE THE POWER PLUG
SUOMI 3. KONEEN HUOLTO YLÄTERÄN VAIHTO Jos yläterä on tylsynyt, vaihda se tarvikelaatikossa olevaan varaterään. Huom. Terän voi myös teroituttaa. . : Ensin irrota pistoke seinäpistorasiasta. , . . 1. Avaa suojakotelo. Avaa yläterän ruuvi ja ota kulunut terä pois. 2. Sulje suojakotelo. Laske
ENGLISH CLEANING AND OILING To keep the machine running smoothly, keep it clean and lubricated at all times. * FIRST DISCONNECT MACHINE FROM POWER SUPPLY BY REMOVING PLUG FROM SOCKET-OUTLET. * 1. Open the front cover and working table. Using the brush provided, remove dust and lint that have
SUOMI NEDERLANDS KONEEN PUHDISTUS JA ÖLJYÄMINEN Jotta koneesi toimisi moitteettomasti, on syytä öljytä se säännöllisesti. Irrota ensin koneen johto seinäpistorasiasta. 1. Avaa etu- ja suojalevyt. Puhdista harjalla nukka ja pöly koneen sisältä. (Pölynimuri on kätevä). 2. Käännä kone selälleen ja
ENGLISH SUOMI 4. CHECKING PERFORMANCE PROBLEMS PROBLEM Irregular StitcheS Breaking Needle Puckering Wavering Skipping StitcheS Breaking ThreadS 58 PROBABLE CAUSE CORRECTION Incorrect Thread TenSion(S). Incorrect Size Needle. ReSet Thread TenSion(S). ChooSe correct Size Needle for Thread and Fabric.
N N , N «1» «1» N ( N ) 59
ENGLISH 5. OPTIONAL ACCESSORIES BLIND HEM FOOT Blind hem feet are obtainable as an optional extra and are available in two sizes. 0.5 for fine-medium fabrics and 1.0 for medium/ heavy fabrics. Fit the appropriate foot. Set the stitch length 4 — 5. Now proceed as follows : 1. Turn up the hem to the
SUOMI NEDERLANDS 5. LISÄVARUSTEITA PIILO-OMMELJALKA Lisävarusteena EVA-saumariin on saatavana kaksi erilaista piilo-ommeljalkaa. Toinen niistä on tarkoitettu ohuille ja toinen paksuille kankaille. Vaihda normaali paininjalka sopivaan piilo-ommeljalkaan. Säädä piston pituus välille 4 — 5. Aseta
ENGLISH ELASTICATOR An elastic foot is available as an optional extra. This foot will guide your elastic and at the same time apply pressure to the elastic with our specially designed tension controlled roller, allowing you to control the elasticity while sewing. 1. Replace regular foot with
SUOMI KUMINAUHAN KIINNITTÄMINEN ERIKOISPAININJALAN AVULLA 1. Vaihda koneeseen erikoispaininjalka. , , 2. Aseta pistonpituus asentoon 4. . 3. Nosta jalan rullaosaa kevyesti ja aseta kuminauha rullan ja tuen väliin (katso kuva), kunnes nauhan reuna on syöttäjän hampaiden kohdalla. 1. 2. 4. Ompele
ENGLISH PIPING FOOT Prepare a piece of ready-made piping (corded bias fold tape). Place folded piping between seam edges with fold extending beyond seam line toward garment. Pin or baste, and stitch the seam. Braid or ribbon may also be used, either flat or folded braid can be used in straight
SUOMI TERENAUHAN KIINNITYSJALKA Aseta terenauha kankaiden väliin kaikki reunat vastakkain. Ompele sauma aivan teren vierestä jolloin vain tere näkyy kankaan oikealla puolella. Ohjaa ompelua kuvan mukaisesti. ( , Jalan pohjassa oleva tereura helpottaa ohjaamista. Terenauhaa voit käyttää koristeena
ENGLISH GATHERING/SHIRRING FOOT 1. Tension settings for gathering : Left needle 4 Right needle 4 Upper looper 4 Lower looper 4 Differential feed 2.0 stitch length 4 2. Replace regular presser foot with gathering foot. 3. Clip both fabric layers approximately 5/8″(1.5 cm.) inside and 1 1/2″(4 cm.)
SUOMI RYPYTYSJALKA 1. Koneen säädöt Vasen neula Oikea neula Yläsieppari Alasieppari 1. 4 4 4 4 : Differentiaalisyöttö 2.0 Ommelpituus 4 -4 -4 -4 -4 2. Vaihda rypytysjalka koneeseen. 3. Leikkaa kangasta (kts kuva) n. 1,5 cm, että saat kankaat paininjalan alle neuloihin saakka, silloin n. 4 cm jää
ENGLISH NEEDLE THREADER 1. Feed the thread through the thread guide of needle clamp as illustrated. Raise the presser foot. Raise the needle bar to highest position, and pull the thread leaving about 4 (10 cm) clear. 1 3 2 5 4 2. Lower the presser foot. set the needle threader ensuring the hooking
SUOMI LANGANPUJOTIN 6 1. Vedä lanka neulatangossa olevaan langanohjaimeen. (Kts kuva) Nosta paininjalka. Nosta neulat lähes korkeimpaan asentoon ja vedä lankaa n. 10 cm. 1. 2. Laske paininjalka. Aseta langanpujotin kuten kuvassa. 2. 3. Pidä lanka ja langanpujotin kädessäsi. Käännä pujotinta kuten
ENGLISH SUOMI This appliance complies Sähkömagneettinen with EEC Directive yhteensopivuus EEC-direktiivin 89 / 336 / EEC covering the 89/336/ electromagnetic compatibility. EEC mukainen. 89/336/ . Part No. 69881 7 / 97
Просмотр
Доступно к просмотру 70 страниц. Рекомендуем вам скачать файл инструкции, поскольку онлайн просмотр документа может сильно отличаться от оригинала.
-
ENGLISH SUOMI NEDERLANDS
-
Radiohairiot on vaimennettu EEC direktiivin 89/336/EEC 89/336/EEC. MKDOGECO %GW IGMKDON C FMKEKLNDOECU. Kun konetta ei kayteta, katso ettei siina ole virtaa, eika se ole lasten ulottuvilla. Tutustu koneen saatoihin ja varusteisiin ennen ompelun aloittamista. Irrota aina pistoke seinapistorasiasta, ennen kuin vaihdat lampun. Kayta aina oikean tyyppisia neuloja ja vaihda riittavan usein. G OGS U WKVFO TON FSGQGZT ZG HUMGLC-IUVFL[OKIU C U SUOMI Kun poistut koneen aaresta, huollat sita tai vaihdat osia tai lisavarusteita, irrota koneen Koneen puhdistusta ja voitelua lukuunottamatta, jata korjaukset ja huollot ammattimiehelle. -GZZKU CQMULCU DUIOCBCXCIKEGZK 6KDDOGZMGIOKW )KDDCC ZG DKKOEUODOECU OIU KEGZC[W ZKIWGOCEZT MKSFWUZOKE 6+$/ 27570.0-87, 6+$/ 27570.22-89, %T HICK IULC TOKEF JEURZF WGJCZF ?DOGIURJUR [HKZDSKR BCIWT ? :GHKWCZGUW %GW , YOK HIC HKLNQKEGZCC ? JEURZKR WGJCZKR ZUK KMCWK HIC HIKEUMUZCC IUWKZOG, DZ[OCC SITJUS, QGWUZU LGWHT ZGSGLCEGZC[ (WGSD. WKJZKDON ? 1 ? ? DIKS DLF T JEURZKR WGJCZT - 7 LUO DK MZ[ HKSFHSC. 6+$/ 23511-79, 6+$/ ) 50033-92. **(IUMHIC[OCUW-CQVKOKECOULUW FDOGZKELUZT : ?. :GMUUWD[, YOK IG KOG ZG OKR WGJCZU DK L MGON?DLUMF PCU WUIT HIUMKDOKIK ZKDOC : FHGSKEKYZKW HGSUOU ZG ? CZKDOIGZZKW [QTSU. mukaisesti. YLEISIA OHJEITA Lue ohjekirja huolellisesti. pistoke pistorasiasta. * ? DIKS VGIGZOCC - 1 VKM ? ?;VFGI 3K., ,/-. ? IKQUOSC. ? SDHLFGOGXCC, ? "When using an electrical appliance, basic safety precautions should always be followed, including "IMPORTANT SAFETY INSTRUCTIONS" To reduce the risk of electric shock: " "This sewing machine should never be left unattended when plugged in. Always unplug this To reduce the risk of burns, fire, electric shock, or injury to "Do not allow to be used as a toy. Close attention is necessary when this sewing machine is "Use this sewing machine only for its intended use as described in this manual. Use only "Never operate this sewing machine if it has a damaged cord or plug, if it is not working properly, if it has been dropped or damaged, or dropped into water. Return ENGLISH "Read all instructions before using this sewing machine." sewing machine from the electric outlet immediately after using and before cleaning." "Always unplug before replacing light bulb. Replace bulb with same type rated 15 watts." persons: " attachments recommended by the manufacturer as contained in this manual." "Never drop or insert any object into any opening." "To disconnect, turn switch to the off ("0") position, then remove plug from outlet." "Do not unplug by pulling on cord. To unplug, grasp the plug, not the cord." "Never sew with the following." "DANGER- 1. 2. "WARNING- 1. used by or near children." 2. 3. or mechanical adjustment." 4. cloth." 5. "Do not use outdoors." 6. 7. administered." 8. 9. 10. needle." 11. "Do not use bent needles." 12. 13. 14. 15. "CAUTION- the electromagnetic compatibility. -
1 cc
?  46 - 47
??? 58- 59
??????????? ??????????? ???????????? 4 - 5 ???????????? ?????????????? ????????????? ????????????? ????????????? ????????????12 - 13 ???????????  ????????????14 - 17 ????????????  ??????????????? ??????????????  ???? 26 - 27  ????  ???  ???  ???  ???  ??  ?? ????????? 36 - 38 ????????  ????? 40 - 41  ?????  ????? 40 - 41 ?????  ???????? ???????? ?????????? 44 - 45 ?????????? ?????????????????  44 - 45  ?  ????  ???? ???????????? 46 - 47 ????????????  ??  ?? ?????????? 50 - 51 ?????????? ?????????????? 52 - 53 ?????????????  ??  ?  ???  ???  )????
$KDOGEZTU YGDOC WGJCZT???????????? 2 - 3 :G KI  HICZGMLU ZKDOUR????????????? (KMSL YUZCU  WGJCZT?????????????? 6 - 7 (KMVKOKESG  S  JCON ??????????????  8 - 11 ,KOKS  ML[  D KIG  K IUQC??????????? QGECDCWKDOC  KO  WGO LG???????????? 1GHIGESG  ZCOKS???????????????? 18 - 23 ??????????????? ??????????????? (KLUQZTU  DKEUOT ???????????????  24 - 25 (IKEUISG  SGYUDOEG  KEUILKYZKR  DOIKYSC ???? 3GIOG  ZGLGMSC????????????????  28 - 30 ???????????????? ??????????????? 1-   ZCOKYZTR  KEUILKYZTR  JKE  D 1  CVLKR????  36 - 37 (UIU KM  S 2-   ZCOKYZKWF  JEF
1GWUZG  CVLT HKM KI  CVKL  C  ZCOKS  E   *CONU  [ ULT   OSGZUR,  ZUDSKLNSC    ?  ?  ?   (  HA1  1 ? 5  WW  8  SV  G EVMU QCRSLWZKHIDOFB XYJP TN  [
?                              +DZKEZTU  KHUIGXCC  ?  ?                                          ' %6-5 1#23,7:+()$/&"
???? 12 - 13  ??  ?  ?               ????? 52 - 53                       7+-5,.  XCDLK ZCOKS  ICICZG K WUOSC  #VL4  -LCZG DOU SG  $SKIKDON JCON[  6G GICO4  7GDDG
?????????????????? ?????????????????? ???????????????????? 4 - 5 ??????????????????? ?????????? ?????????? ?????????????????? 8 - 11 ??????????????????  ??? ????????? 12 - 13 ?????????  ??  ??????????????????? ?????????????????? ????????????????? 26 - 27 ???????????????? ????????????????? 28 - 30 ????????????????  ???? ???? ????????????? 36 - 38 ?????????????  ??????????????? ???????????????  ????????? ????????? ????????  42 - 45 ???????? ???????????? 44 - 45 ???????????? ????????????? 46 - 47 ????????????? ??????????????? 48 - 49 ???????????????
SUOMI     Koneen osat ??????????????????? 2 - 3 Varusteet ???????????????????? Koneen asettaminen ompeluun??????????? 6 - 7 Lankateline??????????????????? Roskakaukalon asettaminen, Kankaan ohjain??? Lankaleikkuri, Paininjalan vaihto????????? Neulan asettaminen, Neulat, Langat ja Kankaat ??? 14 - 17 Langoitus ???????????????????  18 - 23 Ompeleminen????????????????? Koneen saadot???????????????? 3-Lanka ommel, 2-Langan ommelmuunnin????? 32 - 33 Kapea yliluottelu, Rulla paarme ja simpukka reuna??34 - 35 Langankireyden saato?????????????? Pistonpituuden saat
SISALLYSLUETTELO  KONE  1.  OMPELUN ALOITTAMINEN  2.   KONEEN HUOLTO  3.  4.  5.     ERITTELY KONEISTA  MALLI  Lankojen maara  LeikkuuleveyS  Neulat  PiSton pituuS  NopeuS piStoa/min  Koneen mitat  8 kg  Paino
?????????????????2 - 3 ????????????????   ?????????????? ????????????? ????????????? ???????????? ?????????? 12 - 13 ??????????  ??????? ???????  ????? 14 - 17  ?????  ????????????? 18 - 23 ????????????  ?????????? ?????????  ??????? 32 - 33 ?????? ?????????? 32 - 33 ?????????? ????????  34 - 35 ???????? ???????????? 36 - 38 ????????????  ??????????? 40 - 41 ?????????? ???????????????? 42 - 45 ???????????????? ????????????? ?????????????  ???????????? 44 - 45 ????????????  ?? 46 - 47  ?? ?????????????? 48 - 49 ?????????????? ?????????????? 48 - 4
ENGLISH   Identification chart???????????????? Accessories??????????????????? 4 - 5 ??????????????????? ?????????????????? Setting up your machine??????????????  6 - 7 Preparation for threading????????????? 8 - 11 Lint tray, Cutting width gauge??????????? Thread cutter, Changing presser feet???????  12 - 13 Changing needle, thread and fabric chart????? Threading your machine????????????? Helpful hints?????????????????? 24 - 25 ????????????????? ????????????????? Testing stitch overlock stitches?????????? 26 - 27 Setting chart ?????????????????? 28 - 30 ???
TABLE OF CONTENTS  KNOWING YOUR MACHINE  1.   STARTING TO SEW  2.  Adjusting stitch length, Adjusting overedge   Sewing with extra heavyweight fabric   Basic techniques  CARING FOR YOUR MACHINE  3.  4.  5.  SPECIFICATION OF MACHINE  MODEL  Number of threadS  Overedge Stitch width  Needle  1 - 5 mm Stitch length  Stitching Speed  DimenSionS  Weight
- 1
- 2
- 3
- 4
- 70
Kansai Special RX-9803PLK 1/4 (6.4)
Kansai Special RX-9803-PMD
Kansai Special WX-8804D 6,0
ansai Special WX-8803EMK 1/4 (6,4)
Kansai Special WX-8803D-UF/UTC-E 7/32(5.6) (+серводвигатель I90M-4-98)
Kansai Special WX-8803D-UTC-A 7/32(5.6) (+серводвигатель I90M-4-98)
Kansai Special WX-8803D-UTC-E 1/4(6.4) (+серводвигатель I90M-4-98)
Kansai Special WX-8803D-UTC-E 7/32(5.6) (+серводвигатель I90M-4-98)
Kansai Special WX-8803D-UTC-А 1/4(6.4) (+серводвигатель I90M-4-98)
Kansai Special WX-8803DW 1/4″ (6,4мм)
Kansai Special WX-8803DW 7/32″ (5,6мм)
Kansai Special WX-8803D-WD 7/32″ (5,6мм)
Kansai Special RX-9803ALK/UTC-A 1/4(6,4)(+серводвигатель I90M-4-98)
Kansai Special PX301-2S
Kansai Special NW-8804GD-UTE(6,0)+GD60-3-KR-220
Kansai Special NW-8803GD 1/4″ (6,4мм)
Kansai Special RX-9803ALK-UTC-A/+серводвигатель I90M-4-98)
Kansai Special WX-8803F 3/16″ (4,8)
Kansai Special RX-9803PEHK 7/32(5.6)
Kansai Special NFS-6604GLM-DD-60+CS2 (комплект)
Kansai Special NFS-6604GMH-DD-60+CS2 (комплект)
Kansai Special NW-8803GD/UTE 7/32 (5,6) (+серводвигатель I90M-4-98)
Kansai Special NW-8803GMG/UTA 1/4(6.4) (+серводвигатель GD60-9-KR-220)
Kansai Special RX-9803A (4,8) -UTC-Е/Efka DC1550/AB321
Kansai Special NW-8803GF 7/32 (5,6)
Kansai Special RX-9701JKansai Special NW-8803GF 7/32 (5,6)
Kansai Special WX-8803F 7/32″ (5,6мм)
Kansai Special WX-8803F 1/4″ (6,4мм)
Kansai Special WX-8803D-UF/UTC-E 1/4(6.4) (+серводвигатель I90M-4-98)
Kansai Special WX-8803D-UF 1/4(6.4)
Kansai Special WX-8803D 7/32″ (5,6мм)
Kansai Special WX-8803D 1/4 (6,4мм)
Kansai Special WX-8803CLW 7/32 (5,6мм)
Kansai Special NW-8803GCL/UTE 7/32(5.6) (+серводвигатель I90M-4-98)
Kansai Special WX-8803EMK 7/32″ (5,6мм)
Kansai Special WX-8803F-UF 1/4″ (6,4мм)
Kansai Special WX-8842-1GCS1 2,4-6,4
Kansai Special WX-8842-1
Kansai Special WX-8803-1S 7/32-4 мм
Kansai Special DX-9902-3ULK/UTC (комплект)
Kansai Special FSX-6604MH-DD-60 (комплект) без обрезки нити
Kansai Special FSX-6604MH-DD-60+CS2 (комплект)
Kansai Special NC-1103GA 1/4 (6.4)
Kansai Special NC-1103GA 7/32(5.6)
Kansai Special NC-1103GCL/UTA 7/32″ (5,6) (+серводвигатель I90M-4-98)
Kansai Special NC-1103GCL 7/32 (5,6)
Kansai Special NC-1103GCL/UTE 7/32″ (5,6) (+серводвигатель I90M-4-98)
Kansai Special NC-1103GDA 1/4″ (6.4)
Kansai Special NC-1103GDA 7/32″ (5,6)
Kansai Special NM-1001J
Kansai Special NM-1001JCD-UNC-A (I90M-4-98-220)
Kansai Special NR-9803GA 1/4
Kansai Special NR-9803GA 7/32
Kansai Special NR-9803GALK 1/4
Kansai Special NR-9803GALK 7/32
Kansai Special NR-9803GALK/UTЕ 1/4″ (6,4) (+серводвигатель I90С-4-98)
Kansai Special NR-9803GALK/UTA 1/4(6,4) (+серводвигатель GD60-9-KR-220)
Kansai Special NR-9803GALK/UTЕ 7/32″ (5,6) (+серводвигатель I90С-4-98)
Kansai Special NR-9803GA/UTA 1/4″ (6,4) (+серводвигатель GD60-9-KR-220)
Kansai Special NR-9803GA/UTA 7/32″ (5,6)
Kansai Special NR-9803GA/UTE 1/4″ (6,4)
Kansai Special NR-9803GD 7/32
Kansai Special NR-9803GMG 1/4
Kansai Special NR-9803GA/UTЕ 7/32″ (5,6)
Kansai Special NR-9803GP 7/32
Kansai Special NR-9803GPEHK 7/32″ (5,6)
Kansai Special NR-9803GPEHK/UTA 7/32″ (5,6) (+ сервопривод)
Kansai Special NR-9803GPEHK/UTA 1/4(6,4) GD60-9-KR-220
Kansai Special NR-9803GPGHK/UTA 7/32″ (5,6) (+I90C-4-98-220)
Kansai Special NR-9803GPLK/UTA 7/32″ (5,6) (I90M-4-98-220))
Kansai Special NR-9803GPMD 7/32
Kansai Special NR-9804GD 6,0мм
Kansai Special NW-8803GD 7/32″ (5,6мм)
Kansai Special NW-8803GD/UTA 1/4»(6.4) (+серводвигатель GD60-9-KR-220)
Kansai Special NW-8803GD/UTA 7/32 (5,6) (+серводвигатель GD60-9-KR-220)
Kansai Special NW-8803GD/UTE 1/4(6.4) (+серводвигатель I90M-4-98)
Kansai Special NW-8803GF 1/4 (6,4мм)
Kansai Special NW-8804GD 6,0
Kansai Special PX302-4W
Kansai Special PX302-5W
Kansai Special RX-9802A 5/32″ (4,0)
Kansai Special RX-9803A (4,8) -UTC-Е
Kansai Special RX-9803A 1/4″ (6,4)
Kansai Special RX-9803A 7/32″ (5,6)
Kansai Special RX-9803ALK/UTC-A 7/32(5.6)(+серводвигатель I90M-4-98)
Kansai Special RX-9803D 1/4″ (6,4)
Kansai Special RX-9803D 7/32″ (5,6)
Kansai Special RX-9803P
Kansai Special RX-9803PMD 7/32
Bieffe Automatic Vapor BF048C2
Bieffe Automatic Vapor BF048CE
Bieffe Automatic Vapor BF425S02
Bieffe Baby Vapor BF001BE(2л)
Bieffe Baby Vapor BF010BE(2л)
Bieffe Magic Vapor BF005BE(2,4л давление 5 bar)
Bieffe Magic Vapor BF052BE(1,5л)
Bieffe Maxi Vapor BF003CE(3,5л)
Bieffe Maxi Vapor BF004CE(3,5л)
Bieffe Maxi Vapor BF014CETRS(3,5л давление 4,5 bar)
Bieffe Maxi Vapor BF015CETRS(5л давление 4,5 bar)
Bieffe Maxi Vapor Plus BF03PCE(5л)
Bieffe Maxi Vapor Plus BF04PCE(5л)
Bieffe Scarpa Vapor BF4250000S (обувной)
Bieffe Stir Vapor BF054BE(1,5л)
Bieffe Super Vapor BF072CE(2,4л)
Bieffe Super Vapor BF073CE(2,4л)
Bieffe Maxi Vapor BF017CE(6,5л давление 4,5 bar)
![]()
Download Article
![]()
Download Article
The affordable price and straightforward features of mini sewing machines make them a great choice for sewers and crafters of all ages and skill levels. Whether you’re learning how to sew on a mini sewing machine, or you’re using a mini machine as an alternative to a heavier-duty machine, you’ll enjoy the ease and portability of your new sewing tool. You’ll want to refer to the instruction manual to familiarize yourself with the correct process for threading your machine and adjusting the settings. In general, though, you’ll thread and operate your mini machine much like you would a standard machine.
-

1
Place a spool of thread on the thread spindle. Some mini sewing machines have retractable thread spindles (vertical metal or plastic posts on the top-right of the machine). Fully extend the thread spindle by pulling it directly upwards. Then, slide a spool of thread onto the spindle.[1]
- Some mini sewing machines feature a secondary bobbin spindle on the front of the machine, towards the right side. You can place a bobbin here instead of using a full-sized spool for the top thread.
- To use this secondary bobbin spindle, remove the cap and slide the bobbin onto the post. Then push the cap back on so the bobbin clicks into place securely.[2]
- Keep the machine turned off while you thread it to avoid any accidents.
-
2
Wind an empty bobbin to fill it up with thread. Find an empty bobbin that’s compatible with your machine. With the spool of thread positioned on the thread spindle, wrap the loose end of the thread around the central post of the bobbin about 4 or 5 times in a counterclockwise direction. Press the bobbin onto the winding post, which is in the center of the hand wheel on many mini sewing machines.[3]
Hold the thread out with your hands, turn on the machine, and press down on the foot pedal.- Guide the thread from side to side so it fills up around the entire post of the bobbin.[4]
- When the bobbin is completely full, cut the thread to separate the bobbin from the spool.
Advertisement
- Guide the thread from side to side so it fills up around the entire post of the bobbin.[4]
-
3
Guide the loose end of the thread through threading mechanisms. The threading procedure for each sewing machine is slightly different, but you can pinch the end of the thread to guide it along, as directed by your machine’s instructions. Usually, you’ll pass the thread through a series of holes or hooks called thread guides along the way.
- With most machines, you’ll push the thread through one loop and then pull it firmly between two tension disks.[5]
- After this, you’ll direct the thread through a hole or hook on the take-up lever, which moves up and down and is located on the left half of the machine, above the needle.[6]
- Finally you’ll draw the thread down towards the needle, often passing through a hole below the take-up lever and another right above the needle.[7]
- With most machines, you’ll push the thread through one loop and then pull it firmly between two tension disks.[5]
-
4
Pass the thread through the eye of the needle. Once the machine is threaded correctly, you’ll direct the end of the thread through the hole (called the eye) in the tip of the machine’s needle. Use the hand wheel to bring the needle to its highest point. Then push the thread through the eye from front to back or left to right, depending on the position of the needle.[8]
- Refer to the machine’s instructions if you’re not sure which direction to thread the needle.
- Trim the end of the thread so that it’s smooth and not frayed, and wet it with your tongue to keep the fibers together.
- Once the needle is threaded, tug about 5 in (13 cm) of thread towards the back. This will prevent it from slipping back through the eye as you begin moving the machine’s mechanisms.
-
5
Drop the bobbin into the bobbin compartment. Slide off the cover to the bobbin compartment first. Pick up the bobbin and press it into the bobbin-shaped chamber. The bobbin should be sitting horizontally in the compartment, with the thread winding around it in a counterclockwise direction.[9]
You’ll usually need to slip the bobbin thread behind a narrow strip of metal or plastic to keep it in alignment, but check the machine’s threading instructions for guidance.- The cover is a thin plastic piece that rests on top of the bobbin compartment. Slide it off, either towards the left (if the bobbin compartment is to the left of the needle) or towards you (if the compartment is directly in front of the needle).[10]
- The bobbin thread should match the color and fiber content of the top spool of thread you’re using.
- The cover is a thin plastic piece that rests on top of the bobbin compartment. Slide it off, either towards the left (if the bobbin compartment is to the left of the needle) or towards you (if the compartment is directly in front of the needle).[10]
-
6
Turn the hand wheel to lower the needle so it catches the bobbin thread. Hold the loose ends of the bobbin thread and the spool of thread together in your left hand. Use your right hand to turn the hand wheel (on the right side of the machine) towards you.[11]
This will move the needle down and the top thread will catch the bobbin thread.- Pull the loose ends of thread until there’s about 5 in (13 cm) of each strand extending past the needle before you turn the hand wheel.
- If your machine has a thread channel next to the bobbin compartment, you can slip both threads into this channel to line them up while you turn the hand wheel.[12]
Make sure you’re still holding the loose ends firmly.
-
7
Pull the loop of bobbin thread out above the feed dogs. Keep turning the hand wheel to bring the needle back up. It will pull a loop of bobbin thread up through the gap between the feed dogs (metal bars featuring a toothy texture). Tug on this loop out so that the loose end of the bobbin thread comes out of the bobbin compartment.[13]
- You can gently pull the top thread upwards to expose the loop so it’s easier to grab onto.
- Pull the loose ends of both threads towards the back of the machine, passing them under the presser foot.[14]
Now you have a correctly-threaded machine! - Slide the bobbin compartment cover back into place when you’re done.


Advertisement
-
1
Add batteries to the machine or plug it into an external power source. If your mini sewing machines takes batteries, look at the manual to determine which type and quantity to use.[15]
If your machine uses a power cord, plug the pronged end of the power cord into the power source. Plug the other end into the correct slot (it’s usually labeled) on the lower-right side of the machine.[16]
- Keep the machine turned off as you connect it to its power source to prevent any accidents.
-
2
Plug in the foot pedal and place it on the floor. The foot pedal jack connects to another slot on the right side of the machine. It’s usually labeled and will be located near the slot for the power cord.[17]
With your machine situated on your work table, and your chair set up in at the table, position the foot pedal on the floor. Your right foot should be able to comfortably reach and press the pedal.- The narrow end of the pedal should be closest to you.
- Think of the foot pedal like the gas pedal of a car. When you press it, the machine will run.
-
3
Position your fabric under the raised presser foot and needle. Turn the hand wheel towards you to raise the needle to its highest position. Then, push the presser foot lever upwards with your left hand to raise the presser foot. The lever can usually be found on the back of the machine.[18]
With both mechanisms lifted, slip the edge of the fabric underneath the presser foot. Center the fabric you want to stitch directly under the needle.[19]
- It’s helpful to start with a test scrap of fabric before moving onto your project.
- Align the fabric so that only about 1⁄2 in (1.3 cm) of fabric extends past the needle. The end of the fabric should align with the back side of the presser foot.[20]
- If you don’t have enough fabric past the needle to begin with, it might get sucked down between the presser feet. This will jam up the machine.
- You should never sew directly over pins. Remove any pins as you go, before sewing the seam.
-
4
Lower the presser foot and needle. Push the presser foot lever downwards so that it comes into contact with the fabric.[21]
Then turn the hand wheel to lower the needle into the fabric.[22]
- Before you begin stitching, hold onto the loose ends of both threads, gently pulling them them taut towards the back of the machine. This will ensure your stitching gets off to a good start and that the machine doesn’t come unthreaded.
-
5
Apply steady pressure to the foot pedal to begin sewing. Once the machine is correctly threaded and the fabric is in place, you can turn the machine on using the power switch. Press the foot pedal with your right foot, as you would press the gas pedal on a car, to engage the machine and begin stitching.[23]
- The fabric will move away from you, towards the back of the machine.
- Use your hands to gently guide the fabric, but keep them well away from the needle for safety.
- You can press the backstitch button or lever (usually located on the front of the machine) to make a few stitches in the opposite direction. Do this at the start and end of your row of stitches to prevent them from unraveling.
-
6
Lift up the presser foot and needle before pulling out the fabric. When you’re done stitching, turn the hand wheel towards you to raise the needle out of the fabric. Pull up the presser foot lever to lift the presser foot as well.[24]
With the fabric freed up, you can pull it out from under the machine’s mechanisms.- Move the fabric gently, since the threads are still connected.
- You also don’t want to tug on the fabric too hard as this could break the needle.
-
7
Cut the threads loose. Some machines have a small blade called a thread cutter on the left side or the back of the machine. Pull both threads taut over the blade and tug firmly to cut it.[25]
Alternatively, you can use a pair of snips or scissors to trim the thread.- Trim the thread as closely to the fabric as you can for the neatest finish. This will also help prevent the thread from coming out of the needle, so you’ll be ready for your next stitching project.[26]
- Trim the thread as closely to the fabric as you can for the neatest finish. This will also help prevent the thread from coming out of the needle, so you’ll be ready for your next stitching project.[26]


Advertisement
-
1
Turn the tension dial to get even stitch tension. If you notice your top row of stitches is loose and loopy, twist the tension dial clockwise to tighten the tension on the top thread.[27]
If you have the opposite problem, with tight top stitches and loose bottom stitches, turn the tension dial counterclockwise to loosen the tension on the top thread.[28]
- The tension dial controls the tension disks that you sandwiched the top thread between when you threaded the machine. Sometimes it will feature numbers to indicate which tension setting you’re using.
- If you’re switching between thin fabric and thick fabric or bulky layers of material, you’ll likely need to adjust the tension. It’s always useful to do a test row of stitches on a scrap piece of your fabric to see if you need to adjust the tension.
-
2
Select a high or low speed setting. Although you can control the up-and-down movement of the needle by pressing the foot pedal, you can choose whether you want the needle to move quickly or slowly with the speed setting. Many mini sewing machines come with a button for controlling this. If you push the button inwards, it’ll select the low speed setting, and if you leave it outwards, it’ll operate on the high speed setting.[29]
- Other machines have a side-to-side switch or a numbered speed setting. Check the machine’s manual to for instructions on how to control your machine’s speed.
-
3
Choose a stitch type and length. Some mini sewing machines come with additional features that let you choose between straight, zig-zag, and decorative stitches as well as short, medium, and long stitch lengths. Typically these can be controlled by twisting a dial which is printed with each stitch type, as well as another dial or switch that selects the stitch length.
- Refer to your machine’s manual for the full range of settings.
- Select the stitch type and length before you begin sewing, not while you’re sewing.


Advertisement
Add New Question
-
Question
What do I do if the thread is knotting on my fabric?

Andrea Beaulieu is a Professional Tailor, Fashion Designer, and the Owner of MOORE, a Brooklyn, New York based storefront and apparel workshop for gender-neutral, contemporary streetwear as well as custom-tailored products. Andrea has over 20 years in the fashion design and marketing industries and specializes in pattern making, draping, and the construction of garments. She holds a BS in Fashion Design and Merchandising from the University of North Carolina at Greensboro.
Professional Tailor & Fashion Designer
Expert Answer
If the thread is knotting on the bottom of your fabric, adjust the upper tension. If the thread is knotting on the top, adjust the bobbin.
-
Question
Why am I having trouble threading the bobbin?
Andrea Beaulieu is a Professional Tailor, Fashion Designer, and the Owner of MOORE, a Brooklyn, New York based storefront and apparel workshop for gender-neutral, contemporary streetwear as well as custom-tailored products. Andrea has over 20 years in the fashion design and marketing industries and specializes in pattern making, draping, and the construction of garments. She holds a BS in Fashion Design and Merchandising from the University of North Carolina at Greensboro.
Professional Tailor & Fashion Designer
Expert Answer
The tension and bobbin are the most challenging parts of the machine to master, so be patient with yourself and your machine. Make sure to read through the manual before you start, and keep it handy in case you need to do any troubleshooting.
-
Question
Can you make clothes with a mini sewing machine?
This answer was written by one of our trained team of researchers who validated it for accuracy and comprehensiveness.
wikiHow Staff Editor
Staff Answer
Yes, you can! The main drawbacks of mini sewing machines are that they break more easily than full-sized ones and have a harder time handling thick fabrics, like denim and leather.


See more answers
Ask a Question
200 characters left
Include your email address to get a message when this question is answered.
Submit
Advertisement
Video
-
Use the same safety precautions with a mini sewing machine as you would with any other power tool or electrical appliance. Keep it away from water, turn it off and unplug it while it’s not in use, and use your common sense to prevent accidents.[30]
-
Machine needles can easily break if they strike something or are tugged too hard. Do not sew directly over pins and refrain from yanking the fabric as it runs through the machine.[31]
Advertisement
About This Article
Thanks to all authors for creating a page that has been read 191,734 times.
Did this article help you?
http://www.nikmasw.ru/instrukcii-po-remont…ny-brother.html
инструкции для зингера : http://www.singerco.com/accessories/instruction-manuals
старые инструкции англ : http://www.sil.si.edu/DigitalCollections/T…s/NMAHTEX/0873/
инструкция на китайский оверлок GN
http://www.transmetall.ru/upload/instrykcii/JACK/JK-GN1.pdf
Возможно здесь найдется инструкция к Вашей машинке:
http://www.krungprom.ru/manuals.php
http://www.sewing-world.ru/articles/
http://www.swdiscount.ru/articles/
http://www.knit.ru/index.php?ext=content&a…g=1&pid=410
http://www.freemanual.ru/?lang=0&producer=75
http://ukrsewing.com/load
—————-
бесплатно
http://www.elfort.ru/manual.php?firm=janome
бесплатно или за 5$
——————————
http://season.ru/kachat/1_oborudovanie/
Инструкции к машинам и оверлокам
· Коверлок Pfaff 4872 5 Мб murzik
——————————
Пожалуйста, пролистайте всю тему, возможно найдете в ней инструкции к своим машинкам и оверлокам или сможете поделиться своими инструкциями!
————————————
инструкция к «чайке 132 м » : http://witchy.gallery.ru/watch?ph=TNa-bQ4Nq
——————-
Инструкции по эксплуатации на швейные машины и оверлоки BERNINA
http://www.bernina.ru/news_search-n196-sRU.html
————————
швейная машина Радом : http://picasaweb.google.com/max.kmb/Radom432
————————
инструкции и комплектации : http://www.shveimash.spb.ru/big.php?id=598
————————
Мята :
Инструкция к оверлоку Орша МБК-1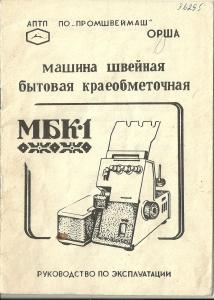
————————
швейная машина Веритас http://omsksewing.narod.ru/BEPITAS_8014_35.htm
————
инструкция на скорняжку ,от Jioti : http://club.season.ru/index.php?s=&sho…st&p=322985
Gallla : много инструкций ,вязальное и швейное оборудование : http://ukrsewing.com/load/instrukcii_k_vja…_silver_reed/11
инструкция Джаноме 6260: http://sewing-machines.ru/manuals/janome_6260-manual.htm
инструкции на пром оборудование : http://www.transmetall.ru/upload/instrykcii/JACK/
инструкция :Сервопривод для пром машины http://www.transmetall.ru/upload/instrykcii/JACK/FDM.doc
Добавьте к списку пожалуйста mcgrp.ru постоянно пополняется каталог инструкций по машинкам и все бесплатно
Ingnar :Вот еще один сайт с инструкциями для швейных машин
http://remontshveynih.ucoz.com/forum/7
инструкция Джуки Е 80 http://gruppa1304.ucoz.ru/load/instrukcii_…_e80/46-1-0-119
заправка скорняжки :
инструкция Бразер Комфорт 15http://mineznaem.ru/main/instrukciya/comfort-15
инструкции для пром машин http://club.season.ru/index.php?s=&sho…st&p=738691
PFAFF 7570 творческих Инструкция Книга Страница http://www.manualslib.com/manual/504979/Pf…page=121#manual
инструкции Пфаффа -автопереводчик переводит , http://www.manualslib.com/brand/pfaff/sewing-machine.html (там много инструкций на разную технику , но смотрите при помощи автопереводчика- что то переводится — что то нет
Инструкция к Radom-432 в хорошем качестве.
http://club.season.ru/index.php?s=&sho…st&p=766132
тут есть инструкции http://overlock.com.ua/p/computerized-66,view,67,55.html