MAIN FEATURES


RADIO RECEPTION SIGNAL 
Indicates the condition of radio reception
[  ] BUTTON
Enables or disables the snooze function when an alarm goes off or activates the backlight and projector for five seconds
TWO-LINE DISPLAY
Displays the local time and second time zone in four selectable modes
ZONE ICON [ ![]() ]
]
Appears when the second time zone is displayed
ALARM ICONS [ ![]() ]
]
Appear when the respective alarm is activated
PROJECTOR
For projecting the current time on the wall or ceiling
FOCUS KNOB
Adjusts the focus of the projector
PROJECTION ON SWITCH
Used with the power adapter to enable extended use of the projector
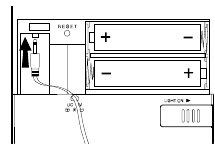
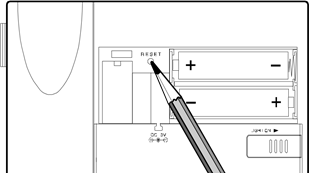
BATTERY COMPARTMENT
Accommodates two UM3 or «AA» size batteries for operation
UP [ ![]() ] AND DOWN [
] AND DOWN [ ![]() ] BUTTONS
] BUTTONS
Increases or decreases the value of a setting
[  ] BUTTON
Sets the time for the alarms
[  ] BUTTON
Enables or disables the alarms
[ MODE/SET ] BUTTON
Toggles the display modes and confirms entry while setting the values for display
BATTERY INSTALLATION
- Slide open the battery compartment on the back of theunit.
- Insert two UM3 or «AA» size batteries.

- Replace the battery compartment door.

Under normal circumstances, the batteries are good for 1 year. However, the battery life can be reduced vastly by frequent use of the backlight, projector and snooze function.
Replace the batteries when Low battery indicator appears on the the LCD display.
HOW TO USE THE PROJECTOR
- Keep pressing the [
 ] BUTTON.
The backlight and projector will turn on. - Adjust the angle of the projector for a good projectionon the wall or ceiling.
- Use the FOCUS KNOB to adjust the focus of theprojection.
After the projector is adjusted, to use the projector, simply press the [  ] BUTTON once. The projector will come on for five seconds before automatically switching off.
HOW TO USE THE PROJECTOR POWER ADAPTER
Your unit comes with a power adapter so you can use the projector for extended period of time.
To install the adapter:
- Slide open the battery compartment.
- Plug the adapter into the adapter socket.
- Replace the battery compartment door.
- Making sure the voltage is correct, plug the other endof the power adapter into a free wall socket.
Once the power adapter is in place, you can select to turn on the projector for a longer period of time, such as throughout the night, by sliding out the LIGHT ON SWITCH on the back of the unit. To turn off the projector, slide the switch back.
Note that this switch can only be used with the power adapter installed. For momentary projection, use the BUTTON
HOW TO USE THE BACKLIGHT
Press the [] BUTTON once. The backlight will be turned on for five seconds.
DISPLAY MODES
The RM318P supports four display modes in the sequence of:
MODE 1.
Hour-Minute-Second (of local time)
——————————————
Day-Month (of local time)
MODE 2.
Hour-Minute-Day-of-the-Week (of local time)
—————————————-
Day-Month (of local time)
MODE 3.
Hour-Minute-Day-of-the-Week (of local time)
——————————————
Hour-Minute (of second time zone)
MODE 4.
Hour-Minute-Day-of-the-Week (of second time zone)
—————————————
Day-Month (of second time zone)
Each press on the [MODE] BUTTON will toggle the display in the above order.
Note that the second line of the display will be replaced by the alarm time if the [] BUTTON is pressed.
ABOUT RADIO RECEPTION — DCF77
The RM318P is designed to automatically synchronize its clock once it is brought within range of the Frankfurt DCF77 radio signal. It will scan and adjust every full hour.
When the RM318P is within range, its radio-control mechanism will override all manual settings. Time will start to run from 00:00:00 and date, 1-1 (January 1), Monday.
When the unit is receiving radio signal, the RADIO RECEPTION SIGNAL will start to blink. A complete reception generally takes about 2 to 10 minutes, depending on the strength of the radio signal. After that, the hourly scanning will only take a few seconds.
When the reception is complete, the RADIO RECEPTION SIGNAL will stop blinking. The strength of the reception for the last full hour will be indicated.
For better reception, place the clock away from metal objects and electrical appliances to minimize interference.
If you wish to disable the auto-reception feature, press the [ ![]() ] BUTTON for three seconds. The RADIO RECEPTION SIGNAL will disappear. The unit will not respond to radio signals.
] BUTTON for three seconds. The RADIO RECEPTION SIGNAL will disappear. The unit will not respond to radio signals.
To enable the feature again, press the [ ![]() ] BUTTON for three seconds. The RADIO RECEPTION SIGNAL will start blinking to initiate reception automatically.
] BUTTON for three seconds. The RADIO RECEPTION SIGNAL will start blinking to initiate reception automatically.
HOW TO SET THE CLOCK MANUALLY
To set the clock, hold [MODE/SET] for three seconds. The display will return to MODE 1, with the hour digits blinking.
Use [ ![]() ] or [
] or [ ![]() ] to select the hour. Keep pressing the button will increase or decrease the value rapidly.
] to select the hour. Keep pressing the button will increase or decrease the value rapidly.
Press [MODE/SET] to confirm. The minute digits will blink. Repeat the same procedure to set the minutes, then the day-of-month, month, display language, day-of-week and offset for the second time zone.
Note that the time and date are displayed in 24-hour clock and DAY-MONTH format, respectively. For display language, you can choose among English, French, German and Italian—in that order. Day-of-week is the usual sequence of Monday through Sunday.
For the second time zone, which is indicated by the ZONE ICON, enter the hour offset and the RM318P will calculate the second time accordingly.
If there is an item you do not wish to change, simply press [MODE/SET] to bypass the item.
When you are done, press [MODE/SET] to exit. The display will return to the mode last chosen.
HOW TO SET AND ARM THE ALARMS
The RM318P has two alarms, ALARM 1 and ALARM 2. They can be invoked together or independently.
To set an alarm:
- Press [
 ] once to select ALARM 1 or again to select ALARM 2. The last selected time of the alarm will be displayed. If you have never set the alarm before, the time will be displayed as 0:00.
 - Press [ ] for three seconds. The hour digits will blink.
- Enter the hour using [
 ] and [ ].
 - Press [ ]. The minute digits will blink.
- Enter the minutes using [ ] and [
 ].
]. - Press [ ] to exit. The ALARM ON ICON for the alarm chosen will be displayed indicating the alarm set above is now armed.
You can also arm or disarm an alarm by pressing the [  ] BUTTON.
When an alarm is armed, it will go off at the set time. The display will light up for 10 seconds with the ALARM ICON flashing.
The four-step crescendo function allows the alarm to start off gently and step up its intensity every 20 seconds for four times. Without interruption, the alarm will go off for a total of two minutes.
If a second alarm goes off when the first alarm is sounding off, the first alarm will be disabled automatically.
HOW TO STOP AN ALARM
To stop an alarm, you can use either of the three buttons:
[ ]
]
Pressing [] during an alarm will invoke the SNOOZE FUNCTION, which will stop the alarm and let it sound off again after eight minutes.
Pressing [ ] will stop the alarm, which is still armed and will go off at the set time the following day.
If [] is pressed instead, the alarm will be stopped and deactivated all together.
HOW TO RESET THE UNIT
There is a RESET BUTTON embedded into the battery compartment. It allows you to return all settings to its factory values, which are 00:00:00 for time and 1-1, Monday, for date.
To use the RESET BUTTON:
- Slide open the battery compartment.
- Use a blunt stylus to press the RESET BUTTON once.

Here you can download full pdf version of manual, it may contain additional safety instructions, warranty information, FCC rules, etc.
инструкцияOregon Scientific RM318P

1
GB
INTRODUCTION
Congratulations on your purchasing the RM318P RF Pro-
jection Clock. The RM318P is a feature-packed device
which automatically synchronizes its current time and date
when it is brought within an approximate 1500km radius of
the radio signal generated from Frankfurt, Germany
(DCF77).
To facilitate reading time at night, the RM318P comes with
an adjustable projector which can project the time in large,
readable figures on the wall or ceiling in dark. Or you can
use its backlight function for a quick check.
The RM318P is primarily radio-controlled. However, it
allows you to enter data manually when it is off range. Other
features include four-language display, four-step crescendo
dual alarms, eight-minute snooze and interchangeable
display modes.
RF PROJECTION CLOCK
Model: RM318P
User’s Instruction
FRONT VIEW
REAR VIEW
TOP VIEW
PROJECTION
ON SWITCH
FOCUS KNOB
PROJECTOR
Посмотреть инструкция для Oregon Scientific RM318P бесплатно. Руководство относится к категории звонки тревоги, 38 человек(а) дали ему среднюю оценку 8.5. Руководство доступно на следующих языках: английский. У вас есть вопрос о Oregon Scientific RM318P или вам нужна помощь? Задайте свой вопрос здесь
Будильник Oregon Scientific RM318P — это компактный прибор для будильника, который может быть использован в доме или в офисе. Размеры будильника составляют 140x40x100 миллиметров, что делает его легким в транспортировке и хранении. Данный будильник работает на батарейках типа AA, что облегчает его использование в условиях, где нет электричества.
Будильник имеет простой и интуитивно понятный интерфейс, который позволяет установить время и выбрать время будильника. Стильный дизайн в сочетании с простотой использования делает его привлекательным для широкого круга потребителей.
Звуковой сигнал будильника достаточно громкий, чтобы разбудить даже самого крепкого сна, без того чтобы заставить проснуться всех животных и соседей. Он предлагает несколько вариантов будильника, таких как звук гонга или звук звонка, что позволяет выбрать наилучший вариант для каждого потребителя.
В целом, Oregon Scientific RM318P – это надежный будильник, который предлагает высокое качество звука и легкость в использовании.
Вес и размеры
| Размеры (ШхГхВ) | 140 x 40 x 100 mm |
Энергопитание
Свойства
| Цвет товара | Черный,Серебристый |
показать больше
Не можете найти ответ на свой вопрос в руководстве? Вы можете найти ответ на свой вопрос ниже, в разделе часто задаваемых вопросов о Oregon Scientific RM318P.
Инструкция Oregon Scientific RM318P доступно в русский?
К сожалению, у нас нет руководства для Oregon Scientific RM318P, доступного в русский. Это руководство доступно в английский.
Не нашли свой вопрос? Задайте свой вопрос здесь
- Инструкции и руководства
- Бренды
- Oregon Scientific
- RM318PU
- Справочник Пользователя
![]()
Перейти к контенту
RF PROJECTION CLOCK
Model: RM318P
User’s Instruction
INTRODUCTION
Congratulations on your purchasing the RM318P RF Pro-
jection Clock. The RM318P is a feature-packed device
which automatically synchronizes its current time and date
when it is brought within an approximate 1500km radius of
the radio signal generated from Frankfurt, Germany
(DCF77).
To facilitate reading time at night, the RM318P comes with
an adjustable projector which can project the time in large,
readable figures on the wall or ceiling in dark. Or you can
use its backlight function for a quick check.
The RM318P is primarily radio-controlled. However, it
allows you to enter data manually when it is off range. Other
features include four-language display, four-step crescendo
dual alarms, eight-minute snooze and interchangeable
display modes.
FRONT VIEW
TOP VIEW
REAR VIEW
1
FOCUS KNOB
PROJECTOR
PROJECTION
ON SWITCH
инструкцияOregon Scientific RM318P
1
GB
INTRODUCTION
Congratulations on your purchasing the RM318P RF Pro-
jection Clock. The RM318P is a feature-packed device
which automatically synchronizes its current time and date
when it is brought within an approximate 1500km radius of
the radio signal generated from Frankfurt, Germany
(DCF77).
To facilitate reading time at night, the RM318P comes with
an adjustable projector which can project the time in large,
readable figures on the wall or ceiling in dark. Or you can
use its backlight function for a quick check.
The RM318P is primarily radio-controlled. However, it
allows you to enter data manually when it is off range. Other
features include four-language display, four-step crescendo
dual alarms, eight-minute snooze and interchangeable
display modes.
RF PROJECTION CLOCK
Model: RM318P
User’s Instruction
FRONT VIEW
REAR VIEW
TOP VIEW
PROJECTION
ON SWITCH
FOCUS KNOB
PROJECTOR
Посмотреть инструкция для Oregon Scientific RM318P бесплатно. Руководство относится к категории Звонки тревоги, 38 человек(а) дали ему среднюю оценку 8.5. Руководство доступно на следующих языках: английский. У вас есть вопрос о Oregon Scientific RM318P или вам нужна помощь? Задайте свой вопрос здесь
Вес и размеры
| Размеры (ШхГхВ) | 140 x 40 x 100 mm |
Энергопитание
Свойства
| Цвет товара | Черный,Серебристый |
показать больше
Не можете найти ответ на свой вопрос в руководстве? Вы можете найти ответ на свой вопрос ниже, в разделе часто задаваемых вопросов о Oregon Scientific RM318P.
Не нашли свой вопрос? Задайте свой вопрос здесь
- Инструкции и руководства
- Бренды
- Oregon Scientific
- RM318PU
- Справочник Пользователя
![]()
Смотреть руководство для Oregon Scientific RM318P ниже. Все руководства на ManualsCat.com могут просматриваться абсолютно бесплатно. Нажав кнопку «Выбор языка» вы можете изменить язык руководства, которое хотите просмотреть.

MANUALSCAT | RU
Вопросы и ответы
У вас есть вопрос о Oregon Scientific RM318P, но вы не можете найти ответ в пользовательском руководстве? Возможно, пользователи ManualsCat.com смогут помочь вам и ответят на ваш вопрос. Заполните форму ниже — и ваш вопрос будет отображаться под руководством для Oregon Scientific RM318P. Пожалуйста, убедитесь, что вы опишите свои трудности с Oregon Scientific RM318P как можно более детально. Чем более детальным является ваш вопрос, тем более высоки шансы, что другой пользователь быстро ответит на него. Вам будет автоматически отправлено электронное письмо, чтобы проинформировать вас, когда кто-то из пользователей ответит на ваш вопрос.
Задать вопрос о Oregon Scientific RM318P
- Бренд:
- Oregon Scientific
- Продукт:
- Звонки тревоги
- Модель/название:
- RM318P
- Тип файла:
- Доступные языки:
- английский
Сопутствующие товары Oregon Scientific RM318P
The RM318P supports four display modes in the sequence
of :
MODE 1. Hour-Minute-Second (of local time)
— — — — — — — — — — — — — — — — — — — — — — — — — — — — — — — — — — — — — — — — — —
Day-Month (of local time)
MODE 2. Hour-Minute-Day-of-the-Week (of local time)
— — — — — — — — — — — — — — — — — — — — — — — — — — — — — — — — — — — — — — — — —
Day-Month (of local time)
MODE 3. Hour-Minute-Day-of-the-Week (of local time)
——————————————-
Hour-Minute (of second time zone)
MODE 4. Hour-Minute-Day-of-the-Week (of second
time zone)
— — — — — — — — — — — — — — — — — — — — — — — — — — — — — — — — — — — — — — —
Day-Month (of second time zone)
Each press on the [MODE] BUTTON will toggle the
display in the above order.
Note that the second line of the display will be replaced by
the alarm time if the [
ABOUT RADIO RECEPTION — DCF77
The RM318P is designed to automatically synchronize its
clock once it is brought within range of the Frankfurt
DCF77 radio signal. It will scan and adjust every full hour.
When the RM318P is within range, its radio-control mecha-
nism will override all manual settings. Time will start to run
from 00:00:00 and date, 1-1 (January 1), Monday.
When the unit is receiving radio signal, the RADIO RE-
CEPTION SIGNAL will start to blink. A complete recep-
tion generally takes about 2 to 10 minutes, depending on the
strength of the radio signal. After that, the hourly scanning
will only take a few seconds.
When the reception is complete, the RADIO RECEPTION
4
] BUTTON is pressed.
Oregon Scientific rm318p Clock PDF User Guides and Manuals for Free Download: Found (1) Manuals for Oregon Scientific rm318p Device Model (User Instructions)
More Clock Device Models:
-
Valcom
V-AW12A
Valcom, Inc.5614 Hollins RoadRoanoke, VA 24019USAP. 540-563-2000F. 540-362-9800www.valcom.comCurrent as of July 2016Valcom Wireless Analog ClockInstallation Manual V2.0V-AW12A / V-AW16A and V-AW12B / V-AW16BV-AW12LP / V-AW16LP and V-AW12BLP / V-AW16BLP …
V-AW12A Clock, 76
-
Clare Controls
Schlage BE369
Doc ID — 1234 • Rev 10 1 / 24 Schlage Z-Wave Door Locks Integration Notes For all models Content Preface…1 Introduction…1 Supported models…2 Installing and programming Schlage door locks…2 Pairing, configuring, and removing the Schlage…2 Pairing and removing the door lock with Fusion…16 Creating rules …
Schlage BE369 Clock, 24
-
Bodet
5 Seconde
1Style II 5 / 5S / 7 / 7S / 7 Date / 7 Ellipse intérieures — indoor clocks — Innenuhren — relojes de interiorQuick start guide — Guide de démarrage rapide — Schnellstartanleitung — Guía de inicio rápidoDocument non contractuel. © 2019, Bodet SA. Tous droits réservés.Réf.: 608090E — 12/19>> www.bodet-time. …
5 Seconde Clock, 9
-
WESTERSTRAND
Wireless Clock
INTELLIGENT MOVEMENTS Document: 1979en01.doc Author: PM Date: 15 Sep 2016 Page: 1 of 3 WESTERSTRAND URFABRIK AB P.O. Box 133 Tel. +46 506 48000 Internet:: http://www.westerstrand.se SE-545 23 TÖREBODA Fax. +46 506 48051 E-mail: info@westerstrand.se Battery operated indoor Wireless …
Wireless Clock Clock, 3
Recommended Documentation: