Search code, repositories, users, issues, pull requests…
Provide feedback
Saved searches
Use saved searches to filter your results more quickly
Sign up
This guide will walk you through installing Oracle Linux 9, a high-performance, secure, and enterprise-ready RHEL fork.
Oracle Linux has a history dating back more than 15 years of consistent stability and reliability, being a popular choice among the large enterprise segment.
The distro is fully 1:1 binaries compatible with Red Hat Enterprise Linux (RHEL) and is entirely free (available under the GNU General Public License) to download and use.
It is a trustworthy Linux distro backed by the enormous financial power of an IT behemoth like Oracle. Security updates are promptly, and stability and reliability are ensured even under heavy workloads.
But, before we get into the meat of the guide, let’s first address a key question.
Why Choose Oracle Linux?
Oracle Linux includes several essential characteristics that make it suitable for running enterprise-class workloads.
One such key feature is KSplice. It is an open-source Linux kernel extension that allows security fixes to be applied to a running kernel without requiring a reboot, avoiding downtime.
The following thing that makes the difference between Oracle Linux and other RHEL-based derivatives is the Unbreakable Enterprise Kernel (EUK). It is a Linux kernel built by Oracle, included and enabled by default in Oracle Linux.
Of course, if you intend to use the Oracle database, selecting Oracle Linux as the operating system is more than reasonable. With little effort, Oracle Linux can enhance Oracle DB performance. Additionally, most of the Oracle products are tested under it.
Last but not least, the distribution is free and available under the GNU General Public License. In other words, you can freely and legally download and use it on your production systems without any additional commitment to Oracle.
With those brief explanations out of the way, let’s get to the meat of this guide: how to install Oracle Linux 9.
1. Download Oracle Linux 9 Installation ISO Image
The first step, of course, is to get the installation ISO image. Oracle Linux, as previously stated, is entirely free to download.
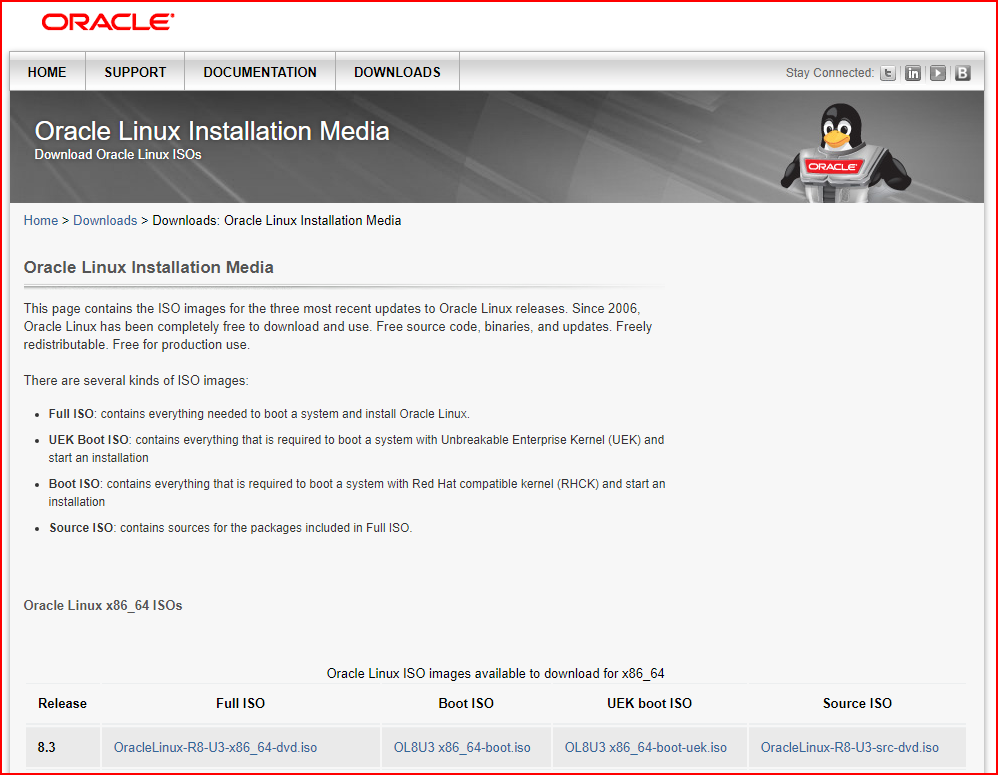
So, open the following URL in your browser: https://yum.oracle.com/oracle-linux-isos.html and download the most recent “Full ISO” version, “OracleLinux-R9-U0-x86_64-dvd.iso.”
This guide will use the “Full ISO” option for the installation image. However, the file is large (9.1 GB) because it contains all packages for offline installation.
Therefore, it’s a good idea to consider downloading it with software like wget, which will ensure that you can resume where you left off if the download is interrupted.
You can use one of the other two options, “Boot ISO” (840 MB) or “UEK boot ISO” (880 MB), if you think it is a better idea. They are significantly lower in size, but all required software will be downloaded from the Internet during installation.
2. Create Bootable USB
If you’re installing Oracle Linux 9 on a physical machine, you may need to make a bootable USB medium and boot from it.
So, after downloading the installation ISO image, make it bootable by burning it to a USB drive.
Various bootable USB creation tools are available, but we will use the most straightforward option by using the dd command. First, don’t forget to replace /dev/sda with the correct path to your USB device.
sudo dd if=OracleLinux-R9-U0-x86_64-dvd.iso of=/dev/sda status=progressHowever, if you prefer to use a graphical application (GUI), here are some excellent guides we can offer you on the subject:
- How To Burn An ISO File To A USB Drive In Linux Using Etcher
- Ventoy: How to Create a Multiboot USB Drive with Multiple ISO Files
Of course, there is no need to create a bootable USB if you will install Oracle Linux 9 into a virtual machine.
Oracle Linux uses the Anaconda installer, also used by RHEL and its clones, such as Alma Linux and Rocky Linux. So, if you install any of these distros, the installation steps are nearly identical.
3.1 Boot from Oracle Linux 9 Installation Media
To start the installation process, boot from your Oracle Linux 9 installation media. You will get the following screen:
Use the up arrow key to pick the “Install Oracle Linux 9.0.0” option and hit “Enter.”
3.2 Choose Your Preferred Language
The Welcome Screen is the first screen to appear once the system has finished booting. Here you should select a language for Oracle Linux 9 installation, so choose the appropriate one for your setup.
3.3 Preparing RHEL 8 Installation
On the next screen, you will be greeted by the “Installation Summary” screen containing 11 settings. It serves as the main or home screen.
Since we’ll leave the default options for some of them, we’ll only focus on the ones we need to change. We will leave the following unchanged because they meet our requirements:
- Keyboard: English (US)
- Language Support: English (United States)
- Time & Date: America/New York timezone
- Installation Source: Local media
- KDUMP: Kdump is enabled
So let’s start by configuring our installation.
Network & Host Name
- Select the “Network & Hostname” option from the installation summary. In the “Host Name” box, enter a custom hostname, for example, “oracle9.”
- Confirm the new hostname by pressing the “Apply” button.
- When finished, click the “Done” button to return to the “Installation Summary” screen.
Installation Destination
For our installation, we will use automatic partitioning of the disk. This ensures the selected destination storage disk will automatically be partitioned with required LVM logical volumes and formatted with the XFS file system.
- Select your machine’s storage under the “Local Standard Disks” heading.
- Confirm the changes by pressing the “Done” button.
Of course, if you want to change the partitioning configuration, tick the “Custom” option, click the “Done” button, and go through the partitioning screens.
Software Selection
Here you will be presented with a list of predefined Base Environment options and optional add-ons. Of course, this is entirely dependent on your requirements.
The screen is divided into “Base Environment” on the left and “Additional Software for Selected Environment” on the right. Each profile represents a collection of functionalities and the packages and software required to fulfill those functionalities.
In the “Base Environment” section, you choose an environment that best matches the system’s intended use. Then, in the “Additional Software for Selected Environment” section, select the software you want to add to your chosen Base Environment.
By default, the “Server with GUI” base environment installs the GNOME desktop, which will be our choice.
- Select your desired “Base Environment” installation type.
- Click the “Done” button.
Of course, if you want a different configuration, you can choose whichever option comes closest to your needs.
Root Password
Click “Root Password” to display the ROOT PASSWORD screen.
- Enter the root password in the “Root Password” and “Confirm” fields. The screen provides a visual indication of the strength of the password.
- Click the “Done” button to return to the “Installation Summary” screen.
User Creation
Let’s now create the user account we’ll use for everyday work. First, click “User Creation” from the “Installation Summary” screen.
- Enter the information for the new local user account.
- Select “Make this user administrator” if you want the user to run administrative tools using the
sudocommand. - Set the user’s password. Again, there is a visual indication of the password’s strength.
- Once configuring the user, click “Done” to return to the “Installation Summary” screen.
3.4 Start Oracle Linux 9 Installation Process
Finally, we’re ready to install our Oracle Linux 9 system! So, once everything is set up according to your liking, hit “Begin Installation.” This will start the initial installation process.
Be patient as the installation takes some time, so wait for the process to complete.
The installer will prompt you to restart the system when the installation is finished. Click on “Reboot System.”
4. Post-Installation Steps
The Oracle Linux 9 GRUB menu will welcome you at boot time.
Next, we will get the GNOME login screen because we installed Oracle Linux 9 server with GUI, so use the username and password we created earlier.
Congratulations! Oracle Linux 9 has been installed successfully and is ready for use!
Of course, the first and most crucial step is to apply all available security updates and bug fixes using the DNF package manager.
sudo dnf updateIt is a good idea to reboot your machine after installing the updates. From now on, you may enjoy the seamless and stable operation that Oracle Linux guarantees.
Conclusion
This step-by-step guide covers Oracle Linux 9 installation. As you can see, the installation is the same as other RHEL-based distros such as AlmaLinux and Rocky Linux.
Oracle Linux 9 is undoubtedly a rock-solid Linux operating system and a reliable option for your server.
I hope you found this helpful guide. Thanks for using it! Feel free to share your thoughts in the comments box below.
Содержимое
- 1 Oracle Linux
- 2 Установка Oracle Linux 8.3
-
3 Шаги по проверке загрузок Oracle Linux
- 3.1 Импорт ключа Oracle Linux GPG
- 3.2 Загружаем и проверяем файл контрольной суммы
- 4 Отпечаток ключа GPG
- 5 Первоначальная установка ORACLE LINUX
Oracle Linux
Один из форков RHEL, на который можно мигрировать прямо сейчас. Он не только готов к использованию, но вы можете даже перевести существующую установку CentOS на Oracle Linux без переустановки.
Oracle Linux известен с 2006 года. Он на 100% бинарно совместим с RHEL и представляет собой эквивалент к каждому RHEL релизу. И нет — вам не нужно заключать какие-либо соглашения с Oracle, что бы начать его использовать.
Oracle Linux поставляется с двумя ядрами на выбор: Unbreakable Enterprise Kernel (UEK) и Red Hat Compatible Kernel (RHCK).
Oracle известен, своей нелояльностью к открытым проектам, и возможно это одна из тех причин, почему сообщество предпочло CentOS, а не Oracle Linux. Но конец CentOS 8 — возможно шанс для Oracle Linux?
Установка Oracle Linux 8.3
Oracle Linux 7.2 используется не только для малых и средних компаний, но для крупных компаний, которые используют сервера с большими вычислительными ресурсами. Перед началом установки ОС необходимо подготовить следующую информацию:
Дисковое пространство.
Перед установкой надо определиться с дисковым пространством для установки ОС. Например, доступны следующие варианты установки ОС:
• локальный диск сервера или персонального компьютера,
• диски дискового массива,
• виртуальный диск гипервизора (в данном посте используется этот вариант).
Во всех трех вариантах должно быть доступно минимум 5 GB дискового пространства для установки ОС OEL. Далее в зависимости от решаемых задач на устанавливаемой ОС, надо увеличить объем доступного для ОС пространства. Также надо будет учитывать, будут ли использован RAID, шифрование файловых систем и выбрать тип файловой системы. В случае использования пространства дискового массива необходимо для iSCSI или FCoE соединений указать WWID или номер порта /Target /LUN.
Сетевые настройки
Если в устанавливаемой ОС не планируется использование DHCP для автоматического назначения сетевых настроек, то необходимо перед установкой ОС определить IP адрес, маску подсети и настройки сетевого шлюза (gateway) для будущей ОС. Сетевые параметры можно настроить и после завершения установки ОС, но рекомендуется заранее определиться с этими данными.
Пользователи
В процессе установки ОС создается пользователь root с правами администратора в OEL. Необходимо будет назначить ему пароль. Также будет предложено создать дополнительного пользователя для работы в ОС.
Программное обеспечение (пакеты)
В процессе установки ОС необходимо выбрать набор программ для определенного типа систем/среды, например, устанавливаемая система будет использована как web server или database server. Также предоставляется возможность выбрать пакеты для автоматической установки. Как и в случае с сетевыми настройками, пакеты можно установить и удалить после завершения установки ОС.
Скачиваем дистрибутив
https://yum.oracle.com/oracle-linux-downloads.html

После загрузки Oracle Linux можно проверить дистрибутив, чтобы убедиться, что они в точности соответствуют загрузкам, опубликованным Oracle, и что они были загружены без каких-либо повреждений.
Шаги по проверке загрузок Oracle Linux
Для проверки загрузок Oracle Linux вам потребуется:
- Файл контрольной суммы, соответствующий загруженному ISO.
- Открытый ключ GPG для проверки ключа Oracle, используемого для подписи файла контрольной суммы.
Файл контрольной суммы содержит список файлов, которые являются частью пакета загрузки с соответствующими контрольными суммами, а также подпись GPG. Подпись GPG позволяет любому проверить, был ли файл контрольной суммы опубликован Oracle. Приведенные ниже шаги описывают, как проверить сам файл контрольной суммы, а затем проверить содержимое загружаемого файла Oracle Linux, сверяя его с файлом контрольной суммы.
Импорт ключа Oracle Linux GPG
Сначала импортируйте ключ GPG Oracle Linux, соответствующий вашей версии Oracle Linux:
|
# curl https://yum.oracle.com/RPM-GPG-KEY-oracle-ol8 | gpg —import |
Загружаем и проверяем файл контрольной суммы
|
$ gpg —verify—file OracleLinux—R8—U3—x86_64—dvd.iso |
После проверки файла контрольной суммы проверьте загрузку следующим образом:
|
$ grep OracleLinux—R8—U3—x86_64—dvd.iso OracleLinux—R8—U3—x86_64—dvd.checksum | sha256sum —c |
Отпечаток ключа GPG
|
# curl https://yum.oracle.com/RPM-GPG-KEY-oracle-ol8 -o RPM-GPG-KEY-oracle # gpg —quiet —keyid-format 0xlong —with-fingerprint RPM-GPG-KEY-oracle pub 4096R/0x82562EA9AD986DA3 2019—04—09 [SC] [expires: 2039—04—04] Key fingerprint = 76FD 3DB1 3AB6 7410 B89D B10E 8256 2EA9 AD98 6DA3 uid Oracle OSS group (Open Source Software group) sub 4096R/0x222F15DFD95DC12B 2019—04—09 [E] [expires: 2039—04—04] |
Записываем образ на флешку или диск перезагружаем ПК или запускаем виртуальную машину, предварительно необходимо смонтировать загрузочный образ.
Первоначальная установка ORACLE LINUX
Загружаемся с загрузочного носителя
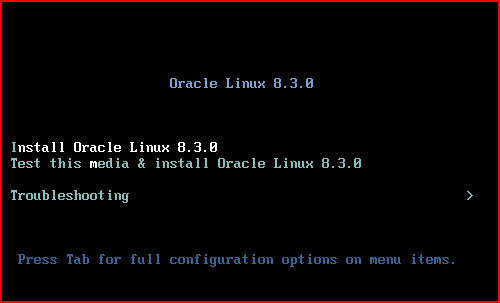
Выбираем Install Oracle Linux 8.3.0
Выбираем язык мастера установки.

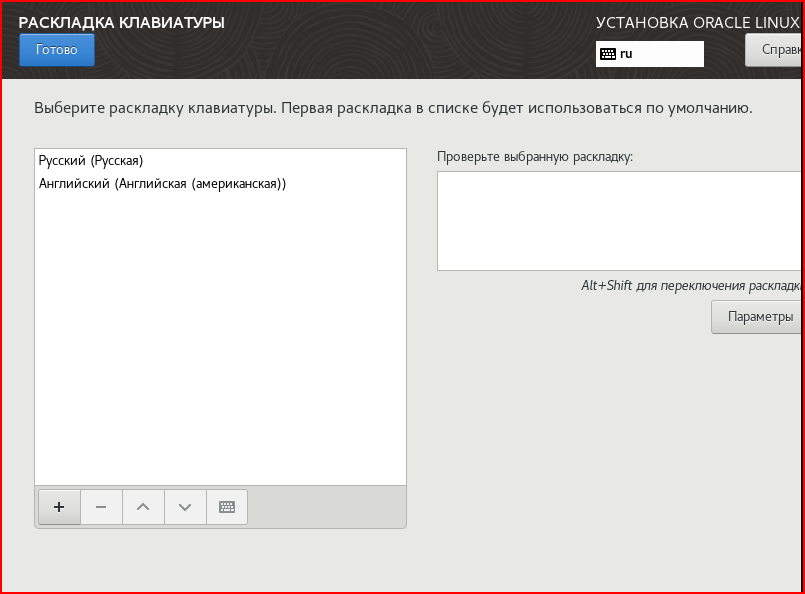
Выбираем раскладку клавиатуры
Настройка сети

Задаем имя узла, если необходимо настраиваем дополнительные параметры, переключаем включатель в положение On, чтобы активировать сеть.
Настройка часового пояса
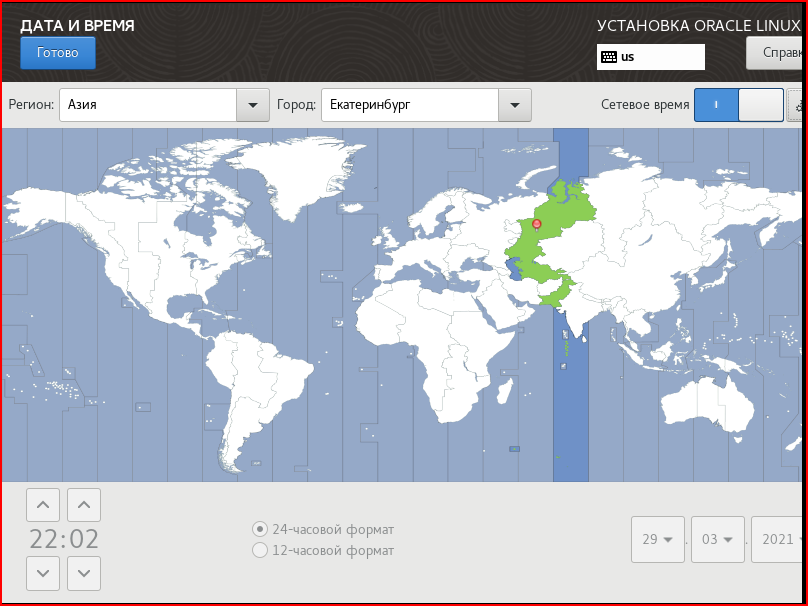
Выбираем часовой пояс, активируем выключателем синхронизацию времени по сети, в параметрах можно указать серверы для синхронизации времени.
Выбор ПО
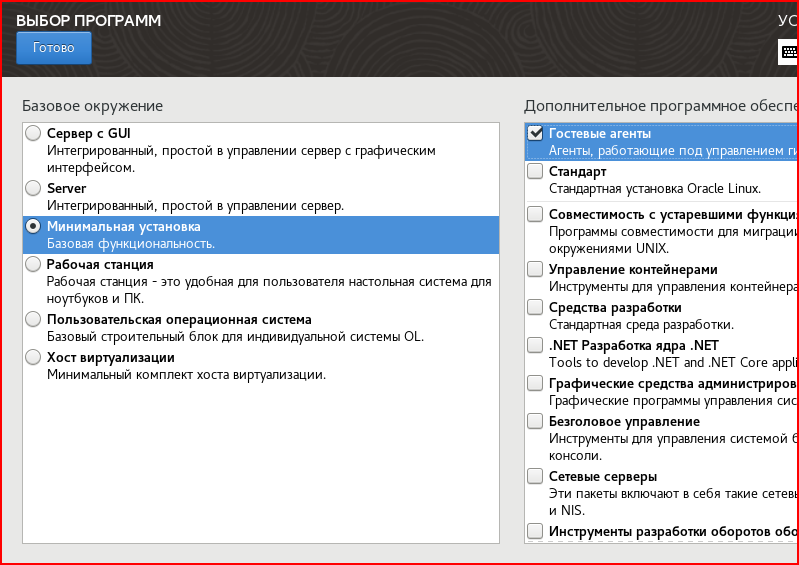
Выбираем базовое окружение, если устанавливаем на виртуальной машине добавляем гостевых агентов.
Разметка диска
Чаще всего предпочитаю стандартную разметку, немного подкорректировав.
Удаляю SWAP раздел, подключим после установки его через файл.
Переименовываю группу томов vm_
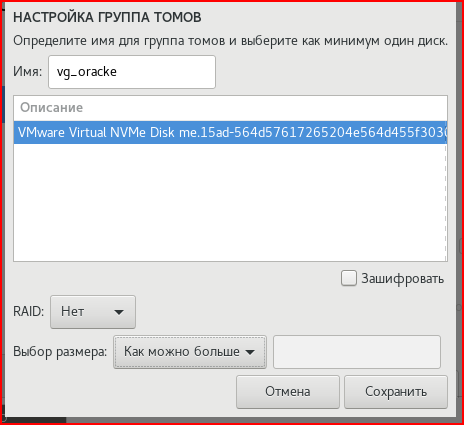
Переименовываю логический том root в lv_root/
Нажимаем готово,
![]()
Система предупреждает, что не создан файл подкачки, игнорируем предупреждение.
Пока будет идти установка нам нужно установить пароль для суперпользователя. Для этого кликните по соответствующему пункту:
Дальше необходимо создать обычного пользователя, от имени которого мы будем использовать систему. Заполните полное имя, логин в системе. Также не забудьте установить галочку сделать пользователя администратором, чтобы он мог использовать sudo.
После завершения установки нажимаем готово, что перезагрузить компьютер.