Собственно, это не совсем сервер, просто несколько внешних дисков, подключенные к Raspberry Pi через USB-HUB. Дело в том, что у меня скопилось порядочное количество архивов — семейные фотографии в RAW, рабочие архивы, коллекция любимых и не очень фильмов с правильным переводом… Ну и так далее.
Хранить все это на компьютере нецелесообразно, да и опасно, в некоторой степени. Диски же крутятся все время, вырабатывая свой ресурс, даже если к ним не обращаются. Поэтому было принято вынести их отдельно, заодно поиграться со свежеприобретенной платой Raspberry.
В итоге у меня получился вполне рабочий файловый сервер на Openmediavault 5.5, который работает автономно и к которому есть доступ с любого устройства, подключенного к моей домашней сети. Теперь можно посмотреть фильм или фотографию, не включая компьютер. Так-же есть торрентокачалка, которая тоже работает автономно. А управлять ей и сервером можно прямо с телефона, через веб-интерфейс.
Содержание
Статья получилась просто огромная, так что если вам нужно выяснить что-то конкретное, можете переходить сразу в нужную ее часть.
Железо
Программная часть
Установка Openmediavault
Вариант 1
Вариант 2
1. Установка системы на Raspberry
2. Установка Openmediavault
Настройка Openmediavault
1. Общие настройки
2. Расшаривание папок
3. Ошибка доступа в Windows
Docker и Portainer. Установка и настройка
Установка Transmission
Заключение
Железо
Итак, мой сервер состоит из собственно, Raspberry Pi 4 B+ с 4Гб памяти, USB 3.0 хаба, гигабитного свитча и нескольких внешних дисков. Еще имеется роутер Zyxel Keenetic какой-то древней ревизии. Он занимается добыванием интернета, посредством USB-модема и распространением его в моей домашней сети. Схему подключения можно увидеть на картинке:

Как видно, один диск подключен напрямую к малине. Это сделано, потому что он 2.5″ и не имеет внешнего питания, а хаб с ним не справляется. Кроме того, этот диск используется для промежуочных операций, поэтому он должен работать быстрее. Я искренне верю, что без хаба он работает быстрее 
Программная часть
Как я уже упоминал, сервер работает под управлением Openmediavault 5.5. В него встроен Docker и интерфейс управления им — Portainer. В Docker’е мной установлен торрент-клиент Transmission и веб-сервер Nginx (зачем-то). Я не очень понимаю, как работает Docker. Вроде он умеет запускать приложения, каждое в своем контейнере и они друг другу не мешают. А он (Docker) занимается распределение ресурсов между ними. Как-то так.
Но, несмотря на то, что я многих вещей не понимаю, я все-же расскажу, как создать и настроить такую систему. Я же сделал
Установка Openmediavault
Вариант 1
Здесь должно было быть написано про то, как скачать с сайта openmediavault.org готовый образ системы для Raspberry с установленным Openmediavault, но случилось так, что этот вариант больше не работает, вот по этой причине, поэтому переходим сразу к варианту 2.
Вариант 2
Собственно, это будет вольным пересказом вот этого документа, который является официальной инструкцией по установке Openmediavault 5.5 на ARM-устройства. Если вы хорошо знаете английский язык, можете прочитать все там. Если нет — едем дальше.
1. Установка системы на Raspberry
Для того, чтобы установить систему на Raspberry, понадобится карта памяти MicroSD. Рекомендуется не менее 8 Гб, но лучше больше, так как вы захотите туда установить дополнительные приложения. Моя, к слову, 32Гб. Поставил и забыл.
Итак, скачиваем образ системы по этой ссылке. Нужно пролистать до заголовка «Raspberry Pi OS» и выбрать «Raspberry Pi OS Lite». Это Debian в минимальной комплектации. Там нет графической оболочки и дополнительного софта. В принципе, можно установить любой из трех вариантов, представленных на той странице, но если вы не планируете подключать к Raspberry монитор и клавиатуру с мышью — смысла в них нет.
Если все скачалось удачно, можно развернуть образ системы на MicroSD карту. В официальной инструкции настоятельно рекомендуется проверить контрольную сумму файла, чтобы подтвердить его целостность, но я этого не делал, понадеявшись… на русское авось, наверное.
Чтобы развернуть образ, понадобится программа Raspberry Pi Imager. Вставляем карту памяти в кардридер, кардридер вставляем в USB порт и запускаем «Raspberry Pi Imager». Там всего три кнопки — ошибиться невозможно

Нажимаем «Choose OS», листаем вниз до пункта «Use custom» и выбираем на диске наш свежескачанный образ.

Затем нужно выбрать диск назначения и «WRITE». После записи и верификации, ваша карта памяти готова к переезду в . Но перед этим нужно сделать одну важную вещь. Откройте карту памяти со свежезаписанным образом в проводнике и создайте в корне пустой файл с именем «ssh». Просто имя, без расширения. Это включит протокол SSH, ведь по-другому вы общаться с малиной не сможете.
Вставляем карту памяти в слот Raspberry, подключаем сетевой кабель и питание. Через несколько минут система запустится и можно будет подключиться к Raspberry по протоколу SSH. Но прежде всего нужно узнать ее IP-адрес. Для этого нужно зайти в интерфейс роутера и посмотреть на новые устройства, появившиеся в сети.

Как видно, в моей сети малине дали адрес 192.168.1.44. Имя «PI4» я назначил уже сам и закрепил постоянный IP за этим устройством. Дело в том, что выдачей адресов у меня там командует DHCP, так что если оставить, как есть, в следующий раз адрес может смениться — поди ищи его потом.
Отлично, адрес мы нашли, теперь нужно подключиться к командной строке Linux. Сделать это рекомендуется про помощи Putty — это бесплатный SSH и Telnet клиент, но у меня свой путь. Я нашел программу Bitvise SSH Client, которая мне нравится больше. Выглядит она вот так:

На скриншоте уже введены IP-адрес и логин с паролем. Сделайте так-же. Логин и пароль по умолчанию будут:
pi
raspberry
И нажимаем кнопку «Log in». Программа при первом подключении выведет окошко с предупреждением:

Нажимаем кнопку «Accept and Save» и видим такую картину:

Теперь сюда можно вводить команды. И первой командой будет обновление ПО Raspberry. Вернее, это будут три команды:
sudo apt-get update

sudo apt-get upgrade -y

sudo rm -f /etc/systemd/network/99-default.link
Вводить их следует по строке за один раз, дожидаясь исполнения каждой. Необязательно вводить их вручную. Можно скопировать отсюда и вставить в окно терминала при помощи правой кнопки мыши. Кстати, чтобы скопировать текст из окна терминала, просто выделите его и он скопируется сам.
Итак, после первой команды вы получите что-то такое:

После второй — такое:

А третья команда просто удаляет какую-то ссылку, видимо, ненужную.
Ну вот и все, система установлена, обновлена и готова к установке Openmediavault.
Перед этим нужно выполнить еще одну команду:
sudo reboot nowДумаю, объяснения тут не требуются
2. Установка Openmediavault
Запускаем команду:
wget -O - https://github.com/OpenMediaVault-Plugin-Developers/installScript/raw/master/install | sudo bashЖдем. Команда эта — ссылка на скрипт, который все загрузит и установит. По времени это может занять до получаса. В это время не закрывайте окно терминала, иначе все сломается. В конце установки Raspberry перезагрузится автоматически.
Вот и все. Openmediavault установлен и готов к работе.
Настройка Openmediavault
Открываем браузер и вводим IP-адрес, по которому у нас находится Raspberry в сети. И сразу попадаем в веб-интерфейс Openmediavault.

Логин/пароль по умолчанию:
admin
openmediavault
После загрузки нас встречает такой экран:

Интерфейс тут несложный, можно прогуляться по ссылкам слева, думаю, многое станет понятно.
1. Общие настройки
Для начала зайдем в настройки («General Settings«):

Лично мне здесь интересен пункт «Auto logout«. Я сделал его «Disabled», чтобы меня не выкидывало из системы каждые 5 минут.
Далее, на этой же странице можно переключиться на вкладку «Web Administrator Password» и поменять пароль.
Не забывайте каждый раз нажимать кнопку «Save». Особенно, когда вверху страницы появляется такая желтая плашка.

Теперь выбираем ссылку («Network«). Тут нас интересует две вкладки. Первая, она уже открыта «General», тут можно поменять «Hostname».

Это имя будет появляться в сетевом окружении. Вторая вкладка «Interfaces». Тут находятся сетевые интерфейсы, которые используются в текущий момент.

Тут можно изменить имеющиеся или добавить/удалить новые сетевые интерфейсы, например, WiFi. У меня подключен проводной интерфейс, пусть так и остается.
2. Расшаривание папок
Теперь посмотрим наши подключенные диски. Если вы их подключили, конечно. Слева нажмите ссылку «Disks». Мои диски выглядят вот так:

Далее, выберите слева ссылку «File Systems», чтобы проверить, все ли доступные диски смонтированы в системе:

Из моих смонтирован оказался только один. Ну ладно, вообще ни одного, этот я сам смонтировал вручную, только что.
Чтобы смонтировать файловую систему, нужно выбрать ее в списке и нажать кнопку «Mount». Потом обязательно сохранить настройки. И так повторить со всеми несмонтированными файловыми системами.
А теперь самое время расшарить пару папок, чтобы их было видно в сети. Для этого слева переходим на страницу «Shared Folders»

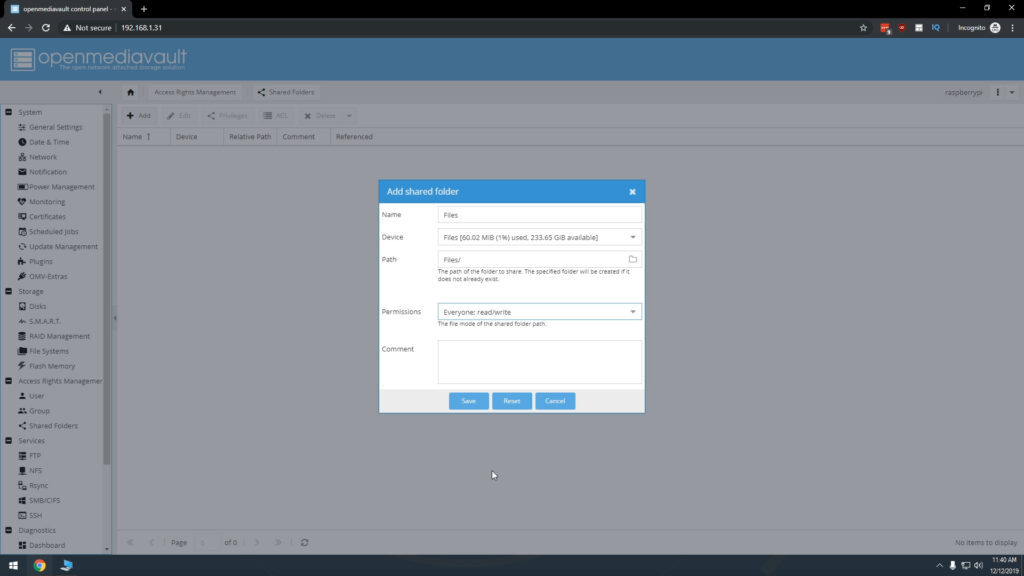
Нажимаем «+ Add» и появляется такое окно:

Поля там конечно будут пустые, вам их нужно заполнить. В поле «Name» пишем название, которое появится в списке сетевых папок в вашем проводнике, в поле «Device» выбираем файловую систему, на которой нужно расшарить папку, в поле «Path» выбираем нужную папку. И все. «Permissions» оставляем по-умолчанию, в комментарии пишем комментарии. Или не пишем. В конце нажимаем «Save». Так же сохраняем общую конфигурацию. Желтая плашка с ней появится чуть позже.
Повторяем то-же самое для остальных папок, которые нужно расшарить. В итоге получится как-то так:

Несмотря на то, что мы расшарили папки, в проводнике мы их пока не увидим. Дело в том, что система Linux способна расшарить папки вовне только при помощи протокола Samba, который нам еще предстоит включить и настроить. Для этого слева выбираем ссылку «SMB/CIFS» и попадаем на страницу настройки протокола SMB.

В разделе «General Settings» Жмем на «Enable», сохраняем. Потом еще раз сохраняем и переходим во вкладку «Shares».
Тут снова Нажимаем «+ Add» и появляется такое окно:

Тут параметров значительно больше, но нам нужно только несколько. В поле «Shared folder» выбираем одну из расшаренных ранее папок, в поле «Public» выбираем «Only Guests», чтобы папка была видна всем.
Еще можно запретить запись/удаление для папки, установив параметр «Read only». Ну и все. Нажимаем «Save», затем «Apply» и все. Первая папка расшарена. Можно открыть проводник и проверить.

3. Ошибка доступа в Windows
Если же папку открыть не удалось и вообще видно только сетевое имя, а открыть его нельзя — появляется ошибка, значит вы все сделали неправильно вы являетесь счастливым обладателем Windows 10, какой-то там версии, с которой Microsoft ужесточил правила безопасности при пользовании сетевыми ресурсами. Короче, анонимныый доступ к ресурсам сети запрещен на уровне системы.

В этом случае нужно создать пользователя специально для доступа к расшаренным папкам и выдать ему соответствующие полномочия.
Для этого слева переходим на страницу «User» и видим там одного единственного пользователя «pi», который является администратором системы. Использовать его пароль в Windows мне не удалось по какой-то причине, поэтому просто создадим нового.

Нажимаем «+ Add», вводим имя, например «guest» и такой-же пароль. Сохраняем все, что можно и переходим на страницу «Shared folders».
Выделяем нужную папку и нажимаем кнопку «Privileges».

Открывается окно с привилегиями для данной папки. Там ставим галку напротив пользователя «guest», разрешая ему что-то делать с этой папкой и сохраняем все.

Опять переходим на страницу «SMB/CIFS», переходим на вкладку «Shares» и дважды щелкаем на папке, которую нужно расшарить.

В поле «Public» ставим значение «No» и сохраняем все. Пробуем открыть в проводнике и все работает. Только сначала нужно ввести логин и пароль пользователя «guest».

После этого папка доступна.

Итак, мы только что расшарили папку и дали ей возможность открываться в Windows 10. Получилось весьма сумбурно, поэтому изложу еще раз, вкратце:
- Создаем пользователя guest
- Расшариваем папку в «Shared folders»
- Тут-же задаем ей привилегии. Кнопка «Privileges», галка на пользователе «guest»
- Создаем шару в «SMB/CIFS», в поле «Public» ставим «No»
- Открываем шару в Windows Explorer, вводим guest/guest
- Радуемся.
Docker и Portainer. Установка и настройка
Docker служит для установки сторонних приложений и запуска их в изолированной среде, так называемых «контейнерах». Но сначала его самого нужно установить. Делается это нажатием одной кнопки в интерфейсе Openmediavault.
Слева выбираем «OMV-Extras» и на открывшейся странице переходим во вкладку «Docker». Там нажимаем на кнопку «Docker» и выбираем в выпадающем списке «+ Install».

Во всплывающем окне будет показан процесс установки. Как только он завершится, это окно можно закрыть.

Теперь установим Portainer. Для этого нужно сделать почти то-же самое, только нажать другую кнопку:

После установки закрываем всплывающее окно и нажимаем соседнюю кнопку «Open Portainer». Приветственный экран Portainer откроется в новой вкладке.

Тут нужно установить пароль и изменить имя, если нужно. После этого нажимаем кнопку «Create user» и попадаем в главное окно Portainer. Интерфейс очень напоминает Openmediavault. Те же ссылки слева, открывающие окна справа.

У меня при первом запуске не работало добавление приложений, Portainer выдавал ошибку, что дескать не настроен «Endpoint», однако при втором подключении я получил вот такой экран:

Знающие люди из Гугла подсказали, что выбирать нужно кнопку Docker, для того, чтобы он работал локально. В общем, в итоге все заработало.
Я уже упоминал ранее, что я не очень понимаю, как это работает. Просто я поставил себе задачу и решил ее. Система вполне работоспособна, хоть и требует доработок. А вы, если хотите узнать больше о работе с Docker, лучше воспользуйтесь специализированными ресурсами.
Тем не менее, напоследок расскажу, как установить и настроить приложение в Docker. Вернее, получится сперва настроить, а потом установить, потому что там это происходит именно так.
Установка Transmission
Большинство нужных приложений можно найти на hub.docker.com. Transmission я взял там-же, как и инструкцию по установке. Мы будем устанавливать Transmission через Stacks, потому что так проще.
Итак, открываем Portainer и приступаем. Выберите слева «Stacks» и откроется такая страница:

Нажимаем синюю кнопку «+ Add stack» и идем на hub.docker.com за Transmission.
Листаем вниз, до заголовка «docker-compose». Отсюда нам нужно взять текст:
---
version: "2.1"
services:
  transmission:
    image: ghcr.io/linuxserver/transmission
    container_name: transmission
    environment:
      - PUID=1000
      - PGID=1000
      - TZ=Europe/London
      - TRANSMISSION_WEB_HOME=/combustion-release/ #optional
      - USER=username #optional
      - PASS=password #optional
      - WHITELIST=iplist #optional
    volumes:
      - <path to data>:/config
      - <path to downloads>:/downloads
      - <path to watch folder>:/watch
    ports:
      - 9091:9091
      - 51413:51413
      - 51413:51413/udp
    restart: unless-stopped
И поправить его под свою конфигурацию. Собственно, это и есть настройка. Итак, нас тут интересует: «PUID/PGID», «TZ», «USER/PASS» и рабочие папки программы.
PUID/PGID — это идентификатор пользователя. Узнать его можно командой «id» в терминале. В ответ получите список идентификаторов:

Нас тут интересует «uid» и «gid», они равны 1000, а значит ничего менять не придется. Далее TZ — это Time Zone. Пишем часовой пояс, в котором мы находимся. Я написал «Europe/Samara». С логином-паролем все понятно, только пишите его тут безо всяких кавычек. Если система локальная и контроль доступа не нужен, можно оставить просто пустое место.
Рабочие папки нужно создать на рабочем диске, очень желательно не на том, где стоит система. Для этого возвращаемся в Openmediavault и создаем расшаренную папку. Ну как, создаем. Нажимаем «Добавить», вводим имя, выбираем диск и вводим путь. Если такого пути нет, система его создаст.
Повторяем два раза, для оставшихся папок и теперь самое интересное. В конфиг нужно ввести абсолютный путь. Чтобы узнать его, нужно здесь-же включить соответствующую колонку отображения, которая не включена по-умолчанию. Как-то так:

И тогда мы его увидим. Самое интересное начинается сейчас. Я нашел решение у одного товарища на ютубе. Проблема в том, что путь слишком длинный для набора вручную и максимально неудобен для запоминания, а скопировать текст в этих полях нельзя. Открываем инспектор кода. В Google Chrome это «Ctrl + Shift + C», тыкаем на абсолютный путь и получаем его в виде кода документа:

Заковыристо, но это самый быстрый способ. Повторяем это еще два раза для остальных папок и в итоге должно получить что-то такое:
---
version: "2.1"
services:
  transmission:
    image: ghcr.io/linuxserver/transmission
    container_name: transmission
    environment:
      - PUID=1000
      - PGID=1000
      - TZ=Europe/Samara
      - TRANSMISSION_WEB_HOME=/combustion-release/ #optional
      - USER=
      - PASS=
      - WHITELIST=
    volumes:
      - /srv/dev-disk-by-uuid-D0B29CC0B29CAD0A/tmp/transmission_config:/config
      - /srv/dev-disk-by-uuid-D0B29CC0B29CAD0A/tmp/transmission_downloads:/downloads
      - /srv/dev-disk-by-uuid-D0B29CC0B29CAD0A/tmp/transmission_watch:/watch
    ports:
      - 9091:9091
      - 51413:51413
      - 51413:51413/udp
    restart: unless-stopped
Хочу обратить внимание на три параметра, которые могут повлиять на доступность Web-интерфейса. Это «USER», «PASS» и «WHITELIST». Их нужно оставить пустыми.
Кажется все готово. Возвращаемся в Portainer. Там должна быть открыта страница добавления нового стека. Пишем его название в поле «Name». Можно назвать просто «transmission» и вставляем содержимое нашего конфига в редактор ниже. Целиком, включая три верхних тире:

И в самом низу страницы нажимаем кнопку «Deploy the stack», несколько минут ждем, пока все загрузится и вуаля!

Открываем новую вкладку в браузере и вводим адрес малины с портом 9091. В моем случае это будет 192.168.1.44:9091
![]()
Дальше, я думаю, понятно, что делать. Можно нажать «+» и загрузить торрент-файл, а можно его просто скопировать в папку «watch» и программа загрузит его автоматически.
Заключение
Итак, у меня теперь есть хранилище файлов, не привязанное к компьютеру. Бонусом имеется торрентокачалка и целый hub.docker.com для установки других нужных приложений.
I’ve been working on getting to a video about installing OpenMediaVault on a Raspberry Pi for a while now and even went so far as to download the files I would need for the video and put them on my desktop for safe keeping and a little reminder to hurry up and make the video.
This morning I decided to finally make the video. I went back through some online resources and realized they had changed the entire process when they released version 5 of OpenMediaVault.
Makes me glad that I didn’t make that video sooner.
In order to setup an OpenMediaVault Raspberry Pi server, you’re going to need a few things:
- Raspberry Pi 3 or 4 with a proper power supply
- Micro SD Card – 8GB or more with USB Adapter
- Ethernet Cable is preferable for network access
- External USB Hard Drive that you’re okay formatting / erasing
- A Computer – I’m using a Windows 10 PC
- SSH program like Putty
Once you’ve gathered all that, you’re set to go.
Getting Started
Download Raspian Lite for your Raspberry Pi.
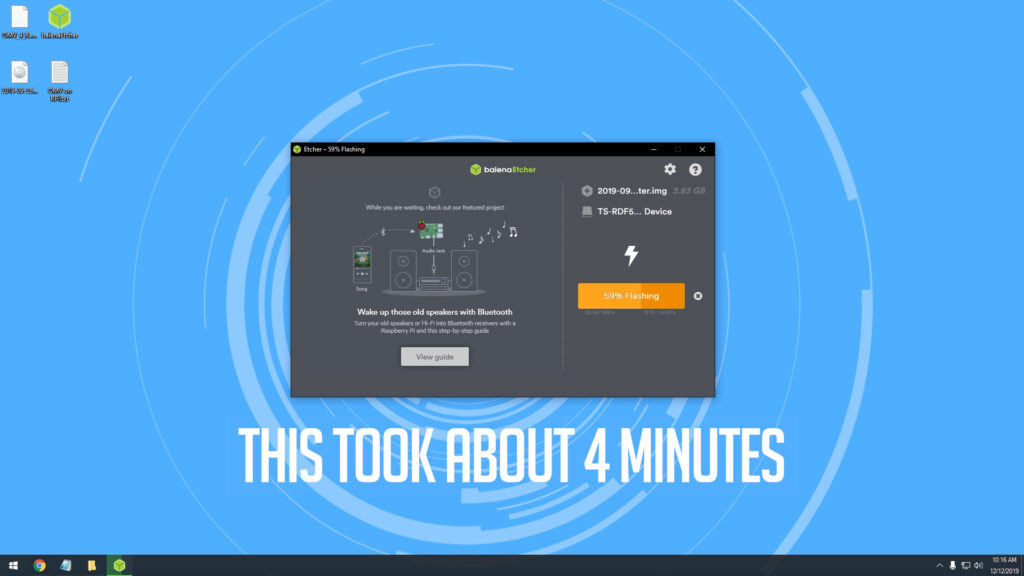
Download Etcher.
Plug your Micro SD card into your computer and open Etcher.
In Etcher, select the Raspbian Lite image file, then select your Micro SD Card, then click “Flash”.
Once Etcher has written and verified everything, unplug the Micro SD card reader and then plug it back in. Then, open your file explorer and look for the drive labeled “boot”. Open that drive and right click inside the windows and click “Create new text file”. Name the file “ssh” (without quotes) and make sure to remove the .txt from the file name. Windows will ask if you’re sure you want to change the file extension. Click “Yes”.
Initial Setup
Unplug the Micro SD card reader, remove the Micro SD card from it and then plug it into your Raspberry Pi. Make sure that your network cable is plugged in and then plug in the power cable to power on your Raspberry Pi.
Now you’ll want to wait a few minutes to give the Raspberry Pi a few minutes to boot up and get settled. While this is happening, login to your router and find the Raspberry Pi’s IP address. You’re going to need that for the rest of the setup process.
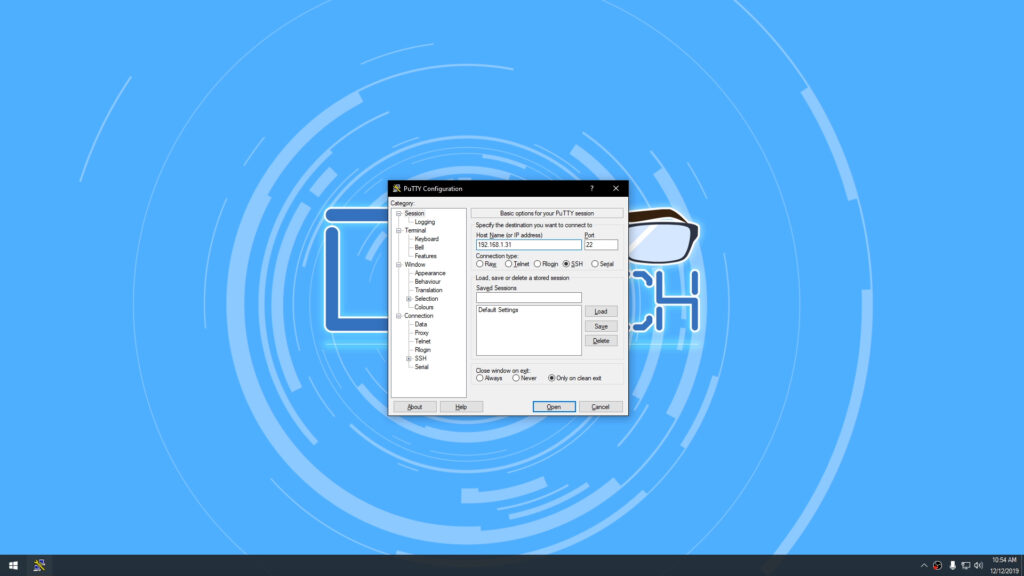
Once you’ve got the IP address and you’ve given the Raspberry Pi time to boot, open an SSH program like Putty. Type in the IP address in the “Host Name” field. Leave the port set to 22.
Click the “Open” button at the bottom of the program.
Click “Yes” on the Putty Security Alert.
A terminal window will pop up asking you to login. The username is “pi” and the password is “raspberry”. Just enter the username and password without the quotes. Any time you’re typing in a password, you won’t see any asterisks or anything. Just type your password and press Enter.
Next, you’ll want to change the “raspberry” password to something more secure. To do that, type “passwd” in the terminal window. It will ask you to enter the current password. Type in “raspberry” (again, without quotes) and press Enter. It will then ask you to enter your new password. Do that and press Enter. It will then ask you to re-enter your new password. Do that and press Enter.
Now it’s time to work on making sure that Raspian is full updated. In the terminal window, type:
sudo apt-get update
Let the system complete. When you’ve got a blinking cursor, type the following:
sudo apt-get upgrade
This may take several minutes, so let it run until you get back to a blinking cursor. Then type:
sudo reboot
This will reboot your Raspberry Pi and close your Putty connection. Wait a couple of minutes and the open Putty and login like you did before with your new password.
Add Pi User to SSH

Next, you’ll add the “pi” user to the SSH group with this command:
sudo adduser pi ssh
Install OpenMediaVault
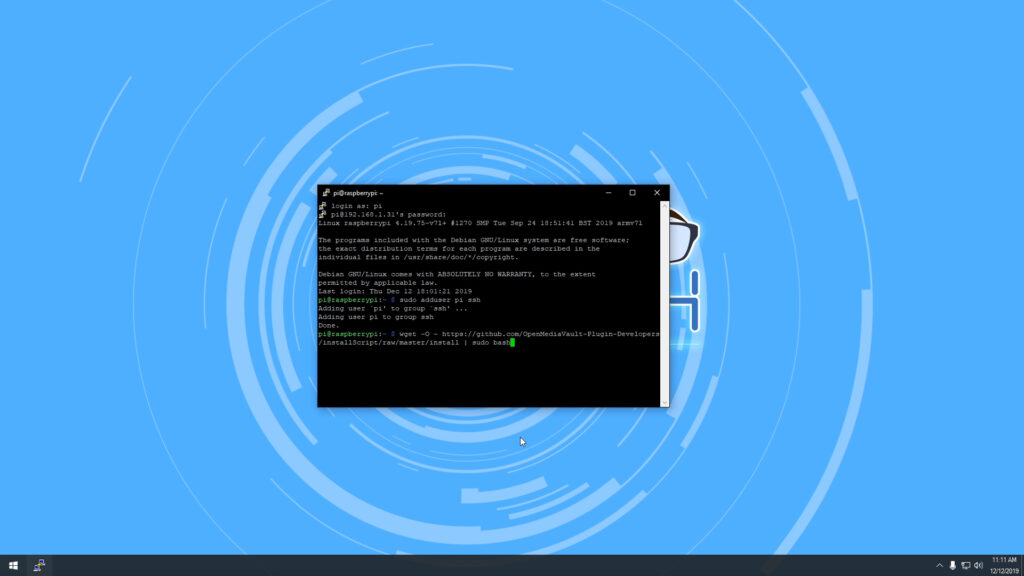
Once that’s complete, you’re going to download and execute a file from Github that will install and configure the OpenMediaVault server software. That script is this:
wget -O - https://github.com/OpenMediaVault-Plugin-Developers/installScript/raw/master/install | sudo bash
This process may take a while depending on your internet connection and what version Raspberry Pi you’ve got. It took me about 15 minutes to complete this, but understand that it could take upwards of 30 minutes.
Once the script has run and completed, reboot the Raspberry Pi:
sudo reboot
At this point, you can plug in your external USB hard drive.
Post Continues After This Ad Break:
Ad Break

Donations help me keep the channel running
Post Continues Here:
First Login
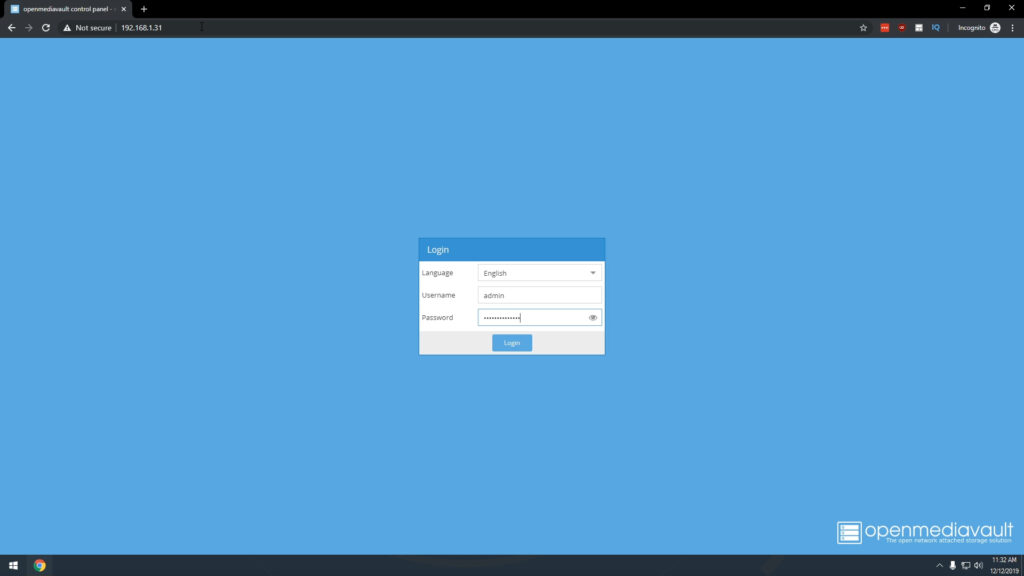
Again, give the Raspberry Pi a couple of minutes to reboot and settle in, then open a web browser like Chrome. In the address bar, type in the IP Address of the Raspberry Pi and press Enter.
This should bring up an OpenMediaVault login screen. The username is “admin” and the default password is “openmediavault” (again without quotes).
There are a couple of things you’ll want to do as soon as you’re signed in for the first time.
First, change the “Auto Logout” setting by clicking “General Settings” under “System” in the left column. Then change the setting from 5 minutes to something like 30 or 60 minutes and then clicking “Save”. Then you’ll see a yellow bar across the top of the page that asks you to “Apply” or “Revert”. Click “Apply”. It may take a minute or 2 for the update to save.
Next, you’ll want to change the Web Administrator Password under “System > General Settings > Web Administrator Password”. Enter your new password in each field and click “Save” and then “Apply” in the yellow bar that appears at the top of the page.
Adding Storage
Now that you have the login stuff taken care of, it’s time to add your storage.
In the left column, look for “Storage”. “Disks” should be the first option under that. Click “Disks”. Select your USB hard drive from the list on the right and then click the “Wipe” button and confirm that you want to wipe the disk. When the process is complete, click the “Done” button.
Next, click “File Systems” in the left column. In the main area of the page, click the “Create” button.
In the “Device” dropdown, select your USB hard drive. Give the device a Label. I called mine “Files”. Then click “OK”. The page will ask if you want to format the device. Click “Yes”. The format process will take a minute or two depending on your hard drive size and if you’re on USB 2.0 or 3.0. Once the process is complete, click “Close”.
Select the newly formated USB hard drive and then click the “Mount” button. Then click “Apply” in the yellow bar at the top of the page.
Saving/applying may take a minute or 2, so be patient.
In the left column under “Access Rights Management” click “Shared Folders”.
Click “Add” and then give the Shared folder a name and select the shared file system you just created in the previous step. The Path will auto-fill with the name you just gave the Shared folder.
Set the “Permissions” to “Everyone: read/write” and click “Save”. Then click “Apply” in the yellow bar at the top of the page.
Next, under “Services” select the appropriate type of share for your network type. Because I’ve got an all Windows network, I’ll select “SMB/CFIS”. Once you’ve selected that, make sure that under “General Settings” the “Enable” option is green. If it’s not, click it so that it is and then click “Save” and then click “Apply” in the yellow bar at the top of the page.
Click the “Shares” tab in the blue bar at the top of the page and click “Add”.
Make sure the share is Enabled and then click the dropdown arrow and select the Shared folder you created earlier. Where it says “Public” change the setting from “No” to “Only guests” and click “Save”. Then click “Apply” in the yellow bar at the top of the page.
Saving/applying may take a minute or 2, so be patient.
At this point, you’ve done everything you need to do in order to setup a shared folder that has fully open access. To test this, we’ll go back to our Windows machine and open the file manager. In the address bar of the file manager, type this:
\\192.168.1.xx (be sure to enter your Raspberry Pi's IP address here)
Then press Enter.
You should then see the shared folder you created. Open that folder and then start dragging files into it from your Documents or Desktop or wherever to make sure that everything is working as expected.
That’s it! You’ve setup your own Raspberry Pi OpenMediaVault Network Attached Storage device.
/=========================================/
Buy Parts on Amazon
Raspberry Pi 4 Max: https://amzn.to/34hHZm1
Hard Drive Enclosure: https://amzn.to/2LRtsag
Hard Drive: https://amzn.to/2PLegMP
/=========================================/
Music
Song: Next Level
Artist: SchemezMusic
YouTube URL: https://www.youtube.com/watch?v=Cl4STzKuNTs
SoundCloud: https://soundcloud.com/user-557502422-986552429
Twitter: https://twitter.com/SchemezM
/=========================================/
Here’s my Amazon Influencer Shop Link:
Amazon: https://dbte.ch/amazonshop
/=========================================/
Like what I do? Want to be generous and help support my channel? Here are some ways to support:
Patreon: https://dbte.ch/patreon
Ko-fi: https://dbte.ch/kofi
/=========================================/
Remember to leave a like on this video and subscribe if you want to see more!
/=========================================/
Follow Me:
Twitter: https://dbte.ch/tw
Facebook: https://dbte.ch/fb
Subscribe: https://dbte.ch/ytsub
#RaspberryPi #openmediavault #canakit
Raspberry Pi 4 — последнее предложение от фонда Raspberry Pi, и оно потрясающее. Это первое устройство в линейке микрокомпьютеров Raspberry Pi с 4 ГБ оперативной памяти, портом Gigabit Ethernet и портами USB 3.0. Эти новые обновления делают его идеальным для использования в качестве недорогого сервера OpenMediaVault.
В этом руководстве мы увидим, как настроить OpenMediaVault, а также как установить Raspbian Lite, базовую операционную систему, необходимую для запуска программного обеспечения.
Примечание: у вас есть более старое устройство Raspberry Pi? Хотите настроить на нем OpenMediaVault? Следуйте этому руководству здесь .
Перед тем как начать
Raspberry Pi 4 — быстрое устройство. Однако для запуска сервера вам все равно понадобится высокоскоростная карта Micro SD. Если у вашего Pi 4 еще нет быстрой карты Micro SD, подумайте о замене ее одной из следующих из списка ниже.
- Samsung 32 ГБ 95 МБ / с (U1) MicroSDXC EVO
- SanDisk Extreme PRO 32 ГБ 100 МБ / с
Конфигурация NOOBS (AKA New из коробки)
К сожалению, для Raspberry Pi 4 в проекте OpenMediaVault было решено отказаться от создания образов, которые можно легко прошить, с предустановленным OpenMediaVault. Вместо этого, если вы планируете использовать OMV на Pi 4, вам нужно вручную настроить его на Raspbian.
Есть несколько способов установить Raspbian на Raspberry Pi 4. Однако самый быстрый и простой способ — использовать установщик NOOBS, инструмент, который может установить Rasbian автоматически. Чтобы заставить NOOBS работать, следуйте пошаговым инструкциям ниже.
Шаг 1: Перейдите на страницу «Загрузки» на raspberrypi.org , потому что именно здесь NOOBS распространяется среди общественности.
> Шаг> На странице «Загрузки» найдите черный значок «NOOBS» и щелкните по нему мышью. Этот значок перенесет вас в область загрузки установщика «NOOBS».
Шаг 3: На странице загрузки «NOOBS» найдите параметр «Автономная и сетевая установка» и нажмите кнопку «Загрузить ZIP», чтобы начать загрузку.
Не используйте опцию «Скачать торрент» для NOOBS, если вы не знаете, как скачать fichiers поток под linux .
Шаг 4: Подключите карту Micro SD к компьютеру. Затем вам нужно отформатировать его в файловой системе Fat32. Если вы используете Mac или Windows, пропустите шаги 4-7. Чтобы отформатировать SD-карту в Fat32, обратитесь к руководству по эксплуатации компьютера.
Вы используете Linux? Откройте окно терминала и установите Gparted.
Ubuntu —sudo apt install gparted
Debian —sudo apt-get install gparted
Arch Linux —sudo pacman -S gparted
Fedora —sudo dnf install gparted
OpenSUSE —sudo zypper install gparted
Шаг 5: Найдите раскрывающееся меню справа в Gparted и щелкните по нему. Выберите карту Micro SD из списка.
Не знаете, как найти свою SD-карту в меню? Щелкните устройство, которое соответствует объему памяти карты Micro SD. Например, если у вас есть карта Micro SD на 32 ГБ, щелкните устройство 32 ГБ. Однако имейте в виду, что некоторые SD-карты округляют данные. Таким образом, 32 ГБ может быть 29 ГБ и т. Д.
Шаг 6: Выберите и удалите все разделы на SD-карте. Когда все разделы будут удалены, вы должны увидеть «не назначено».
Обязательно нажмите кнопку «Применить», чтобы подтвердить удаление разделов.
Шаг 7: Щелкните правой кнопкой мыши «Не назначено» и выберите «Новый». Затем найдите раскрывающееся меню «Файловая система» и установите для него значение Fat32.
Нажмите «Добавить» для подтверждения и «Применить», чтобы записать изменения на диск.
Шаг 8: После форматирования карты Micro SD в файловой системе Fat32 откройте файловый менеджер Linux и смонтируйте его.
Не знаете, как смонтировать SD-карту в файловом менеджере Linux? Найдите его слева и дважды щелкните по нему, чтобы установить.
Шаг 9: Подключив SD-карту, откройте второе окно файлового менеджера Linux и щелкните папку «Загрузки». Затем найдите ZIP-файл для NOOBS и щелкните его правой кнопкой мыши.
Шаг 10: Скопируйте все извлеченные файлы из папки NOOBS ZIP на карту Micro SD.
> Шаг> Отключите SD-карту, подключите ее к Raspberry Pi и включите Raspberry Pi. Также не забудьте подключить кабель HDMI, кабель Ethernet (необходим для правильной работы OpenMediaVault), мышь и клавиатуру.
Настроить NOOBS на Raspberry Pi довольно просто. Сказав это, если вы иметь плохо следуйте нашему руководству, см. официальную информацию о конфигурации noobs the Raspberry Pi Foundation для получить более совет.
Установка Raspbian Lite
Включив Raspberry Pi 4, следуйте пошаговым инструкциям ниже, чтобы установить Raspbian Lite на Raspberry Pi.
Шаг 1: Когда NOOBS запустится на Raspberry Pi 4, вы увидите сообщение «Подождите, пока NOOBS инициализируется». Сядьте, наберитесь терпения и ждите.
Шаг 2: Просмотрите список доступных операционных систем для установки и установите флажок «Raspbian Lite». Эта операционная система необходима для запуска OpenMediaVault, потому что она легкая и не содержит среды рабочего стола.
Шаг 3: Нажмите кнопку «Установить» вверху, чтобы начать установку Raspbian Lite.
Шаг 4: Сядь – Наберитесь терпения и позвольте установщику NOOBS настроить Raspbian Lite на вашем Raspberry Pi 4. По завершении установки вы увидите сообщение: «Операционная система (и) успешно установлена».
> Когда>
> Распбиан> Для этого сначала авторизуйтесь под логином pi и пароль Framboise .
Когда вы войдете в систему, вам нужно будет обновить систему. Для обновления выполните следующие команды в командной строке консоли.
sudo apt update

обновить sudo apt -y
После обновления установите OpenMediaVault с официальным скриптом установки.
wget -O - https://github.com/OpenMediaVault-Plugin-Developers/installScript/raw/master/install | судо баш
Установка OpenMediaVault может занять много времени. Потерпи. После завершения процесса откройте вкладку браузера на любом компьютере в той же сети, что и Pi 4, чтобы получить доступ к веб-интерфейсу OpenMediaVault.
> https:>
Today we are going to be showing you how to install Openmediavault 6 on a Raspberry Pi 4. If you would like to see more like this. Check out our Raspberry Pi series episodes.
Openmediavault 6 is now stable and Openmediavault 5 is now at the end of life (EOL) which means it will no longer get any more development or security patches. So if you are using Openmediavault 5 you will need to upgrade now. Follow our guide here.
If you are looking to install Openmediavault with a fresh installation then follow our guide below.
Table of Contents
What is Openmediavault 6?

OpenMediaVault 6 (OMV) is an open source, Network Attached Storage (NAS) solution based on Debian Linux. Once installed on a Raspberry Pi 4 it will create a fully-fledged server solution.
OMV 6 has a beautiful graphical user interface (GUI) that can be used to fully configure the server. Including setting up user accounts, file shares, docker, and Portainer as well as a mountain of plugins to extend its functionality.
In this guide, we will be installing Openmediavault 6 on a Raspberry Pi 4. If you are ready please read our prerequisites below to make sure you have everything you need to start the installation.
Difficulty = Easy
Prerequisites:
- Raspberry Pi 4 with external USB hard drive storage.
- Raspberry Pi OS Lite (Bullseye) version installed on an SD card, USB attached solid-state drive (SSD), or USB Flash Drive. Follow our guide here
- A device to connect to the Raspberry Pi 4 over the network via SSH.
- An Internet connection
- Your Raspberry Pi’s IP address. (Follow our guide to find out your Raspberry Pi’s IP address)
How to Install Openmediavault 6 on Raspberry Pi 4
Step1: Connect to your Raspberry Pi using SSH and update it.
Open a terminal window and connect to your Raspberry Pi 4 over SSH. If you’re on the latest version of Windows 11 you can use the cmd terminal or Powershell. If not you will need PuTTY. Follow our installation guide here.
Connect to your Raspberry Pi over SSH on Linux type.
ssh pi@PIIPADDRESS
The first thing we need to do is to update and upgrade the Raspberry Pi OS to ensure it has all the latest package updates installed.
sudo apt update -y && sudo apt upgrade -y
Step 2: Install Openmediavault 6 by running the bash Install script
Type the following into your terminal to execute the OMV bash install script from Github (Note the installation can take up to 30 minutes to complete).
sudo wget -O - https://raw.githubusercontent.com/OpenMediaVault-Plugin-Developers/installScript/master/install | sudo bash
Please note: if you have made any SSH port or username changes installing OMV using this script will reset them.
Towards the end, the OMV install script closes the active SSH connection. This is completely normal and as expected as the install script will change the network and user settings.
Important!. You will need to wait a few minutes before trying to access the OMV 6 Dashboard through a browser. This is because the OMV install script will be finishing up in the background.
Step 3: Connect and log into the Openmediavault dashboard.
Navigate to your chosen browser and connect to the Openmediavault interface by putting your Raspberry Pi IP Address into the address bar:
http://PIIPADDRESS
You have now successfully installed Openmediavault 6 on your Raspberry Pi 4.
To log in the default Username and Password is:
Username: admin
Password: openmediavault
This concludes today’s guide.
Did You Know We Have A Raspberry Pi Series?
Our YouTube series will take you from the beginning to more advanced topics. Would you love to use docker?. Install nextcloud or plex?. It IS 100% free. Learn more here!.
We need your support.
We hope you enjoyed this episode and that it was helpful and you got benefit out of it.
If you did, please consider supporting our channel by Subscribing to our YouTube channel, and liking and sharing our content.
You can also make a donation via Paypal or become a Patreon if you wish to do so.
You can also follow us on Facebook or Twitter.
If you have any questions or any requests please ask in the comments below or on YouTube.
If you want to host a file server on your Raspberry Pi, OpenMediaVault (OMV) is a great choice that will make your life easier. It’s a web interface to manage everything on your devices: from your storage drives (detection, mounting, formatting) to your file sharing (creation, permissions, etc.). I’ve used this distribution a lot, so I will explain how to use the distribution on a Raspberry Pi in this article.
OpenMediaVault is a network-attached storage (NAS) solution that can be installed on any Debian-based distribution, such as Raspberry Pi OS (Lite). It can be used to host and configure a file server via a web interface in a few clicks.
This article will explain each step in detail, so you can use the software on your device and easily create a file share at home.
If you’re looking to quickly progress on Raspberry Pi, you can check out my e-book here. It’s a 30-day challenge where you learn one new thing every day until you become a Raspberry Pi expert. The first third of the book teaches you the basics, but the following chapters include projects you can try on your own.
Why do you need OpenMediaVault?
As explained in the introduction, the main goal of OpenMediaVault (OMV) is to install a file server and give you a nice web interface to manage it. But this tool doesn’t reinvent the wheel.
Basically, it will install the main components of a file server (like Samba) and provide an interface between you and the configuration file (a bit like Webmin, but dedicated to the file server, and slightly better I think).
You can absolutely do the same thing by using Samba and a few other packages, but the installation, configuration, and maintenance are way more complicated (I have a complete guide about that if you want, even if it’s just to take a look at the difference).
In my job, I even switched from OpenMediaVault to native Debian on some servers (because I needed to update the base system, but OMV wasn’t available with the latest version at the time). I no longer had the web interface, but the Samba configuration remained the same and the file share still worked.
Anyway, the idea here is to keep things simple for a home project. I have no doubts that some of you are gods with Linux, but there is no reason to avoid adding comfort to managing our Raspberry Pi server.
Recommended hardware to host a file server at home
- Fast & big SD card: For a file server, I recommend a big SD card (at least 128 GB) so you can keep everything on it. This one is the best model available right now (and often available at a discount).
- Raspberry Pi 4: The Raspberry Pi 4 is supported by OpenMediaVault, and it’s the best option available currently. There’s no need to think more about it, get a Raspberry Pi 4 with at least 4 GB, you won’t regret it.
- SSD drive: If you expect more performance, a Raspberry Pi and an SSD allow you to run systems really fast and get the best response time when opening your files. My favorite model is this one, and SSD drives are now really affordable, go for it (USB adapter included).
You’ll need two storage drives anyway, so a combination of an SD card (or USB stick) for the system and the external USB drive (SSD or not) is great for this project.
Recommended reading: How to Boot from SSD on Raspberry Pi: A Detailed Walkthrough
Install the base system for OpenMediaVault
Historically, OpenMediaVault was distributed as a standard Linux distribution. You had an image and had to install it from scratch on a new server (or Raspberry Pi). With the latest versions, OpenMediaVault is now a simple package you can install on any Debian-based distribution, which is way better for us.
Download Your Essential Linux Commands Guide!
It’s a free PDF guide containing every Raspberry Pi Linux command you should know!
Download now
The first step is to have or install your system on a Raspberry Pi. For this tutorial, I’ll use Raspberry Pi OS Lite, which is enough for it. But it should work with other distributions, at least those based on Debian (Ubuntu, DietPi, etc.).
Warning: it looks like OpenMediaVault is no longer supporting installations on a system with a desktop environment. So make sure to use Raspberry Pi OS Lite for this project, or you’ll get an error like:
This system is running a desktop environment!
Please use a Lite version of the image or
do not choose to install a desktop environment.
If you need some guidance for the installation, I’ll let you read this complete guide to set up Raspberry Pi OS and come back here after that.
Whatever your case, make sure you have:
- Installed a Debian-based distribution.
- Configured Internet access.
Take note of the Raspberry Pi IP address, you’ll need it later (read this tutorial if you don’t know what I’m talking about). - Complete the system updates:
sudo apt update && sudo apt upgrade
Setting up SSH access on your Raspberry Pi might be a good idea if you have another computer to follow this tutorial. This way, you can just copy and paste the commands I give you here and access the web interface from your computer.
OpenMediaVault Installation on a Raspberry Pi
Here are the main steps to install OpenMediaVault on Raspberry Pi OS:
- Use the installation script to install all dependencies and complete the basic configuration.
- Access the web interface to create your custom server.
We’ll now learn how to do this in detail.
Note: If you want to see all these steps in action, I have a video lesson available for the community members. You can join here and watch it directly if you are interested (with 10+ other lessons for Raspberry Pi and many other benefits).
Install OpenMediaVault
As mentioned previously, OpenMediaVault can now be installed like a simple package. It’s not available in the default repository, but you can install it by using their installation script, in one command line:wget -O - https://github.com/OpenMediaVault-Plugin-Developers/installScript/raw/master/install | sudo bash

It will install everything you need, there are no additional questions during the installation. The script will reboot your Raspberry Pi when it’s done.
I tested it on Raspberry Pi OS Lite (Bullseye, 64-bit), to check if the latest version was supported, but any version should be fine.
Are you a bit lost in the Linux command line? Check this article first for the most important commands to remember and a free downloadable cheat sheet so you can have the commands at your fingertips.
Access the web interface
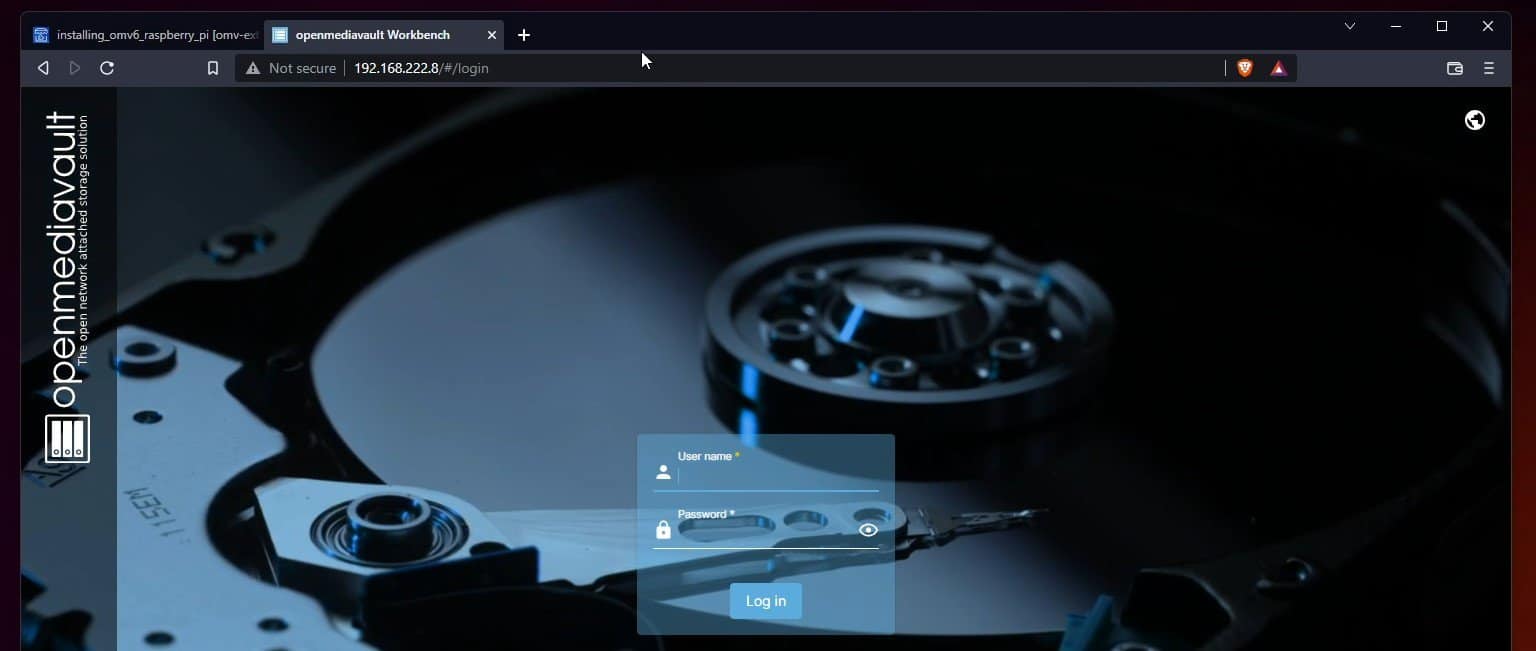
After the system reboots, you should be able to access the web interface directly:
- Open your web browser on your computer.
- Type the Raspberry Pi address with the HTTP prefix, so for example:
http://192.168.1.100
You can also use the Raspberry Pi hostname if you know it:http://raspberrypi.localIt’s just an example, so you may have changed it in Raspberry Pi Imager during the installation, or after installation by using the hostname command (as explained here). - The login form will show up as:

- Enter the default credentials to log in for the first time:
- Login: admin
- Password: openmediavault
- You can change them once logged in, I will show you how in the next part.
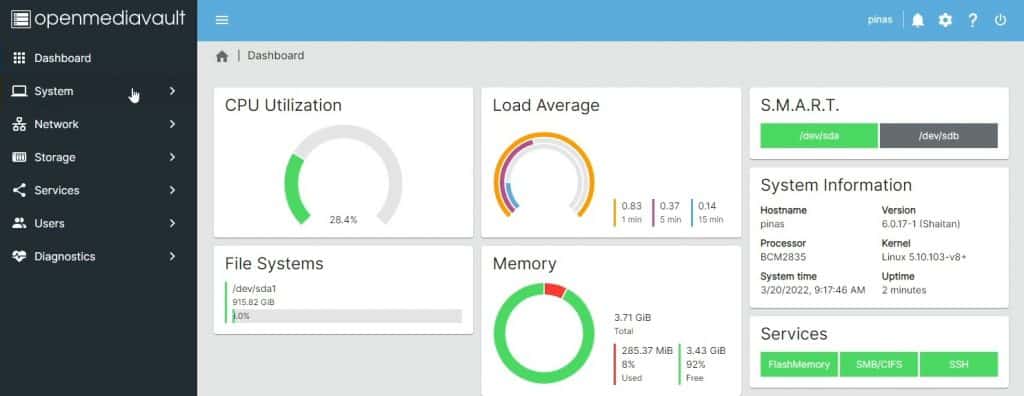
You’ll then access the full interface. The dashboard needs to be configured, but you have a left menu with all the features included in OpenMediaVault.
Download Your Essential Linux Commands Guide!
It’s a free PDF guide containing every Raspberry Pi Linux command you should know!
Download now
Reminder: Remember that all the members of my community get access to this website without ads, exclusive courses and much more. You can become part of this community for as little as $5 per month & get all the benefits immediately.
First Steps with OpenMediaVault
The goal here is not to give you a detailed guide on how to use OpenMediaVault, explaining the options available in the interface (there is the official documentation for that). Instead, I want to guide you with the first steps that anyone will have to follow, whatever the exact project is. I hope it will be useful and save you time.
Feel free to check my video on this topic to see how it looks:
Change the administrator password
For security reasons, it’s always a good practice to change the default credentials as soon as possible after the installation. Even if it’s just a small server at home, default passwords will be tested directly if someone finds that you are using OpenMediaVault or a Raspberry Pi.
To change the default OpenMediaVault password:
Download Your Essential Linux Commands Guide!
It’s a free PDF guide containing every Raspberry Pi Linux command you should know!
Download now
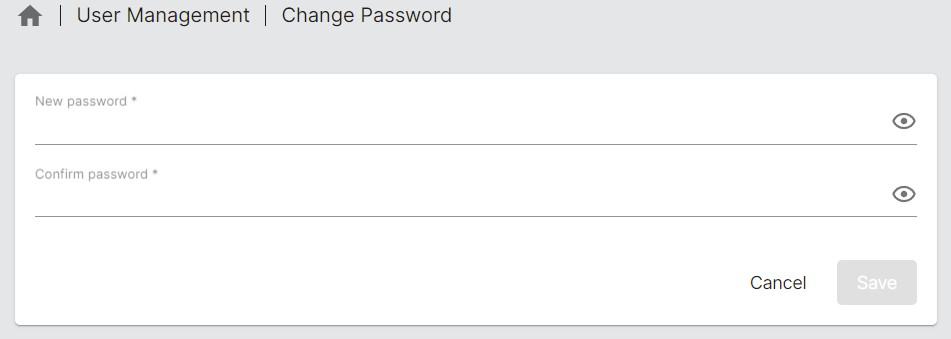
- Click on the “User settings” icon in the top-right corner.
- A menu shows up, click on “Change Password”:

- Enter the new password twice, and click on “Save” to apply your change.
You can also use the same menu to switch to another language if needed.
Good, you can now move on with your project!
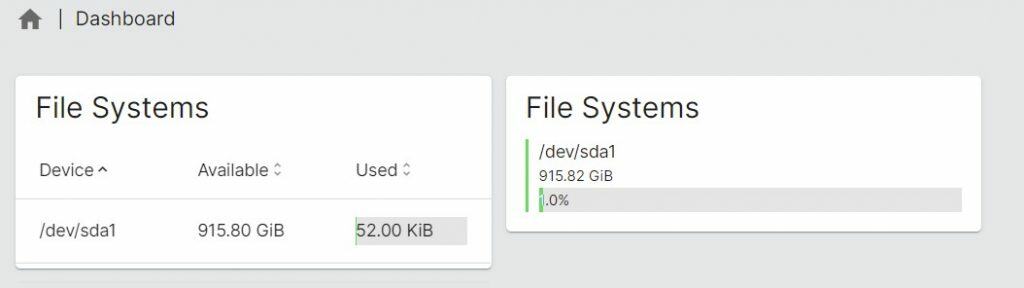
Dashboard configuration
By default, the home page is empty, and you’ll get a message explaining what to do: “The dashboard has not yet been configured. To personalize it, please go to the settings page.”
Just click on the link to configure the widgets you want to add to this page. This is really well done – you can have a quick overview of the hardware usage (CPU, memory, network) and your current configuration (enabled services, shares, file systems, etc.).
For some of them, you have the choice between “table” and “grid”. Just pick one, this is just a different design. Grids have colors and graphs, while tables are more traditional.
Mount your storage drives
The serious part begins when you try to add your storage drives. This was already the case a few years ago when I first tried OpenMediaVault, but I feel it’s not very intuitive. The interface helps, but there are several steps and if you forgot one step, it won’t work.
Anyway, mounting and formatting the disk is not that complicated, so let’s start with it.
I’m testing this by using the Argon One case, with a 1Tb M2 SSD in the case. OpenMediaVault is installed on my favorite USB key (but you can use an SD card), and I will show you how to mount the SSD, format it and create a file share on it. The steps should be similar if you use a USB drive or even a HAT with several SATA drives.
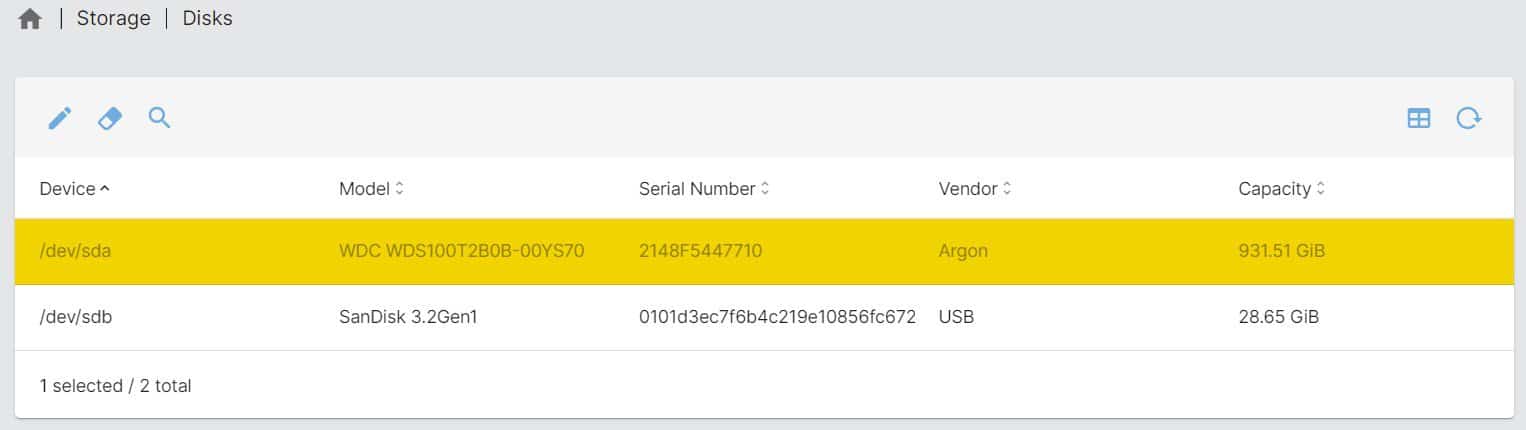
- First, make sure your data drive is detected. Go to Storage > Disks to list all of them:

In my case, both are detected (USB+SSD), and I’m interested in the first one (/dev/sda). - Optional: Go to “Software RAID“ if you have several disks and want additional security.
For example, if you have two drives, you can configure a mirror, so that if one disk is corrupted, the other one will save your life (and files).
This is one step that is particularly complicated to do in command lines, and where OMV is really useful. - Then format your disk with EXT4.
I tried with a FAT partition created on my computer but received many issues, so I guess OMV works best with a Linux file system.
Go to Storage > File Systems and click on “Create”. You may need to mount it first.
Choose your device (/dev/sda in my case) and the file system (EXT4 works fine).
That should be enough. In a few steps, new data storage is now available.
Create your first share
This is where I got a bit lost in the process because there are several locations in the left menu to configure the “share” folder:
- In Storage > Shared folders: you create a folder and can give permissions to it for your users. But it doesn’t mean you can access it from another computer. It’s only a local folder.
- In Services > SMB/CIFS > Shares: that’s where you configure a shared folder, that can be accessed from another computer.
So, start by creating a new folder in Storage > Shared folders.
Set a name (“share” or whatever), select the file system you just created (/dev/sda1 in my case), and pick the default permissions. This is just for local access, so it doesn’t really matter for now.
Then, go to Services > SMB/CIFS.
In the “Settings” submenu, make sure the service is enabled. If not, check the “Enabled” box and click Save.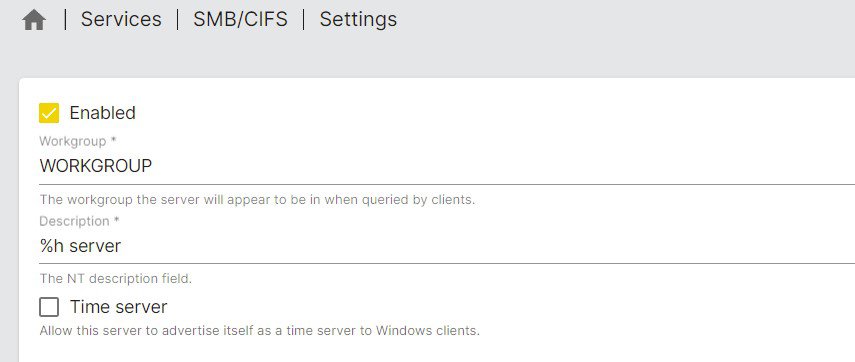
You can now open the “Shares” submenu, and create the shared folder.
The form might feel overwhelming, but you can keep the default values in most cases. Select the shared folder created in the previous step, and everything else is optional. Just change what applies to your case.
If you prefer not to bother with user passwords and permissions, set the “Public” field to “Guests allowed”.
Once all the steps are completed, the new folder is listed under Services > SMB/CIFS > Shares: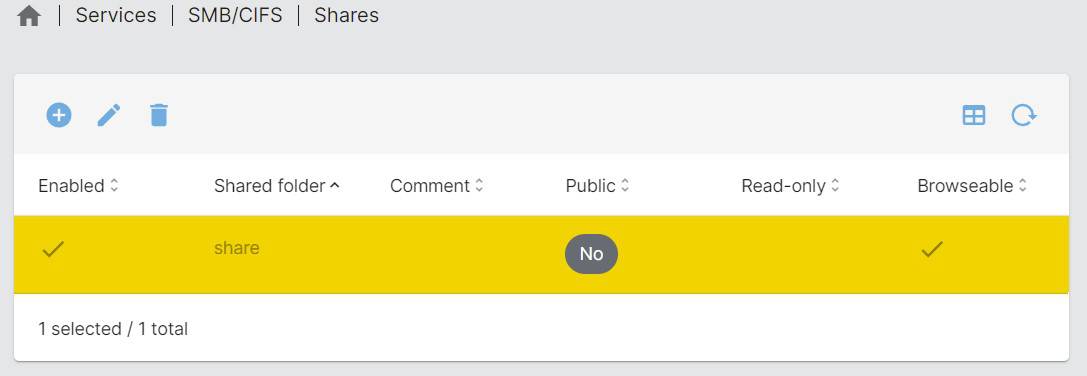
And you can access it via your file explorer from a computer. On Windows, use \\IP_ADDRESS and on Linux/Mac it should be something like smb://IP_ADDRESS.
If guests aren’t allowed, you’ll be asked for a login and password. Keep reading to learn more about this.

Share permissions management
That’s another step that is hard to configure when there is no web interface. So OMV is pretty handy if you want to give different permissions to different users.
The best practice is to use users and groups to manage permissions to your shared folders:
- Create a different group for each level of access.
Maybe it’s “admins” and “users”. Or perhaps it’s one group per shared folder. Find what is best depending on your project.
For a simple share at home, one group named something like “share_access” might be enough, to explicitly configure who can access the shared folder.
Go to Users > Groups to create the corresponding group(s). - Then create one user for everyone.
In general, you’ll create one username for each individual, but you can also have more if you have some scripts or apps connecting to this device (a backup service, for example).
Go to Users > Users to create the corresponding user(s).
Make sure to add them to the correct groups you created previously.
Once you have created at least one user and group for yourself, we can move on and configure the shared folder permissions:
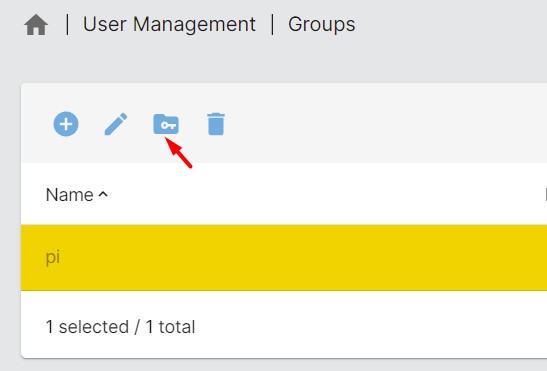
- Get back to “Groups” and select the group you want to give access to your shared folder.
- Click on the privileges icon in the upper bar:

- You can now choose which permissions to give for each shared folder you created:
- Read/Write: full access to the files in this folder.
- Read only: can open all files, but not edit them.
- No access: can’t open any file.
You can do the same thing in the Users submenu. But it’s generally best practice to use groups so that it will work directly when you add new users to this group in the future.
Using plugins with OpenMediaVault
The last feature I want to introduce is the additional plugins. OpenMediaVault is generally used to host a basic file server, which is why I mainly wrote about it in this article. But you can easily install new plugins, to enhance your experience and add new features to your file server.
You can for example add a plugin to enable an Antivirus or file encryption on your system.
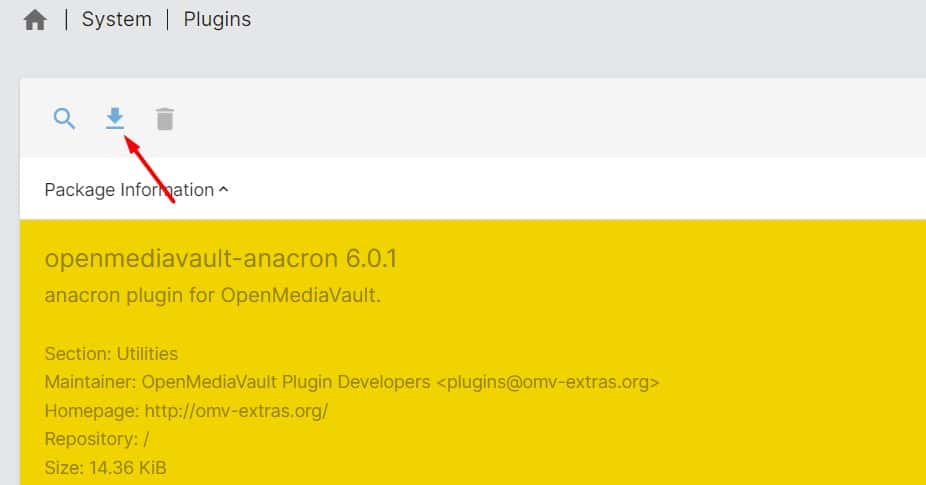
To do this, go to System > Plugins. You’ll get a list of the supported plugins.
Just click on the one you are interested in, and click on “Install” to install it automatically.
After the installation, the plugin will generally be available in a submenu, with additional settings to configure it. Here is an example with the Antivirus plugin (ClamAV):
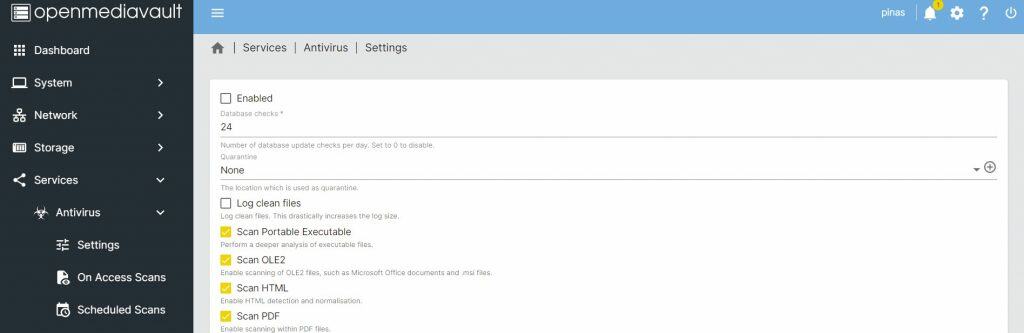
Obviously, you can always use SSH and install ClamAV on your Raspberry Pi manually. But the web interface to manage it is appreciable.
I hope this guide has been useful to get started with OpenMediaVault on your Raspberry Pi. Please don’t hesitate to check their documentation for more details (once installed, using a Raspberry Pi or a $10k server doesn’t change anything in the interface), and contact me if you have any additional questions.
Download Your Essential Linux Commands Guide!
It’s a free PDF guide containing every Raspberry Pi Linux command you should know!
Download now
Additional Resources
Not sure where to start?
Understand everything about the Raspberry Pi, stop searching for help all the time, and finally enjoy completing your projects.
Watch the Raspberry Pi Bootcamp course now.
Master your Raspberry Pi in 30 days
Don’t want the basic stuff only? If you are looking for the best tips to become an expert on Raspberry Pi, this book is for you. Learn useful Linux skills and practice multiple projects with step-by-step guides.
Download the e-book.
VIP Community
If you just want to hang out with me and other Raspberry Pi fans, you can also join the community. I share exclusive tutorials and behind-the-scenes content there. Premium members can also visit the website without ads.
More details here.
Need help building something with Python?
Create, understand, and improve any Python script for your Raspberry Pi.
Learn the essentials step-by-step without losing time understanding useless concepts.
Get the e-book now.
You can also find all my recommendations for tools and hardware on this page.

I’m the lead author and owner of RaspberryTips.com.
My goal is to help you with your Raspberry Pi problems using detailed guides and tutorials.
In real life, I’m a Linux system administrator with web developer experience.