Эта статья посвящена работе с файлами (вводу/выводу) в Python: открытие, чтение, запись, закрытие и другие операции.
Файл — это всего лишь набор данных, сохраненный в виде последовательности битов на компьютере. Информация хранится в куче данных (структура данных) и имеет название «имя файла» (filename).
В Python существует два типа файлов:
- Текстовые
- Бинарные
Текстовые файлы
Это файлы с человекочитаемым содержимым. В них хранятся последовательности символов, которые понимает человек. Блокнот и другие стандартные редакторы умеют читать и редактировать этот тип файлов.
Текст может храниться в двух форматах: (.txt) — простой текст и (.rtf) — «формат обогащенного текста».
Бинарные файлы
В бинарных файлах данные отображаются в закодированной форме (с использованием только нулей (0) и единиц (1) вместо простых символов). В большинстве случаев это просто последовательности битов.
Они хранятся в формате .bin.
Любую операцию с файлом можно разбить на три крупных этапа:
- Открытие файла
- Выполнение операции (запись, чтение)
- Закрытие файла
Открытие файла
Метод open()
В Python есть встроенная функция open(). С ее помощью можно открыть любой файл на компьютере. Технически Python создает на его основе объект.
Синтаксис следующий:
f = open(file_name, access_mode)
Где,
file_name= имя открываемого файлаaccess_mode= режим открытия файла. Он может быть: для чтения, записи и т. д. По умолчанию используется режим чтения (r), если другое не указано. Далее полный список режимов открытия файла
| Режим | Описание |
|---|---|
| r | Только для чтения. |
| w | Только для записи. Создаст новый файл, если не найдет с указанным именем. |
| rb | Только для чтения (бинарный). |
| wb | Только для записи (бинарный). Создаст новый файл, если не найдет с указанным именем. |
| r+ | Для чтения и записи. |
| rb+ | Для чтения и записи (бинарный). |
| w+ | Для чтения и записи. Создаст новый файл для записи, если не найдет с указанным именем. |
| wb+ | Для чтения и записи (бинарный). Создаст новый файл для записи, если не найдет с указанным именем. |
| a | Откроет для добавления нового содержимого. Создаст новый файл для записи, если не найдет с указанным именем. |
| a+ | Откроет для добавления нового содержимого. Создаст новый файл для чтения записи, если не найдет с указанным именем. |
| ab | Откроет для добавления нового содержимого (бинарный). Создаст новый файл для записи, если не найдет с указанным именем. |
| ab+ | Откроет для добавления нового содержимого (бинарный). Создаст новый файл для чтения записи, если не найдет с указанным именем. |
Пример
Создадим текстовый файл example.txt и сохраним его в рабочей директории.

Следующий код используется для его открытия.
f = open('example.txt','r')  # открыть файл из рабочей директории в режиме чтения
fp = open('C:/xyz.txt','r')  # открыть файл из любого каталога
В этом примере f — переменная-указатель на файл example.txt.
Следующий код используется для вывода содержимого файла и информации о нем.
>>> print(*f) # выводим содержимое файла
This is a text file.
>>> print(f) # выводим объект
<_io.TextIOWrapper name='example.txt' mode='r' encoding='cp1252'>
Стоит обратить внимание, что в Windows стандартной кодировкой является cp1252, а в Linux — utf-08.
Закрытие файла
Метод close()
После открытия файла в Python его нужно закрыть. Таким образом освобождаются ресурсы и убирается мусор. Python автоматически закрывает файл, когда объект присваивается другому файлу.
Существуют следующие способы:
Способ №1
Проще всего после открытия файла закрыть его, используя метод close().
f = open('example.txt','r')
# работа с файлом
f.close()
После закрытия этот файл нельзя будет использовать до тех пор, пока заново его не открыть.
Способ №2
Также можно написать try/finally, которое гарантирует, что если после открытия файла операции с ним приводят к исключениям, он закроется автоматически.
Без него программа завершается некорректно.
Вот как сделать это исключение:
f = open('example.txt','r')
try:
   # работа с файлом
finally:
   f.close()
Файл нужно открыть до инструкции
try, потому что если инструкцияopenсама по себе вызовет ошибку, то файл не будет открываться для последующего закрытия.
Этот метод гарантирует, что если операции над файлом вызовут исключения, то он закроется до того как программа остановится.
Способ №3
Инструкция with
Еще один подход — использовать инструкцию with, которая упрощает обработку исключений с помощью инкапсуляции начальных операций, а также задач по закрытию и очистке.
В таком случае инструкция close не нужна, потому что with автоматически закроет файл.
Вот как это реализовать в коде.
with open('example.txt') as f:
    # работа с файлом
Чтение и запись файлов в Python
В Python файлы можно читать или записывать информацию в них с помощью соответствующих режимов.
Функция read()
Функция read() используется для чтения содержимого файла после открытия его в режиме чтения (r).
Синтаксис
file.read(size)
Где,
file= объект файлаsize= количество символов, которые нужно прочитать. Если не указать, то файл прочитается целиком.
Пример
>>> f = open('example.txt','r')
>>> f.read(7)  # чтение 7 символов из example.txt
'This is '
Интерпретатор прочитал 7 символов файла и если снова использовать функцию read(), то чтение начнется с 8-го символа.
>>> f.read(7)  # чтение следующих 7 символов
' a text'
Функция readline()
Функция readline() используется для построчного чтения содержимого файла. Она используется для крупных файлов. С ее помощью можно получать доступ к любой строке в любой момент.
Пример
Создадим файл test.txt с нескольким строками:
This is line1.
This is line2.
This is line3.
Посмотрим, как функция readline() работает в test.txt.
>>> x = open('test.txt','r')
>>> x.readline()  # прочитать первую строку
This is line1.
>>> x.readline(2)  # прочитать вторую строку
This is line2.
>>> x.readlines()  # прочитать все строки
['This is line1.','This is line2.','This is line3.']
Обратите внимание, как в последнем случае строки отделены друг от друга.
Функция write()
Функция write() используется для записи в файлы Python, открытые в режиме записи.
Если пытаться открыть файл, которого не существует, в этом режиме, тогда будет создан новый.
Синтаксис
file.write(string)
Пример
Предположим, файла xyz.txt не существует. Он будет создан при попытке открыть его в режиме чтения.
>>> f = open('xyz.txt','w')  # открытие в режиме записи
>>> f.write('Hello \n World')  # запись Hello World в файл
Hello
World
>>> f.close()  # закрытие файла
Переименование файлов в Python
Функция rename()
Функция rename() используется для переименовывания файлов в Python. Для ее использования сперва нужно импортировать модуль os.
Синтаксис следующий.
import os
os.rename(src,dest)
Где,
src= файл, который нужно переименоватьdest= новое имя файла
Пример
>>> import os
>>> # переименование xyz.txt в abc.txt
>>> os.rename("xyz.txt","abc.txt")
Текущая позиция в файлах Python
В Python возможно узнать текущую позицию в файле с помощью функции tell(). Таким же образом можно изменить текущую позицию командой seek().
Пример
>>> f = open('example.txt')  # example.txt, который мы создали ранее
>>> f.read(4)  # давайте сначала перейдем к 4-й позиции
This
>>> f.tell()  # возвращает текущую позицию
4
>>> f.seek(0,0)  # вернем положение на 0 снова
Методы файла в Python
file.close() |
закрывает открытый файл |
file.fileno() |
возвращает целочисленный дескриптор файла |
file.flush() |
очищает внутренний буфер |
file.isatty() |
возвращает True, если файл привязан к терминалу |
file.next() |
возвращает следующую строку файла |
file.read(n) |
чтение первых n символов файла |
file.readline() |
читает одну строчку строки или файла |
file.readlines() |
читает и возвращает список всех строк в файле |
| file.seek(offset[,whene]) | устанавливает текущую позицию в файле |
file.seekable() |
проверяет, поддерживает ли файл случайный доступ. Возвращает True, если да |
file.tell() |
возвращает текущую позицию в файле |
file.truncate(n) |
уменьшает размер файл. Если n указала, то файл обрезается до n байт, если нет — до текущей позиции |
file.write(str) |
добавляет строку str в файл |
file.writelines(sequence) |
добавляет последовательность строк в файл |
So you know how you can right click on a file and have options to open it with different programs? That’s what I wanted to do when I was working on my Quaver Lyrics Finder project. So here’s how I did it, making it work for macOS, Windows, and Ubuntu, and how it handles in PyQt.
This is the second part of the series where I write about things I learned while writing a desktop app. The first post can be found here.
Contents
- macOS
- Handling in PyQt
- Windows
- Handling in PyQt
- Ubuntu
- Handling in PyQt
macOS
This post assumes basic knowledge of macOS application bundle structure. See here for more details.
On macOS, the framework responsible for managing integration with discovering and managing “open with” context menu items is Core Foundation. It parses the Info.plist file in the Contents folder at the root of the application bundle, and every key that’s relevant to Core Foundation in that file starts with CF.
To integrate with the “Open With” menu on macOS, a CFBundleDocumentTypes1 key should be added in the Info.plist file. The value corresponding to that should be an array of <dict> elements.
Each <dict> element should contain a:
CFBundleTypeExtensions2 key with a corresponding array of<string>values, matching each filetype extension that your program targetsCFBundleTypeName3 with a corresponding<string>value, containing the name that your program assigns to these filetype extensionsCFBundleTypeRole4 with a corresponding<string>value, describing what your program does with the file. This role can be any one of Editor, Viewer, Shell, or None. See the footnote for Apple’s documentation on what each type should do.
<key>CFBundleDocumentTypes</key>              <!-- Declare that program associates filetypes -->
<array>
  <dict>
    <key>CFBundleTypeExtensions</key>         <!-- Declare which extensions to associate with -->
    <array>
      <string>mp3</string>
      <string>mp4</string>
      <string>m4a</string>
      <string>m4v</string>
      <string>tta</string>
      <string>ape</string>
      <string>wma</string>
      <string>aiff</string>
      <string>flac</string>
      <string>ogg</string>
      <string>oga</string>
      <string>opus</string>
    </array>
    <key>CFBundleTypeName</key>               <!-- Declare name to associate with these extensions -->
    <string>Audio Files</string>
    <key>CFBundleTypeRole</key>               <!-- Declare role that program plays when opening file -->
    <string>Viewer</string>
  </dict>
</array>
After the Info.plist file has been updated and the program has been moved to the Applications folder, run the following command to force Core Services to register the newly claimed filetypes:
/System/Library/Frameworks/CoreServices.framework/Versions/A/Frameworks/LaunchServices.framework/Versions/A/Support/lsregister -f /Applications/<YOUR_APP_NAME>.app/
When this is done, run killall Finder to force restart Finder, and your program should now show up in Finder’s context menu!
Handling the file open event in PyQt
Note: this is specific to PyQt, so if you aren’t using that, skip this section!
So now, your program opens when you click on the right click menu, but nothing happens in the program.
As it turns out, the program must listen for the event that occurs when a program is launched via the right click menu, and override the default behaviour of doing nothing. In Qt, the event specific to macOS is QFileOpenEvent, and the listener (or event handler) for all events is part of the main QApplication class.
Thus, we must:
- Subclass
QApplication - Override the
QFileOpenEventhandler
Here’s the snippet that handles this in Quaver:
from gui import main_window # This file just contains code for the main window

import sys
from PyQt5 import QtCore, QtWidgets

class MainApp (QtWidgets.QApplication): # Subclass QApplication

  # Just setup, nothing to see here
  def __init__(self, argv):
    super(MainApp, self).__init__(argv)

    self._window = main_window.MainWindow()
    self._window.show()
    self._window.setWindowTitle('Quaver')

  # This is the handler for all events!
  # By defining a function in QApplication's subclass,
  # we override the default implementation
  def event(self, event):
    # An event has occurred! See http://doc.qt.io/qt-5/qevent.html for more details
    # We can access the type of event by using event.type()

    # QFileOpen is an enum in the C++ version of Qt, equivalent to 116
    # Access and compare against by using QEvent.FileOpen in Python binding
    if event.type() == QtCore.QEvent.FileOpen:
      # self._window.generateFilepathList is a function defined elsewhere that accepts a string parameter
      # event.url() returns a QUrl when event is a QFileOpenEvent;
      # I convert to string with .toString() and remove the file:// protocol section of the URL
      self._window.generateFilepathList([event.url().toString().replace('file://', '')])
    else:
      # If the event is not a FileOpen event, Quaver does not intercept it
      pass
    return True

def main():
  app = MainApp(sys.argv) # Instantiate the main app
  sys.exit(app.exec_()) # Execute app event loop until exit

if __name__ == '__main__':
  main()
And with this, we have: a program that integrates with Finder’s “Open With” context menu, associated to any number of filetype extensions, and the filepath to the file that the user launched the app from.
Windows
This post assumes basic knowledge of the Windows Registry. See here for more details.
On Windows, configuration information is generally stored in the Windows Registry. It also happens to store all of the file type associations, which is what we want.
Note that I am using the free version of Advanced Installer to generate an MSI installer that puts registry keys in the right places, so this section will have little to no code.
Under HKEY_CURRENT_USER/HKEY_LOCAL_MACHINE, depending on whether the user installed your program for themselves only or for the machine, create a key under Software/Clases/Applications/ with the name <YOUR_PROGRAM_HERE>.exe.
The <YOUR_PROGRAM_NAME_HERE>.exe key should have four values:
ApplicationCompany, of type REG_SZ, containing the name of your company.FriendlyAppName, which is a short, friendly app name that you want to show users.Path, which is the absolute path to your program.Version, which is the version of your app.
Under <YOUR_PROGRAM_NAME_HERE>.exe, create three new keys:
Capabilities, which contains a little bit of information about your app.- This key should have values:
(Default), of type REG_SZ, that contains no data.ApplicationDescription, of type REG_SZ, that a short blurb about your program.ApplicationName, of type REG_SZ, that contains the full application name.
- This key should have values:
shell, which contains further subkeys (open>command) that tell Windows how to open your program.commandshould have a value of type REG_SZ with data"<ABSOLUTE_PATH_TO_YOUR_PROGRAM>" "%1", with quotes. (This is a shell command that launches your program, with one argument.)
SupportedTypes, which tells Windows what file types to register.- This key should contain any number of values, with the name of the extension that you wish to register with your program (such as
.mp3), of type REG_SZ, with no data.
- This key should contain any number of values, with the name of the extension that you wish to register with your program (such as
Your registry entries should now look like this:
_HKCU/HKLM
|
└───_Software
    |
    └───_Classes
        |
        └───_Applications
            │
            └───_<YOUR_PROGRAM_NAME_HERE>.exe
                │
                ├───Capabilities
                │
                ├───_shell
                │   │
                │   └───_open
                │       │
                │       └───command
                │
                └───SupportedTypes
Now, when you right click on a file with an extension that you’ve registered, your program should show up, with its icon!
Handling the file in PyQt
Note: this is specific to PyQt, so if you aren’t using that, skip this section!
So now, your program opens when you click on the right click menu, but nothing happens.
In the registry key shell > open > command, notice that we have a “%1”. This means that one argument is passed in, and that argument is the filepath. Thus, what we need to do is read that filepath and pass it in to our application to do things with.
Here’s the snippet in Quaver that handles this:
from gui import main_window # This file just contains code for the main window

import sys
from PyQt5 import QtCore, QtWidgets

class MainApp (QtWidgets.QApplication): # Subclass QApplication

  # Constructor, accepting list of arguments argv[]
  def __init__(self, argv):
    super(MainApp, self).__init__(argv) # Call constructor of superclass

    # Create a main window; code is handled in other file.
    self._window = main_window.MainWindow()
    self._window.show()
    self._window.setWindowTitle('Quaver')

    # The important part!
    # Wrapped in a try/except block since user may not have launched this program from a context menu
    # When not launched by context menu, there is no sys.argv[1], so guard against that
    try:
      filepath = sys.argv[1] # sys.argv[1] contains the second command line argument, aka "%1"
      self._window.generateFilepathList([filepath]) # filepath is passed in as a string
    except:
      pass

def main():
  app = MainApp(sys.argv) # Instantiate the main app, passing in arguments
  sys.exit(app.exec_()) # Execute app event loop until exit

if __name__ == '__main__':
  main()
And with this, we have: a program that integrates with Windows Explorer’s “Open With” context menu, associated to any number of filetype extensions, and the filepath to the file that the user launched the app from.
Ubuntu
This section assumes general knowldge of the structure of a .deb file. This approach should also work on Ubuntu-based distros, such as Kubuntu, Lubuntu, elementary OS, etc., but has only been tested on Ubuntu 16.04/18.04, Kubuntu 18.04, and elementary OS 0.4.1.
This goes hand-in-hand with packaging a .deb file, so if you haven’t read it already, check out my post on that.
Ubuntu and all Ubuntu-based distros follow what’s called the Free Desktop Standard, and adhere specifically to the desktop entry spec, which is what we’re interested in.
What you’ll need is a <YOUR_APP_NAME>.desktop file in the usr/share/applications folder in the Linux machine. This file registers your program for display in an application launcher such as slingshot, and associates MIME types with your program so that they appear in the context menu for files that match the MIME type. See documentation in the GNOME developer guide for more information.
MIME types are associated with the MimeType key, separated by semicolons, and the shell command to execute your program is associated with the Exec key.
As an example, here’s the quaver.desktop file:
[Desktop Entry]
Version=0.5.513
Type=Application
Name=Quaver
GenericName=Lyrics Finder
Comment=Quickly find lyrics for your songs.
Exec=/usr/local/bin/Quaver %F
Terminal=false
MimeType=audio/x-mp3;audio/mp4;audio/x-m4a;video/x-m4v;audio/x-tta;audio/x-ape;audio/x-ms-wma;audio/x-pn-aiff;audio/x-flac;audio/ogg
Icon=/usr/local/bin/quaver.svg
Keywords=Quaver;Audio;Lyrics;Finder;Editor;Songs;
Categories=Audio;Music;Editor;AudioVideo;
StartupNotify=true
In the MimeType line, I declare support for audio/x-mp3 (.mp3 files), video/x-m4v (.m4v files), and so on. In the Exec line, the first argument is the location of the executable (in this case, /usr/local/bin/Quaver), followed by %F, meaning that my program should accept a list of files.5
With this .desktop file and the executable in the right place, my app should now appear in the context menu when right-clicking any file with a filetype listed under MimeTypes!
Handling the file(s) in PyQt
Note: this is specific to PyQt, so if you aren’t using that, skip this section!
Like Windows, the list of filepaths is passed in as an argument when launching the program. And much like Windows, we’ll need to access sys.argv to read them and then do things with them.
Here’s what it looks like in Quaver:
from gui import main_window # This file just contains code for the main window

import sys
from PyQt5 import QtCore, QtWidgets

class MainApp (QtWidgets.QApplication): # Subclass QApplication

  # Constructor, accepting list of arguments argv[]
  def __init__(self, argv):
    super(MainApp, self).__init__(argv) # Call constructor of superclass

    # Create a main window; code is handled in other file.
    self._window = main_window.MainWindow()
    self._window.show()
    self._window.setWindowTitle('Quaver')

    # The important part!
    # Wrapped in a try/except block since user may not have launched this program from a context menu
    # When not launched by context menu, there is no sys.argv[1], so guard against that
    try:
      filepaths = []

      # Loop through each element in sys.argv from the first element
      # starting from the 1st index (i.e. the first file path)

      # Append that filepath to the list of filepaths called filepaths[]
      [filepaths.append(file) for file in sys.argv[1:]]

      # Now, filepaths is a list of all the filepaths that were passed in as arguments,
      # a.k.a. the paths to the files that the user selected when right-clicking to launch the program
      # and self._window.generateFilepathList() accepts a list, then does something with it.
      self._window.generateFilepathList(filepaths)
    except:
      pass

def main():
  app = MainApp(sys.argv) # Instantiate the main app, passing in arguments
  sys.exit(app.exec_()) # Execute app event loop until exit

if __name__ == '__main__':
  main()
Note that you could probably just pass in sys.argv[1:], but this code is more explicit for illustrative purposes.
And with this, we have: a program that integrates with your distro’s file manager, be it Pantheon Files or Nautilus or Dolphin, associated to any number of filetype extensions, and the filepath(s) to the file(s) that the user launched the app from.
In this article, we will discuss how to use “open with” statement to open a file and what are its benefits. Also, how to open multiple files in a single “open with” statement.
The need for “open with” statement
Before going into the “with statement” we need to understand the requirement behind it. For that, we first need to know how to open a file in python.
In python to read or write a file, we need first to open it and python provides a function open(), which returns a file object. Using this file object, we can read and write in the file. But in the end, we need to close the file using this same.
Check out this example,
# open a file
file_object = open('sample.txt')

# read the file content
data = file_object.read()

# print file content
print(data)

#close the file
file_object.close()
This example assumes that we have a file sample.txt in the current folder and print its contents i.e.
This is a sample file.
It contains some sample string.
you are going to use it.
Thanks.
If you don’t have sample.txt in the current directory then you might get an error like this,
Frequently Asked:
- Python: Read a file in reverse order line by line
- How to delete the contents of a folder in Python?
- Find the smallest file in a directory using python
- Python: Add a column to an existing CSV file
FileNotFoundError: [Errno 2] No such file or directory: 'sample.txt'
So, to avoid above error in all the examples of this article, we suggest to create a file sample.txt with some dummy text in the current folder from where you are executing this python code.
In the above example, we opened a file sample.txt using open() function, which returned a file object. Then read file’s content as string using file object’s read() function. Then printed that and in the end closed this file using the same file object.
This will work fine in typical scenarios, but there can be problems in some situations like,
What if someone forgets to close the file in the end?
Well, it seems highly impossible now, but in big projects, people usually do big stuff after opening files, and it includes many conditions and checks. So, there can be scenarios when the return statement hit before close() function gets called, or it got skipped sue to some if condition in code.
Well, in scenarios like these, till we don’t call the close() function, the file will remain open, and its object will be consuming the memory of our process. Also, there might be chances that data will not entirely be flushed to the file. Closing a file using close() function is a graceful way of closing the file.
What if an exception comes?
Check out this code
# File is not closed in case of exception
try:
    # open a file
    file_object = open('sample.txt')
    # read file content
    data = file_object.read()
    # It will raise an exception
    x = 1 / 0
    print(data)
    file_object.close()
except:
    # Handling the exception
    print('An Error')
finally:
    if file_object.closed == False:
        print('File is not closed')
    else:
        print('File is closed')
Output:
An Error
File is not closed
In this code, we are closing the file properly by calling close() function and catching the exception too. But a closure look will show you that when the exception occurred, control moved to the except block and then to the finally block. In the finally block, we check if the file is closed or not. Guess what! file was not closed because due to exception, call to close() function got skipped. To fix this, we need to call the close() function in except block like this,
# File is not closed in case of exception
try:
    # open a file
    file_object = open('sample.txt')
    # read file content
    data = file_object.read()
    # It will raise an exception
    x = 1 / 0
    print(data)
    file_object.close()
except:
    file_object.close()
    # Handling the exception
    print('An Error')
finally:
    if file_object.closed == False:
        print('File is not closed')
    else:
        print('File is closed')
As you can see the close() function is called two times here to avoid the bug. When code gets bigger, then there are high chances of skipping the close() somewhere. So, to avoid these kinds of problems, we should always open a file using “open with” statement in python. Let’s see how to do that
# using "with statement" with open() function
with open('sample.txt', "r") as file_object:
    # read file content
    data = file_object.read()
    # print file contents
    print(data)

# Check if file is closed
if file_object.closed == False:
    print('File is not closed')
else:
    print('File is closed')
Output:
This is a sample file.
It contains some sample string.
you are going to use it.
Thanks.
File is closed
“with statement” creates an execution block and object created in the with statement will be destroyed or gracefully closed when this execution block ends.
It means when we used “with statement” with open() function, an execution blocked started and the file object returned by open() function is assigned to file_object. When this execution block of “with statement” end, then the file object’s close function gets called automatically, and the file will be closed gracefully. We don’t need to manually call the close() function anymore if we are using “with statement”
Benefits of calling open() using “with statement”
Fewer chances of bug due to coding error
No need to explicitly close the opened file, “with statement” takes care of that. When with the block ends, it will automatically close the file. So, it reduces the number of lines of code and reduces the chances of bug.
Excellent handling in case of exception
Check out this example,
# File will be closed before handling the exception
try:
    # using "with statement" with open() function
    with open('sample.txt', "r") as file_object:
        # read file content
        data = file_object.read()
        # it raises an error
        x = 1 / 0
        print(data)
except:
    # handling exception
    print('An Error')
    if file_object.closed == False:
        print('File is not closed')
    else:
        print('File is closed')
Output:
An Error
File is closed
If we have opened a file using “with statement” and an exception comes inside the execution block of “with statement”. Then file will be closed before control moves to the except block.
We don’t need to call the close() function even in case of exceptions, execution block of “with statement” handles that too and closes the file before exception handling.
We confirmed this using file_object.closed in the except block.
Open multiple files in a single “with statement”
Let’s open two files using a single “with statement”. We will read from sample.txt and write in the outfile.txt,
# Read from sample.txt and write in outfile.txt
with open('outfile.txt', 'w') as file_obj_2, open('sample.txt', 'r') as file_obj_1:
    data = file_obj_1.read()
    file_obj_2.write(data)
    # Both the files will be closed automatically when execution block ends.
As we are using the “with statement”, so when execution block ends, close() function will be called on both the file objects automatically.
The complete example is as follows,
def main():

    print('*** Open a file using without "open with" statement ***')

    print('Normal way of opening & reading from a file using open() function')

    # open a file
    file_object = open('sample.txt')

    # read the file content
    data = file_object.read()
    print(data)

    #close the file
    file_object.close()

    print('** Open a file using open() function & handle exception **')

    # File is not closed in case of exception
    try:
        # open a file
        file_object = open('sample.txt')
        # read file content
        data = file_object.read()
        # It will raise an exception
        x = 1 / 0
        print(data)
        file_object.close()
    except:
        # Handling the exception
        print('An Error')
    finally:
        if file_object.closed == False:
            print('File is not closed')
        else:
            print('File is closed')

    print('**** Open a file using "open with" statement ****')

    # using "with statement" with open() function
    with open('sample.txt', "r") as file_object:
        # read file content
        data = file_object.read()
        # print file contents
        print(data)

    # Check if file is closed
    if file_object.closed == False:
        print('File is not closed')
    else:
        print('File is closed')

    print('**** "open with" statement & Exception handling ****')

    # File will be closed before handling the exception
    try:
        # using "with statement" with open() function
        with open('sample.txt', "r") as file_object:
            # read file content
            data = file_object.read()
            # it raises an error
            x = 1 / 0
            print(data)
    except:
        # handling exception
        print('An Error')
        if file_object.closed == False:
            print('File is not closed')
        else:
            print('File is closed')


    print('**** Multiple open() function calls in a single "with statement" ****')

    # Read from sample.txt and write in outfile.txt
    with open('outfile.txt', 'w') as file_obj_2, open('sample.txt', 'r') as file_obj_1:
        data = file_obj_1.read()
        file_obj_2.write(data)
        # Both the files will be closed automatically when execution block ends.

if __name__ == '__main__':
   main()
Output:
*** Open a file using without "open with" statement ***
Normal way of opening & reading from a file using open() function
This is a sample file.
It contains some sample string.
you are going to use it.
Thanks.
** Open a file using open() function & handle exception **
An Error
File is not closed
**** Open a file using "open with" statement ****
This is a sample file.
It contains some sample string.
you are going to use it.
Thanks.
File is closed
**** "open with" statement & Exception handling ****
An Error
File is closed
**** Multiple open() function calls in a single "with statement" ****

Некоторые данные должны быть временными, храниться в ОЗУ во время работы приложения, а затем забываться. Однако другие должны быть постоянными. Они сохраняются на жестком диске для дальнейшего использования, и зачастую именно они больше всего заботят пользователя.
Программисты очень часто пишут код для чтения и записи файлов, но каждый язык решает эту задачу по-своему. В этой статье мы расскажем, как работать с файлами при помощи Python.
Скорее всего, у вас уже установлен Python. Если нет, вы можете установить его из репозитория программного обеспечения вашего дистрибутива. Например, в CentOS Stream или RHEL выполните следующую команду:
$ sudo dnf install python3
В macOS вы можете установить Python из MacPorts или Homebrew. В Windows вы можете установить Python из Chocolatey.
После установки Python откройте свой любимый текстовый редактор и приготовьтесь писать код.
Запись данных в файл с помощью Python
Если вам нужно записать данные в файл, следует сделать три главных шага:
- Открыть файл
- Записать в него данные
- Закрыть файл
В общем-то, это точно такая же последовательность шагов, которую вы используете при написании кода, редактировании фотографий или выполнении практически любых операций на компьютере. Сначала вы открываете документ, который хотите отредактировать, затем вносите некоторые изменения, а затем закрываете документ.
В Python данный процесс будет выглядеть следующим образом:
f = open('example.txt', 'w')
f.write('hello world')
f.close()
В этом примере первая строка открывает файл в режиме записи. Файл представлен как переменная f, что является произвольным выбором. Мы используем f, потому что это общепринятая практика в написании кода на Python. Однако любое другое допустимое имя переменной работает так же.
Есть разные режимы, в которых вы можете открыть файл:
w— для записи данныхr+— для чтения и записиa— только для добавления данных
Вторая строка в нашем коде записывает данные в файл. Данные, записанные в этом примере, представляют собой обычный текст, но вы можете записывать что угодно.
Последней строкой мы закрываем файл.
Запись данных с использованием конструкции with
Существует более короткий способ записи данных в файл, и этот метод может быть полезен для быстрого взаимодействия с файлами. Он не оставляет файл открытым, поэтому вам не нужно вызывать функцию close() после того, как вы выполнили все действия с файлом. Этот способ записи данных предполагает использование конструкции with:
with open('example.txt', 'a') as f:
    f.write('hello pythonist')
Чтение данных из файла с помощью Python
Допустим, вы (или ваш пользователь посредством вашего приложения) поместили данные в файл, и ваш код должен их получить. Тогда перед вами стоит цель – прочитать файл. Логика чтения такая же, как логика записи:
- Открыть файл
- Прочесть данные
- Закрыть файл
Опять же, этот логический поток отражает то, что вы и так делаете постоянно, просто используя компьютер (или читая книгу, если на то пошло). Чтобы прочитать документ, вы открываете его, читаете и закрываете. С компьютерной точки зрения «открытие» файла означает загрузку его в память.
На практике текстовый файл содержит более одной строки. Например, вашему коду может потребоваться прочитать файл конфигурации, в котором сохранены данные игры или текст следующей песни вашей группы. Так же, как вы не прочитываете всю книгу прямо в момент открытия, ваш код не должен распарсить весь файл целиком при загрузке в память. Вероятно, вам потребуется перебрать содержимое файла.
f = open('example.tmp', 'r')

for line in f:
    print(line)

f.close()
В первой строке данного примера мы открываем файл в режиме чтения. Файл обозначаем переменной f, но, как и при открытии файлов для записи, имя переменной может быть произвольным. В имени f нет ничего особенного – это просто кратчайший из возможных способов представить слово file, поэтому программисты Python часто используют его.
Во второй строке мы резервируем line (еще одно произвольное имя переменной), для представления каждой строки f. Это сообщает Python, что нужно выполнить итерацию по строкам нашего файла и вывести каждую из них на экран.
Чтение файла с использованием конструкции with
Как и при записи данных, существует более короткий метод чтения из файлов с использованием конструкции with. Поскольку здесь не требуется вызов функции call(), это более удобно для быстрого взаимодействия.
with open('example.txt', 'r') as f:
    for line in f:
        print(line)
Заключение
Сегодня мы поговорили про чтение и запись файлов с помощью Python. Есть много различных способов записи данных в файлы с помощью Python и множество способов форматирования текста, который вы пишете в файлы, с помощью JSON, YAML, TOML и т.д. Также есть очень хороший встроенный метод для создания и поддержки базы данных SQLite и множество библиотек для обработки любого количества форматов файлов, включая графику, аудио, видео и многое другое.
Возможно, вам также будет интересно:
- Чтение файлов в формате CSV в Python
- Чтение YAML-файлов в Python при помощи модуля PyYAML
- Чтение бинарных файлов с помощью Python
- Как читать excel-файлы (xlsx) при помощи Python
- Использование Python для парсинга файлов конфигурации
Перевод статьи «Reading and writing files with Python».
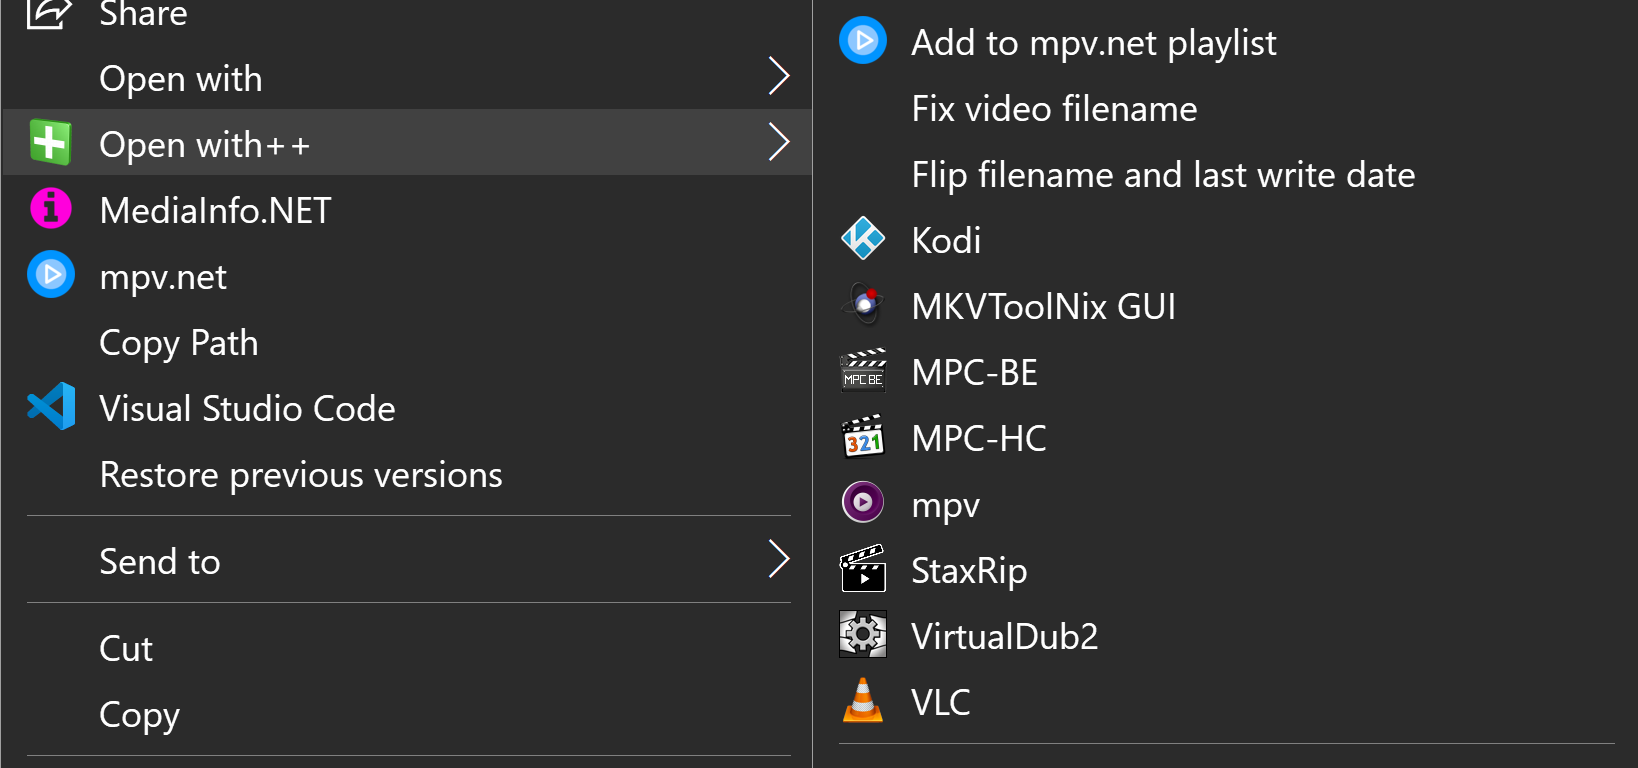
Open with++
Open with++ is a shell extension that allows to add command line driven
custom menu items to the Windows File Explorer context menu.
Windows 11 Note: Open with++ is based on the classic Win32 menu,
which I prefer much over the new menu of Windows 11.
The classic menu can be enabled via registry tweak in Windows 11.
Users that prefer the new Windows 11 menu can use
ContextMenuForWindows11
which is very similar to Open with++.
Screenshots
Setup
The requirements are Windows 7 x64 or higher, .NET Framework 4.8 x64 and Visual C++ 2019 Redistributable x64.
Start the application and click on the Install button. Don’t move the folder after installation.
GUI Elements
Add
Adds a new command to Open with++ menu.
Remove
Removes the selected command from Open with++ menu.
Clone
Dublicates the selected command.
Options
Allows to define a custom settings folder and macros that are usable in the File Type property.
Install/Uninstall
Installs/Uninstalls the shell extension. Uninstall requires a reboot,
logout or restarting the relevant processes manually, Windows File Explorer can be
restarted with the task manager. Common processes which load context menu shell extensions
are Windows File Explorer and Everything.
Name
Specifies the name of the command.
File Types
Specifies for which file types the menu is shown.
All files: *.*
txt and md: txt md
The options dialog defines macros for common file types:
%video% = mpg avi vob mp4 d2v divx mkv avs 264 mov wmv part flv ifo h264 asf webm mpeg mpv y4m avc hevc 265 h265 m2v m2ts vpy mts webm ts m4v part vpy rar crdownload
%audio% = mp2 mp3 ac3 wav w64 m4a dts dtsma dtshr dtshd eac3 thd thd+ac3 ogg mka aac opus flac mpa
%subtitle% = sub sup idx ass aas srt
%image% = png jpg jpeg gif bmp ico
W
Media files: %audio% %video% %image%
Macros are only supported in the File Types property.
Path
Specifies the program to be used for opening the selected files or folders.
Environment variables and relative paths are supported.
Arguments
Specifies the arguments that are passed to the program when the command is executed.
You can use the predefined variable %paths% which expands to the paths of the selected
files or folders. Do not enclose the %paths% macro in quotes because Open with++ adds them
automatically when the macro is expanded, each path is enclosed in double quotation marks
and separated by a space.
To get the filename without extension for a single file there is a %filename-no-ext% variable.
Environment variables get expanded.
Working Directory
The working directory the process will use, if not specified the working directory
will be set to the directory of the selected files or folders.
Environment variables get expanded.
Icon
Supported file types are ICO, EXE and DLL. EXE and DLL files can contain different icons,
Open with++ will show a dialog that allows to choose which icon in the EXE or DLL file to use.
Environment variables and relative paths are supported.
IrfanView can be used to create icons.
Here is an article that
shows which Windows DLLs contain icon resources.
Regex Filter
Show the menu only when selected files and folders match to a regex expression.
Show in sub menu
Specifies if the menu is created on top level or as sub menu.
Show for directories
Specifies that the menu command is shown when folders or the folder background is selected.
Show only if Ctrl key is pressed
The menu item is only visible if the Control key is pressed.
Run as admin
Specifies that the command executes with elevated privilegs.
When disabled commands can still be executed with elevated privilegs
by holding down Shift key while selecting the menu command.
Run hidden
Runs the process with hidden window. Useful to hide terminal tools like PowerShell.
Tips & Tricks
Holding down the Shift key while selecting a command from the Open with++ menu
will execute the command with elevated privileges.
Path, Arguments, Working Directory and Icon support the usage of environment variables.
The location of Open with++ is available as environment variable %OpenWithPPDir%.
The easiest way to change the path of many items is editing
the settings xml file directly with a text editor.
Configuration Suggestions
Visual Studio Code
Open files or a directory with Visual Studio Code.
Name: Visual Studio Code
File Types: *.*
Path: C:\Program Files\Microsoft VS Code\Code.exe
Arguments: %paths%
Show for directories: checked
Icon: C:\Program Files\Microsoft VS Code\Code.exe,0
MediaInfo.NET
Show media info using MediaInfo.NET.
Name: MediaInfo.NET
File Types: %audio% %video% %subtitle% %image%
Path: D:\your path here\MediaInfoNET.exe
Arguments: %paths%
Icon: D:\your path here\MediaInfoNET.exe,0
PowerShell
Start PowerShell at the given folder.
Name: PowerShell
Path: powershell.exe
Arguments: -nologo
Icon: C:\Windows\System32\WindowsPowerShell\v1.0\powershell.exe,0
Command Prompt
Start CMD at the given folder.
Name: Command Prompt
Path: cmd.exe
Show in submenu: checked
Icon: cmd.exe,0
Windows Terminal
Start Windows Terminal at the given folder.
In the Windows Terminal profile settings define:
"startingDirectory" : null,
Name: Windows Terminal
Path: wt.exe
Show for directories: checked
Icon: %OpenWithPPDir%\Icons\Windows Terminal.ico
Open with++ includes a Windows Terminal ICO file, this icon can be used to create a shortcute in order to pin it to the start menu, in the shortcut settings the working directory can be set, something the original UWP start menu entry does not allow.
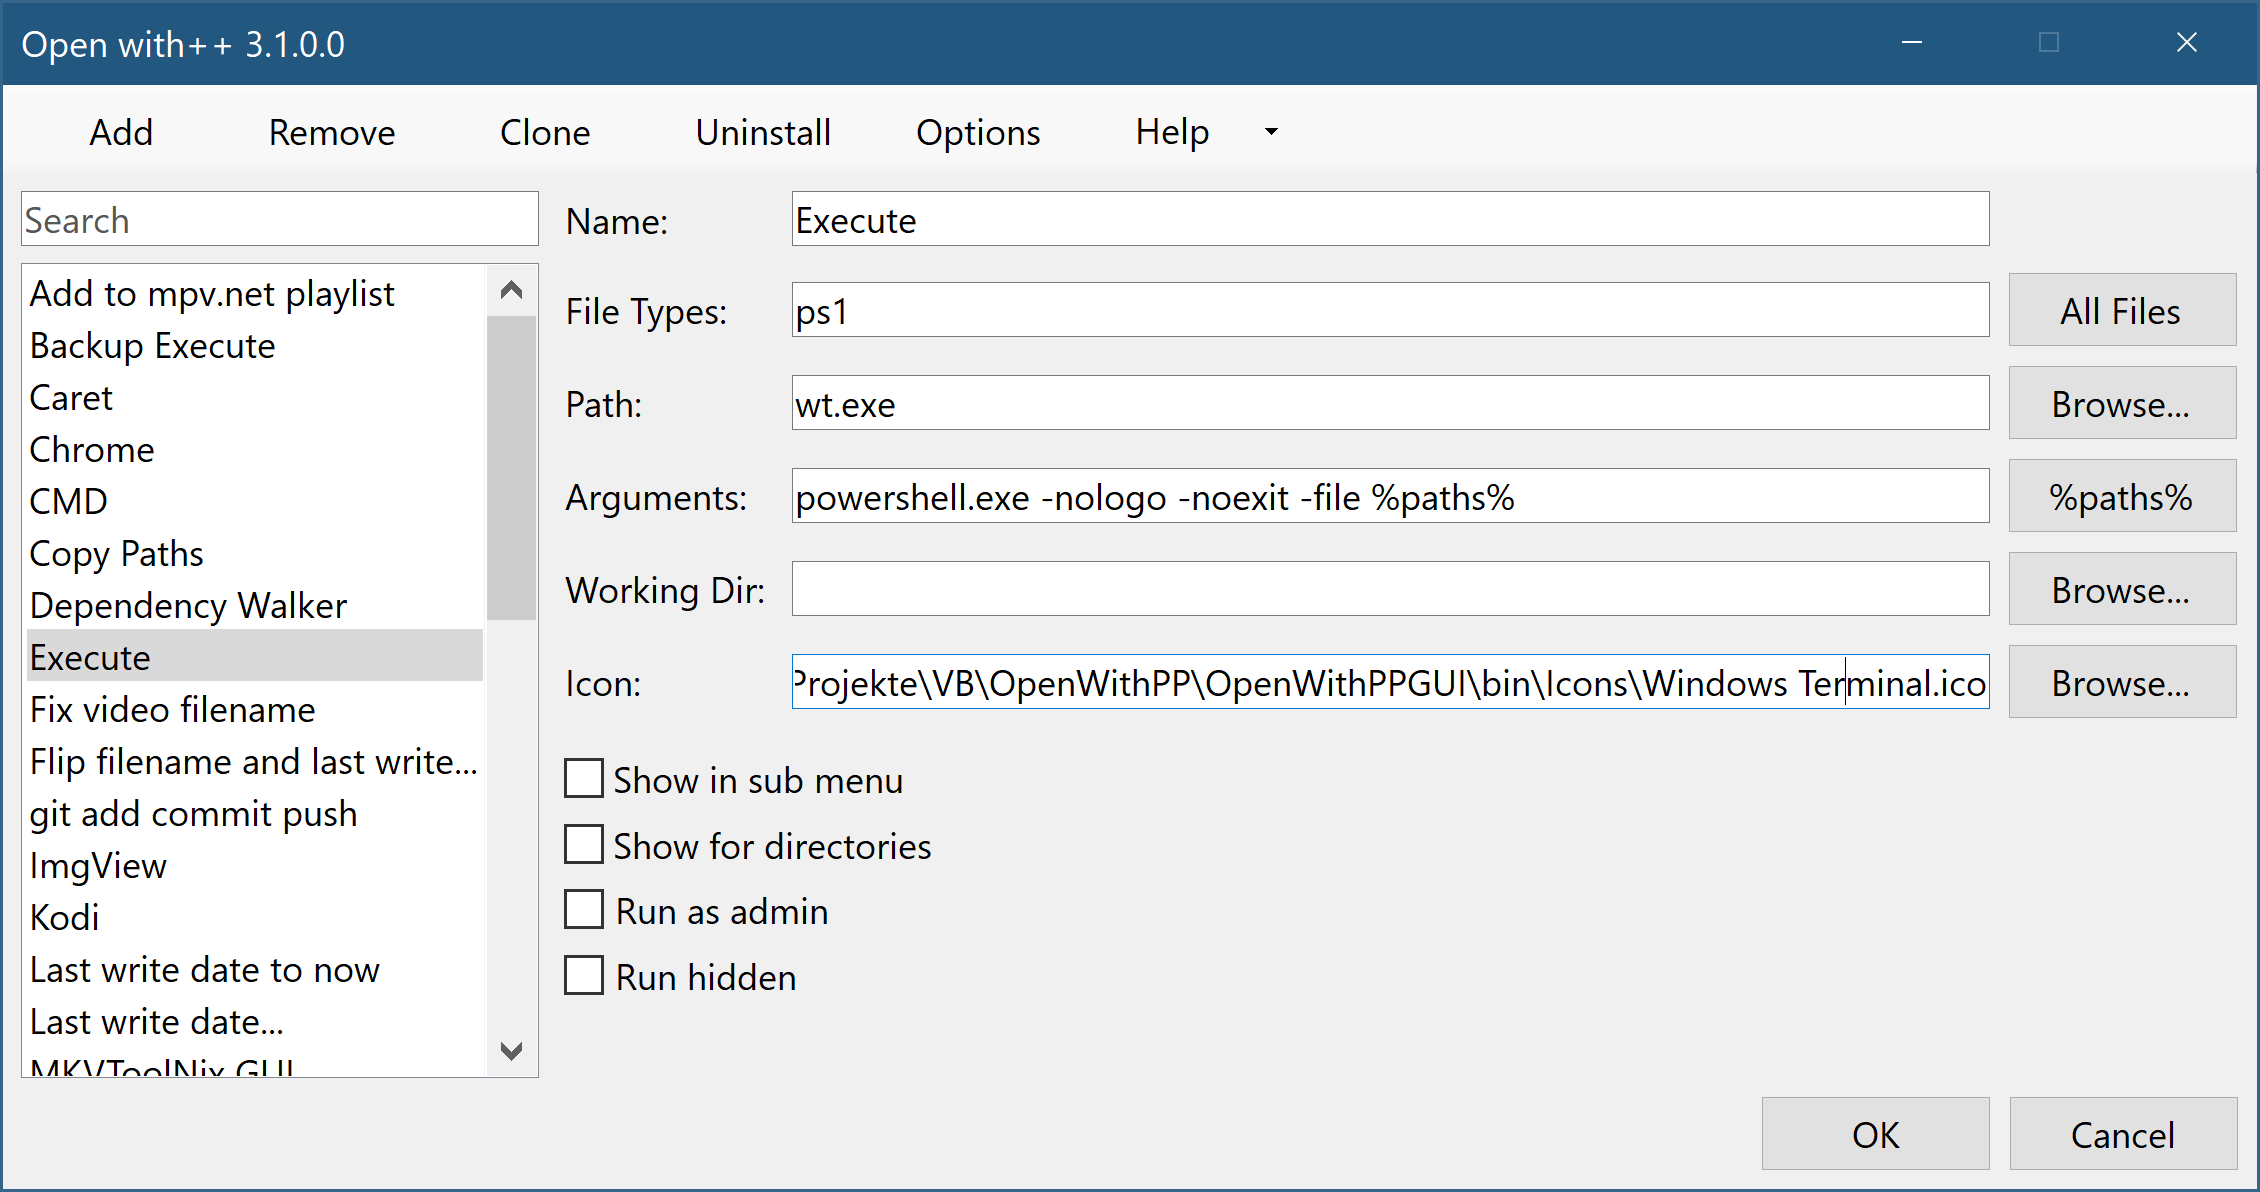
Execute PowerShell script using Windows Terminal
Name: Execute
File Types: ps1
Path: wt.exe
Arguments: -- powershell.exe -NoLogo -NoExit -ExecutionPolicy Unrestricted -File %paths%
Icon: D:\Apps\OpenWithPlusPlus\Icons\Windows Terminal.ico
Copy Paths
Copy the paths of selected files and folders to the clipboard, it can be achieved with a PowerShell one-liner:
Set-Clipboard ($args -join "`r`n")
Name: Copy Paths
File Types: *.*
Path: powershell.exe
Arguments: -file "D:\copy paths.ps1" %paths%
Show for directories: checked
Run hidden: checked
Play with mpv.net
Play media files with the mpv.net media player.
Name: mpv.net
File Types: %audio% %video% %image%
Path: C:\Program Files\mpv.net\mpvnet.exe
Arguments: %paths%
Icon: C:\Program Files\mpv.net\mpvnet.exe,0
Add to mpv.net playlist
Add media files to the mpv.net media player playlist.
Name: Add to mpv.net playlist
File Types: %audio% %video% %image%
Path: C:\Program Files\mpv.net\mpvnet.exe
Arguments: --queue %paths%
Icon: C:\Program Files\mpv.net\mpvnet.exe,0
Chrome
Open files in Google Chrome.
Name: Chrome
File Types: pdf htm html
Path: C:\Program Files (x86)\Google\Chrome\Application\chrome.exe
Arguments: %paths%
Icon: C:\Program Files (x86)\Google\Chrome\Application\chrome.exe,0
Related apps
Find a list of related apps:
https://stax76.github.io/frankskare