-
Contents
-
Table of Contents
-
Bookmarks
Quick Links
Ultra
Ultra
Ultra
Blood Glucose
Blood Glucose
Monitoring System
Monitoring Sy
stem
Related Manuals for Lifescan OneTouch Ultra
Summary of Contents for Lifescan OneTouch Ultra
-
Page 1
Ultra Ultra Ultra Blood Glucose Blood Glucose Monitoring Sy Monitoring System stem… -
Page 2
Discard test strip and retest. send you a gift. If you prefer to fill out a warranty 4. Accurate test results in just card online, please visit LifeScan.com. 5 seconds. American Diabetes Association position statement on the Diabetes Control and Complications Trial (1993). -
Page 3: Important Information
Important Information The ONE TOUCH ® Ultra System is intended for use outside the body (in vitro diagnostic Severe dehydration and excessive water loss use). It should be used only for testing may cause false low results. If you believe you glucose (sugar) and only with fresh are suffering from severe dehydration, consult capillary whole blood samples.
-
Page 4: Table Of Contents
TABLE OF USING THE METER MEMORY VIEWING TEST RESULTS ON A CONTENTS PERSONAL COMPUTER Data Downloading 30 COMPARING METER AND GETTING STARTED LABORATORY RESULTS The Complete ONE TOUCH ® Ultra Blood Glucose Monitoring System SETTING THE METER ONE TOUCH ® Ultra Setting the Time, Blood Glucose Meter…
-
Page 5: Getting Started
Ultra The Complete ONE TOUCH ® GETTING Blood Glucose Monitoring System STARTED The ONE TOUCH Ultra Blood Glucose Monitoring System consists of three main products: the ONE TOUCH ® Ultra Blood Glucose Meter, ONE TOUCH ® Ultra Test Strips, and ONE TOUCH ®…
-
Page 6: One Touch ® Ultra Blood Glucose Meter
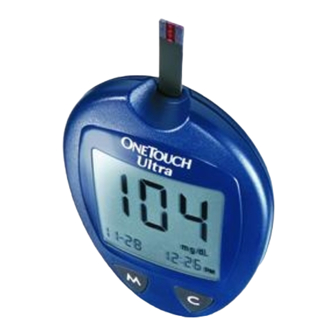
DATA PORT The data port accepts the C BUTTON LifeScan Interface Cable, which The C (Change) button is used can be used to help download to change the date and time, your test results to a computer…
-
Page 7
Ultra ONE TOUCH ® meter display segments KETONES? Appears when a Indicates a test blood glucose test result stored in Indicates a control result is above memory. solution test result. 240 mg/dL. TEST RESULT AREA CODE Test results are Appears with the code number displayed here. -
Page 8: One Touch ® Ultra Test Strips
ONE TOUCH ® Ultra Important Test Strip Information Test Strips Store test strip packages in a cool, dry place below The ONE TOUCH ® Ultra System mea- 86˚F (30˚C). Keep away from direct sunlight and heat. sures the amount of sugar (glucose) Do not refrigerate.
-
Page 9: Before Testing
BEFORE Checking the Display STEP 1 Each time you insert a test strip into the Enter the Code Mode. TESTING ONE TOUCH ® Ultra Meter or turn the Start with the meter turned off. Insert meter on, all segments of the display will a ONE TOUCH ®…
-
Page 10: Checking The System With One Touch Ultra Control Solution
Checking the System STEP 3 with ONE TOUCH ® Ultra Code the Meter. Control Solution Press the C button to select the correct ONE TOUCH Ultra Control Solution is used to code. Each time you press and release check that the meter and the test strips the C button, the number will increase are working together as a system and by one.
-
Page 11: Important Control Solution Test Information
Before you use the ONE TOUCH ® Ultra Important Control Solution Meter to test your blood for the first Test Information time, practice the procedure using control solution. When you can do Use only ONE TOUCH ® Ultra Control Solution. three tests in a row that are within the Check the expiration date on the control expected range, you are ready to test…
-
Page 12
How to do a control Note: Every time you perform a control solution test, you must solution test: mark the test with the “ctl” sign so that the test will be distinguished from a blood glucose test in the meter memory and not included in STEP 1 the 14- and 30-day averages. -
Page 13: Testing Your Blood
Do not use the system to test your blood if you continue to get test results that fall outside of the range. If you are unable to resolve the problem, call LifeScan Customer Services at 1 800 227-8862.
-
Page 14: Getting A Drop Of Blood
Replace the ONE TOUCH ® UltraSoft Cap. Getting a Drop of Blood Turn the cap clockwise until it is snug but not too tight. CAUTION: To reduce the chance of infection: Never share a lancet or the ONE TOUCH ® UltraSoft Sampler with anyone.
-
Page 15
If bruising occurs, you may choose to Press the release button. lance a fingertip instead. If you are having difficulty obtaining blood from the arm, call LifeScan Customer Services at 1 800 227-8862 for assistance. -
Page 16: Step-By-Step Test Procedure
Step-by-Step Test Procedure STEP 5 STEP 1 Gently Massage the Area. Gently massage the chosen area to obtain Insert Test Strip. the required blood sample (1 microliter Insert the test strip, contact bars end in volume [ actual size]). Do not Correct first and facing up, into the test port.
-
Page 17
LifeScan STEP 2 Customer Services for assistance. Apply Sample. Note: If you do not apply a blood sample within two minutes, the meter Obtain a rounded drop of blood using will turn itself off. You must remove the test strip and insert it back into the ONE TOUCH ®… -
Page 18: Special Messages
Your ONE TOUCH ® Ultra Meter stores Special Messages USING the 150 most recent blood glucose The ONE TOUCH ® Ultra Meter displays and control solution test results with THE METER results between 20 and 600 mg/dL date and time in its memory. It also (1.1 to 33.3 mmol/L).
-
Page 19
The 30-day average is calculated from STEP 2 the blood glucose results obtained dur- ing the last 30 days. It, too, indicates Recall Test Results. how many blood glucose tests have After three seconds, the 30-day average been performed, e.g., 138 (138 will be replaced by the most recent test tests in the last 30 days). -
Page 20: Data Downloading
Interface Cable. To learn more about IN TOUCH ® Diabetes Connect the LifeScan Interface Cable to a Management Software or to obtain a serial port on the back of your computer. LifeScan Interface Cable separately, con- With the meter turned off, connect the…
-
Page 21
COMPAR- ONE TOUCH ® Ultra Meter test results and Never use your meter with blood laboratory test results are both expressed that has been collected in a gray-top ING METER test tube. in plasma-equivalent units. However, the result you obtain from your meter may Use fresh capillary blood only. -
Page 22: Setting The Time, Date, And Unit Of Measurement
SETTING The ONE TOUCH ® Ultra Meter comes STEP 2 with the time, date, and unit of measure- THE METER Set the Minutes. ment preset. However, if you need to change the time, or if you remove the Press and release the C button to advance battery, you may need to enter the setting one minute.
-
Page 23
Before setting the date, you must have Note: Your ONE TOUCH ® Ultra Meter displays 14- and 30-day averages first set the time. which you can access from the meter memory. These averages are calculated from results obtained during the 14 and 30 days preceding STEP 4 the current date and time settings. -
Page 24: Maintenance
Maintenance CARING STEP 8 Your ONE TOUCH ® Ultra Meter does FOR YOUR Exit the Setting Mode. not require special maintenance. As After choosing your unit of measurement, no blood or control solution comes in METER press the M button to turn off the meter. contact with the meter, there is no The meter will display all test results in special cleaning required.
-
Page 25: Battery
Battery To replace the battery, make sure that the meter is turned off. Turn the meter Your ONE TOUCH ® Ultra Meter comes over and locate the battery compartment. with one 3.0 V (#2032 or equivalent) 1. Open the battery compartment by lithium battery that is already installed.
-
Page 26
These messages If segments are miss- System check. Appears MESSAGES help to identify certain problems but do ing, contact LifeScan upon insertion of a not appear in all cases when a problem Customer Services for test strip or whenever further action. -
Page 27
MESSAGE WHAT IT MEANS ACTION MESSAGE WHAT IT MEANS ACTION You may now apply the You may want to check The system is ready A blood glucose test control solution. your ketone levels. Act to accept a control result with a sugges- according to instruc- solution test sample. -
Page 28
Error message could the memory. new test strip. If the be caused by a used test error message appears strip, or a temporary or again, contact LifeScan permanent electronics Customer Services at problem occurred. 1 800 227-8862. No action required. -
Page 29
If the error message testing, or inserted from the time this appears again, contact improperly. symbol first appears. LifeScan Customer Services at 1 800 227-8862. Replace the battery at The battery sign once. The meter will appears on the display… -
Page 30
MESSAGE WHAT IT MEANS ACTION If the meter does not display a message after inserting a test strip: Repeat the test after the The temperature of the meter and test strips have air, meter, or test strips PROBABLE CAUSE WHAT TO DO reached a temperature was below the system a. -
Page 31
SPECIFI- Result Range: 20 to 600 mg/dL The makers guarantee that the GUAR- (1.1 to 33.3 mmol/L) ONE TOUCH ® Ultra Meter shall CATIONS ANTEE be free of defects in material and Calibration: Plasma-equivalent workmanship for a period of three Sample: Fresh capillary whole blood years. -
Page 32
Source: Krall, L.P., and Beaser, R.S.: Joslin Diabetes Manual. Philadelphia: Lea and Febiger (1989), 138. Meter Serial No. ___________________ Important phone numbers: LifeScan Customer Services (24 hours a day, 7 days a week): English 1 800 227-8862 Español 1 800 381-7226 ___________ ______________… -
Page 33
LifeScan Customer Services toll-free numbers: (24 hours a day, 7 days a week) U.S.A. English 1 800 227-8862 Español 1 800 381-7226 Visit the LifeScan Web site: www.LifeScan.com © LifeScan, Inc. 2000 Milpitas, CA 95035 12/00 AW 060-175-03A Patent Nos. 5,708,247 and 5,951,836.
-
Lifescan OneTouch Ultra — page 1
Owner’ s Booklet Guide d’utilisation Ultra Eas y on Y ou / Ultrafacile, Ultr arapide, Ultr adoux DCO_06052203A_OTU_OBCVR_CAN 2/20/04 3:02 PM Page 1 …
-
Lifescan OneTouch Ultra — page 2
AW 06052203A OneT ouch ® Customer Care Line / Ligne InfoSoins OneT ouch ® : Canada 1 800 663-5521 U.S.A./É.-U. 1 800 227-8862 Monday–F riday 9 am– 8 pm Eastern Time 6 am– 5 pm P acific time Du lundi au vendredi 9 h à 20 h (heur e de l’Est) 6 h à 17 h (heure du Pacifique) www .OneT ouch.ca Distributed by / Distribué par : LifeScan Cana …
-
Lifescan OneTouch Ultra — page 3
DIABETES BLOOD GLUCOSE MONITORING SYSTEM Ultr a S ystem Owner’s Booklet DCO_06052203A_OTU_OB_CAN_EN 2/20/04 1:39 PM Page i …
-
Lifescan OneTouch Ultra — page 4
ii Dear OneT ouch ® Ultra ® S ystem Owner: Y ou have chosen one of the best blood glucose monitoring systems available. This booklet has impor tant information you must know about the OneT ouch ® Ultra ® System. Please read it carefully . Blood glucose monitoring plays an important role in diabetes control. A long-term study show ed that keepin …
-
Lifescan OneTouch Ultra — page 5
iii T able of Contents ABOUT Y OUR NEW SYSTEM . . . . . . . . .iv The Complete OneT ouch ® Ultra ® Blood Glucose Monitoring System . . . . . . . . . . . . . .5 OneT ouch ® Ultra ® Blood Glucose Meter . . . . . . . . . . . . . . . . . .6 OneT ouch ® Ultra ® T est Strips . . . . . . . . . . . . . . . . . . . .10 BEFORE T ESTING . . . . . . . . …
-
Lifescan OneTouch Ultra — page 6
iv About Y our New System The OneT ouch ® Ultra ® S ystem uses the latest blood glucose monitoring technology . It measures the glucose content of a blood sample by means of an electrical current pr oduced in the test strip and sent to the meter for measurement. T est results are “ plasma-calibrated.” This makes it easier for you and your dia …
-
Lifescan OneTouch Ultra — page 7
1 Y our OneT ouch ® Ultra ® Blood Glucose Monitoring System consists of three main products: the OneT ouch ® Ultra ® Blood Glucose Meter , OneT ouch ® Ultra ® T est Strips (sold separ ately), and OneT ouch ® Ultra ® Contr ol Solution. These pr oducts have been designed, tested, and pro ven to work together to produce accur ate blood glucose …
-
Lifescan OneTouch Ultra — page 8
2 The OneT ouch ® Ultra ® S ystem is intended for use outside the body (in vitro diagnostic use). It should be used only for testing fresh capillary whole blood samples for glucose (sugar). It should not be used for the diagnosis of diabetes or for testing newborns. C AUTION: Before using any pr oduct to test your blood glucose, read all instruct …
-
Lifescan OneTouch Ultra — page 9
3 Impor tant Information • Severe dehy dration resulting fr om excessive water loss may cause false low results. If y ou believe you ar e suffering from severe dehy dration, consult a healthcare pr ofessional immediately . • T est results below 3.3 mmol/L ( 60 mg/dL) mean low blood glucose (hypoglycemia). T est results greater than 10.0 mmol/L …
-
Lifescan OneTouch Ultra — page 10
4 DCO_06052203A_OTU_OB_CAN_EN 2/20/04 1:39 PM Page 4 …
-
Lifescan OneTouch Ultra — page 11
5 • OneT ouch ® Ultra ® Meter • Owner’ s Booklet • Quick Reference Guide • OneT ouch ® UltraSoft ™ Adjustable Blood Sampler • Optional OneT ouch ® UltraClear ™ Cap • OneT ouch ® UltraSoft ™ Sterile Lancets • OneT ouch ® Ultra ® Contr ol Solution • OneT ouch ® Ultra ® T est Strips (Sold Separately) • Carrying Case …
-
Lifescan OneTouch Ultra — page 12
OneT ouch ® Ultra ® Blood Glucose Meter 6 DISPLA Y Symbols, simple messages, and test results appear here. M BUTTON Used to turn meter on to enter: ◗ setting mode ◗ memory mode DA T A PORT Used to download your test results to a computer . DCO_06052203A_OTU_OB_CAN_EN 2/20/04 1:39 PM Page 6 …
-
Lifescan OneTouch Ultra — page 13
7 TEST POR T Insert the OneT ouch ® Ultra ® T est Strip here. C BUTTON Used to: ◗ change date, time and code number ◗ indicate control solution tests ◗ review test results in memory DCO_06052203A_OTU_OB_CAN_EN 2/20/04 1:39 PM Page 7 …
-
Lifescan OneTouch Ultra — page 14
8 OneT ouch ® Ultra ® Meter Display CTL Indicates a control solution test result. COD E Appears with the code number of the test strips. BL OOD DROP SY MBOL T ells you when to apply the sample. DECIMAL POINT Appears in test results only when unit of measure is set to mmol/L. BA TTERY SY MBOL Warns when the battery is low or must be replaced. DCO_ …
-
Lifescan OneTouch Ultra — page 15
9 MONTH KET ONES? Appears when a test result is abov e 13.3 mmol/L ( 240 mg/dL) to suggest ketone testing. MEM Indicates a test result stored in memory . TEST RESUL T AREA T est results are displayed here. MMOL/L Unit of measure. Millimoles per litre (mmol/L) is the standard unit in Canada. MG/DL Unit of measure used in other parts of the world. DA …
-
Lifescan OneTouch Ultra — page 16
OneT ouch ® Ultra ® T est Strips (Sold Separately) The OneT ouch ® Ultra ® S ystem measures the amount of glucose in whole blood. Blood is applied to the T OP EDG E of the OneT ouch ® Ultra ® T est Strip and is automatically drawn into the reaction cell wher e the reaction takes place. Contact Bars Insert this end of the test strip, contact b …
-
Lifescan OneTouch Ultra — page 17
11 Impor tant T est Strip Information • Store test strip vials in a cool, dry place belo w 30 °C ( 86 °F ). K eep away from direct sunlight and heat. Do not refrigerate. • Store y our test strips in their original vial only . T o avoid damage or contamination, do not transfer test strips to any other place. • Do not use test strips beyond t …
-
Lifescan OneTouch Ultra — page 18
BEFORE TES TING Checking the Display Each time you turn on the OneT ouch ® Ultra ® Meter either by inserting a test strip or pressing the M button, all segments of the display will appear briefly . This tells you that the system is performing several self-checks to confirm that the meter is working properly . T o check that all display segments a …
-
Lifescan OneTouch Ultra — page 19
13 Insert a test strip to turn on the meter . Push it all the way in until it will go no further . Avoid bending the test strip. The display check will appear . Then the code number is displayed for three seconds. (The first time you use the meter , three dashes Q will appear , meaning that there is no code stored in the memory .) If three dashes a …
-
Lifescan OneTouch Ultra — page 20
14 Press the C button to select the corr ect code. Each time you press and r elease the C button, the number will increase by one. T o move mor e quickly , press and hold the C button. After selecting the correct code number , it will flash for three seconds and then appear solid for three seconds. Then the R symbol will appear with the unit of mea …
-
Lifescan OneTouch Ultra — page 21
OneT ouch ® Ultra ® Contr ol Solution is used to check that the meter and the test strips are working together as a system and that you are performing the test correctly . OneT ouch ® Ultra ® Contr ol Solution contains a measured amount of glucose that reacts with OneT ouch ® Ultra ® T est Strips. Compar e your control solution test results w …
-
Lifescan OneTouch Ultra — page 22
16 Impor tant Contr ol Solution T est Information • Use only OneT ouch ® Ultra ® Control Solution. • Check the expiration date on the control solution vial. R ecord the discard date (date opened plus three months) on the vial label. Do not use after expiration or discard date, whichev er comes first. • Control solution, meter , and test str …
-
Lifescan OneTouch Ultra — page 23
17 When to do a control solution test: • Once a week. • When y ou open a new vial of test strips. • Whenev er you suspect that the meter or test strips are not working properly . • If your blood glucose test results ar e not consistent with how you feel. • After dropping the meter . C AUTION: The control solution range printed on the test …
-
Lifescan OneTouch Ultra — page 24
18 Insert a test strip, contact bars end first and facing up, into the test port. Push it all the way in until it will go no further . The meter will turn on and the display check will appear briefly . Then the code number will appear , followed by the R symbol and unit of measure. Check that the unit of measure is set correctly . Be sure the meter …
-
Lifescan OneTouch Ultra — page 25
19 T o ensure an accur ate result: • Shake the vial well • Discard the first drop • W ipe the dispenser tip Hold the drop to the narro w channel in the top edge of the test strip. When the confirmation window is full, the meter will begin to count down from N to A second. Compare the control solution test r esult with the range printed on the …
-
Lifescan OneTouch Ultra — page 26
20 If test results fall outside the range printed on the test strip vial, repeat the test. Out-of-range results may be caused by one or mor e of the following: • Error in performing the test. • Failur e to shake the control solution vial well. • Expired or contaminated control solution. • The meter , test strips, or control solution ar e to …
-
Lifescan OneTouch Ultra — page 27
TE S TI NG Y OU R BL OO D Read this section and the test strip package insert carefully before testing. Make sur e you have all items needed to test. • Meter • T est Strips • Sampler • Optional OneT ouch ® UltraClear ™ Cap (for forearm sampling) • Sterile Lancet 21 DCO_06052203A_OTU_OB_CAN_EN 2/20/04 1:39 PM Page 21 …
-
Lifescan OneTouch Ultra — page 28
22 Preparing the OneT ouch ® UltraSoft ™ Sampler Release Button Ejection/Cocking Control Depth Adjustment Knob Cap OneT ouch ® UltraClear TM Cap for Forearm Sampling Protective Disk Lancet Point Lancet with Protective Disk Depth Indicator Puncture Settings C AUTION: T o reduce the chance of infection: • Never share a lancet or the OneT ouch ? …
-
Lifescan OneTouch Ultra — page 29
23 T urn the cap counterclockwise to remo ve it. Insert the lancet into the lancet holder and push down firmly until it is fully seated. Do not twist the lancet. T wist the protectiv e disk until it separates from the lancet. Replace the OneT ouch ® UltraSoft ™ Cap. T urn it clockwise until it is snug. Adjust the puncture depth setting if necess …
-
Lifescan OneTouch Ultra — page 30
24 Use warm, soapy water . Rinse and dry thoroughly . W ash Y our Hands and the Puncture Site. STEP 3 Slide the ejection/cocking control back until it clicks. If it does not click, the sampler may have been cocked when the lancet was inserted. The sampler is now ready for use. Cock the Sampler . STEP 2 DCO_06052203A_OTU_OB_CAN_EN 2/20/04 1:39 PM Pa …
-
Lifescan OneTouch Ultra — page 31
Massaging the fingertip gently will help you obtain a round dr op of blood. Do not squeeze excessiv ely on the puncture site. The blood sample must be at least one microlitre ( 1 µL) in v olume ( actual size) or you may get an Æ message (see page 55 ) or an inaccurate test result. Do not smear the blood sample. Proceed with your blood glucose tes …
-
Lifescan OneTouch Ultra — page 32
F orearm Blood Sampling The forearm has fewer nerve endings than the fingertip so you may find that obtaining a blood sample from the forearm may be much less painful than using the fingertip. The technique for forearm sampling is different from fingertip sampling. Also there are differences between for earm samples and finger tip samples that you …
-
Lifescan OneTouch Ultra — page 33
27 T o increase blood flo w to the puncture site, massage the area gently . For individuals who experience difficulty in getting sufficient blood for a test, rubbing the area more vigorously or applying heat briefly may be helpful. Position the Sampler . STEP 4 Press and hold the sampler against the forearm for a few seconds. Pr ess the release but …
-
Lifescan OneTouch Ultra — page 34
28 Impor tant Information About F orearm T esting • Under certain conditions, blood glucose test results obtained using samples taken from your for earm may differ significantly from fingertip samples. • The conditions in which these differences are mor e likely to occur are when your blood glucose is changing r apidly such as following a meal, …
-
Lifescan OneTouch Ultra — page 35
29 If bruising occurs, you may choose to lance a fingertip instead. If you are having difficulty obtaining blood from the forearm, call the OneT ouch ® Customer Care Line at 1 800 663-5521 . Impor tant Information About F orearm T esting (continued) What you should do: • Use either forearm or finger tip samples for testing prior to, or more than …
-
Lifescan OneTouch Ultra — page 36
30 Step-by-Step T est Procedure Insert a test strip, contact bars end first and facing up, into the test port. Push it in until it will go no further . The meter will turn on and the display check will appear briefly . Then the code number will appear , followed by the R symbol with the unit of measure. Check that the unit of measure is set correct …
-
Lifescan OneTouch Ultra — page 37
31 Good Sample Sample T oo Small Hold the blood drop to the top edge of the test strip until the confirmation window is full before the meter begins to count down . If the confirmation window does not fill completely before the meter begins to count down, do not add more blood to the test strip; discard the test strip and retest. If y ou have troub …
-
Lifescan OneTouch Ultra — page 38
T wist the cap counterclockwise. (Optional: Replace the protectiv e disk on the used lancet by placing it on a hard surface and pushing the lancet tip into the disk.) Point the sampler down and away . Push forward on the ejection/cocking control and eject the lancet directly into a container for sharp objects. Return the ejection/cocking control to …
-
Lifescan OneTouch Ultra — page 39
33 The OneT ouch ® Ultra ® Meter displays r esults between 1.1 to 33.3 mmol/L ( 20 and 600 mg/dL). If your blood glucose test result is lower than 1.1 mmol/L ( 20 mg/dL), T will appear on the meter display . This indicates severe hypogly cemia (low blood glucose). Y ou should treat this condition according to the recommendations of your healthcar …
-
Lifescan OneTouch Ultra — page 40
Y our OneT ouch ® Ultra ® Meter stores the 150 most recent blood glucose and control solution test results with date and time in its memory . It also pro vides you with 14 — and 30 -day aver ages of your blood glucose test results. R eview the test results in memory with these easy steps. 34 Y ou may enter the memory mode either with the meter tu …
-
Lifescan OneTouch Ultra — page 41
35 The most recent test result with date and time will appear . Press and release the C button and the next most recent test result will appear . The meter will recall up to your last 150 test results in order from the most recent to the oldest. When the memory is full, the oldest result is dropped and the newest is added. T o mov e through the tes …
-
Lifescan OneTouch Ultra — page 42
36 T ransferring test results with date and time fr om the meter memory to your personal computer for home viewing requir es OneT ouch ™ Diabetes Management Software fr om LifeScan and a LifeScan Interface Cable both of which are not included with your OneT ouch ® Ultra ® S ystem kit. Visit www .OneT ouch.ca to download the OneT ouch ™ Diabet …
-
Lifescan OneTouch Ultra — page 43
37 NO TE: While in the communication mode, you will be unable to perform a blood glucose test. If the meter is in either memory or setting mode, it will not respond to computer commands. Follo w the instructions in the OneT ouch ™ Software User’ s Manual to initiate the data transfer command. If the command is not received within two minutes, t …
-
Lifescan OneTouch Ultra — page 44
38 COM P AR ING M ETE R AN D L ABORA T O R Y R ES UL T S OneT ouch ® Ultra ® Meter test r esults and laboratory test results are both expressed in plasma-equiv alent units. However , your meter result may differ somewhat from y our laboratory result due to normal variation. Meter r esults can be affected by factors and conditions that do not affe …
-
Lifescan OneTouch Ultra — page 45
39 While at the lab: • Make sure that the meter test and the lab test ar e performed within 15 minutes of each other . • Wash y our hands before obtaining a blood sample. • Use only fresh capillary blood obtained from the fingertip. Y ou may still have a variation fr om the result because blood glucose levels can change significantly o ver sh …
-
Lifescan OneTouch Ultra — page 46
40 The OneT ouch ® Ultra ® Meter comes with the time and date preset. Check that the time, date, and the unit of measure are set corr ectly . If you need to change the time, date, or unit of measure; follow the instructions for changing the settings or call the OneT ouch® Customer Care Line at 1 800 663-5521. Y ou may also need to enter the sett …
-
Lifescan OneTouch Ultra — page 47
41 Press and r elease the C button to advance one minute . T o mov e faster , hold the C button down. With the correct minute on the display , press the M button and the AM/PM ( 12 -hour) format setting will star t flashing. The meter can display the time in either an AM/PM ( 12 -hour) format or a 24 : 00 ( 24 -hour) format. The AM/PM format is pre …
-
Lifescan OneTouch Ultra — page 48
42 Press and r elease the C button to advance one year . T o mo ve faster , hold the C button down. With the correct y ear on the display , press the M button and the date will appear on the display with the month segment flashing. Press and r elease the C button until the correct month appears. T o move faster , hold the C button down. With the co …
-
Lifescan OneTouch Ultra — page 49
43 Press and r elease the C button until the correct day appears. T o move faster , hold the C button down. With the correct day on the display , press the M button and the current unit of measure will start flashing. Set the Day . STEP 6 Note : The 14 — and 30 -day averages in the meter memory are calculated from results obtained during the 14 and …
-
Lifescan OneTouch Ultra — page 50
44 C ARI NG FO R Y OU R OneT ouch ® Ultr a ® SYS TE M Meter Y our OneT ouch ® Ultra ® Meter does not require special maintenance or cleaning. T ake care to avoid getting dirt, dust, blood, control solution, or liquids inside the meter through the test port or data por t. LifeScan recommends that you stor e the meter in its carrying case after e …
-
Lifescan OneTouch Ultra — page 51
2 . When the É symbol appears on the display by itself, it means that the battery will not pro vide enough power for a test. Y ou must change the battery . 45 Batter y Y our OneT ouch ® Ultra ® Meter comes with a pre- installed 3.0 V (# 2032 or equivalent) lithium battery . The battery will pro vide you with enough power to perform about 1 , 000 …
-
Lifescan OneTouch Ultra — page 52
46 Push up on the tab and pull the battery compartment cover towar d you. T o replace the battery , make sure that the meter is turned off. T urn the meter ov er and locate the battery compartment. Pull upward on the ribbon. Insert one 3.0 V (# 2032 or equivalent) lithium battery , making sure the positiv e “+” side of the battery is facing up. …
-
Lifescan OneTouch Ultra — page 53
47 Note: • Replacing the battery does not affect previous test results stored in memory . However , the time and date settings may need to be updated. • After replacing the battery , turn the meter on by inserting a test strip or pressing the M button. If the meter is in setting mode, confirm that the time, time format and date are set correctl …
-
Lifescan OneTouch Ultra — page 54
DISPL A Y ME SSAGE S AN D PROBLEM-SOL VI NG GU I DE Follo wing is a summary of all display messages. These messages help to identify certain problems but do not appear in all cases when a problem has occurred. Impr oper use may cause an inaccurate result without producing an error message or a symbol. In the ev ent of a problem, refer to the inform …
-
Lifescan OneTouch Ultra — page 55
49 MESSA GE WHA T IT MEAN S This is the code number stored in the meter . The system is ready to accept a blood sample. The system is ready to accept a control solution test sample. Five-second countdown. The meter is calculating the result. After the countdown, the meter will display the test result. A CT ION Make sure that this code number matche …
-
Lifescan OneTouch Ultra — page 56
50 MESSA GE WHA T IT MEAN S A blood glucose test result in mmol/L. A blood glucose test result with a suggestion to check your ketone levels. A CT ION None required. Follo w the instructions of your healthcare professional regarding ketone testing. DCO_06052203A_OTU_OB_CAN_EN 2/20/04 1:39 PM Page 50 …
-
Lifescan OneTouch Ultra — page 57
51 MESSA GE WHA T IT MEAN S Y ou may have a very high blood glucose level, exceeding 33.3 mmol/L ( 600 mg/dL). Y ou may have a very low blood glucose level, low er than 1.1 mmol/L ( 20 mg/dL). A blood glucose test result stored in the memory . A CT ION Y ou should recheck your glucose level and if S call your doctor immediately . T reat this condit …
-
Lifescan OneTouch Ultra — page 58
52 MESSA GE WHA T IT MEAN S A control solution test result stored in the memory . There is no test result stored in this place in the memory . Average of the last 14 days √ means that 64 tests were performed within the period). The 30 -day average appears with a © . A CT ION None required. None required. None required. (Example) DCO_06052203A_OT …
-
Lifescan OneTouch Ultra — page 59
53 MESSA GE WHA T IT MEAN S Error message that indicates that there is a problem with the meter . Error message could be caused either by a used test strip or a problem with the meter . Error message that indicates that the blood or control solution sample was applied before the R symbol appeared on the display . A CT ION Do not use the meter . Con …
-
Lifescan OneTouch Ultra — page 60
54 MESSA GE WHA T IT MEAN S 1 ) You may have high glucose and have tested in an environment near the low end of the system’ s operating temperature range( 6–44° C/ 43–111 °F ). 2 ) T here may be a problem with the test strip. F or example, it may have been damaged or mov ed during testing. 3 ) T he sample was improperly applied. A CT ION If …
-
Lifescan OneTouch Ultra — page 61
55 MESSA GE WHA T IT MEAN S Error message that indicates that the meter has detected a problem with the test strip. Possible causes are test strip damage or an incompletely filled confirmation window . The É symbol appears on the display with the unit of measure. The power is getting lo w . Y ou can complete about 50 more tests from the time this …
-
Lifescan OneTouch Ultra — page 62
56 MESSA GE WHA T IT MEAN S Flasing time means the meter has lost power and enter ed the setting mode. The meter has detected that the temperature is belo w the system operating range. Do not perform a test until the meter and test strips reach a temperature within the operating range of 6–44 °C ( 43–111 °F ). The meter has detected that the …
-
Lifescan OneTouch Ultra — page 63
57 If the test does not start after applying the sample: If the meter does not display a message after inserting a test strip: POSSIBL E C A USE Insufficient blood sample Defective test strip Sample applied after automatic shutoff (two minutes after last user action) Defective meter WHA T T O DO Repeat the test with a new test strip and a larger sa …
-
Lifescan OneTouch Ultra — page 64
SPECI FIC A TION S Result R ange: 1.1 to 33.3 mmol/L ( 20 to 600 mg/dL) Calibration: Plasma-equiv alent Sample: Fresh capillary whole blood Sample Size: Minimum 1 microlitre T est Time: 5 seconds Assay Method: Glucose oxidase biosensor Power Sour ce: One replaceable 3.0 V (# 2032 or equivalent) lithium battery Battery Life: 1 , 000 tests or about o …
-
Lifescan OneTouch Ultra — page 65
59 GU ARANT EE The makers guarantee that the OneT ouch ® Ultra ® Meter shall be free of defects in material and workmanship for a period of three years. This guarantee is v alid from the date of purchase. The guarantee extends only to the original purchaser and is not transferable. The OneT ouch ® Ultra ® Blood Glucose Meter complies with the f …
-
Lifescan OneTouch Ultra — page 66
60 IND EX Averages, 14- and 30-Day. . . . . . . . . . . . . . . . . . . . . . . . . . . . . 34 Battery . . . . . . . . . . . . . . . . . . . . . . . . . . . . . . . . . . . . . . . . . . . . 45 Blood Sampling, Forearm. . . . . . . . . . . . . . . . . . . . . . . . . . . . . 26 Blood Sampling, Fingertip . . . . . . . . . . . . . . . . . . . . . . . …
-
Lifescan OneTouch Ultra — page 67
61 Meter Display . . . . . . . . . . . . . . . . . . . . . . . . . . . . . . . . . . . . . . . 8 Meter Display , Checking . . . . . . . . . . . . . . . . . . . . . . . . . . . . . . 12 Meter Maintenance . . . . . . . . . . . . . . . . . . . . . . . . . . . . . . . . . 44 Meter Specifications . . . . . . . . . . . . . . . . . . . . . . . . . . . . . …
-
Lifescan OneTouch Ultra — page 68
62 DCO_06052203A_OTU_OB_CAN_EN 2/20/04 1:39 PM Page 62 …
-
Lifescan OneTouch Ultra — page 69
63 DCO_06052203A_OTU_OB_CAN_EN 2/20/04 1:39 PM Page 63 …
-
Lifescan OneTouch Ultra — page 70
Glucose Ranges for People Without Diabetes, mmol/L (mg/dL) Y our Target Ranges, mmol/L (mg/dL) Before breakfast Before lunch or dinner 1 hour after meals 2 hours after meals Between 2 and 4 AM 3.9–5.8 (70–105) 3.9–6.1 (70–110) L ess than 8.9 (160) L ess than 6.7 (120) Greater than 3.9 (70) Source: Krall, L.P ., and Beaser , R.S.: Joslin Dia …
-
Lifescan OneTouch Ultra — page 71
SYSTÈME DE SURVEILLANCE DE LA GLYCÉMIE Ultr a Guide d’utilisation du système DCO_06052203A_OTU_OB_CAN_FR 2/20/04 1:42 PM Page i …
-
Lifescan OneTouch Ultra — page 72
ii Au détenteur du système OneT ouch ® Ultra ® : V ous avez choisi un des meilleurs systèmes de sur v eillance de la glycémie offerts sur le marché. Ce guide contient des renseignements importants que vous devez connaître au sujet de votre système OneT ouch ® Ultra ® . V euillez le lire attentivement. La surveillance de la glycémie joue …
-
Lifescan OneTouch Ultra — page 73
iii T able des matières PRÉSENT A TION DE VO TR E NOUVEAU SYSTÈME . . . . . . . . . . . . . . . iv Contenu du système de surveillance de la glycémie OneT ouch ® Ultra ® . . . . . . . . . . . . . . . . 5 Le lecteur de glycémie OneT ouch ® Ultra ® . . . . . . . . . . . . . . . . 6 Les bandelettes de test OneT ouch ® Ultra ® . . . . . . . …
-
Lifescan OneTouch Ultra — page 74
iv Présentation de v otre nouv eau système L e système OneT ouch ® Ultra ® utilise la technologie la plus récente dans le domaine de la surveillance de la glycémie. Il mesure le contenu en glucose d’un échantillon de sang au moyen d’un courant électrique produit dans la bandelette de test et transmis au lecteur pour être mesuré. L es …
-
Lifescan OneTouch Ultra — page 75
1 V otre système de sur v eillance de la glycémie OneT ouch ® Ultra ® est constitué de trois principaux produits: L e lecteur de glycémie OneT ouch ® Ultra ® , les bandelettes de test OneT ouch ® Ultra ® (vendues séparément) et la solution de contrôle OneT ouch ® Ultra ® . Ces produits ont été conçus, testés et éprouvés pour fo …
-
Lifescan OneTouch Ultra — page 76
2 L e système OneT ouch ® Ultra ® est destiné à une utilisation à l’extérieur du corps (utilisation diagnostique in vitro). Son utilisation se limite donc à la vérification du taux de glucose (sucre) dans des échantillons de sang entier fraîchement prélevés des capillaires. Il ne devrait pas êtr e utilisé pour établir un diagno …
-
Lifescan OneTouch Ultra — page 77
3 Information impor tante • Une déshydratation importante et une per te excessiv e de liquides peuvent donner des résultats inférieurs aux v aleurs réelles. Si vous cro yez souffrir de déshydr atation impor tante, consultez immédiatement un professionnel de la santé. • L es résultats de test inférieurs à 3,3 mmol/L ( 60 mg/dL) sont l? …
-
Lifescan OneTouch Ultra — page 78
4 DCO_06052203A_OTU_OB_CAN_FR 2/20/04 1:42 PM Page 4 …
-
Lifescan OneTouch Ultra — page 79
5 • L ecteur OneT ouch ® Ultra ® • Guide d’utilisation • Aide-mémoire • Dispositif réglable de prélèvement sanguin OneT ouch ® UltraSoft MC • Embout OneT ouch ® UltraClear MC (en option) • Lancettes stériles OneT ouch ® UltraSoft MC • Solution de contrôle OneT ouch ® Ultra ® • Bandelettes de test OneT ouch ® Ultra ® …
-
Lifescan OneTouch Ultra — page 80
Lecteur de glycémie OneT ouch ® Ultra ® 6 AFFICHAGE Symboles, courts messages et résultats de test y sont affichés. T OUCHE M Utilisée pour mettre le lecteur sous tension et pour entrer en : ◗ Mode de réglage ◗ Mode mémoire POR T D’AC CÈS Utilisé pour télécharger v os résultats de test dans un ordinateur . DCO_06052203A_OTU_OB_CA …
-
Lifescan OneTouch Ultra — page 81
7 POR T D’ANAL YSE Insérez la bandelette de test OneT ouch ® Ultra ® à cet endr oit. T OUCHE C Utilisée pour : ◗ changer la date, l’heure, et le numéro de code. ◗ indiquer les épreuves de contrôle. ◗ revoir les résultats de test en mémoir e. DCO_06052203A_OTU_OB_CAN_FR 2/20/04 1:42 PM Page 7 …
-
Lifescan OneTouch Ultra — page 82
8 Affichage du lecteur OneT ouch ® Ultr a ® CTL Indique qu’il s’agit du résultat d’une épreuve de contrôle. COD E Apparaît avec le numér o de code des bandelettes de test. SYMBOL E DE L A GOUT TE DE SANG V ous dit quand appliquer l’échantillon. POINT DÉCIMAL Apparaît dans vos résultats de test seulement lorsque les mmol/L sont ch …
-
Lifescan OneTouch Ultra — page 83
9 MOIS KET ONES? Apparaît lorsque le résultat du test est supérieur à 13 , 3 mmol/L ( 240 mg/dL) pour suggérer de vérifier la présence de cétones. MEM Indique qu’il s’agit d’un résultat de test enregistré en mémoire. ZONE D’INSCRIPTION DES RÉSUL T A TS L es résultats de test y sont affichés. MMOL/L Unité de mesure. Au Canada, …
-
Lifescan OneTouch Ultra — page 84
Bandelette de test OneT ouch ® Ultr a ® (vendues séparément) L e système OneT ouch ® Ultra ® mesur e la quantité de glucose dans du sang entier . Le sang est appliqué à l’E XTRÉMITÉ S UPÉR IEURE d e la bandelette de test OneT ouch ® Ultra ® et il est automatiquement aspiré dans la cellule de réaction, là où la réaction aura li …
-
Lifescan OneTouch Ultra — page 85
11 R enseignements importants à propos de la bandelette de test • Rangez les flacons de bandelettes de test dans un endroit fr ais et sec, à moins de 30 ° C ( 86 ° F). Il ne faut pas les exposer à la chaleur ou à la lumière solaire dir ecte, ni les réfrigérer . • Rangez les bandelettes de test dans leur flacon d’origine seulement . P …
-
Lifescan OneTouch Ultra — page 86
AVA N T L E T E ST Vérification de l’affichage Chaque fois que vous mettez le lecteur OneT ouch ® Ultra ® sous tension, en insérant une bandelette de test OneT ouch ® Ultra ® ou en appuyant sur la touche M, tous les segments de l’écran d’affichage apparaissent brièv ement. Ceci vous indique que le système effectue plusieurs vérifica …
-
Lifescan OneTouch Ultra — page 87
13 Insérez une bandelette de test pour mettre le lecteur sous tension. Poussez-la bien à fond jusqu’à ce qu ’elle se bloque. Évitez de plier la bandelette de test. La vérification de l’affichage s’effectue. Puis, le numéro de code apparaît pendant trois secondes. (La première fois que v ous utilisez le lecteur , trois tirets Q appar …
-
Lifescan OneTouch Ultra — page 88
14 Appuyez sur la touche C pour choisir le numéro de code voulu. Chaque fois que vous appuyez sur la touche C et que v ous la relâchez, le numéro augmente d’un chiffre. Pour un déroulement plus r apide, maintenez la touche C enfoncée. Après avoir choisi le bon numéro de code, il clignotera pendant trois secondes puis il cessera de clignote …
-
Lifescan OneTouch Ultra — page 89
La solution de contrôle OneT ouch ® Ultra ® est utilisée pour vérifier si le lecteur et les bandelettes de test fonctionnent ensemble en tant que système et si vous effectuez les tests correctement. La solution de contrôle OneT ouch ® Ultra ® contient une quantité mesurée de glucose qui réagit avec les bandelettes de test OneT ouch ® U …
-
Lifescan OneTouch Ultra — page 90
16 R enseignements importants à propos des épreuves de contrôle • Utilisez seulement la solution de contrôle OneT ouch ® Ultra ® . • Vérifiez la date de pér emption sur la bouteille de solution de contrôle. Inscrivez la date de mise au rebut (date d’ouv er ture plus trois mois) sur l’étiquette de la bouteille. N’utilisez pas la …
-
Lifescan OneTouch Ultra — page 91
17 Quand doit-on effectuer une épreuv e de contrôle : • Une fois par semaine. • Quand vous ouvrez un nouv eau flacon de bandelettes de test. • S’il vous semble que le lecteur ou les bandelettes de test ne fonctionnent pas correctement. • Si votre résultat de gly cémie ne concorde pas avec v os symptômes. • Après avoir laissé tomb …
-
Lifescan OneTouch Ultra — page 92
18 Insérez une bandelette de test dans le port d’analyse, en la tenant face vers le haut et en insérant d’abord les contacts. Poussez-la bien à fond jusqu’à ce qu ’elle se bloque. L e lecteur se mettra sous tension et tous les segments de l’affichage apparaîtront brièvement. Puis, le numéro de code appar aîtra, suivi du symbole R …
-
Lifescan OneTouch Ultra — page 93
19 Pour assurer un résultat exact : • Agitez bien la bouteille • Jetez la première goutte • Essuyez le bec doseur Maintenez la goutte contre l’étroit canal à l’extrémité supérieure de la bandelette de test. Lorsque la fenêtr e de confirmation est remplie, le lecteur commence le compte à rebours de N à A . Comparez le résultat d …
-
Lifescan OneTouch Ultra — page 94
20 Si le résultat du test tombe à l’extérieur de l’échelle imprimée sur le flacon de bandelettes de test, refaites le test. Il se peut que vous obteniez des résultats hors cible dans l’une ou l’autre des circonstances suiv antes: • Erreur en effectuant l’épreuv e. • Omission de bien agiter la bouteille de solution de contrôle. …
-
Lifescan OneTouch Ultra — page 95
TE S T SANG UI N Assurez-vous de lir e attentivement cette section et le feuillet d’information de l’emballage des bandelettes de test avant de vérifier la gly cémie. Assurez-vous d’av oir tous les articles nécessaires pour effectuer le test : • L ecteur • Bandelettes de test • Dispositif de prélèvement • Embout OneT ouch ® U …
-
Lifescan OneTouch Ultra — page 96
22 Préparation du dispositif de prélèv ement OneT ouch ® UltraSoft MC Gâchette Contrôle d’armement et d’éjection Bouton de réglage de la profondeur de pénétration Embout Embout OneT ouch ® UltraClear MC (pour les prélèvements sur l’avant-bras) Disque protecteur Pointe de la lancette Lancette avec son disque protecteur Indicateur …
-
Lifescan OneTouch Ultra — page 97
23 T ournez l’embout dans le sens contraire des aiguilles d’une montre pour le retir er . Insérez une lancette dans le support de lancette et poussez-la vers le bas jusqu ’à ce qu’elle soit bien fixée. Ne tordez pas la lancette. T ordez le disque protecteur jusqu’à ce qu’il se sépare de la lancette. R eplacez l’embout OneT ouch ? …
-
Lifescan OneTouch Ultra — page 98
24 Utilisez de l’eau chaude et du savon. Rincez et séchez à fond. Lavez v os mains et le site de ponction. ÉT APE 3 Faites glisser le bouton de contrôle d’armement et d’éjection vers l’arrière jusqu ’à ce que vous entendiez un déclic. Si v ous n’entendez pas de déclic, c’est peut-êtr e parce que le dispositif a été armé a …
-
Lifescan OneTouch Ultra — page 99
L e fait de masser doucement le bout du doigt vous aidera à obtenir une goutte de sang bien ronde. Ne pressez pas tr op le site de ponction. L e volume de l’échantillon sanguin doit être d’au moins 1 microlitr e ( 1 µl) ( taille réelle), sinon vous pourriez obtenir un message d’erreur Æ (voir page 55 ) ou un résultat inexact. N’étal …
-
Lifescan OneTouch Ultra — page 100
Prélèvement sur l’av ant-bras L ’avant-br as contient moins de terminaisons nerveuses que le bout du doigt, de sorte que vous pourriez trouver beaucoup moins douloureux d’obtenir un échantillon de sang de l’avant-br as que d’un doigt. La technique utilisée pour les prélèvements sur l’av ant-bras est différente de celle utilisée …
-
Lifescan OneTouch Ultra — page 101
27 Pour augmenter la circulation sanguine au site de ponction, massez délicatement la zone. Un massage plus vigoureux de la zone de ponction ou une brève application de chaleur pourraient être utiles chez les personnes qui ont de la difficulté à obtenir la quantité de sang désirée. Positionnez le dispositif . ÉT APE 4 Appuyez et maintenez …
-
Lifescan OneTouch Ultra — page 102
28 R enseignements importants à propos des tests sur l’av ant-bras • Dans certaines circonstances, les résultats de glycémie obtenus en utilisant un échantillon pro venant de votr e avant-br as peuvent être très différents de ceux obtenus à partir de sang recueilli par ponction digitale. • Ces différences sont plus susceptibles de se …
-
Lifescan OneTouch Ultra — page 103
29 En cas d’ecchymoses, vous préférer ez peut-être piquer le bout d’un doigt. Si vous av ez de la difficulté à obtenir un échantillon de sang de l’avant-br as, appelez la ligne InfoSoins OneT ouch ® au 1 800 663-5521 . R enseignements importants à propos des tests sur l’av ant-bras (suite) Ce que vous devriez faire : • Utilisez le …
-
Lifescan OneTouch Ultra — page 104
30 Procédé de vérification étape par étape Insérez une bandelette de test dans le port d’analyse, en la tenant face vers le haut et en insérant d’abord les contacts. Poussez-la bien à fond jusqu’à ce qu ’elle se bloque. L e lecteur se mettra sous-tension et tous les segments de l’affichage apparaîtront brièv ement. Puis le num? …
-
Lifescan OneTouch Ultra — page 105
31 à t e t. Échantillon adéquat Échantillon trop petit T enez la goutte de sang contre l’extrémité supérieure de la bandelette de test jusqu’à ce que la fenêtre de confirmation soit complètement remplie, av ant que le lecteur commence le compte à rebours. Si la fenêtre de confirmation ne se remplit pas complètement avant que le lec …
-
Lifescan OneTouch Ultra — page 106
T ournez l’embout dans le sens antihoraire. (Facultatif : R eplacez le disque protecteur sur la lancette usagée en plaçant le disque sur une surface dure et en poussant la lancette dans le disque.) Pointez le dispositif vers le bas, sans diriger la lancette vers vous. Poussez le bouton de contrôle d’armement et d’éjection vers l’av a …
-
Lifescan OneTouch Ultra — page 107
33 L e lecteur OneT ouch ® Ultra ® affiche les résultats qui se situent entre 1 , 1 et 33 , 3 mmol/L ( 20 et 600 mg/dL). Si le résultat de votre test est inférieur à 1 , 1 mmol/L ( 20 mg/dL), le message « T » apparaîtr a à l’écran du lecteur . Ce message indique une hypoglycémie grav e (taux de glucose sanguin bas). V ous devriez trai …
-
Lifescan OneTouch Ultra — page 108
V otre lecteur OneT ouch ® Ultra ® garde en mémoire les 150 derniers résultats de tests de glycémie et d’épreuv es de contrôle accompagnés de la date et l’heure où ils ont été effectués. Il peut aussi vous fournir les moy ennes de vos résultats de glycémie sur 14 et 30 jours. V ous pouvez rappeler les résultats stockés en mémoi …
-
Lifescan OneTouch Ultra — page 109
35 L e résultat du test le plus récent apparaîtra avec la date et l’heure du test. Appuy ez sur la touche C et relâchez-la. L e résultat du test précédent le plus récent sera affiché. L e lecteur rappellera v os 150 derniers résultats dans l’ordre, du plus récent au plus ancien. Lorsque la mémoir e est pleine, le résultat le plus a …
-
Lifescan OneTouch Ultra — page 110
36 L e transfert des résultats de test avec la date et l’heure de la mémoire du lecteur vers v otre ordinateur personnel pour examen à la maison nécessite le logiciel de suivi du diabète OneT ouch MC de LifeScan et un câble d’interface LifeScan lesquels ne sont pas inclus dans la trousse du système OneT ouch ® Ultr a ® . V isitez le …
-
Lifescan OneTouch Ultra — page 111
37 REMARQUE: Lorsque le lecteur est en mode de communication, vous ne pouvez pas l’utiliser pour effectuer une analyse glycémique. Si le lecteur est en mode mémoire ou en mode réglage, il ne pourra pas recevoir d’instructions d’un or dinateur . Suivez les indications fournies dans v otre manuel du logiciel OneT ouch MC pour lancer les inst …
-
Lifescan OneTouch Ultra — page 112
38 COM P ARAISON DE S RÉS UL T A TS DU LECTEU R À DE S RÉSU L T A TS OB TEN US E N L ABORA T OI R E L es résultats du lecteur OneT ouch ® Ultra ® et ceux obtenus en laboratoire sont tous exprimés en équiv alents plasmatiques. T outefois, les résultats obtenus avec v otre lecteur peuvent parfois être légèrement différ ents des résultat …
-
Lifescan OneTouch Ultra — page 113
39 Au laboratoire: • Assurez-vous que les deux tests, celui avec le lecteur et celui en laboratoire, sont effectués à moins de 15 minutes d’intervalle. • Lavez vos mains avant d’effectuer le prélèv ement de l’échantillon de sang. • N’utilisez que du sang capillaire fraîchement prélevé au bout d’un doigt. Il est possible que …
-
Lifescan OneTouch Ultra — page 114
40 Lorsque v ous recev ez votre lecteur OneT ouch ® Ultra ® l’heure et la date ont déjà été progr ammées. Vérifier si la date, l’heure et l’unité de mesure sont réglées correctement. Si vous dev ez changer la date, l’heure ou l’unité de mesure, suivez les instructions pour modifier les réglages ou appelez la ligne …
-
Lifescan OneTouch Ultra — page 115
41 Appuyez sur la touche C et relâchez-la pour avancer d’une minute . Pour un défilement plus rapide, maintenez la touche C enfoncée. Lorsque le chiffr e désiré est affiché, appuyez sur la touche M et le réglage du système horaire AM/PM ( 12 heures) commencer a à clignoter . L e lecteur peut afficher l’heure dans le système de 12 heur …
-
Lifescan OneTouch Ultra — page 116
42 Appuyez sur la touche C et relâchez-la pour avancer d’une année . Pour un défilement plus rapide, maintenez la touche C enfoncée. Lorsque l’année désirée est affichée, appuyez sur la touche M. La date apparaîtr a à l’écran et le mois clignotera. Appuyez sur la touche C et relâchez-la pour avancer jusqu ’au mois voulu. Pour un …
-
Lifescan OneTouch Ultra — page 117
43 Appuyez sur la touche C et relâchez-la pour avancer jusqu ’au jour désiré. Pour un défilement plus rapide, maintenez la touche C enfoncée. Lorsque le jour désiré est affiché, appuyez sur la touche M et l’unité de mesure utilisée commencera à clignoter . Réglez la journée. ÉT APE 6 REMARQUE : L es moyennes sur 14 et 30 jours de …
-
Lifescan OneTouch Ultra — page 118
44 ENTR ET IE N DE VO TR E S YSTÈME OneT ouch ® Ultra ® Lecteur V otre lecteur OneT ouch ® Ultra ® n’a pas besoin d’entretien ou de nettoyage particulier . Faites en sor te que la poussière, la saleté, le sang, la solution de contrôle ou les liquides ne pénètrent pas dans le lecteur par les ports d’analyse et d’accès. LifeScan re …
-
Lifescan OneTouch Ultra — page 119
2 . Lorsque seul le symbole É apparaît à l’écran, la pile est trop faible pour effectuer un test. V ous devez remplacer la pile. 45 Pile Lorsque v ous recev ez votre lecteur OneT ouch ® Ultra ® , une pile au lithium de 3 , 0 volt (N° 2032 ou équiv alent) a déjà été installée. Cette pile vous permettra d’effectuer environ 1 000 test …
-
Lifescan OneTouch Ultra — page 120
46 Soulevez la patte et faites glisser le couvercle du logement v ers vous. Pour remplacer la pile, assurez-v ous que le lecteur est fermé. Retournez le lecteur face vers le bas pour localiser le logement de la pile. Tirez le ruban v ers le haut. Insérez une pile au lithium de 3 , 0 V (# 2032 ou équivalent) en v ous assurant de placer le pôle p …
-
Lifescan OneTouch Ultra — page 121
47 REMARQUE : • Le remplacement de la pile n ’a pas d’effet sur les résultats des tests précédents enregistrés en mémoire. T outefois, vous devr ez peut-être remettre à jour les réglages de la date et de l’heure. • Après avoir remplacé la pile, remettez le lecteur sous tension en insérant une bandelette de test ou en appuyant s …
-
Lifescan OneTouch Ultra — page 122
ME SSAGE S AFFICHÉS ET GU IDE DE DÉP A NNAGE V oici un résumé des différents messages apparaissant à l’écr an. Ces messages peuvent vous aider à identifier certains problèmes, mais ils n’appar aissent pas nécessairement à toutes les fois qu’un pr oblème se présente. Une utilisation inappropriée peut amener un résultat inexact, …
-
Lifescan OneTouch Ultra — page 123
49 MESSA GE SIGNIFIC A T ION 1 ) Ce message appar aît immédiatement après la vérification du système, si votre lecteur n’a pas encor e été codé. 2 ) Si ce message apparaît dans une autre circonstance après que le lecteur ait été codé pour une première fois, c’est que le code a été perdu. L es résultats des tests stockés en mé …
-
Lifescan OneTouch Ultra — page 124
50 MESSA GE SIGNIFIC A T ION L e système est prêt à recevoir une goutte de solution de contrôle. Compte à rebours de 5 secondes. L e lecteur calcule le résultat. Après le compte à rebours, le lecteur affichera le résultat du test. Un résultat d’analyse glycémique en mmol/L. Un résultat de glycémie accompagné d’un message conseilla …
-
Lifescan OneTouch Ultra — page 125
51 MESSA GE SIGNIFIC A T ION V otre glycémie est peut-être très élevée, supérieure à 33 , 3 mmol/L ( 600 mg/dL). V otre glycémie est peut-être très basse, inférieure à 1 , 1 mmol/L ( 20 mg/dL). Un résultat d’analyse glycémique enregistré en mémoire. A CT ION V ous devriez revérifier votr e glycémie. Si le message S apparaît de …
-
Lifescan OneTouch Ultra — page 126
52 MESSA GE SIGNIFIC A T ION Un résultat d’épreuve de contrôle enregistré en mémoire. Il n’y a pas de résultat de test dans cette partie de la mémoire. Moyenne des résultats des 14 derniers jours. √ signifie que 64 tests ont été effectués pendant cette période. La moyenne sur 30 jours apparaît avec le chiffre © . A CT ION Aucune …
-
Lifescan OneTouch Ultra — page 127
53 MESSA GE SIGNIFIC A T ION Message d’erreur indiquant un problème de lecteur . Message d’erreur possiblement causé par l’utilisation d’une bandelette de test usagée ou signalant un problème de lecteur . Message d’erreur qui indique que l’échantillon de sang ou la solution de contrôle ont été appliqués avant que le symbole R a …
-
Lifescan OneTouch Ultra — page 128
54 MESSA GE SIGNIFIC A T ION 1 ) V otre glycémie est peut- être élevée et a été vérifiée à une température ambiante proche de la limite inférieure de la plage des températures de fonctionnement du système ( 6 – 44 °C / 43 – 111 °F). 2 ) Il s’agit peut-être d’un problème de bandelette de test. Par exemple, elle peut avoir é …
-
Lifescan OneTouch Ultra — page 129
55 MESSA GE SIGNIFIC A T ION Message d’erreur qui indique que le lecteur à détecté un problème avec la bandelette de test. Ce message pourrait être causé par l’utilisation d’une bandelette de test endommagée ou par une fenêtre de confirmation partiellement remplie. L e symbole É apparaît à l’écran av ec l’unité de mesure. La …
-
Lifescan OneTouch Ultra — page 130
56 MESSA GE SIGNIFIC A T ION Si l’heure clignote, c’est que l’alimentation électrique du lecteur a été interrompue et qu’il est entré en mode de réglage. L e lecteur a détecté une température inférieur e à la plage de fonctionnement du système. Ne faites pas de test avant que les températures du lecteur et des bandelettes de tes …
-
Lifescan OneTouch Ultra — page 131
57 Si le test ne démarre pas après l’application de l’échantillon : Si le lecteur n’affiche pas de message après av oir inséré une bandelette de test : CA USES PR OBABL ES Échantillon de sang insuffisant. Bandelette de test défectueuse. Échantillon appliqué après l’arrêt automatique (deux minutes après la dernière utilisation) …
-
Lifescan OneTouch Ultra — page 132
SPÉCI FIC A TION S Échelle de résultats : 1 , 1 à 33 , 3 mmol/L ( 20 à 600 mg/dL) Étalonnage : Équivalents plasmatiques Échantillon : Sang entier fraîchement prélevé par ponction capillaire V olume de l’échantillon : Minimum de 1 microlitre T emps requis pour 5 secondes un test : Méthode d’analyse : Biocapteur de la glucose- oxydas …
-
Lifescan OneTouch Ultra — page 133
59 Garantie L es fabricants garantissent le lecteur OneT ouch ® Ultra ® contre tout défaut de fabrication ou de main- d’œuvre pendant une période de trois ans à partir de la date d’achat. Cette garantie n ’est valable que pour l’acheteur initial du lecteur et elle n’est pas transférable. Le lecteur de gly cémie OneT ouch ® Ultr a …
-
Lifescan OneTouch Ultra — page 134
60 IND EX Affichage du lecteur . . . . . . . . . . . . . . . . . . . . . . . . . . . . . . . . . . 8 Affichage du lecteur , vérification . . . . . . . . . . . . . . . . . . . . . . . 12 Avant-br as, prélèvement de sang . . . . . . . . . . . . . . . . . . . . . . 26 Bandelettes de test, information importante . . . . . . . . . . . . . 11 Bandelet …
-
Lifescan OneTouch Ultra — page 135
61 Messages spéciaux . . . . . . . . . . . . . . . . . . . . . . . . . . . . . . . . . 33 Méthode de test, étape par étape . . . . . . . . . . . . . . . . . . . . . . 30 Moyennes, 14 et 30 jours . . . . . . . . . . . . . . . . . . . . . . . . . . . . . 34 M, T ouche M . . . . . . . . . . . . . . . . . . . . . . . . . . . . . . . . . . . . . . . …
-
Lifescan OneTouch Ultra — page 136
62 DCO_06052203A_OTU_OB_CAN_FR 2/20/04 1:42 PM Page 62 …
-
Lifescan OneTouch Ultra — page 137
63 DCO_06052203A_OTU_OB_CAN_FR 2/20/04 1:42 PM Page 63 …
-
Lifescan OneTouch Ultra — page 138
Niveaux de glucose pour une personne non diabétique en mmol/L (mg/dL) V os valeurs cibles, en mmol/L (mg/dL) Avant le déjeuner Avant le dîner ou le souper 1 heure après les repas 2 heures après les repas Entre 2 h et 4 h du matin 3,9–5,8 (70–105) 3,9–6,1 (70–110) Inférieur à 8,9 (160) Inférieur à 6,7 (120) Supérieur à 3,9 (70) So …
Устройство:
Lifescan OneTouch Ultra
Размер: 2,92 MB
Добавлено: 2014-01-03
Количество страниц: 138
Как пользоваться?
Наша цель — обеспечить Вам самый быстрый доступ к руководству по эксплуатации устройства Lifescan OneTouch Ultra. Пользуясь просмотром онлайн Вы можете быстро просмотреть содержание и перейти на страницу, на которой найдете решение своей проблемы с Lifescan OneTouch Ultra.
Для Вашего удобства
Если просмотр руководства Lifescan OneTouch Ultra непосредственно на этой странице для Вас неудобен, Вы можете воспользоваться двумя возможными решениями:
- Полноэкранный просмотр -, Чтобы удобно просматривать инструкцию (без скачивания на компьютер) Вы можете использовать режим полноэкранного просмотра. Чтобы запустить просмотр инструкции Lifescan OneTouch Ultra на полном экране, используйте кнопку Полный экран.
- Скачивание на компьютер — Вы можете также скачать инструкцию Lifescan OneTouch Ultra на свой компьютер и сохранить ее в своем архиве. Если ты все же не хотите занимать место на своем устройстве, Вы всегда можете скачать ее из ManualsBase.
Lifescan OneTouch Ultra Руководство по эксплуатации — Online PDF
Ознакомьтесь с подробным руководством пользователя для замечательного творения Lifescan, модель OneTouch Ultra. Получите ценную информацию и инструкции, чтобы максимально использовать возможности вашего устройства и оптимизировать взаимодействие с пользователем. Раскройте весь потенциал своего устройства Lifescan OneTouch Ultra с помощью этого подробного руководства пользователя, в котором содержатся пошаговые инструкции и советы экспертов, которые сделают работу с ним легкой и приятной.
Печатная версия
Многие предпочитают читать документы не на экране, а в печатной версии. Опция распечатки инструкции также предусмотрена и Вы можете воспользоваться ею нажав на ссылку, находящуюся выше — Печатать инструкцию. Вам не обязательно печатать всю инструкцию Lifescan OneTouch Ultra а только некоторые страницы. Берегите бумагу.
Резюме
Ниже Вы найдете заявки которые находятся на очередных страницах инструкции для Lifescan OneTouch Ultra. Если Вы хотите быстро просмотреть содержимое страниц, которые находятся на очередных страницах инструкции, Вы воспользоваться ими.
Скачать
Ultra
Ultra
Ultra
Blood Glucose
Monitoring System
Owner’s
Booklet
DCO_06405104B_OTU_Uni_OBC_US 3/8/06 12:48 PM Page 2
-
Страница 1
Ul t ra Ul t ra Ul t ra Blood Glucose Monitoring System Owner’ s Booklet DCO_06405104B_OTU_Uni_OBC_US 3/8/06 12:48 PM Page 2[…]
-
Страница 2
Important Safety Information T o be sure your meter is working properly , EVER Y time you turn it on confirm that: ◗ All segments are visible in the display check ◗ The unit of measure is correct (mg/dL) ◗ The date and time are correct ◗ The code number on the meter display matches the code number on the test strip vial unit of measure date[…]
-
Страница 3
i OneT ouch ® Ultra ® System Owner’ s Booklet DCO_06405104B_OTU_Uni_OB_US 3/8/06 12:17 PM Page i[…]
-
Страница 4
ii Each time you turn on your meter , the unit of measure will appear on the display with the R symbol. The unit of measure will also appear under every test result. Y ou may misunderstand your blood glucose results if your meter is set to the incorrect unit of measure. Y our meter’ s unit of measure should be set to mg/dL. If your meter is set t[…]
-
Страница 5
iii If your meter is set to the other unit of meas- ure, “mmol/L” will appear on the display . The test result will include a decimal point (Fig. 2). Unless your doctor has told you to use this unit of measure, Do Not test your blood glucose. Call LifeScan Customer Service at 1 800 227-8862 immediately for assistance. Always confirm that the un[…]
-
Страница 6
iv Dear OneT ouch ® Ultra ® System Owner: Y ou have chosen one of the best blood glucose monitoring systems available. This booklet has important information you must know about the OneT ouch ® Ultra ® System. Please read it carefully . Blood glucose monitoring plays an important role in diabetes control. A long-term study showed that keeping b[…]
-
Страница 7
v Using the Met er Memory 34 Downloading T est Results to a Persona l C omputer 36 C omparing Meter and Laboratory Results 38 Meter Set-up 40 Caring for Y our OneT ouch ® Ultra ® System 46 Meter 46 OneT ouch ® UltraSoft ® Adjustable Blood Sampler 46 Battery 47 Display Messages and Problem- Solving Guide 50 Specification s 60 Guarantee 61 Index […]
-
Страница 8
vi About Y our New System The OneT ouch ® Ultra ® System uses the latest blood glucose moni toring technology . It measures the glucose content of a blood sample by means of an electrical current produced in the test strip and measured by the meter . T est results are “plasma-calibrated.” This makes it easier for you and your diabetes-care te[…]
-
Страница 9
1 The OneT ouch ® Ultra ® Blood Glucose Monitoring System consists of the OneT ouch ® Ultra ® Blood Glucose Meter , OneT ouch ® Ultra ® T est Strips (may be sold separately), and OneT ouch ® Ultra ® Control Solution. These products have been designed, tested, and proven to work together to produce accurate blood glucose results. Use no othe[…]
-
Страница 10
2 Before using any product to test your blood glucose, read all instructions and practice the test. Do all quality control checks as directed and consult with a diabetes healthcare professional. These recommendations apply to all blood glucose monitoring systems and are supported by the American Association of Diabetes Educators, the American Diabe[…]
-
Страница 11
3 ◗ Dehydration: Severe dehydration resulting from excessive water loss may cause false low results. If you believe you are suffering from severe dehydration, consult a healthcare professional immediately . ◗ Low glucose results: If your test result is lower than 70 mg/dL or is shown as LO, it may mean hypoglycemia (low blood glucose). This may[…]
-
Страница 12
4 T he C omplete OneT ouch ® Ultr a ® Blood Glucose Monitoring Sy stem OneT ouch ® Ultr a ® Meter Owner’s Booklet Quick Referenc e Guide OneT ouch ® Ultr aSoft ® Adjustable Blood Sampler Optional OneT ouch ® UltraCle ar ® Cap OneT ouch ® Ultr aSoft ® Sterile Lanc ets OneT ouch ® Ultr a ® Control Solution OneT ouch ® Ultr a ® T est S[…]
-
Страница 13
5 OneT ouc h ® Ultra ® Blood Glucose Met er DISPLA Y Symbols, simple messages, and test results appear here. M BUTTON Used to enter into: ◗ set-up mode ◗ memory mode DA T A PORT Used to download your test results to a computer . TEST POR T The meter turns on when you insert the OneT ouch ® Ultra ® T est Strip here. C BUTTO N Used to: ◗ ch[…]
-
Страница 14
6 BL OOD DROP SY MBOL T ells you when to apply the sample. C ODE Appears with the code number of the test strips. Check your code every time you test. CTL Indicates a control solution test result. BA TTERY SYMBOL Warns when the battery is low or must be replaced. DAY A VG – displayed when 14- or 30-day average is shown. OneT ouc h ® Ultra ® Met[…]
-
Страница 15
7 TEST RE SUL T AREA T est results are displayed here. MONTH DAY HOUR MINUTE S AM/PM SYMBOL AM/PM Displayed when set to 12-hour time format. Note : mmol/L and . (decimal point) appear in display but are not used in this meter when displaying glucose results. If your meter is set to the correct unit of measure, “mg/dL” will appear on the display[…]
-
Страница 16
8 OneT ouc h ® Ultra ® T est Strips The OneT ouch ® Ultra ® System measures the amount of glucose in whole blood. Blood is applied in the TOP EDGE of the OneT ouch ® Ultra ® T est Strip and is automatically drawn into the reaction cell where the reaction takes place. C ONTACT BARS Insert this end of the test strip, contact bars facing up, int[…]
-
Страница 17
9 ◗ Store test strip vials in a cool, dry place below 86˚F (30˚C). Keep away from direct sunlight and heat. Do Not refrigerate. ◗ Store test strips in their original vial only . T o avoid damage or contamina- tion, Do Not transfer test strips to any other place. ◗ After removing a test strip from the vial, replace the vial cap immediately a[…]
-
Страница 18
10 Each time you turn on the OneT ouch ® Ultra ® Meter either by inserting a test strip or pressing the button, all segments of the display will appear briefly . This tells you that the system is performing several self-checks to confirm that the meter is working properly . T o check that all display segments are working, with the meter off, pres[…]
-
Страница 19
11 STEP 1 Enter the Code Mode. Insert a test strip to turn on the meter . Push it all the way in until it will go no fur- ther . A void bending the test strip. The display check will appear . Then the code number is displayed for three seconds. The first time you use the meter , three dashes Q will flash, meaning that there is no code stored in the[…]
-
Страница 20
12 STEP 3 Code the Meter . Immediately press the button, while the code number is displayed on meter to select the correct code. Each time you press and release the button, the number will increase by one. T o move more quickly , press and hold the button. Note : If the apply blood symbol is displayed before the meter is coded correctly , remove th[…]
-
Страница 21
13 Note : Refer to additional information in the OneT ouch ® Ultra ® Control Solution Package. When y ou should do a contr ol solution test: ◗ T o practice the test process instead of using blood. ◗ When you open a new vial of test strips. ◗ Once a week. ◗ Whenever you suspect that the meter or test strips are not working properly . ◗ I[…]
-
Страница 22
14 Befor e you begin: ◗ Use only OneT ouch ® Ultra ® Control Solution. ◗ Check the expiration date on the control solution vial. Record the discard date (date opened plus three months) on the vial label. Do Not use after expiration or discard date, whichever comes first. ◗ Control solution, meter , and test strips should be at room temperat[…]
-
Страница 23
15 Then the code number will appear , followed by the R symbol and mg/dL . Be sure the meter and test strip codes match. If they do not, code the meter correctly . (See pages 10 – 12.) STEP 1 Insert a test strip into the meter . Insert a test strip, contact bars end first and facing up, into the test port. Push it all the way in until it will go […]
-
Страница 24
16 16 STEP 2 Mark this test as a control solution test. ➧ Press and release the button so Ë appears on the display . Note : Mark all control solution tests with Ë to distinguish them from blood glucose tests in the meter memory . Marked control solution tests will not be included in your averages. This mark s the test as a contr ol solution te […]
-
Страница 25
17 T o ensure an accurate control solution test, shake the vial, discard the first drop and wipe the dispenser tip before you begin. The control solution test result will appear on the display . Ë will appear above your result. T ouch and hold a drop of control solution where the narrow channel meets the TOP EDGE of the test strip. The control sol[…]
-
Страница 26
18 If the results are not within the control range printed on the test strip vial, the meter and strips may not be working properly . Repeat the control solution test. CAUTION: The control solution range printed on the test strip vial is for OneT ouch ® Ultra ® Control Solution only . It is not a recommended range for your blood glucose level. C […]
-
Страница 27
19 C ontrol solution out -of-range resu lts m ay be due to: ◗ Incorrect unit of measure. ◗ Error in performing the test. ◗ Failure to shake the control solution vial well. ◗ Improper meter coding. ◗ T est strip deterioration. ◗ Meter malfunction. ◗ Failure to discard the first drop of control solution and wipe the dispenser tip clean.[…]
-
Страница 28
20 T esting Y our Blood Read this section and the test strip package insert carefully before testing. Make sure you have all items needed to test. ◗ OneT ouch ® Ultra ® Meter ◗ OneT ouch ® Ultra ® T est Strips ◗ Lancing Device ◗ Sterile Lancets with protective disks DCO_06405104B_OTU_Uni_OB_US 3/8/06 12:17 PM Page 20[…]
-
Страница 29
21 Preparing the OneT ouch ® Ultr aSof t ® Adjustable Blood Sampler (Sampler) CAUTION: T o reduce the chance of infection: ◗ Never share a lancet or the Sampler with anyone. ◗ Always use a new , sterile lancet. Lancets are for single use only . ◗ Keep the OneT ouch ® Ultra ® Meter and Sampler clean. ◗ Make sure to wash the puncture site[…]
-
Страница 30
22 STEP 1 Insert a Lancet. T urn the OneT ouch ® UltraSoft ® Cap counter- clockwise to remove it. Insert the lancet into the lancet holder and push down firmly until it is fully seated. Do Not twist the lancet. T wist the protec- tive disk until it separates from the lancet. Replace the OneT ouch ® UltraSoft ® Cap. T urn it clockwise until it i[…]
-
Страница 31
23 STEP 3 Wash Y our Hands and the Puncture Site. T o reduce the chance of infection, use warm, soapy water . Rinse and dry thoroughly . STEP 2 Cock the Sampler . Slide the ejection/cocking control back until it clicks. If i t does not click, the Sampler may have been cocked when the lancet was inserted. The Sampler is now ready for use. DCO_064051[…]
-
Страница 32
The OneT ouch ® Ultra ® System requires a very small blood drop to per- form a test. Y ou may obtain it from a fingertip or forearm. (See page 25 for information on obtaining a blood sample from the forearm.) Choose a different puncture site each time you test. Repeated punctures in the same spot may cause soreness and calluses. STEP 1 Position t[…]
-
Страница 33
25 For earm Blood Sampling The forearm has fewer nerve endings than the fingertip so you may find that obtaining a blood sample from the forearm may be much less painful than using the fingertip. The technique for forearm sampling is different from fingertip sampling. Also there are differences between forearm samples and fingertip samples that you[…]
-
Страница 34
STEP 3 Massage the Area. T o increase blood flow to the puncture site, massage the area gently . For individuals who experience difficulty in getting sufficient blood for a test, rubbing the area more vigorously or applying heat briefly may be helpful. STEP 4 Position the Sampler . Press and hold the Sampler against the fore- arm for a few seconds.[…]
-
Страница 35
27 If bruising occurs, you may choose to lance a fingertip instead. If you are having difficulty obtaining blood from the forearm, call LifeScan Customer Service at 1 800 227-8862 . Important information about forearm testing ◗ Under certain conditions, blood glucose test results obtained using samples taken from your forearm may differ significa[…]
-
Страница 36
28 Insert This End Step-b y- Step T est Proc edure STEP 1 Insert T est Strip. Insert a test strip, contact bars end first and facing up, into the test port. Push it in until it will go no further . The meter will turn on and the display check will appear briefly . Then the code number will appear , followed by the symbol with mg/dL. Check to make s[…]
-
Страница 37
29 STEP 2 Apply Sample. Obtain a round drop of blood using the Sampler . The blood sample must be at least 1 µL in volume ( actual size) to fill the confirmation window . When the symbol appears on the dis play , touch and hold the drop of blood to the narrow channel in the top edge of the test strip. ◗ Do Not apply sample to the front or back o[…]
-
Страница 38
Hold the blood drop to the top edge of the test strip until the confirmation window is full before the meter begins to count down. If the confirmation window does not fill completely before the meter begins to count down, Do Not add more blood to the test strip; discard the test strip and retest. If you have trouble filling the test strip, call Lif[…]
-
Страница 39
31 STEP 3 Accurate Results in Just 5 Seconds. Y our blood glucose test result will appear after the meter counts down from 5 to 1 . Blood glucose test results are automatically stored in the meter memory . Y ou may also record them in the logbook provided with your system. T urn the meter off by removing the test strip. Dispose of used test strip i[…]
-
Страница 40
STEP 1 Remove the OneT ouch ® UltraSoft ® Cap from the Sampler . T wist the OneT ouch ® UltraSoft ® Cap counter- clockwise. (Optional: Replace the protective disk on the used lancet by placing it on a hard sur- face and pushing the lancet tip into the disk.) STEP 2 Eject the Lancet. Point the Sampler down and away . Push the release button to e[…]
-
Страница 41
33 If your blood glucose test result is above 600 mg/dL, h1 will appear on the meter display . This may mean severe hyperglycemia (high blood glucose). Y ou should recheck your blood glucose level. If h1 again appears on the display , call your healthcare professional immediately . When your blood glucose test result is above 240 mg/dL or reads h1 […]
-
Страница 42
34 Using the Meter Memor y Y our OneT ouch ® Ultra ® Meter stores the 150 most recent blood glucose and control solution test results with date and time in its memory . It also provides you with 14- and 30-day averages of your blood glucose test results. If your 14-day and 30-day test result averages are not what you expect, you should not rely o[…]
-
Страница 43
35 STEP 2 Recall T est Results. The most recent test result with date and time will appear . Press and release the button and the next most recent test result will appear . The meter will recall up to your last 150 test results in order from the most recent to the oldest. If memory is not full, — — — will appear for memory locations that are empty […]
-
Страница 44
36 Downloading T est Results to a Personal Computer T ransferring test results with date and time from the meter memory to your personal computer requires OneT ouch ® Diabetes Management Software with the accompanying OneT ouch ® Interface Cable. (OneT ouch ® Diabetes Management Software is available separately .) Note to users of OneT ouch ® D[…]
-
Страница 45
37 STEP 3 T ransfer Data. Follow the instructions in the OneT ouch ® Diabetes Management Software User’ s Manual to initiate the data transfer command. O will appear on the meter display when the first com- mand is received, indicating that the meter is in the communi- cation mode. If the command is not received within two minutes, the meter wil[…]
-
Страница 46
38 Comparing Meter and Laborator y Results OneT ouch ® Ultra ® Meter test results and laboratory test results are both expressed in plasma-equivalent units. However , your meter result may differ somewhat from your laboratory result due to normal variation. Meter results can be affected by factors and conditions that do not affect laboratory resu[…]
-
Страница 47
39 While at the lab: ◗ Make sure that the meter test and the lab test are performed within 15 minutes of each other . ◗ Wash your hands before obtaining a blood sample. ◗ Use only fresh capillary blood obtained from the fingertip. Y ou may still have a variation from the laboratory result because blood glucose levels can change significantly […]
-
Страница 48
40 Meter Set-up • Start with the meter off. • Press and continue to hold the button until ONL Y the time appears on the bottom right of the display . • Release the button. Meter on Y ou may need to update the meter settings when you first receive your meter or when you replace the battery . Follow these instructions. If you need assistance, c[…]
-
Страница 49
41 Press and release the button to move to the next step. Press and release the button to change to the desired minutes. Press and release the button to move to the next step. If you use the 12-hour format, the AM or PM will change each time you reach 12:00. Be sure the AM/PM setting is correct when you set the hour . T o scroll faster , hold the b[…]
-
Страница 50
42 Press and release the button to change to the desired year . Press and release the button to move to the next step. Press and release the button to choose between AM/PM and 24-hour formats. Press and release the button to move to the next step. or STEP 4 Set the AM/PM or 24-hour time format. STEP 5 Set the year . DCO_06405104B_OTU_Uni_OB_US 3/8/[…]
-
Страница 51
43 Press and release the button to change to the desired month. Press and release the button to move to the next step. Press and release the button to change to the desired day . Press and release the button. Continue to the next page. STEP 6 Set the month. STEP 7 Set the day . DCO_06405104B_OTU_Uni_OB_US 3/8/06 12:17 PM Page 43[…]
-
Страница 52
44 Press and release the button until mg/dL appears on the display . Press and release the button to save your entry , save your changes, and shut the meter off. W W A A R R N N I I N N G G : : T T h h e e m m g g / / d d L L u u n n i i t t o o f f m m e e a a s s u u r r e e i i s s t t h h e e s s t t a a n n d d a a r r d d i i n n t t h h e e […]
-
Страница 53
45 Note : The 14- and 30-day averages in the meter memory are calculated from results obtained during the 14 and 30 calendar days preceding the current date and time settings. When the date and time are changed, the averages may change. If your 14-day and 30-day test averages are not what you expect, do not rely on them. DCO_06405104B_OTU_Uni_OB_US[…]
-
Страница 54
46 Caring for Y our OneT ouch ® Ultra ® System Meter Y our OneT ouch ® Ultra ® Meter does not require special maintenance or cleaning. T ake care to avoid getting dirt, dust, blood, control solution, or liquids inside the meter through the test port or data port. LifeScan recommends that you store the meter in its carrying case after each use. […]
-
Страница 55
47 Batt er y Y our OneT ouch ® Ultra ® Meter comes with a pre-installed 3.0 V (#2032 or equivalent) lithium battery . The battery will provide you with enough power to perform about 1,000 tests. When replacing the battery , use only a 3.0 V (#2032 or equivalent) lithium battery . The meter will alert you when the power is getting low by displayin[…]
-
Страница 56
48 When the symbol appears on the display by itself, it means that the battery will not provide enough power for a test. Y ou must change the battery . T o replace the battery , make sure that the meter is turned off. T urn the meter over and locate the battery compartment. STEP 1 Open the Battery Compartment. Push up on the tab and pull the batter[…]
-
Страница 57
49 Note : Replacing the battery does not affect previous test results stored in memory . However , the time and date settings may need to be updated. Always confirm the unit of measure is mg/dL. STEP 2 Remove the Old Battery . Pull upward on the clear plastic tab. Insert one 3.0 V (#2032 or equivalent) lithium bat- tery , making sure the positive ?[…]
-
Страница 58
50 Display Messages and Problem-Solving Guide Following is a summary of all display messages. These messages help to identify certain problems but do not appear in all cases when a problem has occurred. Improper use may cause an inaccurate result without pro- ducing an error message or a symbol. In the event of a problem, refer to the information u[…]
-
Страница 59
51 MES SAGE WHA T IT MEANS ACTION This is the code number stored in the meter . Make sure that this code num- ber matches the code number on the vial of the test strips you are using. CAUTION: Matching the code on the meter and the code on the test strip vial is essential to obtain accurate results. Each time you test, check to make sure the code n[…]
-
Страница 60
52 A blood glucose test result in mg / dL. None required. W ARNING: If mg/dL does not appear with the test result, call LifeScan Customer Service at 1 800 227-8862 for assistance. A blood glucose test result with a suggestion to check your ketone levels. Follow the instructions of your healthcare professional regarding ketone testing. MES SAGE WHA […]
-
Страница 61
53 T reat this condition immediately accord- ing to your health- care professional’ s recommendations. Although this message could be due to a test error , it is safer to treat first, and then repeat the test. Y ou may have a very low blood glucose level, lower than 20 mg/dL. Y ou may have a very high blood glucose level, exceeding 600 mg /dL. Y […]
-
Страница 62
54 MES SAGE WHA T IT MEANS ACTION A control solution test result stored in the memory . None required. There is no test result stored in this place in the memory . None required. A verage of results from the last 14 days ( √ means that 64 tests were per- formed within the period) . The 30-day average appears with a © before the on the screen. If[…]
-
Страница 63
55 MES SAGE WHA T IT MEANS ACTION Do Not use the meter . Call LifeScan Customer Service at 1 800 227-8862 for a replacement meter . Error message could be caused either by a used test strip or a problem with the meter . Repeat the test with a new test strip. Refer to pages 8–9 for test strip information. If the error message persists, call LifeSc[…]
-
Страница 64
56 1. Y ou may have high glu- cose and have tested in an environment near the low end of the system’ s oper- ating temperature range (43–111°F / 6–44°C). 2. There may be a problem with the test strip. For example, it may have been damaged or moved during testing. 1. If you tested in a cool environment, repeat the test in a warmer environ- m[…]
-
Страница 65
57 4. If the error message appears again, call LifeScan Customer Service at 1 800 227- 8862. 4. There may be a problem with the meter . Error 4 continued Error message that indicates that the meter has detected a problem with the test strip. Possible causes are test strip damage or an incompletely filled confirmation window . Repeat the test with a[…]
-
Страница 66
58 Repeat the test after the meter and test strips have reached a temperature within the oper- ating range. The meter has detected that the temperature is above the system operating range. Do Not perform a test until the meter and test strips reach a temperature within the operating range of 43–111°F (6–44°C). Repeat the test after the meter […]
-
Страница 67
59 If the meter does not display a message after inserting a test strip: If the test does not start after applying the sample: POSSIBLE CAUS E WHA T TO DO Insufficient blood sample Repeat the test with a new test strip and a larger sample, making sure blood is placed to the narrow channel in the top edge of the test strip. Defective test strip Repe[…]
-
Страница 68
60 Specifications Result Range: 20 to 600 mg /dL Calibration: Plasma-equivalent Sample: Fresh capillary whole blood Sample Size: Minimum 1 microliter T est Time: 5 seconds Assay Method: Glucose oxidase biosensor Power Source: One replaceable 3.0 V (#2032 or equivalent) lithium battery Battery Life: About 1,000 tests (about one year at three tests p[…]
-
Страница 69
61 Guarantee The makers guarantee that the OneT ouch ® Ultra ® Meter shall be free of defects in material and workmanship for a period of three years. This guarantee is valid from the date of purchase. The guarantee extends only to the original purchaser and is not transferable. PRODUCT SAFETY INFORMA TION The OneT ouch ® Ultra ® system complie[…]
-
Страница 70
62 Index A verages, 14- and 30-Day . . . . . . . . . . . . . . . . . . . . . . . . . . . . . . . . . . . . . 34, 45, 54 Battery . . . . . . . . . . . . . . . . . . . . . . . . . . . . . . . . . . . . . . . . . . . . . . . . 47, 57, 60, 61 Blood Sampling, Fingertip . . . . . . . . . . . . . . . . . . . . . . . . . . . . . . . . . . . . . . . . . . .[…]
-
Страница 71
63 Low Glucose . . . . . . . . . . . . . . . . . . . . . . . . . . . . . . . . . . . . . . . . . . . . . . . . . . . 3, 32 M Button . . . . . . . . . . . . . . . . . . . . . . . . . . . . . . . . . . . . . . . . . . . . . . . . . . . . . . . . . 5 Memory , Using . . . . . . . . . . . . . . . . . . . . . . . . . . . . . . . . . . . . . . . . . . . .[…]
-
Страница 72
Glucose Ranges for People Without Diabetes, mg /dL Y our Target Ranges, mg /dL Before breakfast Before lunch or dinner 1 hour after meals 2 hours after meals Between 2 and 4 AM 70 –1 05 70 –1 10 Less than 1 60 Less than 1 20 Greater than 70 Source: Krall, L.P ., and Beaser , R.S.: Joslin Diabetes Manual. Philadelphia: Lea and Febiger (1989), p.[…]
-
Страница 73
© LifeScan, Inc. 2005 Milpitas, CA 95035 02/2006 The system described herein is covered b y one or more of the follo wing U.S . patents: 6,045,567, 6,156,051, 6,197,040, 6,284,125, and D428,150. Use of the monitoring device included herein is protected under one or more of the follo wing U.S . patents: 6,413,410, 6,733,655. Purchase of this device[…]