Сегодня рассмотрим ситуацию, с которой уже сталкивались и/или могут еще столкнуться очень многие компьютерные пользователи. А именно, что делать, если забыли пароль на включение компьютера. Случиться такое может с каждым. Забыть или потерять записку с паролем можно тоже в два счета. Особенно, когда часто этот пароль приходиться менять, как делают некоторые пользователи (например, мамы, пытающиеся ограничить время, которое их дети проводят за компьютером).
Итак, сегодня рассмотрим, один из способов эффективного решения данной проблемы. Конечно, есть множество методов сброса или восстановления (или взлома) забытого пароля от входа в Windows или разблокировки пользователя. Постепенно я буду добавлять описания и других.
Этот способ отличает его универсальность. То есть, данный метод сброса забытого пароля от компьютера подходит для различных операционных систем Windows: 2000, XP, Vista, 7, Server 2003, Server 2008 и т.д.
Воспользуемся утилитой Offline NT Password and Registry editor.
Скачиваем подходящую версию Offline NT Password and Registry editor: для записи на диск или для записи на флешку. Распаковываем архив.
Соответственно в первом случае записываем файл образа на диск (читаем, как записать iso-образ на диск), во втором – создаем загрузочную флешку (в данном случае просто копируем на чистую флешку все файлы их архива). Выбирайте, какой вариант для вас удобней.
После того, как это сделано, вставляем наш диск или флешку в компьютер (нам необходимо загрузиться именно с одного из этих носителей) и включаем его. Если у вас все равно запускается операционная система и просит ввести забытый пароль, значит, придется еще немного поколдовать, чтобы запустить утилиту с диска/флешки. Читаем, как загрузиться с внешнего носителя.
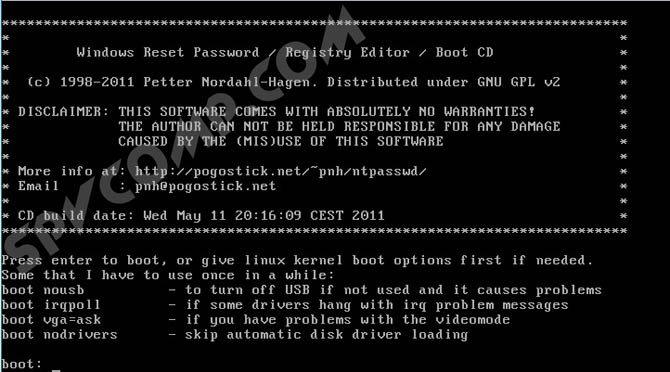
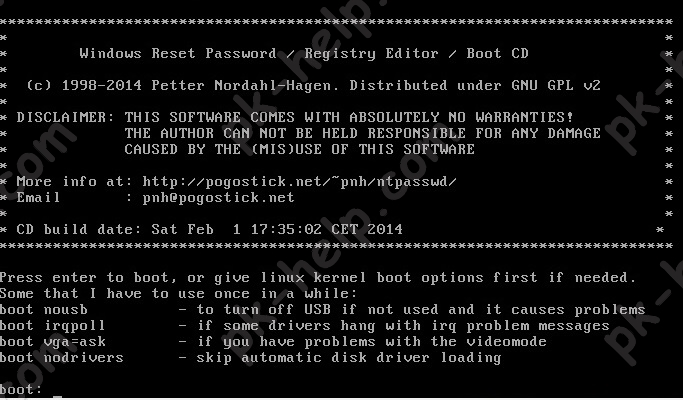
Если на экране появилась такая картинка, значит, все сделали правильно, и вам удалось загрузить Offline NT Password and Registry editor с диска/флешки.
Нажимаем Enter и ждем. Теперь программа предлагает нам выбрать раздел, на котором установлена операционная система (иными словами, где будем сбрасываться пароль). Диск выбирается вводом нужной цифры. На экране нам подсказывают, сколько в данный момент программой видится разделов, и какие они имеют объемы. Собственно, это единственная информация, доступная нам здесь о разделах, поэтому ориентироваться можем только на нее. Но не волнуйтесь, если выберите по ошибке не тот раздел, утилита просто не сможет стереть пароль, и вы вернетесь к этому меню, где вы сможете ввести другой номер раздела и попытаться заново.
В моем случае отображаются два раздела: 1 – объемом 10,7 Гб, 2 – 5490Мб. Если вы помните, какого объема был ваш Локальный диск C, то выбирайте раздел, обладающий схожим размером. Я выбираю раздел 1. Ввожу с клавиатуры цифру 1 и нажимаю Enter.

Далее требуется указать каталог, где находиться файл SAM (хранящий ветку реестра). Программа сама предлагает нам каталог по умолчанию (Windows/System32/config), где обычно и находиться этот файл. Соглашаемся, жмем Enter.

Далее нам предлагается выбрать, какое действие мы хотим произвести. Вводим цифру 1, что соответствует обнулению пароля (Password reset), и нажимаем Enter.

Следующий шаг – тоже выбрать желаемое действие. Вводим цифру 1 — изменить учетные записи и пароли (Edit user data and passwords). Нажимаем Enter.

Перед нами появляется табличка, где приводятся все имена пользователей (Username) и их идентификаторы (RID). Программа предлагает ввести имя пользователя из списка, для которого нужно сбросить пароль. Мне программа сразу предложила Admin – именно на этой учетной записи я и хочу стереть пароль. Поэтому нажимаю просто Enter.
Отступление. Вы, конечно, можете ввести и другое имя пользователя, но лучше, пожалуй, разблокировать администраторскую учетную запись, а уж потом из нее поменять всем, кому надо, пароли.

Если у вас имя пользователя записано на русском языке, то нормально оно не отразиться из-за кириллицы. В таком случае вместо имени пользователя указываем его RID в следующем виде: 0xRID. То есть в моем случае: 0x01f4. Жмем Enter.
Теперь программа предлагает нам следующие варианты действий для выбранной учетной записи: 1 – очистить пароль, 2 – изменить пароль, 3 – сделать пользователя администратором, 4 – разблокировать учетную запись, q – выйти и вернуться к выбору учетной записи. Вводим 1 и нажимаем Enter.

Пароль удален! Дело сделано, осталось выйти из приложения. Вводим восклицательный знак и жмем Enter.

Вводим q и жмем Enter.

Подтверждаем внесение изменений. Вводим y и нажимаем Enter.

Отказываемся от продолжения работы в Offline NT Password and Registry editor и вводим n, затем жмем Enter.

Извлекаем диск из провода или флешку из гнезда usb, перезагружаем компьютер и наслаждаемся результатом. Пароль на вход в Windows сброшен!
Естественно, статья предназначена помочь тем, кто действительно забыл пароль и не имел бы иначе другого выхода, как переустанавливать систему. Ни в коем случае приведенные сведения нельзя использовать для каких-либо вредительских целей.
Оцените статью. Вам не сложно, а автору приятно
Для сброса пароля учетной записи пользователя в операционной системе Windows можно воспользоваться утилитой Offline NT Password and Registry Editor.
На данный момент программа протестирована на следующих версиях:
NT 3.51, NT 4, Windows 2000, Windows XP, Windows 2003 Server, Vista, Windows 7 и Server 2008.
Она должна работать со всеми пакетами обновлений (SP) и выпусками (Server, Professional, Home), а так же с 64-битными версиями.
Для того чтобы создать загрузочную USB-flash необходимо:
1. Распаковать файлы из архива на флэшку
— файлы на флэшке должны лежать в корне, а не в каталоге
— для установки нет необходимости форматировать носитель или удалять файлы
2. Установить загрузчик (необходимы права администратора)
— запустить с командной строки файл «syslinyx.exe», например:
J: \ syslinux.exe -ма J:
J — это буква, присвоенная вашему съемному носителю (замените ее на вашу)
параметр -ma можно убрать, если установщик выдает ошибку
Обратите внимание на то, что вам придется поменять настройки BIOS для загрузи с usb.
Официальная страница разработчика http://pogostick.net/~pnh/ntpasswd/
Архив утилиты Offline NT Password and Registry Editor http://pogostick.net/~pnh/ntpasswd/usb110511.zip
Процесс сброса пароля происходит следующим образом.
После загрузки вы должны увидеть это:
  ISOLINUX 3.51 2007-06-10  Copyright (C) 1994-2007 H. Peter Anvin
  ***************************************************************************
  *                                                                         *
  *  Windows NT/2k/XP/Vista Change Password / Registry Editor / Boot CD     *
  *                                                                         *
  *  (c) 1998-2007 Petter Nordahl-Hagen. Distributed under GNU GPL v2       *
  *                                                                         *
  * DISCLAIMER: THIS SOFTWARE COMES WITH ABSOLUTELY NO WARRANTIES!          *
  *             THE AUTHOR CAN NOT BE HELD RESPONSIBLE FOR ANY DAMAGE       *
  *             CAUSED BY THE (MIS)USE OF THIS SOFTWARE                     *
  *                                                                         *
  * More info at: http://pogostick.net/~pnh/ntpasswd/                       *
  * Email       : pnh@pogostick.net                                         *
  *                                                                         *
  * CD build date: Sun Sep 23 14:15:35 CEST 2007                            *
  ***************************************************************************
  Press enter to boot, or give linux kernel boot options first if needed.
  Some that I have to use once in a while:
  boot nousb          - to turn off USB if not used and it causes problems
  boot irqpoll        - if some drivers hang with irq problem messages
  boot nodrivers      - skip automatic disk driver loading
  boot:
Здесь достаточно просто нажать клавишу «Enter».
Затем будет показано сообщение об установленном на вашем компьютере оборудовании.
  Loading vmlinuz..................
  Loading scsi.cgz.........................
  Loading initrd.cgz..........
  Ready.
  Linux version 2.6.22.6 (root@athene) (gcc version 4.1.1 20060724 (prerelease)
(4.1.1-3mdk)) #2 Sun Sep 9 16:59:48 CEST 2007
  BIOS-provided physical RAM map:
   BIOS-e820: 0000000000000000 - 000000000009f800 (usable)
   BIOS-e820: 000000000009f800 - 00000000000a0000 (reserved)
   BIOS-e820: 00000000000ca000 - 00000000000cc000 (reserved)
   BIOS-e820: 00000000000dc000 - 0000000000100000 (reserved)
   BIOS-e820: 0000000000100000 - 00000000316f0000 (usable)
   BIOS-e820: 00000000316f0000 - 00000000316ff000 (ACPI data)
   BIOS-e820: 00000000316ff000 - 0000000031700000 (ACPI NVS)
   BIOS-e820: 0000000031700000 - 0000000031800000 (usable)
   BIOS-e820: 00000000fec00000 - 00000000fec10000 (reserved)
   BIOS-e820: 00000000fee00000 - 00000000fee01000 (reserved)
   BIOS-e820: 00000000fffe0000 - 0000000100000000 (reserved)
  792MB LOWMEM available.
  Zone PFN ranges:
    DMA             0 ->     4096
    Normal       4096 ->   202752
  early_node_map[1] active PFN ranges
 ...
  Serial: 8250/16550 driver $Revision: 1.90 $ 4 ports, IRQ sharing enabled
  serial8250: ttyS0 at I/O 0x3f8 (irq = 4) is a 16550A
  Floppy drive(s): fd0 is 1.44M
  FDC 0 is a post-1991 82077
  RAMDISK driver initialized: 16 RAM disks of 32000K size 1024 blocksize
  USB Universal Host Controller Interface driver v3.0
  Initializing USB Mass Storage driver...
  usbcore: registered new interface driver usb-storage
  USB Mass Storage support registered.
  serio: i8042 KBD port at 0x60,0x64 irq 1
  serio: i8042 AUX port at 0x60,0x64 irq 12
  usbcore: registered new interface driver usbhid
  drivers/hid/usbhid/hid-core.c: v2.6:USB HID core driver
  Using IPI Shortcut mode
  BIOS EDD facility v0.16 2004-Jun-25, 1 devices found
  Freeing unused kernel memory: 144k freed
  Booting ntpasswd
  Mounting: proc sys
  Ramdisk setup complete, stage separation..
  In stage 2
  Spawning shells on console 2 - 6
  Initialization complete!
  ** Preparing driver modules to dir /lib/modules/2.6.22.6
  input: AT Translated Set 2 keyboard as /class/input/input0
Далее происходит загрузка драйверов дисков.
  ** Will now try to auto-load relevant drivers based on PCI information
  ---- AUTO DISK DRIVER select ----
  --- PROBE FOUND THE FOLLOWING DRIVERS:
  ata_piix
  ata_generic
  mptspi
  --- TRYING TO LOAD THE DRIVERS
  ### Loading ata_piix
  scsi0 : ata_piix
  scsi1 : ata_piix
  ata1: PATA max UDMA/33 cmd 0x000101f0 ctl 0x000103f6 bmdma 0x00011050 irq 14
  ata2: PATA max UDMA/33 cmd 0x00010170 ctl 0x00010376 bmdma 0x00011058 irq 15
  ata2.00: ATAPI: VMware Virtual IDE CDROM Drive, 00000001, max UDMA/33
  ata2.00: configured for UDMA/33
  scsi 1:0:0:0: CD-ROM            NECVMWar VMware IDE CDR10 1.00 PQ: 0 ANSI: 5
  sr0: scsi3-mmc drive: 1x/1x xa/form2 cdda tray
  Uniform CD-ROM driver Revision: 3.20
  ### Loading ata_generic
  ### Loading mptspi
  Fusion MPT base driver 3.04.04
  Copyright (c) 1999-2007 LSI Logic Corporation
  Fusion MPT SPI Host driver 3.04.04
  PCI: Found IRQ 9 for device 0000:00:10.0
  mptbase: Initiating ioc0 bringup
  ioc0: 53C1030: Capabilities={Initiator}
  scsi2 : ioc0: LSI53C1030, FwRev=01032920h, Ports=1, MaxQ=128, IRQ=9
  scsi 2:0:0:0: Direct-Access     VMware,  VMware Virtual S 1.0  PQ: 0 ANSI: 2
   target2:0:0: Beginning Domain Validation
   target2:0:0: Domain Validation skipping write tests
   target2:0:0: Ending Domain Validation
   target2:0:0: FAST-40 WIDE SCSI 80.0 MB/s ST (25 ns, offset 127)
  sd 2:0:0:0: [sda] 83886080 512-byte hardware sectors (42950 MB)
  sd 2:0:0:0: [sda] Write Protect is off
  sd 2:0:0:0: [sda] Cache data unavailable
  sd 2:0:0:0: [sda] Assuming drive cache: write through
  sd 2:0:0:0: [sda] 83886080 512-byte hardware sectors (42950 MB)
  sd 2:0:0:0: [sda] Write Protect is off
  sd 2:0:0:0: [sda] Cache data unavailable
  sd 2:0:0:0: [sda] Assuming drive cache: write through
   sda: sda1
  sd 2:0:0:0: [sda] Attached SCSI disk
Эти сообщения драйверов о марке, модели и размерах найденных дисков.
  -------------------------------------------------------------
  Driver load done, if none loaded, you may try manual instead.
  -------------------------------------------------------------
  ** If no disk show up, you may have to try again (d option) or manual (m).
Все драйвера загружены.
Начинается процесс поиска учетных записей и сброса пароля. Здесь нет ничего страшного и обычно достаточно соглашаться с предложенными программой вариантами.
  *************************************************************************
  * Windows Registry Edit Utility Floppy / chntpw                         *
  * (c) 1997 - 2007 Petter N Hagen - pnh@pogostick.net                    *
  * GNU GPL v2 license, see files on CD                                   *
  *                                                                       *
  * This utility will enable you to change or blank the password of       *
  * any user (incl. administrator) on an Windows NT/2k/XP/Vista           *
  * WITHOUT knowing the old password.                                     *
  * Unlocking locked/disabled accounts also supported.                    *
  *                                                                       *
  * It also has a registry editor, and there is now support for           *
  * adding and deleting keys and values.                                  *
  *                                                                       *
  * Tested on: NT3.51 & NT4: Workstation, Server, PDC.                    *
  *            Win2k Prof & Server to SP4. Cannot change AD.              *
  *            XP Home & Prof: up to SP2                                  *
  *            Win 2003 Server (cannot change AD passwords)               *
  *            Vista 32 and 64 bit                                        *
  *                                                                       *
  * HINT: If things scroll by too fast, press SHIFT-PGUP/PGDOWN ...       *
  *************************************************************************
  =========================================================
  There are several steps to go through:
  - Disk select with optional loading of disk drivers
  - PATH select, where are the Windows systems files stored
  - File-select, what parts of registry we need
  - Then finally the password change or registry edit itself
  - If changes were made, write them back to disk
  DON'T PANIC! Usually the defaults are OK, just press enter
               all the way through the questions
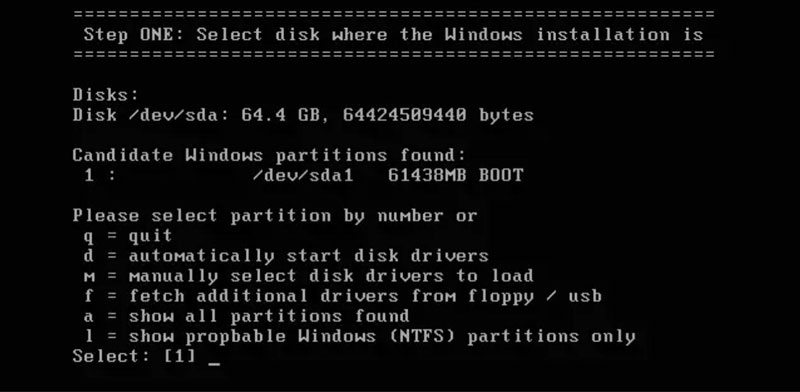
Шаг 1: Выбор диска, на котором установлена Windows
  =========================================================
  ¤ Step ONE: Select disk where the Windows installation is
  =========================================================
  Disks:
  Disk /dev/sda: 42.9 GB, 42949672960 bytes
  Candidate Windows partitions found:
   1 :        /dev/sda1   40958MB BOOT
Здесь найден один диск с одним разделом
  Please select partition by number or
   q = quit
   d = automatically start disk drivers
   m = manually select disk drivers to load
   f = fetch additional drivers from floppy / usb
   a = show all partitions found
   l = show propbable Windows (NTFS) partitions only
  Select: [1]
Наш выбор 1.
 Selected 1
  Mounting from /dev/sda1, with filesystem type NTFS
  NTFS volume version 3.1.
На выбран устройстве смонтирована файловая система NTFS.
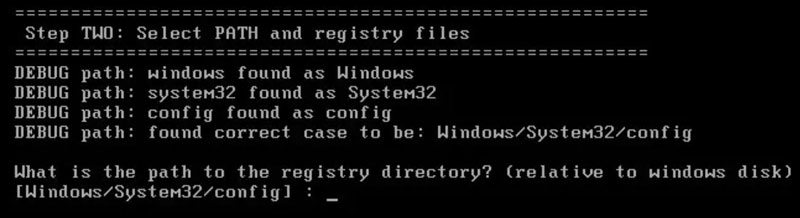
Шаг 2: Указываем директорию реестра
  =========================================================
  ¤ Step TWO: Select PATH and registry files
  =========================================================
  What is the path to the registry directory? (relative to windows disk)
  [WINDOWS/system32/config] :
Показана директория по умолчанию и здесь достаточно просто согласиться и получаем список интересующих файлов.
  -rw-------    2 0        0          262144 Feb 28  2007 BCD-Template
  -rw-------    2 0        0         6815744 Sep 23 12:33 COMPONENTS
  -rw-------    1 0        0          262144 Sep 23 12:33 DEFAULT
  drwx------    1 0        0               0 Nov  2  2006 Journal
  drwx------    1 0        0            8192 Sep 23 12:33 RegBack
  -rw-------    1 0        0          524288 Sep 23 12:33 SAM
  -rw-------    1 0        0          262144 Sep 23 12:33 SECURITY
  -rw-------    1 0        0        15728640 Sep 23 12:33 SOFTWARE
  -rw-------    1 0        0         9175040 Sep 23 12:33 SYSTEM
  drwx------    1 0        0            4096 Nov  2  2006 TxR
  drwx------    1 0        0            4096 Feb 27  2007 systemprofile
  Select which part of registry to load, use predefined choices
  or list the files with space as delimiter
  1 - Password reset [sam system security]
  2 - RecoveryConsole parameters [software]
  q - quit - return to previous
  [1] :
Выбираем 1 для сброса пароля.
Шаг 3: Внесение изменений в учетные записи
Происходит копирование параметров SAM (диспетчер учетных записей безопасности) во временную папку.
Selected files: sam system security
Copying sam system security to /tmp
=========================================================
¤ Step THREE: Password or registry edit
=========================================================
chntpw version 0.99.5 070923 (decade), (c) Petter N Hagen
Hive name (from header): <\SystemRoot\System32\Config\SAM>
ROOT KEY at offset: 0x001020 * Subkey indexing type is: 666c
Page at 0x44000 is not 'hbin', assuming file contains garbage at end
File size 524288 [80000] bytes, containing 11 pages (+ 1 headerpage)
Used for data: 288/250904 blocks/bytes, unused: 15/23176 blocks/bytes.
Hive name (from header):
ROOT KEY at offset: 0x001020 * Subkey indexing type is: 686c
Page at 0x8b4000 is not 'hbin', assuming file contains garbage at end
File size 9175040 [8c0000] bytes, containing 2117 pages (+ 1 headerpage)
Used for data: 96982/6224016 blocks/bytes, unused: 4381/2830032 blocks/bytes.
Hive name (from header): <emRoot\System32\Config\SECURITY>
ROOT KEY at offset: 0x001020 * Subkey indexing type is: 666c
Page at 0x6000 is not 'hbin', assuming file contains garbage at end
File size 262144 [40000] bytes, containing 5 pages (+ 1 headerpage)
Used for data: 334/17312 blocks/bytes, unused: 7/3008 blocks/bytes.
* SAM policy limits:
Failed logins before lockout is: 0
Minimum password length : 0
Password history count : 0
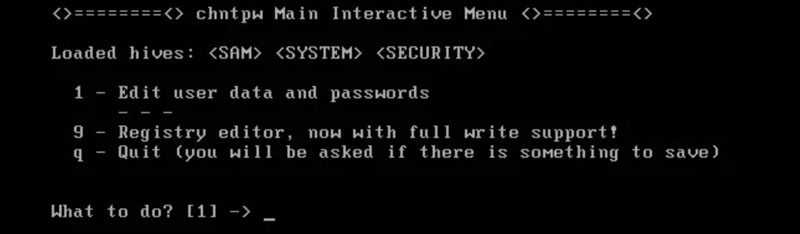
======== chntpw Main Interactive Menu ========
Loaded hives:
1 - Edit user data and passwords
2 - Syskey status & change
3 - RecoveryConsole settings
- - -
9 - Registry editor, now with full write support!
q - Quit (you will be asked if there is something to save)
What to do? [1] ->
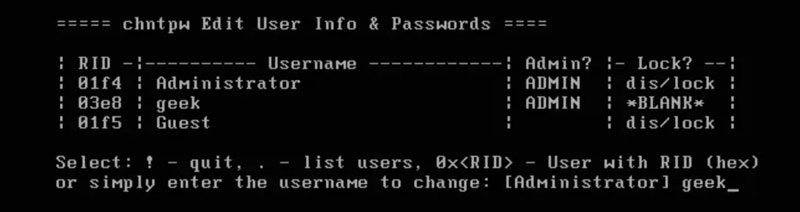
Выбираем интересующий нас пункт под цифрой 1 и получаем список всех локальных учетных записей, зарегистрированных в нашем Windows.
  ===== chntpw Edit User Info & Passwords ====
  | RID -|---------- Username ------------| Admin? |- Lock? --|
  | 03e8 | admin                          | ADMIN  |          |
  | 01f4 | Administrator                  | ADMIN  | dis/lock |
  | 03ec | grumf1                         |        |          |
  | 03ed | grumf2                         |        |          |
  | 03ee | grumf3                         |        |          |
  | 01f5 | Guest                          |        | dis/lock |
  | 03ea | jalla1                         | ADMIN  | *BLANK*  |
  | 03eb | jalla2                         |        | *BLANK*  |
  | 03e9 | petro                          | ADMIN  | *BLANK*  |
В крайней правой колонке Lock?отображается статус пароля. Отсутствует / заблокирован (dis/lock) или пустой (*BLANK*). Колонка Admin? показывает нам принадлежит ли учетная запись к группе администраторов. Мы выбираем учетную запись admin, что позволит нам завладеть учетной записью администратора компьютера. Для этого нам необходимо ввести RID или имя учетной записи.
Select: ! - quit, . - list users, 0x - User with RID (hex)
  or simply enter the username to change: [Administrator] admin
  RID     : 1000 [03e8]
  Username: admin
  fullname:
  comment :
  homedir :
  User is member of 1 groups:
  00000220 = Administrators (which has 4 members)
Пользователь состоит в группе 220 — группа администраторов.
   Account bits: 0x0214 =
  [ ] Disabled        | [ ] Homedir req.    | [X] Passwd not req. |
  [ ] Temp. duplicate | [X] Normal account  | [ ] NMS account     |
  [ ] Domain trust ac | [ ] Wks trust act.  | [ ] Srv trust act   |
  [X] Pwd don't expir | [ ] Auto lockout    | [ ] (unknown 0x08)  |
  [ ] (unknown 0x10)  | [ ] (unknown 0x20)  | [ ] (unknown 0x40)  |
  Failed login count: 0, while max tries is: 0
  Total  login count: 3
Показана информация о статусе учетной записи.
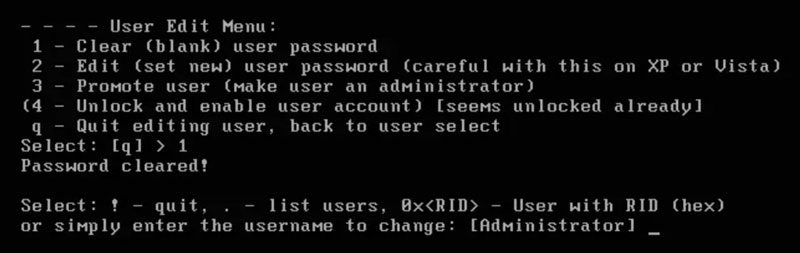
  - - - - User Edit Menu:
   1 - Clear (blank) user password
   2 - Edit (set new) user password (careful with this on XP or Vista)
   3 - Promote user (make user an administrator)
  (4 - Unlock and enable user account) [seems unlocked already]
   q - Quit editing user, back to user select
  Select: [q] > 1
  Password cleared!
Если бы учетная запись была заблокирована, то для разблокирования нужно выбрать 4. Но так как с пользователем все в порядке, то мы выбираем 1 и просто удаляем пароль.
  Select: ! - quit, . - list users, 0x - User with RID (hex)
  or simply enter the username to change: [Administrator] !
Затем возвращаемся в главное меню при помощи выбора символа «!»
======== chntpw Main Interactive Menu ========
Loaded hives:
1 - Edit user data and passwords
2 - Syskey status & change
3 - RecoveryConsole settings
- - -
9 - Registry editor, now with full write support!
q - Quit (you will be asked if there is something to save)
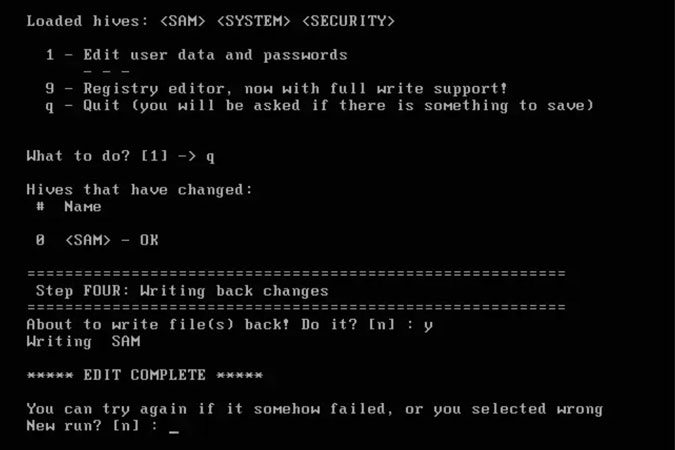
What to do? [1] -> q
Выбираем «q» для выхода.
Шаг 4. Записываем изменения. Отвечаем «y» для записи внесенных изменений
  Hives that have changed:
   #  Name
   0   - OK
  =========================================================
  ¤ Step FOUR: Writing back changes
  =========================================================
  About to write file(s) back! Do it? [n] : y
Writing sam
Редактирование завершено
  ***** EDIT COMPLETE *****
  You can try again if it somehow failed, or you selected wrong
  New run? [n] : n
  =========================================================
  * end of scripts.. returning to the shell..
  * Press CTRL-ALT-DEL to reboot now (remove floppy first)
  * or do whatever you want from the shell..
  * However, if you mount something, remember to umount before reboot
  * You may also restart the script procedure with 'sh /scripts/main.sh'
  (Please ignore the message about job control, it is not relevant)
  BusyBox v1.1.0-pre1 (2005.12.30-19:45+0000) Built-in shell (ash)
  Enter 'help' for a list of built-in commands.
  sh: can't access tty; job control turned off
Выбираем «n» и завершаем работу с программой.
Forgetting passwords is completely natural and let’s admit it, we all know how it feels to forget a password, right? It really makes you think about all your important project files, beautiful photos, and tons of personalizations that you did to make your computer function just the way you want. And the thought of not being able to access them haunts you.
Well, you shouldn’t worry about forgetting a password since we’ve got you an effective solution with an Offline NT password & registry editor. The tool is called chntpw, a free Windows password recovery tool, and it works perfectly on all Windows versions. If you’re wondering whether chntpw Windows 10 friendly or not, then you’re at the right place.
So, let’s start with the first portion.
How to Use Offline NT Password & Registry Editor (Really Complicated)
Getting your hands on NT password edit tool is quite easy and you can use the software by following our guide. Here is how you can use the NTpassword reset tool to get access to your files on windows 11/10/8/7.
Download and Install NTpassword from the official website
In order to download the Offline NT Password, visit its official website and click on the option that says CD/USB boot disk. Since your computer will be locked, you need to follow these steps on another computer.
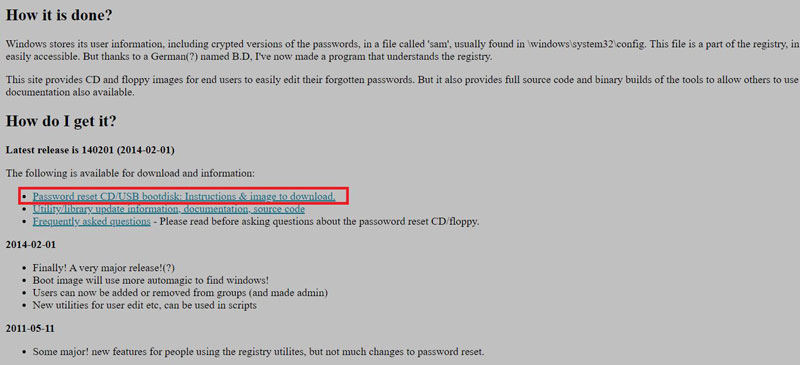
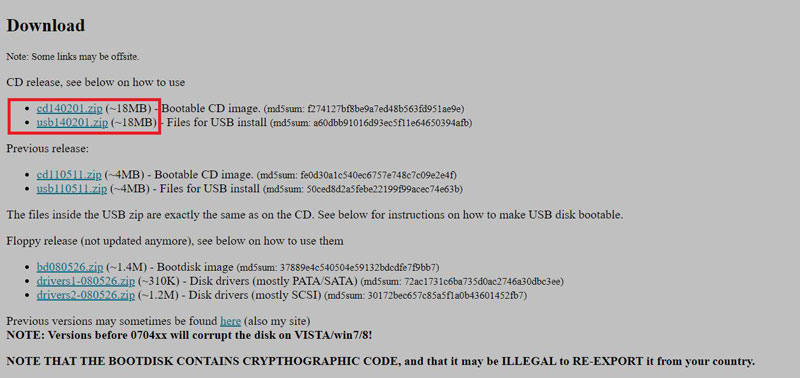
Scroll down to the Download section and you’ll see two options. You can select either the cdxxxxx.zip file to download the bootable CD image or click on the usbxxxxxx.zip file for making a bootable \usb disk.
Insert Bootable Media In Locked Computer
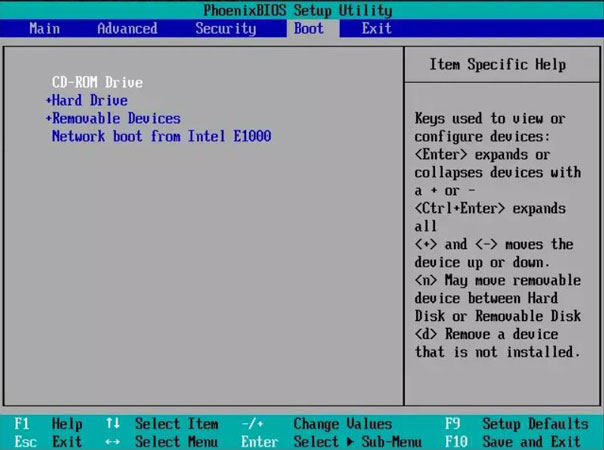
Insert the bootable media device that you just created into the locked computer and start it. Press the button recommended by your computer’s manufacturer to enter into the BIOS. Select the CD-ROM Drive option and hit F10 to Save and Exit, this will make the Windows reboot using a bootable USB drive.
Press 1 to make the Windows partitions selection.
It will ask you to register a path to your registry. Keep it default and hit Enter.
Hit Enter again to select the Password reset option to continue with the password reset action.

It will now ask you several options to select. Choose the one that you need. For instance, if you’re interested in editing a user’s password, press 1 and hit Enter.
The software will now ask you to register a new username. You have to manually type it and hit Enter when you’re done.
If you want to set up a password for your account, you can set it up at this stage. Otherwise, hit Enter and continue with the process. You can set a password anytime you want.
You’re almost done with the process of using the Offline NT password tool. Confirm your choices by typing ! (exclamation mark) and type Y to save the changes.
Detach the bootable USB drive from your computer and restart your computer. You’re good to go!
What are the Pros and Cons of Offline NT Password & Registry Editor?
Before actually using the software, we’d recommend you have a look at its pros and cons to get a better understanding of its functionalities and downsides.
| Pros | Cons |
|---|---|
| Supports all Windows versions including 11, 10, and all the earlier ones | No GUI, you need to enter commands in BIOS |
| Doesn’t require a password to function | No support against partitions encrypted with NTFS |
| Asks for disabling or unlocking a user’s account | Need to make a USB bootable |
| Helps reset all the passwords | Not easy to use |
| Simple steps to make the process work | Need a separate computer to make the USB drive bootable |
| It’s free to use | Might be a lengthy process for many users |
Apart from its cons, the offline NT password & registry editor windows 10 works perfectly fine and does the job quite effectively. It removes your passwords and lets you access your files. There’s no GUI, so that’s a big downside for this chntpw windows 10 software.
Is There Any Alternative to Chntpw? (Quite Simple)
As compared to NTpassword recovery tool, yes, there’s powerful software with an incredible Graphic User Interface. It’s extremely easy to understand and operate; UnlockGo – Windows Password Recovery. Here’re some of its features:
| Removes or Reset all Windows passwords | Works for all windows system |
| Easy steps to follow | It’s just a 3-step process that anyone can do |
| Requires NO prior knowledge | User interface is super sensitive |
| Proves one-click operation | Make bootable USB with just a one-click |
Following are the steps to operate UnlockGo – Windows Password Recovery. It’s a 3-step process.
Step 1. Download and Install the Package
Download and install the UnlockGo – Windows Password Recovery on an accessible computer. And insert a bootable USB/CD/DVD into it as windows password reset disk.

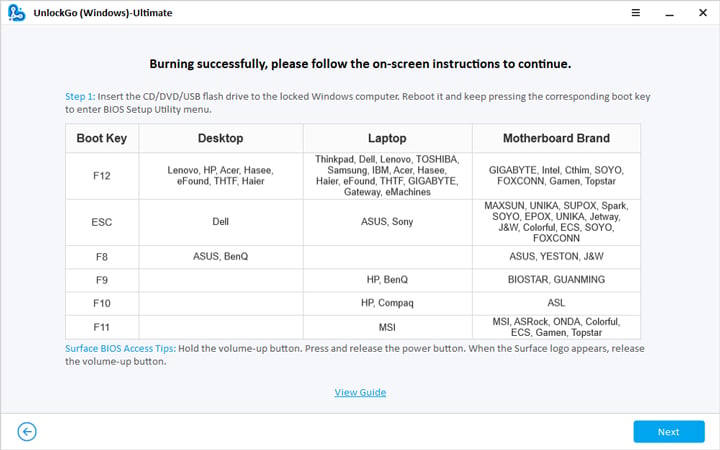
Step 2. Burn Reset Disk and Enter BIOS Menu
After burning the reset disk, you can follow on-screen instructions to enter bios menu, using arrow key to select boot tab and boot device priority to set the bootable disk, last press F10 to save and exit.
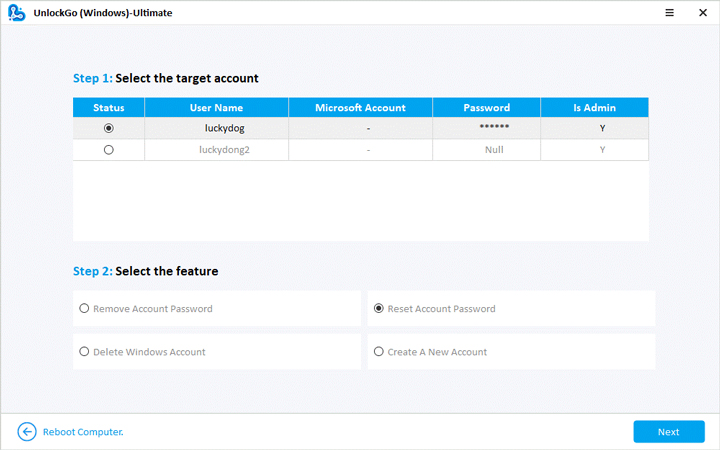
Step 3. Reset/Remove Windows Password as per Requirement
Once your computer reboots, you’ll see the UnlockGo interface. Choose your Windows version. And Select Reset Account Password and click Next. And you can set a new password on it or just remove it.
Resetting your Windows password was quite trickier with Offline NT Password Editor, but with UnlockGo – Windows Password Recovery, things have become much more easier and convenient.
Hot FAQs About Offline NT Password & Registry Editor (Chntpw)
Is it Safe and Free to Use?
Yes, it’s completely safe and free to use the Offline NT Password & Registry Editor program. All you’ve to do is to follow our to-the-point guidelines.
Can I Reset/Remove Domain Account Password Using it?
No, it can’t reset or remove a domain account password.
Final Thoughts
Offline NT Password & Registry Editor is, no doubt, a purposeful and very handy tool when it comes to resetting forgotten Windows passwords. It’s all about securing your important data on the computer and this Offline NT Password works perfectly fine.
But the only problem with it is that it doesn’t come up with a good UI. Well, everything has an alternative, and an alternative to Offline NT Password editor is an elegant tool called UnlockGo (Windows). We discussed how you can reset your password using both software tools.
The Offline NT Password & Registry Editor is a small Linux boot disk that you can use to change or delete Windows passwords outside of the Windows OS environment for local accounts. This can be useful if you forget your Windows password or the password belonging to the Administrator account. This utility can enable you to change or delete passwords, but it cannot tell you what the password for an account actually is. As such it is not appropriate to label Offline NT Password & Registry Editor as a ‘password recovery tool’; it’s a password editor, just like the name says.
It is compatible with Windows 3.x, Windows 95/98/ME, Windows NT, Windows 2000, Windows XP, Windows Server 2003, Windows Vista, Windows 7, and Windows Server 2008.
Please note that the Offline NT Password & Registry Editor (‘Offline’) home page states: “If password is reset on users that have EFS encrypted files, and the system is XP or newer, all encrypted files for that user will be UNREADABLE and cannot be recovered unless you remember the old password again“.
Also note that Offline cannot be used to change or reset Active Directory passwords.
Offline’s versioning is done using release dates. The version used in this tutorial is 110511 (for 11 May 2011).
How to use it
First, download the installation ‘cd******.zip’ file from the website above and extract it locally. Burn the resulting .iso file to a CD-ROM. If you plan to boot to a USB drive, download the ‘usb********.zip’ file and extract its contents to the drive.
Second, insert the CD or USB drive into the computer and reboot it. Before the Windows OS loads (while the manufacturer’s screen is briefly displayed), hit the appropriate key (usually one of the twelve ‘F’ keys) to enter the boot device manager where you can specify a device to boot to (overriding the default device, which is almost always C:\ on the internal hard drive).
Your computer will load the contents of the Offline CD or USB drive. When it is finished you will be prompted as follows.
1. You are first given the opportunity to specify any boot parameters that Offline should follow. Your choices are:
Press enter to boot, or give linux kernel boot options first if needed.

boot nousb - to turn off USB if not used and it causes problems

boot irqpoll - if some drivers hang with irq problem messages

boot vga=ask - if you have problems with the video mode

boot nodrivers - skip automatic disk driver loading
boot:
Just hit Enter. If you don’t make a choice, Offline will start normally after 15 seconds.
2. Offline will search your PC for physical hard drives and for the partitions on those drives. When it is done you will see something like:
Disks:

Disk /dev/sda: x-amount GB, x-amount bytes
Candidate Windows partitions found:
1: /dev/sda1 x-amountMB BOOT
2: /dev/sda2 x-amountMB
Please select partition by number or:
q = quit
d = automatically start disk drivers
m = manually select disk drivers to load
f = fetch additional drivers from floppy/usb
a = show all partitions found
l = show probably Windows (NTFS) partitions only
Select: [1]
Choose the partition where Windows is installed (usually choice 1) and hit Enter.
3. Now you will see output like this:
Selected 1
Mounting from /dev/sda1, with assumed filesystem type NTFS
So, let's really check if it is NTFS?
Yes, read-write seems OK.
Mounting it. This may take up to a few minutes:
Success!
Step TWO: Select PATH and registry files
DEBUG path: windows found as Windows
DEBUG path: system32 found as System32
DEBUG path: config found as config
DEBUG path: found correct case to be: Windows/System32/config
What is the path to the registry directory (relative to windows disk)?
[Windows/System32/config]:
Here is where you specify the location of the SAM file which Offline will attempt to edit. By default it is located in %SystemRoot%\Windows\System32\Config. Hit Enter to choose this default location. If you are not familiar with the Windows SAM file, you should definitely read up on it here and here.
4. Offline will search this location for the SAM and prompt you as follows:
DEBUG path: found correct case to be: Windows/System32/config
<displays all non-log files found in the config directory>
Select which part of registry to load, use predefined choices or list the files with space as delimiter
1 - Password reset [sam system security]
2 - RecoveryConsole parameters [software]
q - quit - return to previous
[1] :
Hit Enter to accept the default option (password reset).
5. The following choices appear:
<>==<> chntpw Main Interactive Menu <>==<>
Loaded hives: <sam> <system> <security>
1 - Edit user data and passwords
9 - Registry editor, now with full write support!
q - Quit (you will be asked if there is something to save)
What to do? [1] ->
Hit Enter to accept the default choice (edit user data and passwords).
6. Offline will now display the user accounts it finds like so:
==chntpw Edit User Info & Passwords==

RID ---- Username -----  Admin? --- | -Lock? --

01f4  |  Administrator |  ADMIN     |  dis/lock

03ea  |  User1                      |  dis/lock

03e9  |  User 2                     |  dis/lock

01f5  |  Guest                      |  dis/lock
Select: ! - quit, . - list users, 0x<RID> - User with RID (hex), or simply enter the username to change: [Administrator]
Type the username whose password you wish to edit or hit Enter to choose Administrator. RID refers to the Relative ID.
7. After you select an account, Offline will display some details on that account and then give you options on how to edit its password.
RID : 0500 [01f4]

Username: Administrator

fullname:

comment: Built-in account for administering the computer/domain

homedir:
User is member of 1 groups:
00000220 = Administrators (which has x members)
Account bits: 0x0211 =
[x] Disabled | [ ] Homedir req. | [ ] Passwd not req.
[ ] Temp. duplicate | [x] Normal account | [ ] NMS account
[ ] Domain trust ac | [ ] Wks trust act. | [ ] Srv trust act
[x] Pwd don't expir | [ ] Auto lockout | [ ] (unknown 0x08)
[ ] (unknown 0x10) | [ ] (unknown 0x20) | [ ] (unknown 0x40)
Failed login count: 0, while max tries is: 0
Total login count: 15
----User Edit Menu:
1 - Clear (blank) user password
2 - Edit (set new) user password (careful with this on XP or Vista)
3 - Promote user (make user an administrator)
4 - Unlock and enable user account [probably locked now]
q - Quit editing user, back to user select
Select: [q]
Choose 1, 2, 3, or 4, hit Enter, and follow the prompts.
8. After you make the required changes, type ‘!’ to quit and hit Enter. Now type ‘q’ to quit and hit Enter again. You will now be asked:
Step Four: Writing back changes

About to write files back! Do it? [n]:
Hit Enter to choose no; you do not want to reverse what you just did. Now you are asked:
New run? [n] :
Hit Enter for no and press Ctrl-Alt-Delete to reboot (you might want to remove your CD-ROM or USB drive first).
Questions?
Consult the Offline NT Password & Registry Editor’s frequently asked questions.
Recommended reading
Yes, it is possible to change the root password on Linux in a similar manner. In fact, you can even use standard Linux distributions to change passwords on Windows.
If you found the content of this article helpful and want to expand your knowledge further, please consider buying a relevant book using the links below. Thanks!
 Hacking Windows Exposed
  Big Book of Windows Hacks
 7 Deadliest Microsoft Attacks
  Basics of Hacking and Pen Testing
 Windows 7: The Missing Manual
  Windows 7 Tweaks
- Computer and technology books on Amazon
Для того, что бы защитить свой компьютер/ ноутбук от лишних глаз, многие используют пароль для своей учетной записи. При этом пароли подбираются как можно сложнее (иначе какой от них смысл), и казалось бы, никаким проблем, НО. Чем сложнее пароль тем легче его забыть и что делать если вы его забыли?! Удалять все и переустанавливать систему?! Вовсе не обязательно, достаточно сбросить пароль и зайти в систему. Этому и будет посвящена статья — как сбросить пароль в Windows 7/ Windows 8.1/ Windows 10. Для экспериментов была использована операционная система Windows 7, для ОС Windows 8/ 8.1/ 10 шаги абсолютно одинаковые.
В Windows для хранения паролей используется система SAM (Security Account Manager). Если вы захотите связаться напрямую с этой системой, то потратите кучу времени, особенно если пароль сложный (более восьми символов с использованием спец знаков). Есть более простой способ сбросить пароль, это загрузиться с другого носителя (USB флешки или DVD диска) и с них отредактировать необходимые файлы в операционной системе. Существует довольно много способов, утилит как это можно сделать. В этой статье я остановлюсь на наиболее, на мой взгляд, удобных:
1) Сбросить пароль в Windows 7/ Windows 8.1/ Windows 10 с помощью стандартных средств Windows;
2) Сбросить пароль в Windows 7/ Windows 8.1/ Windows 10 с помощью утилиты Offline NT Password and Registry editor.
Сбросить пароль с помощью стандартных средств Windows.
Этот способ подразумевает включение изначально выключенной учётной записи «Администратор» с помощью правки реестра из установочной среды Windows. В дальнейшем можно будет войти в систему под учётной записью «Администратор» и отредактировать любой другой аккаунт в ОС.
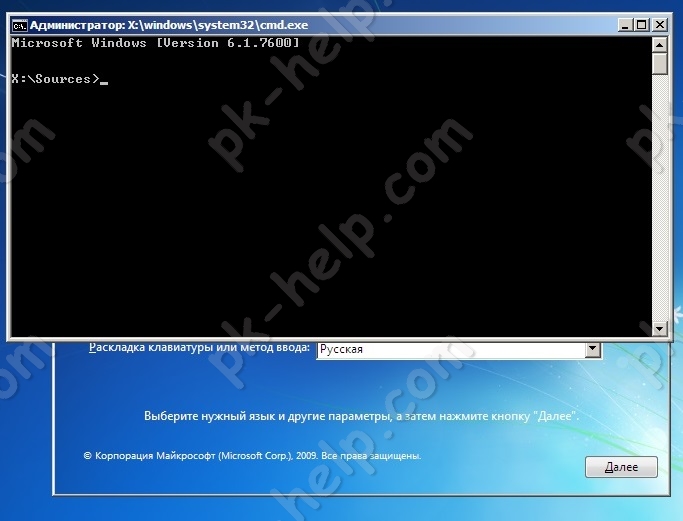
Для этого способа вам понадобиться диск или загрузочная флешка с Windows 7, Windows 8.1, Windows 10 (в зависимости от того какая операционная система установлена у вас). Загрузитесь с носителя и запустите командную строку нажав сочетание клавиш «Shift» + «F10» .
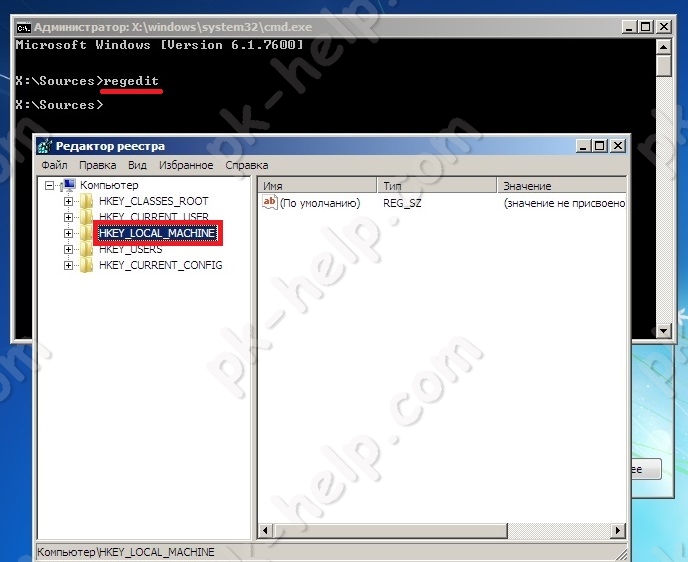
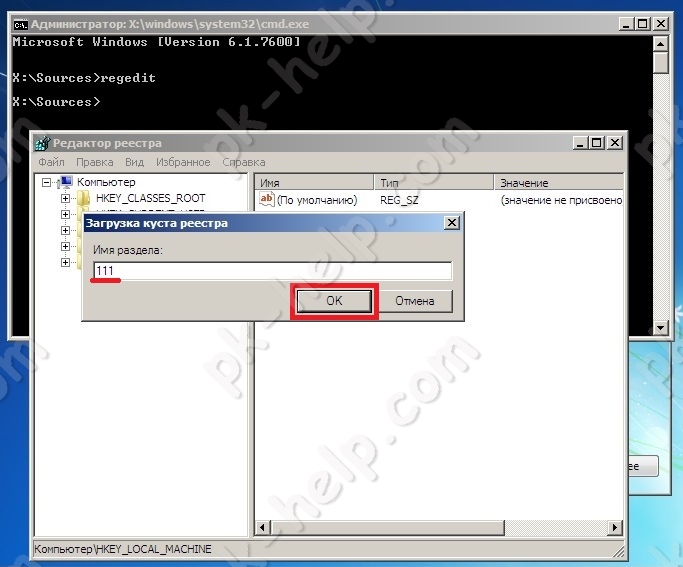
Далее необходимо загрузить реестр, для этого введите команду regedit. В реестре выделите раздел HKEY_LOCAL_MACHINE.
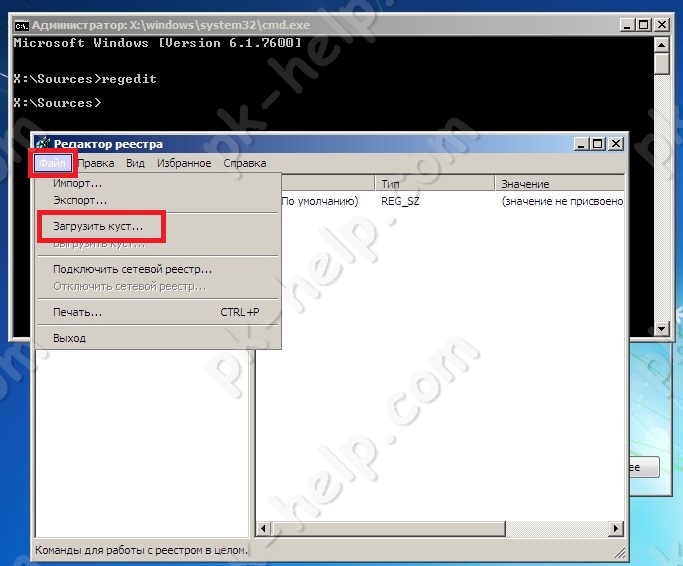
В редакторе реестра выберите «Файл» — «Загрузить куст…».
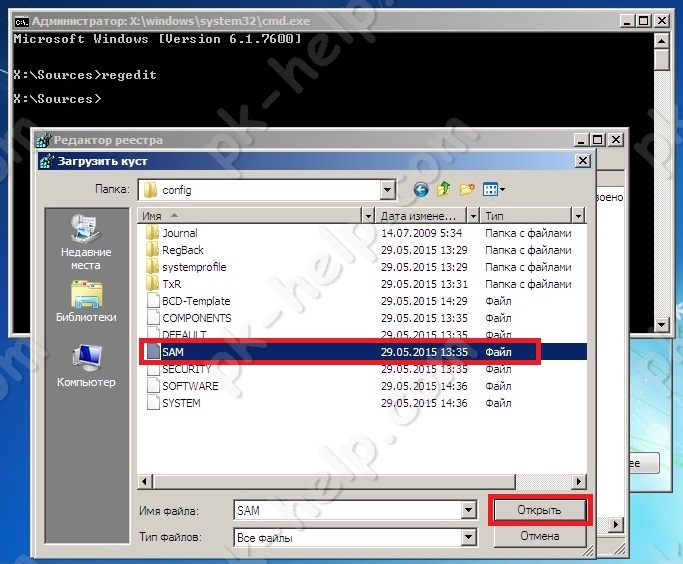
Далее необходимо выбрать файл SAM, который находится в папке Windows\System32\config на том разделе, где установлена Windows 7/ Windows 8.1/ Windows 10.
После чего задайте произвольное имя куста реестра, например 111.
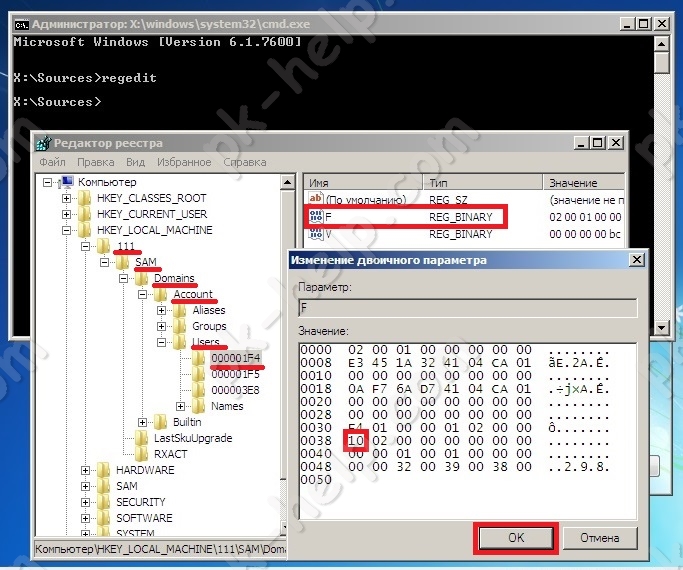
Потом надо выбрать раздел HKEY_LOCAL_MACHINE\имя_куста\SAM\Domains\Account\Users\000001F4 и дважды кликнуть по ключу F. Откроется редактор, в котором надо перейти к первому числу в строке 038 — это 11. Его надо изменить на 10.
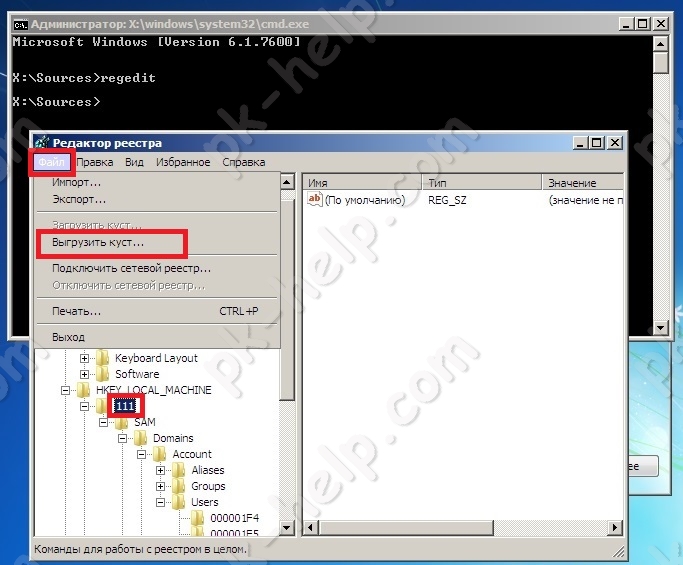
Затем выделите куст, который вы сделали ранее, напомню у меня это 111 и нажмите «Файл» — «Выгрузить куст…».
Подтверждаете выгрузку текущего раздела.

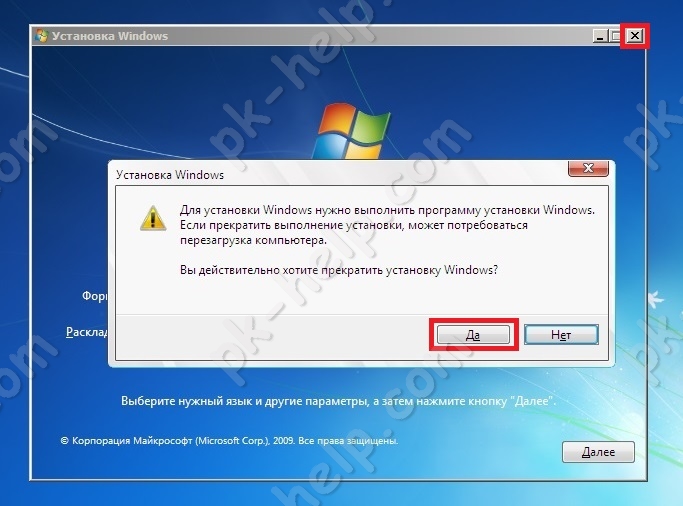
После этого закройте все окна, вытащите носитель и перезагрузите систему.
В результате загрузки вы увидите учетную запись «Администратор».
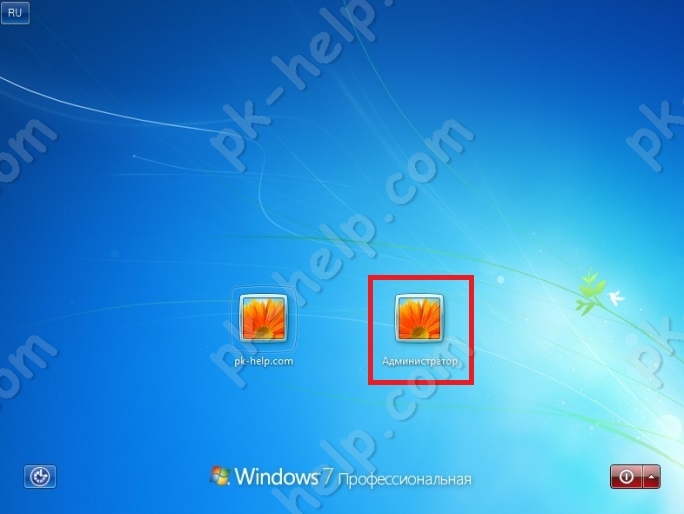
Зайдя под ней, вы сможете без проблем поменять пароль для нужной учетной записи. После этого учетную запись «Администратор» можно отключить, проделав обратную процедуру (поменять значение 10 на 11) или просто отключив ее в учетных записях Windows.
Видео сброса пароля в Windows 7, 8, 10.
Сбросить пароль с помощью утилиты Offline NT Password and Registry editor.
Еще один способ как можно сбросить пароль на Windows 7/ Windows 8.1/ Windows 10 это воспользоваться бесплатной утилитой Offline NT Password and Registry editor. Для этого скачайте ее с официального сайта. Для скачивания доступно две версии:
1 для записи на CD, DVD диск;
2 для записи на USB носитель.
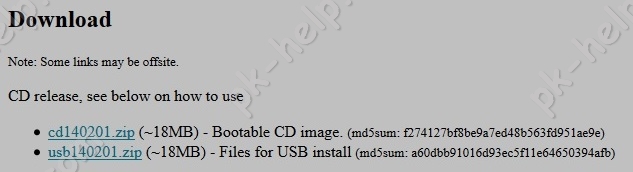
Первый вариант, традиционен: скачивайте архив, разархивируете его и полученный ISO образ записываете на CD или DVD диск.
Второй вариант: разархивируете скаченный архив, форматируете USB флешку, копируете все содержимое разархивированной папки на флешку (именно содержимое папки, не нужно создавать дополнительных папок на USB носителе).

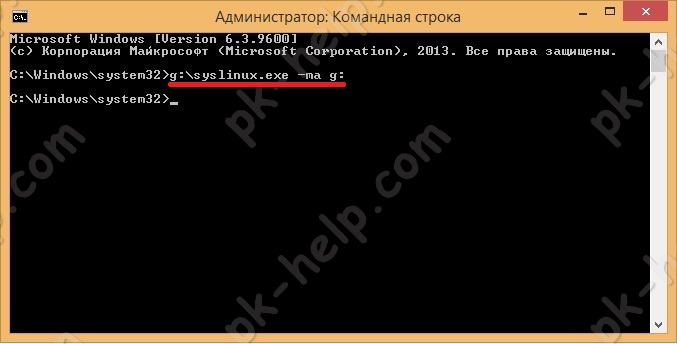
Затем запускаете командную строку с правами администратора (в Windows 8.1 и 10 через правый клик по кнопке Пуск — командная строка (администратор), в Windows 7 — отыскав командную строку в стандартных программах, далее через правый клик Запуск от имени Администратора). Вводите команду:
g:\syslinux.exe -ma g:
где g — буква вашей флешки и нажимаете Enter, может показаться, что ничего не произошло, но на самом деле теперь ваша USB флешка стала загрузочной.
Теперь необходимо загрузиться с CD/ DVD или USB флешки.
Утилита не имеет графического интерфейса, но не нужно пугаться большого количества информации, утилита довольно проста в применении, главное выполняйте все по пунктам и аккуратно.
На первом окне достаточно просто нажать Enter.
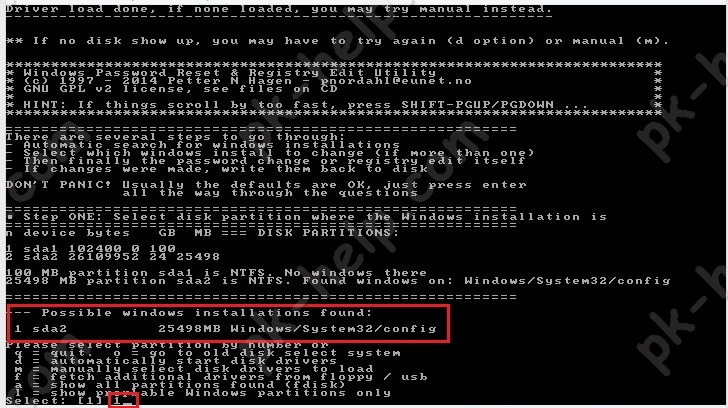
Далее утилита сканирует ваши разделы и находит установленные на них операционные системы Windows 7/ 8.1/ 10. Вам остается только указать нужный, если у вас установлено несколько операционных систем. Для правильного выбора ориентируйтесь на размеры разделов. В данном примере выбирать не из чего, ввожу 1 и нажимаю Enter.
Далее программа убедится в наличии необходимых файлов в выбранной Windows и возможности операций записи на жесткий диск, после чего будет предложено несколько вариантов, из которых нас интересует Password reset (сброс пароля), который и выбираем путем ввода 1 и нажатия клавиши Enter.
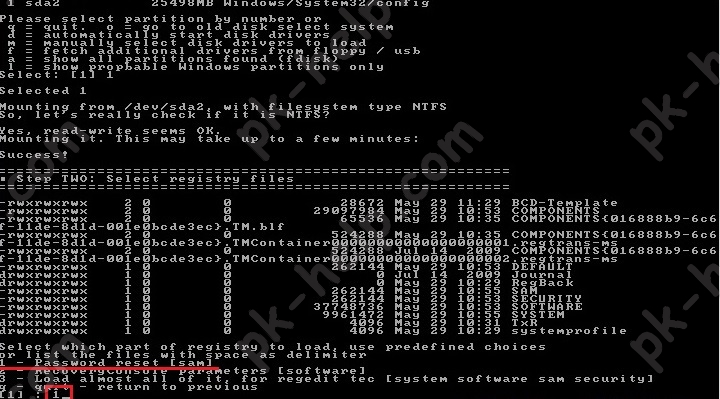
В следующем окне выбираем пункт номер 1 Edit user data and passwords (редактирование пользовательских данных и паролей).

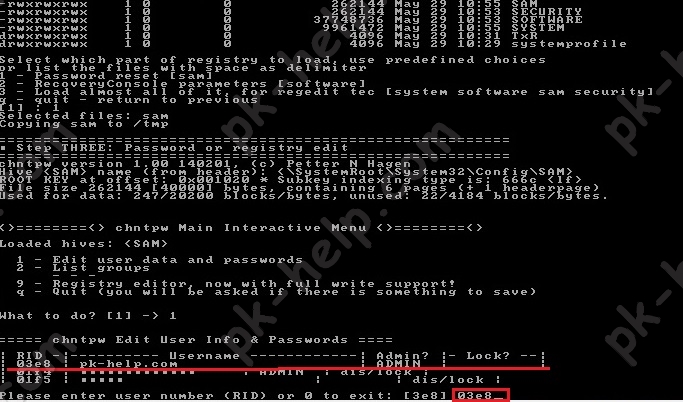
После этого вы увидите таблицу со всеми пользователями, которые используются в Windows, правами которыми обладают (администраторы или нет) и включены они или выключены. Найдите пользователя, чей пароль хотите сбросить и посмотрите на самую правую колонку от него RID. Именно этот идентификатор и нужно ввести в следующей строке.
В следующем окне необходимо выбрать действие, которое мы хотим сделать над выбранной ранее учетной записью. Нас интересует — сброс пароля, поэтому необходимо выбрать первый пункт Clear (blank) user password Сбросить пароль выбранного пользователя.

Если вы увидели строку «Password cleared!», поздравляю вас, пароль сброшен, теперь осталось только выйти, для этого нажмите клавишу q и Enter.
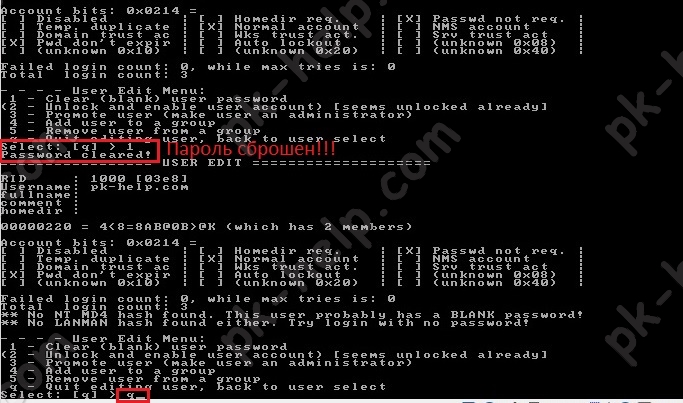
Затем еще раз q и Enter.

И в самом конце нажмите y и Enter.
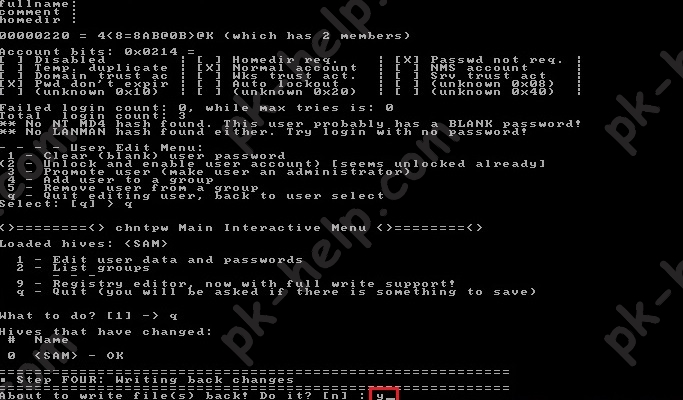
После этого носитель с утилитой Offline NT Password and Registry editor можно вынимать и перезагружать компьютер/ ноутбук. При загрузке вы войдете под учетной записью без пароля.