-
Главная
- Инструкции по эксплуатации
КОФЕМАШИНЫ


КОФЕМОЛКА

ОХЛАДИТЕЛЬ

ОЧИСТКА


Определение даты производства:
ДД-день, ММ-месяц, ГГ-год
серийный номер 123456ДДММГГ123
Используя этот веб-сайт, Вы соглашаетесь с нашими политиками применения файлов cookies и обработки персональных данных в целях корректного функционирования сайта и проведения статических исследований. Используя наш сайт, вы даете согласие на использование файлов cookie.
Вход
Заполните пожалуйста поля!
Регистрация
Заполните пожалуйста поля!
забыли пароль? Не страшно!
Пожалуйста,
введите адрес электронной почты
Обратный звонок
Закажите обратный звонок и наш менеджер свяжится
с Вами в ближайшее время.
Спасибо за заказ обратного звонка! Мы Вам перезвоним в ближайшее время
Товар добавлен в корзину!
Инструкцию по смене пароля придет на Ваш Email!
Узнайте первым о новинках, акциях и мероприятиях!
Подпишитесь на рассылку и получите доступ к специальным предложениям
Товар добавлен в избранное
Товар добавлен в сравнение
Нашли дешевле? Снизим цену!
Если вы нашли цену ниже, чем в официальном магазине Nivona.ru, мы продадим товар по той же цене.
Для участия в акции необходимо предоставить ссылку на товар в наличии, с «розничной» ценой ниже чем на сайте Nivona.ru, сообщить об этом в магазин указав контактные данные: ФИО, E-mail, телефон.
Дождаться ответа магазина.
Список магазинов, которые могут быть приняты к сравнению для снижения цены на товар: Technopark.ru, Mvideo.ru, Сitilink.ru, Dns-shop.ru, Niv-rus.ru, Coffeefine.ru, Holodilnik.ru, Vazaro.ru, Eldorado.ru
Спасибо за уведомление! Мы Вам перезвоним в ближайшее время
Nivona CafeRomatica NICR 520 / NICR 530 / NICR 550 / NICR 560 — Coffee / Espresso Machine Manual
Introduction
Dear Customer,
Congratulations and thank you very much for choosing a quality product by NIVONA. In order to enjoy your new NIVONA appliance to its best, please read this manual and pay attention to the safety tips before rst use. Please keep this manual safe. You can use it for references and hand it over to a future owner. Enjoy your coffee and the top quality appliance by NIVONA.
Оverview
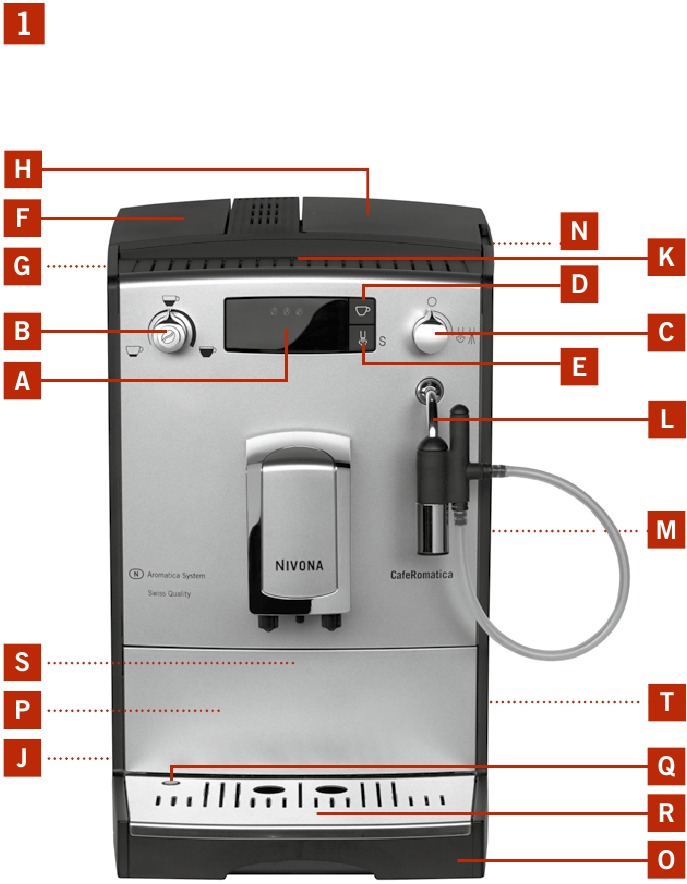
fig. 1
- Display
- Coffee strength / volume selector
- Steam/hot water control
- Coffee button
- Steam/rinsing button
- Cover for water tank
- Water tank
- Cover for coffee bean container
- On/off switch
- Cup rack
- Steam/hot water jet, Spumatore
- Service door
- Lid of coffee powder chute
- Drip tray
- Used coffee container (inside)
- Water indicator for drip tray
- Drip grid
- Type label (inside, remove drip tray)
- Power cord bay
Display symbols
 |
S1 | Water tank |
 |
S2 | Drip tray |
 |
S3 | Coffee strength |
 |
S4 | Lid of coffee powder chute |
 |
S5 | Two cups |
 |
S6 | Filter |
 |
S7 | Descaling |
 |
S8 | Automatic switch-off |
 |
S9 | Temperature |
 |
S10 | Rinsing |
 |
S11 | Cleaning |
 |
S12 | Steam valve |
 |
S13 | Bar |
Safety information
- This appliance may only be used for the intended purpose (domestic use only). It is not intended for commercial use (see guarantee). Warranty claims will become void if this appliance is used for other than its intended purpose.
- It is imperative that appliance voltage and mains voltage are identical. Please check the type label/sticker on the appliance (see fig. 1/S).
- Do not use the appliance if the power cable or the casing is damaged. The power cable must never come into contact with any hot surfaces.
- Always pull the plug, not the power cable, when unplugging the appliance from the wall socket.
- Please adhere to the cleaning and decalcifying instructions at all times! Non-compliance will render warranty claims void.
- Please make sure that the appliance is switched off and the mains plug pulled before maintenance and cleaning.
- Place the appliance on a flat and stable surface and only use it indoors. Never place the appliance on hot surfaces or near an open fire.
- This appliance may be used by children from the age of eight as well as by persons with reduced physical, sensory or mental capabilities, or lack of experience and knowledge, as long as they are being supervised or have been given instructions for the use of the appliance, hence understanding the possible dangers. Children must not play with the appliance. Cleaning and user maintenance must not be undertaken by children without supervision.
- The appliance and its mains connections must be kept away from children under the age of eight.
- Unplug from mains if you are away for a few days.
- Do not leave the appliance on unnecessarily. Never immerse the appliance in water.
- Do not put the appliance or any of its parts in the dishwasher. Non-compliance will render warranty claims void.
- If the appliance shows any defect, pull the plug immediately (never tug at the mains cable or the appliance itself).
- Possible damages caused by incorrect, improper use or unqualified repair works will not be subject to liability. In these cases warranty claims become void.
- Please use the integrated coffee grinder for roasted and untreated beans only, never for other foodstuffs! Please make sure there are no foreign substances among the coffee beans — failing this warranty claims will become void.
- If a repair is necessary (including replacement of the power cable), please first contact the central telephone or email (info@nivona.com) support or the retailer where you bought the appliance – upon consultation and in accordance with item 8 of this manual send the appliance to NIVONA Zentralkundendienst, Südwestpark 90, D-90449 Nürnberg
- If the appliance’s power cable is damaged, it must be replaced by the manufac-turer, its customer service or a similarly qualified person to avoid danger.
Attention
:
Repairs to electrical appliances must only be undertaken by a professional! Improper repairs may result in severe danger for the user! Should the appliance be used or maintained improperly or incorrect, the warranty shall become void!
Attention
:
Using the on/off switch (fig.1/J) during the brewing process may damage the appliance! Turn the appliance off only after it has finished the job.
Attention
:
risk of burning! When drawing steam or hot water, a shot of hot water may spray from the steam/hot water jet or the Spumatore (fig. 1/L); allow the coffee spout, the steam/hot water jet and the Spumatore to cool down before you touch it.
CE – This appliance conforms to valid EG regulations.
Initial start-up
(Please read this and follow instructions before you brew your first coffee!)
Getting started
- Unpack the appliance and all items belonging to it with care.
The following are included in the package contents:
- User Manual
- Warranty card
- Measuring spoon with assembly instruction for filter insert
- Two cleaning tabs
- One Claris filter (NICR 530)
- One testing strip for water hardness
Tip: In case of customer service being required, the appliance should be shipped in its original pack- aging. Please keep this safe, including the polystyrene parts.
- Place the appliance on a flat, dry and suitable surface.
- Plug the power cord into a professionally installed mains socket.
- Your appliance has a power cord bay – if the cable is too long, place the excessive length in the power cord bay at the back (fig. 1/T)
The most important controls
Before you set the basic settings and brew your first coffee, please make yourself familiar with the main controls of your appliance.
Filling with water and beans
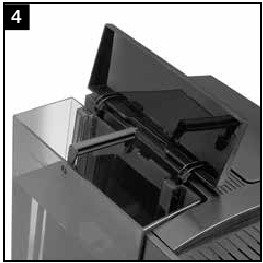
- Open the cover on the left (fig. 1/F) and remove the water tank (fig.4).
Clean it with clear, cold tap water. - Refill the water tank to maximum and insert it back in the appliance. Make sure the tank is safely locked in place.
Attention
:
Only use clear, cold water for the water tank! Never use sparkling water or any other liquids! Non-compliance will render warranty claims void.
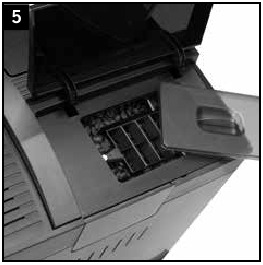
- Open the bean container’s cover on the right (fig. 1/H). Fill with untreated, roasted coffee beans only (fig.5) and close again.
Attention
:
Never use beans that have been treated during or after roasting with supplements like sugar or similar. This may cause damages to the mill. Resulting repairs are not covered by the warranty.
Switching appliance on and filling the system
Tip: For production reasons the internal pipes may be empty when setting the appliance up for the first time. The appliance will show this as follows: the symbol S12
will display when the mains are connected and the ON/OFF switch (fig. 1/J) has been pushed.
- Connect the mains plug to a professionally installed socket.
- Switch the appliance on with the on/off switch (fig. 1/J).
After a short while the symbol S12 will show up in display.
- Place a sufficiently large bowl (minimum contents 0.5 l) under the steam/hot water jet/ Spumatore (fig. 1/L) and turn the steam/hot water control (fig. 1/C) clockwise all the way.
The system is now being filled with water and cleaned through the steam/hot water spout/Spumatore. This process will finish automatically. - Afterwards turn the steam/hot water knob (fig. 1/C) anti-clockwise all the way to close.
Symbol S10 will now appear.
- Press steam/rinsing button (fig. 1/E). Your appliance is now ready for use.
Using the appliance with filter
It is up to you whether you would like to use the appliance with or without filter.
A Claris filter is included in the delivery (NICR 530). Using this filter, the appliance needs descaling less often because the filter softens the water. Ex factory the setting is «no filter».
- Empty the water tank (fig. 4) and carefully screw in the filter into the respective slot in the water tank, using the integrated tool at the end of the measuring spoon (fig. 6).
Attention
:
Do not overtighten or break.
Depending on the presets, one, two or three beans are shown in the display. The appliance is now ready for use.
Tip: If you are using a filter, the internal water softening is automatically set to water hardness level 1! The appliance needs descaling less frequently – but always descale when called upon to do so and always with the FIILTER REMOVED.
The filter will be flat after approx. 50 l of water have been drawn (see chapter 4.1. how to change the filter).
Attention
:
Even if the display does not indicate «Change filter» by highlighting the symbol , the filter needs changing after a maximum of two months if the appliance is not used regularly (see chapter 4).
Using the device without filter, adjust water hardness
Depending on the water hardness in your area, the appliance needs to be descaled every now and again. For the system to be able to indicate that this is necessary, you need to set the correct water hardness prior to first use.
Using the appliance with the filter and the appropriate settings (see above) the water hardness is automatically set to level 1.
First test the water quality with the enclosed test strip.
- Dip the test strip into the water and shake it lightly.
- After about one minute you will be able to read the result by counting the red dots on the test strip.
- The different levels are listed as follows and can be adjusted:
Test strip / Degree of hardness = Display
1 red dot / 1–7° = LEVEL 1 = 1 red bar
2 red dots / 8–14° = LEVEL 2 = 2 red bars
3 red dots/ 15–21° = LEVEL 3 = 3 red bars
4 red dots / >21° = LEVEL 4 = 4 red bars
Tip: If the test strip does not show any red dot, please set up level 1.
Attention
:
Should you want to use the appliance without filter, the water hardness must be set. This is important because depending on the water hardness the appliance needs to be descaled more often (ex factory the appliance comes with the setting «use without filter; level 3 water hardness»!).
Depending on the presets, one, two or three beans are shown in the display. The appliance is now ready for use.
Set automatic switch-off time
This function allows you to determine the automatic switch-off time after the last use. The ex factory setting is «after 5 minutes».
- Press steam/rinsing button (fig. 1/E) for more than 3 seconds to go to main menu. Release button.
- Press steam/rinsing button (fig. 1/E) repeatedly until symbol S8
appears.
- To change the switch-off time press the coffee button (fig.1/D) repeatedly.
In doing so you increase the number of bars at the bottom of the display one bar at a time according to your personal preference:
1 bar = automatic switch-off time after 5 minutes
2 bars = automatic switch-off time after 30 minutes
3 bars = automatic switch-off time after 70 minutes
- Press steam/rinsing button (fig. 1/E) to confirm your choice. The bars will light up briefly.
- Press steam/rinsing button (fig. 1/E) for more than 3 seconds to leave the main menu.
Depending on the presets, one, two or three beans are shown in the display. The appliance is now ready for use.
Adjusting the temperature
You can adjust the temperature as required to «normal», «high» or maximum». The ex factory setting is «high».
- Press steam/rinsing button (fig. 1/E) for more than 3 seconds to go to main menu. Release button.
- Press steam/rinsing button (fig. 1/E) repeatedly until symbol S9
appears.
- To change the temperature press coffee button (fig.1/D) repeatedly.
In doing so you increase the number of bars at the bottom of the display one bar at a time. Set the level for your preferred temperature in accordance with the number of red bars. The bars read as follows:
1 bar = temperature «normal»
2 bars = temperature «high»
3 bars = temperature «maximum»
After 3 bars the display starts again with one bar.
- Press steam/rinsing button (fig. 1/E) to confirm your choice. The bars will light up briefly.
- Press steam/rinsing button (fig. 1/E) for more than 3 seconds to leave the main menu. Depending on the presets, one, two or three beans are shown in the display. The appliance is now ready for use.
Setting the automatic off-rinsing process
Optionally you can activate the automatic off-rinsing process for additional hygiene after the appliance has been switched off.
The ex factory setting is «off».
- Press steam/rinsing button (fig. 1/E) for more than 3 seconds to go to main menu.
- Press steam/rinsing button (fig. 1/E) repeatedly until symbol S10
appears.
- To change the setting press the coffee button (fig.1/D) repeatedly.
In doing so you increase the number of bars at the bottom of the display one bar at a time. Set the level for your preferred temperature in accordance with the number of red bars:
1 bar = automatic off-rinsing „off»
2 bars = automatic off-rinsing „on»
After 2 bars the display starts again with one bar.
- Press steam/rinsing button (fig. 1/E) to confirm your choice. The bars will light up briefly.
- Press steam/rinsing button (fig. 1/E) for more than 3 seconds to leave the main menu.
Depending on the presets, one, two or three beans are shown in the display. The appliance is now ready for use.
Adjusting the coarseness of the grinding
Attention
:
Only adjust the grinding coarseness whilst the grinder is running.
You can adjust the grinder according to the particular blend of bean. We suggest the grinder is kept on a medium setting.
To change the coarseness of the grinding, please follow these steps:
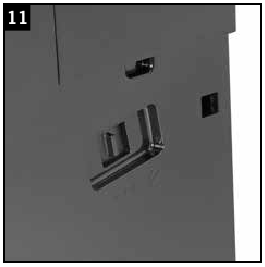
- Open the service door on the right of the casing (fig. 1/M).
The grinding coarseness control is at the top right (fig. 11).
- Place a cup under the coffee spout.
- Press the coffee button (fig. 1/D).
- While the grinder is grinding, change the coarseness of grinding by moving the control (fig. 11).
The smaller the dot, the finer the coffee powder. Please note:
- A light roast level needs finer grinding adjustment (control further to the left).
- A dark roast level requires coarser grinding adjustment (control further to the right).
Check out for yourself the best setting according to your personal taste.
- Close the service door gently and in doing so carefully place the pivots at the back of the service door into the notches. Make sure that the door completely snaps back into place.
Reset to factory settings
To reset the factory settings proceed as follows:
- Switch the appliance on.
- Press steam/rinsing button (fig. 1/E) and coffee button (fig. 1/D) simultaneously for more than 3 seconds.
- All red bars will light up briefly.
The factory setting has been reset.
Making coffee
Tip: Ex factory the appliance is set so that you can brew your first coffee straightaway. But we do recommend to make the necessary adjustments according to your personal preferences. Hence check chapter 2 «Getting started» first and follow its instructions!
Tip: When you use the appliance for the first time or if it hasn’t been used for a prolonged period of time the first cup will not have the full aroma and should therefore not be consumed.
Switching the appliance on
Once you have completed the instructions (chapter 2), the procedure for switching the appliance on is always similar:
- Switch on using the on/off switch (fig. 1/J).
The display shows 5 flashing red bars. When the system has reached its operating temperature, the display will show symbol S10 .
- Press steam/rinsing button (fig. 1/E).
The system is now being rinsed. The appliance is now ready for use. Depending on the presets, one, two or three beans are shown in the display.
Tip: if you do not use the appliance for a prolonged period of time (e.g. holidays), switch it off using the on/off switch (fig. 1/J) and pull the mains plug.
Selecting the coffee strength
The coffee strength can be set in three levels according to taste which the display will show:
MILD, the display features one bean, about 7 grams of ground coffee, e.g. for latte or cappuccino;
STANDARD, the display features two beans, about 9 grams of ground coffee, e.g. for coffee;
STRONG, the display features three beans, about 11 grams of ground coffee, e.g. for espresso or strong coffee.
As soon as the appliance is operational, the display will show either its latest preset or the ex factory setting.
- You can change the setting by repeatedly pressing the coffee strength / volume selector (fig. 1/B). Thus the coffee strength changes from mild (one bean in display) to standard (two beans in display) to strong (three beans in display) and back to mild.
Select water volume
- By turning the coffee strength / volume selector (fig. 1/B), you can smoothly adjust the amount of water (cup symbol bottom left for little water, full cup symbol bottom right for plenty of water).
Making a cup of coffee
Once you’ve chosen coffee strength (see chapter 3.2) and water volume (see chapter 3.3),
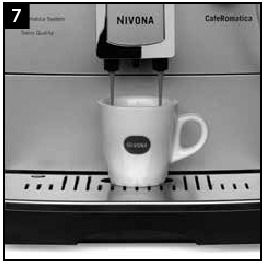
- Place a cup centrally beneath the spout (fig. 7).
The spout is adjustable in height to match the size of the cup.
- Press the coffee button briefly (fig. 1/D).
The appliance will now start grinding, pre-brewing and brewing.
The process can be aborted any time by pressing the coffee button again.
Attention
:
When making your first coffee, the grinder box is still empty. It can therefore happen that the symbol S3 will flash after the first grinding and the appliance will not make any coffee.
- In this case simply press the coffee button again (fig. 1/D).
Tip: The water volume can be adjusted while making coffee. Check out for yourself the best setting according to your personal taste and the size of the cup.
Tip: To remember the ideal setting for your personal taste, proceed as follows:
- Turn the coffee strength / volume selector (fig. 1/B) to the following positions:
- a small espresso cup to the centre,
- a large cup to the far right.
- Press the coffee button (fig. 1/D).
The appliance will now start making coffee. - Shortly before the set amount of coffee is ready, turn the coffee strength / volume selector (fig. 1/B) slowly to the left until the appliance stops working.
Make a note of the coffee strength / volume selector’s position for the size of the coffee cup.
Making two cups of coffee
Once you’ve chosen coffee strength (see chapter 3.2) and water volume (see chapter 3.3),
- place two cups beneath the spout (fig.
.
The spout is adjustable in height to match the size of the cups.
- Press the coffee button twice in succession (fig. 1/D).
The display will show symbol S5 .
The appliance will now start grinding, pre-brewing and brewing.
The process can be aborted any time by pressing the coffee button (fig. 1/D) again.
When making two cups the grinder will automatically do two rounds.
Attention
:
When making your first coffee, the grinder box is still empty. It can therefore happen that the symbol S3 will flash after the first grinding and the appliance will not make any coffee.
- In this case simply press the coffee button again (fig. 1/D).
Tip: In case there is not enough water or the bean container runs out during the two grinding cycles or the trays need emptying, the respective symbols will show on the display. In that case the second cup will not be brewed. Follow the display and press the coffee button (fig. 1/D) again for the second cup.
Making ground coffee
- Turn the coffee strength / volume selector (fig. 1/B) to the water volume required for one cup.
- Open the lid of coffee powder chute (fig. 1/N). Symbol S4
blinkt.
- Pour in one level measuring spoon of ground coffee and close the lid.
Symbol S4 is flashing.
- Place one or two cups under the coffee spout (fig. 7 or
and press the coffee button (fig. 1/D) once or twice respectively.
The appliance will now start pre-brewing and brewing – without grinding.
Tip: If you have opened the lid of coffee powder chute accidentally or did not press the coffee button after having poured in the ground coffee, the appliance will automatically start rinsing for a minute once the lid is closed. The appliance will then be operational again.
Attention
:
The coffee powder chute is not a storage container. Therefore never pour in more than one portion of coffee and only use fresh or vacuum-packed coffee ground from coffee beans. Do not use water-soluble instant coffee!
Making hot water (e.g. for tea)
- Hold a cup under the steam/hot water jet /Spumatore (fig. 1/L).
- Turn the steam/hot water control (fig. 1/C) clockwise.
- Fill the cup with the required water and turn the knob back anti-clockwise to position 0.
Risk of scalding! Escaping water may spray! The steam/hot water jet /the Spumatore becomes very hot when used. Let the steam/hot water jet /the Spumatore cool down for a few minutes before touching it. Only touch the rubber parts.
Tip: You can draw hot water for about 2 minutes, after that the appliance will automatically shut down. By turning the steam/hot water control (fig. 1/C) backwards and forwards, you can re-start the process.
Frothing milk and making cappuccino
The special Spumatore frothing aid (fig. 1/L) can froth milk directly into the cup from a container.
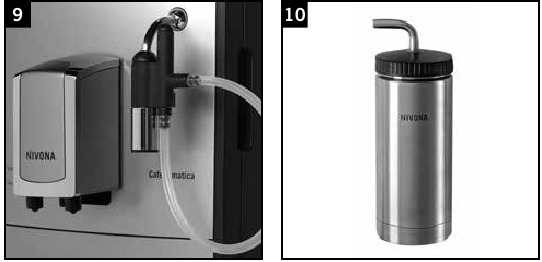
- Immerse the suction hose (fig. 9 and 10) into the milk (in the container or directly into the milk carton).
- Place a cup under the Spumatore.
- Press steam/rinsing button (fig. 1/E).
Whilst heating-up 5 red bars will flash at the bottom of the display. As soon as symbol S12 shows, you can draw steam and froth milk.
Attention
:
A small amount of water will initially precede the milk froth.
- Fill the cup with the required amount of milk froth and turn the steam/hot water knob (fig. 1/C) back anti-clockwise to position 0.
- Wait for the last milk drops before placing the cup under the coffee spout.
- Press the steam/rinsing button (fig. 1/E) once again.
The appliance is now back to coffee mode. - Place the cup with the frothed milk under the coffee spout (fig. 7) and fill up with the required amount of coffee as described in chapter 3.4.
Tip: You can draw hot steam for about. 2 minutes, after that the appliance will automatically shut down. By turning the steam/hot water knob (fig. 1/C) back and forth, you can re-start the process.
Attention
:
Dried milk residue on the steam/hot water jet is dif ficult to remove. Clean immediately after it has cooled off!
- To do this fill a bowl with clean water and immerse the suction hose in it.
- Place an empty bowl under the Spumatore (fig. 1/L).
- Press steam/rinsing button (fig. 1/E).
Whilst heating-up 5 red bars will flash at the bottom of the display. As soon as symbol S12 shows, you can draw steam.
- Turn the steam/hot water control (fig. 1/C) clockwise.
Attention
:
A small amount of water will initially precede the steam.
- Draw water until only clean water/steam emerges.
- Turn the steam/hot water control (fig. 1/C) anti-clockwise back to position 0.
- Press the steam/rinsing button (fig. 1/E) once again.
The appliance is now back to coffee mode.
Attention
:
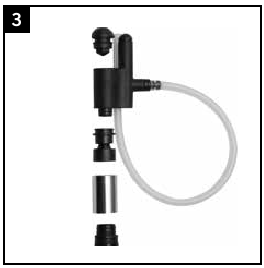
From time to time (ideally each time the appliance will not be used for a while, at any rate in regular intervals!) the Spumatore needs to be completely dismantled (fig. 3) and thoroughly cleaned under running water.
Cleaning and maintenance
Attention
:
If your appliance needs cleaning or maintenance, the display will show the respective sym- bol. Please always follow these instructions, otherwise your warranty will be void. Read chapters 4.1 to 4.5 for further information. Should you wish to maintain or clean your device without being asked to do so, please also follow the instructions in chapters 4.1 to 4.5.
Changing the filter
The filter will be flat after about 50 l of water have been drawn. The display shows symbol S6 .
You can still make coffee, but we recommend to always change the filter immediately.
Attention
:
The filter needs changing after a maximum of two months if the appliance is not in regular use. The display will show no status signal. Use the dial (by the month) at the top of the filter to select the date of change.
The device will heat up briefly and is ready for use again.
System cleaning
If the device needs cleaning, the display will show symbol S11 .
Tip: You can continue making coffee or draw hot water and steam, but we recommend to start the cleaning program as soon as possible. Otherwise the function might be impaired and your warranty could be compromised.
Attention
:
Do not disrupt the cleaning process. Follow the instructions exactly in the stated order. Insert cleaning tab only if the appliance asks for it.
Tip: During the cleaning process the red bars at the bottom of the display will show the progress. The more bars that are visible, the further the program has advanced.
Symbol S11 flashes on the display, symbols S1 and Symbol S2
are on.
- Remove the water tank (fig.4) and fill it to maximum. Reinsert the water tank.
- Remove drip tray with used coffee container (fig. 1/O and P) and empty both.
- Reinsert drip tray and used coffee container.
The appliance starts cleaning. When finished symbol S4 will additionally show.
- Place a sufficiently large bowl (about 0.5 l) under the coffee spout.
- Open the lid of coffee powder chute (fig. 1/N).
Symbol S4flashes to indicate that the cleaning tab should be inserted.
- Place a cleaning tab in the coffee powder chute and close the lid,
The cleaning process starts. Symbol S11 flashes. The cleaning process is automatic and will run for about 10 minutes. Once the process has finished, symbol S2
, is on and symbol S11
flashes.
- Remove drip tray with used coffee container (fig. 1/O and P) and empty both.
- Reinsert drip tray and used coffee container.
The appliance briefly heats up. It is ready for use again when the bean symbols in the display are on.
Manual cleaning
If required the cleaning program can also be started and run as described in chapter 4.2, without the prompt of symbol S11 .
Descaling
If the appliance needs descaling, symbol S7 appears on the display.
Tip: You can continue making coffee or draw hot water and steam, but we recommend to start the desca- ling program as soon as possible. Otherwise the function might be impaired and your warranty could be compromised.
Attention
:
Do not disrupt the descaling program. Follow the instructions exactly in the stated order. Never use vinegar or vinegar-based agents, only standard liquid products specifically recommended for automatic coffee machines.
Attention
:
Before starting the descaling program remove the filter from the water tank.
Tip: During the descaling program the progress is displayed through the red bars at the bottom of the display. The more bars are shown the further the progress.
The appliance briefly heats up. It is ready for use again when the bean symbols in the display are on.
Attention
:
Please remove any descaler residues on the casing immediately with a damp cloth.
Manual descaling
If required the descaling program can also be started and run as described above, without the prompt of symbol S7 .
Regular cleaning by hand
Tip: Please follow these cleaning instructions as working with foodstuffs demands the highest degree of cleanliness.
Attention
:
Never immerse the appliance in water! Do not use abrasive cleaning agents.
- Empty drip tray and used coffee container regularly (fig. 1/O and P). The red floating indicator at the back of the drip tray (fig. 1/Q) shows the tray’s filling level.
- Only use a soft, damp cloth for cleaning the casing inside and outside.
- Empty drip tray and used coffee container (fig. 1/O and P) at the latest when this is indicated on the display (only when the appliance is switched on!).
Occasionally use a little soapy water for cleaning.
- The water tank should be rinsed daily with clear water and then re-filled daily with fresh cool water.
TIP: Dried milk residue is dif ficult to remove.
- Therefore clean the steam/hot water jet/Spumatore, the suction hose regularly.
Attention
:
From time to time (ideally each time the appliance will not be used for a while, at any rate in regular intervals!) the steam/hot water jet needs to be completely dismantled and thoroughly cleaned under running water (fig.3).
We recommend our special cleaning agent for milk residue NICC 705.
Cleaning the brew unit
Attention
:
Remove the brew unit only when the appliance is switched off.
When necessary the brew unit can be removed and cleaned under cold, running water. Never use any cleaning agent, but clear, cold water only! For hygienic reasons we recommend the removal and cleaning of the unit thoroughly after each run of the cleaning program (see chapter 4.2).
- Open and remove the service door on the right of the casing (fig. 1/M).
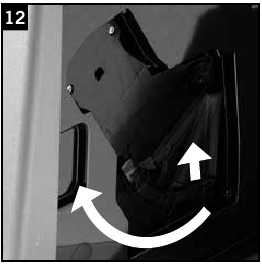
- Remove the brew unit by pressing the red switch and turning the handle all the way to the left until it snaps into place (fig. 12).
- Carefully remove the brew unit using the handle.
- Clean the brew unit under running cold water and let it dry.
- Reinsert the brew unit carefully and lock by pressing down the red switch and turning the handle all the way to the right until it snaps into place.
- Close the service door and in doing so carefully place the pivots at the back of the door into the notches. Make sure that the door (fig. 1/M) completely snaps back into place.
System reports
| Report | Cause | Solution |
S3  flashes flashes |
No beans | Add beans, restart coffee making |
S12  |
Refill water pipe system Filter possibly defective | Turn steam/hot water control clockwise Remove or replace filter |
S1 on on |
Water tank is empty | Fill water tank |
| Water tank is missing or inserted incorrectly | Reinsert water tank | |
S2 on on |
Drip tray and/or used coffee container full | Empty drip tray and/or used coffee container |
S2  flashes flashes |
Drip tray with used coffee container missing or tted incorrectly | Reinsert drip tray with used coffee container |
S11  on on |
System cleaning required | Clean system (see chapter 4.2) |
S7  on on |
System descaling necessary | Descale system (see chapter 4.3) |
S6  on on |
Filter exhausted | Change filter (see chapter 4.1) |
| S13 bar 1 and bar 5 flash alternately | Brew unit fitted incorrectly | Fit brew unit correctly and snap into place (see chapter 4.5) |
Problem solving
| Fault | Cause | Solution |
| No hot water or steam |
Blocked steam/hot water jet/ Spumatore (fig.1/L) System may be calcified |
|
| Not enough milk froth or liquid froth |
Unsuitable milk Blocked steam/hot water jet / Spumatore |
|
| Coffee only drips |
System may be calcified Coffee is too finely ground Coffee powder too fine |
|
| No «crema» on the coffee |
Unsuitable coffee beans Beans may be too old Grinding coarseness not adjusted to beans |
|
| Strong noise from coffee grinder | Foreign matter in grinder, e.g. small stones |
|
In the event of a fault or a system report which you cannot correct yourself, please contact our email (info@nivona.com) or Service-Hotline: 0049 911-25266390
If the system detects any errors, the display will show an error report
- flashing bars or
- lighted bars.
Attention
:
Please make a note of the flashing or lit up bars. Switch the appliance off and pull the mains plug. Then call the service hotline 0049-911-25266390 or email (info@nivona.com) us with name type, serial number (see type label, fig.1/S) and error number. Our service team will take care of the next steps.
Replacement parts/Accessories
Fresh water filter NIRF 700:
New fresh water filters are available from well-stocked local dealers.
Cleaning tabs NIRT 701:
New cleaning tabs are available from well-stocked local dealers.
Descaling agent NIRK 703:
New descaling agents are available from well-stocked local dealers.
Special milk residue cleaner NICC 705:
Special milk residue cleaner is available from well-stocked local dealers.
MilkCooler NICT 500:
This top-quality stainless steel milk cooler keeps milk „fridge cold» for a long time and delivers the best frothing results.
Customer service, guarantee, environmental protection
Customer service
Nivona products are manufactured to the highest quality standards. Should any question arise with regards to your appliance, please do not hesitate to write to us. Only with your active support will we be able to improve our products and further develop them, so that they will fully satisfy your demand. In the event that you need to ship your faulty appliance directly to us, please make sure that no residual water remains in the system:
- Switch the appliance off.
- Press the on/off switch (fig. 1/J) and the steam/rinsing button (fig. 1/E) simultaneously for at least 3 seconds.
- Remove the water tank (fig. 4).
- Place a sufficiently large bowl (minimum contents 0.5 l) under the steam/hot water jet / Spumatore.
- Turn the steam/hot water control (fig. 1/C) clockwise all the way.
The appliance is now steaming off. All 5 red bars are flashing in the display. - When symbol S12
shows, turn the steam/hot water control (fig.1/C) anti-clockwise.
The appliance will then switch off. - Remove drip tray with used coffee container (fig. 1/O and 1/P) and empty both.
- Reinsert drip tray and used coffee container.
Your appliance is now ready for shipment.
Tip: Please make sure that you pack the appliance very carefully before shipping, ideally in the original packaging. The manufacturer will assume no liabilities for damage in transit.
Guarantee and customer service terms and conditions
Please find detailed information about guarantee and customer service terms and conditions in the accompanying document.
Please dispose of filters with domestic waste.
Disposal of your old appliance and packaging
Please keep the original packaging. It will serve as protection should you need to ship the appliance in the event of a customer service issue.
Electrical and electronical appliances often contain valuable, but sometimes also environmentally damaging material and should therefore not be disposed of as normal household waste. They may damage human health and harm the environment when wrongfully handled or left among residual waste. Therefore please drop your old or irreparably damaged appliance at your local community waste collection/recycling centre.
Further information is available from the dealer where you bought the appliance, your town hall or waste collector.
Technical data
Voltage 220 — 240V AC, 50/60 Hz
Power consumption 1455 W
NIVONA Apparate GmbH
Südwestpark 90
D-90449 Nürnberg Germany
www.nivona.com
© 2017 by NIVONA
Documents / Resources
References
http://www.nivona.com
Download manual
Here you can download full pdf version of manual, it may contain additional safety instructions, warranty information, FCC rules, etc.
Download Nivona CafeRomatica NICR 520 / NICR 530 / NICR 550 / NICR 560 — Coffee / Espresso Machine Manual
О кофемашине мечтают многие, но не всем она по карману. Их дороговизна объясняется достаточно сложным устройством в сравнении со многой другой бытовой техникой и более высокотехнологичным производством. В том числе поэтому в мире не так много заводов, которые выпускают кофемашины. Мы нашли относительно недорогую кофемашину, которая продается по цене до 25 000 рублей и проверили на что она способна. Все подробности теста — на видео.
Видео: Тест бюджетной кофемашины Nivona CafeRomatica 520 (NICR 520)
Подписывайтесь на Tostr — наш канал о домашней технике на YouTube
Про кофемашину
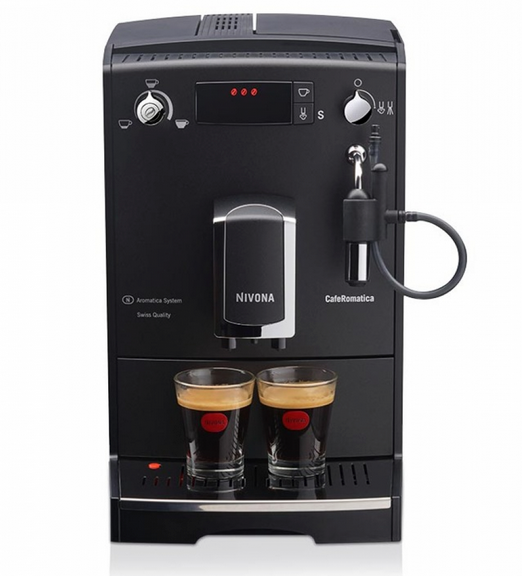
Nivona CafeRomatica 520 — это автоматическая кофемашина. То есть, она в авторежиме готовит кофе из кофейных зерен — сама мелет их (здесь встроенная кофемолка с жерновами из закаленной нержавеющей стали, рассчитанная на 80 000 помолов), сама греет воду и заваривает кофе, а потом наливает его в чашку.
Основные рабочие характеристики и стоимость Nivona CafeRomatica 520 (NICR 520)
− Максимальное давление помпы: 15 Бар
− Кофемолка на 250 г зерен
− Жернова кофемолки из закаленной стали
− Объем контейнера для воды: 2,2 л
− Напитки: ристретто, эспрессо, американо, лунго, капучино, латте, горячая вода
− Регулировки: помола, объема и крепости напитка
− Капучинатор с ручной регулировкой объема молочной пены
− Изменяемая высота кофейного диспенсера (до 14 см)
− Съемный заварочный блок
− Программы автоочистки
− Габариты: 24×34×46 cм
− Страна производства: Португалия
− Стоимость: до 25 000 рублей
Но это не значит, что владелец совсем отстранен от того, что он в итоге пьет. Нет: и степень помола кофемолки регулируется (три уровня, для разных сортов кофе и напитков), и уровень крепости, и объем кофе в чашке. Так что почувствовать себя бариста — специалистом по приготовлению кофе — машина не помешает.
Про кофе
Недорогую (в контексте стоимости подобной техники в принципе) Nivona NICR 520 можно отнести к кофемашинам с базовыми возможностями, но при этом она готовит все популярные кофейные напитки — от ристретто (20 мл), эспрессо или лунго (240 мл) до капучино или кофе латте. То есть, напитки с молочной пеной на основе кофе тоже будут доступны.
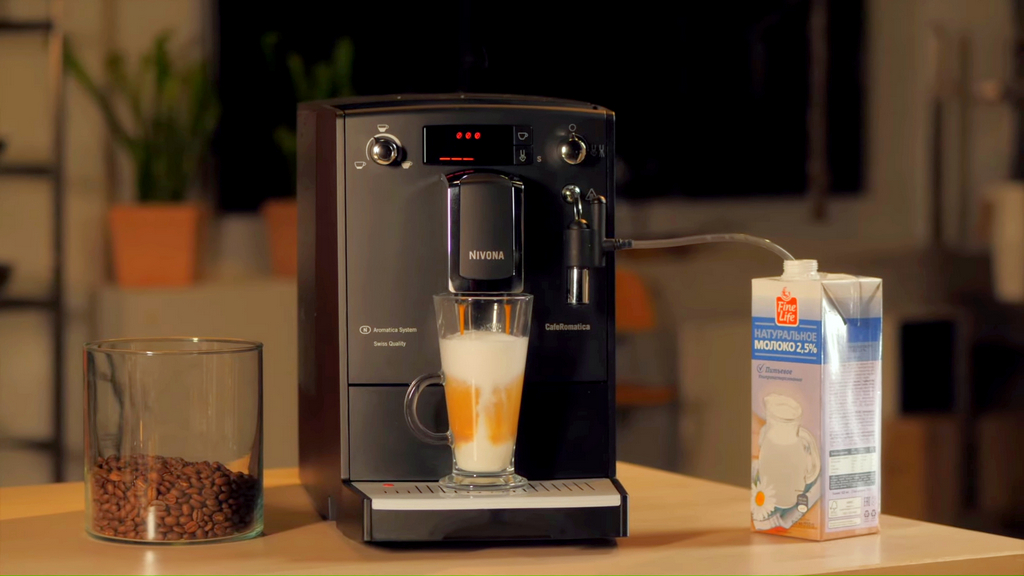
Для приготовления молочной пены нужно активировать капучинатор, причем он может подавать вспененное молоко прямо из пакета с молоком, если так удобно — никуда ничего переливать не надо. Плюс капучинатора в этой кофемашине — то, что владелец самостоятельно контролирует объем пены в чашке. Значит, можно создавать напитки именно на свой вкус.
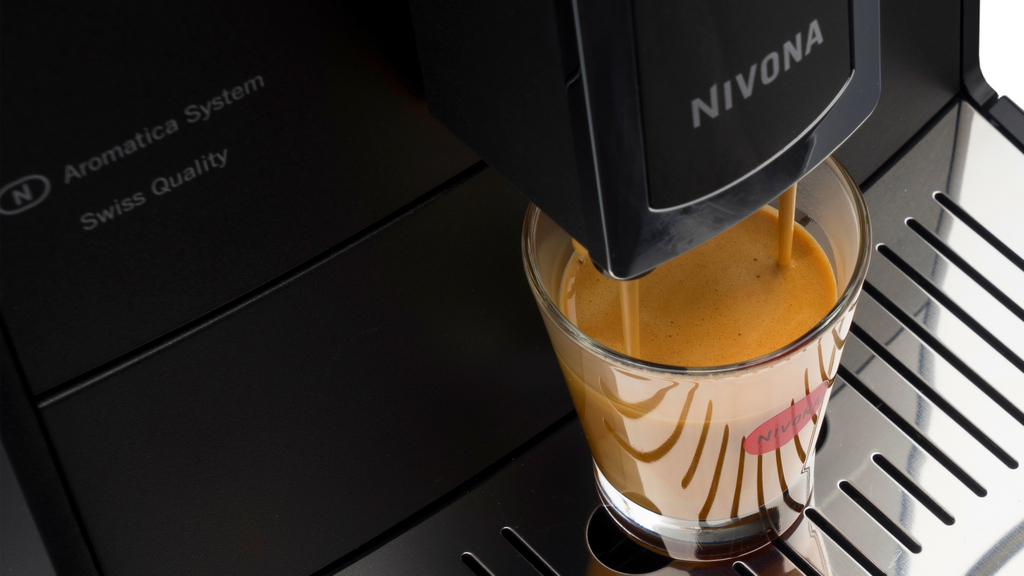
Чтобы вкус кофе был более ярким и насыщенным, здесь реализована технология Aromatica System — заварочная камера с молотым кофе расширяется при подаче туда горячей воды, благодаря специальной эластичной крышке. В итоге кофе и вода лучше спешиваются и в чашку попадает более насыщенный и яркий по вкусу напиток.
Про всё остальное
«Всё остальное» — это, вообще-то, очень важные вещи. Например, контейнер для чистой воды в этой машине весьма объемный — 2,2 л. Значит, не нужно часто воду доливать. При этом сама кофемашина компактная — 24×34×46 cм, так что на кухне, дома или в офисе, она много места не займет.
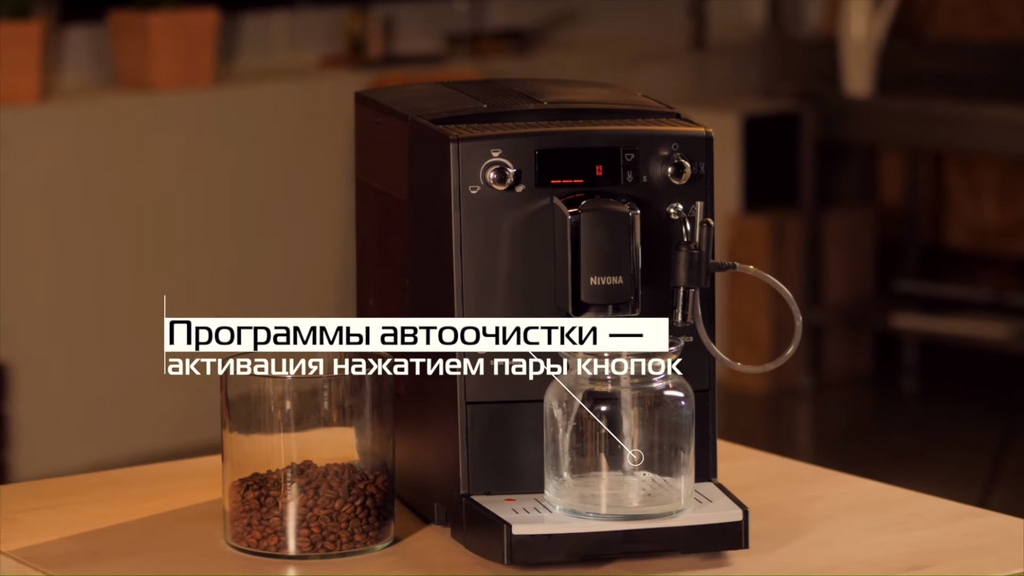
Еще один важный момент — очистка кофемашины, уход за ней. В Nivona NICR 520 есть автопрограммы для очистки заварочной системы от кофейных масел, от накипи, промывание и ополаскивание системы подачи кафе. То есть, нажимаешь пару кнопок и машина сама очищается.
Хорошо еще то, что заварочный блок тут съемный, его можно легко промыть (и лучше это делать раз в неделю-две), да и в контексте ремонтопригодности это правильное решение.
Вывод Chudo.tech
В ходе нашего теста (см. видео в начале материала) мы приготовили с помощью Nivona CafeRomatica 520 несколько кофейных напитков. Эспрессо и лунго получились с насыщенным вкусом и правильной светло-орехового цвета плотной пенкой — за такой кофе кофемашине вполне можно ставить пятерку.
Даниил Головин
эксперт Chudo.tech и канала о домашней технике TostrВ магазинах сейчас широкий выбор автоматических кофемашин по разным ценам. В среднем это 50-60 тысяч рублей, но и есть и за 200 тысяч. Поэтому модели за 20-30 тысяч можно отнести к бюджетным в этом сегменте. И результат теста бюджетной Nivona 520, говорит о том, что возможность купить качественную, простую и надежную кофемашину есть и у тех, кто привык тратить рационально.
С капучино и кофе латте тоже проблем не было. Молочная пена получалась плотная, стойкая, а пользоваться капучинатором было легко. Отметим, что у кофемашины диспенсер с регулировкой по высоте — чтобы наливать кофе в разные чашки и бокалы (высотой до 14 см), как в кофейнях.
За свою стоимость — купить ее можно по цене до 25 000 рублей — Nivona CafeRomatica 520 почти совсем не имеет минусов. Мы нашли только пару незначительных: не очень информативная индикация объема кофе в чашке на корпусе и немного «олдовый» (не сенсорный, без красивых цветных картинок) дисплей.
Однако остальное — только плюсы: от качества кофе, до простоты использования, легкости ухода и, что немаловажно, цены. Chudo.tech и канал о домашней технике Tostr рекомендуют Nivona NICR 520 к покупке.
Больше подробностей об этой кофемашине — в нашем видео в начале материала.



 .
.

 Даниил Головин