NISSAN TIIDA. ВЫПУСК С 2007 Г. РЕСТАЙЛИНГ В 2009 Г. БЕНЗИНОВЫЕ ДВИГАТЕЛИ: 1.6 Л (110 Л.С.) И 1.8 Л (126 Л.С.)
Nissan Tiida. ОБЩИЕ СВЕДЕНИЯ ОБ АВТОМОБИЛЕ
Nissan Tiida. ТЕХНИЧЕСКИЕ ХАРАКТЕРИСТИКИ АВТОМОБИЛЕЙ
Nissan Tiida. Подкапотное пространство
Nissan Tiida. ПАСПОРТНЫЕ ДАННЫЕ
Nissan Tiida. КЛЮЧИ АВТОМОБИЛЯ
Nissan Tiida. ПАНЕЛЬ ПРИБОРОВ
Nissan Tiida. ПАНЕЛЬ ПРИБОРОВ — ЧАСТЬ 2
Nissan Tiida. КОМБИНАЦИЯ ПРИБОРОВ
Nissan Tiida. БОРТОВОЙ КОМПЬЮТЕР
Nissan Tiida. ОТОПЛЕНИЕ, КОНДИЦИОНИРОВАНИЕ И ВЕНТИЛЯЦИЯ САЛОНА
Nissan Tiida. СИСТЕМА ОТОПЛЕНИЯ, КОНДИЦИОНИРОВАНИЯ И ВЕНТИЛЯЦИИ С БЛОКОМ АВТОМАТИЧЕСКОГО УПРАВЛЕНИЯ
Nissan Tiida. СИСТЕМА ОТОПЛЕНИЯ, КОНДИЦИОНИРОВАНИЯ И ВЕНТИЛЯЦИИ С БЛОКОМ РУЧНОГО УПРАВЛЕНИЯ
Nissan Tiida. ЗАМКИ
Nissan Tiida. СТЕКЛОПОДЪЕМНИКИ
Nissan Tiida. РЕМНИ БЕЗОПАСНОСТИ
Nissan Tiida. РЕГУЛИРОВКА ПОЛОЖЕНИЯ ПЕРЕДНИХ СИДЕНИЙ
Nissan Tiida. ОБОГРЕВ ПЕРЕДНИХ СИДЕНИЙ
Nissan Tiida. ЗАДНЕЕ СИДЕНЬЕ
Nissan Tiida. ИСПОЛЬЗОВАНИЕ ДЕТСКИХ СИДЕНИЙ
Nissan Tiida. БАГАЖНОЕ ОТДЕЛЕНИЕ
Nissan Tiida. РЕГУЛИРОВКА ПОЛОЖЕНИЯ РУЛЕВОГО КОЛЕСА
Nissan Tiida. ЗЕРКАЛА ЗАДНЕГО ВИДА
Nissan Tiida. ОСВЕЩЕНИЕ САЛОНА
Nissan Tiida. ПРОТИВОСОЛНЕЧНЫЕ КОЗЫРЬКИ
Nissan Tiida. КАПОТ
Nissan Tiida. УПРАВЛЕНИЕ КОРОБКОЙ ПЕРЕДАЧ
Nissan Tiida. РЫЧАГ СТОЯНОЧНОГО ТОРМОЗА
Nissan Tiida. ЭЛЕКТРИЧЕСКАЯ РОЗЕТКА
Nissan Tiida. ПРАВИЛА ТЕХНИКИ БЕЗОПАСНОСТИ
Nissan Tiida. ПОЛЬЗОВАНИЕ ДОМКРАТОМ
Nissan Tiida. БУКСИРОВКА АВТОМОБИЛЯ
Nissan Tiida. АВТОМОБИЛЬ ДВИЖЕТСЯ РЫВКАМИ
Nissan Tiida. АВТОМОБИЛЬ ПЛОХО РАЗГОНЯЕТСЯ
Nissan Tiida. ПОСТОРОННИЕ СТУКИ СТУКИ В ДВИГАТЕЛЕ
Nissan Tiida. ТЕХНИЧЕСКОЕ ОБСЛУЖИВАНИЕ
Nissan Tiida. РЕГЛАМЕНТ ТЕХНИЧЕСКОГО ОБСЛУЖИВАНИЯ АВТОМОБИЛЯ
Nissan Tiida. ПАДЕНИЕ УРОВНЯ ОХЛАЖДАЮЩЕЙ ЖИДКОСТИ В РАСШИРИТЕЛЬНОМ БАЧКЕ
Nissan Tiida. Сцепление не полностью включается (пробуксовывает)
Nissan Tiida. ДВИГАТЕЛЬ НЕ РАЗВИВАЕТ ПОЛНОЙ МОЩНОСТИ
Nissan Tiida. ПОВЫШЕННЫЙ РАСХОД ТОПЛИВА
Nissan Tiida. Стук и щелчки при поворотах автомобиля
Nissan Tiida. Не горят лампы блок-фар, фонарей
Nissan Tiida. Постоянно горит сигнализатор резерва топлива
Nissan Tiida. Увеличенный свободный ход рулевого колеса
Nissan Tiida. Скрип, визг при торможении
Nissan Tiida. Ежедневное обслуживание (ЕО)
Nissan Tiida. Проверка уровня и доливка масла в систему смазки
Nissan Tiida. Проверка уровня и доливка охлаждающей жидкости
Nissan Tiida. Проверка уровня и доливка тормозной жидкости в бачок главного тормозного цилиндра
Nissan Tiida. Проверка уровня и доливка жидкости в бачок гидроусилителя рулевого управления
Nissan Tiida. Проверка уровня и доливка жидкости в бачок омывателя
Nissan Tiida. ПРОВЕРКА ВНЕШНИХ ОСВЕТИТЕЛЬНЫХ ПРИБОРОВ
Nissan Tiida. Двигатель HR16DE, MR18DE
Nissan Tiida. Возможные неисправности двигателя, их причины и способы устранения
Nissan Tiida. СНЯТИЕ И УСТАНОВКА БРЫЗГОВИКА ДВИГАТЕЛЯ HR16DE, MR18DE
Nissan Tiida. СНЯТИЕ И УСТАНОВКА ДЕКОРАТИВНОГО КОЖУХА ДВИГАТЕЛЯ HR16DE, MR18DE
Nissan Tiida. ПРОВЕРКА КОМПРЕССИИ В ЦИЛИНДРАХ ДВИГАТЕЛЯ HR16DE, MR18DE
Nissan Tiida. ОЧИСТКА СИСТЕМЫ ВЕНТИЛЯЦИИ КАРТЕРА ДВИГАТЕЛЯ HR16DE, MR18DE
Nissan Tiida. УСТАНОВКА ПОРШНЯ ПЕРВОГО ЦИЛИНДРА В ПОЛОЖЕНИЕ ВМТ ТАКТА СЖАТИЯ ДВИГАТЕЛЯ HR16DE, MR18DE
Nissan Tiida. ЗАМЕНА ОПОР ПОДВЕСКИ СИЛОВОГО АГРЕГАТА ДВИГАТЕЛЯ HR16DE, MR18DE
Nissan Tiida. ЗАМЕНА ПРАВОЙ ОПОРЫ ПОДВЕСКИ СИЛОВОГО АГРЕГАТА ДВИГАТЕЛЯ HR16DE, MR18DE
Nissan Tiida. ЗАМЕНА ЛЕВОЙ ОПОРЫ ПОДВЕСКИ СИЛОВОГО АГРЕГАТА ДВИГАТЕЛЯ HR16DE, MR18DE
Nissan Tiida. ПРОВЕРКА, РЕГУЛИРОВКА НАТЯЖЕНИЯ И ЗАМЕНА РЕМНЯ ПРИВОДА ВСПОМОГАТЕЛЬНЫХ АГРЕГАТОВ ДВИГАТЕЛЯ HR16DE, MR18DE
Nissan Tiida. ЗАМЕНА ЦЕПИ ПРИВОДА ГАЗОРАСПРЕДЕЛИТЕЛЬНОГО МЕХАНИЗМА ДВИГАТЕЛЯ HR16DE, MR18DE
Nissan Tiida. СНЯТИЕ, ДЕФЕКТОВКА И УСТАНОВКА МАХОВИКА ДВИГАТЕЛЯ HR16DE, MR18DE
Nissan Tiida. ЗАМЕНА ПРОКЛАДКИ КРЫШКИ ГОЛОВКИ БЛОКА ЦИЛИНДРОВ ДВИГАТЕЛЯ HR16DE, MR18DE
Nissan Tiida. ЗАМЕНА ПРОКЛАДКИ ГОЛОВКИ БЛОКА ЦИЛИНДРОВ ДВИГАТЕЛЯ HR16DE, MR18DE
Nissan Tiida. ЗАМЕНА МАСЛОСЪЕМНЫХ КОЛПАЧКОВ ДВИГАТЕЛЯ HR16DE, MR18DE
Nissan Tiida. ЗАМЕНА САЛЬНИКОВ КОЛЕНЧАТОГО ВАЛА ДВИГАТЕЛЯ HR16DE, MR18DE
Nissan Tiida. ЗАМЕНА УПЛОТНЕНИЯ МАСЛЯНОГО КАРТЕРА ДВИГАТЕЛЯ HR16DE, MR18DE
Nissan Tiida. СНЯТИЕ, ДЕФЕКТОВКА И УСТАНОВКА РАСПРЕДЕЛИТЕЛЬНЫХ ВАЛОВ ДВИГАТЕЛЯ HR16DE ( MR18DE)
Nissan Tiida. РЕГУЛИРОВКА ЗАЗОРОВ В ПРИВОДЕ КЛАПАНОВ ДВИГАТЕЛЯ HR16DE, MR18DE
Nissan Tiida. ПРИТИРКА КЛАПАНОВ ДВИГАТЕЛЯ HR16DE, MR18DE
Nissan Tiida. СНЯТИЕ И УСТАНОВКА СИЛОВОГО АГРЕГАТА ДВИГАТЕЛЯ HR16DE, MR18DE
Nissan Tiida. СИСТЕМА СМАЗКИ ДВИГАТЕЛЯ HR16DE, MR18DE
Nissan Tiida. СНЯТИЕ И УСТАНОВКА МАСЛЯНОГО НАСОСА ДВИГАТЕЛЯ HR16DE, MR18DE
Nissan Tiida. СИСТЕМА ОХЛАЖДЕНИЯ ДВИГАТЕЛЯ HR16DE, MR18DE
Nissan Tiida. ПРОВЕРКА ШЛАНГОВ И СОЕДИНЕНИЙ СИСТЕМЫ ОХЛАЖДЕНИЯ ДВИГАТЕЛЯ HR16DE, MR18DE
Nissan Tiida. ЗАМЕНА ОХЛАЖДАЮЩЕЙ ЖИДКОСТИ ДВИГАТЕЛЯ HR16DE, MR18DE
Nissan Tiida. СНЯТИЕ И УСТАНОВКА ЭЛЕКТРОВЕНТИЛЯТОРА РАДИАТОРА СИСТЕМЫ ОХЛАЖДЕНИЯ ДВИГАТЕЛЯ HR16DE, MR18DE В СБОРЕ С КОЖУХОМ
Nissan Tiida. ЗАМЕНА РАДИАТОРА СИСТЕМЫ ОХЛАЖДЕНИЯ ДВИГАТЕЛЯ HR16DE, MR18DE
Nissan Tiida. СНЯТИЕ И УСТАНОВКА РАСШИРИТЕЛЬНОГО БАЧКА ДВИГАТЕЛЯ HR16DE, MR18DE
Nissan Tiida. ЗАМЕНА ВОДЯНОГО НАСОСА ДВИГАТЕЛЯ HR16DE, MR18DE
Nissan Tiida. ЗАМЕНА ТЕРМОСТАТА ДВИГАТЕЛЯ HR16DE, MR18DE
Nissan Tiida. СИСТЕМА ВЫПУСКА ОТРАБОТАВШИХ ГАЗОВ ДВИГАТЕЛЯ HR16DE, MR18DE
Nissan Tiida. СНЯТИЕ И УСТАНОВКА ОСНОВНОГО ГЛУШИТЕЛЯ ДВИГАТЕЛЯ HR16DE, MR18DE
Nissan Tiida. СНЯТИЕ И УСТАНОВКА ДОПОЛНИТЕЛЬНОГО ГЛУШИТЕЛЯ ДВИГАТЕЛЯ HR16DE, MR18DE
Nissan Tiida. СНЯТИЕ И УСТАНОВКА КАТАЛИТИЧЕСКОГО НЕЙТРАЛИЗАТОРА ДВИГАТЕЛЯ HR16DE, MR18DE
Nissan Tiida. СНЯТИЕ И УСТАНОВКА ВЫПУСКНОГО КОЛЛЕКТОРА ДВИГАТЕЛЯ HR16DE, MR18DE
Nissan Tiida. СНЯТИЕ И УСТАНОВКА ТЕРМОЭКРАНОВ ДВИГАТЕЛЯ HR16DE, MR18DE
Nissan Tiida. СИСТЕМА ПИТАНИЯ ДВИГАТЕЛЯ HR16DE, MR18DE
Nissan Tiida. ПРОВЕРКА ДАВЛЕНИЯ В СИСТЕМЕ ПИТАНИЯ ДВИГАТЕЛЯ HR16DE, MR18DE
Nissan Tiida. ЗАМЕНА ФИЛЬТРУЮЩЕГО ЭЛЕМЕНТА ВОЗДУШНОГО ФИЛЬТРА ДВИГАТЕЛЯ HR16DE, MR18DE
Nissan Tiida. СНЯТИЕ И УСТАНОВКА ВОЗДУХОЗАБОРНИКА ДВИГАТЕЛЯ HR16DE, MR18DE
Nissan Tiida. СНЯТИЕ И УСТАНОВКА КОРПУСА ВОЗДУШНОГО ФИЛЬТРА ДВИГАТЕЛЯ HR16DE, MR18DE
Nissan Tiida. СНЯТИЕ И УСТАНОВКА ТОПЛИВНОГО МОДУЛЯ ДВИГАТЕЛЯ HR16DE, MR18DE
Nissan Tiida. РЕМОНТ ТОПЛИВНОГО МОДУЛЯ ДВИГАТЕЛЯ HR16DE, MR18DE
Nissan Tiida. СНЯТИЕ И УСТАНОВКА ТОПЛИВНОГО БАКА ДВИГАТЕЛЯ HR16DE, MR18DE
Nissan Tiida. СНЯТИЕ И УСТАНОВКА НАЛИВНОЙ ТРУБЫ ДВИГАТЕЛЯ HR16DE, MR18DE
Nissan Tiida. СНЯТИЕ И УСТАНОВКА ТОПЛИВНОЙ РАМПЫ ДВИГАТЕЛЯ HR16DE, MR18DE
Nissan Tiida. СНЯТИЕ ПРОВЕРКА И УСТАНОВКА ТОПЛИВНЫХ ФОРСУНОК ДВИГАТЕЛЯ HR16DE, MR18DE
Nissan Tiida. СНЯТИЕ И УСТАНОВКА ДРОССЕЛЬНОГО УЗЛА ДВИГАТЕЛЯ HR16DE, MR18DE
Nissan Tiida. СНЯТИЕ И УСТАНОВКА ВПУСКНОЙ ТРУБЫ ДВИГАТЕЛЯ HR16DE, MR18DE
Nissan Tiida. СНЯТИЕ И УСТАНОВКА ПЕДАЛИ ПРИВОДА ДРОССЕЛЬНОЙ ЗАСЛОНКИ ДВИГАТЕЛЯ HR16DE, MR18DE
Nissan Tiida. СИСТЕМА УЛАВЛИВАНИЯ ПАРОВ ТОПЛИВА ДВИГАТЕЛЯ HR16DE, MR18DE
Nissan Tiida. СНЯТИЕ, ПРОВЕРКА И УСТАНОВКА КЛАПАНА ПРОДУВКИ АДСОРБЕРА ДВИГАТЕЛЯ HR16DE, MR18DE
Nissan Tiida. СЦЕПЛЕНИЕ
Nissan Tiida. ВОЗМОЖНЫЕ НЕИСПРАВНОСТИ СЦЕПЛЕНИЯ, ИХ ПРИЧИНЫ И СПОСОБЫ УСТРАНЕНИЯ
Nissan Tiida. ЗАМЕНА РАБОЧЕЙ ЖИДКОСТИ В ГИДРОПРИВОДЕ ВЫКЛЮЧЕНИЯ СЦЕПЛЕНИЯ
Nissan Tiida. СНЯТИЕ И УСТАНОВКА СЦЕПЛЕНИЯ
Nissan Tiida. ЗАМЕНА РАБОЧЕГО ЦИЛИНДРА ПРИВОДА ВЫКЛЮЧЕНИЯ СЦЕПЛЕНИЯ С ПОДШИПНИКОМ ВЫКЛЮЧЕНИЯ СЦЕПЛЕНИЯ
Nissan Tiida. ЗАМЕНА ГЛАВНОГО ЦИЛИНДРА ГИДРОПРИВОДА ВЫКЛЮЧЕНИЯ СЦЕПЛЕНИЯ
Nissan Tiida. ЗАМЕНА ТРУБОПРОВОДА ГИДРОПРИВОДА ВЫКЛЮЧЕНИЯ СЦЕПЛЕНИЯ
Nissan Tiida. СНЯТИЕ И УСТАНОВКА ПЕДАЛИ СЦЕПЛЕНИЯ
Nissan Tiida. МЕХАНИЧЕСКАЯ КОРОБКА ПЕРЕДАЧ
Nissan Tiida. ПРОВЕРКА УРОВНЯ, ДОЛИВКА И ЗАМЕНА МАСЛА В МЕХАНИЧЕСКОЙ КОРОБКЕ ПЕРЕДАЧ
Nissan Tiida. ЗАМЕНА САЛЬНИКОВ МЕХАНИЧЕСКОЙ КОРОБКИ ПЕРЕДАЧ
Nissan Tiida. СНЯТИЕ И УСТАНОВКА МЕХАНИЧЕСКОЙ КОРОБКИ ПЕРЕДАЧ
Nissan Tiida. ЗАМЕНА ТРОСОВ УПРАВЛЕНИЯ МЕХАНИЧЕСКОЙ КОРОБКОЙ ПЕРЕДАЧ
Nissan Tiida. АВТОМАТИЧЕСКАЯ КОРОБКА ПЕРЕДАЧ
Nissan Tiida. ЗАМЕНА РАБОЧЕЙ ЖИДКОСТИ В АВТОМАТИЧЕСКОЙ КОРОБКЕ ПЕРЕДАЧ
Nissan Tiida. РЕГУЛИРОВКА И ЗАМЕНА ТРОСА ПРИВОДА УПРАВЛЕНИЯ АВТОМАТИЧЕСКОЙ КОРОБКОЙ ПЕРЕДАЧ
Nissan Tiida. СНЯТИЕ И УСТАНОВКА АВТОМАТИЧЕСКОЙ КОРОБКИ ПЕРЕДАЧ
Nissan Tiida. СНЯТИЕ И УСТАНОВКА КУЛИСЫ СЕЛЕКТОРА УПРАВЛЕHИЯ АВТОМАТИЧЕСКОЙ КОРОБКОЙ ПЕРЕДАЧ
Nissan Tiida. ПРИВОДЫ ПЕРЕДНИХ КОЛЕС
Nissan Tiida. ПРОВЕРКА ТЕХНИЧЕСКОГО СОСТОЯНИЯ ПРИВОДОВ ПЕРЕДНИХ КОЛЕС
Nissan Tiida. СНЯТИЕ И УСТАНОВКА ПРИВОДОВ ПЕРЕДНИХ КОЛЕС
Nissan Tiida. ЗАМЕНА ШАРНИРОВ РАВНЫХ УГЛОВЫХ СКОРОСТЕЙ
Nissan Tiida. ПЕРЕДНЯЯ ПОДВЕСКА
Nissan Tiida. ПРОВЕРКА ТЕХНИЧЕСКОГО СОСТОЯНИЯ ДЕТАЛЕЙ ПЕРЕДНЕЙ ПОДВЕСКИ НА АВТОМОБИЛЕ
Nissan Tiida. СНЯТИЕ И УСТАНОВКА АМОРТИЗАТОРНОЙ СТОЙКИ ПЕРЕДНЕЙ ПОДВЕСКИ
Nissan Tiida. РЕМОНТ АМОРТИЗАТОРНОЙ СТОЙКИ ПЕРЕДНЕЙ ПОДВЕСКИ
Nissan Tiida. ЗАМЕНА РЫЧАГА ПЕРЕДНЕЙ ПОДВЕСКИ
Nissan Tiida. ЗАМЕНА КРОНШТЕЙНОВ ПОПЕРЕЧИНЫ ПЕРЕДНЕЙ ПОДВЕСКИ
Nissan Tiida. ЗАМЕНА ДЕТАЛЕЙ СТАБИЛИЗАТОРА ПОПЕРЕЧНОЙ УСТОЙЧИВОСТИ ПЕРЕДНЕЙ ПОДВЕСКИ
Nissan Tiida. СНЯТИЕ И УСТАНОВКА ПОВОРОТНОГО КУЛАКА
Nissan Tiida. ЗАМЕНА ПОДШИПНИКА СТУПИЦЫ ПЕРЕДНЕГО КОЛЕСА
Nissan Tiida. СНЯТИЕ И УСТАНОВКА ПОПЕРЕЧИНЫ ПЕРЕДНЕЙ ПОДВЕСКИ
Nissan Tiida. ЗАДНЯЯ ПОДВЕСКА
Nissan Tiida. ЗАМЕНА АМОРТИЗАТОРА ЗАДНЕЙ ПОДВЕСКИ
Nissan Tiida. ЗАМЕНА ПРУЖИНЫ ЗАДНЕЙ ПОДВЕСКИ
Nissan Tiida. ЗАМЕНА СТУПИЦЫ ЗАДНЕГО КОЛЕСА
Nissan Tiida. ЗАМЕНА ШПИЛЕК СТУПИЦЫ ЗАДНЕГО КОЛЕСА
Nissan Tiida. ПРОВЕРКА И РЕГУЛИРОВКА УГЛОВ УСТАНОВКИ КОЛЕС
Nissan Tiida. РУЛЕВОЕ УПРАВЛЕНИЕ
Nissan Tiida. ОСМОТР И ПРОВЕРКА РУЛЕВОГО УПРАВЛЕНИЯ НА АВТОМОБИЛЕ
Nissan Tiida. ПРОВЕРКА СВОБОДНОГО ХОДА (ЛЮФТА) РУЛЕВОГО КОЛЕСА
Nissan Tiida. СНЯТИЕ И УСТАНОВКА РУЛЕВОГО КОЛЕСА
Nissan Tiida. СНЯТИЕ И УСТАНОВКА КОЖУХА РУЛЕВОЙ КОЛОНКИ
Nissan Tiida. СНЯТИЕ И УСТАНОВКА РУЛЕВОЙ КОЛОНКИ
Nissan Tiida. ЗАМЕНА НАКОНЕЧНИКА РУЛЕВОЙ ТЯГИ
Nissan Tiida. ЗАМЕНА РУЛЕВОЙ ТЯГИ
Nissan Tiida. ЗАМЕНА РУЛЕВОГО МЕХАНИЗМА
Nissan Tiida. ТОРМОЗНАЯ СИСТЕМА
Nissan Tiida. ПРОВЕРКА ТОРМОЗНОЙ СИСТЕМЫ
Nissan Tiida. ПРОВЕРКА ГЕРМЕТИЧНОСТИ ГИДРОПРИВОДА ТОРМОЗНОЙ СИСТЕМЫ
Nissan Tiida. ПРОВЕРКА РАБОТЫ ВАКУУМНОГО УСИЛИТЕЛЯ ТОРМОЗОВ
Nissan Tiida. ПРОВЕРКА СТЕПЕНИ ИЗНОСА ТОРМОЗНЫХ КОЛОДОК И ДИСКОВ
Nissan Tiida. ПРОВЕРКА СТОЯНОЧНОГО ТОРМОЗА
Nissan Tiida. ЗАМЕНА ТОРМОЗНОЙ ЖИДКОСТИ В ГИДРОПРИВОДЕ ТОРМОЗОВ
Nissan Tiida. ЗАМЕНА БАЧКА ГЛАВНОГО ТОРМОЗНОГО ЦИЛИНДРА
Nissan Tiida. ЗАМЕНА ГЛАВНОГО ТОРМОЗНОГО ЦИЛИНДРА
Nissan Tiida. ЗАМЕНА ВАКУУМНОГО УСИЛИТЕЛЯ
Nissan Tiida. ЗАМЕНА ШЛАНГОВ И ТРУБОПРОВОДОВ ГИДРОПРИВОДА ТОРМОЗОВ
Nissan Tiida. ЗАМЕНА ТРУБОПРОВОДОВ ТОРМОЗНОЙ СИСТЕМЫ
Nissan Tiida. СНЯТИЕ И УСТАНОВКА ПЕДАЛИ ТОРМОЗА
Nissan Tiida. ЗАМЕНА ТОРМОЗНЫХ КОЛОДОК ТОРМОЗНЫХ МЕХАНИЗМОВ ПЕРЕДНИХ КОЛЕС
Nissan Tiida. СНЯТИЕ И УСТАНОВКА ТОРМОЗНОЙ СКОБЫ В СБОРЕ С НАПРАВЛЯЮЩЕЙ КОЛОДОК ПЕРЕДНЕГО КОЛЕСА
Nissan Tiida. ЗАМЕНА ТОРМОЗНОГО ДИСКА ТОРМОЗНОГО МЕХАНИЗМА ПЕРЕДНЕГО КОЛЕСА
Nissan Tiida. ЗАМЕНА ТОРМОЗНЫХ КОЛОДОК ТОРМОЗНЫХ МЕХАНИЗМОВ ЗАДНИХ КОЛЕС
Nissan Tiida. СНЯТИЕ И УСТАНОВКА ТОРМОЗНОЙ СКОБЫ В СБОРЕ С НАПРАВЛЯЮЩЕЙ КОЛОДОК ЗАДНЕГО КОЛЕСА
Nissan Tiida. СНЯТИЕ И УСТАНОВКА ТОРМОЗНОГО ДИСКА ТОРМОЗНОГО МЕХАНИЗМА ЗАДНЕГО КОЛЕСА
Nissan Tiida. РЕГУЛИРОВКА ПРИВОДА СТОЯНОЧНОГО ТОРМОЗА
Nissan Tiida. ЗАМЕНА КОЛОДОК СТОЯНОЧНОГО ТОРМОЗА
Nissan Tiida. ЗАМЕНА ТРОСОВ ПРИВОДА СТОЯНОЧНОГО ТОРМОЗА
Nissan Tiida. ЗАМЕНА РЫЧАГА ПРИВОДА СТОЯНОЧНОГО ТОРМОЗА
Nissan Tiida. ЭЛЕКТРООБОРУДОВАНИЕ
Nissan Tiida. РАСПОЛОЖЕНИЕ ПРЕДОХРАНИТЕЛЕЙ, ПЛАВКИХ ВСТАВОК, РЕЛЕ И ИХ ЗАМЕНА
Nissan Tiida. СНЯТИЕ И УСТАНОВКА МОНТАЖНЫХ БЛОКОВ
Nissan Tiida. АККУМУЛЯТОРНАЯ БАТАРЕЯ
Nissan Tiida. СНЯТИЕ И УСТАНОВКА АККУМУЛЯТОРНОЙ БАТАРЕИ
Nissan Tiida. ГЕНЕРАТОР
Nissan Tiida. СНЯТИЕ И УСТАНОВКА ГЕНЕРАТОРА
Nissan Tiida. РЕМОНТ ГЕНЕРАТОРА
Nissan Tiida. СТАРТЕР
Nissan Tiida. СНЯТИЕ И УСТАНОВКА СТАРТЕРА
Nissan Tiida. РЕМОНТ СТАРТЕРА
Nissan Tiida. ВЫКЛЮЧАТЕЛЬ (ЗАМОК) ЗАЖИГАНИЯ
Nissan Tiida. СНЯТИЕ И УСТАНОВКА АНТЕННОГО БЛОКА ИММОБИЛИЗАТОРА
Nissan Tiida. СНЯТИЕ И УСТАНОВКА ДАТЧИКА ПОЛОЖЕНИЯ КЛЮЧА В ВЫКЛЮЧАТЕЛЕ (ЗАМКЕ) ЗАЖИГАНИЯ
Nissan Tiida. СИСТЕМА УПРАВЛЕНИЯ ДВИГАТЕЛЕМ
Nissan Tiida. СНЯТИЕ И УСТАНОВКА КАТУШЕК ЗАЖИГАНИЯ
Nissan Tiida. СНЯТИЕ И УСТАНОВКА ЭЛЕКТРОННОГО БЛОКА УПРАВЛЕНИЯ ДВИГАТЕЛЕМ
Nissan Tiida. ЗАМЕНА ДАТЧИКОВ СИСТЕМЫ УПРАВЛЕНИЯ ДВИГАТЕЛЕМ
Nissan Tiida. ОСВЕЩЕНИЕ, СВЕТОВАЯ И ЗВУКОВАЯ СИГНАЛИЗАЦИЯ
Nissan Tiida. ЗАМЕНА ЛАМП
Nissan Tiida. ЗАМЕНА ЛАМП — ЧАСТЬ 2
Nissan Tiida. ЗАМЕНА ЛАМП — ЧАСТЬ 3
Nissan Tiida. ЗАМЕНА ЛАМП — ЧАСТЬ 4
Nissan Tiida. СНЯТИЕ И УСТАНОВКА БЛОК-ФАРЫ
Nissan Tiida. ЗАМЕНА БОКОВОГО УКАЗАТЕЛЯ ПОВОРОТА
Nissan Tiida. СНЯТИЕ И УСТАНОВКА ЗАДНЕГО ФОНАРЯ
Nissan Tiida. ЗАМЕНА ПРОТИВОТУМАННОЙ ФАРЫ
Nissan Tiida. ЗАМЕНА ДОПОЛНИТЕЛЬНОГО СТОП-СИГНАЛА
Nissan Tiida. ЗАМЕНА ФОНАРЕЙ ОСВЕЩЕНИЯ НОМЕРНОГО ЗНАКА
Nissan Tiida. ЗАМЕНА ПЛАФОНА ИНДИВИДУАЛЬНОГО ОСВЕЩЕНИЯ МЕСТ ВОДИТЕЛЯ И ПЕРЕДНЕГО ПАССАЖИРА
Nissan Tiida. ЗАМЕНА ПЛАФОНА ОБЩЕГО ОСВЕЩЕНИЯ САЛОНА
Nissan Tiida. ЗАМЕНА ПЛАФОНА ОСВЕЩЕНИЯ БАГАЖНОГО ОТДЕЛЕНИЯ
Nissan Tiida. СНЯТИЕ И УСТАНОВКА ДЕРЖАТЕЛЯ ПОДРУЛЕВЫХ ПЕРЕКЛЮЧАТЕЛЕЙ
Nissan Tiida. ЗАМЕНА ЗВУКОВОГО СИГНАЛА
Nissan Tiida. ЗАМЕНА ЭЛЕКТРОДВИГАТЕЛЯ МОТОРЕДУКТОРА ЭЛЕКТРОУСИЛИТЕЛЯ РУЛЕВОГО УПРАВЛЕНИЯ
Nissan Tiida. СНЯТИЕ И УСТАНОВКА ЭЛЕКТРОДВИГАТЕЛЯ ВЕНТИЛЯТОРА РАДИАТОРА СИСТЕМЫ ОХЛАЖДЕНИЯ ДВИГАТЕЛЯ
Nissan Tiida. ЗАМЕНА ДОПОЛНИТЕЛЬНОГО СОПРОТИВЛЕНИЯ ВЕНТИЛЯТОРА РАДИАТОРА СИСТЕМЫ ОХЛАЖДЕНИЯ ДВИГАТЕЛЯ
Nissan Tiida. СНЯТИЕ И УСТАНОВКА ВОЗДУХОНАГНЕТАТЕЛЯ
Nissan Tiida. БАЧОК ОМЫВАТЕЛЕЙ ЗАМЕНА ЭЛЕКТРОНАСОСОВ ОМЫВАТЕЛЕЙ
Nissan Tiida. СНЯТИЕ И УСТАНОВКА БАЧКАОМЫВАТЕЛЕЙ
Nissan Tiida. ЭЛЕКТРОСТЕКЛОПОДЪЕМНИКИ
ЗАМЕНА КЛАВИШИ УПРАВЛЕНИЯ ЭЛЕКТРОСТЕКЛОПОДЪЕМНИКОМ
Nissan Tiida. ЗАМЕНА МОТОРЕДУКТОРОВ СТЕКЛОПОДЪЕМНИКОВ
Nissan Tiida. КОМБИНАЦИЯ ПРИБОРОВ
Nissan Tiida. АВТОМОБИЛЬНАЯ АУДИОСИСТЕМА
Nissan Tiida. СНЯТИЕ И УСТАНОВКА БЛОКА УПРАВЛЕНИЯ ТРАНСМИССИЕЙ
Nissan Tiida. СНЯТИЕ И УСТАНОВКА БЛОКА УПРАВЛЕНИЯ ЭЛЕКТРООБОРУДОВАНИЕМ КУЗОВА
Nissan Tiida. СНЯТИЕ И УСТАНОВКА БЛОКА УПРАВЛЕНИЯ СИСТЕМОЙ ЭЛЕКТРОУСИЛИТЕЛЯ РУЛЕВОГО УПРАВЛЕНИЯ
Nissan Tiida. ЗАМЕНА ВЫКЛЮЧАТЕЛЯ АВАРИЙНОЙ СИГНАЛИЗАЦИИ И БЛОКА СИГНАЛИЗАТОРОВ НЕПРИСТЕГНУТОГО РЕМНЯ И ПОДУШКИ БЕЗОПАСНОСТИ ПЕРЕДНЕГО ПАССАЖИРА
Nissan Tiida. ЗАМЕНА КЛАВИШ УПРАВЛЕНИЯ ОБОГРЕВОМ СИДЕНИЙ
Nissan Tiida. ЗАМЕНА РОЗЕТКИ ДЛЯ ПОДКЛЮЧЕНИЯ ДОПОЛНИТЕЛЬНОГО ЭЛЕКТРООБОРУДОВАНИЯ
Nissan Tiida. ЗАМЕНА РЕГУЛЯТОРА ЭЛЕКТРОКОРРЕКТОРА СВЕТА ФАР, ВЫКЛЮЧАТЕЛЯ ОМЫВАТЕЛЯ ФАР И ПРИВОДА НАРУЖНЫХ ЗЕРКАЛ ЗАДНЕГО ВИДА
Nissan Tiida. КУЗОВ
Nissan Tiida. СНЯТИЕ И УСТАНОВКА ПОДКРЫЛКОВ КОЛЕС
Nissan Tiida. СНЯТИЕ, РАЗБОРКА И УСТАНОВКА ПЕРЕДНЕГО БАМПЕРА
Nissan Tiida. СНЯТИЕ И УСТАНОВКА ЗАДНЕГО БАМПЕРА
Nissan Tiida. СНЯТИЕ И УСТАНОВКА ПЕРЕДНЕГО КРЫЛА
Nissan Tiida. СНЯТИЕ И УСТАНОВКА РЕШЕТКИ КОРОБА ВОЗДУХОПРИТОКА
Nissan Tiida. СНЯТИЕ И УСТАНОВКА КАПОТА
Nissan Tiida. СНЯТИЕ И УСТАНОВКА ЗАМКА КАПОТА
Nissan Tiida. СНЯТИЕ И УСТАНОВКА РЫЧАГА ПРИВОДА ЗАМКА КАПОТА
Nissan Tiida. СНЯТИЕ И УСТАНОВКА ОБЛИЦОВКИ ПЕРЕДНЕЙ ДВЕРИ
Nissan Tiida. ЗАМЕНА СТЕКЛА ПЕРЕДНЕЙ ДВЕРИ
Nissan Tiida. СНЯТИЕ И УСТАНОВКА СТЕКЛОПОДЪЕМНИКА ПЕРЕДНЕЙ ДВЕРИ
Nissan Tiida. ЗАМЕНА ЗАМКА ПЕРЕДНЕЙ ДВЕРИ
Nissan Tiida. ЗАМЕНА ВЫКЛЮЧАТЕЛЯ ЗАМКА ПЕРЕДНЕЙ ДВЕРИ
Nissan Tiida. ЗАМЕНА НАРУЖНОЙ РУЧКИ ПЕРЕДНЕЙ ДВЕРИ
Nissan Tiida. ЗАМЕНА ВНУТРЕННЕЙ РУЧКИ ПРИВОДА ЗАМКА ПЕРЕДНЕЙ ДВЕРИ
Nissan Tiida. ЗАМЕНА ОГРАНИЧИТЕЛЯ ОТКРЫВАНИЯ ПЕРЕДНЕЙ ДВЕРИ
Nissan Tiida. СНЯТИЕ И УСТАНОВКА ПЕРЕДНЕЙ ДВЕРИ
Nissan Tiida. СНЯТИЕ И УСТАНОВКА ОБЛИЦОВКИ ЗАДНЕЙ ДВЕРИ
Nissan Tiida. ЗАМЕНА ВНУТРЕННЕЙ РУЧКИ ПРИВОДА ЗАМКА ЗАДНЕЙ ДВЕРИ
Nissan Tiida. ЗАМЕНА ЗАМКА ЗАДНЕЙ ДВЕРИ
Nissan Tiida. ЗАМЕНА СТЕКОЛ ЗАДНЕЙ ДВЕРИ
Nissan Tiida. СНЯТИЕ И УСТАНОВКА СТЕКЛОПОДЪЕМНИКА ЗАДНЕЙ ДВЕРИ
Nissan Tiida. ЗАМЕНА НАРУЖНОЙ РУЧКИ ЗАМКА ЗАДНЕЙ ДВЕРИ
Nissan Tiida. СНЯТИЕ И УСТАНОВКА ЗАДНЕЙ ДВЕРИ
Nissan Tiida. СНЯТИЕ И УСТАНОВКА ДВЕРИ ЗАДКА
Nissan Tiida. ЗАМЕНА ЗАМКА ДВЕРИ ЗАДКА
Nissan Tiida. ЗАМЕНА УПОРОВ ДВЕРИ ЗАДКА
Nissan Tiida. СНЯТИЕ И УСТАНОВКА КРЫШКИ ЛЮКА НАЛИВНОЙ ТРУБЫ ТОПЛИВНОГО БАКА
Nissan Tiida. СНЯТИЕ И УСТАНОВКА ПЕРЕДНЕГО СИДЕНЬЯ
Nissan Tiida. СНЯТИЕ И УСТАНОВКА ОБЛИЦОВКИ ТОННЕЛЯ ПОЛА
Nissan Tiida. СНЯТИЕ И УСТАНОВКА НАРУЖНОГО ЗЕРКАЛА
Nissan Tiida. ПАНЕЛЬ ПРИБОРОВ
Nissan Tiida. СНЯТИЕ И УСТАНОВКА ПАНЕЛИ ПРИБОРОВ
Nissan Tiida. СНЯТИЕ И УСТАНОВКА УСИЛИТЕЛЯ ПАНЕЛИ ПРИБОРОВ
Nissan Tiida. СНЯТИЕ И УСТАНОВКА ОБЛИЦОВОК САЛОНА
Nissan Tiida. СНЯТИЕ И УСТАНОВКА ОБЛИЦОВОК БАГАЖНОГО ОТДЕЛЕНИЯ
Nissan Tiida. СТЕКЛООЧИСТИТЕЛЬ ВЕТРОВОГО ОКНА
Nissan Tiida. СТЕКЛООЧИСТИТЕЛЬ ОКНА ДВЕРИ ЗАДКА
Nissan Tiida. ЗАМЕНА НЕПОДВИЖНОГО ОСТЕКЛЕНИЯ КУЗОВА
Nissan Tiida. УХОД ЗА КУЗОВОМ
Nissan Tiida. СМАЗКА АРМАТУРЫ КУЗОВА
Nissan Tiida. ПРОЧИСТКА ДРЕНАЖНЫХ ОТВЕРСТИЙ
Nissan Tiida. СИСТЕМА ОТОПЛЕНИЯ, КОНДИЦИОНИРОВАНИЯ И ВЕНТИЛЯЦИИ САЛОНА
Nissan Tiida. ОСОБЕННОСТИ УСТРОЙСТВА СИСТЕМЫ КОНДИЦИОНИРОВАНИЯ
Nissan Tiida. ОСОБЕННОСТИ УСТРОЙСТВА СИСТЕМЫ ВЕНТИЛЯЦИИ
Nissan Tiida. УДАЛЕНИЕ ХЛАДАГЕНТА ИЗ СИСТЕМЫ КОНДИЦИОНИРОВАНИЯ
Nissan Tiida. ЗАМЕНА ДАТЧИКА ДАВЛЕНИЯ СИСТЕМЫ КОНДИЦИОНИРОВАНИЯ
Nissan Tiida. КОМПРЕССОР КОНДИЦИОНЕРА
Nissan Tiida. ЗАМЕНА ПОДШИПНИКА ШКИВА ПРИВОДА КОМПРЕССОРА КОНДИЦИОНЕРА
Nissan Tiida. ЗАМЕНА ЭЛЕКТРОМАГНИТА МУФТЫ КОМПРЕССОРА КОНДИЦИОНЕРА
Nissan Tiida. ЗАМЕНА РЕСИВЕРА- ОСУШИТЕЛЯ
Nissan Tiida. ЗАМЕНА ТЕРМОРЕГУЛИРУЮЩЕГО КЛАПАНА
Nissan Tiida. СНЯТИЕ И УСТАНОВКА БЛОКА УПРАВЛЕНИЯ СИСТЕМОЙ ОТОПЛЕНИЯ, КОНДИЦИОНИРОВАНИЯ И ВЕНТИЛЯЦИИ
Nissan Tiida. ЗАМЕНА ФИЛЬТРА ПОСТУПАЮЩЕГО В САЛОН ВОЗДУХА
Nissan Tiida. СИСТЕМЫ АКТИВНОЙ БЕЗОПАСНОСТИ
Nissan Tiida. ЗАМЕНА ДАТЧИКОВ ЧАСТОТЫ ВРАЩЕНИЯ КОЛЕС
Nissan Tiida. СНЯТИЕ И УСТАНОВКА ГИДРОЭЛЕКТРОННОГО МОДУЛЯ ABS
Nissan Tiida. СИСТЕМА ПАССИВНОЙ БЕЗОПАСНОСТИ (SRS)
Nissan Tiida. СНЯТИЕ И УСТАНОВКА МОДУЛЯ ПОДУШКИ БЕЗОПАСНОСТИ ВОДИТЕЛЯ
Nissan Tiida. СНЯТИЕ И УСТАНОВКА МОДУЛЯ ПОДУШКИ БЕЗОПАСНОСТИ ПЕРЕДНЕГО ПАССАЖИРА
Nissan Tiida. СНЯТИЕ И УСТАНОВКА ПЕРЕДНИХ РЕМНЕЙ БЕЗОПАСНОСТИ
Nissan Tiida. СНЯТИЕ И УСТАНОВКА ЗАДНИХ РЕМНЕЙ БЕЗОПАСНОСТИ
Nissan Tiida. СНЯТИЕ И УСТАНОВКА ЭЛЕКТРОННОГО БЛОКА УПРАВЛЕНИЯ СИСТЕМОЙ ПАССИВНОЙ БЕЗОПАСНОСТИ
Nissan Tiida. ЗАМЕНА ДАТЧИКОВ УДАРА
Nissan Tiida. КОЛЕСНЫЕ ДИСКИ
Nissan Tiida. ШИНЫ
Nissan Tiida. СОВЕТЫ ПО ВЫБОРУ ШИН
Nissan Tiida. ВОССТАНОВЛЕНИЕ РЕЗЬБОВЫХ СОЕДИНЕНИЙ АВТОМОБИЛЯ
Nissan Tiida. МОМЕНТЫ ЗАТЯЖКИ ОТВЕТСТВЕННЫХ РЕЗЬБОВЫХ СОЕДИНЕНИЙ
Nissan Tiida. ГОРЮЧЕ-СМАЗОЧНЫЕ МАТЕРИАЛЫ, СПЕЦИАЛЬНЫЕ ЖИДКОСТИ И ЗАПРАВОЧНЫЕ ОБЪЕМЫ
Nissan Tiida. ЛАМПЫ, ПРИМЕНЯЕМЫЕ НА АВТОМОБИЛЕ
Nissan Tiida. КОНТРОЛЬНЫЕ РАЗМЕРЫ КУЗОВА
Nissan Tiida. Электросхемы
Nissan Tiida. Электросхемы — часть 2
Nissan Tiida. Электросхемы — часть 3
Nissan Tiida. Электросхемы — часть 4
Nissan Tiida. Электросхемы — часть 5
Nissan Tiida. Электросхемы — часть 6
Nissan Tiida. Электросхемы — часть 7
Nissan Tiida. Электросхемы — часть 8
Nissan Tiida. Коды ошибок
Руководство на английском языке по техническому обслуживанию и ремонту автомобиля Nissan Tiida серии C11 2008 года выпуска.
- Автор: —
- Издательство: Nissan Europe
- Год издания: 2007
- Страниц: —
- Формат: PDF
- Размер: 68,5 Mb
Сборник руководств по эксплуатации и техническому обслуживанию автомобиля Nissan Tiida
- Автор: —
- Издательство: Nissan International
- Год издания: 2010/-
- Страниц: 221/304
- Формат: PDF
- Размер: 71,0 Mb

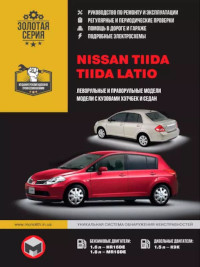
Руководство по эксплуатации, техническому обслуживанию и ремонту автомобиля Nissan Tiida с 2007 года выпуска с бензиновыми двигателями объемом 1,6/1,8 л.
- Автор: —
- Издательство: Третий Рим
- Год издания: 2012
- Страниц: 317
- Формат: PDF
- Размер: 79,9 Mb
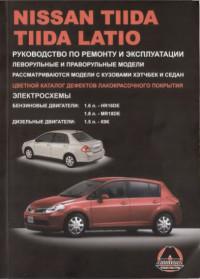
Руководство по эксплуатации и ремонту автомобилей Nissan Tiida и Nissan Tiida Latio с бензиновыми и дизельными двигателями.
- Автор: —
- Издательство: Монолит
- Год издания: 2008
- Страниц: 476
- Формат: DjVu
- Размер: 25,4 Mb
Руководство по эксплуатации и ремонту автомобилей Nissan Tiida и Nissan Tiida Latio с бензиновыми и дизельными двигателями.
- Автор: —
- Издательство: Монолит
- Год издания: —
- Страниц: 486
- Формат: —
- Размер: —
Руководство по эксплуатации, техническому обслуживанию и ремонту автомобиля Nissan Tiida серии C11 с 2004 года выпуска с бензиновыми двигателями.
- Автор: —
- Издательство: Автонавигатор
- Год издания: 2008
- Страниц: 601
- Формат: PDF
- Размер: 320,1 Mb
Руководство по техническому обслуживанию и ремонту автомобиля Nissan Tiida серии C11 с 2004 года выпуска с бензиновыми двигателями объемом 1,6/1,8 л.
- Автор: —
- Издательство: Автонавигатор
- Год издания: —
- Страниц: 376
- Формат: —
- Размер: —
Руководство по техническому обслуживанию и ремонту автомобиля Nissan Tiida серии C11 с 2004 года выпуска с бензиновыми двигателями объемом 1,6/1,8 л.
- Автор: —
- Издательство: Автонавигатор
- Год издания: —
- Страниц: 600
- Формат: —
- Размер: —
Руководство по эксплуатации, техническому обслуживанию и ремонту автомобилей Nissan Sentra с 2014 и Nissan Tiida с 2015 года выпуска с бензиновым двигателем объемом 1,6 л.
- Автор: —
- Издательство: Мир автокниг
- Год издания: —
- Страниц: 320
- Формат: —
- Размер: —

![]()
|
FOREWORD |
READ FIRST—THEN DRIVE SAFELY |
Welcome to the growing family of new NISSAN owners. This vehicle is delivered to you with confidence. It was produced using the latest techniques and strict quality control.
This manual was prepared to help you understand the operation and maintenance of your vehicle so that you may enjoy many miles (kilometers) of driving pleasure. Please read through this manual before operating your vehicle.
A separate Warranty Information Booklet explains details about the warranties covering your vehicle. The “NISSAN Service and Maintenance Guide” explains details about maintaining and servicing your vehicle. Additionally, a separate Customer Care/Lemon Law Booklet (U.S. only) will explain how to resolve any concerns you may have with your vehicle, as well as clarify your rights under your state’s lemon law.
Your NISSAN dealership knows your vehicle best. When you require any service or have any questions, they will be glad to assist you with the extensive resources available to them.
Before driving your vehicle, please read this Owner’s Manual carefully. This will ensure familiarity with controls and maintenance requirements, assisting you in the safe operation of your vehicle.
WARNING
IMPORTANT SAFETY INFORMATION REMINDERS FOR SAFETY!
Follow these important driving rules to help ensure a safe and comfortable trip for you and your passengers!
cNEVER drive under the influence of alcohol or drugs.
cALWAYS observe posted speed limits and never drive too fast for conditions.
cALWAYS give your full attention to driving and avoid using vehicle features or taking other actions that could distract you.
cALWAYS use your seat belts and appropriate child restraint systems. Preteen children should be seated in the rear seat.
cALWAYS provide information about the proper use of vehicle safety features to all occupants of the vehicle.
cALWAYS review this Owner’s Manual for important safety information.
MODIFICATION OF YOUR VEHICLE
This vehicle should not be modified. Modification could affect its performance, safety or durability, and may even violate governmental regulations. In addition, damage or performance problems resulting from modifications may not be covered under NISSAN warranties.
WHEN READING THE MANUAL
This manual includes information for all options available on this model. Therefore, you may find some information that does not apply to your vehicle.
All information, specifications and illustrations in this manual are those in effect at the time of printing. NISSAN reserves the right to change specifications or design without notice and without obligation.
IMPORTANT INFORMATION ABOUT THIS MANUAL
You will see various symbols in this manual. They are used in the following ways:
WARNING
This is used to indicate the presence of a hazard that could cause death or serious personal injury. To avoid or reduce the risk, the procedures must be followed precisely.
CAUTION
This is used to indicate the presence of a hazard that could cause minor or moderate personal injury or damage to your vehicle. To avoid or reduce the risk, the procedures must be followed carefully.
APD1005
If you see this symbol, it means “Do not do this” or “Do not let this happen.”
If you see a symbol similar to these in an illustration, it means the arrow points to the front of the vehicle.
Arrows in an illustration that are similar to these indicate movement or action.
Arrows in an illustration that are similar to these call attention to an item in the illustration.
CALIFORNIA PROPOSITION 65 WARNING
WARNING
Engine exhaust, some of its constituents, and certain vehicle components contain or emit chemicals known to the State of California to cause cancer and birth defects or other reproductive harm. In addition, certain fluids contained in vehicles and certain products of component wear contain or emit chemicals known to the State of California to cause cancer and birth defects or other reproductive harm.

CALIFORNIA PERCHLORATE ADVISORY
Some vehicle parts, such as lithium batteries, may contain perchlorate material. The following advisory is provided: “Perchlorate Material – special handling may apply, See www.dtsc.ca.gov/hazardouswaste/perchlorate.”
BLUETOOTHt is a trademark owned by Bluetooth SIG, Inc., U.S.A. and licensed to Xanavi Informatics Corporation.
XM Radio requires subscription, sold separately after first 90 days. Not available in Alaska or Hawaii. For more information, visit www.xmradio.com.
© Nissan Mexicana, S. A. de C. V.
All rights reserved. No part of this Owner’s Manual may be reproduced or stored in a retrieval system, or transmitted in any form, or by any means, electronic, mechanical, photocopying, recording or otherwise, without the prior written permission of Nissan Mexicana, S. A. de C. V.
NISSAN CUSTOMER CARE PROGRAM
NISSAN CARES . . .
Both NISSAN and your NISSAN dealer are dedicated to serving all your automotive needs. Your satisfaction with your vehicle and your NISSAN dealer are our primary concerns. Your NISSAN dealer is always available to assist you with all your automobile sales and service needs.
However, if there is something that your NISSAN dealer cannot assist you with or you would like to provide NISSAN directly with comments or questions, please contact the NISSAN Consumer Affairs Department using our toll-free number:
For U.S. customers 1-800-NISSAN-1 (1-800-647-7261)
For Canadian customers 1-800-387-0122
The Consumer Affairs Department will ask for the following information:
–Your name, address, and telephone number
–Vehicle identification number (attached to the top of the instrument panel on the driver’s side)
–Date of purchase
–Current odometer reading
–Your NISSAN dealer’s name
–Your comments or questions
OR
You can write to NISSAN with the information at:
For U.S. customers
Nissan North America, Inc. Consumer Affairs Department P.O. Box 685003
Franklin, TN 37068-5003
For Canadian customers Nissan Canada Inc. 5290 Orbitor Drive
Mississauga, Ontario L4W 4Z5
We appreciate your interest in NISSAN and thank you for buying a quality NISSAN vehicle.
|
Illustrated table of contents |
0 |
|
|
Safety—Seats, seat belts and supplemental restraint system |
1 |
|
|
Instruments and controls |
2 |
|
|
Pre-driving checks and adjustments |
3 |
|
|
Heater, air conditioner, audio and phone systems |
4 |
|
|
Starting and driving |
5 |
|
|
In case of emergency |
6 |
|
|
Appearance and care |
7 |
|
|
Maintenance and do-it-yourself |
8 |
|
|
Technical and consumer information |
9 |
|

0 Illustrated table of contents
Air bags, seat belts and child restraints . . . . . . . . . . . . . . 0-2 Exterior front . . . . . . . . . . . . . . . . . . . . . . . . . . . . . . . . . . . . . . 0-3 Exterior rear. . . . . . . . . . . . . . . . . . . . . . . . . . . . . . . . . . . . . . . 0-4 Passenger compartment . . . . . . . . . . . . . . . . . . . . . . . . . . . 0-6
Instrument panel. . . . . . . . . . . . . . . . . . . . . . . . . . . . . . . . . . . 0-7 Engine compartment check locations . . . . . . . . . . . . . . . . 0-8 Warning/indicator lights . . . . . . . . . . . . . . . . . . . . . . . . . . . . 0-9
AIR BAGS, SEAT BELTS AND CHILD
RESTRAINTS
1. Supplemental front-impact air bags (P. 1-36)
2. Roof-mounted curtain side-impact supplemental air bag (P. 1-36)
3. Front seat-mounted side-impact supplemental air bag (P. 1-36)
4. Front seat belts (P. 1-7)
5. Front-Seat Active Head Restraints (P. 1-6)
6. Rear seat belts (P. 1-7)
7. LATCH (Lower Anchors and Tethers for CHildren) (P. 1-17)
8. Seat belt with pretensioner (P. 1-49)
9. Seats (P. 1-2)
10. Occupant classification sensor (pressure sensor) (P.1-36)
See the page number indicated in parentheses for operating details.
WII0157
0-2 Illustrated table of contents

EXTERIOR FRONT
1. Engine hood (P. 3-22)
2. Windshield wiper and washer switch (P. 2-17)
3. Windshield (P. 8-19)
4. Moonroof (if so equipped) (P. 2-31)
5. Power windows (P. 2-28)
6. Door locks, keyfob, NISSAN Intelligent Key ™ (if so equipped), keys
(P. 3-4, 3-7, 3-3, 3-2) 7. Mirrors (P. 3-29)
8. Tire pressure (P. 8-32)
9. Flat tire (P. 6-2)
10. Tire chains (P. 8-38)
11. Headlight and turn signal switch (P. 2-19)
12. Replacing bulbs (P. 8-27)
13. Fog light switch (if so equipped) (P. 2-19)
14. Tie down hook (if so equipped) (P. 6-13)
See the page number indicated in parentheses for operating details.
WII0101
Illustrated table of contents 0-3

EXTERIOR REAR
HATCHBACK MODEL
1. Rear hatch opener switch (P. 3-23)
2. Rear window defroster switch (P. 2-18)
3. Antenna (P. 4-27)
4. Child safety rear door locks (P. 3-6) 5. Fuel-filler door (P. 3-26)
6. Fuel-filler cap, fuel recommendation (P. 3-27, P. 9-3)
7. Replacing bulbs (P. 8-27)
8. Interior hatch release (P. 3-24)
9. Rear window washer (if so equipped) (P. 2-18)
See the page number indicated in parentheses for operating details.
WII0093
0-4 Illustrated table of contents
![]()
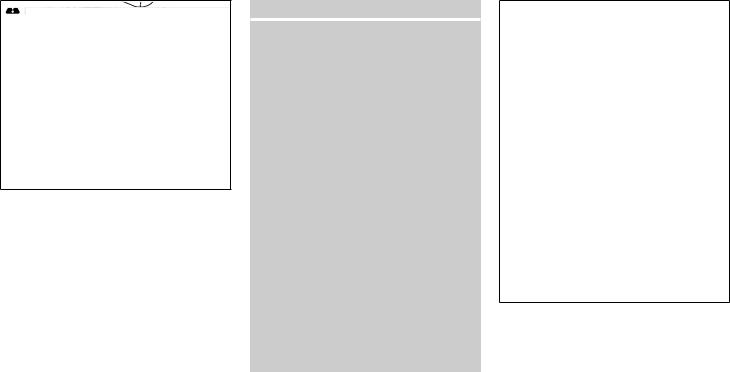
SEDAN MODEL
1.Interior trunk lid release (P.3-26 )
2.Rear window defroster switch (P. 2-18)
3.Antenna (P. 4-27)
4.Child safety rear door locks (P. 3-6)
5.Fuel-filler door (P. 3-26)
6.Fuel-filler cap, fuel recommendation (P. 3-27, P. 9-3)
7.Replacing bulbs (P. 8-27)
8.Trunk opener switch/NISSAN Intelligent Key ™ (if so equipped) (P. 3-24 / 3-13)
See the page number indicated in parentheses for operating details.
WII0102
Illustrated table of contents 0-5

PASSENGER COMPARTMENT
1. Cargo cover (hatchback model only) (P. 2-27)
2. Rear seat (P. 1-4)
3. Interior lights (P. 2-33)
4. Front seat (P. 1-2)
5. Sun visors (P. 3-28)
6. Moonroof switch (if so equipped) (P. 2-31)
7. Map lights (P. 2-34)
8. Sunglasses holder (P. 2-24)
9. Glove box (P. 2-26)
10. Parking brake, parking on hills (P. 5-23, P. 5-27)
11. Rear armrest (if so equipped) (P. 1-5)
See the page number indicated in parentheses for operating details.
LII0083
0-6 Illustrated table of contents

1.Outside mirror control switch (if so equipped) (P. 3-29)
2.Headlight/fog light (if so equipped)/turn signal switch (P. 2-19)
3.Steering wheel switch for audio control and BluetoothT hands-free phone system (if so equipped) (P. 4-26, 4-28)
4.Driver’s supplemental air bag/horn (P. 1-36, 2-22)
5.Meters and gauges (P. 2-3)
6.Cruise control main/set switches (if so equipped) (P. 5-24)
7.Windshield wiper/washer switch (P. 2-17, 2-18)
8.Audio system (P. 4-10)
9.Storage bin (P. 2-23)
10.Center ventilator (P. 4-2)
11.Passenger’s supplemental air bag (P. 1-36)
12.Side ventilator (P. 4-2)
13.Glove box (P. 2-26)
14.Hazard warning flasher switch (P. 2-21)
15.Cup holders (P. 2-25)
16.Shift selector (P. 5-14)
17.Defroster switch (P. 2-18)
18.Climate control (P. 4-3)
19.Passenger air bag status light (P. 1-44)
20.Ignition switch (P. 5-7)
21.Tilt steering (P. 3-28)
22.Hood release lever (P. 3-22)
23.Fuel-filler door release lever (P. 3-26)
24.Fuse block (P. 8-21)
25.Instrument brightness control (P. 2-20)
See the page number indicated in parentheses for operating details.
Illustrated table of contents 0-7

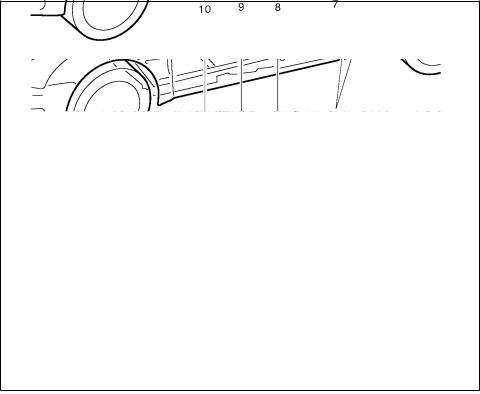
ENGINE COMPARTMENT CHECK
LOCATIONS
1. Engine oil filler cap (P. 8-8)
2. Brake and clutch (*1) fluid reservoir (P. 8-13)
3. Air cleaner (P. 8-18)
4. Battery (P. 8-14)
5. Fuse/fusible link box (P. 8-21)
6. Automatic transmission fluid (ATF) dipstick (*2) (P. 8-11)
7. Radiator cap (P. 8-7)
8. Engine coolant reservoir (P. 8-7)
9. Engine oil dipstick (P. 8-8)
10. Drive belt location (P.8-17)
11. Windshield washer fluid reservoir (P. 8-14)
*1 For Manual Transmission (M/T) model
*2 For Automatic Transmission (A/T) model
NOTE:
Engine cover removed for clarity.
See the page number indicated in parentheses for operating details.
WDI0631
0-8 Illustrated table of contents

WARNING/INDICATOR LIGHTS
|
Warning |
Name |
Page |
|
light |
||
|
Anti-lock Braking |
2-7 |
|
|
or |
System (ABS) warn- |
|
|
ing light (if so |
||
|
equipped) |
||
|
Brake warning light |
2-7 |
|
|
or |
||
|
Charge warning light |
2-8 |
|
|
Door open warning |
2-8 |
|
|
light |
||
|
Electric power |
2-8 |
|
|
steering warning |
||
|
light |
||
|
Engine oil pressure |
2-8 |
|
|
warning light |
||
|
High temperature |
2-8 |
|
|
warning light (red) |
||
|
Warning |
Name |
Page |
|
light |
||
|
Intelligent Key lock |
2-9 |
|
|
warning light (M/T |
||
|
models) (if so |
||
|
equipped) |
||
|
Low fuel warning |
2-9 |
|
|
light |
||
|
Low tire pressure |
2-9 |
|
|
warning light |
||
|
Low windshield |
2-10 |
|
|
washer fluid warning |
||
|
light (if so equipped) |
||
|
NISSAN Intelligent |
2-10 |
|
|
Key ™ warning light |
||
|
(if so equipped) |
||
|
P position selecting |
2-11 |
|
|
warning light (CVT |
||
|
models) (if so |
||
|
equipped) |
||
|
Seat belt warning |
2-11 |
|
|
light and chime |
||
|
Warning |
Name |
Page |
|
light |
||
|
Supplemental air |
2-11 |
|
|
bag warning light |
||
|
Indicator |
Name |
Page |
|
light |
||
|
Automatic Transmis- |
2-11 |
|
|
sion (A/T) / Con- |
||
|
tinuously Variable |
||
|
Transmission (CVT) |
||
|
position indicator |
||
|
light |
||
|
CRUISE main |
2-11 |
|
|
switch indicator light |
||
|
(if so equipped) |
||
|
Cruise SET switch |
2-12 |
|
|
indicator light (if so |
||
|
equipped) |
||
|
Front passenger air |
2-12 |
|
|
bag status light |
||
|
High beam indicator |
2-12 |
|
|
light (blue) |
||
Illustrated table of contents 0-9
|
Indicator |
Name |
Page |
|
light |
||
|
Low temperature |
2-12 |
|
|
indicator light (blue) |
||
|
Malfunction Indica- |
2-12 |
|
|
tor Light (MIL) |
||
|
Overdrive OFF indi- |
2-13 |
|
|
cator light (A/T / |
||
|
CVT models) |
||
|
Security indicator |
2-13 |
|
|
light |
||
|
Turn signal/hazard |
2-13 |
|
|
indicator lights |
||
0-10 Illustrated table of contents

1 Safety—Seats, seat belts and supplemental restraint system
Seats . . . . . . . . . . . . . . . . . . . . . . . . . . . . . . . . . . . . . . . . . . . . 1-2 Front manual seat adjustment . . . . . . . . . . . . . . . . . . . . 1-2
Folding rear seat
(if so equipped for Hatchback models) . . . . . . . . . . . . 1-4 Front-Seat Active Head Restraints. . . . . . . . . . . . . . . . 1-6 Head restraint adjustment . . . . . . . . . . . . . . . . . . . . . . . 1-6 Seat belts . . . . . . . . . . . . . . . . . . . . . . . . . . . . . . . . . . . . . . . . 1-7 Precautions on seat belt usage. . . . . . . . . . . . . . . . . . . 1-7 Child safety . . . . . . . . . . . . . . . . . . . . . . . . . . . . . . . . . . .1-10 Pregnant women . . . . . . . . . . . . . . . . . . . . . . . . . . . . . . 1-11 Injured persons. . . . . . . . . . . . . . . . . . . . . . . . . . . . . . . . 1-11 Three-point type seat belt with retractor . . . . . . . . . . 1-11 Seat belt extenders . . . . . . . . . . . . . . . . . . . . . . . . . . . . 1-14 Seat belt maintenance . . . . . . . . . . . . . . . . . . . . . . . . . 1-15 Child restraints . . . . . . . . . . . . . . . . . . . . . . . . . . . . . . . . . . .1-15
Precautions on child restraints . . . . . . . . . . . . . . . . . . 1-15 LATCH (Lower Anchors and Tethers for
CHildren) System . . . . . . . . . . . . . . . . . . . . . . . . . . . . . 1-17 Top tether strap child restraint . . . . . . . . . . . . . . . . . . 1-19 Child restraint installation using LATCH . . . . . . . . . . 1-21
Child restraint installation using the seat
belts . . . . . . . . . . . . . . . . . . . . . . . . . . . . . . . . . . . . . . . . .1-25 Booster seats . . . . . . . . . . . . . . . . . . . . . . . . . . . . . . . . . . . .1-31 Precautions on booster seats . . . . . . . . . . . . . . . . . . . 1-31 Booster seat installation . . . . . . . . . . . . . . . . . . . . . . . . 1-33 Supplemental restraint system . . . . . . . . . . . . . . . . . . . . . 1-36
Precautions on supplemental restraint
system . . . . . . . . . . . . . . . . . . . . . . . . . . . . . . . . . . . . . . .1-36 Supplemental air bag warning labels. . . . . . . . . . . . . 1-50 Supplemental air bag warning light . . . . . . . . . . . . . . 1-50

WARNING
cDo not ride in a moving vehicle when the seatback is reclined. This can be dangerous. The shoulder belt will not be against your body. In an accident, you could be thrown into it and receive neck or other serious injuries. You could also slide under the lap belt and receive serious internal injuries.
cFor the most effective protection when the vehicle is in motion, the seat should be upright. Always sit well back in the seat with both feet on the floor and adjust the seat properly. See “Precautions on seat belt usage” later in this section.
cAfter adjustment, gently rock in the seat to make sure it is securely locked.
cDo not leave children unattended inside the vehicle. They could unknowingly activate switches or controls. Unattended children could become involved in serious accidents.
1-2 Safety—Seats, seat belts and supplemental restraint system
c The seatback should not be reclined any more than needed for comfort. Seat belts are most effective when the passenger sits well back and straight up in the seat. If the seatback is reclined, the risk of sliding under the lap belt and being injured is increased.
CAUTION
When adjusting the seat positions, be sure not to contact any moving parts to avoid possible injuries and/or damage.
FRONT MANUAL SEAT
ADJUSTMENT

WRS0692
Forward and backward
Pull the lever up and hold it while you slide the seat forward or backward to the desired position. Release the lever to lock the seat in position.
WRS0720
Reclining
To recline the seatback, pull the lever up and lean back. To bring the seatback forward, pull the lever up and lean your body forward. Release the lever to lock the seatback in position.
The reclining feature allows adjustment of the seatback for occupants of different sizes for added comfort and to help obtain proper seat belt fit. See “Precautions on seat belt usage” later in this section. Also, the seatback can be reclined to allow occupants to rest when the vehicle is stopped and the transmission is in P (Park) or N (Neutral) position with the parking brake fully applied.
WRS0694
Seat lifter (if so equipped for driver’s seat)
Pull up or push down the adjusting lever to adjust the seat height until the desired position is achieved.
Safety—Seats, seat belts and supplemental restraint system 1-3
WRS0758
FOLDING REAR SEAT (if so equipped for Hatchback models)
s1 Remove the cargo cover (hatchback model only) from the rear seatback.
s2 Pull the knob sA to fold each seatback down.
WARNING
cNever allow anyone to ride in the cargo area or on the rear seat when it is in the fold-down position. Use of these areas by passengers without proper restraints could result in serious injury in an accident or sudden stop.
cProperly secure all cargo with ropes or straps to help prevent it from sliding or shifting. Do not place cargo higher than the seatbacks. In a sudden stop or collision, unsecured cargo could cause personal injury.
cWhen returning the seatbacks to the upright position, be certain they are completely secured in the latched position. If they are not completely secured, passengers may be injured in an accident or sudden stop.
cClosely supervise children when they are around cars to prevent them from playing and becoming locked in the trunk where they could be seriously injured. Keep the car locked, with the rear seatback and trunk lid securely latched when not in use, and prevent children’s access to car keys.
1-4 Safety—Seats, seat belts and supplemental restraint system
SSS0591
Type A
Interior trunk access (if so equipped for Sedan models)
Type A
Fold down the rear center armrest s1 and open the trunk access panel s2 .
![]()
SSS0592
Type B
Type B
Pull the knob s1 to fold each seatback down s2 .
When returning the seatback to the upright position, make sure the seat belt is routed through the guide sA .
WARNING
cNever allow anyone to ride in the cargo area or on the rear seat when it is in the fold-down position. Use of these areas by passengers without proper restraints could result in serious injury in an accident or sudden stop.
cProperly secure all cargo with ropes or straps to help prevent it from sliding or shifting. Do not place cargo higher than the seatbacks. In a sudden stop or collision, unsecured cargo could cause personal injury.
cWhen returning the seatbacks to the upright position, be certain they are completely secured in the latched position. If they are not completely secured, passengers may be injured in an accident or sudden stop.
cClosely supervise children when they are around cars to prevent them from playing and becoming locked in the trunk where they could be seriously injured. Keep the car locked, with the rear seatback and trunk lid securely latched when not in use, and prevent children’s access to car keys.
WRS0755
Center armrest (if so equipped)
Pull the armrest down until it is horizontal.
Safety—Seats, seat belts and supplemental restraint system 1-5
SPA1025
FRONT-SEAT ACTIVE HEAD RESTRAINTS
WARNING
cAlways adjust the head restraints properly as specified in this section. Failure to do so can reduce the effectiveness of the Active Head Restraint.
cActive Head Restraints are designed to supplement other safety systems. Always wear seat belts. No system can prevent all injuries in any accident.
cDo not attach anything to the head restraint stalks. Doing so could impair Active Head Restraint function.
The Active Head Restraint moves forward utilizing the force that the seatback receives from the occupant in a rear-end collision. The movement of the head restraint helps support the occupant’s head by reducing its backward movement and helping absorb some of the forces that may lead to whiplash-type injuries.
Active Head Restraints are effective for collisions at low to medium speeds in which it is said that whiplash injuries occur most.
Active Head Restraints operate only in certain rear-end collisions. After the collision, the head restraints return to their original positions.
Properly adjust the Active Head Restraints as described in this section.
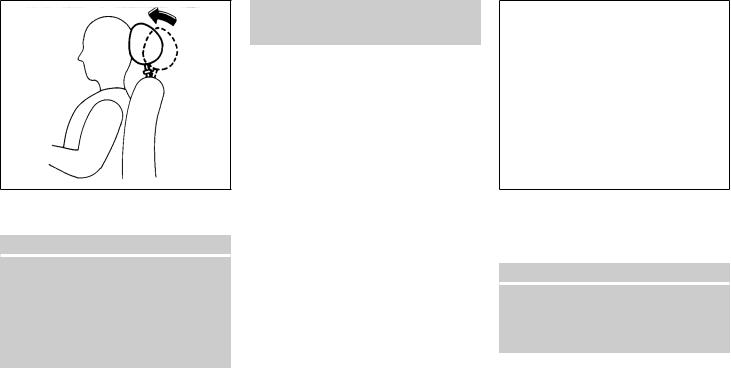
LRS0286
HEAD RESTRAINT ADJUSTMENT
To raise the head restraint, pull it up. To lower, push and hold the lock knob and push the head restraint down.
WARNING
Head restraints should be adjusted properly as they may provide significant protection against injury in an accident. Do not remove them. Check the adjustment after someone else uses the seat.
1-6 Safety—Seats, seat belts and supplemental restraint system
SEAT BELTS
WRS0134
Adjust the head restraint so the center is level with the center of your ears.
SSS0136
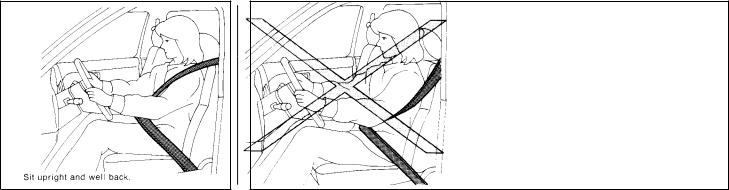
PRECAUTIONS ON SEAT BELT USAGE
If you are wearing your seat belt properly adjusted and you are sitting upright and well back in your seat with both feet on the floor, your chances of being injured or killed in an accident and/or the severity of injury may be greatly reduced. NISSAN strongly encourages you and all of your passengers to buckle up every time you drive, even if your seating position includes a supplemental air bag.
Most U.S. states and Canadian provinces or territories specify that seat belts be worn at all times when a vehicle is being driven.
Safety—Seats, seat belts and supplemental restraint system 1-7
WARNING
cEvery person who drives or rides in this vehicle should use a seat belt at all times. Children should be properly restrained in the rear seat and, if appropriate, in a child restraint.
WARNING
c The seat belt should be properly adjusted to a snug fit. Failure to do so may reduce the effectiveness of the entire restraint system and increase the chance or severity of injury in an accident. Serious injury or death can occur if the seat belt is not worn properly.
1-8 Safety—Seats, seat belts and supplemental restraint system
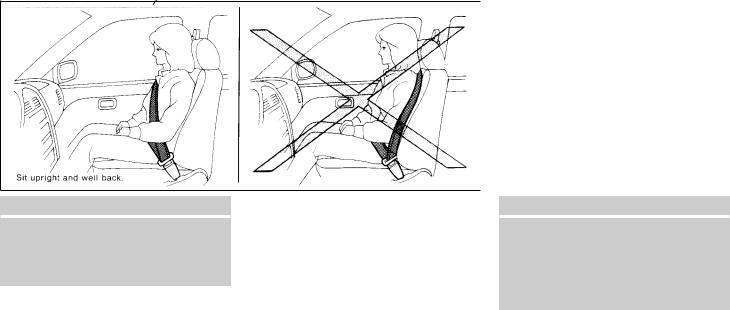
SSS0014
WARNING
c Always route the shoulder belt over your shoulder and across your chest. Never put the belt behind your back, under your arm or across your neck. The belt should be away from your face and neck, but not falling off your shoulder.
cPosition the lap belt as low and snug as possible AROUND THE HIPS, NOT THE WAIST. A lap belt worn too high could increase the risk of internal injuries in an accident.
cBe sure the seat belt tongue is securely fastened to the proper buckle.
cDo not wear the seat belt inside out or twisted. Doing so may reduce its effectiveness.
cDo not allow more than one person to use the same seat belt.
cNever carry more people in the vehicle than there are seat belts.
cIf the seat belt warning light glows continuously while the ignition is turned ON with all doors closed and all seat belts fastened, it may indicate a malfunction in the system. Have the system checked by a NISSAN dealer.
cNo changes should be made to the seat belt system. For example, do not modify the seat belt, add material, or install devices that may change the seat belt routing or tension. Doing so may affect the operation of the seat belt system. Modifying or tampering with the seat belt system may result in serious personal injury.
cOnce a seat belt pretensioner has activated, it cannot be reused and must be replaced together with the retractor. See your NISSAN dealer.
cRemoval and installation of pretensioner system components should be done by a NISSAN dealer.
cAll seat belt assemblies, including retractors and attaching hardware, should be inspected after any collision by a NISSAN dealer. NISSAN recommends that all seat belt assemblies in use during a collision be replaced unless the collision was minor and the belts show no damage and continue to operate properly. Seat belt assemblies not in use during a collision should also be inspected and replaced if either damage or improper operation is noted.
cAll child restraints and attaching hardware should be inspected after any collision. Always follow the restraint manufacturer’s inspection instructions and replacement recommendations. The child restraints should be replaced if they are damaged.
Safety—Seats, seat belts and supplemental restraint system 1-9

CHILD SAFETY
Children need adults to help protect them. They need to be properly restrained.
In addition to the general information in this manual, child safety information is available from many other sources, including doctors, teachers, government traffic safety offices, and community organizations. Every child is different, so be sure to learn the best way to transport your child.
There are three basic types of child restraint systems:
cRear-facing child restraint
cFront-facing child restraint
cBooster seat
The proper restraint depends on the child’s size. Generally, infants up to about 1 year and less than 20 lbs (9 kg) should be placed in rear-facing child restraints. Front-facing child restraints are available for children who outgrow rear-facing child restraints and are at least 1 year old. Booster seats are used to help position a vehicle lap/shoulder belt on a child who can no longer use a front-facing child restraint.
WARNING
Infants and children need special protection. The vehicle’s seat belts may not fit them properly. The shoulder belt may come too close to the face or neck. The lap belt may not fit over their small hip bones. In an accident, an improperly fitting seat belt could cause serious or fatal injury. Always use appropriate child restraints.
All U.S. states and Canadian provinces or territories require the use of approved child restraints for infants and small children. See “Child Restraints” later in this section.
Also, there are other types of child restraints available for larger children for additional protection.
NISSAN recommends that all pre-teens and children be restrained in the rear seat. According to accident statistics, children are safer when properly restrained in the rear seat than in the front seat.
This is especially important because your vehicle has a supplemental restraint system (Air bag system) for the front passenger. See “Supplemental restraint system” later in this section.
1-10 Safety—Seats, seat belts and supplemental restraint system
Infants
Infants up to at least 1 year old should be placed in a rear-facing child restraint. NISSAN recommends that infants be placed in child restraints that comply with Federal Motor Vehicle Safety Standards or Canadian Motor Vehicle Safety Standards. You should choose a child restraint that fits your vehicle and always follow the manufacturer’s instructions for installation and use.
Small children
Children that are over one year old and weigh at least 20 lbs (9 kg) can be placed in a forwardfacing child restraint. Refer to the manufacturer’s instructions for minimum and maximum weight and height recommendations. NISSAN recommends that small children be placed in child restraints that comply with Federal Motor Vehicle Safety Standards or Canadian Motor Vehicle Safety Standards. You should choose a child restraint that fits your vehicle and always follow the manufacturer’s instructions for installation and use.
Larger children
Children who are too large for child restraints should be seated and restrained by the seat belts which are provided. The seat belt may not fit properly if the child is less than 4 ft 9 in (142.5 cm) tall and weighs between 40 lbs (18 kg) and

80 lbs (36 kg). A booster seat should be used to obtain proper seat belt fit.
NISSAN recommends that a child be placed in a commercially available booster seat if the shoulder belt in the child’s seating position fits close to the face or neck or if the lap portion of the seat belt goes across the abdomen. The booster seat should raise the child so that the shoulder belt is properly positioned across the top, middle portion of the shoulder and the lap belt is low on the hips. A booster seat can only be used in seating positions that have a three-point type seat belt. The booster seat should fit the vehicle seat and have a label certifying that it complies with Federal Motor Vehicle Safety Standards or Canadian Motor Vehicle Safety Standards. Once the child has grown so the shoulder belt is no longer on or near the face and neck, use the shoulder belt without the booster seat.
WARNING
Never let a child stand or kneel on any seat and do not allow a child in the cargo areas while the vehicle is moving. The child could be seriously injured or killed in an accident or sudden stop.
PREGNANT WOMEN
NISSAN recommends that pregnant women use seat belts. The seat belt should be worn snug and always position the lap belt as low as possible around the hips, not the waist. Place the shoulder belt over your shoulder and across your chest. Never run the lap/shoulder belt over your abdominal area. Contact your doctor for specific recommendations.
INJURED PERSONS
NISSAN recommends that injured persons use seat belts. Check with your doctor for specific recommendations.
THREE-POINT TYPE SEAT BELT WITH RETRACTOR
WARNING
cEvery person who drives or rides in this vehicle should use a seat belt at all times.
cDo not ride in a moving vehicle when the seatback is reclined. This can be dangerous. The shoulder belt will not be against your body. In an accident, you could be thrown into it and receive neck or other serious injuries. You could also slide under the lap belt and receive serious internal injuries.
cFor the most effective protection when the vehicle is in motion, the seat should be upright. Always sit well back in the seat with both feet on the floor and adjust the seat belt properly.
Safety—Seats, seat belts and supplemental restraint system 1-11

WRS0692
Manual front seat shown
Fastening the seat belts
1.Adjust the seat. See “Seats” earlier in this section.
WRS0137
s2 Slowly pull the seat belt out of the retractor and insert the tongue into the buckle until you hear and feel the latch engage.
cThe retractor is designed to lock during a sudden stop or on impact. A slow pulling motion permits the seat belt to move, and allows you some freedom of movement in the seat.
cIf the seat belt cannot be pulled from its fully retracted position, firmly pull the belt and release it. Then smoothly pull the belt out of the retractor.
WRS0138
s3 Position the lap belt portion low and snug on the hips as shown.
s4 Pull the shoulder belt portion toward the retractor to take up extra slack. Be sure the shoulder belt is routed over your shoulder and across your chest.
The front passenger seat and the rear seating positions three-point seat belts have two modes of operation:
cEmergency Locking Retractor (ELR)
cAutomatic Locking Retractor (ALR)
1-12 Safety—Seats, seat belts and supplemental restraint system
The Emergency Locking Retractor (ELR) mode allows the seat belt to extend and retract to allow the driver and passengers some freedom of movement in the seat. The ELR locks the seat belt when the vehicle slows down rapidly or during certain impacts.
The Automatic Locking Retractor (ALR) mode (child restraint mode) locks the seat belt for child restraint installation.
When the ALR mode is activated, the seat belt cannot be extended again until the seat belt tongue is detached from the buckle and fully retracted. The seat belt returns to the ELR mode after the seat belt fully retracts. See “Child restraints” later in this section for more information.
The ALR mode should be used only for child restraint installation. During normal seat belt use by an occupant, the ALR mode should not be activated. If it is activated, it may cause uncomfortable seat belt tension. It can also change the operation of the front passenger air bag. See “Front passenger air bag and status light” later in this section.
WARNING
When fastening the seat belts, be certain that the seatbacks are completely secured in the latched position. If they are not completely secured, passengers may be injured in an accident or sudden stop.
WRS0139
Unfastening the seat belts
s1 To unfasten the seat belt, press the button on the buckle. The seat belt automatically retracts.
Checking seat belt operation
Seat belt retractors are designed to lock seat belt movement by two separate methods:
cWhen the seat belt is pulled quickly from the retractor.
cWhen the vehicle slows down rapidly.
Safety—Seats, seat belts and supplemental restraint system 1-13
To increase your confidence in the seat belts, check the operation as follows:
cGrasp the shoulder belt and pull forward quickly. The retractor should lock and restrict further belt movement.
If the retractor does not lock during this check or if you have any questions about seat belt operation, see a NISSAN dealer.
LRS0242
Shoulder belt height adjustment (front seats)
The shoulder belt anchor height should be adjusted to the position best for you. (See “Precautions on seat belt usage” earlier in this section.) To adjust, pull out the adjustment button s1 and move the shoulder belt anchor to the desired position s2 , so the belt passes over the center of the shoulder. The belt should be away from your face and neck, but not falling off your shoulder. Release the adjustment button to lock the shoulder belt anchor into position.
1-14 Safety—Seats, seat belts and supplemental restraint system
WARNING
c After adjustment, release the adjustment button and try to move the shoulder belt anchor up and down to make sure it is securely fixed in position.
cThe shoulder belt anchor height should be adjusted to the position best for you. Failure to do so may reduce the effectiveness of the entire restraint system and increase the chance or severity of injury in an accident.
SEAT BELT EXTENDERS
If, because of body size or driving position, it is not possible to properly fit the lap/shoulder belt and fasten it, an extender is available which is compatible with the installed seat belts. The extender adds approximately 8 in (200 mm) of length and may be used for either the driver or front passenger seating position. See a NISSAN dealer for assistance if an extender is required.
WARNING
cOnly NISSAN seat belt extenders, made by the same company which made the original equipment seat belts, should be used with NISSAN seat belts.
![]()
CHILD RESTRAINTS
c Adults and children who can use the standard seat belt should not use an extender. Such unnecessary use could result in serious personal injury in the event of an accident.
cNever use seat belt extenders to install child restraints. If the child restraint is not secured properly, the child could be seriously injured in a collision or a sudden stop.
SEAT BELT MAINTENANCE
cTo clean the seat belt webbing, apply a mild soap solution or any solution recommended for cleaning upholstery or carpet. Then wipe with a cloth and allow the seat belts to dry in the shade. Do not allow the seat belts to retract until they are completely dry.
cIf dirt builds up in the shoulder belt guide of the seat belt anchors, the seat belts may retract slowly. Wipe the shoulder belt guide with a clean, dry cloth.
cPeriodically check to see that the seat belt and the metal components, such as buckles, tongues, retractors, flexible wires and anchors, work properly. If loose parts, deterioration, cuts or other damage on the webbing is found, the entire seat belt assembly should be replaced.
PRECAUTIONS ON CHILD RESTRAINTS
WARNING
c Infants and small children should always be placed in an appropriate child restraint while riding in the vehicle. Failure to use a child restraint can result in serious injury or death.
cInfants and small children should never be carried on your lap. It is not possible for even the strongest adult to resist the forces of a severe accident. The child could be crushed between the adult and parts of the vehicle. Also, do not put the same seat belt around both your child and yourself.
Safety—Seats, seat belts and supplemental restraint system 1-15

c Even with the NISSAN Advanced Air
Bag System, never install a rear-facing child restraint in the front seat. An inflating front air bag could seriously injure or kill your child. A rear-facing child restraint must only be used in the rear seat.
cNISSAN recommends that the child restraint be installed in the rear seat. According to accident statistics, children are safer when properly restrained in the rear seat than in the front seat. If you must install a front facing child restraint in the front seat, see “Child restraint installation using the seat belts” later in this section.
cImproper use or improper installation of a child restraint can increase the risk or severity of injury for both the child and other occupants of the vehicle and can lead to serious injury or death in an accident.
cFollow all of the child restraint manufacturer’s instructions for installation and use. When purchasing a child restraint, be sure to select one which will fit your child and vehicle. It may not be possible to properly install some types of child restraints in your vehicle.
c If the child restraint is not anchored properly, the risk of a child being injured in a collision or a sudden stop greatly increases.
c Child restraint anchor points are designed to withstand only those loads imposed by correctly fitted child restraints. Under no circumstances are they to be used for adult seat belts or harnesses.
c Adjustable seatbacks should be positioned to fit the child restraint, but as upright as possible.
cAfter attaching the child restraint, test it before you place the child in it. Push it from side to side while holding the seat near the LATCH attachment or by the seat belt path. The child restraint should not move more than 1 inch (25 mm), from side to side. Try to tug it forward and check to see if the belt holds the restraint in place. If the restraint is not secure, tighten the belt as necessary, or put the restraint in another seat and test it again. You may need to try a different child restraint. Not all child restraints fit in all types of vehicles.
1-16 Safety—Seats, seat belts and supplemental restraint system
c When your child restraint is not in use, keep it secured with the LATCH system or a seat belt to prevent it from being thrown around in case of a sudden stop or accident.
CAUTION
Remember that a child restraint left in a closed vehicle can become very hot. Check the seating surface and buckles before placing your child in the child restraint.
This vehicle is equipped with a universal child restraint lower anchor system, referred to as the LATCH (Lower Anchors and Tethers for CHildren) system. Some child restraints include two rigid or webbing-mounted attachments that can be connected to these lower anchors. For details, see “LATCH (Lower Anchors and Tethers for CHildren) system” later in this section.
If you do not have a LATCH compatible child restraint, the vehicle seat belts can be used. See “Child restraint installation using the seat belts” later in this section. In general, child restraints are also designed to be installed with a lap/shoulder seat belt.

Several manufacturers offer child restraints for infants and small children of various sizes. When selecting any child restraint, keep the following points in mind:
cChoose only a restraint with a label certifying that it complies with Federal Motor Vehicle Safety Standard 213 or Canadian Motor Vehicle Safety Standard 213.
cCheck the child restraint in your vehicle to be sure it is compatible with the vehicle’s seat and seat belt system.
cIf the child restraint is compatible with your vehicle, place your child in the child restraint and check the various adjustments to be sure the child restraint is compatible with your child. Choose a child restraint that is designed for your child’s height and weight. Always follow all recommended procedures.
All U.S. states and Canadian provinces or territories require that infants and small children be restrained in an approved child restraint at all times while the vehicle is being operated. Canadian law requires the top tether strap on front-facing child restraints be secured to the designated anchor point on the vehicle.
WRS0756
LATCH system anchor locations
LATCH (Lower Anchors and Tethers for CHildren) SYSTEM
Your vehicle is equipped with special anchor points that are used with LATCH (Lower Anchors and Tethers for CHildren) system compatible child restraints. This system may also be referred to as the ISOFIX or ISOFIX compatible system. With this system, you do not have to use a vehicle seat belt to secure the child restraint.
The LATCH anchor points are provided to install child restraints in the rear outboard seating positions only. Do not attempt to install a child restraint in the center position using the LATCH anchors.
Safety—Seats, seat belts and supplemental restraint system 1-17

WRS0700
LATCH lower anchor location
LATCH lower anchor point locations
The LATCH anchors are located at the rear of the seat cushion near the seatback. A label is attached to the seatback to help you locate the LATCH anchors.
WARNING
cAttach LATCH system compatible child restraints only at the locations shown. If a child restraint is not secured properly, your child could be seriously injured or killed in an accident.
cDo not secure a child restraint in the center rear seating position using the LATCH anchors. The child restraint will not be secured properly.
cChild restraint anchor points are designed to withstand only those loads imposed by correctly fitted child restraints. Under no circumstances are they to be used for adult seat belts or harnesses.
1-18 Safety—Seats, seat belts and supplemental restraint system
LRS0661
LATCH webbing-mounted attachment
Installing child restraint LATCH anchor attachments
LATCH compatible child restraints include two rigid or webbing-mounted attachments that can be connected to two anchors located at certain seating positions in your vehicle. With this system, you do not have to use a vehicle seat belt to secure the child restraint. Check your child restraint for a label stating that it is compatible with LATCH. This information may also be in the instructions provided by the child restraint manufacturer.

LRS0662
LATCH rigid-mounted attachment
LATCH child restraints generally require the use of a top tether strap. See “Top tether strap child restraint” later in this section for installation instructions.
When installing a child restraint, carefully read and follow the instructions in this manual and those supplied with the child restraint. See “Child restraint installation using LATCH” later in this section.
TOP TETHER STRAP CHILD RESTRAINT
If the manufacturer of your child restraint requires the use of a top tether strap, it must be secured to the anchor point.
WARNING
c Child restraint anchor points are designed to withstand only those loads imposed by correctly fitted child restraints. Under no circumstances are they to be used for adult seat belts or harnesses.
cYour child could be seriously injured or killed in a collision if the child restraint top tether strap is damaged.
cIf the cargo cover contacts the top tether strap when it is attached to the top tether anchor, remove the cargo cover from the vehicle or secure it on the cargo floor below its attachment location. If the cargo cover is not removed, it may damage the top tether strap during a collision. Your child could be seriously injured or killed in a collision if the child restraint top tether strap is damaged.
cDo not allow cargo to contact the top tether strap when it is attached to the top tether anchor. Properly secure the cargo so it does not contact the top tether strap. Cargo that is not properly secured or cargo that contacts the top tether strap may damage it during a collision. Your child could be seriously injured or killed in a collision if the top tether strap is damaged.
Safety—Seats, seat belts and supplemental restraint system 1-19

WRS0759
Hatchback
Top tether anchor point locations
Anchor points are located on the back of the rear seats (hatchback model) or on the rear parcel shelf (sedan model).
Installing top tether strap (hatchback model)
First, secure the child restraint with the LATCH system (rear outboard seat positions only) or the seat belt, as applicable.
1.Remove the head restraint. Store it in a secure location. Be sure to reinstall the head restraint when the child restraint is removed.
WRS0760
Sedan
2.Position the top tether strap over the top of the seatback.
3.Secure the tether strap to the tether anchor point on the seat directly behind the child restraint.
4.Tighten the tether strap according to the manufacturer’s instructions to remove any slack.
If you have any questions when installing a top tether strap child restraint on the rear seat, consult your NISSAN dealer for details.
1-20 Safety—Seats, seat belts and supplemental restraint system
Installing top tether strap (sedan model)
First, secure the child restraint with the LATCH system (rear outboard seat positions only) or the seat belt, as applicable.
1.Flip up the anchor cover s1 from the anchor point which is located directly behind the child seat.
2.Position the top tether strap over the top of the seatback.
3.Secure the tether strap to the tether anchor point on the rear parcel shelf.
4.Tighten the tether strap according to the manufacturer’s instructions to remove any slack.
If you have any questions when installing a top tether strap child restraint on the rear seat, consult your NISSAN dealer for details.

CHILD RESTRAINT INSTALLATION USING LATCH
WARNING
cAttach LATCH system compatible child restraints only at the locations shown. For the LATCH lower anchor locations see “LATCH (Latch Anchors and Tethers for CHildren) system”. If a child restraint is not secured properly, your child could be seriously injured or killed in an accident.
cThe LATCH anchors are designed to withstand only those loads imposed by correctly fitted child restraints. Under no circumstances are they to be used for adult seat belts or harnesses.
cInspect the lower anchors by inserting your fingers into the lower anchor area and feeling to make sure there are no obstructions over the LATCH anchors, such as seat belt webbing or seat cushion material. The child restraint will not be secured properly if the LATCH anchors are obstructed.
Front-facing
Follow these steps to install a front-facing child restraint using LATCH:
1.Position the child restraint on the seat. Always follow the child restraint manufacturer’s instructions.
WRS0799
Front-facing web-mounted – step 2
2. Secure the child restraint anchor attachments to the LATCH lower anchors. Check to make sure the LATCH attachment is properly attached to the lower anchors.
3. The back of the child restraint should be secured against the vehicle seatback.
If necessary, adjust or remove the head restraint to obtain the correct child restraint fit. See “Head restraints” earlier in this section.
If the head restraint is removed, store it in a secure place. Be sure to reinstall the head restraint when the child restraint is removed.
Safety—Seats, seat belts and supplemental restraint system 1-21

WRS0800
Front-facing rigid-mounted – step 2
If the seating position does not have an adjustable head restraint and it is interfering with the proper child restraint fit, try another seating position or a different child restraint.
LRS0671
Front-facing – step 4
4.For child restraints that are equipped with webbing-mounted attachments, remove any additional slack from the anchor attachments. Press downward and rearward firmly in the center of the child restraint with your knee to compress the vehicle seat cushion and seatback while tightening the webbing of the anchor attachments.
5.If the child restraint is equipped with a top tether strap, route the top tether strap and secure the tether strap to the tether anchor point. See “Top tether strap child restraint” in this section.
1-22 Safety—Seats, seat belts and supplemental restraint system
WRS0697
Front-facing – step 6
6.After attaching the child restraint, test it before you place the child in it. Push it from side to side while holding the seat near the LATCH attachment path. The child restraint should not move more than 1 inch (25 mm), from side to side. Try to tug it forward and check to see if the LATCH attachment holds the restraint in place. If the restraint is not secure, tighten the LATCH attachment as necessary, or put the restraint in another seat and test it again. You may need to try a different child restraint. Not all child restraints fit in all types of vehicles.

7.Check to make sure the child restraint is properly secured prior to each use. If the child restraint is loose, repeat steps 3 through 6.
Rear-facing
Follow these steps to install a rear-facing child restraint using the LATCH system:
1.Position the child restraint on the seat. Always follow the child restraint manufacturer’s instructions.
WRS0801
Rear-facing web-mounted – step 2
2.Secure the child restraint anchor attachments to the LATCH lower anchors. Check to make sure the LATCH attachment is properly attached to the lower anchors.
WRS0802
Rear-facing rigid-mounted – step 2
Safety—Seats, seat belts and supplemental restraint system 1-23

|
LRS0673 |
LRS0674 |
|
|
Rear-facing – step 3 |
Rear-facing – step 4 |
3.For child restraints that are equipped with webbing-mounted attachments, remove any additional slack from the anchor attachments. Press downward and rearward firmly in the center of the child restraint with your hand to compress the vehicle seat cushion and seatback while tightening the webbing of the anchor attachments.
4.After attaching the child restraint, test it before you place the child in it. Push it from side to side while holding the seat near the LATCH attachment path. The child restraint should not move more than 1 inch (25 mm), from side to side. Try to tug it forward and check to see if the LATCH attachment holds the restraint in place. If the restraint is not secure, tighten the LATCH attachment as necessary, or put the restraint in another seat and test it again. You may need to try a different child restraint. Not all child restraints fit in all types of vehicles.
1-24 Safety—Seats, seat belts and supplemental restraint system
5.Check to make sure the child restraint is properly secured prior to each use. If the child restraint is loose, repeat steps 2 through 4.
![]()
WRS0256
CHILD RESTRAINT INSTALLATION USING THE SEAT BELTS
WARNING
c Even with the NISSAN Advanced Air
Bag System, never install a rear-facing child restraint in the front passenger seat. Front air bags inflate with great force. A rear-facing child restraint could be struck by the front air bag in a crash and could seriously injure or kill your child.
c NISSAN recommends that child restraints be installed in the rear seat. However, if you must install a frontfacing child restraint in the front passenger seat, move the passenger seat to the rearmost position. Also, be sure the front passenger air bag status light is illuminated to indicate the passenger air bag is OFF. See “Front passenger air bag and status light” later in this section for details.
cThe three-point seat belt in your vehicle is equipped with an Automatic Locking Retractor (ALR) which must be used when installing a child restraint.
cFailure to use the ALR mode will result in the child restraint not being properly secured. The restraint could tip over or otherwise be unsecured and cause injury to the child in a sudden stop or collision. Also, it can change the operation of the front passenger air bag. See “Front passenger air bag and status light” later in this section.
cA child restraint with a top tether strap should not be used in the front passenger seat.
The instructions in this section apply to child restraint installation using the vehicle seat belts in the rear seat or the front passenger seat.
Safety—Seats, seat belts and supplemental restraint system 1-25

WRS0699
Front-facing (front passenger seat) – step 1
Front-facing
Follow these steps to install a front-facing child restraint using the vehicle seat belt in the rear seats or in the front passenger seat:
1.If you must install a child restraint in the front seat, it should be placed in a front-facing direction only. Move the seat to the rearmost position. Child restraints for infants must be used in the rear-facing direction and therefore must not be used in the front seat.
2.Position the child restraint on the seat. Always follow the child restraint manufacturer’s instructions
The back of the child restraint should be secured against the vehicle seatback.
If necessary, adjust or remove the head restraint to obtain the correct child restraint fit. See “Head restraint adjustment” in this section.
If the head restraint is removed, store it in a secure place. Be sure to reinstall the head restraint when the child restraint is removed.
If the seating position does not have an adjustable head restraint and it is interfering with the proper child restraint fit, try another seating position or a different child restraint.
WRS0680
Front-facing – step 3
3.Route the seat belt tongue through the child restraint and insert it into the buckle until you hear and feel the latch engage. Be sure to follow the child restraint manufacturer’s instructions for belt routing.
1-26 Safety—Seats, seat belts and supplemental restraint system

|
LRS0667 |
LRS0668 |
WRS0681 |
||
|
Front-facing – step 4 |
Front-facing – step 5 |
Front-facing – step 6 |
||
|
4. Pull the shoulder belt until the belt is fully |
5. Allow the seat belt to retract. Pull up on the |
6. Remove any additional slack from the seat |
||
|
extended. At this time, the seat belt retractor |
shoulder belt to remove any slack in the belt. |
belt; press downward and rearward firmly in |
||
|
is in the Automatic Locking Retractor (ALR) |
the center of the child restraint with your |
|||
|
mode (child restraint mode). It reverts to |
knee to compress the vehicle seat cushion |
|||
|
Emergency Locking Retractor (ELR) mode |
and seatback while pulling up on the seat |
|||
|
when the seat belt is fully retracted. |
belt. |
Safety—Seats, seat belts and supplemental restraint system 1-27

WRS0698
Front-facing – step 8
7.If the child restraint is equipped with a top tether strap, route the top tether strap and secure the tether strap to the tether anchor point (rear seat installation only). See “Top tether strap child restraint” in this section. Do not install child restraints that require the use of a top tether strap to seating positions that do not have a top tether anchor.
8.After attaching the child restraint, test it before you place the child in it. Push it from side to side while holding the seat near the seat belt path. The child restraint should not move more than 1 inch (25 mm), from side to side. Try to tug it forward and check to see if
the belt holds the restraint in place. If the restraint is not secure, tighten the belt as necessary, or put the restraint in another seat and test it again. You may need to try a different child restraint. Not all child restraints fit in all types of vehicles.
9.Check that the retractor is in the ALR mode by trying to pull more seat belt out of the retractor. If you cannot pull any more belt webbing out of the retractor, the retractor is in the ALR mode.
10.Check to make sure the child restraint is properly secured prior to each use. If the seat belt is not locked, repeat steps 3 through 9.
1-28 Safety—Seats, seat belts and supplemental restraint system
WRS0475
Front-facing – step 11
11. If the child restraint is installed in the front passenger seat, place the ignition switch in the ON position. The front passenger air bag
status light  should illuminate. If this light is not illuminated see 9Front passenger air bag and status light9 in this section.
Move the child restraint to another seating position. Have the system checked by a NISSAN dealer.
After the child restraint is removed and the seat belt is fully retracted, the ALR mode (child restraint mode) is canceled.

WRS0256
Rear-facing – step 1
Rear-facing
Follow these steps to install a rear-facing child restraint using the vehicle seat belt in the rear seats:
1.Child restraints for infants must be used in the rear-facing direction and therefore must not be used in the front seat. Position the child restraint on the seat. Always follow the restraint manufacturer’s instructions.
WRS0761
Rear-facing – step 2
2.Route the seat belt tongue through the child restraint and insert it into the buckle until you hear and feel the latch engage. Be sure to follow the child restraint manufacturer’s instructions for belt routing.
LRS0669
Rear-facing – step 3
3.Pull the shoulder belt until the belt is fully extended. At this time, the seat belt retractor is in the Automatic Locking Retractor (ALR) mode (child restraint mode). It reverts to the Emergency Locking Retractor (ELR) mode when the seat belt is fully retracted.
Safety—Seats, seat belts and supplemental restraint system 1-29

LRS0670
Rear-facing – step 4
4.Allow the seat belt to retract. Pull up on the shoulder belt to remove any slack in the belt.
WRS0762
Rear-facing – step 5
5.Remove any additional slack from the child restraint; press downward and rearward firmly in the center of the child restraint to compress the vehicle seat cushion and seatback while pulling up on the seat belt.
WRS0763
Rear-facing – step 6
6.After attaching the child restraint, test it before you place the child in it. Push it from side to side while holding the seat near the seat belt path. The child restraint should not move more than 1 inch (25 mm), from side to side. Try to tug it forward and check to see if the belt holds the restraint in place. If the restraint is not secure, tighten the belt as necessary, or put the restraint in another seat and test it again. You may need to try a different child restraint. Not all child restraints fit in all types of vehicles.
1-30 Safety—Seats, seat belts and supplemental restraint system

7.Check that the retractor is in the ALR mode by trying to pull more seat belt out of the retractor. If you cannot pull any more seat belt webbing out of the retractor, the retractor is in the ALR mode.
8.Check to make sure that the child restraint is properly secured prior to each use. If the seat belt is not locked, repeat steps 3 through 7.
After the child restraint is removed and the seat belt fully retracted, the ALR mode (child restraint mode) is canceled.
BOOSTER SEATS
ARS1098
PRECAUTIONS ON BOOSTER SEATS
WARNING
c Infants and small children should always be placed in an appropriate child restraint while riding in the vehicle. Failure to use a child restraint or booster seat can result in serious injury or death.
cInfants and small children should never be carried on your lap. It is not possible for even the strongest adult to resist the forces of a severe accident. The child could be crushed between the adult and parts of the vehicle. Also, do not put the same seat belt around both your child and yourself.
cNISSAN recommends that the booster seat be installed in the rear seat. According to accident statistics, children are safer when properly restrained in the rear seat than in the front seat. If you must install a booster seat in the front seat, see “Booster seat installation” in this section.
cA booster seat must only be installed in a seating position that has a lap/ shoulder belt. Failure to use a threepoint type seat belt with a booster seat can result in a serious injury in sudden stop or collision.
cImproper use or improper installation of a booster seat can increase the risk or severity of injury for both the child and other occupants of the vehicle and can lead to serious injury or death in an accident.
Safety—Seats, seat belts and supplemental restraint system 1-31

c Do not use towels, books, pillows or other items in place of a booster seat. Items such as these may move during normal driving or a collision and result in serious injury or death. Booster seats are designed to be used with a lap/ shoulder belt. Booster seats are designed to properly route the lap and shoulder portions of the seat belt over the strongest portions of a child’s body to provide the maximum protection during a collision.
cFollow all of the booster seat manufacturer’s instructions for installation and use. When purchasing a booster seat, be sure to select one which will fit your child and vehicle. It may not be possible to properly install some types of booster seats in your vehicle.
cIf the booster seat and seat belt is not used properly, the risk of a child being injured in a collision or a sudden stop greatly increases.
cAdjustable seatbacks should be positioned to fit the booster seat, but as upright as possible.
c After placing the child in the booster seat and fastening the seat belt, make sure the shoulder portion of the belt is away from the child’s face and neck and the lap portion of the belt does not cross the abdomen.
cDo not put the shoulder belt behind the child or under the child’s arm. If you must install a booster seat in the front seat, see “Booster seat installation” later in this section.
cWhen your booster seat is not in use, keep it secured with a seat belt to prevent it from being thrown around in case of a sudden stop or accident.
CAUTION
Remember that a booster seat left in a closed vehicle can become very hot. Check the seating surface and buckles before placing your child in the booster seat.
LRS0455
Booster seats of various sizes are offered by several manufacturers. When selecting any booster seat, keep the following points in mind:
cChoose only a booster seat with a label certifying that it complies with Federal Motor Vehicle Safety Standard 213 or Canadian Motor Vehicle Safety Standard 213.
cCheck the booster seat in your vehicle to be sure it is compatible with the vehicle’s seat and seat belt system.
1-32 Safety—Seats, seat belts and supplemental restraint system

LRS0453
cMake sure the child’s head will be properly supported by the booster seat or vehicle seat. The seatback must be at or above the center of the child’s ears. For example, if a
low back booster seat s1 is chosen, the vehicle seatback must be at or above the center of the child’s ears. If the seatback is lower than the center of the child’s ears, a high back booster seat s2 should be used.
cIf the booster seat is compatible with your vehicle, place your child in the booster seat and check the various adjustments to be sure the booster seat is compatible with your child. Always follow all recommended procedures.
LRS0464
All U.S. states and Canadian provinces or territories require that infants and small children be restrained in an approved child restraint at all times while the vehicle is being operated.
The instructions in this section apply to booster seat installation in the rear seats or the front passenger seat.
BOOSTER SEAT INSTALLATION
WARNING
NISSAN recommends that booster seats be installed in the rear seat. However, if you must install a booster seat in the front passenger seat, move the passenger’s seat to the rearmost position.
CAUTION
Do not use the lap/shoulder belt Automatic Locking Retractor mode when using a booster seat with the seat belts.
Follow these steps to install a booster seat in the rear seat or in the front passenger seat:
Safety—Seats, seat belts and supplemental restraint system 1-33

WRS0699
1.If you must install a booster seat in the front seat, move the seat to the rearmost position.
2.Position the booster seat on the seat. Only place it in a front-facing direction. Always follow the booster seat manufacturer’s instructions.
|
LRS0451 |
LRS0452 |
|
|
Rear center position |
Rear outboard position |
|
|
3. The booster seat should be positioned on |
||
|
the vehicle seat so that it is stable. If neces- |
||
|
sary, adjust or remove the head restraint to |
||
|
obtain the correct booster seat fit. See |
||
|
“Head restraint adjustment” earlier in this |
||
|
section. If the head restraint is removed, |
||
|
store it in a secure place. Be sure to reinstall |
||
|
the head restraint when the booster seat is |
||
|
removed. If the seating position does not |
||
|
have an adjustable head restraint and it is |
||
|
interfering with the proper booster seat fit, |
||
|
try another seating position or a different |
||
|
booster seat. |
1-34 Safety—Seats, seat belts and supplemental restraint system
 Loading…
Nissan Tiida C11 с бензиновыми двигателями: HR16DE 1.6 л (1598 см³) 110 л.с./81 кВт и MR18DE 1.8 л (1797 см³) 126 л.с./93 кВт; Руководство по эксплуатации, техническому обслуживанию и ремонту, полные технические характеристики, особенности эксплуатации и ремонта, устранение неисправностей в пути более 3500 оригинальных фотографий электросхемы, контрольные размеры кузова. Пошаговый ремонт в фотографиях легковой автомобиль компактного класса Ниссан Тиида С11 с цельнометаллическими несущими кузовами пятидверный хэтчбек и четырёхдверный седан переднеприводные модели первого поколения выпуска с 2007 (включая рестайлинг в 2009) по 2015 год
Nissan Tiida с 2004 Руководство по эксплуатации, техническому обслуживанию, устройство, диагностика, ремонт здесь
Nissan Tiida Latio Руководство по ремонту и эксплуатации
Nissan Tiida C11 Руководство по эксплуатации
Документ кнопками можно масштабировать до 10 кратного увеличения, перетаскивать для удобного просмотра (наведя и зажав левую кнопку мышки, правильно работает только в «Хроме»)
ЕСЛИ ВЫ ВИДИТЕ ОШИБКУ 406 Not Acceptable и не видите документ, то скорей всего у Вас IP РФ и его надо сменить, на любой другой страны, с помощью VPN ( Scribd и SlideShare блокируют посетителей с Российским IP).
Видео Nissan Tiida замена цепи ГРМ и масла АКПП с фильтром (Ниссан Тиида 04-15)
Nissan Tiida 2004-2015 общая информация (Ниссан Тиида C11)
ЗАМЕНА ЦЕПИ ПРИВОДА ГАЗОРАСПРЕДЕЛИТЕЛЬНОГО МЕХАНИЗМА
Вам потребуются: ключи или торцовые головки «на 8», «на 10», «на 13», «на 14», «на 19», отвертка с плоским лезвием, нож, герметик, пассатижи, обтирочная ткань, емкость для сливаемого масла (не менее 5 литров).
1. Снимите правое переднее колесо.
2. Снимите декоративный кожух двигателя.
3. Отсоедините провод от клеммы «минус» аккумуляторной батареи.
4. Слейте масло из системы смазки двигателя.
5. Установите опору под двигатель.
6. Установите поршень 1-го цилиндра в ВМТ такта сжатия.
7. Снимите ремень привода вспомогательных агрегатов.
8. Снимите кронштейн правой опоры подвески силового агрегата.
9. Снимите впускную трубу.
10. Снимите крышку головки блока цилиндров.
11. Выверните три болта крепления шкива водяного насоса…
12. …и снимите шкив.
13. Удерживая шкив коленчатого вала от проворачивания специальным приспособлением, выверните болт крепления шкива…
ПРИМЕЧАНИЕ
На автомобилях с механической коробкой передач при отсутствии съемника выворачивайте болт крепления шкива коленчатого вала с помощником. Он должен включить пятую передачу, резко нажать на педаль тормоза четыре-пять раз (с интервалом между нажатиями 1 -2 с), после чего удерживать педаль нажатой.
14. …извлеките его из отверстия…
15. и снимите шкив.
16. Выверните болт крепления «массового» провода к крышке цепи привода газораспределительного механизма…
17. …извлеките болт из отверстия и отведите провод в сторону.
18. Выверните восемь болтов нижнего крепления крышки цепи привода газораспределительного механизма…
19. …три болта в центральной части…
20. …и три болта — в верхней.
21. Снимите крышку цепи привода газораспределительного механизма.
22. Отожмите шток натяжителя цепи и зафиксируйте его, вставив в отверстие штифт диаметром 2 мм.
23. Выверните болт крепления натяжителя к блоку цилиндров.
24. …и извлеките его из отверстия. Аналогично выверните второй болт…
25. …и снимите натяжитель.
26. Выверните нижний…
27. …и верхний болты крепления успокоителя цепи привода газораспределительного механизма…
28. …и снимите успокоитель.
29. Снимите башмак натяжителя.
30. Снимите цепь привода газораспределительного механизма со звездочки коленчатого вала…
31. …и со звездочек распределительных валов. Снимите цепь.
32. Установите новую цепь и все детали в порядке, обратном снятию, с учетом следующего: совместите метки на цепи привода газораспределительного механизма с метками на звездочках распределительных валов и меткой на звездочке коленчатого вала.
33. Замените сальник коленчатого вала.
34. Перед установкой очистите привалочные поверхности двигателя и крышки газораспределительного механизма от старого герметика.
35. Нанесите новый герметик на привалочную поверхность крышки газораспределительного механизма валиком толщиной 4,5-4,8 мм.
36. Установите крышку цепи привода газораспределительного механизма и затяните болты ее крепления в указанном порядке.
37. Установите шкив коленчатого вала и затяните болт его крепления в два этапа:
— моментом 35 Н-м;
— доверните на угол 60°.
38. Далее установку проводите в порядке, обратном снятию.
39. Залейте масло в систему смазки двигателя. Убедитесь в отсутствии подтекания масла.
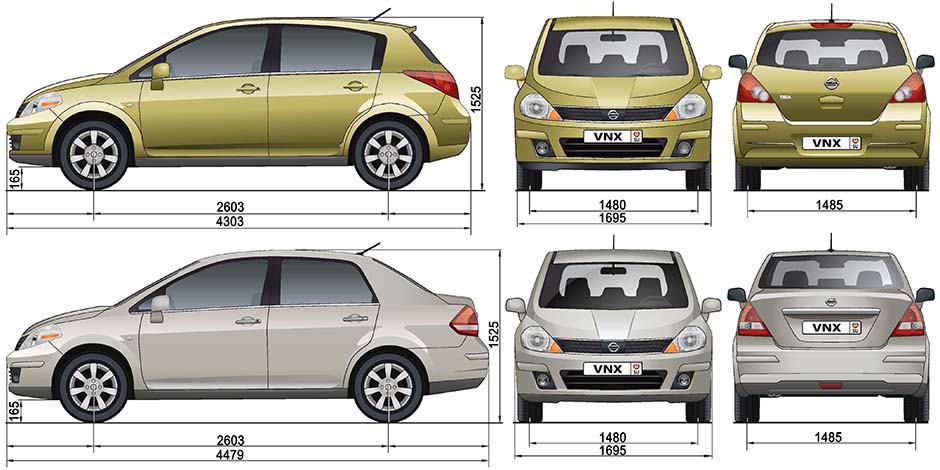
| № | Спецификация / Specs | Данные |
| Габариты (мм/mm) и масса (кг/kg) / Dimensions and Weight | ||
| 1 | Длина / Length | 4479 |
| 2 | Ширина (без/с зеркалами) / Width | 1695 |
| 3 | Высота (загружен/пустой) / Height | 1525 |
| 4 | Колёсная база / Wheelbase | 2603 |
| 5 | Дорожный просвет (клиренс) / Ground clearance | 165 |
| 6 | Снаряжённая масса / Total (curb) weight | 1214 |
| Полная масса / Gross (max.) weight | 1715 | |
|
Двигатель / Engine |
||
| 7 | Тип / Engine Type, Code | Бензиновый, жидкостного охлаждения, четырехтактный, HR16DE |
| 8 | Количество цилиндров / Cylinder arrangement: Total number of cylinders, of valves | 4-цилиндровый, 16V, рядный, DOHC с верхним расположением двух распределительных валов |
| 9 | Диаметр цилиндра / Bore | 78.0 мм |
| 10 | Ход поршня / Stroke | 83.6 мм |
| 11 | Объём / Engine displacement | 1598 см³ |
| 12 | Система питания / Fuel supply, Aspiration | Распределенный впрыск топлива ESM |
| Атмосферный | ||
| 13 | Степень сжатия / Compression ratio | 10.7:1 |
| 14 | Максимальная мощность / Max. output power kW (HP) at rpm | 81 кВт (110 л.с.) при 6000 об/мин |
| 15 | Максимальный крутящий момент / Max. torque N·m at rpm | 153 Нм при 4400 об/мин |
|
Трансмиссия / Transmission |
||
| 16 | Сцепление / Clutch type | Гидротрансформатор с блокировкой / Torque Converter |
| 17 | КПП / Transmission type | RE4F035B АКПП 4 Автоматическая, четырёхступенчатая, гидромеханическая, адаптивная |
О Книге
- Название: Nissan Tiida Руководство по эксплуатации, техническому обслуживанию, устройство, диагностика, ремонт
- Бензиновые двигатели: HR16DE 1.6 л (1598 см³) 110 л.с./81 кВт и MR18DE 1.8 л (1797 см³) 126 л.с./93 кВт
- Выпуск с 2007 года
- Серия: «Ремонт без проблем»
- Год издания: 2012
- Автор: Коллектив авторов
- Издательство: «Ассоциация независимых издателей»
- Формат: PDF
- Страниц в книге: 317
- Размер: 102.21 МБ
- Язык: Русский
- Количество электросхем: 26
Поиск по сайту
Остались вопросы или пожелания? Пишите на почту: support@vnx.su
Manufacturer: NISSAN, Model Year: 2009,
Model line: TIIDA,
Model: NISSAN TIIDA 2009
Pages: 4331, PDF Size: 58.04 MB
Trending: warning, Bulb, Battery type, run flat, fog light, coolant level, keyless entry
Page 1 of 4331

Page 2 of 4331

Page 3 of 4331

Page 4 of 4331
 ........................................................... ..")
Page 5 of 4331
 or
EC-1033,\" System Description \" (MR Type 2).")
Page 6 of 4331

Page 7 of 4331

Page 8 of 4331

Page 9 of 4331

Page 10 of 4331

- Load next 10 pages
Trending: key battery, Bulb, steering wheel, Horn, wiring, Battery type, fuse diagram
View, print and download for free: NISSAN TIIDA 2009 Service Repair Manual, 4331 Pages, PDF Size: 58.04 MB. Search in NISSAN TIIDA 2009 Service Repair Manual online. CarManualsOnline.info is the largest online database of car user manuals. NISSAN TIIDA 2009 Service Repair Manual PDF Download.
All product names, logos, and brands are property of their respective owners.
Privacy Policy | About Us & Contact