Данная лицензия не предназначена для продажи этого Руководства и Вы не становитесь владельцем этого Руководства после приобретения любого продукта, загрузки и/или использования. Nikon сохраняет за собой право владения данным Руководством и, следовательно, всеми копиями и все соответствующие права, относящиеся к интеллектуальной собственности, и сохраняет за собой все права, которые явно не предоставлены Вам в рамках данного Соглашения. Данное Соглашение представляет собой полное и эксклюзивное соглашение, устное и письменное, между Вами и Nikon.
1. РУКОВОДСТВО
Руководство предназначено для клиентов, которые приобрели наши продукты. Мы можем не иметь возможности ответить на запрос физических лиц, которые не приобрели наши продукты. Пожалуйста, имейте в виду, что данное руководство и контактная информация, указанные здесь, могут быть изменены без уведомления.
Данное Руководство защищено Законом об авторском праве Японии и международными законами об авторском праве и международными договорами. Вам необходимо воспроизвести на каждой копии уведомление об авторском праве Nikon и любую другую информацию о праве собственности, которые присутствовали на оригинале.
2. ОГРАНИЧЕНИЯ
Кроме случаев, когда в данном Соглашении указано иное, нельзя делать или передавать копии данного Руководства другим или передавать в электронной форме Руководство с одного компьютера на другой по сети. НЕЛЬЗЯ ИЗМЕНЯТЬ ИЛИ УДАЛЯТЬ ЛЮБЫЕ УВЕДОМЛЕНИЯ ОБ АВТОРСКОМ ПРАВЕ, ТОРГОВОЙ МАРКЕ ИЛИ ДРУГИЕ ЗАЩИТНЫЕ УВЕДОМЛЕНИЯ, СОДЕРЖАЩИЕСЯ В ДАННОМ РУКОВОДСТВЕ. НЕЛЬЗЯ ПРИСВАИВАТЬ ИЛИ ИНЫМ ОБРАЗОМ ИЗБАВЛЯТЬСЯ, МОДИФИЦИРОВАТЬ, НАСТРАИВАТЬ, ПЕРЕВОДИТЬ, АРЕНДОВАТЬ, БРАТЬ В НАЕМ, ЗАНИМАТЬ, ПЕРЕПРОДАВАТЬ, РАСПРОСТРАНЯТЬ, ПЕРЕДАВАТЬ ПО СЕТИ ИЛИ СОЗДАВАТЬ ИЛИ ИМЕТЬ СОЗДАННЫЕ ПРОИЗВОДСТВЕННЫЕ РАБОТЫ, ОСНОВАННЫЕ НА ДАННОМ РУКОВОДСТВЕ ИЛИ ЛЮБОЙ ЧАСТИ ТАКОВОГО.
3. ОГРАНИЧЕННАЯ ГАРАНТИЯ И ОТКАЗ
В НАИБОЛЬШЕЙ СТЕПЕНИ, РАЗРЕШЕННОЙ В СИЛУ ДЕЙСТВУЮЩЕГО ЗАКОНОДАТЕЛЬСТВА, ДАННОЕ РУКОВОДСТВО ПРЕДОСТАВЛЕНО НА ОСНОВЕ ПРИНЦИПА «КАК ЕСТЬ», БЕЗ ГАРАНТИИ В ЛЮБОЙ ФОРМЕ, И КОМПАНИЯ NIKON, ЕЕ СОТРУДНИКИ, РАСПРОСТРАНИТЕЛИ, ДИЛЕРЫ И АГЕНТЫ ПРЯМО НЕ ПРИЗНАЮТ ЛЮБУЮ ГАРАНТИЮ В ЛЮБОЙ ФОРМЕ, ВЫРАЖЕННУЮ ИЛИ ПОДРАЗУМЕВАЕМУЮ, ВКЛЮЧАЯ, НО НЕ ОГРАНИЧИВАЯСЬ, ЛЮБОЙ ПОДРАЗУМЕВАЕМОЙ ГАРАНТИЕЙ ПРИГОДНОСТИ ДЛЯ ТОРГОВЛИ, ПРИГОДНОСТИ ДЛЯ ОПРЕДЕЛЕННОГО НАЗНАЧЕНИЯ ИЛИ ОТСУТСТВИЯ НАРУШЕНИЙ. В НАИБОЛЬШЕЙ СТЕПЕНИ, РАЗРЕШЕННОЙ В СИЛУ ДЕЙСТВУЮЩЕГО ЗАКОНОДАТЕЛЬСТВА, КОМПАНИЯ NIKON, ЕЕ СОТРУДНИКИ, РАСПРОСТРАНИТЕЛИ, ДИЛЕРЫ И АГЕНТЫ НЕ ГАРАНТИРУЮТ ИСПОЛНЕНИЕ ИЛИ РЕЗУЛЬТАТЫ, КОТОРЫЕ ВЫ МОЖЕТЕ ПОЛУЧИТЬ ИЗ ДАННОГО РУКОВОДСТВА, ИЛИ ЧТО ДАННОЕ РУКОВОДСТВО БУДЕТ СООТВЕТСТВОВАТЬ ВАШИМ ТРЕБОВАНИЯМ ИЛИ ЧТО РАБОТА РУКОВОДСТВА БУДЕТ БЕСПЕРЕБОЙНОЙ, БЕЗОШИБОЧНОЙ ИЛИ НЕ БУДЕТ СОДЕРЖАТЬ ВИРУСОВ. В НАИБОЛЬШЕЙ СТЕПЕНИ, РАЗРЕШЕННОЙ В СИЛУ ДЕЙСТВУЮЩЕГО ЗАКОНОДАТЕЛЬСТВА, НИ КОМПАНИЯ NIKON, НИ ЕЕ СОТРУДНИКИ, РАСПРОСТРАНИТЕЛИ, ДИЛЕРЫ И АГЕНТЫ НЕ ДОЛЖНЫ НЕСТИ ПЕРЕД ВАМИ ОТВЕТСТВЕННОСТЬ ЗА ЛЮБЫЕ КОСВЕННЫЕ, ПОСЛЕДУЮЩИЕ ИЛИ НЕПРЕДНАМЕРЕННЫЕ УБЫТКИ, ПОТЕРИ ИЛИ ИЗДЕРЖКИ ЛЮБОГО ТИПА, БУДЬ ТО ПОТЕРЯ ПРИБЫЛИ, ПЕРЕРЫВ В ДЕЯТЕЛЬНОСТИ ИЛИ ИНЫМ СПОСОБОМ ВОЗНИКАЮЩИЙ ИЛИ ЯВЛЯЮЩИЙСЯ СЛЕДСТВИЕМ ДАННОГО РУКОВОДСТВА, ВЫЗВАННЫЙ КАКИМ-ЛИБО СПОСОБОМ, ДАЖЕ ЕСЛИ КОМПАНИЯ NIKON, ЕЕ СОТРУДНИКИ, РАСПРОСТРАНИТЕЛИ, ДИЛЕРЫ ИЛИ АГЕНТЫ УВЕДОМЛЕНЫ О ВОЗМОЖНОСТИ ВОЗНИКНОВЕНИЯ ТАКИХ УБЫТКОВ, ПОТЕРЬ ИЛИ ИЗДЕРЖЕК. ЭТОТ ОТКАЗ СОСТАВЛЯЕТ СУЩЕСТВЕННУЮ ЧАСТЬ ДАННОГО СОГЛАШЕНИЯ, И НЕИСПОЛЬЗОВАНИЕ ДАННОГО РУКОВОДСТВА УПОЛНОМОЧЕНО, КРОМЕ СЛУЧАЕВ В РАМКАХ ДАННОГО ОТКАЗА.
4. ОБЩИЕ СВЕДЕНИЯ
Данное соглашение регулируется и должно истолковываться в соответствии с законами Японии независимо от его принципов коллизионного права. В случае возникновения спора в рамках или в связи с данным соглашением Вы, таким образом, даете согласие на персональную юрисдикцию Японии и отказываетесь от любого возражения, что такая дискуссия вызывает затруднение. Далее Вы соглашаетесь на получение судебных извещений в любом действии, возникающем из данного Соглашения по обычной почте или другими коммерчески оправданными способами доставки расписки в получении. Если любое положение данного Соглашения должно быть определено недействительным по какой-либо причине, то оставшиеся положения не должны быть признаны недействительными и должны остаться в силе без изменений. Данное Соглашение устанавливает в дальнейшем целое соглашение и понимание между Вами и компанией Nikon, и замещает собой и заменяет любые другие соглашения, относящиеся к сути дела данного Соглашения. Неуспех любой стороны в настаивании на строгом исполнении любого правила или положения данного соглашения, или выполнение любой опции, права или защиты прав, содержащихся в данном документе, не должны толковаться в качестве отказа от любого применения такого правила, положения, опции, права или защиты прав в будущем, и такое правило, положение, опция, право или защита прав должны продолжиться и сохранить полную юридическую силу и действие. Заголовки разделов данного Соглашения вставлены только для удобства и не должны составлять часть данного документа или влиять каким-либо образом на значение или толкование данного Соглашения. Кроме случаев, когда иначе явно указано в данном документе, положения раздела 3 и раздела 4 вместе с любыми положениями, которые с помощью своих прямо выраженных условий относятся к периодам после прекращения срока действия данного Соглашения, должны оставаться в силе после прекращения действия данного Соглашения по какой-либо причине.
Руководства для продуктов Nikon/ 2018/02/15/ Вер. 2.0.0

Запрещена перепечатка и воспроизведение данного
руководства и его частей (за исключением цитирования в
кpитических статьях и обзорах) без письменного разрешения
NIKON CORPORATION.
Отпечатано в Eвpопе
TT8F01 (1D)
8MSA321D-01
SB-900
Ru
Руководство пользователя
Ru
Вспышка с автофокусировкой
© 2008 Nikon Corporation
SB900_Ru_Cover.indd 1
SB900_Ru_Cover.indd 1
2008-6-13 11:40:12
2008-6-13 11:40:12
Раздел: Видео Аудио Фото Оборудование
Тип: Фотовспышка
Характеристики, спецификации
Краткое описание:
34;от 0,6 до 20 м;4 x AA (LR 6);530г
Вид гарантии:
гарантийный талон
Автоматическая настройка:
Да
Автоматическая фокусировка:
Да
Ведущие число (ISO100):
34
Высокоскоростная синхронизация:
Да
Диапазон срабатывания:
от 0,6 до 20 м
Беспроводной режим работы:
Да
Режим отраженной вспышки:
Да
Вертикальная регулировка:
Да
Горизонтальная регулировка:
Да
Тип исп. батареи:
4 x AA (LR 6)
Подставка для беспроводного режима:
в комплекте
Батареи в комплекте:
доп.опция
Габаритные размеры (В*Ш*Г):
146*78*118 мм
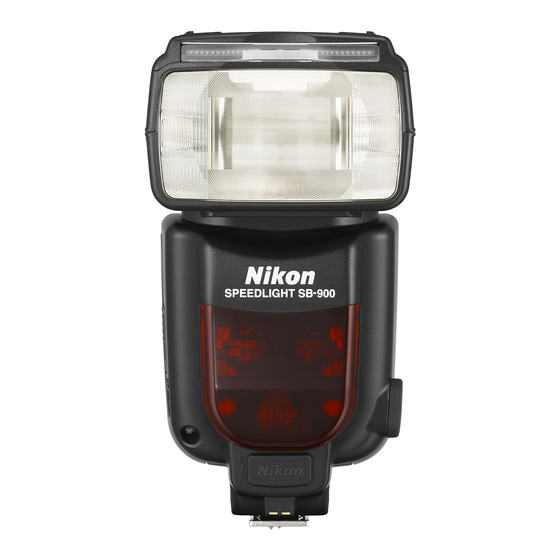
Инструкция к Фотовспышке Nikon SB-900
Вспышка с автофокусировкой
—
SB
900
Руководство пользователя
Запрещена перепечатка и воспроизведение данного
руководства и его частей (за исключением цитирования в
кpитических статьях и обзорах) без письменного разрешения
NIKON CORPORATION.
Отпечатано в Eвpопе
TT8F01 (1D)
Ru
Ru
8MSA321D-01
© 2008 Nikon Corporation
SB900_Ru_Cover.indd 1SB900_Ru_Cover.indd 1 2008—6—13 11:40:122008-6-13 11:40:12

Об этом руководстве пользователя
Поиск необходимой информации
A
Ниже приведены способы поиска ссылок на необходимые страницы.
k
Оглавление
(kA-6)
Поиск по элементам, таким как «метод работы», «режим вспышки» или «функция».
k
Простой поиск по цели
(kA-4)
Подготовка
Поиск в соответствии с определенной целью. Для этого не требуется знать
конкретное название элемента.
k
Функции вспышки
(kB-4)
Поиск конкретной функции SB-900. Это удобно, когда вы знаете название функции и
хотите получить дополнительную информацию.
k
Алфавитный указатель
(kF-22)
Поиск с помощью алфавитного указателя.
k
Устранение неисправностей
(kF-2)
Если возникла проблема со вспышкой, можно определить ее причину.
A–2

Комбинации фотокамеры и объектива
A
При составлении настоящего руководства предполагалось, что SB-900 будет
использоваться с фотокамерой, совместимой с CLS (системой креативного
освещения Nikon), и объективом со встроенным микропроцессором.
t Советы по идентификации объективов Nikkor со встроенным
микропроцессором
Подготовка
Объективы со встроенным микропроцессором имеют контакты микропроцессора.
Контакты микропроцессора
•
SB-900 не может использоваться с
объективами IX-Nikkor.
Термины, используемые в настоящем руководстве
Настройки по умолчанию: настройки функций и режимов, установленные на
момент приобретения, называются «настройками по умолчанию».
CLS (Система креативного освещения Nikon): система креативного освещения
Nikon часто называется CLS.
Чувствительность ISO: «чувствительность ISO» — это общий термин, который
означает как чувствительность датчика цифровых зеркальных фотокамер, так и
чувствительность пленки в 35-миллиметровых пленочных фотокамерах.
Обозначения, используемые в настоящем руководстве
Описывает момент, на который следует обратить особое внимание во
v
избежание проблем при работе вспышки или ошибок во время съемки.
Содержит информацию или советы для упрощения работы со вспышкой.
t
A–3
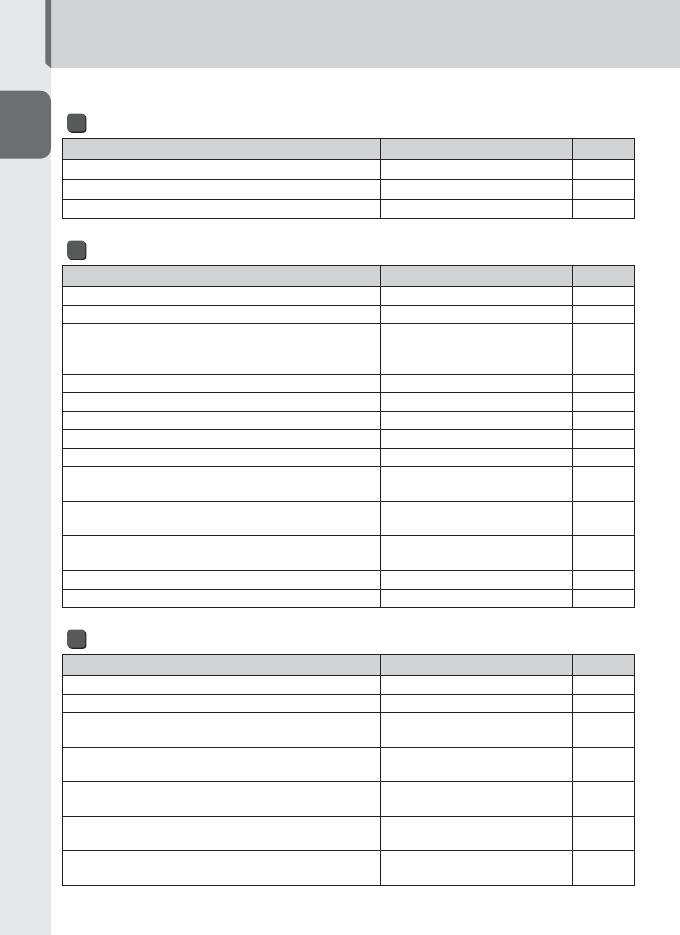
Простой поиск по цели
Доступен поиск специальных пояснений в соответствии с определенной целью.
О деталях вспышки и индикаторах
A
Предмет поиска Ключевые слова
Страницы
Название каждой детали Детали вспышки C-2
Значение каждого отображаемого символа ЖК-экран C-10
Значение символов предупреждения Индикаторы предупреждения F-3
Подготовка
О настройках и процессе работы
Предмет поиска Ключевые слова
Страницы
Функции и использование кнопок управления Кнопки управления C-8
Типы используемых батарей Подходящие батареи C-4
Минимальное время
Минимальное время перезарядки и количество
перезарядки и количество
F-20
вспышек на цикл перезарядки по типам батарей
вспышек на цикл перезарядки
Замена батарей Замена/перезарядка батарей C-27
Изменение настроек с помощью пользовательских настроек
Пользовательская настройка C-20
Тестирование вспышки Пробное срабатывание D–59
Наклон или поворот головки вспышки Регулировка головки вспышки D–26
Сброс различных настроек
Сброс настроек двумя кнопками
C-9
Использование SB-900 при
Подсветка ЖК-экрана
C-24
слабом освещении
Улучшение читаемости данных
Улучшение читаемость данных на ЖК-экране
C-25
на ЖК-экране
Функция перехода в режим
Изменение значения времени до перехода в режим ожидания
C-23
ожидания
Дистанционный контроль вспышек по звуку Звуковое управление C-24
Блокировка кнопок управления во избежание ошибок
Блокировка кнопок C-9
О фотосъемке со вспышкой
Предмет поиска Ключевые слова
Страницы
О режимах вспышки Режимы и функции вспышки D-1
Удобное создание снимков Основные операции C-4
Создание портретных фотоснимков с помощью
Шаблон освещения вспышкой:
D-24
выделения главного объекта
центрально-взвешенный
Шаблон освещения вспышкой:
Создание официальных групповых снимков
D–24
равномерный
Создание более естественных снимков цветов и
Съемка с несколькими
D–39
кукол
беспроводными вспышками
Управление отраженным
Создание снимков с мягкими тенями, отбрасываемыми на стену
D–26
светом вспышки
Вспышка с режимом
Создание ночных снимков объекта вместе с фоном
D–55
медленной синхронизации
A–4
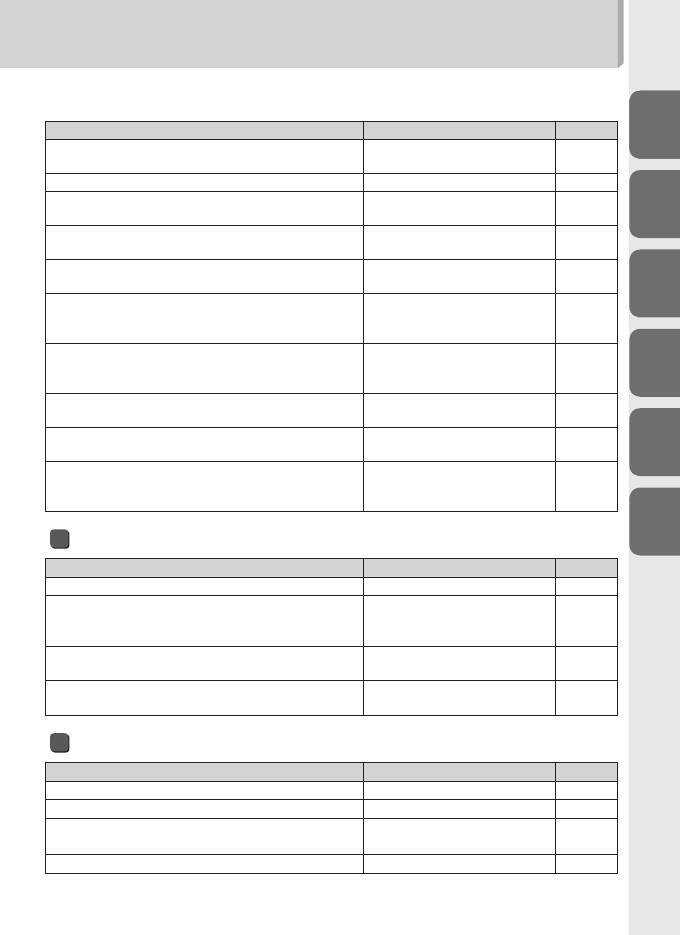
Предмет поиска Ключевые слова
Страницы
AA
Создание снимков с помощью нескольких
Съемка с несколькими
D–39
фотовспышек
беспроводными вспышками
Подтверждение условий освещения Моделирующая подсветка D–61
Создание более ярких (или темных) снимков
Поправка экспозиции D–38
B
объекта вместе с фоном
Поправка выходной мощности
Создание более ярких (или темных) снимков объекта
D–37
вспышки
Создание снимков без появления эффекта «красных
Подавление эффекта «красных
D–56
глаз»
глаз»
C
Съемка движущегося объекта со
стробоскопическими эффектами многократной
Многократная вспышка D–17
экспозиции
Съемка при флуоресцентном освещении и
Съемка со вспышкой и
освещении лампами накаливания, а также
D–33
D
цветными фильтрами
балансировка цветовых эффектов освещения
Съемка со вспышкой и
Съемка с добавлением того или иного цвета
D–33
цветными фильтрами
Съемка со вспышкой и автофокусировкой при слабом
Вспомогательная подсветка
D–58
освещении
АФ
E
Съемка с использованием
Съемка быстро движущихся объектов с
нескольких беспроводных
D–50
несколькими беспроводными вспышками
вспышек типа SU-4
F
О принадлежностях
Предмет поиска Ключевые слова
Страницы
О фотокамерах, совместимых с SB-900 Совместимые фотокамеры B-2
Использование SB-900 с фотокамерами,
Использование вспышки SB-900
несовместимыми с системой креативного
с зеркальными фотокамерами,
E-2
освещения Nikon
несовместимыми с CLS
Использование SB-900 с фотокамерами Nikon
Для использования с i-TTL-
E-3
COOLPIX
совместимыми фотокамерами COOLPIX
Дополнительные
О доступных дополнительных принадлежностях
F-11
принадлежности
Прочее
Предмет поиска Ключевые слова
Страницы
Советы по уходу за вспышкой Советы по уходу за вспышкой F-7
Технические характеристики SB-900 Технические характеристики F-14
Концепция «постоянного
Последняя информация о продуктах Nikon
A-16
совершенствования»
Обновление прошивки Обновление прошивки F-10
A–5

Содержание
Подготовка
AA
A
Об этом руководстве пользователя ………………………………………………………………………………A-2
Поиск необходимой информации ………………………………………………………………………………… A-2
Простой поиск по цели ……………………………………………………………………………………………………….A-4
Правила безопасности …………………………………………………………………………………………………………A-8
Проверка перед использованием ……………………………………………………………………………….A-14
Подготовка
О вспышке SB-900
BB
Особенности SB-900 ……………………………………………………………………………………………………………… B-2
Основные функции ……………………………………………………………………………………………………………….. B-4
Использование вспышки
CC
Детали вспышки ………………………………………………………………………………………………………………………C-2
Основные операции ……………………………………………………………………………………………………………..C-4
Кнопки управления ……………………………………………………………………………………………………………….C-8
ЖК-монитор ……………………………………………………………………………………………………..……………………..C-10
Пользовательские функции и настройки …………………………………………………………………C-20
Батареи ………………………………………………………………………………………………………..……………………………C-27
Режимы и функции вспышки
DD
Режим i-TTL ……………………………………………………………………………………………………………………………….. D-2
Режим с автоматической диафрагмой ………………………………………………………………………… D-5
Автоматический режим вспышки без TTL …………………………………………………………………. D-8
Ручной режим вспышки с приоритетом расстояния ………………………………………….D-11
Ручной режим ………………………………………………………………………………………………………………………..D-14
Многократная вспышка …………………………………………………………………………………………………….D-17
Определение диафрагмы, выходной мощности вспышки и
расстояния при съемке со вспышкой в ручном режиме
вспышки с приоритетом расстояния и ручном режиме вспышки ……………….D-22
Три шаблона освещения вспышкой ……………………………………………………………………………D-24
Управление отраженным светом вспышки ……………………………………………………………..D-26
Съемка объектов с небольшого расстояния с отраженным
светом вспышки ……………………………………………………………………………………………………………………D-30
Съемка со вспышкой и цветовыми фильтрами ………………………………………………………D-33
Поправка выходной мощности вспышки и экспозиции ……………………………………D-37
Съемка с несколькими беспроводными вспышками ………………………………………….D-39
A–6

•
Съемка со вспышкой при улучшенном беспроводном управлении ………………
D-43
•
Съемка с несколькими беспроводными вспышками типа SU-4 ………..D-50
AA
Набор доступных функций для настройки на фотокамере ……………………………..D-55
•
Автоматический режим высокоскоростной синхронизации FP
•
Блокировка мощности вспышки
•
Вспышка с режимом медленной синхронизации
B
•
Подавление эффекта «красных глаз»/подавление эффекта «красных
глаз» в режиме медленной синхронизации
•
Синхронизация по задней шторке
Функции поддержки съемки со вспышкой …………………………………………………………….D-57
C
•
Функция интенсивного увеличения
•
Вспомогательная подсветка АФ
•
Настройка чувствительности ISO
•
Функция пробного срабатывания
D
•
Функция моделирующей подсветки
•
Выбор FX/DX
E
Для использования с фотокамерами, отличными от
EE
CLS-совместимых зеркальных фотокамер
Использование вспышки SB-900 с зеркальными фотокамерами,
несовместимыми с CLS……………………………………………………………………………………………..…………..E-2
F
Для использования с i-TTL-совместимыми фотокамерами COOLPIX………………E-3
Советы по уходу за вспышкой и справочная информация
FF
Поиск и устранение неисправностей ……………………………………………………………………………F-2
Примечания к съемке с непрерывной вспышкой …………………………………………………..F-5
Термовык лючатель ………………………………………………………………………………………………..………………..F-6
Советы по уходу за вспышкой ……………………………………………………………………………………………F-7
Примечания к использованию батарей ……………………………………………………………………….F-8
Сведения о ЖК-экране …………………………………………………………………………………………….……………F-9
Обновление прошивки ………………………………………………………………………………………………………F-10
Дополнительные принадлежности ………………………………………………………………………………F-11
Технические характеристики ………………………………………………………………………………………….F-14
Алфавитный указатель ………………………………………………………………………………………………………..F-22
A–7

Правила безопасности
Перед использованием изделия внимательно прочитайте следующие сведения
о мерах предосторожности, чтобы обеспечить правильное и безопасное
A
использование и избежать повреждения изделия Nikon или травмирования вас или
других людей.
Чтобы пользователи изделия могли в любой момент просмотреть данные сведения,
эти инструкции по безопасности следует хранить рядом с изделием.
В настоящем руководстве инструкции по безопасности обозначены следующими
символами:
Подготовка
ВНИМАНИЕ!
Игнорирование инструкций, обозначенных этим символом, может привести к
травмам или смерти, а также к повреждению имущества.
ПРЕДУПРЕЖДЕНИЕ
Игнорирование инструкций, обозначенных этим символом, может привести к
повреждению имущества.
ВНИМАНИЕ! Вспышки
1.
В случае утечки корродирующих жидкостей из батарей и попадания их в
глаза немедленно промойте глаза проточной водой и обратитесь к врачу.
Если этого быстро не сделать, ваши глаза могут быть серьезно повреждены.
2.
В случае утечки корродирующих жидкостей из батарей и контакта их
с кожей или одеждой немедленно смойте жидкость проточной водой.
Длительный контакт может привести к повреждению кожи.
3.
Никогда не пытайтесь разобрать или отремонтировать вспышку
самостоятельно, так как это может привести к удару электрическим током или
повреждению устройства, которое также может привести к травме.
4.
Если вспышка упала и разбилась, не прикасайтесь к оголенным
металлическим деталям. Такие детали, особенно конденсатор вспышки и
связанные с ним детали, могут обладать высоким зарядом и при прикосновении
вызвать поражение электрическим током. Отключите питание или выньте
батареи, не прикасаетесь к электрическим деталям изделия, доставьте
устройство в местное представительство Nikon или в авторизованный
сервисный центр для ремонта.
5.
Если вспышка перегрелась, виден дым или чувствуется запах гари,
немедленно прекратите работу и удалите батареи для предотвращения
возгорания или оплавления устройства. Позвольте вспышке остыть, чтобы
можно было безопасно прикоснуться к ней и вынуть батареи. Затем доставьте
устройство в местное представительство Nikon или в авторизованный
сервисный центр для ремонта.
6.
Вспышку нельзя помещать в жидкости или подвергать воздействию
дождя, соленой воды или влаги, если не обеспечена надлежащая
защита от жидкостей и влаги. Для использования под водой требуется
сертифицированный подводный корпус.
A–8

Попадание в устройство воды или влаги может привести к возгоранию или
поражению электрическим током. В таких ситуациях следует немедленно вынуть
батареи из вспышки, после чего доставить ее в местное представительство Nikon
A
или в авторизованный сервисный центр для ремонта.
Примечание: Ремонт электронных устройств, в которые попала вода или
влага, зачастую экономически неоправдан.
7.
Не используйте устройство рядом с источником горючего или
взрывоопасного газа.
При работе со вспышкой в зонах, в которых присутствует горючий газ, в том
Подготовка
числе пропан, бензин или пыль, может произойти взрыв или пожар.
8.
Не направляйте вспышку прямо на водителя движущегося автомобиля,
так как это может временно ухудшить его зрение и привести к аварии.
9.
Не направляйте вспышку прямо в глаза кого-либо, находящегося
поблизости, так как это может повредить сетчатку глаз. Никогда не используйте
вспышку на расстоянии менее 1 метра от младенцев.
10.
Не используйте вспышку, если головка вспышки касается человека или
предмета.
Это может привести к ожогу и/или возгоранию одежды от выделяющегося при
вспышке тепла.
11.
Храните мелкие принадлежности в местах, недоступных для детей, чтобы
избежать возможного проглатывания ими этих принадлежностей. Если ребенок
случайно проглотил какую-либо принадлежность, немедленно обратитесь к врачу.
12.
Используйте только батареи, указанные в настоящем руководстве
пользователя. Батареи, отличные от указанных, могут вызвать утечку
корродирующих жидкостей, взрыв или возгорание, или же могут работать
ненадлежащим образом.
13.
Не используйте батареи разных типов, марок, а также старые и новые
батареи, так как это может привести к утечке из батарей корродирующих жидкостей,
взрыву или возгоранию. При использовании в изделии нескольких батарей следует
всегда применять идентичные батареи, приобретенные одновременно.
14.
Неперезаряжаемые батареи, например марганцевые, алкалиново-
марганцевые и литиевые, никогда не следует пытаться зарядить с
помощью зарядного устройства, так как это может привести к утечке
корродирующих жидкостей, взрыву или возгоранию батарей.
15.
При использовании перезаряжаемых батарей стандартного размера
(AA, AAA, C, D) или других типов, например NiCd или Ni-MH, как и при их
перезарядке, следует использовать только указанное производителем
батарей зарядное устройство и внимательно прочитать инструкции.
Не перезаряжайте такие батареи с нарушением полярности или до
того, как они остынут, так как это может привести к утечке корродирующих
жидкостей, взрыву или возгоранию. Те же меры предосторожности касаются
использования перезаряжаемых батарей, которые могут поставляться
производителем изделия.
A–9

Правила безопасности
ПРЕДУПРЕЖДЕНИЯ, касающиеся вспышек
1.
Не прикасайтесь к вспышке мокрыми руками, так как это может привести к
A
поражению электрическим током.
2.
Храните вспышку в недоступных для детей местах, чтобы
предотвратить ее попадание в рот или касания опасных частей изделия
другим способом, так как это может привести к поражению электрическим
током.
3.
Не подвергайте устройство физическому воздействию, так как это может
Подготовка
вызвать его повреждение, которое может привести к взрыву или возгоранию.
4.
Никогда не используйте для чистки изделия средства, содержащие
горючие вещества: растворители, жидкости на основе бензола или
пятновыводители, и никогда не храните изделие в местах, содержащих
химикаты типа камфары или нафталина, так как это может повредить
пластиковый корпус, привести к возгоранию или поражению электрическим
током.
5.
Перед длительным хранением изделия удалите из него батареи для
предотвращения возгорания изделия или утечки корродирующих жидкостей.
ВНИМАНИЕ! Батареи
1.
Никогда не нагревайте батареи и не бросайте их в огонь, так как это может
вызвать утечку из батарей корродирующих жидкостей, выброс тепла или взрыв.
2.
Не замыкайте батареи накоротко и не разбирайте их, так как это может
привести к утечке из батарей корродирующих жидкостей, выбросу тепла или
взрыву.
3.
Не используйте батареи разных типов, марок, а также старые и новые
батареи, так как это может привести к утечке из батарей корродирующих
жидкостей, выбросу тепла или взрыву.
4.
Не устанавливайте батареи с нарушением полярности, так как это может
привести к утечке из батарей корродирующих жидкостей, выбросу тепла или
взрыву. Установка даже одной батареи с нарушением полярности может
вызвать нарушение работы вспышки.
5.
Используйте только указанное производителем батарей зарядное
устройство во избежание вероятной утечки из батарей корродирующих
жидкостей, выброса тепла или взрыва.
6.
Не переносите и не храните батареи вблизи металлических предметов,
таких как бусы или заколки для волос, так как это может вызвать короткое
замыкание батарей и последующую утечку, выброс тепла или взрыв.
Кроме того, особенно при переносе большого количества батарей,
располагайте их с осторожностью, чтобы контакты одной батареи не
касались контактов другой батареи с нарушением полярности, так как их
соприкасание может также вызвать короткое замыкание батарей и последующую
утечку жидкости, выброс тепла или взрыв.
A–10

7.
В случае утечки корродирующих жидкостей из батарей и попадания
их в глаза немедленно промойте глаза проточной водой и обратитесь
к врачу. Если этого быстро не сделать, ваши глаза могут быть серьезно
A
повреждены.
8.
В случае утечки корродирующих жидкостей из батарей и контакта их
с кожей или одеждой немедленно смойте жидкость проточной водой.
Длительный контакт может привести к повреждению кожи.
9.
Всегда следуйте предупреждениям и инструкциям, напечатанным на
батареях, во избежание действий, которые могут вызвать утечку из батарей
Подготовка
корродирующих жидкостей, выброс тепла или возгорание.
10.
Используйте только батареи, указанные в настоящем руководстве
пользователя, во избежание вероятной утечки из батарей корродирующих
жидкостей, выброса тепла или взрыва.
11.
Никогда не вскрывайте оболочку батарей и не используйте батареи
с поврежденной оболочкой, так как это может вызвать утечку из батарей
корродирующих жидкостей, выброс тепла или взрыв.
12.
Храните батареи в местах, недоступных для детей, чтобы избежать
возможного проглатывания батарей. Если ребенок случайно проглотил батарею,
немедленно обратитесь к врачу.
13.
Батареи нельзя окунать в жидкости или подвергать воздействию
дождя, соленой воды или влаги, если не обеспечена надлежащая ее
защита от влажной среды. Попадание в батареи воды или влаги может
вызвать утечку из батарей корродирующих жидкостей или выброс тепла.
14.
Не используйте батареи, которые подозрительно выглядят, в том
числе с изменением цвета или формы. Из таких батарей возможна утечка
корродирующих жидкостей или выброс тепла.
15.
Прекратите зарядку перезаряжаемых батарей, если вы заметили, что
перезарядка не завершена за указанное время, во избежание вероятной
утечки из батарей корродирующих жидкостей или выброса тепла.
16.
При утилизации батарей не забудьте изолировать их контакты лентой.
В случае короткого замыкания положительных и отрицательных контактов
батарей из-за контакта с металлическими предметами возможны возгорание,
выброс тепла или взрыв. Утилизируйте использованные батареи в соответствии
с нормами местных органов власти.
17.
Никогда не пытайтесь перезарядить неперезаряжаемые батареи в
зарядном устройстве, так как это может вызвать утечку корродирующих
жидкостей или выброс тепла.
18.
Немедленно вынимайте разряженные батареи из оборудования, так как
из них возможна утечка корродирующих жидкостей, выброс тепла или взрыв.
A–11
Правила безопасности
ПРЕДУПРЕЖДЕНИЕ, касающееся батарей
Не бросайте батареи и не подвергайте их сильному физическому
A
воздействию, так как это может вызвать утечку из батарей корродирующих
жидкостей, выброс тепла или взрыв.
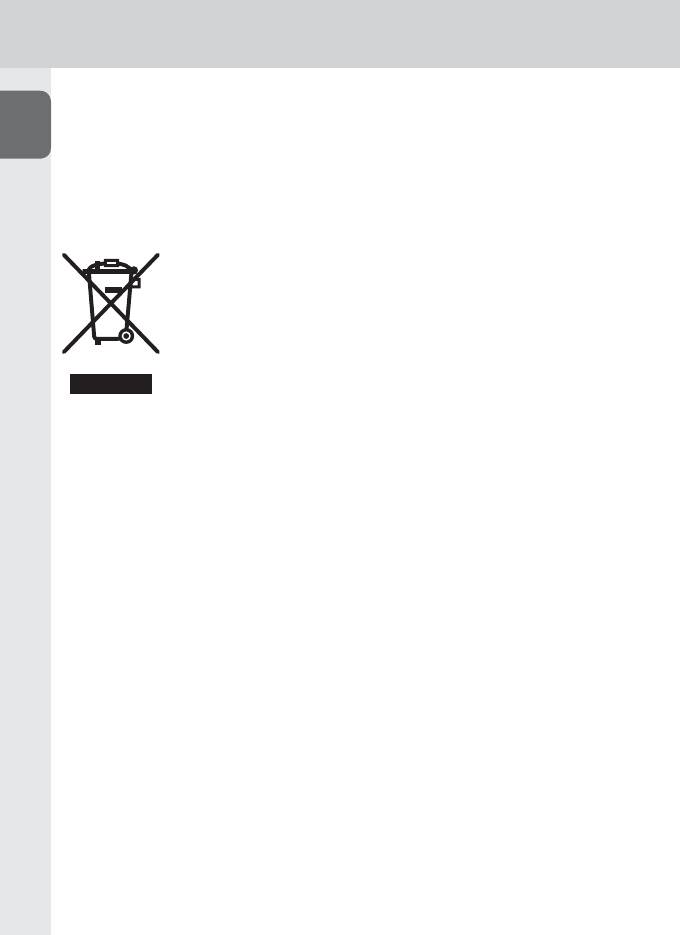
Символ раздельной утилизации, применяемой в европейских странах
Подготовка
Этот символ указывает, что данное изделие подлежит раздельной
утилизации. Следующие положения применимы только к
пользователям из стран Европы.
•
Это изделие предназначено для раздельной утилизации на
соответствующем пункте сбора. Не утилизируйте его вместе с
обычным мусором.
•
Для получения дополнительных сведений обратитесь к продавцу
или местным органам власти, заведующим утилизацией мусора.
A–12

A
Подготовка
A–13
Проверка перед использованием
Введение
A
Благодарим за приобретение вспышки Nikon Speedlight SB-900. Чтобы использовать
все возможности вспышки, перед началом работы внимательно прочитайте настоящее
руководство пользователя и отдельный буклет «Коллекция образцов фотографий».
В настоящем руководстве пользователя приведено описание функций SB-900, приемов
работы, технических характеристик и т. п., а отдельная «Коллекция образцов фотографий»
содержит обзор возможностей съемки со вспышкой SB-900 с примерами фотоснимков.
Подготовка
Кроме того, инструкцию к фотокамере следует хранить в таком месте, чтобы в любой
момент ее можно было просмотреть.
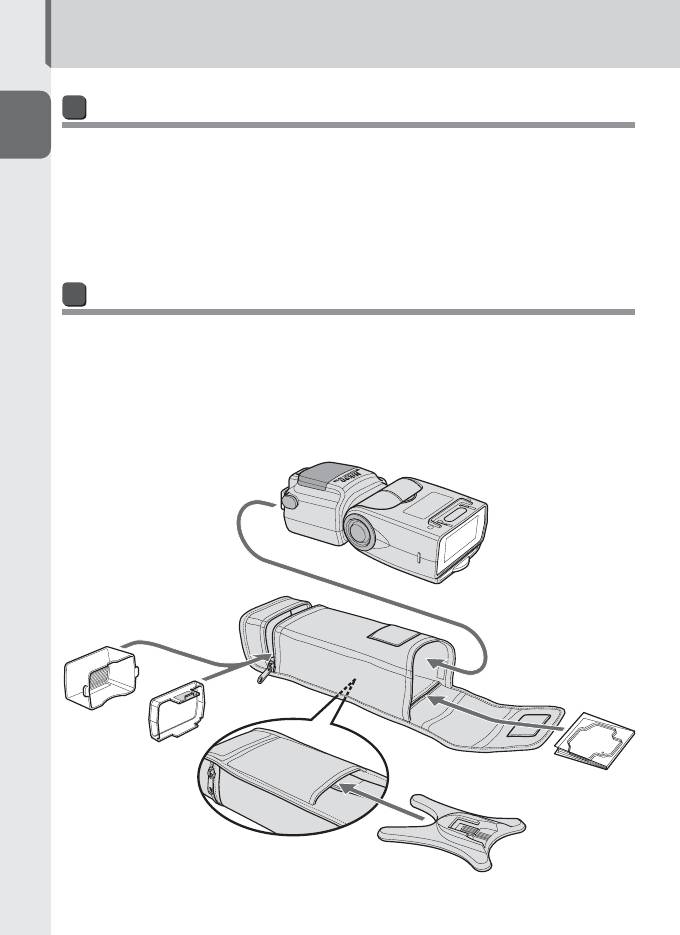
Комплект поставки
В комплект поставки вспышки SB-900 входят следующие принадлежности. Перед
началом работы убедитесь в наличии всех предметов.
❑ Подставка для вспышки AS-21
❑ Мягкий чехол SS-900
❑ Nikon Diffusion Dome SW-13H
❑ Руководство пользователя (данное)
❑ Комплект цветных фильтров SJ-900
❑ Коллекция образцов фотографий
❑ Держатель цветных фильтров SZ-2
❑ Гарантийный талон
SB-900
Мягкий
чехол SS-900
Nikon Diffusion Dome
SW-13H
Держатель цветных
фильтров SZ-2
Комплект цветных
фильтров SJ-900
Подставка для
вспышки AS-21
A–14

Советы по использованию вспышки
A
Делайте пробные снимки
Перед съемкой важных событий, таких как свадьбы или выпускные вечера, делайте
пробные снимки.
Проводите регулярное техобслуживание вспышки Nikon
Компания Nikon рекомендует проводить техобслуживание вспышки у
Подготовка
авторизованного дилера или в сервисном центре как минимум один раз каждые два
года.
Используйте вспышку с оборудованием Nikon
Производительность вспышки Nikon Speedlight SB-900 оптимизирована для
использования с фотокамерами и принадлежностями Nikon, включая объективы.
Фотокамера или принадлежности других производителей могут не соответствовать
требованиям Nikon к техническим характеристикам, а несовместимые фотокамеры и
принадлежности могут повредить компоненты SB-900. Nikon не может гарантировать
производительность SB-900 при использовании с продуктами сторонних
производителей.
A–15
Проверка перед использованием
Концепция «постоянного совершенствования»
A
Как часть концепции «постоянного совершенствования» компании Nikon в отношении
поддержки продуктов и обучения, на следующих веб-сайтах доступна постоянно
обновляемая информация:
•
Пользователям из США:
http://www.nikonusa.com/
Подготовка
•
Пользователям из Европы:
http://www.europe-nikon.com/support
•
Пользователям из Азии, Океании, с Ближнего Востока и из Африки:
http://www.nikon-asia.com/
На этих сайтах можно найти последние сведения о продуктах, советы, ответы
на часто задаваемые вопросы, а также общие рекомендации по цифровой
фотографии и обработке изображений. Дополнительные сведения можно получить
в региональном сервисном центре компании Nikon. Для получения контактной
информации см. приведенный ниже адрес URL:
http://nikonimaging.com/
A–16

О вспышке SB-900
B
B
В этом разделе описаны особенности и ключевые
функции SB-900.
•
Особенности SB-900 …………………………………………………………………B-2
•
Основные функции ……………………………………………………………………B-4
О вспышке SB-900
B–1
B–1
Особенности SB-900
Особенности SB-900
SB-900 – высокопроизводительная CLS-совместимая фотовспышка с большим
ведущим числом 34/48 (ISO 100/200, м) (при фокусном расстоянии 35 мм в формате
Nikon FX со стандартным шаблоном освещения вспышкой, 20°C).
•
В сочетании с CLS-совместимой фотокамерой SB-900 может легко выполнять
B
различные типы операций со вспышкой, например в автоматическом i-TTL режиме
вспышки или с несколькими беспроводными вспышками (kD-39).
•
Три типа шаблонов освещения вспышкой (стандартный, центрально-взвешенный и
равномерный) доступны для получения различных результатов при съемке.
•
Выбор FX/DX позволяет настраивать угол распределения света в соответствии с
областью изображения фотокамеры между форматами FX и DX, что обеспечивает
эффективное и высококачественное освещение.
•
Функция интенсивного увеличения автоматически регулирует положение
О вспышке SB-900
зума для соответствия фокусному расстоянию объектива от 17 мм до 200 мм (в
формате FX) / от 12 мм до 200 мм (в формате DX). При использовании встроенного
широкоугольного рассеивателя или подсоединении Nikon Diffusion Dome
положение зума автоматически устанавливается в соответствие с широкоугольным
объективом с намного меньшим фокусным расстоянием.
•
Можно легко фотографировать с отраженным светом вспышки (kD-26) или с
близкого расстояния (kD-30).
•
Доступны пользовательские функции для установки различных настроек (kC-20).
Совместимые фотокамеры
Вспышка SB-900 оптимизирована для использования с CLS-совместимыми
зеркальными фотокамерами.
•
Для использования с CLS-несовместимыми зеркальными фотокамерами и с i-TTL-
совместимыми фотокамерами COOLPIX см. раздел «Использование вспышки SB-900
с зеркальными фотокамерами, несовместимыми с CLS» (kE-1).
CLS-совместимые зеркальные фотокамеры
D3, D700, серия D2, D300, D200, D80, серия D70, D60, D50,
серия D40, F6 и т. д.
i-TTL-совместимые фотокамеры COOLPIX
COOLPIX 8800, COOLPIX 8400, COOLPIX P5000,
COOLPIX P5100 и т. д.
B–2

Что такое система креативного освещения Nikon (CLS)?
Вспышка SB-900 оснащена системой креативного освещения Nikon (CLS). Эта система
обеспечивает дополнительные возможности съемки со вспышкой для цифровых
фотокамер, используя преимущества их цифровой связи. Система CLS доступна при
использовании SB-900 с совместимыми фотокамерами Nikon.
SB-900 обладает следующими основными функциями.
B
■
Режим i-TTL
Это автоматический режим вспышки TTL системы креативного освещения Nikon.
Пробные вспышки срабатывают все время. Объект правильно экспонируется в свете
вспышки и на экспозицию меньше влияет окружающее освещение (kD-2).
■
Улучшенное беспроводное управление
С улучшенным беспроводным управлением можно работать с несколькими
беспроводными вспышками в режиме TTL (i-TTL) с CLS-совместимыми цифровыми
О вспышке SB-900
зеркальными фотокамерами. В этом режиме можно разделить вспышки с
беспроводным управлением на три группы и независимо управлять световым
потоком от каждой группы, расширяя границы применения систем креативной
съемки с несколькими вспышками (kD-43).
■
Блокировка мощности вспышки
Мощность вспышки (FV) – это экспозиция объекта, освещенного вспышкой.
Используя блокировку мощности вспышки с совместимыми фотокамерами, можно
заблокировать соответствующую экспозицию вспышки для основного объекта.
Мощность вспышки остается заблокированной даже при изменении диафрагмы,
композиции или фокусного расстояния объектива (kD-55).
■
Передача данных о цветовой температуре вспышки
При использовании SB-900 с совместимыми цифровыми зеркальными фотокамерами
данные о цветовой температуре автоматически передаются в камеру. Таким образом,
автоматически регулируется баланс белого в фотокамере, что позволяет получить
корректную цветовую температуре при съемке с SB-900.
■
Автоматический режим высокоскоростной синхронизации FP
Высокоскоростная синхронизация вспышки доступна в сочетании с самой
длительной выдержкой фотокамеры. Это эффективно, если необходимо
использовать более широкое значение диафрагмы для достижения меньшей
глубины резкости для смазывания (kD-55).
■
Вспомогательная подсветка АФ
При работе с автофокусировкой SB-900 обеспечивает вспомогательную подсветку
АФ, которая охватывает более широкую область АФ в CLS-совместимых фотокамерах.
С фотокамерами, которые поддерживают эту функцию, можно осуществлять
фотосъемку при слабом освещении, даже если точка фокусировки (зона
фокусировки) камеры изменяется (kD-58).
B–3
Основные функции
Режимы вспышки и функции SB-900
Режим i-TTL
(kD-2)
Фотокамера управляет мощностью вспышки SB-SB-900, измеряя отраженный от
объекта свет во время серии пробных срабатываний.
B
Автоматический режим с приоритетом диафрагмы
(kD-5)
SB-900 управляет мощностью вспышки, измеряя освещение, отраженное от объекта, с
помощью сенсора для автоматического режима без TTL, и сочетая это с информацией от
камеры (чувствительностью ISO и настройкой диафрагмы).
Автоматический режим вспышки без TTL
(kD-8)
SB-900 управляет мощностью вспышки, измеряя освещение, отраженное от объекта,
с помощью сенсора для автоматического режима без TTL.
Ручной режим вспышки с приоритетом расстояния
(kD-11)
О вспышке SB-900
Если предварительно задать диафрагму и расстояние до объекта, SB-900 будет
автоматически управлять правильной мощностью освещения.
Ручной режим вспышки
(kD-14)
Настроив диафрагму и мощность вспышки, можно вручную задать экспозицию и
расстояние до объекта.
Режим многократной вспышки
(kD-17)
Вспышка SB-900 срабатывает многократно для создания стробоскопических эффектов
многократной экспозиции. Данный режим удобен при съемке быстро движущихся объектов.
Переключение шаблона освещения вспышкой
(kD-24)
Можно выбрать один из трех типов шаблонов (стандартный, центрально-взвешенный
или равномерный) в соответствии с целью.
Отраженная вспышка
(kD-26)
Наклоняя или вращая головку вспышки, можно отразить свет от потолка или стены
для использования отраженного света.
Макросъемка со вспышкой
(kD-30)
Для макросъемки со вспышкой используется встроенный широкоугольный
рассеиватель и наклон головки вспышки вниз.
Использование цветных фильтров
(kD-33)
Можно компенсировать цвет источника освещения или создать интересные
эффекты, изменив цвет от фильтров.
Поправка выходной мощности вспышки и экспозиции
(kD-37)
Поправка выходной мощности вспышки выполняется путем изменения ее мощности
только для освещенного объекта. Поправка экспозиции осуществляется с помощью
одновременного намеренного изменения правильной экспозиции объекта и фона.
B–4
Аннотация для Фотовспышки Nikon SB-900 в формате PDF
Топ 10 инструкций
Другие инструкции
-
Contents
-
Table of Contents
-
Troubleshooting
-
Bookmarks
Related Manuals for Nikon autofocus speedlight SB-900
Summary of Contents for Nikon autofocus speedlight SB-900
-
Page 1
Autofocus Speedlight SB — 900 User’s Manual… -
Page 2: About This User’s Manual
You can search according to your objective without knowing the specific name or term of the item you are looking for. Speedlight functions (kB-4) You can search for a particular SB-900 function. This is handy when you know the name of a function and want more information. Index (kF-22) You can search using the alphabetical index.
-
Page 3
Camera and lens combinations This manual has been compiled with the assumption that the SB-900 will be used in combination with a camera compatible with CLS (Nikon Creative Lighting System) and a CPU lens. Tips on identifying CPU Nikkor lenses CPU lenses have CPU contacts. -
Page 4
D-26 How to reset various settings Two-button reset How to illuminate the LCD panel Using the SB-900 in dim light C-24 How to enhance the readability of the LCD panel Enhancing the LCD panel’s readability C-25 How to change the standby lead time… -
Page 5
I want to know about Key words page About cameras compatible with the SB-900 Compatible cameras How to use the SB-900 with cameras not compatible Using the SB-900 with non- with Nikon Creative Lighting System CLS-compatible SLR cameras For usage with i-TTL-compatible… -
Page 6: Table Of Contents
How to fi nd what you are looking for ……….A-2 Simple search by objective …………..A-4 For your safety ………………A-8 Check before Use …………….A-14 About the SB-900 SB-900 features ………………B-2 Main functions ………………B-4 Operation Speedlight parts ………………C-2 Basic operations ………………C-4 Control buttons ………………C-8…
-
Page 7
• FX-/DX selection For use with cameras other than CLS compatible SLR cameras Using the SB-900 with non-CLS-compatible SLR cameras …… E-2 For usage with i-TTL-compatible COOLPIX cameras ……. E-3 Tips on Speedlight care and reference information Troubleshooting ………………F-2 Notes on continuous fl… -
Page 8: For Your Safety
Allow the flash unit to cool down so that you can safely touch it and remove the batteries. Then bring the unit to your local Nikon dealer or authorized service center for repair.
-
Page 9
Do not use the unit in the presence of flammable or explosive gas. If the flash unit is operated in areas where there is a flammable gas, including propane, gasoline and dust, it could cause an explosion or fire. Do not fire the flash unit directly at the driver of a moving car, as this could temporarily impair the driver’s vision and cause an accident. -
Page 10
For your safety CAUTIONS for Speedlights Do not touch the flash unit with wet hands, as this could cause an electric shock. Keep the flash unit away from children to prevent them from putting the unit in or near their mouth, or otherwise touching a dangerous part of the product;… -
Page 11
If corrosive liquids seep from the batteries and get in your eyes, immediately wash your eyes with running water and consult with a doctor. Your eyes could be seriously damaged if they are not treated quickly. If corrosive liquids seep from the batteries and come in contact with your skin or clothes, wash immediately with running water. -
Page 12
For your safety CAUTIONS for Batteries Do not throw or apply strong physical shocks to the batteries as this could cause batteries to leak corrosive liquids, generate heat or explode. Be careful when replacing batteries after continuous flash use, because batteries may generate heat during continuous flash photography. -
Page 13
A–13… -
Page 14
Check before Use Foreword Thank you for purchasing the Nikon Speedlight SB-900. To get the most out of your Speedlight, please read this user’s manual and the separate booklet “A collection of example photos” thoroughly before use. This user’s manual explains SB-900 functions, operation methods, specifications, etc., and the separate “A collection of example photos”… -
Page 15
Use your Speedlight with Nikon equipment The Nikon Speedlight SB-900’s performance has been optimized for use with Nikon brand cameras/accessories including lenses. Camera/accessories made by other manufacturers may not meet Nikon’s criteria for specifications, and nonconforming cameras/accessories could damage the SB-900’s… -
Page 16: Check Before Use
Check before Use Life-long learning As part of Nikon’s “Life-long learning” commitment to ongoing product support and education, continually-updated information is available on-line at the following sites: • For users in the U.S.A.: http://www.nikonusa.com/ • For users in Europe: http://www.europe-nikon.com/support •…
-
Page 17: About The
About the SB-900 This section explains the features and key functions of the SB-900. • SB-900 features …………B-2 • Main functions …………B-4 B–1 B–1 B–1…
-
Page 18
SB-900 features Features of the SB-900 The SB-900 is a high-performance CLS-compatible Speedlight with a large guide number of 34/48 (ISO 100/200, m) (111.5/157.5, ft.) (at the 35 mm zoom position in Nikon FX format with standard illumination pattern, 20°C/68°F.) •… -
Page 19
What is the Nikon Creative Lighting System (CLS)? The SB-900 features the Nikon Creative Lighting System (CLS). This system offers additional flash shooting possibilities with digital cameras by taking advantage of your camera’s digital communication capabilities. CLS is available when the SB-900 is used with compatible Nikon cameras. -
Page 20: Main Functions
Non-TTL auto flash. Distance Priority manual flash mode (kD-11) If you preset the aperture and the distance to the subject, the SB-900 will automatically take control of correct light output. Manual flash mode…
-
Page 21
Functions that are set on the camera Auto FP High-Speed Sync (kD-55) The SB-900 automatically fires at faster shutter speeds than the camera’s sync shutter speed. FV Lock (Flash Value Lock) (kD-55) Since it is possible to lock in the flash exposure level for the subject, you can alter picture composition while keeping the brightness of the subject constant. -
Page 22
The SB-900 fires continuously in sync with continuous shooting. Thermal Cut-out (kF-6) This function protects the SB-900 from high operating temperatures. If the temperature of the unit rises to a certain level, the SB-900 will switch to protective shutdown mode. Self firmware update (kF-10) Speedlight firmware can be updated through the camera. -
Page 23: Operation
Operation This section explains the Speedlight parts, meaning of each display, and also covers basic procedures for flash photography. • Speedlight parts ………… C-2 • Basic operation …………. C-4 • Control buttons ……….. C-8 • LCD …………..C-10 • Custom functions and settings ……C-20 •…
-
Page 24: Speedlight Parts
Speedlight parts 1 Flash head 10 External power source terminal 2 Flash head tilting/rotating lock (supplied with cover) (kF-12) release button (kC-6) 11 Light sensor for Non-TTL auto 3 Battery chamber lid fl ash (kD-5, D-8) 4 Light sensor window for wireless 12 External AF-assist illuminator remote fl…
-
Page 25
16 Flash head tilting angle scale 20 LCD panel (kC-10) (kD-26) 21 Ready-light (kC-7, D-42) 17 Flash head rotating angle scale 22 Mounting foot lock lever (kD-26) (kC-5) 18 Sync terminal cover 19 Sync terminal Control buttons (kC-8) 23 [MODE] button 24 [ZOOM] button 25 Function button 1 26 Function button 2… -
Page 26: Basic Operations
Basic operation This section covers basic procedures in i-TTL mode in combination with a CLS- compatible camera. i-TTL mode enables you to easily take flash photography with well balanced lighting. STEP Inserting the batteries Slide the battery chamber lid open. Insert the batteries following the [+] and [-] marks as shown.
-
Page 27
STEP Attaching the SB-900 to the camera Make sure the SB-900 and the camera body are turned off. Rotate the mounting foot lock lever to the left. Slide the SB-900’s mounting foot into the camera’s accessory shoe. Turn the lock lever to “L.”… -
Page 28
Flash head is set at horizontal/front. STEP Turning the SB-900 and camera on Turn the SB-900 and the camera body on. • To turn the SB-900 on, turn the [Power ON-OFF] switch to [ON]. When using i-TTL mode • ISO sensitivity is set automatically. •… -
Page 29
Only flash modes that are available are displayed on the LCD. • The flash mode can also be selected by pressing the [MODE] button. Make sure that the ready- light on the SB-900 or in the camera’s viewfinder is on before shooting. •… -
Page 30: Control Buttons
• Functions differ according to 8 Selector dial: selected mode and status of the Rotate to change selected item. The SB-900. (kC-17) selected item is highlighted on the 6 Test fi ring button: LCD. (kC-9) • Controls test firing (kD-60) and 9 [OK] button: modeling illuminator.
-
Page 31
Control button operation The basic control of SB-900 functions is as follows: Select function to be changed and press the button that controls the function. • The selected function is highlighted. Change the setting by rotating the selector dial. •… -
Page 32: Lcd
LCD panel Icons on the LCD show the status of settings. • Displayed icons vary according to selected flash modes and settings. • Settings that can be changed are highlighted. Flash mode icons Monitor pre-fl ashes i-TTL Balanced Fill-Flash Auto FP High-Speed Sync Auto Aperture fl…
-
Page 33
ISO sensitivity ISO sensitivity Distance information • i-TTL/Auto Aperture flash/ Non-TTL auto flash Flash shooting distance range (numerical indicator) Flash shooting distance range (indicated with Indication for minimum/ a bar) maximum flash shooting distance • Distance priority manual flash Shooting distance Shooting distance and… -
Page 34
Zoom position Power zoom Manual setting of angle of coverage Power zoom is not possible (manual only) Angle of coverage at the maximum wide-angle position Angle of coverage at the maximum telephoto position Angle of coverage with manual setting when the built-in wide-fl ash adapter is not working Light distribution angle Light distribution for DX-format image… -
Page 35
Aperture value Aperture value (camera setting) Aperture value (SB-900 setting) Selected aperture value is out of SB-900 fl ash output control range (camera setting) Flash output level compensation Flash output level compensation • For flash output level compensation, see D-37. -
Page 36
SB-900 condition Type of attached color fi lter Illumination pattern: Standard Illumination pattern: Center-weighted Illumination pattern: Even Bounce fl ash operation Tilt 7° down Back light is on AF-assist illumination Communicating with a CLS compatible camera Thermal Cut-out on Thermal Cut-out off… -
Page 37
Flash mode, flash output level compensation Channel Flash mode, flash output level compensation, amount of light at manual setting from A, B or C group ■ Remote mode (with Nikon Advanced Wireless Lighting) (kD-43) Group Channel Remote Sound monitor C–15… -
Page 38
■ Master fl ash unit at repeating fl ash (with Nikon Advanced Wireless Lighting) (kD-49) Repeating flash Number Light amount of flashes Channel Frequency Master and group A, B or C unit fires (ON)/does not fire (OFF) ■ Master mode (with SU-4 type wireless multiple fl ash shooting) -
Page 39
Number of fl ashes Frequency Power zoom Change aperture/frequency ■ When using a SB-900 as master fl ash unit (with Nikon Advanced Wireless Lighting) (kD-43) Change the selected group Channel Flash output level compensation Flash output level at manual mode… -
Page 40
Advanced Wireless Lighting) (kD-43) Group Channel ■ When using the SB-900 as a remote fl ash unit (with SU-4 type wireless multiple fl ash shooting) (kD-50) Flash output level at manual mode Cancel receiving light from other fl ash units (fi xed setting) -
Page 41
■ Master fl ash unit at repeating fl ash (with Nikon Advanced Wireless Lighting) (kD-49) Change the selected group Channel Select item in the 2nd tree Light emit/not emit Flash output level Number of fl ashes Frequency Power zoom C–19… -
Page 42: Custom Functions And Settings
Custom functions and settings Various operations for the SB-900 can be easily set using the LCD. • Displayed icons vary according to the combination of camera and status of SB-900. • Items that cannot be changed or set are indicated with grid squares.
-
Page 43
Custom setting Press the [OK] button for approx. one second to display the custom setting Rotate the selector dial to choose the desired custom functions to be set, and press the [OK] button. • Highlighted item can be set. Current settings Position of highlighted item (within 22 items). -
Page 44
Custom functions and settings Available Custom functions and settings • (Bold: default) Non-TTL auto fl ash mode (kD-5, D-8) Setting Non-TTL auto fl ash mode Auto aperture fl ash (with modeling illumination) Auto aperture fl ash (without modeling illumination) Non-TTL auto fl ash (with modeling illumination) Non-TTL auto fl… -
Page 45
AF ONLY: Restrict fl ash fi ring (only AF-assist illumination fi res) Standby function (kC-28) Adjusting the time before the standby function is activated AUTO: the SB-900 turns off when the camera’s exposure meter turns 40: 40 seconds 80: 80 seconds… -
Page 46
ON: Thermal Cut-out on OFF: Thermal Cut-out off Sound monitor (kD-42, F-6) When the SB-900 is used as a wireless remote fl ash unit, or the overheat detection is on, the sound monitor function can be activated or cancelled. ON: Sound on OFF: Sound off C–24… -
Page 47
LCD panel contrast (kF-9) Adjust the brightness of the LCD panel. Contrast levels are displayed on the LCD in a nine-step graph. 5 levels in 9 steps Unit of measuring distance Set the unit of measuring distance m: meters ft.: feet Zoom position setting if the built-in wide-fl… -
Page 48
Custom functions and settings My menu When frequently used custom setting items are set as “My menu,” only the selected items are displayed on the LCD in the custom setting. • “My menu” items can be changed at any time. •… -
Page 49: Batteries
• If batteries are weak, the flash head zooms back and forth even when the SB-900 is turned on, making a distinctive sound. In this case, replace the batteries even if an external power source is used. Low battery power indicator When battery power is low, the icon shown at the left appears on the LCD and the SB-900 stops working.
-
Page 50
Batteries Standby function to conserve battery power If the SB-900 and the camera are not used for more than a specified time, the Standby function is automatically activated to conserve battery power. • The Standby function activates when the camera’s exposure meter is turned off (default setting). -
Page 51: Flash Modes And Functions
Flash modes and functions Explanation of the SB-900’s flash modes and functions • This section explains SB-900 flash modes and functions in combination with CLS compatible cameras and CPU lenses. Functions and LCD displays vary when other types of cameras are used.
-
Page 52: I-Ttl Mode
• TTL is recommended for standard shooting situations. • To take pictures using SB-900 set in i-TTL mode, see “Basic operation” (kC-4). • i-TTL Automatic Balanced Fill-Flash mode and Standard i-TTL mode are available. i-TTL Automatic Balanced Fill-Flash Adjust the flash output level automatically for a well-balanced exposure of the main subject and background.
-
Page 53
Monitor pre-fl ashes • In i-TTL mode, immediately before the flash fires, the SB-900 fires a series of imperceptible pre-flashes to analyze the information of the subject. SB-900 flash shooting distance range The flash shooting distance range is indicated by numbers and a bar chart on the LCD. -
Page 54
When insuffi cient light for correct exposure is indicated • When the SB-900 fires at full flash output level, ready-lights on the SB-900 and in the camera’s viewfinder blink for approx. three seconds after shooting. • In this case, underexposure may occur. -
Page 55: Auto Aperture Fl Ash
The SB-900’s built-in sensor measures the flash illumination reflected from the subject and controls the flash output in combination with data automatically transmitted from the camera and lens to the SB-900, including the ISO sensitivity value, the exposure compensation value, the aperture and focal length of the lens.
-
Page 56
• Monitor pre-flashes on or off can be set by using the custom setting. (kC-22) • The SB-900 fires a series of imperceptible monitor pre-flashes immediately before the flash fires to obtain information on the subject. • To perform the Auto FP-High Speed Sync (kD-55) or FV Lock (kD-55), activate the monitor pre-flashes. -
Page 57
Compose the picture, confirm that the ready-light is on, then shoot. Insuffi cient light for correct exposure • When the SB-900 fires at full flash output level, ready- lights on the SB-900 and in the camera’s viewfinder blink for approx. three seconds after shooting. •… -
Page 58: Non-Ttl Auto Fl Ash
Non-TTL auto flash The SB-900’s built-in sensor measures the flash illumination reflected from the subject, automatically controlling the SB-900’s light output to give the correct exposure. This allows you to make exposure compensation easily by varying the aperture set on the camera or lens.
-
Page 59
Monitor pre-flashes on or off can be set by using the custom setting. (kC-22) • When the monitor pre-flashes are activated, the SB-900 fires a series of imperceptible monitor pre-flashes immediately before the flash fires to obtain information on the subject. -
Page 60
Checking the correct exposure before shooting Confirm the test firing indicator appears on the LCD. Make the necessary settings on the SB-900 and camera and press the test firing button to fire the flash. •… -
Page 61: Distance-Priority Manual Fl Ash
Distance priority manual flash In this flash mode, when you enter the shooting distance value, the SB-900 automatically controls the light output according to the aperture set. You can take pictures that have the same exposure even when shooting at different apertures.
-
Page 62
Set the aperture on the camera. • Aperture should be calculated using the calculation formula. (kD-22) • The aperture on the SB-900 cannot be set directly. Compose the picture, confirm that the ready-light is on, then shoot. Flash shooting distance range in “Distance-priority manual flash” mode •… -
Page 63
Distance-priority manual flash mode. Insuffi cient light for correct exposure • When the SB-900 fires at full flash output level, ready-lights on the SB-900 and in the camera’s viewfinder blink for approximately three seconds after shooting. -
Page 64: Manual Mode
Manual mode In Manual flash mode, you select the aperture and flash output level. In this way, you can control the exposure and flash shooting distance when shooting subjects where the correct exposure is difficult to obtain in the TTL or Non-TTL auto flash mode. •…
-
Page 65: Manual Mode
Press the [OK] button. Camera’s control panel Set the aperture on the camera. • The aperture on the SB-900 cannot be set directly. • The shooting distance indicated matches the selected flash output level and aperture.
-
Page 66
Manual mode ■ Setting the fl ash output level Press the Function button 1, and then rotate the selector dial to change the flash output level. • When you rotate the selector dial clockwise, the indicated denominator decreases (flash output level increases). 1/128 1/128 ( 0.3) -
Page 67: Repeating Fl Ash
Repeating flash In Repeating flash mode, the SB-900 fires repeatedly during a single exposure, creating stroboscopic multiple-exposure effects. This operation is useful when shooting fast-moving subjects. • Be sure to use fresh or fully charged batteries and allow enough time for the flash to recycle between each repeating flash session.
-
Page 68
Repeating flash ■ Setting the fl ash output level, the number of repeating fl ashes, and the frequency (Hz) per frame • The number of flashes (Times) represents the number of times the flash fires per frame. • The frequency (Hz) represents the number of times the flash fires per second. •… -
Page 69
• The guide number and aperture should be calculated using the calculation formula. (kD-22) • The aperture on the SB-900 cannot be set directly. • The shooting distance indicated matches the selected flash output level and aperture. D–19… -
Page 70
Making sure the fl ash fi res correctly before shooting Confirm the test firing indicator appears on the LCD. Confirm all shooting settings on the SB-900 and the camera are the same as for actual shooting, and then press the test firing button. •… -
Page 71
When the aperture value is not displayed in the SB-900’s LCD • Camera’s aperture data is not transmitted to the SB-900. • Press the Function button 3 for one second to highlight f-number and set appropriate aperture value on the SB-900. -
Page 72: Determining The Aperture, Fl Ash Output Level And Shooting Distance
0.71 Guide number (GN at ISO 100; m/ft) The table below shows the guide numbers while using the standard illumination pattern when the SB-900 is mounted on a Nikon FX format camera. • For others, see “Specifications” (kF-18). Zoom position (mm)
-
Page 73
Referring to the guide number table, determine an appropriate flash output level corresponding to the guide number obtained above, then set the same value on the SB-900. For example, for the shooting distance of 6 m (19.7 ft) with an aperture of f/8 and the ISO sensitivity of 400 (ISO sensitivity factor: 2): 6/19.7 (shooting distance;… -
Page 74: Switching Illumination Pattern
Switching illumination pattern In flash photography, the center of the image is most illuminated, while the edges are darker. The SB-900 provides three types of illumination patterns with different light falloff at edges. Select suitable type according to the shooting environment.
-
Page 75
To set/confirm illumination pattern The illumination pattern can be set using custom setting. (kC-22) • Standard is the default setting. • The selected illumination pattern is indicated with an icon on the LCD. Standard Center-weighted Even D–25… -
Page 76: Bounce Fl Ash Operation
Bounce flash operation You can tilt or rotate the SB-900’s flash head to bounce the light off the ceiling or walls, providing more natural-looking pictures of people with softer shadows. Also, you can soften the shadows even more by using the Nikon Diffusion Dome.
-
Page 77
• When the flash head is adjusted to other than the horizontal/front position, the flash shooting distance range indicator on the SB-900 disappears. To ensure correct exposure, first confirm the flash shooting distance range and aperture with the flash head in the normal position. Next, set this aperture on the camera. -
Page 78
Bounce flash operation Using the built-in bounce card • In bounce flash photography, use the SB-900’s built-in bounce card to create a highlight in the subject’s eyes, making the eyes look more vibrant and avoiding illuminating the front of the subject. -
Page 79
Shooting with the Nikon Diffusion Dome • By attaching the provided Nikon Diffusion Dome over the flash head, you can diffuse the light even more when doing bounce flash, creating extremely soft light with virtually no shadows. • With the camera in either the horizontal or vertical position, you get the same effect. -
Page 80: Taking Close-Up Photographs With Bounce-Down Fl Ash
• When the SB-900 is attached to the camera and used as the only flash unit, tilting down the flash head is recommended to ensure sufficient illumination of the lower portion of the subject in close-up photography.
-
Page 81
Auto (A) or Manual (M). • Set the metering mode to Matrix Metering “ ” or Center-Weighted Metering “ ”. Set the SB-900’s flash mode. Position the built-in wide- flash adapter. Tilt the flash head down. Confirm the ready-light is on then shoot. -
Page 82
With the SB-900 attached to the camera, sufficient illumination of the subject cannot be obtained. • In this case, use the SB-900 off-camera by attaching the optional TTL Remote Cord as shown below. • When monitor pre-flashes are fired, distance information from the lens is used to determine the correct exposure. -
Page 83: Flash Photography With Color Fi Lters
Flash photography with color filters Two types of color filters are supplied with the SB-900 for taking flash pictures under fluorescent lighting and for use with incandescent/tungsten lighting. • The optional Color Filter Set SJ-3 is available. (kF-11) • Four types of color filters for changing the color of the light from the flash are optionally available.
-
Page 84
fi lter holder without creasing the fi lter or leaving any gaps. Place the filter holder on the flash head with the Nikon logo facing up, as shown in the diagram, and insert into the slit at the top. -
Page 85
Confirm the color filter indicator is displayed. • Filter mounted and filter type indicators will be displayed. • Do not block the filter detector window. LCD indication while attaching an FL-G1 fi lter • If the warning shown in the figure in the left below appears on the LCD, the filter is not properly attached. -
Page 86
(such as D3 series, D700, D90) • When a color filter is attached to the SB-900 while the camera’s white balance is set to AUTO or FLASH, filter information is automatically transmitted to the camera, and the camera’s optimum white balance is automatically adjusted to give the correct color temperature. -
Page 87: Flash Output Level Compensation And Exposure Compensation
If you compensate the flash output level on both the camera and the SB-900, the exposure is modified by the sum total of both compensation values. • In this case, the SB-900’s LCD panel shows only the compensation value set on the SB-900. D–37…
-
Page 88: Flash Output Level Compensation And Exposure Compensation
In the Non-TTL auto flash mode, the correct exposure can be obtained when the same aperture is set on the camera as that set on the SB-900. Therefore, to make exposure compensation, vary the aperture set on the camera while retaining the aperture set on the SB-900 or vice versa.
-
Page 89: Wireless Multiple Fl Ash Shooting
Wireless multiple flash shooting With the SB-900, the “Advanced” and “SU-4 type” wireless flash operations are available. • The Advanced Wireless Lighting mode is automatically set as the default. Advanced Wireless Lighting is recommended for standard multiple flash photography. •…
-
Page 90
“OFF,” or select a standby duration that is long enough in the custom setting. • The standby function of the SB-900, SB-800, SB-700, SB-600 and SB-80DX is canceled when wireless remote flash mode is set. Make sure that there is sufficient battery power. -
Page 91
Use the provided Speedlight Stand AS-21 for stable placement of the remote flash units. • Attach the SB-900 to the Speedlight Stand in the same way that you attach it to the camera’s accessory shoe. The same is true when detaching it from the camera. -
Page 92
SB-900 or the sound monitor during and after shooting. • When the SB-900 is used as a wireless remote flash unit, you can monitor its operation by listening to the sound monitor. This function can be activated or canceled using custom setting (kC-24). -
Page 93: Flash Shooting In Advanced Wireless Lighting
Flash shooting in Advanced Wireless Lighting When the SB-900 is used with Nikon CLS-compatible cameras, Advanced Wireless Lighting is possible. In this mode, you can divide the remote flash units into three groups and set the flash mode and flash output level compensation values separately for each group as well as the master flash unit.
-
Page 94
Flash shooting in Advanced Wireless Lighting Flash set-up in the Advanced Wireless Lighting Arrange the master and remote flash units within the range as instructed in the illustration below. Group C Less than approx. 10 m (33 ft.) Approx. 5 to 7 m (16 to 23 ft.) Within 30˚… -
Page 95
Setting the SB-900 to Advanced Wireless Lighting You can set the SB-900 to Advanced Wireless Lighting using the Power ON-OFF switch/wireless setting switch. • Turn the switch while holding down the button on the center. Setting the SB-900 as Setting the SB-900 as… -
Page 96
• A maximum of 3 groups (A, B, C) unit *1 Auto Aperture flash is automatically set. When the SB-900 cannot receive lens information such as focal length and aperture, the flash mode automatically switches to Non-TTL auto flash. *2 If another photographer uses the same type of wireless remote flash setup close by, your remote flash units may accidentally fire in sync with that photographer’s master… -
Page 97
Flash shooting in Advanced Wireless Lighting Setting the flash mode, flash output level compensation values, and channel number on the master flash unit Press the Function button 1 on the master flash unit to highlight “ ”. Press the [MODE] button, then turn the selector dial to choose the desired flash mode, and press the [OK] button. -
Page 98
Commander function • The “Commander function” enables the SB-900 to trigger remote flash units without firing itself. To activate the “Commander function,” set the SB-900 as the master flash unit and set its flash mode to “Flash canceled.” • This operation will normally not affect the correct exposure of the subject, although the exposure might be affected if the subject is close and a high ISO sensitivity has been set. -
Page 99
Repeating flash shooting In the Advanced Wireless Lighting, the repeating flash operation is possible. • The Repeating flash mode can be activated or canceled using the custom setting. (kC-22) LCD display in the repeating flash mode Repeating flash mode Flash output level Channel number Number of repeating… -
Page 100: Su-4 Type Wireless Multiple Flash Shooting
To perform SU-4 type wireless multiple flash, set the wireless flash mode to “SU-4” in the custom setting. (kC-22) • Use the Wireless setting switch to switch over the SB-900 to the master or remote flash unit. • Hold down the button on the center to turn the Wireless setting switch.
-
Page 101
Press the [MODE] button, then turn the selector dial to choose the desired flash mode. • When the SB-900 is set as the master flash unit, monitor pre-flashes will not fire. Remote flash unit • AUTO (auto) and M (manual) modes are available. -
Page 102
In SU-4 type wireless multiple flash, cancel the monitor pre-flashes of the master flash unit, since monitor pre-flashes cause incorrect exposure. • When the SB-900 is set as the master flash unit, monitor pre-flashes will not fire. • For other Speedlights, be sure to cancel the master flash unit’s monitor pre-flashes. -
Page 103
Procedures for SU-4 type wireless multiple flash shooting Camera’s control panel Set the camera’s exposure mode to A (Aperture-Priority Auto) or M (Manual). Set up all Speedlights (both master and remote flash units) as Remote fl ash unit’s LCD panel the SU-4 type wireless multiple flash mode. -
Page 104
F is the lens aperture in use, and D is the distance between the remote fl ash unit and the subject (in meters/feet). For example, with the SB-900’s zoom position adjusted to 18 mm, using an ISO sensitivity of 100, standard illumination pattern, in FX-format, shooting a subject at a distance of 2 m (6.6 ft.) with a lens aperture of f/5.6, then… -
Page 105: Available Functions To Be Set On The Camera
Available functions to be set on the camera The following functions are available when used with cameras so equipped. Set these functions on the camera. They cannot be set on the SB-900 directly. • For detailed information regarding camera functions and settings, refer to your camera user’s manual.
-
Page 106: Red-Eye Reduction/Red-Eye Reduction With Slow-Sync Flash
Red-eye reduction/Red-eye reduction with slow-sync fl ash To prevent your subject’s eyes from appearing red in color pictures shot in dim light, the SB-900 fires three flashes at reduced output just before the picture is taken. • In the Red-eye reduction with slow sync flash, red-eye reduction is combined with slow-sync flash.
-
Page 107: Flash Shooting Support Functions
Flash shooting support functions Power zoom function The power zoom function automatically adjusts the zoom position to match the lens focal length. • Zoom positions to be automatically adjusted differ depending on lillumination pattern. For more details, refer to “Specifications.” (kF-17) •…
-
Page 108: Af-Assist Illuminator
• The SB-900’s AF-Assist Illuminator supports the dynamic-area AF system. • You can set the SB-900’s AF-Assist Illuminator to activate or cancel in the custom setting mode. (kC-23) • The AF-Assist Illuminator cannot be used with cameras not compatible with CLS and COOLPIX cameras.
-
Page 109
■ AF-assist illuminator/fl ash fi ring off You can set the SB-900’s AF-Assist Illuminator and flash firing to activate or cancel in the custom setting. (kC-23) : AF-Assist Illuminator is activated. (Default) : AF-Assist Illuminator is canceled. No “AF” appears. -
Page 110: Setting The Iso Sensitivity
SB-900 before actually taking the picture by pressing the [Test firing] button. • The SB-900 fires at M1/128 flash output in the i-TTL flash mode. The amount of flash output can be modified in the custom setting. (kC-23) •…
-
Page 111: Modeling Illuminator Function
When the depth-of-preview button on a camera compatible with the modeling illumination is pressed, the Modeling illuminator fires. For details, see your camera user’s manual. • This function can be performed without activating the SB-900’s Modeling illuminator in the custom setting. ■ Modeling illuminator in the Advanced Wireless Lighting (kD-43)
-
Page 112: Fx/Dx Selection
When mounted on a camera that can select an image area between FX-format (36 × 24) and DX-format (24 × 16), the SB-900 automatically selects the suitable light distribution angle, in accordance with the camera’s image area setting. For details, see your camera user’s manual.
-
Page 113: For Use With Cameras Other Than Cls Compatible Slr Cameras
For use with cameras other than CLS compatible SLR cameras Refer to this chapter when using the SB-900 with cameras other than CLS-compatible SLR cameras. • Using the SB-900 with non-CLS-compatible SLR cameras ……………..E-2 • For use with i-TTL-compatible COOLPIX cameras …………..E-3 E–1…
-
Page 114: Using The Sb-900 With Non-Cls-Compatible Slr Cameras
Using the SB-900 with non-CLS-compatible SLR cameras Using the SB-900 with non-CLS-compatible SLR cameras is possible with the exception of some functions. • The SB-900’s available functions vary depending on cameras in use. • See your camera user’s manual as well.
-
Page 115: For Usage With I-Ttl-Compatible Coolpix Cameras
With the COOLPIX P7000 and P6000, wireless multiple flash shooting is possible when the SB-800, SB-900 or Wireless Speedlight Commander SU-800 is used as a master flash unit and the SB-600, SB-700, SB-800 or SB-900 as remote flash unit(s). Set the flash mode of the master flash unit to “Commander”…
-
Page 116
For usage with i-TTL-compatible COOLPIX cameras Adjusting the zoom position when used with i-TTL compatible COOLPIX cameras • The power zoom function automatically adjusts the zoom position to match the lens focal length. In this case, appears on the LCD panel, but the zoom position does not appear on the LCD panel. -
Page 117: Tips On Speedlight Care And Reference Information
Tips on Speedlight care and reference information Optional accessories, troubleshooting, Speedlight care, specifications, etc. are presented here. • Troubleshooting …………..F-2 • Notes on continuous flash shooting ……..F-5 • Thermal Cut-out …………..F-6 • Tips on Speedlight care …………F-7 •…
-
Page 118
Troubleshooting If a warning indicator appears, use the following chart to determine the cause of the problem before you take your Speedlight to a retailer or Nikon representative for repair. Problems with the SB-900 Ref. Problem Cause Solution page The batteries are not Insert the batteries correctly. -
Page 119
Warning beeps sound and warning icon appears when the camera’s shutter release The SB-900’s temperature Wait until the SB-900 cools kF-6 rises and the SB-900 may be button is pressed. down naturally. damaged. All operations have stopped because the SB-900’s… -
Page 120: Troubleshooting
Microcomputer characteristics The SB-900 incorporates a microcomputer to control flash operations. In rare cases, the SB-900 may not work properly even after fresh batteries are properly installed. If this happens, replace the batteries while the SB-900 is turned on. F–4…
-
Page 121: Notes On Continuous Fl Ash Shooting
Notes on continuous flash shooting To prevent the SB-900 from overheating, allow the SB-900 to cool down for at least 10 minutes after the maximum number of continuous firings have been performed as shown in the table below. • Setting the “Thermal Cut-out” function is recommended. (kF-6) «…
-
Page 122: Thermal Cut-Out
The temperature of the SB-900 is shown in three stages. • If the temperature of the unit rises as a result of the flash being fired multiple times in quick succession, a warning will be displayed and the SB-900 will enter protective shutdown mode. ■…
-
Page 123: Tips On Speedlight Care
Cleaning • Use a blower brush to remove dirt and dust from the SB-900 and clean it with a soft, clean cloth. After using the SB-900 near saltwater, wipe the flash unit with a soft, clean cloth moistened slightly with plain water to remove the salt, then dry it using a dry cloth.
-
Page 124: Notes On Batteries
Carbon-zinc batteries are not recommended. • Depending on battery specifications, when batteries become hot, the SB-900’s safety circuits are activated, cutting off power. This often occurs when the flash unit is operated in the repeating flash mode. Battery power will recover when the temperature returns to normal.
-
Page 125: About The Lcd Panel
The LCD’s response time slows down at low temperatures (approx. 5°C/41°F and below), but returns to normal at normal temperatures (20°C/68°F). LCD panel illuminator ON/OFF Press any button on the SB-900 to turn the illuminator on (when the SB-900 power is on) and make the LCD panel easier to read. •…
-
Page 126: Updating Fi Rmware
*2 D300 camera with either firmware A or firmware B version 1.10 or later. • See the custom setting section to determine which version of firmware you are using (kC-25). • If your camera is not compatible with firmware updates, please contact a Nikon representative in your area. F–10…
-
Page 127: Optional Accessories
WG-AS2, WG-AS3 AF-assist illuminator function. (The Useful to protect the camera’s hot shoe SC-29 is not equipped with a TTL contact when SB-900 is mounted on a Nikon multiple flash terminal.) digital SLR camera. WG-AS1: for D3 Series WG-AS2: for D300 Series WG-AS3: for D700 F–11…
-
Page 128: Optional Accessories
To use an external power source, remove the cover and connect its power cord to the SB-900’s external power source terminal. • Do not use the power cord SC-16 when connecting the SB-900 to the Nikon DC Unit SD-7; use the SC-16A instead. F–12…
-
Page 129
*3: Use AA-type Ni-MH (2600 mAh) batteries with SB-900. *4: Use AA-type Ni-MH (eneloop) batteries with SB-900. *5: Use the same type batteries with both SB-900 and external power source. • With fresh batteries. Performance may vary depending on battery freshness or battery specifications. -
Page 130: Specifi Cations
Bounce capability Flash head rotates horizontally 180° to the left and right with click-stops at 0°, 30°, 60°, 90°, 120°, 150°, 180° Rotate the Power ON-OFF switch to turn the SB-900 on or off Power ON/OFF Standby function can be set Use four AA-type batteries of any of the following types: •…
-
Page 131
The SB-900 is fully recycled: Rear ready-light lights up and the front light blinks. Ready-light Insuffi cient light for correct exposure (in i-TTL, Auto Aperture fl ash, Non-TTL Auto fl ash, or Distance-priority manual fl ash operations): both rear and front (in remote setting) ready-lights blink. -
Page 132
Flash shooting distance range (for i-TTL auto flash, Auto Aperture flash and Non-TTL auto flash mode) The flash shooting distance range of the SB-900 is between 0.6 m and 20 m (2.0 ft. and 65.6 ft.). The flash shooting distance range differs depending on the camera’s image area, illumination pattern, ISO sensitivity, zoom position and flash output level. -
Page 133
11 (BA/WP)* 180* 105* 200* 120* 135* BA: With the Nikon Diffusion Dome attached 180* WP: With the wide-fl ash adapter in place *1 In center-weighted illumination pattern 200* *2 In standard illumination pattern BA: With the Nikon Diffusion Dome attached *3 In even illumination pattern WP: With the wide-fl… -
Page 134
Specifications Specifications Guide number table The SB-900 guide numbers differ depending on the camera’s image area, illumination pattern, ISO sensitivity, zoom position and flash output level. ISO 100 · m FX-format DX-format Zoom position (mm) Standard Center-weighted Standard Center-weighted Even illumination… -
Page 135
2.3/ 2.5/ 2.6/ 2.7/ 3.1/ 3.5/ 4.3/ 4.5/ 4.6/ 4.7/ 4.9/ 4.9/ 1/128 10.2 11.5 13.1 14.1 14.8 15.1 15.4 16.1 16.1 16.4 • BA: With the Nikon Diffusion Dome attached • WP: With the wide-flash adapter in place F–19… -
Page 136
1.8/ 1.8/ 1/128 • Guide numbers in tables above are for when the SB-900 is mounted to the D3 camera and with 1/500 sec. shutter speed. • Guide number with Auto FP High-Speed Sync varies depending on the camera’s shutter speed. -
Page 137
Min. number of flashes/recycling time of each battery Min. recycling Min. number of fl ashes*/ Batteries time (approx.)* recycling time* Alkaline-manganese (1.5 V) 4.0 sec. 110/4.0 – 30 sec. Lithium (1.5 V) 4.5 sec. 230/4.5 – 120 sec. Oxyride (1.5 V) 3.0 sec. -
Page 138: Index
Index • Refer to the “Speedlight parts” (kC-2) and “LCD panel” (kC-10) for each part name and display indications. Color filter holder ……..D-34 Symbol Color filter set ………F-11 i-TTL Automatic Balanced Fill-Flash …D-2 Commander function ……D-48 i-TTL-compatible COOLPIX cameras … B-2, E-3 Continuous firing ……..F-5 i-TTL mode ……….D-2 Control buttons ……..C-8…
-
Page 139
Highlight in the subject’s eyes ….D-28 Multiple flash shooting ……D-39 My menu ……….C-26 Icons …………C-10 Illumination pattern ….. C-22, D-24 Nikon Creative Lighting System (CLS) ..B-3 Incandescent filters ……..D-33 Nikon Diffusion Dome ……D-29 Included items ……..A-14 Non-CLS-compatible cameras ….E-2 Indication for insufficient light for Non-TTL auto flash …… -
Page 140
Warranty card ……..A-14 Reset ………….C-25 Water Guard ………..F-11 Wireless multiple flash shooting …..D-39 Wireless slave flash controller ….F-11 SB-900 condition ……..C-14 Selector dial ……..C-8, C-9 Setting the ISO sensitivity ….. C-24, D-60 ZOOM button ……….C-8 Shooting distance ……C-11, D-23 Zoom position ……..D-57… -
Page 144
No reproduction in any form of this manual, in whole or in part (except for brief quotation in critical articles or reviews), may be made without written authorization from NIKON CORPORATION. Printed in Japan TT1F08 (11) 8MSA3111-08 © 2008 Nikon Corporation…
Посмотреть инструкция для Nikon SB-900 бесплатно. Руководство относится к категории вспышки, 4 человек(а) дали ему среднюю оценку 8. Руководство доступно на следующих языках: русский. У вас есть вопрос о Nikon SB-900 или вам нужна помощь? Задайте свой вопрос здесь
Не можете найти ответ на свой вопрос в руководстве? Вы можете найти ответ на свой вопрос ниже, в разделе часто задаваемых вопросов о Nikon SB-900.
Какой вес Nikon SB-900?
Nikon SB-900 имеет вес 415 g.
Какая высота Nikon SB-900?
Nikon SB-900 имеет высоту 118.5 mm.
Какая ширина Nikon SB-900?
Nikon SB-900 имеет ширину 78 mm.
Какая толщина Nikon SB-900?
Nikon SB-900 имеет толщину 146 mm.
Инструкция Nikon SB-900 доступно в русский?
Да, руководствоNikon SB-900 доступно врусский .
Не нашли свой вопрос? Задайте свой вопрос здесь