Данная лицензия не предназначена для продажи этого Руководства и Вы не становитесь владельцем этого Руководства после приобретения любого продукта, загрузки и/или использования. Nikon сохраняет за собой право владения данным Руководством и, следовательно, всеми копиями и все соответствующие права, относящиеся к интеллектуальной собственности, и сохраняет за собой все права, которые явно не предоставлены Вам в рамках данного Соглашения. Данное Соглашение представляет собой полное и эксклюзивное соглашение, устное и письменное, между Вами и Nikon.
1. РУКОВОДСТВО
Руководство предназначено для клиентов, которые приобрели наши продукты. Мы можем не иметь возможности ответить на запрос физических лиц, которые не приобрели наши продукты. Пожалуйста, имейте в виду, что данное руководство и контактная информация, указанные здесь, могут быть изменены без уведомления.
Данное Руководство защищено Законом об авторском праве Японии и международными законами об авторском праве и международными договорами. Вам необходимо воспроизвести на каждой копии уведомление об авторском праве Nikon и любую другую информацию о праве собственности, которые присутствовали на оригинале.
2. ОГРАНИЧЕНИЯ
Кроме случаев, когда в данном Соглашении указано иное, нельзя делать или передавать копии данного Руководства другим или передавать в электронной форме Руководство с одного компьютера на другой по сети. НЕЛЬЗЯ ИЗМЕНЯТЬ ИЛИ УДАЛЯТЬ ЛЮБЫЕ УВЕДОМЛЕНИЯ ОБ АВТОРСКОМ ПРАВЕ, ТОРГОВОЙ МАРКЕ ИЛИ ДРУГИЕ ЗАЩИТНЫЕ УВЕДОМЛЕНИЯ, СОДЕРЖАЩИЕСЯ В ДАННОМ РУКОВОДСТВЕ. НЕЛЬЗЯ ПРИСВАИВАТЬ ИЛИ ИНЫМ ОБРАЗОМ ИЗБАВЛЯТЬСЯ, МОДИФИЦИРОВАТЬ, НАСТРАИВАТЬ, ПЕРЕВОДИТЬ, АРЕНДОВАТЬ, БРАТЬ В НАЕМ, ЗАНИМАТЬ, ПЕРЕПРОДАВАТЬ, РАСПРОСТРАНЯТЬ, ПЕРЕДАВАТЬ ПО СЕТИ ИЛИ СОЗДАВАТЬ ИЛИ ИМЕТЬ СОЗДАННЫЕ ПРОИЗВОДСТВЕННЫЕ РАБОТЫ, ОСНОВАННЫЕ НА ДАННОМ РУКОВОДСТВЕ ИЛИ ЛЮБОЙ ЧАСТИ ТАКОВОГО.
3. ОГРАНИЧЕННАЯ ГАРАНТИЯ И ОТКАЗ
В НАИБОЛЬШЕЙ СТЕПЕНИ, РАЗРЕШЕННОЙ В СИЛУ ДЕЙСТВУЮЩЕГО ЗАКОНОДАТЕЛЬСТВА, ДАННОЕ РУКОВОДСТВО ПРЕДОСТАВЛЕНО НА ОСНОВЕ ПРИНЦИПА «КАК ЕСТЬ», БЕЗ ГАРАНТИИ В ЛЮБОЙ ФОРМЕ, И КОМПАНИЯ NIKON, ЕЕ СОТРУДНИКИ, РАСПРОСТРАНИТЕЛИ, ДИЛЕРЫ И АГЕНТЫ ПРЯМО НЕ ПРИЗНАЮТ ЛЮБУЮ ГАРАНТИЮ В ЛЮБОЙ ФОРМЕ, ВЫРАЖЕННУЮ ИЛИ ПОДРАЗУМЕВАЕМУЮ, ВКЛЮЧАЯ, НО НЕ ОГРАНИЧИВАЯСЬ, ЛЮБОЙ ПОДРАЗУМЕВАЕМОЙ ГАРАНТИЕЙ ПРИГОДНОСТИ ДЛЯ ТОРГОВЛИ, ПРИГОДНОСТИ ДЛЯ ОПРЕДЕЛЕННОГО НАЗНАЧЕНИЯ ИЛИ ОТСУТСТВИЯ НАРУШЕНИЙ. В НАИБОЛЬШЕЙ СТЕПЕНИ, РАЗРЕШЕННОЙ В СИЛУ ДЕЙСТВУЮЩЕГО ЗАКОНОДАТЕЛЬСТВА, КОМПАНИЯ NIKON, ЕЕ СОТРУДНИКИ, РАСПРОСТРАНИТЕЛИ, ДИЛЕРЫ И АГЕНТЫ НЕ ГАРАНТИРУЮТ ИСПОЛНЕНИЕ ИЛИ РЕЗУЛЬТАТЫ, КОТОРЫЕ ВЫ МОЖЕТЕ ПОЛУЧИТЬ ИЗ ДАННОГО РУКОВОДСТВА, ИЛИ ЧТО ДАННОЕ РУКОВОДСТВО БУДЕТ СООТВЕТСТВОВАТЬ ВАШИМ ТРЕБОВАНИЯМ ИЛИ ЧТО РАБОТА РУКОВОДСТВА БУДЕТ БЕСПЕРЕБОЙНОЙ, БЕЗОШИБОЧНОЙ ИЛИ НЕ БУДЕТ СОДЕРЖАТЬ ВИРУСОВ. В НАИБОЛЬШЕЙ СТЕПЕНИ, РАЗРЕШЕННОЙ В СИЛУ ДЕЙСТВУЮЩЕГО ЗАКОНОДАТЕЛЬСТВА, НИ КОМПАНИЯ NIKON, НИ ЕЕ СОТРУДНИКИ, РАСПРОСТРАНИТЕЛИ, ДИЛЕРЫ И АГЕНТЫ НЕ ДОЛЖНЫ НЕСТИ ПЕРЕД ВАМИ ОТВЕТСТВЕННОСТЬ ЗА ЛЮБЫЕ КОСВЕННЫЕ, ПОСЛЕДУЮЩИЕ ИЛИ НЕПРЕДНАМЕРЕННЫЕ УБЫТКИ, ПОТЕРИ ИЛИ ИЗДЕРЖКИ ЛЮБОГО ТИПА, БУДЬ ТО ПОТЕРЯ ПРИБЫЛИ, ПЕРЕРЫВ В ДЕЯТЕЛЬНОСТИ ИЛИ ИНЫМ СПОСОБОМ ВОЗНИКАЮЩИЙ ИЛИ ЯВЛЯЮЩИЙСЯ СЛЕДСТВИЕМ ДАННОГО РУКОВОДСТВА, ВЫЗВАННЫЙ КАКИМ-ЛИБО СПОСОБОМ, ДАЖЕ ЕСЛИ КОМПАНИЯ NIKON, ЕЕ СОТРУДНИКИ, РАСПРОСТРАНИТЕЛИ, ДИЛЕРЫ ИЛИ АГЕНТЫ УВЕДОМЛЕНЫ О ВОЗМОЖНОСТИ ВОЗНИКНОВЕНИЯ ТАКИХ УБЫТКОВ, ПОТЕРЬ ИЛИ ИЗДЕРЖЕК. ЭТОТ ОТКАЗ СОСТАВЛЯЕТ СУЩЕСТВЕННУЮ ЧАСТЬ ДАННОГО СОГЛАШЕНИЯ, И НЕИСПОЛЬЗОВАНИЕ ДАННОГО РУКОВОДСТВА УПОЛНОМОЧЕНО, КРОМЕ СЛУЧАЕВ В РАМКАХ ДАННОГО ОТКАЗА.
4. ОБЩИЕ СВЕДЕНИЯ
Данное соглашение регулируется и должно истолковываться в соответствии с законами Японии независимо от его принципов коллизионного права. В случае возникновения спора в рамках или в связи с данным соглашением Вы, таким образом, даете согласие на персональную юрисдикцию Японии и отказываетесь от любого возражения, что такая дискуссия вызывает затруднение. Далее Вы соглашаетесь на получение судебных извещений в любом действии, возникающем из данного Соглашения по обычной почте или другими коммерчески оправданными способами доставки расписки в получении. Если любое положение данного Соглашения должно быть определено недействительным по какой-либо причине, то оставшиеся положения не должны быть признаны недействительными и должны остаться в силе без изменений. Данное Соглашение устанавливает в дальнейшем целое соглашение и понимание между Вами и компанией Nikon, и замещает собой и заменяет любые другие соглашения, относящиеся к сути дела данного Соглашения. Неуспех любой стороны в настаивании на строгом исполнении любого правила или положения данного соглашения, или выполнение любой опции, права или защиты прав, содержащихся в данном документе, не должны толковаться в качестве отказа от любого применения такого правила, положения, опции, права или защиты прав в будущем, и такое правило, положение, опция, право или защита прав должны продолжиться и сохранить полную юридическую силу и действие. Заголовки разделов данного Соглашения вставлены только для удобства и не должны составлять часть данного документа или влиять каким-либо образом на значение или толкование данного Соглашения. Кроме случаев, когда иначе явно указано в данном документе, положения раздела 3 и раздела 4 вместе с любыми положениями, которые с помощью своих прямо выраженных условий относятся к периодам после прекращения срока действия данного Соглашения, должны оставаться в силе после прекращения действия данного Соглашения по какой-либо причине.
Руководства для продуктов Nikon/ 2018/02/15/ Вер. 2.0.0
Manuals Directory
Manualsdir.ru — Онлайн поиск инструкций и руководств
Фотоаппараты Nikon
- Текст
- Оригинал
Cодержание
Document Outline
- Содержание этого руководства
- Меры безопасности
- Уведомления
- Оглавление
- Вопросыиответы
- Введение
- Знакомство с фотокамерой
- Использование меню фотокамеры
- Первые шаги
- Руководство
- навел и снял 《навел и снял》 (режим AUTO)
- Творческая фотосъемка (цифровые сюжетные программы)
- Общие сведения о просмотре снимков
- Справочник
- Дополнительные сведения о фотосъемке (все режимы)
- Фокусировка
- Качество и размер снимка
- Выбор режима съемки
- Использование встроенной вспышки
- Чувствительность ISO
- Двухкнопочный сброс
- Режимы P, S, A и M
- Режим Р (программный авто)
- Режим S (автоматический с приоритетом выдержки)
- Режим А (автоматический с приоритетом диафрагмы)
- Режим M (ручной)
- Экспозиция
- Баланс белого
- Дополнительные сведения о просмотре
- Просмотр снимков на мониторе фотокамеры
- Подключение фотокамеры к телевизору, компьютеру или принтеру
- Просмотр снимков на экране телевизора
- Подключение к компьютеру
- Печать снимков
- Дополнительные сведения о фотосъемке (все режимы)
- Сведения о параметрах меню
- Параметры режима просмотра снимков: меню просмотра
- Параметры съемки: меню съемки
- Пользовательские настройки
- Основные параметры фотокамеры: меню настройки
- Создание отредактированных копий: меню обработки
- Технические примечания
- Дополнительные принадлежности
- Уход за фотокамерой
- Устранение неисправностей
- Приложение
- Технические характеристики
- Индекс
Руководство: Nikon D80
Руководство
Фотосъемка и просмотр снимков
В данном руководстве изложены основы фотосъемки и просмотра снимков в режиме
(авто) и в режимах цифровых сюжетных программ. В этом разделе
подразумевается использование значений параметров фотокамеры, заданных по
умолчанию. Процесс восстановления значений, заданных по умолчанию, описан на
стр. 134
Используйте объектив с микропроцессором
Режим (авто) и режимы цифровых сюжетных программ доступны только при использовании
объективов с микропроцессором. Если установлен объектив без микропроцессора и выбран
один из этих режимов, спусковая кнопка затвора будет заблокирована.
Автоматическое отключение экспонометра
Когда используются значения параметров, заданные по умолчанию, экран видоискателя, а также
индикаторы диафрагмы и выдержки на контрольном дисплее выключатся для экономии заряда
батареи, если на протяжении шести секунд не будут произведены какие—либо действия
(автоматическое отключение экспонометра). Для включения экрана нажмите кнопку спуска
затвора наполовину.
6c
Экспонометр включен Экспонометр выключен Экспонометр включен
Время, по истечении которого экспонометр автоматически выключается,
можно изменить при
помощи пользовательской настройки 28 ( Эксп.-автовыкл.; 99).
18 Руководство

Съемка по принципу «навел и снял» (режим )
Данный раздел содержит инструкции по выполнению фотосъемки в режиме (авто)
— автоматическом режиме «навел и снял», когда большинство значений параметров
выбираются фотокамерой в зависимости от условий съемки.
Включите фотокамеру.
1
1.1
Снимите крышку объектива и включите фотокамеру.
При этом включатся контрольный дисплей и дисплей
видоискателя. Монитор во время съемки не работает.
1.2
Проверьте индикаторы уровня заряда батареи в
видоискателе или на контрольном дисплее.
Контрольный
Видоискатель Описание
дисплей
—
Батарея полностью заряжена.
— Батарея частично разряжена.
Низкий уровень заряда батареи. Подготовьте
полностью заряженную запасную батарею.
Спусковая кнопка затвора заблокирована.
(мигает) (мигает)
Замените батарею.
Если фотокамера работает от сетевого блока питания (приобретается
дополнительно), то уровень заряда батареи не отображается.
1.3
Счетчики кадров в видоискателе и на контрольном
дисплее отображают количество снимков,
сохраненных на карте памяти. Проверьте количество
оставшихся кадров.
Если для сохранения новых снимков с использованием
текущих настроек недостаточно памяти, то индикация
на дисплее будет мигать, как показано справа.
Дальнейшая съемка возможна только после замены
карточки памяти ( 15) или удаления существующих
снимков ( 26, 65, 74).
Руководство: Съемка по принципу «навел и снял» (режим )19

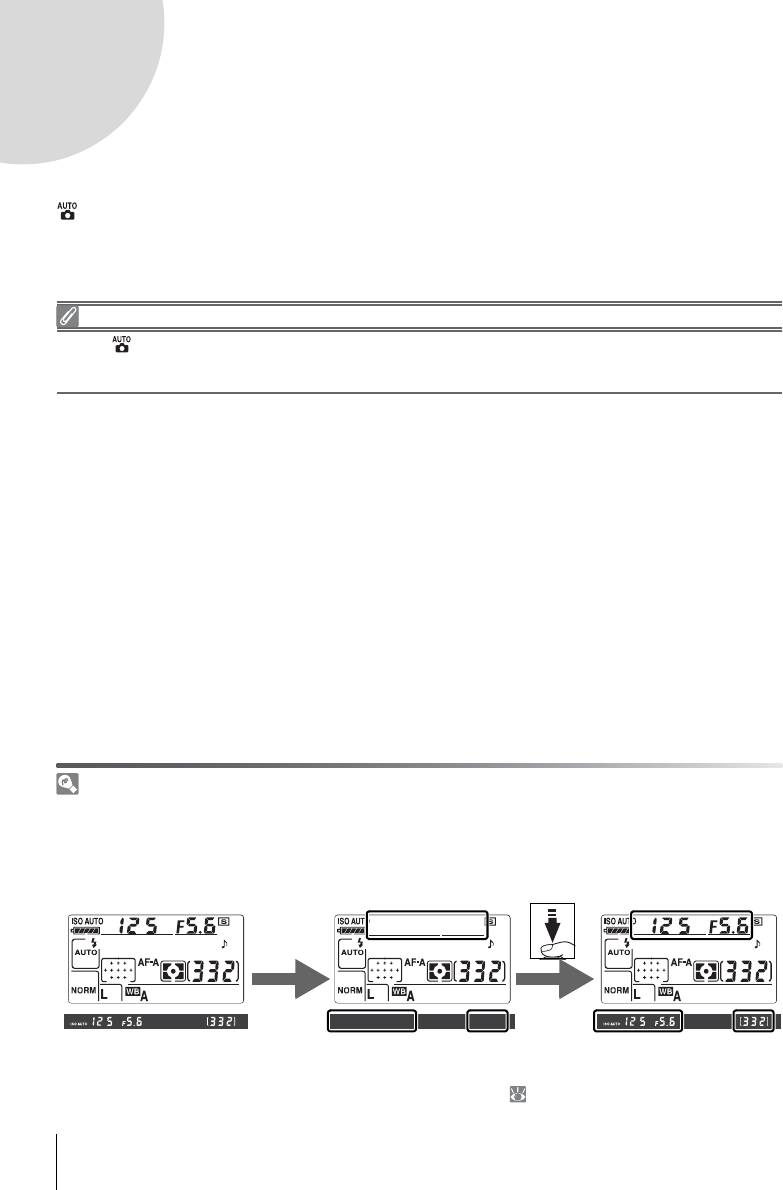
Выберите режим и автоматическую фокусировку.
2
2.1
Поверните диск выбора режимов в положение .
2.2
Вращайте переключатель режимов фокусировки до
положения
AF
(автофокусировка).
Проверьте параметры на контрольном дисплее. Параметры по умолчанию для
3
режима приведены ниже.
Значение по
Параметр
умолчанию
Режим
c
синхронизации
Авто 40
вспышки
d Качество снимка JPEG стд. кач.34
e Размер снимка Большой 35
f Режим съемки Покадровый 36
Режим
g
автоматической
Автовыбор 29
фокусировки
Автом. выбор зоны
h Режим зоны АФ
30
АФ
20 Руководство: Съемка по принципу «навел и снял» (режим )
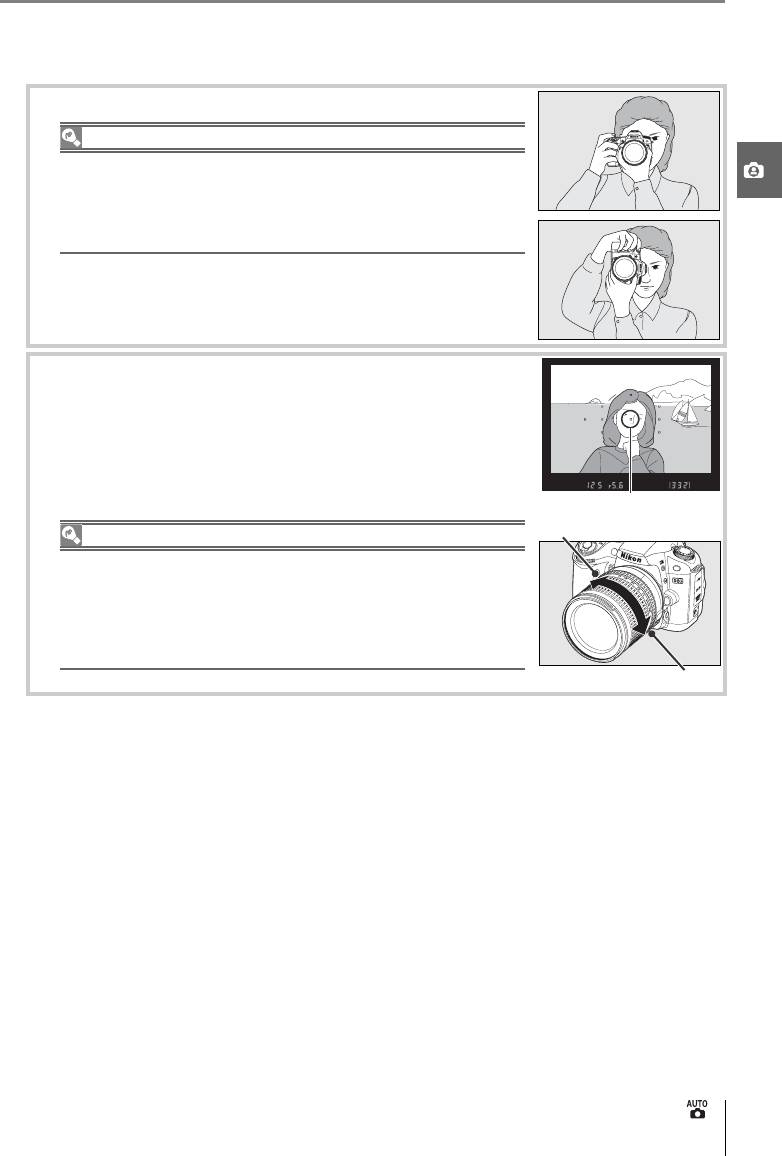
Компоновка будущих снимков осуществляется с помощью видоискателя. Монитор
4
во время съемки не работает.
4.1
Держите фотокамеру, как показано на рисунке.
Правильное положение фотокамеры
Правой рукой обхватите специальный выступ на фотокамере,
а левой рукой поддерживайте корпус или объектив снизу. Для
большей устойчивости и сохранения равновесия слегка
прижмите локти к телу и поставьте одну ногу на полшага
вперед.
4.2
Скомпонуйте снимок в видоискателе, расположив
основной объект в одной из одиннадцати зон
фокусировки.
Зона фокусировки
Увеличение
Использование зум—объектива
С помощью кольца зуммирования можно увеличить объект,
чтобы он занимал больше места на снимке, или, наоборот,
визуально отдалить его, чтобы увеличить размеры области,
видимой на снимке (большее фокусное расстояние на шкале
объектива позволяет приблизить объект, меньшее —
отдалить).
Уменьшение
Руководство: Съемка по принципу «навел и снял» (режим )21

Выполните фокусировку.
5
5.1
Для фокусировки нажмите спусковую кнопку затвора
наполовину. Фотокамера автоматически выберет зону
фокусировки. Если объект недостаточно освещен,
поднимется вспышка и включится вспомогательная
подсветка, облегчающая выполнение фокусировки.
5.2
После завершения операции фокусировки выбранная зона на короткое
время подсвечивается, раздается звуковой сигнал, а в видоискателе
появляется индикатор фокусировки (z) (если объект движется, звуковой
сигнал может не подаваться). При неполном нажатии кнопки затвора
фотоаппарата будет выполнена фокусировка, а в окошке видоискателя
появится число кадров, оставшихся до заполнения памяти.
Выдержка Диафрагма
Выбранная
зона
фокусировки
Индикатор
фокусировки
Выдержка
Диафрагма
Емкость буфера
Видоискатель Контрольный дисплей
Индикатор фокусировки
Описание
z
Объект в фокусе.
z
Фотокамера не может автоматически сфокусироваться
(мигает)
на объекте, находящемся в зоне фокусировки.
Спусковая кнопка затвора
Фотокамера оснащена двухпозиционной спусковой кнопкой затвора. Фокусировка производится
при нажатии спусковой кнопки затвора наполовину. Чтобы сделать снимок, нажмите спусковую
кнопку затвора до конца.
Фокусировка Съемка
22 Руководство: Съемка по принципу «навел и снял» (режим )
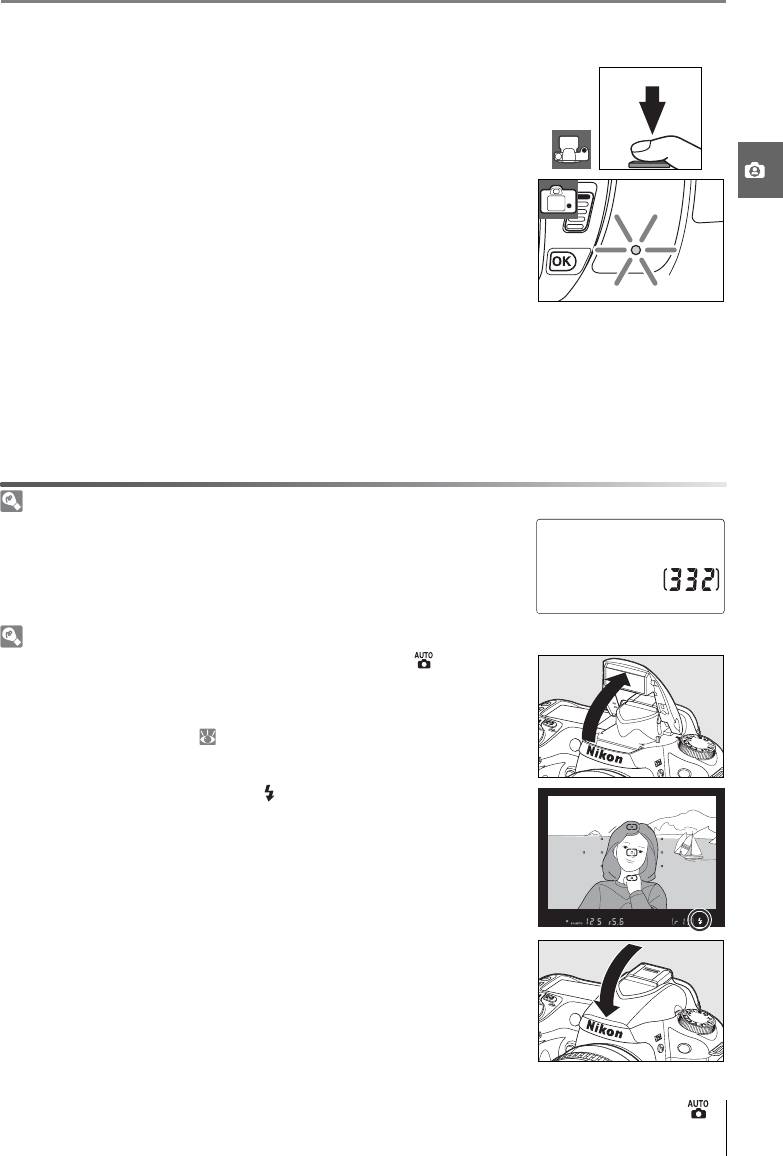
Сделайте снимок.
6
Мягко нажмите спусковую кнопку затвора до конца, чтобы
спустить затвор и сделать снимок. Загорится индикатор
доступа рядом с крышкой гнезда для карточки памяти.
Запрещается извлекать карточку памяти или
отсоединять либо отключать блок питания, пока горит
индикатор доступа к карточке памяти и происходит
запись снимка.
Выключите фотокамеру после съемки.
7
Экран при выключенном фотоаппарате
Если фотоаппарат выключить при вставленной карте памяти, число
кадров, оставшихся до заполнения карты, отобразится на экране
панели управления.
Встроенная вспышка
Если для правильной экспозиции в режиме требуется
дополнительное освещение, то после нажатия наполовину спусковой
кнопки затвора автоматически выдвинется встроенная вспышка.
Дальность действия вспышки зависит от значения диафрагмы и
чувствительности ISO ( 141). При использовании вспышки
необходимо снять бленду с объектива. Если вспышка поднята,
фотографию можно сделать только в том случае, если отображается
индикатор готовности вспышки (). Если
индикатор готовности
вспышки не отображается, ненадолго отпустите спусковую кнопку
затвора и повторите попытку.
Чтобы не расходовать без надобности заряд батареи, когда вспышка
не используется, закройте ее, мягко нажав вниз до щелчка.
Дополнительные сведения об использовании вспышки см. на стр. 40.
Руководство: Съемка по принципу «навел и снял» (режим )23
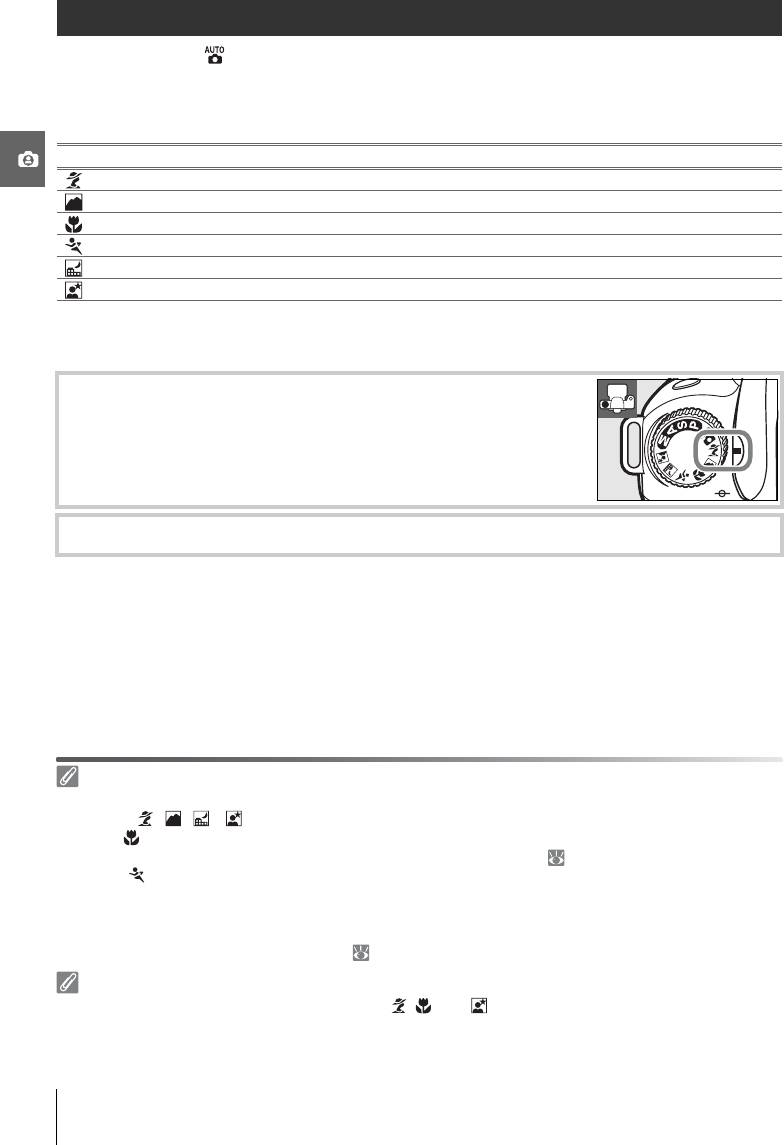
Творческая фотосъемка (цифровые сюжетные программы)
Кроме режима фотокамера D80 поддерживает шесть режимов цифровых
сюжетных программ. В этих режимах происходит автоматическая оптимизация
параметров с учетом выбранного сюжета — чтобы делать качественные фотографии,
достаточно повернуть диск выбора режимов съемки в нужную позицию.
Режим Описание
Портрет Портретная съемка.
Пейзаж Съемка природных и антропогенных пейзажей.
Макро Используется для съемки цветов, насекомых и других мелких объектов.
Спорт Съемка движущихся объектов.
Ночной пейзаж Съемка при недостаточном освещении или ночью.
Ночной портрет Съемка портретов в условиях слабого освещения.
Для съемки в режимах цифровых сюжетных программ выполните следующие
действия.
Поворачивая диск выбора режимов, выберите цифровую
1
сюжетную программу.
Скомпонуйте кадр, выполните фокусировку и сделайте снимок.
2
Зона фокусировки
При настройках по умолчанию фотокамера выбирает зону фокусировки следующим образом.
• Режимы
, , и
. Фотокамера автоматически выбирает зону фокусировки.
• Режим . Фотокамера фокусируется на объекте в центральной зоне фокусировки. Для выбора
другой зоны фокусировки можно использовать мультиселектор ( 30).
• Режим . Фотокамера непрерывно фокусируется и отслеживает перемещения объекта в
центральной зоне АФ все время, пока спусковая кнопка затвора нажата наполовину. Если
объект покидает центральную зону фокусировки, фотокамера будет фокусироваться
на
основании сведений, полученных из других зон. Для выбора начальной зоны фокусировки
можно использовать мультиселектор ( 30).
Встроенная вспышка
Если для правильной экспозиции в режимах , , или требуется дополнительное освещение,
то после нажатия наполовину спусковой кнопки затвора автоматически поднимется встроенная
вспышка.
24
Руководство: Творческая фотосъемка (цифровые сюжетные программы)
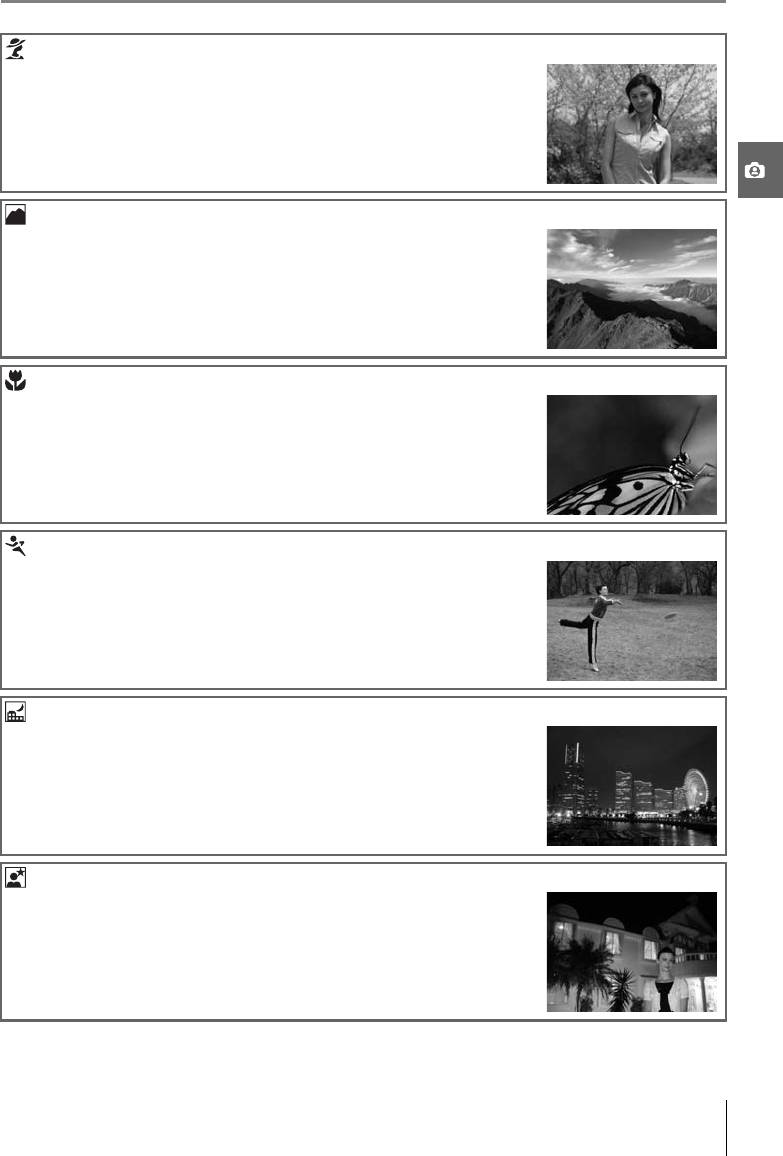
Портрет
Съемка портретов с мягкими и естественными телесными
оттенками кожи. Если человек находится на удалении от
фона или используется телеобъектив, детали заднего плана
будут смягчены. Это придаст композиции впечатление
глубины.
Пейзаж
Съемка живописных пейзажей. Встроенная вспышка и
вспомогательная подсветка АФ автоматически отключаются.
Макросъемка
Используется для съемки цветов, насекомых и других мелких
объектов. Фотокамера автоматически фокусируется на
объекте в центральной зоне фокусировки. Для
предотвращения смазывания изображения рекомендуется
использовать штатив.
Спорт
Короткая выдержка позволяет «остановить» движение и
создавать динамичные снимки, на которых основной объект
четко выделен. Встроенная вспышка и вспомогательная
подсветка АФ автоматически отключаются.
Ночной пейзаж
Съемка с длительной выдержкой позволяет создавать
великолепные ночные пейзажи. Встроенная вспышка и
вспомогательная подсветка АФ автоматически отключаются;
для предотвращения смазывания изображения
рекомендуется использовать штатив.
Ночной портрет
Используется для создания естественного соотношения
уровней яркости основного объекта и фона при съемке в
условиях слабого освещения.
Руководство: Творческая фотосъемка (цифровые сюжетные программы)
25
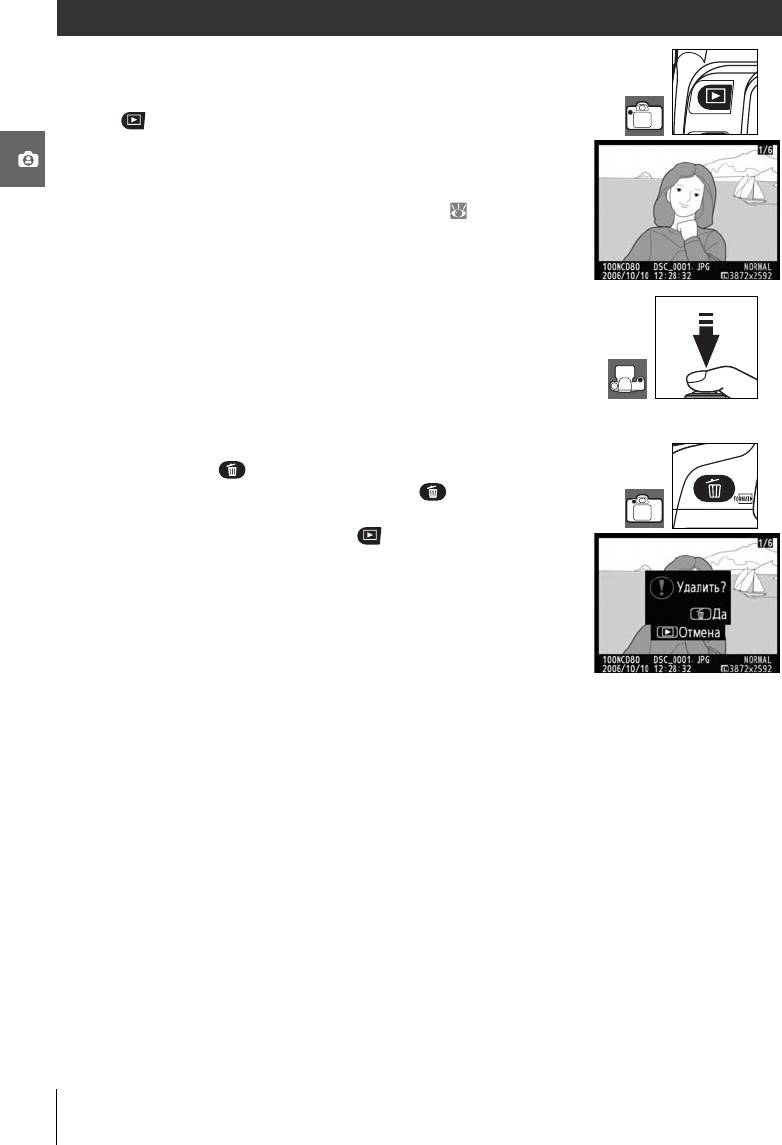
Общие сведения о просмотре снимков
Снимки отображаются автоматически в течение примерно
четырех секунд после съемки. Если на экране нет
фотографии, то просмотреть последний снимок можно, нажав
кнопку . Для просмотра других снимков вращайте диск
управления или нажимайте правую/левую часть
мультиселектора. Чтобы просмотреть выделенные элементы
или дополнительную информацию по съемке текущего кадра,
нажмите на мультиселектор сверху или снизу ( 62-63).
Чтобы завершить просмотр и вернуться в режим
съемки, нажмите спусковую кнопку затвора наполовину.
Удаление ненужных снимков
Чтобы удалить снимок, который отображается на экране,
нажмите кнопку . Появится диалоговое окно для
подтверждения. Еще раз нажмите кнопку , чтобы удалить
снимок и вернуться в режим просмотра. Чтобы выйти без
удаления снимков, нажмите кнопку .
26
Руководство: Общие сведения о просмотре снимков
Оглавление
Топ 10 инструкций
Другие инструкции

- Manuals
- Brands
- Nikon Manuals
- Digital Camera
- D80
- Manual
-
Contents
-
Table of Contents
-
Troubleshooting
-
Bookmarks
Quick Links
Related Manuals for Nikon D80
Summary of Contents for Nikon D80
-
Page 2: Error Messages
Where to Find It Find what you’re looking for from: The Table of Contents Find items by function or menu name. The Q&A Index Know what you want to do but don’t know the function name? Find it from the “question and answer” index. The Index Search by key word.
-
Page 3
Introduction Tutorial Photography and Playback More on Photography (All Modes) P, S, A, and M Modes Reference More on Playback Connecting to a Television, Computer, or Printer Playback Options: The Playback Menu Shooting Options: The Shooting Menu Menu Guide Custom Settings Basic Camera Settings: The Setup Menu Creating Retouched Copies: The Retouch Menu Technical Notes… -
Page 4: For Your Safety
For Your Safety To prevent damage to your Nikon product or injury to yourself or to others, read the fol- lowing safety precautions in their entirety before using this equipment. Keep these safety instructions where all those who use the product will read them.
-
Page 5
• Consult the dealer or an experienced radio/television technician for help. Nikon Inc., 1300 Walt Whitman Road, Melville, New York 11747-3064, U.S.A. Notices for Customers in Canada CAUTION This class B digital apparatus meets all requirements of the Canadian Interference Causing Equipment Regula- tions. -
Page 6
Adobe, Acrobat, and Adobe Reader are registered trademarks of Adobe Systems Inc. PictBridge is a trademark. All other trade names mentioned in this manual or the other documentation provided with your Nikon product are trademarks or registered trademarks of their respective holders. Notices •… -
Page 7: Table Of Contents
Table of Contents For Your Safety … ii Notices … iii Q & A Index …vii Introduction … Introduction …1 1 Getting to Know the Camera … 2 Using Camera Menus …9 First Steps … 11 Attaching a Lens … 11 Charging and Inserting the Battery …
-
Page 8
29: Self-Timer (All Modes) … 99 30: Remote On Duration (All Modes) … 99 31: Exp. Delay Mode (All Modes) … 99 32: MB-D80 Batteries (All Modes) … 100 Basic Camera Settings: The Setup Menu …101 CSM / Setup Menu … 101 Format Memory Card … -
Page 9: Q & A Index
Camera Error messages and displays 132–133 Number of exposures remaining Battery level Exposure Self timer, remote control Optional fl ash units Lenses Accessories for the D80 Approved memory cards Accessories for the D80 Servicing the camera Cleaning the camera Key phrase Viewfi nder focus Monitor off…
-
Page 10
Taking Photographs Question Is there an easy way to take snapshots? Is there an easy way to take more creative shots? How do I bring out a portrait subject? How can I get good landscape shots? How do I take close ups of small objects? How do I “freeze”… -
Page 11
Viewing, Printing, and Retouching Photographs Question Can I view my photographs on the camera? Can I view more information about photos? Why parts of my photos blink? How do I get rid of an unwanted photo? Can I delete several photos at once? Can I zoom in on pictures to make sure they’re in focus? Playback zoom Can I protect photos from accidental deletion? Is there an automatic playback (“slide show”) option? -
Page 12
Visit these sites to keep up-to-date with the latest product information, tips, answers to frequently- asked questions (FAQs), and general advice on digital imaging and photography. Additional informa- tion may be available from the Nikon representative in your area. See the following URL for contact information: http://nikonimaging.com/… -
Page 13: Introduction
Introduction Thank you for your purchase of a Nikon D80 single-lens refl ex (SLR) digital camera with in- terchangeable lenses. This manual has been written to help you enjoy taking pictures with your Nikon digital camera. Read this manual thoroughly before use, and keep it handy when using the product.
-
Page 14: Getting To Know The Camera
Getting to Know the Camera Take a few moments to familiarize yourself with camera controls and displays. You may fi nd it helpful to bookmark this section and refer to it as you read through the rest of the manual. Camera Body Built-in fl…
-
Page 15
Viewfi nder eyepiece … 8 Viewfi nder eyepiece cup … 6, 17, 21 Diopter adjustment control … 17 (AE-L/AF-L) button … 31, 94 DK-5 viewfi nder eyepiece cap … 8 Main command dial … 10, 91 * Multi selector The multi selector is used for menu navigation and to control the display of photo information during playback. -
Page 16: The Mode Dial
The Mode Dial The D80 off ers a choice of the following eleven shooting modes: Advanced Modes (Exposure Modes) Select these modes for full control over camera settings. P — Programmed auto ( shutter speed and aperture, user controls other settings.
-
Page 17
Control Panel Shutter speed … 48, 50 Exposure compensation value … 54 Flash compensation value … 55 ISO sensitivity … 43 White balance fi ne-tuning, or color temperature … 58, 59 Number of shots in bracketing sequence …56, 140 ISO sensitivity indicator … 43 ISO AUTO indicator … -
Page 18
The Viewfi nder Display Framing grid (displayed when On is selected for Custom Setting 8 (Grid display)) … 89 8-mm (0.31 in.) reference circle for center- weighted metering … 52, 90 “No memory card” warning Battery indicator … 19 Black-and-white indicator Focus brackets (focus area) …19, 21, 30 Normal-frame focus brackets (focus area) … -
Page 19: Supplied Accessories
Nikon brand electronic accessories (including lenses, Speedlights, battery chargers, batteries, and AC adapters) certifi ed by Nikon specifi cally for use with this Nikon digital camera are engineered and proven to operate within the operational and safety requirements of this electronic circuitry.
-
Page 20
The Camera Strap Attach the camera strap as shown below. The BM-7 LCD Monitor Cover A clear plastic cover is provided with the camera to keep the moni- tor clean and protect it when the camera is not in use. To attach the cover, insert the projection on the top of the cover into the match- ing indentation above the camera monitor ( ) and press the bot- tom of the cover until it clicks into place ( ). -
Page 21: Using Camera Menus
Using Camera Menus Most shooting, playback, and setup options can be accessed from the camera menus. To view the menus, press the Choose from playback, shoot- ing, Custom Settings, setup, and retouch menus (see below) If “?” icon is displayed, help for the current item can be viewed by pressing button…
-
Page 22
To modify menu settings: Display menus. Select menu. Position cursor in selected menu. Display options. Make selection. Press the shutter-release button halfway to exit the menus and return to shooting mode ( 19, 28). The monitor will turn off . Using the Command Dials The main command dial can be used to move the cursor up and down, the sub-command dial to move the cursor left and right. -
Page 23: First Steps
First Steps Attaching a Lens Care should be taken to prevent dust from entering the camera when the lens is removed. Turn the camera off . Remove the rear cap from the lens. Remove the camera body cap. Keeping the mounting index on the lens aligned with the mounting index on the camera body, position the lens in the camera’s bayonet mount and rotate the lens in the direction shown until it clicks into place.
-
Page 24: Charging And Inserting The Battery
Charging and Inserting the Battery The supplied EN-EL3e battery is not charged at shipment. Charge the battery using the sup- plied MH-18a battery charger as described below. Charge the battery. 1.1 Remove the terminal cover from the battery. 1.2 Connect the power cord to the charger and plug it in. 1.3 Place the battery in the charger.
-
Page 25
Read and follow the warnings and cautions on pages ii–iii and 127–128 of this manual, together with any warnings and instructions provided by the battery manufacturer. Use only EN-EL3e batteries. The D80 is not compatible with the MS-D70 CR2 battery holder or with EN-EL3 or EN-EL3a batteries for D100, D70-series, or D50 cameras. -
Page 26: Basic Setup
Basic Setup The fi rst time the camera is turned on, the language selection dialog shown in Step 1 will be displayed in the monitor. Follow the steps below to choose a language and set the time and date. Turn camera on. Display map of world time zones.
-
Page 27: Inserting Memory Cards
Inserting Memory Cards The camera stores pictures on Secure Digital (SD) memory cards (available separately). Insert a memory card. 1.1 Before inserting or removing memory cards, turn the cam- era off and open the card slot cover. 1.2 Slide the memory card in as shown at right until it clicks into place.
-
Page 28
Memory cards must be formatted the fi rst time they are used in the D80. To format the memory card, turn the camera on and press the fi nder displays fl ash as shown at right. Pressing both buttons together a second time will format the memory card. -
Page 29: Adjusting Viewfi Nder Focus
Adjusting Viewfi nder Focus Photographs are framed in the viewfi nder. Before shooting, make sure that the display in the viewfi nder is in clear focus. Viewfi nder Focus Viewfi nder focus (diopter) can be adjusted in the range –2 – +1 m rately;…
-
Page 30: Tutorial
Tutorial The Tutorial outlines the basics of taking and viewing photographs in Vari-Program modes. This section assumes that default camera settings are used; for infor- mation on restoring default settings, see page 134. Use a CPU Lens (auto) and Digital Vari-Program modes are only available with CPU lenses. If these modes are se- lected when a non-CPU lens is attached, the shutter release will be disabled.
-
Page 31: Point-And-Shoot» Photography ( Mode)
“Point-and-Shoot” Photography ( This section describes how to take photographs in and-shoot” mode in which the majority of settings are controlled by the camera in response to shooting conditions. Turn the camera on. 1.1 Remove the lens cap and turn the camera on. The con- trol panel and viewfi…
-
Page 32
Select mode and choose autofocus. 2.1 Rotate the mode dial to 2.2 Rotate the focus-mode selector to AF (autofocus). Check settings in the control panel. The default settings for Tutorial: “Point-and-Shoot” Photography ( Option Flash sync mode Image quality Image size Shooting mode Autofocus mode AF-area mode… -
Page 33
Frame a photograph in the viewfi nder. The monitor remains off during shooting. 4.1 Hold the camera as shown. Holding the Camera Hold the handgrip in your right hand and cradle the camera body or lens with your left. Keep your elbows propped lightly against your torso for support and place one foot half a pace ahead of the other to keep you upper body stable. -
Page 34
Focus. 5.1 Press the shutter-release button halfway to focus. The cam- era will select the focus area automatically. If the subject is dark, the fl ash may pop up and the AF-assist illuminator may light. 5.2 When the focus operation is complete, the selected focus areas will be briefl y high- lighted, a beep will sound, and the in-focus indicator (●) will appear in the view- fi… -
Page 35
Take the photograph. Smoothly press the shutter-release button the rest of the way down to release the shutter and record the photograph. The ac- cess lamp next to the memory card slot cover will light. Do not eject the memory card or remove or disconnect the power source until the lamp has gone out and recording is complete. -
Page 36: Creative Photography (Digital Vari-Programs)
Creative Photography (Digital Vari-Programs) In addition to , the D80 off ers a choice of six Digital Vari-Program modes. Selecting a program automatically optimizes settings to suit the selected scene, making creative pho- tography as easy as rotating the mode dial.
-
Page 37: Night Portrait
Portrait Use for portraits with soft, natural-looking skin tones. If the subject is far from the background or a telephoto lens is used, background details will be softened to lend the composition a sense of depth. Landscape Use for vivid landscape shots. The built-in fl ash and AF-assist illuminator turn off…
-
Page 38: Basic Playback
Basic Playback Photographs are automatically displayed for about four seconds af- ter shooting. If no photograph is displayed in the monitor, the most recent picture can be viewed by pressing the button. Additional pictures can be displayed by rotating the main command dial or pressing the multi selector left or right.
-
Page 39: Reference
Reference This section builds on the Tutorial to cover more advanced shooting and playback options. More on Photography (All Modes): Shoot a moving subject or focus manually Adjust image quality and size Take photographs in one at a time, in bursts, or using the self-timer or a remote control Use the built-in fl…
-
Page 40: More On Photography (All Modes)
More on Photography (All Modes) More on Photography (All Modes) Focus Focus Focus can be adjusted automatically (see “ Autofocus, ” below) or manually ( 32). The user can also select the focus area for automatic or manual focus ( 30) or use focus lock to focus to recompose photographs after focusing ( 31).
-
Page 41
utofocus Mode The following autofocus modes are available when the focus mode selector is set to AF: Autofocus mode Description Camera automatically selects single-servo autofocus when subject is sta- Auto select AF-A tionary, continuous-servo autofocus when subject is moving. Shutter can (default setting) only be released if camera is able to focus. -
Page 42: Focus Area Selection
Focus Area Selection The D80 off ers a choice of eleven focus areas that together cover a wide area of the frame. At the default settings, the camera chooses the focus area automatically or focuses on subject in the center focus area. The focus area can also be selected manually to compose photo- graphs with the main subject positioned almost anywhere in the frame.
-
Page 43: Focus Lock
Focus Lock Controls used: AE-L/AF-L button (AF-A/AF-C)/Shutter-release button (AF-S) Focus lock can be used to change the composition after focusing, making it possible to fo- cus on a subject that will not be in a focus area in the fi nal composition. It can also be used when the autofocus system is unable to focus ( 29).
-
Page 44: Manual Focus
Manual Focus Manual focus is available for lenses that do not support autofocus (non-AF Nikkor lenses) or when autofocus does not produce the desired results ( 29). To focus manually, set the focus-mode selec- tor to M and adjust the lens focusing ring until the image displayed on the clear matte fi…
-
Page 45: Image Quality And Size
Image Quality and Size Together, image quality and size determine how much space each photograph occupies on the memory card. Larger, higher quality images can be printed at larger sizes but also re- quire more memory, meaning that fewer such images can be stored on the memory card. Image Quality and Size JPEG Fine JPEG Normal…
-
Page 46: Image Quality
Image Quality The camera supports the following image quality options (listed in descending order by im- age quality and fi le size): Option Description Compressed raw data from the image sensor are saved directly to memory card. NEF (RAW) Choose for images that will be processed on a computer. Images are compressed less than JPEG Normal, producing higher-quality images.
-
Page 47: Image Size
Image Size Image size is measured in pixels. The following options are available. Image size Large (3872 × 2592/10.0 M) (default) Medium (2896 × 1944/5.6 M) Small (1936 × 1296/2.5 M) * “dpi” stands for dots per inch, a measure of printer resolution. Images printed at higher resolutions will be smaller, images printed at lower resolutions larger.
-
Page 48: Choosing A Shooting Mode
Choosing a Shooting Mode Choosing a Shooting Mode Shooting mode determines how the camera takes photographs: one at a time, in a continu- ous sequence, with a timed shutter-release delay, or with a remote control. Mode Description Camera takes one photograph each time shutter-release button is pressed. Single frame Access lamp will light while photo is recorded;…
-
Page 49: Self-Timer Mode
Self-Timer Mode The self-timer can be used to reduce camera shake or for self-portraits. Mount the camera on a tripod or place the camera on a stable, level surface. Press the button until Frame the photograph. Before taking a photograph with the fl ash in P, S, A, or M modes 45), press the button to raise the fl…
-
Page 50: Using A Remote Control
Using a Remote Control Use the optional ML-L3 remote control for self-portraits ( remotely. Before Using the Remote Control Before using the remote control for the fi rst time, remove the clear plastic battery insulator sheet. Mount the camera on a tripod or place the camera on a stable, level surface. Press the button to select one of the following modes: Mode…
-
Page 51
Using the Built-in Flash If the fl ash is required, the camera will only respond to the shutter-release button on the ML-L3 once the fl ash has charged. In or quick-response remote mode is selected; once the fl ash is charged, it will pop up automatically if required when the shutter-release button on the ML-L3 is pressed. -
Page 52: Using The Built-In Flash
Using the Built-in Flash The camera supports a variety of fl ash modes for photographing poorly lit or backlit sub- jects. Using the Built-in Flash: Rotate the mode dial to select the desired mode. Press the button and rotate until the desired fl ash mode is displayed in the control panel ( 41).
-
Page 53
Flash Mode The current fl ash mode is displayed in the control panel as shown below. is displayed when the fl ash is off . : Red-eye reduction Use for portraits. Red-eye reduction lamp lights before fl ash fi res, reducing “red-eye. ” : Off Flash does not fi… -
Page 54
The Built-in Flash Use with CPU lenses with focal lengths of 18–300 mm or non-CPU lenses with focal lengths of 18–200 mm ( 118; note that auto fl ash level control is available with CPU lenses only). Remove lens hoods to prevent shadows. Lenses that block the subject’s view of the red-eye reduction lamp may interfere with red-eye reduction. -
Page 55: Iso Sensitivity
ISO Sensitivity ISO Sensitivity “ISO sensitivity” is the digital equivalent of fi lm speed. The higher the ISO sensitivity, the less light needed to make an exposure, allowing higher shutter speeds or smaller apertures. ISO sensitivity can be set between values roughly equivalent to ISO 100 and ISO 1600 in steps equivalent to /…
-
Page 56: Two-Button Reset
Two-Button Reset Two-Button Reset The camera settings listed below can be restored to default values by holding the two seconds (these buttons are marked by a green dot). The con- trol panel turns off briefl y while settings are reset. Custom Settings are not aff…
-
Page 57: P, S, A, And M Modes
P, S, A, and M Modes P, S, A, and M modes off er control over a variety of advanced settings, including exposure ( 52), white balance, and image optimization. Each of these modes off ers a diff erent degree of control over shutter speed and aperture: Mode Description…
-
Page 58
Exposure The exposure (brightness) of photographs is determined by the amount of light that falls on the image sensor (CCD) while the shutter is open. Two factors that determine exposure are shutter speed and aperture. Aperture refers to the size of the opening through which the light passes. The larger the aperture, the greater the amount of light that passes through the opening and the brighter the exposure. -
Page 59: Mode P (Programmed Auto)
Mode P (Programmed Auto) In this mode, the camera automatically adjusts shutter speed and aperture for optimal ex- posure in most situations. This mode is recommended for snapshots and other situations in which you want to leave the camera in charge of shutter speed and aperture. To take photographs in programmed auto: Rotate the mode dial to P.
-
Page 60: Mode S (Shutter-Priority Auto)
Mode S (Shutter-Priority Auto) In shutter-priority auto, you choose the shutter speed from values between 30 s and / s while the camera automatically selects the aperture that will produce the optimal expo- sure. Use slow shutter speeds to suggest motion by blurring moving subjects, high shutter speeds to “freeze”…
-
Page 61: Mode A (Aperture-Priority Auto)
Mode A (Aperture-Priority Auto) In aperture-priority auto, you choose the aperture from values between the minimum and maximum for the lens while the camera automatically selects the shutter speed that will produce the optimal exposure. Small apertures (high f/-numbers) increase depth of fi eld, bringing both the main subject and background into focus.
-
Page 62: Mode M (Manual)
Mode M (Manual) In manual exposure mode, you control both shutter speed and aperture. Shutter speed can be set to values between 30 s and / s, or the shutter can be held open for indefi nitely for longer exposures ( maximum values for the lens.
-
Page 63
Long Time-Exposures Shutter speeds of “bulb” and “—” can be used for long time-exposure photographs of moving lights, the stars, night scenery, or fi reworks. To prevent blurring caused by camera shake, use a tripod and an optional remote control ( Shutter speed Description Shutter remains open while the shutter-release button is held down. -
Page 64: Exposure
Exposure Exposure Metering The metering method determines how the camera sets exposure. The following options are available: Method 3D Color Matrix II Center-weighted Spot To choose a metering method, press the the desired mode is displayed. 12—Center Weight ( This option controls the size of the area assigned the greatest weight in center-weighted metering. The default is 8mm (0.31in.).
-
Page 65: Autoexposure Lock
Autoexposure Lock Use auto exposure lock to recompose photographs after metering exposure: Select mode P, S, or A and choose center-weighted or spot metering (exposure lock has no eff ect in mode M, while center-weighted and spot metering are not available in these modes). If using center- weighted metering, select the center focus area with the multi selector ( Position the subject in the selected focus area and press the shutter-release button halfway.
-
Page 66: Exposure Compensation
Exposure Compensation Exposure compensation is used to alter exposure from the value suggested by the camera, making pictures brighter or darker. It is most eff ective when used with center-weighted or spot metering ( 52). Exposure compensation is available in modes P, S, and A (in mode M, only the exposure information shown in the electronic analog exposure display is aff…
-
Page 67: Flash Exposure Compensation
Flash Exposure Compensation Flash exposure compensation is used to alter fl ash output from the level suggested by the camera, changing the brightness of the main subject relative to the background. Flash out- put can be increased to make the main subject appear brighter, or reduced to prevent un- wanted highlights or refl…
-
Page 68: Bracketing
Bracketing Bracketing automatically varies selected settings slightly with each shot, “bracketing” the current value. The setting aff ected is chosen with Custom Setting 13 (Auto BKT set; Below, it is assumed that AE & fl ash is selected to vary exposure and fl ash level. Other op- tions can be used to vary exposure or fl…
-
Page 69
Compose a photograph, focus, and shoot. The camera will vary exposure and fl ash level with each shot. At default settings, the fi rst shot will be taken at the current values for exposure and fl ash compensation and the following shots at modifi ed values. -
Page 70: White Balance
Use under incandescent lighting. Use under fl uorescent lighting. Use with subjects lit by direct sunlight. Use with built-in fl ash or optional Nikon fl ash units. Use in daylight under overcast skies. Use in daylight with subjects in the shade.
-
Page 71: Choosing A Color Temperature
Choosing a Color Temperature At a setting of (Choose color temp.), color temperature can be selected by pressing the WB button and rotating the sub-command dial until the desired value is displayed in the control panel. Color temperature can also be selected in the shooting menu ( Preset White Balance Preset white balance can be used when the desired results can not be achieved at other set- tings or to match white balance to the value used in an previous photograph.
-
Page 72
Measuring a Value for Preset White Balance Place a neutral gray or white object under the lighting that will be used in the fi nal pho- tograph. A standard gray card can be used as a reference in studio settings. Do not use exposure compensation. -
Page 73: More On Playback
More on Playback Viewing Photographs on the Camera Viewing Photographs on the Camera To play photographs back, press the recent photograph will be displayed in the monitor. Pho- tographs taken in “tall” (portrait) orientation are displayed in tall orientation as shown at right. The following operations can be performed in full-frame playback: View additional photographs…
-
Page 74: Photo Information
Photo Information Photo information is superimposed on images displayed in full-frame playback. Press the multi selector up or down or rotate the sub-command dial to cycle through the following in- formation: Basic Information ↔ Shooting Data Page 1 ↔ Shooting Data Page 2 ↔ Retouch History (retouched copies only) ↔…
-
Page 75: Viewing Multiple Images: Thumbnail Playback
Highlights Highlights are the brightest portions of the image. Details may be lost (“washed out”) in areas of highlights that are over- exposed. Protect status …65 Retouch indicator …109 Image highlights (areas of image that are “washed out”) are indicated by fl ashing border Frame number/total number of images RGB Histogram A histogram is a graph showing the distribution of tones in the…
-
Page 76: Taking A Closer Look: Playback Zoom
Taking a Closer Look: Playback Zoom Press the button to zoom in on a photograph in full-frame play- back. The following operations can be performed: Zoom in and out View other areas of image View other images Cancel zoom Delete photo Protect photo Exit to shooting Shutter button…
-
Page 77: Protecting Photographs From Deletion
Protecting Photographs from Deletion In full-frame, zoom, and thumbnail playback, the graphs from accidental deletion. Protected fi les can not be deleted using the the Delete option in the playback menu, and have DOS “read-only” status when viewed on a Windows computer. Note that protected fi les will be deleted when the memory card is formatted ( 102).
-
Page 78: Connecting To A Tv, Computer, Or Printer
Connecting to a TV, Computer, or Printer Viewing Photographs on TV The supplied EG-D2 audio/video (A/V) cable can be used to connect the camera to a televi- sion or VCR for playback or recording. Background music included with Pictmotion slide shows ( 75) will be played back over the television speakers.
-
Page 79: Connecting To A Computer
Connecting to a Computer The camera can be connected to a computer using the supplied UC-E4 USB cable. The sup- plied PictureProject software can then be used to copy photographs to the computer, where they can be organized, retouched, and printed. Before Connecting the Camera Install PictureProject or any other software you may need after fi…
-
Page 80
Click the “Unplug or Eject Hardware” icon in the taskbar ( ) and select Stop USB Mass Storage Device. Mac OS X Drag the camera volume (“NIKON D80”) into the Trash. During Transfer Do not turn the camera off or disconnect the USB cable while transfer is in progress. -
Page 81: Printing Photographs
Printing Photographs Photographs can be printed by any of the following methods: • Connect the camera to a printer and print JPEG photographs directly from the camera (see below). • Insert the camera memory card in a printer equipped with a card slot (see the printer man- ual for details).
-
Page 82
Connecting the Printer Before printing, check that the camera battery is fully charged. If in doubt, charge the bat- tery or use an EH-5 AC adapter (available separately). Set the camera USB option to PTP ( Turn the printer on. Turn the camera off… -
Page 83
Printing Pictures One at a Time To print the picture currently selected in the PictBridge playback display, press OK. The menu shown at right will be displayed. Press the multi selector up or down to highlight an option and press to the right to select. -
Page 84
Printing Multiple Pictures To print multiple pictures or create an index print listing all JPEG photographs as small thumbnail images, press the PictBridge playback display. The menu shown at right will be dis- played. Press the multi selector up or down to highlight an option and press to the right to select. -
Page 85
Creating a DPOF Print Order: Print Set The Print Set option in the playback menu is used to create digital “print orders” for PictBridge-compatible printers and devices that support DPOF. Selecting Print Set from the playback menu displays the menu shown in Step 1. Highlight Select / Set. -
Page 86: Menu Guide
Menu Guide Playback Options: The Playback Menu Playback Options: The Playback Menu The playback menu contains the following options (options displayed may diff er if My menu is selected for the CSM/Setup menu option in the setup menu; 101). See “Using Camera Menus” ( information on using the menus.
-
Page 87: Playback Folder
Playback Folder Choose a folder for playback: Option Description Only photos in the folder currently selected for Folders in the shoot- ing menu are displayed during playback. This option is selected Current automatically when a photo is taken. If a memory card is inserted (default) and this option selected before photos have been taken, a message stating that the folder contains no images will be displayed during…
-
Page 88
Choose a style Highlight Change settings and press the multi selector right, then highlight Style and press the multi selector right. Highlight one of the following options and press OK to select the highlighted option and return to the slide show menu. •Standard: Pictures are played back at a selected interval, without background music, transitions, or other eff… -
Page 89
Start the show To start the slide show, highlight Start and press OK. The following operations can be performed during a slide show: Go forward or back one frame View photo info Pause slide show Exit to playback menu Exit to playback mode Exit to shooting Shutter… -
Page 90: Hide Image
Hide Image Hide or reveal selected photographs. Hidden images are visible only in the Hide Image menu, and can only be deleted by formatting the memory card. Option Description Select/set Hide or reveal selected photographs ( Deselect all? Reveal all photographs. File Attributes for Hidden Images Hidden images have “hidden”…
-
Page 91: Shooting Options: The Shooting Menu
Shooting Options: The Shooting Menu Shooting Options: The Shooting Menu The shooting menu contains the following options (options displayed may diff er if My menu is selected for the CSM/Setup option in the setup menu; 101). See “Using Camera Menus” ( mation on using the menus.
-
Page 92
Customizing Image Enhancement Options: Custom Select Custom to make separate adjustments to the following options. After adjusting set- tings, highlight Done and press • Image sharpening: Choose how much outlines are sharpened during shooting. Choose high settings for sharp outlines, low settings for softer outlines. -
Page 93: Image Quality (All Modes)
Taking Pictures in Black-and-White: Black-and-White Selecting Black-and-white for Optimize image displays the menu shown at right. Choose Normal to take standard black-and-white pic- tures, or Custom to adjust sharpening and tone compensation before shooting as described in on page 80. Custom also supports the follow- ing color fi…
-
Page 94: White Balance (P, S, A, And M Modes)
‡ Images displayed may include those created with other cameras, but only photographs created with D80 can be used as source for preset white balance. Note that if a new value is measured for white balance, white balance will be set to the mea- sured value even if Use photo is currently selected in the preset white balance menu.
-
Page 95: Iso Sensitivity (All Modes)
ISO Sensitivity (All Modes) Adjust ISO sensitivity. See “Reference: ISO Sensitivity” ( Long Exp. NR (All Modes) Photographs taken at shutter speeds of 8 s or slower can be processed to reduce “noise” in the form of randomly-spaced, brightly-colored pix- els.
-
Page 96: Multiple Exposure (P, S, A, And M Modes)
Multiple Exposure (P, S, A, and M Modes) Follow the steps below to record a series of two or three exposures in a single photograph. Note that at default settings, shooting will end automatically if no operations are performed for 30 s. For an interval between exposures of more than 30 s, choose 30 min for Custom Set- ting 28 (Auto meter-off…
-
Page 97
Highlight Done and press OK. icon will be displayed in the control panel. To exit without re- cording a multiple exposure, select Multiple exposure from the shooting menu, highlight Reset, and press OK. Frame a photograph, focus, and shoot. The blink. -
Page 98: Custom Settings
27 Monitor-off 28 Auto meter-off 29 Self-timer 30 Remote on duration 31 Exp. delay mode 32 MB-D80 batteries 44). See the 37, 38), or when a photograph is 38). The beep will not sound when it is off ( 95–97…
-
Page 99: 2: Af-Area Mode (All Modes)
2: AF-Area Mode (All Modes) This option determines how the focus area is selected in autofocus mode ( 28). Choose from: Option Description User selects focus area using multi selector; camera focuses on subject in selected Single area focus area only. Use with stationary subjects. Default setting for P, S, A, M, and modes.
-
Page 100: 5: No Memory Card? (All Modes)
5: No Memory Card? (All Modes) If Release locked (the default setting) is selected, the shutter-release is disabled when no memory card is inserted. Choose Enable release to enable the shutter-release button when no memory card is inserted. Photographs will be displayed in the monitor but will not be saved. 6: Image Review (All Modes) If On (the default setting) is selected, photographs will automatically be displayed in the monitor for about for seconds after shooting.
-
Page 101: 8: Grid Display (All Modes)
8: Grid Display (All Modes) Select On to display grid lines in the viewfi nder to assist in framing pho- tographs ( 6). The default option is Off . 9: Viewfi nder Warning (All Modes) Select On (the default option) to display the following warnings in the viewfi…
-
Page 102: 12: Center-Weighted (P, S, A, And M Modes Only)
12: Center-Weighted (P, S, A, and M Modes Only) This option controls the size of the area in the center of the viewfi nder assigned the greatest weight in center-weighted metering. The default option is Φ 8 mm. 13: Auto BKT Set (P, S, A, and M Modes Only) The following options are available: Option Description…
-
Page 103: 14: Auto Bkt Order (P, S, A, And M Modes Only)
Compose a photograph, focus, and shoot. Each shot will be pro- cessed to create the number of copies specifi ed in the bracketing program, and each copy will have a diff erent white balance. Modi- fi cations to white balance are added to the white balance adjust- ment made with white balance fi…
-
Page 104: 16: Func Button (All Modes)
16: FUNC Button (All Modes) Choose the function performed by the FUNC. button. Option Description ISO display The modifi ed value for ISO sensitivity is displayed while the FUNC. button is pressed. (default) Press the FUNC. button and rotate the main command dial to turn the grid display in Framing grid the viewfi…
-
Page 105: 17: Illumination (All Modes)
Position the subject in the center of the frame and press the shut- ter-release button halfway to focus. Check that the fl ash-ready in- dicator ( ) is displayed in the viewfi nder. Press the FUNC. button. The fl ash will emit a monitor prefl ash to determine the appropriate fl…
-
Page 106: 18: Ae-L/Af-L (All Modes)
18: AE-L/AF-L (All Modes) Choose the function performed by the AE-L/AF-L button. Option Description AE/AF lock Both focus and exposure lock while the AE-L/AF-L button is pressed. (default) AE lock only Exposure locks while the AE-L/AF-L button is pressed. Focus is unaff ected. AF lock Focus locks while the AE-L/AF-L button is pressed.
-
Page 107: 21: Af Area Illumination (All Modes)
21: AF Area Illumination (All Modes) At the default setting of Auto, the active focus area is highlighted in the viewfi nder as need to establish contrast with the background. If Off is selected, the focus area is not highlighted. If On is selected, the focus area will always be highlighted, although it may be diffi…
-
Page 108
Commander mode: Use the built-in fl ash as a master fl ash controlling one or more remote optional SB-800, SB-600, or SB-R200 fl ash units in up to two groups (A and B) using advanced wireless lighting. Selecting this option displays the menu shown at right. Press the multi selector up or down to highlight the following options, up or down to change. -
Page 109
Press OK. Compose the shot and arrange the fl ash units as shown below. Note that the maxi- mum distance at which the remote fl ash units can be placed may vary with shooting conditions. 10 m/33 ft. or less 30°… -
Page 110: 23: Flash Warning (P, S, A, And M Modes Only)
23: Flash Warning (P, S, A, and M Modes Only) If On (the default setting) is selected and lighting is poor, the fl ash- ready light ( ) will fl icker in the viewfi nder when the shutter-release button is pressed halfway to warn that the built-in fl ash is required. No warning will be displayed if Off…
-
Page 111: 28: Auto Meter-Off (All Modes)
28: Auto Meter-Off (All Modes) Choose how long the camera continues to meter exposure when no operations are performed (the default setting is 6 s). Choose a shorter meter-off delay for longer battery life. Regardless of the setting chosen, the exposure meters remain on for ten minutes when the camera is powered by an optional EH-5 AC adapter.
-
Page 112: 32: Mb-D80 Batteries (All Modes)
32: MB-D80 Batteries (All Modes) To ensure that the camera functions as expected when AA batteries are used in the optional MB-D80 battery pack, match the option selected in this menu to the type of batteries inserted in the battery pack. There is no need to adjust this option when using EN-EL3e batteries.
-
Page 113: Basic Camera Settings: The Setup Menu
Firmware version Auto image rotation * Not available at battery levels of or when camera is powered by optional MB- D80 battery pack with AA batteries. 86) and Menu Guide / Basic Camera Settings: The Setup Menu 106–107 or below…
-
Page 114: Format Memory Card
Press the multi selector up or down to highlight items and then press to the right to select or deselect. Selected items are indi- cated by a check mark. Highlight Done and press OK to return to the list of menu names shown in Step 1.
-
Page 115: World Time
World Time Set the camera clock to the current date and time. Option Description Choose the time zone. The camera clock will automatically be Time zone reset to the time in the selected zone. Set the camera clock ( Date curate time keeping.
-
Page 116: Usb
Choose a USB option for connection to a computer or PictBridge print- er. Choose PTP when connecting to a PictBridge printer or using Cam- era Control Pro (available separately). See “Connecting to a Computer” for information on selecting a USB option for use with PictureProject 67).
-
Page 117: Folders
(e.g., 101NCD80). The camera treats folders with the same name but diff erent folder numbers as the same folder. For example, if the folder NIKON is selected for Select folder, photographs in all folders named NIKON (100NIKON, 101NIKON, 102NIKON, etc.) will be visible when Current is selected for Playback folder (…
-
Page 118: File No. Sequence
File No. Sequence Choose how the camera names fi les. • Off (default): File numbering is reset to 0001 when a new folder is creat- ed, the memory card is formatted, or a new memory card is inserted. • On: File numbering continues from the last number used after a new folder is created, the memory card is formatted, or a new memory card is inserted.
-
Page 119: Battery Info
View information on the EN-EL3e rechargeable Li-ion battery currently inserted in the camera. (If the camera is powered by an optional MB- D80 battery pack containing EN-EL3e batteries, information for each battery will be listed separately. Battery info can not be displayed when MB-D80 is used with AA batteries).
-
Page 120: Firmware Version
Firmware Version View the current camera fi rmware version. Auto Image Rotation Photographs taken while On (the default option) is selected contain information on camera orientation, allowing them to be rotated auto- matically during playback ( 61) or when viewed in Capture NX (avail- able separately;…
-
Page 121: Creating Retouched Copies: The Retouch Menu
Creating Retouched Copies: The Retouch Menu Creating Retouched Copies: The Retouch Menu The options in the retouch menu are used to create trimmed, resized, or retouched copies of the photographs on the memory card. The follow- ing options are available (options displayed may diff er if My menu is selected for the CSM/Setup option in the setup menu;…
-
Page 122: D-Lighting
To copy photos from the retouch menu: Highlight menu item. Highlight photo. * Photos can also be highlighted using command dials: main command dial moves cursor horizontally, sub-command dial moves cursor vertically. To view selected picture full frame, press and hold button.
-
Page 123: Red-Eye Correction
Red-Eye Correction Selecting this option displays a preview image as shown below. Confi rm the eff ects of red- eye correction and create a corrected copy as described in the following table. Note that red-eye correction may not always produce the expected results and may in very rare cir- cumstances be applied to portions of the image that are not aff…
-
Page 124: Monochrome
Monochrome Choose from Black-and-white, Sepia, and Cyanotype (blue and white monochrome). Selecting Sepia or Cyanotype displays a preview of the selected im- age; press the multi selector up to increase color saturation, down to decrease. Press OK to create a monochrome copy and return to the retouch menu or full-frame playback.
-
Page 125
Selecting Small picture from the retouch menu displays the menu shown in Step 1. Follow the steps below to create small copies of multiple pictures. Highlight Choose size. Highlight desired picture size. Highlight Select picture. Select pictures ( 74). Selected pictures are marked with Highlight Yes. -
Page 126: Image Overlay
Image Overlay Image overlay combines two existing RAW photographs to create a single picture that is saved separately from the originals. The new picture is saved at current image quality and size settings; before creating an overlay, set image quality and size ( 33; all options are avail- able).
-
Page 127
61) with the new picture displayed in the monitor. Image Overlay Only RAW photographs created with the D80 can be selected for image overlay. Other images are not displayed on the selection screen. Hidden images are also not displayed on the selection screen and can not be selected. -
Page 128: Technical Notes
10-pin remote terminal Use Only Nikon Brand Electronic Accessories Only Nikon brand accessories certifi ed by Nikon specifi cally for use with your Nikon digital camera are engineered and proven to operate within its operational and safety requirements. T ACCESSORIES COULD DAMAGE YOUR CAMERA AND MAY VOID YOUR NIKON WARRANTY…
-
Page 129: Lenses
CPU contacts, type G and D lenses by a letter on the lens barrel. Type G lenses are not equipped with a lens aperture ring. CPU lens The following CPU lenses can be used with the D80. IX Nikkor CPU lenses can not be used. Camera setting Lens/accessory Type G or D AF Nikkor ;…
-
Page 130
Incompatible Non-CPU Lenses and Accessories The following non-CPU lenses and accessories can • TC-16A AF Teleconverter • Non-AI lenses • Lenses that require the AU-1 focusing unit (400 mm f/4.5, 600 mm f/5.6, 800 mm f/8, 1200 mm f/11) • Fisheye (6 mm f/5.6, 8 mm f/8, OP 10 mm f/5.6) •… -
Page 131: Optional Flash Units (Speedlights)
Auto FP High-Speed Sync (synchronizes the fl ash and shutter at high shutter speeds). With the built-in fl ash in commander mode, the D80 can be used to control remote SB-800, SB-600, and SB-R200 fl ash units. See the Speedlight manual for details.
-
Page 132
SB-21B , SB-29s ✔ ✔ ✔ ✔ 2. When mounted on D80, fl ash mode is automatically set to TTL and shut- ter release is disabled. Set Speedlight to A (non-TTL auto) mode. Advanced Wireless Lighting Commander Remote SB-800 SB-600 SB-R200 ✔… -
Page 133
Refer to the Speedlight manual for detailed instructions. If the Speedlight supports the Creative Light- ing System, refer to the section on CLS-compatible digital SLR cameras. The D80 is not included in the “digital SLR” category in the SB-80DX, SB-28DX, and SB-50DX manuals. -
Page 134: Other Accessories
• Nikon fi lters can be divided into three types: screw-in, slip-in, and rear-interchange. Use Nikon fi lters; other fi lters may interfere with autofocus or electronic range fi nding. • The D80 can not be used with linear polarizing fi lters. Use the C-PL circular polarizing fi lter instead.
-
Page 135
Accessories for the D80 At the time of writing, the following accessories were available for the D80. Up to date infor- mation is available at Nikon websites or from our latest product catalogs. • EN-EL3e rechargeable Li-ion battery: Additional EN-EL3e batteries are available from local retailers and Nikon service representatives. -
Page 136: Caring For The Camera
Caring for the Camera Storage When the camera will not be used for an extended period, turn the camera off , replace the monitor cover, remove the battery, and store the battery in a cool, dry area with the terminal cover in place.
-
Page 137
If you suspect that dirt or dust on the fi lter is appearing in photographs, you can clean the fi lter as described below. Note, however, that the fi lter is extremely delicate and easily damaged. Nikon recommends that the fi lter be cleaned only by Nikon-authorized service personnel. -
Page 138
Nikon takes every possible precaution to prevent foreign matter from coming into contact with the low-pass fi lter during production and shipping. The D80, however, is designed to be used with inter- changeable lenses, and foreign matter may enter the camera when lenses are removed or exchanged. -
Page 139: Caring For The Camera And Battery: Cautions
Caring for the Camera and Battery: Cautions Do not dr op: The product may malfunction if subjected to strong shocks or vibration. Keep dry: This product is not waterproof, and may malfunc- tion if immersed in water or exposed to high levels of hu- midity.
-
Page 140
Batteries: Dirt on the battery terminals can prevent the camera from functioning and should be removed with a soft, dry cloth before use. Batteries may leak or explode if improperly handled. Observe the following precautions when handling batteries: • Turn the product off before replacing the battery. •… -
Page 141: Troubleshooting
Troubleshooting If the camera fails to function as expected, check the list of common problems below before consulting your retailer or Nikon representative. Refer to the page numbers in the right- most column for more information. Problem Camera takes time to turn on.
-
Page 142
Problem Full range of shutter speeds not available. Can not select focus area. Focus does not lock when shutter- release button is pressed halfway. Image in viewfi nder is not in focus. AF-assist illuminator does not light. Shutter release is disabled. No photo taken when remote control shutter-release button is pressed. -
Page 143
Problem Final photo is larger than area shown in viewfi nder. Randomly-spaced bright pixels (“noise”) appears in photographs. Reddish areas appear in photos. Photos are blotched or smeared. Colors are unnatural Flashing areas appear in images Shooting data appear on images A graph appears during playback RAW image is not played back. -
Page 144: Camera Error Messages And Displays
Change fl ash control mode for op- tional Speedlight. Change shutter speed or select mode M. Press shutter-release button again. If error persists, consult with Nikon- authorized service representative. 7, 117 12, 123 65, 74 22, 32…
-
Page 145
• Delete unwanted fi les or in- folder. sert new memory card. Memory card has not been Highlight Format and press formatted for use in D80. OK to format memory card. • Memory card is empty. • Insert another card. • Current folder is empty. -
Page 146: Appendix
• DPOF: Digital Print Order Format (DPOF) is an industry-wide standard that allows pictures to be printed from print orders stored on the memory card. • Exif version 2.21: The D80 supports Exif (Exchangeable Image File Format for Digital Still Cameras) version 2.21, a standard in which information stored with photographs is used for optimal color reproduction when the images are output on Exif-compliant printers.
-
Page 147
1: Beep 2: AF-area mode 3: Center AF area 4: Built-in AF assist illuminator 5: No memory card? 6: Image review 7: ISO auto 8: Grid display 9: Viewfi nder warning 10: EV step 11: Exposure comp. 12: Center-weighted 13: Auto BKT set 14: Auto BKT order 15: Command dials 16: FUNC button… -
Page 148
The following defaults are restored when a two-button reset is performed: Image quality Image size White balance Fine tuning Choose color temp. ISO sensitivity Multiple exposure Shooting mode Focus area Focus lock AE lock hold Autofocus mode Metering Flexible program Exposure compensation Bracketing… -
Page 149
27: Monitor off 28: Auto meter off 29: Self timer 30: Remote 31: Exposure delay mode 32: MB-D80 batteries 1. Max. sensitivity set to 800, Min. shutter speed set to 1/30. Auto-area AF Single Dynamic Auto-area AF Normal frame —… -
Page 150
Memory Card Capacity and Image Quality / Size The following table shows the approximate number of pictures that can be stored on a 1 GB Panasonic Pro HIGH SPEED card at diff erent image quality and size settings. Image quality NEF + JPEG Fine NEF + JPEG Normal NEF + JPEG Basic… -
Page 151
Exposure Program (Mode P) The exposure program for mode P is shown in the following graph. F (lens focal length) ≤ 55 mm 135 mm ≥ F > 55 mm F > 135 mm The maximum and minimum values for EV vary with ISO sensitivity; the above graph as- sumes an ISO sensitivity of ISO 200 equivalent. -
Page 152
Bracketing Programs The number of shots and bracketing increment are shown in the control panel as follows: Number of frames The Bracketing Progress Indicator and Number of Frames Number of frames Order when Under > MTR > over is selected for Custom Setting 14 (Auto BKT order) is negative, unmodifi… -
Page 153
Flash Control ( 42, 120) The following types of fl ash control are supported when a CPU lens is sued in combination with the built-in fl ash or optional SB-800 or SB-600 Speedlights. • i-TTL Balanced Fill-Flash for Digital SLR: Flash output is adjusted for a natural balance between the main subject and the background. -
Page 154: Specifi Cations
Compliant with Design Rule for Camera File System (DCF) 2.0 and Digital Print Order Format (DPOF) Compression • NEF (RAW): compressed 12-bit Autofocus TTL phase detection by Nikon Multi-CAM 1000 autofocus sensor module Detection range –1.0 to +19 EV (ISO 100 at 20 °C/68 °F) AF-area mode Single-area AF, dynamic-area AF, auto-area AF…
-
Page 155
28, 27, or 22s is fully charged; blinks for about 3 s after fl ash is fi red at full output Accessory shoe Standard ISO hot-shoe contact with safety lock Nikon Creative Lighting With SB-800, 600, and R200, supports Advanced Wireless Lighting (SB-600 and R200 only System support AWL when used as remote fl… -
Page 156: Specifi Cations
Nikon reserves the right to change the specifi cations of the hardware and software described in this manual at any time and without prior notice. Nikon will not be held liable for damages that may result from any mistakes that this manual may contain.
-
Page 157
18–135 mm f/3.5–5.6G ED-IF AF-S DX Zoom-Nikkor Lens (Available Separately) Type G-type AF-S DX Zoom-Nikkor lens with built-in CPU and Nikon mount Supported cameras Nikon DX format digital cameras Focal length 18 – 135 mm Max. aperture 1 : 3.5 – 5.6… -
Page 158
Battery Life The number of shots that can be taken with a fully-charged EN-EL3e battery (1500 mAh) varies with the condition of the battery, temperature, and how the camera is used. The following measurements were performed at a temperature of 20 °C (68 °F). Example 1: 2,700 shots AF-S DX IF ED 18–135 mm f/3.5–5.6G lens;… -
Page 159: Index
BASIC. See Image quality (night portrait mode), Battery, 7, 12–13, 19, 123, 127. 24–25 See also Battery info; Clock, (portrait mode), 24–25 battery; MB-D80 (remote control indicator), EN-EL3e, 7, 12–13, 123 38–39 inserting, 12–13 (self timer indicator), 37 life, 146 (sports mode), 24–25…
-
Page 160
M. See Image size non-CPU M. See Manual mode NORMAL. See Image quality Manual mode, 45, 50–51 NTSC. See Video mode MB-D80, 100, 107, 123 Number of exposures remain- ing, 5, 16, 19, 91 Off (Flash mode), 41 Optimize image (shooting menu), 79–81 Options. -
Page 161
Rotating photographs, 75, 108 Mass storage, 67–68, 70, PTP, 67–68, 70, 104 S. See Image size USB (setup menu), 104 S. See Shutter-priority auto (single-frame shooting indicator), 36 Video device, 66 Saturation, 80 Video mode (setup menu), SD. See Memory card Secure Digital.
инструкцияNikon D80

2U
¢»ÊËÀÔÀÈ» ÊÀËÀÊÀÒ»ÍÅ» à ½ÉÌÊËÉýÀ¿ÀÈÃÀ ¿»ÈÈÉ¾É ËÎÅɽɿÌͽ» à À¾É
Ò»ÌÍÀÄ Â» ÃÌÅÆÙÒÀÈÃÀÇ ÑÃÍÃËɽ»ÈÃÚ ½ ÅËÃÍÃÒÀÌÅÃÐ ÌÍ»Í×ÚРà ɼÂÉË»Ð
¼ÀÂÊÃÌ×ÇÀÈÈɾÉË»ÂËÀÓÀÈÃÚ.)+/.#/20/2!4)/.
2U
̱£¯«©©¤¯©©¥§«©¤
«ÎÅɽɿÌͽÉÉÍ.IKONÊÉÑÃÏËɽÉÄ
ÏÉÍɾ˻ÏÃÃ
©ÍÊÀһͻÈɽ½ËÉÊÀ
3″,$
-«!$
%52
Посмотреть инструкция для Nikon D80 бесплатно. Руководство относится к категории фотокамеры, 8 человек(а) дали ему среднюю оценку 8.6. Руководство доступно на следующих языках: русский. У вас есть вопрос о Nikon D80 или вам нужна помощь? Задайте свой вопрос здесь
- Содержание этого руководства
- Меры безопасности
- Уведомления
- Оглавление
- Вопросыиответы
- Введение
- Руководство
- Справочник
- Сведения о параметрах меню
- Технические примечания
Фотоаппарат Nikon D80 имеет ЖК-экран с размером 2,5 дюйма и разрешением 230 000 пикселей. Его матрица типа CCD составляет около 10,2 мегапикселя. Устройство также оснащено встроенной вспышкой и диагональю дисплея 2,5 дюйма. Есть также разъем DC-in и он весит 585 грамм. Размеры камеры составляют 132 миллиметра в ширину, 103 миллиметра в высоту и 77 миллиметров в глубину.
Этот фотоаппарат Nikon D80 предлагает пользователям возможность снимать качественные фотографии благодаря его матрице типа CCD и разрешению около 10,2 мегапикселя. Благодаря ЖК-экрану диагональю 2,5 дюйма вы сможете просматривать свои фотографии и настраивать параметры съемки. Камера оснащена встроенной вспышкой для съемки в условиях низкой освещенности.
Nikon D80 также обладает разъемом DC-in, что облегчает подключение камеры к источнику питания. Его вес составляет 585 грамм, что делает его достаточно портативным и удобным для переноски с места на место.
С общими размерами 132 миллиметра в ширину, 103 миллиметра в высоту и 77 миллиметров в глубину, фотоаппарат Nikon D80 довольно компактен. Это позволяет легко использовать его в различных условиях съемки без необходимости таскать с собой громоздкое оборудование.
Никон D80 представляет собой надежное и качественное фотоаппарат, который может быть идеальным выбором для тех, кто ищет компактное устройство с высоким разрешением для съемки качественных фотографий. Он предлагает широкий спектр функций и возможностей для создания профессиональных снимков.
Главная
| Nikon | |
| D80 | VBA140AE | |
| фото камера | |
| 0018208911691 | |
| русский | |
| Руководство пользователя (PDF), Краткое руководство пользователя (PDF) |
Экран
| Дисплей | ЖК |
| Диагональ экрана | 2.5 « |
| Разрешение дисплея (числовое) | 230000 пикселей |
| Поворотный ЖК дисплей | Нет |
| Сенсорный экран | Нет |
| Поле зрения | 170 % |
Качество изображения
| Мегапиксели | 10.2 MP |
| Тип сенсора | CCD |
| Тип камеры | Однообъективный зеркальный фотоаппарат без объектива |
| Размер сенсора изображения | — « |
| Максимальное разрешение изображения | 3872 x 2592 пикселей |
| Стабилизатор изображения | Нет |
| Разрешение фотоснимков | L (3872 x 2592)\nM (2896 x 1944)\nS (1936 x 1296) |
| Поддерживаемые форматы изображения | EXIF, NEF, RAW |
| Формат сенсора | DX |
| Размер сенсора (Ш х В) | 23.6 x 15.8 mm |
| Всего мегапикселей | 10.75 MP |
Объектив
| Цифровой зум | — x |
| Фокусное расстояние | 27 — 202.5 mm |
| Оптическое увеличение | — x |
| Интерфейс крепления объектива | Nikon F |
| Тип крепления | Байонет |
Прочие свойства
| Встроенная вспышка | Да |
| Цифровая зеркальная камера | Да |
| Тип источника питания | Аккумулятор |
Порты и интерфейсы
| Гнездо входа постоянного тока (DC) | Да |
| PictBridge | — |
| Версия USB | 2.0 |
| HDMI | Нет |
| USB коннектор | Mini-USB B |
| USB порт | Да |
Дизайн
Вес и размеры
| Вес | 585 g |
| Ширина | 132 mm |
| Высота | 103 mm |
| Глубина | 77 mm |
Батарея
| Тип батареек | EN-EL3e |
| Технология батареи | Литий-ионная (Li-Ion) |
| Число поддерживаемых батарей | 1 |
Вспышка
| Режимы вспышки | Red-eye reduction, Second curtain synchro, Slow synchronization |
| Диапазон вспышки (широкоуг.) | — m |
| Диапазон вспышки (теле) | — m |
| Синхронизация скорости вспышки | 0.005 s |
| Коррекция экспозиции вспышки | -3EV — +1EV (1/3 EV step) |
| Компенсация экспозиции вспышки | Да |
| Башмак | Да |
Память
| Совместимые карты памяти | SD, SDHC |
Камера
| Сюжетные режимы | Close-up (macro), Night landscape, Night portrait, Portrait, Sports, Landscape (scenery) |
| Баланс белого | Auto, Fine, Flash, Fluorescent, Incandescent, Shade, Sunny |
| Фотоэффекты | Black&White, Sepia, Vivid |
| Задержка автоcпуска | 2, 3,5, 10, 12, 20 s |
| Гистограмма | — |
| GPS (спутниковый) | Нет |
| Режимы съемки | Aperture priority, Auto, Manual, Program, Shutter priority |
| Диапазон изменения диоптрий (D-D) | -2 — 1 |
| Режимы воспроизведения | Single image, Thumbnails |
| Редактирование изображения | Resizing, Rotating, Trimming |
| Поддержка языков | CHI (SIMPL), CHI (TR), DEU, DUT, ENG, FIN, FRE, ITA, JPN, KOR, POL, POR, RUS, SWE |
| Поддерживается монтаж на штатив | Да |
| Удаление выходного зрачка | 19.5 mm |
Фокус
| Режимы автофокусировки | Multi Point Auto Focus, Servo Auto Focus, Single Auto Focus |
| Фокусировка | Автофокус/Ручной |
| Фокус | TTL |
| Точки автофокусировки | 11 |
| Выбор точек для автофокуса (АФ) | Авто |
Экспозиция
| Чувствительность по ISO | 100,1600 |
| Режимы световой экспозиции | Aperture priority AE, Auto, Manual, Shutter priority AE |
| Коррекция световой экспозиции | ± 2EV (1/3EV step) |
| Экспонометр | Centre-weighted, Matrix, Spot |
| ISO чувствительность (мин) | 100 |
| ISO чувствительность (макс) | 1600 |
Затвор
| Наивысшая скорость выдержки камеры | 1/4000 s |
| Самая низкая скорость выдержки камеры | 30 s |
| Тип затвора камеры | Электронный |
Содержимое упаковки
| Наручный ремешок | Да |
| Батарейки в комплекте | Да |
| Поставляемые кабели | AV, USB |
| Зарядное устройство включено | Да |
| Крышка объектива в комплекте | Да |
Видео
| Запись видео | — |
| Максимальное разрешение видео | — пикселей |
| Тип HD | Не поддерживается |
| Система аналогового формата сигнала | NTSC, PAL |
Аудио
Видоискатель
| Тип видоискателя | Оптический |
| Увеличение | 0.95 x |
Технические характеристики
показать больше
Не можете найти ответ на свой вопрос в руководстве? Вы можете найти ответ на свой вопрос ниже, в разделе часто задаваемых вопросов о Nikon D80.
Какой вес Nikon D80?
Nikon D80 имеет вес 585 g.
Какой размер экрана Nikon D80?
Размер экрана Nikon D80 составляет 2.5 «.
Какая высота Nikon D80?
Nikon D80 имеет высоту 103 mm.
Какая ширина Nikon D80?
Nikon D80 имеет ширину 132 mm.
Какая толщина Nikon D80?
Nikon D80 имеет толщину 77 mm.
Инструкция Nikon D80 доступно в русский?
Да, руководствоNikon D80 доступно врусский .
Не нашли свой вопрос? Задайте свой вопрос здесь