NewlineTT-7519RS/RU – это первыеинтерактивные панели Newline, произведенные в Российской Федерации.
Сочетание уникальных технологий, широкого функционала, современного «железа» и продвинутого программного обеспечения, делают их универсальными, а очень доступная цена позволяет использовать новинки в самых различных организациях и условиях.
4К-дисплей
Все дисплеи NewlineTT-7519RS/RUоборудуются самыми современными ЖК-матрицами с разрешением 3840х2160 точек, высокой яркостью и контрастностью, что гарантирует максимальное качество изображения в любых условиях и сценариях использования. А автоматическая коррекция яркости и фильтр свечения синего цвета на уровне «железа» гарантируют сохранность зрения пользователей.
При этом, будучи уверенным в качестве матриц, установленных в дисплеи Newline, производитель распространяет на них политику нулевого количества битых пикселей – найдете хотя бы один битый пиксель – это гарантийный случай.
Распознавание объектов
Панели серии RS, как и все современные панели Newline распознают палец, как инструмент касания, стилус/простой карандаш/шариковую ручку – как инструмент написания, а ладонь или кулак – как стерку. Таким образом взаимодействие с панелью и контентом на ней не отличается от нашей повседневной жизни, где мы привыкли писать ручкой, взаимодействовать с планшетами/смартфонами пальцем, а стирать с доски тряпкой или стёркой.
Разъем IntelOPS
Все панели Newlineоборудованы стандартным разъемом IntelOPS 80 pin. Данный разъем используется для установки опционального или комплектного встраиваемого компьютера на базе обычного процессора, памяти и SSD-диска с полноценной ОСна борту, что превращает интерактивный дисплей Newlineв моноблок, в который может быть установлено любое привычное пользователю приложение, от образовательных программ до сложных систем просмотра и редактирования 3D-моделей.
Встроенное «железо» и ПО
Большинство интерактивных панелей Newline, в том числе и серия RSимеют встроенную операционную систему Android 8.0 и современную «начинку». Благодаря этому, уже «из коробки» они являются вполне самодостаточными устройствами, с которыми можно работать, просто воткнув их в розетку и не подключая дополнительных источников сигнала. А встроенное программное обеспечение и возможность установки стороннего ПО, позволяет расширить их функционал практически до бесконечности.
Встроенная «белая доска»
Привыкли работать на маркерной доске или флипчарте? Тогда встроенная «белая доска» — это то, что вам надо и даже больше. Меняйте фон, делайте записи (которые, если что, стираются ладонью как на доске), вставляйте изображения и фигуры, сохраняйте результаты в виде изображения или РЕДАКТИРУЕМОГО файла .iwb во встроенную память, на флешку или сетевой диск, либо же сразу отправляйте их по почте всем заинтересованным лицам. Никаких блокнотов, фотоаппаратов и других устройств. Всё встроено!
ВстроенныйNewlineCast
NewlineCast– это функция, позволяющая зеркалировать экран мобильных устройств на дисплей без проводов. По локальной сети или через интернет.
Любые мобильные девайсына ОС iOS, AndroidиWindowsможно транслировать на панель Newlineчерез бесплатное приложение, устанавливаемое на них, а ноутбуки на Linux — через плагин для браузера GoogleChrome.
Помимо трансляции, NewlineCastпозволяет аннотировать транслируемое изображение на панели и отправлять скриншоты на подключенные устройства.
Наконец, устройства Appleможно выводить на экран даже без приложения, посредством встроенной в них технологии AirPlay.
ВстроенныйNewlineBroadcast
NewlineBroadcast – это возможность выводить всё происходящее на экране панели на 200 любых удаленных устройств, имеющих браузер и подключение к интернет. Неважно что, с какого источника и откуда вы демонстрируете, любой человек может увидеть ваши данные даже в отдаленном уголке планеты… Конечно, если вы дадите ему доступ.
Встроенный NewlineDisplayManagement
В парке организации много дисплеев Newlineи всего один системный администратор? Не беда! С NewlineDisplayManagementуправлять и отслеживать состояние всех устройств в организации можно с одного единственного ПК.
Привязывайте дисплеи к своему бесплатному эккаунту, управляйте ими, устанавливайте на них ПО, помогайте пользователям, меняйте настройки, и все это — не вставая из-за компьютера.
NewlineClassroomTools
Новые инструменты Newline для образования, призванные помочь преподавателю в проведении интересных и увлекательных уроков, уже предустановленны в панелях Q-серии.
Встроенный доступ к сетевым дискам и облачным хранилищам
Встроенный в панели Newlineфайловый менеджер позволяет открыть файлы из встроенной памяти панели, с подключенных к панели USB-носителей, с сетевых и даже облачных хранилищ. Даже внешний компьютер не нужен, всё под рукой.
Встроенный веб-браузер
С Newlineдоступ к миллионам веб-ресурсов возможен прямо «из коробки». Нужно сделать на чем-то акцент во время выступления и сохранить этот акцент на будущее? Один клик по экрану для заметок и еще один — для сохранения!
Встроенный просмотр фото и видео
Панели Newline умеют воспроизводить встроенными средствами практически любые изображения и видеофайлы. Что-то не открывается? Просто установите VLCMediaPlayer.
Встроенный редактор документов
Редактирование Word, Excelи PowerPointна-ходу, прямо во время совещания или презентации? Запросто! Нужно сделать заметку на PDF – тоже не проблема! Встроенный офисный редактор OfficeSuiteвсё это умеет.
Newline Engage
Мощнейший программный комплекс для создания и проведения интерактивных уроков! Огромное количество инструментов! Интуитивный интерфейс на русском языке! Возможность импортирования уроков в форматах .notebook, .iwb, .flipchart! Интеграция со встроенной белой доской Newline! Всё это — новое программное обеспечение NewlineEngage, бесплатно идущее со всеми панелями Newlineв комплекте.
Интеграция с MSWindows и Office
Привыкли работать в MicrosoftOffice? Мы тоже. С панелями Newlineнет необходимости устанавливать на компьютер, подключенный к панели, драйверы и учиться взаимодействию с ОС и документами MSOffice 365 или 2019.
Ваши пальцы – это инструменты касания, пролистывания, увеличения/уменьшения и других, привычных вам жестов, стилус, идущий в комплекте, простой карандаш или шариковая ручка – то, чем вы пишете в ваших документах от руки. А стираете вы это всё ладонью или кулаком. Ну как в школе. И всё это даже на гостевом ноутбуке, который впервые подключен кNewline.
Аналогично можно работать с PDF, изображениями и видеофайлами. Да-да, вы можете вносить и сохранять заметки прямо в видеороликах!
DynamicUSB
Любые клавиатуры, мышки, USB-флешки и другие устройства, подключенные к панели Newline,всегда автоматически коммутируются к выводимому на экран источнику сигнала. Встроенный Android, встраиваемый OPSPC, внешний ноутбук – вы всегда управляете ими одной и той же мышкой лежащей на столе, не переключая и не перетыкая ничего и никуда.
HDMI-выход
Одной из особенностей интерактивных дисплеев Newline серии RS является HDMI-выход, работающий как коммутатор. Иными словами, так же как и с NewlineBroadcast, абсолютно всё, что мы видим и делаем на экране панели, может быть протранслировано на HDMI-матрицу, проектор, огромную видеостену или в систему ВКС стандартными средствами панели, но уже не по сети, а через HDMI-кабель. Не важно в помещении какого размера мы работаем, с какого источника выводим сигнал на панель, будь-то встроенный Андроид, встраиваемый OPS, внешние ноутбуки или смартфоны, транслирующие сигнал без проводов –ваша аудитория увидит абсолютно всё.
Встроенные динамики
Благодаря двум встроенным в панели NewlineTT-7519RS/RU15-ваттным динамикам даже в достаточно больших помещениях нет необходимости устанавливать дополнительные колонки. А если встроенного звука все таки не хватит, то всегда есть выход SPDIFи MiniJackдля внешней мощной акустики.
Крепление в комплекте
Настенное крепление для интерактивных панелей NewlineTT-7519RS/RU с настенным креплениемпоставляется в комплекте, поэтому не нужно тратить деньги и время на его подбор и покупку.
Интерактивные дисплеи NewlineTT-7519RS/RU– это универсальные дисплеи для любых переговорных комнат, кабинетов, учебных аудиторий, школьных классов и других помещений, где необходимо отображение информации и взаимодействие с ней.
Они надежны как профессиональный дисплей, доступны почти как обычный телевизор, но гораздо функциональнее и удобнее их обоих.
Интерактивная LED панель Newline TruTouch TT-7519RS, 75 дюймов, 4K
Панель Newline TruTouch TT-7519RS серии RS – это новейшая панель для бизнеса и образования от одного из крупнейших в мире производителей интерактивных дисплеев.
Сочетание уникальных технологий, широкого функционала, современного «железа» и продвинутого программного обеспечения, делают их универсальными, а очень доступная цена позволяет использовать новинки в самых различных организациях и условиях.
4К-дисплей
Все дисплеи Newline серии RS оборудуются самыми современными ЖК-матрицами с разрешением 3840х2160 точек, высокой яркостью и контрастностью, что гарантирует максимальное качество изображения в любых условиях и сценариях использования. А автоматическая коррекция яркости и фильтр свечения синего цвета на уровне «железа» гарантируют сохранность зрения пользователей.
Распознавание объектов

Панели серии RS, как и все современные панели Newline распознают палец, как инструмент касания, стилус/простой карандаш/шариковую ручку – как инструмент написания, а ладонь или кулак – как стерку. Таким образом взаимодействие с панелью и контентом на ней не отличается от нашей повседневной жизни, где мы привыкли писать ручкой, взаимодействовать с палншетами/смартфонами пальцем, а стирать с доски тряпкой или стёркой.
Разъем Intel OPS
Все панели Newline оборудованы стандартным разъемом Intel OPS 80 pin. Данный разъем используется для установки опционального встраиваемого компьютера на базе обычного процессора, памяти и SSD-диска с Windows 10 на борту, что превращает интерактивный дисплей Newline в моноблок, в который может быть установлено любое привычное пользователю Windows-приложение, от образовательных программ до сложных систем просмотра и редактирования 3D-моделей.
Встроенное «железо» и ПО
Большинство интерактивных панелей Newline, в том числе и серия RS имеют встроенную операционную систему Android 8.0 и современную «начинку». Благодаря этому, уже «из коробки» они являются вполне самодостаточными устройствами, с которыми можно работать, просто воткнув их в розетку и не подключая дополнительных источников сигнала. А встроенное программное обеспечение и возможность установки стороннего ПО, позволяет расширить их функционал практически до бесконечности.
Встроенная «белая доска»
Привыкли работать на маркерной доске или флипчарте? Тогда встроенная «белая доска» — это то, что вам надо и даже больше. Меняйте фон, делайте записи (которые, если что, стираются ладонью как на доске), вставляйте изображения и фигуры, сохраняйте результаты в виде изображения во встроенную память, на флешку или сетевой диск, либо же сразу отправляйте их по почте всем заинтересованным лицам. Никаких блокнотов, фотоаппаратов и других устройств. Всё встроено!
Встроенный Newline Cast

Newline Cast – это функция, позволяющая зеркалировать экран мобильных устройств на дисплей без проводов. По локальной сети или через интернет.
Любые мобильные девайсы на ОС iOS, Android и Windows можно транслировать на панель Newline через бесплатное приложение, устанавливаемое на них, а ноутбуки на Linux — через плагин для браузера Google Chrome.
Помимо трансляции, Newline Cast позволяет аннотировать транслируемое изображение на панели и отправлять скриншоты на подключенные устройства.
Наконец, устройства Apple можно выводить на экран даже без приложения, посредством встроенной в них технологии AirPlay.
Встроенный Newline Broadcast

Newline Broadcast – это возможность выводить всё происходящее на экране панели на 200 любых удаленных устройств, имеющих браузер и подключение к интернет. Неважно что, с какого источника и откуда вы демонстрируете, любой человек может увидеть ваши данные даже в отдаленном уголке планеты… Конечно, если вы дадите ему доступ.
Встроенный Newline Display Management

В парке организации много дисплеев Newline и всего один системный администратор? Не беда! С Newline Display Management управлять и отслеживать состояние всех устройств в организации можно с одного единственного ПК.
Привязывайте дисплеи к своему бесплатному эккаунту, управляйте ими, устанавливайте на них ПО, помогайте пользователям, меняйте настройки, и все это — не вставая из-за компьютера.
Встроенный доступ к сетевым дискам и облачным хранилищам
Встроенный в панели Newline файловый менеджер позволяет открыть файлы из встроенной памяти панели, с подключенных к панели USB-носителей, с сетевых и даже облачных хранилищ. Даже внешний компьютер не нужен, всё под рукой.
Встроенный веб-браузер
С Newline доступ к миллионам веб-ресурсов возможен прямо «из коробки». Нужно сделать на чем-то акцент во время выступления и сохранить этот акцент на будущее? Один клик по экрану для заметок и еще один — для сохранения!
Встроенный просмотр фото и видео
Панели Newline умеют воспроизводить встроенными средствами практически любые изображения и видеофайлы. Что-то не открывается? Просто установите VLC Media Player.
Встроенный редактор документов
Редактирование Word, Excel и PowerPoint на-ходу, прямо во время совещания или презентации? Запросто! Нужно сделать заметку на PDF – тоже не проблема! Встроенный офисный редактор OfficeSuite всё это умеет.
Интеграция с MS Windows и Office
Привыкли работать в Microsoft Office? Мы тоже. С панелями Newline нет необходимости устанавливать на компьютер, подключенный к панели, драйверы и учиться взаимодействию с ОС и документами MS Office 365 или 2019.

Ваши пальцы – это инструменты касания, пролистывания, увеличения/уменьшения и других, привычных вам жестов, стилус, идущий в комплекте, простой карандаш или шариковая ручка – то, чем вы пишете в ваших документах от руки. А стираете вы это всё ладонью или кулаком. Ну как в школе. И всё это даже на гостевом ноутбуке, который впервые подключен к Newline.
Аналогично можно работать с PDF, изображениями и видеофайлами. Да-да, вы можете вносить и сохранять заметки прямо в видеороликах!
Dynamic USB
Любые клавиатуры, мышки, USB-флешки и другие устройства, подключенные к панели Newline, всегда автоматически коммутируются к выводимому на экран источнику сигнала. Встроенный Android, встраиваемый OPS PC, внешний ноутбук – вы всегда управляете ими одной и той же мышкой лежащей на столе, не переключая и не перетыкая ничего и никуда.
Кстати, встроенные в Newline RS микрофоны тоже автоматически переключаются между источниками. Пришли со своим ноутбуком в переговорную комнату? Контакты ваши, экран и микрофоны наши!
HDMI-выход
Одной из особенностей интерактивных дисплеев Newline серии RS является HDMI-выход, работающий как коммутатор. Иными словами, так же как и с Newline Broadcast, абсолютно всё, что мы видим и делаем на экране панели, может быть протранслировано на HDMI-матрицу, проектор, огромную видеостену или в систему ВКС стандартными средствами панели, но уже не по сети, а через HDMI-кабель. Не важно в помещении какого размера мы работаем, с какого источника выводим сигнал на панель, будь-то встроенный Андроид, встраиваемый OPS, внешние ноутбуки или смартфоны, транслирующие сигнал без проводов –ваша аудитория увидит абсолютно всё.
Встроенные динамики
Благодаря двум встроенным в панели Newline RS 15-ваттным динамикам даже в достаточно больших помещениях нет необходимости устанавливать дополнительные колонки. А если встроенного звука все таки не хватит, то всегда есть выход SPDIF и MiniJack для внешней мощной акустики.
Интерактивные дисплеи Newline серии RS – это универсальные дисплеи для любых переговорных комнат, кабинетов, учебных аудиторий, школьных классов и других помещений, где необходимо отображение информации и взаимодействие с ней.
Они надежны как профессиональный дисплей, доступны почти как обычный телевизор, но гораздо более функциональны и удобны их обоих.
![]()

новая строка rs+
ИНСТРУКЦИЯ ПО НАЧАЛУ РАБОТЫ
ЛЕТО 2021
Использование ярлыков домашней страницы

![]() Windows
Windows
Переход к внутреннему ПК (OPS), если он подключен к дисплею.![]() Общий доступ к экрану
Общий доступ к экрану
Переходит к приложению Newline Cast для беспроводного совместного использования экрана.![]() Доской
Доской
Переход к встроенной доске.![]() Браузер
Браузер
Подтягивает web браузере, если дисплей подключен к Интернету.![]() File Viewer
File Viewer
Переносит вас на новую строку File Командир, где вы можете получить доступ и предварительноview files в локальных и облачных системах хранения.![]() Гаджеты
Гаджеты
Список всех доступных гаджетов и приложений, к которым вы можете получить доступ и использовать на экране.![]() Добавить
Добавить
Позволяет настраивать и добавлять значки на домашнюю страницу для быстрого доступа к вашим любимым приложениям и источникам.![]() Источник Preview
Источник Preview
Коснитесь имени подключенного источника иview этого источника появится в окне. Коснитесь преview и идите прямо к этому источнику.![]() Конец сессии
Конец сессии
Завершает сеанс и возвращает вас к начальному экрану.
 Ярлык аннотации
Выводит параметры интерактивной доски поверх того, что находится на текущем экране.
Коснитесь второй раз, чтобы сохранить снимок экрана. Ярлык доски
Переносит вас на экран интерактивной доски Android, позволяя мгновенно рисовать и делать заметки. Домашний ярлык
Переносит вас на главный экран начала встречи. Назад Ярлык
Возврат на один экран назад или к предыдущему приложению. Также может использоваться для выхода из приложения. Ярлык OPS/Источники
Проводит вас к бортовому компьютеру (ОПС). Нажмите и удерживайте, чтобы открыть дополнительные значки, с помощью которых можно перейти в меню «Источники», что позволяет легко переключаться между доступными источниками.
Переключение источников на серии RS
Доступ к любому источнику, подключенному к дисплею
- Включите дисплей.
- Коснитесь сообщения «Нажмите, чтобы начать» на первом экране.
- Любые устройства, подключенные в данный момент к дисплею, будут подсвечены белой рамкой вокруг Source Pre.view окно.

- Коснитесь поля источника, на который вы хотите переключиться.
- Источник Preview окно покажет предварительныйview того, что в данный момент находится на экране этого подключенного устройства.
- Коснитесь поля «Источник» еще раз или коснитесь кнопки «Предварительно».view окно, и вы попадете к этому источнику.


Доступ к встроенному компьютеру OPS
- Включите дисплей.
- Коснитесь сообщения «Нажмите, чтобы начать» на первом экране.
- Нажмите кнопку «Windows» на главном экране.

- Ты теперь будешь viewвключение и использование встроенного компьютера OPS.

 Бонусные советы:
Вы также можете быстро переходить к различным источникам, используя эти значки в плавающем меню с обеих сторон дисплея:
Быстрый доступ к ОПС Быстрый доступ к странице источников
Добавление ярлыков на главный экран
Добавление программ в Newline Assistant
- Откройте Ассистент перевода строки на OPS.
- Перетащите в окно любую программу, которую хотите использовать в качестве ярлыка на экране «Начать собрание».


Бонус Подсказка:
В Newline Assistant можно добавлять только исполняемые программы, такие как видеоплеер, в отличие от отдельного PDF-файла или документа. file.
Хотя вы можете добавить программу Microsoft Excel, вы не можете создать ссылку на уже существующую электронную таблицу Excel.
Использование помощника новой строки для настройки экрана начала собранияn
- Нажмите
 значок в правом нижнем углу.
 - Справа появится меню с опциями, которые нужно добавить на экран.
- Нажмите на раздел значков Windows вверху.
- Здесь будут перечислены ваши программы Newline Assistant.
- Нажмите на программы, которые хотите добавить на главный экран.

- Когда вы закроете это окно, добавленные вами элементы будут на главном экране и готовы к работе!


Использование встроенных средств рукописного ввода в Word, Excel и других программах
Использование средств рукописного ввода Microsoft Office
- Откройте документ Microsoft Office.
- Нажмите на «Review»В верхней части документа.
- Нажмите «Начать рукописный ввод».

- Теперь вы можете рисовать и делать аннотации поверх документа в любом месте.

- Вы можете изменить цвет пера, ширину пера или переключиться в режим выделения.

- Когда вы закончите, нажмите «прекратить рисовать».


Бонус Подсказка:
В PowerPoint вы можете преобразовывать рисунки прямо в форму, на которую они больше всего похожи. Нарисуйте круг, и PowerPoint превратит его в идеальный круг. Это работает только в PowerPoint.

![]()
Документы / Ресурсы
Рекомендации
- Manuals
- Brands
- NewLine Manuals
- Monitor
- rs+
- User manual
-
Contents
-
Table of Contents
-
Troubleshooting
-
Bookmarks
Quick Links
Related Manuals for NewLine rs+
Summary of Contents for NewLine rs+
-
Page 1
User Manual V2.0… -
Page 2: Table Of Contents
2.1 Safety Precautions …………………………18 2.2 Installation Precautions …………………………. 19 2.3 Installation ……………………………. 20 2.4 Installing the Internal PC (Optional) ……………………… 21 2.5 Installing Newline Assistant ……………………….23 3 Getting Started……………………..24 3.1 Power On …………………………….24 3.2 Power Off…………………………….25 3.3 Calibration …………………………….
-
Page 3
4.3.10 Input/Output Settings ……………………….. 42 4.3.11 Display & Theme Settings ……………………….. 43 4.3.12 Security Settings …………………………43 4.3.13 System …………………………….. 44 4.4 Windows …………………………….44 4.5 Screen Sharing …………………………..45 4.6 Whiteborad …………………………… 45 4.6.1 Whiteboard Functions ………………………… 48 4.6.2 Page Management …………………………57 4.6.3 Object Detection ………………………… -
Page 4
Welcome to the world of Newline Thank you for choosing the RS+ series Interactive Touch Screen. Please use this document to get the most out of your screen. This device complies with part 15 of the FCC Rules. Operation is subject to the following two conditions: (1) This device may not cause harmful interference, and (2) this device must accept any interference received, including interference that may cause undesired operation. -
Page 5
Energy Star Compliance. Signage Displays with Plug-in Module. As an ENERGY STAR Partner, Newline Interactive Inc., has followed the EPA’s enhanced Product qualification and certification process to ensure that the products marked with the ENERGY STAR logo are ENERGY STAR qualified per the applicable ENERGY STAR guidelines for energy efficiency. -
Page 6: About This Document
About This Document This document describes multiple functions, instructions, and notes about the product. Symbols are used in this document to indicate operations that need particular attention. The symbols are defined as follows: Provides additional information to supplement operation in the main text. Provides tips for operation.
-
Page 7: Safety Instruction
The voltage/current of the rear power output port is 5V/2A (maximum). Purchase the power code/AC adapter according to customer needs. The port can be used for the Newline X10D Android box. Please do not connect any products with different power requirement. Otherwise,…
-
Page 8
WARNING Do not put items on the top of the product. ⚫ Do not put items, such as a container for liquid (a vase, flowerpot, cosmetics, or liquid medicine) on the top of the product. ⚫ If any water or liquid is spilled on the product, the product may short circuit and cause fire or electric shock. -
Page 9
CAUTION ⚫ Do not install the product on carpet or cloth. ⚫ Do not use a cloth, such as table cloth, to cover the product. Keep the product away from the radio. The product complies with the international EMI standard to pervent radio interference. However, interference may still exists and causes noise in the radio. -
Page 10: Overview
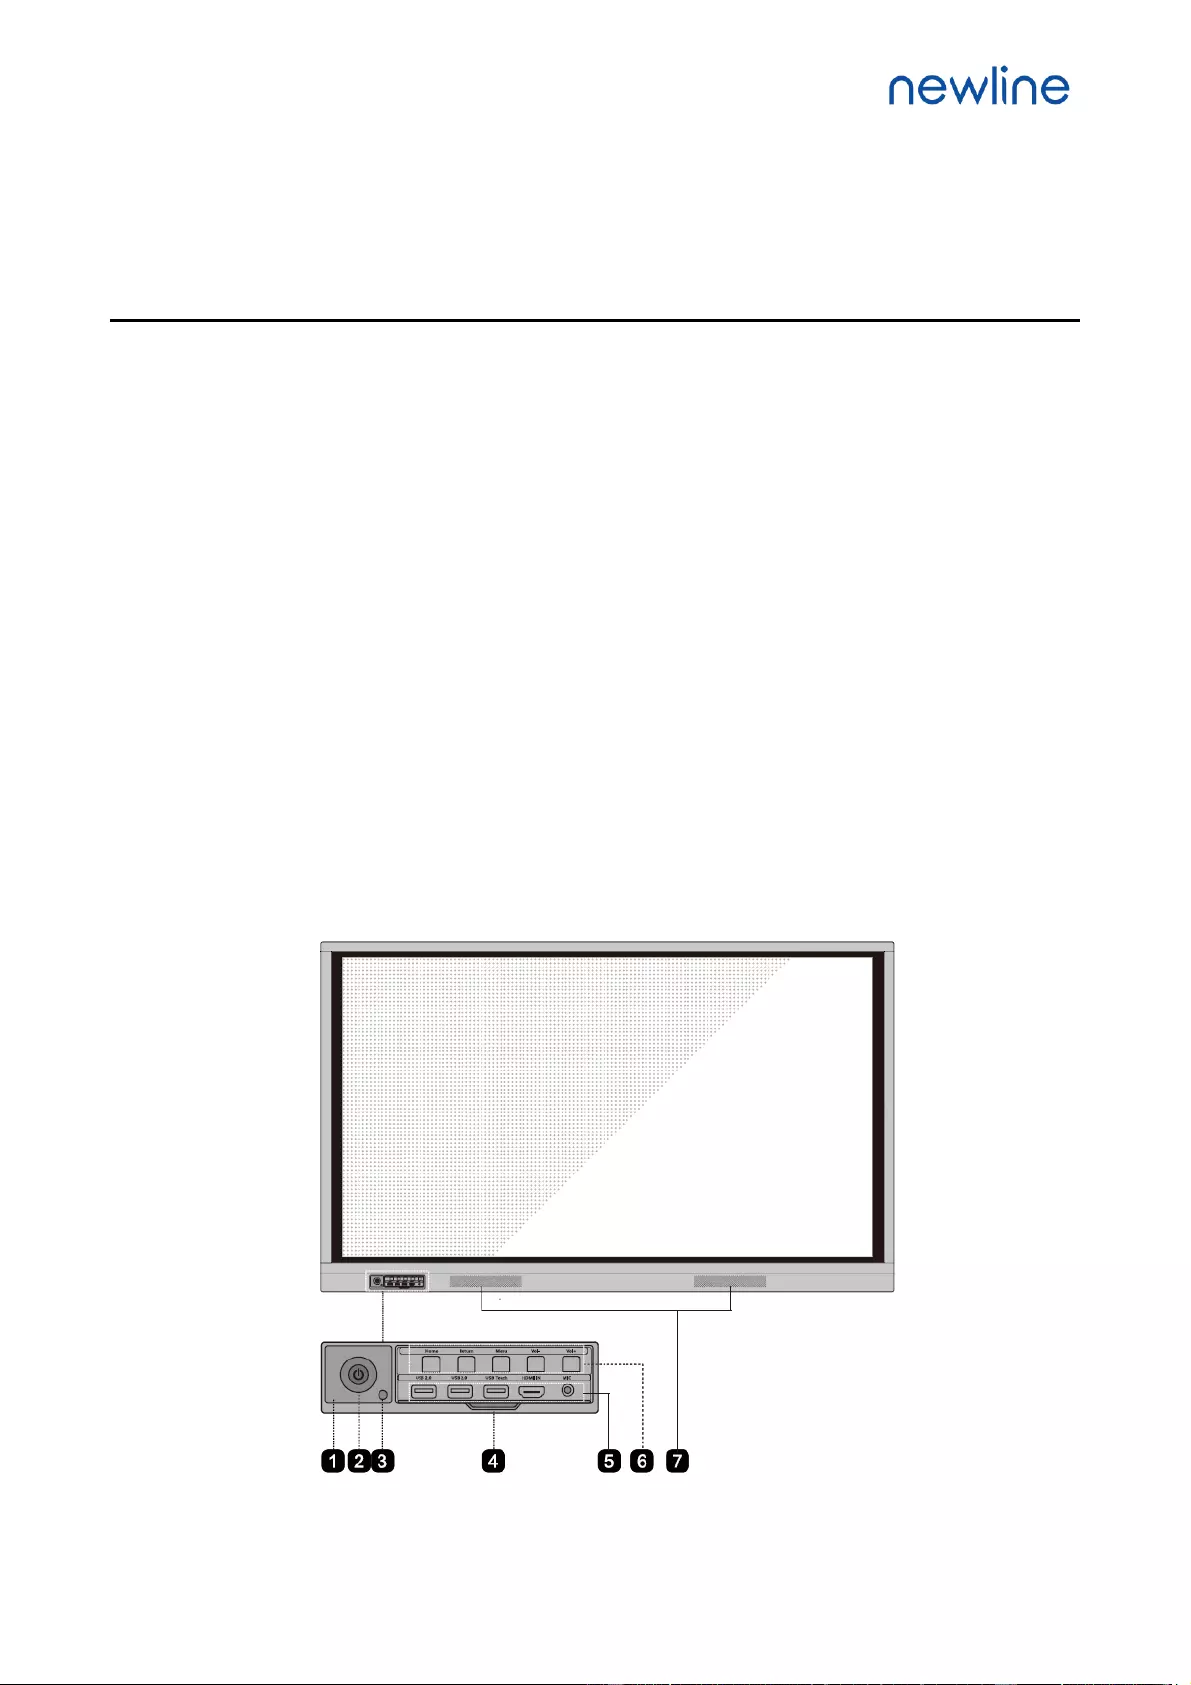
The newline’s 4K Ultra High-Definition LED screen also provides a fluid writing experience. Annotate over anything on the screen, whether in the embedded whiteboard or while using any other device.
-
Page 11
Rear View ⚫ 65 inch: 75 inch/86 inch:… -
Page 12
Remote Control Receiver Speakers Power On/Off Power Supply Plug Light Sensor Power Switch Front Plate Cover Internal PC Port (OPS) Front Ports Rear Ports Front Buttons… -
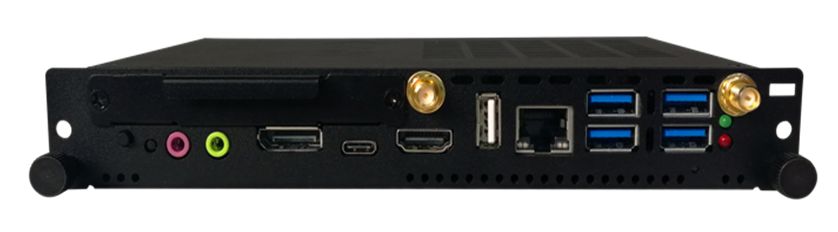
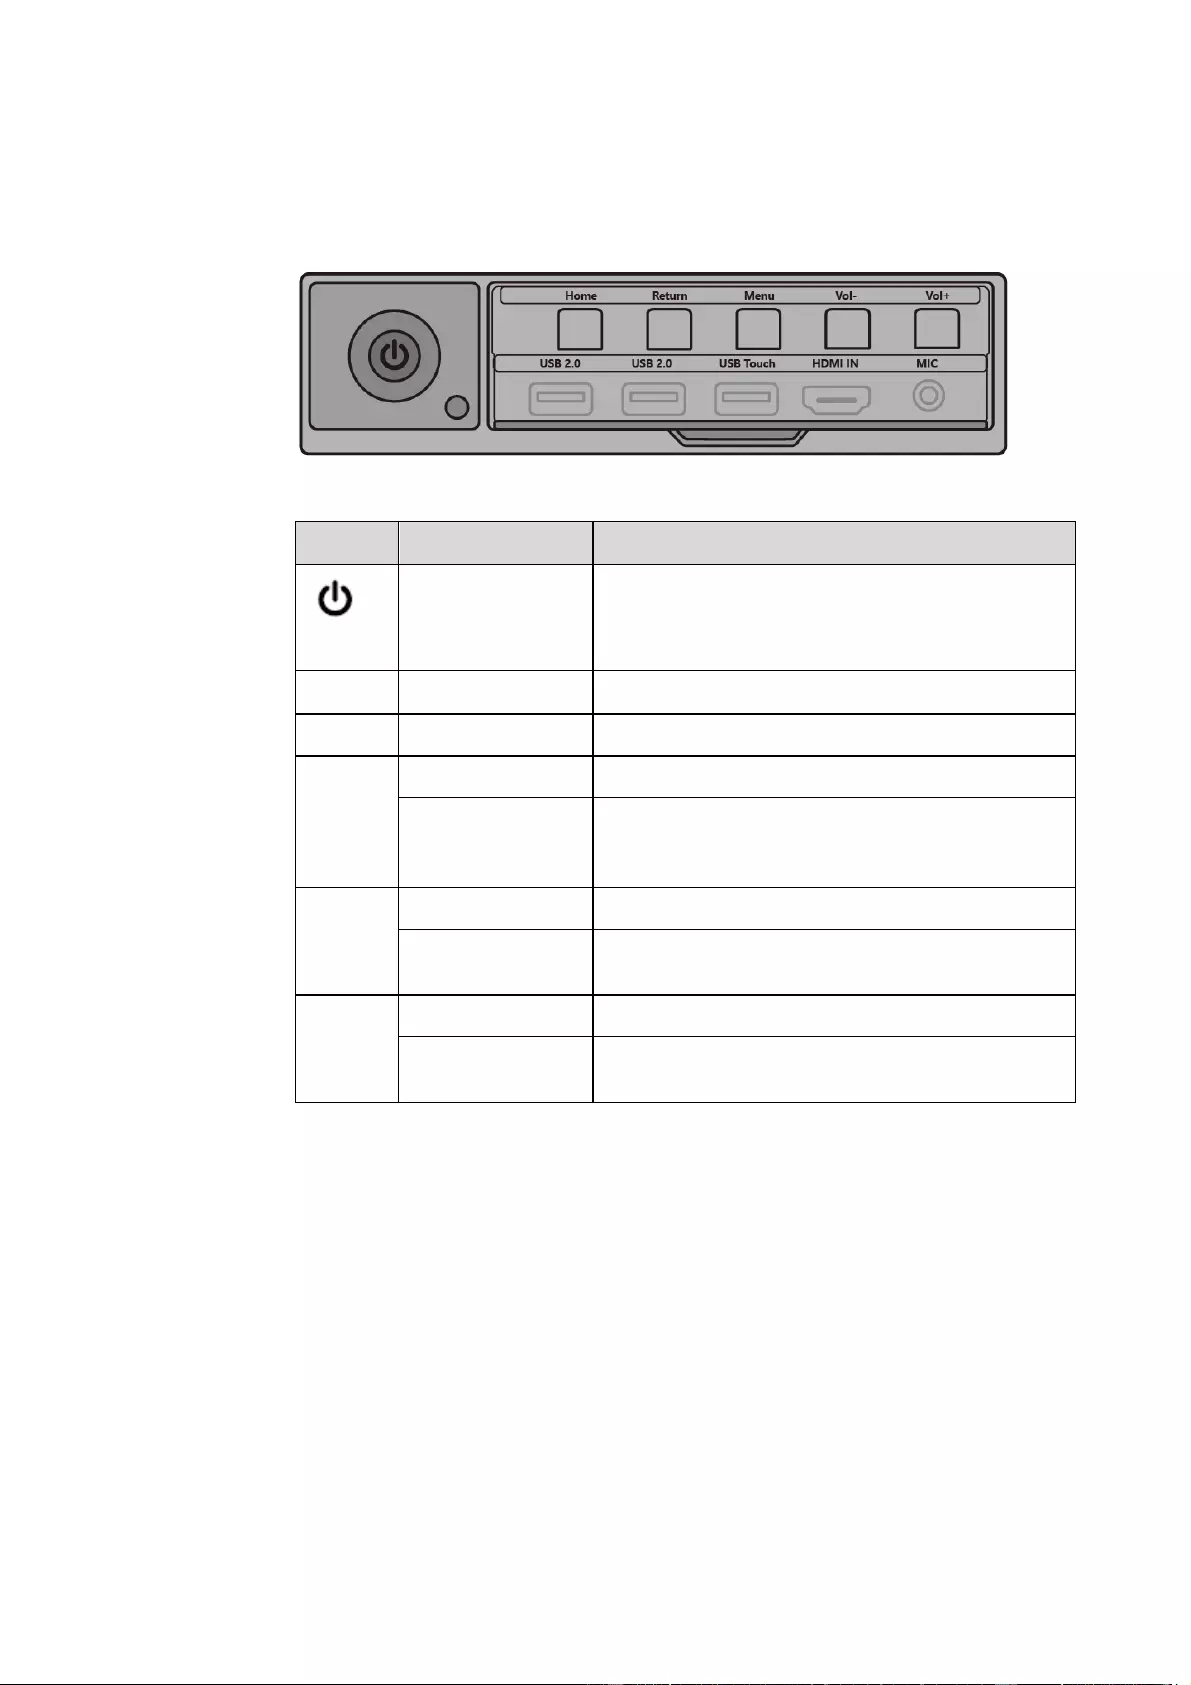
Page 13: Ports
1.3 Ports Front Ports CAUTION Front USB ports and rear USB 3.0/USB 2.0 ports switch connections based on signal sources. If the current signal source is reading the data from an external product connecting to the port, please switch the signal source after the data reading is complete. Otherwise, the data or product may be damaged.
-
Page 14
The voltage/current of the rear power output port is 5V/2A (maximum). Purchase the power code/AC adapter according to customer needs. The port can be used for the Newline X10D Android box. Please do not connect any products with different power requirement. Otherwise… -
Page 16
Front Buttons Buttons Operations Functions Short press Power on/off ⚫ Steady red color: Display is in shut down mode ⚫ Steady white color: Display is on and working Home Short press Go to the home page Return Short press Return to the last menu/Exit Menu Short press Open the Settings menu… -
Page 17: Remote Control
1.4 Remote Control Carefully read the following instructions before using the remote control to avoid possible faults: Do not drop or damage the remote control. ⚫ Do not spill water or other liquids on the remote control. ⚫ Do not place the remote control on a wet object. ⚫…
-
Page 18
Buttons Operations View all Pre-installed Applications Switch Source to Internal PC Switch Source to Display Port HDMI Switch Source to HDMI Front FRONT HDMI 1 Switch Source to HDMI 1 HDMI 2 Switch Source to HDMI 2 Switch Source to VGA Autocorrection Screen Display (For VGA Signal Source) Open the Browser Application… -
Page 19: Installation Guide
Installation Guide 2.1 Safety Precautions Installation Environment Installation Direction…
-
Page 20: Installation Precautions
2.2 Installation Precautions Weight Loading Weight of the product: 161lb/ 72 kg (86 inch), 123lb/56 kg (75 inch), 97lb/ 44kg (65 inch) When using a mobile stand, ensure that the weight of the product is less than the loading ⚫ capacity of the mobile stand.
-
Page 21: Installation
Ventilation Ensure adequate ventilation and/or an air conditioned environment. We recommend keeping certain distances from the side of the product to the wall or panels. Ventilation requirements are shown in following figure: 2.3 Installation The dimensions of the four bracket mounting holes on the back panel are VESA MIS-F compliant (86 inch or 75 inch: 800 x 400 mm/31.50 x 15.75 in;…
-
Page 22: Installing The Internal Pc (Optional)
86 inch/75 inch: 65 inch: 2.4 Installing the Internal PC (Optional) The internal PC does not support hot plugging. Therefore, you must insert or remove the internal PC when the display is powered off. Otherwise, the display or internal PC may be damaged.
-
Page 23
You will need to purchase the internal PC separately. Perform the following steps to install the internal PC: Step 1 Unscrew the M3 screws by hand to remove the internal PC shielding cover. Step 2 Push the internal PC into the port at the rear of the screen from right to left. Step 3 Secure the internal PC to the display by using the M3 screws. -
Page 24: Installing Newline Assistant
2.5 Installing Newline Assistant Introduction The Newline Assistant is the tool used as a bridge between the embedded operating system and the Internal PC (OPS). It helps add Windows software shortcuts to the Home Page, as well as to protect USB data when switching between sources.
-
Page 25: Getting Started
Getting Started 3.1 Power On Step 1 Plug the power supply into the power outlet fully and plug the power connector into the side of the product. Ensure the power supply is in the range of 100V to 240V with frequency at 50 Hz/60 Hz ±…
-
Page 26: Power Off
Step 3 Press the power button on the front control panel or on the remote control. 3.2 Power Off Step 1 Press the power button on the front panel or the power button on the remote control. Step 2 Press the power button on the front panel or the power button on the remote control again, the power indicator will turn to red.
-
Page 27
Step 4 Select in the Tablet PC Settings window. -
Page 28
Step 5 Select Touch input from the option and start calibration. Step 6 Use your finger or a pencil to click and hold the center of the flickering cross . Do not release until moves to the next positioning point. Complete the calibration process as instructed. -
Page 29: Operating The Touch Screen
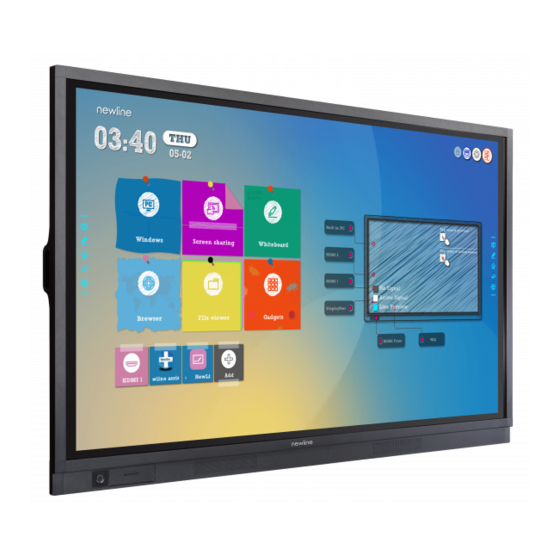
Operating the Touch Screen 4.1 Start Screen When the product is turned on, the product will show the Start Screen page, as shown in the following figure:…
-
Page 30: Home
4.2 Home Touch anywhere on the Start Screen to start a meeting, and the product will go to the Home page, as shown in the following figure: Shortcut for Display& Theme Settings Click the icon on the Home Page to enter the Display & Theme setting page to set the logo image and wallpaper.
-
Page 31
Shortcut for Clock Click the time icon on the Home age to start the clock application. Using the icons on the top left, you may switch from clock mode to alarm mode, or to timer and stopwatch mode. In the clock mode, you may click to add other time zones as shown in the following figure:… -
Page 32
Side Toolbar The Annotation Mode, Whiteboard, Home, Return, and Windows icons are displayed by default in the toolbar on both sides of the screen. You may hide one or both side toolbars in the Settings or move it up and down on the screen, shrink or expand by using touch gestures. You may double-tap the “=”… -
Page 33
Icon Functions Go to your favorite source. You can set favorite source in the “Tool bar” submenu in the system settings. Status Bar and Settings The upper right corner of the home page displays three working status icons (including USB drive(s), Ethernet, and Wi-Fi, system setting shortcut and return to the start screen page). -
Page 34: System Settings
Gadget displays all pre-installed applications, including Gallery, Browser, Music, Calculator, E-mail, File Viewer, Keyboard, Office Viewer and Newline Cast etc. Click the icon of an application to run the application. Click Add to customize the Home page. You can add up to 5 shortcuts to your favorite software, gadgets, or connections.
-
Page 35: Language And Input Settings
Hotspot & tethering: Click to set up Wi-Fi hotspot. ⚫ Wake on LAN: turn on/off LAN. ⚫ Proxy: The settings of the proxy server. ⚫ 4.3.2 Language and Input Settings Enter the Language & Input submenu to set the language and keyboard settings.
-
Page 36
Settings The default input method of the system is Kika Keyboard F, and the Physical keyboard must be enabled. If you want to switch to another language, switch the keyboard input method via Manage keyboards methods, in addition to switching the language. Setting a Language Click Languages on the Language &… -
Page 37: Storage
Adding an Input Method Click Manage keyboards on the Virtual Keyboard interface. On the Manage keyboards page, select the input methods you would like to use (multiple choices can be selected). 4.3.3 Storage Enter the Storage submenu to view space distribution of the internal storage.
-
Page 38: Applications
4.3.4 Applications Enter the Apps submenu to view all downloaded applications by type, running applications, and a summary of all applications. 4.3.5 Whiteboard Enter the Whiteboard submenu to set the version of whiteboard. 4.3.6 Smart Eye Protection Enter the Smart eye protection submenu to set Eye protection writing mode, Eye protection brightness control mode and the Bluelight filter.
-
Page 39: Date And Time Settings
4.3.7 Date and Time Settings Enter the Date & Time setting submenu to set the date and time. Before setting the date and time, users should click Select time zone to set everything to the local time zone. Date Settings You can automatically obtain the date.
-
Page 40
Time Settings You can automatically obtain the time. To automatically obtain the current time, select Automatic date & time. ⚫ To customize time and time format, set them in Set time and select Use 24-hour format. ⚫… -
Page 41: Power Settings
4.3.8 Power Settings Enter the Power setting submenu to set an automatic power on/off time and the time for the system to enter energy saving mode. ⚫ To set the automatic power on time, select Auto power on, and the time you want the display to turn on in Power on time, as shown in the following figure: ⚫…
-
Page 42: Tool Bar Settings
⚫ To set the energy saving time, click Energy saving. In the dialog box that is displayed, set a duration after which the screen enters the lock mode if the screen is left un-operated. After the screen is locked, if the user does not operate the screen within 120s, the screen enters the shut down mode.
-
Page 43: Input/Output Settings
Quick settings: Click to turn on/off the quick settings function. ⚫ 4.3.10 Input/Output Settings Enter the Input and output setting submenu to set the starting source, new input source, and resolution of image output through the HDMI port etc.. New input source: After the New input source function is enabled, the system can ⚫…
-
Page 44: Display & Theme Settings
4.3.11 Display & Theme Settings Enter the Display & Theme setting submenu to set the system theme, wallpaper, Home logo and lock screen logo. 4.3.12 Security Settings Enter the Security setting submenu to set Passkey lock, Whiteboard/Screenshot data clearance, Encryption & credentials, USB lock functions. Passkey lock: Click to set whether you need enter the password or modified password when going from the Start page to the Home page.
-
Page 45: System
USB lock: Click to turn on/off the USB lock function. 4.3.13 System Enter the System submenu to upgrade the system, perform a factory data reset, network settings reset, app preferences reset, view firmware information, embedded operating system version information or the display’s serial number. 4.4 Windows On the Home Page, click Windows to enter the Internal PC source, as shown in the following figure.
-
Page 46: Screen Sharing
Multiple devices can be cast wirelessly to the display through several casting modes (Airplay, Google Cast…). To cast: click Screen Sharing on the Home Page to enter Newline Cast. On screen directions will appear for you to follow in order to wirelessly cast to the display, as shown in the following figure: 4.6 Whiteborad…
-
Page 47
Discussion and screen annotation ⚫ On the whiteboard page, you can select pen type, width, and color to write or annotate on the screen. You can also erase selected content or clear all content on the screen. Page navigation ⚫ Preview or delete pages. -
Page 48
Icon Name Icon Function Mode Switch Click the icon to enter annotation mode. (See more detail in whiteboard mode section) Import Click the icon to insert picture. Insert Text Click and show the text window(Color/ Size) and the keyboard, then type in the text. Click and hold the icon for two seconds to set the default text setting. -
Page 49: Whiteboard Functions
Icon Name Icon Function Slide the turn on or off the object recognition function. Object recognition switch New Page Click to add a new page. Click and hold for two seconds to set the color and the pattern of the new page. Previous Page Click to back to the previous page.
-
Page 50
Click and hold for two seconds to set the color and the pattern of the new page, as shown in the figure below. Mode Switch Click in the lower left corner of the discussion mode to switch between whiteboard modes. Annotation mode ⚫… -
Page 51
Discussion mode ⚫ The background is a single color, as shown in the following figure. You can write content on the page as you wanted. Import On the Whiteboard, Click to import data from file management, you can import the pictures/ whiteboard data (PNG)/ screenshots (PNG) from system files, USB, network. -
Page 52
Insert Text On the Whiteboard, Click to insert text, and show the keyboard. Click and hold the icon for two seconds to set the default text setting. Insert Auto Shape On the Whiteboard, Click to insert the anto shape. Click and hold the icon for two seconds to set the shapes and color. -
Page 53
Pen Type On the Whiteboard, two types of pens are supported: Pen and highlighter. : used to write. ⚫ Highlighter : used to highlight. Characters covered by comments are still visible. ⚫ Line Size and Color On the Whiteboard, click and hold for two seconds to set the size and color. -
Page 54
Select On the Whiteboard, Click and user could choose the data on the page to move/ zoom in/ zoom out/ rotate by two fingers, and the icon turns into white. Click to expand the toolbar,users can copy or delete or cut the data or change the data color, such as the following figure: Icon Functions… -
Page 55
Click this icon to Post the selected items. Click this icon to Change color for the selected items. Paste (long press the screen around two seconds and the icon will appear only after one item copied or cut) Click this icon to Push to bottom layer. Click this icon to Delete the items. -
Page 56
Object recognition switch Press the setting icon, it will pop up a switch and let user to change the object recognition setting, slide to left to open the object recognition function, slide to right to turn it off. Screenshot In annotation mode, click to save the current slide as a picture. -
Page 57
Pictures saved through screenshots can be viewed and obtained using the following methods: Screenshots are saved on the Navigation page, as shown in the following figure: ⚫ Click on the home page and choose Internal storage > Pictures > Screenshots > ⚫… -
Page 58: Page Management
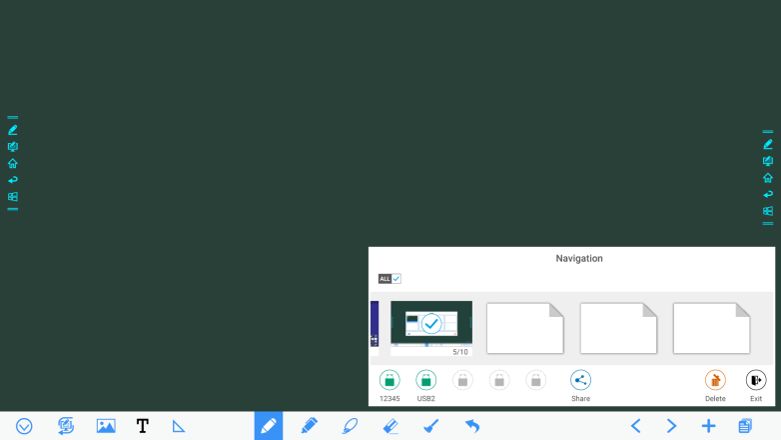
4.6.2 Page Management You can preview, select, share, save, and delete any created writing page. Page Preview Click on the lower right corner in the discussion mode. All pages will be displayed. Click one page to switch to that page for more operations, as shown in the following figure: Only 8 pages are displayed at once.
-
Page 59
Page Select Or Delete Page On the Navigation page, you can select or delete writing pages according to requirements, as shown in the following figure. Click to select all pages. ⚫ Click to share selected pages. ⚫ Click to delete selected pages. ⚫… -
Page 60: Object Detection
Page share Click the button on the Navigation page, click File Commander to save to local storage or to the cloud, or click AquaMail to share current the meeting files by email. Before sending by email, confirm that an email account is successfully set up in Settings. 4.6.3 Object Detection This product supports object recognition and produces different effects according to the diameter and size of the input objects.
-
Page 61
If the diameter or size of the input object is larger than 3mm or smaller than 8mm, there is a risk of identification failure. Keep the object vertical while writing. Object recognition: The system automatically remembers the settings selected for a fine pen and a thick pen. -
Page 62: Browser
4.7 Browser On the Home page, click Browser to view web page, as shown in the following figure: 4.8 File Management The product supports connection to USB flash memory. In File Viewer application, you can preview all files in the internal storage and storage devices connected via USB ports and select, copy, paste, delete and search for files.
-
Page 63: File Preview
4.8.2 File Preview Using the File Viewer application, you can click the submenu on the left side to preview what files are on internal storage, external storage devices connected via the USB ports, cloud stored files, FTP uploaded files, and local network files, as shown in the following figure. 4.8.3 File Search Enter the File Viewer application and click .
-
Page 64: File Filtering
4.8.4 File Filtering You can click the menu on the left side to display files by type, for example, whether the files is a document, a picture, music, a video, archived or was downloaded. The system supports two view modes: list and thumbnail. You can click on the top right ⚫…
-
Page 65: New Folder
4.8.5 New Folder Enter the File Viewer application, and click to create folder. as shown in the following figure. 4.8.6 File Operation Enter the File Viewer application. You can create folders according to requirements, select files by in the long pressing, and set wallpaper/copy/paste/delete. For details on other operation, click upper right corner for more operation.
-
Page 66: Gadget
screenshots and pages in the discussion mode. Depending on the screenshots mode, picture naming is different. Picture files are named in the following of prefix + creation file. Prefix name rule: WB (discussion mode page), AN (annotation page screenshot), and SS (remote control screenshot).
-
Page 67: Add Shortcut
Click this icon to enter the Office viewer application. In this application, you can view office files, including excel, word, power point, and PDF files. Newline Click this icon to enter the Newline Broadcast application. Broadcast E-mail Click this icon to enter the email application and send files.
-
Page 68
Click to view signal sources in Connection. ⚫ Click to view the Windows software shortcuts that the Newline Assistant uploads to the ⚫ embedded operating system. For details, see “Add Quick Start Windows Programs in Smart System”. Click to view all Gadget applications. -
Page 69: Add Quick Start Windows Programs In Smart System
4.10.2 Add Quick Start Windows Programs in Smart System Step 1 In Windows, run the Newline Assistant program and drag the software icons or folder shortcut icons that you want to add from the desktop or menu to the Newline Assistant window. The applications added or deleted through the Windows system will be automatically updated to the embedded operating system until the upload progress reaches 100%.
-
Page 70
The page for adding application programs will be displayed. Step 3 At the shortcut setting page, click icon to view all the Windows software shortcuts added by the Newline Assistant in Step 1. -
Page 71
By default, the Newline Assistant application is added on the tab. Step 4 Tap the icon and add the shortcut at the Home page. Tap again and remove it. Step 5 Return to Home page. Click the icon of an added Windows application to start the software. -
Page 72: Preview Window
4.11 Preview window On the Home page, signal source preview window including internal PC, HDMI Front, HDMI Rear (1 to 2), Display Port, and VGA. An icon without an active signal source connected will be gray, an icon with an active signal sources connected will be white, and the icon of the signal source currently being previewed will be blue.
-
Page 73: Quick Setting Menu
Quick Setting Menu Using two fingers to swipe up from the bottom of the screen, the Quick Settings menu will appear, as shown in the following figure.
-
Page 74
Icon Functions Drag the slider to adjust the brightness. Drag the slider to adjust the volume. Click the icon to return to Home page. Click the icon to enter the settings page. Click the icon to turn on/off the Smart system Wi-Fi. Click the icon to mute/unmute. -
Page 75: Serial Port Control
Serial Port Control Connect RS-232 port to the PC or controlling product. Enable RS-232 serial port connection and complete the following configuration. Port: COM1 (Set according to PC or controlling product’s port number) Baud rate 19200 Odd/even check None Data bits Stop bit The following tables list controlling codes, querying codes and return codes.
-
Page 76
Function Controlling codes Return codes 7F 08 99 A2 B3 C4 02 FF 01 54 7F 09 99 A2 B3 C4 02 FF 01 54 01 Internal PC 7F 08 99 A2 B3 C4 02 FF 01 38 7F 09 99 A2 B3 C4 02 FF 01 38 01 7F 08 99 A2 B3 C4 02 FF 01 56 7F 09 99 A2 B3 C4 02 FF 01 56 01 Page up… -
Page 77
Function Controlling codes Return codes Set display mode 7F 08 99 A2 B3 C4 02 FF 06 7F 09 99 A2 B3 C4 02 FF 06 XX XX CF 01 CF XX indicates the mode. 00 and 01 indicate standard and ECO modes respectively. -
Page 78
Function Controlling codes Return codes 7F 09 99 A2 B3 C4 02 FF 01 37 XX CF Power supply 7F 08 99 A2 B3 C4 02 FF 01 37 XX indicates the power on/off state. XX = 01: power on state ⚫… -
Page 79
Function Querying codes Return codes Backlight 7F 09 99 A2 B3 C4 02 FF 01 49 brightness XX CF 7F 08 99 A2 B3 C4 02 FF 01 49 CF XX indicates the value of backlight brightness (0 — 100), corresponding to the hexadecimal number system (00 — 64). -
Page 80: Faqs & Troubleshooting
FAQs & Troubleshooting Symptom Troubleshooting Methods The screen cannot be powered on or Check whether the power supply is connected. the power indicator light is off. Check whether the power supply plug is properly connected. Check whether the power outlet has electricity. Check whether the rocker switch is enabled.
-
Page 81
Symptom Troubleshooting Methods The touch function is abnormal or the Restart the screen. positioning is inaccurate. In the Windows system, recalibrate the screen. For details, see section «Calibration». The touch function is unavailable when Switch between different external signal sources. the external signal source channel is Ensure that the USB touch cable is connected to being used. -
Page 82
Symptom Troubleshooting Methods When the touch screen connects to Please use the remote control to start and turn off CEC facilities and powers down, touch the touch screen. Then you can use the CEC screen will stay in shut down mode facilities to recall it. -
Page 83: Specifications
Specifications Model TT-6519RS TT-7519RS TT-8619RS Display Backlight Display Area 56.24 x 31.63 in 64.97 in x 36.55 in 74.69 in x 42.05 in 1432 x 807mm 1652 x 930mm 1893 x 1069mm Active Screen Size 65 inch 75 inch 86 inch Display Ratio 16:9 Resolution…
-
Page 84
Model TT-6519RS TT-7519RS TT-8619RS Touch Touch Surface Anti-glare tempered glass Transparency Surface Hardness HID support 10 Points in Smart system Touch Points 20 Points in Windows Writing Tools Eraser, Stylus or Finger Scan Speed 10ms 10 ms 10 ms Center area 1.0 – 1.5 mm / Edge area 1.2 – 2.0 mm Positioning Accuracy Communication… -
Page 85
Flash 16GB build in + 32GB TF card Supports all major types of multi-media files Multimedia File Formats On Screen Annotation, Discussion Board, Gallery, Browser, Music, E-mail, Pre-installed File viewer, Keyboard, Office Viewer, Newline Cast, Newline Broadcast, applications Display Management… -
Page 86: More Information
More Information For More Information Please visit our website (www.newline-interactive.com) for detailed instruction manual. Contact Us for Support support@newline-interactive.com Please email us at Our company is devoted to product innovation and technology enhancement. Therefore, we may change product specification and information without notice. Product pictures in the…
Посмотреть инструкция для Newline TT-7519RS бесплатно. Руководство относится к категории мониторы, 2 человек(а) дали ему среднюю оценку 8.9. Руководство доступно на следующих языках: английский. У вас есть вопрос о Newline TT-7519RS или вам нужна помощь? Задайте свой вопрос здесь
Монитор Newline TT-7519RS имеет диагональ дисплея 75 дюймов. Он использует технологию LED для отображения высококачественных изображений. Разрешение дисплея составляет 3840 x 2160 пикселей, что обеспечивает четкость и детализацию изображений. Яркость дисплея составляет 370 кд/м², что обеспечивает яркое и насыщенное отображение.
Данный монитор имеет диагональ 16:9, что позволяет просматривать контент в широкоформатном режиме. Время отклика равно 8 мс, что делает изображение на экране плавным и без размытий. Контрастное соотношение составляет 4000:1, обеспечивая глубокие черные тона и реалистичные цвета.
Монитор Newline TT-7519RS обладает широкими углами обзора, как по горизонтали, так и по вертикали, составляющими 178°. Это позволяет получать качественное изображение даже при наблюдении с боковых и верхних углов. Активная площадь дисплея составляет 1651 х 929 миллиметров, что создает большую рабочую поверхность.
Конструкция данного монитора обеспечивает длительный срок службы до 30000 часов. Он также оснащен четырьмя портами HDMI, позволяющими подключать различные устройства для вывода видеосигнала.
В целом, монитор Newline TT-7519RS отличается высокой производительностью и качественным отображением изображений благодаря своим спецификациям и технологиям, которые делают его надежным и долговечным решением для выполнения задач, связанных с просмотром мультимедийного контента.
Главная
| Newline | |
| TT-7519RS | TT-7519RS | |
| монитор | |
| 8500083441148 | |
| английский | |
| Руководство пользователя (PDF), Техническая спецификация (PDF), Буклет (PDF) |
Экран
| Диагональ экрана | 75 « |
| Технолигия дисплея | LED |
| Разрешение экрана | 3840 x 2160 пикселей |
| Яркость дисплея | 370 cd/m² |
| Тип HD | 4K Ultra HD |
| Сенсорный экран | Да |
| Собственное форматное соотношение | 16:9 |
| Время отклика | 8 ms |
| Контрастность (типичная) | 4000:1 |
| Угол обзора по горизонтали | 178 ° |
| Угол обзора по вертикали | 178 ° |
| Количество цветов экрана | 1,073 миллиардов цветов |
| Активная область экрана (Ш х В) | 1651 x 929 mm |
| Срок работы панели | 30000 h |
| Тип LED подсветки | Direct-LED |
| Количество одновременных касаний (Windows) | 20 |
| Количество одновременных касаний (Android) | 10 |
| Технология сенсорного экрана | Инфракрасный |
Порты и интерфейсы
| Количество HDMI портов | 4 |
| Версия HDMI | 1.4/2.0 |
| Количество входных портов HDMI | 3 |
| Количество выходных портов HDMI | 1 |
| Порт DVI | Нет |
| Количество входов VGA (D-Sub) | 1 |
| Количество портов DisplayPort | 1 |
| Входы DisplayPort | 1 |
| USB порт | Да |
| Количество портов USB | 10 |
| Версия USB | 2.0/3.2 Gen 1 (3.1 Gen 1) |
| Подключение Ethernet | Да |
| Количество портов Ethernet LAN ( RJ-45) | 2 |
| Wi-Fi | Да |
| Аудио (Л/П) выход | 1 |
| Линейный вход микрофона | Да |
| RS-232 интерфейс | Да |
| Гнездо входа постоянного тока (DC) | Да |
| Слот модуля OPS | Да |
| Аудиовход для ПК | Да |
| Количество HDMI портов | 3 |
| Версия HDMI | 1.4/2.0 |
| Количество портов DisplayPort | 1 |
| Количество портов Ethernet LAN ( RJ-45) | 2 |
| Подключение микрофона | 3,5 мм |
| Интерфейс | — |
| Количество портов USB 3.2 Gen 1 (3.1 Gen 1) Type-A | 1 |
| Количество портов USB 2.0 | 9 |
| Тип USB коннектора | USB тип-A |
| Порт выхода S/PDIF | Да |
| Линейный выход | Да |
| Вход линии | Да |
| Количество портов VGA (D-Sub) | 1 |
| Версия DisplayPort | 1.2 |
| слот OPS | 1 |
Аудио
| Встроенные колонки | Да |
| Число встроенных динамиков | 2 |
| Номинальная RMS-мощность | 15 W |
| Встроенные колонки | Да |
| Число встроенных динамиков | 2 |
| Мощность динамика | 30 W |
Дизайн
| Дизайн продукта | Интерактивная плоская панель |
| Цвет товара | Черный |
| Поддерживаемое размещение | Для помещений |
| ориентация | Горизонтально |
| крепление VESA | Да |
| Крепление VESA | 800 x 400 mm |
Производительность
| Предназначение | Универсальная |
| Экранное меню (OSD) | Да |
| Over the Air Updates (OTA) | Да |
| Open Pluggable Specification (OPS) | Да |
| Тип ручки | Пассивное перо |
Энергопитание
| Потребляемая мощность (в обычном режиме) | 260 W |
| Потребляемая мощность (в режим ожидания) | 0.5 W |
| Входящее напряжение сети | 100 — 240 V |
| Частота входящего переменного тока | 50 — 60 Hz |
| Шкала классов энергоэффективности | от A+++ до D |
| Потребляемая мощность (в обычном режиме) | 260 W |
| Потребляемая мощность (в режим ожидания) | 0.5 W |
| Входящее напряжение сети | 100 — 240 V |
| Частота входящего переменного тока | 50 — 60 Hz |
| Шкала классов энергоэффективности | A — G |
| Класс энергоэффективности | F |
Компьютерная система
| Компьютерная система | Нет |
| Семейство процессоров | ARM Cortex |
| Модель процессора | A73 |
| Количество ядер процессора | 4 |
| Установленная операционная система | Android 8.0 |
| Оперативная память | 3 GB |
| Поддерживаемый видеоформат | AVS, AVS+, H.263, H.264, H.265, HEVC, HEVC/H.265, MPEG1, MPEG2, MPEG4, MVC, RV30, RV40, Sorenson H.263, VP8, VP9, WMV3 |
| Поддерживаемые операционные системы Windows | Windows 10, Windows 7, Windows 8, Windows 8.1, Windows Vista, Windows XP |
| Поддерживаемые операционные системы Mac | Да |
| Поддерживаемые форматы изображения | BMP, JPEG, PNG |
| Поддерживаемые форматы аудио | AAC-LC, AC3, Cook Codec, EAC3, FLAC, G.711, G.711 A-law, G.711 μ-law, HE-AAC, LBR, LC-AAC, LPCM, MS-ADPCM, Vorbis, WMA |
| Встроенный процессор | Да |
| Модель встроенного графического адаптера | ARM Mali-G51 MP2 |
| Количество ядер процессора | 4 |
| Установленная операционная система | Android 8.0 |
| Пользовательская память | 16 GB |
| Встроенный процессор | Да |
| Семейство графического адаптера | ARM |
| Видеокарта | Mali-G51 MP2 |
| Архитектура процессора | ARM Cortex A73 + ARM Cortex A53 |
| Емкость RAM | 3 GB |
Прочие свойства
| Пользовательская память | 16 GB |
| Инструкция | Да |
| Краткая инструкция пользователя | Да |
| Защита от перегрева | Да |
| Полное сопротивление | 8 Ω |
| Подключение микрофона | 3,5 мм |
Вес и размеры
| Ширина | 1770 mm |
| Глубина | 109 mm |
| Высота | 1071 mm |
| Вес | 56000 g |
| Ширина | 1770 mm |
| Глубина | 109 mm |
| Высота | 1071 mm |
| Вес | 56000 g |
Данные об упаковке
| Ширина упаковки | 1894 mm |
| Глубина упаковки | 247 mm |
| Высота упаковки | 1193 mm |
| Масса брутто | 73000 g |
| Ширина упаковки | 1894 mm |
| Глубина упаковки | 247 mm |
| Высота упаковки | 1193 mm |
| Масса брутто | 73000 g |
Содержимое упаковки
| Пульт дистанционного управления | Да |
| Поставляемые кабели | Кабель переменного тока |
| Пульт дистанционного управления | Да |
| Инструкция | Да |
| Краткая инструкция пользователя | Да |
| Поставляемые кабели | Кабель переменного тока |
| Тип стилуса | Пассивный |
Условия эксплуатации
| Диапазон температур при эксплуатации | 0 — 40 °C |
| Диапазон относительной влажности при эксплуатации | 20 — 80 % |
| Диапазон температур при хранении | -20 — 60 °C |
| Диапазон относительной влажности при хранении | 0 — 90 % |
| Диапазон температур при эксплуатации | 0 — 40 °C |
| Диапазон относительной влажности при эксплуатации | 20 — 80 % |
| Диапазон температур при хранении | -20 — 60 °C |
| Диапазон относительной влажности при хранении | 0 — 90 % |
Технические характеристики
| Сертификаты устойчивого развития | ENERGY STAR |
Свойства
| Диагональ экрана | 75 « |
| Разрешение экрана | 3840 x 2160 пикселей |
| Яркость дисплея | 370 cd/m² |
| Тип HD | 4K Ultra HD |
| Сенсорный экран | Да |
| Сенсорная технология | Мультисенсорный |
| Время отклика | 8 ms |
| Угол обзора по горизонтали | 178 ° |
| Угол обзора по вертикали | 178 ° |
| Количество цветов экрана | 1,073 миллиардов цветов |
| Тип LED подсветки | Direct-LED |
| Тип сенсорного экрана | Инфракрасный |
| Контрастность (динамическая) | 4000:1 |
| Технология | Инфракрасный (ИК) |
Сеть
| Подключение Ethernet | Да |
| Wi-Fi | Да |
Эргономика
| Цвет товара | Черный |
| крепление VESA | Да |
| Крепление VESA | 800 x 400 mm |
| Среднее время наработки на отказ | 50000 h |
Системные требования
| Поддерживаемые операционные системы Windows | Windows 10, Windows 7, Windows 8, Windows 8.1, Windows Vista, Windows XP |
| Поддерживаемые операционные системы Mac | Да |
Устойчивость
| Сертификаты устойчивого развития | ENERGY STAR |
показать больше
Не можете найти ответ на свой вопрос в руководстве? Вы можете найти ответ на свой вопрос ниже, в разделе часто задаваемых вопросов о Newline TT-7519RS.
Каковы размеры экрана монитор?
Размер монитор обычно выражается в дюймах, 1 дюйм — 2,54 сантиметра. Под размером понимается размер диагонали монитор, поэтому экран необходимо измерять от нижнего левого угла к верхнему правому.
Что такое HDMI?
HDMI расшифровывается как «интерфейс для мультимедиа высокой четкости». Кабель HDMI используется для передачи аудио- и видеосигналов между устройствами.
Какой вес Newline TT-7519RS?
Newline TT-7519RS имеет вес 56000 g.
Какой размер экрана Newline TT-7519RS?
Размер экрана Newline TT-7519RS составляет 75 «.
Какая высота Newline TT-7519RS?
Newline TT-7519RS имеет высоту 1071 mm.
Какое разрешение экрана дисплея Newline TT-7519RS?
Разрешение экрана Newline TT-7519RS следующее 3840 x 2160 пикселей.
Какая ширина Newline TT-7519RS?
Newline TT-7519RS имеет ширину 1770 mm.
Какая толщина Newline TT-7519RS?
Newline TT-7519RS имеет толщину 109 mm.
Какой тип USB-подключения Newline TT-7519RS имеет?
Newline TT-7519RS имеет USB тип-A подключение.
Какую маркировку энергоэффективности Newline TT-7519RS имеет?
Newline TT-7519RS имеет маркировку энергоэффективности F.
Инструкция Newline TT-7519RS доступно в русский?
К сожалению, у нас нет руководства для Newline TT-7519RS, доступного в русский. Это руководство доступно в английский.
Не нашли свой вопрос? Задайте свой вопрос здесь


i
Contents
About This Document …………………………………………………………………………………………………. 5
Safety Instruction ………………………………………………………………………………………………………… 6
1 Overview ………………………………………………………………………………………………………………….. 9
1.1 Introduction ……………………………………………………………………………………………………………………………………….. 9
1.2 Parts …………………………………………………………………………………………………………………………………………………. 9
1.3 Ports …………………………………………………………………………………………………………………………………………………12
1.4 Remote Control ………………………………………………………………………………………………………………………………….16
2 Installation Guide …………………………………………………………………………………………………… 18
2.1 Safety Precautions ……………………………………………………….……………………………………………………………………..18
2.2 Installation Precautions ………………………………………………………………………………………………………………………..19
2.3 Installation ……………………………………………………….……………………………………………………………………………….20
2.4 Installing the Internal PC (Optional)……………………………………………………………………………………………………….21
2.5 Installing Newline Assistant ………………………………………………………………………………………………………………….23
3 Getting Started ……………………………………………………………………………………………………….. 24
3.1 Power On ………………………………………………………………………………………………………………………………………….24
3.2 Power Off ………………………………………………………………………………………………………………………………………….25
3.3 Calibration ……………………………………………………….……………………………………………………………………………….25
4 Operating the Touch Screen ……………………………………………………………………………………. 28
4.1 Start Screen ……………………………………………………………………………………………………………………………………….28
4.2 Home ………………………………………………………………………………………………………………..……………………………..29
4.3 System Settings ………………………………………………………………………………………………………………………………….33
4.3.1 Network Settings …………………………..…………………………………………………………………………………………………33
4.3.2 Language and Input Settings ……………………………………………………….……………………………………………………..34
4.3.3 Storage …………………………………………………………………………………………………………………………………………..36
4.3.4 Applications ……………………………………………………………………………………………………………………………………37
4.3.5 Whiteboard ……………………………………………………………………………………………………………………………………..37
4.3.6 Smart Eye Protection ………………………………………………………………………………………………………………………..37
4.3.7 Date and Time Settings ……………………………………………………………………………………………………………………..38
4.3.8 Power Settings …………………………………………………………………………………………………………………………………40
4.3.9 Tool Bar Settings …………………………..…………………………………………………………………………………………………41

ii
4.3.10 Input/Output Settings ………………………………………………………………………………………………………………………42
4.3.11 Display & Theme Settings ………………………………………………………………………………………………………………..43
4.3.12 Security Settings …………………………..………………………………………………………………………………………………..43
4.3.13 System………………………………………………………………………………………………………………..………………………..44
4.4 Windows …………………………………………………………………………………………………………………………………………..44
4.5 Screen Sharing …………………………………………………………………………………………………………………………………..45
4.6 Whiteborad ………………………………………………………………………………………………………………………………………..45
4.6.1 Whiteboard Functions ……………………………………………………………………………………………………………………….48
4.6.2 Page Management ……………………………………………………………………………………………………………………………57
4.6.3 Object Detection ………………………………………………………………………………………………………………………………59
4.7 Browser…………………………………………………………………………………………………………………………………………….61
4.8 File Management ………………………………………………………………………………………………………………………………..61
4.8.1 File Viewer Page………………………………………………………………………………………………………………………………61
4.8.2 File Preview ……………………………………………………………………………………………………………………………………62
4.8.3 File Search ……………………………………………………………………………………………………………………………………..62
4.8.4 File Filtering ……………………………………………………….…………………………………………………………………………..63
4.8.5 New Folder……………………………………………………….…………………………………………………………………………….64
4.8.6 File Operation………………………………………………………………………………………………………………………………….64
4.8.7 File Name ……………………………………………………………………………………………………………………………………….64
4.9 Gadget ……………………………………………………………………………………………………………………………………………..65
4.10 Add Shortcut ……………………………………………………………………………………………………………………………………66
4.10.1 Add Shortcuts to Home Page …………………………………………………………………………………………………………….66
4.10.2 Add Quick Start Windows Programs in Smart System …………………………………………………………………………..68
4.11 Preview window ……………………………………………………………………………………………………………………………….71
4.12 Automatically Power Off ………………………………………………………………………………………………………………..….71
5 Quick Setting Menu ………………………………………………………………………………………………… 72
6 Serial Port Control …………………………………………………………………………………………………… 74
7 FAQs & Troubleshooting ………………………………………………………………………………………… 79
8 Specifications ………………………………………………………………………………………………………….. 82
9 More Information ……………………………………………………………………………………………………. 85

Welcome to the world of Newline
Thank you for choosing the RS series Interactive Touch Screen. Please use this document to
get the most out of your screen.
This device complies with part 15 of the FCC Rules. Operation is subject to the following two
conditions: (1) This device may not cause harmful interference, and (2) this device must
accept any interference received, including interference that may cause undesired operation.
NOTE 1: This equipment has been tested and found to comply with the limits for a Class B
digital device, pursuant to part 15 of the FCC Rules. These limits are designed to provide
reasonable protection against harmful interference in a residential installation. This equipment
generates, uses, and can radiate radio frequency energy and, if not installed and used in
accordance with the instructions, may cause harmful interference to radio communications.
However, there is no guarantee that interference will not occur in a particular installation. If
this equipment does cause harmful interference to radio or television reception, which can be
determined by turning the equipment off and on, the user is encouraged to try to correct the
interference by one or more of the following measures:
Reorient or relocate the receiving antenna.
Increase the separation between the equipment and receiver.
Connect the equipment into an outlet on a circuit different from that to which the
receiver is connected.
Consult the dealer or an experienced radio/TV technician for help.
NOTE 2: Any changes or modifications to this unit not expressly approved by the party
responsible for compliance could void the user’s authority to operate the equipment.
The symbol of the crossed out wheeled bin indicates this product should not be placed in
municipal waste. Instead, dispose of waste equipment by taking it to a designated collection
point for electrical and electronic equipment recycling.

4
Energy Star Compliance.
Signage Displays with Plug-in Module.
As an ENERGY STAR Partner, Newline Interactive Inc., has followed the EPA’s enhanced
Product qualification and certification process to ensure that the products marked with the
ENERGY STAR logo are ENERGY STAR qualified per the applicable ENERGY STAR
guidelines for energy efficiency. The logo appears on the pen tray near front connections on
all ENERGY STAR qualified Signage Displays.
The ENERGY STAR program for Signage Displays was created by EPA to promote energy
efficiency and reduce air pollution through more energy-efficient equipment in offices,
classrooms and factories. One way that a product achieve this goal is by using a power
management feature to reduce power consumption when the product is not in use.
For TT—6519RS and TT—7519RS, sleep mode can be initiated in a couple different
ways. Users can take the action of pressing the power button on the panel for 3 seconds, or a
remote command can be sent via RS232. The panel will also go into sleep mode without
user action after 3 hours of inactivity.
TT—6519RS and TT—7519RS can exit sleep mode by the user pressing the power button, or
by the proximity sensors detecting a user’s presence, or through a remote command via
RS232. In the event of a proximity detection, the panel will transition from sleep mode to
another low power mode, STAND BY.
In the event that brightness settings or power mode settings are changed by the user, energy
consumption of the panel may increase beyond the limits required for ENERGY STAR
certification.
Additional information on the ENERGY STAR program and its environmental benefits are
available on the EPA ENERGY STAR Power Management website at
http://www.energystar.gov/powermanagement.
Additional information on the ENERGY STAR program and its environment benefits are
available on the EPA ENERGY STAR website at http://www.energystar.gov
For production, above information will need to be available for the Energy Star V8 build from
27th January 2020.
Manufacturer-reported maximum luminance LMax Reported is 370cd/m2.
5
About This Document
This document describes multiple functions, instructions, and notes about the product.
Symbols are used in this document to indicate operations that need particular attention. The
symbols are defined as follows:
Provides additional information to supplement
operation in the main text.
Provides tips for operation.
Indicates a potentially hazardous situation that, if not
avoided, could result in equipment damage, data loss,
performance deterioration, or unanticipated results.
Indicates a hazard with risk that, if not avoided, could
result in death or injury.
6
Safety Instruction
For your safety, please read the following instruction before you use the product. Serious injury or property
damage may be caused by improper operations. Do not try to repair the product on your own.
Disconnect the product from the power supply immediately if major failures occur.
Major failures include the following:
If smoke, a peculiar smell or an abnormal sound is discharged from the product.
No image or sound is displayed, or the image error occurs.
In the preceding scenarios, do not continue to use the product. Disconnect power supply
immediately and contact professional staff for troubleshooting.
Do not drop any liquids, metal, or anything combustible onto the product.
If any liquids or metal are dropped onto or into the product, power off the product and
disconnect the power supply. Then contact professional staff for solutions.
Pay attention to children when they are close to the product.
Put the product on a stable surface.
An unstable surface includes, and is not limited to, an inclined plane, a shaky stand, desk or
platform, that might cause the product to turnover and be damaged.
Do not open the panel or change the product on your own.
High voltage components are installed in the product. When you open the panel, high voltage,
electric shock, or other dangerous situations may occur.
If inspection, adjustment, or maintenance is required, contact the local distributor for help.
Use the provided power supply.
To prevent the product from being damaged, do not use any types of power cables other than
the one provided with the product.
Use a three-wire socket and ensure that it is properly grounded.
Pull out the power plug from the socket if the product is not used for a long period.
Clean the power plug regularly.
Fire or electric shock may be caused if the product is powered on while you are cleaning.
Pull out the power plug before cleaning it with a dried cloth.
Power output port is 5V/2A.
The voltage/current of the rear power output port is 5V/2A (maximum). Purchase the power
code/AC adapter according to customer needs. The port can be used for the Newline X10D
Android box. Please do not connect any products with different power requirement. Otherwise,
it may cause damage to products or fire.
Do not put items on the top of the product.
Do not put items, such as a container for liquid (a vase, flowerpot, cosmetics, or liquid
medicine) on the top of the product.
If any water or liquid is spilled on the product, the product may short circuit and cause fire or
electric shock.
Do not walk on or hang any items on the product.
Do not install the product in an improper place.
Do not install the product in humid places, such as the bathroom, the shower room, near
windows, or outdoor environments that experience rain, snow, or other harsh weather. Avoid
installation near hot spring vapor. The preceding environments may cause faults in the product
or electric shock under extreme conditions.
Do not put an exposed fire source, such as a lit candle, on the product.
Pull out the power supply during thunderstorms.
Do not touch the product during a lighting storm, you may experience an electric shock.
Install or place components that supply high enough voltage to cause personal injury out of the
reach of children.
Do not touch the power cable with wet hands.
Do not install the product in high temperature environments.
Do not install the product near a heat source, such as a radiator, a heat reservoir, a stove, or
other heating products.
Do not expose the product to direct sunlight, which may cause high temperatures and
subsequent faults in the product.
When transporting the product:
Pack the product for transport or maintenance by using the cartons and cushioning material
provided with the product.
Move the product vertically during transport. The screen or other components are easily
broken if the product is moved in an improper way.
Before you move the product, disconnect all external connections and separate all topple
preventing products. Move the product carefully to prevent it from being hit or squeezed,
especially the screen, which may cause injury if broken.
Do not cover or block up any vents on the product.
Any overheated components may cause fire, damage the product, and shorten the service life.
Do not lay the product down in a way where the venting surface will be covered.
Do not install the product on carpet or cloth.
Do not use a cloth, such as table cloth, to cover the product.
Keep the product away from the radio.
The product complies with the international EMI standard to pervent radio interference.
However, interference may still exists and causes noise in the radio. If noise occurs in the radio,
try the following solutions.
Adjust the direction of the radio antenna to avoid the interference from the product.
Keep the radio away from the product.
If the screen glass is broken or falls off:
Keep all personnel 10 feet away from the screen to ensure safety.
Do not perform any installation or disassembly while the screen glass is broken or has fallen
off.
Use the battery correctly.
Galvanic corrosion, electric leakage, and even fire may be caused by improper battery usage.
It is recommended to use the designated type of battery and install the battery by the correct
electrodes (positive and negative).
Do not install and use a new battery with a used one.
Take out the battery if the remote control is not used for a long period.
Do not expose the battery to overheated environments, such as sunlight or heat sources.
Dispose of the used battery based on your local regulations.
Do not damage the power cable.
Do not damage, change, twist, bend, or forcibly drag the power cable.
Do not put weights (such as the product itself) on the power cable.
Do not forcibly drag the cable when you pull out the power plug. If the power cable is
damaged, please contact the local distributor to repair or replace it.
The power cable in the accessory box is for this product only. Do not use it on other products.
Additional advice:
Use the product in an environment with comfortable lighting. It is harmful to your eyes to
watch in a too bright or too dark environment.
Relax your eyes watching for a period of time.
Keep sufficient distance from the product to protect your eyes and prevent eyestrain.
Adjust the volume to an appropriate level, especially at night.
Use amplifier equipment as the audio input source with caution. If you must use amplifier
equipment, the input power should not exceed the maximum of speaker power. Otherwise, the
speaker can become overpowered and damaged.
About USB port.
Front USB ports and rear USB 3.0/USB 2.0 ports switch connections based on signal sources. If
the current signal source is reading the data from an external product connecting to the port,
please switch the signal source after the data reading is complete. Otherwise, the data or product
may be damaged.
9
1 Overview
1.1 Introduction
Take collaboration to the next level with the RS interactive display.
Increase productivity and collaboration across the board with a display that uses advanced
touch technology.
Each product can be customized to fit your needs. The non-proprietary nature lets you use the
software you prefer, take notes on local files, wirelessly cast to the screen from smaller
devices, run your favorite apps, and view multimedia files, all while making your experience
better than before.
The newline‘s 4K Ultra High-Definition LED screen also provides a fluid writing experience.
Annotate over anything on the screen, whether in the embedded whiteboard or while using
any other device. IntelliTouch automatically identifies pen thickness and color, saving you
time.
1.2 Parts
Front View
10
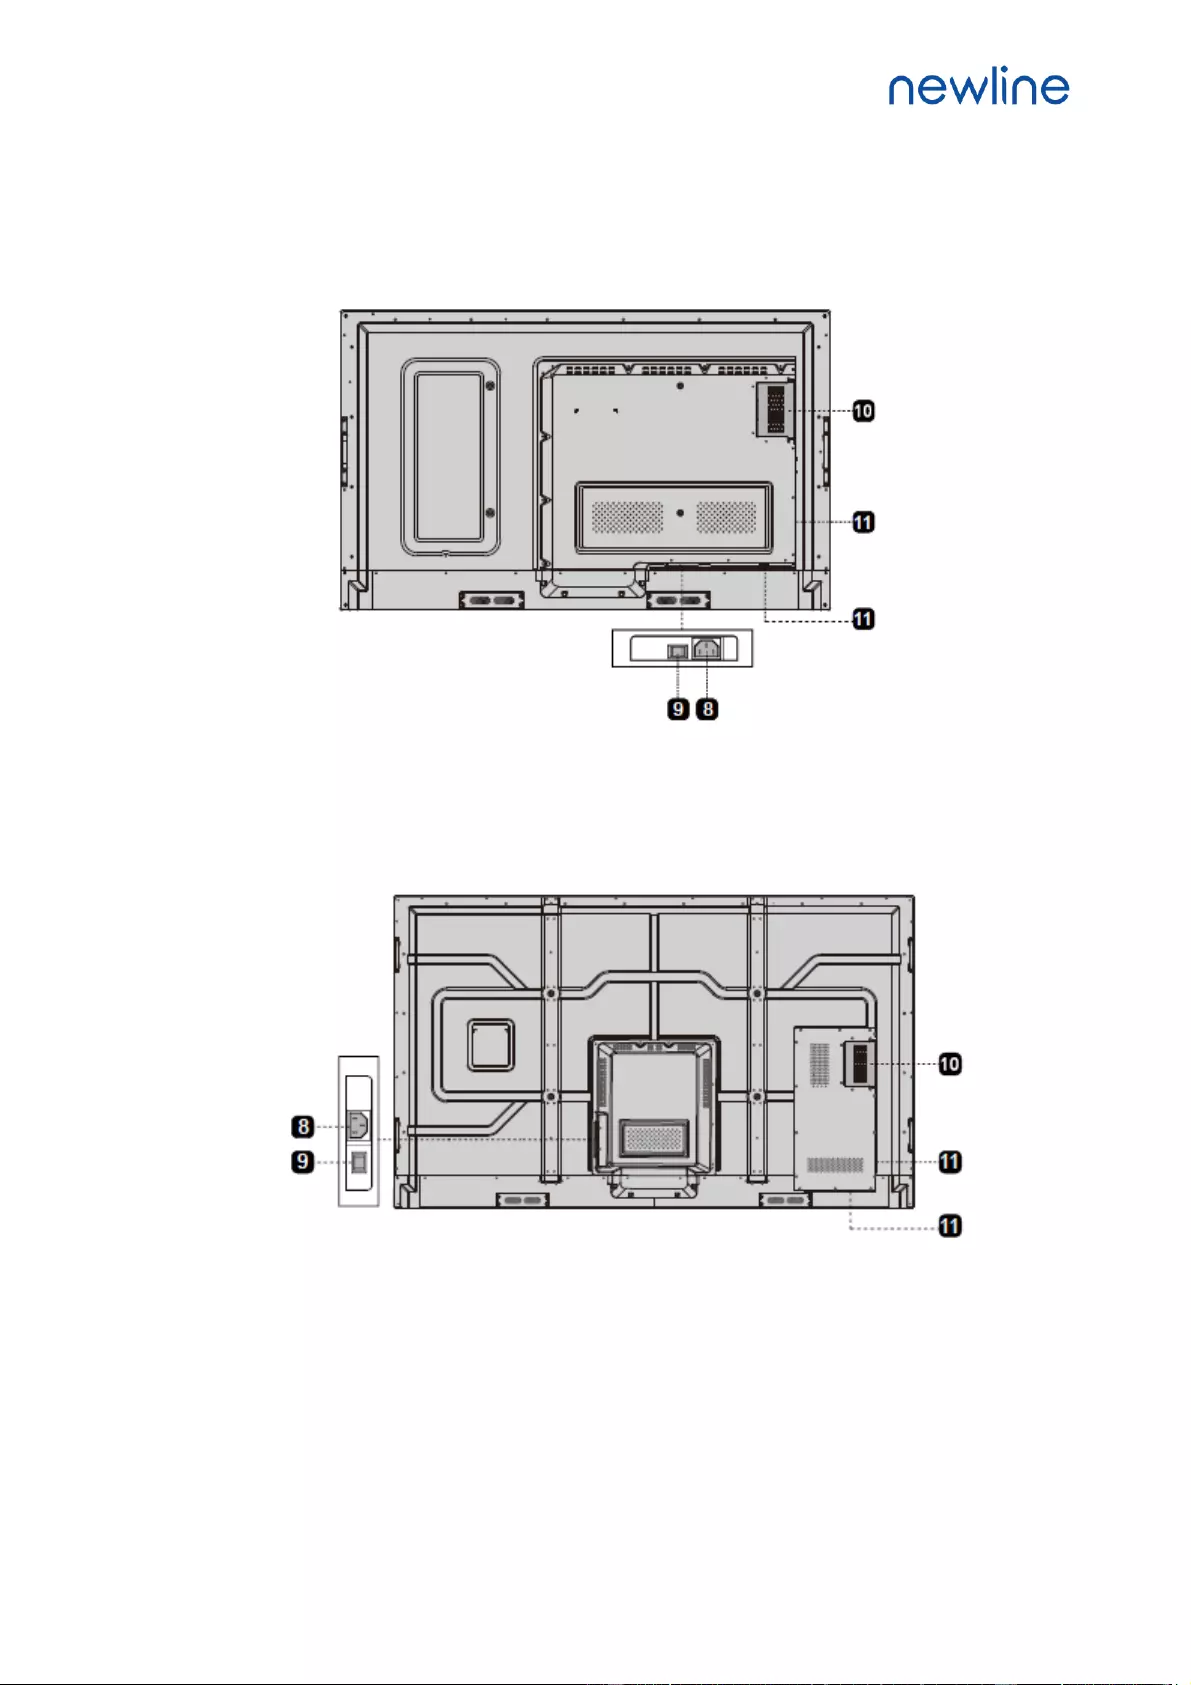
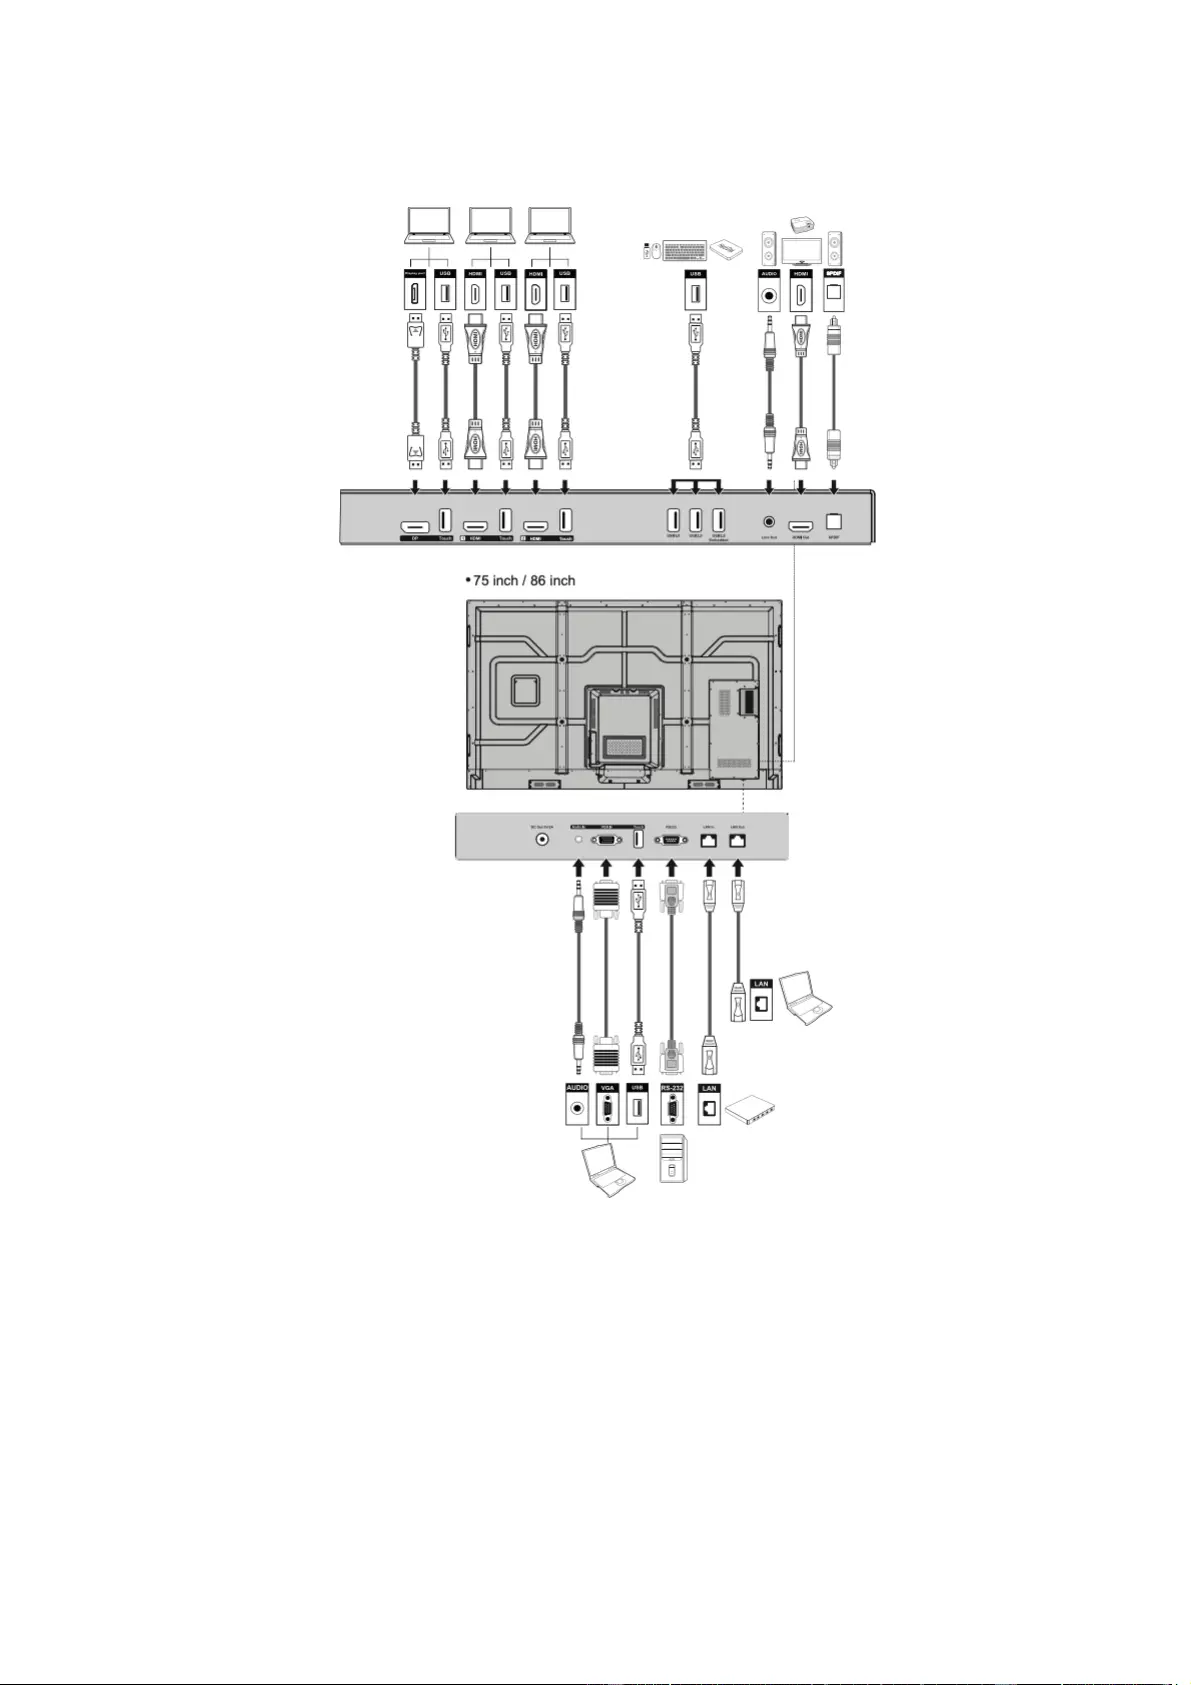
Rear View
65 inch:
75 inch/86 inch:

12
1.3 Ports
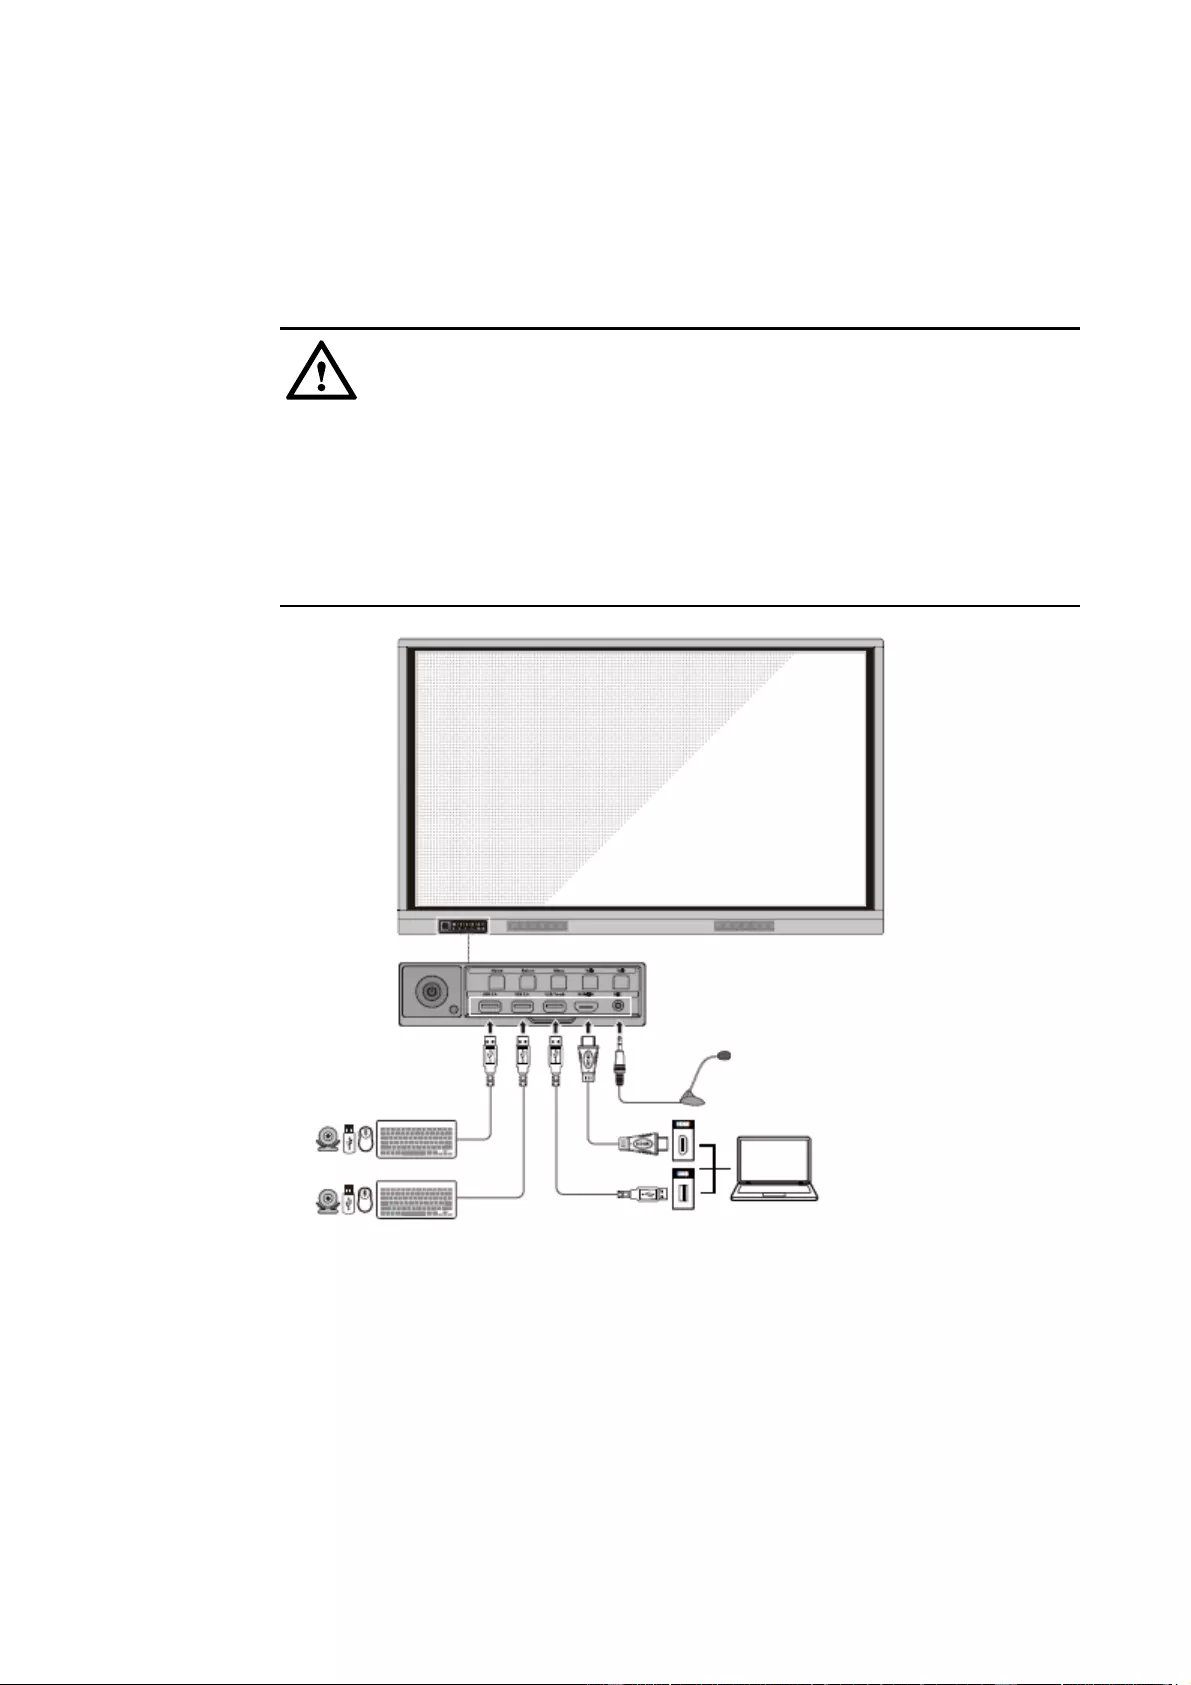
Front Ports
Front USB ports and rear USB 3.0/USB 2.0 ports switch connections based on signal sources.
If the current signal source is reading the data from an external product connecting to the
port, please switch the signal source after the data reading is complete. Otherwise, the data
or product may be damaged.
For USB consumption, USB 2.0 provides up to 500ma whereas USB 3.0 provides up to
900ma. Kindly please make sure your USB flash drive which inserts to the display port is
FAT32 format .
Rear Ports
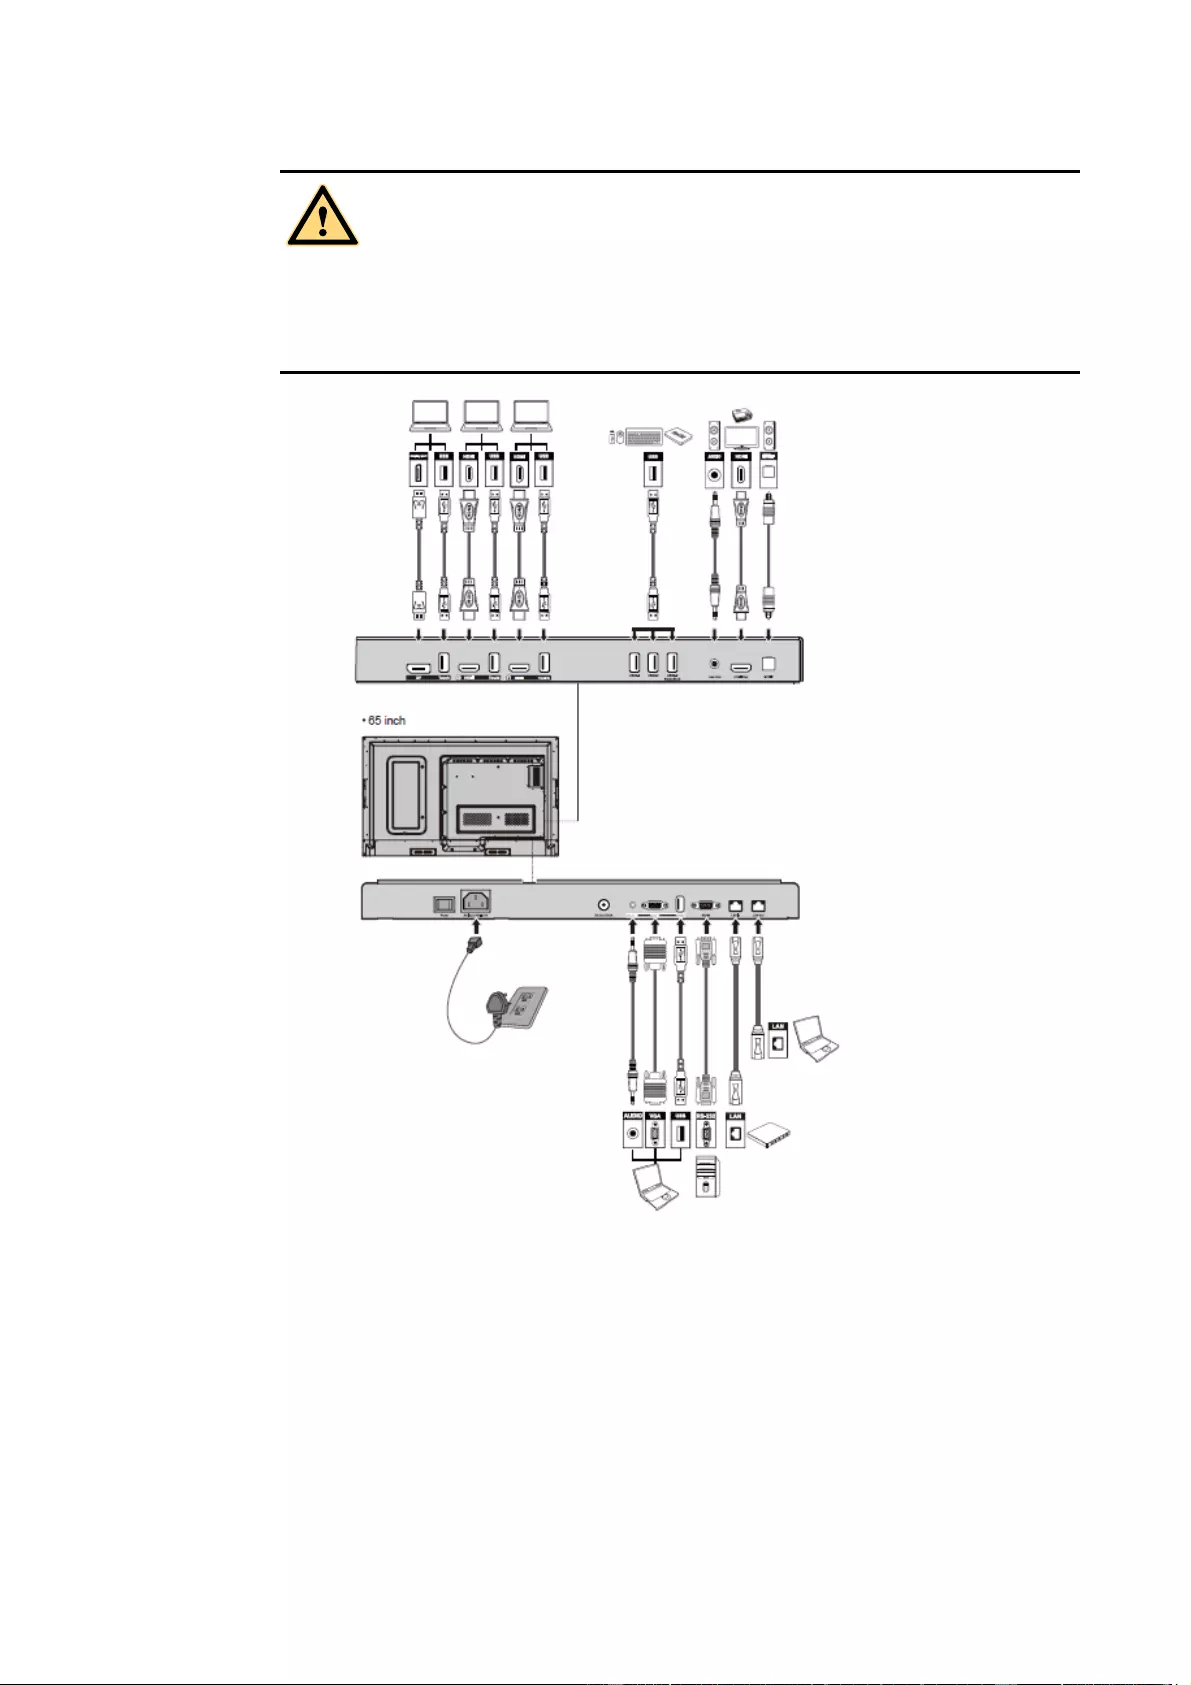
13
The voltage/current of the rear power output port is 5V/2A (maximum). Purchase the power
code/AC adapter according to customer needs. The port can be used for the Newline X10D
Android box. Please do not connect any products with different power requirement. Otherwise
it may cause the damage to products or fire.
Power on/off
Steady red color: Display is in shut down mode
Steady white color: Display is on and working
Return to the last menu/Exit
Long Press for
More than 2
Seconds
Decrease the sound volume
Long press for more
than 1 second
Continously decrease the sound volume
Increase the sound volume
Long press for more
than 1 second
Continuously increase the sound volume
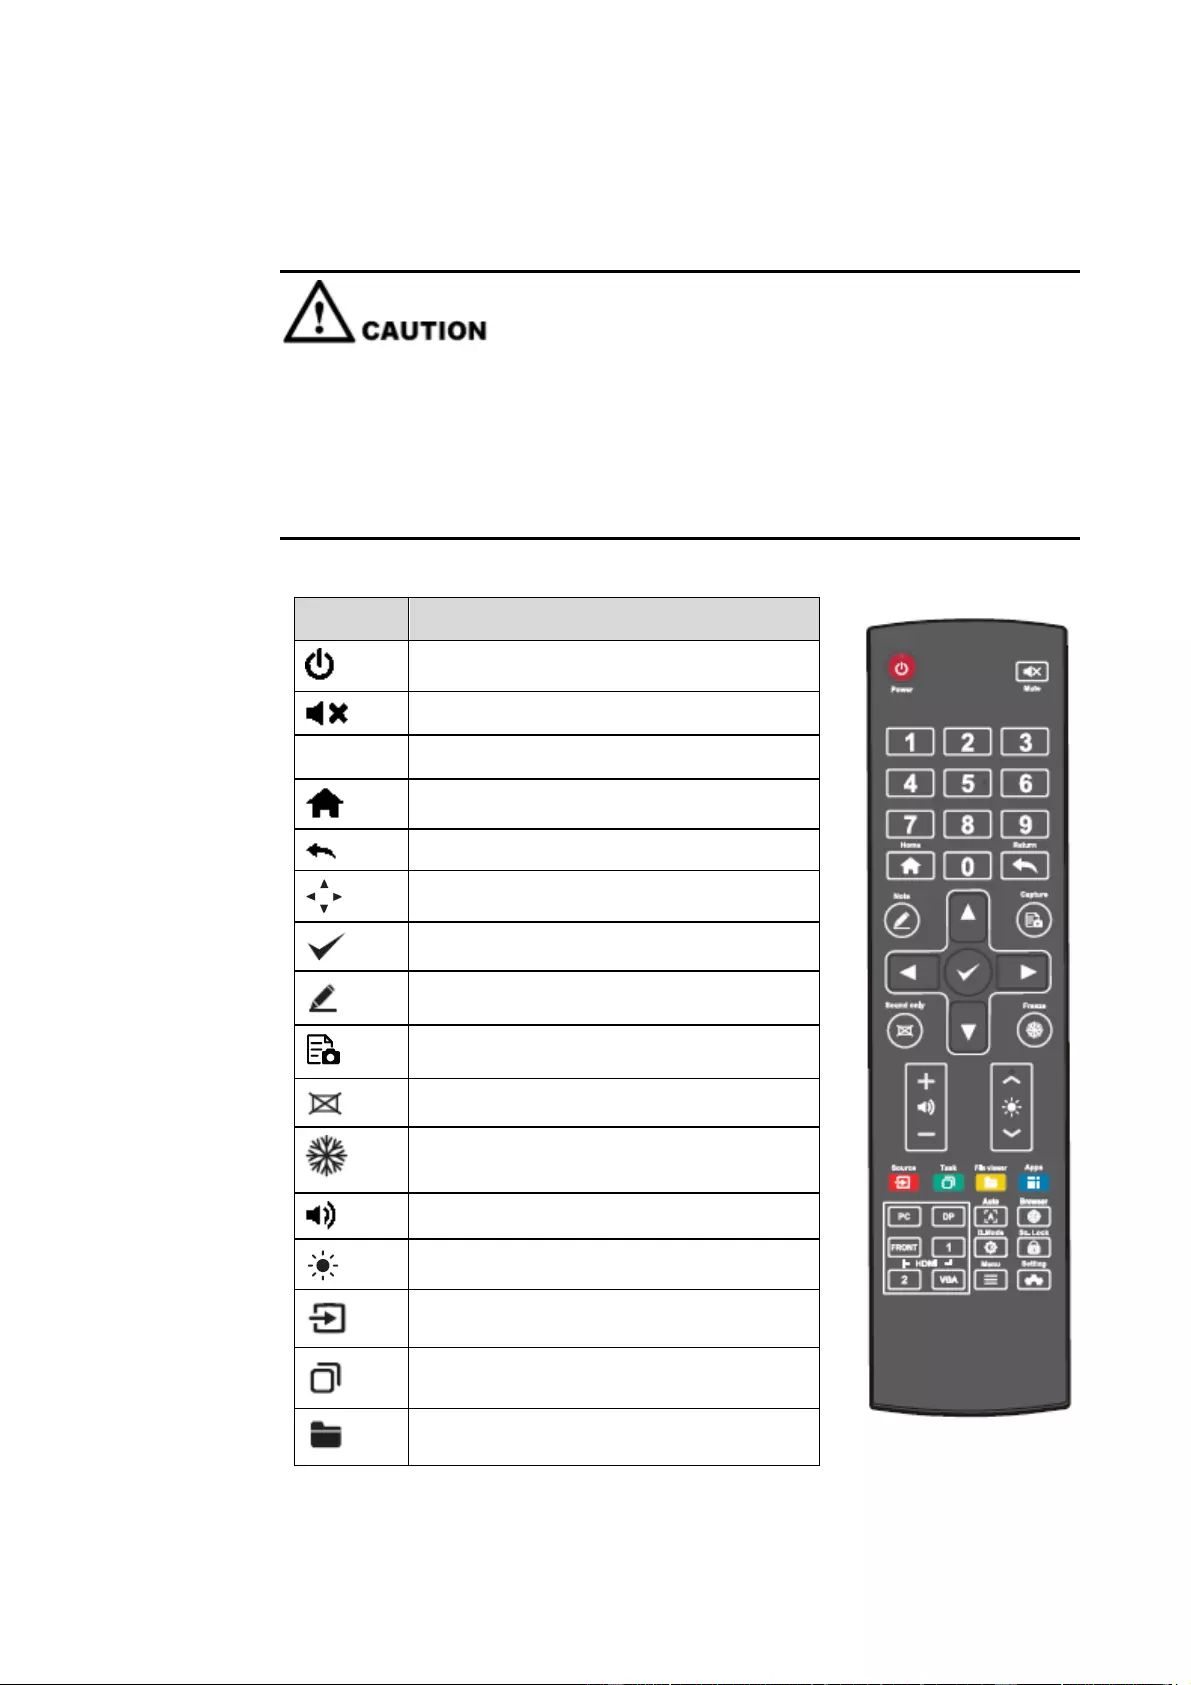
16
1.4 Remote Control
Carefully read the following instructions before using the remote control to avoid possible
faults:
Do not drop or damage the remote control.
Do not spill water or other liquids on the remote control.
Do not place the remote control on a wet object.
Do not place the remote control directly under sunlight or near a heat source.
Freeze the Current Screen, Click Again to
Exit Freeze Function
Enter the Source Selection Page
View Currently Running Applications
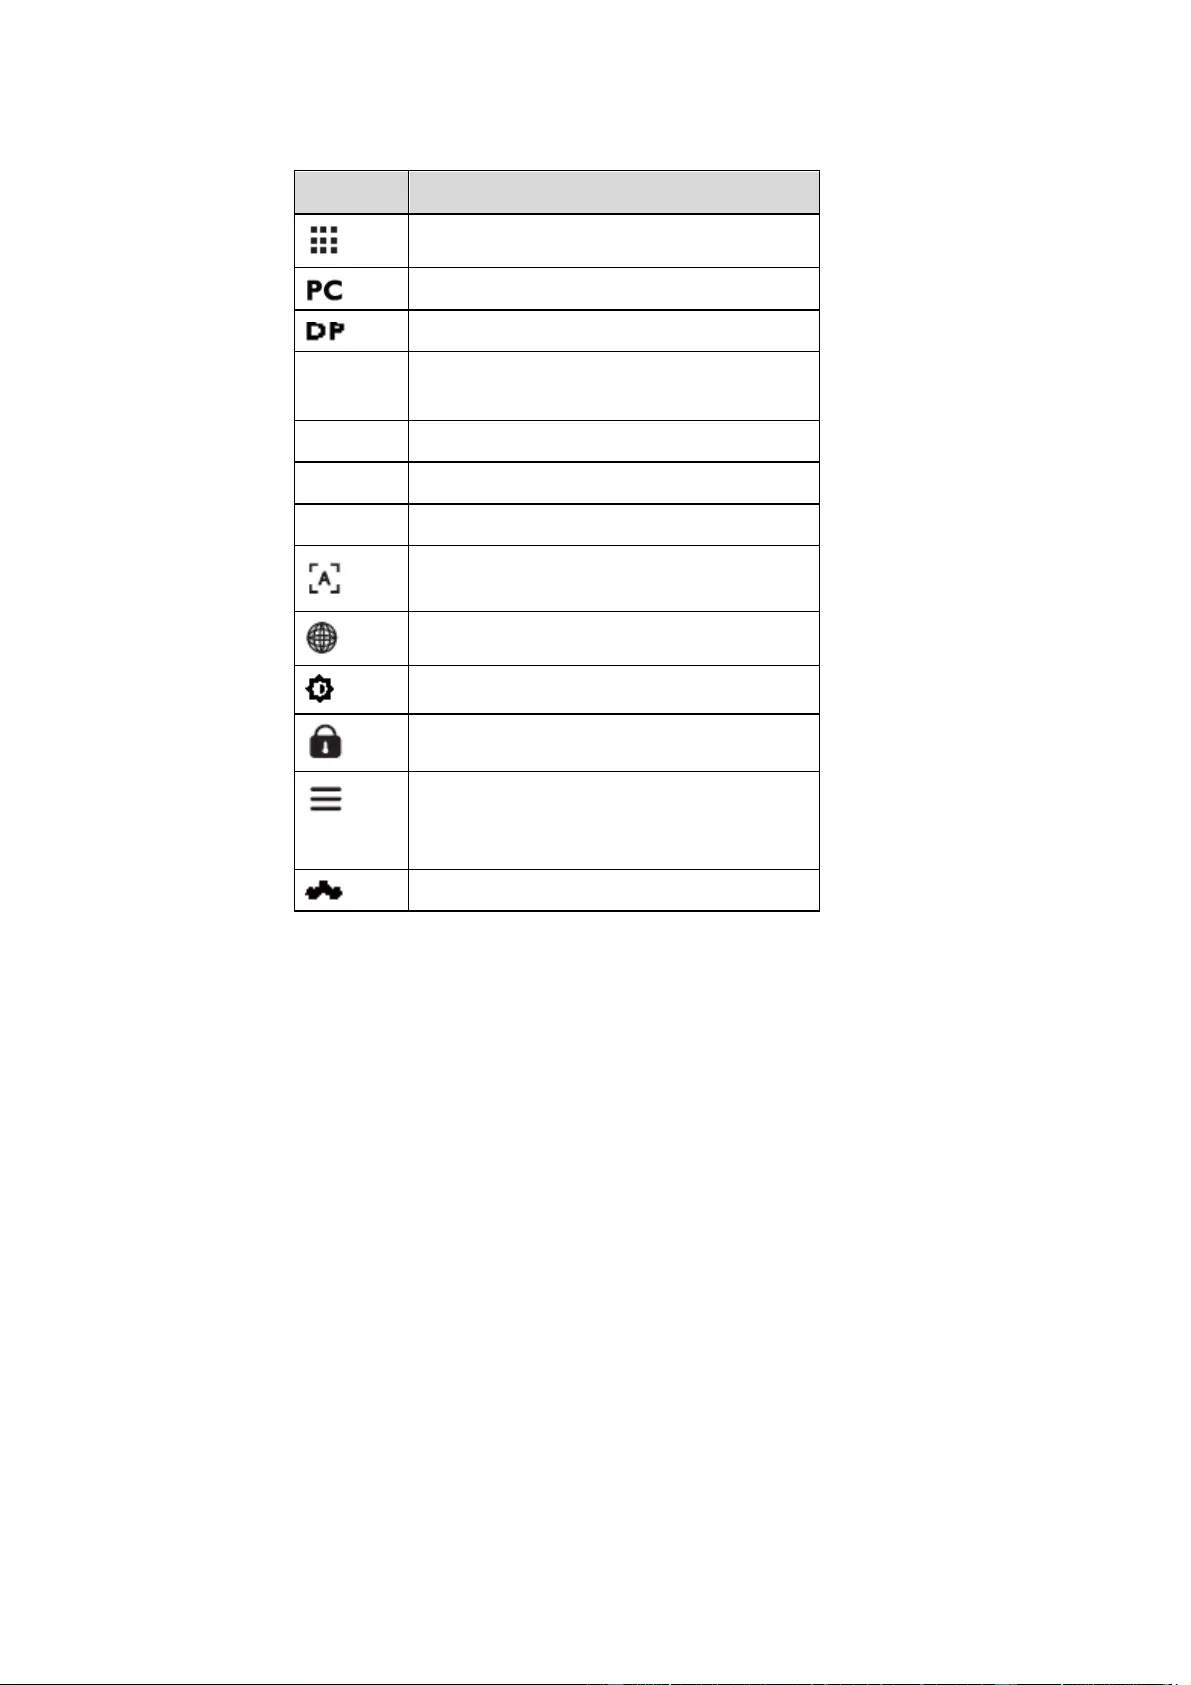
View all Pre-installed Applications
Switch Source to Internal PC
Switch Source to Display Port
Switch Source to HDMI Front
Autocorrection Screen Display (For VGA
Signal Source)
Open the Browser Application
Toggle Display Backlight Mode
Start/Exit the Screen Lock Function
Open the Menu (Short Press)
Screen Lock (Long Press for More than 2
Second)
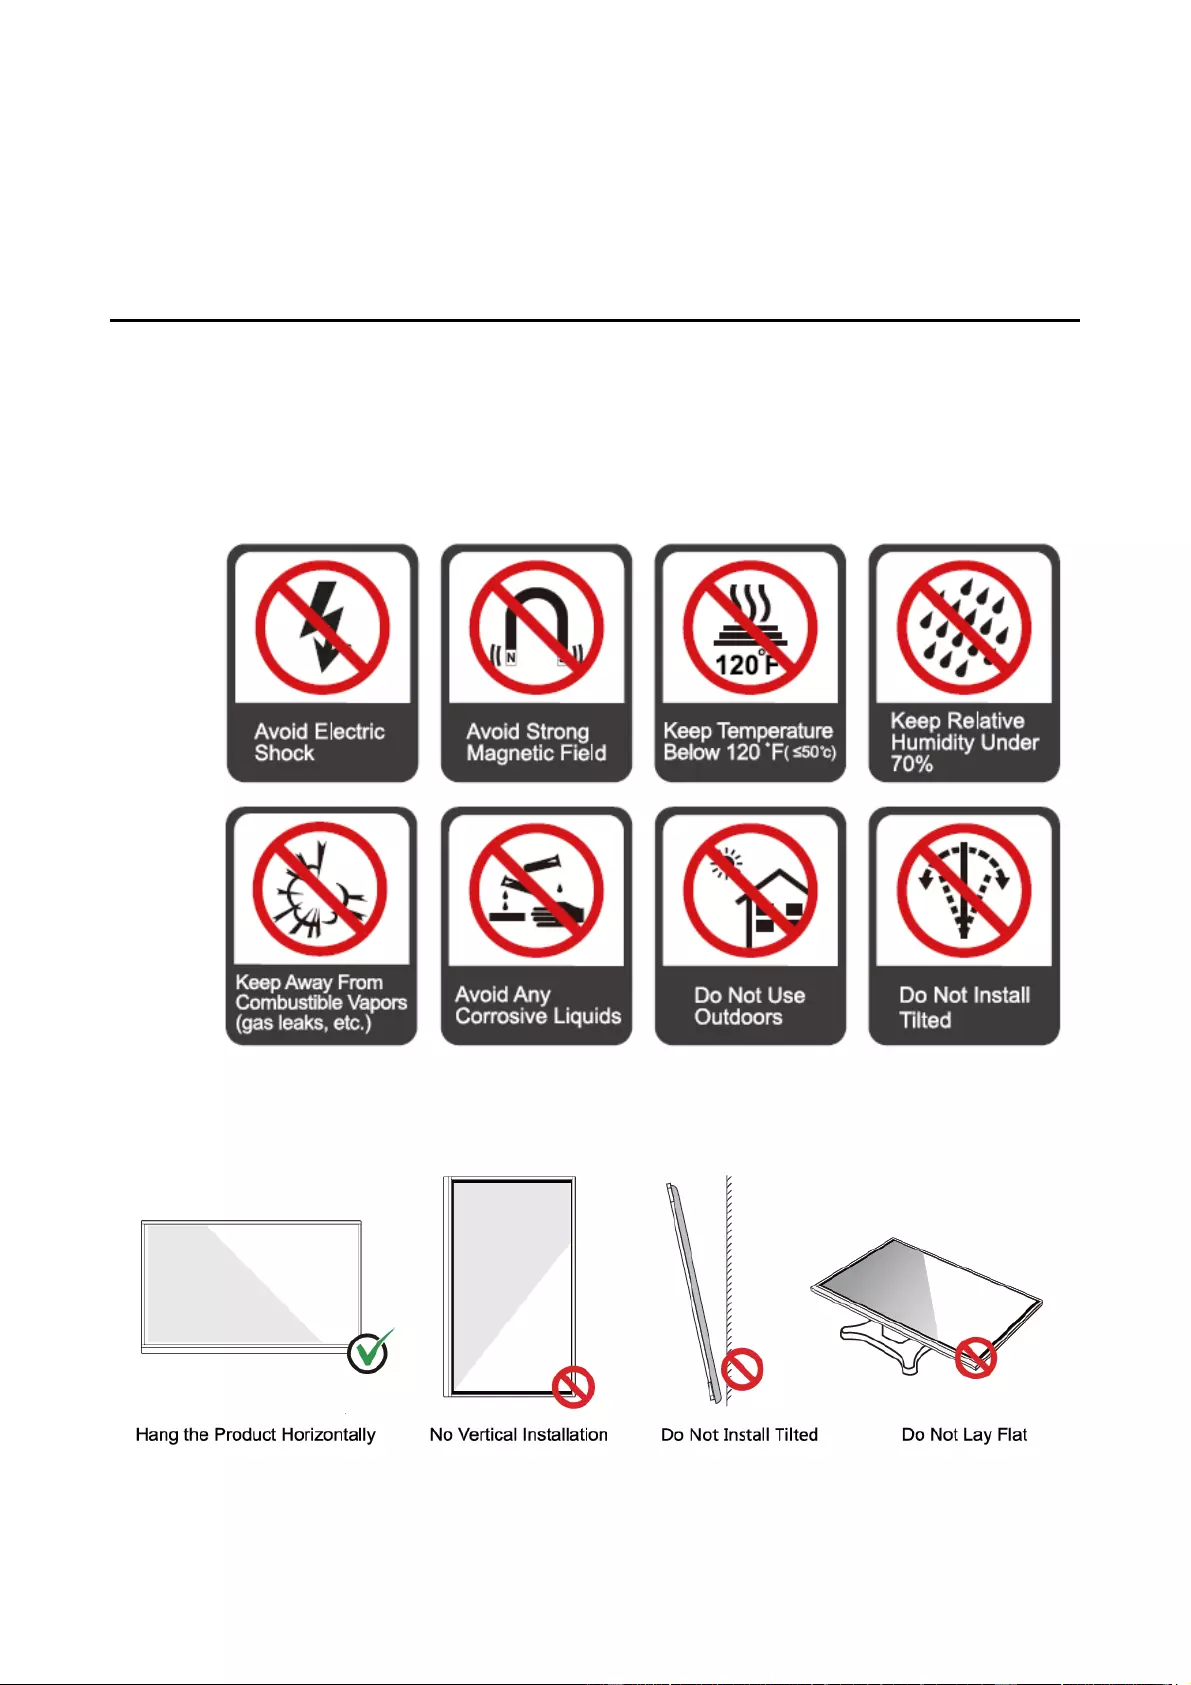
18
2 Installation Guide
2.1 Safety Precautions
Installation Environment
Installation Direction
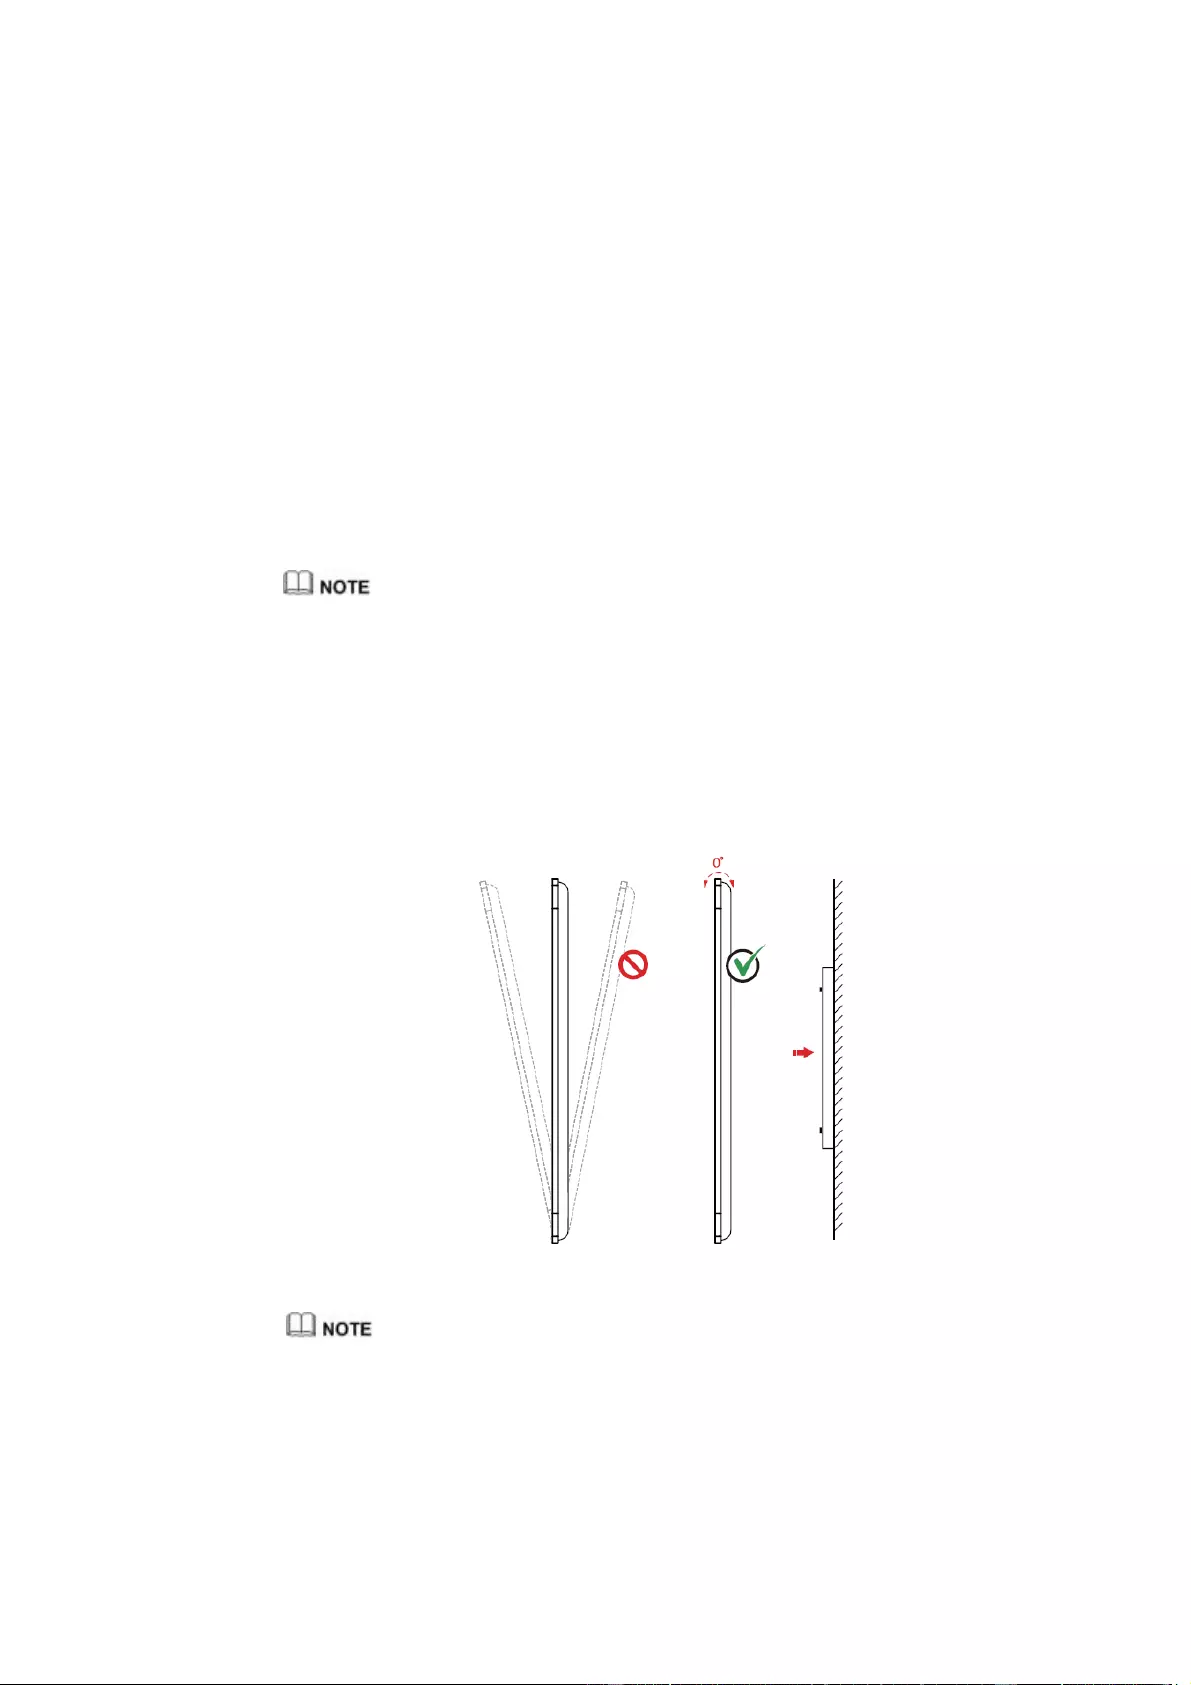
19
2.2 Installation Precautions
Weight Loading
Weight of the product: 161lb/ 72 kg (86 inch), 123lb/56 kg (75 inch), 97lb/ 44kg (65 inch)
When using a mobile stand, ensure that the weight of the product is less than the loading
capacity of the mobile stand.
When using the wall-mount bracket, ensure that the wall can support the weight of the
product. We recommend that the wall surface be reinforced and have a loading capacity
4 times of the weight of the product. Consult a professional installer for wall-mount
installation.
The company does not undertake relevant legal responsibility for any problems caused by improper
operation if the third party mobile stand, or wall-mount bracket is beyond the scope of the product.
Do not install the product where it might be hit by an opening or closing door.
Vertical installation
When installing, try to keep the product vertical. An excessive tilt angle may cause the screen
glass to falloff or the product to collapse.
For any problem, please contact our support desk. Our company is not responsible for any damage or
losses incurred by users if the users fails to follow the instructions.
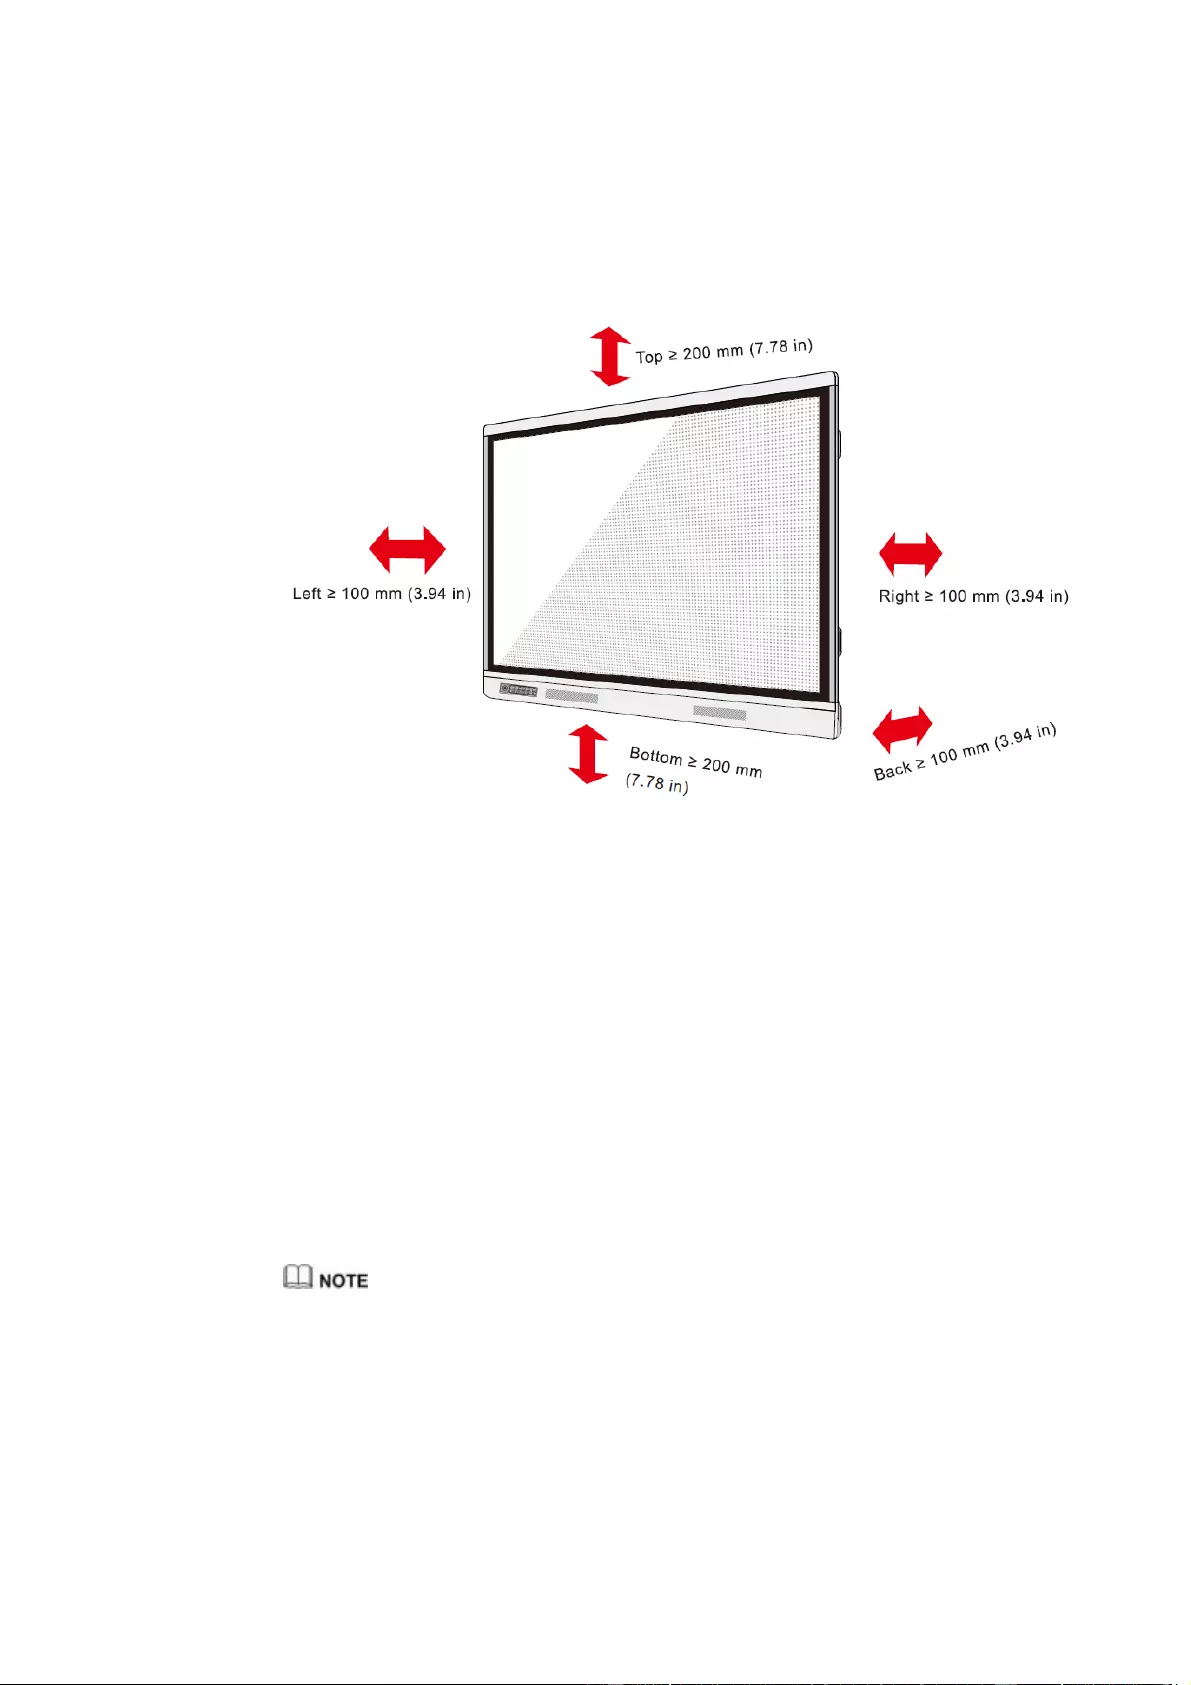
20
Ventilation
Ensure adequate ventilation and/or an air conditioned environment. We recommend keeping
certain distances from the side of the product to the wall or panels. Ventilation requirements are
shown in following figure:
2.3 Installation
The dimensions of the four bracket mounting holes on the back panel are VESA MIS-F
compliant (86 inch or 75 inch: 800 x 400 mm/31.50 x 15.75 in; 65 inch: 600 x 400 mm/23.62
x 15.75 in). Use metric M8 screws with a length of 10 mm to 15 mm (0.40 to 0.59 in) to
secure the touchscreen to the mounting system. Dimensions of the mounting holes on the
back panel are shown on the following figure:
C
onsult a professional installer to install the display product.
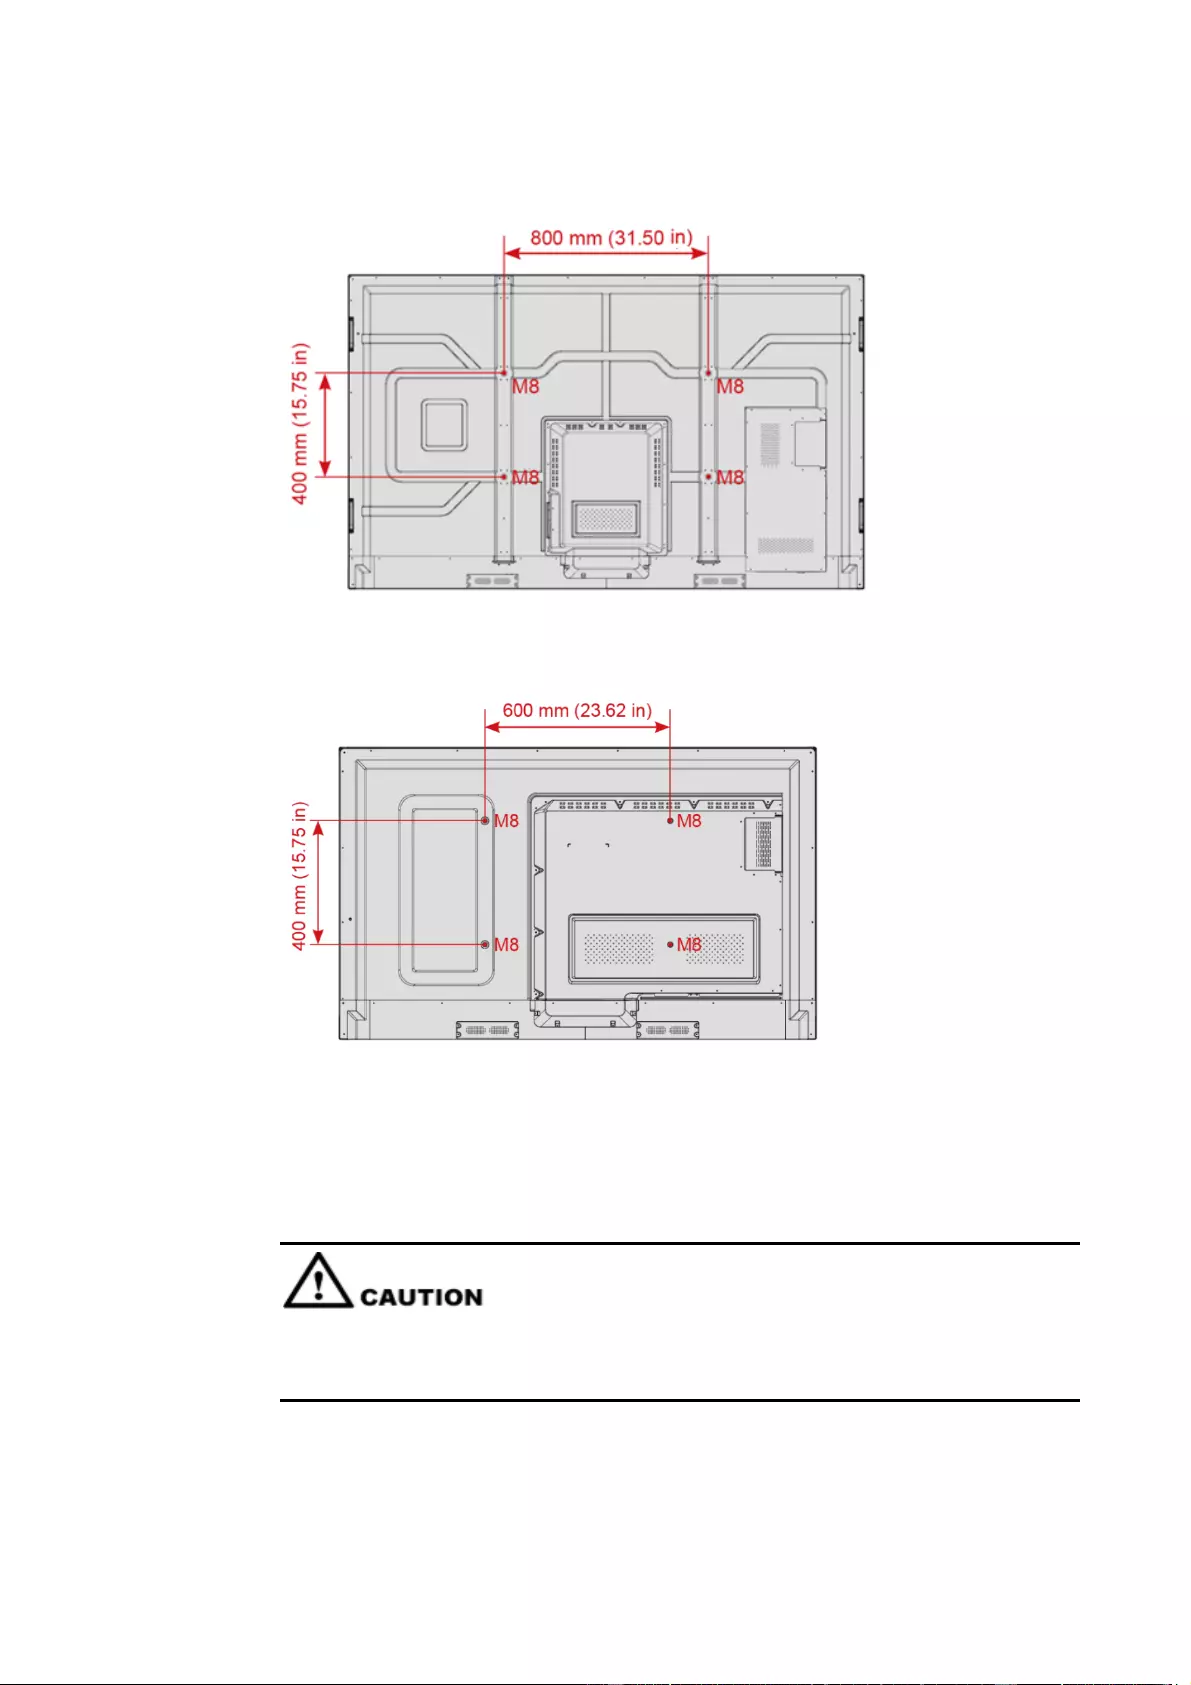
21
86 inch/75 inch:
65 inch:
2.4 Installing the Internal PC (Optional)
The internal PC does not support hot plugging. Therefore, you must insert or remove the
internal PC when the display is powered off. Otherwise, the display or internal PC may be
damaged.
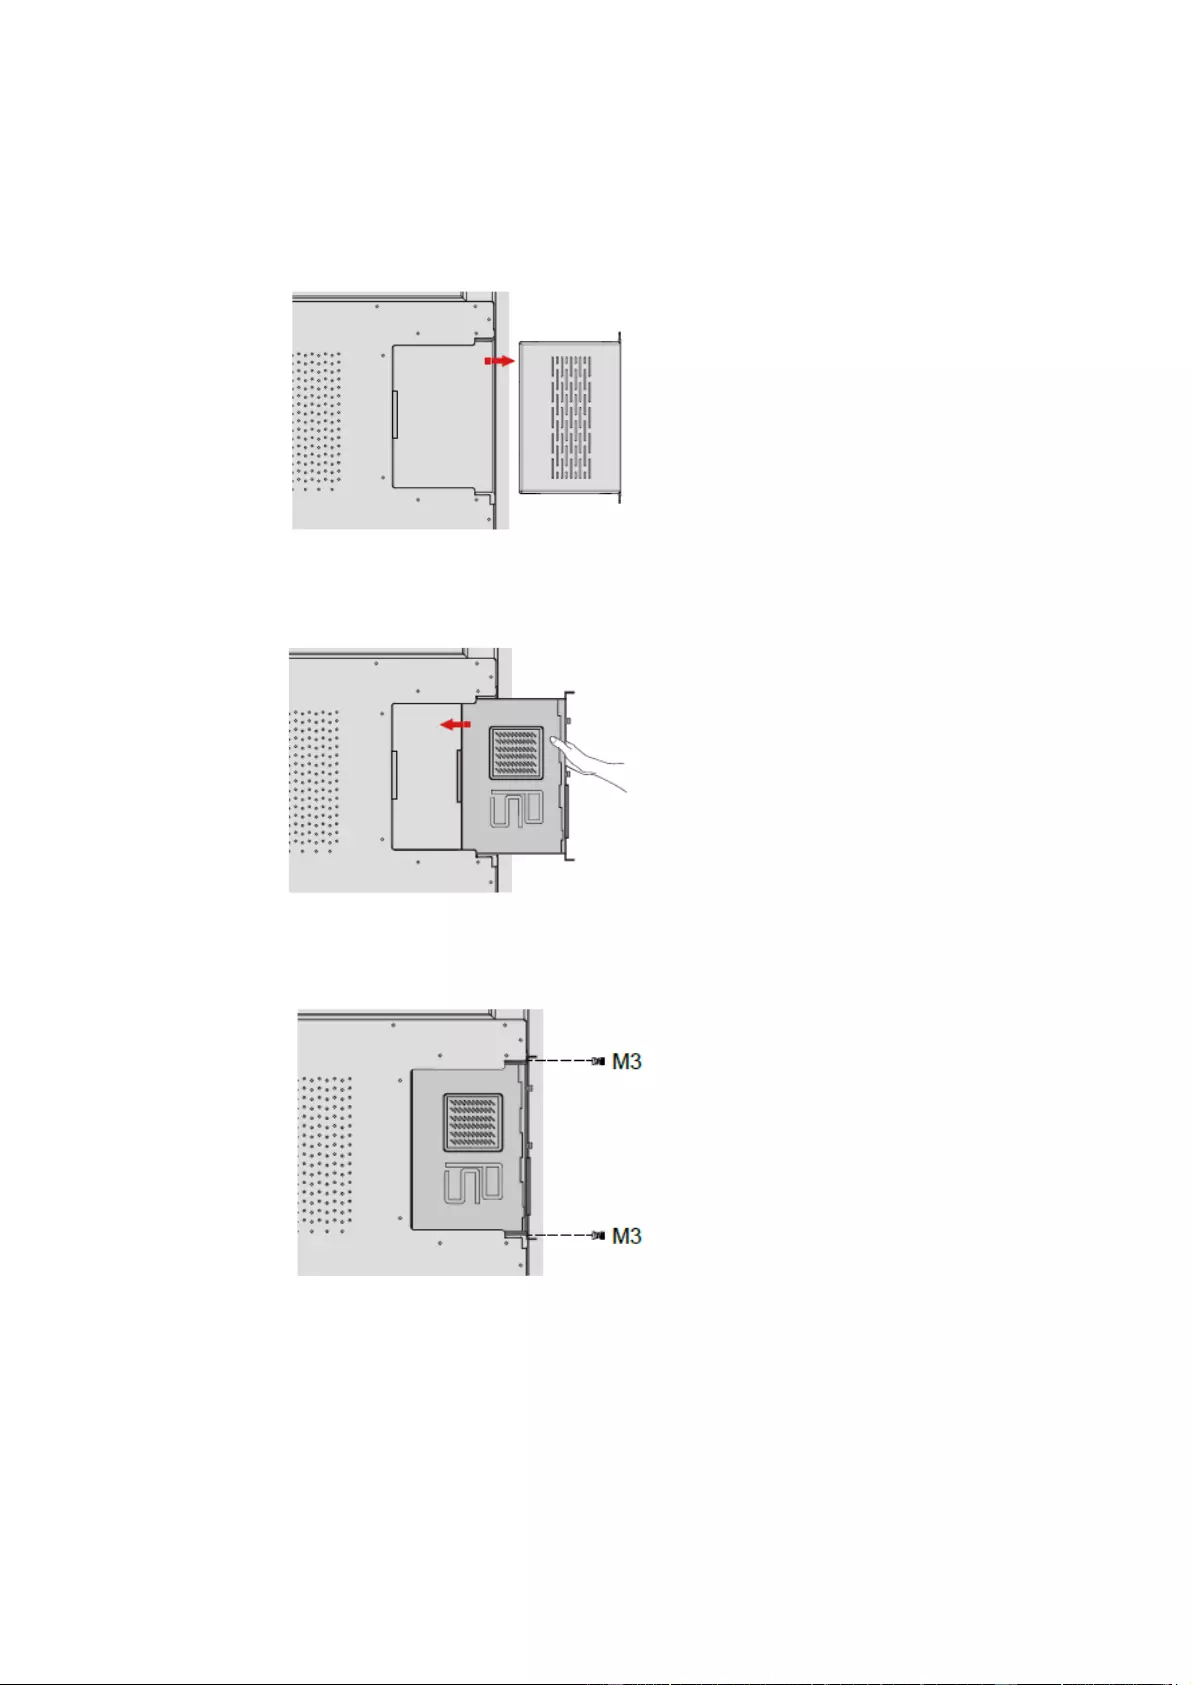
22
You will need to purchase the internal PC separately. Perform the following steps to install the
internal PC:
Step 1 Unscrew the M3 screws by hand to remove the internal PC shielding cover.
Step 2 Push the internal PC into the port at the rear of the screen from right to left.
Step 3 Secure the internal PC to the display by using the M3 screws.
Step 4 Ensure the installation is correct before turning the power on again.
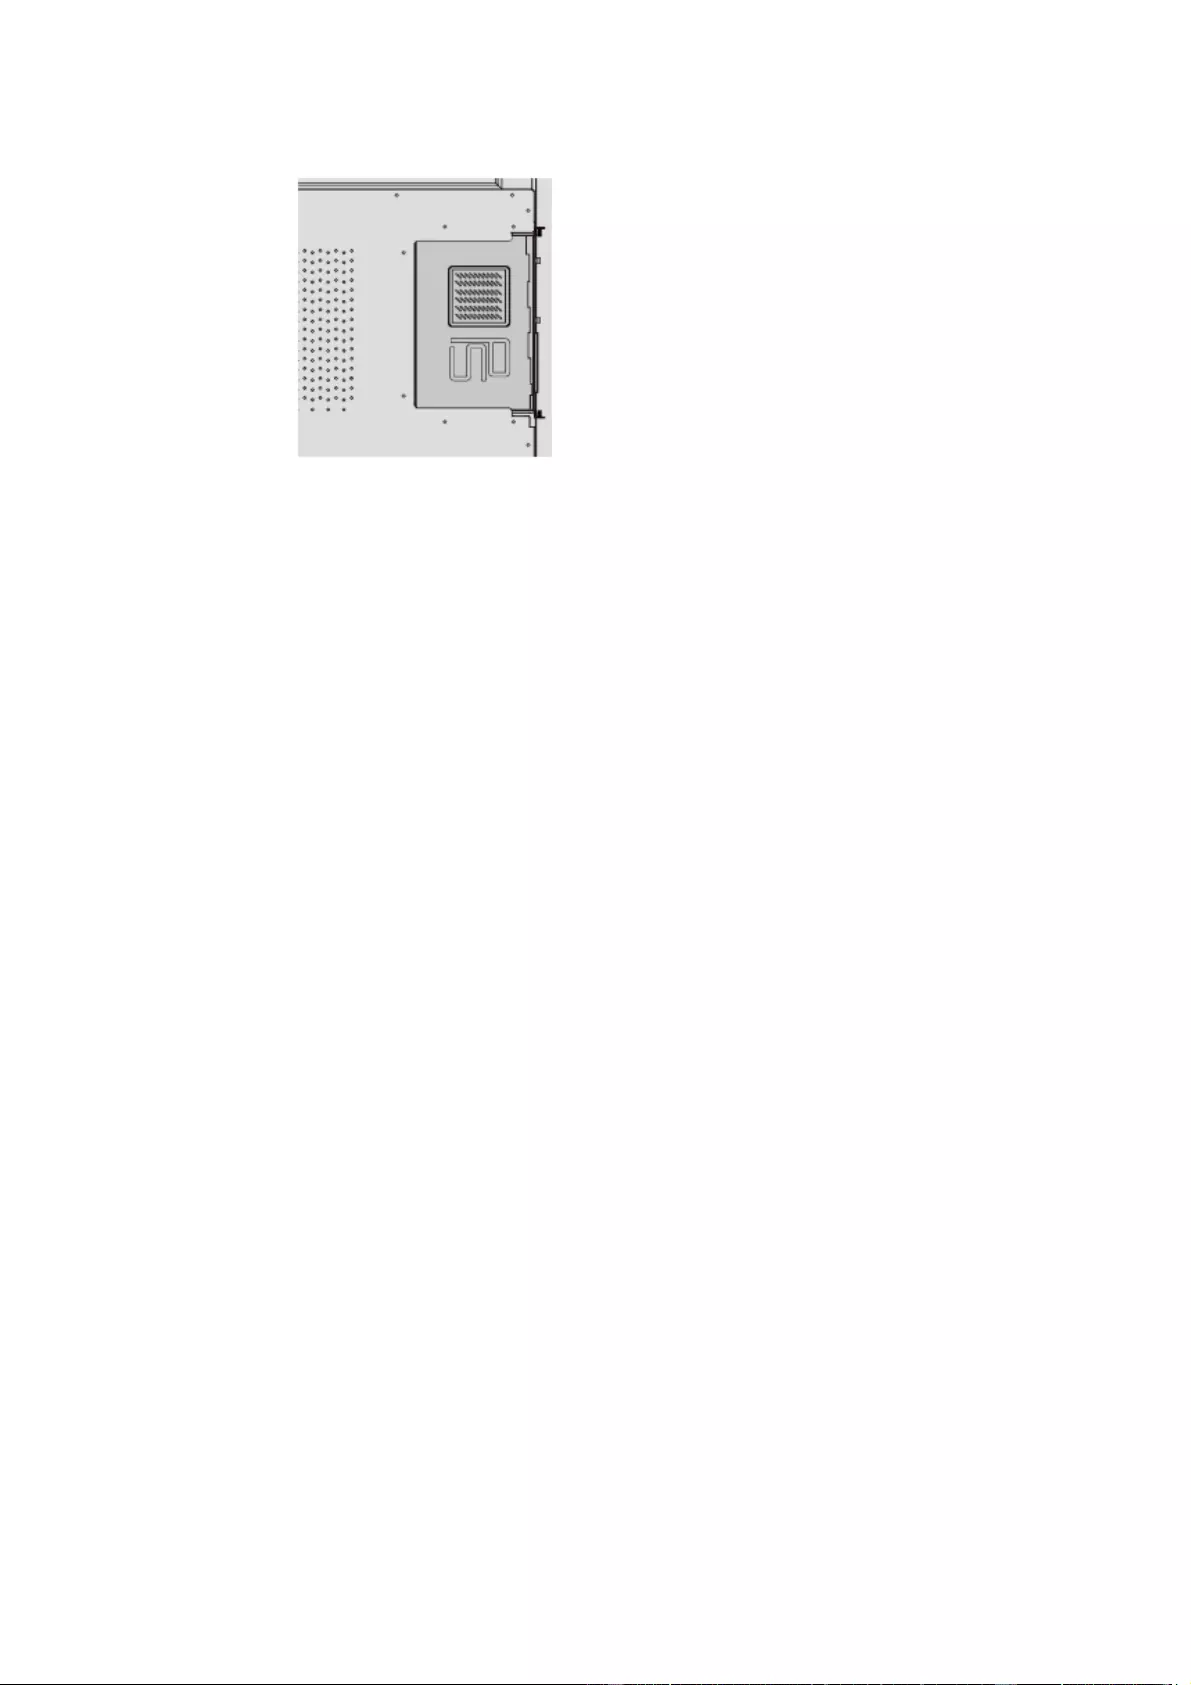
23
2.5 Installing Newline Assistant
Introduction
The Newline Assistant is the tool used as a bridge between the embedded operating system
and the Internal PC (OPS). It helps add Windows software shortcuts to the Home Page, as
well as to protect USB data when switching between sources.
Therefore we strongly recommend users install the Newline Assistant after installing the
internal PC.
Installation
Step 1 Install the Internal PC correctly.
Step 2 On the Home Page, click Windows. It will switch the signal source to the Internal Windows
system.
Step 3 Visit our website at www.newline-interactive.com and choose Products > RS series>
Download to download the Newline Assistant installation package.
Step 4 Install the Newline Assistant as instructed.
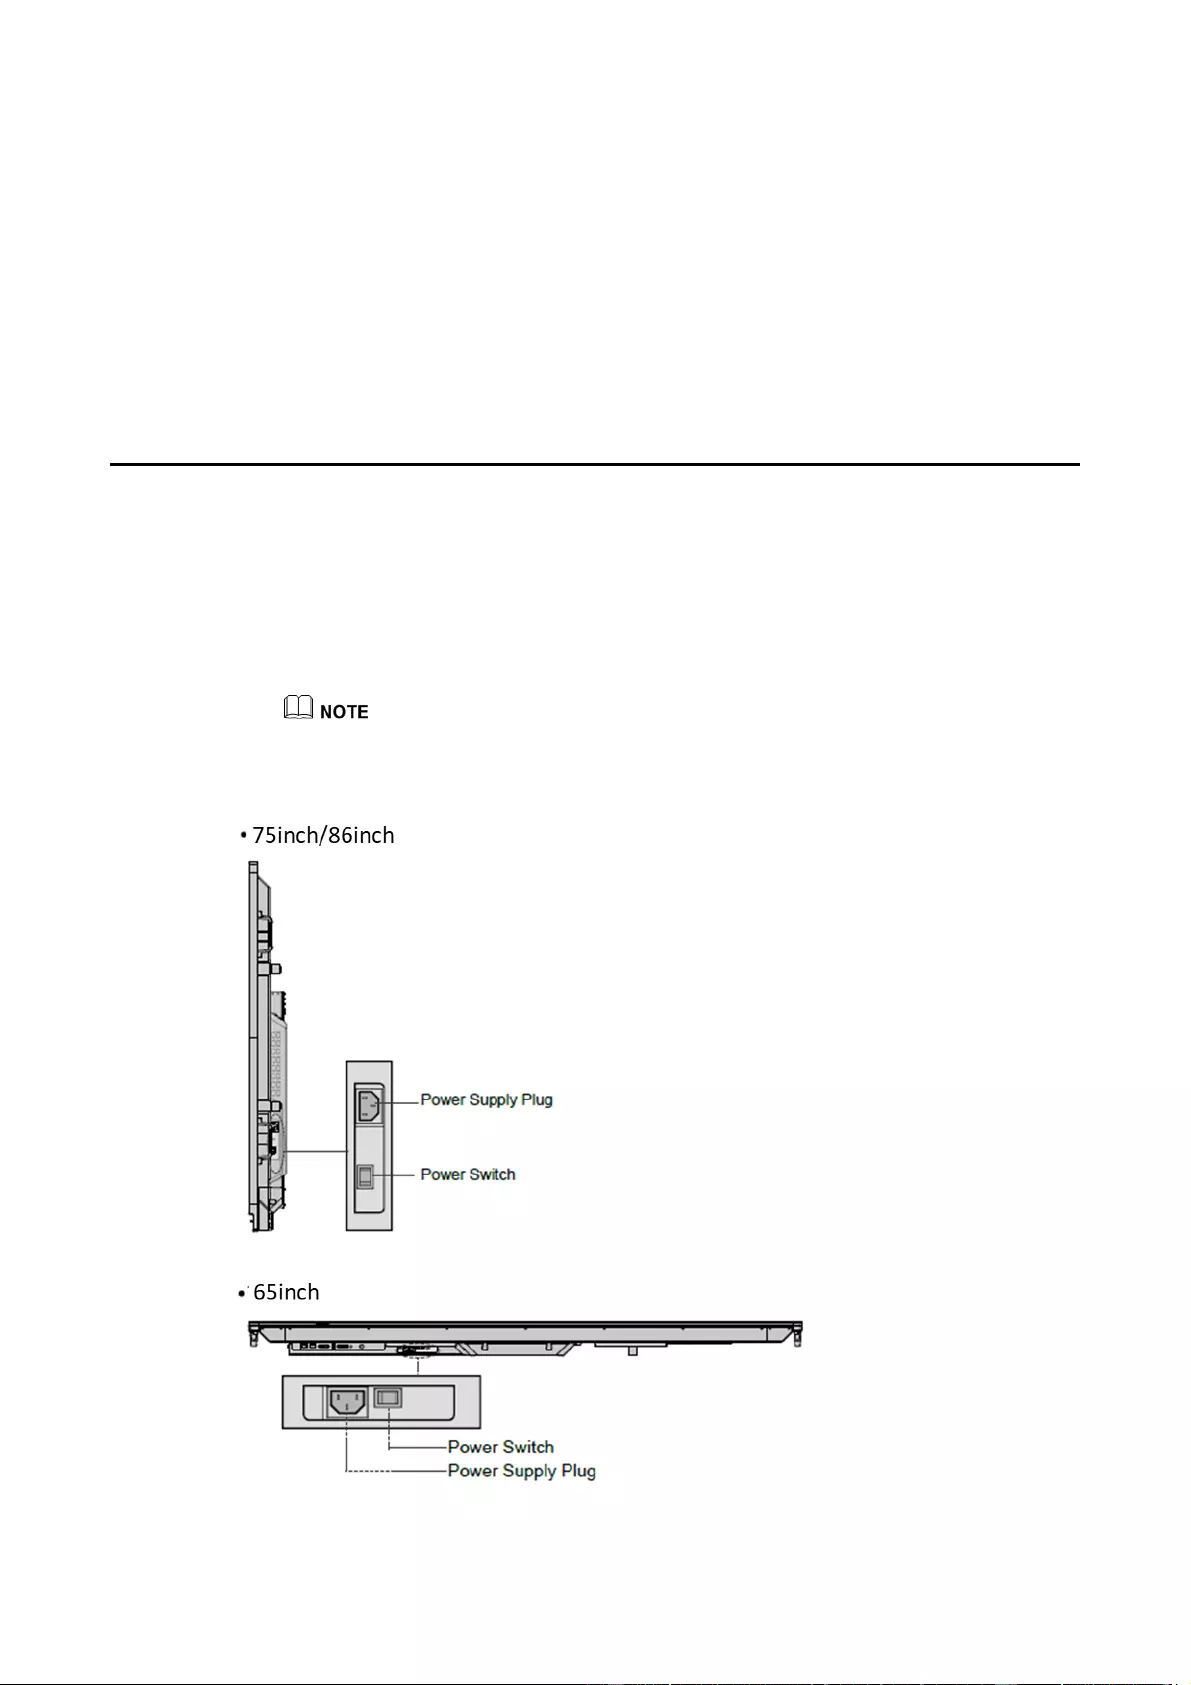
24
3 Getting Started
3.1 Power On
Step 1 Plug the power supply into the power outlet fully and plug the power connector into the side
of the product. Ensure the power supply is in the range of 100V to 240V with frequency at 50
Hz/60 Hz ± 5%. The power current must be grounded.
The power outlet should be installed near the equipment and should be easily accessible.
Step 2 Flip the power switch located on the side of the product to “On”.
25
Step 3 Press the power button on the front control panel or on the remote control.
3.2 Power Off
Step 1 Press the power button on the front panel or the power button on the remote
control.
Step 2 Press the power button on the front panel or the power button on the remote control
again, the power indicator will turn to red.
Step 3 If you are not going to use the product for an extended period of time, we recommend you
switch the power switch to “Off”.
If an internal PC is equipped, the internal PC and the screen are powered off simultaneously when
you power off the display.
Do not forcibly disconnect the power supply of the screen when the internal PC is on.
3.3 Calibration
If the cursor position has a big deviation from the actual touch point, calibration is used to
eliminate the deviation. Calibration is required in the following scenarios:
The internal PC is used.
A computer is connected through the HDMI or Display Port interface.
Interface operation on the embedded operating system does not need positioning. External products with
Microsoft Windows 7 or later versions will require positioning.
If the positioning is not correct, perform the following operations to calibrate again. The
following takes Windows 10 as an example:
Step 1 Ensure that the HDMI or DP interface and external products are connected properly.
Step 2 Select the corresponding Windows signal from the signal source menu. The Windows page
will be displayed.
Step 3 Select Tablet PC Settings on the Control Panel page.
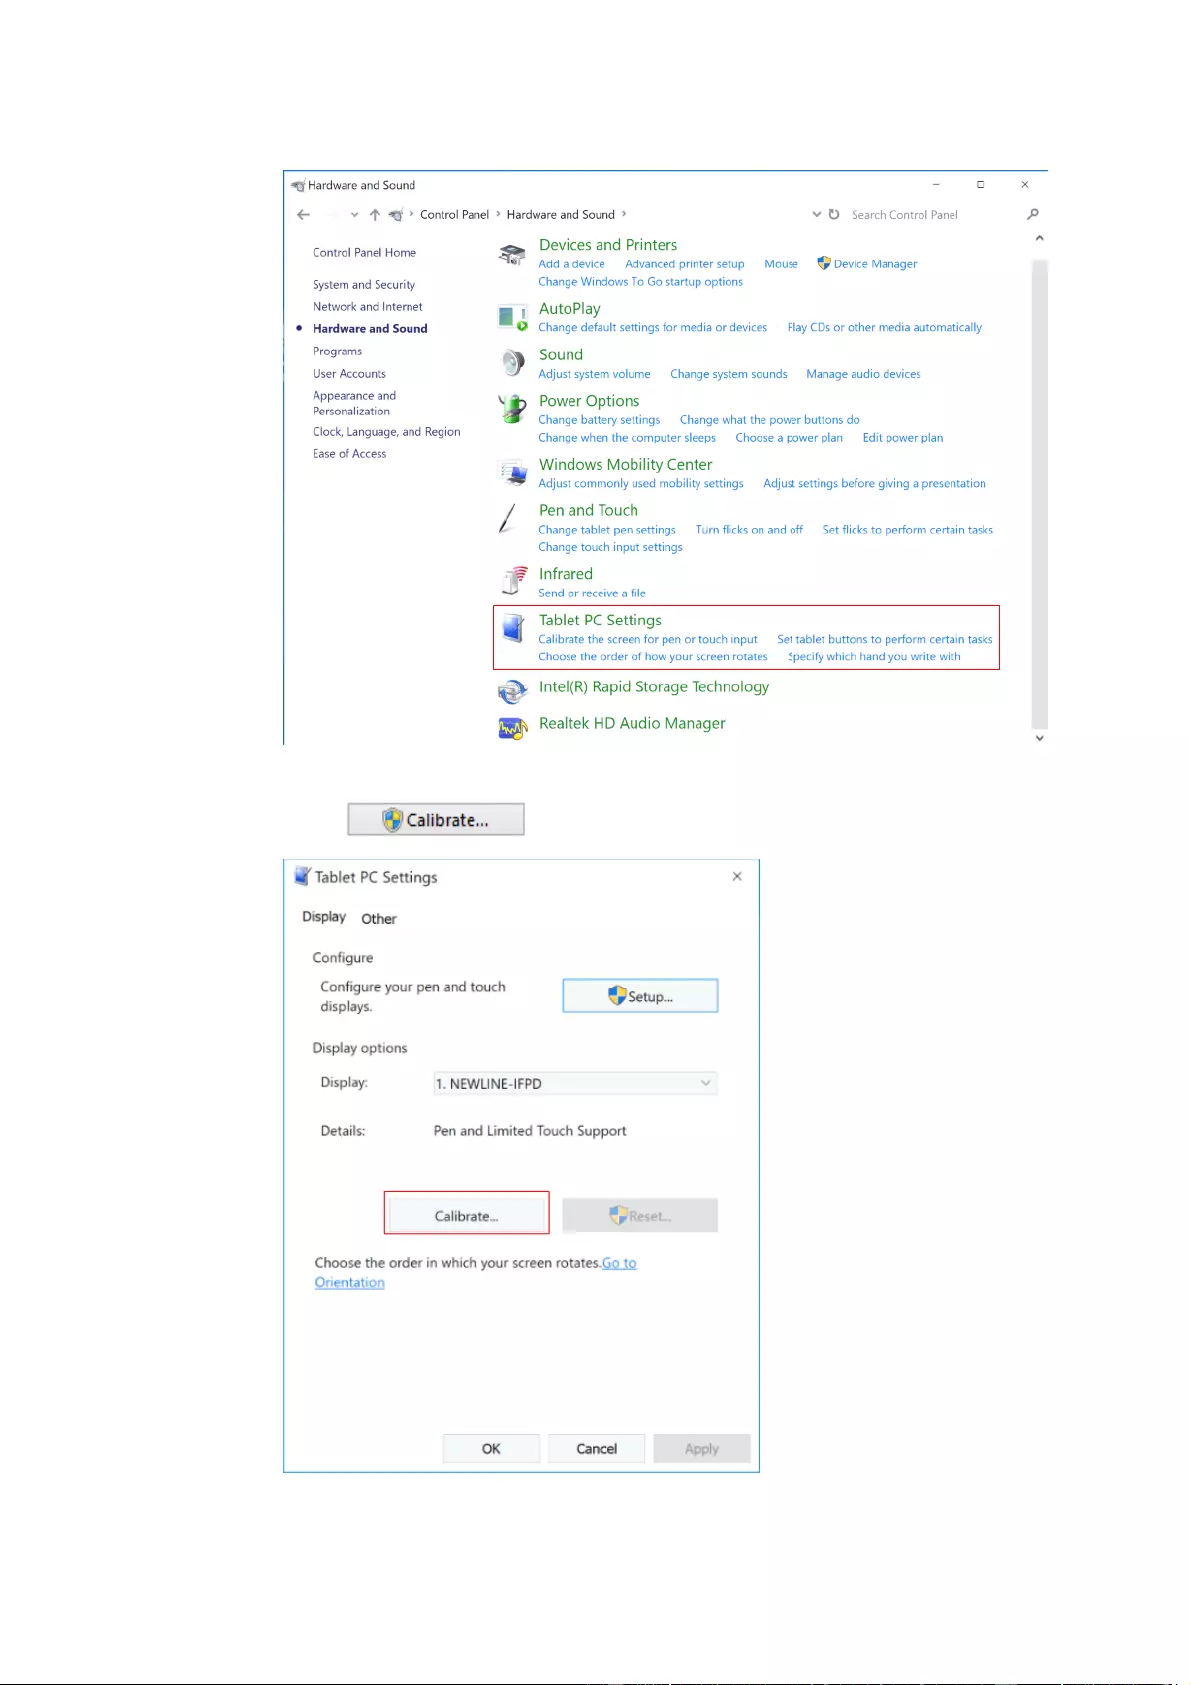
26
Step 4 Select in the Tablet PC Settings window.
27
Step 5 Select Touch input from the option and start calibration.
Step 6 Use your finger or a pencil to click and hold the center of the flickering cross . Do not
release until moves to the next positioning point. Complete the calibration process as
instructed.
Step 7 After the calibration is complete, the Digitizer Calibration Tool dialog box will be
displayed. Click Yes to save calibration data.
To ensure writing accuracy, use the pencil or stylus included with the product for proper positioning.
Positioning errors may cause failure of touch functions of the display. In that case, please perform
calibration again.
Step 8 The Tablet PC Settings dialog box will be displayed again. Click OK. The calibration will
be complete.

28
4 Operating the Touch Screen
4.1 Start Screen
When the product is turned on, the product will show the Start Screen page, as shown in the
following figure:
29
4.2 Home
Touch anywhere on the Start Screen to start a meeting, and the product will go to the Home page,
as shown in the following figure:
Shortcut for Display& Theme Settings
Click the icon on the Home Page to enter the Display & Theme setting page to set
the logo image and wallpaper. The logo and wallpaper can be obtained locally or from a device
connected via the USB port, as shown in the following figure:
30
Shortcut for Clock
Click the time icon on the Home age to start the clock application. Using the icons on the top left,
you may switch from clock mode to alarm mode, or to timer and stopwatch mode. In the clock
mode, you may click to add other time zones as shown in the following figure:
31
Side Toolbar
The Annotation Mode, Whiteboard, Home, Return, and Windows icons are displayed by default in
the toolbar on both sides of the screen. You may hide one or both side toolbars in the Settings or
move it up and down on the screen, shrink or expand by using touch gestures. You may double-tap
the “=” to expand or shrink the toolbar. Long press the customized icon to unfold level-2 icons.
The functions of the side toolbar are as follows:
Enter annotation mode, and click again to stop annotation and take a screenshot.
Return to the previous menu/Exit an app
Go to the internal PC source.
Manage currently running applications.
Slide up/down the currently running application or click “×” at the upper right
corner to close the application.
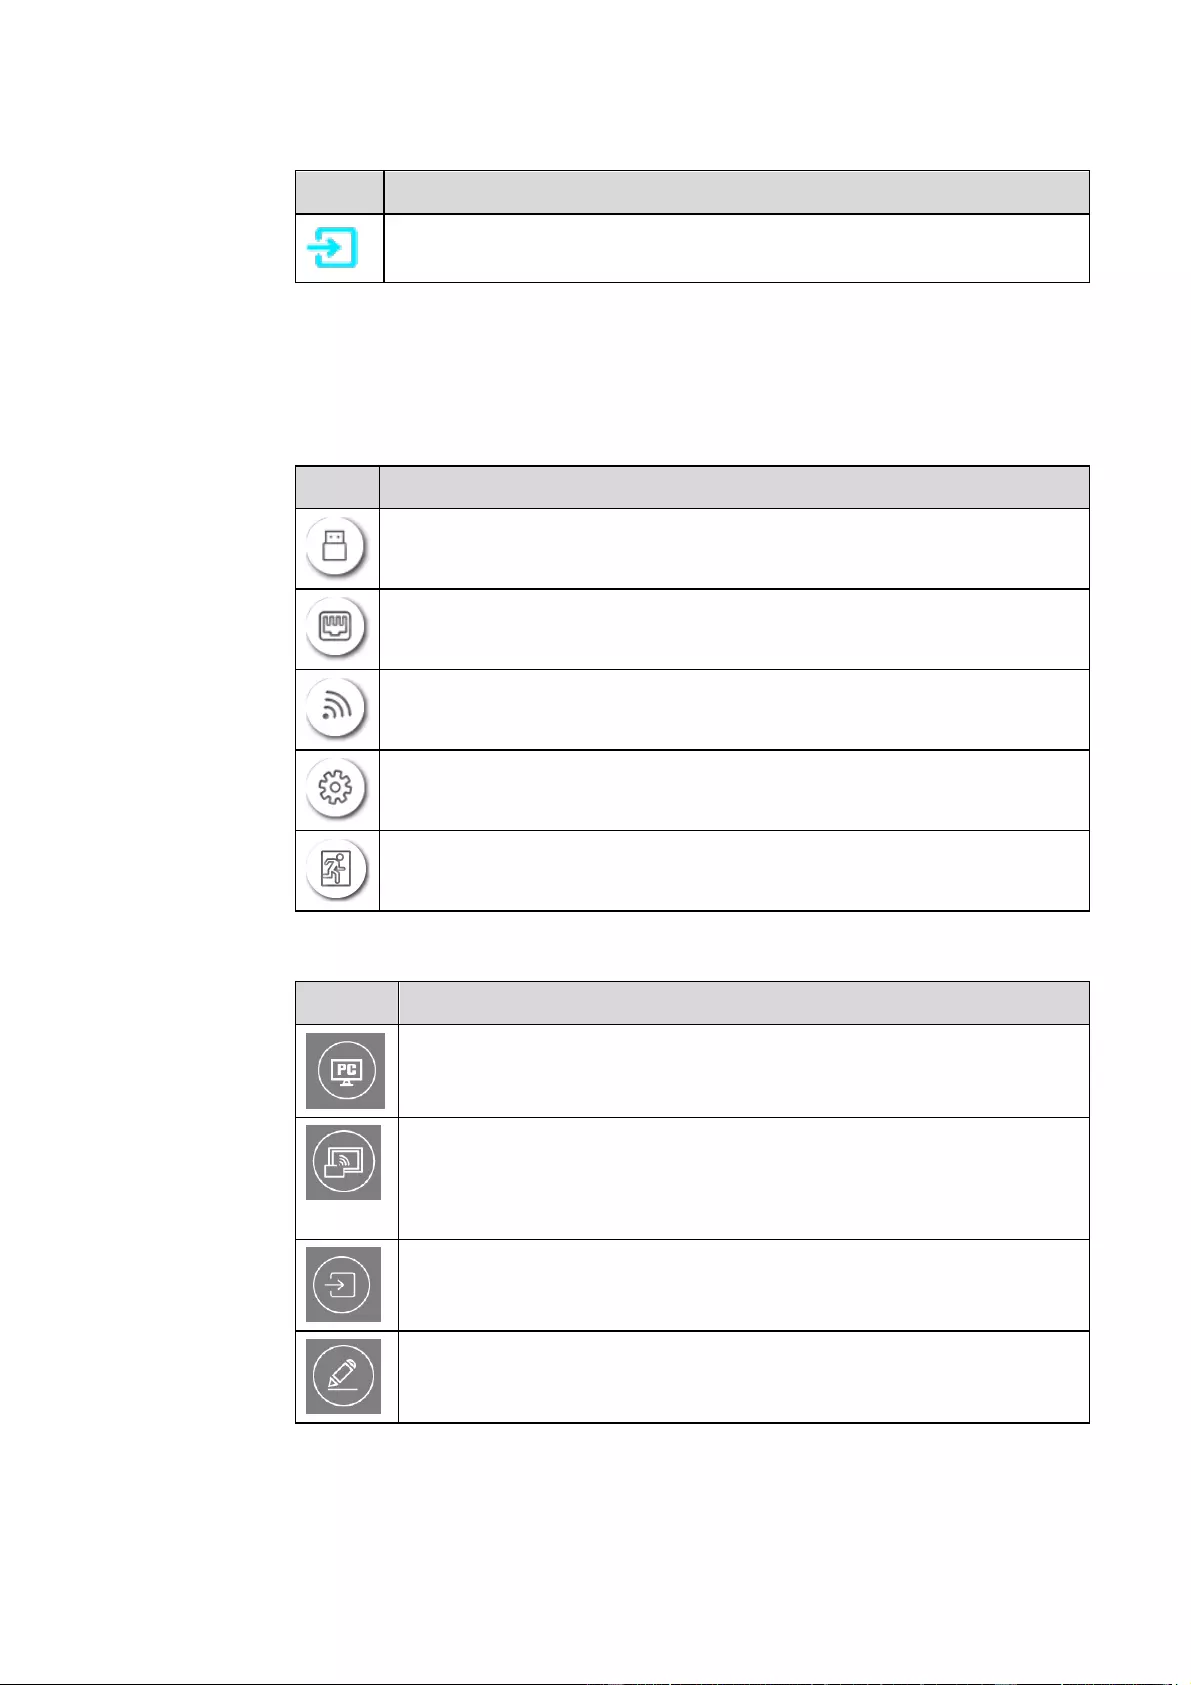
Go to your favorite source. You can set favorite source in the “Tool bar”
submenu in the system settings.
Status Bar and Settings
The upper right corner of the home page displays three working status icons (including USB
drive(s), Ethernet, and Wi-Fi, system setting shortcut and return to the start screen page).
If a USB flash drive is connected to the USB port, this icon will appear.
If the product is connected to Ethernet, this icon will appear.
If the product is connected to a wireless network, this icon will appear.
Access the system setting page.
Return to the Start Screen page.
Switch to the internal PC source.
Click “Screen Sharing” to enable the wireless screen sharing function.
Note: By default, the “Screen sharing” icon is displayed after startup. When
you click “Add” or “Gadget” icon, “Screen sharing” switches to the
“Connection” icon.
Click Connection to switch to the connected sources, including in the internal
PC, HDMI 1, HDMI 2, Display Port, HDMI Front and VGA.
Discussion takes you to the whiteboard function and screen annotation
functions.
Click to enter a quick-access browser.
Open the File Manager to explore internal and external files on the display.
Gadget displays all pre-installed applications, including Gallery, Browser,
Music, Calculator, E-mail, File Viewer, Keyboard, Office Viewer and
Newline Cast etc. Click the icon of an application to run the application.
Click Add to customize the Home page. You can add up to 5 shortcuts to your
favorite software, gadgets, or connections. (See more detail in “Add Shortcuts
to Home Page”)
4.3 System Settings
Enter the System Settings page using one of the following methods:
Click on the Home page.
Press on the remote control.
In the Quick Settings Menu, click the icon.
4.3.1 Network Settings
Enter the Network submenu to set a LAN, Ethernet, Hotspot & tethering, Proxy, enable Wi-Fi
function.
34
Wi-Fi: Click the corresponding button to enable the Wi-Fi function. Press again to see the
available Wi-Fi list.
Ethernet: Click to open ethernet settings.
Hotspot & tethering: Click to set up Wi-Fi hotspot.
Wake on LAN: turn on/off LAN.
Proxy: The settings of the proxy server.
4.3.2 Language and Input Settings
Enter the Language & Input submenu to set the language and keyboard settings.
35
Settings The default input method of the system is Kika Keyboard F, and the Physical keyboard must be
enabled. If you want to switch to another language, switch the keyboard input method via Manage
keyboards methods, in addition to switching the language.
00
Setting a Language
Click Languages on the Language & Input interface. In the Languages dialog box that is
displayed, select your preferred language.
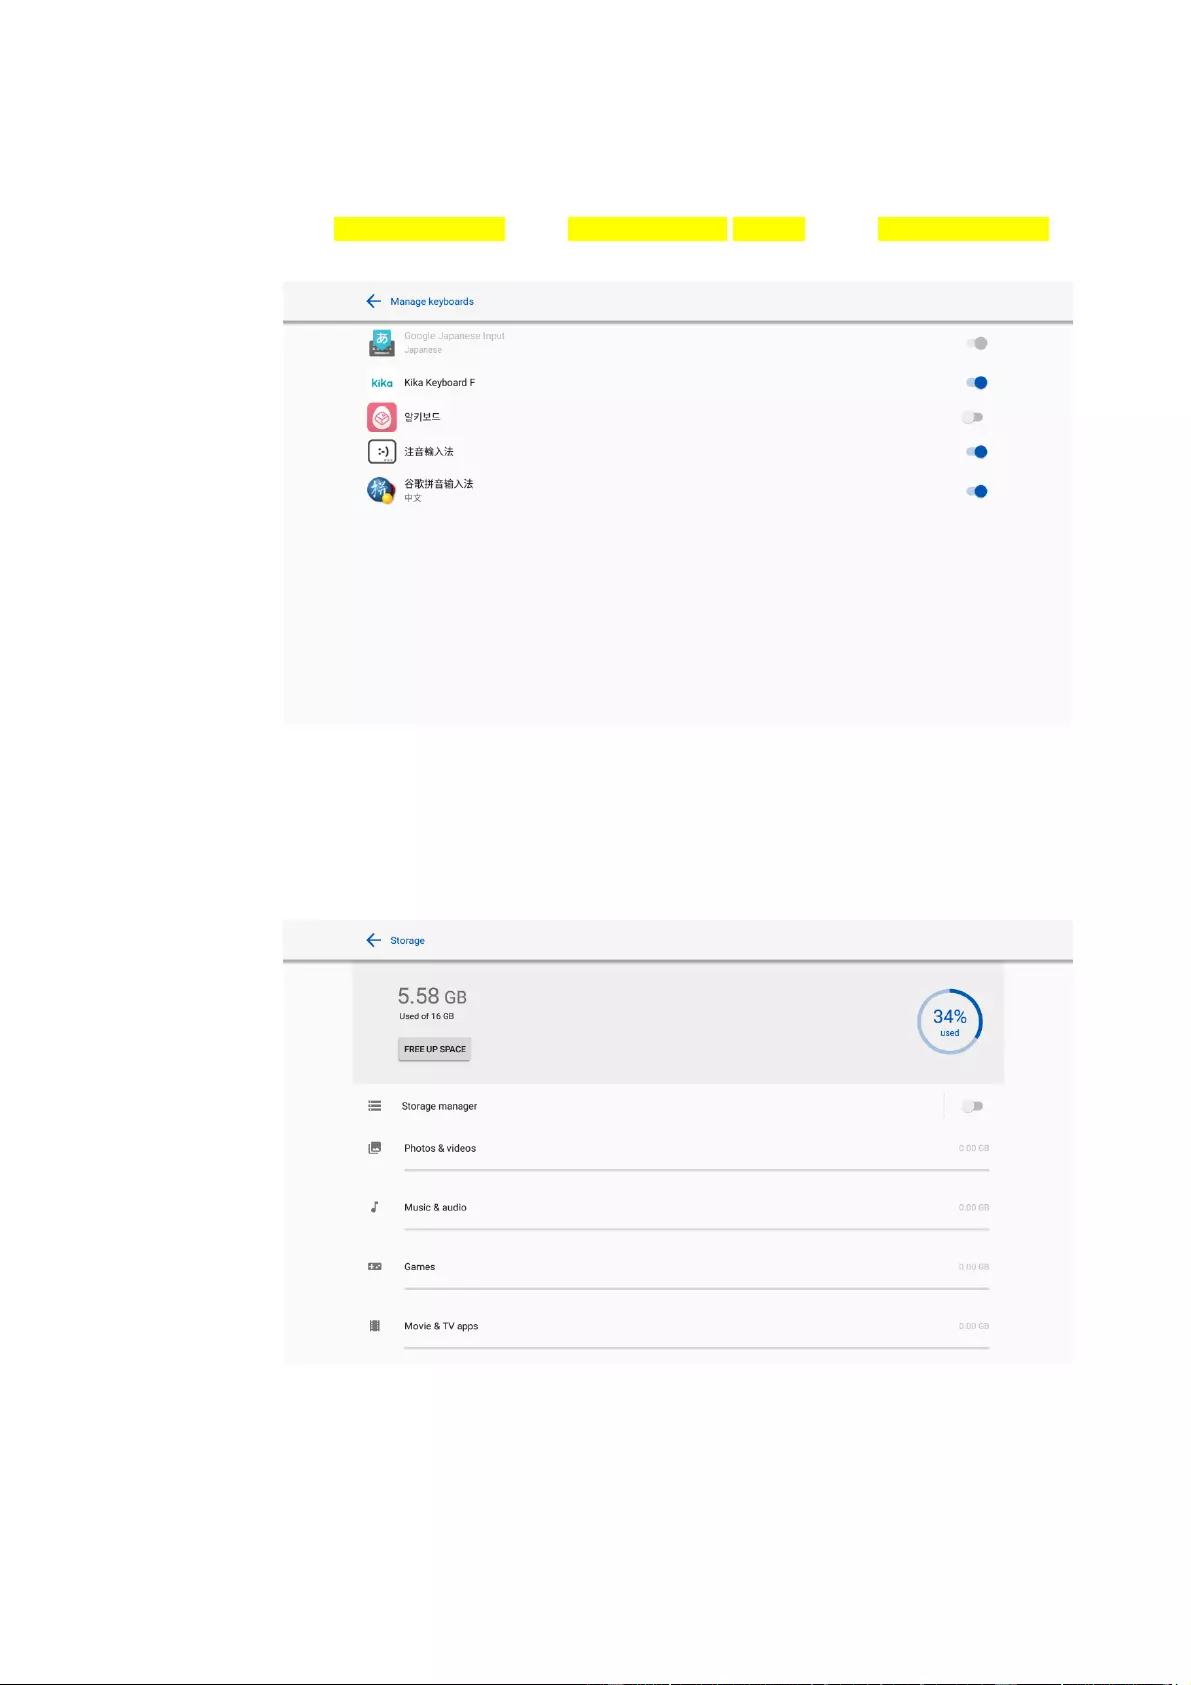
36
Adding an Input Method
Click Manage keyboards on the Virtual Keyboard interface. On the Manage keyboards page,
select the input methods you would like to use (multiple choices can be selected).
4.3.3 Storage
Enter the Storage submenu to view space distribution of the internal storage.
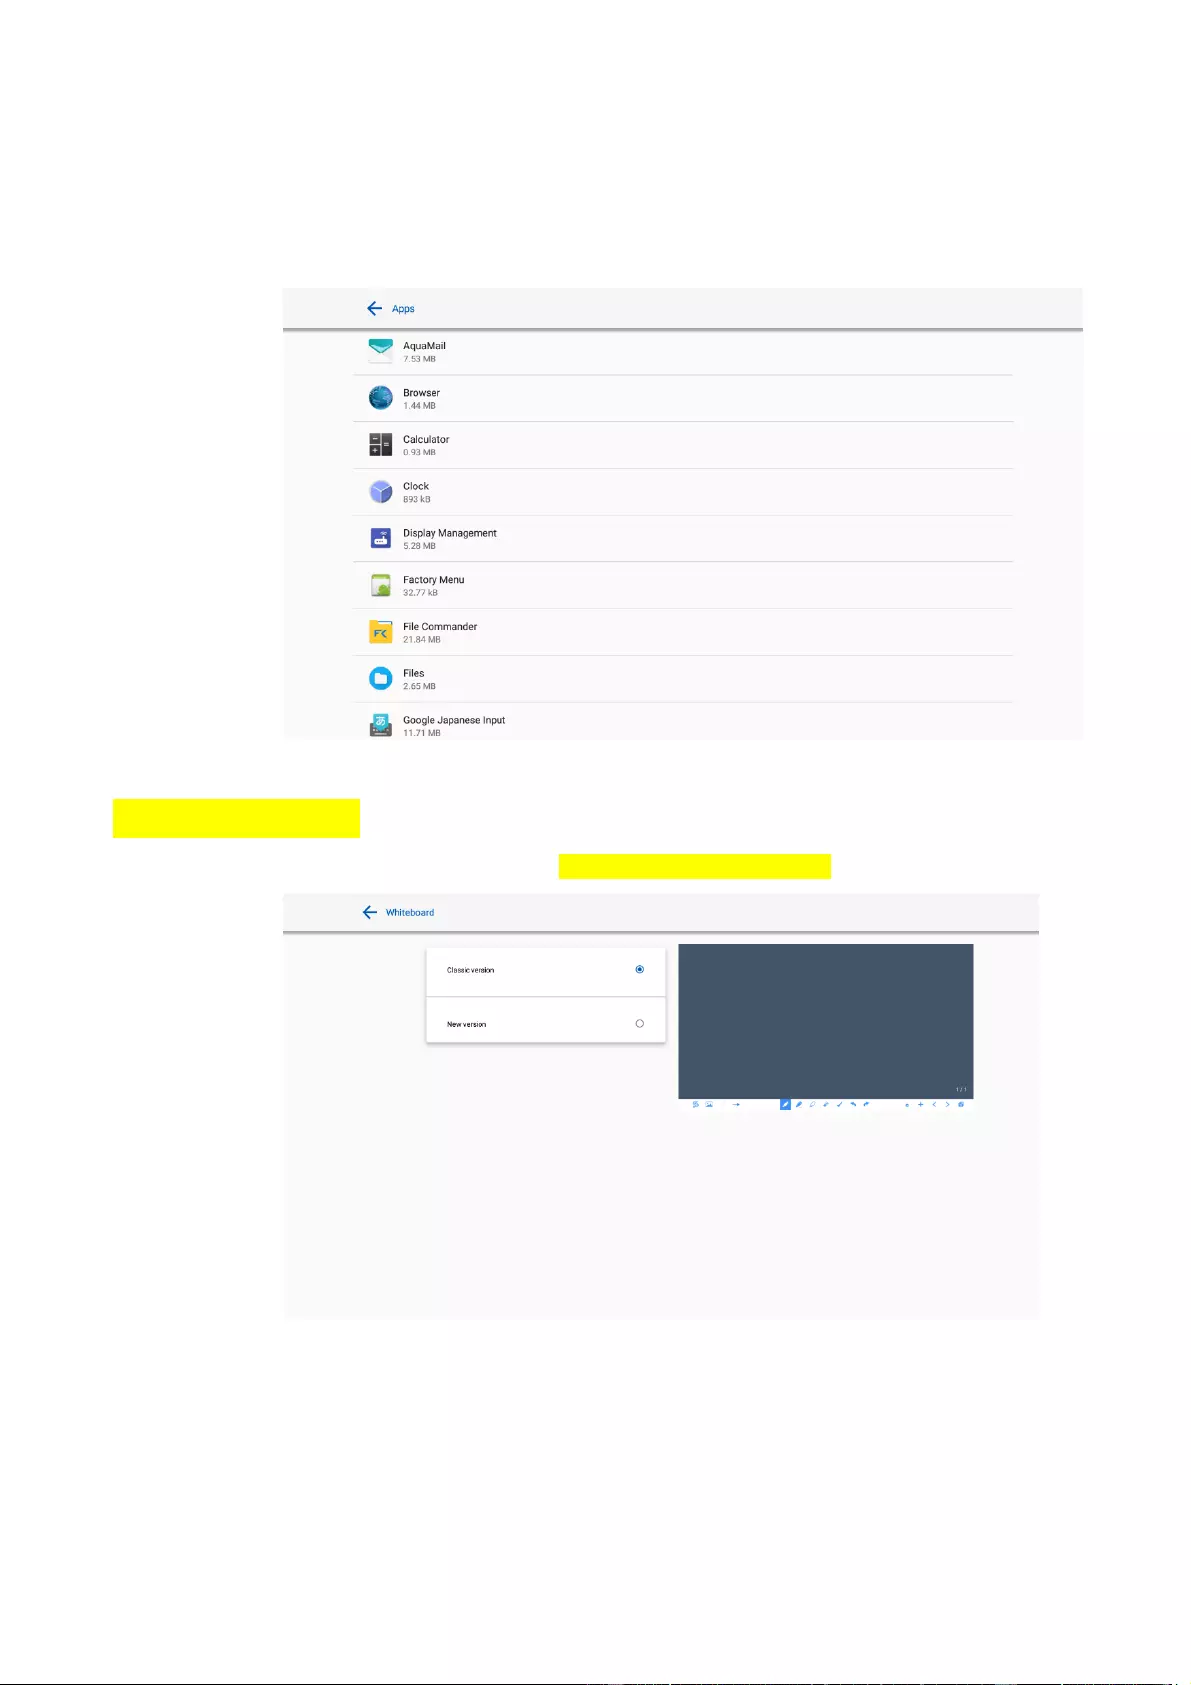
37
4.3.4 Applications
Enter the Apps submenu to view all downloaded applications by type, running applications, and a
summary of all applications.
4.3.5 Whiteboard
Enter the Whiteboard submenu to set the version of whiteboard.
4.3.6 Smart Eye Protection
Enter the Smart eye protection submenu to set Eye protection writing mode, Eye protection
brightness control mode and the Bluelight filter. If only the Bluelight filter setting is on, the filter
level can be set.
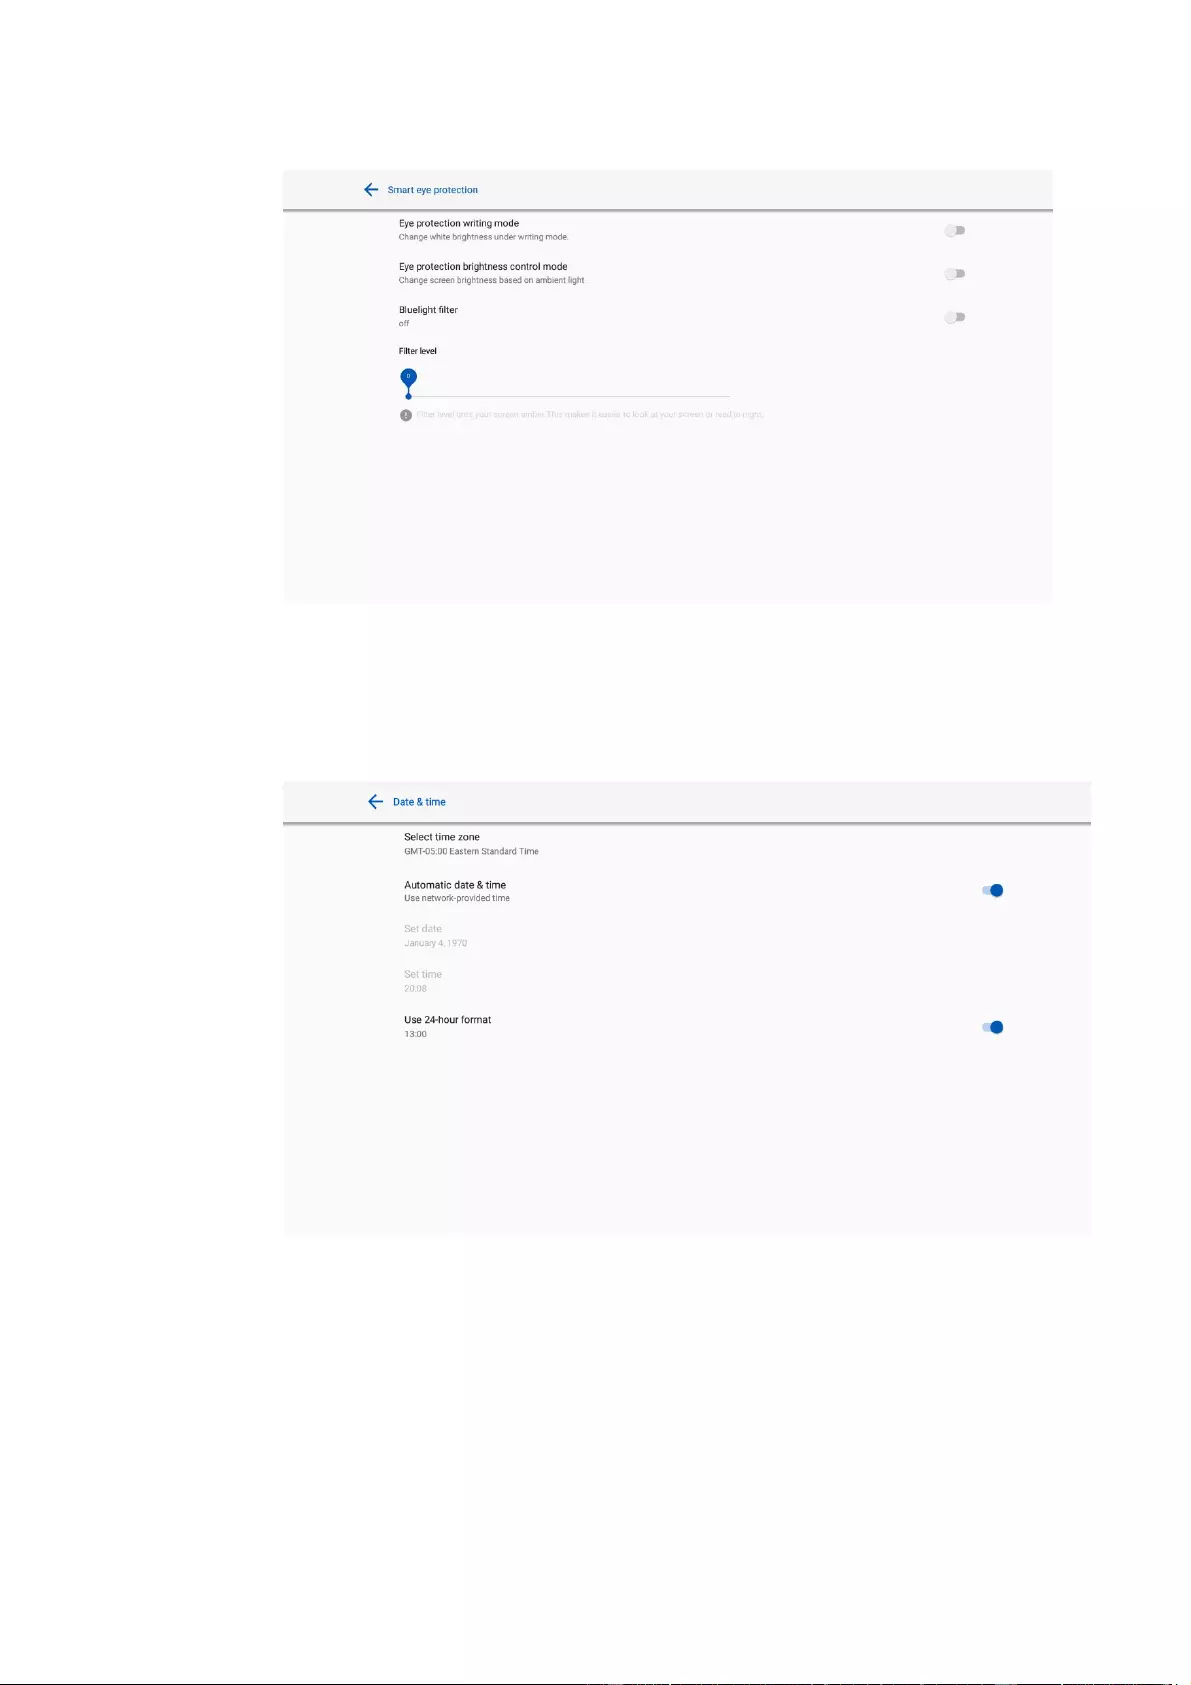
38
4.3.7 Date and Time Settings
Enter the Date & Time setting submenu to set the date and time. Before setting the date and time,
users should click Select time zone to set everything to the local time zone.
Date Settings
You can automatically obtain the date.
To automatically obtain the date, select Automatic date & time.
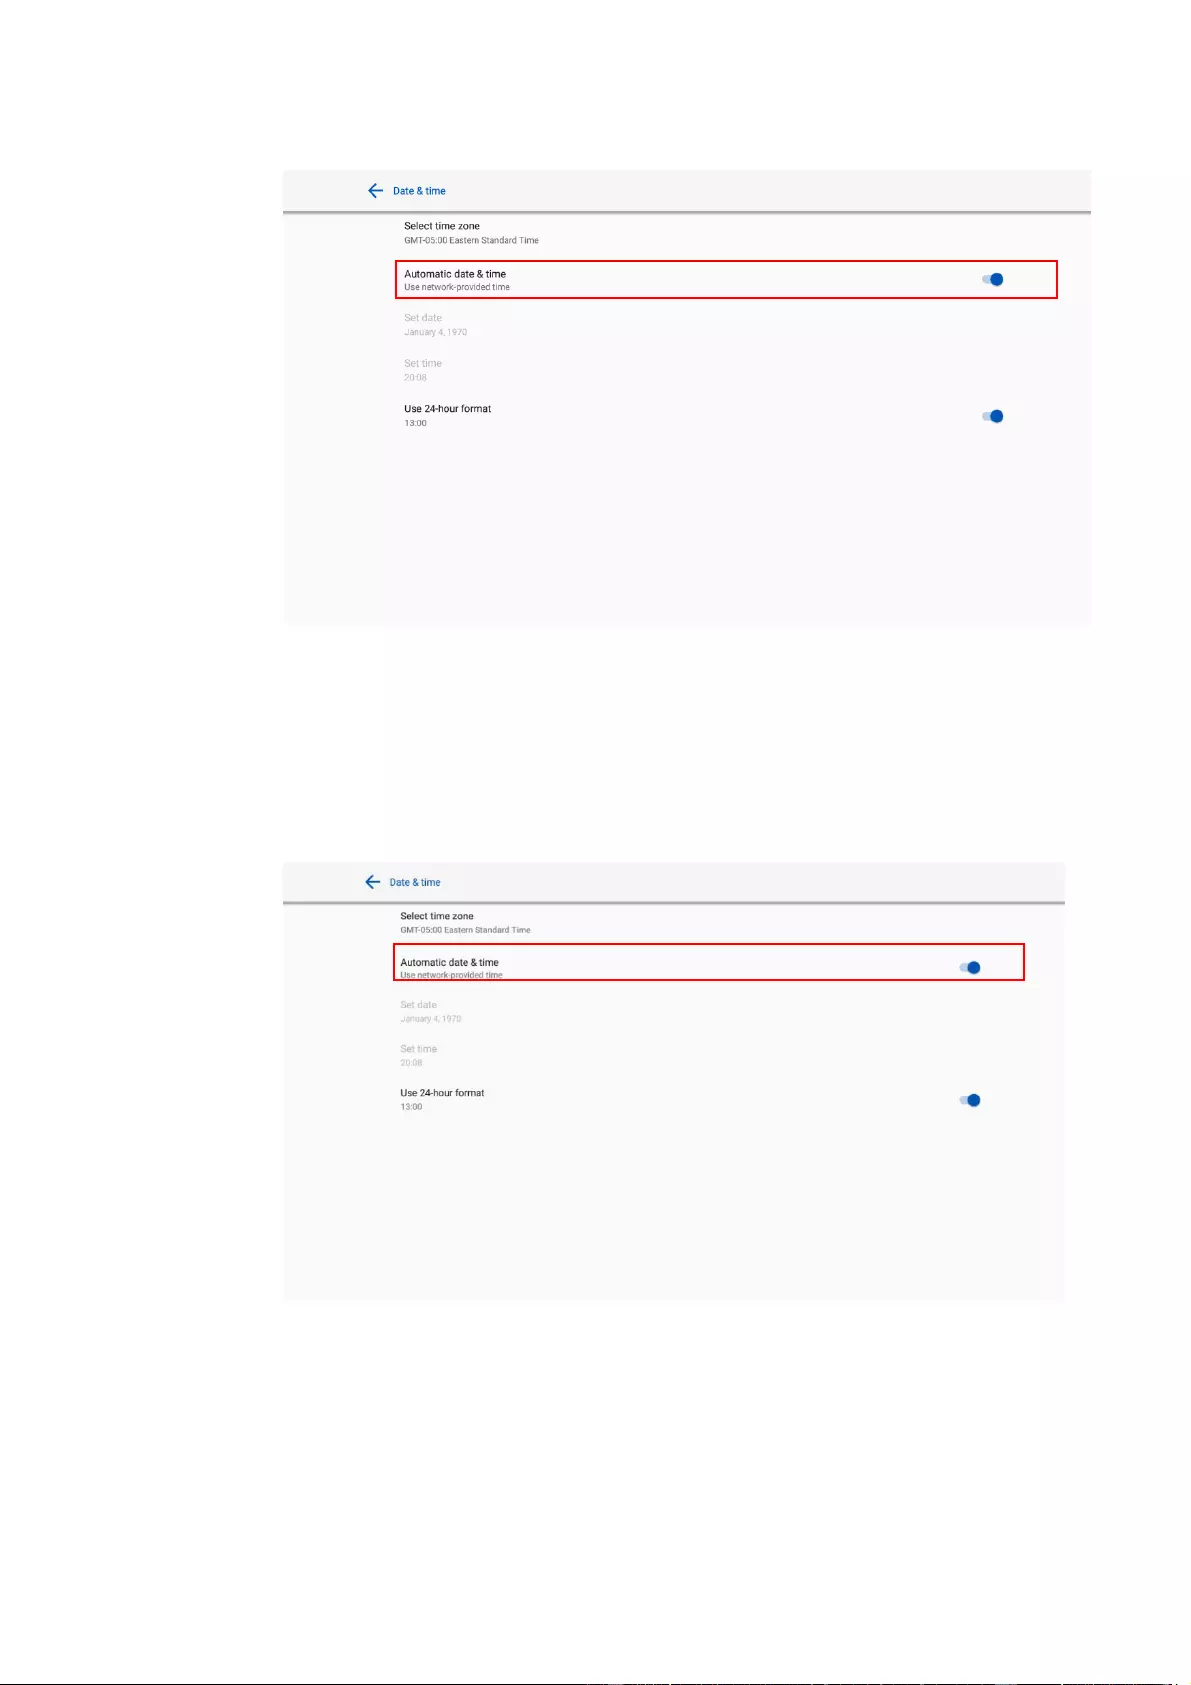
39
Time Settings
You can automatically obtain the time.
To automatically obtain the current time, select Automatic date & time.
To customize time and time format, set them in Set time and select Use 24-hour format.
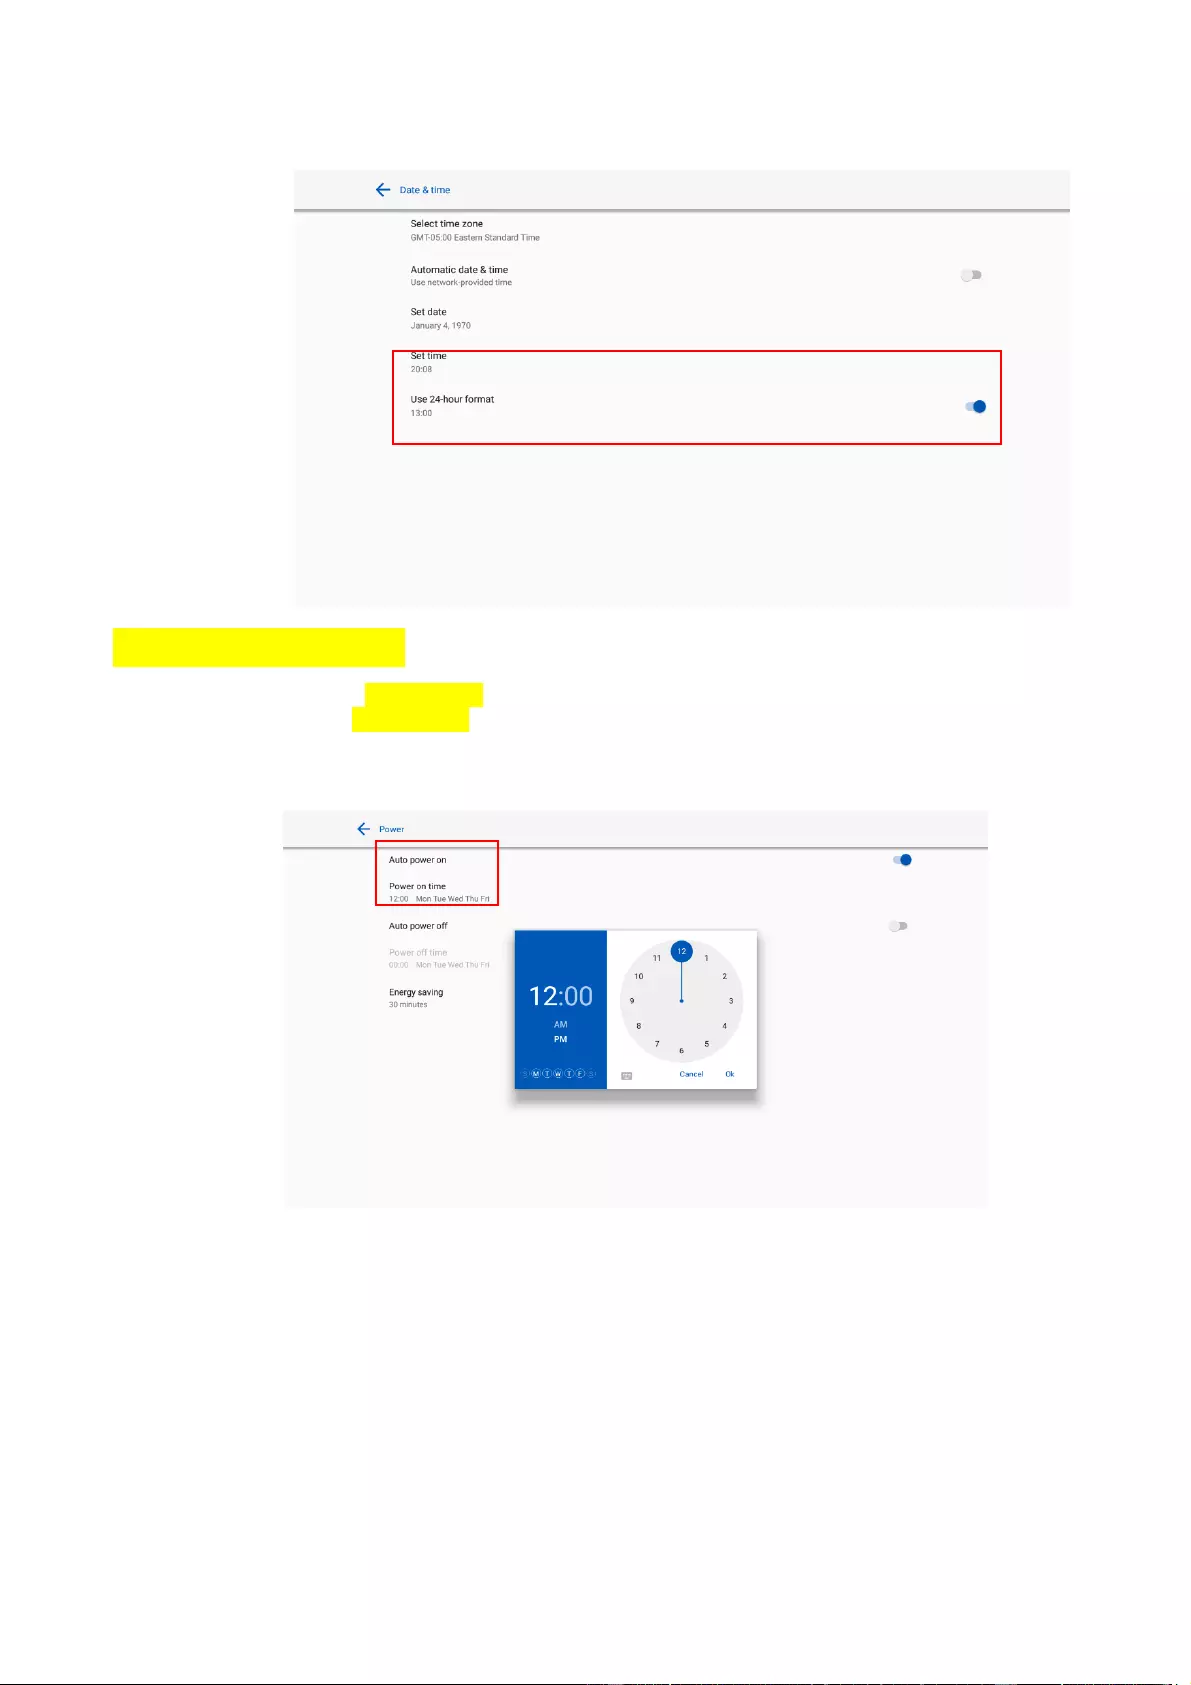
40
4.3.8 Power Settings
Enter the Power setting submenu to set an automatic power on/off time and the time for the system
to enter energy saving mode.
To set the automatic power on time, select Auto power on, and the time you want the display
to turn on in Power on time, as shown in the following figure:
To set the automatic power off time, select Auto power off, and set the time you would like
the display to turn off in Power off time, as shown in the following figure:
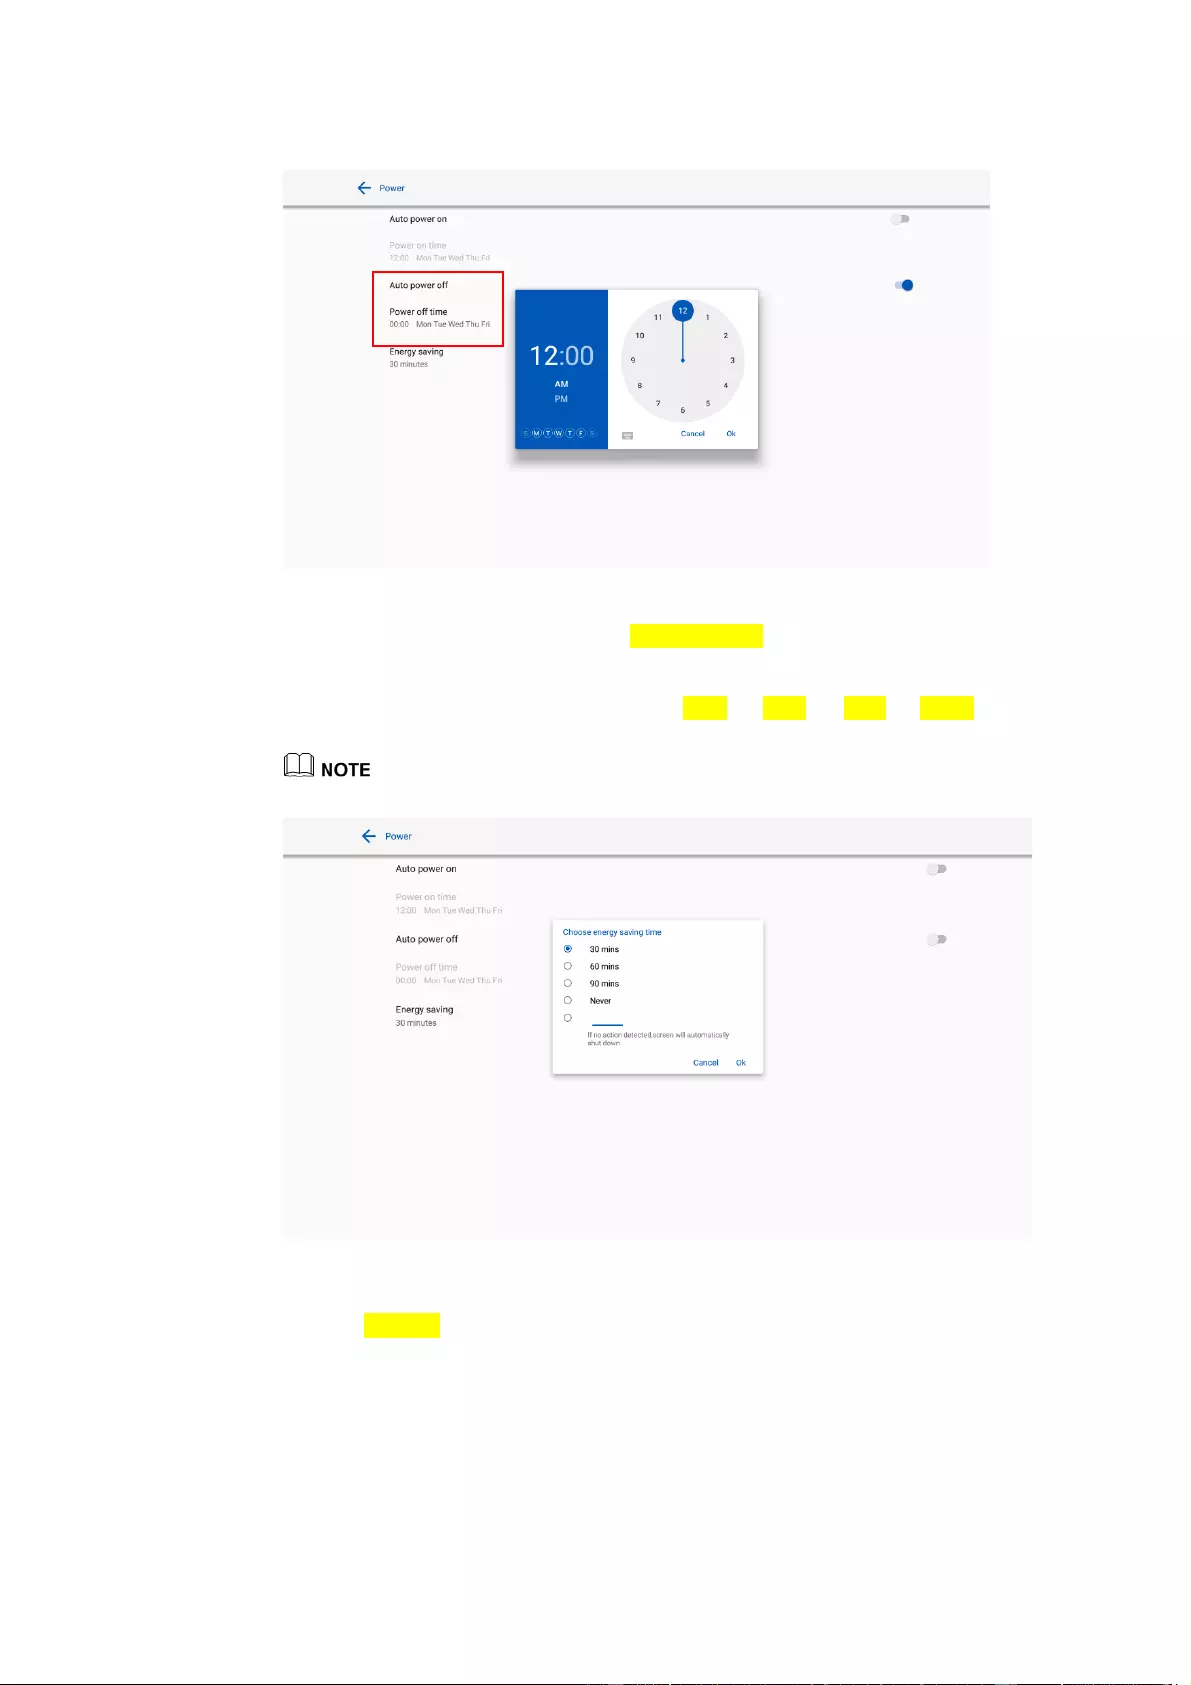
41
To set the energy saving time, click Energy saving. In the dialog box that is displayed, set a
duration after which the screen enters the lock mode if the screen is left un-operated. After the
screen is locked, if the user does not operate the screen within 120s, the screen enters the shut
down mode. The duration can be set to 30 mins, 60 mins, 90 mins, or Never. You can also
customize this duration and the range is 3 minutes to 480 minutes.
NEVER indicates that the automatic shut down mode function is not enabled.
4.3.9 Tool Bar Settings
Enter the Tool bar submenu to set whether to display the side tool bar and icons.
Left: Click to turn on/off the left tool bar.
Right: Click to turn on/off the right tool bar.
Customized icon: Click the icon under Customized icon to display the last shortcut key on
both toolbars. If you define the shortcut key as Connection, you can set a signal source to
enter after this shortcut key is clicked in Favorite Connection.

42
Quick settings: Click to turn on/off the quick settings function.
4.3.10 Input/Output Settings
Enter the Input and output setting submenu to set the starting source, new input source, and
resolution of image output through the HDMI port etc..
New input source: After the New input source function is enabled, the system can
automatically switch to the screen of the newly connected signal source.
CEC auto power on:
When this function is enabled: When the HDMI port of the machine is connected to a CEC
device (such as a DVD), and both the CEC device and the machine are turned off, if the CEC
device is turned on, the machine automatically turns on after receiving command from the
CEC.
CEC auto power off:
When this function is enabled: When the HDMI port of the machine is connected to a CEC
device, and both the CEC device and the machine are turned on, if the machine is turned off,
the CEC device automatically turns off after receiving the command; if the CEC device is
turned off, the machine automatically turns off after receiving the command.
Starting source: Set the signal source entered after power on.
Choose HDMI rear 1/2, DP EDID: Set the EDID version (1.4/2.0) for HDMI rear 1/2, DP
port.
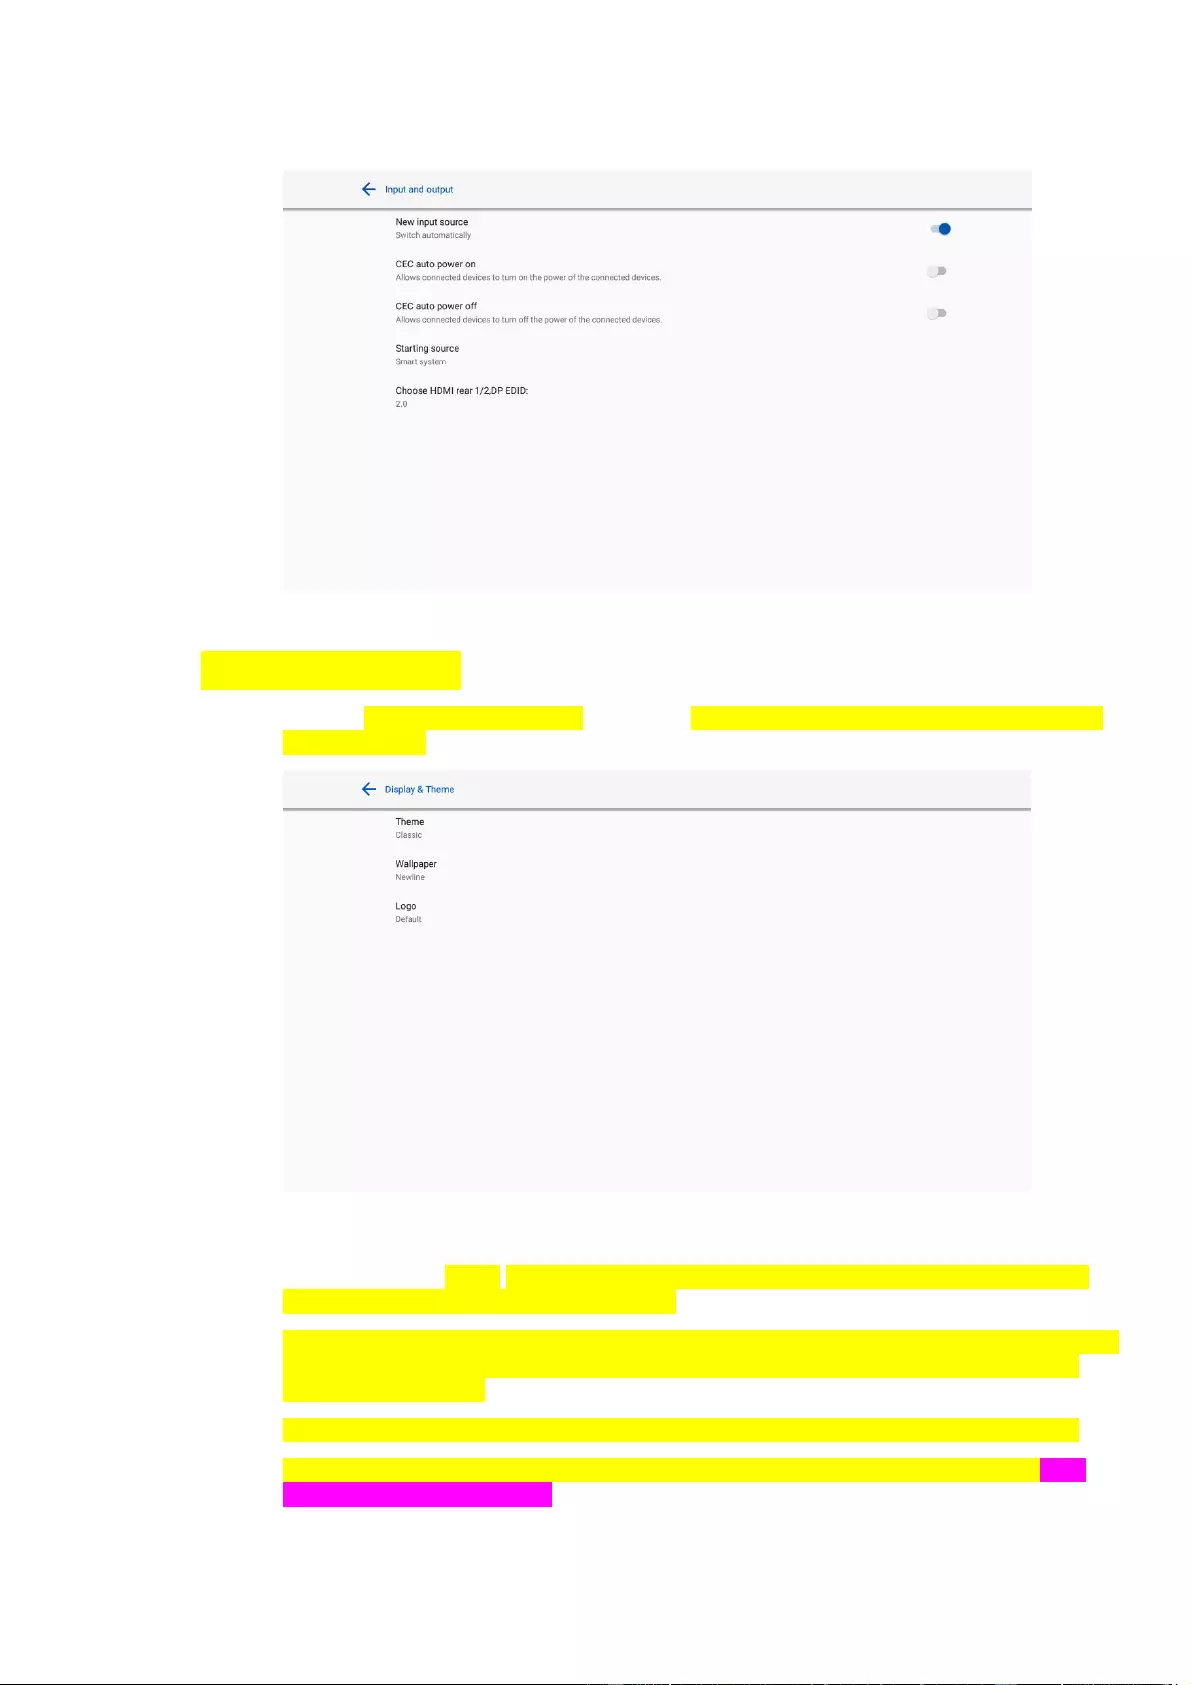
43
4.3.11 Display & Theme Settings
Enter the Display & Theme setting submenu to set the system theme, wallpaper, Home logo and
lock screen logo.
4.3.12 Security Settings
Enter the Security setting submenu to set Passkey lock, Whiteboard/Screenshot data clearance,
Encryption & credentials, USB lock functions.
Passkey lock: Click to set whether you need enter the password or modified password when going
from the Start page to the Home page. The password must be at least 4 digit numbers. English
letters are not allowed.
Whiteboard/Screenshot data clearance: Click to set the regular clearance of discussion data.
Encryption & credentials: Click to view the information about encryption & credentials, and
install the certificate from USB.

44
USB lock: Click to turn on/off the USB lock function.
4.3.13 System
Enter the System submenu to upgrade the system, perform a factory data reset, network settings
reset, app preferences reset, view firmware information, embedded operating system version
information or the display’s serial number.
4.4 Windows
On the Home Page, click Windows to enter the Internal PC source, as shown in the following
figure. If the display is not equipped with an Internal PC, «No Signal» is displayed.
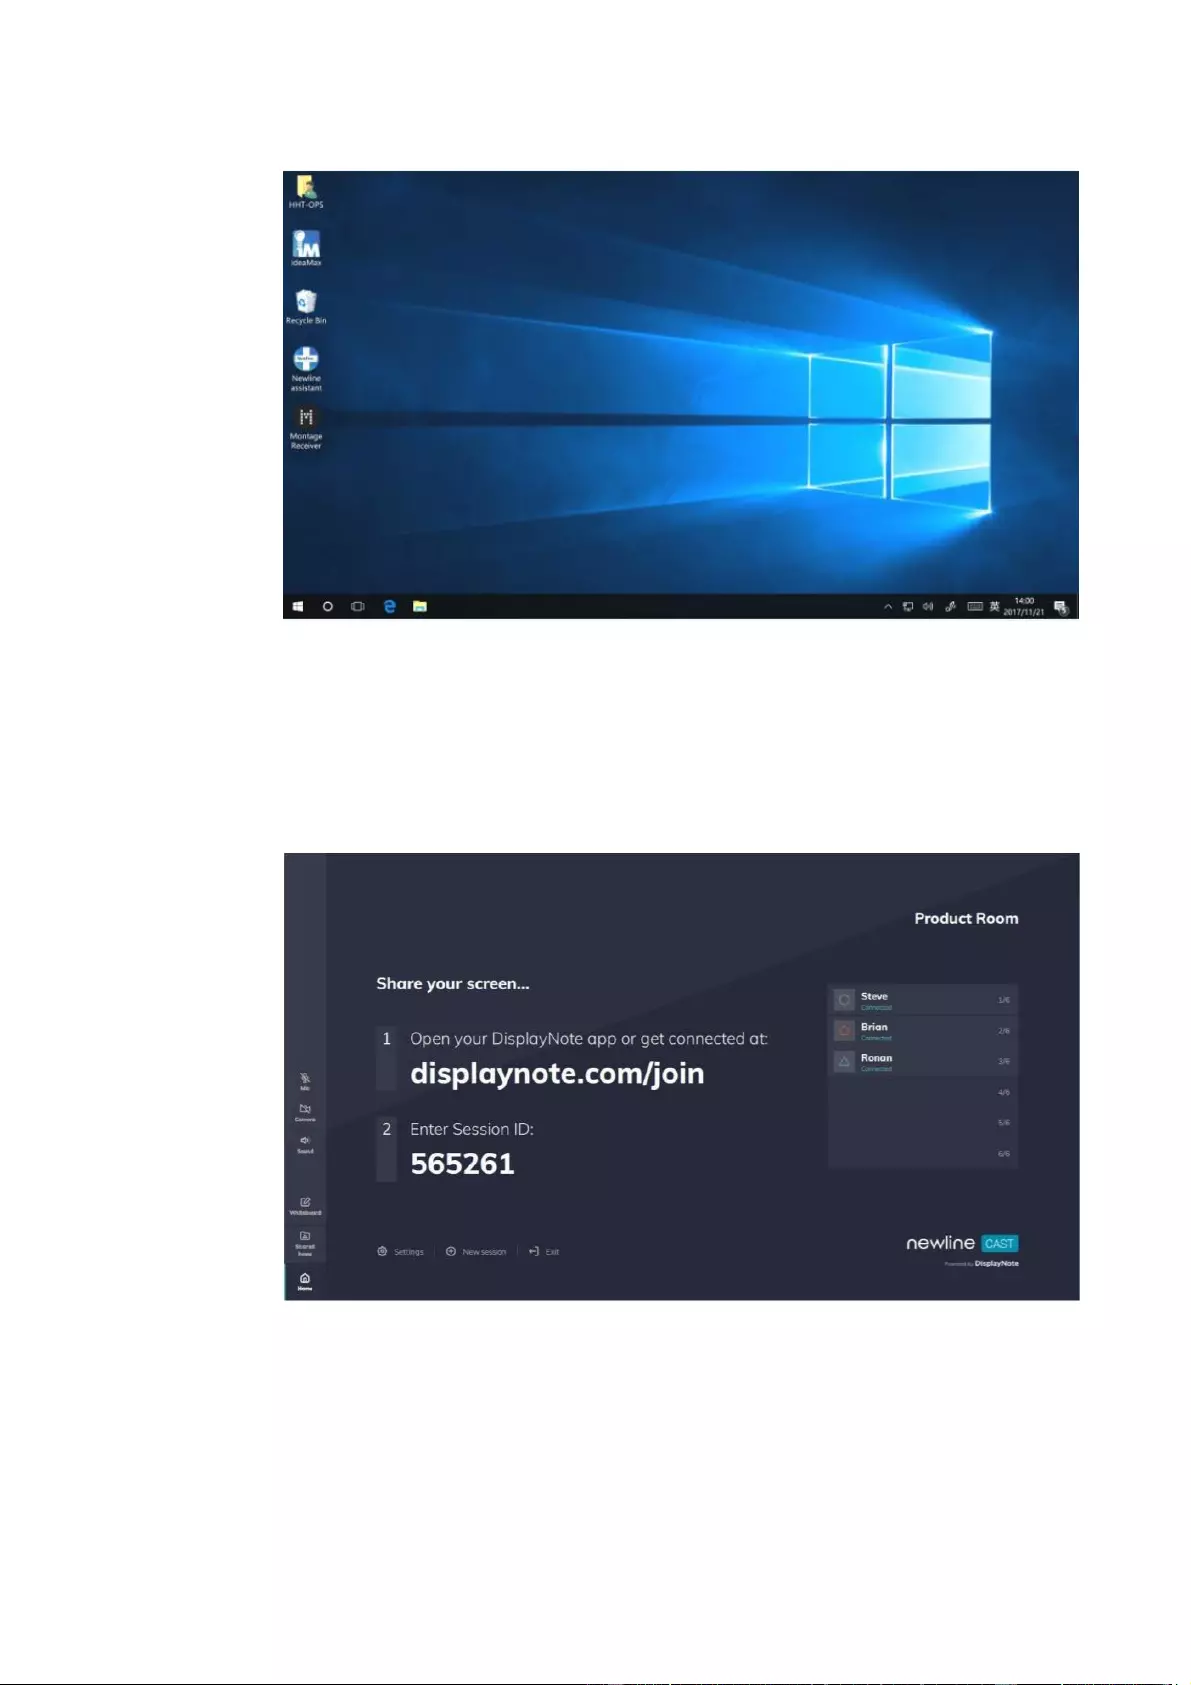
45
4.5 Screen Sharing
Multiple devices can be cast wirelessly to the display through several casting modes (Airplay,
Google Cast…). To cast: click Screen Sharing on the Home Page to enter Newline Cast. On screen
directions will appear for you to follow in order to wirelessly cast to the display, as shown in the
following figure:
4.6 Whiteborad
The whiteboard has the following functions:
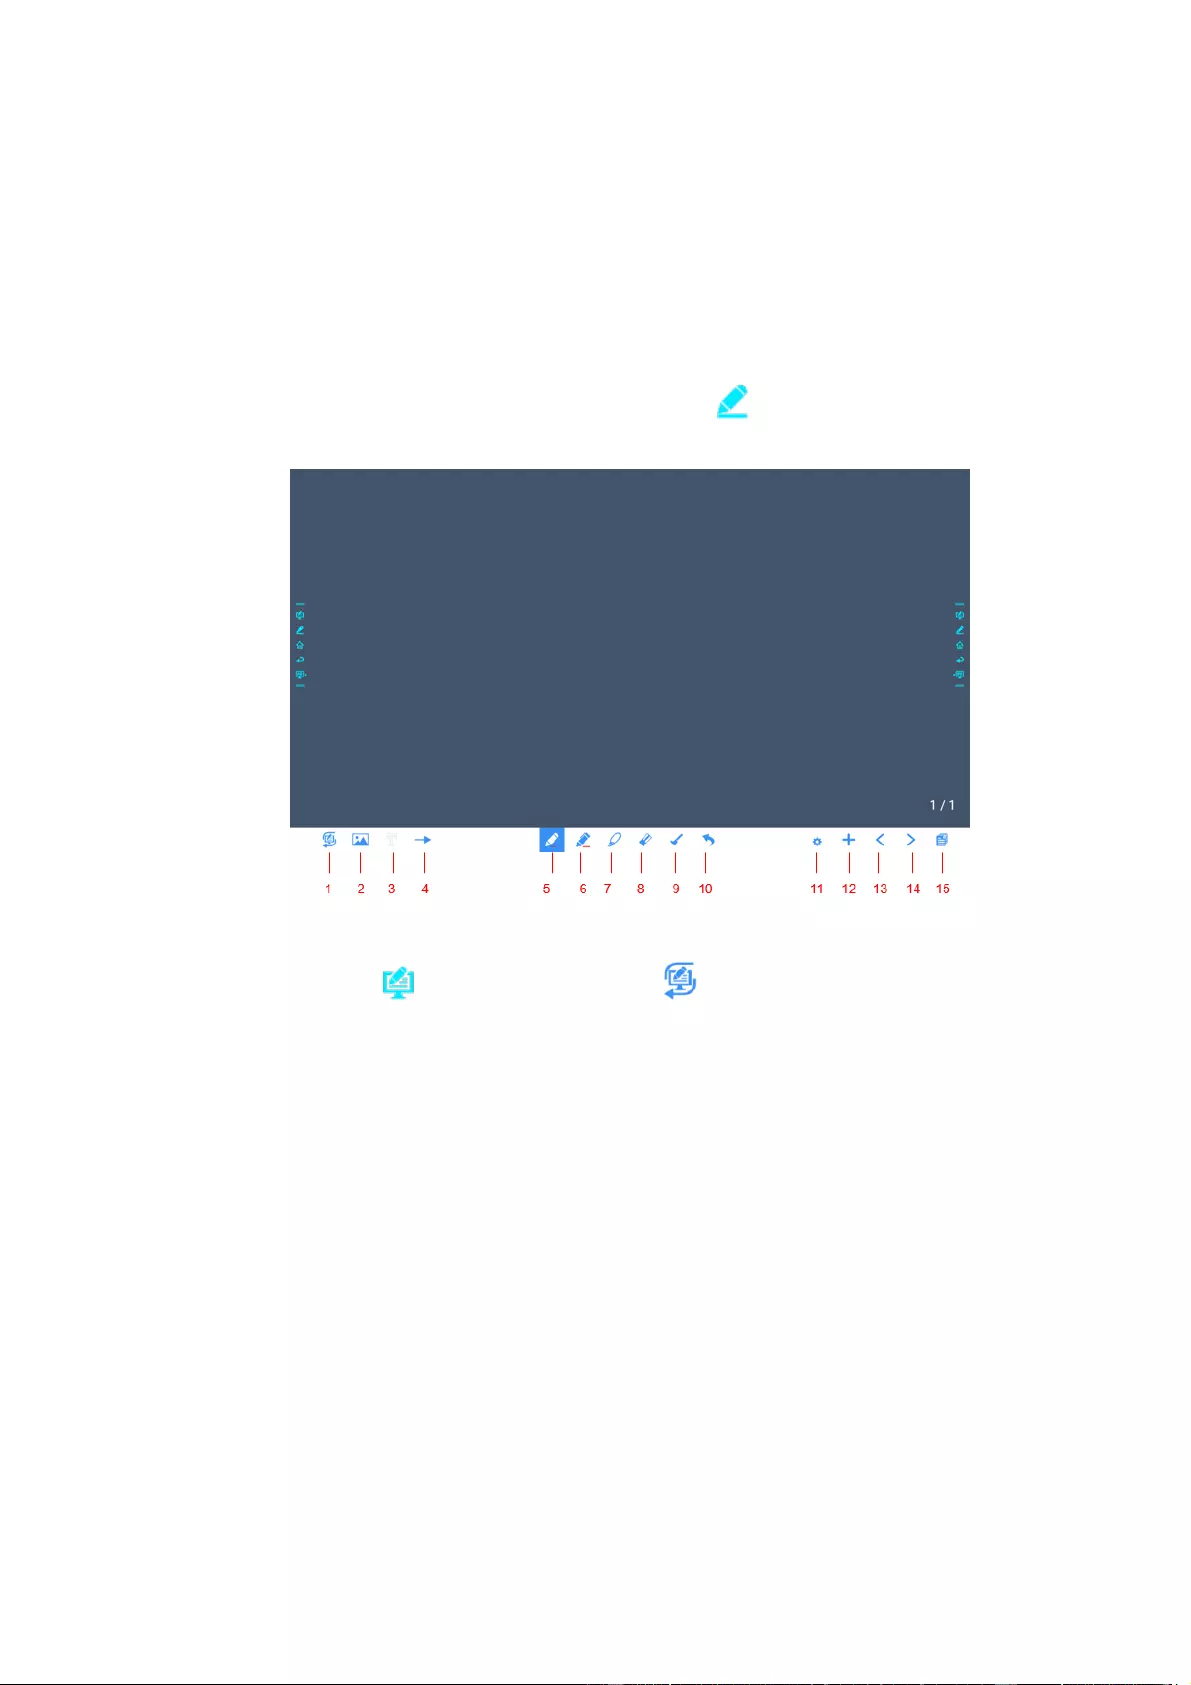
46
Discussion and screen annotation
On the whiteboard page, you can select pen type, width, and color to write or annotate on the
screen. You can also erase selected content or clear all content on the screen.
Page navigation
Preview or delete pages.
Whiteboard Mode
Click Discussion in the main toolbar or click on either side toolbar to enter the
embedded whiteboard mode, as shown in the following figure:
Click on the side toolbar or click in discussion mode to enter annotation mode. In
annotation mode, a transparent layer lays over the screen, letting you write over whatever is
on the screen until you exit annotation mode.
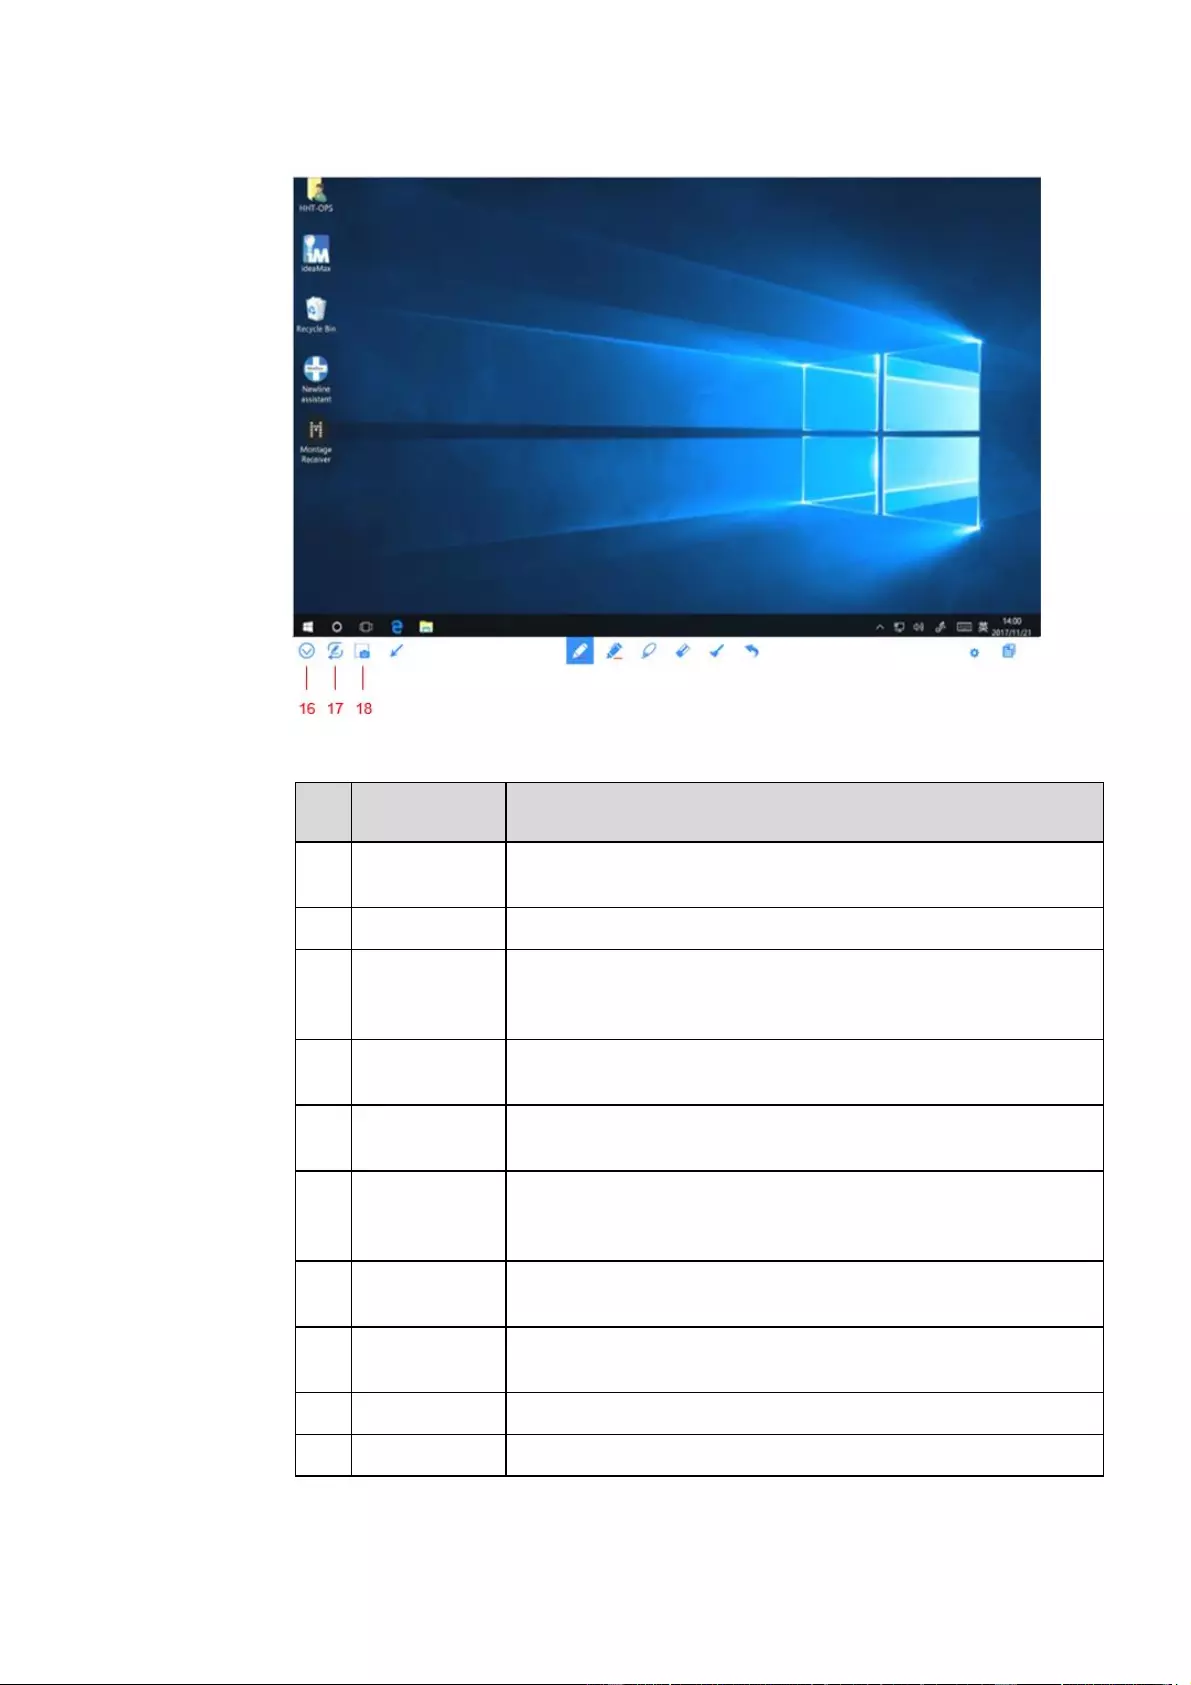
Click the icon to enter annotation mode. (See more detail in
whiteboard mode section)
Click the icon to insert picture.
Click and show the text window(Color/ Size) and the keyboard,
then type in the text. Click and hold the icon for two seconds to set
the default text setting.
Click the icon to insert shape.
Click to use the pen function, and the icon turns into blue. Click and
hold the icon for two seconds to set the size and color.
Click to use the highlighter function, and the icon will turn blue.
Click and hold the icon for two seconds to set the highlighter size or
color.
Click it and user could choose the data on the page to move/ zoom
in/ zoom out, and the icon turns into blue.
Click to select the eraser function and the icon will turn blue. Click
and hold the icon for two seconds to set the size of eraser.
Clear all data on this page.
Back to the previous step.
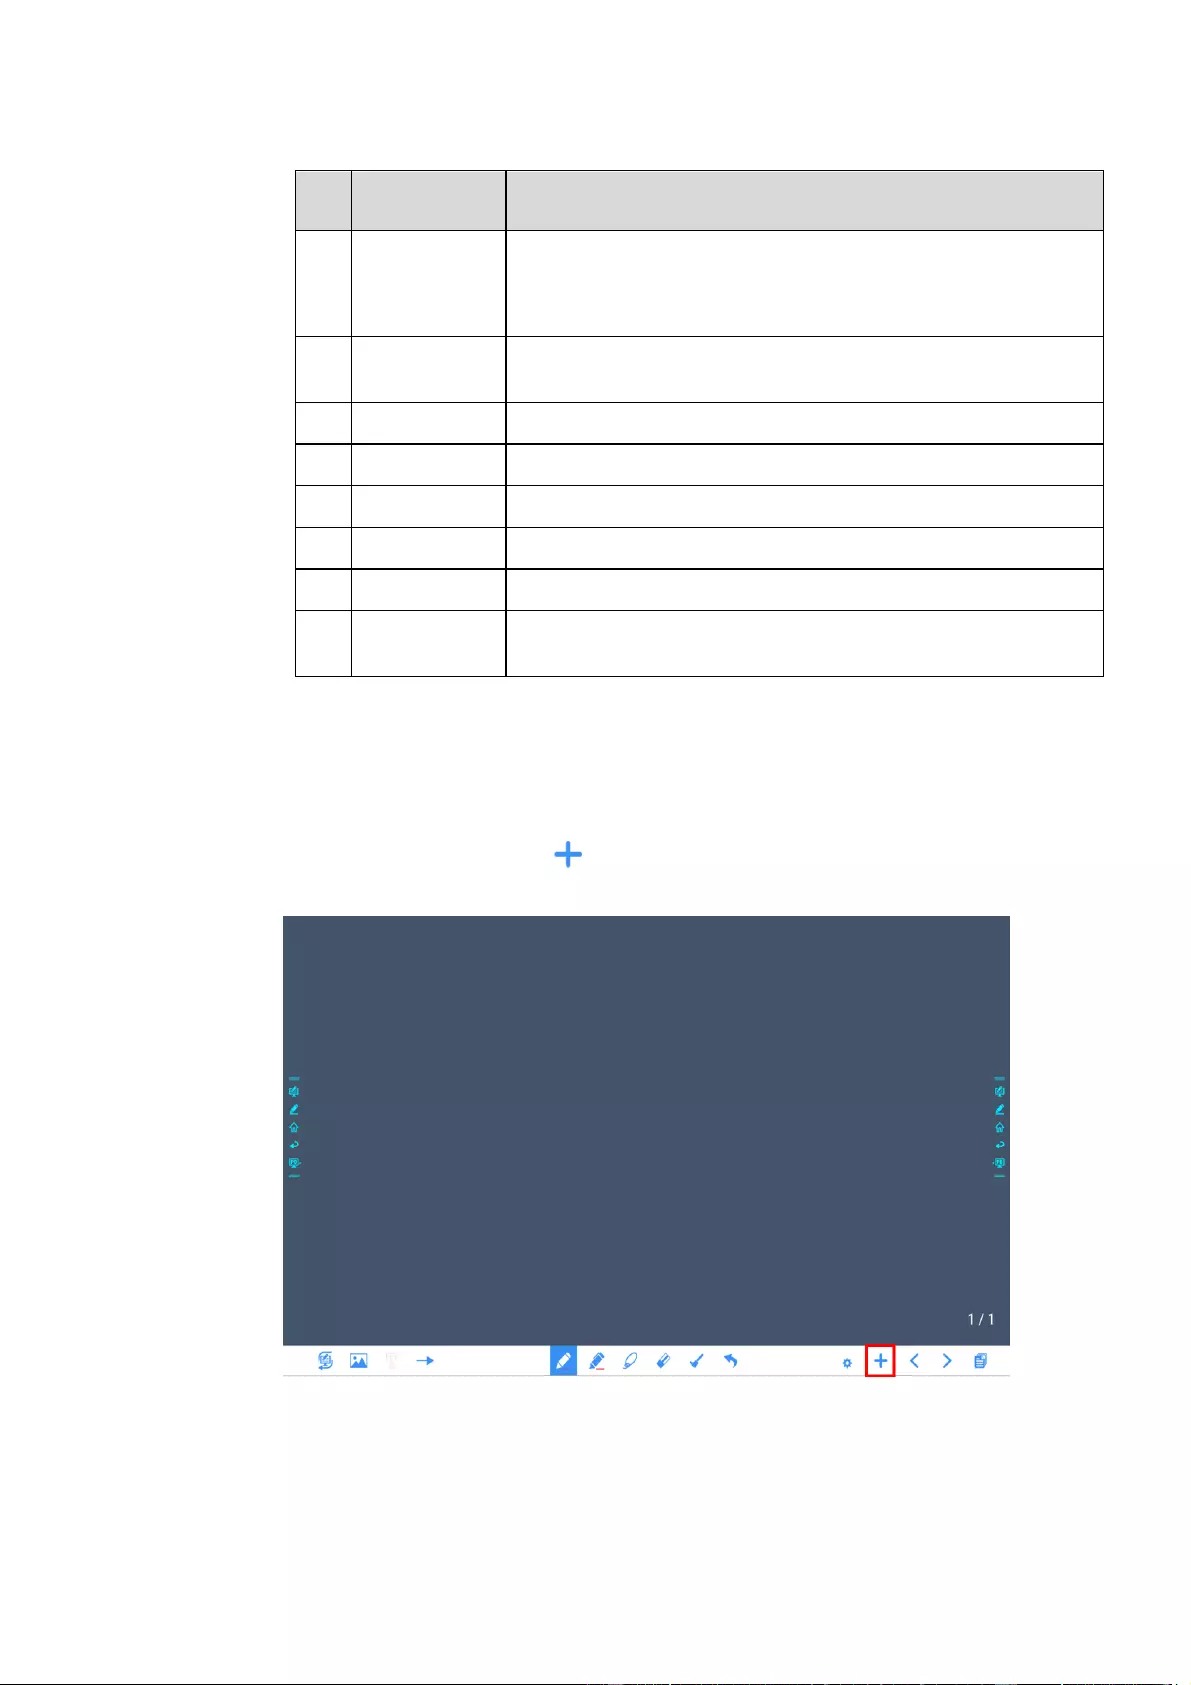
Object
recognition
switch
Slide the turn on or off the object recognition function.
Click to add a new page. Click and hold for two seconds to set the
color and the pattern of the new page.
Click to back to the previous page.
Click to go to the next page.
Click to show the page thumbnails.
Click to hide or show the smart bar.
Click the icon to enter discussion mode.
Click to take a screenshot, and save the data in the display’s internal
storage.
4.6.1 Whiteboard Functions
New Page and Settings
Create a new page
In discussion mode, click to create a new page. Up to 20 pages can be created. See the
following figure:
Page settings
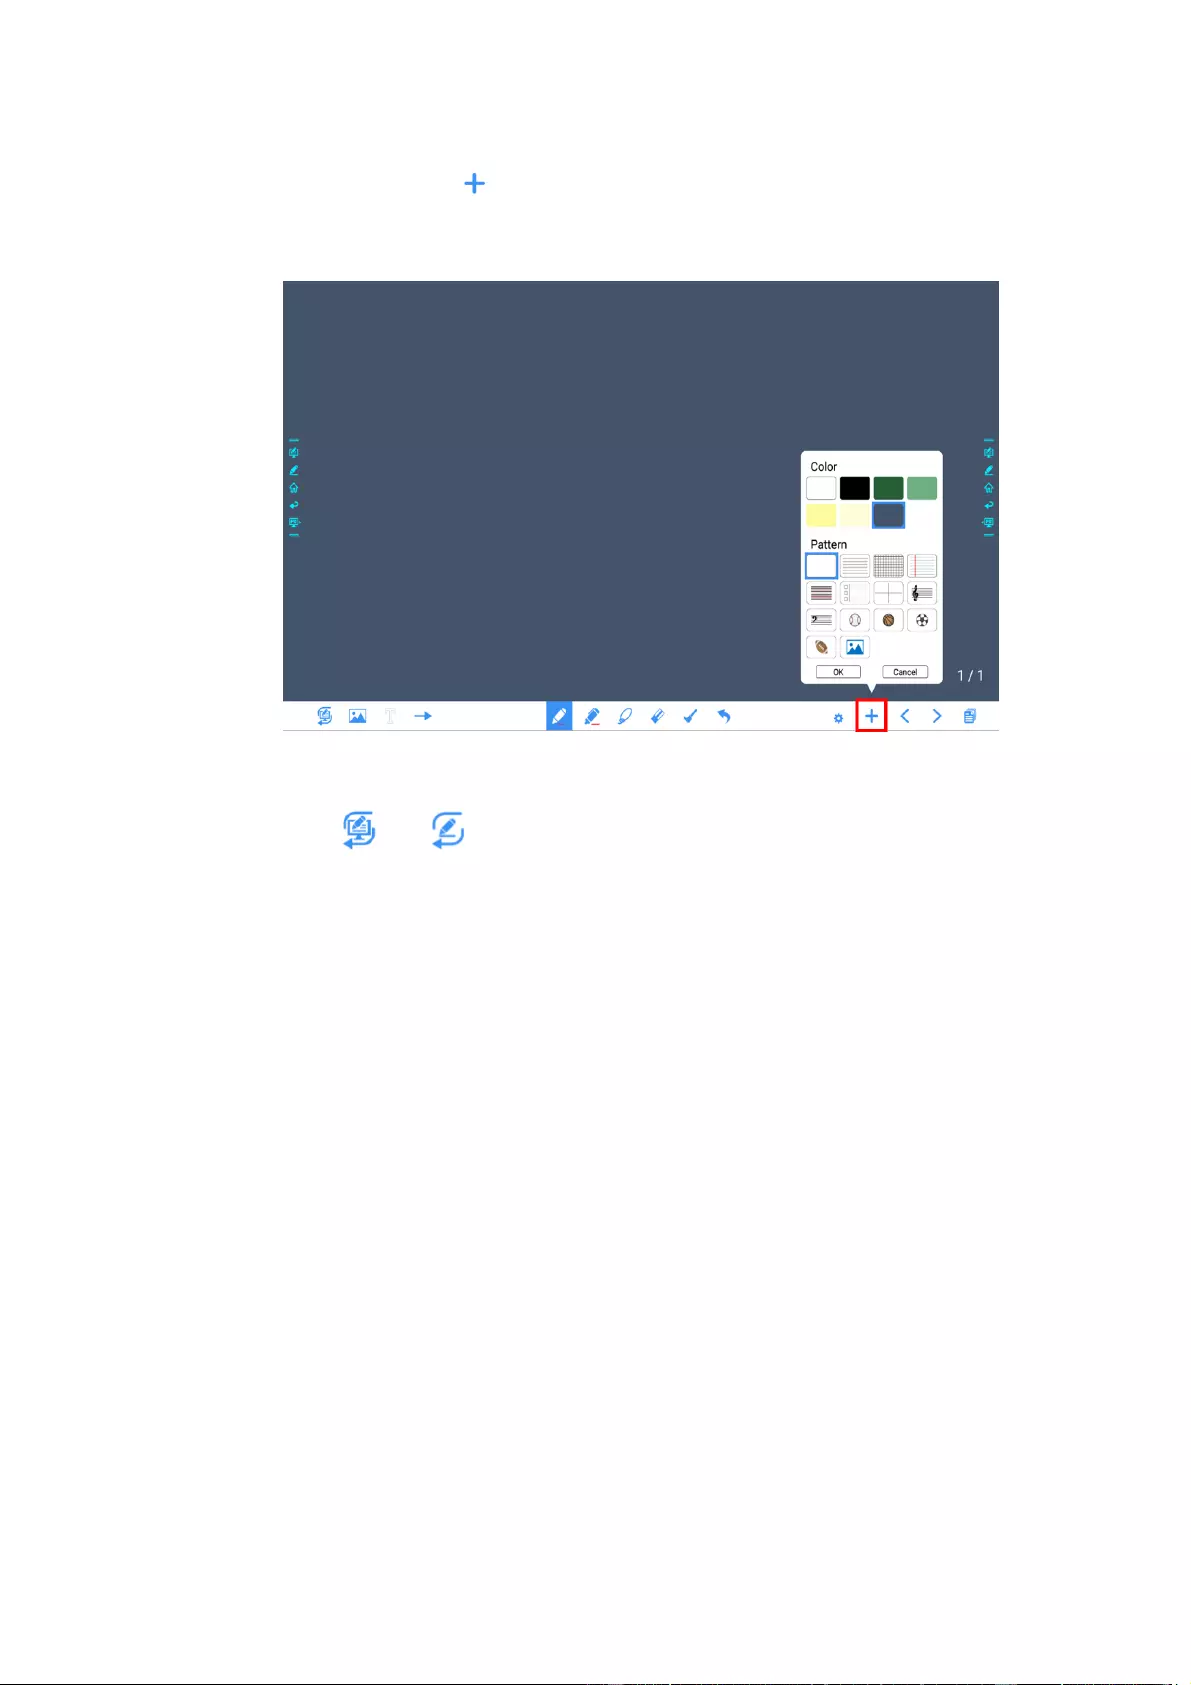
49
Click and hold for two seconds to set the color and the pattern of the new page, as shown
in the figure below.
Mode Switch
Click and in the lower left corner of the discussion mode to switch between
whiteboard modes.
Annotation mode
The background is transparent and the real-time image of the current signal source will be
displayed. You can comment on presentation content such as Office documents and pictures
as shown in the following figure:
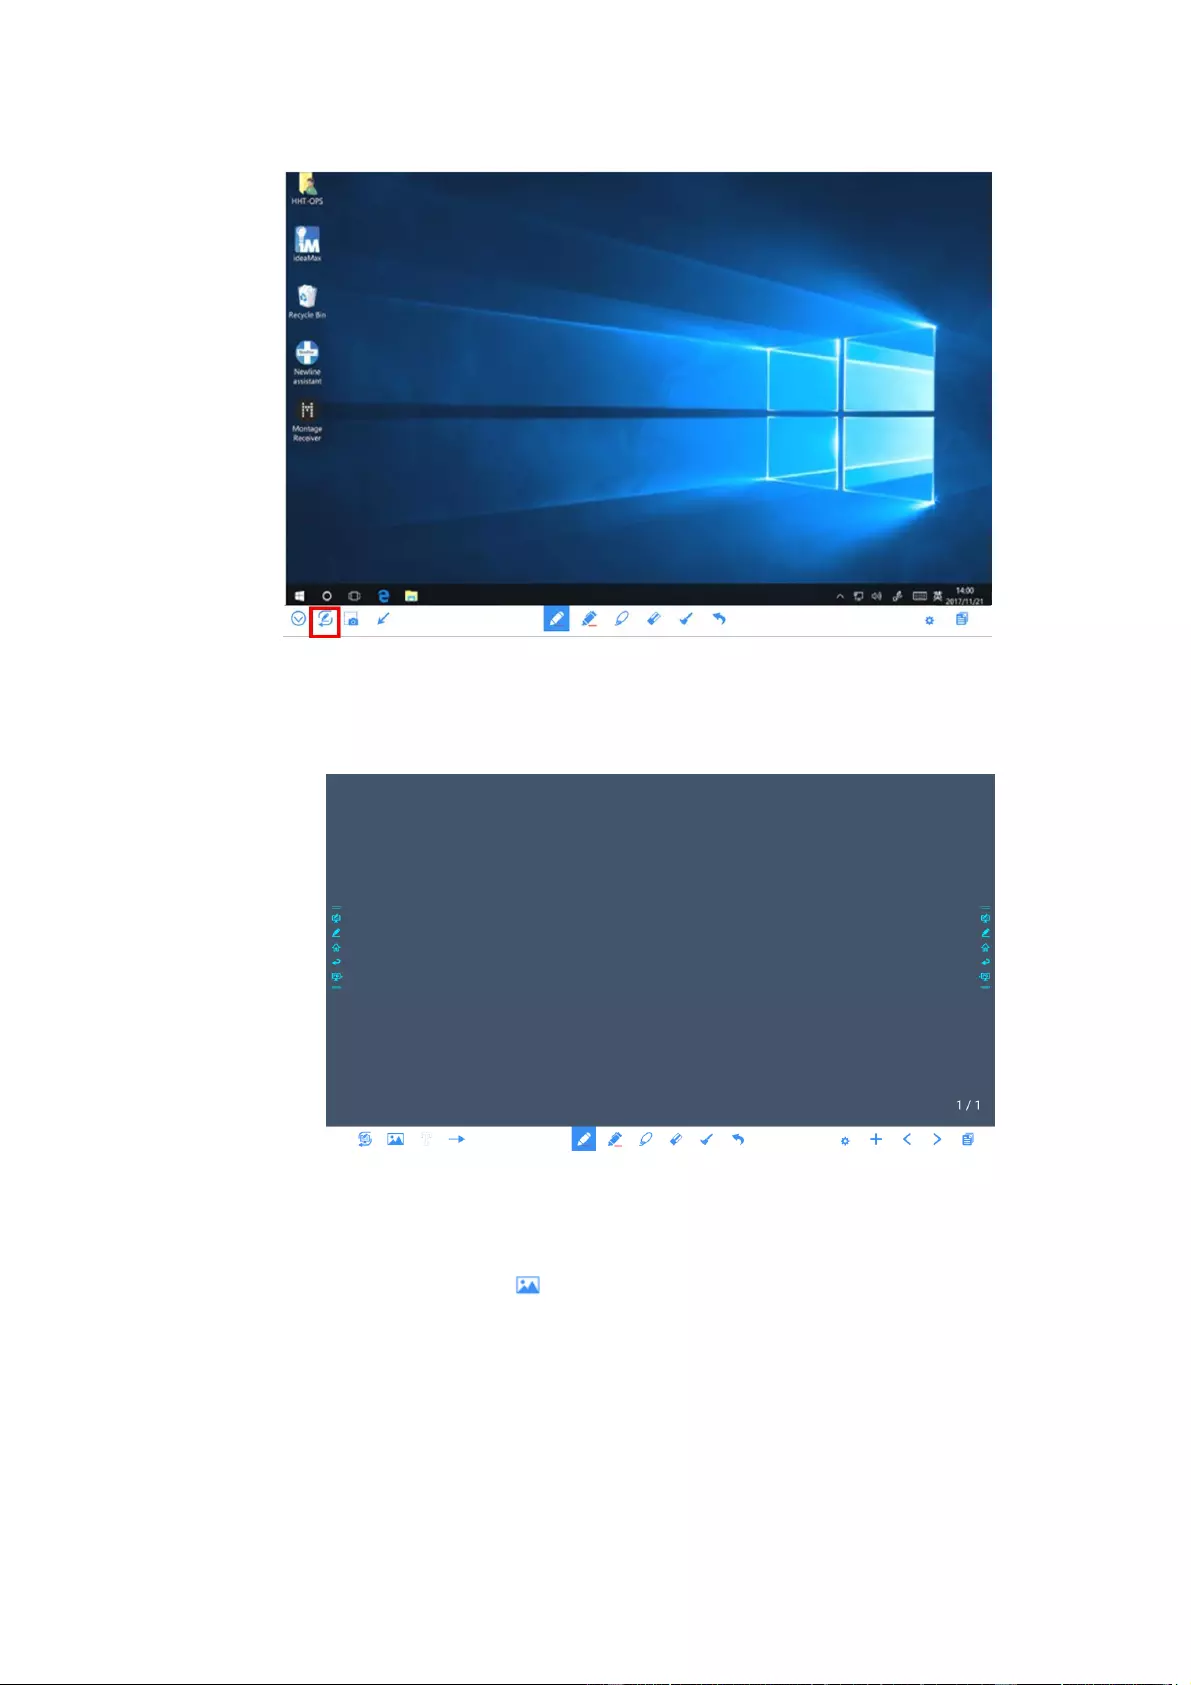
50
Discussion mode
The background is a single color, as shown in the following figure. You can write content on
the page as you wanted.
Import
On the Whiteboard, Click to import data from file management, you can import the pictures/
whiteboard data (PNG)/ screenshots (PNG) from system files, USB, network.
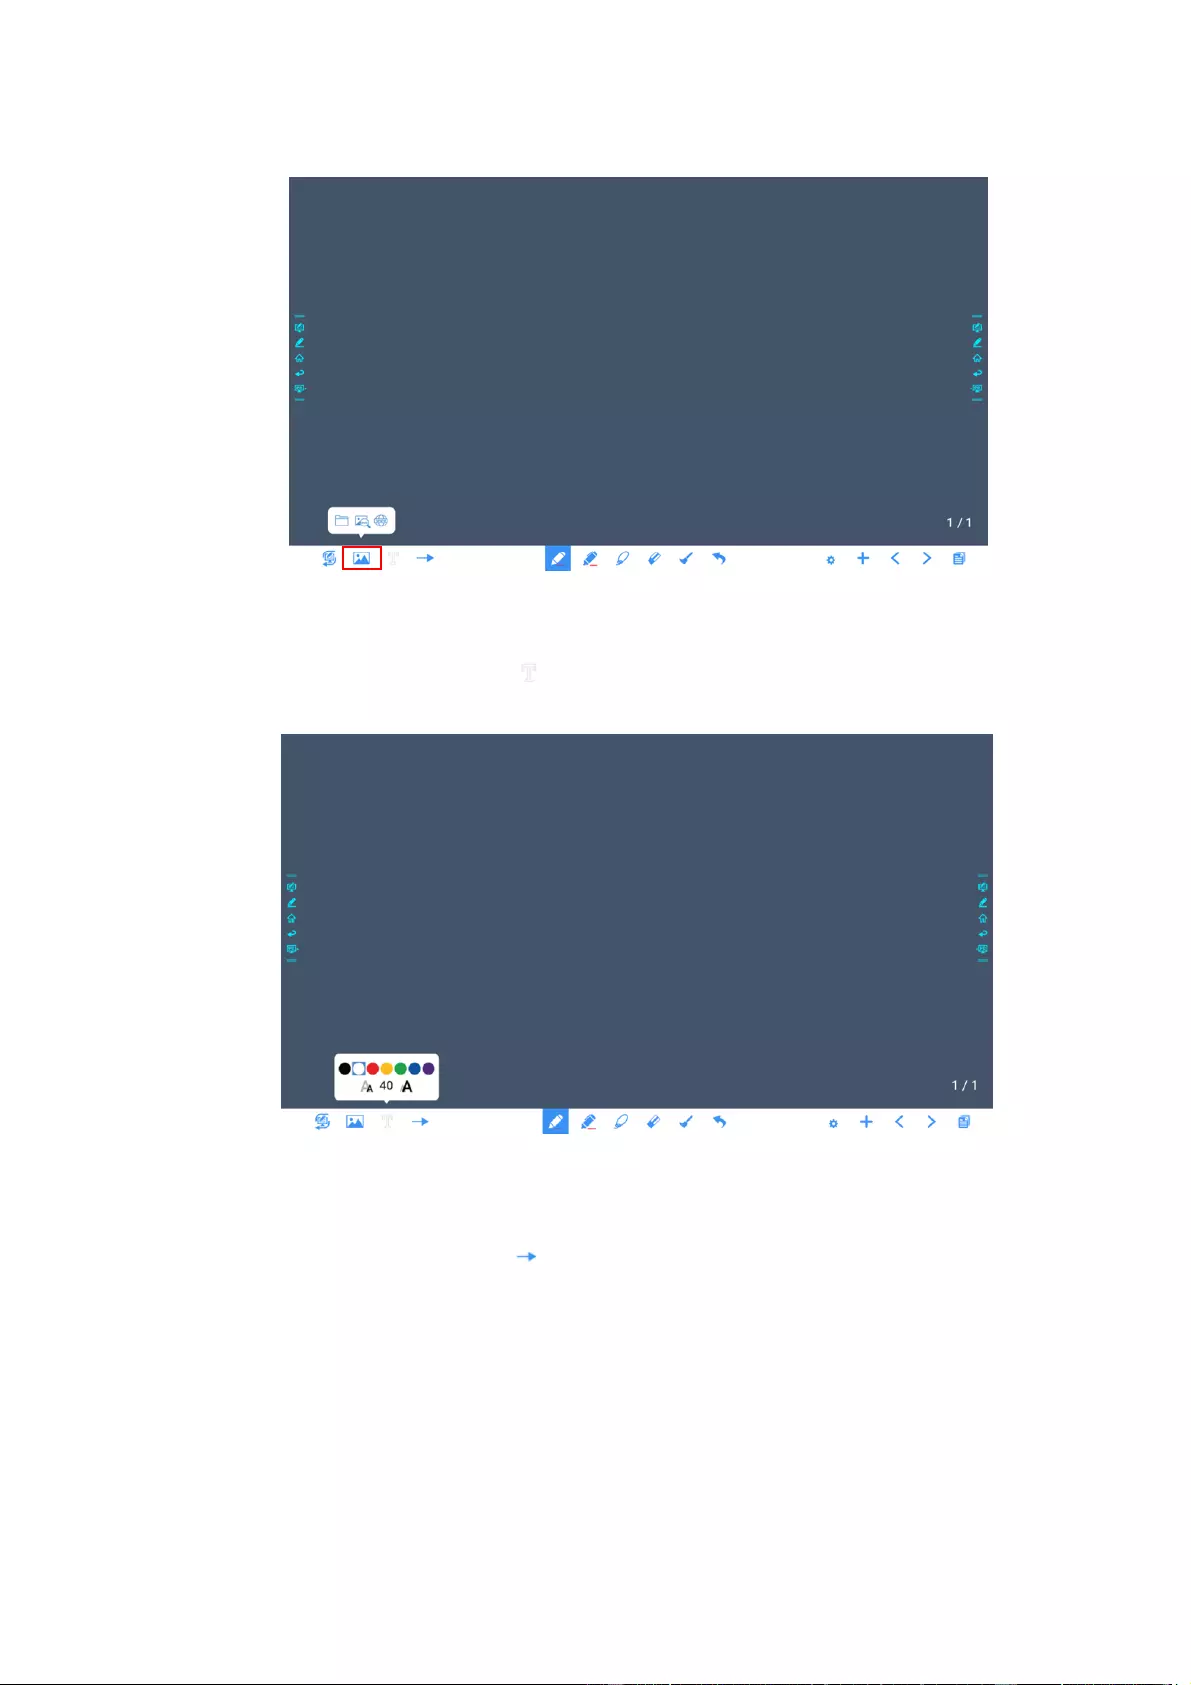
51
Insert Text
On the Whiteboard, Click to insert text, and show the keyboard. Click and hold the icon for
two seconds to set the default text setting.
Insert Auto Shape
On the Whiteboard, Click to insert the anto shape. Click and hold the icon for two seconds to
set the shapes and color.
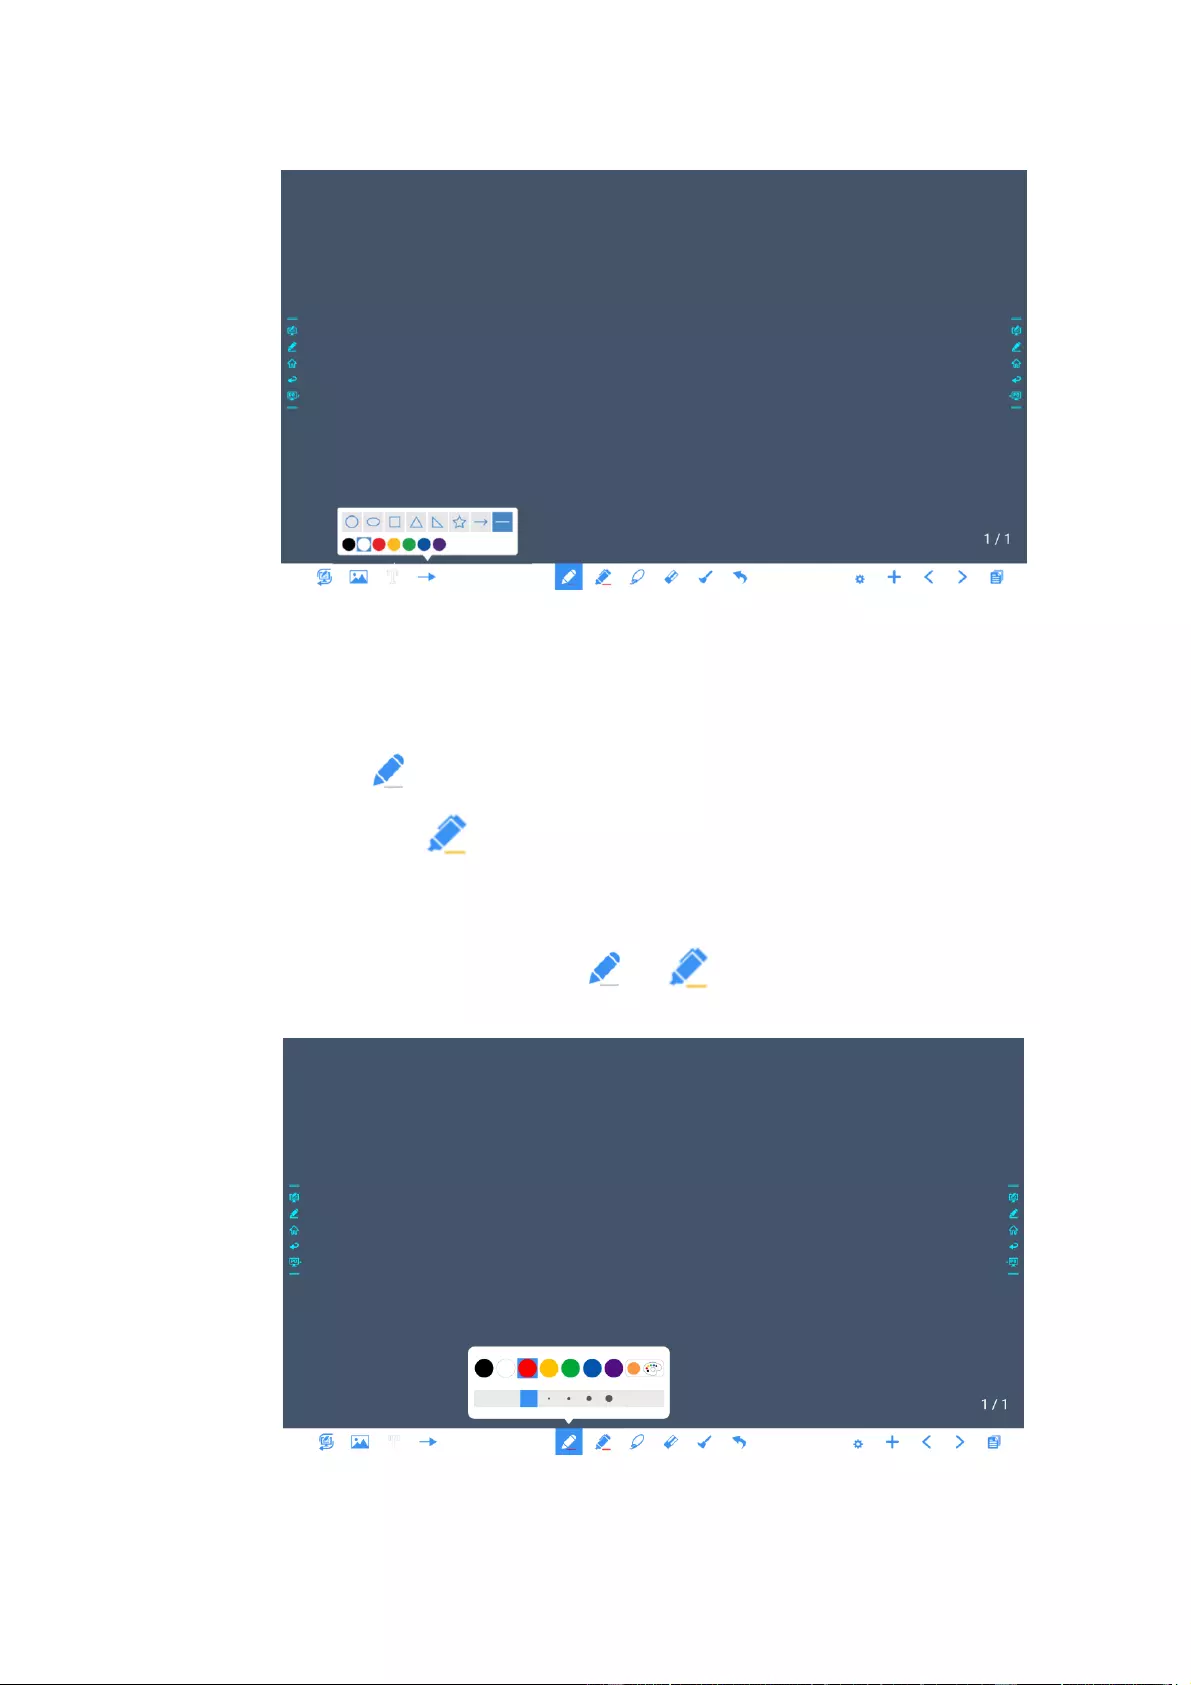
52
Pen Type
On the Whiteboard, two types of pens are supported: Pen and highlighter.
Pen : used to write.
Highlighter : used to highlight. Characters covered by comments are still visible.
Line Size and Color
On the Whiteboard, click and hold or for two seconds to set the size and color. You
can select the line size and color for writing, as shown in the following figure:
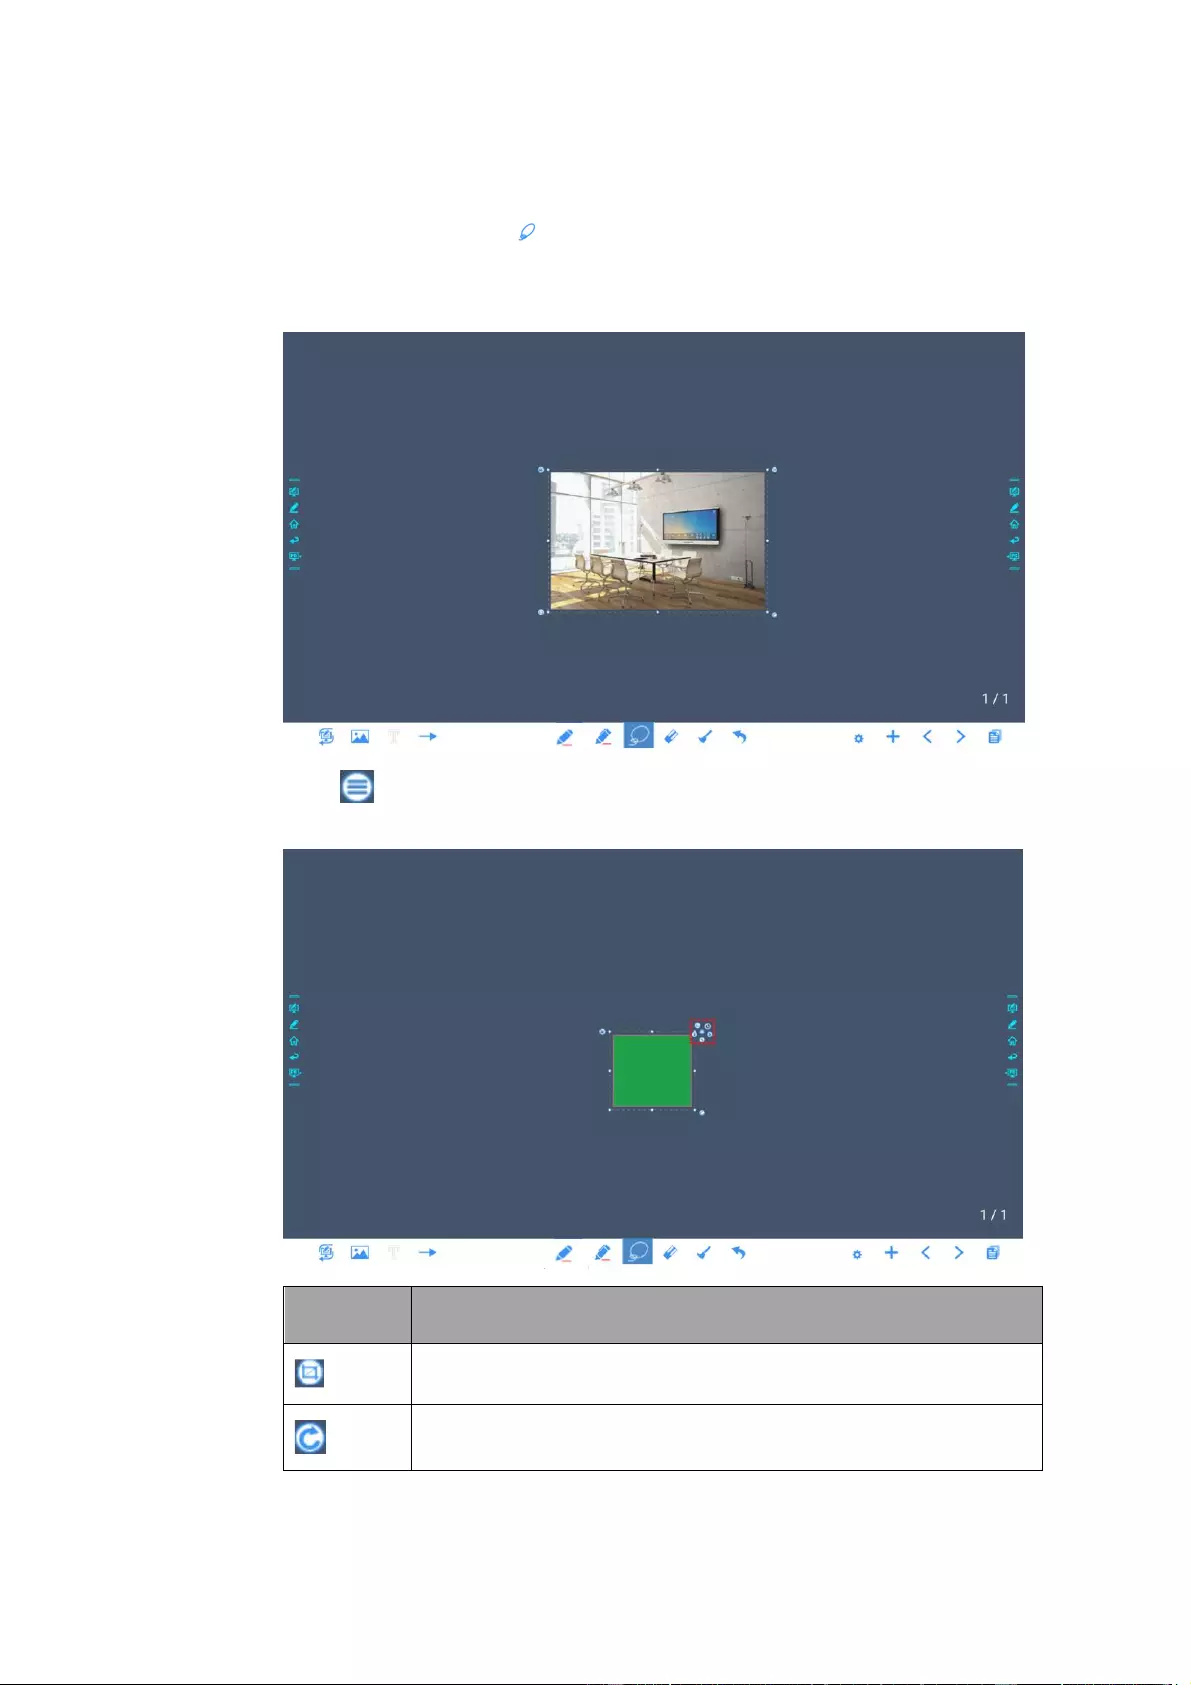
53
Select
On the Whiteboard, Click and user could choose the data on the page to move/ zoom in/
zoom out/ rotate by two fingers, and the icon turns into white.
Click to expand the toolbar,users can copy or delete or cut the data or change the data
color, such as the following figure:
Click this icon to Crop the image.
Long press this icon to Rotate the selected items
Click this icon to Post the selected items.
Click this icon to Change color for the selected items.
Paste (long press the screen around two seconds and the icon will appear
only after one item copied or cut)
Click this icon to Push to bottom layer.
Click this icon to Delete the items.
Click this icon to cut the items.
Click this icon to copy the items.
Eraser
Two methods are available to erase written errors or content as follows:
Fist/hand back erasing: corresponding erase shape is a round with diameter 100pt.
Spot erasing: Click to clear errors or unnecessary content.
Clear All
On the Whiteboard page, click to show the pop-up windows to clear all content on the
current page, as shown in the following figure:
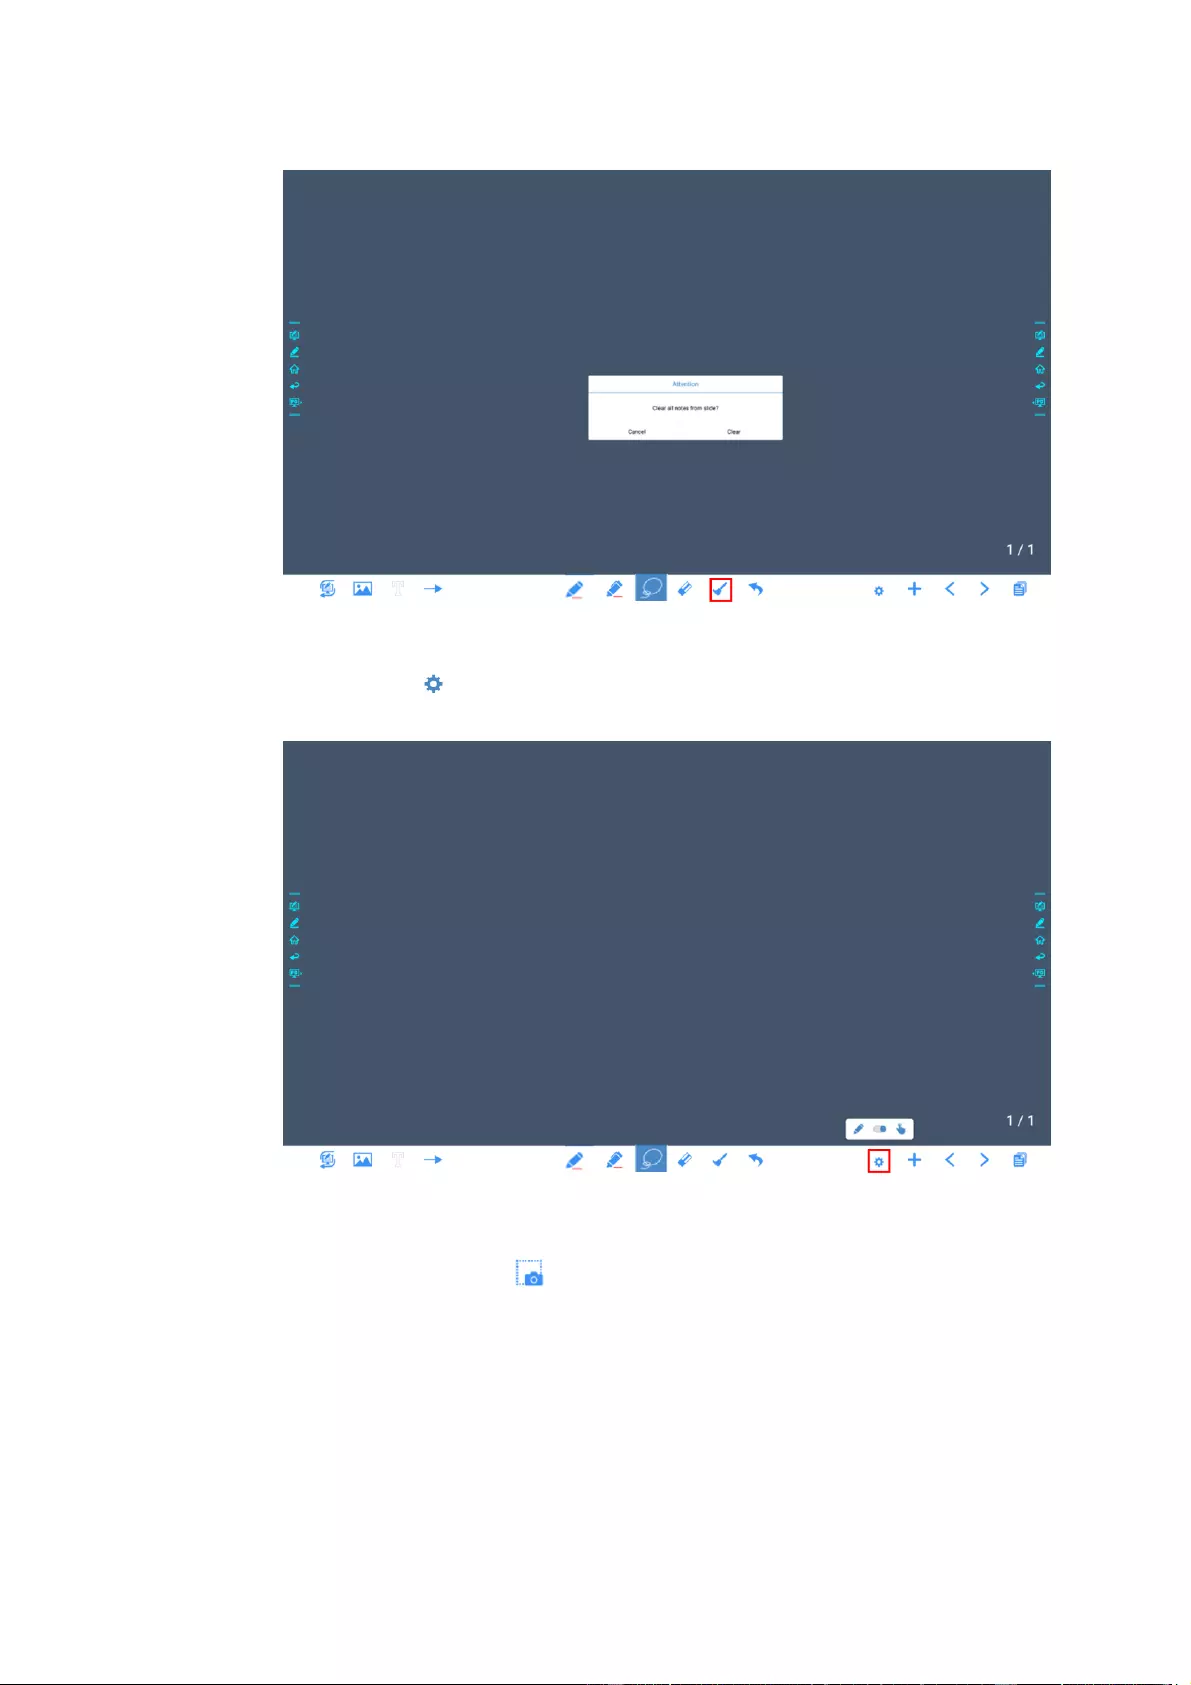
55
Object recognition switch
Press the setting icon, it will pop up a switch and let user to change the object recognition
setting, slide to left to open the object recognition function, slide to right to turn it off.
Screenshot
In annotation mode, click to save the current slide as a picture. Up to 50 screenshots can be
created. as shown in following figure:
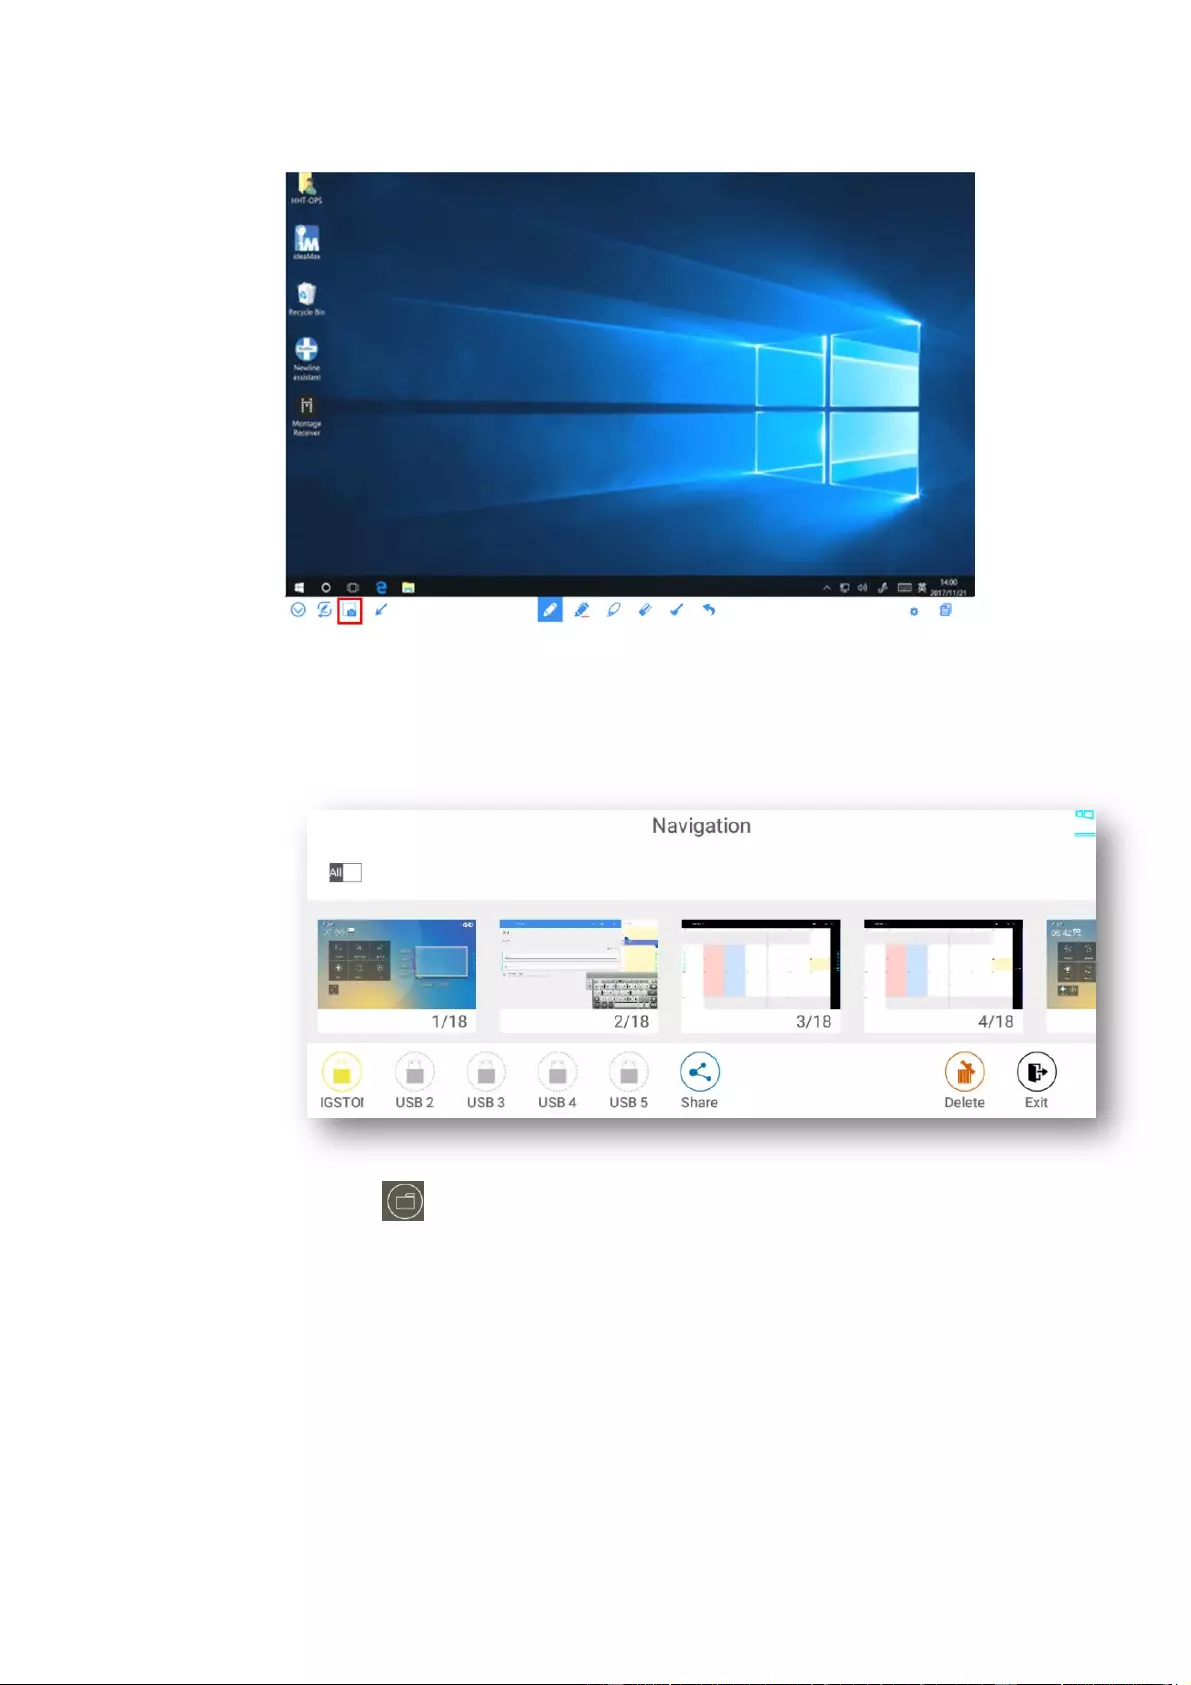
56
Pictures saved through screenshots can be viewed and obtained using the following methods:
Screenshots are saved on the Navigation page, as shown in the following figure:
Click on the home page and choose Internal storage > Pictures > Screenshots >
image to view or share screenshots.
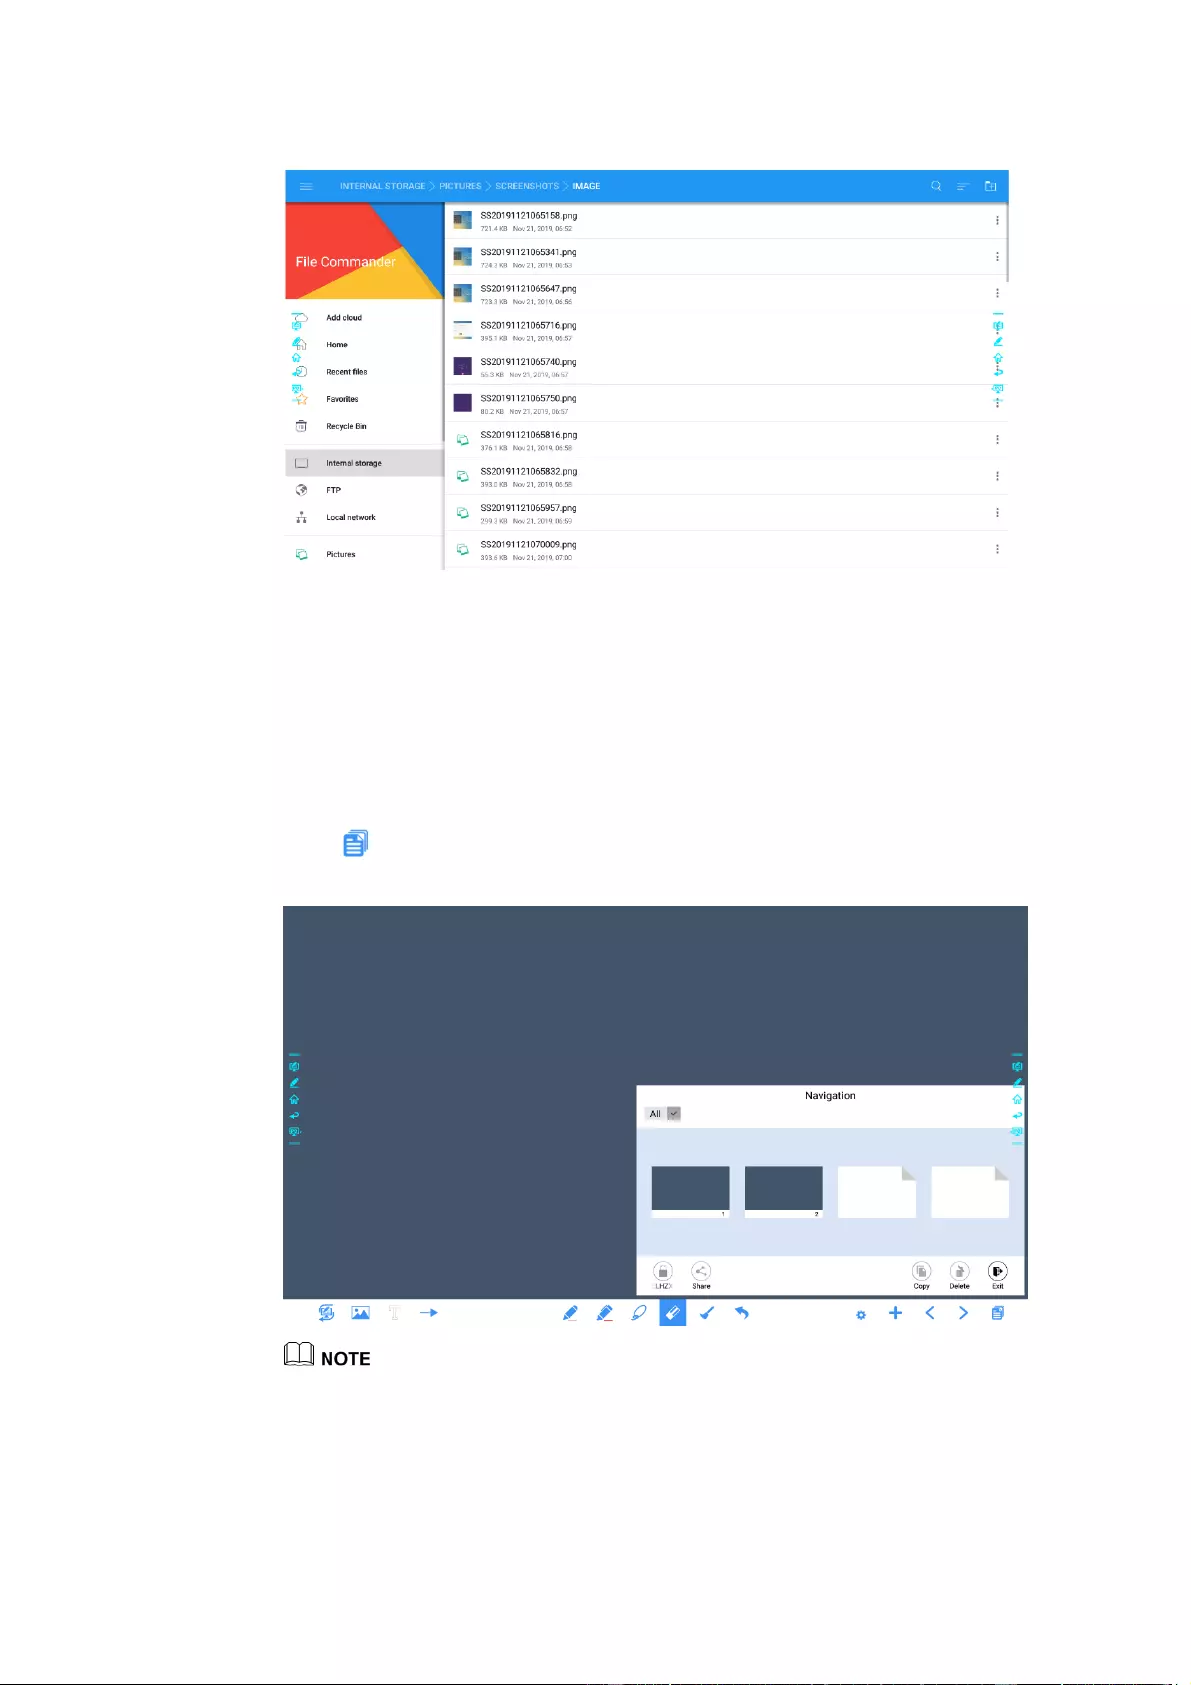
57
4.6.2 Page Management
You can preview, select, share, save, and delete any created writing page.
Page Preview
Click on the lower right corner in the discussion mode. All pages will be displayed. Click
one page to switch to that page for more operations, as shown in the following figure:
Only 8 pages are displayed at once. You can slide right or left using one finger to see more.

58
Page Select Or Delete Page
On the Navigation page, you can select or delete writing pages according to requirements, as
shown in the following figure.
Click to select all pages.
Click to share selected pages.
Click to delete selected pages.
Click to exit Navigation.
Save Page On the Navigation page, when no external USB drives are connected, the USB icons will be gray.
When an external USB drive is connected, the USB icons will turn yellow. Click the yellow USB
icons and the selected whiteboard file can be saved in the folder of «Meeting + year month day
hour minute second» under the root directory of the storage device.
Do not eject USB flash drive before completing the saving process.
If the USB flash drive is larger than 16GB or the file format is not FAT32, the data will not be saved
properly.
If the screen is showing external source, USB port may be used by the source and USB drive may not
appear in the list. In that case, please use the Android USB port on the back of the unit or change the
source to the embedded operating system.
59
Page share
Click the button on the Navigation page, click File Commander to save to local storage or to
the cloud, or click AquaMail to share current the meeting files by email. Before sending by email,
confirm that an email account is successfully set up in Settings.
4.6.3 Object Detection
This product supports object recognition and produces different effects according to the diameter
and size of the input objects.
Fist/palm: identified as an eraser (100 pt).
Fine Pen (3mm): suggested to use while writing.
Thick Pen ( ≥ 8 mm)/ finger: suggested to use when you want to highlight.
60
If the diameter or size of the input object is larger than 3mm or smaller than 8mm, there is a risk of
identification failure. Keep the object vertical while writing.
Object recognition: The system automatically remembers the settings selected for a fine pen and a
thick pen. Users can use a fine pen (stylus or thick pen (finger) to utilize select functions (including
pen color and thickness). After that, the system remembers this information until users change
them manually.
Fist/palm: keep the eraser (100 pt) function.
Fine pen (3mm): before users manually change, the system remembers the previous selected
attributes (including pen color and thickness).
Thick pen (≥ 8 mm): before users manually change, the system remembers the previous
selected attributes (including pen color and thickness).
61
4.7 Browser
On the Home page, click Browser to view web page, as shown in the following figure:
4.8 File Management
The product supports connection to USB flash memory. In File Viewer application, you can
preview all files in the internal storage and storage devices connected via USB ports and select,
copy, paste, delete and search for files.
4.8.1 File Viewer Page
On the Home page, click File Viewer, as shown in the following figure:
62
4.8.2 File Preview
Using the File Viewer application, you can click the submenu on the left side to preview what files
are on internal storage, external storage devices connected via the USB ports, cloud stored files,
FTP uploaded files, and local network files, as shown in the following figure.
4.8.3 File Search
Enter the File Viewer application and click . In the dialog box that pops up, enter the keywords
in the search box. The system will display a list of files that match the searched for keywords.
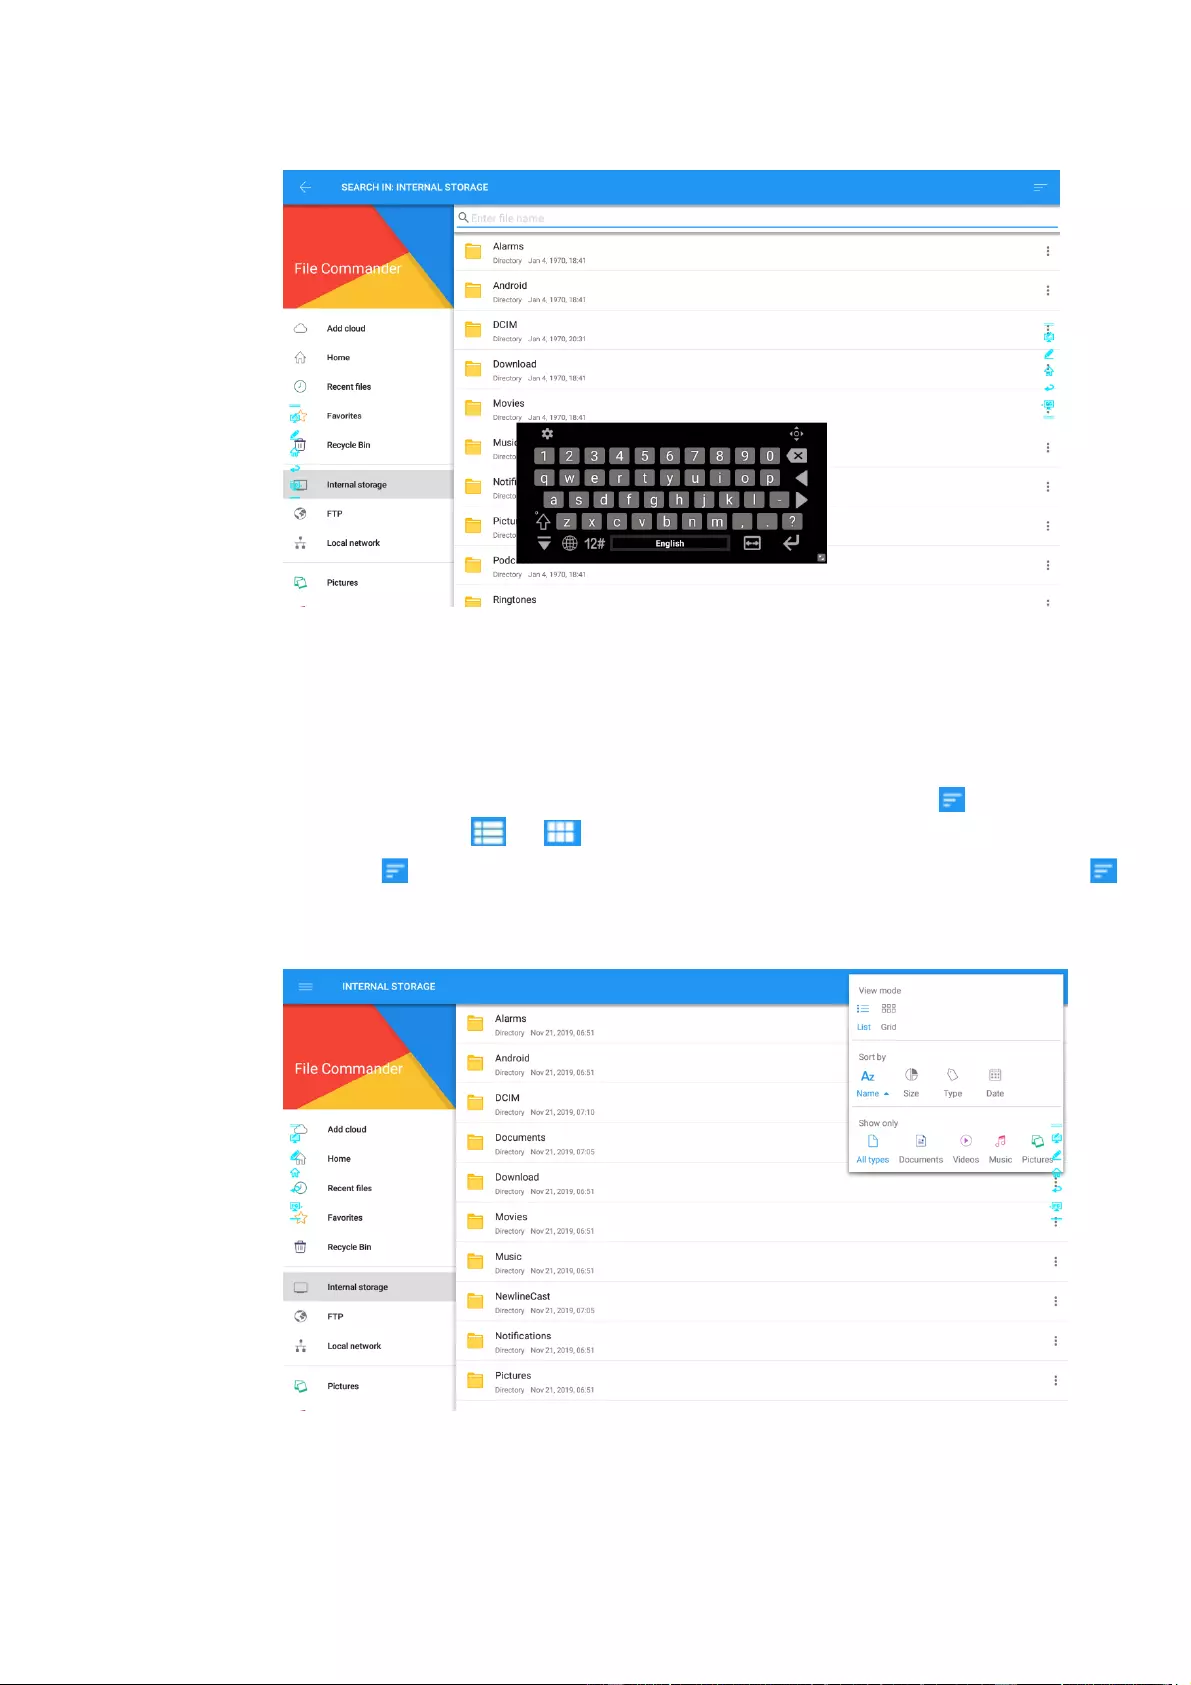
63
4.8.4 File Filtering
You can click the menu on the left side to display files by type, for example, whether the files is a
document, a picture, music, a video, archived or was downloaded.
The system supports two view modes: list and thumbnail. You can click on the top right
corner to switch or view modes
Click to display files based on name, type, size, and modification. You can also click
to filter files by whether they are pictures, music or video files.
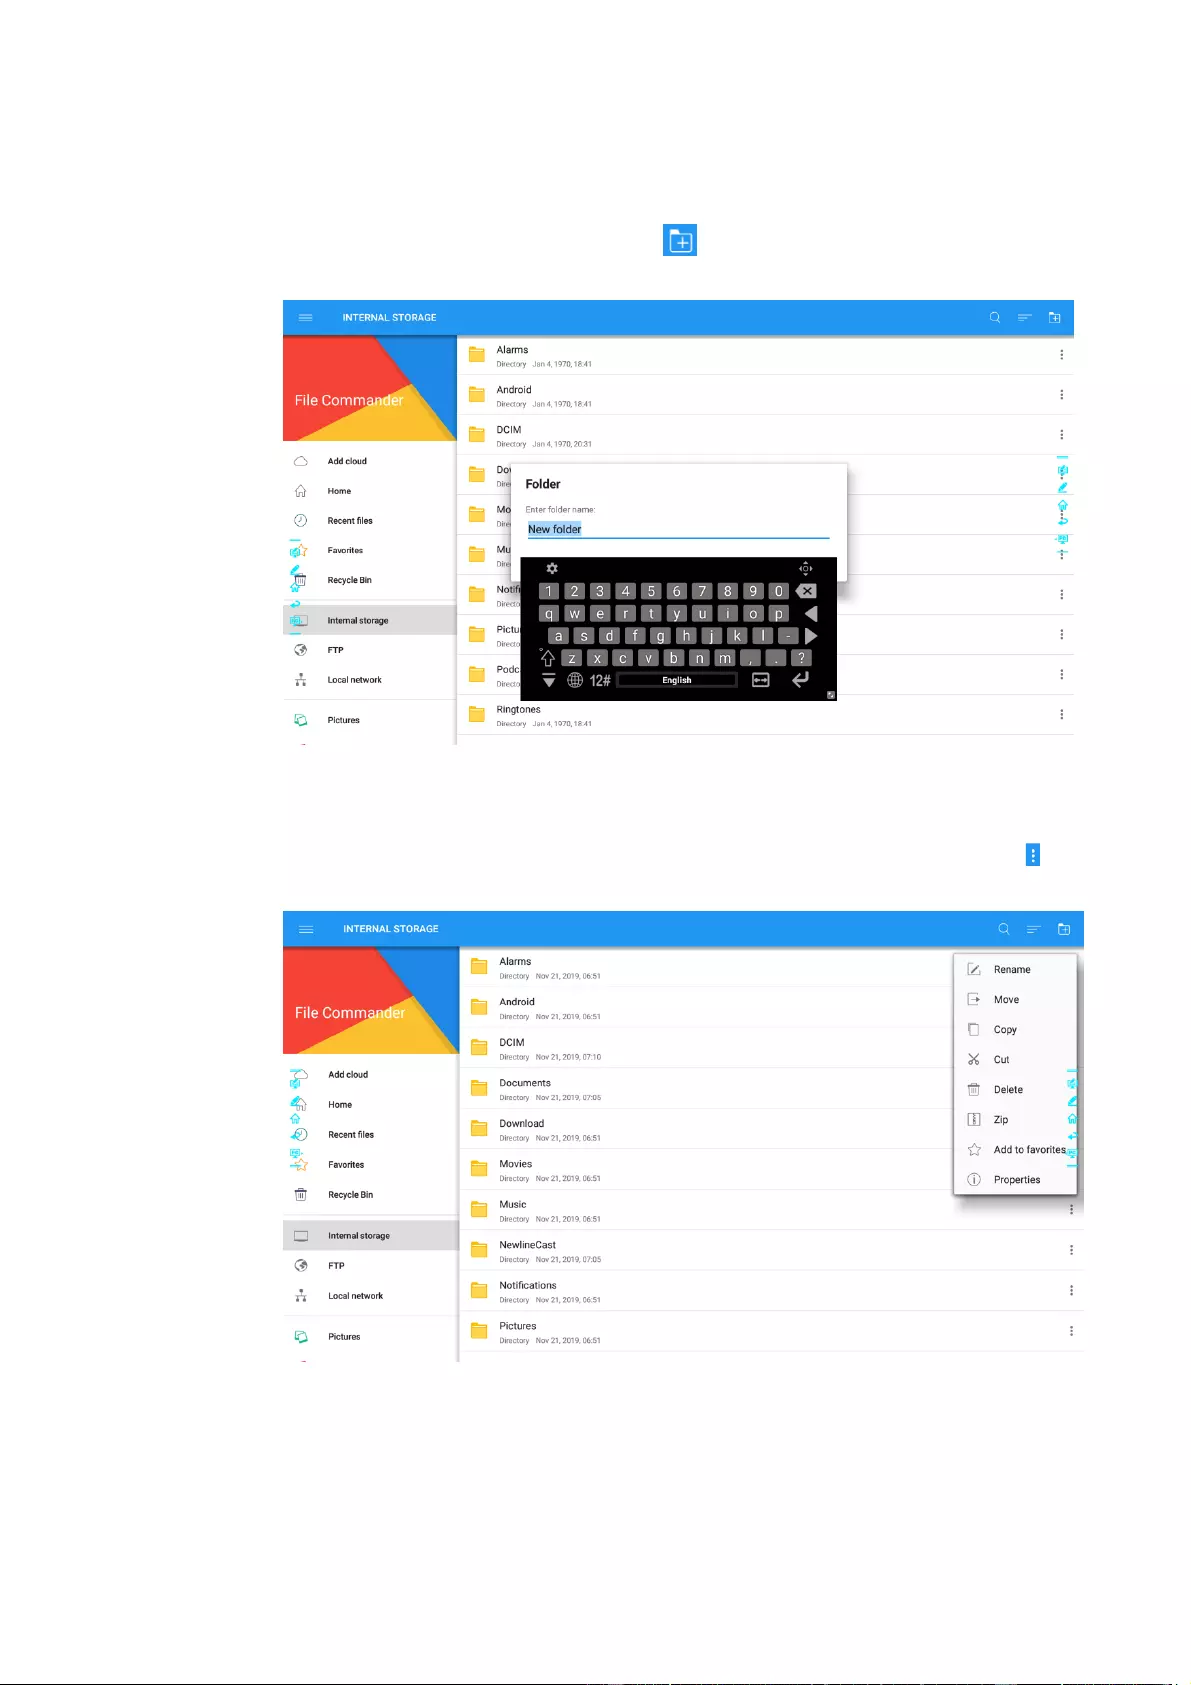
64
4.8.5 New Folder
Enter the File Viewer application, and click to create folder. as shown in the following
figure.
4.8.6 File Operation
Enter the File Viewer application. You can create folders according to requirements, select files by
long pressing, and set wallpaper/copy/paste/delete. For details on other operation, click in the
upper right corner for more operation.
4.8.7 File Name
Under the «Internal storage > Pictures > Screenshots > image» folder in the File Manager, all
pictures of this meeting are saved. Screenshots include annotation page screenshots, remote control
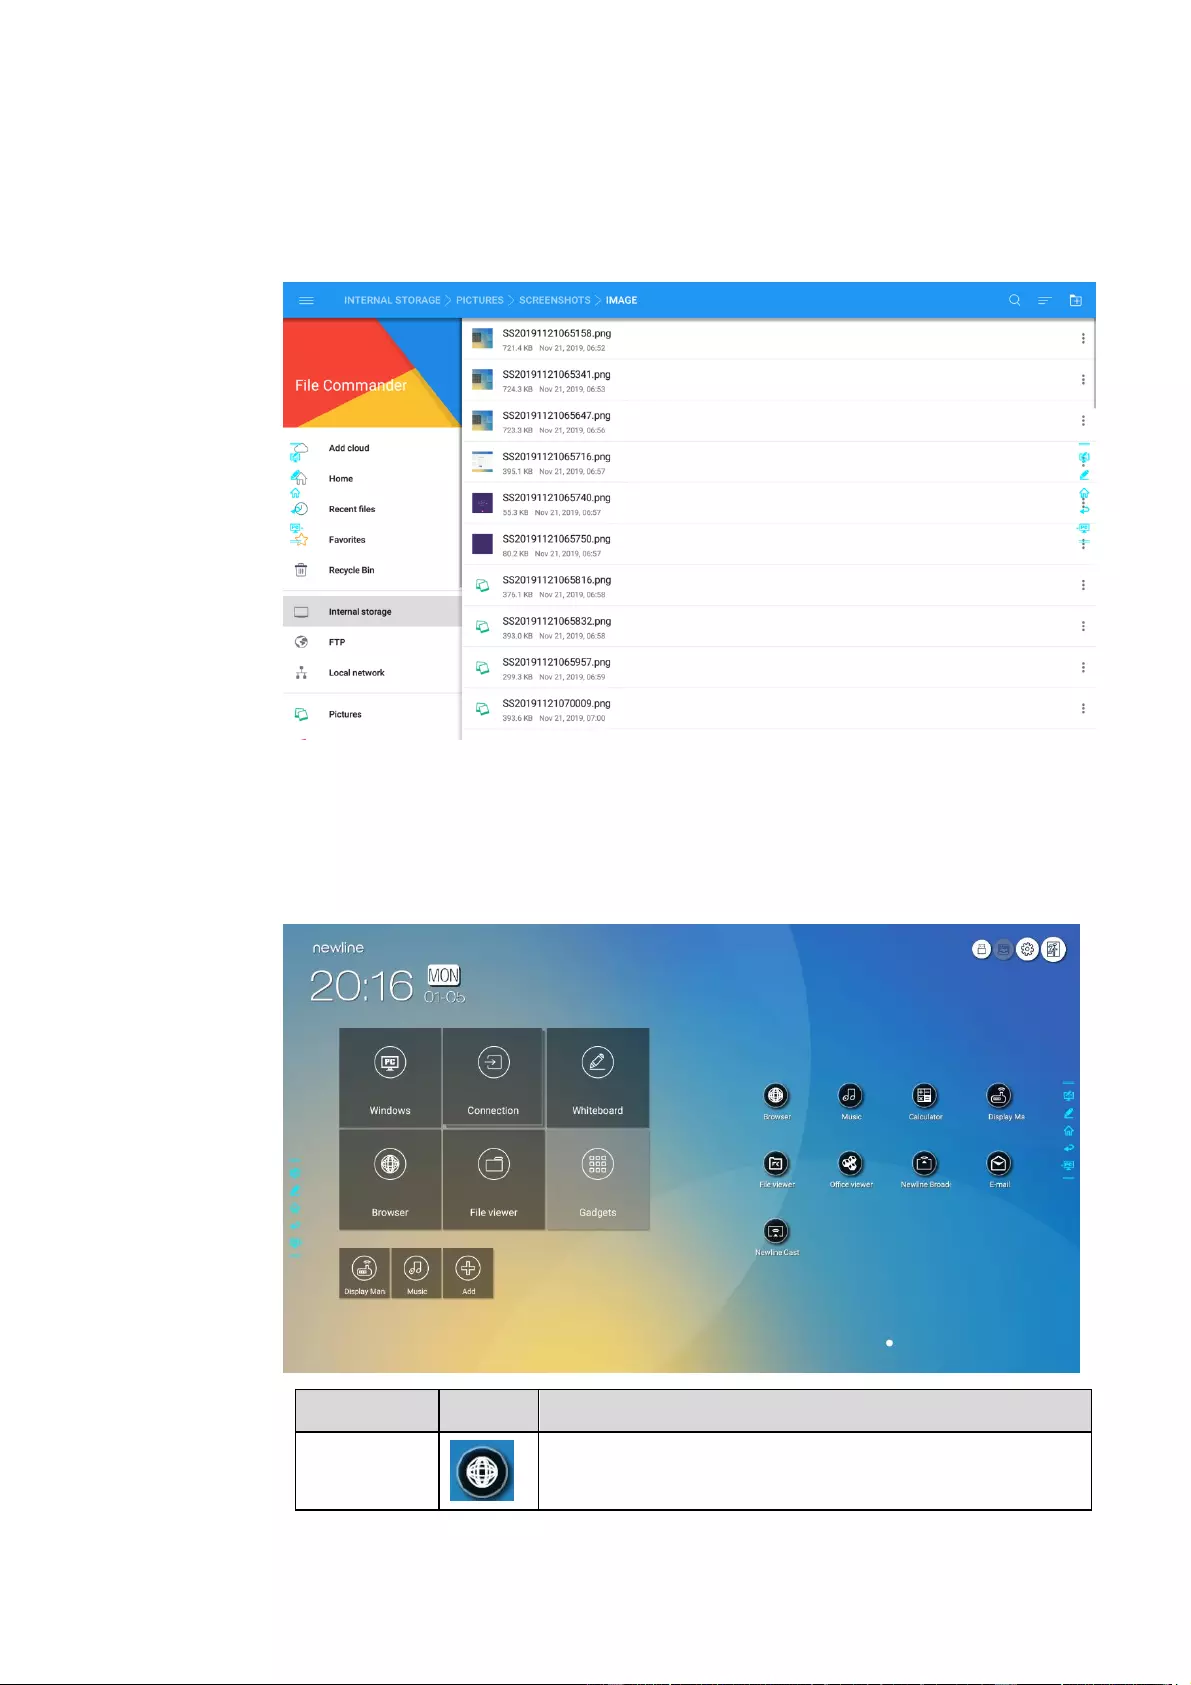
65
screenshots and pages in the discussion mode. Depending on the screenshots mode, picture naming
is different. Picture files are named in the following of prefix + creation file.
Prefix name rule: WB (discussion mode page), AN (annotation page screenshot), and SS (remote
control screenshot).
4.9 Gadget
On the Home page, click Gadget. On the page that is displayed, all applications can be viewed. The
following figure shows applications that the system is delivered with.
Click this icon to enter the browser application.
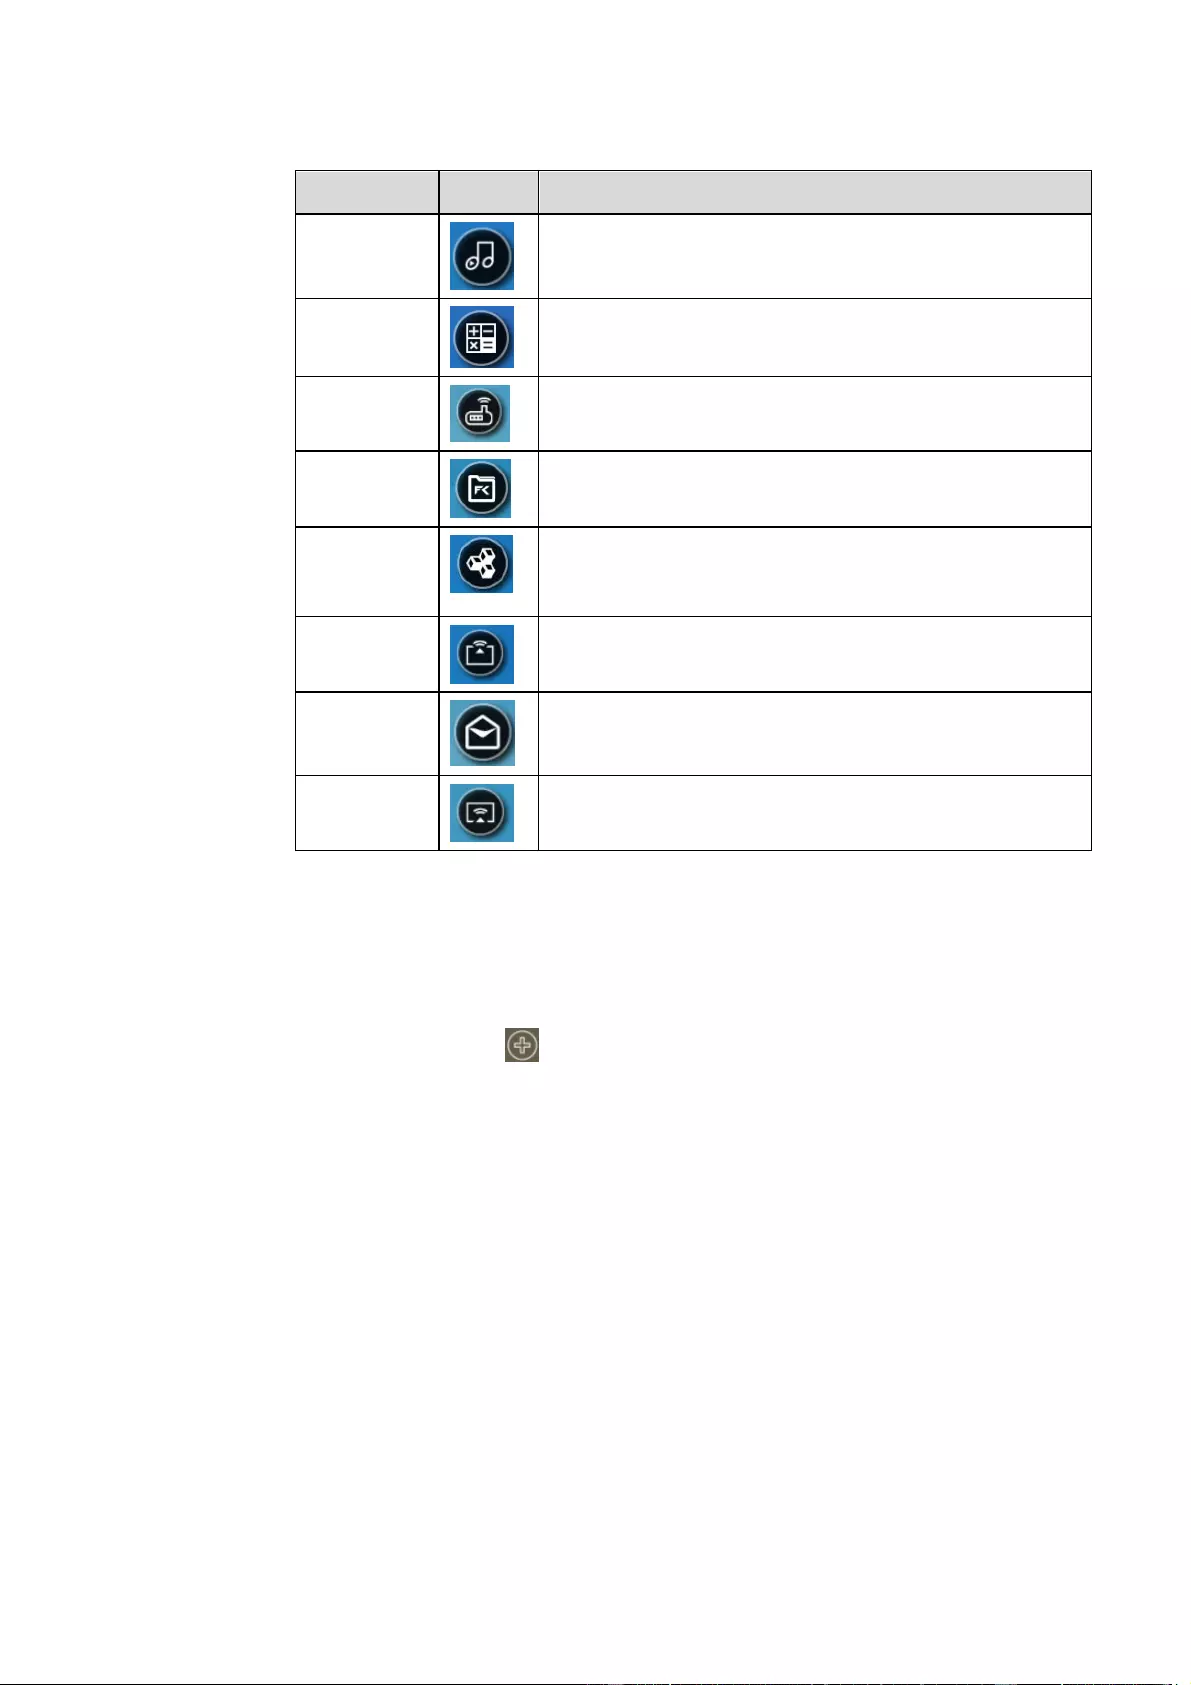
Click this icon to enter the music application.
Click this icon to enter the calculator application.
Click this icon to enter the Display management application.
Click this icon to open the File Manager and you can explore
all internal and external files on the screen.
Click this icon to enter the Office viewer application. In this
application, you can view office files, including excel, word,
power point, and PDF files.
Click this icon to enter the Newline Broadcast application.
Click this icon to enter the email application and send files.
Before sending files, you need to add an email account.
Click this icon to enter the Newline Cast application.
4.10 Add Shortcut
4.10.1 Add Shortcuts to Home Page
Step 1 On Home page, click the icon in the lower right corner. The interface for adding shortcuts
will be displayed.
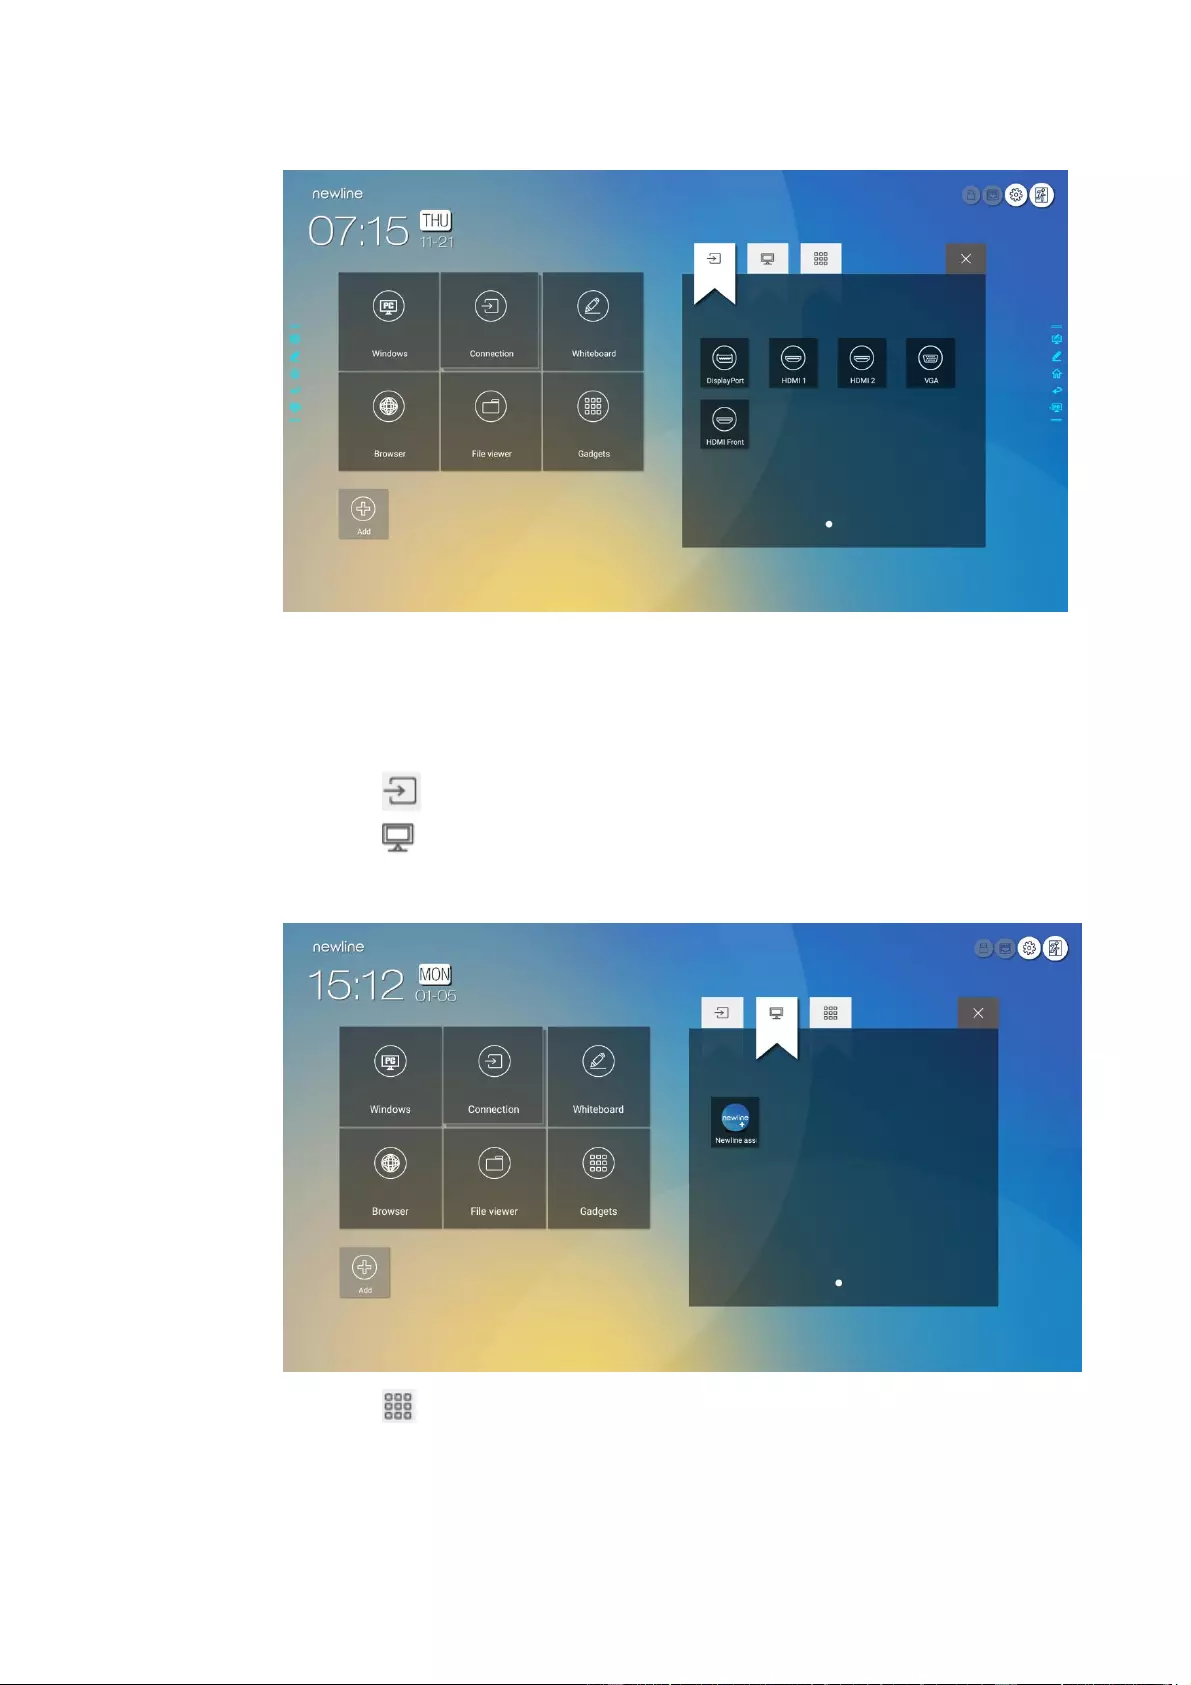
67
Step 2 Click the icons on top to switch the list between external signal sources, Windows software
shortcuts and pre-installed gadgets.
Click to view signal sources in Connection.
Click to view the Windows software shortcuts that the Newline Assistant uploads to the
embedded operating system. For details, see “Add Quick Start Windows Programs in Smart
System”.
Click to view all Gadget applications.

68
Step 3 Add or delete applications on the tab.
In the list, click the icon to add it as a shortcut on the Home page. A check icon will appear at
the upper right corner of the shortcut icons. Up to 5 shortcuts can be added.
Tap the icon with the check mark again. The check icon will disappear and the shortcut will
be removed from the Home page.
Step 4 At the Home page, click the shortcut icon and you can start the program/application or change to
the external signal source.
4.10.2 Add Quick Start Windows Programs in Smart System
Step 1 In Windows, run the Newline Assistant program and drag the software icons or folder shortcut
icons that you want to add from the desktop or menu to the Newline Assistant window. The
applications added or deleted through the Windows system will be automatically updated to the
embedded operating system until the upload progress reaches 100%. If there is an application not
updated, click in the upper right corner to manually update all icons in the Newline assistant
window to the smart system.
Only folders and .exe files are supported.
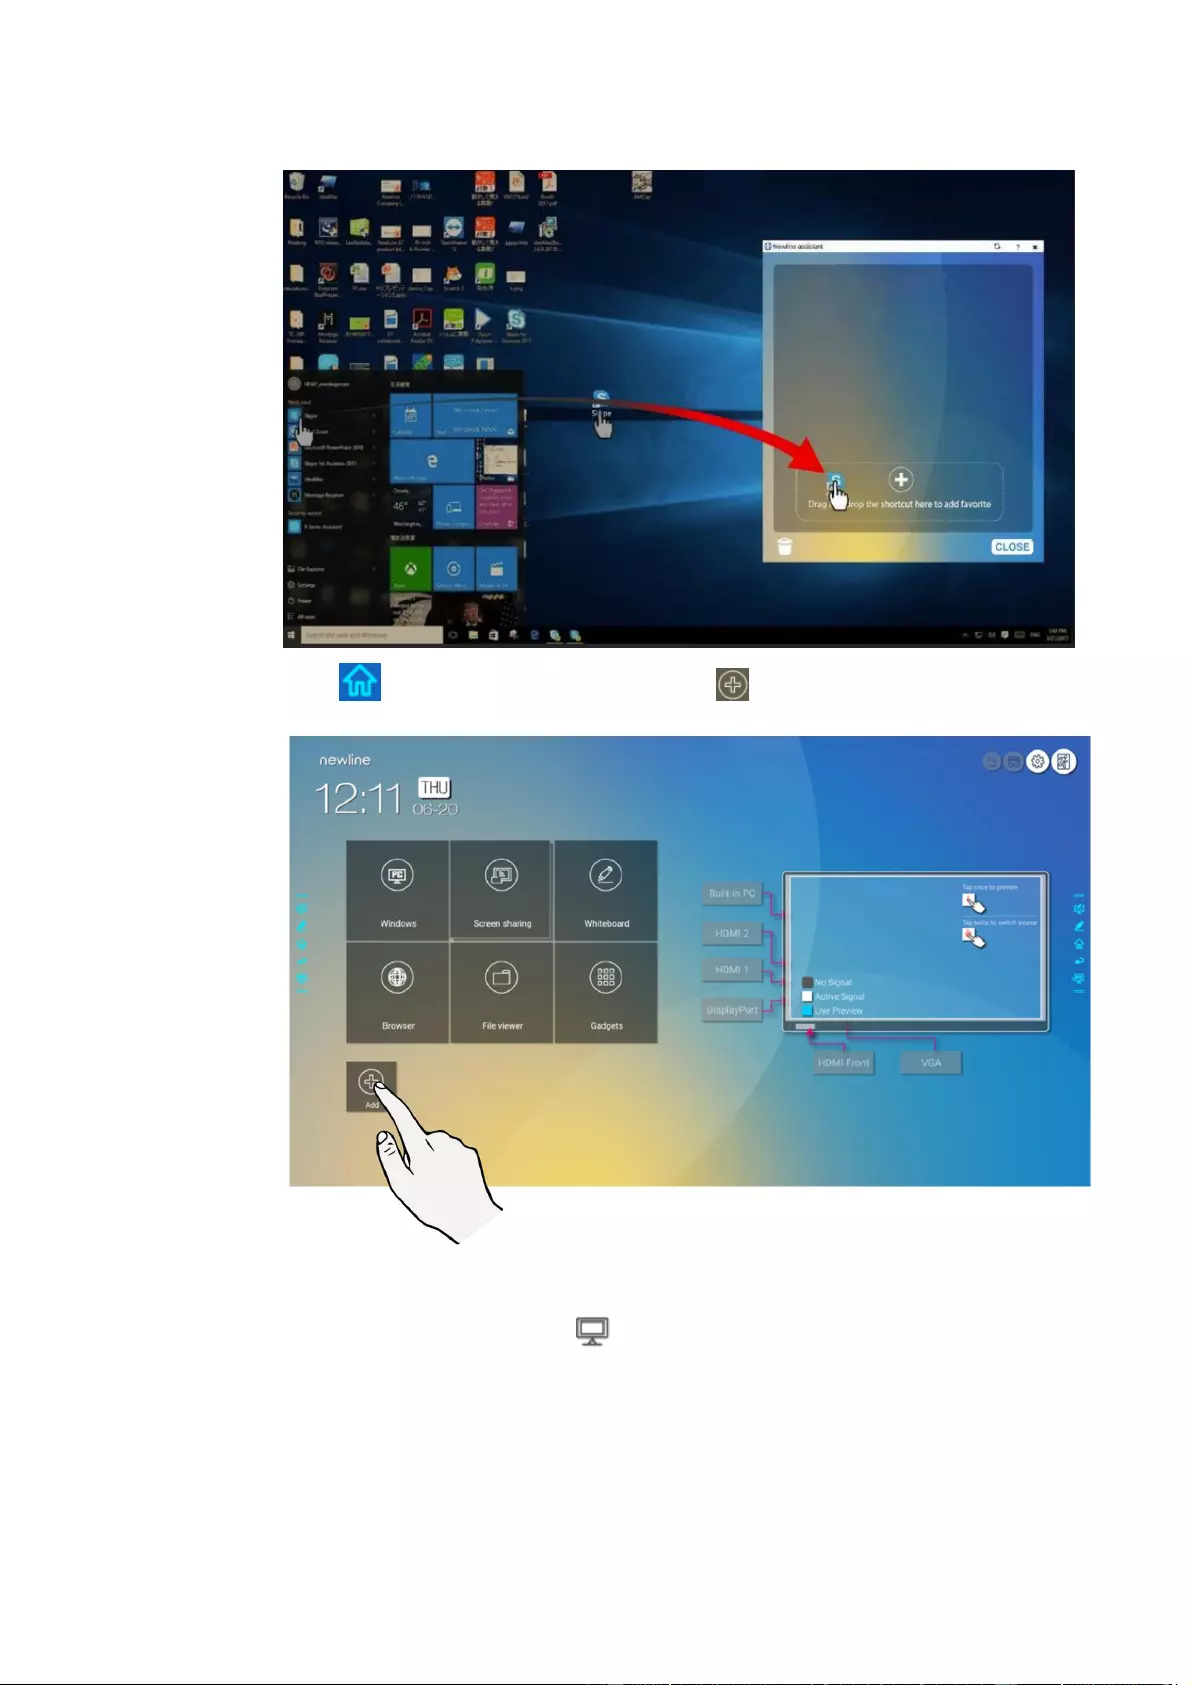
69
Step 2 Click to return to the Home page. Click the icon and go to the shortcut settings. The
page for adding application programs will be displayed.
Step 3 At the shortcut setting page, click icon to view all the Windows software shortcuts added by
the Newline Assistant in Step 1.
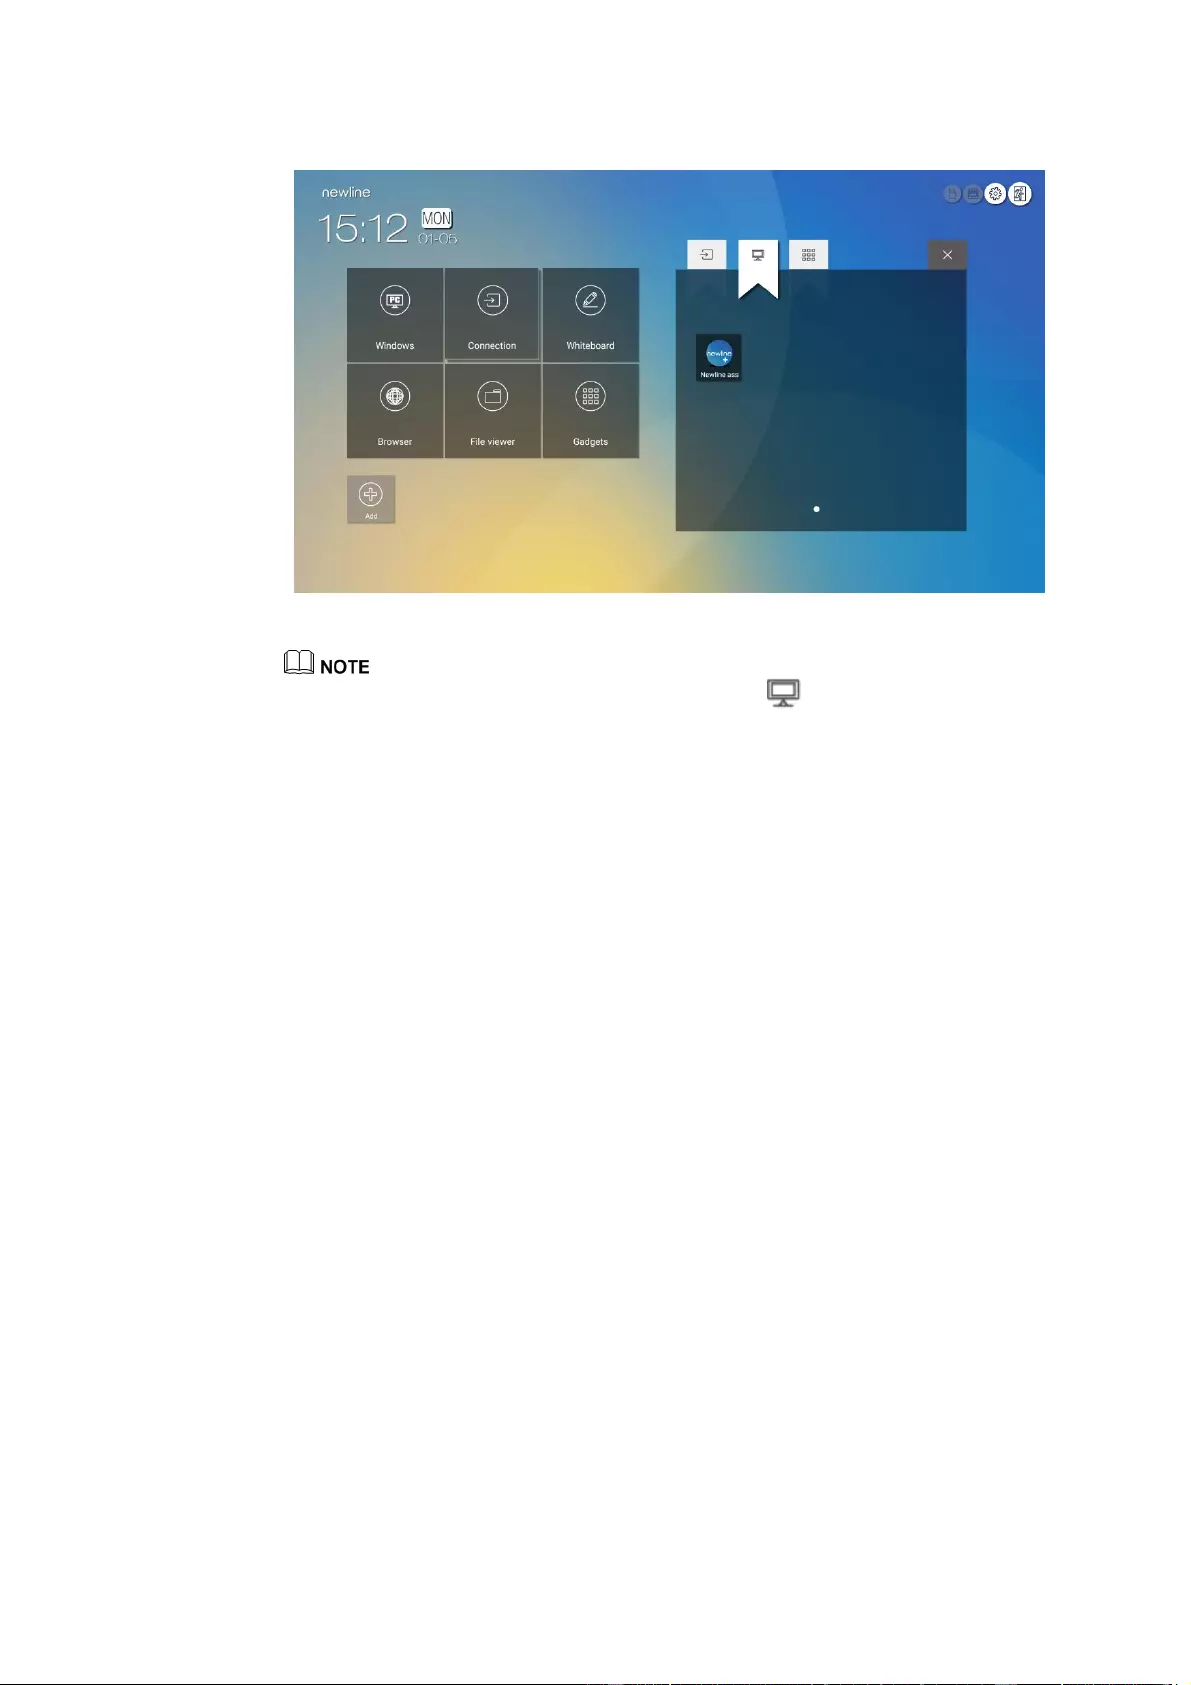
70
By default, the Newline Assistant application is added on the tab.
Step 4 Tap the icon and add the shortcut at the Home page. Tap again and remove it.
Step 5 Return to Home page. Click the icon of an added Windows application to start the software.
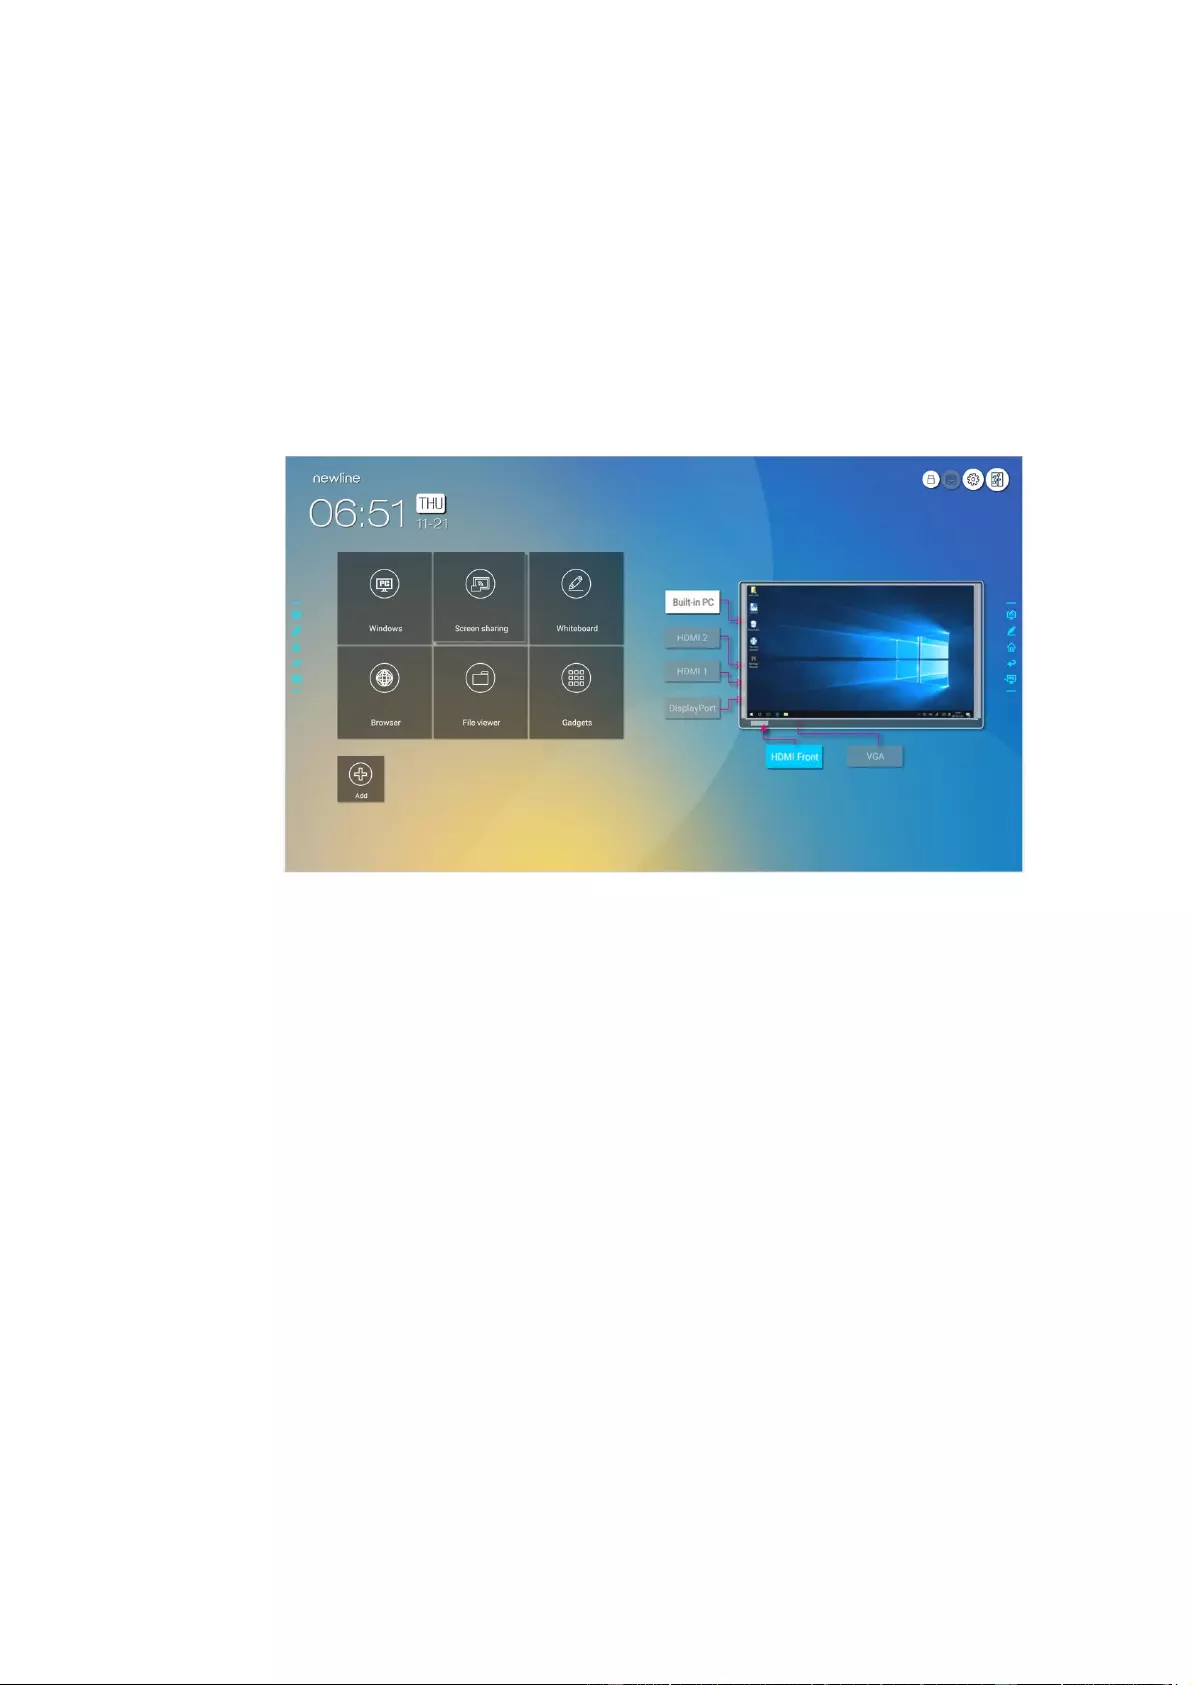
71
4.11 Preview window
On the Home page, signal source preview window including internal PC, HDMI Front,
HDMI Rear (1 to 2), Display Port, and VGA.
An icon without an active signal source connected will be gray, an icon with an active signal
sources connected will be white, and the icon of the signal source currently being previewed will
be blue. After you choose a white icon, the content of the signal source can be displayed in the
window for a real-time preview, the icon color will change from white to blue, and the name of the
preview window for the signal source will change to match with the signal source being
previewed.
4.12 Automatically Power Off
If the screen is left unoperated for a specified duration, it will be locked to guarantee your privacy.
Choose Settings> Power ON/OFF Setting to set the duration. For details on the setting method, see
«Power ON/OFF Setting».
After the screen is locked, if it is operated again within 120 seconds, the screen is unlocked.
Otherwise, the screen enters the power off mode.
72
5 Quick Setting Menu
Using two fingers to swipe up from the bottom of the screen, the Quick Settings menu will
appear, as shown in the following figure.
(
绘图要求:参照下图绘制手势图替换上图
)
Drag the slider to adjust the brightness.
Drag the slider to adjust the volume.
Click the icon to return to Home page.
Click the icon to enter the settings page.
Click the icon to turn on/off the Smart system Wi—Fi.
Click the icon to mute/unmute.
Click the icon to turn on/off the beep sound.
Click the icon to enable sound only mode.
In sound only mode, the screen LCD displays and LED backlight turns off,
other functions are in normal operating condition.
Click the icon to turn on/off the left toolbar.
Click the icon to turn on/off the right toolbar.
Click the icon to turn on/off the screen freeze function.
74
6 Serial Port Control
Connect RS-232 port to the PC or controlling product. Enable RS-232 serial port connection
and complete the following configuration.
Port: COM1 (Set according to PC or controlling product’s port number)
The following tables list controlling codes, querying codes and return codes.
7F 08 99 A2 B3 C4 02 FF 01 00
CF
7F 09 99 A2 B3 C4 02 FF 01 00 01
CF
7F 08 99 A2 B3 C4 02 FF 01 01
CF
7F 09 99 A2 B3 C4 02 FF 01 01 01
CF
7F 08 99 A2 B3 C4 02 FF 01 02
CF
7F 09 99 A2 B3 C4 02 FF 01 02 01
CF
7F 08 99 A2 B3 C4 02 FF 01 06
CF
7F 09 99 A2 B3 C4 02 FF 01 06 01
CF
7F 08 99 A2 B3 C4 02 FF 01 07
CF
7F 09 99 A2 B3 C4 02 FF 01 07 01
CF
7F 08 99 A2 B3 C4 02 FF 01 09
CF
7F 09 99 A2 B3 C4 02 FF 01 09 01
CF
7F 08 99 A2 B3 C4 02 FF 01
0A CF
7F 09 99 A2 B3 C4 02 FF 01 0A 01
CF
7F 08 99 A2 B3 C4 02 FF 01 52
CF
7F 09 99 A2 B3 C4 02 FF 01 52 01
CF
7F 08 99 A2 B3 C4 02 FF 01 53
CF
7F 09 99 A2 B3 C4 02 FF 01 53 01
CF
7F 08 99 A2 B3 C4 02 FF 01 54
CF
7F 09 99 A2 B3 C4 02 FF 01 54 01
CF
7F 08 99 A2 B3 C4 02 FF 01 38
CF
7F 09 99 A2 B3 C4 02 FF 01 38 01
CF
7F 08 99 A2 B3 C4 02 FF 01 56
CF
7F 09 99 A2 B3 C4 02 FF 01 56 01
CF
7F 08 99 A2 B3 C4 02 FF 01 13
CF
7F 09 99 A2 B3 C4 02 FF 01 13 01
CF
7F 08 99 A2 B3 C4 02 FF 01 14
CF
7F 09 99 A2 B3 C4 02 FF 01 14 01
CF
7F 08 99 A2 B3 C4 02 FF 01 17
CF
7F 09 99 A2 B3 C4 02 FF 01 17 01
CF
7F 08 99 A2 B3 C4 02 FF 01 18
CF
7F 09 99 A2 B3 C4 02 FF 01 18 01
CF
7F 08 99 A2 B3 C4 02 FF 01
1B CF
7F 09 99 A2 B3 C4 02 FF 01 1B 01
CF
7F 08 99 A2 B3 C4 02 FF 01
1C CF
7F 09 99 A2 B3 C4 02 FF 01 1C 01
CF
7F 08 99 A2 B3 C4 02 FF 01
1D CF
7F 09 99 A2 B3 C4 02 FF 01 1D 01
CF
7F 08 99 A2 B3 C4 02 FF 01
2B CF
7F 09 99 A2 B3 C4 02 FF 01 2B 01
CF
7F 08 99 A2 B3 C4 02 FF 01
2C CF
7F 09 99 A2 B3 C4 02 FF 01 2C 01
CF
7F 08 99 A2 B3 C4 02 FF 01
2D CF
7F 09 99 A2 B3 C4 02 FF 01 2D 01
CF
7F 08 99 A2 B3 C4 02 FF 01 2E
CF
7F 09 99 A2 B3 C4 02 FF 01 2E 01
CF
7F 08 99 A2 B3 C4 02 FF 01 2F
CF
7F 09 99 A2 B3 C4 02 FF 01 2F 01
CF
7F 08 99 A2 B3 C4 02 FF 05
XX CF
XX indicates the volume value
(0 to 100), corresponding to
hexadecimals 00 to 64.
7F 09 99 A2 B3 C4 02 FF 05 XX
01 CF
Query the
firmware version
number
7F 08 99 A2 B3 C4 02 FF 01
3D CF
7F 09 99 A2 B3 C4 02 FF 01 3D 01
CF
7F 08 99 A2 B3 C4 02 FF 06
XX CF
XX indicates the mode. 00 and
01 indicate standard and ECO
modes respectively.
7F 09 99 A2 B3 C4 02 FF 06 XX
01 CF
Enable the
comment
function
7F 08 99 A2 B3 C4 02 FF 01 40
CF
7F 09 99 A2 B3 C4 02 FF 01 40 01
CF
Increase
backlight
brightness
7F 08 99 A2 B3 C4 02 FF 01 47
CF
7F 09 99 A2 B3 C4 02 FF 01 47 01
CF
Decrease
backlight
brightness
7F 08 99 A2 B3 C4 02 FF 01 48
CF
7F 09 99 A2 B3 C4 02 FF 01 48 01
CF
Set the value of
backlight
brightness
7F 08 99 A2 B3 C4 02 FF 09
XX CF
XX indicates the value of backlight
brightness (0 — 100), corresponding
to the hexadecimal number system
(00 — 64).
7F 09 99 A2 B3 C4 02 FF 09 XX
01 CF
7F 08 99 A2 B3 C4 02 FF 01 15
CF
7F 09 99 A2 B3 C4 02 FF 01 15
XX CF
XX = 01 indicates the backlight is
on.
XX = 00 indicates the backlight is
off.
7F 08 99 A2 B3 C4 02 FF 01 57
CF
7F 09 99 A2 B3 C4 02 FF 01 57 01
CF
7F 08 99 A2 B3 C4 02 FF 01 1F
CF
7F 09 99 A2 B3 C4 02 FF 01 1F 01
CF
7F 08 99 A2 B3 C4 02 FF 01 20
CF
7F 09 99 A2 B3 C4 02 FF 01 20 01
CF
7F 08 99 A2 B3 C4 02 FF 01 37
CF
7F 09 99 A2 B3 C4 02 FF 01 37
XX CF
XX indicates the power on/off state.
XX = 01: power on state
XX = 00: power off state
7F 08 99 A2 B3 C4 02 FF 01 82 CF
7F 08 99 A2 B3 C4 02 FF 01 82
XX CF
01: mute
00: non-mute
7F 08 99 A2 B3 C4 02 FF 01 50 CF
7F 09 99 A2 B3 C4 02 FF 01 50
XX CF
Smart system = 30
PC = 17
DP = 20
HDMI rear 1 = 1F
HDMI Rear 2 = 1E
VGA = 00
HDMI Front = 19
7F 08 99 A2 B3 C4 02 FF 01 33 CF
7F 09 99 A2 B3 C4 02 FF 01 33
XX CF
XX indicates current volume value (XX
is a hexadecimal value, range: 00~64).
For example, XX = 20 indicates current
volume value is 32 (decimal value), XX
= 00 indicates mute state.
7F 08 99 A2 B3 C4 02 FF 01 35 CF
7F 09 99 A2 B3 C4 02 FF 01 35
XX CF
XX indicates the mode.
00- standard,
01- ECO mode,
02- Auto
7F 08 99 A2 B3 C4 02 FF 01 49 CF
7F 09 99 A2 B3 C4 02 FF 01 49
XX CF
XX indicates the value of backlight
brightness (0 — 100), corresponding to
the hexadecimal number system (00 —
64).
7F 08 99 A2 B3 C4 02 FF 01 81 CF
7F 08 99 A2 B3 C4 02 FF 01 81
XX CF
XX = 00 indicates the backlight is
on.
XX = 01 indicates the backlight is
off.
7F 08 99 A2 B3 C4 02 FF 01 84 CF
7F 08 99 A2 B3 C4 02 FF 01 84
XX CF
XX = 01 indicates screen lock status .
XX = 00 indicates exit screen lock
status.
7F 08 99 A2 B3 C4 02 FF 01 83 CF
7F 08 99 A2 B3 C4 02 FF 01 83
XX CF
XX = 01 indicates the whiteboard
state.
XX = 00 indicates non-whiteboard
state.
Return to
system state
of the
previous
options
7F 08 99 A2 B3 C4 02 FF 0A 00 CF
7F 08 99 A2 B3 C4 02 FF 0A 00
AB CD EF GH IJ KL MN OP QR
ST UV CF
AB: Power supply
CD: Speaker
EF: Current signal source
GH: Speaker volume
IJ: D.Mode
OP: Backlight brightness
QR: Backlight state
ST: Whiteboard state
UV: Screen lock state
79
7 FAQs & Troubleshooting
The screen cannot be powered on or
the power indicator light is off.
Check whether the power supply is connected.
Check whether the power supply plug is properly
connected.
Check whether the power outlet has electricity.
Check whether the rocker switch is enabled.
Press the reset switch and start the system again.
The remote control is not causing a
response.
Check whether the polarity direction of the
batteries is correct.
Align the remote control with the IR receiver
window. For details, see section «Remote
Control».
The image is normal but there is no
sound.
Increase volume on both the screen and the
Windows system.
Check whether the screen and the Windows
system are muted.
If an external computer is connected, check
whether the connection cables are normal.
The system is automatically powered
on/off when no operation is being
performed.
Disable the automatic power-on/off function. For
details, see section «Power ON/OFF Setting».
Check whether the screen entered shut down
mode due to no operation for an extended period
of time.
Check whether the input power supply is stable.
The colors of images are abnormal.
Check whether the HDMI cable is properly
connected or has any quality issue.
The touch function is abnormal or the
positioning is inaccurate.
In the Windows system, recalibrate the screen.
For details, see section «Calibration«.
The touch function is unavailable when
the external signal source channel is
being used.
Switch between different external signal sources.
Ensure that the USB touch cable is connected to
the proper port. For details, see section «Ports».
Remove and insert the USB touch cable again.
There is no sound when the HDMI in
channel is used.
Remove and insert the HDMI cable again.
No image is displayed when the HDMI
out channel is used.
Generally, this issue is caused by the
compatibility of the external display product.
Replace the external display product and test
again.
The HDMI cable is too long or has a poor
quality. Replace the HDMI cable delivered with
the product.
The touch function on the front panel is
ineffective.
Touch the button using your full fingertip.
Check whether the finger is wet or has other
liquids on it.
The USB flash drive cannot be
identified.
Check whether the USB flash drive is inserted
into the correct USB port. For details, see section
«Ports.»
The conference records cannot be
saved on the USB flash drive, and the
system prompts «The target storage
product has no write permissions.»
Format the USB flash drive to the FAT32 format.
The internal PC has no signal.
Check whether the internal PC is properly
inserted in the slot.
Check whether the internal PC is in shut down
mode.
Press the power button on the internal PC (for
details, see the instructions of the internal PC),
and manually start up the internal PC.
In the embedded operating system or
Windows system, no wireless network
can be found or the wireless network
signal is weak.
Check whether the Wi-Fi antenna is properly
installed on the embedded operating system. For
details, see section «Ports».
Check whether the Wi-Fi antenna is properly
installed for the internal PC.
The keyboard is not correctly
displayed.
Confirm that the hardware keyboard is enabled.
When you connect a handheld
microphone to a port on the front panel,
the distance from user to microphone
should be no less than 1 meter,
otherwise the sound may distort.
The front panel doesn’t support handheld
microphone, and needs to use the fixed
microphone. To make sure of the sound quality,
the distance from user to microphone should be
no less than 1 meter.
When the touch screen connects to
CEC facilities and powers down, touch
screen will stay in shut down mode
after power restart. CEC facilities can’t
recall the touch screen.
Please use the remote control to start and turn off
the touch screen. Then you can use the CEC
facilities to recall it.
56.24 x 31.63 in
1432 x 807mm
64.97 in x 36.55 in
1652 x 930mm
74.69 in x 42.05 in
1893 x 1069mm
8 bit+FRC, 1.07 billion
colors
8 bit+FRC, 1.07 billion
colors
10 bit, 1.07 billion
colors
Maximum ≤ 250 W
Standby Mode ≤ 0.5 W
Maximum ≤ 400 W
Standby Mode ≤ 0.5 W
Maximum ≤ 450 W
Standby Mode ≤ 0.5 W
AC 100 V – 240 V, 50 Hz / 60 Hz
Anti-glare tempered glass
10 Points in Smart system
20 Points in Windows
Center area 1.0 – 1.5 mm / Edge area 1.2 – 2.0 mm
Storage
Temperature/
Humidity
-15℃~55℃/20~90%RH(Non coagulation)
Working
Temperature/
Humidity
0℃-40℃/20~80%RH(Non coagulation)
60.87 x 37.1 x 3.74 in
1546 x 944 x 96 mm
69.69 x 42.17 x 4.29 in
1770 x 1071 x 109 mm
79.49 x 47.72 x 4.29 in
2019 x 1212 x 109 mm
67.91 x 42.72 x
11.02 in
1670 x 1056 x 221 mm
75.59 x 46.85 x 10.83 in
1894 x 1193 x 247 mm
84.84 x 51.97 x 12.21 in
2170 x 1345 x 275mm
HDMI In x 1, USB (Touch) x 1, USB (Public) x 2, Microphone In x 1
HDMI In x 2, DP x 1, USB (Touch) x 4, HDMI Out x 1, Line Out x 1, DC Out
(5V, 2A), SPDIF out x 1, USB 2.0 (Public) x 1, USB 2.0 (Embedded) x 1, RS-
232 x 1, USB 3.0 (Public) x 1, Audio In x 1, VGA x 1, LAN In x 1, LAN Out x
1, OPS Slots (4K@60Hz)
Intelligent thermos
protector
ARMv8 A73*2+A53*2 ( A53 : 1.05-1.3GHz; A73 : 1.15-1.5GHz)
16GB build in + 32GB TF card
Supports all major types of multi-media files
Pre-installed
applications
On Screen Annotation, Discussion Board, Gallery, Browser, Music, E-mail,
File viewer, Keyboard, Office Viewer, Newline Cast, Newline Broadcast,
Display Management

85
9 More Information
For More Information
Please visit our website (www.newline-interactive.com) for detailed instruction manual.
Contact Us for Support
Please email us at support@newline-interactive.com.
Our company is devoted to product innovation and technology enhancement. Therefore, we
may change product specification and information without notice. Product pictures in the
manual are for reference only, please refer to actual products.