Электрическая мясорубка Moulinex hv4

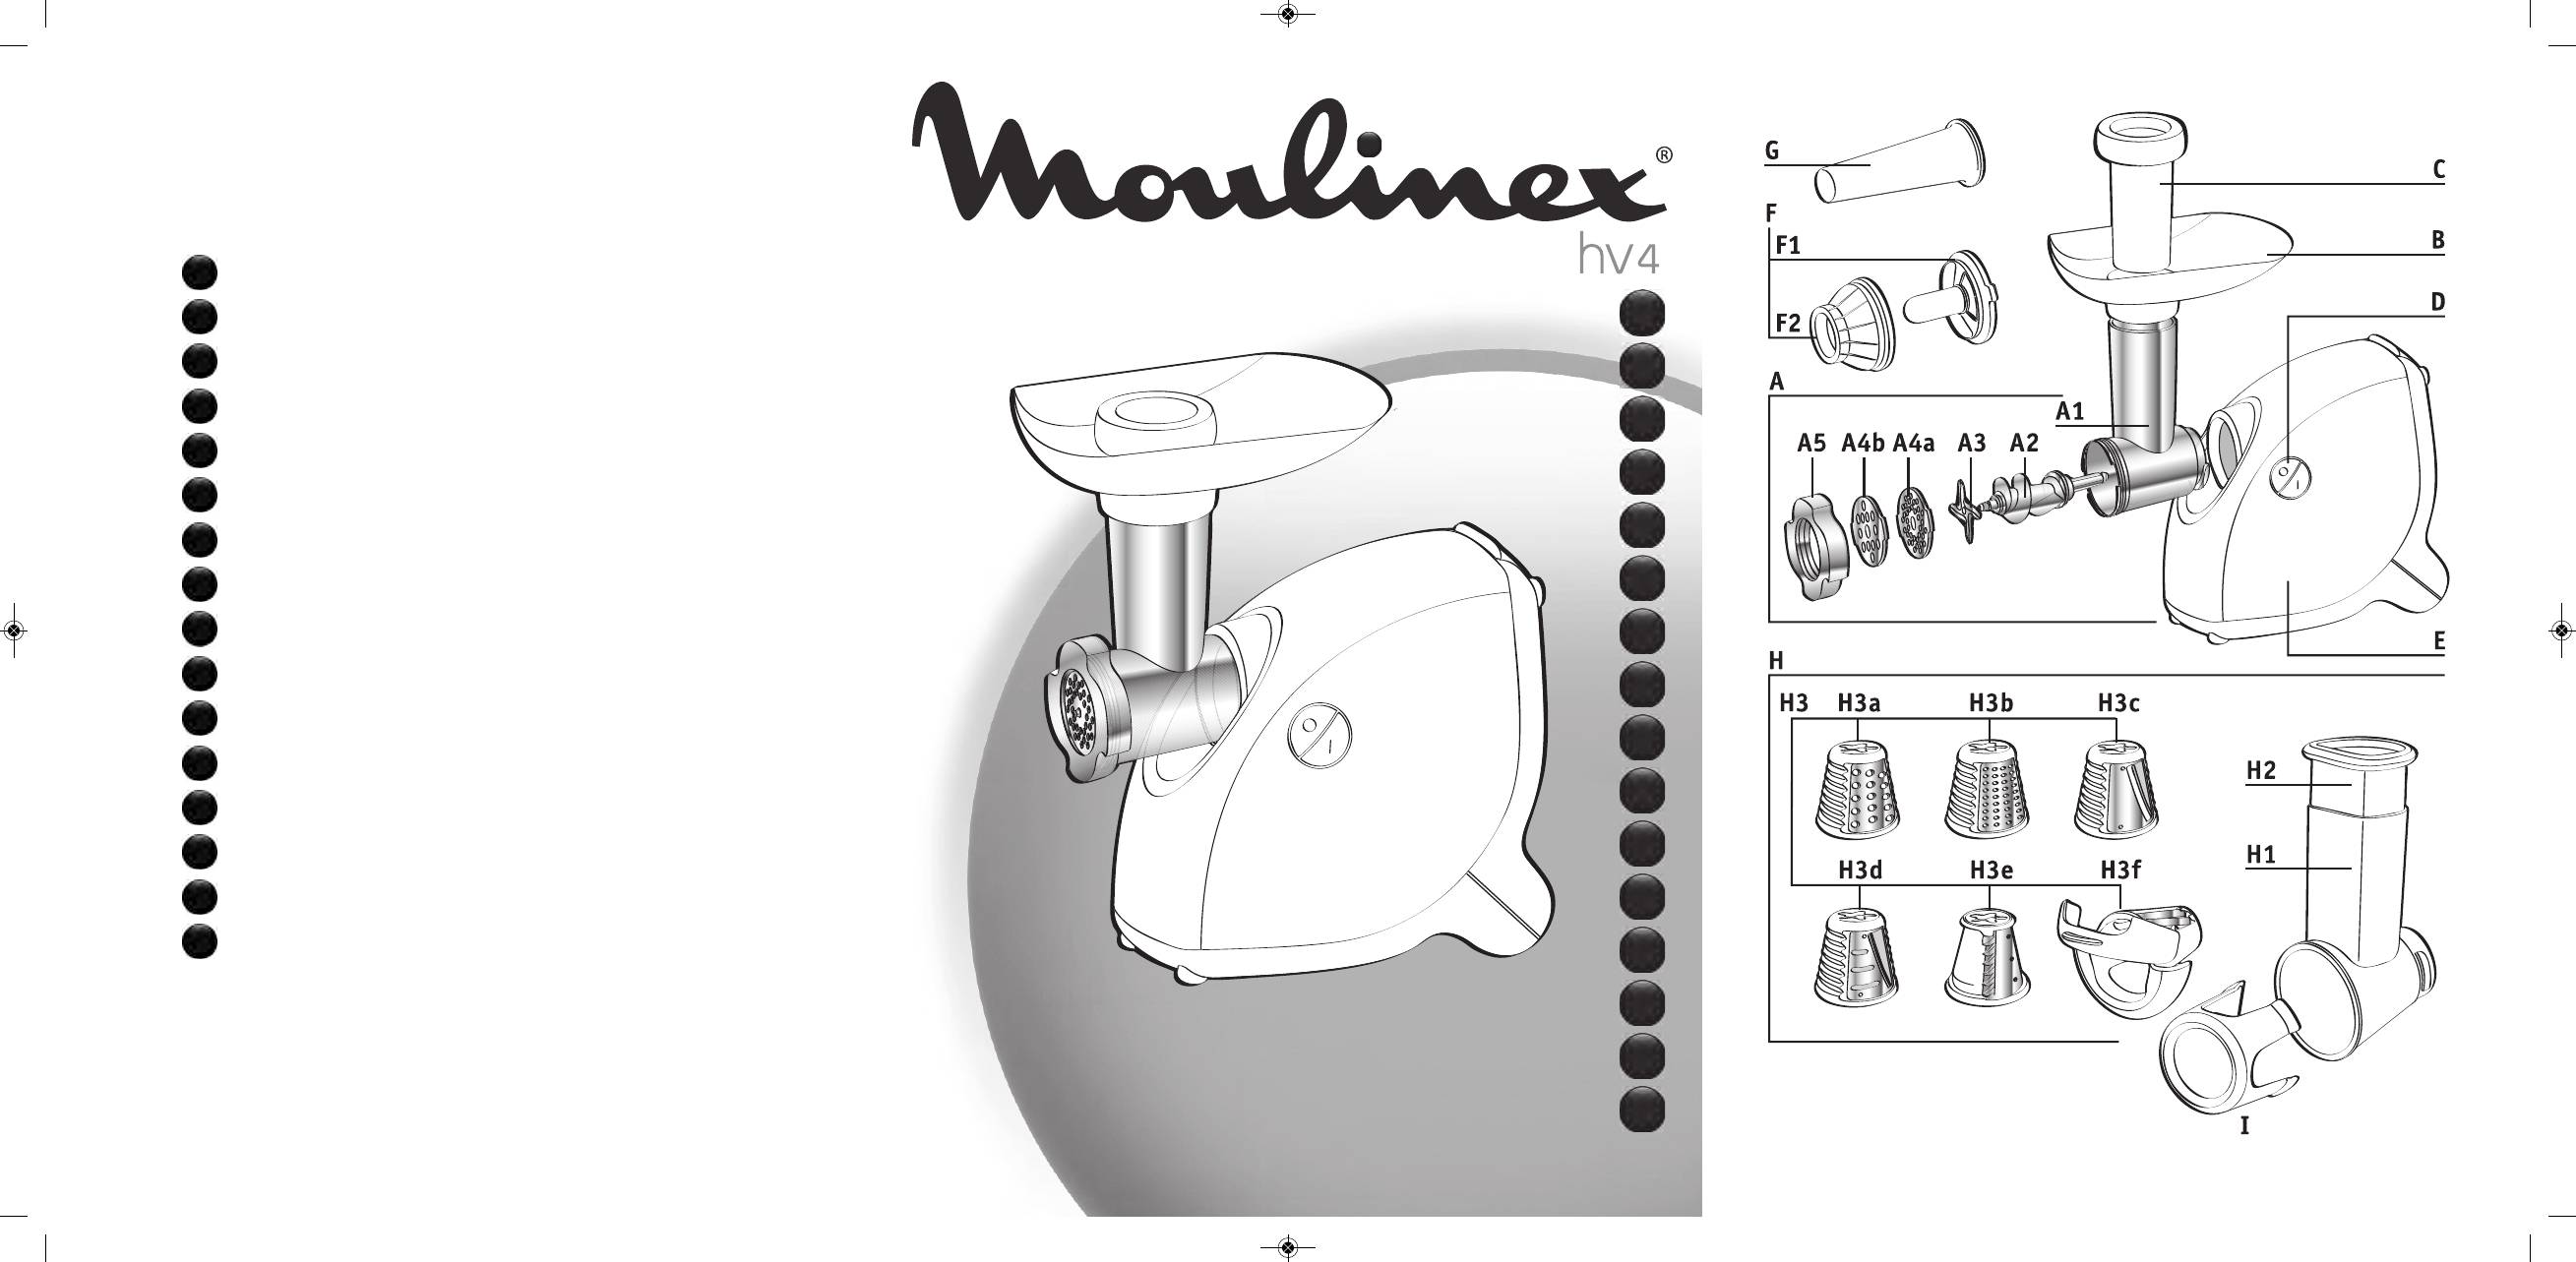
ОПИСАНИЕ

РЕКОМЕНДАЦИИ ПО ПРИМЕНЕНИЮ
Перед первым использованием вымойте все аксессуары в мыльной воде. Сразу после этого промойте их и тщательно высушите. Решетки и лезвие должны оставаться смазанными. Покройте эти части небольшим количеством растительного масла. Не включайте прибор, пока он пуст, если решетки не покрыты должным образом небольшим количеством растительного масла.. Никогда не проталкивайте пищу через носик пальцами или другими предметами. Не используйте прибор более 14 минут.
ГОЛОВКА ДЛЯ ИЗМЕЛЬЧЕНИЯ МЯСА 


Подготовьте количество мяса, которое вы хотите измельчить, удалив все кости, хрящи и сухожилия. Мясо нарежьте кусочками (примерно 2 см х 2 см). Полностью разморозьте замороженные продукты перед измельчением.
Наконечник: В конце можно пропустить через головку мясорубки несколько кусочков хлеба, чтобы извлечь весь фарш.
ПРИНАДЛЕЖНОСТИ ДЛЯ КОЛБАС 


Важнo
Эту насадку можно использовать только после измельчения мяса, добавления ароматизаторов и тщательного вымешивания. Замочив колбасные оболочки в теплой воде, чтобы они стали эластичными, наденьте их на воронку, оставив лишние 5 см (позже вы закроете отверстие, завязав узел ниткой). Сдвиньте узел до конца сопла, чтобы воздух не попал в корпус. Включите прибор, наполните мясорубку приготовленным продуктом и убедитесь, что оболочки заполнены должным образом.
Внимание
Эту работу легче всего выполнить вдвоем. Один будет подавать приготовленное мясо в машину, а другой будет удерживать сосиски по мере их наполнения. Сделайте колбаски любой длины, защипывая и переворачивая оболочку. Чтобы получить хорошую форму колбасы, следите за тем, чтобы во время наполнения внутри оболочек не оставался воздух, и делайте их длиной от 10 до 15 см (разделите колбаски, завязав между ними нитку и завязав узел). с этим).
КЕББЕ ПРИНАДЛЕЖНОСТИ


Практический совет: Чтобы сделать мелкий фарш для кеббе или кефты, пропустите мясо 2 или 3 раза через мясорубку, пока не получите желаемую консистенцию.
АКСЕССУАРЫ ДЛЯ ПЕЧЕНЬЯ 


Приготовьте тесто. Для достижения наилучших результатов используйте мягкое тесто. Выберите дизайн, совместив его со стрелкой. Повторяйте процесс, пока не получите желаемое количество печенья.
ПРИНАДЛЕЖНОСТИ ДЛЯ СТЕЙКА

ПРИНАДЛЕЖНОСТЬ ДЛЯ ПРЕССОВАНИЯ ОВОЩ


ПРИНАДЛЕЖНОСТИ ДЛЯ КУЛИ
 Используйте
Поместите емкость под желобком для сока (K5) для сбора сока и еще одну емкость на конце фильтра для сбора остатков. Если вы хотите приготовить соус или сок, обязательно используйте только свежие фрукты. В зависимости от сезона и качества ваших фруктов, мы рекомендуем вам пропустить мякоть во второй раз, чтобы получить максимально возможное количество соуса или сока.
- Сок: Используйте фильтр К3
- Кули: Используйте фильтр К4
РЕЗКА ДЛЯ ОВОЩЕЙ 


- Используйте конус, указанный для каждого типа продуктов:
- См. график на рис. 10 Полезные советы для достижения наилучших результатов:
Ингредиенты, которые вы используете, должны быть твердыми, а овощи и фрукты должны быть свежими, чтобы получить удовлетворительные результаты и избежать накопления пищи в отделении. Не используйте прибор для натирания или нарезки слишком твердых пищевых продуктов, таких как кубики сахара или кусочки мяса.
ОЧИСТКА


Документы / Ресурсы
Рекомендации

Groupe SEB — LA reférence mondiale du Petit Equipement Domestique

- Manuals
- Brands
- Moulinex Manuals
- Meat Grinder
- hv4
- Owner’s manual
-
Bookmarks
Quick Links
Related Manuals for Moulinex hv4
Summary of Contents for Moulinex hv4
-
Page 4: Safety Recommendations
Thank you for having chosen an appliance from the Moulinex range. DESCRIPTION Steak Moulding System (SMS) Removable mincing head (according to model) Aluminium body see diagram Mould support Screw H2 Fish mould Self-sharpening stainless steel H3 Steak mould blade H4 Nuggets mould…
-
Page 5: Before Using For The First Time
BEFORE USING FOR THE FIRST TIME Wash all of the accessories and dry them carefully immediately. USING YOUR APPLIANCE Mincing head (A): Recipe: NB: For recipes that require a high power (500W approximately), the user time should Assembling the mincing head (diagram 1) not exceed 20 seconds.
-
Page 6
Biscuit nozzle (J) Sausage casings (information for UK only) (according to model): If your local butcher is unable to sell you sausage casings, we suggest contacting the Assembly (diagram 4): following suppliers: Put the screw A2 into the body A1 of the Ascott Smallholding Supplies Ltd mincing head. -
Page 7
IF YOUR APPLIANCE DOES NOT WORK Check the connection. If your appliance still does not work, for help and advice contact our Helpline (see list in the service booklet). 0845 602 1454 — UK (01) 461 0390 – Ireland or consult our website – www.moulinex.co.uk… -
Page 8
ACCESSORIES You can customise your appliance and purchase the following accessories from a Moulinex approved service centre: Coarse grating drum Citrus press Fine grating drum Steak Moulding System Parmesan drum KEBBE Accessory Ice drum Biscuit nozzle Small hole disc (3 mm) Sausage stuffer Medium hole disc (4.7 mm) -
Page 9
RECIPES LAHMA BI AJEEN BRIOUATS (Moroccean puff pastry (Stuffed Meat Focaccia) parcels filled with 4 Portions – Preparation: 20 min. + 1 hr minced beef) Cooking: 45 min. 4 Portions – Preparation: 40 min. Cooking: 35 min. Ingredients: 300 g pizza dough mix Ingredients: 300 g beef or lamb 250 g puff pastry… -
Page 10
KIBBE BI LABAN PIROJKI (Fish pasties) (Kebbe balls with yoghurt) Serves 4 – Preparation 25 min. – Cooking: 10 Serves 6 – Preparation 1 hr – Refrigeration: to 15 min. 1 hr Ingredients: Preparation of the kebbe mixture: 250 g puff pastry 400 g lean meat (lamb or beef) 300 g cooked fish or smoked salmon 1 glass (180 g) of bulghar wheat (crushed…
EN
p 1 – p 8
LT
p 9 – p 16
LV
p 17 – p 24
ET
p 25 – p 32
PL
p 33 – p 40
RU
p 41 – p 49
UK
p 50 – p 58
HU
p 59 – p 66
CS
p 67 – p 74
SK
p 75 – p 82
BS
p 83 – p 90
BG
p 91 – p 99
HR
p 100 – p 107
RO
p 108 – p 115
SR
p 116 – p 123
SL
p 124 – p 131
EN
LT
LV
ET
PL
RU
UK
HU
CS
SK
BS
BG
HR
RO
SR
SL
www.moulinex.com
Réf. 2643049A
Notice_2643049A:Mise en page 1 29/10/10 16:23 Pagea1
!#
8><496026F7<4A>@<B286//L
<?2/j.?=>6=>.B25
%<j6@285B59.169;68A
Sestavine za testo za kibbé:
280=,U6:D,<0.2-?<2?7,D/<:-75090;`094.0U%:7
Sestavine za omako:
625:2?<>,U`:;066:<4,9/<,U=><:64i0=9,U5?`90b74.06:<?D0U%:7;:;0<
0=:<,D<0b4>09,6:=0!,@,`=0675,79469,80=>4>0889,=>,@06+80754>080=:49-?<2?7%:74>049;?=>4>0
>0=>:=>,>49,37,/908?<:
»-746:@,9506<:274.64—J9,=0675,79469,80=>4>0/:/,>0664—J&0=>:/,5>0@=0675,7946492,:-746?5>0@6<:27:>,6:
/,9,<:-:@09,90=0>08,7:@:/0
#<4;<,@,:8,60?845>0`:;066:<4,9/<,:=?`4>02,D@;:5948;,;4<50849:/><2,5>074=>0h0=09:7?;4>049=><4>0
h0=09496:<4,9/0<6?3,5>0/:849?>49,8,53908:295?@;:9@4D@4`548<:-:8»/=>,@4>0
:2?<>496:<?D:D80`,5>0=6?;,59,>:;:=:74>049;:;:;<,5>0(=0D745>0@09:;:=:/:=6:D4.0/47:D8,5394847?
695,84#:i,6,5>0/,80`,94.,D,@<09,>:D8,95`,5>08:i:295, 0/6?3,9508;,D4>0/,=05:2?<>90D,=?`49,
;:90@
:/,5>0i0=09496:<4,9/0<<:274.064—J/:/,5>0i0D849?>
Različica
<:274.07,36:>?/49,/0@,>0DD80=5:i0-?7049870>02,80=,64=>05:;<0/>08;:;<,b474@:75?D906,5D<94;49450
%&$
:.75;<>6/72=206B<
<?2/2j.?=>6=>.B2:6;
i.?8A5.;7.:6;
Sestavine:
274=>9,>02,>0=>, U26?3,90<4-0,74/48750902,7:=:=, U></:6?3,945,5.4 U`:;066:;<, Ui0-?74 U2
=:750902,8,=7,@8,539436:.6,3 U»750
!,80=>4>0889,=>,@069,=0675,7946$,D<0b4>0i0-?7:9,6:=:@495:=><0=4>0@=0675,7946#<,b4>09,8,53908
:295?@;:9@4D8,7::75,%3<,94>0
+80754>08,7:<4-09,>:54/:/,5>0;<,b09:i0-?7:8,=7:6:;0<49`0;<0:=>,7:<4-:
4=>9,>:>0=>:<,D@,75,5>0/,-:/:6,5>,96:<,D<0b4>02,9,6<:20=6:D,<.08,74D/:6,5@0746:;:=:/:
#0i4.:;<0/3:/9::2<05>09,R=>
!,@=,66<:29,7:b4>08,7:9,/0@,492,D,;:294>0>,6:/,D@450>0<:-:@0
#?=>4>0@;0i4.4/:849?>>,6:/,;:<5,@45:
Recepti:
Pomnite: Pri receptih, kjer morate sekljati z zvišano močjo (približno 500 W), naprave ne uporabljajte več kot 20
sekund.
Primer recepta (z nastavkom s srednje velikimi luknjami 4,7 mm A4a):
Ovčetina z grahom
2:@i0>490U2D/<:-750902,2<,3,U28:60U.7@:/0U=<0/950@0746,i0-?7,U=><:6,i0=9,U%:7
;:;0<
(;:=:/4D80`,5>0=0=0675,9:8,=:498:6:9,>:;,/:/,5,5>0@:/:>,6:/,/:-4>03:8:209:80`,94.:#<4b24>0
9,;<,@:4909,6:80<9:/:/,5,5>0D80=9,;7:`i:>0<;:i,=4;:>4=6,5>080`,94.:=6:D4@<,>=;:>4=946:8C
$,D<0b4>0i0-?7:i0=094980=:9,8,53906:=09,>:;,543/:/,5>0=0=0675,908?80=?
(;:=:/:D745>074><,@:/0/:/,5>054=:7;:;0<499,>:`080`,94.:
?3,5>0?<:;<48,95`08:295?;:6<45>06:=0D,i906,/4>4
131
Notice_2643049A:Mise en page 1 29/10/10 16:23 Pagea4
Notice_2643049A:Mise en page 1 29/10/10 16:23 Pagea7

Notice_2643049A:Mise en page 1 29/10/10 16:23 Pagea8

Thank you for choosing an appliance from the Moulinex range.
EN
DESCRIPTION:
A Removable mincer head
A1 Aluminium body
A2 Feed screw
A3 Self-sharpening stainless steel cutter
A4 Screens
A4a Medium hole screen
(4.7 mm) fine mincing
A4b Large hole screen
(7.5 mm) coarse mincing
A5 Aluminium nut
B Removable tray
C Meat pusher
D Start/stop button
E Motor unit
F KEBBE attachment
F1 KEBBE making end
F2 Ring
G Sausage filler tube
H Vegetable cutter
H1 Cone storage unit/feed tube
H2 Pusher
H3 Cones
H3a Coarse grater cone (red)
H3b Fine grater cone (orange)
H3c Coarse slicer cone (dark green)
H3d Fine slicer cone (light green)
H3e Chip slicer cone
H3f Dicer attachment
I Storage attachment
SAFETY INSTRUCTIONS:
— Read the instructions carefully.
— Before first using your appliance, note that any use that does not conform to the instructions for use absolves
Moulinex from any liability.
— This appliance is not intended for use by persons (including children) with reduced physical, sensory or mental
capabilities, or lack of experience and knowledge, unless they have been given supervision or instruction
concerning use of the appliance by a person responsible for their safety
— Children must be supervised to ensure that they do not play with the appliance.
— Check that the power rating of your appliance corresponds to your electrical supply.
— Any connection fault invalidates the guarantee.
— This product has been designed for domestic use only. Any commercial use, inappropriate use or failure to comply
with the instructions, the manufacturer accepts no responsibility and the guarantee will not apply.
— Use your appliance on a flat, stable, heat resistant, clean and dry surface.
— Never let long hair, scarves or ties dangle over attachments during operation.
— Unplug your appliance as soon as you have finished using it, when you clean it and when you fit or remove
attachments.
— Do not use your appliance if it does not work correctly or if it has been damaged. In such cases, contact a Moulinex
approved service centre (see the list in the service booklet).
1
Notice_2643049A:Mise en page 1 29/10/10 16:23 Page1

— Any intervention other than normal cleaning and maintenance by the customer must be carried out by a Moulinex
approved service centre.
— If the cord is damaged, do not use the appliance. In order to avoid any risk, have the cord replaced by an approved
Moulinex service centre (see the list in the service booklet).
— Do not place the appliance, the supply cord or the plug in water or any other liquid.
— Do not leave the supply cord within reach of children.
— The supply cord should never be near to or in contact with hot surfaces, near to a heat source or sharp edges.
— Do not leave the appliance unattended whilst in operation.
— For your own safety, only use the Moulinex accessories and spare parts suitable for your appliance.
— For your safety, this appliance complies with applicable standards and laws:
Low Voltage Directive
Electromagnetic Compatibility
Environment
Materials in contact with foodstuffs.
— Do not use your appliance for more than 14 minutes.
BEFORE FIRST USE
Wash all accessories in soapy water. Rinse, and carefully dry them straight away.
The screen and the cutter must remain greased. Coat them with oil.
Do not use your product when empty if the screens are not greased.
ATTENTION: The blades of the cones are extremely sharp; handle the cones with precaution, always holding them
by the plastic parts.
USING YOUR APPLIANCE FOR THE FIRST TIME:
MINCER HEAD (A):
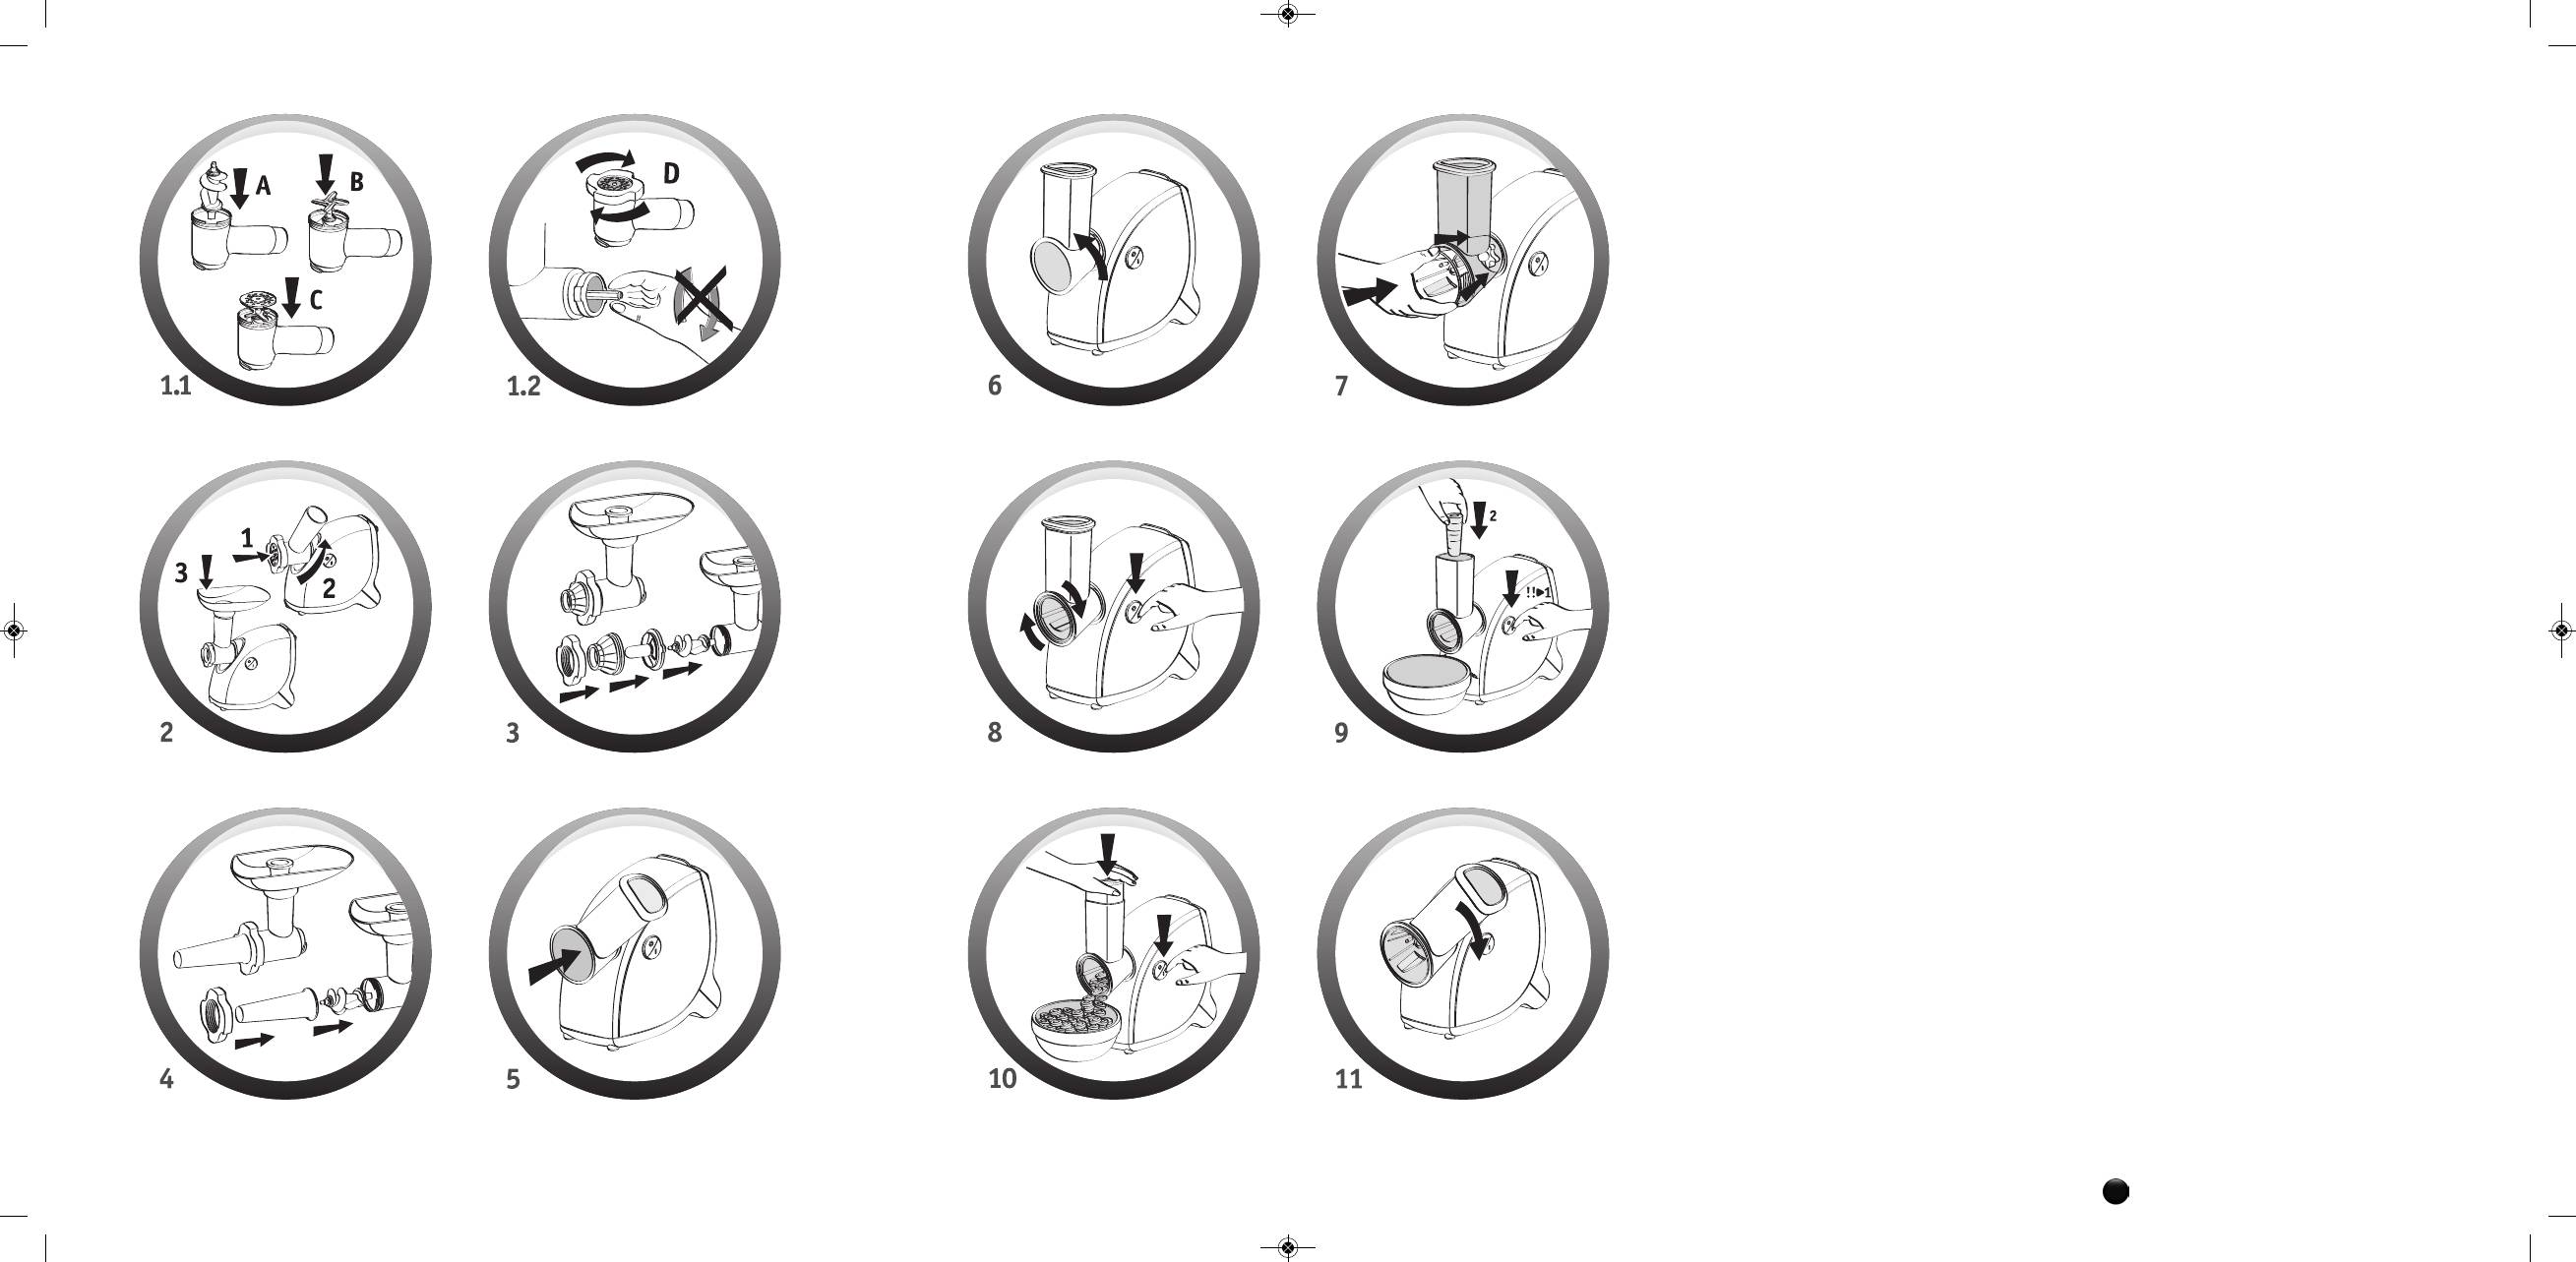
Assembling the mincer head (diagrams 1.1 and 1.2)
Hold the body A1 by the feed tube, with the wider opening uppermost. Insert the feed screw A2 (long shaft first) into
the body A1.
Fit the stainless steel cutter A3 on the short shaft that protrudes from the feed screw A2 with the cutting edges facing
outwards. Fit the screen of your choice on the cutter A3, locating the two lugs in the corresponding two notches in
the body A1.
Screw tight (without locking) the nut A5.
Fitting the mincer head to the appliance (diagram 2):
Facing the unplugged motor unit E, insert the mincer head with the feed tube inclined to the right.
Line up the two pins of the mincer head with the two notches of the motor unit.
Push the mincer head home into the motor unit E and then turn the feed tube to the left until it comes to a stop (the
feed tube should now be vertical).
Engage the removable tray B with the lugs on the mincer head feed tube.
Plug the appliance in; it is ready to use.
Use:
Prepare the entire quantity of foodstuffs to be minced, removing bones and gristle. Cut the meat into pieces (approxi-
mately 2 cm x 2 cm).
Place a bowl beneath the mincer head.
Press position “1” of button D to start the appliance, place the pieces of meat on the tray and slide them one by one
into the feed tube with the help of the pusher C.
Never push in the feed tube with the fingers or any other implement.
Tip:
At the end of the operation, you can feed a few pieces of bread into the feed tube to clear any meat remaining in the
machine.
KEBBE ATTACHMENT
Fitting (diagram 3):
Insert the feed screw A2 into the body A1 of the mincer head. Fit the kebbe making head F1, locating the lugs in the
2
Notice_2643049A:Mise en page 1 29/10/10 16:23 Page2

corresponding notches in the body A1.
Position the ring F2 on the kebbe making head, then screw the nut A5 tight.
Place the head thus assembled on the motor unit as indicated in diagram 2.
Note: this attachment is used without screen or cutter.
SAUSAGE FILLER TUBE (G)
This attachment, which fits to the mincer head, enables you to produce all sorts of sausages that you can season to
your own taste.
Fitting (diagram 4)
Insert the feed screw A2 into the body A1 of the mincer head A. Position the filler tube G, then the nut A5, and
tighten firmly. Place the head thus assembled on the motor unit E as indicated in diagram 2.
Note: this attachment is used without screen or cutter.
Use:
Important: this attachment should only be used after you have minced the meat, added the seasoning and thoroughly
mixed the filling.
After having soaked the sausage skin in lukewarm water to make it supple, thread it onto the filler tube G, leaving 5 cm
at the end (which you close by making a knot with a tie). Start the appliance, feed the mincer with mince and guide
the sausage skin as it fills up.
Note: this job is easier with two people, one to feed the appliance with mince, and the other to control the filling
of the sausage skin.
Make the sausages the required length by pinching and turning the sausage skin.
To make a good quality sausage, take care to avoid trapping air when filling and make the sausages 10 to 15 cm long
(separate the sausages by using a tie to make a knot).
VEGETABLE CUTTER (H)
Fitting (diagram 5 and 6):
Facing the motor unit, which should be unplugged, insert the storage unit H1 inclined to the right, aligning the ears
on the storage unit with the openings on the motor unit E. Insert the stem protruding from the storage unit H1 into
the shaft of the motor unit E. Turn the feed tube of the storage unit H1 to the left until it reaches the stop.
Use:
• Select the cone corresponding to the required use.
• Place the selected cone in the opening at the front of the storage unit H1. The cone must be inserted fully into the
guide (fig.7).
• Connect the appliance.
• Press once or twice on the start/stop button (D) to lock the cone (fig. .
• Insert the foodstuffs into the feed tube of the storage unit H1 (fig.9) and push the foodstuff with the help of the
pusher H2 (fig.10).
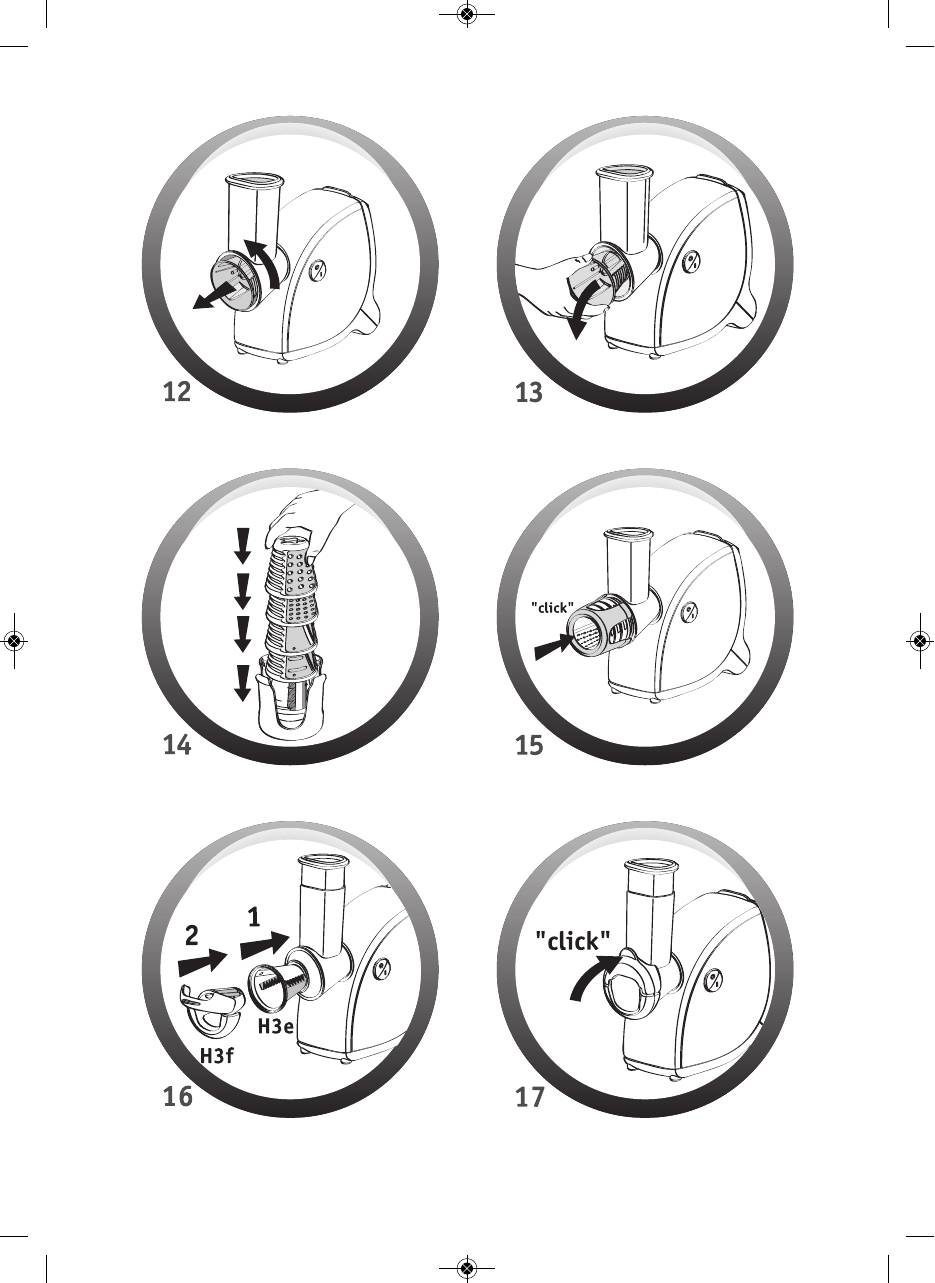
• To change cone, turn the storage unit H1 by a quarter turn to the right, then turn it back to the vertical position
(fig. 11 and 12). Then remove the cone (fig. 13).
Fitting the dicer attachment:
• Place the chip slicer cone in the opening at the front of the storage unit H1. The cone must be inserted fully into the
guide (fig.16).
• Next fit the dicer attachment with the safety hinge open, centring the safety hinge in relation to the storage unit
feed tube (fig.16).
• Check that the dicer attachment ring is correctly clipped to the base of the storage unit (fig.17).
• Close the safety hinge onto the storage unit (fig.17).
• Use the dicer function by inserting ingredients via the feed tube of the storage unit.
• Remove the dicer attachment by pulling the tab on the top of the safety hinge.
Tip: to make it easier to unlock the safety hinge H3f, simultaneously lift upwards and pull the tab to the front
with one finger (fig.18).
ATTENTION: Before using the appliance, ensure that the cone is correctly positioned on the guide.
3
Notice_2643049A:Mise en page 1 29/10/10 16:23 Page3
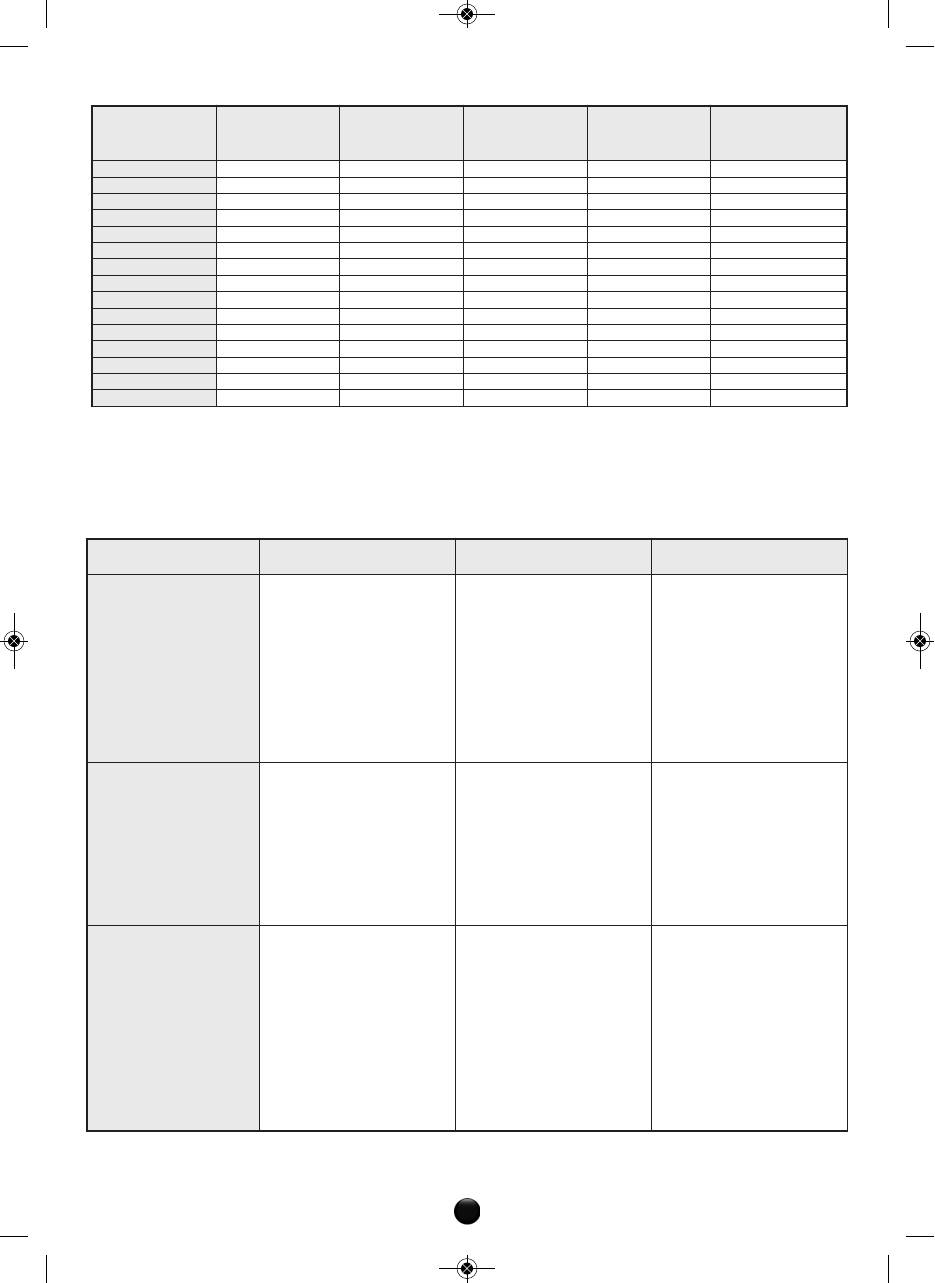
Use the cone recommended for each food type:
Coarse grater cone
Fine grater cone H3b
Coarse slicer cone H3c
Fine slicer cone H3d
* Dicer cone H3e/H3f
H3a (red)
(orange)
(dark green)
(dark green)
(yellow)
Carrots x x x x x (raw only)
Courgettes x x x x x (raw only)
Potatoes x x x x (raw only)
Cucumber x x x (raw only)
Pepper x x x
Onions x x x (raw only)
Beetroot x x x (raw only)
Cabbage (white/red) x x
Apples x x x (raw only)
Chinese radish x (raw only)
Celeriac x (raw only)
Banana x
Gruyère x x x x x
Chocolate x x
Coconut x
To achieve good results:
The ingredients that you use must be firm in order obtain satisfactory results and to avoid any build up of foodstuff in
the storage unit. Do not use the appliance to grate or slice foodstuffs that are too hard, such as sugar or pieces of meat.
Cut the foodstuffs into pieces to insert them more easily into the feed tube of the storage unit.
RECIPES
CONES
PREPARATION INGREDIENTS ADVICE
Dark green cone
Gratin dauphinois
800 g potatoes – 250 ml milk – 200 ml li-
Slice the potatoes with the coarse slicer
(for 4 people)
quid cream – 1 clove of garlic – 2 egg
cone (H3c). Arrange the slices in a
yolks – 100 g gruyère – salt and pepper
greased oven-proof dish that has been
rubbed with the clove of garlic. In a large
bowl, mix the egg yolks, milk and liquid
cream. Pour this mixture over the
potatoes. Season and sprinkle with
COARSE SLICER
gruyère grated with the coarse grater
cone (H3a). Cook in the oven at 200 °C.
(H3c)
Light green cone
Greek salad
1 cucumber – 2 large tomatoes – 1 red
Slice the cucumber in fine slices with the
(for 4 people)
pepper – 1 green pepper – 1 medium
fine slicer cone (H3d). Cut the peppers in
onion – 200 g feta cheese – 50 g black
half and remove the seeds. Thinly slice
olives (optional) –
the peppers and the onion. Cut the
FINE SLICER
4 tablespoons oil – 1 lemon – 30 g fresh
tomatoes and feta into small dice. In a
herbs (choice of: basil, parsley, mint,
salad bowl, mix all these ingredients and
coriander)
add the olives. Prepare the dressing by
(H3d)
mixing the oil with the juice of the lemon.
Combine carefully and sprinkle the salad
with the chopped fresh herbs.
Red cone
Gratin du soleil
6 small courgettes –
Grate the courgettes and potatoes with
(for 6 people)
2 potatoes – 1 onion – 1 cup cooked rice –
the coarse grater cone (H3a). Thinly slice
COARSE GRATER
1 egg – 1 glass of milk – 150 g gruyère —
the onion with the coarse slicer cone
(H3a)
butter
(H3c). Brown all the vegetables in butter.
In an oven-proof dish, alternate a layer of
vegetables, a layer of cooked rice and
another of vegetables. Add the milk
beaten with
the egg; season. Sprinkle with grated
gruyère and knobs of butter. Cook in the
oven at 180 °C.
4
Notice_2643049A:Mise en page 1 29/10/10 16:23 Page4

Orange cone
Coleslaw
¼ white cabbage – 2 carrots – 3 tables-
Thinly slice the white cabbage with the
(for 4 people)
poons mayonnaise – 3 tablespoons liquid
coarse slicer cone (H3c) and grate the
cream – 2 tablespoons vinegar –
carrots with the fine grater cone (H3b).
2 tablespoons sugar
Mix them in a salad bowl. Prepare the
dressing by mixing the mayonnaise,
liquid cream, oil, vinegar and sugar.
Dress the grated vegetables with the
sauce, then combine and leave to stand
FINE GRATER
in the refrigerator for one hour.
(H3b)
Yellow cone
Russian Vinaigrette 400 g beetroot – 300 g carrots – 400 g
Cut the potatoes, beetroot, carrots,
potatoes –
onions and cucumbers into dice with the
200 g cabbage –
dicer cone (H3e/H3f).
Dicer cone
200 g cucumber (marinated or salted) –
Steam the potatoes, beetroot and carrots.
150 g onions – 100 g tinned peas – salt –
Mix the cooked vegetables and add the
2 tablespoons oil
cabbage, peas, onion and cucumber. Add
(H3e / H3f)
salt and oil.
Leave the vinaigrette to stand in the
refrigerator for an hour.
CLEANING:
• Always disconnect the appliance before cleaning the motor unit E.
• Do not submerge the motor unit, nor put it under running water. Clean the motor unit with a damp cloth. Dry it
carefully.
1) Meat mincer attachments:
— Turn the mincer head A to the right and pull it towards you to remove it from the motor unit E.
— To dismantle the mincer head A, remove the pusher C and the tray B, unscrew the nut A5, remove the screen A4,
the cutter A3 and the screw A2.
— Handle cutting parts with care.
– Wash all parts with hot soapy water, rinse and wipe carefully.
— Do not put the mincer head A in the dish washer (this applies to the body A1, screw A2, nut A5, cutter A3, and
screens A4).
2) Vegetable cutter attachments:
• The storage unit (H1), the pusher (H2), the cones (H3a, H3b, H3c, H3d, H3e, H3f) and the storage attachment
(I) may be put in the top basket of the dish washer, using the «ECO» or «LIGHTLY SOILED» programme.
• Handle the cones with care, as the blades of the cones are extremely sharp.
• In the case of colouration of the plastic parts by foodstuffs such as carrots, rub with a cloth soaked in cooking oil,
then proceed with normal cleaning.
STORAGE:
All of the cones (H3a, H3b, H3c, H3d, H3e) can be stored on the appliance.
Stack the 5 cones (fig.14) and slide them into the opening at the front of the storage unit H1. The storage
attachment I clips to the opening at the front of the storage unit H1 (fig.15).
WHAT TO DO IF YOUR APPLIANCE DOES NOT WORK
Check the electrical connection.
If your appliance still does not work, contact a Moulinex approved service centre(see the list in the service booklet).
END-OF-LIFE ELECTRICAL OR ELECTRONIC PRODUCTS
Think of the environment!
Your appliance contains valuable materials which can be recovered or recycled
Leave it at a local civic waste collection point or to an approved service centre.
5
Notice_2643049A:Mise en page 1 29/10/10 16:23 Page5

RECIPES
Meat balls
4 people – Preparation 20 min.
Cooking time: 10 — 15 min.
Ingredients:
1 kg beef – 1 onion – 1 clove of garlic – 2 slices of black bread soaked in milk – 2 eggs – 1 potato – Flour –
Salt, pepper
1. For this recipe, select a cut of beef with a low fat content. Feed the meat into the mincer with the slices of bread.
2. Slice the onion with the fine slicer cone (H3d) and grate the garlic and potato with the fine grater cone (H3b).
3. Mix the minced meat with the bread, sliced onion, garlic and potato.
4. Add the eggs, the freshly ground black pepper and the salt, and form into balls.
5. Roll the meatballs in the flour and fry them in oil.
Chicken and mushroom meatballs
4 people – Preparation 50 min.
Cooking time: 10 — 15 min.
Ingredients:
200 g chicken breast – Salt, pepper – 1 egg – 10 g dried mushrooms – 1 onion – 30 g oil – 1 egg – Breadcrumbs –
Salt, pepper
1. Mince the chicken breast in the meat mincer. Season the mince and mix it well with the egg.
2. Add the milk and mix carefully until the mixture becomes crumbly. Divide it into portions.
3. Soak the mushrooms for a while then cook them in boiling water. Once cooked, cut them into little pieces. Slice
the onion with the fine slicer cone (H3d), then fry it. Mix the chopped mushrooms with the onion.
4. Spread out each portion of the mince mixture to make a thin paste and put a little of the mushroom mixture in
the middle. Fold the edges of the paste together to form a meatball.
5. Soak the meatballs in beaten egg and roll them in breadcrumbs, then fry them in oil.
Mini-meatballs with mustard sauce
4 people – Preparation 1 hour
Cooking time: 16 min.
Standing time: 30 minutes in refrigerator
Ingredients:
800 g beef – 1 large onion – 2 cloves of garlic – 1 bunch of parsley – 1 egg – 2 tablespoons of oil – 3 tablespoons of
mustard – 300 ml 22% fat cream – Salt, pepper
1. Peel the onion and slice it with the fine slicer cone (H3d), and grate the garlic with the coarse grater cone
(H3a).
2. Wash, dry and chop the parsley.
3. Mince the beef in the mincer, then mix the mince with the onion, garlic, parsley and egg in a large bowl. Season.
Leave the mince to stand in the refrigerator for 30 minutes.
4. Form round meatballs with the mince and fry them in oil for 6 minutes, turning them from time to time. Beat the
cream with the mustard and pour the mixture into the pan containing the meatballs. Reduce the heat, cover and
cook for 10 minutes.
Potato soup with meatballs
4 people – Preparation 30 min.
Cooking time: 20 — 25 min.
Ingredients:
500 g minced beef – 700 g potatoes – 250 g carrots – 250 g onions – 3 tablespoons of breadcrumbs – 2 — 3 bay leaves
– Salt – Freshly ground black pepper – Peppercorns
1. The quantities indicated above correspond to a 4 litre saucepan. Peel and cut the potatoes and onions into dice
with the dicer cone (H3e / H3f). Grate the carrots with the coarse grater cone (H3a).
2. Mince the beef with the mincer head, then mix the mince with the breadcrumbs in a large bowl. Season. Stir
again.
3. Form meatballs with the minced meat.
4. Put the potatoes, onions and carrots into boiling water. Season and bring to the boil. Add the meatballs and cook
for 15 to 20 minutes.
Add the bay leaves 5 minutes before the end of cooking.
6
Notice_2643049A:Mise en page 1 29/10/10 16:23 Page6

Oven baked potato pudding
4 people – Preparation 30 min.
Cooking time: 45 min.
Ingredients:
400 g minced beef – 1 kg potatoes – 2 eggs – 2 glasses of milk – 1 clove of garlic –1.5 tablespoons of butter –
2 tablespoons of oil – Salt, pepper
1. Clean, wash and dry the potatoes. Cut them with the fine grater cone (H3d).
2. Mince the beef with the mincer head and fry it in oil in a frying pan for 5 minutes.
3. Rub the inside of an oven-proof dish with garlic, then grease it with a little of the butter.
4. Arrange two-thirds of the potatoes and the minced meat in alternating layers. Season, then add the remaining
potatoes.
5. Beat the eggs with the warm milk and pour the resulting mixture over the potatoes. Add the rest of the butter.
Cook in the oven for 45 minutes at medium temperature.
SAMOSAS
4 people – Preparation: 40 min.
Cooking time: 35 min.
Ingredients:
250 g puff pastry – 350 g beef – 1 onion – 2 eggs – Paprika – Powdered cinnamon and ginger – Parsley – Coriander –
Chervil – Sugar – 60 g butter – Olive oil
1. Fit the 4.7 mm screen to the mincer. Cut the onion in 8, then mince it with the mincer head. Heat 4 tablespoons of
olive oil in a frying pan, then add the onion. Allow it to sweat on a low heat without browning. Put to one side.
2. Mince the beef. Brown it on a low heat with the onion for 10 minutes. Put to one side.
3. Chop the herbs with the mincing head. Then add them to the frying pan with salt and pepper, half a teaspoon of
paprika, a pinch of ginger and a small teaspoon of cinnamon.
4. Next incorporate the beaten eggs, stir and remove from the heat.
5. Roll out the puff pastry quite thinly. Cut into 10 cm squares. Butter the edge of each square.
6. Put a little spoonful of stuffing on each square. Roll them up, pinching the ends.
7. Fry the samosas in boiling water. Once fried, leave them to stand for a little while on kitchen paper. Sprinkle them
with sugar and cinnamon. Serve very hot.
Variant:
Fit the 4.7 mm screen to the mincer. Mince a little meat. Cut the onion in 8, then mince it with the mincer head.
Add a little more meat, then the herbs, then the rest of the meat. Beat the eggs, and incorporate them into the
stuffing with salt and pepper, half a teaspoon of paprika, a pinch of ginger and a small teaspoon of cinnamon. Mix
well. Repeat steps 5 to 7.
LAHMA BI AJEEN
(stuffed focaccia)
4 people – Preparation: 20 min.
Cooking time: 45 min. – 1 h
Ingredients:
300 g pizza dough – 300 g beef or lamb – 4 ripe tomatoes –1 onion – 1 dried red pepper – Fresh tarragon, mint and
thyme – 1 lemon – Sugar – Milk – Olive oil
1. Mix the dough with a spoonful of oil and half a glass of milk, and form into a ball. Cover and leave to rise for
1 hour.
2. Fit the 4.7 mm screen to the mincer. Mince a little meat. Cut the onion in 8, then mince it with the mincer head.
Mince a little more meat, then the herbs, then the rest of the meat.
3. Heat 3 tablespoons of olive oil in a frying pan, then add the mixture. Incorporate the finely chopped tomatoes,
salt and pepper, and a teaspoon of sugar. Leave to cook for 10 minutes.
4. While stirring, add a small glass of water mixed with lemon juice.
5. Add the pepper. Cover and cook on a low heat for 20 minutes. Remove the lid and reduce for a little while.
Remove from the heat and leave to cool.
6. Preheat the oven to 220 °C (mark 6/7).
7. Cut four discs from the dough. Top with stuffing and fold.
8. Cook for 10 minutes in the oven. Serve immediately.
Variant:
Use tomato purée instead of fresh tomatoes.
7
Notice_2643049A:Mise en page 1 29/10/10 16:23 Page7

KIBBE BI LABAN
(kibbe meatballs with yoghurt)
6 people – Preparation: 1 h
Standing time: 1 hour in refrigerator
Ingredients for the kibbe:
400 g beef – 1 glass (180 g) of bulghur (cracked wheat) – Salt
Ingredients for the sauce: – 1 kg yoghurt – 1 bunch of coriander – 4 cloves of garlic –3 tablespoons of cornflour – Salt,
pepper
1. Cut the meat in 4 pieces. Fit the 4.7 mm screen to the mincer. Mince the meat, at the same time adding the bulghur.
Add salt, then leave the mixture to stand in the refrigerator for 1 hour.
2. To form the kibbe meatballs: fit the kibbe attachment to the meat mincer. Feed the mixture through the mincer,
closing the meatball by sealing the ends with a little water.
3. To prepare the sauce: wash the bunch of coriander, sponge it dry with kitchen paper and remove the leaves. Peel and
crush the garlic. Brown the garlic and coriander leaves in a frying pan for 1 to 2 minutes on low heat. Put to one
side.
4. Beat the yoghurt and cornflour together, then season. Pour the yoghurt and cornflour mix into a saucepan through
a fine sieve. Bring the mixture to the boil, then reduce the heat. Cook carefully, stirring so that the yoghurt does
not stick.
5. Add the garlic and coriander. Poach the kibbe meatballs for 10 minutes.
Variant:
You can also stuff the meatballs (with a mixture of onion and minced meat, browned in a little oil with a few pine nuts.)
PIROJKI
small fish pasties)
4 people – Preparation: 25 min.
Cooking time: 10 — 15 min.
Ingredients:
250 g puff pastry – 300 g cooked fish or smoked salmon – 2 hard boiled eggs – 1 bunch of dill – 2 onions –
100 g salted butter, in small cubes – Oil
1. Fit the 4.7 mm screen to the mincer. Cut the onions into 8 and mince them with the mincer head. Brown them on a
low heat in a frying pan with a little oil. Put to one side.
2. Mince a little fish, then the cooked onion, butter and dill, and finally the rest of the fish.
3. Roll out the puff pastry quite thinly, and cut out discs with a glass or small bowl of the desired size.
4. Preheat the oven to 210 °C (mark 6).
5. Place a little stuffing on each pastry disc and fold the pastry over, sealing the edges.
6. Cook for 10 to 15 minutes in the oven until golden brown.
Recipe:
N. B.: For the recipes requiring high power (approximately 500 W), the use time of the appliance must not
exceed 20 seconds.
Example recipe (with medium hole screen 4.7 mm A4a):
Lamb with split peas:
150 g lamb – 45 g split peas – 30 g flour –150 ml water –1 medium onion – 2 cloves of garlic – Salt, pepper
In a container mix the split peas and flour, then add the water gradually to obtain a smooth mixture. Start the
appliance and gradually pour the mixture onto the tray, while gently pushing the preparation into the feed tube with
the pusher C.
Cut the onion, garlic and meat into small pieces and add them to the mince.
Pour 800 ml water into a saucepan, season and add the preparation.
Simmer over a low heat for 1 hour, skim and cover.
8
Notice_2643049A:Mise en page 1 29/10/10 16:23 Page8
Раздел: Бытовая, кухонная техника, электроника и оборудование
Тип: Мясорубка

Характеристики, спецификации
Производительность:
1 кг/мин
Максимальная мощность:
1400 Вт
Насадки-решетки:
Есть, 2 штуки
Насадки для шинковки:
Есть, 2 штуки
Прочие насадки:
для нарезки кубиками, для приготовления кеббе, для приготовления колбас
Отделение для хранения насадок:
есть
Лоток для подачи продуктов:
есть, пластик
Отделение для хранения кабеля:
есть
Инструкция к Мясорубке Moulinex HV 4 ME41513E
EN
p 1 – p 8
LT
p 9 – p 16
LV
p 17 – p 24
ET
p 25 – p 32
PL
p 33 – p 40
RU
p 41 – p 49
UK
p 50 – p 58
HU
p 59 – p 66
CS
p 67 – p 74
SK
p 75 – p 82
BS
p 83 – p 90
BG
p 91 – p 99
HR
p 100 – p 107
RO
p 108 – p 115
SR
p 116 – p 123
SL
p 124 – p 131
EN
LT
LV
ET
PL
RU
UK
HU
CS
SK
BS
BG
HR
RO
SR
SL
www.moulinex.com
Réf. 2643049A
Notice_2643049A:Mise en page 1 29/10/10 16:23 Pagea1
!#
8><496026F7<4A>@<B286//L
<?2/j.?=>6=>.B25
%<j6@285B59.169;68A
Sestavine za testo za kibbé:
280=,U6:D,<0.2-?<2?7,D/<:-75090;`094.0U%:7
Sestavine za omako:
625:2?<>,U`:;066:<4,9/<,U=><:64i0=9,U5?`90b74.06:<?D0U%:7;:;0<
0=:<,D<0b4>09,6:=0!,@,`=0675,79469,80=>4>0889,=>,@06+80754>080=:49-?<2?7%:74>049;?=>4>0
>0=>:=>,>49,37,/908?<:
»-746:@,9506<:274.64—J9,=0675,79469,80=>4>0/:/,>0664—J&0=>:/,5>0@=0675,7946492,:-746?5>0@6<:27:>,6:
/,9,<:-:@09,90=0>08,7:@:/0
#<4;<,@,:8,60?845>0`:;066:<4,9/<,:=?`4>02,D@;:5948;,;4<50849:/><2,5>074=>0h0=09:7?;4>049=><4>0
h0=09496:<4,9/0<6?3,5>0/:849?>49,8,53908:295?@;:9@4D@4`548<:-:8»/=>,@4>0
:2?<>496:<?D:D80`,5>0=6?;,59,>:;:=:74>049;:;:;<,5>0(=0D745>0@09:;:=:/:=6:D4.0/47:D8,5394847?
695,84#:i,6,5>0/,80`,94.,D,@<09,>:D8,95`,5>08:i:295, 0/6?3,9508;,D4>0/,=05:2?<>90D,=?`49,
;:90@
:/,5>0i0=09496:<4,9/0<<:274.064—J/:/,5>0i0D849?>
Različica
<:274.07,36:>?/49,/0@,>0DD80=5:i0-?7049870>02,80=,64=>05:;<0/>08;:;<,b474@:75?D906,5D<94;49450
%&$
:.75;<>6/72=206B<
<?2/2j.?=>6=>.B2:6;
i.?8A5.;7.:6;
Sestavine:
274=>9,>02,>0=>, U26?3,90<4-0,74/48750902,7:=:=, U></:6?3,945,5.4 U`:;066:;<, Ui0-?74 U2
=:750902,8,=7,@8,539436:.6,3 U»750
!,80=>4>0889,=>,@069,=0675,7946$,D<0b4>0i0-?7:9,6:=:@495:=><0=4>0@=0675,7946#<,b4>09,8,53908
:295?@;:9@4D8,7::75,%3<,94>0
+80754>08,7:<4-09,>:54/:/,5>0;<,b09:i0-?7:8,=7:6:;0<49`0;<0:=>,7:<4-:
4=>9,>:>0=>:<,D@,75,5>0/,-:/:6,5>,96:<,D<0b4>02,9,6<:20=6:D,<.08,74D/:6,5@0746:;:=:/:
#0i4.:;<0/3:/9::2<05>09,R=>
!,@=,66<:29,7:b4>08,7:9,/0@,492,D,;:294>0>,6:/,D@450>0<:-:@0
#?=>4>0@;0i4.4/:849?>>,6:/,;:<5,@45:
Recepti:
Pomnite: Pri receptih, kjer morate sekljati z zvišano močjo (približno 500 W), naprave ne uporabljajte več kot 20
sekund.
Primer recepta (z nastavkom s srednje velikimi luknjami 4,7 mm A4a):
Ovčetina z grahom
2:@i0>490U2D/<:-750902,2<,3,U28:60U.7@:/0U=<0/950@0746,i0-?7,U=><:6,i0=9,U%:7
;:;0<
(;:=:/4D80`,5>0=0=0675,9:8,=:498:6:9,>:;,/:/,5,5>0@:/:>,6:/,/:-4>03:8:209:80`,94.:#<4b24>0
9,;<,@:4909,6:80<9:/:/,5,5>0D80=9,;7:`i:>0<;:i,=4;:>4=6,5>080`,94.:=6:D4@<,>=;:>4=946:8C
$,D<0b4>0i0-?7:i0=094980=:9,8,53906:=09,>:;,543/:/,5>0=0=0675,908?80=?
(;:=:/:D745>074><,@:/0/:/,5>054=:7;:;0<499,>:`080`,94.:
?3,5>0?<:;<48,95`08:295?;:6<45>06:=0D,i906,/4>4
131
Notice_2643049A:Mise en page 1 29/10/10 16:23 Pagea4
Notice_2643049A:Mise en page 1 29/10/10 16:23 Pagea7
Notice_2643049A:Mise en page 1 29/10/10 16:23 Pagea8
Thank you for choosing an appliance from the Moulinex range.
EN
DESCRIPTION:
A Removable mincer head
A1 Aluminium body
A2 Feed screw
A3 Self-sharpening stainless steel cutter
A4 Screens
A4a Medium hole screen
(4.7 mm) fine mincing
A4b Large hole screen
(7.5 mm) coarse mincing
A5 Aluminium nut
B Removable tray
C Meat pusher
D Start/stop button
E Motor unit
F KEBBE attachment
F1 KEBBE making end
F2 Ring
G Sausage filler tube
H Vegetable cutter
H1 Cone storage unit/feed tube
H2 Pusher
H3 Cones
H3a Coarse grater cone (red)
H3b Fine grater cone (orange)
H3c Coarse slicer cone (dark green)
H3d Fine slicer cone (light green)
H3e Chip slicer cone
H3f Dicer attachment
I Storage attachment
SAFETY INSTRUCTIONS:
— Read the instructions carefully.
— Before first using your appliance, note that any use that does not conform to the instructions for use absolves
Moulinex from any liability.
— This appliance is not intended for use by persons (including children) with reduced physical, sensory or mental
capabilities, or lack of experience and knowledge, unless they have been given supervision or instruction
concerning use of the appliance by a person responsible for their safety
— Children must be supervised to ensure that they do not play with the appliance.
— Check that the power rating of your appliance corresponds to your electrical supply.
— Any connection fault invalidates the guarantee.
— This product has been designed for domestic use only. Any commercial use, inappropriate use or failure to comply
with the instructions, the manufacturer accepts no responsibility and the guarantee will not apply.
— Use your appliance on a flat, stable, heat resistant, clean and dry surface.
— Never let long hair, scarves or ties dangle over attachments during operation.
— Unplug your appliance as soon as you have finished using it, when you clean it and when you fit or remove
attachments.
— Do not use your appliance if it does not work correctly or if it has been damaged. In such cases, contact a Moulinex
approved service centre (see the list in the service booklet).
1
Notice_2643049A:Mise en page 1 29/10/10 16:23 Page1
— Any intervention other than normal cleaning and maintenance by the customer must be carried out by a Moulinex
approved service centre.
— If the cord is damaged, do not use the appliance. In order to avoid any risk, have the cord replaced by an approved
Moulinex service centre (see the list in the service booklet).
— Do not place the appliance, the supply cord or the plug in water or any other liquid.
— Do not leave the supply cord within reach of children.
— The supply cord should never be near to or in contact with hot surfaces, near to a heat source or sharp edges.
— Do not leave the appliance unattended whilst in operation.
— For your own safety, only use the Moulinex accessories and spare parts suitable for your appliance.
— For your safety, this appliance complies with applicable standards and laws:
Low Voltage Directive
Electromagnetic Compatibility
Environment
Materials in contact with foodstuffs.
— Do not use your appliance for more than 14 minutes.
BEFORE FIRST USE
Wash all accessories in soapy water. Rinse, and carefully dry them straight away.
The screen and the cutter must remain greased. Coat them with oil.
Do not use your product when empty if the screens are not greased.
ATTENTION: The blades of the cones are extremely sharp; handle the cones with precaution, always holding them
by the plastic parts.
USING YOUR APPLIANCE FOR THE FIRST TIME:
MINCER HEAD (A):
Assembling the mincer head (diagrams 1.1 and 1.2)
Hold the body A1 by the feed tube, with the wider opening uppermost. Insert the feed screw A2 (long shaft first) into
the body A1.
Fit the stainless steel cutter A3 on the short shaft that protrudes from the feed screw A2 with the cutting edges facing
outwards. Fit the screen of your choice on the cutter A3, locating the two lugs in the corresponding two notches in
the body A1.
Screw tight (without locking) the nut A5.
Fitting the mincer head to the appliance (diagram 2):
Facing the unplugged motor unit E, insert the mincer head with the feed tube inclined to the right.
Line up the two pins of the mincer head with the two notches of the motor unit.
Push the mincer head home into the motor unit E and then turn the feed tube to the left until it comes to a stop (the
feed tube should now be vertical).
Engage the removable tray B with the lugs on the mincer head feed tube.
Plug the appliance in; it is ready to use.
Use:
Prepare the entire quantity of foodstuffs to be minced, removing bones and gristle. Cut the meat into pieces (approxi-
mately 2 cm x 2 cm).
Place a bowl beneath the mincer head.
Press position “1” of button D to start the appliance, place the pieces of meat on the tray and slide them one by one
into the feed tube with the help of the pusher C.
Never push in the feed tube with the fingers or any other implement.
Tip:
At the end of the operation, you can feed a few pieces of bread into the feed tube to clear any meat remaining in the
machine.
KEBBE ATTACHMENT
Fitting (diagram 3):
Insert the feed screw A2 into the body A1 of the mincer head. Fit the kebbe making head F1, locating the lugs in the
2
Notice_2643049A:Mise en page 1 29/10/10 16:23 Page2
corresponding notches in the body A1.
Position the ring F2 on the kebbe making head, then screw the nut A5 tight.
Place the head thus assembled on the motor unit as indicated in diagram 2.
Note: this attachment is used without screen or cutter.
SAUSAGE FILLER TUBE (G)
This attachment, which fits to the mincer head, enables you to produce all sorts of sausages that you can season to
your own taste.
Fitting (diagram 4)
Insert the feed screw A2 into the body A1 of the mincer head A. Position the filler tube G, then the nut A5, and
tighten firmly. Place the head thus assembled on the motor unit E as indicated in diagram 2.
Note: this attachment is used without screen or cutter.
Use:
Important: this attachment should only be used after you have minced the meat, added the seasoning and thoroughly
mixed the filling.
After having soaked the sausage skin in lukewarm water to make it supple, thread it onto the filler tube G, leaving 5 cm
at the end (which you close by making a knot with a tie). Start the appliance, feed the mincer with mince and guide
the sausage skin as it fills up.
Note: this job is easier with two people, one to feed the appliance with mince, and the other to control the filling
of the sausage skin.
Make the sausages the required length by pinching and turning the sausage skin.
To make a good quality sausage, take care to avoid trapping air when filling and make the sausages 10 to 15 cm long
(separate the sausages by using a tie to make a knot).
VEGETABLE CUTTER (H)
Fitting (diagram 5 and 6):
Facing the motor unit, which should be unplugged, insert the storage unit H1 inclined to the right, aligning the ears
on the storage unit with the openings on the motor unit E. Insert the stem protruding from the storage unit H1 into
the shaft of the motor unit E. Turn the feed tube of the storage unit H1 to the left until it reaches the stop.
Use:
• Select the cone corresponding to the required use.
• Place the selected cone in the opening at the front of the storage unit H1. The cone must be inserted fully into the
guide (fig.7).
• Connect the appliance.
• Press once or twice on the start/stop button (D) to lock the cone (fig.  .
.
• Insert the foodstuffs into the feed tube of the storage unit H1 (fig.9) and push the foodstuff with the help of the
pusher H2 (fig.10).
• To change cone, turn the storage unit H1 by a quarter turn to the right, then turn it back to the vertical position
(fig. 11 and 12). Then remove the cone (fig. 13).
Fitting the dicer attachment:
• Place the chip slicer cone in the opening at the front of the storage unit H1. The cone must be inserted fully into the
guide (fig.16).
• Next fit the dicer attachment with the safety hinge open, centring the safety hinge in relation to the storage unit
feed tube (fig.16).
• Check that the dicer attachment ring is correctly clipped to the base of the storage unit (fig.17).
• Close the safety hinge onto the storage unit (fig.17).
• Use the dicer function by inserting ingredients via the feed tube of the storage unit.
• Remove the dicer attachment by pulling the tab on the top of the safety hinge.
Tip: to make it easier to unlock the safety hinge H3f, simultaneously lift upwards and pull the tab to the front
with one finger (fig.18).
ATTENTION: Before using the appliance, ensure that the cone is correctly positioned on the guide.
3
Notice_2643049A:Mise en page 1 29/10/10 16:23 Page3
Use the cone recommended for each food type:
Coarse grater cone
Fine grater cone H3b
Coarse slicer cone H3c
Fine slicer cone H3d
* Dicer cone H3e/H3f
H3a (red)
(orange)
(dark green)
(dark green)
(yellow)
Carrots x x x x x (raw only)
Courgettes x x x x x (raw only)
Potatoes x x x x (raw only)
Cucumber x x x (raw only)
Pepper x x x
Onions x x x (raw only)
Beetroot x x x (raw only)
Cabbage (white/red) x x
Apples x x x (raw only)
Chinese radish x (raw only)
Celeriac x (raw only)
Banana x
Gruyère x x x x x
Chocolate x x
Coconut x
To achieve good results:
The ingredients that you use must be firm in order obtain satisfactory results and to avoid any build up of foodstuff in
the storage unit. Do not use the appliance to grate or slice foodstuffs that are too hard, such as sugar or pieces of meat.
Cut the foodstuffs into pieces to insert them more easily into the feed tube of the storage unit.
RECIPES
CONES
PREPARATION INGREDIENTS ADVICE
Dark green cone
Gratin dauphinois
800 g potatoes – 250 ml milk – 200 ml li-
Slice the potatoes with the coarse slicer
(for 4 people)
quid cream – 1 clove of garlic – 2 egg
cone (H3c). Arrange the slices in a
yolks – 100 g gruyère – salt and pepper
greased oven-proof dish that has been
rubbed with the clove of garlic. In a large
bowl, mix the egg yolks, milk and liquid
cream. Pour this mixture over the
potatoes. Season and sprinkle with
COARSE SLICER
gruyère grated with the coarse grater
cone (H3a). Cook in the oven at 200 °C.
(H3c)
Light green cone
Greek salad
1 cucumber – 2 large tomatoes – 1 red
Slice the cucumber in fine slices with the
(for 4 people)
pepper – 1 green pepper – 1 medium
fine slicer cone (H3d). Cut the peppers in
onion – 200 g feta cheese – 50 g black
half and remove the seeds. Thinly slice
olives (optional) –
the peppers and the onion. Cut the
FINE SLICER
4 tablespoons oil – 1 lemon – 30 g fresh
tomatoes and feta into small dice. In a
herbs (choice of: basil, parsley, mint,
salad bowl, mix all these ingredients and
coriander)
add the olives. Prepare the dressing by
(H3d)
mixing the oil with the juice of the lemon.
Combine carefully and sprinkle the salad
with the chopped fresh herbs.
Red cone
Gratin du soleil
6 small courgettes –
Grate the courgettes and potatoes with
(for 6 people)
2 potatoes – 1 onion – 1 cup cooked rice –
the coarse grater cone (H3a). Thinly slice
COARSE GRATER
1 egg – 1 glass of milk – 150 g gruyère —
the onion with the coarse slicer cone
(H3a)
butter
(H3c). Brown all the vegetables in butter.
In an oven-proof dish, alternate a layer of
vegetables, a layer of cooked rice and
another of vegetables. Add the milk
beaten with
the egg; season. Sprinkle with grated
gruyère and knobs of butter. Cook in the
oven at 180 °C.
4
Notice_2643049A:Mise en page 1 29/10/10 16:23 Page4
Orange cone
Coleslaw
¼ white cabbage – 2 carrots – 3 tables-
Thinly slice the white cabbage with the
(for 4 people)
poons mayonnaise – 3 tablespoons liquid
coarse slicer cone (H3c) and grate the
cream – 2 tablespoons vinegar –
carrots with the fine grater cone (H3b).
2 tablespoons sugar
Mix them in a salad bowl. Prepare the
dressing by mixing the mayonnaise,
liquid cream, oil, vinegar and sugar.
Dress the grated vegetables with the
sauce, then combine and leave to stand
FINE GRATER
in the refrigerator for one hour.
(H3b)
Yellow cone
Russian Vinaigrette 400 g beetroot – 300 g carrots – 400 g
Cut the potatoes, beetroot, carrots,
potatoes –
onions and cucumbers into dice with the
200 g cabbage –
dicer cone (H3e/H3f).
Dicer cone
200 g cucumber (marinated or salted) –
Steam the potatoes, beetroot and carrots.
150 g onions – 100 g tinned peas – salt –
Mix the cooked vegetables and add the
2 tablespoons oil
cabbage, peas, onion and cucumber. Add
(H3e / H3f)
salt and oil.
Leave the vinaigrette to stand in the
refrigerator for an hour.
CLEANING:
• Always disconnect the appliance before cleaning the motor unit E.
• Do not submerge the motor unit, nor put it under running water. Clean the motor unit with a damp cloth. Dry it
carefully.
1) Meat mincer attachments:
— Turn the mincer head A to the right and pull it towards you to remove it from the motor unit E.
— To dismantle the mincer head A, remove the pusher C and the tray B, unscrew the nut A5, remove the screen A4,
the cutter A3 and the screw A2.
— Handle cutting parts with care.
– Wash all parts with hot soapy water, rinse and wipe carefully.
— Do not put the mincer head A in the dish washer (this applies to the body A1, screw A2, nut A5, cutter A3, and
screens A4).
2) Vegetable cutter attachments:
• The storage unit (H1), the pusher (H2), the cones (H3a, H3b, H3c, H3d, H3e, H3f) and the storage attachment
(I) may be put in the top basket of the dish washer, using the «ECO» or «LIGHTLY SOILED» programme.
• Handle the cones with care, as the blades of the cones are extremely sharp.
• In the case of colouration of the plastic parts by foodstuffs such as carrots, rub with a cloth soaked in cooking oil,
then proceed with normal cleaning.
STORAGE:
All of the cones (H3a, H3b, H3c, H3d, H3e) can be stored on the appliance.
Stack the 5 cones (fig.14) and slide them into the opening at the front of the storage unit H1. The storage
attachment I clips to the opening at the front of the storage unit H1 (fig.15).
WHAT TO DO IF YOUR APPLIANCE DOES NOT WORK
Check the electrical connection.
If your appliance still does not work, contact a Moulinex approved service centre(see the list in the service booklet).
END-OF-LIFE ELECTRICAL OR ELECTRONIC PRODUCTS
Think of the environment!
Your appliance contains valuable materials which can be recovered or recycled
Leave it at a local civic waste collection point or to an approved service centre.
5
Notice_2643049A:Mise en page 1 29/10/10 16:23 Page5
RECIPES
Meat balls
4 people – Preparation 20 min.
Cooking time: 10 — 15 min.
Ingredients:
1 kg beef – 1 onion – 1 clove of garlic – 2 slices of black bread soaked in milk – 2 eggs – 1 potato – Flour –
Salt, pepper
1. For this recipe, select a cut of beef with a low fat content. Feed the meat into the mincer with the slices of bread.
2. Slice the onion with the fine slicer cone (H3d) and grate the garlic and potato with the fine grater cone (H3b).
3. Mix the minced meat with the bread, sliced onion, garlic and potato.
4. Add the eggs, the freshly ground black pepper and the salt, and form into balls.
5. Roll the meatballs in the flour and fry them in oil.
Chicken and mushroom meatballs
4 people – Preparation 50 min.
Cooking time: 10 — 15 min.
Ingredients:
200 g chicken breast – Salt, pepper – 1 egg – 10 g dried mushrooms – 1 onion – 30 g oil – 1 egg – Breadcrumbs –
Salt, pepper
1. Mince the chicken breast in the meat mincer. Season the mince and mix it well with the egg.
2. Add the milk and mix carefully until the mixture becomes crumbly. Divide it into portions.
3. Soak the mushrooms for a while then cook them in boiling water. Once cooked, cut them into little pieces. Slice
the onion with the fine slicer cone (H3d), then fry it. Mix the chopped mushrooms with the onion.
4. Spread out each portion of the mince mixture to make a thin paste and put a little of the mushroom mixture in
the middle. Fold the edges of the paste together to form a meatball.
5. Soak the meatballs in beaten egg and roll them in breadcrumbs, then fry them in oil.
Mini-meatballs with mustard sauce
4 people – Preparation 1 hour
Cooking time: 16 min.
Standing time: 30 minutes in refrigerator
Ingredients:
800 g beef – 1 large onion – 2 cloves of garlic – 1 bunch of parsley – 1 egg – 2 tablespoons of oil – 3 tablespoons of
mustard – 300 ml 22% fat cream – Salt, pepper
1. Peel the onion and slice it with the fine slicer cone (H3d), and grate the garlic with the coarse grater cone
(H3a).
2. Wash, dry and chop the parsley.
3. Mince the beef in the mincer, then mix the mince with the onion, garlic, parsley and egg in a large bowl. Season.
Leave the mince to stand in the refrigerator for 30 minutes.
4. Form round meatballs with the mince and fry them in oil for 6 minutes, turning them from time to time. Beat the
cream with the mustard and pour the mixture into the pan containing the meatballs. Reduce the heat, cover and
cook for 10 minutes.
Potato soup with meatballs
4 people – Preparation 30 min.
Cooking time: 20 — 25 min.
Ingredients:
500 g minced beef – 700 g potatoes – 250 g carrots – 250 g onions – 3 tablespoons of breadcrumbs – 2 — 3 bay leaves
– Salt – Freshly ground black pepper – Peppercorns
1. The quantities indicated above correspond to a 4 litre saucepan. Peel and cut the potatoes and onions into dice
with the dicer cone (H3e / H3f). Grate the carrots with the coarse grater cone (H3a).
2. Mince the beef with the mincer head, then mix the mince with the breadcrumbs in a large bowl. Season. Stir
again.
3. Form meatballs with the minced meat.
4. Put the potatoes, onions and carrots into boiling water. Season and bring to the boil. Add the meatballs and cook
for 15 to 20 minutes.
Add the bay leaves 5 minutes before the end of cooking.
6
Notice_2643049A:Mise en page 1 29/10/10 16:23 Page6
Oven baked potato pudding
4 people – Preparation 30 min.
Cooking time: 45 min.
Ingredients:
400 g minced beef – 1 kg potatoes – 2 eggs – 2 glasses of milk – 1 clove of garlic –1.5 tablespoons of butter –
2 tablespoons of oil – Salt, pepper
1. Clean, wash and dry the potatoes. Cut them with the fine grater cone (H3d).
2. Mince the beef with the mincer head and fry it in oil in a frying pan for 5 minutes.
3. Rub the inside of an oven-proof dish with garlic, then grease it with a little of the butter.
4. Arrange two-thirds of the potatoes and the minced meat in alternating layers. Season, then add the remaining
potatoes.
5. Beat the eggs with the warm milk and pour the resulting mixture over the potatoes. Add the rest of the butter.
Cook in the oven for 45 minutes at medium temperature.
SAMOSAS
4 people – Preparation: 40 min.
Cooking time: 35 min.
Ingredients:
250 g puff pastry – 350 g beef – 1 onion – 2 eggs – Paprika – Powdered cinnamon and ginger – Parsley – Coriander –
Chervil – Sugar – 60 g butter – Olive oil
1. Fit the 4.7 mm screen to the mincer. Cut the onion in 8, then mince it with the mincer head. Heat 4 tablespoons of
olive oil in a frying pan, then add the onion. Allow it to sweat on a low heat without browning. Put to one side.
2. Mince the beef. Brown it on a low heat with the onion for 10 minutes. Put to one side.
3. Chop the herbs with the mincing head. Then add them to the frying pan with salt and pepper, half a teaspoon of
paprika, a pinch of ginger and a small teaspoon of cinnamon.
4. Next incorporate the beaten eggs, stir and remove from the heat.
5. Roll out the puff pastry quite thinly. Cut into 10 cm squares. Butter the edge of each square.
6. Put a little spoonful of stuffing on each square. Roll them up, pinching the ends.
7. Fry the samosas in boiling water. Once fried, leave them to stand for a little while on kitchen paper. Sprinkle them
with sugar and cinnamon. Serve very hot.
Variant:
Fit the 4.7 mm screen to the mincer. Mince a little meat. Cut the onion in 8, then mince it with the mincer head.
Add a little more meat, then the herbs, then the rest of the meat. Beat the eggs, and incorporate them into the
stuffing with salt and pepper, half a teaspoon of paprika, a pinch of ginger and a small teaspoon of cinnamon. Mix
well. Repeat steps 5 to 7.
LAHMA BI AJEEN
(stuffed focaccia)
4 people – Preparation: 20 min.
Cooking time: 45 min. – 1 h
Ingredients:
300 g pizza dough – 300 g beef or lamb – 4 ripe tomatoes –1 onion – 1 dried red pepper – Fresh tarragon, mint and
thyme – 1 lemon – Sugar – Milk – Olive oil
1. Mix the dough with a spoonful of oil and half a glass of milk, and form into a ball. Cover and leave to rise for
1 hour.
2. Fit the 4.7 mm screen to the mincer. Mince a little meat. Cut the onion in 8, then mince it with the mincer head.
Mince a little more meat, then the herbs, then the rest of the meat.
3. Heat 3 tablespoons of olive oil in a frying pan, then add the mixture. Incorporate the finely chopped tomatoes,
salt and pepper, and a teaspoon of sugar. Leave to cook for 10 minutes.
4. While stirring, add a small glass of water mixed with lemon juice.
5. Add the pepper. Cover and cook on a low heat for 20 minutes. Remove the lid and reduce for a little while.
Remove from the heat and leave to cool.
6. Preheat the oven to 220 °C (mark 6/7).
7. Cut four discs from the dough. Top with stuffing and fold.
8. Cook for 10 minutes in the oven. Serve immediately.
Variant:
Use tomato purée instead of fresh tomatoes.
7
Notice_2643049A:Mise en page 1 29/10/10 16:23 Page7
KIBBE BI LABAN
(kibbe meatballs with yoghurt)
6 people – Preparation: 1 h
Standing time: 1 hour in refrigerator
Ingredients for the kibbe:
400 g beef – 1 glass (180 g) of bulghur (cracked wheat) – Salt
Ingredients for the sauce: – 1 kg yoghurt – 1 bunch of coriander – 4 cloves of garlic –3 tablespoons of cornflour – Salt,
pepper
1. Cut the meat in 4 pieces. Fit the 4.7 mm screen to the mincer. Mince the meat, at the same time adding the bulghur.
Add salt, then leave the mixture to stand in the refrigerator for 1 hour.
2. To form the kibbe meatballs: fit the kibbe attachment to the meat mincer. Feed the mixture through the mincer,
closing the meatball by sealing the ends with a little water.
3. To prepare the sauce: wash the bunch of coriander, sponge it dry with kitchen paper and remove the leaves. Peel and
crush the garlic. Brown the garlic and coriander leaves in a frying pan for 1 to 2 minutes on low heat. Put to one
side.
4. Beat the yoghurt and cornflour together, then season. Pour the yoghurt and cornflour mix into a saucepan through
a fine sieve. Bring the mixture to the boil, then reduce the heat. Cook carefully, stirring so that the yoghurt does
not stick.
5. Add the garlic and coriander. Poach the kibbe meatballs for 10 minutes.
Variant:
You can also stuff the meatballs (with a mixture of onion and minced meat, browned in a little oil with a few pine nuts.)
PIROJKI
small fish pasties)
4 people – Preparation: 25 min.
Cooking time: 10 — 15 min.
Ingredients:
250 g puff pastry – 300 g cooked fish or smoked salmon – 2 hard boiled eggs – 1 bunch of dill – 2 onions –
100 g salted butter, in small cubes – Oil
1. Fit the 4.7 mm screen to the mincer. Cut the onions into 8 and mince them with the mincer head. Brown them on a
low heat in a frying pan with a little oil. Put to one side.
2. Mince a little fish, then the cooked onion, butter and dill, and finally the rest of the fish.
3. Roll out the puff pastry quite thinly, and cut out discs with a glass or small bowl of the desired size.
4. Preheat the oven to 210 °C (mark 6).
5. Place a little stuffing on each pastry disc and fold the pastry over, sealing the edges.
6. Cook for 10 to 15 minutes in the oven until golden brown.
Recipe:
N. B.: For the recipes requiring high power (approximately 500 W), the use time of the appliance must not
exceed 20 seconds.
Example recipe (with medium hole screen 4.7 mm A4a):
Lamb with split peas:
150 g lamb – 45 g split peas – 30 g flour –150 ml water –1 medium onion – 2 cloves of garlic – Salt, pepper
In a container mix the split peas and flour, then add the water gradually to obtain a smooth mixture. Start the
appliance and gradually pour the mixture onto the tray, while gently pushing the preparation into the feed tube with
the pusher C.
Cut the onion, garlic and meat into small pieces and add them to the mince.
Pour 800 ml water into a saucepan, season and add the preparation.
Simmer over a low heat for 1 hour, skim and cover.
8
Notice_2643049A:Mise en page 1 29/10/10 16:23 Page8
Оглавление
Аннотация для Мясорубки Moulinex HV 4 ME41513E в формате PDF
Топ 10 инструкций
Другие инструкции
Электрическая мясорубка Moulinex hv4
ОПИСАНИЕ
РЕКОМЕНДАЦИИ ПО ПРИМЕНЕНИЮ
Перед первым использованием вымойте все аксессуары в мыльной воде. Сразу после этого промойте их и тщательно высушите. Решетки и лезвие должны оставаться смазанными. Покройте эти части небольшим количеством растительного масла. Не включайте прибор, пока он пуст, если решетки не покрыты должным образом небольшим количеством растительного масла.. Никогда не проталкивайте пищу через носик пальцами или другими предметами. Не используйте прибор более 14 минут.
ГОЛОВКА ДЛЯ ИЗМЕЛЬЧЕНИЯ МЯСА
Подготовьте количество мяса, которое вы хотите измельчить, удалив все кости, хрящи и сухожилия. Мясо нарежьте кусочками (примерно 2 см х 2 см). Полностью разморозьте замороженные продукты перед измельчением.
Наконечник: В конце можно пропустить через головку мясорубки несколько кусочков хлеба, чтобы извлечь весь фарш.
ПРИНАДЛЕЖНОСТИ ДЛЯ КОЛБАС
Важнo
Эту насадку можно использовать только после измельчения мяса, добавления ароматизаторов и тщательного вымешивания. Замочив колбасные оболочки в теплой воде, чтобы они стали эластичными, наденьте их на воронку, оставив лишние 5 см (позже вы закроете отверстие, завязав узел ниткой). Сдвиньте узел до конца сопла, чтобы воздух не попал в корпус. Включите прибор, наполните мясорубку приготовленным продуктом и убедитесь, что оболочки заполнены должным образом.
Внимание
Эту работу легче всего выполнить вдвоем. Один будет подавать приготовленное мясо в машину, а другой будет удерживать сосиски по мере их наполнения. Сделайте колбаски любой длины, защипывая и переворачивая оболочку. Чтобы получить хорошую форму колбасы, следите за тем, чтобы во время наполнения внутри оболочек не оставался воздух, и делайте их длиной от 10 до 15 см (разделите колбаски, завязав между ними нитку и завязав узел). с этим).
КЕББЕ ПРИНАДЛЕЖНОСТИ
Практический совет: Чтобы сделать мелкий фарш для кеббе или кефты, пропустите мясо 2 или 3 раза через мясорубку, пока не получите желаемую консистенцию.
АКСЕССУАРЫ ДЛЯ ПЕЧЕНЬЯ
Приготовьте тесто. Для достижения наилучших результатов используйте мягкое тесто. Выберите дизайн, совместив его со стрелкой. Повторяйте процесс, пока не получите желаемое количество печенья.
ПРИНАДЛЕЖНОСТИ ДЛЯ СТЕЙКА
ПРИНАДЛЕЖНОСТЬ ДЛЯ ПРЕССОВАНИЯ ОВОЩ
ПРИНАДЛЕЖНОСТИ ДЛЯ КУЛИ
Используйте
Поместите емкость под желобком для сока (K5) для сбора сока и еще одну емкость на конце фильтра для сбора остатков. Если вы хотите приготовить соус или сок, обязательно используйте только свежие фрукты. В зависимости от сезона и качества ваших фруктов, мы рекомендуем вам пропустить мякоть во второй раз, чтобы получить максимально возможное количество соуса или сока.
- Сок: Используйте фильтр К3
- Кули: Используйте фильтр К4
РЕЗКА ДЛЯ ОВОЩЕЙ
- Используйте конус, указанный для каждого типа продуктов:
- См. график на рис. 10 Полезные советы для достижения наилучших результатов:
Ингредиенты, которые вы используете, должны быть твердыми, а овощи и фрукты должны быть свежими, чтобы получить удовлетворительные результаты и избежать накопления пищи в отделении. Не используйте прибор для натирания или нарезки слишком твердых пищевых продуктов, таких как кубики сахара или кусочки мяса.
ОЧИСТКА
Документы / Ресурсы
Рекомендации
Groupe SEB — LA reférence mondiale du Petit Equipement Domestique
-
Каталог
-
Профиль
-
Корзина
-
Избранное
-
Сравнение
- Manuals
- Brands
- Moulinex Manuals
- Meat Grinder
- hv4
- Owner’s manual
-
Bookmarks
Quick Links
Related Manuals for Moulinex hv4
Summary of Contents for Moulinex hv4
-
Page 4: Safety Recommendations
Thank you for having chosen an appliance from the Moulinex range. DESCRIPTION Steak Moulding System (SMS) Removable mincing head (according to model) Aluminium body see diagram Mould support Screw H2 Fish mould Self-sharpening stainless steel H3 Steak mould blade H4 Nuggets mould…
-
Page 5: Before Using For The First Time
BEFORE USING FOR THE FIRST TIME Wash all of the accessories and dry them carefully immediately. USING YOUR APPLIANCE Mincing head (A): Recipe: NB: For recipes that require a high power (500W approximately), the user time should Assembling the mincing head (diagram 1) not exceed 20 seconds.
-
Page 6
Biscuit nozzle (J) Sausage casings (information for UK only) (according to model): If your local butcher is unable to sell you sausage casings, we suggest contacting the Assembly (diagram 4): following suppliers: Put the screw A2 into the body A1 of the Ascott Smallholding Supplies Ltd mincing head. -
Page 7
IF YOUR APPLIANCE DOES NOT WORK Check the connection. If your appliance still does not work, for help and advice contact our Helpline (see list in the service booklet). 0845 602 1454 — UK (01) 461 0390 – Ireland or consult our website – www.moulinex.co.uk… -
Page 8
ACCESSORIES You can customise your appliance and purchase the following accessories from a Moulinex approved service centre: Coarse grating drum Citrus press Fine grating drum Steak Moulding System Parmesan drum KEBBE Accessory Ice drum Biscuit nozzle Small hole disc (3 mm) Sausage stuffer Medium hole disc (4.7 mm) -
Page 9
RECIPES LAHMA BI AJEEN BRIOUATS (Moroccean puff pastry (Stuffed Meat Focaccia) parcels filled with 4 Portions – Preparation: 20 min. + 1 hr minced beef) Cooking: 45 min. 4 Portions – Preparation: 40 min. Cooking: 35 min. Ingredients: 300 g pizza dough mix Ingredients: 300 g beef or lamb 250 g puff pastry… -
Page 10
KIBBE BI LABAN PIROJKI (Fish pasties) (Kebbe balls with yoghurt) Serves 4 – Preparation 25 min. – Cooking: 10 Serves 6 – Preparation 1 hr – Refrigeration: to 15 min. 1 hr Ingredients: Preparation of the kebbe mixture: 250 g puff pastry 400 g lean meat (lamb or beef) 300 g cooked fish or smoked salmon 1 glass (180 g) of bulghar wheat (crushed…
 30:46
30:46
Мясорубка MOULINEX HV8 ME626132.
 06:55
06:55
Мясорубка Moulinex.hv4 me4561.Обзор
 13:59
13:59
Обзор мясорубки Moulinex. Нарезка овощей . Такого обзора вы еще не видели
 09:38
09:38
Преимущества электромясорубки MOULINEX ME452839. Подробный обзор
 02:46
02:46
Мясорубка Moulinex hv4 краткий обзор
 03:47
03:47
Мясорубка мулинекс — тестирование. Moulinex HV4 ME452839
 09:47
09:47
Электромясорубка Moulinex HV8 тестируем дома
 06:17
06:17
Обзор электромяморубки Moulinex HV4 ME458139 и Moulinex HV8 ME622832
RUS UA BG LV LT EST PL BIH CZ SLO SK H RO HR SCG…
Мясорубки Moulinex
- Изображение
- Текст
RUS
UA
BG
LV
LT
EST
PL
BIH
CZ
SLO
SK
H
RO
HR
SCG

H
L
A
A5
A4b
A4a
A4c
A2
A3
H2
H4
H3
H5
H1
L3a
L3b
L3d
L3e
L2
G1
G2
I2
I1
J1
J2
K
G3
L1
L3c
C
D
A1
F
E
B

1
7
8
2
3
4
6
5
A
C
D
B
A
C
D
B
1
1
2
2
3
3

1
О
ОП
П И
ИС
СА
А Н
НИ
ИЕ
Е
Благодарим вас за то, что вы выбрали продукцию марки Moulinex
A
A
Съемная головка мясорубки
A
A1
1
Алюминиевый корпус
A
A2
2
Шнек
A
A3
3
Режущий нож из нержавеющей
стали с устройством самозаточки
A
A4
4
Решетки (в зависимости от модели)
A
A4
4a
a Pешетка с маленькими
отверстиями (3мм): для очень
мелко нарубленного фарша
A
A4
4b
b Pешетка со средними
отверстиями (4.7мм): для
мелко нарубленного фарша
A
A4
4c
c Pешетка с крупными
отверстиями (7.5мм): для
крупно нарубленного фарша
A
A5
5
Алюминиевая гайка
B
B
Съемный лоток
C
C
Толкатель для мяса
D
D
Отсек для аксессуаров
E
E
Переключатель вкл / выкл
F
F
Блок-мотор
G
G
Пресс для цитрусовых (в зависимости от
модели)
G
G1
1
полусфера с фильтром
G
G2
2
привод пресса для цитрусовых
G
G3
3
сокосборник
H
H
Система Steak Moulding System
(в зависимости от модели)
H
H1
1
подставка для формы
H
H2
2
форма для рыбы
H
H3
3
форма для бифштексов
H
H4
4
форма для наггетсов
H
H5
5
емкость для сбора жидкости
II
Насадка для кеббе (в зависимости от
модели)
II1
1
Наконечник насадки
II2
2
кольцо
J
J
Насадка для приготовления печенья (в
зависимости от модели)
J
J1
1
подставка
J
J2
2
форма
K
K
Воронка для колбас (в зависимости от
модели)
LL
Овощерезка (в зависимости от модели)
LL1
1
держатель
LL2
2
толкатель
LL3
3
терки-барабаны (в зависимости
от модели)
LL3
3a
a барабан для нарезания на
ломтики
LL3
3b
b барабан с крупной теркой
LL3
3c
c барабан с мелкой теркой
LL3
3d
d барабан с теркой для
твердого сыра
LL3
3e
e барабан для измельчения льда
С
СО
ОВ
ВЕ
Е Т
Т Ы
Ы П
П О
О Б
Б Е
Е З
З О
ОП
ПА
А С
СН
НО
ОС
СТ
Т И
И
—
— В
Вн
ни
им
м а
ат
те
ел
л ь
ьн
но
о п
пр
ро
оч
чи
ит
та
ай
йт
те
е и
ин
нс
ст
тр
ру
ук
кц
ци
ию
ю
п
пе
ер
ре
ед
д п
пе
ер
рв
вы
ым
м и
ис
сп
по
ол
ль
ьз
зо
ов
ва
ан
ни
ие
ем
м
м
м я
яс
со
ор
ру
уб
бк
ки
и;; н
не
ес
со
об
бл
лю
ю д
д е
ен
ни
ие
е и
ин
нс
ст
тр
ру
ук
к ц
ци
ии
и
п
пр
ри
и и
ис
сп
по
ол
ль
ьз
зо
ов
ва
ан
ни
ии
и э
эл
ле
ек
к т
тр
ро
оп
пр
ри
иб
бо
ор
ра
а
с
сн
ни
им
ма
ае
ет
т с
с ф
фи
ир
рм
м ы
ы M
M o
ou
ulliin
ne
ex
x в
вс
ся
як
к у
ую
ю
о
от
тв
ве
ет
тс
ст
тв
ве
ен
нн
но
ос
ст
ть
ь..
—
— Э
Эт
то
от
т п
пр
ри
иб
бо
ор
р н
не
е п
пр
ре
ед
д н
на
аз
зн
на
ач
ч е
ен
н д
д л
ля
я
и
ис
сп
по
ол
ль
ьз
зо
ов
ва
ан
ни
ия
я л
лю
ю д
дь
ьм
м и
и с
с о
ог
гр
ра
ан
ни
ич
че
ен
нн
ны
ы м
ми
и
ф
ф и
из
зи
ич
че
е с
ск
ки
им
ми
и,, с
се
ен
нс
со
ор
рн
ны
ы м
м и
и и
и у
ум
м с
ст
тв
ве
ен
нн
ны
ы м
ми
и
с
сп
по
ос
со
об
бн
но
ос
ст
тя
ям
м и
и ((в
в т
то
ом
м ч
ч и
ис
сл
ле
е д
д е
ет
ть
ьм
м и
и)) и
ил
ли
и
л
л ю
юд
д ь
ьм
м и
и,, н
не
е и
им
м е
ею
ю щ
щ и
им
м и
и с
со
оо
от
тв
ве
ет
тс
ст
тв
ву
ую
ю щ
щ е
ег
го
о
о
оп
пы
ыт
та
а и
ил
ли
и н
не
ео
об
бх
хо
од
д и
им
м ы
ых
х з
зн
на
ан
ни
ий
й.. О
Он
ни
и м
мо
ог
гу
ут
т
п
по
ол
ль
ьз
зо
ов
ва
ат
ть
ьс
ся
я д
д а
ан
нн
ны
ы м
м у
ус
ст
тр
ро
ой
йс
ст
тв
во
ом
м т
то
ол
ль
ьк
ко
о
п
по
од
д н
на
аб
бл
лю
ю д
де
е н
ни
ие
ем
м л
л и
иц
ц,, о
от
тв
ве
еч
ч а
аю
ю щ
щ и
их
х з
за
а и
их
х
б
бе
ез
зо
оп
па
ас
сн
но
ос
ст
ть
ь,, и
ил
л и
и п
по
ос
сл
л е
е п
по
ол
л у
уч
че
ен
ни
ия
я о
от
т н
ни
их
х
и
ин
нс
ст
тр
ру
ук
кц
ци
ий
й п
по
о е
ег
го
о э
эк
кс
сп
пл
лу
уа
ат
та
ац
ци
ии
и..
—
— Т
Тр
ре
еб
бу
уе
ет
тс
ся
я с
сл
л е
ед
д и
ит
ть
ь з
за
а д
д е
ет
ть
ьм
м и
и,, ч
ч т
то
об
бы
ы о
он
ни
и н
не
е
и
иг
гр
ра
ал
ли
и с
с п
пр
ри
иб
бо
ор
ро
ом
м ..
— Убедитесь, что напряжение питания
электроприбора соответствует напряжению
в электросети.
—
— Л
Л ю
ю б
бо
ое
е н
не
ев
ве
ер
рн
но
ое
е п
по
од
дк
к л
лю
ю ч
че
ен
ни
ие
е в
вл
ле
еч
ч е
ет
т з
з а
а
с
со
об
бо
ой
й а
ан
нн
ну
ул
ли
ир
ро
ов
ва
ан
ни
ие
е г
га
ар
ра
ан
нт
ти
ии
и..
RUS
— Данный электроприбор предназначен
исключительно для домашне го приг
отовления пищи и должен использоваться в
помещении, под постоянным наблюдением.
— Электроприбор должен быть установлен на
ровной, чистой и сухой поверхности.
— Длинные волосы, шарфы и галстуки никогда
не должны нависать над работающим
устройством.
— Следует выключать устройство из сети сразу
по окончании работы, а также перед чисткой,
установкой или заменой деталей.
— Не следует пользоваться электроприбором,
если он работает неправильно или был
поврежден. В этом случае обратитесь в один
из уполномоченных сервисных центров
Moulinex (см. список в гарантийной книжке).
— Любое вмешательство, кроме чистки и
обычного ухода, должно осуществляться в
уполномоченном сервисном центре Moulinex.
— Не пользуйтесь электроприбором в случае
повреждения шнура. Во избежание
опасности, замените шнур в одном из

2
П
ПЕ
Е Р
Р Е
Е Д
Д П
ПЕ
Е Р
Р В
В Ы
Ы М
М И
ИС
СП
ПО
ОЛ
Л Ь
Ь З
З О
О В
ВА
А Н
НИ
ИЕ
Е М
М
Вымойте все принадлежности и сразу же тщательно высушите их.
Н
НА
А Ч
Ч А
А Л
Л О
О Э
Э К
К С
СП
ПЛ
Л У
У А
А Т
Т А
А Ц
Ц И
ИИ
И
Г
Го
ол
л о
ов
вк
ка
а м
м я
яс
со
ор
ру
уб
бк
ки
и
(
(A
A)
)::
У
Ус
ст
та
ан
но
ов
вк
ка
а г
го
ол
ло
ов
вк
ки
и м
м я
яс
со
ор
ру
уб
бк
ки
и
(
(с
сх
хе
ем
ма
а 1
1 )
)::
Возьмите корпус (
(A
A1
1 )
) за загрузочную трубу;
широким концом вверх.
Затем вставьте шнек A
A2
2 (длинной осью
вперед) в корпус A
A1
1 ;
Поместите режущий нож из нержавеющей
стали A
A3
3 на короткую ось, выступающую из
шнека A
A2
2, при этом режущие кромки должны
быть направлены наружу. Поместите
выбранную вами решетку на нож A
A3
3 таким
образом, чтобы два выступа на решетке
совместились с двумя пазами на корпусе A
A1
1 .
До конца (однако не блокируя шнек) закрутите
гайку A
A5
5.
У
Ус
ст
та
ан
но
ов
вк
ка
а г
го
ол
ло
ов
вк
ки
и м
м я
яс
со
ор
ру
уб
бк
ки
и н
на
а
б
бл
ло
ок
к-
-м
м о
от
то
ор
р
(
(с
с х
хе
ем
м а
а 2
2 )
)::
Приблизьте головку мясорубки (загрузочная
труба должна быть наклонена вправо) к
блок-мотору F
F, выключенному из сети.
Совместите байонетные соединения на
головке мясорубки с двумя пазами на
блок-моторе.
Вставьте головку мясорубки в блок-мотор F
F и
до упора поверните загрузочную трубу налево
(она должна принять вертикальное
положение).
Установите cъемный лоток B
B на
соответствующие крепления головки
мясорубки. Подключите электроприбор к
сети, он готов к работе.
И
Ис
сп
по
ол
ль
ьз
зо
ов
ва
ан
ни
ие
е::
Приготовьте необходимое количество
продуктов для измельчения, удалите кости,
хрящи и жилы. Порежьте мясо на кусочки
(приблизительно 2 на 2 см.).
Поместите емкость для фарша под головкой
мясорубки. Включите электроприбор,
установив переключатель E
E в позицию 1,
положите кусочки мяса в лоток и с помощью
толкателя C
C протолкните их в загрузочную
трубу.
Никогда не подталкивайте мясо в загрузочную
трубу пальцами или какими-либо предметами.
Не используйте электроприбор больше
14 минут подряд.
Если вы хотите приготовить очень мелко
нарубленный фарш (с помощью решетки A4a),
необходимо предварительно измельчить
мясо, используя решетку A
A4
4c
c. Несоблюдение
этого правила может привести к поломке
электроприбора.
П
По
ол
ле
ез
зн
ны
ы й
й с
со
ов
ве
ет
т
:: з
за
ак
ко
он
нч
чи
ив
в и
из
зм
м е
ел
ль
ьч
че
ен
ни
ие
е
м
м я
яс
са
а,, в
вы
ы м
мо
ож
ж е
ет
те
е п
пр
ро
ок
к р
ру
ут
ти
ит
ть
ь ч
че
ер
ре
ез
з
м
м я
яс
со
ор
ру
уб
бк
ку
у н
не
ес
ск
к о
ол
ль
ьк
к о
о к
к у
ус
со
оч
чк
к о
ов
в х
х л
ле
еб
ба
а,,
ч
чт
то
об
бы
ы с
со
об
бр
ра
ат
ть
ь о
ос
ст
та
ат
тк
ки
и ф
ф а
ар
рш
ш а
а..
Р
Ре
ец
це
еп
пт
т::
В
Вн
ни
им
ма
ан
ни
ие
е: Д
Дл
ля
я р
ре
ец
це
еп
пт
то
ов
в,, т
тр
ре
еб
бу
ую
ю щ
щ и
их
х
п
по
ов
вы
ы ш
ш е
ен
нн
но
ой
й м
м о
ощ
щ н
но
ос
ст
ти
и (
(п
пр
ри
им
м е
ер
рн
но
о 5
5 0
0 0
0
В
Вт
т)
),, в
вр
ре
ем
м я
я и
ис
сп
по
ол
л ь
ьз
зо
ов
ва
ан
ни
ия
я э
эл
л е
ек
кт
тр
ро
оп
пр
ри
иб
бо
ор
ра
а
н
не
е д
д о
ол
лж
ж н
но
о п
пр
ре
ев
вы
ыш
ш а
ат
ть
ь 2
20
0 с
се
ек
ку
ун
нд
д..
П
Пр
ри
им
м е
ер
р р
ре
ец
це
еп
пт
та
а
(
(д
дл
ля
я р
ре
еш
ш е
ет
тк
ки
и с
с
о
от
тв
ве
ер
рс
ст
ти
ия
ям
м и
и 4
4..7
7 м
мм
м А
А4
4b
b)
)::
Б
Ба
ар
ра
ан
ни
ин
на
а с
с с
су
ух
хи
им
м г
го
ор
ро
ох
хо
ом
м::
150 г. баранины, 45 г. гороха, 30 г. муки, 15 г.
воды, 1 средняя луковица, 2 зубчика чеснока,
соль и перец.
В емкости смешать сухой горох с мукой,
потом постепенно влить воду до получения
однородной массы. Поместить толкатель С
С в
загрузочную трубу и включить электроприбор.
Постепенно вливать смесь в лоток, используя
толкатель для заполнения загрузочной трубы.
Мелко порезать лук, чеснок и мясо и добавить
их к полученной смеси.
— Держите шнур питания в недоступном для
детей месте.
— Шнур питания ни в коем случае не должен
находиться вблизи нагретых поверхностей,
источников тепла или острых углов, а также
соприкасаться с ними.
— Для вашей безопасности пользуйтесь только
запчастями Moulinex, предназначенными для
данного электроприбора.
уполномоченных сервисных центров
Moulinex (см. список в гарантийной книжке).
— Не погружайте электроприбор,
электрический шнур или штепсель в воду
или любую другую жидкость.
— Держите шнур питания в недоступном для
детей месте.

Оов во ощ щ е ер ре ез зк ка а, Ii) ), J j ) )
K k) ), L l) ), G g) )
- Изображение
- Текст
3
Налить в кастрюлю 0,8 литра воды, посолить,
поперчить и добавить полученную смесь.
Варить на медленном огне в течение часа,
накрыв крышкой после снятия пены.
В
Ва
ас
са
ад
д к
ка
а д
дл
л я
я к
ке
еб
бб
бе
е
(
(II)
)
(
(в
в з
за
а в
ви
ис
си
им
м о
ос
ст
ти
и о
от
т м
м о
од
д е
ел
ли
и)
)::
У
Ус
ст
та
ан
но
ов
вк
ка
а
(
(с
сх
х е
ем
м а
а 3
3 )
)::
Поместите шнек A
A2
2 в корпус A
A1
1 головки
мясорубки.
Установите наконечник насадки I1 таким
образом, чтобы выступы совместились с
пазами на корпусе A
A1
1 ..
Поместите кольцо II2
2 на наконечник насадки,
потом закрутите гайку A
A5
5 до конца.
Установите собранную головку на блок-мотор,
как указано на с
сх
х е
ем
м е
е 2
2 ..
В
Вн
ни
им
м а
ан
ни
ие
е:: э
эт
та
а н
на
ас
са
а д
дк
к а
а н
не
е т
тр
ре
еб
бу
уе
ет
т н
ни
и
р
ре
еш
ш е
ет
тк
к и
и,, н
ни
и н
но
ож
ж а
а..
В
Ва
ас
са
ад
д к
ка
а д
дл
л я
я п
пр
ри
иг
го
от
то
ов
вл
л е
ен
ни
ия
я
п
пе
еч
че
ен
нь
ья
я
(
(J
J )
)
(
(в
в з
за
ав
ви
ис
си
им
м о
ос
ст
ти
и о
от
т м
м о
од
де
ел
л и
и)
)::
У
Ус
ст
та
ан
но
ов
вк
ка
а
(
(с
сх
х е
ем
м а
а 4
4)
):
Поместите шнек A
A2
2 в корпус A
A1
1 головки
мясорубки.
Поместите форму J
J2
2 на подставку J
J 1
1 и
установите их на головке мясорубки; далее
совместите выступы с пазами на корпусе A
A1
1 ,
после чего до конца закрутите гайку A
A5
5.
Установите собранную головку на блок-мотор
F
F, как указано на с
сх
хе
ем
м е
е 2
2..
В
Вн
ни
им
м а
ан
ни
ие
е:: п
пр
ри
и и
ис
с п
по
ол
ль
ьз
зо
ов
ва
ан
ни
ии
и э
эт
то
ой
й
н
на
ас
са
ад
дк
к и
и н
не
е т
тр
ре
еб
бу
уе
ет
тс
ся
я н
ни
и р
ре
еш
ш е
ет
тк
к а
а,, н
ни
и н
но
ож
ж ..
И
Ис
сп
по
ол
ль
ьз
зо
ов
ва
ан
ни
ие
е::
— Приготовьте тесто (вы получите лучший
результат, если тесто будет не слишком
крутым).
— Выберите рисунок, совмещая стрелку с
выбранной формой.
— Включите аппарат и загрузите в него тесто.
В
Во
ор
ро
он
нк
ка
а д
д л
л я
я к
ко
ол
лб
ба
ас
с
(
(K
K)
)
(
(в
в з
за
а в
ви
ис
си
им
м о
ос
ст
ти
и о
от
т м
м о
од
д е
ел
ли
и)
)::
Эта насадка, монтирующаяся на головку
мясорубки, позволит вам изготавливать
любые колбасы, приправленные по вашему
вкусу.
У
Ус
ст
та
ан
но
ов
вк
ка
а::
Поместите шнек A
A2
2 в корпус A
A1
1 головки
мясорубки А
А. Установите воронку K
K и до конца
закрутите гайку A
A5
5. Установите собранную
головку на блок-мотор F
F, как указано на схеме
2
2 A
A.
В
Вн
ни
им
м а
ан
ни
ие
е:: п
пр
ри
и и
ис
с п
по
ол
ль
ьз
зо
ов
ва
ан
ни
ии
и э
эт
то
ой
й
н
на
ас
са
а д
дк
к и
и н
не
е т
тр
ре
еб
бу
уе
ет
тс
ся
я н
ни
и р
ре
еш
ш е
ет
тк
ка
а ,, н
ни
и н
но
ож
ж ..
И
Ис
сп
по
ол
л ь
ьз
зо
ов
ва
ан
ни
ие
е::
В
Ва
а ж
ж н
но
о:: эту насадку можно использовать
только после предварительного измельчения
мяса, в которое надо добавить приправы и как
следует перемешать.
Размочите в воде колбасную оболочку для
придания ей эластичности, после чего
наденьте ее на воронку для колбас K
K,, оставив
свободными примерно 5 см (этот конец надо
завязать узлом). Включите электроприбор,
заполняйте мясорубку фаршем и подавайте
колбасную оболочку по мере ее заполнения.
В
Вн
ни
им
ма
а н
ни
ие
е:: э
э т
ту
у р
ра
аб
бо
от
ту
у п
пр
ро
ощ
щ е
е в
вы
ып
по
ол
лн
ня
ят
ть
ь
в
вд
дв
во
ое
ем
м :: о
од
д и
ин
н ч
ч е
ел
ло
ов
ве
ек
к с
сл
ле
ед
д и
ит
т з
за
а п
по
од
д а
ач
ч е
ей
й
ф
ф а
ар
рш
ш а
а,, д
др
ру
уг
го
ой
й –
– з
за
а н
на
ап
по
ол
л н
не
ен
ни
ие
ем
м
о
об
бо
ол
ло
оч
ч к
ки
и.
Когда колбаска достигнет нужной длины,
зажмите оболочку пальцами и поверните
вокруг оси.
Для достижения лучшего качества
постарайтесь не допускать попадания воздуха
в оболочку во время ее наполнения; следите,
чтобы длина колбас составляла 10 – 15 см
(отделяйте их одну от другой с помощью нити,
дополнительно завязывая на узел).
О
Ов
во
ощ
щ е
ер
ре
ез
зк
ка
а
(
(L
L)
)
(
(в
в з
за
ав
ви
ис
си
им
м о
ос
ст
ти
и о
от
т м
мо
од
де
ел
ли
и)
)
У
Ус
ст
та
ан
но
ов
вк
ка
а
(
(с
сх
хе
ем
м а
а 6
6 )
)::
Приблизьте держатель L
L1
1 , наклоненный
вправо, к блок-мотору, выключенному из сети;
совместите выступы на держателе с пазами на
блок-моторе F
F. Вставьте штифт держателя L
L1
1
в ось блок-мотора F
F. Поверните загрузочную
трубу держателя L
L1
1 до упора налево.
Возьмите выбранный барабан L
L3
3 и вставьте
его в держатель L
L1
1 , слегка поворачивая, чтобы
он до конца вошел в паз.
И
Ис
сп
по
ол
л ь
ьз
зо
ов
ва
ан
ни
ие
е::
Приготовьте необходимые продукты (они
должны быть вымыты и, при необходимости,
нарезаны, чтобы войти в загрузочную трубу).
Подключите электроприбор к сети и включите
его. Поместите продукты в загрузочную трубу
держателя L
L1
1 и равномерно направляйте их,
при необходимости используя толкатель L
L2
2.
Никогда не используйте вместо толкателя
пальцы или какие-либо предметы.
Не кладите пальцы в барабан во время работы.
П
Пр
ре
ес
сс
с д
д л
л я
я ц
ци
ит
тр
ру
ус
со
ов
вы
ы х
х
(
(G
G)
)
(
(в
в з
за
ав
ви
ис
си
им
м о
ос
ст
ти
и о
от
т м
мо
од
де
ел
ли
и)
)::

Чтобы использовать пресс для цитрусовых, поверните блок…
Страница 7
- Изображение
- Текст
4
Чтобы использовать пресс для цитрусовых,
поверните блок-мотор, как указано на с
сх
хе
ем
ме
е 7
7.
У
Ус
ст
та
ан
но
ов
вк
ка
а
(
(с
сх
хе
ем
м а
а 7
7)
)::
Сначала поместите сокосборник G
G3
3 на
блок-мотор F
F, совместив выступы на
сокосборнике с пазами на блок-моторе F
F, и
поверните сокосборник до упора.
Присоедините привод G
G2
2, вставив его ось в
ось блок-мотора F
F.
Поместите полусферу с фильтром G
G 1
1 на
привод G
G 2
2..
Цитрусовые следует разрезать на две части
поперек. Поместите какую-либо емкость под
носиком сокосборника G
G 3
3, чтобы собирать
сок. Включите электроприбор, возьмите
половинки фруктов, поместите на полусферу
для выжимания сока и надавите.
С
Си
ис
ст
те
ем
ма
а S
Stte
ea
ak
k M
Mo
ou
ulld
diin
ng
g S
Sy
ys
stte
em
ms
s
и
ил
ли
и
(
(H
H)
)
(
(в
в з
за
ав
ви
ис
си
им
мо
ос
ст
ти
и о
от
т м
мо
од
де
ел
ли
и)
):
У
Ус
ст
та
ан
но
ов
вк
ка
а::
Установка головки мясорубки (
(с
сх
х е
ем
ма
а 1
1 )
)::
Соберите мясорубку для измельчения мяса
(
(с
сх
х е
ем
ма
а 1
1 )
) и выберите решетку.
У
Ус
ст
та
ан
но
ов
вк
ка
а
(
(с
сх
х е
ем
м а
а 8
)::
Вставьте подставку для формы H
H1
1 в головку
мясорубки A
A.
Чтобы открыть отверстие подставки для
формы H1, поднимите язычок, и весь узел
откинется.
Вставьте форму по вашему выбору (
(H
H2
2 и
ил
ли
и
H
H3
3 и
ил
л и
и H
H4
4)
)..
Закройте узел и хорошо закрепите его на
подставке H
H1
1.
Поместите сокосборник под отверстием
подставки H
H1
1.
Подключите электроприбор к сети и включите
его. Кладите в лоток мясо для измельчения
(предварительно его следует порезать на
кусочки 2 на 2 см). Когда вы увидите, что
форма заполнилась,
выключите электроприбор. Если форма
переполнится, отверстие подставки для
формы H
H1
1 откроется автоматически,
сигнализируя переполнении и во избежание
риска поломки.
Чтобы извлечь бифштекс, поднимите язычок,
тогда узел откинется, и вы сможете взять
форму за ручки.
Поместите заполненную форму на тарелку.
Чтобы извлечь продукт, необходимо
раздвинуть ручки.
Снова поставьте форму в подставку, чтобы
сделать новый бифштекс.
О
ОЧ
ЧИ
ИС
СТ
ТК
КА
А
Перед очисткой выключите прибор.
Поверните головку мясорубки A направо и
потяните на себя, чтобы отсоединить ее от
блок-мотора F
F.
Чтобы разобрать головку мясорубки A,
снимите толкатель С
С и лоток B
B, открутите
гайку A
A5
5, снимите решетку A
A4
4, нож A
A3
3 и шнек
A
A2
2. Следует осторожно обращаться с
режущими частями.
Вымойте все детали в горячей мыльной воде,
сполосните и тщательно высушите.
Категорически не допускается попадание
влаги в блок-мотор F
F. Его следует протирать
слегка влажной тканью.
Не мойте головку мясорубки A
A (то есть корпус
A
A1
1, шнек A
A2
2, гайку A
A5
5, нож A
A3
3, и решетки A
A4
4)
в посудомоечной машине.
Е
Е С
СЛ
Л И
И В
ВА
А Ш
Ш Э
Э Л
Л Е
ЕК
К Т
Т Р
Р О
ОП
ПР
Р И
ИБ
Б О
ОР
Р Н
НЕ
Е Р
Р А
А Б
Б О
ОТ
Т А
А Е
Е Т
Т
Убедитесь в том, что прибор подключен к электросети.
Если электроприбор все равно не работает, обратитесь в один из уполномоченных сервисных
центров Moulinex (см. список в гарантийной книжке).

Рре ец це еп пт ты ы б бр ри иу уа ат т, Лл а ах х м ма а б би и а аж жи ин н
Страница 8
- Изображение
- Текст
5
Р
РЕ
ЕЦ
ЦЕ
ЕП
ПТ
ТЫ
Ы
Б
БР
РИ
ИУ
УА
АТ
Т
(
(м
ма
а р
ро
ок
кк
к а
ан
нс
ск
ки
ие
е п
пи
ир
ро
ож
жк
к и
и)
)
4 порции – Подготовка: 40 мин. –
Приготовление: 35 мин.
И
Ин
нг
гр
ре
ед
д и
ие
ен
нт
ты
ы::
250 г слоеного теста
350 г говядины
1 луковица
2 яйца
паприка, молотая корица & имбирь
петрушка, кориандр и кервель
сахар
60 г сливочного масла
оливковое масло
1
1 .. Установить на мясорубку решетку 4.7.
Разрезать луковицу на 8 частей, затем
пропустить через мясорубку. Разогреть в
сотейнике 4 столовые ложки оливкового
масла, добавить лук. Припустить на
небольшом огне, не дожидаясь, пока лук
приобретет золотистый оттенок. Отложить.
2
2 .. Измельчить мясо в мясорубке. Обжарить на
небольшом огне вместе с луком в течение
10 минут. Отложить.
3
3 .. Пропустить зелень через мясорубку.
Выложить в сотейник, добавить соль и
перец, пол-чайной ложки паприки, щепотку
имбиря и небольшую ложку корицы.
4
4.. Добавить взбитые яйца, перемешать,
выключить огонь.
5
5 .. Тонко раскатать слоеное тесто. Нарезать на
квадратики 10х10 см. Смазать маслом
противень.
6
6 .. Положить на каждый квадратик небольшую
ложку фарша. После этого свернуть тесто,
залепив края.
7
7 .. Зажарить пирожки-бриуаты в кипящем
масле. Готовые пирожки положить
ненадолго на впитывающую бумагу, чтобы
убрать излишки жира.
Посыпать сахаром и корицей. Подавать
очень горячими.
В
Ва
ар
ри
иа
ан
нт
т:: Установить на мясорубку решетку
4.7. Разрезать луковицу на 8 частей.
Измельчить немного мяса, затем пропустить
через мясорубку лук. Измельчить еще немного
мяса, затем зелень, и, наконец, — оставшееся
мясо.
Взбить яйца и добавить их в фарш вместе с
солью и перцем, половиной чайной ложки
паприки, щепоткой имбиря и небольшой
ложкой корицы. Все перемешать. Далее — как
в пунктах 5-7.
Л
Л А
АХ
Х М
МА
А Б
БИ
И А
АЖ
ЖИ
ИН
Н
(
(ф
фа
а р
рш
ш и
ир
ро
ов
ва
а н
нн
ны
ы е
е м
м у
уч
чн
ны
ы е
е
л
ле
еп
пе
еш
ш к
к и
и)
)
4 порции – Подготовка: 20 мин. + 1 час –
Приготовление: 45 мин.
Ингредиенты:
300 г теста для пиццы
300 г говядины или баранины
4 зрелых томатов
1 луковица
1 сухой красный перчик
свежий эстрагон, мята и тимьян
1 лимон
сахар
молоко
оливковое масло
1
1 .. Добавить в тесто ложку растительного
масла и полстакана молока, перемешать,
скатать шар. Накрыть и оставить на 1 час,
чтобы тесто поднялось.
2
2 .. Установить на мясорубку решетку 4.7.
Разрезать луковицу на 8 частей.
Измельчить в мясорубке немного мяса,
затем пропустить через мясорубку лук.
Измельчить еще немного мяса, затем
зелень и, наконец, измельчить оставшееся
мясо.
3
3 .. В сотейнике подогреть на небольшом огне
3 столовые ложки растительного масла,
затем выложить туда полученную смесь.
Добавить мелко нарезанные томаты, соль и
перец, а также чайную ложку сахара.
Готовить в течение 10 минут.
4
4.. Влить, помешивая, небольшой стакан воды
с лимоном.
5
5 .. Добавить стручковый перец. Накрыть
крышкой и готовить на небольшом огне в
течение 20 минут. Снять крышку и
уваривать еще некоторое время. Снять с
огня и остудить.
6
6 .. Разогреть духовку до 220°C (термостат
6/7).
7
7 .. Раскатать из теста четыре лепешки.
Начинить фаршем и сложить, залепив края.
8
8 .. Печь в духовке в течение 10 минут.
Немедленно подавать на стол.
В
Ва
ар
ри
иа
ан
нт
т:: в
вм
м е
ес
ст
то
о с
св
ве
еж
ж и
их
х т
то
ом
м а
ат
то
ов
в м
м о
ож
ж н
но
о
и
ис
сп
по
ол
ль
ьз
зо
ов
ва
ат
ть
ь т
то
ом
ма
ат
тн
ну
ую
ю п
па
ас
ст
ту
у.

6
К
КЕ
ЕБ
ББ
БЕ
Е Б
БИ
И Л
Л А
АБ
БА
АН
Н
(
(л
л и
ив
ва
ан
нс
ск
к и
ие
е м
м я
яс
сн
ны
ые
е
ш
ш а
ар
ри
ик
ки
и-
-к
к е
еб
бб
бе
е с
с й
йо
ог
гу
ур
рт
то
ом
м )
)
6 порций – Подготовка 1 час –
Охлаждение: 1 час
Ф
Фа
ар
рш
ш ::
400 г мяса
1 стакан (180 г) дробленой пшеницы
соль
С
Со
оу
ус
с::
1 кг йогурта
1 пучок кориандра
4 зубчика чеснока
3 ч.л. кукурузного крахмала
соль, перец
1
1 .. Разрезать мясо на 4 куска. Установить на
мясорубку решетку 4.7. Измельчить мясо,
постепенно добавляя дробленую пшеницу.
Посолить, затем на 1 час поставить в
холод.
2
2.. Придание формы мясным шарикам-кеббе:
установить на мясорубку насадку для
кеббе. Заложить фарш и сформировать
шарики, залепив края, предварительно
смоченные водой.
3
3.. Приготовление соуса: вымыть пучок
кориандра, промокнуть впитывающей
бумагой и отделить листья. Очистить
чеснок, раздавить зубчики. Обжарить
чеснок и кориандр в сковороде на
небольшом огне в течение 1-2 минут.
Отложить.
4
4.. Взбить вместе йогурт и кукурузного
крахмала, добавить соль и перец. Через
мелкое сито вылить полученную смесь в
кастрюлю. Довести до кипения на
небольшом огне. Следить за варкой,
помешивая, чтобы йогурт не приставал к
стенкам.
5
5.. Добавить чеснок и кориандр. Опустить
кеббе в кипящую воду и варить 10 минут.
В
Ва
ар
ри
иа
ан
нт
т:: кеббе можно фаршировать
(смесью лука и рубленого мяса,
предварительно обжаренного в небольшом
количестве растительного масла с горсткой
кедровых орешков).
Р
РА
АС
СС
СТ
ТЕ
ЕР
РГ
ГА
АИ
И
(
(п
пи
ир
ро
ож
ж к
к и
и с
с р
ры
ыб
бо
ой
й)
)
4 порции – Подготовка: 25 мин. –
Приготовление: 10-15 мин.
И
Ин
нг
гр
ре
ед
ди
ие
ен
нт
ты
ы::
250 г слоеного теста
300 г вареной рыбы или копченого лосося
2 крутых яйца
1 пучок укропа
2 луковицы
100 г соленого сливочного масла
(небольшими кусочками)
растительное масло
1
1 .. Установить на мясорубку решетку 4.7.
Разрезать луковицу на 8 частей и
пропустить через мясорубку. Поджарить в
сотейнике на медленном огне в небольшом
количестве масла. Отложить.
2
2 .. Измельчить немного рыбы, затем
пропустить через мясорубку жареный лук,
сливочное масло, укроп, и, наконец,
измельчить остальную рыбу.
3
3 .. Достаточно тонко раскатать слоеное тесто,
с помощью стакана или пиалы вырезать из
него более или менее большие круги.
4
4.. Разогреть духовку до 210°C (термостат 6).
5
5 .. Начинить каждый круг небольшим
количеством фарша, сложить и залепить
края.
6
6 .. Выпекать в духовке 10-15 минут до
золотистого цвета.

7
О
ОП
ПИ
ИС
С
Дякуємо за вибiр приладу з асортименту фiрми “Мулiнекс”.
A
A
Знiмна головка м’ясорубки
A
A1
1
Алюмiнiєвий корпус
A
A2
2
Гвинт
A
A3
3
Самозагострювальний нiж з
нержавiючої сталi
A
A4
4
Сiточки – залежно вiд моделi
A
A4
4a
a сiточка з малими отворами
(3 мм) для дуже тонкого
помелу
A
A4
4b
b сiточка з середнiми
отворами (4,7 мм) для
тонкого помелу
A
A4
4c
c сiточка з великими отворами
(7,5 мм) для грубого помелу
A
A5
5
Алюмiнiєва гайка
B
B
Знiмний пiддон
C
C
Штовхач для м’яса
D
D
Кришка мiсця для зберiгання приладдя
E
E
Кнопка ввiмкнення/вимкнення
F
F
Блок двигуна
G
G
Прес для цитрусових (залежно вiд
моделi)
G
G1
1
конус фiльтра
G
G2
2
привод пресу для цитрусових
G
G3
3
збiрник
H
H
Система формування стейкiв (залежно вiд
моделi)
H
H1
1
тримач форм
H
H2
2
форма у виглядi риби
H
H3
3
овальна форма
H
H4
4
форма для нагетiв
H
H5
5
збiрник соку
II
Приладдя для КЕБАБУ (залежно вiд
моделi)
II1
1
насадка
II2
2
кiльце
J
J
Насадка для печива (залежно вiд моделi)
J
J1
1
тримач
J
J2
2
форма
K
K
Конус для ковбас (залежно вiд моделi)
LL
Овочерiзка (залежно вiд моделi)
LL1
1
бункер
LL2
2
штовхач
LL3
3
барабани (залежно вiд моделi)
LL3
3a
a барабан для нарiзання
LL3
3b
b барабан для грубого натирання
LL3
3c
c барабан для тонкого натирання
LL3
3d
d барабан для сиру пармезан
LL3
3e
e барабан для льоду
П
ПО
ОР
Р А
А Д
Д И
И З
З Т
Т Е
Е Х
Х Н
НІІ К
К И
И Б
Б Е
Е З
З П
ПЕ
Е К
К И
И
—
— П
Пе
ер
ре
ед
д п
пе
ер
рш
ш и
им
м в
ви
ик
ко
ор
ри
ис
ст
та
ан
нн
ня
ям
м в
ва
аш
ш о
ог
го
о
п
пр
ри
ил
ла
ад
ду
у у
ув
ва
аж
ж н
но
о п
пр
ро
оч
чи
ит
та
ай
йт
те
е ц
цю
ю
iiн
нс
ст
тр
ру
ук
к ц
цiiю
ю;; ф
фiiр
рм
м а
а “
“ М
М у
ул
л iiн
не
ек
к с
с”
” н
не
е н
не
ес
ст
ти
им
м е
е
ж
ж о
од
д н
но
оїї в
вiiд
д п
по
ов
вiiд
да
а л
ль
ьн
но
ос
ст
тii з
з а
а в
ви
ик
ко
ор
ри
ис
ст
та
ан
нн
ня
я
п
пр
ри
ил
ла
ад
ду
у н
не
е у
у в
вiiд
д п
по
ов
вiiд
д н
но
ос
ст
тii з
з ц
цiiє
єю
ю
iiн
нс
ст
тр
ру
ук
к ц
цiiє
єю
ю ..
—
— Ц
Це
ей
й п
пр
ри
ил
ла
ад
д н
не
е п
пр
ри
из
зн
на
ач
ч е
ен
ни
ий
й д
д л
ля
я
в
ви
ик
ко
ор
ри
ис
ст
та
ан
нн
ня
я л
лю
ю д
д ь
ьм
м и
и з
з о
об
бм
м е
еж
ж е
ен
ни
им
ми
и
ф
ф ііз
зи
ич
ч н
ни
им
ми
и,, с
се
ен
нс
со
ор
рн
ни
им
м и
и т
та
а р
ро
оз
зу
ум
м о
ов
ви
им
м и
и
з
зд
д ііб
бн
но
ос
ст
тя
ям
м и
и ((у
у т
то
ом
м у
у ч
чи
ис
сл
л іі д
д ііт
ть
ьм
м и
и)) а
аб
бо
о
л
лю
ю д
д ь
ьм
м и
и,, щ
щ о
о н
не
е м
м а
аю
ют
ть
ь в
віід
дп
по
ов
віід
д н
но
ог
го
о д
д о
ос
св
віід
д у
у
а
аб
бо
о н
не
ео
об
бх
хіід
д н
ни
их
х з
зн
на
ан
нь
ь.. В
Во
он
ни
и м
м о
ож
ж у
ут
ть
ь
к
ко
ор
ри
ис
ст
ту
ув
ва
ат
ти
ис
ся
я ц
ци
им
м п
пр
ри
ис
ст
тр
ро
оє
єм
м т
тііл
ль
ьк
ки
и п
піід
д
с
сп
по
ос
ст
те
ер
ре
еж
ж е
ен
нн
ня
ям
м о
ос
сііб
б,, в
віід
дп
по
ов
віід
д а
ал
ль
ьн
ни
их
х з
за
а
їїх
хн
ню
ю б
бе
ез
зп
пе
ек
ку
у,, а
аб
бо
о п
пііс
сл
ля
я о
од
д е
ер
рж
ж а
ан
нн
ня
я в
віід
д н
ни
их
х
іін
нс
ст
тр
ру
ук
кц
ціій
й з
з й
йо
ог
го
о е
е к
кс
сп
пл
лу
уа
ат
та
ац
цііїї..
—
— П
По
от
тр
рііб
бн
но
о с
ст
те
е ж
ж и
ит
ти
и з
за
а д
д ііт
ть
ьм
м и
и,, щ
щ о
об
б в
во
он
ни
и н
не
е
г
гр
ра
ал
л и
и ііз
з п
пр
ри
ил
л а
ад
д о
ом
м..
— Перевiрте, щоб номiнальна напруга вашого
приладу вiдповiдала напрузi електромережi.
—
— Б
Бу
уд
дь
ь-
-я
як
к е
е н
не
еп
пр
ра
ав
ви
ил
ль
ьн
не
е п
пiiд
дк
к л
лю
ю ч
че
ен
нн
ня
я д
д о
о
е
ел
ле
ек
к т
тр
ро
ом
м е
ер
ре
еж
ж ii а
ан
ну
ул
лю
ю є
є г
га
а р
ра
ан
нт
тiiю
ю ..
— Ваш прилад призначений виключно для
домашнього кулiнарного використання,
всерединi будинку i пiд наглядом.
— Користуйтесь приладом на рiвнiй, чистiй i
сухiй поверхнi.
— Слiдкуйте, щоб пiд час роботи над
приладдям не звисало довге волосся, хустка
або краватка.
— Вiдключайте прилад вiд електромережi пiсля
закiнчення використання, пiд час очищення,
при встановленнi або зняттi приладдя.
— Не користуйтесь приладом, якщо вiн
несправно працює або пошкоджений. У
такому випадку звернiться до
уповноваженого сервiс-центру фiрми
“Мулiнекс” (див. перелiк у брошурi про
сервiс)..
— Якщо електрошнур пошкоджений, не
користуйтесь приладом. Щоб уникнути будь-
якої небезпеки, замiнiть його в
уповноваженому сервiс-центрi фiрми
“Мулiнекс” (див. перелiк у брошурi про
сервiс).
— Не занурюйте прилад, електрошнур або
вилку у воду чи будь-яку iншу рiдину.
— Слiдкуйте, щоб електрошнур не звисав у
доступних для дiтей мiсцях.
— Електрошнур нiколи не повинен бути
поблизу або в контактi з гарячими
частинами, поблизу джерел тепла або
UA

Комментарии

Год назад я приобрела мясорубку Moulinex HV4. Собственно, для меня она стала незаменимой помощницей во всех моих кулинарных фантазиях. Я бы даже не назвала ее просто мясорубкой, она практически полноценный кухонный комбайн. Но при множестве функций она проста в управлении и подойдет даже для тех, кто боится бытовой техники.
Описание Moulinex HV4
Moulinex HV4 имеет в составе моторный блок, собственно мясорубку и овощерезку.
Сама мясорубка полностью снимается. Собирается она легко, как старая добрая ручная мясорубка. К блоку мотора корпус подсоединяется легким движением. Нужно просто вставить уже собранный алюминиевый корпус и повернуть его до щелчка против часовой стрелки.
- корпус (из алюминия), стальной нож самозатачивающийся, винт;
- набор решеток: с очень маленькими отверстиями, со средними для тонкого измельчения и для крупного измельчения с крупными отверстиями;
- насадка для колбасы, кеббе и печенья;
- съемная подставка-лоток и толкатель для мяса.
Овощерезка состоит из прозрачного корпуса из прочного пластика, прозрачного толкателя овощей, насадки для нарезания кубиками и нескольких конусообразных насадок:
- светло-зеленая для тонких ломтиков;
- темно-зеленая для крупных ломтиков;
- оранжевая для тонкой терки;
- желтая для соломки фри;
- красная для крупной терки.
Достоинства
На мой взгляд, самое главное достоинство Moulinex HV4 в простоте. Детали и насадки легко собираются и разбираются. Управление всего одной кнопкой понятно людям любого возраста. Моя мама, которая плохо разбирается в технике, сразу поняла, что к чему.
Многофункциональность Moulinex HV4 делает ее незаменимой на кухне. На ней можно измельчить любые овощи и мясо до того состояния и формы, которая необходима. При заготовках на зиму она спасает от многочасового натирания овощей вручную. Натереть 5 кг моркови на салат теперь не проблема — 15 минут и все готово.
Интересный дизайн и яркий внешний вид Moulinex HV4 тоже отнесу к ее достоинствам. Мясорубка отлично смотрится на любой кухне. Немаловажно удобство хранения насадок и компактность прибора. Для хранения терок придумано отличное удерживающее устройство. Они не валяются отдельно, а аккуратно собираются в корпус. Компактность актуальна для небольшой кухни как у меня. Мясорубка смотрится аккуратно и занимает мало места.
В блоке мотора есть очень удобное место для хранения решеток мясорубки или ножа. Незаменимая вещь, решетки лежат в одном месте и не теряются. Емкость для хранения полностью вытаскивается из блока и ее удобно мыть.
Недостатки
Как таковых недостатков я не заметила, но один недочет все же имеется. Хотя нож и острый, но если крутить на фарш, например, не вырезку, а мясо с жилками, прокрутить его достаточно проблематично. Когда я крутила 10 кг телятины, пришлось разбирать мясорубку 2 раза. Пленки и жилки просто накручиваются на нож. Других недостатков за год эксплуатации не выявилось.
Рекомендации
Главное — не забывать содержать детали в чистоте. Это залог того, что ваша помощница прослужит долго. Обязательно нужно следить за тем, чтобы детали мясорубки: решетки, нож, винт — были масляными. Не нужно отмывать их до скрипа. Если необходимо, можно смазать растительным маслом.
Старайтесь не перегревать мясорубку, после 14 минут непрерывной работы давайте ей остыть. Если перегреется, то может сгореть.
89 страниц подробных инструкций и пользовательских руководств по эксплуатации
RUS UA BG LV LT EST PL BIH CZ SLO SK H RO HR SCG.

Cd a1 f e b

Мясорубки Moulinex

Ооп п и ис са а н ни ие е
Благодарим вас за то, что вы выбрали продукцию марки Moulinex
Съемная головка мясорубки
Режущий нож из нержавеющей
стали с устройством самозаточки
Решетки (в зависимости от модели)
a Pешетка с маленькими
отверстиями (3мм): для очень
мелко нарубленного фарша
b Pешетка со средними
отверстиями (4.7мм): для
мелко нарубленного фарша
c Pешетка с крупными
отверстиями (7.5мм): для
крупно нарубленного фарша
Толкатель для мяса
Отсек для аксессуаров
Переключатель вкл / выкл
Пресс для цитрусовых (в зависимости от
полусфера с фильтром
привод пресса для цитрусовых
Система Steak Moulding System
(в зависимости от модели)
подставка для формы
форма для бифштексов
форма для наггетсов
емкость для сбора жидкости
Насадка для кеббе (в зависимости от
Насадка для приготовления печенья (в
зависимости от модели)
Воронка для колбас (в зависимости от
Овощерезка (в зависимости от модели)
терки-барабаны (в зависимости
a барабан для нарезания на
b барабан с крупной теркой
c барабан с мелкой теркой
d барабан с теркой для
e барабан для измельчения льда
— Убедитесь, что напряжение питания
электроприбора соответствует напряжению
— Данный электроприбор предназначен
исключительно для домашне го приг
отовления пищи и должен использоваться в
помещении, под постоянным наблюдением.
— Электроприбор должен быть установлен на
ровной, чистой и сухой поверхности.
— Длинные волосы, шарфы и галстуки никогда
не должны нависать над работающим
— Следует выключать устройство из сети сразу
по окончании работы, а также перед чисткой,
установкой или заменой деталей.
— Не следует пользоваться электроприбором,
если он работает неправильно или был
поврежден. В этом случае обратитесь в один
из уполномоченных сервисных центров
Moulinex (см. список в гарантийной книжке).
— Любое вмешательство, кроме чистки и
обычного ухода, должно осуществляться в
уполномоченном сервисном центре Moulinex.
— Не пользуйтесь электроприбором в случае