Ваш лучший помощник по кухне – мультиварка Philips HD3139/03.
Готовьте быстро, вкусно и много
Объема мультиварки в 4 литра будет достаточно, что приготовить достаточно большое количество еды. Удобно, что в этом приборе вы сможете готовить огромное количество блюд. Вы с легкостью пожарите и потушите в ней мясо, сварите супы, сделаете запеканку и пироги. Благодаря возможности готовки на пару, вы сможете добавить в свое меню полезные диетические блюда.
Всего мультиварка имеет 9 автоматических режимов приготовления еды.
Поддержание тепла и отложенный старт
Благодаря дополнительным функциям пользоваться прибором будет еще удобнее. Так в режиме поддержания тепла еда останется горячей долгое время после приготовления.
Режим отложенного старта пригодится при приготовлении завтраков. Вы сможете с вечера загрузить продукты в мультиварку, и с утра вас будет ждать свежеприготовленная, горячая запеканка или каша.

Specifications are subject to change without notice
© 2014 Koninklijke Philips N.V.
All rights reserved.
HD3165
HD3167
Мультиварка
Мультипісіргіш
Register your product and get support at
www.philips.com/welcome
Always there to help you
Question?
Contact
Philips
http://www.philips.com/welcome
User manual
http://www.philips.com/welcome
Recipe
http://www.philips.com/welcome
Safety leaflet
http://www.philips.com/welcome
Warranty
e
f
a
b
c
g
h
i
k
j
d
m
l
n
o
r
s
t
u
p q
3S
3S
Изготовитель:
“Филипс Консьюмер Лайфстайл Б.В.”, Туссендиепен 4, 9206
АД, Драхтен, Нидерланды
Импортер на территорию России и Таможенного Союза:
ООО «ФИЛИПС», Российская Федерация, 123022 г.
Москва, ул. Сергея Макеева, д.13, тел. +7 495 961-1111
Сделано в Китае
Дата производства указана в серийном номере
устройства. Например, “XP1A1347000001” означает, что
изделие было произведено на 47-ой неделе 2013 года.
Өндіруші:
“Филипс Консьюмер Лайфстайл Б.В.”, Туссендиепен 4, 9206
АД, Драхтен, Нидерланды
Ресей және Кедендік Одақ территориясына импорттаушы:
«ФИЛИПС» ЖШҚ, Ресей Федерациясы, 123022 Мәскеу
қаласы, Сергей Макеев көшесі, 13-үй, тел. +7 495 961-1111
Қытайда жасап шығарылған
Өнімнің сериялық нөмірінен өндірілген күнін табуға болады.
Мысалы, «XP1A1347000001» өнімнің 2013 жылдың 47-ші
аптасында шығарылғанын білдіреді.
1 2 3
3S
English
1 Your multicooker
Congratulations on your purchase, and welcome to Philips!
To fully benet from the support that Philips offers, register your
product at www.philips.com/welcome.
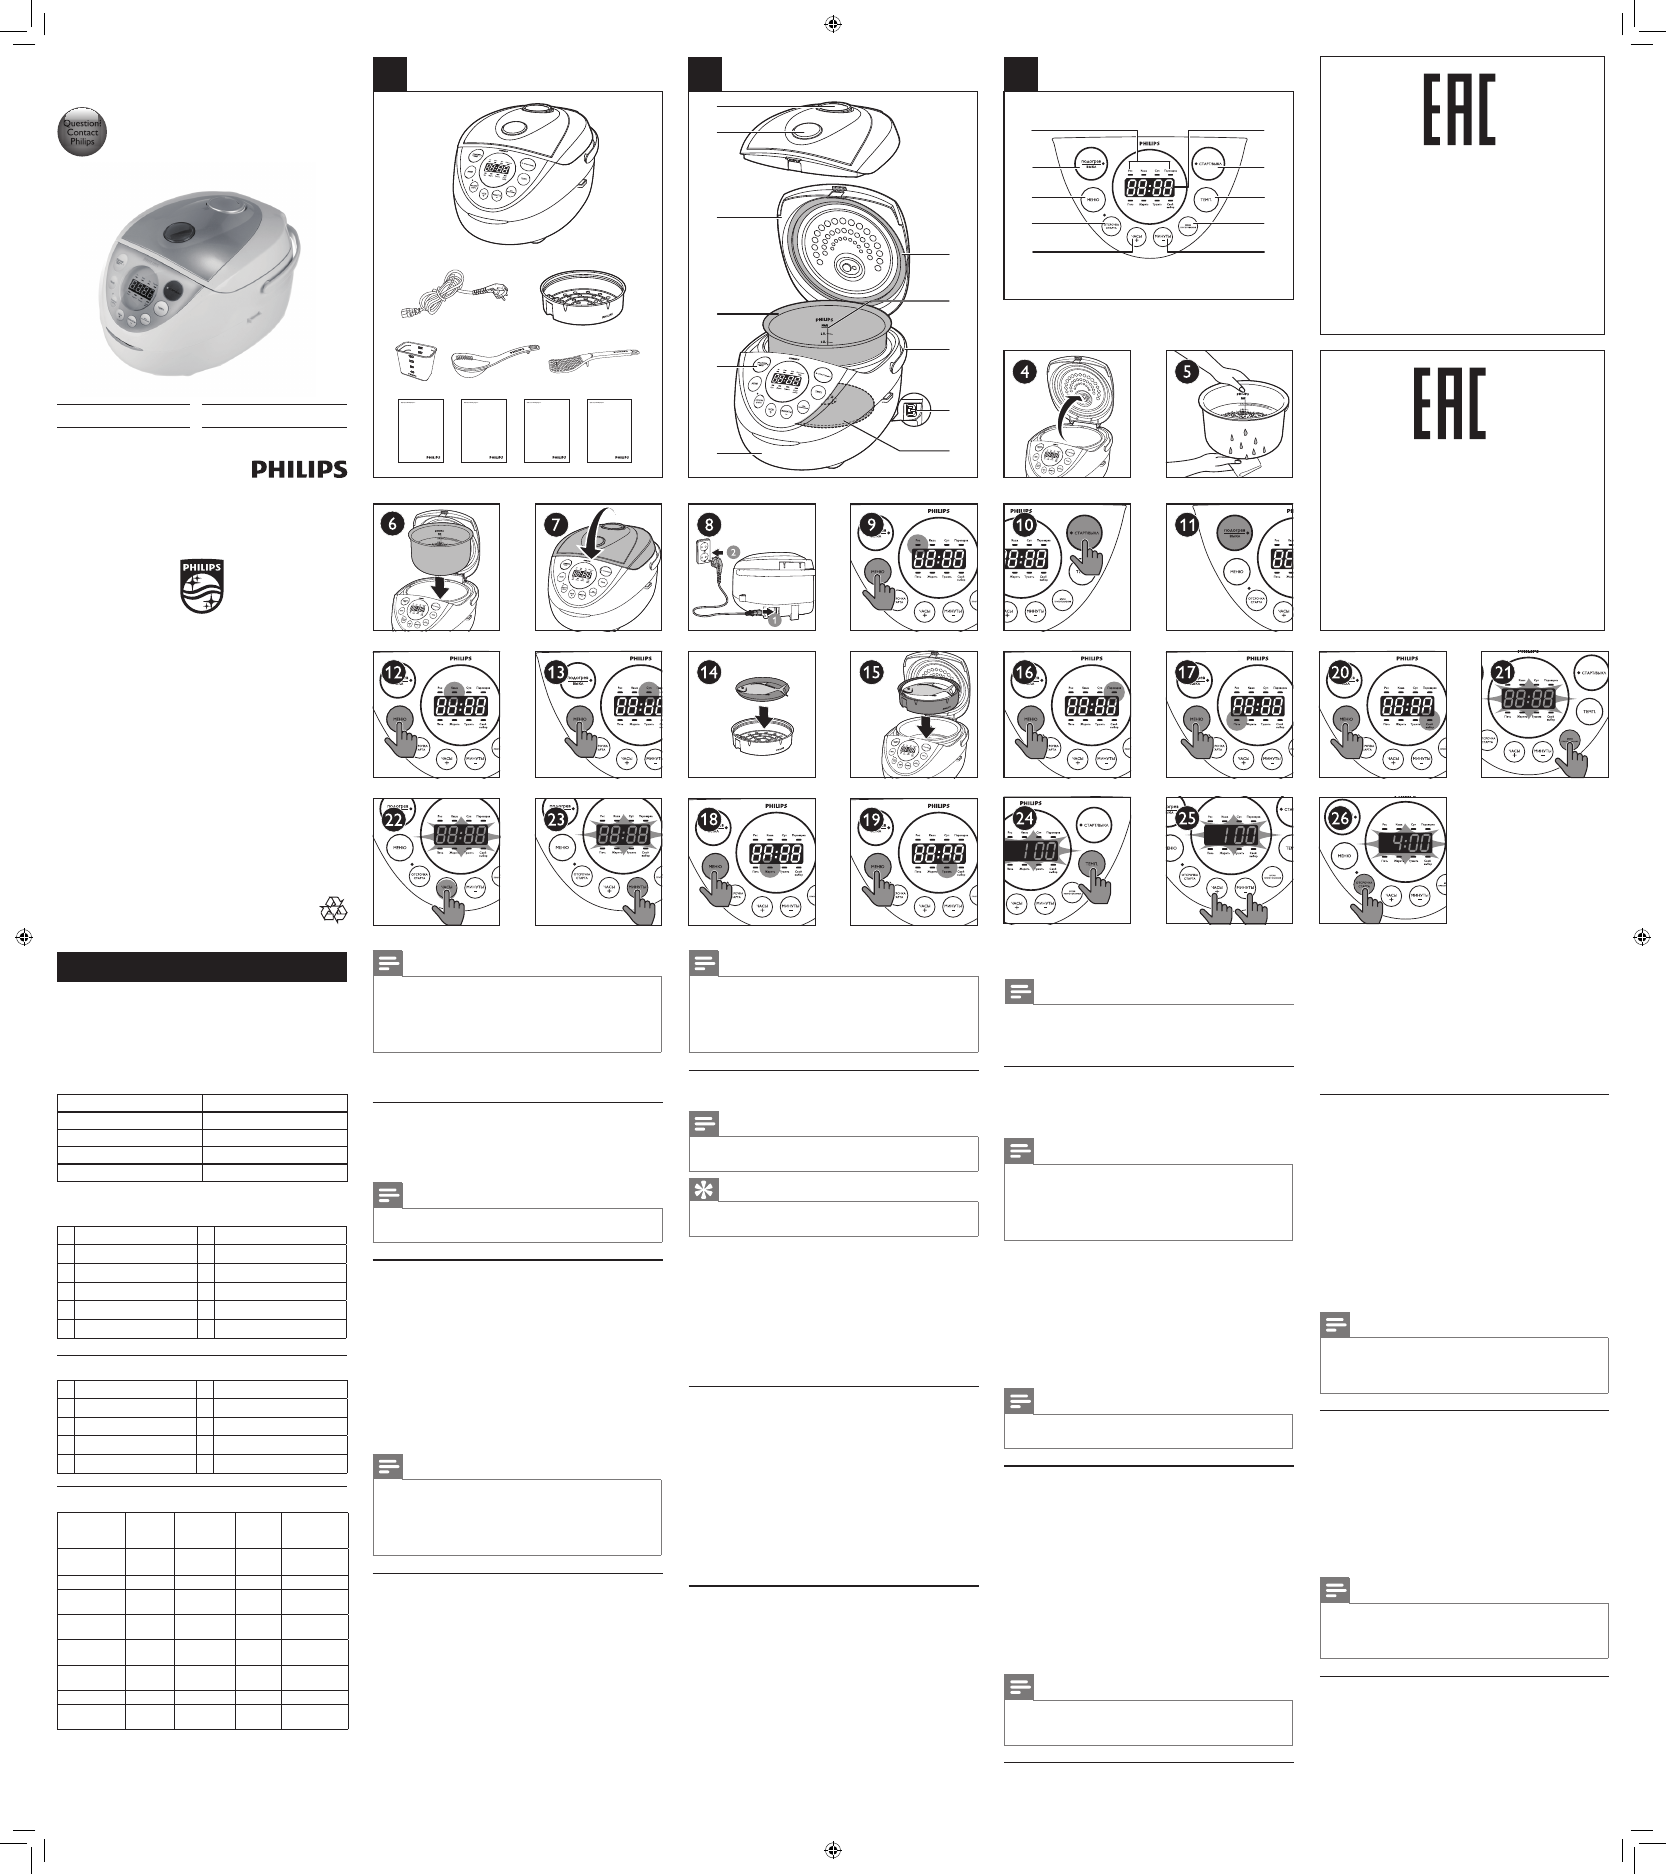
2 What’s in the box (fig.1)
Multicooker main unit Measuring cup
Power cord Steam rack
User manual Recipe
Safety leaet Warranty card
3 Overview (fig.2)
a
Detachable steam vent cap
g
Heating element
b
Lid release button
h
Power socket
c
Top lid
i
Cooker handle
d
Inner pot
j
Water level indications
e
Control panel
k
Sealing ring
f
Main body
Controls overview (g.3)
l
Cooking functions
q
Decrease button
m
Keep-warm button
r
Temperature button
n
Menu button
s
Preset button
o
Cooking time button
t
Start/Cancel button
p
Increase button
u
Display screen
Functions overview
Functions
Default
cooking
time
Adjustable
cooking
time
Preset
time
Default
cooking
temperature
Rice/Grains
(рис/крупы)
40 min / 1-24 hr 130-140
°C
Porridge
(каша)
10 min 5 min — 2 hr 1-24 hr 90-100°C
Plov
(плов)
35 min / 1-24 hr 130-140
°C
Yogurt
(йогурт)
8 hr 6-12 hr 1-24 hr 40±3°C
Soup
(суп)
1 hr
20 min-
10 hr
1-24 hr 100°C
Drinks
(напитки)
10 min 5-40 min 1-24 hr 100°C
Jelly meat
(холодец)
6 hr 4-10 hr 1-24 hr 90-100°C
Reheat
(разогреть)
25 min 5-60 min / 85°C
Bake
(печь)
45 min
20 min —
2 hr
/ 130°C
Stew/Ragout
(тушить/рагу)
1 hr
20 min —
10 hr
1-24 hr 90°C
Functions
Default
cooking
time
Adjustable
cooking
time
Preset
time
Default
cooking
temperature
Steam/Boil
(варить/на
пару)
20 min 5 min — 2 hr 1-24 hr 100°C
Fry
(жарить)
15 min 5-60 min / 145-150°C
Slow cook
(томить)
5 hr 1-15 hr 1-24 hr 80°C
Roast
(Запекать)
1 hr / 1-24 hr 130
°C
Manual
(мультиовар)
2 hr
5 min — 10
hr
1-24 hr 100
°C
Note
• The cooking temperature for the baking and manual functions is
adjustable. You can select temperature for the baking function between
40°C to 160°C, and select temperature for the manual function between
30°C to 160°C The step is 10°C.
• After the cooking has started, you can press and hold the Start/Cancel
button (СТАРТ/ВЫКЛ) for 3 seconds to deactivate the cooking process
and the multicooker will enter the standby mode.
4 Using the multicooker
Before rst use
1 Take out all the accessories from the inner pot. Remove the
packaging material of the inner pot.
2 Clean the parts of the multicooker thoroughly before using it for
the rst time (see chapter ‘Cleaning and Maintenance’).
Note
• Make sure all parts are completely dry before you start using the
multicooker.
Preparations before cooking
Before using the multicooker, you need to do the following steps:
1 Measure the grains using the measuring cup provided.
2 Wash the grains thoroughly.
3 Put the pre-washed grains in the inner pot.
4 Add water to the level indicated on the scale inside the inner pot
and smooth the grains surface.
5 Press the lid release button to open the lid (g.4).
6 Wipe the outside of the inner pot dry (g.5), then put the inner
pot in the multicooker (g.6). Check if the inner pot is in proper
contact with the heating element.
7 Close the lid of the multicooker (g.7), and put the plug in the
power socket (g.8).
Note
• Make sure that the inner pot is proper contact with the heating element.
• For details about the ratio of grains and water, see the recipe.
• The level marked inside the inner pot is just an indication. You can
always adjust the water level for different types of grains and your own
preference.
• Make sure that the outside of the inner pot is clean and dry, and that
there is no foreign residue on the heating element or the magnetic switch.
Cooking rice/grains
1 Follow the steps in “Preparations before cooking”.
2 Press the menu button (МЕНЮ) until the rice/grain cooking
function (рис/крупы) is selected (g.9).
3 Press and hold the start button (СТАРТ/ВЫКЛ) for 3 seconds
to start cooking (g.10).
4 When the cooking is nished, you will hear 4 beeps and the
selected cooking function light will be off.
5 The multicooker will be in keep-warm mode automatically.
» The keep-warm indicator (ПОДОГРЕВ) lights up (g.11).
Note
• If the voltage is unstable at the area you live, it is possible that the
multicooker overows.
• After the cooking is nished, stir the rice and loosen it immediately to
release excessive moisture for uffy rice.
• Depending on the cooking conditions, the bottom portion of the rice may
become slightly browned.
Cooking porridge
1 Follow steps 1 to 7 in “Preparations before cooking”.
Note
• Do not exceed the maximum water level indicated in the inner pot, as this
may cause the multicooker to overow.
Tip
• Besides following the water level indications, you may also add rice and
water at 1:4 ratio for porridge cooking
2 Press the menu button (МЕНЮ) until the porridge function
(каша) is selected (g.12).
» To set a different cooking time, refer to chapter “Adjusting the
cooking time and temperature”.
3 Press the start button (СТАРТ/ВЫКЛ) for 3 seconds to start
cooking (g.10).
4 When the cooking is nished, you will hear 4 beeps and the
selected cooking function light will be off.
5 The multicooker will be in keep warm mode automatically.
» The keep-warm indicator (ПОДОГРЕВ) lights up (g.11).
Making plov
1 Put the food and ingredients into the inner pot.
2 Follow steps 6 and 7 in “Preparations before cooking”.
3 Press the menu button (МЕНЮ) until the plov function (плов) is
selected (g.13).
4 Press and hold the start button (СТАРТ/ВЫКЛ) for 3 seconds
to start cooking (g.10).
5 When the cooking is nished, you will hear 4 beeps and the
selected cooking function light will be off.
6 The multicooker will be in keep-warm mode automatically.
» The keep-warm indicator (ПОДОГРЕВ) lights up (g.11).
Making yogurt
1 Whisk the ingredients for the yogurt well and put them in a glass
container (g.14).
2 Put the glass container in the inner pot (g.15). Make sure that
the container is sealed.
3 Pour some water in the inner pot. Make sure that half of the
container is immersed in water.
4 Follow steps 6 and 7 in “Preparations before cooking”.
5 Press the menu button (МЕНЮ) until the yogurt function
(йогурт) is selected (g.16).
» To set a different cooking time, refer to chapter “Adjusting the
cooking time and temperature”.
6 Press and hold the start button (СТАРТ/ВЫКЛ) for 3 seconds
to start cooking (g.10).
7 When the cooking is nished, you will hear 4 beeps and the
selected cooking function light will be off.
» The multicooker will enter the standby mode automatically.
Making soup
1 Put ingredients and water into the inner pot.
2 Follow steps 6 and 7 in “Preparations before cooking”.
3 Press the menu button (МЕНЮ) until the soup function (cуп) is
selected (g.17).
» To set a different cooking time, refer to chapter “Adjusting the
cooking time and temperature”.
4 Press the start button (СТАРТ/ВЫКЛ) for 3 seconds to start
cooking (g.10).
5 When the cooking is nished, you will hear a few beeps and the
selected cooking function light will be off.
6 The multicooker will be in keep-warm mode automatically.
» The keep-warm indicator (ПОДОГРЕВ) lights up (g.11).
Making drinks
1 Put ingredients and water into the inner pot.
2 Follow steps 6 and 7 in “Preparations before cooking”.
3 Press the menu button (МЕНЮ) until the drinks function
(напиток) is selected (g.18).
» To set a different cooking time, refer to chapter “Adjusting the
cooking time and temperature”.
4 Press the start button (СТАРТ/ВЫКЛ) for 3 seconds to start
cooking (g.10).
5 When the cooking is nished, you will hear a few beeps and the
selected cooking function light will be off.
6 The multicooker will be in keep-warm mode automatically.
» The keep-warm indicator (ПОДОГРЕВ) lights up (g.11).
Making jelly meat/slow cooking
1 Put the food and ingredients in the inner pot.
2 Follow steps 6 and 7 in “Preparations before cooking”.
3 Press the menu button (МЕНЮ) until the jelly meat cooking
function (холодец) or the slow cooking function (томить) is
selected (g.19).
» To set a different cooking time, refer to chapter “Adjusting the
cooking time and temperature”.
4 Press and hold the start button (СТАРТ/ВЫКЛ) for 3 seconds
to start cooking (g.10).
5 When the cooking is nished, you will hear a few beeps and the
selected cooking function light will be off.
6 The multicooker will be in keep-warm mode automatically.
» The keep-warm indicator (ПОДОГРЕВ) lights up (g.11).
Reheating
1 Loosen the cooled food and evenly distribute it in the inner pot
(g.20).
2 Pour some water onto the food to prevent it from becoming too
dry (g.21). The quantity of the water depends on the amount
of food.
3 Follow steps 6 and 7 in “Preparations before cooking”.
4 Press the menu button (МЕНЮ) until the reheating function
(разогреть) is selected (g.22).
» To set a different cooking time, refer to chapter “Adjusting the
cooking time and temperature”.
5 Press and hold the start button (СТАРТ/ВЫКЛ) for 3 seconds
to start cooking (g.10).
6 When the cooking is nished, you will hear 4 beeps and the
selected cooking function light will be off.
7 The multicooker will be in keep warm mode automatically.
» The keep-warm indicator (ПОДОГРЕВ) lights up (g.11).
Baking
1 Put the food and ingredients in the inner pot.
2 Follow step 6 in “Preparations before cooking”.
3 Put the plug in the power socket.
Note
• When baking cake, keep the lid closed during cooking. Baking cake at
130°C and by 45 minutes usually delivers best cooking result.
• It’s recommended to open lid during cooking when the temperature is
above 130°C.
4 Press the menu button (МЕНЮ) until the baking function (печь)
is selected (g.23).
» To set a different cooking time and temperature, refer to
chapter “Adjusting the cooking time and temperature”.
5 Press and hold the start button (СТАРТ/ВЫКЛ) for 3 seconds
to start cooking (g.10).
6 When the baking is nished, you will hear 4 beeps and the
selected function light will be off.
7 The multicooker will be in keep-warm mode automatically.
» The keep-warm indicator (ПОДОГРЕВ) lights up (g.11).
Note
• When removing the inner pot from the multicooker, use a kitchen glove
or a cloth, as the inner pot will be very hot.
Stewing/cooking ragout
1 Put the food and ingredients in the inner pot.
2 Follow steps 6 and 7 in “Preparations before cooking”.
3 Press the menu button (МЕНЮ) until the stewing/ragout
function (тушить/рагу) is selected (g.24).
» To set a different cooking time, refer to chapter “Adjusting the
cooking time and temperature”.
4 Press and hold the start button (СТАРТ/ВЫКЛ) for 3 seconds
to start cooking (g.10).
5 When the cooking is nished, you will hear a few beeps and the
selected cooking function light will be off.
6 The multicooker will be in keep-warm mode automatically.
» The keep-warm indicator (ПОДОГРЕВ) lights up (g.11).
Steaming
1 Pour some water into the inner pot.
2 Put the steam tray into the inner pot (g.25).
3 Put the food to be steamed on a plate or in the steam tray.
4 If you are using a separate plate, put it into the steam tray (g.26).
5 Follow steps 6 and 7 in “Preparations before cooking”.
6 Press the menu button (МЕНЮ) until the steaming function
(варить/на пару) is selected (g.27).
» To set a different cooking time, refer to chapter “Adjusting the
cooking time and temperature”.
7 Press and hold the start button (СТАРТ/ВЫКЛ) for 3 seconds
to start cooking (g.10).
8 When the cooking is nished, you will hear 4 beeps and the
selected cooking function light will be off.
9 The multicooker will be in keep warm mode automatically.
» The keep-warm indicator (ПОДОГРЕВ) lights up (g.11).
10 Open the lid and carefully take out the steamed food from the
plate or steam basket.
Note
• The quantity of water depends on the amount of food in the steam tray.
Do not immerse the steam tray in water.
• Use a kitchen glove or a cloth, as the plate and steam tray will be very hot.
Boiling
1 Put the food and ingredients in the inner pot.
2 Follow steps 6 and 7 in “Preparations before cooking”.
3 Press the menu button (МЕНЮ) until the boiling function
(варить/на пару) is selected (g.27).
» To set a different cooking time, refer to chapter “Adjusting the
cooking time and temperature”.
4 Press the start button (СТАРТ/ВЫКЛ) to start cooking (g.10).
5 When the cooking is nished, you will hear a few beeps and the
selected cooking function light will be off.
6 The multicooker will be in keep-warm mode automatically.
» The keep-warm indicator (ПОДОГРЕВ) lights up (g.11).
Frying
1 Put food and ingredients into the inner pot.
2 Follow step 6 in “Preparations before cooking”.
3 Put the plug in the power socket.
4 Press the menu button (МЕНЮ) until the frying function
(жарить) is selected (g.28).
» To set a different cooking time, refer to chapter “Adjusting the
cooking time and temperature”.
5 Press and hold the start button (СТАРТ/ВЫКЛ) for 3 seconds
to start cooking (g.10).
6 When the cooking is nished, you will hear 4 beeps and the
selected cooking function light will be off.
7 The multicooker will be in keep-warm mode automatically.
» The keep-warm indicator (ПОДОГРЕВ) lights up (g.11).
Note
• Do not close the top lid when cooking in the fry mode.
Roasting
1 Put food and ingredients into the inner pot.
2 Follow step 6 in “Preparations before cooking”.
3 Put the plug in the power socket.
4 Press the menu button (МЕНЮ) until the roasting function
(Запекать) is selected (g.29).
» To set a different cooking time, refer to chapter “Adjusting the
cooking time”.
5 Press and hold the start button (СТАРТ/ВЫКЛ) for 3 seconds
to start cooking (g.10).
6 There are 2 stages of roasting. For the rst stage, cooking time
is about 35 minutes, you will hear 5 beeps to remind to turn the
food.
7 Press the menu button (МЕНЮ) to continue the second stage,
if it beeps for 5 minutes without operation, the multicooker will
enter into keep warm mode until end of the cooking time.
Manual
You may use the manual mode to cook food with more control over
the cooking time and temperature.
1 Put food and ingredients into the inner pot.
2 Follow steps 6 and 7 in “Preparations before cooking”. Press the
menu button (МЕНЮ) until the manual function (мультиовар) is
selected (g.30).
» To set a different cooking time and temperature, refer to
chapter “Adjusting the cooking time and temperature”.
3 Press and hold the start button (СТАРТ/ВЫКЛ) for 3 seconds
to start cooking (g.10).
4 When the cooking is nished, you will hear 4 beeps and the
selected cooking function light will be off.
5 The multicooker will be in keep-warm mode automatically.
» The keep-warm indicator (ПОДОГРЕВ) lights up (g.11).
Note
• If you cook food at a temperature below 70°C, please turn off the keep-
warm mode before start cooking.
• In manual (мультиовар) mode, when cooking at a temperature higher
than 130°C, the top lid must be opened during cooking.
Keep-warm mode
The multicooker provides you with easy control over the keep-warm
mode.
• After you have selected the cooking function using the menu
button (МЕНЮ), if you press the start button (СТАРТ/ВЫКЛ)
for 3 seconds directly, the keep-warm indicator will light up. After
the cooking is nished, the multicooker will switch to keep-warm
mode directly.
• After you have selected the cooking function using the menu
button (МЕНЮ), if you press the keep-warm button rst,
and then the start button (СТАРТ/ВЫКЛ) for 3 seconds, the
keep-warm indicator will be off. After the cooking is nished, the
multicooker will be in standby mode.
Note
• In standby mode, you can press the keep-warm button (ПОДОГРЕВ) to
enter keep-warm mode.
• In keep-warm mode, you can press the keep-warm button (ПОДОГРЕВ)
to enter standby mode.
Adjusting the cooking time and temperature
You can adjust the cooking time for all functions except the rice/grain ,
roast, and plov functions; and you can adjust the cooking temperature
for baking and manual functions. Refer to the “Functions overview”
table for the time and temperature regulation of each function.
After you have selected the desired cooking function using the menu
button, the default cooking time will be displayed on the screen.
1 To set a different cooking time, press the cooking time button
(ВРЕМЯ ПРИГОТОВЛЕНИЯ) (g.31), and the default cooking
time starts ashing on the display.
2 Press the increase (+) or the decrease (—) button to set the hour
unit (g.32).
3 After the hour unit is set, wait for a few seconds before the
hour unit is conrmed, and the minute unit starts ashing on the
display.
4 Press the increase (+) or the decrease (—) button to set the
minute unit.
5 To set a different cooking temperature, press the temperature
button (ТЕMП.) (g.33), and the default temperature starts
ashing on the display.
6 Press the increase (+) or the decrease (—) button to set the
desired cooking temperature (g.34).
Preset time for delayed cooking
You can preset the delayed cooking time for all cooking modes
except the reheating, baking, and frying modes.
1 Follow steps 6 and 7 in “Preparations before cooking”.
2 Press the menu button (МЕНЮ) until your preferred cooking
function is selected.
3 Press the preset time button (ОТСРОЧКА), and the default
preset time starts ashing on the display (g.35).
4 Preset the increase button (+) and the decrease button (—) to set
the desired preset time.
5 Press the start button (СТАРТ/ВЫКЛ) for 3 seconds to conrm
the preset timer (g.10).
6 The cooking will be nished when the preset time has elapsed.
You will hear 4 beeps and the selected cooking function light will
be off.
7 The multicooker will be in keep-warm mode automatically.
» The keep- warm indicator (ПОДОГРЕВ) lights up (g.11).
Note
• The preset function is not available in bake (печь), fry (жарить), and
reheat (разогреть) mode.
• The preset button is not responsive in standby mode.
Setting up child lock
To protect your child from using the multicooker, you may set up the
child lock function.
• Press and hold the preset button (ОТСРОЧКА) for 3 seconds
to enter the child lock mode (g.36).
» The child lock icon lights up on the display.
• To unlock, press and hold the preset button (ОТСРОЧКА) for 3
seconds again.
» The child lock lights off (g.37).
5 Cleaning and Maintenance
Note
• Unplug the multicooker before starting to clean it.
• Wait until the multicooker has cooled down sufciently before cleaning it.
Interior
Inside of the top lid and the main body:
• Wipe with wrung out and damp cloth.
• Make sure to remove all the food residues stuck to the
multicooker.
Heating element:
• Wipe with wrung out and damp cloth.
• Remove food residues with wrung out and damp cloth.
Exterior
Surface of the top lid and outside of the main body:
• Wipe with a cloth damped with soap water.
• Only use soft and dry cloth to wipe the control panel.
• Make sure to remove all the food residues around the
control panel.
Accessories
Inner pot, steam rack, and steam vent cap:
• Soak in hot water and clean with sponge.
EN User manual
RU Руководство пользователя
UK Посібник користувача
6 Environment
Do not throw away the appliance with normal household
waste at the end of its life, but hand it in at an ofcial
collection point for recycling. By doing this, you can help to
preserve the environment.
7 Guarantee and service
If you need service or information, or if you have a problem, visit the
Philips website at www.philips.com or contact the Philips Customer
Care Center in your country. You can nd its phone number in the
worldwide guarantee leaet. If there is no Customer Care Center in
your country, go to your local Philips dealer.
8 Specifications
Model Number HD3165 HD3167
Rated power output 980W 980W
Rated capacity 4.0L 5.0L
9 Troubleshooting
If you encounter problems when using this multicooker, check the
following points before requesting service. If you cannot solve the
problem, contact the Philips Consumer Care Center in your country.
Problem Solution
The light on the button
does not go on.
There is a connection problem. Check
if the power cord is connected to the
multicooker properly and if the plug is
inserted rmly into the power outlet.
The light is defective. Take the appliance
to your Philips dealer or a service center
authorized by Philips.
The display does not
function.
The multicooker is not connected to
the power supply. If there is no power
supply, the power failure backup function
does not work and the display does not
function.
The battery for the display runs out of
power. Take the appliance to your Philips
dealer or a service center authorized by
Philips to have the battery replaced.
The rice is not cooked. There is not enough water. Add water
according to the scale on the inside of the
inner pot.
You did not press the start button
(СТАРТ/ВЫКЛ).
Make sure that there is no foreign residue
on the heating element and the outside
of the inner pot before switching the
multicooker on.
The heating element is damaged, or
the inner pot is deformed. Take the
multicooker to your Philips dealer or a
service center authorized by Philips.
The rice is too dry and
not well cooked.
Add more water to the rice, and cook for
a bit longer.
The multicooker does
not switch to the
keep-warm mode
automatically.
You might have pressed the keep-warm
button (ПОДОГРЕВ) before pressing the
start button (СТАРТ/ВЫКЛ). In this case
the multicooker will be in standby mode
after the cooking is nished.
The temperature control is defective. Take
the appliance to your Philips dealer or a
service center authorized by Philips.
The rice is scorched. You have not rinse the rice properly. Rinse
the rice until the water runs clear.
Water spills out of the
multicooker during
cooking.
Make sure that you add water to the level
indicated on the scale inside the inner pot
that corresponds to the number of cups
of rice used.
I cannot get to the
desired cooking
function.
Press the menu button (МЕНЮ)
repeatedly to select the desired function
as shown by the indicator.
Rice smells bad after
cooking
Clean the inner pot with some washing
detergent and warm water.
After cooking, make sure the steam vent
cap, inner lid and inner pot is cleaned
thoroughly.
Error message (E1, E2,
E3, or E4) appears on
the display.
There has been a power failure during
cooking. Take the appliance to your Philips
dealer or a service center authorized by
Philips.
Русский
1 Мультиварка
Поздравляем с покупкой и приветствуем вас в клубе Philips!
Чтобы воспользоваться всеми преимуществами поддержки Philips,
зарегистрируйте устройство на веб-сайте
www.philips.com/welcome.
2 Комплект поставки (рис. 1)
Мультиварка (основное устройство) Мерный стакан
Шнур питания Корзина для
приготовления на пару
Руководство пользователя Книга рецептов
Буклет с информацией о
безопасности
Гарантийный талон
3 Описание прибора (рис. 2)
a
Съемная крышка
отверстия выхода пара
g
Нагревательный элемент
b
Кнопка открывания
крышки
h
Разъем кабеля питания
c
Верхняя крышка
i
Ручка мультиварки
d
Внутренняя чаша
j
Индикация уровня воды
e
Панель управления
k
Уплотнительное кольцо
f
Основной корпус
Описание элементов управления (рис. 3)
l
Автоматические
программы
q
Кнопка уменьшения значения
m
Кнопка индикации
подогрева и его
отключения
r
Кнопка выбора температуры
n
Кнопка меню
s
Кнопка отсрочки старта
o
Кнопка выбора времени
приготовления
t
Кнопка включения/отмены
p
Кнопка увеличения
значения
u
Дисплей
Обзор функций
Функции
Время
приготовления
по умолчанию
Регулируемое
время
приготовления
Время
отсрочки
старта
Температура
приготовления
по умолчанию
Рис/крупы 40 мин. / 1—24 ч. 130—140 °C
Каша 10 мин. 5 мин. — 2 ч. 1—24 ч. 90—100 °C
Плов 35 мин. / 1—24 ч. 130—140 °C
Йогурт 8 ч. 6—12 ч. 1—24 ч. 40±3 °C
Суп 1 час 20 мин. — 10 ч. 1—24 ч. 100 °C
Напитки 10 мин. 5—40 мин. 1—24 ч. 100 °C
Холодец 6 ч 4—10 ч. 1—24 ч. 90—100 °C
Разогреть 25 мин. 5—60 мин. / 85 °C
Печь 45 мин. 20 мин. — 2 ч. / 130 °C
Тушить/рагу 1 час 20 мин. — 10 ч. 1—24 ч. 90 °C
Варить/на
пару
20 мин. 5 мин. — 2 ч. 1—24 ч. 100 °C
Жарить 15 мин. 5—60 мин. / 145—150 °C
Томить 5 ч 1—15 ч. 1—24 ч. 80 °C
Запекать 1 час / 1—24 ч. 130 °C
Мультиповар 2 ч. 5 мин. — 10 ч. 1—24 ч. 100 °C
Примечание
• Температуру можно настраивать для функции приготовления выпечки
и ручных режимов. Для выпекания можно выбрать температуру от
40 °C до 160 °C, а для режима мультиповара — от 30 °C до 160 °C
(с шагом 10 °C).
• После запуска процесса приготовления для отключения
программы нажмите и удерживайте кнопку включения/выключения
(СТАРТ / ВЫКЛ) в течение 3 секунд. Мультиварка перейдет в режим
ожидания.
4 Использование мультиварки
Перед первым использованием
1 Извлеките все принадлежности из внутренней чаши. Снимите
с внутренней чаши упаковочные материалы.
2 Тщательно очистите все детали мультиварки перед первым
использованием (см. главу «Очистка и уход»).
Примечание
• Перед использованием мультиварки убедитесь, что все части
абсолютно сухие.
Подготовка к работе
Перед использованием мультиварки выполните следующие
действия.
1 Измерьте количество крупы с помощью прилагаемого
мерного стакана.
2 Тщательно промойте крупу.
3 Поместите предварительно промытый рис во внутреннюю
чашу.
4 Налейте воду до уровня, указанного на шкале во внутренней
чашу, и равномерно распределите крупу.
5 Откройте крышку, нажав соответствующую кнопку (рис. 4).
6 Протрите насухо внешнюю поверхность внутренней чаши
(рис. 5), установите чашу в мультиварку (рис. 6). Убедитесь,
что внутренняя чаша касается нагревательного элемента
должным образом.
7 Закройте крышку мультиварки (рис. 7), вставьте вилку в
розетку электросети (рис. 8).
Примечание
• Убедитесь, что внутренняя чаша правильно соединена с
нагревательным элементом.
• Подробности о соотношении количества крупы и воды см. в рецепте.
• Уровень, отмеченный во внутренней чаше, является
рекомендованным. Объем воды можно изменять в соответствии с
типом крупы и вашими предпочтениями.
• Убедитесь, что внешняя поверхность внутренней чаши является
сухой и чистой, а на нагревательном элементе и магнитном
переключателе отсутствуют загрязнения.
Приготовление риса и круп
1 Следуйте инструкциям в главе «Подготовка к работе».
2 С помощью кнопки меню (МЕНЮ) выберите функцию
приготовления риса/круп (рис/крупы) (рис. 9).
3 Нажмите и удерживайте кнопку включения (СТАРТ/ВЫКЛ)
в течение 3 секунд для запуска процесса приготовления
(рис. 10).
4 По окончании приготовления прозвучит 4 звуковых сигнала,
индикатор выбранной функции погаснет.
5 Мультиварка автоматически перейдет в режим подогрева.
» Загорится индикатор режима подогрева (ПОДОГРЕВ)
(рис. 11).
Примечание
• Если в вашем регионе в сети наблюдаются перепады напряжения,
чаша мультиварки может переполняться.
• По окончании приготовления сразу же перемешайте рис, чтобы
разрыхлить его и выпарить лишнюю жидкость. Это позволит
получить более рассыпчатый рис.
• В зависимости от условий приготовления нижний слой риса может
стать золотистым.
Приготовление каши
1 Следуйте шагам 1—7 в главе «Подготовка к работе».
Примечание
• Во избежание переполнения мультиварки не превышайте
максимальный уровень воды, указанный во внутренней чаше.
Совет
• Помимо соблюдения указанного уровня воды, для приготовления
каши можно также использовать рис и воду в пропорции 1:4.
2 С помощью кнопки меню (МЕНЮ) выберите функцию
приготовления каши (каша) (рис. 12).
» Чтобы задать другое время приготовления, см. главу
«Изменение времени и температуры приготовления».
3 Нажмите кнопку включения (СТАРТ/ВЫКЛ) в течение
3 секунд для запуска процесса приготовления (рис. 10).
4 По окончании приготовления прозвучит 4 звуковых сигнала,
индикатор выбранной функции погаснет.
5 Мультиварка автоматически перейдет в режим подогрева.
» Загорится индикатор режима подогрева (ПОДОГРЕВ)
(рис. 11).
Приготовление плова
1 Положите ингредиенты во внутреннюю чашу.
2 Следуйте шагам 6 и 7 в главе «Подготовка к работе».
2
Press the hour button (ЧАСЫ +) to set the hour unit (fig.22).
3
Press the minute button (МИНУТЫ -) to set the minute unit
(fig.23).
4
To set a different cooking temperature, press the temperature
button (ТЕMП) (fig.24), and the default temperature starts
flashing on the display.
5
Press the increase (ЧАСЫ +) or the decrease (МИНУТЫ -)
button to set the desired cooking temperature (fig.25).
Preset time for delayed cooking
You can preset the delayed cooking time for all cooking modes except
the frying mode.
1
Follow steps 6 and 7 in “Preparations before cooking”.
2
Press the menu button (МЕНЮ) until your preferred cooking
function is selected.
3
Press the preset time button (ОТСРОЧКА СТАРТА), and the
default preset time starts flashing on the display (fig.26).
4
Preset the hour button (ЧАСЫ +) and the minute button
(МИНУТЫ -) to set the desired preset time.
5
Press the start button (СТАРТ/ВЫКЛ) to confirm the preset
timer (fig.10).
6
The cooking will be finished when the preset time has elapsed.
You will hear 4 beeps and the selected cooking function light will
be off.
7
The multicooker will be in keep-warm mode automatically.
»
The keep- warm (ПОДОГРЕВ/ВЫКЛ) indicator lights up
(fig.11).
Note
•
The preset function is not available in fry mode.
•
The preset button is not responsive in standby mode.
5
Cleaning and Maintenance
Note
•
Unplug the multicooker before starting to clean it.
•
Wait until the multicooker has cooled down sufficiently before cleaning it.
Interior
Inside of the top lid and the main body:
•
Wipe with wrung out and damp cloth.
•
Make sure to remove all the food residues stuck to the
multicooker.
Heating element:
•
Wipe with wrung out and damp cloth.
•
Remove food residues with wrung out and damp cloth.
Exterior
Surface of the top lid and outside of the main body:
•
Wipe with a cloth damped with soap water.
•
Only use soft and dry cloth to wipe the control panel.
•
Make sure to remove all the food residues around the
control panel.
Accessories
Spatula, soup ladle, inner pot, steam basket, and steam vent cap:
•
Soak in hot water and clean with sponge.
6 Environment
Do not throw away the appliance with normal household
waste at the end of its life, but hand it in at an official
collection point for recycling. By doing this, you can help to
preserve the environment.
7
Guarantee and service
If you need service or information, or if you have a problem, visit the
Philips website at www.philips.com or contact the Philips Customer
Care Center in your country. You can find its phone number in the
worldwide guarantee leaflet. If there is no Customer Care Center in
your country, go to your local Philips dealer.
8 Specifications
Model Number
HD3139
Rated power output
980W
Rated capacity
4.0L
9 Troubleshooting
If you encounter problems when using this multicooker, check the
following points before requesting service. If you cannot solve the
problem, contact the Philips Consumer Care Center in your country.
Problem
Solution
The light on the
button does not
go on.
There is a connection problem. Check
if the power cord is connected to the
multicooker properly and if the plug is
inserted firmly into the power outlet.
The light is defective. Take the appliance
to your Philips dealer or a service center
authorized by Philips.
The display does not
function.
The multicooker is not connected to the
power supply. If there is no power supply,
the power failure backup function does not
work and the display does not function.
The battery for the display runs out of
power. Take the appliance to your Philips
dealer or a service center authorized by
Philips to have the battery replaced.
The rice is not cooked. There is not enough water. Add water
according to the scale on the inside of the
inner pot.
You did not press the start button
(СТАРТ/ВЫКЛ).
Make sure that there is no foreign residue
on the heating element and the outside
of the inner pot before switching the
multicooker on.
The heating element is damaged, or the
inner pot is deformed. Take the multicooker
to your Philips dealer or a service center
authorized by Philips.
The rice is too dry
and not well cooked.
Add more water to the rice, and cook for
a bit longer.
The multicooker does
not switch to the
keep-warm mode
automatically.
You might have pressed the keep-warm
button (ПОДОГРЕВ/ВЫКЛ) before
pressing the start button (СТАРТ/ВЫКЛ).
In this case the multicooker will be in
standby mode after the cooking is finished.
The temperature control is defective. Take
the appliance to your Philips dealer or a
service center authorized by Philips.
The rice is scorched.
You have not rinse the rice properly. Rinse
the rice until the water runs clear.
Problem
Solution
Water spills out of the
multicooker during
cooking.
Make sure that you add water to the level
indicated on the scale inside the inner pot
that corresponds to the number of cups of
rice used.
I cannot get to the
desired cooking
function.
Press the menu button (МЕНЮ) repeatedly
to select the desired function as shown by
the indicator.
Rice smells bad after
cooking
Clean the inner pot with some washing
detergent and warm water.
After cooking, make sure the steam vent
cap, inner lid and inner pot is cleaned
thoroughly.
Error message (E1, E2,
E3, or E4) appears on
the display.
There has been a power failure during
cooking. Take the appliance to your Philips
dealer or a service center authorized by
Philips.
Русский
1
Мультиварка
Поздравляем с покупкой и приветствуем вас в клубе Philips!
Чтобы воспользоваться всеми преимуществами поддержки Philips,
зарегистрируйте приобретенное устройство на сайте
www.philips.com/welcome.
2
Комплект поставки
(рис. 1)
Мультиварка
Шнур питания
Паровая корзина
Мерный стакан
Лопатка
Половник для супа
Руководство пользователя
Книга рецептов
Инструкция по технике
безопасности
Гарантийный талон
3
Описание (рис. 2)
a
Съемная крышка
отверстия выхода пара
g
Нагревательный элемент
b
Кнопка открывания крышки
h
Разъем кабеля питания
c
Верхняя крышка
i
Ручка мультиварки
d
Внутренняя чаша
j
Индикация уровня воды
e
Панель управления
k
Уплотнительное кольцо
f
Основной корпус
Описание элементов управления (рис. 3)
l
Автоматические
программы
q
Кнопка установки минут/
уменьшения значения
m
Кнопка индикации
подогрева и его
отключения
r
Кнопка выбора времени
приготовления
n
Кнопка меню
s
Кнопка выбора температуры
o
Кнопка отсрочки старта
t
Кнопка включения/отмены
p
Кнопка установки часов/
увеличения значения
u
Дисплей
Обзор функций
Функции
Время
приготовления
по умолчанию
Регулируемое
время
приготовления
Время
отсрочки
старта
Температура
приготовления
по умолчанию
Рис
40 мин.
/
1—24 ч.
130—140 °C
Каша
10 минут
5 мин.—2 ч.
1—24 ч.
95—100 °C
Суп
1 ч
20 мин—4 ч
1—24 ч.
90—100 °C
Пароварка
45 мин.
5 мин.—2 ч.
1—24 ч.
90—100 °C
Печь
45 мин.
20 мин.-2 ч.
1—24 ч.
100 °C
Жарить
15 мин.
5—60 мин.
/
145—150 °C
Тушить
1 час
20 мин.-10 ч.
1—24 ч.
85—90 °C
Свой выбор
2 ч.
5 мин.—10 ч.
1—24 ч.
100 °C
Примечание
•
Можно настраивать температуру для функции приготовления
выпечки и ручных режимов. Можно выбрать температуру для
функции приготовления выпечки и ручных режимов в диапазоне от
40 °C до 160 °C. Шаг изменения температуры составляет 10 °С.
•
После запуска процесса приготовления для отключения программы
нажмите кнопку отмены (СТАРТ/ВЫКЛ), мультиварка перейдет в
режим ожидания.
4
Использование мультиварки
Перед первым использованием
1
Извлеките все принадлежности из внутренней чаши. Снимите
с внутренней чаши упаковочные материалы.
2
Тщательно очистите все детали мультиварки перед первым
использованием (см. главу «Очистка и уход»).
Примечание
•
Перед использованием мультиварки убедитесь, что все части
абсолютно сухие.
Подготовка к работе
Перед использованием мультиварки выполните следующие
действия.
1
Измерьте количество крупы с помощью прилагаемого
мерного стакана.
2
Тщательно промойте крупу.
3
Поместите предварительно промытую крупу во внутреннюю
чашу.
4
Добавьте воду до уровня, указанного на шкале во внутренней
чаше, и равномерно распределите крупу.
5
Откройте крышку, нажав соответствующую кнопку (рис. 4).
6
Протрите насухо внешнюю поверхность внутренней чаши
(рис. 5), установите чашу в мультиварку (рис. 6). Убедитесь,
что внутренняя чаша касается нагревательного элемента
должным образом.
7
Закройте крышку мультиварки (рис. 7), вставьте сетевую вилку
в розетку электросети (рис. 8).
Примечание
•
Подробности о соотношении количества крупы и воды см. в рецепте.
•
Уровень, отмеченный во внутренней чаше, является
рекомендованным. Объем воды можно изменять в соответствии с
типом крупы и вашими предпочтениями.
•
Убедитесь, что внешняя поверхность внутренней чаши является
сухой и чистой, а на нагревательном элементе и магнитном
переключателе отсутствуют загрязнения.
Приготовление риса
1
Следуйте инструкциям в главе «Подготовка к работе».
2
С помощью кнопки меню (МЕНЮ) выберите функцию
приготовления риса (Рис) (рис. 9).
3
Нажмите кнопку включения (СТАРТ/ВЫКЛ) для запуска
процесса приготовления (рис. 10).
4
По окончании приготовления прозвучит 4 звуковых сигнала,
индикатор выбранной функции погаснет.
5
Мультиварка автоматически перейдет в режим подогрева.
»
Загорится индикатор режима подогрева
(ПОДОГРЕВ / ВЫКЛ) (рис. 11).
Примечание
•
Если в вашем регионе в сети наблюдаются перепады напряжения,
чаша мультиварки может переполниться.
•
По окончании приготовления сразу же перемешайте рис, чтобы
разрыхлить его и выпарить лишнюю жидкость. Это позволит
получить более рассыпчатый рис.
•
В зависимости от условий приготовления нижний слой риса может
стать золотистым.
Приготовление каши
1
Следуйте шагам 1 — 7 в главе «Подготовка к работе».
Примечание
•
Во избежание переполнения мультиварки не превышайте
максимальный уровень воды, указанный во внутренней чаши.
Совет
•
Помимо соблюдения требуемого уровня воды для приготовления
каши можно также использовать крупу и воду в пропорции 1:4.
2
С помощью кнопки меню (МЕНЮ) выберите функцию
приготовления каши (Каша) (рис. 12).
»
Чтобы задать другое время приготовления, см. главу
«Изменение времени и температуры приготовления».
3
Нажмите кнопку включения (СТАРТ
/
ВЫКЛ) для запуска
процесса приготовления (рис. 10).
4
По окончании приготовления прозвучит 4 звуковых сигнала,
индикатор выбранной функции погаснет.
5
Мультиварка автоматически перейдет в режим подогрева.
»
Загорится индикатор режима подогрева
(ПОДОГРЕВ
/
ВЫКЛ) (рис. 11).
Приготовление супа
1
Положите ингредиенты и налейте воду во внутреннюю чашу.
2
Следуйте шагам 6 и 7 в главе «Подготовка к работе».
3
С помощью кнопки меню (МЕНЮ) выберите функцию
приготовления супа (Суп) (рис. 13).
»
Чтобы задать другое время приготовления, см. главу
«Изменение времени и температуры приготовления».
4
Нажмите кнопку включения (СТАРТ
/
ВЫКЛ) для запуска
процесса приготовления (рис. 10).
5
По окончании приготовления прозвучит несколько звуковых
сигналов, индикатор выбранной функции погаснет.
6
Мультиварка автоматически перейдет в режим подогрева.
»
Загорится индикатор режима подогрева
(ПОДОГРЕВ
/
ВЫКЛ) (рис. 11).
Пароварка
1
Налейте воду во внутреннюю чашу.
2
Поместите продукты для приготовления на пару на тарелку
или в поддон пароварки.
3
При использовании отдельной тарелки поместите ее в
поддон пароварки (рис. 14).
4
Поставьте поддон пароварки во внутреннюю чашу (рис. 15).
5
Следуйте шагам 6 и 7 в главе «Подготовка к работе».
6
С помощью кнопки меню (МЕНЮ) выберите функцию
приготовления на пару (Пароварка) (рис. 16).
»
Чтобы задать другое время приготовления, см. главу
«Изменение времени и температуры приготовления».
7
Нажмите кнопку включения (СТАРТ
/
ВЫКЛ) для запуска
процесса приготовления (рис. 10).
8
По окончании приготовления прозвучит 4 звуковых сигнала,
индикатор выбранной функции погаснет.
9
Мультиварка автоматически перейдет в режим подогрева.
»
Загорится индикатор режима подогрева
(ПОДОГРЕВ
/
ВЫКЛ) (рис. 11).
10
Откройте крышку и аккуратно извлеките продукты из тарелки
или паровой корзины.
Примечание
•
Количество воды зависит от количества продуктов в лотке для
приготовления на пару. Не погружайте лоток для приготовления на
пару в воду.
•
Используйте кухонную прихватку или ткань, так как тарелка и поддон
очень горячие.
Выпечка
1
Положите ингредиенты во внутреннюю чашу.
2
Следуйте инструкциям в шаге 6 главы «Подготовка к работе».
3
Подключите сетевую вилку к электророзетке.
Примечание
•
При выпечке тортов крышка должна быть закрыта. Оптимальной
для выпечки считается температура 130 °C и время приготовления
45 минут.
•
При выпечке других изделий крышка должна быть открыта.
•
Во время приготовления рекомендуется открывать крышку, если
температура превышает 130 °C.
4
С помощью кнопки меню (МЕНЮ) выберите функцию
выпечки (Печь) (рис. 17).
»
Чтобы задать другое время приготовления, см. главу
«Изменение времени и температуры приготовления».
5
Нажмите кнопку включения (СТАРТ
/
ВЫКЛ) для запуска
процесса приготовления (рис. 10).
6
По окончании приготовления выпечки прозвучит 4 звуковых
сигнала, индикатор выбранной функции погаснет.
7
Мультиварка автоматически перейдет в режим подогрева.
»
Загорится индикатор режима подогрева
(ПОДОГРЕВ
/
ВЫКЛ) (рис. 11).
Примечание
•
Извлекая внутреннюю емкость из мультиварки, пользуйтесь
кухонными рукавицами или прихватками — емкость сильно
нагревается.
Жарка
1
Положите ингредиенты во внутреннюю чашу.
2
Следуйте инструкциям в шаге 6 главы «Подготовка к работе».
3
Подключите сетевую вилку к электророзетке.
4
С помощью кнопки меню (МЕНЮ) выберите функцию
обжаривания (Жарить) (рис. 18).
»
Чтобы задать другое время приготовления, см. главу
«Изменение времени и температуры приготовления».
5
Нажмите кнопку включения (СТАРТ
/
ВЫКЛ) для запуска
процесса приготовления (рис. 10).
6
По окончании приготовления прозвучит 4 звуковых сигнала,
индикатор выбранной функции погаснет.
7
Мультиварка автоматически перейдет в режим подогрева.
»
Загорится индикатор режима подогрева
(ПОДОГРЕВ
/
ВЫКЛ) (рис. 11).
Примечание
•
В режиме обжаривания не накрывайте прибор верхней крышкой.
•
Во время приготовления рекомендуется открывать крышку, если
температура превышает 130 °C.
ушение
1
Положите ингредиенты во внутреннюю чашу.
2
Следуйте шагам 6 и 7 в главе «Подготовка к работе».
3
С помощью кнопки меню (МЕНЮ) выберите функцию
тушения (Тушить) (рис. 19).
»
Чтобы задать другое время приготовления, см. главу
«Изменение времени и температуры приготовления».
4
Нажмите кнопку включения (СТАРТ
/
ВЫКЛ) для запуска
процесса приготовления (рис. 10).
5
По окончании приготовления прозвучит 4 звуковых сигнала,
индикатор выбранной функции погаснет.
6
Мультиварка автоматически перейдет в режим подогрева.
»
Загорится индикатор режима подогрева
(ПОДОГРЕВ
/
ВЫКЛ) (рис. 11).
Ручной
Для настройки температуры и времени приготовления можно
воспользоваться ручным режимом.
1
Положите ингредиенты во внутреннюю чашу.
2
Следуйте шагам 6 и 7 в главе «Подготовка к работе».
3
С помощью кнопки меню (МЕНЮ) выберите функцию
приготовления в ручном режиме (Свой выбор) (рис. 20).
»
Чтобы задать другое время приготовления, см. главу
«Изменение времени и температуры приготовления».
4
Нажмите кнопку включения (СТАРТ
/
ВЫКЛ) для запуска
процесса приготовления (рис. 10).
5
По окончании приготовления прозвучит 4 звуковых сигнала,
индикатор выбранной функции погаснет.
6
Мультиварка автоматически перейдет в режим подогрева.
»
Загорится индикатор режима подогрева
(ПОДОГРЕВ
/
ВЫКЛ) (рис. 11).
Примечание
•
Во время приготовления еды при температуре ниже 70 °C следует
выключить режим поддержания температуры перед началом
приготовления.
•
В ручном режиме при выборе температуры выше 130 °C верхняя
крышка во время приготовления должна быть открыта.
Режим подогрева
В мультиварке предусмотрена функция простого управления
режимом поддержания температуры.
•
Если после выбора функции приготовления с помощью кнопки
меню (МЕНЮ) нажать кнопку включения (СТАРТ
/
ВЫКЛ),
загорится индикатор режима подогрева. После окончания
приготовления мультиварка перейдет в режим подогрева.
•
Если после выбора функции приготовления с помощью кнопки
меню (МЕНЮ) сначала нажать кнопку режима подогрева, а
затем кнопку включения (СТАРТ
/
ВЫКЛ), индикатор режима
подогрева не загорится. По окончании приготовления
мультиварка перейдет в режим ожидания.
Примечание
•
Для перехода в режим подогрева в режиме ожидания нажмите
кнопку режима подогрева (ПОДОГРЕВ
/
ВЫКЛ).
•
Для перехода в режим ожидания в режиме поддержания
температуры нажмите кнопку режима подогрева
(ПОДОГРЕВ
/
ВЫКЛ).
Изменение времени и температуры
приготовления
Время приготовления можно изменить для всех функций, кроме
функции приготовления риса; температуру приготовления можно
изменить для функции выпечки и ручных режимов. Допустимые
значения времени см. в таблице «Обзор функций».
После выбора функции приготовления с помощью кнопки меню
на дисплее отобразится заданное по умолчанию время.
1
Чтобы выбрать другое время приготовления, нажмите кнопку
выбора времени приготовления (ВРЕМЯ ПРИГОТОВЛЕНИЯ)
(рис. 21). На дисплее начнет мигать время приготовления,
установленное по умолчанию.
2
Нажмите кнопку установки значения часа (ЧАСЫ +), чтобы
установить значение часа (рис. 22).
3
Нажмите кнопку установки значения минут (МИНУТЫ -),
чтобы установить значение минут (рис. 23).
4
Чтобы установить другую температуру приготовления,
нажмите кнопку нагрева (ТЕMП) (рис. 24), на дисплее начнет
мигать значение температуры, установленное по умолчанию.
5
С помощью кнопки увеличения (ЧАСЫ +) или уменьшения
значения (МИНУТЫ -) выберите температуру приготовления
(рис. 25).
Функция отсрочки старта для включения в
заданное время
Функцию отсрочки старта можно выбрать для всех режимов
приготовления, кроме режима обжаривания.
1
Следуйте шагам 6 и 7 в главе «Подготовка к работе».
2
С помощью кнопки меню (МЕНЮ) выберите функцию
приготовления.
3
Нажмите кнопку отсрочки старта (ОТСРОЧКА СТАРТА), и
на дисплее начнет мигать время отсрочки, установленное по
умолчанию (рис. 26).
4
Установить время отсрочки старта можно с помощью кнопок
установки значения часа (ЧАСЫ +) и минут (МИНУТЫ -).
5
Нажмите кнопку включения (СТАРТ/ВЫКЛ), чтобы
подтвердить заданное время отсрочки (рис. 10).
6
По истечении установленного времени приготовление
будет завершено. Прозвучит 4 звуковых сигнала, индикатор
выбранной функции погаснет.
7
Мультиварка автоматически перейдет в режим подогрева.
»
Загорится индикатор режима подогрева
(ПОДОГРЕВ
/
ВЫКЛ) (рис. 11).
Примечание
•
Функция отсрочки старта недоступна для режима обжаривания.
•
Кнопка отсрочки старта не работает в режиме ожидания.
5
Очистка и уход
Примечание
•
Перед тем как приступать к очистке, отключите мультиварку от сети.
•
Перед началом очистки дождитесь, пока мультиварка остынет.
Уход за внутренними поверхностями
Внутренняя поверхность верхней крышки и корпуса.
•
Протрите слегка влажной тканью.
•
Обязательно удалите все приставшие остатки пищи.
Нагревательный элемент.
•
Протрите слегка влажной тканью.
•
Удалите остатки пищи слегка влажной тканью.
Уход за внешними поверхностями
Поверхность верхней крышки и внешняя поверхность корпуса.
•
Протрите тканью, смоченной мыльной водой.
•
Для очистки панели управления используйте только
мягкую сухую ткань.
•
Тщательно удаляйте остатки пищи вокруг кнопок
управления.
Аксессуары
Лопатка, половник для супа, внутренняя емкость, паровая корзина
и крышка отверстия выхода пара.
•
Замочите в горячей воде и очистите губкой.
6
Защита окружающей среды
После окончания срока службы не выбрасывайте
прибор вместе с бытовыми отходами. Передайте его в
специализированный пункт для дальнейшей утилизации.
Таким образом вы поможете защитить окружающую
среду.
7
Гарантия и обслуживание
Если вам требуется обслуживание прибора или дополнительная
информация, а также в случае возникновения проблем посетите
веб-сайт Philips, расположенный по адресу
www.philips.com, или обратитесь в центр поддержки
потребителей Philips в вашей стране. Ее телефонный номер
можно найти в гарантийном буклете. Если в вашей стране нет
центра поддержки потребителей Philips, обратитесь по месту
приобретения изделия.
8
Характеристики
Номер модели
HD3139
Расчетная выходная мощность 980 Вт
Номинальная емкость
4 л
9
Устранение неисправностей
При возникновении неполадок в процессе использования
мультиварки перед обращением в сервисную службу проверьте
следующее. Если устранить неполадку не удается, обратитесь в
центр поддержки потребителей Philips в вашей стране.
Проблема
Решение
Не загорается
индикатор кнопки.
Неправильное подключение. Убедитесь,
что сетевой шнур правильно подключен
к мультиварке, а сетевая вилка плотно
установлена в розетку электросети.
Индикатор неисправен. Отнесите
прибор в торговую организацию или
авторизованный сервисный центр Philips.
Не работает
дисплей.
Мультиварка не подключена к источнику
питания. При отсутствии электропитания
не срабатывает функция возобновления
работы, не работает дисплей.
Элемент питания дисплея разряжен. Для
замены элемента питания обратитесь
в торговую организацию Philips или
авторизованный сервисный центр Philips.
Рис не готов.
Добавлено недостаточно воды. Добавьте
воду в соответствии со шкалой, указанной
во внутренней чаше.
Не нажата кнопка включения
(СТАРТ
/
ВЫКЛ).
Перед включением мультиварки убедитесь,
что на нагревательном элементе и
внешней поверхности внутренней чаши
нет загрязнений.
Поврежден нагревательный элемент
или деформирована внутренняя
емкость. Для проверки мультиварки
обратитесь в торговую организацию или
авторизованный сервисный центр Philips.
Рис пересушен и
недоварен.
Добавьте больше воды, увеличьте время
приготовления.
Мультиварка не
переключается
в режим
поддержания
температуры
автоматически.
Возможно, кнопка режима подогрева
(ПОДОГРЕВ
/
ВЫКЛ) была нажата до
кнопки включения (СТАРТ
/
ВЫКЛ). В
этом случае по окончании приготовления
мультиварка переходит в режим ожидания.
Неисправен регулятор температуры.
Отнесите прибор в торговую организацию
или авторизованный сервисный центр Philips.
Крупа пригорела.
Крупа плохо промыта. Промывайте крупу,
пока вода не станет прозрачной.
Во время
приготовления
из мультиварки
пролилась вода.
Убедитесь, что вода добавлена до уровня,
указанного в шкале во внутренней чаше, в
соответствии с количеством используемой
крупы.
Не удается выбрать
нужную функцию
приготовления.
Последовательно нажимайте кнопку меню
(МЕНЮ), чтобы выбрать нужную функцию,
ориентируясь на показания индикатора.
Приготовленная
крупа неприятно
пахнет.
Очистите внутреннюю чашу в теплой воде
с помощью средства для мытья посуды.
После приготовления тщательно
очистите крышку отверстия выхода пара,
внутреннюю крышку и внутреннюю чашу..
На дисплее
появляется
сообщение об
ошибке (E1, E2, E3
или E4).
Во время процесса приготовления
произошел сбой подачи питания. Отнесите
прибор в торговую организацию или
авторизованный сервисный центр Philips.
Specifications are subject to change without notice
© 2014 Koninklijke Philips N.V.
All rights reserved.
HD3139
Мультиварка
Мультипісіргіш
Register your product and get support at
www.philips.com/welcome
Always there to help you
Question?
Contact
Philips
English
1
Your multicooker
Congratulations on your purchase, and welcome to Philips!
To fully benefit from the support that Philips offers, register your
product at www.philips.com/welcome.
2
What’s in the box
(fig.1)
Multicooker main unit
Power cord
Steam basket
Measuring cup
Spatula
Soup ladle
User manual
Recipe
Safety leaflet
Warranty card
3
Overview (fig.2)
a
Detachable steam vent cap
g
Heating element
b
Lid release button
h
Power socket
c
Top lid
i
Cooker handle
d
Inner pot
j
Water level indications
e
Control panel
k
Sealing ring
f
Main body
Controls overview (fig.3)
l
Cooking functions
q
Minute/Decrease button
m
Keep-warm/Off button
r
Cooking time button
n
Menu button
s
Temperature button
o
Preset timer button
t
Start/Cancel button
p
Hour/Increase button
u
Display screen
Functions overview
Functions
Default
cooking
time
Adjustable
cooking time
Preset
time
Default cooking
temperature
Ric
(
Рис)
40 min
/
1-24 hr
130-140°C
Porridge (Каша)
10 min
5 min-2 hr
1-24 hr
95-100°C
Soup
(Суп)
1 hr
20 min-4 hr
1-24 hr
90-100°C
Steam
(Пароварка)
45 min
5 min-2 hr
1-24 hr
90-100°C
Bake
(Печь)
45 min
20 min-2 hr
1-24 hr
100°C
Fry
(Жарить)
15 min
5-60 min
/
145-150°C
Stew (Тушить)
1 hr
20 min-10 hr
1-24 hr
85-90°C
Manual
(Свой выбор)
2 hr
5 min-10 hr
1-24 hr
100°C
Note
•
The cooking temperature for the baking and manual functions is
adjustable. You can select temperature for both the baking and manual
functions between 40°C to 160°C. The step is 10°C.
•
After the cooking has started, you can press the cancel button (
СТАРТ/
ВЫКЛ
) to deactivate the cooking process and the multicooker will enter
the standby mode.
4
Using the multicooker
Before first use
1
Take out all the accessories from the inner pot. Remove the
packaging material of the inner pot.
2
Clean the parts of the multicooker thoroughly before using it for
the first time (see chapter ‘Cleaning and Maintenance’).
Note
•
Make sure all parts are completely dry before you start using the
multicooker.
Preparations before cooking
Before using the multicooker, you need to do the following steps:
1
Measure the grains using the measuring cup provided.
2
Wash the grains thoroughly.
3
Put the pre-washed grains in the inner pot.
4
Add water to the level indicated on the scale inside the inner pot
and smooth the grains surface.
5
Press the lid release button to open the lid (fig.4).
6
Wipe the outside of the inner pot dry (fig.5), then put the inner
pot in the multicooker (fig.6). Check if the inner pot is in proper
contact with the heating element.
7
Close the lid of the multicooker (fig.7), and put the plug in the
power socket (fig.8).
Note
•
For details about the ratio of grains and water, see the recipe.
•
The level marked inside the inner pot is just an indication. You can
always adjust the water level for different types of grains and your own
preference.
•
Make sure that the outside of the inner pot is clean and dry, and that
there is no foreign residue on the heating element or the magnetic switch.
Cooking rice
1
Follow the steps in “Preparations before cooking”.
2
Press the menu button (
МЕНЮ
) until the rice cooking function
(
Рис
) is selected (fig.9).
3
Press the start button (
СТАРТ/ВЫКЛ
) to start cooking (fig.10).
4
When the cooking is finished, you will hear 4 beeps and the
selected cooking function light will be off.
5
The multicooker will be in keep-warm mode automatically.
»
The keep-warm (
ПОДОГРЕВ/ВЫКЛ
) indicator lights up
(fig.11).
Note
•
If the voltage is unstable at the area you live, it is possible that the
multicooker overflows.
•
After the cooking is finished, stir the rice and loosen it immediately to
release excessive moisture for fluffy rice.
•
Depending on the cooking conditions, the bottom portion of the rice may
become slightly browned.
Cooking porridge
1
Follow steps 1 to 7 in “Preparations before cooking”.
Note
•
Do not exceed the maximum water level indicated in the inner pot, as this
may cause the multicooker to overflow.
Tip
•
Besides following the water level indications, you may also add rice and
water at 1:4 ratio for porridge cooking
2
Press the menu button (
МЕНЮ
) until the porridge function
(
Каша
) is selected (fig.12).
»
To set a different cooking time, refer to chapter “Adjusting the
cooking time and temperature”.
3
Press the start button (
СТАРТ/ВЫКЛ
) to start cooking (fig.10).
4
When the cooking is finished, you will hear 4 beeps and the
selected cooking function light will be off.
5
The multicooker will be in keep warm mode automatically.
»
The keep-warm indicator (
ПОДОГРЕВ/ВЫКЛ
) lights up
(fig.11).
Making soup
1
Put ingredients and water into the inner pot.
2
Follow steps 6 and 7 in “Preparations before cooking”.
3
Press the menu button (
МЕНЮ
) until the soup making function
(
Суп
) is selected (fig.13).
»
To set a different cooking time, refer to chapter “Adjusting the
cooking time and temperature”.
4
Press the start button (
СТАРТ/ВЫКЛ
) to start cooking (fig.10).
5
When the cooking is finished, you will hear a few beeps and the
selected cooking function light will be off.
6
The multicooker will be in keep-warm mode automatically.
»
The keep-warm indicator (
ПОДОГРЕВ/ВЫКЛ
) lights up
(fig.11).
Steaming
1
Pour some water into the inner pot.
2
Put the food to be steamed on a plate or in the steam tray.
3
If you are using a separate plate, put it into the steam tray (fig.14).
4
Put the steam tray into the inner pot (fig.15).
5
Follow steps 6 and 7 in “Preparations before cooking”.
6
Press the menu button (
МЕНЮ
) until the steaming function
(
Пароварка
) is selected (fig.16).
»
To set a different cooking time, refer to chapter “Adjusting the
cooking time and temperature”.
7
Press the start button (
СТАРТ/ВЫКЛ
) to start cooking (fig.10).
8
When the cooking is finished, you will hear 4 beeps and the
selected cooking function light will be off.
9
The multicooker will be in keep warm mode automatically.
»
The keep-warm indicator (
ПОДОГРЕВ/ВЫКЛ
) lights up
(fig.11).
10
Open the lid and carefully take out the steamed food from the
plate or steam basket.
Note
•
The quantity of water depends on the amount of food in the steam tray.
Do not immerse the steam tray in water.
•
Use a kitchen glove or a cloth, as the plate and steam tray will be very hot.
Baking
1
Put the food and ingredients in the inner pot.
2
Follow step 6 in “Preparations before cooking”.
3
Put the plug in the power socket.
Note
•
When baking cake, keep the lid closed during cooking. Baking cake at
130°C and by 45 minutes usually delivers best cooking result.
•
When baking food other than cake, the lid must be opened during
cooking.
•
It’s recommended to open lid during cooking when the temperature is
above 130°C.
4
Press the menu button (
МЕНЮ
) until the baking function (
Печь
)
is selected (fig.17).
»
To set a different cooking time, refer to chapter “Adjusting the
cooking time and temperature”.
5
Press the start button (
СТАРТ/ВЫКЛ
) to start cooking (fig.10).
6
When the baking is finished, you will hear 4 beeps and the
selected function light will be off.
7
The multicooker will be in keep-warm mode automatically.
»
The keep-warm indicator (
ПОДОГРЕВ/ВЫКЛ
) lights up
(fig.11).
Note
•
When removing the inner pot from the multicooker, use a kitchen glove
or a cloth, as the inner pot will be very hot.
Frying
1
Put food and ingredients into the inner pot.
2
Follow step 6 in “Preparations before cooking”.
3
Put the plug in the power socket.
4
Press the menu button (
МЕНЮ
) until the fry function (
Жарить
)
is selected (fig.18).
»
To set a different cooking time, refer to chapter “Adjusting the
cooking time and temperature”.
5
Press the start button (
СТАРТ/ВЫКЛ
) to start cooking (fig.10).
6
When the cooking is finished, you will hear 4 beeps and the
selected cooking function light will be off.
7
The multicooker will be in keep-warm mode automatically.
»
The keep-warm indicator (
ПОДОГРЕВ/ВЫКЛ
) lights up
(fig.11).
Note
•
Do not close the top lid when cooking in the fry mode.
•
It’s recommended to open lid during cooking when the temperature is
above 130°C.
Stewing
1
Put the food and ingredients in the inner pot.
2
Follow steps 6 and 7 in “Preparations before cooking”.
EN
User manual
RU
Руководство пользователя
http://www.philips.com/welcome
User manual
http://www.philips.com/welcome
Recipe
http://www.philips.com/welcome
Safety leaflet
http://www.philips.com/welcome
Warranty
m
l
n
o
r
s
t
u
p
q
3
Press the menu button (
МЕНЮ
) until the stewing function
(
Тушить
) is selected (fig.19).
»
To set a different cooking time, refer to chapter “Adjusting the
cooking time and temperature”.
4
Press the start button (
СТАРТ/ВЫКЛ
) to start cooking (fig.10).
5
When the cooking is finished, you will hear 4 beeps and the
selected cooking function light will be off.
6
The multicooker will be in keep-warm mode automatically.
»
The keep-warm indicator (
ПОДОГРЕВ/ВЫКЛ
) lights up
(fig.11).
Manual
You may use the manual mode to cook food with more control over
the cooking time and temperature.
1
Put the food and ingredients in the inner pot.
2
Follow steps 6 and 7 in “Preparations before cooking”.
3
Press the menu button (
МЕНЮ
) until the manual function
(
Свой выбор
) is selected (fig.20).
»
To set a different cooking time, refer to chapter “Adjusting the
cooking time and temperature”.
4
Press the start button (
СТАРТ/ВЫКЛ
) to start cooking (fig.10).
5
When the cooking is finished, you will hear 4 beeps and the
selected cooking function light will be off.
6
The multicooker will be in keep-warm mode automatically.
»
The keep-warm indicator (
ПОДОГРЕВ/ВЫКЛ
) lights up
(fig.11).
Note
•
If you cook food at a temperature below 70°C, please turn off the keep-
warm mode before start cooking.
•
In manual mode, when cooking at a temperature higher than 130°C, the
top lid must be opened during cooking.
Keep-warm mode
The multicooker provides you with easy control over the keep-warm
mode.
•
After you have selected the cooking function using the menu
button (
МЕНЮ
), if you press the start button (
СТАРТ/ВЫКЛ
)
directly, the keep-warm indicator will light up. After the cooking is
finished, the multicooker will switch to keep-warm mode directly.
•
After you have selected the cooking function using the menu
button (
МЕНЮ
), if you press the keep-warm button first, and then
the start button (
СТАРТ/ВЫКЛ
), the keep-warm indicator will
be off. After the cooking is finished, the multicooker will enter the
standby mode.
Note
•
In standby mode, you can press the keep-warm button (
ПОДОГРЕВ/
ВЫКЛ
) to enter keep-warm mode.
•
In keep-warm mode, you can press the keep-warm button (
ПОДОГРЕВ/
ВЫКЛ
) to enter standby mode.
Adjusting the cooking time and temperature
You can adjust the cooking time for all functions except the rice
function; and you can adjust the cooking temperature for baking and
manual functions. Refer to the “Functions overview” table for the time
regulation of each function.
After you have selected the desired cooking function using the menu
button, the default cooking time will be displayed on the screen.
1
To set a different cooking time, press the cooking time button
(
ВРЕМЯ ПРИГОТОВЛЕНИЯ
) (fig.21), and the default cooking
time starts flashing on the display.
1
2
3
e
f
a
b
c
g
h
i
k
j
d
Изготовитель:
“Филипс Консьюмер Лайфстайл Б.В.”, Туссендиепен 4,
9206 АД, Драхтен, Нидерланды
Импортер на территорию России и Таможенного Союза:
ООО «ФИЛИПС», Российская Федерация, 123022 г.
Москва, ул. Сергея Макеева, д.13, тел. +7 495 961-1111
Сделано в Китае
Дата производства указана в серийном номере
устройства. Например, “XP1A1347000001” означает, что
изделие было произведено на 47-ой неделе 2013 года.
Өндіруші:
“Филипс Консьюмер Лайфстайл Б.В.”, Туссендиепен 4, 9206
АД, Драхтен, Нидерланды
Ресей және Кедендік Одақ территориясына импорттаушы:
«ФИЛИПС» ЖШҚ, Ресей Федерациясы, 123022 Мәскеу
қаласы, Сергей Макеев көшесі, 13-үй, тел. +7 495 961-1111
Қытайда жасап шығарылған
Өнімнің сериялық нөмірінен өндірілген күнін табуға
болады. Мысалы, «XP1A1347000001» өнімнің 2013 жылдың
47-ші аптасында шығарылғанын білдіреді.
Обзор
Philips HD3139 – мультиварка, обладающая высокой мощностью нагрева в 980 Вт и 9 режимами готовки. Чаша имеет объём 4 литра и имеет керамическое покрытие.
Режимы готовки
В этой модели предусмотрено 9 режимов, среди них: выпечка, каша, крупа, тушение, приготовление на пару, плов, жарка, йогурт и подогрев. В сравнении с моделью HD3039, появилась программа для приготовления йогурта. Режимов более чем достаточно для повседневного меню, но для более сложных блюд параметры готовки придется подбирать опытным путем.
Чаша
Чаша имеет объём в 4 литра, изготавливается из алюминия, покрытие – керамика. Производитель заявляет, что толщина покрытия составляет 2 мм, это довольно хороший показатель. Такая чаша прослужит долго, к тому же её можно мыть в посудомоечной машине.
Дополнительные функции
Автоматический подогрев рассчитан на время до двух часов.
Таймер отложенного старта можно установить на время до 24 часов, после истечения этого времени мультиварка самостоятельно начнет готовить по заранее выбранной пользователем программе.
Нагрев
Мощность нагрева очень высокая, 980 Вт для чаши объёмом 4 литра – отличный показатель.
Нагревательные элементы расположены вокруг чаши (применена технология 3D нагрева), это позволяет равномерней нагревать содержимое чаши, что сказывается на качестве приготовления еды, особенно выпечке.
Управление
Управление предельно простое, реализовано с помощью всего нескольких кнопок. Есть кнопки для выбора режима, установки времени и запуска режима. Дисплей небольшой, основное его назначение – отображение времени готовки.
Корпус
Корпус мультиварки выполнен из пластика, оснащен нескользящими ножками и ручкой для переноски. Габариты прибора -230x291x389 мм (ШхВхГ), вес – 3,6 кг.
Комплектация
Мультиварка комплектуется лопаткой и ложкой из пластика, контейнером-пароваркой, мерной чашей (мультистаканом).
Заключение
HD3139 от Philips – качественная мультиварка с хорошим набором функций, благодаря высокой мощности и 3D нагреву она отлично подойдет для выпекания. Любителям поэкспериментировать с готовкой лучше подыскать модель с большим количеством программ готовки или мультиповаром.

Марина Русакова
Автор в разделах кухонной техники. Специализируется на технике для готовки, встраиваемой технике.
e-mail для вопросов: rusakovamarina@likechef.ru
Основные характеристики
Тип: мультиварка
Программы: молочная каша, жарка, приготовление на пару, выпечка, тушение, плов, йогурт, крупа
3D нагрев: есть
Отложенный старт: есть
Поддержание тепла: есть
Мощность: 980 Вт
Объем: 4 л
Материал корпуса: пластик
Антипригарное покрытие чаши: да
Съемная верхняя крышка: нет
Управление: электронное
Дисплей: есть
Дополнительная информация: пластиковая чаша для приготовления на пару, ложка для супа, лопатка, мерная чаша, книга с рецептами
Вес: 3.6 кг