- Manuals
- Brands
- MOTU Manuals
- Accessories
- MicroBook II
- User manual
-
Contents
-
Table of Contents
-
Troubleshooting
-
Bookmarks
Quick Links
Related Manuals for MOTU MicroBook II
Summary of Contents for MOTU MicroBook II
-
Page 2
That license agreement is a contract, and clicking Authorization Number on the outside of the box below the shipping address. “Accept” binds you and MOTU to all its terms and conditions. In the event This warranty does not apply if the equipment has been damaged by anything contained in this summary is incomplete or in conflict with the actual… -
Page 3: User Guide
MicroBook II ™ User Guide 1280 Massachusetts Avenue Cambridge, MA 02138 Business voice: (617) 576-2760 Business fax: (617) 576-3609 Web site: www.motu.com Tech support: www.motu.com/support…
-
Page 4: Important Safeguards
3. Heed Warnings — All warnings on the MOTU MicroBook and in the owner’ s manual should be adhered to. 4. Follow Instructions — All operating and use instructions should be followed. 5. Cleaning — Unplug the MOTU MicroBook from the computer before cleaning and use a damp cloth. Do not use liquid or aerosol cleaners.
-
Page 5: Table Of Contents
Contents Quick Reference: MicroBook Front Panel Quick Reference: MicroBook Rear Panel Quick Reference: MicroBook Top Panel Quick Reference: CueMix FX About the MicroBook Packing List and System Requirements Installing the MicroBook Software Installing the MicroBook Hardware Mac OS X Audio Software Windows Audio Software CueMix FX Troubleshooting…
-
Page 9: Quick Reference: Cuemix Fx
CHAPTER Launch CueMix FX (in your Mac Applications folder or in the Windows Start menu under Programs>MOTU>CueMix FX) to control the MicroBook. This chapter gives you a quick overview. For further details, see chapter 7, “CueMix FX” (page 39). 1. Input settings include trim 3.
-
Page 10
1. Click the Outputs tab to access White, or Pink produces a sine 3. If you want to apply EQ or settings for the MicroBook’s wave or white/pink noise from dynamics processing to the outputs. For example, you can the MicroBook’s signal genera- output, click here to enable it choose one of four different tor (item 8 on the previous… -
Page 11: About The Microbook
About the MicroBook CHAPTER Overview Obtaining your MicroBook The MicroBook is a USB audio interface serial number for Mac and Windows with on-board The MicroBook holds its serial effects and mixing that offers six inputs number electronically in the unit and eight outputs for recording and itself.
-
Page 12
S/PDIF digital out on RCA (duplicates AudioDesk™ full-featured audio ■ ■ Main Out). workstation software for Mac OS X. Headphone output on a quarter-inch USB cable included. ■ ■ stereo jack with independent volume With a variety of I/O formats, dedicated control. -
Page 13
recorded wet, dry, or dry with a wet monitor mix (for musicians during recording, for example). Effects include parametric EQ and compression/limiting. Standard compression provides conventional threshold, ratio, attack, release, trim, and knee controls. The 7-band parametric EQ is modeled after British analog console EQs, featuring four filter styles (gain/Q profiles) to effectively cover a wide range of audio material. -
Page 14
A B O U T T H E M I C R O B O O K… -
Page 15: Packing List And System Requirements
first open it, please immediately contact or faster your dealer or MOTU. 512 MB of RAM; 1 GB or more is ■ One MicroBook II audio interface ■ recommended One USB cable (Type A to Type B) ■ Windows 7 or Vista, 32- or 64-bit ■…
-
Page 16
To obtain must be registered separately. You can do the serial number, follow the hardware so online at motu.com/register. Doing so and software installation instructions in will allow you to be eligible to receive the next two chapters, and then do the… -
Page 17: Installing The Microbook Software
MicroBook’s on-board mixing, interface to your PC and turn it on, insert EQ and dynamics processing. It also the MOTU Audio installer disc and run provides access to all MicroBook the MicroBook Installer. This ensures settings. For details, see chapter 7, that all the MicroBook components are “CueMix FX”…
-
Page 18
Figure 3-1: AudioDesk for Mac OS X. I N S T A L L I N G T H E M I C R O B O O K S O F T W A R E… -
Page 19: Installing The Microbook Hardware
Installing the MicroBook CHAPTER Hardware OVERVIEW Windows users: install the software first ..17 Connect the MicroBook interface … 17 Connect inputs and outputs ….18 Bus power .
-
Page 20: Quick Reference: Microbook Top Panel
48V LED. See “Quick Reference: separately), which adds proper MicroBook Top Panel” on page 6. impedance characteristics that cannot be modeled in software. Visit motu.com for Alternately, you can use the MicroBook’s details. CueMix FX software. See “Input settings”…
-
Page 21
☛ Do not use the stereo mini input and Line out You can use the eighth-inch stereo mini quarter-inch inputs at the same time. If line out jack for output to desktop you are using the mini jack, unplug the speakers or any other line level quarter-inch jacks. -
Page 22
Input metering while adjusting trim INPUT SETTINGS Use the long-throw, horizontal input level To access input channel settings such as meter (5) at the top of the channel 48V phantom power, pad and trim, settings section (Figure 4-4) to calibrate launch the MicroBook’s CueMix FX the level. -
Page 23
BUS POWER Examples of bus- powered operation Here are a few typical examples of bus- Bus power requirements powered MicroBook operation: The MicroBook draws all the power it needs from the USB bus connection to Bus power from a desktop computer the computer. -
Page 24
A TYPICAL MICROBOOK SETUP MicroBook’s CueMix™ FX mixer to Here is a typical MicroBook studio setup. apply EQ and compression to what you This rig can be operated without an are recording and monitor it via the main external mixer. All mixing and processing outs, headphone outs, or any other can be done either in the MicroBook, in output pair. -
Page 25: Mac Os X Audio Software
MOTU MicroBook Core MOTU Audio installer disc as detailed in Audio driver. Check the audio system or chapter 3, “Installing the MicroBook audio hardware configuration window in Software”…
-
Page 26
Exchanging projects with AudioDesk Choose the MOTU MicroBook from this Digital Performer can exchange projects menu, as discussed in the following with AudioDesk. To open an AudioDesk sections. project in Digital Performer, open it in Digital Performer and AudioDesk same way you would a DP project. To Choose the MicroBook as your audio export a project to AudioDesk, use DP’s… -
Page 27
MicroBook from the Audio Output and Audio tab as shown in Figure 5-4. Choose Audio Input menus (Figure 5-6). For the MOTU MicroBook from the Output information about the Optimize for and Input device menus. For info about setting, see “Adjusting the audio I/O the I/O Buffer Size setting, see “Adjusting… -
Page 28
Audio tab. Choose and click Devices under the Audio CoreAudio from the Driver Type menu. preferences. Choose MOTU MicroBook Choose the MOTU MicroBook from the from the Audio Device menu as shown Input Audio Device and Output Audio below in Figure 5-10. -
Page 29
BUFFER SIZE WORKING WITH CUEMIX FX Most host applications provide a Buffer MIXING AND EFFECTS setting, which can be adjusted to reduce The MicroBook provides powerful the delay — or monitoring latency — that external mixing, EQ and compression, you hear when live audio is patched which you can operate hand-in-hand through your host software. -
Page 30
MONITORING LIVE INPUT “Adjusting the audio I/O buffer” for There are two ways to monitor live audio details about how to reduce or eliminate input with a MicroBook: the audible monitoring delay that the computer introduces. 1 Through the computer Figure 5-12 on page 29 shows method #2. -
Page 31
“CueMix FX hardware monitoring” later ADJUSTING THE AUDIO I/O BUFFER A buffer is a small amount of computer in this chapter for details on how to use memory used to hold data. For audio CueMix FX with your audio software, or interfaces like the MicroBook, buffers are with CueMix FX. -
Page 32
Under Mac OS X, audio I/O buffer size is Cubase handled by the host audio application (not the MicroBook Core Audio driver). Most audio software applications provide an adjustable audio buffer setting that lets you control the amount of delay you’ll hear when monitoring live inputs or processing them with software plug-ins. -
Page 33
Lower latency versus higher CPU AudioDesk’s Performance Monitor. If you overhead hear distortion, or if the Performance meter The buffer setting has a large impact on is peaking, try raising the buffer size. the following things: If you are at a point in your recording Patch thru latency project where you are not currently ■… -
Page 34
It completely eliminates the patch thru On the other hand, if you really need to ■ delay (reducing it to a small number of use the mixing and processing provided samples — about the same amount as by your audio software, you should not one of today’s advanced digital mixers). -
Page 35: Windows Audio Software
MOTU MicroBook ASIO or audio drivers, just run the installer on the Windows multimedia driver. Check the MOTU Audio installer disc as detailed in audio system or audio hardware chapter 3, “Installing the MicroBook configuration window in your software.
-
Page 36
In Ableton Live, access the preferences window and click the Audio tab. Choose ASIO from the Driver Type menu. Choose the MOTU Audio ASIO from the Audio Device menu (Figure 6-4). To Figure 6-2: Enabling the MOTU Audio ASIO enable or disable input or output driver in Pro Tools. -
Page 37
In Propellerhead Reason and Record, go In Cakewalk SONAR, you can use the to the Preferences window, choose Audio MOTU ASIO driver or the MOTU WDM preferences from the menu and choose driver. Note that when using ASIO, only ASIO MOTU Audio ASIO from the Audio… -
Page 38
3 Additionally, if you are using the MOTU WDM driver, click the Wave Figure 6-9: Enabling the MOTU WDM driver Profiler button and run the Wave Profiler. in SONAR. This process chooses the optimum settings for the MicroBook hardware. -
Page 39
routing channels to musicians, or it can serve as an integrated extension of your digital audio workstation’s mixing environment. If you program a MicroBook mixing and processing configuration that goes hand in hand Figure 6-11: Running the Wave Profiler in with your digital audio workstation’s Cakewalk’s SONAR. -
Page 40
W I N D O W S A U D I O S O F T W A R E… -
Page 41: Cuemix Fx
CueMix FX CHAPTER OVERVIEW can be recorded wet, dry, or dry with a CueMix FX is a cross-platform software wet monitor mix (for musicians during application that provides graphic, on- recording, for example). screen control for the MicroBook’s Effects include: flexible CueMix FX on-board mixer and effects processing.
-
Page 42: Cuemix Fx Installation
CUEMIX FX INSTALLATION single stereo audio stream that you can CueMix FX is installed with the rest of then assign to any MicroBook output your MicroBook software. pair — or combination of output pairs — that you choose. For example, Mix 1 CUEMIX FX BASIC OPERATION could go to the headphones, Mix 2 could Here is a brief overview of the CueMix FX…
-
Page 43
Viewing one mix bus at a time and dynamics processing. These settings CueMix FX displays one mix bus at a time are applied to the signal just before it is in the Mixes tab (Figure 7-1 on page 40). sent to the output. To select which mix you are viewing, Channel focus and settings choose it from the mix bus menu. -
Page 44: The Inputs Tab
THE INPUTS TAB input pair. Use the Focus button Click the Inputs tab (Figure 7-2) to access (Figure 7-2) to access the Channel , EQ, and control all of these input channel and dynamics tab settings for each input. settings for each MicroBook input or Inputs tab Input name Channel focus…
-
Page 45: The Mixes Tab
THE MIXES TAB MicroBook from your host audio Click the Mixes tab (Figure 7-3) to gain software. By bringing up this fader, you access to the MicroBook’s four stereo mix can combine live inputs (mic, guitar, and busses. The Mixes tab displays one mix line 1-2) with any audio from the bus at a time: choose each mix from the computer.
-
Page 46: The Outputs Tab
THE OUTPUTS TAB Signal flows from top to bottom Settings in each Output tab channel strip The Outputs tab (Figure 7-4) lets you are applied to the signal in order from top apply EQ and dynamics to any output to bottom. For example, EQ occurs pair, just before the signal leaves the before Dynamics.
-
Page 47: The Meters Tab
THE METERS TAB THE SIGNAL GENERATOR TAB The Meters tab (Figure 7-5) serves as a The Signal Generator tab (Figure 7-6) comprehensive meter bridge for all provides settings for the Sine Wave inputs, outputs and mix busses in the generator (frequency and amplitude) and MicroBook, giving you a “bird’s-eye”…
-
Page 48: Scope/Return Channels
SCOPE/RETURN CHANNELS For example, if you want to mix inputs Choose Devices menu> MicroBook> with effects and send the result to Setup to access the Scope/Return Channel MicroBook outputs, but you also want to Selection settings below (Figure 7-7). The send those same inputs dry (no MicroBook sends two extra return processing) to the host, then select those…
-
Page 49: Audio Analysis Tools
AUDIO ANALYSIS TOOLS Spectrogram Choose Options menu> Show CueMix FX provides advanced audio Spectrogram (Figure 7-8) to superimpose analysis tools. This section gives a brief a real-time spectrogram “waterfall” summary. For complete information, display in the EQ display background: refer to the CueMix FX PDF manual, which is placed on your hard drive by the MicroBook installer.
-
Page 50
right channel amplitude equals zero (Figure 7-10, below). There are also thick white diagonal lines for y = x and y = -x. Phase Analysis To open the Phase Analysis window (Figure 7-11), choose it from the Devices menu. Phase Analysis graphs frequency Figure 7-11: R e c t a n g u l a r v e r s u s Po l a r display with a logarithmic plot. -
Page 51: Troubleshooting
Try recording just using the analog inputs haven’t already done so, please take a and outputs of the MicroBook. If you moment to register on line at motu.com, encounter the same artifacts you may or fill out and mail the registration card want try using another drive in your included with your MicroBook.
-
Page 52
Please see “Obtaining your from you. Please contact us online at MicroBook serial number” on page 14. www.motu.com/suggestions or write to: You must be able to supply this number to receive technical support. MicroBook Development Team MOTU Inc. -
Page 53: Index
Index EQ tab 42 guitar 18 focus 41 line 18 20 dB pad 18 Inputs tab 42 mic 18 24-bit 27, 37 installation 15, 40 trim 19 recording 10 launching 7 Inputs tab 7, 20, 41, 42 48V phantom power 4 Mac OS X software 27 Installation Meters tab 45…
-
Page 54
Oscilloscope 48 Record (application) 35 minimum 13 Outputs Registration 13 recommended 13 line 19 Return 1-2 46 main 19 phones Technical support 49, 50 S/PDIF 5 S/PDIF 5, 19 Trim 19 signal flow 44 Sample rate 26, 37 Troubleshooting 49-50 Outputs tab 8, 41, 44 Samplers TRS connectors 18, 19…

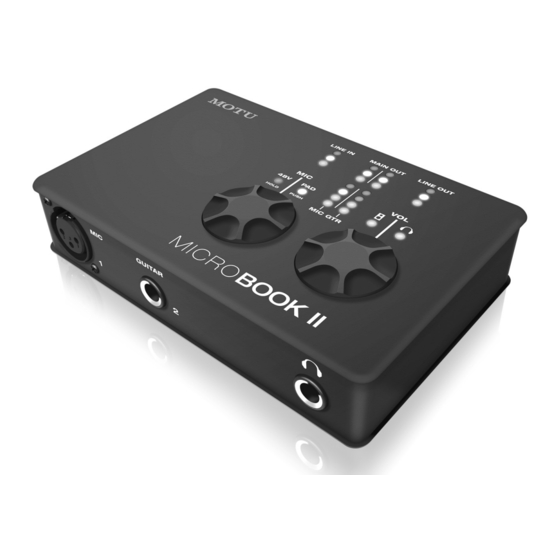
Заменяя оригинальный аудио интерфейс MOTU MicroBook, компания MOTU анонсировала Motu Microbook 2 IIc, обновленную версию компактного аудио интерфейса студийного класса, который превращает Mac или ПК в личную 4 х 6 студию звукозаписи с профессиональными входами / выходами и мониторным микшированием.
Новый MOTU MicroBook II поставляется в компактном, надежном металлическом литом корпусе, подходящим для записей на выступлениях, ди-джеинга с ноутбуком, а также других записывающих и воспроизводящих приложений. Портативное устройство, размером примерно с руку, питается от шины и предлагает все те же функции, что и у оригинальной модели. Добавленные функции включают в себя регулятор громкости, USB 2.0 подключение с низкой задержкой, шесть выходов, микрофонный вход XLR, а также поддержку запись и воспроизведение на 96 кГц.
Технические характеристики звуковой карты Motu Microbook 2 IIc:
Converters 24-bit
Sample Rates 44.1, 48, 88.2, 96kHz
Analog In 1 x XLR mic input with preamp
Pre-amp equipped mic input with Precision Digital Trim™ 48V phantom power, and -20 dB pad
1 x 1/4″ hi-Z guitar
Hi-Z guitar input with -20 dB pad Precision Digital Trim.
2 x 1/4″ TRS phone (balanced/unbalanced)
1 x 1/8″ stereo «mini» (unbalanced)
Analog Outputs 2 x 1/4″ balanced TRS main out
1 x 1/8″ stereo «mini» line out (unbalanced)
1 x 1/4″ TRS headphone
Digital Input — none —
Digital Output 1 x RCA coaxial S/PDIF
Computer I/O 1 x USB 2.0 «High-speed»
Sync Out S/PDIF
Headphone Output 1 x 1/4″ TRS phone with volume control
Phantom Power +48V
Power Supply 1 x Micro-B USB
Top panel 2 x 3-segment ladder LEDs • main outs
1 x 4-segment LEDs • mic in
1 x 4-segment LEDs • guitar in
1 x 3-segment LEDs • line in
1 x 3-segment LEDs • line out
1 x LED • 48V phantom power
1 x LED • -20 dB pad
2 x LEDs • main/phone vol
1 x digital rotary encoder • mic trim
1 x digital rotary encoder • main/phone volume
Power Specifications USB bus power (computer)
USB-to-AC power adapter (iPad)
(USB cable and AC wall adapter included)
Dimensions Length: 5 ½ in / 14 cm
Width: 3 ⅝ in / 9.2 cm
Height: 1 ¼ in / 3.2 cm
4-input, 6-output bus-powered «plug-and-play» high-speed USB 2.0
Operating Systems
Mac OS X version 10.11, 10.10, 10.9, 10.8, 10.7, 10.6 (10.6.8 or later required)
Windows 10, 8, or 7
64-bit operation
Available for Mac OS X version 10.6.8 or later
Available for 64-bit versions of Windows 7 (or later)
Requires a 64-bit CPU (and host application for plug-in versions)
Обзор №1
Вчера купил себе аудио интерфейс Motu Microbook 2 IIc, доволен по уши, если есть какие нить вопросы по работе карты пишите, отвечу.
Плюсы звуковой карты Motu Microbook 2 IIc:
1) наличие параметрического эквалайзера и компрессора во встроенном DSP, причом довольно неплохих, очень удобно когда парица не охота, а послушать «отмастерённое демо» кусочка написанного тречка хочется.
2) Внутренний роутинг карты через cue mix — прилагается с драйвером.
3) Маленький размер, примерно 3 пачки парламента
4) Питание только от USB, не нужно заморачиваться и искать лишнюю розетку
5) Наличие всех необходимых входов-выходов для домашней студии, для микрофонного входа в комплекте идёт переходник XLR-мама to TRS. все аналоговые инпуты карты независимые, аналоговый выход только 1 либо балансными джеками в мониторы, либо миниджеком в компьютерные пукалки (я кстати их тоже подключил, чтоб переключаться с моников, послушать как звучит трек на бытовухе) + выход на наушники.
6) Все мьюты, соло и другие прелести на встроенном микшере CUE MIX-очень удобен и нагляден
Минусы, он один и очень жирный
Отсутствие в звуковой карте Motu Microbook 2 IIc Ручки громкости
Обзор №2
Вот и начались долгожданные продажи аудио интерфейса MOTU Microbook II — логичной и несколько более технологичной замены предыдущей модели мобильного интерфейса Microbook. В этой статье мы проведём небольшое сравнение Microbook II с предшественницей и несколько подробнее рассмотрим характеристики и возможности новинки от MOTU.
Итак, что же нового в данном интерфейсе? В первую очередь бросается в глаза новый внешний вид — смотрится устройство гораздо интереснее — современный, приятный техногенный дизайн, регуляторы, индикация — несравнимо с первой моделью, дизайн которой был совершенно простым, почти безликим и, что немаловажно, совершенно неинформативным.
В случае же с новинкой мы визуально получаем хотя бы элементарную информацию о задействованных каналах, уровнях сигнала и возможных перегрузках, что бесспорно может пригодиться, если в какой-то момент нет возможности взглянуть на монитор компьютера и проверить уровни в программном микшере. А вот и ещё одно приятное отличие от первого мобильного интерфейса MOTU Microbook — новинка имеет полноценный встроенный XLR-вход для подключения конденсаторного микрофона. Напомним, что в первой модели как такового XLR-входа не было, для подключения микрофона использовался стандартный TRS-вход (Jack 6,35 мм), а в комплекте с интерфейсом шёл переходник XLR-TRS для подключения конденстаторных микрофонов. При этом размеры корпуса у Microbook II остались практически идентичными.
Ну а теперь перейдём к наиболее интересной и важной части — какие возможности для подключения и работы даёт нам MOTU Microbook II, и как это всё звучит?
Аудио интерфейс оснащён следующими входами и выходами:
Аналоговые входы:
1 x XLR микрофонный вход с предусилителем и подачей фантомного питания;
1 x 1/4″ hi-Z гитарный вход;
2 x 1/4″ TRS линейные входы (балансный/небалансный);
1 x 1/8″ стерео «mini Jack» (небалансный);
Аналоговые выходы:
2 x 1/4″ балансные TRS главные выходы (main out);
1 x 1/8″ стерео «mini Jack» линейный выход (небалансный);
2 x 1/4″ TRS выход для наушников;
Кроме этого представлен 1 цифровой выход RCA coaxial S/PDIF на 2 канала, выходящий сигнал которого дублирует главные выходы. Цифровые входы на устройстве отсутствуют.
Сам интерфейс подключается к компьютеру и получает питание посредством высокоскоростного подключения USB 2.0. Отдельного источника питания не предусмотрено.
Индикация и регуляторы MOTU MicroBook II
В чём MOTU остаётся неизменна, так это в высочайшем качестве A/D-D/A конвертации и передачи звука даже в своих мобильных интерфейсах. Производитель заявляет качество студийного уровня, который зачастую предоставляют лишь интерфейсы на порядок дороже. Microbook II способна одновременно записывать и воспроизводить все доступные каналы даже при максимальном для данного интерфейса качестве в 24 бита и 96 кГц. И пусть вас не смущает отсутствие FireWire-подключения, инженеры и программисты MOTU сделали всё необходимое для передачи всей этой красоты по высокоскорстному подключению USB 2.0 в мельчайших деталях и без задержек.
Также никуда не делась замечательная технология PDT (Precision Digital Trim™), позволяющая получить лучшее от двух миров — аналогового и цифрового. Аналоговая схема делает регулировку уровней плавной и мягкой, а цифровой контроль позволяет отстроить их с высочайшей точностью, а также сохранить настройки уровней и вызвать их в будущем при необходимости.
Аудио интерфейс MOTU MicroBook II оснащен высокоомным Hi-Z гитарным входом, который специально отстроен для обеспечения надлежащего уровня сопротивления, что позволяет одинаково успешно использовать его для записи гитар как с активными, так и с пассивными датчиками, и получать действительно чистый, мощный, аутентичный звук, благодаря чему гитары будут звучать живо и естественно при использовании виртуальных комбо-усилителей и плагинов гитарной обработки.
Возвращаясь к разговору о теперь уже встроенном XLR-входе — производитель без лишней скромности сообщает, что их новый, исключительно прозрачный предусилитель высочайшего класса точно сохраняет особенности и нюансы даже очень дорогих микрофонов, так что можете смело использовать с MOTU MicroBook II ваш микрофон за $5000, будучи уверенным, что интерфейс выжмет из него всё.
Ещё одному моменту в MOTU уделили немалое внимание — отсутствию балансных TRS входов/выходов в звуковых интерфейсах других производителей, причём даже достаточно дорогих, в связи с чем сделали более чем логичный шаг, встроив балансные TRS на линейные входы и главные выходы, благодаря чему вы получаете максимально чистый сигнал как при записи, так и при воспроизведении.
Фирменный софт CueMix FX позволит вам гибко настроить маршрутизацию сигналов, направив каждый канал на необходимый вам выход (главные выходы, линейные выходы, выход на наушники), а также задействовать встроенную DSP-обработку эквалайзером и компрессором на каждом отдельном канале. Кроме этого CueMix предоставляет профессиональный визуальный контроль сигнала, представленный частотным визуализатором, осциллоскопом, спектрографом, визуализатором стереопанорамы, анализатором фазы и т.д. В качестве дополнительного бонуса в CueMix встроен точный цифровой тюнер для настройки ваших инструментов, а также генератор сигнала (синусоида, белый шум, розовый шум) для калибровки и точной настройки всей студии.
Итак, подводя общий итог — в новом мобильном интерфейсе MOTU уделила довольно большое внимание как общему внешнему виду и удобству работы, так и каждой отдельной детали, касающейся всех нюансов записи внешних инструментов, качественному предусилению и передаче сигнала, а также точному контролю на всех этапах работы с миксом. Таким образом мы действительно получаем качественный, надёжный, многофункциональный прибор профессионального уровня за более чем демократичную цену. Отличная работа MOTU!
Обзор №3
Я купил Motu Microbook на ибее за 225 долларов. Мне он равится, почему я купил именно его? Во первых у меня уже есть в репитиционной файр варная карта 826МК3 по мойму, я ей очень доволен, доволен Cuemix приложение которое с ним идёт. Что могу сказать, качество записи меня устраивает на 100%. 4 входа, два выхода по аналоговым каналам, из минусов то, что регулировки чувствительности входов и выходов нужно делать программно но это не сильно отвлекает. В комплекте идёт переходник джека на XLR, дурня конечно, можно былобы и сразу сделать выход один микрофонный, что в принципе реализовано в микробуке втором.
А так, свои 225 + 30 доставка, оправдывает на сто процентов, мне очень нравится сей девайс, если что то конкретно интересно по нему, спрашивайте отвечу с удовольствием, в плоть до продовца, который мне продал:)))
По поводу уровней. у меня датчик сеймур дункан SH12 уровень записи -6dB (рипере) усиление на гитарном входе находится примерно на 1 трети. Запас ещё огромен. В мониторы Ямаха 80ки, орёт мама не горюй:)) Ещё минус, ну для кого как в принципе что выход на наушники маленький джек, лично для меня это не минус. В наушники играет достаточно громко… но конечно желательно разогнаться усилком каким нибудь для наушников, хотя для записи, для игры, в принципе достаточно громко.
В программном обеспечении есть классный тюнер, отличный эквалайзер и неплохой компрессор. Ревера как на старших моделях нет, но эта карта расчитана на домашнее пользование, для дома — самое оно. Коробочка сама маленькая, железненькая, вес примерно 0.8 кг В комплекте идут липучие кругленькие, типо ножки чтоли, когда их клеешь, на столе стоит как вкопанная.В общем моя оценка, твёрдая 4 с плюсом. Хотя думаю что микробук два, симпотичнее, с крутилками и индикаторами.. с входом микрофоным XLR всё как нада, может лучше и её купить… не знаю, по начинке сомневаюсь что микробук два отличается от микробука.
Больше не знаю что добавить. Разве только то, что я сижу на моту уже три года, очень доволен этими девайсами.
Удачи
About the Mark of the Unicorn License Agreement
and Limited Warranty on Software
TO PERSONS WHO PURCHASE OR USE THIS PRODUCT: carefully
read all the terms and conditions of the «click-wrap» license agreement
presented to you when you install the software. Using the software or this
documentation indicates your acceptance of the terms and conditions of that
license agreement.
Mark of the Unicorn, Inc. («MOTU») owns both this program and its
documentation. Both the program and the documentation are protected
under applicable copyright, trademark, and trade-secret laws. Your right to
use the program and the documentation are limited to the terms and
conditions described in the license agreement.
Reminder of the terms of your license
This summary is not your license agreement, just a reminder of its terms.
The actual license can be read and printed by running the installation
program for the software. That license agreement is a contract, and clicking
«Accept» binds you and MOTU to all its terms and conditions. In the event
anything contained in this summary is incomplete or in conflict with the actual
click-wrap license agreement, the terms of the click-wrap agreement prevail.
YOU MAY: (a) use the enclosed program on a single computer; (b)
physically transfer the program from one computer to another provided that
the program is used on only one computer at a time and that you remove any
copies of the program from the computer from which the program is being
transferred; (c) make copies of the program solely for backup purposes. You
must reproduce and include the copyright notice on a label on any backup
copy.
YOU MAY NOT: (a) distribute copies of the program or the documentation to
others; (b) rent, lease or grant sublicenses or other rights to the program; (c)
provide use of the program in a computer service business, network, time-
sharing, multiple CPU or multiple user arrangement without the prior written
consent of MOTU; (d) translate, adapt, reverse engineer, decompile,
disassemble, or otherwise alter the program or related documentation
without the prior written consent of MOTU.
MOTU warrants to the original licensee that the disk(s) on which the program
is recorded be free from defects in materials and workmanship under normal
use for a period of ninety (90) days from the date of purchase as evidenced
by a copy of your receipt. If failure of the disk has resulted from accident,
abuse or misapplication of the product, then MOTU shall have no responsi-
bility to replace the disk(s) under this Limited Warranty.
THIS LIMITED WARRANTY AND RIGHT OF REPLACEMENT IS IN LIEU
OF, AND YOU HEREBY WAIVE, ANY AND ALL OTHER WARRANTIES,
BOTH EXPRESS AND IMPLIED, INCLUDING BUT NOT LIMITED TO
WARRANTIES OF MERCHANTABILITY AND FITNESS FOR A
PARTICULAR PURPOSE. THE LIABILITY OF MOTU PURSUANT TO
THIS LIMITED WARRANTY SHALL BE LIMITED TO THE
REPLACEMENT OF THE DEFECTIVE DISK(S), AND IN NO EVENT
SHALL MOTU OR ITS SUPPLIERS, LICENSORS, OR AFFILIATES BE
LIABLE FOR INCIDENTAL OR CONSEQUENTIAL DAMAGES,
INCLUDING BUT NOT LIMITED TO LOSS OF USE, LOSS OF PROFITS,
LOSS OF DATA OR DATA BEING RENDERED INACCURATE, OR
LOSSES SUSTAINED BY THIRD PARTIES EVEN IF MOTU HAS BEEN
ADVISED OF THE POSSIBILITY OF SUCH DAMAGES. THIS
WARRANTY GIVES YOU SPECIFIC LEGAL RIGHTS WHICH MAY VARY
FROM STATE TO STATE. SOME STATES DO NOT ALLOW THE
LIMITATION OR EXCLUSION OF LIABILITY FOR CONSEQUENTIAL
DAMAGES, SO THE ABOVE LIMITATION MAY NOT APPLY TO YOU.
Update Policy
In order to be eligible to obtain updates of the program, you must register the
software at motu.com.
Copyright Notice
Copyright © 2012 by Mark of the Unicorn, Inc. All rights reserved. No part of
this publication may be reproduced, transmitted, transcribed, stored in a
retrieval system, or translated into any human or computer language, in any
form or by any means whatsoever, without express written permission of
Mark of the Unicorn, Inc., 1280 Massachusetts Avenue, Cambridge, MA,
02138, U.S.A.
Limited Warranty on Hardware
Mark of the Unicorn, Inc. and S&S Research («MOTU/S&S») warrant this
equipment against defects in materials and workmanship for a period of
TWO (2) YEARS from the date of original retail purchase. This warranty
applies only to hardware products; MOTU software is licensed and
warranted pursuant to separate written statements.
If you discover a defect, first write or call Mark of the Unicorn at (617) 576-
2760 to obtain a Return Merchandise Authorization Number. No service will
be performed on any product returned without prior authorization. MOTU
will, at its option, repair or replace the product at no charge to you, provided
you return it during the warranty period, with transportation charges prepaid,
to Mark of the Unicorn, Inc., 1280 Massachusetts Avenue, MA 02138. You
must use the product’s original packing material for in shipment, and insure
the shipment for the value of the product. Please include your name,
address, telephone number, a description of the problem, and the original,
dated bill of sale with the returned unit and print the Return Merchandise
Authorization Number on the outside of the box below the shipping address.
This warranty does not apply if the equipment has been damaged by
accident, abuse, misuse, or misapplication; has been modified without the
written permission of MOTU, or if the product serial number has been
removed or defaced.
ALL IMPLIED WARRANTIES, INCLUDING IMPLIED WARRANTIES OF
MERCHANTABILITY AND FITNESS FOR A PARTICULAR PURPOSE,
ARE LIMITED IN DURATION TO TWO (2) YEARS FROM THE DATE OF
THE ORIGINAL RETAIL PURCHASE OF THIS PRODUCT.
THE WARRANTY AND REMEDIES SET FORTH ABOVE ARE
EXCLUSIVE AND IN LIEU OF ALL OTHERS, ORAL OR WRITTEN,
EXPRESS OR IMPLIED. No MOTU/S&S dealer, agent, or employee is
authorized to make any modification, extension, or addition to this warranty.
MOTU/S&S ARE NOT RESPONSIBLE FOR SPECIAL, INCIDENTAL, OR
CONSEQUENTIAL DAMAGES RESULTING FROM ANY BREACH OF
WARRANTY, OR UNDER ANY LEGAL THEORY, INCLUDING LOST
PROFITS, DOWNTIME, GOODWILL, DAMAGE OR REPLACEMENT OF
EQUIPMENT AND PROPERTY AND COST OF RECOVERING REPRO-
GRAMMING, OR REPRODUCING ANY PROGRAM OR DATA STORED
IN OR USED WITH MOTU/S&S PRODUCTS.
Some states do not allow the exclusion or limitation of implied warranties or
liability for incidental or consequential damages, so the above limitation or
exclusion may not apply to you. This warranty gives you specific legal rights,
and you may have other rights which vary from state to state.
MOTU, AudioDesk, Mark of the Unicorn and the unicorn silhouette logo are
trademarks of Mark of the Unicorn, Inc.
This equipment has been type tested and found to comply with the limits for a class
B digital device, pursuant to Part 15 of the FCC Rules. These limits are designed to
provide reasonable protection against harmful interference in a residential
installation. This equipment generates, uses, and can radiate radio frequency
energy and, if not installed and used in accordance with the instruction manual, may
cause harmful interference to radio communications. However, there is no
guarantee that interference will not occur in a particular installation. If this equipment
does cause interference to radio or television equipment reception, which can be
determined by turning the equipment off and on, the user is encouraged to try to
correct the interference by any combination of the following measures:
• Relocate or reorient the receiving antenna
• Increase the separation between the equipment and the receiver
• Plug the equipment into an outlet on a circuit different from that to which the
receiver is connected
If necessary, you can consult a dealer or experienced radio/television technician for
additional assistance.
PLEASE NOTE: only equipment certified to comply with Class B (computer input/
output devices, terminals, printers, etc.) should be attached to this
equipment, and it must have shielded interface cables in order
to comply with the Class B FCC limits on RF emissions.
WARNING: changes or modifications to this unit not
expressly approved by the party responsible for compliance
could void the user’s authority to operate the equipment.
Заменяя оригинальный аудио интерфейс MOTU MicroBook, компания MOTU анонсировала Motu Microbook 2 IIc, обновленную версию компактного аудио интерфейса студийного класса, который превращает Mac или ПК в личную 4 х 6 студию звукозаписи с профессиональными входами / выходами и мониторным микшированием.
Новый MOTU MicroBook II поставляется в компактном, надежном металлическом литом корпусе, подходящим для записей на выступлениях, ди-джеинга с ноутбуком, а также других записывающих и воспроизводящих приложений. Портативное устройство, размером примерно с руку, питается от шины и предлагает все те же функции, что и у оригинальной модели. Добавленные функции включают в себя регулятор громкости, USB 2.0 подключение с низкой задержкой, шесть выходов, микрофонный вход XLR, а также поддержку запись и воспроизведение на 96 кГц.
Технические характеристики звуковой карты Motu Microbook 2 IIc:
Converters 24-bit
Sample Rates 44.1, 48, 88.2, 96kHz
Analog In 1 x XLR mic input with preamp
Pre-amp equipped mic input with Precision Digital Trim™ 48V phantom power, and -20 dB pad
1 x 1/4″ hi-Z guitar
Hi-Z guitar input with -20 dB pad Precision Digital Trim.
2 x 1/4″ TRS phone (balanced/unbalanced)
1 x 1/8″ stereo «mini» (unbalanced)
Analog Outputs 2 x 1/4″ balanced TRS main out
1 x 1/8″ stereo «mini» line out (unbalanced)
1 x 1/4″ TRS headphone
Digital Input — none —
Digital Output 1 x RCA coaxial S/PDIF
Computer I/O 1 x USB 2.0 «High-speed»
Sync Out S/PDIF
Headphone Output 1 x 1/4″ TRS phone with volume control
Phantom Power +48V
Power Supply 1 x Micro-B USB
Top panel 2 x 3-segment ladder LEDs • main outs
1 x 4-segment LEDs • mic in
1 x 4-segment LEDs • guitar in
1 x 3-segment LEDs • line in
1 x 3-segment LEDs • line out
1 x LED • 48V phantom power
1 x LED • -20 dB pad
2 x LEDs • main/phone vol
1 x digital rotary encoder • mic trim
1 x digital rotary encoder • main/phone volume
Power Specifications USB bus power (computer)
USB-to-AC power adapter (iPad)
(USB cable and AC wall adapter included)
Dimensions Length: 5 ½ in / 14 cm
Width: 3 ⅝ in / 9.2 cm
Height: 1 ¼ in / 3.2 cm
4-input, 6-output bus-powered «plug-and-play» high-speed USB 2.0
Operating Systems
Mac OS X version 10.11, 10.10, 10.9, 10.8, 10.7, 10.6 (10.6.8 or later required)
Windows 10, 8, or 7
64-bit operation
Available for Mac OS X version 10.6.8 or later
Available for 64-bit versions of Windows 7 (or later)
Requires a 64-bit CPU (and host application for plug-in versions)
Обзор №1
Вчера купил себе аудио интерфейс Motu Microbook 2 IIc, доволен по уши, если есть какие нить вопросы по работе карты пишите, отвечу.
Плюсы звуковой карты Motu Microbook 2 IIc:
1) наличие параметрического эквалайзера и компрессора во встроенном DSP, причом довольно неплохих, очень удобно когда парица не охота, а послушать «отмастерённое демо» кусочка написанного тречка хочется.
2) Внутренний роутинг карты через cue mix — прилагается с драйвером.
3) Маленький размер, примерно 3 пачки парламента 
4) Питание только от USB, не нужно заморачиваться и искать лишнюю розетку
5) Наличие всех необходимых входов-выходов для домашней студии, для микрофонного входа в комплекте идёт переходник XLR-мама to TRS. все аналоговые инпуты карты независимые, аналоговый выход только 1 либо балансными джеками в мониторы, либо миниджеком в компьютерные пукалки (я кстати их тоже подключил, чтоб переключаться с моников, послушать как звучит трек на бытовухе) + выход на наушники.
6) Все мьюты, соло и другие прелести на встроенном микшере CUE MIX-очень удобен и нагляден
Минусы, он один и очень жирный
Отсутствие в звуковой карте Motu Microbook 2 IIc Ручки громкости
Обзор №2
Вот и начались долгожданные продажи аудио интерфейса MOTU Microbook II — логичной и несколько более технологичной замены предыдущей модели мобильного интерфейса Microbook. В этой статье мы проведём небольшое сравнение Microbook II с предшественницей и несколько подробнее рассмотрим характеристики и возможности новинки от MOTU.
Итак, что же нового в данном интерфейсе? В первую очередь бросается в глаза новый внешний вид — смотрится устройство гораздо интереснее — современный, приятный техногенный дизайн, регуляторы, индикация — несравнимо с первой моделью, дизайн которой был совершенно простым, почти безликим и, что немаловажно, совершенно неинформативным.
В случае же с новинкой мы визуально получаем хотя бы элементарную информацию о задействованных каналах, уровнях сигнала и возможных перегрузках, что бесспорно может пригодиться, если в какой-то момент нет возможности взглянуть на монитор компьютера и проверить уровни в программном микшере. А вот и ещё одно приятное отличие от первого мобильного интерфейса MOTU Microbook — новинка имеет полноценный встроенный XLR-вход для подключения конденсаторного микрофона. Напомним, что в первой модели как такового XLR-входа не было, для подключения микрофона использовался стандартный TRS-вход (Jack 6,35 мм), а в комплекте с интерфейсом шёл переходник XLR-TRS для подключения конденстаторных микрофонов. При этом размеры корпуса у Microbook II остались практически идентичными.
Ну а теперь перейдём к наиболее интересной и важной части — какие возможности для подключения и работы даёт нам MOTU Microbook II, и как это всё звучит?
Аудио интерфейс оснащён следующими входами и выходами:
Аналоговые входы:
1 x XLR микрофонный вход с предусилителем и подачей фантомного питания;
1 x 1/4″ hi-Z гитарный вход;
2 x 1/4″ TRS линейные входы (балансный/небалансный);
1 x 1/8″ стерео «mini Jack» (небалансный);
Аналоговые выходы:
2 x 1/4″ балансные TRS главные выходы (main out);
1 x 1/8″ стерео «mini Jack» линейный выход (небалансный);
2 x 1/4″ TRS выход для наушников;
Кроме этого представлен 1 цифровой выход RCA coaxial S/PDIF на 2 канала, выходящий сигнал которого дублирует главные выходы. Цифровые входы на устройстве отсутствуют.
Сам интерфейс подключается к компьютеру и получает питание посредством высокоскоростного подключения USB 2.0. Отдельного источника питания не предусмотрено.
Индикация и регуляторы MOTU MicroBook II
В чём MOTU остаётся неизменна, так это в высочайшем качестве A/D-D/A конвертации и передачи звука даже в своих мобильных интерфейсах. Производитель заявляет качество студийного уровня, который зачастую предоставляют лишь интерфейсы на порядок дороже. Microbook II способна одновременно записывать и воспроизводить все доступные каналы даже при максимальном для данного интерфейса качестве в 24 бита и 96 кГц. И пусть вас не смущает отсутствие FireWire-подключения, инженеры и программисты MOTU сделали всё необходимое для передачи всей этой красоты по высокоскорстному подключению USB 2.0 в мельчайших деталях и без задержек.
Также никуда не делась замечательная технология PDT (Precision Digital Trim™), позволяющая получить лучшее от двух миров — аналогового и цифрового. Аналоговая схема делает регулировку уровней плавной и мягкой, а цифровой контроль позволяет отстроить их с высочайшей точностью, а также сохранить настройки уровней и вызвать их в будущем при необходимости.
Аудио интерфейс MOTU MicroBook II оснащен высокоомным Hi-Z гитарным входом, который специально отстроен для обеспечения надлежащего уровня сопротивления, что позволяет одинаково успешно использовать его для записи гитар как с активными, так и с пассивными датчиками, и получать действительно чистый, мощный, аутентичный звук, благодаря чему гитары будут звучать живо и естественно при использовании виртуальных комбо-усилителей и плагинов гитарной обработки.
Возвращаясь к разговору о теперь уже встроенном XLR-входе — производитель без лишней скромности сообщает, что их новый, исключительно прозрачный предусилитель высочайшего класса точно сохраняет особенности и нюансы даже очень дорогих микрофонов, так что можете смело использовать с MOTU MicroBook II ваш микрофон за $5000, будучи уверенным, что интерфейс выжмет из него всё.
Ещё одному моменту в MOTU уделили немалое внимание — отсутствию балансных TRS входов/выходов в звуковых интерфейсах других производителей, причём даже достаточно дорогих, в связи с чем сделали более чем логичный шаг, встроив балансные TRS на линейные входы и главные выходы, благодаря чему вы получаете максимально чистый сигнал как при записи, так и при воспроизведении.
Фирменный софт CueMix FX позволит вам гибко настроить маршрутизацию сигналов, направив каждый канал на необходимый вам выход (главные выходы, линейные выходы, выход на наушники), а также задействовать встроенную DSP-обработку эквалайзером и компрессором на каждом отдельном канале. Кроме этого CueMix предоставляет профессиональный визуальный контроль сигнала, представленный частотным визуализатором, осциллоскопом, спектрографом, визуализатором стереопанорамы, анализатором фазы и т.д. В качестве дополнительного бонуса в CueMix встроен точный цифровой тюнер для настройки ваших инструментов, а также генератор сигнала (синусоида, белый шум, розовый шум) для калибровки и точной настройки всей студии.
Итак, подводя общий итог — в новом мобильном интерфейсе MOTU уделила довольно большое внимание как общему внешнему виду и удобству работы, так и каждой отдельной детали, касающейся всех нюансов записи внешних инструментов, качественному предусилению и передаче сигнала, а также точному контролю на всех этапах работы с миксом. Таким образом мы действительно получаем качественный, надёжный, многофункциональный прибор профессионального уровня за более чем демократичную цену. Отличная работа MOTU!
Обзор №3
Я купил Motu Microbook на ибее за 225 долларов. Мне он равится, почему я купил именно его? Во первых у меня уже есть в репитиционной файр варная карта 826МК3 по мойму, я ей очень доволен, доволен Cuemix приложение которое с ним идёт. Что могу сказать, качество записи меня устраивает на 100%. 4 входа, два выхода по аналоговым каналам, из минусов то, что регулировки чувствительности входов и выходов нужно делать программно но это не сильно отвлекает. В комплекте идёт переходник джека на XLR, дурня конечно, можно былобы и сразу сделать выход один микрофонный, что в принципе реализовано в микробуке втором.
А так, свои 225 + 30 доставка, оправдывает на сто процентов, мне очень нравится сей девайс, если что то конкретно интересно по нему, спрашивайте отвечу с удовольствием, в плоть до продовца, который мне продал:)))
По поводу уровней. у меня датчик сеймур дункан SH12 уровень записи -6dB (рипере) усиление на гитарном входе находится примерно на 1 трети. Запас ещё огромен. В мониторы Ямаха 80ки, орёт мама не горюй:)) Ещё минус, ну для кого как в принципе что выход на наушники маленький джек, лично для меня это не минус. В наушники играет достаточно громко… но конечно желательно разогнаться усилком каким нибудь для наушников, хотя для записи, для игры, в принципе достаточно громко.
В программном обеспечении есть классный тюнер, отличный эквалайзер и неплохой компрессор. Ревера как на старших моделях нет, но эта карта расчитана на домашнее пользование, для дома — самое оно. Коробочка сама маленькая, железненькая, вес примерно 0.8 кг В комплекте идут липучие кругленькие, типо ножки чтоли, когда их клеешь, на столе стоит как вкопанная.В общем моя оценка, твёрдая 4 с плюсом. Хотя думаю что микробук два, симпотичнее, с крутилками и индикаторами.. с входом микрофоным XLR всё как нада, может лучше и её купить… не знаю, по начинке сомневаюсь что микробук два отличается от микробука.
Больше не знаю что добавить. Разве только то, что я сижу на моту уже три года, очень доволен этими девайсами.
Удачи
Посмотреть инструкция для Motu MicroBook II бесплатно. Руководство относится к категории DJ-система, 1 человек(а) дали ему среднюю оценку 9.3. Руководство доступно на следующих языках: английский. У вас есть вопрос о Motu MicroBook II или вам нужна помощь? Задайте свой вопрос здесь
Не можете найти ответ на свой вопрос в руководстве? Вы можете найти ответ на свой вопрос ниже, в разделе часто задаваемых вопросов о Motu MicroBook II.
Когда звук считается слишком громким?
Уровень звука выше 80 децибел может нанести вред слуху. Уровень звука выше 120 децибел может нанести прямое повреждение слуху. Вероятность повреждения слуха зависит от частоты и продолжительности прослушивания.
Инструкция Motu MicroBook II доступно в русский?
К сожалению, у нас нет руководства для Motu MicroBook II, доступного в русский. Это руководство доступно в английский.
Не нашли свой вопрос? Задайте свой вопрос здесь
One of the drawbacks of inexpensive audio interfaces, when used for acoustic measurement, is that there is no precise and repeatable input gain setting. While this is an acceptable trade-off for cost, it can be, every now and then, rather inconvenient. For example: you may want to run a nearfield measurement of a sub and then return to an in-room measurement; if only you could precisely set and reset the gain to do this. Unfortunately, precise input gain is typically only found on more expensive audio interfaces – so my eyebrow shot up when I noticed the press releases for the MOTU MicroBook II advertising the “digitally-controlled analog gain” on the microphone input.
I waited quite some time to get one, and eventually did from the venerable Turramurra Music on Sydney’s North Shore, almost by accident. I was in there to get the Focusrite Scarlett 2i2 that I reviewed in our last issue, and they happened to have just gotten the MicroBook II in. So I walked out that day with two interfaces under my arm. In retrospect, this may be an example of the good side of the Impermanence of Technology; I had just paid less than my old (and now sold for a song) Roland UA-25EX a few years ago, and gained a whole lot of interesting functionality. Read on for more….
A note on this review: my interest here is the use of the MicroBook II as a measurement and diagnostic accessory for the two-channel hifi enthusiast. If your interest is in using the MicroBook II with a DAW (Digital Audio Workstation) and/or for audio recording, please note that while I expect you will find useful information in here about the MicroBook II, I won’t specifically be testing those aspects in this review.
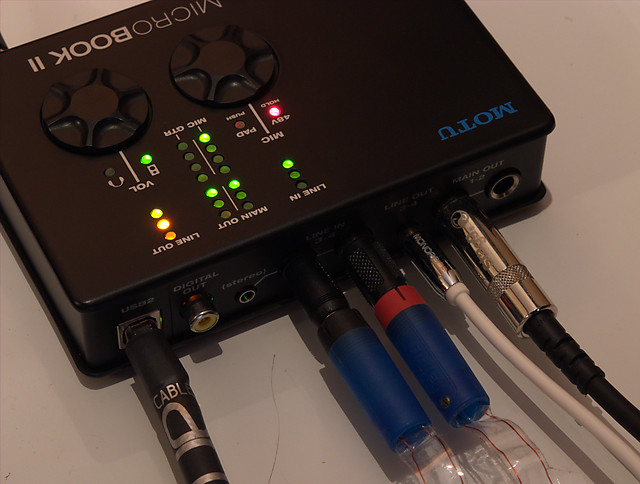
Getting acquainted
The MicroBook II makes a good first impression. It’s nestled within a foam… cave… within the box. Taking it out and setting it on the desk, it reminded me of the black ship belonging to Hotblack Desiato, from Hitchhiker’s Guide to the Galaxy. “Every time I press one of these black controls, labelled in black on a black background, a little black light lights up black to let me know I’ve done it.” OK, it’s not quite like that, but even if you’re not a HHGTTG fan, hopefully you get it – it’s black.
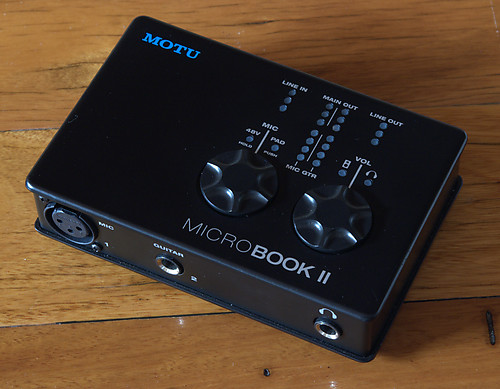
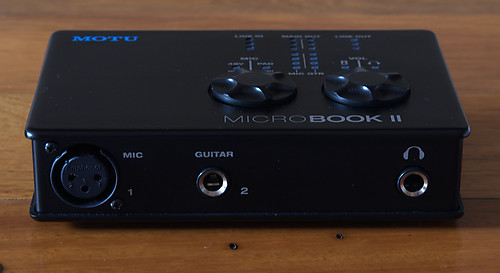
The front panel of the MicroBook II is fairly straightforward, with XLR and TRS jacks for the two inputs for microphone and “guitar,” and a 1/4″ headphone output socket.
The back panel is a little more crowded, with a mix of inputs and outputs in different plug sizes. Apart from the USB connector, there are two balanced TRS output jacks for outputs 1 and 2, a stereo (unbalanced) minijack for outputs 3 and 4, a pair of TRS jacks for inputs 3 and 4, and a stereo minijack also for inputs 3 and 4. There is a lone RCA jack for the S/PDIF output.

The star of the show, from the outside anyway, is the top panel, which has two “soft” rotary controls and an array of LED indicators and meters. The left control adjusts the gain of the microphone input. It can be pressed to turn on a 20 dB attenuation pad, and held down to turn phantom power on and off. The right control adjusts output gain, of either the main output, the headphone output, or both. You select between these options by pressing on it.
I love these rotary controls – I’ve been using the MicroBook as a headphone DAC/amp for a bit of late-night listening lately, and to adjust volume you just kinda flick your finger around on the control. It’s a very touchy experience. When performing acoustic measurements though, I wish there were an indicator of the setting without having to look at the computer.
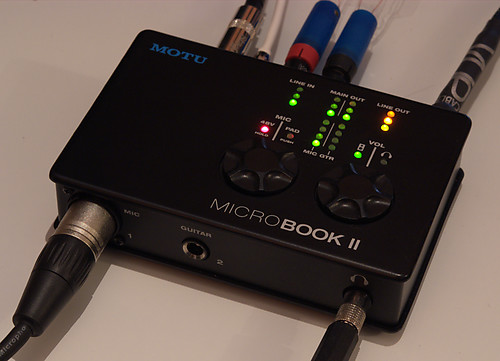
The LED meters are useful for what they are, but you do have to learn them, as there are several different types. The mic and guitar inputs have a 4-LED display, with two green, one orange, and one red, which come on at around -40, -26, -7 (orange), and -1 dB (red). The main outs have a 3-LED meter for each channel, which come on at about -40 (green), -13 (orange), and -1.4 (red) dB. The Line In and Line Out have a single 3-LED display for both channels, and the headphones don’t rate a meter. There are also two LED indicators for the mic input: for phantom power, and the 20 dB pad.
A surprise with the metering is that the Main Out and Line Out LEDs don’t actually meter the output level – rather, they meter the signal that is being sent to these output channels before processing and volume control. I assume there is a reason for this that makes sense in music-production land, but it isn’t what I expected.
My griping about the meters aside, physically the MicroBook II really works well for me: it’s compact and unobtrusive, has those two easily accessible rotary controls on top, and the metering is useful once it’s understood how it works.
Digging Deeper
Internally, the MicroBook II is a bit more complicated. I have to admit that when I first got it home, it was some time until I could even play an audio file through the headphones – usually the easiest way to check out a new interface. I struggled with it for a while, and eventually realized that I was thinking about it all wrong. A block diagram may help to understand how it works – see Figure 1.
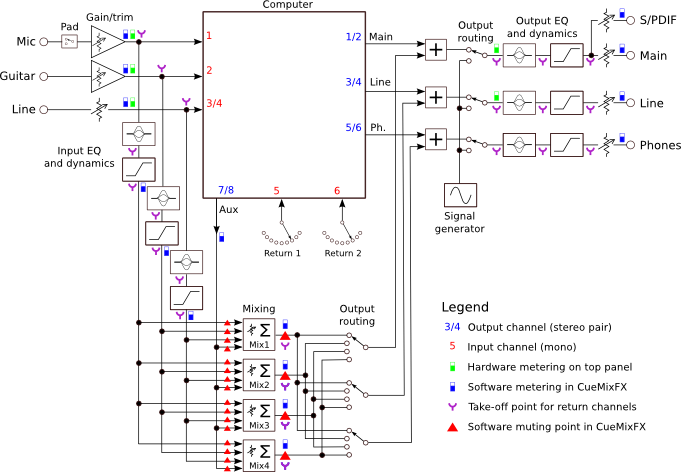
Figure 1. MOTU MicroBook II Block Diagram (click for larger)
The key realization that the diagram shows is that the headphones are a distinct output channel – you have to tell the computer specifically to send audio to channels 5 and 6 to get headphone audio – they don’t “follow” the main outs as in other interfaces.
Let’s cover the diagram in broad sections. At the top center is the computer. What happens in the computer depends on what software you are running – we will see specific examples below. From the computer’s point of view, there are six input channels and eight output channels, all of which can run simultaneously over USB at sample rates of up to 96 kHz (and 24 bits).
At the left are the inputs to the MicroBook itself. There is a single microphone input, a “guitar” input, and a stereo line input. The first two pass through an adjustable gain block, while the line input can only be attenuated. The microphone input also has a switchable 20 dB pad (attenuator), greatly extending its usefulness.
To the bottom of the diagram is the mixer section. There are four separate mixes, each of which mixes the mic, guitar, and line inputs, as well as an Aux pair from the computer (output channels 7 and 8). The mic, guitar, and line signals are each passed through their own EQ and dynamics (compression and limiting) block before being presented to the mixer. Each mix can be selected for any output channel.
To the right are the output channels. Each of channels 1 through 6 pass through a summing block that adds the selected mixer signal to the signal from the computer, a switch to select between audio signal or a test signal, an EQ block, a dynamics block, and finally the output gain control. The S/PDIF output mirrors the main output signal, but has its own gain adjustment.
Finally, there are two additional input channels from the MicroBook to the computer, called the Return channels, which appear as input channels 5 and 6. These channels can be set to receive the signal from any of the locations marked with a little purple “socket” in Figure 1 – as you can see, there are a lot of locations.
CueMixFX
Everything about the MicroBook is configured with the supplied CueMixFX program. Here are some screenshots to illustrate the flavour and overall layout. There are three regions to the CueMixFX window, as shown here:
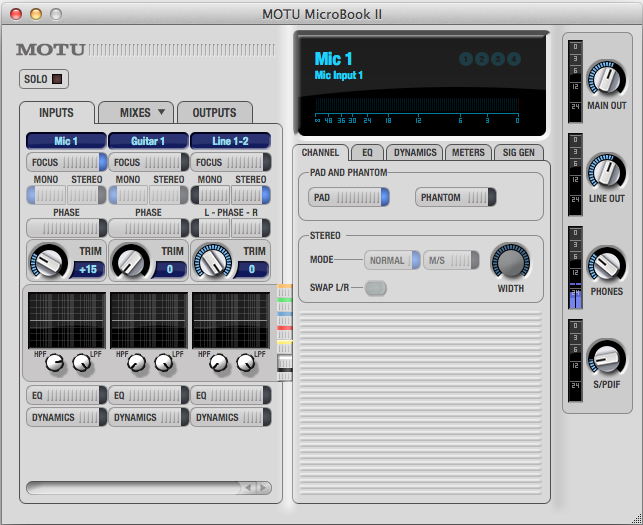
CuemixFX Input Tab
In the left 40% of the screen are the control strips for inputs, mixes, and outputs, each set of which is selected by a tab near the top. In this example, the Inputs tab is selected. In the centre-right portion of the screen is information related to the channel or mix that has the “focus” that has been selected in the left panel – in this example, the mic input. At the far right are the level controls for the outputs: main out, line out, headphones, and S/PDIF.
This screenshot shows the Mixes tab:
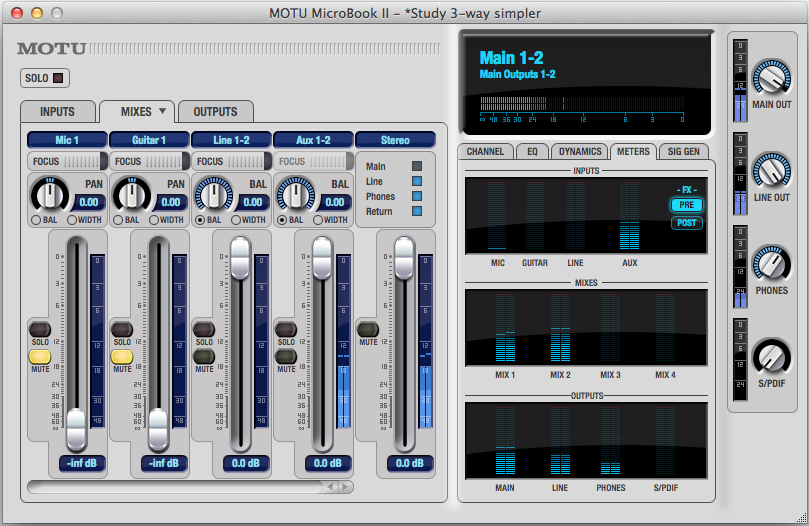
Each of the mic, guitar, line, and aux inputs has its own strip with gain adjustment and mute controls. The line input can be treated as a single stereo pair (as shown here), or as separate mono channels. With the stereo channels, the balance can be panned left and right, or a “width” mode can be used to cross-feed the signal by a variable amount, with a mono mix being the result at zero width. A nice touch in the user interface is that you can rename each mix, to give them more meaningful names than “Mix 1”, “Mix 2”, etc – in this example, I renamed Mix 1 to “Stereo”, as that’s how it’s used in the active crossover configuration discussed later in this article.
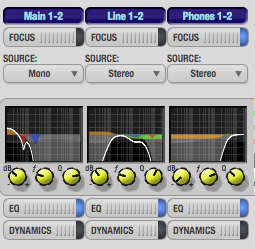
This screenshot shows the Outputs tab:
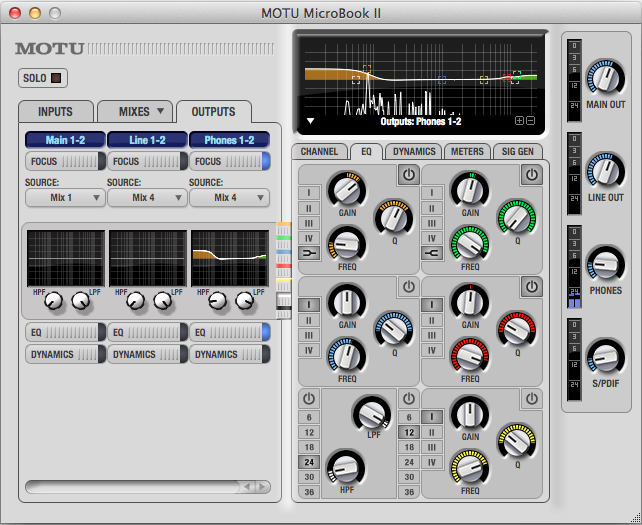
CuemixFX Output Tab
In this example, the headphone output has the focus. In the center-right portion of the screen, I have selected the EQ tab, and so the 7-band EQ controls are shown, along with the frequency spectrum through the headphones in the top section.
The combination of all of these features results in a surprising amount of flexibility. In the Sample Applications section below I’ll work through some specific configurations that I’ve found useful.
Loopback Measurements
I ran a series of tests on the MicroBook II using my standard “simple test protocol for soundcards“. Figure 2 shows the frequency response at 44.1, 48, and 96 kHz sampling rates, as reported by FuzzMeasure Pro, with the main output connected back to the mic input. It’s about a dB down at 20 Hz and at 36 kHz, when operated at 96 kHz sample rate. At 44.1 and 48 kHz sample rates there’s a small peak prior to cutoff.
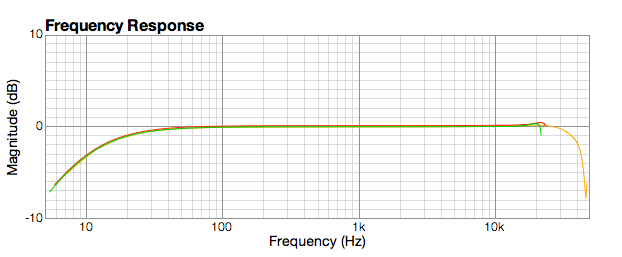
Figure 2. MicroBook II frequency response
Figure 3 shows the harmonic distortion of a 1 kHz sine wave, as reported by the Electroacoustics Toolbox, with the output and input gains set so that 1.0 V RMS is equal to a full-scale digital signal. The THD calculates out at -103 dB. There are some spurious digital noise components visible here, but they are all very low in level – under -120 dB.
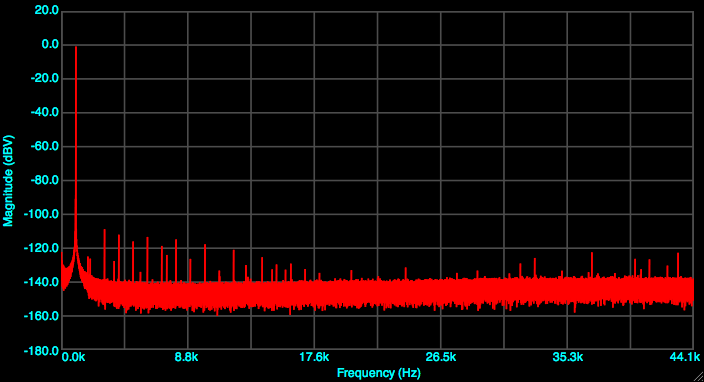
Figure 3. MicroBook II Harmonic Distortion at -1 dB FS
To check inter-modulation distortion, I used the CCIF method with 19 and 20 kHz sinusoids. To avoid clipping in the signal generator, each sinusoid was scaled down to 50%, and the signal then scaled down to -1 dB peak. Figure 4 shows the IMD spectrum of the MicroBook II. The odd-order components are 100 dB down, and the even-order components almost 110 dB down.
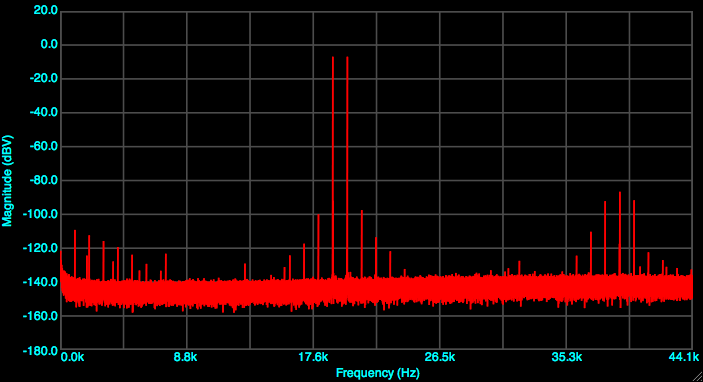
Figure 4. MicroBook II CCITT IMD at -1 dB FS
I believe these results are excellent in general, and especially good for a bus-powered device. The low distortion and general lack of noise makes the MicroBook a good candidate for use as an inexpensive tool for audio-frequency measurements of electronics components as well as for acoustic measurement.
Sample applications
During my time with the MicroBook, I have found it a bit chameleon-like – in a good way – in its ability to adapt to a broad set of uses in an audio system. In this section, I’ll illustrate with some specific configurations. Each configuration can be saved within CueMixFX and reloaded at any time in the future; in addition, the set of configurations can be exported to a file for loading onto another computer.
For acoustic measurement
As noted in the introduction, the key feature that triggered the purchase of the MicroBook II is the digitally-adjustable gain control on the microphone input. MOTU states on their website that it provides “adjustments in approximately 1 dB increments”, which is perfect for many applications in acoustic measurement where a repeatable and known gain setting is needed. Unfortunately, the gain adjustment turns out to be in 3 dB increments, not in 1 dB increments as promised. So I can’t set the preamp gain to, say, 40 dB gain – I have to use 39 dB and adjust something somewhere else. It’s still handy, just not quite what I really wanted. Still, other interfaces in this price range only have an analog knob.
Figure 5 shows the configuration for acoustic measurement. The speaker measurement program feeds a test signal through output channels 1 and 2, and reads the microphone signal on input channel 1. I’ve used this configuration quite a lot recently with FuzzMeasure Pro. With Room EQ Wizard (REW) on the Mac, limitations in the handling of multi-input interfaces in the underlying JavaSound layer means that a workaround needs to be used – this has been working well so far.
On Windows, REW worked without a hitch the few times that I tried it. I also tried some testing with ARTA, and it seemed to work fine. But I am not an ARTA or Windows user in general.
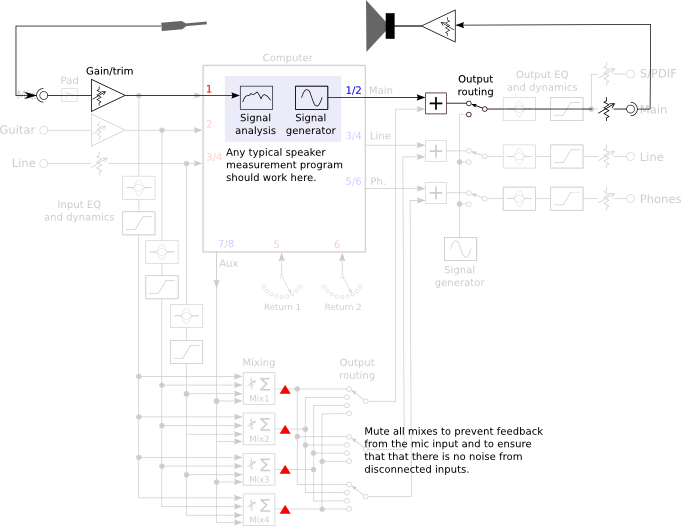
Figure 5. MicroBook II used for Acoustic Measurement
As a multi-channel DAC
Since it has three sets of stereo analog outputs, the MicroBook II can be used as a six-channel DAC. A number of adaptors or adaptor cables will be needed: TRS balanced for the main outputs, stereo 3.5mm for the line out, and 6.5mm stereo for the headphone out. An obvious application for this capability is an computer-based active speaker system, with the music player and crossover being done in software on the host computer. This configuration is illustrated in Figure 6.
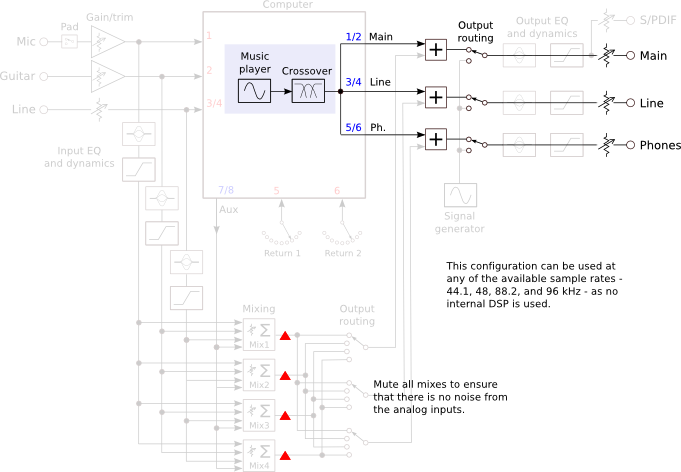
Figure 6. MicroBook II as Multichannel DAC
To try this out, I used the MicroBook II as the multi-channel DAC in a prototype 3-way system, using Pure Music as the music player and active crossover, with FabFilter Pro-Q running as a plugin in Pure Music for equalization. The MicroBook worked well, delivering a clean and noise-free signal in both cases. I won’t claim that it’s a high-end solution – for that, take a look at the Pure Music Supported Soundcards page – but for prototyping or for a budget system, it’s excellent.
This configuration can be combined with the measurement configuration in Figure 5. Pure Music has a “playthrough” mode that allows you to feed the output of the measurement program through Pure Music, and thus the associated crossover and equalization software. Combined with an inexpensive calibrated microphone, you can do all of your design work with just the one box.
As an active crossover
As it turns out, the MicroBook II can also be used as a standalone active crossover. The key feature that enables this is the presence of the EQ block on each output channel, which includes a high pass and low pass filter with selectable slopes. The slopes are all Butterworth – no Linkwitz-Riley.
(Note that – at least on the Mac – the filter slopes were incorrect in early versions, which was apparently an issue with CueMixFX. The version of CueMix FX that MOTU provided me that corrected the problem was 1.6 55864, so if yours is an earlier version you may wish to check for an update.)
To use the MicroBook as an active crossover, I configured it as shown in Figure 7 below. This configuration can only be used at 44.1 or 48 kHz sample rates, as the onboard DSP is inactive at 88.2 and 96 kHz. The music player on the computer must be set to feed the Aux channels i.e. output channels 7 and 8, which is fed into two mixes: Mix 1 passes the stereo signal unaltered, while Mix 2 is set to merge left and right into a mono signal for use with a subwoofer. (Use the “Width” mode on the input channel strip and set the width to zero.) Each output channel is switched to get its signal from Mix 1, unless it’s driving a mono subwoofer, in which case it is switched to Mix 2.
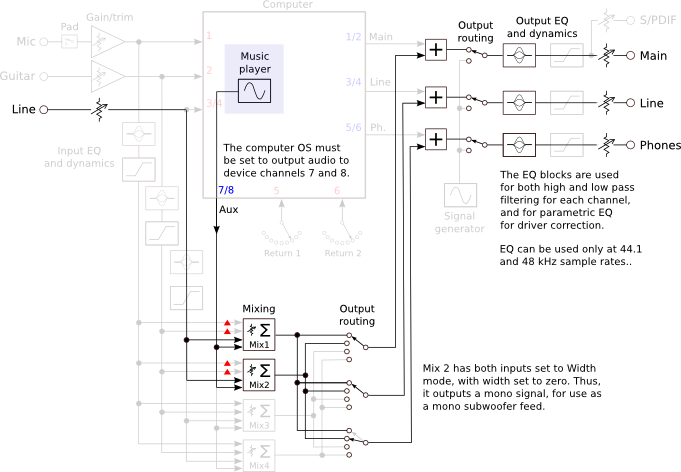
Figure 7. MicroBook II as Active Crossover
There are seven parametric filters on each output channel. Two are the high pass and low pass filters that we use to implement the crossover. That leaves five for driver response correction, two of which can be shelving filters. The peak/notch filters offer a choice of four different types of response, which I have graphed here. I found Type II to be the most useful for this application.
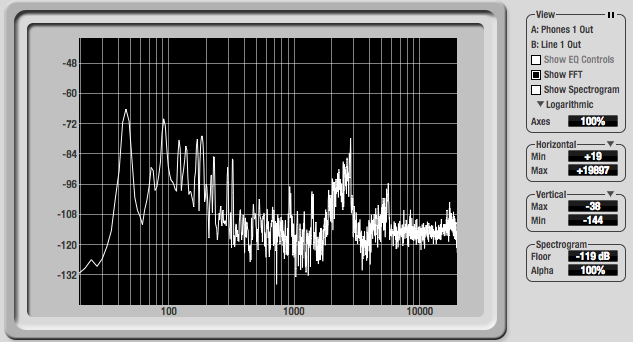
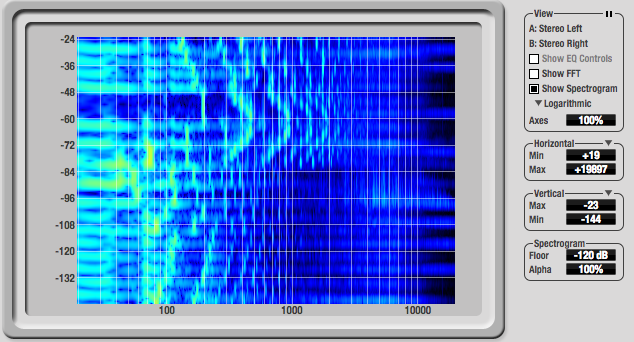
The filter controls on the CueMixFX main screen are small and fiddly to use. There is a way to get a much better interface, which is to use the Return channels and the FFT Analysis window. In the Device Setup menu, select the left and right channels being equalized, and then open up the FFT Analysis screen. Provided that EQ is turned on, the FFT Analysis window shows the EQ curve with grabbable control points for the enabled filters.
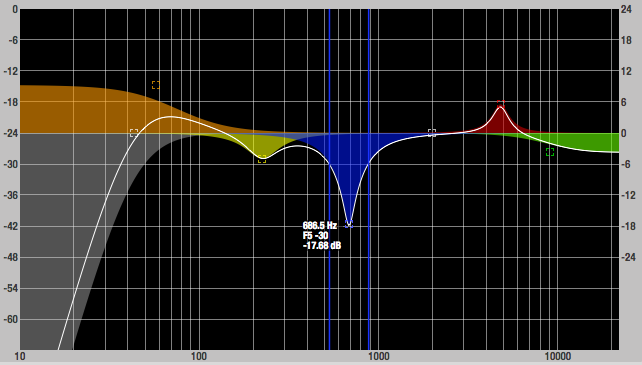
MicroBook II FFT window showing EQ controls
Configured as shown in Figure 7, the MicroBook can also accept an analog input signal on the line inputs. If your source doesn’t have its own volume control, you can control volume with the Trim control on the Input screen. The Line input does have a fairly high signal level and it has no gain (only attenuation), so there may some sources that will not provide enough signal to drive the system to full output. At home, I didn’t find this to be a problem, but if you do, you can work around this using the Dynamics block.
I have to admit, I chuckled to myself for quite a while after figuring out this configuration. I’m currently listening to a small 2-way-plus-sub system in my study using the MicroBook in this configuration. It works just as expected driven by USB from my laptop, using Pure Music as the player (Pure Music makes it easy to send the audio output to the required output channels 7 and 8). For the analog input, I tried a CD player, a Pure i-20 dock with an iPod touch, and a direct connection from the iPod touch to the mini-jack line input. All of them worked fine.
You might be wondering at this point if you can use the MicroBook II as just an analog in-out crossover – in other words, once the crossover parameters are set up, can you just connect the USB port to a power supply and leave the computer out of the picture? And the answer is: yes, you can. With the current version of the firmware (1.04), no computer is needed for the MicroBook to start up and operate with the most recent configuration. I’ve settled on using it this way in the little study system with the iPod touch and Pure i-20 dock, as it’s nice to not have the laptop tethered to the USB cable (it stays cooler as well).
So, here is a tiny box that will do a full 3-way (or 2-way plus sub) active crossover with EQ, with both USB digital input and analog input, for around $250. Compared to a typical DSP crossover, you lose some choices of crossover slopes and the ability to set delays on each channel. But you gain, with the addition of an inexpensive calibrated microphone, the ability to use the same box for doing the speaker/room measurements of the active system at the same time. It may not be true high end but… for a second system or for prototyping with a little take-anywhere box of tricks, it’s just brilliant.
Other applications
Because of its flexibility, I’ve found the MicroBook II useful in ways that I hadn’t anticipated. For example, when measuring the crossover functions in Pure Music for a forthcoming article, I fed one channel’s high and low outputs into the two line inputs. I also created a mix that summed the two inputs and set the mix output as one of the return channels. I was then able to measure the high pass output, the low pass output, and the summed output, with a single sweep in FuzzMeasure Pro.
Monitoring and diagnostic functions
One of the unusual features of the MicroBook II is a set of diagnostic functions built into it. First up is a set of basic test signal generators. Each output channel can be set to output a sine wave, pink noise, or white noise. The main caveat with the sine wave generator is that it can be hard to set the exact frequency that you want.
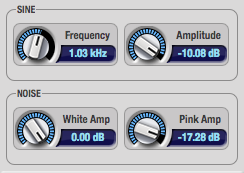
MicroBook II signal generators
The next feature to mention is the soft metering – built into CueMixFX is a metering screen that monitors the signal in a bunch of locations. The locations are shown as the blue bars in the block diagram of Figure 1.
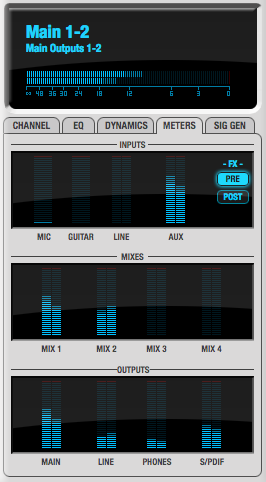
MicroBook II Metering Pane
A more elaborate set of analysis tools is available from the Device menu. You have to first go to the Setup menu and select two signals to send to the computer on the Return channels. The locations that you can select are shown with the purple connector in Figure 1. Once you have done that, you can analyse the signals present at those locations with any of the five tools available: FFT Analysis (with optional spectrogram and EQ control curve), Oscilloscope, X-Y plot, Phase Analysis, and a tuner/frequency meter.
The FFT window displays a single FFT plot of the return channels. There is only one plot, so the two return channels are summed before being passed through the FFT.
It can also be set to display a spectrogram:
The oscilloscope is useful mostly when passing test signals through the system. Each return channel is displayed independently, although both share the same horizontal and vertical scale.
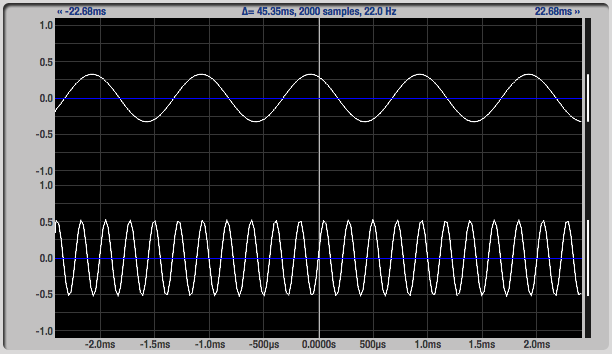
MicroBook II Oscilloscope window
Finally, of the tools that I have used so far, the Tuner window is intended for instrument tuning, but it has a handy frequency meter reading in the top left corner. Now and then, this can be useful – I used it when a measurement program I was using seemed to be generating the incorrect frequency – the frequency meter was a simple way to check it.
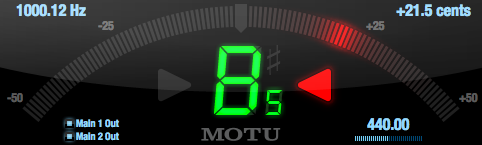
MicroBook II Tuner window
When first reading about the diagnostics tools in CueMixFX, my initial thought was that they wouldn’t be that useful. However, I’ve since changed my mind about that, as just having them there in the audio interface is very convenient and can save starting up another program to add to the others that are already competing to access the audio streams in and out of the computer. Combined with the flexibility of the Return channel selection, they are very useful tools for debugging a configuration or system and checking things like levels and frequency content.
Caveats and limitations
It seems a bit petty to have a whole section for limitations of the MicroBook II, considering that it’s a $250 gizmo that does so much. On the other hand, it’s easy to assume that it does something that it doesn’t. To avoid disappointment, I provide the following notes.
- The gain increments for the microphone input are in 3 dB steps, not 1 dB steps as advertised. While CueMixFX will show 1 dB steps when adjusted on-screen, the actual gain steps only change every 3 dB.
- The EQ and dynamics blocks work only at 44.1 and 48 kHz. While quite reasonable given how DSP has to work, it may come as a surprise. It would have been “nice” if MOTU could have made them work at the higher sample rates but with lower capability – for example, fewer EQ sections.
- The shelving filters in the EQ blocks only have a maximum of +/- 12 dB of gain, although CueMixFX will show +/- 20 dB.
- Like most inexpensive devices, the MicroBook II emits an audible pop when powered on and off. It’s not likely to damage anything, but nonetheless I recommend that your power amps are turned off when connecting and disconnecting the MicroBook.
- On the Mac, in order for the MicroBook to work with Room EQ Wizard (REW), you will need to use the workaround that I have documented here.
It used to be that the MicroBook II didn’t always initialize properly if you boot the computer while the MicroBook is connected. Since the firmware update (to version 1.04), I haven’t been able to reproduce this, so MOTU seem to have addressed this issue.
Finally, there is a learning curve. If you’re the type of person who want to plug it in and have it “just work” then the MicroBook II may not be the best choice for you.
Concluding remarks
The MicroBook II is an audio geek’s Swiss Army knife: an incredibly handy set of tools in a compact package. The role of acoustic measurement interface is fulfilled without fuss – my disappointment with the microphone gain increments notwithstanding – and the multi-channel DAC and standalone active crossover configurations work well and are a dream for a portable prototyping/experimenting tool. The onboard diagnostics are very useful and the extensive soft metering and analysis tools help when trouble-shooting a system and during initial setup. Even just as a simple portable USB DAC/headphone amp, the MicroBook II works well enough if you don’t want to carry a second unit for headphone listening.
While any one of those functions could arguably be better filled by a dedicated unit, having all of them in a single, inexpensive, and compact bus-powered unit makes the MicroBook II a winner in my book. In fact, since I use almost everything on it – the “guitar” input being the only exception – and have found little else to want for (within reason), the MicroBook II is now one of my favorite gizmos. If you’re after a simple plug-and-play unit just for acoustic measurement, check out the Focusrite Scarlett 2i2 that I reviewed in the last issue; but if you don’t mind a learning curve and have an inclination to tinker and experiment, the MicroBook II has a lot packed into it. Definitely worth a look.
Acknowledgements
HifiZine gratefully acknowledges the support of:
- Faber Acoustical, for the use of the Electroacoustics Toolbox
- Super-Mega Ultra-Groovy, for the use of Fuzz-Measure Pro
- Earthworks Audio, for the M30 measurement microphone calibration file