- Manuals
- Brands
- Moog Manuals
- Synthesizer
- Mother-32
- User manual
-
Contents
-
Table of Contents
-
Bookmarks
Quick Links
Related Manuals for Moog Mother-32
Summary of Contents for Moog Mother-32
-
Page 3
W h a t a r t i s t s n e e d i s a n e n d l e s s “ r e s o u r c e , f u l l o f r o u g h e d g e s a n d d i m l y — l i t n o o k s a n d c r a n n i e s t h a t o n e c a n e x p l o r e a s o n e s e e s fi… -
Page 4: Important Safety Instructions
—Consult the dealer or an experienced radio/TV technician for help. CAUTION: Please note that any changes or modifications made to this product not expressly approved by Moog Music Inc. could void the user’s authority granted by the FCC to operate the equipment.
-
Page 5: Table Of Contents
Keyboard Overview Sequencer Overview & Panel Control MIDI Input VC Mix (Voltage Controlled Mixer/Attenuator) Patchbay Overview UNDERSTANDING AND USING THE MOTHER-32 SEQUENCER Basic Concepts Sequencer Modes Tutorial — Creating a Pattern in Keyboard Mode Play a Pattern Sequencer Performance Functions Editing a Pattern Saving &…
-
Page 6: Unpacking & Inspection
Check the contents of the shipping carton. Be careful when unpacking your new Mother-32 so that nothing is lost or damaged. Moog recommends saving the carton and all packing materials in case you ever need to ship the instrument for any reason.
-
Page 7: Setup & Connections
If you are using a 5-pin MIDI cable for external control or sync, connect the MIDI OUT of your MIDI controller to the MIDI IN on your Mother-32. By default, the Mother-32 is set to receive MIDI data on MIDI Channel 1.
-
Page 8: Mother-32 Overview
EXT. AUDIO input, the White Noise signal is replaced with the external signal. This allows you to blend the VCO with any sound source you like on the Mother-32. The output of the Mixer then goes to the input of the Voltage Controlled Filter (VCF).
-
Page 9: Vco (Voltage Controlled Oscillator)
This control is used to tune the oscillator’s pitch up or down one octave from its center position. This is useful for ensuring that Mother-32 is in tune with other instruments, or can also be used as a live performance control.
-
Page 10: Vco Modulation
VCO MODULATION VCO MOD SOURCE This switch is used to determine whether the LFO, EG or an external modulation source is being sent to the VCO MOD AMOUNT control. NOTE: If an external modulation source is patched into the VCO MOD input patch point, and EG/VCO MOD is selected as your VCO MOD SOURCE, only the external modulation signal will be applied to the VCO MOD AMOUNT control.
-
Page 11: Lfo (Low Frequency Oscillator)
The Mother-32’s LFO is also capable of audio-rate modulation, which can be used to add harmonic complexity to any selected destination.
-
Page 12: Vcf (Voltage Controlled Filter)
This switch selects between LOW PASS and HIGH PASS Filter modes. LOW PASS The Low Pass Filter is a traditional Moog 24dB/Octave resonant Ladder Filter. This is the heart of the Moog sound and is ideal for bass sounds and other sounds that mimic melodic acoustic instruments. HIGH PASS The High Pass Filter is a classic Moog 24dB/Octave non-resonant Ladder Filter.
-
Page 13: Vcf Modulation
VCF MODULATION VCF MOD SOURCE This switch is used to determine whether the LFO or EG is being sent to the VCF MOD AMOUNT control. VCF MOD AMOUNT This variable control determines how much the modulation source changes the Filter Cutoff frequency. VCF MOD POLARITY This switch is used to determine whether the VCF modulation has a positive or negative effect on the Filter Cutoff frequency.
-
Page 14: Vca (Voltage Controlled Amplifier)
When set to ON, Mother-32’s audio signal is allowed to pass without the need for a Gate or note ON message to occur. This is ideal for drones and continuously evolving modulated sounds, but is also useful for eliciting new behavior and sounds from an existing sequence.
-
Page 15: Keyboard Overview
VCF and VCA at a fixed level. SEQUENCER PANEL CONTROLS The following is an overview of the Mother-32 Sequencer Panel controls. For full details of their operation, please refer to the “Understanding and Using the Mother-32 Sequencer” section of this manual.
-
Page 16
SEQUENCER PANEL CONTROLS (continued) PATTERN (BANK) This button is used to view the currently active pattern location, or select a new pattern. While holding the (SHIFT) button, it is used to view the current Bank containing 8 patterns, or select a new Bank. RUN/STOP (REC) This button is used to start the Sequencer, and to stop it. -
Page 17: Midi Input
MIDI INPUT MIDI IN The Mother-32 has a 5-pin DIN MIDI input that allows for external MIDI control, MIDI clock sync and MIDI to CV conversion. When MIDI information is being received, the MIDI IN LED will flash red. Details of the MIDI implementation are contained in the “MIDI Functions and Implementation”…
-
Page 18: Understanding And Using The Mother-32 Sequencer
Accent signal which modulates the VCF and VCA for emphasizing notes. Other than that, the sound you hear from the Mother-32 when using the sequencer is determined by the front panel controls and any patch cables in use on the patchbay.
-
Page 19: Tutorial — Creating A Pattern In Keyboard Mode
TUTORIAL — CREATING A PATTERN IN KEYBOARD MODE This is a tutorial that will walk you through the sequencing capabilities of your Mother-32 in KB mode. Keyboard mode is the best place to start when learning to use the Sequencer. Before starting, disconnect any patch cables and set all controls to the default positions found on Page 7.
-
Page 20
KB MODE TUTORIAL — CREATING A PATTERN (continued) SET THE GATE LENGTH Set the GATE LENGTH control to minimum. The Octave/Location LEDs temporarily light red to indicate the current Gate Length. Gate Length is set per-step and determines the Indicates Gate Length (Red LED) duration that a note is held relative to the length of its step (from 1/8 — 8/8). -
Page 21
KB MODE TUTORIAL — CREATING A PATTERN (continued) TURNING GLIDE ON/OFF To turn Glide ON for a step, simply turn the GLIDE control to the right. Octave/Location LED 5 is lit green indicating Glide is turned ON for the current step. To turn Glide OFF for a step, simply turn the GLIDE control all the way down. -
Page 22
KB MODE TUTORIAL — CREATING A PATTERN (continued) ADD A RATCHET TO STEP 6 Yellow LEDS Green LED Hold (SHIFT) while turning the GLIDE control. Octave/Location LEDs 1-4 will temporarily light yellow, indicating the number of Ratchets (repeats) in the current step. Select a value of 2, which will produce 2 notes during the step (up to 4 can be selected). -
Page 23: Play A Pattern
PLAY A PATTERN RUN THE PATTERN Adjust the TEMPO control to the speed you want, and press RUN/STOP. The Sequencer will advance through each step in the pattern. When it reaches the end, it loops around to Step 1. The current step being played is indicated by the corresponding Step LED being lit.
-
Page 24: Sequencer Performance Functions
SEQUENCER PERFORMANCE FUNCTIONS LIVE ACCENT Press (SHIFT)+ACCENT during playback to temporarily add an Accent to each step in a pattern. Live Accent overrides stored Accent data and is only active when both buttons are held. Live Accent data is not stored in memory. LIVE MUTE Press (SHIFT)+REST during playback to temporarily Mute the output of the sequencer as it continues to advance.
-
Page 25: Editing A Pattern
KB MODE PATTERN EDITING To make changes to an existing pattern using the Record function with step write behavior, press (SHIFT)+(REC) when the pattern is paused. Steps with data entered will be lit. Octave/Location LED 1 will be lit green to indicate Page 1 of the pattern. Step LED 1 will blink at the current tempo, indicating that it can be edited.
-
Page 26: Saving & Restoring A Pattern
SAVING A PATTERN Any changes to the current pattern are discarded when changing to a new pattern Blinking Green LED Indicates Save Destination unless they are saved. To Save a pattern, hold (SHIFT)+RUN/STOP for one second. An Octave/Location LED will rapidly blink green indicating the current destination for saving.
-
Page 27: Initializing A Pattern
TUTORIAL — CREATING A PATTERN IN STEP MODE This is a tutorial that will walk you through the sequencing capabilities of your Mother-32 in Step mode. Before starting, disconnect any patch cables, set all controls to the default position found on Page 7, and ensure the current pattern is initialized by pressing (SHIFT)+RESET+PATTERN.
-
Page 28
STEP MODE TUTORIAL — CREATING A PATTERN (continued) SETTING PATTERN LENGTH Set End Step Select End Step You can create a pattern with up to 32 steps, however, in this case we are going to set the pattern length to be eight steps. Press SET END and then press Step 8. -
Page 29
STEP MODE TUTORIAL — CREATING A PATTERN (continued) EDITING NOTES Play A New Note For The Selected Step Select Octave Select octave 4 with the LEFT/RIGHT arrows and play the “G” key (located above Step LED 5). As the pattern continues to play back, you will hear the new note on Step 2. Now rotate the GATE LENGTH control fully clockwise so that the maximum Gate Length (Tie) is selected. -
Page 30
STEP MODE TUTORIAL — CREATING A PATTERN (continued) ADDING ACCENTS TO STEP 1, STEP 4 AND STEP 7 Select Step To Add Accent To Press (SHIFT)+Step 1. Step LED 1 will blink to indicate it is selected for editing. Press ACCENT. Octave/Location LED 7 will be lit yellow. -
Page 31: Playing & Editing A Pattern In Step Mode
Turning ON or OFF Individual Steps Or Selecting Steps To Edit Rotate Controls The Mother-32 Step mode repurposes the 13-note Keyboard and LEFT/RIGHT arrows to be performance controls for modifying patterns during playback. The eight buttons directly above the Step LEDs are the Step buttons.
-
Page 32: Sequencer Panel Function Quick Reference
SEQUENCER PANEL FUNCTION QUICK REFERENCE SEQUENCER MEMORY AND LOADING A PATTERN SELECT BANK While holding (SHIFT)+PATTERN, use Step buttons 1-8, or the LEFT/RIGHT arrows to select a new bank. SELECT PATTERN While holding PATTERN, use Step buttons 1-8, or the LEFT/RIGHT arrows to select a new pattern. NOTE: Unsaved changes to a pattern will be lost when a pattern location is changed, initialized, or restored during normal operation.
-
Page 33: Mode Selection
SEQUENCER PANEL FUNCTION QUICK REFERENCE (continued) MODE SELECTION KB (KEYBOARD) Press (SHIFT)+(KB). STEP Press (SHIFT)+(STEP). SEQUENCER CONTROLS SET INTERNAL CLOCK TEMPO Rotate the TEMPO control. START/PAUSE PATTERN PLAYBACK Press RUN/STOP. RETURN TO STEP 1 Press RESET. REPEAT CURRENT STEP DURING PLAYBACK Press HOLD while the sequencer is running.
-
Page 34: Kb Mode Panel Functions
SEQUENCER PANEL FUNCTION QUICK REFERENCE (continued) SEQUENCER CONTROLS (continued) MOMENTARY MUTE DURING PLAYBACK Hold (SHIFT)+REST. Normal playback resumes on release. MOMENTARY RATCHETS DURING PLAYBACK Hold (SHIFT) and rotate the GLIDE Control. Normal playback resumes on release. MODIFY SWING Press (SHIFT) and rotate the TEMPO Control. KB MODE PANEL FUNCTIONS LIVE PLAY With The Sequencer Off…
-
Page 35
SEQUENCER PANEL FUNCTION QUICK REFERENCE (continued) KB MODE PANEL FUNCTIONS (continued) GATE LENGTH | STEP MODE Rotate the GATE LENGTH control to modify the Gate Length of a currently selected step. Maximum Gate Length ties the selected step to the next step. ACCENT | KB MODE Press ACCENT to add an Accent to the current step. -
Page 36: Step Mode Panel Functions
SEQUENCER PANEL FUNCTION QUICK REFERENCE (continued) KB MODE PANEL FUNCTIONS (continued) SET END STEP | KB MODE Select Page Of End Step Set End Step Press (SHIFT)+SET END. If the desired end step is on a different page, press (SHIFT)+Page button 1-8, 9-16, 17-24 or 25-32.
-
Page 37
SEQUENCER PANEL FUNCTION QUICK REFERENCE (continued) STEP MODE PANEL FUNCTIONS (continued) STEP EDIT | STEP MODE Press (SHIFT)+Step button 1-8 to select it for editing whether the sequencer is Specify Step For Editing running or stopped. The currently selected Step LED will blink and all other Step LEDs are turned off to indicate the step being edited. -
Page 38: Control Voltage Overview
Frequently they have only two levels that represent On and Off. A Gate signal in the Mother-32 for instance, is off at 0 Volts and on at +5 Volts. A Gate signal can be used to trigger events, such as starting an Envelope Generator, or starting the sequencer running.
-
Page 39: Patchbay Inputs And Outputs
EXTERNAL AUDIO INPUT This is a unity gain input that allows other sound sources to be processed by Mother-32’s onboard Filter. Because this is a unity gain input designed to Eurorack level standards, an external audio source applied to this input should be 10V peak to peak.
-
Page 40: Noise
(continued) NOISE NOISE OUTPUT This is the output for the Mother-32’s White Noise generator. Noise is useful for creating percussion and wind sounds, as well as for random noise modulations (+/-5V, typical). NOTE: Noise is also normalled to the clockwise position of the main MIX control.
-
Page 41: Vco
PATCHBAY INPUTS AND OUTPUTS (continued) VOLTAGE CONTROLLED OSCILLATOR (continued) VCO LIN FM INPUT This is a Linear Frequency Modulation input, which is useful for modulating the VCO with audio rate waveforms to achieve very harmonically rich sounds. (Accepts a -5 to +5V signal). VCO MOD INPUT This input is routed to the UP position of the VCO MOD SOURCE selector switch (EG/VCO MOD).
-
Page 42: Patchbay Inputs And Outputs (Continued)
PATCHBAY INPUTS AND OUTPUTS (continued) LOW FREQUENCY OSCILLATOR (continued) LFO SQ OUTPUT This output is the LFO Square waveform (+/-5V). LFO TRI OUTPUT This output is the LFO Triangle waveform (+/-5V). VC MIX — VOLTAGE CONTROLLED, DC COUPLED MIXER MIX 1 INPUT This input is normalized to 0V and routed to the counterclockwise position of the VC MIX control.
-
Page 43: Multiple
PATCHBAY INPUTS AND OUTPUTS (continued) VC MIX — VOLTAGE CONTROLLED, DC COUPLED MIXER (continued) VC MIX OUTPUT This is the output of the VC Mixer which is a blend of the MIX 1 and MIX 2 input signals set by the VC MIX panel control and VC MIX CTRL CV input. (+/-5V). VC MIX ALTERNATE USES: FIXED VOLTAGE SOURCE With nothing plugged into the MIX 1 or MIX 2 inputs, the VC MIX control…
-
Page 44: Assignable Output
PATCHBAY INPUTS AND OUTPUTS (continued) ASSIGNABLE OUTPUT ASSIGN OUTPUT This is the output for the assignable jack. Its source is programmed in Setup mode. To learn more about Setup mode, go to Page 49. The following output sources are available: 1: ACCENT (Default) This outputs a 0 to +5V filtered pulse signal from Accented pattern steps only.
-
Page 45: Envelope Generator
(0 to +7.5V) KEYBOARD The Mother-32 has a 13-note keyboard that is also used to program the sequencer. When a note is played manually, via the sequencer, or by an external MIDI input, a control voltage and gate signal are generated. The control voltage is routed internally to VCO Pitch, while the Gate signal is routed internally to trigger the EG.
-
Page 46
-5V to +5V control voltage changes the tempo from minimum to maximum (40 BPM to 750 BPM). If the Mother-32 sequencer is synced to a MIDI clock signal, then this input can be used to select clock divisions. -
Page 47: Clock/Tempo Input
PATCHBAY INPUTS AND OUTPUTS (continued) CLOCK/TEMPO (continued) RUN/STOP When a +5V signal is applied to this input, the sequencer will play from its current pattern location for the duration that the voltage is applied. When a 0V signal is applied to this input, the sequencer will stop at its current pattern location.
-
Page 48: Midi Functions And Implementation
MIDI Channel. MIDI NOTE ON The Mother-32 responds to MIDI Note On messages on the current MIDI Channel (default Channel 1). MIDI Note values received are converted into a 1V/Octave Keyboard CV, and then routed to the VCO and KB CV output jack.
-
Page 49: Setup Mode
(continued) MIDI SYSTEM REAL TIME MESSAGES MIDI CLOCK MESSAGES: When the Mother-32 detects a MIDI Clock signal, the Tempo LED blinks green at the detected tempo and the panel TEMPO control becomes a clock divider. After MIDI clock messages cease to be received, the internal clock can be restarted by pressing the RUN/STOP button.
-
Page 50
SETUP MODE (continued) PARAMETER SELECTION 9-16 Select Values 9-16 To access values 9-16, press (SHIFT)+Step buttons 1-8 (9-16). The value is indicated by red Octave/Location LEDs. If a setting is on the same LED as the current page, the LED will flash alternately between the yellow page color and the green or red setting color. -
Page 51: Vco Calibration
3. A 1 V/Octave source (One that is confirmed to be well calibrated — no more than 1 mV error per octave). CALIBRATION 1. Make sure your Mother-32 has been powered on for at least 15 minutes, and that it is in a place where the temperature will not change drastically while performing the calibration.
-
Page 52: Using Mother-32 As A Eurorack Module
The Mother-32 can be removed from its case, and easily installed into a Eurorack system as a 60HP module. Before doing this, it is important to note that the Mother-32 draws a maximum of 230mA from a +12V supply. It does not use the -12V supply at all.
-
Page 53: Presets
PRESETS NOTE: Additional presets and blank patch sheets can be downloaded at www.moogmusic.com OCTAVE BOUNCE BACK (Adjust VC MIX to control tuning) NOISE TRANSIENT METAL SNARE…
-
Page 54
SEQUENCER BASS RESONANT HIGH PASS FILTER 8-BIT PERCUSSION… -
Page 55
‘80S TOMS SHORT BRASS FILTER KICK… -
Page 56
PRESET NAME: NOTES: PRESET NAME: NOTES:… -
Page 57
PRESET NAME: NOTES: PRESET NAME: NOTES:… -
Page 58: Specifications
CURRENT DRAW: 230mA (maximum) from +12VDC (10-pin header) MOUNTING DIMS: 60HP (.69” 26mm Module Depth) Specifications Subject To Change Without Notice ACCESSORIES The following accessories are available at authorized Moog dealers. 2 UNIT VERTICAL RACK KIT 3 UNIT VERTICAL RACK KIT HIGH QUALITY GIG BAG 6”…
-
Page 59: Service And Support
(828) 251-0090 to register your product. CARING FOR THE MOTHER-32 Clean the Mother-32 with a soft, dry cloth only – do not use solvents or abrasive detergents. Heed the safety warnings at the beginning of the manual. Don’t drop the unit.
-
Page 60
Mother-32 Is Handcrafted With Care By Employee-Owners In Asheville, NC…
This manual is also suitable for:
Mother-32
Посмотреть инструкция для Moog Mother-32 бесплатно. Руководство относится к категории синтезаторы, 5 человек(а) дали ему среднюю оценку 8.1. Руководство доступно на следующих языках: английский. У вас есть вопрос о Moog Mother-32 или вам нужна помощь? Задайте свой вопрос здесь
Не можете найти ответ на свой вопрос в руководстве? Вы можете найти ответ на свой вопрос ниже, в разделе часто задаваемых вопросов о Moog Mother-32.
Инструкция Moog Mother-32 доступно в русский?
К сожалению, у нас нет руководства для Moog Mother-32, доступного в русский. Это руководство доступно в английский.
Не нашли свой вопрос? Задайте свой вопрос здесь


![]()
- Гарантия легкого возврата
- Безопасные способы оплаты
-
Способы оплаты
-
Способы доставки
-
Гарантия и возврат
-
Главная
-
Каталог
-
Клавиши
-
Синтезаторы
-
Аналоговые синтезаторы
-
Moog Mother-32

![]()
![]()
![]()
![]()
![]()
![]()
![]()
![]()
![]()
![]()
![]()
![]()
-
Безопасные способы оплаты
При оплате банковской картой через наш сайт используется эквайринг от Сбербанка, который помогает сохранить конфиденциальность персональных и платёжных данных покупателя.
-
Официальная гарантия
Большинство товаров имеют гарантийный срок 6 месяцев, исчисляемый со дня передачи товара потребителю. Исключение составляют бренды Elektron, Pioneer, Sony, RME, Yamaha и Steinberg (для них гарантия составляет 12 месяцев), а также Casio, ADAM (гарантия 2 года)
Наличие в магазинах
Интернет-магазин —
в наличии
Санкт-Петербург —
отсутствует
Москва —
отсутствует
Доставка на дом и в ПВЗ01 — 03 октября
Самовывоз из магазинов 01 — 03 октября
-
Описание
-
Характеристики
-
Комментарии
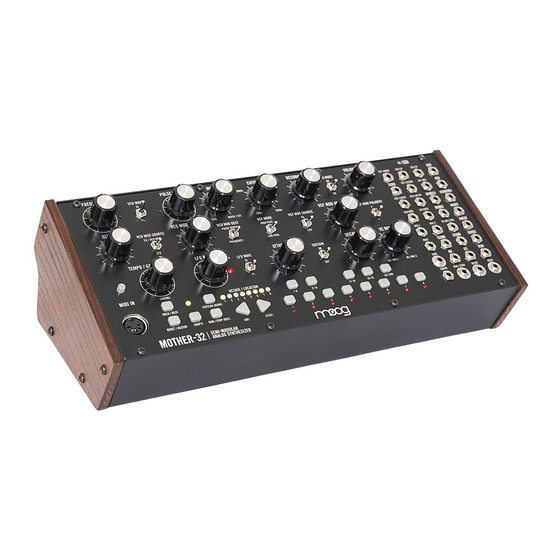
Монофонический полумодульный синтезатор модели Mother-32 принадлежит к полностью аналоговым приборам. Поддерживается как автономная работа, так и в виде модуля под системы типа Eurorack. Функционал звукового синтеза расширен за счет встроенной патч-секции на 32 порта и секвенсора на 32 шага. Mother-32 отлично дополнит Minitaur, Werkstatt-Ø1 и прочие синтезаторы.
- Moog
- Клавиши Moog
- Синтезаторы Moog
Файлы для скачивания
- Инструкция для Moog Mother-32 (на англ.) (PDF 14 Мб 987 Кб)
Главные спецификации:
- Звуковой движок на 100% аналоговый.
- Предусмотрено полумодульное исполнение, не требующее патчинг под создание звуков.
- Встроены аналоговый осциллятор на 10 октав (меняется ширина импульса), микшер CV, генератор белого шума (аналоговый), лестничный фильтр LP/HP с переключением и генератор LFO с парой форм волны – Square/Triangle.
- Можно сохранить и вызвать максимум 64 пользовательские секвенции.
- В секвенсоре CV на 32 шага имеется два перфоранс-режима: Step Edit и Keyboard.
- Работа с секвенсором с помощью однооктавной клавиатуры на 13 нот.
- Аналоговый выход совмещен с выходом под наушники.
- Для модульного патчинга предусмотрена коммутационная панель на 32 разъема, включая 14 выходов и 18 входов.
- Имеется стандартный вход MIDI на 5 контактов. Ко входу можно подключить клавиатуру MIDI или внешние секвенсоры для управления синтезатором. Интерфейс поддерживает работу в режиме конвертера MIDI-CV.
- Корпус сделан из алюминия, боковые панели – из дерева.
- Можно поставить в любой кейс Eurorack с прочими модулями.
- В набор входит 5 патч-кабелей и адаптер питания.
Moog Mother 32 – первый полумодульный аналоговый синтезатор от легендарной компании! Как и любой другой синтезатор от компании MOOG, новый Mother 32 обладает великолепным звучанием, в очередной раз подкрепляющим эталонный статус легендарного бренда.
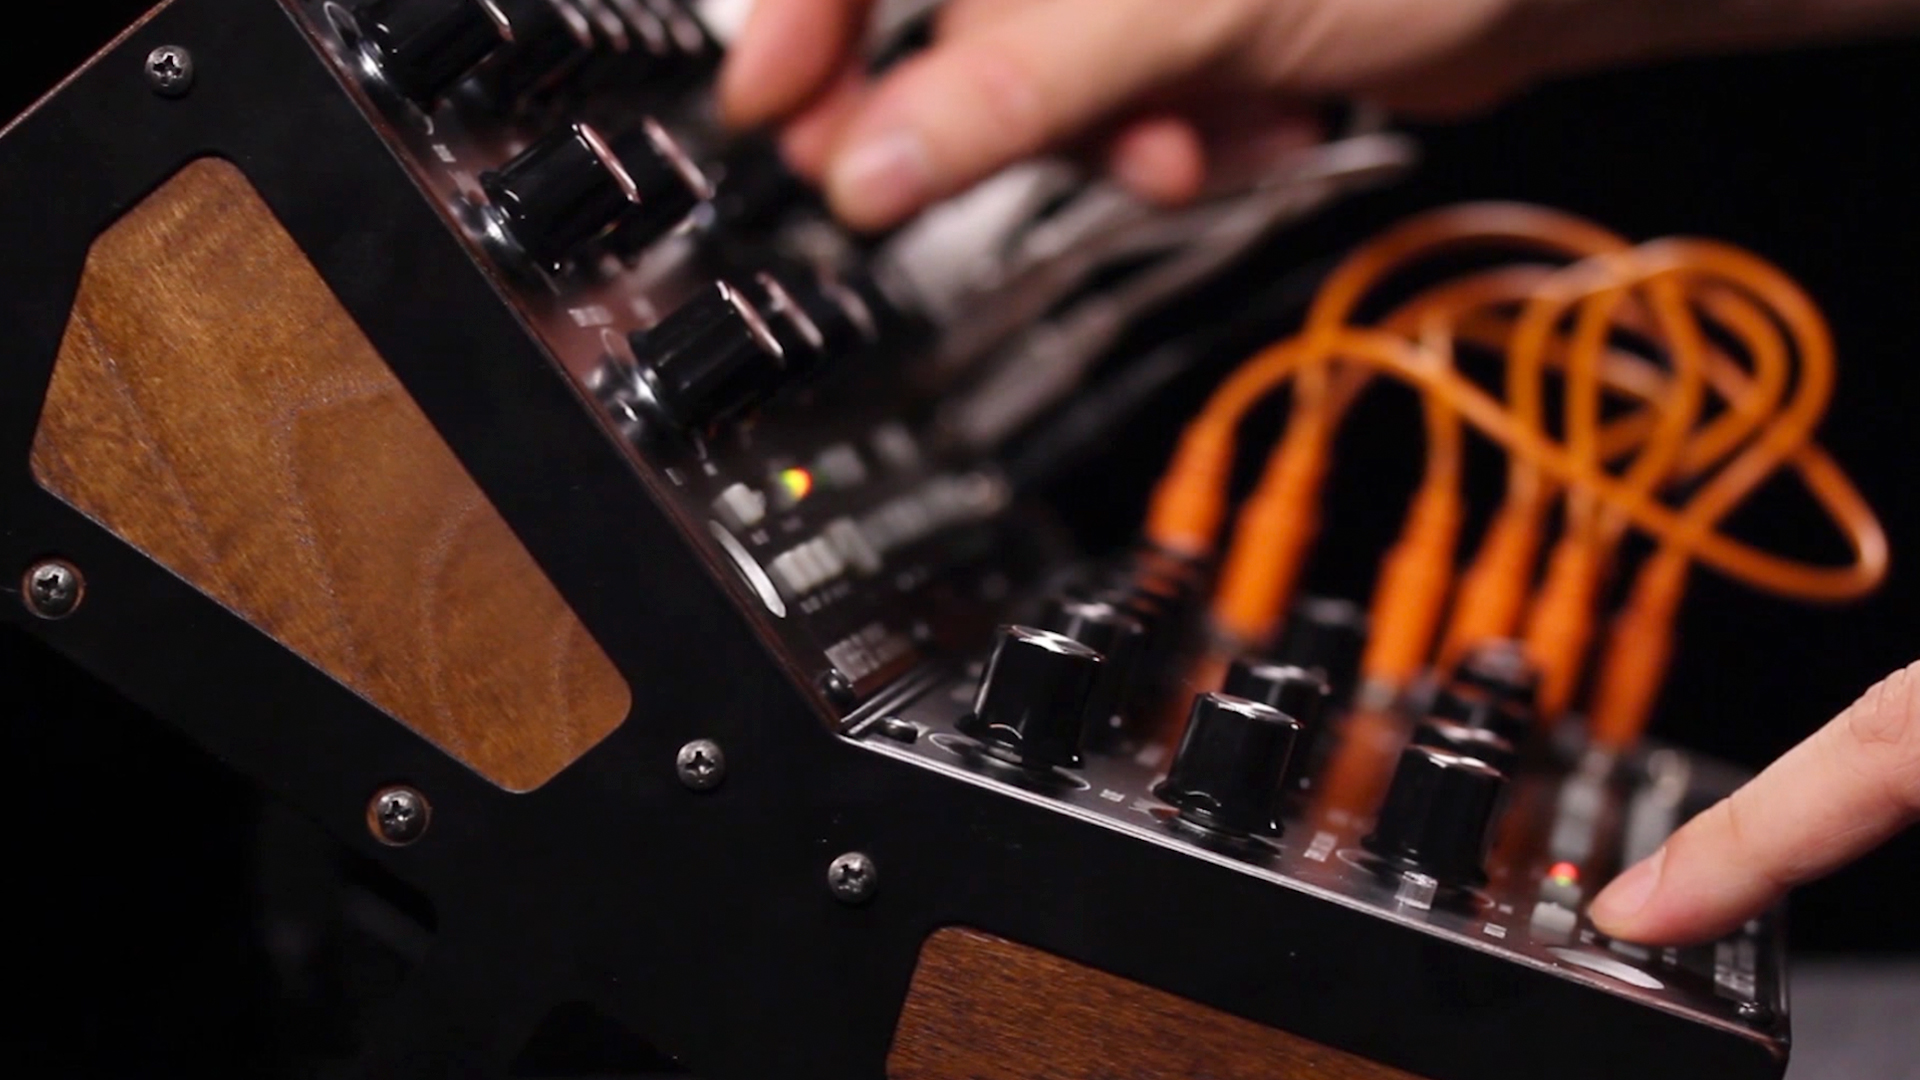
Благодаря встроенному 32-шаговому секвенсору и обширной матрице модуляции с 64 разъёмами для CV/Gate пэтчинга, новый инструмент имеет широчайшую палитру аналоговых тембров, пригодных для использования в любых современных электронных жанрах музыки!
Полумодульный дизайн инструмента позволяет использовать синтезатор и без пэтч-кабелей, однако истинная мощь модуляционных возможностей инструмента будет доступна только при мануальном CV/Gate пэтчинге.
MOOG Mother 32 поставляется в прочном алюминиевом корпусе с деревянными боковинами. При этом инструмент выполнен в стандартном формакторе Eurorack (60HP)и может быть установлен в любой Eurorack-кейс вместе с другими модулями.
Синтезатор оснащен 1 осциллятором с 2 формами волны, классическим 2-режимным LP/HP лестничным фильтром, секцией микшера, управляемой с помощью CV, а также – мощным генератором LFO с широким диапазоном значений.
Также, имеется встроенный MIDI-интерфейс для управления с помощью внешних секвенсоров или подключения MIDI-клавиатуры. Интерфейс может работать и в режиме MIDI—CV конвертера для полной автоматизации параметров.
Стоимость проибора составит всего 679$, что для такого мощного и функционального инструмента, в общем, то не так много!

Спецификации инструмента:
Осциллятор:
· 1 VCO (+/-5v) с 2 формами волны (Sawtooth/Pulse) и раздельными аудиовыходами
· Частота VCO — от 8Гц до 8кГц c возможностью повышения до 16кГц с помощью пэтчинга
· Регуляторы октав
· Переключатель формы волны
· Регулятор глубины импульса
· Генератор белого шума (+/-5v) или аудиовход
· Регулятор (+/-5v) плавной смены уровня осциллятора/белого шума или аудиовхода
Фильтр:
· Аналоговый резонансный транзисторный лестничный фильтр с 2 режимами (LP/HP)
· Частота среза, глубина резонанса и уровень фильтра управляются по CV (+/-5V)
· Частотный диапазон: от 20Гц до 20кГц
Усилитель:
· Возможность отключения триггера усилителя для работы в Drone-режиме
· Контроль по CV в режиме огибающей (0/+8V) или Drone-режиме (+/-5V)
· Основной регулятор громкости (+/-5V)
· Регулятор громкости наушников (+/-1.7V)
LFO:
· 1 LFO (+/-5V) c 2 формы волны (square, triangle) и раздельными выходами
· Раздельные переключатели формы волны для модуляции осциллятора и фильтра
· Частотный диапазон: от 1гЦ до 350Гц (с панели) или 600Гц (с помощью пэтчинга)
· CV-вход для управления частотой (+/-5V)
Генератор огибающей:
· 3-фазный (ADS) генератор огибающей с отключаемой фазой удержания
· Триггерный вход (0/+5V, 10V max)
· CV-выход (0/7.5V)
Модуляционные возможности осциллятора:
· Переключатель источника модуляции: EG/VCO MOD или LFO
· CV-вход VCO MOD
· Переключатель цели модуляции: высота или ширина импульса
Модуляционные возможности фильтра:
· Переключатель источника модуляции: EG или LFO
· Прямая и обратная полярность модуляции
CV-микшер:
· Специальная схематика узла для микширования двух переменных сигналов
· 2 CV-входа
· 1 CV-вход для управления (+/-5V)
· 1 CV-выход (+/-5V)
Множитель:
· Встроенный множитель, позволяющий дублировать любой сигнал
Клавиатура:
· 1-октавная триггерная клавиатура с 13 кнопками и диапазоном в 8 октав
· Переключатели октав с обжим диапазоном в 8 октав
· Регулируемый глайд
· CV-выход (+/-5V)
· Gate-выход (0/+5V)
Секвенсор:
· Двухрежимный секвенсор на 32 шага
· 64 цели для модуляции с помощью секвенсора
· Каждый шаг содержит следующие данные: Note Value, Gate, Rest, Accent, Glide, Ratchet count (до 4 нотных повторов)
· Параметры секвенсора: Tempo, Swing, Run/Stop, Hold и Reset
· CV-входы секвеснора: Tempo, Run/Stop, Hold и Reset
· CV-выходы секвенсора: KB, Gate, Accent Pulse
Разъемы для пэтчинга:
· 32 разъема для модульного пэтчинга
· Входы: External Audio, Mix CV, VCA CV, VCF Cutoff, VCF Resonance, VCO 1V/Octave, VCO Linear FM, VCO Modulation, LFO Rate, Mix 1, Mix 2, VC Mix Control, Mult, Gate, Tempo, Run/Stop, Reset, Hold
· Выходы: VCA, Noise, VCF, VCO Saw, VCO Pulse, LFO Triangle, LFO Square, VC Mix, Mult 1, Mult 2, Assign, EG, KB, Gate
Назначаемый выход:
· 1 назначаемый выход с 16 функциями: Sequencer Accent, Sequencer Clock, Sequencer Clock /2 Sequencer Clock /4, Decimated «Ramp”, Decimated «Saw”, Decimated «Triangle”, Stepped Random, STEP 1, MIDI Note On Velocity, MIDI Channel Aftertouch, MIDI Pitch Bend, MIDI CC1 Mod Wheel, MIDI CC2, MIDI CC4, MIDI CC7
- Manuals
- Brands
- Moog Manuals
- Synthesizer
- Mother-32
- User manual
-
Contents
-
Table of Contents
-
Bookmarks
Quick Links
Related Manuals for Moog Mother-32
Summary of Contents for Moog Mother-32
-
Page 3
W h a t a r t i s t s n e e d i s a n e n d l e s s “ r e s o u r c e , f u l l o f r o u g h e d g e s a n d d i m l y — l i t n o o k s a n d c r a n n i e s t h a t o n e c a n e x p l o r e a s o n e s e e s fi… -
Page 4: Important Safety Instructions
—Consult the dealer or an experienced radio/TV technician for help. CAUTION: Please note that any changes or modifications made to this product not expressly approved by Moog Music Inc. could void the user’s authority granted by the FCC to operate the equipment.
-
Page 5: Table Of Contents
Keyboard Overview Sequencer Overview & Panel Control MIDI Input VC Mix (Voltage Controlled Mixer/Attenuator) Patchbay Overview UNDERSTANDING AND USING THE MOTHER-32 SEQUENCER Basic Concepts Sequencer Modes Tutorial — Creating a Pattern in Keyboard Mode Play a Pattern Sequencer Performance Functions Editing a Pattern Saving &…
-
Page 6: Unpacking & Inspection
Check the contents of the shipping carton. Be careful when unpacking your new Mother-32 so that nothing is lost or damaged. Moog recommends saving the carton and all packing materials in case you ever need to ship the instrument for any reason.
-
Page 7: Setup & Connections
If you are using a 5-pin MIDI cable for external control or sync, connect the MIDI OUT of your MIDI controller to the MIDI IN on your Mother-32. By default, the Mother-32 is set to receive MIDI data on MIDI Channel 1.
-
Page 8: Mother-32 Overview
EXT. AUDIO input, the White Noise signal is replaced with the external signal. This allows you to blend the VCO with any sound source you like on the Mother-32. The output of the Mixer then goes to the input of the Voltage Controlled Filter (VCF).
-
Page 9: Vco (Voltage Controlled Oscillator)
This control is used to tune the oscillator’s pitch up or down one octave from its center position. This is useful for ensuring that Mother-32 is in tune with other instruments, or can also be used as a live performance control.
-
Page 10: Vco Modulation
VCO MODULATION VCO MOD SOURCE This switch is used to determine whether the LFO, EG or an external modulation source is being sent to the VCO MOD AMOUNT control. NOTE: If an external modulation source is patched into the VCO MOD input patch point, and EG/VCO MOD is selected as your VCO MOD SOURCE, only the external modulation signal will be applied to the VCO MOD AMOUNT control.
-
Page 11: Lfo (Low Frequency Oscillator)
The Mother-32’s LFO is also capable of audio-rate modulation, which can be used to add harmonic complexity to any selected destination.
-
Page 12: Vcf (Voltage Controlled Filter)
This switch selects between LOW PASS and HIGH PASS Filter modes. LOW PASS The Low Pass Filter is a traditional Moog 24dB/Octave resonant Ladder Filter. This is the heart of the Moog sound and is ideal for bass sounds and other sounds that mimic melodic acoustic instruments. HIGH PASS The High Pass Filter is a classic Moog 24dB/Octave non-resonant Ladder Filter.
-
Page 13: Vcf Modulation
VCF MODULATION VCF MOD SOURCE This switch is used to determine whether the LFO or EG is being sent to the VCF MOD AMOUNT control. VCF MOD AMOUNT This variable control determines how much the modulation source changes the Filter Cutoff frequency. VCF MOD POLARITY This switch is used to determine whether the VCF modulation has a positive or negative effect on the Filter Cutoff frequency.
-
Page 14: Vca (Voltage Controlled Amplifier)
When set to ON, Mother-32’s audio signal is allowed to pass without the need for a Gate or note ON message to occur. This is ideal for drones and continuously evolving modulated sounds, but is also useful for eliciting new behavior and sounds from an existing sequence.
-
Page 15: Keyboard Overview
VCF and VCA at a fixed level. SEQUENCER PANEL CONTROLS The following is an overview of the Mother-32 Sequencer Panel controls. For full details of their operation, please refer to the “Understanding and Using the Mother-32 Sequencer” section of this manual.
-
Page 16
SEQUENCER PANEL CONTROLS (continued) PATTERN (BANK) This button is used to view the currently active pattern location, or select a new pattern. While holding the (SHIFT) button, it is used to view the current Bank containing 8 patterns, or select a new Bank. RUN/STOP (REC) This button is used to start the Sequencer, and to stop it. -
Page 17: Midi Input
MIDI INPUT MIDI IN The Mother-32 has a 5-pin DIN MIDI input that allows for external MIDI control, MIDI clock sync and MIDI to CV conversion. When MIDI information is being received, the MIDI IN LED will flash red. Details of the MIDI implementation are contained in the “MIDI Functions and Implementation”…
-
Page 18: Understanding And Using The Mother-32 Sequencer
Accent signal which modulates the VCF and VCA for emphasizing notes. Other than that, the sound you hear from the Mother-32 when using the sequencer is determined by the front panel controls and any patch cables in use on the patchbay.
-
Page 19: Tutorial — Creating A Pattern In Keyboard Mode
TUTORIAL — CREATING A PATTERN IN KEYBOARD MODE This is a tutorial that will walk you through the sequencing capabilities of your Mother-32 in KB mode. Keyboard mode is the best place to start when learning to use the Sequencer. Before starting, disconnect any patch cables and set all controls to the default positions found on Page 7.
-
Page 20
KB MODE TUTORIAL — CREATING A PATTERN (continued) SET THE GATE LENGTH Set the GATE LENGTH control to minimum. The Octave/Location LEDs temporarily light red to indicate the current Gate Length. Gate Length is set per-step and determines the Indicates Gate Length (Red LED) duration that a note is held relative to the length of its step (from 1/8 — 8/8). -
Page 21
KB MODE TUTORIAL — CREATING A PATTERN (continued) TURNING GLIDE ON/OFF To turn Glide ON for a step, simply turn the GLIDE control to the right. Octave/Location LED 5 is lit green indicating Glide is turned ON for the current step. To turn Glide OFF for a step, simply turn the GLIDE control all the way down. -
Page 22
KB MODE TUTORIAL — CREATING A PATTERN (continued) ADD A RATCHET TO STEP 6 Yellow LEDS Green LED Hold (SHIFT) while turning the GLIDE control. Octave/Location LEDs 1-4 will temporarily light yellow, indicating the number of Ratchets (repeats) in the current step. Select a value of 2, which will produce 2 notes during the step (up to 4 can be selected). -
Page 23: Play A Pattern
PLAY A PATTERN RUN THE PATTERN Adjust the TEMPO control to the speed you want, and press RUN/STOP. The Sequencer will advance through each step in the pattern. When it reaches the end, it loops around to Step 1. The current step being played is indicated by the corresponding Step LED being lit.
-
Page 24: Sequencer Performance Functions
SEQUENCER PERFORMANCE FUNCTIONS LIVE ACCENT Press (SHIFT)+ACCENT during playback to temporarily add an Accent to each step in a pattern. Live Accent overrides stored Accent data and is only active when both buttons are held. Live Accent data is not stored in memory. LIVE MUTE Press (SHIFT)+REST during playback to temporarily Mute the output of the sequencer as it continues to advance.
-
Page 25: Editing A Pattern
KB MODE PATTERN EDITING To make changes to an existing pattern using the Record function with step write behavior, press (SHIFT)+(REC) when the pattern is paused. Steps with data entered will be lit. Octave/Location LED 1 will be lit green to indicate Page 1 of the pattern. Step LED 1 will blink at the current tempo, indicating that it can be edited.
-
Page 26: Saving & Restoring A Pattern
SAVING A PATTERN Any changes to the current pattern are discarded when changing to a new pattern Blinking Green LED Indicates Save Destination unless they are saved. To Save a pattern, hold (SHIFT)+RUN/STOP for one second. An Octave/Location LED will rapidly blink green indicating the current destination for saving.
-
Page 27: Initializing A Pattern
TUTORIAL — CREATING A PATTERN IN STEP MODE This is a tutorial that will walk you through the sequencing capabilities of your Mother-32 in Step mode. Before starting, disconnect any patch cables, set all controls to the default position found on Page 7, and ensure the current pattern is initialized by pressing (SHIFT)+RESET+PATTERN.
-
Page 28
STEP MODE TUTORIAL — CREATING A PATTERN (continued) SETTING PATTERN LENGTH Set End Step Select End Step You can create a pattern with up to 32 steps, however, in this case we are going to set the pattern length to be eight steps. Press SET END and then press Step 8. -
Page 29
STEP MODE TUTORIAL — CREATING A PATTERN (continued) EDITING NOTES Play A New Note For The Selected Step Select Octave Select octave 4 with the LEFT/RIGHT arrows and play the “G” key (located above Step LED 5). As the pattern continues to play back, you will hear the new note on Step 2. Now rotate the GATE LENGTH control fully clockwise so that the maximum Gate Length (Tie) is selected. -
Page 30
STEP MODE TUTORIAL — CREATING A PATTERN (continued) ADDING ACCENTS TO STEP 1, STEP 4 AND STEP 7 Select Step To Add Accent To Press (SHIFT)+Step 1. Step LED 1 will blink to indicate it is selected for editing. Press ACCENT. Octave/Location LED 7 will be lit yellow. -
Page 31: Playing & Editing A Pattern In Step Mode
Turning ON or OFF Individual Steps Or Selecting Steps To Edit Rotate Controls The Mother-32 Step mode repurposes the 13-note Keyboard and LEFT/RIGHT arrows to be performance controls for modifying patterns during playback. The eight buttons directly above the Step LEDs are the Step buttons.
-
Page 32: Sequencer Panel Function Quick Reference
SEQUENCER PANEL FUNCTION QUICK REFERENCE SEQUENCER MEMORY AND LOADING A PATTERN SELECT BANK While holding (SHIFT)+PATTERN, use Step buttons 1-8, or the LEFT/RIGHT arrows to select a new bank. SELECT PATTERN While holding PATTERN, use Step buttons 1-8, or the LEFT/RIGHT arrows to select a new pattern. NOTE: Unsaved changes to a pattern will be lost when a pattern location is changed, initialized, or restored during normal operation.
-
Page 33: Mode Selection
SEQUENCER PANEL FUNCTION QUICK REFERENCE (continued) MODE SELECTION KB (KEYBOARD) Press (SHIFT)+(KB). STEP Press (SHIFT)+(STEP). SEQUENCER CONTROLS SET INTERNAL CLOCK TEMPO Rotate the TEMPO control. START/PAUSE PATTERN PLAYBACK Press RUN/STOP. RETURN TO STEP 1 Press RESET. REPEAT CURRENT STEP DURING PLAYBACK Press HOLD while the sequencer is running.
-
Page 34: Kb Mode Panel Functions
SEQUENCER PANEL FUNCTION QUICK REFERENCE (continued) SEQUENCER CONTROLS (continued) MOMENTARY MUTE DURING PLAYBACK Hold (SHIFT)+REST. Normal playback resumes on release. MOMENTARY RATCHETS DURING PLAYBACK Hold (SHIFT) and rotate the GLIDE Control. Normal playback resumes on release. MODIFY SWING Press (SHIFT) and rotate the TEMPO Control. KB MODE PANEL FUNCTIONS LIVE PLAY With The Sequencer Off…
-
Page 35
SEQUENCER PANEL FUNCTION QUICK REFERENCE (continued) KB MODE PANEL FUNCTIONS (continued) GATE LENGTH | STEP MODE Rotate the GATE LENGTH control to modify the Gate Length of a currently selected step. Maximum Gate Length ties the selected step to the next step. ACCENT | KB MODE Press ACCENT to add an Accent to the current step. -
Page 36: Step Mode Panel Functions
SEQUENCER PANEL FUNCTION QUICK REFERENCE (continued) KB MODE PANEL FUNCTIONS (continued) SET END STEP | KB MODE Select Page Of End Step Set End Step Press (SHIFT)+SET END. If the desired end step is on a different page, press (SHIFT)+Page button 1-8, 9-16, 17-24 or 25-32.
-
Page 37
SEQUENCER PANEL FUNCTION QUICK REFERENCE (continued) STEP MODE PANEL FUNCTIONS (continued) STEP EDIT | STEP MODE Press (SHIFT)+Step button 1-8 to select it for editing whether the sequencer is Specify Step For Editing running or stopped. The currently selected Step LED will blink and all other Step LEDs are turned off to indicate the step being edited. -
Page 38: Control Voltage Overview
Frequently they have only two levels that represent On and Off. A Gate signal in the Mother-32 for instance, is off at 0 Volts and on at +5 Volts. A Gate signal can be used to trigger events, such as starting an Envelope Generator, or starting the sequencer running.
-
Page 39: Patchbay Inputs And Outputs
EXTERNAL AUDIO INPUT This is a unity gain input that allows other sound sources to be processed by Mother-32’s onboard Filter. Because this is a unity gain input designed to Eurorack level standards, an external audio source applied to this input should be 10V peak to peak.
-
Page 40: Noise
(continued) NOISE NOISE OUTPUT This is the output for the Mother-32’s White Noise generator. Noise is useful for creating percussion and wind sounds, as well as for random noise modulations (+/-5V, typical). NOTE: Noise is also normalled to the clockwise position of the main MIX control.
-
Page 41: Vco
PATCHBAY INPUTS AND OUTPUTS (continued) VOLTAGE CONTROLLED OSCILLATOR (continued) VCO LIN FM INPUT This is a Linear Frequency Modulation input, which is useful for modulating the VCO with audio rate waveforms to achieve very harmonically rich sounds. (Accepts a -5 to +5V signal). VCO MOD INPUT This input is routed to the UP position of the VCO MOD SOURCE selector switch (EG/VCO MOD).
-
Page 42: Patchbay Inputs And Outputs (Continued)
PATCHBAY INPUTS AND OUTPUTS (continued) LOW FREQUENCY OSCILLATOR (continued) LFO SQ OUTPUT This output is the LFO Square waveform (+/-5V). LFO TRI OUTPUT This output is the LFO Triangle waveform (+/-5V). VC MIX — VOLTAGE CONTROLLED, DC COUPLED MIXER MIX 1 INPUT This input is normalized to 0V and routed to the counterclockwise position of the VC MIX control.
-
Page 43: Multiple
PATCHBAY INPUTS AND OUTPUTS (continued) VC MIX — VOLTAGE CONTROLLED, DC COUPLED MIXER (continued) VC MIX OUTPUT This is the output of the VC Mixer which is a blend of the MIX 1 and MIX 2 input signals set by the VC MIX panel control and VC MIX CTRL CV input. (+/-5V). VC MIX ALTERNATE USES: FIXED VOLTAGE SOURCE With nothing plugged into the MIX 1 or MIX 2 inputs, the VC MIX control…
-
Page 44: Assignable Output
PATCHBAY INPUTS AND OUTPUTS (continued) ASSIGNABLE OUTPUT ASSIGN OUTPUT This is the output for the assignable jack. Its source is programmed in Setup mode. To learn more about Setup mode, go to Page 49. The following output sources are available: 1: ACCENT (Default) This outputs a 0 to +5V filtered pulse signal from Accented pattern steps only.
-
Page 45: Envelope Generator
(0 to +7.5V) KEYBOARD The Mother-32 has a 13-note keyboard that is also used to program the sequencer. When a note is played manually, via the sequencer, or by an external MIDI input, a control voltage and gate signal are generated. The control voltage is routed internally to VCO Pitch, while the Gate signal is routed internally to trigger the EG.
-
Page 46
-5V to +5V control voltage changes the tempo from minimum to maximum (40 BPM to 750 BPM). If the Mother-32 sequencer is synced to a MIDI clock signal, then this input can be used to select clock divisions. -
Page 47: Clock/Tempo Input
PATCHBAY INPUTS AND OUTPUTS (continued) CLOCK/TEMPO (continued) RUN/STOP When a +5V signal is applied to this input, the sequencer will play from its current pattern location for the duration that the voltage is applied. When a 0V signal is applied to this input, the sequencer will stop at its current pattern location.
-
Page 48: Midi Functions And Implementation
MIDI Channel. MIDI NOTE ON The Mother-32 responds to MIDI Note On messages on the current MIDI Channel (default Channel 1). MIDI Note values received are converted into a 1V/Octave Keyboard CV, and then routed to the VCO and KB CV output jack.
-
Page 49: Setup Mode
(continued) MIDI SYSTEM REAL TIME MESSAGES MIDI CLOCK MESSAGES: When the Mother-32 detects a MIDI Clock signal, the Tempo LED blinks green at the detected tempo and the panel TEMPO control becomes a clock divider. After MIDI clock messages cease to be received, the internal clock can be restarted by pressing the RUN/STOP button.
-
Page 50
SETUP MODE (continued) PARAMETER SELECTION 9-16 Select Values 9-16 To access values 9-16, press (SHIFT)+Step buttons 1-8 (9-16). The value is indicated by red Octave/Location LEDs. If a setting is on the same LED as the current page, the LED will flash alternately between the yellow page color and the green or red setting color. -
Page 51: Vco Calibration
3. A 1 V/Octave source (One that is confirmed to be well calibrated — no more than 1 mV error per octave). CALIBRATION 1. Make sure your Mother-32 has been powered on for at least 15 minutes, and that it is in a place where the temperature will not change drastically while performing the calibration.
-
Page 52: Using Mother-32 As A Eurorack Module
The Mother-32 can be removed from its case, and easily installed into a Eurorack system as a 60HP module. Before doing this, it is important to note that the Mother-32 draws a maximum of 230mA from a +12V supply. It does not use the -12V supply at all.
-
Page 53: Presets
PRESETS NOTE: Additional presets and blank patch sheets can be downloaded at www.moogmusic.com OCTAVE BOUNCE BACK (Adjust VC MIX to control tuning) NOISE TRANSIENT METAL SNARE…
-
Page 54
SEQUENCER BASS RESONANT HIGH PASS FILTER 8-BIT PERCUSSION… -
Page 55
‘80S TOMS SHORT BRASS FILTER KICK… -
Page 56
PRESET NAME: NOTES: PRESET NAME: NOTES:… -
Page 57
PRESET NAME: NOTES: PRESET NAME: NOTES:… -
Page 58: Specifications
CURRENT DRAW: 230mA (maximum) from +12VDC (10-pin header) MOUNTING DIMS: 60HP (.69” 26mm Module Depth) Specifications Subject To Change Without Notice ACCESSORIES The following accessories are available at authorized Moog dealers. 2 UNIT VERTICAL RACK KIT 3 UNIT VERTICAL RACK KIT HIGH QUALITY GIG BAG 6”…
-
Page 59: Service And Support
(828) 251-0090 to register your product. CARING FOR THE MOTHER-32 Clean the Mother-32 with a soft, dry cloth only – do not use solvents or abrasive detergents. Heed the safety warnings at the beginning of the manual. Don’t drop the unit.
-
Page 60
Mother-32 Is Handcrafted With Care By Employee-Owners In Asheville, NC…
This manual is also suitable for:
Mother-32
инструкцияMoog Mother-32

Посмотреть инструкция для Moog Mother-32 бесплатно. Руководство относится к категории синтезаторы, 5 человек(а) дали ему среднюю оценку 8.1. Руководство доступно на следующих языках: английский. У вас есть вопрос о Moog Mother-32 или вам нужна помощь? Задайте свой вопрос здесь
- Mother32-Manual-Inside-Web.pdf
- Mother32-Manual-V2_Web.pdf
Нужна помощь?
У вас есть вопрос о Moog а ответа нет в руководстве? Задайте свой вопрос здесь Дай исчерпывающее описание проблемы и четко задайте свой вопрос. Чем детальнее описание проблемы или вопроса, тем легче будет другим пользователям Moog предоставить вам исчерпывающий ответ.
Количество вопросов: 0

Главная
Не можете найти ответ на свой вопрос в руководстве? Вы можете найти ответ на свой вопрос ниже, в разделе часто задаваемых вопросов о Moog Mother-32.
Инструкция Moog Mother-32 доступно в русский?
Не нашли свой вопрос? Задайте свой вопрос здесь
Moog Mother 32 – первый полумодульный аналоговый синтезатор от легендарной компании! Как и любой другой синтезатор от компании MOOG, новый Mother 32 обладает великолепным звучанием, в очередной раз подкрепляющим эталонный статус легендарного бренда.
Благодаря встроенному 32-шаговому секвенсору и обширной матрице модуляции с 64 разъёмами для CV/Gate пэтчинга, новый инструмент имеет широчайшую палитру аналоговых тембров, пригодных для использования в любых современных электронных жанрах музыки!
Полумодульный дизайн инструмента позволяет использовать синтезатор и без пэтч-кабелей, однако истинная мощь модуляционных возможностей инструмента будет доступна только при мануальном CV/Gate пэтчинге.
MOOG Mother 32 поставляется в прочном алюминиевом корпусе с деревянными боковинами. При этом инструмент выполнен в стандартном формакторе Eurorack (60HP)и может быть установлен в любой Eurorack-кейс вместе с другими модулями.
Синтезатор оснащен 1 осциллятором с 2 формами волны, классическим 2-режимным LP/HP лестничным фильтром, секцией микшера, управляемой с помощью CV, а также – мощным генератором LFO с широким диапазоном значений.
Также, имеется встроенный MIDI-интерфейс для управления с помощью внешних секвенсоров или подключения MIDI-клавиатуры. Интерфейс может работать и в режиме MIDI—CV конвертера для полной автоматизации параметров.
Стоимость проибора составит всего 679$, что для такого мощного и функционального инструмента, в общем, то не так много!
Спецификации инструмента:
Осциллятор:
· 1 VCO (+/-5v) с 2 формами волны (Sawtooth/Pulse) и раздельными аудиовыходами
· Частота VCO — от 8Гц до 8кГц c возможностью повышения до 16кГц с помощью пэтчинга
· Регуляторы октав
· Переключатель формы волны
· Регулятор глубины импульса
· Генератор белого шума (+/-5v) или аудиовход
· Регулятор (+/-5v) плавной смены уровня осциллятора/белого шума или аудиовхода
Фильтр:
· Аналоговый резонансный транзисторный лестничный фильтр с 2 режимами (LP/HP)
· Частота среза, глубина резонанса и уровень фильтра управляются по CV (+/-5V)
· Частотный диапазон: от 20Гц до 20кГц
Усилитель:
· Возможность отключения триггера усилителя для работы в Drone-режиме
· Контроль по CV в режиме огибающей (0/+8V) или Drone-режиме (+/-5V)
· Основной регулятор громкости (+/-5V)
· Регулятор громкости наушников (+/-1.7V)
LFO:
· 1 LFO (+/-5V) c 2 формы волны (square, triangle) и раздельными выходами
· Раздельные переключатели формы волны для модуляции осциллятора и фильтра
· Частотный диапазон: от 1гЦ до 350Гц (с панели) или 600Гц (с помощью пэтчинга)
· CV-вход для управления частотой (+/-5V)
Генератор огибающей:
· 3-фазный (ADS) генератор огибающей с отключаемой фазой удержания
· Триггерный вход (0/+5V, 10V max)
· CV-выход (0/7.5V)
Модуляционные возможности осциллятора:
· Переключатель источника модуляции: EG/VCO MOD или LFO
· CV-вход VCO MOD
· Переключатель цели модуляции: высота или ширина импульса
Модуляционные возможности фильтра:
· Переключатель источника модуляции: EG или LFO
· Прямая и обратная полярность модуляции
CV-микшер:
· Специальная схематика узла для микширования двух переменных сигналов
· 2 CV-входа
· 1 CV-вход для управления (+/-5V)
· 1 CV-выход (+/-5V)
Множитель:
· Встроенный множитель, позволяющий дублировать любой сигнал
Клавиатура:
· 1-октавная триггерная клавиатура с 13 кнопками и диапазоном в 8 октав
· Переключатели октав с обжим диапазоном в 8 октав
· Регулируемый глайд
· CV-выход (+/-5V)
· Gate-выход (0/+5V)
Секвенсор:
· Двухрежимный секвенсор на 32 шага
· 64 цели для модуляции с помощью секвенсора
· Каждый шаг содержит следующие данные: Note Value, Gate, Rest, Accent, Glide, Ratchet count (до 4 нотных повторов)
· Параметры секвенсора: Tempo, Swing, Run/Stop, Hold и Reset
· CV-входы секвеснора: Tempo, Run/Stop, Hold и Reset
· CV-выходы секвенсора: KB, Gate, Accent Pulse
Разъемы для пэтчинга:
· 32 разъема для модульного пэтчинга
· Входы: External Audio, Mix CV, VCA CV, VCF Cutoff, VCF Resonance, VCO 1V/Octave, VCO Linear FM, VCO Modulation, LFO Rate, Mix 1, Mix 2, VC Mix Control, Mult, Gate, Tempo, Run/Stop, Reset, Hold
· Выходы: VCA, Noise, VCF, VCO Saw, VCO Pulse, LFO Triangle, LFO Square, VC Mix, Mult 1, Mult 2, Assign, EG, KB, Gate
Назначаемый выход:
· 1 назначаемый выход с 16 функциями: Sequencer Accent, Sequencer Clock, Sequencer Clock /2 Sequencer Clock /4, Decimated «Ramp”, Decimated «Saw”, Decimated «Triangle”, Stepped Random, STEP 1, MIDI Note On Velocity, MIDI Channel Aftertouch, MIDI Pitch Bend, MIDI CC1 Mod Wheel, MIDI CC2, MIDI CC4, MIDI CC7
Смотреть руководство для Moog Mother-32 ниже. Все руководства на ManualsCat.com могут просматриваться абсолютно бесплатно. Нажав кнопку «Выбор языка» вы можете изменить язык руководства, которое хотите просмотреть.

MANUALSCAT | RU
Вопросы и ответы
У вас есть вопрос о Moog Mother-32, но вы не можете найти ответ в пользовательском руководстве? Возможно, пользователи ManualsCat.com смогут помочь вам и ответят на ваш вопрос. Заполните форму ниже — и ваш вопрос будет отображаться под руководством для Moog Mother-32. Пожалуйста, убедитесь, что вы опишите свои трудности с Moog Mother-32 как можно более детально. Чем более детальным является ваш вопрос, тем более высоки шансы, что другой пользователь быстро ответит на него. Вам будет автоматически отправлено электронное письмо, чтобы проинформировать вас, когда кто-то из пользователей ответит на ваш вопрос.
Здравствуйте помогите пожалуйста разобраться с синхронизацией инструментов у меня есть муг мозер 32 и муг субгармоникон а также корг мс 20 мини и 5 штук волька корг !семпл фм битс кейс и басс !как это все за синхронизировать !заранее огромное спасибо за помощь !
Александр 2020-09-06
Задать вопрос о Moog Mother-32
- Бренд:
- Moog
- Продукт:
- синтезаторы
- Модель/название:
- Mother-32
- Тип файла:
- Доступные языки:
- английский
Сопутствующие товары Moog Mother-32
![]()
- Гарантия легкого возврата
- Безопасные способы оплаты
-
Способы оплаты
-
Способы доставки
-
Гарантия и возврат
-
Главная
-
Каталог
-
Клавиши
-
Синтезаторы
-
Аналоговые синтезаторы
-
Moog Mother-32
![]()
![]()
![]()
![]()
![]()
![]()
![]()
![]()
![]()
![]()
![]()
![]()
-
Безопасные способы оплаты
При оплате банковской картой через наш сайт используется эквайринг от Сбербанка, который помогает сохранить конфиденциальность персональных и платёжных данных покупателя.
-
Официальная гарантия
Большинство товаров имеют гарантийный срок 6 месяцев, исчисляемый со дня передачи товара потребителю. Исключение составляют бренды Elektron, Pioneer, Sony, RME, Yamaha и Steinberg (для них гарантия составляет 12 месяцев), а также Casio, ADAM (гарантия 2 года)
Наличие в магазинах
Интернет-магазин —
в наличии
Санкт-Петербург —
отсутствует
Москва —
отсутствует
Доставка на дом и в ПВЗ28 — 30 мая
Самовывоз из магазинов 28 — 30 мая
-
Описание
-
Характеристики
-
Комментарии
Монофонический полумодульный синтезатор модели Mother-32 принадлежит к полностью аналоговым приборам. Поддерживается как автономная работа, так и в виде модуля под системы типа Eurorack. Функционал звукового синтеза расширен за счет встроенной патч-секции на 32 порта и секвенсора на 32 шага. Mother-32 отлично дополнит Minitaur, Werkstatt-Ø1 и прочие синтезаторы.
- Moog
- Клавиши Moog
- Синтезаторы Moog
Файлы для скачивания
- Инструкция для Moog Mother-32 (на англ.) (PDF 14 Мб 987 Кб)
Главные спецификации:
- Звуковой движок на 100% аналоговый.
- Предусмотрено полумодульное исполнение, не требующее патчинг под создание звуков.
- Встроены аналоговый осциллятор на 10 октав (меняется ширина импульса), микшер CV, генератор белого шума (аналоговый), лестничный фильтр LP/HP с переключением и генератор LFO с парой форм волны – Square/Triangle.
- Можно сохранить и вызвать максимум 64 пользовательские секвенции.
- В секвенсоре CV на 32 шага имеется два перфоранс-режима: Step Edit и Keyboard.
- Работа с секвенсором с помощью однооктавной клавиатуры на 13 нот.
- Аналоговый выход совмещен с выходом под наушники.
- Для модульного патчинга предусмотрена коммутационная панель на 32 разъема, включая 14 выходов и 18 входов.
- Имеется стандартный вход MIDI на 5 контактов. Ко входу можно подключить клавиатуру MIDI или внешние секвенсоры для управления синтезатором. Интерфейс поддерживает работу в режиме конвертера MIDI-CV.
- Корпус сделан из алюминия, боковые панели – из дерева.
- Можно поставить в любой кейс Eurorack с прочими модулями.
- В набор входит 5 патч-кабелей и адаптер питания.