-
Contents
-
Table of Contents
-
Troubleshooting
-
Bookmarks
Quick Links
MLT 3000
Headlight Tester
Original Operating Instructions
BA380701-en
Related Manuals for MAHA MLT 3000
Summary of Contents for MAHA MLT 3000
-
Page 1
MLT 3000 Headlight Tester Original Operating Instructions BA380701-en… -
Page 2
BA380701-en 2018-11-20 © MAHA Maschinenbau Haldenwang GmbH & Co. KG The reproduction, distribution and utilization of this document as well as the communication of its con- tents to others without explicit authorization is prohibited. Offenders will be held liable for the payment of damages. -
Page 3: Table Of Contents
Requirements for the Place of Installation …………….7 Technical Data ……………………7 Design……………………….. 8 Electronic Levelling …………………… 9 2.4.1 Compensation Coordinate Axes of MLT 3000 …………… 9 2.4.2 Angle Symbols ……………………10 Definition of Technical Terms ………………..11 2.5.1 Pitch Angle ……………………… 11 2.5.2…
-
Page 4
3.4.1 Test Phase Indication via Light Buttons …………….22 3.4.2 Measuring ……………………..22 3.4.3 Light Selection Buttons Disabled ………………23 3.4.4 Adjusting: Setting the Headlights in Real Time…………..24 3.4.5 Saving the Measurement Values to PDF …………….25 Settings ……………………..27 3.5.1 Variables …………………….. -
Page 5: Safety
Safety Introduction Thoroughly read this manual before operating the equipment and comply with the instructions. Always display the manual in a conspicuous location. Personal injury and property damage incurred due to non-compliance with these safety instructions are not covered by the product liability regulations. Symbols and Signal Words 1.2.1 Personal Injury…
-
Page 6: Intended Use
Intended Use This device only serves to check and adjust the alignment of vehicle headlights. This device cannot be modified without the express, written consent of the manufacturer. Any infringement renders the conformity declaration invalid. Requirements on Operating and Service Personnel WARNING All persons employed in the operation, maintenance, installation, removal and disposal of the device must…
-
Page 7: Description
Description Requirements for the Place of Installation Please observe your national guidelines and specifications. Technical Data Measuring range above hotspot 0…800 mm / 10 m (0…8 %) above pitch angle 0…300 mm / 10 m (0…3 %) below 0…700 mm / 10 m (0…7 %) left 0…1000 mm / 10 m (0…10 %) right…
-
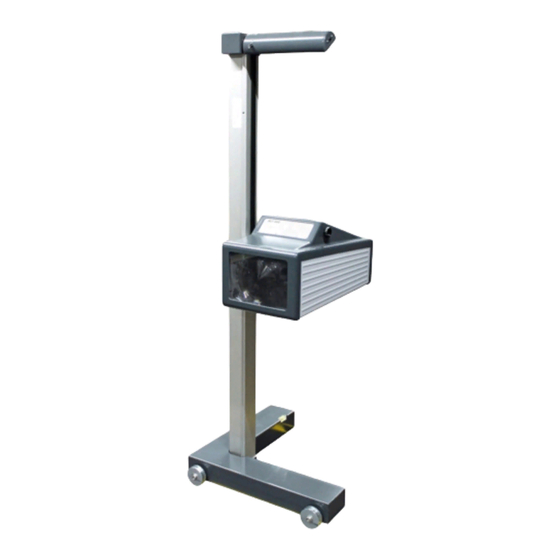
Page 8: Design
Design Mirror, with optional Charging socket laser alignment unit Column Casing, with adjusting handle Display Carriage, with spirit level USB port Battery compartment BA380701-en…
-
Page 9: Electronic Levelling
See section “Operation > Settings > Calibrating the Camera according to Directive”. NOTICE This function must be enabled exclusively by authorised service technicians and is ap- plicable for the respective test surface only. 2.4.1 Compensation Coordinate Axes of MLT 3000 BA380701-en…
-
Page 10: Angle Symbols
2.4.2 Angle Symbols Once the adjustment of the inclination sensor has been completed, an angle symbol appears in the info bar to indicate the adjusted/active inclination axes. Overview of symbols: Both axes adjusted/active, Z-axis active, headlight tester headlight tester ready for op- ready for operation eration Both axes active, inclination of…
-
Page 11: Definition Of Technical Terms
Definition of Technical Terms 2.5.1 Pitch Angle Angle of inclination of light-dark limit against the test surface. The inclination of headlight lighting bundle against the test surface is expressed as a percentage, using 10 m as a reference parameter: H X 100 1000 2.5.2…
-
Page 12: High Beam
Light-dark limit Boundary for light distribution between ‘top dark’ and ‘bottom light’ for low- beam lights. Inflection point Synonymous with the light-dark limit for asymmetric low-beam lighting. The deviation of the inflection point is expressed in %. 10 meters is used as the ref- erence dimension.
-
Page 13: Operation
Operation Switching On / Off The headlight tester is operated via touchscreen buttons. The resistive touchscreen reacts to pressure and can also be operated while wearing work gloves. The On/Off button is on the right-hand side underneath the touchscreen. Press to confirm Switch Off.
-
Page 14: Aligning
Aligning When using guide rails, position the device centrally in front of the vehicle. Without guide rails, the device must be adjusted in front of each headlight. Please ob- serve your national guidelines and specifications. The device is correctly aligned when two symmetrical reference points on the front of the vehicle are located on the black line of the alignment mirror.
-
Page 15: Led Adjustment Aid (Option)
3.2.2 LED Adjustment Aid (Option) This optional unit is integrated into the window housing (A) above the Fresnel lens. The colour LEDs (B) pointing toward the vehicle indicate the direction of adjustment. Green LED = Optimum setting (corresponds to green rating in the display centre) Yellow LED = Minor deviation within tolerance range (corresponds to yellow direction arrows on the display)
-
Page 16: Light Selection Buttons
Light Selection Buttons 3.3.1 Headlight Test according to § 29 StVZO (Germany) Headlight test according to § 29 StVZO (Germany). Use the OEM button for manufacturer-specific test instructions. BA380701-en…
-
Page 17: Showing The Button Labels
3.3.2 Showing the Button Labels When the Info button is activated, the button labels are shown instead of the symbols. 3.3.3 Adjusting the Pitch Angle The pitch angle can be increased or reduced using the Arrow buttons. BA380701-en…
-
Page 18: Choosing The Vehicle Class
3.3.4 Choosing the Vehicle Class The Truck/Car button activates the appropriate settings for the respective vehicle class. 3.3.5 Browsing back through the Test Screens Use the Back Arrow button to browse back through the test screens one by one. BA380701-en…
-
Page 19: Choosing Between Left-Hand Or Right Hand Traffic
3.3.6 Choosing between Left-Hand or Right Hand Traffic Left-hand/Right-hand traffic can be changed under “User Settings”. Right-hand traffic is preset by default. 3.3.7 Manufacturer-Specific Test Instructions (OEM) OEM area! Perform the test according to manufacturer’s instructions. BA380701-en…
-
Page 20
Button “ALL“ makes several test levels available. Example: testing Volkswagen matrix headlights OEM area! Perform the test according to manufacturer’s instructions. BA380701-en… -
Page 21: Navigating Through The Test Levels
3.3.8 Navigating through the Test Levels Use the Play button to open the activated test levels one by one. BA380701-en…
-
Page 22: Testing The Headlights
Testing the Headlights 3.4.1 Test Phase Indication via Light Buttons Green dot = Headlight tested, measurement OK Red dot = Headlight tested, not OK Grey dot = Headlight without evaluation Adjusting direction: Yellow arrow = Minor deviation within tolerance range Red arrow = Outside tolerance 3.4.2 Measuring…
-
Page 23: Light Selection Buttons Disabled
PA = Pitch Angle; IP = Inflection Point; I = Intensity Yaw and Rolling angles can be additionally activated under “User Settings”. Use the Camera button (bottom centre) to change from the Measuring menu to the Adjusting menu. 3.4.3 Light Selection Buttons Disabled During measurement the light selection buttons are disabled.
-
Page 24: Adjusting: Setting The Headlights In Real Time
3.4.4 Adjusting: Setting the Headlights in Real Time Green light button = Current measurement Use the “New vehicle” button to change back to the Main menu. BA380701-en…
-
Page 25: Saving The Measurement Values To Pdf
3.4.5 Saving the Measurement Values to PDF Using the USB stick button, all available test values can be saved as PDF to a USB stick. The button appears only in the Measuring and Adjusting menus and if a USB stick has been detected by the headlight tester.
-
Page 26
Overview of test results as PDF file (example) BA380701-en… -
Page 27: Settings
Settings 3.5.1 Variables Limit values as well as user and customer variables can be set directly at the headlight tester. BA380701-en…
-
Page 28
Limit values, user and customer variables can be adjusted directly on the equipment. BA380701-en… -
Page 29: User Settings
3.5.2 User Settings Quick access to all important settings. BA380701-en…
-
Page 30: Language
3.5.3 Language Use the flag button to open the language selection. Choose the desired language. BA380701-en…
-
Page 31: Calibrating The Camera According To Directive
3.5.4 Calibrating the Camera according to Directive Compensation values can be checked using button “Calibrate camera according to di- rective”. No password required. Choose between Cross hair / Spot laser. BA380701-en…
-
Page 32
BA380701-en… -
Page 33: Country Specifications
3.5.5 Country Specifications Statutory requirements, limit values and country-specific settings. Switching back from some of the country-specific test procedures requires a password. BA380701-en…
-
Page 34: Settings With Password
The disabled (greyed out) menu items can be accessed only by entering a service technician password. Adjustment of the headlight tester is permitted exclusively with the following calibration equipment approved by MAHA and must be performed by an authorised service technician. VP 990175…
-
Page 35: List Of Variables (Extract)
3.5.7 List of Variables (Extract) User variables Default Percentage 0 / Degrees 1 Lux 0 / Candela 1 Target value Pitch angle Car Target value Pitch angle HGV Switch-off time of display in minutes 1200 10.1 RHT/LHT button enabled 1 / disabled 0 11.0 OEM in main menu enabled 12.0.1…
-
Page 36: Interfaces And Software Updates
Interfaces and Software Updates Software updates are normally performed using a USB stick (FAT32). Procedure: 1 Download the current software version from the MAHA homepage. www.maha.de/downloads.htm 2 Open the ZIP file by double-clicking. 3 Select the MAHA folder with preset folder structure and copy it to a USB stick.
-
Page 37
BA380701-en… -
Page 38: Eurosystem V7.50
Troubleshooting > Charging the Battery”) Wireless connection via Bluetooth, order number: VZ 990312 These interfaces can be used for establishing a connection to MAHA’s EUROSYSTEM software, which is included with the cable or Bluetooth module. Alternatively, the headlight tester can also be integrated into a EUROSYSTEM test lane.
-
Page 39
Test devices are connected automatically. After the measurement has been started, all measured values are transferred to EUROSYSTEM. The connection to the MLT 3000 is re- tained until EUROSYSTEM is quit. Select menu item <Display measurement values>. Select menu item <Light tester>. -
Page 40
The selected measurement data is dis- played in detail. Graphic representation of headlight ad- justment in EUROSYSTEM: Use the camera button on the MLT 3000 display to switch over to headlight ad- justment. EUROSYSTEM shows the coordi- nates, the measured values and the head- light image in real time. -
Page 41: Energy Management And Troubleshooting
Energy Management and Troubleshooting Charging the Battery The plug of the charger is inserted into the round (Neutrik) connector on the underside of the housing (see Fig.). The charging process normally takes 11 hours. Full battery capacity is achieved when the battery voltage has exceeded 14.00 V during charging.
-
Page 42: Battery Status
Battery Status 4.2.1 Battery Life The battery has a rated capacity of 9500mAh and can provide up to 20 hours of continuous workshop operation at an optimum environmental temperature of 20°C. 4.2.2 Energy Saving Function After 10 minutes of no activity, the display switches off. By tapping the touchscreen, the device is immediately ready for operation.
-
Page 43: Data Recording For Error Analysis
4.2.5 Data Recording for Error Analysis The data records of the battery status allow for an optimum analysis in problem cases. A USB stick is needed for data recording. Records with a duration of more than 2 h can be saved by setting variable 9.0 accordingly. BA380701-en…
-
Page 44: Troubleshooting
Troubleshooting This message may appear after updating older software versions. Acknowledge with “Wait”. Maintenance Care Instructions NOTICE The equipment must be periodically cleaned. Do not use high pressure and steam jet cleaners nor caustic cleaning agents. Regular care and maintenance is the key condition for functionality and long life expec- tancy of the equipment! Spare Parts To ensure safe and reliable operation, only use original spare parts supplied by the…
-
Page 45: Disposal
Disposal If you want to dispose of the equipment, please contact your MAHA dealer or the following address, indicating equipment type, date of purchase and serial number: MAHA Maschinenbau Haldenwang GmbH & Co. KG Hoyen 20 | 87490 Haldenwang | Germany…
(Ocr-Read Summary of Contents of some pages of the MAHA MLT 3000 Document (Main Content), UPD: 31 March 2023)
-
9, MAHA MLT 3000 9 BA380701-en 2.4 Electronic Levelling This headlight tester comes standard with an electronic position sensor which determines the inclination angle of the device. The software compensates possible deviations in the X- and Z-axes while calculating the position of the headlights. The headlight tester may be set up on uneven surfaces even if the ground unevenness is outside the permissible tolerances, provided that the…
-
42, MAHA MLT 3000 42 BA380701-en 4.2 Battery Status 4.2.1 Battery Life The battery has a rated capacity of 9500mAh and can provide up to 20 hours of continuous workshop operation at an optimum environmental temperature of 20°C. 4.2.2 Energy Saving Function After 10 minutes of no activity, the display switches off. By tapping the touchscreen, the device is immediately ready for operation. After 120 minutes of no activi…
-
34, 34 BA380701-en 3.5.6 Settings with Password The disabled (greyed out) menu items can be accessed only by entering a service technician password. Adjustment of the headlight tester is permitted exclusively with the following calibration equipment approved by MAHA and must be performed by an authorised service technician. VP 990175 Laser calibration device with spot laser, model LK1 (no longer available) VP 990471 Laser calibration device with cross ha…
-
24, 24 BA380701-en 3.4.4 Adjusting: Setting the Headlights in Real Time Green light button = Current measurement Use the “New vehicle” button to change back to the Main menu.
… -
18, MAHA MLT 3000 18 BA380701-en 3.3.4 Choosing the Vehicle Class The Truck/Car button activates the appropriate settings for the respective vehicle class. 3.3.5 Browsing back through the Test Screens Use the Back Arrow button to browse back through the test screens one by one.
… -
40, 40 BA380701-en An overview of the measured values ap- pears. Select the desired measurement. In this example: second level with dynamic high-beam and motorway light. The selected measurement data is dis- played in detail. Graphic representation of headlight ad- justment in EUROSYSTEM: Use the camera button on the MLT 3000 display to switch over to headlight ad- justment. EUROSYSTEM shows the coordi- nates…
-
44, MAHA MLT 3000 44 BA380701-en 4.3 Troubleshooting This message may appear after updating older software versions. Acknowledge with “Wait”. 5 Maintenance 5.1 Care Instructions NOTICE The equipment must be periodically cleaned. Do not use high pressure and steam jet cleaners nor caustic cleaning agents. Regular care and maintenance is the key condition for functionality and long life expec- tancy of the equipment! 5.2 Spare P…
-
43, 43 BA380701-en 4.2.5 Data Recording for Error Analysis The data records of the battery status allow for an optimum analysis in problem cases. A USB stick is needed for data recording. Records with a duration of more than 2 h can be saved by setting variable 9.0 accordingly. USB
… -
33, 33 BA380701-en 3.5.5 Country Specifications Statutory requirements, limit values and country-specific settings. Switching back from some of the country-specific test procedures requires a password.
… -
11, 11 BA380701-en 2.5 Definition of Technical Terms 2.5.1 Pitch Angle Angle of inclination of light-dark limit against the test surface. The inclination of headlight lighting bundle against the test surface is expressed as a percentage, using 10 m as a reference parameter: 1000 hH X 100 2.5.2 Low Beam
… -
22, 22 BA380701-en 3.4 Testing the Headlights 3.4.1 Test Phase Indication via Light Buttons Green dot = Headlight tested, measurement OK Red dot = Headlight tested, not OK Grey dot = Headlight without evaluation Adjusting direction: Yellow arrow = Minor deviation within tolerance range Red arrow = Outside tolerance 3.4.2 Measuring Rating in centre = Headlight within tolerance range
… -
20, 20 BA380701-en Button “ALL“ makes several test levels available. Example: testing Volkswagen matrix headlights OEM area! Perform the test according to manufacturer’s instructions.
… -
19, 19 BA380701-en 3.3.6 Choosing between Left-Hand or Right Hand Traffic Left-hand/Right-hand traffic can be changed under “User Settings”. Right-hand traffic is preset by default. 3.3.7 Manufacturer-Specific Test Instructions (OEM) OEM area! Perform the test according to manufacturer’s instructions.
… -
17, 17 BA380701-en 3.3.2 Showing the Button Labels When the Info button is activated, the button labels are shown instead of the symbols. 3.3.3 Adjusting the Pitch Angle The pitch angle can be increased or reduced using the Arrow buttons.
… -
21, 21 BA380701-en 3.3.8 Navigating through the Test Levels Use the Play button to open the activated test levels one by one.
… -
10, 10 BA380701-en 2.4.2 Angle Symbols Once the adjustment of the inclination sensor has been completed, an angle symbol appears in the info bar to indicate the adjusted/active inclination axes. Overview of symbols: Both axes adjusted/active, headlight tester ready for op- eration Z-axis active, headlight tester ready for operation Both axes active, inclination of Z- and X-axis too large, no measurement possible Z-axis act…
-
29, 29 BA380701-en 3.5.2 User Settings Quick access to all important settings.
… -
5, 5 BA380701-en 1 Safety 1.1 Introduction Thoroughly read this manual before operating the equipment and comply with the instructions. Always display the manual in a conspicuous location. Personal injury and property damage incurred due to non-compliance with these safety instructions are not covered by the product liability regulations. 1.2 Symbols and Signal Words 1.2.1 Personal Injury…
-
2, 2 BA380701-en BA380701-en 2018-11-20 © MAHA Maschinenbau Haldenwang GmbH & Co. KG The reproduction, distribution and utilization of this document as well as the communication of its con- tents to others without explicit authorization is prohibited. Offenders will be held liable for the payment of damages. All rights reserved in the event of the grant of a patent, utility model or design. The contents of this edition have been checked with great care. H…
Table of Contents for MAHA MLT 3000:
-
33 BA380701-en 3.5.5 Country Specifications Statutory requirements, limit values and country-specific settings. Switching back from some of the country-specific test procedures requires a password.
-
29 BA380701-en 3.5.2 User Settings Quick access to all important settings.
-
2 BA380701-en BA380701-en 2018-11-20 © MAHA Maschinenbau Haldenwang GmbH & Co. KG The reproduction, distribution and utilization of this document as well as the communication of its con- tents to others without explicit authorization is prohibited. Offenders will be held liable for the payment of damages. All rights reserved in the event of the grant of a patent, utility model or design. The contents of this edition have been checked with great care. However, errors cannot be fully excluded. Subject to technical change without n
-
23 BA380701-en PA = Pitch Angle; IP = Inflection Point; I = Intensity Yaw and Rolling angles can be additionally activated under “User Settings”. Use the Camera button (bottom centre) to change from the Measuring menu to the Adjusting menu. 3.4.3 Light Selection Buttons Disabled During measurement the light selection buttons are disabled.
-
44 BA380701-en 4.3 Troubleshooting This message may appear after updating older software versions. Acknowledge with “Wait”. 5 Maintenance 5.1 Care Instructions NOTICE The equipment must be periodically cleaned. Do not use high pressure and steam jet cleaners nor caustic cleaning agents. Regular care and maintenance is the key condition for functionality and long life expec- tancy of the equipment! 5.2 Spare Parts To ensure safe
-
4 BA380701-en 3.4.1 Test Phase Indication via Light Buttons ……………………………………………………………………. 22 3.4.2 Measuring ……………………………………………………………………………………………………………. 22 3.4.3 Light Selection Buttons Disabled …………………………………………………………………………….. 23 3.4.4 Adjusting: Setting the Headlights in Real Time………………….
-
17 BA380701-en 3.3.2 Showing the Button Labels When the Info button is activated, the button labels are shown instead of the symbols. 3.3.3 Adjusting the Pitch Angle The pitch angle can be increased or reduced using the Arrow buttons.
-
38 BA380701-en Please wait until the software has been installed and restarted. Interfaces for connecting a computer: RS232 as cable connection (round connector, see section “Energy Management and Troubleshooting > Charging the Battery”) Wireless connection via Bluetooth, order number: VZ 990312 These interfaces can be used for establishing a connection to MAHA’s EUROSYSTEM software, which is included with the cable or Bluetooth module. Alternatively, the headligh
-
28 BA380701-en Limit values, user and customer variables can be adjusted directly on the equipment.
-
8 BA380701-en 2.3 Design A Mirror, with optional laser alignment unit E Charging socket B Column F Casing, with adjusting handle C Display G Carriage, with spirit level D USB port H Battery compartment A B D G H C E F
-
42 BA380701-en 4.2 Battery Status 4.2.1 Battery Life The battery has a rated capacity of 9500mAh and can provide up to 20 hours of continuous workshop operation at an optimum environmental temperature of 20°C. 4.2.2 Energy Saving Function After 10 minutes of no activity, the display switches off. By tapping the touchscreen, the device is immediately ready for operation. After 120 minutes of no activity, the unit switches off completely and then needs to be switched b
-
MLT 3000 Headlight Tester Original Operating Instructions BA380701-en
-
18 BA380701-en 3.3.4 Choosing the Vehicle Class The Truck/Car button activates the appropriate settings for the respective vehicle class. 3.3.5 Browsing back through the Test Screens Use the Back Arrow button to browse back through the test screens one by one.
-
26 BA380701-en Overview of test results as PDF file (example)
-
9 BA380701-en 2.4 Electronic Levelling This headlight tester comes standard with an electronic position sensor which determines the inclination angle of the device. The software compensates possible deviations in the X- and Z-axes while calculating the position of the headlights. The headlight tester may be set up on uneven surfaces even if the ground unevenness is outside the permissible tolerances, provided that the maximum unevenness does not exceed the headlight tester’s self-l
-
36 BA380701-en 3.6 Interfaces and Software Updates Software updates are normally performed using a USB stick (FAT32). Procedure: 1 Download the current software version from the MAHA homepage. www.maha.de/downloads.htm 2 Open the ZIP file by double-clicking. 3 Select the MAHA folder with preset folder structure and copy it to a USB stick. 4 Connect the USB stick containing the software update to the USB port outside at t
Questions, Opinions and Exploitation Impressions:
You can ask a question, express your opinion or share our experience of MAHA MLT 3000 device using right now.
 |
[Page 1] MAHA MLT 3000 MLT 3000 Headlight Tester Original Operating Instructions BA380701-en |
 |
[Page 2] MAHA MLT 3000 2 BA380701-en BA380701-en 2018-11-20 © MAHA Maschinenbau Haldenwang GmbH & Co. KG The reproduction, distribution and utilization of this document as well as the communication of its con- tents to others without explicit authoriza… |
 |
[Page 3] MAHA MLT 3000 3 BA380701-en Contents 1 Safety …………………………………………………………………………………………………………….. 5 1.1 Introduction ……………………………………………………… |
 |
[Page 4] MAHA MLT 3000 4 BA380701-en 3.4.1 Test Phase Indication via Light Buttons ……………………………………………………………………. 22 3.4.2 Measuring ………………………………………………………………………….. |
 |
[Page 5] MAHA MLT 3000 5 BA380701-en 1 Safety 1.1 Introduction Thoroughly read this manual before operating the equipment and comply with the instructions. Always display the manual in a conspicuous location. Personal injury and property damage incurred … |
 |
[Page 6] MAHA MLT 3000 6 BA380701-en 1.3 Intended Use This device only serves to check and adjust the alignment of vehicle headlights. This device cannot be modified without the express, written consent of the manufacturer. Any infringement renders the confo… |
 |
[Page 7] MAHA MLT 3000 7 BA380701-en 2 Description 2.1 Requirements for the Place of Installation Please observe your national guidelines and specifications. 2.2 Technical Data Measuring range above hotspot 0…800 mm / 10 m (0…8 %) above p… |
 |
[Page 8] MAHA MLT 3000 8 BA380701-en 2.3 Design A Mirror, with optional laser alignment unit E Charging socket B Column F Casing, with adjusting handle C Display G Carriage, with spirit level D USB port H Battery com… |
 |
[Page 9] MAHA MLT 3000 9 BA380701-en 2.4 Electronic Levelling This headlight tester comes standard with an electronic position sensor which determines the inclination angle of the device. The software compensates possible deviations in the X- and Z-axes whil… |
 |
[Page 10] MAHA MLT 3000 10 BA380701-en 2.4.2 Angle Symbols Once the adjustment of the inclination sensor has been completed, an angle symbol appears in the info bar to indicate the adjusted/active inclination axes. Overview of symbols: Both axes adju… |
 |
[Page 11] MAHA MLT 3000 11 BA380701-en 2.5 Definition of Technical Terms 2.5.1 Pitch Angle Angle of inclination of light-dark limit against the test surface. The inclination of headlight lighting bundle against the test surface is expressed as a p… |
 |
[Page 12] MAHA MLT 3000 12 BA380701-en A Light-dark limit Boundary for light distribution between ‘top dark’ and ‘bottom light’ for low- beam lights. B Inflection point Synonymous with the light-dark limit for asymmetric low-beam lighting. The dev… |
 |
[Page 13] MAHA MLT 3000 13 BA380701-en 3 Operation 3.1 Switching On / Off The headlight tester is operated via touchscreen buttons. The resistive touchscreen reacts to pressure and can also be operated while wearing work gloves. The On/Off button is on th… |
 |
[Page 14] MAHA MLT 3000 14 BA380701-en 3.2 Aligning When using guide rails, position the device centrally in front of the vehicle. Without guide rails, the device must be adjusted in front of each headlight. Please ob- serve your national guidelines and specif… |
 |
[Page 15] MAHA MLT 3000 15 BA380701-en 3.2.2 LED Adjustment Aid (Option) This optional unit is integrated into the window housing (A) above the Fresnel lens. The colour LEDs (B) pointing toward the vehicle indicate the direction of adjustment. Green L… |
 |
[Page 16] MAHA MLT 3000 16 BA380701-en 3.3 Light Selection Buttons 3.3.1 Headlight Test according to § 29 StVZO (Germany) Headlight test according to § 29 StVZO (Germany). Use the OEM button for manufacturer-specific test instructions. … |
 |
[Page 17] MAHA MLT 3000 17 BA380701-en 3.3.2 Showing the Button Labels When the Info button is activated, the button labels are shown instead of the symbols. 3.3.3 Adjusting the Pitch Angle The pitch angle can be increased or reduced using the Arr… |
 |
[Page 18] MAHA MLT 3000 18 BA380701-en 3.3.4 Choosing the Vehicle Class The Truck/Car button activates the appropriate settings for the respective vehicle class. 3.3.5 Browsing back through the Test Screens Use the Back Arrow button to browse bac… |
 |
[Page 19] MAHA MLT 3000 19 BA380701-en 3.3.6 Choosing between Left-Hand or Right Hand Traffic Left-hand/Right-hand traffic can be changed under “User Settings”. Right-hand traffic is preset by default. 3.3.7 Manufacturer-Specific Test Instructions (O… |
 |
[Page 20] MAHA MLT 3000 20 BA380701-en Button “ALL“ makes several test levels available. Example: testing Volkswagen matrix headlights OEM area! Perform the test according to manufacturer’s instructions. |
 |
[Page 21] MAHA MLT 3000 21 BA380701-en 3.3.8 Navigating through the Test Levels Use the Play button to open the activated test levels one by one. |
 |
[Page 22] MAHA MLT 3000 22 BA380701-en 3.4 Testing the Headlights 3.4.1 Test Phase Indication via Light Buttons Green dot = Headlight tested, measurement OK Red dot = Headlight tested, not OK Grey dot = Headlight without evaluation Adjusting d… |
 |
[Page 23] MAHA MLT 3000 23 BA380701-en PA = Pitch Angle; IP = Inflection Point; I = Intensity Yaw and Rolling angles can be additionally activated under “User Settings”. Use the Camera button (bottom centre) to change from the Measuring menu to the Adjust… |
 |
[Page 24] MAHA MLT 3000 24 BA380701-en 3.4.4 Adjusting: Setting the Headlights in Real Time Green light button = Current measurement Use the “New vehicle” button to change back to the Main menu. |
 |
[Page 25] MAHA MLT 3000 25 BA380701-en 3.4.5 Saving the Measurement Values to PDF Using the USB stick button, all available test values can be saved as PDF to a USB stick. The button appears only in the Measuring and Adjusting menus and if a USB stick h… |
 |
[Page 26] MAHA MLT 3000 26 BA380701-en Overview of test results as PDF file (example) |
 |
[Page 27] MAHA MLT 3000 27 BA380701-en 3.5 Settings 3.5.1 Variables Limit values as well as user and customer variables can be set directly at the headlight tester. |
 |
[Page 28] MAHA MLT 3000 28 BA380701-en Limit values, user and customer variables can be adjusted directly on the equipment. |
 |
[Page 29] MAHA MLT 3000 29 BA380701-en 3.5.2 User Settings Quick access to all important settings. |
 |
[Page 30] MAHA MLT 3000 30 BA380701-en 3.5.3 Language Use the flag button to open the language selection. Choose the desired language. |
 |
[Page 31] MAHA MLT 3000 31 BA380701-en 3.5.4 Calibrating the Camera according to Directive Compensation values can be checked using button “Calibrate camera according to di- rective”. No password required. Choose between Cross hair / Spot las… |
 |
[Page 32] MAHA MLT 3000 32 BA380701-en |
 |
[Page 33] MAHA MLT 3000 33 BA380701-en 3.5.5 Country Specifications Statutory requirements, limit values and country-specific settings. Switching back from some of the country-specific test procedures requires a password. |
 |
[Page 34] MAHA MLT 3000 34 BA380701-en 3.5.6 Settings with Password The disabled (greyed out) menu items can be accessed only by entering a service technician password. Adjustment of the headlight tester is permitted exclusively with the following ca… |
 |
[Page 35] MAHA MLT 3000 35 BA380701-en 3.5.7 List of Variables (Extract) No. User variables Default Min Max 3.0 Percentage 0 / Degrees 1 0 0 1 4.0 Lux 0 / Candela 1 0 0 1 6.0 Target value Pitch angle Car 11 0 50 6.1 Ta… |
 |
[Page 36] MAHA MLT 3000 36 BA380701-en 3.6 Interfaces and Software Updates Software updates are normally performed using a USB stick (FAT32). Procedure: 1 Download the current software version from the MAHA homepage. www.maha.de/downloads.htm 2 Open the ZI… |
 |
[Page 37] MAHA MLT 3000 37 BA380701-en |
 |
[Page 38] MAHA MLT 3000 38 BA380701-en Please wait until the software has been installed and restarted. Interfaces for connecting a computer: RS232 as cable connection (round connector, see section “Energy Management and Troubleshooting > Chargin… |
 |
[Page 39] MAHA MLT 3000 39 BA380701-en Set variables using System / Settings / Sec- tion, Lanes, External Devices. Variable 1: 100 (standalone device only) Variable 25: 1 Variable 26: COM port Reboot EUROSYSTEM. Test devices are connected auto… |
 |
[Page 40] MAHA MLT 3000 40 BA380701-en An overview of the measured values ap- pears. Select the desired measurement. In this example: second level with dynamic high-beam and motorway light. The selected measurement data is dis- played in detail. Graphic … |
 |
[Page 41] MAHA MLT 3000 41 BA380701-en 4 Energy Management and Troubleshooting 4.1 Charging the Battery The plug of the charger is inserted into the round (Neutrik) connector on the underside of the housing (see Fig.). The charging process norma… |
 |
[Page 42] MAHA MLT 3000 42 BA380701-en 4.2 Battery Status 4.2.1 Battery Life The battery has a rated capacity of 9500mAh and can provide up to 20 hours of continuous workshop operation at an optimum environmental temperature of 20°C. 4.2.2 Energy Saving F… |
 |
[Page 43] MAHA MLT 3000 43 BA380701-en 4.2.5 Data Recording for Error Analysis The data records of the battery status allow for an optimum analysis in problem cases. A USB stick is needed for data recording. Records with a duration of more than 2 h can be sa… |
 |
[Page 44] MAHA MLT 3000 44 BA380701-en 4.3 Troubleshooting This message may appear after updating older software versions. Acknowledge with “Wait”. 5 Maintenance 5.1 Care Instructions NOTICE The equipment must be periodic… |
 |
[Page 45] MAHA MLT 3000 45 BA380701-en 6 Disposal If you want to dispose of the equipment, please contact your MAHA dealer or the following address, indicating equipment type, date of purchase and serial number: MAHA Maschinenbau Haldenwang GmbH & Co. KG … |
Прибор проверки света фар для легкового, грузового, коммерческого транспорта и мотоциклов.
— Для проверки существующих и будущих систем освещения.
— Может использоваться в составе диагностической линии.
— Лазерный прицел.
— Вертикально перемещающаяся измерительная камера.
— Большая линза Френеля.
— Удобное меню с цветным 7” сенсорным дисплеем.
— Электронное нивелирование на неровностях пола.
— Высокопроизводительная CMOS-камера.
— Встроенный электронный контроль для цифровой фиксации и оценки (обработки) результатов измерений,
— Возможность подключения к компьютеру.
* Производитель оставляет за собой право без уведомления дилера менять характеристики, внешний вид, комплектацию товара и место его производства. Указанная информация не является публичной офертой.
Способы доставки:
Время работы пунктов самовывоза: пн-пт с 9.00 — 18.00
Адреса самовывоза:
- г. Москва, ул. Боровая 7 стр.2 — Центральный офис ТД Эквинет
- Московская область, Ногинский р-он, пос. Обухово, Кудиновское шоссе 26 (по согласованию с менеджером)
- г. Санкт-Петербург, ул. Арсенальная, д.23, лит.Л — Центральный офис Эквинет-Норд
2. Доставка курьером
Доступна для Москвы и Санкт-Петербурга
Тарифы:
г. Москва
- Доставка курьером в пределах МКАД — бесплатно (при сумме заказа от 5000 руб.)
- Доставка курьером в пределах МКАД — 500 руб. (при сумме заказа до 5000 руб.)
- Доставка курьером в пределах 25 км от МКАД — бесплатно (при сумме заказа от 30000 руб.)
- Доставка курьером в пределах 25 км от МКАД — 1000 руб. (при сумме заказа до 30000 руб.)
- Доставка курьером на большее расстояние и в соседние области обговаривается отдельно
- Доставка курьером до терминала транспортной компании (при отправке в другой регион) — бесплатно
г. Санкт-Петербург
- Доставка курьером в пределах КАД — бесплатно (при сумме заказа от 5000 руб.)
- Доставка курьером в пределах КАД — 1000 руб. (при сумме заказа до 5000 руб.)
- Доставка курьером в пределах 25 км от КАД — бесплатно (при сумме заказа от 30000 руб.)
- Доставка курьером в пределах 25 км от КАД — 1000 руб. (при сумме заказа до 30000 руб.)
- Доставка курьером на большее расстояние и в соседние области обговаривается отдельно
- Доставка курьером до терминала транспортной компании (при отправке в другой регион) — бесплатно
Условия доставки
Доставка по городу осуществляется в течении 2 рабочих дней после оформления заказа или по согласованию с менеджером при условии, что товар имеется в наличии. Доставка осуществляется после того, как деньги поступили на наш расчетный счет.
Время работы службы доставки:
пн — пт: с 9:00 до 18:00
3. Доставка транспортной компанией по России
- Байкал Сервис — рассчитывается автоматически при оформлении заказа (от терминала ТК до терминала ТК)
- ПЭК, Деловые линии и другие — рассчитываются менеджером
Доставка до терминала транспортной компании — бесплатно.
Для самостоятельного расчета стоимости доставки на сайтах транспортных компаний вам потребуются габариты в упаковке и вес брутто товаров. Эту информацию вы можете найти в характеристиках товара на сайте или запросить у наших менеджеров.
Способы оплаты:
1. Банковской картой в наших магазинах:
г. Москва, ул. Боровая 7 стр.2 — Центральный офис ТД Эквинет
г. Санкт-Петербург, ул. Арсенальная, д.23, лит.Л — Центральный офис Эквинет-Норд (временно недоступно)
К оплате принимаем:
- Карты оплаты Visa, MasterCard, МИР
- Samsung Pay (МИР)
2. Электронные способы платежа при оформлении покупки через форму заказа на сайте
К оплате принимаем:
- Карты оплаты Visa, MasterCard, МИР
- ЮMoney
Важно! Согласно Федеральному закону № 161-ФЗ «О национальной платежной системе» при расчетах электронными деньгами приостановлено проведение платежей от юридических лиц. При оплате заказа через платежные системы физическим лицом действует ограничение: для неидентифицированных пользователей сумма оплаты составляет не более 15 тыс. руб. Можно увеличить лимит платежа, подтвердив свою личность на сайте платежной системы ЮMoney.
Интернет-магазин equinet.ru не несет ответственности за содержание информации на сайтах платежных систем.
Как оплатить заказ через сайт?
При оформлении заказа необходимо выбрать электронный способ оплаты.
После подтверждения заказа менеджером в личном кабинете на странице «Мои заказы» напротив оформленного заказа появится кнопка «Оплатить заказ». Для оплаты вы будете направлены на сайт платежной системы.
Важно! Оплата производится без комиссии.
Оплатив покупку электронным способом, вы можете выбрать удобный вид доставки.
При получении заказа обязательно предъявите документ, удостоверяющий личность (паспорт, водительские права, удостоверение личности военнослужащего, удостоверение личности моряка, загранпаспорт). Если заказ будет получать другой человек, необходима доверенность, заверенная нотариусом.
3. Банковским переводом при оплате заказа по выставленному счету в отделении банка
Необходимо заполнить бланк и осуществить почтовый перевод или оплатить счет, который выставляет менеджер, оформляющий ваш заказ.
Важно! Будьте внимательны при заполнении реквизитов получателя платежа. Все платежные документы необходимо сохранять до момента получения товара.
4. Безналичный расчет для юридических лиц
Если покупка совершается от юридического лица, оплата производится по счету, который выставляет менеджер интернет-магазина.
Важно! Срок оплаты счета – до 3 дней. Возможно продление периода оплаты счета. Для этого необходимо связаться с персональным менеджером.
Товар отгружается в течение суток после поступления денежных средств на счет интернет-магазина (исключение составляют случаи оформления товаров в статусе «Под заказ»).
При отгрузке продукции в регионы сроки доставки включают время доставки товара на наш склад (до 2 рабочих дней) и время доставки до транспортной компании. Далее сроки доставки зависят от условий ТК.
Возврат денежных средств или обмен товара
Подробную информацию по возврату денежных средств или обмену товара можно посмотреть на странице Обмен и возврат.