Код: 22904
Извините, товара сейчас нет в наличии

Бесплатная доставка
по Красноярску
Извините, товара сейчас нет в наличии
Новости интернет-магазина «Лаукар»:
Дополнительная информация в категории Микроволновая печь (СВЧ):
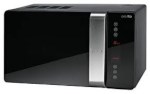
В интернет-магазине бытовой техники «Лаукар» Вы можете скачать инструкцию к товару Микроволновая печь (СВЧ) Gorenje GMO 23 ORA ITO Black совершенно бесплатно.
Все инструкции, представленные на сайте интернет-магазина бытовой техники «Лаукар», предоставляются производителем товара.
Перед началом использования товара рекомендуем Вам ознакомиться с инструкцией по применению.
Для того чтобы скачать инструкцию, Вам необходимо нажать на ссылку «скачать инструкцию», расположенную ниже, а в случае, если ссылки нет,
Вы можете попробовать обратиться к данной странице позднее,
возможно специалисты интернет-магазина бытовой техники «Лаукар» еще не успели загрузить для скачивания инструкцию к товару:
Микроволновая печь (СВЧ) Gorenje GMO 23 ORA ITO Black.

Фирма-производитель оставляет за собой право на внесение изменений в конструкцию, дизайн и комплектацию товара: Микроволновая печь (СВЧ) Gorenje GMO 23 ORA ITO Black. Пожалуйста, сверяйте информацию о товаре с информацией на
официальном сайте компании производителя.
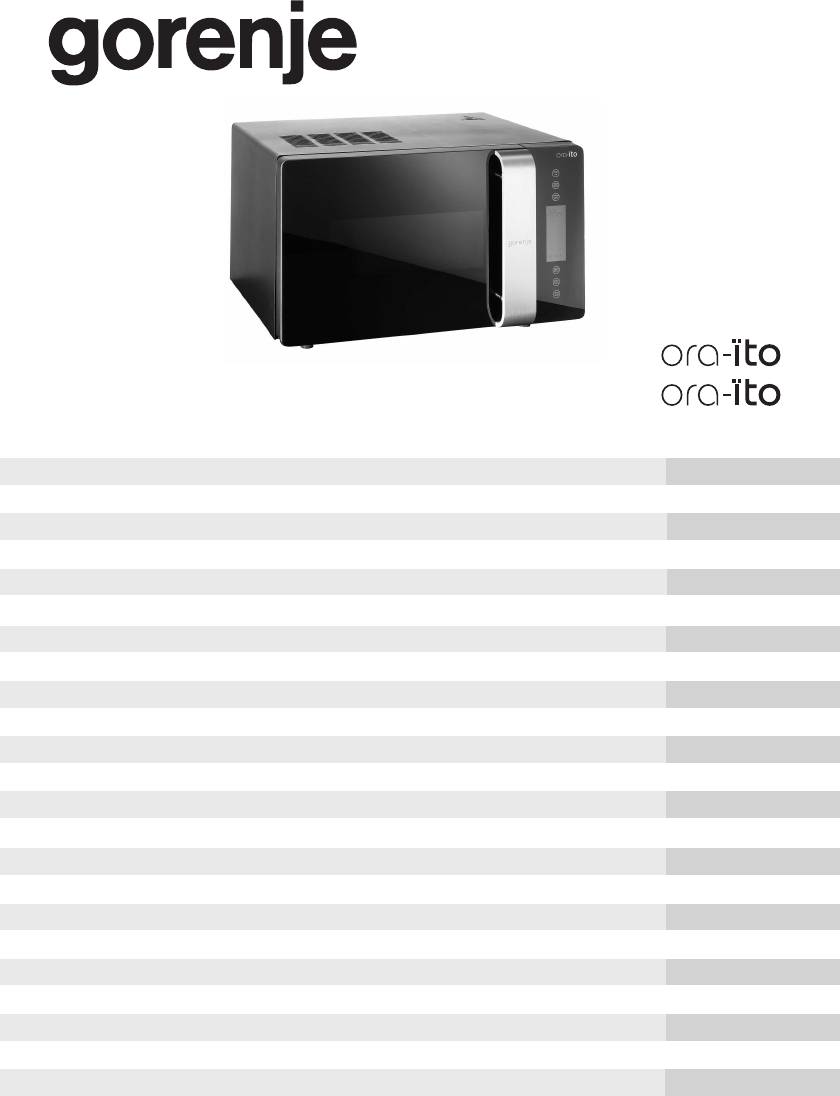
- Manuals
- Brands
- Gorenje Manuals
- Oven
- ora-ito
- Instructions for use, installation, and connection
-
Contents
-
Table of Contents
-
Bookmarks
Quick Links
Instructions for use, installation,
MT
IE
GB
and connection
Related Manuals for Gorenje ora-ito
Summary of Contents for Gorenje ora-ito
-
Page 1
Instructions for use, installation, and connection Electric oven… -
Page 2
Electric oven Dear customer! We sincerely thank you for your purchase. We believe you will soon fi nd ample evidence that you can really rely on our products. To make the use of the appliance easier, we attach these comprehensive instruction manual. The instructions should aid you in getting familiar with your new appliance. -
Page 3
Important — Read before using the appliance Safety percautions • This appliance can be used by children aged from 8 years and above and persons with reduced physical, sensory or metal capabilities or lack of experience and knowledge if they have been given supervision or instruction concerning use of the appliance in a safe way and understand the hazards involved. -
Page 4
• Oven door become very hot during operation. A third glass is installed or additional protection to reduce the temperature of the outside surface (only with some models). • Appliance operation is safe with and without tray guides. • Oven door hinges may be damaged if overloaded. Do not place heavy cookware on the open oven door and do not lean against the door while cleaning the oven. -
Page 5
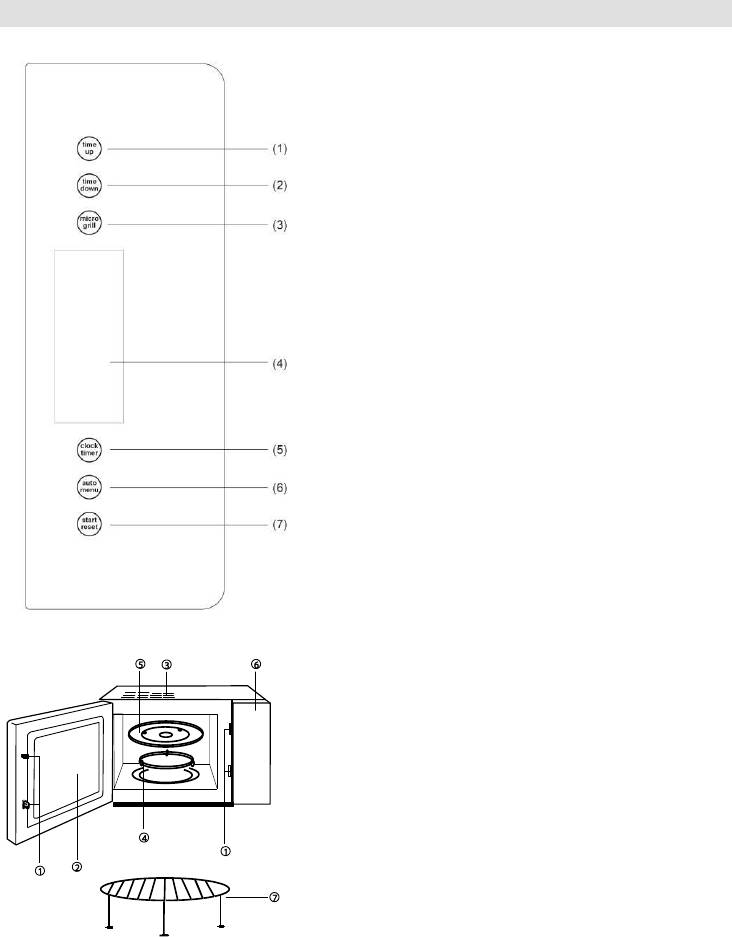
Appliance description The fi gure represents one of the appliance models. Since a group of appliances to which these instructions apply, have different features, the instruction manual may describe functions and equipment that may not be available in your appliance. 1. -
Page 6
Control unit 1 Control unit 2 OPERATION / SETTINGS SENSOR KEYS A Appliance on / off 1 chicken B child lock 2 pizza C Oven heaters on/off 3 chops / cutlets, fi sh D Clock 4 cutlet – chunk E Alarm timer 5 small / bite-size pastry F Cooking end time setting key 6 leavened Kugelhupf… -
Page 7
(only with some models) Oven door switch The switch will turn off the oven heating and the fan when door is opened during oven operation; when the door is closed again, the heating is resumed. Cooling fan The appliance features a built-in cooling fan which cools the appliance housing and control panel. -
Page 8
• Turn on the appliance by pressing the on/off key (A). Setting the clock Setting the time of day • Press the (A) key to turn on the appliance. • Press the (D) key to activate the fl ashing clock. •… -
Page 9
• Press the (D) key to activate the fl ashing clock. • Use the (H) “+, -” keys to change the time of day to the desired setting. • Confi rm the setting by pressing the (D) key once again; if nothing is pressed for a few seconds, the settings are adopted automatically. -
Page 10
Grill Only the infra heater is activated (which also operates, along with the upper heater, in the Large grill mode). This mode is appropriate for grilling smaller quantities of toasted sandwiches, grill sausages, or simply for toasting bread. Preset temperature 240°C. Grill &… -
Page 11
Lower heater and fan With this operation mode, the lower heater and the fan operate simultaneously. Used for baking low leavened dough and preserving fruit and vegetables. Use the fi rst shelf position from the bottom and shallow rather than deep baking trays to allow the warm air circulate around the upper side of the dish as well. -
Page 12
During oven operation, you may change the temperature (see section “Selecting and setting the oven temperature”), timer functions. After the end of cooking and when the oven is turned off, the temperature display will indicate the falling temperature until it reaches 50°C. B Cooking by selecting the type of food (L) (only with control unit 2) This operation mode enables preparing food by automatic setting… -
Page 13
Cooking table for selected types of food Cutlet — chunk 1:50 Cooking in a smaller baking tray in the grid. Cooking on the grid (a baking tray is placed on the second guide under the grid to catch Chops, fi sh 0:25 4×0,2 dripping fat and juices –… -
Page 14
Timer functions Setting the cooking duration This programming mode enables setting the duration of oven operation, i.e. the cooking time. The maximum possible setting is 10 hours. • Touch the (G) key to activate the cooking time setting. “00.00” will fl ash on the display (D). •… -
Page 15
set to a maximum of 24 hours from the current time. • Make sure the clock on the oven is set correctly. • Set the cooking time (see section “Setting the cooking duration”). • Press the end of cooking time setting key (F). (The sum of current time and the cooking duration will be displayed automatically on the display (D)). -
Page 16
Defrosting (only with control unit 2) With this operation mode, the air circulates without any heaters operating. Only the fan is activated. This is used for slow defrosting of frozen food. Aqua clean – wet cleaning (only with control unit 2) Activate the wet cleaning by touching the (O) sensor key. -
Page 17
Memory programs (J) The oven enables you to save three customized cooking modes. Factory settings are already stored in memory programs (M1, M2, M3); however, these can be changed by the following procedure: — press the selected memory program once to display the current (factory) settings (heater combination / operation mode, temperature, cooking time). -
Page 18
Beep Every time a sensor key is pressed, this is acknowledged by a short beep. The sound signal for the end of cooking process will be active for one minute. It can be cancelled earlier by pressing any sensor key. Setting the audible signal volume The volume (loudness) of the beep can be set as follows: •… -
Page 19
Shelf levels • Accessories (grid, shallow and deep baking tray) can be inserted into the oven at four levels. • Please note that the shelf levels are always referred to by consecutive numbers starting from the bottom (particular shelf levels are described in the cooking tables below) •… -
Page 20
Easy-clean inserts The easy-clean inserts prevent the fat from spattering directly on (depending on the the oven wall. model) The easy-clean inserts are installed as follows: • Remove the wire or telescopic guides (see the section Removing the telescopic and wire guides). •… -
Page 21
Shallow baking tray is only intended for baking pastry and cakes. Deep baking tray is intended for baking meat and moist pastry; it is also intended as a drip tray. Unless you are using the grill, or the deep baking tray is used only as a drip tray when spit-roasting, the deep tray should not be inserted into the fi… -
Page 22
Food preparation Baking pastry • For baking pastry, use the mode of operation. (Oven operation with the selected mode, or system, depends on the appliance model). • When baking pastry, always remove the fat fi lter. Instructions • When baking pastry, always observe the instructions on the shelf / guide level, temperature, and cooking time indicated in the pastry baking table. -
Page 23
the same thickness and height. Unevenly sized pastry will be unevenly browned! • When baking several types of pastry simultaneously, there will be a signifi cant amount of vapor in the oven, resulting in accumulation of condensate on the oven door. Tips on baking pastry Is the pastry completely done? Use a wooden stick to pierce the pastry at the highest point. -
Page 24
Pastry baking table for combined upper and lower heater or hot air operating mode — when cooking on one level only Type of pastry Guide Temperature Guide Temperature (°C) Cooking (from the (°C) (from the time bottom) bottom) (minutes) Sweet pastry Marble cake, ring cake 160-170 150-160… -
Page 25
Settings table for baking pastry with hot air and lower heater Type of pastry Guide (from the bottom) Temperature (°C) Cooking time (minutes) Cheesecake (750g cheese) 150-160 65-80 — short pastry Pizza * — leavened dough 200-210 15-20 Quiche Loraine — short crust 180-200 35-40 dough… -
Page 26
• In order to prevent accumulation of condensate, do not let the dishes to cool down in the oven. Meat cooking table for upper/lower heater combination or with hot air — when cooking on one level only Type of meat Weight Guide (from Tempera-… -
Page 27
Grilling and browning • When grilling meat, you should be particularly careful. The high temperatures and infra heater heat the grid and other parts of the oven to very high degrees; use protective kitchen gloves and special meat tongs. • Hot fat may squirt out of pierced meat (e.g. from sausages). To avoid burning your skin or eyes, use meat tongs. -
Page 28
Spit roasting (only with some models) • The rotating roast spit set consists of a rotating spit with a detachable handle and two forks with screws for fi xing the meat chunk. • When using the roast spit, fi rst insert the special support frame into the third guide from the bottom. -
Page 29
Cooking table — Large grill Type of food Weight Guide Temperature Temperature Cooking time level (from (°C) (°C) (min) bottom) Meat and sausages 4 beef loin chops, rare 180g/pc 14-16 4 beef loin chops, medium “ 16-20 4 beef loin chops, well done “… -
Page 30
Cooking table — grill Food type Weight (g) Guide Temperature Temperature Cooking time level (from (°C) (°C) (min.) bottom) Meat and sausages 2 beef loin stakes, well done 180g/pc 180-21 2 cutlets 20-22 2 pork neck steaks 180g/pc 18-22 4 grill sausages 100g/pc 11-14 4 toasted sandwiches… -
Page 31
• Then, touch the (D1) key and use the (H) “+, -” keys to set the temperature in the range from 30 to 99 °C; the temperature can be set in 1°C steps. • Confi rm the setting by touching the (D1) key again; if this is not done, the setting will be adopted automatically after a few seconds. -
Page 32
Preservation For food preservation, use the lower heater + fan operating mode. Prepare the food to be preserved and the jars as usually. Use conventional jars with a rubber sealing and glass cover. Do not use jars with threaded or metal covers and metal cans / tins. Preferably, the jars should be of the same size, fi… -
Page 33
Cleaning and maintenance Do not use a steam cleaner or a high-pressure steam cleaner to clean the appliance. Before you start cleaning the appliance, disconnect it from the power mains and let it cool down. Appliance housing front Clean the surfaces with liquid non-abrasive detergents intended for smooth surfaces, and a soft cloth. -
Page 34
Cleaning Oven • The oven can be cleaned in conventional manner (with detergents, oven spray), but only when there is vey dirty and when the stains are particularly stubborn. • For regular cleaning of your oven (after each use), the following procedure is recommended: Pour 0.6 l of water into a glass or shallow baking dish and insert it into the lower guide. -
Page 35
prevent the grease from being spattered on the oven interior walls. • When grilling meat on the grid, place a drip tray underneath. Cleaning the oven interior ceiling (only with some models) • To facilitate cleaning of the oven interior upper wall, some appliances feature a foldable upper infra heater. -
Page 36
Do not attempt to grease the telescopic retractable guides. After cleaning, simply replace the guide rack by following the procedure in reverse order. Removing wire guide racks To facilitate cleaning of the oven interior side walls, the wire guide rack can be removed. •… -
Page 37
• Slightly lift the supports on the left and right side of the door (marking 1 on the support) and pull them away from the glass (marking 2 on the support) (see Figure 1). fi gure 1 • Hold the door glass by the lower edge, slightly lift it so that it is no longer attached to the support, and remove it (Figure 2). -
Page 38
REMOVING AND REPLACING THE OVEN DOOR WITH A SINGLE-AXIS HINGE (depending on the model) a) Conventional closing b) GentleClose – the system absorbs the shock from door closing. It allows simple, quiet, and smooth closing. A gentle push (to a 15° angle relative to the closed door position) is enough for the door to close automatically and softly. -
Page 39
Attention Always make sure the hinge attachment clips are fi rmly seated in their supports when installing the door. If this is not the case, the main hinge that is operated by a strong spring may be released any time while installing or removing the door. Risk of physical injury. -
Page 40
Special warnings and error reporting During the warranty period, any repairs may only be performed by service technicians authorized by the appliance manufacturer. Before starting the repair, the appliance must be disconnected from the power mains by removing the fuse or by removing the mains cord from the wall outlet. Unauthorized tampering and repairs may cause the risk of electric shock and short circuit;… -
Page 41
Instructions for installation and connection Important warnings • The appliance may only be connected by a qualifi ed expert. • The appliance should be fi tted with a device that disconnects it from all poles of the home network (an omnipolar switch), with at least 3 mm of distance between the contacts in open position. -
Page 42
Electrical connection The appliance may only be connected to the power mains by an authorized service technician or a registered electrician! Incorrect connection may result in damage to or destruction of respective parts of the appliance; in such cases, the warranty is void. •… -
Page 43
Procedure (depanding on the model) • Use a screwdriver to open the cover of the connection terminal on the back of the appliance. Release the two clips as indicated on the cover of the connection terminal. • The mains cord must be inserted into the strain release device which protects the cable from being pulled out. -
Page 44
WE RESERVE THE RIGHT TO MAKE ANY CHANGES THAT DO NOT AFFECT THE FUNCTIONALITY OF THE APPLIANCE. Instructions for use of the appliance can also be found on our website at www.gorenje.com / < http://www.gorenje.com /> EVP_EPM_ORA ITO en (06-16)
GMO23
GMO23
W
Mikrovalovnapečica
Navodilazauporabo
SI
Mikrovalovnapećnica
Uputezauporabu
BIHHR
Mikrotalasnarerna
Uputstvozaupotrebu
BIHSRBMNE
Микробрановатапечка
Упатствазаупотреба
MK
Microwaveoven
Instructionmanual
GB
Mikrowellengerät
Gebrauchsanweisung
D
Micro-ondes
Noticed‘utilisation
F
Mikrohullámúsütő
Használatiutasítás
H
Kuchenkamikrofalowa
Instrukcjaobsługi
PL
Microunde
Manualdeutilizare
RO
Mikrovlnnárúra
Návodnaobsluhu
SK
Mikrovlnnátrouba
Návodnapoužití
CZ
Микровълноватафурна
Инструкциизаупотреба
BG
Мікрохвильовапіч
I
нцтрукціязексплуатації
UA
Микроволноваяпечь
Инструкцияпоэксплуатации
RUS
Fornoamicroonde
Istruzionid’uso
I
Mikrobřlgeovn
Brugsanvisning
DK
Mikrobřlgeoven
Bruksanvisning
SE
Mikrovĺgsugnen
Bruksanvisning
NO
Mikroaaltouuni
Käyttöohje
FI
Mikrovilnukrasnij
Lietotajarokasgramata
LV
Mikrobangukrosnele
Naudojimoinstrukcija
LT
Mikrolaineahi
Kasutusjuhend
EE
Microondas
Instruccionesparaeluso
E
2
SI Navodila za uporabo ………………………………………. 3
HR Upute za uporabu ………………………………………… 10
SRB, MNE Uputstvo za upotrebu ………………………………….. 17
MK …………………………………. 24
EN Instruction manual ………………………………………. 32
DE Gebrauchsanweisung ………………………………….. 39
FR Notice d’utilisation ………………………………………. 47
HU ………………………………………. 54
PL ……………………………………….. 62
RO Manual de utilizare ……………………………………….. 70
SK ……………………………………….. 77
CZ ………………………………………….. 84
BG …………………………….. 91
UK …………………………….. 99
RU ……………………. 106
IT Istruzioni d‘uso …………………………………………. 113
DK Brugsanvisning ………………………………………… 120
SE Bruksanvisning ………………………………………….. 127
NO Bruksanvisning …………………………………………. 134
FI K ………………………………………………… 141
LV ………….. 148
LT Naudojimo instrukcija …………………………………. 155
EE Kasutusjuhend …………………………………………… 162
ES Instrucciones para el uso ……………………………. 169

3
NAVODILA ZA UPORABO SI
Pozorno preberite navodila in jih shranite!
Specifikacije
Poraba el. Energije …………………………. 230V~50Hz,1280W
……………………………………………………………………………………………………………….. 900W
……………………………………………………………………………………………………………. 1200W
Delovna frekvenca: …………………………………………………………………………………………………. 2450MHz
Zunanje mere: …………………………………………………………………. X 303mm(V) X 405mm(G)
Mere komore (notranjosti) p ……………………………………….. X 212mm(V) X 330mm(G)
……………………………………………………………………………………………………. 23 litrov
……………………………………………………….……………………………..4,5 kg
Raven hrupa: …………………………………………………………………………………………………… Lc < 58 dB (A)
Radijske motnje (interference)
ijskem sprejemniku, TV
a)
b) Postavite radijski sprejemnik, TV sprejemnik
c) Za radijski sprejemnik, TV sprejemnik itd.
1.
ne pojavi n
a)
Namestitev
1.
2. Ko odstranite
b)
ok
primer:
— nagnjena vrata,
varovalkah ni videti napake, preskusite
—
— udrtine ali luknje v steklu (oknu) na vratih
2.
ter na zaslonu,
oddaja mikrovalovne energije:
—
a)
odb,
pravilno nastavljena.
b) Prev
3. M4,5 kg;
niso, se mikrovalovna energija ne bo
4.
temperature in pare.
5.
6.
Opomba:
Aparat je nam
njo pa 10cm.
gospodinjstvu, in sicer za segrevanje hrane
7. Ne odstranjujte pogonske gredi vrtljivega
podstavka.
energije. Aparat uporabljajte le v zaprtih
prostorih.
evropsko smernico 2002/96/EG o odpadni
electrical and electronic equipment —
WEEE). Smernica opredeljuje zahteve za
in elektronsko opremo, ki veljajo v celotni
Evropski Uniji.

4
8. Kot pri vseh drugih aparatih je tudi pri tem
nadzoruje ali jim
potreben skrben nadzor, ko ga uporabljajo
svetuje oseba, ki je odgovorna za njihovo
otroci.
varnost.
OPOZORILO: TA APARAT JE
Otroci naj se ne igrajo z aparatom.
POTREBNO OZEMLJITI.
9.
vsaj 8cm prostora, ob straneh vsaj 10cm,
10. 3
10cm. Ne odstranj
posvetujete s serviserjem oz. ustreznim
strokovnjakom.
POZOR:
varovalko 250V, 10A.
e
POMEMBNO
pomen:
Zeleno-rumena: ozemljitveni vod
Modra: nevtralni vod
Rjava: fazni vod
zato v tem primeru ravnajte posebej
da ne
previdno.
odgovarjajo barvnim oznakam na terminalih
— —
E ali s
simbolom za ozemljitev.
—
lupini ali celih trdo kuhanih jajc, saj lahko
N
eksplodirajo, tudi potem, ko je segrevanje v
barve.
—
L
barve.
z gobo ali mehko krpo.
Pomembna varnostna
navodila
morebitne ostanke hrane.
OPOZORILO: Ko aparat deluje v
zelo visokih temperatur, ki nastajajo,
uporabljati aparat le pod skrbnim nadzorom
uporabi.
OPOZORILO:
izogib nevarnosti zamenjati le proizvajalec,
dokler ga ne popravi za to poklicana oseba.
usposobljen strokovnjak.
OPOZORILO: Vsako popravilo ali servis, ki
Varnostna navodila za
serviserja, in pri katerem je potrebno
OPOZORILO:
nekateri varnostni ukrepi, ki jih, podobno kot pri
segrevajte v zaprtih oz. zatesnjenih
posod
ta eksplodira.
OPOZORILO: Aparat ni namenjen, da bi ga
1.
sposobnostmi in tudi ne
valj vedno na svojem mestu.
5
2. rabljajte v noben drug namen
obleke, papirja ali drugih predmetov in je ne
12. Pred uporabo vedno preverite temperaturo
uporabljajte za sterilizacijo.
3.
4.
npr. papirja, kuharskih knjig ipd.
erno
5. Ne kuhajte hrane, ki je obdana z
porazdeli.
13.
vilicami.
6. Ne vstavljajte nobenih predmetov v odprtine
ico ali vanjo vrgli
7.
14. Pri pripravi hrane bodite pozorni, da se
8. Ne kuhajte hrane neposredno na steklenem
podstavku. Preden hrano postavite v
marmelada ali mleto meso, segrejejo zelo
hitro. Ko segrevate ali kuhate hrano z
visoko vsebnostjo masti ali sladkorja, ne
uporabljajte
POMEMBNO:
15.
— Ne uporabljajte kovinskih ponev ali
— Ne uporabljajte posode s kovinsko
obrobo.
prijemanju te posode
— Ne uporabljajte s papirjem prekritih
boste morda potrebovali kuhinjske rokavice.
16.
— Ne uporabljajte posode iz melamina,
a) Pazite, da hrane ne kuhate predolgo.
saj vsebujejo material, ki vsrkava
Skrbno nadzorujte potek segrevanja,
mikrovalovno energijo. To lahko
papirja, plastike ali drugih lahko
vnetljivih oz. gorljivih materialov.
segrevanje / kuhanje.
b)
— Ne uporabljajte posode brez
ustreznega premaza za uporabo v
c)
—
glavno
varovalkami.
steklenici, saj lahko ta med
— termometrov
le termometre, ki so namenjeni prav
9.
uporabljajte le v skladu z navodili njihovega
proizvajalca.
10. ovalovni
11.
6
1.
2. —
3.
(mikrovalovi, odtaljevanje
kombinacija) / Cooking mode (microwave,
defrost, grill and combination)
4. Prikazovalnik
5.
set and Timer
6. Izbira menija / Auto menu
7.
reset function
1. Zapiralo vrat
2.
3. ventilator za
4.
5. Stekleni pladenj
6.
7.

7
Navodila za upravljanje
1. Segrevanje z enim pritiskom na
gumb
Z enim samim pritiskom na gumb lahko
segrejete kozarec vode ipd.
Primer: Segrevanje kozarca mleka
a) Kozarec mleka postavite na stekleni
b) Pritisnite tipko «Start/Reset» in
.
c)
2.
a) Hitro segrevanje z mikrovalovnimi
Primer:
minut.
1.
2. Pritisnite «Start/Reset».
b)
Primer: Segrevanje hrane s 70%
minut.
1. Pritisnite tipko «Micro«,
2.
3. Pritisnite «Start/Reset».
Nast
pritiskov
na tipko
«Micro»
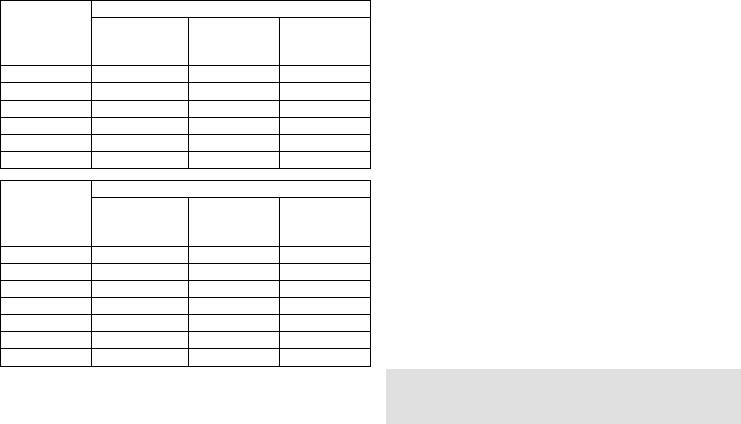
mikrovalovnih
1
100%
P100
2
70%
P70
3
50%
P50
4
30%
P30
5
10%
P10
b) S pritiskom na tipki «1min» (1 kg) ter
«10sec» (0,1 kg) vnesite maso.
c) Pritisnite tipko «Start/Reset».
Masa zamrznjene hrane mora biti
4.
lahko izberete s pritiskom na tipko
«Micro
je 60 minut).
Način 1: 8
izpisano G-1
Način 2:
izpisano G-2.
Primer:
a) Pritisnite tipko «Micro«, da
-1″.
b)
c) Pritisnite tipko «Start/Reset».
toploto oddaja kovinski grelnik na vrhu
polovici priprave se bo izvajanje
programa samodejno prekinilo, dva
obrnete. Ko obrnete hrano, ponovno
«Start/Reset». Program priprave hrane
hrane, se bo program nadaljeval
samodejno po eni minuti.
5. Kombinirano delovanje
kombinirane priprave hrane.
Možnost 1: Kombinirano delovanje (55%
mikrov). Na ekranu
bo izpisano «C-1».
Možnost 2: Kombinirano delovanje (30%
. Na ekranu
bo izpisano «C-2».
3. Samodejno odtajevanje glede na
Primer:
maso
minut.
Izbe
a) Pritiskajte tipko «Micro«,
dokler se na prikazovalniku LED ne
pojavi oznaka «C-2».
Primer: Odtajanje 0,5 kg zamrznjenega
b) Nastavite
mesa.
c) Pritisnite tipko «Start/Reset».
a) S pritiskom na tipko «Micro
menu» izberite «DEF».
8
6. Samodejni meni
Izbrati morate le vrsto hrane in maso,
Primer: Samodejno kuhanje 0,4 kg ribe.
a) Pritisnite tipko «Microto menu»
tolikokrat, da je na ekranu izpisano «A—
5″.
b)
min»(1 kg) in «10 sec» (0,1 kg), dokler
c) Pritisnite tipko «Start/Reset».
pritiskov
na tipko
«1min»
Masa (Kg), meni
1
0,1
0,1
1
2
0,2
0,2
2
3
0,3
0,3
4
0,4
0,4
5
0,5
0,5
6
0,6
pritiskov
na tipko
«1min»
Masa, Meni
1
0,2
0,2
0,2
2
0,3
0,3
0,4
3
0,4
0,4
0,6
4
0,5
0,5
0,8
5
0,6
0,6
1,0
6
0,8
0,8
7
1,0
1,0
Primer:
a) Pritisnite tipko » Clock/Timer» in s
tipkama «1 min» in «10 sec» nastavite
nastavitvi ure).
b) S pritiskom na tipko «Micro
menu
c)
d) Pritisnite tipko «Start/Reset».
«Start/Reset», bo aparat deloval le kot
10 piskov, aparat pa se bo izklopil.
9. Zaklepanje pred otroci
8.
otroki, hkrati pritisnite tipki »
9. » in » —
10.
nastavitev»)
a) e med delovanjem aparata pritisnete
tipko «Start/Reset«, bo delovanje
b)
programiran vklop, bo po pritisku na
tipko «Start/Reset» programirano
delovanje preklicano.
7. Ura
-urno digitalno uro. Za
vanje
1.
a) Pritisnite tipko «Clock/Timer». Napis na
2.
Nastavite uro s tipkama «1 min» in «10
sec».
—
b) Ponovno pritisnite tipko «Clock/Timer»
in nastavite minute s tipkama «1 min»
det
in «10 sec».
c) Znova pritisnite tipko «Clock/Timer» in
3.
d)
ponovite zgornji postopek.
4.
8. Programska ura
ej
detergentov, grobih (abrazivnih) sredstev ali
hrane.
Preden uporabite to funkcijo, mora biti
5.
mehko krpo. Do tega lahko pride, ko

9
6.
vodi z nekaj detergenta ali v pomivalnem
stroju.
7.
er
topli vodi z nekaj detergenta ali v
hlapi od kuhanja, vendar to ne vpliva na
utora na dnu komore (notranjosti
ponovno namestili.
8.
odstranite tako, da v globoko posodo za
ene
limone. Posodo nato za pet minut postavite
-to vklopite. Po
krpo.
9.
se, prosimo, obrnite na prodajalca.
OKOLJE
za recikliranje. Tako pripomorete k ohranitvi
okolja.
GARANCIJA IN SERVIS
obrnite na
lokalnega Gorenjevega prodajalca ali Gorenjev
oddelek za male gospodinjske aparate.
Samo za osebno uporabo!
spletni strani:
http://microwave.gorenje.com

GMO 25
Mikrovalovna pečica
Mikrovalovna pećnica
Mikrotalasna rerna
Mikrohullámú sütő
Mikrovlnná rúra
Mikrovlnná trouba
Microwave oven
Mikrowellengerät
Micro-ondes
Kuchenka mikrofalowa
Microunde
Mikrobųlgeovn
Mikrobųlgeoven
Mikrovågsugnen
Microondas
Микробрановата печка
Микровълновата фурна
Мікрохвильова піч
Микроволновая печь
Mikroaaltouuni
Mikrovilnu krasnij
Mikrobangu krosnele
Mikrolaineahi
Navodila za uporabo
Upute za uporabu
Uputstvo za upotrebu
Instrukcja obsługi
Návod na obsluhu
Návod na použití
Instruction manual
Gebrauchsanweisung
Notice d’utilisation
Hasznįlati utasķtįs
I
Brugsanvisning
Bruksanvisning
Bruksanvisning
Käyttöohje
Instrucciones para el uso
Упатства за употреба
Инструкции за употреба
Инструкция по эксплуатации
Manual de utilizare
Lietotaja rokasgramata
Naudojimo instrukcija
Kasutusjuhend
нцтрукція з експлуатації
DK
SE
NO
FI
LV
LT
EE
MNE
E
SI
BIH HR
BIH SRB
MK
GB
D
F
H
PL
RO
SK
CZ
BG
UA
RUS
Страницы и текст этой инструкции
 Инструкция микроволновой печи Gorenje GMO-23 Ora Ito
 Информация отображена на картинке
 Информация отображена на картинке
 Информация отображена на картинке
 Информация отображена на картинке
Как использовать наш сайт инструкций OnlineManuals.ru
Наша цель состоит в том, чтобы предоставить вам быстрый доступ к содержанию инструкции для микроволновой печи Gorenje GMO-23 Ora Ito.
С помощью онлайн просмотра, Вы можете быстро просмотреть содержимое инструкции и найти решение проблемы с микроволновой печи Gorenje GMO-23 Ora Ito.
Для Вашего удобства
Если листать руководство пользователя микроволновой печи Gorenje GMO-23 Ora Ito прямо на сайте, не очень удобно для Вас, есть два возможных решения:
• Просмотр в полноэкранном режиме — легко просмотреть руководство пользователя (без загрузки его на свой компьютер), Вы можете использовать режим полноэкранного просмотра.
Для просмотра инструкции пользователя микроволновой печи Gorenje GMO-23 Ora Ito на полном экране, используйте кнопку «Открыть в Pdf-viewer».
• Загрузка на компьютер — Вы можете также скачать Инструкция микроволновой печи Gorenje GMO-23 Ora Ito на свой компьютер и сохранить его в файлах.
Многие люди предпочитают читать документы не на экране, а в печатной версии.
Возможность печати руководства пользователя также была предусмотрена на нашем сайте,
и вы можете использовать ее, нажав на иконку «печать» в Pdf-viewer.
Нет необходимости печатать все руководство микроволновой печи Gorenje GMO-23 Ora Ito, можно выбрать только нужные страницы инструкции.