Инструкцию для Miele G 1173 SCVi на русском языке, в формате pdf можно скачать с нашего сайта. Наш каталог предоставляем Вам инструкцию производителя фирмы Miele, которая была взята из открытых источников. Ознакомившись с руководством по эксплуатации от Miele, Вы на все 100% и правильно сможете воспользоваться всеми функциями устройства.
Для сохранения инструкции «Встраиваемая посудомоечная машина 60 см Miele G 1173 SCVi» на русском языке на вашем компьютере либо телефоне, нажмите кнопку «Скачать инструкцию». Если активна кнопка «Инструкция онлайн», то Вы можете просмотреть документ (manual), в своём браузере онлайн.
Если у Вас нет возможности скачать инструкцию по эксплуатации либо просмотреть её, Вы можете поделиться ссылкой на эту страницу в социальных сетях и при удобном моменте скачать инструкцию. Либо добавьте эту страницу в закладки Вашего браузера, нажав кнопку «Добавить страницу в закладки браузера».
-
Страница 1
Operating instructions for dishwashers To avoid the risk of accidents or damage to the appliance, it is essential to read these instructions as well as the installation plan before it is installed and used for the first time. M.-Nr. 07 223 570 en — AU, NZ[…]
-
Страница 2
Description of the appliance …………………………………..4 Appliance overview ………………………………………….4 Control panel ………………………………………………5 Warning and Safety instructions ……………………………….6 Caring for the environment ………………………………….[…]
-
Страница 3
Selecting a programme ………………………………………3 3 Starting a programme ……………………………………….3 3 At the end of a programme ……………………………………3 4 Switching off ……………………………………………..3 4 Unloading the dishwasher ………………………………….[…]
-
Страница 4
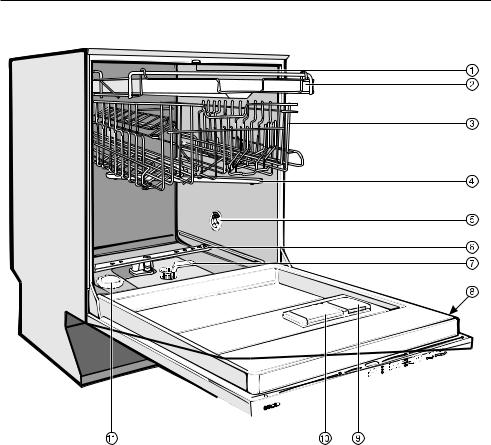
Appliance overview a Upper spray arm (not visible) b Cutlery tray (depending on model) c Upper basket d Middle spray arm e Air inlet for drying (depending on model) f Lower spray arm g Filter combination h Data plate i Rinse aid reservoir j Dual compartment detergent dispenser k Salt reservoir Description of the appliance 4[…]
-
Страница 5
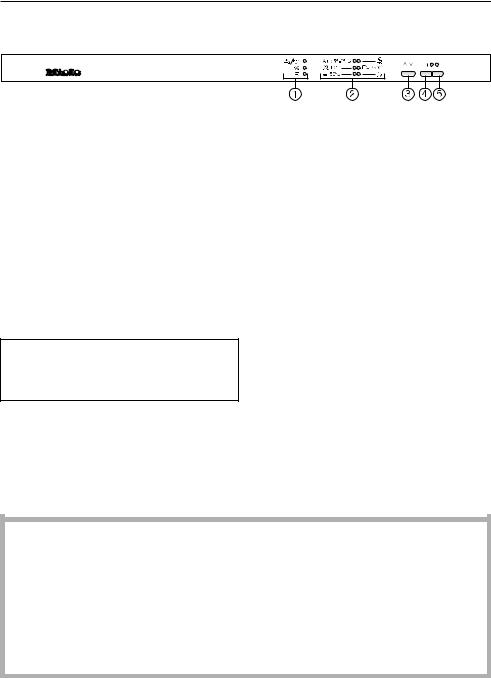
Control panel a Check/Refill indicators b Programmes c Programme selector button YX d On button U with indicator light e Off button V The symbols are described in greater detail in the relevant sections of these instructions. Symbols U On V Off YX Programme selector button Check/Refill indicators 2 / 2 Inlet / Drain ( Rinse aid F Salt Programmes Au[…]
-
Страница 6
This appliance conforms to current safety requirements. Inappropriate use can, however, lead to personal injury and damage to property. To avoid the risk of accidents and damage to the appliance, please read these instructions carefully before using it for the first time. They contain important information on its safety, use and maintenance. Keep t[…]
-
Страница 7
Technical safety ~ Before setting up the appliance, check it for any externally visible damage. Under no circumstances should you use a damaged appliance. A damaged appliance could be dangerous. ~ The dishwasher must only be plugged into the electricity supply via a suitable switched socket. The electrical socket must be easily accessible after the[…]
-
Страница 8
~ This equipment may only be installed in mobile installations such as ships if a risk assessment of the installation has been carried out by a suitably qualified engineer. ~ The plastic housing of the water connection contains an electrical component. The housing must not be dipped in water. ~ There are live wires in the water inlet hose. Never cu[…]
-
Страница 9
Installation ~ The dishwasher must be installed and connected in compliance with the installation instructions. ~ The dishwasher must be correctly aligned to ensure problem-free operation. ~ In order to ensure stability, built-under and integrated dishwashers must only be installed under a continuous worktop which is secured to adjacent cabinetry. […]
-
Страница 10
~ Inadvertently filling the salt reservoir with powder or liquid dishwasher detergent will damage the water softener. Make sure you have picked up the correct packet of dishwasher salt before filling the salt reservoir! ~ Please only use special coarse grained dishwasher salt for reactivation, as other salts may contain insoluble additives which ca[…]
-
Страница 11
Disposal of the packing material The transport and protective packing has been selected from materials which are environmentally friendly for disposal and can normally be recycled. Ensure that any plastic wrappings, bags, etc. are disposed of safely and kept out of the reach of babies and young children. Danger of suffocation. The packaging consist[…]
-
Страница 12
Energy saving washing This dishwasher is exceptionally economical in its use of water and electricity. You can make the most of your appliance by following these tips: ^ If your household water system is suitable, this dishwasher can be connected to a hot water supply for further economies. If the water is heated by for example, solar panels, this […]
-
Страница 13
To open the door ^ Pull the handle. If the door is opened during operation all functions are automatically interrupted. To close the door ^ Push the baskets right in. ^ Then lift the door upwards and push until it clicks into position. Before using for the first time 13[…]
-
Страница 14
Water softener In order to achieve good cleaning results, the dishwasher needs to operate with soft water. Hard water results in the build-up of calcium deposits on crockery and in the dishwasher. Mains water with a hardness level higher than 0.7 mmol/l (4 °d – German scale) needs to be softened. This takes place automatically in the integrated […]
-
Страница 15
To programme the water hardness level Each time a button is pressed, one of the indicator lights will flash and light up in the control panel. However, only the indicator lights mentioned in the following programming process stages are significant. The programming procedure can be cancelled at any time by pressing the Off button V . The procedure c[…]
-
Страница 16
Checking the programmed water hardness level ^ Switch the dishwasher off with the Off button V . ^ Press the programme selector button ;? in, and whilst holding it in switch the dishwasher on using the On button U . Keep the programme selector button ;? pressed in until the lower right hand programme indicator comes on. ^ Press the programme select[…]
-
Страница 17
Before using the appliance for the first time you require: – approx. 2 litres of water, – approx. 2 kg dishwasher salt*, – domestic dishwasher detergent*, – rinse aid* formulated for domestic dishwashers. Every dishwasher is tested at the factory. There will be residual water in the appliance from this test. It is not an indication that it […]
-
Страница 18
^ Remove the lower basket and unscrew the salt reservoir cap. Only open the salt reservoir when you want to fill it with dishwasher salt as water or salt solution will run out of the reservoir when the cap is removed. ^ Fill the reservoir with approx. 2 litres of water (first use only). ^ Place the funnel provided over the salt reservoir and carefu[…]
-
Страница 19
Rinse aid Rinse aid is necessary to ensure water does not cling and leave marks on crockery during the drying phase and helps crockery dry faster after it has been washed. Rinse aid is poured into the storage reservoir and the amount set is dispensed automatically. , Inadvertently filling the rinse aid reservoir with powder or liquid detergent alwa[…]
-
Страница 20
^ Add rinse aid only until it is visible in the opening. The rinse aid reservoir holds approx. 110 ml. ^ Close the flap firmly so that it clicks into place. Otherwise water can enter the rinse aid during a programme. ^ Wipe up any spilled rinse aid. This prevents over-foaming occurring during the next programme. Rinse aid indicator ( When the rinse[…]
-
Страница 21
Setting the rinse aid dosage You can adjust the rinse aid dosage for best results. The rinse aid dosage can be set from approx. 0-6 ml. It is set to a recommended setting of approx. 3 ml at the factory. If spots appear on crockery and glassware: ^ Increase the rinse aid dosage. If clouding or smearing appears on crockery and glassware: ^ Decrease t[…]
-
Страница 22
Note Remove coarse food residues from crockery. There is no need to rinse items under running water. , Do not wash items soiled with ash, sand, wax, lubricating grease or paint in the dishwasher. Ash does not dissolve and is distributed in the wash cabinet. Wax, sand, lubricating grease and paint cause damage to the dishwasher. Crockery can be load[…]
-
Страница 23
Items not suitable for dishwashers: – Wooden cutlery and crockery or items with wooden parts: these may discolour and fade. The glue used in these items is not dishwasher-proof and wooden handles may come loose after being washed in a dishwasher. – Craft items, antiques, valuable vases and decorative glassware are also not suitable for dishwash[…]
-
Страница 24
Upper basket , For safety reasons, do not operate the dishwasher without the upper and lower baskets in place. ^ Use the upper basket for small, lightweight and delicate items such as cups, saucers, glasses, dessert bowls, etc. Shallow pans or casserole dishes can also be placed in the upper basket. ^ Long items such as soup ladles, mixing spoons a[…]
-
Страница 25
Adjusting the upper basket In order to gain more space for taller pieces of crockery in the bottom or upper basket, the upper basket can be adjusted on three levels with 2 cm between each level. The upper basket can also be set at an angle with one side high and the other side low. This can be useful to help prevent water collecting in deep dishes […]
-
Страница 26
Lower basket ^ For larger and heavier items such as plates, serving platters, saucepans, bowls, etc. Small items such as saucers can also be placed in the lower basket. Do not place thin, delicate glassware in the lower basket. Dishwashers with cutlery tray Dishwashers with cutlery basket Hinged spikes The spikes are used for washing plates and sau[…]
-
Страница 27
Removable spiked insert You can remove the spiked insert to make more room for larger items of crockery, e.g. a large, flat pot, or another type of insert. To remove the insert a ^ Pull it upwards by the handle as shown. To replace the insert b ^ Fit the insert into the lower basket with the hooks going under the long cross-piece as illustrated. ^ […]
-
Страница 28
Cutlery Cutlery tray (depending on model) ^ Arrange the cutlery in the tray as shown. To make unloading much easier, cutlery should be grouped in zones, one for knives, one for forks, one for spoons, etc. Spoon heads should be placed in contact with at least one of the serrated retainers on the base of the cutlery tray to ensure that water runs off[…]
-
Страница 29
Cutlery basket (depending on model) ^ To avoid the risk of injury, knives and forks should be placed with the handles upwards in the basket. However, cutlery placed handle down in the basket will come out cleaner and drier. ^ Place small spoons in the individual slots to either side of the cutlery basket. Cutlery insert for the cutlery basket Use t[…]
-
Страница 30
Detergent , Only use detergents formulated for domestic dishwashers. Do not use washing-up liquid. Active ingredients Modern detergents contain various active ingredients, the most important of which are: – Phosphates to prevent calcification. – Alkalis to aid removal of dried on soiling. – Enzymes to break down starch and loosen protein. –[…]
-
Страница 31
Dispensing ^ Follow the dosage recommended by the manufacturer on the packaging. ^ Unless directed otherwise, use one detergent tab or add 20 to 30 ml detergent in compartment II, depending on the level of soiling. With very heavy soiling you can also add a small amount of detergent to compartment l (see «Programme chart»). ^ Do not use t[…]
-
Страница 32
Adding detergent ^ Press the opening catch on the detergent dispenser. The flap will spring open. The flap is always open at the end of a programme. ^ Add the required amount of detergent and close the flap. ^ Make sure that the detergent packaging is properly closed after use to avoid it getting damp and becoming lumpy. For information Compartment[…]
-
Страница 33
Switching on ^ Open the stopcock, if it is closed. ^ Open the door. ^ Make sure the spray arms are not obstructed. ^ Switch the dishwasher on using the On button U . The On indicator light U comes on. Selecting a programme Choose your programme according to the type of load and how dirty it is. The different programmes and their uses are described […]
-
Страница 34
At the end of a programme ^ Open the door slightly to check that the programme has finished. The indicator light next to the programme selected switches off once the programme has finished. If the programme indicator light is still on, the programme has not yet finished. Close the door again to allow the programme to finish. You can then empty the […]
-
Страница 35
Interrupting a programme A programme is interrupted as soon as the door is opened. If the door is closed again, the programme will continue from the point it was at before the door was opened. , Water in the dishwasher may be hot. Danger of scalding. Only open the door if absolutely necessary and exercise extreme caution when doing so. Before closi[…]
-
Страница 36
Additional functions Buzzer An audible tone sounds at the end of the programme or if there is a fault. You will hear the buzzer at the end of a programme in bursts of five with a short pause in between. The buzzer will continue to sound for up to an hour if you do not switch the dishwasher off. In the event of a fault, the buzzer will sound continu[…]
-
Страница 37
Factory default setting If you have altered any settings from the factory default, you can re-set them back to the factory default settings as follows: ^ Open the door. ^ Switch the dishwasher off with the Off button V . ^ Press the programme selector button ;? in, and whilst holding it in switch the dishwasher on using the On button U . Keep the p[…]
-
Страница 38
Check your dishwasher regularly (approx. ever y4-6 months). This way faults and problems can be avoided. , The outer surfaces of the dishwasher are susceptible to scratching. Contact with unsuitable cleaning agents can alter or discolour the outer surfaces. Cleaning the wash cabinet The wash cabinet is largely self-cleaning, provided that the corre[…]
-
Страница 39
Cleaning the control panel and door front , Remove any soiling immediately. If not, it might become impossible to remove and could cause the outer surface to alter or discolour. ^ The control panel should only be wiped with a damp cloth. ^ Clean the front using a damp cloth or a sponge and a solution of hot water and washing-up liquid. Then dry wit[…]
-
Страница 40
Cleaning the filters in the wash cabinet The filter combination in the base of the wash cabinet retains coarse soil from the suds solution, preventing it accessing the circulation system and re-entering the cabinet through the spray arms. , The dishwasher must not be used without all the filters in place. Collection of coarse soil may cause the fil[…]
-
Страница 41
To clean the inside of the filter, the flap must be opened: ^ Press catches a together in the direction of the arrows as shown, and open the filter b . ^ Rinse all the filters under running water. ^ Then close the flap so that the catch engages. ^ Replace the filter combination so that it lies flat in the base of the wash cabinet. ^ Then turn the h[…]
-
Страница 42
Cleaning the spray arms Particles of food can get stuck in the spray arm jets and bearings. The spray arms should therefore be inspected and cleaned regularly (approx. every 4 — 6 months). ^ Switch the dishwasher off. Remove the spray arms as follows: ^ Take out the cutlery tray (if your dishwasher is fitted with one). ^ Push the top spray arm upwa[…]
-
Страница 43
With the aid of the following guide, minor problems can be easily corrected without calling in a Miele service technician, saving you both time and money. , Repairs should only be carried out by a suitably qualified and trained person in strict accordance with current local and national safety regulations. Unauthorised or incorrect repairs could ca[…]
-
Страница 44
Problem Possible cause Remedy The buzzer sounds. All the programme indicators flash when the door is opened. There may be a technical fault. Clean the water inlet filter and clean the drain pump and non-return valve as described in “Maintenance”. If this does not resolve the problem, – switch the dishwasher off with the Off button V . After a[…]
-
Страница 45
The dishwasher does not fill/drain. Problem Possible cause Remedy The dishwasher stops working shortly after the start of the programme. The buzzer sounds. The Inlet/drain check light 2 / 2 flashes when the door is opened. The stopcock is closed. – Open the stopcock fully. The dishwasher stops during a programme. The buzzer sounds. The Inlet/drai[…]
-
Страница 46
General problems Problem Possible cause Remedy Detergent residue is left in the dispenser at the end of a programme. The dispenser was still damp when detergent was added. Make sure the dispenser is dry before adding detergent. The detergent dispenser lid cannot be closed properly. Clogged detergent residue is blocking the catch. Clean the detergen[…]
-
Страница 47
Noises Problem Possible cause Remedy Knocking noise in the wash cabinet. A spray arm is knocking against an item in a basket. Interrupt the programme, and rearrange the items which are obstructing the spray arm. Rattling noise in the wash cabinet. Items of crockery are insecure in the wash cabinet. Interrupt the programme, and rearrange the items o[…]
-
Страница 48
Unsatisfactory washing result Problem Possible cause Remedy The dishes are not clean. The dishes were not loaded correctly. See notes in «Loading the dishwasher» The programme was not powerful enough. Select a more intensive programme. See Programme chart. Not enough detergent was dispensed. Use more detergent, or change your detergent. I[…]
-
Страница 49
Problem Possible cause Remedy Dishes, cutlery and glasses are not dry or are flecked. The amount of rinse aid may be insufficient, or the rinse aid reservoir empty. Replenish the reservoir, increase the dosage or change the brand of rinse aid. See «Before using for the first time». Crockery was taken out of the cabinet too soon. Leave it […]
-
Страница 50
Problem Possible cause Remedy Glassware has a brown or blue tinge, and film cannot be wiped off. This may be caused by the detergent. Change your detergent. Glassware is dull and discoloured; film cannot be wiped off. The glasses are not dishwasher-proof. The surfaces are affected. There is no remedy. Purchase glassware which is dishwasher-proof. T[…]
-
Страница 51
Cleaning the water inlet filter A filter is incorporated in the screw connection of the valve on the water inlet hose. The filter must be cleaned when dirty, otherwise insufficient water flows into the wash cabinet. , The plastic housing of the water connection contains an electrical component. It must not be dipped in water. Recommendation If the […]
-
Страница 52
Cleaning the drain pump and non-return valve If the water has not been pumped away at the end of a programme the drain pump or the non-return valve might be blocked. They are, however, easy to clean. ^ Disconnect the dishwasher from the mains supply. Switch off at the mains socket and withdraw the plug. ^ Take the filter combination out of the wash[…]
-
Страница 53
Test standard: AS/NZS 2007.1:2005, AS/NZS 2007.2:2005; AS/NZS 6400:2005 Standard programme for energy label comparison tests: Normal Capacity: 12/14 place settings (depending on model) Amount of detergent: 12 place settings: 5 g in compartment I, 25 g in compartment II 14 place settings: 5 g in compartment I, 27,5 g in compartment II Rinse aid disp[…]
-
Страница 54
Model types G 1xxx with a cutlery tray (12 place settings): Upper basket Cutlery tray Lower basket Comparison tests 54[…]
-
Страница 55
Model types G 2xxx with a cutlery tray (14 place settings): Upper basket Cutlery tray Lower basket Comparison tests 55[…]
-
Страница 56
Programme When to use Sensor wash Sensor controlled programme for normally soiled crockery Normal 1) For normally soiled crockery with dried on soiling; includes glass care system. Quick wash «Quick programme» for lightly soiled crockery, e.g. party crockery; for flushing out salt residues after replenishing the salt reservoir; includes g[…]
-
Страница 57
Programme sequence Consumption Duration Energy Water Pre- wash Main wash °C Interim rinse 12 Final rinse °C Drying Cold water connec- tion (20 °C) kWh Hot water connec- tion (60 °C) kWh Litres Cold water connec- tion (20 °C) h:min Hot water connec- tion (60 °C) h:min If required 5 5-6 5 I f required 65 X 1.30-1.60 0.75-1.00 13-22 1:45-2:30 1:[…]
-
Страница 58
Repairs In the event of any faults that you cannot remedy yourself, please contact: – Your Miele Chartered Agent, or – the Miele Service Department (see back cover for address). Please note that telephone calls may be monitored and recorded to improve our service. ^ When contacting your Chartered Agent or the Service Department, please quote th[…]
-
Страница 59
To make the most of your dishwasher Optional accessories for particular purposes are available from your Miele Chartered Agent or the Spare Parts Department (some may be supplied as stan — dard, depending on model). If you would like to … you will need to order … … wash long-stemmed glassware … a glassware insert for the upper basket … wa[…]
-
Страница 60
, Please follow the installation instructions carefully. All electrical work should be carried out only by a suitably qualified and competent person, in strict accordance with national and local safety regulations. Ensure power is not supplied to the appliance while installation work is being carried out. This dishwasher is supplied with a mains ca[…]
-
Страница 61
The Miele waterproof anti-leak system Providing your dishwasher has been installed correctly, the Miele waterproof anti-leak system will protect you from water damage throughout its lifetime. Connection to the water supply , Water in the dishwasher must not be used as drinking water. – The dishwasher may be connected to a cold or hot water supply[…]
-
Страница 62
! The inlet hose must not be shortened or damaged in any way as it contains electrical components (see illustration). This appliance incorporates back — flow protection complying with AS/NZS 3500.1.2. No further backflow protection required for connection to the water supply. Plumbing 62[…]
-
Страница 63
Drainage – The appliance drainage system is fitted with a non-return valve, which prevents dirty water from flowing back into the dishwasher via the drain hose. – The dishwasher is supplied with approx. 1.5 m of flexible drain hose with an internal diameter of 22 mm. – The drain hose can be extended using a connection piece to attach a furthe[…]
-
Страница 64
Dishwasher model G 1XXX G 2XXX Height 80.5 cm (adjustable + 6.5 cm) 84.5 cm (adjustable + 6.5 cm) Height of building-in recess Min. 80.5 cm (+ 6.5 cm) Min. 84.5 cm (+ 6.5 cm) Width 59.8 cm 59.8 cm Width of building-in recess 60 cm 60 cm Depth 57 cm 57 cm Weight Max. 55 kg Max. 61 kg Voltage 230 V 230 V Connected load 2300 W 2300 W Fuse rating 10 A […]
-
Страница 65
65[…]
-
Страница 66
66[…]
-
Страница 67
67[…]
-
Страница 68
Alteration rights reserved/ G1173/G2173/ 1608 M.-Nr. 07 223 570 / 00[…]

|
Инструкция по эксплуатации |
|
и гарантия качества |
|
Посудомоечная машина |
|
G 1173 |
|
G 2173 |
|
До установки, подключения и подготовки прибора |
ru — RU, UA |
|
к работе обязательно прочтите |
|
|
инструкцию по эксплуатации и монтажную схему. |
|
|
Вы обезопасите себя и |
|
|
предотвратите повреждения прибора. |
M.-Nr. 07 503 861 |

Содержание
Описание устройства . . . . . . . . . . . . . . . . . . . . . . . . . . . . . . . . . . . . . . . . . . . . . 5
Внешний вид прибора . . . . . . . . . . . . . . . . . . . . . . . . . . . . . . . . . . . . . . . . . . . . . . 5
Панель управления . . . . . . . . . . . . . . . . . . . . . . . . . . . . . . . . . . . . . . . . . . . . . . . . 6
Указания по безопасности и предупреждения . . . . . . . . . . . . . . . . . . . . . . . 7
Ваш вклад в охрану окружающей среды . . . . . . . . . . . . . . . . . . . . . . . . . . . 12
Утилизация упаковки . . . . . . . . . . . . . . . . . . . . . . . . . . . . . . . . . . . . . . . . . . . . . 12 Утилизация отслужившего прибора. . . . . . . . . . . . . . . . . . . . . . . . . . . . . . . . . . 12 Экономное мытье посуды . . . . . . . . . . . . . . . . . . . . . . . . . . . . . . . . . . . . . . . . . . 13
Первый ввод в эксплуатацию. . . . . . . . . . . . . . . . . . . . . . . . . . . . . . . . . . . . . 14
Открывание дверцы . . . . . . . . . . . . . . . . . . . . . . . . . . . . . . . . . . . . . . . . . . . . . . 14 Закрывание дверцы . . . . . . . . . . . . . . . . . . . . . . . . . . . . . . . . . . . . . . . . . . . . . . 14 Устройство смягчения воды . . . . . . . . . . . . . . . . . . . . . . . . . . . . . . . . . . . . . . . . 15 Программирование устройства смягчения воды. . . . . . . . . . . . . . . . . . . . . 16 Контроль запрограммированного значения жесткости воды . . . . . . . . . . 17 Для первого ввода в эксплуатацию Вам нужно:. . . . . . . . . . . . . . . . . . . . . . . . 18 Заполнение контейнера регенерационной солью . . . . . . . . . . . . . . . . . . . . . . 18
Индикатор недостатка соли . . . . . . . . . . . . . . . . . . . . . . . . . . . . . . . . . . . . . . 19 Ополаскиватель. . . . . . . . . . . . . . . . . . . . . . . . . . . . . . . . . . . . . . . . . . . . . . . . . . 20 Заправка контейнера ополаскивателем . . . . . . . . . . . . . . . . . . . . . . . . . . . . . . 20 Индикатор недостатка ополаскивателя . . . . . . . . . . . . . . . . . . . . . . . . . . . . 21 Установка дозирования ополаскивателя . . . . . . . . . . . . . . . . . . . . . . . . . . . . . 22
Размещение посуды и столовых приборов . . . . . . . . . . . . . . . . . . . . . . . . . 23
Предметы, не подходящие для мытья в посудомоечной машине: . . . . . . . . . 24 Верхний короб . . . . . . . . . . . . . . . . . . . . . . . . . . . . . . . . . . . . . . . . . . . . . . . . . . . 25 Подставка для чашек. . . . . . . . . . . . . . . . . . . . . . . . . . . . . . . . . . . . . . . . . . . 25 Фиксирующая планка (в зависимости от модели) . . . . . . . . . . . . . . . . . . . 25 Перестановка верхнего короба. . . . . . . . . . . . . . . . . . . . . . . . . . . . . . . . . . . 26 Нижний короб. . . . . . . . . . . . . . . . . . . . . . . . . . . . . . . . . . . . . . . . . . . . . . . . . . . . 27 Откидные направляющие . . . . . . . . . . . . . . . . . . . . . . . . . . . . . . . . . . . . . . . 27 Съемная вставка с направляющими . . . . . . . . . . . . . . . . . . . . . . . . . . . . . . 28 Держатель для бутылок (в зависимости от модели) . . . . . . . . . . . . . . . . . 28 Столовые приборы . . . . . . . . . . . . . . . . . . . . . . . . . . . . . . . . . . . . . . . . . . . . . . . 29 Выдвижной поддон для столовых приборов (в зависимости от модели). 29 Короб для столовых приборов (в зависимости от модели) . . . . . . . . . . . . 30
2

Содержание
Эксплуатация . . . . . . . . . . . . . . . . . . . . . . . . . . . . . . . . . . . . . . . . . . . . . . . . . . . 31
Моющее средство . . . . . . . . . . . . . . . . . . . . . . . . . . . . . . . . . . . . . . . . . . . . . . . . 31 Загрузка моющего средства. . . . . . . . . . . . . . . . . . . . . . . . . . . . . . . . . . . . . . . . 33 Включение . . . . . . . . . . . . . . . . . . . . . . . . . . . . . . . . . . . . . . . . . . . . . . . . . . . . . . 34 Выбор программы . . . . . . . . . . . . . . . . . . . . . . . . . . . . . . . . . . . . . . . . . . . . . . . . 34 Запуск программы . . . . . . . . . . . . . . . . . . . . . . . . . . . . . . . . . . . . . . . . . . . . . . . . 34 Завершение программы . . . . . . . . . . . . . . . . . . . . . . . . . . . . . . . . . . . . . . . . . . . 35 Выключение . . . . . . . . . . . . . . . . . . . . . . . . . . . . . . . . . . . . . . . . . . . . . . . . . . . . . 35 Извлечение посуды . . . . . . . . . . . . . . . . . . . . . . . . . . . . . . . . . . . . . . . . . . . . . . . 35 Остановка выполнения программы . . . . . . . . . . . . . . . . . . . . . . . . . . . . . . . . . . 36 Замена программы. . . . . . . . . . . . . . . . . . . . . . . . . . . . . . . . . . . . . . . . . . . . . . . . 36 Дополнительные функции. . . . . . . . . . . . . . . . . . . . . . . . . . . . . . . . . . . . . . . . . . 37
Зуммер . . . . . . . . . . . . . . . . . . . . . . . . . . . . . . . . . . . . . . . . . . . . . . . . . . . . . . . 37 Заводская настройка . . . . . . . . . . . . . . . . . . . . . . . . . . . . . . . . . . . . . . . . . . . 38
Чистка и уход . . . . . . . . . . . . . . . . . . . . . . . . . . . . . . . . . . . . . . . . . . . . . . . . . . . 39
Чистка моечной камеры . . . . . . . . . . . . . . . . . . . . . . . . . . . . . . . . . . . . . . . . . . . 39 Чистка дверного уплотнения и дверцы . . . . . . . . . . . . . . . . . . . . . . . . . . . . . . . 39 Чистка панели управления и фронтальной панели . . . . . . . . . . . . . . . . . . . . 40 Чистка сеток фильтра в моечной камере . . . . . . . . . . . . . . . . . . . . . . . . . . . . . 41 Очистка распылительных коромысел . . . . . . . . . . . . . . . . . . . . . . . . . . . . . . . . 43
Помощь при неисправностях . . . . . . . . . . . . . . . . . . . . . . . . . . . . . . . . . . . . . 44
Технические неполадки . . . . . . . . . . . . . . . . . . . . . . . . . . . . . . . . . . . . . . . . . . . 44 Неполадка в системе залива / слива воды. . . . . . . . . . . . . . . . . . . . . . . . . . . . 46 Общие проблемы, связанные с работой посудомоечной машины . . . . . . . . . 47 Шумы. . . . . . . . . . . . . . . . . . . . . . . . . . . . . . . . . . . . . . . . . . . . . . . . . . . . . . . . . . . 48 Неудовлетворительный результат мытья. . . . . . . . . . . . . . . . . . . . . . . . . . . . . 49
Устранение неисправностей . . . . . . . . . . . . . . . . . . . . . . . . . . . . . . . . . . . . . . 52
Чистка фильтра в заливном шланге . . . . . . . . . . . . . . . . . . . . . . . . . . . . . . . . . 52 Чистка сливного насоса и обратного клапана . . . . . . . . . . . . . . . . . . . . . . . . . 53
Обзор программ . . . . . . . . . . . . . . . . . . . . . . . . . . . . . . . . . . . . . . . . . . . . . . . . . 54
Обзор программ . . . . . . . . . . . . . . . . . . . . . . . . . . . . . . . . . . . . . . . . . . . . . . . . . 56
Сервисная служба. . . . . . . . . . . . . . . . . . . . . . . . . . . . . . . . . . . . . . . . . . . . . . . 58
Ремонтные работы . . . . . . . . . . . . . . . . . . . . . . . . . . . . . . . . . . . . . . . . . . . . . 58 Обновление программ (Update). . . . . . . . . . . . . . . . . . . . . . . . . . . . . . . . . . . 58 Сертификат (только для РФ) . . . . . . . . . . . . . . . . . . . . . . . . . . . . . . . . . . . . 58
3

Содержание
Дополнительно приобретаемые принадлежности. . . . . . . . . . . . . . . . . . . 59
Электроподключение . . . . . . . . . . . . . . . . . . . . . . . . . . . . . . . . . . . . . . . . . . . . 60
Подключение к системе водоснабжения . . . . . . . . . . . . . . . . . . . . . . . . . . . 61
Система защиты от протечек воды Miele . . . . . . . . . . . . . . . . . . . . . . . . . . . . . 61 Подача воды. . . . . . . . . . . . . . . . . . . . . . . . . . . . . . . . . . . . . . . . . . . . . . . . . . . . . 61 Слив воды. . . . . . . . . . . . . . . . . . . . . . . . . . . . . . . . . . . . . . . . . . . . . . . . . . . . . . . 62
Технические характеристики . . . . . . . . . . . . . . . . . . . . . . . . . . . . . . . . . . . . . 63
Гарантия качества товара . . . . . . . . . . . . . . . . . . . . . . . . . . . . . . . . . . . . . . . . 64
4
Описание устройства
Внешний вид прибора
Верхнее распылительное коромысло (не видимо)
Поддон для столовых приборов (в зависимости от модели)
Верхний короб
Среднее распылительное коромысло
Отверстие поступления воздуха при сушке (в зависимости от модели)
Нижнее распылительное коромысло
Комбинированный фильтр
Типовая табличка
Контейнер для запаса ополаскивателя
Двухкамерная кювета для моющих средств
Контейнер для запаса регенерационной соли
5
Описание устройства
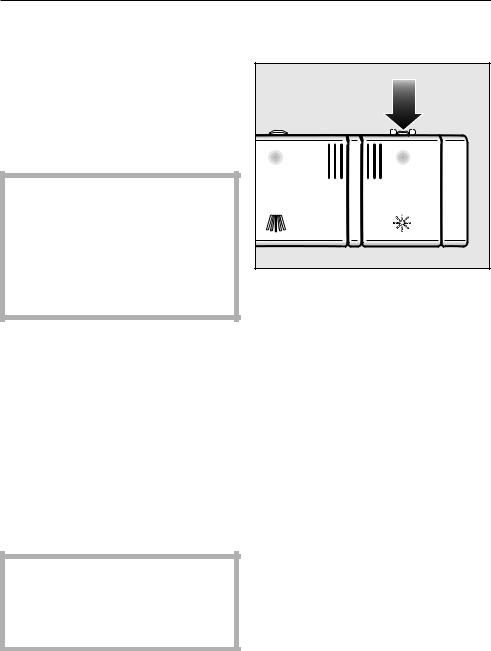
Панель управления
Контрольные лампочки / индикаторы дозаполнения
Список программ
Кнопка выбора программ
Кнопка (кнопка включения) с индикатором
Кнопка (кнопка выключения)
Подробное описание символов Вы найдете в соответствующих главах.
Краткий обзор символов
Âêë
Âûêë
Кнопка выбора программ
Индикаторы
/ Залив/слив
Ополаскиватель
Ñîëü
|
Программы |
|
|
Àâòî 55-65 °C |
Автоматическая |
|
55-65 °C |
|
|
40 °C |
Быстрая 40 °C |
|
50 °C |
Легкая 50 °C |
|
EnergieSpar |
|
|
75 °C |
Интенсивная 75 °C |
|
Предварительное |
|
|
ополаскивание |
В этой инструкции по эксплуатации описано несколько моделей посудомоечных машин. Различные модели обозначаются следующим образом: G 1173 и т.д. = G 1 XXX
G 2173 è ò.ä. = G 2XXX
Обозначения G 1XXX и G 2XXX всегда являются ссылкой на номер, указанный на типовой табличке машины, назависимо от того, как обозначена модель на панели управления.
Типовая табличка находится с правой стороны дверцы.
6

Указания по безопасности и предупреждения
Эта посудомоечная машина отве- чает нормам технической безопасности. Однако ненадлежащее использование прибора может привести к травмам персонала и материальному ущербу.
Прежде чем начать эксплуатировать этот прибор, внимательно
прочитайте данную инструкцию по эксплуатации.
Благодаря этому Вы защитите себя, а также избежите повреж-
дений посудомоечной машины. Бережно храните инструкцию по эксплуатации.
Надлежащее использование
Используйте эту посудомоечную машину исключительно в домашнем
хозяйстве и только для мытья быто-
вой посуды. Использование машины в любых других целях, внесение изменений в ее конструкцию недопустимо и может оказаться опасным.
Производитель прибора не может нести ответственности за те его повреждения, причиной которых послужило неправильное пользование прибором или использование его не по назначению.
Лицам, которые по состоянию здоровья или из-за отсутствия опыта и соответствующих знаний не могут уверенно управлять прибором, не рекомендуется его эксплуатация без присмотра или руководства со стороны ответственного лица.
Åñëè ó Âàñ åñòü äåòè
Не оставляйте без надзора детей,
если они находятся вблизи прибора.
Никогда не позволяйте детям играть с прибором. Существует опасность, что дети закроются в посудомоечной машине!
Дети могут пользоваться посудомоечной машиной без надзора взрослых, если они настолько освоили работу c прибором, что могут это делать c уверенностью. Кроме того, они должны осознавать возможную опасность, связанную с неправиль-
ной эксплуатацией прибора.
Следите, чтобы моющее средство
было не доступно для детей!
Моющие средства могут быть причи- ной появления раздражения в рото-
вой полости и гортани или привести
к удушью. Поэтому также не подпускайте детей к открытой посудомоеч- ной машине. В посудомоечной машине еще могут оставаться остатки моющего средства.
Немедлено обратитесь к врачу, если Ваш ребенок взял в рот моющее средство.
7

Указания по безопасности и предупреждения
Техника безопасности
Перед установкой проверьте отсутствие у посудомоечной машины внешних видимых повреждений. Ни в коем случае не вводите в эксплуатацию поврежденный прибор. Эксплуатация поврежденной посудомоечной машины ставит под угрозу
Вашу безопасность!
Подключение посудомоечной машины к электросети должно выполняться только после окончания всех монтажных работ.
Убедитесь в том, что напряжение,
частота и предохранители электросети в Вашем доме соответствуют данным, указанным на типовой таб-
личке машины.
Посудомоечная машина должна
подключаться к электросети только с помощью трехполюсной вилки,
имеющей защитный контакт
(нестационарное подключение). После установки машины должен оста-
ваться свободным доступ к розетке,
чтобы в любое время можно было отключить машину от электросети.
Посудомоечной машиной не
должна закрываться сетевая вилка какого-либо электроприбора. Так
как глубина ниши может быть не-
большой, то из-за давления на вилку возникает угроза перегрева (опасность возникновения пожара).
Посудомоечную машину запрещается устанавливать под варочной панелью. Высокая температура, излу- чаемая варочной панелью, может повредить посудомоечную машину. По этой же причине не допускается установка машины в непосредственной близости к нагревательным устройствам, не типичным для кухонных помещений (например, источникам открытого огня, используемым для обогрева).
Электробезопасность прибора гарантирована только в том случае, если он подключен к системе защит-
ного заземления, выполненной в соответствии с предписаниями. Очень важно проверить соблюдение этого
основополагающего условия обеспе-
чения электробезопасности. В слу- чае сомнения поручите специалисту- -электрику проверить домашнюю
электропроводку.
Производитель не может нести ответственности за повреждения, при- чиной которых является отсутствующее или оборванное защитное заземление (например, удар электротоком).
Не допускается подключение посудомоечной машины к электросети через разветвительную розетку или удлинитель. Такие устройства не могут обеспечить необходимую безопасность прибора (например, возникает опасность перегрева).
8

Указания по безопасности и предупреждения
Размещение и подключение этого прибора на нестационарных объек-
тах (например, на судах) должно
быть выполнено только специализированной организацией/специалистами, если они обеспечат условия
для безопасной эксплуатации этого прибора.
Поврежденная посудомоечная машина может представлять угрозу для Вашей безопасности! Сразу же выведите неисправную посудомоеч- ную машину из эксплуатации и проинформируйте Вашего поставщика или сервисную службу о необходимости проведения ремонта.
Пластмассовое гнездо подключе- ния воды содержит электрические
компоненты. Поэтому его нельзя погружать в жидкости.
В заливном шланге имеются провода, находящиеся под напряжением. Поэтому не допускается укора- чивание этого шланга.
Встроенная система Waterproof надежно защищает прибор от проте-
чек воды при следующих условиях:
–правильная установка и подклю- чение,
–своевременный ремонт посудомоечной машины или, соответственно, замена деталей при выявленных неисправностях,
–перекрытие водопроводного крана при длительном отсутствии (например, во время отпуска).
Система безопасности Waterproof функционирует также, если посудомоечная машина выключена. Машина, однако, не должна быть отключена от электросети.
Неквалифицированный ремонт может стать для потребителя причи- ной повышенной опасности, за которую Miele не может нести ответственности. Ремонтные работы могут проводиться только авторизован-
ными фирмой Miele организациями, в
противном случае при последущих повреждениях прибора будет утеряно право на гарантийный ре-
ìîíò.
Вышедшие из строя детали кон-
струкции должны заменяться только
на оригинальные запчасти Miele. Только при использовании этих деталей Miele гарантирует, что требования по технике безопасности будут выполнены в полном объеме.
Отключите посудомоечную машину от электросети перед проведением техобслуживания (выклю- чить машину, вынуть сетевую вилку из розетки).
Поврежденный сетевой кабель должен заменяться только специальным кабелем того же типа (можно приобрести в сервисной службе Miele). В целях обеспечения безопасности замена кабеля должна выполняться только квалифицированным электриком или специалистом сервисной службы Miele.
9

Указания по безопасности и предупреждения
Надлежащая установка
Производите установку и подклю- чение посудомоечной машины в соответствии с монтажным планом.
Надлежащая эксплуатация
Не наливайте в моечную камеру никаких растворителей. В противном случае существует опасность взрыва!
Для того чтобы была гарантирована безупречная работа прибора, посудомоечная машина должна быть установлена горизонтально.
Для обеспечения устойчивости следует устанавливать встраивае-
мые и интегрируемые посудомоеч- ные машины только под сплошную
столешницу, соединенную со стоящими рядом шкафами.
Если Вы хотели бы переналадить отдельно стоящую посудомоечную машину в машину, встраиваемую под
столешницу, и удалить для этого цо-
коль, то Вам необходимо смонтировать цокольную бленду для под-
страивания. Используйте для этого
соответствующий монтажный комплект.
В ином случае существует опасность получения травм выступающими металлическими деталями!
Избегайте вдыхания порошкообразных моющих средств! Не глотайте моющее средство! Попадание моющего средства в дыхательные
пути может вызвать раздражение в
носу, полости рта и гортани. Незамедлительно обратитесь к вра- чу, если Вы вдохнули или проглотили моющее средство.
Не оставляйте без нужды дверцу посудомоечной машины открытой.
Вы можете наткнуться на открытую
дверцу.
Не становитесь и не садитесь на открытую дверь. Посудомоечная машина может опрокинуться. При этом Вы можете получить травму, или может сломаться посудомоечная машина.
Используйте только стандартные моющие средства и ополаскиватели для бытовых посудомоечных машин. Ни в коем случае — для рук!
Не применяйте моющие средства промышленного назначения, так как при этом могут быть повреждены материалы, а также существует опасность возникновения интенсивных химических реакций (например, с выделением гремучего газа).
Не задавайте моющее средство (также и жидкое моющее средство) в контейнер для ополаскивателя.
Моющее средство может разрушить контейнер!
10
![]()
Указания по безопасности и предупреждения
Не дозируйте моющее средство (также и жидкое моющее средство) в контейнер для запаса регенерационной соли. Моющее средство разрушает устройство для смягчения
âîäû.
Используйте только специальные, по возможности крупнозернистые
регенерационные соли или другие
чистые выварочные соли.
Другие виды соли могут содержать нерастворимые в воде примеси, ко-
торые могут стать причиной выхода
из строя системы смягчения воды.
При размещении ножей и вилок в
посудомоечную машину с корзиной для столовых приборов (зависит от модели) вставляйте их из соображе-
ний безопасности остриями и
лезвиями вниз. В ином случае существует опасность получения
травм.
Мойка и сушка приборов, однако, облегчается, если их размещают в корзине ручками вниз.
Не разрешается мыть пластмассовые предметы, восприимчивые к горячей воде, например, одноразовые столовые приборы и посуду. Из-за воздействия высокой температуры эти предметы могут деформироваться.
Если Вы используете дополнительную функцию отсрочки старта (в зависимости от модели), контейнер для моющего средства должен быть сухим или насухо вытертым. Во влажном контейнере моющее средство превратится в комок и, возможно, не будет полностью смыто.
Дополнительные принадлежности
B прибор могут быть установлены
или встроены дополнительные принадлежности, если на это имеется особое разрешение фирмы Miele.
При установке и встраивании других
деталей будет утрачено право на гарантийное обслуживание, a также может произойти потеря гарантиро-
ванного качества работы прибора.
Утилизация посудомоечной машины
Чтобы дети не смогли закрыться в машине, выведите из строя замок дверцы. Удалите или сломайте ско-
бы замка.
Производитель прибора не несет ответственность за повреждения, причиной которых было игнорирование приведенных указаний по безопасности и предупреждений.
11
Ваш вклад в охрану окружающей среды
Утилизация упаковки
Упаковка защищает посудомоечную машину от повреждений при транспортировке. Материалы, используемые при изготовлении упаковки, безопасны для окружающей среды и легко утилизируемы, поэтому они
подлежат переработке.
В частности речь идет о следующих
видах материала:
Внешняя упаковка
–Гофрированный картон 100%
утилизируемый материал, альтер-
натива: термоусадочная пленка из полиэтилена (РЕ)
–Синтетическая упаковочная лента
из полипропилена (РР)
Внутренняя упаковка:
–Растягивающийся полистрол (EPS) без добавления хлора или фтора
–Днище, рамы крышки и опорные планки из необработанного дерева из лесных хозяйств
–Защитная пленка из полиэтилена (РЕ)
Возвращение упаковки для ee вторичной переработки приводит к экономии сырья и уменьшению коли- чества отходов. Просим Bac по возможности сдать упаковку в пункт приема вторсырья.
Утилизация отслужившего прибора
Отслужившие электрические и электронные приборы часто содержат ценные компоненты. В то же время материалы приборов содержат вредные вещества, необходимые для работы и безопасности тех-
ники. При неправильном обращении
с отслужившими приборами или их попадании в бытовой мусор такие
вещества могут нанести вред здоровью человека и окружающей среде. Поэтому не рекомендуется
выбрасывать отслужившие приборы
вместе с обычным бытовым мусором.
Использйте вместо этого специально оборудованное место для сдачи и утилизации старых электрических и электронных приборов. Узнайте информацию у Вашего продавца.
До момента отправления в утилизацию Ваш отслуживший прибор должен храниться в недоступном для детей месте.
Все пластиковые части прибора маркированы значком в соответствии с международной нормой. Это позволяет рассортировать их при утилизации.
12

Ваш вклад в охрану окружающей среды
Экономное мытье посуды
Работа этой посудомоечной машины отличается значительной экономией воды и электроэнергии.
Если Вы примете во внимание следующие советы, то расход ресурсов будет также экономным:
Вы можете подключить посудомо- ечную машину к системе горячего водоснабжения, если эта система
в Вашем доме оснащена
термостатом, регулирующим температуру входящей воды (мин.
45°C, макс. 65°C). Такое подклю- чение особенно подходит, например, при использовании солнечной энергии для нагрева воды.
При использовании
электронагреваемых установок рекомендуется подключение к систе-
ме холодного водоснабжения.
Полностью используйте вместимость корзин для посуды, но не перегружая посудомоечную машину; тогда мойка будет выполняться наиболее экономично.
Выбирайте программу мойки, которая соответствует виду посуды и степени ее загрязненности.
Выбирайте программу «EnergiaOptima» для энергосберегающей мойки.
Принимайте во внимание рекомендации по дозировке производителя моющего средства.
Применяя порошкообразные или
жидкие моющие средства, Вы мо-
жете сократить количество средства на 1/3, если короба для посуды заполнены только наполовину.
13
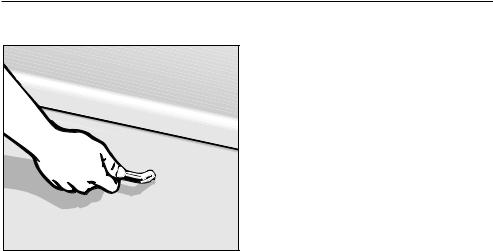
|
Первый ввод в эксплуатацию |
|
|
Открывание дверцы |
Закрывание дверцы |
|
Задвиньте короба для посуды. |
|
|
Прижмите дверцу до фиксации. |
|
|
Потяните за ручку, чтобы открыть |
|
|
дверцу. |
|
|
Если Вы открываете дверцу во вре- |
|
|
мя работы машины, то функции мой- |
|
|
ки автоматически будут прерваны. |
14

Первый ввод в эксплуатацию
Устройство смягчения воды
Для получения хороших результатов мытья посуды для работы посудомо- ечной машины требуется мягкая (с малым количеством растворенной извести) вода. При использовании жесткой воды на посуде и стенках
моечной камеры начнут появляться
белые отложения.
Поэтому вода c жесткостью более
4 °d (0,7 ммоль/л) должна быть смяг- чена. Это происходит автоматически
во встроенном в машину устройстве смягчения воды.
–Для работы устройства смягчения
воды необходима регенерационная соль.
При использовании средств «3 в 1» также заправляйте машину солью для достижения оптимальных результатов мойки.
–Посудомоечная машина должна быть точно запрограммирована на величину жесткости используемой Вами воды.
–Справку о точном значении жесткости Вашей воды следует полу- чить на предприятии водоснабжения.
При колеблющемся значении жесткости воды (например, 37 — 50 °d) программируйте всегда наивысшее значение (в этом примере 50 °d).
В случае последующего обращения в сервисную службу Вы облегчите ра-
боту техническому персоналу, если
будете знать значение жесткости воды.
Запишите, пожалуйста, здесь зна- чение жесткости Вашей воды:
°d
На заводе-изготовителе машина запрограммирована на жесткость воды 12 — 15 °d (2,2 — 2,7 ммоль/л).
Если эта установка соответствует
Вашей жесткости воды, то Вы можете не продолжать чтения этого
раздела инструкции.
Если у Вас однако другая жесткость воды, то Вам необходимо запрограм-
мировать ее с помощью кнопок пане-
ли управления.
15
Первый ввод в эксплуатацию
Программирование устройства смягчения воды
При программировании после каждого нажатия кнопок мигают и загораются другие индикаторы. Для программирования имеют значения только те индикаторы, которые ука-
заны ниже, в описании действий по
управлению.
Вы можете прервать процесс программирования в любой момент и начать его сначала, выключив по-
судомоечную машину кнопкой .
Выключите посудомоечную машину кнопкой .
Держите нажатой кнопку и одновременно включите посудомо- ечную машину кнопкой .
При этом держите нажатой кнопку
не менее четырех секунд, пока
не загорится нижний правый индикатор в списке программ.
Если это не так, то начните еще раз все сначала.
Нажмите два раза кратко кнопку
.
Индикатор / мигнет 2 раза кратко с интервалом, а верхний правый индикатор программ мигнет 4 раза кратко с интервалом (заводская настройка).
Нажимайте кнопку не менее одной секунды, пока не загорится индикатор / .
Установленное значение можно определить по ритму мигания верхнего правого индикатора программ (см.
таблицу).
|
°d |
mmol/l |
°f |
Ритм мигания |
||||
|
1 |
— |
4 |
0,2 — |
0,7 |
2- |
7 |
1 раз кратко |
|
5 |
— |
7 |
0,9 — |
1,3 |
9- |
13 |
2 раза кратко |
|
8 |
— 11 |
1,4 — |
2,0 |
1420 |
3 раза кратко |
|
12 — 15 |
2,2 — |
2,7 |
2227 |
4 раза кратко |
|
16 — 20 |
2,9 — |
3,6 |
2936 |
5 раз кратко |
|
21 — 25 |
3,8 — |
4,5 |
3845 |
6 раз кратко |
|
26 — 30 |
4,7 — |
5,4 |
4754 |
7 раз кратко |
|
31 — 36 |
5,6 — |
6,5 |
5665 |
8 раз кратко |
|
37 — 45 |
6,7 — |
8,1 |
6781 |
9 раз кратко |
|
46 — 70 |
8,3 — 12,6 |
83-126 |
1 раз долго |
Выберите соответственно кратким
нажатием кнопки ритм мига-
ния, который соответствует жесткости используемой Вами воды.
С каждым нажатием кнопки выби-
рается следующая ступень жесткости. После самого высокого зна- чения установка производится сначала.
Пример:
Жесткость воды составляет 22 °d. Верхний правый индикатор программ мигает 6 раз кратко с интервалом.
Выключите посудомоечную машину кнопкой .
16

Первый ввод в эксплуатацию
Контроль запрограммированного значения жесткости воды
Выключите посудомоечную машину кнопкой .
Держите нажатой кнопку и одновременно включите посудомо- ечную машину кнопкой .
При этом держите нажатой кнопку
не менее четырех секунд, пока не загорится нижний правый индикатор в списке программ.
Нажмите два раза кратко кнопку
.
Верхний правый индикатор программ
мигает в ритме, который соответствует установленному значению
жесткости воды (см. таблицу).
Выключите посудомоечную машину кнопкой .
17

Первый ввод в эксплуатацию
Для первого ввода в
эксплуатацию Вам нужно:
–ïðèì. 2 ë âîäû,
–прим. 2 кг регенерационной соли,
–моющее средство для бытовых посудомоечных машин,
–ополаскивающее средство для бытовых посудомоечных машин
Работоспособность каждой посудомоечной машины проверяется
на заводе.
Наличие в машине остатков воды является следствием этой проверки и не указывает на то, что машина находилась ранее в эксплуатации.
Заполнение контейнера регенерационной солью
При использовании многофункциональных моющих средств используйте также регенерационную соль, для обеспече- ния превосходного результата мойки и продолжительного функционирования устройства смягче- ния воды.
Если значение жесткости исполь-
зуемой Вами воды постоянно
ниже 4 °d (= 0,7 ммоль/л), òî Âàì
не нужно заполнять контейнер солью.
Однако, Вам необходимо запрограммировать посудомоечную машину на жесткость Вашей воды.
Важно! Перед первой загрузкой
соли Вы должны залить в контейнер для регенерационной соли около 2 л воды для того, чтобы соль могла раствориться. После ввода машины в эксплуатацию в этом контейнере всегда находится достаточное количество воды.
Не наполняйте моющим средством (в том числе жидким) контейнер для запаса регенерационной соли. Моющее средство разрушает устройство для смягчения воды!
Используйте только специальные, по возможности крупнозернистые регенерационные соли или другие чистые выварочные соли. Другие виды соли могут содержать нерастворимые в воде примеси, которые могут стать причи- ной выхода из строя системы смягчения воды.
18
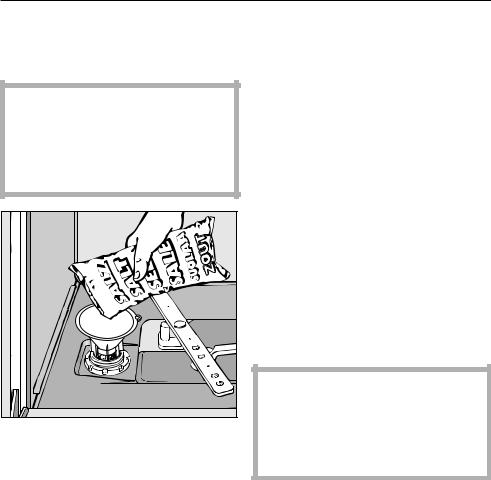
Первый ввод в эксплуатацию
Выдвиньте нижний короб из моеч- ной камеры и откройте крышку контейнера для регенерационной соли.
При каждом открывании крышки контейнера из него вытекает вода или солевой раствор. Поэтому открывайте крышку контейнера только для того, чтобы
добавить соль.
|
Сначала влейте в контейнер для |
|
регенерационной соли примерно |
|
2 литра воды. |
Вставьте воронку и засыпьте соль в контейнер для регенерационной соли до его полного заполнения.
Емкость контейнера составляет, в зависимости от вида соли, до 2 кг.
Очистите область загрузки от остатков соли, а затем плотно приверните крышку на контейнер для соли.
Затем сразу запустите на выполнение программу «Быстрая» без по-
суды, чтобы выплеснувшийся солевой раствор был разбавлен и отка- чан.
Индикатор недостатка соли
Добавьте соль по окончании программы, как только загорится индикатор .
Если Вы добавили соль в контейнер, то индикатор недостатка соли может еще гореть некоторое время. Он
погаснет, как только концентрация
соли будет достаточно высокой.
Индикатор недостатка соли выклю-
чится, если Вы запрограммируете посудомоечную машину на жесткость воды до 4 °d (= 0,7 ммоль/л).
После каждого добавления соли сразу запускайте на выполнение программу «Быстрая» без посуды, чтобы выплеснувшийся солевой раствор был разбавлен и откачан.
19
Первый ввод в эксплуатацию
Ополаскиватель
Ополаскиватель необходим для того, чтобы с посуды при сушке хорошо стекала вода и чтобы посуда быстрее высыхала после полоскания. Ополаскиватель загружается в специальный контейнер и автоматически дозируется в соответствии с установкой.
Используйте только ополаскиватели, предназначенные для бытовых посудомоечных машин, но ни в коем случае не моющие средства для рук и любые другие моющие средства. Они могут привести к разрушению контейнера для ополаскивателя.
В качества заменителя ополаски-
вающего средства Вы можете использовать
–бытовой уксус с концентрацией уксусной кислоты не более 5%
èëè
–10%-íûé раствор лимонной кислоты
В этом случае посуда будет более влажной и покрытой пятнами от капель, чем при использовании специального ополаскивателя.
Ни в коем случае не используйте уксус с высоким содержанием кислоты (например, 25%-ную уксусную эссенцию). При этом машина может выйти из строя.
|
Заправка контейнера |
|
ополаскивателем |
|
Нажмите клавишу отпирания на |
|
крышке контейнера для ополаски- |
|
вателя в направлении стрелки. |
|
Крышка откинется. |
20
![]()
Первый ввод в эксплуатацию
|
Заполняйте контейнер ополаски- |
|
вателем до тех пор, пока он не |
|
станет виден в загрузочном отвер- |
|
ñòèè. |
|
Контейнер вмешает около 110 мл. |
Закройте крышку до отчетливой фиксации, в противном случае во время мойки в контейнер для ополаскивателя может попасть вода.
Тщательно вытрите расплескавшийся ополаскиватель для того, чтобы избежать сильного пенообразования при выполнении последующей программы мойки.
Индикатор недостатка ополаскивателя
Если загорается индикатор , зна- чит в контейнере еще имеется резерв ополаскивателя, которого хватит на 2 — 3 цикла мойки.
Своевременно загружайте ополаскиватель.
21
 Loading…
инструкцияMiele G 1173 SCVi

Operating instructions
for dishwashers
To avoid the risk of accidents or
damage to the appliance, it is
essential to read these instructions
as well as the installation plan before
it is installed and used for the
first time.
M.-Nr. 07 223 570
en — AU, NZ
Посмотреть инструкция для Miele G 1173 SCVi бесплатно. Руководство относится к категории посудомоечные машины, 9 человек(а) дали ему среднюю оценку 7.6. Руководство доступно на следующих языках: английский. У вас есть вопрос о Miele G 1173 SCVi или вам нужна помощь? Задайте свой вопрос здесь
- Contents
Посудомоечная машина Miele G 1173 SCVi имеет следующие характеристики: ширина — 600 мм, глубина — 600 мм, высота — 805 мм, уровень шума — 46 дБ, расход воды за цикл — 13 л, класс стирки — A, класс сушки — A, число программ стирки — 6, энергопотребление за цикл — 1,05 кВтч, энергоэффективность (старая метка) — A.
Данная посудомоечная машина имеет стандартный размер и подходит для средних кухонь. Уровень шума в 46 дБ подходит для использования в домашних условиях. Расход воды за цикл составляет 13 л, что является довольно экономичным. Класс стирки и сушки — A, что гарантирует отличный результат при любых условиях. Количество программ стирки составляет 6, позволяя выбрать нужный режим в зависимости от загрузки и типа посуды. Энергопотребление за цикл составляет 1,05 кВтч, а энергоэффективность (старая метка) — A, что является весьма экономным вариантом.
В целом, посудомоечная машина Miele G 1173 SCVi является надежным и долговечным устройством с отличными показателями стирки и сушки, а также экономичным расходом воды и энергии. Количество программ стирки позволяет выбрать оптимальный режим для различных видов посуды и загрузок.
Главная
| Miele | |
| G 1173 SCVi | G1173SCVI | |
| посудомоечная машина | |
| 4002514418834, 4002514461052, 4002514417783 | |
| английский | |
| Руководство пользователя (PDF) |
Вес и размеры
| Ширина | 600 mm |
| Глубина | 600 mm |
| Высота | 805 mm |
Производительность
| Уровень шума | 46 dB |
| Количество программ стирки | 6 |
Энергопитание
| Потребление воды за цикл | 13 L |
| Потребление энергии за цикл | 1.05 кВт·ч |
| Класс энергоэффективности (старый) | A |
Дизайн
| Цвет двери | Неприменимо |
| Размещение бытового устройства | Полностью встраиваемый |
| Цвет панели управления | Нержавеющая сталь |
Прочие свойства
| Класс стирки | A |
| Класс сушки | A |
показать больше
Не можете найти ответ на свой вопрос в руководстве? Вы можете найти ответ на свой вопрос ниже, в разделе часто задаваемых вопросов о Miele G 1173 SCVi.
Что мне делать при появлении в посудомоечной машине неприятного запаха?
В случае появления в посудомоечной машине неприятного запаха вы можете предпринять следующие шаги: — Очистить фильтры — Очистить разбрызгиватели — Очистить резиновые прокладки — Запустить программу мытья горячей водой — Запустить программу мойки при пустой посудомоечной машине
Следует ли предварительно ополаскивать посуду?
Перед помещением посуды в посудомоечную машину не рекомендуется ее ополаскивать. Для продления срока службы посудомоечной машины лучше всего складывать в нее посуду грязной. Грязь на посуде является смазкой для насоса посудомоечной машины.
Сколько средства для мытья посуды следует использовать?
Среднее количество средства для мытья посуды составляет около 25 г. Рекомендуется следовать указанным на упаковке инструкциям.
Как добавлять в посудомоечную машину соль?
Каждая посудомоечная машина оснащена отдельным отсеком для соли. Такие отсеки открываются поворотом ручки на отделении. Соль можно засыпать в отсек при помощи воронки.
Какая высота Miele G 1173 SCVi?
Miele G 1173 SCVi имеет высоту 805 mm.
Какая ширина Miele G 1173 SCVi?
Miele G 1173 SCVi имеет ширину 600 mm.
Какая толщина Miele G 1173 SCVi?
Miele G 1173 SCVi имеет толщину 600 mm.
Инструкция Miele G 1173 SCVi доступно в русский?
К сожалению, у нас нет руководства для Miele G 1173 SCVi, доступного в русский. Это руководство доступно в английский.
Не нашли свой вопрос? Задайте свой вопрос здесь
- Manuals
- Brands
- Miele Manuals
- Dishwasher
- G 1173 Vi
- Operating instructions manual
-
Contents
-
Table of Contents
-
Bookmarks
Quick Links
Operating instructions
for dishwashers
To avoid the risk of accidents or
en — GB
damage to the appliance, it is
essential to read these instructions
as well as the installation plan before
it is installed and used for the
first time.
M.-Nr. 07 502 110
Related Manuals for Miele G 1173 Vi
Summary of Contents for Miele G 1173 Vi
-
Page 1: Operating Instructions
Operating instructions for dishwashers To avoid the risk of accidents or en — GB damage to the appliance, it is essential to read these instructions as well as the installation plan before it is installed and used for the first time. M.-Nr.
-
Page 2: Table Of Contents
Contents Description of the appliance ……… 5 Appliance overview .
-
Page 3
Contents Operation …………31 Detergent . -
Page 4
Plumbing…………60 The Miele waterproof anti-leak system ……. . . 60 Connection to the water supply . -
Page 5: Description Of The Appliance
Description of the appliance Appliance overview a Upper spray arm (not visible) g Filter combination b Cutlery tray (depending on model) h Data plate c Upper basket i Rinse aid reservoir d Middle spray arm j Dual compartment detergent dispenser e Air inlet for drying k Salt reservoir (depending on model)
-
Page 6: Control Panel
Description of the appliance Control panel a Check/Refill indicators Symbols b Programmes c Programme selector button YX YX Programme selector button d On button U with indicator light Check/Refill indicators e Off button V 2 / 2 Inlet / Drain Rinse aid Salt Programmes…
-
Page 7: Warning And Safety Instructions
Warning and Safety instructions Safety with children This appliance conforms to current This appliance is not a toy! To avoid safety requirements. Inappropriate the risk of injury, keep children well use can, however, lead to personal away and do not allow them to play in injury and damage to property.
-
Page 8
Warning and Safety instructions Technical safety Do not connect the dishwasher to the mains supply until it has been fully Before setting up the appliance, installed. check it for any externally visible damage. Under no circumstances Before connecting the appliance, should you use a damaged appliance. -
Page 9
If the connection cable is damaged where necessary. it must be replaced with a Miele cable – The stopcock has been turned off by a Miele approved service technician when the appliance is not used for a only. -
Page 10: Correct Use
Warning and Safety instructions Installation Correct use The dishwasher must be installed Do not use solvents in the and connected in compliance with the dishwasher. Danger of explosion. installation diagram supplied. Do not inhale or ingest dishwasher The dishwasher must be correctly detergent.
-
Page 11
Warning and Safety instructions Accessories Inadvertently filling the salt reservoir with powder or liquid dishwasher Only use genuine Miele spare parts detergent will damage the water and accessories with this appliance. If softener. Make sure you have picked spare parts or accessories from other… -
Page 12: Caring For The Environment
Caring for the environment Disposal of the packing Disposal of your old appliance material Electrical and electronic appliances often contain materials which, if The transport and protective packing handled or disposed of incorrectly, has been selected from materials which could be potentially hazardous to are environmentally friendly for disposal human health and to the environment.
-
Page 13: Energy Saving Washing
Caring for the environment Energy saving washing This dishwasher is exceptionally economical in its use of water and electricity. You can make the most of your appliance by following these tips: ^ If your household water system is suitable, this dishwasher can be connected to a hot water supply for further economies.
-
Page 14: Before Using For The First Time
Before using for the first time To open the door To close the door ^ Push the baskets right in. ^ Then lift the door upwards and push until it clicks into position. ^ Pull the handle. If the door is opened during operation all functions are automatically interrupted.
-
Page 15: Water Softener
Before using for the first time Water softener The dishwasher is set at the factory for a hardness level of In order to achieve good cleaning 2.2 — 2.7 mmol/l (12 — 15 °d). results, the dishwasher needs to operate with soft water. Hard water If this setting corresponds to the results in the build-up of calcium hardness of your water you do not need…
-
Page 16: To Programme The Water Hardness Level
Before using for the first time To programme the water hardness The number of times the upper right hand programme indicator flashes tells level you the water hardness level which has Each time a button is pressed, one of been set (see chart). the indicator lights will flash and light up in the control panel.
-
Page 17: Checking The Programmed Water Hardness Level
Before using for the first time Checking the programmed water hardness level ^ Switch the dishwasher off with the Off button V. ^ Press the programme selector button ;? in, and whilst holding it in switch the dishwasher on using the On button U .
-
Page 18: Before Using The Appliance For The First Time You Require
Before using for the first time Miele branded products are available If you use combination products from the Miele Spare Parts which have salt in them, such as Department or via the internet at «3 in 1» or «4 in 1» products you www.miele-shop.com.
-
Page 19: Salt Refill Indicator F
Before using for the first time Salt refill indicator F ^ Remove the lower basket and unscrew the salt reservoir cap. ^ Fill the salt reservoir with dishwasher salt when the salt indicator light F Only open the salt reservoir when comes on.
-
Page 20: Rinse Aid
Before using for the first time Rinse aid If you only ever use combination Rinse aid is necessary to ensure water products containing rinse aid in your does not cling and leave marks on dishwasher, you do not need to add crockery during the drying phase and rinse aid.
-
Page 21: Rinse Aid Indicator
Before using for the first time Rinse aid indicator ( When the rinse aid indicator ( comes on, the reservoir contains sufficient rinse aid for 2 — 3 programmes only. ^ Add rinse aid in plenty of time. ^ Add rinse aid only until it is visible in the opening.
-
Page 22: Setting The Rinse Aid Dosage
Before using for the first time Setting the rinse aid dosage The upper right hand programme indicator will flash briefly three times at You can adjust the rinse aid dosage for intervals. best results. This means that approx. 3 ml of rinse The rinse aid dosage can be set from aid will be used per programme approx.
-
Page 23: Loading The Dishwasher
Loading the dishwasher Note – Wide based items should be placed at an angle so that water can run off Remove coarse food residues from them freely. crockery. – The spray arms must not be blocked There is no need to rinse items under by items which are too tall or hang running water.
-
Page 24: Items Not Suitable For Dishwashers
Loading the dishwasher Items not suitable for We recommend: dishwashers: – When purchasing new crockery and cutlery, make sure they are – Wooden cutlery and crockery or dishwasher-proof. items with wooden parts: these may discolour and fade. The glue used in –…
-
Page 25: Upper Basket
Loading the dishwasher Upper basket Hinged cup rack ^ To make room for tall items, raise the For safety reasons, do not rack upwards. operate the dishwasher without the upper and lower baskets in place. Positioning rail (depending on model) Glasses can be arranged along the positioning rail to give them some support during the programme.
-
Page 26: Adjusting The Upper Basket
Loading the dishwasher Adjusting the upper basket Depending on the setting of the upper basket, the following plate dimensions In order to gain more space for taller can be accommodated. pieces of crockery in the bottom or upper basket, the upper basket can be Dishwasher with cutlery tray adjusted on three levels with 2 cm (see data plate for model number)
-
Page 27: Lower Basket
Loading the dishwasher Lower basket Hinged spikes ^ For larger and heavier items such as The spikes are used for washing plates plates, serving platters, saucepans, and saucers. bowls, etc. Small items such as saucers can also be placed in the lower basket. Do not place delicate glassware in the lower basket.
-
Page 28: Removable Spiked Insert
Loading the dishwasher Removable spiked insert Bottle holder (depending on model) You can remove the spiked insert to The bottle holder can be used to wash make more room for larger items of narrow items, e.g. milk and baby crockery, e.g. a large, flat pot, or bottles.
-
Page 29: Cutlery
Loading the dishwasher Cutlery Cutlery tray (depending on model) If spoon handles do not fit between the holders, then lay them the other way round. ^ Arrange the cutlery in the tray as shown. To make unloading much easier, cutlery should be grouped in zones, one for knives, one for forks, one for spoons, etc.
-
Page 30: Cutlery Basket (Depending On Model)
Loading the dishwasher Cutlery basket (depending on model) ^ Fit it into the cutlery basket if required. ^ To avoid the risk of injury, knives and forks should be placed with the handles upwards in the basket. However, cutlery placed handle down in the basket will come out cleaner and drier.
-
Page 31: Operation
Combi tabs are available as «3 in 1» or, Miele branded dishwasher cleaning when they also contain other components products are available from the Miele such as glass and stainless steel Spare Parts Department or via the protective additives and enhanced Internet at www.miele-shop.com.
-
Page 32: Adding Detergent
Operation The flap is always open at the end of a Avoid inhalation of powder programme. detergents and do not ingest dishwasher detergent. Dishwasher detergents contain irritant or corrosive ingredients which can cause burning in the nose, mouth and throat if swallowed, or inhibit breathing.
-
Page 33: Switching On
Operation Switching on Starting a programme ^ Open the stopcock, if it is closed. ^ Select the programme required with the programme selector button ;?. ^ Open the door. The indicator light next to the selected ^ Make sure the spray arms are not programme will come on.
-
Page 34: At The End Of A Programme
Operation At the end of a programme Switching off ^ Open the door slightly to check that At the end of a programme: the programme has finished. ^ Open the door. The indicator light next to the ^ Switch the dishwasher off using the programme selected switches off once Off button V.
-
Page 35: Interrupting A Programme
Operation Interrupting a programme Changing a programme A programme is interrupted as soon as Important: the door is opened. If the detergent dispenser flap has If the door is closed again, the already opened, do not change the programme will continue from the point programme.
-
Page 36: Additional Functions
Operation ^ Press the programme selector button Additional functions ;? four times briefly. Buzzer The Inlet/drain check light 2/2 will flash briefly four times at intervals. An audible tone sounds at the end of the programme or if there is a fault. The upper right hand programme You will hear the buzzer at the end of a indicator light shows whether the…
-
Page 37: Factory Default Setting
Operation Factory default setting The upper right hand indicator shows whether a setting other than the factory If you have altered any settings from default setting has been set. the factory default, you can re-set them back to the factory default settings as –…
-
Page 38: Cleaning And Care
Miele branded cleaning and drip onto the sides of the dishwasher conditioning products are available door. from the Miele Spare Parts These surfaces are outside the wash Department or via the internet at cabinet and are not accessed by www.miele-shop.com.
-
Page 39: Cleaning The Control Panel And Door Front
^ The control panel should only be powder cleaners and cream wiped with a damp cloth. cleaners. ^ Clean the front using a damp Miele – solvent-based cleaning agents, microfibre E-cloth or with a sponge – stainless steel cleaning agents, and a solution of hot water and washing-up liquid.
-
Page 40: Cleaning The Filters In The Wash Cabinet
Cleaning and care Cleaning the filters in the wash cabinet The filter combination in the base of the wash cabinet retains coarse soil from the suds solution, preventing it accessing the circulation system and re-entering the cabinet through the spray arms. The dishwasher must not be used without all the filters in place.
-
Page 41
Cleaning and care ^ Replace the filter combination so that To clean the inside of the filter, the flap must be opened: it lies flat in the base of the wash cabinet. ^ Press catches a together in the ^ Then turn the handle clockwise, until direction of the arrows as shown, and open the filter b. -
Page 42: Cleaning The Spray Arms
Cleaning and care ^ Remove the lower basket. Cleaning the spray arms Particles of food can get stuck in the spray arm jets and bearings. The spray arms should therefore be inspected and cleaned regularly (approx. every 4 — 6 months). ^ Switch the dishwasher off.
-
Page 43: Problem Solving Guide
Problem solving guide With the aid of the following guide, faults in the performance of the appliance, some of which may result from incorrect operation can be put right without contacting the Service Department. Repairs should only be carried out by a suitably qualified and trained person in strict accordance with current local and national safety regulations.
-
Page 44
Problem solving guide Problem Possible cause Remedy The buzzer sounds. There may be a Clean the water inlet filter All the programme technical fault. and clean the drain pump indicators flash when and non-return valve as the door is opened. described in “Maintenance”. -
Page 45: The Dishwasher Does Not Fill/Drain
Problem solving guide The dishwasher does not fill/drain. Problem Possible cause Remedy The dishwasher The stopcock is – Open the stopcock fully. stops working closed. shortly after the start of the programme. The buzzer sounds. The Inlet/drain check light 2/2 flashes when the door is opened.
-
Page 46: General Problems
Problem solving guide General problems Problem Possible cause Remedy Detergent residue is The dispenser was still Make sure the dispenser is left in the dispenser at damp when detergent was dry before adding the end of a added. detergent. programme. Clogged detergent residue Clean the detergent from The detergent…
-
Page 47: Noises
Problem solving guide Noises Problem Possible cause Remedy Knocking noise in the A spray arm is knocking Interrupt the programme, wash cabinet. against an item in a and rearrange the items basket. which are obstructing the spray arm. Rattling noise in the Items of crockery are Interrupt the programme, wash cabinet.
-
Page 48: Unsatisfactory Washing Result
Problem solving guide Unsatisfactory washing result Problem Possible cause Remedy The dishes are not The dishes were not loaded See notes in «Loading the clean. correctly. dishwasher» The programme was not Select a more intensive powerful enough. programme. See Programme chart.
-
Page 49
Problem solving guide Problem Possible cause Remedy Dishes, cutlery The amount of rinse aid Replenish the reservoir, and glasses are may be insufficient, or the increase the dosage or not dry or are rinse aid reservoir empty. change the brand of rinse aid. flecked. -
Page 50
Problem solving guide Problem Possible cause Remedy Glassware has a This may be caused by the Change your detergent. brown or blue tinge, detergent. and film cannot be wiped off. Glassware is dull and The glasses are not There is no remedy. discoloured;… -
Page 51: Maintenance
^ Replace the filter and seal, making union. This filter is available from the Miele Spares Parts dept. sure they are sitting correctly. ^ Reconnect the inlet hose to the Cleaning the filter:…
-
Page 52: Cleaning The Drain Pump And Non-Return Valve
Maintenance Cleaning the drain pump and non-return valve If the water has not been pumped away at the end of a programme the drain pump or the non-return valve might be blocked. They are, however, easy to clean. ^ Disconnect the dishwasher from the mains supply.
-
Page 53: After Sales Service
– Your Miele dealer, or technology. – the Miele Service Department (see Information regarding programme back cover for address). updates will be made known by the Miele Company as and when such Please note that telephone calls may developments become available.
-
Page 54: Programme Chart
Programme chart Crockery Food deposits Action required Mixed, All normal This needs an everyday crockery food deposits adaptable programme… Heat-sensitive glasses and plastic Fresh, This needs a short easily removed programme… food deposits Mixed crockery This needs a standard programme… Normal food deposits which have begun to dry To save water and…
-
Page 55
Programme chart Programme Detergent Compartment I Compartment II 25 ml Sensor wash – 1 tab 25 ml Quick wash 40°C – 1 tab 25 ml Light soiling 50°C – 1 tab 25 ml Energy save – 1 tab 25 ml Pots &… -
Page 56
Programme chart Programme Programme sequence Pre-wash Main wash Interim rinse Final rinse Drying °C °C Sensor wash Variable programme sequence, 55-65 °C sensor controlled adjustment according to the amount of crockery and level of food deposits If required 55-65 If required Quick wash 40 °C Light soiling 50 °C Energy save… -
Page 57
Programme chart Consumption Duration Energy Water Cold Litres Cold water water water water connection connection connection connection (15 °C) (55 °C) (15 °C) (55 °C) h:min h:min 1.30-1.60 0.75-1.00 13-22 1:45-2:30 1:35-2:16 0.70 0.22 0:38 0:30 1.25 0.90 1:32 1:20 1.05 0.70 2:54… -
Page 58: Optional Accessories
Optional accessories To make the most of your dishwasher Optional accessories for particular purposes are available from your Miele dealer, the Spare Parts Department or online at www.miele-shop.com (some may be supplied as standard, depending on model). If you would like to ……
-
Page 59: Electrical Connection
Electrical connection Electrical connection U.K. Non-rewireable plugs BS 1363 The fuse cover must be refitted when All electrical work must be changing the fuse, and if the fuse cover carried out by a suitably qualified is lost, the plug must not be used until a and competent person, in suitable replacement is obtained.
-
Page 60: Plumbing
30 and 1000 kPa (0.3 and 10 bar). Providing your dishwasher has been If the water pressure is too high, a installed correctly, the Miele waterproof pressure reducer valve must be anti-leak system will protect you from fitted. water damage throughout its lifetime.
-
Page 61: Drainage
Plumbing Drainage Venting the drainage system – The appliance drainage system is If the on-site drain connection is fitted with a non-return valve, which situated lower than the guide path for prevents dirty water from flowing the bottom basket rollers in the open back into the dishwasher via the door, the drainage system must be drain hose.
-
Page 62: Technical Data
Technical data Dishwasher model G 1XXX G 2XXX Height 80.5 cm 84.5 cm (adjustable + 6.5 cm) (adjustable + 6.5 cm) Height of building-in Min. 80.5 cm (+ 6.5 cm) Min. 84.5 cm (+ 6.5 cm) recess Width 59.8 cm 59.8 cm Width of building-in 60 cm…
-
Page 64
Alteration rights reserved/ M.-Nr. 07 502 110 / 00 G1173/G2173/ 0509…