инструкцияMicrolife BP A80

EN 1
FR 6
ES 12
PT 18
DE 24
NL 30
RU 36
PL 42
HU 48
BG 54
RO 60
CZ 66
SK 72
TR 78
GR 84
AR 90
FA 96
Europe / Middle-East / Africa
Microlife AG
Espenstrasse 139
9443 Widnau / Switzerland
Tel. +41 / 71 727 70 30
Fax +41 / 71 727 70 39
Email admin@microlife.ch
www.microlife.com
Asia
Microlife Corporation.
9F, 431, RuiGang Road, NeiHu
Taipei, 11492, Taiwan, R.O.C.
Tel. 886 2 8797-1288
Fax.886 2 8797-1283
Email service@microlife.com.tw
www.microlife.com
North / Central / South America
Microlife USA, Inc.
1617 Gulf to Bay Blvd., 2nd Floor Ste A
Clearwater, FL 33755 / USA
Tel. +1 727 442 5353
Fax +1 727 442 5377
Email msa@microlifeusa.com
www.microlife.com
IB BP A80 V17 2315
Посмотреть инструкция для Microlife BP A80 бесплатно. Руководство относится к категории сфигмоманометры, 1 человек(а) дали ему среднюю оценку 5.9. Руководство доступно на следующих языках: русский, английский. У вас есть вопрос о Microlife BP A80 или вам нужна помощь? Задайте свой вопрос здесь
- 1. Important Facts about Blood Pressure and Self- Measurement
- 2. Using the Device for the First Time
- 3. Taking a Blood Pressure Measurement using this Device
- 4. Appearance of the Heart Arrhythmia Indicator for early Detection
- 5. Data Memory
- 6. Replacing the Slot-in Card
- 7. Battery Indicator and Battery change
- 8. Error Messages
- 9. Safety, Care, Accuracy Test and Disposal
- 10. Guarantee
- 11. Technical Specifications
- 1. Informations importantes sur la tension et l’auto- mesure
- 2. Première mise en service de l’appareil
- 3. Prise de tension avec cet appareil
- 4. Apparition de l’indicateur d’arythmie cardiaque pour une détection précoce
- 5. Mémoire
- 6. Remplacement de la carte
- 7. Indicateur d’état de charge des piles et de remplacement
- 8. Messages d’erreurs
- 9. Sécurité, entretien, test de précision et élimination de l’équipement
- 10. Garantie
- 11. Caractéristiques techniques
- 1. Datos importantes acerca de la presión arterial y la automedición
- 2. Uso del dispositivo por primera vez
- 3. Medición de la presión arterial usando este dispositivo
- 4. Aparición del indicador de arritmia cardiaca para una detección anticipada
- 5. Memoria de datos
- 6. Reemplazar la tarjeta insertable
- 7. Indicador de baterías y cambio de baterías
- 8. Mensajes de error
- 9. Seguridad, cuidado, control de precisión y eliminación de residuos
- 10. Garantía
- 11. Especificaciones técnicas
- 1. Aspectos importantes sobre a tensão arterial e a auto-medição
- 2. Utilizar o dispositivo pela primeira vez
- 3. Medir a tensão arterial utilizando este aparelho
- 4. Apresentação do indicador de arritmia cardíaca como meio de detecção precoce
- 5. Memorização de dados
- 6. Substituir o cartão incorporado
- 7. Indicador de carga e substituição de pilhas
- 8. Mensagens de erro
- 9. Segurança, cuidados, teste de precisão e eliminação de resíduos
- 10. Garantia
- 11. Especificações técnicas
- 1. Wichtige Informationen zum Blutdruck und zur Selbstmessung
- 2. Erste Inbetriebnahme des Gerätes
- 3. Durchführung einer Blutdruckmessung mit diesem Gerät
- 4. Anzeige der Herz-Arrhythmie Früherkennung
- 5. Messwertspeicher
- 6. Austausch der Einschubkarte
- 7. Batterieanzeige und Batteriewechsel
- 8. Fehlermeldungen und Probleme
- 9. Sicherheit, Pflege, Genauigkeits-Überprüfung und Entsorgung
- 10. Garantie
- 11. Technische Daten
- 1. Belangrijke feiten over bloeddruk en het zelf meten hiervan
- 2. Eerste gebruik van het apparaat
- 3. Bloeddruk meten met behulp van dit apparaat
- 4. Weergave van de aritmie indicator voor vroegtijdige detectie
- 5. Geheugenopslag
- 6. Vervangen van de insteekkaart
- 7. Batterij-indicator en batterijvervanging
- 8. Foutmeldingen
- 9. Veiligheid, onderhoud, nauwkeurigheidstest en verwijdering
- 10. Garantie
- 11. Technische specificaties
- 1. Важная информация об артериальном давлении и самостоятельное измерение
- 2. Использование прибора в первый раз
- 3. Выполнение измерений артериального давления при помощи прибора
- 4. Появление индикатора аритмии сердца на ранней стадии
- 5. Память
- 6. Замена сменной карты
- 7. Индикатор разряда батарей и их замена
- 8. Сообщения об ошибках
- 9. Техника безопасности, уход, проверка точности и утилизация
- 10. Гарантия
- 11. Технические характеристики
- 1. Ważne zagadnienia związane z ciśnieniem krwi i samodzielnym wykonywaniem pomiarów
- 2. Korzystanie z urządzenia po raz pierwszy
- 3. Pomiar ciśnienia krwi przy użyciu ciśnieniomierza
- 4. Pojawienie się wskaźnika arytmii serca
- 5. Pamięć
- 6. Wymiana karty
- 7. Wskaźnik baterii i wymiana baterii
- 8. Komunikaty o błędach
- 9. Bezpieczeństwo, konserwacja, sprawdzanie dokładności i utylizacja
- 10. Gwarancja
- 11. Specyfikacje techniczne
- 1. Fontos információk a vérnyomásról és annak méréséről
- 2. A készülék üzembe helyezése
- 3. Vérnyomásmérés a készülékkel
- 4. A szívritmuszavar-kijelző megjelenése
- 5. Memória
- 6. A tájékoztató kártya cseréje
- 7. Elemállapot-kijelző és elemcsere
- 8. Hibaüzenetek
- 9. Biztonságos használat, tisztíthatóság, pontosságellenőrzés és az elhasznált elemek kezelése
- 10. Garancia
- 11. Műszaki adatok
- 1. Важни факти за кръвното налягане и самостоятелното измерване
- 2. Ако използвате апарата за първи път
- 3. Измерване на кръвното налягане чрез използване на този апарат
- 4. Поява на индикатора за ранно установяване на сърдечна аритмия
- 5. Памет за данни
- 6. Подменяне на картата в слота
- 7. Индикатор за батериите и подмяна на батериите
- 8. Съобщения за грешка
- 9. Тест за безопасност, грижа, точност и депониране
- 10. Гаранция
- 11. Технически спецификации
- 1. Elemente importante cu privire la tensiunea arterială şi auto-măsurare
- 2. Utilizarea pentru prima oară a instrumentului
- 3. Măsurarea tensiunii arteriale cu acest instrument
- 4. Apariţia indicatorului de aritmie cardiacă pentru detecţia timpurie
- 5. Memoria pentru date
- 6. Înlocuirea cardului detaşabil
- 7. Indicatorul bateriei şi înlocuirea bateriei
- 8. Mesaje de eroare
- 9. Siguranţă, îngrijire, verificarea preciziei şi salubrizarea
- 10. Garanţia
- 11. Specificaţii tehnice
- 1. Důležitá fakta o krevním tlaku a samoměření
- 2. První použití přístroje
- 3. Měření krevního tlaku pomocí tohoto přístroje
- 4. Výskyt indikátoru srdeční arytmie pro včasnou detekci
- 5. Paměť
- 6. Výměna zasouvací karty
- 7. Indikátor baterií a výměna baterií
- 8. Chybová hlášení
- 9. Bezpečnost, péče, zkouška přesnosti a likvidace
- 10. Záruka
- 11. Technické specifikace
- 1. Dôležité skutočnosti o tlaku krvi a samomeraní
- 2. Prvé použitie prístroja
- 3. Meranie tlaku krvi použitím tohto prístroja
- 4. Objavenie sa ukazovateľa srdcovej arytmie pre jej včasné odhalenie
- 5. Pamäť údajov
- 6. Výmena zasúvacej karty
- 7. Indikátor stavu batérií a výmena batérií
- 8. Identifikácia chýb a porúch
- 9. Bezpečnosť, ochrana, skúška presnosti a likvidácia použitého zariadenia
- 10. Záruka
- 11. Technické údaje
- 1. Tansiyon Ölçümü ve Kendi Kendine Ölçüm Hakkında Önemli Gerçekler
- 2. Aygıtın İlk Kez Kullanımı
- 3. Aygıtı kullanarak Tansiyonun Ölçülmesi
- 4. Erken algılama durumunda Kalp Atışı Düzensizliği Göstergesinin Görünümü
- 5. Veri Belleği
- 6. Yuvalı Kartın Değiştirilmesi
- 7. Pil Göstergesi ve Pil değişimi
- 8. Hata İletileri
- 9. Güvenlik, Bakım, Doğruluk Testi ve Elden Çıkarma
- 10. Garanti Kapsamı
- 11. Teknik Özellikler
- 1. Σημαντικές πληροφορίες σχετικά με την αρτηριακή πίεση και την αυτομέτρηση
- 2. Χρήση της συσκευής για πρώτη φορά
- 3. Μέτρηση της αρτηριακής πίεσης με αυτή την συσκευή
- 4. Εμφάνιση της ένδειξης καρδιακής αρρυθμίας για έγκαιρη ανίχνευση
- 5. Μνήμη δεδομένων
- 6. Αντικατάσταση της ένθετης κάρτας
- 7. Ένδειξη μπαταρίας και αντικατάσταση μπαταριών
- 8. Μηνύματα σφάλματος
- 9. Ασφάλεια, φροντίδα, έλεγχος ακρίβειας και απόρριψη
- 10. Εγγύηση
- 11. Τεχνικά χαρακτηριστικά
Свойства
| Тип | Полуавтоматический |
| Поддерживаемое размещение | Верхняя часть руки |
| Число пользователей | 1 пользов. |
| Среднее артериальное давление | Да |
| Измерение частоты пульса | Да |
| Диастолическое кровяное давление | — |
| Систолическое кровяное давление | — |
| Автовыключение | Да |
Энергопитание
| Число поддерживаемых батарей | 4 |
| Тип батареек | AA |
Экран
показать больше
Не можете найти ответ на свой вопрос в руководстве? Вы можете найти ответ на свой вопрос ниже, в разделе часто задаваемых вопросов о Microlife BP A80.
Что такое систолическое давление?
Систолическое давление — это высший показатель тонометра. Систолическое давление означает давление в артериях во время сокращения сердечной мышцы.
Что означает диастолическое давление?
Диастолическое давление — это низший показатель тонометра. Диастолическое давление означает давление между ударами сердечной мышцы.
Какой показатель считается нормой артериального давления?
Нормой артериального давления считается показатель 120/80 мм ртутного столба.
Инструкция Microlife BP A80 доступно в русский?
Да, руководствоMicrolife BP A80 доступно врусский .
Не нашли свой вопрос? Задайте свой вопрос здесь

- Manuals
- Brands
- Microlife Manuals
- Medical Equipment
- BP A80
- Manual
-
Contents
-
Table of Contents
-
Bookmarks
Quick Links
Microlife AG
Espenstrasse 139
9443 Widnau / Switzerland
CHDE Polska S.A.
Biesiadna 7, 35-304 Rzeszów
www.microlife.com
Tel. (0-17) 229-37-89
Fax. (0-17) 230-21-14
E-mail: biuro.rzeszow@chde.pl
BDO 000046780
Microlife BP A80
EN
1
PL
8
IB BP A80 EN-PL 1420
Related Manuals for Microlife BP A80
Summary of Contents for Microlife BP A80
-
Page 1
Microlife BP A80 1 8 Microlife AG Espenstrasse 139 9443 Widnau / Switzerland CHDE Polska S.A. Biesiadna 7, 35-304 Rzeszów www.microlife.com Tel. (0-17) 229-37-89 Fax. (0-17) 230-21-14 IB BP A80 EN-PL 1420 E-mail: biuro.rzeszow@chde.pl BDO 000046780… -
Page 2
Guarantee Card BP A80 Microlife BP A80 Name of Purchaser Imię i nazwisko nabywcy Serial Number Numer seryjny Date of Purchase Data zakupu AL AT Specialist Dealer Przedstawiciel… -
Page 3: Table Of Contents
AK Pump Ball Connector please contact your local Microlife-Customer Service. Your dealer AL Quick-acting Discharge Valve or pharmacy will be able to give you the address of the Microlife Display dealer in your country. Alternatively, visit the internet at www.microlife.com where you will find a wealth of invaluable infor- AM Irregular Heartbeat (IHB) Symbol mation on our products.
-
Page 4: Important Facts About Blood Pressure And Self-Measurement
It is quite normal for two measurements taken in quick succes- 8. Error Messages sion to produce significantly different results. 9. Safety, Care, Accuracy Test and Disposal Deviations between measurements taken by your doctor or in • Safety and protection the pharmacy and those taken at home are quite normal, as •…
-
Page 5: Using The Device For The First Time
Selecting the correct cuff 6. Switch on the device and wait until «0» appears in the display Microlife offers 3 different cuff sizes: S, M and L. Select the cuff and the arrow «» BT starts to flash. size to match the circumference of your upper arms (measured by 7.
-
Page 6: Data Memory
5. Data Memory Always remove the rechargeable batteries if you do not intend to use the device for a week or more. This device always stores the last result at the end of the measure- Batteries cannot be charged in the blood pressure monitor. ment.
-
Page 7
We recommend this device is tested for accuracy every 2 years or Protect it from: after mechanical impact (e.g. being dropped). Please contact your — water and moisture local Microlife-Service to arrange the test (see foreword). — extreme temperatures Disposal — impact and dropping… -
Page 8
Measuring procedure: oscillometric, corresponding to Korotkoff method: Phase I systolic, Phase V diastolic Measurement range: 20 — 280 mmHg – blood pressure 40 — 200 beats per minute – pulse Cuff pressure display range: 0 — 299 mmHg Resolution: 1 mmHg Static accuracy: pressure within ±… -
Page 9
BP A80… -
Page 10
AM Symbol nieregularnego bicia serca (IHB) Biurem Obsługi klienta Microlife. Adres dystrybutora produktów Microlife na terenie swojego kraju znajdziecie Państwo u sprze- AN Wskaźnik tętna dawcy lub farmaceuty. Zapraszamy także na naszą stronę interne- AO Ikona baterii tową… -
Page 11
Zrób przynajmniej 15-sekundową przerwę między kolejnymi pomiarami. W czasie ciąży należy regularnie monitorować ciśnienie krwi, które w tym okresie może ulegać znacznym wahaniom! Jeśli cierpisz na arytmię serca, skonsultuj się z lekarzem przed użyciem urządzenia. Patrz także rozdział «Pojawienie się BP A80… -
Page 12
6. Włącz przyrząd i zaczekaj, aż na wyświetlaczu pojawi się «0» i Wybór właściwego mankietu zacznie mrugać strzałka «» BT. Microlife produkuje mankiety w 3 rozmiarach: S, M i L. Wybierz 7. Chwyć pompkę wolną ręką (na której nie mierzysz ciśnienia) i mankiet według obwodu ramienia (dobrze dopasowany w środkowej napompuj mankiet. -
Page 13
Po zakończeniu pomiaru przyrząd zawsze zapisuje wartość ostat- uszkodzeniem (całkowite rozładowanie spowodowane niego wyniku. Aby wywołać wynik, naciśnij i przytrzymaj przycisk minimalnym poborem energii przez urządzenie, nawet jeśli ON/OFF 1 (przyrząd musi zostać najpierw wyłączony). Wyświet- pozostaje ono wyłączone). BP A80… -
Page 14
Zawsze wyjmuj akumulatorki, jeżeli nie zamierzasz używać 9. Bezpieczeństwo, konserwacja, sprawdzanie przyrządu przez ponad tydzień! dokładności i utylizacja Akumulatorki NIE mogą być ładowane, gdy znajdują się w Bezpieczeństwo i ochrona urządzeniu! Zawsze korzystaj z niezależnej ładowarki, przestrzegając zaleceń dotyczących ładowania, konser- … -
Page 15
2 lata lub zawsze, gdy poddane zostanie ono wstrząsom mecha- Dokładność pomiaru nicznym (np. w wyniku upuszczenia). Skontaktuj się z lokalnym tętna: ±5 % wartości odczytu serwisem Microlife w celu przeprowadzenia testów (patrz Wstęp). Źródło napięcia: 4 x 1,5 V baterie alkaliczne; rozmiar AA Utylizacja Żywotność baterii: Około 3000 pomiarów (używając nowych…
Страницы и текст этой инструкции
 Инструкция тонометра Microlife BP A80
 Информация отображена на картинке
 Информация отображена на картинке
 Информация отображена на картинке
 Информация отображена на картинке
Как использовать наш сайт инструкций OnlineManuals.ru
Наша цель состоит в том, чтобы предоставить вам быстрый доступ к содержанию инструкции для тонометра Microlife BP A80.
С помощью онлайн просмотра, Вы можете быстро просмотреть содержимое инструкции и найти решение проблемы с тонометра Microlife BP A80.
Для Вашего удобства
Если листать руководство пользователя тонометра Microlife BP A80 прямо на сайте, не очень удобно для Вас, есть два возможных решения:
• Просмотр в полноэкранном режиме — легко просмотреть руководство пользователя (без загрузки его на свой компьютер), Вы можете использовать режим полноэкранного просмотра.
Для просмотра инструкции пользователя тонометра Microlife BP A80 на полном экране, используйте кнопку «Открыть в Pdf-viewer».
• Загрузка на компьютер — Вы можете также скачать Инструкция тонометра Microlife BP A80 на свой компьютер и сохранить его в файлах.
Многие люди предпочитают читать документы не на экране, а в печатной версии.
Возможность печати руководства пользователя также была предусмотрена на нашем сайте,
и вы можете использовать ее, нажав на иконку «печать» в Pdf-viewer.
Нет необходимости печатать все руководство тонометра Microlife BP A80, можно выбрать только нужные страницы инструкции.
Europe / Middle-East / Africa
Microlife AG
Espenstrasse 139
9443 Widnau / Switzerland
Tel. +41 / 71 727 70 30
Fax +41 / 71 727 70 39
Email admin@microlife.ch
www.microlife.com
Asia
Microlife Corporation.
9F, 431, RuiGang Road, NeiHu
Taipei, 114, Taiwan, R.O.C.
Tel. 886 2 8797-1288
Fax.886 2 8797-1283
Email service@microlife.com.tw
www.microlife.com
North / Central / South America
Microlife USA, Inc.
1617 Gulf to Bay Blvd., 2nd Floor Ste A
Microlife BP A80
Clearwater, FL 33755 / USA
Tel. +1 727 442 5353
EN Ä 1
BG Ä 58
Fax +1 727 442 5377
Email msa@microlifeusa.com
FR Ä 8
RO Ä 64
www.microlife.com
ES Ä 14
CZ Ä 70
PT Ä 20
SK Ä 76
DE Ä 26
TR Ä 82
NL Ä 32
GR Ä 88
RU Ä 38
AR Ä 94
PL Ä 46
FA Ä 100
HU Ä 52
IB BP A80 V17 4211
Microlife BP A80
I
267 3
II
8 AK
18 9 4
5
AL AT
Guarantee Card BP A80
Name of Purchaser / Nom de l’acheteur / Nombre del comprador / Nome
do comprador / Name des Käufers / Naam koper / Ф.И.О. покупателя /
Imię i nazwisko nabywcy / Vásárló neve
/ Име на купувача /
Numele
cumpărătorului
/
Jméno kupujícího
/
Meno zákazníka
/ Alıcının Adı /
Ονοματεπώνυμο αγοραστή / /
ØĮęĸŤşº Ţijº
Serial Number / Numéro de série / Número de serie / Número de série /
Serien-Nr. / Serienummer / Серийный номер /
Numer seryjny
/
Sorozatszám
/
Сериен номер /
Număr de serie
/
Výrobní číslo
/
Výrobné číslo
/ Seri Numarası / Αριθμός σειράς / /
Date of Purchase / Date d’achat / Fecha de compra / Data da compra /
III
IV
Kaufdatum/ Datum van aankoop / Дата покупки /
Data zakupu
/
Vásárlás dátuma
/ Дата на закупуване /
Data cumpărării
/
Datum
nákupu
/
Dátum kúpy
/ Satın Alma Tarihi / Ημερομηνία αγοράς /
AQ
/
Specialist Dealer / Revendeur / Vendedor especializado / Revendedor
autorizado / Fachhändler / Specialist Dealer / Специализированный
дилер /
Przedstawiciel
/
Forgalmazó
/ Специалист дистрибутор /
Distribuitor de specialitate
/
Specializovaný dealer
/
Špecializovaný
AR
predajca
/ Uzman Satıcı / Εξειδικευμένος αντιπρόσωπος /
/
AP
AN
AM
BT
AS
AO BK
:
ﺪﺮﺧ ﺎﻧ
ŞĴŠĴęşº ŢŗÄ
ﺎﺮﺳ ﺎﻤﺷ
´ºĮĸşº ĦųÄďĘ
ﺪﺮﺧ ﺦﺎﺗ
ĺęĨŤşº Įğďęşº
:
ﺺﺼﺨﺘﻣ ﺪﻨﺷﺮﻓ

Microlife BP A80
EN
1
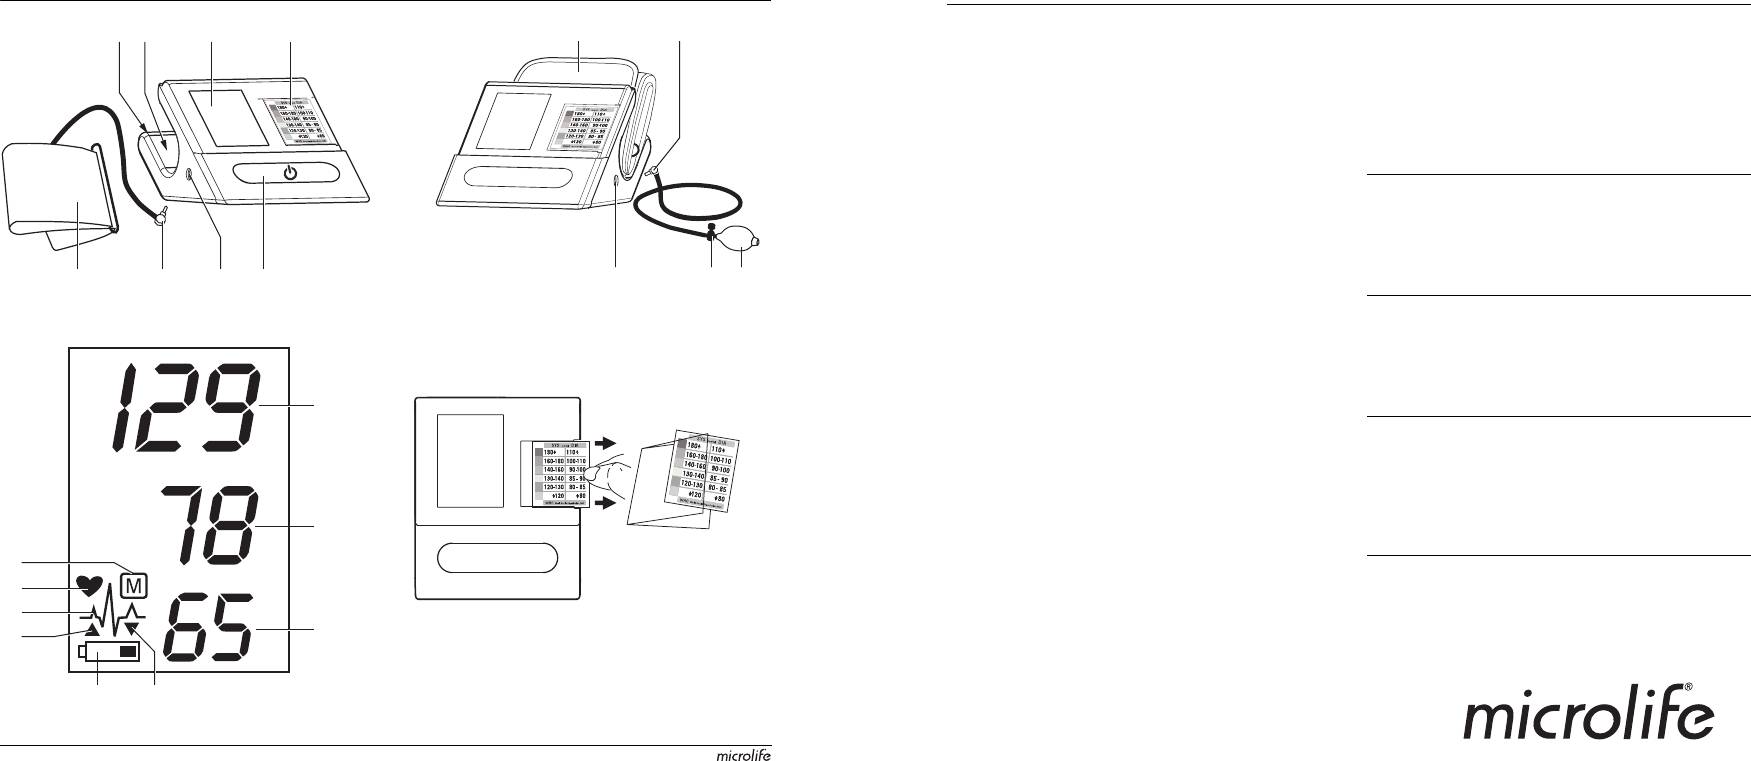
ON/OFF Button
Dear Customer,
2
Display
Your new Microlife blood pressure monitor is a reliable medical
3
Slot-in Card
instrument for taking measurements on the upper arm. It is simple
4
Cuff Socket
to use, accurate and comes highly recommended for blood pres-
5
Pump Ball Socket
sure monitoring in your home. This instrument was developed in
6
collaboration with physicians and clinical tests proving its
Cuff Compartment
measurement accuracy to be very high.*
7
Battery Compartment
8
Please read through these instructions carefully so that you under-
Cuff
stand all functions and safety information. We want you to be
9
Cuff Connector
happy with your Microlife product. If you have any questions, prob-
AT
Pump Ball
lems or want to order spare parts, please contact Microlife-
AK
Pump Ball Connector
Customer Service. Your dealer or pharmacy will be able to give you
AL
Quick-acting Discharge Valve
the address of the Microlife dealer in your country. Alternatively,
Display
visit the Internet at www.microlife.com where you will find a
wealth of invaluable information on our products.
AM
Heart Arrhythmia Indicator
AN
Pulse Rate
Stay healthy – Microlife AG!
AO
Battery Display
* This instrument uses the same measuring technology as the
AP
Stored Value
«BP 3BTO-H» model tested according to the protocol of the Euro-
AQ
Systolic Value
pean Society for Hypertension (ESH).
AR
Diastolic Value
AS
Pulse
BT
Air Pump-up
BK
Air Discharge
Type BF applied part
Read the instructions carefully before using this device.
1BP A80
EN

Table of Contents
•
The instrument also indicates the pulse rate (the number of
1. Important Facts about Blood Pressure and Self-
times the heart beats in a minute).
Measurement
•
Permanently high blood pressure values can damage
• How do I evaluate my blood pressure?
your health and must be treated by your doctor!
2. Using the Instrument for the First Time
•
Always discuss your values with your doctor and tell him/her if
• Activating the fitted batteries
you have noticed anything unusual or feel unsure. Never rely
• Selecting the correct cuff
on single blood pressure readings.
• Connecting the pump ball
•
Enter your readings in the enclosed blood pressure diary. This
3. Taking a Blood Pressure Measurement using this
will give your doctor a quick overview.
Instrument
•
There are many causes of excessively
high blood pressure va-
4. Appearance of the Heart Arrhythmia Indicator for early
lues
. Your doctor will explain them in more detail and offer treat-
Detection
ment where appropriate. Besides medication, relaxation techni-
5. Data Memory
ques, weight loss and exercise can also lower your blood pressure.
6. Replacing the Slot-in Card
•
Under no circumstances should you alter the dosages of
7. Battery Indicator and Battery change
any drugs prescribed by your doctor!
• Low battery
•
Depending on physical exertion and condition, blood pressure is
• Flat battery – replacement
subject to wide fluctuations as the day progresses.
You should
therefore take your measurements in the same quiet condi-
• Which batteries and which procedure?
tions and when you feel relaxed!
Take at least two measure-
• Using rechargeable batteries
ments per day, one in the morning and one in the evening.
8. Error Messages
•
It is quite normal for two measurements taken in quick succes-
9. Safety, Care, Accuracy Test and Disposal
sion to produce significantly different results.
• Safety and protection
•
Deviations between measurements taken by your doctor or in
• Instrument care
the pharmacy and those taken at home are quite normal, as
• Cleaning the cuff
these situations are completely different.
• Accuracy test
•
Several measurements provide a much clearer picture than
• Disposal
just one single measurement.
10. Guarantee
•
Leave a small break of at least 15 seconds between two
11. Technical Specifications
measurements.
Guarantee Card
•
If you are pregnant, you should monitor your blood pressure
very closely as it can change drastically during this time!
•
If you suffer from an irregular heartbeat (arrhythmia, see
«Section 4.»), measurements taken with this instrument should
only be evaluated after consultation with your doctor.
1. Important Facts about Blood Pressure and Self-
•
The pulse display is not suitable for checking the
Measurement
frequency of heart pacemakers!
•
Blood pressure is the pressure of the blood flowing in the
arteries generated by the pumping of the heart. Two values, the
systolic (upper) value and the diastolic (lower) value, are
always measured.
2
How do I evaluate my blood pressure?
Connecting the pump ball
Table for classifying blood pressure values in adults in accordance
Connect the pump ball AT to the instrument by firmly inserting the
with the World Health Organisation (WHO) in 2003. Data in mmHg.
connector AK into the pump ball socket 5.
Range Systolic Diastolic Recommendation
3. Taking a Blood Pressure Measurement using this
blood pressure too low z 100 z 60 Consult your doctor
Instrument
1. blood pressure optimum 100 — 120 60 — 80 Self-check
Checklist for taking a reliable measurement
2. blood pressure normal 120 — 130 80 — 85 Self-check
1. Avoid activity, eating or smoking immediately before the
3. blood pressure slightly
130 — 140 85 — 90 Consult your doctor
measurement.
high
2. Sit down for at least 5 minutes before the measurement and
4. blood pressure too high 140 — 160 90 — 100 Seek medical advice
relax.
5. blood pressure far too
160 — 180 100 — 110 Seek medical advice
high
3. Always measure on the same arm (normally left).
6. blood pressure danger-
180 y 110 y Urgently seek
4. Remove close-fitting garments from the upper arm. To avoid
ously high
medical advice!
constriction, shirt sleeves should not be rolled up — they do
The higher value is the one that determines the evaluation.
not interfere with the cuff if they are laid flat.
Example: a readout value between 150/85 or 120/98 mmHg indi-
5. Always ensure that the cuff is positioned correctly, as shown
cates «blood pressure too high».
in the pictures illustrated on the short instruction card.
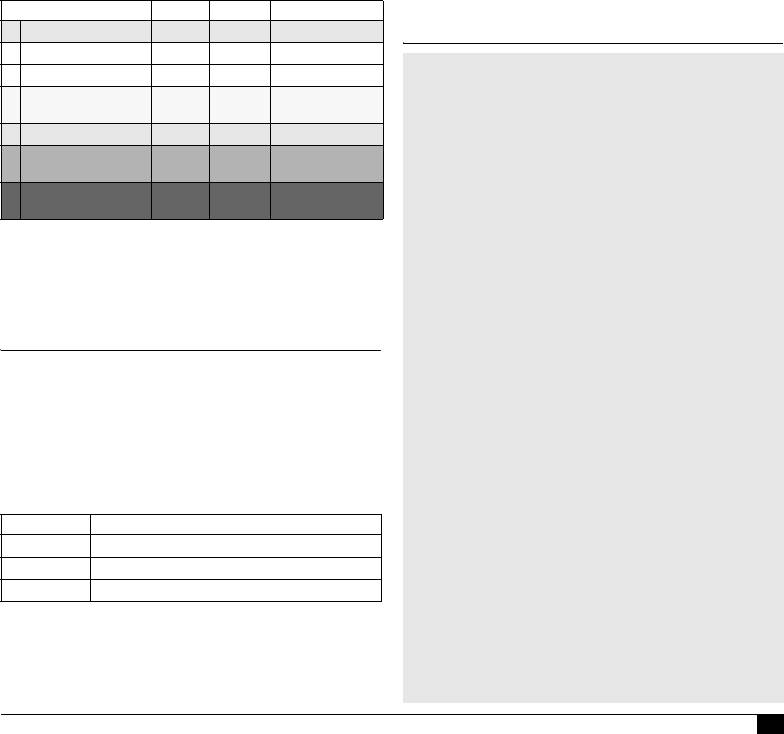
The slot-in card 3 on the front of the instrument shows ranges
• Fit the cuff closely, but not too tight.
1-6 in the Table.
• Make sure that the cuff is 2 cm (0.75 inch) above your
elbow with the tube on the inside of your arm.
2. Using the Instrument for the First Time
• Support your arm so it is relaxed.
Activating the fitted batteries
• Ensure that the cuff is at the same height as your heart.
Pull out the protective strip projecting from the battery compart-
6. Switch on the instrument and wait until «0» appears in the
ment 7.
display and the arrow «S» BT starts to flash.
Selecting the correct cuff
7. Take the pump ball in your free hand (the arm you are not
Microlife offers 3 different cuff sizes: S, M and L. Select the cuff
measuring from) and pump up the cuff. Watch the pressure
size to match the circumference of your upper arms (measured by
indication in the display and pump approx. 40 mmHg higher
close fitting in the centre of the upper arm). M is the correct size
than the expected systolic value (the upper value). If you
for most people.
have not pumped enough, a flashing arrow «S» BT will
Cuff size for circumference of upper arm
appear telling you to pump higher.
S 17 — 22 cm (6.75 — 8.75 inches)
8.
After pumping, the measurement is taken automatically. Relax,
do not move and do not tense your arm muscles until the mea-
M 22 — 32 cm (8.75 — 12.5 inches)
surement result is displayed. Breathe normally and do not talk.
L 32 — 42 cm (12.5 — 16.5 inches)
9.
During the measurement, the heart symbol
AN
flashes in the
)
Only use Microlife cuffs.
display and a beep sounds every time a heartbeat is detected.
X
Contact Microlife Service if the enclosed cuff 8 does not fit.
10. The result, comprising the systolic AQ and the diastolic AR
X
Connect the cuff to the instrument by inserting the cuff
blood pressure and the pulse AS is displayed and longer beep
connector 9 into the cuff socket 4 as far as it will go.
is heard. Note also the explanations on further displays in
this booklet.
3BP A80
EN

11. When the measurement has finished, press the quick-acting
6. Replacing the Slot-in Card
discharge valve AL in order to release any remaining air in
You can replace the slot-in card 3 by pulling it out to the side, as
the cuff. Remove the cuff and pack it into the instrument as
shown in Fig. IV and replacing the paper insert.
shown in Fig. II.
It may be helpful to have your doctor note down the medication
12. Enter the result in the enclosed blood pressure pass and
dosage or an emergency telephone number on the card. Extra
switch off the instrument. (The monitor does switch off auto-
cards are supplied with the instrument for this purpose.
matically after approx. 1 min.).
7. Battery Indicator and Battery change
)
You can interrupt the measurement at any time by pressing
the quick-acting discharge valve AL (e.g. if you feel uneasy
Low battery
or notice an unpleasant pressure sensation).
When the batteries are approximately ¾ empty the battery symbol
AO will flash as soon as the instrument is switched on (partly filled
4. Appearance of the Heart Arrhythmia Indicator for
battery displayed). Although the instrument will continue to
early Detection
measure reliably, you should obtain replacement batteries.
This symbol AM indicates that certain pulse irregularities were
Flat battery – replacement
detected during the measurement. In this case, the result may
When the batteries are flat, the battery symbol
AO
will flash as soon
deviate from your normal blood pressure – repeat the measure-
as the instrument is switched on (flat battery displayed). You cannot
ment. In most cases, this is no cause for concern. However, if the
take any further measurements and must replace the batteries.
symbol appears on a regular basis (e.g. several times a week with
1. Open the battery compartment 7 at the back of the instrument
measurements taken daily) we advise you to tell your doctor.
by pushing inwards at the two arrows and pulling out the
Please show your doctor the following explanation:
battery compartment cover.
2. Replace the batteries – ensure correct polarity as shown by the
Information for the doctor on frequent appearance of the
symbols in the compartment.
Arrhythmia indicator
This instrument is an oscillometric blood pressure monitor that
Which batteries and which procedure?
also analyses pulse frequency during measurement. The instru-
)
Use 4 new, long-life 1.5V, size AA batteries.
ment is clinically tested.
)
Do not use batteries beyond their date of expiry.
The arrhythmia symbol is displayed after the measurement, if
)
Remove batteries if the instrument is not going to be used
pulse irregularities occur during measurement. If the symbol
for a prolonged period.
appears more frequently (e.g. several times per week on
Using rechargeable batteries
measurements performed daily) we recommend the patient to
You can also operate this instrument using rechargeable batteries.
seek medical advice.
)
Only use «NiMH» type reusable batteries.
The instrument does not replace a cardiac examination, but
serves to detect pulse irregularities at an early stage.
)
Batteries must be removed and recharged when the flat
battery symbol appears. They should not remain inside the
5. Data Memory
instrument as they may become damaged (total discharge as
a result of low use of the instrument, even when switched off).
This instrument always stores the last result at the end of the
measurement. To call up the value, press and hold down the
)
Always remove the rechargeable batteries if you do not
intend to use the instrument for a week or more.
ON/OFF button 1 (the instrument must be switched off first). All
display elements are now shown. Release the button when you
)
Batteries cannot be charged in the blood pressure monitor.
Recharge batteries in an external charger and observe the
see the stored reading value and the letter «M».
information regarding charging, care and durability.
4
Хорошее руководство по эксплуатации
Законодательство обязывает продавца передать покупателю, вместе с товаром, руководство по эксплуатации Microlife BP A80. Отсутствие инструкции либо неправильная информация, переданная потребителю, составляют основание для рекламации в связи с несоответствием устройства с договором. В законодательстве допускается предоставлении руководства в другой, чем бумажная форме, что, в последнее время, часто используется, предоставляя графическую или электронную форму инструкции Microlife BP A80 или обучающее видео для пользователей. Условием остается четкая и понятная форма.
Что такое руководство?
Слово происходит от латинского «instructio», тоесть привести в порядок. Следовательно в инструкции Microlife BP A80 можно найти описание этапов поведения. Цель инструкции заключается в облегчении запуска, использования оборудования либо выполнения определенной деятельности. Инструкция является набором информации о предмете/услуге, подсказкой.
К сожалению немного пользователей находит время для чтения инструкций Microlife BP A80, и хорошая инструкция позволяет не только узнать ряд дополнительных функций приобретенного устройства, но и позволяет избежать возникновения большинства поломок.
Из чего должно состоять идеальное руководство по эксплуатации?
Прежде всего в инструкции Microlife BP A80 должна находится:
— информация относительно технических данных устройства Microlife BP A80
— название производителя и год производства оборудования Microlife BP A80
— правила обслуживания, настройки и ухода за оборудованием Microlife BP A80
— знаки безопасности и сертификаты, подтверждающие соответствие стандартам
Почему мы не читаем инструкций?
Как правило из-за нехватки времени и уверенности в отдельных функциональностях приобретенных устройств. К сожалению само подсоединение и запуск Microlife BP A80 это слишком мало. Инструкция заключает ряд отдельных указаний, касающихся функциональности, принципов безопасности, способов ухода (даже то, какие средства стоит использовать), возможных поломок Microlife BP A80 и способов решения проблем, возникающих во время использования. И наконец то, в инструкции можно найти адресные данные сайта Microlife, в случае отсутствия эффективности предлагаемых решений. Сейчас очень большой популярностью пользуются инструкции в форме интересных анимаций или видео материалов, которое лучше, чем брошюра воспринимаются пользователем. Такой вид инструкции позволяет пользователю просмотреть весь фильм, не пропуская спецификацию и сложные технические описания Microlife BP A80, как это часто бывает в случае бумажной версии.
Почему стоит читать инструкции?
Прежде всего здесь мы найдем ответы касательно конструкции, возможностей устройства Microlife BP A80, использования отдельных аксессуаров и ряд информации, позволяющей вполне использовать все функции и упрощения.
После удачной покупки оборудования/устройства стоит посвятить несколько минут для ознакомления с каждой частью инструкции Microlife BP A80. Сейчас их старательно готовят или переводят, чтобы они были не только понятными для пользователя, но и чтобы выполняли свою основную информационно-поддерживающую функцию.