Содержание
- Singer 9020 Manual
- Need help? Post your question in this forum.
- Register and keep informed
- Singer
- Report abuse
- Product:
- Forumrules
- Register
- Get your user manual by e-mail
- Others manual(s) of Singer 9020
- The manual is sent by email. Check your email
- The email address you have provided is not correct.
- Your question is posted on this page
- Руководство по эксплуатации Simplicity singer 9020
- Руководство по эксплуатации для устройства Simplicity singer 9020
- Как пользоваться?
- Singer 9020 User Manual
- Simplicity singer 9020
- Информация и инструкции по эксплуатации, касающиеся устройства Simplicity singer 9020 Машина для шитья
Singer 9020 Manual


Need help? Post your question in this forum.
Register and keep informed
Receive emails when:
- new questions and answers are posted
- new manuals are uploaded
Singer
Report abuse
Libble takes abuse of its services very seriously. We’re committed to dealing with such abuse according to the laws in your country of residence. When you submit a report, we’ll investigate it and take the appropriate action. We’ll get back to you only if we require additional details or have more information to share.
Product:
Forumrules
To achieve meaningful questions, we apply the following rules:
- First, read the manual;
- Check if your question has been asked previously;
- Try to ask your question as clearly as possible;
- Did you already try to solve the problem? Please mention this;
- Is your problem solved by a visitor then let him/her know in this forum;
- To give a response to a question or answer, do not use this form but click on the button ‘reply to this question’;
- Your question will be posted here and emailed to our subscribers. Therefore, avoid filling in personal details.
Register
Register getting emails for Singer 9020 at:
- new questions and answers
- new manuals
You will receive an email to register for one or both of the options.
Get your user manual by e-mail
Enter your email address to receive the manual of Singer 9020 in the language / languages: English as an attachment in your email.
The manual is 1,22 mb in size.
You will receive the manual in your email within minutes. If you have not received an email, then probably have entered the wrong email address or your mailbox is too full. In addition, it may be that your ISP may have a maximum size for emails to receive.
Others manual(s) of Singer 9020
The manual is sent by email. Check your email
If you have not received an email with the manual within fifteen minutes, it may be that you have a entered a wrong email address or that your ISP has set a maximum size to receive email that is smaller than the size of the manual.
The email address you have provided is not correct.
Please check the email address and correct it.
Your question is posted on this page
Would you like to receive an email when new answers and questions are posted? Please enter your email address.
Источник
Руководство по эксплуатации Simplicity singer 9020
Руководство по эксплуатации для устройства Simplicity singer 9020
Устройство: Simplicity singer 9020
Размер: 0,69 MB
Добавлено: 2013-10-10 18:55:35
Количество страниц: 52
Печатать инструкцию
Как пользоваться?
Наша цель — обеспечить Вам самый быстрый доступ к руководству по эксплуатации устройства Simplicity singer 9020 . Пользуясь просмотром онлайн Вы можете быстро просмотреть содержание и перейти на страницу, на которой найдете решение своей проблемы с Simplicity singer 9020 .
Для Вашего удобства
Если просмотр руководства Simplicity singer 9020 непосредственно на этой странице для Вас неудобен, Вы можете воспользоваться двумя возможными решениями:
- Полноэкранный просмотр -, Чтобы удобно просматривать инструкцию (без скачивания на компьютер) Вы можете использовать режим полноэкранного просмотра. Чтобы запустить просмотр инструкции Simplicity singer 9020 на полном экране, используйте кнопку Полный экран .
- Скачивание на компьютер — Вы можете также скачать инструкцию Simplicity singer 9020 на свой компьютер и сохранить ее в своем архиве. Если ты все же не хотите занимать место на своем устройстве, Вы всегда можете скачать ее из ManualsBase.
Печатная версия
Многие предпочитают читать документы не на экране, а в печатной версии. Опция распечатки инструкции также предусмотрена и Вы можете воспользоваться ею нажав на ссылку, находящуюся выше — Печатать инструкцию . Вам не обязательно печатать всю инструкцию Simplicity singer 9020 а только некоторые страницы. Берегите бумагу.
Резюме
Ниже Вы найдете заявки которые находятся на очередных страницах инструкции для Simplicity singer 9020 . Если Вы хотите быстро просмотреть содержимое страниц, которые находятся на очередных страницах инструкции, Вы воспользоваться ими.
Источник
Singer 9020 User Manual
![]()
5, 8, 10, 16 & 22 PATTERN SEWING MACHINES

TABLE OF CONTENTS
1. Getting to Know Your Machine
Principal Parts Accessories
2. Getting Ready to Sew
Connecting the Machine/Running the Machine Choosing and Changing Needles
Free Arm Sewing Changing Presser Foot
Replacing Presser Foot with Shank Attaching Feed Cover
Winding a Bobbin Threading the Machine Inserting a Wound Bobbin Raising Bobbin Thread Selecting a Pattern
3. Straight Stitching
Preparation Sewing a Seam
Free Motion Embroidery Inserting a Zipper
4. Special Stitches
Patterns capability and graphics illustration Zig-Zag Stitch
Zig-Zag Blindstitch Multi Stitch Zig-Zag
» M » Stitch/Sandcastle Stitch
Crescent Stitch/Chinese/Dynasty Stitch/Solid
Arrow Stitch/Bunting Stitch/Privet Stitch
Wizard Stitch/Random Ric-Rac Stitch
Stretch Overedge Stitch
Ric-Rac/Straight Stretch Stitch
Road Runner/Fagoting Stitch
Slant Overedge Stitch/Seagull Stitch
5. Four Step Buttonholing
6. Caring for Your Machine
Removing and Replacing Bobbin Case Removing and Replacing Light Bulb Cleaning the Machine
Performance Checklist Additional Accessories
Fabric, Thread and Needle Table

You are about to begin an adventure in creativity: You are going to sew! And, you are going to sew with one of the easiest to use machines ever made.
The following features have been included on your machine, promising rewarding hours of uncomplicated sewing pleasure:
• Clearly defined thread path, reducing the possibility of threading errors.
• Built in buttonholer for fast, easy buttonholes.
• Slant needle designed do allow you to sit, see & sew better.
• One-step pattern selection, eliminating complicated selection operation.
In addition, this machine features a removable bed extension, permitting both flat and free-arm sewing; snap-on presser feet that are quickly removed and easily replaced; and a one-way needle-clamp that makes it impossible to put the needle in backwards.
Take some time to acquaint yourself with this owner’s manual and your machine. Whether you are a novice or an experienced sewer, you will discover how easy it is to create something uniquely your own!
We recommend that for future reference you record the Serial Number of your Sewing Machine in the space provided.
Refer to illustration below for location of Serial Number on your machine.
Model No. ______________________
Serial No. ______________________
To ensure that you are always provided with the most modern sewing capabilities, the manufacturer reserves the right to change the appearance, design or accessories of this sewing machine when considered necessary.
*A Trademark of The Singer Company

IMPORTANT SAFETY INSTRUCTIONS
When using this machine, basic safety precautions should always be followed including the following: Read all instructions before using this machine.
To reduce the risk of electric shock:
• The machine should never be left unattended when plugged in. Always unplug the machine from the electric outlet immediately after using and before cleaning.
• Always unplug before changing light bulb. Replace bulb with the same type rated 15 watts. Be sure to replace the face plate which covers the light bulb before operating the machine.
To reduce the risk of burns, fire, electric shock or injury to persons:
• Be sure that the electrical voltage of the socket outlet (wall receptacle) is the same as the rated voltage of the motor.
• Use this machine only for its intended use as described in this Operator’s Guide. Use only attachments recommended by the manufacturer as contained in the Operator’s Guide.
• To disconnect, turn all controls to the off (» 0 «) position, then remove plug from outlet.
• Disconnect the power-line plug from the socket outlet or switch the machine off when making any adjustments in the needle area, such as threading needle, changing needle, changing needle plate or changing presser foot, etc.
• Always unplug the machine from the electrical outlet when removing covers, lubricating, or when making any other user servicing adjustments mentioned in the Operator’s Guide.
• Do not attempt to adjust the motor belt. Contact your nearest Service Center should any adjustment be required.
• Do not unplug by pulling on cord. To unplug, grasp the plug, not the cord.
• Handle the foot controller with care and avoid dropping it on the floor. Be sure not to place anything on top of it.
• Always use the proper needle plate. The wrong plate can cause the needle to break.
• Do not use bent needles.
• When sewing, keep fingers away from all moving parts. Special care is required around the sewing machine needle.
• Do not pull or push fabric while stitching. This may deflect the needle causing it to break.
• Before removing the bobbin case, remove plug from the socket outlet.
• For double insulated machines, when servicing, use only identical Singer replacement parts. See instructions for Servicing of Double-lnsulated Appliances.
• Never operate the machine if it has a damaged cord or plug, if it is not working properly, if it has been dropped or damaged, or dropped into water. Return the machine to the nearest authorized dealer or Service Center for examination, repair, electrical, or mechanical adjustment.

Safety Instructions continued.
• Never operate the machine with any air openings blocked. Keep ventilation openings of the machine and foot controller free from the accumulation of lint, dust, and loose cloth.
• Never drop or insert any object into any opening.
• Do not use outdoors.
• Do not operate where aerosol (spray) products are being used or where oxygen is being administered.
• Do not allow to be used as a toy. Close attention is necessary when the machine is used by or near children.
• SERVICING OF DOUBLE-INSULATED PRODUCTS. In a double-insulated product, two systems of insulation are provided instead of grounding. No grounding means is provided on a double-insulated product, nor should a means for grounding be added to the product. Servicing of a double-insulated product requires extreme care and knowledge of the system, and should be done only by qualified service personnel. Replacement parts for a double-insulated product must be identical to those parts in the product. A dou- ble-insulated product is marked with the words «DOUBLE-INSULATION» or «DOUBLE-INSULATED».
SAVE THESE INSTRUCTIONS
Servicing should be performed by an authorized service representative.
This product is intended for household use.
FOR EUROPEAN AND SIMILAR TERRITORIES:
This product is suppressed for radio and television interference with the International Electrotechnical Commission requirements of the CISPR .
Machines for Great Britain and some other countries having similar wiring standards are shipped from the factory with a plug for connection to the mains. The wires in this mains lead are coloured in accordance with the following code:
Blue: neutral ( N ) Brown: live ( L )
As the colours of the wires in the mains lead of this appliance may not correspond with the coloured markings identifying the terminals in your plug, proceed as follows:
The wire which is coloured blue must be connected to the terminal which is marked with the letter N or coloured black. The wire which is coloured brown must be connected to the terminal which is marked with the letter L or coloured red. If a 13 Amp. (BS 1363) plug is used, a 3 Amp. fuse must be fitted, or if any other type of plug is used, a 5 Amp. fuse must be fitted either in the plug or adaptor or at the distribution board. Neither cord is to be connected to the earth terminal of a three-pin plug.
Источник
Simplicity singer 9020
Информация и инструкции по эксплуатации, касающиеся устройства Simplicity singer 9020 Машина для шитья
Вы потеряли руководство по эксплуатации устройства Simplicity singer 9020 Машина для шитья? У Вас с ним какая-то другая проблема? Вы попали по адресу.
Зачастую первые проблемы с устройством Simplicity singer 9020 Машина для шитья появляются через несколько недель, месяцев после покупки. Для многих после истечения этого времени проблематично найти документы, полученные при покупке (такие как инструкция по эксплуатации), — они либо выброшены, либо потерялись и их невозможно найти. Ниже находится список документов, Simplicity singer 9020 Машина для шитья, которое Вы можешь скачать непосредственно с наших серверов. С этого момента Вам не придется следить за документацией устройств. Достаточно заглянуть в нашу базу и найти инструкцию по эксплуатации, так же как в Simplicity singer 9020 Машина для шитья.
Документы добавленные в Simplicity singer 9020 Машина для шитья
Вы можете добавить следующий документ для устройства Simplicity singer 9020 Машина для шитья. Когда ты считаете, что у вас есть более новая или лучшая версия инструкции поделись ею с другими. Вы можете также связаться с нами если инструкция Вас не устраивает или она слишком плохого качества. Мы постараемся найти для Вас соответствующий документ. Если у Вас появились проблемы с освещением либо скачиванием мануаля, свяжитесь с нами.
Вам необходима помощь?
Если Вам необходима помощь, касающаяся ресурсов, содержащихся в в нашей базе, либо Вы хотите запросить добавление новых инструкций в наш сервис, воспользуйтесь возможными формами контакта:
Источник
Посмотреть инструкция для Singer 9020 бесплатно. Руководство относится к категории швейные машины, 14 человек(а) дали ему среднюю оценку 8.7. Руководство доступно на следующих языках: английский. У вас есть вопрос о Singer 9020 или вам нужна помощь? Задайте свой вопрос здесь
Singer 9020 — это швейная машина, которая предлагает широкие возможности для профессионального и любительского шитья. Машина оснащена большим количеством функций: оверлоком, бархатчаткой, сборкой ткани, накладным карманом, укрепляющими строчками и другими.
Кроме того, Singer 9020 имеет мощный двигатель и высокую скорость шитья, что повышает производительность и уменьшает время выполнения работы. Машина может шить различные типы тканей, включая тонкие, средние и тяжелые.
Singer 9020 имеет множество настроек, включая регулировку скорости шитья, регулировку длины стежка и многие другие. Все эти функции позволяют пользователю настроить швейную машину Singer 9020 в соответствии с его индивидуальными потребностями и требованиями.
Конструкция Singer 9020 выполнена из прочных материалов и обеспечивает надежность и долговечность в работе. Данная машина является идеальным выбором для тех, кто ищет высококачественную швейную машину для профессионального использования или для любительского шитья.
Главная
Не можете найти ответ на свой вопрос в руководстве? Вы можете найти ответ на свой вопрос ниже, в разделе часто задаваемых вопросов о Singer 9020.
Какой размер иглы лучше всего использовать?
Наиболее подходящий размер иглы зависит от используемой толщины ткани. С плотной тканью следует использовать толстую иглу. Подходящие типы тканей указываются на упаковке с иглами.
Какой срок службы у швейной иглы?
Как правило, срок службы швейной иглы составляет от 7 до 9 часов.
Что может повредить иглу при шитье?
Причин повреждения иглы может быть несколько: — Использование неподходящей иглы для определенного типа ткани — Установка иглы слишком низко — Неправильное расположение ткани — Неправильно установленный шпульный колпачок
Инструкция Singer 9020 доступно в русский?
К сожалению, у нас нет руководства для Singer 9020, доступного в русский. Это руководство доступно в английский.
Не нашли свой вопрос? Задайте свой вопрос здесь
Simplicity
singer 9020 Инструкция по запчастям
Популярность:
11037 просмотры
Подсчет страниц:
52 страницы
Тип файла:
Размер файла:
674 Kb
![]()
5, 8, 10, 16 & 22 PATTERN SEWING MACHINES
Instruction Manual
TABLE OF CONTENTS
Important Safeguards
1.Getting to Know Your Machine
Principal Parts Accessories
2.Getting Ready to Sew
Connecting the Machine/Running the Machine Choosing and Changing Needles
Free Arm Sewing Changing Presser Foot
Replacing Presser Foot with Shank Attaching Feed Cover
Winding a Bobbin Threading the Machine Inserting a Wound Bobbin Raising Bobbin Thread Selecting a Pattern
3.Straight Stitching
Preparation Sewing a Seam
Free Motion Embroidery Inserting a Zipper
4.Special Stitches
Preparation
Patterns capability and graphics illustration Zig-Zag Stitch
Zig-Zag Blindstitch Multi Stitch Zig-Zag
» M » Stitch/Sandcastle Stitch
Crescent Stitch/Chinese/Dynasty Stitch/Solid
Scallop Stitch
Arrow Stitch/Bunting Stitch/Privet Stitch
Wizard Stitch/Random Ric-Rac Stitch
Stretch Overedge Stitch
Ric-Rac/Straight Stretch Stitch
Road Runner/Fagoting Stitch
Honeycomb Stitch
Slant Overedge Stitch/Seagull Stitch
5.Four Step Buttonholing
6.Caring for Your Machine
Removing and Replacing Bobbin Case Removing and Replacing Light Bulb Cleaning the Machine
Performance Checklist Additional Accessories
Fabric, Thread and Needle Table
|
CONGRATULATIONS |
Dear Customer: |
You are about to begin an adventure in creativity: You are going to sew! And, you are going to sew with one of the easiest to use machines ever made.
The following features have been included on your machine, promising rewarding hours of uncomplicated sewing pleasure:
•Clearly defined thread path, reducing the possibility of threading errors.
•Built in buttonholer for fast, easy buttonholes.
•Slant needle designed do allow you to sit, see & sew better.
•One-step pattern selection, eliminating complicated selection operation.
In addition, this machine features a removable bed extension, permitting both flat and free-arm sewing; snap-on presser feet that are quickly removed and easily replaced; and a one-way needle-clamp that makes it impossible to put the needle in backwards.
Take some time to acquaint yourself with this owner’s manual and your machine. Whether you are a novice or an experienced sewer, you will discover how easy it is to create something uniquely your own!
We recommend that for future reference you record the Serial Number of your Sewing Machine in the space provided.
Refer to illustration below for location of Serial Number on your machine.
Serial No.
Model No. ______________________
Serial No. ______________________
To ensure that you are always provided with the most modern sewing capabilities, the manufacturer reserves the right to change the appearance, design or accessories of this sewing machine when considered necessary.
*A Trademark of The Singer Company
3
IMPORTANT SAFETY INSTRUCTIONS
When using this machine, basic safety precautions should always be followed including the following: Read all instructions before using this machine.
DANGER
To reduce the risk of electric shock:
•The machine should never be left unattended when plugged in. Always unplug the machine from the electric outlet immediately after using and before cleaning.
•Always unplug before changing light bulb. Replace bulb with the same type rated 15 watts. Be sure to replace the face plate which covers the light bulb before operating the machine.
WARNING
To reduce the risk of burns, fire, electric shock or injury to persons:
•Be sure that the electrical voltage of the socket outlet (wall receptacle) is the same as the rated voltage of the motor.
•Use this machine only for its intended use as described in this Operator’s Guide. Use only attachments recommended by the manufacturer as contained in the Operator’s Guide.
•To disconnect, turn all controls to the off («0«) position, then remove plug from outlet.
•Disconnect the power-line plug from the socket outlet or switch the machine off when making any adjustments in the needle area, such as threading needle, changing needle, changing needle plate or changing presser foot, etc.
•Always unplug the machine from the electrical outlet when removing covers, lubricating, or when making any other user servicing adjustments mentioned in the Operator’s Guide.
•Do not attempt to adjust the motor belt. Contact your nearest Service Center should any adjustment be required.
•Do not unplug by pulling on cord. To unplug, grasp the plug, not the cord.
•Handle the foot controller with care and avoid dropping it on the floor. Be sure not to place anything on top of it.
•Always use the proper needle plate. The wrong plate can cause the needle to break.
•Do not use bent needles.
•When sewing, keep fingers away from all moving parts. Special care is required around the sewing machine needle.
•Do not pull or push fabric while stitching. This may deflect the needle causing it to break.
•Before removing the bobbin case, remove plug from the socket outlet.
•For double insulated machines, when servicing, use only identical Singer replacement parts. See instructions for Servicing of Double-lnsulated Appliances.
•Never operate the machine if it has a damaged cord or plug, if it is not working properly, if it has been dropped or damaged, or dropped into water. Return the machine to the nearest authorized dealer or Service Center for examination, repair, electrical, or mechanical adjustment.
4
Safety Instructions continued…
•Never operate the machine with any air openings blocked. Keep ventilation openings of the machine and foot controller free from the accumulation of lint, dust, and loose cloth.
•Never drop or insert any object into any opening.
•Do not use outdoors.
•Do not operate where aerosol (spray) products are being used or where oxygen is being administered.
•Do not allow to be used as a toy. Close attention is necessary when the machine is used by or near children.
•SERVICING OF DOUBLE-INSULATED PRODUCTS. In a double-insulated product, two systems of insulation are provided instead of grounding. No grounding means is provided on a double-insulated product, nor should a means for grounding be added to the product. Servicing of a double-insulated product requires extreme care and knowledge of the system, and should be done only by qualified service personnel. Replacement parts for a double-insulated product must be identical to those parts in the product. A dou- ble-insulated product is marked with the words «DOUBLE-INSULATION» or «DOUBLE-INSULATED».
SAVE THESE INSTRUCTIONS
Servicing should be performed by an authorized service representative.
This product is intended for household use.
FOR EUROPEAN AND SIMILAR TERRITORIES:
This product is suppressed for radio and television interference with the International Electrotechnical Commission requirements of the CISPR.
Machines for Great Britain and some other countries having similar wiring standards are shipped from the factory with a plug for connection to the mains. The wires in this mains lead are coloured in accordance with the following code:
Blue: neutral (N) Brown: live (L)
As the colours of the wires in the mains lead of this appliance may not correspond with the coloured markings identifying the terminals in your plug, proceed as follows:
The wire which is coloured blue must be connected to the terminal which is marked with the letter N or coloured black. The wire which is coloured brown must be connected to the terminal which is marked with the letter L or coloured red. If a 13 Amp. (BS 1363) plug is used, a 3 Amp. fuse must be fitted, or if any other type of plug is used, a 5 Amp. fuse must be fitted either in the plug or adaptor or at the distribution board. Neither cord is to be connected to the earth terminal of a three-pin plug.
5
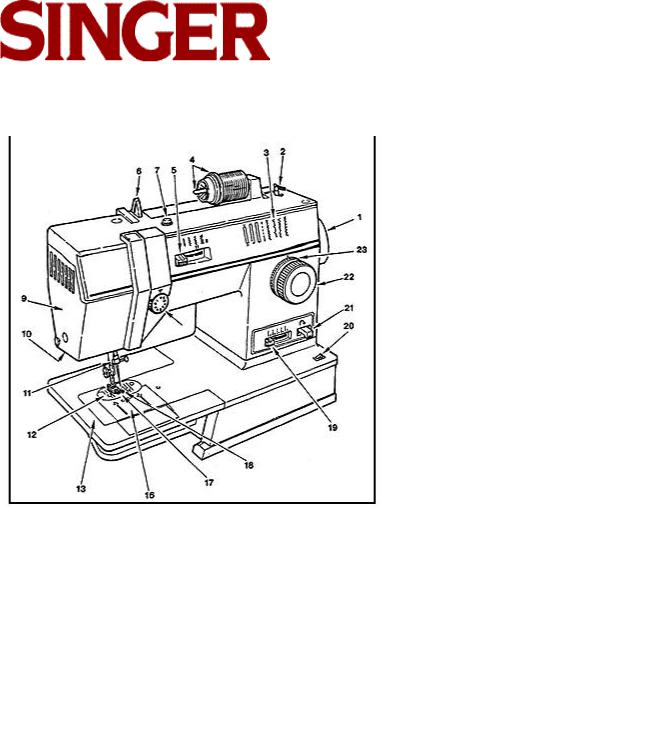
SECTION 1
GETTING TO KNOW YOUR MACHINE
9.Face Plate is a removable cover protecting movable parts and sewing light.
10.Sewing Light illuminates sewing area.
11.Needle Clamp holds needle in machine and prevents incorrect insertion.
12.Needle Plate supports the
13.Removable Extension Table lets you change the machine bed from flat to free arm.
16.Slide Plate opens for easy removal and replacement of bobbin.
17.Feed System moves fabric under presser foot.
Principal Parts
1.Hand Wheel provides a means for raising or lowering the needle.
2.Bobbin Winder lets you fill the bobbin with thread quickly and easily.
3.Pattern Display Panel shows a variety of patterns available for your sewing needs.
4.Spool Pin and Cap hold the top thread supply and allow it to unwind smoothly as the spool does not turn.
5.Stitch Width Lever controls the width of patterns and sets the needle for straight stitching.
6.Snap-In Thread Guide helps to insure a smooth flow of thread from the spool of tension.
7.Bobbin Winder Tension Disc provides thread tension for bobbin winding.
8.Needle Thread Tension Dial controls top thread tension.
18.Presser Foot holds fabric against the feed system and snaps on and off.
19.Stitch Length Lever allows for a variety of stitch lengths.
20.Power and Light Switch turns on the machine and sewing light at the same time.
21.Reverse Lever provides either momentary or continuous reverse fabric movement.
22.Reverse Lever provides either momentary or continuous reverse fabric movement.
23.Pattern Selector Dial turns directly to any of the pattern display panel.
6

Principal Parts Continued…
14.Presser Foot Lifter, at the back of machine, lets you raise and lower presser foot.
15.Thread Cutter
24.Electrical Power Cord connects machine to your electrical outlet.
25.Speed Controller regulates the sewing machine speed. fabric during sewing.
7

ACCESSORIES
The accessories for your machine are designed to simplify many of your sewing projects.
1.General Purpose Needle Plate (A), and Presser Foot (B), are standard on the machine. Used for straight and zigzag sewing.
2.Zipper Foot (E), for inserting zippers.
3.Feed Cover (F), used for button sewing, free motion work and darning. It keeps the feed from moving fabric.
4.Special Purpose Presser Foot (J), used for decorative and zig-zag stitching.
5.Buttonhole Presser Foot (L), used to make fourstep buttonholes.
6.Spool Holder, for medium and large thread spools.
7.Lint Brush, for cleaning the machine.
8.Needle Pack, includes an assortment for sewing various types of fabrics.
9.Bobbins, transparent for easy viewing.
10.Blindstitch Hem Guide, is used to position the hem for blindstitch hemming.
8

SECTION 2
GETTING READY TO SEW
CONNECTING THE MACHINE
Before plugging in your machine, be sure that the voltage and number of cycles indicated on the electrical data table (1), conform to your electrical power supply.
Plug the controller (2), into the receptacle, at the right end of the machine.
Then connect the electrical power cord plug (3), to your electrical outlet.
Do not operate machine without material under the presser foot as this may damage the feed and the foot.
RUNNING THE MACHINE
The machine and the sewing light are turned on and off by the same power switch.
POWER SWITCH
Power on-press «1» side of switch. Power off-press «0» side.
To run the machine, press the speed controller. The harder you press, the faster the machine will sew.
To stop the machine from sewing, remove pressure from speed controller.
9
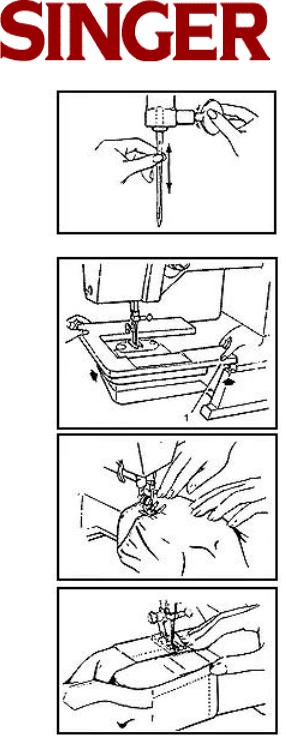
CHOOSING AND CHANGING NEEDLES
IMPORTANT: For best sewing results, use only Singer * needles. Check the needle package, and the Fabric, Thread and Needle Table for the correct needle and fabric combination.
•Raise needle to its highest position.
•Loosen needle clamp screw and remove needle.
•With flat side of, needle to the back insert new needle up into clamp as far as it will go.
•Tighten needle clamp screw securely.
FREE ARM SEWING
Free arm sewing makes it easier to sew hard-to-reach areas.
To change machine for free arm sewing, push in and lift right edge (1) of extension table, slide it to the left and off the machine.
•Topstitch edges on sleeves, or finish waistbands and pants legs easily.
•Sew buttonholes without stretching cuffs or neckbands.
10
![]()
CHANGING THE PRESSER FOOT
(B) (E) (J) (L)
Your machine comes with the General Purpose Presser Foot already attached. You can easily change to any one of the other presser feet which snap onto a common shank by following the directions below.
•Raise needle to its highest position by turning hand wheel toward you.
•Raise presser foot using presser foot lifter in back of machine.
•Push toe of presser foot (1) up, until it snaps off the shank (2).
•Take foot off machine.
•Place new foot under center of shank.
•Lower presser foot lifter, fitting shank over presser foot pin (3).
•Don’t turn screw. Instead, push presser foot screw4() down firmly until foot snaps into place.
11

REPLACING PRESSER FOOT WITH SHANK
Presser feet with built-in shanks can be replaced as follows:
•Turn machine off.
•Raise needle and presser foot.
•Loosen presser foot screw (1) and remove presser foot with shank (2), guiding it toward you and to the right.
•To replace presser foot with shank, hook shank around the presser bar and tighten presser foot screw.
ATTACHING FEED COVER (F)
The feed cover keeps the feed from moving the fabric.
•Raise needle and presser foot.
•Open slide plate.
•Slide feed cover on top of needle plate, pressing tabs (1) and (2) into holes.
•Close slide plate.
•To remove, open slide plate and lift front edge of cover; pull it away.
12

WINDING A BOBBIN
Winding a bobbin is quick and easy when you follow the directions below. Always wind the bobbin before threading the machine.
•Push in indent (1) on hand wheel disc. This will stop the needle from moving.
•Place spool of thread on spool pin.
•Slide spool cap (2) firmly over rim of spool to prevent thread tangling.
•Lead thread from spool and snap into thread guide post (3).
•Wind thread clockwise around front of bobbin winder tension disc (4).
•Pass thread end, from inside, through small hole in rim of bobbin.
•Place bobbin on spindle and push it to the right.
•Holding thread end, step on speed controller to run machine until desired amount of thread is wound.
•Cut thread; push bobbin to the left and remove it from spindle.
•Trim thread end from top of bobbin.
•Return hand wheel disc to sewing position by pressing on side opposite indent.
13

THREADING THE MACHINE
Your sewing machine is easily threaded. The clear threading path helps you avoid threading errors.
To thread your machine correctly, simply follow the steps below:
•Raise presser foot lifter.
•Raise needle to its highest position by turning hand wheel toward you.
•Place spool of thread on spool pin (1).
•Slide spool cap (2) firmly over the rim of the spool to prevent thread tangling.
•Snap thread into thread guide post (3).
•Following arrows, guide thread into threading channel (4) down to needle and firmly pull thread.
•Thread needle from front to back.
14
 Loading…
Хорошее руководство по эксплуатации
Законодательство обязывает продавца передать покупателю, вместе с товаром, руководство по эксплуатации Simplicity singer 9020. Отсутствие инструкции либо неправильная информация, переданная потребителю, составляют основание для рекламации в связи с несоответствием устройства с договором. В законодательстве допускается предоставлении руководства в другой, чем бумажная форме, что, в последнее время, часто используется, предоставляя графическую или электронную форму инструкции Simplicity singer 9020 или обучающее видео для пользователей. Условием остается четкая и понятная форма.
Что такое руководство?
Слово происходит от латинского «instructio», тоесть привести в порядок. Следовательно в инструкции Simplicity singer 9020 можно найти описание этапов поведения. Цель инструкции заключается в облегчении запуска, использования оборудования либо выполнения определенной деятельности. Инструкция является набором информации о предмете/услуге, подсказкой.
К сожалению немного пользователей находит время для чтения инструкций Simplicity singer 9020, и хорошая инструкция позволяет не только узнать ряд дополнительных функций приобретенного устройства, но и позволяет избежать возникновения большинства поломок.
Из чего должно состоять идеальное руководство по эксплуатации?
Прежде всего в инструкции Simplicity singer 9020 должна находится:
— информация относительно технических данных устройства Simplicity singer 9020
— название производителя и год производства оборудования Simplicity singer 9020
— правила обслуживания, настройки и ухода за оборудованием Simplicity singer 9020
— знаки безопасности и сертификаты, подтверждающие соответствие стандартам
Почему мы не читаем инструкций?
Как правило из-за нехватки времени и уверенности в отдельных функциональностях приобретенных устройств. К сожалению само подсоединение и запуск Simplicity singer 9020 это слишком мало. Инструкция заключает ряд отдельных указаний, касающихся функциональности, принципов безопасности, способов ухода (даже то, какие средства стоит использовать), возможных поломок Simplicity singer 9020 и способов решения проблем, возникающих во время использования. И наконец то, в инструкции можно найти адресные данные сайта Simplicity, в случае отсутствия эффективности предлагаемых решений. Сейчас очень большой популярностью пользуются инструкции в форме интересных анимаций или видео материалов, которое лучше, чем брошюра воспринимаются пользователем. Такой вид инструкции позволяет пользователю просмотреть весь фильм, не пропуская спецификацию и сложные технические описания Simplicity singer 9020, как это часто бывает в случае бумажной версии.
Почему стоит читать инструкции?
Прежде всего здесь мы найдем ответы касательно конструкции, возможностей устройства Simplicity singer 9020, использования отдельных аксессуаров и ряд информации, позволяющей вполне использовать все функции и упрощения.
После удачной покупки оборудования/устройства стоит посвятить несколько минут для ознакомления с каждой частью инструкции Simplicity singer 9020. Сейчас их старательно готовят или переводят, чтобы они были не только понятными для пользователя, но и чтобы выполняли свою основную информационно-поддерживающую функцию.