- Manuals
- Brands
- BMW Manuals
- Motorcycle
- R 1200 GS —
- Rider’s manual
-
Contents
-
Table of Contents
-
Troubleshooting
-
Bookmarks
Related Manuals for BMW R 1200 GS
Summary of Contents for BMW R 1200 GS
-
Page 1
Rider’s Manual R 1200 GS BMW Motorrad The Ultimate Riding Machine… -
Page 2
Motorcycle data/dealership details Motorcycle data Dealership details Model Person to contact in Service department Vehicle identification number Ms/Mr Phone number Colour code Date of first registration Dealership address/phone number (com- Registration number pany stamp) -
Page 3
The right to modify designs, equipment and accessories is reserved. Errors and omissions excepted. © 2010 BMW Motorrad Not to be reproduced either wholly or in part without written permission from BMW Motorrad, After Sales. Printed in Germany. -
Page 4: Fuel
2.2 bar, one-up, tyre cold 2.5 bar, two-up and/or with luggage, tyre cold Tyre pressure, rear 2.5 bar, one-up, tyre cold 2.9 bar, two-up and/or with luggage, tyre cold BMW recommends *01418520391* Order No.: 01 41 8 520 391 02.2010, 2nd edition *01418520391*…
-
Page 5
We congratulate you on your choice of a motorcycle from We hope that you will enjoy rid- BMW and welcome you to the ing your BMW and that all your community of BMW riders. journeys will be pleasant and Familiarise yourself with your new safe. -
Page 6: Table Of Contents
Standard warnings ..24 Equipment ….7 BMW Motorrad Integral Warnings issued by the on- Technical data .
-
Page 7
Front-wheel stand ..124 Brake system with BMW Bulbs ….. . 125 Wheels and tyres . -
Page 8
11 Service ….161 BMW Motorrad service ..162 BMW Motorrad service quality ….. 162… -
Page 9: General Instructions
General instructions Overview ……6 Abbreviations and symbols ..6 Equipment .
-
Page 10: Overview
BMW optional ex- overview of your motorcycle. All tras originally ordered. Indicates the end of an maintenance and repair work on item of information.
-
Page 11: Equipment
(DIN). Versions for individual items of custom equipment. This countries may differ. Rider’s Manual describes option- Currency al extras (OE) offered by BMW and selected optional accessor- The high safety and quality ies (OA). This explains why the standards of BMW motorcycles…
-
Page 13: General Views
General views General view, left side ….11 General view, right side … . . 13 Handlebar fitting, left .
-
Page 15: General View, Left Side
General view, left side Adjuster, spring preload, front ( Adjustment of windscreen Adjuster for headlight beam throw (underneath the instrument panel) Clutch-fluid reservoir 116) Type plate (on frame, be- hind side cover) Seat lock ( Power socket ( Adjuster for damping char- acteristic, rear suspension Engine oil level indicator 109)
-
Page 17: General View, Right Side
General view, right side Adjuster for spring preload, rear ( Fuel filler neck ( Brake-fluid reservoir, front 114) Vehicle Identification Num- ber (VIN) (on steering-head bearing) Air filter (behind right side panel) ( 131) Engine-oil filler neck 110) Brake-fluid reservoir, rear 115)
-
Page 18: Handlebar Fitting, Left
Handlebar fitting, left Control for the odometer Operation of the clock with on-board com- puter Operating the on-board computer ( with BMW Motorrad In- tegral ABS II Operating the ABS with Automatic Stability Control Operating ASC ( with Electronic Suspen-…
-
Page 19
Headlight flasher and high- beam headlight (… -
Page 20: Handlebar Fitting, Right
Handlebar fitting, right Emergency off switch (kill switch) ( Starter button ( with heated handlebar grips Grip heating control Flashing turn indicators, right ( Hazard warning flashers Cancel button, flashing turn indicators ( Pushbutton, cancel hazard warning flashers (…
-
Page 21: Underneath The Seat
Underneath the seat Rider’s Manual Battery ( 135) Standard toolkit ( 108) Payload table (in tool tray) Tyre pressures table (in tool tray) Helmet holder (…
-
Page 22: Instrument Panel
Instrument panel Speedometer Rev. counter Telltale lights ( Warning lights ( Multifunction display Ambient-light brightness sensor (for adapting the brightness of the instru- ment lighting) with anti-theft alarm (DWA) Anti-theft alarm telltale light (see the instructions for use for the anti-theft alarm) Control for the odometer Operation of the clock The instrument-cluster…
-
Page 23: Headlight
Headlight Low-beam headlight High-beam headlight Side light…
-
Page 25: Status Indicators
Status indicators Standard status indicators ..22 Status indicators with on-board computer ……23 Status indicators with tyre pressure monitoring (RDC) .
-
Page 26: Standard Status Indicators
Standard status Telltale lights level, before the reading is up- dated. indicators Gear indicator Multifunction display The gear engaged or for neutral appears on the display. If no gear is engaged, the ‘neutral’ telltale light also lights up. Flashing turn indicators, Engine temperature gauge left reading…
-
Page 27: Status Indicators With On
1 is shown briefly consult a specialist workshop, serviced at a date in advance after the Pre-Ride Check com- preferably an authorised BMW of the forecast due date. If the pletes. In this example the read- Motorrad dealer.
-
Page 28: (Rdc)
Standard warnings Mode of presentation Status-indicator panel of Tyre-pressure readout the on-board computer The figures shown in the Warnings are indicated by the tyre-pressure readings are ‘General’ warning light 1 show- Status indicators temperature-compensated (see ing in combination with a warning with tyre pressure the section entitled «Engineering word, for example 2 or in com-…
-
Page 29
The possible warnings are listed on the next page. -
Page 30
Warnings, overview Warning light Status indicators Meaning EWS ! Lights up yellow appears on Electronic immobiliser active ( the display FUEL ! Lights up yellow appears Fuel down to reserve ( on the display Lights up yellow Appears on the dis- Engine in emergency-operation mode play Flashes red… -
Page 31
Refuelling ( 85). placed, preferably by an au- mode. thorised BMW Motorrad dealer. You can continue to ride, but Engine in emergency- bear in mind that the usual en- Fuel down to reserve operation mode gine power might not be avail- The «General»… -
Page 32
BMW Motorrad Top up the engine oil. the engine or the ABS. This can dealer. result in dangerous situations. Possible cause: If possible, do not continue your Insufficient engine oil The engine-oil pressure is insuffi- journey. pressure cient. -
Page 33: Warnings Issued By The On
The LED rear light must be with on-board computer replaced. Consult a specialist Bulbs defective workshop, preferably an author- The «General» warning light ised BMW Motorrad dealer. shows yellow. Front light bulb defective LAMPS ! appears on the dis- LAMPF ! appears on the dis- play.
-
Page 34
Warnings, overview Warning light Status indicators Meaning Appears on the dis- Engine-oil level too low ( play Check Oil pears on the dis- play Appears on the dis- Ice warning ( play… -
Page 35: Abs Warnings
Seek the advice of a specialist ABS warnings workshop, preferably an author- The detailed descriptions relating ised BMW Motorrad dealer. Mode of presentation to BMW Motorrad Integral ABS with BMW Motorrad Integral start on page ( 90), and you Ice warning ABS II…
-
Page 36
Warnings, overview Warning light Status indicators Meaning Flashes Self-diagnosis not completed ( Lights up ABS deactivated ( Lights up ABS fault (… -
Page 37: Asc Warnings
The detailed descriptions relating lead to an ABS fault ( 91). The ABS warning light to BMW Motorrad ASC start on Have the fault rectified as comes on. page ( 92), and you will find…
-
Page 38
an overview listing the possible warnings on the next page. -
Page 39
Warnings, overview Warning light Status indicators Meaning Quick-flashes yel- Appears on the dis- ASC intervention ( play Quick-flashes yel- Appears on the dis- Off-road ASC intervention ( play Slow-flashes Self-diagnosis not completed ( Slow-flashes Self-diagnosis in off-road mode not completed ( Appears on the dis- ASC deactivated ( play… -
Page 40
The «General» warning light Pull away slowly. The ASC workshop, preferably an author- quick-flashes yellow. warning light must go out with- ised BMW Motorrad dealer. in a few metres. The off-road ASC symbol appears on the display. If the ASC warning light contin-… -
Page 41: Rdc Warnings
The rider has switched off the Have the fault rectified as ASC system. quickly as possible by a with Automatic Stability Con- specialist workshop, preferably trol an authorised BMW Motorrad Activating ASC function dealer. 61). RDC warnings ASC fault The «General» warning light…
-
Page 42
The detailed descriptions relating to BMW Motorrad RDC start on page ( 94), and you will find an overview listing the possible warnings on the next page. -
Page 43
Warnings, overview Warning light Status indicators Meaning Lights up yellow Tyre symbol ap- Tyre pressure close to limit of permitted pears on the dis- tolerance ( play. The critical tyre pressure flashes. Flashes red Tyre symbol ap- Tyre pressure outside permitted toler- pears on the dis- ance ( play. -
Page 44
Measured tyre pressure is close Check the tyre for damage and authorised BMW Motorrad to the limit of permitted toler- to ascertain whether the mo- dealer. ance. torcycle can be ridden with the… -
Page 45
RDC specialist workshop, preferably toms. Under these circum- readings. Assume that a per- an authorised BMW Motorrad stances: manent fault has not occurred dealer. Have the fault rectified by a unless the ‘General’ warning… -
Page 46: Anti-Theft Alarm Warnings
Seek the advice of a specialist ing light 1 showing after the Pre- workshop, preferably an author- Ride Check and relate to the ca- ised BMW Motorrad dealer. pacity of the internal battery that supplies power to the anti-theft alarm.
-
Page 47
Warnings, overview Warning light Status indicators Meaning DWALO ! appears Anti-theft alarm battery weak ( on the display DWA ! Lights up yellow appears on Anti-theft alarm battery flat ( the display… -
Page 48
Seek the advice of a specialist proportion of its original capa- workshop, preferably an author- city. There is no assurance of ised BMW Motorrad dealer. how long the anti-theft alarm can remain operational if the motor- cycle’s battery is disconnected. -
Page 49: Operation
Front and rear seats ….71 BMW Motorrad Integral ABS ..59 Helmet holder ….. . 73 Automatic Stability Control ASC .
-
Page 50: Ignition Switch And Steering Lock
Pre-ride check is performed. Electrically powered accessor- with topcase ies remain operational for a lim- If you wish you can arrange to with BMW Motorrad Integral ited period of time. have the cases and the top- ABS II The battery can be recharged case fitted with locks that can via the socket.
-
Page 51: Electronic Immobiliser Ews
You can obtain replacement/extra unit has recognised the key as keys only through an authorised «authorised» for your motorcycle. BMW Motorrad dealer. The keys are part of an integrated security A spare key attached to system, so the dealer is under an…
-
Page 52: Clock
Clock reading appears on the display. Setting clock with on-board computer Attempting to set the clock while riding the motorcycle with tyre pressure monitoring can lead to accidents. (RDC) Set the clock only when the mo- torcycle is stationary. Switch on the ignition. Press and hold down the but- without on-board computer ton until the hours number 3…
-
Page 53: Odometer And Tripmeters
Odometer and with on-board computer tripmeters with tyre pressure monitoring Select the readings (RDC) Switch on the ignition. without on-board computer without tyre pressure monitor- ing (RDC) Repeatedly press the button until the value you want ap- pears in panel 3. The following values can be dis- played: Press button 1.
-
Page 54
without on-board computer with on-board computer without tyre pressure monitor- ing (RDC) with tyre pressure monitoring (RDC) The residual-range readout 1 in- dicates how far you can ride with the fuel remaining in the tank. This reading is not displayed until Press and hold down button 1 fuel level has dropped to reserve. -
Page 55: On-Board Computer
The calculated range is an Ambient temperature approximate value. Con- sequently, BMW Motorrad re- commends that you should not try to use the full residual range before refuelling. On-board computer with on-board computer The following values can be dis- Select the readings…
-
Page 56
drops below this threshold for Average consumption the first time. Average speed Press and hold down button 1 until the average-speed reading Average consumption 1 is cal- is reset. culated by dividing the distance covered since the last reset by Average speed 1 is calculated the corresponding amount of fuel on the basis of the time elapsed… -
Page 57
Range when the motorcycle is on the move. The calculated range is only an approximate reading. Consequently, BMW Motorrad recommends that you should not try to use the full range before refuelling. Oil level Press and hold down button 1… -
Page 58: Tyre Pressure Monitoring Rdc
In this Repeatedly press button 1 un- case, consult your authorised The readings mean: til the tyre-pressure readings BMW Motorrad dealer. : Oil level is correct. appear on the display. CHECK Tyre pressure : Check the oil level the next time you stop for fuel.
-
Page 59: Lights
ing on the right is the rear tyre When the engine is not Parking light — — pressure. appears dir- running you can switch on Switch off the ignition. ectly after the ignition is switched the lights by switching on the ig- on, because the sensors do not nition and either switching on the transmit tyre pressures until the…
-
Page 60: Turn Indicators
Turn indicators Operating flashing turn indicators Switch on the ignition. The turn indicators are can- celled automatically after you have ridden for approxim- ately 10 seconds, or covered a distance of about 200 m. Press left section of switch 1 Press button 2 to switch on to switch on the auxiliary head- the right flashing turn indicator.
-
Page 61: Emergency Off Switch
Emergency off switch If you press a turn-indicat- or button with the ignition (kill switch) switched on, the turn-indicator function is activated instead of the hazard warning flashers, and remains active until you release the button. The hazard warning flashers recommence flashing as soon as the button is released.
-
Page 62: Operating Grip Heating
is low, grip heating is switched off to ensure the battery’s start- ing capability. Normal operating position The handlebar grips have two- (run) stage heating. Stage two is for heating the grips quickly: it is ad- Engine switched off. visable to switch back to stage You cannot start the engine Set switch 1 to the desired one as soon as the grips are…
-
Page 63: Bmw Motorrad Integral Abs
Integral function ensures that comes on. the rear wheel is also braked and ABS control remains active for with Automatic Stability Con- with BMW Motorrad Integral the rear wheel. ABS control for trol ABS II the rear wheel is not deactivated…
-
Page 64: Automatic Stability Control Asc
ASC function The off-road ASC symbol Operation remains visible or continues Switch on the ignition. The BMW Motorrad ASC sys- to flash. You have the option of de- tem can be deactivated and ac- The off-road ASC function is…
-
Page 65: Seat Height
Seat height To switch off ASC, press and The ASC symbol no longer hold down button 1 until the shows; if ASC self-diagnos- Adjusting seat height ASC symbol changes status. is has not completed the ASC Remove the front seat ( 72).
-
Page 66: Windscreen
Windscreen Clutch Adjusting windscreen Adjusting clutch lever If the position of the clutch fluid reservoir is changed, air can enter the clutch system. Do not twist the handlebar fitting or the handlebars. Attempting to adjust the clutch lever while riding the The front seat can work motorcycle can lead to accidents.
-
Page 67: Brakes
Mirrors between the clutch lever and handbrake lever unless the mo- the handlebar grip. torcycle is at a standstill. Adjusting mirrors Turn adjusting screw 1 counter-clockwise to reduce the span between the clutch lever and the handlebar grip. The adjusting screw is easi- er to turn if you push the clutch lever forward.
-
Page 68: Handlebars
Slacken nut 2. workshop, preferably an author- Turn the mirror arm to the ap- ised BMW Motorrad dealer. propriate position. Tighten the nut to the spe- Spring preload cified tightening torque, while Setting…
-
Page 69
It is essential to set spring pre- Spring preload at front load of the rear suspension to wheel suit the load carried by the mo- torcycle. Increase spring preload Spring preload at setting 3 when the motorcycle is heavily (For riding on gravel tracks loaded and reduce spring preload and similar and with load) accordingly when the motorcycle… -
Page 70: Damping
If you want to increase spring preload, turn knob 1 in the dir- ection indicated by the HIGH arrow. Basic setting of spring preload, rear without Electronic Suspen- sion Adjustment (ESA) You can ascertain the current Your motorcycle’s hand- Turn the knob as far as it setting by counting the num- ling will suffer if you do not will go in the LOW direction,…
-
Page 71
An increase in spring preload Adjust the damping character- Basic setting of rear-sus- requires firmer damping, a re- istic, using the tool from the pension damping charac- duction in spring preload re- on-board toolkit to turn adjust- teristic quires softer damping. ing screw 1. -
Page 72: Electronic Suspension Adjustment
Electronic Suspension Calling up settings function display, and spring pre- load in panel 2. Adjustment ESA Switch on the ignition. with Electronic Suspension Ad- The setting shows briefly, then justment (ESA) disappears automatically. Possible adjustments Adjust the suspension damping Electronic Suspension Adjust- ment ESA provides a convenient Switch on the ignition.
-
Page 73
Repeatedly press button 1 until then automatically disappears from the display. the setting you want to use appears on the display. Adjust spring preload If a road-riding mode has been Start the engine. selected the following can be displayed: You cannot adjust spring preload while the motor- COMF : comfort mode… -
Page 74: Tyres
The riding modes you can select ling characteristics and increase Tyre pressure, front also change accordingly. the rate of tyre wear. Always check that the tyre pres- Predominantly smooth ter- sures are correct. 2.5 bar (two-up and/or with rain luggage, tyre cold) At high road speeds, tyre Uneven terrain valves installed perpen-…
-
Page 75: Front And Rear Seats
BMW Headlight beam-throw Motorrad dealer. adjustment Headlight beam throw and spring preload Headlight beam throw is gener- ally kept constant when spring preload is adjusted to suit load. Spring preload adjustment might not suffice only if the motorcycle Neutral position is very heavily loaded.
-
Page 76
Install the front seat Turn the key clockwise in seat Turn the key counter-clockwise lock 1 and hold it in this pos- in seat lock 1 and hold it in this Position the front seat with ition while pressing down the position while pressing down mounts 4 in holders 5 on left front part of rear seat 2. -
Page 77: Helmet Holder
Engage the rear seat in The helmet catch can mounts 6. scratch the panelling. Press down firmly on the front Make sure the lock is out of the of the rear seat until it engages way when you hook the helmet with an audible click.
-
Page 79: Riding
Riding Safety instructions ….76 Checklist ……78 Starting .
-
Page 80: Safety Instructions
When riding over with case the year. Your authorised BMW kerbs and similar obstacles, bear Ensure that the case volumes Motorrad dealer will be glad to in mind that your motorcycle’s on the left and right are equal.
-
Page 81
with tank rucksack Settings of the spring-strut and Payload of cases shock-absorber system Note the maximum permissible Imbalanced load payload of the tank rucksack and the speed limit for riding Loose clothing see label in case with a tank rucksack on the Insufficient tyre pressure Maximum permissible motorcycle. -
Page 82: Checklist
Risk of poisoning Stop the engine immediately if Tampering it misfires. Exhaust fumes contain carbon Tampering with motor- Use only unleaded fuel. monoxide, which is colourless cycle settings (e.g. elec- Comply with all specified main- and odourless but highly toxic. tronic engine management unit, tenance intervals.
-
Page 83: Starting
BMW Motorrad Integral slightly when starting the engine. the side stand. ABS II At ambient temperatures below ABS self-diagnosis is 0 °C, disengage the clutch after…
-
Page 84
ABS II The engine starts. CHECK! appears on the dis- BMW Motorrad Integral ABS per- Consult the troubleshooting play. forms self-diagnosis to ensure its chart below if the engine re- operability. Self-diagnosis is per- If the ‘General’ warning light does fuses to start. -
Page 85: Running In
The ABS warning light ASC self-diagnosis BMW Motorrad ASC performs completed flashes. self-diagnosis to ensure its op- erability. Self-diagnosis is per- The ASC symbol no longer ABS self-diagnosis formed automatically when you shows. completed switch on the ignition. If an indicator showing an ASC…
-
Page 86: Off-Roading
Enduro reading 0…200 km) tend stopping distance by a attachment kit available from significant margin. <6500 min (Odometer your authorised BMW Motorrad Apply the brakes in good time. reading 200…400 km) dealer. <7500 min (Odometer Tyres Rims reading 400…600 km)
-
Page 87: Brakes
After off-roading The brake pads will wear Air filter element more rapidly if you ride fre- BMW Motorrad recommends Engine damage due to quently on unsurfaced tracks or checking the following after riding clogged air filter element. poor roads. the motorcycle off-road:…
-
Page 88
ABS II situations: To optimise stopping distance, Riding in the rain or through BMW Motorrad Integral ABS pre- apply the front brakes rapidly and puddles of water. vents the front wheel from lock- keep on increasing the force you ing up. -
Page 89: Parking Your Motorcycle
Parking your Refuelling On a gradient, the motorcycle should always face uphill; se- motorcycle Fuel is highly flammable. A lect 1st gear. naked flame close to the Side stand fuel tank can cause a fire or ex- Centre stand Switch off the engine. plosion.
-
Page 90
onto the road surface. This could Recommended fuel cause a fall. grade Do not overfill the fuel tank. Premium plus unleaded Leaded fuel will destroy the 98 ROZ/RON catalytic converter. 91 AKI Use only unleaded fuel. Refuel with fuel of the grade alternative fuel grade stated below;… -
Page 91: Secure The Motorcycle For Transport
Usable fuel capacity approx. 20 l Reserve fuel approx. 4 l Press the fuel tank cap down The motorcycle can topple Risk of damaging compon- firmly to close. and fall on its side. ents. Remove the key and close the Make sure that the motorcycle Take care not to trap protective cap.
-
Page 92
At the rear, secure the straps to the rear footrests on both sides and tighten the straps. Tighten all the straps uniformly; the motorcycle’s suspension should be compressed as tightly as possible front and rear. -
Page 93: Engineering Details
Integral ABS ……90 Electronic engine management with BMW Motorrad ASC ….92 Tyre pressure monitoring RDC ..94 Electronic Suspension Adjustment ESA .
-
Page 94: Brake System With Bmw Motorrad Integral Abs
Do not attempt burn-outs. is maintained irrespective of the with BMW Motorrad Integral condition of the road surface. How does ABS work? ABS II What are the effects of…
-
Page 95
Motorrad Integral ABS? tual circumstances, the system pulled. Within the limits imposed by reacts instantly and adjusts brak- physics, the BMW Motorrad In- Rear wheel lift ing force accordingly to achieve tegral ABS ensures directional optimum braking. Under very severe and sudden stability on any surface. -
Page 96: Electronic Engine Management With
Motorrad ASC of maintenance. iary stand, engine idling or with In order to ensure that the BMW with Automatic Stability Con- a gear engaged. Motorrad Integral ABS is always trol…
-
Page 97
Self-diagnos- Motorrad ASC? ity for assessing road and traffic is has to complete before fault BMW Motorrad ASC is designed conditions and adopting his or messages can be issued. as an assistant system for the her style of riding accordingly. -
Page 98: Asc
15 minutes after the The BMW Motorrad ASC is un- tyres, with the result that ASC motorcycle comes to a stop. able to control a situation of this…
-
Page 99: Electronic Suspension Adjustment
In order to ensure rapid adjust- The tyre-pressure readings the value in the table. ment at ambient temperatures shown by the multifunction below 0 °C, BMW Motorrad re- display are temperature- commends adjusting the sus- compensated; the reference tyre pension to the setting for two-up…
-
Page 100
Off-road settings um. It can be used, for example, The Enduro ESA developed spe- in terrain where the likelihood of cially for the R 1200 GS incor- having to negotiate bumps and porates the road-riding modes holes in the ground necessit-… -
Page 101: Accessories
Accessories General instructions ….98 Power sockets ….. . 98 Case .
-
Page 102: General Instructions
BMW motorcycles Power sockets are shut down proved by BMW for this purpose. without constituting a safety haz- automatically under the following Genuine BMW parts and ac- ard. Country-specific official au-…
-
Page 103: Case
remains operational if the igni- Opening cases tion is subsequently switched off. The power sockets are switched off approximately 15 after the ig- nition is switched off, in order to prevent overloading of the on- board electrics. Cable routing The cables from the power sock- Push yellow button 4 down ets to the auxiliary devices must and at the same time open the…
-
Page 104
Adjusting case volume Remove the cases Open the case and remove all its contents. Closing the carry handle while the case lock is in Turn key 1 in the case lock to line with the forward direction of right angles with the forward travel can result in damage to the direction of travel. -
Page 105
Take a firm grip of the handle and lift the case out of the holder. Installing cases Open locking lever 4. Fully open latching flap 6, if ne- cessary pulling up red release lever 5. Open locking lever 4. Pull red release lever 5 up. Latching flap 6 pops up. -
Page 106: Topcase
carriers 7, noting the locking Opening topcase lever at the side. Close locking lever 4. Close the carry handle. Turn key 1 in the topcase lock Turn the key parallel with the to the vertical position. Push latching flap 6 down as direction of travel and remove.
-
Page 107
Closing the carry handle while the topcase lock is horizontal can result in damage to the locking tongue. Make sure that the topcase lock is vertical when you close the carry handle. Close carry handle 3. The handle engages with an Push yellow button 4 forward Engage pivot lever 1 at the audible click. -
Page 108
Removing topcase Installing topcase Pull red lever 4 back as far as it will go. Turn key 1 in the topcase lock Fully open latching flap 5, if Latching flap 5 pops up. to the vertical position. necessary pulling red release Fully open latching flap 5. -
Page 109: Luggage Carrier
Luggage carrier Extra-large luggage platform By removing the luggage carrier with the rear seat removed and cases (OA) installed, you have a large, flat luggage platform to which you can secure bulky items of luggage in various ways. Engage the topcase in front Push latching flap 5 fully When loading, make sure that holders 6 of the topcase carrier…
-
Page 110
Remove screws 1 on left and Place the luggage rack in posi- right. tion. Remove screw 2. Install screw 2 with the sleeve and the washer and tighten to Remove the sleeves and wash- the specified torque. ers. Install screws 1 with the Remove the luggage carrier. -
Page 111: Maintenance
Maintenance General instructions ….108 Toolkit ……108 Engine oil .
-
Page 112: General Instructions
Some of the work calls for spe- plain tips cial tools and a thorough know- Replacing turn indicat- ledge of motorcycle technology. or bulbs, front and rear If you are in doubt consult a spe- 128). cialist workshop, preferably your authorised BMW Motorrad deal-…
-
Page 113: Engine Oil
Extension for hook wrench Switch off the engine when it is Hook wrench BMW Motorrad has assembled at operating temperature. Adjusting spring preload a tools service set that is ideal Make sure the ground is level for front wheel ( 65).
-
Page 114
110). If the oil level is above the MAX mark: Have the oil level corrected by a specialist workshop, preferably an authorised BMW Motorrad dealer. Check the oil level in oil-level Wipe the area around the filler indicator 1. neck clean. -
Page 115: Brake System
0.5 l (Difference Have the brakes checked by a between MIN and MAX) specialist workshop, preferably an authorised BMW Motorrad Checking engine oil level dealer. 109). Install the cap of the oil filler Check the front brake pad neck.
-
Page 116
Have the brake pads replaced by a specialist workshop, preferably an authorised BMW Motorrad dealer. Visually inspect the brake pads Brake-pad wear limit, Checking rear brake pad to ascertain their thickness. -
Page 117
Have the brake pads replaced by a specialist workshop, preferably an authorised BMW Motorrad dealer. Shaft 1 with three marker rings 2 Brake-pad wear limit, Brake-pad wear is between the brake pads. -
Page 118
MIN mark. (Brake-fluid reservoir horizontal, motorcycle up- right) If the brake fluid level drops be- low the permitted level: Have the defect rectified as quickly as possible by a spe- cialist workshop, preferably an authorised BMW Motorrad dealer. -
Page 119
(for example replacing brake pads or changing brake fluid). Consult a specialist workshop, preferably an authorised BMW Motorrad dealer. -
Page 120: Clutch
If the pressure point is not clearly perceptible: Have the clutch checked by a specialist workshop, preferably Check the clutch fluid level in Brake fluid level, rear an authorised BMW Motorrad reservoir 1. dealer. Wear of the clutch causes Checking clutch fluid level DOT4 brake fluid the fluid level in the clutch fluid reservoir to rise.
-
Page 121: Rims And Tyres
Do not attempt to top up the wear marks. an authorised BMW Motorrad system with fluids of any kind. dealer. Tyres have wear indicators Have the defect rectified as…
-
Page 122: Wheels
Tyre recommendation calculations. Any change in these (RDC) For each size of tyre BMW influencing variables, caused for Motorrad tests and classifies example by a switch to wheels as roadworthy certain makes.
-
Page 123
Remove securing screws 2 of sensor. Be sure to draw the rim that could be scratched in the left and right brake calipers. attention of the authorised BMW the process of removing the Motorrad dealer or specialist brake calipers. workshop to the fact that the wheel is fitted with an RDC sensor. -
Page 124
BMW Motorrad Integral ABS II Release axle clamping screw 2. Remove spacing bushing 4 from the left-hand side of the Remove quick-release axle 3, front-wheel hub. while supporting the wheel. Remove screw 1 and remove the ABS sensor from its bore. -
Page 125
Roll the front wheel into posi- with BMW Motorrad Integral threads can suffer damage. tion between the front forks. ABS II Always have the security of the fasteners checked by a specialist workshop, preferably an author- ised BMW Motorrad dealer. -
Page 126
Make sure that the sensor bedded. cable is routed correctly. with BMW Motorrad Integral Make sure that the sensor ABS II cable is routed as shown here. Install securing screws 2 on… -
Page 127
Parts of the exhaust system The wheel studs for the ised BMW Motorrad dealer. can be hot. cross-spoked wheel (op- tional extra) and the cast alumini- Do not touch hot parts of the Seat the rear wheel on the um wheel differ in length. -
Page 128: Front-Wheel Stand
BMW Motorrad Centre the front-wheel stand Tightening sequence: tight- front-wheel stand. relative to the front wheel and en in diagonally opposite push it against the front axle.
-
Page 129: Bulbs
Bulbs in the section entitled «Technical data». General instructions A warning appears in the multi- Replacing low-beam/high- function display if a bulb is de- beam headlight bulb fective. If the brake or rear light The positions of the plug, fails, the symbol is accompan- the spring retainer and the ied by the ‘General’ warning light, bulb might not be as illustrated…
-
Page 130
cover 2 by turning the cover Replace the defective bulb. counter-clockwise. Do not touch the glass of new bulbs with your fingers. Use a clean, dry cloth to hold the bulbs when handling them. Dirt deposits, in particular oil and grease, interfere with heat radi- ation from the bulb. -
Page 131
Replacing parking-light bulb Make sure the ground is level and firm and place the motor- cycle on its stand. Switch off the ignition. Turn the handlebars all the way to the right Install plug 3. Pull the bulb out of the bulb socket. -
Page 132
Bulb for parking light W5W / 12 V / 5 W Install bulb carrier 1 in the Remove screw 1. headlight housing. Replacing turn indicator bulbs, front and rear Make sure the ground is level Install the bulb in the bulb and firm and place the motor- socket. -
Page 133
Bulbs for flashing turn indicators, front RY10W / 12 V / 10 W with LED turn indicators LED / 12 V Bulbs for flashing turn indicators, rear Turn bulb 2 counter-clockwise Working from the inboard side, and remove it from the bulb insert the glass into the bulb RY10W / 12 V / 10 W housing. -
Page 134
LEDs. Consult a specialist workshop, preferably an authorised BMW Disconnect plug 2. Replace fuse 4 for right head- Motorrad dealer. light or fuse 5 for left headlight, as applicable. -
Page 135: Air Filter
Air filter Remove the air filter Make sure the ground is level and firm and place the motor- cycle on its stand. Remove the front seat ( 72). Connect plug 2. Remove screw 1. Remove two screws 2. Pull the side panel at 3 out of the retainer and remove.
-
Page 136
Installing air filter Push out both retainers 1 by Position the air intake pipe on pressing at rear. the air filter housing and push it Insert air filter 3 into the air fil- into holder 2. Pull the intake air pipe out of ter housing at the top. -
Page 137: Jump Starting
Hold the fuel-tank cover in po- Push side cover 1 into the two Cylinders not synchronised. sition and install two screws 5. mounts. Make sure the throttle-valve Install the front seat ( 72). cable is correctly routed. Check that the throttle-valve Jump starting cable is seated in guide 4 of The wires leading to the…
-
Page 138
A short-circuit can res- The spring-strut screw can ult if the crocodile clips be used as an alternative to of the jump leads are accident- the battery’s negative terminal. ally brought into contact with the Run the engine of the donor motorcycle. -
Page 139: Battery
If you switch on the igni- BMW Motorrad has de- tion and the multifunction Compliance with the points be- veloped a float charger spe- display and telltale lights fail to…
-
Page 140
Remove the front seat ( 72). electrics. with your motorcycle’s electron- Remove the rider’s manual, if Use BMW chargers with the ics. If this happens, disconnect applicable. part numbers 71 60 7 688 864 the battery from the on-board (220 V) or, as applicable, systems and connect the charger 71 60 7 688 865 (110 V). -
Page 141
If you want to have the date set Then remove the protective consult a specialist workshop, Engage the retainer at the bot- cap and disconnect positive preferably an authorised BMW tom, push it over the battery lead 1. Motorrad dealer. and install screw 3. -
Page 142
Slip the holder underneath the tank cover and install screws 1. Insert the rider’s manual, if ap- plicable. Install the front seat ( 72). Setting clock ( 48). -
Page 143: Care
Care Care products ….. 140 Washing motorcycle ….140 Cleaning easily damaged compon- ents .
-
Page 144: Care Products
Apply the brakes in good time Washing motorcycle until the brake discs and brake BMW Motorrad recommends pads have dried out. that you use BMW insect re- mover to soften and wash off insects and stubborn dirt on…
-
Page 145: Cleaning Easily Damaged
Do not use cleaning agents. agents, the surfaces can be dam- aged. Chrome Do not use cleaning agents that Use plenty of water and BMW contain alcohol, solvents or ab- shampoo to clean chrome, par- Use only proprietary motorcycle rasives to clean plastic parts.
-
Page 146: Paint Care
BMW Motorrad recommends ever, as otherwise the paint can Take care not to bend the fins applying only BMW car wax or be affected or become discol- when cleaning the radiator. products containing carnauba oured. Substances of this nature wax or synthetic wax.
-
Page 147: Restoring Motorcycle To Use
BMW Motorrad dealer. Com- bine work for laying up/restoring to use with a BMW service or inspection. Restoring motorcycle to use Remove the protective wax coating.
-
Page 149: Technical Data
Technical data Troubleshooting chart … . . 146 Riding specifications ….159 Threaded fasteners ….147 Engine .
-
Page 150: Troubleshooting Chart
Troubleshooting chart Engine does not start or is difficult to start Possible cause Remedy Emergency off switch (kill switch) Kill switch in operating position Side stand Retract the side stand ( Gear engaged and clutch not disengaged Select neutral or pull clutch lever ( Clutch pulled before ignition was switched on Switch on the ignition, then pull the clutch lever No fuel in tank…
-
Page 151: Threaded Fasteners
Threaded fasteners Front wheel Value Valid Brake caliper to slider tube M8 x 32 — 10.9 30 Nm Clamp screw of quick-release axle M8 x 35 19 Nm Quick-release axle in axle holder M24 x 1.5 50 Nm Rear wheel Value Valid Rear wheel to wheel carrier…
-
Page 152
Mirror arm Value Valid Mirror to adapter Locknut, M10 x 1.25 — 4.8 22 Nm Mirror adapter to clamping block M10 x 14 — 4.8 25 Nm Frame Value Valid Luggage carrier to rear frame M6 x 35, Replace screw 8 Nm Micro-encapsulated… -
Page 153: Engine
Engine Engine design Four-stroke opposed twin, air-cooled with oil- cooled exhaust ports, installed longitudinally, two overhead camshafts and four radially positioned valves per cylinder, electronic engine manage- ment. Displacement 1170 cm Cylinder bore 101 mm Piston stroke 73 mm Compression ratio 12.0 : 1 Nominal output 81 kW, at engine speed: 7750 min…
-
Page 154: Fuel
Premium unleaded (slight power- and consumption-related restrictions) 95 ROZ/RON 89 AKI with regular unleaded (RON 91) Regular unleaded (power- and consumption-re- lated restrictions) 91 ROZ/RON 87 AKI Usable fuel capacity approx. 20 l Reserve fuel approx. 4 l BMW recommends BP fuels…
-
Page 155: Engine Oil
Engine oil Engine oil, capacity max 4.0 l, with filter change of products recommended by BMW Motorrad and generally admissible viscosity classes Castrol GPS SAE 10W-40, API SG / JASO MA ~-20 °C SAE 5W-40, API SF / ACEA A2, or better ~-20 °C…
-
Page 156: Clutch
Clutch Clutch type Single-plate dry clutch Transmission Gearbox type Helical 6-speed gearbox with integral reaction damper, claw-action shift by sliding sleeves Gearbox transmission ratios 1,737, Primary transmission ratio 2.375 (38:16 teeth), 1st gear 1.696 (39:23 teeth), 2nd gear 1.296 (35:27 teeth), 3rd gear 1.065 (33:31 teeth), 4th gear 0.939 (31:33 teeth), 5th gear 0.848 (28:33 teeth), 6th gear…
-
Page 157: Rear-Wheel Drive
2.910 (32:11 teeth) Running gear Front wheel Type of front suspension BMW Telelever, with anti-dive top fork bridge, leading link pivot-mounted on engine and tele- scopic forks, central spring strut supported by leading link and front frame Spring strut, front, type Central spring strut with coil spring and twin-tube gas-filled shock absorber;…
-
Page 158: Brakes
Rear wheel Type of rear suspension Cast-aluminium single swinging arm with BMW Motorrad Paralever Type of rear suspension Central spring strut with coil spring, adjustable re- bound damping and hydraulically adjustable spring preload with Electronic Suspension Adjustment (ESA) Central spring strut with coil spring, electrically…
-
Page 159: Wheels And Tyres
Wheels and tyres Recommended tyre sets You can obtain an up-to-date list of approved tyres from your authorised BMW Motorrad dealer or on the Internet at «www.bmw-motorrad.com». Front wheel Front wheel, type Cast wheel with 5 double spokes, MT H2…
-
Page 160: Electrics
Electrics Electrical rating of on-board socket with extra socket max 5 A, Total for all sockets Fuses Electronic fuses protect the circuits. If an elec- tronic fuse trips and de-energises a circuit, the circuit is active as soon as the ignition is switched on after the fault has been rectified.
-
Page 161: Frame
Bulb for tail light/brake light LED / 12 V Bulbs for flashing turn indicators, front RY10W / 12 V / 10 W with LED turn indicators LED / 12 V Bulbs for flashing turn indicators, rear RY10W / 12 V / 10 W with LED turn indicators LED / 12 V Frame…
-
Page 162: Dimensions
Dimensions Length of motorcycle 2210 mm, Across luggage carrier Height of motorcycle 1450 mm, To top of windscreen when lowered, at DIN unladen weight with lowered suspension 1420 mm, To top of windscreen when lowered, at DIN unladen weight Width of motorcycle 940 mm, Across handlebars Front-seat height 850…870 mm, At unladen weight…
-
Page 163: Weights
Weights Unladen weight 229 kg, DIN unladen weight, ready for road 90 % load of fuel, without optional extras Permissible gross weight 440 kg Maximum payload 211 kg Riding specifications Top speed >200 km/h…
-
Page 165: Service
Service BMW Motorrad service … . 162 BMW Motorrad service quality ..162 BMW Motorrad mobility services — roadside assistance ….162 BMW Motorrad service network .
-
Page 166: Bmw Motorrad Service
To ensure that your BMW is al- BMW Motorrad mobility ably an authorised BMW Motor- ways in optimum condition, BMW rad dealer.
-
Page 167: Network
BMW Service place to look after you and your vice is approaching, on the basis The BMW Service is carried out motorcycle in more than 100 of the programmed values. once a year; the extent of servi- countries.
-
Page 168: Ance Work
Confirmation of maintenance work BMW Pre-delivery BMW Running-in Check Check Completed Completed Odometer reading Next service at the latest or, if logged beforehand, Odometer reading Stamp, signature Stamp, signature…
-
Page 169
BMW Service BMW Service BMW Service Completed Completed Completed Odometer reading Odometer reading Odometer reading Next service Next service Next service at the latest at the latest at the latest or, if logged beforehand, or, if logged beforehand, or, if logged beforehand,… -
Page 170
BMW Service BMW Service BMW Service Completed Completed Completed Odometer reading Odometer reading Odometer reading Next service Next service Next service at the latest at the latest at the latest or, if logged beforehand, or, if logged beforehand, or, if logged beforehand,… -
Page 171
BMW Service BMW Service BMW Service Completed Completed Completed Odometer reading Odometer reading Odometer reading Next service Next service Next service at the latest at the latest at the latest or, if logged beforehand, or, if logged beforehand, or, if logged beforehand,… -
Page 172
BMW Service BMW Service BMW Service Completed Completed Completed Odometer reading Odometer reading Odometer reading Next service Next service Next service at the latest at the latest at the latest or, if logged beforehand, or, if logged beforehand, or, if logged beforehand,… -
Page 173: Confirmation Of Service
Confirmation of service The table is intended as a record of maintenance and repair work, the installation of optional accessories and, if appropriate, special campaign (recall) work. Item Odometer Date reading…
-
Page 174
Item Odometer Date reading… -
Page 175
Position on the motorcycle, 17 Accessories Overview, headlights, 19 General instructions, 98 Warning, charge current, 28 Replacing auxiliary-headlight Air filter BMW Motorrad service, 162 bulbs, 130 Installation, 132 Brake fluid Replacing fuses for auxiliary Position on the motorcycle, 13 Reservoir, front, 13… -
Page 176
Electrics Frame Case Technical data, 156 Technical data, 157 Operation, 99 Emergency off switch (kill Front-wheel stand Checklist, 78 Installing, 124 switch), 16, 57 Clock, 22 Fuel Engine Adjusting, 48 Filler neck, 13 Starting, 79 Control, 14, 18 Fill-level indicator, 22 Technical data, 149 Clutch Refuelling, 85… -
Page 177
Telltale lights, 22 High-beam headlight Lights Control, 14 Auxiliary headlights, 55 Underneath the seat, 17 Switching on, 55 Headlight flasher, 55 Grip heating Control, 16 Telltale light, 22 Parking light, 55 Horn, 14 Switching on high-beam headlight, 55 Handlebar fittings Switching on low-beam General view, left side , 14 Idle… -
Page 178
Mirrors Seat Parking, 85 Adjusting, 63 Adjusting seat height, 61 Parking light, 55 Mobility services, 162 Lock, 11 Power socket, 11 Motorcycle Removing and installing, 71 Notes on use, 98 Laying up, 142 Service, 162 Pre-ride check, 80 Service-due indicator, 23 Restoring to use, 143 Side light Multifunction display, 18… -
Page 179
Topcase Table of tyre pressures, 17 Technical data Operation, 102 Technical data, 155 Brakes, 154 Torques, 147 Top speed, 77 Bulbs, 156 Transmission Clutch, 152 Technical data, 152 Dimensions, 158 Vehicle identification number, 13 Transportation Electrics, 156 Lashing, 87 Engine, 149 Troubleshooting chart, 146 Warning lights, 18 Engine oil, 151… -
Page 180
Installing rear wheel, 123 Remove the front wheel, 119 Removing rear wheel, 122 Technical data, 155 Windscreen Adjuster, 11 Adjusting, 62…
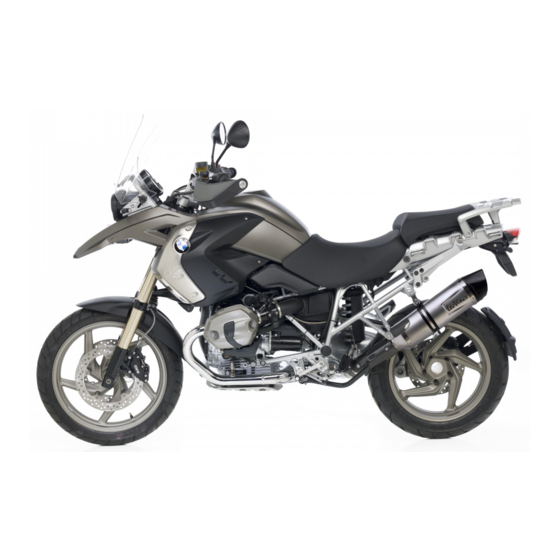
Page 1 — R 1200 GS Adventure
BMW MotorradRider’s ManualR 1200 GS AdventureThe UltimateRiding Machine
Page 2 — Dealership details
OverviewChapter 2 of this Rider’s Manu-al will provide you with an initialoverview of your motorcycle. Allmaintenance and repair work onthe motor
Page 3
complete before your passengermounts the motorcycle.The ESA indicator continuesto flash until adjustment com-pletes. Do not attempt to movethe motorcy
Page 4 — *01417726941*
AccessoriesAccessoriesGeneral instructions. . . . . . . . . . . . . . . . . 98Power sockets . . . . . . . . . . . . . . . . . . . . . . 98Case . . . .
Page 5 — Welcome to BMW
General instructionsBMW Motorrad recommendsthe use of parts and accessoriesfor your motorcycle that are ap-proved by BMW for this purpose.Genuine BMW
Page 6 — Table of Contents
remains operational if the igni-tion is subsequently switched off.The power sockets are switchedoff approximately 15 after the ig-nition is switched o
Page 7
Pull catch 2 up as far as it willgo, while pressing down on thecase lid.Lift the lid of the case.Closing casesPush case lid and catch 2down, engaging
Page 8
Close the case lid.Open the second catch of thecase lid.Remove the case lid.Installing case lidPlace the case lid on the case.Close one of the catches
Page 9
Pivot the case against thetop rail, push it back into themounts and hold it in position.Press catch 2 out as far as itwill go.Turn key 1 in the case l
Page 10 — General instructions
Open the topcase lid.Close the topcaseClose the topcase lid.Push topcase lid and catch 2down, engaging the catch hookin the topcase lid.The catch enga
Page 11 — Equipment
Installing topcasePosition the topcase on thetopcase mount in such a waythat hooks 3 are just behindrails 4.Press the topcase down untilit is seated f
Page 12
Adjustable topcase mountThe topcase mount can be in-stalled on the luggage carrier orinstead of the rear seat.The luggage carrier has two setsof holes
Page 13 — General views
ESA Electronic SuspensionAdjustmentElectronic SuspensionAdjustment.RDCTyre pressure control(ReifenDruck-Control)EquipmentWhen you ordered your BMWmoto
Page 15 — General view, left side
MaintenanceMaintenanceGeneral instructions. . . . . . . . . . . . . . . . 108Toolkit . . . . . . . . . . . . . . . . . . . . . . . . . . . . . 108Engi
Page 16
General instructionsThe «Maintenance» chapter de-scribes straightforward proced-ures for checking and replacingcertain wear parts.Special ti
Page 17 — General view, right side
2 Hook wrenchAdjusting spring preloadfor front wheel ( 66).3 Extension for screwdriverbladeAdjusting damping forrear wheel ( 68).Tools service setBMW
Page 18 — Handlebar fitting, left
Engine oil, specified levelBetween MIN and MAXmarksIf the oil level is below the MINmark:Top up the engine oil ( 110).If the oil level is above the MA
Page 19
If pressure points are not clearlyperceptible:Incorrect working practicesendanger the reliability ofthe brakes.Have all work on the brake sys-tem unde
Page 20 — Handlebar fitting, right
In order to ensure the dependab-ility of the brake system, do notpermit the brake pads to wearpast the minimum permissiblethickness.Have the brake pad
Page 21 — Underneath the seat
In order to ensure the dependab-ility of the brake system, do notpermit the brake pads to wearpast the minimum permissiblethickness.Have the brake pad
Page 22 — Instrument panel
Check the brake fluid level infront reservoir 1.Wear of the brake padscauses the brake fluid levelin the reservoir to sink.Brake fluid level, frontDOT
Page 23 — Headlight
Check the brake-fluidlevel, rear brakesA low fluid level in thebrake reservoir can allow airto penetrate the brake system.This significantly reduces b
Page 25 — Status indicators
ClutchChecking clutch operationPull the clutch lever.The pressure point must beclearly perceptible.If the pressure point is not clearlyperceptible:Hav
Page 26 — Standard status
Make sure the ground is leveland firm and place the motor-cycle on its stand.Measure the tyre tread depthin the main tread grooves withwear marks.Tyre
Page 27 — Status indicators with
are programmed into the controlunit and are fundamental to allcalculations. Any change in theseinfluencing variables, caused forexample by a switch to
Page 28 — Mode of presentation
Mask off the parts of the wheelrim that could be scratched inthe process of removing thebrake calipers.Once the calipers havebeen removed, there isa r
Page 29
Release axle clamping screw 2.Remove quick-release axle 3,while supporting the wheel.Roll the front wheel forward toremove.Remove spacing bushing 4fro
Page 30 — Warnings, overview
Raise the front wheel, insertquick-release axle 3 and tight-en to specified torque.Quick-release axle in axleholder50 NmTighten axle clamping screw 2t
Page 32 — LAMPR ! appears on the dis
See the information on the effectof wheel size on the ABS andASC systems at the start of thischapter.Threaded fasteners nottightened to the specifiedt
Page 33 — Bulbs defective
Slacken adjusting screws 1.Push the two adapters 2 apartuntil the front forks fit betweenthem.Use locating pins 3 to set thefront-wheel stand to the d
Page 34 — Check Oil ap
BulbsGeneral instructionsA warning appears in the multi-function display if a bulb is de-fective. If the brake or rear lightfails, the symbol is accom
Page 35 — ABS warnings
General viewsGeneral viewsGeneral view, left side. . . . . . . . . . . . . . . 11General view, right side . . . . . . . . . . . . . 13Handlebar fittin
Page 36
Disengage spring clip 4 andswing it aside.Remove bulb 5.Replace the defective bulb.Do not touch the glass ofnew bulbs with your fingers.Use a clean, d
Page 37 — ASC warnings
clockwise. Make sure that thewording TOP is at the top.Replacing parking-lightbulbMake sure the ground is leveland firm and place the motor-cycle on i
Page 38
Install bulb carrier 1 in theheadlight housing.Replacing turn indicatorbulbs, front and rearMake sure the ground is leveland firm and place the motor-
Page 39
Bulbs for flashing turnindicators, frontRY10W / 12 V / 10 Wwith LED turn indicatorsOELED / 12 VBulbs for flashing turnindicators, rearRY10W / 12 V / 1
Page 40 — RDC warnings
Pivot the headlight lens for-ward.Remove four screws 3.Push bulb cover 4 down toremove.Pull bulb housing 5 down untilit is clear of the holder.Turn bu
Page 41
Push bulb housing 5 up intothe holder from below.Seat bulb cover 4 from below.Install four screws 3.Pivot the headlight lens back.Tighten screw 2.Conn
Page 42 — RDC! appears on
To do so, squeeze retainingclips 3 together on left andright and disconnect the plug.Replace fuse 4 for right head-light or fuse 5 for left headlight,
Page 43
Remove long screw 1 andshort screws 2 and removethe cover.Remove screw 3.Pull the side cover at 4 and 5to disengage it from the hold-ers.Remove two sc
Page 44
Push the air filter into the airfilter housing at the bottom,making sure that the vanes arenot bent.Position the air intake pipe onthe air filter hous
Page 45 — Anti-theft alarm
Hold the cover in position andinstall short screws 2 and longscrew 1.Install the front seat ( 73).Jump startingThe wires leading to thepower socket do
Page 48
Charge the battery whenconnectedCharging the connectedbattery directly at the bat-tery terminals can damage thevehicle electronics.Always disconnect t
Page 49 — Operation
of disuse. See the instructionsfor caring for your battery. Al-ways fully recharge the batterybefore restoring it to useRemoving batteryRemove the fro
Page 50 — Ignition switch and
Installation in the wrongsequence increases the riskof short-circuits.Always proceed in the correctsequence.Never install the battery withoutthe prote
Page 52
CareCareCare products . . . . . . . . . . . . . . . . . . . . . 142Washing motorcycle . . . . . . . . . . . . . . . 142Cleaning easily damaged compon-
Page 53 — Resetting tripmeter
Care productsBMW Motorrad recommendsthat you use the cleaning andcare products you can obtainfrom your authorised BMWMotorrad dealer. The substancesin
Page 54
Even fly-remover pads or clean-ing pads with hard surfaces canproduce scratches.Soften stubborn dirt andinsects by covering the af-fected areas with a
Page 55 — Ambient temperature
BMW Motorrad recommendsBMW tar remover for removingspecks of tar. Remember to waxthe parts treated in this way.Protective wax coatingBMW Motorrad reco
Page 56
Technical dataTechnical dataTroubleshooting chart . . . . . . . . . . . . . 146Threaded fasteners . . . . . . . . . . . . . . . . 147Engine . . . . .
Page 57
General view, left side1 Adjuster, spring preload,front ( 66)2 Adjustment of windscreen( 62)3 Adjuster for headlightbeam throw (underneaththe instrume
Page 58 — Viewing tyre-pressure
Troubleshooting chartEngine does not start or is difficult to startPossible cause RemedyEmergency off switch (kill switch) Kill switch in operating po
Page 59 — — — appears dir
Threaded fastenersFront wheel Value ValidBrake caliper to slider tubeM8 x 32 — 10.9 30 NmClamp screw of quick-releaseaxleM8 x 35 19 NmQuick-release ax
Page 60 — Hazard warning
Mirror arm Value ValidMirror adapter to clampingblockM10 x 14 — 4.8 25 NmShift lever Value ValidPeg to gearshift leverM6 x 16 8 Nm10148zTechnical data
Page 61 — (kill switch)
EngineEngine design Four-stroke opposed twin, air-cooled with oil-cooled exhaust ports, installed longitudinally, twooverhead camshafts and four radia
Page 62 — Operating grip heating
FuelRecommended fuel grade Premium plus unleaded98 ROZ/RON91 AKIPremium unleaded (slight power- andconsumption-related restrictions)95 ROZ/RON89 AKIwi
Page 63 — BMW Motorrad Integral
Engine oilEngine oil, capacity max 4.0 l, with filter changeof products recommended by BMW Motorrad and generally admissible viscosity classesCastrol
Page 64 — Control ASC
ClutchClutch type Single-plate dry clutchTransmissionGearbox type Helical 6-speed gearbox with integral reactiondamper, claw-action shift by sliding s
Page 65
Rear-wheel driveType of final drive Shaft drive with bevel gearsType of rear suspension Cast-aluminium single swinging arm with BMWMotorrad ParaleverG
Page 66 — Windscreen
Rear wheelType of rear suspension Cast-aluminium single swinging arm with BMWMotorrad ParaleverType of rear suspension Central spring strut with coil
Page 67
Wheels and tyresRecommended tyre sets You can obtain an up-to-date list of approvedtyres from your authorised BMW Motorrad dealeror on the Internet at
Page 69 — Handlebars
ElectricsElectrical rating of on-board socket 5 Awith extra socketOAmax 5 A, Total for all socketsFuses Electronic fuses protect the circuits. If an e
Page 70 — Spring preload
LightingBulb for high-beam headlight H7 / 12 V / 55 WBulbs for the low-beam headlight H7 / 12 V / 55 WBulb for parking light W5W / 12 V / 5 WBulb for
Page 71
FrameFrame type Tubular steel front frame and rear frame, withload-bearing drive unitType plate location On left side behind side coverVIN location Fr
Page 72
WeightsUnladen weight 256 kg, DIN unladen weight, ready for road 90 %load of fuel, without optional extrasPermissible gross weight 475 kgMaximum paylo
Page 74 — Adjust spring preload
ServiceServiceBMW Motorrad service . . . . . . . . . . . . 162BMW Motorrad service quality . . . . . 162BMW Motorrad mobility services -roadside assis
Page 75
BMW Motorrad serviceAdvanced technology requiresspecially adapted methods ofmaintenance and repair.If maintenance and re-pair work is performed in-exp
Page 76 — Front and rear seats
contact the Mobile Service or-ganisation of BMW Motorrad.The specialists will provide thenecessary advice and assistance.You will find important count
Page 77
Confirmation of maintenance workBMW Pre-deliveryCheckCompletedonStamp, signatureBMW Running-inCheckCompletedonOdometer readingNext serviceat the lates
Page 78 — Helmet holder
BMW ServiceCompletedonOdometer readingNext serviceat the latestonor, if logged beforehand,Odometer readingStamp, signatureBMW ServiceCompletedonOdomet
Page 79
General view, right side1 Adjuster for spring preload,rear ( 66)2 Fuel filler neck ( 84)3 Brake-fluid reservoir, front( 113)4 Vehicle Identification N
Page 80 — Safety instructions
BMW ServiceCompletedonOdometer readingNext serviceat the latestonor, if logged beforehand,Odometer readingStamp, signatureBMW ServiceCompletedonOdomet
Page 81 — Catalytic converter
BMW ServiceCompletedonOdometer readingNext serviceat the latestonor, if logged beforehand,Odometer readingStamp, signatureBMW ServiceCompletedonOdomet
Page 82 — Starting
BMW ServiceCompletedonOdometer readingNext serviceat the latestonor, if logged beforehand,Odometer readingStamp, signatureBMW ServiceCompletedonOdomet
Page 83 — CHECK! appears on the dis
Confirmation of serviceThe table is intended as a record of maintenance and repair work, the installation of optional accessoriesand, if appropriate,
Page 85 — Running in
AAbbreviations and symbols, 6ABSControl, 14Engineering details, 90Operation, 59Self-diagnosis, 80Warnings, 31AccessoriesGeneral instructions, 98Air fi
Page 86 — Off-roading
Technical data, 157Warning, bulb failure, 28, 29CCaseOperation, 99Checklist, 78Clock, 22Adjusting, 48Control, 18ClutchAdjusting clutch lever, 63Checki
Page 87 — Wet and dirty brakes
Left handlebar fitting, 14Left side of motorcycle, 11Multifunction display, 22Right handlebar fitting, 16Right side of motorcycle, 13Telltale lights,
Page 88 — Refuelling
MotorcycleLaying up, 144Restoring to use, 144Multifunction display, 18Overview, 22OOdometer and tripmeters, 22Control, 18Operation, 49Off-roading, 82O
Page 89
TTechnical dataBrakes, 154Bulbs, 157Clutch, 152Dimensions, 158Electrics, 156Engine, 149Engine oil, 151Frame, 158Fuel, 150Rear-wheel drive, 153Running
Page 90 — Secure the motorcycle
Handlebar fitting, left1 Control for the odometer( 49)Operation of the clock( 48)with on-board com-puterOEOperating the on-boardcomputer ( 51)2 with a
Page 91
Remove the rear wheel, 122Technical data, 155WindscreenAdjuster, 11Adjusting, 6212176zIndex
Page 92
6 Flashing turn indicators,left ( 56)Hazard warning flashers( 56)7 Headlight flasher and high-beam headlight ( 55)215zGeneral views
Page 93
Motorcycle data/dealership detailsMotorcycle dataModelVehicle identification numberColour codeDate of first registrationRegistration numberDealership
Page 94 — Brake system with
Handlebar fitting, right1 Emergency off switch (killswitch) ( 57)2 Starter button ( 78)3 with heated handlebargripsOEGrip heating control( 58)4 Flashi
Page 95
Underneath the seat1 Rider’s Manual2 Battery ( 136)3 ToolkitPayload table (in tool tray)Tyre pressures table (intool tray)4 Helmet holder ( 74)21
Page 96 — Motorrad ASC
Instrument panel1 Speedometer2 Rev. counter3 Telltale lights ( 22)Warning lights ( 24)4 Multifunction display( 22)5 Ambient-light brightnesssensor (fo
Page 97
Headlight1 Low-beam headlight2 High-beam headlight3 Side light219zGeneral views
Page 99
Status indicatorsStatus indicatorsStandard status indicators . . . . . . . . . . 22Status indicators with on-boardcomputer . . . . . . . . . . . . . .
Page 100 — Engineering details
Standard statusindicatorsMultifunction display1 Gear indicator ( 22)2 Clock ( 48)3 Engine temperature gaugereading ( 22)4 Odometer and tripmeters( 49)
Page 101 — Accessories
Service-due indicatorIf the next service is due in lessthan one month, the date for thenext service 1 is shown brieflyafter the Pre-Ride Check com-ple
Page 102 — Power sockets
1 Status-indicator panel ofthe on-board computer( 51)Status indicatorswith tyre pressuremonitoring (RDC)with tyre pressure monitoring(RDC)OE1 Tyre-pre
Page 103
The possible warnings are listedon the next page.325zStatus indicators
Page 104
Details described or illustratedin this booklet may differ fromthe motorcycle’s actual specifica-tion as purchased, the accessor-ies fitted or th
Page 105
Warnings, overviewTelltale lights Status indicators MeaningLights up yellowEWS ! appears onthe displayElectronic immobiliser active ( 27)Lights up yel
Page 106
Electronic immobiliseractiveThe «General» warning lightshows yellow.EWS ! appears on the display.Possible cause:The key being used is not au
Page 107
an authorised BMW Motorraddealer.Insufficient engine oilpressureThe «General» warning lightflashes red.The oilcan symbol appearson the displ
Page 108
Possible cause:Rear light or brake light bulb de-fective.The LED rear light must bereplaced. Consult a specialistworkshop, preferably an author-ised B
Page 109
Warnings, overviewTelltale lights Status indicators MeaningAppears on the dis-playEngine-oil level too low ( 31)Check Oil ap-pears on the dis-playAppe
Page 110
Engine-oil level too lowThe oil-level symbol ap-pears on the display.Check Oil appears on thedisplay.Possible cause:The electronic oil-level sensorhas
Page 111 — Maintenance
Warnings, overviewTelltale lights Status indicators MeaningFlashesSelf-diagnosis not completed ( 33)Lights upABS deactivated ( 33)Lights upABS fault (
Page 112
Self-diagnosis notcompletedThe ABS warning lightflashes.Possible cause:The ABS function is notavailable, because self-diagnosis did not complete. Them
Page 113 — Engine oil
Warnings, overviewTelltale lights Status indicators MeaningQuick-flashes yel-lowAppears on the dis-playASC intervention ( 35)Quick-flashes yel-lowAppe
Page 114 — Brake system
ASC interventionThe «General» warning lightquick-flashes yellow.The ASC symbol appearson the display.The ASC has detected a degreeof instabi
Page 115
The most important data for a filling-station stop can be found in the following chart:FuelRecommended fuel grade Premium plus unleaded98 ROZ/RON91 AK
Page 116
Possible cause:The rider has switched off theASC system.with Automatic Stability Con-trolOEActivating ASC function( 61).ASC faultThe «General&quo
Page 117
means that pressure in the fronttyre has reached a critical value.The detailed descriptions relatingto BMW Motorrad RDC start onpage ( 94), and you wi
Page 118
Warnings, overviewTelltale lights Status indicators MeaningLights up yellow Tyre symbol ap-pears on the dis-play.Tyre pressure close to limit of permi
Page 119
Tyre pressure closeto limit of permittedtoleranceThe «General» warning lightshows yellow.The tyre symbol appearson the display.The critical
Page 120 — Rims and tyres
Signal transmissiondisrupted»—» or «— —» is displayed.Possible cause:The motorcycle has not yet ac-celerated past the threshold
Page 121
Battery of tyre-pressuresensor weakThe «General» warning lightshows yellow.RDC! appears on the display.This error message appearsonly briefl
Page 122
Warnings, overviewTelltale lights Status indicators MeaningDWALO ! appearson the displayAnti-theft alarm battery weak ( 43)Lights up yellowDWA ! appea
Page 123
Anti-theft alarm batteryweakDWALO ! appears on the dis-play.This error message appearsonly briefly after the pre-ride check completes.Possible cause:T
Page 125
OperationOperationIgnition switch and steering lock . . . . 46Electronic immobiliser EWS . . . . . . . . . 47Clock . . . . . . . . . . . . . . . . . .
Page 126
Welcome to BMWWe congratulate you on yourchoice of a motorcycle fromBMW and welcome you to thecommunity of BMW riders.Familiarise yourself with your n
Page 127 — Front-wheel stand
Ignition switch andsteering lockKeysYou receive two master keys andone spare key. Please consultthe information on the electronicimmobiliser (EWS) if
Page 128
bars to the left or right. However,the motorcycle is more stable ona level surface with the handle-bars turned to the left than withthe handlebars tur
Page 129
ClockSetting clockAttempting to set the clockwhile riding the motorcyclecan lead to accidents.Set the clock only when the mo-torcycle is stationary.Sw
Page 130
Odometer andtripmetersSelect the readingsSwitch on the ignition.without on-board computerOEwithout tyre pressure monitor-ing (RDC)OEPress button 1 or
Page 131
without on-board computerOEwithout tyre pressure monitor-ing (RDC)OEPress and hold down button 1or button 2 until the tripmeterreading is reset.with o
Page 132
The calculated range is anapproximate value. Con-sequently, BMW Motorrad re-commends that you should nottry to use the full residual rangebefore refue
Page 133
drops below this threshold forthe first time.Average speedAverage speed 1 is calculatedon the basis of the time elapsedsince the last reset. Timesduri
Page 134
Press and hold down button 1until the average-consumptionreading is reset.RangeThe description of the residual-range function ( 50) also cov-ers range
Page 135
The preconditions for the oil levelcheck are as follows:Engine at operating temperat-ure.Engine idling for at least tenseconds.Side stand retracted.Ma
Page 136 — Air filter
ing on the right is the rear tyrepressure. — — appears dir-ectly after the ignition is switchedon, because the sensors do nottransmit tyre pressures
Page 137
Table of ContentsYou can also consult the index atthe end of this Rider’s Manual ifyou want to find a particular topicor item of information.1 Ge
Page 138
Press left section of switch 1to switch on the auxiliary head-lights.Press right section of switch 1to switch off the auxiliary head-lights.The LED au
Page 139 — Jump starting
If you press a turn-indicat-or button with the ignitionswitched on, the turn-indicatorfunction is activated instead ofthe hazard warning flashers, and
Page 140
a Normal operating position(run)b Engine switched off.You cannot start the engineunless the kill switch is inthe run position.Operating grip heatingwi
Page 141
The heating stage you have se-lected also appears in the multi-function display.50 % heating power100 % heating powerBMW Motorrad IntegralABSwith BMW
Page 142
Activating ABS functionPress and hold down button 1until the ABS warning lightchanges status.The ABS warning lightgoes out; if self-diagnosishas not c
Page 143
To switch to offroad ASC,press and hold down button 1until the ASC symbol changesstatus.The off-road ASC symbolappears on the display; ifself-diagnosi
Page 144
Seat heightAdjusting seat heightRemove the front seat ( 73).Turn the front seat upsidedown.Remove seat rods 1 and 2from holders 3.The front seat can w
Page 145
ClutchAdjusting clutch leverIf the position of the clutchfluid reservoir is changed,air can enter the clutch system.Do not twist the handlebar fitting
Page 146 — Body panels
Adjust the footbrake leverMake sure the ground is leveland firm and place the motor-cycle on its stand.Push footplate 1 of the footrestforward to dise
Page 147 — Paint care
Peg to gearshift lever8 NmMirrorsAdjusting mirrorsTurn the mirror to the correctposition.Adjusting mirror armPush protective cap 1 up overthe threaded
Page 148
Headlight . . . . . . . . . . . . . . . . . . . . 72Front and rear seats. . . . . . . . . 72Helmet holder . . . . . . . . . . . . . . . 745 Riding ..
Page 149
Long-reach position, handlebarsaway from rider.If you want to have the handle-bars adjusted consult a specialistworkshop, preferably an author-ised BM
Page 150 — Troubleshooting chart
Spring preload at frontwheelSpring preload at setting 3(For riding on gravel tracksand similar and with load)Spring preload at setting 5(For riding of
Page 151 — Threaded fasteners
You can ascertain the currentsetting by counting the num-ber of slots that are visible(five when the adjuster is atthe LOW stop).DampingSettingDamping
Page 152
Basic setting of rear-sus-pension damping charac-teristicwithout Electronic Suspen-sion Adjustment (ESA)OETurn the adjusting screw asfar as it will go
Page 153
The setting shows briefly, thendisappears automatically.Adjust the suspensiondampingSwitch on the ignition.You can adjust the damp-ing characteristic
Page 154
Repeatedly press button 1 untilthe setting you want to useappears on the display.The following can be displayed:One-upOne-up with luggageTwo-up (with
Page 155
HeadlightAdjustment for driving onright/driving on leftIf the motorcycle is ridden in acountry where the opposite ruleof the road applies, its asymmet
Page 156 — Transmission
Turn the key clockwise in seatlock 1 and hold it in this pos-ition while pressing down thefront part of rear seat 2.Lift the rear seat at the frontand
Page 157 — Running gear
Engage rear seat 2 in mount 6.Push down firmly on the rearseat, applying pressure to thefront of the seat.The rear seat engages with anaudible click.H
Page 158
RidingRidingSafety instructions . . . . . . . . . . . . . . . . . . 76Checklist . . . . . . . . . . . . . . . . . . . . . . . . . . . . 78Starting . .
Page 159 — Wheels and tyres
11 Service .. . . . .. . . . .. . . . 161BMW Motorrad service. . . . 162BMW Motorrad servicequality . . . . . . . . . . . . . . . . . . . . . 162BMW M
Page 160 — Electrics
Safety instructionsRider’s equipmentDo not ride without the correctclothing. Always wear:HelmetMotorcycling jacket andtrousersGlovesBootsThis app
Page 161
Payload of tank rucksack}5 kgMaximum permissiblespeed for riding with thetank rucksack fitted to the mo-torcycle}130 km/hSpeedIf you ride at high spee
Page 162 — Dimensions
Note the points listed for protec-tion of the catalytic converter.Risk of overheatingCooling would beinadequate if the enginewere allowed to idle for
Page 163 — Riding specifications
Starting engineKill switch in run position a.Switch on the ignition.Pre-ride check is performed.( 79)with BMW Motorrad IntegralABS IIOEABS self-diagno
Page 164
If the ‘General’ warning light doesnot show:Some malfunctions cannotbe indicated if the ‘Gener-al’ warning light cannot be dis-pla
Page 165
Phase 2Test of the diagnosis-compat-ible system components whilethe motorcycle is on the move.The motorcycle must reach aspeed of at least 5 km/h in o
Page 166
TyresNew tyres have a smooth sur-face. This must be roughened byriding in a restrained manner atvarious heel angles until the tyresare run in. This ru
Page 167 — Maintenance work
Air filter elementBMW Motorrad recommendscleaning the air filter elementafter lengthy rides in very dustyterrain.BrakesHow can stoppingdistance be min
Page 168 — BMW Running-in
Riding on salted or grittedroads.After work has been carried onthe brakes, due to traces of oilor grease.Riding on dirt-covered surfacesor off-road.We
Page 169 — BMW Service
Do not smoke. Never bring anaked flame near the fuel tank.Fuel attacks plastics, whichbecome dull or unsightly.Wipe off plastic parts immediatelyif th
Page 170
General instructionsGeneral instructionsOverview . . . . . . . . . . . . . . . . . . . . . . . . . . . . 6Abbreviations and symbols . . . . . . . . .
Page 171
Recommended fuelgradeRegular unleaded (power-and consumption-relatedrestrictions)91 ROZ/RON87 AKIUsable fuel capacityapprox. 33 lReserve fuelapprox. 4
Page 172
At the rear, secure the strapsto the rear footrests on bothsides and tighten the straps.Tighten all the straps uniformly;the motorcycle’s suspens
Page 174 — Item Odometer
Engineering detailsEngineering detailsBrake system with BMW MotorradIntegral ABS . . . . . . . . . . . . . . . . . . . . . . . . 90Electronic engine m
Page 175
Brake system withBMW Motorrad IntegralABSwith BMW Motorrad IntegralABS IIOEPartially integral brakesYour motorcycle is equipped withpartially integral
Page 176
because this is the preconditionfor ensuring directional stability.As soon as is registers the ac-tual circumstances, the systemreacts instantly and a
Page 177
exceptional riding conditions canlead to a fault message beingissued.Exceptional ridingconditions:Heating up with the motorcycleon the centre stand or
Page 178
What is the designbaseline for BMWMotorrad ASC?BMW Motorrad ASC is designedas an assistant system for therider and for use on public roads.The extent
Page 179
Accelerating the motorcycle toa speed in excess of 10 km/hafter switching the ignition offand then on again reactivates theASC.Slip can be increased b
Page 180
Tyre pressure within permittedtolerance.Tyre pressure close to limit ofpermitted tolerance.Tyre pressure outside permit-ted tolerance.A warning is als
(Ocr-Read Summary of Contents of some pages of the BMW R 1200 GS 2005 Document (Main Content), UPD: 14 July 2023)
-
35, BMW R 1200 GS 2005 Residual braking function active General warning light lights up red. ABS warning light flashes four times per second. Without the assistance of the ABS function, the wheels could lock when the brakes are applied hard. You have to apply considerably more force to the brake levers to brake without servo-assisted brakes. The changed braking response can cause accidents. Avoid hard braking if possible. Apply brakes in good time as increased effort is required. Only residual braking func- tion …
-
89, Check the oil level in oil- level indicator 1. Engine oil, specified level between MIN and MAX marks If the oil level is below the MIN mark: Topping up the engine oil ( 87) If the oil level is above the MAX mark: Have the fault rectified by a specialist workshop, preferably an authorised BMW Motorrad dealer. Topping up the engine oil Damage to the engine can result if it is oper- ated without enough oil, but the same also applies if the oil level is…
-
34, Only residual braking function available in both brake cir- cuits, because self-diagnosis did not complete. You can continue to ride. Bear in mind that until self- diagnosis has completed, neither the ABS function nor the brake booster is avail- able. As soon as possible leave the brake lever and the brake pedal released, so that self-diagnosis can complete. ABS warning indicators de- fective General warning light lights up red. ABS warning light ON. ABS warning…
-
148, Lights Switching off the parking lights, 45 Switching on the high-beam headlight, 45 switching on the low-beam headlight, 44 Switching on the parking lights, 45 switching on the side lights, 44 M Maintenance General instructions, 86 Multifunction display, 22 Anti-theft alarm, 18 P Power socket, 11 Pre-ride check, 59 R Refuelling, 72 Reserve Warning, 26 Residual range, 40 Restoring to use, 119 Rev. counter, 18…
-
152, BMW R 1200 GS 2005 E 1 BMW Motorrad Integral ABS About BMW Motorrad Integral ABS How does ABS work? The maximum braking force it is possible to transfer to the carriageway depends, among other things, on the road surface’s coefficient of friction. Gravel, ice and snow, and water on the road, have significantly poorer coeffi- cients of friction than a dry, clean asphalt road surface. The poorer the road’s coeffi- cient of friction, the longer t…
-
17, Underneath the seat 1 Helmet holders, left and right ( 50) 2 Battery ( 112) 3 Toolkit 4 Seat holders ( 49) 2 15 z General views
… -
28, Electronic immobiliser act- ive General warning light lights up yellow. EWS! warning appears on the display. The key being used is not au- thorised for starting, or com- munication between key and engine electronics is disrup- ted. Remove all other vehicle keys from the same ring as the ignition key. Use the reserve key. Have the defective key re- placed, preferably by an authorised BMW Motorrad dealer. Fuel down to reserve General …
-
111, Pull out air filter 3 at the bottom. Installing air filter Insert air filter 3 into the air filter housing at the top. Push the air filter into the air filter housing at the bottom, making sure that the vanes are not bent. Position intake air pipe 2 on the air filter housing. Push retainers 1 into the holders until they engage with an audible click. Check that the throttle-valve cable is seated in guide 4 of the intake and that the throttle val…
-
157, BMW R 1200 GS 2005 Note on safety BMW Motorrad Order No: 01 41 7 714 311 04.2008 Aligning hand protector • Push the handlebar lever fully forward. Turn the hand protec- tor until the tip of the handlebar lever touches the cross on the label. • Have the settings and the threaded-fastener tightening torques checked by a special- ist workshop, preferably an …
-
91, BMW R 1200 GS 2005 Visually inspect left and right brake pads 1 to ascer- tain their thickness. Viewing direction: Between wheel and fork tube toward the brake caliper. Brake-pad thickness, front The wear indicators (arrows) must be clearly visible on each brake pad. If the wear indicating mark is no longer clearly visible: Have the brake pads re- placed by a specialist work- shop, preferably an author- ised BMW Motorrad dealer. Checking brake pad thickness, rear brakes Brake pads worn past the m…
-
48, Commercially available adhesive tape will dam- age the plastic cover over the light. Use only the special, black adhesive film for bodywork applications available from trade outlets. Headlight beam throw and spring preload Headlight beam throw is gen- erally kept constant when spring preload is adjusted to suit load. Spring preload adjustment might not suffice only if the motorcycle is very heavily lo…
-
104, Release spring clips 3 at top and bottom and swing them aside. Remove bulb 4. Replace the defective bulb. Low-beam headlight bulb, standard designation H7 halogen bulb Low-beam headlight bulb, voltage 12 V Low-beam headlight bulb, power 55 W Install bulb 1 with tab 2 in guide 3. Engage spring clip 4 in the catch. Install plug 5. 7 102 z Maintenance
… -
69, Removing motorcycle from side stand Unlock the steering lock. With OE BMW Motorrad In- tegral ABS: Brake servo assistance is not available when the ignition is off; the motorcycle can start to roll. Particularly when the motor- cycle is parked on a gradi- ent, switch on the ignition and wait for the ABS to complete its self-diagnosis. Switch on the ignition. Wait for ABS self-diagnosis to complete. Pull the handbrake lever. Swing your right leg over the sea…
-
120, Paint care Washing the motorcycle regularly will help counteract the long-term effects of substances that damage the paint, especially if your motorcycle is ridden in areas with high air pollution or natural sources of dirt, for example tree resin or pollen. Remove particularly aggressive substances immediately, however, as otherwise the paint can be affected or become discoloured. Substances of this nature include spilt fuel, oil, grease, brake fluid and bird droppings. We recommend BMW…
-
33, Brake switch defective General warning light lights up red. There is a defect in the brake system and it could result in delayed braking response and, consequently, accidents. Brake in good time as delayed braking response can be expected. The brake switch is defective or incorrectly adjusted. The increase in pressure when the lever is pulled or the pedal depressed is the signal in- dicating to the BMW Integral ABS that the rider wants to apply the brakes. There may be an unus…
инструкцияBMW R 1200 GS (2012)

BMW Motorrad
Руководство по эксплуатации
С удовольствием
за рулем
Посмотреть инструкция для BMW R 1200 GS (2012) бесплатно. Руководство относится к категории мотоциклы, 5 человек(а) дали ему среднюю оценку 8.2. Руководство доступно на следующих языках: русский. У вас есть вопрос о BMW R 1200 GS (2012) или вам нужна помощь? Задайте свой вопрос здесь
- Руководство по эксплуатации
R 1200 GS - Общие указания
- Обзорная информация
- Индикация
- Управление
- Вождение
- Техника в деталях
- Принадлежности
- Техническое обслуживание
- Уход
- Технические характеристики
- Служба сервиса
- Алфавитный указатель
BMW R 1200 GS (2012) — это мотоцикл от известного бренда BMW, который был выпущен в 2012 году. Он оснащен двигателем воздушно-жидкостного охлаждения с объемом 1170 куб.см, мощностью 110 л.с. и крутящим моментом 120 Нм при 6000 об/мин. Мотоцикл имеет шестиступенчатую коробку передач, а также систему ABS и систему управления стабилизацией. Его сухой вес составляет 205 кг, а максимальная скорость — 200 км/ч.
За счет своих технических характеристик и оборудования, BMW R 1200 GS (2012) становится отличным выбором для долгих путешествий на мотоцикле. Он имеет большой бензобак на 20 литров, который позволяет проехать более 300 км на одном баке. Большой внимание уделено комфорту водителя: мотоцикл оснащен комфортным сиденьем и высоким ветровым стеклом. Также для максимального удобства предусмотрена подогрев рукояток.
BMW R 1200 GS (2012) — это мотоцикл высокого уровня, который имеет превосходную управляемость и достойный дизайн. Он предназначен для тех, кто ценит надежность и безопасность, а также хочет обладать мотоциклом, способным дарить максимальное удовольствие во время поездки.
Главная
| BMW | |
| R 1200 GS (2012) | |
| мотоцикл | |
| русский | |
| Руководство пользователя (PDF) |
Не можете найти ответ на свой вопрос в руководстве? Вы можете найти ответ на свой вопрос ниже, в разделе часто задаваемых вопросов о BMW R 1200 GS (2012).
Как перевести мили в километры?
1 миля равна 1,609344 километрам, а 1 километр — 0,62137119 милям.
В чем разница между топливом E10 и E5?
В топливе E10 содержится до десяти процентов этанола, в то время как в E5 содержится менее пяти процентов. Соответственно, топливо E10 менее вредит окружающей среде.
Какова рекомендуемая частота замены масляного фильтра в двигателе BMW?
В большинстве двигателей масляный фильтр необходимо менять через каждые 6000 километров (около 4000 миль).
Как часто следует менять масло в двигателе BMW?
В большинстве двигателей масло необходимо менять через каждые 6000 километров (около 4000 миль).
Как удалить ржавчину с устройства BMW мотоцикл?
1. Замочите поржавевшую деталь в уксусе, пока ржавчина не размокнет полностью. 2. Обрабатывайте ржавчину уксусом в течение 24 часов. 3. Удалите ржавчину с помощью металлической щетки или алюминиевой фольги.
Инструкция BMW R 1200 GS (2012) доступно в русский?
Да, руководствоBMW R 1200 GS (2012) доступно врусский .
Не нашли свой вопрос? Задайте свой вопрос здесь

Rider’s Manual (US Model)
R 1200 GS
BMW Motorrad

Welcome to BMW
Welcome to BMW
We congratulate you on your choice of a motorcycle from BMW and welcome you to the community of BMW riders. Familiarize yourself with your new motorcycle, so that you can ride it safely and confidently in all traffic situations.
To make sure of this, please read this Rider’s Manual carefully before starting to use your new motorcycle. It contains important information on how to operate the controls and how to make the best possible use of all your BMW’s technical features.
In addition, it contains information on maintenance and care to help you maintain your motorcycle’s reliability and safety, as well as its value. It also offers useful hints and information on the correct equipment for machine and rider, again geared toward maximizing reliability and safety.
If you have any questions concerning your motorcycle, your authorized BMW Motorrad retailer will gladly provide advice and assistance.
We hope you enjoy reading this Rider’s Manual and wish you many a pleasant, safe journey on your BMW motorcycle.
Best wishes,
BMW Motorrad

General information
Symbols and abbreviations
About this Rider’s Manual
We have tried to make all the information in this Rider’s Manual easy to find.
The quickest access to a particular topic or item is by consulting the detailed alphabetical index at the end. The first chapter of this Rider’s Manual will provide you with an initial overview of your motorcycle.
When the time comes to sell your BMW, please remember to hand over this Rider’s Manual; it is, by law, an important part of the vehicle.
This symbol indicates precautions and measures which are essential in protecting the rider and other persons from severe or fatal injury.
Instructions and precautions specifically intended to prevent damage to the motorcycle. Disregarding them may render the warranty invalid.
Special information on operating and inspecting your motorcycle as well as maintenance and adjustment procedures.

General information
i
3 Introduction
XTightening torque:
This symbol introduces values for the various tightening torques
•This symbol introduces a passage containing instructions on how to perform a particular operation
–This symbol draws your attention to the outcome of the instructions on how to perform a particular operation
() Figure in parentheses bpage number with explanations
OE Optional equipment Your motorcycle was
assembled complete with all the optional equipment you ordered
OA Optional accessory You can obtain optional
accessories only through your authorized BMW Motorrad retailer or specialized retail outlet; optional accessories must be retrofitted to the motorcycle
EWS Electronic immobilizer DWA Anti-theft alarm

General information
i
4 Introduction
Custom equipment
When you ordered your BMW motorcycle, you chose various items of custom equipment. This Rider’s Manual describes all the optional equipment (OE) and selected optional accessories (OA) that BMW offers for this model series.
This explains why the manual may also contain descriptions of equipment which you have not ordered.
If your BMW was supplied with equipment not described in this Rider’s Manual (such as a radio or anti-theft alarm, for example), you will find these features described in separate manuals.
Technical specifications
All dimensions, weights and power ratings stated in the Rider’s Manual are quoted to the standards and comply with the tolerance requirements
of the Deutsche Institut für Normung e. V. (DIN). Configurations for individual countries may differ.

Safety information
i
5 Introduction
Currency
The high safety and quality standards of BMW motorcycles are maintained by unceasing development work on designs, equipment and accessories. Because of this, your motorcycle may differ from the information supplied in the Rider’s Manual. Nor can errors and omissions be entirely ruled out. We hope you will appreciate that no legal claims can be entertained on the basis of the data, illustrations or descriptions in this manual.
For your own safety
Use only parts and accessories approved by BMW for your motorcycle.
Parts and products approved for your motorcycle by BMW have been checked for safety, function and suitability.
BMW accepts product liability for these products. Conversely, BMW is unable to accept any liability whatsoever for parts and accessories which it has not approved.

Safety information
Genuine BMW parts and accessories and other products which BMW has approved can be obtained from your authorized BMW Motorrad retailer, together with expert advice on their installation and use.
BMW cannot assess every product of outside origin in order to decide whether it can be used on or with a BMW vehicle without constituting a safety hazard.
Even approval by an official inspection authority such as the TÜV in Germany, or an official permit (General Operating Permit) cannot always provide this guarantee.
The right clothing
To reach your destination safely every time, there’s only one choice:
•Helmet
•Suit
•Gloves
•Boots
It’s foolish to ride without the right clothing. This applies even to short journeys, and to every season of the year.
Your authorized BMW Motorrad retailer will be happy to provide advice and tell you about the latest developments, and help you select the right clothing for your purpose.

Safety information
Service
For safety reasons and to maintain the value of your motorcycle, regular maintenance intervals have been laid down. Always keep to the specified maintenance intervals. This is the only way to ensure that warranty claims are not invalidated. Your authorized BMW Motorrad retailer can provide information on the currently specified Service, Inspection and Annual Inspection needed, or you can fetch the information from the Internet whenever you want by visiting “www.bmw-motorrad.com/ maintenance”.
Important:
BMW refuses to accept liability for damage or consequential damage due to repairs or service work performed by other than BMW-authorized workshops.
Consequently, we advise you to have service and inspection work performed by your authorized BMW Motorrad retailer’s specially trained, expert personnel, and confirmed by an entry in the “Service” section of this Rider’s Manual. Authorized BMW Motorrad retailers are supplied with the latest technical information and have the necessary technical know-how and specially trained staff.
Please do not hesitate to contact your authorized BMW Motorrad retailer on all matters concerning your motorcycle. Authorized BMW Motorrad retailers are fully informed about all aspects of your motorcycle and will gladly advise and assist you.
Best wishes,
BMW Motorrad

Contents
|
Welcome to BMW ……………… |
1 |
Shock-absorber |
||
|
General information………… |
2-4 |
adjustment ……………………… |
52 |
|
|
Safety information ………….. |
5-7 |
Wheels…………………………… |
53 |
|
|
Willkommen bei BMW 1 |
54-55 |
|||
|
Loading…………………….. |
||||
|
Overview |
Allgemeine Informationen 2 |
56 |
||
|
11 |
Shift lever……………………….. |
|||
|
Allgemeine Informationen 3 |
||||
|
General view, left side ………. |
12 |
|||
|
Allgemeine Informationen 4 |
57 |
|||
|
General view, right side …….. |
13 |
Riding …………………………… |
||
|
Sicherheitsinformationen 5 |
58-59 |
|||
|
Left handlebar fitting ………… |
14 |
Safety instructions ……… |
||
|
Sicherheitsinformationen 6 |
60-61 |
|||
|
Right handlebar fitting ………. |
15 |
Checklist…………………… |
||
|
Cockpit |
Sicherheitsinformationen 7 |
62-63 |
||
|
8 |
16 |
First time out ……………… |
||
|
Before you start |
64-66 |
|||
|
8 |
||||
|
17 |
Starting |
67 |
||
|
Status indicators ……………. |
||||
|
9 |
Running in |
68-69 |
||
|
Indicator and |
||||
|
10 |
18 |
Gear shifts |
70-71 |
|
|
warning lights ………………….. |
||||
|
11 |
19 |
Off-road riding |
72-73 |
|
|
Multifunction display…………. |
||||
|
12 |
20 |
Parking |
74-77 |
|
|
Function indicators…………… |
||||
|
13 |
21-23 |
Refueling |
78-79 |
|
|
Warning indicators ……… |
||||
|
14 |
24-25 |
Brake system — |
||
|
ABS warning lights ……… |
||||
|
15 |
general |
80-81 |
||
|
16 |
||||
|
Operation |
27 |
Brake system — with |
||
|
17 |
||||
|
BMW Integral ABS |
82-89 |
|||
|
Ignition switch and |
||||
|
steering lock18……………… |
28-29 |
|||
|
19 |
Accessories |
91 |
||
|
Electronic immobilizer |
||||
|
EWS |
11 |
30-31 |
General instructions |
92 |
|
Gesamtansicht links 12 |
93-94 |
|||
|
Hazard warning |
12 V sockets……………… |
|||
|
flashers |
Gesamtansicht rechts 13 |
95-101 |
||
|
32-33 |
Luggage system ………. |
|||
|
Tripmaster |
Lenkerarmatur links 14 |
|||
|
34-35 |
||||
|
Kill switch |
Lenkerarmatur rechts 15 |
103 |
||
|
Cockpit 16 |
36 |
Arrive safely…………………. |
||
|
37 |
Reliable operation |
104 |
||
|
Heated handlebar grips…….. |
||||
|
Clock |
17 |
38 |
Service worldwide |
105 |
|
Windshield |
…………………….. |
39 |
Training means |
|
|
Handlebar levers ………… |
40-41 |
extra safety …………………… |
106 |
|
|
Lights ……………………….. |
42-45 |
|||
|
Seat …………………………. |
46-48 |
|||
|
Mirrors …………………………… |
49 |
|||
|
Spring preload …………… |
50-51 |
![]()
Contents
Maintenance ……………….. 107 Technical data ………………159 Safety information………….. 108 Engine…………………………..160 Troubleshooting Power train …………………….161 chart……………………… 109-110 Frame and
Engine oil ………………. 111-112 suspension…………….. 162-166 Brake system — Fuel and lubricants ….. 167-168 general ………………….. 113-114 Electrical system …………….169 Brake system …………. 115-116 Dimensions and weights ….170 Clutch …………………………. 117 Performance data……………171 Wheels ………………….. 118-129 Tightening torques ………….172 Brake pads…………….. 130-131
Notes on Service …………………………173 changing bulbs……………… 132 Maintenance ………………….174 Bulbs…………………….. 133-139 Confirmation of
Air filter ………………….. 140-142 maintenance ………….. 174-180 Jump starting …………. 143-145 Confirmation of
Battery maintenance service ………………….. 181-182 instructions…………….. 146-148 Concluding thoughts ……….183 Installing battery ……… 149-150
Index ……………………. 185-192
Care……………………………. 151
Cleaning/care …………. 152-155
Storing ………………………… 156 Returning to use……………. 157
i
9 Introduction

Contents
i
10
Introduction
1
11
Overview
General view, left side
General view, right side
Left handlebar fitting
Right handlebar fitting
Cockpit

General view, left side
|
1 |
2 |
3 |
4 |
5 |
6 |
7 |
8 |
9 |
|||
1
12
Overview
|
16 |
15 |
14 |
13 |
12 11 |
10 |
1 Spring-strut adjuster, front (b 50)
2 Power socket 12 VOA (b 93)
3 Windshield, (b 39)
4Headlight adjustment (b 45)
5Reservoir for clutch hydraulic fluid (b 117)
6 Helmet holder
7 Engine oil filler neck (b 111-112)
8 Seat adjustment (b 47)
9 Luggage rack (b 101)
10Seat lock (b 46-48)
11On-board socket, 12 V for connecting electrical accessories (b 93)
12Rear suspension strut, shock-absorber adjuster (b 51-52)
13Primary spark plug
14Secondary spark plug
15Engine oil level display (b 112)
16Type plate
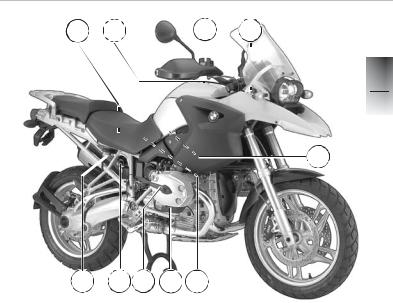
General view, right side
|
17 |
18 |
19 |
20 |
|||
21
26 25 24 23 22
17Toolkit storage compartment
|
18 |
Fuel filler cap |
22 |
Helmet holder |
|
(b 78-79) |
23 |
Secondary spark plug |
|
|
19 |
Brake-fluid reservoir for |
24 |
Primary spark plug |
|
front brake (b 115) |
25 |
Spring-strut adjuster, rear |
|
|
20 |
Vehicle identification |
(b 51) |
|
|
number |
26 |
Brake-fluid reservoir for rear |
|
|
21 |
Air filter (b 140-142) |
brake (b 116) |
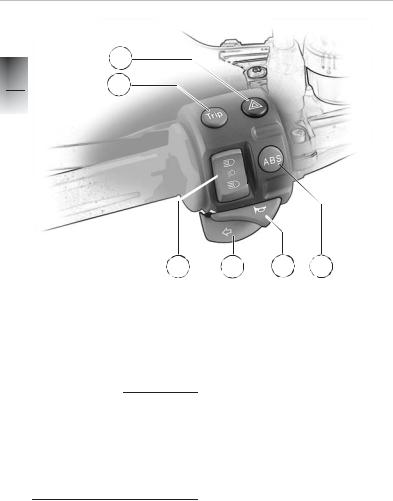
Left handlebar fitting
2
1 1
14
Overview
To prevent air from entering the hydraulic circuit:
•Do not turn the fitting on the handlebar.
•Do not turn the handlebars in the clamping blocks.
1 Tripmaster button (b 34)
2 Hazard warning flasher switch (b 32)
3 ABS buttonOE (b 88)
4 Horn switch
5 Left flashing turn indicator switch
6High/low beam switch (b 42-45)
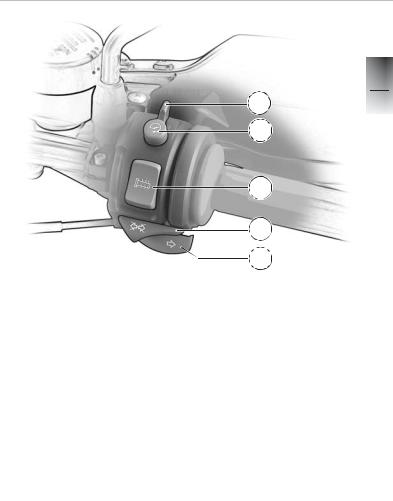
Right handlebar fitting
7
8
9
10
11
|
7 |
Emergency off (kill) switch |
|||
|
for ignition (b 65) |
||||
|
To prevent air from entering |
8 |
Starter button (b 67) |
||
|
the brake circuit: |
9 |
Switch for heated handlebar |
||
|
• Do not turn the fitting on the |
gripsOE (b 37) |
|||
|
handlebar. |
10 |
Turn indicator cancel switch |
||
|
• Do not turn the handlebars |
11 |
Right flashing turn indicator |
||
|
in the clamping blocks. |
switch |
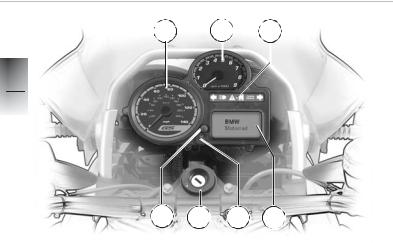
Cockpit
|
1 |
2 |
3 |
||
1
16
Overview
7 6 5 4
|
1 |
Speedometer |
|
|
2 |
Tachometer (b 68) |
|
|
3 |
Indicator and warning lights |
|
|
(b 18) |
||
|
4 |
Multifunction display (b 19) |
|
|
The cockpit lights have auto- |
5 |
Indicator light for anti-theft |
|
matic brightness control for |
alarmOE /Lighting sensor |
|
|
daytime/night-time riding. The |
bright/dark |
|
|
sensor that controls the bright- |
6 |
Ignition switch and steering |
|
ness of the cockpit lights is next |
lock (b 28) |
|
|
to the indicator light for the |
7 |
Knob for setting clock |
|
anti-theft alarmOE. |
(b 38) |

2
17
Status indicators
Indicator and warning lights
Multifunction display
Function indicators
Warning indicators
ABSOE warning lights

Indicator and warning lights
2 3 4 5
|
2 |
1 |
6 |
||||||
|
18 |
||||||||
|
Status indicators |
|
1 |
Left turn indicator light s |
||
|
2 |
High beam indicator light |
||
|
q |
|||
|
3 |
General warning light e |
ABS warning light lOE |
|
|
(b 86) |
5 |
||
|
4 |
Neutral indicator light k |
(b 86) |
|
|
(b 66) |
6 |
Right turn indicator light t |
![]()
Multifunction display
8
|
7 |
9 |
|||
13 12 11 10
14
15
16
17
|
Possible warnings |
|||
|
12 |
Oil pressure i(b 21) |
||
|
13 |
Battery charge light r |
||
|
Fuel level n |
(b 22) |
||
|
7 |
14 |
Bulb failure 7 |
|
|
(b 20, 79) |
15 |
EWS active (b 30) |
|
|
8 |
Gear indicator (b 66) |
16 |
Fault in electronic engine |
|
9 |
Oil temperature j(b 20) |
management system 5 |
|
|
10 |
Tripmaster display panel |
(b 21) |
|
|
(b 34, 35) |
17 |
Fuel reserve indicator n |
|
|
11 |
Clock display panel (b 38) |
(b 20, 79) |
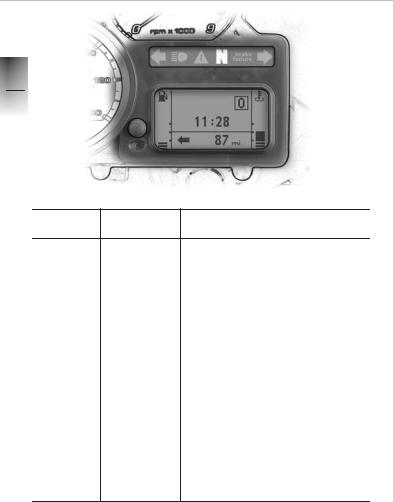
Function indicators
|
Indicator |
Multifunction Meaning |
|
light |
display |
|
11 : 28 |
Clock |
|
|
Shows the time in |
||
|
12-hour mode |
||
|
N |
Gear indicator |
|
|
Indicator light klights up when the |
||
|
transmission is in neutral. |
||
|
The display shows a number corre- |
||
|
sponding to the gear you have engaged |
||
|
eyellow |
n |
Fuel level |
|
flashes |
when the reserve range is reached, the |
|
|
symbol nappears and flashes, the gen- |
||
|
eral warning symbol e flashes. |
||
|
The Tripmaster calculates the residual |
||
|
operating range and shows this esti- |
||
|
mated figure on the display. |
||
|
e red |
Engine temperature |
|
|
ON |
The bar indicator flashes if the engine |
|
|
overheats and |
||
|
general warning light e lights up. |
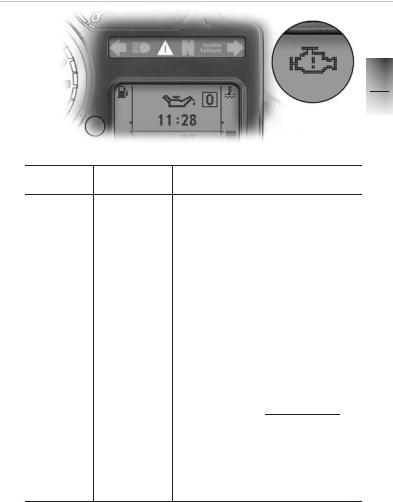
Warning indicators
|
Warning |
Multifunction Meaning/measure |
|
light |
display |
|
e yellow |
5 |
Engine electronics |
|
ON |
There is a fault in the electronic engine |
|
|
management system. |
||
|
Maintain a defensive riding style and |
||
|
proceed immediately to a specialized |
||
|
workshop, preferably an authorized |
||
|
BMW Motorrad retailer. |
||
|
e red |
i |
Oil pressure |
|
ON |
Insufficient engine oil pressure |
|
|
(b 111, 112) |
||
|
Taking the traffic situation into account: |
||
|
Disengage the clutch |
||
|
Operate the emergency (kill) switch |
||
|
Bring the motorcycle safely to a halt |
||
|
Check the engine oil level |
If the warning indicator lights up but the oil level is correct, always consult a specialized workshop without
delay, preferably an authorized BMW Motorrad retailer.
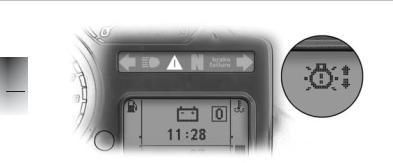
Warning indicators
2
22
|
Status indicators |
||||
|
Warning |
Multifunction |
Meaning/measure |
||
|
light |
display |
|||
|
e red |
3 |
Battery charge current |
||
|
ON |
The battery is no longer charging, |
|||
|
generator fault. |
||||
|
Immediately consult a specialized work- |
||||
|
shop, preferably an authorized |
||||
|
BMW Motorrad retailer. |
||||
|
eyellow |
8 |
Bulb failure |
||
|
ON |
8Rear light or brake light defective |
|||
|
Replace bulbs (b 133) |
||||
|
Bulb failure |
||||
|
6 |
6Front parking light, low-beam head- |
|||
|
light, high-beam headlight defective |
||||
|
7 |
7Double flashing frequency, turn |
|||
|
indicator flasher defective |
||||
|
Replace bulbs (b 134-139) |
||||
|
eyellow |
7 |
7Combination of light defects |
||
|
ON |
described above |
|||
|
Replace bulbs (b 134-139) |
||||
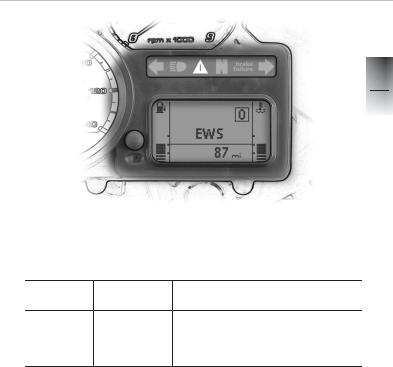
Warning indicators
2
23
Status indicators
|
Warning |
Multifunction Meaning/measure |
|
light |
display |
|
e yellow |
EWS |
Electronic immobilizer |
|
ON |
Key not recognized (b 30, 31). |
|
|
Communication with engine electronics |
||
|
defective |
Various warnings may be issued simultaneously. Some warnings combine e yellow and e red, in which case the two are displayed alternately.
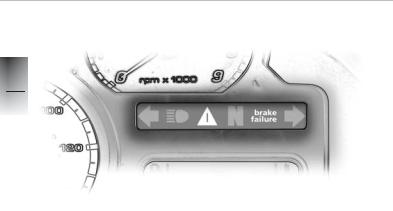
ABSOE warning lights
2
24
Status indicators
|
General |
ABS warning |
Malfunctions |
|
warning |
light D |
|
|
light e |
||
|
OFF |
ON |
ABS function deactivated by the rider, |
|
integral braking system available (b 88) |
||
|
OFF |
Flashes at |
ABS not available, because pull-away |
|
1 Hz |
test not completed (b 86) |
|
|
OFF |
Flashes at |
Only RESIDUAL BRAKING FUNCTION |
|
4 Hz |
available in both circuits, (b 85) because |
|
|
self-diagnosis not completed (b 86) |
||
|
Red ON |
OFF |
Brake-light switch defective or not cor- |
|
rectly adjusted |
||
|
Red ON |
Flashes at |
ABS function unavailable in at least one |
|
1 Hz |
braking circuit |
|
|
Red ON |
Flashes at |
Only RESIDUAL BRAKING FUNCTION |
|
4 Hz |
available in at least one circuit (b 85) |
|

ABSOE warning lights
|
Warning light, |
Warning light, |
Malfunctions |
|
general e |
ABS D |
|
|
Red, alternate |
Alternate |
Fluid level in BMW Integral ABS too low. |
|
flashing at |
flashing at |
If the functions listed below are active, |
|
1 Hz |
1 Hz |
maintain a defensive riding style and pro- |
|
ceed immediately to the nearest special- |
||
|
ized workshop, preferably an authorized |
||
|
BMW Motorrad retailer. |
||
|
– Ignition OFF, brake pressure OK at the |
||
|
brake levers |
||
|
– Brakes acting on both wheels |
||
|
– Brake system leaktight, no signs of |
||
|
brake fluid escaping |
||
|
Otherwise the brake system is defective: |
||
|
do not attempt to ride the motorcycle. |
||
|
Red, alternate |
Alternate |
Fluid level in BMW Integral ABS insuffi- |
|
flashing at |
flashing at |
cient, conduct checks listed above. |
|
4 Hz |
4 Hz |
Only RESIDUAL BRAKING FUNCTION |
|
available in at least one circuit (b 85) |
||
Do not ride the motorcycle if you have any doubts about the safety of the brake system.

2
26
Status indicators

Ignition switch and steering lock Electronic immobilizer (EWS) Hazard warning flashers On-board computer
Kill switch
Heated handlebar gripsOE
Setting the clock Adjusting the windshield Handlebar levers
Lights
Seat
Mirrors
Spring preload
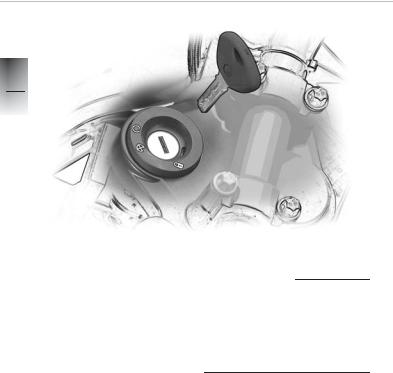
Ignition switch and steering lock
3
28
Operation
If the motorcycle is fitted with BMW Integral ABSOE, only
RESIDUAL BRAKING FUNCTION is available when the ignition is switched off (b 85)
|
Ignition switch and steering |
|
|
lock, tank lock and seat lock are |
|
|
actuated with the same key. On |
|
Keys |
request, system casesOA can |
|
You will receive two master |
be arranged to lock with the |
|
keys and one spare key. |
same key. |
![]()
Ignition switch and steering lock
3
29
Operation
Key positions
Do not switch over to
1position while driving!
UOperating position; ignition, parking light and all circuits switched on, predrive check is
performed (b 64) V* Ignition and lights off,
steering not locked (handlebars can be turned freely to left or right)
1*Ignition and lights off, steering lock engaged.
Turn the handlebars all the way to the left before engaging the steering lock.
|
Switch the parking light on only |
|
|
* The key can be removed in these |
for limited periods. Note state of |
|
positions |
battery charge. |

Electronic immobilizer (EWS)
3
30
Operation
In-key security
The electronic immobilizer helps protect your BMW motorcycle from theft, and this enhanced security is at your disposal without any need for you to set parameters or activate additional systems. The engine of a motorcycle fitted with this electronic immobilizer can be started only with the keys that belong to the vehicle. You can also have your authorized BMW Motorrad retailer bar individual keys, for example if a particular key goes missing. The engine cannot be started with a key that has been barred.
Function
An electronic component is integrated into each of your keys.
The motorcycle’s electronics exchange certain continuously changing signals with the electronics in the key; these signals are specific to your motorcycle and they are transmitted by the ignition switch. Ignition, fuel supply and starter are not enabled for starting until the key has been recognized as “authorized” for your motorcycle.

Electronic immobilizer (EWS)
3
31
Operation
A spare key attached to the same ring as the ignition key used to start the engine could “irritate” the electronics, in which case the enabling signal for ignition, fuel supply and starter is not issued. Under these circumstances the motorcycle will refuse to start. Consequently, always keep the spare key or keys separate from the ignition key.
Similarly, physical force could damage the ignition key’s integral electronics. If this happens, you will not be able to start the engine.
Spare/extra keys
You can obtain spare/extra keys only through an authorized BMW Motorrad retailer. The keys are part of an integrated security system, so the retailer is under an obligation to check the legitimacy of all applications for spare/extra keys.
If you want to have a key barred, you have to bring along all the keys that belong to the motorcycle.
A key that has been barred can subsequently be cleared and reactivated for use.

Hazard warning flashers
3
32
1
Operation
Hazard warning flashers
You cannot activate the hazard warning flashers if the ignition is switched off.
Do not use the hazard warning flashers for longer than absolutely necessary.
Note state of battery charge.
Switching on hazard warning flashers
•Switch on the ignition, ignition key in the Uposition
–Hazard warning flasher switch 1 lights up
•Operate hazard warning flasher switch 1
–Hazard warning flashers in operation
–Left/right flashing turn indicator lights 2 in the indicator light panel flash

Hazard warning flashers
2
•Switch off the ignition, and with the ignition key in the V position, the hazard warning
flashers continue to flash
–Left/right turn indicator
lights 2 in indicator light panel
go out
•Turn the handlebars to the position for locking the steer-
ing and lock the steering, turn the ignition key to 1
–The hazard warning flashers continue to operate
Switching off hazard warning flashers
•Actuate hazard warning flasher switch 1 or switch on ignition
–Hazard warning flashers cease to operate

Tripmaster
3
34 1
Operation
You can activate the Tripmaster only when the ignition is switched on, in other words when the ignition key is in the U position.
When you switch on the ignition, the information shown by the Tripmaster when the ignition was switched off always reappears on the multifunction display.
•Each time you briefly
press button 1 on the left handlebar fitting, you step from one function to the next in the following sequence:
–A Total distance covered
–B Tripmeter reading 1
–C Tripmeter reading 2
–D Residual range
Residual range
This reading appears only when the fuel level drops to reserve. The range is estimated on the basis of style of riding and taking the remaining supply of available fuel into account.
If the motorcycle is resting on its side stand the level in the tank cannot be measured correctly, so this estimate of residual operating range will be inaccurate. The display shows residual range in km or miles (depending on the national-market version). Also observe the reading of fuel-level gauge 2 (b 19, 79).
The Tripmaster registers that you have refueled when approximately 3.2 qt (3 liters) have been added.

Tripmaster
Resetting Tripmeter
–Only when the motorcycle is at a standstill and the ignition switched on, in other words when the ignition key is in the
U position
•Repeatedly press button 1 (Trip) for less than 2 seconds until
– B Tripmeter reading 1 Trip I or
– C Tripmeter reading 2 Trip II appears in the display
•Press button 1 (Trip) for longer than 2 seconds
–Reading is reset to zero

Kill switch
|
3 |
B A |
||
|
1 |
B |
||
|
36 |
|||
|
Operation |
Operating the kill switch
In an emergency only:
•Move switch 1 to the B position
–The electrical circuits for the electronic engine management system, instrument panel, fuel pump and starter motor are de-energized
If you move the kill switch to position B while the ignition is on (switch in the U position), the BMW Integral ABSOE remains operational (b 82-89).

Heated handlebar gripsOE
Actuating heated handlebar grips
The grip heating is only active with the engine running. The increase in power consumption can drain the battery if you are riding at low engine speeds.
•Operate switch for heated handlebar grips 1
A Heating function OFF B 50% (center position) C 100%

Clock
3
38
Operation
Setting clock
Do not attempt to set the clock unless the motorcycle is at a standstill
– Risk of accident
•Ignition switch in the U position
•Press button 1 for longer than
2 seconds, until the clock enters set mode
–Hours reading 2 starts flashing: briefly press button 1 to set
•Press button 1 again for longer than 2 seconds
–Minutes reading 3 starts flashing: briefly press button 1 to set
•Press button 1 again for longer than 2 seconds to exit
set mode
Set mode is automatically exited if 20 seconds elapse without the button being pressed.
![]()
Windshield
A
|
1 |
|||
|
B |
3 |
||
|
39 |
|||
|
Operation |
Adjusting windshield
Always be sure to adjust clamping screws 1 on left and right symmetrically and hand-tighten the screws.
•Slacking clamping screws 1 on left and right until the windshield can be adjusted
You can set the windshield to any of six different positions.
•Move the windshield in the A or B direction
•Carefully retighten clamping screws 1 on left and right

Handlebar levers
Clutch lever, adjusting
Sudden changes in the amount of play at the lever or a spongy feeling when it is applied may indicate a fault in the hydraulic system.
If you are doubtful about the reliability of the hydraulic clutch operating system consult a specialized workshop, preferably an authorized BMW Motorrad retailer.
Do not attempt to turn adjusting screw 1 while riding the motorcycle.
• Turn adjusting screw 1 to set the most comfortable span:
–Turn clockwise: to increase span
–Turn counter-clockwise: to reduce span

Handlebar levers
1
— +
Adjusting handbrake lever
|
Do not attempt to turn adjust- |
|
|
ing screw 1 while riding the |
|
|
motorcycle. |
– Turn clockwise: to increase |
|
• Turn adjusting screw 1 to set |
span |
|
– Turn counter-clockwise: to |
|
|
the most comfortable span: |
reduce span |

Lights
3
42
Operation
Switching on parking light
|
You can switch on the parking |
|
|
light only immediately after |
|
|
switching off the ignition, when |
|
|
the ignition key is in the |
|
|
V position. |
|
|
• Switch off the ignition |
|
|
• Press left turn indicator switch |
|
|
– The parking light is on |
|
|
Switching on low-beam |
Switching off the parking |
|
head light |
light |
|
The low-beam head light |
• Switch the ignition on and off |
|
switches on automatically when |
again |
|
you start the engine. |
– The parking light is off |

Always check that all lights are in full working order before riding off.
If turn indicator repeater flashes at twice the usual speed: Defective flasher bulb. Similarly, general warning
light eand warning indicator 7in the multifunction display (b 19) both light up notify you if a bulb fails.
1 Low-beam head light
2 High-beam headlight
3 Parking light
For instructions on changing bulbs for parking light, high- beam/low-beam head lights, rear light, brake light and flashing turn indicators, (b 133-139).

Headlight setting RHD/ LHD traffic
If the motorcycle is ridden in a country where the opposite rule of the road applies, its asymmetric low beam will tend to dazzle oncoming traffic. Consult a specialized workshop, preferably an authorized BMW motorcycle retailer, to have the headlight adjusted to suit whichever rule of the road applies.
Adhesive films with unsuitable adhesives can damage the headlight lens.
Headlight beam throw adjustment
Headlight beam throw is kept constant when spring preload is adjusted to suit load.
For instructions on adjusting spring-strut and shockabsorber settings to suit load, (b 50-52).
Consult a specialized workshop, preferably an authorized BMW motorcycle retailer, if you are unsure whether the headlight basic setting is correct.

Lights
A
B
Headlight setting with motorcycle heavily loaded
|
Only if the load carried on the |
|
|
motorcycle is very high, the |
|
|
headlight beam can also be |
Pivot lever 1: |
|
lowered by moving pivot |
|
|
lever 1. This shortens the beam |
A = neutral position |
|
throw. |
B = high load |

Removing seat
You must remove the rear seat before the front seat can be removed.
If it is difficult to turn the key in direction A, apply firm pressure on the driver’s seat for support.
•Turn the key in the seat lock to position B
•Remove the rear seat
•Turn the key in the seat lock to position A
•Pull front seat to the rear and remove.
–Toolkit, Rider’s Manual and battery are accessible

|
Seat |
|||
|
A |
|||
|
B A |
B |
||
|
2 |
3 |
||
|
47 |
Operation
1

Adjusting seat
Front and rear retainers 1 and 2 for height adjustment must always both be set to the same height. Never set retainer 1 to the high position and retainer 2 to the low position, or vice versa.
•Remove the rear seat
•Remove the front seat and
turn it upside down
The front seat can be set to either of two positions by means of retainers 1 and 2:
A = high
B = low

Seat
3
48
Operation
Installing seat
When installing, make sure that front and rear seats are firmly located.
•Set the front seat to the desired height (b 47)
•Slide the front seat into front lock 1 and press firmly on the seat to secure it
Toolkit must be packed as flat as possible.
•Engage the rear seat in rear retainers 3 first, and then in front retainers 2
•Press firmly to engage the seat
 Loading…