
Руководство по эксплуатации автомобилей SEAT Toledo и SEAT Leon.
- Автор: —
- Издательство: SEAT
- Год издания: —
- Страниц: 132
- Формат: PDF
- Размер: 7,0 Mb

Руководство по эксплуатации и ремонту автомобиля SEAT Toledo 1991-1998 годов выпуска с бензиновыми и дизельными двигателями.
- Автор: —
- Издательство: Петит
- Год издания: 2006
- Страниц: 240
- Формат: PDF
- Размер: 164,7 Mb
Руководство по эксплуатации и ремонту автомобилей SEAT Altea/Altea XL/Leon/Toledo с 2004 года выпуска с бензиновыми и дизельными двигателями.
- Автор: —
- Издательство: Монолит
- Год издания: —
- Страниц: 550
- Формат: —
- Размер: —


- Manuals
- Brands
- Seat Manuals
- Automobile
- toledo
- Owner’s manual
-
Contents
-
Table of Contents
-
Bookmarks
Quick Links
All manuals and user guides at all-guides.com
toledo
Owner’s manual
Related Manuals for Seat toledo
Summary of Contents for Seat toledo
-
Page 1
All manuals and user guides at all-guides.com toledo Owner’s manual… -
Page 2
All manuals and user guides at all-guides.com… -
Page 3: On Board Literature
All manuals and user guides at all-guides.com ON BOARD LITERATURE This o o wner’s M M anual and the Supplements provided should be read carefully so that you can quickly become familiar with the controls and operation of your vehicle. As well as care and regular maintenance, correct handling helps maintain the car’s value.
-
Page 4: Structure Of This Manual
All manuals and user guides at all-guides.com STRUCTURE OF THIS MANUAL You s s hould n n ote t t hese p p oints b b efore r r eading t t his O O wner’s M M anual Range o o f e e quipment Notes o o n d d irection It describes the largest possible range of Apart from exceptions, all notes on the…
-
Page 5
Manual is divided into. Safety f f irst This chapter provides information on your vehicle’s passive safety fittings such as seat belts, Air Bags, child seats and safety and head rests. Handling i i nstructions This chapter provides information on the layout of the driver’s controls, the different seat adjustments,… -
Page 6
All manuals and user guides at all-guides.com… -
Page 7
Introduction to the subject … . . 1.2 Seat belts ……1.3 Air Bag system* . -
Page 8: Safety First
TOLEDO in this chapter. We have detailed everything you need to know about, for example, seat belts, Air Bags, child seats, safety for children and head restraints. Please p p ay p p articular a a ttention t t o t t he notes a a nd w w arnings i i n t t his c c hapter–…
-
Page 9: Seat Belts
All manuals and user guides at all-guides.com SAFETY FIRST Seat b b elts Why h h ave s s eat b b elts? It h h as b b een p p roven t t hat s s eat b b elts give g g ood p p rotection i i n a a ccidents.
-
Page 10
The forces exerted on the body will As the vehicle occupants in our example increase further at higher speeds, e.g. At are wearing no seat belts, their entire twice the speed the forces increase four- kinetic energy can only be dispersed… -
Page 11
Somebody sitting in wheel, instrument panel or windscreen. the rear and not using a seat belt is endangering not only himself but also the Vehicle occupants who are not belted in occupants of the front seats. -
Page 12
These physical principles also apply, of course, to other types of accidents and to vehicles with the Air Bag System. This is why you must put on your seat belt before every journey, even if you are only going “just around the corner”. Please also ensure that your passengers are cor- rectly belted in. -
Page 13
» » Front s s eats» c c hapter. on y y our l l ap. Please t t ake n n otice o o f t t he w w arning notes o o n t t he n n ext p p age. SEAT BELTS ––––––––––––––––––––––––––––––––––––––––––––––––––––––––––––––––––––––––––––––… -
Page 14
Note otherwise n n ot e e ngage p p roperly. In some export countries seat belt func- • You s s hould c c heck y y our s s eat tions could differ from the 3 point or lap belts r r egularly. -
Page 15
Warning Warning Seat b b elts c c an o o nly g g ive t t heir m m ax- The t t ongue m m ust b b e p p ressed i i nto imum p p rotection i i n a a n a a ccident i i f… -
Page 16
1.10 –––––––––––––––––––––––––––––––––––––––––––––––––––––––––––––––––––––––––––––… -
Page 17
• After adjusting, pull the belt with a jerk to ensure that the relay fitting is properly engaged. Note The seat height adjustment* can also be used to adjust belt routing on front seats. SEAT BELTS ––––––––––––––––––––––––––––––––––––––––––––––––––––––––––––––––––––––––––––– 1.11… -
Page 18
Taking t t hree p p oint b b elt o o ff Lap b b elt* To release the belt, press the red button in The centre place on the rear seat is fitted the lock. The tongue will then spring out. with a lap belt. -
Page 19
– see illustrations. The surplus belt length is taken up by The belt is easier to adjust if tongue and moving the plastic slide. cap are pressed together. SEAT BELTS ––––––––––––––––––––––––––––––––––––––––––––––––––––––––––––––––––––––––––––– 1.13… -
Page 20
• It is of utmost importance to observe the relevant safety regulations when the vehicle or components of the system are scrapped. Technical Service Centres are familiar with these regulations. 1.14 ––––––––––––––––––––––––––––––––––––––––––––––––––––––––––––––––––––––––––––– SEAT BELTS… -
Page 21
T T his e e nsures t t hat t t he c c hild seat i i s p p roperly f f ixed i i n t t he c c ar. SEAT BELTS –––––––––––––––––––––––––––––––––––––––––––––––––––––––––––––––––––––––––––––… -
Page 22
Also b b ear i i n m m ind t t he i i nstructions from t t he » » Seat b b elts» c c hapter. This equipment may vary according to the country. -
Page 23
All manuals and user guides at all-guides.com SAFETY FIRST Air B B ag f f unctions a a re c c ontrolled e e lec- tronically: • Each time that the ignition is turned on, the Air Bag warning light will light for about 3 seconds. -
Page 24
When the system is triggered, the bags seat belts. are inflated by gas opening in front of the driver and passenger. It is not possible to define globally when… -
Page 25
Technical Service Centres are famil- front-seat o o ccupants a a nd t t he e e ffec- iar with these regulations. tive r r ange o o f t t he A A ir B B ags. -
Page 26
All manuals and user guides at all-guides.com SAFETY FIRST Warning n n otes Warning • Any r r epairs t t o t t he s s ide A A ir B B ag, such a a s t t he r r emoval o o r a a ssembly of a a ny s s ystem c c omponent i i n c c on- nection w w ith a a ny o o ther r r epair w w ork (e.g. -
Page 27
All manuals and user guides at all-guides.com SAFETY FIRST • • Only l l ight a a rticles o o f c c lothing Any d d amage t t o t t he o o riginal s s eat should b b e h h ung o o n t t he c c oat h h ooks. -
Page 28
• if it is not possible to keep a minimum child seat uniquely o o n t t he r r ear p p assen- distance of 25 cm between the center of ger s s eat, and to avoid the need to deac- the steering wheel and the breastbone tivate the passenger Air Bag. -
Page 29
Air Bags. This measure is necessary in the excep- tional cases where a child seat must be installed in the passenger seat. In general, child seats should o o nly b b e fitted i i n t t he r r ear s s eats o o f t t he v v ehicle. -
Page 30
All manuals and user guides at all-guides.com SAFETY FIRST Warning! If t t he “ “ AIR B B AG O O FF” w w arning l l ight flashes: • There i i s n n o g g uarantee t t hat t t he passenger A A ir B B ags w w ill b b e t t rig- gered i i n t t he e e vent o o f a a n a a ccident. -
Page 31: Safety For Children
A A ir B B ag s s ystem i i s to u u se a a s s uitable c c hild r r estraint s s ys- triggered d d uring a a n a a ccident.
-
Page 32
L – Adequate for retention systems with systems officially authorized with ISOFIX anchoring. this age group. (Universal retention X – Seat space not adequate for children systems are those fixed by the adult of this age group. safety belt). UF – Adequate for the universal retention… -
Page 33
If i i n a a n e e xceptional c c ase, a a c c hild seat i i s f f itted i i n t t he p p assenger s s eat where t t he c c hild i i s t t ravelling w w ith… -
Page 34
ody. -
Page 35
1.50 m (5’) tall. Best suited should y y ou t t ransport c c hildren o o r are seat cushions combined with the 3- infants i i n t t he v v ehicle, b b y c c arrying point seat belt. -
Page 36
Warning back t t o t t he d d irection o o f t t ravel, t t he •… -
Page 37
ISOFIX s s ystem There are four attachment rings (see arrows) on the body work between the chassis and the cushions of the rear seat. You can use these rings to attach a maxi- mum of two child seats with the ISOFIX system. -
Page 38: Seats And Head Restraints
– At the same time push the seat back as resting o o n t t he i i nstrument p p anel o o r far as possible.
-
Page 39
Correctly adjusted head restraints together with the seat belts offer effective protection. It is also possi- ble to set the angle of the front head restraints. Adjusting h h eight •… -
Page 40
All manuals and user guides at all-guides.com… -
Page 41
Doors ….. 2.26 Rear seat ….2.67 Central locking* . -
Page 42
All manuals and user guides at all-guides.com HANDLING INSTRUCTIONS Table 2.2 –––––––––––––––––––––––––––––––––––––––––––––––––––––––––––––––––––––––INSTRUMENT PANEL… -
Page 43: Instrument Panel
All manuals and user guides at all-guides.com HANDLING INSTRUCTIONS LEO-001A INSTRUMENT PANEL –––––––––––––––––––––––––––––––––––––––––––––––––––––––––––––––––––––––…
-
Page 44
8 – Hazard warning light switch ..2.47 adjustment lever* ….2.54 9 – Knurled wheel for left 27 – Central locking button* … 2.29 seat heating*/ Drink can holder ….2.63/2.73 28 – Electric window controls* ..2.39 10 – Knurled wheel for right seat heating*/ •… -
Page 45
All manuals and user guides at all-guides.com HANDLING INSTRUCTIONS Instruments LEO-002 In some model versions or in certain 1 – – R R evolutions c c ounter* countries, it is possible to insert the igni- On n n o a a ccount m m ust t t he r r evolutions tion key and have the dash panel lights counter n n eedle m m ove i i nto t t he r r ed go on without switching the engine on. -
Page 46
All manuals and user guides at all-guides.com HANDLING INSTRUCTIONS 2 – – C C oolant t t emperature The gauge starts to work when the igni- tion is switched on. When the ignition is switched on the warning lamp (c) flashes for a few sec- onds as a functional check. -
Page 47
All manuals and user guides at all-guides.com HANDLING INSTRUCTIONS • The minutes are set by turning the but- ton clockwise until it stops. By turning the knob once, you move forward one minute. By turning and holding the knob, the min- utes move forward continuously. -
Page 48
All manuals and user guides at all-guides.com HANDLING INSTRUCTIONS B8L-103 LEO-003 5 – – M M ultifunction i i ndicator* When the ignition is switched on, the function which was selected before The multifunction indicator includes: switching off the ignition will be acti- •… -
Page 49
All manuals and user guides at all-guides.com HANDLING INSTRUCTIONS Memory If some of the before mentioned data is exceeded, the memory is deleted and the The system is equipped with two memo- calculation starts over. Contrary to the ries which function automatically. partial route memory, this memory is not A p p artial r r oute m m emory ( ( Multifunction deleted when driving is interrupted for… -
Page 50
All manuals and user guides at all-guides.com HANDLING INSTRUCTIONS Indications o o n s s creen Driving t t ime Multifunction I I ndicator 1 1 – Driving time The last selected item will be displayed from switching on the ignition or from when the ignition is switched on. -
Page 51
All manuals and user guides at all-guides.com HANDLING INSTRUCTIONS Average f f uel 6 – – S S elector l l ever p p osition d d isplay* consumption Ø l/100 k k m The position of the automatic gearbox Indicates the average fuel consumption, selector lever is indicated in the display. -
Page 52
All manuals and user guides at all-guides.com HANDLING INSTRUCTIONS 7 – – S S ervice i i nterval i i ndicator* Notes • Do n n ot z z ero t t he d d isplay b b etween t t he If a service is due, the word «Service»… -
Page 53
All manuals and user guides at all-guides.com HANDLING INSTRUCTIONS Warning l l amps LEO-004 The layout of the warning lamps depends Page on the model version and engine fitted. 1 – Indicators ……..2.15 The symbols shown here are also on the 2 –… -
Page 54
22 – Preheating system/ IB9-024 Electronic Accelerator- Pedal Control (EPC)*….2.22 Page 8 – Seat belt warning lamp*…2.17 9 – Alternator ……..2.17 10 – Brakes/Hand brake ….2.18 11 – Engine oil pressure/level ..2.18 12 – Tailgate ……..2.19 13 – Diagnosis*/Excess of pollution .2.19 14 –… -
Page 55
All manuals and user guides at all-guides.com HANDLING INSTRUCTIONS LEO-004 1 – – I I ndicators Warning n n otes The pilot light flashes at the same time as • Never o o pen t t he b b onnet o o f y y our the indicator. -
Page 56
All manuals and user guides at all-guides.com HANDLING INSTRUCTIONS LEO-004 If the level is correct the failure may be 3 – – T T railer i i ndicators* due to a fan failure. In this case check the The warning lamp* flashes when turn sig- radiator fan fuse and replace if necessary. -
Page 57
6 seconds or when the seat belt is fastened. Please r r efer t t o c c hapter “ “ Seat b b elts”. INSTRUMENT PANEL ––––––––––––––––––––––––––––––––––––––––––––––––––––––––––––––––––––– 2.17… -
Page 58
All manuals and user guides at all-guides.com HANDLING INSTRUCTIONS 10 – – B B rakes/Hand b b rake 11 – – E E ngine o o il p p ressure/ level The warning lamp comes on when the brake fluid level is too low. The warning light lights up for a few sec- onds as a functional check when the igni- The ignition must be switched on. -
Page 59
All manuals and user guides at all-guides.com HANDLING INSTRUCTIONS 12 – – T T ailgate The pilot light* comes on if the tailgate is open or badly closed. 13 – – D D iagnosis*/ Excess o o f p p ollution This pilot light lights up when the ignition is switched on as a testing device and goes out after a few seconds. -
Page 60
All manuals and user guides at all-guides.com HANDLING INSTRUCTIONS 16 – – W W indscreen w w asher • ABS w w arning l l amp l l ights u u p water l l evel* together w w ith b b rake s s ystem w w arning lamp. -
Page 61
All manuals and user guides at all-guides.com HANDLING INSTRUCTIONS 18 – – E E lectronic S S tability Program ( ( ESP)* The warning light lights up for a few sec- onds as a functional check when the igni- tion is switched on; it should go off after a couple of seconds. -
Page 62
All manuals and user guides at all-guides.com HANDLING INSTRUCTIONS 20 – – R R ear f f og l l ight* 22 – – P P reheating s s ystem (Diesel engines only) The pilot light will light up as soon as the rear fog light is switched on. -
Page 63: Opening And Closing
With this number you can order a duplicate of your key from a SEAT Official Service Center. B11-002D Note The vehicle is supplied with two keys A You s s hould k k eep t t his p p lastic k k ey which fit all locks.
-
Page 64
All manuals and user guides at all-guides.com HANDLING INSTRUCTIONS Keys w w ith r r emote c c ontrol* LEO-005 LEO-006 Vehicles with remote control* have two Foldable k k ey* keys. One is a conventional key (see pre- To u u nfold the key sword, press button A. vious page). -
Page 65
The system is automatically activated when the ignition is switched off. Note The engine can thus only be started with a correctly coded Genuine SEAT key. Trouble free operation of your vehicle can only be guaranteed when using genuine keys. -
Page 66
All manuals and user guides at all-guides.com HANDLING INSTRUCTIONS Doors From t t he o o utside o o f t t he v v ehicle, it may From t t he i i nside o o f t t he v v ehicle, all the be locked or unlocked using the driver doors may be locked by pushing the secu- door key. -
Page 67
All manuals and user guides at all-guides.com HANDLING INSTRUCTIONS Central l l ocking* When the key is used in the driver’s door, When the vehicle is opened using the key, all doors and the boot are unlocked at the the locking security system (double lock- same time by the central locking system. -
Page 68
All manuals and user guides at all-guides.com HANDLING INSTRUCTIONS Locking • If the key is turned t t wo c c onsecutive • To lock your vehicle, turn t t he k k ey times to the locking position in less than once (the double lock is activated) to the one second then only the simple locking locking position in the driver’s door lock. -
Page 69
All manuals and user guides at all-guides.com HANDLING INSTRUCTIONS Notes If t t he v v ehicle i i s l l ocked u u sing t t he c c en- tral l l ocking s s witch, i i ndividual d d oors may b b e u u nlocked. -
Page 70
All manuals and user guides at all-guides.com HANDLING INSTRUCTIONS Unlocking • Once t t he v v ehicle h h as b b een Pushing the left part of the locking switch locked w w ith t t he r r adio w w ave r r emote B will open all doors. -
Page 71
All manuals and user guides at all-guides.com HANDLING INSTRUCTIONS B6L-0012 Child s s afety The rear doors also have child-proof catches. Child l l ock Using the vehicle key, turn the child lock slot in the direction of the arrow (figure A). -
Page 72
All manuals and user guides at all-guides.com HANDLING INSTRUCTIONS Tailgate TO8-010 TO8-011 The doors can be locked and unlocked Opening and c c losing t t he t t ailgate from the tailgate via the central locking To o o pen the tailgate when key slot is ver- system. -
Page 73
All manuals and user guides at all-guides.com HANDLING INSTRUCTIONS Anti-theft a a larm s s ystem* Note With the anti-theft alarm, break-in attempts and theft of the vehicle are ren- When you lock the car the indicator pilot dered more difficult. The system triggers lights will only come on if the alarm has acoustic and optical warning signals if been properly activated (all security areas… -
Page 74
All manuals and user guides at all-guides.com HANDLING INSTRUCTIONS Notes • The warning lamp goes out after approx. 28 days. This prevents the battery becoming discharged when the vehicle is not used for a long period. The alarm sys- tem remains activated. •… -
Page 75
All manuals and user guides at all-guides.com HANDLING INSTRUCTIONS Note • If, after deactivating the volumetric sensor, the door is locked with the remote control or manually with the key in the door lock within less than 30 seconds the volumetric sensor is deactivated even though all other anti-theft alarm functions remain activated. -
Page 76
All manuals and user guides at all-guides.com HANDLING INSTRUCTIONS Radio-frequency r r emote c c ontrol k k ey* The following functions can be operated using the radio wave remote control with- out using the key manually. – Locking and unlocking the central lock- ing system. -
Page 77
All manuals and user guides at all-guides.com HANDLING INSTRUCTIONS When the dead-lock mechanism and the anti-theft alarm* are activated, proceed as follows: If the vehicle is unlocked by using the open button on the radio-frequency remote control*, all of the doors and the boot will be relocked automatically if they are not opened within 30 seconds. -
Page 78
All manuals and user guides at all-guides.com HANDLING INSTRUCTIONS Synchronization Uncoded keys can be obtained at SEAT Official Service Centers. These keys, how- If the vehicle cannot be opened by press- ever, must be synchronized by a SEAT ing the radio transmitter button, it could… -
Page 79
All manuals and user guides at all-guides.com HANDLING INSTRUCTIONS Electric w w indows* There are additional controls on the pas- senger door and the rear doors* for each window. These controls will only open or close their respective windows. With the safety switch 3 in the driver’s door, the rear electric windows can be deactivated. -
Page 80
All manuals and user guides at all-guides.com HANDLING INSTRUCTIONS Window o o pening a a nd c c losing Electric windows with an automatic clos- ing function* are equipped with a power variants w w ith t t he d d oor k k eys limiter. -
Page 81
All manuals and user guides at all-guides.com HANDLING INSTRUCTIONS The r r oll-back f f unction* Note 1 – If the window in the driver or passen- If you wait for longer than 5 seconds ger‘s door is hindered whilst closing between the individual steps, the system through stiffness or by an obstacle will reactivate. -
Page 82
All manuals and user guides at all-guides.com HANDLING INSTRUCTIONS Function o o f t t he e e lectric w w indows Notes with i i gnition s s witched o o ff The automatic opening/closing, and roll- back functions* on the driver and passen- After the ignition has been switched off, ger door windows will not function after the windows can still be operated for… -
Page 83
All manuals and user guides at all-guides.com HANDLING INSTRUCTIONS Sliding/tilting r r oof* To o o pen Turn the switch clockwise. There are intermediate opening positions that are shown by notches on the switch. The biggest notch shows the biggest opening advisable for high speed driving with min- imum aerodynamic noise. -
Page 84
All manuals and user guides at all-guides.com HANDLING INSTRUCTIONS Roll b b ack f f unction The roof has a roll back function to avoid possible injury when closing the roof. When the roof is closed in a normal way, it will re-open automatically if it encounters any obstacle. -
Page 85: Lights And Visibility
All manuals and user guides at all-guides.com HANDLING INSTRUCTIONS Switches Rear f f og l l ight* Vehicles w w ithout f f og l l ights Turn lighting switch to dipped/main beam position and pull switch out to stop. Vehicles w w ith f f og l l ights With lighting switch in dipped/main beam position, pull switch out to 2nd…
-
Page 86
All manuals and user guides at all-guides.com HANDLING INSTRUCTIONS TO8-014A TO8-015 2 – – I I nstrument l l ighting 4 – – H H eated r r ear w w indow When the lights are on, the level of the The heating works only when ignition is instrument lighting can be set to any on. -
Page 87
All manuals and user guides at all-guides.com HANDLING INSTRUCTIONS 5 – – H H azard w w arning l l ights 6 – – S S eat h h eating* f f or l l eft s s eat The system also works when the ignition For further information on its functions is switched off. -
Page 88
All manuals and user guides at all-guides.com HANDLING INSTRUCTIONS Sun v v isors The sun visors can be pulled out of the side mountings and swung towards the doors. The make up mirrors are fitted with a cover flap. A lamp* will light up in the cover when it is folded up. -
Page 89
All manuals and user guides at all-guides.com HANDLING INSTRUCTIONS Indicators a a nd d d ipped b b eam l l ever Headlight f f lasher Pull the lever towards the steering wheel (3) – the main beam warning lamp will light up. -
Page 90
All manuals and user guides at all-guides.com HANDLING INSTRUCTIONS Interior l l ights B45-144C B45-146C A – – F F ront i i nterior l l ight Rear i i nterior l l ights Switch positions: Switch positions: 0 – Off 0 –… -
Page 91
All manuals and user guides at all-guides.com HANDLING INSTRUCTIONS Windscreen w w ipers a a nd w w ashers Warning The w w indshield w w iper b b lades m m ust be i i n p p erfect c c ondition t t o e e nsure good v v isibility ( ( see «… -
Page 92
All manuals and user guides at all-guides.com HANDLING INSTRUCTIONS Headlight w w asher s s ystem* When the main or dipped beam is on, the lenses are washed every time the wind- screen is washed. At regular intervals, such as when filling the tank, the dirt on the lenses (insects) should be removed. -
Page 93
All manuals and user guides at all-guides.com HANDLING INSTRUCTIONS Wiper b b lades Warning • The w w iper b b lades m m ust b b e i i n good c c ondition f f or c c lear v v isibility. •… -
Page 94
All manuals and user guides at all-guides.com HANDLING INSTRUCTIONS Rear-view m m irrors Electrically a a djustable m m irrors* Electrically adjustable mirrors* are set by pressing the edge of the knob A in the dri- ver’s door trim. The surface of the mirror may be angled upwards, downwards, to the left or the right, as required. -
Page 95
All manuals and user guides at all-guides.com HANDLING INSTRUCTIONS Note f f or v v ehicles w w ith c c onvex o o r Note aspherical o o utside m m irrors * * • Before putting the vehicle through an Convex (curved outwards) -
Page 96
All manuals and user guides at all-guides.com HANDLING INSTRUCTIONS Note If the mirror housing is moved by an exter- nal force (e.g. knocked when maneuver- ing) the mirrors must be folded right in electrically. Under n n o c c ircumstances must t t he m m irror housing be adjusted by hand as the operation of the mirror might be affected. -
Page 97: Seats And Luggage Compartment
Please adjust your seat as detailed on the You w w ould n n o l l onger b b e a a ble t t o next pages.
-
Page 98
• Be c c areful w w hen a a djusting t t he catch engages. seat h h eight! C C areless a a nd u u ncon- trolled a a djustment c c an c c ause Warning injuries. -
Page 99
• Be c c areful w w hen a a djusting t t he seat h h eight. C C areless a a nd u u ncon- trolled a a djustment c c an c c ause injuries. •… -
Page 100
All manuals and user guides at all-guides.com HANDLING INSTRUCTIONS B45-181C Switch B B * The backrest is adjusted in the corre- sponding arrow direction by pressing the switch: Arrow 1: Backrest comes forward Arrow 2: Backrest moves back Warning Do n n ot h h ave t t he b b ackrest t t oo f f ar forward w w hile t t he v v ehicle i i s i i n motion a a s t t his m m ay a a ffect t t he effectiveness o o f t t he s s eat b b elts. -
Page 101
Correctly adjusted head press button (arrow) and at the same time restraints together with the seat belts take restraints out. offer effective protection. The front head To remove the rear head restraint first pull restraints can also be adjusted to a differ- the backrest forwards a little. -
Page 102
All manuals and user guides at all-guides.com HANDLING INSTRUCTIONS Armrest* B45-022C Front a a rmrest* The armrest can be adjusted to several different positions. To adjust, press the button in the front end of the armrest A and fold down the rest. -
Page 103
All manuals and user guides at all-guides.com HANDLING INSTRUCTIONS Heated s s eats* Adjustable s s teering c c olumn* TO8-018 TO8-018A 6 – – S S eat h h eating* f f or l l eft s s eat The steering column can be adjusted at will both for reach and for height. -
Page 104
All manuals and user guides at all-guides.com HANDLING INSTRUCTIONS Pedals Luggage c c ompartment The m m ovement o o f t t he p p edals m m ust n n ot In the interests of good handling ensure be r r estricted! that the load (persons and luggage) is distributed evenly. -
Page 105
The other boot. A A ll p p assengers m m ust w w ear two eyelets are near the loading edge seat b b elts. S S ee » » Seat b b elts» c c hap- (see illustration). ter. -
Page 106
All manuals and user guides at all-guides.com HANDLING INSTRUCTIONS Rear s s helf Clothing can be placed on the shelf The rear shelf may be provided with a cur- behind the rear backrests. tain* that acts as a sun shade. Please note that the field of vision of the Unrolling rear view mirror can be obstructed by… -
Page 107
You may tip the rear seats forwards to cushion a little and then pull it forwards increase the boot space: if it is a split seat as far as possible. Then raise the rear part each half can be tipped separately. -
Page 108
t. -
Page 109
All manuals and user guides at all-guides.com HANDLING INSTRUCTIONS Roof r r ack* When loads are to be carried on the roof, • Distribute the load evenly. Each cross the following should be noted: bar may carry 40 kg if loaded uniformly •… -
Page 110
All manuals and user guides at all-guides.com HANDLING INSTRUCTIONS LEO-045 Press forcefully on the cover on the marked side in the direction of the arrow. Lift the aforementioned cover until there is a 90° angle in relation to the roof of the vehicle. -
Page 111
All manuals and user guides at all-guides.com HANDLING INSTRUCTIONS Ashtrays B8L-098 B8L-067 Front a a shtray Rear Opening Opening Push the front of the ashtray B. See figure. Open the lid. Emptying Emptying Take the ashtray by the side groves (A) Remove the inside by pulling it upwards, pulling it upwards. -
Page 112
All manuals and user guides at all-guides.com HANDLING INSTRUCTIONS Cigarette l l ighter/ electric s s ocket Stowage b b ox The cigarette lighter is switched on by pushing in the element. When the heating element glows, the lighter springs out automatically –… -
Page 113
All manuals and user guides at all-guides.com HANDLING INSTRUCTIONS Drink c c an h h older* Located in the central console. Opening Press the edge of the drink can holder and it will spring open. Closing Push the drink can holder closed. Warning The d d rink c c an h h older s s hould always r r emain c c losed w w hile d d ri-… -
Page 114: Climate Control
All manuals and user guides at all-guides.com HANDLING INSTRUCTIONS Heating a a nd v v entilation LEO-023 Vents Warning The illustration shows the air vents on the • For r r oad s s afety i i t i i s i i mportant dashboard.
-
Page 115
All manuals and user guides at all-guides.com HANDLING INSTRUCTIONS Air f f low f f or t t he windscreen In this position you cannot connect posi- tion D for air recirculation. Additionally, vents 3 can be used to direct hot air to the side windows. -
Page 116
All manuals and user guides at all-guides.com HANDLING INSTRUCTIONS Adjustment i i nstructions Heating i i nterior q q uickly • Rotary switch B to level III. Defrosting w w indscreen a a nd s s ide • Rotary regulator C to ….windows •… -
Page 117
All manuals and user guides at all-guides.com HANDLING INSTRUCTIONS Air c c onditioning* General n n otes Warning • To ensure that the heating and ventila- • For r r oad s s afety i i t i i s i i mportant tion can work properly, the air inlet in that a a ll w w indows a a re f f ree o o f i i ce, front of the windscreen should be kept… -
Page 118
All manuals and user guides at all-guides.com HANDLING INSTRUCTIONS B – – B B lower Air throughput can be adjusted in four stages. In position 0 the blower is switched off, but air is let in from the outside. If you want to stop polluted (smelly) air coming in from outside press switch E (air circula- tion). -
Page 119
All manuals and user guides at all-guides.com HANDLING INSTRUCTIONS LEO-024 D – – A A ir c c onditioner o o n/off Air v v ents The system can be switched on by press- Depending on the position of rotary regu- ing button D. -
Page 120
All manuals and user guides at all-guides.com HANDLING INSTRUCTIONS Defrosting w w indscreen a a nd s s ide Heating i i nterior c c omfortably windows When the windows are clear and the • desired temperature has been reached we Rotary regulator B to level III. -
Page 121
All manuals and user guides at all-guides.com HANDLING INSTRUCTIONS Maximum c c ooling Ideal c c ooling • • Close all windows and sliding/raising Rotary switch B to speed II or III (ideal roof. cooling levels). • • Switch B to speed IIII. Rotary switch A as far to the left as pos- sible. -
Page 122
All manuals and user guides at all-guides.com HANDLING INSTRUCTIONS General n n otes • Best results are obtained from the air • When the outside temperature is low conditioning if the windows and sun roof* the fan will not switch on until the cooling remain closed. -
Page 123
All manuals and user guides at all-guides.com HANDLING INSTRUCTIONS Using a a ir c c onditioner economically • In cooling operation the air conditioner compressor places demands on the engine and therefore influences the fuel consumption. • If the inside temperature is very high after the car has been parked in the sun, we recommend that you open doors or windows briefly to enable the hot air to… -
Page 124
All manuals and user guides at all-guides.com HANDLING INSTRUCTIONS Climatronic* LEO-025 Vents Warning The vents are adjusted automatically or • For r r oad s s afety i i t i i s i i mportant manually, depending on the operating that a a ll w w indows a a re f f ree o o f i i ce, system chosen. -
Page 125
All manuals and user guides at all-guides.com HANDLING INSTRUCTIONS TO8-027 The Climatronic* system automatically Controls provides a uniform temperature inside the Automatic vehicle. (normal m m ode) To do so it automatically adjusts the tem- The temperature, volume and air distribu- perature of the air released, the fan revo- tion are automatically adjusted to provide lutions (air flow) and the air distribution. -
Page 126
All manuals and user guides at all-guides.com HANDLING INSTRUCTIONS – + + T T emperature s s election If t t he w w indows s s team u u p d d isconnect the a a ir c c irculation m m ode b b y p p ressing The temperature can be adjusted between the a a ir c c irculation b b utton a a gain o o r b b y 18°C (64°F) and 29°C (84°F). -
Page 127
All manuals and user guides at all-guides.com HANDLING INSTRUCTIONS General n n otes • Best results are obtained from the • When the outside temperature is low the Climatronic with the windows and sun fan will not switch itself on until the coolant roof* closed. -
Page 128
All manuals and user guides at all-guides.com HANDLING INSTRUCTIONS Operating f f aults • If the cooling system does not work, it may be due to one of the following: – temperature is below +5 °C. – the cooling system compressor has switched itself off temporarily due to the coolant temperature being too high. -
Page 129
All manuals and user guides at all-guides.com HANDLING INSTRUCTIONS Manual g g earbox Automatic g g earbox* TO8-028 B8L-009 Reverse gear may only be engaged when Driving p p rogrammes s s oftware the vehicle is stationary. When engine is The gearbox management is fitted with running, depress clutch fully and wait a several driving programmes. -
Page 130
All manuals and user guides at all-guides.com HANDLING INSTRUCTIONS Selector l l ever l l ock The downward shift occurs at a higher rate of revolutions than in the economy In positions “P” and “N” with the ignition programmes. switched on the selector lever is locked. The gear box is self adapting, and contin- To move the selector lever out of these uously selects the most suitable gear pro-… -
Page 131
All manuals and user guides at all-guides.com HANDLING INSTRUCTIONS R – – R R everse g g ear The reverse gear should only be engaged when the vehicle is stationary and with the engine idling. Before engaging the position “R” from the positions “P” or “N” the brake pedal must be depressed and the lock button in the selector lever han- dle must also be pressed. -
Page 132
All manuals and user guides at all-guides.com HANDLING INSTRUCTIONS 2 – – P P osition f f or s s teep h h ills Warning This selector lever position is suitable for Please n n ote t t hat t t he d d riving w w heels long climbs and descents. -
Page 133
All manuals and user guides at all-guides.com HANDLING INSTRUCTIONS Parking When t t he v v ehicle i i s s s tationary a a nd a g g ear i i s e e ngaged, t t he t t hrottle Warning must n n ot b b e o o pened i i nadvertently To p p revent t t he v v ehicle f f rom r r olling… -
Page 134
All manuals and user guides at all-guides.com HANDLING INSTRUCTIONS Emergency p p rogram In case of an electronic failure of the gear- box, emergency programs are activated depending on the type of failure. • The gear box continues to shift auto- matically, but strong jerking is noticeable. -
Page 135
All manuals and user guides at all-guides.com HANDLING INSTRUCTIONS Handbrake Warning • To p p revent t t he v v ehicle f f rom rolling a a way i i nadvertently, y y ou should a a lways a a pply t t he h h and- brake f f irmly a a fter t t he v v ehicle h h as come t t o a a c c omplete s s top. -
Page 136
All manuals and user guides at all-guides.com HANDLING INSTRUCTIONS Ignition l l ock For a a ll v v ehicles: Position 1 1 : To lock the steering wheel withdraw the key and turn the wheel until you hear the pin engage. -
Page 137
All manuals and user guides at all-guides.com HANDLING INSTRUCTIONS Starting t t he e e ngine General n n otes • Do not over-rev or use full throttle until the engine has reached the normal oper- Warning ating temperature. When r r unning t t he e e ngine i i n c c on- •… -
Page 138
All manuals and user guides at all-guides.com HANDLING INSTRUCTIONS Diesel e e ngines Do not depress the accelerator while starting. Glow p p lug s s ystem If the engine only fires irregularly, con- After switching to the driving position tinue to operate the starter a few seconds (ignition on) the required glow plug longer (30 seconds at maximum) until the… -
Page 139
All manuals and user guides at all-guides.com HANDLING INSTRUCTIONS Stopping t t he e e ngine • • Valid f f or a a ll e e ngines: Valid f f or a a ll v v ersions w w ith c c atalytic converter*: When t t he e e ngine h h as b b een s s ubjected to a a h h eavy e e ngine l l oad f f or a a l l ong t t i-… -
Page 140
All manuals and user guides at all-guides.com HANDLING INSTRUCTIONS Cruise c c ontrol s s ystem* To relieve the foot on the accelerator pedal this system can hold any speed above around 30 km/h constant, so far as this is permitted by engine output. Warning The c c ruise c c ontrol s s ystem s s hould not b b e u u sed i i n d d ense t t raffic a a nd… -
Page 141
All manuals and user guides at all-guides.com HANDLING INSTRUCTIONS Altering s s tored s s peed Switching s s ystem o o ff temporarily Reducing/setting Vehicles w w ith m m anual g g earbox: The stored speed can be reduced by pressing button B. -
Page 142
All manuals and user guides at all-guides.com HANDLING INSTRUCTIONS Storing s s peed If no speed was saved before the system was temporarily switched off or if the stored speed was deleted, a new speed can be stored in the following manner: •… -
Page 143
All manuals and user guides at all-guides.com INDEX FILLING THE TANK Engine oil ….3.37 Cooling system ….3.41 Filling the tank . -
Page 144: Tips And Maintenance
All manuals and user guides at all-guides.com TIPS AND MAINTENANCE Filling t t he t t ank TO8-016 CON-009 Unlocking t t he t t ank f f lap The filler neck is in the rear right-side panel. To unlock the tank flap press the button. You can reach the lockable cap after hav- The unlock function only functions if the ing opened the tank flap (see illustration).
-
Page 145
All manuals and user guides at all-guides.com TIPS AND MAINTENANCE Notes Any fuel spillage should be wiped off the paint finish immediately, as the paint could otherwise be damaged, especially if it is RME (“biodiesel”) fuel. On v v ehicles w w ith a a c c atalytic c c onverter, never d d rive u u ntil t t he f f uel t t ank i i s c c om- pletely e e mpty. -
Page 146
All manuals and user guides at all-guides.com TIPS AND MAINTENANCE Petrol Petrol a a dditives In the chapter “Technical Data” and on the inside of the tank flap you will find The quality of the fuel has a decisive influ- information on the correct octane rating ence upon the running behavior, perfor- for your engine. -
Page 147
All manuals and user guides at all-guides.com TIPS AND MAINTENANCE Diesel Diesel fuel must correspond to DIN EN 590. • Exhaust gas contains less no l l ower t t han 4 4 9. – carbon monoxide RME f f uel ( ( “diester”) –… -
Page 148
All manuals and user guides at all-guides.com TIPS AND MAINTENANCE Driving i i n w w inter Filter p p reheating When using summer Diesel trouble may The vehicle is fitted with a filter preheater. be experienced at temperatures below This will ensure that the fuel system will 0 °C because the fuel thickens due to wax remain operational down to about –25 °C,… -
Page 149: Intelligent Technology
All manuals and user guides at all-guides.com TIPS AND MAINTENANCE Brakes General n n otes What c c an h h ave a a n n egative e e ffect o o n the b b rakes? • Brake lining wear depends to a large extent on the operating conditions and Wet o o r g g ritted r r oad s s urface style of driving.
-
Page 150
All manuals and user guides at all-guides.com TIPS AND MAINTENANCE Overheating o o f t t he b b rakes Servobrake Warning Warning • Never l l et t t he b b rakes “ “ rub” b b y The s s ervo i i s o o perated b b y a a v v acuum pressing t t he p p edal t t oo l l ightly which i i s o o nly g g enerated w w hen t t he… -
Page 151
All manuals and user guides at all-guides.com TIPS AND MAINTENANCE How t t he A A BS* s s ystem w w orks Warning An automatic check is made when a However t t he A A BS s s ystem c c annot speed of approx. -
Page 152
All manuals and user guides at all-guides.com TIPS AND MAINTENANCE Wheelspin c c ontrol ( ( TCS)* In vehicles with front wheel traction, the To ensure that the brake disc of the TCS lowers the engine power to stop the braked wheel does not overheat, the EDL wheel from spinning when you accelerate. -
Page 153
All manuals and user guides at all-guides.com TIPS AND MAINTENANCE The TCS connects automatically once the Warning engine is started. If necessary, it can be Driving s s tyle s s hould a a lways b b e connected or disconnected by briefly modified t t o s s uit t t he t t raffic a a nd pressing the button located on the central road c c onditions. -
Page 154
All manuals and user guides at all-guides.com TIPS AND MAINTENANCE Electronic S S tability P P rogram ( ( ESP)* Functioning The ESP increases the control over the vehicle in situations such as accelerating The electronic stability program encom- or in turns. passes the ABS, EDS and TCS. -
Page 155
All manuals and user guides at all-guides.com TIPS AND MAINTENANCE Power s s teering* Do not keep the steering wheel fully turned more than 15 seconds when the engine is switched on, as the hydraulic oil will be heated to a high temperature by the servo pump. -
Page 156: Your Vehicle And The Environment
All manuals and user guides at all-guides.com TIPS AND MAINTENANCE The f f irst 1 1 ,500 k k m – a a nd a a fterwards Running-in From 1 1 000 – – 1 1 500 k k m During the first few operating hours the The speed can be gradually increased to engine internal friction is higher than…
-
Page 157
All manuals and user guides at all-guides.com TIPS AND MAINTENANCE Cleaning t t he e e xhaust f f umes The p p erfect f f unctioning o o f t t he c c lean- Warning ing s s ystem f f or e e xhaust f f umes is of •… -
Page 158
All manuals and user guides at all-guides.com TIPS AND MAINTENANCE Environment-friendly a a nd e e conomical d d riving Three factors determine the fuel con- sumption, the burden on the environment and the wear on the engine, brakes and tyres: •… -
Page 159
All manuals and user guides at all-guides.com TIPS AND MAINTENANCE Suggestion 4 4 Decrease i i dling It is worth switching off the engine in traffic jams, at railroad crossings and at traffic lights with a long red light. The sav- ings in fuel after 30-40 seconds with the engine switched off is higher than the fuel used to switch the engine on again. -
Page 160
All manuals and user guides at all-guides.com TIPS AND MAINTENANCE Suggestion 7 7 Check t t he t t yre p p ressure Make sure that the tyres have always ade- quate pressure. Even half a bar less increases the level of fuel consumption by 5 percent. -
Page 161
All manuals and user guides at all-guides.com TIPS AND MAINTENANCE Suggestion 9 9 Suggestion 1 1 0 Save e e lectricity Written c c heck-up The alternator generates electricity while If you wish to reduce fuel consumption driving. The more electricity is used, the keep a trip book. -
Page 162
All manuals and user guides at all-guides.com TIPS AND MAINTENANCE Trailer t t owing The vehicle is intended mainly for the transportation of persons and luggage but it can, with the appropriate technical equipment, also be used to tow a trailer, if it is fitted with the appropriate technical equipment and the maximum payloads are not exceeded (see chapter “Technical… -
Page 163
All manuals and user guides at all-guides.com TIPS AND MAINTENANCE Operations i i nstructions • When using a trailer on mountain • The removable ball coupling of the tow- routes you must bear in mind that the tow ing bracket* may be stored in the tool box loads given in the “Technical data”… -
Page 164
All manuals and user guides at all-guides.com TIPS AND MAINTENANCE • • The tyre pressures on the towing vehi- For s s afety r r easons o o ne s s hould n n ot drive f f aster t t han 8 8 0 k k m/h ( ( 50 m m ph). cle must be adjusted for full load condi- This a a lso a a pplies i i n c c ountries w w here tions, and also check the pressures on the… -
Page 165
• Observe all statutory requirements The addresses are given in the SEAT regarding the use of a trailer. International Assistance Guide which comes with the car documentation. YOUR VEHICLE AND THE ENVIRONMENT ––––––––––––––––––––––––––––––––––––––––––––––––––… -
Page 166
All manuals and user guides at all-guides.com TIPS AND MAINTENANCE Headlight c c overing When the vehicle is used in a country Warning which drives on the opposite side of the When y y ou d d rive o o n t t he o o pposite road to the home country, the asymmetric side o o f t t he r r oad t t o y y our o o wn c c oun- dipped headlights will dazzle oncoming… -
Page 167
All manuals and user guides at all-guides.com TIPS AND MAINTENANCE TO8-031 TO8-032 On t t he r r ight h h eadlamp, i i f y y ou c c hange On t t he l l eft h h eadlamp, i i f y y ou c c hange from d d riving o o n t t he r r ight h h and s s ide t t o from d d riving o o n t t he r r ight h h and s s ide t t o driving o o n t t he l l eft h h and s s ide o o f t t he… -
Page 168
All manuals and user guides at all-guides.com TIPS AND MAINTENANCE TO8-033 TO8-034 On t t he r r ight h h eadlamp, i i f y y ou c c hange On t t he l l eft h h eadlamp, i i f y y ou c c hange from d d riving o o n t t he l l eft h h and s s ide t t o from d d riving o o n t t he l l eft h h and s s ide t t o driving o o n t t he r r ight h h and s s ide o o f t t he… -
Page 169: Care And Maintenance
All manuals and user guides at all-guides.com TIPS AND MAINTENANCE Care o o f t t he v v ehicle Regular a a nd e e xpert c c are h h elps t t o How often this treatment is required maintain t t he v v alue o o f t t he v v ehicle.
-
Page 170
All manuals and user guides at all-guides.com TIPS AND MAINTENANCE Notes Note • • Before going through the car wash, The vehicle should not be washed in apart from the usual precautions (closing strong sunshine. windows and sliding roof). • If the vehicle is rinsed with a hose, do You do not need to remove the Original not direct the jet of water at the lock cylin-… -
Page 171
All manuals and user guides at all-guides.com TIPS AND MAINTENANCE Polishing The windows should also be cleaned on the inside at regular intervals. Should only be done if paint has lost its Do not dry the windows with the leather shine and gloss cannot be brought back used for the paintwork because traces of with wax. -
Page 172
All manuals and user guides at all-guides.com TIPS AND MAINTENANCE Upholstery c c loth a a nd t t extile t t rim Cleaning s s eat b b elts Upholstery cloth and textile trim on door Keep b b elts c c lean. T T hey m m ay n n ot r r etract panels, parcel shelves, luggage compart- properly i i f v v ery d d irty. -
Page 173
All manuals and user guides at all-guides.com TIPS AND MAINTENANCE Steel w w heels Cleaning a a nd a a nti-corrosion treatment o o f e e ngine c c ompartment The wheels and the wheel trims should be cleaned thoroughly at regular intervals Warning when the vehicle is being washed. -
Page 174
All manuals and user guides at all-guides.com TIPS AND MAINTENANCE The i i gnition m m ust b b e s s witched o o ff Undercoating before w w ashing t t he e e ngine. The underside of the vehicle is coated Do n n ot p p oint t t he w w ater j j et d d ircetly a a t with a special compound to protect it from the h h eadlights t t o a a void d d amage. -
Page 175
All manuals and user guides at all-guides.com TIPS AND MAINTENANCE Note f f or v v ehicles w w ith a a c c atalytic converter Due to the high temperatures which occur in the afterburning process, additional heat shields are fitted over the catalytic converter. -
Page 176: Checking And Refilling
All manuals and user guides at all-guides.com TIPS AND MAINTENANCE Engine b b onnet B8L-035 LEO-029 Unlocking Closing Pull the lever on the left side panel, under Hold the bonnet on the side where the the instrument panel. The bonnet springs gas filled rod is fitted.
-
Page 177
All manuals and user guides at all-guides.com TIPS AND MAINTENANCE Engine c c ompartment Warning • If t t ests h h ave t t o b b e c c arried o o ut Particular c c are s s hould b b e t t aken with t t he e e ngine r r unning, t t here i i s when w w orking i i n t t he e e ngine c c om- an a a dditional d d anger p p resent f f rom… -
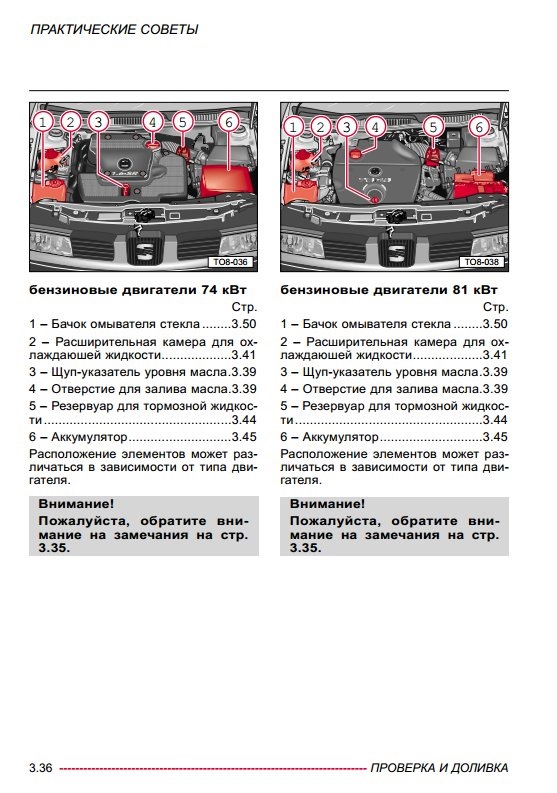
Page 178
All manuals and user guides at all-guides.com TIPS AND MAINTENANCE TO8-036 TO8-038 77 k k W p p etrol e e ngines 81 k k W d d iesel e e ngines Page Page 1 – Windscreen washer container..3.50 1 – Windscreen washer container..3.50 2 –… -
Page 179
All manuals and user guides at all-guides.com TIPS AND MAINTENANCE Engine o o il Specifications The engine comes with a special, high quality, multi grade oil that can be used in all seasons of the year except for those regions affected by extreme cold. As the use of high quality oil is essential for the correct operation of the engine and its long useful life, when topping up… -
Page 180
All manuals and user guides at all-guides.com TIPS AND MAINTENANCE Petrol e e ngine Denomination Specification Comments A – synthetic oil VW 502 00 VW 500 00 Dated after 1-97 B – mineral oil VW 501 01 Dated after 1-97 A/B –… -
Page 181
All manuals and user guides at all-guides.com TIPS AND MAINTENANCE When the engine is working hard such as in sustained high-speed motorway cruis- ing in summer, when towing a trailer or when climbing mountain passes, the oil level should be kept at area (c) – n n ot above. -
Page 182
All manuals and user guides at all-guides.com TIPS AND MAINTENANCE Changing e e ngine o o il • If y y our h h ands c c ome i i nto c c ontact The e e ngine o o il m m ust b b e c c hanged a a t with e e ngine o o il y y ou m m ust w w ash the i i ntervals g g iven i i n t t he I I nspection them t t horoughly a a fterwards. -
Page 183
All manuals and user guides at all-guides.com TIPS AND MAINTENANCE Cooling s s ystem Other a a dditives can b b e v v ery d d etrimen- The cooling system is filled at the factory with a permanent coolant which is not tal t t o t t he a a nti-corrosion e e ffect i i n p p ar- changed. -
Page 184
All manuals and user guides at all-guides.com TIPS AND MAINTENANCE Coolant l l osses Coolant loss normally indicates leaks in the system. In this case the cooling sys- tem should be checked by a Technical Service Centre without delay. It is not suf- ficient merely to add coolant. -
Page 185
All manuals and user guides at all-guides.com TIPS AND MAINTENANCE Radiator f f an If a lot of coolant has been lost, only add The radiator fan is driven electrically and cold coolant after the engine has cooled controlled by a thermoswitch from the down. -
Page 186
All manuals and user guides at all-guides.com TIPS AND MAINTENANCE Brake f f luid Renewing t t he b b rake f f luid Brake fluid absorbs moisture. In the course of time it takes in water from the atmosphere. Too high a content of water in the brake fluid system can cause corro- sion damage. -
Page 187
All manuals and user guides at all-guides.com TIPS AND MAINTENANCE Battery Warning n n otes Keep a a cid a a nd b b attery o o ut o o f the r r each o o f c c hildren. Wear e e ye p p rotection. -
Page 188
All manuals and user guides at all-guides.com TIPS AND MAINTENANCE Location The battery is in the engine compartment. Start with the help of another battery. See «Emergency starting» chapter. Checking a a cid l l evel Take the following warnings of the «Engine compartment»… -
Page 189
All manuals and user guides at all-guides.com TIPS AND MAINTENANCE Charging the b b attery • Fast c c harging a a b b attery i i s d d an- Before charging, switch off the engine gerous a a nd s s hould o o nly b b e d d one a a t and all electrical consumers. -
Page 190
All manuals and user guides at all-guides.com TIPS AND MAINTENANCE What h h appens w w hen t t he b b attery i i s disconnected a a nd t t hen reconnected ..After reconnecting the battery to the onboard electronics, you should reset the digital clock. -
Page 191
All manuals and user guides at all-guides.com TIPS AND MAINTENANCE New output and capacity should be the same as the old battery. Technical Service Centres have a range of suitable batteries. Because o o f t t he p p roblem o o f d d is- posing o o f t t he o o ld b b attery, t t he renewal s s hould p p referably d d one a a t a a Technical S S ervice C C entre. -
Page 192
All manuals and user guides at all-guides.com TIPS AND MAINTENANCE Windscreen w w asher B8L-075 TO8-039 The fluid container is on the right of the Note engine compartment. The container holds To avoid a possible error by the fluid level about 3 litres: on vehicles with a head- sensor, the p p roportion o o f a a lcohol a a nd light washer system* it holds about… -
Page 193: Servicing And Replacing
• Accessories s s uch a a s t t elephone • Approved accessories and original SEAT retainers o o r d d rinks h h olders m m ust spare parts may be obtained through the never b b e a a ttached t t o t t he A A ir B B ag…
-
Page 194
All manuals and user guides at all-guides.com TIPS AND MAINTENANCE Spark p p lugs The spark plugs are renewed during the SEAT Inspection Service. If the spark plugs have to be renewed between the Inspection Services, the fol- lowing should be noted: •… -
Page 195
All manuals and user guides at all-guides.com TIPS AND MAINTENANCE Dust a a nd p p ollen f f ilter* TO8-040 B1J-034 The dust and pollen filter for the heating • Push back spring clips C in the direc- and ventilation system can be found tion of the arrow and remove the filter under the cover on the right in the plenum insert. -
Page 196
All manuals and user guides at all-guides.com TIPS AND MAINTENANCE B11-060D Installing f f ilter For greater clarity, the illustration shows the dust and pollen filter already disman- tled. Push the filter into the recesses of the fil- ter unit with the lugs D first. Then press the filter down at the front until the spring clips C engage on the lugs Screw the cover on tightly and press the… -
Page 197: If And When
All manuals and user guides at all-guides.com TIPS AND MAINTENANCE First a a id k k it, w w arning t t riangle Recommendations In some countries a luminous hazard warning triangle must be carried in the • The f f irst a a id k k it a a nd w w arning t t rian- vehicle to be used in an emergency, as gle m m ust f f ulfil l l egal r r equirements.
-
Page 198
All manuals and user guides at all-guides.com TIPS AND MAINTENANCE On b b oard t t ools, s s pare w w heel The tools are located in a polystyrene retainer, inside the spare wheel recess secured with a rubber strap. Warning Ensure t t hat t t he v v ehicle t t ools a a nd spare w w heel a a re s s towed s s ecurely… -
Page 199
All manuals and user guides at all-guides.com TIPS AND MAINTENANCE Vehicle t t ools / / j j ack Warning • The j j ack s s upplied b b y t t he f f actory is o o nly d d esigned f f or y y our v v ehicle model. -
Page 200
All manuals and user guides at all-guides.com TIPS AND MAINTENANCE B1J-054D B1J-055D Spare w w heel Securing t t he s s pare w w heel • Place the defective wheel in the hous- The wheel is located in the well under the ing and secure with the nut. -
Page 201
All manuals and user guides at all-guides.com TIPS AND MAINTENANCE Wheels General n n otes • Keep grease, oil and fuel off the tyres. • New tyres do not give maximum grip • Replace missing dust caps as soon as straight away and should therefore be run possible. -
Page 202
All manuals and user guides at all-guides.com TIPS AND MAINTENANCE Mode o o f d d riving At this opportunity do not forget the spare wheel: Fast cornering, hard acceleration and vio- • The spare wheel with normal tyre lent braking also increase tyre wear. should always be inflated to the highest Balancing w w heels pressure required on the vehicle. -
Page 203
All manuals and user guides at all-guides.com TIPS AND MAINTENANCE Renewing w w heels/tyres Wheels and tyres are important design features. The wheels and tyres approved by us should be used. They are specially matched to the model concerned and con- tribute largely to the excellent roadhold- ing and safe driving characteristics. -
Page 204
All manuals and user guides at all-guides.com TIPS AND MAINTENANCE • You should only combine radial tyres of Warning the same construction, size (rolling cir- Tyres w w hich a a re m m ore t t han 6 6 y y ears cumference) and, as far as possible, the old s s hould o o nly b b e u u sed i i n a a n same tread profile on all four wheels. -
Page 205
All manuals and user guides at all-guides.com TIPS AND MAINTENANCE • Wheels a a nd w w heel b b olts a a re matched t t o e e ach o o ther. Therefore, w w henever w w heels a a re changed t t o a a d d ifferent v v ersion (e.g. -
Page 206
All manuals and user guides at all-guides.com TIPS AND MAINTENANCE When fitting winter tyres note the follow- • If you have a flat tyre the remarks on ing: using the spare wheel on page 3.58 • For better driving performance, fit win- should be noted. -
Page 207
All manuals and user guides at all-guides.com TIPS AND MAINTENANCE Changing w w heels Warning • In c c ase o o f a a f f lat t t yre o o r p p uncture, park t t he v v ehicle a a s f f ar a a s p p ossible away f f rom t t he t t raffic f f low. -
Page 208
All manuals and user guides at all-guides.com TIPS AND MAINTENANCE B45-082C • Push the wheel spanner as far as possi- ble onto the wheel bolt as shown and turn the spanner anti-clockwise. When doing this, grip the spanner as far as possible towards the lever end. -
Page 209
All manuals and user guides at all-guides.com TIPS AND MAINTENANCE TO8-043 B45-084C • • Depressions under vehicle for jack: Place jack under vehicle: The illustration shows the jack fitted on Warning the rear left hand side. If t t he j j ack i i s n n ot f f itted a a t t t he points m m arked o o r d d escribed, d d am- Warning age c c ould b b e c c aused t t o t t he v v ehi-… -
Page 210
All manuals and user guides at all-guides.com TIPS AND MAINTENANCE – Wind jack arm up by turning the crank in the spindle until the jack just goes under the vehicle. – The claw of the jack must fit round the vertical rib on the side member so that the jack cannot slip when vehicle is lifted –… -
Page 211
All manuals and user guides at all-guides.com TIPS AND MAINTENANCE Notes Notes f f or t t yres w w here t t he d d irection of r r otation i i s s s tipulated • The box spanner in the screwdriver han- dle makes handling the wheel bolts eas- It is imperative that the designated direc- ier. -
Page 212
All manuals and user guides at all-guides.com TIPS AND MAINTENANCE Code The code for the wheel bolt is engraved in the front of the adapter. Make a a n n ote o o f t t he c c ode a a nd k k eep i i t in a a s s afe p p lace. -
Page 213
All manuals and user guides at all-guides.com TIPS AND MAINTENANCE Fuses The individual current circuits are pro- tected by fuses. It is advisable to always carry a few spare fuses on the vehicle. Notes Warning Never, u u nder a a ny c c ircumstances “repair”… -
Page 214
19– Main beam, left ……. 43– Engine control, petrol engine … 20– Dipped beam, right ….Engine control, diesel engine .. 21– Dipped beam, left….44– Heated seat ……22– Side light, right ……. Amperes. 3.72 ––––––––––––––––––––––––––––––––––––––––––––––––––––––––––––––––––––––––––– IF AND WHEN… -
Page 215
All manuals and user guides at all-guides.com TIPS AND MAINTENANCE Fuse c c olour c c ode: Beige: 5 Amp Brown: 7.5 Amp Red: 10 Amp Blue: 15 Amp Yellow: 20 Amp White 25 Amp Green: 30 Amp B1J-092D Automatic f f use All electric windows are protected as a Fuse b b ox i i n t t he e e ngine single set via an automatic fuse which… -
Page 216
All manuals and user guides at all-guides.com TIPS AND MAINTENANCE Changing b b ulbs Main b b eam b b ulb w w ith f f og l l ight Before starting to replace a bulb, you must first always switch off the consumer Dipped beam ….12V/55W (H7) concerned. -
Page 217
All manuals and user guides at all-guides.com TIPS AND MAINTENANCE TO8-044A TO8-045 Main b b eam b b ulbs Warning The illustration shows the left headlight When d d oing w w ork i i n t t he e e ngine from the rear. -
Page 218
All manuals and user guides at all-guides.com TIPS AND MAINTENANCE TO8-046 TO8-044B A – – D D ipped b b eam b b ulb B – – M M ain b b eam b b ulb • • Open bonnet. Open bonnet. -
Page 219
All manuals and user guides at all-guides.com TIPS AND MAINTENANCE TO8-044C TO8-044D C – – S S ide l l ight b b ulbs D – – I I ndicator b b ulb • • Open the bonnet. Open the bonnet. •… -
Page 220
All manuals and user guides at all-guides.com TIPS AND MAINTENANCE B11-080D B1J-084D Side i i ndicators Door l l ights • • Press the indicator to the left or to the Remove complete light carrier. To do right and remove the bulb. this, insert the flat blade of the screw- driver between the light and the roof trim •… -
Page 221
All manuals and user guides at all-guides.com TIPS AND MAINTENANCE TO8-047 TO8-048 Rear l l ights Body w w ork l l ights Tailgate l l ights Rear l l ight Fog l l ight Brake l l ight Reverse l l ight Indicator l l ight •… -
Page 222
All manuals and user guides at all-guides.com TIPS AND MAINTENANCE TO8-048A B45-145C Number p p late l l ight Interior l l ights a a nd f f ront r r eading lights ( ( three p p arts) • Unscrew lens and lever it off with great •… -
Page 223
All manuals and user guides at all-guides.com TIPS AND MAINTENANCE B45-147C B1J-087D Rear i i nterior l l ight* • Move plastic cover in the direction of • Remove complete bulb holder. To do the arrow and remove. this, insert the flat blade of the screw- •… -
Page 224
All manuals and user guides at all-guides.com TIPS AND MAINTENANCE Additional b b rake l l ight* Luggage c c ompartment l l ight Because of the difficulty of the operation, The luggage compartment light is located this bulb should only be changed by a in the centre, under the tray. -
Page 225
Connectors* fitted in the vehicle are for all the technical specificities of the vehi- Original SEAT Radios cles, and have Original Radios and all the necessary spares from the SEAT • Radios with different connectors must Original Parts Program . Moreover, all be connected with adaptor cables. -
Page 226
Service Centre. radios o o perated i i nside t t he v v ehicle SEAT has authorised the use of mobile without a a s s eparate e e xternal a a erial telephones and two-way radios for your… -
Page 227
All manuals and user guides at all-guides.com TIPS AND MAINTENANCE Emergency s s tarting If the engine will not start because the Warning battery is flat, jump l l eads can be con- A f f lat b b attery c c an f f reeze a a t t t emper- nected to the battery of another vehicle to atures o o f l l ess t t han 0 0 °C. -
Page 228
All manuals and user guides at all-guides.com TIPS AND MAINTENANCE Warning • The n n on-insulated p p arts o o f t t he cable c c lips m m ust n n ot t t ouch o o ne another o o n a a ny a a ccount. -
Page 229
All manuals and user guides at all-guides.com TIPS AND MAINTENANCE Tow s s tart/towing General n n otes • When using a tow-rope the driver of the • Check whether there are any local traffic towing vehicle must engage the clutch regulations concerning the towing of vehi- very gently when moving off and changing cles. -
Page 230
All manuals and user guides at all-guides.com TIPS AND MAINTENANCE Screw in the towing eye which is located in the vehicle’s tool box. Turn the eye to the l l eft with the wheel spanner until the eye is perfectly screwed in. To remove the towing eye, turn it to the right with the wheel spanner. -
Page 231
All manuals and user guides at all-guides.com TIPS AND MAINTENANCE IB9-051 Rear t t owing e e ye The towing eye is located on the right under the rear bumper. Remove t t he c c over To remove the cover insert the flat part of a screwdriver in the existing groove between the cover and the bumper and carefully lever off. -
Page 232
All manuals and user guides at all-guides.com TIPS AND MAINTENANCE Tow s s tarting Towing It i i s n n ot a a dvisable t t o t t ow s s tart a a v v ehi- When t t owing vehicles with an auto- cle. -
Page 233
All manuals and user guides at all-guides.com TIPS AND MAINTENANCE Lifting t t he v v ehicle Trolley j j ack To prevent damage to the underside of the vehicle it is essential to use a s s uitable rubber p p ad. On n n o a a ccount s s hould t t he v v ehicle b b e lifted u u nder t t he e e ngine, g g earbox, r r ear axle o o r f f ront a a xle a a s t t his c c an c c ause… -
Page 234
All manuals and user guides at all-guides.com TIPS AND MAINTENANCE B45-105C Rear On the vertical side member reinforce- ment in the area of the marking for the vehicle jack. Vehicle j j ack Lifting with the vehicle jack is described on page 3.67. -
Page 235: General Notes
All manuals and user guides at all-guides.com INDEX GENERAL NOTES ENGINE DATA 1.4 55 kW 16V Petrol engine ..4.7 General considerations on technical data….4.2 1.6 77 kW 16V Petrol engine .
-
Page 236
All manuals and user guides at all-guides.com TECHNICAL DATA General c c onsiderations o o n t t echnical d d ata Unless o o therwise i i ndicated, a a ll t t ech- • Total c c onsumption is based on a bal- nical d d etails p p rovided b b elow a a pply t t o anced average of 37% of town driving and vehicles w w ith s s tandard f f ittings. -
Page 237
All manuals and user guides at all-guides.com TECHNICAL DATA Tow l l oads Warning • Support l l oads The m m aximum a a uthorized l l oad and t t he l l oad o o n t t he a a xle m m ust The maximum authorised load on the never b b e e e xceeded. -
Page 238: Weights And Measurements
All manuals and user guides at all-guides.com TECHNICAL DATA Fixing p p oints f f or t t ow b b ar* Warning Danger o o f a a ccident! We r r ecommend t t hat y y ou v v isit a a Technical S S ervice C C entre f f or t t he retrofitting o o f a a t t ow h h ook.
-
Page 239: Vehicle Identification Data
All manuals and user guides at all-guides.com TECHNICAL DATA Vehicle i i dentification d d ata TO0-002 B1H-116C Data-carrying a a dhesive 1 – Type plate. 2 – Vehicle identification number. sticker is stuck on the inside rim of the spare wheel or on the floor of the boot.
-
Page 240
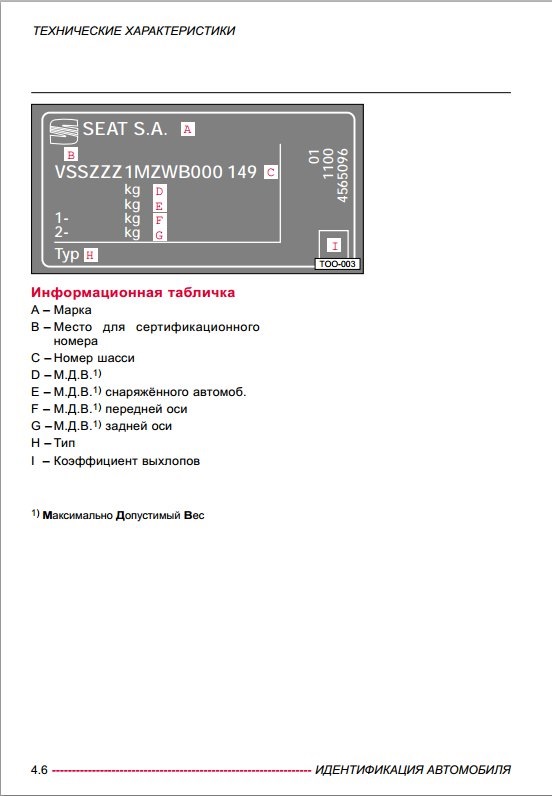
All manuals and user guides at all-guides.com TECHNICAL DATA TOO-003 Data-carrying a a dhesive A – Brand B – Countersign for the official approval number C – Chassis number D – M.A.W. E – M.A.W. of vehicle (loaded vehicle) F – M.A.W. on front axle G –… -
Page 241: Engine Data
All manuals and user guides at all-guides.com TECHNICAL DATA 1.4 5 5 5 k k W 1 1 6V P P etrol e e ngine Engine d d ata Output kW (HP) after 1/min 55 (75)/5000 Maximum engine torque in Nm after 1/min 126/3300 Number of cylinders/Cylinder capacity in cm 4/1390…
-
Page 242
All manuals and user guides at all-guides.com TECHNICAL DATA 1.6 7 7 7 k k W 1 1 6V P P etrol e e ngine Engine d d ata Output kW (HP) after 1/min 77 (105)/5700 Maximum engine torque in Nm after 1/min 148/4500 Number of cylinders/Cylinder capacity in cm 4/1598… -
Page 243
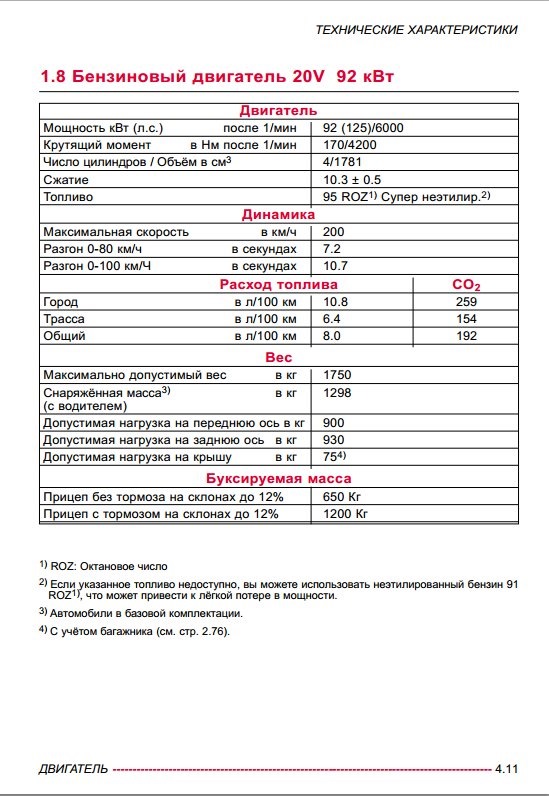
All manuals and user guides at all-guides.com TECHNICAL DATA 1.8 1 1 32 k k W 2 2 0VT P P etrol e e ngine ( ( 6 g g ears) Engine d d ata Output kW (HP) after 1/min 132 (180)/5500 Maximum engine torque in Nm after 1/min… -
Page 244
All manuals and user guides at all-guides.com TECHNICAL DATA 1.9 6 6 6 k k W T T DI D D iesel e e ngine Engine d d ata Output kW (HP) after 1/min 66 (90)/3750 Maximum engine torque in Nm after 1/min 210/1900 Number of cylinders/Cylinder capacity in cm 4/1896… -
Page 245
All manuals and user guides at all-guides.com TECHNICAL DATA 1.9 8 8 1 k k W T T DI D D iesel e e ngine Engine d d ata Output kW (HP) after 1/min 81 (110)/4150 Maximum engine torque in Nm after 1/min 235/1900 Number of cylinders/Cylinder capacity in cm 4/1896… -
Page 246
All manuals and user guides at all-guides.com TECHNICAL DATA 1.9 T T DI 9 9 6 k k W D D iesel e e ngine Engine d d ata Output kW (HP) after 1/min 96 (130)/4000 Maximum engine torque in Nm after 1/min 310/1900 Number of cylinders/Cylinder capacity in cm 4/1896… -
Page 247
All manuals and user guides at all-guides.com TECHNICAL DATA 1.9 1 1 10 k k W T T DI D D iesel e e ngine ( ( 6 g g ears) Engine d d ata Output kW (HP) after 1/min 110 (150)/4000 Maximum engine torque in Nm after 1/min… -
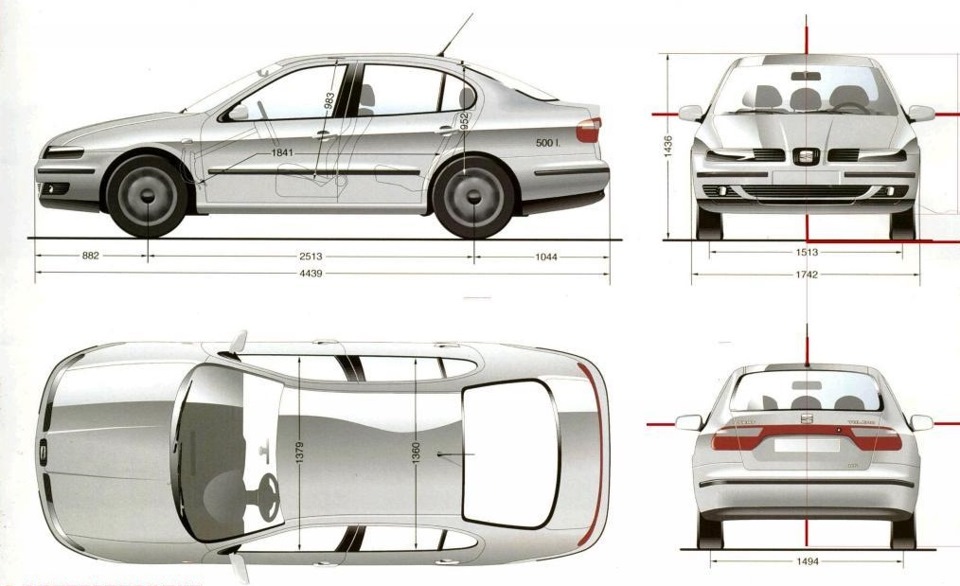
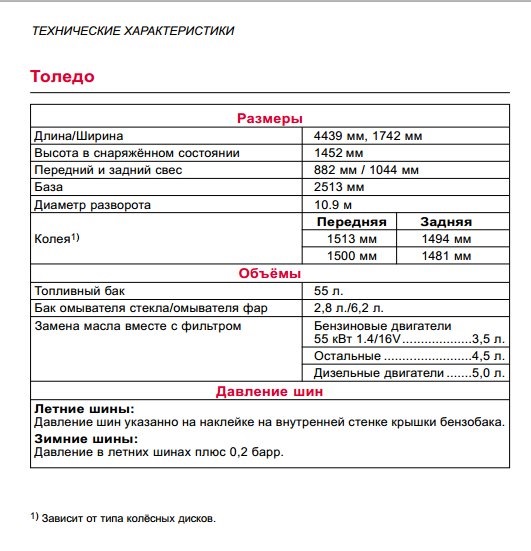
Page 248
All manuals and user guides at all-guides.com TECHNICAL DATA Toledo Measurements Length/Width 4439 mm, 1742 mm Height at free standing weight 1436 mm Front and rear overhang 882 mm / 1044 mm Wheel base 2513 mm Turning ratio 10.9 m… -
Page 249
Anti-theft wheel bolts ..3.70 – cleaning seat belts ..3.30 Aquaplane ….3.61 Catalyst . -
Page 250
All manuals and user guides at all-guides.com GENERAL INDEX Central locking button ..2.29 Defrosting windscreen and side windows ..2.76/2.80/2.85 – automatic Locking ..2.29 Diesel . -
Page 251
Engine data … . . 4.7-4.13 – driver’s seat … . . 2.57 Engine number ….4.5 –… -
Page 252
All manuals and user guides at all-guides.com GENERAL INDEX Heated rear window ..2.46 Heated seats ….2.63 Lashing eyes . -
Page 253
– additives ….3.4 Seat belts ….1.3 –… -
Page 254
– rear fog light … . . 2.22 Vehicle identification data ..4.5 – seat belt warning lamp ..2.17 Vehicle identification number..4.5 –… -
Page 255
All manuals and user guides at all-guides.com GENERAL INDEX – warning lamps display screen 2.16 Wheels ….3.59 Wheelspin control (TCS) ..3.10 –… -
Page 256
All manuals and user guides at all-guides.com… -
Page 257
Except for error or omission, the information included in the current handbook is valid as of the date of closing print. Re-printing, copying or translating, whether total or partial is not allowed unless SEAT allows it in written form. -
Page 258
All manuals and user guides at all-guides.com Inglés 1M5012003AN (07.03) (GT9)
Решил выложить немного технической информации и мини мануал, может кому будет полезно и пригодится что-то, ну или просто посмотрите на интересные цифры о габаритах, графике момента и мощности ну и так далее, а если кому совсем будет интересно могу скинуть ссылку на полный пользовательский мануал.
Ну вот начнем с габаритов, багажник в 500 литров конечно впечатляет для машины такого класса, но проем багажника неудобно мал, что позволяет перевозить много груза, но мелкогабаритного, хотя меня это в принципе не смущает, четыре баллона с резиной помещаются, если постараться то я думаю можно и пятый поместить.
Так затем у нас идет график мощности и крутящего момента при различном количестве оборотов, для двигателя 1.8 20v AGN(125 л.с.). Ну для атмосферного мотора все стандартно.

Запчасти на фото: SP1929, SP1979
Ну вот технические характеристики, хотя мануал там не точный 1,6 по их данным разгоняется быстрее 1.8, так вообще во всех источниках написано 10,5, но это не так важно. В плане расхода по городу всегда у меня выходит ровно 10 литров.
Вот что касается того что где находится, но я думаю это и так все знают.
Ну и на последок расшифровка таблички.
Надеюсь что хоть кто-то узнал что-то для себя новое .Ну ладно все же сразу кину ссылку на полный мануал.
vwts.ru/vw_doc2/seat_toledo_leon_rus.pdf
Посмотреть инструкция для Seat Toledo (2008) бесплатно. Руководство относится к категории автомобили, 2 человек(а) дали ему среднюю оценку 7.6. Руководство доступно на следующих языках: английский. У вас есть вопрос о Seat Toledo (2008) или вам нужна помощь? Задайте свой вопрос здесь
Не можете найти ответ на свой вопрос в руководстве? Вы можете найти ответ на свой вопрос ниже, в разделе часто задаваемых вопросов о Seat Toledo (2008).
Как перевести мили в километры?
1 миля равна 1,609344 километрам, а 1 километр — 0,62137119 милям.
Где я могу узнать идентификационный номер транспортного средства Seat?
Место размещения идентификационного номера транспортного средства зависит от марки и типа транспортного средства. Номер может быть выбит на раме транспортного средства или указан на номерном знаке. Чтобы узнать место расположения идентификационного номера транспортного средства лучше всего ознакомиться с руководством по эксплуатации Seat Toledo (2008).
Что такое идентификационный номер транспортного средства (VIN)?
Идентификационный номер транспортного средства — уникальный для каждого транспортного средства идентификационный номер. Аббревиатура VIN расшифровывается как «Vehicle Identification Number» (Идентификационный номер транспортного средства).
Когда транспортному средству Seat требуется техническое обслуживание?
Регулярное техническое обслуживание необходимо всем транспортным средствам. С информацией о том, как часто необходимо проходить техническое обслуживание и чему именно стоит уделять особое внимание можно ознакомиться в инструкции по техническому обслуживанию. Как правило, транспортное средство требует технического обслуживания каждые 2 года или 30 000 километров пробега.
Когда следует заменять тормозную жидкость на Seat?
Тормозную жидкость рекомендуется менять каждые два года.
В чем разница между топливом E10 и E5?
В топливе E10 содержится до десяти процентов этанола, в то время как в E5 содержится менее пяти процентов. Соответственно, топливо E10 менее вредит окружающей среде.
Одна или несколько дверей не открываются изнутри. Что мне делать?
Скорее всего, замок оснащен защитой от детей и поэтому не может быть открыт изнутри. Процедура открытия замка с защитой от детей зависит от марки и типа замка.
Автомобильный радиоприемник не включается, что делать?
Если автомобильный радиоприемник не включен, на него не будет подаваться питание. Убедитесь, что красный провод подключен к контактному источнику питания, а желтый провод — к источнику питания постоянной мощности.
Инструкция Seat Toledo (2008) доступно в русский?
К сожалению, у нас нет руководства для Seat Toledo (2008), доступного в русский. Это руководство доступно в английский.
Не нашли свой вопрос? Задайте свой вопрос здесь
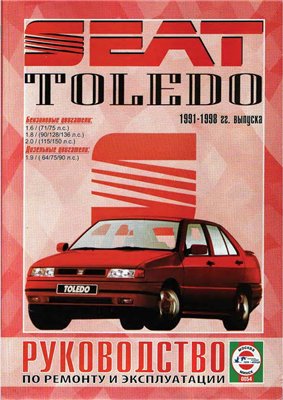
SEAT TOLEDO 1991-1998 года выпуска — руководство по ремонту и эксплуатации. Приведены ррисунки и описания, показывающие функцию различных деталей и их расположение.
Работы описываются и фотографируются в поэтапной последовательности, так что их может выполнить даже новичок. Инструкция позволит грамотно обсудить и спланировать ремонт Вашего автомобиля с профессиональным механиком или выполнить его своими силами.
Бензиновые двигатели:
EZ 1,6 л. / 55 кВт (75 л.с.) карбюратор Pierburg 2E3;
ABN 1,6 л. / 55 кВт (75 л.с.) карбюратор Pierburg 2E3;
IF 1,6 л. / 52 кВт (71 л.с.) впрыск Bosch Mono-Jetronic;
RP 1,8 л. / 66 кВт (90 л.с.) впрыск Bosch Mono-Jetronic;
ABS 1,8 л. / 66 кВт (90 л.с.) впрыск Bosch Mono-Jetronic;
ADZ 1,8 л. / 66 кВт (90 л.с.) впрыск Bosch Mono-Jetronic;
KR (16 кл.) 1,8 л. / 100 кВт (136 л.с.) впрыск Bosch Mono-Jetronic;
PL (16 кл.) 1,8 л. / 94 кВт (128 л.с.) впрыск Bosch KE-Jetronic;
2E 2,0 л. / 85 кВт (115 л.с.) впрыск VW Digifant 1/2;
ABF (16 кл.) 2,0 л. / 110 кВт (150 л.с.) впрыск VW Digifant 4.
Дизельные двигатели:
1Y 1,9 л. / 47 кВт (64 л.с.);
AAZ 1,9 л. / 55 кВт (75 л.с.) турбо;
1Z 1,9 л. / 66 кВт (90 л.с.) турбо.
Год выпуска: 2006 г.
Автор: В.А.Деревянко
Формат: PDF
Язык : Русский
размер : 165 мб.
Скачать руководство Seat Toledo
Внимание! У Вас нет прав для просмотра скрытого текста.