From Wikipedia, the free encyclopedia
In the field of photography, a manual focus camera is one in which the user has to adjust the focus of the lens by hand. Before the advent of autofocus, all cameras had manually adjusted focusing; thus, the term is a retronym.
The focus itself may be adjusted in a variety of ways. Larger view cameras and the like slide the lens closer or further from the film plane on rails; on smaller cameras, a focus ring on the lens is often rotated to move the lens elements by means of a helical screw. Other systems include levers on the lens or on the camera body.
There are a number of ways in which focus may be determined. Simplest is using a distance scale and measuring or estimating distance to the subject. Other methods include the rangefinder, which uses triangulation to determine the distance. On other cameras, the photographer examines the focus directly by means of a focusing screen. On the view camera, this ground glass is placed where the film will ultimately go, and is replaced by a sheet of film once focus is correct. Twin lens reflex cameras use two lenses that are mechanically linked, one for focusing and the other to take the photograph. Single lens reflex cameras, meanwhile, use the same objective lens for both purposes, with a mirror to direct the light to either the focusing screen or the film.[1]
Focusing screens, in their simplest form, consist of a matte glass or plastic surface on which the image can be focused. Other devices, such as split-image prisms or microprisms, can help determine focus.
Manual focus lenses can also be used on modern digital cameras with an adapter. Zeiss, Leica and Cosina Voigtländer are among current manufacturers who continue to make manual lenses in lens mounts native to modern cameras.
References[edit]
- ^ Hedgecoe, John (1982). The Photographer’s Handbook. New York: Alfred A. Knopf.
Что такое ручная фокусировка?
Несмотря на успехи, достигнутые производителями камер с точки зрения производительности автофокусировки, с системами, которые включают в себя более чувствительные и точные точки автофокусировки, более быстрое время сбора данных и лучшее отслеживание, все еще есть случаи, когда подойдет только ручная фокусировка.
Автофокус не является безошибочным: он может заблокировать неправильную часть сцены, которую вы фотографируете, и он может бороться, когда недостаточно света или когда недостаточно контраста между объектом и остальной частью сцены для датчики автофокусировки, чтобы обнаружить это.
В этих ситуациях объектив будет постоянно фокусироваться взад и вперед, «охотясь» за чем-то, что можно зафиксировать, прежде чем в конечном итоге откажется. Съемка через препятствия, такие как высокая трава, ветки или окна, также может вызывать разочарование, поскольку система автофокусировки камеры будет иметь тенденцию сосредотачиваться на ближайшем к ней объекте, а не на предмете за его пределами. Неудивительно, что движущиеся объекты создают определенный набор проблем для автофокусировки, особенно если они попадают в кадр на большой скорости или из неожиданного места.
Ручная фокусировка против автофокуса
Ручная фокусировка поможет вам выбраться из таких труднодоступных мест. Вы можете исправить неточности автофокусировки и установить расстояние фокусировки в ситуациях, когда камера не может найти ничего, за что можно было бы укусить. Ручная фокусировка обеспечивает постоянство: после того, как фокус установлен, камера не сможет сфокусироваться где-либо еще.
Это не значит, что это прогулка по парку. Если вы пробовали фокусироваться вручную, глядя на сцену через яркий оптический видоискатель цифровой SLR, вы знаете, как трудно определить, где находится лучшая точка резкости, когда вы поворачиваете кольцо фокусировки, особенно если вы Вы используете широкоугольный объектив, в котором практически все может казаться резким практически все время.
К счастью, вам не дано летать в одиночку. Датчик фокусировки камеры продолжает работать, а индикатор фокусировки в видоискателе отображается, когда объект, охватываемый активной точкой (точками) автофокусировки, находится в фокусе. Скорее всего, вы захотите проверить результат, чтобы убедиться, что вы точно сфокусировались — и внести необходимые корректировки, прежде чем пытаться снова, если вы этого не сделали — так что процесс может быть немного длинным.

Live View с ручной фокусировкой
Live View изменил представление о ручной фокусировке. Мало того, что большой экран с подсветкой позволяет легко фокусироваться при слабом освещении, когда вы почти ничего не разглядите в оптическом видоискателе, возможность увеличения области изображения позволяет вам убедиться, что мельчайшие детали находятся в резком фокусе. . И вы можете сделать все это до того, как сделаете снимок.
Однако у использования Live View для фокусировки есть некоторые недостатки. Помимо дополнительного расхода заряда аккумулятора, при съемке без штатива может быть сложнее поддерживать камеру во время экспозиции, а любое движение камеры назад или вперед изменит фокусное расстояние. Также может быть трудно видеть экран при съемке при дневном свете.
Преимущества электронных видоискателей
Беззеркальные камеры, оснащенные электронными видоискателями (EVF), в значительной степени сделали эти проблемы аннулированными. В отличие от оптического видоискателя, который показывает на фокусировочном экране отраженное изображение, снятое прямо с объектива, электронный видоискатель по сути представляет собой миниатюрный дисплей Live View, показывающий прямую трансляцию с датчика изображения камеры.
В результате вы не сталкиваетесь с такими же проблемами при съемке при ярком свете или поддержке камеры во время экспозиции. Конечно, есть такой же риск получения результата нечеткой фокусировки, если вы переместите камеру после установки расстояния фокусировки. Крайне важно, что электронный видоискатель имеет те же средства ручной фокусировки, что и основной дисплей Live View, например, возможность увеличивать часть изображения и «максимальную фокусировку», которая добавляет наложение, чтобы показать, какие области изображения резкие. Это означает, что вам не нужно отрывать взгляд от сцены перед вами, пока вы фокусируетесь.
Вы также получите лучшее руководство по глубине резкости с электронным видоискателем (оптический видоискатель становится темнее, когда вы используете предварительный просмотр глубины резкости камеры), поэтому вы можете видеть, какие части изображения будут выглядеть приемлемо резкими за пределами точки, которую вы фокусируете. на. Именно это постепенное изменение в простоте и гибкости ручной фокусировки привело к возрождению объективов, предназначенных только для ручного управления, особенно макро- и светосильных объективов, которые могут выиграть от точности, обеспечиваемой увеличением деталей на дисплее Live View.

Творческие преимущества ручной фокусировки
В этой области создана кустарная промышленность с широким спектром устройств фокусировки — кожухами для камер, которые позволяют точно настроить фокус для кинематографических эффектов фокусировки при съемке видео — направляющими макро-фокусировки и ползунками таймлапса, доступными для всех, кто хочет изучить творческий потенциал ручной фокусировки.
Выбор объектива только для ручного управления может показаться странным, если объективы с автофокусировкой можно сфокусировать вручную. Проблема в том, что многие объективы с автофокусом рассчитаны на короткий ход фокусировки — небольшой поворот кольца фокусировки имеет большое значение для положения точки фокусировки. Хотя это обеспечивает более быструю фокусировку, затрудняет выполнение небольших ручных настроек. При этом некоторые объективы с автофокусом имеют более широкие рукоятки и электронную функцию «фокусировки по проводам», что позволяет увеличить диапазон фокусировки для более удобной ручной фокусировки.

Что можно и чего нельзя делать при ручной фокусировке
НЕОБХОДИМО: сфокусируйтесь перед масштабированием
После того, как вы установили фокусное расстояние, избегайте масштабирования объектива, так как это может привести к смещению фокуса, что может привести к нечетким результатам.
ДО: Подумайте о том, чтобы купить лупу.
При дневном свете бывает сложно увидеть изображение в режиме Live View. Средство просмотра ЖК-экрана или лупа могут одновременно экранировать экран и увеличивать изображение.
НЕ: забудьте про ротацию
Зная, в какую сторону повернуть кольцо фокусировки, чтобы переместить точку фокусировки, вы не пропустите снимки в самый разгар момента.
НЕЛЬЗЯ: фокусироваться слишком быстро
Постоянная фокусировка вперед и назад по деталям, которые вы хотите сфокусировать, позволяет легче увидеть, где изображение становится резким.
Получите все наши отличные шпаргалки здесь
Как имитировать эффект наклона-сдвига
23 вещи, которые следует проверить при покупке нового объектива
In the field of photography, a manual focus camera is one in which the user has to adjust the focus of the lens by hand. Before the advent of autofocus, all cameras had manually adjusted focusing; thus, the term is a retronym.
The focus itself may be adjusted in a variety of ways. Larger view cameras and the like slide the lens closer or further from the film plane on rails; on smaller cameras, a focus ring on the lens is often rotated to move the lens elements by means of a helical screw. Other systems include levers on the lens or on the camera body.
There are a number of ways in which focus may be determined. Simplest is using a distance scale and measuring or estimating distance to the subject. Other methods include the rangefinder, which uses triangulation to determine the distance. On other cameras, the photographer examines the focus directly by means of a focusing screen. On the view camera, this ground glass is placed where the film will ultimately go, and is replaced by a sheet of film once focus is correct. Twin lens reflex cameras use two lenses that are mechanically linked, one for focusing and the other to take the photograph. Single lens reflex cameras, meanwhile, use the same objective lens for both purposes, with a mirror to direct the light to either the focusing screen or the film.[1]
Focusing screens, in their simplest form, consist of a matte glass or plastic surface on which the image can be focused. Other devices, such as split-image prisms or microprisms, can help determine focus.
Manual focus lenses can also be used on modern digital cameras with an adapter. Zeiss, Leica and Cosina Voigtländer are among current manufacturers who continue to make manual lenses in lens mounts native to modern cameras.
References
Edit
- ^ Hedgecoe, John (1982). The Photographer’s Handbook. New York: Alfred A. Knopf.
Manually focusing your camera lens can seem tricky. Compared to the ease of autofocus, you may wonder why you even still have manual focus as an option. It still has a number of important uses, however, and it’s a great skill to learn. In this introduction to manual focusing a lens, I’ll explain what sets manual focus apart, as well as how and when to set focus manually.
Table of Contents
What Is Manual Focus?
Almost all camera lenses have the ability to adjust focus. Focusing is when the elements of the lens move back and forth within the lens – or the whole lens moves forward and backward – to change how it projects the light.

In practice, what this means is the lens renders a specific area “in-focus” and sharp, with the regions in front and behind becoming increasingly less sharp.
Manual focus is when you adjust the in-focus region to be closer or further from the camera. Usually, this is done by rotating the focusing ring on your lens while autofocus is disabled.
Manual vs Autofocus on a Camera Lens
Focusing the lens, whether by manual or automatic methods, is just choosing where the region of sharp focus is. Manual focus and autofocus both do the same thing at the end of the day, which is to move the region of sharp focus further away or closer toward the camera. At a mechanical level, here’s the difference:
- Manual focus is when you move the focusing ring yourself to change how far away the lens is focused.
- Autofocus is when the camera moves the lens elements in order to place focus on your chosen subject.
Autofocus can become complex when you consider the impact of autofocus modes like AF-S or AF-C, along with AF area modes like dynamic tracking, Eye AF, and more. But don’t let this complexity fool you. Both approaches move the same lens elements and – if done correctly – position your focus on the same spot.
While you can get the same results from either manual or autofocus, some images are significantly easier to get with one mode or the other, and that’s why both modes exist. Later in this guide, I’ll explain when to use manual focus. Before I get to these situations, however, first you need to understand how to switch over to manual focus.
How to Enable Manual Focus on Your Camera
The simplest lenses are exclusively manual focus. They have no focus motors, and no support for things like screw-driven autofocus. (Older Nikon AF-D lenses like the 50mm rely on the camera body turning a little screw to autofocus, for example, while newer lenses just need an electronic connection.) Exclusively manual focus lenses, like the TTArtisan 50mm f/1.4, can be significantly less expensive than autofocus capable versions, but they will always require you to manually focus. Manual focus doesn’t always mean cheap, though: Lenses like the $8,000 Noct are manual focus only, too!
On many lenses with autofocus support, you’ll see a switch with positions labeled A and M. Other lenses will have more complex options like M/A, A/M, or A-M. The differences depend on the lens in question, but they usually involve whether manual focus override is possible while the lens’s autofocus is on. Nevertheless, if you’ve set your lens simply to the “M” setting, it almost universally means that you’ve turned off autofocus and entered manual-focus-only mode.
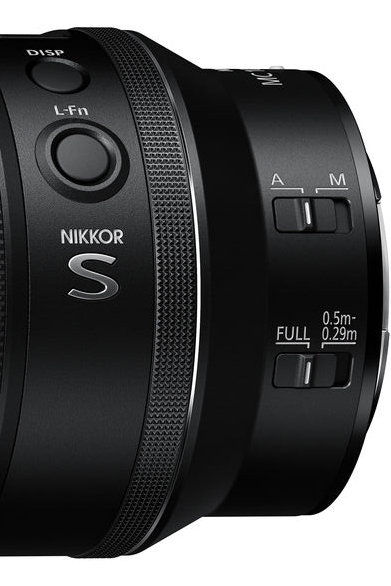
To get to manual focus, regardless of your camera or lens maker, this switch-on-a-lens interface is the most common. Moving the switch lets you set focus manually, and if you want to get back to autofocus, it’s just one click back. With that in mind, it’s easy to give manual focus a try, while still having the backup option of autofocus.
Other times, there will be a manual focus switch or menu option on the camera itself. This usually functions the same way as the switch on the lens; it’s just a different way to do the same thing. If either the lens or camera – or both – are set to manual focus, the general behavior is that autofocus is disabled. (Test this on your camera to be sure, since a few cameras still focus automatically when AF-On is pressed, even if set to manual focus mode.)
When to Use Manual Focus in Photography
Now that you understand how to set manual focus, let’s take a look at some of the best times to use manual focus.
1. Low Light
Low light levels, like a candle lit reception or dark street, can present a particular challenge to the autofocus system. In these cases, switching over to manual focus may be easier than trying to fight the autofocus system. The performance difference between autofocus and manual focus will be most noticeable on older cameras, as some of the newer cameras can autofocus under really low light levels, levels that would even be challenging to manually focus in.
2. Astrophotography
Astrophotography presents one of the most difficult subjects for autofocus, combining both very low light and a need for very precise focus. In this case I almost always choose to manually focus on my astrophotography subjects, even using magnified live view (a technique I’ll discuss more later in this guide).

3. Pre-Focusing
Consider a scenario where you’re expecting action in a specific location: whether it’s someone sliding into home plate, or the bride stepping into the doorway of the church, you want your camera to already be focused at that point, ready to go. By setting focus manually on that point, you can just click the shutter when the action occurs, without worrying about finding focus.
4. Tricky Subjects
This next category is a bit more nebulous, but it’s basically “times where autofocus is just getting confused.” This might be a really low contrast subject, like a dark subject on a black background, or a transparent subject. Either way, it’s a subject that autofocus just isn’t working well on. In these cases, setting focus manually may be easier than fighting the system. Also, don’t think that focusing manually requires you to set focus perfectly – sometimes the system just needs a little nudge in the right direction, by setting focus roughly in the correct place. I find this works really well for transparent subjects and macros subjects, where the system may try to focus on the background instead of the foreground.
5. Shallow Depth of Field
Depth of field is the common term for that concept of “in focus” areas I discussed earlier – for more info, check out our beginner guide to depth of field. Some lenses, particularly at fast aperture like f/1.4 and telephoto focal lengths, have very narrow depth of field. This narrow zone of focus can challenge autofocus systems. In these cases, manually focusing may give better results. Many macro photographers manually focus by rocking forward and backward, then taking their photo at the opportune moment, rather than relying on autofocus.

6. Studio Settings
Manual focus can also be a great option when working in the studio with still subjects. With your camera typically on a tripod, manual focus is a lot easier, and gives you the ability to be very precise with your focus placement.
How to Get Sharp Results with Manual Focus
There are a number of ways to get better results with manual focus, but the first one, unfortunately, isn’t a trick. It’s just good ole’ practice. Manual focus is a skill, and requires developing a bit of dexterity, especially when working with moving subjects. With that said, it’s definitely a skill you can develop. Understanding intuitively which direction to move the focus ring, and even roughly how much, all comes down to muscle memory. Practicing your technique can help with building this “feeling” for it.
Fortunately, technology is always there to help us out. There are a few things to make sure you’re getting the most accurate impression of your focus area. The first is the diopter adjustment (usually a wheel on the side of your viewfinder). Depending on your eyesight, the viewfinder by default may not look very sharp to you, or it may require some straining before it looks clear. Your view through the viewfinder should be immediately and effortlessly crisp. If it isn’t, it’s going to be far more difficult to focus manually, so you should adjust the diopter control.
On the other hand, if you prefer using the camera’s rear screen to focus, you’ve got even more options to make your life easier. The first is the use of a loupe. While you’ll still be limited by the resolution of your screen, this tool both magnifies the screen and blocks glare, making it easier to gauge focus.
Another useful tool is the simple magnifying button to zoom in on your live view screen. Many mirrorless cameras support magnifying the image in the viewfinder via the same button, too. It takes a bit more time but offers a much easier view most of the time.
Also, you don’t have to go it alone. When in manual focus, many autofocus systems will still be working, and you’ll often have an indicator like the brackets and dot, to help guide you. The brackets >< indicate what direction the system thinks you should turn the ring, while the dot shows when you’ve achieved focus under the active focus point.
If you have a newer camera, chances are good that it supports focus peaking, too. Focus peaking is a graphical representation, overlaid on your screen, where objects that are in focus are outlined in bright colors. This is a great manual focus aid, particularly on fast lenses with a correspondingly narrow depth of field. Often, focus peaking even works when you’re using old, manual-focus-only glass! It’s a great way to revive old lenses if you have a newer camera.
Lastly, if you’re still having difficulty nailing focus, consider widening your depth of field. Stop your lens down to a smaller aperture value, take a step back, or use a wider angle lens. Any of these will give you more depth of field and therefore give you some slack when focusing.
Conclusion
Knowing how to set your camera up for manual focus, and how to manually focus once it’s set, is a great skill to have. There are plenty of scenarios where autofocus will have difficulties or fail completely, but that doesn’t mean you need to put away your camera. You just need to practice and understand how to shoot via manual focus. Plus, being comfortable with manual focus opens up a huge library of specialty, adapted, and manual focus only lenses that you can explore.
Just don’t start to think that manual focus is “better” or “more professional” than autofocus once you learn how to use it. Both are simply tools. I would rarely use autofocus for Milky Way photography, but I would rarely use manual focus for photographing sports! They have their own strengths and weaknesses. The key is to learn how to use both hand-in-hand so you don’t miss an important photo.
Let me know in the comments section below if you have any thoughts or questions about manual focus in photography!
It’s hard to imagine a time before our trusty autofocus (AF) systems when we used manual focus. We now have cameras that boast a whopping total of 850 AF points. And the manual focus ring barely seems to be touched anymore.
Today, I’ll show you how to manually focus and tell you why this function is still available on every lens produced.
eBooks and Courses for Everyone
![]()
![]()
![]()
![]()
What is Manual Focus?
Manual focus is the process of adjusting the depth of field by hand—manually selecting the clarity of the image in the various distances you set your lens. When you turn the manual focusing ring, you adjust elements inside the lens. You change the distance between a selection of lenses, moving one or more lenses either closer or further from the imaging sensor. It is how a telescope or pair of binoculars work.
Most analog film cameras require manual adjustments because they don’t have digital features. It means they only use manual focus lenses. It wasn’t until 1978 that Sony released the first-ever SLR with autofocusing. Every camera that came out before this time (and many film cameras after) would strictly involve manual focus.
How to Use Manual Focus
Manually focusing your image is as easy as turning the focus ring on your lens. But this can be trickier than it seems. I don’t recommend using this function when taking quick shots is a crucial factor in your photography, like wedding photography, when missing important moments can cost you the job.
But if your camera’s AF starts to fail you, there are some ways to work around that by manually focusing. Various kinds of cameras will have different techniques. You can even manually focus on your iPhone! Simply by tapping the element on the screen that you want in focus. But I will mainly focus on DSLRs.
3 Manual Focus Techniques
1. Depth of Field Preview
Pretty much all modern DSLRs feature a depth of field (DoF) button. Pressing this button will give you an idea of your image with your selected aperture. It will show how far your depth of field focus range will span through the viewfinder.
The button is usually found next to your lens mount but can vary from camera to camera. If you have an issue finding it, you can always check the manual for your camera.
The DoF button will show the exact aperture you have set on your camera. The presented image will look a bit darker. So don’t worry about the image turning out like this. If you set a higher numerical aperture like f/22, the aperture is smaller. Therefore, it lets less light into the camera.
The feature is helpful, giving you an idea of how the image will look. It shows how much of your surroundings will be in sharp focus or soft focus.
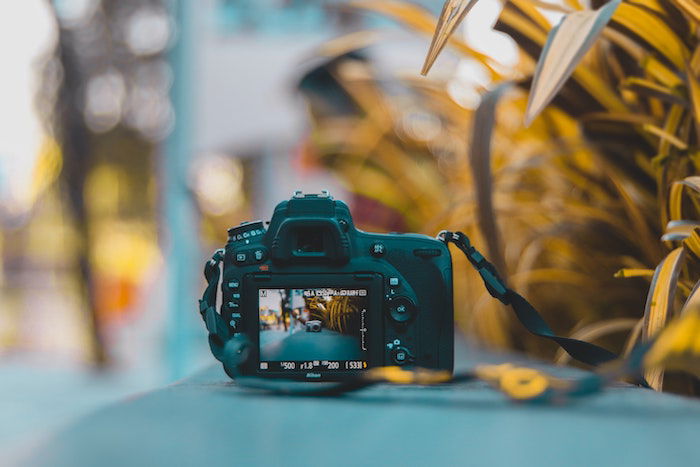
2. Live View
Modern cameras, especially DSLRs with video capabilities, can have a ‘Live View’ feature. It is beneficial when it comes to manual focusing. Using this feature will bring up a real-time view through your lens on your LCD screen.
It provides a wider screen to view your image. That makes it easier to judge the sharpness of the subject you are focusing on. You can also zoom into this screen. It allows you to take time and care with this process, giving you confidence in the sharpness of the image.
Some cameras will have a focus-magnifier setting. It will automatically zoom in to give you a part of the image for you to focus on. Some new cameras, especially mirrorless ones, have this function applied whenever you move the focus ring.
2. Focus Distance Windows
The oldest way of manually focusing is still readily presented to us, of measuring the distance from your lens to the subject. These distance windows can be helpful when all else fails, giving you a chance to judge or even measure the length. The distance the camera provides should be in both metric and imperial measurements.
Most lenses should have a focus distance window (or even numbers engraved on older lenses). But they are getting less common, especially in mirrorless ranges of cameras. This window is an active lens element that moves according to how much you alter the focus ring.
This method is not the most accurate way of focusing an image. But it can be a lifesaver when emergency occasions arise!
3. Rangefinder
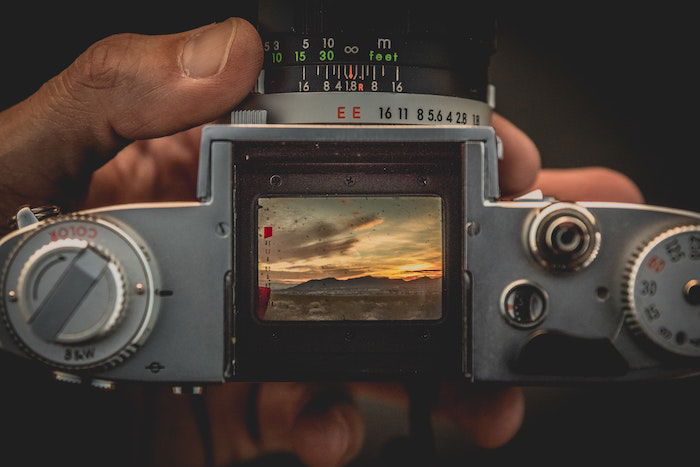
Some cameras use alternate ways of focusing because the viewfinder doesn’t look through the lens. These are found on ‘rangefinder’ cameras and digital rangefinders—for example, many of Fuji’s X Series.
The rangefinder presents a section showing two images of the same scene. To get the desired focus point, you have to overlay the two images to match them up perfectly.
When to Use Manual Focus
Now I’ll look at seven situations that benefit from using manual focusing. These may be due to personal preferences or from the automatic features of your camera not allowing you to be fully in control.
1. Choosing Your Subject of Focus
A pretty obvious one, but regardless, manual focusing allows you to pick the exact subject you want to focus on. It is handy when there are many layers throughout your scene. For instance, if you’re going to shoot through flowers or windows.
Sometimes in these situations, the autofocus system will snap to elements that you don’t want in focus. When this happens, that’s when I recommend hitting the manual focus switch and adjusting it yourself.
It can be helpful when photographing crowded or busy situations.

2. Low Light
If it hasn’t happened to you already, it will do at one point. In a dark environment, you will hold down the autofocus button, and all you will hear is the lens adjusting and readjusting itself. With no sign of that comforting beep, it is time to focus manually.
Cameras have a hard time reading distance in low light, which isn’t surprising. Hopefully, you should be able to make out some forms through your viewfinder. Turn your focus ring manually to make an accurate selection of the subject.

2. Macro Photography
Macro photography fans out there will already know the importance that manual focus brings. Macro photography involves taking images very close to the lens. It requires wide apertures. And wide apertures give hardly any forgiveness when it comes to sharp focus.
You don’t need manual focus for this process. But it is where a majority of the creative aspects come from. Mastering manual focusing is a must for macro photography because it allows for a much greater range of experimentation.

3. Focus Stacking
Focus stacking is a method to ensure that every element is in focus to its fullest. It is often used in landscape photography, mainly by photographers who like the HDR process.
This process is very similar to HDR. You have your camera on a tripod, take many images, and then stitch them together through post-production. Instead of taking the best exposure for each section of the image, you’ll be gathering the sharpest focus. You use manual focus to target each different aspect.
This method is helpful because you will be able to take images on a wide aperture. Using a wide aperture will allow you to drop your ISO down, in turn producing sharper images. It also allows you to take many photos to pick the best ones later when looking on a bigger screen.

4. Low Contrast
If you have been a photographer for a while, you will have identified situations where the autofocus system can fall short. Certain cases are when there isn’t much definition in the subject or no contrast in particular areas.
The autofocus function looks for lines of contrast to find depth to base its measurements. Environments with a lack of different tones can force you to use manual focus. Use the techniques I wrote above to work through this issue.

5. Fast-Moving Objects
Relying on autofocus for fast-moving objects isn’t the best idea. Especially if you only have a small window to get the perfect shot.
Hopefully, you know your subject well or can quickly assess how the subject will act. Preparation will allow you to measure out and take some test images beforehand. By using manual focus, you can get the sharpest image. Adjust the camera in manual focus and then wait for the subject to move by and snap.

6. Panoramas
A panorama is an image where a whole landscape or skyline is presented seamlessly in one picture. Some cameras, as well as iPhones, have this feature embedded in their software already. The manual way of doing this is to take a series of images and stitch them together in the post-photography process.
If you were to take these images with an autofocus system, you would risk the focus adjusting. If this happens, the viewer will notice it in the final result. The image will look disjointed, and the believability of the image being one seamless photograph will be lost entirely. I suggest focusing beforehand and then taking each image accordingly.
Conclusion
Technology has come so far with its constant advancements in autofocusing capabilities. Still, there is no denying the importance of being able to use manual focus with confidence.
The more you photograph, the more this will become clear. I’m not saying you need to be the quickest manual focuser to be a confident photographer. But there will be times when you will be glad you studied this article. So turn that switch to manual focus, put your hand on the focusing ring, and get practising!
Are you looking for an amazing way to improve your photography skills? Check out our Products in Focus to learn how to capture attention-grabbing product photos that stand out and sell!
eBooks and Courses for Everyone
![]()
![]()
![]()
![]()