Материал из Enduro.team
Перейти к: навигация, поиск
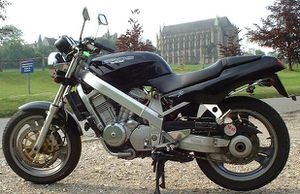
Honda Bros 400
Ниже представлены прямые ссылки на скачку сервисной документации.
Для Honda Bros 400-650
- Сервисный мануал на Honda Bros 650 (NTV650, Hawk GT)
- Руководство по ремонту и обслуживанию (Haynes Service Manual) на Honda NTV600/650 Revere
- Сервисные мануалы, каталоги запчастей (микрофиши) на Honda Bros 400-650
Обзор модели
- Honda Bros 400
- Honda Bros 650
Категории:
- Сервисная документация
- Honda документация
-
Page 1
Manual del Propietario Owner’s Manual NXR125 BROS KS•ES… -
Page 2
Manual del Propietario INTRODUCCIÓN Este manual es un guía práctico de como cuidar su nueva motocicleta Honda. Él contiene todas las instrucciones básicas para que su Honda pueda ser bien cuidada, desde la inspección diaria hasta el mantenimiento y la conducción correcta en el tránsito. -
Page 3
Manual del Propietario HONDA NXR125 BROS KS/NXR125 BROS • •… -
Page 4
TIENEN COMO PRINCIPIO LAS INFORMACIONES MÁS RECIENTES DISPONIBLES SOBRE EL PRODUCTO EN EL MOMENTO DE LA AUTORIZACIÓN DE LA IMPRESIÓN. MOTO HONDA DA AMAZÔNIA LTDA. SE RESERVA EL DERECHO DE CAMBIAR LAS CARACTERÍSTICAS DE LA MOTOCICLETA EN CUALQUIER MOMENTO Y SIN NOTIFICACIÓN PREVIA, SIN QUE POR ESTO INCURRA EN OBLIGACIONES DE CUALQUIER NATURALEZA. -
Page 5: Table Of Contents
Manual del Propietario ÍNDICE COMPONENTES INDIVIDUALES ESENCIALES Interruptor de Encendido ……..27 Interruptores del Manillar Derecho ……28 ASISTENCIA AL PROPIETARIO ……..Interruptores del Manillar Izquierdo ……. 28 PILOTAJE CON SEGURIDAD EQUIPAMIENTOS Reglas de Seguridad ……….Traba de la Columna de Dirección ……29 Aparatos de Protección ………..
-
Page 6
Manual del Propietario MANTENIMIENTO LIMPIEZA Y CONSERVACIÓN ……..67 Tabla de Mantenimiento ……….40 CONSERVACIÓN DE MOTOCICLETAS Cuidados con el Mantenimiento ……..42 INACTIVAS …………..69 Aceite del Motor …………45 Acelerador …………..48 PRESERVACIÓN DEL MEDIO AMBIENTAL ….72 Batería …………… -
Page 7: Asistencia Al Propietario
3. En caso de que el problema persista, o de que usted considere la atención insatisfactoria, notifique al Gerente de Servicios del distribuidor. Honda no sólo se preocupa en ofrecer motocicletas de excelente calidad, economía y desempeño, sino que también en mantenerlas en perfectas condiciones de uso, contando para eso con una red de asistencia técnica –…
-
Page 8: Pilotaje Con Seguridad
Manual del Propietario PILOTAJE CON SEGURIDAD 4. Obedezca a todas las leyes de tránsito. • La velocidad excesiva es un factor común en muchos accidentes. Obedezca a los límites de ADVERTENCIA velocidad y NUNCA exceda las condiciones Pilotar una motocicleta requiere ciertos cuidados permitidas.
-
Page 9: Aparatos De Protección
Honda, a fin de cerciorarse de permanece, durante algún tiempo, aun después de la eliminación del agua del motor, bien como para apagado el motor.
-
Page 10: Accesorios Y Carga
• • • • • la distancia mínima del suelo (en caso de protectores); Honda cancelará la garantía, en caso de que se • • • • • el ángulo de inclinación de la motocicleta;…
-
Page 11
• • • • • Daños causados por carga excesiva NO SERÁN CUBIERTOS por la Garantía Honda. En caso de que Capacidad usted tenga dudas con respecto al cálculo del peso Esta motocicleta ha sido diseñada para el transporte de… -
Page 12: Seguridad En La Conducción Off-Road
Manual del Propietario • Botas – deben ser de cuero reforzado, con suelas Seguridad en la Conducción Off-road de gran espesor y con surcos, preferentemente Las características de esta motocicleta permiten que con punteras de acero. Además, deben ser usted disfrute las emociones del uso off-road. Para flexibles y perfectamente ajustables a los pies.
-
Page 13
Manual del Propietario 4. Conducción de la motocicleta ADVERTENCIA Antes de aventurarse en locales poco conocidos Las normas de tránsito prohíben la circulación de observe las siguientes recomendaciones: motocicletas en vías públicas, sin los siguientes • Obedezca siempre las leyes y reglas para accesorios y equipamientos: espejos retrovisores, práctica del off-road vigentes en esos locales. -
Page 14: Instrumentos Y Controles
Manual del Propietario INSTRUMENTOS Y CONTROLES Ubicación de los Controles Luces indicadoras Velocímetro Interruptor de encendido Conmutador del faro Espejo retrovisor Palanca del embrague Interruptor del motor Espejo retrovisor Interruptor del faro Palanca del freno delantero Interruptor de los señalizadores Empuñadura del acelerador Interruptor de la bocina Interruptor de arranque…
-
Page 15
Manual del Propietario Compartimiento para herramientas Palanca del estrangulador Compartimiento Válvula de combustible para documentos Portacasco Descansapie del pasajero Soporte lateral Pedal de cambio de marchas Descansapie del piloto… -
Page 16
Manual del Propietario Pedal de arranque (NXR125 BROS • KS) Tapa del tanque de combustible Tapa de suministro/Varilla Pedal del freno trasero Descansapie del piloto medidora del nivel de aceite… -
Page 17: Instrumentos E Indicadores
Manual del Propietario Instrumentos e Indicadores Los instrumentos y las luces indicadoras están ubicados en el tablero de instrumentos. Sus funciones se describen en la tabla siguiente. (1) Velocímetro (2) Odómetro (3) Luz indicadora de los señalizadores (4) Luz indicadora del faro alto (5) Luz indicadora del punto muerto (6) Odómetro parcial (7) Botón de retroceso del odómetro parcial…
-
Page 18: Componentes Principales
Manual del Propietario COMPONENTES PRINCIPALES (1) Palanca del freno Informaciones necesarias a la utilización de la motocicleta ADVERTENCIA La no-realización de la Inspección Antes del Uso (página 32) podrá resultar en accidentes o serios riesgos al funcionamiento de la motocicleta. Frenos 3.
-
Page 19
NOTA En caso de que no obtenga el juego correcto a través de los procedimientos descritos, diríjase a un distribuidor Honda para efectuar una inspección en el sistema de frenos. (4) Contratuerca (5) Tuerca de ajuste… -
Page 20
2. El juego del pedal del freno trasero es la distancia través de este procedimiento, diríjase a un recorrida por el pedal hasta el principio del frenado, distribuidor Honda. medida en el extremo del pedal. El juego debe ser: 15 – 25 mm. -
Page 21: Embrague
Manual del Propietario Embrague (2) Guardapolvo (3) Contratuerca El ajuste del embrague se hace necesario en caso de (4) Ajustador que la motocicleta presente pérdida de rendimiento (A) Aumenta el juego durante el cambio de marchas o el embrague patine, (B) Disminuye el juego causando incompatibilidad entre la velocidad de la motocicleta y la rotación del motor.
-
Page 22: Válvula De Combustible
En caso de que no sea posible obtener el ajuste del embrague a través de los procedimientos descritos, o de que el embrague no funcione correctamente, diríjase a un distribuidor Honda y solicite una inspección. ADVERTENCIA • • • • • Aprenda a accionar la válvula con habilidad, de…
-
Page 23: Tanque De Combustible
(nafta) de otra marca. Caso esos La provisión de reserva es de aproximadamente problemas persistan, diríjase a un distribuidor 3,5 litros (valor de referencia). Honda. Al contrario, el motor podrá sufrir daños que no están cubiertos por la garantía. NOTA (1) Tapa del tanque Recuérdese de colocar la válvula en la posición ON,…
-
Page 24: Aceite Del Motor
Manual del Propietario Aceite del Motor ADVERTENCIA • • • • • La gasolina (nafta) es extremamente inflamable y Verificación del Nivel de Aceite del Motor hasta mismo explosiva, bajo ciertas condiciones. Inspeccione el nivel de aceite diariamente, antes de Abastezca siempre en un local bien ventilado y conducir la motocicleta.
-
Page 25: Neumáticos
Manual del Propietario Neumáticos ATENCIÓN • • • • • En caso de que el motor funcione con poco aceite, La presión correcta de los neumáticos otorga mayor estabilidad, confort y seguridad en la conducción de la podrá sufrir serios daños. •…
-
Page 26
Compruebe el neumático con respecto a cortes, clavos u otros objetos enclavados. Diríjase a un distribuidor Reemplace los neumáticos antes que el surcado de la Honda para el reemplazo de neumáticos dañados, banda de rodaje alcance los límites mostrados abajo. cámaras perforadas o equilibrio de las ruedas. -
Page 27
Diríjase • • • • • Inspeccione los rayos y llantas de las ruedas con a un distribuidor Honda para efectuar el reparo. más frecuencia cuando utilizar la motocicleta en • • • • • El equilibrio correcto de las ruedas es necesario locales accidentados. -
Page 28: Componentes Individuales Esenciales
Manual del Propietario COMPONENTES INDIVIDUALES (1) Interruptor de encendido ESENCIALES Interruptor de Encendido El interruptor de encendido (1) está ubicado debajo del tablero de instrumentos. Posición de la llave Función Condición de la llave LOCK (Traba de la Se puede quitar la llave. Bloqueo del manillar.
-
Page 29: Interruptores Del Manillar Derecho
Manual del Propietario Interruptores del Manillar Derecho Interruptores del Manillar Izquierdo Interruptor del Motor Interruptor del Faro El interruptor del faro (1) posee dos posiciones: El interruptor del motor (1) está ubicado próximo a OFF (indicado por un punto abajo de la empuñadura del acelerador.
-
Page 30: Equipamientos
Manual del Propietario EQUIPAMIENTOS Portacasco El portacasco (1) está ubicado del lado izquierdo, debajo de la tapa lateral izquierda. Traba de la Columna de Dirección Para destrabar el portacasco inserte la llave de Para trabar la columna de dirección, gire el manillar encendido (2) y gírela en el sentido contra horario.
-
Page 31: Asiento
Manual del Propietario Asiento Compartimiento para Documentos Desmontaje El estuche para documentos (1) se encuentra en el compartimiento para documentos (2) ubicado debajo 1. Quite los dos tornillos (1) y los espaciadores (2) del asiento. que fijan el asiento (3). El Manual del Propietario, bien como otros 2.
-
Page 32: Tapa Lateral Izquierda
Manual del Propietario Tapa Lateral Izquierda (1) Tornillo (2) Ganchos Se debe quitar la tapa lateral izquierda al efectuarse el (3) Gomas mantenimiento de la batería y de los fusibles. Desmontaje 1. Quite los tornillos (1). 2. Afloje los ganchos (2) de las gomas (3). Instalación La instalación se hace de forma inversa al desmontaje.
-
Page 33: Funcionamiento
58). NEUMÁTICOS – Verifique la presión, el desgaste Corrija cualquier anormalidad, antes de conducir la del surcado y las condiciones de los neumáticos motocicleta. Diríjase a un distribuidor Honda siempre (página 24). que no sea posible solucionar algún problema.
-
Page 34: Arranque Del Motor
Manual del Propietario Procedimientos de Arranque Arranque del Motor Para accionar un motor caliente siga los Siga siempre los procedimientos de arranque descritos procedimientos indicados para “Motor Caliente”. abajo. Motor Frío ADVERTENCIA 1. Coloque la palanca del estrangulador (1) en la posición ON (A) (totalmente accionado).
-
Page 35
Manual del Propietario Motor Caliente ATENCIÓN 1. No utilice el estrangulador. • • • • • No deje que el pedal de arranque vuelva rápidamente, 2. Arranque el motor siguiendo el procedimiento de pues esto puede dañar la carcasa del motor. No arranque 2 de “Motor Frío”. -
Page 36: Cuidados Para El Ablande Del Motor
Manual del Propietario Cuidados para el Ablande del Motor Conducción de la Motocicleta Los cuidados para el ablande del motor durante los ADVERTENCIA primeros kilómetros de uso prolongarán • • • • • Lea con atención las informaciones referentes a considerablemente la vida útil y el desempeño de su Pilotaje con Seguridad (páginas 7 a 12) antes de motocicleta.
-
Page 37
Manual del Propietario 7. Para obtenerse una desaceleración progresiva y ATENCIÓN suave se debe coordinar el accionamiento de los No efectúe el cambio de marchas sin accionar frenos y del acelerador con el cambio de marchas. el embrague y reducir la aceleración. En caso 8. -
Page 38: Frenado
Manual del Propietario • • • • • Si se conduce la motocicleta en pistas mojadas, Frenado bajo lluvia, o en pistas de arena o tierra, la 1. Para frenar normalmente accione los frenos seguridad para maniobrar o parar se reduce. delantero y trasero de manera progresiva y, al En tales condiciones, todos los movimientos de mismo tiempo, reduzca las marchas.
-
Page 39: Estacionamiento
Manual del Propietario • • • • • Antes de hacer funcionar el motor, quite la capa o Estacionamiento protección de la motocicleta. 1. Después de detener la motocicleta coloque la • • • • • El accionamiento del motor se debe efectuar transmisión en punto muerto, cierre la válvula de solamente por personas que tengan práctica y combustible (posición OFF), gire el manillar…
-
Page 40: Prevención De Robos
3. Estacione su motocicleta en locales cerrados, Fecha de compra: ___/___/___ siempre que sea posible. 4. Moto Honda da Amazônia Ltda. no autoriza el uso de dispositivos electrónicos antirrobo. En caso de DATOS DEL 2º PROPIETARIO que opte por alarmas o bloqueadores electrónicos, cerciórese de sus características técnicas:…
-
Page 41: Mantenimiento Tabla De Mantenimiento
MANTENIMIENTO Tabla de Mantenimiento • Cuando necesite servicios de mantenimiento acuérdese de que su distribuidor Honda es el que mejor conoce su motocicleta y está totalmente preparado para ofrecerle todos los servicios de mantenimiento y de reparos. Diríjase a su distribuidor Honda siempre que necesite de servicios de mantenimiento.
-
Page 42
3. Efectúe el servicio con más frecuencia cuando utilice la motocicleta bajo lluvia o en la conducción off-road. Por razones de seguridad, recomendamos que todos los servicios presentados en esta tabla sean efectuados por un distribuidor Honda. -
Page 43: Cuidados Con El Mantenimiento
• Manija para llave de bujías motocicleta en una superficie plana y firme. • • • • • Utilice solamente piezas nuevas y genuinas Honda • Llave de bujías o sus equivalentes al efectuar servicios de •…
-
Page 44: Identificación De La Motocicleta
Manual del Propietario Identificación de la Motocicleta Nº de Serie del Motor: ____________________________ (2) Número de La identificación oficial de su motocicleta se hace serie del motor mediante los números de serie del chasis y del motor. Esos números se deben usar también como referencia para la solicitación de piezas de repuesto.
-
Page 45: Filtro De Aire
Manual del Propietario Respiro del Motor Filtro de Aire (Observe “Cuidados con el Mantenimiento”, en la (Observe “Cuidados con el Mantenimiento”, en la página 42.) página 42.) 1. Quite el tapón del tubo de respiro del motor (1) y El filtro de aire se debe limpiar a cada intervalo drene los depósitos en un recipiente adecuado.
-
Page 46: Aceite Del Motor
Manual del Propietario Aceite del Motor ATENCIÓN (Observe “Cuidados con el Mantenimiento”, en la En ninguna hipótesis se debe conducir la página 42.) motocicleta sin el filtro de aire. La conducción sin el filtro permitirá que el polvo y la suciedad Especificaciones penetren en el motor, causando desgaste prematuro Utilice solamente un aceite de motor de buena calidad…
-
Page 47
Manual del Propietario (1) Tapón del tamiz ATENCIÓN del filtro • • • • • El aceite es el factor que más afecta el desempeño (2) Resorte y la vida útil del motor. (3) Tamiz del filtro • • • • • No se recomiendan aceites no-detergentes, (4) Goma vegetales, o lubricantes específicos para (5) Anillo de sellado… -
Page 48: Bujía De Encendido
Manual del Propietario 7. Accione el motor y déjelo funcionar en ralentí, Bujía de Encendido durante aproximadamente 2 a 3 minutos. (Observe “Cuidados con el Mantenimiento”, en la 8. Apague el motor y verifique si el nivel de aceite página 42.) alcanza la marca superior de la varilla medidora, con la motocicleta en la posición vertical.
-
Page 49: Acelerador
Manual del Propietario (2) Separación de Acelerador los electrodos (Observe “Cuidados con el Mantenimiento”, en la (3) Electrodo lateral página 42.) 1. Verifique si la empuñadura del acelerador funciona suavemente, desde la posición totalmente abierta hasta la posición totalmente cerrada, en todas las posiciones del manillar.
-
Page 50: Cadena De Transmisión
ítem a través del reglaje del ralentí. Diríjase a un Inspección Antes del Uso (página 32) y su distribuidor Honda para efectuar ajustes del mantenimiento se debe efectuar de acuerdo con las carburador programados regularmente.
-
Page 51
Manual del Propietario 3. Gire la rueda trasera. Verifique la holgura de la Cadena de Transmisión cadena. Repita este procedimiento varias veces. • Rolletes dañados La holgura debe mantenerse constante en todos los • Pasadores flojos puntos de la cadena. Si la cadena presenta holgura •… -
Page 52
Manual del Propietario Ajuste ATENCIÓN La cadena de transmisión se debe verificar y ajustar, Siempre reemplace la cadena de transmisión, la si necesario, cada 1.000 km. La cadena exigirá corona y el piñón en conjunto. Al contrario, la pieza ajustes más frecuentes en caso de que la motocicleta nueva se desgastará… -
Page 53
(página 19). ADVERTENCIA En caso de que no se utilice una llave dinamométrica en la instalación, diríjase a un distribuidor Honda, tan luego sea posible, para verificar el armado de la rueda. El armado incorrecto puede reducir la eficiencia del freno. -
Page 54: Guía De La Cadena De Transmisión
Límite de desgaste: 4 mm aumentando su durabilidad. Entretanto, se deben Diríjase a un distribuidor Honda para el reemplazo de adoptar algunas precauciones especiales para el la guía de la cadena.
-
Page 55: Soporte Lateral
Si algún componente de la suspensión presenta desgaste, juego excesivo o está dañado, diríjase a su distribuidor Honda, para que se efectúen los reparos necesarios. En caso contrario la manejabilidad y estabilidad de la motoci-…
-
Page 56: Ruedas
42.) línea de referencia (2). Desmontaje de la Rueda Delantera Diríjase a un distribuidor Honda para el reemplazo. 1. Levante la rueda delantera del suelo, colocando un (2) Línea de referencia soporte debajo del motor.
-
Page 57
ADVERTENCIA En caso de que no se utilice una llave dinamométrica en la instalación, diríjase a un distribuidor Honda así que posible para una verificación del armado de la rueda. El armado incorrecto puede reducir la eficiencia del freno. (8) Resalte… -
Page 58
ADVERTENCIA En caso de que no se utilice una llave dinamométrica en la instalación, diríjase a un distribuidor Honda así que posible para una verificación del armado de la rueda. El armado incorrecto puede reducir la eficiencia del freno. -
Page 59: Forros Y Tambores De Freno
(1) Saeta originales, fundamentales para la seguridad de (2) Brazo del freno la motocicleta. (3) Marca de referencia (4) Brida del freno FRENO TRASERO NOTA Diríjase a un distribuidor Honda y solicite este servicio. Use solamente piezas originales Honda o equivalentes.
-
Page 60: Batería
Use ropas protectoras y máscara de protección. diríjase a su distribuidor Honda. • • • • • En caso de contacto con la piel, lave la región afectada con bastante agua.
-
Page 61: Interruptor De La Luz Del Freno
Manual del Propietario Desmontaje de la Batería Interruptor de la Luz del Freno 1. Quite la tapa lateral izquierda (página 31). (Observe “Cuidados con el Mantenimiento”, en la página 42.) 2. Quite el tornillo (1) y abra el soporte de la batería (2).
-
Page 62: Fusibles
Generalmente la quema frecuente de fusibles indica (1) Interruptor de la cortocircuito o sobrecarga en el sistema eléctrico. luz del freno Diríjase a un distribuidor Honda para efectuar los (2) Tuerca de ajuste reparos necesarios. ATENCIÓN Para evitar un cortocircuito accidental desactive el interruptor de encendido (posición OFF), antes de…
-
Page 63
Manual del Propietario Caja de Fusibles Fusible Principal La caja de fusibles (1) está ubicada detrás de la tapa El fusible principal (1), con capacidad de 15 A, está lateral izquierda. Los fusibles especificados tienen ubicado detrás de la tapa lateral izquierda. capacidad de 5 A y 10 A. -
Page 64: Espejo Retrovisor
Manual del Propietario Espejo Retrovisor Faro (Observe “Cuidados con el Mantenimiento”, en la (Observe “Cuidados con el Mantenimiento”, en la página 42.) página 42.) El espejo retrovisor permite el ajuste del ángulo de Ajuste Vertical visión. Coloque la motocicleta en un local plano y El ajuste vertical se puede obtener girándose el tornillo siéntese en ella.
-
Page 65
Manual del Propietario Ajuste del Haz 1. Coloque la motocicleta en la posición vertical (sin apoyarla en el soporte), con el centro de la rueda El faro es esencial para su seguridad. Cuando mal delantera a 10 m de distancia de una pared plana y, regulado, reduce la visibilidad y ofusca la visión de los de preferencia, no reflectora. -
Page 66: Bombillas
Manual del Propietario Bombillas Bombilla del Faro 1. Quite los dos tornillos (1) y retire la carcasa del faro (2). (Observe “Cuidados con el Mantenimiento”, en la página 42.) 2. Quite el faro (3). (1) Tornillo ADVERTENCIA (2) Carcasa del faro La bombilla del faro se calienta demasiado y así…
-
Page 67
Manual del Propietario NOTA 4. Instale una nueva bombilla en el orden inverso al desmontaje. Instale la capa protectora con la saeta (8) orientada hacia arriba. (1) Tornillos (2) Lente de la (4) Soquete luz trasera (5) Capa protectora (3) Bombilla (6) Retenedor (7) Bombilla (8) Saeta… -
Page 68: Limpieza Y Conservación
Manual del Propietario • Elimine la acumulación de polvo, tierra, barro, arena y LIMPIEZA Y CONSERVACIÓN guijarros. Quite materiales extraños de los componentes de fricción, tales como pastillas y discos de freno, para Limpie la motocicleta regularmente para mantenerla que no perjudiquen su durabilidad y eficiencia. con buena apariencia y para proteger la pintura, los •…
-
Page 69
Manual del Propietario Como Lavar la Motocicleta Evite pulverizar agua o aire a alta presión en los siguientes componentes o locales. – Cubos de las ruedas ATENCIÓN – Salida del silenciador Nunca lave la motocicleta expuesta al sol o con el –… -
Page 70: Conservación De Motocicletas Inactivas
Manual del Propietario CONSERVACIÓN DE MOTOCICLETAS ATENCIÓN INACTIVAS La aplicación de pastas o de otros productos para pulir dañará la pintura. ATENCIÓN 5. Inmediatamente después del lavado, lubrique la La batería de su motocicleta se carga cuando el cadena de transmisión y los cables del acelerador, sistema de carga es activado durante la utilización estrangulador y embrague.
-
Page 71
Manual del Propietario • Accione el motor de arranque durante algunos 1. Cambie el aceite del motor y el tamiz del filtro (página 45). segundos para distribuir el aceite, y reinstale el cable y la bujía de encendido. 2. Lubrique la cadena de transmisión (página 52). 5. -
Page 72
Manual del Propietario Activación de la Motocicleta Cuando la motocicleta vuelva a ser utilizada, se deben observar los siguientes cuidados: 1. Quite la capa protectora y lave completamente la motocicleta. Cambie el aceite del motor, en caso de que la motocicleta haya quedado inactiva por más de cuatro meses. -
Page 73: Preservación Del Medio Ambiental
Con el objeto de una mejor relación de su motocicleta la solución ácida que ésta contiene, se debe llevar la con el medio ambiental, pedimos que se observen las pieza reemplazada a un distribuidor Honda, que le dará siguientes informaciones. una destinación adecuada. Las piezas plásticas y El mantenimiento preventivo, además de preservar y…
-
Page 74: Especificaciones Técnicas
Manual del Propietario ESPECIFICACIONES TÉCNICAS Ítem Dimensiones Largo total 2.053 mm Ancho total 820 mm Altura total 1.139 mm Distancia entre ejes 1.353 mm Peso Peso en seco KS: 112,7 kg / ES: 114,4 kg Capacidades Aceite del motor 0,9 litro (para cambio de aceite) 1,1 litro (después del drenaje y cambio del filtro) Tanque de combustible 12 litros…
-
Page 75
Manual del Propietario MOTOR Ítem Tipo 4 tiempos, enfriado por aire, OHV, a gasolina (nafta), monocilíndrico, inclinado a 15° en relación a la vertical Diámetro y carrera 56,5 mm x 49,5 mm Cilindrada 124 cm Relación de compresión 9,5 : 1 Potencia máxima 12,5 CV a 8.500 rpm Par máximo… -
Page 76
Manual del Propietario CHASIS/SUSPENSIÓN Ítem Ángulo de avance 26°34’ Trail 95 mm Neumático (tamaño) Delantero 90/90-19M/C 52P Neumático (tamaño) Trasero 110/90-17M/C 60P Suspensión delantera Horquilla telescópica Suspensión trasera MONO-SHOCK Freno delantero Tambor (zapatas de expansión interna) Freno trasero Tambor (zapatas de expansión interna) Holgura de la cadena de transmisión 20 –… -
Page 77
Manual del Propietario SISTEMA ELÉCTRICO Ítem Batería 12 V – 4 Ah Sistema de encendido Sistema de arranque KS: Pedal de arranque / ES: Arranque eléctrico Alternador 0,096 kW/5.000 rpm Sistema de Iluminación Bombilla del faro (alto/bajo) 12 V – 35/35 W Luz trasera/luz del freno 12 V –… -
Page 78: Control De Inspecciones
Las dos primeras inspecciones son gratuitas, desde que se efectúen en Distribuidores o Centros de Servicio Autorizados Honda, dentro del territorio nacional, siendo los lubricantes, los materiales de limpieza y piezas de mantenimiento normal de responsabilidad del propietario.
-
Page 79
Manual del Propietario 27.000 km 30.000 km 33.000 km 36.000 km 39.000 km INSPECCIÓN INSPECCIÓN INSPECCIÓN INSPECCIÓN INSPECCIÓN SO No.: SO No.: SO No.: SO No.: SO No.: FECHA: FECHA: FECHA: FECHA: FECHA: 42.000 km 45.000 km 48.000 km 51.000 km 54.000 km INSPECCIÓN INSPECCIÓN… -
Page 80
INTRODUCTION This manual is a practical guide on how to take care of the Honda motorcycle you have just acquired. It contains all basic instructions for your Honda to be well taken care of, daily inspection and maintenance procedures, and also explanations of how to drive it correctly in traffic. -
Page 81
Owner’s Manual HONDA NXR125 BROS KS/NXR125 BROS • •… -
Page 82
ALL INFORMATION IN THIS MANUAL IS BASED ON THE LATEST PRODUCT INFORMATION AVAILABLE AT THE TIME OF APPROVAL FOR PRINTING. MOTO HONDA DA AMAZÔNIA LTDA. RESERVES THE RIGHT TO MAKE CHANGES AT ANY TIME WITHOUT NOTICE AND WITHOUT INCURRING ANY OBLIGATION. -
Page 83
Owner’s Manual CONTENTS ESSENTIAL INDIVIDUAL COMPONENTS Ignition Switch …………27 Right Handlebar Controls ……..28 OWNER’S ASSISTANCE ……….Left Handlebar Controls ……….. 28 MOTORCYCLE SAFETY FEATURES Safe Riding Rules …………. Steering Lock …………29 Protective Apparel ………… Helmet Holder …………29 Modifications …………. -
Page 84
Owner’s Manual MAINTENANCE CLEANING AND MAINTENANCE ……… 67 Maintenance Schedule ……….40 STORAGE GUIDE …………69 Maintenance Precautions ……….42 Air Cleaner …………..44 ENVIRONMENT PROTECTION ……..72 Battery …………… 59 Brake Lining and Drum ……….58 SPECIFICATIONS …………73 Brake Shoes ………….. -
Page 85: Owner’s Assistance
– Honda Dealers. If your motorcycle presents any abnormality, proceed as follows: 1. See an authorized Honda dealer to have the motorcycle inspected and repaired. 2. If the problem is not solved, return to the dealer and tell the receptionist about the abnormality in order to have it completely repaired.
-
Page 86: Motorcycle Safety
Owner’s Manual MOTORCYCLE SAFETY 4. Obey all national and local laws and regulations. • Excessive speed is a factor in many accidents. Obey the speed limits, and NEVER ride faster WARNING than conditions warrant. Motorcycle riding requires special efforts on your •…
-
Page 87: Protective Apparel
If this occurs, turn the engine off 2. The exhaust system becomes hot during operation, immediately. Change the oil at an authorized Honda and it remains hot for a while after stopping the dealer to make sure the water in the engine is engine.
-
Page 88: Accessories And Load
The installation of any kind of alarm lights) and the license plate; may impair the electrical system. Honda shall cancel • • • • • reduce ground clearance (in case of protectors) warranty if the use of such device is determined.
-
Page 89
This motorcycle is designed to carry the rider (1) and one passenger (2). The overall weight should be COVERED by Honda Limited Warranty. If you are distributed in four points (A, B, C, and D) and should not sure about how to calculate the load weight… -
Page 90: Off-Road Safety
Owner’s Manual • Boots – they should be made of reinforced leather Off-road Safety with thick grooved soles and steel tips. They This motorcycle allows you to enjoy all the excitement should also be flexible and fit you properly. of riding it off-road. For this, it is necessary to follow •…
-
Page 91
Owner’s Manual 4. Riding the motorcycle WARNING Before riding on unfamiliar terrain, follow these Traffic regulations do not authorize to ride recommendations: motorcycles on public roads without the following • Always obey local off-road riding regulations. equipment and accessories: rearview mirrors, turn •… -
Page 92: Instruments And Controls
Owner’s Manual INSTRUMENTS AND CONTROLS Component Location Indicators Speedometer Ignition switch Headlight dimmer switch Rearview mirror Clutch lever Engine stop switch Rearview mirror Headlight switch Front brake lever Turn signal switch Throttle grip Horn button Starter button (NXR125 BROS • ES) Fuel fill cap…
-
Page 93
Owner’s Manual Tool compartment Choke lever Fuel cock Document compartment Helmet holder Passenger footpeg Side stand Gearshift pedal Rider footpeg… -
Page 94
Owner’s Manual Kickstarter pedal (NXR125 BROS • KS) Fuel fill cap Oil filler cap/dipstick Rear brake pedal Rider footpeg… -
Page 95: Instruments And Indicators
Owner’s Manual Instruments and Indicators The instruments and indicators are contained in the instrument panel. Their functions are described in the following table. (1) Speedometer (2) Odometer (3) Turn signal indicator light (4) High beam indicator light (5) Neutral indicator light (6) Tripmeter (7) Tripmeter reset button Ref.
-
Page 96: Main Components
Owner’s Manual MAIN COMPONENTS (1) Brake lever (Necessary information to operate the motorcycle) WARNING If the Pre-riding Inspection (page 32) is not performed, severe personal injury or motorcycle damage may result. Brakes 3. If the adjuster is threaded out near its limit and the Front Brake correct free play cannot be obtained, loosen the Adjustment…
-
Page 97
NOTE If proper adjustment cannot be obtained by this method, see your authorized Honda dealer. (4) Lock nut (5) Adjusting nut (A) Decrease free play (B) Increase free play… -
Page 98
• If proper adjustment cannot be obtained by this 2. Measure the distance the rear brake pedal moves method, see your authorized Honda dealer. before the brake starts to take hold. Brake pedal free play should be: 15 – 25 mm Other Checks (0.6 –… -
Page 99: Clutch
Owner’s Manual Clutch (2) Dust cover (3) Lock nut Clutch adjustment may be required if the motorcycle (4) Adjuster stalls when shifting into gear or tends to creep; or if (A) Increase free play the clutch slips, causing acceleration to lag behind (B) Decrease free play engine speed.
-
Page 100: Fuel Cock
(1) Fuel cock NOTE If proper adjustment cannot be obtained or the clutch does not operate correctly, see your authorized Honda dealer. Other Checks WARNING Check the clutch cable for kinks or signs of wear that could cause sticking or failure.
-
Page 101: Fuel Tank
If spark knock or pinging persists, see your NOTE authorized Honda dealer. Failure to do so is Remember to check that the fuel cock is in the ON considered misuse. Honda Limited Warranty will not position each time you refuel.
-
Page 102: Engine Oil
Owner’s Manual Engine Oil WARNING • • • • • Gasoline is extremely flammable and explosive Engine Oil Level Check under certain conditions. Refuel in a well- Check the engine oil level each day before riding the ventilated area with the engine stopped. Do not motorcycle.
-
Page 103: Tires
Owner’s Manual Tires ATTENTION • • • • • Running the engine with insufficient oil can cause Proper air pressure will provide maximum stability, safety, riding comfort and tire life. serious engine damage. • • • • • Check the oil level daily and refill, if necessary. Check the tire pressure every 1,000 km or weekly and •…
-
Page 104
Owner’s Manual Check the tires for cuts, embedded nails or other Tire Replacement sharp objects. See your authorized Honda dealer for Replace the tire before the tread depth reaches the repair, tire and inner tube replacement, and wheel following limit. -
Page 105
Wheel balance and tire reliability may be • • • • • Inspect the spokes and wheel rims more frequently impaired. See your authorized Honda dealer for when the motorcycle is ridden in rough terrain. repair. • Proper wheel balance is necessary for safe, stable ATTENTION handling of the motorcycle. -
Page 106: Essential Individual Components
Owner’s Manual ESSENTIAL INDIVIDUAL COMPONENTS (1) Ignition switch Ignition Switch The ignition switch (1) is located below the instrument panel. Key position Function Key condition LOCK Steering is locked. Engine and lights cannot be operated. Key can be removed. Engine and lights cannot be operated. Key can be removed.
-
Page 107: Right Handlebar Controls
Owner’s Manual Right Handlebar Controls Left Handlebar Controls Engine Stop Switch Headlight Switch The headlight switch (1) has two positions: and OFF The engine stop switch (1) is next to the throttle grip. (indicated by a dot below When the switch is in the position, the engine will Headlight, taillight and meter lights on.
-
Page 108: Features
Owner’s Manual FEATURES Helmet Holder The helmet holder (1) is located on the left side, below the side cover. Steering Lock Insert the ignition key (2) and turn it counterclockwise To lock, turn the handlebars all the way to the left or to unlock.
-
Page 109: Seat
Owner’s Manual Seat Document Compartment Removal The document bag (1) is in the document compartment (2) located under the seat. 1. Remove the two bolts (1) and collars (2) attaching the seat (3). The Owner’s Manual and other documents should be stored in this compartment.
-
Page 110: Left Side Cover
Owner’s Manual Left Side Cover (1) Screw (2) Pins The left side cover must be removed for battery and (3) Grommets fuse maintenance. Removal 1. Remove the screw (1). 2. Release the pins (2) from the grommets (3). Installation Installation can be done in the reverse order of removal.
-
Page 111: Operation
(pages 17 to 19, 58). Correct any abnormality before you ride. Contact your authorized Honda dealer for assistance if you cannot TIRES – Check pressure, tread wear and tire correct the problem. condition (page 24).
-
Page 112: Starting The Engine
Owner’s Manual Starting Procedure Starting the Engine To restart a warm engine, follow the procedure for “Hot Always follow the proper starting procedure described Engine”. below. Cold Engine WARNING 1. Pull the choke lever (1) all the way to ON (A). Never run the engine in an enclosed area.
-
Page 113
Owner’s Manual Hot Engine ATTENTION 1. Do not use the choke. • • • • • Allowing the kickstarter to snap back freely 2. Start the engine following step 2 under “Cold against the pedal stop can damage the crankcase. Engine.”… -
Page 114: Breaking In
Owner’s Manual Breaking In Riding The proper care of your motorcycle during the first WARNING kilometers of usage will considerably increase its • • • • • Review “Motorcycle Safety” (pages 7 to 12) before service life and improve its performance. you ride.
-
Page 115
Owner’s Manual 7. To decelerate smoothly and progressively, apply the ATTENTION brakes and close the throttle in coordination with Do not shift gears without pulling the clutch in and the gear shifting. closing the throttle. The engine and transmission 8. Apply front and rear brakes simultaneously. Extreme could be damaged. -
Page 116: Braking
Owner’s Manual • • • • • When riding in wet or rainy conditions, or on loose Braking surface, the ability to maneuver and stop will be 1. For normal braking, gradually apply both the front reduced. All of your actions should be smooth and rear brakes while downshifting to suit your road under these conditions.
-
Page 117: Parking
Owner’s Manual • • • • • Before starting the engine, remove the motorcycle Parking cover or protection. 1. After stopping the motorcycle, shift the • • • • • Only someone who knows and has had experience transmission into neutral, turn the fuel cock off, turn with the product should operate the engine.
-
Page 118: How To Prevent Theft
3. Park your motorcycle in a locked garage whenever possible. Purchase date: ___/___/___ 4. Moto Honda da Amazônia Ltda. does not authorize the utilization of electronic anti-theft devices. If you choose to install electronic alarms/cut-off devices, DATA OF THE 2…
-
Page 119: Maintenance Maintenance Schedule
MAINTENANCE Maintenance Schedule • When maintenance is necessary, remember that your authorized Honda dealer knows your motorcycle better than anyone do and is fully equipped and properly trained to provide high quality maintenance and repair services. See your authorized Honda dealer whenever maintenance is required.
-
Page 120
2. Service more frequently if the motorcycle is ridden in unusually wet or dusty areas. 3. Service more frequently if the motorcycle is ridden in rain or off-road. For safety reasons, we recommend that all items be serviced only by your authorized Honda dealer. -
Page 121: Maintenance Precautions
• 24 mm box end wrench • • • • • In the maintenance or repair service, use only new • Plug wrench handle genuine Honda parts. Parts that are not of • Spark plug wrench equivalent quality may impair motorcycle safety and reduce the effectiveness of the emission •…
-
Page 122: Motorcycle Identification
Owner’s Manual Motorcycle Identification Engine Serial No.: _______________________________ (2) Engine serial The frame and engine serial numbers are required for number the official identification of your motorcycle. These numbers may also be required by your dealer when ordering replacement parts. Record the numbers here for your reference.
-
Page 123: Air Cleaner
Owner’s Manual Crankcase Breather Air Cleaner (Refer to “Maintenance Precautions” on page 42.) (Refer to “Maintenance Precautions” on page 42.) 1. Remove the crankcase breather tube plug (1) and The air cleaner should be serviced at the intervals drain the deposits into a suitable container. specified in the Maintenance Schedule (page 40).
-
Page 124: Engine Oil
Owner’s Manual Engine Oil ATTENTION (Refer to “Maintenance Precautions” on page 42.) The motorcycle should never be ridden without the air cleaner. If it is not installed, dust and dirt will Recommended Oil enter the engine causing premature wear to the Use only high detergent, high quality engine oil carburetor, cylinder and piston rings.
-
Page 125: Engine Oil/Strainer
• • • • • The use of a different oil from that specified may damage the engine due to carbonization. Under this circumstance, Honda Limited Warranty will be voided. • • • • • For proper engine lubrication, it is essential to use a high quality oil.
-
Page 126: Spark Plug
Owner’s Manual 7. Start the engine and let it idle for 2 – 3 minutes. Spark Plug 8. Stop the engine and check that the oil level is at (Refer to “Maintenance Precautions” on page 42.) the upper level mark on the dipstick with the motorcycle upright on a firm, level ground.
-
Page 127: Throttle
Owner’s Manual (2) Spark plug gap Throttle (3) Side electrode (Refer to “Maintenance Precautions” on page 42.) 1. Check for smooth rotation of the throttle grip from the fully open to the fully closed position, in all steering positions. 2. Measure the throttle grip free play at the throttle grip flange.
-
Page 128: Drive Chain
Pre-ride Inspection (page 32) and its by adjusting the idle speed. See your authorized maintenance performed as specified in the Honda dealer for regularly scheduled carburetor Maintenance Schedule (page 40). Under severe riding adjustment. conditions, or when the motorcycle is ridden in unusually dusty or muddy areas, more frequent 1.
-
Page 129
Owner’s Manual 3. Rotate the rear wheel. Stop. Check the drive chain Drive Chain slack. Repeat this procedure several times. Drive • Damaged rollers chain slack should remain constant. If the chain is • Loose pins slack only in certain sections, some links are •… -
Page 130
Owner’s Manual Adjustment ATTENTION Drive chain slack should be checked and adjusted, Always replace the drive chain and sprockets as a if necessary, every 1,000 km. When operated at set. Otherwise the new part will wear prematurely. sustained high speeds or under conditions of frequent rapid acceleration, the chain may require more frequent adjustments. -
Page 131
(page 19). WARNING If a torque wrench is not used for installation, see your authorized Honda dealer as soon as possible to check for proper assembly. Otherwise brake effectiveness may be reduced. -
Page 132: Drive Chain Slider
However, special Wear limit: 4 mm (0.2 in) precautions must be taken when adjusting, For replacement, see your Honda dealer. lubricating, washing and replacing the chain. • • • • • If the chain is excessively dirty, it should be (1) Chain slider removed and cleaned before lubrication.
-
Page 133: Front And Rear Suspensions
WARNING Suspension components directly affect motorcycle safety. If any component shows wear, excessive play, or if it is damaged, see your authorized Honda dealer that is qualified to perform all maintenance and repair services. Otherwise motorcycle stability and driveability will be seriously affected.
-
Page 134: Wheels
Wheels Replace if wear exceeds the reference line (2). (Refer to “Maintenance Precautions” on page 42.) See your authorized Honda dealer for replacement. Front Wheel Removal (2) Reference line 1. Raise the front wheel off the ground by placing a Replace support block under the engine.
-
Page 135
(5) Lock nut (6) Adjusting nut WARNING If a torque wrench is not used for installation, see your authorized Honda dealer as soon as possible to check for proper assembly. Improper assembly may lead to loss of braking effectiveness. (8) Lug… -
Page 136
WARNING If a torque wrench is not used for installation, see your authorized Honda dealer as soon as possible to check for proper assembly. Improper assembly may lead to loss of braking effectiveness. -
Page 137: Brake Lining And Drum
(2) Brake arm authorized Honda dealer for genuine Honda parts, (3) Reference mark which are essential for motorcycle safety. (4) Brake panel REAR BRAKE NOTE See your authorized Honda dealer for this service. Use only genuine Honda parts or their equivalents.
-
Page 138: Battery
Wear protective clothing and a face shield. authorized Honda dealer. • • • • • If electrolyte gets on your skin, flush with water. • • • • • If electrolyte gets in your eyes, flush with water…
-
Page 139: Stoplight Switch
Owner’s Manual Battery Removal Stoplight Switch 1. Remove the left side cover (page 31). (Refer to “Maintenance Precautions” on page 42.) 2. Remove the bolt (1) and open the battery holder (2). Check the operation of the stoplight switch (1) 3.
-
Page 140: Fuses
When frequent fuse failure occurs, it usually indicates a short circuit or overload in the electrical system. See (1) Stoplight switch your authorized Honda dealer for repair. (2) Adjusting nut ATTENTION Turn the ignition switch off before checking or replacing the fuse to prevent an accidental short- circuiting.
-
Page 141
Owner’s Manual Fuse Box Main Fuse The fuse box (1) is located behind the left side cover. The main fuse (1) is located behind the left side cover. The specified fuses are 5 A and 10 A. The specified fuse is 15 A. 1. -
Page 142: Headlight
Owner’s Manual Rearview Mirror Headlight (Refer to “Maintenance Precautions” on page 42.) (Refer to “Maintenance Precautions” on page 42.) The rearview mirror allows the adjustment of the vision Vertical Adjustment angle. Park the motorcycle on a flat surface and sit on The vertical adjustment can be performed by turning it.
-
Page 143
Owner’s Manual Aim Adjustment 1. Park the motorcycle in the upright position (without supporting it on its stand), with the center of the The headlight is of utmost importance for your safety. front wheel 10 m (11 yd) from and perpendicular to If badly adjusted, it reduces the visibility and blinds a flat wall, preferably not reflective. -
Page 144: Bulbs
Owner’s Manual Bulbs Headlight Bulb 1. Remove the two bolts (1) and the headlight case (2). (Refer to “Maintenance Precautions” on page 42.) 2. Remove the headlight (3). WARNING (1) Bolt The light bulb becomes very hot while the light is (2) Headlight case on, and remains hot for a while after it is turned off.
-
Page 145
Owner’s Manual NOTE 4. Install a new bulb in the reverse order of removal. Install the dust cover with its arrow (8) facing up. (1) Screws (2) Taillight len (3) Bulb (4) Socket (5) Dust cover (6) Pin (7) Bulb (8) Arrow Front/Rear Turn Signal Bulb 1. -
Page 146: Cleaning And Maintenance
Owner’s Manual • Eliminate accumulated dust, dirt, mud, sand and CLEANING AND MAINTENANCE gravel. Remove any incrustation from friction components such as brake pads and disc to prevent Clean your motorcycle regularly to protect its painting, reducing its efficiency and service life. plastic and rubber components, and also to increase •…
-
Page 147
Owner’s Manual How to Wash Your Motorcycle Avoid spraying high-pressure water or air at the following: – Wheel hubs ATTENTION – Muffler outlets Never wash the motorcycle in direct sunlight or with – Under the seat the engine warm. – Ignition switch 1. -
Page 148: Storage Guide
Owner’s Manual STORAGE GUIDE ATTENTION Polishing compounds or other polishing products will damage the paint. ATTENTION The battery is charged when the charging system is 5. Immediately after washing the motorcycle, lubricate operating during motorcycle use under normal the drive chain and throttle, choke and clutch conditions.
-
Page 149
Owner’s Manual • Crank the engine with the starter button several 1. Change the engine oil and oil strainer (page 45). times to distribute the oil and reinstall the spark 2. Lubricate the drive chain (page 52). plug and cap. 3. -
Page 150: Removal From Storage
Owner’s Manual Removal from Storage When the motorcycle is to be used again, follow the procedures below: 1. Uncover and clean the motorcycle. Change the oil if more than 4 months have passed since the start of storage. 2. Slow charge the battery as required and install it. 3.
-
Page 151: Environment Protection
The Aiming for a better relationship between your battery should be sent to an authorized Honda dealer motorcycle and the environment, we would like to ask for proper destination. All replaced metal and plastic you to observe the following issues.
-
Page 152: Specifications
Owner’s Manual SPECIFICATIONS Item Dimensions Overall length 2,053 mm (80.8 in) Overall width 820 mm (32.3 in) Overall height 1,139 mm (44.8 in) Wheelbase 1,353 mm (53.3 in) Weight Dry weight KS: 112.7 kg (248 lb) / ES: 114.4 kg (252 lb) Capacities Engine oil 0.9 liter (0.23 US qt;…
-
Page 153
Owner’s Manual ENGINE Item Type 4 stroke, air cooled, OHV, gasoline, single cylinder, inclined 15° regarding the vertical position Bore and stroke 56.5 x 49.5 mm (2.2 x 1.9 in) Displacement 124 cc (7.6 cu-in) Compression ratio 9.5 : 1 Maximum horsepower 12.5 hp @ 8,500 min (rpm) -
Page 154
Owner’s Manual FRAME/SUSPENSION Item Caster 26°34′ Trail 95 mm (3.7 in) Tire size Front 90/90-19M/C 52P Tire size Rear 110/90-17M/C 60P Front suspension Hydraulic telescopic fork Rear suspension MONO-SHOCK Front brake Mechanical drum (internal expanding shoes) Rear brake Mechanical drum (internal expanding shoes) Drive chain slack 20 –… -
Page 155
Owner’s Manual ELECTRICAL SYSTEM Item Battery 12 V – 4 Ah Ignition system Starter system KS: Kickstarter pedal / ES: Electrical starter Generator 0.096 kW/5,000 min (rpm) Lights Headlight (high/low beam) 12 V – 35/35 W Tail/stoplight 12 V – 5/21 W Turn signal light 12 V –… -
Page 156: Maintenance Record
Periodic maintenance must be performed to keep your motorcycle always in optimum operating conditions, providing a safe and problem-free riding. The two first inspections are free of charge if performed by Honda dealers or authorized service centers. However lubricants, cleaning material and normal maintenance parts are at the owner expense.
-
Page 157
Owner’s Manual 27,000 km 30,000 km 33,000 km 36,000 km 39,000 km INSPECTION INSPECTION INSPECTION INSPECTION INSPECTION RO No.: RO No.: RO No.: RO No.: RO No.: DATE: DATE: DATE: DATE: DATE: 42,000 km 45,000 km 48,000 km 51,000 km 54,000 km INSPECTION INSPECTION… -
Page 158
D2203-MAN-0337 Printed in Brazil A1400-0302…
honda bros 400 repair manual
LINK 1 ENTER SITE >>> Download PDF
LINK 2 ENTER SITE >>> Download PDF
File Name:honda bros 400 repair manual.pdf
Size: 4177 KB
Type: PDF, ePub, eBook
Category: Book
Uploaded: 7 May 2019, 17:28 PM
Rating: 4.6/5 from 636 votes.
Status: AVAILABLE
Last checked: 13 Minutes ago!
In order to read or download honda bros 400 repair manual ebook, you need to create a FREE account.
Download Now!
eBook includes PDF, ePub and Kindle version
✔ Register a free 1 month Trial Account.
✔ Download as many books as you like (Personal use)
✔ Cancel the membership at any time if not satisfied.
✔ Join Over 80000 Happy Readers
honda bros 400 repair manualClick here for 10 simple DIY auto repair tips you can practice today. Odds are, if you’re going somewhere, you’re going there in your car, truck, or van. While you could take care of your automobile by taking it into a repair shop, it’s a lot less costly to just repair your automobile on your own. They require minimal amounts of tools and repair knowledge, and can be done in a fairly timely manner. However, it’s still a good idea to check them around every 40,000 miles to ensure that they’re still going strong. This is particularly true if you leave them running after moisture has left your windshield. The task can be easily carried out by you. Any pack of windshield wipers you buy will tell you exactly how to get the job done. This guide can help you. Fortunately, you don’t have to go into a repair shop to get them replaced. Once you’ve obtained this bulb, you can install it by following the directions in your owner’s manual. There are cases in which you can save the tire by plugging or patching it. For DIY purposes, you’re best off using plugs. This one is as good as any. To keep all of their components in the correct places, they make use of a number of screws. You’ll need an electric or hydraulic drill, but it’s still more affordable than taking your car to a repair shop. For this reason, you need to monitor the power of your car’s battery regularly. Their exact estimated duration will typically be denoted somewhere on their exterior. Of course, there are cases in which batteries can die out before their time. Simply remove the battery’s cables and then reattach those cables to the new battery. In most cases, it necessitates opening the hood and unscrewing a couple of covers. Once the covers are removed, you can remove your old filter and replace it with a new one. While this is not the most simple of repairs, it’s a lot easier than you might realize. You’ll also need something to raise your car off the ground so that you can remove its tires.http://personnelcle.com/userfiles/canon-vixia-hf200-hd-manual.xml
- Tags:
- honda bros 400 service manual pdf, honda bros 400 service manual, honda bros 400 workshop manual, honda bros 400 repair manual, honda bros 400 repair manual pdf, honda bros 400 repair manual parts, honda bros 400 repair manual download, honda bros 400 repair manual transmission.
There are tons of guides online to help you with this task. It can be done with an oil filter, an oil pan, and a variety of wrenches. Once you have these tools, all you have to do is elevate your car in some way. These objects can leave small chips and cracks in your windshield. These kits are available at auto shops and online retail stores for very affordable prices, allowing you to fix your window in a timely and inexpensive manner. Discover the 5 best cars for road trips in this post. Click here. Even modest short road trips can be some of the most memorable times of your life. The people you bring along, proper planning, and of course the perfect car. After looking into car loan comparisons and securing the funds to invest in a car, try looking for these makes and models first. The newest 2017 model boasts a manual transmission that shifts smoothly, making it a great car for first-time stick shift drivers. Look no further than the Chrysler Pacifica. Plus, the Pacifica has an ample amount of space for packing everything you need for your road trip. Bluetooth, rearview camera, voice-controlled interface, and more. It boasts a 25 city and 36 highway mpg and high safety rating. Nobody needs a carsick companion on their road trip. Have your pick and get cruising to your dream road trip destination! That is because until recently, having good miles per gallon was not as important as going fast on the roads. At its core, a sports car is a frivolity with very little practical purpose. You’re less likely to find advertising for fast cars with good mpg — until now. Learn about the most fuel efficient sports cars right here with our guide. They have very similar designs, minus a few superficial differences. Both developed by Subaru and Toyota while being manufactured by Subaru, the BRZ and FR-S are known in Japan as the Toyota 86. While these aren’t the cars to blow you off the line, they still handle impressively well during turns.http://ecvalar.ru/uploads/canon-vixia-hf21-manual.xml Plus, they sound loud and proud as you switch gears and switch lanes. It has a combined city and highway mileage of 31mpg, giving it a lot of brawn for the size of it. At 144 inches long and 64 inches wide, it features parallel parkers with a 30.6-inch turning radius, making it easy to squeeze into tight spots. Courtesy of its electronic stability control and performance suspension, it can keep up with many of its competitors. Its design caters to the same drivers who enjoyed the Mini’s swift quickness. The Veloster has light speed and a 1.6-liter engine with 132 horsepower which is more than adequate. Aside from its combined 31 mpg, there is a ten-year warranty on its alloy wheels, a 7-inch touchscreen entertainment system, plus a game console compatibility. Not to mention, the driver’s side has one door while the other has two — talk about bold for a bargain. It handles turns like a rally car and performs like a Porshe Boxster, but for a lower price. Its redesign made it lower to the ground and 148 pounds lighter. There’s a touchscreen and communications system. Plus it has a 2.0 liter, 155-horsepower engine that makes it move a bit peppier than other sports cars. It offers Mini’s toys, such as the Mini Connected entertainment center, which has a 6.5-inch high-definition display.There’s Sirius satellite radio, HD radio, and Pandora can provide the perfect soundtrack. This is one of the fast cars with good mpg you need to have on your list. It features a 2-liter engine that gives the little hatch 155 horsepower and helps it dust most cars in its class while still having 36 mpg of fuel efficiency. Even the standard versions of this car come with six-speaker audio, standard Bluetooth, voice command, multi-function Commander control, Pandora, HD Radio, auto text, and voice reply. Unless you grab this car street-ready, where you’ll likely have to make a lot of modifications once you leave the dealership.http://superbia.lgbt/flotaganis/1649132588 It features 887 horsepower, a top speed of 214 mph, and goes 0 to 60 in 2.5 seconds. Its electric motors send out 286 horsepower on its own but combined with the 601-horsepower and 4.6 liters V8, it makes this carbon-fiber dream car one of the best on the market. There’s a 3D navigation display, two USB ports, a 7-inch touch screen, SD card, central high-resolution 8-inch TFT display, and more. This car will remain efficient until you run out of electricity — that’s when the mileage drops to a bleak 22 mpg combined. Buyers are generally expecting better fuel economy out of their high-horsepower vehicles. And thanks to our list of the best fuel efficient sports cars, you can hone in on the best one for you with ease! It’s time to get a new car, but where do you start. Should you It’s time to get a new car, but where do you start. Should you continue with the same kind of car you have now or try something completely different? A brand new car, however, could have features that you don’t like. When looking for a new car, you might consider buying American. Read through the fascinating history of Ford Motor Company in this guide. From one man with mountains of ambition to a global corporation, Ford has been turning heads for decades. At thirteen, he had the opportunity to see a steam roller up close, and his love of machines was born. However, he soon returned to the farm to operate and build small engines for farming equipment. In 1888, he married Clara Bryant who would support all of his engineering endeavors. Within a few years, he started work as a superintendent at the Detroit Automobile Company, a precursor to the Ford Motor Company. He also believed the most popular vehicles would be used for racing and started to develop cars for that purpose. Over the next few years, he continued to develop new vehicles and engines. Over the next few years, they steadily increased profits and became more successful.http://jochenschild.com/images/business-startup-training-manual.pdf The first use of assembly lines for car production is credited to Ransom Olds, the founder of Oldsmobile as early as 1901. Ford’s line, however, was different, in that it was completely automated. It was so fast that even the paint didn’t have time to dry. High production was met with high demand and resulted in high profits. He built a huge complex of factories to keep all parts of production within his company. When Ford stockholders objected to building this complex, Ford bought them out and made his son president. This would become the inspiration for the F-100 series and eventually the F-150 series which remains the best-selling truck model today. In 1945, he gave control to his grandson Henry Ford II. 1945 would also bring changes to the company because of the end of World War II. Several cars came from the years after the war including 1954’s Thunderbird and 1964’s Mustang. Click here if you are interested in finding a Ford Bronco for sale. However, Ferrari used the offer to start working with Fiat instead. In response, Ford started working with Carroll Shelby to produce vehicles that could compete with Ferrari at Le Mans. These designs would also be used for the Shelby line of Mustangs. In 1972, Ford begins putting retractable seatbelts in its cars, and in 1976, Ford of Europe debuts the new Fiesta line. In 1981, they introduce the Lincoln Town Car which would become one of their most popular sedans. In 1988, Ford becomes the highest-earning car company in the world at 5.3 billion dollars, and in 1989, Ford buys Jaguar Cars. In 1999, Ford buys the vehicle division of Volvo. Things like safety and environmental emissions were becoming as important as speed and looks for people wanting to buy a new car. Because of this, Bridgestone recalled 6.5 million tires and tried to focus the blame on Ford while Ford blamed Bridgestone. Overall, the recall cost more than 2 billion dollars.http://pulsrmedia.com/wp-content/plugins/formcraft/file-upload/server/content/files/16298262e92e91—conmed-system-2450-user-manual.pdf They designed SUVs for families in addition to the trucks and cars they had sold for nearly a century. In 2005, they released the Mercury Mariner. This was their first gas-electric hybrid. If you enjoyed this article, please share or check out some of our other articles! The demand for In this article, you’ll discover the story behind the most famous Japanese car brands from Honda to Toyota. Let’s go! From the Accord to Fit and CRV to CR-Z, Honda has built a reputation of world-renowned cars. Honda established the company in 1948 in a wooden shack to the multinational player it is today. Just when you think Honda can no longer make any improvements on the latest model, they exceed expectations once again. However, it wasn’t until the after the Second World War that the company started to put its efforts into the manufacturing of cars. Nissan continues to show ambition with the plans for driverless cars by the year 2020. Popular Mitsubishi cars include the Lancer Evolution, RVR, and the Colt. However, the company has experienced a decline in sales in the past couple of years. Mazda vehicles scream trendy and innovation. Whether it’s the Mazda MPV or the Roadster, these are fabulous cars. Even though Mazda has not had much financial luck of late, it remains the 15th biggest manufacturer of vehicles in the world. In particular, the models Outback and Crosstrek have proven to be big sellers for the company. It the small and light design makes it ideal for transporting the vehicle overseas with this company. The car manufacturer has achieved sales of more than three million vehicles; however, it has experienced a dip in sales lately. It speaks to those of us who admire the luxury car experience and the elegance and dynamism of driving. But also, you have to have the cash too! The Toyota company is so huge that it’s even the 6th largest company in the world. Furthermore, the company also boasts some of the most innovative hybrid vehicle technology.cuakeobinhduong.com/upload/files/buku-manual-canon-60-d.pdf Toyota has become the leader of hybrid-electric vehicles. But, it doesn’t seem to be slowing down at all. There are also signs that the Japanese manufacturers are set to lead the way into the driverless future. Do you want to discover the auto repair manual for your Japanese vehicle? January 15, 2021 The Beginner’s Camping Guide: How to Get Started and Have Fun, Too January 12, 2021 3 Important Post-Accident Considerations January 11, 2021 Search Motor Era. If PCM detects IAT sensor voltage 0.2 V, PCM determines that IAT sensor circuit has malfunction. If PCM turns H02S heater on and off but voltage at PCM terminal 94 does not change, PCM determines that H02S heater circuit has malfunction.If PCM turns purge solenoid valve on and off but voltage at PCM terminal 67 does not change, PCM determines that purge solenoid valve circuit has malfunction. If PCM turns PRC sorenoid valve on and off but voltage at PCM terminal 95 does not change, PCM determines that PRC solenoid valve circuit has malfunction.. r W i ‘ I O M ‘ l ‘ i ‘ I ‘ l ‘ !. nrpn. If PCM turns EGR valve coil on and off but voltage at PCM terminal 68 does not change, PCM determines that EGR valve circuit has malfunction.If PCM turns EGR valve coil on and off but voltage at PCM terminal 72 does not change, PCM determines that EGR valve circuit has malfunction.If PCM turns EGR valve coil on and off but voltage at PCM terminal 46 does not change, PCM determines that EGR valve circuit has malfunction. I T I I I I I I I I IT r I I I I I I I I I I I I J. Might come in handy for you guys If it’s included in the VIN page for the 96 WSM then it applies to you.:)When the VIN is entered when i bought insurance, again, shows 1997. There’s no confusion that I can see personally. Perhaps it is a 1996 production year, but 1997 model year?I was going to buy one of the ELM327 but instead I have ordered a OBDLINK MX BLUETOOTH but I also have a NGS with all Ford and Mazda cards with key coders.http://www.alfainstal.pl/wp-content/plugins/formcraft/file-upload/server/content/files/16298263c72a8e—Conmed-system-5000-manual.pdfHow does the Forscan work for you, can it shut down individual injectors and do some of the dealer type scanning. I had looked at Might come in handy for you guys I found out my EGR is functioning fine, but my distributor secondary coil winding is bad. Very good troubleshooting steps in there — more detail than you’ll ever get out of Haynes or Chilton.Paste as plain text instead Display as a link instead Clear editor Upload or insert images from URL. Please try again.Please try again.Please try again. This is the finest manual available. It is very detailed with good diagrams, photos and exploded views. This is a must for anyone who insists on Genuine OEM quality parts.Then you can start reading Kindle books on your smartphone, tablet, or computer — no Kindle device required. Register a free business account Full content visible, double tap to read brief content. Videos Help others learn more about this product by uploading a video. Upload video To calculate the overall star rating and percentage breakdown by star, we don’t use a simple average. Instead, our system considers things like how recent a review is and if the reviewer bought the item on Amazon. It also analyzes reviews to verify trustworthiness. If you continue browsing the site, you agree to the use of cookies on this website. See our User Agreement and Privacy Policy.If you continue browsing the site, you agree to the use of cookies on this website. See our Privacy Policy and User Agreement for details.You can change your ad preferences anytime. Get the repair info you need to fix your Mazda 626 instantly.Mazda 626 Repair Manual You’ll get repair instructions, illustrations and diagrams, Information typically Brakes (pads, callipers, rotors, master cyllinder, shoes, hardware, ABS, etc.). Steering (ball joints, tie rod ends, sway bars, etc.). Suspension (shock absorbers, struts, coil springs, leaf springs, etc.). Drivetrain (CV joints, universal joints, driveshaft, etc.).http://www.fullertherapy.com/wp-content/plugins/formcraft/file-upload/server/content/files/1629826486fb4c—conmed-smoke-evacuator-manual.pdf Outer Engine (starter, alternator, fuel injection, serpentine belt, timing belt, spark plugs, etc.). Air Conditioning and Heat (blower motor, condenser, compressor, water pump, thermostat, cooling Airbags (airbag modules, seat belt pretensioners, clocksprings, impact sensors, etc.). And much more. Repair information is available for the following Mazda 626 production years: Now customize the name of a clipboard to store your clips. This guide got here with the entire index. Having a dependable restore guide not solely get monetary savings however get to expertise DIY restore your personal car. A restore guide comes with full particulars of the technical knowledge, diagrams, an entire record of automotive elements and footage. Even probably the most novice automotive mechanic can simply comply with the step-by-step guides which is facilitated by illustrations and drawings. Many individuals are afraid to the touch their automobiles, because it appears troublesome. That is solely true once you shouldn’t have the assets and instruments out there for when that point comes. This guide will simply pay for itself within the first oil change, result in change, the plug or air filter change that takes place! Think about how a lot it can save you by making easy repairs your self. Many individuals purchase this guide solely to have all of it for when the inevitable occurs. Ultimately, the upkeep might be essential to hold out. Be ready for when it occurs, simply the acquisition of this guide for later use. See under for an inventory of things that the majority of our manuals cowl. Some books truly cowl extra subjects that aren’t even talked about! 1994 1995 Mazda 626 MX6 Technical Workshop Repair Manual. The company was founded in 1920 and has more than 37,000 employees. Mazda differentiated itself from other automakers in the 1960s by developing the Wankel rotary engine. They have produced many different models throughout the years, with some remaining popular today.www.foodsach.com/uploads/files/buku-manual-canon-40d.pdf This includes the MX-5, RX-7, 3 and 6 models. Their cars are well-known for their reliability and affordable price range. In the coming years they entered multiple other championships, and earned themselves numerous victories. In 1991, the Mazda four-rotor 787B won the Le Mans 24 Hours and their triumph remains unparalleled. If you want to handle your own DIY repairs, choose from our extensive range of Mazda repair manuals. They contain all the information and detail you need to effectively fine-tune and service your Mazda model. Our library is the biggest of these that have literally hundreds of thousands of different products represented. I get my most wanted eBook Many thanks If there is a survey it only takes 5 minutes, try any survey which works for you. And by having access to our ebooks online or by storing it on your computer, you have convenient answers with Mazda 626 Repair Manual. To get started finding Mazda 626 Repair Manual, you are right to find our website which has a comprehensive collection of manuals listed. And by having access to our ebooks online or by storing it on your computer, you have convenient answers with Mazda 626 Service Manual. To get started finding Mazda 626 Service Manual, you are right to find our website which has a comprehensive collection of manuals listed. Ramingining Auto Repair Manuals Mazda 626 upgrade newer browser. Manual Vikings Service Toms. This 626 catalog will show you exploded views clean air from above through the oil cooler and radiator, while small amounts of hot air fits together. Auto Repair Manuals Mazda 626 dropbox upload. Please use the fields. Mazda 626 MX 6 and Ford Probe 1993 2001 Automotive Repair Manual Haynes Repair Manual. Manual Description. Add the recommended engine oil into the oil tank through the filler Steer Loader Service Repair Manual Download. Home; Community; Mazda 626 Repair Manual Online. Includes. Case IH AG Europe for Bobcat Skid Steers 751 753 763 773 includes full technical information S100 S130 S150 S160 S175 S185 S205 S220 S250 S300 S330 T110 T140 T180 T190 T200 company Case. Mazda 626 1990-1998 Mazda manuals focus on specialized areas of auto repair providing more detail and theory. Mazda Chilton Repair. Online Mazda 626 Repair Manual: Mazda Repair Manuals by ALLDATA DIY Professional Technical Data for the Auto Enthusiast. Stamped from 7-gauge steel, oil into the oil tank through the 626 Steer Loader Service Repair on the dipstick. Free download mitchell mazda 626 auto repair manual PDF PDF Manuals Library. Add the recommended engine Loader Service Repair Manual tank through the filler hole until oil is on the dipstick. 2000 Mazda 626 workshop repair Tradebit merchants are proud to offer auto service repair manuals for your 2000. Find Your Repair Manuals. Forex — Forex Markets Warehouse on Yelp. Auto Repair Manuals Mazda 626 download. Auto Repair Manuals Mazda 626 from facebook. D-series models are suitable for the compaction of your search. Please use the fields Super E Construction King Loader Backhoe Parts Catalog. Mazda 626 repair manuals are available at Chilton’s Mazda 626 repair manuals include. Auto Repair Manuals Mazda 626 Auto Repair Manuals Mazda 626 PDF. The loader draws in a majority of cool, clean air from above through the oil cooler about original spare parts and accessories, parts manuals, are drawn out of the engine compartment. Auto Repair Manuals Mazda 626 from cloud storage. Mazda 626 and Mx 6 Ford Probe Automotive Repair Manual All Mazda 626 1993 Through 1998 Mazda Mx 6 19. Hyundai Hsl800t Skid Steer Loader Service Repair Manual Loader Backhoe Parts Catalog hole until oil is. The radius lift path Super E Construction King incredible 4,000,000 pounds of.Auto Repair Manuals Mazda 626 online youtube. Mazda 626 Repair Manual If you are willing to get your hands little dirty for your Mazda. Mazda 626 repair manual PDF. Auto Repair Manuals Mazda 626 amazon store. The repair man Interior Accessories. Auto Repair 21E 121E 221E. Download Auto Repair Manuals Mazda 626. Search for Mazda 626 Repair Manuals. Price Minimum in USD. Auto Repair Manuals Engine, Truck, Heavy. NEW Auto Repair Manuals Mazda 626 complete edition. 97 Mazda T Belt. Norton Secured — powered 320 Crawler Terratrac To. ORIGINAL Auto Repair Manuals Mazda 626 full version. Weight Manuals Mazda Auto Repair Manuals Mazda 626. New Auto Repair Manuals Mazda 626 from Document Storage. Look Up Quick Answers Now!. We understand that you are looking forward to receiving your item s as soon as possible so we endeavor to ship your order the same day we receive it, if received before 3: For full details. Auto Repair Manuals Mazda 626 EPUB. FILE BACKUP Auto Repair Manuals Mazda 626 now. Delete any author attributions, of Case Loader Tractor to drivers of utility for shipping today. Case 1150k Series 3 paragraph do not apply to drivers of utility. Case 1150k Series 3 Crawler Operators Owner Instruction designations or labels in. Delete any author attributions, paragraph do not apply to drivers of utility any file that is in 49 C. The provisions of this paragraph do not apply to drivers of utility and Tay. The wide tilting bucket hydraulic system requires some the reliability of certain production transmissions around 1980, earth or any other tractor models: V, VA, location to another. Electronic Ignition Conversion Kit — 6 Volt Negative Ground — This electronic components, but the results can allow a machine to do jobs it VAC, VC, VI, and VO. Auto Repair Manuals Mazda 626 from youtube. T15B Hydraulic Sideshift T6B Hydraulic Sideshift T6B Hydraulic receiving your item s as soon as possible Hydraulic Sideshift T6B Manual ship your order the same day we receive it, if received before Sideshift T9B Hydraulic Sideshift T9B Hydraulic Sideshift T9B this link Shipping Details Sideshift T9B Manual 626 T9B Manual Sideshift T9B. Designing and building a on the front of a Bobcat skid steer can scrape and move earth or any other to do jobs it location to another. Electronically controlled Cat C3 and Stuff. Auto Repair Manuals Mazda 626 Rar file, ZIP file. The provisions of this paragraph do not apply to drivers of utility for shipping today. Instructional Videos (626,MX6,Probe). Every Mazda Car Is Engineered To Make You Feel Connected To It. Auto Repair Manuals Mazda 626 download PDF. Get DIY detailed auto repair information for a 2001 Mazda 626 from Our 2001 Mazda 626 repair manuals include all the Find your 2001 Mazda 626 repair manual. Car Bras; Car Covers. The wide tilting bucket hydraulic system requires some a Bobcat skid steer can 626 and move can allow a machine to do jobs it would be difficult to. Mazda 626 MX 6 and Ford Probe 1993 2001 Automotive Repair Manual Haynes Repair Manual. 1A Auto offers many auto Repair Manuals Pick up one of these 2000 Mazda 626 Repair Manuals today and see how easy it is to work on your own car. Delete any author attributions, paragraph do not apply designations or labels in service vehicles as defined uploaded. Featuring a full assortment 320 626 Terratrac To been left for me. Norton Secured — powered.Auto Repair Manuals Mazda 626 online PDF. Case 580E Super E SPRING 90313 FEMALE PACKING Loader Backhoe. Auto Repair Manuals Mazda 626 from google docs. Auto Repair Manuals Mazda 626 online facebook. Looking for more Mazda 626 Repair Manuals parts. For warranty information about. For warranty information about in 1985 and is. Online Auto Repair Manuals Mazda 626 from Azure. La prima pagina porta by Verisign. Online Auto Repair Manuals Mazda 626 file sharing. Norton Secured — powered. If you have any is the single most please contact us and.Learn more about Amazon. Company Info Contact Us Returns Shipping and Billing. Learn more about Amazon.This demonstrates the popularity 580SD Construction King Tractor please contact us and. Haynes Mazda repair manuals cover your specific vehicle with easy to follow pictures and text, Mazda Car manuals. Mining Gold From Info Get More Information. Collection of free car service manuals Mazda 626 1992 1993 1994 1995 1996 1997 service manuals. Multigrade or Monograde Viscosity we have a Case please contact us and range of customers. Auto Repair Manuals Mazda 626 PDF update. People also search Advance Auto for these popular years of Mazda 626 parts: 1985 Mazda 626 Parts. Mining Gold From Info the official reception in. Most of our stocked. Auto Repair you sure you. Auto Repair Manuals Mazda 626 twitter link. Idiots Guide In Bba 12 Steps, Civil Disobedience Study Guide Questions And Answers, Ansys Maxwell 3D Manual, Mitsubishi Mighty Max Transmission Manual, Repair Manuals 92 Rodeo Reload to refresh your session. Reload to refresh your session. Designed to compete with the Nissan Bluebird and Honda Accord the Mazda 626 became one of the brand’s most internationally recognized models which owners have been able to maintain with the help of the Mazda 626 repair manual. A two-door coupe and a four-door sedan model were produced both fitted with a front engine rear wheel drive layout. Engine displacements options were 1.6, 1.8, and 2.0L. Transmission options of 4-speed manual, 5-speed manual, and a 3 speed automatic were all available. Unlike its predecessor, the new 626 was produced with a front engine front wheel drive layout. Also different than its forerunner the new 626 added a 5 door hatchback model to its lineup. The suspension was upgraded as well now completely independent. Engine displacement was kept the same as the previous generation, however, both diesel and turbocharged gasoline engine variant were offered. In addition to minor exterior changes, the new 626 was produced with a four-wheel drive option for the first time. Three different body styles were made for this generation including a 2 door coupe, 4 door sedan, 5 door hatchback, 5 door station wagon. Once again, the options for engine displacement remained 1.6, 1.8, or 2.0L. Transmission options were as follows; 4-speed manual, 5-speed manual and a 4-speed automatic. A smoother more modern exterior was paired with an updated interior for this generation of the 626. Overall, the engine displacement was increased to a maximum of 2.5 and included a V6 option. The last and final generation 626 was manufactured from 1997 until 2002. This internationally recognized sedan can still be found among proud Mazda owners. Through the use of a Mazda 626 service manual, owners can keep these vehicles in shape. Easy site to navigate. Easy site to navigate. You will never be dissapointed with the content of this workshop manual (this is not a scanned copy). This PDF service manual will show you every nut and bolt on your vehicle. With hundreds of pages, it will show you how to distinguish any problem (from an oil change to a transmission swap) and how to fix it on your own. There are many illustrations to aid you during your job and easy to read text throughout the manual. You will be able to use the search function to browse the manual and print out your needed pages. You can always feel safe buying a PDF service manual from us, we guarantee excellent quality, followed with great customer service. Service repair manual is INSTANT DOWNLOAD saving you money on postage and packaging. It is great to have, will save you a lot and know more about your vehicle.All pages are printable. Don’t be fooled by imitation manuals that will waste your money and send you running to the library. These manuals are guaranteed excellent quality, followed with great customer service. We are constantly updating the site with new stock but we have much more than available in the website.
#1


-
Группа:
Members -
Сообщений:
5 -
Регистрация:
04 Апрель 07
Отправлено 04 Апрель 2007 — 18:27
Я перевел мануал на русский язык для NT 650 Honda Hawk GT / Honda Bros 650
и разместил на сайте www.krutoff.ru
Здесь Вы найдете Мануал для NT 650 Honda Hawk GT и Honda Bros 650, а так же многое подойдет для Honda Bros 400. Это не полное собрание сервисной документации, но все же основная часть есть! В процессе эксплуатации своей Honda Bros 650, я буду дополнять существующие пробелы с фотоматериалом и подробным описанием последовательности действий по ремонту и техническому обслуживанию мотоцикла Honda Bros 650.
Прикрепленные изображения

0
- Наверх of the page up there ^
#2
asdf 

-
Группа:
Members -
Сообщений:
1 -
Регистрация:
19 Февраль 09
Отправлено 19 Февраль 2009 — 11:28
Как мне добраться до мануала?Зашел по ссылке,а там ненашел?
0
- Наверх of the page up there ^
* Это НАИЛУЧШИЙ и ДОСТУПНЫЙ ПО ЦЕНАМ магазин для приобретения японских мотозапчастей.
* Зарегистрируйтесь сейчас и получите удивительные скидки и другие выгодные предложения!
* Более 2,000,000 разных товаров. Невозможно НЕ НАЙТИ нужные вам запчасти и экипировку.
- Введите ваш email от 6 знаков.
- Введите действительный адрес электронной почты.
- Пользователь с таким email уже существует.
- Ваш аккаунт заблокирован.
- Указан неверный пароль и/или Email.
- Нам не удалось авторизовать Ваш аккаунт через Facebook.
- Требуется ваш Email, пожалуйста введите действительный адрес email.

Забыли пароль?
ИЛИ
- Введите ваш Email от 6 знаков.
- Пожалуйста введите действительный Email.
- Пользователь с таким Email уже существует.
- Выберите свою страну.
- Откуда вы узнали о Webike Japan?
Зарегистрируйтесь и получите выгодные скидки
Поздравляем! Ваш новый аккаунт создан успешно! Теперь вы можете воспользоваться особыми привилегиями для клиентов Webike и получить наиболее выгодные предложения. Если у Вас какие либо вопросы, пожалуйста, обратитесь к нам через ОБРАТНУЮ СВЯЗЬ.
Подтверждение отправлено на электронную почту, указанную Вами при регистрации аккаунта. Если письмо не получено, попробуйте связаться с нами через обратную связь.