P6T Deluxe V2

Регистрация устройства поможет вам управлять его гарантией, получать техническую поддержку и отслеживать статус ремонта.
Регистрация продукта
Руководства пользователя
Версия E4398
11.18 MB
P6T Deluxe V2 User’s Manual (English)
Версия J4398
5.52 MB
P6T Deluxe V2 user’s manual(Japanese)
Версия T4398
30.59 MB
P6T Deluxe V2 user’s manual(Traditional Chinese)
Версия T4204
1.97 MB
Motherboard Installation Guide (Traditional Chinese)
Версия C4204
1.83 MB
Motherboard Installation Guide (Simplified Chinese)
Версия F4398
5.08 MB
P6T Deluxe V2 user’s manual(French)
- Инструкции и руководства
- Бренды
- ASUS
- P6T Deluxe V2
- Справочник Пользователя
![]()
- Manuals
- Brands
- Asus Manuals
- Motherboard
- P6T DELUXE V2
Manuals and User Guides for Asus P6T DELUXE V2. We have 2 Asus P6T DELUXE V2 manuals available for free PDF download: Bedienungshandbuch, User Manual

Asus P6T DELUXE V2 User Manual (182 pages)
User Guide
Brand: Asus
|
Category: Motherboard
|
Size: 11.72 MB
Table of Contents
-
Table of Contents
3
-
Contents
4
-
Canadian Department of Communications Statement
8
-
Federal Communications Commission Statement
8
-
-
Notices
8
-
Electrical Safety
9
-
Safety Information
9
-
About this Guide
10
-
Conventions Used in this Guide
11
-
P6T Deluxe V2 Specifications Summary
12
-
Chapter 1: Product Introduction
15
-
Welcome
17
-
Package Contents
17
-
Special Features
18
-
Product Highlights
18
-
ASUS Unique Features
19
-
Asus Quiet Thermal Solution
20
-
Asus Crystal Sound
21
-
Tpm Support
21
-
Asus Mylogo2
23
-
-
-
-
Chapter 2: Hardware Information
25
-
Before You Proceed
27
-
Motherboard Overview
28
-
Motherboard Layout
28
-
Layout Contents
29
-
Placement Direction
30
-
Screw Holes
30
-
-
Central Processing Unit (CPU)
31
-
Installing the CPU
32
-
Installing the CPU Heatsink and Fan
35
-
Uninstalling the CPU Heatsink and Fan
36
-
Installing the Optional Fans
37
-
-
System Memory
38
-
Overview
38
-
Memory Configurations
39
-
DIMM Sockets
39
-
Installing a DIMM
45
-
Removing a DIMM
45
-
-
Expansion Slots
46
-
Installing an Expansion Card
46
-
Configuring an Expansion Card
46
-
Interrupt Assignments
47
-
Irq Assignments for this Motherboard
47
-
PCI Slots
48
-
PCI Express X4 Slot
48
-
PCI Express 2.0 X16 Slots
48
-
-
Jumpers
50
-
Jumper
50
-
Clear RTC RAM
50
-
-
Onboard Switches
52
-
Connectors
53
-
Rear Panel Connectors
53
-
Internal Connectors
55
-
Chassis Intrusion Connector
61
-
Front Panel Audio Connector
61
-
System Panel Connector
64
-
-
-
Installing the Additional Heatsink Fan
66
-
2.10 Starting up for the First Time
67
-
2.11 Turning off the Computer
68
-
Using the os Shut down Function
68
-
Using the Dual Function Power Switch
68
-
-
-
Chapter 3: BIOS Setup
69
-
Managing and Updating Your BIOS
71
-
ASUS Update Utility
71
-
ASUS EZ Flash 2 Utility
74
-
Creating a Bootable Floppy Disk
75
-
AFUDOS Utility
76
-
ASUS Crashfree BIOS 3 Utility
78
-
-
BIOS Setup Program
79
-
BIOS Menu Screen
80
-
Menu Bar
80
-
Navigation Keys
80
-
Menu Items
81
-
Sub-Menu Items
81
-
Configuration Fields
81
-
Pop-Up Window
81
-
Scroll Bar
81
-
General Help
81
-
-
Main Menu
82
-
System Time
82
-
System Date
82
-
Legacy Diskette a
82
-
Language
82
-
Sata 1-6
83
-
Storage Configuration
84
-
AHCI Configuration
85
-
System Information
86
-
-
Ai Tweaker Menu
87
-
Ai Overclock Tuner
87
-
CPU Ratio Setting
88
-
Intel(R) Speedstep(TM) Tech
88
-
Intel(R) Turbo Mode Tech
88
-
DRAM Frequency
89
-
DRAM Timing Control
89
-
CPU Voltage
91
-
CPU PLL Voltage
91
-
QPI/DRAM Core Voltage
91
-
IOH Voltage
92
-
IOH PCIE Voltage
92
-
ICH Voltage
92
-
ICH PCIE Voltage
92
-
DRAM Bus Voltage
92
-
DRAM DATA REF Voltage on CHA/B/C
93
-
DRAM CTRL REF Voltage on CHA/B/C
93
-
Load-Line Calibration
93
-
CPU Differential Amplitude
93
-
CPU Clock Skew
93
-
CPU Spread Spectrum
94
-
IOH Clock Skew
94
-
PCIE Spread Spectrum
94
-
-
Advanced Menu
95
-
CPU Configuration
95
-
Chipset
98
-
Onboard Device Configuration
99
-
USB Configuration
100
-
Pcipnp
101
-
-
Power Menu
102
-
Suspend Mode
102
-
Repost Video on S3 Resume
102
-
ACPI 2.0 Support
102
-
ACPI APIC Support
102
-
APM Configuration
103
-
Hardware Monitor
104
-
-
Boot Menu
106
-
Boot Device Priority
106
-
Boot Settings Configuration
107
-
Security
108
-
Change User Password
109
-
Clear User Password
109
-
-
-
Tools Menu
110
-
ASUS EZ Flash 2
110
-
Express Gate
111
-
ASUS O.C. Profile
112
-
Ai Net 2
113
-
-
Exit Menu
114
-
-
Chapter 4: Software Support
115
-
Installing an Operating System
117
-
Support DVD Information
117
-
Running the Support DVD
117
-
Drivers Menu
118
-
Utilities Menu
119
-
Make Disk Menu
121
-
Manual Menu
122
-
ASUS Contact Information
122
-
Other Information
123
-
Technical Support Form
124
-
-
Software Information
125
-
ASUS Mylogo 2
125
-
Ai Net2
127
-
ASUS PC Probe II
128
-
ASUS AI Suite
134
-
ASUS AI Nap
136
-
ASUS Fan Xpert
137
-
Fan Profile Modes
138
-
ASUS EPU-6 Engine
139
-
Engine Main Menu
140
-
Advanced Settings Menu
141
-
-
ASUS Turbov
143
-
Soundmax ® High Definition Audio Utility
145
-
Listening Environment Options
149
-
Microphone Options
150
-
-
ASUS Express Gate SSD
151
-
Using the Configuration Panel
153
-
Using the Launchbar
154
-
Using the Photo Manager
157
-
-
-
RAID Configurations
160
-
RAID Definitions
160
-
Creating a RAID Driver Disk
160
-
Installing Serial ATA Hard Disks
161
-
Intel ® RAID Configurations
161
-
Intel Matrix Storage Manager Option Rom Utility
162
-
Creating a Raid 1 Set (Mirrored)
165
-
-
-
Creating a RAID Driver Disk
169
-
Creating a RAID Driver Disk Without Entering the os
169
-
Creating a RAID Driver Disk in Windows
169
-
-
-
Chapter 5: Multiple GPU Technology Support
171
-
ATI ® Crossfirex™ Technology
173
-
Requirements
173
-
Before You Begin
173
-
-
Installing Crossfirex™ Graphics Cards
174
-
Dual Crossfirex Installation
174
-
Triple Crossfirex Installation
175
-
-
Software Information
176
-
Installing the Device Drivers
176
-
Enabling the ATI ® Crossfirex™ Technology
176
-
-
NVIDIA ® SLI™ Technology
178
-
Requirements
178
-
Installing SLI™ Graphics Cards
178
-
Installing the Device Drivers
179
-
Enabling the NVIDIA ® SLI™ Technology in Windows
179
-
-
Advertisement
(German) Asus P6T DELUXE V2 Bedienungshandbuch (196 pages)
User Guide
Brand: Asus
|
Category: Motherboard
|
Size: 6.35 MB
Table of Contents
-
Table of Contents
3
-
Inhalt
4
-
Erklärungen
8
-
Sicherheitsinformationen
9
-
Kapitel 1: Produkteinführung
10
-
Über dieses Handbuch
10
-
Willkommen
16
-
Paketinhalt
17
-
Sonderfunktionen
18
-
Leistungsmerkmale des Produkts
18
-
ASUS-Eigene Sonderfunktionen
19
-
Asus Mylogo2
23
-
-
Bevor Sie Beginnen
27
-
-
Kapitel 2 : Hardware-Beschreibungen
27
-
Motherboard-Übersicht
28
-
Motherboard-Layout
28
-
Layout-Inhalt
29
-
Ausrichtung
30
-
Schraubenlöcher
30
-
-
Zentralverarbeitungseinheit (CPU)
31
-
Installieren der CPU
32
-
Installieren von CPU-Kühlkörper und Lüfter
35
-
Deinstallieren des CPU-Kühlkörpers und -Lüfters
36
-
Installieren des Optionalen Lüfters
37
-
-
Systemspeicher
38
-
Übersicht
38
-
Speicherkonfigurationen
39
-
Installieren eines Dimms
43
-
Entfernen eines Dimms
43
-
-
Erweiterungssteckplätze
44
-
Installieren einer Erweiterungskarte
44
-
Konfigurieren einer Erweiterungskarte
44
-
Interruptzuweisungen
45
-
PCI-Steckplätze
46
-
PCI Express X4-Steckplatz
46
-
PCI Express 2.0 X16-Steckplätze
46
-
-
Jumper
48
-
Integrierte Schalter
50
-
Anschlüsse
51
-
Rücktafelanschlüsse
51
-
Interne Anschlüsse
53
-
-
Erstmaliges Starten
66
-
2.11 Ausschalten des Computers
67
-
Verwenden der OS-Ausschaltfunktion
67
-
Verwenden des Dualfunktions-Stromschalters
67
-
-
-
Kapitel 3 : BIOS-Setup
71
-
Verwalten und Aktualisieren des BIOS
71
-
ASUS Update-Programm
71
-
ASUS EZ Flash 2-Programm
74
-
Erstellen einer Bootfähigen Diskette
75
-
AFUDOS-Programm
76
-
ASUS Crashfree BIOS 3-Programm
78
-
-
BIOS-Setupprogramm
79
-
BIOS-Menübildschirm
80
-
Menüleiste
80
-
Navigationstasten
80
-
Allgemeine Hilfe
81
-
Bildlaufleiste
81
-
Konfigurationsfelder
81
-
Menüelemente
81
-
Pop-Up-Fenster
81
-
Untermenüelemente
81
-
Language [English]
82
-
Legacy Diskette a [1.44M, 3.5 In.]
82
-
Main-Menü
82
-
System Date [Day XX/XX/XXXX]
82
-
System Time [XX:XX:XX]
82
-
Sata 1-6
83
-
Storage Configuration
84
-
AHCI Configuration
85
-
System Information
86
-
Ai Overclock Tuner
87
-
-
Ai Tweaker-Menü
87
-
CPU Ratio Setting
88
-
Intel(R) Speedstep (TM) Tech
88
-
BCLK Frequency
88
-
DRAM Frequency
89
-
DRAM Timing Control
89
-
CPU Voltage
91
-
CPU PLL Voltage
91
-
QPI / DRAM Core Voltage
91
-
IOH Voltage
92
-
IOH PCIE Voltage
92
-
ICH Voltage
92
-
ICH PCIE Voltage
92
-
DRAM Bus Voltage
92
-
DRAM DATA REF Voltage on CHA/B/C
93
-
DRAM CTRL REF Voltage on CHA/B/C
93
-
Load-Line Calibration
93
-
CPU Differential Amplitde
93
-
CPU Clock Skew
93
-
CPU Spread Spectrum
94
-
IOH Clock Skew
94
-
PCIE Spread Spectrum
94
-
CPU Configuration
95
-
-
Advanced-Menü
95
-
Chipset
98
-
Onboard Device Configuration
99
-
USB Configuration
100
-
Pcipnp
101
-
ACPI 2.0 Support [Disabled]
102
-
ACPI APIC Support [Enabled]
102
-
Power-Menü
102
-
Repost Video on S3 Resume [No]
102
-
Suspend Mode [Auto]
102
-
APM Configuration
103
-
Hardware Monitor
104
-
Boot Device Priority
106
-
-
Boot-Menü
106
-
Boot Settings Configuration
107
-
Security
108
-
Change User Password
109
-
Clear User Password
109
-
-
ASUS EZ Flash 2
110
-
-
Tools-Menü
110
-
Express Gate [Enabled]
111
-
ASUS O.C. Profile
112
-
Ai Net 2
113
-
Exit-Menü
114
-
Ausführen der Support-DVD
117
-
Drivers-Menü
118
-
Utilities-Menü
119
-
Marvell Raid Utility
120
-
Make Disk-Menü
121
-
Manual-Menü
122
-
ASUS Kontaktdaten
122
-
Weitere Informationen
123
-
-
Installieren eines Betriebssystems
117
-
-
Kapitel 4 : Software-Unterstützung
117
-
Support-DVD-Informationen
117
-
ASUS Mylogo2
125
-
Software-Informationen
125
-
Ai Net 2
127
-
ASUS PC Probe II
128
-
ASUS AI Suite
134
-
ASUS AI Nap
136
-
ASUS Fan Xpert
137
-
ASUS EPU-6 Engine
139
-
ASUS Turbov
143
-
Soundmax ® High Definition Audioprogramm
145
-
Listening Environment Options
149
-
Microphone Options
150
-
-
ASUS Express Gate SSD
151
-
ASUS OC Palm (nur für die OC Palm-Version)
160
-
-
RAID-Definitionen
164
-
Serial ATA-Festplatten Installieren
165
-
Intel ® RAID-Konfigurationen
165
-
Marvell
173
-
-
Erstellen einer RAID-Treiberdiskette
182
-
Erstellen einer RAID-Treiberdiskette ohne Aufrufen des Betriebssystems
182
-
Erstellen einer RAID-Treiberdiskette unter Windows
182
-
-
ATI ® Crossfirex™ Technologie
187
-
Bevor Sie Anfangen
187
-
Voraussetzungen
187
-
Installieren der Gerätetreiber
190
-
Aktivieren der ATI ® Crossfirex™ Technologie
190
-
-
Softwareinformationen
190
-
Installieren von SLI™-Grafikkarten
192
-
NVIDIA ® SLI™ Technologie
192
-
Voraussetzungen
192
-
Installieren der Gerätetreiber
193
-
NVIDIA ® SLI™-Technologie in Windows ® Aktivieren
193
-
-
Advertisement
Related Products
-
Asus P6TD — Deluxe Motherboard — ATX
-
Asus P6TD-DELUXE GREEN
-
Asus P6T DELUXE/OC PALM — Motherboard — ATX
-
Asus P6T7 WS SuperComputer — Motherboard — SSI CEB
-
Asus P6T SE — Motherboard — ATX
-
Asus P6T WS PRO
-
Asus P6T WS Professional — Motherboard — ATX
-
Asus P6T6WS Revolution — Motherboard — ATX
-
Asus SABERTOOTH P67 R3
-
ASUS P6X58DE
Asus Categories
Motherboard
![]()
Laptop
![]()
Desktop
![]()
Monitor
![]()
Network Router
More Asus Manuals
(Ocr-Read Summary of Contents of some pages of the Asus P6T DELUXE V2 Document (Main Content), UPD: 16 July 2023)
-
15, 1 Chapter 1: Product introduction This chapter describes the motherboard features and the new technologies it supports.
… -
37, 2.3.4 Installing the optional fans Install the optional fan only if you are using a passive cooler or a water cooler. Installing the optional fan with an active CPU cooler will interfere with the airow and destabilize the system. 1. Position the fan above the pipe and heatsink assembly. 2. Fit the fan to the grooved edge of the heatsink. 3. Carefully push down the fan until it snugly ts the heatsink, then connect the fan cable. 4. The photo sh…
-
155, ASUS P6T Deluxe V2 4-39 Click to change LaunchBar options (auto-hide, docking position, etc). Click to show the “ASUS Utility” panel (if supported). Click to show “About Express Gate SSD”. Click to open Express Gate SSD Help. Click to bring up power options window to boot to OS, restart or power down. This window is also shown when you press Ctrl-Alt-Del on the keyboard. Power off Enter OS Cancel and return to Express Gate SSD Restart Check to save user prole Op…
-
165, Asus P6T DELUXE V2 ASUS P6T Deluxe V2 4-49 Creating a RAID 1 set (mirrored) To create a RAID 1 set: 1. From the utility main menu, select 1. Create RAID Volume and press <Enter>. The following screen appears. 2. Enter a name for the RAID 1 set and press <Enter>. 3. When the RAID Level item is highlighted, press the up/down arrow key to select RAID 1(Mirror) , then press <Enter>. 4. When the Capacity item is highlighted, enter the RAID volume capacity that you w…
-
14, xiv P6T Deluxe V2 specications summary *Specications are subject to change without notice. Back Panel I/O Ports 1 x PS/2 Keyboard / Mouse combo port 1 x S/PDIF Out (Coaxial + Optical) 1 x External SATA 1 x IEEE1394a 2 x RJ45 ports 8 x USB 2.0/1.1 8-channel Audio I/O Internal I/O Connectors 3 x USB connectors support additional 6 USB ports 1 x Floppy disk drive connector 1 x IDE connect…
-
135, ASUS P6T Deluxe V2 4-19 Other feature buttons Click on right corner of the main window to open the monitor window. Click on right corner of the expanded window to switch the temperature from degrees Centigrade to degrees Fahrenheit. Displays the CPU/ system temperature, CPU/memory/PCIE voltage, and CPU/ chassis fan speed Displays the FSB/CPU frequency
… -
102, 3-32 Chapter 3: BIOS setup 3.6 Power menu The Power menu items allow you to change the settings for the Advanced Power Management (APM). Select an item then press <Enter> to display the conguration options. 3.6.1 Suspend Mode [Auto] Allows you to select the Advanced Conguration and Power Interface (ACPI) state to be used for system suspend. Conguration options: [S1 (POS) Only] [S3 Only] [Auto] 3.6.2 Repost Video on S3 Resume [No] Determines whether to invoke VGA BIOS POST…
-
49, • In single VGA card mode, use rst the PCIe 2.0 x16_1 slot (blue) for a PCI Express x16 graphics card to get better performance. • In CrossFireX™ or SLI™ mode, use the PCIe 2.0 x16_1 (blue) and PCIe 2.0 x16_2 (white) slots for PCI Express x16 graphics cards to get better performance. • Use the three PCIe 2.0 x16 slots for 3-Way CrossFireX™ mode. • If you install a PCIe x16 graphics card on to the PCIe x16_1 slot, a PCIe device wi…
-
150, 4-34 Chapter 4: Software support Microphone options Click the Microphone tab allows you to optimize your microphone input settings. Enhanced Microphone Features Voice recording Enables Noise Filter function. Detects repetitive and stationary noises like computer fans, air conditioners, and other background noises then eliminates it in the incoming sudio stream while recording. You can enable it for a better recording quality. Directional Array Receives only the …
-
19, ASUS P6T Deluxe V2 1-3 1.3.2 ASUS Unique features ASUS TurboV Feel the adrenaline rush of real-time OC—now a reality with the ASUS TurboV. This extreme OC tool lets you set new ambitions on the OC stage with an advanced and easy-to-use interface—allowing you to overclock without exiting or rebooting the OS. With micro adjustments of the CPU PLL, NB, NB-PCIe, and DRAM voltages in 0.02v intervals, there are no limits—only extreme results to b…
-
80, 3-10 Chapter 3: BIOS setup 3.2.2 Menu bar The menu bar on top of the screen has the following main items: Main For changing the basic system conguration Ai Tweaker For changing the overclocking settings Advanced For changing the advanced system settings Power For changing the advanced power management (APM) conguration Boot For changing the system boot conguration Tools For conguring options for special functions Exit For selecting the exit options and loa…
-
101, ASUS P6T Deluxe V2 3-31 3.5.5 PCIPnP The PCIPnP menu items allow you to change the advanced settings for PCI/PnP devices. Plug And Play O/S [No] When set to [NO], BIOS congures all the devices in the system. When set to [YES] and if you install a Plug and Play operating system, the operating system congures the Plug and Play devices not required for boot. Conguration options: [No] [Yes] Select Screen Select Item +- …
-
48, 2.5.4 PCI slots The PCI slots support cards such as a LAN card, SCSI card, USB card, and other cards that comply with PCI specications. Refer to the gure below for the location of the slot. 2.5.5 PCI Express x4 slot This motherboard supports PCI Express x4 network cards, SCSI cards and other cards that comply with the PCI Express specications. Refer to the gure below for the location of the slot. 2.5.6 PCI Express 2.0 x16 …
-
122, 4-6 Chapter 4: Software support 4.2.5 Manual menu The Manual menu contains a list of supplementary user manuals. Click an item to open the folder of the user manual. Most user manual les are in Portable Document Format (PDF). Install the Adobe ® Acrobat ® Reader from the Utilities menu before opening a user manual le. 4.2.6 ASUS Contact information Click the Contact tab to display the ASUS contact information. You can also nd this …
-
50, 2.6 Jumpers 1. Clear RTC RAM (CLRTC) This jumper allows you to clear the Real Time Clock (RTC) RAM in CMOS. You can clear the CMOS memory of date, time, and system setup parameters by erasing the CMOS RTC RAM data. The onboard button cell battery powers the RAM data in CMOS, which include system setup information such as system passwords. Except when clearing the RTC RAM, never remove the cap on CLRTC jumper default position. Removing the cap…
-
178, 5-6 Chapter 5: Multiple GPU technology support 5.4 NVIDIA ® SLI™ Technology The motherboard supports the NVIDIA ® SLI™ (Scalable Link Interface) technology that allows you to install up to two identical PCI Express™ x16 graphics cards. Follow the installation procedures in this section. 5.4.1 Requirements • In SLI mode, you should have two identical SLI-ready graphics cards that are NVIDIA …
-
123, Asus P6T DELUXE V2 ASUS P6T Deluxe V2 4-7 ASUS TurboV ASUS EPU 6-Engine ASUS Express Gate SSD Browse this DVD Displays the support DVD contents in graphical format. 4.2.7 Other information The icons on the top right corner of the screen give additional information on the motherboard and the contents of the support DVD. Click an icon to display the specied information. Motherboard Info Displays the general speci�…
-
16, Asus P6T DELUXE V2 ASUS P6T Deluxe V2 Chapter summary 1 1.1 Welcome! ………………………………………………………………………….. 1-1 1.2 Package contents ………………………………………………………………. 1-1 1.3 Special features …………………………………………………………………. 1-2
… -
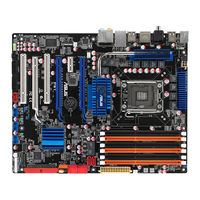
29, Asus P6T DELUXE V2 2.2.2 Layout contents Connectors/Jumpers/Slots Page 1. ATX power connectors (24-pin EATXPWR, 8-pin EATX12V) 2-36 2. LGA1366 CPU Socket 2-6 3. CPU, chassis, and power fan connectors (4-pin CPU_FAN, 3-pin CHA_FAN1-3, 3-pin PWR_FAN) 2-34 4. DDR3 DIMM slots 2-12 5. CPU / DRAM Bus / QPI DRAM overvoltage settings (3-pin OV_CPU; 3-pin OV_DRAM_BUS; 3-pin OV_QPI_DRAM) 2-25 6. IDE connector (40-1 pin PRI_EIDE) 2-30 7. ICH10R Serial ATA connectors [red] (7-pin SA…
- About
- Blog
- Projects
- Help
-
Donate
Donate icon
An illustration of a heart shape - Contact
- Jobs
- Volunteer
- People
Bookreader Item Preview
texts
ASUS P6T Deluxe V2 Manual
- Addeddate
- 2022-01-07 07:30:10
- Identifier
- manuallib-id-2593931
- Identifier-ark
- ark:/13960/s20b44ghw3b
- Ocr
- tesseract 5.0.0-1-g862e
- Ocr_autonomous
- true
- Ocr_detected_lang
- en
- Ocr_detected_lang_conf
- 1.0000
- Ocr_detected_script
- Latin
- Ocr_detected_script_conf
- 0.9998
- Ocr_module_version
- 0.0.14
- Ocr_parameters
- -l eng+nor+Latin
- Ppi
- 600
comment
Reviews
There are no reviews yet. Be the first one to
write a review.
26
Views
DOWNLOAD OPTIONS
Uploaded by
chris85
on
SIMILAR ITEMS (based on metadata)