Akai MPK MINI Quick Start Guide

BOX CONTENTS
- MPK mini
- Software CD
- USB-mini cable
- Safety Instructions & Warranty Information
SOFTWARE CD
PC Users: To install the Akai Professional MPK mini Editor, open the contents of the disc, double-click Setup.exe, and follow the on-screen instructions. To open the editor, connect the MPK mini to your computer with a standard USB-mini cable (included) then double-click MPK mini Editor.exe.
Mac Users: Drag the contents of the disc to an appropriate location on your hard drive. To open the editor, connect the MPK mini to your computer with a standard USB-mini cable (included) then double-click the MPK mini Editor.
Note: Always connect the MPK mini to your computer before opening the editor.
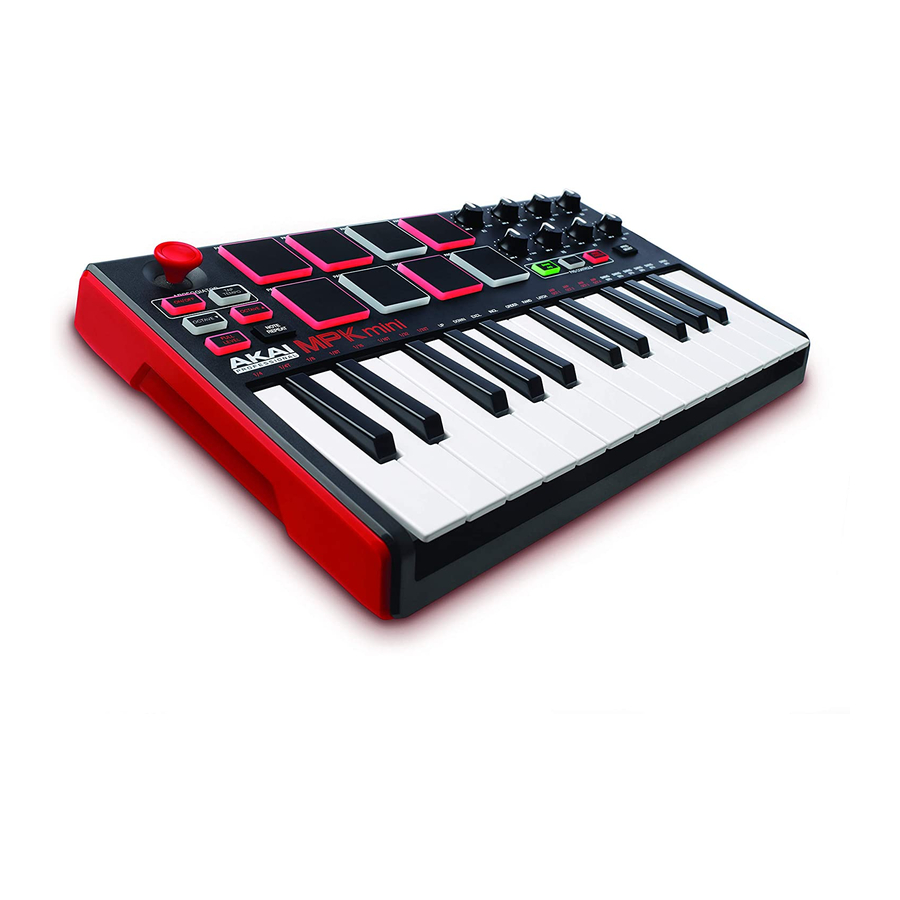
TOP PANEL OVERVIEW

- USB CONNECTION – Plug a standard USB-mini cable into this outlet and into the USB port of your computer. The computer’s USB port will provide power to the MPK mini.
- 8 VELOCITY-SENSITIVE PADS – The pads can be used to trigger drum hits or other samples in your software. The pads are velocity-sensitive, which makes them very responsive and intuitive to play.
- 8 ASSIGNABLE KNOBS – Each 270-degree knob can be used to send continuous control data to a desktop audio workstation or external MIDI device.
- PAD BANK 1 / 2 – When either of these buttons are active, the MPK mini’s pads will send MIDI Note messages (from Pad Bank 1 or 2). These messages are assignable in the included software editor.
- PROG CHNG – When this button is active, the MPK mini’s pads will send Program Change messages. These messages are assignable in the included software editor.
- CC – When this button is active, the MPK mini’s pads will send out MIDI Control Change messages. These messages are assignable in the included software editor.
- KEYBOARD – This 25-note keyboard is velocity-sensitive and, in conjunction with the OCTAVE –/+ buttons, can control a nine-octave range. The ARP ON / OFF and PROGRAM buttons allow some of its keys to access additional commands (see below).
- ARP ON / OFF – Press this button to turn the Arpeggiator on or off. Pressing it during a latched arpeggio will stop the arpeggio. Hold down ARP ON / OFF and press a labeled key on the MPK mini’s KEYBOARD to enter new settings for the Arpeggiator (see EDITING PRESETS for more information on these settings):
- Time Division – 1/4 note, 1/4 note triplet («1/4 T»), 1/8 note, 1/8 note triplet («1/8 T»), 1/16 note, 1/16 note triplet («1/16 T»), 1/32 note, or 1/32 note triplet («1/32 T»)
- Arpeggiator Mode – Up, Down, Inclusive, Exclusive, Order, or Random
- Arpeggiator Octave – ARP OCT 0, 1, 2, or 3
- TAP TEMPO – Tap this button at the desired rate to determine the tempo of the Arpeggiator. The minimum number of taps required is programmable in the software. (Note: This button is disabled if the Arpeggiator is synced to an external clock.)
- SUSTAIN – When the Arpeggiator is off, you can hold down the SUSTAIN button to sustain the currently held notes on the KEYBOARD, which will stop when SUSTAIN is released.
When the Arpeggiator is on, this button will «latch» the Arpeggiator. Holding this button down then pressing a combination of keys arpeggiate those notes continuously, even if you release the keys. Releasing the SUSTAIN button will stop the arpeggios. There are a couple of ways to use this function:- While holding down the keys, you can add more notes to the arpeggio by pressing down additional keys.
- If you press the keys, release them, and then press down a new combination of notes, the Arpeggiator will memorize and arpeggiate the new notes.
Note: When you check the «Arp Latch» option in the included MPK mini Editor, the SUSTAIN button will «latch» itself each time it is pressed if the Arpeggiator is on. This way, an arpeggio can be sustained by pressing the SUSTAIN button once and releasing it (instead of holding it down continuously).
- PROGRAM – Hold down this button and press one of the KEYBOARD keys labeled PROG 1, 2, 3 or 4 to recall the preset of the same number.
- OCTAVE –/+ – These buttons can be used to shift the KEYBOARD’s range up or down four octaves in either direction. When you are higher or lower than the center octave, the corresponding OCTAVE button will light. Press both OCTAVE buttons simultaneously to reset the KEYBOARD to the default center octave.
SOFTWARE EDITOR
OPENING THE EDITOR
Always connect the MPK mini to your computer before opening the software editor.
After opening the software editor, you will need to select the MPK mini from the drop-down menu on the opening screen and click «Done.»
- For Mac or Windows Vista users, it will be listed as Akai MPK mini.
- For Windows XP users, it will be listed as USB Audio Device. (If you have other USB audio devices connected to your computer, which may have identical names, you may need to try selecting each one until the MPK mini is recognized.)
The first time you use the software editor, even if the correct device is already shown in the drop-down menu, you still need to click on the menu and select the device. (You will also need to do this if you move your files to a new location.) In future sessions, though, you can simply click «Done» if the correct device is shown in this window.
PRESETS

LOADING & SAVING PRESETS
The editor lets you edit, save, or load presets for the MPK mini on your computer.
- GET PRESET – Click a button to select the number of a preset currently on the MPK mini (1-4). When you select it, its settings will be shown on the software interface.
- PRESET # – Click on this field to select the number that the currently shown preset will use if you upload it to the MPK mini (by clicking UPLOAD).
- UPLOAD – Click this button to send the currently shown preset to the MPK mini. The number of this preset is determined by the PRESET # field.
- SAVE PRESET – Click this button to save the currently shown preset to your computer.
- LOAD PRESET – Click this button to load a saved preset from your computer. Once it loads, you will see its settings in the software interface.
Note: When you save a preset, the current PRESET # will be saved with it. When you load that preset later, the PRESET # field will be updated with that number. If you want to change the preset number before uploading it to the MPK mini, simply select a new PRESET # before clicking UPLOAD.
TO COPY A PRESET:
- Load the preset you want to copy from the MPK mini by clicking the GET PRESET button.
- Set the preset you want to copy it to on the MPK mini by clicking PRESET # field and selecting it.
- Click UPLOAD to send the copied preset to the MPK mini.
EDITING PRESETS
This section outlines the editable items for each preset. Items #7-10 are editable for every pad. Items #11-13 are editable for every knob.
- NOTE DISPLAY TYPE – Click this to change how the MIDI Note Numbers are displayed in the editor.
- NOTE # – Click on this field and drag up or down with the mouse (or use your computer keyboard’s or keys) to change the MIDI Note Number the pad will send.
- PC # – Click on this field and drag up or down with the mouse (or use your computer keyboard’s or keys) to change the MIDI Program Change number the pad will send.
- CC # (PAD) – Click on this field and drag up or down with the mouse (or use your computer keyboard’s or keys) to change the MIDI Control Change number the pad will send.
- PAD BEHAVIOR – Click this button to select whether the MPK mini’s pads will function as a «Momentary» or «Toggle» switch.
- CC # (KNOB) – Click on this field and drag up or down with the mouse (or use your computer keyboard’s or keys) to change the MIDI Control Change number the knob will send.
- LOW VALUE – Click on this field and drag up or down with the mouse (or use your computer keyboard’s or keys) to change the lowest possible value the knob will send.
- HI VALUE – Click on this field and drag up or down with the mouse (or use your computer keyboard’s or keys) to change the highest possible value the knob will send.
- PAD MIDI CHANNEL – Click this field to select the number of the MIDI channel which the pads will use to transmit MIDI messages while using this preset.
- KEY + KNOBS MIDI CHANNEL – Click this field to select the number of the MIDI channel which the keyboard and knobs will use to transmit MIDI messages while using this preset.
- TRANSPOSITION – Click on this field and drag up or down with the mouse (or use your computer keyboard’s or keys) to change the transposition of the MPK mini’s KEYBOARD. You can transpose it up to 12 semitones in either direction.
- OCTAVE – Click this field to select the default octave for the preset.
- ARP OCTAVE – Click this field to select the number of octaves (0-3) that an arpeggio will span. If this number is larger than zero, after the first arpeggio in its original octave, subsequent arpeggios will sound in increasingly higher octaves. After sounding at the highest octave (assigned here), the process will repeat from the original octave.
- ARP ENABLE – Click this button to enable or disable the Arpeggiator. The button is red when the Arpeggiator is enabled.
- ARP MODE – Click this field to select the mode for the Arpeggiator.
- Up – Notes arpeggiate from the lowest note up to the highest note.
- Down – Notes arpeggiate from the highest note down to the lowest note.
- Inclusive – Notes arpeggiate from the lowest to the highest note and back down. Lowest and highest notes are retriggered when the arpeggio changes direction.
- Exclusive – Notes arpeggiate from the lowest to the highest note and back down. Lowest and highest notes are not retriggered when the arpeggio changes direction.
- Random – Plays the held notes in random selection.
- Order – Notes will be repeated in the same order in which their keys were pressed.
- ARP TIME DIVISION – Click this field to select the time division, which determines how often the Arpeggiator will play a note. The smaller the value, the faster the arpeggio.
- ARP CLOCK – Click this field to select whether the Arpeggiator will follow the MPK mini’s internal clock or an external clock. (Note: When synced to an external clock, the MPK mini’s TAP TEMPO button will be disabled.)
- ARP LATCH – Click this button to enable or disable latching for the Arpeggiator. When this button is red, latching is enabled, which means notes will continue to arpeggiate even after the key is no longer being pressed. (Press the ARP ON / OFF button to stop the arpeggio.) When latching is disabled, notes will only arpeggiate when their keys are held down.
- TAP TEMPO TAPS – Click this field to select the minimum number of taps (of the TAP TEMPO button) required to detect and enter a new tempo for the Arpeggiator.
- TEMPO – Click on this field and drag up or down with the mouse (or use your computer keyboard’s
 or keys) to change the current tempo for the Arpeggiator.
 or
or  keys) to change the current tempo for the Arpeggiator.
 MIDI IMPLEMENTATION CHART
| Manufacturer: Akai Professional Model: MPK mini Version: 1.0 Date: 2010.08.26 | ||
| Transmit/Export | Recognize/Import | |
|
||
| MIDI channels | 1-16 | 1-16 |
| Note numbers | 0-127 | 0-127 |
| Program change | 0-127 | 0-127 |
| Bank Select response? (Yes/No) If yes, list banks utilized in remarks column | No | No |
| Modes supported: Mode 1: Omni-On, Poly (Yes/No) Mode 2: Omni-On, Mono (Yes/No) Mode 3: Omni-Off, Poly (Yes/No) Mode 4: Omni-Off, Mono (Yes/No) Multi Mode (Yes/No) |
No | No |
| Note-On Velocity (Yes/No) | Yes | No |
| Note-Off Velocity (Yes/No) | No | No |
| Channel Aftertouch (Yes/No) | No | No |
| Poly (Key) Aftertouch (Yes/No) | No | No |
| Pitch Bend (Yes/No) | No | No |
| Active Sensing (Yes/No) | No | No |
| System Reset (Yes/No) | No | No |
| Tune Request (Yes/No) | No | No |
| Universal System Exclusive: Sample Dump Standard (Yes/No) Device Inquiry (Yes/No) File Dump (Yes/No) MIDI Tuning (Yes/No) Master Volume (Yes/No) Master Balance (Yes/No) Notation Information (Yes/No) Turn GM1 System On (Yes/No) Turn GM2 System On (Yes/No) Turn GM System Off (Yes/No) DLS-1 (Yes/No) File Reference (Yes/No) Controller Destination (Yes/No) Key-based Instrument Ctrl (Yes/No) Master Fine/Coarse Tune (Yes/No) Other Universal System Exclusive |
No | No |
| Manufacturer or Non-Commercial System Exclusive | Yes | Yes |
| NRPNs (Yes/No) | No | No |
| RPN 00 (Pitch Bend Sensitivity) (Yes/No) RPN 01 (Channel Fine Tune) (Yes/No) RPN 02 (Channel Coarse Tune) (Yes/No) RPN 03 (Tuning Program Select) (Yes/No) RPN 04 (Tuning Bank Select) (Yes/No) RPN 05 (Modulation Depth Range) (Yes/No) |
No | No |
|
||
| MIDI Clock (Yes/No) | No | Yes |
| Song Position Pointer (Yes/No) | No | Yes |
| Song Select (Yes/No) | No | No |
| Start (Yes/No) Continue (Yes/No) Stop (Yes/No) |
No | Yes |
| MIDI Time Code (Yes/No) | No | No |
| MIDI Machine Control (Yes/No) | No | No |
| MIDI Show Control (Yes/No) If yes, MSC Level supported |
No | No |
|
||
| General MIDI compatible? (Level(s)/No) Is GM default power-up mode? (Level/No) |
No | No |
| DLS compatible? (Levels(s)/No) (DLS File Type(s)/No) |
No | No |
| Standard MIDI Files (Type(s)/No) | No | No |
| XMF Files (Type(s)/No) | No | No |
| SP-MIDI compatible? (Yes/No) | No | No |
SPECIFICATIONS
| Number of presets: | 4 |
| MIDI output channels over USB: | 16 |
| Note keys: | 25 (velocity-sensitive) |
| Drum pads: | 8 (velocity-sensitive) |
| Knobs: | 8 |
| Inputs/outputs: | 1 mini-USB port |
| Power: | < 100 mA, 5V DC via USB |
| Dimensions (W x D x H): | 12″ x 7″ x 1.7″ (306 mm x 180 mm x 43 mm) |
| Weight: | 1.55 lbs. (0.7 kg) |

WWW.AKAIPRO.COM
Videos
AKAI MPK MINI TUTORIAL AND REVIEW VIDEO
Documents / Resources
References
- Music Production Hardware & Software | Akai Pro
Download manual
Here you can download full pdf version of manual, it may contain additional safety instructions, warranty information, FCC rules, etc.
Download Akai MPK MINI Quick Start Guide
перейти к содержанию
AKAI PROFESSIONAL MPKMINIMK3 MPK Mini MKIII 25-клавишный MIDI-контроллер

Технические спецификации
| Клавиши нот | 25 чувствительных к скорости нажатия клавиш; 10-октавный диапазон с кнопками октавы вверх/вниз |
| Салфетки | 8 назначаемых пэдов с подсветкой, чувствительных к силе нажатия и силе нажатия; 2 банка |
| Knobs | 8 назначаемых ручек на 360º |
| XY-контроллер | 1 настраиваемый мини-джойстик с 3 режимами |
| Входы / Выходы | USB-порт 1
1 1/4″ (6.35 мм) вход TS для педали сустейна |
| Питания | питание от шины USB |
| Габаритные размеры: (ширина x глубина x высота) | 12.5 «х» х 7.13 1.75 «
31.8 см х 18.1 см х 4.4 см |
| Вес | 1.65 кг.
0.75 кг |
Товарные знаки и лицензии
Akai Professional является товарным знаком Music Brands, Inc., зарегистрированным в США и других странах. Все остальные названия продуктов, названия компаний, товарные знаки или торговые наименования принадлежат их соответствующим владельцам.
Краткое руководство пользователя
Комплектация
- МПК мини
- USB-кабель
- Карта загрузки программного обеспечения
- Руководство по безопасности и гарантии
Поддержка
- Для получения полного руководства пользователя и последней информации об этом продукте посетите akaipro.com.
- Для получения дополнительной поддержки по продукту посетите akaipro.com/support.
Установка
Регистрация и загрузка программного обеспечения
- Мы рекомендуем зарегистрировать ваш продукт, чтобы вы могли получить бесплатное программное обеспечение, доступ к учебным пособиям и дополнительную поддержку. Перейдите по ссылке на прилагаемой карте загрузки программного обеспечения, а затем следуйте инструкциям для регистрации.
- Если вы хотите настроить MIDI-конфигурацию вашего MPK mini, для загрузки также доступен MPK mini Editor.
Настройка MPK mini с вашей DAW
Чтобы выбрать MPK mini в качестве контроллера для цифровой звуковой рабочей станции (DAW):
- Подключите MPK mini к компьютеру с помощью стандартного USB-кабеля. Если вы подключаете MPK mini к концентратору USB, убедитесь, что это концентратор с питанием.
- Откройте свою DAW.
- Откройте «Настройки», «Параметры» или «Настройка устройства» DAW, выберите MPK mini в качестве аппаратного контроллера, а затем закройте это окно. Теперь ваш MPK mini может обмениваться данными с вашим программным обеспечением.
Особенности

- USB-порт: Используйте стандартный USB-кабель для подключения этого USB-порта к USB-порту на вашем компьютере.
- Вход педали сустейна: Подключите к этому входу дополнительную 1/4-дюймовую педаль сустейна TS.
- Клавиатура: Эта 25-клавишная клавиатура чувствительна к силе нажатия и в сочетании с кнопками Octave Down/Up может управлять десятиоктавным диапазоном.
- Дисплей: На этом экране показаны настройки MPK mini. Экран по умолчанию показывает текущую выбранную программу и BPM.
- Октава вниз/вверх: Используйте эти кнопки для смещения диапазона клавиатуры вверх или вниз (до четырех октав в любом направлении). Нажмите обе кнопки Octave одновременно, чтобы сбросить клавиатуру на центральную октаву по умолчанию.
- Арпеджиатор вкл/выкл: Нажмите эту кнопку, чтобы включить или выключить арпеджиатор (нажатие ее во время фиксированного арпеджио остановит арпеджио). Чтобы ввести новые настройки для арпеджиатора, удерживайте кнопку включения/выключения арпеджиатора, поворачивая соответствующие регуляторы или нажимая соответствующие клавиши.
- Нажмите Темп: Нажимайте эту кнопку с нужной скоростью, чтобы определить темп MPK mini (для функции арпеджиатора и повторения нот). Примечание. Эта кнопка отключена, если для параметра синхронизации MPK mini установлено значение EXT (внешний).
- XY-контроллер: По умолчанию перемещение этого 4-осевого джойстика влево и вправо изменяет высоту звука клавиатуры, а перемещение вверх и вниз применяет эффект колеса модуляции. При перемещении джойстика на дисплее будет отображаться обновленное значение (000–127) редактируемого параметра.
- колодки: Пэды могут использоваться для запуска ударов по барабанам или других звуков.ampфайлы в вашем программном обеспечении. Каждый раз, когда вы нажимаете на пэд, на дисплее отображается уровень силы нажатия (000–127).
- Банк А/Б: Нажмите кнопку Bank A/B, чтобы переключить пэды MPK mini между банком пэдов A (красный) или банком пэдов B (зеленый).
- CC: Когда эта кнопка активна, пэды MPK mini будут отправлять сообщения MIDI CC вместо сообщений MIDI Note On.
- Изменение программы: Когда эта кнопка активна, пэды MPK mini будут отправлять сообщения MIDI Program Change вместо сообщений MIDI Note On.
- Полный уровень: Нажмите эту кнопку, чтобы активировать или деактивировать режим полного уровня, в котором пэды всегда играют с максимальной скоростью (127), независимо от силы или мягкости удара по ним.
- Примечание Повторить: Нажмите эту кнопку, чтобы активировать или деактивировать режим повторения нот. Когда функция повтора ноты активирована, нажатие пэда автоматически перезапустит его с текущими настройками темпа и временного разделения. Чтобы ввести новые настройки функции повторения ноты, удерживайте кнопку повтора ноты, поворачивая соответствующие ручки или нажимая соответствующие клавиши.
- Назначаемые ручки: Каждая ручка 360º отправляет сообщение MIDI CC. Ручки также можно использовать для редактирования настроек арпеджиатора или повторения нот (при нажатой и удерживаемой соответствующей кнопке).
- Выбор программы: Удерживая эту кнопку, нажмите один из пэдов, чтобы выбрать соответствующий номер программы (1–8). Программа – это набор настроек, хранящихся в виде file на вашем МПК мини. Программы можно создавать, а затем отправлять в MPK mini с помощью загружаемого редактора MPK mini.
Документы / Ресурсы
Рекомендации
-
Contents
-
Table of Contents
-
Bookmarks
Quick Links
QUICKSTART GUIDE
ENGLISH
WWW.AKAIPRO.COM
Related Manuals for Akai MPKMINI
Summary of Contents for Akai MPKMINI
-
Page 1
QUICKSTART GUIDE ENGLISH WWW.AKAIPRO.COM… -
Page 3: Box Contents
Safety Instructions & Warranty Information SOFTWARE CD PC Users: To install the Akai Professional MPK mini Editor, open the contents of the disc, double-click Setup.exe, and follow the on-screen instructions. To open the editor, connect the MPK mini to your computer with a standard USB-mini cable (included) then double-click MPK mini Editor.exe.
-
Page 4
ARP ON / OFF – Press this button to turn the Arpeggiator on or off. Pressing it during a latched arpeggio will stop the arpeggio. Hold down ARP ON / OFF and press a labeled key on the MPK mini’s KEYBOARD to enter new settings for the Arpeggiator (see EDITING PRESETS for more information on these settings): •… -
Page 5: Software Editor
After opening the software editor, you will need to select the MPK mini from the drop-down menu on the opening screen and click «Done.» For Mac or Windows Vista users, it will be listed as Akai MPK mini. For Windows XP users, it will be listed as USB Audio Device. (If you have other USB audio devices connected to your computer, which may have identical names, you may need to try selecting each one until the MPK mini is recognized.)
-
Page 6: Editing Presets
EDITING PRESETS This section outlines the editable items for each preset. Items #7-10 are editable for every pad. Items #11-13 are editable for every knob. NOTE DISPLAY TYPE – Click this to change how the MIDI Note Numbers are displayed in the editor. NOTE # –…
-
Page 7: Midi Implementation Chart
MIDI IMPLEMENTATION CHART Manufacturer: Akai Professional Model: MPK mini Version: 1.0 Date: 2010.08.26 Transmit/Export Recognize/Import Remarks 1. Basic Information MIDI channels 1-16 1-16 Note numbers 0-127 0-127 Program change 0-127 0-127 Bank Select response? (Yes/No) If yes, list banks utilized in remarks column…
-
Page 8: Specifications
SPECIFICATIONS Number of presets: MIDI output channels over USB: Note keys: 25 (velocity-sensitive) Drum pads: 8 (velocity-sensitive) Knobs: Inputs/outputs: 1 mini-USB port Power: < 100 mA, 5V DC via USB Dimensions (W x D x H): 12″ x 7″ x 1.7″ (306 mm x 180 mm x 43 mm) Weight: 1.55 lbs.
-
Page 10
WWW.AKAIPRO.COM RevA…
This manual is also suitable for:
Mpk mini

BOX CONTENTS
|
y |
MPK mini |
y |
Software CD |
|
y |
USB-mini cable |
y |
Safety Instructions & Warranty Information |
SOFTWARE CD
PC Users: To install the Akai Professional MPK mini Editor, open the contents of the disc, double-click Setup.exe, and follow the on-screen instructions. To open the editor, connect the MPK mini to your computer with a standard USB-mini cable (included) then double-click MPK mini Editor.exe.
Mac Users: Drag the contents of the disc to an appropriate location on your hard drive. To open the editor, connect the MPK mini to your computer with a standard USB-mini cable (included) then double-click the
MPK mini Editor.
Note: Always connect the MPK mini to your computer before opening the editor.
TOP PANEL OVERVIEW
|
2 |
2 |
2 |
2 |
1 |
||||
|
3 |
3 |
3 |
3 |
|||||
|
2 |
2 |
2 |
2 |
|||||
|
3 |
3 |
3 |
3 |


 7
7 


1.USB CONNECTION – Plug a standard USB-mini cable into this outlet and into the USB port of your computer. The computer’s USB port will provide power to the MPK mini.
2.8 VELOCITY-SENSITIVE PADS – The pads can be used to trigger drum hits or other samples in your software. The pads are velocity-sensitive, which makes them very responsive and intuitive to play.
3.8 ASSIGNABLE KNOBS – Each 270-degree knob can be used to send continuous control data to a desktop audio workstation or external MIDI device.
4.PAD BANK 1 / 2 – When either of these buttons are active, the MPK mini’s pads will send MIDI Note messages (from Pad Bank 1 or 2). These messages are assignable in the included software editor.
5.PROG CHNG – When this button is active, the MPK mini’s pads will send Program Change messages. These messages are assignable in the included software editor.
6.CC – When this button is active, the MPK mini’s pads will send out MIDI Control Change messages. These messages are assignable in the included software editor.
7.KEYBOARD – This 25-note keyboard is velocity-sensitive and, in conjunction with the OCTAVE –/+ buttons, can control a nine-octave range. The ARP ON / OFF and PROGRAM buttons allow some of its keys to access additional commands (see below).
1
- Manuals
- Brands
- Akai
- MPK MINI
- User Manual
![]()
WWW.AKAIPRO.COM
QUICKSTART GUIDE
ENGLISH