Посмотреть инструкция для Philips Lumea Precision Plus SC2003 бесплатно. Руководство относится к категории световые эпиляторы, 5 человек(а) дали ему среднюю оценку 8. Руководство доступно на следующих языках: русский, английский. У вас есть вопрос о Philips Lumea Precision Plus SC2003 или вам нужна помощь? Задайте свой вопрос здесь
Не можете найти ответ на свой вопрос в руководстве? Вы можете найти ответ на свой вопрос ниже, в разделе часто задаваемых вопросов о Philips Lumea Precision Plus SC2003.
Инструкция Philips Lumea Precision Plus SC2003 доступно в русский?
Да, руководствоPhilips Lumea Precision Plus SC2003 доступно врусский .
Не нашли свой вопрос? Задайте свой вопрос здесь
-
Contents
-
Table of Contents
-
Bookmarks
Quick Links
Related Manuals for Philips Lumea precision plus
Summary of Contents for Philips Lumea precision plus
-
Page 3: General Description
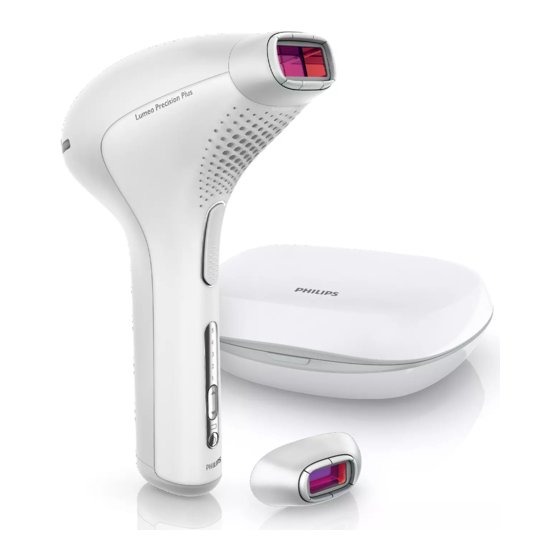
General description Light exit window with integrated UV filter Attachments 2a — F acial attachment: with additional light filter, for use on face below the cheek bone and on other sensitive areas 2b — Body attachment: suitable for all body areas below the neck 2c — B ikini area attachment: with special filter for treating the bikini area (SC2008 only) Metallic frame inside the attachment Safety system (safety ring with contact switches) Flash button…
-
Page 4: Before Using
48 hr. Guide does not substitute the user manual. To ensure that Philips Lumea Precision Plus hair removal system is suitable for you and safe for you to use, read the user manual carefully before first use. Before you use Philips Lumea Precision Plus, perform a skin test: Choose a hair-free area close to the area to be treated.
-
Page 5: Recommended Light Intensities
Recommended light intensities table Consult the table on the following page to determine which light intensities are most suitable for your skin and body hair colour and check if this method is suitable for you. The method is more effective at higher intensities; however, you should reduce the light intensity if you experience any pain or discomfort.
-
Page 6: Using
Preparing for use Charge the appliance. Shave the areas you intend to treat. Using Check the attachments and light exit window for any dirt, hair or fibres. If there is any contamination, clean it with the cloth supplied. Choose the right attachment — Body attachment The body attachment can be used to treat unwanted body hair on all body areas below the neck, especially…
-
Page 7
— Bikini area attachment (SC2008 only) T he bikini area attachment has a special filter for treating the bikini area. The attachment is optimised for effective hair reduction in the bikini area. It has been specifically designed to remove the coarser hairs in this area. You can also use the bikini area attachment on the underarms. -
Page 8
Press the flash button to release a flash. Now you have 2 options to release the next flash: A K eep the flash button pressed. The appliance releases one flash after another as long as the safety ring is in full contact with the skin. Immediately after the appliance has flashed, slide the appliance to the next area. Make sure the safety ring is fully pressed onto the skin. -
Page 9: After Treatment
Take a white eye pencil and draw a line on your leg. Start at any point of your leg and draw a straight line. Draw additional lines at a distance of 3cm from the first line if you use the appliance horizontally or at a distance of 1cm if you use the appliance vertically.
-
Page 10: Average Treatment Time/Attachment Per Body
Average treatment time and recommended attachment per body area: Area Approx. treatment time Recommended attachment SC2006 Upper lip/ chin/ sideburns 1 minute Facial attachment Underarms 1 minute Body attachment/facial attachment Bikini line 1 minute Body attachment/facial attachment Entire bikini area 4 minutes Body attachment/facial attachment One lower leg…
-
Page 11
Treatment no. Date Treated body area Next treatment date Used setting Note… -
Page 12
©2013 Koninklijke Philips Electronics N.V. All rights reserved. Document order number: 4222.100.1485.2…
Запрещается использовать прибор на коже, обгоревшей
на солнце, на коже, которая недавно (в последние
48 часов) подверглась воздействию солнечных лучей или
воздействию искусственного загара:
— На безопасность процедуры может повлиять наличие загара
любого типа. Это относится как к естественному солнечному
загару, так и к искусственно приобретенному (при помощи
лосьонов, специального оборудования и пр.). Если вы недавно
загорали или собираетесь загорать/наносить средства для загара,
ознакомьтесь с главой “Подготовка к использованию прибора”,
раздел “Советы по эпиляции при наличии загара”.
Примечание Это не полный список. Если вы не уверены в том, можно ли
вам использовать прибор, проконсультируйтесь с врачом.
Электромагнитные поля (ЭМП)
Данный прибор Philips соответствует стандартам по электромагнитным
полям (ЭМП). При правильном обращении согласно инструкциям,
приведенным в руководстве пользователя, применение прибора
безопасно в соответствии с современными научными данными.
Зарядка
Перед первым использованием прибора или при полной разрядке
аккумуляторов его необходимо зарядить. Полная зарядка
аккумуляторов занимает примерно 1 час 40 минут.
Зарядите прибор, если во время использования индикатор
зарядки загорается оранжевым светом, что указывает на разрядку
аккумулятора.
Полностью заряженный аккумулятор обеспечивает генерацию не
менее 370 вспышек при использовании 5 уровня интенсивности света.
Полностью заряжайте прибор каждые 3-4 месяца, даже если прибор
не используется в течение длительного времени.
Зарядите прибор следующим образом:
1
Выключите прибор.
2
Вставьте маленький штекер в прибор и подключите адаптер к
розетке электросети.
, Мигающий зеленым индикатор зарядки сигнализирует о том, что
прибор заряжается.
, При полной зарядке аккумуляторов индикатор зарядки ровно
горит зеленым.
Примечания.
— Во время зарядки адаптер и прибор нагреваются. Это нормально.
— Во время зарядки прибор использовать нельзя.
— Данный прибор оснащен системой защиты аккумуляторов от
перегрева и не заряжается, если температура в помещении
превышает 40 °C.
Запрещается покрывать прибор и адаптер во время зарядки.
3
После завершения зарядки извлеките адаптер из розетки
электросети и отключите маленький штекер от прибора.
Русский
67
Просмотр
Доступно к просмотру 87 страниц. Рекомендуем вам скачать файл инструкции, поскольку онлайн просмотр документа может сильно отличаться от оригинала.
-
SC2003/00
SC2003/11
User manual
-
EngliSh  6
?аза?ша 31
Русский  59
SC2003/00, SC2003/11
-
6   EngliSh
Table of contents
Introduction  7
Benefits  7
Intense Pulsed Light (IPL) technology for home use  7
Effective hair regrowth prevention for everyday smoothness  7
Gentle treatment, even on sensitive body areas  8
Cordless operation for maximum freedom and flexibility  8
Long-lasting battery for complete body and face treatment  8
No replacement parts needed, no hidden costs  8
How Philips’ Intense Pulsed Light technology works  8
Hair growth  8
Working principle   8
General description  9
Important  9
Danger  9
Warning  9
To prevent damage  10
Caution  10
Keep the following things in mind to avoid compromising the lifetime of
your Philips Lumea Precision Plus:  10
For whom is Philips Lumea Precision Plus NOT suitable?   11
Contraindications  11
Never use the appliance if you are pregnant or breast feeding.  11
Never use the appliance if you have an unsuitable skin and/or hair
colour, i.e.:  11
Never use the appliance if you suffer from any of the diseases listed
below, i.e.:   11
Never use the appliance if you take any of the medications listed below,
i.e.:   12
Never use the appliance on the following areas:   12
Never use the appliance on sunburnt, recently tanned (last 48 hours)
or fake-tanned skin:  12
Electromagnetic fields (EMF)  12
Charging  12
Preparing for use  13
Preparing treatment areas  13
Setting the light intensity  14
Recommended light intensities (1-5)  15
Important  14
Tanning advice  15
Using the appliance  15
Choosing the right attachment  16
First use and skin test  16
Subsequent use  17
Guidelines for treatment  19
Average treatment time  19
Intended treatment areas  19
Using the appliance on the legs  19
Tip: White eye pencil  20
Using the appliance in the bikini area  21
Using the appliance on the underarms  21
Using the appliance on the face (upper lip, chin, sideburns)  21
- 1
- 2
- 3
- 4
- 87
Посмотреть инструкция для Philips Lumea Precision Plus SC2003 бесплатно. Руководство относится к категории Световые эпиляторы, 5 человек(а) дали ему среднюю оценку 8. Руководство доступно на следующих языках: русский, английский. У вас есть вопрос о Philips Lumea Precision Plus SC2003 или вам нужна помощь? Задайте свой вопрос здесь
- Table of content
- English
- Қазақша
- Русский
Главная
| Philips | |
| Lumea Precision Plus SC2003 | SC2003/12 | |
| Световой эпилятор | |
| 8710103580072, 8710103609681 | |
| русский, английский | |
| Руководство пользователя (PDF) |
Свойства
| Уровни интенсивности | 5 |
| Срок службы лампы (вспышек) | 100000 |
| Цвет товара | Grey, White |
Содержимое упаковки
| Сетевой адаптер в комплекте | Да |
| Чехол для хранения | Да |
Энергопитание
| Входящее напряжение сети | 100 — 240 V |
показать больше
Не можете найти ответ на свой вопрос в руководстве? Вы можете найти ответ на свой вопрос ниже, в разделе часто задаваемых вопросов о Philips Lumea Precision Plus SC2003.
Инструкция Philips Lumea Precision Plus SC2003 доступно в русский?
Не нашли свой вопрос? Задайте свой вопрос здесь
(скачивание инструкции бесплатно)
Формат файла: PDF
Доступность: Бесплатно как и все руководства на сайте. Без регистрации и SMS.
Дополнительно: Чтение инструкции онлайн
User manual
SC2003/00
SC2003/11
Страница:
(1 из 92)
навигация

1

2

3

4

5

6

7

8

9

10

11

12

13

14

15

16

17

18

19

20

21

22

23

24

25

26

27

28

29

30

31

32

33

34

35

36

37

38

39

40

41

42

43

44

45

46

47

48

49

50

51

52

53

54

55

56

57

58

59

60

61

62

63

64

65

66

67

68

69

70

71

72

73
74

75

76

77

78

79

80

81

82

83

84

85

86

87

88

89

90

91

92
Инструкции и руководства похожие на PHILIPS SC2003/01 Lumea Precision Plus
Другие инструкции и руководства из категории фотоэпилятор
© 2023 manuals-help.ru, Все права защищены
-
Contents
-
Table of Contents
-
Bookmarks
Quick Links
Related Manuals for Philips Lumea precision plus
Summary of Contents for Philips Lumea precision plus
-
Page 3: General Description
General description Light exit window with integrated UV filter Attachments 2a — F acial attachment: with additional light filter, for use on face below the cheek bone and on other sensitive areas 2b — Body attachment: suitable for all body areas below the neck 2c — B ikini area attachment: with special filter for treating the bikini area (SC2008 only) Metallic frame inside the attachment Safety system (safety ring with contact switches) Flash button…
-
Page 4: Before Using
48 hr. Guide does not substitute the user manual. To ensure that Philips Lumea Precision Plus hair removal system is suitable for you and safe for you to use, read the user manual carefully before first use. Before you use Philips Lumea Precision Plus, perform a skin test: Choose a hair-free area close to the area to be treated.
-
Page 5: Recommended Light Intensities
Recommended light intensities table Consult the table on the following page to determine which light intensities are most suitable for your skin and body hair colour and check if this method is suitable for you. The method is more effective at higher intensities; however, you should reduce the light intensity if you experience any pain or discomfort.
-
Page 6: Using
Preparing for use Charge the appliance. Shave the areas you intend to treat. Using Check the attachments and light exit window for any dirt, hair or fibres. If there is any contamination, clean it with the cloth supplied. Choose the right attachment — Body attachment The body attachment can be used to treat unwanted body hair on all body areas below the neck, especially…
-
Page 7
— Bikini area attachment (SC2008 only) T he bikini area attachment has a special filter for treating the bikini area. The attachment is optimised for effective hair reduction in the bikini area. It has been specifically designed to remove the coarser hairs in this area. You can also use the bikini area attachment on the underarms. -
Page 8
Press the flash button to release a flash. Now you have 2 options to release the next flash: A K eep the flash button pressed. The appliance releases one flash after another as long as the safety ring is in full contact with the skin. Immediately after the appliance has flashed, slide the appliance to the next area. Make sure the safety ring is fully pressed onto the skin. -
Page 9: After Treatment
Take a white eye pencil and draw a line on your leg. Start at any point of your leg and draw a straight line. Draw additional lines at a distance of 3cm from the first line if you use the appliance horizontally or at a distance of 1cm if you use the appliance vertically.
-
Page 10: Average Treatment Time/Attachment Per Body
Average treatment time and recommended attachment per body area: Area Approx. treatment time Recommended attachment SC2006 Upper lip/ chin/ sideburns 1 minute Facial attachment Underarms 1 minute Body attachment/facial attachment Bikini line 1 minute Body attachment/facial attachment Entire bikini area 4 minutes Body attachment/facial attachment One lower leg…
-
Page 11
Treatment no. Date Treated body area Next treatment date Used setting Note… -
Page 12
©2013 Koninklijke Philips Electronics N.V. All rights reserved. Document order number: 4222.100.1485.2…
48 hr.
Примечание Загар любого типа
может повлиять на безопасность
процедуры. После приема солнечных
ванн до использования прибора
должно пройти не менее 48 часов.
Не используйте фотоэпилятор Philips
Lumea Precision Plus на тех участках
кожи, которые подверглись солнечному
ожогу. Для получения дополнительной
информации см. раздел «Советы по
эпиляции при наличии загара»
в руководстве пользователя.
Введение
Поздравляем с покупкой продукции Philips!
— Эпиляция при помощи света — один из наиболее
эффективных методов избавления от нежелательных
волос на теле, обеспечивающий более длительные
результаты. Теперь вы можете использовать
инновационную технологию фотоэпиляции в комфортных
домашних условиях в любое удобное для вас время.
Фотоэпилятор Philips Lumea Precision Plus со специальными
насадками позволяет удалять волосы на всех участках тела,
а также на лице (включая область над верхней губой,
подбородок и виски).
— Фотоэпилятор Philips Lumea Precision Plus воздействует
на волос и волосяной фолликул при помощи световых
импульсов. В результате волосы выпадают естественным
образом, а их дальнейший рост прекращается.
Дополнительную информацию о фотоэпиляторе Philips
Lumea Precision Plus IPL и видеоролики с инструкциями по
его использованию см. на веб-сайте www.philips.com/Lumea.
Также можно зарегистрировать свой продукт на веб-сайте
www.philips.com/welcome.
Перед использованием
Обратите внимание!
1
Прибор подходит не всем. Данное краткое руководство не
заменяет полное руководство пользователя. Чтобы удостовериться,
что фотоэпилятор Philips Lumea Precision Plus подходит вам
и его использование безопасно в вашем случае, перед первым
применением внимательно прочитайте руководство пользователя.
Перед началом использования фотоэпилятора Philips Lumea
Precision Plus проведите пробный сеанс. Для этого выберите
участок без волос рядом с обрабатываемой областью. Нажмите
кнопку подачи светового импульса (см. шаги 3—7 в главе
«Использование»), выбрав минимальную рекомендованную
для вашего цвета кожи интенсивность светового воздействия.
Постепенно увеличивайте интенсивность светового воздействия на
один уровень, не выходя за пределы рекомендованного диапазона.
После пробного использования подождите 24 часа, обратите
внимание на наличие кожных реакций. В случае появления
кожных реакций выберите максимальную интенсивность,
при которой кожные реакции будут отсутствовать.
17