Описание
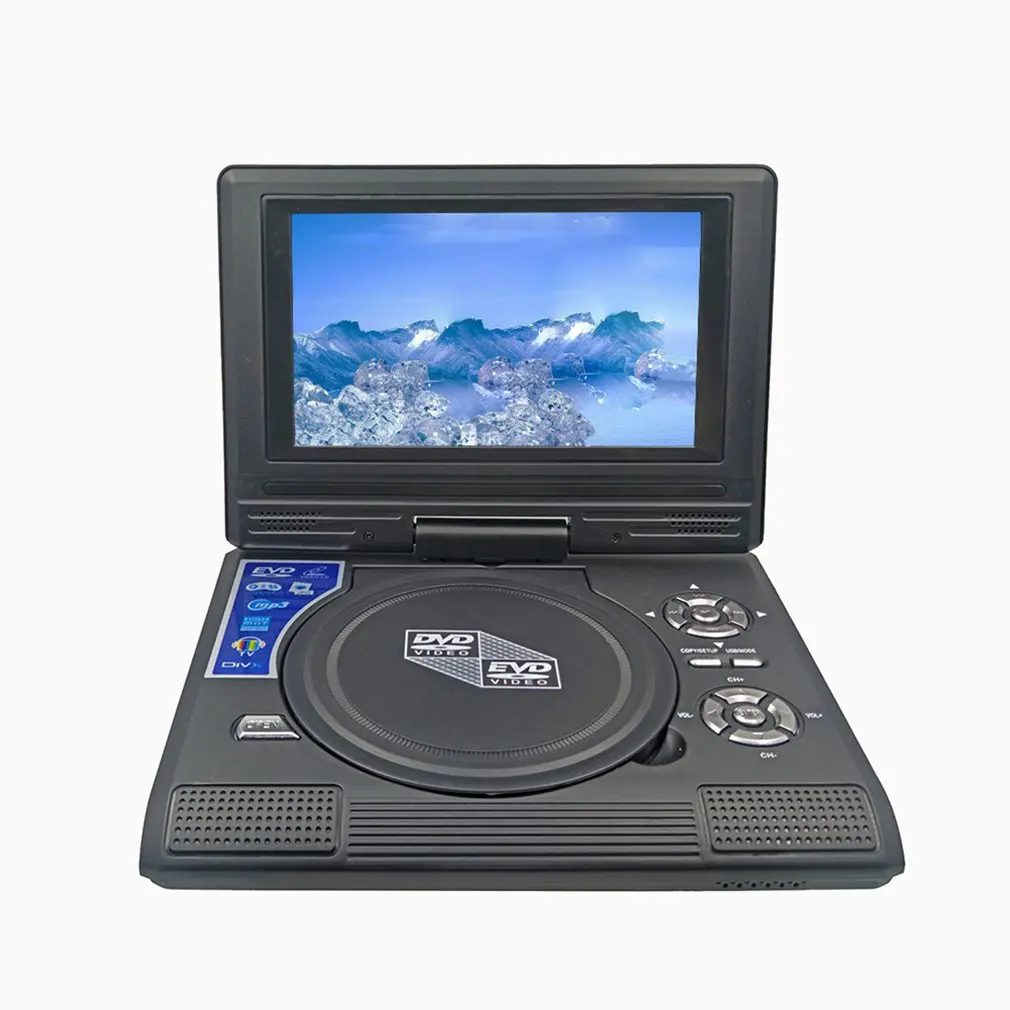
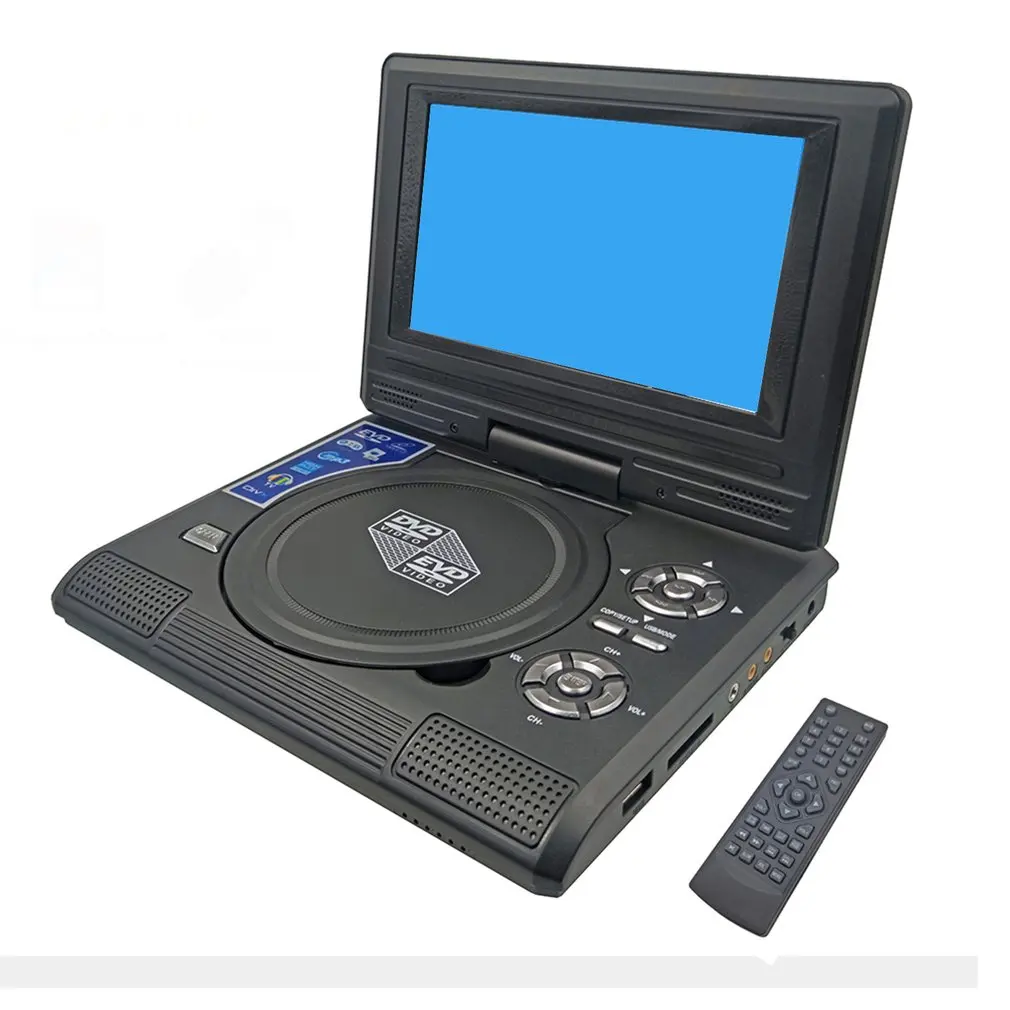
Мультифункциональный 7,8 дюймов HD ТВ Портативный dvd-плеер HD портативный CD ТВ плеер мультимедийный плеер LMD750
Особенности:
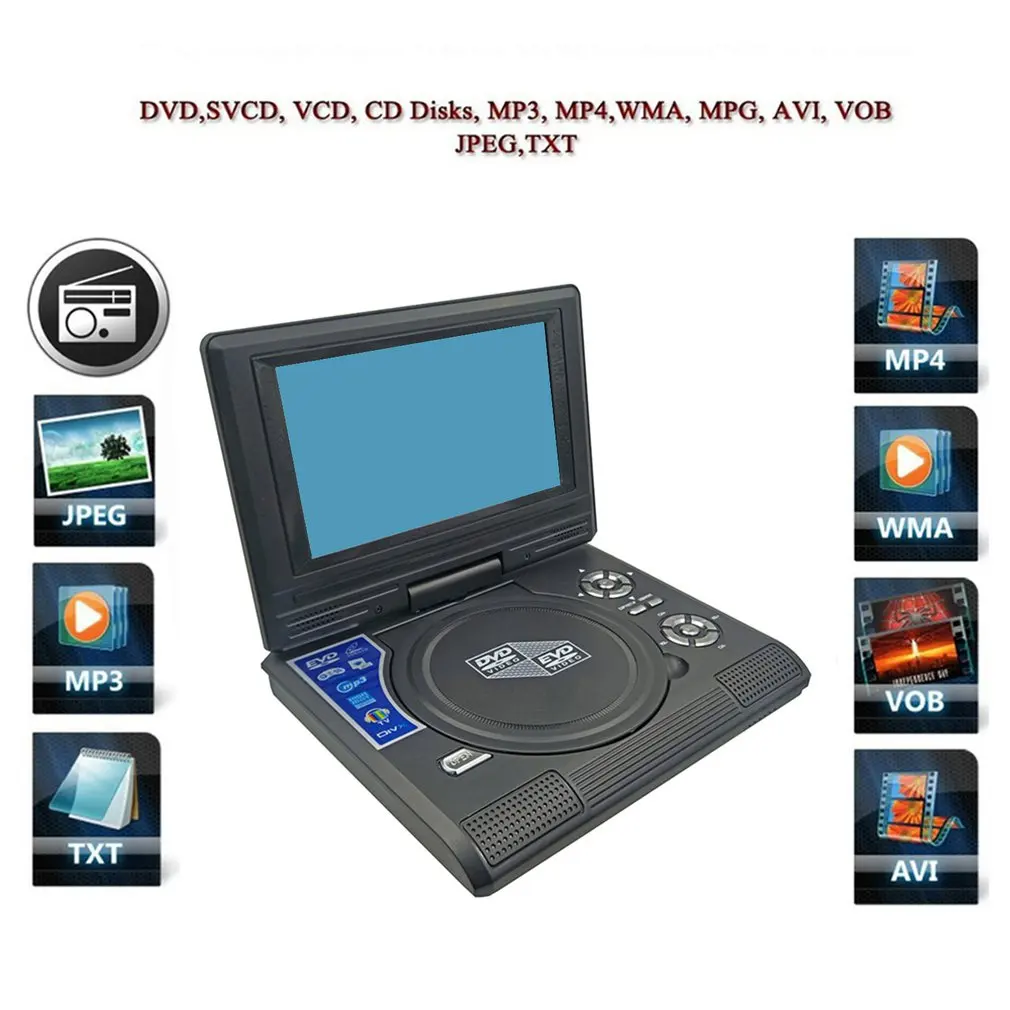
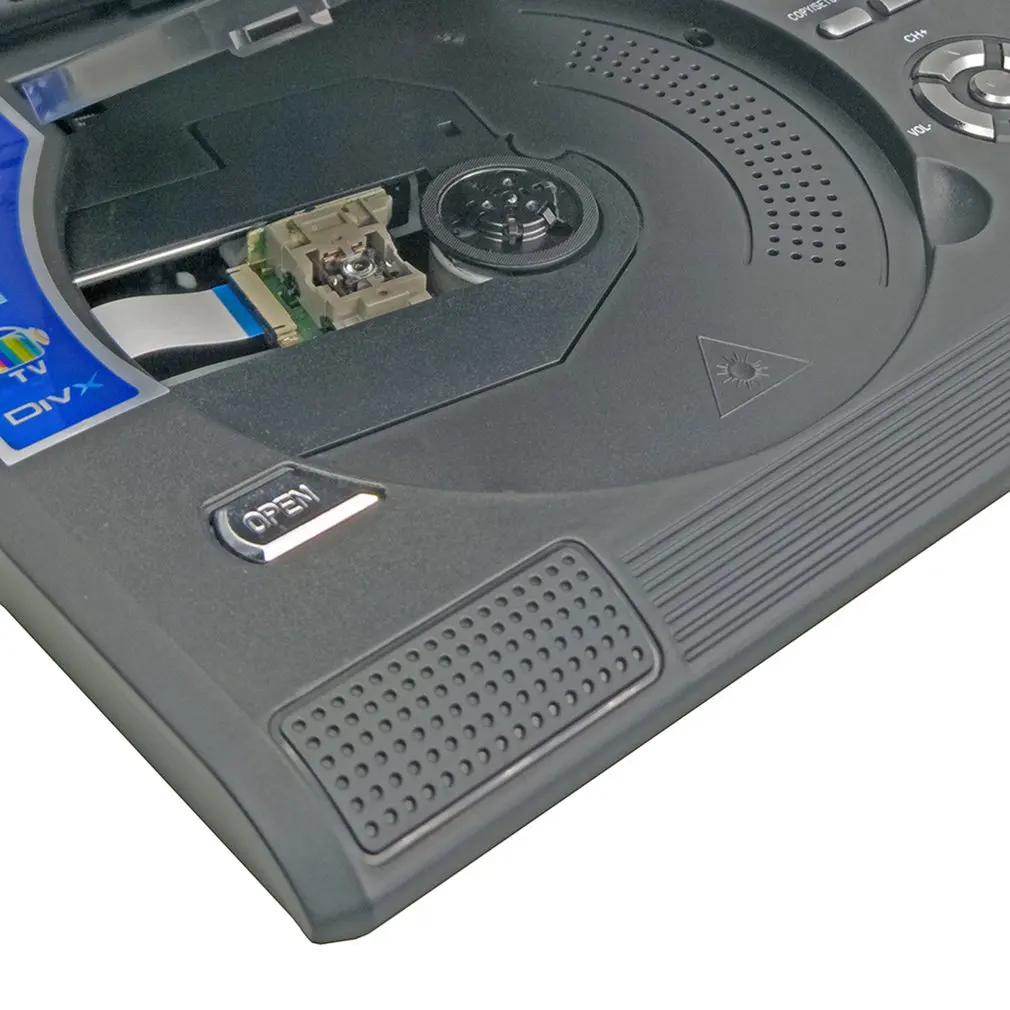
1: полностью совместим с AVI EVD, DVD, SVCD, VCD, CD, CD-R/RW, и MPEG-4 форматы и JPG форматы изображений. DVD с полным кодом площади (диск не ограничен кодом площади);
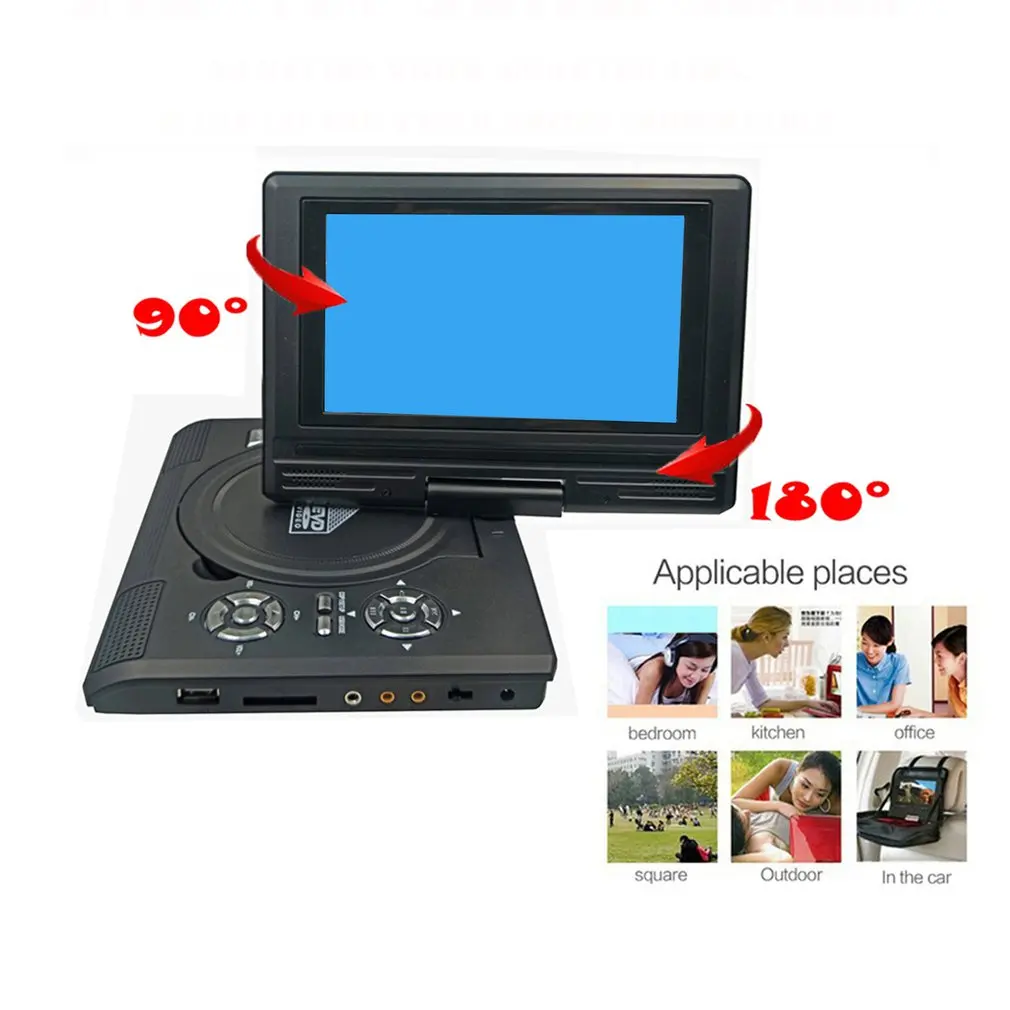
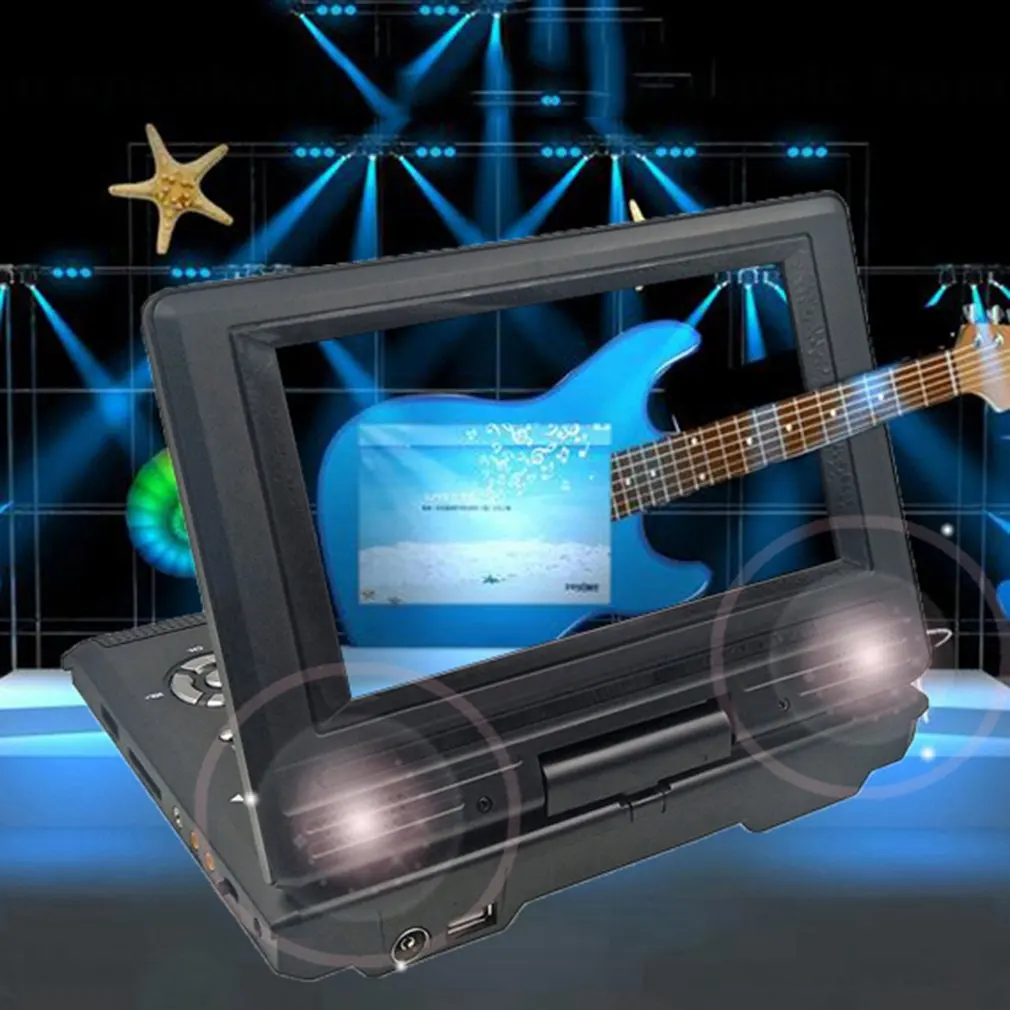
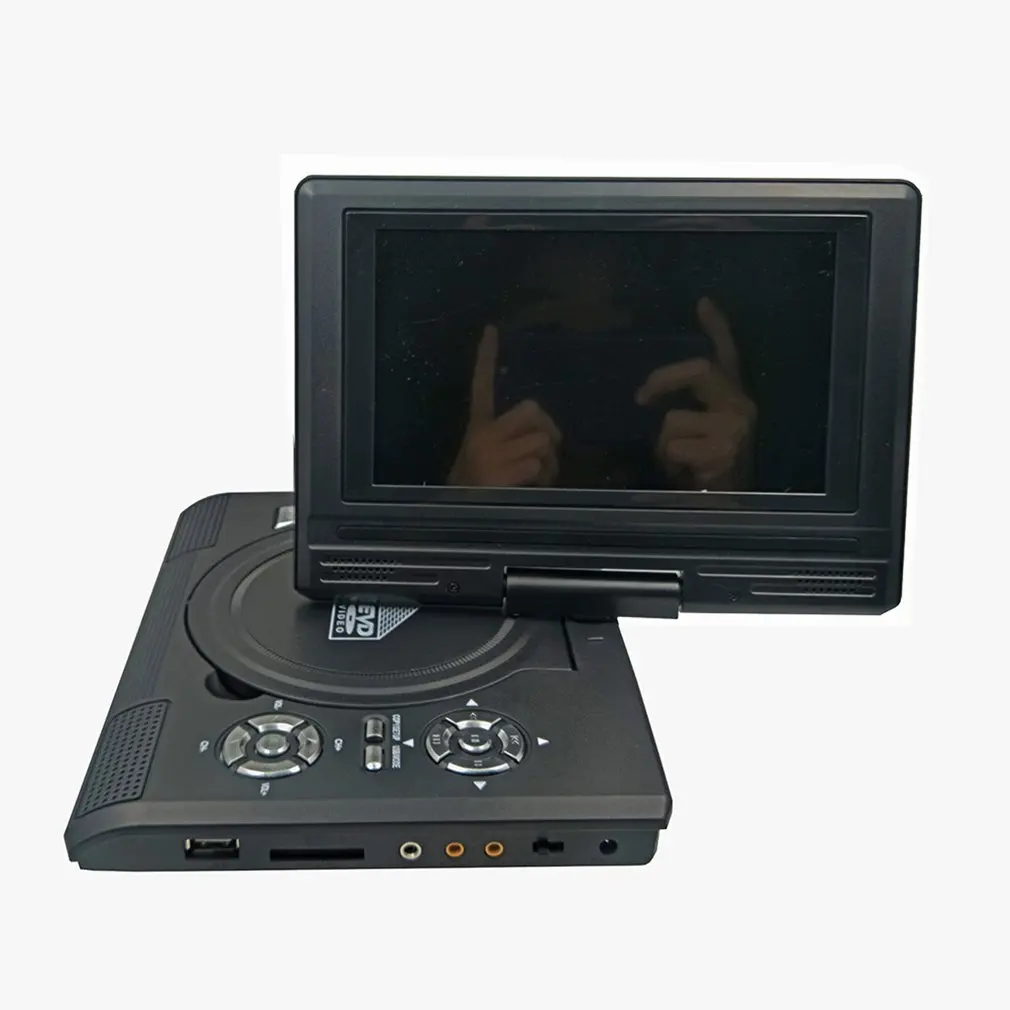
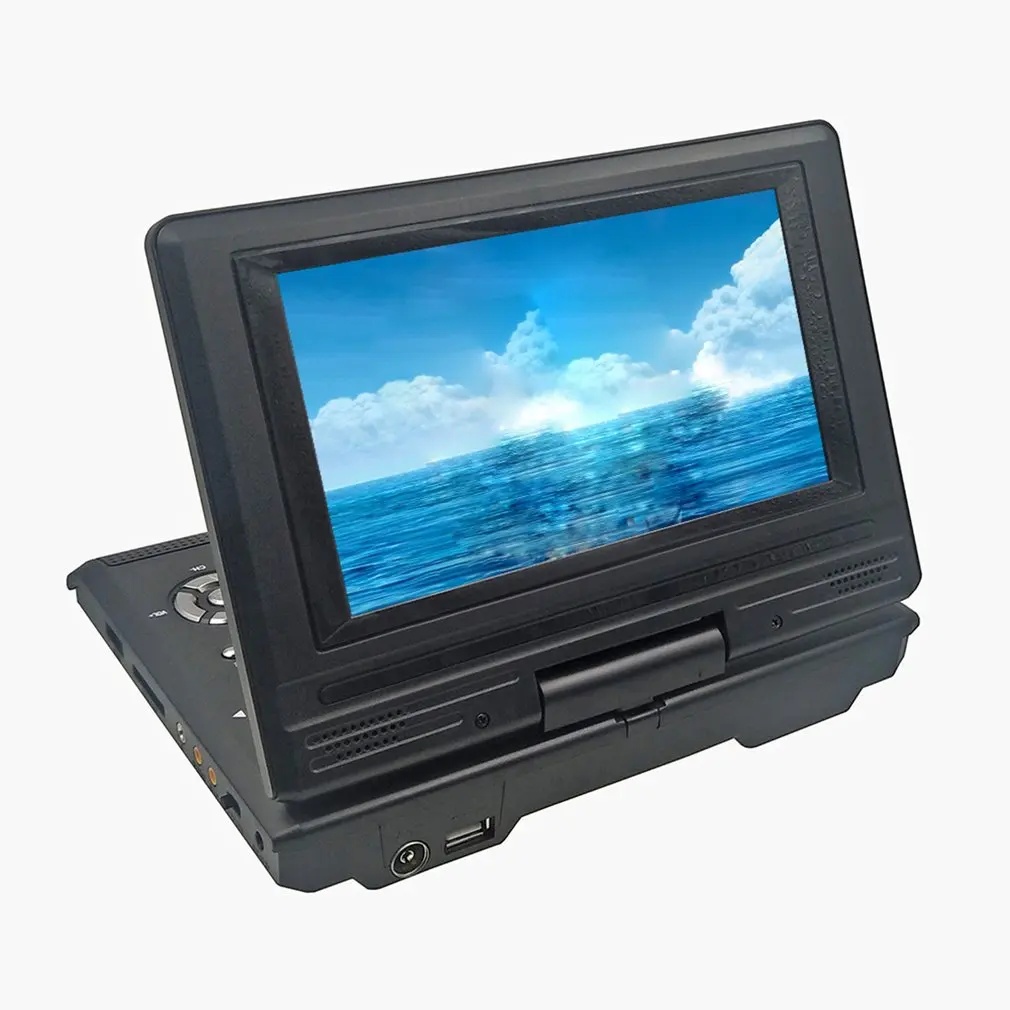
2: широкоформатный ЖК-дисплей высокой четкости 7,8 дюйма, вращение на 270 градусов, подходит для различных сред воспроизведения, как его видеть!
3: Функция ТВ, с аналоговым телевизором сигнальный интерфейс, может легко получать проводные и беспроводные аналоговые ТВ-сигналы (беспроводной просмотр зависит от силы местного сигнала).
4: поддержка функций игры
5: Инфракрасный полнофункциональный пульт дистанционного управления
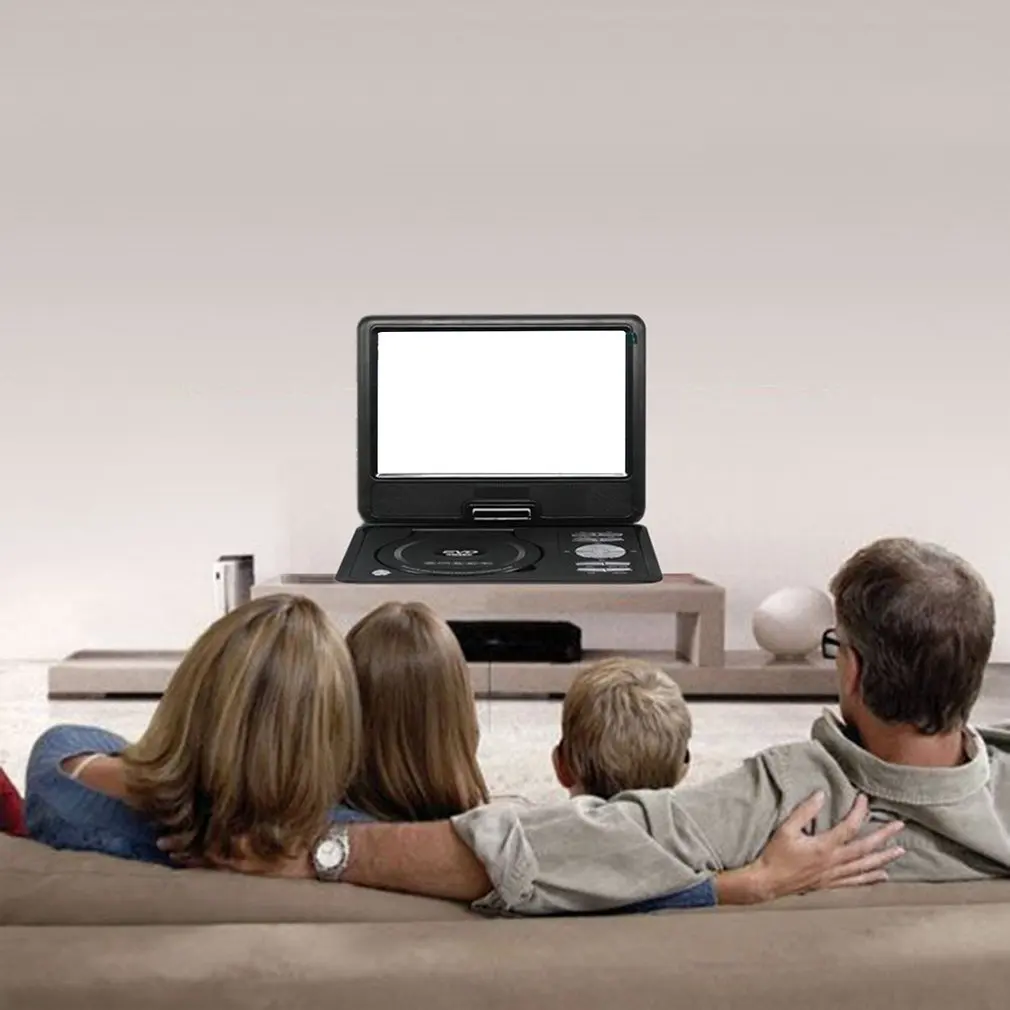
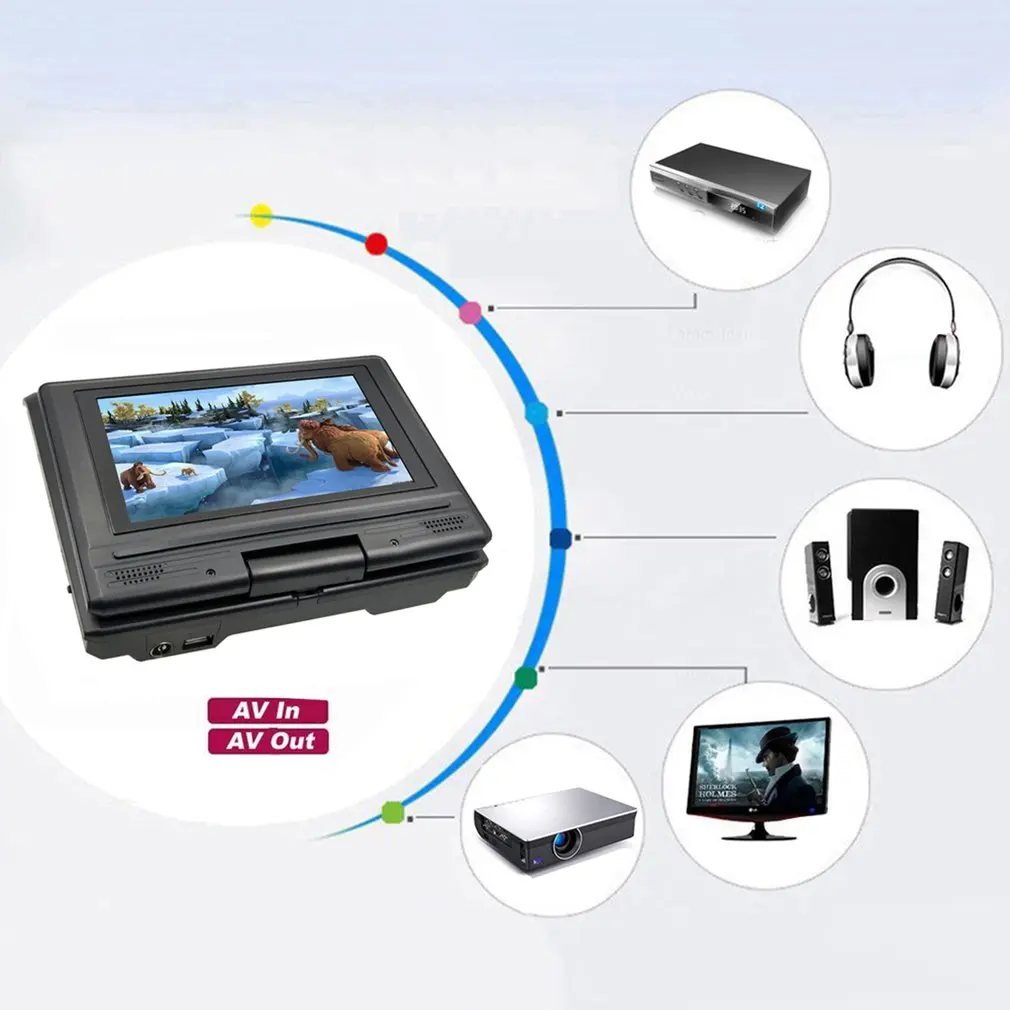
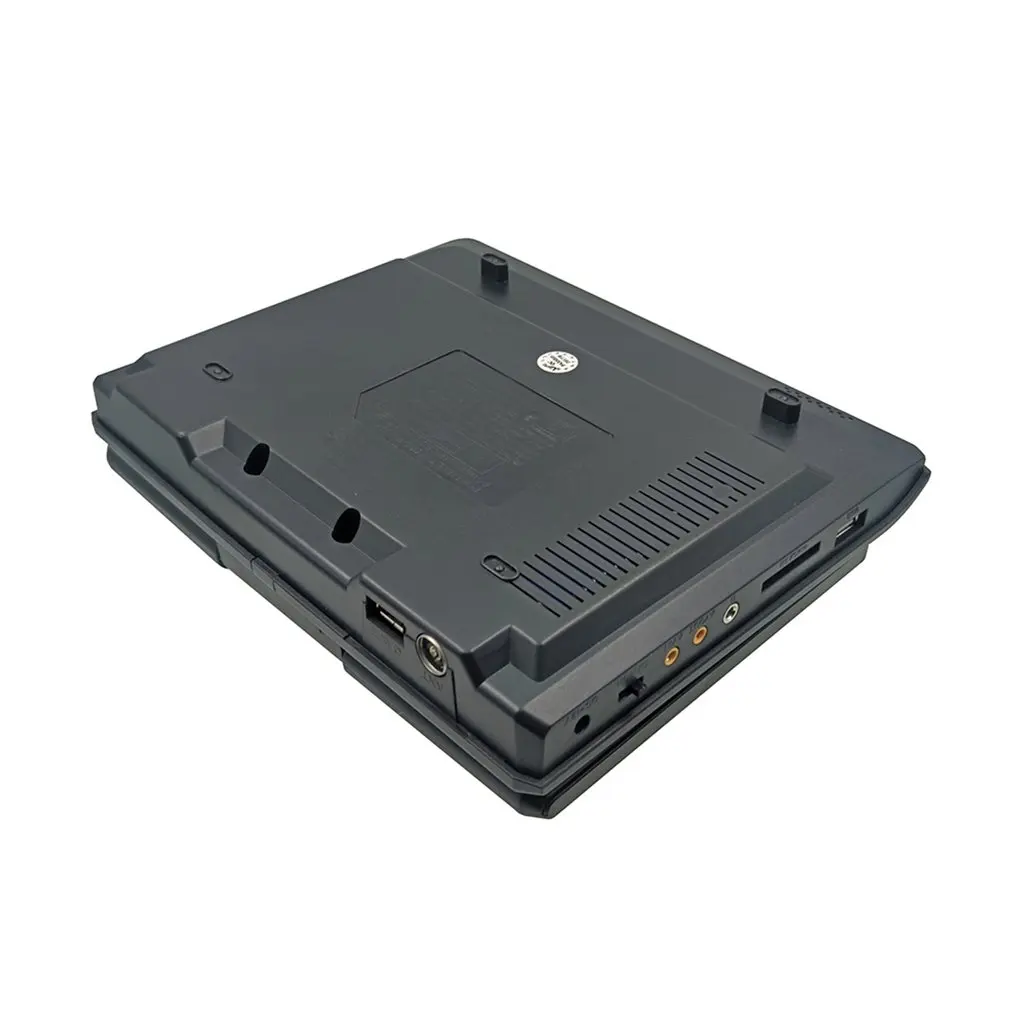
6: функция вывода AV: вы можете подключить этот блок к телевизору для просмотра DVD фильмов; вы также можете подключить аудио к передовому аудио, чтобы наслаждаться ударным эффектом музыки!
7: функция входа AV: можно подключить к внешнему видео или обычному DVD.
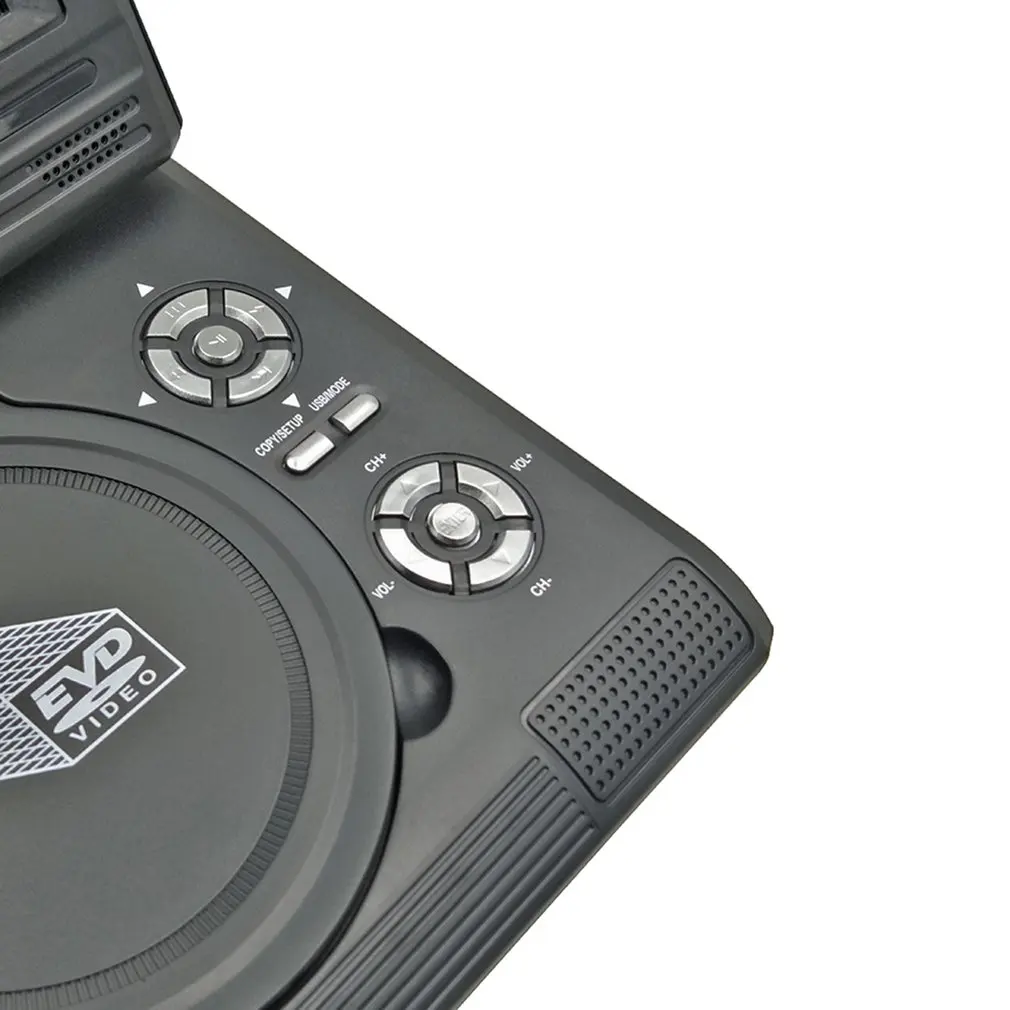
8: с скоростным интерфейсом USB он может быть подключен к мобильному жесткому диску U. На этом блоке удобно загружать фильмы и музыку.
9: Встроенный кардридер, может непосредственно читать фильмы, музыку, фотографии и так далее, хранящиеся в SD/MS/MMC-карте.
10: встроенные стереодинамики, выход на наушники.
11: Супер сильная электронная Антивибрационная схема.
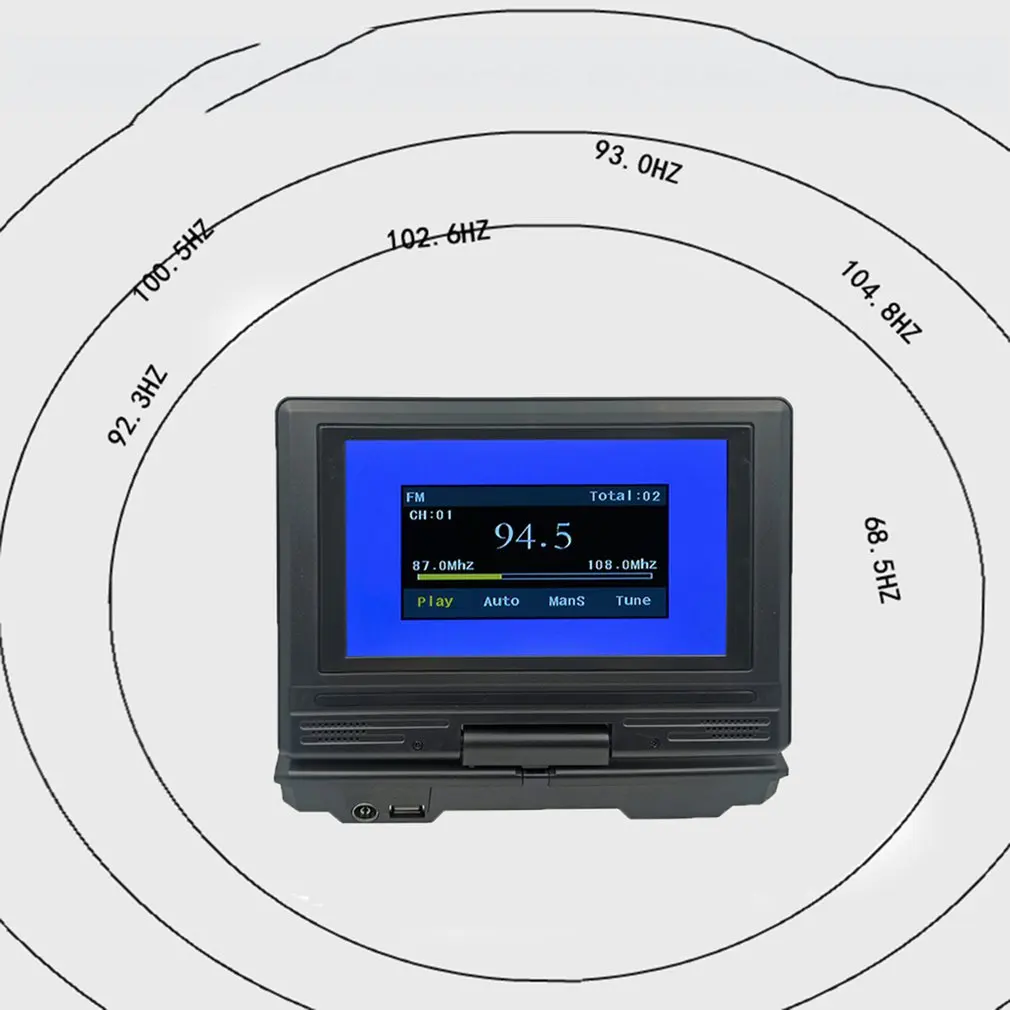
12: встроенная поддержка 3D-обработки звука функция fm-радио
13: поддержка воспроизведения меню диска язык настройки (Английский Французский Испанский Китайский Японский Корейский Русский тайский) очень подходит для внешней торговли клиентов
14: Встроенный с литиевой батареей большой емкости перезаряжаемая. Он удобен для использования на открытом воздухе и может играть непрерывно около 30-60 минут. Время воспроизведения может варьироваться в зависимости от работы. Оснащен блоком питания автомобиля для удобного использования на автомобиле
Параметры:
Модель: LMD750
Размер: 154,8*73,8*9,3 мм
Цвет: черный
Тип: США/ЕС/Великобритания/AU
Объемный звук: виртуальный объемный
Удаленный Управление: Промежуточные
Слот для карты памяти: Mmc карта, sd-карта, USB
Размер экрана: 7 дюймов.
Экранное меню: Да
Тип: портативный dvd-плеер с экраном
Система вывода видео: NTSC, PAL
Количество дисков: 1
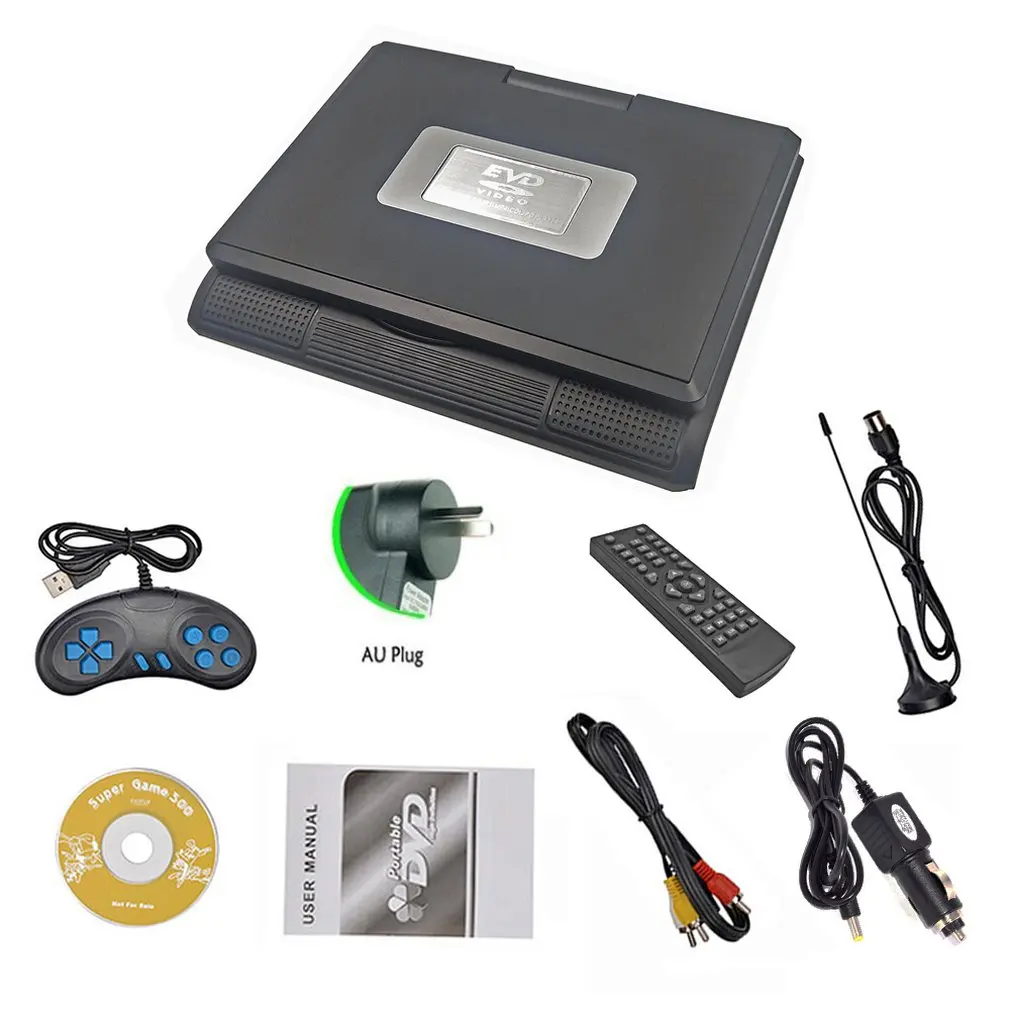
Посылка включает:
1 * портативный dvd-плеер
1 * game pad
1 * CD
1 * Используйте руководство
1 * av-кабель
1 * дистанционного controllor
1 * кабель зарядного устройства
1 * Цифровая антенна
Примечания:
1. из-за разницы между различными мониторами изображение может не отражать фактический цвет изделия. Мы гарантируем, что модель реального изделия не отличается от представленной на фото.
2. Из-за различных методов личного измерения может быть погрешность в 1-3 см. Спасибо!


Портативный DVD проигрыватель LMD750 China
Подробнее
Цена действительна только для интернет-магазина и может отличаться от цен в розничных магазинах
- Описание
- Характеристики
- Отзывы
- Задать вопрос
-
Наличие
Описание
Портативный DVD плеер с TFT LCD экраном диаганалью 7,8″
Поддержка форматов: Mp4, DVD, SVC, VCD, CD, MP3.
Поддержка приема телевизионного сигнала PAL/SECAM
Антишок: DVD — 3 сек, CD/VCD — 10 сек, MP3 — 90 сек.
Многофункциональный пульт дистанционного управления
Мощная литий-ионная аккумуляторная батарея
Адаптер питания от сети переменного тока 100-240 Вольт
Адаптер питания от сети постоянного тока 12 Вольт ( Авто )
Поддержка игр
Интерфейсы: USB, SD, AUX in, AUX out, выход под наушники
Характеристики
|
Реквизиты |
Товар, Товар, 00-00009735, 0 |
|
Базовая единица |
шт |
|
Вид товара |
Портативный DVD проигрыватель |
Задать вопрос
Вы можете задать любой интересующий вас вопрос по товару или работе магазина.
Наши квалифицированные специалисты обязательно вам помогут.
Задать вопрос
-
Автотовары
-
Бытовые моющие средства
-
Бытовая техника и аппаратура
-
Все для сотовых
-
Запчасти
-

для блендеров -
для водонагревателей- Аноды водонагревателей
- Разное для водонагревателя
- Терморегуляторы водонагревателей
- ТЭНы водонагревателей
- Форсунки для газовых водонагревателей,котлов
- Клапаны водонагревателей
- Электронные модули водонагревателей
- Уплотнительные прокладки водонагревателей
- для аквариумов
-
для вытяжек- Фильтр для вытяжки
- Двигатели для вытяжек
- Прочее для вытяжек
- Электронные модуля для вытяжек
-
Для аэрогриля
- Тэны для аэрогриля
-
для газовых плит- Блоки поджига
- Варочные поверхности
- Горелки
- Дверцы
- Краны
- Крепежи
- Провода
- Противни
- Рассекатели газовых плит
- Решётки газовых плит
- Ручки газовых плит
- Свечи газовых плит
- Лицевые панели
- Термопары газовых плит
- Трубки
- Уплотнители газовых плит
- Форсунки для газовых плит
- Шланг для гозовых плит
- Крышки рассекателей
- Разное для газовых плит
-
для душевых кабин -
для кондиционеров - для беговых дорожек
-
для кофе-машин- Уплотнительные кольца кофе-машин
- Насосы для кофе-машин
- Переходники-соединители кофе-машин
- Разное для кофе-машин
- Заварные устройства
- ЗИП редукторов кофемашин
- Тэны для кофе-машин
- для водяных насосов
-
для кулеров -
для кухонных комбайнов- Шестерни-комплекты кухонных комбайнов
- Шестерни кухонных комбайнов
- Разное для кухонных комбайнов
- Ремни кухонных комбайнов
-
для мультиварок -
для мясорубок- Двигатели мясорубок
- Комплекты нож-решетка
- Ножи мясорубок
- Решетки мясорубок
- Шестерни мясорубок
- Шестерни-комплекты
- Шнеки мясорубок
- Разное для мясорубок
- Насадки мясорубок
- Комплектующие шнека
- Гайки мясорубок
- Корпус мясорубки
- Втулки шнека
- Смазка для мясорубок
-
для ноутбуков- Аккумуляторы ноутбуков
- Вентиляторы
- Клавиатуры ноутбуков
- Материнские платы
- Матрицы (экраны)
- Разъемы
- Разное для ноутбуков
-
для пароварок -
для посудомоечных машин- Аксессуары
- Баки ПММ
- Датчики ПММ
- Датчики температуры ПММ
- Дозаторы моющего средства ПММ
- Емкости для соли (ионизаторы) ПММ
- Замки ПММ
- Клапаны ПММ
- Кнопки, переключатели ПММ
- Колёса для корзин, направляющие ПММ
- Корзины ПММ
- Элементы корпуса ПММ
- Крышки ПММ
- Навесы дверцы ПММ
- Помпы ПММ
- Ножки ПММ
- Патрубки, шланги ПММ
- Модули управления ПММ
- Поддоны ПММ
- Ремкомплект
- Разбрызгиватели ПММ
- Графитовые втулки ПММ
- Рециркуляционные насосы ПММ
- Теплообменники ПММ
- Трубки подачи воды ПММ
- Шланги АКВАСТОП ПММ
- ТЭНы ПММ
- Уплотнители ПММ
- Фильтры ПММ
- Кабель питания (сетевой провод) ПММ
- Шланги заливные ПММ
- Электропроводка ПММ
- Переключатели потока ПММ
- Фильтры сетевые ПММ
- Ручки для посудомоечных машин
- Разное для посудомоечных машин
-
для пылесосов- Двигатели пылесосов
- Катушки с кабелем пылесосов
- Модули управления пылесосов
- Прокладки, уплотнители пылесосов
- Фильтры пылесосов
- Щетки пылесосов
- Электронные модули пылесосов
- Мешки-пылесборники пылесосов
- Модуль колеса пылесосов
- Разное для пылесосов
- Шланг пылесоса
- Щётки,насадки пылесосов
-
для саун -
для поломоечных машин - для рисоварок
-
для СВЧ печей- Двигатели СВЧ печей
- Колпачки магнетрона
- Кольца, крестовины СВЧ
- Конденсаторы высоковольтные
- Крыльчатки СВЧ
- Крючки (защёлки) дверцы СВЧ
- Лампы подсветки СВЧ
- Магнетроны
- Муфты (Коплеры)
- Поддоны (тарелки)
- Предохранители СВЧ
- Провода СВЧ
- Реле времени, таймеры СВЧ
- Слюда для СВЧ печей
- Трансформаторы СВЧ
- Тэны, нагреватели СВЧ
- Электронные модули СВЧ
- Фильтры сетевые СВЧ
- Разное для СВЧ печей
- Крышка СВЧ
-
для стиральных машин- Амортизаторы СМ
- Баки СМ
- Электронные модули СМ
- Крестовины СМ
- Крышки СМ
- КЭНы(клапана) СМ
- Петли люка СМ
- Активаторы СМ
- Манжеты люка СМ
- Моторы СМ
- Патрубки СМ
- Переключатели режимов, реле времени, таймеры стиральных машин
- Подшипники СМ
- Помпы СМ
- Прессостаты СМ
- Провода сетевые СМ
- Панели управления СМ
- Проводка СМ
- Корпуса насоса СМ
- Крепёж СМ
- Пружины СМ
- Ребра барабана СМ (Реданы)
- Люки СМ
- Замок люка (двери)
- Ремни СМ
- Втулки крестовин СМ
- Ручки панелей СМ
- Ручки люка СМ
- Сальники СМ
- Ножки СМ
- Сетевые фильтры СМ
- Смазка для сальников СМ
- Суппорты СМ
- Редукторы СМ
- Термодатчики СМ
- Хомуты манжеты люка СМ
- ТЭНы СМ
- УБЛ (замок люка) СМ
- Электроприводы СМ
- Шкивы СМ
- Выключатели и кнопки СМА
- Шланги СМ
- Пальцы амортизаторов СМ
- Щетки СМ
- Термостаты СМ
- Диафрагмы СМ
- Фильтры сливного насоса СМ
- Прочее для стиральных машин
- Рамки люка СМ
- Таходатчики (датчики Холла) СМ
-
для сушильных машин- Термодатчики сушильных машин
- Ролики сушильных машин
- Фильтры сушильных машин
- Ручки сушильных машин
- Ремни сушильных машин
- Двигатели сушильных машин
- Кабель питания сушильных машин
- Кнопки, выключатели сушильных машин
- Люки сушильных машин
- Насосы сливные сушильных машин
- Панели управления
- Поплавки сушильных машин
- Разное для сушильных машин
- Уплотнитель
- Электропроводка сушильных машин
- Электронные модули сушильных машин
-
для блинниц -
для телевизоров- Светодиодная подсветка (LED_Strip)
-
для тепловентиляторов -
для термопотов -
для увлажнителей воздуха -
для овощерезок -
для утюгов и парогенераторов- Помпы утюгов
- Тэн парогенератора
- Клапаны утюгов, парогенераторов
- Подошвы
- Прочее для утюгов и парогенераторов
- Терморегуляторы
- Шнуры сетевые
-
для хлебопечей- Нож тестомешалки
- двигатель хлебопечей
- Ремни хлебопечей
- Шестерни хлебопечей
- разное для хлебопечей
- Тэн для хлебопечей
- Сальники хлебопечей
-
для обогревателей- Тэны к конвектомату
- Двигатели обогревателей
- Регуляторы мощности обогревателей
- Термостаты обогревателей
-
для холодильников- Хладагенты Фреоны
- Разное для холодильников
- Таймеры оттайки
- Реле холодильника
- Платы холодильника
- Ручка холодильника
- Вентиляторы, крыльчатки холодильников
- Выключатели, кнопки холодильников
- Тэн оттайки
- Ручки терморегуляторов холодильников
- Датчики холодильников
- Испарители холодильников
- Клеммные колодки холодильников
- Лампы холодильников
- Ножки холодильников
- Шланги заправочные для холодильников
- Уплотнители холодильников
- Микродвигатель для холодильника
- Петли дверей, фасадов холодильников
- Шнуры сетевые холодильников
- Ящики, полки холодильников
- Компрессоры
- Трансформатор тока для холодильника
- Терморегуляторы, термостаты холодильников
-
для чайников- Выключатели чайников
- Разъёмы чайников
- Тэны для чайников
- Разное для чайников
-
для швейных машинок -
для электрических котлов -
для соковыжималок -
для электроинструментов -
для электроплит и варочных поверхностей- Вентиляторы электроплит
- Конфорки электроплит
- Лампы электроплиты
- Модули управления электроплит
- Переключатели электроплит
- Петли дверцы электроплит
- Проводка электроплит
- Противни, решетки
- Реле времени (таймер) электрической плиты
- Ручки переключателей режимов и регуляторов электроплит
- Ручки дверцы духовок
- Спирали электроплит
- Стёкла и двери электрических плит, духовок
- Терморегуляторы духовок
- Термостаты электроплит
- Разное для электроплит и варочных поверхностей
- ТЭНы электроплит, духовых шкафов
- Уплотнители электроплит и варочных поверхностей
- Клеммные колодки электроплит
- Прочие запчасти для электроплит и варочных поверхностей
- Сетевые разьемы
- Крыльчатки вентиляторов электроплит
- Моторы гриля
-
широкого применения- Реле давления
- Торцевые уплотнители
- Щетки для электродвигателей
- Насосы
- Кольца резиновые
- Ремни клиновые
- Ремни синхронные
- Подшипники
-
для фритюрниц- Терморегуляторы фритюрниц
- Сетки для фритюрниц
- Тэны для фритюрниц
-
для тепловых пушек - для тонометров
-
-
Пульты и аксессуары
-
Разборка
- Комплектующие мелкой бытовой техники
-
Комплектующие для ПК
- Переходники и шлейфы
- Процессоры
- Блок питания ПК
- HDD
- DDR
- Прочее для ПК
- DVD/CD приводы
- Комплектующие ноутбуков
- Комплектующие мониторов
- Комплектующие DVD проигрывателей
- Комплектующие оргтехники
- Комплектующие СВЧ — печей
-
Неисправные
- Ноутбуки неисправные
- Стиральные машины неисправные
- Телевизоры неисправные
- Мониторы неисправные
- Телефоны неисправные
- Электрические плиты неисправные
- Планшеты неисправные
- DVD-проигрыватели неисправные
- Пылесосы неисправные
- Акустика
- Посудомоечные машины неисправные
- Газовые плиты неисправные
- Духовые шкафы неисправные
- Холодильники неисправные
- Электроинструменты неисправные
- Вытяжки неисправные
- Микроволновые (СВЧ) печи на запчасти
- Сушильные машины неисправные
- Варочные поверхности неисправные
- Мелкая бытовая техника неисправная
- Комплектующие сотовых телефонов, планшетов.
- Автозапчасти
-
Комплектующие телевизоров
- Разное телевизоров
- TunerBoard
- YDriveBoard
- YSUS
- ZSUS
- Блоки питания телевизоров
- Матрицы
- Audio
- Bluetooth-WiFi
- Input-Output
- IR+Key
- LED подсветка телевизоров
- Logic-CTRL
- XDriveBoard
- MatrixBoard
- Инверторы
- Tcon
- Кабель LVDS
- Подсветка с корпусом дисплея
- Кабель соединительный
- Лампы подсветки
- Динамики телевизоров
- Шлейфы телевизоров
- LED Board
- LED Board Connections
- LED Driver TV
- Подставки (Ножки) телевизоров
- PowerBoard
- MainBord, SSB
- Платы матриц
- Комплектующие кондиционеров
-
Электронные компоненты
-
Электронные средства
-
Блоки и элементы питания- Батарейки
- Элементы питания
- Блоки питания
- Источники питания для светодиодов
- Зарядные устройства
- Аккумуляторы
- Батарейные отсеки
-
Антенны и аксессуары- Антенные разветвители и сумматоры
- ТВ приставки, антенны
- Штекер, переходник телевизионный
-
Провода, кабели, переходники- Кабель акустический
- Кабель антенный
- VGA
- Кабель AUX
- HDMI (кабели, переходники)
- Кабель RCA
- RS232
- USB (кабели, переходники, удлинители и др)
- Кабель питания силовой
- Кабель телефонный
- Кабель + штекер для БП (DC)
- Патч-корды
- Jack
- Кабель компьютерный
-
Накопители информации- CD, DVD
- HDD
- MicroSD
- MMC
- SD
- USB Flash
- Картридеры
- Сетевые фильтры и удлинители
-
Корпусные и установочные изделия
- Видеонаблюдение
- Крепёжные элементы
- Радиаторы
- Электродвигатели и приводы
- Вентиляторы
- Ручки для аппаратуры
-
Средства разработки, конструкторы, модули
- Электронные модули
- Средства программирования
- Микрофоны для систем видеонаблюдения
-
Кнопки, переключатели, разъёмы, реле
- Кнопки
- Разъёмы
- Переключатели
- Индикаторы
- Адаптеры и переходники
- Крокодилы
-
Оптоэлектроника
- Лазерные излучатели
- Фоточувствительные элементы
-
Электротехника
- Устройства защиты
- Электроустановочные изделия
- Устройства управления электродвигателями, пускатели, контакторы и аксессуары к ним
- Офисная техника
- Измерительные приборы
-
Паяльное оборудование
- Газовые горелки
- Паяльники
- Паяльные станции
- Приспособления для пайки
- Химия для пайки
- Жала для паяльников
- Нагревательные элементы для паяльников
-
-
Инструмент
-
Для активного отдыха
- Для рыбалки
- Съемники
- Приспособления для хранения
- Магниты
-
Ключи гаечные
- Слесарный инструмент
- Прочий инструмент
- Электроинструмент
- Кабельный инструмент
- Наборы инструментов
- Оптические приспособления
- Отвертки
- Режущий инструмент
- Плоскогубцы и др.
-
Для активного отдыха
-
Расходные материалы
-
Разное — каталог
- Разное
-
Средства по уход за техникой
-
Канцелярские товары
-
Прогрммное обеспечение
-
яУценка
-
Фильтры очистки воды
-
яАрхив
-
Маски защитные медицинские
-


Будьте всегда в курсе!
Узнавайте о скидках и акциях первым
| Минимальный Заказ: | 200 Куски |
|---|---|
| Производственная Мощность: | 10000pcs per month |
| Транспортная Упаковка: | gift box,Customer′s demand |
")
Описание Товара
Информация о Компании
Адрес:
Xinmao Building, No. 127 Meilong Rd., Longhua, Shenzhen, Guangdong, China
Тип Бизнеса:
Производитель/Завод
Диапазон Бизнеса:
Бытовая Электроника, Компьютерные Товары, Спортивные Предметы и Развлечение, Электричество и Электроника
Введение Компании:
Описание компании.
Once receive your question, the supplier will answer you as soon as possible.
Отправить ваш запрос напрямую данному поставщику
 02:40
02:40
Ritmix Rf 8800 Прошивка
 00:30
00:30
DVD-плеер портативный Elenberg PDVD-13609 — 3D-обзор от Elmir.ua
PDVD-851TV
8.5” PORTABLE DVD PLAYER WITH TV TUNER
8.5” ПОРТАТИВНЫЙ DVD ПЛЕЕР С ТВ ТЮНЕРОМ
User manual
Руководство пользователя

6
СОДЕРЖАНИЕ
ИНСТРУКЦИЯ ПО МЕРАМ БЕЗОПАСНОСТИ…………………………………………..7
Меры безопасности…………………………………………………………………………………7
Меры предосторожности………………………………………………………………………….8
ПОДКЛЮЧЕНИЕ К ВНЕШНИМ УСТРОЙСТВАМ………………………………………..9
РАСПОЛОЖЕНИЕ ФУНКЦИЙ И ОРГАНОВ УПРАВЛЕНИЯ………………………..30
Панель управления………………………………………………………………………………….30
Пульт дистанционного управления…………………………………………………………..3
Просмотр ТВ программ……………………………………………………………………………38
ИСПОЛЬЗОВАНИЕ ПЕРЕЗАРЯЖАЕМОЙ БАТАРЕИ…………………………………39
УСТАНОВКА РЕЖИМОВ И ВЫБОР ФУНКЦИЙ…………………………………………40
Системные Настройки……………………………………………………………………………..40
Установка языка……………………………………………………………………………………..4
Аудио Настройки……………………………………………………………………………………..43
Видео Настройки……………………………………………………………………………………..44
Цифровые Настройки………………………………………………………………………………45
ПОДДЕРЖИВАЕМЫЕ ФОРМАТЫ ФАЙЛОВ……………………………………………..46
ПРОЧЕЕ………………………………………………………………………………………………….48
ЧАСТЫЕ ПРИЧИНЫ НЕИСПРАВНОСТЕЙ И ИХ УСТРАНЕНИЕ………………….49
КОМПЛЕКТАЦИЯ…………………………………………………………………………………….50
ТЕХНИЧЕСКИЕ ХАРАКТЕРИСТИКИ………………………………………………………..51

ИНСТРУКЦИЯ ПО МЕРАМ БЕЗОПАСНОСТИ Меры безопасности Благодар…
Страница 3
- Изображение
- Текст
7
ИНСТРУКЦИЯ ПО МЕРАМ БЕЗОПАСНОСТИ
Меры безопасности
Благодарим Вас за приобретение портативного DVD плеера. Внимательно
ознакомьтесь с руководством перед эксплуатацией плеера и сохраните его
для дальнейшего использования.
В целях Вашей безопасности
Внимание!
Во избежание опасности поражения электрическим током и возникновения
пожара не открывайте корпус изделия. Обращайтесь к квалифицированному
персоналу для ремонта изделия.
Знак молнии предупреждает о наличии высокого напряжения внутри изделия.
Прикосновение к оголенным внутренним деталям опасно поражением
электротока.
Восклицательный знак используется для предупреждения о наличии важных
инструкций по применению.
Данный знак означает, что устройство принадлежит к лазерной продукции
1-го класса.
Лазерное излучение
Внимание!
Внутри системы расположен маломощный лазерный излучатель, поэтому в
целях Вашей безопасности запрещается снимать крышки, пытаться разобрать
корпус и смотреть в зону лазерного излучения. Об этом напоминают надписи.
При необходимости ремонта обращайтесь к услугам квалифицированных
специалистов.

8
Меры предосторожности
1. Перед тем, как включить систему, убедитесь, что ее напряжение
питания соответствует напряжению Вашей электрической сети.
. Когда устройство не используется, отключайте его от электросети.
Извлекать кабель питания из розетки следует только за корпус вилки.
3. Во избежание поражения электрическим током не открывайте
корпус устройства – это разрешается делать только
квалифицированному персоналу.
4. Внутри корпуса нет никаких элементов, предназначенных для
регулировки пользователем. В случае выхода системы из строя
отключите ее от электрической сети и обратитесь в компанию,
где приобрели ее.
5. Не размещайте устройство на наклонной и неустойчивой поверхности.
Необходимо также обеспечить хорошую вентиляцию в месте установки.
Во избежание пожара не закрывайте вентиляционные отверстия
газетами, накидками, занавесями и так далее.
6. Во избежание опасности пожара или поражения электрическим током
не помещайте на устройство емкости с жидкостью, например, вазы.
Не ставьте на него горящие свечи.
7. Во избежание пожара и поражения электрическим током не помещайте
устройство в жарких местах, оберегайте его от воздействия дождя,
влаги и пыли.
8. Не пользуйтесь системой вблизи воды, например, в ванных комнатах,
душевых, вблизи сливов и стиральных машин. Не ставьте ее на мокрую
плитку около плавательных бассейнов и других подобных мест.
9. Оберегайте устройство от воздействия сильных магнитных полей.
10. Не помещайте систему вблизи увлажнителей воздуха, так как
скапливающаяся влага сокращает срок службы лазерной головки.
11. Когда систему переносят из холода в теплое помещение, либо
размещают ее во влажном месте, на линзе лазерного излучателя
внутри проигрывателя может осесть конденсат, мешающий нормальной
работе системы. В этом случае необходимо извлечь диск и оставить
устройство включенным примерно на час, чтобы испарилась влага.
1. При попадании внутрь систему каких-либо предметов или влаги
немедленно отключите ее от электрической сети и не включайте до
осмотра специалистом.
13. Перед чисткой отключите устройство от электрической сети. Не
пользуйтесь чистящими средствами на основе спиртов и аэрозолями
(например, пестицидами). Чистить систему можно только мягкой тканью.
14. Для подключения устройства к электрической сети пользуйтесь только
приложенным кабелем питания – применение других кабелей может
привести к поражению электрическим током.

ПОДКЛЮЧЕНИЕ К ВНЕШНИМ УСТРОЙСТВАМ Схема подключения к телев…
Страница 5
- Изображение
- Текст
9
ПОДКЛЮЧЕНИЕ К ВНЕШНИМ УСТРОЙСТВАМ
Схема подключения к телевизору.
Схема подключения к усилителю.
ПРИМЕЧАНИЕ: не рекомендуем подключать аудио устройства во время
работы DVD-плеера.

30
РАСПОЛОЖЕНИЕ ФУНКЦИЙ И ОРГАНОВ УПРАВЛЕНИЯ
Панель управления
1. OPEN
Кнопка Открыть
(загрузка и извлечение диска)
. DISC TRAY
Отсек диска
3. TFT menu
Настройка дисплея
4. PLAY
Воспроизведение
5. POWER LED
Индикатор питания
6. PAUSE
Пауза
7. INFRARED SENSOR
Сенсор ПДУ
8. STOP
Стоп
9. PREV
Воспроизведение с предыдущей метки
10.
▲ВВЕРХ
Кнопки навигации по меню
11. FORWARD
Ускоренное воспроизведение вперед
1. REW
Ускоренное обратное воспроизведение
13. SETUP
Меню SETUP
14.
◄ ВЛЕВО
Кнопки навигации по меню
15. СТЕРЕО ДИНАМИКИ
16. NEXT
Воспроизведение с последующей метки
17. PBC
Меню DVD-диска/режим PBC
18. FUNCTION
Переключение функций TV /DVD/AV
19. АУДИО
Выбора языка перевода
0.
►ВПРАВО
Кнопки навигации по меню
1. ENTER
Кнопка подтверждения выбора
.
▼ВНИЗ
Кнопки навигации по меню
3. ЖК ЭКРАН

31
1. VOLUME CONTROL
Громкость +/-
. SD/MS/MMC SLOT
Слот SD/MS/MMC
3. EARPHONE OUTPUT
Разъем для наушников
4. AV вход
5. AV выход
6. ВХОД DC 9 В
1. ВХОД ТВ АНТЕННЫ
. ПОРТ USB
3. POWER ON/OFF
Кнопка питания

3
Пульт дистанционного управления
1. PAL/ NTSC — Выбор системы цветности ТВ
. MENU — Меню диска
3. STOP — Остановка воспроизведения
4. SETUP — Входа в меню установок SETUP
5.
▼/▲ и ◄/► — Кнопки навигации по меню
6. ENTER — Кнопка подтверждения выбора
7. ZOOM — Масштабируемое изображение
8. TITLE — Разделы DVD-диска
9. PBC — Меню DVD-диска/режим PBC
10. SUBTITLE — Изменение языка субтитров
11. RETURN — Возврат к предыдущему меню
1. LANGUAGE — Выбор языка перевода
13. R/L — Режим Моно/Стерео
14. ANGLE — Изменение ракурса камеры
15. 3D — Настройка 3D аудио эффектов
16. PROG — Воспроизведения в з
аданном порядке.
17. CLEAR — Отмена ранее установленных
закладок
18. RANDOM — Воспроизведения в
произвольном порядке.
19. VIEW — Выбор эпизодов фильма
0. DISPLAY — Информация о воспроизводимых
треках и главах диска
1. 0-10+ NUMBERED KEYS — Цифровые кнопки
. SEARCH — Воспроизведение с заданного места
3. PLAY/PAUSE — Нормальное воспроизведение/Пауза
4. TFT menu — Настройка дисплея
5. FUNCTION — Переключение функций TV/DVD/AV.
6. PREV/NEXT — Воспроизведение с предыдущей метки/с последующей метки
7. REV/FORWARD — Ускоренное обратное воспроизведение/воспроизведение
вперед
8. VOL-/ VOL+ — Уменьшение/увеличение громкости
9. STEP/SLOW — Замедленное воспроизведение
30. A-B — Повтор выбранного участка
31. REPEAT — Повторное воспроизведение
3. MUTE — Включение/выключение звука
33. RESTORE — Кнопка возврата к заводским настройкам

33
Используйте кнопки
▼/▲ и ◄/► для навигации по Меню настроек
SETUP. Используйте кнопку ENTER для подтверждения выбора и установки
необходимых параметров настроек.
Кнопки пульта дистанционного управления.
Нажмите P/N для настройки ТВ системы устройства: PAL,
NTSC или AUTO.
Нажмите MENU для входа в меню диска.
Нажмите кнопку STOP во время воспроизведения
для остановки воспроизведения. Для возобновления
воспроизведения с того места, где Вы остановились,
нажмите кнопку PLAY.
ПРИМЕЧАНИЕ: после 5 минут со времени остановки, автоматически
включается экранная заставка.
Используйте кнопку SETUP для входа в меню установок
Setup menu.
Используйте кнопки для навигации в меню
Для подтверждения нажмите ENTER.
Вы можете увеличить или уменьшить изображение или его
фрагмент. Для этого последовательно нажимайте кнопку
ZOOM:
Во время воспроизведения файлов JPEG нажмите ZOOM и используйте
кнопки REV/FWD для изменения размера изображения.
Во время воспроизведения DVD, SVCD или VCD диска нажмите ZOOM для
изменения размера изображения.
В режиме видео нажмите кнопку TITLE, чтобы отобразить
меню DVD lдиска или воспроизвести первый заголовок.
ПРИМЕЧАНИЕ: действие функции зависит от данного
диска.

Если установить PBC как ВКЛ., то при воспроизведении дисков…
Страница 10
- Изображение
- Текст
34
Если установить PBC как ВКЛ., то при воспроизведении
дисков, поддерживающих эту функцию, появляется меню,
в котором можно выбрать порядок воспроизведения
содержимого диска.
Если установить PBC как ВЫКЛ., то воспроизведение содержимого диска
осуществляется в том же порядке, в котором оно записано на диске.
ПРИМЕЧАНИЕ: наличие данной функции зависит от диска.
Во время воспроизведения DVD диска нажмите
SUBTITLE для выбора языка субтитров. Их количество
может достигать 3.
ПРИМЕЧАНИЕ: наличие функции зависит от данного диска.
(языки субтитров на разных дисках различны).
Нажимайте RETURN для возврата в меню.
Во время воспроизведения диска нажмите LANGUAGE для
выбора языка/формата звуковой дорожки.
ПРИМЕЧАНИЕ: наличие функции зависит от данного диска.
Во время воспроизведения SVCD и VCD дисков нажмите
R/L для выбора MONO R, MONO L или AUTO.
Во время воспроизведения CD и MP3 файлов нажмите R/L
для переключения моно и стерео режимов: MONO R, MONO L или STEREO.
Во время воспроизведения DVD диска нажмите ANGLE для
просмотра изображения под разным ракурсом камеры.
Нажимайте
ANGLE,
для
просмотра
изображений
графических файлов под углом 90 и 180 градусов.
ПРИМЕЧАНИЕ: наличие функции и количество ракурсов зависит от записи
конкретного DVD диска.
Во время воспроизведения SVCD/VCD/CD дисков нажмите
3D для настройки звуковых эффектов объемного звучания,
эквалайзера и настройки тональности.
Во время воспроизведения нажмите кнопку PROG, на
дисплее отобразится информационное меню диска.
Используя пронумерованные кнопки, введите время или
номер композиции, главы или сюжета. Нажмите для
начала ENTER воспроизведения.Нажмите CLEAR для отмены создания
закладок. Нажмите еще раз PROG для выхода.
ПРИМЕЧАНИЕ: для некоторых DVD дисков функция поиска недоступна.

Комментарии
- Manuals
- Brands
- TYT Manuals
- Two-Way Radio
- MD-750
- User manual
-
Contents
-
Table of Contents
-
Bookmarks
Quick Links
Related Manuals for TYT MD-750
Summary of Contents for TYT MD-750
-
Page 1
MD-750 User manual… -
Page 2: Table Of Contents
contents 一.Familiar with the machine ………………….错误!未定义书签。 二.Button part ……………………..错误!未定义书签。 三.LCD icon display …………………….. 错误!未定义书签。 四.Menu information ……………………错误!未定义书签。 五.Introduction to common operations ………………错误!未定义书签。 1. Dual stage single / double guard switch ………………….. 9 2. Frequency / channel mode switching ………………错误!未定义书签。 3.
-
Page 3
一. Familiar with the machine Waiting to add appearance and description 二. Button part PTT button (transmit button) The transfer button for transmitting and receiving, press this button when transmitting, and speak to the microphone; when receiving, release this button Side button 1 A. -
Page 4: 三.Lcd Icon Display
C. SMS editing interface, move down Left shift key:P1 A. Move to the left. B. Under DTMF function, it means C code word (without any word code) C. SMS editing interface, move left Right shift key:P2 A. Move right. B.
-
Page 5
Current transmit power is high (H) or low (L) digital non-dual capacity direct mode Digital mode, dual capacity direct mode is on and works in time slot 1 Digital mode, dual capacity direct mode is on and works in time slot 2 CTDCS Analog and no CT/DCS setting Analog and CT setting… -
Page 6
四. Menu info Press OK to enter the menu; press up, down, left, and right to select, press OK to confirm; press EXIT to return First level Second level Third level Option Setting description Remarks menu menu menu view contact Check contact name and number Contact The contact configuration number is 0-9, and… -
Page 7
mode Delete all Yes: clear dialed call list, No: Do not delete Received private call,press OK to view/add Answered List… contact/delete, add to contact to enter Answered alias to store in contact list Yes: clear received call list, No: Do not Delete all delete Missed private call,press OK to view/add… -
Page 8
There is a warning 10 seconds before transmission limit time. limit is reached, and it is time to prohibit transmitting. For 15~495S example, set 60 seconds and issue a warning for 10 seconds at the 50th second. If you continue to trasnmit, the transmit is prohibited at 60 seconds turn off VOX Do n’t press PTT when you turn it on, you… -
Page 9
Both:Enable this tone for both digital and analog channels Options: off / on. No beep sound when the Key Beep close button is selected Always On Always On Backlight Always Off Always Off 5/10sec Time to automatically turn off the backlight Long press * to lock, then press OK and * Key Manual unlock… -
Page 10: Dual Stage Single / Double Guard Switch
Digital processing chip DSP software version DSP-version number Program Date Program last programmed date and time of radio Time Receiving frequency settings, press * to clear them all, press BACK Rx_Freq to delete them individually Transmission frequency setting, press * to clear all, press BACK to TX_Freq delete them individually Channel name settings, press * to clear all, press BACK to delete…
-
Page 11: Digital Calling
Note: Since the double wait mode is in the primary and secondary channel scanning by turns, the DTMF signaling system and auto scan do not work. 2. VFO / MR mode switch In the main interface, press P2 to switch between VFO mode and MR mode. There is no channel number display in VFO mode.
-
Page 12: Emergency Alarm
number input box and enter the other party’s number) . Press PTT to initiate private call. The interface displays: the first line displays the call type: private call, the second line displays the contact alias, and the third line displays the private call number.
-
Page 13: Radio Activation
Initiate: In the digital mode, select private call contact (press OK to enter menu, select private call contact or main interface press # key to enter private call number), select “radio check”, press OK button to start, display “radio check success”when success, displays «radio check fail» when failed.After radio is successfully checked, you can call the other party by PTT.
-
Page 14: Pttid
codeword is a remote code or wake-up code. 6.2 PTTID Initiation: In analog mode, you can configure the DTMF online and offline codes through the host computer. The analog channel enables the online and offline codes. Each time the PTT is pressed, the online code is issued. 7.Sacn 7.1 switch 1:The upper computer configures the current channel to enable automatic scanning, switch to this channel for…
-
Page 15
This radio is NOT intended for use by the“General Population” in an uncontrolled environment. This radio has been tested and complies with the FCC RF exposure limits for“Occupational Use Only”.Inaddition, our TYT Electronics Co., Ltd. radio complies with the following Standards and Guidelines with regard to RF energy and electromagnetic energy levels and evaluation of such levels for exposure to humans: —IEEE Std. -
Page 16
distance of 2.5cm must be maintained when held-to-face, and body-worn operations are restricted to the approve doriginal acessories. Cet EUT est conforme aux normes SAR pour les limites d’exposition contrôlée de la norme IC RSS-102 et a été testé conformément aux méthodes et procédures de mesure spécifiées dans les normes IEEE 1528 et IEC 62209.
На нашем сайте отображены товары, которые автоматически импортируются с сайта allegro.pl и переводятся на русский язык.
Так как мы не являемся продавцами товара, который отображен на нашем сайте, мы не можем обладать всей информацией о том или ином товаре. Дополнительную информацию о товарах можно узнать несколькими способами:
1. Подробно ознакомиться с описанием. Обычно вся необходимая информация находится в официальном описании на странице лота.
2. Если интересующей вас информации в описании не оказалось, можно задать вопрос напрямую продавцу. Он ответит вам в течение одного рабочего дня.
3. Если вы обладаете богатым опытом серфинга в интернете, возможно, вы сможете найти информацию о данном товаре на различных форумах и других интернет-ресурсах, воспользовавшись глобальными службами интернет-поиска.
4. Если вы не владеете языком или не желаете уточнить информацию по какой-либо другой причине, пожалуйста, обращайтесь к нам — мы с радостью вам поможем. Для того, чтобы мы задали вопрос продавцу, оформите заказ и в комментариях к товару пропишите интересующие вопросы. В течении дня мы сделаем запрос продавцу, комментарии появятся в личном кабинете.
Точный вес товара становится известным, только когда товар поступает на склад. Узнать примерный вес товара можно характеристиках товара, но не все продавцы его пишут.
Избежать некачественного товара можно путем тщательного отбора продавцов, т.е. старайтесь не гнаться за дешевыми товарами, которые продаются у продавцов с низким рейтингом. Доверяйте только проверенным интернет-магазинам. Если вы покупаете товар и сомневаетесь в надёжности продавца, то лучше заказать дополнительные фотографии.
1.Ищите по ключевым словам, уточняйте по каталогу слева
Допустим, вы хотите найти фару для AUDI, но поисковик выдает много результатов, тогда нужно будет в поисковую строку ввести точную марку автомобиля, потом в списке категорий, который находится слева, выберите новую категорию (Автозапчасти — Запчасти для легковых авто – Освещение- Фары передние фары). После, из предъявленного списка нужно выбрать нужный лот.
2. Сократите запрос
Например, вам понадобилось найти переднее правое крыло на KIA Sportage 2015 года, не пишите в поисковой строке полное наименование, а напишите крыло KIA Sportage 15 . Поисковая система скажет «спасибо» за короткий четкий вопрос, который можно редактировать с учетом выданных поисковиком результатов.
3. Используйте аналогичные сочетания слов и синонимы
Система сможет не понять какое-либо сочетание слов и перевести его неправильно. Например, у запроса «стол для компьютера» более 700 лотов, тогда как у запроса «компьютерный стол» всего 10.
4. Не допускайте ошибок в названиях, используйтевсегдаоригинальное наименованиепродукта
Если вы, например, ищете стекло на ваш смартфон, нужно забивать «стекло на xiaomi redmi 4 pro», а не «стекло на сяоми редми 4 про».
5. Сокращения и аббревиатуры пишите по-английски
Если приводить пример, то словосочетание «ступица бмв е65» выдаст отсутствие результатов из-за того, что в e65 буква е русская. Система этого не понимает. Чтобы автоматика распознала ваш запрос, нужно ввести то же самое, но на английском — «ступица BMW e65».
6. Мало результатов? Ищите не только в названии объявления, но и в описании!
Не все продавцы пишут в названии объявления нужные параметры для поиска, поэтому воспользуйтесь функцией поиска в описании объявления! Например, вы ищите турбину и знаете ее номер «711006-9004S», вставьте в поисковую строку номер, выберете галочкой “искать в описании” — система выдаст намного больше результатов!
7. Смело ищите на польском, если знаете название нужной вещи на этом языке
Вы также можете попробовать использовать Яндекс или Google переводчики для этих целей. Помните, что если возникли неразрешимые проблемы с поиском, вы всегда можете обратиться к нам за помощью.
Портативный DVD проигрыватель LMD750 China
Подробнее
Цена действительна только для интернет-магазина и может отличаться от цен в розничных магазинах
- Описание
- Характеристики
- Отзывы
- Задать вопрос
-
Наличие
Описание
Портативный DVD плеер с TFT LCD экраном диаганалью 7,8″
Поддержка форматов: Mp4, DVD, SVC, VCD, CD, MP3.
Поддержка приема телевизионного сигнала PAL/SECAM
Антишок: DVD — 3 сек, CD/VCD — 10 сек, MP3 — 90 сек.
Многофункциональный пульт дистанционного управления
Мощная литий-ионная аккумуляторная батарея
Адаптер питания от сети переменного тока 100-240 Вольт
Адаптер питания от сети постоянного тока 12 Вольт ( Авто )
Поддержка игр
Интерфейсы: USB, SD, AUX in, AUX out, выход под наушники
Характеристики
|
Реквизиты |
Товар, Товар, 00-00009735, 0 |
|
Базовая единица |
шт |
|
Вид товара |
Портативный DVD проигрыватель |
Задать вопрос
Вы можете задать любой интересующий вас вопрос по товару или работе магазина.
Наши квалифицированные специалисты обязательно вам помогут.
Задать вопрос
-
Автотовары
-
Бытовые моющие средства
-
Бытовая техника и аппаратура
-
Все для сотовых
-
Запчасти
-
для блендеров, миксеры -
для водонагревателей- Аноды водонагревателей
- Разное для водонагревателя
- Терморегуляторы водонагревателей
- ТЭНы водонагревателей
- Форсунки для газовых водонагревателей,котлов
- Клапаны водонагревателей
- Электронные модули водонагревателей
- Уплотнительные прокладки водонагревателей
- для аквариумов
-
для вытяжек- Фильтр для вытяжки
- Двигатели для вытяжек
- Прочее для вытяжек
- Электронные модуля для вытяжек
-
для аэрогрилей
- Тэны для аэрогриля
-
для газовых плит- Блоки поджига
- Варочные поверхности газовых плит
- Горелки
- Стекла дверей газовых плит
- Краны газовых плит
- Крепежи газовых плит
- Провода газовых плит
- Противни
- Рассекатели газовых плит
- Циркуляционные насосы газовых плит
- Решётки газовых плит
- Ручки газовых плит
- Свечи газовых плит
- Лицевые панели
- Термопары газовых плит
- Трубки
- Уплотнители газовых плит
- Форсунки для газовых плит
- Шланг для газовых плит
- Крышки рассекателей
- Разное для газовых плит
-
для душевых кабин -
для кондиционеров - для беговых дорожек
-
для кофе-машин- Уплотнительные кольца кофе-машин
- Насосы для кофе-машин
- Переходники-соединители кофе-машин
- Разное для кофе-машин
- Заварные устройства
- ЗИП редукторов кофемашин
- Тэны для кофе-машин
- для водяных насосов
-
для кулеров -
для кухонных комбайнов- Шестерни-комплекты кухонных комбайнов
- Шестерни кухонных комбайнов
- Разное для кухонных комбайнов
- Ремни кухонных комбайнов
-
для мультиварок -
для мясорубок- Двигатели мясорубок
- Комплекты нож-решетка
- Ножи мясорубок
- Решетки мясорубок
- Шестерни мясорубок
- Шестерни-комплекты
- Шнеки мясорубок
- Разное для мясорубок
- Насадки мясорубок
- Комплектующие шнека
- Гайки мясорубок
- Корпус мясорубки
- Втулки шнека
- Смазка для мясорубок
-
для ноутбуков- Аккумуляторы ноутбуков
- Вентиляторы
- Клавиатуры ноутбуков
- Материнские платы
- Матрицы (экраны)
- Разъемы
- Разное для ноутбуков
-
для пароварок -
для посудомоечных машин- Аксессуары
- Баки ПММ
- Датчики ПММ
- Датчики температуры ПММ
- Дозаторы моющего средства ПММ
- Емкости для соли (ионизаторы) ПММ
- Замки ПММ
- Клапаны ПММ
- Кнопки, переключатели ПММ
- Колёса для корзин, направляющие ПММ
- Корзины ПММ
- Элементы корпуса ПММ
- Крышки ПММ
- Навесы дверцы ПММ
- Помпы ПММ
- Ножки ПММ
- Патрубки, шланги ПММ
- Модули управления ПММ
- Поддоны ПММ
- Ремкомплект
- Разбрызгиватели ПММ
- Графитовые втулки ПММ
- Рециркуляционные насосы ПММ
- Теплообменники ПММ
- Трубки подачи воды ПММ
- Шланги АКВАСТОП ПММ
- ТЭНы ПММ
- Уплотнители ПММ
- Фильтры ПММ
- Кабель питания (сетевой провод) ПММ
- Шланги заливные ПММ
- Электропроводка ПММ
- Переключатели потока ПММ
- Фильтры сетевые ПММ
- Ручки для посудомоечных машин
- Разное для посудомоечных машин
-
для пылесосов- Двигатели пылесосов
- Катушки с кабелем пылесосов
- Модули управления пылесосов
- Прокладки, уплотнители пылесосов
- Фильтры пылесосов
- Щетки пылесосов
- Электронные модули пылесосов
- Мешки-пылесборники пылесосов
- Модуль колеса пылесосов
- Разное для пылесосов
- Шланг пылесоса
- Щётки,насадки пылесосов
-
для саун -
для поломоечных машин - для рисоварок
-
для СВЧ печей- Двигатели СВЧ печей
- Колпачки магнетрона
- Кольца, крестовины СВЧ
- Конденсаторы высоковольтные
- Крыльчатки СВЧ
- Крючки (защёлки) дверцы СВЧ
- Лампы подсветки СВЧ
- Магнетроны
- Муфты (Коплеры)
- Поддоны (тарелки)
- Предохранители СВЧ
- Провода СВЧ
- Реле времени, таймеры СВЧ
- Слюда для СВЧ печей
- Трансформаторы СВЧ
- Тэны, нагреватели СВЧ
- Электронные модули СВЧ
- Фильтры сетевые СВЧ
- Разное для СВЧ печей
- Крышка СВЧ
-
для стиральных машин- Амортизаторы СМ
- Баки СМ
- Электронные модули СМ
- Крестовины СМ
- Крышки СМ
- КЭНы(клапана) СМ
- Петли люка СМ
- Активаторы СМ
- Манжеты люка СМ
- Моторы СМ
- Патрубки СМ
- Переключатели режимов, реле времени, таймеры стиральных машин
- Подшипники СМ
- Помпы СМ
- Прессостаты СМ
- Провода сетевые СМ
- Панели управления СМ
- Проводка СМ
- Корпуса насоса СМ
- Крепёж СМ
- Пружины СМ
- Ребра барабана СМ (Реданы)
- Люки СМ
- Замок люка (двери)
- Ремни СМ
- Втулки крестовин СМ
- Ручки панелей СМ
- Ручки люка СМ
- Сальники СМ
- Ножки СМ
- Сетевые фильтры СМ
- Смазка для сальников СМ
- Суппорты СМ
- Редукторы СМ
- Термодатчики, термостаты СМ
- Хомуты манжеты люка СМ
- ТЭНы СМ
- УБЛ (замок люка) СМ
- Электроприводы СМ
- Шкивы СМ
- Выключатели и кнопки СМА
- Шланги СМ
- Пальцы амортизаторов СМ
- Щетки СМ
- Термостаты СМ
- Диафрагмы СМ
- Фильтры сливного насоса СМ
- Прочее для стиральных машин
- Рамки люка СМ
- Таходатчики (датчики Холла) СМ
-
для сушильных машин- Термодатчики сушильных машин
- Ролики сушильных машин
- Фильтры сушильных машин
- Ручки сушильных машин
- Ремни сушильных машин
- Двигатели сушильных машин
- Кабель питания сушильных машин
- Кнопки, выключатели сушильных машин
- Люки сушильных машин
- Насосы сливные сушильных машин
- Панели управления
- Поплавки сушильных машин
- Разное для сушильных машин
- Уплотнитель
- Электропроводка сушильных машин
- Электронные модули сушильных машин
-
для блинниц -
для телевизоров- Светодиодная подсветка (LED_Strip)
-
для тепловентиляторов -
для термопотов -
для увлажнителей воздуха -
для овощерезок -
для утюгов и парогенераторов- Помпы утюгов
- Тэн парогенератора
- Клапаны утюгов, парогенераторов
- Подошвы
- Прочее для утюгов и парогенераторов
- Терморегуляторы
- Шнуры сетевые
-
для хлебопечей- Нож тестомешалки
- двигатель хлебопечей
- Ремни хлебопечей
- Шестерни хлебопечей
- разное для хлебопечей
- Тэн для хлебопечей
- Сальники хлебопечей
-
для обогревателей- Тэны к конвектомату
- Двигатели обогревателей
- Регуляторы мощности обогревателей
- Термостаты обогревателей
-
для холодильников- Хладагенты Фреоны
- Разное для холодильников
- Таймеры оттайки
- Реле холодильников
- Электронные модули холодильников
- Ручки дверей холодильников
- Вентиляторы, крыльчатки холодильников
- Выключатели, кнопки холодильников
- ТЭНы оттайки
- Ручки терморегуляторов холодильников
- Датчики холодильников
- Испарители холодильников
- Клеммные колодки холодильников
- Лампы холодильников
- Ножки холодильников
- Шланги заправочные для холодильников
- Уплотнители холодильников
- Микродвигатель для холодильника
- Петли дверей, фасадов холодильников
- Шнуры сетевые холодильников
- Ящики, полки холодильников
- Компрессоры холодильников
- Трансформатор тока для холодильника
- Терморегуляторы, термостаты холодильников
-
для чайников- Выключатели чайников
- Разъёмы чайников
- Тэны для чайников
- Разное для чайников
-
для швейных машинок -
для электрических котлов -
для соковыжималок -
для электроинструментов -
для электроплит и варочных поверхностей- Вентиляторы электроплит
- Конфорки электроплит
- Лампы электроплиты
- Модули управления электроплит
- Переключатели электроплит
- Петли дверцы электроплит
- Проводка электроплит
- Противни, решетки
- Реле времени (таймер) электрической плиты
- Ручки переключателей режимов и регуляторов электроплит
- Ручки дверцы духовок
- Спирали электроплит
- Стёкла и двери электрических плит, духовок
- Терморегуляторы духовок
- Термостаты электроплит
- Разное для электроплит и варочных поверхностей
- ТЭНы электроплит, духовых шкафов
- Уплотнители электроплит и варочных поверхностей
- Клеммные колодки электроплит
- Прочие запчасти для электроплит и варочных поверхностей
- Сетевые разьемы
- Крыльчатки вентиляторов электроплит
- Моторы гриля
-
широкого применения- Реле давления
- Торцевые уплотнители
- Щетки для электродвигателей
- Насосы
- Кольца резиновые
- Ремни клиновые
- Ремни синхронные
- Подшипники
-
для фритюрниц- Терморегуляторы фритюрниц
- Сетки для фритюрниц
- Тэны для фритюрниц
-
для тепловых пушек - для тонометров
-
-
Пульты и аксессуары
-
Разборка
- Комплектующие мелкой бытовой техники
-
Комплектующие для ПК
- Переходники и шлейфы
- Процессоры
- Блок питания ПК
- HDD
- DDR
- Прочее для ПК
- DVD/CD приводы
- Комплектующие ноутбуков
- Комплектующие мониторов
- Комплектующие DVD проигрывателей
- Комплектующие оргтехники
- Комплектующие СВЧ — печей
-
Неисправные
- Ноутбуки неисправные
- Стиральные машины неисправные
- Телевизоры неисправные
- Мониторы неисправные
- Телефоны неисправные
- Электрические плиты неисправные
- Планшеты неисправные
- DVD-проигрыватели неисправные
- Пылесосы неисправные
- Акустика
- Посудомоечные машины неисправные
- Газовые плиты неисправные
- Духовые шкафы неисправные
- Холодильники неисправные
- Электроинструменты неисправные
- Вытяжки неисправные
- Микроволновые (СВЧ) печи на запчасти
- Сушильные машины неисправные
- Варочные поверхности неисправные
- Мелкая бытовая техника неисправная
- Комплектующие сотовых телефонов, планшетов.
- Автозапчасти
-
Комплектующие телевизоров
- Разное телевизоров
- TunerBoard
- YDriveBoard
- YSUS
- ZSUS
- Блоки питания телевизоров
- Матрицы
- Audio
- Bluetooth-WiFi
- Input-Output
- IR+Key
- LED подсветка телевизоров
- Logic-CTRL
- XDriveBoard
- MatrixBoard
- Инверторы
- Tcon
- Кабель LVDS
- Подсветка с корпусом дисплея
- Кабель соединительный
- Лампы подсветки
- Динамики телевизоров
- Шлейфы телевизоров
- LED Board
- LED Board Connections
- LED Driver TV
- Подставки (Ножки) телевизоров
- PowerBoard
- MainBord, SSB
- Платы матриц
- Комплектующие кондиционеров
-
Электронные компоненты
-
Электронные средства
-
Батарейки, аккумуляторы- Батарейки
- Элементы питания
- Аккумуляторы универсальные с выводами
- Аккумуляторы
- Батарейные отсеки
-
Антенны и аксессуары- Антенные разветвители и сумматоры
- ТВ приставки, антенны
- Штекер, переходник телевизионный
-
Провода, кабели, переходники- Кабель акустический
- Кабель антенный
- VGA
- Кабель AUX
- HDMI (кабели, переходники)
- Кабель RCA
- RS232
- USB (кабели, переходники, удлинители и др)
- Кабель питания силовой
- Кабель телефонный
- Кабель + штекер для БП (DC)
- Патч-корды
- Jack
- Кабель компьютерный
-
Накопители информации- CD, DVD
- HDD
- MicroSD
- MMC
- SD
- USB Flash
- Картридеры
- Сетевые фильтры и удлинители
-
Корпусные и установочные изделия
- Видеонаблюдение
- Крепёжные элементы
- Радиаторы
- Электродвигатели и приводы
- Вентиляторы
- Ручки для аппаратуры
-
Средства разработки, конструкторы, модули
- Электронные модули
- Средства программирования
- Микрофоны для систем видеонаблюдения
-
Кнопки, переключатели, разъёмы, реле
- Кнопки
- Разъёмы
- Переключатели
- Индикаторы
- Адаптеры и переходники
- Крокодилы
-
Оптоэлектроника
- Лазерные излучатели
- Фоточувствительные элементы
-
Электротехника
- Устройства защиты
- Электроустановочные изделия
- Устройства управления электродвигателями, пускатели, контакторы и аксессуары к ним
-
Блоки питания и зарядные устройства
- Блоки питания
- Источники питания для светодиодов
- Зарядные устройства
- Офисная техника
- Измерительные приборы
-
Паяльное оборудование
- Газовые горелки
- Паяльники
- Паяльные станции
- Приспособления для пайки
- Химия для пайки
- Жала для паяльников
- Нагревательные элементы для паяльников
-
-
Инструмент
-
Для активного отдыха
- Для рыбалки
- Съемники
- Приспособления для хранения
- Магниты
-
Ключи гаечные
- Слесарный инструмент
- Прочий инструмент
- Электроинструмент
- Кабельный инструмент
- Наборы инструментов
- Оптические приспособления
- Отвертки
- Режущий инструмент
- Плоскогубцы и др.
-
Для активного отдыха
-
Расходные материалы
-
Разное — каталог
- Разное
-
Средства по уход за техникой
-
Канцелярские товары
-
Прогрммное обеспечение
-
яУценка
-
Фильтры очистки воды
-
яАрхив
-
Маски защитные медицинские
-
Будьте всегда в курсе!
Узнавайте о скидках и акциях первым
Как настроить портативный двд на тв
Содержание
- НАЗНАЧЕНИЕ КНОПОК УПРАВЛЕНИЯ
- НАСТРОЙКА КАНАЛОВ ТВ (на пульте)
- ПРОСМОТР DVD (на пульте)
- НАЗНАЧЕНИЕ КНОПОК УПРАВЛЕНИЯ
- НАСТРОЙКА КАНАЛОВ ТВ (на пульте)
- ПРОСМОТР DVD (на пульте)
- Описание DVD проигрывателя с ТВ-тюнером
- Особенности и характеристики
- Топ самых качественных DVD плееров со встроенным TV тюнером, по версии потребителей
- BBK PL944TI
- Gold Star PD – 10A12
- BBK PL947TI
- BBK PL747TI

Рекомендации и помощь по настройке телевизионных каналов и других функций на портативных двд-плеерах Sony LS-. с цифровым тв-тюнером DVB-T2. Краткая инструкция по настройке и назначению кнопок управления. Читать инструкцию по применению на русском языке:
НАЗНАЧЕНИЕ КНОПОК УПРАВЛЕНИЯ
 НАЗНАЧЕНИЕ КНОПОК УПРАВЛЕНИЯ
НА ПЛЕЕРЕ
VOL — ↔ VOL+ — громкость
LCD MENU – настройка экрана (изображения)
MODE – выбор режима просмотра (ТВ →AVIN →FM →DVD)
PREV – повтор воспроизведения/выбор фильма. В процессе просмотра DVD – предыдущая глава фильма
REV ↔ FVD — перемотка (назад/вперёд)
►‖ — пауза. Повторное нажатие – продолжение показа
NEXT – воспроизведение. В процессе просмотра DVD – следующая глава фильма
MENU – показ списка DVD
SETUP – настройки. Повторное нажатие – продолжение показа DVD
STOP – остановка воспроизведения
USB/CARD – выбор источника воспроизведения (USB →CARD →DVD)
НА ПУЛЬТЕ
MODE – выбор режима просмотра (ТВ →AVIN →FM →DVD)
SETUP – системные настройки
CH+/CARD/USB — выбор источника воспроизведения (USB →CARD →DVD)
VOL — ↔ VOL+ — громкость
▲/▼ – выбор фильма
◄ ◄ ↔ ► ► — перемотка назад/вперёд
I◄ ◄ — предыдущий фильм
► ►I – следующий фильм
LCD MENU – настройка изображения
SUBTITLE – выбор языка субтитров. Отключение/включение
RETURN – возврат в меню DVD
GOTO/OSD – информация о DVD
НАСТРОЙКА КАНАЛОВ ТВ (на пульте)
Кнопка «MODE» переключает режим показа — DVD→TV→AVIN
Для настройки каналов, после выбора режима TV, нажать кнопку DTV/DVD MENU и выбрать «Поиск каналов» пункт «Автопоиск» и нажать «ENTER». Плеер сам настроит и запомнит ТВ каналы и станции радио. Перед этим, в этом же пункте, выбрать «Включить антену», тогда плеер будет ловить и цифровое ТВ. В дальнейшем кнопками ▼/ ▲ можно переключать каналы.
В режиме DTV/DVD MENU настраивается системные настройки.
В режиме просмотра ТВ кнопки «OSD, GOTO, ZOOM» переключают плеер в режим радио.
Во время просмотра ТВ, кнопкой «INFO SETUP» можно посмотреть информацию о просмотре передачи (не все каналы поддерживают эту функцию). На плеере кнопки работают аналогично.
ПРОСМОТР DVD (на пульте)
Кнопкой «MODE» выбираем DVD (чтение). Кнопками ▼/▲/◄/► выбираем нужны фильм и нажимаем «ENTER».
Кнопки ◄◄ и ►► перемотка назад/вперёд, кнопки |◄◄ и ►►| переключают на раздел назад/вперёд.
Кнопка «OSD» позволяет просмотреть информацию о фильме. Кнопка «ZOOM» увеличивает изображение на экране.
В режиме просмотра, кнопкой «CARD/USB» переключается режим просмотра с карты памяти или флешки. Во время просмотра кнопка «DTV/DVD MENU» возвращает в меню диска. На плеере кнопки работают аналогично.
 ВНИМАНИЕ.
Перед просмотром DVD обязательно снять бумажную накладку в приводе!
Рекомендации и помощь по настройке телевизионных каналов и других функций на портативных двд-плеерах Sony LS-. с цифровым тв-тюнером DVB-T2. Краткая инструкция по настройке и назначению кнопок управления. Читать инструкцию по применению на русском языке:
НАЗНАЧЕНИЕ КНОПОК УПРАВЛЕНИЯ
НА ПЛЕЕРЕ
VOL — ↔ VOL+ — громкость
LCD MENU – настройка экрана (изображения)
MODE – выбор режима просмотра (ТВ →AVIN →FM →DVD)
PREV – повтор воспроизведения/выбор фильма. В процессе просмотра DVD – предыдущая глава фильма
REV ↔ FVD — перемотка (назад/вперёд)
►‖ — пауза. Повторное нажатие – продолжение показа
NEXT – воспроизведение. В процессе просмотра DVD – следующая глава фильма
MENU – показ списка DVD
SETUP – настройки. Повторное нажатие – продолжение показа DVD
STOP – остановка воспроизведения
USB/CARD – выбор источника воспроизведения (USB →CARD →DVD)
НА ПУЛЬТЕ
MODE – выбор режима просмотра (ТВ →AVIN →FM →DVD)
SETUP – системные настройки
CH+/CARD/USB — выбор источника воспроизведения (USB →CARD →DVD)
VOL — ↔ VOL+ — громкость
▲/▼ – выбор фильма
◄ ◄ ↔ ► ► — перемотка назад/вперёд
I◄ ◄ — предыдущий фильм
► ►I – следующий фильм
LCD MENU – настройка изображения
SUBTITLE – выбор языка субтитров. Отключение/включение
RETURN – возврат в меню DVD
GOTO/OSD – информация о DVD
НАСТРОЙКА КАНАЛОВ ТВ (на пульте)
Кнопка «MODE» переключает режим показа — DVD→TV→AVIN
Для настройки каналов, после выбора режима TV, нажать кнопку DTV/DVD MENU и выбрать «Поиск каналов» пункт «Автопоиск» и нажать «ENTER». Плеер сам настроит и запомнит ТВ каналы и станции радио. Перед этим, в этом же пункте, выбрать «Включить антену», тогда плеер будет ловить и цифровое ТВ. В дальнейшем кнопками ▼/ ▲ можно переключать каналы.
В режиме DTV/DVD MENU настраивается системные настройки.
В режиме просмотра ТВ кнопки «OSD, GOTO, ZOOM» переключают плеер в режим радио.
Во время просмотра ТВ, кнопкой «INFO SETUP» можно посмотреть информацию о просмотре передачи (не все каналы поддерживают эту функцию). На плеере кнопки работают аналогично.
ПРОСМОТР DVD (на пульте)
Кнопкой «MODE» выбираем DVD (чтение). Кнопками ▼/▲/◄/► выбираем нужны фильм и нажимаем «ENTER».
Кнопки ◄◄ и ►► перемотка назад/вперёд, кнопки |◄◄ и ►►| переключают на раздел назад/вперёд.
Кнопка «OSD» позволяет просмотреть информацию о фильме. Кнопка «ZOOM» увеличивает изображение на экране.
В режиме просмотра, кнопкой «CARD/USB» переключается режим просмотра с карты памяти или флешки. Во время просмотра кнопка «DTV/DVD MENU» возвращает в меню диска. На плеере кнопки работают аналогично.
ВНИМАНИЕ.
Перед просмотром DVD обязательно снять бумажную накладку в приводе!

Отличным способом расслабится и провести время с удовольствием является просмотр любимого фильма или сериала. Однако компьютер или ноутбук не всегда под рукой и не везде их можно использовать. На выручку приходит портативный DVD плеер со встроенным TV-тюнером, который позволяет наслаждаться любимым кино, где хочется и когда хочется. В чем плюсы и минусы данного устройства мы поговорим ниже.
Описание DVD проигрывателя с ТВ-тюнером
Проигрыватель с ТВ-тюнером – портативное устройство, помещенное в компактный корпус, при помощи которого пользователь может просматривать видео-контент. Такая техника удобна в длительных путешествиях, когда для компьютера или ноутбука нет места, а посмотреть любимое кино очень хочется. Современные модели позволяют не только просматривать DVD диски, но и подключаться к телевизионным каналам, за счет встроенного ТВ-тюнера. Такая техника пользуется популярностью, несмотря на большую цену и меньшее время работы между подзарядками.
Обратите внимание! При воспроизведении радиоканалов, батарея разряжается медленнее обычного.
Большинство моделей имеет опцию подключения к телевизору или компьютеру, посредством специальных переходников. Они бывают следующих видов:
- VGA кабель, подключающий устройство к персональному компьютеру, благодаря чему качество сигнала увеличивается.
- RCA кабель, с двумя или тремя разъемами. Позволяет подсоединиться к телевизору напрямую и смотреть видео на большом экране.
- S-Video. Обеспечивает передачу не только качественного изображения, но и звука.
Если поблизости нет телевизора или компьютера, это не беда. Устройство оснащено собственным дисплеем и колонками. Причем в современных моделях, особенно с большим экраном, качество картинки и звука ничем не уступают телевизионным.
В данном видео рассмотрим карманный DVD плеер:
Особенности и характеристики
При покупке портативных плееров с цифровым, или обычным TV-тюнером, обращайте внимание на следующие характеристики:
- Количество форматов, которые проигрыватель способен воспроизводить. Будет обидно купить устройство, на котором большинство форматов не читается.
- Разрешение экрана устройства. От него зависит удобство просмотра. Минусом проигрывателей с большим экраном является их вес, зато вам не придется напрягать глаза и всматриваться в детали на маленьком экране. Комфортным для просмотра считается разрешение экрана 800х420.
- Качество передаваемого звука. На первый взгляд кажется, что это не столь значимая характеристика, но вы ошибаетесь. Не забывайте о следующем нюансе – чаще всего портативный ДВД плеер используется в затяжных поездках. Такие мероприятия сопровождаются большим количеством стороннего шума, который будет мешать просмотру. Если качество звука оставляет желать лучшего, вы рискуете ничего не услышать или мешать другим чересчур громкими звуками, что не прибавит вам популярности.
- Помимо количества поддерживаемых форматов, не стоит забывать о количестве носителей, с которых эти форматы можно воспроизвести. Хорошее устройство позволяет считывать информацию не только с дисков или внешних накопителей, но и с фото и видеокамер. Это удобно и позволяет просмотреть отснятый в дороге материал на большом экране, а не в маленьком окошечке камеры.
 Насладитесь просмотром фильма с карманного плеера
- Материал, из которого изготовлен корпус, важная характеристика. Пластиковое устройство обладает малым запасом прочности, но стоит дешево и мало весит. Металлический корпус надежно защитит начинку от повреждений, но прибавит проигрывателю не только в весе, но и в цене. Есть варианты с прорезиненным корпусом, которые являются переходным звеном между пластиком и металлом. Они прочнее пластиковых, но весят меньше металлических.
- Время работы и способы подзарядки. Дешевые устройства работают по 3-4 часа, после чего их нужно заряжать. Дорогие модели работают без перебоев по 12 и более часов, позволяя пользователю не отвлекаться на долгую зарядку.
- Способ управления устройством. Качественные, дорогие модели, оснащены кнопками переключения на корпусе плеера и дистанционным пультом управления, позволяющим переключать каналы и настраивать качество картинки на расстоянии. Устройства, работающие только от пульта, могут стать проблемой, в случае выхода его из строя.
- Конструкция устройства имеет несколько вариаций: в форме книжки, слайдера или устройства с корректируемыми углами наклона экрана.
-
Дополнительные комплектующие, продающиеся вместе с устройством. Стандартный набор состоит из проигрывателя, запасной батареи аккумулятора, дистанционного пульта управления, и переходника, для соединения с персональным компьютером. Дорогие версии комплектуются наушниками, ТВ-тюнерами, специальными крепежами для фиксации плеера и сумками-переносками;
Важно! Любая дополнительная опция, идущая в комплекте с устройством, существенно увеличивает его стоимость.
Перед покупкой постарайтесь четко представить цель, ради которой вы ее совершаете. В дорогу подойдут дешевые модели, которые не жалко испортить. Их легкий вес, из-за использования дешевых материалов, также играет вам на руку. Для просмотра телевизора в автомобиле, во время остановок, желательно приобретать дорогие модели известных фирм производителей. Они будут радовать глаз не только качественной картинкой, но и гармоничным внешним видом, который не будет портить салон автомобиля.
Топ самых качественных DVD плееров со встроенным TV тюнером, по версии потребителей
Ниже будут представлены модели популярных проигрывателей, которые пользуются у покупателей повышенным спросом.
BBK PL944TI
Средняя цена за устройство колеблется в районе 5 тысяч рублей. За эти деньги вы получите:
- Плеер с экраном в 9 дюймов.
- Масса устройства – 900 грамм.
- Способ воспроизведения информации – через USB носители, DVD диски, карты памяти.
- Поддержка форматов: DivX, Xv >
- компактные размеры;
- укомплектован пультом дистанционного управления;
- простое и интуитивно понятное меню, не вызывающее затруднений при настройке;
- звук и картинка хорошего качества;
Явных недостатков не выявлено.
Gold Star PD – 10A12
Портативный ДВД плеер, заплатив за который 7 тысяч рублей покупатель получает:
- Монитор диагональю в 10 дюймов.
- Встроенный картридер.
- Поддержка форматов: DivX, XviD, Mpeg4.
- Чтение данных с USB носителей.
Сильные стороны модели:
- малый вес;
- простота эксплуатации;
- большое разрешение экрана;
- приемлемое качество изображения и звука.
- Слабая антенна ТВ-тюнера. Поймать большое количество каналов с хорошим качеством изображения задаче не из легких.
- Покрытие экрана бликует, что создает дискомфорт в некоторых ситуациях.
- Во время воспроизведения изображения с USB носителя, отсутствует опция ускоренной перемотки.
Обратите внимание! В описании устройств указывается средняя цена, которая может изменяться в большую или меньшую стоимость в зависимости от региона проживания.
BBK PL947TI
Цена устройства находится в районе 5 тысяч рублей. При весе в 1 килограмм и разрешении экран в 9 дюймов, покупатель получает продукт со следующими достоинствами:
- Качественная батарея. Долго держит заряд, благодаря чему можно не прерываться на подзарядку плеера.
- Гармоничное соотношение цены и качества сборки.
- Экран имеет функцию поворота. Пользователь имеет возможность подстроить монитор под себя.
- Антенна справляется со своими обязанностями и ловит как телевизионные, так и радиоканалы.
- Компактные размеры.
- Приятный внешний вид.
- Управление проигрывателем осуществляется исключительно с пульта управления. Дублирующих кнопок на корпусе нет и это проблема.
- Меню запутанное и с первого раза не у всех получается разобраться. Из-за этого возникают проблемы с настройкой.
 Будьте в курсе всех новостей вместе с портативным плеером
BBK PL747TI
Миниатюрное устройство, весящее всего 700 грамм при разрешении экрана в 7 дюймов. Цена плеера демократичная, всего 4 500 рублей, заплатив которые вы получаете:
- Возможность просмотра файлов формата DivX, XviD, Mpeg4.
- Чтение информации с сторонних накопителей.
- Гармоничный внешний вид.
- Качественную сборку корпуса;.
- Звук и изображение четкие, без помех.
- Батарея держит заряд долго.
- Простое и понятное меню, с которым в состоянии освоиться даже ребенок.
Недочетов как таковых нет.
Как вы видите, торговая марка BBK выпускает продукцию лучшего качества и ее модели получают лестные отзывы от пользователей. Качество продукции не падает с ценой и бюджетные модели обладают характеристиками, ничуть не уступающими качеством другим конкурентам. Другие модели также имеют достойных представителей, но их не так много, а стоят они даже дороже.
-
Contents
-
Table of Contents
-
Bookmarks
Quick Links
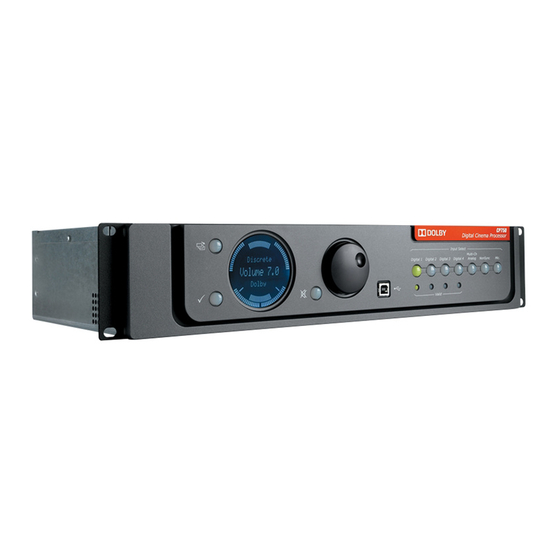
Dolby CP750 Digital
®
Cinema Processor
Manual
Issue 5
Part Number 9110270
Related Manuals for Dolby Laboratories CP750
Summary of Contents for Dolby Laboratories CP750
-
Page 1
Dolby CP750 Digital ® Cinema Processor Manual Issue 5 Part Number 9110270… -
Page 2
European Headquarters Dolby Laboratories, Inc. Wootton Bassett Wiltshire SN4 8QJ England Telephone 44‐1793‐842100 Fax 44‐1793‐842101 DISCLAIMER OF WARRANTIES: EQUIPMENT MANUFACTURED BY DOLBY LABORATORIES IS WARRANTED AGAINST DEFECTS IN MATERIALS AND WORKMANSHIP FOR A PERIOD OF ONE YEAR FROM THE DATE OF PURCHASE. THERE ARE NO OTHER EXPRESS OR IMPLIED WARRANTIES AND NO WARRANTY OF MERCHANTABILITY OR FITNESS FOR A PARTICULAR PURPOSE, OR OF NONINFRINGEMENT OF THIRD‐PARTY RIGHTS (INCLUDING, BUT NOT LIMITED TO, COPYRIGHT AND PATENT RIGHTS). LIMITATION OF LIABILITY: IT IS UNDERSTOOD AND AGREED THAT DOLBY LABORATORIES’ LIABILITY, WHETHER IN CONTRACT, IN TORT, UNDER ANY WARRANTY, IN NEGLIGENCE, OR OTHERWISE, SHALL NOT EXCEED THE COST OF REPAIR OR REPLACEMENT OF THE DEFECTIVE COMPONENTS OR ACCUSED INFRINGING DEVICES, AND UNDER NO CIRCUMSTANCES SHALL DOLBY LABORATORIES BE LIABLE FOR INCIDENTAL, SPECIAL, DIRECT, INDIRECT, OR CONSEQUENTIAL DAMAGES (INCLUDING, BUT NOT LIMITED TO, DAMAGE TO SOFTWARE OR RECORDED AUDIO OR VISUAL MATERIAL), COST OF DEFENSE, OR LOSS OF USE, REVENUE, OR PROFIT, EVEN IF DOLBY LABORATORIES OR ITS AGENTS HAVE BEEN ADVISED, ORALLY OR IN WRITING, OF THE POSSIBILITY OF SUCH DAMAGES. . Dolby, Pro Logic, and the double‐D symbol are registered trademarks of Dolby Laboratories. Surround EX Part Number 9110270 is a trademark of Dolby Laboratories. All other trademarks remain the property of their respective owners. Issue 5 © 2011 Dolby Laboratories. All rights reserved. S11/21444/24795 ® Dolby CP750 Digital Cinema Processor Manual… -
Page 3
2. Keep these instructions. 3. Heed all warnings. 4. Follow all instructions. 5. Do not use this apparatus near water. 6. WARNING: To reduce the risk of fire or electric shock, do not expose this apparatus to rain or moisture. 7. Clean only with dry cloth. 8. Do not install near any heat sources such as radiators, heat registers, stoves, or other apparatus (including amplifiers) that produce heat. 9. No naked flame sources, such as lighted candles, should be placed on the apparatus 10. Protect the power cord from being walked on or pinched particularly at plugs, convenience receptacles, and the point where they exit from the apparatus. 11. Only use attachments/accessories specified by the manufacturer. 12. Unplug this apparatus when unused for long periods of time. 13. Refer all servicing to qualified service personnel. Servicing is required when the apparatus has been damaged in any way, such as power‐supply cord or plug is damaged, liquid has been spilled or objects have fallen into the apparatus, the apparatus has been exposed to rain or moisture, does not operate normally, or has been dropped. 14. Do not expose the apparatus to dripping or splashing and no objects filled with liquids, such as vases, shall be placed on the apparatus. ® Dolby CP750 Digital Cinema Processor Manual… -
Page 4
22. To avoid exposure to dangerous voltages and to avoid damage to the unit, do not connect the rear‐panel Ethernet port to telephone circuits. 23. As the colors of the cores in the mains lead may not correspond with the colored markings identifying the terminals in your plug, proceed as follows: • The green and yellow core must be connected to the terminal in the plug identified by the letter E, or by the earth symbol , or colored green, or green and yellow. • The blue core must be connected to the terminal marked with the letter N or colored black. • The brown core must be connected to the terminal marked with the letter L or colored red. 24. This apparatus must be earthed. Fuses Warning: Check that the correct fuses have been installed. For continued protection against risk of fire, replace only with fuses of the same type and rating. WEEE PRODUCT END‐OF‐LIFE INFORMATION This product was designed and built by Dolby Laboratories to provide many years of service, and is backed by our commitment to provide high‐quality support. When it eventually reaches the end of its serviceable life, it should be disposed of in accordance with local or national legislation. For current information please visit our website at: http://www.dolby.com/environment ® Dolby CP750 Digital Cinema Processor Manual… -
Page 5
êlettrica o dʹincendio vanno osservate le seguenti misure di sicurezza: Assicurarsi che il selettore di cambio tensione sia posizionato sul valore corretto. Assicurarsi che la portata ed il tipo di fusibili siano quelli prescritti dalla casa costruttrice. Lʹapparecchiatura deve avere un collegamento di messa a terra ben eseguito; anche la connessione rete deve avere un collegamento a terra. Il cavo di alimentazione a corredo dellʹapparecchiatura deve essere collegato come segue: Filo tensione—Marrone Neutro—Blu Massa—Verde/Giallo AVISO IMPORTANTE DE SEGURIDAD Esta unidad cumple con la norma de seguridad EN60065. La unidad no debe ser expuesta a goteos o salpicaduras y no deben colocarse sobre el equipo recipientes con liquidos, como tazas de cafe. Para asegurarse un funcionamiento seguro y prevenir cualquier posible peligro de descarga o riesgo de incendio, se han de observar las siguientes precauciones: Asegúrese que el selector de tensión esté ajustado a la tensión correcta para su alimentación. Asegúrese que los fusibles colocados son del tipo y valor correctos, tal como se marca en la unidad. La unidad debe ser puesta a tierra, conectándola a un conector de red correctamente cableado y puesto a tierra. El cable de red suministrado con esta unidad, debe ser cableado como sigue: Vivo—Marrón Neutro—Azul Tierra—Verde/Amarillo VIKTIGA SÄKERHETSÅTGÄRDER! Denna enhet uppfyller säkerhetsstandard EN60065. Enheten får ej utsättas för yttre åverkan samt föremål innehållande vätska, såsom kaffemuggar, får ej placeras på utrustningen. För att garantera säkerheten och gardera mot eventuell elchock eller brandrisk, måste följande observeras: Kontrollera att spänningsväljaren är inställd på korrekt nätspänning. Konrollera att säkringarna är av rätt typ och för rätt strömstyrka så som anvisningarna på enheten föreskriver. Enheten måste vara jordad genom anslutning till ett korrekt kopplat och jordat el‐uttag. El‐sladden som medföljer denna enhet måste kopplas enligt foljande: Fas—Brun Neutral—Blå Jord—Grön/Gul BELANGRIJK VEILIGHEIDS‐VOORSCHRIFT: Deze unit voldoet aan de EN60065 veiligheids‐standaards. Dit apparaat mag niet worden blootgesteld aan vocht. Vanwege het risico dat er druppels in het apparaat vallen, dient u er geen vloeistoffen in bekers op te plaatsen. Voor een veilig gebruik en om het gevaar van electrische schokken en het risico van brand te vermijden, dienen de volgende regels in acht te worden genomen: Controleer of de spanningscaroussel op het juiste Voltage staat. Gebruik alleen zekeringen van de aangegeven typen en waarden. Aansluiting van de unit alleen aan een geaarde wandcontactdoos. De netkabel die met de unit wordt geleverd, moet als volgt worden aangesloten: Fase—Bruin Nul—Blauw Aarde—Groen/Geel ® Dolby CP750 Digital Cinema Processor Manual… -
Page 6
Regulatory Notices This symbol that appears on the unit rear panel is intended to alert the user Figure ii‐1 to the presence of uninsulated “dangerous” voltage within the product’s enclosure that maybe of sufficient magnitude to constitute a risk of electric shock to persons. Figure ii‐2 Figure ii‐3 This symbol is intended to alert the user to the presence of important Figure ii‐4 safety operating and maintenance instructions. Figure ii‐5 ® Dolby CP750 Digital Cinema Processor Manual… -
Page 7: Table Of Contents
1.3.15 Main Audio Output Connector ……………..9 1.3.16 Multi-Channel Analog Input Connector…………..9 1.4 Questions or Feedback ………………….9 Chapter 2 Installation 2.1 CP750 Floating Signal Grounds ………………11 2.2 Digital Audio Inputs………………….11 2.2.1 Consumer Interface Standards for Digital Audio…………12 2.2.2 Cable Issues ………………….12 2.2.3 Multiple Sources: Conversion Between Interface Standards………12…
-
Page 8
5.9 Managing Decode Mode Switches with v.4.2.0 Software……….39 5.10 Managing Decode Mode Switches with Prior Software …………39 5.11 Using Software to Configure the CP750 for Dolby Surround 7.1……..39 5.12 Calibration and Alignment ………………..39 5.13 Setting the Decode Mode of the CP750 …………….40 5.14 Manually Configuring the CP750 for Dolby Surround 7.1……….40… -
Page 9
8.2.2 RS-232 Serial Port ………………..66 8.2.3 Remote Fader Connector ………………66 8.2.4 4xAES IN Connector………………..67 8.2.5 Automation Connector ……………….67 8.2.6 Mic. Input Connector………………..68 8.2.7 Main Audio Output Connector…………….69 8.2.8 Multichannel Input Connector …………….69 8.2.9 RS-232 ASCII String Commands…………….71 ® Dolby CP750 Digital Cinema Processor Manual… -
Page 10
Table of Contents 8.3 Remote Commands and Control ………………71 8.3.1 Serial……………………71 8.3.2 Ethernet …………………….72 Chapter 9 Replacement Parts ………………….73 ® Dolby CP750 Digital Cinema Processor Manual… -
Page 11
Fader Characteristic ………………….5 Figure 1-4 CP750 Rear Panel……………………. 6 Figure 2-1 Star Washers and Rack-Mounting Screws…………….13 Figure 2-2 CP750 Inputs and Outputs ………………..15 Figure 3-1 Installer Welcome Screen………………..17 Figure 3-2 Running the Installer Without Administrator Privileges…………18 Figure 3-3 Action Menu……………………. -
Page 12
Mic. Input Connector Pinout ………………..68 Table 8-8 Main Audio Output Connector Pinout ………………. 69 Table 8-9 Multichannel Audio Input Connector Pinout …………….. 69 Table 8-10 ASCII String Commands …………………. 71 Table 9-1 Available Replacement Parts ………………..73 ® Dolby CP750 Digital Cinema Processor Manual… -
Page 13: Chapter 1 Introduction
• Digital satellite or cable TV receivers • Blu‐ray Disc • DVDs • PCM • Dolby Digital consumer bitstreams The CP750 provides analog audio inputs for: • An external six‐ or eight‐channel processor • A nonsync source • A public address microphone Its analog audio outputs are balanced, with a multipin connector configured to the THX standard. Built‐in Ethernet, USB, and serial interfaces accommodate PC control and cinema network connectivity. An independently adjustable global audio delay is assigned to each input to ensure that sound and picture are perfectly synchronized during digital cinema presentations. Different delays can be assigned to different inputs, providing flexibility for alternative content sources, which often require different delays. The CP750 is compatible with existing theatre automation systems and ASCII command strings. Its ability to handle multiple formats and future upgrades make it an essential tool for an evolving digital cinema market. Installation is simplified by built‐in test instrumentation that includes a real‐time analyzer and signal generators for pink noise, sweep tones, tones, and a phase check thumper. Third‐octave equalization, plus bass and treble trim controls, are provided for all channels. A digital parametric equalizer is provided for the Subwoofer channel. Easily programmed internal software manages audio settings and configuration. The full‐featured software package facilitates the setup process. ® Dolby CP750 Digital Cinema Processor Manual…
-
Page 14: About This Manual
Digital Cinema Processor Input Select Input Select Multi-Ch Multi-Ch Digital 1 Digital 1 Digital 2 Digital 2 Digital 3 Digital 3 Digital 4 Digital 4 Analog Analog NonSync Mic. Valid Figure 1-1 CP750 Front Panel ® Dolby CP750 Digital Cinema Processor Manual…
-
Page 15: Front-Panel Menu Navigation Buttons
Front-Panel Status Display Day‐to‐day operation of the CP750 is performed through interaction with the front‐panel status display shown in Figure 1‐2. Processing Display The top line displays the processing being applied to the audio. The supported processes are: • Dolby Pro Logic • Dolby Pro Logic II • Dolby Digital • Dolby Digital Surround EX • Discrete • Dolby 7.1 Volume Display The main fader level is displayed as a two‐digit number. As with previous generations of Dolby cinema processors, a fader setting of 7.0 (0 dB) is the nominal correct operating level. 7.0 matches the level used during production of the motion picture. Input Display The bottom line of the display shows the type of audio being input. Meter Display The circle of lights surrounding the display text serves as channel meters when the CP750 is in use. ® Dolby CP750 Digital Cinema Processor Manual…
-
Page 16: Mute Button
Left Processing Volume Input Subwoofer Left Surround Right Surround Figure 1-2 Front-Panel Display 1.2.3 Mute Button Pressing the mute button shown in red in Figure 1‐1 fades the audio output to all channels without disturbing the current main fader setting. Fade‐in and fade‐out speeds are separately adjustable from 0.2 to 5 seconds, using the PC setup software. The mute button flashes red when activated. 1.2.4 Main Fader Knob Use this knob to adjust the sound level. A fader reading of 7.0 is the nominal correct operating level. The main fader knob rotates continuously with no end stops. The knob is also used to adjust parameters during setup operations. When the fader knob is rotated between readings of 0 and 4.0, the output level changes in 20 dB steps between –90 and –10 dB. When the fader knob is rotated between readings 4.0 and 10, the output level changes in 3.33 dB steps between –10 and –10 dB. Figure 1‐3 shows the characteristic graph. ® Dolby CP750 Digital Cinema Processor Manual…
-
Page 17: Usb Port
Digital 2 DIGITAL 2 Selects the input signal from the 1xAES connector (BNC) Digital 3 DIGITAL 3 Selects the input signal from the 1xAES connector (S/PDIF optical) Digital 4 DIGITAL 4 1.2.7 Valid Input LEDs Each digital input push button has a green LED located beneath it. These LEDs light Valid up when the CP750 detects a valid signal on the respective input, whether or not the input is selected. and have valid signals in Figure 1‐1. Digital 1 Digital 4 ® Dolby CP750 Digital Cinema Processor Manual…
-
Page 18: Analog Inputs
LISTED AUTOMATION ANALOG INPUT Dolby, Pro Logic and the double-D symbol LINK NOT ETHERNET DIGITAL 2 DIGITAL 3 DIGITAL 4 PROFESSIONAL AUDIO are registered trademarks of Dolby Laboratories. EQUIPMENT 4J06 Figure 1-4 CP750 Rear Panel The CP750 rear panel, shown in Figure 1‐4, includes the following components: • AC input. •…
-
Page 19: Ac Input
Ethernet Port This is an illuminated RJ‐45 10/100 Base‐T Ethernet port with activity LEDs, which provides an interface to a Dolby Digital Cinema network and also ASCII string commands over TCP to port 61408. You can also use this port for setup software and firmware upgrades. 1.3.4 RS-232 Serial Port You can use this port for serial control using ASCII string commands. The equipment connected to this port should have its serial port set to 9600 baud, no parity, 1 stop bit. Use a pin‐to‐pin serial cable. The same control functions are available through the Ethernet port. 1.3.5 Remote Connector This is not an Ethernet connection, but an Ethernet cable is used to connect to the Cat. No. 868 Remote Fader. 1.3.6 4xAES IN Connector This 25‐pin female D‐connector, linked to the button, receives four AES/EBU Digital 1 streams. The four AES input signals must be time aligned with each other. Typically, this input connects to a Dolby Digital cinema server. It accommodates PCM audio at 96, 48, and 44.1 kHz, and 32 kHz (16, 20, and 24 bits) and Dolby Digital at all data rates and sample rates. The decoding of Dolby Digital is restricted to the first AES3 channel pair. This connector has a floating ground. ® Dolby CP750 Digital Cinema Processor Manual…
-
Page 20: Automation Connector
48, 44.1, and 32 kHz (16, 20, and 24 bits) and Dolby Digital at all data rates and sample rates. 1.3.10 NonSync Input Connector Two RCA jacks labeled and that accept 3 V maximum input. 1.3.11 Aux Out Connectors These analog output represents channel pair 7/8 of the 4× AES input. For the top output (labeled ), the source is channel 7 of the 4× AES input. No equalization or level control is applied. For the lower output (labeled ), the source is channel 8 of the 4× AES input. No equalization or level control is applied. These analog output connectors represent either channel pair 7/8 of the 4× AES input or the input present on the input, depending on the selected output configuration and Digital 2 the setting on the tab. HI/VI-N Options General Settings ® Dolby CP750 Digital Cinema Processor Manual…
-
Page 21: H/I Out Connector
1.3.14 Mic. Input This input is for use with a balanced output microphone. Phantom power is provided, and can be turned on and off under software control using the setup software. 1.3.15 Main Audio Output Connector This connector is an 8‐channel analog output (L, C, R, Ls, Rs, SW, Bsl, and Bsr), which is present on a male 25‐pin D‐connector (300 mV reference level). Bsl and Bsr channels are required for Dolby Digital Surround EX ™ installations. For other installations these channel can be configured to represent channel pair 7/8 of the 4xAES input. These mutually exclusive options are configured in the setup software. 1.3.16 Multi-Channel Analog Input Connector This connector is an 8‐channel analog input (L, C, R, Ls, Rs, SW, Bsl, Bsr) designed to receive 300 mV (ref) inputs from external sources and inputs on a female 25‐pin D‐connector. These inputs are balanced and floating, but the common mode voltage must not exceed ±6 V peak. Questions or Feedback If you have questions or comments about this document, please contact technical publications. ® Dolby CP750 Digital Cinema Processor Manual…
-
Page 22
If you have technical questions about this product/technology, please contact technical support. -
Page 23: Chapter 2 Installation
• BNC digital inputs: These are transformer isolated and their grounds can be 1xAES IN +10 V peak from the chassis ground. • D‐connector digital inputs: These are transformer isolated and their grounds 4xAES can be +10 V peak from the chassis ground. Note: The RS‐232 input ground is connected to the CP750 chassis ground and is not floating. Digital Audio Inputs There are two professional interface standards for digital audio transmission: AES/EBU (also known as AES3) and AES‐3id. These methods stream the same digital data and professional audio header information over copper conductor links, but use different types of conductors and connectors. AES/EBU uses a balanced connection (two conductors plus shield) with a characteristic input impedance of 110, a nominal peak‐to‐peak signal level of 5 V, and, most commonly, XLR connectors. The typical maximum transmission distance is 100 meters (328 feet). AES‐3id uses an unbalanced connection (one signal conductor plus shield) with a characteristic input impedance of 75, peak‐to‐peak signal level of 1 V, and BNC (“push and twist”) connectors. The typical maximum transmission distance is 1,000 meters (3,280 feet). Professional digital audio equipment typically uses the AES/EBU method because balanced operation yields superior noise immunity, as it does with analog audio signals, and because XLR connectors are the standard on analog professional audio equipment. Professional video equipment typically uses the AES‐3id interface, with BNC connectors. As with XLR connectors on professional audio equipment, the adoption of BNC connectors for the audio on professional video equipment stems from their use for the video signal. Also, the unbalanced AES‐3id signal can connect to more than one piece of ® Dolby CP750 Digital Cinema Processor Manual…
-
Page 24: Consumer Interface Standards For Digital Audio
For conversion between the AES‐3id and S/PDIF formats, you can use high‐quality RCA‐to‐BNC adapters because the cable and impedance are both the same (75). For conversion between the AES/EBU and AES‐3id or AES/EBU and S/PDIF formats, a simple and economical method uses inline transformers. These devices perform the necessary impedance and balanced/unbalanced conversion. Table 2‐1 shows some examples of suitable adapters. The unbalanced connector in these examples is BNC. You can add BNC‐to‐RCA adapters for connecting to consumer S/PDIF connections. The following units use passive circuitry. Table 2-1 Examples of Available Balanced/Unbalanced Adapters ® ® Adapter Type Neutrik Canare XLR female 110 in to BNC female 75 out NA‐BF BCJ‐XJ‐TRA BNC female 75 in to male XLR 110 out NA‐BM BCJ‐XP‐TRA Higher‐priced units incorporating active circuitry are also available. These offer additional features such as multiple inputs, inputs for optical connections, and multiple outputs. ® Dolby CP750 Digital Cinema Processor Manual…
-
Page 25: Mounting The Cp750
To ensure good ground contact, install a star washer on at least one (and preferably all) rack‐mounting screws as shown in Figure 2‐1. This will also aid in the prevention of electrical noise problems. Figure 2‐1 Figure 2-1 Star Washers and Rack-Mounting Screws Proper shielding and termination of cables and cable assemblies are also very important. Follow the methods shown in the wiring diagrams. Connections To connect the CP750 to your auditorium equipment, refer to Figure 2‐2. For proper operation in locations where there is considerable interference, strictly adhere to the cable types, lengths, and pin assignments. Shields must connect only to the chassis and should not be paralleled with the negative side of inputs or outputs. Connector pinouts are listed in Section 8.2. Fuse Information The CP750 uses a universal‐switching power supply that handles the full range of nominal mains voltages between 100 and 240 VAC, and any frequency between 50 and 60 Hz. If a power supply fuseinside the unit blows, do not attempt to replace it. Instead, contact Dolby Laboratories. The fuse on the unit rear panel is intended to be replaceable. If it blows, replace it with a fuse of the same type. ® Dolby CP750 Digital Cinema Processor Manual…
-
Page 26: Mains Power Wiring
Installation Mains Power Wiring In some countries, the primary mains cable may not have a connector fitted. Nonterminated leads must be properly wired to an approved mains connector in accordance with the following international code: • Brown wire: live or hot • Blue wire: neutral • Green wire: mains ground Warning: If you are uncertain about the wiring of your AC mains outlet, do not use it. Consult a qualified electrician. Cable Diagram The cable diagram for the CP750 rear panel is shown in Figure 2‐2. ® Dolby CP750 Digital Cinema Processor Manual…
-
Page 27: Figure 2-2 Cp750 Inputs And Outputs
Installation Cable Diagram Figure 2‐2 Figure 2-2 CP750 Inputs and Outputs ® Dolby CP750 Digital Cinema Processor Manual…
-
Page 29: Chapter 3 Installing, Launching, And Connecting The Setup Software
Begin by installing the software on a PC, which you can connect to the CP750 with a USB cable. System Requirements The CP750 setup software runs on Microsoft ® Windows ® XP and Windows Vista ® . Installing the Software To install the CP750 setup application: Open the folder and run . This file is named with CP750 Setup CP750Setup_x_x_x.exe the current software version number. The installer opens displaying the screen shown in Figure 3‐1. Figure 3‐1 Figure 3-1 Installer Welcome Screen Select the desired language. Follow the screen prompts. ® Dolby CP750 Digital Cinema Processor Manual…
-
Page 30: Connecting The Hardware
• You can connect directly to the connector on the unit rear panel. If your Ethernet laptop supports Gigabit Ethernet, use a standard Ethernet cable. Otherwise, use a crossover cable. • You can connect a pin‐to‐pin serial cable to the connector on the unit rear RS-232 panel. Launching the Setup Application To launch the CP750 setup application, click the Start button and scroll to Programs. In the Dolby folder, double‐click Dolby CP750 Setup. The Dolby ® CP750 setup window appears, as shown in Figure 4‐1. Connecting to a Local or Remote Device You can use the setup software menu, shown in Figure 3‐3, to connect to a local or a Action remote device. ® Dolby CP750 Digital Cinema Processor Manual…
-
Page 31: Figure 3-3 Action Menu
Connecting to a Local or Remote Device Figure 3‐3 Figure 3-3 Action Menu These options allow you to connect to a CP750 that is either connected to your PC (local device) or connected to an Ethernet network (remote device). If you select Connect to remote device the system prompts you to enter an IP address. You must change TCP/IP properties of your laptop to communicate properly with the CP750 when connecting the setup software to a CP750 using a PC Ethernet connection. We recommend the following TCP/IP settings to enable your PC to communicate with a CP750 using its default setting. IP address: 192.168.1.200 Subnet mask: 255.255.255.128 Default gateway: 192.168.1.129 Note: The CP750 default IP address (for connecting) is 192.168.1.136. ® Dolby CP750 Digital Cinema Processor Manual…
-
Page 33: Chapter 4 Configuring The Cp750 Software
Chapter 4 Configuring the CP750 Software Note: After you load a saved configuration file, you must adjust the Network tab settings to reflect the correct auditorium. Loading a Saved Configuration File is a convenient way to make these changes quickly. Using the Application Tabs to Configure a CP750 Each setup application tab controls a different part of the application function. They are discussed separately in the following sections: • Profile Tab: Lets you enter identifying information that is important for service calls and technical support. • Network/Time Tab: Lets you specify unit addresses and connections • General Settings: Lets you define a power‐on mode, a subwoofer filter frequency, and a surround delay for the CP750. • Input Settings: Lets you define attributes and processing for each input. • Alignment: Lets you optimize the sound in the auditorium. This important topic is described in detail in Chapter 4.1.1 Profile Tab When you launch and connect the CP750 setup software, the application opens with the tab active, as shown in Figure 4‐1. Profile ®…
-
Page 34: Network/Time Tab
Digital Cinema System • : Identifying information for your projector. Digital Cinema Projector • : The identifying text you enter here is repeated as the titles of the Input Descriptions tab. Input Settings Tip: Assigning clear names to the digital inputs is an easy way to prevent input selection errors. The tab displays the current network settings, but you can modify them only on the Profile tab. Network/Time 4.1.2 Network/Time Tab The tab, shown in Figure 4‐2, lets you configure the CP750 Ethernet settings Network/Time and time and date settings. The host name and IP address are echoed, read‐only, on the tab. Network Profile configuration and status are also available though the ASCII control interface. ® Dolby CP750 Digital Cinema Processor Manual…
-
Page 35: Figure 4-2 Network/Time Tab
Using the Application Tabs to Configure a CP750 Ethernet Settings By default DHCP is turned off, and entries follow the Dolby ® Digital Cinema private network address naming convention in which the third octet indicates the auditorium number: • : CP750 Host Name xxxxx • : 192.168. .136 IP Address • : 255.255.255.128 Subnet Mask • : 192.168. .129 Default Gateway If you are using the Dolby TMS you need only enter the auditorium number in the third triad of the and fields. IP Address…
-
Page 36: General Settings
4.1.3 General Settings This tab, shown in Figure 4‐3, lets you set four system attributes: • Power‐On Mode • Surround Delay • Main Output Configuration and HI/VI‐N Options • Mute Duration Figure 4‐3 Figure 4-3 General Settings Tab Power-On Mode The Power‐on Mode selects the input that is activated when the CP750 unit is powered on. You can select Last Setting, or any of the inputs. Surround Delay The setup application can calculate and set the General surround delay value based on theatre measurements entered here. Measurements may be entered in feet or meters. Click Feet or Meters to choose a unit of measure. Enter a Distance from screen to rear wall of theatre value between 0 and 200. Enter an Average distance between left and right Surround channels value between 0 and 140. Click Calculate. ® Dolby CP750 Digital Cinema Processor Manual…
-
Page 37: Input Settings
Using the Application Tabs to Configure a CP750 The General value is adjustable from 0 to 150 ms in 1 ms steps. The display shows a marker every 10 ms. After you set the general surround delay for digital material, set the Pro Logic/Pro Logic II value which is applied to analog material. The minimum value for this slider is 20 ms because this value should always be 20 ms higher than the General value. Main Output Configuration and HI/VI-N Options You can choose either of two options: • 5.1 Output Configuration (No BSL or BSR Installed): Selecting this option causes the audio on channels 7 and 8 of the 4× AES input to be routed to the Aux Output connector on the rear panel of the CP750 to support HI/VI‐N in the DCP. • Dolby Surround 7.1 /Surround EX Output Option (BSL and BSR Installed): Selecting this option enables 7.1‐channel support in the CP750, if the auditorium has back surround speakers installed. When this option is selected, you can choose to: • Disable 7/8 Aux Out: Selecting this option disables the output on the rear Aux 7/8 panel of the CP750. • Route Digital 2: Selecting this option causes the CP750 to route digital audio present on the …
-
Page 38: Figure 4-4 Digital Input 1 Tab
Global Audio Delay • Mute Main Bsl/Bsr Output Pins • Fader Preset • PCM Channel Assignment • PCM Decode Mode • PCM Processing Mode • Dolby Digital Decode Mode • Dolby Digital Dialogue Normalization Global Audio Delay The Global Audio Delay field specifies an audio delay in addition to the CP750 decoding delay of approximately 13 ms for 4× AES PCM. Use this function to synchronize the audio with the video from digital cinema projectors, which add a video processing delay. Use the up and down arrows to set the Global Audio Delay between 0 250 ms. This delay value is set independently for each digital input. Note: Systems that use an external video scaler may add another decoding delay. Mute Main Bsl/Bsr Output Pins Choose Enable to mute these pins if your auditorium does not use them. ® Dolby CP750 Digital Cinema Processor Manual…
-
Page 39
Using the Application Tabs to Configure a CP750 Fader Preset To use the Fader Preset feature, choose Enable and indicate a value on the slider. This ensures that inputs play at correct values each time they are selected. PCM Channel Assignment The analog audio output channels (L, R, C, LFE, Ls, Rs) are always fixed and hardwired to a cinema processor. However, when the input‐channel mapping of a PCM bitstream is not a default SMPTE configuration (L/R, C/LFE, Ls/Rs), you must reassign the input channels to match the hardwired audio outputs. For channel reassignment, the surround delay and the LFE filter are always tied at the output, and therefore cause no problem. To reassign the input channels, use the drop‐down Assigned To menu for each of the AES Input channels or click one of the three preset buttons (L/R C/Sw Ls/Rs; L/C R/Ls Rs/Sw; or L/Ls C/Rs R/Sw). To activate your changes, click the Apply changes button. To cancel your changes, click the Discard changes button. PCM Decode Mode You can select one of four surround channel processing options: • None • Pro Logic • Pro Logic II • Surround EX • Dolby Surround 7.1 PCM Processing Mode You have three choices of mode:… -
Page 40: Digital Inputs 2, 3, And 4
Digital Inputs 2, 3, and 4 The options available on these three tabs are identical. Figure 4‐5 shows the Digital Input 2 tab. The tab titles are repeated from the input descriptions on the Profile tab. Figure 4‐5 Figure 4-5 Digital Input 2 Tab For these inputs you can configure: • Global Audio Delay • Fader Preset • PCM Decode Mode • PCM Processing Mode • Dolby Digital Decode Mode • Dolby Digital Dialogue Normalization The options for Global Audio Delay, Fader Preset, PCM Processing Mode, Dolby Digital Decode Mode, and Dolby Digital Dialogue Normalization are identical to those on the Digital Input 1 tab. ® Dolby CP750 Digital Cinema Processor Manual…
-
Page 41: Analog Input
Using the Application Tabs to Configure a CP750 PCM Decode Mode There are three decoding options for two‐channel PCM streams: • None • Pro Logic • Pro Logic II 4.1.7 Analog Input Figure 4‐6 shows the Analog Input tab. Figure 4‐6 Figure 4-6 Analog Input Tab On this tab you can set: • Global Audio Delay • Mute Main Bsl/Bsr Output Pins • Fader Preset • PCM Channel Assignment •…
-
Page 42: Mic Input
• Format 70 Mono CS • Format 71 Mono C • Format 73 Pro Logic LCR • Format 74 Pro Logic ® with no subwoofer • Format 75 Pro Logic with a subwoofer You can also set an Input Trim using the slider. Figure 4‐7 Figure 4-7 Nonsync Input Tab 4.1.9 Mic Input On the Mic Input tab, shown in Figure 4‐8, you can choose: • Global Audio Delay • Fader Preset The options operate identically to those on other tabs. The PCM Channel Assignment field allows you to assign the microphone input to either the Center channel or the Surrounds. In the Phantom Power field, you can enable phantom power to the microphone as needed. ® Dolby CP750 Digital Cinema Processor Manual…
-
Page 43: Saving Settings In A Configuration File
.dlb Chose Save in the File menu as shown in Figure 4‐9, browse to the location on your PC where you want to save the file, enter a file name, and click Save. Figure 4‐9 Figure 4-9 Selecting Save in the File Menu To modify an existing . file and save it under a different name, open the file, then select in the menu. Save As File Loading a Saved Configuration File A CP750 can be restored from an existing configuration file. .dlb To do so, choose Open in the File menu of the setup application, browse to the desired . file on your PC, and open it. ® Dolby CP750 Digital Cinema Processor Manual…
-
Page 44: Using Expert View
Using Expert View When you choose Expert View on the Window menu, all the CP750 parameters and command strings are available as shown in Figure 4‐11.You can modify a parameter highlighted in green by double clicking it and typing a new value. To return to the tab display, reselect Expert View. Figure 4‐11 Figure 4-11 Expert View Window Updating the CP750 Firmware To update the CP750 firmware: Obtain the latest version of the CP750 setup application from Dolby Laboratories and install it on your PC. Obtain the update file from Dolby Laboratories and copy it to your PC. .dlb Connect your PC to the USB port on the CP750 front panel. Click the tab to begin the update process. The tab is shown in Software Update Figure 4‐12.. ® Dolby CP750 Digital Cinema Processor Manual…
-
Page 45: Figure 4-12 Dolby Software Update Screen
Updating the CP750 Firmware Figure 4‐12 Figure 4-12 Dolby Software Update Screen Click to find the update file on your PC, then click Browse .dlb Open Click Update. After a few seconds, a progress bar displays the status of the update process. When the process is completed, the CP750 automatically reboots with the updated firmware. ® Dolby CP750 Digital Cinema Processor Manual…
-
Page 47: Chapter 5 Playing Dolby Surround 7.1 Audio
Playing Dolby Surround 7.1 Audio Preparation of a Dolby ® CP750 Digital Cinema Processor for Dolby Surround 7.1 audio requires four steps: Upgrade the cinema processor and server software, if necessary. Make any necessary changes to the AES audio cable connecting the server and processor. Manually change the audio output of the DSP100 Dolby Show Player (if your auditorium uses one). If necessary, make changes to surround speaker wiring to accommodate Dolby Surround 7.1 audio. This chapter provides details of the setup processes for auditoriums using Dolby cinema servers. If your auditorium does not contain a Dolby cinema server, contact the server manufacturer to ensure you have 16‐channel playback capability and to obtain the necessary digital audio pinouts of the server. Sixteen ‐channel playback is required because the Back Surround Left (Bsl) and Back Surround Right (Bsr) audio channels are carried on channels 11 and 12 (AES pair 6). Required Software The Dolby Digital Cinema server requires, at a minimum, software release v.4.2.1. The CP750 requires software version 1.2.6.5 or later. Install all required software updates before proceeding. Cable Connections Each combination of server and sound processor has its own cabling requirements. Refer to the section that matches your equipment. The combinations are: • Connecting a DSP100 to a CP750 • Connecting a DSS200 to a CP750…
-
Page 48: Connecting A Dsp100 To A Cp750
Connecting a DSP100 to a CP750 The pinout is listed in Table 5‐1. Table 5-1 DSP100 Output Connector Pinout Description Description AES common 14 Channels 1/2 + Channels 1/2 − AES common Channels 3/4 + 16 Channels 3/4 − AES common 17 Channels 5/6 + Channels 5/6 −…
-
Page 49: Connecting A Dss200 To A Cp750
Connecting a DSS200 to a CP750 Dolby Surround 7.1 requires changes to the wiring of the DSS200 output cable. The pinout is listed in Table 5‐2. Table 5-2 DSS200 Audio Output Pinout Description Description AES common Channels 1/2 + Channels 1/2 − AES common Channels 3/4 + Channels 3/4 − AES common Channels 5/6 + Channels 5/6 − AES common Channels 7/8 + Channels 7/8 − AES common AES common Channels 9/10 + Channels 9/10 − AES common Channels 11/12 + Channels 11/12 − AES common Channels 13/14 + Channels 13/14 − AES common Channels 15/16 +…
-
Page 50: Update Surround Speaker Wiring
Enter is highlighted gives you the option of changing to channels 9–16. Channel Mapping Use the down arrow key to select . Highlight and press the key once. 9–16 Enter Your DSP100 is now configured to pass up to 16 channels of audio. Update Surround Speaker Wiring If your auditorium is wired to support Dolby Digital Surround EX™ audio, you do not need to make any additional changes. If your auditorium is not wired to support Dolby Digital Surround EX, you may need to make changes to the wiring and add amplifiers, as described in the CP650 Dolby Digital Surround EX Connections installation note. The sound pressure level is 82 dB for each. HI and VI-N Channels With the introduction of Dolby Surround 7.1, AES pair 4 inputs to the CP750 are required for routing the Bsl and Bsr channels into the cinema processor. If these CP750 inputs are currently being used for routing hearing impaired (HI) or visually impaired narration (VI‐N, also known as audio description) channels, an external digital‐to‐analog (D/A) converter will be required for the HI/VI‐N channels. You may use aftermarket cables or adapters to fit your installation. HI/VI‐N channels may be placed in AES pair 4 (channels 7/8) or AES pair 8 (channels 15/16) depending on territory or the configuration of the digital cinema package (DCP). For the DSP100 and CP750 combination, when configured for Dolby Surround 7.1 playback, BNC connector 4 on the rear of the DSP100 will be accessible to retrieve AES pair 8. Dolby Laboratories offers a 7.1 cable to connect the DSP100 to the CP750; the cable package also includes a dongle connector to access HI and VI‐N on AES pair 4. For the DSS200 and CP750 combination, when configured for Dolby Surround 7.1 playback, all audio connections are made on the 25‐pin D‐connector port. A custom cable or breakout board can be made to retrieve the AES pair 8 from the output of the DSS200 on pins 25 and 13, as referenced in Table 5‐2. AES pair 4 from the output of the DSS200 is on …
-
Page 51: Managing Decode Mode Switches With V.4.2.0 Software
cue. This reselects Dolby CP750 Input: Digital 1 Surround 7.1 mode. For shows containing 5.1 discrete content only, always place a CP750 Decode Mode: cue after is selected to ensure that 5.1 discrete monitoring is used. Discrete Digital Input 1 5.11 Using Software to Configure the CP750 for Dolby Surround 7.1 Using the CP750 PC setup software version 1.2.4.3 or later, connect to your CP750 and select the general settings tab. In the section, click Main Audio Output Configuration Bsl/Bsr (shown in Figure 4‐3) to select it. This configuration is required for Dolby (Surround EX) Surround 7.1 and Dolby Digital Surround EX decode modes, and applies the required …
-
Page 52: Setting The Decode Mode Of The Cp750
Dolby Surround 7.1 Note: The decode mode set here is applied whenever is selected. Digital Input 1 Ensure that the box is cleared, not checked. These channels Mute Main Bsl/Bsr Output Pins are required. 5.14 Manually Configuring the CP750 for Dolby Surround 7.1 The decode mode can also be set manually using the front‐panel interface. Digital Input 1 Push the menu button on the front panel of the CP750 (shown circled in Figure 5‐3) to place the unit into editing mode. Figure 5‐3 Figure 5-3 CP750 Front-Panel Menu Button Once in editing mode, you will be presented with the decode mode choices. Rotating the …
-
Page 53: Serial And Ethernet
is Digital Input 1 selected. Figure 5‐5 Figure 5-5 Dolby 7.1 Decode Mode 5.15 Serial and Ethernet Table 5‐3 lists the string parameters needed for ASCII control over serial or Ethernet. Table 5-3 ASCII String Commands CP750 ASCII String Parameter Action 5.1 discrete decode mode cp750.sys.pcm_2_channel_decode_mode_1 lr_discrete Dolby Surround 7.1 decode cp750.sys.pcm_2_channel_decode_mode_1 4_discrete_sur mode …
-
Page 55: Chapter 6 Aligning The Auditorium
Checking Theatre Equipment Thoroughly check the loudspeakers and power amplifiers for any sources of poor performance, using the checklists below as a guide. 6.1.1 Speakers • Check loudspeaker cable condition and confirm that the cables are the correct gauge for the impedance of the speakers and the length of the run. • Check that the speakers are connected to the correct power amp channel. • Check for leaks in the low‐frequency driver cabinet which may sound like rattles. • Check for loose bolts or other hardware. • Check the speakers with an ohmmeter. If one channel requires markedly more equalization than the other, or if one speaker overloads at lower levels than the other speakers, an open driver circuit could be the cause. In systems with pairs of drivers, one voice coil of the pair may be open but the system will still function. • Check for missing drivers or other components. • Verify that crossover settings matching the type of drivers in use and the acoustics of the theatre. The high‐frequency driver level control must be set for the best possible frequency response before you attempt any equalization. This is especially true if the system uses active crossovers with biamp equipment. • Check for proper polarity between the low‐ and high‐frequency drivers, and between the channels. • Ensure that the speakers are correctly aimed into the auditorium, and that they are not obstructed by the screen frame, struts, or other objects. ® Dolby CP750 Digital Cinema Processor Manual…
-
Page 56: Amplifiers
6.1.3 Air Conditioning If air‐conditioning noise is audible in the theatre, minimize it by: • Lubricating the motor and fan bearings • Adjusting belts and drives • Cleaning the filters or screens on the air‐conditioning returns Microphone Placement Position a microphone multiplexer in the center of the auditorium listening area. Place each microphone in the reverberant field rather than in an area that receives the most direct energy from the speakers. In addition, avoid perfect symmetry. Arrange the microphones so that they do not form a square or rectangle parallel to the sides of the room. Take care not to place any of the multiplexing microphones on the auditorium center line. Standing waves and nodes can cause measurement errors. During final SPL calibration, microphone number 1 should be placed two‐thirds of the distance from the front speakers to the rear, at the exact side‐to‐side center of the room, approximately five feet above the floor level, and rotated 45 degrees upward toward the screen. (Some multiplexer microphones are designed to be pointed directly at the ceiling.) Placement of this microphone is important for output level adjustments. Figure 6‐1 Figure 6-1 Microphone Placement for Equalization If a single microphone is used, which we do not recommend, use the number 1 position detailed above, but place it slightly off center during equalization. ® Dolby CP750 Digital Cinema Processor Manual…
-
Page 57: Initial Setup
Mic. Input rear panel. Note: Many microphones require phantom power, which can be enabled in the CP750 setup software. Initial Setup Prepare for the alignment process with the following steps: Set all the gain controls on all power amplifiers to known, repeatable settings. The preferred setting for most amplifier gain controls is the maximum. If a different setting is required in order to optimize the noise performance of the system, the controls should be locked in position or marked clearly. Caution: The following process causes the CP750 to output pink noise to the power amplifiers. The CP750 output levels may be set too high. If you are unsure of the settings on your unit, turn off the power amplifiers before calibrating SPL. Then, select and observe the present output level adjustment settings. Set up your crossovers if present. Apply power to the CP750. Launch the CP750 Setup Software, connect to the unit, and click Alignment. The software displays a warning that entering alignment mode will disturb auditorium audio. Click Continue in the warning tab that appears to begin the auditorium alignment process. The Room Levels tab appears active. Room Levels shows a summary of current settings, allows you to calibrate the internal SPL meter, allows you to choose a channel with which to work, or to adjust any channel’s level with a slider. Each increment of the displayed relative number from a value of 1 to 127, represents an increment of approximately 0.25 dB of range adjustment. Figure 6‐2 shows an example of the tab before the SPL is calibrated. ® Dolby CP750 Digital Cinema Processor Manual…
-
Page 58: Calibrating The Internal Spl Meter
Aligning the Auditorium Figure 6‐2 Figure 6-2 Alignment Tab Showing Room Levels Calibrating the Internal SPL Meter You must calibrate the internal SPL before proceeding with alignment. To start the process, click C under Signal Generator Enable to activate the Center channel. Select Pink Noise from the Signal Mode drop‐down list. Pink noise is sent to the Center channel speaker. Note: The CP750 is shipped from the factory with the Mic. Input level control set to the minimum. Check the microphone level to be sure it appears in the target range as shown in Figure 6‐2. If necessary, adjust the on the rear panel of the CP750 until the level is within Mic. Gain the target range. ® Dolby CP750 Digital Cinema Processor Manual…
-
Page 59: Initial Output-Level Adjustment
6.2. Enter the measured value into the Measured Value field. Wait while the system automatically calibrates to the room reading. The calibration is retained in CP750 memory and can be used in future alignments. However, it is advisable to recalibrate the system when rearranging microphones because the sound pressure level varies slightly with microphone placement. Initial Output-Level Adjustment Next, adjust each channel slider to make sure the pink noise is audible and to achieve a reasonable sound pressure level in the auditorium. It is not necessary to set exact levels because the levels will change slightly during equalization. Exact output level adjustment is performed after equalization. Note: For this and all other adjustments using sliders, use the slider to get close to the optimal value. Use the up and down arrow keys to make fine adjustments. 6.5.1 Setting Main Channel Levels When the CP750 is first installed, you must repeat these steps for each channel. Values are adjusted on the Channel Tune tab after a channel is chosen. Figure 6‐3 shows an example with the Center channel selected. Click a channel radio button to make it active and lock pink noise to it. Check the level indicated underneath the Channel Level slider, and move it up or down until the measured level reads 85 dB. Repeat steps 1 and 2 for the R and L channels, setting the Channel Level to 85 dB. Repeat steps 1 and 2 for the Rs, Ls, Bsr, and Bsl channels, setting each to read 82 dB. ® Dolby CP750 Digital Cinema Processor Manual…
-
Page 60: Subwoofer Levels
Aligning the Auditorium Figure 6‐3 Figure 6-3 Channel Tune Tab Showing the Center Channel 6.5.2 Subwoofer Levels After the last surround channel is adjusted, click LFE to calibrate the subwoofer. Pink noise is now present on the subwoofer channel only (140 Hz bandwidth for EQ and level setting screens). The LFE has distinct options that appear on the Channel Tune tab, as shown in Figure 6‐4. ® Dolby CP750 Digital Cinema Processor Manual…
-
Page 61: Room Equalization
Figure 6‐4 Figure 6-4 Channel Tune Tab Showing LFE EQ Initial subwoofer level setting uses a blue reference line displayed on the LFE Channel Tune tab, established from the Center channel pink‐noise level. Using the Channel Level slider, adjust the level, moving the average subwoofer RTA display to match the reference line on the screen as closely as possible. Final subwoofer level adjustments for both digital and Dolby ® Pro Logic ® signal paths are carried out later, after the room is equalized. Room Equalization Room equalization is performed using the RTA built into the CP750. The desired result is a frequency response that closely matches the “x‐curve” overlay (SMPTE 202M‐1998). Results achieved within ±3 dB of the x‐curve are considered within tolerance of the specification. Small diameter, pressure calibrated microphones are preferred for accuracy over large diameter types. Use of a microphone multiplexer will accommodate spatial averaging of different positions within the room, which is recommended for best results. Follow this sequence: Perform coarse adjustments of each channel using the Bulk EQ Bass and Treble sliders. Perform fine adjustments of each band using the 27‐band one‐third‐octave equalizer. Perform LFE channel equalization by setting the frequency, Q (width), and level of cut, using the single‐band parametric equalizer. ® Dolby CP750 Digital Cinema Processor Manual…
-
Page 62: Setting Bulk Eq
Using EQ Assist The EQ Assist feature automatically adjusts the frequency response to the x‐curve. Use this feature with care since it adjusts adjacent bands as necessary (even to extremes) to achieve the exact x‐curve. The EQ Assist feature does not adjust to room anomalies as a human operator can, avoiding overcompensation in any frequency bands. Note: If you use this feature, be sure to use it after adjusting the bass and treble bulk EQ. To prevent overcompensation for possible speaker problems, the 20, 25, 30, 40, 50, and 63 Hz, as well as the 12.5 and16 kHz, bands are not automatically adjusted. You must adjust these bands manually. 6.6.3 Making Fine Adjustments to Individual Bands Observe adjacent band effects when adjusting individual frequencies. Be aware of frequency bands that are very different from neighboring bands, and use caution so as not to overcompensate. (Major differences could be the result of a room node at the particular microphone location.) Adjust each frequency band as necessary to achieve a smooth EQ with results nearing the x‐curve overlay. The goal is to achieve (or come close to) the x‐curve without overcompensating. Remember that the SMPTE tolerance is ±3 dB, although closer results are often easily achieved. 6.6.4 Adjusting LFE Channel EQ Begin with zero cut and observe the worst peak within the spectrum. Adjust the Center slider until the frequency matches the peak, and then adjust the Cut to flatten that region. Adjust the Q (width) and Cut, until the smoothest response is achieved. ® Dolby CP750 Digital Cinema Processor Manual…
-
Page 63: Final Output-Level Calibration
Click to check other Q values for the flattest possible frequency response. Final Output-Level Calibration Once room equalization is complete, the sound pressure level in the theatre can be set accurately. 6.7.1 Main Channels If a microphone multiplexer is being used in your auditorium, move Mic 1 to room center two‐thirds back from the screen. Click the Room Levels tab to activate it. Using the sliders, set L, C, R to 85 dB, and the surround channels to 82 dB. Note: Because the sound pressure level calibration was performed earlier, a recalibration is not required unless the microphone placement has changed. Repeat the steps in Section 6.4 if necessary. 6.7.2 Subwoofer Channel Level Whereas the final sound pressure levels of the main audio channels are ideally adjusted with a single microphone two‐thirds back from screen at room center, the subwoofer channel level is best adjusted with the microphone multiplexer cycling (if available). First complete the center channel equalization and level adjustment. On the Channel Tune tab, click LFE to make it the active channel and select Pink Noise as the Signal Mode. Use the slider and arrow keys to achieve an average level of +10 dB as indicated on the spectrum analyzer. This is the “digital” level, which is always set 10 dB higher than the Center channel. ® Dolby CP750 Digital Cinema Processor Manual…
-
Page 64: Subwoofer Speaker Polarity Check
Choose a Filter Frequency to select the crossover point between your main speakers and the LFE. Use 50 Hz if your main speakers are full spectrum. Use 100 Hz otherwise. Click Phase Invert and watch the behavior of the filter frequency band. There should be a level decrease as soon as you click Phase Invert. If you do not see a decrease, the polarity of the subwoofer wiring is incorrect. Reverse the subwoofer speaker wire connections to correct it. The subwoofer polarity always resets to normal after completing this check. Phase Invert is a temporary setting for this test only. Final Sound Check Follow these steps to do a final equalization check of the auditorium. On the Room Levels tab, click Rotate under Signal Generator Enable. Choose Signal Mode Pink Noise to start pink noise. Pink noise is sent to each channel in turn, holding for five seconds at each channel. Note: Unlike the different levels used during alignment, the rotating pink noise is set to 85 dB for all channels during this test. Pressing <Enter> stops the pink noise from moving to the next channel. Pressing <Enter> again resumes pink‐noise rotation. Go to the auditorium and sit two‐thirds of the distance from the front speakers to the rear, and at the side‐to‐side center of the room. All channels should sound equally loud and have similar frequency response as the noise rotates. An SPL meter can be used to confirm accurate and equal level settings. Nonsync Level Adjustment You can adjust the Nonsync level on the Nonsync Input tab. Click the Nonsync Input tab to open it. Play a CD or other audio source on your nonsync device and adjust the slider in the setup software for the desired level in the theatre. If possible, select a recording that has a natural ambience, such as an orchestral work. ® Dolby CP750 Digital Cinema Processor Manual…
-
Page 65: Noise Floor Optimization
Noise Floor Optimization 6.10 Noise Floor Optimization Noise Floor Optimization calculates and utilizes any available leftover capacity in each channel to improve the overall noise floor of the CP750. It operates by measuring the extent to which the unit uses the available headroom in the B‐chain, then boosts the overall gain to use all available headroom. The analog output level trims are then reduced by the amount of that boost, resulting in an optimally reduced noise floor. This adjustment also factors in the headroom available to the fader. Changes to the output trim values are transparent to the user, and no changes will be seen in the fader values in the setup software. Clipping may occur on high level signals if the fader is set above 7.0. ® Dolby CP750 Digital Cinema Processor Manual…
-
Page 67: Chapter 7 Remote Control And Monitoring
Status Monitoring and Level Control in the Setup Software The virtual status monitor at the bottom of the setup software screens shown in Figure 7‐1 provides a user‐friendly interface. Its signal‐presence meter monitors the CP750 analog output. There is a virtual input selector for each CP750 input. Clicking any of these buttons activates the associated input. Each of the digital input virtual buttons has an associated virtual LED, indicating a valid signal. The software also echoes the state of the front‐panel display and fader. Any action available at the unit front panel can be executed through the remote software. Figure 7‐1 Figure 7-1 Virtual Status Monitor ASCII Control Full control of the CP750 is available through a set of ASCII commands and queries. No error correction (CRC), sync bytes, or protocol is applied to this interface. 7.2.1 Connections ASCII commands can be communicated over any of three ports: • The connector supports standard 9‐pin serial connections to PC serial ports RS-232 and other RS‐232 devices. It operates at 9600 baud with 8 data bits, 1 stop bit, no parity, and no flow control. It cannot be invoked while the serial data port is in use by the CP750 setup program. ® Dolby CP750 Digital Cinema Processor Manual…
-
Page 68: Command Syntax
7.2.3 Command Set The set of serial commands is listed in Table 7‐1. Table 7-1 Normal Commands Parameter Name Valid Values Description and Comments 1.2.8.3 cp750.sysinfo.version 0, 1 cp750.ctrl.calc_surround_delays 0, 1 cp750.ctrl.default_params –100 to 100 cp750.ctrl.fader_delta 0, 1 cp750.ctrl.log_erase 0 to 2147483647 cp750.ctrl.log_uptime 0 to 2147483647 cp750.ctrl.reboot 0 to 170 cp750.sys.analog_global_delay ® Dolby CP750 Digital Cinema Processor Manual…
-
Page 69
0, 1 cp750.sys.fader_preset_a_enable 0 to 100 cp750.sys.fader_preset_m 0, 1 cp750.sys.fader_preset_m_enable 0 to 100 cp750.sys.fader_preset_n 0, 1 cp750.sys.fader_preset_n_enable n_a | off | on cp750.sys.full_ascii_ctrl 0, 1 cp750.sys.input_7_8_mute 0, 1 cp750.sys.input_7_8_mute_1 0, 1 cp750.sys.input_7_8_mute_a analog | dig_1 | dig_2 | dig_3 cp750.sys.input_mode | dig_4 | last | mic | non_sync [ip.ip.ip.ip nm.nm.nm.nm cp750.sys.ip_setting gw.gw.gw.gw| off|on hostname] 0, 1 cp750.sys.log_content 0 to 170 cp750.sys.mic_global_delay center | surrounds cp750.sys.mic_route 0, 1 cp750.sys.mute ® Dolby CP750 Digital Cinema Processor Manual… -
Page 70
0–147483647 cp750.sys.screen_distance 0–147483647 cp750.sys.serial_number 50 to 100 cp750.sys.subwoofer_filter 0, 1 cp750.sys.surround_boost 0, 1 0, 1 cp750.sys.surround_boost_a 0 to 150 cp750.sys.surround_delay cp750.sys.time 1 to 60 cp750.sys.time_update_int 4_discrete_sur | auto | invalid cp750.sys.two_channel_decode_mode | lr_discrete | n_a | prologic | prologic_2 | surround_ex Prints most recent log events dump_log_4096 Prints entire log dump_log help status Basic query format cp750.<category>.<parameter> ? exit ® Dolby CP750 Digital Cinema Processor Manual… -
Page 71: Snmp
Other Standard MIBs Supported Sections RFC2006 MIP‐MIB, faRegistration group RFC 4292 IP‐FORWARD‐MIB ipForward, inetCidrRoutNumber, inetCidrRouteDiscards, inetCidrRoute table Table 7-4 V3 MIBS RFC 3411 SNMP‐FRAMEWORK MIB RFC 3412 SNMP‐MPD‐MIB RFC 3413 SNMP‐TARGET‐MIB, SNMP‐NOTIFICATION‐MIB, SNMP‐PROXY‐MIB RFC 3414 USM‐MIB RFC 2786 USM‐DH‐OBJECTS‐MIB RFC 3415 VACM‐MIB RFC 3417 SNMPv2‐TM mib RFC 3584 SNMP‐COMMUNITY‐MIB In addition, the CP750 supports local SNMP variables, listed in the DOLBY‐CP750‐MIB. All Dolby ® MIBs are available on the Dolby Digital Cinema Resources CD, and from sales representatives and technicians. ® Dolby CP750 Digital Cinema Processor Manual…
-
Page 73: Chapter 8 Technical Reference
Digital Input 2, Digital Input 3 1× AES, male BNC connector, unbalanced but floating, per AES‐3id‐1995/SMPTE 276M Input impedance: 75 Digital Input 4 Optical Toslink ™ connector for digital input Multichannel Analog Input Eight‐channel, balanced analog, 10 kdifferential input impedance, 300 mV reference level 25‐pin female D‐connector NonSync Input Two‐channel, RCA connector, 21 k input impedance, adjustable input level Microphone Input XLR connector, standard pinout, 10 kdifferential input impedance, 12 V phantom power available, adjustable gain 8.1.2 Audio Outputs Main Audio Output Eight‐channel, balanced analog, 100 differential output impedance, 25‐pin male D‐connector Do not load with less than 600 differential. ® Dolby CP750 Digital Cinema Processor Manual…
-
Page 74: Other Input/Output
Note: This fixed level output has no EQ and is not controlled by either the fader or mute controls. H/I Output One‐channel, unbalanced analog, 70 mV fixed reference level, 100 output impedance, RCA connector, center‐weighted sum of Left, Center, Right 8.1.3 Other Input/Output Ethernet Port RJ‐45 for network connection and PC setup software Automation Port 25‐pin female D‐connector, floating ground RS-232 Port 9‐pin female D‐connector Remote Port RJ‐45 connector for optional Cat. No. 868 Remote Fader (not an Ethernet connection) Backup Power Connector For optional Cat. No. 994 External Power Supply AC Mains Input Unswitched IEC power inlet module USB Port For connection to PC to run setup software ® Dolby CP750 Digital Cinema Processor Manual…
-
Page 75: Audio Processing
Dolby Pro Logic II Left, Center, Right, Left Surround, Right Surround (subwoofer optional) Dolby Surround EX Left, Center, Right, Left Surround, Back Surround, Right Surround, subwoofer Dolby Surround 7.1 Left, Center, Right, Left Surround, Right Surround, Back Surround Left, Back Surround Right, subwoofer Nonsync Left, Right, Surround (subwoofer optional) 8.1.5 Other Parameters Global Audio Delay Adjustable delay of all channels from 0–250 ms; each input may be adjusted separately Surround Delay Digital Surround delay, 0–150 ms Dolby ® Pro Logic ® Surround delay, 20–150 ms Equalization Eight‐channel one‐third‐octave plus parametric for subwoofer channel Dynamic Range 105 dB clip to CCIR/AMR weighted typical without noise optimizer enabled ® Dolby CP750 Digital Cinema Processor Manual…
-
Page 76: Optional Accessories Ordered Separately
8.1.9 Dimensions and Weight Width: 17 in (432 mm) Height: 3.5 in (89 mm) Overall depth, including connectors and fader knob: 10.6 in (269 mm) Depth behind rack ears, including connectors: 9.75 in (248 mm) Weight: 9.4 lb (4.2 kg) 8.1.10 PC Connection Ethernet USB port for setup operations and software upgrades 8.1.11 Input Selector Buttons Four digital input source buttons Eight‐channel analog input Nonsync input Mic input 8.1.12 Indicators Valid LEDs indicate digital input clock presence for each digital input LCD front‐panel indicates PCM or Dolby Digital processing Pro Logic II, Pro Logic, or Discrete decode modes indicated by LCD text 8.1.13 Environmental Conditions Operating: 0°C to 40°C (32°F to 104°F) Nonoperating (storage): 0°C to 85°C (32°F to 185°F) Humidity: 20 to 80 percent relative, noncondensing ® Dolby CP750 Digital Cinema Processor Manual…
-
Page 77: Regulatory Notices
Eight‐channel balanced floating analog output: DB‐25 M MAIN AUDIO OUTPUT L, C, R, Ls, Rs, Sw, 7, 8 MIC. INPUT 3‐pin, female XLR connector XLR F MULTI-CHANNEL Eight‐channel balanced floating analog input for DB‐25 F ANALOG INPUT external processor, such as a Dolby DA20 8.2.1 Backup Power Connector Figure 8‐1 Figure 8‐2 Figure 8-1 Backup Power Connector Detail ® Dolby CP750 Digital Cinema Processor Manual…
-
Page 78: Rs-232 Serial Port
Connected to pin 7 No connection 8.2.3 Remote Fader Connector Figure 8‐4 Figure 8-2 Cat. No. 868 Remote Fader Connector Detail Table 8-4 Remote Fader Connector Pinout RJ-45 Pin Fader Connection TX– +15 V No connection RX– Ground No connection ® Dolby CP750 Digital Cinema Processor Manual…
-
Page 79: 4Xaes In Connector
No connection No connection AES common No connection No connection 8.2.5 Automation Connector This is a female 25‐pin D‐connector. To assert a CTRLx pin, connect it to pin 12. All output voltages and current are with respect to pin 12. Table 8-6 Automation Connector Pinout D-Connector Connection Description CTRL0 – Automation Read Digital 1 button CTRL1 – Automation Read Digital 2 button CTRL2 – Automation Read Digital 3 button CTRL3 – Automation Read Digital 4 button CTRL4 – Automation Read Multichannel Analog button CTRL5 – Automation Read Nonsync button CTRL6 – Automation Read Microphone button ® Dolby CP750 Digital Cinema Processor Manual…
-
Page 80: Mic. Input Connector
ID7 – Tally Output Unused No connection Mute indicator (Low = muted) Output No connection No connection 8.2.6 Mic. Input Connector This is a 3‐pin female XLR connector. Figure 8‐5 Figure 8-3 Mic. Input Connector Detail lMain Audio Ouput and Multi‐Channel Audio Input Connectors Table 8-7 Mic. Input Connector Pinout XLR Pin Signal Shield + Signal – Signal ® Dolby CP750 Digital Cinema Processor Manual…
-
Page 81: Main Audio Output Connector
Chassis C– Chassis R– Chassis Chassis 8.2.8 Multichannel Input Connector The pinout is described in Table 8‐9. The connector is MULTI-CHANNEL AUDIO INPUT female, pin 1 is at the upper right. Table 8-9 Multichannel Audio Input Connector Pinout D-Connector Signal Name Chassis Bsl– Chassis Bsr– Chassis Chassis ® Dolby CP750 Digital Cinema Processor Manual…
-
Page 82
Technical Reference Table 8-9 Multichannel Audio Input Connector Pinout (continued) D-Connector Signal Name Ls– Rs– SW– Chassis L– Chassis Bsl+ C– Chassis Bsr+ R– Chassis Chassis ® Dolby CP750 Digital Cinema Processor Manual… -
Page 83: Rs-232 Ascii String Commands
0–150 CP750.sys.surround_delay Returns list of commands help Returns all parameter status status extract event log mfg_print_log Legacy ASCII Strings Parameter or Action dig_1 input mode (DMA8 legacy string) 4xaes_input dig_2 input mode (DMA8 legacy string) aes_input dig_4 input mode (DMA8 legacy string) optical_input film input mode (DMA8 legacy string) film Remote Commands and Control The CP750 is designed for remote communication using serial or Ethernet connections. 8.3.1 Serial ASCII character strings sent to the rear‐panel serial port can be used to set CP750 parameters and obtain current CP750 status information. The currently available remote commands are listed in Table 8‐10. ® Dolby CP750 Digital Cinema Processor Manual…
-
Page 84: Ethernet
Serial Communication Connections can be made from the CP750 rear‐panel serial port to a PC serial port or other RS‐232 device. The serial port speed on your PC should be set to 9600 baud, 8 data bits, no parity, 1 stop bit. After the CP750 is powered on, the commands can simply be typed from a program such as HyperTerminal. 8.3.2 Ethernet ASCII character strings can be sent through telnet to set CP750 parameters and obtain current CP750 status information. The currently available remote commands are listed in Table 8‐10. Ethernet Communication Default CP750 Ethernet Parameters IP Address: 192.168.1.136 Subnet Mask (Netmask): 255.255.255.128 Gateway: 192.168.1.129 ASCII control over TCP command strings must be sent to port 61408. DHCP is off.
-
Page 85: Chapter 9 Replacement Parts
Chapter 9 Replacement Parts The replacement parts described in Table 9‐1 may be ordered from Dolby Laboratories. Table 9-1 Available Replacement Parts Part Number Type Description 8310110.01 CBL 4XAES 7.1 DSP100‐CP750 12 12‐foot 7.1 audio cable from DSP100 to CP750 8310160.01 CBL 4XAES 7.1 DSS200‐CP750 12 12‐foot 7.1 audio cable from DSS200 to CP750 8310170.02 CBL 4XAES 7.1 DSS200‐CP750 25 25‐foot 7.1 audio cable from DSS200 to CP750 4901490 Replacement power supply ® Dolby CP750 Digital Cinema Processor Manual…
Шасси: LMD-750D DVD MAIN Ver-1.3
Состав MAIN:
U8,U9 — ACT4060
U10 — AMS1117
U19 — EUA6011A
U18 — A2308
U17 — 74HC4052B
U12 — SA5954
U15 — 24C16
U11 — MT1389DE
0802-PDAL (MT1389PDAL)
U14 — 29LV160
RAM — HY57V641620FTP-7
U18 — 4053
U20 — 4558
U21 — ID97C
Тюнер — QSD-MT-S77
Оптика — HOP-1200W
Шасси платы батареи: XRT-750D MBT-BT-2017C
IC — 4953
Шасси платы LCD: NEW SUN LMD-750D DC/DC Ver-1.1
U1 — F071SK 32020M
Матрица — AT070TN07 V.A
Прошивки 29LV160 и 24C16 — http://tele-sat.ru/forum/showthread.php?t=2258 или http://remont-aud.net/board/175-1-0-224