
Как сделать оружие

Самодельное оружие это одна из излюбленных забав мальчишек всех возрастов. Конечно же, можно играть в войнушку и готовыми пластмассовыми пистолетами, но самостоятельно сделанные образцы это ведь еще и творчество и развитие полезных навыков.
Когда то, оружие делали из дерева и других подручных материалов. Но с приходом конструктора лего все изменилось. Теперь вы сможете собрать себе практически что угодно, было бы желание и необходимые детали.
Граната
Оружие не обязательно должно быть огнестрельным, из простых кубиков лего вы сможете собрать самую настоящую гранату. С чекой и всем прочим. А если ее посильнее зашвырнуть куда-нибудь, то она прямо как настоящая разлетится на куски.
Дробовик
Для защиты на близких расстояниях сложно придумать что либо лучше чем проверенный временем дробовик. Это оружие обладает поразительной убойной силой. Собрать свой собственный экземпляр будет не сложно, правда понадобится по больше деталек чем на гранату, но зато результат того стоит.
Пулемет
Разобравшись с метательным оружием и оружием ближнего боя можно переходить к тяжелой артиллерии. Если вам срочно нужно укрепить позицию на который вы стоите, то лучше всего использовать для этой цели стационарный пулемет.
Это оружие обладает огромной мощностью и скорострельностью, что способно запросто из изменить баланс сил во время сражения.
Introduction: My Small Machine Gun From LEGO
This is my first small project on Instructables. I have seen similar and nice projects so I wanted to try it myslef. Enjoy and let me know how you like it.
Step 1: Parts
Just couple of pieces from your lego!
Step 2: Main Body
Step 3: Barrel
Step 4: Sights
Step 5: Support
Be the First to Share
Recommendations
3 Comments
Nice gun
Cool.
Nice design. Thanks for sharing.
АК-47 АВТОМАТ КАЛАШНИКОВА | ЛЕГО ИНСТРУКЦИЯ В LDD
АПС АВТОМАТИЧЕСКИЙ ПИСТОЛЕТ СТЕЧКИНА | ЛЕГО ИНСТРУКЦИЯ В LDD
ВИНТОРЕЗ ВСС | ВИНТОВКА СНАЙПЕРСКАЯ СПЕЦИАЛЬНАЯ | ЛЕГО ИНСТРУКЦИЯ В LDD
ГАУСС № 62 ВИНТОВКА | ЛЕГО ИНСТРУКЦИЯ В LDD
ЛЕГО | 9А91 + ВСК-94 | СТРЕЛЯЕТ
ЛЕГО БУЛЛ-ПАП | МЕХАНИЗМ | ИНСТРУКЦИЯ В LDD
ПП-2000 ПИСТОЛЕТ- ПУЛЕМЕТ | ЛЕГО ИНСТРУКЦИЯ В LDD
СВД | CНАЙПЕРСКАЯ ВИНТОВКА ДРАГУНОВА | ЛЕГО ИНСТРУКЦИЯ В LDD
BREN L4A3 ПУЛЕМЁТ | ЛЕГО ИНСТРУКЦИЯ В LDD
CUDA ПИСТОЛЕТ- ПУЛЕМЕТ | ЛЕГО ИНСТРУКЦИЯ В LDD
FN P-90 ПИСТОЛЕТ — ПУЛЕМЕТ | ЛЕГО ИНСТРУКЦИЯ В LDD
L-96 AWP СНАЙПЕРСКАЯ ВИНТОВКА | ЛЕГО ИНСТРУКЦИЯ В LDD
LEGO MAKAROV PM RUBBER-BAND GUN
LEGO MAUSER KAR-98 4 POINTS SHELL EJECTED
M-14 EBR МЕХАНИЗМ КАРТИНКИ
M-79 | ГРАНАТОМЁТ | ЛЕГО ИНСТРУКЦИЯ В LDD
P — 99 WALTHER ПИСТОЛЕТ | ЛЕГО ИНСТРУКЦИЯ В LDD
SIG P-226 ПИСТОЛЕТ | ЛЕГО ИНСТРУКЦИЯ В LDD
TAR — 21 АВТОМАТ | ЛЕГО ИНСТРУКЦИЯ В LDD
TYPE-88 ПУЛЕМЁТ С ЛЕНТОЙ | ЛЕГО ИНСТРУКЦИЯ В LDD
В этой папке нет файлов.Чтобы добавить файлы, войдите в аккаунт

Лего арбалет из тф2
Скачать

Пушки из лего самоделки инструкция
Скачать

LEGO оружие самоделки
Скачать

LEGO Desert Eagle instruction
Скачать

Лего Калашников набор BRICKARMS
Скачать

LEGO Скорпион инструкция
Скачать

LEGO оружие для человечков самоделки
Скачать

Лего пистолет стреляющий инструкция
Скачать

Легкий пистолет из лего
Скачать

Лего пистолет стреляющий
Скачать

Пистолет п350 из лего
Скачать

LEGO пулемет схема сборки
Скачать

Лего самоделки 6п пистолет
Скачать

Лего оружие из КС го для человечков
Скачать

Лего ВСС Винторез
Скачать

Пушка лего пистолет м1911
Скачать

Автомат из конструктора
Скачать

LEGO World Racers Buggy 2010 30032
Скачать

Лего оружие схема сборки
Скачать

Оружие из Апекс лего
Скачать

Лего фамас для минифигурок
Скачать

Лего пистолет Макарова чертеж
Скачать

LEGO 6889 инструкция
Скачать

Лего пистолет стреляющий инструкция
Скачать

Лего машинка 7737 схема сборки
Скачать

Схемы из деталей LEGO Technic
Скачать

Лего пулемет инструкция по сборке
Скачать

Инструкция лего пистолета дигл
Скачать

Лего пулемет Максим самоделка
Скачать

Лего Сити схемы сборки машин
Скачать

Лего снайперская винтовка для минифигурок
Скачать

Лего нёрф самоделки
Скачать

Машинки лего дупло схемы сборки
Скачать

Автомат из пластилина
Скачать

Шлагбаум из LEGO WEDO 2.0
Скачать

Лего оружие самоделки
Скачать

Схема сбора машины из лего
Скачать

Лего пистолет инструкция
Скачать

Лего деталь пистолета Макарова
Скачать

LEGO Mini Shotgun
Скачать

Оружие из пластилина
Скачать

Лего пулемет Максим самоделка
Скачать

LEGO Gun instructions
Скачать

LEGO оружие самоделки
Скачать

Лего пистолет через LDD
Скачать

LEGO Makarov Pistol
Скачать

Скачать

Скачать

5 месяцев назад

2 года назад
")
2 года назад

1 год назад

5 лет назад
")
2 года назад

4 года назад

2 года назад

3 года назад

2 года назад

2 года назад

1 год назад
")
2 года назад

2 года назад

2 года назад

2 года назад
")
2 года назад

1 год назад

5 лет назад
")
3 года назад
")
8 лет назад

3 года назад
")
2 года назад

2 года назад
![Инструкция пистолета-пулемёта. Часть вторая - Основа [Lego]](https://images.mixrolik.ru/image/NqD9qEFdfFQ/instruktsiya-pistoleta-pulemiota-chasty-vtoraya-osnova-lego.webp "Инструкция пистолета-пулемёта. Часть вторая - Основа [Lego]")
6 лет назад

7 лет назад

2 месяца назад
 инструкции как сделать в описании")
2 года назад

4 года назад

7 месяцев назад

9 лет назад

1 год назад

3 года назад

2 года назад

3 года назад
")
5 лет назад

6 лет назад

1 год назад

1 год назад

2 года назад

3 года назад

5 месяцев назад

3 года назад

2 года назад

3 года назад

3 года назад

2 года назад

1 год назад
")
2 года назад

5 лет назад
Как сделать оружие
Самодельное оружие это одна из излюбленных забав мальчишек всех возрастов. Конечно же, можно играть в войнушку и готовыми пластмассовыми пистолетами, но самостоятельно сделанные образцы это ведь еще и творчество и развитие полезных навыков.
Когда то, оружие делали из дерева и других подручных материалов. Но с приходом конструктора лего все изменилось. Теперь вы сможете собрать себе практически что угодно, было бы желание и необходимые детали.
Граната
Оружие не обязательно должно быть огнестрельным, из простых кубиков лего вы сможете собрать самую настоящую гранату. С чекой и всем прочим. А если ее посильнее зашвырнуть куда-нибудь, то она прямо как настоящая разлетится на куски.
Дробовик
Для защиты на близких расстояниях сложно придумать что либо лучше чем проверенный временем дробовик. Это оружие обладает поразительной убойной силой. Собрать свой собственный экземпляр будет не сложно, правда понадобится по больше деталек чем на гранату, но зато результат того стоит.
Пулемет
Разобравшись с метательным оружием и оружием ближнего боя можно переходить к тяжелой артиллерии. Если вам срочно нужно укрепить позицию на который вы стоите, то лучше всего использовать для этой цели стационарный пулемет.
Это оружие обладает огромной мощностью и скорострельностью, что способно запросто из изменить баланс сил во время сражения.
-
20/07/2022
09/11/2022 - Construction Equipment, Creations for sale, Free Building Instructions, Original Creations, Pro-Instructions, Trucks
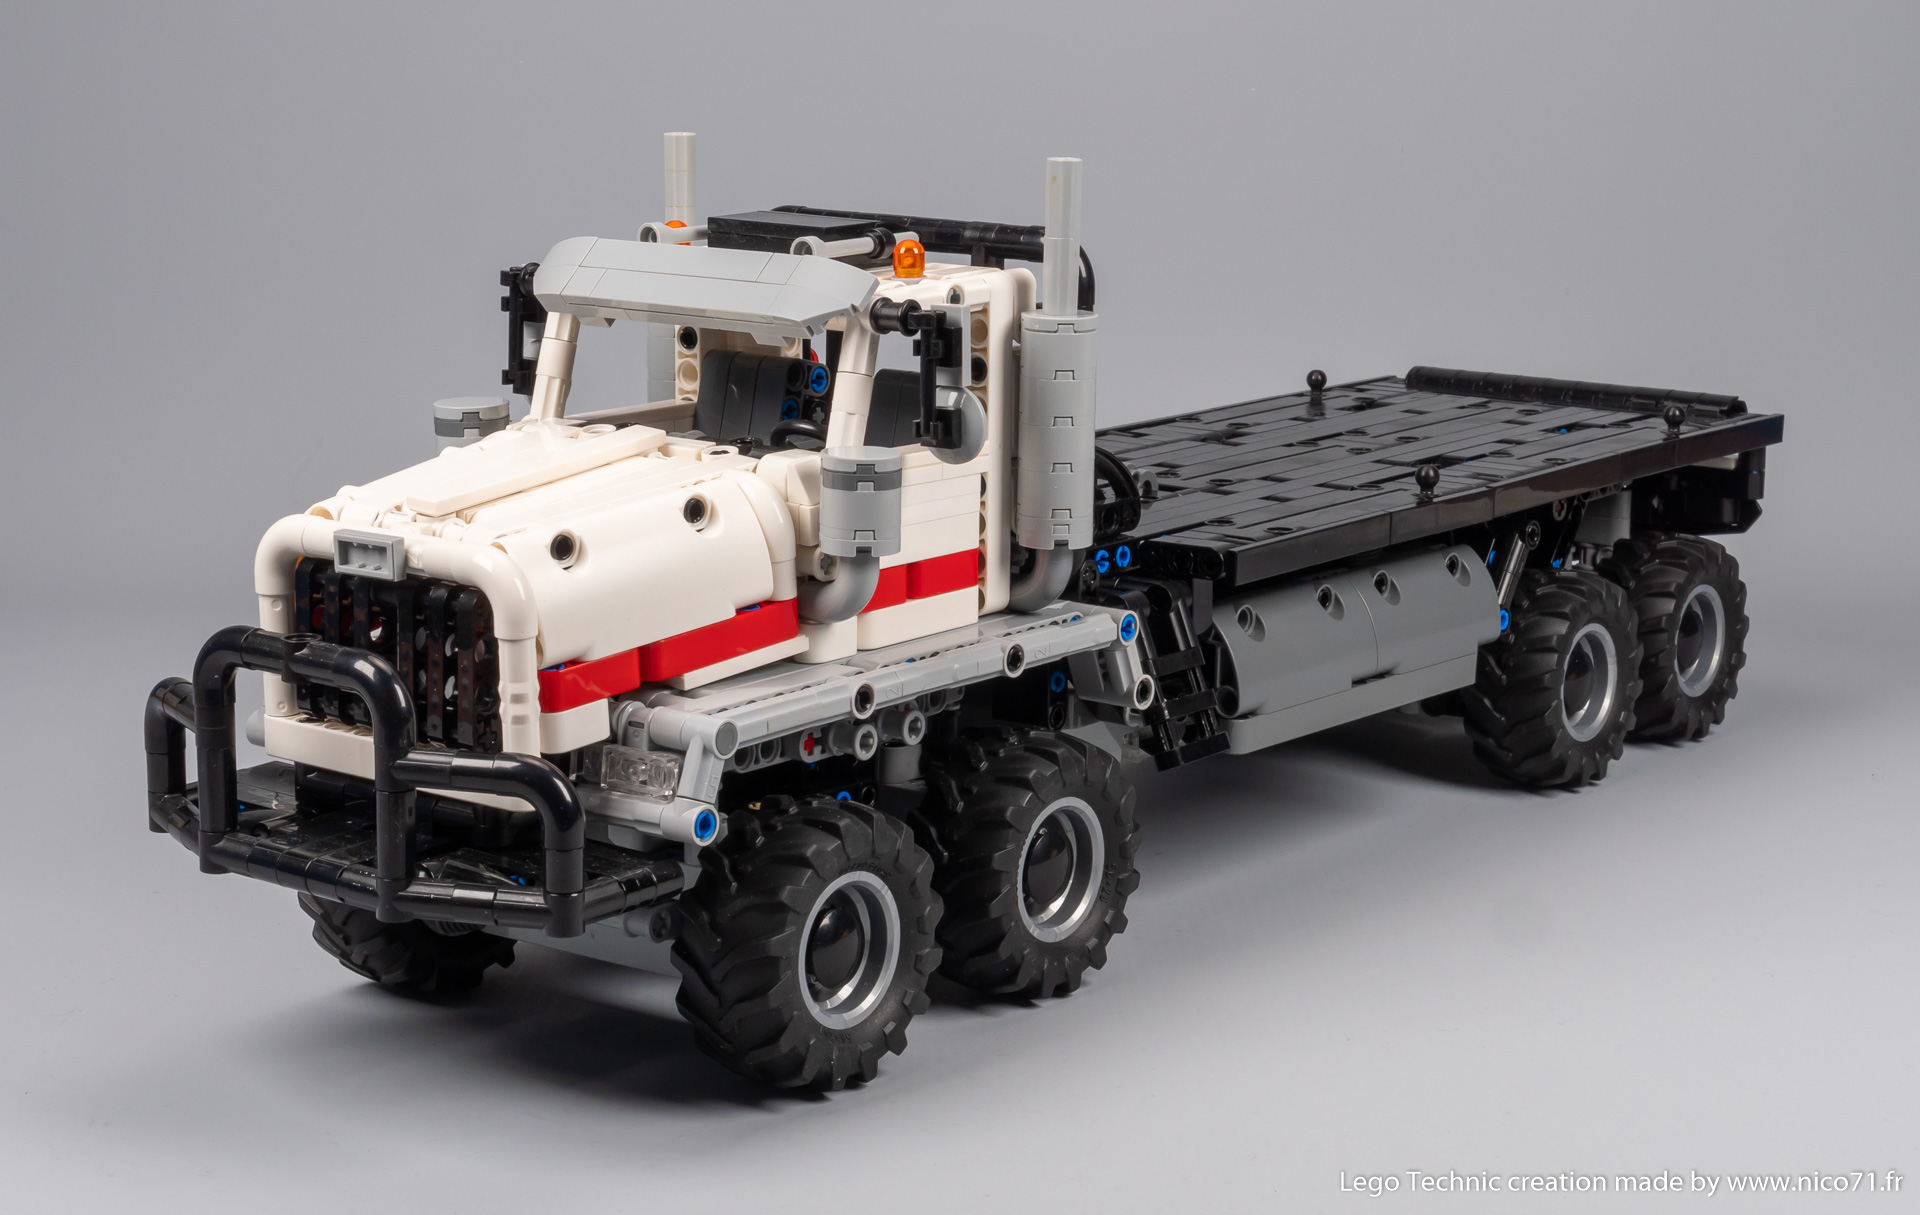
A Western Star 6900 Twinsteer made in Lego Technic. Remote controlled using Control+ and PoweredUp App for the drive, steering and winch. Tandem bogies suspensions with oscillating arm, removable hood with fake working engine, and openable doors complete the model, as well as a mud pump as the load. With Building instructions….
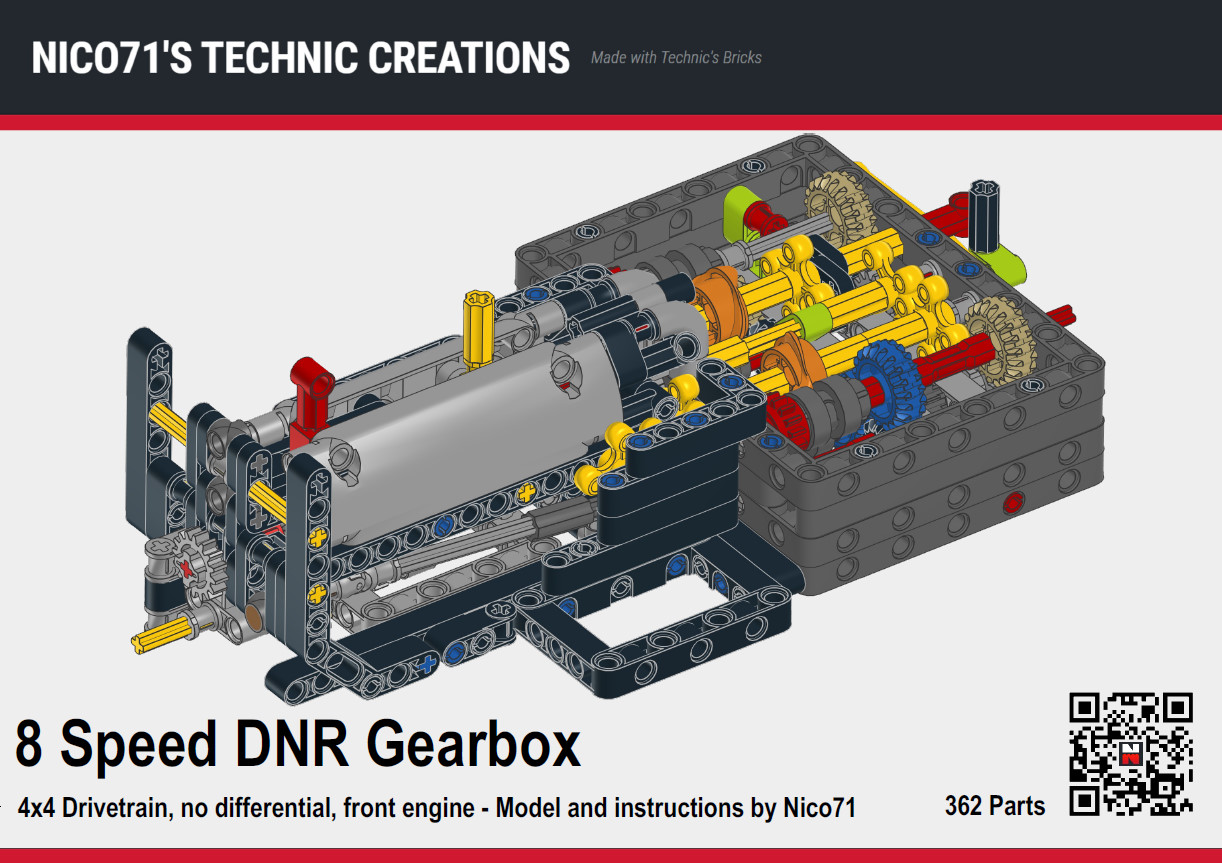
8 Speed sequential gearbox with DNR selector
-
22/03/2022
09/11/2022 - Cars, Free Building Instructions, Miscellaneous, Original Creations, Pro-Instructions
Free instructions of the 8 speed sequential gearbox issued from my 42115 Alternate – Ford F150….
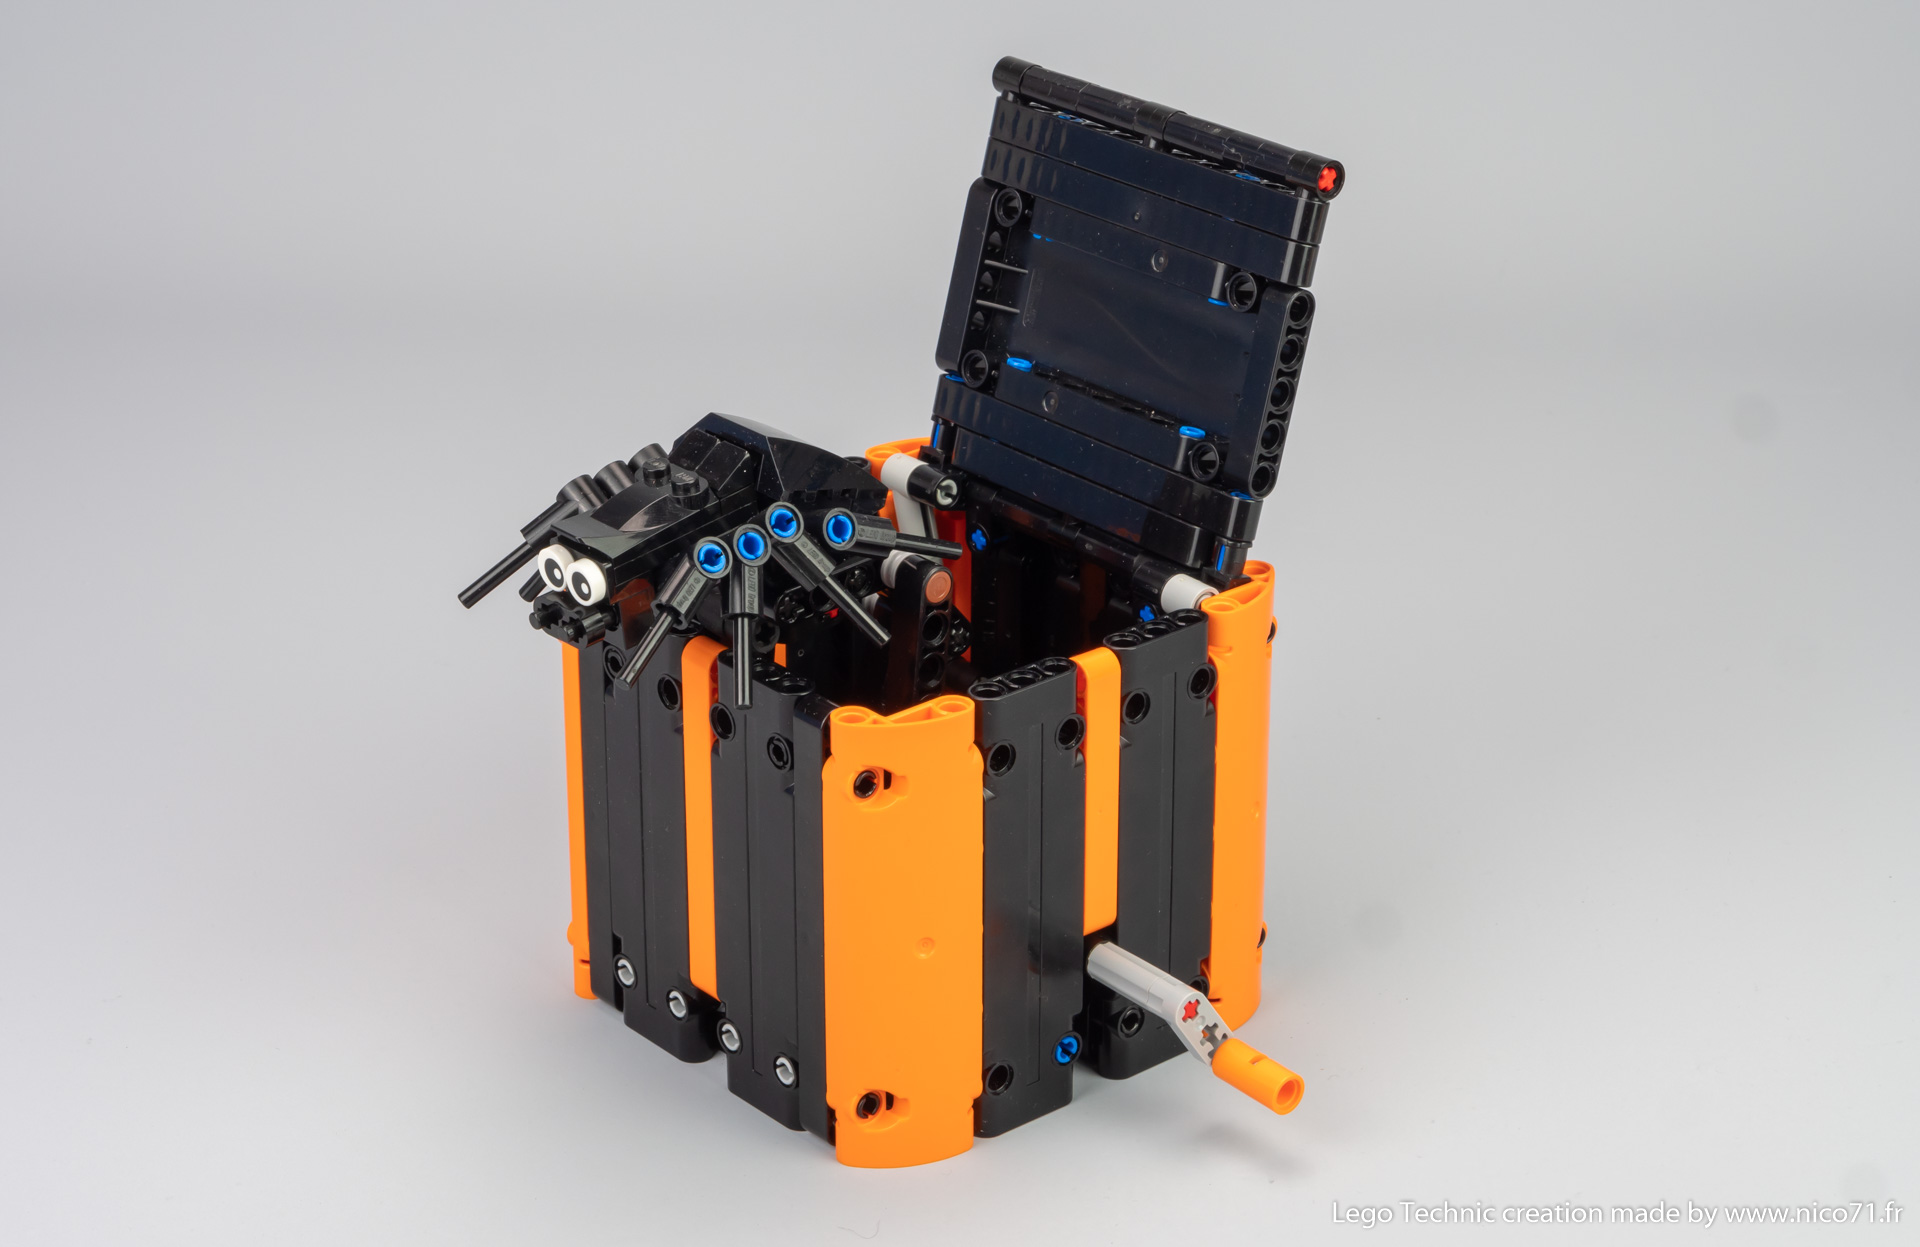
Halloween Spider Box
-
25/10/2021
09/11/2022 - Creations for sale, Free Building Instructions, Machine, Original Creations, Pro-Instructions
A Halloween creation : a box which contains a jumping spider revealed by a turning crank. With free video tutorial and pro building instructions….
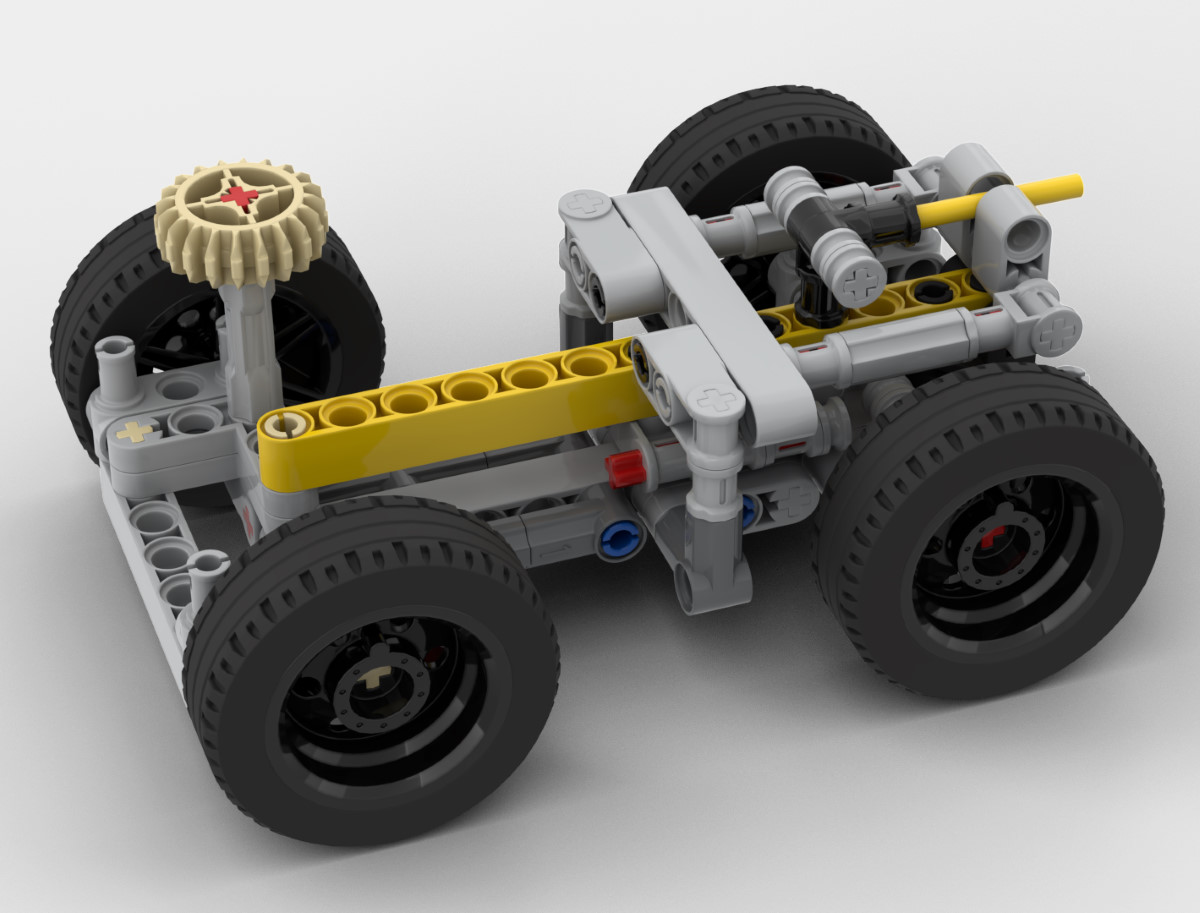
Lego Crab Steering At Mini Scale
-
03/02/2021
09/11/2022 - Free Building Instructions, Miscellaneous, Original Creations, Pro-Instructions
A Lego Technic multi mode crab Steering at mini scale, with free building instructions….
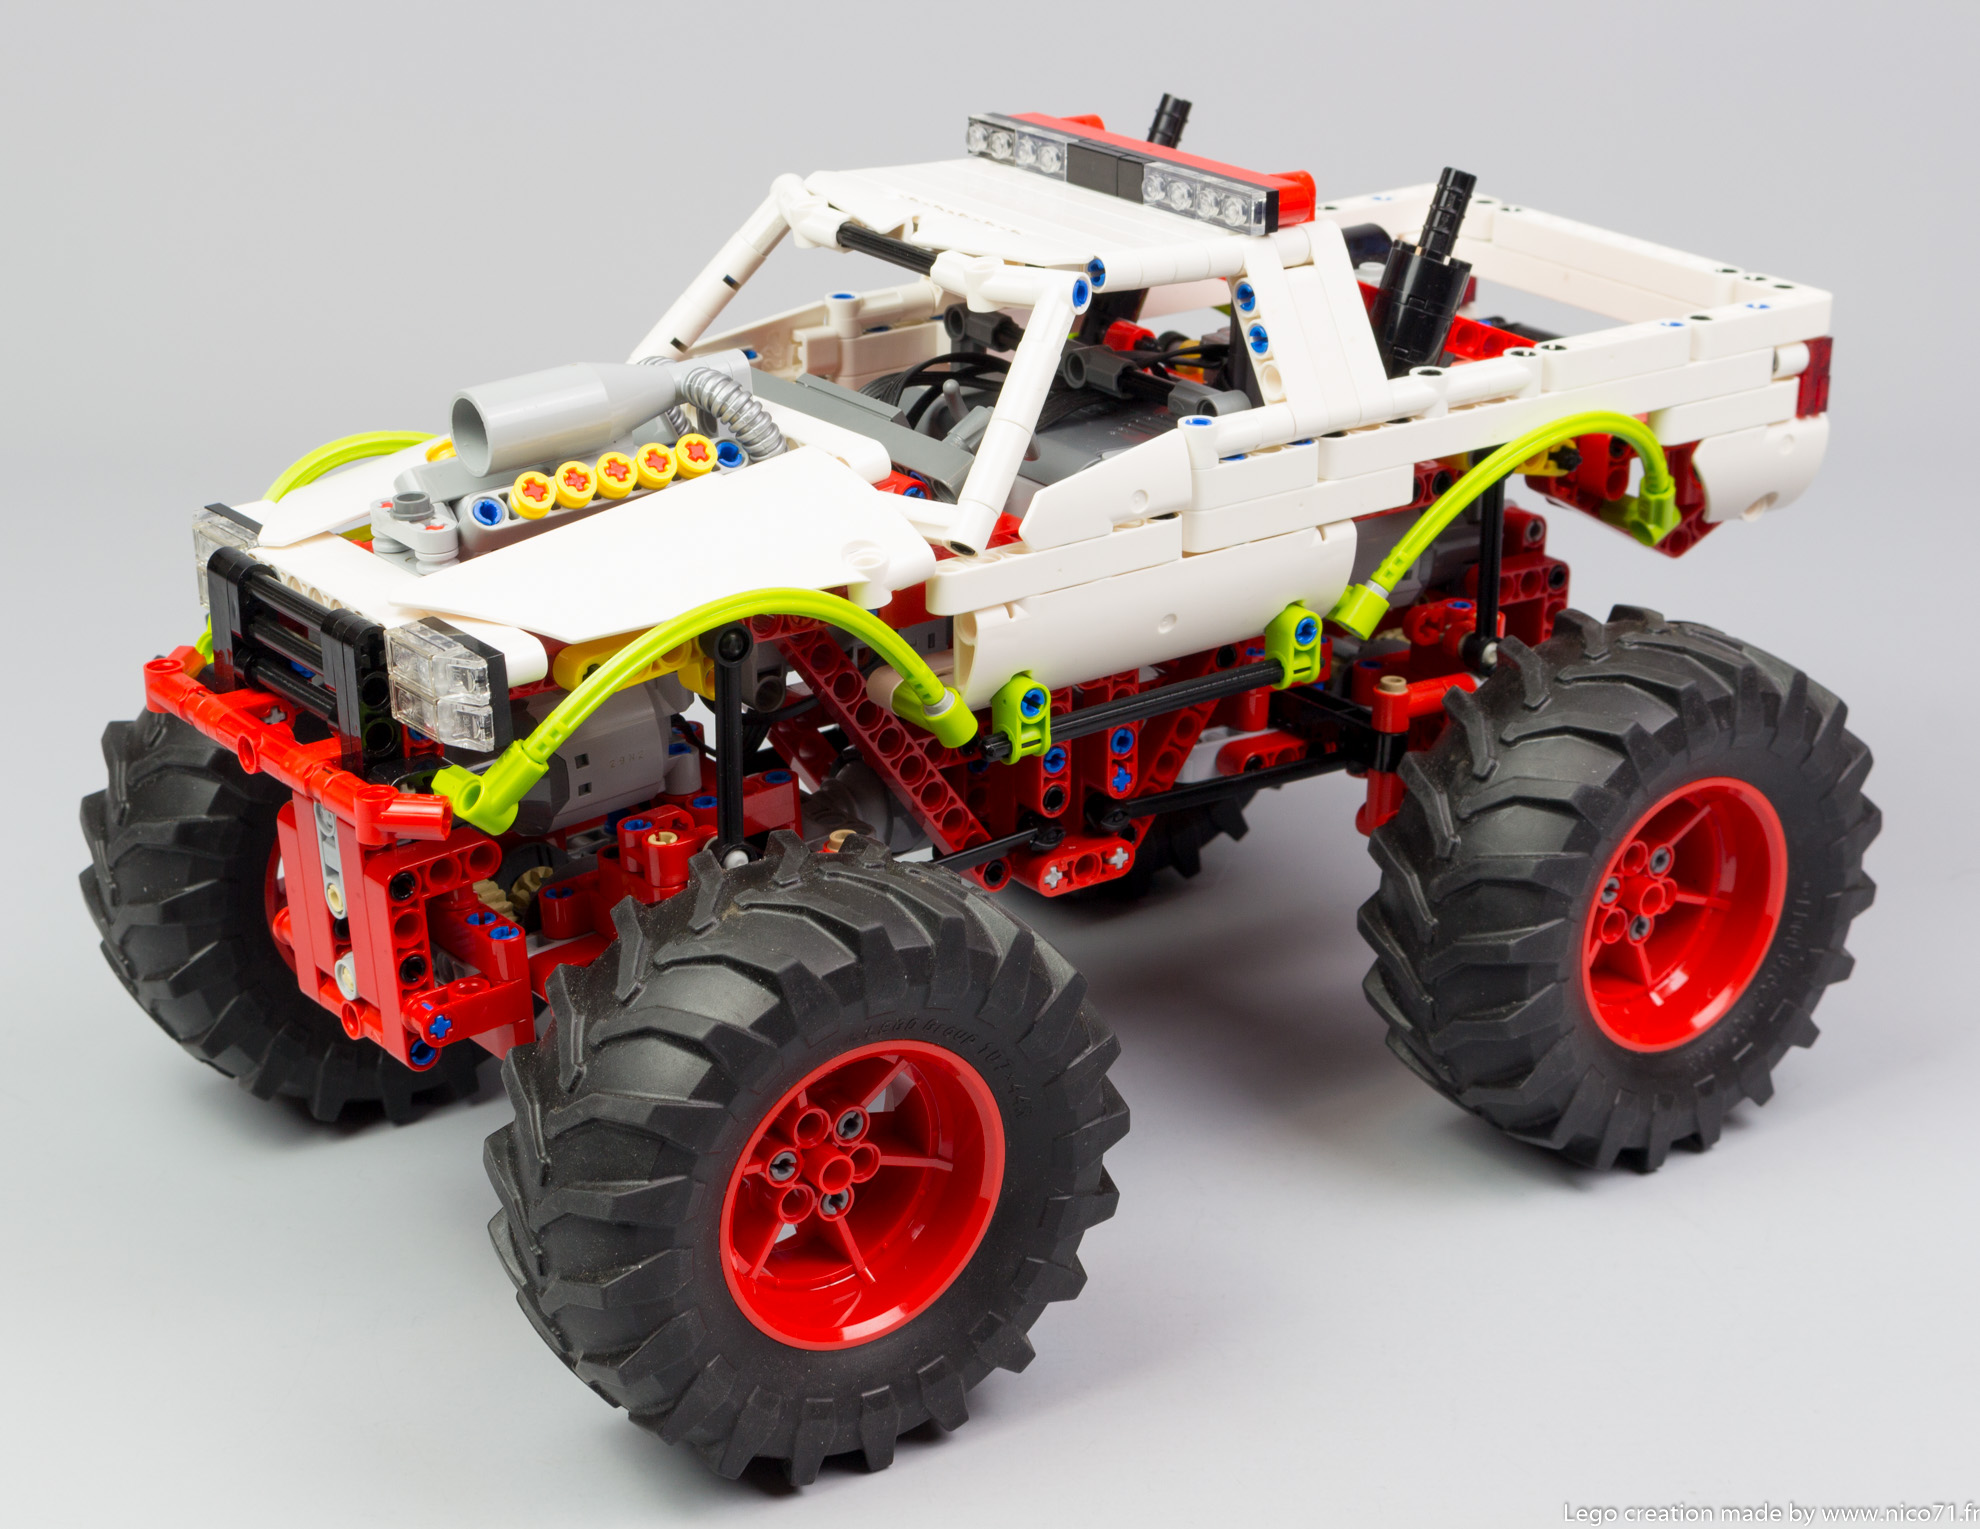
Monster Truck
-
29/12/2018
10/08/2022 - Cars, Free Building Instructions, Original Creations, Trial Trucks, Trucks
A tiny monster truck, features all wheel drive and steering, torsion bar suspensions, changeable gear reductions and power source, and openable hood, with building instructions….
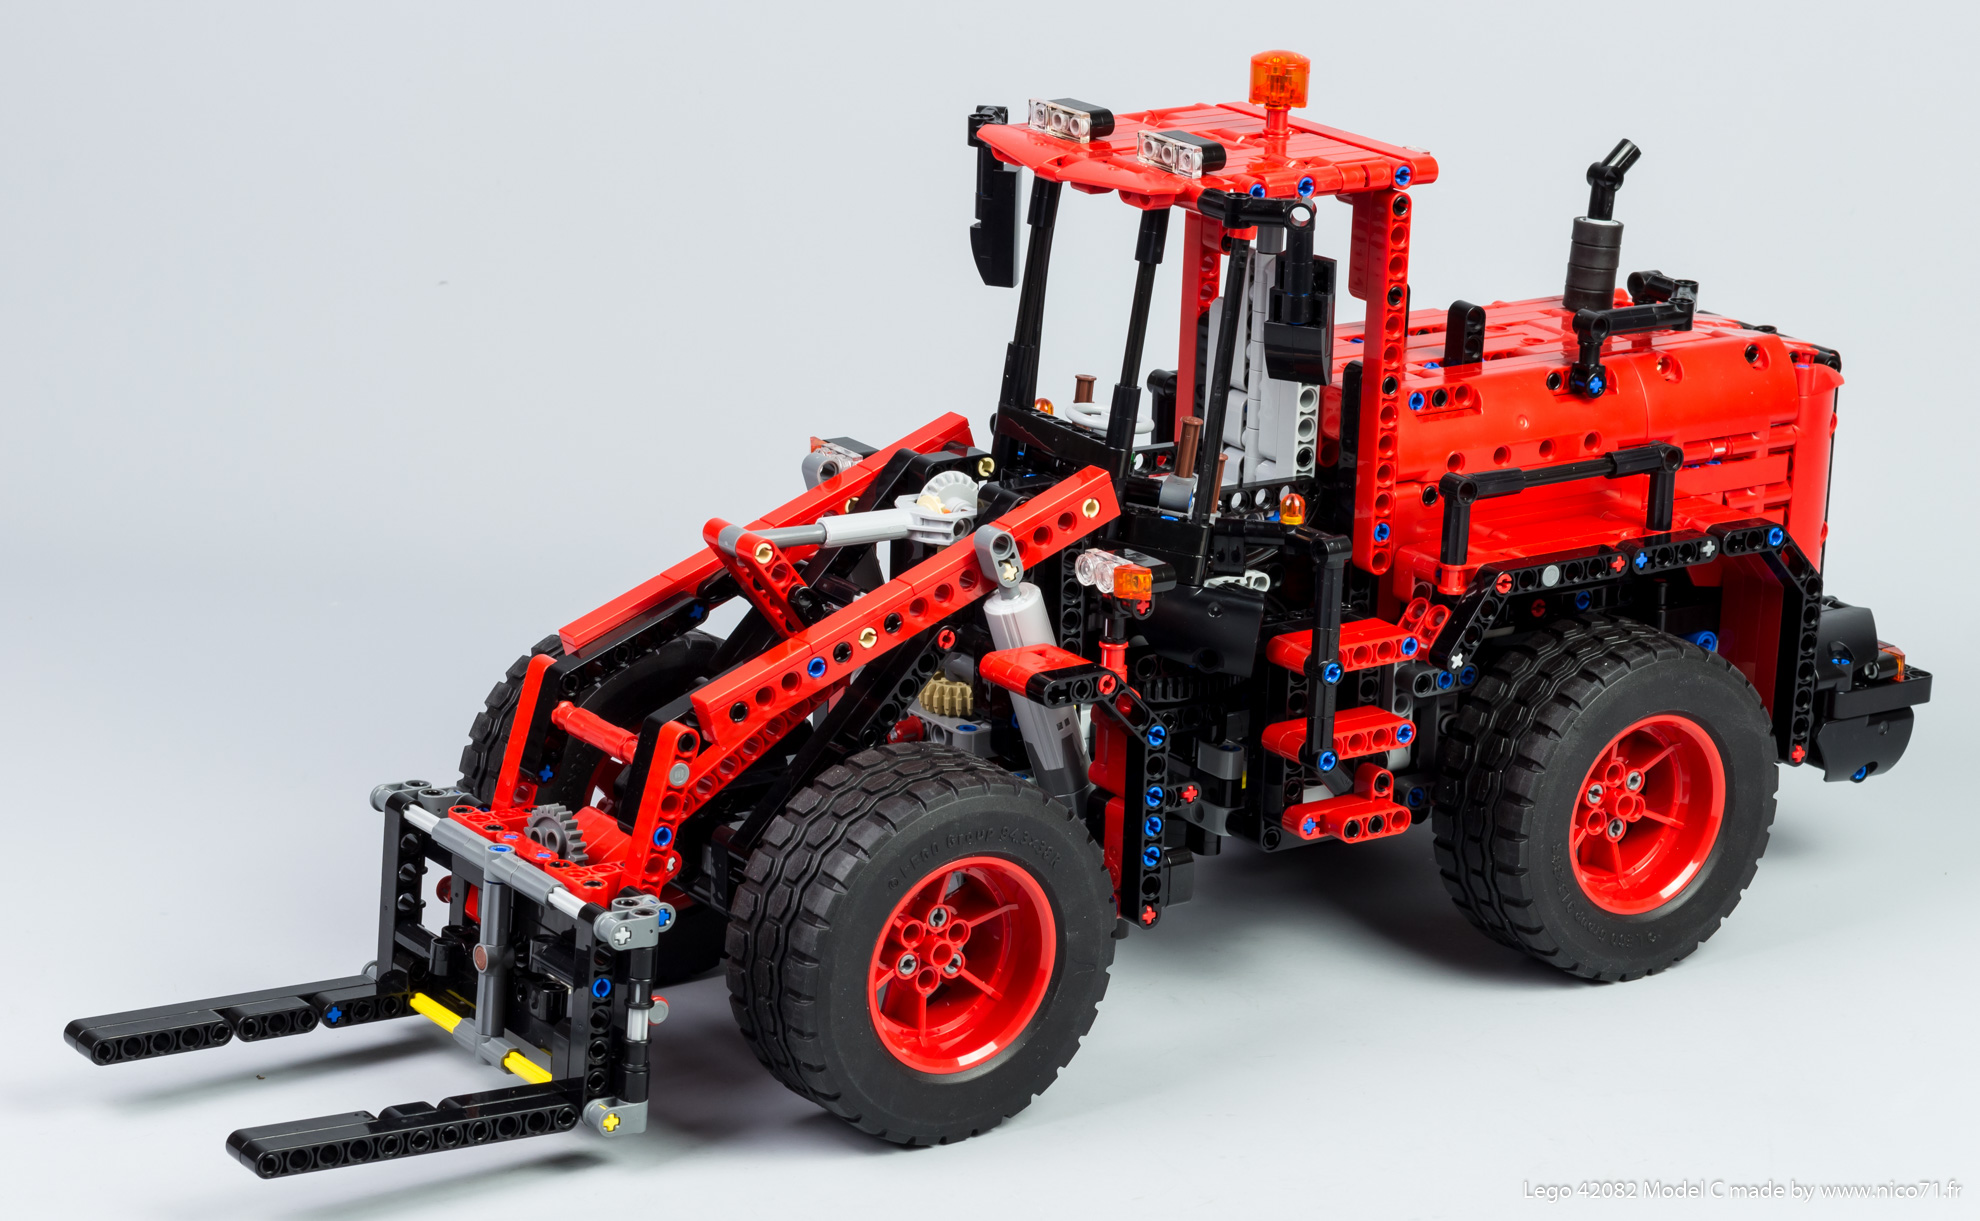
42082 Model C Wheel Loader
-
23/10/2018
09/11/2022 - Alternate Model, Construction Equipment, Free Building Instructions, Original Creations, Pro-Instructions
A alternate model of the Lego #42082, features central articulation with steering wheel, 4×4 drivetrain with fake engine, rear pendular suspension, motorized raising and tilting fork, adjustable fork width and many opening elements….
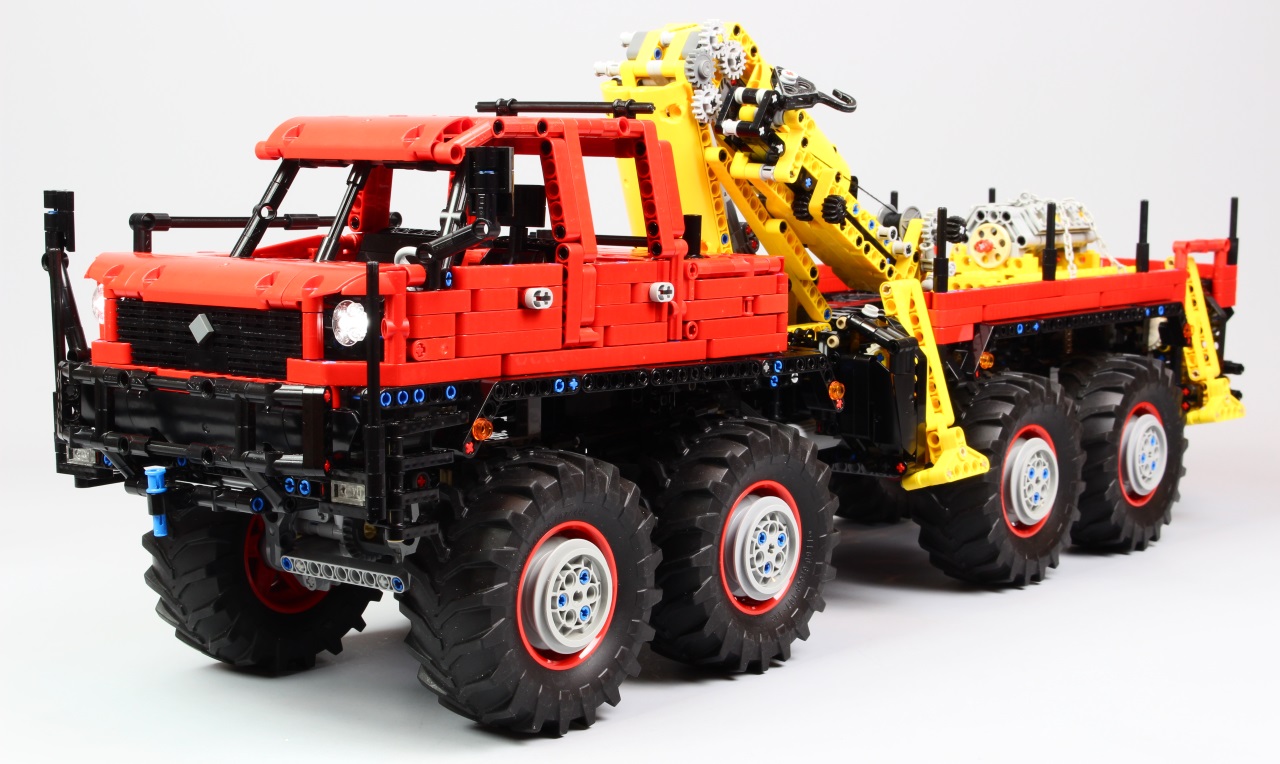
Articulated 8×8 Offroad Truck
-
04/07/2018
09/11/2022 - Free Building Instructions, Original Creations, Trucks
The biggest vehicle I have ever done, an articulated 8×8 offroad truck. Featured 2x sbricks, drives, steering, spring leaf dual suspensions, outriggers, operating 4 axis crane, opening elements and many details….
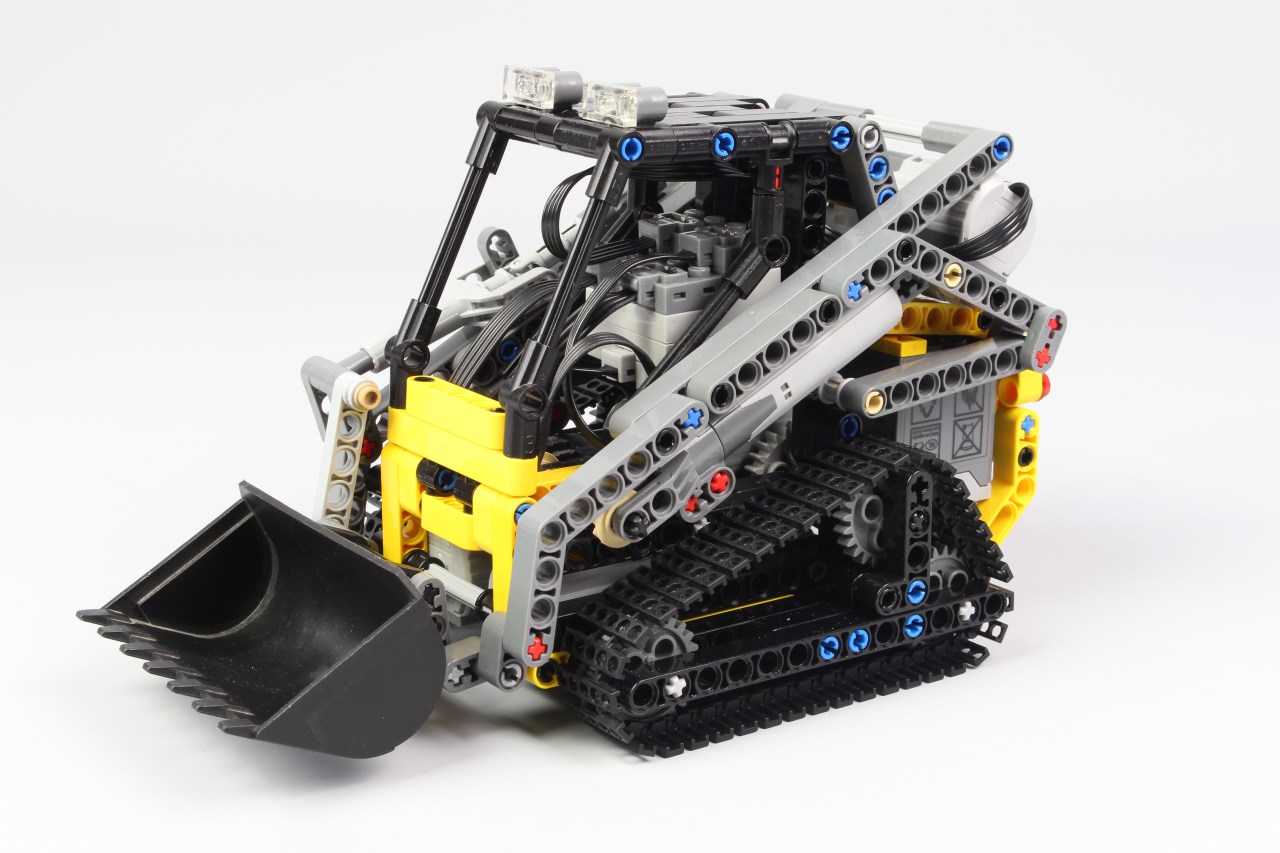
Compact Tracked Loader
-
01/03/2018
09/11/2022 - Construction Equipment, Creations for sale, Free Building Instructions, Original Creations, Pro-Instructions
A compact tracked loader featured powered tread, raised and tilted bucket with dual pivot boom in very small volume. With building instructions….
Leaning Tricycle
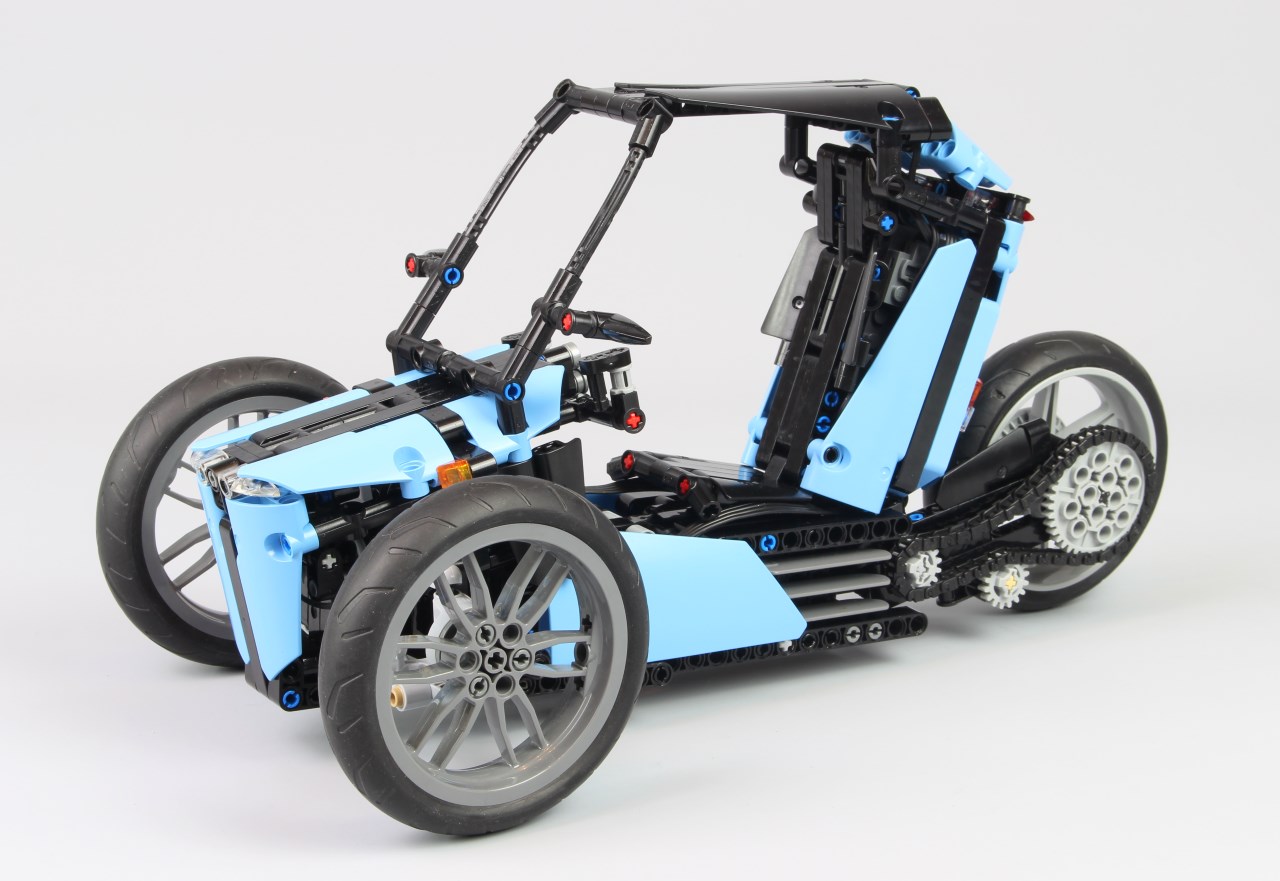
-
04/02/2018
22/08/2019 - Cars, Free Building Instructions, Motorbike, Original Creations
A leaning tricycle powered by Buwizz 2.0 with RC buggy motor, steering with servomotor, working handlebars, lights, and suspensions. With building instructions….
You can now buy my creations !
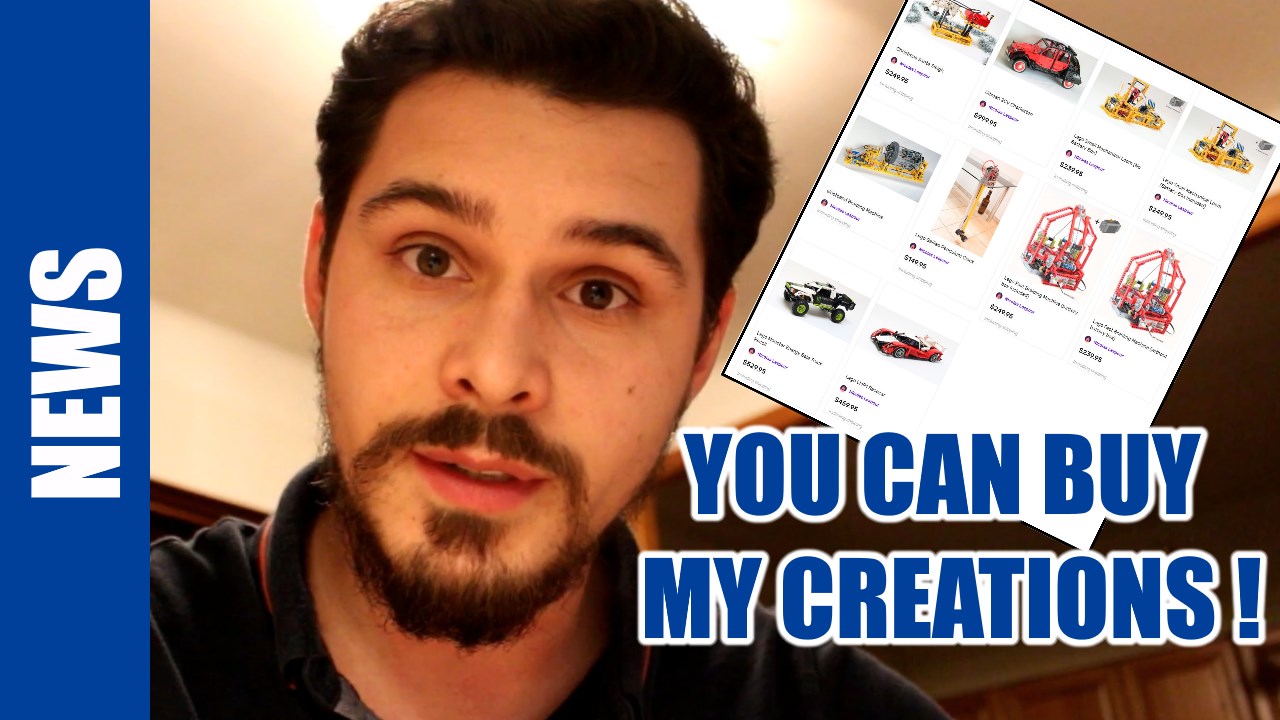
-
02/12/2017
10/08/2022 - Free Building Instructions, Miscellaneous
Always ask for buying my creations ? Now you can, with the new service Mochub !…
Honda NSX type 1

-
09/10/2017
09/11/2022 - Cars, Creations for sale, Free Building Instructions, Original Creations, Pro-Instructions
A reproduction of an iconic car from the 90’s : the honda NSX type 1 featured V6 fake engine with rear wheel drive, steering with steering wheel, double wishbone suspensions, pop-up headlight, opening doors, hood, trunk and rear glass roof, and adjustable seats….
Lego Halo Warthog
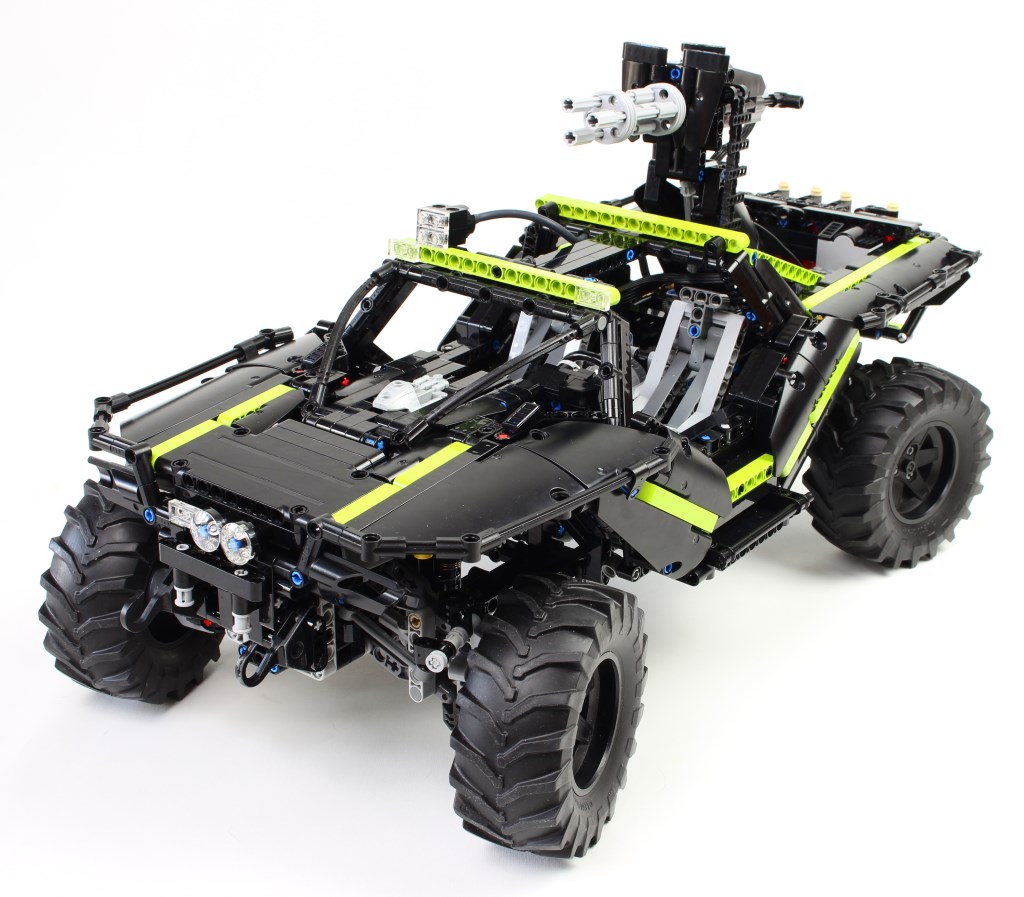
-
26/07/2017
09/11/2022 - Cars, Free Building Instructions, Original Creations
A Lego Technic replica of the warthog from Halo licence, featured drive, steering, suspensions, lockable differential, turret and opening element….
Как сделать турель из лего (самоделка)

!Самоделка! Механический Лего турель.Подробнее

Боевой Гусеничный Вездеход из Лего Техник / Кабина, Салон, Турели, ФИНАЛ! / LEGO TECHNIC самоделкаПодробнее

Лего Самоделка — Нексо Турэль / Nexo Турель из Лего / Самоделки и Инструкции от ЭКВИОН’АПодробнее

Самоделки Лего Portal: Портальная пушка, картофельная батарейка и турель.Подробнее

как сделать турель из портал 2 из легоПодробнее

Лего звездные войны республиканская турель обзор на самоделкуПодробнее

Лего самоделка турель portal, portal 2Подробнее

Как сделать ракетную турель Portal 2Подробнее

Как сделать турель на калёсах из легоПодробнее

Актуальное
Introduction: Lego Portal 2 Sentry Turret and Wheatley
Hey guys, and welcome to another instructable! If you missed my last one, go ahead and take a look at my page, it should be the first one! If anything is confusing or unclear, don’t heasitate to ask, and I will try and get back to you in a day or two. Enjoy!
Step 1: Wheatley
Here are the pieces you will need for Wheatley
Step 2: The «Head»
For Wheatley’s face, take a translucent light blue stud and put it on the inside of a mini white satellite. Connect that to the bottom of a black sextant brick.
Step 3: The Handles
To make Wheatley’s handle things, take two black handle bars and two black 1×1 clips. Put them together like so. Connect them to the sextant and bend them forward as desired.
Step 4: The Back
The back of Wheatley just takes a mini white satellite piece placed on the opposite side of the face.
Step 5: The Final Step to Wheatley
To finish it off, take two white satellite dishes and place a white stud on the inside of each of them. Take the two pieces and place them on the empty sides sextant. There you have Wheatley!
Step 6: The Sentry Turret
Here are the pieces you will need for the sentry turret.
Step 7: The Body
To start off the turret, take a white jumper plate and two black 1×1’s with studs and place them like so.
Step 8: The «Wings»
To make the sentry turret’s wings, take two white jumpers and four black studs. Place two black studs on either side of the 1×1 with stud and put the jumper on top of that. If you want to open the wings, take the other two black studs and stack them on the original studs.
Step 9: The Front Two Legs
For the front two legs, take two white antenna and place them on the remaining 1×1 with stud.
Step 10: The Back Leg
This one’s a bit trickier. Don’t worry if it hangs really low, the pressure will push the leg up once it’s standing. To make the back leg, take a neckbracket and put it on the back of the 1×1 with stud. Then, take a half axel and place it upright into the hole in the neck bracket (if this gets confusing, don’t be afraid to ask me in the comments for help). Take the antenna and place it upside down on the half axel (sorry, this sounds really bad…). The white sloped brick is optional, but helps give a nicer look to the back.
Step 11: The Final Step for the Sentry Turret
Finally, you did it! Okay, so you can use either a translucent red stud, or a translucent red «smooth» stud. Personally, I think the smooth one looks better, but I know it’s a rare piece, so the red stud looks just as good. Thanks so much for taking time out of your day to look at my instructable, it really does mean a lot to me to know that people out there are actually interested in what I build. I hope to continue making more builds, and maybe inspire you to try some creative building of your own! Thanks again! ~Shade Heart
Introduction: Lego Portal Turret
These are the instructions for my popular design of a laser turret from Portal. It’s all Lego; you won’t need any other materials to make this nice display piece.
Step 1: Parts Needed
Here are the parts you’ll need. You may have some, most, or all of these in your own collection; if not, you can get them from Bricklink.com (or Lego’s Pick-A-Brick , but they tend to be much more expensive, if somewhat easier). Part names may be different between Bricklink and Pick-A-Brick.
No. Color LDraw no. BL no. Part name
—————————————————————————————————
4 Black 48729.dat 48729b Bar 1.5L with Clip
2 Dark-Gray 44728.dat 44728 Bracket 1 x 2 — 2 x 2
2 Dark-Gray 4733.dat 4733 Brick 1 x 1 with Studs on Four Sides (color doesn’t matter)
2 White 4733.dat 4733 Brick 1 x 1 with Studs on Four Sides
2 Black 47905.dat 47905 Brick 1 x 1 with Studs on Two Opposite Sides (can be Dark-Gray)
2 Black 4593.dat 4593 Hinge Control Stick
3 Black 3820.dat 983 Minifig Hand
1 Black 4497.dat 4497 Minifig Spear
2 Dark-Gray 30162.dat 30162 Minifig Tool Binoculars Town
2 Black 4006.dat 4006 Minifig Tool Spanner/Screwdriver
2 White 3024.dat 3024 Plate 1 x 1
8 Dark-Gray 4073.dat 4073 Plate 1 x 1 Round (color doesn’t matter)
1 Trans-Red 4073.dat 4073 Plate 1 x 1 Round
2 Black 4085c.dat 4085 Plate 1 x 1 with Clip Vertical Type 3
2 Dark-Gray 4085c.dat 4085 Plate 1 x 1 with Clip Vertical Type 3 (type 4 is even better)
2 White 3023.dat 3023 Plate 1 x 2
2 Black 3794.dat 3794 Plate 1 x 2 with 1 Stud
4 White 3710.dat 3710 Plate 1 x 4
4 White 3460.dat 3460 Plate 1 x 8
2 White 3021.dat 3021 Plate 2 x 3
4 White 50746.dat 54200 Slope Brick 31 1 x 1 x 2/3
2 White 3048.dat 3048 Slope Brick 45 1 x 2 Triple
22 White 50950.dat 50950 Slope Brick Curved 3 x 1
5 White 61678.dat 61678 Slope Brick Curved 4 x 1
4 Black 4599.dat 4599 Tap 1 x 1
2 Black 41677.dat 41677 Technic Beam 2 x 0.5 Liftarm
2 White 6541.dat 6541 Technic Brick 1 x 1 with Hole
2 Light-Gray 4274.dat 4274 Technic Pin 1/2
1 Black 6558.dat 6558 Technic Pin Long with Friction and Slot
1 Light-Gray 4697b.dat 4696 Technic Pneumatic T Piece — Type II
4 White 3069b.dat 3069 Tile 1 x 2 with Groove
An Excel sheet of the parts with links and more information is attached.
Step 2: Step 1
Onto the build! I’ll add hints down here for the Lego-illiterate.
Step 3: Step 2
Yes, the tiles are supposed to swing back and forth loosely here. They will be secured later.
Step 4: Step 3
Unlike the previous step’s bricks, these have studs (the knobby things) on all four vertical sides — they are often called «travis bricks». This step ties the whole assembly thus far into one piece.
Step 5: Step 4
Step 6: Step 5
Step 7: Step 6
None of the non-white pieces’ colors here matter much; they won’t be very visible.
Step 8: Step 7
Notice that you do the same thing on the other side.
Step 9: Step 8
Step 10: Step 9
Step 11: Step 10
Step 12: Step 11
This connection may be a little loose; using newer clips or gently squeezing the clips before attaching the brackets can help.
Step 13: Step 12
The 1×1 slopes are called «cheese slopes», one of my favorite parts.
Step 14: Step 13
Step 15: Step 14
This one can be a bit tricky; the bases of the sticks, when put in together, should stick tight in the red plate.
Step 16: Step 15
Fit the previous assembly in the 1/2-plate gap that goes around the body. Try to fit the balls of the lever handles in the gap in the middle; this may take several tries. Once they’re in, gently squeeze the body to slightly shrink the gap, to hold the eye in place.
Step 17: Step 16
Did you get the eye in? Great!
Step 18: Step 17
Step 19: Step 18
The tap’s top can move around a bit within the slope, making for some nice angles.
Step 20: Step 19
Depending on the parts you have, you may have to pull the hands out of your minifigs’ arms. It’s okay, they won’t mind.
Step 21: Step 20
Step 22: You’re Done!
Once you’ve adjusted the legs to your liking, congratulations! You now have your very own Portal turret. I recommend using it only as a display trinket; it won’t hold up to much play.
Step 23: Credits
These instructions were built in LDraw/MLCad, then screencapped in LDView and edited in Photoshop Elements.
Step 24: …But What About the Laser?
Oh, right. You’re wondering how I achieved the laser in my photograph? Don’t worry, your turret won’t actually kill you.
Materials needed for laser effect:
Laser light (warning: don’t shine in anyone’s eyes, etc.)
Misting humidifier or something else that creates a mist or fog
Step 1: Shine laser into turret’s eye (it’s okay, he can’t be blinded)
Step 2: Fog up the area with the humidifier to make the laser visible
Step 3: Take picture
Here’s my setup:


Remember when Lego used to be cool before you got all these sets with custom shaped pieces and step by step instructions on how to put it together? Seriously, Lego used to be about nothing more than 4-5 different shaped bricks that you used to foster your own imagination. Now? Well, some would argue that Lego is more awesome than ever whereas some are pining for the old days. We’re not here to judge. But I will say this. When I saw this Portal 2 made out of Lego I was definitely on the more awesome now bandwagon.
So what happened after that? Only coming across instructions on how to build your own lego turret. Yeah, legos rule.

Step 1: Parts needed
Here are the parts you’ll need. You may have some, most, or all of these in your own collection; if not, you can get them from Bricklink.com (or Lego’s Pick-A-Brick , but they tend to be much more expensive, if somewhat easier). Part names may be different between Bricklink and Pick-A-Brick.
No. Color LDraw no. BL no. Part name
————————————————————————————————–
4 Black 48729.dat 48729b Bar 1.5L with Clip
2 Dark-Gray 44728.dat 44728 Bracket 1 x 2 – 2 x 2
2 Dark-Gray 4733.dat 4733 Brick 1 x 1 with Studs on Four Sides (color doesn’t matter)
2 White 4733.dat 4733 Brick 1 x 1 with Studs on Four Sides
2 Black 47905.dat 47905 Brick 1 x 1 with Studs on Two Opposite Sides (can be Dark-Gray)
2 Black 4593.dat 4593 Hinge Control Stick
3 Black 3820.dat 983 Minifig Hand
1 Black 4497.dat 4497 Minifig Spear
2 Dark-Gray 30162.dat 30162 Minifig Tool Binoculars Town
2 Black 4006.dat 4006 Minifig Tool Spanner/Screwdriver
2 White 3024.dat 3024 Plate 1 x 1
8 Dark-Gray 4073.dat 4073 Plate 1 x 1 Round (color doesn’t matter)
1 Trans-Red 4073.dat 4073 Plate 1 x 1 Round
2 Black 4085c.dat 4085 Plate 1 x 1 with Clip Vertical Type 3
2 Dark-Gray 4085c.dat 4085 Plate 1 x 1 with Clip Vertical Type 3 (type 4 is even better)
2 White 3023.dat 3023 Plate 1 x 2
2 Black 3794.dat 3794 Plate 1 x 2 with 1 Stud
4 White 3710.dat 3710 Plate 1 x 4
4 White 3460.dat 3460 Plate 1 x 8
2 White 3021.dat 3021 Plate 2 x 3
4 White 50746.dat 54200 Slope Brick 31 1 x 1 x 2/3
2 White 3048.dat 3048 Slope Brick 45 1 x 2 Triple
22 White 50950.dat 50950 Slope Brick Curved 3 x 1
5 White 61678.dat 61678 Slope Brick Curved 4 x 1
4 Black 4599.dat 4599 Tap 1 x 1
2 Black 41677.dat 41677 Technic Beam 2 x 0.5 Liftarm
2 White 6541.dat 6541 Technic Brick 1 x 1 with Hole
2 Light-Gray 4274.dat 4274 Technic Pin 1/2
1 Black 6558.dat 6558 Technic Pin Long with Friction and Slot
1 Light-Gray 4697b.dat 4696 Technic Pneumatic T Piece – Type II
4 White 3069b.dat 3069 Tile 1 x 2 with Groove
Want to learn the rest? Check out the post on Instructables

Lover of all things video game, anime, or manga. I’m passionate about these things and virtually nothing else. Hope you enjoy my musings!

Lover of all things video game, anime, or manga. I’m passionate about these things and virtually nothing else. Hope you enjoy my musings!
Introduction: Lego Mindstorm Turret Shooter
In this Instructable I am going to show you to the best of my ability how to make a Lego Mindstorm Turret Shooter I am mainly going to use just pictures because thats how lego does it. All the parts you need for this instructable are in the Mindstorm 2.0 NXT kit.
Step 1: Parts From the Kit Needed
These are the parts you need from the NXT kit.
Step 2: Base Part 1/3
This is the first part of the base you need to build
Step 3: Base Part 2/3
this is the next part of the base you need to build
Step 4: Base Part 3/3
Now we make the final part of the base and put the 3 parts together
Step 5: Putting the Base Together
Now we put the three parts of the base together to make it complete
Step 6: 360 Turning Piece
Now were going to make the next piece i don’t really know what to call it so look at the first picture
Step 7: The Shooting Mechanism Part 1/6
this is just one of the sides of the supports that holds up the motor that shoots the plastic balls.
Step 8: The Shooting Mechanism Part 2/6
Next were going to make this which is basically a mirror image of the pervious piece we built.
Step 9: The Shooting Mechanism Part 3/6
Next were going to make the piece that points the shooter up and down so follow the pictures
Step 10: The Shooting Mechanism 4/6
next were going to make this which is part of the firing system.
Step 11: The Shooting Mechanism Part 5/6
this is one of the last pieces we need to build it is what holds the plastic balls before they are fired
Step 12: The Shooting Mechanism Part 6/6
This is hardly a step because it’s just putting two connectors in a motor but here it is anyway
Step 13: Putting It All Together
Step 14: Oops
I forgot when I was building this that I ordered extra connectors and used 2 extra black connectors then what comes in the standard 2.0 NXT kit you can easily substitute a black connector for a long blue connector or short grey connector in many places.
Step 15: Controlling It
Right Now I just use the remote control through bluetooth function on the NXT software. with port A as the Action and BC as keypad controlled
A Western Star 6900 Twinsteer made in Lego Technic. Remote controlled using Control+ and PoweredUp App for the drive, steering and winch. Tandem bogies suspensions with oscillating arm, removable hood with fake working engine, and openable doors complete the model, as well as a mud pump as the load. With Building instructions….
8 Speed Sequential Gearbox
Free instructions of the 8 speed sequential gearbox issued from my 42115 Alternate – Ford F150….
Halloween Spider Box
A Halloween creation : a box which contains a jumping spider revealed by a turning crank. With free video tutorial and pro building instructions….
Lego Crab Steering At Mini Scale
A Lego Technic multi mode crab Steering at mini scale, with free building instructions….
Monster Truck
A tiny monster truck, features all wheel drive and steering, torsion bar suspensions, changeable gear reductions and power source, and openable hood, with building instructions….
42082 Model C Wheel Loader
A alternate model of the Lego #42082, features central articulation with steering wheel, 4×4 drivetrain with fake engine, rear pendular suspension, motorized raising and tilting fork, adjustable fork width and many opening elements….
Articulated 8×8 Offroad Truck
The biggest vehicle I have ever done, an articulated 8×8 offroad truck. Featured 2x sbricks, drives, steering, spring leaf dual suspensions, outriggers, operating 4 axis crane, opening elements and many details….
Compact Tracked Loader
A compact tracked loader featured powered tread, raised and tilted bucket with dual pivot boom in very small volume. With building instructions….
Leaning Tricycle
A leaning tricycle powered by Buwizz 2.0 with RC buggy motor, steering with servomotor, working handlebars, lights, and suspensions. With building instructions….