-
Contents
-
Table of Contents
-
Troubleshooting
-
Bookmarks
Quick Links
Related Manuals for Samsung Laser MFP SCX-4100
Summary of Contents for Samsung Laser MFP SCX-4100
-
Page 2
This manual is provided for information purposes only. All information included herein is subject to change without notice. Samsung Electronics is not responsible for any changes, direct or indirect, arising from or related to the use of this manual. -
Page 3
Contact SAMSUNG WORLD WIDE If you have any comments or questions regarding Samsung products, contact the SAMSUNG customer care center. Country CANADA MEXICO U.S.A ARGENTINE BRAZIL CHILE COSTA RICA ECUADOR EL SALVADOR GUATEMALA JAMAICA PANAMA PUERTO RICO REP. DOMINICA TRINIDAD &… -
Page 4
MALAYSIA 1800-88-9999 PHILIPPINES 1800-10-SAMSUNG (7267864) SINGAPORE 1800-SAMSUNG (7267864) THAILAND 1800-29-3232 02-689-3232 TAIWAN 0800-329-999 VIETNAM 1 800 588 889 SOUTH AFRICA 0860 7267864 (SAMSUNG) U.A.E 800SAMSUNG (7267864) Web Site www.samsung.com/hu www.samsung.com/it www.samsung.lu www.samsung.com/nl www.samsung.com/no www.samsung.com/pl www.samsung.com/pt www.samsung.com/sk www.samsung.com/es www.samsung.com/se www.samsung.com/uk www.samsung.ru www.samsung.com/ur… -
Page 5: Table Of Contents
Loading Paper … 1.8 Making Connections … 1.11 Turning the Machine On … 1.13 About Samsung Software … 1.14 Installing Samsung Software in Windows … 1.16 Repairing Software … 1.22 Removing Software … 1.23 Changing the Display Language … 1.25 Setting the Paper Size and Type …
-
Page 6
What is an Overlay? … 3.18 Creating a New Page Overlay … 3.18 Using a Page Overlay … 3.20 Deleting a Page Overlay … 3.21 Setting Up the Locally Shared Printer … 3.22 In Windows 9x/Me … 3.22 In Windows NT 4.0/2000/XP … 3.23 OPYING Chapter 4: Loading Paper for Copying … -
Page 7
Chapter 5: Scanning Basics … 5.2 Scanning Using Samsung SmarThru … 5.2 Scanning Process with TWAIN-enabled Software … 5.6 Chapter 6: Getting Started … 6.2 Installing the MFP Driver … 6.3 Using the MFP Configurator … 6.7 Configuring Printer Properties … 6.11 Printing a Document … -
Page 8
Common Linux Problems … 8.20 PECIFICATIONS Appendix A: General Specifications … A.2 Scanner and Copier Specifications … A.3 Printer Specifications … A.4 Paper Specifications … A.5 Overview … A.5 Supported Sizes of Paper … A.6 Guidelines for Using Paper … A.7 Paper Specifications … -
Page 9
Important Precautions and Safety Information When using this machine, these basic safety precautions should always be followed to reduce risk of fire, electric shock, and injury to people: 1. Read and understand all instructions. 2. Use common sense whenever operating electrical appliances. 3. -
Page 10
14. Unplug the machine from the, PC and AC wall outlet, and refer servicing to qualified service personnel under the following conditions: • When any part of the power cord, plug, or connecting cable is damaged or frayed. • If liquid has been spilled into the machine. •… -
Page 11: Laser Safety Statement
Laser Safety Statement The printer is certified in the U.S. to conform to the requirements of DHHS 21 CFR, chapter 1 Subchapter J for Class I(1) laser products, and elsewhere is certified as a Class I laser product conforming to the requirements of IEC 825.
-
Page 13: Radio Frequency Emissions
Radio Frequency Emissions FCC Information to the User This equipment has been tested and found to comply with the limits for a Class B digital device, pursuant to Part 15 of the FCC Rules. These limits are designed to provide reasonable protection against harmful interference in a residential installation.
-
Page 14
Directive 1999/5/EC. The product has been designed to work with the national PSTNs and compatible PBXs of European countries. In the event of problems, you should contact the Euro QA Lab of Samsung Electronics Co., Ltd. in the first instance. -
Page 15
Replacing the Fitted Plug (for UK Only) MPORTANT The mains lead for this machine is fitted with a standard (BS 1363) 13 amp plug and has a 13 amp fuse. When you change or examine the fuse, you must re-fit the correct 13 amp fuse. -
Page 17
Differences Between British and American English British English Cancelling Favourite Colour Colours Coloured Centre Grey Greyscale Millimetres Discolour Fibre Emphasise Recognise Organise Authorise Customise Labelling American English Canceling Favorite Color Colors Colored Center Gray Grayscale Millimeters Discolor Fiber Emphasize Recognize Organize Authorize Customize… -
Page 18: Chapter 1: Getting Started
• Loading Paper • Making Connections • Turning the Machine On Installing Software • About Samsung Software • Installing Samsung Software in Windows • Repairing Software • Removing Software Setting Up the Machine System • Changing the Display Language • Setting the Paper Size and Type •…
-
Page 19: Unpacking
Unpacking Remove the machine and all accessories from the packing carton. Make sure that the machine has been packed with the following items. If there is a missing item, contact the retailer where you bought the machine: Starter Toner Cartridge *The 1,000 pages and 3,000 pages toner cartridges have different shapes.
-
Page 20: Selecting A Location
Selecting a Location Select a level, stable place with adequate space for air circulation. Allow extra space for opening covers and trays. The area should be well-ventilated and away from direct sunlight or sources of heat, cold and humidity. Do not set the machine close to the edge of your desk or table.
-
Page 21: Understanding The Component Location
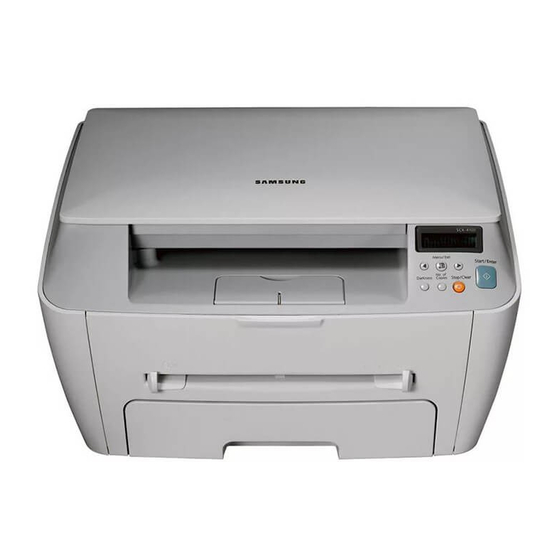
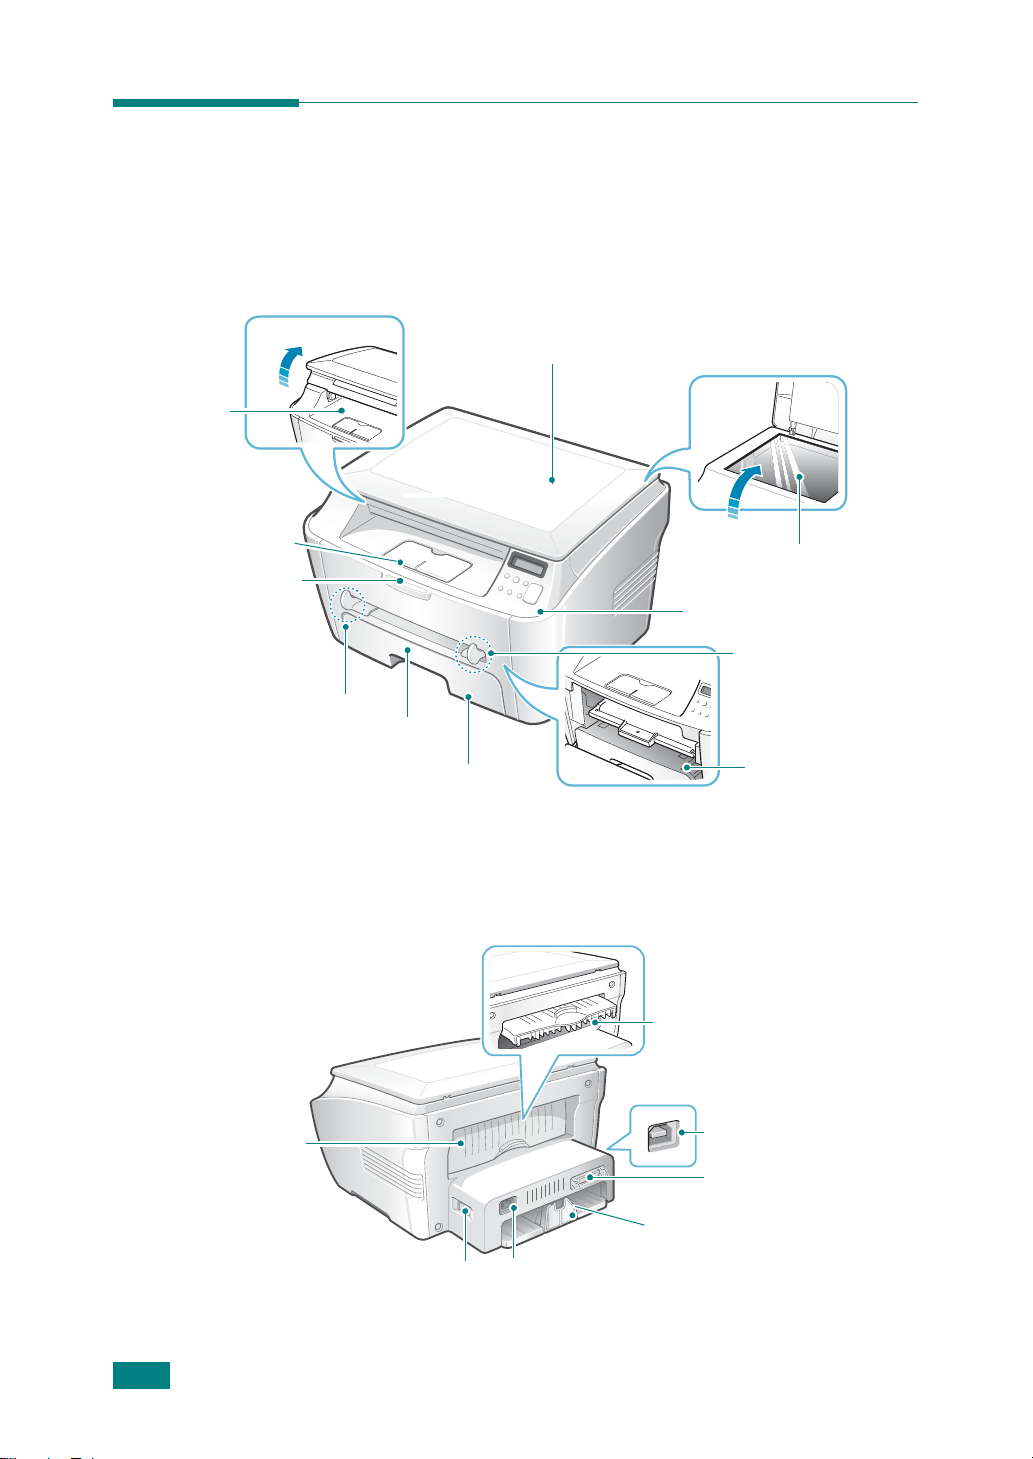
Understanding the Component Location These are the main components of your machine: Front View Jam Cover Front Output Tray (Face down) Front Paper Output Extension Manual Feeder Guides Manual Feeder Rear View Rear Cover ETTING TARTED Document Cover Paper Tray Power Switch AC Power Cord Connector Document Glass…
-
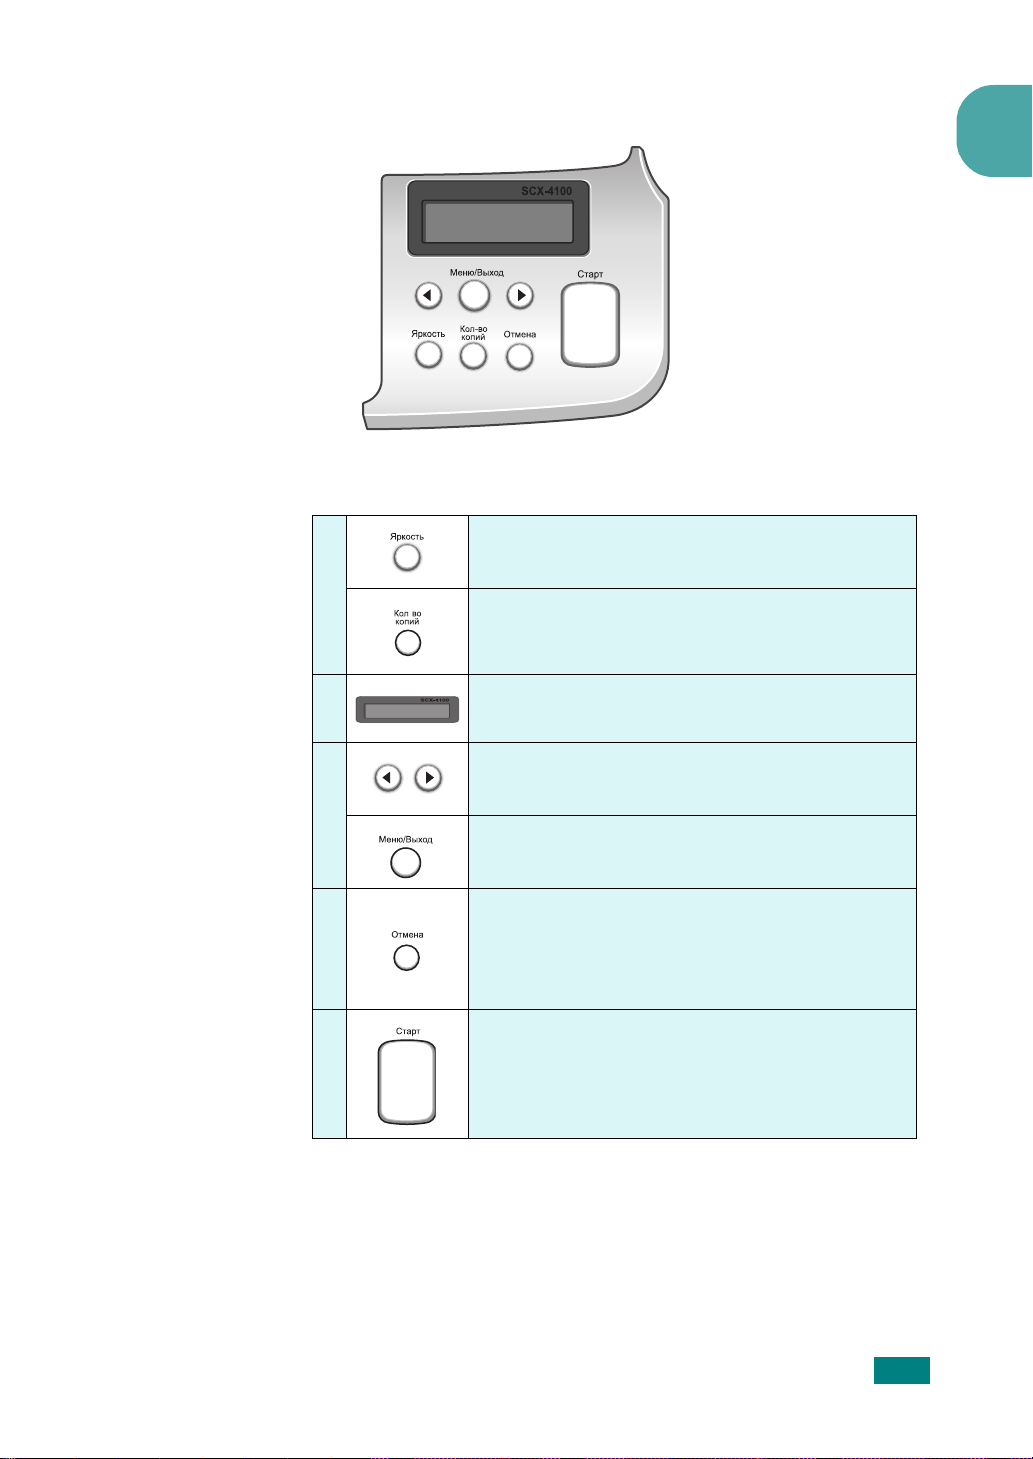
Page 22: Control Panel Functions
Control Panel Functions Adjusts the brightness of the documents for the current copy job. Selects the number of copies. Displays the current status and prompts during an operation. Scrolls through the options available for the selected menu item. Enters Menu mode and scrolls through the menus available and sends you back to Standby mode.
-
Page 23: Installing The Toner Cartridge
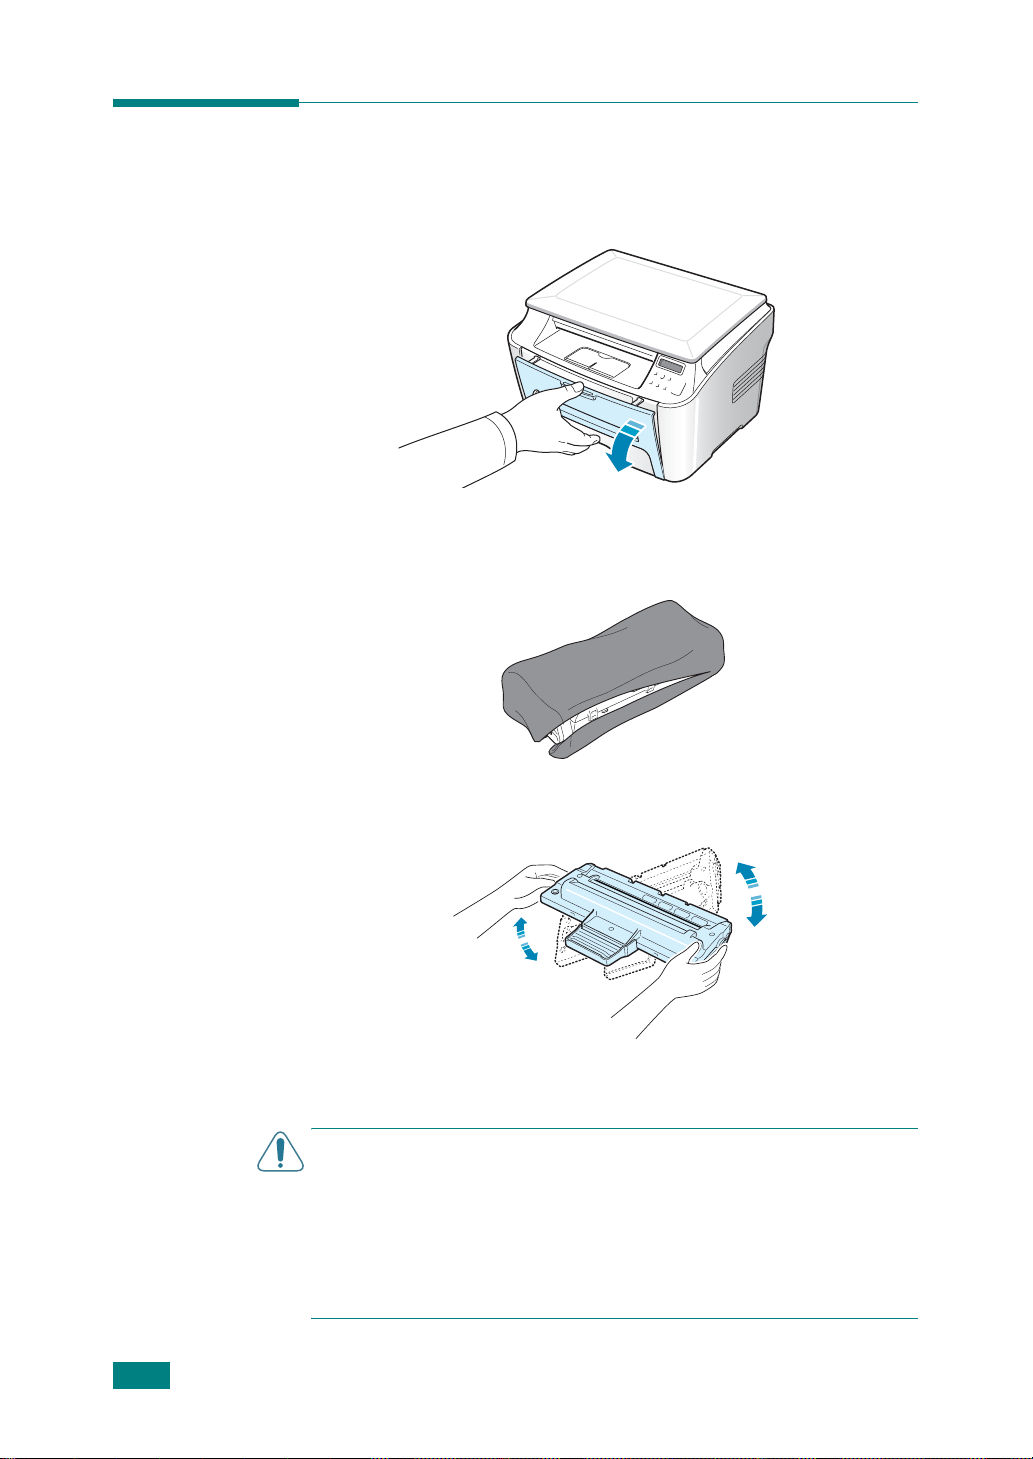
Installing the Toner Cartridge Open the front cover. Remove the starter toner cartridge from its bag. Don’t use a knife or other sharp object as it might scratch the drum of the cartridge. Gently roll the cartridge 5 or 6 times to distribute the toner evenly inside the cartridge.
-
Page 24
Close the front cover. Make sure that the cover is securely closed. : When printing text at 5% coverage, you can expect a toner cartridge life of approximately 3,000 pages. (1,000 pages for the toner cartridge that is shipped with the printer.) ETTING TARTED… -
Page 25: Loading Paper
Loading Paper You can load approximately 250 sheets. To load a stack of Letter-sized paper: Pull open the paper tray and remove it from the machine. Fan the edges of the paper stack to separate the pages. Then tap the stack on a flat surface to even it up. Insert the paper stack into the paper tray with the side you want to print on facing down.
-
Page 26: Changing The Paper Size In The Paper Tray
Pay attention to the paper limit mark on the left inside wall of the tray. Paper overloading may cause paper jams. Insert and slide the paper tray back into the machine. : After you load the paper, you need to set up your machine for the paper type and size you loaded.
-
Page 27
After inserting paper into the tray, slide in the guide until it lightly touches the end of the paper stack. For paper smaller than letter, adjust the paper length guide accordingly. Pinching the paper width guide as shown, move it toward the stack of paper until it lightly touches the side of the stack. -
Page 28: Making Connections
Universal Serial Bus (USB) cable. Using a Parallel Cable (Windows only) : To connect the printer to the parallel port of the computer requires a certified parallel cable. You will need to buy a IEEE1284 compliant cable.
-
Page 29
Plug the USB printer cable into the connector on the back of the printer. Connect the other end of the cable to the USB port on your computer. See your computer User’s Guide if you need help. OTES • For using a USB cable, you must be running Windows 98/Me/ 2000/XP. -
Page 30: Turning The Machine On
Turning the Machine On Plug one end of the supplied three-pronged electrical type cord into the AC socket on the machine and the other end into a properly grounded AC outlet. Press the power switch to turn the machine on. “Warming Up Please Wait”…
-
Page 31: About Samsung Software
The CD-ROM provides you with the following software: Windows GDI Driver To use your machine as a printer and scanner in Windows, you must install the GDI driver. For information about installing the GDI driver in Windows, see page 1.16.
-
Page 32: Printer Driver Features
Printer Driver Features Your printer drivers support the following standard features: • Paper source selection • Paper size, orientation and media type • number of copies The following table lists a general overview of features supported by your printer drivers.
-
Page 33: Installing Samsung Software In Windows
Installing Samsung Software in Windows System Requirements Before you begin, ensure that your system meets the minimum requirements. Verify the following: Operating system Free disk space At least Internet Explorer 5.0 OTES • For Windows NT 4.0/2000/XP, the system administrator should install the software.
-
Page 34: Installing Samsung Software
OK. When the following window opens, connect your machine to the computer and turn the printer on. Then click Next. If the machine is already connected and turned on, this screen does not appear. Skip to the next step.
-
Page 35
Otherwise, Skip to step 6. 1.18 ETTING TARTED such as printer driver, Twain driver, Remote Control Panel. This is Recommended for most users. software and the components you want to install. After selecting the language and the component(s), click Next. -
Page 36
When the test page prints out correctly, click Yes. If not, click No to reprint it. To register yourself as a user of Samsung Printers, select the check box and click Finish. You are now accessed to the Samsung web site. -
Page 37: Installing Samsung Smarthru
Installing Samsung SmarThru Insert the supplied CD-ROM into your CD-ROM drive. Click Install SmarThru. Click Next. Follow the on-screen instructions and click Next. Click Next. Select the installation type and click Next. 1.20 ETTING TARTED : SmarThru 4 does not support Windows 95.
-
Page 38
The software installation supports two types of setup: • Typical: Program will be installed with the most common options and is recommended for most users. • Custom: You may choose the options you want to install. If you select the Custom installation, you may choose the components you want to install. -
Page 39: Repairing Software
Repairing is required if your installation fails or the software does not work properly. This Repairing procedure does not repair SmarThru software. You can select Start → Programs → Samsung SCX-4100 Series → Maintenance. Otherwise, Insert the supplied CD-ROM into your CD-ROM drive.
-
Page 40: Removing Software
Uninstall is required if you are upgrading the software or if your installation fails. You can uninstall the item you want using the Windows uninstallShield. Uninstalling the MFP Driver You can select Start → Programs → Samsung SCX-4100 Series → Maintenance. Otherwise, Insert the supplied CD-ROM into your CD-ROM drive.
-
Page 41: Uninstalling Samsung Smarthru
Uninstalling Samsung SmarThru are closed on your computer. A system reboot is required after the software is uninstalled. From the Start menu, select Programs. Select SmarThru 4, and then select Uninstall SmarThru 4. When your computer asks you to confirm, click OK.
-
Page 42: Changing The Display Language
Setting Up the Machine System Changing the Display Language To change the language that displays on the display of the control panel, follow these steps: Press Menu/Exit until «Machine Setup» appears on the top line of the display. Press the scroll button ( on the bottom line of the display.
-
Page 43: Setting The Paper Size And Type
Setting the Paper Size and Type After loading paper in the paper tray, you need to set the paper type and size using the control panel buttons. These settings will apply to Copy modes. For PC-printing, you need to select the paper type and size in the application program you use.
-
Page 44: Using The Save Modes
Selecting «Off» means that toner save mode turns off. : For PC-printing, you can also turn toner save mode on or off, in the printer properties. See page 3.9. Power Save Mode Power Save mode allows your machine to reduce power consumption when it is not in actual use.
-
Page 45
1.28 ETTING TARTED… -
Page 46: Chapter 2: Paper Handling
APER ANDLING This chapter introduces you to the basics of selecting print materials and loading them into your machine. This chapter includes: • Selecting Print Materials • Selecting an Output Location • Loading Paper in the Paper Tray • Using the Manual Feeder…
-
Page 47: Selecting Print Materials
Selecting Print Materials You can print on a variety of print materials, such as plain paper, envelopes, labels, transparencies, and so on. Always use print materials that meet the guidelines for use with this machine. See “Paper Specifications” on page A.5. To get the best possible print quality, use only high-quality copier-grade paper.
-
Page 48: Guidelines For Paper And Special Materials
Guidelines for Paper and Special Materials When selecting or loading paper, envelopes, or other special material, keep these guidelines in mind: • Always use paper and other materials that conform with the specifications listed under “Paper Specifications” on page A.5. •…
-
Page 49: Selecting An Output Location
• Do not use Carbonless paper and Tracing paper. Use of these types of paper could result in chemical smells and could damage your printer. Selecting an Output Location The machine has two output locations; the rear output slot (face up) and the front output tray (face down).
-
Page 50: Printing To The Front Output Tray (Face Down)
Printing to the Front Output Tray The front output tray collects printed paper face-down in the order in which it was printed. The tray should be used for most print jobs. If you use paper which is not long enough to reach the front output tray, use the jam cover.
-
Page 51: Printing To The Rear Output Slot (Face Up)
Close the jam cover. In order to close the cover, push the tab to the left and hold it down. Then lower the cover carefully until the cover is holding down the tab. Then you can move your hand and finish lowering the cover. Be careful not to pinch your fingers! •…
-
Page 52
To use the rear output slot: Open the rear cover by pulling it upward. : The fusing area inside the rear part of your machine AUTION becomes hot once the machine is turned on. Be careful when you access this area. If you do not want to use the rear output slot, close the rear cover. -
Page 53: Loading Paper In The Paper Tray
Loading Paper in the Paper Tray The paper tray can hold a maximum of 250 sheets of 20 lb(75g/ ) plain paper. For copying, you can use A4-, Letter- or Legal- sized paper only. For PC-printing, you can use many different sizes of paper;…
-
Page 54: Using The Manual Feeder
Postcards, 3.5 by 5.83 in.(index) cards and other custom-sized materials can be printed with this printer. The minimum size is 76 by 127 mm (3.0 by 5.0 in.) and the maximum size is 216 by 356 mm (8.5 by 14 in.).
-
Page 55
AUTION transparencies. If not, they may tear while exiting the machine. Adjust the paper guide to the width of the print material. manual feeder, the printed side should be facing down with an uncurled edge to the machine. If you experience problems with paper feed, turn the paper around. -
Page 56: Setting The Paper Type And Size For The Manual Feeder
Setting the Paper Type and Size for the Manual Feeder After loading paper in the manual feeder, you need to set the correct paper type and size using the control panel buttons. These settings will apply to Copy mode. For PC-printing, you need to select the paper size in the application program you use.
-
Page 57
2.12 APER ANDLING… -
Page 58: Chapter 3: Printing
• Printing Multiple Pages on One Sheet of the Paper • Printing a Reduced or Enlarged Document • Fitting Your Document to a Selected Paper Size • Printing Posters • Using Watermarks • Using Overlays • Setting Up the Locally Shared Printer…
-
Page 59: Printing A Document In Windows
To take advantage of the printer features provided by your machine, click Properties or Preferences in the application’s print window and go to step 4. If you see a Setup, Printer or Options button, click it instead. Then click Properties on the next screen. RINTING…
-
Page 60
Now you see the Samsung SCX-4100 Series Properties window, which allows you to access all of information you need when using your machine. The Layout tab first displays. The preview image shows the sample page with the settings you specified. -
Page 61
• Reverse All Pages: Your machine prints from the last • Print Odd Pages: Your machine prints only the odd • Print Even Pages: Your machine prints only the even Click other tabs on the top of the Samsung SCX-4100 Series Properties window to access other features, if needed. -
Page 62: Canceling A Print Job
To stop a print job from the Printers folder: If the print job is waiting in a print queue or print spooler, such as the Printer group in Windows, delete the job as follows: Click the Windows Start menu. For Windows 9x/NT4.0/2000/Me, Select Settings and then Printers.
-
Page 63: Using A Favorite Setting
To delete a favorite setting item, select it from the list and click Delete. You can also restore the printer driver’s default settings by selecting <Printer Default> from the list. Using Help Your machine has a help screen that can be activated using the Help button in the printer’s Properties window.
-
Page 64: Setting Paper Properties
Setting Paper Properties Use the following options for paper handling. See page 3.2 for more information about accessing printer’s Properties. Click the Paper tab to access many paper properties. Property Copies allows you to choose the number of Copies copies to be printed. You can enter up to 999.
-
Page 65: Setting Graphic Properties
Make sure that Type is set to Printer Default. If you load a different type of print material, select the corresponding paper type.
-
Page 66
• Printer Setting: When you select this option, the Toner Save feature is determined by the setting you’ve made on the control panel of the machine. -
Page 67: Printing Multiple Pages On One Sheet Of The Paper
You can print up to 16 pages on one sheet. To change the print settings from your software application, access the printer’s Properties. See page 3.2. From the Layout tab, choose Multiple Pages per Side from the Type drop-down list.
-
Page 68
Select the number of pages you want to print per sheet (1, 2, 4, 9 or 16) on the Pages per Side drop-down list. Preview image Select the page order on the Page Order drop-down list, if necessary. Down, Then Right, Then Right Down… -
Page 69: Printing A Reduced Or Enlarged Document
Document You can scale your print job on a page. When you change the print settings from your software application, access the printer’s Properties. See page 3.2. From the Layout tab, select Reduce/Enlarge on the Type drop-down list. Enter the scaling rate in the Percentage input box.
-
Page 70: Fitting Your Document To A Selected Paper Size
This can be useful when you want to check the fine details on a small document. To change the print settings from your software application, access the printer’s Properties. See page 3.2. From the Layout tab, select Fit to Page on the Type drop- down list.
-
Page 71: Printing Posters
To change the print settings from your software application, access the printer’s Properties. See page 3.2. From the Layout tab, select Poster on the Type drop- down list.
-
Page 72: Using Watermarks
Using an Existing Watermark To change the print settings from your software application, access the printer’s Properties. See page 3.2. Click the Extras tab and select a watermark on the Watermark drop-down list. It appears in the preview image window.
-
Page 73: Creating A Watermark
Creating a Watermark To change the print settings from your software application, access the printer’s Properties. See page 3.2. Click the Extras tab and click Edit in the Watermark section. The Edit Watermarks window appears. Enter text message you want to print in the Watermark Message box.
-
Page 74: Editing A Watermark
Editing a Watermark To change the print settings from your software application, access the printer properties. See page 3.2. Click the Extras tab and click Edit in the Watermark section. The Edit Watermarks window appears. Select the watermark you want to edit on the Current Watermarks list, to change the watermark message and the options.
-
Page 75: Using Overlays
If needed, save the file for later use. To change the print settings from your software application, access the printer’s Properties. See page 3.2. Click the Extras tab and click Edit in the Overlay section. 3.18…
-
Page 76
In the Edit Overlays window, click Create Overlay. In the Create Overlay window, type a name of up to eight characters in the File name box. Select the destination path, if necessary. (The default is C:\Formover). Click Save. The name appears on the Overlay List. Click Ok or Yes to finish creating. -
Page 77: Using A Page Overlay
To print an overlay with a document: Create or open the document you want to print. To change the print settings from your software application, access the printer’s Properties. See page 3.2. Click the Extras tab. Select the overlay you want to print from the Overlay drop-down list box.
-
Page 78: Deleting A Page Overlay
Deleting a Page Overlay You can delete page overlays that you no longer use. In the printer’s properties window, click the Extras tab. Click Edit in the Overlay section. Select the overlay you want to delete from the Overlay List box.
-
Page 79: Setting Up The Locally Shared Printer
“host computer,” on the network. Your machine can be shared by other users on the network through a Windows 9x, Me, 2000, XP or NT 4.0 network printer connection. connected, you need to install the printer software on each computer that will print documents to the printer.
-
Page 80: In Windows Nt 4.0/2000/Xp
From the Start menu, select Settings and then Printers. Double-click your printer icon. From the Printer menu, select Properties. From the Details tab, select the printer port and click OK. In Windows NT 4.0/2000/XP Setting Up the Host Computer Start Windows.
-
Page 81
For Windows XP, from the Start menu, select Printers and Faxes. Double-click your printer icon. From the Printer menu, select Properties. Press the Ports tab and click Add Port. Select Local Port and click New Port. Fill in the Enter a port name field and enter the shared name. -
Page 82: Chapter 4: Copying
OPYING This chapter gives you step-by-step instructions for copying documents. This chapter includes: • Loading Paper for Copying • Preparing a Document • Making a Copy • Setting Copy Options • Using Special Copy Features • Changing the Default Settings •…
-
Page 83: Loading Paper For Copying
Loading Paper for Copying The instructions for loading print materials are the same whether you are printing, or copying. For copying, you can use Letter-, A4-sized print materials. For further details, see page 1.8 for loading in the paper tray and page 2.9 for loading in the manual feeder.
-
Page 84: Making A Copy
Making a Copy Lift and open the document cover. Place the document face down on the document glass. Align it with the registration guide on the top left corner of the glass. Close the document cover. Be careful not to move the document.
-
Page 85
OTES • Leaving the cover open while copying may affect the copy quality and toner consumption. • If you are copying a page from a book or magazine which is thicker than 30 mm, start copying with the cover open. Customize the copy settings including number of copies, copy size, darkness and original type by using the control panel buttons. -
Page 86: Setting Copy Options
Setting Copy Options The buttons on the control panel let you make all the basic copy options; darkness, number of copies, copy size and document type. Set the following options for the current copy job before pressing Start/Enter to make copies. : If you press Stop/Clear while you set the copy options, all of the options you have set for the current copy job will be canceled and return to their default status.
-
Page 87: Reduced/Enlarged Copying
Reduced/Enlarged Copying larger than A4 size and setting an enlargement rate of more than 100%, Text/Photo will be automatically selected. You can reduce or enlarge the size of a copied image from 50% to 200%. To select from the predefined copy sizes: Press Menu/Exit on the control panel.
-
Page 88: Original Type
Original Type The Original Type setting is used to improve the copy quality by selecting the document for the current copy job. To select the document type: Press Menu/Exit on the control panel until «Original Type» appears on the top line of the display Press Start/Enter to access the menu item.
-
Page 89: Using Special Copy Features
Using Special Copy Features larger than A4 size, Text/Photo will be automatically selected. You can use the following copy features using the «Special Copy» menu: • Off: Prints in normal mode. • Clone: Prints multiple image copies from the original document on a single page.
-
Page 90: Auto Fit Copying
Auto Fit Copying : When the size of the document you want to copy is not same as the size of the paper loaded, this function automatically adjusts the size of the document to fit the paper. You can not adjust the copy size manually.
-
Page 91: Sided In 1 Page Copying
2 sided in 1 page Copying You can copy a 2-sided document on one page of A4, or Letter -sized paper. When you copy using this feature, the machine prints one side on the upper half of the paper and the other side on the lower half.
-
Page 92: 2-Up Copying
2-up Copying :2-up lets you copy two original documents on one sheet of paper. The documents are reduced 50 % to allow them to fit on paper the same size as the original documents. You can not adjust the copy size to fit on a different size of paper. Load the document to be copied on the document glass, and close the cover.
-
Page 93: Poster Copying
Poster Copying Load the documents to be copied on the document glass and close the cover. Press Menu/Exit until «Special Copy» appears on the top line of the display. Press the scroll button ( the bottom line. Press Start/Enter to save the selection. Customize the copy settings including number of copies, copy size, darkness and original type by using the control panel buttons.
-
Page 94: Changing The Default Settings
Changing the Default Settings Copy options, including darkness, original type, copy size and number of copies, can be set to the most frequently used modes. When you copy a document, the default settings are used unless they are changed by using the corresponding buttons on the control panel.
-
Page 95: Setting The Time Out Option
Setting the Time Out Option You can set the time the machine waits before it restores the default copy settings, if you do not start copying after changing them on the control panel. Press Menu/Exit on the control panel until «Copy Setup» appears on the top line of the display.
-
Page 96: Chapter 5: Scanning
Scanning with your machine lets you turn pictures and text into digital files on your computer. Then you can e- mail the files, display them on your web site or use them to create projects that you can print using Samsung SmarThru software. This chapter includes: •…
-
Page 97: Scanning Basics
Scanning Basics Your machine offers two ways to scan: • From the Samsung SmarThru software: Launch Samsung SmarThru and open the Scan To to begin scanning. See below. • From TWAIN-compliant software: You can use other software including Adobe PhotoDeluxe and Adobe Photoshop. See page 5.6.
-
Page 98
Close the document cover. Once you have installed Samsung SmarThru, you will see the SmarThru 4 icon on your desktop. Double-click the SmarThru 4 icon. Double-click this icon. -
Page 99
• Image • Copy • Print Click Scan To. The Scan To menu bar appears on the SmarThru 4 window. Scan To lets you use the following services: • Application • Email • Folder CANNING Allows you to edit an image you have saved as a graphic file and send it to a selected application or folder, email it, or publish it on a web site. -
Page 100: To Use On-Line Help File
• OCR Scanning an image and performing text recognition. Allows you to scan an image, preview it, and send it to the OCR program for text recognition. — Recommended Scan Option for OCR — Resolution: 200 or 300 dpi — Image Type: Mono (Black & White) •…
-
Page 101: Scanning Process With Twain-Enabled Software
Scanning Process with TWAIN- enabled Software If you want to scan documents using other software, you will need to use TWAIN-compliant software, such as Adobe PhotoDeluxe or Adobe Photoshop. The first time you scan with your machine, select it as your TWAIN source in the application you use.
-
Page 102: Chapter 6: Using Your Printer In Linux
This chapter gives you information about how to use your machine in the Linux system. This chapter includes: • Getting Started • Installing the MFP Driver • Using the MFP Configurator • Configuring Printer Properties • Printing a Document • Scanning a Document RINTER IN…
-
Page 103: Getting Started
Getting Started The supplied CD-ROM provides you with Samsung’s MFP driver package for using your machine with a Linux computer. Samsung’s MFP driver package contains printer and scanner drivers, providing the ability to print documents and scan images. The package also delivers powerful applications for configuring your machine and further processing of the scanned documents.
-
Page 104: Installing The Mfp Driver
Installing the MFP Driver System Requirements Supported OS Various Linux OS (via USB interface only) • Redhat 7.1 and above • Linux Mandrake 8.0 and above • SuSE 7.1 and above • Caldera OpenLinux 3.1 and above • Turbo Linux 7.0 and above •…
-
Page 105: Installing The Mfp Driver
Click Install. When the welcome screen appears, click Next. SING RINTER IN : You must log in as a super user (root) to install the printer : The installation program runs automatically if you have an INUX icon…
-
Page 106
When the installation is completed, click Finish. The installation program has added the MFP Configurator desktop icon and Samsung MFP group to the system menu for your convenience. If you have any difficulties, consult the on-line help that is available through your system menu or can otherwise be called from the driver package windows applications, such as MFP Configurator or Image Editor. -
Page 107: Uninstalling The Mfp Driver
Click Uninstall. Click Next. Click Finish. SING RINTER IN : You must log in as a super user (root) to install the printer : The installation program runs automatically if you have an INUX icon…
-
Page 108: Using The Mfp Configurator
Since an MFP device combines the printer and scanner, the MFP Configurator provides options logically grouped for printer and scanner functions. There is also a special MFP port option responsible for the regulation of access to an MFP printer and scanner via a single I/O channel.
-
Page 109: Printers Configuration
Printers Configuration Printers Configuration has the two tabs; Printers and Classes. Printers Tab You can see the current system’s printer configuration by clicking on the printer icon button on the left side of MFP Configurator window. Switches to Printer configuration.
-
Page 110: Scanners Configuration
The Classes tab shows the list of the available printer classes. Shows all of the printer classes. Scanners Configuration In this window, you can monitor activity of scanner devices, view the list of installed Samsung MFP devices, change device properties, and scan images. Switches to Scanners configuration.
-
Page 111: Mfp Ports Configuration
(printer and scanner), it is necessary to organize proper access of “consumer” applications to these devices via the single I/O port. The Samsung MFP driver package provides an appropriate port sharing mechanism that is used by Samsung printer and scanner drivers. The drivers address their devices via so-called MFP ports.
-
Page 112: Configuring Printer Properties
• Classes: shows the class that your printer is in. Click Add to Class to add your printer to a specific class or click Remove from Class to remove the printer from the selected class.
-
Page 113: Printing A Document
From the application you are using, select Print from the File menu. Select Print directly using lpr. In the Samsung LPR window, select the model name of your machine from the Printer list and click Properties. Change the printer and print job properties.
-
Page 114: Printing Files
To abort the current job, click Cancel. Printing Files You can print many different types of files on the Samsung MFP device using the standard CUPS way — directly from the command line interface. The CUPS lpr utility allows you do that.
-
Page 115: Scanning A Document
Scanning a Document You can scan a document using the MFP Configurator window. Double-click the MFP Configurator on your desktop. Click the Select the scanner on the list. When you have only one MFP device and it is connected to the computer and turned on, your scanner appears on the list and is automatically selected.
-
Page 116
Load the document to be scanned face down on the document glass. Click Preview in the Scanner Properties window. The document is scanned and the image preview appears in the Preview Pane Drag the pointer to set the image area to be scanned. -
Page 117
Change the scan options in the Image Quality and Scan Area sections. • Image Quality: allows you to select the color • Scan Area: allows you to select the page size. The If you want to use one of the preset scan option settings, select from the Job Type drop-down list. -
Page 118
Using Preset Job Type Settings You can save your scan option settings to retrieve for a later scanning. To save a new Job Type setting: Change the options from the Scanner Properties window. Click Save As. Enter the name for your setting. Click OK. -
Page 119: Using The Image Editor
Using the Image Editor The Image Editor window provides you with menu commands and tools to edit your scanned image. You can use the following tools to edit the image: Tools 6.18 SING RINTER IN Use these tools to edit the image. Saves the image.
-
Page 120
Tools Allows you to scale the image size; you can enter the size manually, or set the rate to scale proportionally, vertically or horizontally. Allows you to rotate the image; you can select the number of degrees from the drop-down list. Allows you to flip the image vertically or horizontally. -
Page 121
6.20 SING RINTER IN INUX… -
Page 122: Chapter 7: Maintenance
AINTENANCE This chapter provides information for maintaining your machine and the toner cartridge. This chapter includes: • Printing the System Data List • Clearing the Memory • Cleaning Your Machine • Maintaining the Toner Cartridge • Consumables and Replacement Parts •…
-
Page 123: Printing The System Data List
Printing the System Data List Your machine can print the system data report shows the status of the user-selectable options. You may print this list to confirm your changes after changing any settings. To print the system data list: Press Menu/Exit until «Report» appears on the top line of the display.
-
Page 124: Cleaning Your Machine
Cleaning Your Machine To maintain print quality, follow the cleaning procedures below each time the toner cartridge is replaced or if print quality problems occur. OTES • While cleaning the inside of the machine, be careful not to touch the transfer roller, located underneath the toner cartridge. Oil from your fingers can cause print quality problems.
-
Page 125
With a dry lint-free cloth, wipe away any dust and spilled toner from the toner cartridge area and the toner cartridge cavity. AUTION it to light for more than a few minutes. Cover it with a piece of paper, if necessary. Do not touch the black transfer roller inside the machine. Locate the long strip of glass (LSU) inside the top of the cartridge compartment, and gently swab the glass to see if dirt turns the white cotton black. -
Page 126: Cleaning The Document Glass
Cleaning the Document Glass Keeping the document glass clean helps ensure the best possible copies. We suggest that you clean the document glass at the start of each day and during the day, as needed. Slightly dampen a soft lint-free cloth or paper towel with water.
-
Page 127: Maintaining The Toner Cartridge
Maintaining the Toner Cartridge Toner Cartridge Storage To get the most from the toner cartridge, keep the following guidelines in mind: • Do not remove the toner cartridge from its package until ready for use. • Do not refill the toner cartridge. The machine warranty does not cover damage caused by using a refilled cartridge.
-
Page 128: Redistributing Toner
Redistributing Toner When the toner cartridge is near the end of its life, white streaks or light print occurs. You can temporarily re-establish the print quality by redistributing the remaining toner in the cartridge. Open the front cover. Pull the toner cartridge out and gently roll the cartridge 5 or 6 times to distribute the toner evenly inside the cartridge.
-
Page 129: Replacing The Toner Cartridge
Replacing the Toner Cartridge When the toner eventually runs out, only blank pages print when a print job is sent. At this stage, the toner cartridge needs to be replaced. The machine stops printing. Open the front cover. Lightly pushing the used cartridge down, pull it out. Unpack the new toner cartridge and gently roll it horizontally four or five times to distribute the toner evenly inside the cartridge.
-
Page 130: Cleaning The Drum
Transfer roller Fuser unit To purchase consumables and replacement parts, contact your Samsung dealer or the retailer where you bought your machine. We strongly recommend that items be installed by trained service professional, except for the toner cartridge. Yield (Average) Approx.
-
Page 131: Using The Remote Control Panel
Using the Remote Control Panel, you can update the firmware program of your machine on the desktop of your computer. When you install the Samsung Software, the Remote Control Panel program is automatically installed. To open the Remote Control Panel: Start Windows.
-
Page 132: Chapter 8: Troubleshooting
ROUBLESHOOTING This chapter gives helpful information for what to do if you encounter an error. This chapter includes: • Clearing Paper Jams • Clearing LCD Error Messages • Solving Problems…
-
Page 133: Clearing Paper Jams
Clearing Paper Jams When a paper jam occurs, «Paper Jam» appears on the display. Refer to the table below to locate and clear the paper jam. Paper Jam 0 Open/Close Door Paper Jam 1 Open/Close Door Paper Jam 2 Check Inside To avoid tearing the paper, pull the jammed paper out gently and slowly.
-
Page 134: In The Paper Exit Area
Insert the paper tray into the machine until it snaps into place. Open and close the front cover to resume printing. In the Paper Exit Area Open and close the front cover. The jammed paper automatically exits the machine. If the paper does not exit, continue to step 2. Gently pull the paper out of the front output tray.
-
Page 135
Close the jam cover by pushing a tab to the left and hold it down and lowering the cover carefully until the cover is holding down the tab. If there is any resistance and the paper does not move when you pull or if you cannot see the paper in the jam cover, continue to step 6. -
Page 136: In The Fuser Area Or Around The Toner Cartridge
In the Fuser Area or Around the Toner Cartridge : The fuser area is hot. Take care when removing paper from the machine. Open the front cover and pull the toner cartridge out, lightly pushing it down. Remove the jammed paper by gently pulling it straight out. Replace the toner cartridge and close the front cover.
-
Page 137: In The Manual Feeder
In the Manual Feeder “ Paper Jam 1 Open/Close Door ” appears on the display when you try to print using the manual feeder and the machine does not detect paper, due to no paper or improper paper loading. The error message may also occur when the paper is not properly fed into the machine through the manual feeder.
-
Page 138
— Load the paper into the tray as shown below. — Open the Samsung SCX-4100 Series Properties window, set the paper size to A5(5.8×8.3 in.) from the Paper tab. — From the Orientation option of the Layout tab, set the Rotate option to 90º. -
Page 139: Clearing Lcd Error Messages
Clearing LCD Error Messages Messages appears on the display to indicate the control panel to indicate the machine’s status or errors. Refer to the following table to understand the message’s meaning and correct the problem, if necessary. Messages and their meanings are listed in alphabetical order.
-
Page 140: Solving Problems
• There may be debris inside the machine. Open the front Transparencies stick Use only the transparencies specifically designed for a laser together in the paper printer. Remove each transparency as it exits from the exit. machine. Envelopes skew or fail Ensure that the paper guides are against both sides of the to feed correctly.
-
Page 141: Printing Problems
ROUBLESHOOTING Suggested solutions Check the power cord connections. Check the power switch and the power source. Select Samsung SCX-4100 Series as your default printer in your Windows. After locating the problem, clear it. • Close the cover. • Clear the paper jam. See page 8.2.
-
Page 142
15 PPM for Letter-sized paper 14 PPM for A4-sized paper. From the Start menu, choose Settings and Printers. Right-click the Samsung SCX-4100 Series printer icon, choose Properties, click the Details tab, and then choose the Spool Settings button. -
Page 143
Condition Possible cause Pages print, The toner cartridge is but are blank. defective or out of toner. The file may have blank pages. Some parts, such as the controller or the board, may be defective. The setting in the illustrations software application is print wrong. -
Page 144: Printing Quality Problems
Printing Quality Problems If the inside of the printer is dirty, or paper is improperly loaded, print quality maybe reduced. See the table below to clear the problem. Condition Light or faded If a vertical white streak or faded area appears on the page: print •…
-
Page 145
Condition Vertical lines Gray background Toner smear Vertical repetitive defects 8.14 ROUBLESHOOTING Suggested solutions If black vertical streaks appear on the page: • The drum inside the toner cartridge has probably been scratched. Remove the toner cartridge and install a new one. See “Replacing the Toner Cartridge”… -
Page 146
• If background scatter covers the entire surface area of a printed page, adjust the print resolution through your software application or the printer properties. Miss-formed • If characters are improperly formed and producing hollow images, the paper stock may be too slick. Try a different characters paper. -
Page 147
Condition Wrinkles or creases Back of printouts are dirty Black pages Loose toner 8.16 ROUBLESHOOTING Suggested solutions • Ensure that the paper is loaded properly. • Check the paper type and quality. See “Paper Specifications” on page A.5. • Turn the stack of paper over in the paper tray. Also try rotating the paper 180°… -
Page 148
Contact a service representative. Curl If the printed paper is curl or paper does not feed into the printer: • Turn the stack of paper over in the paper tray. Also try rotating the paper 180° in the paper tray. -
Page 149: Copying Problems
Copying Problems Condition Copies are too light or too dark. Smears, lines, marks or spots appears on copies. Copy image is skewed. Blank copies print out. Image rubs off the copy easily. Frequent copy paper jams occurs. Fewer copies from the toner cartridge than expected prints out.
-
Page 150: Scanning Problems
• The selected port is currently being used. Restart your computer and try again. • The printer cable may be improperly connected or the power may be off. You must use a USB 1.1 compliant cable or a parallel cable that supports IEEE-1284 bi- directional communications.
-
Page 151: Common Linux Problems
8.20 ROUBLESHOOTING Possible Cause and Solution • Check if the printer driver is installed in your system. Open MFP configurator and switch to the Printers tab in Printers configuration window to look at the list of available printers. Make sure that your machine is displayed on the list.
-
Page 152
• Check if your machine is connected to the computer. • Check if MFP port is not busy. Since functional Possible Cause and Solution components of MFP (printer and scanner) share the same I/O interface (MFP port), the situation of simultaneous access of different «consumer» application to the same MFP port is possible. -
Page 153
8.22 ROUBLESHOOTING Possible Cause and Solution • Since both Linux Printer Package and MFP driver make a symbolic link to «lpr» printing command, which is commonly used on Unix clones, it is not recommended to use both package on the same machine. -
Page 154: Appendix A: Specifications
PECIFICATIONS This chapter includes: • General Specifications • Scanner and Copier Specifications • Printer Specifications • Paper Specifications…
-
Page 155: General Specifications
General Specifications Item Paper input capacity Paper output capacity Paper type Power requirements Power consumption Noise Warm-up Time Operating conditions Duty Cycle Consumables Toner cartridge life SET dimension (W x D x H) Weight Package Weight Description Paper tray: 250 sheets (weight: 75 g/m Manual feeder: 1 sheet (weight: 75 g/m Front output tray: 50 sheets (face down) Rear output slot: 1 sheet (face up)
-
Page 156: Scanner And Copier Specifications
Item Interface • OS Compatibility • Sound Pressure Level, ISO7779. ** May be affected by operating environment, printing interval, media type, media size and color/black. *** Please visit www.samsungprinter.com to download the latest software version. Scanner and Copier Specifications Item Compatibility Scan method Scan resolution…
-
Page 157: Printer Specifications
Envelope C6, Envelope Monarch, Envelope B5 * Min.: 76 x 127 mm (3 x 5 in.) Max.: 216 x 356 mm (8.5 x 14 in.) 600 x 600 dpi SPL (Samsung Printer Language) 8MB (Max. 8MB) Standby mode: 12 seconds…
-
Page 158: Paper Specifications
• Before purchasing large quantities of paper, insure the paper meets the requirements specified in this user’s guide. : Using paper that does not meet these specifications may cause problems, AUTION requiring repairs. These repairs are not covered by the Samsung warranty or service agreements.
-
Page 159: Supported Sizes Of Paper
Supported Sizes of Paper Size (mm/in.) Plain paper Letter (216 x 279/8.5 x 11) Legal (216 x 356/8.5 x 14) Executive (184 x 267/7.2 x 10.5) A4 (210 x 297/8.3 x 11.7) A5 (148 x 210/5.8 x 8.3) A6 (105 x 148/4.1 x 5.8) Folio (216 x 330/8.5 x 13) Envelopes JIS B5 (182 x 257/7.2 x 10.1)
-
Page 160: Guidelines For Using Paper
Guidelines for Using Paper For the best result, use conventional 75 g/m of good quality, and free of cuts, nicks, tears, spots, loose particles, dust, wrinkles, voids, and curled or bent edges. If you are unsure of what type of paper you are loading, such as bond or recycled paper, check the label on the package.
-
Page 161: Paper Specifications
Paper Specifications Category Acid Content Caliper Curl in Ream Cut Edge Conditions Fusing Compatibility Grain Moisture Content Smoothness Paper Output Capacity Output Location Face-down output tray Face-up output slot Specifications 5.5 pH or lower 0.094 ~ 0.18 mm (3.0 ~ 7.0 mils) Flat within 5 mm (0.02 in.) Cut with sharp blades with no visible fray.
-
Page 162: Paper Storage Environment
Paper Storage Environment Paper storage environment conditions directly affect the feed operation. Ideally, the machine and paper storage environment should be at or near room temperature, and not too dry or humid. Remember that paper is hygroscopic; it absorbs and loses moisture rapidly. Heat works with humidity to damage paper.
-
Page 163: Envelopes
Envelopes Envelope construction is critical. Envelope fold lines can vary considerably, not only between manufacturers, but also within a box from the same manufacturer. Successful printing on envelopes depends upon the quality of the envelopes. When selecting envelopes, consider the following components: Weight: The weight of the envelope paper should not exceed 90g/m •…
-
Page 164: Envelopes With Adhesive Strips Or Flaps
Envelopes with Adhesive Strips or Flaps Envelopes with a peel-off adhesive strip or with more than one flap that folds over to seal must use adhesives compatible with the heat and pressure in the machine. The extra flaps and strips might cause wrinkling, creasing or even jams and may even damage the fuser.
-
Page 165: Labels
Labels AUTIONS • To avoid damaging the machine, use only labels recommended for laser printers. • To prevent serious jams, always use the manual feeder to print labels and always use the rear output tray. • Never print on the same sheet of labels more than once and never print on a partial sheet of labels.
-
Page 166
NDEX Numerics 2-side, special copy 4.10 2-up, special copy 4.11 auto fit, special copy 4.9 canceling copy 4.4 print 3.5 scan 5.5 cleaning document glass 7.5 drum 7.9 inside 7.3 outside 7.3 clone, special copy 4.8 connect parallel cable 1.11 USB cable 1.11 connection AC power 1.13… -
Page 167
7.2 MFP driver, install Linux 6.4 network printer, set 3.22 n-up (multiple pages per sheet) copy 4.11 orientation, print 3.3 6.13 output location, select 2.4 overlay, use 3.18 paper guidelines 2.3 paper jam, clear 8.2 paper load in manual feeder 2.9 in paper tray 1.8… -
Page 168
uninstalling MFP driver Linux 1.23 Windows Remote Control Panel 1.23 SmarThru 1.24 mode, change 8.12 watermarks, use 3.15… -
Page 169
Visit us at: www.samsungprinter.com Rev.3.00…

О руководстве пользователя
В руководстве пользователя приведена информация о настройке многофункционального
устройства и установке поставляемого с ним программного обеспечения. Кроме того,
представлены инструкции по использованию устройства в качестве копировального аппарата,
сканера и принтера, по обслуживанию устройства, а также по поиску и устранению
неисправностей.
В руководстве содержатся также общие сведения о работе с многофункциональным
приложением. Программа Samsung SmarThru позволяет сканировать и редактировать
изображения, а также сканировать документы в целях копирования и отправки по электронной
почте с компьютера.
Данное руководство предназначено только для ознакомления. Любая информация, содержащаяся
в руководстве, может быть изменена без предупреждения. Компания Samsung Electronics
не несет ответственности за какие бы то ни было изменения, прямые или косвенные,
произошедшие в результате или в связи с использованием данного руководства.
© 2004 Samsung Electronics Co., Ltd. Все права защищены.
•
SCX-4100 и эмблема Samsung являются товарными знаками компании
Samsung Electronics
Co., Ltd.
•PCL и PCL 6 являются товарными знаками компании Hewlett-Packard.
• Microsoft, Windows, Windows 9x, Windows Me, Windows 2000, Windows NT 4.0
и Windows XP являются охраняемыми товарными знаками корпорации Майкрософт.
• PostScript 3, Adobe Acrobat Reader, Adobe PhotoDeluxe и Adobe Photoshop являются
товарными знаками корпорации Adobe System, Inc.
• Остальные торговые марки и названия изделий являются товарными знаками
соответствующих компаний или организаций.

Contact SAMSUNG WORLD
WIDE
If you have any comments or questions regarding Samsung products, contact
the SAMSUNG customer care center.
Country Customer Care Center Web Site
CANADA 1-800-SAMSUNG (7267864) www.samsung.com/ca
MEXICO 01-800-SAMSUNG
(7267864)
U.S.A 1-800-SAMSUNG (7267864) www.samsung.com
ARGENTINE 0800-333-3733 www.samsung.com/ar
BRAZIL 0800-124-421 www.samsung.com/br
CHILE 800-726-7864 (SAMSUNG) www.samsung.com/cl
COSTA RICA 0-800-507-7267 www.samsung.com/latin
ECUADOR 1-800-10-7267 www.samsung.com/latin
EL SALV ADO R 800-6225 www.samsung.com/latin
GUA T EMALA 1-800-299-0013 www.samsung.com/latin
JAMAICA 1-800-234-7267 www.samsung.com/latin
PANAMA 800-7267 www.samsung.com/latin
PUERTO RICO 1-800-682-3180 www.samsung.com/latin
REP.
DOMINICA
TRINIDAD &
TOBAGO
1-800-751-2676 www.samsung.com/latin
1-800-7267-864 www.samsung.com/latin
www.sam sung. com / mx
VENEZUELA 1-800-100-5303 www .sam sung.com/latin
BELGIUM 02 201 2418 www.samsung.com/be
CZECH
REPUBLIC
DENMARK 38 322 887 www.samsung.com/dk
FINLAND 09 693 79 554 www.samsung.com/fi
FRANCE 08 25 08 65 65
GERMANY 01805 — 121213
844 000 844 www.samsung.com/cz
www.sam sung. com / fr
(€ 0,15/min)
www.sam s ung. de
(€ 0,12/min)
2
Country Customer Care Center Web Site
HUNGARY 06 40 985 985 www.samsung.com/hu
ITALIA 199 153 153 www.samsung.com/it
LUXEMBURG 02 261 03 710 www.samsung.lu
NETHERLANDS 0900 20 200 88
(€ 0,10/min)
NORWAY 231 627 22 www.samsung.com/no
POLAND 0 801 801 881 www.samsung.com/pl
PORTUGAL 80 8 200 128 www.samsung.com/pt
SLOVAKIA 0850 123 989 www.samsung.com/sk
SPAIN 902 10 11 30 www. samsung.com/es
SWEDEN 08 585 367 87 www.samsung.com/se
U.K 0870 242 0303 www.samsung.com/uk
RUSSIA 8-800-200-0400 www.samsung.ru
UKRAINE 8-800-502-0000 www.samsung.com/ur
AUSTRALIA 1300 362 603 www.samsung.com/au
CHINA 800-810-5858
010- 6475 1880
HONG KONG 2862 6001 www.samsung.com/hk
INDIA 3030 8282
1600 1100 11
www.sam sung. com / nl
www.samsung.com.cn
www.sam sung. com / in
INDONESIA 0800-112-8888 www.samsung.com/id
JAPAN 0120-327-527 www.samsung.com/jp
MALAYSIA 1800-88-9999 www.samsung.com/my
PHILIPPINES 1800-10-SAMSUNG
(7267864)
SINGAPORE 180 0-SAMSU NG (7267864) www.samsung.com/sg
THAILAND 1800-29-3232
02-689-3232
TAIWAN 0800-329-999 www.samsung.com/tw
VIETNAM 1 800 588 889 www.samsung.com/vn
SOUTH AFRICA 0860 7267864 (SAMSUNG) www.samsung.com/za
U.A.E 800SAMSUNG (7267864) www.samsung.com/mea
www.sam sung. com / ph
www.sam sung. com / th
3

СОДЕРЖАНИЕ
Глава 1:
ПРИСТУПАЯ К РАБОТЕ
Распаковка ……………………………………………………………………………… 1.2
Выбор места установки ……………………………………………………… 1.3
Внешний вид устройства …………………………………………………………. 1.4
Вид спереди ……………………………………………………………………… 1.4
Вид сзади …………………………………………………………………………. 1.4
Функции панели управления ……………………………………………… 1.5
Установка картриджа с тонером ……………………………………………….. 1.6
Загрузка бумаги ………………………………………………………………………. 1.8
Загрузка в лоток бумаги других размеров …………………………… 1.9
Подключение устройства ……………………………………………………….. 1.11
Включение устройства …………………………………………………………… 1.13
Комплект программного обеспечения Samsung ………………………. 1.14
Характеристики драйверов принтера ……………………………….. 1.15
Установка программного обеспечения Samsung в ОС Windows .. 1.16
Требования к системе ……………………………………………………… 1.16
Установка программного обеспечения Samsung ……………….. 1.17
Установка программы Samsung SmarThru ………………………… 1.20
Восстановление программного обеспечения …………………………… 1.22
Удаление программного обеспечения …………………………………….. 1.23
Отмена установки драйвера многофункционального
устройства ………………………………………………………………………. 1.23
Отмена установки Samsung SmarThru ……………………………… 1.24
Изменение языка сообщений на дисплее ……………………………….. 1.25
Выбор размера и типа бумаги ………………………………………………… 1.26
Использование режимов экономии …………………………………………. 1.27
Режим экономии тонера ………………………………………………….. 1.27
Режим энергосбережения ………………………………………………… 1.27
Глава 2:
4
РАБОТА С БУМАГОЙ
Выбор материала для печати ………………………………………………….. 2.2
Тип бумаги, источники бумаги и их емкость ………………………… 2.2
Рекомендации по использованию бумаги и других
материалов для печати …………………………………………………….. 2.3
Выбор выходного лотка …………………………………………………………… 2.4
Печать с использованием переднего выходного лотка
(лицевой стороной вниз) ……………………………………………………. 2.5
Печать с использованием заднего выходного лотка
(лицевой стороной вверх) ………………………………………………….. 2.6
Загрузка бумаги в лоток …………………………………………………………… 2.8
Ручная подача ………………………………………………………………………… 2.9
Выбор типа и размера бумаги для лотка ручной подачи ……. 2.11

Глава 3:
ПЕЧАТЬ
Печать документов в Windows …………………………………………………. 3.2
Отмена задания печати …………………………………………………….. 3.5
Использование набора настроек ……………………………………….. 3.6
Работа со справкой …………………………………………………………… 3.6
Выбор параметров бумаги ……………………………………………………….. 3.7
Настройка параметров графики ……………………………………………….. 3.8
Печать нескольких страниц на одной стороне листа бумаги ……. 3.10
Печать документов с масштабированием ……………………………….. 3.12
Размещение документов на странице выбранного размера …….. 3.13
Печать плакатов ……………………………………………………………………. 3.14
Использование водяных знаков ……………………………………………… 3.15
Использование имеющихся водных знаков ………………………. 3.15
Создание водяного знака ………………………………………………… 3.16
Изменение водяного знака ………………………………………………. 3.17
Удаление водяного знака ………………………………………………… 3.17
Использование наложения …………………………………………………….. 3.18
Что такое наложение? …………………………………………………….. 3.18
Создание нового наложения ……………………………………………. 3.18
Использование наложения ………………………………………………. 3.20
Удаление наложения ………………………………………………………. 3.21
Настройка локального общего принтера …………………………………. 3.22
В операционной системе Windows 9x/Me ………………………….. 3.22
В операционной системе Windows NT 4.0/2000/XP ……………. 3.23
Глава 4:
КОПИРОВАНИЕ
Загрузка бумаги для копирования …………………………………………….. 4.2
Подготовка документов ……………………………………………………………. 4.2
Копирование …………………………………………………………………………… 4.3
Задание параметров копирования ……………………………………………. 4.5
Плотность …………………………………………………………………………. 4.5
Выбор числа копий ……………………………………………………………. 4.5
Копирование с масштабированием ……………………………………. 4.6
Изначальный тип ………………………………………………………………. 4.7
Особые режимы копирования ………………………………………………….. 4.8
Клонирование …………………………………………………………………… 4.8
Копирование с масштабированием по размеру страницы …… 4.9
Копирование двустороннего документа на одну страницу …. 4.10
Копии двух документов на одной странице ………………………. 4.11
Копирование плакатов …………………………………………………….. 4.12
Изменение настроек по умолчанию ………………………………………… 4.13
Выбор времени ожидания ……………………………………………………… 4.14
5

Глава 5:
СКАНИРОВАНИЕ
Основные операции сканирования …………………………………………… 5.2
Сканирование с помощью программы Samsung SmarThru …………. 5.2
Использование встроенной справки …………………………………… 5.5
Сканирование с использованием программного обеспечения,
поддерживающего интерфейс TWAIN ………………………………………. 5.6
Глава 6:
Глава 7:
РАБОТА С ПРИНТЕРОМ ВОПЕРАЦИОННОЙ
СИСТЕМЕ LINUX
Приступая к работе …………………………………………………………………. 6.2
Установка драйвера многофункционального устройства …………… 6.3
Требования к системе ……………………………………………………….. 6.3
Установка драйвера многофункционального устройства …….. 6.4
Отмена установки драйвера многофункционального
устройства ………………………………………………………………………… 6.6
Использование программы MFP Configurator ……………………………. 6.7
Запуск программы MFP Configurator …………………………………… 6.7
Окно «Printers configuration» ………………………………………………. 6.8
Окно «Scanners Configuration» …………………………………………… 6.9
Окно «MFP Ports Configuration» ……………………………………….. 6.10
Настройка свойств принтеров ………………………………………………… 6.11
Печать документов ………………………………………………………………… 6.12
Печать из приложений …………………………………………………….. 6.12
Печать файлов ……………………………………………………………….. 6.13
Сканирование документов ……………………………………………………… 6.14
Использование программы Image Editor …………………………… 6.18
ОБСЛУЖИВАНИЕ
Печать отчета о данных системы …………………………………………….. 7.2
Сброс памяти ………………………………………………………………………….. 7.2
Чистка устройства …………………………………………………………………… 7.3
Чистка внешних частей устройства ……………………………………. 7.3
Чистка внутренних частей устройства ………………………………… 7.3
Чистка стекла экспонирования …………………………………………… 7.5
Обслуживание картриджа с тонером ………………………………………… 7.6
Перераспределение тонера ………………………………………………. 7.7
Замена картриджа с тонером …………………………………………….. 7.8
Чистка барабана ……………………………………………………………….. 7.9
Расходные материалы и запасные части ………………………………….. 7.9
Работа с панелью дистанционного управления ………………………. 7.10
6

Глава 8:
УСТРАНЕНИЕ НЕПОЛАДОК
Устранение замятия бумаги …………………………………………………….. 8.2
Лоток для бумаги ………………………………………………………………. 8.2
Замятие в области выхода бумаги …………………………………….. 8.3
Замятие в области блока закрепления тонера или картриджа . 8.5
Замятие в лотке для ручной подачи …………………………………… 8.6
Советы по предупреждению замятия бумаги ……………………… 8.6
Сообщения об ошибках на дисплее …………………………………………. 8.8
Устранение неполадок …………………………………………………………….. 8.9
Неполадки при подаче бумаги …………………………………………… 8.9
Неполадки при печати …………………………………………………….. 8.10
Проблемы качества печати ……………………………………………… 8.13
Неполадки при копировании ……………………………………………. 8.18
Неполадки при сканировании …………………………………………… 8.19
Типичные неполадки в операционной системе Linux …………. 8.20
Приложение A:
Общие характеристики …………………………………………………………… A.2
Характеристики сканера и копировального аппарата ……………….. A.3
Технические характеристики принтера ……………………………………. A.4
Характеристики бумаги …………………………………………………………… A.5
ТЕХНИЧЕСКИЕ ХАРАКТЕРИСТИКИ
Обзор ………………………………………………………………………………. A.5
Допустимые размеры бумаги ……………………………………………. A.6
Рекомендации по использованию бумаги ………………………….. A.7
Характеристики бумаги …………………………………………………….. A.8
Емкость выходного лотка …………………………………………………. A.8
Условия хранения бумаги …………………………………………………. A.9
Конверты ……………………………………………………………………….. A.10
Наклейки ……………………………………………………………………….. A.12
Прозрачная пленка …………………………………………………………. A.12
7

Правила техники безопасности и меры предосторожности
Во избежание возникновения пожара, поражения электрическим током или получения
травмы при эксплуатации устройства соблюдайте меры предосторожности.
1. Внимательно изучите все инструкции.
2. Следуйте общим правилам эксплуатации электрических устройств.
3. Обратите внимание на предупреждения и инструкции, содержащиеся в надписях
на самом устройстве и в прилагаемой к нему документации.
4. Если инструкция по эксплуатации противоречит требованиям безопасности,
следуйте правилам безопасности. Возможно, инструкция по эксплуатации была
неправильно понята. Если противоречие между инструкциями разрешить не
удается, обратитесь к продавцу устройства или в службу технической поддержки.
5. Перед чисткой устройства отсоедините его от сети электропитания. Не пользуйтесь
чистящими жидкостями и аэрозолями. Для чистки устройства можно применять
только влажную ткань.
6. Не размещайте устройство на неустойчивых тележках, подставках или столах.
Падение устройства может причинить серьезный ущерб.
7. Никогда не размещайте устройство на отопительных устройствах, нагревателях,
кондиционерах, вентиляционных каналах или вблизи них.
8. Не ставьте никакие предметы на шнур питания. Размещайте устройство таким
образом, чтобы нельзя было наступить на кабели устройства.
9. Электрическая нагрузка на розетки и шнуры питания не должна превышать
допустимую для этих устройств. Иначе может уменьшиться производительность
ивозникнет угроза пожара и поражения электрическим током.
10. Не позволяйте домашним животным грызть шнур электропитания и интерфейсные
кабели для подключения к компьютеру.
11. Избегайте попадания в устройство посторонних предметов через отверстия
в корпусе устройства. Они могут вызвать замыкание электрических цепей под
высоким напряжением, что может привести к пожару или поражению электрическим
током. Избегайте попадания жидкостей внутрь устройства или на него.
12. Устройство может быть оснащено тяжелой крышкой, прижимающей документ
во время сканирования для повышения качества изображения. В этом случае
после размещения документа на стекле экспонирования закройте прижимную
крышку. Это следует делать медленно, придерживая крышку рукой, пока она
не опустится на место.
13. Не разбирайте устройство во избежание поражения электрическим током. Если
требуется ремонт, обратитесь в службу технической поддержки. Эксплуатация
устройства с открытыми или снятыми крышками опасна, в том числе из-за угрозы
поражения электрическим током. Неправильная сборка устройства может вызвать
поражение электрическим током при последующей эксплуатации.
8

14. В перечисленных ниже случаях следует немедленно отсоединить устройство
от компьютера и сети электропитания и обратиться за помощью к техническому
специалисту.
• Поврежден шнур питания, разъемы или кабель для подключения к компьютеру.
• В устройство попала жидкость.
• Устройство облили водой, или оно попало под дождь.
• Устройство работает неправильно, хотя инструкции соблюдались точно.
• Устройство уронили, или на его корпусе видны повреждения.
• Производительность устройства внезапно значительно изменилась.
15. Пользуйтесь только теми органами управления устройством, которые описаны
винструкциях по эксплуатации. Использование других органов управления
устройством может привести к его повреждению, устранение которого и
восстановление работоспособности устройства потребуют вмешательства
технических специалистов.
16. Не пользуйтесь устройством во время грозы. Существует риск поражения
молнией. По возможности отсоединяйте устройство от сети электропитания во
время грозы.
17. При печати большого количества копий поверхность выходного лотка может
нагреться. Не прикасайтесь к этой поверхности сами и следите, чтобы к ней
не прикасались дети.
18. СОХРАНЯЙТЕ ЭТИ ИНСТРУКЦИИ.
9
Техника безопасности при эксплуатации лазерных устройств
Данное устройство сертифицировано в США и соответствует требованиям параграфа J
главы 1 сборника № 21 федеральных норм и правил Министерства здравоохранения
исоциального обеспечения для лазерных устройств класса I(1). В других странах
данный принтер сертифицирован как лазерное устройство класса I, соответствующее
требованиям Международной электротехнической комиссии (IEC 825).
Лазерные устройства класса I не считаются опасными. Блок лазера и принтер
сконструированы таким образом, что во время нормальной работы или технического
обслуживания облучение человека лазерным излучением не превышает уровня,
соответствующего классу I.
В
НИМАНИЕ
Не используйте и не обслуживайте устройство, если с блока сканирующего лазера
снята защитная крышка. Невидимый отраженный луч может повредить глаза.
Во избежание возникновения пожара, поражения электрическим током или получения
травмы при эксплуатации устройства соблюдайте перечисленные ниже меры
предосторожности.
!
10
Техника безопасности при наличии озона
Во время нормальной работы данное устройство
вырабатывает озон. Количество выделяемого озона
не представляет опасности для оператора. Тем не менее,
рекомендуется использовать устройство в хорошо
проветриваемом помещении.
Дополнительную информацию об озоне можно получить
вместном торговом представительстве компании Samsung.
Энергосбережение
Данное устройство использует современную технологию энергосбережения, которая
позволяет снизить потребление энергии устройством во время простоя.
Если устройство не получает никаких данных в течение длительного времени,
потребление им электроэнергии автоматически уменьшается.
Эмблема ENERGY STAR не означает одобрения какого-либо изделия или услуги
Управлением по охране окружающей среды (EPA).
Утилизация
AЯ46
При переработке и утилизации упаковки данного товара
соблюдайте нормы охраны окружающей среды.
9

б‡fl‚ОВМЛВ У ТУУЪ‚ВЪТЪ‚ЛЛ (В‚УФВИТНЛВ ТЪ‡М˚)
й‰У·ВМЛfl Л ТВЪЛЩЛН‡ˆЛЛ
е‡НЛУ‚Н‡ “CE” М‡ ‰‡ММУП ‡ФФ‡‡ЪВ У·УБМ‡˜‡ВЪ б‡fl‚ОВМЛВ У ТУУЪ‚ВЪТЪ‚ЛЛ Samsung
Electronics Co., Ltd. ТУ ТОВ‰Ы˛˘ЛПЛ ФЛПВМЛП˚ПЛ ‰ЛВНЪЛ‚‡ПЛ Ц‚УФВИТНУ„У лУ˛Б‡ 93/
68/EEC, ‚ ТУУЪ‚ВЪТЪ‚ЛЛ Т ‰‡Ъ‡ПЛ:
1 flМ‚‡fl, 1995 „.: СЛВНЪЛ‚‡ лУ‚ВЪ‡ 73/23/EEC “л·ОЛКВМЛВ Б‡НУМУ‰‡ЪВО¸ТЪ‚
„УТЫ‰‡ТЪ‚-˜ОВМУ‚ ‚ УЪМУ¯ВМЛЛ У·УЫ‰У‚‡МЛfl МЛБНУ„У М‡ФflКВМЛfl”.
1 flМ‚‡fl, 1996 „.: СЛВНЪЛ‚‡ лУ‚ВЪ‡ 89/336/EEC (92/31/EEC) “л·ОЛКВМЛВ Б‡НУМУ‰‡ЪВО¸ТЪ‚ „УТЫ‰‡ТЪ‚-˜ОВМУ‚ ‚
УЪМУ¯ВМЛЛ ˝ОВНЪУП‡„МЛЪМУИ ТУ‚ПВТЪЛПУТЪЛ”.
9 П‡Ъ‡, 1999 „.: СЛВНЪЛ‚‡ лУ‚ВЪ‡ 1999/5/EC У ‡‰ЛУУ·УЫ‰У‚‡МЛЛ Л УНУМВ˜МУП Т‚flБМУП У·УЫ‰У‚‡МЛЛ Л
‚Б‡ЛПМУП ФЛБМ‡МЛЛ Лı ТУУЪ‚ВЪТЪ‚Лfl.
иУОМУВ Б‡fl‚ОВМЛВ, УФВ‰ВОfl˛˘ВВ СЛВНЪЛ‚˚ Л ЫФУПflМЫЪ˚В ТЪ‡М‰‡Ъ˚, ПУКМУ ФУОЫ˜ЛЪ¸ Ы ФВ‰ТЪ‡‚ЛЪВОfl
НУПФ‡МЛЛ Samsung Electronics Co., Ltd.
лВЪЛЩЛН‡ˆЛfl EC
лВЪЛЩЛН‡ˆЛfl ‚ ТУУЪ‚ВЪТЪ‚ЛЛ Т “СЛВНЪЛ‚УИ 1999/5/EC ФУ ‡‰ЛУУ·УЫ‰У‚‡МЛ˛ Л
УНУМВ˜МУПЫ Т‚flБМУПЫ У·УЫ‰У‚‡МЛ˛ (оДдл)”
С‡ММ˚И ‡ФФ‡‡Ъ ФУЛБ‚У‰ТЪ‚‡ НУПФ‡МЛЛ Samsung ТВЪЛЩЛˆЛУ‚‡М НУПФ‡МЛВИ Samsung ‰Оfl Ф‡М-В‚УФВИТНУ„У
У‰МУЪВПЛМ‡О¸МУ„У ФУ‰ТУВ‰ЛМВМЛfl Н ‡М‡ОУ„У‚УИ ТВЪЛ У·˘В„У ФУО¸БУ‚‡МЛfl (PSTN) ‚ ТУУЪ‚ВЪТЪ‚ЛЛ Т
СЛВНЪЛ‚УИ 1999/5/EC. ДФФ‡‡Ъ ФВ‰М‡БМ‡˜ВМ ‰Оfl ‡·УЪ˚ Т М‡ˆЛУМ‡О¸М˚ПЛ PSTN Л ТУ‚ПВТЪЛП Т Днл ‚
В‚УФВИТНЛı ТЪ‡М‡ı.
иЛ ‚УБМЛНМУ‚ВМЛЛ МВФУО‡‰УН ТОВ‰ЫВЪ ‚ ФВ‚Ы˛ У˜ВВ‰¸ У·‡ЪЛЪ¸Тfl ‚ Ц‚УФВИТНЫ˛ О‡·У‡ЪУЛ˛ НУМЪУОfl
Н‡˜ВТЪ‚‡ НУПФ‡МЛЛ Samsung Electronics Co., Ltd.
ДФФ‡‡Ъ ФУ‚ВВМ ФУ ТЪ‡М‰‡ЪЫ TBR21 Л/ЛОЛ TBR 38. СОfl ФУ‰‰ВКНЛ ‚ ФЛПВМВМЛЛ ЪВПЛМ‡О¸МУ„У
У·УЫ‰У‚‡МЛfl, ТУУЪ‚ВЪТЪ‚Ы˛˘В„У ˝ЪУПЫ ТЪ‡М‰‡ЪЫ, Ц‚УФВИТНЛИ аМТЪЛЪЫЪ ЪВОВНУППЫМЛН‡ˆЛУММ˚ı ТЪ‡М‰‡ЪУ‚
(ETSI) ‚˚ФЫТЪЛО ВНУПВМ‰‡ЪВО¸М˚И ‰УНЫПВМЪ (EG 201 121), ТУ‰ВК‡˘ЛИ Б‡ПВ˜‡МЛfl Л ‰УФУОМЛЪВО¸М˚В
ЪВ·У‚‡МЛfl ‰Оfl У·ВТФВ˜ВМЛfl ТВЪВ‚УИ ТУ‚ПВТЪЛПУТЪЛ ЪВПЛМ‡ОУ‚ TBR21. ДФФ‡‡Ъ ТФУВНЪЛУ‚‡М Л ФУОМУТЪ¸˛
ТУУЪ‚ВЪТЪ‚ЫВЪ ‚ТВП ВНУПВМ‰‡ˆЛflП, ТУ‰ВК‡˘ЛПТfl ‚ ˝ЪУП ‰УНЫПВМЪВ.

1
ПРИСТУПАЯ К РАБОТЕ
Благодарим вас за покупку этого многофункционального
устройства. Многофункциональное устройство позволяет
распечатывать, копировать и сканировать документы.
В этой главе приведена пошаговая инструкция
по подключению устройства.
Данная глава содержит следующие разделы:
• Распаковка
• Внешний вид устройства
• Установка картриджа с тонером
• Загрузка бумаги
• Подключение устройства
• Включение устройства
Установка программного обеспечения
• Комплект программного обеспечения Samsung
• Установка программного обеспечения Samsung
в ОС Windows
• Восстановление программного обеспечения
• Удаление программного обеспечения
Настройка интерфейса устройства
• Изменение языка сообщений на дисплее
• Выбор размера и типа бумаги
• Использование режимов экономии
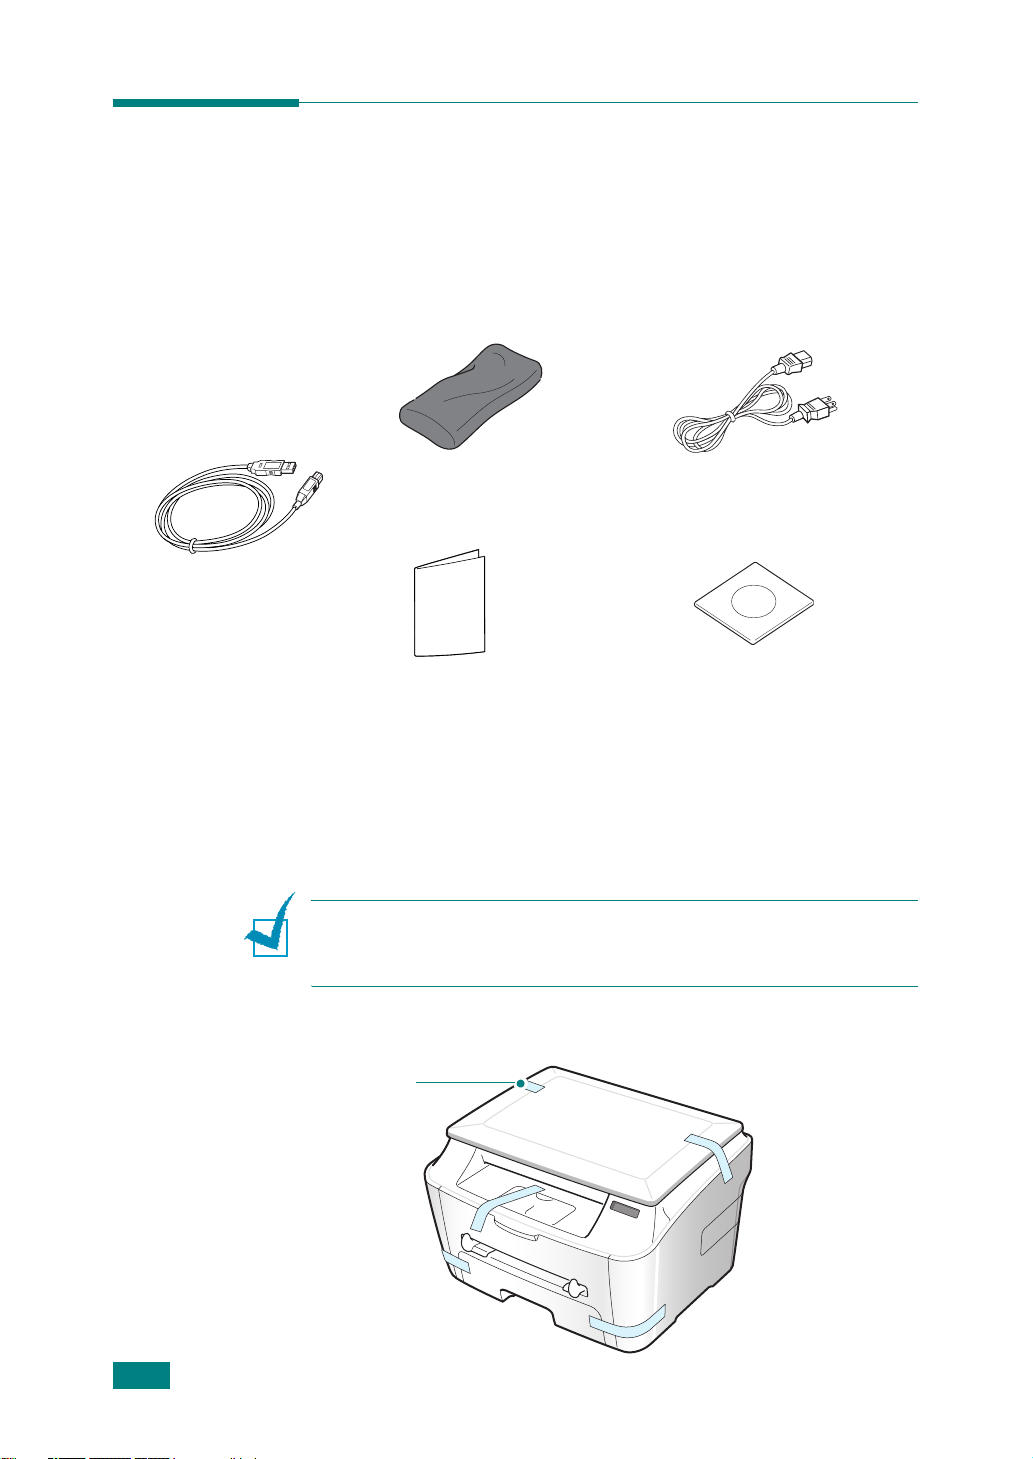
Распаковка
Извлеките устройство и все принадлежности из коробки.
В комплект поставки устройства входят перечисленные ниже
компоненты. Если не хватает какого-либо компонента, обратитесь
в розничный магазин, где вы приобрели данное устройство.
кабель USB
Картридж с тонером
Краткое руководство
Шнур питания
Компакт-диск
**
***
по установке
**
Внешний вид шнура питания может отличаться от указанного в соответствии
сместными стандартами.
***
На компакт-диске находятся драйвер многофункционального устройства,
программное обеспечение SmarThru, руководство пользователя и программа
Adobe Acrobat Reader. Программное обеспечение SmarThru обеспечивает
сканирование, копирование, печать и многие другие возможности.
П
РИМЕЧАНИЯ
.
• Шнур питания необходимо включать в розетку с заземлением.
• Комплекты поставки для разных стран могут различаться.
Снимите упаковочную ленту спереди, сзади и по бокам устройства.
1.2
П
РИСТУПАЯ К РАБОТЕ
Лента
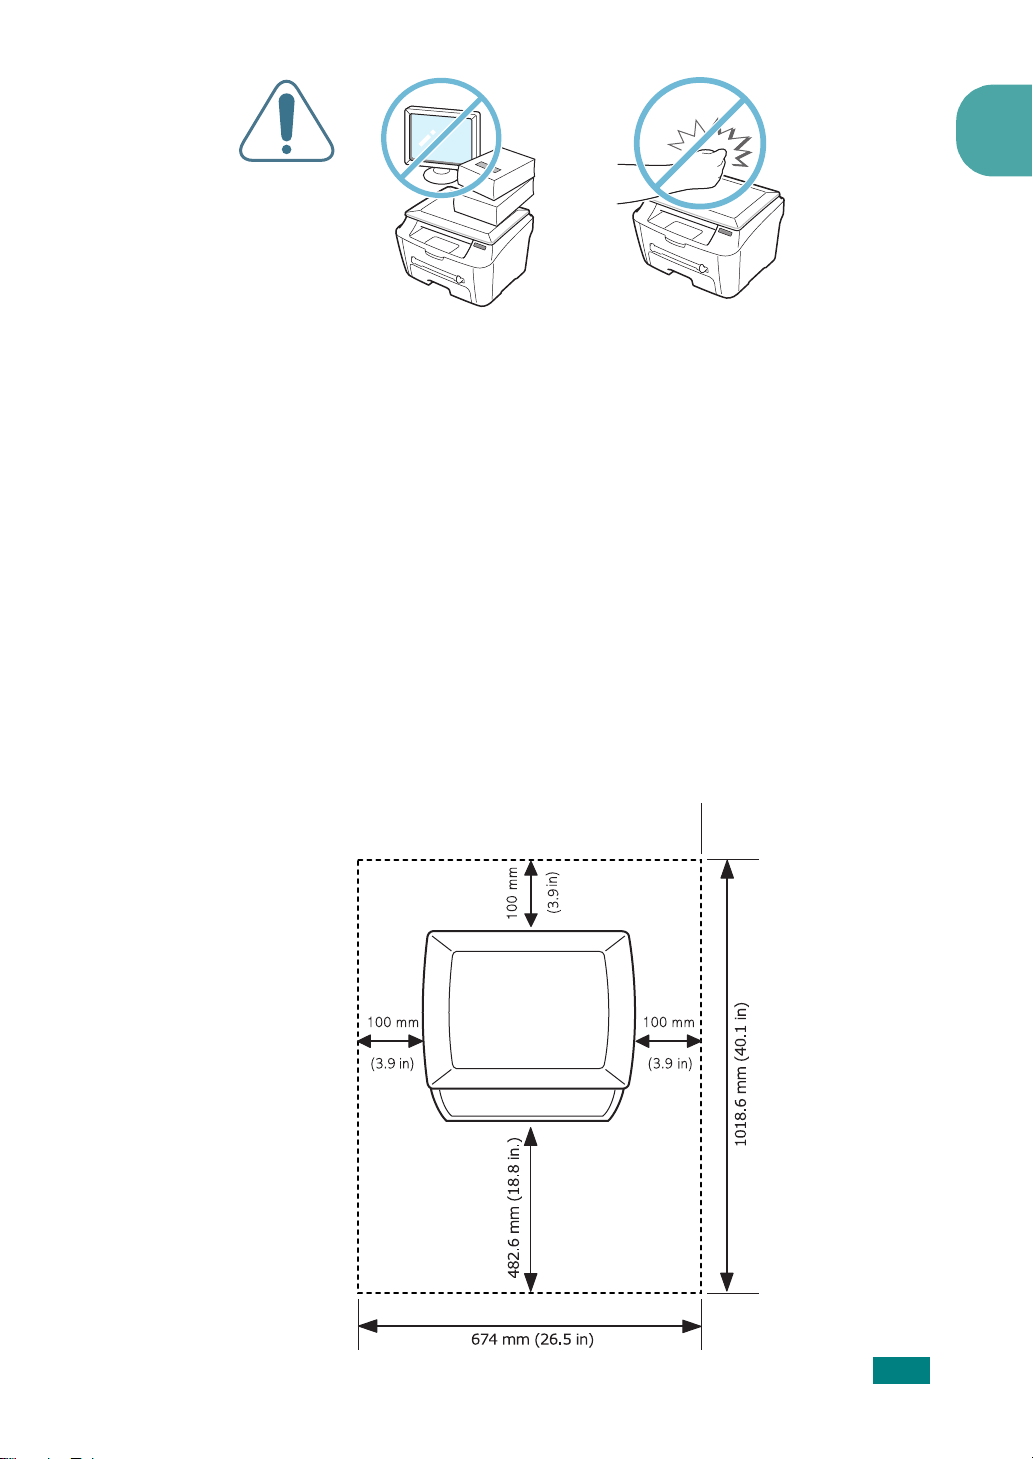
Выбор места установки
Расположите устройство на ровной устойчивой поверхности
со свободной циркуляцией воздуха. Вокруг устройства должно
быть достаточно места для открывания крышек и лотков.
Устройство должно находиться в сухом, хорошо проветриваемом
помещении, вдали от прямых солнечных лучей и источников тепла
или холода. Не ставьте устройство на край стола.
Необходимые расстояния
•
Спереди:
лотка)
482,6 мм (расстояние, достаточное для вытаскивания
1
•
Сзади:
•
Справа:
Слева:
•
100 мм (для вентиляции)
100 мм
100 мм (для вентиляции)
П
РИСТУПАЯ К РАБОТЕ
1.3
Крышка для
устранения
замятия
бумаги
Передний выходной
лоток
(лицевой стороной
Передняя
подставка для
Направляющие
Внешний вид устройства
На рисунке показаны основные элементы устройства.
Вид спереди
вниз)
бумаги
лотка ручной
подачи
Лоток для
ручной подачи
Лоток для
бумаги
Крышка стекла
экспонирования
Стекло
экспонирования
Панель управления
(см.
стр.1.5
)
Передняя крышка
Картридж
с тонером
1.4
Вид сзади
Задняя крышка
Выключатель питания
П
РИСТУПАЯ К РАБОТЕ
Шнур питания
Задний выходной лоток
(лицевой стороной вверх)
Разъем USB
Разъем
параллельного
интерфейса
Ограничитель длины бумаги
Функции панели управления
1
О
П
И
Р.
1
К
2
Настройка яркости изображения
при копировании.
Задание числа копий.
Вывод текущего состояния и подсказок.
Переключение между значениями, доступными
для выбранного пункта меню.
3
Вход в режим меню, выбор доступных пунктов
меню и возврат в режим ожидания.
Остановка выполнения операции.
4
В режиме ожидания — сброс или отмена
параметров копирования (плотности
выводимого изображения и количества копий).
Подтверждение выбора и запуск задания.
5
П
РИСТУПАЯ К РАБОТЕ
1.5
Установка картриджа с тонером
1
Откройте переднюю крышку.
2
Выньте картридж из упаковки. Не вскрывайте упаковку ножом
или другим острым предметом, чтобы не повредить барабан
картриджа.
1.6
3
В
• Во избежание повреждения картриджа не держите его на свету
• Если тонер попал на одежду, удалите его сухой тряпкой и выстирайте
П
РИСТУПАЯ К РАБОТЕ
Аккуратно встряхните картридж 5-6 раз, чтобы тонер
вкартридже распределился равномерно.
Это необходимо для получения максимального количества
копий с каждого картриджа.
НИМАНИЕ
больше нескольких минут. Если нужно оставить картридж на свету
на более длительный срок, положите его на ровную чистую
поверхность и накройте бумагой.
одежду в холодной воде. Не пользуйтесь горячей водой, так как под
ее воздействием тонер въедается в ткань.
!

4
Вставьте картридж в устройство так, чтобы он надежно
зафиксировался в рабочем положении.
5
Закройте переднюю крышку принтера. Крышка должна быть
закрыта плотно.
1
П
РИМЕЧАНИЕ
картриджа составляет около 3 000 страниц.
. При печати текста с 5% заполнением листа ресурс
П
РИСТУПАЯ К РАБОТЕ
1.7

Загрузка бумаги
В лоток можно загрузить около 250 листов бумаги.
Загрузка пачки бумаги размера Letter:
1
Откройте лоток и извлеките его из устройства.
2
Разверните бумагу веером, чтобы разделить листы. Выровняйте
края пачки бумаги, постучав ею о ровную поверхность.
1.8
3
П
РИСТУПАЯ К РАБОТЕ
Загрузите стопку бумаги в лоток стороной для печати
Допускается повторная печать на использованной бумаге.
Бумага должна лежать использованной стороной вверх,
несвернутым краем по направлению к устройству. Если при
загрузке возникают проблемы, разверните стопку бумаги.
вниз
.
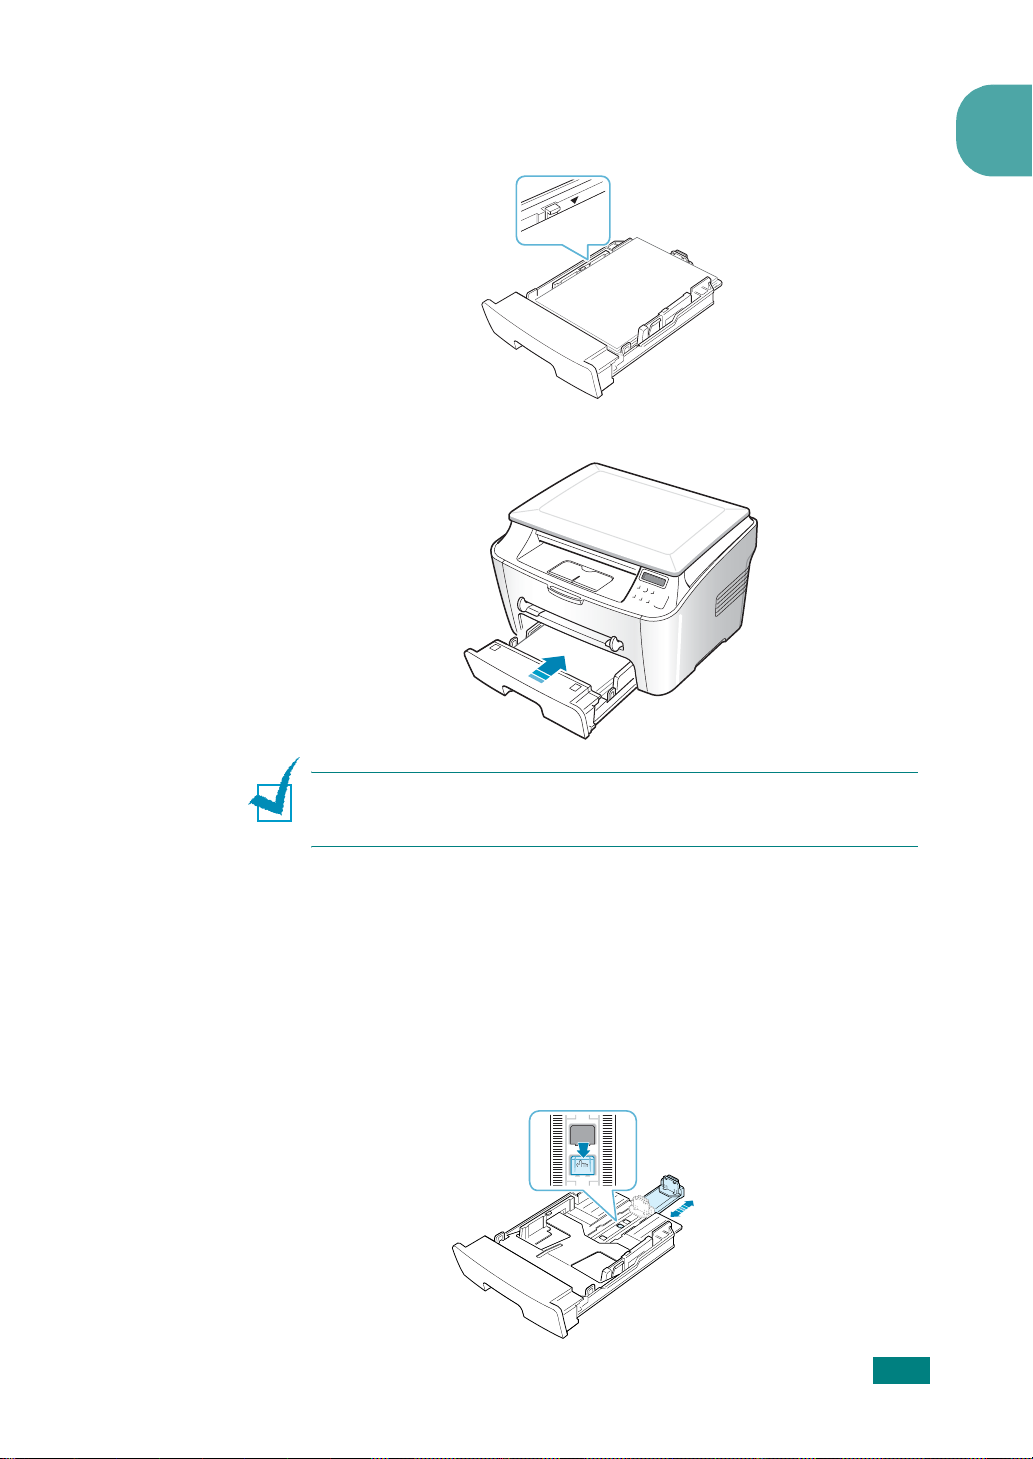
4
Обратите внимание на отметку ограничителя уровня бумаги
на левой внутренней стороне лотка. Переполнение лотка
может привести к замятию бумаги.
5
Вставьте лоток в устройство и задвиньте его внутрь.
1
П
РИМЕЧАНИЕ
для работы с бумагой данного типа и размера. Для настройки копирования
см. стр.1.26, а для настройки печати с компьютера — стр.3.7.
.
После загрузки бумаги необходимо настроить устройство
Загрузка в лоток бумаги других размеров
Для загрузки более длинной бумаги (например, 33 х 40,6 см)
отрегулируйте соответствующим образом положение
направляющих бумаги в лотке.
1
Нажав на защелку ограничителя длины бумаги
и разблокировав его, выдвиньте ограничитель наружу
до упора. Это позволит увеличить длину лотка.
П
РИСТУПАЯ К РАБОТЕ
1.9
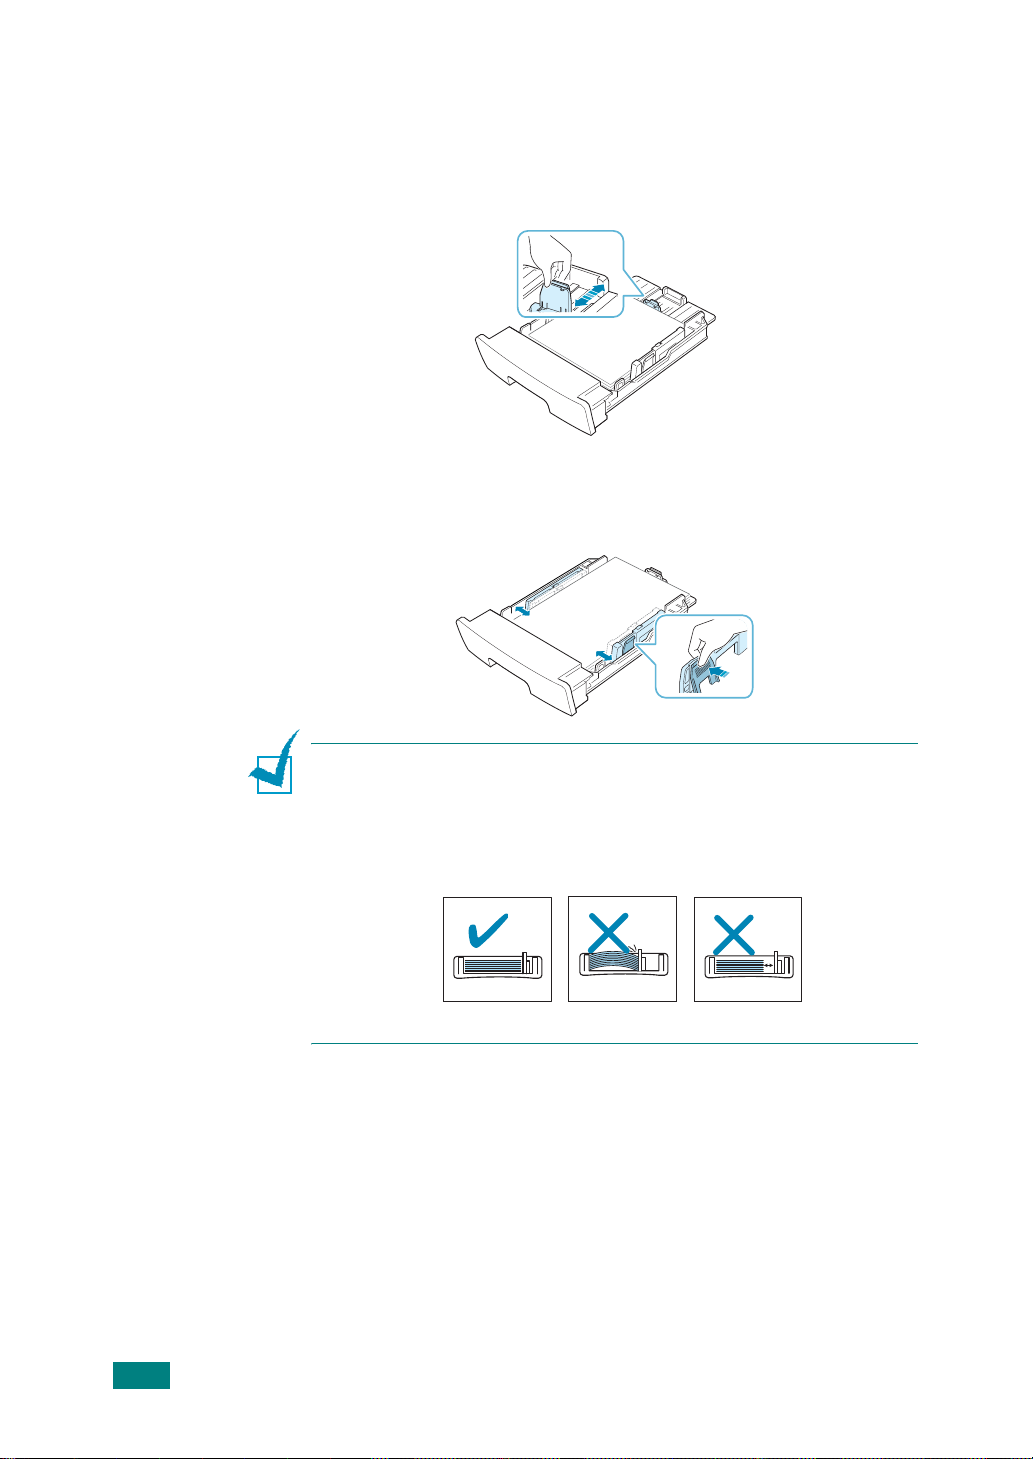
2
Загрузив бумагу в лоток, сдвиньте ограничитель размера
так, чтобы он слегка касался края пачки бумаги. Чтобы
использовать бумагу другого размера, необходимо
соответствующим образом изменить положение ограничителя
длины бумаги.
3
Зажмите ограничитель ширины бумаги (см. рисунок)
исдвиньте его по направлению к пачке бумаги так, чтобы
он касался краев пачки.
П
РИМЕЧАНИЯ
• Не допускайте сильного зажатия бумаги ограничителем ширины
бумаги. Это может привести к деформации бумаги.
• Неправильное положение ограничителя ширины бумаги может
привести к замятию бумаги.
.
1.10
П
РИСТУПАЯ К РАБОТЕ
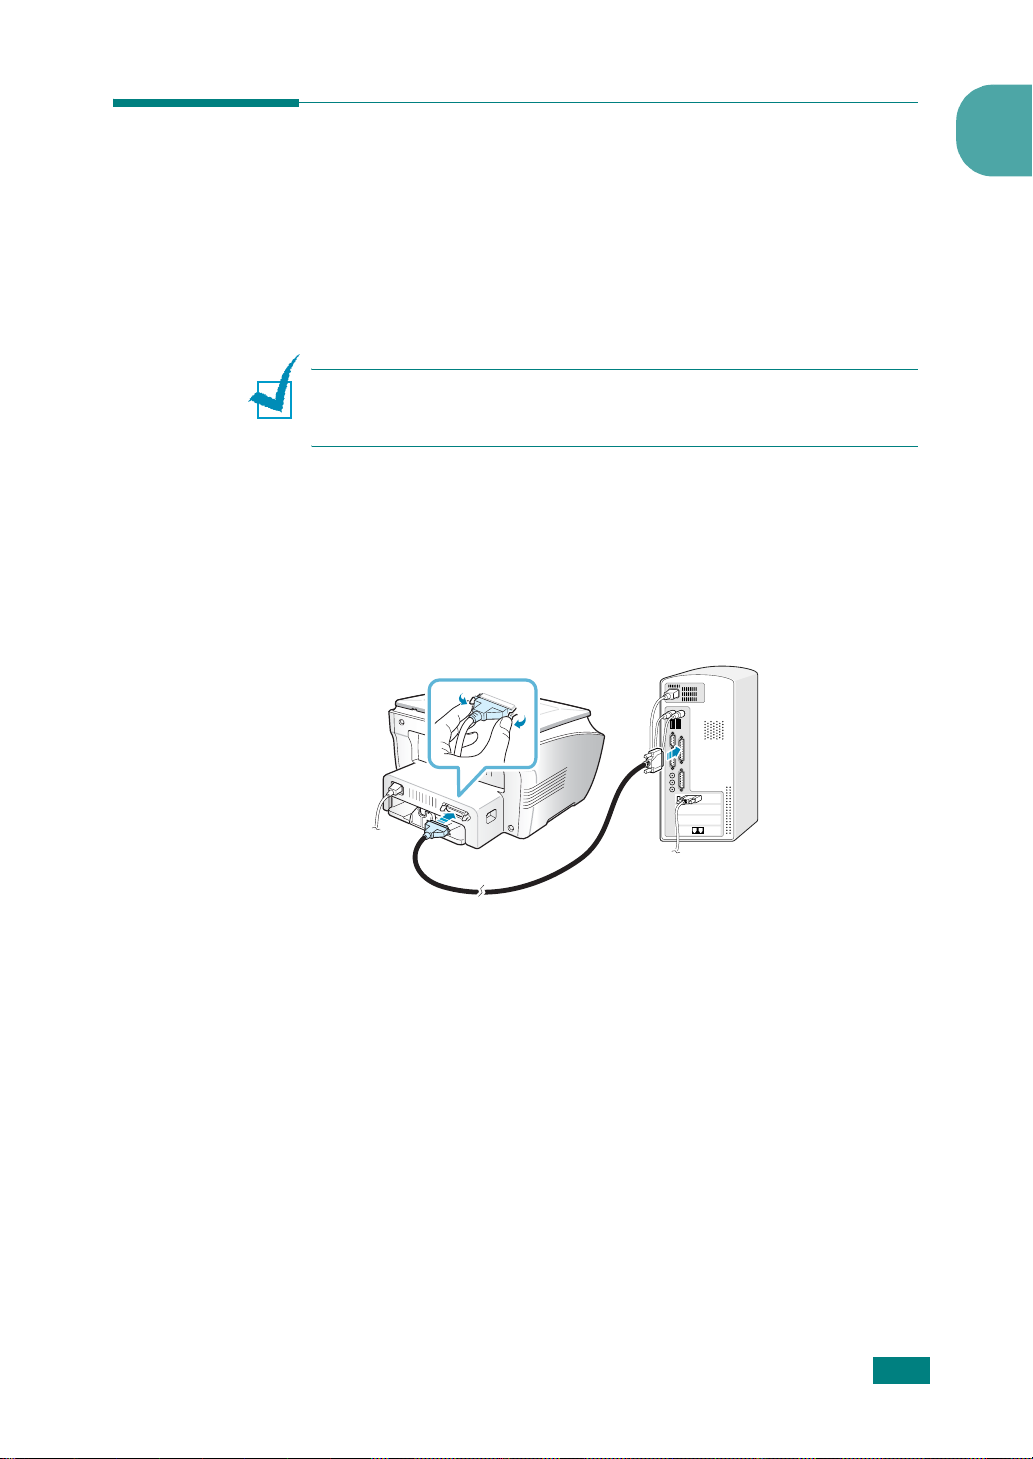
Подключение устройства
Чтобы печатать непосредственно с компьютера, подключите
кнему принтер, используя кабель параллельного интерфейса
или кабель универсальной последовательной шины (USB).
Работа с кабелем параллельного интерфейса
(только для Windows)
П
РИМЕЧАНИЕ
компьютера используйте кабель, одобренный производителем.
Кабель должен соответствовать стандарту IEEE 1284.
1
Выключите принтер и компьютер.
2
Вставьте кабель параллельного интерфейса в разъем
на задней стороне принтера.
Опустите металлические фиксаторы так, чтобы они вошли
вжелобки на разъеме кабеля.
.
Для подключения принтера к параллельному порту
1
К параллельному
порту компьютера
3
Подключите другой конец кабеля к порту параллельного
интерфейса компьютера и затяните винты.
Дополнительную информацию см. в руководстве пользователя
данного компьютера.
П
РИСТУПАЯ К РАБОТЕ
1.11
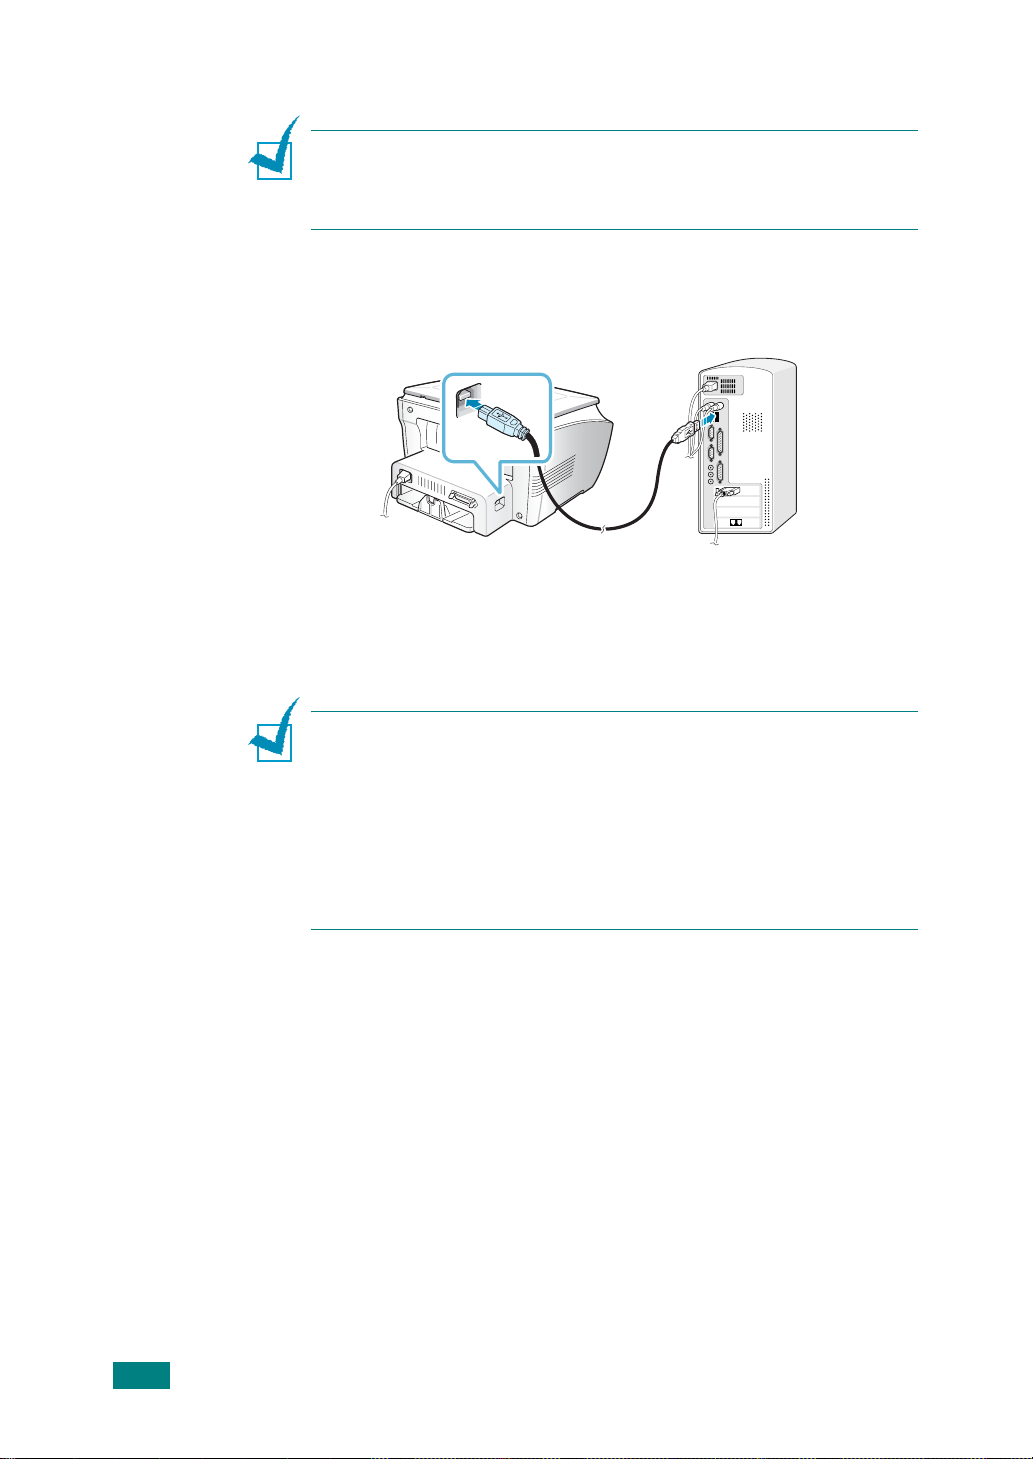
Работа с кабелем USB
П
РИМЕЧАНИЕ
использовать кабель USB, одобренный производителем. Кабель
должен соответствовать стандарту USB 1.1. Длина кабеля не должна
превышать 3 м.
1
Выключите принтер и компьютер.
2
Вставьте кабель USB в разъем на задней стороне принтера.
3
Подключите другой конец кабеля к порту USB компьютера.
Дополнительную информацию см. в руководстве пользователя
данного компьютера.
. Для подключения принтера к порту USB необходимо
К порту USB
компьютера
П
РИМЕЧАНИЯ
• Для использования интерфейса USB на компьютере должна быть
установлена операционная система Windows 98/Me/2000/XP.
• Устройст во поддерживает два режима работы с интерфейсом USB:
БЫСТРЫЙ и МЕДЛЕННЫЙ. По умолчанию используется режим
БЫСТРЫЙ. Иногда при работе в режиме USB, действующем по
умолчанию, возникают проблемы. В таком случае попробуйте
выбрать режим «Медленный». Дополнительные сведения
об изменении режима USB см. на стр. 8.12.
.
1.12
П
РИСТУПАЯ К РАБОТЕ
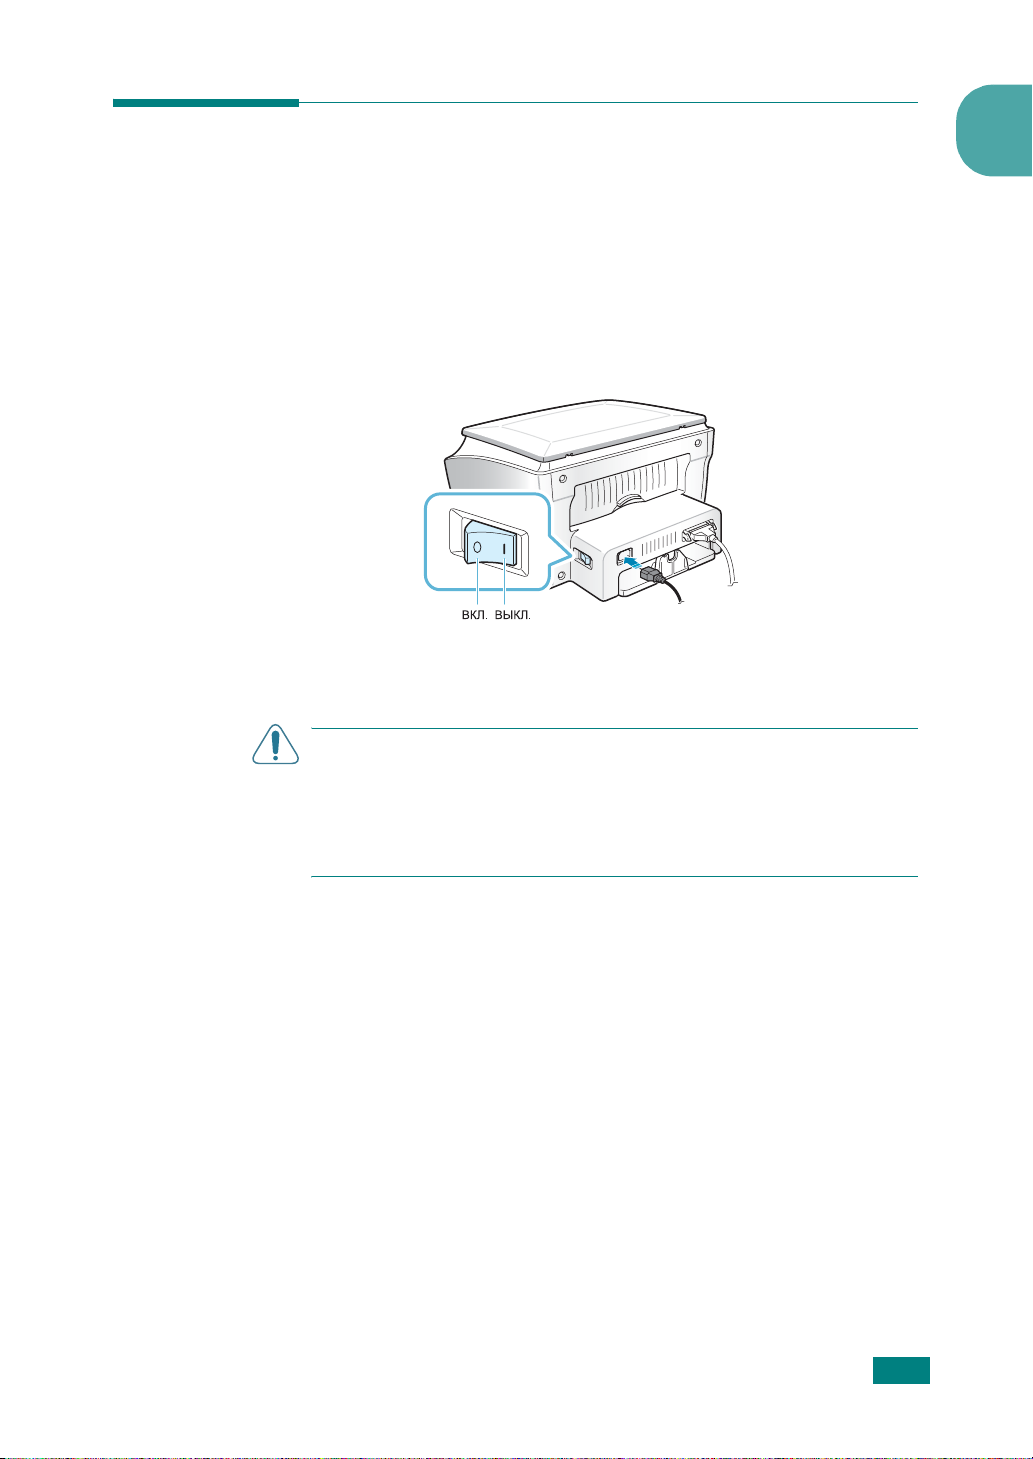
Включение устройства
1
Подключите один конец трехжильного шнура питания
к разъему питания устройства, а другой — к розетке
с заземлением.
2
Нажмите на выключатель питания и включите устройство.
На дисплее появится надпись Разогрев. Подождите,
означающая, что устройство включено.
«
К электрической розетке
Информацию о выборе языка сообщений на дисплее
см. на стр.1.25.
1
В
НИМАНИЕ
• После включения устройства начинает нагреваться блок
закрепления тонера в задней части устройства. Соблюдайте
осторожность при доступе к этой части устройства.
• Не разбирайте включенный принтер во избежание поражения
электрическим током.
!
П
РИСТУПАЯ К РАБОТЕ
1.13

Установка программного
обеспечения
Комплект программного обеспечения
Samsung
После установки устройства и подключения его к компьютеру
необходимо установить программное обеспечение с компактдиска, который входит в комплект поставки. На компакт-диске
находятся:
•
Программное обеспечение
• Руководства пользователя
• Программа Adobe Acrobat Reader
С компакт-диска можно установить следующее программное
обеспечение.
Samsung
Драйвер GDI для Windows
Для работы с устройством в качестве принтера и сканера
в операционной системе Windows необходимо установить
драйвер GDI. Дополнительную информацию об установке
драйвера GDI в Windows см. на стр. 1.16.
Драйвер для Linux
Устройство может работать как принтер и сканер в операционной
системе Linux. Информацию об установке драйвера принтера
всистеме Linux см. главу 6 «Работа с принтером в операционной
системе Linux».
Программное обеспечение SmarThru
Программное обеспечение SmarThru для операционной системы
Windows расширяет возможности данного многофункционального
устройства. Пакет программ SmarThru содержит графический
редактор, поддерживающий широкий набор функций обработки
изображений, а также мощный почтовый клиент для Интернета.
SmarThru позволяет сохранять отсканированные изображения
вопределенном месте для последующего редактирования,
отправки по электронной почте, печати и обработки с помощью
любых других программ.
1.14
П
РИСТУПАЯ К РАБОТЕ
Панель дистанционного управления
Эта программа для Windows устанавливается автоматически при
установке драйвера GDI. Дополнительную информацию о работе
с программой см. на стр. 7.10.
Характеристики драйверов принтера
Драйверы принтера поддерживают следующие стандартные
функции:
• Выбор источника бумаги
• Выбор ориентации, размера и типа материала для печати
• Выбор числа копий
В таблице перечислены стандартные функции, которые могут
поддерживаться драйверами принтера.
Драйвер принтера
Функция
Win9x/Me Win2000/XP WinNT4.0 Linux
Режим экономии тонера Да Да Да Да
Выбор качества печати Да Да Да Да
Печать плакатов Да Да Да Нет
1
Печать нескольких страниц
на одном листе
Печать по размеру страницы Да Да Да Да
Печать с масштабированием Да Да Да Да
Водяные знаки Да Да Да Нет
Наложение Да Да Да Нет
Да Да Да
Да
(2 или 4)
П
РИСТУПАЯ К РАБОТЕ
1.15
Установка программного обеспечения
Samsung
в ОС Windows
Требования к системе
Перед началом установки проверьте, соответствует ли ваша
система минимальным требованиям.
Проверьте перечисленные ниже параметры.
Компонент
Операционная
система
Процессор
ОЗУ
Windows 95/98/Me/NT 4.0/2000/XP
95/98/Me/NT 4.0/2000
XP
95/98/Me/NT 4.0/2000
XP 128
Требования
Pentium II 400
или
Pentium III 933
или
64 МБ или больше
или больше
выше
выше
МБ
95/98/Me/NT 4.0/2000
Свободное место
на диске
Internet Explorer версии не ниже 5.0
П
РИМЕЧАНИЯ
• В Windows NT 4.0/2000/XP программное обеспечение должен
устанавливать администратор системы.
• Вследствие несовместимости с библиотеками OLE/COM
не рекомендуется использовать ОС Windows 95 более
ранней версии, чем OSR2.
.
XP 1
300 МБ
или больше
ГБ
или больше
1.16
П
РИСТУПАЯ К РАБОТЕ
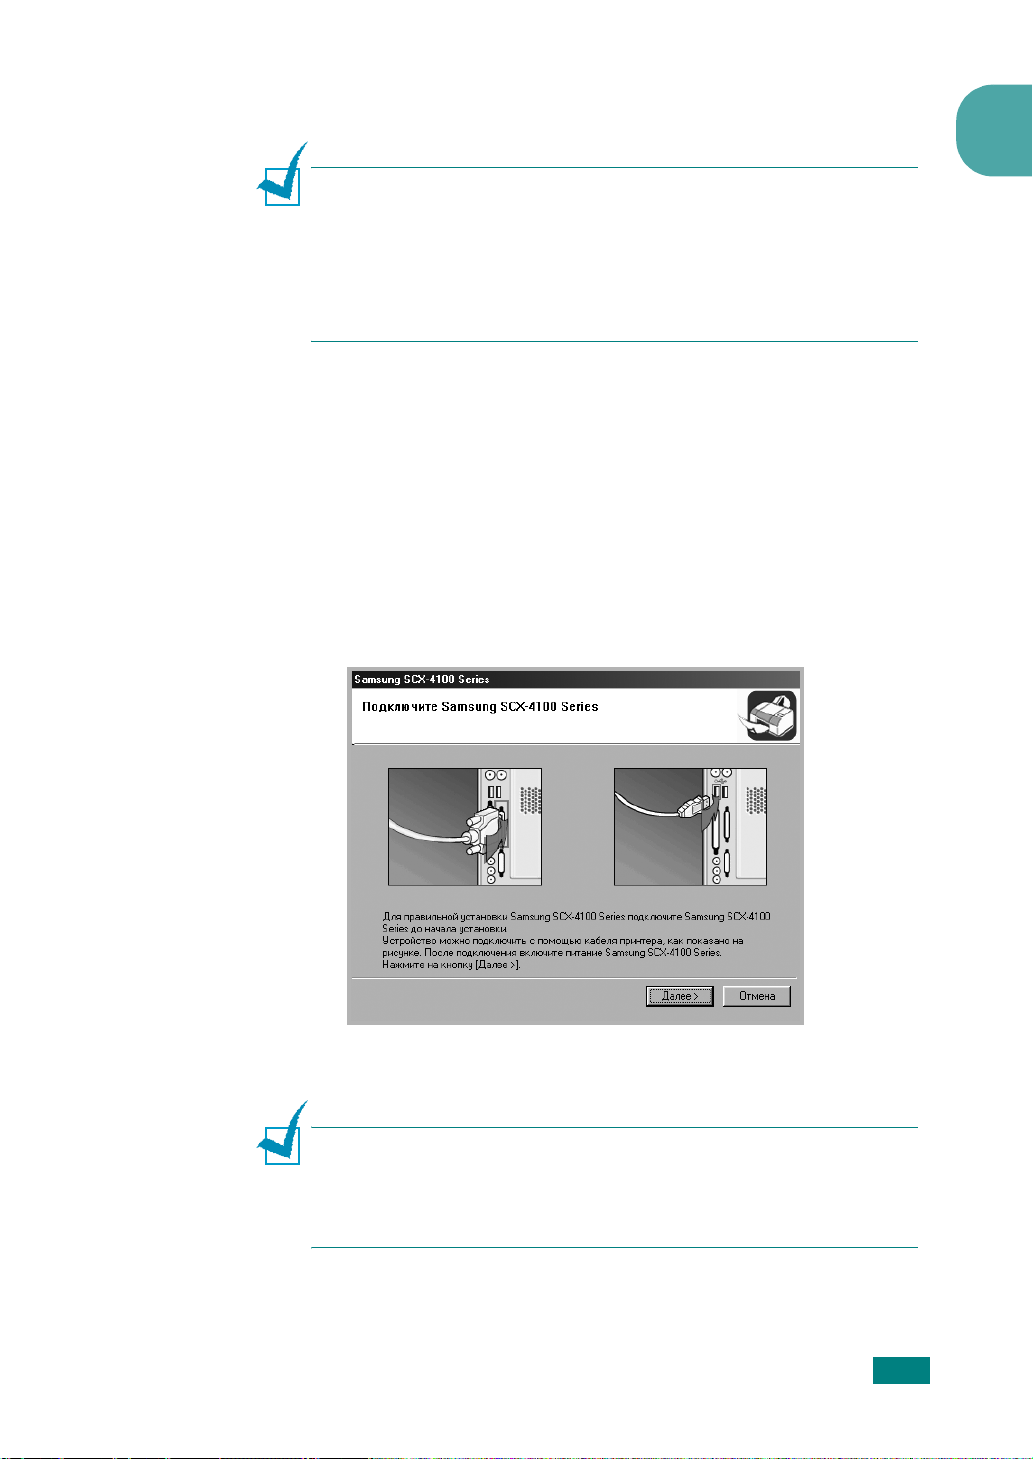
Установка программного обеспечения Samsung
П
РИМЕЧАНИЯ
• Закройте окно
открывается при загрузке компьютера.
Перед началом установки программного обеспечения
•
подключите устройство к порту параллельного интерфейса или
USB и включите его. В ОС Windows 95 и Windows NT 4.0
подключение через порт USB не поддерживается.
1
Вставьте компакт-диск, входящий в комплект поставки,
вдисковод для компакт-дисков.
Должен произойти автоматический запуск компакт-диска
с открытием окна установки.
.
«Обнаружено новое устройство»
, которое
1
Если окно установки не появилось, войдите в меню
ивыберите команду
X:\Setup.exe
2
После появления следующего окна подключите устройство
к компьютеру и включите устройство. Нажмите кнопку
Если принтер уже подключен и включен, данное окно
не появится. Пропустите этот шаг.
, где X — имя дисковода, и нажмите кнопку ОК.
Выполнить
. Введите строку
Пуск
Далее
.
П
РИМЕЧАНИЕ
нажатия кнопки
устройство к компьютеру, включите устройство инажмите кнопку
Если требуется установить программное обеспечение без подключения
устройства, нажмите кнопку
. Если устройство не подключено к компьютеру, после
Далее
последует предупреждение. Подключите
Да
Нет
.
П
РИСТУПАЯ К РАБОТЕ
1.17
.
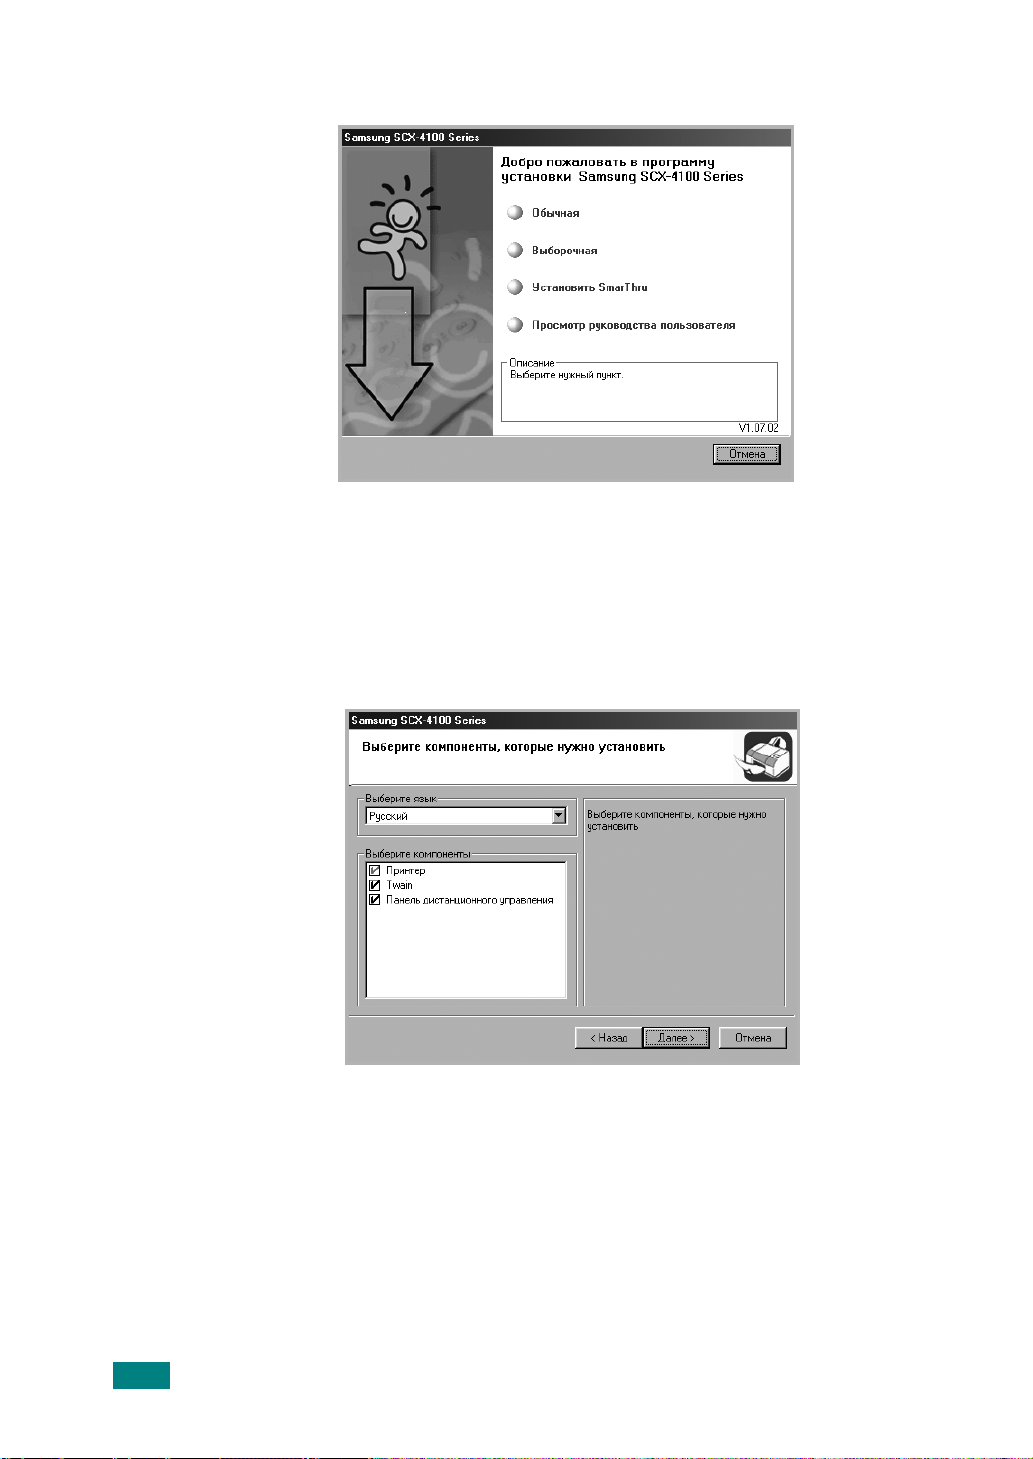
3
Выберите тип установки.
Обычная
•
. Устанавливается общее программное
обеспечение для принтера, включая драйвер принтера,
драйвер Twain и панель дистанционного управления. Этот
вариант установки рекомендуется для большинства
пользователей.
•
Выборочная
. Позволяет выбрать язык программного
обеспечения и устанавливаемые компоненты. Указав
необходимый язык и компоненты, нажмите кнопку
Установить SmarThru
•
. Устанавливается программа
Далее
SmarThru. Если выбрана установка программы SmarThru
на этом экране, следуйте инструкциям на стр. 1.20, начиная
с шага 3.
•
Просмотр руководства пользователя
. Позволяет
просмотреть данное руководство пользователя. Если
на компьютере не установлена программа Adobe Acrobat,
при выборе этого пункта автоматически начнется установка
программы Adobe Acrobat.
.
1.18
П
РИСТУПАЯ К РАБОТЕ
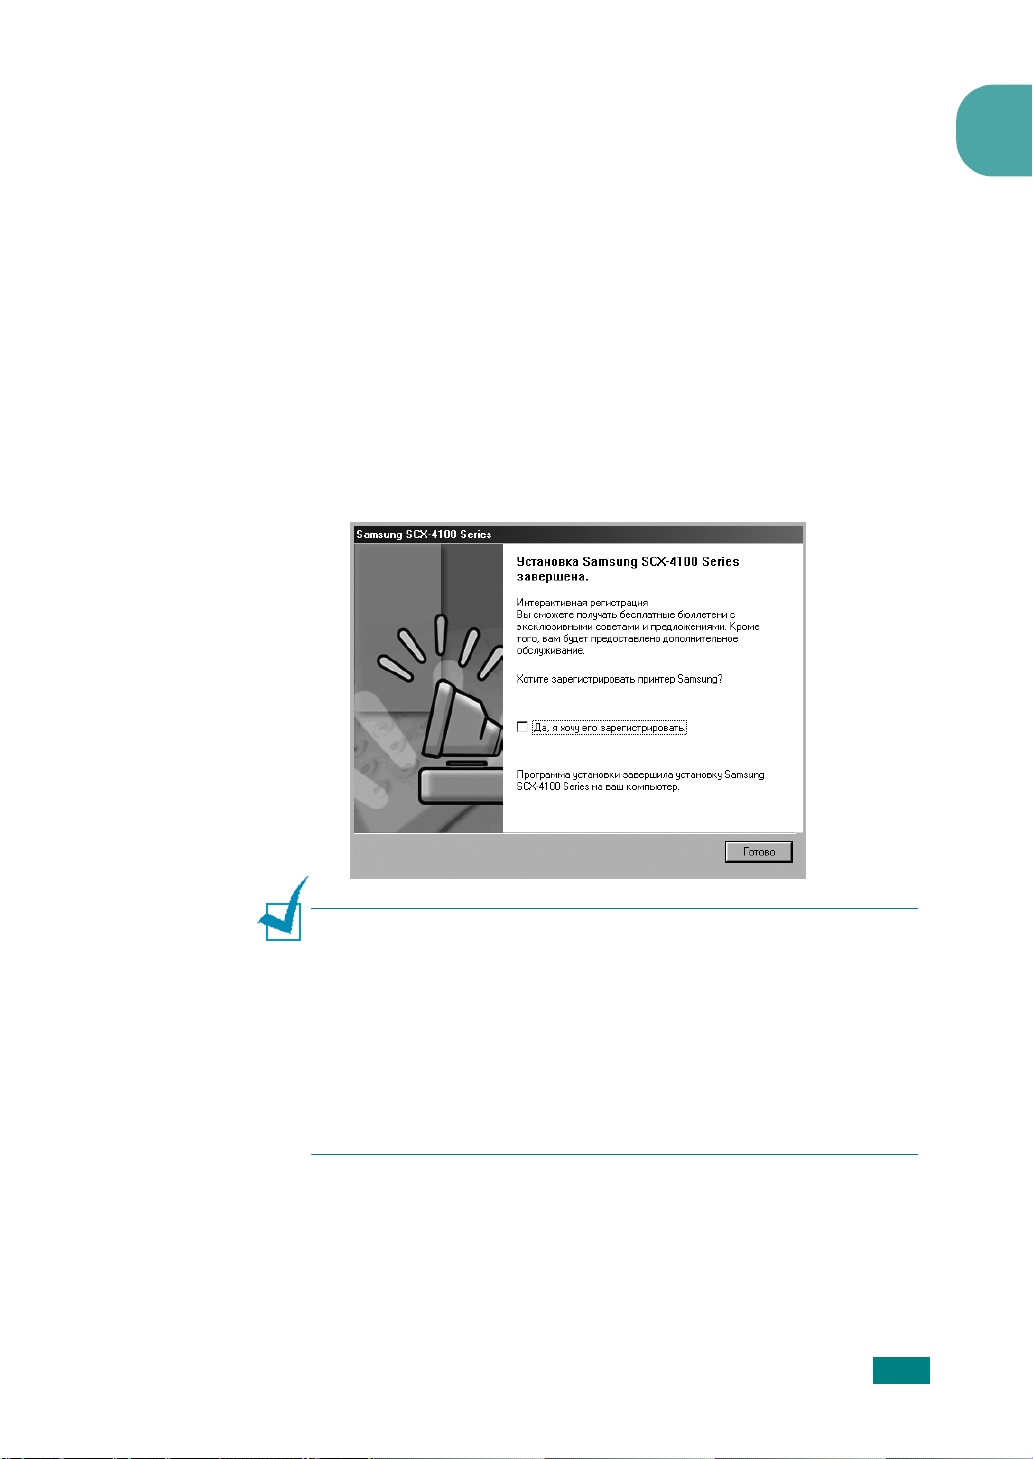
4
После завершения установки появится окно с запросом
на печать тестовой страницы. Чтобы распечатать тестовую
страницу, установите соответствующий флажок и нажмите
Далее
кнопку
В другом случае перейдите к шагу 6.
5
Если тестовая страница напечатана правильно, нажмите
кнопку
.
Да.
1
Если страница напечатана с ошибками, нажмите кнопку
чтобы напечатать ее еще раз.
6
Чтобы зарегистрироваться в качестве пользователя принтера
Samsung
кнопку
Если вы не хотите регистрироваться, нажмите кнопку
, установите соответствующий флажок и нажмите
Готово
. Вы перейдете на веб-узел
Samsung
.
Нет,
Готово
.
П
РИМЕЧАНИЯ
•
Для подключения устройства с помощью параллельного кабеля
отключите кабель USB и подключите кабель параллельного
интерфейса. После этого переустановите драйвер принтера:
выберите
Обслуживание ¤ Восстановить ¤ Принтер
кабеля параллельного интерфейса кабелем USB выполните ту же
последовательность действий.
• Если принтер работает неправильно, переустановите драйвер
принтера.
.
Пуск ¤ Программы ¤ Samsung SCX-4100 Series ¤
. После замены
П
РИСТУПАЯ К РАБОТЕ
1.19
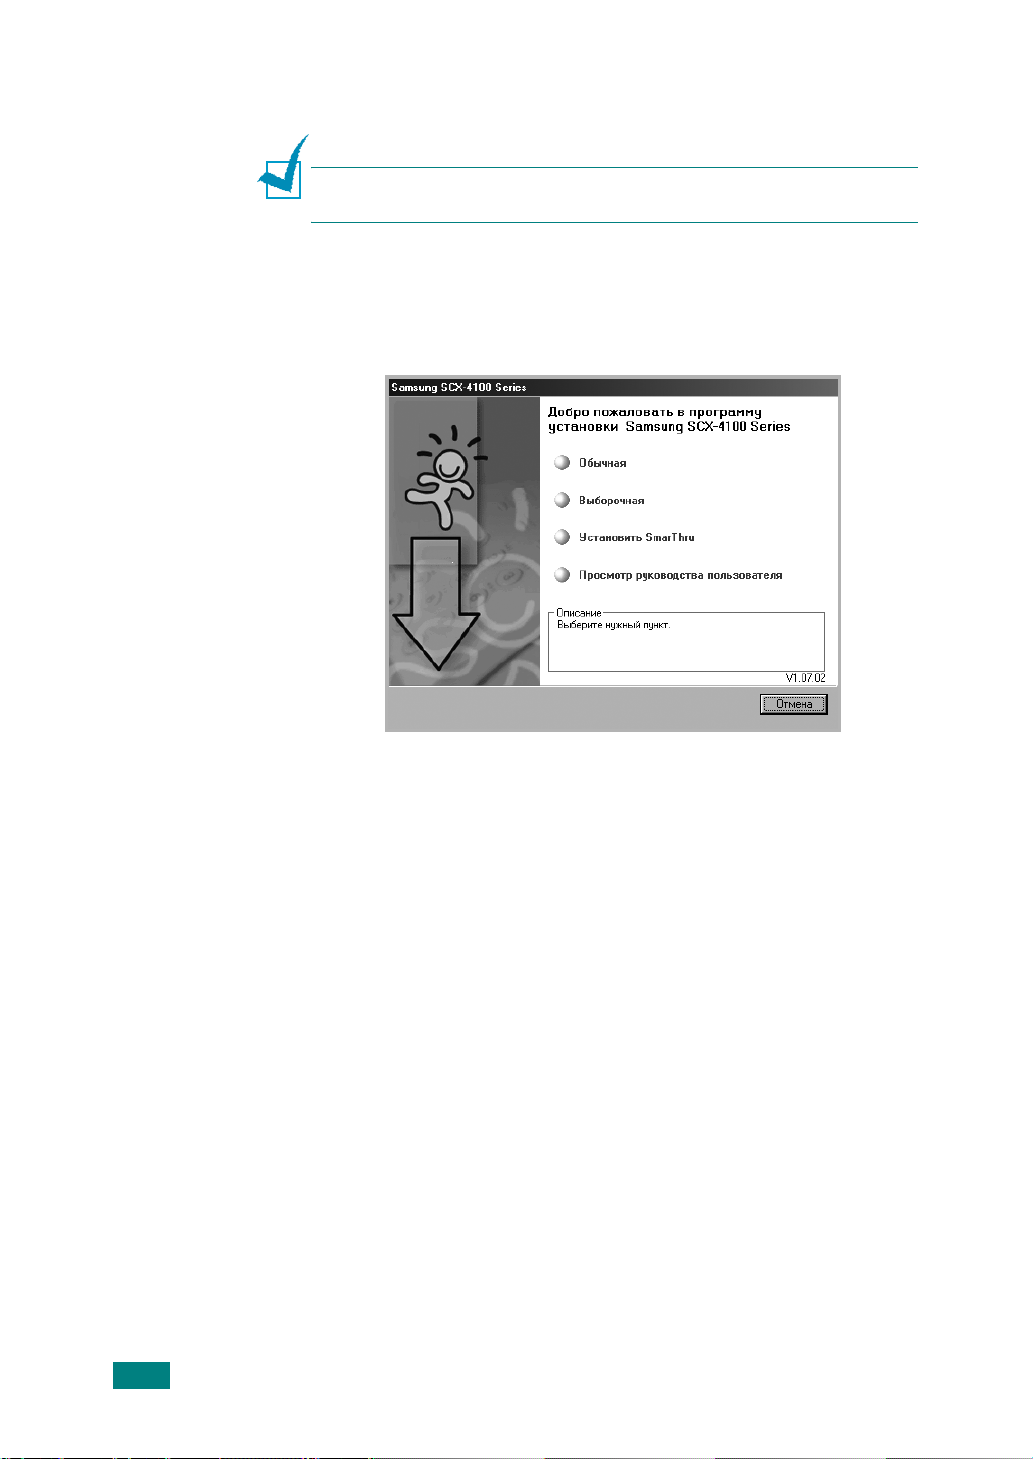
Установка программы Samsung SmarThru
П
РИМЕЧАНИЯ
Windows 95.
1
Вставьте компакт-диск, входящий в комплект поставки,
вдисковод для компакт-дисков.
2
Выберите
.
Программа SmarThru 4 не поддерживается системой
Установить SmarThru
.
3
Нажмите кнопку
4
Выполните появляющиеся на экране инструкции и нажмите
кнопку
5
Нажмите кнопку
6
Выберите тип установки и нажмите кнопку
Next
Next
.
.
Next
.
Next
.
1.20
П
РИСТУПАЯ К РАБОТЕ
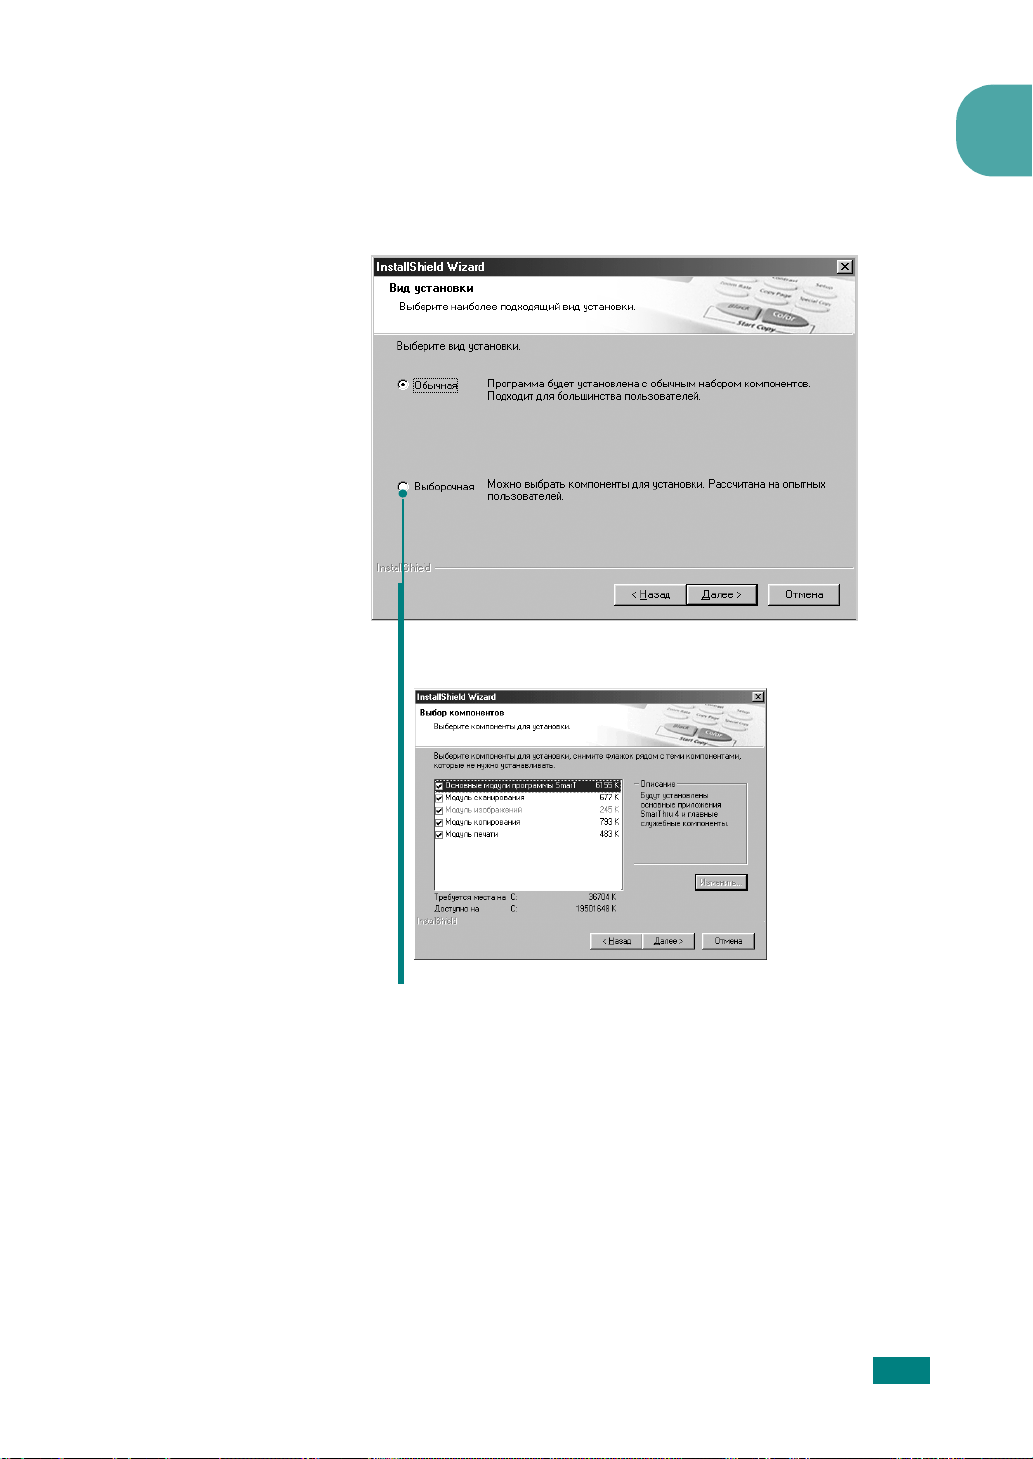
Программа установки поддерживает два типа установки.
•
Обычная
. Программа устанавливается с самыми общими
параметрами, рекомендуемыми для большинства
пользователей.
•
Выборочная
При выборочной установке можно самостоятельно выбрать
устанавливаемые компоненты.
. Можно выбрать устанавливаемые компоненты.
1
•
Основные модули программы
использования ядра и основных приложений SmarThru 4.
Модуль сканирования
•
с последующим сохранением результатов впамяти
приложения или в папке, отправкой по электронной почте
или публикацией на
веб-узле.
Модуль изображений
•
сохраненных в виде графических файлов.
Модуль копирования
•
профессионального качества.
Модуль печати
•
7
Завершите установку, следуя инструкциям на экране.
8
После завершения установки нажмите кнопку
.
.
Редактирование изображений,
.
Изготовление копий
.
Печать ранее сохраненных изображений.
SmarThru.
Сканирование исходного документа
П
Для
РИСТУПАЯ К РАБОТЕ
Finish
.
1.21
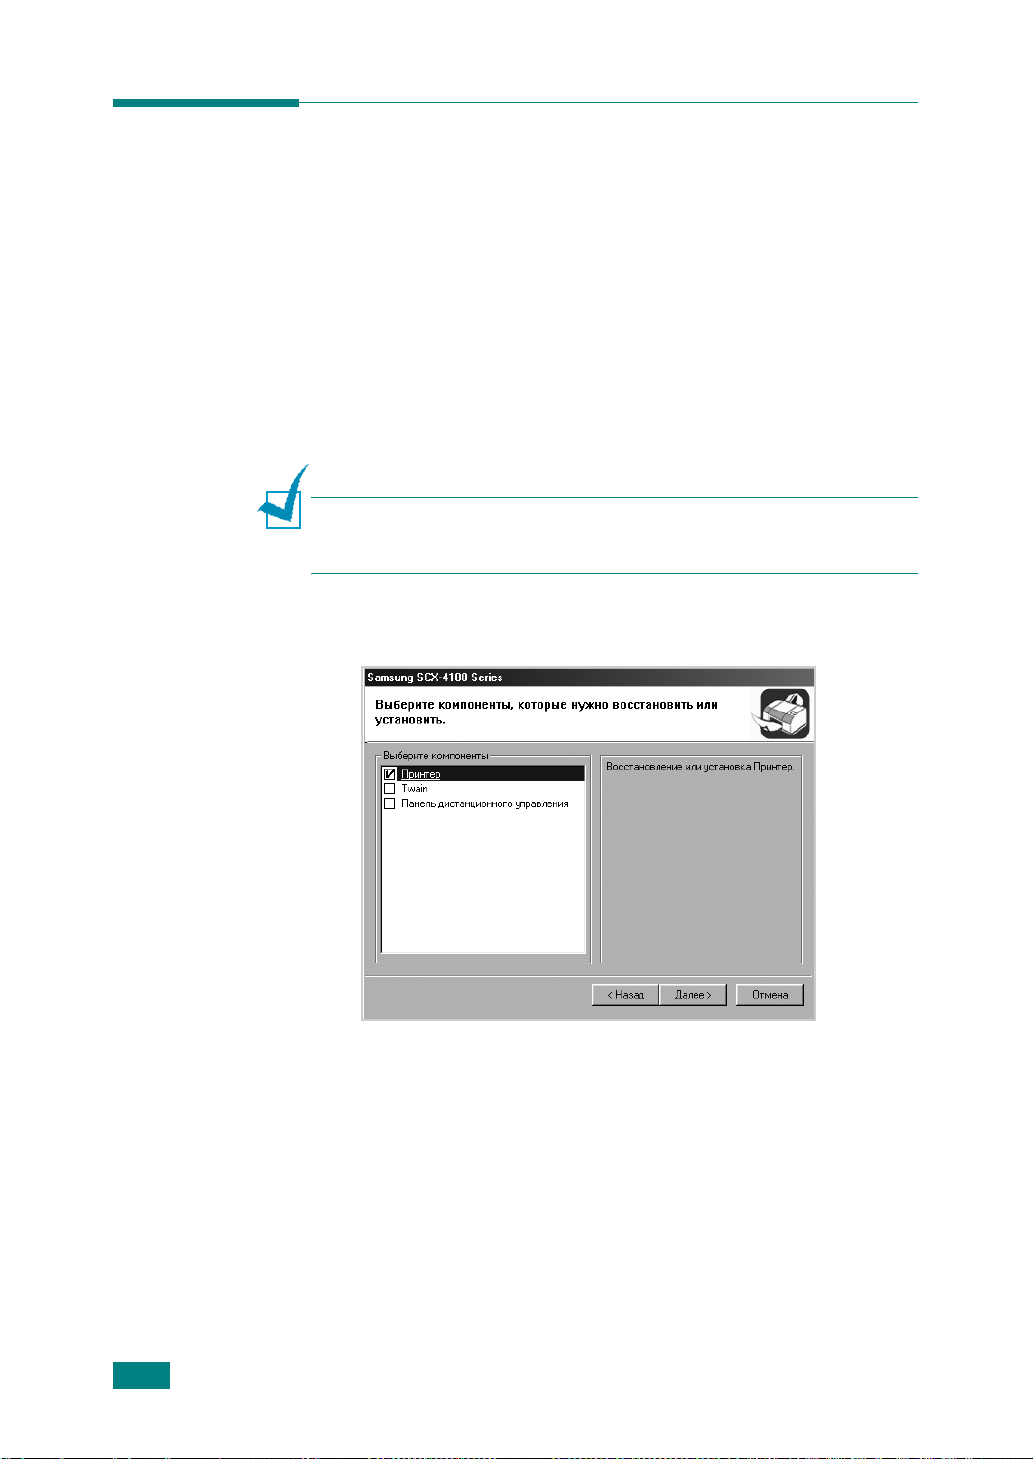
Восстановление программного
обеспечения
Восстановление программы требуется в случае сбоев
при установке программы или ошибок в ее работе.
Восстановление программы SmarThru не поддерживается.
1
Выберите
Samsung SCX-4100 Series
Либо вставьте компакт-диск, входящий в комплект поставки,
в дисковод для компакт-дисков.
2
Нажмите кнопку
П
РИМЕЧАНИЕ
откроется окно подключения «Samsung SCX-4100 Series».
Подключите устройство и нажмите кнопку
3
Выберите компоненты, которые необходимо переустановить,
и нажмите кнопку
Пуск
¤
Программы
Восстановить
.
Если устройство не подключено к компьютеру,
Далее
¤
¤
Обслуживание
.
.
Далее
.
.
1.22
4
П
РИСТУПАЯ К РАБОТЕ
В случае восстановления программного обеспечения
принтера последует предложение напечатать тестовую
страницу. Действуйте следующим образом:
а) Чтобы напечатать тестовую страницу, установите флажок
и нажмите кнопку
б) Если тестовая страница напечатана правильно, нажмите
кнопку
Если страница напечатана неправильно, нажмите кнопку
Нет
После завершения переустановки нажмите кнопку
Да
.
, чтобы напечатать ее еще раз.
Далее
.
Готово
.

Удаление программного обеспечения
Удаление программы требуется в случае сбоя при установке
программы или если программу необходимо обновить. Для
отмены установки программы можно воспользоваться
соответствующим средством Windows.
Отмена установки драйвера
многофункционального устройства
1
Выберите
Samsung SCX-4100 Series
Либо вставьте компакт-диск, входящий в комплект поставки,
в дисковод для компакт-дисков.
2
Нажмите кнопку
Появится список компонентов, каждый из которых можно
удалить по отдельности.
Чтобы удалить драйвер принтера, установите флажок
Принтер
Пуск
.
¤
Программы
Удалить
¤
¤
Обслуживание
.
.
1
Чтобы удалить драйвер Twain, установите флажок
Для удаления панели дистанционного управления
установите флажок
3
Выбрав нужные компоненты, нажмите кнопку
4
В окне подтверждения выбора нажмите кнопку Да.
Выбранный драйвер и все его компоненты будут удалены.
5
После завершения удаления нажмите кнопку
Панель дистанционного управления
Далее
Готово
Twa in
.
.
.
.
П
РИСТУПАЯ К РАБОТЕ
1.23

Отмена установки
П
РИМЕЧАНИЕ
завершите работу всех приложений, запущенных на компьютере.
После отмены установки программного обеспечения требуется
перезагрузка системы.
1
В меню
2
Выберите
3
В окне подтверждения выбора нажмите кнопку OK.
4
Нажмите кнопку
Если необходимые для сохранения изменений завершение
работы и перезагрузка компьютера не происходят
автоматически, это нужно сделать вручную.
.
Прежде чем приступить к отмене установки,
Пуск
выберите пункт
SmarThru 4
Samsung
Finish
SmarThru
Программы
, а затем —
.
.
Uninstall SmarThru 4
.
1.24
П
РИСТУПАЯ К РАБОТЕ

Настройка интерфейса
устройства
Изменение языка сообщений
на дисплее
Чтобы изменить язык сообщений на дисплее панели управления,
выполните следующие действия.
1
Нажимайте кнопку
строке дисплея не появится надпись
2
С помощью кнопок прокрутки ( и ) выведите
внижней строке дисплея.
Меню/Выход
до тех пор, пока в верхней
«НАСТРОЙКА»
.
«ЯЗЫК»
1
3
Нажмите кнопку
появятся в нижней строке дисплея.
4
С помощью кнопок прокрутки ( и ) выведите на дисплей
нужный язык.
5
Нажмите кнопку
6
Для возврата в режим ожидания нажмите кнопку
Старт
. Тек ущие параметры настройки
Старт
, чтобы сохранить изменения.
Отмена
.
П
РИСТУПАЯ К РАБОТЕ
1.25

Выбор размера и типа бумаги
После загрузки бумаги в лоток необходимо задать правильные
тип и размер бумаги с помощью кнопок панели управления. Эти
настройки будут действовать в режиме копирования. В случае
печати документов с компьютера тип и размер бумаги необходимо
задавать в том приложении, откуда выполняется печать.
Чтобы задать тип и размер бумаги в лотке:
1
Нажимайте
«НАСТР. БУМАГИ»
Первый пункт меню, «РАЗМЕР БУМАГИ», появится в нижней
строке.
2
Для доступа к этому пункту меню нажмите
3
Нажмите
«БУМАГА В ЛОТКЕ»
4
С помощью кнопок прокрутки ( и ) найдите размер
используемой бумаги и нажмите
эти данные.
Меню/Выход
.
Старт,
когда в нижней строке появится пункт
, пока в верхней строке не появится
Старт
.
Старт,
чтобы сохранить
.
5
Для возврата в режим ожидания нажмите кнопку
Чтобы задать тип бумаги в лотке:
1
Нажимайте
«НАСТР. БУМАГИ»
2
С помощью кнопки выведите
строке и нажмите кнопку
меню.
3
С помощью кнопок прокрутки ( и ) найдите тип используемой
бумаги и нажмите
4
Для возврата в режим ожидания нажмите кнопку
Меню/Выход
.
Старт
, пока в верхней строке не появится
«ТИП БУМАГИ»
Старт
, чтобы сохранить эти данные.
для доступа к этому пункту
Отмена
в нижней
Отмена
.
.
1.26
П
РИСТУПАЯ К РАБОТЕ

Использование режимов экономии
Режим экономии тонера
Режим экономии тонера позволяет уменьшить расход тонера при
печати каждой страницы. В этом режиме картридж служит дольше,
но качество печати снижается.
Чтобы включить или отключить режим экономии тонера:
1
Нажимайте кнопку
строке дисплея не появится надпись
2
С помощью кнопок прокрутки ( и ) выведите
внижней строке и нажмите кнопку
«ВЫК» означает, что режим экономии тонера отключен.
П
РИМЕЧАНИЕ
можно управлять также в окне свойств данного принтера. См. стр.3.9
.
При печати с компьютера режимом экономии тонера
Режим энергосбережения
Меню/Выход
до тех пор, пока в верхней
«ЭКОНОМ. ТОНЕРА»
«ВКЛ»
Старт
.
.
.
1
Режим энергосбережения позволяет снизить потребление энергии
устройством во время простоя. Для включения этого режима
достаточно указать, сколько должно пройти времени после
выполнения задания, прежде чем устройство автоматически
перейдет в режим пониженного энергопотребления.
1
Нажимайте кнопку
строке дисплея не появится надпись
2
С помощью кнопок прокрутки ( и ) выведите
в нижней строке. Нажмите кнопку
3
С помощью кнопок прокрутки ( и ) выведите
внижней строке и нажмите кнопку
«ВЫК» означает, что режим пониженного энергопотребления
отключен.
4
С помощью кнопок прокрутки ( и ) выберите нужные
периоды времени.
Можно выбрать следующие значения: 5, 10, 15, 30 или
45 минут.
5
Нажмите кнопку
6
Для возврата в режим ожидания нажмите кнопку
Меню/Выход
Старт
, чтобы сохранить изменения.
до тех пор, пока в верхней
«НАСТРОЙКА»
Старт
Старт
«ЭНЕРГОСБЕР.»
.
«ВКЛ»
.
Отмена
.
.
П
РИСТУПАЯ К РАБОТЕ
1.27

Д
ЛЯ ЗАПИСЕЙ
1.28
П
РИСТУПАЯ К РАБОТЕ

2
РАБОТА С БУМАГОЙ
В этой главе приведена основная информация о выборе
изагрузке материалов для печати.
Данная глава содержит следующие разделы:
• Выбор материала для печати
• Выбор выходного лотка
• Загрузка бумаги в лоток
• Ручная подача
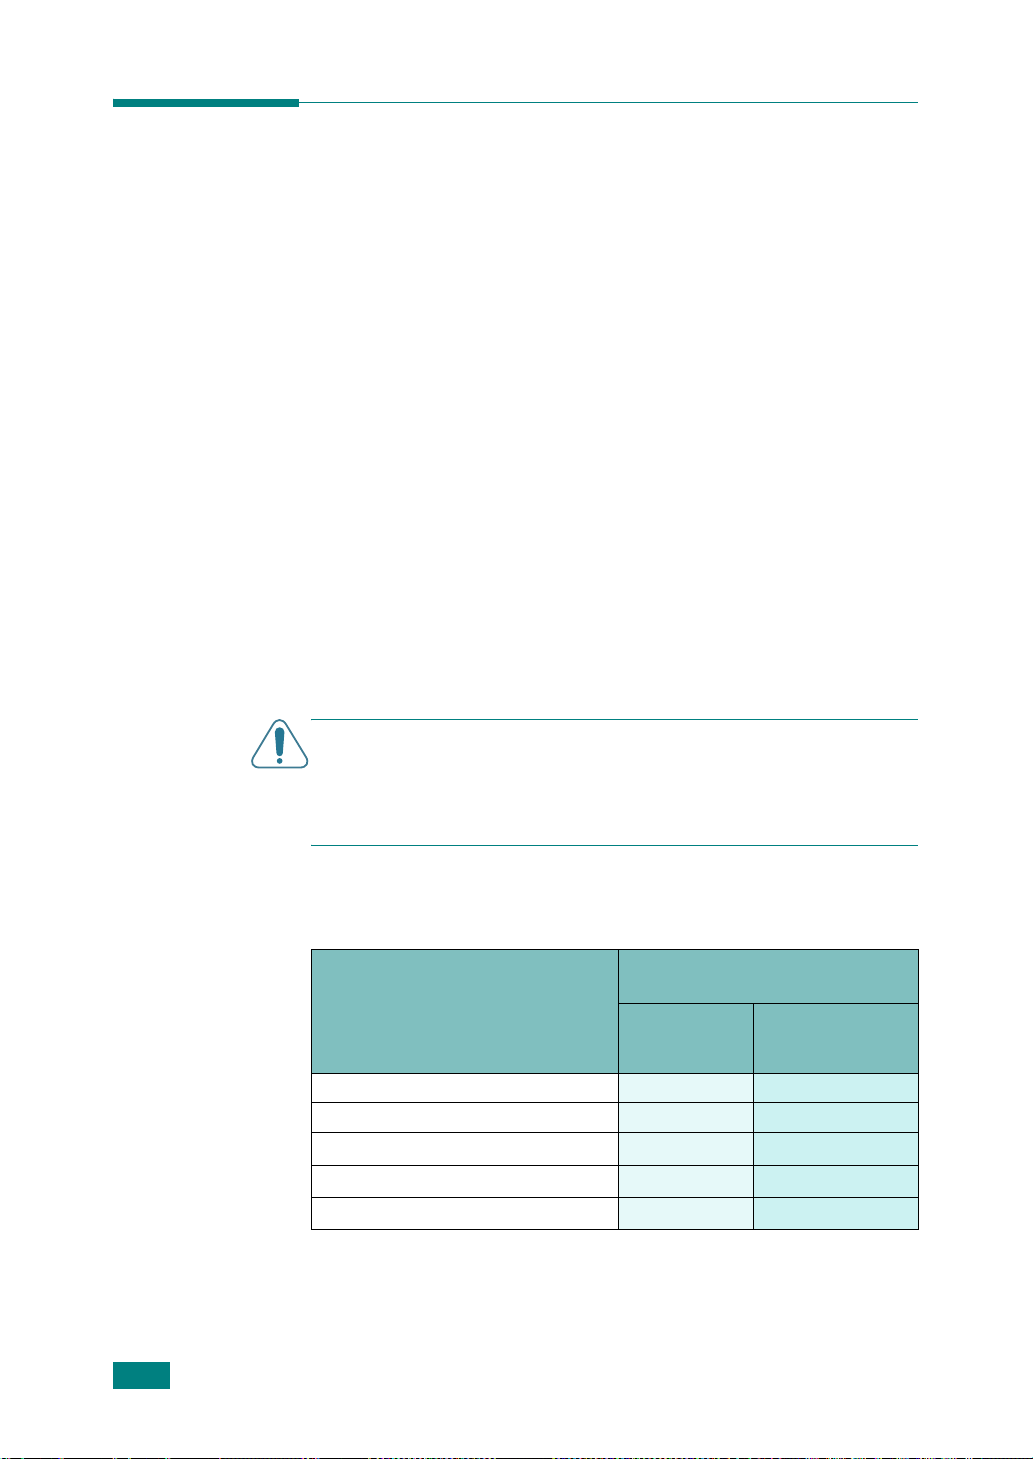
Выбор материала для печати
Для печати можно использовать материалы различных типов,
например, обычную бумагу, конверты, наклейки, прозрачную
пленку и т. д. Используйте только материалы, соответствующие
рекомендациям по работе с данным устройством. См. раздел
«Характеристики бумаги» на стр. A.5. Для достижения наилучшего
качества печати используйте только высококачественную бумагу
для копировальных аппаратов.
При выборе материала для печати обратите внимание
на следующее.
• Желаемый результат: выбранная бумага должна
соответствовать поставленной задаче.
• Размер: можно использовать бумагу любых размеров, которые
допускаются направляющими для бумаги в лотке.
• Вес: данное устройство позволяет использовать бумагу
следующей плотности:
— 60 ~ 90 г/м
— 60 ~ 163 г/м
• Яркость: чем белее бумага, тем более четкими и живыми
получаются изображения.
• Гладкость поверхности: гладкость бумаги влияет на четкость
напечатанного изображения.
2
для лотка
2
для ручного податчика
В
НИМАНИЕ
! Использование бумаги, не соответствующей
требованиям, перечисленным в разделе «Характеристики бумаги»
на стр. A.5, может привести к неполадкам, для устранения которых
придется обратиться в службу технической поддержки. Гарантия и
соглашение об обслуживании на такие случаи не распространяются
Тип бумаги, источники бумаги и их емкость
Источник бумаги
и его емкость
Тип бумаги
Лоток для
бумаги
Обычная бумага
Конверты
Этикетки
Прозрачные пленки
Картон
*
Максимальная емкость источника бумаги зависит от толщины бумаги.
** В случае частых замятий бумаги печатайте листы по одному через лоток
для ручной подачи.
**
**
**
250 1
— 1
— 1
—
—
*
Лоток
для ручной
подачи
1
1
.
2.2
Р
АБОТА С БУМАГОЙ

Рекомендации по использованию бумаги
и других материалов для печати
При выборе и загрузке бумаги, конвертов или других материалов
для печати обратите внимание на следующее.
• Используйте только материалы, соответствующие требованиям.
См. раздел «Характеристики бумаги» на стр.A.5.
• Использование влажной, скрученной, мятой или рваной бумаги
может привести к замятию бумаги и плохому качеству печати.
• Для наилучшего качества печати используйте только
высококачественную бумагу для копировальных аппаратов.
• Не используйте бумагу с тиснением, перфорацией, а также
слишком гладкую или шершавую бумагу. Это может привести
кзамятию бумаги.
• Храните бумагу в заводской упаковке. Держите коробки
с бумагой на поддонах или на полках, но не на полу. Не ставьте
тяжелые предметы на стопки бумаги, даже если бумага
находится в заводской упаковке. Не подвергайте бумагу
воздействию влаги или других факторов, которые могут
привести к ее сворачиванию или смятию.
• Храните неиспользуемые материалы для печати при температуре
• Храните бумагу в герметичной упаковке (например,
• Загружайте специальные материалы для печати по одному
• Используйте только материалы, предназначенные для лазерных
• Для предотвращения склеивания специальных материалов
• Конверты.
• Прозрачные пленки.
o
от 15
C до 30oC и относительной влажности 10–70%.
вполиэтиленовом пакете), чтобы она оставалась сухой
ичистой.
листу.
принтеров.
для печати (например, прозрачных пленок или листов наклеек)
вынимайте их из лотка по мере печати.
— Используйте только хорошо склеенные конверты с острыми
краями и четкими линиями сгиба.
— Не используйте конверты с зажимами или защелками.
— Не используйте конверты с окошками, клеящим или
самоклеящимся слоем и другими синтетическими
материалами.
— Не используйте поврежденные или плохо склеенные
конверты.
— После извлечения пленок из устройства положите их
на ровную поверхность.
— Не оставляйте прозрачные пленки в лотке на продолжительное
время. На них может налипнуть грязь и пыль, что приведет
к неравномерной печати.
2
Р
АБОТА С БУМАГОЙ
2.3

— При работе с прозрачными пленками и мелованной бумагой
соблюдайте осторожность, избегайте появления отпечатков
пальцев.
— Чтобы избежать выцветания изображения, не подвергайте
напечатанные прозрачные плёнки продолжительному
воздействию солнечного света.
• Наклейки.
— Клейкое вещество наклеек должно выдерживать температуру
закрепления тонера 208
oC
в течение 0,1 секунды.
— В промежутках между наклейками не должно быть открытого
слоя клейкого вещества. В противном случае при печати
наклейки могут отсоединиться от подложки, что приведет
кзамятию бумаги. Кроме того, клейкие вещества могут
повредить устройство.
— Лист наклеек можно пропустить через устройство не более
одного раза. Подложка наклейки рассчитана на одно
прохождение через устройство.
— Не используйте наклейки, отделяющиеся от подложки,
наклейки с пузырьками, а также поврежденные или мятые
наклейки.
• Не используйте бумагу с
или
копировальную
безугольным копировальным слоем
бумагу. Эти типы бумаги выделяют летучие
химические вещества, которые могут повредить принтер.
2.4
Р
АБОТА С БУМАГОЙ
Выбор выходного лотка
Данное устройство имеет два выходных лотка: задний (лицевой
стороной вверх) и передний (лицевой стороной вниз).
Чтобы использовать передний выходной лоток, закройте заднюю
крышку. Чтобы использовать задний выходной лоток, откройте
заднюю крышку.
П
РИМЕЧАНИЯ
• Если при выходе бумаги через передний лоток возникают
проблемы (например, бумага сворачивается), попробуйте
использовать задний лоток.
• Не открывайте и не закрывайте заднюю крышку во время печати.
Это может вызвать замятие бумаги.
.
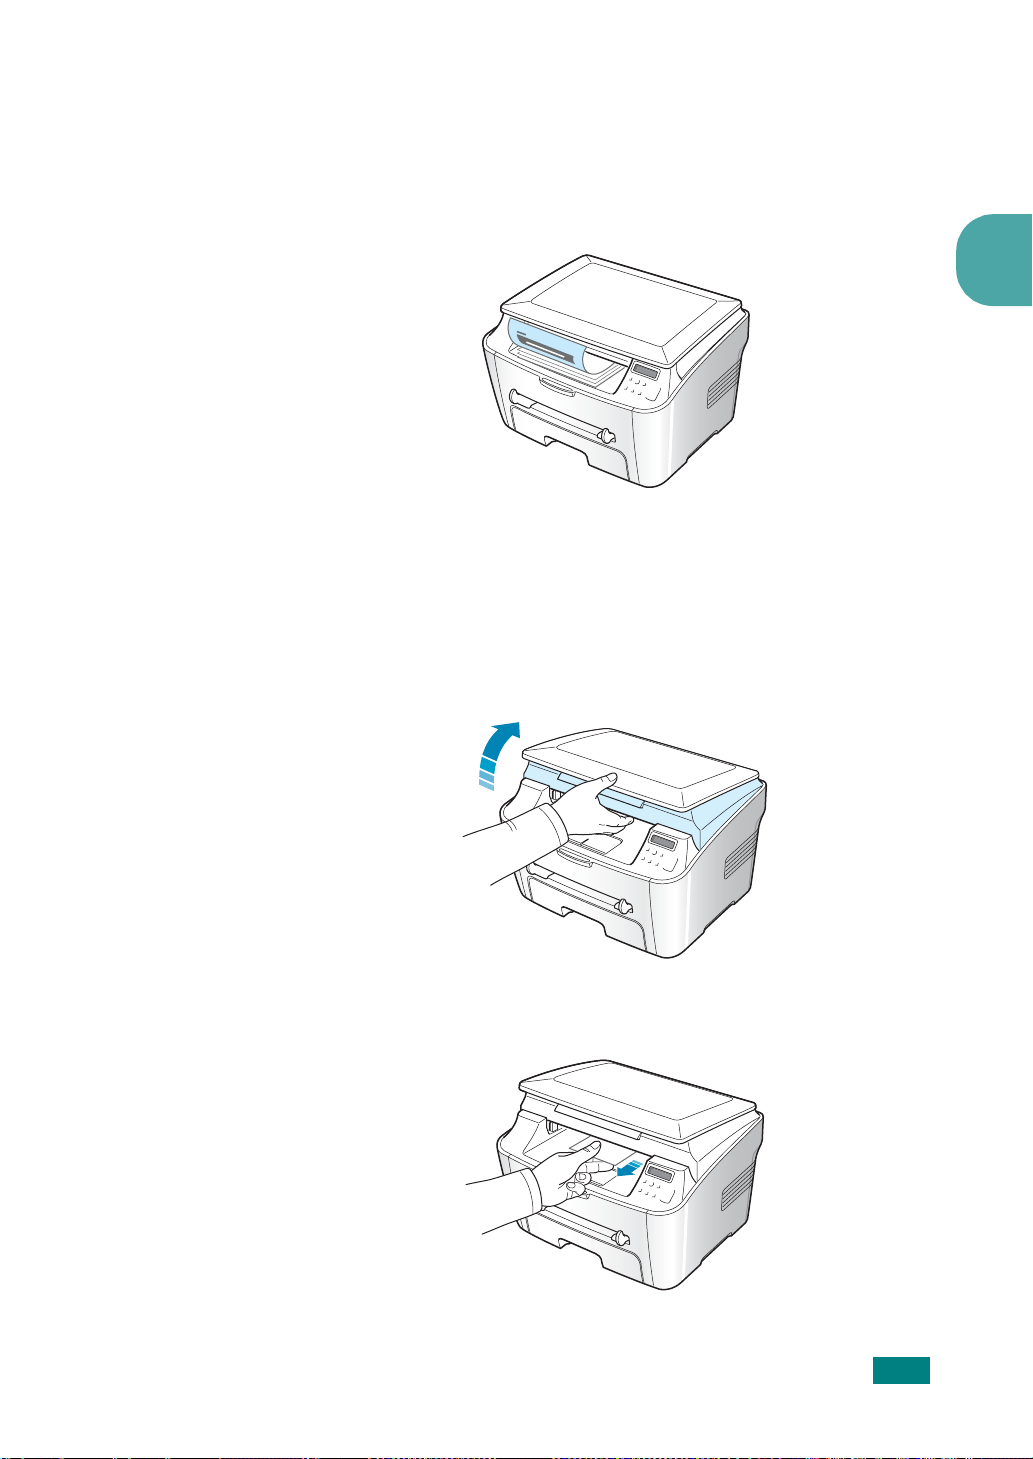
Печать с использованием переднего выходного
лотка
Бумага поступает в передний выходной лоток лицевой стороной
вниз в том порядке, как она печатается. Этот лоток рекомендуется
для печати большинства документов.
Если лист бумаги слишком короткий, он может не дойти
до переднего лотка. В этом случае воспользуйтесь крышкой
отсека для устранения замятий бумаги.
Чтобы использовать отсек для устранения замятий бумаги:
1
(лицевой стороной вниз)
Поднимите крышку отсека для устранения замятий бумаги.
Автоматически выдвинется упор, поддерживающий крышку.
2
2
Выньте бумагу.
Р
АБОТА С БУМАГОЙ
2.5
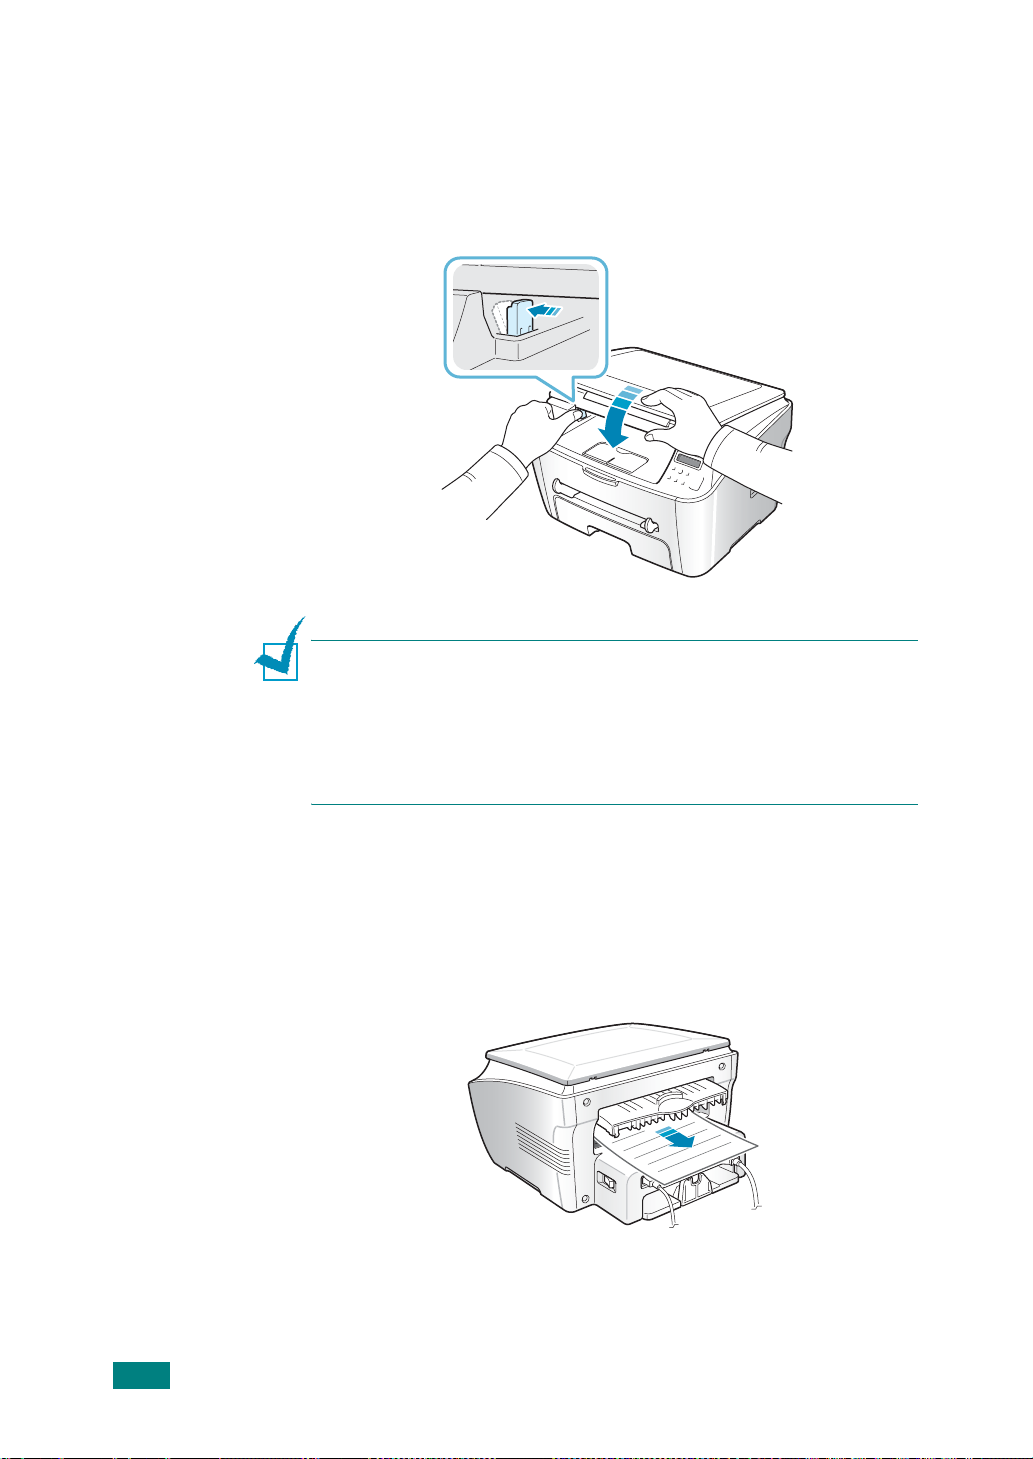
3
Закройте крышку отсека для устранения замятий бумаги.
Чтобы закрыть крышку, отожмите упор влево и придержите
его. Осторожно опускайте крышку, пока она не зафиксирует
упор. Отпустите упор и окончательно закройте крышку.
Не прищемите пальцы!
П
РИМЕЧАНИЕ
• При печати большого количества страниц поверхность выходного
лотка может нагреться. Не прикасайтесь к этой поверхности сами
и следите, чтобы к ней не прикасались дети.
• Передний выходной лоток вмещает до 50 листов бумаги.
Вынимайте бумагу из лотка, чтобы он не переполнился.
.
2.6
Р
АБОТА С БУМАГОЙ
Печать с использованием заднего выходного
лотка
При работе с задним лотком бумага выходит из устройства
лицевой стороной вверх.
(лицевой стороной вверх)
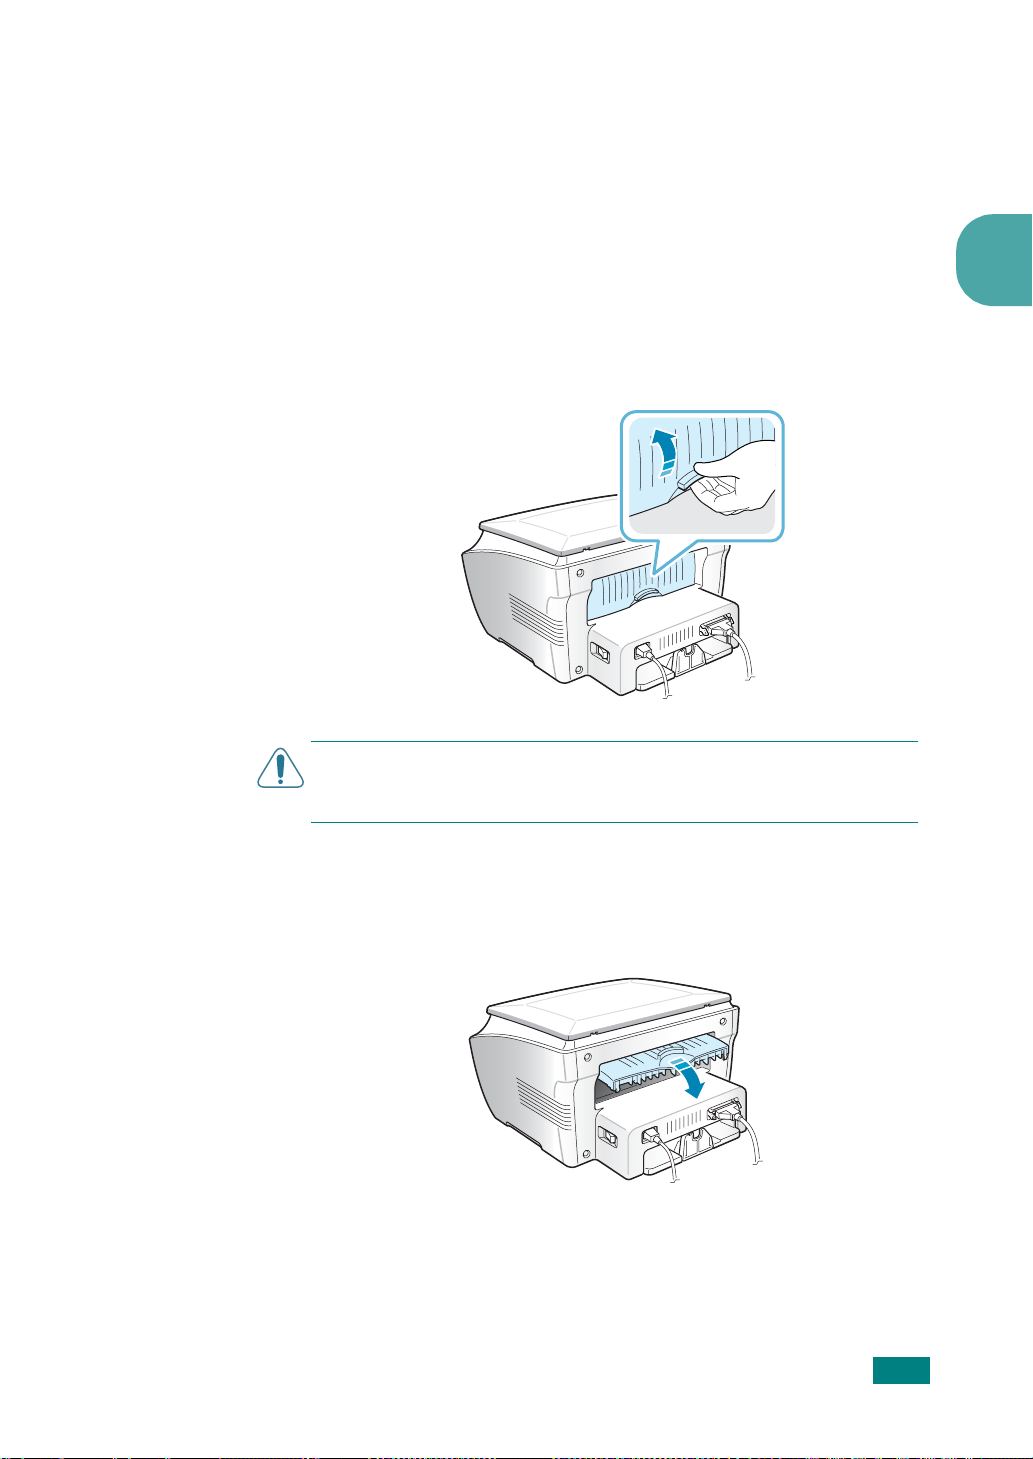
При печати из лотка для ручной подачи в задний выходной лоток
бумага проходит по
выходного лотка позволяет улучшить качество печати следующих
материалов:
• конвертов • наклеек
• бумаги размером меньше стандартного • открыток
• прозрачных плёнок
Работа с задним выходным лотком.
1
Откройте заднюю крышку, потянув ее вверх.
прямому пути
. Использование заднего
2
В
НИМАНИЕ
вего задней части начинает нагреваться. Соблюдайте осторожность
при доступе в эту часть устройства.
2
Если задний выходной лоток больше не нужен, закройте
заднюю крышку. Печать будет перенаправлена в передний
выходной лоток.
!
После включения устройства блок закрепления тонера
Р
АБОТА С БУМАГОЙ
2.7
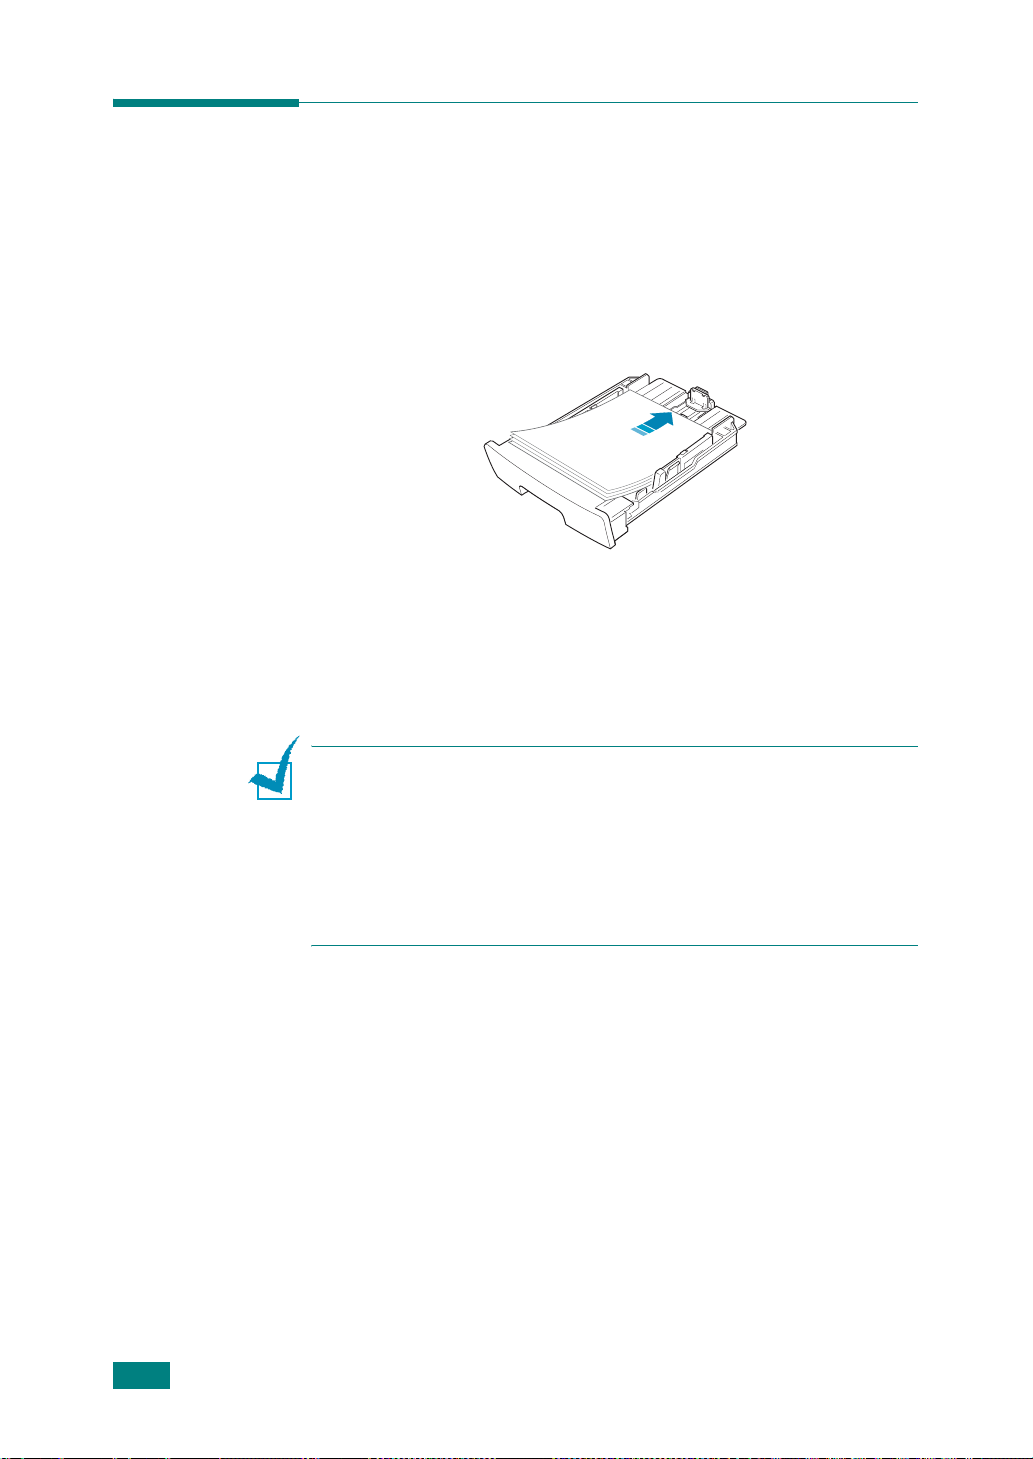
Загрузка бумаги в лоток
Лоток для бумаги вмещает до 250 листов обычной бумаги (75 г/м2).
Для копирования можно использовать только бумагу формата A4,
Letter или Legal. При печати с компьютера доступна бумага
различного размера, см. стр.A.6.
Откройте лоток для бумаги и положите в него листы бумаги
стороной для печати
Фирменные бланки следует загружать эмблемой вниз. При этом
верхний край листа с эмблемой должен находиться у переднего
края лотка.
Дополнительную информации о загрузке бумаги см. в разделе
«Загрузка бумаги» на стр.1.8.
вниз
.
П
РИМЕЧАНИЯ
• Если при подаче бумаги возникают проблемы, используйте лоток
для ручной подачи.
• Допускается повторная печать на использованной бумаге. Бумагу
следует загружать использованной стороной вверх и несвернутым
краем по направлению к устройству. Если при подаче возникают
проблемы, поверните бумагу другой стороной. При этом высокое
качество печати не гарантируется.
.
2.8
Р
АБОТА С БУМАГОЙ
 Loading…
Скачать
SERVICE
DIGITAL LASER MFP
SCX-4100
Manual
DIGITAL LASER MFP
CONTENTS
1.
Precautions
2. Reference
Information
3.
Specifications
4.
Summary of product
5. Disassembly and Reassembly
6. Alignment
and
Adjustments
7.
Troubleshooting
8.
Exploded Views and Parts List
9.
Block Diagram
10. Connection Diagram
-
Драйверы
9
-
Руководства по ремонту
1
-
Инструкции по эксплуатации
7
Языки:

Samsung SCX-4100 инструкция по эксплуатации
(166 страниц)
- Языки:Русский
-
Тип:
PDF -
Размер:
6.66 MB
Просмотр

Samsung SCX-4100 инструкция по эксплуатации
(169 страниц)
- Языки:Английский
-
Тип:
PDF -
Размер:
5.25 MB
Просмотр

Samsung SCX-4100 инструкция по эксплуатации
(166 страниц)
- Языки:Португальский
-
Тип:
PDF -
Размер:
6.3 MB
Просмотр

Samsung SCX-4100 инструкция по эксплуатации
(166 страниц)
- Языки:Французский
-
Тип:
PDF -
Размер:
6.18 MB
Просмотр

Samsung SCX-4100 инструкция по эксплуатации
(169 страниц)
- Языки:Испанский
-
Тип:
PDF -
Размер:
6.71 MB
Просмотр

Samsung SCX-4100 инструкция по эксплуатации
(166 страниц)
- Языки:Немецкий
-
Тип:
PDF -
Размер:
6.67 MB
Просмотр

Samsung SCX-4100 инструкция по эксплуатации
(166 страниц)
- Языки:Итальянский
-
Тип:
PDF -
Размер:
5.47 MB
Просмотр
На NoDevice можно скачать инструкцию по эксплуатации для Samsung SCX-4100. Руководство пользователя необходимо для ознакомления с правилами установки и эксплуатации Samsung SCX-4100. Инструкции по использованию помогут правильно настроить Samsung SCX-4100, исправить ошибки и выявить неполадки.