- Manuals
- Brands
- PerkinElmer Manuals
- Laboratory Equipment
- Lambda 25
- User manual
-
Contents
-
Table of Contents
-
Bookmarks
Quick Links
PerkinElmer
Lambda 25
User Manual
Related Manuals for PerkinElmer Lambda 25
Summary of Contents for PerkinElmer Lambda 25
-
Page 1
Artisan Technology Group is your source for quality new and certified-used/pre-owned equipment SERVICE CENTER REPAIRS WE BUY USED EQUIPMENT • FAST SHIPPING AND DELIVERY Experienced engineers and technicians on staff Sell your excess, underutilized, and idle used equipment at our full-service, in-house repair center We also offer credit for buy-backs and trade-ins •… -
Page 2
Lambda 25, 35, 45 User’s Guide Artisan Technology Group — Quality Instrumentation … Guaranteed | (888) 88-SOURCE | www.artisantg.com… -
Page 3
The information contained in this document is subject to change without notice. PerkinElmer makes no warranty of any kind with regard to the material, including, but not limited to, the implied warranties of merchantability and fitness for a particular purpose. -
Page 4: Table Of Contents
Notes, cautions and warnings …………..24 Other Warnings used in this Manual …………. 27 System Description ………………35 Introduction ………………..37 Features ………………..37 Optical System of the Lambda 25, 35, 45…………. 38 Lambda 25 Specification …………….41 General ………………..41 Optics………………… 42 Abscissa………………..42 Ordinate ………………..
-
Page 5
Lambda 25, 35, 45 User’s Guide Lambda 45 Specification …………….49 General ………………..49 Optics………………… 50 Abscissa………………..50 Ordinate ………………..51 Data Output ………………. 52 Installation………………..53 Preparing the Working Area…………….. 55 Equipment Provided ………………57 Spectrometer………………57 Components………………. 57 Unpacking your Instrument ……………. -
Page 6
Contents Accessories ……………….. 82 Requirements for Operation with Accessories ……..83 Maintenance ………………..85 Maintenance………………..87 Obtaining Service ……………… 87 Daily Care………………..87 Cleaning the Sample Compartment…………88 Use and Care of Cells ………………. 90 Cell Handling………………90 Pressure Buildup in Cells …………..91 Replacing a Lamp ……………… -
Page 7
Lambda 25, 35, 45 User’s Guide Artisan Technology Group — Quality Instrumentation … Guaranteed | (888) 88-SOURCE | www.artisantg.com… -
Page 8: Warnings And Safety Information
Warnings and Safety Information Artisan Technology Group — Quality Instrumentation … Guaranteed | (888) 88-SOURCE | www.artisantg.com…
-
Page 9
Artisan Technology Group — Quality Instrumentation … Guaranteed | (888) 88-SOURCE | www.artisantg.com… -
Page 10: Safety Information
Warnings and Safety Information Safety Information Safety Information in the Handbook This handbook contains information and warnings that must be followed by the user to ensure safe operation and to maintain the instrument in a safe condition. Possible hazards that could harm the user or result in damage to the instrument are clearly stated at appropriate places throughout this handbook.
-
Page 11: Electrical Safety
To ensure satisfactory and safe operation of the instrument, it is essential that the green/yellow lead of the line power cord is connected to true electrical earth (ground). If any part of the instrument is not installed by a PerkinElmer service representative, make sure that the line power plug is wired correctly: Terminal…
-
Page 12
Do not operate the instrument with any covers or parts removed. Servicing should be carried out only by a PerkinElmer service representative or similarly authorized and trained person. Disconnect the instrument from all voltage sources before opening it for any adjustment, replacement, maintenance, or repair. -
Page 13
Lambda 25, 35, 45 User’s Guide Use only fuses with the required current rating and of the specified type for replacement. Do not use makeshift fuses or short-circuit the fuse holders. Whenever it is likely that the instrument is no longer electrically safe for use, make the instrument inoperative and secure it against any unauthorized or unintentional operation. -
Page 14: Emc Compliance
Warnings and Safety Information EMC Compliance EC Directive This product complies with the minimum immunity requirements of IEC 61326 and has been tested to the relevant parts of the following standards: IEC 61000-4-2 IEC 61000-4-3 IEC 61000-4-4 IEC 61000-4-5 IEC 61000-4-6 IEC 61000-4-11 This product complies with EN 55011 Group 1 Class A and IEC 61000-3-2.
-
Page 15: Environment
Lambda 25, 35, 45 User’s Guide Environment Operating Conditions Explosive Atmosphere This instrument is not designed for operation in an explosive atmosphere. WARNING The instrument will operate correctly under the following conditions: • Indoors. • Ambient temperature +15 ºC to +35 ºC.
-
Page 16
Warnings and Safety Information When you remove the instrument from storage, before putting it into operation allow it to stand for at least a day under the approved operating conditions. Chemicals Use, store, and dispose of chemicals that you require for your analyses in accordance with the manufacturer’s recommendations and local safety regulations. -
Page 17
Lambda 25, 35, 45 User’s Guide Waste Disposal Waste containers may contain corrosive or organic solutions and small amounts of the substances that were analyzed. If these materials are toxic, you may have to treat the collected effluent as hazardous waste. Refer to your local safety regulations for proper disposal procedures. -
Page 18: Lifting The Lambda 25, 35, 45
WARNING As the Lambda 25, 35, 45 weighs approximately 26 Kg we recommend that the instrument is lifted by 2 adults, and that it is lifted by the base of the instrument. Artisan Technology Group — Quality Instrumentation … Guaranteed | (888) 88-SOURCE | www.artisantg.com…
-
Page 19: Labels
Lambda 25, 35, 45 User’s Guide Labels Labels are fixed to the Lambda 25, 35, 45 in the locations shown in Figure 1 and Figure 3. Serial number Electrical warnings Serial number inside the sample compartment Figure 1 Labels on the spectrometer housing…
-
Page 20
Warnings and Safety Information Warning labels shown on the inside of the lamp compartment Figure 3 Lambda 25, 35, 45 Spectrometers warning labels (inside of lamp compartment) The following warnings are shown on the inside of the lamp compartment. Figure 4 Warnings on the inside of the lamp compartment… -
Page 21
Lambda 25, 35, 45 User’s Guide Artisan Technology Group — Quality Instrumentation … Guaranteed | (888) 88-SOURCE | www.artisantg.com… -
Page 22: Introduction
Introduction Artisan Technology Group — Quality Instrumentation … Guaranteed | (888) 88-SOURCE | www.artisantg.com…
-
Page 23
Artisan Technology Group — Quality Instrumentation … Guaranteed | (888) 88-SOURCE | www.artisantg.com… -
Page 24: About This Manual
Introduction About this Manual This manual contains the following sections: • Warnings and Safety Information; • Introduction; • System Description; • Installation; • Accessories; • Maintenance; • Analytical Notes. Artisan Technology Group — Quality Instrumentation … Guaranteed | (888) 88-SOURCE | www.artisantg.com…
-
Page 25: Conventions Used In This Manual
Lambda 25, 35, 45 User’s Guide Conventions Used in this Manual Normal text is used to provide information and instructions. text refers to text that is displayed on the screen. Bold text, for example , refers to keys on the PC keyboard.
-
Page 26
Introduction We use the term CAUTION to inform you about situations that could result in serious damage to the instrument or other equipment. Details CAUTION about these circumstances are in a box like this one. Caution (Achtung) Bedeutet, daß die genannte Anleitung genau befolgt werden muß, um einen Geräteschaden zu vermeiden. -
Page 27
Lambda 25, 35, 45 User’s Guide We use the term WARNING to inform you about situations that could result in personal injury to yourself or other persons. Details about these circumstances are in a box like this one. WARNING Warning (Warnung) Bedeutet, daß… -
Page 28: Other Warnings Used In This Manual
Introduction Other Warnings used in this Manual Artisan Technology Group — Quality Instrumentation … Guaranteed | (888) 88-SOURCE | www.artisantg.com…
-
Page 29
Lambda 25, 35, 45 User’s Guide Artisan Technology Group — Quality Instrumentation … Guaranteed | (888) 88-SOURCE | www.artisantg.com… -
Page 30
Introduction Artisan Technology Group — Quality Instrumentation … Guaranteed | (888) 88-SOURCE | www.artisantg.com… -
Page 31
Lambda 25, 35, 45 User’s Guide Artisan Technology Group — Quality Instrumentation … Guaranteed | (888) 88-SOURCE | www.artisantg.com… -
Page 32
Introduction Artisan Technology Group — Quality Instrumentation … Guaranteed | (888) 88-SOURCE | www.artisantg.com… -
Page 33
Lambda 25, 35, 45 User’s Guide Artisan Technology Group — Quality Instrumentation … Guaranteed | (888) 88-SOURCE | www.artisantg.com… -
Page 34
Introduction Artisan Technology Group — Quality Instrumentation … Guaranteed | (888) 88-SOURCE | www.artisantg.com… -
Page 35
Lambda 25, 35, 45 User’s Guide Artisan Technology Group — Quality Instrumentation … Guaranteed | (888) 88-SOURCE | www.artisantg.com… -
Page 36: System Description
System Description Artisan Technology Group — Quality Instrumentation … Guaranteed | (888) 88-SOURCE | www.artisantg.com…
-
Page 37
Artisan Technology Group — Quality Instrumentation … Guaranteed | (888) 88-SOURCE | www.artisantg.com… -
Page 38: Introduction
The Lambda 25, 35, 45 are versatile spectrometers operating in the ultraviolet (UV) and visible (Vis) spectral ranges. The spectrometers feature a double-beam, all- reflecting system. Lambda 25, 35, 45 spectrometers are usable in a wide range of applications as indicated by their performance specification. Features…
-
Page 39: Optical System Of The Lambda 25, 35, 45
Lambda 25, 35, 45 User’s Guide Optical System of the Lambda 25, 35, 45 The Lambda 25, 35, 45 UV/Vis Spectrometers features an all-reflecting optical system. The optical components are coated with silica for durability. A holographic grating is used in the monochromator.
-
Page 40
Grating (Monochromator) Detector Sample Figure 6 Optical Path for Lambda 25, 35, 45 replaced with a pre-monochromator in the Lambda 45 † — selectable on the Lambda 35/45 Artisan Technology Group — Quality Instrumentation … Guaranteed | (888) 88-SOURCE | www.artisantg.com… -
Page 41
The exit slit restricts the spectrum segment to a near-monochromatic radiation beam. The slits provide a spectral bandpass of 1 nm on the Lambda 25, and are selectable to be 0.5, 1, 2, or 4 nm on the Lambda 35 or 45. -
Page 42: Lambda 25 Specification
System Description Lambda 25 Specification General Type Scanning double-beam spectrometer for the UV/Vis range; operation by PC Dimensions Width: 650 nm Height: 260 nm Depth: 560 nm Mass 26 kg approx. Power requirements 100 V to 240 V AC, 50/60 Hz; 250 VA Ambient operating temperature 15 ºC to 35 ºC…
-
Page 43: Optics
Lambda 25, 35, 45 User’s Guide Optics Beam center height 15 mm above cell holder bottom Beam cross-section 1 nm slit ca. 0.6 mm x 9 mm (width x height) at focal point of sample and reference beam in sample compartment…
-
Page 44: Ordinate
System Description Ordinate Photometric range Transmission 0% to 100% Absorbance –6.000 to 6.000 (display range) 1 to 9999 (concentration units) Photometric accuracy Absorbance ±0.003 (measured at Absorbance = 1 at 440 nm, 546.1 nm and 635 nm with NIST 930 filters) Absorbance ±0.015 (measured at Absorbance = 1, at 257 nm and 350 nm with potassium dichromate solution…
-
Page 45: Data Output
Lambda 25, 35, 45 User’s Guide Data Output Digital port One RS 232 C interface (serial), for connecting a PC. Artisan Technology Group — Quality Instrumentation … Guaranteed | (888) 88-SOURCE | www.artisantg.com…
-
Page 46: Lambda 35 Specification
System Description Lambda 35 Specification General Type Scanning double-beam spectrometer for the UV/Vis range; operation by PC Dimensions Width: 650 nm Height: 260 nm Depth: 560 nm Mass 26 kg approx. Power requirements 100 V to 240 V AC, 50/60 Hz; 250 VA Ambient operating temperature 15 ºC to 35 ºC Humidity range…
-
Page 47: Optics
Lambda 25, 35, 45 User’s Guide Optics Beam center height 15 mm above cell holder bottom Beam cross-section 0.5 nm slit ca. 0.25 mm x 7 mm (width x height) 1 nm slit ca. 0.5 mm x 7.5 mm (width x height) 2 nm slit ca.
-
Page 48: Ordinate
System Description Ordinate Photometric range Transmission 0% to 100% Absorbance –6.000 to 6.000 (display range) 1 to 9999 (concentration units) Photometric accuracy Absorbance ±0.003 (measured at Absorbance = 1 at 440 nm, 546.1 nm and 635 nm with NIST 930 filters) Absorbance ±0.015 (measured at Absorbance = 1, at 257 nm and 350 nm with potassium dichromate solution…
-
Page 49
Lambda 25, 35, 45 User’s Guide Data Output Digital port One RS 232 C interface (serial), for connecting a PC Artisan Technology Group — Quality Instrumentation … Guaranteed | (888) 88-SOURCE | www.artisantg.com… -
Page 50: Lambda 45 Specification
System Description Lambda 45 Specification General Type Scanning double-beam spectrometer for the UV/Vis range; operation by PC Dimensions Width: 650 nm Height: 260 nm Depth: 560 nm Mass 26 kg approx. Power requirements 100 V to 240 V AC, 50/60 Hz; 250 VA Ambient operating temperature 15 ºC to 35 ºC Humidity range…
-
Page 51: Optics
Lambda 25, 35, 45 User’s Guide Optics Beam center height 15 mm above cell holder bottom Beam cross-section 0.5 nm slit ca. 0.25 mm x 7 mm (width x height) 1 nm slit ca. 0.5 mm x 7.5 mm (width x height) 2 nm slit ca.
-
Page 52: Ordinate
System Description Ordinate Photometric range Transmission 0% to 100% Absorbance –6.000 to 6.000 (display range) 1 to 9999 (concentration units) Photometric accuracy Absorbance ±0.003 (measured at Absorbance = 1 at 440 nm, 546.1 nm and 635 nm with NIST 930 filters) Absorbance ±0.015 (measured at Absorbance = 1, at 257 nm and 350 nm with potassium dichromate solution…
-
Page 53: Data Output
Lambda 25, 35, 45 User’s Guide Data Output Digital port One RS 232 C interface (serial), for connecting a PC Artisan Technology Group — Quality Instrumentation … Guaranteed | (888) 88-SOURCE | www.artisantg.com…
-
Page 54: Installation
Installation Artisan Technology Group — Quality Instrumentation … Guaranteed | (888) 88-SOURCE | www.artisantg.com…
-
Page 55
Artisan Technology Group — Quality Instrumentation … Guaranteed | (888) 88-SOURCE | www.artisantg.com… -
Page 56: Preparing The Working Area
Installation Preparing the Working Area For maximum stability and minimum maintenance observe the following requirements when siting the instrument: • A firm base free from vibration. • Enough space around and underneath the instrument for efficient air circulation. • A constant temperature between 15 ºC and 35 ºC. •…
-
Page 57
Lambda 25, 35, 45 User’s Guide Front view 26 cm 65 cm Right side view 56 cm Figure 7 Space Requirements Artisan Technology Group — Quality Instrumentation … Guaranteed | (888) 88-SOURCE | www.artisantg.com… -
Page 58: Equipment Provided
Lambda 45 Spectrometer (Double-beam, with four selectable slit widths, with pre monochromator) according to order. Components The components listed below are provided with the spectrometer. Quantity Item Part Number Single-cell holders (Lambda 25, 35, 45) B0505071 Screwdriver 4 mm B0126972 Hexagonal socket-head wrench 3 mm B0140883 Spare fuses…
-
Page 59: Unpacking Your Instrument
In the event of damage or missing parts, file an immediate claim with the authorized carrier, and inform your PerkinElmer office or representative. NOTE: PerkinElmer offers an installation service for your spectrometer. Contact your local PerkinElmer office or representative for further information.
-
Page 60: Connecting To The Electrical Supply
Installation Connecting to the Electrical Supply Electrical Hazard To prevent potential injury to yourself and damage to the instrument, first make the electrical connections between the instruments in the system WARNING before connecting to the line power supply. The spectrometer automatically adjusts to the correct operating voltage. Before starting the instrument for the first time, make sure that the correct fuse is fitted to your line power supply.
-
Page 61: Setting Up The Pc
Lambda 25, 35, 45 User’s Guide Setting up the PC The Lambda 25, 35, 45 range requires a PC running UV WinLab version 2.85 or above. Connecting the PC to the spectrometer Connect the PC to the spectrometer using the cable provided (09410022) as shown in Figure 8.
-
Page 62: Startup And Shutdown
Installation Startup and Shutdown Before starting analysis, leave the spectrometer switched on for approximately 10 minutes to allow the lamps to warm up and stabilize. Wait until all initialization is complete before starting UV WinLab. This will take approximately 3 minutes from switch on. Startup 1.
-
Page 63: Shutdown
Lambda 25, 35, 45 User’s Guide Shutdown 1. Close down UV WinLab. 2. Switch off the accessories. 3. Open the sample compartment cover. 4. Remove samples and cells from the sample compartment. 5. If accessories (for example, flowcell) are installed in the sample compartment clean them thoroughly.
-
Page 64: Installing The Single Cell Holder
Installation Installing the Single Cell Holder Description Locking screw for horizontal alignment Vertical adjustment screw Milled post Lifter Locking screw for horizontal alignment Figure 9 Single Cell Holder B0505071 Artisan Technology Group — Quality Instrumentation … Guaranteed | (888) 88-SOURCE | www.artisantg.com…
-
Page 65
BIO LAMBDA 2 The cell holder should be used in this position with Lambda 25, 35, 45 Series Spectrometers. The smallest beam diameter is exactly in the middle of the cell. This is useful especially for operation with micro and semi- micro cells. -
Page 66
Installation Arrow LAMBDA 2 Center Point Tube Ports Figure 10 Installing the single cell holder 3. Move the milled posts a little to locate the threaded holes in the baseplate, and then tighten the milled posts. The tube ports located at the front of the sample compartment allow you to lead tubes from flowcells, water-thermsotatted cell holders, etc. -
Page 67
Lambda 25, 35, 45 User’s Guide 5. Block the sample and reference beam window on the right hand side of the sample compartment with a card to prevent white light from saturating the detector. 6. Return to standby display. 7. From the Application menu in UV WinLab select Manual The lambda Manual Control dialog is displayed. -
Page 68
Installation Min. 2 mm Figure 11 Correct Alignment of the Radiation Beam in the Cell Sample Area 13. If vertical alignment is required, turn the vertical adjustment screw on the lifter either clockwise to raise the cell, or counterclockwise to lower the cell. 14. -
Page 69
Lambda 25, 35, 45 User’s Guide 3. In the UV WinLab Manual control dialog select transmission (%T) as ordinate and click Setup 4. Open the sample compartment cover. 5. Insert the cell with a low absorbing solvent into the sample cell holder. -
Page 70
Installation Minimum Volume Applications To measure minimum sample volumes, use microcells (offered by PerkinElmer). The minimum sample volume required is a function of the cell internal width or volume and is specified below. Cell Type Cell Pathlength Minimum Part Internal… -
Page 71
Lambda 25, 35, 45 User’s Guide Artisan Technology Group — Quality Instrumentation … Guaranteed | (888) 88-SOURCE | www.artisantg.com… -
Page 72: Accessories
Accessories Artisan Technology Group — Quality Instrumentation … Guaranteed | (888) 88-SOURCE | www.artisantg.com…
-
Page 73
Artisan Technology Group — Quality Instrumentation … Guaranteed | (888) 88-SOURCE | www.artisantg.com… -
Page 74: Accessory Installation
Accessories Accessory Installation To operate the spectrometer with some accessories, for example the Peltier Temperature sensor, an accessory panel kit (L6000500) is required. Procedures for installing the accessories in the spectrometer are described in the directions provided with the respective accessory. To install certain accessories you need to remove the sample compartment cover.
-
Page 75: Accessory Connector Panel
Lambda 25, 35, 45 User’s Guide Accessory Connector Panel To facilitate manufacturing procedures, a common connector panel is used for the Lambda Series of instruments. TEMPERATURE PELTIER (J30) Accessory panel AUTOSAMPLER Standard configuration ACCY SPHERE (J88) P.C. Figure 12 Accessory Connector Panel…
-
Page 76
Accessories Designation Connector for Remarks Accessory Port (Accy) Linear transporter, C-bus interface multi-sipper RS 232 C interface J14, 13 Cell Changer, 13 Cell autochanger Active J10, J11, Temp Temperature sensor J10: 2-pin socket J11: 4-pin socket J30, Peltier Peltier cell changer Active and Peltier cell holder J88, Sphere… -
Page 77: Accessory Connections Overview
Autosampler Integrating sphere Linear Transporter Multi-sipper Figure 13 Accessories for the Lambda 25, 35, 45 Sample Compartment Cover Some of the accessories used with the spectrometer require removal of the sample compartment cover. Do this carefully as follows: 1. Open the cover only about 90 degrees to the sample compartment.
-
Page 78: Sample Compartment Front Cover
Accessories Sample Compartment Front Cover Some of the accessories used with the spectrometer require removal of the sample compartment front cover. Do this carefully as follows: 1. Open the sample compartment cover. 2. Loosen the two screws securing the front cover of the sample compartment. 3.
-
Page 79: Linear Transporter
Lambda 25, 35, 45 User’s Guide Linear Transporter Electrical hazard To prevent potential injury to yourself and damage to the instrument, switch OFF all instruments in the system and disconnect them from the line power supply before you alter, or make any new, electrical WARNING connections.
-
Page 80: Temperature Sensor
Accessories Temperature Sensor Electrical hazard To prevent potential injury to yourself and damage to the instrument, switch OFF all instruments in the system and disconnect them from the line power supply before you alter, or make any new, electrical WARNING connections.
-
Page 81: Multisippers
Lambda 25, 35, 45 User’s Guide Multisippers Electrical hazard To prevent potential injury to yourself and damage to the instrument, switch OFF all instruments in the system and disconnect them from the line power supply before you alter, or make any new, electrical WARNING connections.
-
Page 82: Autosampler
Accessories Autosampler Electrical hazard To prevent potential injury to yourself and damage to the instrument, switch OFF all instruments in the system and disconnect them from the line power supply before you alter, or make any new, electrical WARNING connections. Installation Overview Connector on Spectrometer: Autosampler…
-
Page 83: Operating With Accessories
Lambda 25, 35, 45 User’s Guide Operating with Accessories General Accessories are components, or instruments, that are installed or connected in the sample compartment, or otherwise connected to the spectrometer. For some of these accessories parameters have to be taken into account in the UV WinLab methods.
-
Page 84: Requirements For Operation With Accessories
Accessories Requirements for Operation with Accessories The following preconditions must be fulfilled in order to operate with accessories: • The accessory in use must be activated on the accessory page of the UV WinLab software. • The connector panel for the accessory in question must be installed in the spectrometer.
-
Page 85
Lambda 25, 35, 45 User’s Guide Artisan Technology Group — Quality Instrumentation … Guaranteed | (888) 88-SOURCE | www.artisantg.com… -
Page 86: Maintenance
Maintenance Artisan Technology Group — Quality Instrumentation … Guaranteed | (888) 88-SOURCE | www.artisantg.com…
-
Page 87
Artisan Technology Group — Quality Instrumentation … Guaranteed | (888) 88-SOURCE | www.artisantg.com… -
Page 88: Maintenance
Maintenance Maintenance Obtaining Service All internal servicing of the instrument should be performed by a PerkinElmer service representative or similarly authorized person. Please contact your local PerkinElmer sales or service office to obtain service. Maintenance procedures that you can perform yourself are described in this chapter.
-
Page 89: Cleaning The Sample Compartment
Lambda 25, 35, 45 User’s Guide You should observe the following care routine to maintain your instrument in good condition: • Immediately clean all spilled materials from the affected area and wipe it dry with lintless paper or cloth. If the sample compartment windows have to be wiped, make sure scratches are not introduced.
-
Page 90
Maintenance 2. Using a soft cloth and mild laboratory detergent solution, lightly scrub away all foreign material. 3. Using a clean cloth dampened with water, rinse the cleaned surfaces thoroughly. 4. Dry with lint free cloth or tissue. Sample Compartment Window Windows are provided with the spectrometer. -
Page 91: Use And Care Of Cells
Lambda 25, 35, 45 User’s Guide Use and Care of Cells Cell Handling A good spectrometer cell is an optical device, forming a part of the optical system of the instrument with which it is used. It must be accorded the same careful treatment applied to any optical component.
-
Page 92: Pressure Buildup In Cells
Maintenance Pressure Buildup in Cells If you are using stoppered cells, observe the following rules to prevent the buildup of internal pressure that could cause the stopper to pop-out of the cell, • Only fill the cell so full that the liquid meniscus is just above the radiation beam.
-
Page 93: Replacing A Lamp
Lambda 25, 35, 45 User’s Guide Replacing a Lamp Lamp compartment Figure 16 Lamp compartment White ceramic connector Halogen lamp assembly Deuterium lamp connector Deuterium lamp assembly Lamp energy attenuator Figure 17 Inside the Lamp Compartment (Baffle removed) Artisan Technology Group — Quality Instrumentation … Guaranteed | (888) 88-SOURCE | www.artisantg.com…
-
Page 94: Halogen Lamp Replacement
Maintenance Halogen Lamp Replacement If the lamp burns out, or if the bulb becomes blackened after prolonged use, you should replace the lamp. Replacement lamp assemblies are provided complete with prealigned mounts (Part Number B0114620). Figure 18 Prealigned Halogen Lamp (B0114620) Electrical Hazard Switch off the spectrometer and remove the plug from the electrical supply before starting with the replacement.
-
Page 95
Lambda 25, 35, 45 User’s Guide 1. Switch off the spectrometer and unplug the line power cord. 2. Remove the lamp compartment cover by pressing down the catch and pushing the cover to the left. 3. Remove the lamp baffle by slackening the thumbscrew for the deuterium lamp and lifting the lamp baffle vertically upward. -
Page 96
Maintenance White ceramic Thumbscrew connector Halogen lamp assembly Figure 20 White ceramic connector 5. Remove the lamp assembly from the bracket by slackening the thumbscrew and pulling the lamp mount vertically upward. Save the thumbscrew for use with the new lamp assembly. 6. -
Page 97: Deuterium Lamp Replacement
Lambda 25, 35, 45 User’s Guide Deuterium Lamp Replacement If the lamp burns out, or indicates falling energy after prolonged use, you should replace the lamp. Replacement lamp assemblies are provided complete with prealigned mounts (Part Number B0160917). Operating Hours…
-
Page 98
Maintenance 1. Switch off the spectrometer and unplug the line power cord. 2. Remove the lamp compartment cover by pressing down the catch and pushing the cover to the left. 3. Remove the lamp baffle by slackening the thumbscrews and lifting the lamp baffle vertically upward. -
Page 99
Lambda 25, 35, 45 User’s Guide Deuterium lamp connector Deuterium lamp assembly Figure 23 Deuterium lamp connector 5. Remove the lamp assembly from the bracket by slackening the thumbscrew and pulling the lamp mount vertically upward. Save the thumbscrew for use with the new lamp assembly. -
Page 100: Lamp Energy Attenuator
Maintenance Lamp Energy Attenuator An attenuator is located in the lamp compartment between the deuterium lamp and the beam entrance slit. If required you can decrease or increase the energy by placing the attenuator into, or taking the attenuator out of, the beam. The attenuator is set at the factory, normally in the out position.
-
Page 101
Lambda 25, 35, 45 User’s Guide Thumbscrew Thumbscrew Figure 24 Lamp baffle 3. Loosen the thumbscrew holding the attenuator in place. Deuterium lamp Lamp energy assembly attenuator Figure 25 Deuterium lamp assembly Artisan Technology Group — Quality Instrumentation … Guaranteed | (888) 88-SOURCE | www.artisantg.com… -
Page 102: Lamp Alignment Procedure
Maintenance 4. Slide the attenuator downwards into the beam. 5. Tighten the thumbscrew. Follow the above procedure in reverse to slide the attenuator out of the beam. 6. Replace the lamp baffle using the reverse of the procedure described in step 2. 7.
-
Page 103: Changing Fuses
Lambda 25, 35, 45 User’s Guide Changing Fuses Electrical hazard To prevent potential injury to yourself and damage to the instrument, switch OFF the instrument and disconnect it from the line power supply before you change the fuses. WARNING The fuses are located in a fuse holder at the rear of the instrument:…
-
Page 104
NOTE: If you use the correct fuses but the instrument still does not work correctly, or the fuses blow repeatedly, contact your PerkinElmer office or representative. Artisan Technology Group — Quality Instrumentation … Guaranteed | (888) 88-SOURCE | www.artisantg.com… -
Page 105: Replacement Parts
If you are located within the U.S., call toll free 1-800-762-402, 8 a.m. to 8 p.m. EST. Your order will be shipped promptly, usually within 24 hours. If you are located outside of the U.S., call your local PerkinElmer sales office. Accessories, spares and other parts and information are available on-line at essentials.perkinelmer.com.
-
Page 106: Analytical Notes
Analytical Notes Artisan Technology Group — Quality Instrumentation … Guaranteed | (888) 88-SOURCE | www.artisantg.com…
-
Page 107
Artisan Technology Group — Quality Instrumentation … Guaranteed | (888) 88-SOURCE | www.artisantg.com… -
Page 108: Unusual Samples
Analytical Notes Unusual Samples If a sample is chemically stable and undergoes no physical or chemical change other than to absorb incident radiation, errors in photometric values should not be caused by the sample. Many samples are not stable, and special consideration must be given to them.
-
Page 109: Chemically Reactive Samples
Lambda 25, 35, 45 User’s Guide The absorption characteristics of a sample can be changed during sample preparation, depending on the amount of reagent added for color development and so on. For details, refer to reference books covering these subjects.
-
Page 110: Solvent Properties
Analytical Notes Solvent Properties The solvent should meet the following requirements: • It should dissolve the sample without reacting with it. • The radiation absorption in the scanning region should be low. High absorption by the blank reduces the reference energy, thus increasing noise.
-
Page 111
Lambda 25, 35, 45 User’s Guide Figure 28 Lower Wavelength Limits of Solvent Artisan Technology Group — Quality Instrumentation … Guaranteed | (888) 88-SOURCE | www.artisantg.com… -
Page 112: Index
Index Artisan Technology Group — Quality Instrumentation … Guaranteed | (888) 88-SOURCE | www.artisantg.com…
-
Page 113
Artisan Technology Group — Quality Instrumentation … Guaranteed | (888) 88-SOURCE | www.artisantg.com… -
Page 114: Index
Index Index Accessories, 82 Replacement Parts, 105 Accessory Installation Requirements for Operation with Accessories, Autosampler, 81 General (accessory installation), 73 Linear Transporter, 78 Multi-sippers, 80 Temperature Sensor, 79 Safety information Electromagnetic Compatibility (EMC), 13 Safety Information in the Handbook, 9 Safety Information, 9 Basic Installation CSA Compliance, 9…
-
Page 115
Lambda 25, 35, 45 User’s Guide Artisan Technology Group — Quality Instrumentation … Guaranteed | (888) 88-SOURCE | www.artisantg.com… -
Page 116
Artisan Technology Group is your source for quality new and certified-used/pre-owned equipment SERVICE CENTER REPAIRS WE BUY USED EQUIPMENT • FAST SHIPPING AND DELIVERY Experienced engineers and technicians on staff Sell your excess, underutilized, and idle used equipment at our full-service, in-house repair center We also offer credit for buy-backs and trade-ins •…
Введение
Основные правила эксплуатации и обслуживания УФ-спектрофотометров изложены в оригинальном руководстве пользователя «Руководство пользователя спектрометров Lambda 25, 35,45».
Основное назначение данного документа — информационно-прикладное обеспечение пользователя для выполнения рутинных сервисных процедур, не требующих обязательного присутствия представителя сервисной службы авторизированного дистрибьютора «PerkinElmer» по Украине ООО «СОК ТРЕЙД».
Все описываемые в данном руководстве процедуры и действия рекомендуется исполнять в том порядке, в котором они изложены. Нарушение последовательности тех или иных действий по отладке оборудования может привести к его сбоям в работе или выходу из строя.
Краткий обзор
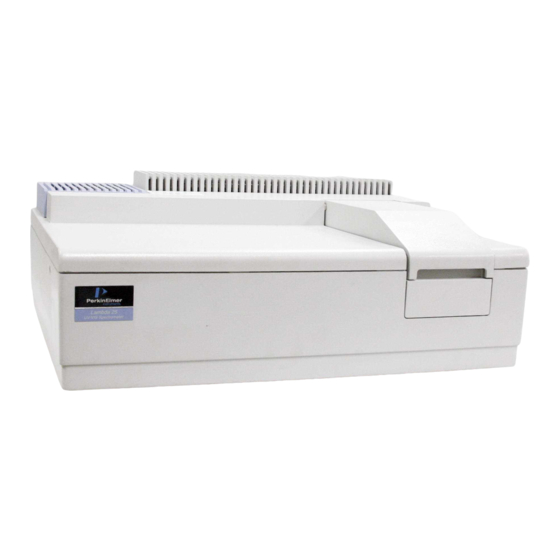
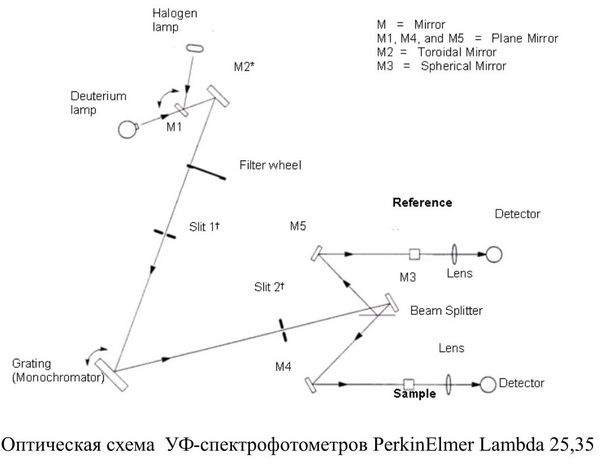
В УФ-спектрофотометрах фирмы Perkin Elmer Lambda 25, 35 в качестве источников света используется два типа источника – галогеновая (далее «Гал») и дейтериевая (далее «Д2») лампы. В среднем, время работы Гал-лампы составляет около тысячи часов, Д2-лампы около двух тысяч часов. В реальности, время наработки на отказ может меняться в зависимости от частоты использования оборудования и спектрального диапазона, в котором работает пользователь. Также стоит иметь в виду, что в силу специфики конструкции дейтериевой лампы, а также высокой текучести газа «водорода» и его изотопов (в данном случае дейтерия), вне зависимости от типа эксплуатации, включен он в сеть питания или нет, источник Д2-излучения постепенно разряжается. При включении оборудования происходит его инициализация в соответствие со «вшитой» внутренней программой. Процедура заключается в следующем: включается дейтериевая лампа, включается галогеновая лампа, колесо фильтров поворачивается стартовой позицией («треугольник») в канал, затем, сделав два оборота, становится свободной апертурой («прямоугольник») в тот же канал, монохроматор разворачивается зеркальной частью решетки и прибор проходит внутреннюю калибровку по «белому свету»; после этого происходит переключение зеркала между «Гал» и «Д2» лампами и в оптический канал начинает светить дейтериевая лампа, оборудование проходит калибровку по референсным пикам Д2-источника, вращая колесо фильтров и монохроматор, отсекая необходимые длины волн; на финальной стадии включения, снова происходит переключение зеркала и в канале опять оказывается свет галогеновой лампы, колесо фильтров становится в позицию «двойной фильтр» (парные стекла – рыжий с прозрачным).
Оптическая схема УФ-спектрофотометров PerkinElmer Lambda 25,35
Так как модификация программного обеспечения UVWinLab, предназначенная для управления приборами рутинного типа, класса «Lambda 25,35» не ведет учет тайминга эксплуатации ламп, единственным способом узнать время замены ламп — это выход самого источника из строя. Поэтому пользователю рекомендуется иметь, по крайней мере, один запасной комплект.
В данном разделе описана постадийная процедура замены ламп, перечень системных сообщений и простая диагностика, которая позволит установить и устранить неисправность, в случае отказа одного или второго источника.
Процедура замены источников света для УФ-спектрофотометров Перкин Элмер Lambda 25 и Lambda 35, в том числе, описана и в основном руководстве пользователя.
Симптомы
В данной главе перечислены основные симптомы, которые могут с высокой долей вероятности указывать на сбой в работе ламп.
- При рутинных сканированиях образца возникает нетипичный или аномальной высокий шум в видимой области (340 – 1100 нм), при этом в области работы дейтериевой лампы (340 – 190 нм) уровень шумов резко снижается – решение – заменить галогеновую лампу.
- При рутинных сканированиях образца возникает нетипичный или аномальной высокий шум в ультрафиолетовой области, при этом в области работы галогеновой лампы (1100 – 340 нм) уровень шумов резко снижается – решение – заменить дейтериевую лампу.
- При работе с концентрационными методами, когда калибровочная длина волны или пик находятся в видимом диапазоне (1100 – 340 нм) возникают сильные расхождения в результатах измерений (расхождение с предыдущим анализом или невоспроизводимость в заданной погрешности) – решение – заменить галогеновую лампу (если исключена ошибка пробоподготовки).
- При работе с концентрационными методами, когда калибровочная длина волны или пик находятся в ультрафиолетовом диапазоне (340 – 190 нм) возникают сильные расхождения в результатах измерений (расхождение с предыдущим анализом или невоспроизводимость в заданной погрешности) – решение – заменить дейтериевую лампу (если исключена ошибка пробоподготовки).
- При контроле по «белому свету» на световом пятне внутри кюветного отделения видны потемнения и неравномерности светимости – спеклась спираль – решение – заменить галогеновую лампу.
- При запуске программного обеспечения UVWinLab и старте метода измерения, система выдаёт сообщение об ошибке: «The instrument’s calibration has failed» — в данном случае рекомендуется провести инспекцию оптических узлов и блоков спектрофотометра, скорее всего, одна из ламп была некорректно установлена в держатель.
Замена галогеновой лампы
Данная процедура также описана в стандартном руководстве пользователя. В этом руководстве, процесс перестановки «Гал»-источника описан с позиции большего комфорта для специалиста, производящего замену.
- Используя крестовую отвертку подходящего размера, ослабить и извлечь два винта (справа и слева от кюветного отделения), удерживающих основную защитную крышку оборудования.
- Поднять вверх крышку кюветного отделения и бережно потянуть ее рукой вверх, высвободив из пазов крепления.
- Поднять защитную декоративную панель прибора.
- В левой части приборной схемы оборудования демонтировать радиаторную решетку блока ламп, для этого, используя входящий в комплект поставки шестигранный ключ ослабить и извлечь два винта, после этого снять решетку.
- Галогеновая лампа находится ближе к задней стенке блока ламп; для извлечения источника необходимо ослабить крепежный винт и аккуратным движением руки вверх вытащить лампу вместе с посадочным крепежом.
- Провести замену сборки источника, для этого необходимо отсоединить питание от отработавшей лампы, подключив его к новой, настоятельно рекомендуется не касаться плафона нового источника пальцами.
- Установить галогеновый источник света вместе с предъюстированным держателем обратно в соответствующее крепление блока ламп; обратить особенное внимание на соответствие разъема в нижней части держателя лампы со шпинделем крепления внутри блока ламп прибора; в случае несоответствия, держатель источника встанет неровно и свет от галогеновой лампы, частично или полностью, перестанет проходить через апертуры оптической схемы прибора, что может повлечь за собой предстартовый сбой процедуры автоматической калибровки.
- Правильное позиционирование источника в креплении блока ламп выглядит следующим образом (держатель источника должен плотно прилегать к креплению).
Замена дейтериевой лампы
Данная процедура также описана в стандартном руководстве пользователя. В этом руководстве, процесс перестановки «Д2»-источника описан с позиции большего комфорта для специалиста производящего замену. Процесс замены дейтериевой лампы, в целом, идентичен процедуре описанной для галогеновой лампы.
- Воспроизвести по пунктам процедуру замены «Гал»-источника по пунктам с 1-ого по 4-ый.
- Дейтериевая лампа находится ближе к фронтальному краю прибора; для извлечения источника необходимо ослабить крепежный винт и аккуратным движением руки вверх вытащить лампу вместе с посадочным крепежом.
- Провести замену сборки источника, для этого необходимо отсоединить питание от отработавшей лампы, подключив его к новой, настоятельно рекомендуется не касаться плафона нового источника пальцами (разъем питания Д2-лампы находится на отдельной панели у левого края блока ламп и представляет собой белый трехконтактный ключ-замок – для размыкания замка необходимо сжать держатели и потянуть на себя коннектор).
- Установить дейтериевый источник света вместе с предъюстированным держателем обратно в соответствующее крепление блока ламп; обратить особенное внимание на соответствие разъема в нижней части держателя лампы со шпинделем крепления внутри блока ламп прибора; в случае несоответствия, держатель источника встанет неровно и свет от Д2-лампы, частично или полностью, перестанет проходить через апертуры оптической схемы прибора, что может повлечь за собой предстартовый сбой процедуры автоматической калибровки:
- Правильное позиционирование Д2-источника в креплении блока ламп выглядит следующим образом (держатель источника должен плотно прилегать к креплению).
Контроль корректного позиционирования источников
Для старта процедуры контроля установки источников света, необходимо установить радиаторную решетку обратно, закрыть декоративную панель и установить крышку кюветного отделения.
После этого включить прибор. В момент инициализации оборудование «Lambda 25,35» не должно издавать каких-либо громких и протяженных посторонних звуков. При стартовой проверке в блоке ламп, сквозь декоративную пластмассовую решетку зеленого света должен стать виден «белый свет» галогеновой лампы. Через некоторое время свет погаснет. Прибор переключит зеркало в позицию Д2-лампы. Через 2-3 минуты галогеновый источник должен вновь загореться. После этого необходимо запустить управляющее программное обеспечение UVWinLab.
В открывшемся окне выбрать закладку «Instruments», в ней «Lambdda*5» и «Manual Control».
В новом окне «Manual Control», отметить ячейку «Alignment mode» и нажать кнопку «Apply».
Данная программная процедура поворачивает решетку монохроматора зеркальной стороной, выводя полезный сигнал прибора на «белый свет». Если программное обеспечение отрабатывает корректно, в поле отображения текущих длин волн монохроматора должны загореться нули.
Теперь необходимо проверить корректность установки ламп. Для этого поместите фрагмент белой бумаги внутрь кюветного отделения. Если лампа в держатель установлена правильно в держатель, то в кюветном отделении должна наблюдаться следующая картина: световые пятна должны иметь прямоугольную форму высотой около сантиметра, отображаться на белом фоне ярко и быть равномерно заполнены светом.
Если у вас возникли трудности с выполнением описанных процедур, обращайтесь в сервисный отдел компании SokTrade по телефону: 048-757-87-88
-
Page 1
Artisan Technology Group is your source for quality new and certified-used/pre-owned equipment SERVICE CENTER REPAIRS WE BUY USED EQUIPMENT • FAST SHIPPING AND DELIVERY Experienced engineers and technicians on staff Sell your excess, underutilized, and idle used equipment at our full-service, in-house repair center We also offer credit for buy-backs and trade-ins •… -
Page 2
Lambda 25, 35, 45 User’s Guide Artisan Technology Group — Quality Instrumentation … Guaranteed | (888) 88-SOURCE | www.artisantg.com… -
Page 3
The information contained in this document is subject to change without notice. PerkinElmer makes no warranty of any kind with regard to the material, including, but not limited to, the implied warranties of merchantability and fitness for a particular purpose. -
Page 4: Table Of Contents
Notes, cautions and warnings …………..24 Other Warnings used in this Manual …………. 27 System Description ………………35 Introduction ………………..37 Features ………………..37 Optical System of the Lambda 25, 35, 45…………. 38 Lambda 25 Specification …………….41 General ………………..41 Optics………………… 42 Abscissa………………..42 Ordinate ………………..
-
Page 5
Lambda 25, 35, 45 User’s Guide Lambda 45 Specification …………….49 General ………………..49 Optics………………… 50 Abscissa………………..50 Ordinate ………………..51 Data Output ………………. 52 Installation………………..53 Preparing the Working Area…………….. 55 Equipment Provided ………………57 Spectrometer………………57 Components………………. 57 Unpacking your Instrument ……………. -
Page 6
Contents Accessories ……………….. 82 Requirements for Operation with Accessories ……..83 Maintenance ………………..85 Maintenance………………..87 Obtaining Service ……………… 87 Daily Care………………..87 Cleaning the Sample Compartment…………88 Use and Care of Cells ………………. 90 Cell Handling………………90 Pressure Buildup in Cells …………..91 Replacing a Lamp ……………… -
Page 7
Lambda 25, 35, 45 User’s Guide Artisan Technology Group — Quality Instrumentation … Guaranteed | (888) 88-SOURCE | www.artisantg.com… -
Page 8: Warnings And Safety Information
Warnings and Safety Information Artisan Technology Group — Quality Instrumentation … Guaranteed | (888) 88-SOURCE | www.artisantg.com…
-
Page 9
Artisan Technology Group — Quality Instrumentation … Guaranteed | (888) 88-SOURCE | www.artisantg.com… -
Page 10: Safety Information
Warnings and Safety Information Safety Information Safety Information in the Handbook This handbook contains information and warnings that must be followed by the user to ensure safe operation and to maintain the instrument in a safe condition. Possible hazards that could harm the user or result in damage to the instrument are clearly stated at appropriate places throughout this handbook.
-
Page 11: Electrical Safety
To ensure satisfactory and safe operation of the instrument, it is essential that the green/yellow lead of the line power cord is connected to true electrical earth (ground). If any part of the instrument is not installed by a PerkinElmer service representative, make sure that the line power plug is wired correctly: Terminal…
-
Page 12
Do not operate the instrument with any covers or parts removed. Servicing should be carried out only by a PerkinElmer service representative or similarly authorized and trained person. Disconnect the instrument from all voltage sources before opening it for any adjustment, replacement, maintenance, or repair. -
Page 13
Lambda 25, 35, 45 User’s Guide Use only fuses with the required current rating and of the specified type for replacement. Do not use makeshift fuses or short-circuit the fuse holders. Whenever it is likely that the instrument is no longer electrically safe for use, make the instrument inoperative and secure it against any unauthorized or unintentional operation. -
Page 14: Emc Compliance
Warnings and Safety Information EMC Compliance EC Directive This product complies with the minimum immunity requirements of IEC 61326 and has been tested to the relevant parts of the following standards: IEC 61000-4-2 IEC 61000-4-3 IEC 61000-4-4 IEC 61000-4-5 IEC 61000-4-6 IEC 61000-4-11 This product complies with EN 55011 Group 1 Class A and IEC 61000-3-2.
-
Page 15: Environment
Lambda 25, 35, 45 User’s Guide Environment Operating Conditions Explosive Atmosphere This instrument is not designed for operation in an explosive atmosphere. WARNING The instrument will operate correctly under the following conditions: • Indoors. • Ambient temperature +15 ºC to +35 ºC.
-
Page 16
Warnings and Safety Information When you remove the instrument from storage, before putting it into operation allow it to stand for at least a day under the approved operating conditions. Chemicals Use, store, and dispose of chemicals that you require for your analyses in accordance with the manufacturer’s recommendations and local safety regulations. -
Page 17
Lambda 25, 35, 45 User’s Guide Waste Disposal Waste containers may contain corrosive or organic solutions and small amounts of the substances that were analyzed. If these materials are toxic, you may have to treat the collected effluent as hazardous waste. Refer to your local safety regulations for proper disposal procedures. -
Page 18: Lifting The Lambda 25, 35, 45
WARNING As the Lambda 25, 35, 45 weighs approximately 26 Kg we recommend that the instrument is lifted by 2 adults, and that it is lifted by the base of the instrument. Artisan Technology Group — Quality Instrumentation … Guaranteed | (888) 88-SOURCE | www.artisantg.com…
-
Page 19: Labels
Lambda 25, 35, 45 User’s Guide Labels Labels are fixed to the Lambda 25, 35, 45 in the locations shown in Figure 1 and Figure 3. Serial number Electrical warnings Serial number inside the sample compartment Figure 1 Labels on the spectrometer housing…
-
Page 20
Warnings and Safety Information Warning labels shown on the inside of the lamp compartment Figure 3 Lambda 25, 35, 45 Spectrometers warning labels (inside of lamp compartment) The following warnings are shown on the inside of the lamp compartment. Figure 4 Warnings on the inside of the lamp compartment… -
Page 21
Lambda 25, 35, 45 User’s Guide Artisan Technology Group — Quality Instrumentation … Guaranteed | (888) 88-SOURCE | www.artisantg.com… -
Page 22: Introduction
Introduction Artisan Technology Group — Quality Instrumentation … Guaranteed | (888) 88-SOURCE | www.artisantg.com…
-
Page 23
Artisan Technology Group — Quality Instrumentation … Guaranteed | (888) 88-SOURCE | www.artisantg.com… -
Page 24: About This Manual
Introduction About this Manual This manual contains the following sections: • Warnings and Safety Information; • Introduction; • System Description; • Installation; • Accessories; • Maintenance; • Analytical Notes. Artisan Technology Group — Quality Instrumentation … Guaranteed | (888) 88-SOURCE | www.artisantg.com…
-
Page 25: Conventions Used In This Manual
Lambda 25, 35, 45 User’s Guide Conventions Used in this Manual Normal text is used to provide information and instructions. text refers to text that is displayed on the screen. Bold text, for example , refers to keys on the PC keyboard.
-
Page 26
Introduction We use the term CAUTION to inform you about situations that could result in serious damage to the instrument or other equipment. Details CAUTION about these circumstances are in a box like this one. Caution (Achtung) Bedeutet, daß die genannte Anleitung genau befolgt werden muß, um einen Geräteschaden zu vermeiden. -
Page 27
Lambda 25, 35, 45 User’s Guide We use the term WARNING to inform you about situations that could result in personal injury to yourself or other persons. Details about these circumstances are in a box like this one. WARNING Warning (Warnung) Bedeutet, daß… -
Page 28: Other Warnings Used In This Manual
Introduction Other Warnings used in this Manual Artisan Technology Group — Quality Instrumentation … Guaranteed | (888) 88-SOURCE | www.artisantg.com…
-
Page 29
Lambda 25, 35, 45 User’s Guide Artisan Technology Group — Quality Instrumentation … Guaranteed | (888) 88-SOURCE | www.artisantg.com… -
Page 30
Introduction Artisan Technology Group — Quality Instrumentation … Guaranteed | (888) 88-SOURCE | www.artisantg.com… -
Page 31
Lambda 25, 35, 45 User’s Guide Artisan Technology Group — Quality Instrumentation … Guaranteed | (888) 88-SOURCE | www.artisantg.com… -
Page 32
Introduction Artisan Technology Group — Quality Instrumentation … Guaranteed | (888) 88-SOURCE | www.artisantg.com… -
Page 33
Lambda 25, 35, 45 User’s Guide Artisan Technology Group — Quality Instrumentation … Guaranteed | (888) 88-SOURCE | www.artisantg.com… -
Page 34
Introduction Artisan Technology Group — Quality Instrumentation … Guaranteed | (888) 88-SOURCE | www.artisantg.com… -
Page 35
Lambda 25, 35, 45 User’s Guide Artisan Technology Group — Quality Instrumentation … Guaranteed | (888) 88-SOURCE | www.artisantg.com… -
Page 36: System Description
System Description Artisan Technology Group — Quality Instrumentation … Guaranteed | (888) 88-SOURCE | www.artisantg.com…
-
Page 37
Artisan Technology Group — Quality Instrumentation … Guaranteed | (888) 88-SOURCE | www.artisantg.com… -
Page 38: Introduction
The Lambda 25, 35, 45 are versatile spectrometers operating in the ultraviolet (UV) and visible (Vis) spectral ranges. The spectrometers feature a double-beam, all- reflecting system. Lambda 25, 35, 45 spectrometers are usable in a wide range of applications as indicated by their performance specification. Features…
-
Page 39: Optical System Of The Lambda 25, 35, 45
Lambda 25, 35, 45 User’s Guide Optical System of the Lambda 25, 35, 45 The Lambda 25, 35, 45 UV/Vis Spectrometers features an all-reflecting optical system. The optical components are coated with silica for durability. A holographic grating is used in the monochromator.
-
Page 40
Grating (Monochromator) Detector Sample Figure 6 Optical Path for Lambda 25, 35, 45 replaced with a pre-monochromator in the Lambda 45 † — selectable on the Lambda 35/45 Artisan Technology Group — Quality Instrumentation … Guaranteed | (888) 88-SOURCE | www.artisantg.com… -
Page 41
The exit slit restricts the spectrum segment to a near-monochromatic radiation beam. The slits provide a spectral bandpass of 1 nm on the Lambda 25, and are selectable to be 0.5, 1, 2, or 4 nm on the Lambda 35 or 45. -
Page 42: Lambda 25 Specification
System Description Lambda 25 Specification General Type Scanning double-beam spectrometer for the UV/Vis range; operation by PC Dimensions Width: 650 nm Height: 260 nm Depth: 560 nm Mass 26 kg approx. Power requirements 100 V to 240 V AC, 50/60 Hz; 250 VA Ambient operating temperature 15 ºC to 35 ºC…
-
Page 43: Optics
Lambda 25, 35, 45 User’s Guide Optics Beam center height 15 mm above cell holder bottom Beam cross-section 1 nm slit ca. 0.6 mm x 9 mm (width x height) at focal point of sample and reference beam in sample compartment…
-
Page 44: Ordinate
System Description Ordinate Photometric range Transmission 0% to 100% Absorbance –6.000 to 6.000 (display range) 1 to 9999 (concentration units) Photometric accuracy Absorbance ±0.003 (measured at Absorbance = 1 at 440 nm, 546.1 nm and 635 nm with NIST 930 filters) Absorbance ±0.015 (measured at Absorbance = 1, at 257 nm and 350 nm with potassium dichromate solution…
-
Page 45: Data Output
Lambda 25, 35, 45 User’s Guide Data Output Digital port One RS 232 C interface (serial), for connecting a PC. Artisan Technology Group — Quality Instrumentation … Guaranteed | (888) 88-SOURCE | www.artisantg.com…
-
Page 46: Lambda 35 Specification
System Description Lambda 35 Specification General Type Scanning double-beam spectrometer for the UV/Vis range; operation by PC Dimensions Width: 650 nm Height: 260 nm Depth: 560 nm Mass 26 kg approx. Power requirements 100 V to 240 V AC, 50/60 Hz; 250 VA Ambient operating temperature 15 ºC to 35 ºC Humidity range…
-
Page 47: Optics
Lambda 25, 35, 45 User’s Guide Optics Beam center height 15 mm above cell holder bottom Beam cross-section 0.5 nm slit ca. 0.25 mm x 7 mm (width x height) 1 nm slit ca. 0.5 mm x 7.5 mm (width x height) 2 nm slit ca.
-
Page 48: Ordinate
System Description Ordinate Photometric range Transmission 0% to 100% Absorbance –6.000 to 6.000 (display range) 1 to 9999 (concentration units) Photometric accuracy Absorbance ±0.003 (measured at Absorbance = 1 at 440 nm, 546.1 nm and 635 nm with NIST 930 filters) Absorbance ±0.015 (measured at Absorbance = 1, at 257 nm and 350 nm with potassium dichromate solution…
-
Page 49
Lambda 25, 35, 45 User’s Guide Data Output Digital port One RS 232 C interface (serial), for connecting a PC Artisan Technology Group — Quality Instrumentation … Guaranteed | (888) 88-SOURCE | www.artisantg.com… -
Page 50: Lambda 45 Specification
System Description Lambda 45 Specification General Type Scanning double-beam spectrometer for the UV/Vis range; operation by PC Dimensions Width: 650 nm Height: 260 nm Depth: 560 nm Mass 26 kg approx. Power requirements 100 V to 240 V AC, 50/60 Hz; 250 VA Ambient operating temperature 15 ºC to 35 ºC Humidity range…
-
Page 51: Optics
Lambda 25, 35, 45 User’s Guide Optics Beam center height 15 mm above cell holder bottom Beam cross-section 0.5 nm slit ca. 0.25 mm x 7 mm (width x height) 1 nm slit ca. 0.5 mm x 7.5 mm (width x height) 2 nm slit ca.
-
Page 52: Ordinate
System Description Ordinate Photometric range Transmission 0% to 100% Absorbance –6.000 to 6.000 (display range) 1 to 9999 (concentration units) Photometric accuracy Absorbance ±0.003 (measured at Absorbance = 1 at 440 nm, 546.1 nm and 635 nm with NIST 930 filters) Absorbance ±0.015 (measured at Absorbance = 1, at 257 nm and 350 nm with potassium dichromate solution…
-
Page 53: Data Output
Lambda 25, 35, 45 User’s Guide Data Output Digital port One RS 232 C interface (serial), for connecting a PC Artisan Technology Group — Quality Instrumentation … Guaranteed | (888) 88-SOURCE | www.artisantg.com…
-
Page 54: Installation
Installation Artisan Technology Group — Quality Instrumentation … Guaranteed | (888) 88-SOURCE | www.artisantg.com…
-
Page 55
Artisan Technology Group — Quality Instrumentation … Guaranteed | (888) 88-SOURCE | www.artisantg.com… -
Page 56: Preparing The Working Area
Installation Preparing the Working Area For maximum stability and minimum maintenance observe the following requirements when siting the instrument: • A firm base free from vibration. • Enough space around and underneath the instrument for efficient air circulation. • A constant temperature between 15 ºC and 35 ºC. •…
-
Page 57
Lambda 25, 35, 45 User’s Guide Front view 26 cm 65 cm Right side view 56 cm Figure 7 Space Requirements Artisan Technology Group — Quality Instrumentation … Guaranteed | (888) 88-SOURCE | www.artisantg.com… -
Page 58: Equipment Provided
Lambda 45 Spectrometer (Double-beam, with four selectable slit widths, with pre monochromator) according to order. Components The components listed below are provided with the spectrometer. Quantity Item Part Number Single-cell holders (Lambda 25, 35, 45) B0505071 Screwdriver 4 mm B0126972 Hexagonal socket-head wrench 3 mm B0140883 Spare fuses…
-
Page 59: Unpacking Your Instrument
In the event of damage or missing parts, file an immediate claim with the authorized carrier, and inform your PerkinElmer office or representative. NOTE: PerkinElmer offers an installation service for your spectrometer. Contact your local PerkinElmer office or representative for further information.
-
Page 60: Connecting To The Electrical Supply
Installation Connecting to the Electrical Supply Electrical Hazard To prevent potential injury to yourself and damage to the instrument, first make the electrical connections between the instruments in the system WARNING before connecting to the line power supply. The spectrometer automatically adjusts to the correct operating voltage. Before starting the instrument for the first time, make sure that the correct fuse is fitted to your line power supply.
-
Page 61: Setting Up The Pc
Lambda 25, 35, 45 User’s Guide Setting up the PC The Lambda 25, 35, 45 range requires a PC running UV WinLab version 2.85 or above. Connecting the PC to the spectrometer Connect the PC to the spectrometer using the cable provided (09410022) as shown in Figure 8.
-
Page 62: Startup And Shutdown
Installation Startup and Shutdown Before starting analysis, leave the spectrometer switched on for approximately 10 minutes to allow the lamps to warm up and stabilize. Wait until all initialization is complete before starting UV WinLab. This will take approximately 3 minutes from switch on. Startup 1.
-
Page 63: Shutdown
Lambda 25, 35, 45 User’s Guide Shutdown 1. Close down UV WinLab. 2. Switch off the accessories. 3. Open the sample compartment cover. 4. Remove samples and cells from the sample compartment. 5. If accessories (for example, flowcell) are installed in the sample compartment clean them thoroughly.
-
Page 64: Installing The Single Cell Holder
Installation Installing the Single Cell Holder Description Locking screw for horizontal alignment Vertical adjustment screw Milled post Lifter Locking screw for horizontal alignment Figure 9 Single Cell Holder B0505071 Artisan Technology Group — Quality Instrumentation … Guaranteed | (888) 88-SOURCE | www.artisantg.com…
-
Page 65
BIO LAMBDA 2 The cell holder should be used in this position with Lambda 25, 35, 45 Series Spectrometers. The smallest beam diameter is exactly in the middle of the cell. This is useful especially for operation with micro and semi- micro cells. -
Page 66
Installation Arrow LAMBDA 2 Center Point Tube Ports Figure 10 Installing the single cell holder 3. Move the milled posts a little to locate the threaded holes in the baseplate, and then tighten the milled posts. The tube ports located at the front of the sample compartment allow you to lead tubes from flowcells, water-thermsotatted cell holders, etc. -
Page 67
Lambda 25, 35, 45 User’s Guide 5. Block the sample and reference beam window on the right hand side of the sample compartment with a card to prevent white light from saturating the detector. 6. Return to standby display. 7. From the Application menu in UV WinLab select Manual The lambda Manual Control dialog is displayed. -
Page 68
Installation Min. 2 mm Figure 11 Correct Alignment of the Radiation Beam in the Cell Sample Area 13. If vertical alignment is required, turn the vertical adjustment screw on the lifter either clockwise to raise the cell, or counterclockwise to lower the cell. 14. -
Page 69
Lambda 25, 35, 45 User’s Guide 3. In the UV WinLab Manual control dialog select transmission (%T) as ordinate and click Setup 4. Open the sample compartment cover. 5. Insert the cell with a low absorbing solvent into the sample cell holder. -
Page 70
Installation Minimum Volume Applications To measure minimum sample volumes, use microcells (offered by PerkinElmer). The minimum sample volume required is a function of the cell internal width or volume and is specified below. Cell Type Cell Pathlength Minimum Part Internal… -
Page 71
Lambda 25, 35, 45 User’s Guide Artisan Technology Group — Quality Instrumentation … Guaranteed | (888) 88-SOURCE | www.artisantg.com… -
Page 72: Accessories
Accessories Artisan Technology Group — Quality Instrumentation … Guaranteed | (888) 88-SOURCE | www.artisantg.com…
-
Page 73
Artisan Technology Group — Quality Instrumentation … Guaranteed | (888) 88-SOURCE | www.artisantg.com… -
Page 74: Accessory Installation
Accessories Accessory Installation To operate the spectrometer with some accessories, for example the Peltier Temperature sensor, an accessory panel kit (L6000500) is required. Procedures for installing the accessories in the spectrometer are described in the directions provided with the respective accessory. To install certain accessories you need to remove the sample compartment cover.
-
Page 75: Accessory Connector Panel
Lambda 25, 35, 45 User’s Guide Accessory Connector Panel To facilitate manufacturing procedures, a common connector panel is used for the Lambda Series of instruments. TEMPERATURE PELTIER (J30) Accessory panel AUTOSAMPLER Standard configuration ACCY SPHERE (J88) P.C. Figure 12 Accessory Connector Panel…
-
Page 76
Accessories Designation Connector for Remarks Accessory Port (Accy) Linear transporter, C-bus interface multi-sipper RS 232 C interface J14, 13 Cell Changer, 13 Cell autochanger Active J10, J11, Temp Temperature sensor J10: 2-pin socket J11: 4-pin socket J30, Peltier Peltier cell changer Active and Peltier cell holder J88, Sphere… -
Page 77: Accessory Connections Overview
Autosampler Integrating sphere Linear Transporter Multi-sipper Figure 13 Accessories for the Lambda 25, 35, 45 Sample Compartment Cover Some of the accessories used with the spectrometer require removal of the sample compartment cover. Do this carefully as follows: 1. Open the cover only about 90 degrees to the sample compartment.
-
Page 78: Sample Compartment Front Cover
Accessories Sample Compartment Front Cover Some of the accessories used with the spectrometer require removal of the sample compartment front cover. Do this carefully as follows: 1. Open the sample compartment cover. 2. Loosen the two screws securing the front cover of the sample compartment. 3.
-
Page 79: Linear Transporter
Lambda 25, 35, 45 User’s Guide Linear Transporter Electrical hazard To prevent potential injury to yourself and damage to the instrument, switch OFF all instruments in the system and disconnect them from the line power supply before you alter, or make any new, electrical WARNING connections.
-
Page 80: Temperature Sensor
Accessories Temperature Sensor Electrical hazard To prevent potential injury to yourself and damage to the instrument, switch OFF all instruments in the system and disconnect them from the line power supply before you alter, or make any new, electrical WARNING connections.
-
Page 81: Multisippers
Lambda 25, 35, 45 User’s Guide Multisippers Electrical hazard To prevent potential injury to yourself and damage to the instrument, switch OFF all instruments in the system and disconnect them from the line power supply before you alter, or make any new, electrical WARNING connections.
-
Page 82: Autosampler
Accessories Autosampler Electrical hazard To prevent potential injury to yourself and damage to the instrument, switch OFF all instruments in the system and disconnect them from the line power supply before you alter, or make any new, electrical WARNING connections. Installation Overview Connector on Spectrometer: Autosampler…
-
Page 83: Operating With Accessories
Lambda 25, 35, 45 User’s Guide Operating with Accessories General Accessories are components, or instruments, that are installed or connected in the sample compartment, or otherwise connected to the spectrometer. For some of these accessories parameters have to be taken into account in the UV WinLab methods.
-
Page 84: Requirements For Operation With Accessories
Accessories Requirements for Operation with Accessories The following preconditions must be fulfilled in order to operate with accessories: • The accessory in use must be activated on the accessory page of the UV WinLab software. • The connector panel for the accessory in question must be installed in the spectrometer.
-
Page 85
Lambda 25, 35, 45 User’s Guide Artisan Technology Group — Quality Instrumentation … Guaranteed | (888) 88-SOURCE | www.artisantg.com… -
Page 86: Maintenance
Maintenance Artisan Technology Group — Quality Instrumentation … Guaranteed | (888) 88-SOURCE | www.artisantg.com…
-
Page 87
Artisan Technology Group — Quality Instrumentation … Guaranteed | (888) 88-SOURCE | www.artisantg.com… -
Page 88: Maintenance
Maintenance Maintenance Obtaining Service All internal servicing of the instrument should be performed by a PerkinElmer service representative or similarly authorized person. Please contact your local PerkinElmer sales or service office to obtain service. Maintenance procedures that you can perform yourself are described in this chapter.
-
Page 89: Cleaning The Sample Compartment
Lambda 25, 35, 45 User’s Guide You should observe the following care routine to maintain your instrument in good condition: • Immediately clean all spilled materials from the affected area and wipe it dry with lintless paper or cloth. If the sample compartment windows have to be wiped, make sure scratches are not introduced.
-
Page 90
Maintenance 2. Using a soft cloth and mild laboratory detergent solution, lightly scrub away all foreign material. 3. Using a clean cloth dampened with water, rinse the cleaned surfaces thoroughly. 4. Dry with lint free cloth or tissue. Sample Compartment Window Windows are provided with the spectrometer. -
Page 91: Use And Care Of Cells
Lambda 25, 35, 45 User’s Guide Use and Care of Cells Cell Handling A good spectrometer cell is an optical device, forming a part of the optical system of the instrument with which it is used. It must be accorded the same careful treatment applied to any optical component.
-
Page 92: Pressure Buildup In Cells
Maintenance Pressure Buildup in Cells If you are using stoppered cells, observe the following rules to prevent the buildup of internal pressure that could cause the stopper to pop-out of the cell, • Only fill the cell so full that the liquid meniscus is just above the radiation beam.
-
Page 93: Replacing A Lamp
Lambda 25, 35, 45 User’s Guide Replacing a Lamp Lamp compartment Figure 16 Lamp compartment White ceramic connector Halogen lamp assembly Deuterium lamp connector Deuterium lamp assembly Lamp energy attenuator Figure 17 Inside the Lamp Compartment (Baffle removed) Artisan Technology Group — Quality Instrumentation … Guaranteed | (888) 88-SOURCE | www.artisantg.com…
-
Page 94: Halogen Lamp Replacement
Maintenance Halogen Lamp Replacement If the lamp burns out, or if the bulb becomes blackened after prolonged use, you should replace the lamp. Replacement lamp assemblies are provided complete with prealigned mounts (Part Number B0114620). Figure 18 Prealigned Halogen Lamp (B0114620) Electrical Hazard Switch off the spectrometer and remove the plug from the electrical supply before starting with the replacement.
-
Page 95
Lambda 25, 35, 45 User’s Guide 1. Switch off the spectrometer and unplug the line power cord. 2. Remove the lamp compartment cover by pressing down the catch and pushing the cover to the left. 3. Remove the lamp baffle by slackening the thumbscrew for the deuterium lamp and lifting the lamp baffle vertically upward. -
Page 96
Maintenance White ceramic Thumbscrew connector Halogen lamp assembly Figure 20 White ceramic connector 5. Remove the lamp assembly from the bracket by slackening the thumbscrew and pulling the lamp mount vertically upward. Save the thumbscrew for use with the new lamp assembly. 6. -
Page 97: Deuterium Lamp Replacement
Lambda 25, 35, 45 User’s Guide Deuterium Lamp Replacement If the lamp burns out, or indicates falling energy after prolonged use, you should replace the lamp. Replacement lamp assemblies are provided complete with prealigned mounts (Part Number B0160917). Operating Hours…
-
Page 98
Maintenance 1. Switch off the spectrometer and unplug the line power cord. 2. Remove the lamp compartment cover by pressing down the catch and pushing the cover to the left. 3. Remove the lamp baffle by slackening the thumbscrews and lifting the lamp baffle vertically upward. -
Page 99
Lambda 25, 35, 45 User’s Guide Deuterium lamp connector Deuterium lamp assembly Figure 23 Deuterium lamp connector 5. Remove the lamp assembly from the bracket by slackening the thumbscrew and pulling the lamp mount vertically upward. Save the thumbscrew for use with the new lamp assembly. -
Page 100: Lamp Energy Attenuator
Maintenance Lamp Energy Attenuator An attenuator is located in the lamp compartment between the deuterium lamp and the beam entrance slit. If required you can decrease or increase the energy by placing the attenuator into, or taking the attenuator out of, the beam. The attenuator is set at the factory, normally in the out position.
-
Page 101
Lambda 25, 35, 45 User’s Guide Thumbscrew Thumbscrew Figure 24 Lamp baffle 3. Loosen the thumbscrew holding the attenuator in place. Deuterium lamp Lamp energy assembly attenuator Figure 25 Deuterium lamp assembly Artisan Technology Group — Quality Instrumentation … Guaranteed | (888) 88-SOURCE | www.artisantg.com… -
Page 102: Lamp Alignment Procedure
Maintenance 4. Slide the attenuator downwards into the beam. 5. Tighten the thumbscrew. Follow the above procedure in reverse to slide the attenuator out of the beam. 6. Replace the lamp baffle using the reverse of the procedure described in step 2. 7.
-
Page 103: Changing Fuses
Lambda 25, 35, 45 User’s Guide Changing Fuses Electrical hazard To prevent potential injury to yourself and damage to the instrument, switch OFF the instrument and disconnect it from the line power supply before you change the fuses. WARNING The fuses are located in a fuse holder at the rear of the instrument:…
-
Page 104
NOTE: If you use the correct fuses but the instrument still does not work correctly, or the fuses blow repeatedly, contact your PerkinElmer office or representative. Artisan Technology Group — Quality Instrumentation … Guaranteed | (888) 88-SOURCE | www.artisantg.com… -
Page 105: Replacement Parts
If you are located within the U.S., call toll free 1-800-762-402, 8 a.m. to 8 p.m. EST. Your order will be shipped promptly, usually within 24 hours. If you are located outside of the U.S., call your local PerkinElmer sales office. Accessories, spares and other parts and information are available on-line at essentials.perkinelmer.com.
-
Page 106: Analytical Notes
Analytical Notes Artisan Technology Group — Quality Instrumentation … Guaranteed | (888) 88-SOURCE | www.artisantg.com…
-
Page 107
Artisan Technology Group — Quality Instrumentation … Guaranteed | (888) 88-SOURCE | www.artisantg.com… -
Page 108: Unusual Samples
Analytical Notes Unusual Samples If a sample is chemically stable and undergoes no physical or chemical change other than to absorb incident radiation, errors in photometric values should not be caused by the sample. Many samples are not stable, and special consideration must be given to them.
-
Page 109: Chemically Reactive Samples
Lambda 25, 35, 45 User’s Guide The absorption characteristics of a sample can be changed during sample preparation, depending on the amount of reagent added for color development and so on. For details, refer to reference books covering these subjects.
-
Page 110: Solvent Properties
Analytical Notes Solvent Properties The solvent should meet the following requirements: • It should dissolve the sample without reacting with it. • The radiation absorption in the scanning region should be low. High absorption by the blank reduces the reference energy, thus increasing noise.
-
Page 111
Lambda 25, 35, 45 User’s Guide Figure 28 Lower Wavelength Limits of Solvent Artisan Technology Group — Quality Instrumentation … Guaranteed | (888) 88-SOURCE | www.artisantg.com… -
Page 112: Index
Index Artisan Technology Group — Quality Instrumentation … Guaranteed | (888) 88-SOURCE | www.artisantg.com…
-
Page 113
Artisan Technology Group — Quality Instrumentation … Guaranteed | (888) 88-SOURCE | www.artisantg.com… -
Page 114: Index
Index Index Accessories, 82 Replacement Parts, 105 Accessory Installation Requirements for Operation with Accessories, Autosampler, 81 General (accessory installation), 73 Linear Transporter, 78 Multi-sippers, 80 Temperature Sensor, 79 Safety information Electromagnetic Compatibility (EMC), 13 Safety Information in the Handbook, 9 Safety Information, 9 Basic Installation CSA Compliance, 9…
-
Page 115
Lambda 25, 35, 45 User’s Guide Artisan Technology Group — Quality Instrumentation … Guaranteed | (888) 88-SOURCE | www.artisantg.com… -
Page 116
Artisan Technology Group is your source for quality new and certified-used/pre-owned equipment SERVICE CENTER REPAIRS WE BUY USED EQUIPMENT • FAST SHIPPING AND DELIVERY Experienced engineers and technicians on staff Sell your excess, underutilized, and idle used equipment at our full-service, in-house repair center We also offer credit for buy-backs and trade-ins •…
Release History
Part Number
Release
09934422
User Assistance
PerkinElmer Ltd
Post Office Lane
Beaconsfield
Buckinghamshire
HP9 1QA
Printed in the United Kingdom.
Notices
The information contained in this document is subject to change without notice.
PerkinElmer makes no warranty of any kind with regard to the material, including, but not
limited to, the implied warranties of merchantability and fitness for a particular purpose.
PerkinElmer shall not be liable for errors contained herein for incidental consequential
damages in connection with furnishing, performance or use of this material.
Copyright Information
This document contains proprietary information that is protected by copyright.
All rights are reserved. No part of this publication may be reproduced in any form
whatsoever or translated into any language without the prior, written permission of
PerkinElmer, Inc.
Copyright © 2000 PerkinElmer, Inc.
Trademarks
Registered names, trademarks, etc. used in this document, even when not specifically marked
as such, are protected by law.
UV WinLab is a trademark of PerkinElmer, Inc.
PerkinElmer is a registered trademark of PerkinElmer, Inc.
Artisan Technology Group — Quality Instrumentation … Guaranteed | (888) 88-SOURCE | www.artisantg.com
Publication Date
A
August 2000
B
September 2000
-
Hamilton HYGIENIC SOCKET
HYGIENIC SOCKETTM Operating Instructions Bedienungsanleitung HAMILTON Bonaduz AG Via Crusch 8 CH-7402 Bonaduz Switzerland Tel. +41 81 660 60 60 Fax +41 81 660 60 70 [email protected] http://www.hamiltoncompany.com HAMILTON Company 4970 Energy Way Reno, Nevada 89502 USA Toll Free 800 648 5950 Tel. +1 (775) 858 3 …
HYGIENIC SOCKET Laboratory Equipment, 29
-
CANGAROO X55P02AS-D
BG: ИНСТРУКЦИЯ ЗА УПОТРЕБА ЗА ЕЛЕКТРИЧЕСКИ ПАРЕН СТЕРИЛИЗАТОР С ФУНКЦИИ ЗА ГОТВЕНЕ НА ПАРА И ЗАТОПЛЯНЕ НА ШИШЕТААРТИКУЛЕН НОМЕР: X55P02AS – DEN: ELECTRIC STEAM STERILIZER WITH THE FUNCTIONS OF FOOD STEAMER AND BO …
X55P02AS-D Laboratory Equipment, 39
-
Thermo Scientific IonPac CS16
Errata Product Manual for Dionex IonPac™ CS16 and CG16 Columns 031747-05 For new orders of the following parts discussed in this manual, please use the updated part numbers listed below. Part Old Part Number in this manual Updated Part Number to use for new orders PROD,COL,IP,CS16,5X250MM 057573 079805 PROD,CO …
IonPac CS16 Laboratory Equipment, 67
-
LW Scientific ComboXL Centrifuge
ComboXL CentrifugeInstruction ManualHorizontal separation offers many advantages over traditional fixed-angle separations, including tighter straight-line gel separa-tions to reduce re-spins and re-mixes. The ComboXL centrifuge spins test tubes from 3ml to 15ml, and even 50ml, at speeds up to 4,000 rpm, with microproce …
ComboXL Centrifuge Laboratory Equipment, 4
-
MELAG MELAtronic 23EN
User Manual Steam sterilizer MELAtronic 23EN from software version 5.15 Dear customer, We thank you for your confidence demonstrated by the purchase of this MELAG product. As an owner-run and operated family concern founded in 1951, we have a long history of successful specialization in hygiene products for …
MELAtronic 23EN Laboratory Equipment, 55
-
Guide Sensmart IPT Series
Thanks for buying this product. Please read this manual before use and then carefully collect it for future reference. The pictures are for reference only and the products are subject to the available products. � …
IPT Series Laboratory Equipment, 40
-
Waters 717plus
Artisan Technology Group is your source for quality new and certied-used/pre-owned equipment• FAST SHIPPING AND DELIVERY• TENS OF THOUSANDS OF IN-STOCK ITEMS• EQUIPMENT DEMOS• HUNDREDS OF MANUFACTURERS SUPPORTED• LEASING/MONTHLY RENTALS• ITAR CERTIFIED SECURE ASSET SOLUTIONSSERVICE CENTER …
717plus Laboratory Equipment, 190