-
Contents
-
Table of Contents
-
Troubleshooting
-
Bookmarks
Quick Links
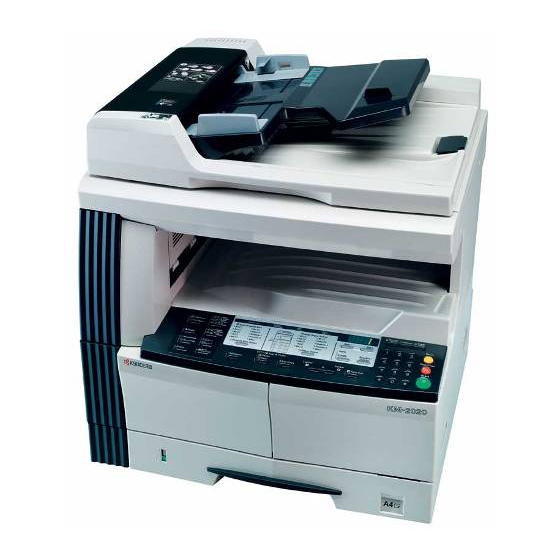
Please read the Operation Guide before using the copier.
Keep it close to the copier for easy reference.
1620
KM-
2020
KM-
Related Manuals for Kyocera KM-1620
Summary of Contents for Kyocera KM-1620
-
Page 1
1620 2020 Please read the Operation Guide before using the copier. Keep it close to the copier for easy reference. -
Page 2
Low Power Mode to engage is any 1 minute, 5 minutes, 15 minutes, 30 minutes, 45 minutes, 60 minutes, 90 minutes or 120 minutes. This Operation Guide mentioned that the KM-1620 is a 16-sheet copier and the KM-2020 is a 20-sheet copier. -
Page 3
About this User’s Manual Symbols This User’s Manual has been divided into a number of chapters in This manual uses symbols to indicate essential and supplementary order to allow even first-time users of the copier to use the product items that must be observed. efficiently and effectively. -
Page 4: Table Of Contents
CONTENTS Memorizing frequently used settings: Program Function ..5-18 Registering a program …………5-18 Using programmed setting to make copies ……5-18 Energy Star Program ……………..v Please read this Operation Guide before using the copier. Keep it close to the copier for easy reference……..vi Section 6 COPIER MANAGEMENT …….
-
Page 5
Making Full use of the copier’s advanced functions The copier will automatically select Making clear copies of photograph A variety of magnification/reduction the paper that is the same size as the originals methods original <Image Quality Selection> • Enlargement/Reduction for specified <Auto Paper Selection Mode>… -
Page 6
Using department ID-Codes to A full range of optional equipment is manage the number of copies made by available • Paper Feeder each department • Document Processor (Refer to P.7-4) <Copy Management Mode> (Refer to P.7-1) (Refer to P.6-1) • Duplex Unit •… -
Page 7: Energy Star Program
“Low Power Mode” When 15 minutes have elapsed since the last usage, the machine is automatically switched into “Low Power Mode”. Note that the time before switching to “Low Power Mode” can be lengthened. Please refer to P.4-7 «Low Power Mode» and P.6-31 «Low Power Mode Our company is a participant in the International Energy Star Transition Time»…
-
Page 8: Please Read This Operation Guide Before Using The Copier
Please read this Operation Guide before using the copier. Keep it close to the copier for easy reference. The sections of this guide and parts of the copier marked with symbols are safety warnings meant to protect the user, other individuals and surrounding objects, and ensure correct and safe usage of the copier. The symbols and their meanings are indicated below.
-
Page 9: Important! Please Read First
Section 1 IMPORTANT! PLEASE READ FIRST. Caution Labels Labels related to safety have been attached to the product in the locations shown below. Please observe the warnings to prevent accidents such as burns and electrical shock while clearing paper misfeeds and adding toner. Label2 Label3 High temperature inside this section.
-
Page 10: Installation Precautions
INSTALLATION PRECAUTIONS Environment During copying, some ozone is released, but the amount will not cause any ill effect to one’s health. If, CAUTION however, the copier is used over a long period of time in a poorly ventilated room or when making an extremely large number of copies, the smell may become unpleasant.
-
Page 11: Precautions For Use
PRECAUTIONS FOR USE CAUTION Cautions when using the copier WARNING DO NOT pull the power cord when removing it from the outlet. Pulling on the power cord may break the wires and start a fire or cause DO NOT place metallic objects or containers an electrical shock.
-
Page 12
Cautions when handling Do not look directly at the light from the scanning lamp. Doing so may cause pain in the eyes or consumables eyestrain. CAUTION DO NOT attempt to incinerate the toner containers or the waste toner box. Dangerous sparks may cause burns……… -
Page 13: Laser Safety
Laser Safety Laser radiation can be hazardous to the human body. For this reason, laser radiation emitted inside this machine is hermetically sealed within the protective housing and external cover. In the normal operation of the product by user, no radiation can leak from the machine. This machine is classified as a Class 1 laser product under IEC 60825.
-
Page 14
CAUTION! The power plug is the main disconnect device! Other switches on the equipment are only functional switches and are not suitable for disconnecting the equipment from the power source. VORSICHT! Der Netzstecker ist die Hauptisoliervorrichtung! Die anderen Schalter auf dem Gerat sind nur Funktionsschalter und konnen nicht verwendet werden, um den Stromflus im Gerat zu unterbrechen. -
Page 15
DECLARATION OF CONFORMITY 89/336/EEC, 73/23/EEC and 93/68/EEC We declare under our sole responsibility that the product to which this declaration relates is in conformity with the following specifications. Limits and methods of measurement for immunity characteristics of information technology equipment EN55024 Limits and methods of measurement for radio interference characteristics of information technology equipment… -
Page 16
Section 1 IMPORTANT! PLEASE READ FIRST. -
Page 17: Names Of Parts
Section 2 NAMES OF PARTS Main Body (10) (1) Original Cover Open/Close this to set the copy original on the glass platen. (2) Copy Store Section Finished copies will be accumulated here. Up to 250 (80 g/m sheets of standard paper can be accumulated here. (3) Operation Panel Contains the keys and indicators for operating the copier.
-
Page 18: Section 2 Names Of Parts
Section 2 NAMES OF PARTS (19) (11) (20) (12) (15) (16) (14) (17) (13) (18) (20) (11) Platen Set the original here. Place the copy original face down and align it so that it is flush against the left rear corner of the platen.
-
Page 19: Operation Panel
Section 2 NAMES OF PARTS Operation Panel Inch specifications (27) (26) (25) (24) (17) (16) (35) (31)(30) (23) (22) (21) (20) (19) (18) (15)(13) (14) (34) (33) (32) (29) (28) (12) (11) (10) (1) [Start] Key (Indicator) (12) [Program] Key Press this to begin copying.
-
Page 20: Operation Panel
Section 2 NAMES OF PARTS Metric specifications (27) (26) (25) (24) (17) (16) (35) (31)(30) (23) (22) (21) (20) (19) (18) (15)(13) (14) (34) (33) (32) (29) (28) (12) (11) (10) Regarding the Default Setting Mode (the mode after (24) Toner Disposal Indicator This will be lit red when the Waste Toner Box is full.
-
Page 21
Section 2 NAMES OF PARTS Regarding the Automatic Drawer Switching Function When multiple drawers containing the same paper size have been set, in the event the drawer supplying the paper becomes empty during copying, the paper feeding will be automatically be switched to another drawer. -
Page 22
Section 2 NAMES OF PARTS… -
Page 23: Preparations
Section 3 PREPARATIONS Loading Paper Paper can be loaded into the copier via the drawer or multi-bypass tray. Note when adding paper Fan through the stack of paper a few times after taking it out of its package before loading it into the drawer or multi-bypass tray. IMPORTANT! Special Types of Paper The size of the paper to be accommodated by the drawer…
-
Page 24
Section 3 PREPARATIONS Pull the drawer all the way out towards you. IMPORTANT! When setting 11″ × 17″ paper, move the length size adjustment tab to the right side end and push it down as shown in the illustration below. Note Do not pull out several drawers at one time. -
Page 25: Drawer Size Detection
Section 3 PREPARATIONS Press either the Zoom (+) or Zoom (–) key to display the Note “F17 (Drawer 1 Paper Size)”. When loading paper into the drawer, set it so that the Inch specifications Metric specifications side that is to be copied faces upwards. Set the accompanying paper sheet so that the paper size set in the drawer can be identified from the front of the drawer.
-
Page 26: Setting Paper On The Multi-Bypass Tray
Section 3 PREPARATIONS The display will blink and copying can begin. Open the Multi-bypass tray. Inch specifications Metric specifications Note When setting paper sizes greater than 8 » × 11″/A4R, Setting paper on the multi-bypass tray pull out the Multi-bypass tray Support Tray to match the paper size.
-
Page 27: Multi-Bypass Tray Size Input
Section 3 PREPARATIONS Use the Insert Guides to push the paper in until it reaches Press either the Zoom (+) key or the Zoom (–) key and select the point where it stops. the paper size. The paper sizes displayed are as given in the table below.
-
Page 28: Inputting Custom Sizes
Section 3 PREPARATIONS Inputting Custom Sizes Press either the Zoom (+) key or the Zoom (–) key and select the size. The paper sizes displayed are as shown in the Sizes that are not displayed on the Operation Panel are registered table below.
-
Page 29
Section 3 PREPARATIONS Press either the Zoom (+) or Zoom (–) key and input the Press either the Zoom (+) or Zoom (–) key to display “F00”. Length Size (Y Direction). 3.88 — 11.63(«)/98 — 297 (mm): The Inch specifications Metric specifications range in which setting is possible. -
Page 30
Section 3 PREPARATIONS… -
Page 31: Basic Operation
Section 4 BASIC OPERATION Basic Copying Procedure Warm-up Selecting Functions Turn ON (|) the Power Switch. The [Start] key will light up after Select any of the various functions available. warm up has been completed. • Making enlarged and reduced copies (Refer to P.4-4.) •…
-
Page 32
Section 4 BASIC OPERATION Image Quality Selection Pressing the [Auto Exposure] key will detect the copy exposure and set it to the optimal setting. Notes • The exposure can be adjusted when the overall exposure is too light or too dark using Auto Exposure. (Refer to P.6-14 «Auto Exposure Adjustment».) •… -
Page 33
Section 4 BASIC OPERATION Completion of the Copying Procedure The finished copy will be ejected into the copy store section. IMPORTANT! Up to 250 regular paper copies (80 g/m ) can be stored. Note, however, that the number of copies that can be stored may differ with the condition of the paper used. -
Page 34: Making Enlarged And Reduced Copies
Section 4 BASIC OPERATION Making enlarged and reduced copies Automatic Magnification Selection Press the [Paper Select] key and select the paper. The magnification for the copy will be displayed in Mode accordance with the paper size. Inch specifications Metric specifications Reduction/Enlargement is done to match the selected Paper Size (Drawer).
-
Page 35
Section 4 BASIC OPERATION Change the zoom percentage displayed using the Zoom (+) or Zoom (–) key. The percentage can also be input using the Keypad. Inch specifications Metric specifications Press the [Enter] key. After the zoom percentage has been confirmed the display changes back to the No. -
Page 36: Interrupt Copying
Section 4 BASIC OPERATION Interrupt Copying Interrupt Copying is useful when you want to make a copy of a After the Interrupt copy has been produced, pressing the different original at different settings during copying operations. [Interrupt] key will cause the display to light up. Replace it After the Interrupt Copy has been produced, the copying operation with the original that had been put aside and press the resumes at the same settings in effect prior to the interruption.
-
Page 37: Low Power Mode
Section 4 BASIC OPERATION Low Power Mode Pressing the [Energy Saver] key will put the copier into a resting state even when the Power Switch is ON. The No. of Copies display on the Operation Panel will change to “- — -”, the Conserve Power indicator will light up and all other indicators will be turned off.
-
Page 38: Auto Off Mode
Section 4 BASIC OPERATION Auto Off Mode Auto Off Mode The Auto Off Function is a function that automatically turns the copier off after a set period of time (1 to 240 minutes) has passed. The Auto Off Function is a power-saving function that “-”…
-
Page 39: Copy Functions
Section 5 COPY FUNCTIONS Making 2-Sided copies from various types of originals Making 2-Sided copies from an Copies of both sides can be made from open-faced originals as well as from 2-in-1 originals. open-faced (book, etc.) original Note The double-page original of books, magazines, etc. can be copied The Duplex Unit (option) is necessary.
-
Page 40: Making 2-Sided Copies From One-Sided Originals
Section 5 COPY FUNCTIONS Making 2-Sided copies from one-sided Set the original. originals 2-Sided Copy one side of an original to the front and back sides. When the number of pages is an odd number, the back side of the last page is copied as a blank page.
-
Page 41: Sided Copy Reverse Side Rotation Setting
Section 5 COPY FUNCTIONS 2-Sided Copy Reverse Side Rotation Setting Press the [Start] key. The copier will begin scanning the original. Follow the procedure below to change the rotation setting for the reverse side when making 2-Sided copies. Press the 2-Sided Copy key for 3 seconds. The Default Setting Mode for the reverse side setting of 2-Sided Copies will be displayed.
-
Page 42: Copying Two-Page Originals Onto Separate Sheets: Page Separation/Split Copy Modes
Section 5 COPY FUNCTIONS Copying two-page originals onto separate sheets: Page Separation/Split Copy Modes Page separation/Split copy from book Set the original. originals Copy books, magazines, etc. with two facing pages of an open-faced original onto separate sheets of paper. Original Copy Note…
-
Page 43
Section 5 COPY FUNCTIONS Replace the original with the next one and press the [Start] key. The copier will scan the original. If there are no more originals to be scanned, press the [Enter] key. The copier will begin copying. -
Page 44: Making A Margin Space On The Copies
Section 5 COPY FUNCTIONS Making a margin space on the copies Standard Margin Note The Binding Margin can also be set in the Default Settings Mode. (Refer to P.6-25 «Margin Shift».) [Inch specifications] The value set in the Default Setting Mode will inherit the The position of the image of the original is shifted for copying and a value that is set at the time when the copy is made.
-
Page 45
Section 5 COPY FUNCTIONS Press either the Zoom (+) key or the Zoom (–) key and select the binding margin width. [Inch specifications] 0.13/0.25/0.38/0.50/0.63/0.75(«): the range in which the margin can be set. [Metric specifications] A margin from 1 — 18 (mm) can be set. Inch specifications Metric specifications Press the [Enter] key. -
Page 46: Making Copies With Clean Edges
Section 5 COPY FUNCTIONS Making copies with clean edges Erasing blemishes from edges of copies Set the original. (Sheet erase mode) [Inch specifications] Use this to remove the dark shading that appears around sheet originals during copying. Select the border width to be erased from among 0.13/0.25/0.38/0.50/0.63/0.75 («).
-
Page 47
Section 5 COPY FUNCTIONS Press either the Zoom (+) key or the Zoom (–) key and select the border width. [Inch specifications] Select from 0.13 («), 0.25 («), 0.38 («), 0.50 («), 0.63 («) or 0.75 («). [Metric specifications] Select from 1 — 18 (mm). Inch specifications Metric specifications Press the [Enter] key. -
Page 48: Fitting The Image Of Either Two Or Four Originals Onto A Single Copy Page
Section 5 COPY FUNCTIONS Fitting the image of either two or four originals onto a single copy page The sizes of 2-sheet or 4-sheet originals can be reduced and copied The directions for setting the original and the finished copy are as together onto a single sheet.
-
Page 49
Section 5 COPY FUNCTIONS 4 in 1 <When the original is set in the Document Processor> Original Setting Direction Finished Product 4 sheets of originals can be copied onto a single sheet. If used together with 2-Sided Copy, 8 sheets of originals can be copied onto both sides of a single sheet. -
Page 50
Section 5 COPY FUNCTIONS The directions for setting the original and the finished copy are as Press the [Combine/Merge Copy] key to light up either the follows. “2 in 1” or “4 in 1” display. <When the original is set on the platen> Original Setting Direction Finished Product Input the number of sets of copies using the keypad. -
Page 51: Setting The Merge Copy Border Lines
Section 5 COPY FUNCTIONS If there are no more originals, press either the Press either the Zoom (+) key or the Zoom (–) key and select [Combine/Merge Copy] key or the [Enter] key. the layout order from “1-” to “4-”. The copier will begin copying.
-
Page 52
Section 5 COPY FUNCTIONS Press the Zoom (+) key to display “F29”. Inch specifications Metric specifications Press the [Enter] key. Inch specifications Metric specifications Press either the Zoom (+) key or the Zoom (–) key and select the type of border line from among “1- (No Border Lines)” to “2- (Solid Line)”… -
Page 53: Automatic Sorting Of Copy Sets
Section 5 COPY FUNCTIONS Automatic Sorting of copy sets It is possible to Sort the number of copy sets needed from multiple Press the [Sort] key. sheets of originals. Sort (no sorting) Copy Original Input the number. of sets of copies using the Keypad. Press the [Start] key.
-
Page 54
Section 5 COPY FUNCTIONS Replace the original with the next one and press the [Start] key. The copier will read in the original. If there are no more originals, press either the [Sort] key or the [Enter] key. The copier will begin copying. 5-16… -
Page 55: Saving On Toner Use
Section 5 COPY FUNCTIONS Saving on toner use Setting Eco-copy will result in a reduced amount of toner being consumed. Use this to make test copies or copies where high-quality printing is not required. Refer to P.6-13 «Eco-copy» for instructions on how to select or deselect Eco-copy in the Default Setting Mode.
-
Page 56: Memorizing Frequently Used Settings: Program Function
Section 5 COPY FUNCTIONS Memorizing frequently used settings: Program Function Using programmed setting to make Copy settings that are frequently used can be registered and then recalled up by pressing the [Program] key. Even types of copies can copies be stored. Registering a program Press the [Program] key.
-
Page 57: Copier Management
Section 6 COPIER MANAGEMENT Copy Management Mode Department Management Modes The Department Management Mode allows you to manage the number of copies for each department through the setting of the Department Code separately for each department. This copier has the following features available through the Department Management Code. •…
-
Page 58: Department Code Registration
Section 6 COPIER MANAGEMENT Department Code Registration Press either the Zoom (+) key or the Zoom (–) key and select each of the mode displays. Inch specifications Metric specifications A Department Code of up to 8 digits can be entered. Display the Department Management Code.
-
Page 59: Deleting Department Codes
Section 6 COPIER MANAGEMENT Deleting Department Codes Input the Department Code to be registered (up to a maximum of 8 digits) using the Keypad. Number from 0 to 99999999 can be input. Deleting a registered Department Code. Display the Department Management Code. (Refer to P.6-1 «Department Management Code Operations Procedures».) Inch specifications…
-
Page 60: Clearing The Department Management Count
Section 6 COPIER MANAGEMENT Clearing the Department Management Input the Department Code to be deleted using the Keypad and then press the [Enter] key. Count The Total No. of Copies Count for all sections can be cleared. Display the Department Management Code. (Refer to P.6-1 «Department Management Code Operations Procedures».) Inch specifications…
-
Page 61: Outputting The Department Management List
Section 6 COPIER MANAGEMENT Press the [Enter] key. Sample: Department Management List The counter will be cleared and the display will return to that of Step 2. Outputting the Department Management List The Total No. of Copies by section can be output. Display the Department Management Code.
-
Page 62: Making Copies When The Copier Is In The Department Management Mode
Section 6 COPIER MANAGEMENT Making copies when the copier is in the Press either the Zoom (+) or Zoom (–) key to display “d01”. Inch specifications Metric specifications Department Management Mode When Department Management is being carried out “= = =” will be displayed in the No.
-
Page 63: Default Setting Mode
Section 6 COPIER MANAGEMENT Default Setting Mode The copier will enter Default Setting Mode after warm up has been completed or when the [Stop/Reset] key has been pressed. The settings automatically set for the copier in Default Setting Mode are called the Default Settings. These settings can be freely changed to match the usage of the copier.
-
Page 64
Section 6 COPIER MANAGEMENT Display Reference Settings Items Description Available settings Items Page Drawer Selection Selects whether the drawer with the same size of 1-: Automatic Paper Selection* 6-19 paper as the manuscript size will be automatically 2-: Selected Drawer selected or whether a selected drawer level is to be used. -
Page 65
Section 6 COPIER MANAGEMENT Display Reference Settings Items Description Available settings Items Page Custom 1 Size Sets the size to be set to the Custom size (1 — 2). [Inch specifications] 6-23 * This makes it possible to set the size that do not A3r: A3 Horizontal Custom 2 Size appear on the operation panel. -
Page 66
Section 6 COPIER MANAGEMENT Display Reference Settings Items Description Available settings Items Page Merge Copy Selects the type of borderline to be used in the Layout 1-: No Borderline* 6-27 Borderline mode. 2-: Solid Line 3-: Dotted Line Rotate Sort Setting Sets the copier so that each copy set is rotated and on: Rotational Sorting Enabled 6-28… -
Page 67: Default Settings Mode Operations Procedures
Section 6 COPIER MANAGEMENT Default Settings Mode Operations Press the [Enter] key. The mode display will return to the No. of Copies display. Procedures Inch specifications Metric specifications Follow the procedure listed below to operate in the [Default Settings Mode]. Depress the [Exposure Adjustment] keys on both sides for 3 seconds.
-
Page 68: Original Image Quality
Section 6 COPIER MANAGEMENT Press the [Enter] key. The report will be output. Press either the Zoom (+) or Zoom (–) key to display “F02”. Inch specifications Metric specifications Inch specifications Metric specifications Sample: User Status Report Press the [Enter] key. Inch specifications Metric specifications Press either the Zoom (+) key or the Zoom (–) key and select…
-
Page 69: Exposure Mode
Section 6 COPIER MANAGEMENT Exposure Mode Press the [Enter] key. The display will return to that of Step 2. Sets the copy exposure at the time the copier is turned on to Inch specifications Metric specifications Manual or Automatic. Display the Default Settings Mode. (Refer to P.6-11 «Default Settings Mode Operations Procedures».) Inch specifications Metric specifications…
-
Page 70: Exposure Steps
Section 6 COPIER MANAGEMENT When Eco-copy is to be used as the initial value press the Press the [Enter] key. Zoom (–) key and select “on” (Enable). Inch specifications Metric specifications Inch specifications Metric specifications Press either the Zoom (+) key or the Zoom (–) key and select Press the [Enter] key.
-
Page 71
Section 6 COPIER MANAGEMENT Text & Photo Mode Exposure Adjustment Press either the Zoom (+) or Zoom (–) key to display “F06”. Inch specifications Metric specifications Adjusts the median exposure value of the copy for the Text + Photo original. Display the Default Settings Mode. -
Page 72
Section 6 COPIER MANAGEMENT Press the [Enter] key. Press either the Zoom (+) key or the Zoom (–) key and select The display will return to that of Step 2. an exposure from 1 to 7. Inch specifications Metric specifications Inch specifications Metric specifications Press the [Enter] key. -
Page 73
Section 6 COPIER MANAGEMENT Press the [Enter] key. Display the Default Settings Mode. (Refer to P.6-11 «Default Settings Mode Operations Procedures».) Inch specifications Metric specifications Inch specifications Metric specifications Press either the Zoom (+) key or the Zoom (–) key and select an exposure from 1 to 7. -
Page 74
Section 6 COPIER MANAGEMENT Press the [Enter] key. Press either the Zoom (+) key or the Zoom (–) key and select The display will return to that of Step 2. either “1- (Error Diffusion)”, or “2- (Dithering)”. Inch specifications Metric specifications Inch specifications Metric specifications Press the [Enter] key. -
Page 75
Section 6 COPIER MANAGEMENT Press the [Enter] key. Press either the Zoom (+) or Zoom (–) key to display “F13”. Inch specifications Metric specifications Inch specifications Metric specifications Press either the Zoom (+) key or the Zoom (–) key and select Press the [Enter] key. -
Page 76: Auto Drawer Switching
Section 6 COPIER MANAGEMENT Selected Drawer Press the [Enter] key. The display will return to that of Step 2. When the optional Paper Feeder is installed, priority will be Inch specifications Metric specifications assigned to the drawer that is selected automatically. Manual paper feeding cannot be set using the Selected Drawer function.
-
Page 77
Section 6 COPIER MANAGEMENT Press either the Zoom (+) or Zoom (–) key and select “on” Press the [Enter] key. when the Auto Drawer Switching function is to be used and Inch specifications Metric specifications “oFF” when it will not be used. Inch specifications Metric specifications Press either the Zoom (+) or Zoom (–) key and select “on”… -
Page 78
Section 6 COPIER MANAGEMENT Multi-bypass Tray Paper Size Press either the Zoom (+) or Zoom (–) key to display “F17”. Inch specifications Metric specifications Sets the Manual Paper Feed Size. Display the Default Settings Mode. (Refer to P.6-11 «Default Settings Mode Operations Procedures».) Inch specifications Metric specifications Press the [Enter] key. -
Page 79
Section 6 COPIER MANAGEMENT Press the [Enter] key. Press either the Zoom (+) key or the Zoom (–) key and select The display will return to that of Step 2. the size. InP (Irregular Size) When selecting Irregular Sizes, carry Inch specifications Metric specifications out the following procedure. -
Page 80: Copy Limit
Section 6 COPIER MANAGEMENT Press either the Zoom (+) or Zoom (–) key and input the Press the [Enter] key. Width Size (X Direction) in inch/mm units. Inch specifications Metric specifications Inch specifications Metric specifications Press either the Zoom (+) key or the Zoom (–) key and set Press the [Enter] key.
-
Page 81: Margin Shift
Section 6 COPIER MANAGEMENT Margin Shift Press either the Zoom (+) or Zoom (–) key to display “F25”. Inch specifications Metric specifications Set the Margin Width. Display the Default Settings Mode. (Refer to P.6-11 «Default Settings Mode Operations Procedures».) Inch specifications Metric specifications Press the [Enter] key.
-
Page 82: Border Width
Section 6 COPIER MANAGEMENT Press the [Enter] key. Press either the Zoom (+) key or the Zoom (–) key and select The display will return to that of Step 2. the initial value for the Border Width from among “0.13”, “0.25”, “0.38”, “0.50”, “0.63”, “0.75”(«)/1 — 18 (mm).
-
Page 83
Section 6 COPIER MANAGEMENT Press the [Enter] key. Press either the Zoom (+) or Zoom (–) key to display “F29”. Inch specifications Metric specifications Inch specifications Metric specifications Press either the Zoom (+) key or the Zoom (–) key and select Press the [Enter] key. -
Page 84
Section 6 COPIER MANAGEMENT Rotate Sort Setting Press the [Enter] key. The display will return to that of Step 2. Set whether or not to change the direction for each copy set and Inch specifications Metric specifications sort it when sorting copies. Display the Default Settings Mode. -
Page 85: Auto Clear Setting
Section 6 COPIER MANAGEMENT Press either the Zoom (+) key or the Zoom (–) key and select Press the [Enter] key. the amount of time for transition into Silent Mode. Inch specifications Metric specifications Inch specifications Metric specifications Press either the Zoom (+) or Zoom (–) key and select either Press the [Enter] key.
-
Page 86: Auto Clear Time
Section 6 COPIER MANAGEMENT Auto Clear Time Press either the Zoom (+) or Zoom (–) key to display “F33”. Inch specifications Metric specifications Set the time interval to automatically return the copier to “ready to copy” state when copying is finished. Display the Default Settings Mode.
-
Page 87
Section 6 COPIER MANAGEMENT Press the [Enter] key. Press either the Zoom (+) key or the Zoom (–) key and select The display will return to that of Step 2. an time interval from 1 minute to 240 minutes. Inch specifications Metric specifications Inch specifications Metric specifications… -
Page 88
Section 6 COPIER MANAGEMENT Alarm Press either the Zoom (+) or Zoom (–) key to display “F36”. Inch specifications Metric specifications The Alarm can be set to sound when a key on the Operation Panel is pressed or in cases when errors occur, etc. Display the Default Settings Mode. -
Page 89
Section 6 COPIER MANAGEMENT Press the [Enter] key. Press the [Enter] key. The report will be output and the The display will return to that of Step 2. display will return to that of Step 2. Inch specifications Metric specifications Inch specifications Metric specifications Sample: Toner Coverage Report… -
Page 90: Checking The Total Counter And Printing Out The Counter Report
Section 6 COPIER MANAGEMENT Checking the Total Counter and Printing Out the Counter Report The Total Count can be viewed on the Operation Panel. A Counter Sample: Counter Report Report can also be output. Depress the [Stop/Clear] key for 3 seconds. The Copy Count will be displayed on the No.
-
Page 91: Optional Equipment
Section 7 OPTIONAL EQUIPMENT Document Processor Section Names The Document Processor automatically feeds one-sided originals one by one for scanning. If also reverses two-sided originals automatically for duplex copying and page separation copying. Originals that can be used with the Document Processor •…
-
Page 92: Setting Originals In The Document Processor
Section 7 OPTIONAL EQUIPMENT Setting Originals in the Document Processor Place the originals to be copied with the side to be copied facing up (in the case of 2-Sided copies, place them with the Front side facing up) and place them in order on the Adjust the Original Insert Guides to match the size of the Originals Table.
-
Page 93: Section 7 Optional Equipment
Section 7 OPTIONAL EQUIPMENT Setting the Original on the Platen Mixed Original Sizes (Auto Selection) Mode When copying items such as books or magazines that cannot be set When the original size has not been specified using the [Paper in the Document Processor, open the Document Processor and Select] key while using the Document Processor, the original sizes place the original on the platen.
-
Page 94: Paper Feeder
Section 7 OPTIONAL EQUIPMENT Paper Feeder Setting the Key Counter Set the Key Counter securely in the Key Counter Slot. In addition to the drawer provided with the copier, a Paper Feeder (a 3-level device with a drawer that can hold 300 sheets) can also be used.
-
Page 95: Troubleshooting
Section 8 TROUBLESHOOTING If one of the following indications is Displayed Carry out the corresponding corrective procedure when any of the error messages shown in the table below are displayed. Reference Display Corrective Procedure Page “E12” appears on the copy quantity display. No 11″…
-
Page 96: Key Counter
Section 8 TROUBLESHOOTING Reference Display Corrective Procedure Page “E91” appears on the copy quantity display. Copies cannot be produced because memory is full during the interrupt copy operation. Interrupt Copying cannot be carried out so press the [Stop/Clear] key and then press the [Interrupt] key again after the data read in has been deleted to exit the Interrupt Copying.
-
Page 97: If Paper Jams
Section 8 TROUBLESHOOTING If paper jams Stop copying operations when a paper misfeed occurs. When a CAUTION paper misfeed occurs, the indicator for the location of the paper misfeed will light up on the Operation Panel and either “J” plus a 2-digit number or “PF”…
-
Page 98
Section 8 TROUBLESHOOTING If a sheet of paper is jammed inside, remove it carefully so Remove all of the Multi-bypass Tray paper. as not to tear it. Check to see that the paper misfeed indicator lamp has gone out and then set the Multi-bypass Tray paper again. Note If the paper is torn, be sure to remove all remnants or fragments from the drawer. -
Page 99
Section 8 TROUBLESHOOTING Grasp the Left Cover handles to lift the cover and open it. Close the front cover. CAUTION Paper misfeed in the Document Processor (J70, J71, J72, J73, J74, J75) (option) When the paper misfeed location is lit as shown in the illustration below, the paper misfeed has occurred in the optional Document The fixation section inside the main unit of the Processor. -
Page 100
Section 8 TROUBLESHOOTING Paper misfeed in the optional drawer (J12, J13, If an original is jammed inside, remove it carefully so as not to tear it. J14, J15, J16, J22, J23, J24) When the paper misfeed location is lit as shown in the illustration below, the paper misfeed has occurred in the optional drawer. -
Page 101
Section 8 TROUBLESHOOTING Pull the drawer out. If a sheet of paper is jammed inside, remove it carefully so as not to tear it. Note If the paper is torn, be sure to remove all remnants or fragments from the drawer. Gently push the drawer back into its original position. -
Page 102: If Other Trouble Occurs
Section 8 TROUBLESHOOTING If other trouble occurs Check the following items when trouble occurs. If the problem is not resolved after checking these items, contact your service representative. Reference Symptom Items to Check Corrective Procedure Page Nothing displays on the Check to make sure the copier is plugged Plug the copier power cord into the outlet.
-
Page 103
Section 8 TROUBLESHOOTING Reference Symptom Items to Check Corrective Procedure Page The copy image is skewed. Check to see that the original has been set Make sure that the original is correctly set properly. against the Original Size Indicator Plate when placing the original on the platen. -
Page 104
Section 8 TROUBLESHOOTING 8-10… -
Page 105: Maintenance And Operation Information
Section 9 MAINTENANCE AND OPERATION INFORMATION Cleaning the Copier Cleaning the Platen CAUTION Open the Original Cover and use a cloth dampened with alcohol or a dilute neutral detergent to clean the Platen. IMPORTANT! Remove the power plug from the outlet during Do not use thinner, organic solvents etc.
-
Page 106
Section 9 MAINTENANCE AND OPERATION INFORMATION Cleaning the Separation Pawl Close the front cover. Open the front cover. Cleaning the Transfer Rollers Remove the cleaning brush. Open the front cover. Grasp the Left Cover handles to lift the cover and open it. Remove the cleaning brush. -
Page 107
Section 9 MAINTENANCE AND OPERATION INFORMATION Turn the Left Transport Roller gear as shown in the illustration and move the brush from left to right while turning the gear to remove any dust or dirt on the rollers. Close the front cover. -
Page 108: Replacing The Toner Container And Waste Toner Box
Section 9 MAINTENANCE AND OPERATION INFORMATION Replacing the Toner Container and Waste Toner Box When the Add Toner Indicator on the Operation Panel lights up Push the Waste Toner Box holder to the left and remove the and the copier stops, replace the Toner. Replace the Waste Toner Waste Toner Box while pushing the holder.
-
Page 109
Section 9 MAINTENANCE AND OPERATION INFORMATION Grasp the Cleaning Rod and pull gently pull it out as far as it will go and then push it in again. CAUTION Repeat this operation several times. Do not attempt to incinerate the toner cartridge or waste toner box. -
Page 110
Section 9 MAINTENANCE AND OPERATION INFORMATION Remove the Grid Cleaner and close the cap. Install the new Waste Toner Box. Close the front cover. IMPORTANT! After using the Grid Cleaner to clean the electrical charge section, it can be used again after more than 5 minutes have elapsed. -
Page 111: Specifications
Section 9 MAINTENANCE AND OPERATION INFORMATION Specifications Main Body Type …………….Desktop Type Original Table …………..Fixed Original Table Copy System…………..Indirect electrostatic system Original Types Accommodated ……..Sheets, books and 3-dimensional objects (Maximum original size: 11″ × 17″/A3) Copy Sizes …………..11″ × 17″, 8 «…
-
Page 112: Document Processor (Option)
Section 9 MAINTENANCE AND OPERATION INFORMATION Document Processor (option) Original Feed System………….Automatic feed system Acceptable Types of Originals ……..Sheet originals Original Sizes …………..Maximum: 11″ × 17″/A3 Minimum: 5 » × 8 «/A5R Original Thickness (paper weight)……..Single-side Originals: 45 to 160 g/m Double-sided Originals: 50 to 120 g/m No.
-
Page 113: Environmental Specifications
Section 9 MAINTENANCE AND OPERATION INFORMATION Environmental Specifications Power consumption [Inch specifications] [Metric specifications] 120V AC 60Hz 220-240V AC 50Hz • During copying …………….less than 449 Wh less than 365Wh • During standby ……………less than 90 Wh less than 88 Wh •…
-
Page 114: Optional Equipment
Section 9 MAINTENANCE AND OPERATION INFORMATION Optional Equipment Installation locations for each optional device are explained. Available Options The following options are available for the copier. Duplex Unit Document Processor Additional Memory Key Counter Paper Feeder 9-10…
-
Page 115
Section 9 MAINTENANCE AND OPERATION INFORMATION Document Processor This device automatically feeds and scans multiple sheet originals one at a time. Up to 50 sheets can be set at a single time. It also can automatically turn over front and back originals and scan them in. Paper Feeder The number of drawer levels can be increased by 3 levels by placing the same type of drawer as that on the machine (300 sheet storage) under the standard drawer. -
Page 116: Appendix: Functions And Settings Combination Chart
Section 9 MAINTENANCE AND OPERATION INFORMATION Appendix: Functions and Settings Combination Chart This copier has various functions, which if used together, can further increase copying efficiency. Refer to the chart below for function combinations. The blank space can be combined as desired. =Cannot be combined.
-
Page 117
Section 9 MAINTENANCE AND OPERATION INFORMATION Neces- After Setting sary Option 1 2 3 1 2 1 2 1 2 3 1 2 3 1 2 1 2 1 2 1 2 1 Image 1 Text & Photo 01 — Quality 2 Photo 01 11… -
Page 118
Section 9 MAINTENANCE AND OPERATION INFORMATION 9-14… -
Page 119
Index Numerics 2 in 1 ………………… 5-10 Eco-copy ………………5-17 2-Sided copies …………….. 5-1 Eco-copy (Default Settings) …………6-13 2-Sided Copy Reverse Side Rotation (Default Settings) …. 6-24 Environment ……………… 1-2 2-Sided Copy Reverse Side Rotation Setting …….. 5-3 Exposure Mode (Default Settings) ……….6-13 4 in 1 ………………… -
Page 120
Page Separation/Split Copy Modes ……….5-4 Paper Feeder ………………7-4 Paper misfeed in the Document Processor (option) ……8-5 Paper misfeed in the drawer …………8-3 Paper misfeed in the Left Cover internal section ……8-4 Paper misfeed in the Multi-bypass tray ……..8-4 Paper misfeed in the optional drawer ………..8-6 Paper misfeed in the paper supply section ……..8-3 Paper Selection …………….4-1 Photo Exposure Adjustment (Default Settings) ……6-16… -
Page 121
MEMO… -
Page 122
MEMO… -
Page 123
For best copy results and machine performance, we recommend that you use only KYOCERA MITA original supplies for your KYOCERA MITA copier. -
Page 124
©2003 is a trademark of Kyocera Corporation 2004. 3 2FX80031B…
This manual is also suitable for:
Km-2020
инструкцияKyocera KM-1620

1-3-1
2C9
1-3-1 Распаковка и установка
(1) Процедура установки
Начало
Распаковать.
Установить опционный лоток подачи бумаги.
Удалить ленты и фиксаторы.
Установить крышку стекла или опционный DP.
Установить опционное дуплексное устройство.
Установить тубу с тонером.
(сервисная программа U000).
Вывести на печать статус аппарата
Покинуть сервисный режим.
Проинсталлировать тонер
Загрузить бумагу в аппарат.
Подключить провод питания.
Выполнить пробное копирование.
(сервисная программа U130).
Завершение инсталляции аппарата.
Посмотреть инструкция для Kyocera KM-1620 бесплатно. Руководство относится к категории копировальные аппараты, 2 человек(а) дали ему среднюю оценку 9. Руководство доступно на следующих языках: русский. У вас есть вопрос о Kyocera KM-1620 или вам нужна помощь? Задайте свой вопрос здесь
Главная
| Kyocera | |
| KM-1620 | KM-1620 | |
| копировальный аппарат | |
| русский | |
| Руководство пользователя (PDF), Вопросы и ответы (PDF), Правила техники безопасности (PDF), Техническая спецификация (PDF) |
Печать
| Скорость печати (ч/б, обычное кач., A4/US Letter) | 16 ppm |
| Время разогрева | 20 s |
| Время выхода первой страницы (ч/б, норм. качество) | 5.9 s |
Память
| Оперативная память | 32 MB |
| Максимальный объём внутренней памяти | 160 MB |
Форматы носителей
| Максимальные размеры печати | А3 (297 x 420 мм) |
| Стандартные размеры печатного материала | A3, A4, A5, Ledger, Letter, Legal, Folio |
| Индивидуальные размеры | 98×147 — 297×432 (mm) |
Копирование
| Скорость копирования (обычное кач., ч/б, A4) | 16 cpm |
| Функция приближения | 50 — 200% |
| Максимальное число копий | 250 копий |
Входная и выходная емкость
| Максимальная вместимость выходного лотка | 250 листов |
| Стандартная вместимость на входе | 300 листов |
Качество печати
| Шкала уровней серого цвета | 256 |
Технические характеристики
Прочие свойства
| Размеры (ШхГхВ) | 574 x 552 x 502 mm |
Вес и размеры
Технология печати
| Число картриджей для печати | 1 |
| Технология печати | Лазерная |
Цвет
Плотность носителя
| Рекоммендуемая плотность носителей | 45 — 160 g/m² |
Уровень шума
| Эмиссии звукового давления | 65 dB |
Расходные материалы
| Совместимые типы чернил, принадлежности | TK-410 |
Прочность
| Максимальный рабочий цикл | 20000 стр/мес |
Энергопитание
| Требования к питанию | 220-240V, 50/60 Hz |
| Потребляемая мощность (в обычном режиме) | 356 W |
| Потребляемая мощность (в режим ожидания) | 88 W |
Сертификаты
| Сертификация | GS \nTUV \nCE \nISO 9001\nISO 14001 |
показать больше
Не можете найти ответ на свой вопрос в руководстве? Вы можете найти ответ на свой вопрос ниже, в разделе часто задаваемых вопросов о Kyocera KM-1620.
Какой вес Kyocera KM-1620?
Kyocera KM-1620 имеет вес 39000 g.
Какие сертификаты Kyocera KM-1620 имеет?
Kyocera KM-1620 имеет следующие сертификаты: GS \nTUV \nCE \nISO 9001\nISO 14001.
Сколько картриджей можно поместить в Kyocera KM-1620?
1 картриджи могут быть помещены в Kyocera KM-1620.
Инструкция Kyocera KM-1620 доступно в русский?
Да, руководствоKyocera KM-1620 доступно врусский .
Не нашли свой вопрос? Задайте свой вопрос здесь
-
Драйверы
3
-
Руководства по ремонту
6
-
Инструкции по эксплуатации
8


Kyocera KM-1620 инструкция по эксплуатации
(96 страниц)
- Языки:Английский
-
Тип:
PDF -
Размер:
548.12 KB -
Описание:
Kyocera Net Viewer User Guide
The KYOCERA Net Viewer application lets you organize and monitor network device information. This guide provides instructions on how to use the features and settings of the application.

Kyocera KM-1620 инструкция по эксплуатации
(119 страниц)
- Языки:Английский
-
Тип:
PDF -
Размер:
816.87 KB -
Описание:
Command Center RX User Guide
Command Center RX (Remote eXtension), is the web server that is built into the printing device. It allows you to verify the operating status of the device and make settings related to security, network printing, E-mail transmission and advanced networking.


На NoDevice можно скачать инструкцию по эксплуатации для Kyocera KM-1620. Руководство пользователя необходимо для ознакомления с правилами установки и эксплуатации Kyocera KM-1620. Инструкции по использованию помогут правильно настроить Kyocera KM-1620, исправить ошибки и выявить неполадки.
Информация предназначена для начинающих сервис-инженеров.
В связи с большой распространенностью этих аппаратов, а также, большим количеством вопросов по этой серии, решил опубликовать данную статью по функциям и настройкам этих аппаратов. Данные, естественно, взяты из мануалов и сгруппированы в таблицу, нечасто используемые функции, режимы и команды не включены.
TESTCOPY
Скорость печати
TESTCOPY
TESTCOPY
20 секунд
10 секунд
TESTCOPY
300 листов
КМ-1620/35/50/2020/35 1 лоток стандартно
КМ-2050/2550 2 лотка стандартно
50 листов А4
25 листов А3
TESTCOPY
Емкость выходного лотка (изображением вниз)
250 листов
150 листов
100 листов
Непрямой электростатический
ТК-420 15К при 6% А4
Основные отличия между КМ-хх20, КМ-хх35, КМ-хх50 и КМ- 2550
КМ-1620/2020 может быть только копиром.
КМ-1635/2035 стандартно копир, опционально GDI-принтер, сетевой принтер.
КМ-1650/2050 стандартно копир и сетевой принтер, опционально — сканер, факс.
КМ-2550 в сравнении с КМ-16/20хх имеет различие в: фотобарабан из аморфного кремния (ОРС), скорость механизма 130 mm/s (100 mm/s у остальных KM), привод и материал ролика переноса, секцию фиксации, тонер, двигатель подкачки тонера, отсутствует озоновый фильтр и другой цвет свечения лазера.
Дополнительные устройства (опции)
Все модели
Дополнительная кассета на 300 листов (max 4 кассеты)
для КМ-хх35/50 начиная с серийного номера 23022912 (РF-410А)
г/кв. м при двустороннем копировании) для КМ-хх35/50 начиная с серийного номера АН13022719 (DР-410А)
КМ-хх35
КМ-хх50
Опции для платы принтера
Процедура установки
— Установить дополнительные кассеты
— Удалить транспортные ленты и вставки
— Удалить транспортные винты сканера (2 шт.)
— Установить дополнительные устройства
— Установить тонер и бункер отработанного тонера
— Подсоединить шнур питания
— Запустите процедуру U130 (9 минут) для заполнения блока проявки
— Загрузить бумагу
— Распечатать отчеты U000
— Сделать тестовые копии
Режим техобслуживания
Вход в режим
Начальные установки
Управление через меню пользователя KM-1620/2020/1635/2035
*-значение по умолчанию. Жирный шрифт— этих значений нет у KM-xx20
1: Текст и Фото* 2:Фото 3Текст
1:Выкл* 2:Слабое
3:Сильное
1: Диффузная (Фото+Текст)*
2:Сглаживание(Фото)
1 (светлее)-
5 (темнее) (3)*
1: Авто (APS)*
2: Ручной
Обычный*
Польз.разм.1, 2 (См. F22 и F23)
Пользовательский тип бумаги 1-8
(Плотность и двустороннее копирование — ВКЛ/ВЫКЛ)
Обычный 2*
ВКЛ/ВЫКЛ*
двустороннем копировании
без дуплекса не отображается
on-по короткой кромке
off-по длинной кромке
малой мощности
90/120/180/240 мин
Учет заданий(АУДИТРОН) КМ-1620/1635/2020/2035
сброс отдельных счетчиков невозможен)
Проверка общего счетчика и распечатка отчета
— Значение выглядит как три трехзначные цифры, напр., «—001-234»
— Нажмите клавишу Start для распечатки отчета общего счетчика
Системное меню (System Menu) КМ-1650/2050/2550
Меню пользовательских настроек машины по умолчанию
Структура меню
Размер бумаги
Печать отчета по счетчикам
Отчет копира (настройки по умолчанию для копира),
Отчет машины(настройки по умолчанию для машины), Отчет по обслуживанию (заполнение тонером)
Сброс счетчика
Кажд. учет зад. всего
Ред. учет заданий
Удалить
Измен, использ. предел
Учет заданий копира
Превышен предел
Настройки параметров по умолчанию для КМ-хх50 (структура меню)
Интерфейс
Эмуляция
Шрифт
Установки страницы
Качество печати
Режим диска КАМ
Загрузка бумаги
Другие
Процедуры режима обслуживания для секции управления (Вход в режим — 10871087)
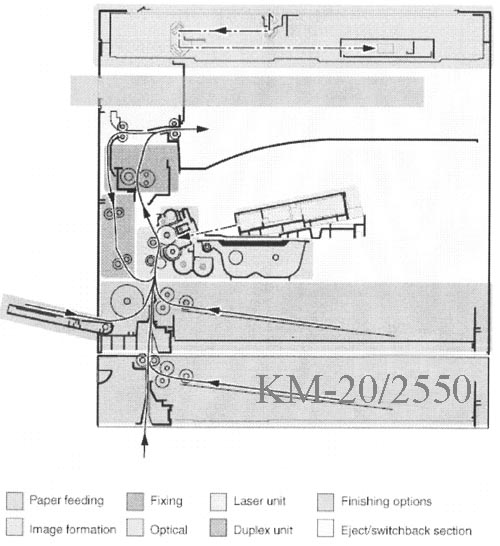
Общая конструкция копира
Система привода (просмотр со стороны задней крышки)
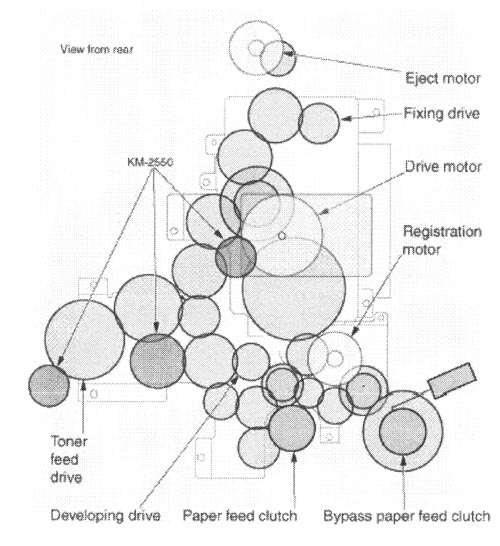
Режимы обслуживания для секции привода
Коды самодиагностики
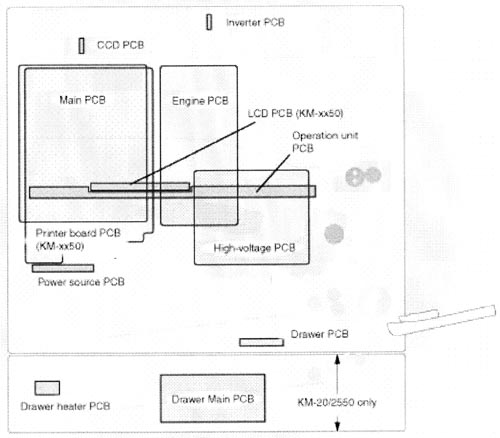
Расположение электрических плат
Коды самодиагностики
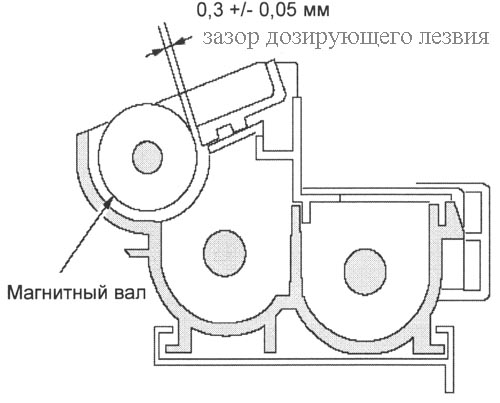
Конструкция секции проявки
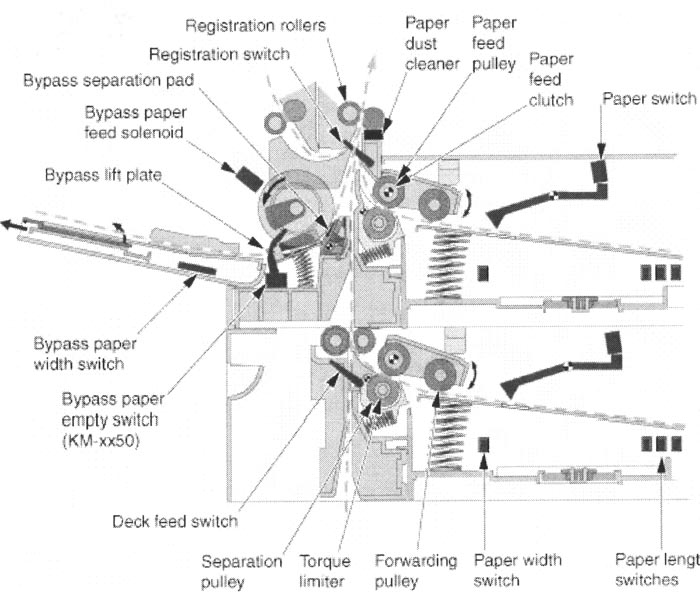

Регулировка прогиба бумаги U051
Процедуры режима обслуживания для секции подачи бумаги
Коды самодиагностики
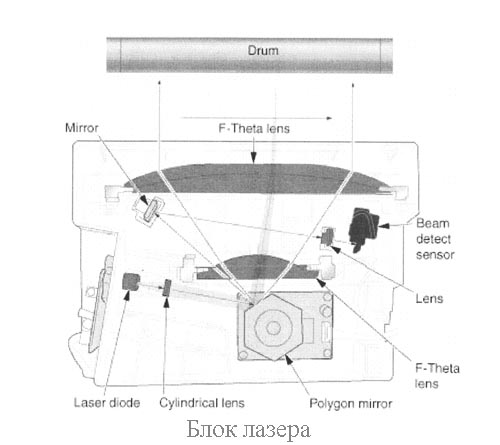
Секция экспозиции
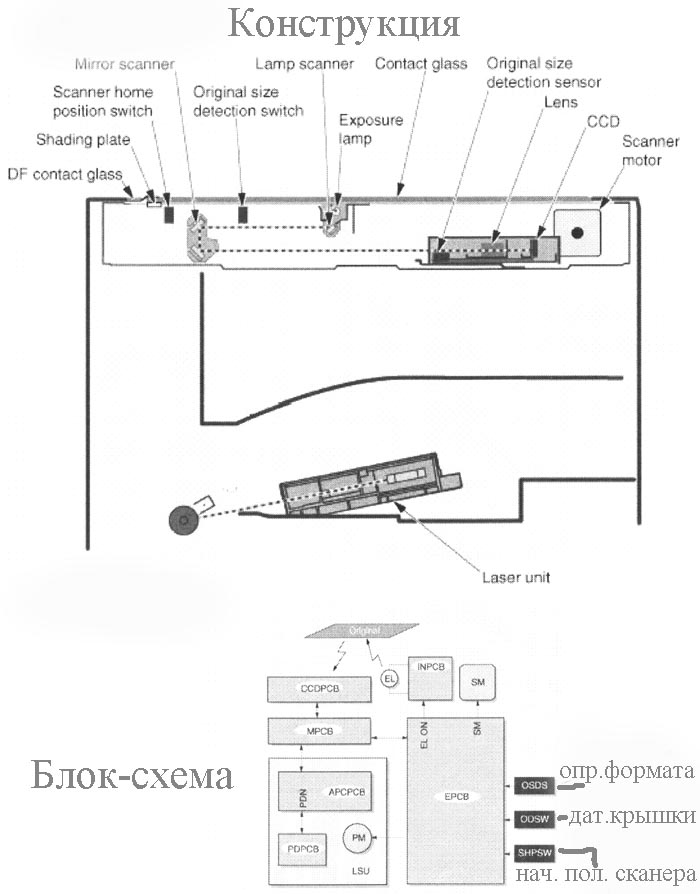
Блок лазера
Регулировка качества изображения
Текст
Процедуры режима обслуживания для секции экспозиции
Инициализация резервной памяти сканера (КМ-хх50)
-Сбрасывает U060, U067, U092, U093, U 099, U403, U990, U991
-Сбрасывает все настройки платы сетевого сканера
со стекла автоподатчика
-Включение режима корректировки позиции сканера при сканировании с автоподатчика
-Установка режима вкл/выкл (ON)
-Установка порога определения пыли (35)
(КМ-хх20) Ехр.1: Первые три цифры; Ехр.2: Последние три цифры
Коды самодиагностики для секции экспозиции
полигонного зеркала
Секция заряда фотобарабана
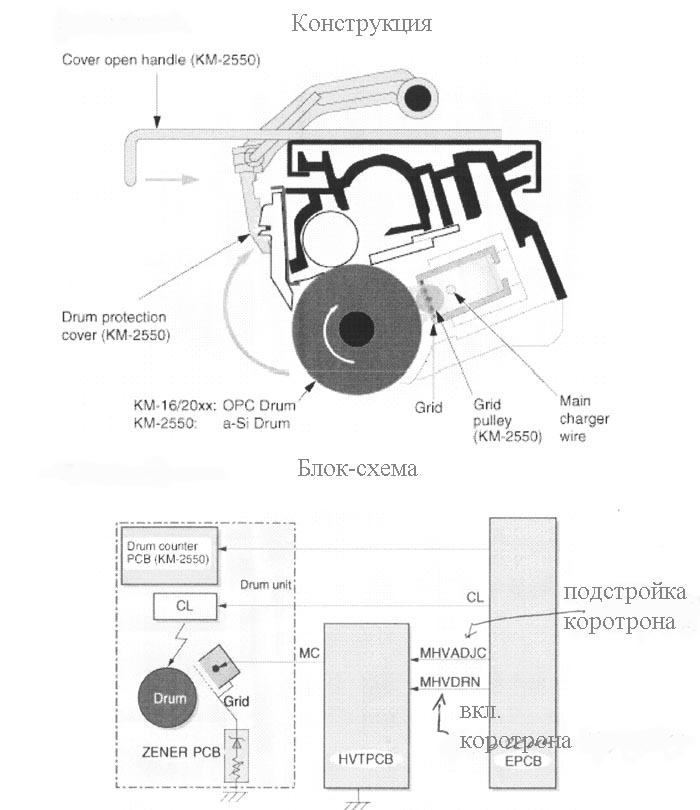
Процедуры режима обслуживания для секции заряда барабана
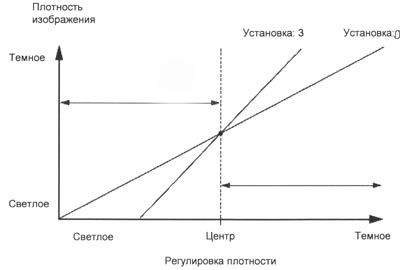
Изменяет поверхностный потенциал фотобарабана изменением напряжения на сетке.
(х) мин после окончания копирования
Проверка истории барабана (КМ-2550)
Показывает максимум 5 серийных номеров копиров и счетчиков барабана из EEPROM в блоке
Коды самодиагностики для секции заряда барабана
Секция проявки
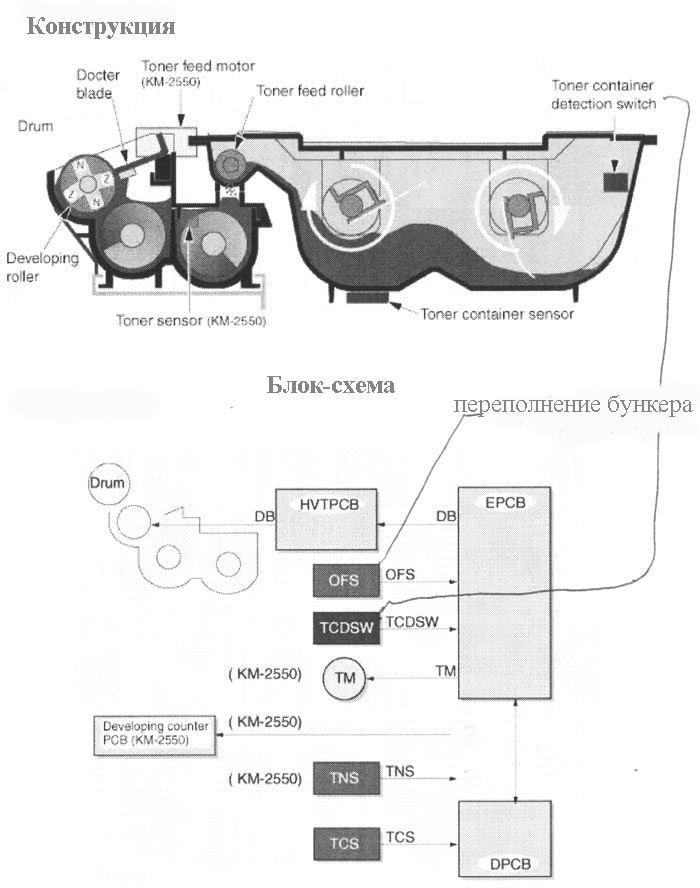
Процедуры режима обслуживания для секции проявки
Установка режима загрузки тонера
Для поддержания минимального 3% потока тонера через блок. Для этого через определенное время на фотобарабан наносится полоска тонера и он уходит в отработку. Вывод-нет никакого смысла использовать копир в режиме экономии тонера-сэкономленный тонер окажется в отработке, или его начнет «выпирать» из блока проявки, если не выставлена эта функция.
Проверка истории блока проявки (КМ-2550)
Показывает макс 5 серийных номеров копиров и счетчиков
Коды самодиагностики для секции проявки
Секция переноса и отделения
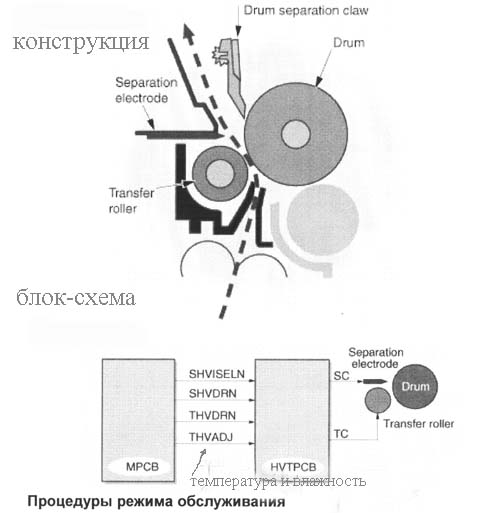
Процедуры режима обслуживания
Коррекция напряжения переноса для больших форматов
Коррекция напряжения переноса для малых форматов
Время выключения напряжения переноса
Время включения напряжения переноса
Напряжение отделения
Время выключения напряжения отделения
Время включения напряжения отделения
Секция закрепления

Процедуры режима обслуживания для секции закрепления
Коды самодиагностики для секции фиксации
1-я и 2-я температуры стабилизации превышает определенные значения
Секция очистки
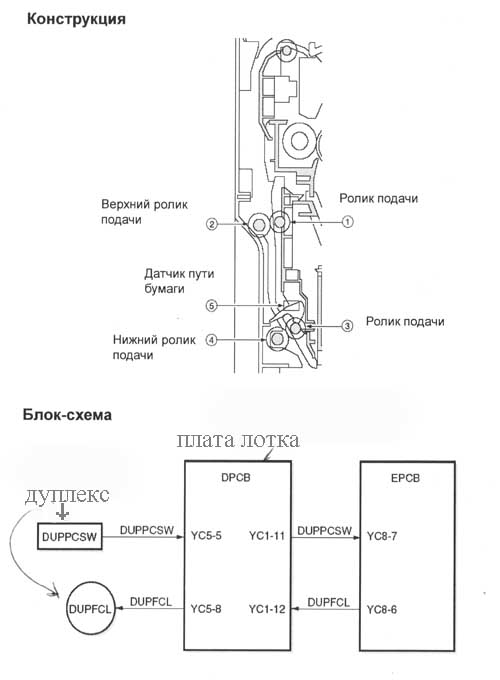
Дуплекс
Разное
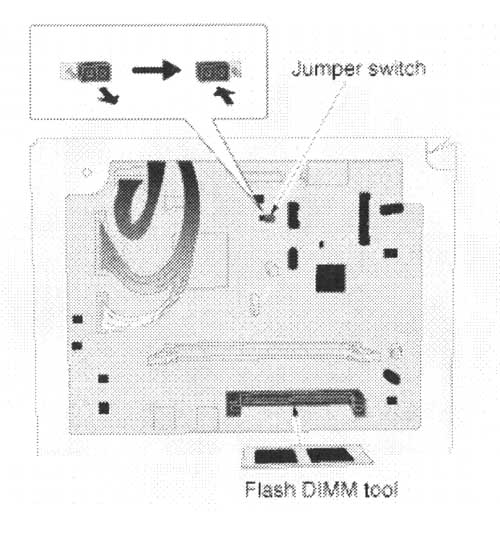
Обновление программного обеспечения (Firmware) KM-xx/20/35
•Запустите U019 для проверки текущей версии firmware
•Выключите копир и отключите кабель питания
•Снимите заднюю крышку и переключите перемычку в левое положение
•Установите инструмент в DIMM слот, подключите кабель питания и включите копир
•Начнется процесс обновления, на дисплее отображается отсчет от 1до 99
•После окончания обновления появится звуковой сигнал и будет отображена контрольная сумма
•Выключите копир и отключите кабель питания
•Удалите инструмент из слота, верните исходное положение перемычки, установите на место заднюю крышку
•Подключите кабель питания, включите копир и проверьте версию firmware
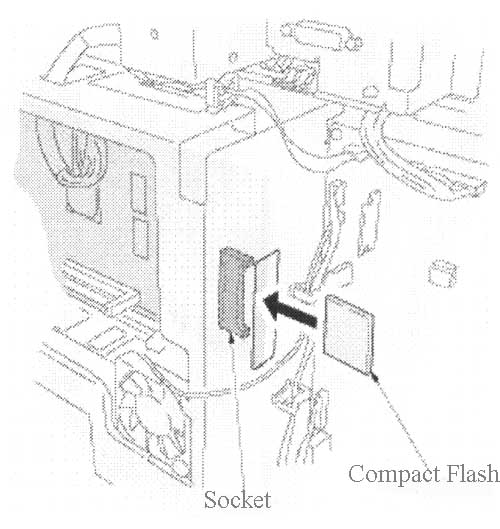
Обновление программного обеспечения (Firmware) KM-xx/50
•Снимите заднюю крышку
•Установите CF Card в слот на главной плате
•Подключите кабель питания и включите копир у
•Дождитесь появления надписи «Complited» на дисплее!!!
•Выключите копир и отключите кабель питания
•Удалите CF Card из слота на главной плате
•Подключите кабель питания и включите копир
•Выберите русский язык в меню пользователя
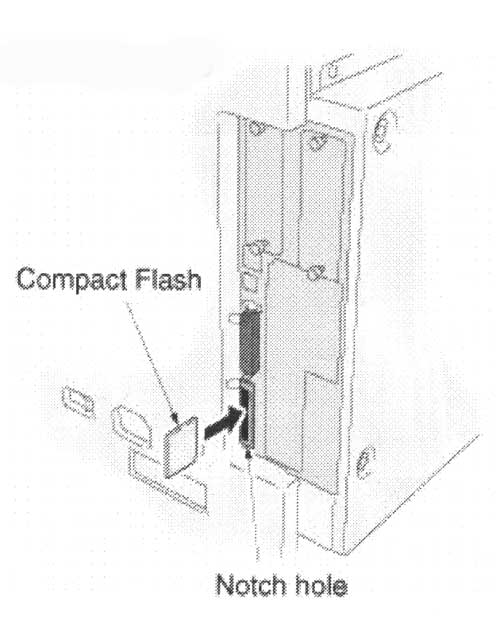
Обновление Printing System firmware KM-xx50
•Выключите копир и отключите кабель питания
•Установите CF Card в слот на плате принтера
•Подключите кабель питания и включите копир
•Дождитесь появления надписи «Complited»
•Выключите копир и отключите кабель питания
•Удалите CF Card из слота
•Подключите кабель питания и включите копир
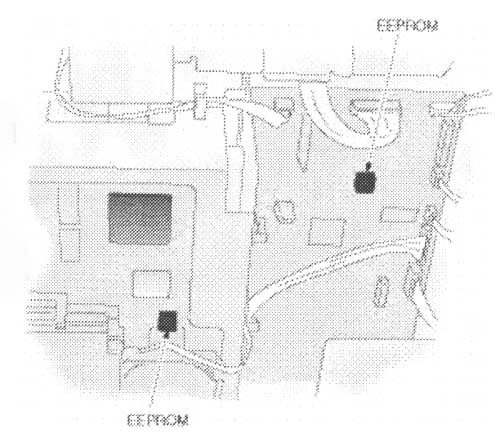
Замена Main РСВ или Engine РСВ
Замена Main РСВ КМ-хх50
•Извлеките EEPROM из старой платы и установите ее в новую
•Замените платы
•Выполните U027 для чтения данных из EEPROM
Другие процедуры обслуживания
U019 Проверка версии firmware
U020 Инициализация всех данных (кроме общего счетчика и номера машины)
U021 Инициализация всех данных за исключением счетчиков,
истории ошибок, сервисных настроек. (сбрасываются только пользовательские настройки)
U203 Проверка автоподатчика (отдельно, сканирование без бумаги)
U243 Проверка двигателей, соленоидов и муфт автоподатчика
U244 Проверка датчиков автоподатчика
U246 Установки финишера (позиции ограничителей, выравнивание бумаги при степлировании)
U249 Проверка вывода бумаги в опционные устройства (КМ-хх50)
U250 Установка цикла обслуживания (установка счетчика до загорания «масленки»)
U251 Проверка/сброс счетчика обслуживания
U265 Установка печати названия машины в отчетах
U504 Сброс настроек Scan System (КМ-хх50)
U506 Установка времени на соединение (ScanSys — PC) (КМ-хх50)
U904 Проверка/сброс счетчиков ошибок
U905 Проверка/сброс счетчиков опциональных устройств (лотки и финишеры)
U906 Сброс ошибок опциональных устройств (КМ-хх50) (лотки и финишеры)
U908 Проверка общего счетчика
U910 Сброс отчета об использовании тонера (в процентном соотношении)
U917 Установки факса (копирование на CF) (КМ-хх50)
U920 Проверка счетчиков принтера, сканера, факса (КМ-хх50)
U925 Проверка/сброс счетчиков системных ошибок (КМ-хх50)
U926 Перезапись программы факса (КМ-хх50)
U927 Сброс счетчика U920 (единожды, < 1 к)
U928 Проверка счетчика срока службы машины
U942 Настройка прогиба оригинала в автоподатчике
Коды самодиагностики
(S): системная ошибка (U925: счетчик системных ошибок)
После неудачной попытки самостоятельного сброса — С код.
С0070 Несовпадение типа факса (КМ-хх50)
С(А)0100 Ошибка чтения/записи резервной памяти (Main РСВ) Считанные и записанные данные не совпадают (ошибка EPROM)
С(А)0110 Ошибка данных резервной памяти (Main РСВ) (ошибка EPROM)
С(А)0130 Ошибка чтения/записи резервной памяти (КМ-хх50) (ошибка EPROM)
С(А)0140 Ошибка данных резервной памяти (КМ-хх50) (ошибка EPROM)
С(А)0150 Ошибка чтения/записи резервной памяти (Engine РСВ) Считанные и записанные данные не совпадают (ошибка EPROM)
С(А)0160 Ошибка данных резервной памяти (Е РСВ) (ошибка EPROM)
С0170 Ошибка общего счетчика
С0180 Несовпадение серийного номера
C(A,S)0210 Ошибка связи между Main РСВ и Engine РСВ
С0220 Ошибка связи между Main РСВ и Operation РСВ
C(S)0250 Ошибка связи со Scan System (КМ-хх50)
C(S)0440 Ошибка связи с финшером (КМ-хх50)
C(S)0620 Ошибка интерфейса записи — (КМ-хх20) (панель оператора не работает)
С(А)7800 Обрыв в цепи термистора внешней температуры (в плате лотка)
С(А)7810 Короткое замыкание в цепи термистора внешней температуры (в плате лотка)
Периодическое обслуживание
Процедуры при периодическом обслуживании
U130 Загрузка тонера
U157 Счетчик блока проявки
U167 Счетчик блока закрепления (КМ-2550 сбрасывает автоматически)
U251 Счетчик обслуживания (масленка)
U901 Счетчик подач бумаги по областям (если меняются ролики захвата, например)
U903 Счетчик замятий
U904 Счетчик ошибок
TESTCOPY
Секция экспозиции-настройка изображения
Общая процедура настройки:
1. Печать: Форма, Размер, Положение, Поля (Недоступно)
2. Сканирование со стекла: Форма, Размер, Положение, Поля
3. Сканирование с автоподатчика: Форма, Размер, Положение, Поля
РЕГУЛИРОВКИ ДЛЯ ПЕЧАТИ (выделено курсивом — для КМ-1650/2050/2550)
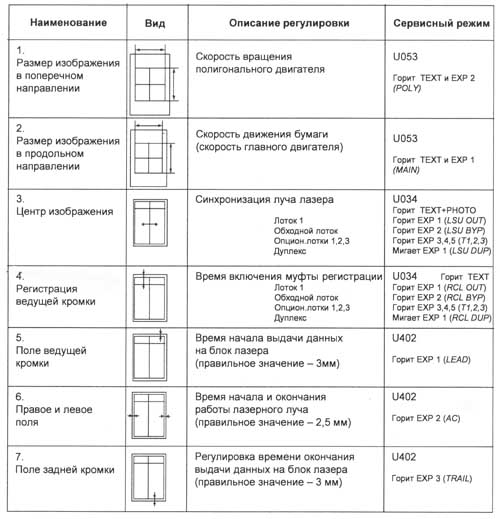
РЕГУЛИРОВКИ ДЛЯ СКАНИРОВАНИЯ
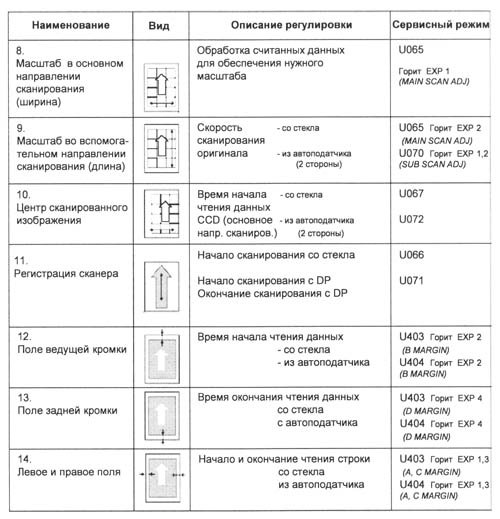
(p/n 2АС68240)
Настраивает:
Центр сканированного изображения — U067
Регистрацию ведущей кромки сканера — U066
Масштаб в основном направлении сканирования — U065
Устранение оптического перекоса сканера
Проводится регулировкой положения каретки.
Напечатайте тестовый лист VTC-PG2 из U993 и сделайте его копию.
При наличии перекоса — отрегулируйте положение каретки.
Kyocera KM-1620 All in One Printer PDF User Guides and Manuals for Free Download: Found (3) Manuals for Kyocera KM-1620 Device Model (Service Manual, Operation Manual)
More Copier Device Models:
-
Kyocera
FS-9130DN
INSTALLATION GUIDE FOR PAPER FEEDERGUIDE D’INSTALLATION DU BUREAU PAPIERGUÍA DE INSTALACIÓN PARA EL ALIMENTADOR DE PAPELINSTALLATIONSANLEITUNG FÜR PAPIEREINZUGGUIDA ALL’INSTALLAZIONE UNITÀ DI ALIMENTAZIONE DELLA CARTA供纸工作台安装手册ペーパーフィーダ設置手順書PF-700/PF-710 …
FS-9130DN All in One Printer, 12
-
Muratec
MFX-1430
Step 1 : Pick an installation spot ………………………………………1Step 2 : Unpack the machine …………………………………………..2Step 3 : Setup the machine …………………………………………….3Step 4 : Install the consumables ………………………………………5S …
MFX-1430 Copier, 28
-
Canon
IMAGERUNNER ADVANCE C5051
987654321imageRUNNER ADVANCEC5051/C5045/C5035/C5030 SeriesService Manual September 13, 2017Revision 15Product OvervewTechnologyPeriodical ServiceParts Replacement and CleaningAdjustmentTroubleshootingError CodeService ModeInstallationAppendix …
IMAGERUNNER ADVANCE C5051 All in One Printer, 1455
-
Sharp
AL-1040
DIGITAL COPIERMODELAL-1040AL-1240This Service Manual describes only the differences from the AL-1000/1200. For the common items with the AL-1000/1200, pleaserefer to the AL-1000/1200 manual.For the GDI printer section, please refer to the AL-1041 Service Manual.The AL-1040/1240 is an upgrade model of the AL-1000/1200, …
AL-1040 Copier, 4
Recommended Documentation: