- Standby/on switch [
 ], [/I]
Press to switch the unit from on to standby mode or vice versa. In standby mode, the unit is still consuming a small amount of power. - Select the audio source
On the remote control:
Press the corresponding button to select the source.
On the main unit:
* For Australia and New Zealand - Basic playback control
- View the setup menu
- View the content information
- Select or confirm the option
- Open or close the disc tray
- Decrease the brightness of the display panel
To cancel, press the button again. - Adjust the volume level
- Mute the sound
To cancel, press the button again.
«MUTE» is also cancelled when you adjust the volume or when you switch off the system. - View the play menu
- Select the sound effects
- Display panel
- Remote control sensor
Distance: Within approximately 7 m
Angle: Approximately 20° up and down, 30° left and right - USB port (
 )
) - Disc tray
- Select «BLUETOOTH» as the audio source
To start Bluetooth® pairing, press and hold the button.

Preparing the remote control
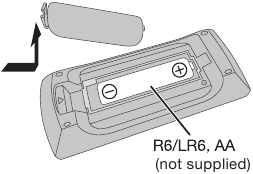
Use alkaline or manganese battery.
Install the battery so that the poles (+ and –) align with those in the remote control.
Disc
- Press [CD ] (main unit: [OPEN/CLOSE]) to open the disc tray.
Put in a disc with the label facing up.
Press again to close the disc tray. - Press [USB/CD] to select «CD».
 ] (main unit: [
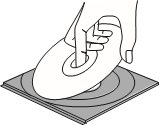
USB
- Reduce the volume and connect the USB device to the USB port.
Hold the main unit when connecting or disconnecting the USB device. - Press [USB/CD] to select «USB».

Note:
Do not use a USB extension cable. The system cannot recognise USB device connected through a cable.
Bluetooth®
You can connect and play an audio device wirelessly through Bluetooth®.
Preparation
- Switch on the Bluetooth® feature of the device and put the device near the system.
- Read the operating instructions of the device for details.
Pairing a device
Preparation
If this system is connected to a Bluetooth® device, disconnect it (→ «Disconnecting a device»).
- Press [
 ].
].
If «PAIRING» is shown, continue with step 4. - Press [PLAY MENU] to select «PAIRING».
Or press and hold [ –PAIRING] on the main unit until «PAIRING» is shown. Continue with step 4. - Press [] to select «OK? YES» and then press [OK].
«PAIRING» is shown.
To cancel, select «OK? NO». - Select «SC-PM250» from the Bluetooth® menu of the device.
If prompted for a passkey, input «0000».
The device connects with this system automatically after pairing is complete.
The name of the connected device is shown for a few seconds.
Note:
You can pair up to 8 devices with this system. If a 9th device is paired, the device that has not been used for the longest time will be replaced.
Connecting a device
Preparation
If this system is connected to a Bluetooth® device, disconnect it (→ «Disconnecting a device»).
- Press [].
«BLUETOOTH READY» is shown. - Select «SC-PM250» from the Bluetooth® menu of the device.
The name of the connected device is shown for a few seconds. - Start playback on the device.
Note:
- A device must be paired to connect.
- This system can only connect to one device at a time.
- When «BLUETOOTH» is selected as the source, this system will automatically try to connect to the last connected device.
Disconnecting a device
- Press [].
- Press [PLAY MENU] repeatedly to select «DISCONNECT?».
- Press [] to select «OK? YES» and then press [OK].
«BLUETOOTH READY» is shown.
To cancel, select «OK? NO».
Using the main unit
Press and hold [ –PAIRING] until «PAIRING» is shown.
Note:
A device is disconnected when you:
- Select a different source.
- Move the device out of the maximum range.
- Disable the Bluetooth® transmission of the device.
- Switch off the system or the device.
The following marks indicate the availability of the feature.
CD: CD-R/RW in CD-DA format or with MP3 files.
USB: USB device with MP3 files.
BLUETOOTH: Bluetooth® device.
Basic playback
CD USB BLUETOOTH
| Play | Press [ ]. ]. |
| Stop |
Press [ USB The track is memorised. |
| Pause |
Press [ Press again to continue playback. |
| Skip |
Press [ CD USB Press [ |
| Search | Press and hold [ ] or [ ] or [ ]. ]. |
 ].
].Note:
Depending on the Bluetooth® device, some operations may not work.
Viewing available information
CD USB BLUETOOTH
You can view the available information on the display panel.
Press [DISPLAY].
Note:
- Maximum characters that can be shown:
CD USB: approximately 32
BLUETOOTH: approximately 16 - This system supports ver. 1.0, 1.1 and 2.3 ID3 tags.
- Text data that the system does not support can show differently.
- Example: MP3 album and track number display.
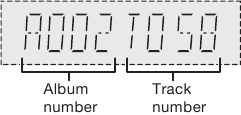
CD USB
- Press [PLAY MENU] repeatedly to select «PLAYMODE» or «REPEAT».
- Press [] to select the setting and then press [OK].
| PLAYMODE | |
| OFF PLAYMODE | Cancel the setting. |
| 1-TRACK 1TR |
Play one selected track. Press [ ] or [] to select the track. |
| 1-ALBUM 1ALBUM |
Play one selected MP3 album. Press [  ] to select the MP3 album. ] to select the MP3 album. |
| RANDOM RND |
Play all tracks randomly. |
| 1-ALBUM RANDOM 1ALBUM RND |
Play all tracks in one selected MP3 album randomly. Press [ ] to select the MP3 album. |
| REPEAT | |
| OFF REPEAT | Cancel the setting. |
ON REPEAT |
Repeat playback. |
Note:
- During random playback, you cannot skip to tracks which have been played.
- The setting is cancelled when you open the disc tray.
Link mode
BLUETOOTH
You can change the link mode to suit the connection type.
Preparation
If this system is connected to a Bluetooth® device, disconnect it (→ «Disconnecting a device»).
- Press [PLAY MENU] repeatedly to select «LINK MODE».
- Press [] to select the mode and then press [OK].
MODE 1 Emphasis on connectivity. MODE 2
(default)Emphasis on sound quality.
Input level
BLUETOOTH
You can change the input level setting if the sound input level of the Bluetooth® transmission is too low.
- Press [PLAY MENU] repeatedly to select «INPUT LEVEL».
- Press [] to select the level and then press [OK].

Note:
Select «LEVEL 0» if the sound is distorted.
Note on disc
- This system can play CD-R/RW with CD-DA or MP3 format content.
- Some CD-R/RW cannot be played because of the condition of the recording.
Note on USB device
- This system supports USB 2.0 full speed.
- This system can support USB devices of up to 32 GB.
- Only FAT 12/16/32 file system is supported.
Note on MP3 file
- Files are defined as tracks and folders are defined as albums.
- Tracks must have the extension «.mp3» or «.MP3».
- Tracks will not necessarily be played in the order you recorded them.
- Some files can fail to work because of the sector size.
MP3 file on disc
- This system can access up to:
- 255 albums (including root folder)
- 999 tracks
- 20 sessions
- Disc must conform to ISO9660 level 1 or 2 (except for extended formats).
MP3 file on USB device
- This system can access up to:
- 800 albums (including root folder)
- 8000 tracks
- 999 tracks in one album
Radio
Preparation
For Australia and New Zealand
Press [RADIO] to select «FM» or «AM».
For others
Press [RADIO].
Manual tuning
- Press [PLAY MENU] repeatedly to select «TUNEMODE».
- Press [] to select «MANUAL» and then press [OK].
- Press [] or [] to tune in to the station.
To tune automatically, press and hold the button until the frequency starts changing quickly.
«STEREO» is shown when a stereo broadcast is being received.
Memory presetting
You can preset up to 30 FM stations.
For Australia and New Zealand
You can preset up to 15 AM stations.
Automatic presetting
- Press [PLAY MENU] to select «A.PRESET».
- Press [] to select the setting and then press [OK].
LOWEST Tuning begins from the lowest frequency. CURRENT Tuning begins from the current frequency. The tuner presets all the stations it can receive into the channels in ascending order.
To cancel, press [].
Manual presetting
- Press [PLAY MENU] repeatedly to select «TUNEMODE».
- Press [] to select «MANUAL» and then press [OK].
- Press [] or [] to tune in to the station.
- Press [OK].
- Press [] to select a preset number and then press [OK].
Do steps 3 through 5 again to preset more stations. The new station replaces any station that occupies the same preset number.
Selecting a preset station
- Press [PLAY MENU] repeatedly to select «TUNEMODE».
- Press [] to select «PRESET» and then press [OK].
- Press [] or [] to select the preset station.
Improving the sound quality
When «FM» is selected
- Press [PLAY MENU] repeatedly to select «FM MODE».
- Press [] to select «MONO» and then press [OK].
To cancel, select «STEREO».
«MONO» is also cancelled when you change the frequency.
To memorise the setting
Continue with step 4 of «Manual presetting».
Checking the signal status
When «FM» is selected
For Continental Europe, the United Kingdom and Ireland
Press [PLAY MENU] repeatedly to select «FM STATUS» and then press [OK].
For others
Press [DISPLAY].
| FM | The FM signal is in monaural. The system is not tuned in to a station. |
| FM ST | The FM signal is in stereo. |
| FM MONO | «MONO» is selected as the «FM MODE». |
RDS broadcasting
For Continental Europe, the United Kingdom and Ireland
This system can show the text data transmitted by the radio data system (RDS) available in some areas.
Press [DISPLAY].
| PS | Programme service |
| PTY | Programme type |
| FREQ | Frequency |
Note:
RDS may not be available if the reception is poor.
AM allocation setting
For Australia and New Zealand
This system can also receive AM broadcasts allocated in 10 kHz steps.
- Press [RADIO] to select «AM».
- Press and hold [SELECTOR] on the main unit.
After a few seconds, the display panel shows the current minimum radio frequency. Release the button when the minimum frequency changes.
- To go back to the initial setting, do the above steps again.
- Preset frequencies are erased after you change the setting.
Clock and timers
Setting the clock
This is a 24-hour clock.
- Press [SETUP] repeatedly to select «CLOCK».
- Press [] to set the time and then press [OK].
To check the time
Press [SETUP] repeatedly to select «CLOCK» and then press [OK].
In standby mode, press [DISPLAY].
Note:
Reset the clock regularly to maintain accuracy.
Sleep timer
The sleep timer switches off the system after the set time.
- Press [SETUP] to select «SLEEP».
- Press [] to select the setting (in minutes) and then press [OK].
To cancel, select «OFF».

Note:
- The remaining time is always shown on the display. The display changes temporarily when you perform other operations.
- The sleep timer can be used together with the play timer.
- The sleep timer always comes first. Be sure not to set an overlap of timers.
Play timer
(Except for Bluetooth® source)
You can set the timer to come on at a certain time to wake you up.
Preparation
Set the clock.
- Press [SETUP] repeatedly to select «TIMER ADJ».
- Press [] to set the start time and then press [OK].
- Do step 2 again to set the end time.
- Press [] to select the source you want to play and then press [OK].
To start the timer
- Press [SETUP] repeatedly to select «TIMER SET».
- Press [] to select «SET» and then press [OK].
«» is shown.
To cancel, select «OFF».
The system must be switched off for the timer to operate.
 » is shown.
To check the setting
Press [SETUP] repeatedly to select «TIMER ADJ» and then press [OK].
In standby mode, press [DISPLAY] two times.
Note:
- The timer starts at a low volume and increases gradually to the preset level.
- The timer comes on at the set time every day if the timer is on.
- If you switch off the system and then switch on again while a timer is in operation, the timer will not stop at the end time.
Sound effects
- Press [SOUND] repeatedly to select the sound effect.
- Press [] to select the setting and then press [OK].
| PRESET EQ | «HEAVY» (default), «SOFT», «CLEAR», «VOCAL» or «FLAT» |
| BASS |
–4 to +4 (default: 0) Using the main unit
|
| TREBLE |
–4 to +4 (default: 0) Using the main unit
|
| D.BASS | «ON D.BASS» (default) or «OFF D.BASS» |
| SURROUND | «ON SURROUND» or «OFF SURROUND» (default) |
Others
Auto off
This system automatically switches off when you do not use it for 20 minutes.
- Press [SETUP] repeatedly to select «AUTO OFF».
- Press [] to select «ON» and then press [OK].
To cancel, select «OFF».
Note:
This function does not work when you are in radio source or when a Bluetooth® device is connected.
Bluetooth® standby
This function automatically switches on the system when you establish a Bluetooth® connection from a paired device.
- Press [SETUP] repeatedly to select «BLUETOOTH STANDBY».
- Press [] to select «ON» and then press [OK].
To cancel, select «OFF».
Checking the software version
- Press [SETUP] repeatedly to select «SW VER.» and then press [OK].
The software version is shown. - Press [OK] again to exit.
Maintenance
To clean this system, wipe with a soft, dry cloth.
- Never use alcohol, paint thinner or benzine to clean this system.
- Before using chemically treated cloth, read the instructions that came with the cloth carefully.
Troubleshooting
Before requesting service, make the following checks. If you are in doubt about some of the check points, or if the solutions indicated do not solve the problem, consult your dealer for instructions.
Common problems
No operations can be done with the remote control.
- Examine that the battery is installed correctly.
Sound is distorted or no sound.
- Adjust the volume of the system.
- Switch off the system, determine and correct the cause, and then switch on again. It can be caused by straining of the speakers through excessive volume or power, and when using the system in a hot environment.
A humming sound can be heard during playback.
- An AC mains lead or fluorescent light is near the cables. Keep other appliances and cords away from the cables of this system.
Disc
Display not shown correctly.
Playback does not start.
- You have not put in the disc correctly. Put it in correctly.
- Disc is dirty. Clean the disc.
- Replace the disc if it is scratched, warped, or non-standard.
- There is condensation. Let the system dry for 1 to 2 hours.
USB
The USB device or the contents in it cannot be read.
- The format of the USB device or the contents in it are not compatible with the system.
- USB devices with storage capacity of more than 32 GB cannot work in some conditions.
Slow operation of the USB device.
- Large content size or large memory USB device takes longer time to read.
The elapsed time shown is different from the actual play time.
- Transfer the data to another USB device or backup the data and reformat the USB device.
Radio
Sound is distorted.
- Use an optional outdoor antenna. The antenna should be installed by a competent technician.
A beat sound is heard.
- Switch off the TV or move it away from the system.
- Move mobile telephones away from the system if the interference is apparent.
A low hum is heard during AM broadcast.
- Separate the antenna from other cables and cords.
Bluetooth®
Pairing cannot be done.
- Check the Bluetooth® device condition.
- The device is out of the 10 m communication range. Move the device nearer to the system.
The device cannot be connected.
- The pairing of the device was unsuccessful. Do pairing again.
- The pairing of the device has been replaced. Do pairing again.
- This system might be connected to a different device. Disconnect the other device and try pairing the device again.
The device is connected but audio cannot be heard through the system.
- For some built-in Bluetooth® devices, you have to set the audio output to «SC-PM250» manually. Read the operating instructions of the device for details.
Sound from the device is interrupted.
- The device is out of the 10 m communication range. Move the device nearer to the system.
- Remove any obstacle between the system and the device.
- Other devices that use the 2.4 GHz frequency band (wireless router, microwaves, cordless phones, etc.) are interfering. Move the device nearer to the system and distance it from the other devices.
- Select «MODE 1» for stable communication.
Playback image and sound are not synchronised.
- Restart the playback app of the device.
Main unit displays
«—:—«
- You connected the AC mains lead for the first time or there was a power failure recently. Set the clock.
«ADJUST CLOCK»
- The clock is not set. Adjust the clock.
«ADJUST TIMER»
- The play timer is not set. Adjust the play timer.
«AUTO OFF»
- The system has not been used for 20 minutes and will switch off within a minute. To cancel, press any button.
«ERROR»
- An incorrect operation was done. Read the instructions and try again.
«F61″
«F77″
- Disconnect the AC mains lead and consult your dealer.
«F70″
- Examine the Bluetooth® device.
- Disconnect the Bluetooth® device. Switch off the system and then switch on again.
«F76″
- There is a problem with the power supply.
- Disconnect the AC mains lead and consult your dealer.
«NODEVICE»
- The USB device is not connected. Examine the connection.
«NO DISC»
- You have not put in a disc.
«NO PLAY»
- Examine the content. You can only play supported format.
- The system may have a problem. Switch off the system and then switch on again.
«PLAYERROR»
- You disconnected the USB device during playback. Connect the USB device again.
«REMOTE 1″
«REMOTE 2″
- The remote control and the main unit are using different codes. Change the code of the remote control.
- When «REMOTE 1» is shown, press and hold [OK] and []for a minimum of 4 seconds.
- When «REMOTE 2» is shown, press and hold [OK] and [USB/CD] for a minimum of 4 seconds.
- When «REMOTE 1» is shown, press and hold [OK] and [
«USB OVER CURRENT ERROR»
- The USB device is using too much power. Disconnect the USB device, switch off the system and then switch on again.
«–VBR–»
- The system cannot show the remaining play time for variable bit rate (VBR) tracks.
Remote control code
When other Panasonic equipment responds to the remote control of this system, change the remote control code for this system.
Preparation
Press [USB/CD] to select «CD».
To set the code to «REMOTE 2»
- Press and hold [SELECTOR] on the main unit and [USB/CD] on the remote control.
«REMOTE 2» is shown. - Press and hold [OK] and [USB/CD] for a minimum of 4 seconds.
To set the code to «REMOTE 1»
- Press and hold [SELECTOR] on the main unit and [] on the remote control.
«REMOTE 1» is shown. - Press and hold [OK] and [] for a minimum of 4 seconds.
System memory reset
Reset the memory when the following situations occur:
- There is no response when buttons are pressed.
- You want to clear and reset the memory contents.
- Disconnect the AC mains lead.
- While you press and hold [/I] on the main unit, connect the AC mains lead again.
Continue to press and hold the button until «– – – – – – – –» is shown. - Release [/I].
All the settings are set back to the factory preset. It is necessary to set the memory items again.
About Bluetooth®
Panasonic cannot be held responsible for data and/or information that can possibly be compromised during a wireless transmission.
Frequency band
- This system uses the 2.4 GHz frequency band.
Certification
- This system conforms to the frequency restrictions and has received certification based on frequency laws. Thus, a wireless permit is not necessary.
- The actions below are punishable by law:
- Taking apart or modifying the main unit.
- Removing specification indications.
Restrictions of use
- Wireless transmission and/or usage with all Bluetooth® equipped devices is not guaranteed.
- All devices must conform to standards set by Bluetooth SIG, Inc.
- Depending on the specifications and settings of a device, it can fail to connect or some operations can be different.
- This system supports Bluetooth® security features. But depending on the operating environment and/or settings, this security is possibly not sufficient. Transmit data wirelessly to this system with caution.
- This system cannot transmit data to a Bluetooth® device.
Range of use
- Use this device at a maximum range of 10 m.
- The range can decrease depending on the environment, obstacles or interference.
Interference from other devices
- This system may not function properly and troubles such as noise and sound jumps may arise due to radio wave interference if this unit is located too close to other Bluetooth® devices or the devices that use the 2.4 GHz band.
- This system may not function properly if radio waves from a nearby broadcasting station, etc. is too strong.
Intended usage
- This system is for normal, general use only.
- Do not use this system near an equipment or in an environment that is sensitive to radio frequency interference (example: airports, hospitals, laboratories, etc.).
Licenses
| MPEG Layer-3 audio coding technology licensed from Fraunhofer IIS and Thomson. |
| The Bluetooth® word mark and logos are owned by the Bluetooth SIG, Inc. and any use of such marks by Panasonic Corporation is under license. Other trademarks and trade names are those of their respective owners. |
Making the connections
Connect the AC mains lead only after all the other connections have been made.
The illustrations shown are of the model for Australia and New Zealand. Your unit may differ in appearance.

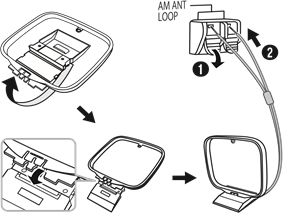
- Connect the FM indoor antenna.
Place the antenna where reception is best.
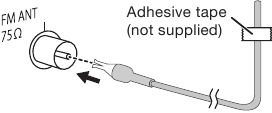
For the United Kingdom and Ireland
Connect the FM outdoor antenna.
Use an outdoor antenna if the reception is poor.
Keep the antenna plug adaptor out of reach of children to prevent swallowing.Note:
- Do not use the outdoor antenna during a lightning storm.
- Disconnect the outdoor antenna if you do not use the system.
- For Australia and New Zealand
Connect the AM loop antenna.
Stand the antenna up on its base until it clicks.
- Connect the speakers.

Be careful not to cross (short-circuit) or reverse the polarity of the speaker wires as doing so may damage the speakers. - Connect the AC mains lead.
(For the AC mains plug of three pins)
READ THE «Caution for AC mains lead» BEFORE CONNECTION.
Do not use an AC mains lead from other equipment.


Conserving power
The system consumes a small amount of power (→ «Specifications») when it is in standby mode. Disconnect the power supply if you do not use the system.
Some settings will be lost after you disconnect the system. You have to set them again.
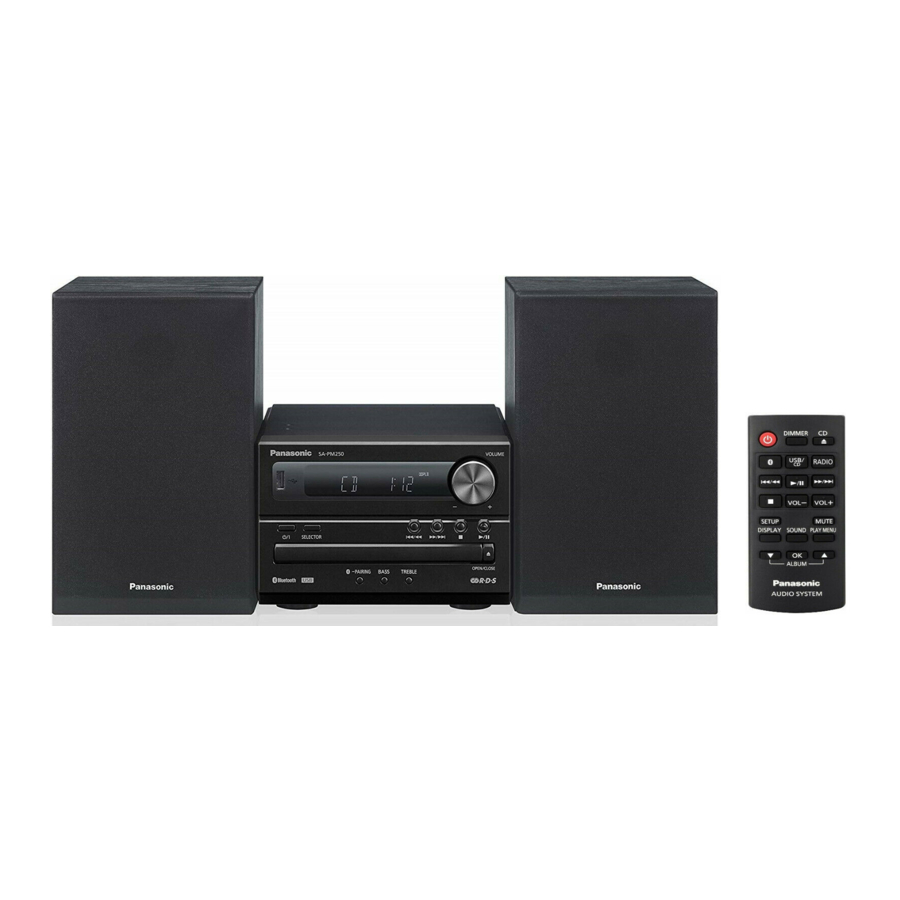
Your system and the illustrations can look differently. These operating instructions are applicable to the following system.
| System | SC-PM250 |
| Main unit | SA-PM250 |
| Speakers | SB-PM02 |
Back of product
Supplied accessories
Check and identify the supplied accessories.
For the United Kingdom and Ireland
Use numbers indicated in parentheses when asking for replacement parts. (Product numbers correct as of February 2014. These may be subject to change.)
Safety precautions
Unit
- To reduce the risk of fire, electric shock or product damage,
- Do not expose this unit to rain, moisture, dripping or splashing.
- Do not place objects filled with liquids, such as vases, on this unit.
- Use only the recommended accessories.
- Do not remove covers.
- Do not repair this unit by yourself. Refer servicing to qualified service personnel.
- Do not let metal objects fall inside this unit.
AC mains lead
- The mains plug is the disconnecting device. Install this unit so that the mains plug can be unplugged from the socket outlet immediately.
Unit
- To reduce the risk of fire, electric shock or product damage,
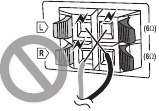
- Do not install or place this unit in a bookcase, built-in cabinet or in another confined space. Ensure this unit is well ventilated.
- Do not obstruct this unit’s ventilation openings with newspapers, tablecloths, curtains, and similar items.
- Do not place sources of naked flames, such as lighted candles, on this unit. •
- For Asia and the Middle East
This unit is intended for use in tropical climates.
For others
This unit is intended for use in moderate climates. - This unit may receive radio interference caused by mobile telephones during use. If such interference occurs, please increase separation between this unit and the mobile telephone.
- This unit utilizes a laser. Use of controls or adjustments or performance of procedures other than those specified herein may result in hazardous radiation exposure.
Battery
- Danger of explosion if battery is incorrectly replaced. Replace only with the type recommended by the manufacturer.
- When disposing the batteries, please contact your local authorities or dealer and ask for the correct method of disposal.
- Do not heat or expose to flame.
- Do not leave the battery(ies) in a car exposed to direct sunlight for a long period of time with doors and windows closed.
- Do not break open or short-circuit the battery.
- Do not charge the alkaline or manganese battery.
- Do not use the battery if the cover has peeled off.
- Remove the battery if you do not use the remote control for a long period of time. Keep in a cool, dark area.
Caution for AC mains lead
(For the AC mains plug of three pins)
For your safety, please read the following text carefully.
This appliance is supplied with a moulded three pin mains plug for your safety and convenience.
A 5-ampere fuse is fitted in this plug.
Should the fuse need to be replaced please ensure that the replacement fuse has a rating of 5-ampere and that it is approved by ASTA or BSI to BS1362.
Check for the ASTA mark ![]() or the BSI mark
or the BSI mark ![]() on the body of the fuse.
on the body of the fuse.
If the plug contains a removable fuse cover you must ensure that it is refitted when the fuse is replaced.
If you lose the fuse cover the plug must not be used until a replacement cover is obtained.
A replacement fuse cover can be purchased from your local dealer.
Before use
Remove the connector cover.
How to replace the fuse
The location of the fuse differ according to the type of AC mains plug (figures A and B). Confirm the AC mains plug fitted and follow the instructions below.
Illustrations may differ from actual AC mains plug.
- Open the fuse cover with a screwdriver.
- Replace the fuse and close or attach the fuse cover.


Disposal of Old Equipment and Batteries
Only for European Union and countries with recycling systems

These symbols on the products, packaging, and/or accompanying documents mean that used electrical and electronic products and batteries must not be mixed with general household waste.
For proper treatment, recovery and recycling of old products and used batteries, please take them to applicable collection points in accordance with your national legislation. By disposing of them correctly, you will help to save valuable resources and prevent any potential negative effects on human health and the environment.
For more information about collection and recycling, please contact your local municipality.
Penalties may be applicable for incorrect disposal of this waste, in accordance with national legislation.
Note for the battery symbol (bottom symbol): 
This symbol might be used in combination with a chemical symbol. In this case it complies with the requirement set by the Directive for the chemical involved.
Sales and Support Information
For the United Kingdom and Ireland
Customer Communications Centre
- For customers within the UK: 0844 844 3899
- For customers within Ireland: 01 289 8333
- Monday – Friday 9:00am – 5:00pm (Excluding public holidays).
- For further support on your product, please visit our website: www.panasonic.co.uk
Direct Sales at Panasonic UK
- Order accessory and consumable items for your product with ease and confidence by phoning our Customer Communications Centre Monday – Friday 9:00am – 5:00pm (Excluding public holidays).
- Or go on line through our Internet Accessory ordering application at www.pas-europe.com.
- Most major credit and debit cards accepted.
- All enquiries transactions and distribution facilities are provided directly by Panasonic UK.
- It couldn’t be simpler!
- Also available through our Internet is direct shopping for a wide range of finished products. Take a browse on our website for further details.
Specifications
Amplifier section
RMS output power stereo mode
Front Ch (both ch driven) 10 W per channel (6 Ω), 1 kHz, 10% THD
Total RMS stereo mode power 20 W
For Asia and the Middle East
PMPO output power 220 W
Tuner, terminals section
Preset memory FM 30 stations
For Australia and New Zealand
AM 15 stations
Frequency modulation (FM)
Frequency range 87.50 MHz to 108.00 MHz (50 kHz step)
Antenna terminals 75 Ω (unbalanced)
For Australia and New Zealand
Amplitude modulation (AM)
Frequency range 522 kHz to 1629 kHz (9 kHz step)
520 kHz to 1630 kHz (10 kHz step)
Disc section
Disc played (8 cm or 12 cm) CD, CD-R/RW (CD-DA, MP3![]() )
)
Pick up
Wavelength 790 nm (CD)
![]() MPEG-1 Layer 3, MPEG-2 Layer 3
MPEG-1 Layer 3, MPEG-2 Layer 3
USB section
USB port
USB standard USB 2.0 full speed
Media file format support MP3 (*.mp3)
USB device file system FAT12, FAT16, FAT32
USB port power DC OUT 5 V, 500 mA
Bluetooth® section
Version Bluetooth® Ver. 2.1 + EDR
Class Class 2
Supported profiles A2DP, AVRCP
Operating frequency 2.4 GHz band FH-SS
Operation distance 10 m line of sight
Speaker section
Speaker unit(s)
Full range 10 cm cone type x 1 per channel
Impedance 6 Ω
Dimensions (W x H x D) 139 mm x 224 mm x 136 mm
Mass 1.3 kg
General
Power supply
For Asia and the Middle East AC 110 V to 240 V, 50/60 Hz
For others AC 220 V to 240 V, 50 Hz
Power consumption 14 W
Dimensions (W x H x D) 184 mm x 123 mm x 228 mm
Mass 1.1 kg
Operating temperature range 0°C to +40°C
Operating humidity range 35% to 80% RH (no condensation)
Power consumption in standby mode
(With «BLUETOOTH STANDBY» set to «OFF»)
0.2 W (approximate)
Power consumption in standby mode
(With «BLUETOOTH STANDBY» set to «ON»)
0.3 W (approximate)
Note:
- Specifications are subject to change without notice. Mass and dimensions are approximate.
- Total harmonic distortion is measured by the digital spectrum analyzer.
Manufactured by: Panasonic Corporation
Kadoma, Osaka, Japan
Importer for Europe: Panasonic Marketing Europe GmbH
Panasonic Testing Centre
Winsbergring 15, 22525 Hamburg, Germany

Panasonic Corporation
Web Site: http://panasonic.net
© Panasonic Corporation 2014

Here you can download full pdf version of manual, it may contain additional safety instructions, warranty information, FCC rules, etc.
Инструкцию для Panasonic SC-PM250EE-S на русском языке, в формате pdf можно скачать с нашего сайта. Наш каталог предоставляем Вам инструкцию производителя фирмы Panasonic, которая была взята из открытых источников. Ознакомившись с руководством по эксплуатации от Panasonic, Вы на все 100% и правильно сможете воспользоваться всеми функциями устройства.
Для сохранения инструкции «Музыкальный центр Micro Panasonic SC-PM250EE-S» на русском языке на вашем компьютере либо телефоне, нажмите кнопку «Скачать инструкцию». Если активна кнопка «Инструкция онлайн», то Вы можете просмотреть документ (manual), в своём браузере онлайн.
Если у Вас нет возможности скачать инструкцию по эксплуатации либо просмотреть её, Вы можете поделиться ссылкой на эту страницу в социальных сетях и при удобном моменте скачать инструкцию. Либо добавьте эту страницу в закладки Вашего браузера, нажав кнопку «Добавить страницу в закладки браузера».
Перейти к контенту
(скачивание инструкции бесплатно)
Формат файла: PDF
Доступность: Бесплатно как и все руководства на сайте. Без регистрации и SMS.
Дополнительно: Чтение инструкции онлайн

EE
RQT9930-R
Дякуємо
Вам
за
придбання
цього
пристрою
.
Щоб
забезпечити
найбільш
оптимальну
та
безпечну
роботу
,
будь
ласка
,
уважно
ознайомтеся
з
цими
інструкціями
.
Збережіть
цей
посібник
для
майбутнього
використання
.
Инструкция
по
эксплуатации
Інструкція
з
експлуатації
CD-
стереосистема
CD-c
тереосистема
Mo
дель
№
.
SC-PM250
Благодарим
Вас
за
покупку
данного
изделия
.
Для
обеспечения
оптимальной
и
безопасной
p
аботы
системы
внимательно
п
p
очтите
данную
инст
p
укцию
.
Сохраните
инструкцию
для
дальнейших
справок
.
EE_RQT9930-R.book Page 1 Thursday, February 6, 2014 1:29 PM
printing
Страница:
(1 из 32)
навигация

1

2

3

4

5

6

7

8

9

10

11

12

13

14

15

16

17

18

19

20

21

22

23

24

25

26

27

28

29

30

31

32
Оглавление инструкции
- Страница 1 из 33
printing EE_RQT9930-R.book Page 1 Thursday, February 6, 2014 1:29 PM Инструкция по эксплуатации Інструкція з експлуатації CD-стереосистема CD-cтереосистема Moдель №. SC-PM250 Благодарим Вас за покупку данного изделия. Для обеспечения оптимальной и безопасной pаботы системы внимательно пpочтите - Страница 2 из 33
printing EE_RQT9930-R.book Page 2 Thursday, February 6, 2014 1:29 PM Ваша система может отличаться от представленных иллюстраций. Данная инстpукция по эксплуатации пpименима к следующей системе. Система SC-PM250 Основное устройство SA-PM250 Громкоговорители SB-PM02 Меpы предосторожности ОСТОРОЖНО! - Страница 3 из 33
printing EE_RQT9930-R.book Page 3 Thursday, February 6, 2014 1:29 PM Проверьте наличие принадлежностей в комплекте. Выполнение соединений РУССКИЙ Принадлежности, поставляемые в комплекте Подключите сетевой кабель питания переменного тока только после того, как будут подключены все остальные кабели. - Страница 4 из 33
printing EE_RQT9930-R.book Page 4 Thursday, February 6, 2014 1:29 PM Обзор органов управления Выполните действия с помощью пульта ДУ. Вы также можете использовать кнопки, расположенные на основном устройстве, если они не отличаются. A Включение питания/переход в режим ожидания [`], [1] Нажмите - Страница 5 из 33
printing EE_RQT9930-R.book Page 5 Thursday, February 6, 2014 1:29 PM Диск 1 Нажмите [CD x] (основное устройство: [x OPEN/CLOSE]) чтобы открыть лоток для дисков. Поместите диск этикеткой кверху. 3 4 РУССКИЙ Подготовка медиа Нажмите [R, T] чтобы выбрать “OK? YES” и затем нажмите [OK]. Появится - Страница 6 из 33
printing EE_RQT9930-R.book Page 6 Thursday, February 6, 2014 1:29 PM Воспроизведение медиа Следующие знаки указывают на наличие функции. CD : CD-R/RW в формате CD-DA или с файлами MP3. USB : USB-устройство с файлами MP3. BLUETOOTH : Bluetooth®-устройство. Меню воспроизведения CD USB 1 2 Основное - Страница 7 из 33
printing EE_RQT9930-R.book Page 7 Thursday, February 6, 2014 1:29 PM BLUETOOTH Если уровень громкости входящего аудио при передаче через Bluetooth® слишком низкий, настройку уровня громкости входящего аудио можно изменить. 1 2 Pадио Подготовка Нажмите [RADIO]. Ручная настройка Нажмите [PLAY MENU] - Страница 8 из 33
printing EE_RQT9930-R.book Page 8 Thursday, February 6, 2014 1:29 PM █ Выбор предустановленной станции 1 2 3 Нажмите [PLAY MENU] несколько раз для выбора “TUNEMODE”. Нажмите [R, T] чтобы выбрать “PRESET” и затем нажмите [OK]. Нажмите [2/3] или [5/6], чтобы выбрать предварительно настроенную - Страница 9 из 33
printing EE_RQT9930-R.book Page 9 Thursday, February 6, 2014 1:29 PM Таймер сна выключает систему после наступления установленного времени. 1 2 Нажмите [SETUP], чтобы выбрать “SLEEP”. Нажмите [R, T], чтобы выбрать настройку (в минутах), и затем нажмите [OK]. Для отмены выберите “OFF”. Другие - Страница 10 из 33
printing EE_RQT9930-R.book Page 10 Thursday, February 6, 2014 1:29 PM Устранение неисправностей Перед тем как обратиться к специалисту сервисного обслуживания, выполните следующие действия. В случае возникновения сомнения относительно некоторых пунктов проверки или если указанные решения не - Страница 11 из 33
printing EE_RQT9930-R.book Page 11 Thursday, February 6, 2014 1:29 PM “F76” • Возникла проблема с электроснабжением. • Отключите сетевой кабель питания переменного тока и проконсультируйтесь со своим дилером. “NODEVICE” • USB-устройство не подключено. Проверьте соединения. Сброс памяти системы - Страница 12 из 33
printing EE_RQT9930-R.book Page 12 Thursday, February 6, 2014 1:29 PM О Bluetooth® Panasonic не несет ответственности за данные и/или информацию, сохранность которых может быть поставлена под угрозу во время беспроводной передачи. Частотный диапазон • Данная система использует частотный диапазон - Страница 13 из 33
printing EE_RQT9930-R.book Page 13 Thursday, February 6, 2014 1:29 PM █ Блок усилителя █ Блок динамиков Выходная мощность (среднеквадратичная) в стереорежиме Передний канал (оба канала активны) 10 Вт на канал (6 Ом), 1 кГц, 10% THD Полная мощность стерео режима RMS 20 Вт Блок(и) динамиков Полный - Страница 14 из 33
printing EE_RQT9930-R.book Page 14 Thursday, February 6, 2014 1:29 PM – Если Вы увидите такой символ – Информация по обращению с отходами для стран, не входящих в Европейский Союз Действие этого символа распространяется только на Европейский Союз. Если Вы собираетесь выбросить данный продукт, - Страница 15 из 33
RQT9930 РУССКИЙ RQT9930-R_ru.fm Page 15 Thursday, February 6, 2014 2:08 PM 15 15 - Страница 16 из 33
printing EE_RQT9930-R.book Page 2 Thursday, February 6, 2014 1:29 PM Фактичний вигляд вашої системи й ілюстрації системи в цій інструкції можуть відрізнятися. Ця інструкція з експлуатації стосується таких систем. Система SC-PM250 Головній пристрій SA-PM250 Динаміки SB-PM02 Заходи безпеки ОБЕРЕЖНО! - Страница 17 из 33
printing Приладдя у комплекті Виконання підключень Перевірте та ідентифікуйте додане приладдя. Шнур живлення змінного струму під’єднуйте в останню чергу. 1 Шнур живлення змінного струму 1 Кімнатна антена FM-діапазону 1 Пульт ДК 1 (N2QAYB000984) 3 Розміщення акустичних систем 1 УКРАЇНСЬКА - Страница 18 из 33
printing EE_RQT9930-R.book Page 4 Thursday, February 6, 2014 1:29 PM Огляд елементів керування Виконуйте операції за допомогою пульта дистанційного керування. Ви також можете використовувати кнопки, розташовані на головному пристрої, якщо вони виконують аналогічні функції. A Перемикач режимiв - Страница 19 из 33
printing EE_RQT9930-R.book Page 5 Thursday, February 6, 2014 1:29 PM Підготовка носія 2 Натисніть [CD x] (основний пристрій: [x OPEN/CLOSE]) щоб відкрити лоток для дисків. Вставте диск етикеткою вгору. 4 Натисніть щоб закрити лоток для дисків. Примітка: Натисніть [USB/CD], щоб вибрати «CD». Із цією - Страница 20 из 33
printing EE_RQT9930-R.book Page 6 Thursday, February 6, 2014 1:29 PM Відтворення з носія Наведені нижче позначки вказують на доступність функції. CD : Диск CD-R/RW у форматі CD-DA або з MP3 файлами. USB : Пристрій USB з MP3-файлами. Меню відтворення CD USB 1 2 BLUETOOTH : Пристрій Bluetooth®. - Страница 21 из 33
printing EE_RQT9930-R.book Page 7 Thursday, February 6, 2014 1:29 PM 1 2 Підготовка Натисніть [RADIO]. Ручна настройка Натисніть [PLAY MENU] кілька разів поспіль для вибору діапазону «INPUT LEVEL». 1 За допомогою [R, T] встановіть рівень, тоді натисніть [OK]. 2 (за умовчанням) 3 Примітка: Якщо звук - Страница 22 из 33
printing EE_RQT9930-R.book Page 8 Thursday, February 6, 2014 1:29 PM █ Вибір попередньо налаштованої станції 1 2 3 Натисніть [PLAY MENU] кілька разів поспіль для вибору діапазону «TUNEMODE». Натисніть [R, T], щоб вибрати «PRESET», а тоді натисніть [OK]. За допомогою кнопок [2/3] чи [5/6] виберіть - Страница 23 из 33
printing EE_RQT9930-R.book Page 9 Thursday, February 6, 2014 1:29 PM Таймер режиму очікування вимикає систему у встановлений час. 1 2 Натисніть [SETUP], щоб вибрати «SLEEP». За допомогою [R, T] виберіть значення (в хвилинах), тоді натисніть [OK]. Для скасування виберіть «OFF». Інше Автоматичне - Страница 24 из 33
printing EE_RQT9930-R.book Page 10 Thursday, February 6, 2014 1:29 PM Усунення несправностей Перш ніж звертатися до ремонтної служби, прочитайте надані нижче поради. Якщо ви маєте сумніви відносно деяких пунктів перевірки, або якщо перелічені дії не вирішують проблему, зверніться за інструкціями до - Страница 25 из 33
printing EE_RQT9930-R.book Page 11 Thursday, February 6, 2014 1:29 PM «NODEVICE» • Пристрій USB не під’єднано. Перевірте з’єднання. «NO DISC» • Ви не вставили диск. «NO PLAY» • Перевірте вміст. Можна відтворювати тільки підтримуваний формат даних. • Система може бути проблема. Вимкніть систему, а - Страница 26 из 33
printing EE_RQT9930-R.book Page 12 Thursday, February 6, 2014 1:29 PM Про Bluetooth® Компанія Panasonic не несе відповідальності за порушення конфіденційності даних і/або інформації, яка сталася під час їх бездротового передавання. Частотний діапазон • Ця система використовує частотний діапазон 2,4 - Страница 27 из 33
printing EE_RQT9930-R.book Page 13 Thursday, February 6, 2014 1:29 PM Технічні характеристики █ Секція підсилювача █ Характеристики Bluetooth® Середньоквадратичне значення вихідної потужності у стереорежимі Передній канал (по обох каналах) 10 Вт на канал (6 Ом), 1 кГц, 10% THD Середньоквадратичне - Страница 28 из 33
printing EE_RQT9930-R.book Page 14 Thursday, February 6, 2014 1:29 PM – За наявності цього знаку – Інформація щодо утилізації в країнах, які не входять в Європейський Союз Даний символ дійсний тільки на території Європейського Союзу. При потребі утилізації даного виробу зверніться до місцевого - Страница 29 из 33
printing EE_RQT9930-R.book Page 15 Thursday, February 6, 2014 1:29 PM ІНФОРМАЦІЯ ПРО ПІДТВЕРДЖЕННЯ ВІДПОВІДНОСТІ ПРОДУКТУ УКРАЇНСЬКА CD стереосистема моделі SC-PM250* торгової марки “Panasonic” відповідає вимогам Технічного Регламенту з електромагнітної сумісності обладнання (затвердженому - Страница 30 из 33
printing RQT9930 EE_RQT9930-R.book Page 16 Thursday, February 6, 2014 1:29 PM 16 30 - Страница 31 из 33
printing RQT9930 EE_RQT9930-R.book Page 17 Thursday, February 6, 2014 1:29 PM 17 31 - Страница 32 из 33
printing EE_RQT9930-R.book Page 2 Thursday, February 6, 2014 1:29 PM Информационный центр Panasonic Для звонков из Москвы: +7 (495) 725-05-65 Бесплатный звонок по России: 8-800-200-21-00 Інфармацыйны цэнтр Panasonic Для фiксаванай сувязi званок па тэррыторыi Беларусi бясплатны: 8-820-007-1-21-00 - Страница 33 из 33
-
Инструкции по эксплуатации
1

Panasonic SC-PM250EE-S инструкция по эксплуатации
(32 страницы)
- Языки:Русский
-
Тип:
PDF -
Размер:
3.41 MB -
Описание:
Музыкальный центр
На NoDevice можно скачать инструкцию по эксплуатации для Panasonic SC-PM250EE-S. Руководство пользователя необходимо для ознакомления с правилами установки и эксплуатации Panasonic SC-PM250EE-S. Инструкции по использованию помогут правильно настроить Panasonic SC-PM250EE-S, исправить ошибки и выявить неполадки.
-
Contents
-
Table of Contents
-
Troubleshooting
-
Bookmarks
Available languages
-
EN
-
FR
Quick Links
Owner’s Manual
CD Stereo System
SC-PM250
Model No.
Thank you for purchasing this product.
For optimum performance and safety, please read these instructions carefully.
Please keep this manual for future reference.
If you have any questions, visit
www.panasonic.ca/english/support
PC
RQT0A12-C
Related Manuals for Panasonic SC-PM250
Summary of Contents for Panasonic SC-PM250
-
Page 1
Owner’s Manual CD Stereo System SC-PM250 Model No. Thank you for purchasing this product. For optimum performance and safety, please read these instructions carefully. Please keep this manual for future reference. If you have any questions, visit www.panasonic.ca/english/support RQT0A12-C… -
Page 2: Important Safety Instructions
Your system and the illustrations can look differently. User memo: These operating instructions are applicable to the DATE OF PURCHASE following system: DEALER NAME System SC-PM250 DEALER ADDRESS Main unit SA-PM250 Speakers SB-PM02 TELEPHONE NUMBER The model number and serial number of this product can be found on either the back or the bottom of the unit.
-
Page 3: Safety Precautions
Safety precautions WARNING! CAUTION: TO REDUCE THE RISK OF ELECTRIC Unit SHOCK, DO NOT REMOVE SCREWS. • To reduce the risk of fire, electric shock or product NO USER-SERVICEABLE PARTS damage, INSIDE. – Do not expose this unit to rain, moisture, dripping or REFER SERVICING TO QUALIFIED splashing.
-
Page 4: Table Of Contents
Fraunhofer IIS and Thomson. The Bluetooth ® word mark and logos are registered trademarks owned by the Bluetooth SIG, Inc. and any use of such marks by Panasonic Corporation is under license. Other trademarks and trade names are those of their respective owners.
-
Page 5: Making The Connections
Making the connections Placement of speakers Connect the AC power supply cord only after all the other connections have been made. SPEAKERS (SB-PM02) The left and right speakers are the same. You cannot remove the net of the speakers. Use only the supplied speakers. You can cause damage to the system and decrease the sound quality if you use other speakers.
-
Page 6: Overview Of Controls
Overview of controls Do the procedures with the remote control. You can also use the buttons on the main unit if they are the same. Standby/on switch [`], [1] USB port ( Press to switch the unit from on to standby mode or Disc tray vice versa.
-
Page 7: Preparing The Media
Press [R, T] to select “OK? YES” and then press Preparing the media [OK]. “PAIRING” is shown. To cancel, select “OK? NO”. Disc Select “SC-PM250” from the Bluetooth menu of ® the device. Press [CD x] (main unit: [x OPEN/CLOSE]) to If prompted for a passkey, input “0000”.
-
Page 8: Media Playback
Play menu Media playback CD USB The following marks indicate the availability of the Press [PLAY MENU] repeatedly to select feature. “PLAYMODE” or “REPEAT”. CD-R/RW in CD-DA format or with MP3 files. Press [R, T] to select the setting and then press USB device with MP3 files.
-
Page 9: Radio
Input level Radio BLUETOOTH Preparation You can change the input level setting if the sound input Press [RADIO]. level of the Bluetooth ® transmission is too low. Press [PLAY MENU] repeatedly to select Manual tuning “INPUT LEVEL”. Press [R, T] to select the level and then press Press [PLAY MENU] repeatedly to select [OK].
-
Page 10: Clock And Timers
█ Selecting a preset station Clock and timers Press [PLAY MENU] repeatedly to select “TUNEMODE”. Setting the clock Press [R, T] to select “PRESET” and then press [OK]. This is a 12-hour clock. Press [2/3] or [5/6] to select the preset Press [SETUP] repeatedly to select “CLOCK”.
-
Page 11: Sound Effects
Sleep timer Others The sleep timer switches off the system after the set time. Press [SETUP] to select “SLEEP”. Auto off Press [R, T] to select the setting (in minutes) and This system automatically switches off when you do not then press [OK].
-
Page 12: Troubleshooting
® the speakers through excessive volume or power, and audio output to “SC-PM250” manually. Read the operating when using the system in a hot environment. instructions of the device for details. A humming sound can be heard during playback.
-
Page 13: Remote Control Code
█ Main unit displays Remote control code “—:—” When other Panasonic equipment responds to the remote • You connected the AC power supply cord for the first time control of this system, change the remote control code for or there was a power failure recently. Set the clock.
-
Page 14: Specifications
Specifications █ █ Amplifier section Speaker section RMS output power stereo mode Speaker unit(s) Front Ch (both ch driven) Full range 10 cm (4″) cone type x 1 per channel 10 W per channel (6 Ω), 1 kHz, 10% THD 6 Ω…
-
Page 15: Limited Warranty
One (1) year, parts and labour This warranty is given only to the original purchaser, or the person for whom it was purchased as a gift, of a Panasonic brand product mentioned above sold by an authorized Panasonic dealer in Canada and purchased and used in Canada, which product was not sold “as is”, and which product was delivered to you in new condition in the original…
-
Page 16
Panasonic Canada Inc. 5770 Ambler Drive Mississauga, Ontario L4W 2T3 www.panasonic.com RQT0A12-C © Panasonic Corporation 2015 Printed in Malaysia L0315CH0… -
Page 17
Panasonic Canada Inc. 5770 Ambler Drive Mississauga, Ontario L4W 2T3 www.panasonic.com RQT0A12-C © Panasonic Corporation 2015 Imprimé en Malaisie L0315CH0… -
Page 18
La présente garantie n’est fournie qu’à l’acheteur original d’un des produits de marque Panasonic indiqués plus haut, ou à la personne l’ayant reçu en cadeau, vendu par un détaillant Panasonic agréé au Canada et utilisé au Canada. Le produit ne doit pas avoir été « vendu tel quel » et doit avoir été livré à l’état neuf dans son emballage d’origine. -
Page 19
Spécifications █ █ Section amplificateur Section enceintes Puissance de sortie eff. en mode stéréo Enceinte(s) Canal avant (les deux canaux en circuit) Pleine gamme 10 W par canal (6 Ω), 1 kHz, 10 % DHT 10 cm (4 po) de type cône x 1 par canal Puissance eff. -
Page 20
█ Messages affichées Code de télécommande « —:— » Si d’autres appareils Panasonic réagissent au signal de la • Il s’agit de la première mise sous tension de l’appareil ou télécommande, changer le code sur cet appareil. une panne de courant est survenue récemment. Régler l’horloge. -
Page 21
• Vérifier la mise en place de la pile. nécessaire de régler manuellement la sortie audio sur « SC-PM250 ». Pour de plus amples détails, se reporter à la Présence de distorsion ou absence de son. notice d’utilisation du dispositif. -
Page 22
Minuterie-sommeil Autres La minuterie-sommeil met la chaîne hors marche après le laps de temps prédéterminé. Mise hors marche automatique Appuyer sur [SETUP] pour sélectionner « SLEEP ». Cette chaîne est mise hors marche automatiquement si Appuyer sur [R, T] pour sélectionner le réglage vous ne l’utilisez pas depuis 20 minutes. -
Page 23
█ Sélection d’une adresse mémoire Horloge et minuteries Appuyer à plusieurs reprises sur [PLAY MENU] pour sélectionner « TUNEMODE ». Réglage de l’horloge Appuyer sur [R, T] pour sélectionner « PRESET » puis appuyer sur [OK]. L’horloge fonctionne sur un cycle de 12 heures. Appuyer sur [2/3] ou [5/6] pour Appuyer à… -
Page 24: Syntonisation Manuelle
Niveau d’entrée Radio BLUETOOTH Préparatifs Il est possible de modifier le réglage du niveau d’entrée si Appuyer sur [RADIO]. le niveau d’entrée sonore de la transmission Bluetooth ® est trop faible. Syntonisation manuelle Appuyer à plusieurs reprises sur [PLAY MENU] pour sélectionner «…
-
Page 25
Menu de lecture Lecture multimédia CD USB Les identifications suivantes indiquent la disponibilité de Appuyer à plusieurs reprises sur [PLAY MENU] cette fonction. pour sélectionner « PLAYMODE » ou « REPEAT ». CD-R/RW en format CD-DA ou avec des fichiers MP3. Appuyer sur [R, T] pour sélectionner le réglage Dispositif USB avec des fichiers MP3. -
Page 26
« PAIRING » est affiché. disque. Pour annuler, sélectionner « OK? NO ». Mettre un disque en place, étiquette vers le haut. Sélectionner « SC-PM250 » dans le menu Bluetooth ® du dispositif. Si un message demande à entrer un mot de passe, entrer «… -
Page 27: Emplacement Des Commandes
Emplacement des commandes Les opérations décrites dans ce manuel sont pilotées à partir de la télécommande, mais il est possible d’utiliser les mêmes commandes sur l’appareil. Interrupteur de marche/attente [`], [1] Capteur de signal de la télécommande Appuyer sur cet interrupteur pour commuter l’appareil Distance : à…
-
Page 28
Raccordements Positionnement des enceintes Brancher le cordon d’alimentation secteur dans la prise secteur une fois que tous les autres raccordements ont été effectués. SPEAKERS Les enceintes de gauche et de droite sont identiques. (SB-PM02) Il n’est pas possible de retirer le treillis recouvrant les enceintes. -
Page 29: Accessoires Fournis
Le nom de marque et les logos Bluetooth ® sont des marques de commerce déposées et détenues par Bluetooth SIG, Inc. et leur utilisation par Panasonic Corporation fait l’objet d’une licence. Les autres marques de commerce sont la propriété de leurs détenteurs respectifs.
-
Page 30
Mesures de sécurité AVERTISSEMENT ! AVIS: AFIN DE PRÉVENIR LE RISQUE DE CHOCS Appareil ÉLECTRIQUES, NE PAS RETIRER LES VIS. • Pour réduire les risques d’incendie, de choc électrique TOUTE RÉPARATION DEVRAIT ÊTRE ou de dommage à l’appareil, CONFIÉE À UN PERSONNEL QUALIFIÉ. –… -
Page 31: Importantes Mises En Garde
à l’arrière, ou sous le fond de l’appareil, et de conserver ce manuel pour référence ultérieure. NUMÉRO DE MODÈLE SC-PM250 NUMÉRO DE SÉRIE IMPORTANTES MISES EN GARDE Avant d’utiliser l’appareil, lire attentivement les instructions qui suivent. Se conformer tout particulièrement aux avertissements inscrits sur l’appareil et aux consignes de sécurité…
-
Page 32
Manuel d’utilisation Chaîne stéréo avec lecteur CD SC-PM250 Modèle Nous vous remercions d’avoir arrêté votre choix sur cet appareil. Pour en tirer un rendement optimal et par mesure de sécurité, lire attentivement le présent manuel. Conserver ce manuel pour référence ultérieure.
Музыкальные центры Panasonic SC-PM250 — инструкция пользователя по применению, эксплуатации и установке на русском языке. Мы надеемся, она поможет вам решить возникшие у вас вопросы при эксплуатации техники.
Вы можете скачать инструкцию к Panasonic SC-PM250 по ссылке ниже, если не хотите ждать загрузки. Если остались вопросы, задайте их в комментариях после инструкции.
«Загружаем инструкцию», означает, что нужно подождать пока файл загрузится и можно будет его читать онлайн. Некоторые инструкции очень большие и время их появления зависит от вашей скорости интернета.
Полезные видео
Остались вопросы?
Не нашли свой ответ в руководстве или возникли другие проблемы? Задайте свой вопрос в форме ниже с подробным описанием вашей ситуации, чтобы другие люди и специалисты смогли дать на него ответ. Если вы знаете как решить проблему другого человека, пожалуйста, подскажите ему
![:)]()
Часто задаваемые вопросы

Как посмотреть инструкцию к Panasonic SC-PM250?
Необходимо подождать полной загрузки инструкции в сером окне на данной странице или скачать кликнув по специальной кнопке.
Руководство на русском языке?
Все наши руководства представлены на русском языке или схематично, поэтому вы без труда сможете разобраться с вашей моделью
Как можно распечатать инструкцию?
Скачайте ее по специальной кнопке над формой чтения на ваше устройства и отправьте на печать.
-
Инструкции по эксплуатации
1
Panasonic SC-PM250EE-S инструкция по эксплуатации
(32 страницы)
- Языки:Русский
-
Тип:
PDF -
Размер:
3.41 MB -
Описание:
Музыкальный центр
Просмотр
На NoDevice можно скачать инструкцию по эксплуатации для Panasonic SC-PM250EE-S. Руководство пользователя необходимо для ознакомления с правилами установки и эксплуатации Panasonic SC-PM250EE-S. Инструкции по использованию помогут правильно настроить Panasonic SC-PM250EE-S, исправить ошибки и выявить неполадки.