TE 506.. / TE 509..
siemens-home.com/welcome
en Instruction manual
fr Mode d’emploi
pl Instrukcjaobsługi
nl Gebruiksaanwijzing
cs Návodkpoužití
ru Инструкцияпоэксплуатации
Register
your
product
online
c
a
b
E-Nr. ……… FD… …
TE509
d
e f g
A
4
1 2 3
18
17
16
15
14
5
13
12
11
6
10
9
TE509
22
8 7
en ���������������������������������������������������������������������������������������������������������������������������������2
fr �������������������������������������������������������������������������������������������������������������������������������22
pl �������������������������������������������������������������������������������������������������������������������������������43
nl �������������������������������������������������������������������������������������������������������������������������������65
cs �������������������������������������������������������������������������������������������������������������������������������86
ru �����������������������������������������������������������������������������������������������������������������������������106
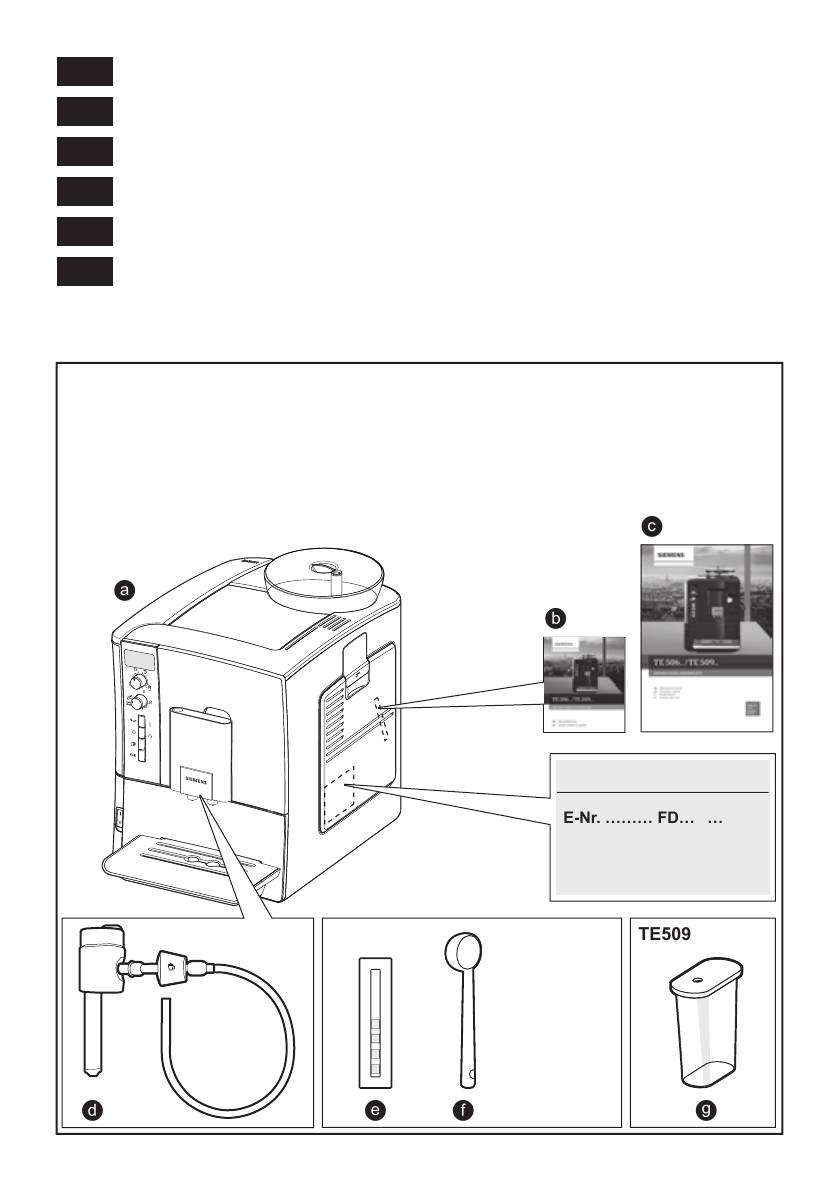
Included in delivery (see page 2)
Contenu de l’emballage (voir page 22)
Zakres dostawy (patrz strona 43)
Leveringsomvang (zie pagina 65)
Součást dodávky (viz strana 86)
Объем поставки (см. стр. 106)
A
4
1 2 3
18
17
16
15
14
5
13
12
11
6
10
9
TE509
22
8 7
B
19
2021
C D
8a
8b
6e
6d
8e
6a
8c
6b
6c
8d
E
5c
2.
5f
5a
5b
5d
1.
5e
1.
2.

deen
Dear Coffee Connoisseur,
Table of Contents
Congratulations on purchasing this fully
Included in delivery ������������������������������������� 2
automatic espresso machine from Siemens�
Safety instructions ��������������������������������������3
These instructions describe various models
Overview�����������������������������������������������������5
with different features�
Controls ������������������������������������������������������5
Please also note the enclosed quick refer-
Display messages ��������������������������������������6
ence guide� It can be kept in the special
aromaDouble Shot��������������������������������������6
storage compartment (5c) until it is needed�
Before using for the rst time����������������������7
Water lter ��������������������������������������������������8
Menu settings ���������������������������������������������9
Included in delivery
Adjusting the grinding unit ������������������������10
Preparation using coffee beans ���������������� 10
(see overview image at the start of the
Preparation using ground coffee ������������� 11
instructions)
Dispensing hot water �������������������������������� 11
Preparing milk froth and warm milk ����������12
a Fully automatic espresso machine
Maintenance and daily cleaning ���������������12
TE506/TE509
Tips on energy saving ������������������������������15
b Quick reference guide
Service Programmes ��������������������������������15
c Instruction manual
Frost protection�����������������������������������������18
d Milk frother
Accessories ����������������������������������������������18
e Water hardness testing strip
Disposal ���������������������������������������������������� 19
f Measuring spoon
Guarantee�������������������������������������������������19
Technical data�������������������������������������������19
Only for TE509
Simple troubleshooting �����������������������������20
g Milk container
2

deen
Safety instructions
Please read and follow the operating instructions carefully and
keep them for later reference. Enclose these instructions when
you give this appliance to someone else. This appliance is
designed for the preparation of normal household quantities in
the home, or in household-like, non-commercial environments.
Household-like environments include staff kitchens in shops,
of ces, agricultural and other small businesses or for use by
guests at bed-and-breakfast establishments, small hotels and
similar residential facilities.
¡ Danger of electric shock!
Connect and operate the appliance only according to the type plate
speci cations. To avoid potential hazards, repairs such as replacing
a damaged cable must only be carried out by our customer service
personnel�
This appliance may be used by children aged 8 years and older and
by persons with reduced physical, sensory or mental capabilities
or who lack experience and/or knowledge if they are supervised or
have been given instruction in the safe use of the appliance and
have understood the dangers involved� Keep children under 8 years
of age away from the appliance and connecting cable and do not
allow them to use the appliance� Children shall not play with the
appliance� Cleaning and user maintenance shall not be made by
children unless they are older than 8 years and supervised�
Never immerse the appliance or mains cable in water� Use only if
power cord and appliance show no signs of damage� Should a fault
occur, pull the plug or disconnect from the mains immediately�
3

deen
¡ Risk of suffocation!
Do not allow children to play with packaging material�
¡ Risk of scalding!
The milk frother outlet (6a) gets very hot� After use, allow to cool
down rst before touching.
Use this appliance only after the milk frother (6) has been fully
assembled and installed�
¡ Risk of injury!
Do not reach into the grinding unit�
4

deen
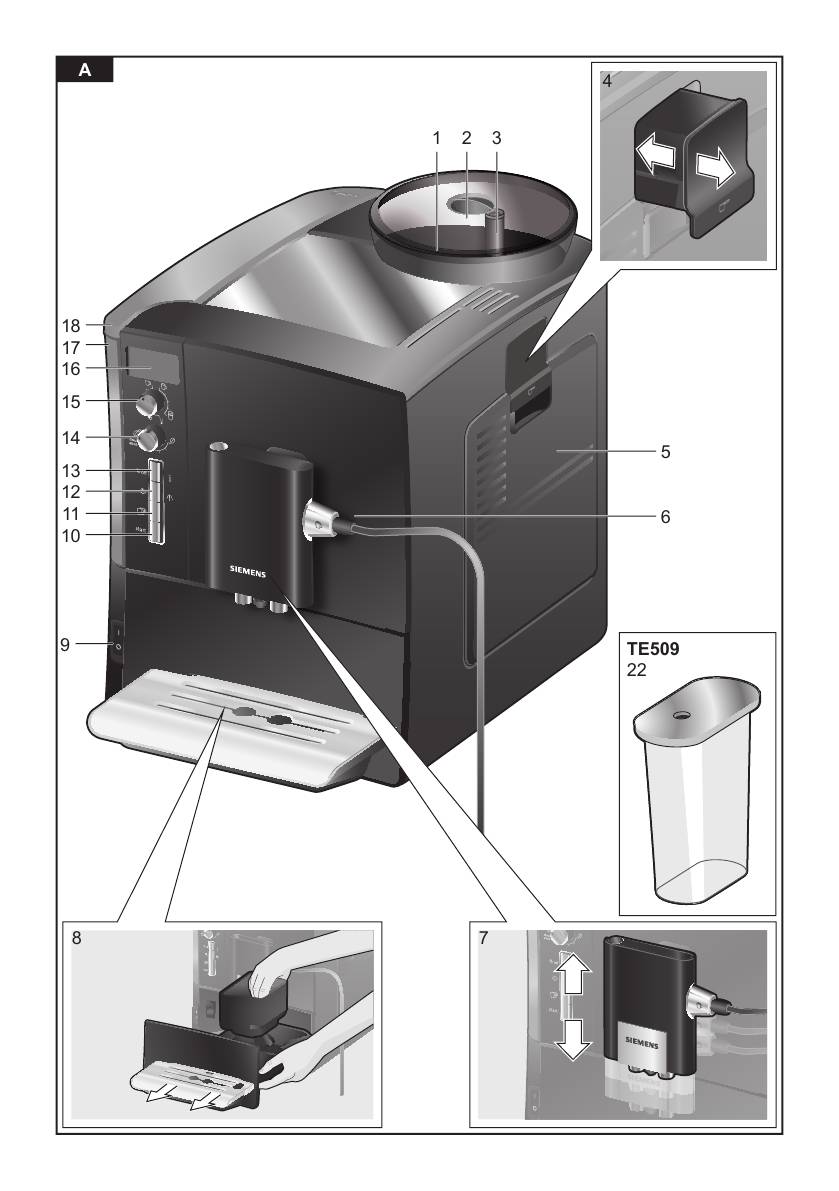
Overview
Controls
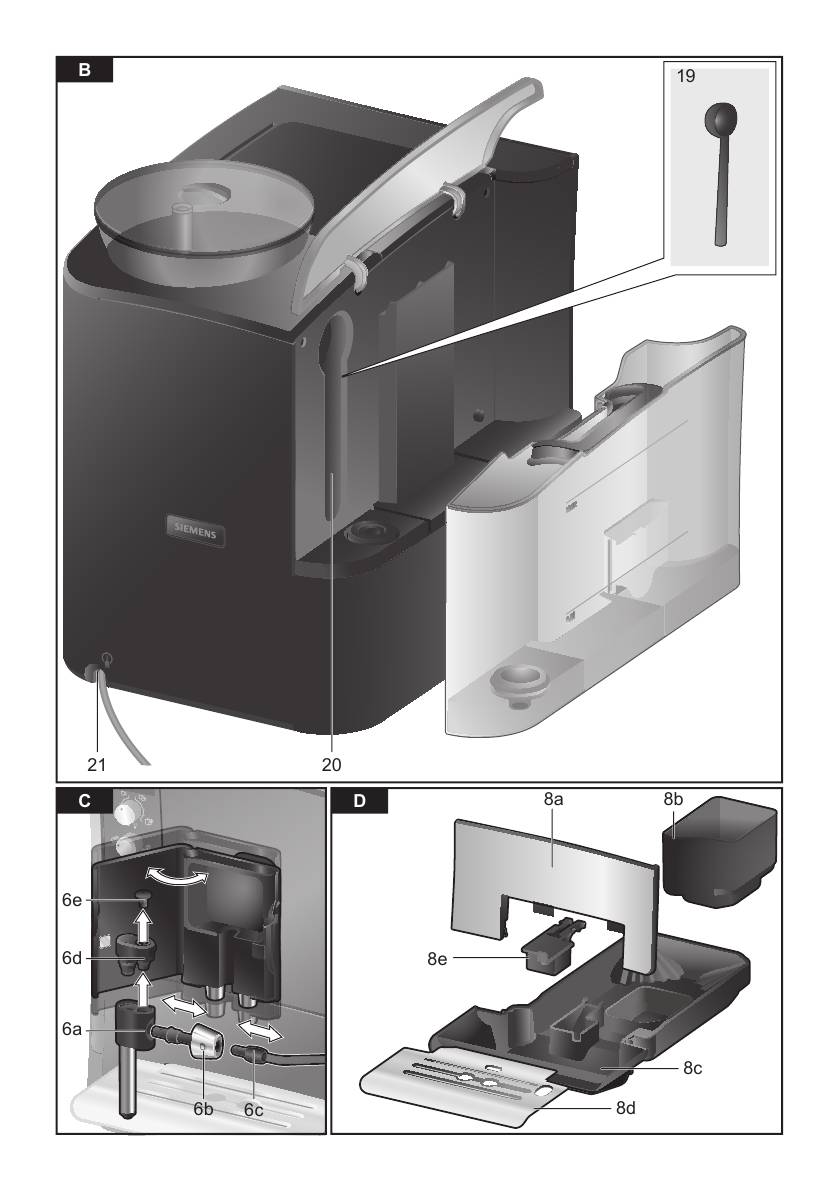
(see overview images A, B, C, D and E at
Power on/off switch O / I
the beginning of this instruction manual)
The power switch O / I (9) is used to switch
1 Bean container
the appliance on or to switch it off fully
2 Aroma cover
(power supply off)�
3 Selector for grind setting
Important: Before switching off, run the
4 Drawer (ground coffee/cleaning tablet)
cleaning programme or use the e off / j
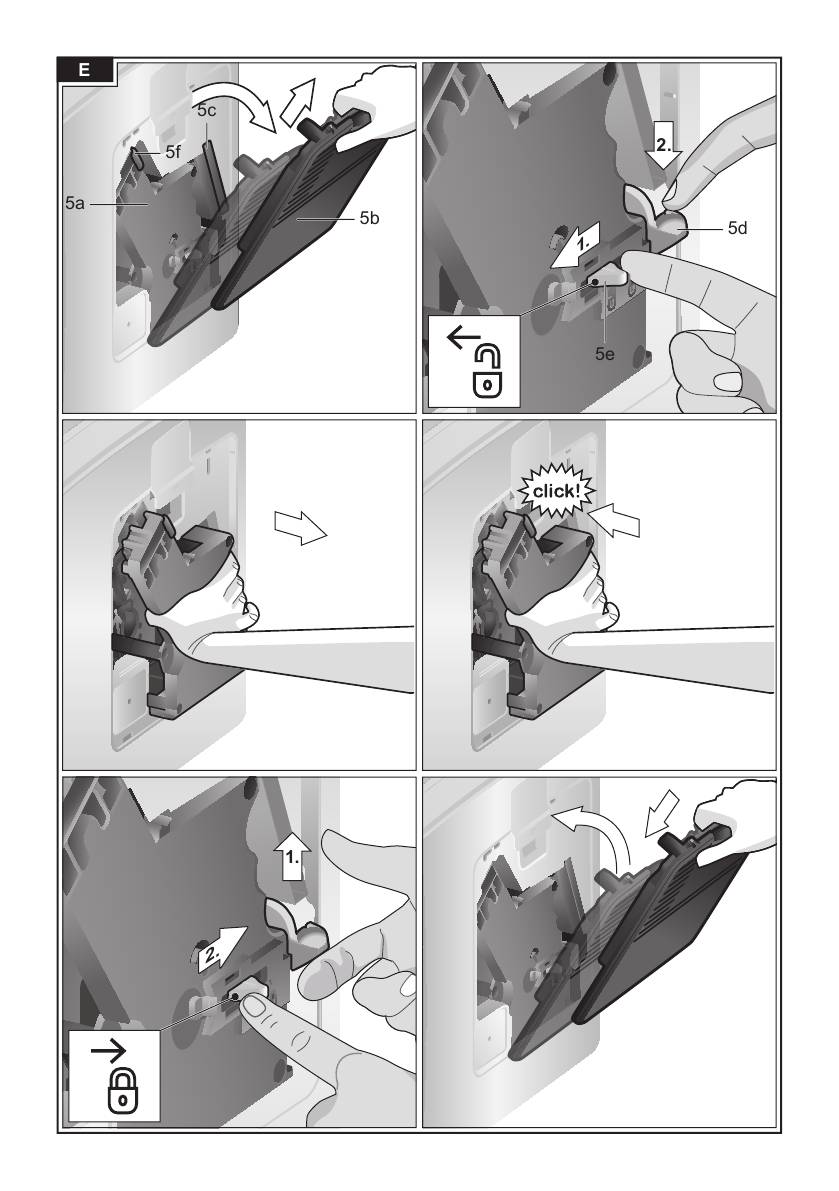
5 Brewing unit (Fig. E)
button (13) to switch off�
a) Brewing unit
b) Door
d button
c) Storage compartment for quick
Press the d button (11) to prepare
reference guide
two cups of the selected drink at the
d) Eject lever for brewing unit
same time� The button can be activated
e) Lock
for drinks without milk and without the
f) Cover
aromaDouble Shot function�
6 Milk frother (Fig. C) removable
a) Outlet
e off / j button
b) Rotary selector for warm milk/
When the e off / j button (13) is pressed
milk froth
briey, the appliance rinses and switches
c) Milk tube
off� Pressing and holding down the e off / j
d) Upper part
button (13) displays the user settings or
e) Air nozzle
starts the descaling and cleaning function�
7 Coffee outlet, height-adjustable
8 Drip tray (Fig. D)
h / g button
a) Drip tray panel
Press the h / g button (12) to generate
b) Coffee grounds container
steam for preparing milk froth or warm milk�
c) Drip tray for coffee outlet
This button is also used to dispense hot
d) Grate for coffee outlet
water�
9 Power on/off switch O / I
10 start button
start button
11
d
button
Press the start button (10) to begin drink
12
h / g button
preparation or to start a service programme�
13 e off / j button
Press the start button (10) again during
14 “Coffee strength” rotary knob
drink preparation to cut the dispensing
15 “Drink selection” rotary knob
process short�
16 Display
17 Removable water tank
18 Lid for water tank
19 Measuring spoon
(insertion aid for water lter)
20 Storage compartment for
measuring spoon
21 Power cable with storage compartment
ONLY FOR TE509
22 Milk container
5
deen
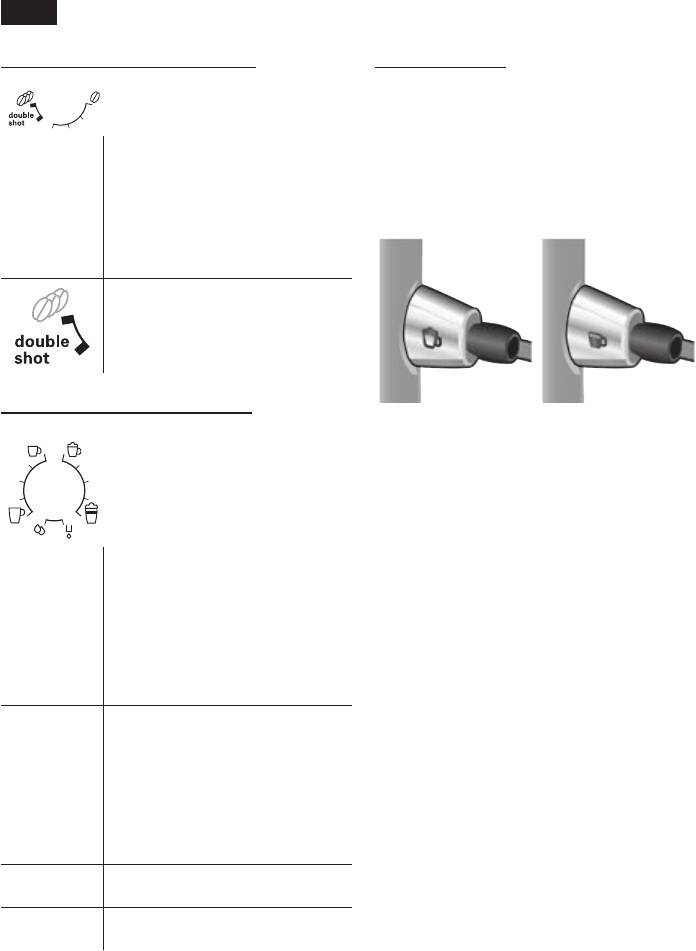
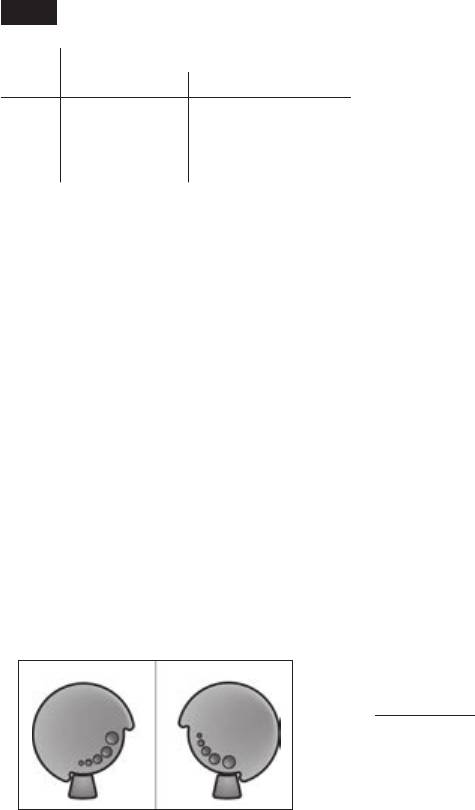
“Coffee strength” rotary knob
Rotary selector
To dispense milk froth – for example for a
This rotary knob (14) is used
latte macchiato or cappuccino – turn the
j
to set the coffee strength�
symbol to the front�
To dispense warm milk, turn the
i symbol
Very mild
h
to the front�
Mild
To dispense hot water, set the rotary
Normal
selector to the horizontal position�
to
Strong
DoubleShot strong+
g
DoubleShot strong++
With these coffee strengths
the coffee is brewed in
2 stages� See “aromaDouble
Shot”�
“Drink selection” rotary knob
This rotary knob (15) is used
to select the required drink
Display messages
and the per-cup quantity� It
is also used to change user
The display (16) shows not only the current
settings�
operating status, but also various messages
that give you status information or let
Coffee-based drinks without
you know when you need to take action�
milk:
As soon as you have taken the necessary
a
Small Espresso
action, the message disappears and the
Espresso
menu for drink selection is displayed again�
to
Small Café Crème
Café Crème
c
Large Café Crème
aromaDouble Shot
Coffee-based drinks with
milk:
The longer the coffee is brewed, the more
m
Small Cappuccino
bitter substances and undesired aromas
Large Cappuccino
are released� This has a negative effect on
to
Small Macchiato
the taste and makes the coffee less easily
Macchiato
digestible� So for extra strong coffee the
n
Large Macchiato
TE506/TE509 has a special aromaDouble
Shot function� When half the quantity
Rinse machine
e
has been prepared, coffee is ground and
brewed again so that only the pleasant,
Rinse milk system
f
aromatic scents are released�
N.B.: If a drink is selected that cannot be
prepared,
Invalid combination appears in
the display� Change the coffee strength or
the selected drink�
6
deen
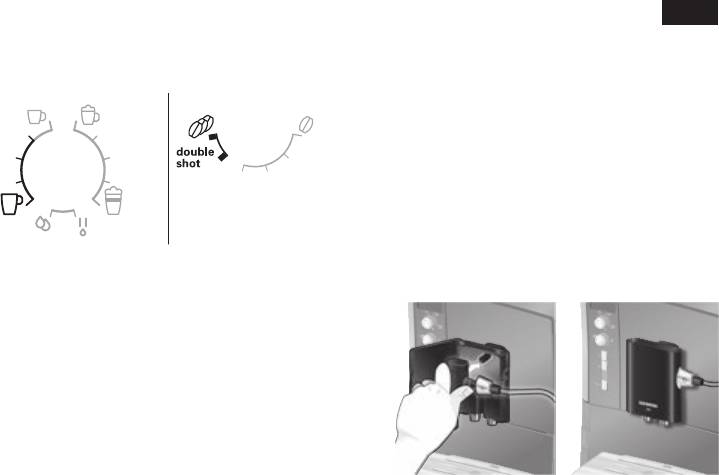
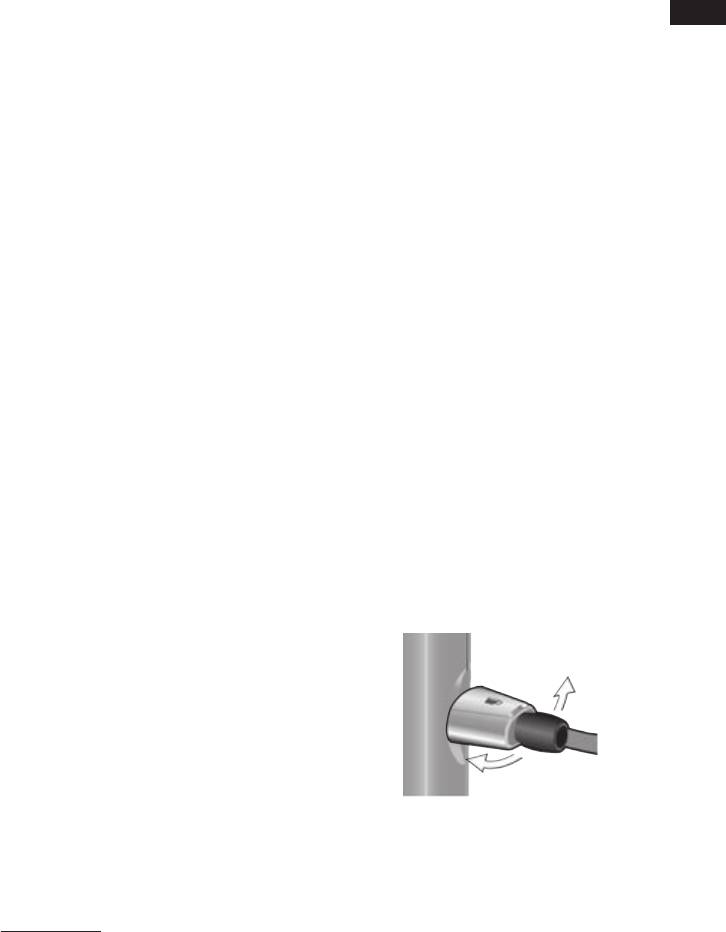
The aromaDouble Shot function is activated
3� Pull the power cord out of the storage
with the following settings:
compartment (21) and plug in� Adjust
the length of the cable by pushing it
back in or pulling it out� The easiest way
to do this is to place the appliance so
that its back is ush with the edge of the
counter and either pull the cable down-
ward or push it upward�
4� Install the milk frother� Operate the
machine only after the milk frother (6)
has been fully assembled and installed�
Before using for
the rst time
General
Fill the appropriate container using only
pure, cold, uncarbonated water and only
roasted beans (preferably espresso or
coffee bean blends for fully automatic coffee
machines)� Do not use coffee beans that
have been glazed, caramelised or treated
with other additives containing sugar, since
5� Lift the lid of the water tank (18)�
they will block the brewing unit�
6� Remove and rinse the water tank (17)
The water hardness setting can be adjusted
and ll it with fresh cold water.
on this appliance� The factory default setting
Do not ll above the max mark�
for the water hardness is 4� Check the
7� Replace the water tank (17) and push it
water hardness with the enclosed test strip�
rmly downward into place.
If the check reveals a value other than 4,
8� Close the lid of the water tank (18)
change the setting on the appliance accord-
again�
ingly after switching on (see “Menu settings”
9� Fill the bean container (1) with coffee
Water hardness)�
beans (for preparation using ground
coffee, see “Preparation using
Switching on the appliance
ground coffee”)�
1� Remove the protective lm.
10� Press the power switch O / I (9)� The
2� Place the fully automatic espresso
display (16) shows the menu for setting
machine on a at, water-resistant
the display language�
surface that can take its weight� Make
11� Select the required display language
sure that the machine’s ventilation slots
with the upper rotary knob (15)�
remain unobstructured�
The following languages are available:
English Nederlands
Important: Only use the appliance in
Français Italiano
frost-free rooms� If the appliance has been
Svenska Español
transported or stored at temperatures below
Polski Magyar
0 °C, wait at least 3 hours before operation�
Türkçe Dansk
Norsk Suomi
Português Čeština
Ελληνικα Български
Русский
7
deen
12� Place a receptacle under outlet (6a)�
Water lter
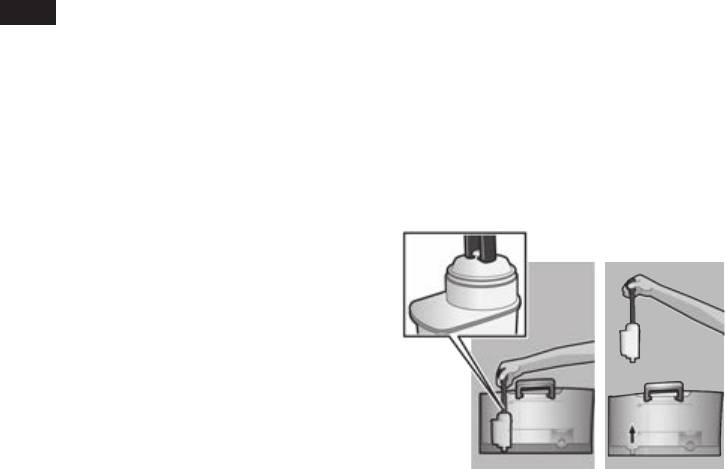
13� Press the start button (10)�
The language you selected is saved�
A water lter can prevent scale buildup.
The appliance heats up and rinses� Some
Before a new water lter is used, it must be
water will run out of the coffee outlet�
rinsed� To do this, proceed as follows:
When the drink selection menu is shown in
1� Press the water lter rmly into the
the display, the appliance is ready for use�
water tank with the aid of the measuring
spoon (19)�
Switching off the appliance
The factory settings of the fully automatic
espresso machine are programmed for
optimal performance� The appliance
switches off automatically after a specic
time (time span can be programmed, see
“Menu settings” Shut off)�
Exception: The appliance switches off
without rinsing if only hot water or steam
were dispensed�
To switch the appliance off manually before
this, press the e off / j button (13)�
2� Fill the water tank (17) with water up to
The appliance rinses and switches off�
the max mark�
3� Press and hold the
e off / j button (13)
N.B.: If the appliance is being used for the
for at least three seconds� The menu
rst time, a service program has been run,
opens�
or the appliance has not been operated
4� Press the e off / j button (13)
for a long period, the rst beverage will
repeatedly until the display shows
not have the full aroma and should not be
No/Oldfilter�
consumed�
5� Select Activate filter with the upper
rotary knob (15)�
When using the espresso machine for the
6� Press the start button (10)�
rst time, you will achieve a suitably thick
7� Place a receptacle with a capacity of
and stable “crema” only after the rst few
0�5 litres under the outlet (6a)�
cups have been dispensed�
8� Press the start button (10)�
9� Water will now ow through the lter to
After extended use, water droplets may
rinse it�
form on the ventilation slots� This is normal�
10� Empty the container�
The appliance is ready to use once more�
Note: Rinsing the lter simultaneously
activates the setting for the Change filter!
display�
8
deen
The lter is no longer effective when the
You can set the following:
Change filter! display appears, or at
the latest after 2 months� It needs to be
Shut off: Here you can set the time
replaced for reasons of hygiene and so
span after which the appliance automati-
that there is no build-up of limescale (this
cally switches off following the last drink
could damage the appliance)� Replacement
preparation� A time between 15 minutes and
lters can be obtained from retailers or from
4 hours can be set� The default time can be
customer service (see “Accessories”)� If no
shortened to save energy�
new lter is used, turn the filter setting to
To save power you can specify a shorter
No / Old�
period�
Note: You can use the lter indicator to
Filter: Here you can set whether a water
mark the month in which you inserted the
lter is being used. If a water lter is not
lter. You can also mark the month in which
being used, turn the setting to
No / Old� If
you will need to replace the lter next (at
a water lter is being used, turn the setting
the latest after two months)�
to
Activate filter. New water lters have
to be rinsed before use (see “Water lter”).
Start Calc‘n‘Clean: The service
programmes (
Calc‘n‘Clean / descaling /
cleaning) can be selected manually
here� Press the start button (10) and run
the selected programme (see “Service
Programmes”)�
Note: If the appliance has not been used
Temp.: The brewing temperature (high /
for a prolonged period (e�g� vacation) the
middle / low) can be set here�
lter should be rinsed before the appliance
is used again� To do so, dispense a cup of
Language: The display language can be
hot water and pour it away�
set here�
Water hardness: The water hardness
Menu settings
setting can be adjusted on this appliance�
It is important to set the water hardness
You can adapt the appliance to your indi-
correctly, so that the appliance indicates
vidual needs in the menu settings�
accurately when the descaling programme
1� Hold the e off / j button (13) down for
should be run� The factory setting for the
at least 3 seconds�
water hardness is 4�
2� Press the e off / j button (13) repeat-
You can check the water hardness using
edly until the required menu item
the enclosed test strip or by asking your
appears in the display�
local water supplier�
3� Select the required setting with the
Dip the test strip briey in water, gently
upper rotary knob (15)�
shake off any drips, and check the result
4� Conrm by pressing the start
after one minute�
button (10)�
To leave the menu without making any
changes, turn the rotary selector to Exit and
press the start button (10)�
9
deen
Level Water hardness
Preparation using
German (°dH) French (°fH)
coffee beans
1
1-7
1-13
2
8-14
14-25
This fully automatic espresso machine
3
15-21
26-38
grinds beans freshly for each brew�
4
22-30
39-54
The appliance must be ready for use� To
Drink counter: This displays how many
prepare a coffee-based drink with milk, rst
drinks have been dispensed since the appli-
insert the milk tube into a milk container
ance was rst put into operation.
and turn the rotary selector (6b) to “Milk
froth” j�
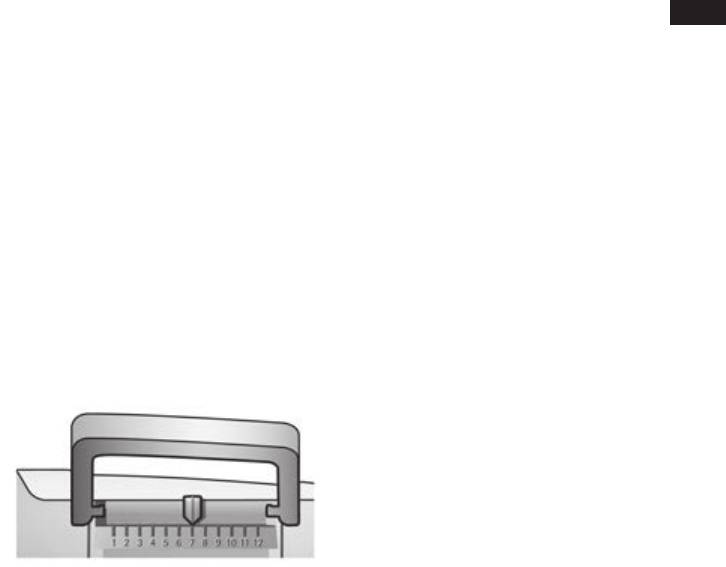
Adjusting the
Important: Dried milk residue is difcult
to remove, so the milk frother (6) must be
grinding unit
cleaned with lukewarm water immediately
The rotary selector (3) adjusts the grind
after use and rinse using the Clean milk
settings from coarse to ne.
system programme�
A
Warning!
Tip: If possible, use only beans for fully
Adjust the grinding unit only while it is
automatic coffee and espresso machines�
running! Otherwise the appliance may be
For optimal quality, deep-freeze the beans
damaged� Do not reach into the grinding
or store in a cool place in sealed containers�
unit�
Coffee beans can be ground while frozen�
● While the grinding unit is running, adjust
the rotary selector (3) from ne (a: Turn
Important: Fill the water tank (17) with
anticlockwise) to coarse (b: Turn clock—
fresh water every day� The tank (17) should
wise) as required�
always contain sufcient water for operating
the appliance�
a b
Preparation
1� Place the pre-warmed cup(s) under the
coffee outlet (7)�
Tip: For a small espresso, always
preheat the cup, e�g� using hot water�
2� Select the required coffee and the
Note: The new setting will not become
required per-cup quantity by turning the
apparent until after the second cup of
upper rotary knob (15)� The selected
coffee�
coffee and the per-cup quantity are
shown in the display�
Note: If the message
Please adjust
3� Select the required coffee strength by
grinding unit to coarser setting!
turning the lower rotary knob (14)� The
appears in the display, the grind setting
selected coffee strength is shown in
for the coffee beans is too ne. Adjust the
the display� To prepare two cups at the
grinding unit to a coarser setting�
same time, press the d button (11)
(only for drinks without milk and without
Tip: For dark roast coffee beans, choose a
the aromaDouble Shot function)�
ner grind, for lighter beans a coarser grind.
4� Press the start button (10)�
10
deen
Coffee is brewed and then poured into the
4� Select the required drink by turning the
cup(s)�
upper rotary knob (15) (only one cup
possible)�
N.B.: With some settings the coffee is
5� Press the start button (10)�
prepared in two stages (see “aromaDouble
Coffee is brewed and then poured into the
Shot”)� Wait until the procedure is fully
cup�
completed�
N.B.: Repeat the procedure for another
Press the start button (10) again to cut the
cup of coffee� If no coffee is taken within
brewing process short�
90 seconds, the brewing chamber empties
automatically to avoid overlling. The appli—
ance rinses�
Preparation using
ground coffee
Dispensing hot water
This fully automatic espresso machine can
also be operated with ground coffee (not
A
Risk of burns!
instant coffee powder)�
The milk frother (6) gets very hot� Hold the
milk frother (6) by the plastic part only�
The appliance must be ready for use� To
prepare a coffee-based drink with milk,
The milk frother must be cleaned before
rst insert the milk tube into a milk container
drawing hot water�
and turn the rotary selector (6b) to “Milk
The appliance must be ready for use�
froth” j�
1� Place the pre-warmed cup or glass
under the outlet of the milk frother (6)�
N.B.: The aromaDouble Shot function
2� Set the rotary selector (6b) to the
cannot be used when coffee is prepared
horizontal position�
using ground coffee�
Important: Dried milk residue is difcult
to remove, so the milk frother (6) must be
cleaned with lukewarm water immediately
after use and rinse using the Clean milk
system programme�
Important: Fill the water tank (17) with
3� Press and hold the h / g button (12)
fresh water every day� The tank (17) should
for approx� 3 seconds� The appliance
always contain sufcient water for operating
heats up� Hot water runs out of the milk
the appliance�
frother outlet (6) for about 40 seconds�
4� Press the h / g button (12) again to
Preparation
cut the process short�
1� Open the drawer (4)�
2� Pour in no more than 2 level measuring
spoons of ground coffee�
Warning: Do not use whole beans or
instant coffee�
3� Close the drawer (4)�
11
deen
Important: Dried milk residue is difcult
Preparing milk froth and
to remove, so the milk frother (6) must be
warm milk
cleaned with lukewarm water immediately
after use and rinse using the Clean milk
A
Risk of burns!
system programme�
The milk frother (6) gets very hot� Hold the
milk frother (6) by the plastic part only�
Maintenance and daily
Tip: You can foam the milk rst and then
cleaning
dispense coffee, or foam the milk separately
and pour it onto the coffee�
A
Risk of electric shock!
Unplug the appliance before cleaning it�
The appliance must be ready for use�
Never immerse the appliance in water�
1� Place a pre-warmed cup under outlet
Do not use a steam cleaner�
(6a)�
2� Insert the milk tube (6c) into a milk
● Wipe the outside of the appliance with a
container�
soft, damp cloth�
3� Turn the rotary selector (6b) to “Milk
● Do not use abrasive cloths or cleaning
froth” j or “Warm milk” i�
agents�
● Always remove any limescale, coffee,
milk or descaling uid residue immedi—
ately� Such residue can cause corrosion�
4� Press the h / g button (12)�
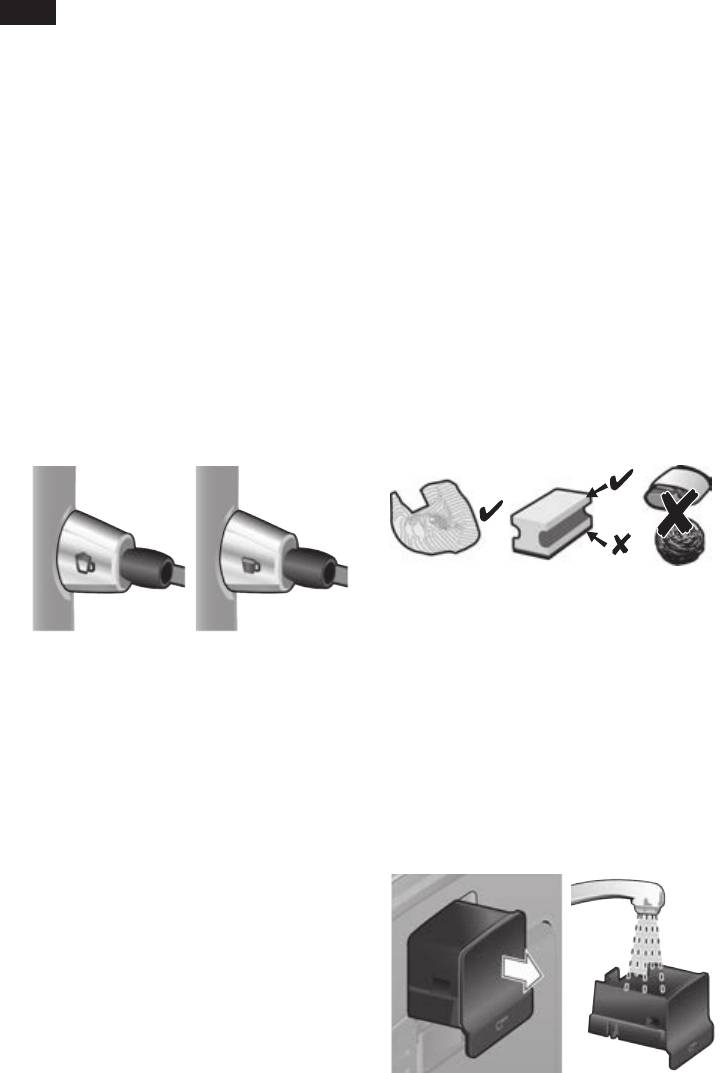
● New sponge cloths may contain salts�
The h / g button (12) ashes and
Salts can cause rust lm on stainless
the appliance now heats up for approx�
steel and must therefore be washed out
20 seconds�
thoroughly before use�
● Pull the drip tray (8c) with the coffee
A
Risk of burns!
grounds container (8b) forward and out�
Milk froth or warm milk comes out of the
Remove the panel (8a) and the grate (8d)�
milk frother (6) at high pressure� Splashes
Empty and clean the drip tray and coffee
of milk can scald� Do not touch the outlet
grounds container�
(6a) or aim it at anyone�
● Remove drawer (4) and clean�
5� End the process by pressing the
h / g button (12)�
Tip: For optimal milk froth quality, use cold
milk with a fat content of at least 1�5 % if
possible�
12
deen
Do not put the following items in
The rinse procedure stops automatically
O
the dishwasher: drip tray panel (8a),
after about 1 minute�
drawer (4), brewing unit (5a)�
6� Empty the container and clean the milk
The following items are dishwasher-
tube (6c)�
N
safe: drip tray for coffee outlet (8c),
coffee grounds container (8b), grate
In addition to this, clean the milk system
for coffee outlet (8d), aroma cover (2)
thoroughly at regular intervals (by hand or
and measuring spoon (19)�
in the dishwasher)�
● Wipe out the inside of the appliance (tray
holders and drawer)�
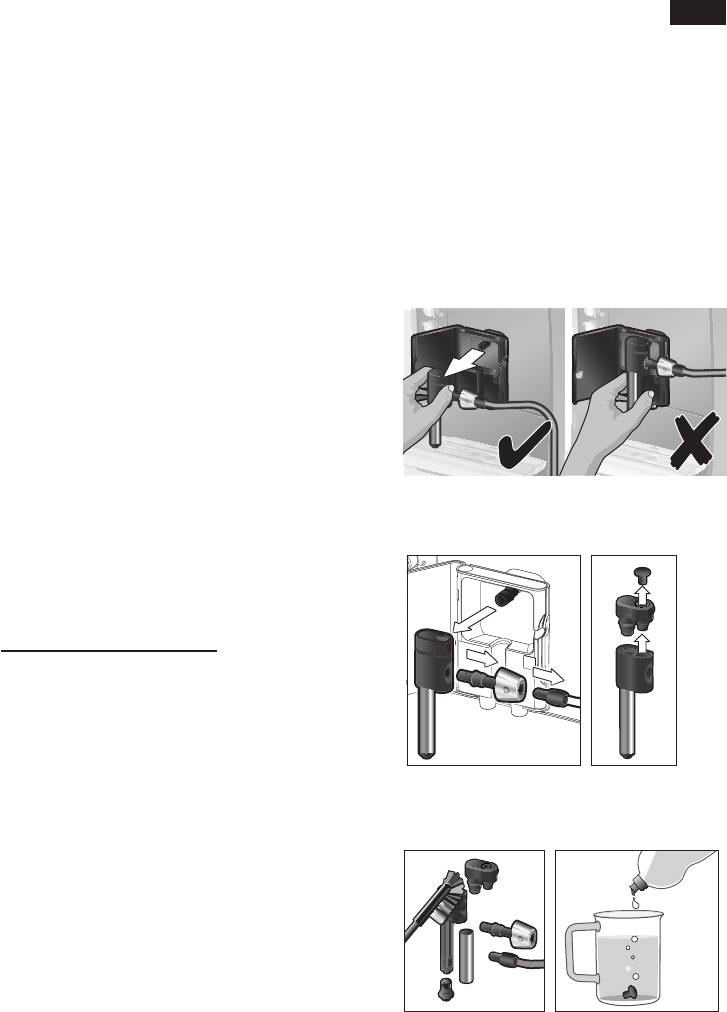
Dismantling the milk system for cleaning:
Important: Drip tray for coffee outlet (8c)
1� Pull the milk frother (6) forward out of
and coffee grounds container (8b) should
the appliance�
be emptied and cleaned daily to prevent
mould from developing�
N.B.: If the appliance is cold when switched
on with the power switch O / I (9) or if it
switches off automatically after coffee has
been dispensed, it rinses automatically� In
other words the system cleans itself�
2� Dismantle the milk frother into its indi-
Important: If the appliance has not been
vidual parts (6a to 6d) (see gure C at
used for a prolonged period of time (e�g�
the start of the operating instructions)�
after a vacation), clean the entire appliance
thoroughly, including the milk system and
brewing unit�
Cleaning the milk system
If the milk system was not cleaned after
milk has been dispensed, after a certain
amount of time the message Clean milk
system! will appear on the display�
Clean the milk system immediately after
use! To clean, leave the rotary selector (6b)
in the same position it was in when last
3� Clean the individual parts with a deter-
used�
gent solution and a soft brush� If neces-
To pre-clean the milk system automatically:
sary, soak in a warm detergent solution�
1� Select f by turning the rotary knob (15)�
2� Place a tall, empty container under the
outlet (6a)�
3� Push the outlet as close as possible to
the container�
4� Place the end of the milk tube (6c) into
the container�
5� Press the start button (10)�
The machine automatically releases water
4� Rinse all parts with clear water and dry
into the container and vacuums it up again
them�
via the milk tube to rinse the milk system�
13
deen
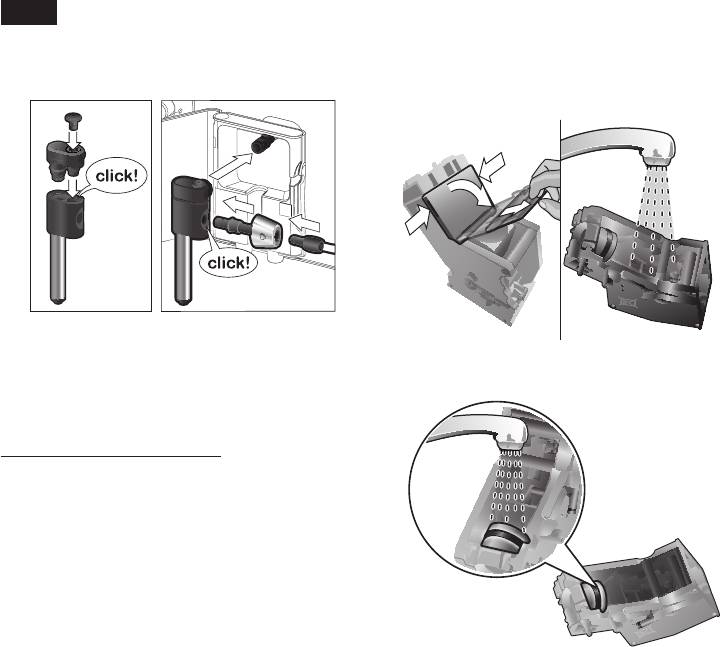
5� Reassemble all the parts and replace
6� Remove the cover (5f) of the brewing
fully in the appliance�
unit and rinse the brewing unit (5a)
thoroughly under running water�
A
Risk of scalding!
7� Thoroughly clean the brewing unit sieve
Use this appliance only after the milk frother
under the running water�
(6) has been fully assembled and installed�
Cleaning the brewing unit
Clean the brewing unit regularly!
To pre-clean the brewing unit automatically:
1� Select e by turning the rotary knob (15)�
2� Place an empty glass under outlet (6a)�
3� Press the start button (10)�
The appliance rinses�
In addition to the automatic cleaning
programme, the brewing unit (5a) should
be removed regularly for cleaning� (See
Important: Do not clean with detergent or
gure E at the start of the operating
other cleaning agents and do not put it in
instructions�)
the dishwasher�
1� Switch the appliance off at the power
on/off switch O / I (9)� No buttons are lit�
8� Wipe out the inside of the appliance
2� Open the door (5b) to the brewing unit�
thoroughly with a damp cloth and
3� Slide the red lock (5e) on the brewing
remove any coffee residues�
unit (5a) completely to the left�
9� Allow the brewing unit (5a) and the
4� Press the eject lever (5d) down fully�
inside of the appliance to dry�
The brewing unit is released�
10� Replace the cover (5f) on the brewing
5� Grasp the brewing unit (5a) by the
unit and reinsert the brewing unit (5a)
recessed grips and remove carefully�
fully into the appliance�
11� Press the eject lever (5d) up fully�
12� Slide the red lock (5e) fully to the right
and close the door (5b)�
14

deen
Tips on energy saving
A
Warning!
Each time you run the service programme,
● Switch off the fully automatic espresso
you should follow the instructions for using
machine when not in use� To do this,
the descaling and cleaning agents� Please
press the e off / j button (13)� The
observe the safety instructions on the pack-
appliance rinses and switches off�
aging of the cleaning agent�
● If possible, do not interrupt coffee or milk
Never interrupt the service programme!
froth dispensing� Cutting the coffee or milk
Do not drink the liquids!
froth dispensing process short results in
Never use vinegar, vinegar-based products,
higher energy consumption and in more
citric acid or citric acid-based products!
residual water collecting in the drip tray�
Never put descaling tablets or other desca-
● Descale the appliance regularly to avoid
ling agents in the ground coffee drawer or
a build-up of limescale� Limescale residue
the drawer for cleaning tablets (4)!
results in higher energy consumption�
Specially developed descaling and
cleaning tablets are available from
Service Programmes
retailers or customer service (see
“Accessories”).
Tip: Refer also to the quick reference guide
in the storage compartment (5c)�
Descaling
Depending on usage, the following
Duration: approx� 25 minutes�
messages will appear on the display at
certain intervals:
Important: If there is a lter in the water
Descale required!
tank (17), it needs to be removed before the
or
descaling programme is run�
Clean required!
or
If the message Descale required! appears
Calc‘n‘Clean required!
on the display, press the e off / j button
(13) for 3 seconds and then press the start
The appliance should be cleaned or
button (10)� The descaling programme will
descaled immediately using the corre-
start� To descale the appliance before being
sponding programme� You also have the
prompted, press the e off / j button (13) for
option of combining both processes with the
at least 3 seconds� Then press the e off / j
Calc‘n‘Clean function (see “Calc‘n‘Clean”)�
button (13) briey twice. Turn the upper
If the service programme is not run as
rotary knob (15) until Start descaling
instructed, the appliance may be damaged�
appears in the display� To start the desca-
ling procedure, press the start button (10)�
The display will guide you through the
programme�
Empty drip tray
Insert drip tray
● Empty drip tray (8) and replace them�
15

deen
N.B.: If the water lter is activated, the
Salts can cause rust lm on stainless
display will prompt you to remove the lter
steel and must therefore be washed out
and then press the start button (10) again�
thoroughly before use�
Remove the lter now if you have not
already done so� Press the start button (10)�
Cleaning
Fill descaler
Duration: approx� 10 minutes�
Press start
● Pour lukewarm water into the empty
If the message
Clean required! appears
water tank (17) up to the 0.5 l mark and
on the display, press the
e off / j button
then dissolve 1 Siemens descaling tablet
(13) for 3 seconds and then press the start
TZ80002 in it� When using TZ60002,
button (10)�
2 tablets must be dissolved�
The cleaning programme will start�
● Press the start button (10)�
To clean the appliance before being
prompted, press the e off / j button (13) for
Place container
at least 3 seconds� Then press the e off / j
Press start
button (13) briey twice. Turn the upper
● Place a receptacle with a capacity of at
rotary knob (15) until
Start cleaning
least 0�5 litres under the outlet (6a)�
appears in the display� To start the cleaning
● Press the start button (10)�
procedure, press the start button (10)�
The display will guide you through the
Descale in progress
programme�
The descaling pro gramme will now run for
about 20 minutes�
Empty drip tray
Insert drip tray
Clean / Fill water tank
● Empty drip tray (8) and replace them�
Press start
● Rinse the water tank (17) and rell it with
Cleaning in progress
fresh water up to the max mark�
The appliance rinses twice�
● Press the start button (10)�
Open drawer
Descale in progress
● Open the drawer (4)�
The descaling pro gramme now runs for
about 3 minutes and rinses the appliance�
Fill cleaner
● Drop a Siemens cleaning tablet in the
Empty drip tray
drawer (4) and close�
Insert drip tray
● Empty drip tray (8) and replace them�
Cleaning in progress
Replace the lter if one is being used. The
The cleaning pro gramme will now run for
appliance has completed descaling and is
about 8 minutes�
ready for use again�
Empty drip tray
Important: Wipe down the appliance using
Insert drip tray
a soft, damp cloth to immediately remove
● Empty drip tray (8) and replace them�
any descaler residue� Such residue can
The appliance has nished cleaning is
cause corrosion� New sponge cloths may
ready for use again�
contain salts�
16

deen
Calc‘n‘Clean
Fill descaler
Duration: approx� 35 minutes�
Press start
● Pour lukewarm water into the empty
Calc‘n‘Clean combines the separate func-
water tank (17) up to the 0.5 l mark and
tions of descaling and cleaning� If both
then dissolve 1 Siemens descaling tablet
programmes are due to be run soon, the
TZ80002 in it� When using TZ60002,
espresso machine automatically suggests
2 tablets must be dissolved�
this service programme�
● Press the start button (10)�
Important: If there is a lter in the water
Place container
tank (17), it needs to be removed before the
Press start
service programme is run�
● Place a receptacle with a capacity of at
least 1 litre under the outlet (6a)�
If the message Calc‘n‘Clean required!
● Press the start button (10)�
appears on the display, press the e off / j
button (13) for 3 seconds and then
Calc‘n‘Clean in progress
press the start button (10)� The service
The descaling pro gramme will now run for
programme will start�
about 22 minutes�
To run Calc‘n‘Clean before being prompted,
press the e off / j button (13) for at
Clean / Fill water tank
least 3 seconds� Then press the e off / j
Press start
button (13) briey twice. Turn the upper
● Rinse the water tank (17) and rell it with
rotary knob (15) until Start Calc‘n‘Clean
fresh water up to the max mark�
appears in the display� To start
● Press the start button (10)�
Calc‘n‘Clean, press the start button (10)�
The display will guide you through the
Calc‘n‘Clean in progress
programme�
The descaling pro gramme now runs for
about 10 minutes and rinses the appliance�
Empty drip tray
Insert drip tray
Empty drip tray
● Empty drip tray (8) and replace them�
Insert drip tray
● Empty drip tray (8) and replace them�
Calc‘n‘Clean in progress
Replace the lter if one is being used. The
The appliance rinses twice�
appliance has nished cleaning is ready for
use again�
Open drawer
● Open the drawer (4)�
Important: Wipe down the appliance using
a soft, damp cloth to immediately remove
Fill cleaner
any descaler residue� Such residue can
● Drop a Siemens cleaning tablet in the
cause corrosion� New sponge cloths may
drawer (4) and close�
contain salts. Salts can cause rust lm
on stainless steel and must therefore be
N.B.: If the water lter is activated, the
washed out thoroughly before use�
display will prompt you to remove the lter
and then press the start button (10) again�
Remove the lter now if you have not
already done so�
Press the start button (10)�
17

deen
Frost protection
Accessories
A
To avoid damage from low
The following accessories can be obtained
temperatures during transport and
from retailers and customer service�
storage, the appliance must be
completely emptied rst.
Accessories Ordering number
Retail /
Note: The appliance must be ready for use
Customer service
and the water tank (17) lled.
Cleaning tablets TZ60001
1� Place a large receptacle under
00310575
outlet (6a)�
Descaling tablets TZ80002
2� Press the h / g button (12) and
00576693
allow the appliance to steam for about
Water lter TZ70003
15 seconds�
00575491
3� Switch the appliance off at the power
on/off switch O / I (9)�
Care set TZ80004
4� Empty the water tank (17) and the drip
00576330
tray (8)�
Milk container with
TZ80009N
“Fresh Lock” lid
00576166
18
Инструкции по эксплуатации
Укажите здесь торговую марку и тип
В настоящее время вы находитесь на странице с руководствами Siemens кофеварка. Выберите один из продуктов, чтобы сразу перейти к руководству по этому продукту. Не можете найти Siemens ? Тогда попробуйте вбить в поле поиска Siemens и модель, чтобы найти нужное руководство Siemens. На ManualsPDF.ru в настоящее время имеется 321 руководств Siemens . Самые популярные Siemens кофеварка:
- Siemens Surpresso compact TK 53009
- Siemens EQ.300 TI351209RW
- Siemens EQ.6 Plus S100 TE651209RW
Последнее добавленное руководство Siemens было добавлено 2023-09-04, и это Siemens TQ907R05.
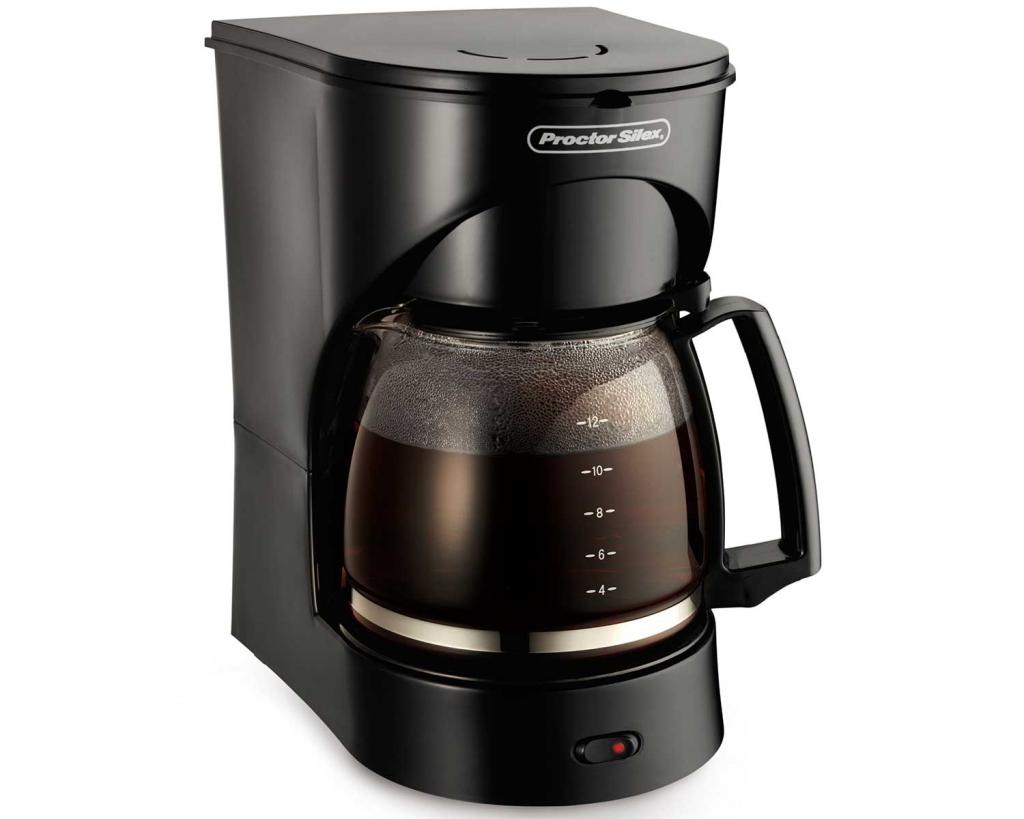
Многие люди не представляют свою жизнь без кофе. Причем некоторые предпочитают использовать капельную кофеварку. Это электрический прибор для получения фильтрованного кофе методом пролива или перколяции. Устройства выпускают давно, но и сейчас они остаются одними из популярных. Как пользоваться капельной кофеваркой, рассказано в статье.
Что это такое?
Капельная кофеварка имеет свою историю. Впервые устройство, которое готовило кофе процеживанием горячей воды через молотый порошок, предложили покупателям в 1800 году. Изобретателем способа считается Жан-Батист де Беллуа – служитель церкви, парижский архиепископ.
Данное изобретение было многократно модернизировано, переделано, представлено в разных странах. Но принцип приготовления остался прежним. Благодаря эволюции электрических устройств капельная кофеварка имеет свой источник нагрева. Современная машина представлена в виде электрического аппарата с нагревателем, где горячая вода поступает через фильтр с молотым кофе и проникает в резервуар. Крепость и аромат напитка обеспечиваются при помощи медленного прохождения воды через кофе, благодаря чему она имеет вкус и аромат молотых зерен.
Из чего состоит?
Приборы выпускаются различными производителями, но основные элементы у них одинаковые. Каково устройство капельной кофеварки? Прибор состоит из:
- резервуара для холодной воды (обычно он несъемный, находится сзади);
- бака или бойлера, где выполняется нагревание;
- нагревательного элемента;
- воронки или фильтра для молотого кофе (воронка в некоторых устройствах съемная, а фильтр автономный, бывает одноразовым и для регулярного применения);
- емкости для готового кофе (выполнена в виде колбы, кофейника).

В инструкции капельной кофеварки указаны особенности устройства прибора. Также там обозначены правила пользования прибором и приготовления кофе.
Принцип работы
Важно знать не только то, как пользоваться капельной кофеваркой, но и о принципе работы:
- Воду наливают в резервуар, из которого она переходит в бойлер.
- В баке происходит нагрев воды и поднятие по трубке вверх.
- По каплям она поступает через толщу кофейного порошка и проникает в нижний отсек.
- После нагревания и прокапывания воды через фильтр кофе считается приготовленным.
Кофейная гуща будет в фильтре и не пачкает чашку. Площадка, где присутствует резервуар с напитком, будет подогревать и сохранять температуру кофе. Хоть кофеварки разных производителей подобны, все же они отличаются дизайном, объемом, материалами и мощностью. Разница наблюдается в функциях: автоотключение, таймер, индикация, управление.
Правила пользования
Как пользоваться капельной кофеваркой, указано в инструкции к каждому прибору. Правила эксплуатации несложные, научиться это делать может даже новичок. Все же как пользоваться капельной кофеваркой? Для этого требуется:
- Подсоединение к сети.
- Наполнение резервуара водой до необходимой отметки.
- Добавление кофе в пропорции, обозначенной в инструкции. Обычно 1 ч. л. с горкой добавляют на каждые 100 мл жидкости.
- Закрытие фильтра. Требуется поставить емкость для полученного напитка.
- Нажатие на кнопку включения.
- Ожидание перетекания воды в виде кофе в резервуар.
- Выключение.
- Разлив кофе по чашкам.
Когда устройство остынет, одноразовый фильтр с гущей надо утилизировать. Многоразовый очищают, моют, сушат. По такому принципу работают все приборы.
Особенности
Что еще надо знать тем, кто интересуется, как пользоваться кофеваркой капельного типа? Устройство готовит только один вид кофе – натуральный черный фильтрованный. Именуют этот напиток американо, так как именно его предлагают в кофейнях США. С таким прибором не получится готовить эспрессо, капучино, кофе по-восточному.
Крепость напитка будет средней. Хотя есть возможность повышения данного показателя, если взять кофе мелкого помола и немного воды. Обычно для прибора используются зерна, имеющие среднюю и сильную обжарку среднего помола. По простоте и надежности эта кофеварка является лидирующей.
Преимущества и недостатки
Данные приборы являются востребованными из-за:
- простоты и надежности;
- безотказной работы;
- удобства управления;
- доступной стоимости;
- распространенности и доступности;
- стабильного качества кофе.

Но кофе готовится только по одному рецепту. С кофеваркой теряется тонкий аромат и вкус элитных сортов. Хоть приборы отличаются дизайном, у многих производителей они однотипные.
Еще кофеварки отличаются типом фильтров. Они бывают многоразовые и одноразовые. Это влияет на эксплуатацию прибора и приготовление напитка.
Многоразовый
Он идет в комплекте. Многоразовый фильтр представлен в виде съемной воронки-ситечка, обычно из пластика и нейлона. Дорогим является вариант с металлизированным напылением, наносимым на нейлон. Преимуществом фильтра считается отсутствие дополнительных расходов. Недостатком является необходимость чистки после каждого применения.
Одноразовый
Данный фильтр имеет существенное преимущество – не следует устранять кофейную гущу. После приготовления напитка фильтрованный элемент с содержимым просто выкидывают. Его недостатком считается большой расход средств. Хоть к кофеварке может прилагаться некий комплект, но все равно он через некоторое время заканчивается.
Одноразовые фильтры отличаются размерами. В их изготовлении применяют целлюлозу:
- Необработанную. Она имеет коричневый цвет. При изготовлении не используют отбеливающие компоненты. Является экологичным вариантом.
- Отбеленную. Фильтры из отбеленной целлюлозы белого цвета. Ранее в изготовлении применяли химические компоненты, сейчас для отбеливания применяют кислород.
Иногда в продаже есть фильтры из бамбуковых волокон, это та же целлюлоза, но имеет более высокую стоимость. Средняя цена равна 2-3 рублям.
Размеры
Фильтры бывают разных размеров – от 1 до 10, где 1 считается самым маленьким. Цифры свидетельствуют о количестве чашек. Если нет сведений, какой нужен, то следует выбирать 2 или 4. Они идеальны для большинства кофеварок объемом до 1 литра. Если края немного выступают, то их следует подогнуть или обрезать.
Для приборов объемом 1-1,5 литра используются размеры 4, 6 или 8. Точный размер обозначен в инструкции, а иногда и на упаковочной коробке. Одноразовые фильтры подходят для любой капельной кофеварки.
Производители
Данные приборы достаточно простые, поэтому являются востребованными. Многие производители мелкой бытовой техники вносят их в число своего ассортимента. Кофеварки «Браун» и «Филипс» могут отличаться дизайном, функциями и особенностями работы.
Разница между приборами небольшая. Отличия могут быть в:
- объеме резервуара;
- типе фильтра;
- дополнительных функциях.
Хоть устройства однотипные, все же кофеварки «Бош» и «Тефаль» могут иметь особенности. У дешевых вариантов будет хуже качество сборки или материалы. Желательно выбирать товары известных марок, предоставляющих гарантию, а также имеющих сеть сервисных центров. К лучшим капельным кофеваркам относят:
- Philips.
- Tefal.
- DeLonghi.
- Bosch.
К более дешевым относят Vitek, Polaris, Maxwell. Кофеварки «Браун» используются так же, как и многие другие приборы, может быть лишь небольшая разница. Все устройства отличаются нюансами работы. Кофеварка «Бош» тоже включена в список лучшей техники.
У покупателей востребованными являются следующие кофеварки:
- Redmond SkyCoffee RCM-1508S. У прибора электронное управление, запуск осуществляется со смартфона. Получается ароматный напиток. В комплекте прилагается многоразовый фильтр. Высокое качество позволило заслужить лидирующее место.
- Maxwell MW-1650. Прибор удобный, простой и надежный. С ним получится готовить прекрасный напиток.
- Bosch TKA 3A031. Устройство представлено в разных цветах, у него высокая надежность и доступная цена.
- Redmond RCM-1510. Прибор прочный и качественный, в комплекте прилагаются многоразовые металлизированные фильтры, функциональное электронное управление, функция отложенного старта.
- Philips Daily Mini. Надежная и прочная кофеварка тоже востребована у покупателей.
- Philips HD7459. Прибор имеет таймер отложенного старта, качественную сборку. С ним получается качественный кофе.
Таким образом, капельные кофеварки являются одними из самых востребованных. Перед началом эксплуатации следует ознакомиться с правилами использования прибора. Соблюдение рекомендаций производителя продлевает срок службы любой кофеварки.
-
Инструкции
-
Кофемашины
- Siemens

Кофемашина Siemens CT636LES1
Схема встраивания
JPG, 59.95 Кб
Инструкция к Siemens CT636LES1
PDF, 2.34 Мб
Инструкция по эксплуатации фильтра
PDF, 1.84 Мб

Кофемашина Siemens CT636LEW1
Инструкция к Siemens CT636LEW1
PDF, 2.34 Мб
Схема встраивания
JPG, 59.95 Кб

Автоматическая кофемашина Siemens TE657319RW
Инструкция к Siemens TE657319RW
PDF, 4.67 Мб

Кофемашина Siemens TP703R09
Инструкция к Siemens TP703R09
PDF, 14.47 Мб

Кофемашина Siemens TK 76K573
Инструкция к Siemens TK 76K573
PDF, 471.85 Кб

- Manuals
- Brands
- Siemens Manuals
- Coffee Maker
- EQ.7 Plus
- User manual
-
Contents
-
Table of Contents
-
Troubleshooting
-
Bookmarks
Quick Links
Related Manuals for Siemens EQ.7 Plus
Summary of Contents for Siemens EQ.7 Plus
-
Page 1
å… -
Page 6
< > ¡ ¡… -
Page 7
< >… -
Page 8
< > Language English start Pycckий Nederlands Water hardness English Русский Nederlands Français Italiano Svenska Español Polski Български Magyar Türkçe Dansk Norsk Suomi Português Čeština Ελληνικa Ë Í Espresso  à À Á Ä Å… -
Page 9
Auto off after < > < >… -
Page 10
Water tank almost empty Bean container almost empty Please wait ËË Í Espresso Refill water tank Replace water tank  à À Á Ä Å Check water tank Replace drip tray Empty drip tray Refill bean container Position swivel arm Set up milk frother Î… -
Page 11
 à ËË Í 2 Espresso 2 Coffee À Á My coffee Espresso Coffee Ä Å White coffee Macchiato Æ Ç Cappuccino My coffee Á Ä Å Æ Ç È È É Milk froth Warm milk Ê Hot water Short rinse Ì… -
Page 12
À Â Ã < > Î Ð Ò Temperature Ò Coffee normal Hot water À Æ Temperature Coffee Hot water <85°C… -
Page 13
Ë Í Espresso < > Info À Descale after À Clean after No filter À Change filter in Info No. of coffees No. of milk mixes Amount hot water… -
Page 14
Settings Language English Water hardness Descale > < > Settings Water hardness Descale start Clean ¡ > Language > Water hardness warmer on 1,2,3… -
Page 15
> Set clock 08:25 > Cup warmer on at > Descale Set clock > Clean > Cup warm. off in > Calc‘n‘Clean > Auto off after > Show clock = yes = no > Water filter Set clock > Time mode start Place 0.5 l container under milk frother… -
Page 16
> Factory reset < > Change filter Water filter > Contrast –20… -
Page 17
Ë Í Espresso  à À Á Ä Å À Á Å Ä Æ Ç Ë Í Cappuccino À Á Ä Å Æ Ç Å Ä Æ Ç… -
Page 18
¡ Ê ¡ È É… -
Page 19
¡ Ì Place glass under frother, Place suction pipe in glass start… -
Page 21
Auto off after Ë Í Espresso Service — descale i — button 3 sec. Service — descale Service — clean Service — Calc‘n‘Clean Descale start Empty drip tray Replace drip tray… -
Page 22
Not enough descaling fluid. Refill fluid start Empty drip tray Replace drip tray Clean and refill water tank start Position swivel arm Cleaning Open drawer Descaling Empty drip tray Insert Siemens cleaning tablet Replace drip tray and close drawer Press start Cleaning… -
Page 23
Empty drip tray Insert Siemens cleaning tablet Replace drip tray and close drawer Remove filter start Add 0.5 L water and descaler start Ë Í Espresso Descaling Service — Calc‘n‘Clean Not enough descaling fluid. i — button 3 sec. Refill fluid… -
Page 24
Cleaning Empty drip tray Replace drip tray ¡ È… -
Page 25
Refill bean container… -
Page 26
Error Please contact hotline. Clean brewing unit… -
Page 27
< > ¡… -
Page 28
¡ < >… -
Page 29
< > Language English Start Pycckий Nederlands Dureté eau English Русский Nederlands Français Italiano Svenska Español Polski Български Magyar Türkçe Dansk Norsk Suomi Português Čeština Ελληνικa… -
Page 30
Ë Í Espresso  à À Á Ä Å AR auto dans < > < >… -
Page 31
Rés. eau presque vide Bac à café presque vide Patientez SVP ËË Í Remplir le réservoir d’eau Espresso Placer le réservoir d’eau Contrôler le réservoir d’eau  à À Á Ä Å Placer le bac collecteur Vider le bac collecteur Remplir le bac à… -
Page 32
 à ËË Í 2 Espresso 2 Café À Á My coffee Espresso Café Ä Å Café au lait Macchiato Æ Ç Cappuccino My coffee Á Ä Å Æ Ç È È É Mousse lait Lait chaud Ê Eau chaude Bref rinçage Ì… -
Page 33
À Â Ã < > Î Ð Ò Température Café normal Eau chaude Ò À Æ Température Café Eau chaude <85°C… -
Page 34
Ë Í Espresso < > Menu Info À Détartrage À Nettoyer Filtre non placé À Chang. filtre ds Menu Info Café Boisson lait Eau chaude… -
Page 35
Chauff. tasses ma Réglages Langue Français Dureté eau Détartrage > < > Réglages Dureté eau Détartrage start Nettoyage ¡… -
Page 36
> > Langue Afficher heure > Dureté eau 1,2,3 Régler heure > Mode > Régler heure 08:25 > Chauff. tasses ma > Détartrage Régler heure > Nettoyage arrêt > Ar ch. tasses > Calc‘n‘Clean… -
Page 37
> AR auto dans > Filtre eau Filtre eau start > Placer récipient 0,5 l sous Contraste mousseur lait start −20 > Réglages usine < > Changer le filtre… -
Page 38
Å Æ Ä Ç Ë Í Cappuccino À Á Ä Å Æ Ç Ë Í Espresso  à À Á Ä Å… -
Page 39
À Á Å Æ Ä Ç… -
Page 40
¡ ¡ Ê È É… -
Page 41
¡ Ì Glisser verre sous mousseur, placer embout dans le verre start… -
Page 43
Détartrer SVP Nettoyer SVP Calc‘n‘Clean AR auto dans… -
Page 44
Retirer le filtre eau start 0,5 l eau + détartrant Remplir start Détartrage en cours Détartrant insuffis. Rajouter détartrant start Ë Í Espresso Détartrer SVP Touche i 3 s Rincer le réservoir d’eau et remplir start Détartrage en cours Détartrage start Vider le bac collecteur Placer le bac collecteur… -
Page 45
Placer le bac collecteur Pivoter le bec verseur Calc‘n‘Clean start Nettoyage en cours Ouvrir tiroir Vider le bac collecteur Placer le bac collecteur Placer une pastille de nettoyage Siemens dans le tiroir et refermer Appuyer sur start Nettoyage en cours Nettoyage en cours… -
Page 46
Ouvrir tiroir Placer une pastille de nettoyage Siemens dans le tiroir et refermer Retirer le filtre eau start 0,5 l eau + détartrant Nettoyage en cours Remplir start Vider le bac collecteur Placer le bac collecteur Détartrage en cours Détartrant insuffis. -
Page 48
Remplir le bac à café… -
Page 49
Defaillance Appeler Service Clientèle. Nettoyer unité passage… -
Page 50
< > ¡… -
Page 51
¡ < >… -
Page 52
< > Language English Start Pycckий Nederlands Durezza acqua English Русский Nederlands Français Italiano Svenska Español Polski Български Magyar Türkçe Dansk Norsk Suomi Português Čeština Ελληνικa Ë Í Espresso  à À Á Ä Å… -
Page 53
Auto spegn. in < > < >… -
Page 54
Serb. acqua in esaur. Serb. chicchi in esaur. Si prega di attendere ËË Í Riempire serbatoio acqua Espresso Inserire serbatoio acqua Controllare serbat. H2O Â Ã À Á Ä Å Inserire raccogligocce Vuotare raccogligocce Riempire serbatoio chicchi Posizionare uscita caffè Inserire innesto schiuma Inserire unità… -
Page 55
 à ËË Í 2 Espresso 2 Caffè À Á My coffee Espresso Caffè Ä Å Caffelatte Macchiato Æ Ç Cappuccino My coffee Á Ä Å Æ Ç È È É Schiuma latte Latte caldo Ê Acqua calda Lav. rapido Ì… -
Page 56
À Â Ã Î Ð Ò < > Ò Temperatura Caffè normale À Acqua calda Æ Temperatura Caffè Acqua calda <85°C… -
Page 57
Ë Í Espresso < > Menu Info À Decalc. tra ca. À Pulire tra ca. Manca filtro À Cambio filtro tra Menu Info Caffè mix latte Acqua calda… -
Page 58
Risc. tazza ON Impostazioni Lingua Italiano Durezza acqua Decalcificare > < > Impostazioni Durezza acqua Decalcificare start Pulire ¡ > Lingua… -
Page 59
> > Durezza acqua Visualizzare ora 1,2,3 4 sì Regolare ora. > Modo ora 12h 24h > Regolare ora 08:25 > > Decalcificare Risc.tazza ON > Pulire Regolare ora. > Calc‘n‘Clean spento > Risc.t. OFF tra… -
Page 60
> Auto spegn. in Cambiare filtro > Filtro acqua Filtro acqua start Posizionare recip. da 0,5 l sotto inserto schiuma start > Contrasto –20 +20. > Imp. predefinita < >… -
Page 61
Ë Í Espresso  à À Á Ä Å Ä Å Æ Ç Ë Í Cappuccino À Á Ä Å Æ Ç… -
Page 62
Ä Å Æ Ç À Á… -
Page 63
¡ ¡ Ê È É… -
Page 64
¡ Ì Posiz.bicch.sotto ins.schiuma, aspir. nel bicch. start… -
Page 66
Decalcificare Eseguire pulizia Calc‘n‘Clean Auto spegn. in… -
Page 67
Versare 0,5 L acqua + decalcificante start Decalcificazione in corso Ë Í Manca decalcificante Espresso Aggiung. decalcificante start Decalcificare Tasto per 3 sec. Sciacquare e riempire serbatoio acqua start Decalcificare start Decalcificazione in corso Vuotare raccogligocce Vuotare raccogligocce Inserire raccogligocce Inserire roccogligocce Posizionare recip. -
Page 68
Pulire start Tasto per 3 sec. Vuotare raccogligocce Inserire raccogligocce Posizionare uscita caffè Calc‘n‘Clean start Pulizia in corso Aprire cassetto polvere Vuotare raccogligocce Inserire raccogligocce Inserire pastiglia pulizia Siemens e chiudere cassetto Premere start Pulizia in corso Pulizia in corso… -
Page 69
Aprire cassetto polvere Vuotare raccogligocce Inserire raccogligocce Inserire pastiglia pulizia Siemens e chiudere cassetto Eliminare filtro acqua start Versare 0,5 L acqua + decalcificante start Pulizia in corso Vuotare raccogligocce Inserire raccogligocce Decalcificazione in corso Manca decalcificante Aggiung. decalcificante start ¡… -
Page 71
Riempire serbatoio chicchi… -
Page 72
Errore Chiamare l’Assistenza Pulire unità di infusione… -
Page 73
< > ¡… -
Page 74
¡ < >… -
Page 75
< > Language English start Pycckий Nederlands Waterhardheid English Русский Nederlands Français Italiano Svenska Español Polski Български Magyar Türkçe Dansk Norsk Suomi Português Čeština Ελληνικa… -
Page 76
Ë Í Espresso  à À Á Ä Å Auto off na < > < >… -
Page 77
Waterreserv. bijna leeg Bonenreserv. bijna leeg Even geduld ËË Í Waterreservoir vullen Espresso Waterreservoir plaatsen Waterreservoir checken  à À Á Ä Å Lekschaal plaatsen Lekschaal legen Bonenreservoir vullen Koffie-uitloop draaien Melkschuimer plaatsen Î Zetgroep plaatsen Deur sluiten Zetgroep reinigen Lade sluiten Filter vervangen Ontkalken… -
Page 78
 à ËË Í 2 x Espresso 2 x Koffie À Á My coffee Espresso Koffie Ä Å Koffie + melk Macchiato Æ Ç Cappuccino My coffee Á Ä Å Æ Ç È È É Melkschuim Warme Melk Ê Warm water Kort spoelen Ì… -
Page 79
À Â Ã < > Î Ð Ò Temperatuur Koffie normaal Ò Warm water À Æ Temperatuur Koffie Warm water <85°C… -
Page 80
Ë Í Espresso < > Info-menu À Ontkalken na À Reinigen na Geen filter ingezet À Filt. verv. na Info-menu Aantal koffie Melkdranken Heet water… -
Page 81
Instellingen Taal Nederlands Waterhardheid Ontkalken > < > Instellingen Waterhardheid Ontkalken start Reinigen ¡ > Taal > Waterhardheid 1, 2, 3 opjeswarmer AAN… -
Page 82
> Tijd instellen 08:25 > Kopjeswarm. AAN > Ontkalken Tijd instellen > Reinigen > Kopjesw. UIT na > Calc‘n‘Clean > Auto off na > Tijd tonen > Tijd Waterfilter instellen > Tijdmodus… -
Page 83
start 0,5l-reservoir onder melkschuimer plaatsen start > Contrast –20 > Fabrieksinstelling < > Filter vervangen Waterfilter… -
Page 84
Ë Í Espresso  à À Á Ä Å Ä Æ Ç Å Ë Í Cappuccino À Á Ä Å Æ Ç… -
Page 85
Ä Æ Ç Å À Á… -
Page 86
¡ ¡ Ê È É… -
Page 87
Ì Glas onder schuimer plaatsen, Aanzuigpijpje in glas steken start… -
Page 89
Ontkalken, Reinigen a.u.b. Calc‘n‘Clean Auto off na… -
Page 90
0,5 l water + ontkalker toevoegen start Ontkalkingsprogr. loopt Ë Í Espresso Te weinig ontkalker Ontkalker bijvullen start Ontkalken i-knop 3 sec indrukken Waterreservoir spoelen en vullen start Ontkalken start Ontkalkingspr. loopt Lekschaal legen Lekschaal plaatsen Lekschaal legen Lekschaal plaatsen 0,5l- reservoir onder melkschuimer plaatsen start… -
Page 91
3 sec indrukken Ë Í Espresso Reinigen start Calc‘n‘Clean i-knop 3 sec indrukken Lekschaal legen Lekschaal plaatsen Koffie-uitloop draaien Reinigingsprogr. loopt Calc‘n‘Clean start Poederlade openen Lekschaal legen Siemens-reinigingstablet inleggen Lekschaal plaatsen en lade sluiten Op start drukken Reinigingsprogr. loopt Reinigingsprogr. loopt… -
Page 92
Poederlade openen Lekschaal legen Lekschaal plaatsen Siemens-reinigingstablet inleggen en lade sluiten Waterfilter wegnemen start 0,5 l water + ontkalker toevoegen start Reinigingsprogr. loopt Lekschaal legen Lekschaal plaatsen Ontkalkingspr. loopt Te weinig ontkalker Ontkalker bijvullen start ¡ Waterreservoir spoelen en vullen start È… -
Page 94
Bonenreservoir vullen… -
Page 95
Storing bel de hotline a.u.b. Zetgroep reinigen… -
Page 96
< >… -
Page 97
¡ < >… -
Page 98
< > Language English start Pycckий Nederlands Жесткость воды English Русский Nederlands Français Italiano Svenska Español Polski Български Magyar Türkçe Dansk Norsk Suomi Português Čeština Ελληνικa… -
Page 99
Ë Í Эспрессо Â Ã À Á Ä Å Автооткл. через < > < >… -
Page 100
Контейнер для воды почти пуст Отсек для зёрен почти пуст пожалуйста ждите Заполнить контейнер для воды ËË Í Устан. конт-р для воды Эспрессо Пров. конт-р для воды Â Ã À Á Ä Å Установить поддон для капель Опустошить поддон для капель Заполнить… -
Page 101
 à ËË Í 2 Эспрессо 2 Кофе À Á My coffee Эспрессо Кофе Ä Å Кофе с молоком Маккиато Æ Ç Капучино My coffee Á Ä Å Æ Ç È È É Молочная пена Теплое молоко Ê Горячая вода Быстр. -
Page 102
À Â Ã < > Î Ð Ò Температура Кофе нормальн Горячая вода Ò À Температура Кофе Æ Горячая вода <85°C… -
Page 103
Ë Í Эспрессо < > Инфо-меню À Декальц.: À Очистка: Не установлен фильтр À Замена фильтра: Инфо-меню Чашек кофе Молочн. нап. Горячей воды xл… -
Page 104
Подогр. ч. вкл. Настройки Язык Pусский Жесткость воды Декальцинация > < > Настройки Жесткость воды Декальцинация start Очистка ¡ > Язык… -
Page 105
> Жесткость воды да нет 1,2,3 4 Установить часы > Формат времени > становить часы У 08:25 > Подогр. ч. вкл. > Декальцинация > Очистка Установить часы выкл. > > Calc‘n‘Clean Подогр. ч. выкл. > Показать время… -
Page 106
> Автооткл. через Заменить фильтр > Фильтр воды Фильтр воды нет start Установить ёмкость 0,5 л под вспениватель молока start > Контраст > Фабр. настройки < >… -
Page 107
Ë Í Эспрессо Â Ã À Á Ä Å Ä Æ Å Ç Ë Í Капучино À Á Ä Å Æ Ç… -
Page 108
Ä Æ Å Ç À Á… -
Page 109
¡ ¡ Ê È É ¡… -
Page 110
Ì Под вспенив. постав. пустой стакан, опуст. в него трубку start… -
Page 112
Автооткл. через Провести декальцинацию Необходима чистка Запустить Calc‘n‘Clean… -
Page 113
Идет декальцинация Ë Í Эспрессо Слишком мало средства для декальцинации Провести декальцинацию Добавить ср-во start Кнопка i 3 сек. Промыть и заполнить контейнер для воды start Декальцинация start Опустошить поддон для капель Идет декальцинация Установить поддон для капель Опустошить поддон для капель Установить… -
Page 114
Эспрессо Установить поддон для капель Запустить Calc‘n‘Clean Кнопка i 3 сек. Повернуть блок подачи кофе Работает программа Идет очистка Открыть лоток с порошком Calc‘n‘Clean start Добавить чистящие таблетки Siemens и закрыть лоток Опустошить поддон для капель Установить поддон для капель… -
Page 115
Идет очистка Работает программа Идет очистка Открыть лоток с порошком Опустошить поддон для капель Установить поддон для капель Добавить чистящие таблетки Siemens и закрыть лоток Снять фильтр для воды start Добавить 0,5 л воды + средство для декальцинации start Работает программа… -
Page 116
¡ È… -
Page 117
Заполнить отсек для кофейных зерен… -
Page 118
Неисправность Позвоните в службу технической поддержки Очистить заварочный блок… -
Page 120
< > ¡… -
Page 121
¡ < >… -
Page 122
< > Language English start Pycckий Nederlands English Русский Tvrdost vody Nederlands Français Italiano Svenska Español Polski Български Magyar Türkçe Dansk Norsk Suomi Português Čeština Ελληνικa Ë Í Espresso  à À Á Ä Å… -
Page 123
Autom. vypnout po < > < >… -
Page 124
Nádržka na vodu je téměř prázdná Zásobník na kávová zrna je téměř prázdný ËË Í Čekejte prosím Espresso  à À Á Ä Å Doplňte vodu do nádržky Nasaďte nádržku na vodu Zkontrolujte nádržku na vodu Nasaďte odkapávač Vylijte vodu z odkapávače Î… -
Page 125
 à ËË Í 2 Espresso 2 Café créme À Á My coffee Espresso Café créme Ä Å Káva s mlékem Macchiato Æ Ç Cappuccino My coffee Á Ä Å Æ Ç È È É Mléčná pěna Teplé mléko Ê Horká… -
Page 126
À Â Ã < > Î Ð Ò Ò Teplota Káva normální À Horká voda Æ Teplota Káva Horká voda < °C… -
Page 127
Ë Í Espresso < > Informace À Odvápnit po À Vyčistit po Chybí filtr À Vyměnit filtr po Informace Kávy: Mléčné nápoje: Objem horké vody… -
Page 128
Nastavení Jazyk: čeština Tvrdost vody Odvápnění > < > Nastavení Tvrdost vody Odvápnění start Čištění ¡ > Jazyk > Tvrdost vody 1,2,3 Nahřívač zap. v… -
Page 129
> Nastavit čas 08:25 > Nahřívač zap. v > Odvápnění Nastavit čas > Čištění > Nahřívač vyp. v > Calc‘n‘Clean > Autom. vypnout po > Zobrazit hodiny > Vodní filtr Nastavit čas > Režim hodin start Vložte 0,5l nádobu pod šlehač mléka start… -
Page 130
> Tov. nastavení < > Servis – výměna filtru Vodní filtr > Kontrast –20… -
Page 131
Ë Í Espresso  à À Á Ä Å À Á Ä Æ Å Ç Ë Í Cappuccino À Á Ä Å Æ Ç… -
Page 132
Ä Å Æ Ç ¡ È É… -
Page 133
¡ Ê ¡ Ì Položte sklenici pod šlehač, vložte do ní sací trubičku start… -
Page 135
Servis – odvápnění Servis – čištění Servis – Calc‘n‘Clean Autom. vypnout po… -
Page 136
Přidejte 0,5 l vody a odvápňovač start Odvápnění Ë Í Nedostatek odvápňovače. Espresso Přidejte odvápňovač start Servis – odvápnění i – stisknout na 3 s Vyčistěte nádržku na vodu a do- plňte vodu start Odvápnění start Odvápnění Vylijte vodu z odkapávače Vylijte vodu z odkapávače Nasaďte odkapávač… -
Page 137
Servis – Calc‘n‘Clean i – stisknout na 3 s Vylijte vodu z odkapávače Nasaďte odkapávač Nastavte otočné rameno Calc‘n‘Clean start Čištění Otevřete přihrádku Vylijte vodu z odkapávače Nasaďte odkapávač Vložte čisticí tabletu Siemens a zavřete přihrádku Stiskněte tlačítko start Čištění Čištění… -
Page 138
Otevřete přihrádku Vložte čisticí tabletu Siemens a zavřete přihrádku Odstraňte filtr start Čištění Přidejte 0,5 l vody a odvápňovač start Vylijte vodu z odkapávače Nasaďte odkapávač Odvápnění ¡ Nedostatek odvápňovače. Přidejte odvápňovač start È Vyčistěte nádržku na vodu a doplňte vodu start Odvápnění… -
Page 140
Doplňte kávová zrna do zásobníku… -
Page 141
Chyba Obraťte se na telefonickou podporu Vyčistěte spařovací jednotku… -
Page 144
• • • • • • • •… -
Page 147
Siemens Info Line (Mo-Fr: 8.00-18.00 Uhr erreichbar) Für Produktinformationen sowie Anwendungs- und Bedienungsfragen zu Kleinen Hausgeräten: DE-Tel.: 01805 54 74 36* oder unter siemens-info-line@bshg.com *) 0,14 /Min. aus dem Festnetz, Mobilfunk max. 0,42 /Min. Nur für Deutschland gültig!