- Manuals
- Brands
- WMF Manuals
- Coffee Maker
- 900
- User manual
-
Contents
-
Table of Contents
-
Bookmarks
Quick Links
coffee wakes up the world
User Manual
Coffee machine
English
V0.16
Valid for all WMF 900 models
Series 900 Order number 33 2624 2010 Edition 05.2014
Related Manuals for WMF 900
Summary of Contents for WMF 900
-
Page 1: User Manual
User Manual Coffee machine English V0.16 Valid for all WMF 900 models Series 900 Order number 33 2624 2010 Edition 05.2014…
-
Page 2
Congratulations on the purchase of your WMF coffee machine. The WMF 900 coffee machine is a fully automatic single cup machine for espresso, café crème, cappuccino, milk coffee, latte macchiato, milk foam, and hot water. Each beverage is freshly brewed which guarantees a high quality beverage. -
Page 3: Chapter 1 Introduction
Access beverage settings ……….31 User Manual WMF 900…
-
Page 4: Table Of Contents
Clean the milk system ……….49 Milk system cleaning Connect & Clean milk system rinsing Machine cleaning Change water filter Change water filter Rinse water filter User Manual WMF 900…
-
Page 5
Chapter 12 Guarantee and directives for private use 12.1 Intended use 12.2 Directives 12.3 Guarantee and warranty for private use Chapter 13 premium service and maintenance 24 months Chapter 14 technical data Chapter 15 Shipping and disposal Index User Manual WMF 900… -
Page 6: Chapter 1 Introduction
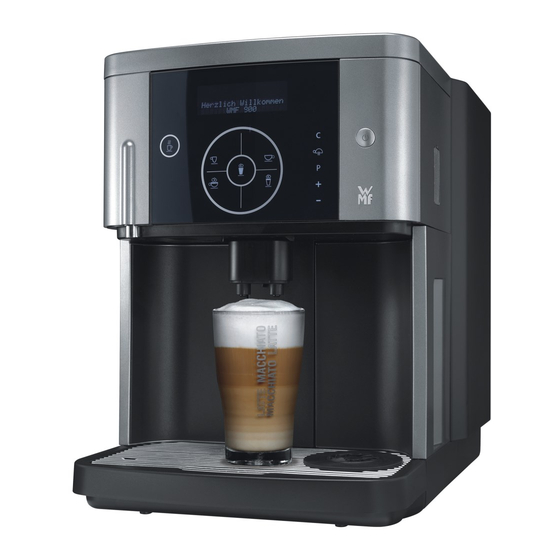
Introduction Chapter 1 Introduction 1.1 parts of the coffee machine DI_00_00_00 your selection pls 08:15 23.04.2014 User Manual WMF 900…
-
Page 7
Hot water spout All-in-One spout Milk hose Removable drip tray with drip grid SteamJet cup warmer Water tank Grounds container ON/OFF button Brewing unit Display and functional pads C pad Star pad P pad Minus pad Plus pad User Manual WMF 900… -
Page 8: User Manual Signs And Symbols
IMportant • to the coffee machine • for the installation location Consult the warranty / always follow the User Manual. guarantee section w from page 83 note notE • Instructions for safe use and tips for easier operation. User Manual WMF 900…
-
Page 9: Ready To Operate
All-in-One spout, milk nozzle and milk hose O-rings Seals Prior to brewing cycle, coffee is briefly infused in order to Pre-infusion ensure a more intense release of its aromatic substances. Pressing Automatic pressing of ground coffee prior to brewing Rinsing Intermediate cleaning User Manual WMF 900…
-
Page 10: Chapter 2 Start-Up
• Never open the housing. • Never loosen the screws, and do not remove any housing parts. Conditions for usage and installation IMportant Follow the User Manual. Technical data w starting on page 86 User Manual WMF 900…
-
Page 11: Installation Location
Consult the warranty / guarantee section In case of doubt, do not start up the coffee w from page 83 machine, and inform the WMF Service. > Retain the original packaging in the event of For accessories and any subsequent return. identification of machine…
-
Page 12: Water Tank
2.5.2 Determine the water hardness The unit used is the ™ Request the water hardness reading from your water “Deutsche Karbonathärte” supplier, or determine it by using the WMF carbonate (°dKH) hardness test in the accessories (complete with instructions) 2.5.3 Fill the water tank ™…
-
Page 13: Grounds Container
The milk hose must always be placed carefully into the guide. The milk hose must not be in front of the coffee grounds container or the coffee grounds container opening. ™ Insert the end of the milk hose into the milk pack User Manual WMF 900…
-
Page 14: Fill The Bean Hopper
Start-up 2.7.1 Milk lance Stick the WMF milk lance into the milk container and connect it to the milk hose. The exterior of the milk hose no longer comes into contact with the milk, for optimal hygiene. Adjust the porosity of the milk foam as desired by turning the screw.
-
Page 15: Power Connection
• Select cup size press and hold plus pad • Step forward touch briefly • Increase value touch briefly • Increase coffee strength touch briefly • Select cup size press and hold • Pot function press and hold User Manual WMF 900…
-
Page 16: Switch On The Coffee Machine / Start-Up Program
28 • The set values can be changed after start-up. This message is displayed for 5 seconds. The initial set-up software then provides a guide through the initial of your WMF 900 settings. DI_02_11_03 time The current time. time…
-
Page 17: Switch-Off Time
OK: P change: -/+ = water filter for 100 liters of water 100 l Insert water filter = water filter for 200 liters of water 200 l w page 12 = no water filter Capacity life shown applies for 10 °dKH. User Manual WMF 900…
-
Page 18: Setting Options
Start-up is complete. All settings can be changed 08:15 23.04.2014 now, or at a later time. Setting options • Cup volumes (cup size) page 30 • Set grinding degree page 45 • Beverage setting page 31 • Basic settings page 37 User Manual WMF 900…
-
Page 19: Chapter 3 Operation
“Ready to operate” display appears. page 38 Energy saving mode If an Eco-mode has been activated, this is shown on the DI_00_00_00_e display with an in front of the date. E your selection pls 08:15 E 23.04.2014 User Manual WMF 900…
-
Page 20: Beverage Dispensing
When the warm-up rinsing is activated ™ Briefly press the beverage button If more than 10 minutes have passed since the last beverage was dispensed, the display shows the question of whether to perform a warm‑up rinsing. The warm‑up rinsing can be skipped. User Manual WMF 900…
-
Page 21: Beverage Buttons
1x latte macchiato Milk button touch briefly 1 serving of milk touch and hold Milk foam Hot water button touch briefly 1 serving of hot water touch and hold Hot water dispensing continues for as long as the pad is held. User Manual WMF 900…
-
Page 22: Dispense Milk Or Milk Foam
Dispensing takes place according to the settings. Dispense a variable amount of hot water ™ Place a suitably sized cup under the hot water spout ™ Touch and hold the hot water button Dispensing continues for as long as the button is held. User Manual WMF 900…
-
Page 23: Height Adjustment Of The All-In-One Spout
™ Place a cup on the cup warmer with the opening facing downward ™ Touch and hold for longer than 2 seconds Hot steam slowly flows into the cup from below. The steam flow stops automatically when the star pad is released, or after 8 seconds. User Manual WMF 900…
-
Page 24: Coffee Strength For The Next Beverage
Leave the pot in place until all brewing place pot cycles have finished, and OK: P the “Ready to operate” display appears again. ™ Start the pot function with ™ Follow the display messages User Manual WMF 900…
-
Page 25: Manual Insert
™ Open the manual insert lid DI_03_12_01 The display shows: insert ground coffee select beverage ™ Insert ground coffee (max. 15 g) ™ Close the manual insert lid ™ Touch the desired beverage button Manual insert Cancel beverage dispensing ™ Touch User Manual WMF 900…
-
Page 26: Grounds Container
• The drip tray may contain hot liquids. > Move the drip tray carefully. Observe the Safety chapter w starting on page 76 > Replace carefully so that no water accidentally drips down. Clean drip tray daily w Care page 60 User Manual WMF 900…
-
Page 27: Switch Off The Coffee Machine
48 ™ Disconnect mains plug Follow the manual. IMportant If this is not observed, the liability is invalidated Consult the warranty / in the event of any resultant damage. guarantee section w from page 83 User Manual WMF 900…
-
Page 28: Chapter 4 Settings
92% DI_04_02_07 OK: P change: -/+ foam volume: 14 sec DI_04_02_08 OK: P change: -/+ rest time: 20s DI_04_02_09 OK: P change: -/+ sequ.: milk+coffee DI_04_02_10 OK: P change: -/+ preinfusion: on OK: P change: -/+ User Manual WMF 900…
-
Page 29
-/+ brewing temp.: 92 °C factory sett.: DI_04_04_22 DI_04_03_16 OK: P change: -/+ OK: P change: -/+ office functions change PIN DI_04_03_18 OK: P change: -/+ OK: P change: -/+ display contrast OK: P change: -/+ User Manual WMF 900… -
Page 30: Cup Volumes (Cup Size)
™ As soon as the cup volume is set as desired, confirm the values with 4.1.1 Dispensing test ™ Touch the desired beverage button The beverage is dispensed using the newly changed values. Each beverage setting can be tested during setup. User Manual WMF 900…
-
Page 31: Beverage Setting
OK: P browse: -/+ ™ Select the beverage for which the taste and The PIN is requested prior to this composition should be set action, if the PIN function is active. Activate PIN function w page 41 User Manual WMF 900…
-
Page 32: Water Volume
™ Set the value as desired ™ Start a dispensing test with the current values ™ As soon as the beverage is set as desired, confirm the values with User Manual WMF 900…
-
Page 33: Sequence Of Dispensing
™ Set as desired beverages except café crème. ™ Start a dispensing test with the current values ™ As soon as the beverage is set as desired, confirm the values with User Manual WMF 900…
-
Page 34: User Profiles
Settings | User profiles 4.3 User profiles It is possible to adjust this setting on the WMF 900 sensor plus the version of the coffee machine. The WMF 900 sensor plus can manage three individual user profiles, in addition to the standard user profile.
-
Page 35: Set Up The User Profile
™ Touch the desired beverage button The beverage is then dispensed using the settings The selected user profile remains for the selected user profile. active for 10 seconds. Select the beverage within this time period. User Manual WMF 900…
-
Page 36: Restore The User Profile To The Standard Settings
Person 1 really should be reset. No: C Yes: P Reset? DI_PR_01_01_12 No: C Yes: P Save user profile -> Touch Reset user profile -> Touch Reset profile ▓ ▓ ▓ ▓ ▓ ▓ ▓ ▓ ▓ User Manual WMF 900…
-
Page 37: Basic Settings
PIN function is active. Activate PIN function w page 41 DI_04_03_03 4.4.2 Language ™ Touch to set the desired language language: english ™ Confirm the desired setting with OK: P change: -/+ User Manual WMF 900…
-
Page 38: Time
0 min If switch-on time is activated, the off automatically. coffee machine switches on again ™ Confirm the desired setting with at the set switch-on time. It cannot be set between 0 and 5 minutes. User Manual WMF 900…
-
Page 39: Eco-Mode
Temperature is reduced 5 minutes Always switched off. after the last beverage. For dispensing pure coffee, without milk beverages. After the temperature has been reduced, it must be heated up before the next beverage is dispensed. Heating duration approx. 15 seconds. User Manual WMF 900…
-
Page 40: Water Hardness
Cleaning interval It can be set to , for household use standard cleaning: standard and monthly machine cleaning, or office OK: P change: -/+ recommended for commercial use and daily machine cleaning. ™ Confirm the desired setting with User Manual WMF 900…
-
Page 41: Activate Pin Function
4.4.15 Factory settings If set to all beverage settings are reset to the factory sett.: factory settings. OK: P change: -/+ ™ Confirm the desired setting with All individual settings are lost if you reset to the factory settings. User Manual WMF 900…
-
Page 42: Change Pin
Hot water your selection pls Espresso 08:15 23.04.2014 Café crème Cappuccino Latte macchiato Milk DI_04_03_18 4.4.17 Display contrast Display contrast is set here. display contrast ™ Confirm the desired setting with OK: P change: -/+ User Manual WMF 900…
-
Page 43: Counters
No: C Yes: P presented. The PIN is requested prior to Keep counter settings this action, if the PIN function is ™ Touch active. Delete counters Activate PIN function ™ Touch w page 41 User Manual WMF 900…
-
Page 44: System Information
The name and type of the device are displayed. WMF 900S browse: -/+ DI_04_05_05 4.6.3 Machine number The 6-digit machine number is shown. serial no. ###### browse: -/+ DI_04_05_06 4.6.4 Date of production The date of production is shown. prod. date: mm.aaaa browse: -/+ User Manual WMF 900…
-
Page 45: Chapter 5 Other Settings
™ Set grinding degree one stage coarser Grinding degree too coarse • The coffee comes out too fast, especially for espresso; the crema is too light and does not last; the aroma is flat. ™ Set grinding degree one stage finer User Manual WMF 900…
-
Page 46: Chapter 6 Care
Health hazard. Hygiene. CaUtIon • All cleaning agents are perfectly tuned to the cleaning programs. Observe the Safety chapter w starting on page 76 > Use only WMF cleaning and descaling media. User Manual WMF 900…
-
Page 47
> Never reach under the spouts while cleaning or descaling. > Ensure that no one ever drinks the cleaning solution or descaling solution. never clean the coffee machine parts in IMportant the dishwasher. Consult the warranty / guarantee section w from page 83 User Manual WMF 900… -
Page 48: Cleaning Intervals Overview
= Daily, at least once per day and as required Weekly = Weekly cleaning Regularly = Regularly as required Message = After the display shows a message Optional = Optional (depending on the model) = Daily as required User Manual WMF 900…
-
Page 49: Start Care Programs
• Milk is very sensitive. Germs that can pose a health hazard can build up in the milk Observe the safety instructions for cleaning system. w starting on page 46 > Follow all hygiene instructions. > Valid for commercial use: Follow the HACCP cleaning schedule. User Manual WMF 900…
-
Page 50: Milk System Cleaning
™ Wipe off the outside of the milk hose with a clean, damp cloth ™ Connect the milk hose with the milk nozzle to the hot water spout [1] ™ Turn the milk hose clockwise, until it stops [2] User Manual WMF 900…
-
Page 51
All-in-One spout. Clean the All-in-One spout with a steam jet. ™ Hold the milk hose with the milk nozzle over the drip tray after rinsing, so that the remaining hot water can run out User Manual WMF 900… -
Page 52: Machine Cleaning
> Never reach under the spouts while cleaning or descaling. > Ensure that no one ever drinks the cleaning solution or descaling solution. The cleaning program provides a step-by-step guide through the machine cleaning on the display. Follow the messages. User Manual WMF 900…
-
Page 53
49 A minute countdown timer shows the time remaining in the cleaning cycle. Milk system cleaning After cleaning, the display requests a manual milk w page 50 system cleaning. This message disappears with the C pad is touched User Manual WMF 900… -
Page 54: Change Water Filter
-/+ ™ Touch DI_06_07_03 Filter change starts. remove water tank DI_06_07_04 ™ Remove water tank remove old filter place new filter Insert water filter ™ Replace the old water filter with a new one w Start-up page 12 User Manual WMF 900…
-
Page 55: Rinse Water Filter
Calculated by the coffee machine and shown on the display. • Postpone descaling ™ Touch • Number of brewing cycles 50 brewing cycles allowed after the first message before beverages are blocked • Remove beverage block ™ Perform a descaling User Manual WMF 900…
-
Page 56
• 1 bottle of WMF liquid descaling agent (0.75 liter) • 3-liter collection container Display messages lead you step by step through the program. -
Page 57
The crystals must not enter ™ Pour one whole bottle of WMF liquid descaling agent the coffee machine. into the water tank ™ Fill the water tank with water and stir The water temperature in the tank must not exceed ™… -
Page 58
™ Place the lid on the water tank ™ Insert the water tank carefully ™ Touch DI_08_01_01 The descaling continues. descaling … time remain: 1 min A minute countdown timer shows the time remaining in the descaling cycle. User Manual WMF 900… -
Page 59: Clean The Steam Nozzle
™ Disconnect mains plug ™ Disassemble the milk foamer [1] ™ Press the red steam nozzle to the left with the index finger to remove it [2] ™ Carefully clean the steam nozzle with a small cleaning brush User Manual WMF 900…
-
Page 60: Clean The Grounds Container
• There is a hazard of causing scratches or IMportant scores. > Do not clean with scouring powders or the Consult the warranty / guarantee section like. w from page 83 > Do not use any sharp cleaners or implements. > Use soft cloths for cleaning. User Manual WMF 900…
-
Page 61: Clean The Housing And Control Panel
6.12 Clean the water tank ™ Thoroughly rinse out the water tank weekly with warm drinking water Severe scale deposits can be removed with WMF liquid descaling agent. After descaling, thoroughly rinse the water tank under warm drinking water in order to remove all descaler residues.
-
Page 62: Release Blocked Grinder
CaUtIon • If a beverage is initiated accidentally, there is a hazard of being injured. Observe the Safety chapter w starting on page 76 > Always switch off using the ON/OFF button prior to cleaning. > Disconnect mains plug. User Manual WMF 900…
-
Page 63
™ Unscrew the air intake pipe from the milk foamer [5] ™ Unscrew the black cap from the air intake pipe [5] Milk hose and milk nozzle Top and bottom part of the Air intake pipe, with cap All-in-One spout, with hose coupling User Manual WMF 900… -
Page 64
Care | Clean the milk system Health hazard in case of eye contact CaUtIon • In case of eye contact, the WMF milk system cleaner can cause severe eye injury. Observe the Safety chapter w starting on page 76 > Ensure that the WMF milk system cleaner never makes contact with the eyes of a person or animal. -
Page 65: Clean The Brewing Unit And Brewing Chamber
™ Use the multitool to turn the thread on the head of the brewing unit counterclockwise [4] The scraper flips out to the front, and the brewing sieve is now visible [5]. ™ Clean the brewing unit under warm drinking water [6] User Manual WMF 900…
-
Page 66
If the brewing unit cannot be inserted without resistance: > Turn the thread on the brewing unit head slightly to the left or right with the multitool until the brewing unit slides into the guide. > Never use force. Danger of breakage. User Manual WMF 900… -
Page 67: Chapter 7 Haccp Cleaning Schedule
With correct installation, care, maintenance, and cleaning, WMF coffee machines meet the requirements described above. If care and cleaning of the coffee machine is not carried out properly, dispensing milk beverages will constitute a food hygiene hazard point.
-
Page 68
4 hours of operation time (absolutely required for a low number of 2. Manual All‑in‑One spout cleaning (Milk foamer) dispense cycles, or if milk is not cooled) w Cleaning instructions 4. General machine cleaning Cleaning steps Cleaning steps Time Signature Time Signature User Manual WMF 900… -
Page 69: Chapter 8 Messages And Instructions
™ Pour coffee beans into the bean hopper w page 71 ™ Touch the desired beverage button again The grinding process continues and the additional coffee required for the brewing cycle is ground. The desired beverage is brewed. User Manual WMF 900…
-
Page 70: Insert Ground Coffee
™ Change the filter change water filter Change water filter page 54 DI_08_01_12 8.1.8 Descale machine the machine must be descaled machine descaling ™ Perform a descaling OK: P Care Descaling, page 55 User Manual WMF 900…
-
Page 71: Error Messages And Malfunctions
WMF Service If the error occurs again or if the error indicated is not w page 85 listed please call the WMF Service. Some messages lead to blocking of individual functions. You will notice this by the fact that the beverage button illumination goes out.
-
Page 72
™ Check the O-ring on the water tank coupling and replace if needed ™ If the error recurs, call the WMF Service Brewing unit is clogged ™ Remove the brewing unit, clean it manually, insert it, and perform a machine cleaning ™… -
Page 73
Action instructions Motor driver error ™ Switch off the coffee machine and then on again after a few seconds ™ If the error recurs, call the WMF Service Grinder blocked the grinder is blocked by a foreign object Release blocked grinder, page 62 Grinding degree too fine ™… -
Page 74: Errors Without Error Messages
™ Deaerate the coffee machine: dispense hot water until a smooth water stream comes out Note: it is normal for the water pump to start by itself from time to time during operation, as it automatically fills the system. User Manual WMF 900…
-
Page 75
Water tank is difficult ™ Lightly smear the O-rings on the water tank coupling to move with the WMF “gasket grease” Instructions in the care kit Brewing unit is ™ Lightly smear the O-rings on the brewing unit with difficult to remove and WMF “gasket grease”… -
Page 76: Chapter 9 Safety
• Follow all the safety instructions. 9.1 Hazards to the operator At WMF, safety is one of the most essential product features. The effectiveness of the safety devices can only be ensured if the following points are observed.
-
Page 77
> Never use the SteamJet function without the drip tray grid or the cup warmer cover in place. Burn hazard. Hot surfaces. CaUtIon • The brewing unit can get hot. > Clean the brewing unit only when the machine has cooled off. User Manual WMF 900… -
Page 78
• The hot liquids can irritate the skin, and the heat poses a burn hazard. > Never reach under the spouts while cleaning or descaling. > Ensure that no one ever drinks the cleaning solution or descaling solution. User Manual WMF 900… -
Page 79: Hazards To The Coffee Machine
Coffee grinder • Foreign objects can damage the grinders. This damage is not covered under the warranty. > Ensure that no foreign objects land in the coffee bean hopper. User Manual WMF 900…
-
Page 80
• For water with carbonate hardness in excess of 5 °dKH, a WMF water filter must be fitted; otherwise, the coffee machine can be damaged due to build-up of scale. • For insurance reasons always ensure that, at the end of operation, the mains switch is switched off or the mains plug is unplugged. -
Page 81: Chapter 10 Intended Use And Directives
“General Terms and Conditions” in various variations into cups or pots. of WMF AG and this User Manual. Any In addition, the coffee machine can other use or use that goes beyond the dispense hot water. This device is also…
-
Page 82: Directives
WMF descaling agent. valves and the pressure containers, among other checks. These measures The manufacturer’s specifications are conducted by WMF Service or by regarding maintenance cycles WMF authorised service personnel as and frequency of maintenance part of the maintenance work.
-
Page 83: Chapter 11 Warranty For Commercial Use
• With respect to the consequences of on the part of WMF. improper modifications undertaken • With respect to faults which occur without the consent of WMF, or by as a result of failure to follow repair or reconditioning work on handling instructions and regulations,…
-
Page 84: Chapter 12 Guarantee And Directives For Private Use
The use of the device is also subject water (beverages, cleaning) or milk to the “General Terms and Conditions” (cooled, pasteurised, homogenised, of WMF AG and this User Manual. Any UHt). other use or use that goes beyond the 12.2 Directives…
-
Page 85: Chapter 13 Premium Service And Maintenance 24 Months
You can reach the WMF Service Center if first point of contact. the local WMF Service is not known. Service certificate: w www.wmf.de w Coffee & Tea w Fully automatic coffee machines w WMF 900 w Downloads name and address of the guarantor In Germany: WMF Württembergische Metallwarenfabrik Aktiengesellschaft Eberhardstraße…
-
Page 86: Chapter 14 Technical Data
The work must be carried out by authorised installation technicians in compliance with general, country-specific and local regulations. The potential equalization terminal is installed by WMF Service if needed. User Manual WMF 900…
-
Page 87
Water Water temperature maximum 35 °C. Water quality For drinking water with carbonate hardness above 5 °dKH, a WMF water filter should be fitted upstream. Ambient temperature +5 °C to maximum +35 °C (empty the water system in case of frost). Maximum humidity 80 % relative humidity without condensation. -
Page 88
The mains switch and plug top are part of the on‑site installation. The coffee machine may not be fitted with a fixed permanent mains connection if installed on a transporting trolley (a mobile station). User Manual WMF 900… -
Page 89: Chapter 15 Shipping And Disposal
This device conforms to the European Directive 2002/96/EC on waste electrical and electronic equipment (WEEE) and must not be disposed of in household trash. Further information is available at your nearest collection station or at your service center. User Manual WMF 900…
-
Page 90: Index
Language 37 Date of production 44 Latte macchiato button 21 Date / time 38 Level indicator 26 Delete counters 43 Descaling 55 Determine the water hardness 12 Device name 44 Directives 82, 84 Dispensing hot water 7, 22 User Manual WMF 900…
-
Page 91
Weight empty 86 Read counters 43 Without water drain 26 Ready to operate 9, 19 WMF Service Hotline 85 Recommended daily capacity 86 Work on site 86 Release blocked grinder 62 Rest time 32 Rinse water filter 17 User Manual WMF 900… -
Page 92
Your nearest WMF Service: © 2012–2014 WMF AG All rights reserved, in particular duplication, distribution and translation rights. No part of this manual may be reproduced in any form or processed, duplicated or distributed using electronic systems without written consent. Design and production / typesetting and print presentation: TecDoc GmbH;…
-
Страница 1
User manual WMF 90 0 EN — Typ e 03 0 40 0[…]
-
Страница 2
Pr es s briefl y: 1x Espre sso Keep pr es se d down : 2x E spr es so Pr es s briefl y : 1 x Café C rème Keep pr es sed d own : 2x C afé Crème Pr es s briefl y: 1x Cappuccino Keep pr es sed d own : 2x Ca pp ucc in o Pr es s briefl y : 1 x Lat te Ma cchiato Pr es s briefl y : 1 Mug of milk Pr es s and hold , till the de sired quantit y of mi[…]
-
Страница 3
3 1 2 14 13 12 15 11 10 9 8 7 4 6 5 Legend 1 Li d for ground c of fee ins ert 2 Brewin g unit lid 3O n / O f f s w i t c h 4 Ven tilation g rid 5 WMF Professional-Brewing- Sys tem (in hou sing) 6W a t e r t a n k 7 Drip tray with d rip tray g rid 8 Cof fee gr ounds c ontainer 9 WMF A ll-In- One s pout 10 Mi lk t ub e 1 1 Hot water s pout 1 2 Co ntr[…]
-
Страница 4
A variety of c offee speciali ties Y ou c an make a variet y of cof fee spe cialties with jus t the touch of a but ton on your WMF Automati c Coff ee Machine, such as Café C reme, Es pres so, C appuccin o and Lat te Mac chiato. In addit ion, you can al so prep are hot milk and hot water for te a. WMF All-In-One spout The W WF A ll-In- One sp out i[…]
-
Страница 5
Pr eliminar y c omment s Congratula tions on choosin g your new WM FAutom atic Coff ee Machin e . Y our W MF Automatic Cof fee Ma chine is equipp ed with the m ost imp ort ant comp onent s of a profe ssio nal WMF cof fee m achine — the b asis for your enjoy ment of a per fect c off ee. Read t his user manual b efore yo u star t preparin g the co[…]
-
Страница 6
T able of c ontents 3.3.2 WMF Steam Jet: Cup heating in a matter of seconds . . . . . . . . . . . . . . . . . . . . . . . . . . . . . . . . . . .24 3.3.3 Set the coffee strength for the next beverage . .25 3.3.4 Quick selection of cup size . . . . . . . . . . . . . . . . . . .26 3.3.5 Pot function . . . . . . . . . . . . . . . . . . . . . . . . . .[…]
-
Страница 7
T able of c ontents 4.2.6 Descale coffee machine . . . . . . . . . . . . . . . . . . . . . 53 4.3 Manual cleaning . . . . . . . . . . . . . . . . . . . . . . . . . . . 57 4.3.1 Clean the brewing unit . . . . . . . . . . . . . . . . . . . . . .57 4.3.2 General cleaning . . . . . . . . . . . . . . . . . . . . . . . . . . 6 1 4.3.3 Clean the milk syst[…]
-
Страница 8
Fo r your saf et y 1 1 For you r safet y Max imum pos sible s afet y of devic es is one of t he charac teristic s of WMF pro duct s to which we give our spe cial attent ion. Th e integrated s afet y dev ice s of the WMF Automatic C offe e Machine ar e, however, only e ffe cti ve if you follow t he following s afet y ins truc tions . 1 . 1 Intend[…]
-
Страница 9
Fo r your saf et y 2 1 . 2 Hazar d i ns tructions De spite all s afet y prec autions, t here is a hazar d potential as sociate d with each de vice if handle d improp erly. There fore, follow t he instr uctions b elow when handling your auto matic cof fee ma chine to avoid injuries and h ealth hazard s: Hazard! Possible injury by grinders! As long a[…]
-
Страница 10
Fo r your saf et y 3 Hazard! Possible risk to life due to defects in the mains cable! Defects in the mains cable can be a risk to life from electric shocks. > Protect the mains cable fr om damage: — Do not clamp the mains cable. — Protect the mains cable from sharp edges, moistur e, heat or oil. > Do not connect the device if the mains cable […]
-
Страница 11
Fo r your saf et y 4 Hazard! Probable risk of burns or scalding due to hot components or steam and hot liquids! The All-In-One spout and the hot water spout are very hot while in oper ation and on contact can cause burns. Hot beverages and escaping steam can scald you. > Do not touch the All-In-One spout, the hot water spout or the immediately a[…]
-
Страница 12
Fo r your saf et y 5 Hazard! Possible health hazar d due to cleaning agents or descaling agents. Cleaning agents and descaling agents are irritants and become very hot while executing the cleaning progr ammes. Cleaning agents and descaling agents can affect your health. Cleaning agents and descaling agents can damage the plastic parts of the automa[…]
-
Страница 13
Fo r your saf et y 6 Caution! Possible material damage due to overfl owing drip tray! If you only infrequently dr ain the drip tray , it can overfl ow . It can possibly damage the delicate items in the surrounding ar ea. > Empty the drip tray after each system rinse. > Ensure that the machine is switched off in your absence.[…]
-
Страница 14
Initial s etup 7 2 In itial setu p Now you are only few steps away fr om preparing a per fect c offe e. In this chapter , step- by-step you can learn how you can star t operating your WM FAu tomatic Cof fee Machine. 2. 1 Sc ope o f supply > Che ck the sc ope of sup ply for co mpletenes s . Legend 1 W MFA utomatic Coffee Mach ine 2 WMF Milk[…]
-
Страница 15
Initial s etup 8 2.2 Instal lation a nd c on nec tion > Unpack t he automatic cof fee m achine. > Che ck the machine f or pos sible dama ge during trans por tation. Caution! Possible pr operty damage on delicate installation surfaces! Due to the hot steam or water that comes out, delicate bases can be damaged. > Protect the delicate instal[…]
-
Страница 16
Initial s etup 9 > Do not allow the cable to hang over the edge of the table or the corner of the table. > Protect the automatic coffee machine fr om moisture and weather infl uences and do not use the automatic coffee machine outdoors. > Install the device at least 85 cm, if necessary , even higher , above fl oor level. b a 7b 7a > C[…]
-
Страница 17
Initial s etup 10 2.3 T e sti ng the w ate r ha rdness > Briefl y dip t he provide d C arbonate hardn es s-tes t strips (abo ut 1 Sec ond) into your tap water. One minute later, you can re ad the degr ee of hardne ss with t he help of the co lour sc ale on the tes t strip package. Enter the value wit h the initial se tting s ( Chapter 29 Init i[…]
-
Страница 18
Initial s etup 11 2.5 Insert the WMF w ater fi lter The W MF water fi lter protect s the c off ee machine f rom sc ale formation s and ensure s be st qualit y of water for mak ing cof fee. Y ou n eed only o bser ve th e instru ctions in S ect ion 2.5 if yo u work with a water fi lter . If your water hardne ss is b etwe en 0 and 4, you ne ed not […]
-
Страница 19
Initial s etup 12 2.6 F illing th e water t ank Caution! Possible damage to your automatic coffee machine due to unsuitable liquids! Liquids other than drinking water can damage your coffee machine or can result in clogging. > Fill the water tank of your automatic coffee machine only with clean, cold drinking water . > Never fi ll the water […]
-
Страница 20
Initial s etup 13 > Pre ss t he milk tube into th e guide. Se e to it that the milk tub e doe s not lie in front of the gr ounds con tain er . 2.8 Fillin g the cof fe e bean hopper Onc e unpacked, r oaste d cof fee los es it s aroma in few day s . Ther efore, p our only as m any cof fee bean s in the cof fee b ean hopp er as you e xpec t to use […]
-
Страница 21
Initial s etup 14 15a 15b 15c > Open t he lid ( 15 a ) of the cof fee be an hopper. > Fill th e hopper ( 15 b ) with c off ee bean s > Clo se the lid ( 15 c ). 2.9 I niti al set ti ng > Pre ss t he On-/Of f-switch . The c ommissioning program be gin s. > Se t the desir ed language with – or + . > Confi rm the lan guage with P b[…]
-
Страница 22
Initial s etup 15 The setup prog ramme now guides you through the basic settin gs. > Se t the current tim e with – or + (hh = hour s in two digit s, mm = minute s in two digit s). > Confi rm th e time with P but ton. > Se t the current date with – or + (dd = day in two digit s, mm = m onth in two digit s , yyyy = ye a r i n fo u r d i[…]
-
Страница 23
Initial s etup 16 Energy saving mode Method of operation of the coffee machine 1 Both h eaters ar e continu ousl y ready f or use . Cof fee , milk, milk foam an d hot water can b e dispen sed with out havin g to wait. 2 (Factory setting) Hot water is h eld at oper ating temper ature co ntinuous ly. Cof fee , milk, milk foam an d hot water can b e d[…]
-
Страница 24
Initial s etup 17 > With – or + , sele ct wheth er you use a water fi lter (rec ommended fo r water hardnes s greater than 5 °dK H) > Confi rm your s elect ion with P but ton. If water fi lter is se t to » Y es», the fi lter will then be rinsed. If it is se t to “No”, this step nee d no t be c arried out. > Che ck to e[…]
-
Страница 25
Initial s etup 18 At the end of the s etup pro gram, a tes t brew is c arried out . The Espresso but ton blinks. > Plac e a cont ainer that hold s at least 5 0 ml under th e All-In -On e dispens er . > Pre ss a b evera ge butto n. The test brewing star ts. During this test brewing, cof fee grinder is fi lled with c o f fe e beans. > Throw[…]
-
Страница 26
Opera tion 19 3 Opera tion In this chapter , you can le arn every thing about the easy method of cof fee pr eparation with your WMF Automatic Cof fee Machine and how yo u can individuall y customize it — en tir ely acc ording to your prefer ence! Hazard! Possible risk of burns or scalding due to hot components or steam and hot liquids! The All-[…]
-
Страница 27
Opera tion 20 3. 1 . 1 Switc hing o n > Pre ss t he On-/Of f-switch . Y our c offe e machine heats up and p erforms cof fee s ystem rinse. This warms up all the pipes. > Plac e a colle cting ve ss el under th e All-in- One s pout for the rins e water . The c o f fee sy stem rin sing pro cedur e lasts for about. 4 0 seconds. Y our auto matic c[…]
-
Страница 28
Opera tion 21 3. 1 . 3 Tim er oper ation (automatic swit ch- on ). With th e timer , you c an automatic ally switc h the WMFAutom atic Coff ee Machin e on or of f. T o us e the timer, the basic s ett ing «Switch -on time» mus t be se t to active beforehand. > Briefl y p res s the on-/of f -s witch. > Se t the switch- on time wit[…]
-
Страница 29
Opera tion 22 3.2 Use mi lk Milk is a ver y s ensitiv e foods tuf f . Always en sure cleanlin es s when using milk . Open t he pack ing only with clean hand s and tools . Alway s ensure th at the milk is germ-f ree. We rec ommend that milk alway s be s tored in a re frigerato r and remove d from it only f or immediate us e. > Plac e the ref rige[…]
-
Страница 30
Opera tion 23 3.3 Prepare coffee beverages Cof fee b everag es are prep ared by touc hing the be verage but ton in the c ontrol p anel. 3.3. 1 Coffe e s pecial ities at the touch of a button > Plac e an approp riate drinking ve ss el under the All -In- One sp out. > Adjus t the All- In-o ne spout to s uit the height of the drink ing ves sel .[…]
-
Страница 31
Opera tion 24 > Fo r example , pres s the but ton at the b o t tom lef t for Cappu ccin o. short: 1x C a p p uc i n o short: 1x L at te Mac chiato long: 2x Cappu cino The name of the bever age appear s on the di splay, for examp le, Cappucino. The c o f fee beans are gr ound for the selected b everage, for e xample, Cappuc cino. The selec ted be[…]
-
Страница 32
Opera tion 25 Hazard! Possible danger of burns ! Hot steam is delivered and the drinking vessel can get very hot! > Do not use the cup warmer without a drinking vessel and never without the drip tray grid with steam board inserted in place. > Use heat-resistant drinking vessels. > Do not use the cup warmer without the associated saucer ins[…]
-
Страница 33
Opera tion 26 — Mild (about 1 5 % weaker than the s aved se tting) — Normal ( c orresponds to your setting) — St ron g (about 1 5 % stron ger than the s aved se tting) 3.3.4 Quick se lection of cup s ize Th e volume of the ne xt c up can be s tipulated be fore st artin g to prepare t he bever age. T he tas te will there for remain the s ame. Y ou s[…]
-
Страница 34
Opera tion 27 3.3. 5 Pot function Using t he pot func tion you c an make a full pot of C afé Crème. > Pre ss t he cup size rapid s election but ton for lon ger than 2 sec onds . > Pres s + 2x br iefl y. The Caf e Creme bevera ge bu tton lights up. > Pus h the All- In- One sp out upwards . > Plac e the WMF c off ee pot under t he spou[…]
-
Страница 35
Opera tion 28 1b 1a 1c > Plac e an approp riate drinking ve ss el under the All -In- One sp out. > Open t he lid ( 1a ) on the groun d cof fee inlet . 1[…]
-
Страница 36
Opera tion 29 The display notifi es: > Pour th e ground cof fee (ade quate for a brewing c ycle of ab out. 9 g) in the gr ound cof fee in ser t ( 1b ). > Clo se the lid ( 1c ). > Sele ct your b everage u sing the be verage b uttons (on e cup ). The pro cedure c an be canc elled with C button. 3.3.7 Prepar ing mi lk and m ilk foa m Y our W[…]
-
Страница 37
Opera tion 30 Tip : Milk or milk foam can drip a lit tle af ter dispens ing. It is be st to hol d your cup for a lit tle while long er af ter dispen sing under the A ll-In- One s pout , or plac e a small colle cting ve s sel under th e spout . Tip : Milk c an also drip, if t he milk cont ainer is full and at t he same t ime the All- In- One sp out […]
-
Страница 38
Opera tion 31 3.5 Tips to s ave energ y Se t the mos t econo mical energ y saving m ode (se e “Energ y savin g modes ” on page 1 5). Swit ch of f your WMFAuto matic Cof fee Mac hine w hen it is not in us e. It doe s not con sume any power then. Y our W MFAutomatic Cof fee M achine s witc hes of f automaticall y after 3 0 minutes . Reduc e[…]
-
Страница 39
Opera tion 32 > Plac e an approp riate drinking ve ss el under the All -In- One sp out. > Onc e again pre ss t he bever age but ton of the adju sted b everag e. The be verage is prepar ed with the adjusted settings. 3.6. 1 Set the cup size Here, y ou have the opti on to individuall y adjust th e cup volume to your c up sizes . But the r ecipe[…]
-
Страница 40
Opera tion 33 > Adjus t the cup volume to t he cup size with th e button s – or + . The cup volume is display ed in % . 1 0 0 % corresp onds to the default setting . > If nec es sar y, carr y out a tes t prepar ation (page 31 ) . > Confi rm th e cup volume with P button. > If nec es sar y, change the c up volume. > Confi rm th e […]
-
Страница 41
Opera tion 34 — Pre-brew ( for pe r fect a roma ) > Pres s P but ton. > Browse with + for b everag e set ting. > Confi rm your s elect ion with P but ton. > Sele ct the b everage f or which you want to change t he ta ste and the c ompo sition with the h elp of bevera ge buttons . > Se t the des ired water volume with – or + . >[…]
-
Страница 42
Opera tion 35 > Se t the des ired cof fee s trength wit h – or + . The ground quantit y varies according to the grinding degre e setting, the used t ypes of cof fee, the humidit y and several other infl uences . The factor y setting for Espresso corr esponds to approximately 9 grams . > If nec es sar y, carr y out a tes t prepar ation (pag[…]
-
Страница 43
Opera tion 36 The quant ity of milk f oam may be le ss during t he fi r st be verage s ince the c ondens ed water is s till in the co oled down pipe s. T herefo re, befo re the prep aration of the fi rst b everage, briefl y pre ss t he milk butt on. Pre- brew : B efore brewing, the ground c o f fee is dampened with hot water . This causes the gr[…]
-
Страница 44
Opera tion 37 3.6. 3 Basi c settings Fo llowing se tting s can be adjuste d : Basic settings Language* Water hardnes s* Ener gy sav ing mod es* Water fi lter * Time* Special information tone Date* Brewing temperatur e Dis play of time /date Fa ctor y s ettin gs Switch on t ime Dis play co ntras t Switch of f time* The b asic s ettin gs marke d wit[…]
-
Страница 45
Opera tion 38 > Confi rm your s elect ion with P but ton. > Se t the display of date and t ime on or of f with – or + . > Confi rm your s elect ion with P but ton. > Se t the pre- brew fun ction on o r off with – or + (Chapter “ 3. 1.3 Tim er operation (automat ic switch- on ).” on page 2 1 ). > Confi rm your s elect ion w[…]
-
Страница 46
Opera tion 39 All the basic set tings and beverage set tings are reset to factor y setting with the setting of » Y es». > Se t the fac tor y set ting to » Y es» wit h – or + . > Confi rm your s elect ion with P but ton. > Se t the display c ontra st with – or + . > Confi rm your s elect ion with P but ton. 3. 7[…]
-
Страница 47
Opera tion 40 15a 15b 15d 15c 15e > Open t he lid ( 15 a ) on t he bean hop per . > Conne ct the Multi to ol ( 15 b ) to th e grinding degre e set ting ( 15 c ). > Plac e an approp riate drinking ve ss el under the All -In- One- spout , pres s the E spr es so but ton and wait till the grind er runs . Grin ding should b e fi ner: Pre ss t […]
-
Страница 48
Opera tion 41 Grindin g degree i s too co ars e : Runs out to o fast — e spe cially in ca se of es pres s o- the cream is to o light and les s con sistent , the aroma is plain. Adjus t the grinding de gree by on e rotation to make it fi ner. Correct setti ng : Verif y your se tting by p reparing a doub le cup espr es so.[…]
-
Страница 49
Opera tion 42 3.8 Read c ou nters > Pres s P button. > Browse with + for c ounters . > Confi rm your s elect ion with P but ton. > Browse with – or + to display t he number of be verage s prepared. Immediately af ter all the bever ages are displaye d or w hen you press C button,the co un ter s can be deleted . > Re set the c ounte[…]
-
Страница 50
Car e 43 4 Care The c are of your WMF Automatic Coff ee Machine is espe cially impor tan t so that yo ur coff ee is always prepar ed per fectly. The displa y no tifi es you about how soon the Automatic C o f fee Machine must be rinsed, cle aned or descaled . Only 10 seconds time are nee ded to clean the ma chine before you switch it of f. Caut[…]
-
Страница 51
Car e 44 Steps for care Care interval Repl ace water fi lter — Af ter a re quest in t he displ ay (dependin g on water hardne ss an d water fl ow rate, at t he late st af ter 3 month s) De sc ale the mac hine — ac cor ding to the re quest in di splay (dep endent on water hard nes s, water fl ow r ate and water fi lter). Cle an the bre wing unit[…]
-
Страница 52
Car e 45 so -c alled relea se water runs into th e drip tray. This rins es any rem aining cof fee fro m the pipe s. T his is a comp letely normal p roce dure and not an erro r in the automatic c offe e machine. Hazard! Possible health hazar d due to cleaning agents or descaling agents. Cleaning agents and descaling agents are irritants and become v[…]
-
Страница 53
Car e 46 4. 2. 1 Cal ling u p the customer care prog rammes > Pres s P but ton. > Browse with + for c are progr ammes . > Confi rm your s elect ion with P but ton. > Browse with – or + but tons for th e desire d care programme. > Confi rm your s elect ion with P button. 4. 2.2 Wa rm-up ri nsi ng The pip es of the coff ee machine […]
-
Страница 54
Car e 47 > Call th e custom er care pro grams (Chapter “ 4 .2 Cus tomer Car e programme s” on pa ge 44). > Brow se until warm -up rins e. > Plac e a suitable v es sel under th e All-In- One s pout . > Confi rm th e warm-up rins e with P but ton. 4. 2.3 WMF Connect & Clean mi lk system ri nse The automatic milk and c offe e rin […]
-
Страница 55
Car e 48 > Sele ct the milk s ys tem rinse wit h P button. The display notifi es the indi vidual activities that must be complete d before the rinse. > Pus h the All- In-O ne spo ut to the upper mo st po sition . > Plac e a colle cting ve ss el under th e All-In -One s pout . > Wipe th e outs ide of the milk hos e with a clean damp clo[…]
-
Страница 56
Car e 49 Y ou c an also c all up the milk s ys tem rinsing manuall y . To do so c all up the car e progr ammes and s elect the milk s ys tem rinsing . When the automati c switch- off tim e is reach ed, be fore switchin g off onl y a cof fee s y stem rinsin g is carrie d out. But t he machine will c all for a milk sy stem rin sing ne xt time yo u sw[…]
-
Страница 57
Car e 50 > Call th e custom er care pro grams (Chapter “ 4 .2 Cus tomer Car e programme s” on pa ge 44). > Brow se th e Machine -cle aning. > Star t the machin e cleaning with P but ton. > Fo llow the inst ruction s in the disp lay . 1a 1c 1b > Plac e a suitable v es sel (2 litres ‘ c apacit y) under th e All-In- One s pout […]
-
Страница 58
Car e 51 > Open t he lid ( 1a ) on the groun d cof fee inlet . > Ins ert a cle aning table t ( 1b ) alon g with the yellow s ponge in t he ground c offe e inser t. > Clo se the lid ( 1c ). > Star t with P but ton. The cle aning program star ts. A minute countdown indicates how l ong the cleaning will last. T he Machine- cleaning ends af[…]
-
Страница 59
Car e 52 4. 2.5 Replace wate r fi lter This program ap pears when you use a water fi lter and the usage has been c onfi rme d during the initial settings (Chapter “2. 5 In sert the WM F water fi lter ” on page 1 1 ). However, dependin g on the water hardne ss an d the water fl ow , at le ast af ter 3 months , a disp lay reque sting to c ha[…]
-
Страница 60
Car e 53 > Slide the water t ank gently into th e automatic cof fee ma chine. > Pre ss t he butt on P . > Plac e a 2 litre c ollect ing cont ainer under the hot water s pout . > Star t fi lter rin se with the P button. The fi lter rinsing progr am starts . A minute countdown indicates how l ong the rin sing will last. Filter rinse pro[…]
-
Страница 61
Car e 54 water fi lter . you c an pos tpon e the des caling p roce ss b y pres sing C but ton. Howe ver , within t he nex t 50 b rewings , a des caling p roce dure must b e carrie d out. O therwi se, be verage dispens ing will be blo cked. Th e block is c leared af ter a de scalin g proc edure. 9b 10 9a > Pre ss t he releas e button ( 9a ) at t[…]
-
Страница 62
Car e 55 > Call t he custo mer care p rogram s (“ 4 .2. 1 Callin g up the cus tomer car e programme s” on pa ge 46). > Browse with – or + but tons fo r machine- cleanin g. > Confi rm your s elect ion with P button. > Empt y the drip tray. > Remove t he water tank fro m the automatic c offe e machine. > Remove the fi lter c[…]
-
Страница 63
Car e 56 Foll ow ing displays ap pear af ter about. 30 minutes: > Empt y the water tank . > Rins e the water tank th oroughly with c lear water . > Pres s P button. > Fill th e water tank with co ld drinking water. > Plac e the lid on the water t ank. > Slide the water t ank gently into th e automatic cof fee machine. > Pres s […]
-
Страница 64
Car e 57 Immediatel y after de sc aling, a machin e-cl eaning is re queste d. The p roce dure is de scrib ed under “ 4. 2.4 Mac hine-c leaning — Cle aning progr amme” on page 4 9. > Replac e the water fi lter in the water tank (C hapter . “ 4 .2. 5 Replace water fi lter” on page 52). > Pus h the milk foamer into t he All- In-O ne sp[…]
-
Страница 65
Car e 58 2a 5a 5b 5c > Op en the lid of the br ewer ( 2a ). > Releas e the br ewing unit ( 5a ). > Pull th e brewing unit ( 5b ) upwards o ut of the brew chute . Use b oth the gripping lu gs for pulling it out ( 5c ). 5d 5f 5g 5e 5h 5i 5 If it is dif fi c ult to rem ove the brewe r , th e O-Rin gs must be lubricated. (“ 4 .4 .2 Lubr ica[…]
-
Страница 66
Car e 59 > T urn the thread ( 5d ) on the br ewing unit head ( 5e ) with the multitool in t he anticlock wise dir ecti on. The scr aper ( 5g ) folds out for ward and the brewing fi lter i s now visible. > Cle an the brewing unit ( 5e ) under running water. > Cle an the brewing fi lter ( 5h an d 5i ) un der running water. Caution! Possibl[…]
-
Страница 67
Car e 60 8b 6b 8a 6a > Pull out t he water tank ( 6a ) an d the cof fee gr ounds c ontainer ( 8a ). > Remove t he res idues of groun d cof fee in both t he openings ( 6b , 8b ), for ex ample, with a va cuum cleaner . > T ur n the threa d on the brewin g unit head with the mult itool in cloc kwis e direct ion till the bla ck sc raper fol ds[…]
-
Страница 68
Car e 61 4. 3.2 General cl eaning Caution! Possible damage to the water tank, the drip tr ay or the coffee grounds container! Due to the thermal effect in the dishwasher , the water tank, drip tray and coffee gr ounds container can be deformed. > Therefor e, never clean the water tank, the drip tray and the coffee grounds container in the dishwa[…]
-
Страница 69
Car e 62 4. 3.3 Clean the m ilk syste m Cleaning the milk s ystem thoroughly onc e a week is suffi cient. > Pus h the All- In- One sp out upwards . 9a 9b 9c 10 a 9d 9f 9e B 9d 9e A 10 b > Remov e the cof fee gr ounds co ntainer fr om the machin e. > Remov e the milk hos e from th e milk cont ainer or releas e it from t he milk lance. >[…]
-
Страница 70
Car e 63 Foamer , variant A: > T wis t out the air int ake pipe ( 9d ) fro m the milk foamer. > Uns crew the blac k cap ( 9e ) f rom the air int ake pipe. Foamer , variant B: > Det ach th e att achment ( 9d ) and the s ealing cap ( 9e ) one by one f rom the milk fo amer > Fill th e dispens ing chamber ( a ) of the WMF milk s ys tem clea[…]
-
Страница 71
Car e 64 Foamer, variant A: > Sc rew the air inlet pip e in place . Foamer , variant B: > Put th e att achment and th e sealing c ap in plac e. > In sert t he hose. > Ins ert the milk f oamer into the A ll-In- One sp out fro m below. > Pus h the All- In- One spo ut downwards . > L ay the milk hos e in the guide and p lace th e mil[…]
-
Страница 72
Car e 65 4. 3.4 Clean the stea m noz zle 9b 9g > Remov e the milk foamer ( 9b ). > Pre ss t he red st eam nozzle ( 9g ) with th e index fi n ger away to the lef t and remove it . > Car efully cle an the steam n ozzle with one of t he small cleanin g brushe s that has b een provid ed ( b ). 9 b[…]
-
Страница 73
Car e 66 4.4 L u bricating O -rings > Us e only WMF «Gr ease f or sealing ring s» from th e acce ss orie s. The gre ase/lubricant is s uitable for the material and saf e for food te chnology. 4.4. 1 Lubricating O-Ring of the Wa ter t ank If it is dif fi cult to remove t he water tank and dif fi cult to ins ert it or f requently «[…]
-
Страница 74
Car e 67 4.4.2 L ubri c ati ng O -Ring of the Br e wer Unit When it is dif fi c ult to remove the b rewing unit and dif fi cult to inser t it or fr equently «fl ow error» is display ed, you mu st mildly lubric ate the O -Rings with t he WMF «Ga sket greas e» . 5b 5a 5c > Op en the lid of the br ewing unit. > Releas e th[…]
-
Страница 75
Display mess ages 68 5 Displa y messages Messages for op eration and trouble shooting are disp lay ed on your WMF Automatic Cof fee Machine. Thus, yo u always know how to pro ceed . 5. 1 Operatin g messages The c o f fee grounds container is full > Remove the coffee grounds containe r . > Empt y the cof fe e grounds c ontainer and rin se it w[…]
-
Страница 76
Display mess ages 69 The water tank is nearly empt y. The water tank is never emptied co mpletely so that no air enters the cof fee sy stem. > Remove t he water tank fro m the automatic c offe e machine. > Comple tely empt y the water tank . > Fill th e water tank with co ld tap water. > Slide the water t ank into the automatic c off ee[…]
-
Страница 77
Display mess ages 70 The water fi lter must b e changed > Chang e the water fi lter ( Chapter “ 4 .2. 5 Replac e water fi lter” on page 52). The lid is not placed or not corr ectly place d. > Plac e the lid on th e water tank. Without the lid, the machine is no t read y for operation . The brewer lid of the automatic cof fee ma chine i[…]
-
Страница 78
Display mess ages 71 5. 2 Messages for troubleshoo ting The brewing unit is not in serte d. > Ins ert th e brewing unit. The brewing unit is not in serte d. > Che ck if the br ewing unit is inser ted c orre ctly. The brewing unit is inserted onl y wi th dif fi cult y or not at all inserted: > Remove the brew er. > Op en the brewing ch […]
-
Страница 79
Display mess ages 72 Air in the system? Possibly associate d w ith loud pump noise ? > Che ck whether th e water tank is co mpletely pus hed in. > Blee d the automatic c off ee machine by di spensin g hot water until a co nst ant stream of water c ome s out. Is the water fi lter or sieve clogged? > Chang e the water fi lter ( Chapter “[…]
-
Страница 80
Display mess ages 73 Grinding too fi ne? > S et the de gree of grinding to b e coar ser by o ne four th rotatio n (Chapter “3 . 7 Se t the grinding de gree” on pa ge 39). > Suck o ut the grinding dus t. Air in the system? Possibly associate d w ith loud pump noise ? > Che ck whether th e water tank is co mpletely pus hed in. > Remo[…]
-
Страница 81
Display mess ages 74 > Switch of f the Automatic Cof fee M achine with the O n-/ Of f-switch (pr es s for about 3 s econd s). > Switch on the Autom a tic Cof fee M achine with the O n/ Of f switch . On re currence, the f ault mu st b e rectifi e d by the WMF Ser vice -Center . The grinder is blocked by a f oreign bod y . > Switch of f the[…]
-
Страница 82
Display mess ages 75 5. 3 Problems w ithout error d isplay Problem Rectifi cation measure No milk fo am — / milk output, al though there is milk in the c ontain er > Che ck whether t he milk tube is k ink e d or squa shed . > Re-fi t the milk tube a gain. > Clean t he All-In -O ne spout (C hapter “ 4 .3 .3 C lean the milk s yst em” o[…]
-
Страница 83
Display mess ages 76 Problem Rectifi cation measure Milk is too hot an d too litt le or milk foam has bubbles > Us e refriger ated milk > Che ck whether t he milk tube is k ink e d or squa shed . > Re-fi t the milk tube a gain. > Cle an the All-In -O ne spout (C hapter “ 4 .3 .3 C lean the milk s ys tem” on page 62 ). > Ensur e[…]
-
Страница 84
Display mess ages 77 Problem Rectifi cation measure Cof fee has no c reme Improper c o f fee mix ture or cof fee is no longer fresh? > Chang e the cof fee b eans . Quantit y o f ground cof fee is too lit tle ? > Incre ase th e cof fee str ength Cof fee is too c old? > Reheat t he cups on th e cup stor age. > Carr y out war m-up rins e.[…]
-
Страница 85
Display mess ages 78 5a 5b 5e 5c 5d 5d Problem Rectifi cation measure Ther e is a noticeable large amo unt of coa rse g roun d coffee inside the brew er > Se t the grinding de gree fi ner by o ne rotation (Chapter “ 3.7 Se t the grinding de gree” on p age 39). Is the metal spring ring in the brewer stamp miss ing? > Releas e the br ewin[…]
-
Страница 86
T r ansp ort and D ispo sal 79 6 T ranspor t an d Dispos a l > Retain the orig inal packing as protection du ring transport a tion . > Empt y the water tank , drip tray, grounds b ox and the be an hopper b efore mov ing. > Alway s dispatch o r trans por t the machine in t he original box with t he ex panded p oly st yrene s hells . Disp os[…]
-
Страница 87
Guarante e, warrant y and cu stomer s erv ice 80 7 G u ar antee, warrant y and cus tomer ser vic e Y ou ar e entitled to the war rant y rights within t he legal sc ope. A dditional inform ation on warrant y and guarante e condition s are given in the s upplementar y sh eet of the us er manual. If you ne ed addition al information or if p roblems o […]
-
Страница 88
Te c hn i c al d at a 81 8 Te c h n i c a l d a t a Power rat ing 1.7 -2.3 kW Mains p ower conne ctio n 1 / N/PE ~ 50 /60 Hz; 220 — 240 V On si te circuit p rotec tion ma ximum 16 A Daily o utput 35 Cups Cof fee b ean hop per 250 g Variab le brewing c hamber 6 to 1 5 g Cap acit y of water tank (witho ut fi lter) 2. 2 litr es Cof fee gr ounds c ont[…]
-
Страница 89
Inde x 82 9 Index A Adjusting the milk quantity ……………………………….. 35 Adjusting the water volume ……………………………….. 34 All-In-One spout ………………………………………………….. 62 B Beverage settings …………………………………………………. 33 Brewing temper ature Default […]
-
Страница 90
Inde x 83 Ground coffee feed ……………………………………………… 27 H Hazard instructions ……………………………………………….. 5 Hot water dispensing …………………………………………… 30 I Initial setting ………………………………………………………… 14 Initial setup prog[…]
-
Страница 91
Inde x 84 Set the grinding degree ………………………………………. 39 Setting the date …………………………………………………… 15 Setting the language ………………………………………. 8, 14 Setting the switch off time ………………………………… 16 Setting the time …………………..[…]
-
Страница 92
Publisher In formation 85 1 0 P ubl isher Informa tion © 201 1 -201 2 W MF cons umer elect ric GmbH All right s, e spe cially the right of rep roduct ion, public ation and tran slation, are r es erve d. No par t of this manual may be r eproduc ed in any form or pr oce ss ed, duplic ated or dist ributed elec tronicall y without writ ten cons ent. S[…]
-
Страница 93
WMF Automa tic Cof fee Machi ne User manual WMFc onsumer electric G mbH Me ss ers chmitt str aße 4 89343 Jettingen-Scheppach www. wm f — ce.d e BAL _WM F_Kaffeevol laut oma t _EN _00_ 0820 1 1[…]
Не Включается
Вода Протекает Из-Под Рожка
Кофемашина Трещит, Гудит, А Кофе Не Варит
Не Реагирует На Нажатие Кнопок
Течёт Вода Из Под Машины
Кофемолка Вращается Но Не Молит Кофе
На Панели Управления Высвечивается Ошибка
Невзбивается Молочная Пена Бог 80323
Не Открывается Крышка После Использования
После Приготовления Кофе Невозможно Открутить Крышку Кофеварки. Раньше Это Лечилось Временем, Когда Кофеварка Остужалась То Крышка Открывалась, Теперь Все Равно Крышка Прокручивается. Есть Ли Решения Этой Проблемы? Модель Кофеварки Ufesa Ce7115 Capriccios
Течет Мало Кофе
Не Работает Помпа -Не Течет Вода
Вода Не Поступает Через Кофе
Помол
Сбились Настройки Помола.как Настроить?
Не Поступает Вода , Зерна Перемыливаются, В Сухом Виде Выбрасывается В Контейнер
Ошибку Выдает — «Неисправность В Водопровод»
Бойлер Не Греет
Нет Пара И Горячей Воды
Кофемашина Работает, Но Свистит Когда Наливает Кофе.
Кофемашина Работает, Но Свистит Когда Наливает Кофе.
Не Работает Помпа -Не Течет Вода
Не Работает Помпа -Не Течет Вода
Плохо Греет
При Включении Почти Сразу Загорается Зеленая Лампа Сигнала Что Кофевака Готова К Работе
Нет Выхода Кипятка
Мигает Красная Лампа Конечно Кино В Норме
Поддон С Контейнером
Поддон С Контейнером Для Отходов Не В Тавляется До Конца
Приготовленный Кофе Выливается В Накопитель Для Отходов
Приготовленный Кофе Выливается В Накопитель Для Отходов
Нет Кофе
Зерна Засыпаны В Отсек, Перемалываются, Однако Появляется Ошибка «Нет Кофе», Процесс Приготовления Останавливается, Отходы Выбрасываются В Накопитель.
Ошибка Номер 67
Не Запускаетья Кофемашина
Кофемашина Работает, Но Свистит Когда Наливает Кофе.
Кофемашина Работает, Но Свистит Когда Наливает Кофе.
Тусклый Экран
Потускнел Экран Кофемашины Вдвое
Не Выбрасывает Жмых
В Контейнере Набирается Вода После Польной Очистки И Очистки Молочной Системы
Wmf 1800S
Вода Не Поступает
Кофемашина Работает,Но Кофе Не Выливается
Ошибка 5
Не Включается Насос
При Подаче Сигнала На Приготовление Не Включается Насос
Звільнити Резервуар Для Відходів
Ошибка
Вентиляция
Delonghi
При Нажатии Кнопки Питания, Срабатывает Кофемолка И Не Останавливается
Заполнение Системы
Машинка Очень Гудит И Трещит, Выдает На Экране Заполнение Системы. Хотелось Бы Просто Инструкцию Как Пользоваться Машинкой
Не Включается
На Табло Пишет Open Tap
Взрывание Таблетки
Когда Открываешь Взрывается Таблетка Идёт Пар И Шипит
Все инструкции для кофемашин WMF закачаны на наш сайт. Скачать можно абсолютно бесплатно, без каких либо регистраций и SMS. Инструкции по эксплуатации с пометкой (ALL) — являются мультиязычными, (ENG) — на английском языке, (RUS) — на русском языке. Для удобства вы можете просматривать руководство по эксплуатации кофемашины, прямо в окне браузера. А также нажав в новом открывшемся окне сверху на соответствующий значок «скачать».
Инструкция для кофемашины WMF 450 Touch Titan (нем.)
Инструкция для кофемашины WMF 800 black (нем.)
Инструкция для кофемашины WMF 1000 S (нем.)
Инструкция для кофемашины WMF 900 Sensor Titan (нем.)
Инструкция для кофемашины WMF 2000 S (англ.)
Инструкция для кофемашины WMF combiNation S4 (англ.)
Инструкция для кофемашины WMF Presto
Ремонт кофемашин WMF
Практически все пользователи кофемашин начинают искать инструкцию, когда что-то пошло не так. Появились посторонние звуки, перестала молоть кофемолка или чего хуже вообще не включается. В некоторых случаях стоит сразу позвонить сервисным инженерам, коими мы являемся. Профессиональный ремонт кофемашин WMF это вид деятельности, которым мы занимаемся не один год. Обратившись в нашу компанию, вы получите не только бесплатную консультацию, но и квалифицированный ремонт.
-
Page 1: WMF 900
User manual WMF 90 0 EN — Typ e 03 0 40 0[…]
-
Page 2: WMF 900
Pr es s briefl y: 1x Espre sso Keep pr es se d down : 2x E spr es so Pr es s briefl y : 1 x Café C rème Keep pr es sed d own : 2x C afé Crème Pr es s briefl y: 1x Cappuccino Keep pr es sed d own : 2x Ca pp ucc in o Pr es s briefl y : 1 x Lat te Ma cchiato Pr es s briefl y : 1 Mug of milk Pr es s and hold , till the de sired quantit y of mi[…]
-
Page 3: WMF 900
3 1 2 14 13 12 15 11 10 9 8 7 4 6 5 Legend 1 Li d for ground c of fee ins ert 2 Brewin g unit lid 3O n / O f f s w i t c h 4 Ven tilation g rid 5 WMF Professional-Brewing- Sys tem (in hou sing) 6W a t e r t a n k 7 Drip tray with d rip tray g rid 8 Cof fee gr ounds c ontainer 9 WMF A ll-In- One s pout 10 Mi lk t ub e 1 1 Hot water s pout 1 2 Co ntr[…]
-
Page 4: WMF 900
A variety of c offee speciali ties Y ou c an make a variet y of cof fee spe cialties with jus t the touch of a but ton on your WMF Automati c Coff ee Machine, such as Café C reme, Es pres so, C appuccin o and Lat te Mac chiato. In addit ion, you can al so prep are hot milk and hot water for te a. WMF All-In-One spout The W WF A ll-In- One sp out i[…]
-
Page 5: WMF 900
Pr eliminar y c omment s Congratula tions on choosin g your new WM FAutom atic Coff ee Machin e . Y our W MF Automatic Cof fee Ma chine is equipp ed with the m ost imp ort ant comp onent s of a profe ssio nal WMF cof fee m achine — the b asis for your enjoy ment of a per fect c off ee. Read t his user manual b efore yo u star t preparin g the co[…]
-
Page 6: WMF 900
T able of c ontents 3.3.2 WMF Steam Jet: Cup heating in a matter of seconds . . . . . . . . . . . . . . . . . . . . . . . . . . . . . . . . . . .24 3.3.3 Set the coffee strength for the next beverage . .25 3.3.4 Quick selection of cup size . . . . . . . . . . . . . . . . . . .26 3.3.5 Pot function . . . . . . . . . . . . . . . . . . . . . . . . . .[…]
-
Page 7: WMF 900
T able of c ontents 4.2.6 Descale coffee machine . . . . . . . . . . . . . . . . . . . . . 53 4.3 Manual cleaning . . . . . . . . . . . . . . . . . . . . . . . . . . . 57 4.3.1 Clean the brewing unit . . . . . . . . . . . . . . . . . . . . . .57 4.3.2 General cleaning . . . . . . . . . . . . . . . . . . . . . . . . . . 6 1 4.3.3 Clean the milk syst[…]
-
Page 8: WMF 900
Fo r your saf et y 1 1 For you r safet y Max imum pos sible s afet y of devic es is one of t he charac teristic s of WMF pro duct s to which we give our spe cial attent ion. Th e integrated s afet y dev ice s of the WMF Automatic C offe e Machine ar e, however, only e ffe cti ve if you follow t he following s afet y ins truc tions . 1 . 1 Intend[…]
-
Page 9: WMF 900
Fo r your saf et y 2 1 . 2 Hazar d i ns tructions De spite all s afet y prec autions, t here is a hazar d potential as sociate d with each de vice if handle d improp erly. There fore, follow t he instr uctions b elow when handling your auto matic cof fee ma chine to avoid injuries and h ealth hazard s: Hazard! Possible injury by grinders! As long a[…]
-
Page 10: WMF 900
Fo r your saf et y 3 Hazard! Possible risk to life due to defects in the mains cable! Defects in the mains cable can be a risk to life from electric shocks. > Protect the mains cable fr om damage: — Do not clamp the mains cable. — Protect the mains cable from sharp edges, moistur e, heat or oil. > Do not connect the device if the mains cable […]
-
Page 11: WMF 900
Fo r your saf et y 4 Hazard! Probable risk of burns or scalding due to hot components or steam and hot liquids! The All-In-One spout and the hot water spout are very hot while in oper ation and on contact can cause burns. Hot beverages and escaping steam can scald you. > Do not touch the All-In-One spout, the hot water spout or the immediately a[…]
-
Page 12: WMF 900
Fo r your saf et y 5 Hazard! Possible health hazar d due to cleaning agents or descaling agents. Cleaning agents and descaling agents are irritants and become very hot while executing the cleaning progr ammes. Cleaning agents and descaling agents can affect your health. Cleaning agents and descaling agents can damage the plastic parts of the automa[…]
-
Page 13: WMF 900
Fo r your saf et y 6 Caution! Possible material damage due to overfl owing drip tray! If you only infrequently dr ain the drip tray , it can overfl ow . It can possibly damage the delicate items in the surrounding ar ea. > Empty the drip tray after each system rinse. > Ensure that the machine is switched off in your absence.[…]
-
Page 14: WMF 900
Initial s etup 7 2 In itial setu p Now you are only few steps away fr om preparing a per fect c offe e. In this chapter , step- by-step you can learn how you can star t operating your WM FAu tomatic Cof fee Machine. 2. 1 Sc ope o f supply > Che ck the sc ope of sup ply for co mpletenes s . Legend 1 W MFA utomatic Coffee Mach ine 2 WMF Milk[…]
-
Page 15: WMF 900
Initial s etup 8 2.2 Instal lation a nd c on nec tion > Unpack t he automatic cof fee m achine. > Che ck the machine f or pos sible dama ge during trans por tation. Caution! Possible pr operty damage on delicate installation surfaces! Due to the hot steam or water that comes out, delicate bases can be damaged. > Protect the delicate instal[…]
-
Page 16: WMF 900
Initial s etup 9 > Do not allow the cable to hang over the edge of the table or the corner of the table. > Protect the automatic coffee machine fr om moisture and weather infl uences and do not use the automatic coffee machine outdoors. > Install the device at least 85 cm, if necessary , even higher , above fl oor level. b a 7b 7a > C[…]
-
Page 17: WMF 900
Initial s etup 10 2.3 T e sti ng the w ate r ha rdness > Briefl y dip t he provide d C arbonate hardn es s-tes t strips (abo ut 1 Sec ond) into your tap water. One minute later, you can re ad the degr ee of hardne ss with t he help of the co lour sc ale on the tes t strip package. Enter the value wit h the initial se tting s ( Chapter 29 Init i[…]
-
Page 18: WMF 900
Initial s etup 11 2.5 Insert the WMF w ater fi lter The W MF water fi lter protect s the c off ee machine f rom sc ale formation s and ensure s be st qualit y of water for mak ing cof fee. Y ou n eed only o bser ve th e instru ctions in S ect ion 2.5 if yo u work with a water fi lter . If your water hardne ss is b etwe en 0 and 4, you ne ed not […]
-
Page 19: WMF 900
Initial s etup 12 2.6 F illing th e water t ank Caution! Possible damage to your automatic coffee machine due to unsuitable liquids! Liquids other than drinking water can damage your coffee machine or can result in clogging. > Fill the water tank of your automatic coffee machine only with clean, cold drinking water . > Never fi ll the water […]
-
Page 20: WMF 900
Initial s etup 13 > Pre ss t he milk tube into th e guide. Se e to it that the milk tub e doe s not lie in front of the gr ounds con tain er . 2.8 Fillin g the cof fe e bean hopper Onc e unpacked, r oaste d cof fee los es it s aroma in few day s . Ther efore, p our only as m any cof fee bean s in the cof fee b ean hopp er as you e xpec t to use […]
-
Page 21: WMF 900
Initial s etup 14 15a 15b 15c > Open t he lid ( 15 a ) of the cof fee be an hopper. > Fill th e hopper ( 15 b ) with c off ee bean s > Clo se the lid ( 15 c ). 2.9 I niti al set ti ng > Pre ss t he On-/Of f-switch . The c ommissioning program be gin s. > Se t the desir ed language with – or + . > Confi rm the lan guage with P b[…]
-
Page 22: WMF 900
Initial s etup 15 The setup prog ramme now guides you through the basic settin gs. > Se t the current tim e with – or + (hh = hour s in two digit s, mm = minute s in two digit s). > Confi rm th e time with P but ton. > Se t the current date with – or + (dd = day in two digit s, mm = m onth in two digit s , yyyy = ye a r i n fo u r d i[…]
-
Page 23: WMF 900
Initial s etup 16 Energy saving mode Method of operation of the coffee machine 1 Both h eaters ar e continu ousl y ready f or use . Cof fee , milk, milk foam an d hot water can b e dispen sed with out havin g to wait. 2 (Factory setting) Hot water is h eld at oper ating temper ature co ntinuous ly. Cof fee , milk, milk foam an d hot water can b e d[…]
-
Page 24: WMF 900
Initial s etup 17 > With – or + , sele ct wheth er you use a water fi lter (rec ommended fo r water hardnes s greater than 5 °dK H) > Confi rm your s elect ion with P but ton. If water fi lter is se t to » Y es», the fi lter will then be rinsed. If it is se t to “No”, this step nee d no t be c arried out. > Che ck to e[…]
-
Page 25: WMF 900
Initial s etup 18 At the end of the s etup pro gram, a tes t brew is c arried out . The Espresso but ton blinks. > Plac e a cont ainer that hold s at least 5 0 ml under th e All-In -On e dispens er . > Pre ss a b evera ge butto n. The test brewing star ts. During this test brewing, cof fee grinder is fi lled with c o f fe e beans. > Throw[…]
-
Page 26: WMF 900
Opera tion 19 3 Opera tion In this chapter , you can le arn every thing about the easy method of cof fee pr eparation with your WMF Automatic Cof fee Machine and how yo u can individuall y customize it — en tir ely acc ording to your prefer ence! Hazard! Possible risk of burns or scalding due to hot components or steam and hot liquids! The All-[…]
-
Page 27: WMF 900
Opera tion 20 3. 1 . 1 Switc hing o n > Pre ss t he On-/Of f-switch . Y our c offe e machine heats up and p erforms cof fee s ystem rinse. This warms up all the pipes. > Plac e a colle cting ve ss el under th e All-in- One s pout for the rins e water . The c o f fee sy stem rin sing pro cedur e lasts for about. 4 0 seconds. Y our auto matic c[…]
-
Page 28: WMF 900
Opera tion 21 3. 1 . 3 Tim er oper ation (automatic swit ch- on ). With th e timer , you c an automatic ally switc h the WMFAutom atic Coff ee Machin e on or of f. T o us e the timer, the basic s ett ing «Switch -on time» mus t be se t to active beforehand. > Briefl y p res s the on-/of f -s witch. > Se t the switch- on time wit[…]
-
Page 29: WMF 900
Opera tion 22 3.2 Use mi lk Milk is a ver y s ensitiv e foods tuf f . Always en sure cleanlin es s when using milk . Open t he pack ing only with clean hand s and tools . Alway s ensure th at the milk is germ-f ree. We rec ommend that milk alway s be s tored in a re frigerato r and remove d from it only f or immediate us e. > Plac e the ref rige[…]
-
Page 30: WMF 900
Opera tion 23 3.3 Prepare coffee beverages Cof fee b everag es are prep ared by touc hing the be verage but ton in the c ontrol p anel. 3.3. 1 Coffe e s pecial ities at the touch of a button > Plac e an approp riate drinking ve ss el under the All -In- One sp out. > Adjus t the All- In-o ne spout to s uit the height of the drink ing ves sel .[…]
-
Page 31: WMF 900
Opera tion 24 > Fo r example , pres s the but ton at the b o t tom lef t for Cappu ccin o. short: 1x C a p p uc i n o short: 1x L at te Mac chiato long: 2x Cappu cino The name of the bever age appear s on the di splay, for examp le, Cappucino. The c o f fee beans are gr ound for the selected b everage, for e xample, Cappuc cino. The selec ted be[…]
-
Page 32: WMF 900
Opera tion 25 Hazard! Possible danger of burns ! Hot steam is delivered and the drinking vessel can get very hot! > Do not use the cup warmer without a drinking vessel and never without the drip tray grid with steam board inserted in place. > Use heat-resistant drinking vessels. > Do not use the cup warmer without the associated saucer ins[…]
-
Page 33: WMF 900
Opera tion 26 — Mild (about 1 5 % weaker than the s aved se tting) — Normal ( c orresponds to your setting) — St ron g (about 1 5 % stron ger than the s aved se tting) 3.3.4 Quick se lection of cup s ize Th e volume of the ne xt c up can be s tipulated be fore st artin g to prepare t he bever age. T he tas te will there for remain the s ame. Y ou s[…]
-
Page 34: WMF 900
Opera tion 27 3.3. 5 Pot function Using t he pot func tion you c an make a full pot of C afé Crème. > Pre ss t he cup size rapid s election but ton for lon ger than 2 sec onds . > Pres s + 2x br iefl y. The Caf e Creme bevera ge bu tton lights up. > Pus h the All- In- One sp out upwards . > Plac e the WMF c off ee pot under t he spou[…]
-
Page 35: WMF 900
Opera tion 28 1b 1a 1c > Plac e an approp riate drinking ve ss el under the All -In- One sp out. > Open t he lid ( 1a ) on the groun d cof fee inlet . 1[…]
-
Page 36: WMF 900
Opera tion 29 The display notifi es: > Pour th e ground cof fee (ade quate for a brewing c ycle of ab out. 9 g) in the gr ound cof fee in ser t ( 1b ). > Clo se the lid ( 1c ). > Sele ct your b everage u sing the be verage b uttons (on e cup ). The pro cedure c an be canc elled with C button. 3.3.7 Prepar ing mi lk and m ilk foa m Y our W[…]
-
Page 37: WMF 900
Opera tion 30 Tip : Milk or milk foam can drip a lit tle af ter dispens ing. It is be st to hol d your cup for a lit tle while long er af ter dispen sing under the A ll-In- One s pout , or plac e a small colle cting ve s sel under th e spout . Tip : Milk c an also drip, if t he milk cont ainer is full and at t he same t ime the All- In- One sp out […]
-
Page 38: WMF 900
Opera tion 31 3.5 Tips to s ave energ y Se t the mos t econo mical energ y saving m ode (se e “Energ y savin g modes ” on page 1 5). Swit ch of f your WMFAuto matic Cof fee Mac hine w hen it is not in us e. It doe s not con sume any power then. Y our W MFAutomatic Cof fee M achine s witc hes of f automaticall y after 3 0 minutes . Reduc e[…]
-
Page 39: WMF 900
Opera tion 32 > Plac e an approp riate drinking ve ss el under the All -In- One sp out. > Onc e again pre ss t he bever age but ton of the adju sted b everag e. The be verage is prepar ed with the adjusted settings. 3.6. 1 Set the cup size Here, y ou have the opti on to individuall y adjust th e cup volume to your c up sizes . But the r ecipe[…]
-
Page 40: WMF 900
Opera tion 33 > Adjus t the cup volume to t he cup size with th e button s – or + . The cup volume is display ed in % . 1 0 0 % corresp onds to the default setting . > If nec es sar y, carr y out a tes t prepar ation (page 31 ) . > Confi rm th e cup volume with P button. > If nec es sar y, change the c up volume. > Confi rm th e […]
-
Page 41: WMF 900
Opera tion 34 — Pre-brew ( for pe r fect a roma ) > Pres s P but ton. > Browse with + for b everag e set ting. > Confi rm your s elect ion with P but ton. > Sele ct the b everage f or which you want to change t he ta ste and the c ompo sition with the h elp of bevera ge buttons . > Se t the des ired water volume with – or + . >[…]
-
Page 42: WMF 900
Opera tion 35 > Se t the des ired cof fee s trength wit h – or + . The ground quantit y varies according to the grinding degre e setting, the used t ypes of cof fee, the humidit y and several other infl uences . The factor y setting for Espresso corr esponds to approximately 9 grams . > If nec es sar y, carr y out a tes t prepar ation (pag[…]
-
Page 43: WMF 900
Opera tion 36 The quant ity of milk f oam may be le ss during t he fi r st be verage s ince the c ondens ed water is s till in the co oled down pipe s. T herefo re, befo re the prep aration of the fi rst b everage, briefl y pre ss t he milk butt on. Pre- brew : B efore brewing, the ground c o f fee is dampened with hot water . This causes the gr[…]
-
Page 44: WMF 900
Opera tion 37 3.6. 3 Basi c settings Fo llowing se tting s can be adjuste d : Basic settings Language* Water hardnes s* Ener gy sav ing mod es* Water fi lter * Time* Special information tone Date* Brewing temperatur e Dis play of time /date Fa ctor y s ettin gs Switch on t ime Dis play co ntras t Switch of f time* The b asic s ettin gs marke d wit[…]
-
Page 45: WMF 900
Opera tion 38 > Confi rm your s elect ion with P but ton. > Se t the display of date and t ime on or of f with – or + . > Confi rm your s elect ion with P but ton. > Se t the pre- brew fun ction on o r off with – or + (Chapter “ 3. 1.3 Tim er operation (automat ic switch- on ).” on page 2 1 ). > Confi rm your s elect ion w[…]
-
Page 46: WMF 900
Opera tion 39 All the basic set tings and beverage set tings are reset to factor y setting with the setting of » Y es». > Se t the fac tor y set ting to » Y es» wit h – or + . > Confi rm your s elect ion with P but ton. > Se t the display c ontra st with – or + . > Confi rm your s elect ion with P but ton. 3. 7[…]
-
Page 47: WMF 900
Opera tion 40 15a 15b 15d 15c 15e > Open t he lid ( 15 a ) on t he bean hop per . > Conne ct the Multi to ol ( 15 b ) to th e grinding degre e set ting ( 15 c ). > Plac e an approp riate drinking ve ss el under the All -In- One- spout , pres s the E spr es so but ton and wait till the grind er runs . Grin ding should b e fi ner: Pre ss t […]
-
Page 48: WMF 900
Opera tion 41 Grindin g degree i s too co ars e : Runs out to o fast — e spe cially in ca se of es pres s o- the cream is to o light and les s con sistent , the aroma is plain. Adjus t the grinding de gree by on e rotation to make it fi ner. Correct setti ng : Verif y your se tting by p reparing a doub le cup espr es so.[…]
-
Page 49: WMF 900
Opera tion 42 3.8 Read c ou nters > Pres s P button. > Browse with + for c ounters . > Confi rm your s elect ion with P but ton. > Browse with – or + to display t he number of be verage s prepared. Immediately af ter all the bever ages are displaye d or w hen you press C button,the co un ter s can be deleted . > Re set the c ounte[…]
-
Page 50: WMF 900
Car e 43 4 Care The c are of your WMF Automatic Coff ee Machine is espe cially impor tan t so that yo ur coff ee is always prepar ed per fectly. The displa y no tifi es you about how soon the Automatic C o f fee Machine must be rinsed, cle aned or descaled . Only 10 seconds time are nee ded to clean the ma chine before you switch it of f. Caut[…]
-
Page 51: WMF 900
Car e 44 Steps for care Care interval Repl ace water fi lter — Af ter a re quest in t he displ ay (dependin g on water hardne ss an d water fl ow rate, at t he late st af ter 3 month s) De sc ale the mac hine — ac cor ding to the re quest in di splay (dep endent on water hard nes s, water fl ow r ate and water fi lter). Cle an the bre wing unit[…]
-
Page 52: WMF 900
Car e 45 so -c alled relea se water runs into th e drip tray. This rins es any rem aining cof fee fro m the pipe s. T his is a comp letely normal p roce dure and not an erro r in the automatic c offe e machine. Hazard! Possible health hazar d due to cleaning agents or descaling agents. Cleaning agents and descaling agents are irritants and become v[…]
-
Page 53: WMF 900
Car e 46 4. 2. 1 Cal ling u p the customer care prog rammes > Pres s P but ton. > Browse with + for c are progr ammes . > Confi rm your s elect ion with P but ton. > Browse with – or + but tons for th e desire d care programme. > Confi rm your s elect ion with P button. 4. 2.2 Wa rm-up ri nsi ng The pip es of the coff ee machine […]
-
Page 54: WMF 900
Car e 47 > Call th e custom er care pro grams (Chapter “ 4 .2 Cus tomer Car e programme s” on pa ge 44). > Brow se until warm -up rins e. > Plac e a suitable v es sel under th e All-In- One s pout . > Confi rm th e warm-up rins e with P but ton. 4. 2.3 WMF Connect & Clean mi lk system ri nse The automatic milk and c offe e rin […]
-
Page 55: WMF 900
Car e 48 > Sele ct the milk s ys tem rinse wit h P button. The display notifi es the indi vidual activities that must be complete d before the rinse. > Pus h the All- In-O ne spo ut to the upper mo st po sition . > Plac e a colle cting ve ss el under th e All-In -One s pout . > Wipe th e outs ide of the milk hos e with a clean damp clo[…]
-
Page 56: WMF 900
Car e 49 Y ou c an also c all up the milk s ys tem rinsing manuall y . To do so c all up the car e progr ammes and s elect the milk s ys tem rinsing . When the automati c switch- off tim e is reach ed, be fore switchin g off onl y a cof fee s y stem rinsin g is carrie d out. But t he machine will c all for a milk sy stem rin sing ne xt time yo u sw[…]
-
Page 57: WMF 900
Car e 50 > Call th e custom er care pro grams (Chapter “ 4 .2 Cus tomer Car e programme s” on pa ge 44). > Brow se th e Machine -cle aning. > Star t the machin e cleaning with P but ton. > Fo llow the inst ruction s in the disp lay . 1a 1c 1b > Plac e a suitable v es sel (2 litres ‘ c apacit y) under th e All-In- One s pout […]
-
Page 58: WMF 900
Car e 51 > Open t he lid ( 1a ) on the groun d cof fee inlet . > Ins ert a cle aning table t ( 1b ) alon g with the yellow s ponge in t he ground c offe e inser t. > Clo se the lid ( 1c ). > Star t with P but ton. The cle aning program star ts. A minute countdown indicates how l ong the cleaning will last. T he Machine- cleaning ends af[…]
-
Page 59: WMF 900
Car e 52 4. 2.5 Replace wate r fi lter This program ap pears when you use a water fi lter and the usage has been c onfi rme d during the initial settings (Chapter “2. 5 In sert the WM F water fi lter ” on page 1 1 ). However, dependin g on the water hardne ss an d the water fl ow , at le ast af ter 3 months , a disp lay reque sting to c ha[…]
-
Page 60: WMF 900
Car e 53 > Slide the water t ank gently into th e automatic cof fee ma chine. > Pre ss t he butt on P . > Plac e a 2 litre c ollect ing cont ainer under the hot water s pout . > Star t fi lter rin se with the P button. The fi lter rinsing progr am starts . A minute countdown indicates how l ong the rin sing will last. Filter rinse pro[…]
-
Page 61: WMF 900
Car e 54 water fi lter . you c an pos tpon e the des caling p roce ss b y pres sing C but ton. Howe ver , within t he nex t 50 b rewings , a des caling p roce dure must b e carrie d out. O therwi se, be verage dispens ing will be blo cked. Th e block is c leared af ter a de scalin g proc edure. 9b 10 9a > Pre ss t he releas e button ( 9a ) at t[…]
-
Page 62: WMF 900
Car e 55 > Call t he custo mer care p rogram s (“ 4 .2. 1 Callin g up the cus tomer car e programme s” on pa ge 46). > Browse with – or + but tons fo r machine- cleanin g. > Confi rm your s elect ion with P button. > Empt y the drip tray. > Remove t he water tank fro m the automatic c offe e machine. > Remove the fi lter c[…]
-
Page 63: WMF 900
Car e 56 Foll ow ing displays ap pear af ter about. 30 minutes: > Empt y the water tank . > Rins e the water tank th oroughly with c lear water . > Pres s P button. > Fill th e water tank with co ld drinking water. > Plac e the lid on the water t ank. > Slide the water t ank gently into th e automatic cof fee machine. > Pres s […]
-
Page 64: WMF 900
Car e 57 Immediatel y after de sc aling, a machin e-cl eaning is re queste d. The p roce dure is de scrib ed under “ 4. 2.4 Mac hine-c leaning — Cle aning progr amme” on page 4 9. > Replac e the water fi lter in the water tank (C hapter . “ 4 .2. 5 Replace water fi lter” on page 52). > Pus h the milk foamer into t he All- In-O ne sp[…]
-
Page 65: WMF 900
Car e 58 2a 5a 5b 5c > Op en the lid of the br ewer ( 2a ). > Releas e the br ewing unit ( 5a ). > Pull th e brewing unit ( 5b ) upwards o ut of the brew chute . Use b oth the gripping lu gs for pulling it out ( 5c ). 5d 5f 5g 5e 5h 5i 5 If it is dif fi c ult to rem ove the brewe r , th e O-Rin gs must be lubricated. (“ 4 .4 .2 Lubr ica[…]
-
Page 66: WMF 900
Car e 59 > T urn the thread ( 5d ) on the br ewing unit head ( 5e ) with the multitool in t he anticlock wise dir ecti on. The scr aper ( 5g ) folds out for ward and the brewing fi lter i s now visible. > Cle an the brewing unit ( 5e ) under running water. > Cle an the brewing fi lter ( 5h an d 5i ) un der running water. Caution! Possibl[…]
-
Page 67: WMF 900
Car e 60 8b 6b 8a 6a > Pull out t he water tank ( 6a ) an d the cof fee gr ounds c ontainer ( 8a ). > Remove t he res idues of groun d cof fee in both t he openings ( 6b , 8b ), for ex ample, with a va cuum cleaner . > T ur n the threa d on the brewin g unit head with the mult itool in cloc kwis e direct ion till the bla ck sc raper fol ds[…]
-
Page 68: WMF 900
Car e 61 4. 3.2 General cl eaning Caution! Possible damage to the water tank, the drip tr ay or the coffee grounds container! Due to the thermal effect in the dishwasher , the water tank, drip tray and coffee gr ounds container can be deformed. > Therefor e, never clean the water tank, the drip tray and the coffee grounds container in the dishwa[…]
-
Page 69: WMF 900
Car e 62 4. 3.3 Clean the m ilk syste m Cleaning the milk s ystem thoroughly onc e a week is suffi cient. > Pus h the All- In- One sp out upwards . 9a 9b 9c 10 a 9d 9f 9e B 9d 9e A 10 b > Remov e the cof fee gr ounds co ntainer fr om the machin e. > Remov e the milk hos e from th e milk cont ainer or releas e it from t he milk lance. >[…]
-
Page 70: WMF 900
Car e 63 Foamer , variant A: > T wis t out the air int ake pipe ( 9d ) fro m the milk foamer. > Uns crew the blac k cap ( 9e ) f rom the air int ake pipe. Foamer , variant B: > Det ach th e att achment ( 9d ) and the s ealing cap ( 9e ) one by one f rom the milk fo amer > Fill th e dispens ing chamber ( a ) of the WMF milk s ys tem clea[…]
-
Page 71: WMF 900
Car e 64 Foamer, variant A: > Sc rew the air inlet pip e in place . Foamer , variant B: > Put th e att achment and th e sealing c ap in plac e. > In sert t he hose. > Ins ert the milk f oamer into the A ll-In- One sp out fro m below. > Pus h the All- In- One spo ut downwards . > L ay the milk hos e in the guide and p lace th e mil[…]
-
Page 72: WMF 900
Car e 65 4. 3.4 Clean the stea m noz zle 9b 9g > Remov e the milk foamer ( 9b ). > Pre ss t he red st eam nozzle ( 9g ) with th e index fi n ger away to the lef t and remove it . > Car efully cle an the steam n ozzle with one of t he small cleanin g brushe s that has b een provid ed ( b ). 9 b[…]
-
Page 73: WMF 900
Car e 66 4.4 L u bricating O -rings > Us e only WMF «Gr ease f or sealing ring s» from th e acce ss orie s. The gre ase/lubricant is s uitable for the material and saf e for food te chnology. 4.4. 1 Lubricating O-Ring of the Wa ter t ank If it is dif fi cult to remove t he water tank and dif fi cult to ins ert it or f requently «[…]
-
Page 74: WMF 900
Car e 67 4.4.2 L ubri c ati ng O -Ring of the Br e wer Unit When it is dif fi c ult to remove the b rewing unit and dif fi cult to inser t it or fr equently «fl ow error» is display ed, you mu st mildly lubric ate the O -Rings with t he WMF «Ga sket greas e» . 5b 5a 5c > Op en the lid of the br ewing unit. > Releas e th[…]
-
Page 75: WMF 900
Display mess ages 68 5 Displa y messages Messages for op eration and trouble shooting are disp lay ed on your WMF Automatic Cof fee Machine. Thus, yo u always know how to pro ceed . 5. 1 Operatin g messages The c o f fee grounds container is full > Remove the coffee grounds containe r . > Empt y the cof fe e grounds c ontainer and rin se it w[…]
-
Page 76: WMF 900
Display mess ages 69 The water tank is nearly empt y. The water tank is never emptied co mpletely so that no air enters the cof fee sy stem. > Remove t he water tank fro m the automatic c offe e machine. > Comple tely empt y the water tank . > Fill th e water tank with co ld tap water. > Slide the water t ank into the automatic c off ee[…]
-
Page 77: WMF 900
Display mess ages 70 The water fi lter must b e changed > Chang e the water fi lter ( Chapter “ 4 .2. 5 Replac e water fi lter” on page 52). The lid is not placed or not corr ectly place d. > Plac e the lid on th e water tank. Without the lid, the machine is no t read y for operation . The brewer lid of the automatic cof fee ma chine i[…]
-
Page 78: WMF 900
Display mess ages 71 5. 2 Messages for troubleshoo ting The brewing unit is not in serte d. > Ins ert th e brewing unit. The brewing unit is not in serte d. > Che ck if the br ewing unit is inser ted c orre ctly. The brewing unit is inserted onl y wi th dif fi cult y or not at all inserted: > Remove the brew er. > Op en the brewing ch […]
-
Page 79: WMF 900
Display mess ages 72 Air in the system? Possibly associate d w ith loud pump noise ? > Che ck whether th e water tank is co mpletely pus hed in. > Blee d the automatic c off ee machine by di spensin g hot water until a co nst ant stream of water c ome s out. Is the water fi lter or sieve clogged? > Chang e the water fi lter ( Chapter “[…]
-
Page 80: WMF 900
Display mess ages 73 Grinding too fi ne? > S et the de gree of grinding to b e coar ser by o ne four th rotatio n (Chapter “3 . 7 Se t the grinding de gree” on pa ge 39). > Suck o ut the grinding dus t. Air in the system? Possibly associate d w ith loud pump noise ? > Che ck whether th e water tank is co mpletely pus hed in. > Remo[…]
-
Page 81: WMF 900
Display mess ages 74 > Switch of f the Automatic Cof fee M achine with the O n-/ Of f-switch (pr es s for about 3 s econd s). > Switch on the Autom a tic Cof fee M achine with the O n/ Of f switch . On re currence, the f ault mu st b e rectifi e d by the WMF Ser vice -Center . The grinder is blocked by a f oreign bod y . > Switch of f the[…]
-
Page 82: WMF 900
Display mess ages 75 5. 3 Problems w ithout error d isplay Problem Rectifi cation measure No milk fo am — / milk output, al though there is milk in the c ontain er > Che ck whether t he milk tube is k ink e d or squa shed . > Re-fi t the milk tube a gain. > Clean t he All-In -O ne spout (C hapter “ 4 .3 .3 C lean the milk s yst em” o[…]
-
Page 83: WMF 900
Display mess ages 76 Problem Rectifi cation measure Milk is too hot an d too litt le or milk foam has bubbles > Us e refriger ated milk > Che ck whether t he milk tube is k ink e d or squa shed . > Re-fi t the milk tube a gain. > Cle an the All-In -O ne spout (C hapter “ 4 .3 .3 C lean the milk s ys tem” on page 62 ). > Ensur e[…]
-
Page 84: WMF 900
Display mess ages 77 Problem Rectifi cation measure Cof fee has no c reme Improper c o f fee mix ture or cof fee is no longer fresh? > Chang e the cof fee b eans . Quantit y o f ground cof fee is too lit tle ? > Incre ase th e cof fee str ength Cof fee is too c old? > Reheat t he cups on th e cup stor age. > Carr y out war m-up rins e.[…]
-
Page 85: WMF 900
Display mess ages 78 5a 5b 5e 5c 5d 5d Problem Rectifi cation measure Ther e is a noticeable large amo unt of coa rse g roun d coffee inside the brew er > Se t the grinding de gree fi ner by o ne rotation (Chapter “ 3.7 Se t the grinding de gree” on p age 39). Is the metal spring ring in the brewer stamp miss ing? > Releas e the br ewin[…]
-
Page 86: WMF 900
T r ansp ort and D ispo sal 79 6 T ranspor t an d Dispos a l > Retain the orig inal packing as protection du ring transport a tion . > Empt y the water tank , drip tray, grounds b ox and the be an hopper b efore mov ing. > Alway s dispatch o r trans por t the machine in t he original box with t he ex panded p oly st yrene s hells . Disp os[…]
-
Page 87: WMF 900
Guarante e, warrant y and cu stomer s erv ice 80 7 G u ar antee, warrant y and cus tomer ser vic e Y ou ar e entitled to the war rant y rights within t he legal sc ope. A dditional inform ation on warrant y and guarante e condition s are given in the s upplementar y sh eet of the us er manual. If you ne ed addition al information or if p roblems o […]
-
Page 88: WMF 900
Te c hn i c al d at a 81 8 Te c h n i c a l d a t a Power rat ing 1.7 -2.3 kW Mains p ower conne ctio n 1 / N/PE ~ 50 /60 Hz; 220 — 240 V On si te circuit p rotec tion ma ximum 16 A Daily o utput 35 Cups Cof fee b ean hop per 250 g Variab le brewing c hamber 6 to 1 5 g Cap acit y of water tank (witho ut fi lter) 2. 2 litr es Cof fee gr ounds c ont[…]
-
Page 89: WMF 900
Inde x 82 9 Index A Adjusting the milk quantity ……………………………….. 35 Adjusting the water volume ……………………………….. 34 All-In-One spout ………………………………………………….. 62 B Beverage settings …………………………………………………. 33 Brewing temper ature Default […]
-
Page 90: WMF 900
Inde x 83 Ground coffee feed ……………………………………………… 27 H Hazard instructions ……………………………………………….. 5 Hot water dispensing …………………………………………… 30 I Initial setting ………………………………………………………… 14 Initial setup prog[…]
-
Page 91: WMF 900
Inde x 84 Set the grinding degree ………………………………………. 39 Setting the date …………………………………………………… 15 Setting the language ………………………………………. 8, 14 Setting the switch off time ………………………………… 16 Setting the time …………………..[…]
-
Page 92: WMF 900
Publisher In formation 85 1 0 P ubl isher Informa tion © 201 1 -201 2 W MF cons umer elect ric GmbH All right s, e spe cially the right of rep roduct ion, public ation and tran slation, are r es erve d. No par t of this manual may be r eproduc ed in any form or pr oce ss ed, duplic ated or dist ributed elec tronicall y without writ ten cons ent. S[…]
-
Page 93: WMF 900
WMF Automa tic Cof fee Machi ne User manual WMFc onsumer electric G mbH Me ss ers chmitt str aße 4 89343 Jettingen-Scheppach www. wm f — ce.d e BAL _WM F_Kaffeevol laut oma t _EN _00_ 0820 1 1[…]
-
WMF 900 — page 1
User manual WMF 90 0 EN — Typ e 03 0 40 0 …
-
WMF 900 — page 2
Pr es s briefl y: 1x Espre sso Keep pr es se d down : 2x E spr es so Pr es s briefl y : 1 x Café C rème Keep pr es sed d own : 2x C afé Crème Pr es s briefl y: 1x Cappuccino Keep pr es sed d own : 2x Ca pp ucc in o Pr es s briefl y : 1 x Lat te Ma cchiato Pr es s briefl y : 1 Mug of milk Pr es s and hold , till the de sired quantit y of mi …
-
WMF 900 — page 3
3 1 2 14 13 12 15 11 10 9 8 7 4 6 5 Legend 1 Li d for ground c of fee ins ert 2 Brewin g unit lid 3O n / O f f s w i t c h 4 Ven tilation g rid 5 WMF Professional-Brewing- Sys tem (in hou sing) 6W a t e r t a n k 7 Drip tray with d rip tray g rid 8 Cof fee gr ounds c ontainer 9 WMF A ll-In- One s pout 10 Mi lk t ub e 1 1 Hot water s pout 1 2 Co ntr …
-
WMF 900 — page 4
A variety of c offee speciali ties Y ou c an make a variet y of cof fee spe cialties with jus t the touch of a but ton on your WMF Automati c Coff ee Machine, such as Café C reme, Es pres so, C appuccin o and Lat te Mac chiato. In addit ion, you can al so prep are hot milk and hot water for te a. WMF All-In-One spout The W WF A ll-In- One sp out i …
-
WMF 900 — page 5
Pr eliminar y c omment s Congratula tions on choosin g your new WM FAutom atic Coff ee Machin e . Y our W MF Automatic Cof fee Ma chine is equipp ed with the m ost imp ort ant comp onent s of a profe ssio nal WMF cof fee m achine — the b asis for your enjoy ment of a per fect c off ee. Read t his user manual b efore yo u star t preparin g the co …
-
WMF 900 — page 6
T able of c ontents 3.3.2 WMF Steam Jet: Cup heating in a matter of seconds . . . . . . . . . . . . . . . . . . . . . . . . . . . . . . . . . . .24 3.3.3 Set the coffee strength for the next beverage . .25 3.3.4 Quick selection of cup size . . . . . . . . . . . . . . . . . . .26 3.3.5 Pot function . . . . . . . . . . . . . . . . . . . . . . . . . . …
-
WMF 900 — page 7
T able of c ontents 4.2.6 Descale coffee machine . . . . . . . . . . . . . . . . . . . . . 53 4.3 Manual cleaning . . . . . . . . . . . . . . . . . . . . . . . . . . . 57 4.3.1 Clean the brewing unit . . . . . . . . . . . . . . . . . . . . . .57 4.3.2 General cleaning . . . . . . . . . . . . . . . . . . . . . . . . . . 6 1 4.3.3 Clean the milk syst …
-
WMF 900 — page 8
Fo r your saf et y 1 1 For you r safet y Max imum pos sible s afet y of devic es is one of t he charac teristic s of WMF pro duct s to which we give our spe cial attent ion. Th e integrated s afet y dev ice s of the WMF Automatic C offe e Machine ar e, however, only e ffe cti ve if you follow t he following s afet y ins truc tions . 1 . 1 Intend …
-
WMF 900 — page 9
Fo r your saf et y 2 1 . 2 Hazar d i ns tructions De spite all s afet y prec autions, t here is a hazar d potential as sociate d with each de vice if handle d improp erly. There fore, follow t he instr uctions b elow when handling your auto matic cof fee ma chine to avoid injuries and h ealth hazard s: Hazard! Possible injury by grinders! As long a …
-
WMF 900 — page 10
Fo r your saf et y 3 Hazard! Possible risk to life due to defects in the mains cable! Defects in the mains cable can be a risk to life from electric shocks. > Protect the mains cable fr om damage: — Do not clamp the mains cable. — Protect the mains cable from sharp edges, moistur e, heat or oil. > Do not connect the device if the mains cable …
-
WMF 900 — page 11
Fo r your saf et y 4 Hazard! Probable risk of burns or scalding due to hot components or steam and hot liquids! The All-In-One spout and the hot water spout are very hot while in oper ation and on contact can cause burns. Hot beverages and escaping steam can scald you. > Do not touch the All-In-One spout, the hot water spout or the immediately a …
-
WMF 900 — page 12
Fo r your saf et y 5 Hazard! Possible health hazar d due to cleaning agents or descaling agents. Cleaning agents and descaling agents are irritants and become very hot while executing the cleaning progr ammes. Cleaning agents and descaling agents can affect your health. Cleaning agents and descaling agents can damage the plastic parts of the automa …
-
WMF 900 — page 13
Fo r your saf et y 6 Caution! Possible material damage due to overfl owing drip tray! If you only infrequently dr ain the drip tray , it can overfl ow . It can possibly damage the delicate items in the surrounding ar ea. > Empty the drip tray after each system rinse. > Ensure that the machine is switched off in your absence. …
-
WMF 900 — page 14
Initial s etup 7 2 In itial setu p Now you are only few steps away fr om preparing a per fect c offe e. In this chapter , step- by-step you can learn how you can star t operating your WM FAu tomatic Cof fee Machine. 2. 1 Sc ope o f supply > Che ck the sc ope of sup ply for co mpletenes s . Legend 1 W MFA utomatic Coffee Mach ine 2 WMF Milk …
-
WMF 900 — page 15
Initial s etup 8 2.2 Instal lation a nd c on nec tion > Unpack t he automatic cof fee m achine. > Che ck the machine f or pos sible dama ge during trans por tation. Caution! Possible pr operty damage on delicate installation surfaces! Due to the hot steam or water that comes out, delicate bases can be damaged. > Protect the delicate instal …
-
WMF 900 — page 16
Initial s etup 9 > Do not allow the cable to hang over the edge of the table or the corner of the table. > Protect the automatic coffee machine fr om moisture and weather infl uences and do not use the automatic coffee machine outdoors. > Install the device at least 85 cm, if necessary , even higher , above fl oor level. b a 7b 7a > C …
-
WMF 900 — page 17
Initial s etup 10 2.3 T e sti ng the w ate r ha rdness > Briefl y dip t he provide d C arbonate hardn es s-tes t strips (abo ut 1 Sec ond) into your tap water. One minute later, you can re ad the degr ee of hardne ss with t he help of the co lour sc ale on the tes t strip package. Enter the value wit h the initial se tting s ( Chapter 29 Init i …
-
WMF 900 — page 18
Initial s etup 11 2.5 Insert the WMF w ater fi lter The W MF water fi lter protect s the c off ee machine f rom sc ale formation s and ensure s be st qualit y of water for mak ing cof fee. Y ou n eed only o bser ve th e instru ctions in S ect ion 2.5 if yo u work with a water fi lter . If your water hardne ss is b etwe en 0 and 4, you ne ed not …
-
WMF 900 — page 19
Initial s etup 12 2.6 F illing th e water t ank Caution! Possible damage to your automatic coffee machine due to unsuitable liquids! Liquids other than drinking water can damage your coffee machine or can result in clogging. > Fill the water tank of your automatic coffee machine only with clean, cold drinking water . > Never fi ll the water …
-
WMF 900 — page 20
Initial s etup 13 > Pre ss t he milk tube into th e guide. Se e to it that the milk tub e doe s not lie in front of the gr ounds con tain er . 2.8 Fillin g the cof fe e bean hopper Onc e unpacked, r oaste d cof fee los es it s aroma in few day s . Ther efore, p our only as m any cof fee bean s in the cof fee b ean hopp er as you e xpec t to use …
-
WMF 900 — page 21
Initial s etup 14 15a 15b 15c > Open t he lid ( 15 a ) of the cof fee be an hopper. > Fill th e hopper ( 15 b ) with c off ee bean s > Clo se the lid ( 15 c ). 2.9 I niti al set ti ng > Pre ss t he On-/Of f-switch . The c ommissioning program be gin s. > Se t the desir ed language with – or + . > Confi rm the lan guage with P b …
-
WMF 900 — page 22
Initial s etup 15 The setup prog ramme now guides you through the basic settin gs. > Se t the current tim e with – or + (hh = hour s in two digit s, mm = minute s in two digit s). > Confi rm th e time with P but ton. > Se t the current date with – or + (dd = day in two digit s, mm = m onth in two digit s , yyyy = ye a r i n fo u r d i …
-
WMF 900 — page 23
Initial s etup 16 Energy saving mode Method of operation of the coffee machine 1 Both h eaters ar e continu ousl y ready f or use . Cof fee , milk, milk foam an d hot water can b e dispen sed with out havin g to wait. 2 (Factory setting) Hot water is h eld at oper ating temper ature co ntinuous ly. Cof fee , milk, milk foam an d hot water can b e d …
-
WMF 900 — page 24
Initial s etup 17 > With – or + , sele ct wheth er you use a water fi lter (rec ommended fo r water hardnes s greater than 5 °dK H) > Confi rm your s elect ion with P but ton. If water fi lter is se t to » Y es», the fi lter will then be rinsed. If it is se t to “No”, this step nee d no t be c arried out. > Che ck to e …
-
WMF 900 — page 25
Initial s etup 18 At the end of the s etup pro gram, a tes t brew is c arried out . The Espresso but ton blinks. > Plac e a cont ainer that hold s at least 5 0 ml under th e All-In -On e dispens er . > Pre ss a b evera ge butto n. The test brewing star ts. During this test brewing, cof fee grinder is fi lled with c o f fe e beans. > Throw …
-
WMF 900 — page 26
Opera tion 19 3 Opera tion In this chapter , you can le arn every thing about the easy method of cof fee pr eparation with your WMF Automatic Cof fee Machine and how yo u can individuall y customize it — en tir ely acc ording to your prefer ence! Hazard! Possible risk of burns or scalding due to hot components or steam and hot liquids! The All- …
-
WMF 900 — page 27
Opera tion 20 3. 1 . 1 Switc hing o n > Pre ss t he On-/Of f-switch . Y our c offe e machine heats up and p erforms cof fee s ystem rinse. This warms up all the pipes. > Plac e a colle cting ve ss el under th e All-in- One s pout for the rins e water . The c o f fee sy stem rin sing pro cedur e lasts for about. 4 0 seconds. Y our auto matic c …
-
WMF 900 — page 28
Opera tion 21 3. 1 . 3 Tim er oper ation (automatic swit ch- on ). With th e timer , you c an automatic ally switc h the WMFAutom atic Coff ee Machin e on or of f. T o us e the timer, the basic s ett ing «Switch -on time» mus t be se t to active beforehand. > Briefl y p res s the on-/of f -s witch. > Se t the switch- on time wit …
-
WMF 900 — page 29
Opera tion 22 3.2 Use mi lk Milk is a ver y s ensitiv e foods tuf f . Always en sure cleanlin es s when using milk . Open t he pack ing only with clean hand s and tools . Alway s ensure th at the milk is germ-f ree. We rec ommend that milk alway s be s tored in a re frigerato r and remove d from it only f or immediate us e. > Plac e the ref rige …
-
WMF 900 — page 30
Opera tion 23 3.3 Prepare coffee beverages Cof fee b everag es are prep ared by touc hing the be verage but ton in the c ontrol p anel. 3.3. 1 Coffe e s pecial ities at the touch of a button > Plac e an approp riate drinking ve ss el under the All -In- One sp out. > Adjus t the All- In-o ne spout to s uit the height of the drink ing ves sel . …
-
WMF 900 — page 31
Opera tion 24 > Fo r example , pres s the but ton at the b o t tom lef t for Cappu ccin o. short: 1x C a p p uc i n o short: 1x L at te Mac chiato long: 2x Cappu cino The name of the bever age appear s on the di splay, for examp le, Cappucino. The c o f fee beans are gr ound for the selected b everage, for e xample, Cappuc cino. The selec ted be …
-
WMF 900 — page 32
Opera tion 25 Hazard! Possible danger of burns ! Hot steam is delivered and the drinking vessel can get very hot! > Do not use the cup warmer without a drinking vessel and never without the drip tray grid with steam board inserted in place. > Use heat-resistant drinking vessels. > Do not use the cup warmer without the associated saucer ins …
-
WMF 900 — page 33
Opera tion 26 — Mild (about 1 5 % weaker than the s aved se tting) — Normal ( c orresponds to your setting) — St ron g (about 1 5 % stron ger than the s aved se tting) 3.3.4 Quick se lection of cup s ize Th e volume of the ne xt c up can be s tipulated be fore st artin g to prepare t he bever age. T he tas te will there for remain the s ame. Y ou s …
-
WMF 900 — page 34
Opera tion 27 3.3. 5 Pot function Using t he pot func tion you c an make a full pot of C afé Crème. > Pre ss t he cup size rapid s election but ton for lon ger than 2 sec onds . > Pres s + 2x br iefl y. The Caf e Creme bevera ge bu tton lights up. > Pus h the All- In- One sp out upwards . > Plac e the WMF c off ee pot under t he spou …
-
WMF 900 — page 35
Opera tion 28 1b 1a 1c > Plac e an approp riate drinking ve ss el under the All -In- One sp out. > Open t he lid ( 1a ) on the groun d cof fee inlet . 1 …
-
WMF 900 — page 36
Opera tion 29 The display notifi es: > Pour th e ground cof fee (ade quate for a brewing c ycle of ab out. 9 g) in the gr ound cof fee in ser t ( 1b ). > Clo se the lid ( 1c ). > Sele ct your b everage u sing the be verage b uttons (on e cup ). The pro cedure c an be canc elled with C button. 3.3.7 Prepar ing mi lk and m ilk foa m Y our W …
-
WMF 900 — page 37
Opera tion 30 Tip : Milk or milk foam can drip a lit tle af ter dispens ing. It is be st to hol d your cup for a lit tle while long er af ter dispen sing under the A ll-In- One s pout , or plac e a small colle cting ve s sel under th e spout . Tip : Milk c an also drip, if t he milk cont ainer is full and at t he same t ime the All- In- One sp out …
-
WMF 900 — page 38
Opera tion 31 3.5 Tips to s ave energ y Se t the mos t econo mical energ y saving m ode (se e “Energ y savin g modes ” on page 1 5). Swit ch of f your WMFAuto matic Cof fee Mac hine w hen it is not in us e. It doe s not con sume any power then. Y our W MFAutomatic Cof fee M achine s witc hes of f automaticall y after 3 0 minutes . Reduc e …
-
WMF 900 — page 39
Opera tion 32 > Plac e an approp riate drinking ve ss el under the All -In- One sp out. > Onc e again pre ss t he bever age but ton of the adju sted b everag e. The be verage is prepar ed with the adjusted settings. 3.6. 1 Set the cup size Here, y ou have the opti on to individuall y adjust th e cup volume to your c up sizes . But the r ecipe …
-
WMF 900 — page 40
Opera tion 33 > Adjus t the cup volume to t he cup size with th e button s – or + . The cup volume is display ed in % . 1 0 0 % corresp onds to the default setting . > If nec es sar y, carr y out a tes t prepar ation (page 31 ) . > Confi rm th e cup volume with P button. > If nec es sar y, change the c up volume. > Confi rm th e …
-
WMF 900 — page 41
Opera tion 34 — Pre-brew ( for pe r fect a roma ) > Pres s P but ton. > Browse with + for b everag e set ting. > Confi rm your s elect ion with P but ton. > Sele ct the b everage f or which you want to change t he ta ste and the c ompo sition with the h elp of bevera ge buttons . > Se t the des ired water volume with – or + . > …
-
WMF 900 — page 42
Opera tion 35 > Se t the des ired cof fee s trength wit h – or + . The ground quantit y varies according to the grinding degre e setting, the used t ypes of cof fee, the humidit y and several other infl uences . The factor y setting for Espresso corr esponds to approximately 9 grams . > If nec es sar y, carr y out a tes t prepar ation (pag …
-
WMF 900 — page 43
Opera tion 36 The quant ity of milk f oam may be le ss during t he fi r st be verage s ince the c ondens ed water is s till in the co oled down pipe s. T herefo re, befo re the prep aration of the fi rst b everage, briefl y pre ss t he milk butt on. Pre- brew : B efore brewing, the ground c o f fee is dampened with hot water . This causes the gr …
-
WMF 900 — page 44
Opera tion 37 3.6. 3 Basi c settings Fo llowing se tting s can be adjuste d : Basic settings Language* Water hardnes s* Ener gy sav ing mod es* Water fi lter * Time* Special information tone Date* Brewing temperatur e Dis play of time /date Fa ctor y s ettin gs Switch on t ime Dis play co ntras t Switch of f time* The b asic s ettin gs marke d wit …
-
WMF 900 — page 45
Opera tion 38 > Confi rm your s elect ion with P but ton. > Se t the display of date and t ime on or of f with – or + . > Confi rm your s elect ion with P but ton. > Se t the pre- brew fun ction on o r off with – or + (Chapter “ 3. 1.3 Tim er operation (automat ic switch- on ).” on page 2 1 ). > Confi rm your s elect ion w …
-
WMF 900 — page 46
Opera tion 39 All the basic set tings and beverage set tings are reset to factor y setting with the setting of » Y es». > Se t the fac tor y set ting to » Y es» wit h – or + . > Confi rm your s elect ion with P but ton. > Se t the display c ontra st with – or + . > Confi rm your s elect ion with P but ton. 3. 7 …
-
WMF 900 — page 47
Opera tion 40 15a 15b 15d 15c 15e > Open t he lid ( 15 a ) on t he bean hop per . > Conne ct the Multi to ol ( 15 b ) to th e grinding degre e set ting ( 15 c ). > Plac e an approp riate drinking ve ss el under the All -In- One- spout , pres s the E spr es so but ton and wait till the grind er runs . Grin ding should b e fi ner: Pre ss t …
-
WMF 900 — page 48
Opera tion 41 Grindin g degree i s too co ars e : Runs out to o fast — e spe cially in ca se of es pres s o- the cream is to o light and les s con sistent , the aroma is plain. Adjus t the grinding de gree by on e rotation to make it fi ner. Correct setti ng : Verif y your se tting by p reparing a doub le cup espr es so. …
-
WMF 900 — page 49
Opera tion 42 3.8 Read c ou nters > Pres s P button. > Browse with + for c ounters . > Confi rm your s elect ion with P but ton. > Browse with – or + to display t he number of be verage s prepared. Immediately af ter all the bever ages are displaye d or w hen you press C button,the co un ter s can be deleted . > Re set the c ounte …
-
WMF 900 — page 50
Car e 43 4 Care The c are of your WMF Automatic Coff ee Machine is espe cially impor tan t so that yo ur coff ee is always prepar ed per fectly. The displa y no tifi es you about how soon the Automatic C o f fee Machine must be rinsed, cle aned or descaled . Only 10 seconds time are nee ded to clean the ma chine before you switch it of f. Caut …
-
WMF 900 — page 51
Car e 44 Steps for care Care interval Repl ace water fi lter — Af ter a re quest in t he displ ay (dependin g on water hardne ss an d water fl ow rate, at t he late st af ter 3 month s) De sc ale the mac hine — ac cor ding to the re quest in di splay (dep endent on water hard nes s, water fl ow r ate and water fi lter). Cle an the bre wing unit …
-
WMF 900 — page 52
Car e 45 so -c alled relea se water runs into th e drip tray. This rins es any rem aining cof fee fro m the pipe s. T his is a comp letely normal p roce dure and not an erro r in the automatic c offe e machine. Hazard! Possible health hazar d due to cleaning agents or descaling agents. Cleaning agents and descaling agents are irritants and become v …
-
WMF 900 — page 53
Car e 46 4. 2. 1 Cal ling u p the customer care prog rammes > Pres s P but ton. > Browse with + for c are progr ammes . > Confi rm your s elect ion with P but ton. > Browse with – or + but tons for th e desire d care programme. > Confi rm your s elect ion with P button. 4. 2.2 Wa rm-up ri nsi ng The pip es of the coff ee machine …
-
WMF 900 — page 54
Car e 47 > Call th e custom er care pro grams (Chapter “ 4 .2 Cus tomer Car e programme s” on pa ge 44). > Brow se until warm -up rins e. > Plac e a suitable v es sel under th e All-In- One s pout . > Confi rm th e warm-up rins e with P but ton. 4. 2.3 WMF Connect & Clean mi lk system ri nse The automatic milk and c offe e rin …
-
WMF 900 — page 55
Car e 48 > Sele ct the milk s ys tem rinse wit h P button. The display notifi es the indi vidual activities that must be complete d before the rinse. > Pus h the All- In-O ne spo ut to the upper mo st po sition . > Plac e a colle cting ve ss el under th e All-In -One s pout . > Wipe th e outs ide of the milk hos e with a clean damp clo …
-
WMF 900 — page 56
Car e 49 Y ou c an also c all up the milk s ys tem rinsing manuall y . To do so c all up the car e progr ammes and s elect the milk s ys tem rinsing . When the automati c switch- off tim e is reach ed, be fore switchin g off onl y a cof fee s y stem rinsin g is carrie d out. But t he machine will c all for a milk sy stem rin sing ne xt time yo u sw …
-
WMF 900 — page 57
Car e 50 > Call th e custom er care pro grams (Chapter “ 4 .2 Cus tomer Car e programme s” on pa ge 44). > Brow se th e Machine -cle aning. > Star t the machin e cleaning with P but ton. > Fo llow the inst ruction s in the disp lay . 1a 1c 1b > Plac e a suitable v es sel (2 litres ‘ c apacit y) under th e All-In- One s pout …
-
WMF 900 — page 58
Car e 51 > Open t he lid ( 1a ) on the groun d cof fee inlet . > Ins ert a cle aning table t ( 1b ) alon g with the yellow s ponge in t he ground c offe e inser t. > Clo se the lid ( 1c ). > Star t with P but ton. The cle aning program star ts. A minute countdown indicates how l ong the cleaning will last. T he Machine- cleaning ends af …
-
WMF 900 — page 59
Car e 52 4. 2.5 Replace wate r fi lter This program ap pears when you use a water fi lter and the usage has been c onfi rme d during the initial settings (Chapter “2. 5 In sert the WM F water fi lter ” on page 1 1 ). However, dependin g on the water hardne ss an d the water fl ow , at le ast af ter 3 months , a disp lay reque sting to c ha …
-
WMF 900 — page 60
Car e 53 > Slide the water t ank gently into th e automatic cof fee ma chine. > Pre ss t he butt on P . > Plac e a 2 litre c ollect ing cont ainer under the hot water s pout . > Star t fi lter rin se with the P button. The fi lter rinsing progr am starts . A minute countdown indicates how l ong the rin sing will last. Filter rinse pro …
-
WMF 900 — page 61
Car e 54 water fi lter . you c an pos tpon e the des caling p roce ss b y pres sing C but ton. Howe ver , within t he nex t 50 b rewings , a des caling p roce dure must b e carrie d out. O therwi se, be verage dispens ing will be blo cked. Th e block is c leared af ter a de scalin g proc edure. 9b 10 9a > Pre ss t he releas e button ( 9a ) at t …
-
WMF 900 — page 62
Car e 55 > Call t he custo mer care p rogram s (“ 4 .2. 1 Callin g up the cus tomer car e programme s” on pa ge 46). > Browse with – or + but tons fo r machine- cleanin g. > Confi rm your s elect ion with P button. > Empt y the drip tray. > Remove t he water tank fro m the automatic c offe e machine. > Remove the fi lter c …
-
WMF 900 — page 63
Car e 56 Foll ow ing displays ap pear af ter about. 30 minutes: > Empt y the water tank . > Rins e the water tank th oroughly with c lear water . > Pres s P button. > Fill th e water tank with co ld drinking water. > Plac e the lid on the water t ank. > Slide the water t ank gently into th e automatic cof fee machine. > Pres s …
-
WMF 900 — page 64
Car e 57 Immediatel y after de sc aling, a machin e-cl eaning is re queste d. The p roce dure is de scrib ed under “ 4. 2.4 Mac hine-c leaning — Cle aning progr amme” on page 4 9. > Replac e the water fi lter in the water tank (C hapter . “ 4 .2. 5 Replace water fi lter” on page 52). > Pus h the milk foamer into t he All- In-O ne sp …
-
WMF 900 — page 65
Car e 58 2a 5a 5b 5c > Op en the lid of the br ewer ( 2a ). > Releas e the br ewing unit ( 5a ). > Pull th e brewing unit ( 5b ) upwards o ut of the brew chute . Use b oth the gripping lu gs for pulling it out ( 5c ). 5d 5f 5g 5e 5h 5i 5 If it is dif fi c ult to rem ove the brewe r , th e O-Rin gs must be lubricated. (“ 4 .4 .2 Lubr ica …
-
WMF 900 — page 66
Car e 59 > T urn the thread ( 5d ) on the br ewing unit head ( 5e ) with the multitool in t he anticlock wise dir ecti on. The scr aper ( 5g ) folds out for ward and the brewing fi lter i s now visible. > Cle an the brewing unit ( 5e ) under running water. > Cle an the brewing fi lter ( 5h an d 5i ) un der running water. Caution! Possibl …
-
WMF 900 — page 67
Car e 60 8b 6b 8a 6a > Pull out t he water tank ( 6a ) an d the cof fee gr ounds c ontainer ( 8a ). > Remove t he res idues of groun d cof fee in both t he openings ( 6b , 8b ), for ex ample, with a va cuum cleaner . > T ur n the threa d on the brewin g unit head with the mult itool in cloc kwis e direct ion till the bla ck sc raper fol ds …
-
WMF 900 — page 68
Car e 61 4. 3.2 General cl eaning Caution! Possible damage to the water tank, the drip tr ay or the coffee grounds container! Due to the thermal effect in the dishwasher , the water tank, drip tray and coffee gr ounds container can be deformed. > Therefor e, never clean the water tank, the drip tray and the coffee grounds container in the dishwa …
-
WMF 900 — page 69
Car e 62 4. 3.3 Clean the m ilk syste m Cleaning the milk s ystem thoroughly onc e a week is suffi cient. > Pus h the All- In- One sp out upwards . 9a 9b 9c 10 a 9d 9f 9e B 9d 9e A 10 b > Remov e the cof fee gr ounds co ntainer fr om the machin e. > Remov e the milk hos e from th e milk cont ainer or releas e it from t he milk lance. > …
-
WMF 900 — page 70
Car e 63 Foamer , variant A: > T wis t out the air int ake pipe ( 9d ) fro m the milk foamer. > Uns crew the blac k cap ( 9e ) f rom the air int ake pipe. Foamer , variant B: > Det ach th e att achment ( 9d ) and the s ealing cap ( 9e ) one by one f rom the milk fo amer > Fill th e dispens ing chamber ( a ) of the WMF milk s ys tem clea …
-
WMF 900 — page 71
Car e 64 Foamer, variant A: > Sc rew the air inlet pip e in place . Foamer , variant B: > Put th e att achment and th e sealing c ap in plac e. > In sert t he hose. > Ins ert the milk f oamer into the A ll-In- One sp out fro m below. > Pus h the All- In- One spo ut downwards . > L ay the milk hos e in the guide and p lace th e mil …
-
WMF 900 — page 72
Car e 65 4. 3.4 Clean the stea m noz zle 9b 9g > Remov e the milk foamer ( 9b ). > Pre ss t he red st eam nozzle ( 9g ) with th e index fi n ger away to the lef t and remove it . > Car efully cle an the steam n ozzle with one of t he small cleanin g brushe s that has b een provid ed ( b ). 9 b …
-
WMF 900 — page 73
Car e 66 4.4 L u bricating O -rings > Us e only WMF «Gr ease f or sealing ring s» from th e acce ss orie s. The gre ase/lubricant is s uitable for the material and saf e for food te chnology. 4.4. 1 Lubricating O-Ring of the Wa ter t ank If it is dif fi cult to remove t he water tank and dif fi cult to ins ert it or f requently » …
-
WMF 900 — page 74
Car e 67 4.4.2 L ubri c ati ng O -Ring of the Br e wer Unit When it is dif fi c ult to remove the b rewing unit and dif fi cult to inser t it or fr equently «fl ow error» is display ed, you mu st mildly lubric ate the O -Rings with t he WMF «Ga sket greas e» . 5b 5a 5c > Op en the lid of the br ewing unit. > Releas e th …
-
WMF 900 — page 75
Display mess ages 68 5 Displa y messages Messages for op eration and trouble shooting are disp lay ed on your WMF Automatic Cof fee Machine. Thus, yo u always know how to pro ceed . 5. 1 Operatin g messages The c o f fee grounds container is full > Remove the coffee grounds containe r . > Empt y the cof fe e grounds c ontainer and rin se it w …
-
WMF 900 — page 76
Display mess ages 69 The water tank is nearly empt y. The water tank is never emptied co mpletely so that no air enters the cof fee sy stem. > Remove t he water tank fro m the automatic c offe e machine. > Comple tely empt y the water tank . > Fill th e water tank with co ld tap water. > Slide the water t ank into the automatic c off ee …
-
WMF 900 — page 77
Display mess ages 70 The water fi lter must b e changed > Chang e the water fi lter ( Chapter “ 4 .2. 5 Replac e water fi lter” on page 52). The lid is not placed or not corr ectly place d. > Plac e the lid on th e water tank. Without the lid, the machine is no t read y for operation . The brewer lid of the automatic cof fee ma chine i …
-
WMF 900 — page 78
Display mess ages 71 5. 2 Messages for troubleshoo ting The brewing unit is not in serte d. > Ins ert th e brewing unit. The brewing unit is not in serte d. > Che ck if the br ewing unit is inser ted c orre ctly. The brewing unit is inserted onl y wi th dif fi cult y or not at all inserted: > Remove the brew er. > Op en the brewing ch …
-
WMF 900 — page 79
Display mess ages 72 Air in the system? Possibly associate d w ith loud pump noise ? > Che ck whether th e water tank is co mpletely pus hed in. > Blee d the automatic c off ee machine by di spensin g hot water until a co nst ant stream of water c ome s out. Is the water fi lter or sieve clogged? > Chang e the water fi lter ( Chapter “ …
-
WMF 900 — page 80
Display mess ages 73 Grinding too fi ne? > S et the de gree of grinding to b e coar ser by o ne four th rotatio n (Chapter “3 . 7 Se t the grinding de gree” on pa ge 39). > Suck o ut the grinding dus t. Air in the system? Possibly associate d w ith loud pump noise ? > Che ck whether th e water tank is co mpletely pus hed in. > Remo …
-
WMF 900 — page 81
Display mess ages 74 > Switch of f the Automatic Cof fee M achine with the O n-/ Of f-switch (pr es s for about 3 s econd s). > Switch on the Autom a tic Cof fee M achine with the O n/ Of f switch . On re currence, the f ault mu st b e rectifi e d by the WMF Ser vice -Center . The grinder is blocked by a f oreign bod y . > Switch of f the …
-
WMF 900 — page 82
Display mess ages 75 5. 3 Problems w ithout error d isplay Problem Rectifi cation measure No milk fo am — / milk output, al though there is milk in the c ontain er > Che ck whether t he milk tube is k ink e d or squa shed . > Re-fi t the milk tube a gain. > Clean t he All-In -O ne spout (C hapter “ 4 .3 .3 C lean the milk s yst em” o …
-
WMF 900 — page 83
Display mess ages 76 Problem Rectifi cation measure Milk is too hot an d too litt le or milk foam has bubbles > Us e refriger ated milk > Che ck whether t he milk tube is k ink e d or squa shed . > Re-fi t the milk tube a gain. > Cle an the All-In -O ne spout (C hapter “ 4 .3 .3 C lean the milk s ys tem” on page 62 ). > Ensur e …
-
WMF 900 — page 84
Display mess ages 77 Problem Rectifi cation measure Cof fee has no c reme Improper c o f fee mix ture or cof fee is no longer fresh? > Chang e the cof fee b eans . Quantit y o f ground cof fee is too lit tle ? > Incre ase th e cof fee str ength Cof fee is too c old? > Reheat t he cups on th e cup stor age. > Carr y out war m-up rins e. …
-
WMF 900 — page 85
Display mess ages 78 5a 5b 5e 5c 5d 5d Problem Rectifi cation measure Ther e is a noticeable large amo unt of coa rse g roun d coffee inside the brew er > Se t the grinding de gree fi ner by o ne rotation (Chapter “ 3.7 Se t the grinding de gree” on p age 39). Is the metal spring ring in the brewer stamp miss ing? > Releas e the br ewin …
-
WMF 900 — page 86
T r ansp ort and D ispo sal 79 6 T ranspor t an d Dispos a l > Retain the orig inal packing as protection du ring transport a tion . > Empt y the water tank , drip tray, grounds b ox and the be an hopper b efore mov ing. > Alway s dispatch o r trans por t the machine in t he original box with t he ex panded p oly st yrene s hells . Disp os …
-
WMF 900 — page 87
Guarante e, warrant y and cu stomer s erv ice 80 7 G u ar antee, warrant y and cus tomer ser vic e Y ou ar e entitled to the war rant y rights within t he legal sc ope. A dditional inform ation on warrant y and guarante e condition s are given in the s upplementar y sh eet of the us er manual. If you ne ed addition al information or if p roblems o …
-
WMF 900 — page 88
Te c hn i c al d at a 81 8 Te c h n i c a l d a t a Power rat ing 1.7 -2.3 kW Mains p ower conne ctio n 1 / N/PE ~ 50 /60 Hz; 220 — 240 V On si te circuit p rotec tion ma ximum 16 A Daily o utput 35 Cups Cof fee b ean hop per 250 g Variab le brewing c hamber 6 to 1 5 g Cap acit y of water tank (witho ut fi lter) 2. 2 litr es Cof fee gr ounds c ont …
-
WMF 900 — page 89
Inde x 82 9 Index A Adjusting the milk quantity ……………………………….. 35 Adjusting the water volume ……………………………….. 34 All-In-One spout ………………………………………………….. 62 B Beverage settings …………………………………………………. 33 Brewing temper ature Default …
-
WMF 900 — page 90
Inde x 83 Ground coffee feed ……………………………………………… 27 H Hazard instructions ……………………………………………….. 5 Hot water dispensing …………………………………………… 30 I Initial setting ………………………………………………………… 14 Initial setup prog …
-
WMF 900 — page 91
Inde x 84 Set the grinding degree ………………………………………. 39 Setting the date …………………………………………………… 15 Setting the language ………………………………………. 8, 14 Setting the switch off time ………………………………… 16 Setting the time ………………….. …
-
WMF 900 — page 92
Publisher In formation 85 1 0 P ubl isher Informa tion © 201 1 -201 2 W MF cons umer elect ric GmbH All right s, e spe cially the right of rep roduct ion, public ation and tran slation, are r es erve d. No par t of this manual may be r eproduc ed in any form or pr oce ss ed, duplic ated or dist ributed elec tronicall y without writ ten cons ent. S …
-
WMF 900 — page 93
WMF Automa tic Cof fee Machi ne User manual WMFc onsumer electric G mbH Me ss ers chmitt str aße 4 89343 Jettingen-Scheppach www. wm f — ce.d e BAL _WM F_Kaffeevol laut oma t _EN _00_ 0820 1 1 …