Руководства Siemens S40 Размер файлов: 4433 KB, Язык: English, Формат: pdf, Платформа: Windows/Linux, Дата: 2016-07-14
На данной странице вы можете скачать руководства Siemens S40. Мы предлагаем вам ознакомиться с руководством пользователя, инструкцией по сервисному обслуживанию и ремонту.
Также здесь вы найдете список заказных номеров на комплектующие Siemens S40.
Все файлы предоставляются исключительно в ознакомительных целях. И не являютя руководством по ремонту, а направлены лишь на то чтобы помочь вам более детально ознакомиться с принципом построения устройства.
Содержимое представленных здесь руководств требуют от вас знания технического английского языка.
Если вы собираетесь скачать руководство по сервисному обслуживанию Siemens S40, иными словами сервис мануал, вы дожны обладать хотя бы минимальными познаниями в области электроники и пониманием базовых принципов работы электромеханических устройств.
Для просмотра руководств вам понадобится Adobe Acrobat Reader версии 9 и выше либо другая программа для просмотра pdf файлов.
В связи с популярностью информации представленной на сайте и ее бесплатного предоставления конечному пользователю, убедительная просьба использовать специальные программные продукты для многопотокового скачивания файлов.
Руководства для Siemens S40
- Руководство пользователя (User manual)
- Руководство по сервисному обслуживанию (Service manual)
- Руководство по ремонту (Repair manual)
- Перечень комплектующих (PartList)
![]()
Gebrauchsanleitung
Operating instructions
Notice d’utilisation
Istruzioni per l’uso
Gebruiksaanwijzing
Kullanma talimatž
TK 64…


|
Inhaltsverzeichnis |
|
|
Was Sie unbedingt beachten müssen . . . . . . . . . . . . . . . |
5 |
|
Sicherheitshinweise . . . . . . . . . . . . . . . . . . . . . . . . . . . . . . . . |
5 |
|
Vor dem ersten Gebrauch . . . . . . . . . . . . . . . . . . . . . . . . . . |
6 |
|
System füllen . . . . . . . . . . . . . . . . . . . . . . . . . . . . . . . . . . . . . . |
6 |
|
Bedienelemente . . . . . . . . . . . . . . . . . . . . . . . . . . . . . . . . . . |
7 |
|
Zubereitung . . . . . . . . . . . . . . . . . . . . . . . . . . . . . . . . . . . . . . |
10 |
|
Allgemeines . . . . . . . . . . . . . . . . . . . . . . . . . . . . . . . . . . . . . . . |
10 |
|
Espresso’/Kaffeebohnen verwenden . . . . . . . . . . . . . . . . . . |
10 |
|
Mahlwerk einstellen . . . . . . . . . . . . . . . . . . . . . . . . . . . . . . . . |
11 |
|
Espresso’/Kaffeepulver verwenden . . . . . . . . . . . . . . . . . . . . |
11 |
|
Heißwasser bereiten . . . . . . . . . . . . . . . . . . . . . . . . . . . . . . . . |
11 |
|
Dampf zum Getränke erwärmen . . . . . . . . . . . . . . . . . . . . . . |
12 |
|
Milchschaum bereiten . . . . . . . . . . . . . . . . . . . . . . . . . . . . . . |
12 |
|
Einstellungen ändern / Programmieren . . . . . . . . . . . . . . |
13 |
|
Programmieren . . . . . . . . . . . . . . . . . . . . . . . . . . . . . . . . . . . . |
13 |
|
Sprache . . . . . . . . . . . . . . . . . . . . . . . . . . . . . . . . . . . . . . . . . . |
14 |
|
Wasser Härte . . . . . . . . . . . . . . . . . . . . . . . . . . . . . . . . . . . . . |
14 |
|
Filter . . . . . . . . . . . . . . . . . . . . . . . . . . . . . . . . . . . . . . . . . . . . . |
15 |
|
Temperatur . . . . . . . . . . . . . . . . . . . . . . . . . . . . . . . . . . . . . . . |
15 |
|
Aktuelle Uhrzeit . . . . . . . . . . . . . . . . . . . . . . . . . . . . . . . . . . . . |
15 |
|
Timer . . . . . . . . . . . . . . . . . . . . . . . . . . . . . . . . . . . . . . . . . . . . |
16 |
|
Energiespar’Modus . . . . . . . . . . . . . . . . . . . . . . . . . . . . . . . . |
16 |
|
Anzeige der Bezüge . . . . . . . . . . . . . . . . . . . . . . . . . . . . . . . . |
16 |
|
RESET’Funktion . . . . . . . . . . . . . . . . . . . . . . . . . . . . . . . . . . . |
17 |
|
System)Meldungen . . . . . . . . . . . . . . . . . . . . . . . . . . . . . . . |
17 |
|
Reinigen . . . . . . . . . . . . . . . . . . . . . . . . . . . . . . . . . . . . . . . . . |
18 |
|
Entkalken . . . . . . . . . . . . . . . . . . . . . . . . . . . . . . . . . . . . . . . . |
21 |
|
Kleine Störungen selbst beheben . . . . . . . . . . . . . . . . . . . |
23 |
English . . . . . . . . . . . . . . . . . . . . . . . . . . . . . . . . . . . . . . . . . . 25
Français . . . . . . . . . . . . . . . . . . . . . . . . . . . . . . . . . . . . . . . . . 47
Italiano . . . . . . . . . . . . . . . . . . . . . . . . . . . . . . . . . . . . . . . . . . 71
Nederlands . . . . . . . . . . . . . . . . . . . . . . . . . . . . . . . . . . . . . . 94
Türkçe . . . . . . . . . . . . . . . . . . . . . . . . . . . . . . . . . . . . . . . 117
3

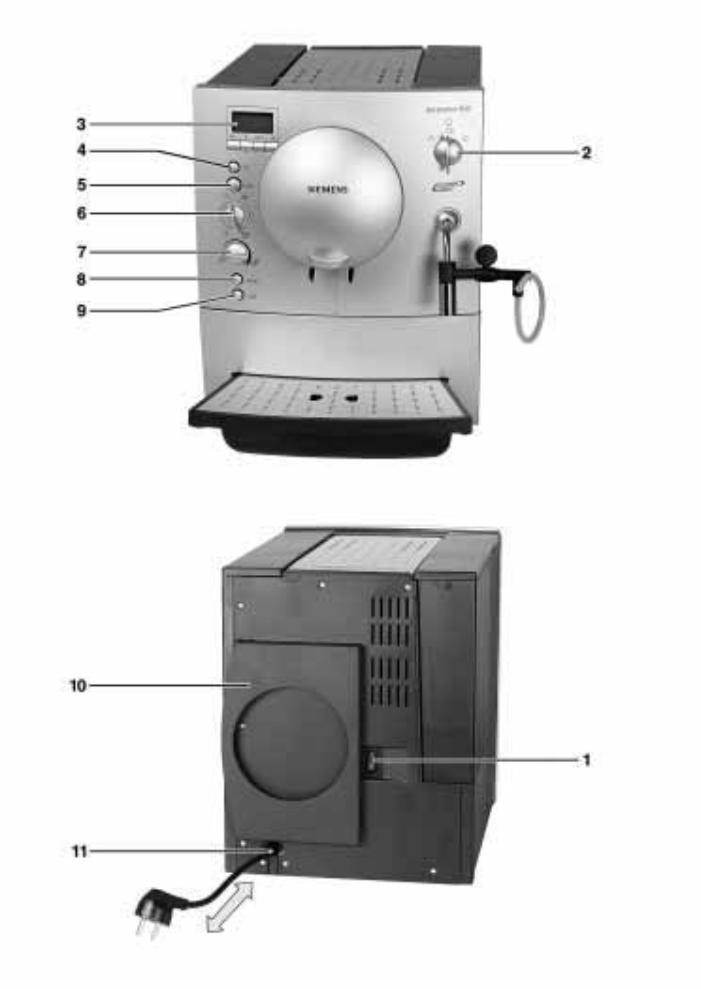
Bedienelemente
Geräteteile
Entsorgungshinweise
1 Netzschalter
2 Funktionswähler (Kaffee, Dampf, Heißwasser)
3 Display mit 4 Funktionstasten
4 Taste d
5 Bezugstaste 2
6Drehknopf zum Einstellen der Füllmenge (— (/ 8— 8
7 Drehknopf zum Einstellen der Kaffeestärke /— 7
8 Reinigungstaste +
9 Entkalkungstaste 4
10Schriftguthalter
11Kabelstaufach
12Höhenverstellbarer Kaffee’Auslauf
13Schwenkbare Düse mit Aufschäumvorrichtung (Schaum, Dampf, Heißwasser) — Geschirrspüler geeignet
|
a |
Drehgriff |
|
b |
Ansaugventil |
|
c |
Verbindungswinkel |
|
d |
Schlauch |
|
e |
T’Stück |
|
f |
Hülse |
14Drehknopf Kaffee’Mahlgrad
15Bohnenbehälter mit Aromadeckel
16Schacht für Kaffeepulver mit Deckel = Schacht für Reinigungstablette
17Tür zur Brüheinheit
18Rechter Gerätedeckel
19Tassenablage (Vor’Wärmefunktion)
20Linker Gerätedeckel
21Filter (Sonderzubehör)
22Abnehmbarer Wassertank
23Schale für Kaffeesatz (Geschirrspüler geeignet)
24Schale (für Restwasser)
25Gitter
26Kontakte
Über aktuelle Entsorgungswege können Sie sich beim Fachhändler oder in der Gemeindeverwaltung informieren.
4

Was Sie unbedingt beachten müssen
Gebrauchsanleitung sorgfältig durchlesen und im Schriftguthalter 10 aufbewahren!
Dieses Gerät ist für den Haushalt und die Verarbeitung haushaltsüblicher Mengen und nicht für den gewerblichen Gebrauch bestimmt.
d Stromschlag)Gefahr
|
Sicherheitshinweise |
Gerät nur gemäß Angaben auf dem Typenschild anschließen |
|
und betreiben. |
|
|
Nur benutzen, wenn Zuleitung und Gerät keine |
|
|
Beschädigungen aufweisen. |
|
|
Gerät nur in Innenräumen bei Raumtemperatur verwenden. |
|
|
Kinder vom Gerät fernhalten. |
|
|
Im Fehlerfall sofort den Netzstecker ziehen. |
|
|
Gerät niemals in Wasser tauchen. |
|
|
Reparaturen am Gerät, wie z. B. der Austausch einer |
|
|
beschädigten Zuleitung, dürfen nur durch unseren |
|
|
Kundendienst ausgeführt werden, um Gefährdungen zu |
|
|
vermeiden. |
|
|
Nicht in das Mahlwerk greifen. |
|
|
d Verbrühungsgefahr! |
|
|
Düse 13 nur am Kunststoffteil anfassen. Düse 13 niemals auf |
|
|
Personen richten! Düse 13 kann bei Bezug von Dampf oder |
|
|
Heißwasser am Anfang spritzen. |
5

Vor dem ersten Gebrauch
Allgemeines
In Betrieb nehmen
KAFFEE
System füllen
SYSTEM DRUECKE FUELLEN CAFE
SYSTEM
FUELLT
Nur reines Wasser und vorzugsweise Espresso’ oder Vollautomaten’ Bohnenmischungen in die entsprechenden Behälter füllen.
Keine glasierten, karamelisierten oder mit sonstigen zuckerhaltigen Zusätzen behandelte Kaffeebohnen verwenden. Sie verstopfen das Mahlwerk.
Härte des verwendeten Wassers mit beiliegendem Prüfstreifen feststellen. Wird ein anderer Wert als Härte 3 angezeigt, das Gerät nach Inbetriebnahme entsprechend programmieren (siehe Seite 14).
Die Wasserhärte kann auch bei der örtlichen
Wasserversorgung abgefragt werden.
qNetzstecker aus Kabelfach ziehen und anschließen.
qWassertank 22 mit kaltem Frischwasser füllen. Markierung Gmax» beachten.
qBohnenbehälter 15 mit Kaffeebohnen befüllen.
qNetzschalter 1 auf I stellen.
qFunktionswähler 2 auf zstellen.
qTaste d 4 drücken.
iDas Gerät ist betriebsbereit, wenn die Leuchtringe der Taste d 4 und der Bezugstaste 25 grün leuchten.
Hinweis: Bei der ersten Benutzung oder wenn das Gerät längere Zeit nicht in Betrieb war, hat die erste Tasse Kaffee noch nicht das volle Aroma und sollte deshalb nicht getrunken werden.
Aus Fertigungsgründen muss in einzelnen Fällen bei der ersten Inbetriebnahme das Wasserleitungssystem im Gerät noch gefüllt werden:
q Bezugstaste 25 drücken.
6
Sprache einstellen
SPRACHE
DEUTSCH
Um die Displayanzeige auf die gewünschte der einstellbaren Sprachen zu ändern:
qTaste %am Display 3 mindestens 3 Sekunden gedrückt halten.
qTaste %drücken, bis Anzeige blinkt.
qMit <oder >gewünschte Sprache auswählen.
qTaste %zum Speichern der Sprache drücken.
qTaste 6drücken.
Bedienelemente
KAFFEE
WASSER
BEZUG
GERAET ACHTUNG HEIZT DAMPF
DAMPF
BEZUG
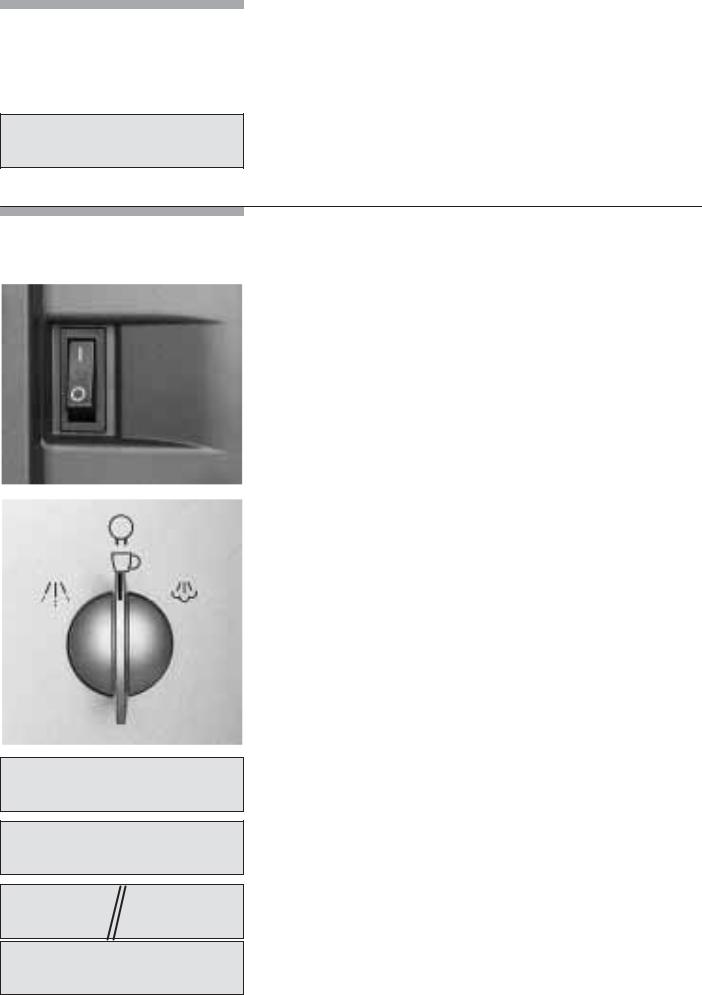
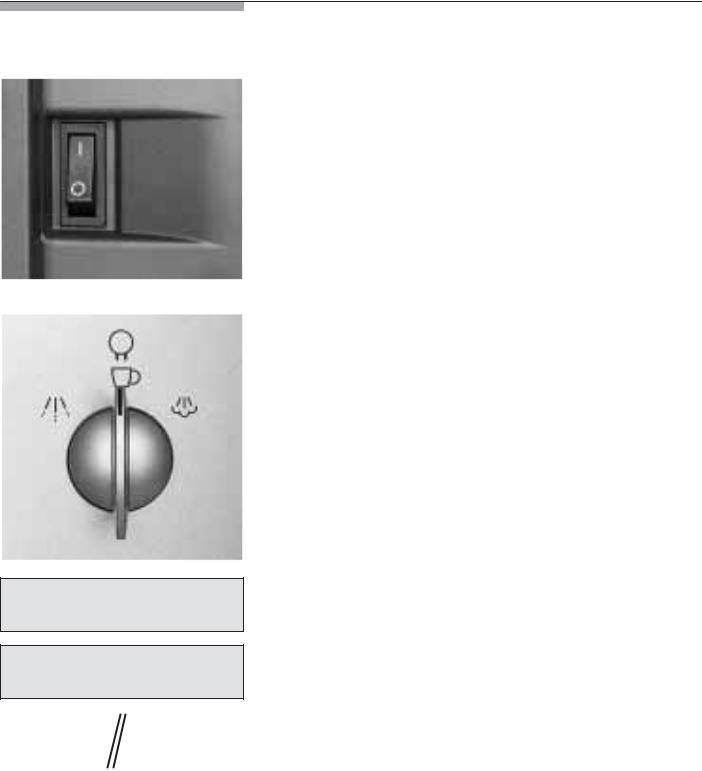
Netzschalter 1
Der Netzschalter 1 auf der Rückseite des Gerätes schaltet die Stromzufuhr ein oder aus.
Nach Einschalten des Netzschalters leuchtet der Leuchtring der Taste d 4 grün auf. Das Gerät ist im GStand by•’Betrieb.
Achtung
Netzschalter während des Betriebes nicht betätigen. Gerät erst abschalten, wenn es in Stand by» Betrieb ist.
Funktionswähler 2
Durch Drehen des Funktionswählers 2 kann der Bezug von Kaffee, Heißwasser oder Dampf gewählt werden.
d Verbrühungsgefahr!
Nach Einstellung auf 0kann es etwas spritzen. Austretender Dampf ist sehr heiß.
Die Einstellungen werden im Display angezeigt: Bezug Kaffee z
Bezug Heißwasser 0
Bezug Dampf =
Displayanzeigen während des kurzen Aufheizens für Dampfbezug.
7
GERAET HEIZT
GERAET SPUELT
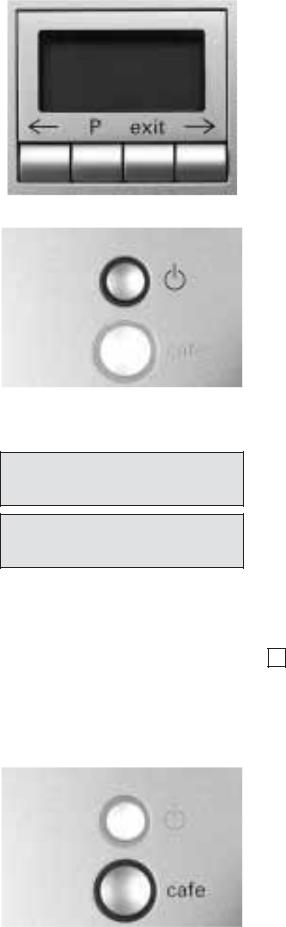
Display 3
Das Display 3 zeigt die Einstellungen, laufenden Vorgänge und Meldungen des Gerätes an.
Das Gerät ist ab Werk mit Standardeinstellungen für optimalen Betrieb programmiert. Diese Einstellungen können verändert werden — siehe Kapitel GEinstellungen ändern / Programmieren».
Taste d 4
Mit der Taste d 4 wird das Gerät eingeschaltet oder in GStand by•’Betrieb versetzt.
Nach Betätigung der Taste d 4 heizt das Gerät auf und spült anschließend. Der Leuchtring der Taste d 4 blinkt während des Vorgangs.
Das Gerät spült nicht, wenn:
—es beim Einschalten noch warm war oder
—vor dem Schalten in den GStand by•’Betrieb kein Kaffee bezogen wurde.
Heiz’ und Spülvorgang werden im Display angezeigt.
Während des Kaffeebezugs ist die Taste d 4 mit einer Stopp’Funktion belegt. Durch Betätigen der Taste d 4 wird der Vorgang vorzeitig beendet.
i4 Stunden nach dem letzten Bezug wird automatisch ein Spülvorgang eingeleitet und in den GStand by•’Betrieb gewechselt. Diese Einstellungen können verändert werden — siehe Kapitel GEinstellungen ändern / Programmieren».
Bezugstaste 25
Durch Drücken der Bezugstaste 25 kann Espresso oder Kaffee bezogen werden. Während des Bezugs blinkt der grüne Leuchtring.
Durch nochmaliges Drücken der Bezugstaste 25 wird der Kaffeebezug vorzeitig abgebrochen.
8
ESPRESSO
2 ESPRESSO
NORMAL PLUS
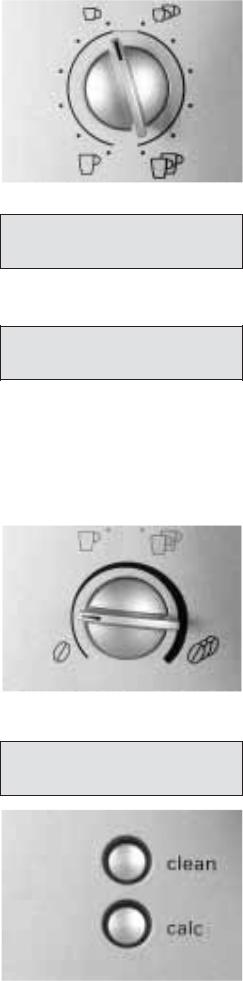
Drehknopf zum Einstellen der Füllmenge 6
(— (/ 8— 8
Mit dem Drehknopf (— (/ 8— 86 wird die Flüssigkeitsmenge eingestellt.
Durch Drehen des Drehknopfes gegen den Uhrzeigersinn kann man in 6 Stufen wählen zwischen:
KLEINER ESPRESSO ESPRESSO
KLEINER KAFFEE KAFFEE
GROSSER KAFFEE XXL KAFFEE
Durch Drehen des Drehknopfes im Uhrzeigersinn kann man in 6 Stufen jeweils 2 Tassen wählen:
2 KLEINE ESPRESSO
2ESPRESSO
2KLEINE KAFFEE
2KAFFEE
2GROSSE KAFFEE
2XXL KAFFEE
Zum Bezug von 2 Tassen verfügt der Auslauf 12 über zwei Auslaufdüsen.
Drehknopf zum Einstellen der Kaffeestärke 7 /— 7
Mit dem Drehknopf /— 77 wird die Menge gemahlenen Kaffees ausgewählt
SEHR MILD MILD NORMAL
NORMAL PLUS STARK
EXTRA STARK
Die gewählte Kaffeestärke wird im Display angezeigt:
Reinigungstaste +8
Entkalkungstaste 49
Bei der Reinigungstaste +8 und der Entkalkungstaste 49 leuchtet jeweils der Leuchtring rot auf, wenn das Gerät gereinigt oder entkalkt werden muss — siehe Kapitel GReinigen oder Entkalken».
9
![]()
Zubereitung
Allgemeines
Espresso)/Kaffee) bohnen verwenden
Dieser Espresso’/Kaffee’Vollautomat mahlt für jeden Brühvorgang frischen Kaffee.
Vorzugsweise Espresso’ oder Vollautomaten’Bohnenmischungen verwenden. Kühl, luftdicht und verschlossen aufbewahren oder tiefgefrieren. Die Kaffeebohnen können auch tiefgefroren gemahlen werden.
Tipp: Tasse(n), vor allem kleine, dickwandige Espressotassen auf der Tassenablage 19 vorwärmen oder mit Heißwasser füllen und ausspülen.
Funktionswähler 2 muss auf zstehen.
qMit dem Drehknopf (— (/ 8— 86 die gewünschte Kaffee’Menge und die Anzahl der Tassen einstellen.
qMit dem Drehknopf /— 77 die bevorzugte Kaffeestärke auswählen.
qTasse(n) unter den Auslauf 12 stellen. Bei Bedarf Höhe des Auslaufs 12 anpassen.
qBezugstaste 25 drücken. Der Brühvorgang erfolgt nun automatisch.
Tipp: Bei Bezug von 2 Tassen gleichzeitig STARK oder EXTRA STARK einstellen.
iDurch erneutes Drücken der Bezugstaste 25 oder der Taste d 4 kann der Brühvorgang vorzeitig beendet werden.
Hinweis: Erscheint im Display Bohnen fuellen trotz gefülltem Bohnenbehälter, muß das Mahlwerk noch automatisch gefüllt werden.
q Bezugstaste 25 nochmals drücken.
10

Mahlwerk einstellen
Espresso)/Kaffee) pulver verwenden
Heißwasser bereiten
qMit dem Drehknopf Kaffee’Mahlgrad 14 die gewünschte Feinheit des Kaffeepulvers einstellen.
Achtung
Den Mahlgrad nur bei laufendem Mahlwerk verstellen! Das Gerät kann sonst beschädigt werden.
qRechten Gerätedeckel 18 öffnen.
qBezugstaste 25 drücken.
qBei laufendem Mahlwerk den Drehknopf für den Mahlgrad in die gewünschte Richtung drehen:
je kleiner die Punkte, desto feiner das Kaffeepulver.
iDie neue Einstellung macht sich erst bei der zweiten oder dritten Tasse Kaffee bemerkbar.
qMit dem Drehknopf (— (/ 8— 86 die gewünschte Füllmenge einstellen.
qTasse(n) unter den Auslauf 12 stellen. Bei Bedarf Höhe des Auslaufs 12 anpassen.
qRechten Gerätedeckel 18 und den Deckel vom Schacht für Kaffeepulver 16 öffnen.
qEin bis zwei gestrichene Meßlöffel mittelfein gemahlenen Kaffee in den Schacht für Kaffeepulver 16 füllen.
Achtung
Keine ganzen Bohnen oder löslichen Kaffee einfüllen! Maximal zwei Meßlöffel Kaffee einfüllen.
qDeckel vom Schacht für Kaffeepulver 16 und den rechten Gerätedeckel 18 schließen.
qBezugstaste 25 drücken.
iFür eine weitere Tasse Pulverkaffee den Vorgang wiederholen.
Hinweis: Wird innerhalb von 90 Sekunden kein Kaffee bezogen, entleert sich die Brühkammer automatisch, um einer Überfüllung vorzubeugen. Das Gerät spült.
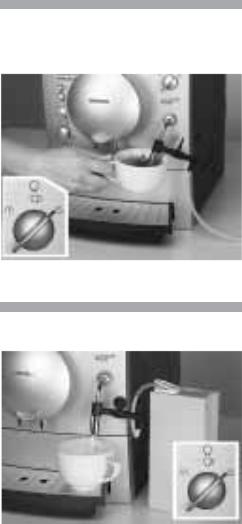
qAnsaugventil 13/b mit Drehgriff 13/a schließen.
qPassende Tasse unter die Düse 13 stellen.
qFunktionswähler 2 auf 0drehen und die Tasse füllen. d Verbrühungsgefahr!
Nach Einstellung auf 0kann es etwas spritzen. Austretender Dampf ist sehr heiß.
Düse 13 nicht berühren oder auf Personen richten.
qVorgang durch Zurückdrehen des Funktionswählers 2 auf zbeenden.
11
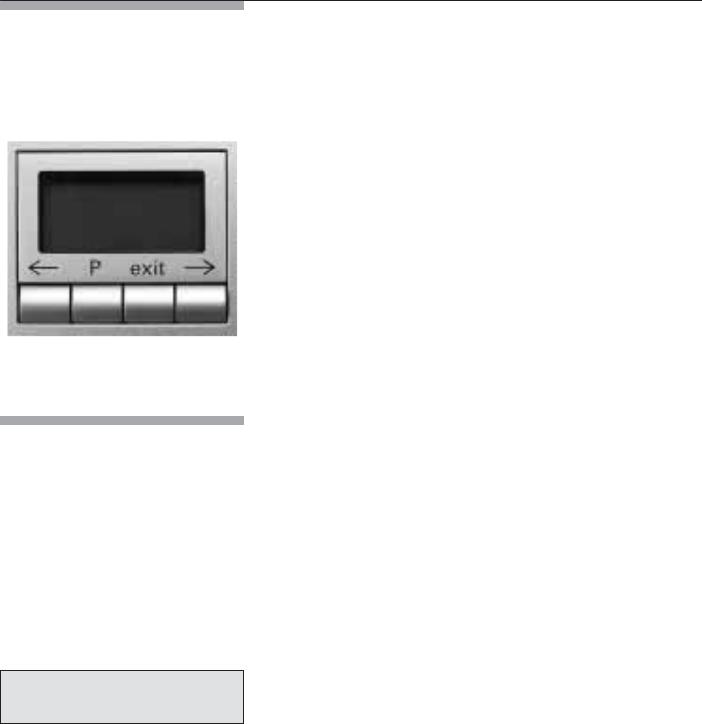
Dampf zum Getränke erwärmen
Milchschaum bereiten
qAnsaugventil 13/b mit Drehgriff 13/a schließen.
qDüse 13 tief in die zu erwärmende Flüssigkeit tauchen.
qFunktionswähler 2 langsam auf =drehen.
Das Gerät heizt nun ca. 20 Sekunden auf. Anschließend wird die Flüssigkeit erwärmt.
d Verbrühungsgefahr!
Nach Einstellung auf =kann es etwas spritzen. Austretender Dampf ist sehr heiß.
Düse 13 nicht berühren oder auf Personen richten.
qVorgang durch Zurückdrehen des Funktionswählers 2 auf zbeenden.
Hinweis: Düse 13 nach dem Abkühlen sofort reinigen. Getrocknete Rückstände sind schwer zu entfernen.
qAnsaugventil 13/b mit Drehgriff 13/a öffnen.
qSchlauch 13/d in ein Gefäß mit Milch tauchen.
qPassende Tasse unter die Düse 13 stellen.
qFunktionswähler 2 langsam auf =drehen. Das Gerät heizt nun ca. 20 Sekunden auf, saugt anschließend die Milch an und schäumt sie auf.
d Verbrühungsgefahr!
Nach Einstellung auf =kann es etwas spritzen. Austretender Dampf ist sehr heiß.
Düse 13 nicht berühren oder auf Personen richten.
qBevor das Milchgefäß ganz geleert ist:
Vorgang durch Zurückdrehen des Funktionswählers 2 auf zbeenden.
qSchlauch 13/d aus dem Gefäß mit Milch nehmen.
Hinweis: Düse 13 und Schlauch 13/d nach dem Abkühlen sofort mit klarem Wasser durchspülen und reinigen M siehe Kapitel GReinigen / Düse Reinigen». Getrocknete Rückstände sind schwer zu entfernen und beeinträchtigen die Bildung des Milchschaums.
Tipp: Bevorzugt kalte Milch mit einem Fettgehalt von 1,5 % verwenden.
Milch’Getränke, wie z.B. Kakao, können wie Milchschaum zubereitet werden.
Mit dem Drehgriff 13/a kann durch leichtes Drehen der Milchschaum optimiert werden.
12
Einstellungen ändern / Programmieren
Programmieren
SPRACHE
DEUTSCH
Das Gerät ist ab Werk so eingestellt, dass ohne zusätzliche Programmierung Kaffee bezogen werden kann.
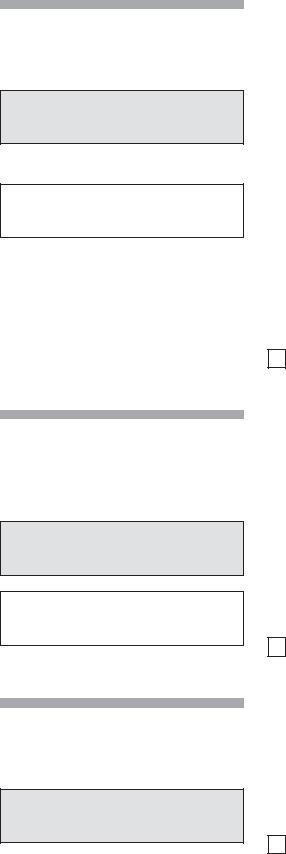
Zur Änderung dieser Grundeinstellungen die Funktionstasten unterhalb des Displays 3 verwenden.
<Auswahltaste
%Zugang zum Programmier’Modus Einstellungen speichern
6Programmieren abbrechen
>Auswahltaste
Achtung
Während des Programmierens das Gerät nicht ausschalten. Änderungen werden sonst nicht übernommen.
Um die Grundeinstellungen zu ändern, muss das Gerät eingeschaltet sein.
Folgende Einstellungen können verändert werden:
—Sprache
—Wasserhärte
—Filter
—Temperatur
—Aktuelle Uhrzeit
—Timerfunktion
—Energiespar’Modus
Einstellungen ab Werk sind in diesem Kapitel grau unterlegt — hier ein Beispiel.
13

Sprache
SPRACHE
DEUTSCH
Wasser Härte
WASSER
HAERTE 1
WASSER
HAERTE 2
WASSER
HAERTE 3
WASSER
HAERTE 4
Um die Displayanzeige auf die gewünschte Sprache zu ändern:
qTaste %am Display 3 mindestens 3 Sekunden gedrückt halten.
qTaste %drücken, bis Anzeige blinkt.
qMit <oder >gewünschte Sprache auswählen.
qTaste %zum Speichern der Einstellung drücken.
qTaste 6drücken. Zurück zur Bezugsbereitschaft.
i Es stehen folgende weitere Sprachen zur Verfügung:
|
LANGUAGE |
LANGUE |
|
|
ENGLISH |
FRANCAIS |
|
|
LINGUA |
IDIOMA |
|
|
ITALIANO |
ESPANOL |
|
|
TAAL |
SPRAK |
|
|
NEDERL. |
SVENSKA |
|
|
JASYK |
||
|
RUSSKIY |
||
qWasser’Härte mit mitgelieferten Teststreifen feststellen, z. B.:
= Härte 2
qTaste %am Display 3 mindestens 3 Sekunden gedrückt halten.
q Mit <oder >WASSER HAERTE auswählen.
qTaste %drücken, bis die Zahl in der Anzeige blinkt.
qMit <oder >festgestelle Härte auswählen.
qTaste %zum Speichern der Einstellung drücken.
qTaste 6drücken. Zurück zur Bezugsbereitschaft.
Hinweis: Die richtige Einstellung der Wasser’Härte ist wichtig für das Entkalkungsprogramm.
Bei externen Wasserenthärtern in der Hausanlage oder Verwendung von bereits gefiltertem Wasser die Wasser HAErte1 einstellen.
14

Filter
FILTER
JA/NEU
FILTER
NEIN/ALT
Temperatur
TEMP. normal
TEMP. hoch
TEMP.
MAXIMUM
Aktuelle Uhrzeit
UHRZEIT —:—
UHRZEIT 14:39
Als Sonderzubehör ist für den Wassertank 22 ein Filter 21 erhältlich (Best.’Nr. 46 1732). Die dem Filter 21 beiliegende Anweisung beachten!
iZuerst Filter 21 einsetzen, dann Geräteeinstellung verändern.
qTaste %am Display 3 mindestens 3 Sekunden gedrückt halten.
qMit <oder >Filter auswählen.
qTaste %drücken, bis Anzeige blinkt.
qMit <oder >Einstellung vornehmen.
qTaste %zum Speichern der Einstellung drücken.
qTaste 6drücken. Zurück zur Bezugsbereitschaft.
Hinweis: Verbrauchten Filter 21 sofort nach Systemmeldung FILTER WECHSELN auswechseln oder entfernen!
Wird kein neuer Filter eingesetzt, Einstellung auf FILTER nein / alt und Wasserhärte kontrollieren.
Hiermit kann die Kaffeetemperatur eingestellt werden.
qTaste %am Display 3 mindestens 3 Sekunden gedrückt halten.
qMit <oder >TEMP. auswählen.
qTaste %drücken, bis Anzeige blinkt.
qMit <oder >Einstellung vornehmen.
qTaste %zum Speichern der Einstellung drücken.
qTaste 6drücken. Zurück zur Bezugsbereitschaft.
Hiermit wird die aktuelle Uhrzeit eingespeichert. Dies ist für die Nutzung der Timer’Funktion erforderlich.
qTaste %am Display 3 mindestens 3 Sekunden gedrückt halten.
qMit <oder >UHRZEIT auswählen.
qTaste %drücken, Stundenanzeige blinkt.
qMit <oder >Einstellung vornehmen.
qTaste %drücken, Minutenanzeige blinkt.
qMit <oder >Einstellung vornehmen.
qTaste %zum Speichern der Einstellung drücken.
qTaste 6drücken. Zurück zur Bezugsbereitschaft.
Die eingestellte Uhrzeit geht verloren,
—wenn der Netzstecker gezogen wird,
—das Gerät mit dem Netzschalter 1 ausgeschaltet wird,
—bei Stromausfall.
Die aktuelle Uhrzeit muss neu eingegeben werden.
15
Timer
EIN UM —:—
EIN UM 07:45
Energiespar)Modus
AUS NACH 4 STD.
AUS NACH
2 Std.
Anzeige der Bezüge
BEZUEGE
— — — 86
Mit dieser Funktion kann die Zeit eingestellt werden, zu der das Gerät automatisch einschaltet.
qTaste %am Display 3 mindestens 3 Sekunden gedrückt halten.
q Mit <oder >EIN UM auswählen.
qTaste %drücken, Stundenanzeige blinkt.
qMit <oder >Einstellung vornehmen.
qTaste %drücken, Minutenanzeige blinkt.
qMit <oder >Einstellung vornehmen.
qTaste %zum Speichern der Einstellung drücken.
qTaste 6drücken. Zurück zur Bezugsbereitschaft. Einstellung deaktivieren:
qMit <oder >die Zeitangabe auf —:— stellen.
Hinweis: Für die Ausführung dieser Funktion muss die aktuelle Uhrzeit eingestellt sein.
iDie Einschaltzeit bleibt auch bei Stromausfall oder Betätigung des Netzschalters 1 erhalten.
Mit dieser Funktion kann eingestellt werden, nach wieviel Stunden das Gerät ab dem letzten Bezug automatisch in GStand by•’Betrieb schaltet.
qTaste %am Display 3 mindestens 3 Sekunden gedrückt halten.
qMit <oder >AUS NACH auswählen.
qTaste %drücken, Stundenanzeige blinkt.
qMit <oder >Einstellung vornehmen.
qTaste %zum Speichern der Einstellung drücken.
qTaste 6drücken. Zurück zur Bezugsbereitschaft.
iDie Ausschaltzeit bleibt auch bei Stromausfall oder Betätigung des Netzschalters 1 erhalten.
Hier wird die Anzahl der bereits bezogenen Espresso, Kaffee und Pulverkaffee angezeigt. Die Zählung erfolgt automatisch.
qTaste %am Display 3 mindestens 3 Sekunden gedrückt halten.
qMit <oder >BEZUEGE auswählen.
qTaste 6drücken. Zurück zur Bezugsbereitschaft.
i Es können keine Veränderungen vorgenommen werden!
16

Nur aus AStand by»)Betrieb möglich
|
RESET)Funktion |
q |
Gleichzeitig <und >mindestens 3 Sekunden |
|
gedrückt halten — alle eigenen Speicherungen werden |
||
|
gelöscht. |
||
System)Meldungen
Das Gerät zeigt Vorgänge und Meldungen im Display 3 an.
|
Bedeutung |
Abhilfe |
|||
|
Wasser fehlt. |
Frisches, kaltes Wasser in den |
|||
|
WASSER |
||||
|
FUELLEN |
Wassertank 22 einfüllen. |
|||
|
Hinweis: Eine kleine Restmenge Wasser bleibt immer im |
||||
|
Wassertank 22. |
||||
|
Wassertank 22 fehlt oder |
Wassertank 22 einsetzen |
|||
|
nicht richtig eingesetzt. |
||||
|
Kaffeebohnen fehlen. |
Kaffeebohnen in den Bohnen’ |
|||
|
BOHNEN |
||||
|
FUELLEN |
behälter 15 einfüllen. |
|||
|
Hinweis: Die Displayanzeige Bohnen fUEllen leuchtet |
||||
|
so lange, bis erneut Kaffee bezogen wird. |
||||
|
SYSTEM |
DRUECKE |
Wasserleitungssystem |
Bezugstaste 25 drücken. |
|
|
FUELLEN |
CAFE |
im Gerät ist leer. |
||
|
System durch Dampf’ |
System durch Bezug von Heiss’ |
|||
|
SYSTEM |
||||
|
ZU HEISS |
bezug aufgeheizt. |
wasser 0abkühlen lassen. |
||
|
Schale 24 und Schale |
Schale 24 und Schale für |
|||
|
SCHALEN |
||||
|
LEEREN |
für Kaffeesatz 23 sind |
Kaffeesatz 23 entnehmen, |
||
|
voll oder Kontakte 26 ver’ |
ausleeren und wieder einsetzen. |
|||
|
schmutzt. |
Kontakte 26 reinigen und |
|||
|
trocknen. |
||||
|
Schale 24 und Schale für |
Schale 24 und Schale für |
|||
|
SCHALEN |
||||
|
FEHLEN |
Kaffeesatz 23 fehlen. |
Kaffeesatz 23 einsetzen. |
||
|
Der Leuchtring der |
Reinigungsprogramm |
|||
|
GERAET |
||||
|
REINIGEN |
Reinigungstaste +8 |
durchführen — siehe Kapitel |
||
|
leuchtet rot auf. |
AReinigen». |
|||
|
Der Leuchtring der |
Entkalkungsprogramm |
|||
|
GERAET |
||||
|
VERKALKT |
Entkalkungstaste 49 |
durchführen — siehe Kapitel |
||
|
leuchtet rot auf. |
GEntkalken». |
|||
17

|
Bedeutung |
Abhilfe |
|||
|
Die Wirkung des Filters 21 |
Filter 21 wechseln (Best.’Nr. |
|||
|
FILTER |
||||
|
WECHSELN |
ist nach 400 Bezügen oder |
46 1732) oder den Betrieb |
||
|
nach ca. 2 Monaten er’ |
ohne Filter 21 fortsetzen. |
|||
|
schöpft. |
Einstellungen ändern. |
|||
|
Tür zur Brüheinheit 17 ist |
Tür zur Brüheinheit 17 |
|||
|
TUERE |
||||
|
ZU |
nicht geschlossen. |
schließen. |
||
|
Funktionswähler 2 auf zstellen |
||||
|
DREH AUF |
||||
|
KAFFEE |
||||
|
Hinweis: Während die Meldungen WASSER FUELLEN, |
||||
|
TUERE ZU, SCHALEN LEEREN oder SCHALEN |
||||
|
FEHLEN im Display aufleuchten, kann kein Kaffee bezogen |
||||
|
werden. |
||||
Reinigen
Tägliche Reinigung
d Stromschlag)Gefahr!
Vor der Reinigung Netzstecker ziehen.
Achtung
Keine Scheuermittel verwenden!
Das Gerät niemals in Wasser tauchen!
Keinen Dampfreiniger benutzen.
qDas Gerät außen mit einem feuchten Tuch abwischen.
qWassertank 22 ausspülen und mit frischem Wasser auffüllen.
qSchale 24 und Schale für Kaffeesatz 23 entnehmen und entleeren. Nur die Schale für Kaffeesatz 23 im Geschirrspüler reinigen!
qKontakte reinigen.
qInnenraum des Gerätes (Schalen) auswischen oder aussaugen.
Hinweis: Wenn das Gerät mit der Taste d 4 im kalten Zustand eingeschaltet oder nach Bezug von Kaffee in GStand by•’Betrieb versetzt wird, spült das Gerät automatisch. Das System reinigt sich somit selbst.
18

Reinigungsprogramm
GERAET
REINIGEN
GERAET
REINIGEN KAFFEE
SCHALEN
LEEREN
GERAET
REINIGT
TAB IN DECKEL SCHACHT ZU
DRUECKE
CAFE
GERAET
REINIGT
Leuchtet bei eingeschaltetem Gerät der Leuchtring der Reinigungstaste +8 rot auf und erscheint im Display 3 die Meldung GerAEt reinigen, ist das Gerät schnellstmöglich zu reinigen.
Zur Reinigung die beigelegte Reinigungstablette verwenden.
Reinigungstablette erst nach Aufforderung einwerfen.
Diese Tabletten sind speziell für dieses Gerät entwickelt und über den Kundendienst zu beziehen (Best.’Nr. 31 0655).
iWährend des Reinigungsprogramms blinkt der Leuchtring der Reinigungstaste +8.
Achtung
Das Reinigungsprogramm niemals unterbrechen! Flüssigkeiten nicht trinken! Keinesfalls Entkalkungstabletten oder andere Entkalkungsmittel einfüllen.
Während der Dauer des Reinigungsprogramms — ca. 15 Minuten — werden im Display 3 Vorgänge und Handlungsanweisungen angezeigt.
Reinigungsprogramm starten
qWassertank 22 ganz füllen.
qReinigungstaste +8 mindestens 3 Sekunden gedrückt halten.
qSchale 24 und Schale für Kaffeesatz 23 entleeren und wieder einsetzen.
Hinweis: Das Gerät reinigt automatisch. Nächste Displayanzeige abwarten (ca. 1 Minute).
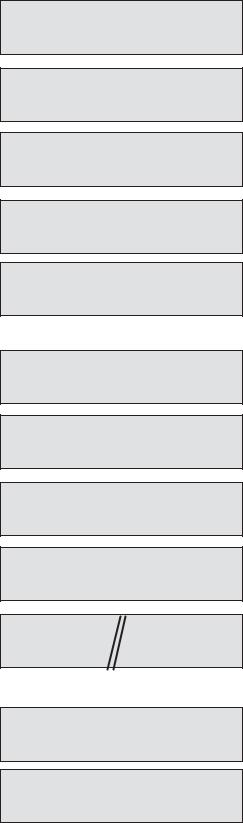
qRechten Gerätedeckel 18 und Deckel vom Schacht für Kaffeepulver 16 öffnen.
qEine Reinigungstablette in Schacht 16 einwerfen.
qDeckel vom Schacht für Kaffeepulver 16 und den rechten Gerätedeckel 18 schließen.
qBezugstaste 25 drücken.
Hinweis: Das Gerät reinigt automatisch. Nächste Displayanzeige abwarten (ca. 10 Minuten).
19
![]()
SCHALEN
LEEREN
KAFFEE
Düse reinigen
qSchale 24 und Schale für Kaffeesatz 23 entleeren und wieder einsetzen.
Der Reinigungsvorgang ist abgeschlossen. Der Leuchtring der Reinigungstaste +8 ist erloschen. Das Gerät ist wieder betriebsbereit.
Achtung
Die Düse 13 nach jedem Gebrauch reinigen.
qSchlauch 13/d in ein Gefäß mit warmem Wasser tauchen.
qPassendes Gefäß unter die Düse 13 stellen.
qAnsaugventil 13/b mit Drehgriff 13/a öffnen.
qFunktionswähler 2 auf =stellen.
d Verbrühungsgefahr!
Nach Einstellung auf =kann es etwas spritzen. Austretender Dampf ist sehr heiß.
Düse 13 nicht berühren oder auf Personen richten.
qFunktionswähler 2 auf zstellen.
qDüse 13 nach Abkühlen außen abwischen.
qDie Düse 13 zum gründlichen Reinigen zerlegen.
20

Entkalken
GERAET
VERKALKT
FILTER
NEIN/ALT
GERAET
VERKALKT KAFFEE
SCHALEN
LEEREN
ANTIKALK DREH AUF IN TANK WASSER
Leuchtet bei eingeschaltetem Gerät der Leuchtring der Entkalkungstaste 49 rot auf und erscheint im Display die Meldung Geraet VERKALKT, das Gerät unverzüglich entkalken. Wird das Gerät nicht nach Anweisung entkalkt, kann es beschädigt werden.
Achtung
Niemals mit Essig oder Mitteln auf Essigbasis entkalken! Keine Reinigungstabletten verwenden.
Das Entkalkungsprogramm niemals unterbrechen! Flüssigkeiten nicht trinken!
iEin Entkalkungsmittel ist im Lieferumfang enthalten, Speziell entwickelte und geeignete Mittel sind über den Kundendienst zu beziehen (Best.’Nr.: 31 0451).
iDer Leuchtring der Entkalkungstaste 49 blinkt während des Entkalkungsprogramms.
Achtung
Das Entkalkungsprogramm startet nur in der
Programmierung FILTER nein/alt.
Keinesfalls mit eingesetztem Filter entkalken.
Während der Dauer des Entkalkungsprogramms — ca. 35 Minuten — werden im Display 3 Vorgänge und Handlungsanweisungen angezeigt.
Die angegebenen Zeiten können abweichen.
Entkalkungsprogrammstarten
qEntkalkungstaste 49 mindestens 3 Sekunden gedrückt halten.
qSchale 24 und Schale für Kaffeesatz 23 entleeren und wieder einsetzen.
qWassertank 22 mit Wasser füllen und Entkalkungsmittel zugeben (gesamte Flüssigkeitsmenge 0,5 Liter)
oder
q0,5 Liter fertige Entkalkungsmischung zugeben.
qEntsprechend großes Auffanggefäß unter Düse 13 stellen.
qFunktionswähler 2 auf 0stellen.
21
GERAET
ENTKALKT
DREH AUF
KAFFEE
GERAET
ENTKALKT
SCHALEN
LEEREN
WASSER
FUELLEN
DREH AUF
WASSER
GERAET
ENTKALKT
DREH AUF
KAFFEE
GERAET
ENTKALKT
SCHALEN KONTAKTE LEEREN REINIGEN
GERAET
SPUELT
KAFFEE
Hinweis: Gerät entkalkt automatisch. Entkalkungslösung fließt in Intervallen in das Auffanggefäß. Nächste Anzeige im Display 3 abwarten (ca. 10 Minuten).
q Funktionswähler 2 auf zstellen.
Hinweis: Gerät entkalkt automatisch. Entkalkungslösung fließt in Intervallen in die Schale 24. Nächste Anzeige im Display 3 abwarten (ca. 10 Minuten).
qSchale 24 und Schale für Kaffeesatz 23 entleeren und wieder einsetzen.
qWassertank 22 ausspülen, mit frischem Wasser bis zur Markierung max füllen und wieder einsetzen.
qAuffanggefäß ausleeren und wieder unter die Düse 13 stellen.
qFunktionswähler 2 auf 0stellen.
Hinweis: Gerät spült automatisch. Wasser fließt in Intervallen in das Auffanggefäß. Nächste Anzeige im Display 3 abwarten (ca. 4 Minuten).
q Funktionswähler 2 auf zstellen.
Hinweis: Gerät spült automatisch. Wasser fließt in Intervallen in die Schale 24. Nächste Anzeige im Display 3 abwarten (ca. 4 Minuten).
qSchale 24 und Schale für Kaffeesatz 23 entleeren.
qKontakte 26 reinigen und trocknen.
qSchale 24 und Schale für Kaffeesatz 23 wieder einsetzen.
qSpritzer auf Düse 13 und Gerät abwischen.
Hinweis: Gerät spült automatisch.
Der Entkalkungsvorgang ist abgeschlossen. Der Leuchtring der Entkalkungstaste 49 ist erloschen. Das Gerät ist wieder betriebsbereit.
22

Heißwasser ablassen
SYSTEM
ZU HEISS
Das Entkalkungsprogramm benötigt eine bestimmte Wassertemperatur zum Start. Ist diese zu hoch, erst Heißwasser ablassen!
qGeeignetes Auffanggefäß unter die Düse 13 stellen.
qFunktionswähler 2 auf 0stellen. Wasser läuft in das Auffanggefäß.
qFunktionswähler 2 auf zstellen.
Die benötigte Temperatur ist erreicht. Mit dem Entkalkungsvorgang kann begonnen werden.
Kleine Störungen selbst beheben
|
Störung |
Ursache |
Abhilfe |
|
|
Displayanzeige BOHNEN |
Mahlwerk ist noch nicht |
Bezugstaste 25 |
|
|
FUELLEN trotz gefülltem |
automatisch gefüllt worden. |
nochmals drücken. |
|
|
Bohnenbehälter. |
|||
|
Kein Heißwasser’ oder |
Düse 13 ist verstopft. |
Düse 13 gründlich reinigen. |
|
|
Dampfbezug möglich. |
|||
|
Zu wenig Schaum oder zu |
Drehgriff 13/a an Ansaugventil |
Drehgriff 13/a fest in das |
|
|
flüssiger Schaum. |
13/b nicht fest. |
Ansaugventil 13/b eindrücken. |
|
|
Verstopftes Ansaugventil |
Ansaugventil 13/b reinigen. |
||
|
13/b. |
|||
|
Ungeeignete Milch. |
Kalte Milch mit 1,5 % |
||
|
Fettgehalt verwenden. |
|||
|
Kaffee läuft nur tropfenweise. |
Mahlgrad zu fein. |
Mahlgrad gröber einstellen. |
|
|
Pulverkaffee zu fein. |
Gröberes Kaffeepulver |
||
|
verwenden. |
|||
|
Kaffee hat keine GCrema• |
Ungeeignete Kaffeesorte. |
Kaffeesorte wechseln. |
|
|
(Schaumschicht). |
|||
|
Bohnen nicht mehr röstfrisch. |
Frische Bohnen verwenden. |
||
|
Mahlgrad nicht auf |
Mahlgrad optimieren. |
||
|
Kaffeebohnen abgestimmt. |
|||
|
Mahlwerk mahlt keine |
Bohnen fallen nicht ins |
Leicht an den Bohnenbehälter |
|
|
Kaffeebohnen. |
Mahlwerk (zu ölig). |
klopfen. |
|
|
Entkalkungsprogramm startet |
Aktuelle Programmierung ist |
Programmierung auf |
|
|
nicht. |
auf: FILTER JA/NEU oder |
FILTER NEIN/ALT |
|
|
Displayanzeige Filter |
stellen — Nie mit eingesetztem |
||
|
wechseln. |
Filter entkalken. |
||
|
System zu heiß. |
Heisswasser beziehen. |
||
|
Reinigungsprogramm startet |
System zu heiß. |
Heisswasser beziehen. |
|
|
nicht. |
|||
|
Displayanzeige Filter |
Filter auswechseln. |
||
|
wechseln. |
|||
23

|
Störung |
Ursache |
Abhilfe |
|
|
Lautes Geräusch des |
Fremdkörper im Mahlwerk |
Hotline kontaktieren. |
|
|
Mahlwerks. |
(z. B. Steinchen, die auch |
Hinweis: Pulverkaffee kann |
|
|
bei erlesenen Kaffeesorten |
|||
|
weiterhin zubereitet werden. |
|||
|
vorkommen). |
|||
|
Displayanzeige |
Gerät zu kalt. |
Erwärmung des Gerätes auf |
|
|
STÖRUNG |
1 |
Raumtemperatur abwarten. |
|
|
Displayanzeige |
Technische Störung. |
Mit dem Netzschalter 1 |
|
|
STÖRUNG |
5 |
das Gerät für mindestens |
|
|
oder |
10 Sekunden abschalten. |
||
|
STÖRUNG |
8 |
||
Können Störungen nicht behoben werden, unbedingt die Hotline anrufen! Telefon Nr. 0 18 05 54 74 36
Änderungen vorbehalten
24

Table of Contents
Important information . . . . . . . . . . . . . . . . . . . . . . . . . . . . . 27
Safety instructions . . . . . . . . . . . . . . . . . . . . . . . . . . . . . . . . . 27
Before using your appliance for the firstGtime . . . . . . . . . 28
Filling up the pipe system . . . . . . . . . . . . . . . . . . . . . . . . . . . . 28
Controls . . . . . . . . . . . . . . . . . . . . . . . . . . . . . . . . . . . . . . . . . 29 Preparation . . . . . . . . . . . . . . . . . . . . . . . . . . . . . . . . . . . . . . 32
General . . . . . . . . . . . . . . . . . . . . . . . . . . . . . . . . . . . . . . . . . . 32 Using espresso/ coffeeRbeans . . . . . . . . . . . . . . . . . . . . . . . . 32 Adjusting the grindingRunit . . . . . . . . . . . . . . . . . . . . . . . . . . . 32 Using ground espresso/coffee powder . . . . . . . . . . . . . . . . . 33 Preparing hot water . . . . . . . . . . . . . . . . . . . . . . . . . . . . . . . . 33 Steam for heating drinks . . . . . . . . . . . . . . . . . . . . . . . . . . . . 33 Preparing frothy milk . . . . . . . . . . . . . . . . . . . . . . . . . . . . . . . . 34
Changing settings / programming . . . . . . . . . . . . . . . . . . . 35
Programming . . . . . . . . . . . . . . . . . . . . . . . . . . . . . . . . . . . . . 35 Language . . . . . . . . . . . . . . . . . . . . . . . . . . . . . . . . . . . . . . . . 35 Water hardness . . . . . . . . . . . . . . . . . . . . . . . . . . . . . . . . . . . . 36 Filter . . . . . . . . . . . . . . . . . . . . . . . . . . . . . . . . . . . . . . . . . . . . . 36 Temperature . . . . . . . . . . . . . . . . . . . . . . . . . . . . . . . . . . . . . . 37 Current time . . . . . . . . . . . . . . . . . . . . . . . . . . . . . . . . . . . . . . 37 Timer . . . . . . . . . . . . . . . . . . . . . . . . . . . . . . . . . . . . . . . . . . . . 37 Energy saving mode . . . . . . . . . . . . . . . . . . . . . . . . . . . . . . . . 38 Displaying number ofRbrews . . . . . . . . . . . . . . . . . . . . . . . . . . 38 RESET function . . . . . . . . . . . . . . . . . . . . . . . . . . . . . . . . . . . . 38
System messages . . . . . . . . . . . . . . . . . . . . . . . . . . . . . . . . 38 Cleaning the appliance . . . . . . . . . . . . . . . . . . . . . . . . . . . . 40 Descaling the appliance . . . . . . . . . . . . . . . . . . . . . . . . . . . 43 Eliminating minor faults yourself . . . . . . . . . . . . . . . . . . . . 45 Guarantee . . . . . . . . . . . . . . . . . . . . . . . . . . . . . . . . . . . . . . . 46
Deutsch . . . . . . . . . . . . . . . . . . . . . . . . . . . . . . . . . . . . . . . . . 3
Français . . . . . . . . . . . . . . . . . . . . . . . . . . . . . . . . . . . . . . . . . 47
Italiano . . . . . . . . . . . . . . . . . . . . . . . . . . . . . . . . . . . . . . . . . . 71
Nederlands . . . . . . . . . . . . . . . . . . . . . . . . . . . . . . . . . . . . . . 94
Türkçe . . . . . . . . . . . . . . . . . . . . . . . . . . . . . . . . . . . . . . . 117
25

Controls
Appliance components
Information concerning disposal
1 Mains switch
2 Function selector (coffee, steam, hot water)
3 Display with 4 function buttons
4d button
52button
6Rotary knob for adjusting the filling quantity (— (/ 8— 8
7 Rotary knob for adjusting the coffee strength /— 7 8 +button
9 4descaling button
10Document holder
11Cord store
12Height’adjustable coffee outlet
13Hinged nozzle with frothing device (froth, steam, hot water) M dishwasher’proof
|
a |
Knob |
|
b |
Inlet valve |
|
c |
Connection bracket |
|
d |
Hose |
|
e |
T’piece |
|
f |
Sleeve |
14Rotary knob for degree of ground coffee
15Bean container with aroma cover
16Ground coffee duct with cover = cleaning tablet duct
17Door for brewing unit
18Right cover of the appliance
19Cup shelf (pre’warming function)
20Left cover of the appliance
21Filter (optional accessory)
22Detachable water tank
23Coffee dregs tray (dishwasher’proof)
24Tray (for residual water)
25Grille
26Contacts
Please ask your dealer or inquire at your local authority aboutRcurrent means of disposal.
26

Important information
Safety instructions
Carefully read the operating instructions and keep in the document holder 10!
This appliance is designed for domestic use and for processing normal quantities of food and not for industrial use.
d Risk of electric shock
Connect and operate the appliance only in accordance withRthe specifications on the rating plate.
Do not use the appliance if the power cord or appliance isRdamaged.
Use the appliance indoors at room temperature only.
Keep children away from the appliance.
If the appliance malfunctions, pull out the mains plug immediately.
Never immerse the appliance in water.
To prevent injury, repairs such as replacing a damaged cord, should be carried out by our customer service only.
Do not touch the grinder. d Risk of scalding!
Grip nozzle 13 by the plastic part only. Never direct nozzle 13 at people! When steam or hot water is released, nozzle 13 may spurt initially.
27

Before using your appliance for the firstGtime
General
Switching on the appliance
COFFEE
Filling up the pipe system
|
FILL UP |
PRESS |
|
PIPE-SYS |
CAFE |
|
PIPE-SYS |
|
|
FILLS UP |
|
Selecting the language
Sprache deutsch
Fill the respective containers with pure water and coffee beans only.
Do not use coffee beans which have been glazed, caramelised or treated with other additives containing sugar.
Ascertain the water hardness with the enclosed test strip. If a hardness value other than 3 is indicated, switch on the appliance and program accordingly (see page 36).
qPull the power cord out of the cord store and connect.
qFill water tank 22 with cold fresh water. Do not fill above •max.» mark.
qFill the bean container 15 with coffee beans.
qSet mains switch 1 to I.
qSet function selector 2 to z.
qPress button d 4.
iThe appliance is ready for use when the illuminated ringsRon button d 4 and on the 2button 5 are litRgreen.
Note: If the appliance is being used for the first time or has not been operated for a prolonged period, the first cup of coffee will not have the full aroma and should not be drunk.
For production reasons when switched on for the first time, the water pipe system in the appliance may occasionally have to be refilled:
q Press the 2button 5.
To change the display to the desired language:
qHold down button %on the display 3 for at least 3 seconds.
qPress button %until the display flashes.
qSelect the desired language with <or >.
qPress button %to save the language.
qPress the &button.
28
Controls
COFFEE
WATER
ON
|
UNIT IS |
MIND THE |
|
HEATING |
STEAM |
|
STEAM |
|
|
ON |
|
Mains switch 1
The mains switch 1 on the rear of the appliance switches theRpower supply on or off.
When the mains switch has been switched on, the illuminated ring on button d 4 is lit green. The appliance is in standby mode.
Warning
Do not press the mains switch while the appliance is5operating.
Do not switch off the appliance until it is in standby mode.
Function selector 2
Coffee, hot water or steam can be selected by rotating function selector 2.
d Risk of scalding!
When the function selector is set to 0, the nozzle may spurt slightly. Escaping steam is very hot.
The settings are displayed:
Coffee on z
Hot water on 0
Steam on =
Displays during the brief heating up period for Steam on.
29
![]()
UNIT IS HEATING
UNIT IS RINSING
Display 3
Display 3 indicates the settings, the processes which are running and any messages issued by the appliance.
The appliance has been programmed ex works with standard settings for optimum operation. These settings can be changed M see chapter •Changing settings / programming».
Button d 4
The appliance is switched on or set to standby mode with button d 4.
When button d 4 is pressed, the appliance heats up and is then rinsed. The illuminated ring on button d 4 flashes during this process.
The appliance is not rinsed if:
—the appliance was still warm when switched on or
—no coffee was brewed before the appliance was switched to «Standby» mode.
Heating and washing processes are displayed.
While coffee is being brewing, button d 4 is assigned a stop function. The process is terminated by pressing button d 4.
i4 hours after the last coffee was brewed, a rinsing process is automatically actuated and the appliance switches to •standby» mode. These settings can be changed M see chapter •Changing settings / programming».
cafe button 5
Espresso or coffee can be brewed by pressing the 2button 5. The green illuminated ring flashes whileRespresso or coffee is being brewed.
If the 2button 5 is pressed again, the coffee brewing process is terminated.
30

ESPRESSO
2 ESPRESSO
NORMAL PLUS
Rotary knob for adjusting the filling quantity 6
(— (/ 8— 8
The amount of liquid is adjusted with rotary knob (— (/ 8— 86.
One of 6 settings can be selected by rotating the knob in an anti’clockwise direction:
SMALL ESPRESSO ESPRESSO
SMALL COFFEE COFFEE
LARGE COFFEE XXL COFFEE
One of 6 settings can be selected for 2 cups by rotating the knob in a clockwise direction:
2 SMALL ESPRESSO
2ESPRESSO
2SMALL COFFEES
2COFFEES
2LARGE COFFEES
2XXL COFFEES
Outlet 12 has two nozzles for filling 2 cups.
Rotary knob 7 /— 7for adjusting the coffee strength.
The amount of ground coffee is selected with rotary knob /— 77.
VERY MILD
MILD
NORMAL
NORMAL PLUS
STRONG
VERY STRONG
The selected coffee strength is displayed:
+button 8
4descaling button 9
If the appliance requires cleaning or descaling, the illuminated ring lights up on the +button 8 or the 4descaling button 9 M see chapter •Cleaning the appliance» or •Descaling the appliance».
31

Preparation
General
Using espresso/ coffeeGbeans
Adjusting the grindingGunit
This fully automatic espresso/coffee machine grinds fresh coffee for each brewing process.
Preferably use a mixture of espresso and coffee beans. StoreRor deep’freeze in cool, air’tight and sealed containers. Deep’frozen coffee beans can also be ground.
Tip: Prewarm cup(s), especially small, thick’walled espresso cups, on the cup shelf 19 or fill with hot water and rinse out.
Set function selector 2 to z.
qSelect the desired amount of coffee and number of cups with rotary knob (— (/ 8— 86.
qSelect the preferred coffee strength with rotary knob /— 77.
qPlace the cup(s) under the outlet 12. If required, adjustRthe height of the outlet 12.
qPress the 2button 5. The brewing process nowRruns automatically.
Tip: If brewing coffee simultaneously for 2 cups, selectRSTRONG or VERY STRONG.
iThe brewing process can be terminated by pressing theR2button 5 or button d 4 again.
Note: If ADD BEANS is displayed despite a full bean container, the grinder must still be filled automatically.
qPress the 2button 5 again.
qThe desired degree of ground coffee can be selected withRthe Rotary knob for degree of ground coffee 14.
Warning
Adjust the degree of grinding only while the grinding unit is5running! Otherwise the appliance may be damaged.
qOpen the right cover of the appliance 18.
qPress the 2button 5.
qWhile the grinding unit is running, turn the knob to select the degree of grinding:
the smaller the dots the finer the ground coffee.
iThe new setting will not become apparent until the second or third cup of coffee.
32

Using ground espresso/coffee powder
Preparing hot water
Steam for heating drinks
qSelect the desired amount with the rotary knob (— (/8— 86.
qPlace cup(s) under the outlet 12. If required, adjust the height of the outlet 12.
qOpen the right cover of the appliance 18 and the cover onRthe ground coffee duct 16.
qAdd one to two level scoops of medium’fine ground coffee to the ground coffee duct 16.
Warning!
Do not add whole beans or instant coffee!
Add a maximum two scoops of coffee.
qClose the cover on the ground coffee duct 16 and the right cover of the appliance 18.
qPress the 2button 5.
i Repeat the process for another cup of preground coffee.
Note: If coffee is not brewed within 90 seconds, the brewing chamber is emptied automatically in order to prevent overfilling. The appliance is rinsed.
qClose inlet valve 13/b with rotary knob 13/a.
qPlace an appropriate cup under the nozzle 13.
qRotate function selector 2 to 0and fill the cup. d Risk of scalding!
When the function selector is set to 0, the nozzle may spurt slightly.
Escaping steam is very hot.
Do not touch nozzle 13 or direct at people.
qEnd the process by rotating the function selector 2 backRto z.
qClose inlet valve 13/b with rotary knob 13/a.
qImmerse nozzle 13 deep into the liquid which isRtoRbeRheated.
qSlowly rotate function selector 2 to =.
The appliance now heats up for approx. seconds. ThenRthe liquid is heated.
d Risk of scalding!
When the function selector is set to =, the nozzle may spurt slightly.
Escaping steam is very hot.
Do not touch nozzle 13 or direct at people.
qEnd the process by rotating the function selector 2 backRto z.
Note: When nozzle 13 has cooled down, clean immediately. Dried residue is difficult to remove.
33

q Open inlet valve 13/b with rotary knob 13/a.
|
Preparing frothy milk |
q |
Immerse hose 13/d into a receptacle containing milk. |
q Place an appropriate cup under the nozzle 13. q Slowly rotate function selector 2 to =.
The appliance now heats up for approx. 20 seconds, then draws in the milk and froths it.
d Risk of scalding!
When the function selector is set to =, the nozzle may spurt slightly. Escaping steam is very hot.
Do not touch nozzle 13 or direct at people.
q Before the receptacle has been completely drained ofRmilk: End the process by rotating the function selector 2 backRto z.
q Take the hose 13/d out of the receptacle.
Note: When nozzle 13 and hose 13/d have cooled down, rinse immediately with clear water and clean M see •Cleaning the appliance / Cleaning the nozzle».
Dried residue is very difficult to remove and impairs formation of the frothy milk.
Tip: Preferably use semi’skimmed milk.
Milk drinks, such as cocoa, can be prepared in the same wayRas frothy milk. The frothy milk can be optimised by rotating the knob 13/a slightly.
34

Changing settings / programming
Programming
Sprache deutsch
Language
Sprache deutsch
The appliance has been set ex works so that coffee can be brewed without any additional programming.
These basic settings can be changed with the function buttons under display 3.
<Selection button
%Access to programming mode / Save settings
&Terminate programming
>Selection button
Warning
Do not switch off the appliance during programming. Otherwise changes will not be accepted.
The appliance must be switched on before the standard settings can be changed.
The following settings can be changed:
—Language
—Water hardness
—Filter
—Temperature
—Current time
—Timer function
—Energy saving mode
Factory settings have a grey background in this chapter M see example opposite.
To change the display to the desired language:
qHold down button %on display 3 for at least 3 seconds.
qPress button %until the display flashes.
qSelect the desired language with <or >.
qPress button %to save the setting.
qPress the &button. Back to standby.
35

Water hardness
HARDNESS
WATER 1
HARDNESS
WATER 2
HARDNESS
WATER 3
HARDNESS
WATER 4
Filter
FILTER
YES/NEW
FILTER
NO/OLD
i The following other languages are available:
|
LANGUAGE |
LANGUE |
|
|
ENGLISH |
FRANCAIS |
|
|
LINGUA |
IDIOMA |
|
|
ITALIANO |
ESPANOL |
|
|
TAAL |
SPRAK |
|
|
NEDERL. |
SVENSKA |
|
|
JASYK |
||
|
RUSSKIY |
||
qAscertain the water hardness with the supplied test strip, e.g.:  = hardness 2
qHold down button %on display 3 for at least 3 seconds.
q Select HARDNESS WATER with <or>.
qPress button %until the number in the display flashes.
qSelect the ascertained hardness with <or >.
qPress button %to save the setting.
qPress the &button. Back to standby.
Note: It is important for the descaling programme that the water hardness is set correctly.
If external water softeners are used in the domestic water system or if filtered water is used, select HARDNESS WATER 1.
A filter 21 (order no. 46 1732) is available as an optional accessory for the water tank 22. Follow the instructions enclosed with the filter 21.
i First insert filter 21, then change the appliance setting.
qHold down button %on display 3 for at least 3 seconds.
qSelect FILTER with<or >.
qPress button %until the display flashes.
qChange the setting with <or >.
qPress button %to save the setting.
qPress the &button. Back to standby.
Note: Change or remove used filter 21 as soon as system message FILTER CHANGE is displayed! If a new filter is not inserted, check that the appliance has been set to FILTER n0/old and check the water hardness.
36

Temperature
TEMP. normal
TEMP. high
TEMP.
MAXIMUM
Current time
TIME —:—
TIME 14:39
Timer
ON AT —:—
ON AT 07:45
The coffee temperature can be set with this function.
qHold down button %on display 3 for at least 3 seconds.
qSelect TEMP. with <or >.
qPress button %until the display flashes.
qChange the setting with <or >.
qPress button %to save the setting.
qPress the &button. Back to standby.
The current time is programmed with this function. This is required when using the timer function.
qHold down button %on display 3 for at least 3 seconds.
qSelect TIME with <or >.
qPress button %— hours display flashes.
qChange the setting with <or>.
qPress button %— minutes display flashes.
qChange the setting with <or >.
qPress button %to save the setting.
qPress the &button. Back to standby.
The set time will be deleted
—if the mains plug is pulled out,
—if the appliance is switched off with the mains switch 1,
—if there is a power failure.
The current time must be input again.
This function is used to set the time at which the appliance automatically switches on.
q Hold down button %on display 3 for at least 3 seconds. q Select ON AT with <or>.
qPress button %, hours display flashes.
qChange the setting with <or >.
qPress button %, minutes display flashes.
qChange the setting with <or >.
qPress button %to save the setting.
qPress the &button. Back to standby. De’activating the setting:
qSet the time to —:— with <or>.
Note: The current time must be set for this function to run.
iThe switch’on time is retained even if there is a power failure or the mains switch 1 is actuated.
37

Energy saving mode
OFF IN 4 HOURS
OFF IN 2 HOURS
Displaying number ofGbrews
NO.BREWS
— — — 86
RESET function
This function is used to specify after how many hours following the last brew the appliance automatically switches to standby mode.
q Hold down button %on display 3 for at least 3 seconds. q Select OFF IN with <or>.
qPress button %, hours display flashes.
qChange the setting with <or >.
qPress button %to save the setting.
qPress the &button. Back to standby.
iThe switch’off time is retained even if there is a power failure or the mains switch 1 is actuated.
The number of brewed espressos, coffees and preground coffees is displayed here. The number of brews are counted automatically.
qHold down button %on display 3 for at least 3 seconds.
qSelect NO.BREWS with<or>.
qPress the &button. Back to standby.
i This number cannot be changed!
Possible from •standby» mode only
qSimultaneously hold down <and >for at least 3 seconds M all saved settings are deleted.
System messages
The appliance indicates processes and messages on displayR3.
|
Meaning |
Remedial action |
||
|
No water. |
Pour fresh, cold water into the |
||
|
ADD |
|||
|
WATER |
water tank 22. |
||
|
Note: There is always a small amount of water left in the water |
|||
|
tank 22. |
|||
|
Water tank 22 is missing |
Insert water tank 22. |
||
|
orRnot inserted correctly. |
|||
|
No coffee beans. |
Add coffee beans to the bean |
||
|
ADD |
|||
|
BEANS |
container 15. |
||
|
Note: The ADD BEANS display is lit until coffee is brewed |
|||
|
again. |
|||
38

|
Meaning |
Remedial action |
|||
|
Water pipe system in the |
Press 2button 5. |
|||
|
FILL UP |
PRESS |
|||
|
PIPE-SYS |
CAFE |
appliance is empty. |
||
|
System heated up by |
Allow system to cool down by |
|||
|
SYSTEM |
||||
|
TOO HOT |
Steam on. |
letting out some hot water 0. |
||
|
Tray 24 and coffee dregs |
Remove, empty, and re’insert |
|||
|
EMPTY |
||||
|
TRAYS |
tray 23 are full, or contacts |
tray 24 and coffee dregs tray 23. |
||
|
26 soiled. |
Clean and dry contacts 26. |
|||
|
Tray 24 and coffee dregs |
Insert tray 24 and coffee dregs |
|||
|
TRAYS |
||||
|
MISSING |
tray 23 are missing. |
tray 23. |
||
|
The illuminated ring on the |
Run cleaning programme M |
|||
|
CLEAN |
||||
|
UNIT |
+button 8 is lit red. |
see chapter •Cleaning the |
||
|
appliance». |
||||
|
The illuminated ring on the |
Run descaling programme M |
|||
|
UNIT |
||||
|
CALCIF. |
4descaling button 9 |
see chapter •Descaling the |
||
|
is lit red. |
appliance». |
|||
|
The filter 21 is no longer |
Change filter 21 (order no. |
|||
|
FILTER |
||||
|
CHANGE |
effective after 400 brews |
46 1732) or continue operating |
||
|
or approx. 2 months. |
the appliance without filter 21. |
|||
|
Change settings. |
||||
|
Door of brewing unit 17 is |
Close door of brewing unit 17. |
|||
|
CLOSE |
||||
|
THE DOOR |
not closed. |
|||
|
Set function selector 2 to z. |
||||
|
TURN ON |
||||
|
COFFEE |
||||
|
Note: While the messages ADD WATER, CLOSE THE |
||||
|
DOOR, EMPTY TRAYS or TRAYS MISSING are |
||||
|
displayed, coffee cannot be brewed. |
||||
39
![]()
Cleaning the appliance
Daily cleaning
Cleaning programme
CLEAN
UNIT
d Risk of electric shock!
Pull out the mains plug before cleaning the appliance.
Warning
Do not use scouring agents!
Never immerse the appliance in water!
Do not use a steam cleaner.
qWipe the outside of the appliance with a damp cloth.
qRinse out the water tank 22 and fill with fresh water.
qRemove and empty tray 24 and coffee dregs tray 23. Only the coffee dregs tray 23 may be cleaned in the dishwasher!
qClean contacts.
qWipe out or vacuum the interior of the appliance (trays).
Note: If the appliance is switched on in a cold state with button d 4 or is set to standby after brewing coffee, the appliance is automatically rinsed. The system therefore cleans itself.
If the illuminated ring on the +button 8 is lit red and theRmessage CLEAN UNIT is indicated on display 3 when the appliance is switched on, the appliance must be cleaned as quickly as possible.
Clean the appliance with the enclosed cleaning tablet.
Do not drop in the cleaning tablet until you are prompted to do so.
These tablets have been specially developed for this appliance and are available from customer service (order no. 31 0655).
|
i While the cleaning programme is running, the illuminated |
|||
|
ring on the +button 8 flashes. |
|||
|
Warning |
|||
|
Never interrupt the cleaning programme! Do not drink liquid! |
|||
|
Never use descaling tablets or other descaling agents. |
|||
|
While the cleaning programme is running — |
|||
|
CLEAN |
|||
|
UNIT |
COFFEE |
approx. 15 minutes — processes and instructions are |
|
|
indicated on display 3. |
|||
40

EMPTY
TRAYS
UNIT IS
CLEANING
|
PILL |
IN CLOSE |
|
DUCT |
THE LID |
|
PRESS |
|
|
CAFE |
|
|
UNIT |
IS |
CLEANING
EMPTY
TRAYS
COFFEE
Start cleaning programme
qCompletely fill water tank 22.
qHold down+button 8 for at least 3 seconds.
qEmpty and re’insert tray 24 and coffee dregs tray 23.
Note: The appliance is automatically cleaned. Wait for the next display (approx. 1 minute).
qOpen the right cover of the appliance 18 and duct cover for ground coffee 16.
qDrop a cleaning tablet in the duct 16.
qClose the cover on the ground coffee duct 16 and the right cover of the appliance 18.
qPress the 2button 5.
Note: The appliance is automatically cleaned. Wait for the next display (approx. 10 minutes).
q Empty and re’insert tray 24 and coffee dregs tray 23.
The cleaning process is complete. The illuminated ring on +button 8 goes out. The appliance is ready for use again.
41

Warning
|
Cleaning the nozzle |
Clean the nozzle 13 after each use. |
|
q Immerse the hose 13/d into a receptacle of warm water. |
|
|
q Place an appropriate receptacle under the nozzle 13. |
|
|
q Open the inlet valve 13/b with rotary knob 13/a. |
|
|
q Briefly set function selector 2 to =. |
|
|
d Risk of scalding! |
|
|
When the function selector is set to =, the nozzle may |
|
|
spurt slightly. |
|
|
Escaping steam is very hot. |
|
|
Do not touch nozzle 13 or direct at people. |
|
|
q Set function selector 2 to z. |
|
|
q Wipe the outside of the nozzle 13 after it has cooled |
|
|
down. |
|
|
q Dismantle the nozzle 13 to clean thoroughly. |
|
42
 Loading…
-
Siemens S40 — page 1
ss S 40 S 40 Siemens Information And Communication Mobile, LLC 167 45 W est Bernardo Drive San Diego , CA 921 27 http://www .icm.siemens.com © Siemens AG 200 0 All rights reserved. Subject to availability . Rights of modification reserved. Siemens Aktiengesellsc haft http://www .m y -siemens.com Ref . No.: A31 008-H640 0-A19-1 -4A19 Printed in Ger …
-
Siemens S40 — page 2
Setup menu Network services Call divert Call barring Call waiting Call back Calling name presentation Call deflection Closed user group Network selection Selection mode Pref erred list Country list Network types T ones setup Ringing tone Message tone Broadcast tone Y our own ring tone Key tone Silent mode T rembler F actory settings Phone setup Lan …
-
Siemens S40 — page 3
Content s Important safety Instruc t ion s 4 TIA Safety languag e 5 CTIA Driving safety tips 8 Information on SAR 10 Getting start ed 11 Bat tery and charging 1 2 SIM card 1 4 Calling 1 5 Redialing a number 1 6 Silent mode 1 6 Ke ypad lock 16 Address and phone books 17 T ext input 1 8 Storing entries 20 Finding an entry 22 Reset phone memory 24 Lis …
-
Siemens S40 — page 4
Important safety instructions 4 Please observe the f ollowing guide- lines. Br eaking these rules ma y be dangerous or illegal: Mobile phones must be switc hed of f at all times on board an aircraf t. Do not activate near gas sta- tions, fuel depots, chemical plants or blasting oper a- tions. A void use in hospitals; med- ical electronics, e.g . pa …
-
Siemens S40 — page 5
7 when in a “blasting area” or in areas posted: “T urn of f two-w ay radio. ” Obey all signs and instruc- tions. P otentially explosive atmospheres T urn your phone OFF when in any area with a potentially explosiv e atmosphere and obey all signs and instructions. Sparks in suc h areas could cause an explosion or fire resulting in bodily inj …
-
Siemens S40 — page 6
9 Use your wireless phone to help others in emergencies. If you see an auto accident, crime in progress or other serious emer- gencies where lives ar e in danger , call 9-1 -1 or other local emergency number , as you w ould w ant others to do f or y ou. Call roadside assistance or a special non-emergenc y wireless assistance number when neces- sary …
-
Siemens S40 — page 7
10 Getting st arted Learn how to get y our phone ready for action, and how to make and recei ve calls. 11 THIS MODEL PHONE MEETS THE GO VERNMENT’S REQUIREMENTS FOR EXPOSURE T O RADIO W A VES. Y our wir eless phone is a radio trans- mitter and receiver . It is designed and manufact ured not to e xceed the emis- sion limits f or e xposure to radiof …
-
Siemens S40 — page 8
Charge battery Insert the charger plug at the bot tom of the telephone, and it will start charging immedi- ately . F ully charging the bat tery takes up to 1 20 minutes. Rem ove cha rger Press 1 and pull out the c harger plug. Facts & T ips • F ull perf ormance from a ne w bat- tery is only obtained af ter tw o or three complete char ge/disch …
-
Siemens S40 — page 9
Insert SIM card Bef ore you can make a call with your mobile phone, y ou need to insert the SIM card. Switc h of f your phone. Remo ve the bat tery lid and the bat tery . Open the SIM card holder by sliding the catch to war ds your- self and lif ting the holder . Insert the SIM card in the holder with its cut-of f corner pointing up and lef t. Clos …
-
Siemens S40 — page 10
16 Getting start ed Redialing a number Press f or one second, and the latest dialed number will be redialed automatically . If you wish to use this f eature, activate the speed dial function first. See p. 64. Silent mode Y ou can disable all selected tones: Press (»MENU«) Press The s ymbol will be seen in the display . Just press these tw o ke ys …
-
Siemens S40 — page 11
19 P r e ss 3 ti m e s i f y ou w an t t o enter a capital let ter . T o activate the caps lock function, press 4 times. P ress it once again to deac- tivate the function. grid mode Press the r elev ant ke y f or the intended let ter , e.g. B . No w a table is shown in the displa y . P ress the ke y corresponding to the intended let ter (B = 2). Wh …
-
Siemens S40 — page 12
Phone books 20 Address and phone books 21 Y our telephone contains a com- plete address book similar to the address book on a PC. Just f ollow the instructions belo w to store an entry . See on p. 18 ho w to use the ke ypad on your phone. Storing information in your address book Enter the phone number and press . Select » Addr ess book« by pressi …
-
Siemens S40 — page 13
Facts & T ips Both address and phone books • Calling Line Identification (CLI) is a network f eatur e which displa ys the caller’ s phone number in your phone’s display . If the caller is one of the entries stored in your phone book, his/her name will appear in your dis- play . • When storing a phone number start entering it with a ? …
-
Siemens S40 — page 14
24 List menu See how to get information about your calls and messages and how to edit your address and phone books. 25 Reset phone memory Because y our phone can s ync hro- nize with dif ferent platf orms, out- side factor s might spoil the phone’ s functioning. If this happens, y ou can reset the phone memory . Proceed in the f ollowing wa y: Sw …
-
Siemens S40 — page 15
Calendar • V iew y our events • New event • V iew w eek planner • Go to other date • Delete e vents automatically • Delete e vents automatically af ter a certain period • Delete all e vents at once Missed events • V iew the e vents y ou hav e missed IrD A operation • Receiving • S ynchr onization and data • Send business card …
-
Siemens S40 — page 16
Enter the List menu by pressing Select »Phone books« Select » Addr ess book« or one of the phone books Add entry Select » Add entry« if y ou w ant to add a new entry (See pp. 20-21). View entries This pro vides a variety of options, such as calling, editing or moving the entries. These options are described in greater detail in the f ollowing …
-
Siemens S40 — page 17
31 30 List menu Address and phone book editing List menu First Enter the List menu by pressing Select »Phone books« Select » Addr ess book« or one of the phone books View entries (continued) • Mov e: Entries can be mov ed from your address book to one of your phone books. Only the name and the relev ant phone number will be mov ed. Y ou hav e …
-
Siemens S40 — page 18
33 Stat us 32 Address and phone book editing List menu List menu First First Enter the List menu by pressing Select »Phone books« and then »Groups« Groups (continued) • Ringing tone: Y ou can c hange the ringing tone used f or the group. • Add to group: If the selected entry is not already assigned to a group, » Add to group« will be disp …
-
Siemens S40 — page 19
Enter the List menu by pressing Select »Calculator« In this mode, your telephone acts as a normal calculator . The eq uals sign (=) is f ound on the right-hand function ke y . Enter the first number you want to use in your calculation and hold down the rele vant k ey f or one sec- ond to access the desired arith- metic operation. Key Oper ation 1 …
-
Siemens S40 — page 20
37 List menu 36 List menu Calendar First Enter the List menu by pressing Select »Calendar« Calendar Use your phone to remind you of dif f erent e vents suc h as meetings, phone calls to be made, birthday s, etc. T o ensure the proper function- ing of the calendar it is an absolute condition that you set the act ual date and time in the Calendar S …
-
Siemens S40 — page 21
39 IrD A operation Missed events 38 List menu List menu First First Enter the List menu by pressing Select »IrD A operation« IrD A operation The built-in IrD A modem allows wireless communication to take place between your phone and computer , pro vided your computer is equipped with an IrD A interface as well, and provided y ou hav e installed t …
-
Siemens S40 — page 22
41 Exit the browser Press »QUI T « when the Home deck is displa yed, or hold down »BA CK« f or more than 2 seconds. Y ou can also exit the br owser by holding down the side v olume-up ke y on the right-hand side of the phone. Some cards give access to an option menu where you can find more functions. Press »OPTION« to enter the menu. Using th …
-
Siemens S40 — page 23
43 Messages List menu 42 List menu W AP browser First Enter the List menu by pressing Select »Messages« Messages Y our phone can receive and send messages via the network. Mes- sages are stored on y our SIM car d. Composing or r etrieving mes- sages can be extremely danger ous if done while driving, operating machinery or engaged in any other tas …
-
Siemens S40 — page 24
Enter the List menu by pressing Select »Messages« Outbox If you ha ve entered an SMS message, but do not w ant to send it right aw ay , you can store it in the Outbox b y selecting »Sav e message« . Sent items The messages y ou send are automatically stored under »Sent items« fr om where they can alw ay s be retrie ved again. Drafts If you do …
-
Siemens S40 — page 25
T9®text input feature This is a f eature enabling you to more easily use SMS messaging. Unlike the con ventional w ay of en- tering/editing texts where y ou hav e to press one ke y up to sev eral times to enter the desir ed let ter , the T9 f eature allows y ou to com- pose text messages with only one ke ypress per letter . T9 T ext Input compar e …
-
Siemens S40 — page 26
49 49 S etup menu Find out how to set your phone according to your own personal wishes and needs. 49 48 Messages List menu First Enter the List menu by pressing Select »Messages« Favourites Instead of entering you r own message y ou can make use of the «F avourites» whic h are standard messages already stored in y our phone. Y ou only n …
-
Siemens S40 — page 27
Enter the Set up menu: Press »MENU« Scroll through the options: and Select an option: Press »SELECT « or »OK« Go back one le vel: Press »EXI T « Go back to standb y: Hold down »EXI T « Here is a brief ov erview of the options that may be a vailable when you enter the Setup menu. The options are described in detail on the follo wing pages. …
-
Siemens S40 — page 28
53 Number Enter the phone number you w ant to divert to or select a number in your phone book using . On some networks you can pr ess , and your calls will be diverted to your voice mail (see p. 48). Deactivation/activation On some networks you ha ve the possibility of activating and deacti- vating y our call div ert. This means that when you ha ve …
-
Siemens S40 — page 29
55 Call back Some networks of fer the possibility of automatically establishing a con- nection to a busy subscriber when the number is no longer engaged. The phone will inf orm you that the subscriber is bus y and ask you whether y ou want to call bac k. Select »Status« to see ho w many phone numbers are still w aiting to be called back. Select ? …
-
Siemens S40 — page 30
57 Facts & T ips • If you w ant to add a network that is not shown on the list of networks, select »Specify« and enter the coun- try code and network number of the network. • The country list can contain 1 5 dif- f erent countries. The country of your home network will alwa ys be the fir st one on the list and cannot be deleted. • Selec …
-
Siemens S40 — page 31
Enter the Set up menu by pressing »MENU« Select » T ones setup« The T ones menu of f ers y ou dif f er — ent options in relation to the f ollow- ing tones: Ringing tone Message tone Broadcast tone Vo l u m e Select whether y ou want the volume to be high, medium, low or of f . The ringing tone can also be set to »Escalating« . Pa t t er n Y o …
-
Siemens S40 — page 32
Enter the Set up menu by pressing »MENU« Select » T ones setup« Create melody (Continued) • Play back speed: Choose between 5 dif ferent standard pla y back speeds. The speed selected here will be the one whic h is used if you press »8« when composing or editing a melod y . • T ones sound: Select whether you want to hear the tones or not …
-
Siemens S40 — page 33
63 S Owner ID Y ou can store an o wner ID in your phone to be shown when y ou switc h on the phone. Select »Define« to enter the necessary inf ormation, whic h corr esponds to an address book entry . Y ou can also select an entry from your address book or one of y our phone books to be stored as your owner ID . Select »Show at po wer up« to act …
-
Siemens S40 — page 34
65 Auto redial If you ha ve activ ated A uto redial and the phone number y ou are call- ing is busy or your call is not answer ed, the phone mak es up to 1 0 automatic redial attempts. A special redialing success tone is heard when the at tempt is suc- cessful. T o cancel the auto redial at tempts, just press the lef t-hand function ke y . This f e …
-
Siemens S40 — page 35
Enter the Set up menu by pressing »MENU« Select »Message setup« Send SMS setup T o be able to send and receive SMS messages you must store the name and number of the service centre of your network operator . Howeve r , m any n et wor k o per ato rs will already ha ve stored this inf or- mation and some other necessary parameters f or you on y o …
-
Siemens S40 — page 36
69 Browser Menu The connection to the WAP gate- wa y is established as a data call via an access point. Y ou must enter the dial number of this access point in the »Profile set up« belo w . Communication between the access point and the gatew ay takes place automatically when you hav e entered the IP address of the gatew ay as mentioned belo w . …
-
Siemens S40 — page 37
Enter the Set up menu by pressing »MENU« Select »Calendar set up« Calendar Y ou can select to hav e the time and date shown in the standby dis- play b y entering this menu. Y ou hav e the f ollowing options: Tim e Select »Set time« to set and/or edit the cur rent time. Enter the current hour or use the ar ro w ke ys to edit the displa yed hou …
-
Siemens S40 — page 38
Encryption indicat ion Get a warning in the displa y and a sound alarm, if y ou connect to a network whic h does not support encryption. Fixed dialling Select whether y ou want the fix ed dialing function to be on or of f (only av ailable if you ha ve defined and stored numbers in the fix ed dialing phone book (p. 21). If you ha ve selected »F ixe …
-
Siemens S40 — page 39
Conversation menu See everything about the possibilities that you have during a conversation. 75 S ecurity 74 Setup menu Enter the Set up menu by pressing »MENU« Select »Security« Keypad lock T o avoid making calls accidentally , you can loc k the ke ypad. In this submenu you ha ve the f ollowing options: Activ ate Activ ates the ke ypad lock. …
-
Siemens S40 — page 40
77 T ransfer call If you ha ve an activ e call and a call on hold, y ou can connect the two by selecting » T ransfer« call. In that wa y , the two parties can talk together while y ou withdra w from the conv ersation. Reco rd con ver sa t ion Y ou can record an ongoing con v er- sation by selecting »R ecord call« . The name (if the entry is sto …
-
Siemens S40 — page 41
78 79 Further informat ion Get an overview of the keypad functions and the display symbols on your phone. 79 User guide S40 US 19/09/01 15:44 Side 78 …
-
Siemens S40 — page 42
81 Further information 80 Further information • • • • • • • • • • • • • • Function keys with text line in display The lef t-hand function key t urns your phone on and of f. When the phone is on , the fu nct io n o f th es e keys va ri es, depending on whether you are in standby or menu mode. The te xt line at the bot tom …
-
Siemens S40 — page 43
83 Event indicators Occurring/Missed event The digit indicates ho w many ev ents you ha ve missed. Recurring event Event occurs toda y W AP connection indicators Ongoing data call Network a vailable Network not a vailable Microphone off V olume level Indicates volume le vel when adjust- ing. Ringing tone off All tones off Indicates that all tones h …
-
Siemens S40 — page 44
85 Further information T echnical specifications 84 This product uses fr equenc y bands whose use is harmonized within the European Community area. This product is intended to be connect- ed to the GSM public telecommu- nications network. • GSM900 Class 4 (2 Wat ts) F requency range 880-960 MHz • GSM1 800 Class 1 (1 Wat t) F requency range 1 71 …
-
Siemens S40 — page 45
87 86 How much e vidence is there that hand-held mobile phones might be harmful? Briefly , there is not enough e vi- dence to know f or sure, either w ay; howeve r , r esearc h ef forts are on- going. The existing scientific e vi- dence is conflicting and many of the studies that ha ve been done to date hav e suf f ered from fla ws in their r esear …
-
Siemens S40 — page 46
89 FD A Updat e on mobile phone safety 88 In summary , we do not ha v e enough inf ormation at this point to assure the public that there are, or are not, any low incident health problems associated with use of mobile phones. FD A continues to work with all parties, including other feder al agencies and industry , to assure that researc h is undert …
-
Siemens S40 — page 47
91 FD A Updat e on mobile phone safety 90 sure lev el drops of f dramatically with distance. F or example, they could switc h to • A mobile phone in whic h the antenna is located outside the vehi- cle, • A hand-held phone with a built-in antenna connected to a dif f erent antenna mounted on the outside of the car or built into a separate packag …
-
Siemens S40 — page 48
93 92 93 93 Index 93 Original Siemens accessories • Car Kit Comf ort Plus • Car Char ger • Data Cable • Li-Ion 650 mAh Bat tery • Desktop Charger • T alk and Carry P ack Y ou can buy original Siemens accessories at http://www .icm.siemens.com Accessories Further information User guide S40 US 19/09/01 15:44 Side 92 …
-
Siemens S40 — page 49
95 94 G etting started 1 1 Graphics 63 Greeting 62 Go to date 37 Groups 31 H andsfree (Car kit & headset) 62 Holding a call 7 6 Homedeck, Go to 40 I mmediate SMS messages 43 Important safety instructions 4 Inbox 43 Inf ormation numbers 21 Insert SIM card 14 Internal antenna 1 5 International calls 1 5, 80 IrD A 39, 45, 62 J oining calls 7 6 K e …
-
Siemens S40 — page 50
96 Q uick scr olling 23 R eading a message — Broadcast 48 — SMS 43 Recording a con ver sation 35, 77 Recurring e vent 36 Redialing a number 1 6, 65 Remaining call c harge 65 Remo ve c harger 1 3 Rem ove even t a ut oma ti cal ly 7 1 Remo ve from gr oup 32 Rename a group 31 Reply path 68 Reset phone memory 24 Reset timer s & charge 65 Ringing to …

 TK 64...
! ! # & '() * + & '() * * , - . / / + $ % & ' 1 4 ,/ 5 6 # 7 6 & '+ # 8! 9&&6'5 ( )* + $- - / 0 "
"#
$%
$%
$$
$$
$$
$0
$0
"
$2
$3
$3
$
$
$
$"
$"
$"
$:
"
",
."
.
$
1 2 4 .
3
"
53
""
%
$ 3
" . 5 / ;)< .< , - =
. 3 5 3 6 > d
8 >2
. & 5! (?((8?8
. & ) / / ? 7
, 9 +
5 & 4
"# "" ) ". ,@ * )'# " .! # /* ;< .< , - = ? ! . # *
A 6' !
,! "3 . )'+ " 8 / #
" ! ) * . B
>!>9 " 6! 8! ", 9 / "5 6 ;A'4/ =
.# C / ." 5 ; @=
.. # 4 . ! ) ; ! =
.3 ;! 9 =
. . ) 6 D & @ 5/ * / > >"# E
. /
! , A ! + ! 6 d )
/ /- # 6
-
< F / 8 / /
/ 9 * ) * / 5 /
4 9 / < 8 # / F < ! ) ! < / * + d 7
.! " )
.! "
1 E .! " 8 * . , - # 4 * & ' A ' 8 8/ ! :
) < F / ) * >* + ,/ * 4 1! 4 4 ,/ 2
< / ; > >$3=
. 4 / @ 4 * q ) - q 4 .. 5 ! + GHI q 8 / " ) ! q " > q 5 / . >z q 6 d 3 ! i . /
< C 6 d 3 8 2 ! 86 9 8 8 /
/ F 8 < 6 )
* # ( # 5 ! 5/ 4 /
! J
q 8 2 ! ; 7 . !
/ J
q 6
q 6
q +
q 6
q 6
% . 2> !
% ! < # < > ! / % ! 6 ! 4 "
. " 9! / & C G K'8 6 d >3 ! . /
: 1- 6% .
. . 5 / . 8 *
)< , - . / d 7
0 ! " #$! %
. &
. J
8 ) z
8 , - 0
8 . =
. / # .
!
< ; (
. . & < A/ + / . /
4 !
8 . & @ >*/ ? ) G& / ( 1 I
= d 3
+ 6 d 3 / G K'8 * 8 / 6 d 3 / !
- . C 6 d 3 / A . / ! < J
? & ? * G K'8 )
, ' ! * . 4/ )
6 d 3 ;;'5 . 8 / 6 d 3 A * i 3> 8 ! * G K'8 . & @ */ ? ) G& / (
1 I
2 . .! 8 2 & ) 4/ 8 ! C . .! 8 2 ) * ,
< -; $ 1 (?((8?8
+ . ( ? ( ( 8 ? 8 >5 ! . . . 7 " / J
. . . 7 " 0>6 / J
F 8 * 0 6 *! # ". ! # ! < -; $ / %- / > 7
+ . / ? 7 + ) /
. / ) / . J
+ + ,
$- - 4 5
8 9 + , & 4 5 C < / ? >) G9 & I
5
!
:
. & '()'A ! 8!* )
A & A '8 * . ) @
' * )! <
=;;9 6 ; =< * < & 6 "5 */ , - ! ! $ ; )&/ )
6
5 / . >z
q + . ( ? ( ( 8 ? 8 ! )'+ # 6 q + . / ? 7 * ) / / q 6 ; = # ". 8 8 ,@
# ". q 8 2 ! . 8!* =;;9 8 8 * 0>6 i . .! 8 2 6 d 3 8!* * 86 9 & . >! 8 / < - + > ! q 8 2 ! "#
*
6- q + . )'+ "3 ! 5 ) * : # & $ & ' (
# ) q 9 / ", @ q 8 2 ! q 8 + . ! + ! 9 J
1 < ) *
i . &
6 ) $ ; )&/ )
; 6
q + . ( ? ( ( 8 ? 8 ! 5! q 6 ; = # ". 8 8 ,@
# ". q 9 / ", . * ! ) * " @ q $ 6 +- @ ) ! ) * " ! : * ) ) + * , (
&-$ &% + * , q . * ! ) * " / ", - q 8 2 ! i 5! 6 1 * A 86 9 4 * L%> )
< 8! < D! * . / ! 8?6
q # * " & . " & - q 1 6 .! "
q 5 / . >0 6 ! d 7
0 ! " #$! %
#, 13 , ) . ) q A F! 5 >z / .
""
< ; %-
6%
q # * " & . " & -
q .! " / 5 ! q 5 / . >= . / 0%> #
5 ! / d 7
= ! " #$! %
#, 13 , ) . ) - q A F! 5 / .
>z 86 9 .! " #! 9! / *
q
q
q
q
# * " & . " & @ " & /- + 1 6 .! "
5 / . >= . / 0%> < - + / d 7
= ! " #$! %
#, 13 , ) . ) q 8* + /- J
A F! 5 / .
>z q " & /- + 86 9 .! " " & #! 4 ! M ) G9 ( .! 9 I 9! / / 8 + =;;9 8* + 5 * $< N
* + ' / < 8 )< @ + + . " & . + ".
$ % & ' . /
4 < / 1 ) F O 5 . * <
# %
F 1 '+
& 6
1 >
# : / . ) $$ 0 ) , )$$ ' 7 / < 5 &
@
/
*/ J
? ? 4 / ? 5 ? 6 ? # 7
? 6 ? & '+
& 4
8 ) ?
"
; 7 . !
/ J
q 6
q 6
q +
q 6
q 6
% . 2> !
% ! < # < > ! / % & ! 6 ! F! 8 i &
A! J
ÄÄÄÄÄÄÄÄ
ÄÄÄÄÄÄÄÄ
ÄÄÄÄÄÄÄÄ ÄÄÄÄÄÄÄÄ
ÄÄÄÄÄÄÄÄ
ÄÄÄÄÄÄÄÄ
ÄÄÄÄÄÄÄÄ
ÄÄÄÄÄÄÄÄ
ÄÄÄÄÄÄÄÄ ÄÄÄÄÄÄÄÄ
ÄÄÄÄÄÄÄÄ
ÄÄÄÄÄÄÄÄ
ÄÄÄÄÄÄÄÄ ÄÄÄÄÄÄÄÄ
ÄÄÄÄÄÄÄÄ
ÄÄÄÄÄÄÄÄ
" !
#
8%
ÄÄÄÄÄÄÄÄÄ
ÄÄÄÄÄÄÄÄÄ
ÄÄÄÄÄÄÄÄÄ
ÄÄÄÄÄÄÄÄÄ
ÄÄÄÄÄÄÄÄÄ
(
)
ÄÄÄÄÄÄÄÄÄ
ÄÄÄÄÄÄÄÄÄ
ÄÄÄÄÄÄÄÄÄ
*
"3
q 4 ',/ 6
>8J
q 6
q +
q 6
q +
q 6
<
B ,/ 0
% . 2> !
< > / % ! < F # < > ,/ / % & ! q 6 6 ! F! 8 86 9 . & 4 ',/ ! & 8 H 4 / , A * 4 $%%&
&'( 1
ÄÄÄÄÄÄÄÄÄ
ÄÄÄÄÄÄÄÄÄ
ÄÄÄÄÄÄÄÄÄ
#, , =; # @ ! 4 .. 5 ."
/ ;8 ' 3">$:20= . 5 ." # E
i F 5 ." < / */ q 6 % . 2> !
q + < > +'& / q 6 % ! < # q + < > & * q 6 % & ! q 6 6 ! F! 8 86 9 A 5 ." E
4 >
5 < & + , $' 4 / , ) % . 2> !
< > ! / % ! < # !
&-$
q 6
q +
q 6
!
.
q + < > & * q 6 % & ! !
q 6 6 ! F! 8 ÄÄÄÄÄÄÄÄÄ
ÄÄÄÄÄÄÄÄÄ
ÄÄÄÄÄÄÄÄÄ
ÄÄÄÄÄÄÄÄÄ
ÄÄÄÄÄÄÄÄÄ
ÄÄÄÄÄÄÄÄÄ
:- @ //0//
ÄÄÄÄÄÄÄÄÄ
ÄÄÄÄÄÄÄÄÄ
ÄÄÄÄÄÄÄÄÄ
(*0)1
, 7 . 6 '5 !
q 6 % . 2> !
q + < > / q 6 % ! < q + < > & * q 6 % ! < + q + < > & * q 6 % & ! q 6 6 ! F! 8 . 7 * <
? <
? / " <
? . 7 "
+ 5 F < / =
//0//
ÄÄÄÄÄÄÄÄÄ
ÄÄÄÄÄÄÄÄÄ
230*4
q 6 % . 2> !
q + < > / q 6 % ! < q + < > & * q 6 % ! < + q + < > & * q 6 % & ! q 6 6 ! F! 8 & * J
q + < > F > //0// 86 9 5! # ! 5 7 i . &
8 / " $ ; )*
* !
ÄÄÄÄÄÄÄÄÄ
ÄÄÄÄÄÄÄÄÄ
ÄÄÄÄÄÄÄÄÄ
'5!
: / / / 67
"
+ 5 < * / 8 G K'8 q 6
q +
q 6
q +
q 6
q 6
% . 2> !
< > / % ! < < > & * % & ! 6 ! F! 8 i . # 8 / " , # & < )
1 * . F/ q 6
q +
q 6
% . 2> !
< > / 6 ! F! 8 i & @ A/ * E
+$$=)1-
4 A (B) 0
q < > 2> ! ? @ ( )*
. / A/ + . : 4 5 < 4 4 .. ! 86 9 & 9 4 4 ..
4 .. 4 .. ) ) 8 '
/ " ! 86 9 . . < ) 4 >/
8 2 ! .'
8 * ,
0 ! .3 !>) .
* > ) . *'
.3 !
) . <
) . .3 !
) . .3 !
) . . C 9 + ,
9 ! ? >) A9 I
" . C & 4 5
& ! ? >) G& I
'
"
: . 4 5 ."
3%%>8! >0>+ '
@ 5 ." ;8 '
3">$:20= 8 >5 ." & / 6! 8! "
6! 8! "
- 5 / . >z
86 9 4/ + <
< . < - ) +
=% +
d )
7
1) 2 : * $ ' (
# $ / (
* #$! q . / - 6 q 4 .. ! 4 ! q .3 ! ) . ! ) . ! E
q ) q / ; = 86 9 4 / 6 d 3 F 8 * ) G K'8 * < ! / .
",
+ ; C / C 9 + , . + &' &++8< /
@ F 9 9 * + : 6
. 6 ! / ! ) ;8 ' 2$>%"=
i 4/ 9 C 9 + ,
: # 2 ! ) $$ $ (
3 , ( * ) $ , + ; q 4 .. ! q 9 + , -
! q .3 ! ) . 86 9 . / / . ;>$>+ =
4/ . 9 ?
>$>+ ? . A/ , q 9 / ", . * !
) * " @ q $ 9 " q . * ! ) * " / ", - q 8 2 ! 86 9 . / / . ;>$%>+ =
"5
< q .3 ! ) . . 9 * . C 9 + , . /
: # #, 13 4$ q " & /- 4 q 1 /- .! "
q # * " & . " & @ q 5 / . >= d 7
= ! " #$! %
#, 13 , ) . ) q 5 / . >z q .! " #! - q . .! " ! 9 .#
$- -
C / C & 4 5 . + &$' " < / *! 4 / # <
/ " : $ $ ) & (
* 2 ' # ! ) $$ $ (
3 , (
i & & C <
+ ! ) ;8 'J 2$>%3$=
i . C & 4 5 / & : . & 1 +,$'
, ) " 5 4/ . >2>+ ? , . F & ?
. A/ @ $- - ; q & 4 5 -
! q .3 ! ) . q 4 .. 4 ! & ; 5 ! %< C =
q %< C & q & - # /- .! "
q 5 / . >0 ."
86 9 / & @ * # /- / # . ;>$%>+ =
q 5 86 9 / & @ * .3 / # . ;>$%>+ =
q .3 ! ) . q 4 .. ! < 4 + C ! q # /- .! "
q 5 / . >0 / . >z
86 9 / ! 4 * # /- / # . ;>3>+ =
q 5 86 9 / ! 4 * .3 / # . ;>3>+ =
..
/ . >z
q .3 ! ) . q ) . q .3 ! ) . q .! " / 86 9 / ! . & * . C & 4 5 . /
8?6
. & @ 4 <
>, - E
q # /- .! "
q 5 / . >0 4 /
# /-
q 5 / . >z . @ 6 + & * / 0 0
@
. ! 8 / ) , - ' . @ F ! + ! 8 2 ! .! "
.! " ! ) /
) GGPK
; ;
==
+ ) & 9 : * . " & # *
" & A # *
" &
7 + + 1 * 7 ) 8 @ + ) 8 + ; @ =
# 1 J #, . +'&
9.%
-
-
. +'&
9.%
. " & # * " & ! # * " & ) + $< N
5 * + @ @ ) *
* ) 5 8 * + C 8 / 1 : , >? 5 , , 5 .
0
@
C / + [email protected] + ;>8 < > ) * =
/ . ;
(
. ;
4
6
@ : ,
86 9 1 * &/ / 9 + "
>/ ! $% $%>
;
6
/0 0 6D 8 7
=E4E# ", # 3 3 O * .3
= F
; ( ;; E E G 5 F '; 7 ( R #
R
7 ( 1 1 F & ; 1 C 4 5 6 P
6 & * . R 9&&6 ( F ;; < ;; $ ( .
0:
.,
0Q
.5
.
20
20
20
22
22
22
23
2
2
2"
2"
2:
2:
2:
2Q
2Q
2Q
,
3#
3
3
3
< 1 2 4 3
"
53
""
.
" +
. 5 ;<
. 3 3 >d >2 9 (?((8?8
9 , + 5 4 "# . F
:;; ;
;
.
< =
S
/ ? 7
"" P ". , ' " , * ; < <
> = M '
) * *
P , 6' *
"3 9 " 8 *
" * B " . ", 9 * "5 P ;' =
.# C * ." 5 ; =
.. . . P ; '=
.3 6 ; =
. . P 1 S R ; P >"#E
6 S ( d + - P R . R
7 ) < * 6 *
< <
* . d + - 7
" * "
E 4
< "
.
( ;; E E G
5 * . * <
* # >> * 2
< ; >2"=
6 ;; q 1 q 5 .. . *
KHI q 5 " q " > q . >z
q 1 d 3
i 6 ( R d 3 2 R 49 < * 1 ; ;;
( /
5 <
*
J
q 1
2 /
<&$.
5'%.
.,
6 J
q , % 2> q 1 % q < >
q 1 % * q 1
& F
* 6 "
6 " R 4 d >3
< 6 #) ) ! $ !! 5)! #) ) ) !! $)
1 .
P< .
d + - 7
/ ) ) )0 ) $
! ! $ ' )
6 J
P z
, 0
=
. .5
< ; (
. < 6 H 6 M KP ( I
d 3
6 d 3
4 d 3 < 6 d 3 6 J
? ?
I I ,
4 < d 3 ;
6 d 3
i 3 < K I 6 M KP (
I
& 2 6 R 2 < #
+ ( - H I ( (?((8?8
6 S ( ? ( (
8 ? 8 " ' J
" 0 J
". 0 + ( - / > 7 H 6 / ? 7 "
"
6 J
+ ,
4 5
S < + , 4 5 M KP I K. I
"
'; 6 ( 1 H R ' < ' .' =;9 1 ; =< < ' < "5 @ ;
G &
. >z
q ( ? ( ( 8 ? 8 q / ? 7 q 1 ; = ". S <
R ".
q 1
2 6 R
=;9 0 <
R " i 6 R2 d 3 49 < q 1
:H G
2 q 6 R 9 "3
"4 ) ) 5 ( 6 !! $ $
q * ",
q 1
2 q 4 < J
i 6 .
@ ; &
;6
q ( ? ( (8 ? 8 q 1 ; = ". S < ".
q * ", *
R "
q # 6 * ' "
7
#) ) ) ) )(
" $-$$ ) ))! ) )
q P * " * ",
q 1
2 i 9 49 L% < *
* 6 '; 6 q P * * " & " & q 1 " q 9 . >0 d + - 7
/ ) ) )0 ) $
! ! $ ' )
#) ) ) ) 13 ) !)! q & R > z
-
.
q P * * " & " & q " S R RR q 6( . >=
6 H> 6 R S d + - 7
/ ) ) )= ) $
! ! $ ' )
#) ) ) ) 13 ) !)! q & .
R > z
49 4 " < . *
'; ( -
q
q
q
q
* * " & " & " & 1 " 6( . >=
6 H 0% <
d + - 7
/ ) ) )= ) $
! ! $ ' )
#) ) ) ) 13 ) !)! q 8 R J & . R >z
q 6 " & 49 4 " " & * <
M KP ( P I
. * * =;9 1 ' + < < R 6 " &
3
F
& ; 6 H 6 <
%
#
&
6 >
( * #) ) ) !! ! ) $$ 6 ) !
' 6 6 ?
?
?
?
?
?
?
<&$.
5'%.
J <&$.
5'%.
J
C 4 5 6 P
6 & * 5 * H M
6 J
q
q
q
q
q
, % 2 1 % < >
1 % * 1
& 8 ÄÄÄÄÄÄÄÄ
ÄÄÄÄÄÄÄÄ
ÄÄÄÄÄÄÄÄ
ÄÄÄÄÄÄÄÄ
ÄÄÄÄÄÄÄÄ ÄÄÄÄÄÄÄÄ
ÄÄÄÄÄÄÄÄ ÄÄÄÄÄÄÄÄ
ÄÄÄÄÄÄÄÄ ÄÄÄÄÄÄÄÄ
ÄÄÄÄÄÄÄÄ
ÄÄÄÄÄÄÄÄ
ÄÄÄÄÄÄÄÄ
ÄÄÄÄÄÄÄÄ
ÄÄÄÄÄÄÄÄ ÄÄÄÄÄÄÄÄ
ÄÄÄÄÄÄÄÄ
ÄÄÄÄÄÄÄÄ
i 6 * J
" !
#
ÄÄÄÄÄÄÄÄÄ
ÄÄÄÄÄÄÄÄÄ
ÄÄÄÄÄÄÄÄÄ
ÄÄÄÄÄÄÄÄÄ
ÄÄÄÄÄÄÄÄÄ
(
)
ÄÄÄÄÄÄÄÄÄ
ÄÄÄÄÄÄÄÄÄ
ÄÄÄÄÄÄÄÄÄ
*
1
ÄÄÄÄÄÄÄÄÄ
ÄÄÄÄÄÄÄÄÄ
ÄÄÄÄÄÄÄÄÄ
, ,
q # q
q
q
q
q
<
B 0
J
, % 2 < >
1 % < >
1 % * q 1
& 8 49 H < (
# ." ; 3" $:20= * .. 5 >."
i 5
."< q , % 2 q < >
q 1 % q P < >
q 1 % * q 1
& 8 49 P * ." E > < 2,5 ÄÄÄÄÄÄÄÄÄ
ÄÄÄÄÄÄÄÄÄ
ÄÄÄÄÄÄÄÄÄ
ÄÄÄÄÄÄÄÄÄ
ÄÄÄÄÄÄÄÄÄ
ÄÄÄÄÄÄÄÄÄ
=; 6 !
&-$
q , % q ! < >
q 1 % !
+8
q P < >
q 1 % * !
q 1
F //0//
ÄÄÄÄÄÄÄÄÄ
ÄÄÄÄÄÄÄÄÄ
ÄÄÄÄÄÄÄÄÄ
(*0)1
6 S //0//
ÄÄÄÄÄÄÄÄÄ
ÄÄÄÄÄÄÄÄÄ
230*4
6
q , % q < >
q 1 %? q P < >
q 1 %? q P < >
q 1 % * q 1
& 8 6 ? <
? ? 6 =
& 8 2 2 "<
6 q , % q < >
q 1 %< q P < >
q 1 %< q P < >
q 1 % * q 1
& 8 .' * J
2 q ??J?? < >>
49 6 i 6 '
* " $(
* ÄÄÄÄÄÄÄÄÄ
ÄÄÄÄÄÄÄÄÄ
ÄÄÄÄÄÄÄÄÄ
< ; ( G6
! / / / 67
+$$= ( 6 q
q
q
q
q
q
, % < >
1 %< P < >
1 % * 1
& 8 i 6 ' * " 2 6 < 6 q , % q ! < >
q 1
& 8 i 6
'
2 E
K (B (
q < > 2> M * 6 R ,
* + 1 < ..
49 6
..
4 .. R # "
49 6 ..
* /
+ 4 1
2 # 0
6 .3 . < . 9*< < ' .3 . P .
6 .3 . 6 + ,
9 M
> KP I
!
6 4 5
9 M
> K. I
6 ."
* 3%% >H 0 P ." ; 3">$:20= ."
P . P "
.3 . "
. >z
49 4 < < < 5
F ;; < ( d + - -7
. ) $ ! ) !! #) ) ) (
' $$ !! #) ) $ (
q 4 q 9 .. q 9* .3 . . E
q P q 4 * ; =
49 < d 3 6 F ; + ,
R < S P <EE; (
E;; E 6 * * * * ;> >2$ %"=
i 4 + , < ' ! ! ) $$( #) ) 7(
' ) ) 3#
4 H>$> ? ?
q
q
q
49 6 4 H ;H $ =
; P ..
, + , & ' .3 . q * ", *
"
q . "
q P * " * ",
q 1
2 49 6 4 H ;H $% =
q & '
.3 . 6 6 + , 6 3"
F 8 ) 13 q
q
q
q
" & 1 " * * " & " & 8 . >=
d + - 7
/ ) ) )= ) $
! ! $ ' )
#) ) ) ) 13 ) !)! q . >z
q 4 " q . " 3.
< ;; 4 5
! < < !
' !! ' )
' ( #) ) ' ! ! ) $$(
#) ) 7(
i # * * * ; J 2$ %3$=
i 6 4 5
,
6 ,
* !
4 H>2> ? 6 /
?
; q , 4 5 E q & ' .3 . q 5 .. ; * S % =
q % ' H q 1 " q . >0 49 6 . *
4 H ;H>$%> =
3
. >z
q /
49 6 . *
.3 4 H
;H>$%> =
q & '
q 9 ..< C < ' q & R" q . >0
.3 . /
49 6 4 R *
4 H ;H>3> =
q /
49 6 4 *
.3 4 H ;H>3> =
< 6 33
. >z
q & .3 . q P .
q 9' .3 . q 4 " 49 6 6 6 4 5 6 6 S R < E
q 1 " q . >0
4 q . >z
6 S 6 $ ( 1 F "
5 7
P KI
; R
=
=
9 " & " & 8 P R + . P 2 6 * *
* * " &
" 1
" &
* * " &
P * * " &
7 ' . 1 7 7
P 8
. 1
7 8 ; =
P J
, ,
? * . . P 3
1 > . . 4
6
(
F + 5 ; > =
P ,
49 # 4 6 55 * " D 6 ( 87
6 R *
. 6 3
F ;L M ; P T T : ;N 9 > U $L 'L; L T T T 7 H ( >T 9T 7 H ( T 1T A T 1T * L & ' 1 C . T 5 6T , + + & T # T U*
5 9&&6 *
( N 4( <L +L )O ; ; 35
3L
#
%
"
3
3
3
"
"
"
Q
Q
L
L
"%
"%
"$
"$
"0
"0
.
3
5
#
< $
4 .
"
53
""
3
$L
E 'N P ;; F ; 3,
" . T ;T< *< =
& * 3 3 6> d
6 T U* >2
8 * V T S T
(?((8?8
8 * V T T
/?7
, 6 +
5 6 T 4
"# T "" P ". T< T " 8 * * ; <
*< = ? & * *'* 1 T *
9 P 5 H 1 U 6
. "3 8 * V T T RT
" 9T * T * * W
" P T < * * B
T " 1 U V T ", P* "5 6 V ; T=
.# P* ." 5 ; =
.. 9T * * . 8 T ;* *'* =
.3 8 ; T =
. . P 1 X < * * * * * F ;L M ;
A T * U < * "# V P T V S< V T S T T Y
R R T V F LL
d + I PL
S H S
T S
S R T SV T U
SV T U<
V> > T & T < T T Z C T H T H< H * T *T V * U '* ;#A=<
T* S
V T
d + I L 7
" S U S
>S " * C S
* T * * < "
T T 35
: ;N * S S T R T * LL L
T T [<
T T T S S
P S .T T V W ' S T T 2< * * TS U * ;* >L=
* q 6 Z ' q . T * ..< * 9 U H]
q A T T * " V q # " > q 9T T . >z
q # d 3
i C ;O M S H H d 3 RT U*
2 * + I 9 U T * < T U
W Y H * U +;
E ( N
#
1 T V < U * < T * J
q # T U*
2 <
+L 1 S T < T J
q # 2 %
T q # % SV S q # < >< T * q # % T * q # &
$L ; ;; "
C " T T #U < H d >3 * C * A :
. $ 9!! 9) !
9 ! ! ! 9: 9!! 79 ) ' 5$)51 L .
& T .< * * T U* T< *
d + I L 7
"! ; ') : : : 0 ! )4) !' ) < '! 4 ; "
C T T J
1T U*
T z
1T U*
0
1T U*
* =
"!
!
!
"
+ T S TU T U* *
T
"!
"
$ CT
T < T # < T T T T A
* T ? * + T ( 1 ]
= d 3
C d 3 V V A ]
#U S * * T d 3< C H d 3
T C *
J
? T S * * T ? * * T *T T A !
C [ T 1 T U* T< d 3 ; C d 3 T T [
i 3 U T U* < S [< A ] ; '= A * T A + T (
1 ]
.
= ;LN 2 C T U* 2 *
T * H T 1 T U* < H * C V * T U*
2 * T T T U* T
M L I L L (?((8?8
C ( ? ( ( 8 ? 8 V T S T S C * " S T
T J
C T * S 0 " T * J
1 * T * 0 < ". T T
TS T H M L L />7
C / ? 7 V T S T T J
= ( + ,
= L 4 5
+ , T 4 5 < H S T A  ] (.T ] 'L; L
LL L
P V H ( U S T * S T
7 TT T T
HR V H H U U
S 9 T < T S T ' A
* ^ T @ 9 T "5 ; =
V H < V T ' * U @ ; C; &
;E L
C T . * >z
q # ( ? ( ( 8 ? 8 <
T R S T T * q # / ? 7 < T
q 1 ( ; = ". T <
".
q # T U* 2 CR T S @ 9 * T * S 0 <
T i A * T T
TRJ V * RT U* 2 d 3
+ I 9 T X # S T * < S S q # V * T U*
2E
3
+L @ PC; ; & L ;
q C T "3
T T
:
$) : $) 7 ! 7 $) ) ( 1) 7 ) 9 )$$
9!! q * * ",
q # T U* 2 q 6 S < * J C V R i C * T S
H U U T
q # ( ? ( ( 8 ? 8 < T S T T
q 1 ( ; = ". T <
".
q * * ", * *
R " V T q . " V T < * VRH U T :
' ! : ) : ) (
1 $-$$ ) - ; $ q 9 * " V T
R * ", q # T U* 2 i 1 T * * T <
TT T + I 9 * T * T RL%R < * S T* T C 'L; P q 5 " & V T " & q 1 * " q 9T T . >0 d + I L 7
"! ; ') : : : 0 ! )4) !' ) < '! 4 ; ) ! 13 7 ! ! ) q 9 T . >z Y
RT T
; ; L
q * " & V T " & q 1 " S V T
q # T . >=
C * 0% & < S T
d + I L 7
"! ; ') : : : = ! )4) !' ) < '! 4 ; ) ! 13 7 ! ! ) q 9 RT + I 9 S C T 'L; T . >z Y
T
" T U
V * q * " & V T " & q 1 H " & T q 1 * " q # T . >=
C * 0% d + I L 7
"! ; ') : : : = ! )4) !' ) < '! 4 ; ) ! 13 7 ! ! ) q #* S T U * J
9 T . >z Y
RT T
q H " & T S + I 9 U S < T " H " & * A  ] (  ]
& < T V * ^ > @ 9 TT U $< N
C T< <
R S H 6 TU " & * L &
' C T T T T V S
* > T * T T 1 T < R T T <
6 T %
#U 1 +T T &
# >
6 T :
9: ! 9!! ! ! ) $$) ! 9!! 9! ! $)) 5 : ' 1 T < S * T
A * T *
J
? C ? . T ? 5 ? 6T ? , ? 5 ? + & T %<&$.
5'%.
J %<&$.
5'%.
. < T T V A H 1 T T J
H * <
q # 2 % T q # % SV S q # < >< T * q # % T T q # & C *
^ T U* ÄÄÄÄÄÄÄÄ
ÄÄÄÄÄÄÄÄ
ÄÄÄÄÄÄÄÄ
ÄÄÄÄÄÄÄÄ
ÄÄÄÄÄÄÄÄ ÄÄÄÄÄÄÄÄ
ÄÄÄÄÄÄÄÄ
ÄÄÄÄÄÄÄÄ
ÄÄÄÄÄÄÄÄ ÄÄÄÄÄÄÄÄ
ÄÄÄÄÄÄÄÄ
ÄÄÄÄÄÄÄÄ
ÄÄÄÄÄÄÄÄ ÄÄÄÄÄÄÄÄ
ÄÄÄÄÄÄÄÄ
ÄÄÄÄÄÄÄÄ
ÄÄÄÄÄÄÄÄ
i . J
" !
#
,
<L P ÄÄÄÄÄÄÄÄÄ
ÄÄÄÄÄÄÄÄÄ
ÄÄÄÄÄÄÄÄÄ
ÄÄÄÄÄÄÄÄÄ
ÄÄÄÄÄÄÄÄÄ
ÄÄÄÄÄÄÄÄÄ
(
ÄÄÄÄÄÄÄÄÄ
ÄÄÄÄÄÄÄÄÄ
ÄÄÄÄÄÄÄÄÄ
)
*
1
ÄÄÄÄÄÄÄÄÄ
ÄÄÄÄÄÄÄÄÄ
ÄÄÄÄÄÄÄÄÄ
, , q .T T V <
H J
q
q
q
q
q
B T 0
# 2 % T # < > # % SV S # < >< T T T T
# % T T q # & C ^ T U* *
+ I 9 S T < S T T T > TS T H < *
TV T< T (
." ; = >T * .. ; ° T 3" $:20= 9 ."
i P ." < T q # 2 % T q # < >< q # % SV S q # < >< T q # % T T q # & C *
^ T U* + I 9 * T ."
T U S T * > > < T , W T 5
=;L ÄÄÄÄÄÄÄÄÄ
ÄÄÄÄÄÄÄÄÄ
ÄÄÄÄÄÄÄÄÄ
ÄÄÄÄÄÄÄÄÄ
ÄÄÄÄÄÄÄÄÄ
ÄÄÄÄÄÄÄÄÄ
!
P * T T T
q # 2 % T q # < >< !
q # % SV S !
"
q # < >< T q # % T T !
-
q # & C ^ T U* 8 //0//
ÄÄÄÄÄÄÄÄÄ
ÄÄÄÄÄÄÄÄÄ
ÄÄÄÄÄÄÄÄÄ
(*0)1
*
P * T R * q # 2 % T q # < >< q # %< q # < >< T q # V * %< q # < >< T q # % T T q # & C *
^ T U* C T * T *
J
? * T Z ? * T R"
? . < * * V * #
*
! //0//
ÄÄÄÄÄÄÄÄÄ
ÄÄÄÄÄÄÄÄÄ
ÄÄÄÄÄÄÄÄÄ
! 230*4
P * T V S S q # 2 % T q # < >< ! q # %< q # < >< T q # V * %< q # < >< T q # % T T q # & C *
^ T U* 1 T * T J
q # < >< T > //0//
+ I 9 * < * *
T * T T i +^
*
"< * T V S HT * $
PL
* ÄÄÄÄÄÄÄÄÄ
ÄÄÄÄÄÄÄÄÄ
ÄÄÄÄÄÄÄÄÄ
P T S < U T U* < A q # 2 % T q # < >< q # %< q # < >< T q # % T T q # & C *
^ T U* i +^
*
"< * T S T "
: ;LN
/ / / 67
P * T U*
H < T T C S q # 2 % T q # < >< q # & C *
^ T U* i A
1 +$$=
* T
F P ;
QR
I ; q # T
< >
2 P * >T T T *
( N
C T
# T +N
+ S A X T * ..
+ I 9 S
T * ..
# !
.
T C T * ..
S T T
+ T * .. + S A T T * " V T
+ I 9 # T
SV S * T * V * T
C * C U T T U* *
# T U* 2 1T * 0
+N
" C .3 .
V> T .
T
9 .3 .
V> T< * ' > ' > . T' C .3 V T . S + .3 VR T . C H +
, T & A  ]
C H T 4
5 T & T A .T ]
C ." 3%% T U*
0 * P ." ; ° T
3" $:20= *
." + T C T " T
5 U
V> T "
" 9T T . >z
+ I 9 S # <
< " < < T < ; T
4( 4( I
d + I PL 7
"' ) 9!! : $= ! ) :
9 4$ ! ) : ! ) 4$ 9!! 9
9 4$ ) > '! q & * ' q 9 T * .. ' X
q 9 .3 V T . * ' V T . *
R *'* q q & T ; =< S
* + I 9 * d 3 * A U T U*
T< S C '^
' E( H + ,
S * < T
< ' 1 < ' 4P ; ( IP IEP ;; P T T T T* T U * U '* ; _R T 2$>%"=
i 1 < H
+ , :
9 )$! ! ) $$ )
' 7 (
' 4$ ! : 9 ! ) : 3
<L ; ( q 9 U T * ..
q # + , ; G q A .3 V T . ' " + I 9 S # ;$ *= S *
T !
!
# 1 T < *
$R < T R T " q * * ", * *
" V T q > "
q 9 * " V T * ", q # T U* 2 !
!
+ I 9 S # ;$ *= S *
T " q A .3 V T . ' C T C H
+ , T C * ^ V 4( :
) 13 ! ; 7 ) q 1 H " & T q 1 T T " q * " & V T " & q # U* T . >=
d + I L 7
"! ; ') : : : = ! )4) !' ) < '! 4 ; ) ! 13 7 ! ! ) q 9T T . >z
q & " U S q .T " V <L H T 4 5 T < T T * T T H
< * S :
: 4$ 9!! ' ' ) '
5! ) > ' 9 4$ ! )
9 )$! 4$ ! ) $$ : ' 4$ 7 : (
i 7 T T T *T *
#U * U '* < * *
* T ; _ T
2$R%3$=< T T* T i C H T 4 5
T T , :
C T T S , T * 1 T T < *>2R < T T C ST * T
" # " <L ; L q # T 4 5 G q A .3 V T . ' q 9 T * .. * T ;S T S J %< =
q # %< T T ^ V q 1 T " q 9T T . >0
!
+ I 9 T S C T T S T TT # ; * $% = S * T " q 9T T !
+ I 9 T S C T T S .3 # ; * $% = S * T " q A .3 V T . ' # q 9 T * ..< ' * S U C ' q A T TT ' R " q 9T T . >0
" . >z
!
+ I 9 S C
T S T TT # ; * 3 = S * T " q 9T T !
+ I 9 S C
T S .3 # ; *
3R = S * T " !
,
q
q
q
q
A .3 V T . . T' 9 .3 V T . & S " + I 9 S C T T C H T 4 5 T C * ^
V P . >z
C T T S V T <
* q 1 T T " q 9T T . >0
C T TT q 9T T . >z
C T S A *
T T +L )O ; ; <L F +N
# # S T * C S # V * T U*
2E
T * *
C " " V 6 S C " & HT " &
& " &
" &
9 " &
T
" &
C 7 * $< N U C T S C T T
* .T 9T T PT 7 T A T T T
P * T T T
TS C T T T T
R 7 .T T
H T
T C T
C ; =
6 TU
>T * C T T C * , T T 9T , >T * U 1T * U 1T * # !
P C T T T
5
<L C + > T (
+ 4
6
T
; ;
;; F +N
1T T ; H < T * T T
T =
P + I 9 * *
T T
# # S > T 1 "<
T ' >T $%> S
M ;; L D ; ;L C T
` T T T C * S * * ^ T T * & < * * * T * #
S : ; ; 9 $ '; 7 ( U 9 R 7 * (U 1 S A * 1 R * & ' 1 C . S 5 6 6 + V 5 9&&6 *
' < $ ; :2
3
:3
,
:Q
:Q
:L
:L
:L
Q%
Q%
,"
Q$
Q0
Q0
Q2
Q2
Q3
Q3
Q
Q
Q
,
,
5#
5.
5
< $
1 2 4 .
3
53
""
"
$ ' P ;; ; .
" . ;U< *< S =
. 3 3 1 >d
1 >2
+ S V
(?((8?8
+ V U / ? 7
, 1 +
5 1 4
"# A "" A *
". 7 U " 6 *
>; < *< S = ?
>> * * * + A * 6 9 6
8 "3 + U
" P U *'
" 1 U * B " ", P "5 . ; =
.# P ." 5 ; =
.. S * . 1 U ; * * * =
.3 1 ; S =
. . P 1 * * S
C > * "#
a U * S V < d ' 7
P 7 * R 7 6 S
1 * < < * <
* * d ' # " R * " * E
# R * * S R" b : ; ;
* UR S U < R * &
R # S * * U * 2<
* ;* R >Q0=
* =
q & * *
R q 9 S .. S 9 H
q 9 U " U q . " > q . . >z
q 1 d 3
i C U ; ; S d 3 2 * : J < U < U b * * +; 3
1 * <
R S *
q 1 2 ; %<&$.
5'%.
1 J
S q 1 % 2> q 1 % T q < > q 1 % * q 1 6
$ "
C " . * < d >3 * C U
'] ; =
:
) ) 9 ) ) $ )
! 9!! ) ) ) 7 ) ; ) ) 5? @
.
9 . b U< S *
d ' #)!) ) ) 0 !) $) ! A '!) $) ; $) ) )
C * J
& U
z
=
& S 0
!
> !
" & * =
* *
!
" < ; (
* < > C U a > ? *
+ ( 1]
F ; d 3
P d 3  ']
. * d 3 R * . d 3 C * J
? ? I I U U
"! !
* S
. U< d 3 U ; # d 3 * i 3 < ** S  ] a ? * + (
1]
' 2 1 2 U U . * 1 * 2 U
* ; ; I M (?((8?8
P ( ? ( ( 8 ? 8 S V S 9 U " V J
=
=
=
=
9 U " V * 0 J
=
=
=
=
1 0 < ". * ; ; M N />7
P / ? 7 S V U
*
' ; + ,
' 4 5
* * + , 4 5 S * * ?
* 1 ( . ]
'; a ( U U 7 U P * U R UR F J "5 S S ( (<
U @ ;
; &; N
. * >z
q 9 ( ? ( ( 8 ? 8 RS V U q / ? 7 V
RU q . ( ( ". ".
q 1 2 C ** F 9 0 < i 1 * 2 d 3< b : J <
U V <
> * q 1 * 2 ,
+ G q 9 RU "3 U *
:
2) ) $ ) ) ) 7 ) $ ;
; ) ( " $ 9!! ) !B (
q # ",
q 1 2 q # U < J
S ` < ` U U
R *
i C * U
@ ; ;
; & N
q 9 ( ? ( ( 8 ? 8 >S V q . ( ( ". ".
q # ", U * "
q A U *
' U * "
:
) ) )!! ; ) (
A ) $$) $ ;
q P U *
" ",
q 1 2 i 1 U : 9 U * L% <
R * * C * '; P I
q P * * " & " & q . " q 9 . >0 d ' #)!) ) ) 0 !) $) ! A '!) $) ; $) ) )
) ) ) ) 13 : ') ) ' ) ! ) q 6 . >z
5
; ; q P * * " & " & q " S q 9 . >=
C 0% R R S U d ' #)!) ) ) = !) $) ! A '!) $) ; $) ) ) ) ) ) ) 13 : ') ) ' ) ! ) q 6 . >z
: 9 " *
'; G q # * * " & " & q " & q . " q 9 . >=
C 0% <
R R d ' #)!) ) ) = !) $) ! A '!) $) ; $) ) ) ) ) ) ) 13 : ') ) ' ) ! ) q 1 * J 6 . >z
q & " & : J S S <
< " " & ? * 1 ( 1 ] *
> F 9 $< N C * < < R 9 " &
b ,#
* & ' C U U *
1 S < <
%
*
6
>
:
) ! 9!! ) ! ) $$) " $ $) ) ' ) ) 7
' 1 U ?
?
?
?
?
?
?
%<&$.
'%.
S
C S a ,"
J
%<&$.
5'%.
1 J
q 1 2 % R q 1 % T q < > q 1 % * q 1 6 9 R ÄÄÄÄÄÄÄÄ
ÄÄÄÄÄÄÄÄ
ÄÄÄÄÄÄÄÄ
ÄÄÄÄÄÄÄÄ
ÄÄÄÄÄÄÄÄ ÄÄÄÄÄÄÄÄ
ÄÄÄÄÄÄÄÄ
ÄÄÄÄÄÄÄÄ
ÄÄÄÄÄÄÄÄ ÄÄÄÄÄÄÄÄ
ÄÄÄÄÄÄÄÄ
ÄÄÄÄÄÄÄÄ
ÄÄÄÄÄÄÄÄ ÄÄÄÄÄÄÄÄ
ÄÄÄÄÄÄÄÄ
ÄÄÄÄÄÄÄÄ
i J
" !
#
< P I
ÄÄÄÄÄÄÄÄÄ
ÄÄÄÄÄÄÄÄÄ
ÄÄÄÄÄÄÄÄÄ
ÄÄÄÄÄÄÄÄÄ
ÄÄÄÄÄÄÄÄÄ
q # S *< q
B S 0
1 2 % R P < > > 1 % T P < > 1 % * > (
q
q
> q
q
> )
q 1 6 9 > *
: 9 S
UR S S V < > (
ÄÄÄÄÄÄÄÄÄ
ÄÄÄÄÄÄÄÄÄ
ÄÄÄÄÄÄÄÄÄ
,.
1
ÄÄÄÄÄÄÄÄÄ
ÄÄÄÄÄÄÄÄÄ
ÄÄÄÄÄÄÄÄÄ
,
"
, ÄÄÄÄÄÄÄÄÄ
ÄÄÄÄÄÄÄÄÄ
ÄÄÄÄÄÄÄÄÄ
=; !
!
ÄÄÄÄÄÄÄÄÄ
ÄÄÄÄÄÄÄÄÄ
ÄÄÄÄÄÄÄÄÄ
!
P S ..
U> ." ; ° 3" $:20= * ."
i ."< q 1 2 %
R R q P < > q 1 % T q P < > q 1 % * q 1 6 9 R : J < * ."
*< > , S
1 U
q 1 2 % R q P < > !
q 1 % T q P < > q 1 % * q 1 6 9 R ,
S
//0//
ÄÄÄÄÄÄÄÄÄ
ÄÄÄÄÄÄÄÄÄ
ÄÄÄÄÄÄÄÄÄ
(*0)1
1 a U q 1 2 % R q P < > q 1 %< q P < > q 1 %< q P < > q 1 % * q 1 6 9 R C * J
? <
?
"<
?
S
=
//0//
ÄÄÄÄÄÄÄÄÄ
ÄÄÄÄÄÄÄÄÄ
230*4
* * P S b q 1 2 % R q P < > q 1 %< q P < > q 1 %< q P < > q 1 % * q 1 6 9 R . * J
q P < > > //0// : 9 S * V i C * "
,3
* M ; * ÄÄÄÄÄÄÄÄÄ
ÄÄÄÄÄÄÄÄÄ
ÄÄÄÄÄÄÄÄÄ
; ! / / / 67
P S b S U  ']
q 1 2 % R q P < > q 1 %< q P < > q 1 % * q 1 6 9 R i * "
1 * < U U
V ** *
'
; Q (R
q + < >
> 2 ? * C * > *
q 1 2 % R q P < > ! q 1 6 9 R i 1 +$$=
+
+ S
S S ..
: 9 .. S V S
.. R U
..
,
+ U
+
U U "
: 9 * U
S
U * 1 2 *
9
* S 0
" .3 .
U > > . 9 * .3 > . >U< * > * 1 .
+ .3 R U . .3 U . ! !
C + , R & * ? * 1 ]
!
C 4 5 R & ? *
. ]
C ."
3%%
>0> ." ; ° 3" $:20= * ." P C "
U P "
=
9 >z
.
: J S * > < < " < < U U
,
'
' I ' ;
! !
d ' 7
. $ ! ! $ ) :
) ) '(
) $$ $ 9!! ) 7(
) ! '!) q 1 q S S .. S q & .3 U .
R* C* * * U . E
q 1 q # * ; =
: 9 R d 3  '] U< * c + , U ! ! < * ` 7 ;
; ; ;
E a * S S * ; _ 2$>%"=
i . * + , :
) )$! $ ! ) $$ ! (
) 7( ) ) ) $ )$! ) ! )) ,
! !
=
: ; ;
q 9 S ..
q 1 + , ; q A .3 U .
R *
" : 9 # ;>$> =
"" !
1 ? >$> ?
R * R !
q # ", U * "
q "
q P U *
" ",
q 1 2 "" : 9 # ;>$%> =
" q A .3 U .
R *
=
,,
C U C R + ,
C U * ' :
. ) ) 13 )!) ) )
q " & S q + " q # * * " & " & q . * . >=
d ' #)!) ) ) = !) $) ! A '!) $) ; $) ) )
) ) ) ) 13 : ') ) ' ) ! ) q . . >z
q . < " q 1 < " ,5
< 4 5 U <
C b * !
, ! =
" !
5#
> :
) $ ) ) )!! ) ! ))
)( ) )$! ! ! ) )$! $ ! ) $$ ) (
) 7(
i 7 U <
* S * ; _ 2$>%3$=
i . * 4 5 :
** , 1 M
>2R M * * > R > > > : ; q 1 4 5
q A .3 U .
R *
q 9 S S ..
> ;S V S %<> =
q
%< q . " q . . >0
: 9 C * # *
;>$%> =
=
q . : 9 C * .3 # * ;>$%> =
" q A .3 U .
R *
> q S S ..< S C *
q A " q . . >0 > . >z
: 9 S
CS * # * ;>3> =
=
q . : 9 S
CS * .3
# * ;>3> =
" <$+'
$?!$'!
=
. >z
q A .3 U . q 1 .
q * .3 U . q # " : 9 S
C U C 4 5
C U * 5"
S S U <
S E
P I
q + " q . . >0
CS q . . >z
C U b R $ ; F +
U
1 * 2 RS *
" U 1 > R " S + " & * * " & " & * * " &
A * " &
1 * * " &
C 7 $< N
+ U U R U ] ; =
=
U RU 5.
9 ` PU
7 U *
` * 6 U P U
6 * 7 U
8 ; =
F +
C U
@,
" . ,
U 1 * S * > ** U 1 * S + !
5 P > ; <
S V U =
P '
** *
: J b U + (
# # + 4
6
P " $% $%>
N ;
D 1 S * * R * < S U S <
U R 1 U S
S * 5
53
; A * - * # & '( + & '( , * * + & ; 1 6 4 5 6 # 6 & 4* * 9&&6' ( + S- - / ; 5
L"
5
L:
5,
"#"
$%$
$%$
$%0
$%0
$%0
$%2
$%2
"#3
$%3
$%
$%
$%"
$%"
$%:
$%:
$%Q
$%Q
$%Q
"#,
""#
""
""
""
< $
1 2 .
3
"
""
:;; : 6H G " . 5 ; < < =
. 3 3 6 >d
# >2
. * * * (?((8?8
. * * /?7
, 9 +
5 4
"# . "" *
". A ' " . ; < <
= ? * . # A 6' ,
"3 . " 8 " * B *
" . * ' ", 9 "5 ) '** .# C ." 5 ; =
.. 7 * . ) * ; * =
.3 ;* =
. 9 . P A * * * 5
; * > "#E
. * * * * * < * )
d - , * R* # * # ) * * *
, * * <
* ** * <
* * d + 67
, " * , " E , " *
5
7
:
RR * ' R d .R* * . * *
*
* 2 < * ; >$%=
- q * q 4 * .. * .> KHI q 8 " * q " > q 5 . >z q 6 d 3 i , *
- - * '
d 3 2 4J 8 < * ( "
.$
* * * J
q # 2
" =
%<&$.
5'%.
* J
q 6 % 2> q 6 % * q + < > q 6 % q 6 6 5
4 - "
+ " * R * ' < * * d >3 , R G 'I
:
# 4 C
!! ! )! 1--; .
. . < < d + 67
)!0 !! ' ! # ' 4)$ ))$ .
* J
# z
# 0
5,
# =
. *
*
< ; (
. < * * , * .
? G >* ( I
= d 3
+ d 3 G 'I < d 3
, * *
d 3
, J
? < ? * I 'I
> , * 6 * d 3 ;' . d 3 * d i 3 K 'I
.
M G >* ( I
: 2 . 2 < * 6 * . 2 < * d 55
<
-; (?((8?8
+ ( ? ( ( 8 ? 8 >* * . < "R J
. < "R 0 J
A * 0 ". *
0R <
-; - - />7
+ / ? 7 * . J
+ + ,
S- - 4 5
8 + , 4
5 * M G9 I>(
G I
"##
:
. * '( *> * 8 * * * ) < * . * =;J ) ;* < =
** '** "5 * $ ; )&-
-
5 . >z
q + ( ? ( ( 8 ? 8 * q + / ? 7 q ); = ". * ". q # 2 & =;9 8 * 0>6 < i . 2 d 3 < * d 49 # G "
I * * < * q 2 "#"
*
6- q + "3 * :
# $ 4 4 )! $ (
" !! q 9 ", q # 2 q 8 ' J
, < i . $ ; )&-)
; -
q + ( ? ( ( 8 ? 8 * q ); = ". * ". q 9 ", * * " q $ 6 * " :
' $ ) ) )! ))(
&-$ $!4 ) )') q . * * "
R R ", q # 2 i A 49 # L%> * < * * , 8 6 q # " & " & q 1 " q 5 . >0 * d + 67
!! )!0 ' ! # ' 4)$ ))$ .4!4 13 ) )! ! ) q , d .
R >z
"#.
;)
6 -
q # " & " & q 1 " * * q 5 . >= , 0% **
. * *
d + 67
!! )!= ' ! 1 4)$ ))$ .4!4 13 ) )! ! ) q , d . >z
49 1 " * *- q
q
q
q
# " & " & " & 1 " 5 . >= , 0%> **<
* d + 67
!! )!= ' ! 1 4)$ ))$ .4!4 13 ) )! ! ) q A J
, d .
R >z
q " & 4J 1 " " & ? G9 I(G1 I * * * =;9 * * *
$< N + .
" & < * "#
& ; , H * <
%
6
>
:
D4 ! ) $$ $ !! " ) 4 )! ' ) . * * J
?
* < ? ? ?
? ?
? %<&$.
5'%.
"#3
. * M * =
* %<&$.
5'%.
J
q 6 % 2> q 6 % * q + < > q 6 % q 6 6 6 * i . * J
ÄÄÄÄÄÄÄÄ
ÄÄÄÄÄÄÄÄ
ÄÄÄÄÄÄÄÄ ÄÄÄÄÄÄÄÄ
ÄÄÄÄÄÄÄÄ
ÄÄÄÄÄÄÄÄ
ÄÄÄÄÄÄÄÄ
ÄÄÄÄÄÄÄÄ
ÄÄÄÄÄÄÄÄ ÄÄÄÄÄÄÄÄ
ÄÄÄÄÄÄÄÄ
ÄÄÄÄÄÄÄÄ
ÄÄÄÄÄÄÄÄ ÄÄÄÄÄÄÄÄ
ÄÄÄÄÄÄÄÄ
ÄÄÄÄÄÄÄÄ
" !
#
ÄÄÄÄÄÄÄÄÄ
ÄÄÄÄÄÄÄÄÄ
ÄÄÄÄÄÄÄÄÄ
ÄÄÄÄÄÄÄÄÄ
ÄÄÄÄÄÄÄÄÄ
$&5+5
9$'& (
$&5+5
9$'& $&5+5
9$'& )
ÄÄÄÄÄÄÄÄÄ
ÄÄÄÄÄÄÄÄÄ
ÄÄÄÄÄÄÄÄÄ
$&5+5
9$'& *
q 4 *
* * < *J
q
q
q
q
q
B 0
6 % 2> + < > $&5+5 9$'& % + < > * 6 % q 6
6 6 * 49 . * * $&5+5 9$'& (
* * *
"#
1
ÄÄÄÄÄÄÄÄÄ
ÄÄÄÄÄÄÄÄÄ
ÄÄÄÄÄÄÄÄÄ
#, ,
=; # H * * ..
> >." ; 3" $:20=
> ." E
i & ." < * * q 6 % 2> q + < > q 6 % * q + < > q 6 % q 6 6 6 * 4J & * ." ** * E
# < ,
, !
q 6 % 2> q + < > ! q 6 % * !
q + < > q 6 % !
q 6
ÄÄÄÄÄÄÄÄÄ
ÄÄÄÄÄÄÄÄÄ
ÄÄÄÄÄÄÄÄÄ
ÄÄÄÄÄÄÄÄÄ
ÄÄÄÄÄÄÄÄÄ
"#
6 6 * : H
#
//0//
ÄÄÄÄÄÄÄÄÄ
ÄÄÄÄÄÄÄÄÄ
#
(*0)1
, .
* q 6 % 2> q + < > # q % < * q + < > q % < * q + < > q 6 % q 6 6 6 * . ? <
? "<
? . =
//0//
ÄÄÄÄÄÄÄÄÄ
ÄÄÄÄÄÄÄÄÄ
ÄÄÄÄÄÄÄÄÄ
230*4
*
+ q 6 % 2> q + < > q % < * q + < > q % < * q + < > q 6 % q 6 6 6 * * J
q + < > > //0// 49 . R i .
R " "#
$ ; )
ÄÄÄÄÄÄÄÄÄ
ÄÄÄÄÄÄÄÄÄ
ÄÄÄÄÄÄÄÄÄ
*
-;H
#
/ / / 67
+$$=)
+ G 'I
q 6 % 2> q + < > q % < * q + < > q 6 % q 6 6 6 * i . " , < * . q 6 % 2> q + < > # q 6 6 6 * i . E
: H- ;; ; A )(B q 6 < > 2 M ( , R "
-
S;
A < * .. 49 & * * ..
4 * ..
"#,
4 * .. "
-
S;
& ) " 49 . * "
4 *
* * 0
.3 * . * . * .3 * . * < P .> .3 * .
.3 * . . * * + ,
9 *
M G9 I
" . * * 4 5
* M G I
3%% 0> ."
* 5 ." ** ; 3">$:20= ."
. * '
" R . * ' " "
2 5 . >z
49 4 "
< < * < "#5
+
< H- d - -7
1)) )!) :
$ (
C !! )) )$! (
))$ q . * * * q 4 * .. * q .3 * . * # * . E
q P q 8 * ; = * 49 4 d 3 * G 'I
< F + ; # * * + , * < R * * 8 ; ;; 6 E 6 . * R * * ; 2$>%"=
i 6 * * + ,
:
C ! ) $$ )) ) (
# ' )) (
A ' ) ) ) $ !! ) ""#
6 ; $ =
* R + ; q 4 * .. * q 9 + , q .3 * .
49 , RR* ;>$> =
q 9 ", * * " q $L " q . * * " ", q # 2 49 , RR* ;>$%> =
q .3 * .
. * . * *
+ , , *
"""
'H;H :
C !4!4 13 q
q
q
q
" & 1 * "
# " & " & 5 . >= d + 67
!! )!= ' ! 1 4)$ ))$ .4!4 13 ) )! ! ) q 5 . >z q . * " * q 1 " "".
S- -
# * *
4 5 " < # * < " :
)) ) $ 4 ) $ $ )! 4 (
C ) ! ) $$ )) ) (
# ' )) (
i 8 *
* * ; 2$>%3$=
i . * * 4 5
,
:
, : ,
" 6 ; >2> =
. * S- - ; q 4 5 q .3 * . q 4 * .. * * ; * * %< =
q %< ' ' * q A * " q 5 . >0 ""
49 , , R * R* . * ;>$%> =
q 5 . >z 49 , , R * . * ;>$%> =
q .3 * .
"
q 4 * .. < C' > * q * "
q 5 . >0 q 5 . >z 49 , , * .3 . * ;>3> =
""3
49 , , * * . * ;>3> =
.3
q .3 * . q P . q .3 * . q * * " * 49 , , d . * * 4 5 , * 8 6 ;;
, # < E
q * " q 5 . >0 , * q 5 . >z . , / ;
S
. "
* + * # 2 * 1 "
1 " 6 . " &
* " &
. " & *
" & # " & * # " & + ) * * $<N
) ) GUI
; =
=
S;
* 6 * 1 * ) # 8 + -
* A + *
. 8 * ; * =
C , J
#, 1 : ,
? > > , ""
S
9 + -
S;
, . ' :" " 5 ** *
; * < *
=
) * 4J 1 * . (
# 4 > . 4
6
, $%> "
"
6
:
; - 6D - 7
A * * * * * . * R R * R 4 *
""
! #$ ! % & '!( & '!( ! * ! +, * , . $ ! ! " # $% / 1 $ & * 3 4 5 6 7 . 8554 ' 7 ( 7% ' ( * + * + - "
"
)
)
&
0
2
2
2
2
2
2
2
)
)
),
)
< $
1 2 4 .
3
"
53
""
)
.
,
/
* + 0 - 1 "",
&
5 9 &% , $ ' : : * (
7% 9 d 9
9;2
< % , . $
(? ( 8? 8
%$$ % , . $
/?7
4 ! 9 +
, 9 4
< *
.!
= $ % , 9
" . , '. : ; * ( ? >9 % <. 5
>$ .9 ?
4 ,
<. $ .$ * . 3 , , ! ! @ 4 ! ! / /9 $
& $ *! $
&* % % '. 7%(
*! $
& '.! (
) '9 % (
'% ,(
. A!
, * %. ,:
% * ! % $ $! % %
9 !
! % %!
! , 7! !B
> *!: ! 9 : *
, 9 $
*
9 , 9 -4 1 d 2 0 + 3
C! * % 9 * % ! $% , 9 !
C! $ % !
: * % $% !
, 9 % !
C! * % * $ !
* *! ! !
? 79 , , !
C! % % !
C! % * '.D $9 (
$ 9 : 9 . ,: * % !* % 5! .$ ! % !
d " + 3
1 % ) * ! 1 % )
$ % !B 1 ) ! % * : 9 ,
% , .! ""5
- 1 + * 7 !
% * , E 9: 9 % 9 9 9 9 9 , % ! > .$ ! % ,
% $ 9 !
% * 9 ! 5$ * 2 $ 7
$ . : *! % $ 9 % ! '! %7;(
* + " q 5 .! , , !
! !
q $ ! ! FGF % 9 !
q . , !
q 5 9 ;5 !% %% !
q &% , $ z !%
%% !
q d 9 !
i d 9 9 9 2 .
% 9 % $ !: + " + 6 7 C! $ % ! !
9: 9 7* ! % $
, ' % /
/
".#
+ % : ! :*! ! , 9 *! H
q 9 2 . !
: <&$.
5'%.
5 . % $! % ,H
q 5 ) % 9 ! 2 % !
q
. % . * % : % 9
!
q < % > 9 : $! ,!
q 1 $ % ,: % 9 !
q 6 9 !
2 " C! % ! 9 , % 5 9 % : d 9 ;
9 % 9 % C! FD%F 8 9% % ! &% , $ , : % , % : * d " + 3
0 ! "."
3% . . H
z * 0 > = > , % . 2 )
5 ): *! % : 6 . 9 *!
C! 7 , $ : % 9 , 9 , % 9 > %
$9 ? K3% $9 / K . !
d " d 9 *! , : FD%F FD%F , %
% ! d 9 : *! % 9
9 % > 9 d
9 9 % . C! 9 9 %!H
? C! , $ ! * %
? FD%F , .* %
"..
A 9 . . : d 9 7% 9 d 9 : 9 i ! : 9 % KD% K , > % $9 ? K3% $9 /K
. !
+4 " 2 .
2 . 9 : %
9 % 9 9 % . 2 . 9 : 9 8% ! ,
(? ( 8? 8
<. $ ( ? ( 8 ? 8 , ;
% <. $ %. , : ) , H
<. $ , 9 %. , :
) I9 7* , H
7* , * ,: , 9 .. 9 , 9 ".
+4 %! ! !
//?7
<. $ / ? 7 / : .$ 9 % "
"
,9 %$$ . H
" + &
" 4 + ! 9 &
4 , 9 : *! ! % , $ : 9 9 !
% , I . % ? K4 ! !
- 1 > 9$ ! .$ #* % ,
9 9 , 9 !
% : ! %* 9 7! ! % ! 9 .$ ; 1 7 &*'( : .! , : 7* 7* % % ! .* ! % * % !
".3
< 0 % #
< +4
&% , $ z q <. $ ( ? ( 8 ? 8 , $!
7* %% !
q <. $ / ? 7 / : * $! %$$ ,!
q &*'( , 9 % 9!
, 9 % % %% !
q 9 2 . ! 9
9 9 , 9
; 1 7 7* *$ !: % " %% !
9 2 . % d 9 : 9 9 i 6 7 $ :
. %! . : .$ ! ! q 2 . 9 !
=! q .$ * . $ : 7
% ! $! * $ %% !
8 "# # # $ % q $ *! $ & , !
q 9 2 . !
q 9 .$ ! : .$ * . $ $! %. $ , !H
J , : 7 * i = % * *
% , * 7* ".
9 ?%@ 0 % #
9 ?%@ +4
q <. $ ( ? ( ( 8 ? 8 : $!
%% !
q &*'( , 9 % 9!
, 9 % % %% !
q $ *! $ &
7 ! ,
$ , !
q & ! , , 1 > ., 9 $ * .$ 9 !
8 & ' ( ) $ % q & ! , $ $ & !
q 9 2 . !
i > 7* 7 % !
$ *!
,: 9 >%7 % , !: 7! %
9% . ,: 9 * 9 C! 9 , ' + q 5
)#1 . )# q K% 7* ) %!
q &% , $ ;0 , !
7* !
d " + 3
0 ! * 13 # q &% , $ ;z , : 9 !
".
1+
q 5
)#1 . )# q 1 % ) * , %* !
q &% , $ 4" =
, !
C! 9 %9 % 3 d " + 3
= ! * 13 # q &% , $ ;z , : 9 !
>%7 1 % ): $ ! %!
9 ! !
' 0!
+ q
q
q
q
5
)#1 . )# , ? )# , , !
K% 7* ) %!
&% , $ 4" =
, !
C! 9 %9 % : . d " + 3
= ! * 13 # q 9 .* H
&% , $ ;z , : 9 !
q ? )# , , !
6 7 L % )
)# $ ! % !
! %! ?
K4 ! L % ! K . !
9 ! !
. $
! ; 1 7 #* $
%$ M:" !
# , * : . $ 9 <. )# , : . $ % 9 %
".
! " # $% C! 7 , 9 % * 9 % 9 > % $9 ,: ) 7 7% 9 !
<
, 9
%
/ 9
3% $ % 6
/ >
, 9
8 + % # $% 4 % $9 ,: *! , E % $9 !H
? 1
? $
? &
? * ? 3
? 4 7%
? 5 6 7 <&$.
5'%.
".,
& % . 9
: <&$.
5'%.
5 . $! $9 ,H
q 5 ) % 9 ! 2 % !
q
. % . * % : % 9
!
q < % > 9 : $! ,!
q 3% $ % ,: % 9 !
q 6 9 ! % ! . i E , %!H
ÄÄÄÄÄÄÄÄ
ÄÄÄÄÄÄÄÄ
ÄÄÄÄÄÄÄÄ ÄÄÄÄÄÄÄÄ
ÄÄÄÄÄÄÄÄ
ÄÄÄÄÄÄÄÄ
ÄÄÄÄÄÄÄÄ
ÄÄÄÄÄÄÄÄ
ÄÄÄÄÄÄÄÄ ÄÄÄÄÄÄÄÄ
ÄÄÄÄÄÄÄÄ
ÄÄÄÄÄÄÄÄ
ÄÄÄÄÄÄÄÄ ÄÄÄÄÄÄÄÄ
ÄÄÄÄÄÄÄÄ
ÄÄÄÄÄÄÄÄ
" !
#
' !
ÄÄÄÄÄÄÄÄÄ
ÄÄÄÄÄÄÄÄÄ
ÄÄÄÄÄÄÄÄÄ
ÄÄÄÄÄÄÄÄÄ
ÄÄÄÄÄÄÄÄÄ
(
q % * 9 q
q
q
B * !: .J
5 ) % 9 ! 2 % !
< % > 9 : 7% ,!
. % % . * % : % 9
!
< % > 9 : $! $
,!
3% $ % ,: % 9 !
q
)
q 6 9 ! . ÄÄÄÄÄÄÄÄÄ
ÄÄÄÄÄÄÄÄÄ
ÄÄÄÄÄÄÄÄÄ
*
q
% ! >%7 $ $ % : , , . 5 * $ % .* 7 9 : ( % ,!
".5
9 ÄÄÄÄÄÄÄÄÄ
ÄÄÄÄÄÄÄÄÄ
ÄÄÄÄÄÄÄÄÄ
, ,
' ÄÄÄÄÄÄÄÄÄ
ÄÄÄÄÄÄÄÄÄ
ÄÄÄÄÄÄÄÄÄ
ÄÄÄÄÄÄÄÄÄ
ÄÄÄÄÄÄÄÄÄ
ÄÄÄÄÄÄÄÄÄ
!
&-$
!
+8
!
" #
#! , 7 '9 ) -2( & % ; 9 !B
i #* 7 % !: *! % $9!
q 5 ) % 9 ! 2 % !
q < % > 9 : 7%
,!
q
. % . * % : % 9
!
q < % > 9 %% % !
q 3% $ % ,: % 9 !
q 6 9 ! % ! . 6 7 9: % 9 7 % 6 $9!
% , !B = 7 %*: ,5 % * !
> * $ %
q 5 ) % 9 ! 2 % !
q < % > 9 : ! 7% ,!
q
. % . * % : % 9
!
q < % > 9 %% % !
q 3% $ % ,: % 9 !
q 6 9 ! . % ! //0//
ÄÄÄÄÄÄÄÄÄ
ÄÄÄÄÄÄÄÄÄ
ÄÄÄÄÄÄÄÄÄ
(*0)1
> % % 4 7%
,: % q
q
q
q
q
q
q
q
E
?
?
?
5 ) % 9 ! 2 % !
< % > 9 : 7% ,!
% 9 !: . % . < % > 9 %% % !
% 9 !: . % . < % > 9 %% % !
3% $ % ,: % 9 !
6 9 ! % ! . : % % %H
5 79 ! , *
C! 9 ! *
5 >.% % % % //0//
ÄÄÄÄÄÄÄÄÄ
ÄÄÄÄÄÄÄÄÄ
ÄÄÄÄÄÄÄÄÄ
230*4
> 7% : *! %
% * $
q 5 ) % 9 ! 2 % !
q < % > 9 : 7%
,!
q % 9 !: . % . q < % > 9 %% % !
q % 9 !: . % . q < % > 9 %% % !
q 3% $ % ,: % 9 !
q 6 9 ! % ! . 3% 7 9 H
q < % > 9 : ! ;//0// % !
>%7 > 7% ,: * % 9 i C! % ! : % 9 " "
2( B % * ÄÄÄÄÄÄÄÄÄ
ÄÄÄÄÄÄÄÄÄ
ÄÄÄÄÄÄÄÄÄ
> 7% : , *! FD%F , $ %
q 5 ) % 9 ! 2 % !
q < % > 9 : 7%
,!
q % 9 !: . % . q < % > 9 %% % !
q % 9 !: . % . q 6 9 ! % ! . i C! % ! : % 9 +4 ! / / / 67
>: 9 : 7
. % 9 , 9
q 5 ) % 9 ! 2 % !
q < % > 9 : ! 7%
,!
q 6 9 ! % ! . i > $9 % !B
C2'2 ? B @
B% %
' K' A1K % 1 q 3% <
> 9 ! 2 % ! M % $ ! % ' ( C!: 9 6
; %
!: $
!
>%7 ! %
% % $
9
" .
) . % !
; %
, ! .
!
>%7
. : *% %
C! , 9
9 2 .
!
> $ , * 0 $ $% !
) %
, 9
)
, : 9 ; % , ! ; ) %
+ ! 9 4 ! & 9 !
% ? K4 ! K
% %
. !
!
4 , 9 9 ! % %
, % ? K , K . !
& !
% %9 % %
& $9 '9 ) -2( %
*! , 9 7 !
3%
. $9 /9 /
$
/9 /
!
/
)
&% , $ ;z %% !
>%7 5 : :
% 6
% : *! "
* + - d 2 0 + 3
, # ( 1 8 $
$
& q C! 9 ! !
q ,% % !
, ! !
q ) , !
9 ! * ) 9 ! %!B
q ! %!
q C! , '( ! % ! %!
>%7 5$ *! d 9 $ , %
FD%F : *!
9 % >.% ! 9 0%
C! , + ! 9 & 9 ! %
) 6
. : *! ! ! C! ! ,: *! ! !
0 " 1 +
B 0 % +
D > .! *! , 99
% ! '9 H 2;)""(
i 4 ! : ! 9
+ & 9 % . 8 , $ $
- " 3
0% 1" q !
q 4 ! 9 + & ) !
q ) , 9 !
% !
>%7 C! ! > . %! '%9 (
4 ! * '%9 " ( ) 9 . q $ *! $ &
7 ! ,
$ , !
q 6 ! . % , q & ! , $ $ *!
$ & !
q 9 2 . !
>%7 C! ! > . %! '%9 (
q ) , 9 !
% !
4 ! 9 9 4 ! 9
+ & 9 . C! , 9%
! " : 8 * 13 q ? )# , * ,
!
q K% ) %!
q 5
)#1 . )# , q &% , $ ,;=
, !
d " + 3
= ! * 13 # q &% , $ ;z , !
q 1 ) 9 $ !
q 1 % ) %* ! , , % !
* + !
C! , ** , 9 9 ! %
. 0
6 . : *! $ ,
, 9 % C! . , !: ! . 8 - $
- - $ . $
" i > , *! N .! 99
% % ! '9 H 2;"(
i , 4 , 9 9 % . ,
8 , * +'& ,5
, 9 7 % , 9 %% !
!
, * '%9 2" (: ) 9 . >9 , 7 /
0% 1" q , 9 4 ) !
q ) , 9 !
% !
q !
, , ! ' :"; (
%
q ?! , 9 ! ':"; (
q K% % ) %!
q &% , 9 ;0 , !
>%7 C! , , %$ ,
> ) . %! '%9 (
q &% , 9 ;z ,
!
/
>%7 C! , , %$ , > ) . %! '%9 (
q ) , 9 !
% !
" q : ! 'E( 9 ! % q 4 9 !
) %!
q &% , 9 ;0 , !
>%7 C! , > )
. %! '%9 (
/
q &% , 9 ;z ,
>%7 C! , > ) . %! '%9 (
/
' 1%" " ,
!
q ) , 9 !
% !
q , ! q ) % !
q 1 )
*! ! * !
>%7 C! , 9 9 , 9 4 9 . C! , 9% ! , 9 , * $ > * , % : .* !
* 9 !B
q K% % ) %!
q &% , 9 ;0 , !
, q &% , 9 ;z , !
* $ 9 , 9 9
F+
; $ :
. 6
. %
.$ ! ! 9
2 . * % $
1 ) 9
1 % ) %* ! %!
!
. 5
)#1
. )# 9
<. )# * )#1 , !
5
)#1
9
5
K% % 9
M :" %$ $ !
% , * %%
- 9 )#1 ! %!
#$ * , * #$ * %% !
& F F '. ( $
$
10 , * < .$ 9 7 !
K% % 9
! $
4! , #$ * % $
%
$9!
!
#$ * %9 !
#$ ! , .$ %
.$ ! , 9 %
', %$ (
!
, , 9%
9 %
* H +'&
A%,9 % . . +'&:.$8!
/ +'&
,5 % 7
% , 9 % , *
C! * !
, *
C! * !
. . : & $9 4 ! , 9% 9 %
%
7,
" 5
F+
#$ ! , #$ ! ,
%* '. , 9(
? ,!
C! , $
C! * $ %!
4 !
C! 9 *!
! % . . %
5 . 4
O %
(
10 - >%7 & % %
6
1 1 G % 1 -
> *! ,: % 9 * ! 9
$ 9 , > %
,: *! $ ! * % 9 !
, % ,: *! $ ! . 79 % 7%
. ! 9 < $9 "3#
;- < . 8 < A 7 < '
/ * A/
)* & ! 5! / /- '
8 J
$ 4 +- 8 ; 0 ? "= +/ / < + ' ( , *! 5
* 03 + ? 8 * $0 + ? C & F + * " + C < * < + '
, 0 . 6 8 )
! <
/ < + * / & * 4 < * , & ! < ! / A - < / !/- 8 ; :%% 8! e=
& @ ! # * '8 < !
4 / < / & * 4 < 7 8 / 8! & ! < +/ / 6 / < * * < + < 5 < 1 * 8 ' + !!
. < 9 & * 1 * < > * / < / & < &/ ' [email protected] * < . * 2 . 4 < 6 4 6 & '()'A ! 8 < F ! ) , / ; # = ) ', # * # @ ! / ;
= / * &
) )' ( C * & 6 & !
3 * / < 4 & & 5 & ! *
A / < C . ! & ! / " 4 # !< & - / /
? , ? . ! . / 4 / # * <
> A ;8 < 5S < < = ! C ! ) ' 7 < < C ) 5! # / * / C * . @ ! 5/ < / < C * 6 / ):9
# # 4 )$%E8
F ( 3 & ," 5 * && (
* A! , 3" (( < < < < < (( Q3%Q
Loading…
![]()
Gebrauchsanleitung
Operating instructions
Notice d’utilisation
Istruzioni per l’uso
Gebruiksaanwijzing
Kullanma talimatž
TK 64…
|
Inhaltsverzeichnis |
|
|
Was Sie unbedingt beachten müssen . . . . . . . . . . . . . . . |
5 |
|
Sicherheitshinweise . . . . . . . . . . . . . . . . . . . . . . . . . . . . . . . . |
5 |
|
Vor dem ersten Gebrauch . . . . . . . . . . . . . . . . . . . . . . . . . . |
6 |
|
System füllen . . . . . . . . . . . . . . . . . . . . . . . . . . . . . . . . . . . . . . |
6 |
|
Bedienelemente . . . . . . . . . . . . . . . . . . . . . . . . . . . . . . . . . . |
7 |
|
Zubereitung . . . . . . . . . . . . . . . . . . . . . . . . . . . . . . . . . . . . . . |
10 |
|
Allgemeines . . . . . . . . . . . . . . . . . . . . . . . . . . . . . . . . . . . . . . . |
10 |
|
Espresso’/Kaffeebohnen verwenden . . . . . . . . . . . . . . . . . . |
10 |
|
Mahlwerk einstellen . . . . . . . . . . . . . . . . . . . . . . . . . . . . . . . . |
11 |
|
Espresso’/Kaffeepulver verwenden . . . . . . . . . . . . . . . . . . . . |
11 |
|
Heißwasser bereiten . . . . . . . . . . . . . . . . . . . . . . . . . . . . . . . . |
11 |
|
Dampf zum Getränke erwärmen . . . . . . . . . . . . . . . . . . . . . . |
12 |
|
Milchschaum bereiten . . . . . . . . . . . . . . . . . . . . . . . . . . . . . . |
12 |
|
Einstellungen ändern / Programmieren . . . . . . . . . . . . . . |
13 |
|
Programmieren . . . . . . . . . . . . . . . . . . . . . . . . . . . . . . . . . . . . |
13 |
|
Sprache . . . . . . . . . . . . . . . . . . . . . . . . . . . . . . . . . . . . . . . . . . |
14 |
|
Wasser Härte . . . . . . . . . . . . . . . . . . . . . . . . . . . . . . . . . . . . . |
14 |
|
Filter . . . . . . . . . . . . . . . . . . . . . . . . . . . . . . . . . . . . . . . . . . . . . |
15 |
|
Temperatur . . . . . . . . . . . . . . . . . . . . . . . . . . . . . . . . . . . . . . . |
15 |
|
Aktuelle Uhrzeit . . . . . . . . . . . . . . . . . . . . . . . . . . . . . . . . . . . . |
15 |
|
Timer . . . . . . . . . . . . . . . . . . . . . . . . . . . . . . . . . . . . . . . . . . . . |
16 |
|
Energiespar’Modus . . . . . . . . . . . . . . . . . . . . . . . . . . . . . . . . |
16 |
|
Anzeige der Bezüge . . . . . . . . . . . . . . . . . . . . . . . . . . . . . . . . |
16 |
|
RESET’Funktion . . . . . . . . . . . . . . . . . . . . . . . . . . . . . . . . . . . |
17 |
|
System)Meldungen . . . . . . . . . . . . . . . . . . . . . . . . . . . . . . . |
17 |
|
Reinigen . . . . . . . . . . . . . . . . . . . . . . . . . . . . . . . . . . . . . . . . . |
18 |
|
Entkalken . . . . . . . . . . . . . . . . . . . . . . . . . . . . . . . . . . . . . . . . |
21 |
|
Kleine Störungen selbst beheben . . . . . . . . . . . . . . . . . . . |
23 |
English . . . . . . . . . . . . . . . . . . . . . . . . . . . . . . . . . . . . . . . . . . 25
Français . . . . . . . . . . . . . . . . . . . . . . . . . . . . . . . . . . . . . . . . . 47
Italiano . . . . . . . . . . . . . . . . . . . . . . . . . . . . . . . . . . . . . . . . . . 71
Nederlands . . . . . . . . . . . . . . . . . . . . . . . . . . . . . . . . . . . . . . 94
Türkçe . . . . . . . . . . . . . . . . . . . . . . . . . . . . . . . . . . . . . . . 117
3
Bedienelemente
Geräteteile
Entsorgungshinweise
1 Netzschalter
2 Funktionswähler (Kaffee, Dampf, Heißwasser)
3 Display mit 4 Funktionstasten
4 Taste d
5 Bezugstaste 2
6Drehknopf zum Einstellen der Füllmenge (— (/ 8— 8
7 Drehknopf zum Einstellen der Kaffeestärke /— 7
8 Reinigungstaste +
9 Entkalkungstaste 4
10Schriftguthalter
11Kabelstaufach
12Höhenverstellbarer Kaffee’Auslauf
13Schwenkbare Düse mit Aufschäumvorrichtung (Schaum, Dampf, Heißwasser) — Geschirrspüler geeignet
|
a |
Drehgriff |
|
b |
Ansaugventil |
|
c |
Verbindungswinkel |
|
d |
Schlauch |
|
e |
T’Stück |
|
f |
Hülse |
14Drehknopf Kaffee’Mahlgrad
15Bohnenbehälter mit Aromadeckel
16Schacht für Kaffeepulver mit Deckel = Schacht für Reinigungstablette
17Tür zur Brüheinheit
18Rechter Gerätedeckel
19Tassenablage (Vor’Wärmefunktion)
20Linker Gerätedeckel
21Filter (Sonderzubehör)
22Abnehmbarer Wassertank
23Schale für Kaffeesatz (Geschirrspüler geeignet)
24Schale (für Restwasser)
25Gitter
26Kontakte
Über aktuelle Entsorgungswege können Sie sich beim Fachhändler oder in der Gemeindeverwaltung informieren.
4
Was Sie unbedingt beachten müssen
Gebrauchsanleitung sorgfältig durchlesen und im Schriftguthalter 10 aufbewahren!
Dieses Gerät ist für den Haushalt und die Verarbeitung haushaltsüblicher Mengen und nicht für den gewerblichen Gebrauch bestimmt.
d Stromschlag)Gefahr
|
Sicherheitshinweise |
Gerät nur gemäß Angaben auf dem Typenschild anschließen |
|
und betreiben. |
|
|
Nur benutzen, wenn Zuleitung und Gerät keine |
|
|
Beschädigungen aufweisen. |
|
|
Gerät nur in Innenräumen bei Raumtemperatur verwenden. |
|
|
Kinder vom Gerät fernhalten. |
|
|
Im Fehlerfall sofort den Netzstecker ziehen. |
|
|
Gerät niemals in Wasser tauchen. |
|
|
Reparaturen am Gerät, wie z. B. der Austausch einer |
|
|
beschädigten Zuleitung, dürfen nur durch unseren |
|
|
Kundendienst ausgeführt werden, um Gefährdungen zu |
|
|
vermeiden. |
|
|
Nicht in das Mahlwerk greifen. |
|
|
d Verbrühungsgefahr! |
|
|
Düse 13 nur am Kunststoffteil anfassen. Düse 13 niemals auf |
|
|
Personen richten! Düse 13 kann bei Bezug von Dampf oder |
|
|
Heißwasser am Anfang spritzen. |
5
Vor dem ersten Gebrauch
Allgemeines
In Betrieb nehmen
KAFFEE
System füllen
SYSTEM DRUECKE FUELLEN CAFE
SYSTEM
FUELLT
Nur reines Wasser und vorzugsweise Espresso’ oder Vollautomaten’ Bohnenmischungen in die entsprechenden Behälter füllen.
Keine glasierten, karamelisierten oder mit sonstigen zuckerhaltigen Zusätzen behandelte Kaffeebohnen verwenden. Sie verstopfen das Mahlwerk.
Härte des verwendeten Wassers mit beiliegendem Prüfstreifen feststellen. Wird ein anderer Wert als Härte 3 angezeigt, das Gerät nach Inbetriebnahme entsprechend programmieren (siehe Seite 14).
Die Wasserhärte kann auch bei der örtlichen
Wasserversorgung abgefragt werden.
qNetzstecker aus Kabelfach ziehen und anschließen.
qWassertank 22 mit kaltem Frischwasser füllen. Markierung Gmax» beachten.
qBohnenbehälter 15 mit Kaffeebohnen befüllen.
qNetzschalter 1 auf I stellen.
qFunktionswähler 2 auf zstellen.
qTaste d 4 drücken.
iDas Gerät ist betriebsbereit, wenn die Leuchtringe der Taste d 4 und der Bezugstaste 25 grün leuchten.
Hinweis: Bei der ersten Benutzung oder wenn das Gerät längere Zeit nicht in Betrieb war, hat die erste Tasse Kaffee noch nicht das volle Aroma und sollte deshalb nicht getrunken werden.
Aus Fertigungsgründen muss in einzelnen Fällen bei der ersten Inbetriebnahme das Wasserleitungssystem im Gerät noch gefüllt werden:
q Bezugstaste 25 drücken.
6
Sprache einstellen
SPRACHE
DEUTSCH
Um die Displayanzeige auf die gewünschte der einstellbaren Sprachen zu ändern:
qTaste %am Display 3 mindestens 3 Sekunden gedrückt halten.
qTaste %drücken, bis Anzeige blinkt.
qMit <oder >gewünschte Sprache auswählen.
qTaste %zum Speichern der Sprache drücken.
qTaste 6drücken.
Bedienelemente
KAFFEE
WASSER
BEZUG
GERAET ACHTUNG HEIZT DAMPF
DAMPF
BEZUG
Netzschalter 1
Der Netzschalter 1 auf der Rückseite des Gerätes schaltet die Stromzufuhr ein oder aus.
Nach Einschalten des Netzschalters leuchtet der Leuchtring der Taste d 4 grün auf. Das Gerät ist im GStand by•’Betrieb.
Achtung
Netzschalter während des Betriebes nicht betätigen. Gerät erst abschalten, wenn es in Stand by» Betrieb ist.
Funktionswähler 2
Durch Drehen des Funktionswählers 2 kann der Bezug von Kaffee, Heißwasser oder Dampf gewählt werden.
d Verbrühungsgefahr!
Nach Einstellung auf 0kann es etwas spritzen. Austretender Dampf ist sehr heiß.
Die Einstellungen werden im Display angezeigt: Bezug Kaffee z
Bezug Heißwasser 0
Bezug Dampf =
Displayanzeigen während des kurzen Aufheizens für Dampfbezug.
7
GERAET HEIZT
GERAET SPUELT
Display 3
Das Display 3 zeigt die Einstellungen, laufenden Vorgänge und Meldungen des Gerätes an.
Das Gerät ist ab Werk mit Standardeinstellungen für optimalen Betrieb programmiert. Diese Einstellungen können verändert werden — siehe Kapitel GEinstellungen ändern / Programmieren».
Taste d 4
Mit der Taste d 4 wird das Gerät eingeschaltet oder in GStand by•’Betrieb versetzt.
Nach Betätigung der Taste d 4 heizt das Gerät auf und spült anschließend. Der Leuchtring der Taste d 4 blinkt während des Vorgangs.
Das Gerät spült nicht, wenn:
—es beim Einschalten noch warm war oder
—vor dem Schalten in den GStand by•’Betrieb kein Kaffee bezogen wurde.
Heiz’ und Spülvorgang werden im Display angezeigt.
Während des Kaffeebezugs ist die Taste d 4 mit einer Stopp’Funktion belegt. Durch Betätigen der Taste d 4 wird der Vorgang vorzeitig beendet.
i4 Stunden nach dem letzten Bezug wird automatisch ein Spülvorgang eingeleitet und in den GStand by•’Betrieb gewechselt. Diese Einstellungen können verändert werden — siehe Kapitel GEinstellungen ändern / Programmieren».
Bezugstaste 25
Durch Drücken der Bezugstaste 25 kann Espresso oder Kaffee bezogen werden. Während des Bezugs blinkt der grüne Leuchtring.
Durch nochmaliges Drücken der Bezugstaste 25 wird der Kaffeebezug vorzeitig abgebrochen.
8
ESPRESSO
2 ESPRESSO
NORMAL PLUS
Drehknopf zum Einstellen der Füllmenge 6
(— (/ 8— 8
Mit dem Drehknopf (— (/ 8— 86 wird die Flüssigkeitsmenge eingestellt.
Durch Drehen des Drehknopfes gegen den Uhrzeigersinn kann man in 6 Stufen wählen zwischen:
KLEINER ESPRESSO ESPRESSO
KLEINER KAFFEE KAFFEE
GROSSER KAFFEE XXL KAFFEE
Durch Drehen des Drehknopfes im Uhrzeigersinn kann man in 6 Stufen jeweils 2 Tassen wählen:
2 KLEINE ESPRESSO
2ESPRESSO
2KLEINE KAFFEE
2KAFFEE
2GROSSE KAFFEE
2XXL KAFFEE
Zum Bezug von 2 Tassen verfügt der Auslauf 12 über zwei Auslaufdüsen.
Drehknopf zum Einstellen der Kaffeestärke 7 /— 7
Mit dem Drehknopf /— 77 wird die Menge gemahlenen Kaffees ausgewählt
SEHR MILD MILD NORMAL
NORMAL PLUS STARK
EXTRA STARK
Die gewählte Kaffeestärke wird im Display angezeigt:
Reinigungstaste +8
Entkalkungstaste 49
Bei der Reinigungstaste +8 und der Entkalkungstaste 49 leuchtet jeweils der Leuchtring rot auf, wenn das Gerät gereinigt oder entkalkt werden muss — siehe Kapitel GReinigen oder Entkalken».
9
![]()
Zubereitung
Allgemeines
Espresso)/Kaffee) bohnen verwenden
Dieser Espresso’/Kaffee’Vollautomat mahlt für jeden Brühvorgang frischen Kaffee.
Vorzugsweise Espresso’ oder Vollautomaten’Bohnenmischungen verwenden. Kühl, luftdicht und verschlossen aufbewahren oder tiefgefrieren. Die Kaffeebohnen können auch tiefgefroren gemahlen werden.
Tipp: Tasse(n), vor allem kleine, dickwandige Espressotassen auf der Tassenablage 19 vorwärmen oder mit Heißwasser füllen und ausspülen.
Funktionswähler 2 muss auf zstehen.
qMit dem Drehknopf (— (/ 8— 86 die gewünschte Kaffee’Menge und die Anzahl der Tassen einstellen.
qMit dem Drehknopf /— 77 die bevorzugte Kaffeestärke auswählen.
qTasse(n) unter den Auslauf 12 stellen. Bei Bedarf Höhe des Auslaufs 12 anpassen.
qBezugstaste 25 drücken. Der Brühvorgang erfolgt nun automatisch.
Tipp: Bei Bezug von 2 Tassen gleichzeitig STARK oder EXTRA STARK einstellen.
iDurch erneutes Drücken der Bezugstaste 25 oder der Taste d 4 kann der Brühvorgang vorzeitig beendet werden.
Hinweis: Erscheint im Display Bohnen fuellen trotz gefülltem Bohnenbehälter, muß das Mahlwerk noch automatisch gefüllt werden.
q Bezugstaste 25 nochmals drücken.
10
Mahlwerk einstellen
Espresso)/Kaffee) pulver verwenden
Heißwasser bereiten
qMit dem Drehknopf Kaffee’Mahlgrad 14 die gewünschte Feinheit des Kaffeepulvers einstellen.
Achtung
Den Mahlgrad nur bei laufendem Mahlwerk verstellen! Das Gerät kann sonst beschädigt werden.
qRechten Gerätedeckel 18 öffnen.
qBezugstaste 25 drücken.
qBei laufendem Mahlwerk den Drehknopf für den Mahlgrad in die gewünschte Richtung drehen:
je kleiner die Punkte, desto feiner das Kaffeepulver.
iDie neue Einstellung macht sich erst bei der zweiten oder dritten Tasse Kaffee bemerkbar.
qMit dem Drehknopf (— (/ 8— 86 die gewünschte Füllmenge einstellen.
qTasse(n) unter den Auslauf 12 stellen. Bei Bedarf Höhe des Auslaufs 12 anpassen.
qRechten Gerätedeckel 18 und den Deckel vom Schacht für Kaffeepulver 16 öffnen.
qEin bis zwei gestrichene Meßlöffel mittelfein gemahlenen Kaffee in den Schacht für Kaffeepulver 16 füllen.
Achtung
Keine ganzen Bohnen oder löslichen Kaffee einfüllen! Maximal zwei Meßlöffel Kaffee einfüllen.
qDeckel vom Schacht für Kaffeepulver 16 und den rechten Gerätedeckel 18 schließen.
qBezugstaste 25 drücken.
iFür eine weitere Tasse Pulverkaffee den Vorgang wiederholen.
Hinweis: Wird innerhalb von 90 Sekunden kein Kaffee bezogen, entleert sich die Brühkammer automatisch, um einer Überfüllung vorzubeugen. Das Gerät spült.
qAnsaugventil 13/b mit Drehgriff 13/a schließen.
qPassende Tasse unter die Düse 13 stellen.
qFunktionswähler 2 auf 0drehen und die Tasse füllen. d Verbrühungsgefahr!
Nach Einstellung auf 0kann es etwas spritzen. Austretender Dampf ist sehr heiß.
Düse 13 nicht berühren oder auf Personen richten.
qVorgang durch Zurückdrehen des Funktionswählers 2 auf zbeenden.
11
Dampf zum Getränke erwärmen
Milchschaum bereiten
qAnsaugventil 13/b mit Drehgriff 13/a schließen.
qDüse 13 tief in die zu erwärmende Flüssigkeit tauchen.
qFunktionswähler 2 langsam auf =drehen.
Das Gerät heizt nun ca. 20 Sekunden auf. Anschließend wird die Flüssigkeit erwärmt.
d Verbrühungsgefahr!
Nach Einstellung auf =kann es etwas spritzen. Austretender Dampf ist sehr heiß.
Düse 13 nicht berühren oder auf Personen richten.
qVorgang durch Zurückdrehen des Funktionswählers 2 auf zbeenden.
Hinweis: Düse 13 nach dem Abkühlen sofort reinigen. Getrocknete Rückstände sind schwer zu entfernen.
qAnsaugventil 13/b mit Drehgriff 13/a öffnen.
qSchlauch 13/d in ein Gefäß mit Milch tauchen.
qPassende Tasse unter die Düse 13 stellen.
qFunktionswähler 2 langsam auf =drehen. Das Gerät heizt nun ca. 20 Sekunden auf, saugt anschließend die Milch an und schäumt sie auf.
d Verbrühungsgefahr!
Nach Einstellung auf =kann es etwas spritzen. Austretender Dampf ist sehr heiß.
Düse 13 nicht berühren oder auf Personen richten.
qBevor das Milchgefäß ganz geleert ist:
Vorgang durch Zurückdrehen des Funktionswählers 2 auf zbeenden.
qSchlauch 13/d aus dem Gefäß mit Milch nehmen.
Hinweis: Düse 13 und Schlauch 13/d nach dem Abkühlen sofort mit klarem Wasser durchspülen und reinigen M siehe Kapitel GReinigen / Düse Reinigen». Getrocknete Rückstände sind schwer zu entfernen und beeinträchtigen die Bildung des Milchschaums.
Tipp: Bevorzugt kalte Milch mit einem Fettgehalt von 1,5 % verwenden.
Milch’Getränke, wie z.B. Kakao, können wie Milchschaum zubereitet werden.
Mit dem Drehgriff 13/a kann durch leichtes Drehen der Milchschaum optimiert werden.
12
Einstellungen ändern / Programmieren
Programmieren
SPRACHE
DEUTSCH
Das Gerät ist ab Werk so eingestellt, dass ohne zusätzliche Programmierung Kaffee bezogen werden kann.
Zur Änderung dieser Grundeinstellungen die Funktionstasten unterhalb des Displays 3 verwenden.
<Auswahltaste
%Zugang zum Programmier’Modus Einstellungen speichern
6Programmieren abbrechen
>Auswahltaste
Achtung
Während des Programmierens das Gerät nicht ausschalten. Änderungen werden sonst nicht übernommen.
Um die Grundeinstellungen zu ändern, muss das Gerät eingeschaltet sein.
Folgende Einstellungen können verändert werden:
—Sprache
—Wasserhärte
—Filter
—Temperatur
—Aktuelle Uhrzeit
—Timerfunktion
—Energiespar’Modus
Einstellungen ab Werk sind in diesem Kapitel grau unterlegt — hier ein Beispiel.
13
Sprache
SPRACHE
DEUTSCH
Wasser Härte
WASSER
HAERTE 1
WASSER
HAERTE 2
WASSER
HAERTE 3
WASSER
HAERTE 4
Um die Displayanzeige auf die gewünschte Sprache zu ändern:
qTaste %am Display 3 mindestens 3 Sekunden gedrückt halten.
qTaste %drücken, bis Anzeige blinkt.
qMit <oder >gewünschte Sprache auswählen.
qTaste %zum Speichern der Einstellung drücken.
qTaste 6drücken. Zurück zur Bezugsbereitschaft.
i Es stehen folgende weitere Sprachen zur Verfügung:
|
LANGUAGE |
LANGUE |
|
|
ENGLISH |
FRANCAIS |
|
|
LINGUA |
IDIOMA |
|
|
ITALIANO |
ESPANOL |
|
|
TAAL |
SPRAK |
|
|
NEDERL. |
SVENSKA |
|
|
JASYK |
||
|
RUSSKIY |
||
qWasser’Härte mit mitgelieferten Teststreifen feststellen, z. B.:
= Härte 2
qTaste %am Display 3 mindestens 3 Sekunden gedrückt halten.
q Mit <oder >WASSER HAERTE auswählen.
qTaste %drücken, bis die Zahl in der Anzeige blinkt.
qMit <oder >festgestelle Härte auswählen.
qTaste %zum Speichern der Einstellung drücken.
qTaste 6drücken. Zurück zur Bezugsbereitschaft.
Hinweis: Die richtige Einstellung der Wasser’Härte ist wichtig für das Entkalkungsprogramm.
Bei externen Wasserenthärtern in der Hausanlage oder Verwendung von bereits gefiltertem Wasser die Wasser HAErte1 einstellen.
14
Filter
FILTER
JA/NEU
FILTER
NEIN/ALT
Temperatur
TEMP. normal
TEMP. hoch
TEMP.
MAXIMUM
Aktuelle Uhrzeit
UHRZEIT —:—
UHRZEIT 14:39
Als Sonderzubehör ist für den Wassertank 22 ein Filter 21 erhältlich (Best.’Nr. 46 1732). Die dem Filter 21 beiliegende Anweisung beachten!
iZuerst Filter 21 einsetzen, dann Geräteeinstellung verändern.
qTaste %am Display 3 mindestens 3 Sekunden gedrückt halten.
qMit <oder >Filter auswählen.
qTaste %drücken, bis Anzeige blinkt.
qMit <oder >Einstellung vornehmen.
qTaste %zum Speichern der Einstellung drücken.
qTaste 6drücken. Zurück zur Bezugsbereitschaft.
Hinweis: Verbrauchten Filter 21 sofort nach Systemmeldung FILTER WECHSELN auswechseln oder entfernen!
Wird kein neuer Filter eingesetzt, Einstellung auf FILTER nein / alt und Wasserhärte kontrollieren.
Hiermit kann die Kaffeetemperatur eingestellt werden.
qTaste %am Display 3 mindestens 3 Sekunden gedrückt halten.
qMit <oder >TEMP. auswählen.
qTaste %drücken, bis Anzeige blinkt.
qMit <oder >Einstellung vornehmen.
qTaste %zum Speichern der Einstellung drücken.
qTaste 6drücken. Zurück zur Bezugsbereitschaft.
Hiermit wird die aktuelle Uhrzeit eingespeichert. Dies ist für die Nutzung der Timer’Funktion erforderlich.
qTaste %am Display 3 mindestens 3 Sekunden gedrückt halten.
qMit <oder >UHRZEIT auswählen.
qTaste %drücken, Stundenanzeige blinkt.
qMit <oder >Einstellung vornehmen.
qTaste %drücken, Minutenanzeige blinkt.
qMit <oder >Einstellung vornehmen.
qTaste %zum Speichern der Einstellung drücken.
qTaste 6drücken. Zurück zur Bezugsbereitschaft.
Die eingestellte Uhrzeit geht verloren,
—wenn der Netzstecker gezogen wird,
—das Gerät mit dem Netzschalter 1 ausgeschaltet wird,
—bei Stromausfall.
Die aktuelle Uhrzeit muss neu eingegeben werden.
15
Timer
EIN UM —:—
EIN UM 07:45
Energiespar)Modus
AUS NACH 4 STD.
AUS NACH
2 Std.
Anzeige der Bezüge
BEZUEGE
— — — 86
Mit dieser Funktion kann die Zeit eingestellt werden, zu der das Gerät automatisch einschaltet.
qTaste %am Display 3 mindestens 3 Sekunden gedrückt halten.
q Mit <oder >EIN UM auswählen.
qTaste %drücken, Stundenanzeige blinkt.
qMit <oder >Einstellung vornehmen.
qTaste %drücken, Minutenanzeige blinkt.
qMit <oder >Einstellung vornehmen.
qTaste %zum Speichern der Einstellung drücken.
qTaste 6drücken. Zurück zur Bezugsbereitschaft. Einstellung deaktivieren:
qMit <oder >die Zeitangabe auf —:— stellen.
Hinweis: Für die Ausführung dieser Funktion muss die aktuelle Uhrzeit eingestellt sein.
iDie Einschaltzeit bleibt auch bei Stromausfall oder Betätigung des Netzschalters 1 erhalten.
Mit dieser Funktion kann eingestellt werden, nach wieviel Stunden das Gerät ab dem letzten Bezug automatisch in GStand by•’Betrieb schaltet.
qTaste %am Display 3 mindestens 3 Sekunden gedrückt halten.
qMit <oder >AUS NACH auswählen.
qTaste %drücken, Stundenanzeige blinkt.
qMit <oder >Einstellung vornehmen.
qTaste %zum Speichern der Einstellung drücken.
qTaste 6drücken. Zurück zur Bezugsbereitschaft.
iDie Ausschaltzeit bleibt auch bei Stromausfall oder Betätigung des Netzschalters 1 erhalten.
Hier wird die Anzahl der bereits bezogenen Espresso, Kaffee und Pulverkaffee angezeigt. Die Zählung erfolgt automatisch.
qTaste %am Display 3 mindestens 3 Sekunden gedrückt halten.
qMit <oder >BEZUEGE auswählen.
qTaste 6drücken. Zurück zur Bezugsbereitschaft.
i Es können keine Veränderungen vorgenommen werden!
16
Nur aus AStand by»)Betrieb möglich
|
RESET)Funktion |
q |
Gleichzeitig <und >mindestens 3 Sekunden |
|
gedrückt halten — alle eigenen Speicherungen werden |
||
|
gelöscht. |
||
System)Meldungen
Das Gerät zeigt Vorgänge und Meldungen im Display 3 an.
|
Bedeutung |
Abhilfe |
|||
|
Wasser fehlt. |
Frisches, kaltes Wasser in den |
|||
|
WASSER |
||||
|
FUELLEN |
Wassertank 22 einfüllen. |
|||
|
Hinweis: Eine kleine Restmenge Wasser bleibt immer im |
||||
|
Wassertank 22. |
||||
|
Wassertank 22 fehlt oder |
Wassertank 22 einsetzen |
|||
|
nicht richtig eingesetzt. |
||||
|
Kaffeebohnen fehlen. |
Kaffeebohnen in den Bohnen’ |
|||
|
BOHNEN |
||||
|
FUELLEN |
behälter 15 einfüllen. |
|||
|
Hinweis: Die Displayanzeige Bohnen fUEllen leuchtet |
||||
|
so lange, bis erneut Kaffee bezogen wird. |
||||
|
SYSTEM |
DRUECKE |
Wasserleitungssystem |
Bezugstaste 25 drücken. |
|
|
FUELLEN |
CAFE |
im Gerät ist leer. |
||
|
System durch Dampf’ |
System durch Bezug von Heiss’ |
|||
|
SYSTEM |
||||
|
ZU HEISS |
bezug aufgeheizt. |
wasser 0abkühlen lassen. |
||
|
Schale 24 und Schale |
Schale 24 und Schale für |
|||
|
SCHALEN |
||||
|
LEEREN |
für Kaffeesatz 23 sind |
Kaffeesatz 23 entnehmen, |
||
|
voll oder Kontakte 26 ver’ |
ausleeren und wieder einsetzen. |
|||
|
schmutzt. |
Kontakte 26 reinigen und |
|||
|
trocknen. |
||||
|
Schale 24 und Schale für |
Schale 24 und Schale für |
|||
|
SCHALEN |
||||
|
FEHLEN |
Kaffeesatz 23 fehlen. |
Kaffeesatz 23 einsetzen. |
||
|
Der Leuchtring der |
Reinigungsprogramm |
|||
|
GERAET |
||||
|
REINIGEN |
Reinigungstaste +8 |
durchführen — siehe Kapitel |
||
|
leuchtet rot auf. |
AReinigen». |
|||
|
Der Leuchtring der |
Entkalkungsprogramm |
|||
|
GERAET |
||||
|
VERKALKT |
Entkalkungstaste 49 |
durchführen — siehe Kapitel |
||
|
leuchtet rot auf. |
GEntkalken». |
|||
17
|
Bedeutung |
Abhilfe |
|||
|
Die Wirkung des Filters 21 |
Filter 21 wechseln (Best.’Nr. |
|||
|
FILTER |
||||
|
WECHSELN |
ist nach 400 Bezügen oder |
46 1732) oder den Betrieb |
||
|
nach ca. 2 Monaten er’ |
ohne Filter 21 fortsetzen. |
|||
|
schöpft. |
Einstellungen ändern. |
|||
|
Tür zur Brüheinheit 17 ist |
Tür zur Brüheinheit 17 |
|||
|
TUERE |
||||
|
ZU |
nicht geschlossen. |
schließen. |
||
|
Funktionswähler 2 auf zstellen |
||||
|
DREH AUF |
||||
|
KAFFEE |
||||
|
Hinweis: Während die Meldungen WASSER FUELLEN, |
||||
|
TUERE ZU, SCHALEN LEEREN oder SCHALEN |
||||
|
FEHLEN im Display aufleuchten, kann kein Kaffee bezogen |
||||
|
werden. |
||||
Reinigen
Tägliche Reinigung
d Stromschlag)Gefahr!
Vor der Reinigung Netzstecker ziehen.
Achtung
Keine Scheuermittel verwenden!
Das Gerät niemals in Wasser tauchen!
Keinen Dampfreiniger benutzen.
qDas Gerät außen mit einem feuchten Tuch abwischen.
qWassertank 22 ausspülen und mit frischem Wasser auffüllen.
qSchale 24 und Schale für Kaffeesatz 23 entnehmen und entleeren. Nur die Schale für Kaffeesatz 23 im Geschirrspüler reinigen!
qKontakte reinigen.
qInnenraum des Gerätes (Schalen) auswischen oder aussaugen.
Hinweis: Wenn das Gerät mit der Taste d 4 im kalten Zustand eingeschaltet oder nach Bezug von Kaffee in GStand by•’Betrieb versetzt wird, spült das Gerät automatisch. Das System reinigt sich somit selbst.
18
Reinigungsprogramm
GERAET
REINIGEN
GERAET
REINIGEN KAFFEE
SCHALEN
LEEREN
GERAET
REINIGT
TAB IN DECKEL SCHACHT ZU
DRUECKE
CAFE
GERAET
REINIGT
Leuchtet bei eingeschaltetem Gerät der Leuchtring der Reinigungstaste +8 rot auf und erscheint im Display 3 die Meldung GerAEt reinigen, ist das Gerät schnellstmöglich zu reinigen.
Zur Reinigung die beigelegte Reinigungstablette verwenden.
Reinigungstablette erst nach Aufforderung einwerfen.
Diese Tabletten sind speziell für dieses Gerät entwickelt und über den Kundendienst zu beziehen (Best.’Nr. 31 0655).
iWährend des Reinigungsprogramms blinkt der Leuchtring der Reinigungstaste +8.
Achtung
Das Reinigungsprogramm niemals unterbrechen! Flüssigkeiten nicht trinken! Keinesfalls Entkalkungstabletten oder andere Entkalkungsmittel einfüllen.
Während der Dauer des Reinigungsprogramms — ca. 15 Minuten — werden im Display 3 Vorgänge und Handlungsanweisungen angezeigt.
Reinigungsprogramm starten
qWassertank 22 ganz füllen.
qReinigungstaste +8 mindestens 3 Sekunden gedrückt halten.
qSchale 24 und Schale für Kaffeesatz 23 entleeren und wieder einsetzen.
Hinweis: Das Gerät reinigt automatisch. Nächste Displayanzeige abwarten (ca. 1 Minute).
qRechten Gerätedeckel 18 und Deckel vom Schacht für Kaffeepulver 16 öffnen.
qEine Reinigungstablette in Schacht 16 einwerfen.
qDeckel vom Schacht für Kaffeepulver 16 und den rechten Gerätedeckel 18 schließen.
qBezugstaste 25 drücken.
Hinweis: Das Gerät reinigt automatisch. Nächste Displayanzeige abwarten (ca. 10 Minuten).
19
![]()
SCHALEN
LEEREN
KAFFEE
Düse reinigen
qSchale 24 und Schale für Kaffeesatz 23 entleeren und wieder einsetzen.
Der Reinigungsvorgang ist abgeschlossen. Der Leuchtring der Reinigungstaste +8 ist erloschen. Das Gerät ist wieder betriebsbereit.
Achtung
Die Düse 13 nach jedem Gebrauch reinigen.
qSchlauch 13/d in ein Gefäß mit warmem Wasser tauchen.
qPassendes Gefäß unter die Düse 13 stellen.
qAnsaugventil 13/b mit Drehgriff 13/a öffnen.
qFunktionswähler 2 auf =stellen.
d Verbrühungsgefahr!
Nach Einstellung auf =kann es etwas spritzen. Austretender Dampf ist sehr heiß.
Düse 13 nicht berühren oder auf Personen richten.
qFunktionswähler 2 auf zstellen.
qDüse 13 nach Abkühlen außen abwischen.
qDie Düse 13 zum gründlichen Reinigen zerlegen.
20
Entkalken
GERAET
VERKALKT
FILTER
NEIN/ALT
GERAET
VERKALKT KAFFEE
SCHALEN
LEEREN
ANTIKALK DREH AUF IN TANK WASSER
Leuchtet bei eingeschaltetem Gerät der Leuchtring der Entkalkungstaste 49 rot auf und erscheint im Display die Meldung Geraet VERKALKT, das Gerät unverzüglich entkalken. Wird das Gerät nicht nach Anweisung entkalkt, kann es beschädigt werden.
Achtung
Niemals mit Essig oder Mitteln auf Essigbasis entkalken! Keine Reinigungstabletten verwenden.
Das Entkalkungsprogramm niemals unterbrechen! Flüssigkeiten nicht trinken!
iEin Entkalkungsmittel ist im Lieferumfang enthalten, Speziell entwickelte und geeignete Mittel sind über den Kundendienst zu beziehen (Best.’Nr.: 31 0451).
iDer Leuchtring der Entkalkungstaste 49 blinkt während des Entkalkungsprogramms.
Achtung
Das Entkalkungsprogramm startet nur in der
Programmierung FILTER nein/alt.
Keinesfalls mit eingesetztem Filter entkalken.
Während der Dauer des Entkalkungsprogramms — ca. 35 Minuten — werden im Display 3 Vorgänge und Handlungsanweisungen angezeigt.
Die angegebenen Zeiten können abweichen.
Entkalkungsprogrammstarten
qEntkalkungstaste 49 mindestens 3 Sekunden gedrückt halten.
qSchale 24 und Schale für Kaffeesatz 23 entleeren und wieder einsetzen.
qWassertank 22 mit Wasser füllen und Entkalkungsmittel zugeben (gesamte Flüssigkeitsmenge 0,5 Liter)
oder
q0,5 Liter fertige Entkalkungsmischung zugeben.
qEntsprechend großes Auffanggefäß unter Düse 13 stellen.
qFunktionswähler 2 auf 0stellen.
21
GERAET
ENTKALKT
DREH AUF
KAFFEE
GERAET
ENTKALKT
SCHALEN
LEEREN
WASSER
FUELLEN
DREH AUF
WASSER
GERAET
ENTKALKT
DREH AUF
KAFFEE
GERAET
ENTKALKT
SCHALEN KONTAKTE LEEREN REINIGEN
GERAET
SPUELT
KAFFEE
Hinweis: Gerät entkalkt automatisch. Entkalkungslösung fließt in Intervallen in das Auffanggefäß. Nächste Anzeige im Display 3 abwarten (ca. 10 Minuten).
q Funktionswähler 2 auf zstellen.
Hinweis: Gerät entkalkt automatisch. Entkalkungslösung fließt in Intervallen in die Schale 24. Nächste Anzeige im Display 3 abwarten (ca. 10 Minuten).
qSchale 24 und Schale für Kaffeesatz 23 entleeren und wieder einsetzen.
qWassertank 22 ausspülen, mit frischem Wasser bis zur Markierung max füllen und wieder einsetzen.
qAuffanggefäß ausleeren und wieder unter die Düse 13 stellen.
qFunktionswähler 2 auf 0stellen.
Hinweis: Gerät spült automatisch. Wasser fließt in Intervallen in das Auffanggefäß. Nächste Anzeige im Display 3 abwarten (ca. 4 Minuten).
q Funktionswähler 2 auf zstellen.
Hinweis: Gerät spült automatisch. Wasser fließt in Intervallen in die Schale 24. Nächste Anzeige im Display 3 abwarten (ca. 4 Minuten).
qSchale 24 und Schale für Kaffeesatz 23 entleeren.
qKontakte 26 reinigen und trocknen.
qSchale 24 und Schale für Kaffeesatz 23 wieder einsetzen.
qSpritzer auf Düse 13 und Gerät abwischen.
Hinweis: Gerät spült automatisch.
Der Entkalkungsvorgang ist abgeschlossen. Der Leuchtring der Entkalkungstaste 49 ist erloschen. Das Gerät ist wieder betriebsbereit.
22
Heißwasser ablassen
SYSTEM
ZU HEISS
Das Entkalkungsprogramm benötigt eine bestimmte Wassertemperatur zum Start. Ist diese zu hoch, erst Heißwasser ablassen!
qGeeignetes Auffanggefäß unter die Düse 13 stellen.
qFunktionswähler 2 auf 0stellen. Wasser läuft in das Auffanggefäß.
qFunktionswähler 2 auf zstellen.
Die benötigte Temperatur ist erreicht. Mit dem Entkalkungsvorgang kann begonnen werden.
Kleine Störungen selbst beheben
|
Störung |
Ursache |
Abhilfe |
|
|
Displayanzeige BOHNEN |
Mahlwerk ist noch nicht |
Bezugstaste 25 |
|
|
FUELLEN trotz gefülltem |
automatisch gefüllt worden. |
nochmals drücken. |
|
|
Bohnenbehälter. |
|||
|
Kein Heißwasser’ oder |
Düse 13 ist verstopft. |
Düse 13 gründlich reinigen. |
|
|
Dampfbezug möglich. |
|||
|
Zu wenig Schaum oder zu |
Drehgriff 13/a an Ansaugventil |
Drehgriff 13/a fest in das |
|
|
flüssiger Schaum. |
13/b nicht fest. |
Ansaugventil 13/b eindrücken. |
|
|
Verstopftes Ansaugventil |
Ansaugventil 13/b reinigen. |
||
|
13/b. |
|||
|
Ungeeignete Milch. |
Kalte Milch mit 1,5 % |
||
|
Fettgehalt verwenden. |
|||
|
Kaffee läuft nur tropfenweise. |
Mahlgrad zu fein. |
Mahlgrad gröber einstellen. |
|
|
Pulverkaffee zu fein. |
Gröberes Kaffeepulver |
||
|
verwenden. |
|||
|
Kaffee hat keine GCrema• |
Ungeeignete Kaffeesorte. |
Kaffeesorte wechseln. |
|
|
(Schaumschicht). |
|||
|
Bohnen nicht mehr röstfrisch. |
Frische Bohnen verwenden. |
||
|
Mahlgrad nicht auf |
Mahlgrad optimieren. |
||
|
Kaffeebohnen abgestimmt. |
|||
|
Mahlwerk mahlt keine |
Bohnen fallen nicht ins |
Leicht an den Bohnenbehälter |
|
|
Kaffeebohnen. |
Mahlwerk (zu ölig). |
klopfen. |
|
|
Entkalkungsprogramm startet |
Aktuelle Programmierung ist |
Programmierung auf |
|
|
nicht. |
auf: FILTER JA/NEU oder |
FILTER NEIN/ALT |
|
|
Displayanzeige Filter |
stellen — Nie mit eingesetztem |
||
|
wechseln. |
Filter entkalken. |
||
|
System zu heiß. |
Heisswasser beziehen. |
||
|
Reinigungsprogramm startet |
System zu heiß. |
Heisswasser beziehen. |
|
|
nicht. |
|||
|
Displayanzeige Filter |
Filter auswechseln. |
||
|
wechseln. |
|||
23
|
Störung |
Ursache |
Abhilfe |
|
|
Lautes Geräusch des |
Fremdkörper im Mahlwerk |
Hotline kontaktieren. |
|
|
Mahlwerks. |
(z. B. Steinchen, die auch |
Hinweis: Pulverkaffee kann |
|
|
bei erlesenen Kaffeesorten |
|||
|
weiterhin zubereitet werden. |
|||
|
vorkommen). |
|||
|
Displayanzeige |
Gerät zu kalt. |
Erwärmung des Gerätes auf |
|
|
STÖRUNG |
1 |
Raumtemperatur abwarten. |
|
|
Displayanzeige |
Technische Störung. |
Mit dem Netzschalter 1 |
|
|
STÖRUNG |
5 |
das Gerät für mindestens |
|
|
oder |
10 Sekunden abschalten. |
||
|
STÖRUNG |
8 |
||
Können Störungen nicht behoben werden, unbedingt die Hotline anrufen! Telefon Nr. 0 18 05 54 74 36
Änderungen vorbehalten
24
Table of Contents
Important information . . . . . . . . . . . . . . . . . . . . . . . . . . . . . 27
Safety instructions . . . . . . . . . . . . . . . . . . . . . . . . . . . . . . . . . 27
Before using your appliance for the firstGtime . . . . . . . . . 28
Filling up the pipe system . . . . . . . . . . . . . . . . . . . . . . . . . . . . 28
Controls . . . . . . . . . . . . . . . . . . . . . . . . . . . . . . . . . . . . . . . . . 29 Preparation . . . . . . . . . . . . . . . . . . . . . . . . . . . . . . . . . . . . . . 32
General . . . . . . . . . . . . . . . . . . . . . . . . . . . . . . . . . . . . . . . . . . 32 Using espresso/ coffeeRbeans . . . . . . . . . . . . . . . . . . . . . . . . 32 Adjusting the grindingRunit . . . . . . . . . . . . . . . . . . . . . . . . . . . 32 Using ground espresso/coffee powder . . . . . . . . . . . . . . . . . 33 Preparing hot water . . . . . . . . . . . . . . . . . . . . . . . . . . . . . . . . 33 Steam for heating drinks . . . . . . . . . . . . . . . . . . . . . . . . . . . . 33 Preparing frothy milk . . . . . . . . . . . . . . . . . . . . . . . . . . . . . . . . 34
Changing settings / programming . . . . . . . . . . . . . . . . . . . 35
Programming . . . . . . . . . . . . . . . . . . . . . . . . . . . . . . . . . . . . . 35 Language . . . . . . . . . . . . . . . . . . . . . . . . . . . . . . . . . . . . . . . . 35 Water hardness . . . . . . . . . . . . . . . . . . . . . . . . . . . . . . . . . . . . 36 Filter . . . . . . . . . . . . . . . . . . . . . . . . . . . . . . . . . . . . . . . . . . . . . 36 Temperature . . . . . . . . . . . . . . . . . . . . . . . . . . . . . . . . . . . . . . 37 Current time . . . . . . . . . . . . . . . . . . . . . . . . . . . . . . . . . . . . . . 37 Timer . . . . . . . . . . . . . . . . . . . . . . . . . . . . . . . . . . . . . . . . . . . . 37 Energy saving mode . . . . . . . . . . . . . . . . . . . . . . . . . . . . . . . . 38 Displaying number ofRbrews . . . . . . . . . . . . . . . . . . . . . . . . . . 38 RESET function . . . . . . . . . . . . . . . . . . . . . . . . . . . . . . . . . . . . 38
System messages . . . . . . . . . . . . . . . . . . . . . . . . . . . . . . . . 38 Cleaning the appliance . . . . . . . . . . . . . . . . . . . . . . . . . . . . 40 Descaling the appliance . . . . . . . . . . . . . . . . . . . . . . . . . . . 43 Eliminating minor faults yourself . . . . . . . . . . . . . . . . . . . . 45 Guarantee . . . . . . . . . . . . . . . . . . . . . . . . . . . . . . . . . . . . . . . 46
Deutsch . . . . . . . . . . . . . . . . . . . . . . . . . . . . . . . . . . . . . . . . . 3
Français . . . . . . . . . . . . . . . . . . . . . . . . . . . . . . . . . . . . . . . . . 47
Italiano . . . . . . . . . . . . . . . . . . . . . . . . . . . . . . . . . . . . . . . . . . 71
Nederlands . . . . . . . . . . . . . . . . . . . . . . . . . . . . . . . . . . . . . . 94
Türkçe . . . . . . . . . . . . . . . . . . . . . . . . . . . . . . . . . . . . . . . 117
25
Controls
Appliance components
Information concerning disposal
1 Mains switch
2 Function selector (coffee, steam, hot water)
3 Display with 4 function buttons
4d button
52button
6Rotary knob for adjusting the filling quantity (— (/ 8— 8
7 Rotary knob for adjusting the coffee strength /— 7 8 +button
9 4descaling button
10Document holder
11Cord store
12Height’adjustable coffee outlet
13Hinged nozzle with frothing device (froth, steam, hot water) M dishwasher’proof
|
a |
Knob |
|
b |
Inlet valve |
|
c |
Connection bracket |
|
d |
Hose |
|
e |
T’piece |
|
f |
Sleeve |
14Rotary knob for degree of ground coffee
15Bean container with aroma cover
16Ground coffee duct with cover = cleaning tablet duct
17Door for brewing unit
18Right cover of the appliance
19Cup shelf (pre’warming function)
20Left cover of the appliance
21Filter (optional accessory)
22Detachable water tank
23Coffee dregs tray (dishwasher’proof)
24Tray (for residual water)
25Grille
26Contacts
Please ask your dealer or inquire at your local authority aboutRcurrent means of disposal.
26
Important information
Safety instructions
Carefully read the operating instructions and keep in the document holder 10!
This appliance is designed for domestic use and for processing normal quantities of food and not for industrial use.
d Risk of electric shock
Connect and operate the appliance only in accordance withRthe specifications on the rating plate.
Do not use the appliance if the power cord or appliance isRdamaged.
Use the appliance indoors at room temperature only.
Keep children away from the appliance.
If the appliance malfunctions, pull out the mains plug immediately.
Never immerse the appliance in water.
To prevent injury, repairs such as replacing a damaged cord, should be carried out by our customer service only.
Do not touch the grinder. d Risk of scalding!
Grip nozzle 13 by the plastic part only. Never direct nozzle 13 at people! When steam or hot water is released, nozzle 13 may spurt initially.
27
Before using your appliance for the firstGtime
General
Switching on the appliance
COFFEE
Filling up the pipe system
|
FILL UP |
PRESS |
|
PIPE-SYS |
CAFE |
|
PIPE-SYS |
|
|
FILLS UP |
|
Selecting the language
Sprache deutsch
Fill the respective containers with pure water and coffee beans only.
Do not use coffee beans which have been glazed, caramelised or treated with other additives containing sugar.
Ascertain the water hardness with the enclosed test strip. If a hardness value other than 3 is indicated, switch on the appliance and program accordingly (see page 36).
qPull the power cord out of the cord store and connect.
qFill water tank 22 with cold fresh water. Do not fill above •max.» mark.
qFill the bean container 15 with coffee beans.
qSet mains switch 1 to I.
qSet function selector 2 to z.
qPress button d 4.
iThe appliance is ready for use when the illuminated ringsRon button d 4 and on the 2button 5 are litRgreen.
Note: If the appliance is being used for the first time or has not been operated for a prolonged period, the first cup of coffee will not have the full aroma and should not be drunk.
For production reasons when switched on for the first time, the water pipe system in the appliance may occasionally have to be refilled:
q Press the 2button 5.
To change the display to the desired language:
qHold down button %on the display 3 for at least 3 seconds.
qPress button %until the display flashes.
qSelect the desired language with <or >.
qPress button %to save the language.
qPress the &button.
28
Controls
COFFEE
WATER
ON
|
UNIT IS |
MIND THE |
|
HEATING |
STEAM |
|
STEAM |
|
|
ON |
|
Mains switch 1
The mains switch 1 on the rear of the appliance switches theRpower supply on or off.
When the mains switch has been switched on, the illuminated ring on button d 4 is lit green. The appliance is in standby mode.
Warning
Do not press the mains switch while the appliance is5operating.
Do not switch off the appliance until it is in standby mode.
Function selector 2
Coffee, hot water or steam can be selected by rotating function selector 2.
d Risk of scalding!
When the function selector is set to 0, the nozzle may spurt slightly. Escaping steam is very hot.
The settings are displayed:
Coffee on z
Hot water on 0
Steam on =
Displays during the brief heating up period for Steam on.
29
![]()
UNIT IS HEATING
UNIT IS RINSING
Display 3
Display 3 indicates the settings, the processes which are running and any messages issued by the appliance.
The appliance has been programmed ex works with standard settings for optimum operation. These settings can be changed M see chapter •Changing settings / programming».
Button d 4
The appliance is switched on or set to standby mode with button d 4.
When button d 4 is pressed, the appliance heats up and is then rinsed. The illuminated ring on button d 4 flashes during this process.
The appliance is not rinsed if:
—the appliance was still warm when switched on or
—no coffee was brewed before the appliance was switched to «Standby» mode.
Heating and washing processes are displayed.
While coffee is being brewing, button d 4 is assigned a stop function. The process is terminated by pressing button d 4.
i4 hours after the last coffee was brewed, a rinsing process is automatically actuated and the appliance switches to •standby» mode. These settings can be changed M see chapter •Changing settings / programming».
cafe button 5
Espresso or coffee can be brewed by pressing the 2button 5. The green illuminated ring flashes whileRespresso or coffee is being brewed.
If the 2button 5 is pressed again, the coffee brewing process is terminated.
30
ESPRESSO
2 ESPRESSO
NORMAL PLUS
Rotary knob for adjusting the filling quantity 6
(— (/ 8— 8
The amount of liquid is adjusted with rotary knob (— (/ 8— 86.
One of 6 settings can be selected by rotating the knob in an anti’clockwise direction:
SMALL ESPRESSO ESPRESSO
SMALL COFFEE COFFEE
LARGE COFFEE XXL COFFEE
One of 6 settings can be selected for 2 cups by rotating the knob in a clockwise direction:
2 SMALL ESPRESSO
2ESPRESSO
2SMALL COFFEES
2COFFEES
2LARGE COFFEES
2XXL COFFEES
Outlet 12 has two nozzles for filling 2 cups.
Rotary knob 7 /— 7for adjusting the coffee strength.
The amount of ground coffee is selected with rotary knob /— 77.
VERY MILD
MILD
NORMAL
NORMAL PLUS
STRONG
VERY STRONG
The selected coffee strength is displayed:
+button 8
4descaling button 9
If the appliance requires cleaning or descaling, the illuminated ring lights up on the +button 8 or the 4descaling button 9 M see chapter •Cleaning the appliance» or •Descaling the appliance».
31
Preparation
General
Using espresso/ coffeeGbeans
Adjusting the grindingGunit
This fully automatic espresso/coffee machine grinds fresh coffee for each brewing process.
Preferably use a mixture of espresso and coffee beans. StoreRor deep’freeze in cool, air’tight and sealed containers. Deep’frozen coffee beans can also be ground.
Tip: Prewarm cup(s), especially small, thick’walled espresso cups, on the cup shelf 19 or fill with hot water and rinse out.
Set function selector 2 to z.
qSelect the desired amount of coffee and number of cups with rotary knob (— (/ 8— 86.
qSelect the preferred coffee strength with rotary knob /— 77.
qPlace the cup(s) under the outlet 12. If required, adjustRthe height of the outlet 12.
qPress the 2button 5. The brewing process nowRruns automatically.
Tip: If brewing coffee simultaneously for 2 cups, selectRSTRONG or VERY STRONG.
iThe brewing process can be terminated by pressing theR2button 5 or button d 4 again.
Note: If ADD BEANS is displayed despite a full bean container, the grinder must still be filled automatically.
qPress the 2button 5 again.
qThe desired degree of ground coffee can be selected withRthe Rotary knob for degree of ground coffee 14.
Warning
Adjust the degree of grinding only while the grinding unit is5running! Otherwise the appliance may be damaged.
qOpen the right cover of the appliance 18.
qPress the 2button 5.
qWhile the grinding unit is running, turn the knob to select the degree of grinding:
the smaller the dots the finer the ground coffee.
iThe new setting will not become apparent until the second or third cup of coffee.
32
Using ground espresso/coffee powder
Preparing hot water
Steam for heating drinks
qSelect the desired amount with the rotary knob (— (/8— 86.
qPlace cup(s) under the outlet 12. If required, adjust the height of the outlet 12.
qOpen the right cover of the appliance 18 and the cover onRthe ground coffee duct 16.
qAdd one to two level scoops of medium’fine ground coffee to the ground coffee duct 16.
Warning!
Do not add whole beans or instant coffee!
Add a maximum two scoops of coffee.
qClose the cover on the ground coffee duct 16 and the right cover of the appliance 18.
qPress the 2button 5.
i Repeat the process for another cup of preground coffee.
Note: If coffee is not brewed within 90 seconds, the brewing chamber is emptied automatically in order to prevent overfilling. The appliance is rinsed.
qClose inlet valve 13/b with rotary knob 13/a.
qPlace an appropriate cup under the nozzle 13.
qRotate function selector 2 to 0and fill the cup. d Risk of scalding!
When the function selector is set to 0, the nozzle may spurt slightly.
Escaping steam is very hot.
Do not touch nozzle 13 or direct at people.
qEnd the process by rotating the function selector 2 backRto z.
qClose inlet valve 13/b with rotary knob 13/a.
qImmerse nozzle 13 deep into the liquid which isRtoRbeRheated.
qSlowly rotate function selector 2 to =.
The appliance now heats up for approx. seconds. ThenRthe liquid is heated.
d Risk of scalding!
When the function selector is set to =, the nozzle may spurt slightly.
Escaping steam is very hot.
Do not touch nozzle 13 or direct at people.
qEnd the process by rotating the function selector 2 backRto z.
Note: When nozzle 13 has cooled down, clean immediately. Dried residue is difficult to remove.
33
q Open inlet valve 13/b with rotary knob 13/a.
|
Preparing frothy milk |
q |
Immerse hose 13/d into a receptacle containing milk. |
q Place an appropriate cup under the nozzle 13. q Slowly rotate function selector 2 to =.
The appliance now heats up for approx. 20 seconds, then draws in the milk and froths it.
d Risk of scalding!
When the function selector is set to =, the nozzle may spurt slightly. Escaping steam is very hot.
Do not touch nozzle 13 or direct at people.
q Before the receptacle has been completely drained ofRmilk: End the process by rotating the function selector 2 backRto z.
q Take the hose 13/d out of the receptacle.
Note: When nozzle 13 and hose 13/d have cooled down, rinse immediately with clear water and clean M see •Cleaning the appliance / Cleaning the nozzle».
Dried residue is very difficult to remove and impairs formation of the frothy milk.
Tip: Preferably use semi’skimmed milk.
Milk drinks, such as cocoa, can be prepared in the same wayRas frothy milk. The frothy milk can be optimised by rotating the knob 13/a slightly.
34
Changing settings / programming
Programming
Sprache deutsch
Language
Sprache deutsch
The appliance has been set ex works so that coffee can be brewed without any additional programming.
These basic settings can be changed with the function buttons under display 3.
<Selection button
%Access to programming mode / Save settings
&Terminate programming
>Selection button
Warning
Do not switch off the appliance during programming. Otherwise changes will not be accepted.
The appliance must be switched on before the standard settings can be changed.
The following settings can be changed:
—Language
—Water hardness
—Filter
—Temperature
—Current time
—Timer function
—Energy saving mode
Factory settings have a grey background in this chapter M see example opposite.
To change the display to the desired language:
qHold down button %on display 3 for at least 3 seconds.
qPress button %until the display flashes.
qSelect the desired language with <or >.
qPress button %to save the setting.
qPress the &button. Back to standby.
35
Water hardness
HARDNESS
WATER 1
HARDNESS
WATER 2
HARDNESS
WATER 3
HARDNESS
WATER 4
Filter
FILTER
YES/NEW
FILTER
NO/OLD
i The following other languages are available:
|
LANGUAGE |
LANGUE |
|
|
ENGLISH |
FRANCAIS |
|
|
LINGUA |
IDIOMA |
|
|
ITALIANO |
ESPANOL |
|
|
TAAL |
SPRAK |
|
|
NEDERL. |
SVENSKA |
|
|
JASYK |
||
|
RUSSKIY |
||
qAscertain the water hardness with the supplied test strip, e.g.: = hardness 2
qHold down button %on display 3 for at least 3 seconds.
q Select HARDNESS WATER with <or>.
qPress button %until the number in the display flashes.
qSelect the ascertained hardness with <or >.
qPress button %to save the setting.
qPress the &button. Back to standby.
Note: It is important for the descaling programme that the water hardness is set correctly.
If external water softeners are used in the domestic water system or if filtered water is used, select HARDNESS WATER 1.
A filter 21 (order no. 46 1732) is available as an optional accessory for the water tank 22. Follow the instructions enclosed with the filter 21.
i First insert filter 21, then change the appliance setting.
qHold down button %on display 3 for at least 3 seconds.
qSelect FILTER with<or >.
qPress button %until the display flashes.
qChange the setting with <or >.
qPress button %to save the setting.
qPress the &button. Back to standby.
Note: Change or remove used filter 21 as soon as system message FILTER CHANGE is displayed! If a new filter is not inserted, check that the appliance has been set to FILTER n0/old and check the water hardness.
36
Temperature
TEMP. normal
TEMP. high
TEMP.
MAXIMUM
Current time
TIME —:—
TIME 14:39
Timer
ON AT —:—
ON AT 07:45
The coffee temperature can be set with this function.
qHold down button %on display 3 for at least 3 seconds.
qSelect TEMP. with <or >.
qPress button %until the display flashes.
qChange the setting with <or >.
qPress button %to save the setting.
qPress the &button. Back to standby.
The current time is programmed with this function. This is required when using the timer function.
qHold down button %on display 3 for at least 3 seconds.
qSelect TIME with <or >.
qPress button %— hours display flashes.
qChange the setting with <or>.
qPress button %— minutes display flashes.
qChange the setting with <or >.
qPress button %to save the setting.
qPress the &button. Back to standby.
The set time will be deleted
—if the mains plug is pulled out,
—if the appliance is switched off with the mains switch 1,
—if there is a power failure.
The current time must be input again.
This function is used to set the time at which the appliance automatically switches on.
q Hold down button %on display 3 for at least 3 seconds. q Select ON AT with <or>.
qPress button %, hours display flashes.
qChange the setting with <or >.
qPress button %, minutes display flashes.
qChange the setting with <or >.
qPress button %to save the setting.
qPress the &button. Back to standby. De’activating the setting:
qSet the time to —:— with <or>.
Note: The current time must be set for this function to run.
iThe switch’on time is retained even if there is a power failure or the mains switch 1 is actuated.
37
Energy saving mode
OFF IN 4 HOURS
OFF IN 2 HOURS
Displaying number ofGbrews
NO.BREWS
— — — 86
RESET function
This function is used to specify after how many hours following the last brew the appliance automatically switches to standby mode.
q Hold down button %on display 3 for at least 3 seconds. q Select OFF IN with <or>.
qPress button %, hours display flashes.
qChange the setting with <or >.
qPress button %to save the setting.
qPress the &button. Back to standby.
iThe switch’off time is retained even if there is a power failure or the mains switch 1 is actuated.
The number of brewed espressos, coffees and preground coffees is displayed here. The number of brews are counted automatically.
qHold down button %on display 3 for at least 3 seconds.
qSelect NO.BREWS with<or>.
qPress the &button. Back to standby.
i This number cannot be changed!
Possible from •standby» mode only
qSimultaneously hold down <and >for at least 3 seconds M all saved settings are deleted.
System messages
The appliance indicates processes and messages on displayR3.
|
Meaning |
Remedial action |
||
|
No water. |
Pour fresh, cold water into the |
||
|
ADD |
|||
|
WATER |
water tank 22. |
||
|
Note: There is always a small amount of water left in the water |
|||
|
tank 22. |
|||
|
Water tank 22 is missing |
Insert water tank 22. |
||
|
orRnot inserted correctly. |
|||
|
No coffee beans. |
Add coffee beans to the bean |
||
|
ADD |
|||
|
BEANS |
container 15. |
||
|
Note: The ADD BEANS display is lit until coffee is brewed |
|||
|
again. |
|||
38
|
Meaning |
Remedial action |
|||
|
Water pipe system in the |
Press 2button 5. |
|||
|
FILL UP |
PRESS |
|||
|
PIPE-SYS |
CAFE |
appliance is empty. |
||
|
System heated up by |
Allow system to cool down by |
|||
|
SYSTEM |
||||
|
TOO HOT |
Steam on. |
letting out some hot water 0. |
||
|
Tray 24 and coffee dregs |
Remove, empty, and re’insert |
|||
|
EMPTY |
||||
|
TRAYS |
tray 23 are full, or contacts |
tray 24 and coffee dregs tray 23. |
||
|
26 soiled. |
Clean and dry contacts 26. |
|||
|
Tray 24 and coffee dregs |
Insert tray 24 and coffee dregs |
|||
|
TRAYS |
||||
|
MISSING |
tray 23 are missing. |
tray 23. |
||
|
The illuminated ring on the |
Run cleaning programme M |
|||
|
CLEAN |
||||
|
UNIT |
+button 8 is lit red. |
see chapter •Cleaning the |
||
|
appliance». |
||||
|
The illuminated ring on the |
Run descaling programme M |
|||
|
UNIT |
||||
|
CALCIF. |
4descaling button 9 |
see chapter •Descaling the |
||
|
is lit red. |
appliance». |
|||
|
The filter 21 is no longer |
Change filter 21 (order no. |
|||
|
FILTER |
||||
|
CHANGE |
effective after 400 brews |
46 1732) or continue operating |
||
|
or approx. 2 months. |
the appliance without filter 21. |
|||
|
Change settings. |
||||
|
Door of brewing unit 17 is |
Close door of brewing unit 17. |
|||
|
CLOSE |
||||
|
THE DOOR |
not closed. |
|||
|
Set function selector 2 to z. |
||||
|
TURN ON |
||||
|
COFFEE |
||||
|
Note: While the messages ADD WATER, CLOSE THE |
||||
|
DOOR, EMPTY TRAYS or TRAYS MISSING are |
||||
|
displayed, coffee cannot be brewed. |
||||
39
![]()
Cleaning the appliance
Daily cleaning
Cleaning programme
CLEAN
UNIT
d Risk of electric shock!
Pull out the mains plug before cleaning the appliance.
Warning
Do not use scouring agents!
Never immerse the appliance in water!
Do not use a steam cleaner.
qWipe the outside of the appliance with a damp cloth.
qRinse out the water tank 22 and fill with fresh water.
qRemove and empty tray 24 and coffee dregs tray 23. Only the coffee dregs tray 23 may be cleaned in the dishwasher!
qClean contacts.
qWipe out or vacuum the interior of the appliance (trays).
Note: If the appliance is switched on in a cold state with button d 4 or is set to standby after brewing coffee, the appliance is automatically rinsed. The system therefore cleans itself.
If the illuminated ring on the +button 8 is lit red and theRmessage CLEAN UNIT is indicated on display 3 when the appliance is switched on, the appliance must be cleaned as quickly as possible.
Clean the appliance with the enclosed cleaning tablet.
Do not drop in the cleaning tablet until you are prompted to do so.
These tablets have been specially developed for this appliance and are available from customer service (order no. 31 0655).
|
i While the cleaning programme is running, the illuminated |
|||
|
ring on the +button 8 flashes. |
|||
|
Warning |
|||
|
Never interrupt the cleaning programme! Do not drink liquid! |
|||
|
Never use descaling tablets or other descaling agents. |
|||
|
While the cleaning programme is running — |
|||
|
CLEAN |
|||
|
UNIT |
COFFEE |
approx. 15 minutes — processes and instructions are |
|
|
indicated on display 3. |
|||
40
EMPTY
TRAYS
UNIT IS
CLEANING
|
PILL |
IN CLOSE |
|
DUCT |
THE LID |
|
PRESS |
|
|
CAFE |
|
|
UNIT |
IS |
CLEANING
EMPTY
TRAYS
COFFEE
Start cleaning programme
qCompletely fill water tank 22.
qHold down+button 8 for at least 3 seconds.
qEmpty and re’insert tray 24 and coffee dregs tray 23.
Note: The appliance is automatically cleaned. Wait for the next display (approx. 1 minute).
qOpen the right cover of the appliance 18 and duct cover for ground coffee 16.
qDrop a cleaning tablet in the duct 16.
qClose the cover on the ground coffee duct 16 and the right cover of the appliance 18.
qPress the 2button 5.
Note: The appliance is automatically cleaned. Wait for the next display (approx. 10 minutes).
q Empty and re’insert tray 24 and coffee dregs tray 23.
The cleaning process is complete. The illuminated ring on +button 8 goes out. The appliance is ready for use again.
41
Warning
|
Cleaning the nozzle |
Clean the nozzle 13 after each use. |
|
q Immerse the hose 13/d into a receptacle of warm water. |
|
|
q Place an appropriate receptacle under the nozzle 13. |
|
|
q Open the inlet valve 13/b with rotary knob 13/a. |
|
|
q Briefly set function selector 2 to =. |
|
|
d Risk of scalding! |
|
|
When the function selector is set to =, the nozzle may |
|
|
spurt slightly. |
|
|
Escaping steam is very hot. |
|
|
Do not touch nozzle 13 or direct at people. |
|
|
q Set function selector 2 to z. |
|
|
q Wipe the outside of the nozzle 13 after it has cooled |
|
|
down. |
|
|
q Dismantle the nozzle 13 to clean thoroughly. |
|
42
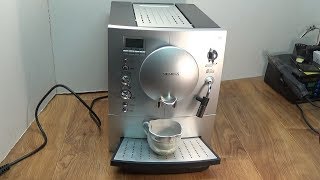 31:51
31:51
Кофемашина Siemens Поиск неисправности
 12:14
12:14
Замена редуктора на кофемашине Siemens TK68E, часть 1
 02:17
02:17
Bosch-Siemens много воды льет в поддон (каплесборник).
 01:55
01:55
Как правильно промыть и смазать варочный блок кофемашин Siemens, Bosch
 07:49
07:49
Чистка от накипи и кофейных масел кофемашины Bosch TCA 5401
 09:34
09:34
Кофеварка / кофеавтомат / Кофемашина / кавоварка Siemens TK 64001- S40
 18:00
18:00
Siemens TK 58001, замена дренажного клапана.
 14:52
14:52
Чистка кофемашины Siemens
Инструкция по эксплуатации Кофеварка TK …
Инструкция по эксплуатации
- Изображение
- Текст
Инструкция по эксплуатации
Кофеварка
TK 64001
Напечатано в России / ноябрь 2006 / 1000 / GA2514
900268

Информация для предварительного ознакомления. Официальной и…
Страница 2
- Изображение
- Текст
1
Информация для предварительного ознакомления. Официальной информацией изготовителя не является.
Содержание
Обзор . . . . . . . . . . . . . . . . . . . . . . . . . . . . . . . . . . . . . . . . 2
Элементы управления . . . . . . . . . . . . . . . . . . . . . . . . . . 2
Элементы конструкции . . . . . . . . . . . . . . . . . . . . . . . . . . 2
Указания по утилизации . . . . . . . . . . . . . . . . . . . . . . . . . 2
На что следует обратить особое внимание . . . . . 3
Указания по технике безопасности . . . . . . . . . . . . . . . 3
Перед первым использованием . . . . . . . . . . . . . . . 4
Общая информация . . . . . . . . . . . . . . . . . . . . . . . . . . . . 4
Ввод в эксплуатацию . . . . . . . . . . . . . . . . . . . . . . . . . . . 4
Наполнение системы . . . . . . . . . . . . . . . . . . . . . . . . . . . 5
Установка языка сообщений . . . . . . . . . . . . . . . . . . . . . 5
Элементы управления . . . . . . . . . . . . . . . . . . . . . . . . 5
Приготовление кофе . . . . . . . . . . . . . . . . . . . . . . . . . . 9
Общая информация . . . . . . . . . . . . . . . . . . . . . . . . . . . . 9
Приготовление кофе из кофейных зерен
«эспрессо»/обычных кофейных зерен . . . . . . . . . . . . . 9
Регулировка кофемолки . . . . . . . . . . . . . . . . . . . . . . . . 10
Приготовление кофе из молотого кофе
«эспрессо»/обычного молотого кофе . . . . . . . . . . . . 10
Приготовление горячей воды . . . . . . . . . . . . . . . . . . . 11
Приготовление пара . . . . . . . . . . . . . . . . . . . . . . . . . . . 11
Приготовление молочной пены . . . . . . . . . . . . . . . . . 11
Изменение установок/Программирование . . . . 12
Системные сообщения . . . . . . . . . . . . . . . . . . . . . . . 17
Чистка . . . . . . . . . . . . . . . . . . . . . . . . . . . . . . . . . . . . . . . 19
Ежедневная чистка . . . . . . . . . . . . . . . . . . . . . . . . . . . . 19
Программа чистки . . . . . . . . . . . . . . . . . . . . . . . . . . . . . 19
Чистка насадки . . . . . . . . . . . . . . . . . . . . . . . . . . . . . . . 21
Удаление накипи . . . . . . . . . . . . . . . . . . . . . . . . . . . . . 22
Как самостоятельно устранить
мелкие неисправности . . . . . . . . . . . . . . . . . . . . . . . 25

Обзор, Элементы управления, Элементы конструкции
Указания по утилизации
- Изображение
- Текст
2
Информация для предварительного ознакомления. Официальной информацией изготовителя не является.
Обзор
1
Выключатель
2
Переключатель выбора функций
(кофе, пар, горячая вода)
3
Дисплей с 4 функциональными клавишами
4
Кнопка
5
Кнопка отбора кофе cafe
6
Ручка регулировки количества получаемой
жидкости
–
/
–
7
Ручка регулировки крепости кофе
8
Кнопка проведения чистки clean
9
Кнопка удаления накипи calc
Элементы
управления
См. иллюстрации на стр. 27–30.
Элементы
конструкции
10
Держатель для инструкции
11
Отделение для сетевого шнура
12
Регулируемое по высоте приспособление
для разлива кофе
13
Поворотная насадка с приспособлением
для вспенивания молока, подачи пены, пара
и горячей воды:
а вращающаяся ручка
b всасывающий клапан
c соединительный уголок
d трубка
e тройник
f втулка
14
Ручка регулировки степени помола кофе
15
Емкость с герметичной крышкой
для кофейных зерен
16
Ствол с крышкой для загрузки молотого
кофе (или таблетки чистящего средства)
17
Дверца блока заваривания кофе
18
Правая крышка кофеварки
19
Подставка для чашек (с подогревом)
20
Левая крышка кофеварки
21
Фильтр (специальная принадлежность)
22
Съемный резервуар для воды
23
Поддон для кофейной гущи (пригоден
для мытья в посудомоечной машине)
24
Поддон (для остатков воды)
25
Решетка
26
Контакты
Указания по
утилизации
Информацию о правильной утилизации домашних
электроприборов Вы можете получить в торговой
организации или в органах коммунального управ
ления.

3
Информация для предварительного ознакомления. Официальной информацией изготовителя не является.
На что следует обратить
особое внимание
Прочтите внимательно инструкцию по эксплуата
ции и положите ее на хранение в держатель 10!
Эта кофеварка не предназначена для промышлен
ного использования. Ею можно пользоваться толь
ко для приготовления кофе в количестве, необхо
димом для домашнего потребления.
Указания по технике
безопасности
Опасность поражения электрическим
током!
Кофеварку следует подключать к сети и вводить в
эксплуатацию только в соответствии с данными,
приведенными на типовой табличке.
Кофеваркой можно пользоваться только в случае,
если на сетевом шнуре и самой кофеварке не за
метно следов повреждения.
Кофеваркой можно пользоваться только во внут
ренних помещениях при комнатной температуре.
Не подпускайте детей близко к кофеварке!
В случае возникновения неисправности немед
ленно извлеките штекер кофеварки из сетевой ро
зетки.
Ни в коем случае не погружайте кофеварку в воду.
Во избежание возникновения опасной ситуации,
ремонт кофеварки (например, замена сетевого
шнура) должен выполняться только специалиста
ми нашей Службы сервиса.
Нельзя вставлять руку в кофемолку.
Опасность ошпаривания!
Браться можно только за пластмассовый наконеч
ник насадки 13. Никогда не направляйте насадку
13 на людей! При отборе пара или горячей воды из
насадки 13 в самом начале могут вырываться
брызги.

Перед первым использованием, Общая информация, Ввод в эксплуатацию
Страница 5
- Изображение
- Текст
4
Информация для предварительного ознакомления. Официальной информацией изготовителя не является.
Общая информация
В соответствующие емкости кофеварки можно за
ливать только чистую воду и загружать кофейные
зерна.
Нельзя использовать глазурованные, карамелизи
рованные кофейные зерна или зерна с какими
либо иными сахаросодержащими добавками. Ина
че кофемолка забьется.
Жесткость используемой воды Вы можете опреде
лить с помощью имеющейся в комплекте поставки
индикаторной бумажной полоски. Если полученное
значение жесткости отличается от значения «3», то
кофеварку следует соответствующим образом зап
рограммировать (см. стр. 12).
Перед первым использованием
Ввод в
эксплуатацию
Извлеките штекер кофеварки из отделения для
электрошнура и вставьте его в розетку.
Наполните резервуар 22 свежей холодной во
дой. Проследите, чтобы уровень воды не захо
дил за отметку «max».
В емкость 15 загрузите кофейные зерна.
Переведите сетевой выключатель 1 в положе
ние «I».
Переключатель выбора функций 2 установите
напротив символа .
Нажмите на кнопку 4.
Кофеварка готова к эксплуатации, если коль
ца вокруг кнопки 4 и кнопки cafe 5 светятся
зеленым светом.
Указание: при использовании кофеварки в первый
раз или включении ее после продолжительного
перерыва первую чашку кофе желательно не пить,
так как этот кофе еще недостаточно ароматный.
KOFE

Элементы управления, Наполнение системы, Установка языка сообщений
Страница 6
- Изображение
- Текст
5
Информация для предварительного ознакомления. Официальной информацией изготовителя не является.
Перед вводом кофеварки в эксплуатацию в первый
раз из за особенностей конструкции в некоторых
случаях необходимо наполнить систему подачи
воды:
Нажмите на кнопку отбора кофе cafe 5.
Наполнение
системы
NAPOLN.
NAZHJMI
SISTEMA
CAFE
SISTEMA
NAPOLN.
Чтобы на дисплее появлялись сообщения на не
обходимом Вам языке, имеющимся в памяти сис
темы:
Нажмите на клавишу P дисплея 3 и не отпус
кайте ее в течение мин. 3 сек.
Нажимать на клавишу P следует до тех пор, пока
индикация на дисплее не замигает.
С помощью клавиш
или
выберите не
обходимый Вам язык.
Для того чтобы выбранный язык сообщений ос
тался в памяти системы, еще раз нажмите на
клавишу P.
Теперь нажмите на клавишу exit.
Установка языка
сообщений
SPRACHE
DEUTSCH
Элементы управления
Выключатель 1
Выключатель 1, расположенный с обратной сто
роны кофеварки, включает и выключает подачу
электроэнергии.
После включения кофеварки с помощью выключа
теля 1 загорается зеленым светом кольцо вокруг
кнопки 4. Кофеварка находится в режиме ожи
дания «Stand by».
Внимание!
Во время работы кофеварки на выключатель нажи
мать нельзя! Кофеварку можно выключать, только
когда она находится в режиме ожидания «Stand by».

Информация для предварительного ознакомления. Официальной и…
Страница 7
- Изображение
- Текст
6
Информация для предварительного ознакомления. Официальной информацией изготовителя не является.
KOFE
OTBOR
WODY
OTBOR
PARA
Установки выводятся на дисплей:
отбор кофе ;
отбор горячей воды
;
отбор пара
.
Индикация на дисплее во время непродолжитель
ного периода нагрева воды для получения пара.
Дисплей 3
На дисплей 3 кофеварки выводятся установки, ин
формация о выполняемых операциях и различные
сообщения.
На заводе изготовителе в память кофеварки были
введены стандартные установки, обеспечивающие
ее оптимальную работу. Эти установки можно из
менить (см. раздел «Изменение установок/Про
граммирование»).
Переключатель выбора функций 2
Путем вращения переключателя 2 можно выбрать,
что будет приготавливаться: кофе, горячая вода
или пар.
Опасность ошпаривания!
После установки переключателя напротив симво
ла
из насадки могут вырваться брызги горячей
воды. Выходящий пар имеет очень высокую тем
пературу.
AVTOMAT
VNIMANIE
NAGREV.
PAR

Информация для предварительного ознакомления. Официальной и…
Страница 8
- Изображение
- Текст
7
Информация для предварительного ознакомления. Официальной информацией изготовителя не является.
Кнопка 4
С помощью кнопки 4 кофеварка включается и пе
реводится в режим ожидания или из режима ожи
дания в режим готовности к отбору кофе.
После нажатия на кнопку 4 кофеварка нагревает
ся и в заключение промывается. Во время выпол
нения этих операций светящееся кольцо вокруг
кнопки 4 мигает.
Промывка не выполняется, если:
при включении кофеварка еще не остыла или
перед переводом кофеварки в режим ожидания
«Stand by» не проводился отбор кофе.
Сообщения о проведении нагрева и промывки вы
водятся на дисплей.
avtomat
nagrev.
avtomat
promyv.
Во время отбора кофе кнопка 4 выполняет функ
цию «Стоп». Путем нажатия на кнопку 4 процесс
отбора кофе преждевременно прекращается.
Через 4 часа после отбора кофе в последний
раз автоматически включается процесс про
мывки, и кофеварка переходит в режим ожида
ния «Stand by». Эти установки могут быть изме
нены (см. раздел «Изменение установок/Про
граммирование»).
Кнопка отбора кофе cafe 5
Путем нажатия на кнопку cafe 5 можно проводить
отбор кофе «эспрессо» или обычного кофе. Во вре
мя отбора кофе светящееся зеленым светом коль
цо вокруг кнопки мигает.
При повторном нажатии на кнопку cafe 5 процесс
отбора кофе преждевременно прерывается.
Ручка регулировки количества получаемой
жидкости –
/
–
6
С помощью ручки 6 устанавливается количество
получаемой жидкости.
Путем вращения ручки против часовой стрелки
можно выбирать одну из 6 установок:
MAL. ESPRESSO
ESPRESSO
MAL. KOFE
KOFE
BOLSHOJ KOFE
XXL KOFE
espresso

Информация для предварительного ознакомления. Официальной и…
Страница 9
- Изображение
- Текст
8
Информация для предварительного ознакомления. Официальной информацией изготовителя не является.
Путем вращения ручки по часовой стрелке можно
выбирать одну из 6 установок для получения 2 ча
шек кофе:
2 MAL. ESPRESSO
2 ESPRESSO
2 MAL. KOFE
2 KOFE
2 BOLSH. KOFE
2 XXL KOFE
Для одновременного отбора 2 чашек кофе в при
способлении 12 имеется два раздаточных отвер
стия.
Ручка регулировки крепости кофе
7
С помощью ручки 7 выбирается количество моло
того кофе:
OTSCHEn SLaByj
SlaByj
normaln.
normaln. PLJUS
KREPkiJ
OTSCHEn KREPKIJ
На дисплей выводится выбранная степень крепос
ти кофе.
normaln.
PLJUS
2
ESPRESSO
Кнопка проведения чистки clean 8
Кнопка удаления накипи calc 9
Если возникает необходимость в очищении кофе
варки или удалении накипи (см. раздел «Чистка»
или «Удаление накипи»), то кольцо вокруг кнопки
clean 8 или вокруг кнопки calc 9 начинает светить
ся красным светом.

9
Информация для предварительного ознакомления. Официальной информацией изготовителя не является.
Приготовление кофе
Эта кофеварка автомат для получения кофе «эсп
рессо» и обычного кофе перед каждой заваркой
приготавливает свежий молотый кофе.
Лучше всего использовать кофейные зерна «эсп
рессо» или смеси зерен для кофеварок автома
тов. Зерна следует хранить в прохладном месте в
герметично закрытой посуде или в морозильни
ке. Перемалывать можно и замороженные кофей
ные зерна.
Рекомендация: чашку(и), особенно маленькие
толстостенные чашечки для кофе «эспрессо», сна
чала подогрейте на подставке 19 или ополосните
горячей водой.
Общая информация
Приготовление
кофе из кофейных
зерен «эспрессо»/
обычных кофейных
зерен
Переключатель выбора функций 2 должен нахо
диться напротив символа .
С помощью ручки
–
/
–
6 установите
необходимое количество кофе и чашек.
С помощью ручки
7 выберите предпочи
таемую Вами крепость кофе.
Поставьте чашку(и) под приспособление для
отбора кофе 12. При необходимости отрегули
руйте приспособление 12 по высоте.
Нажмите на кнопку отбора кофе cafe 5. Процесс
заваривания кофе выполняется автоматически.
Рекомендация: при приготовлении двух чашек
кофе одновременно установите крепость кофе
KREPKIJ
или
otschen KREPKIJ
.
Путем повторного нажатия кнопки отбора кофе
cafe 5 или кнопки 4 можно закончить процесс
заваривания кофе преждевременно.
Рекомендация: если несмотря на полную емкость
для кофейных зерен на дисплее появляется
zagruzka zjoren
, то это значит, что в кофемолку
еще должны быть автоматически загружены кофей
ные зерна.
Еще раз нажмите на кнопку отбора кофе cafe 5.
