У вас уже есть продукция Canon? Зарегистрируйте свои продукты для доступа к программному обеспечению и обновлениям встроенного ПО, а также подпишитесь на рассылку, чтобы получать персонализированные советы и эксклюзивные предложения

Поддержка
Canon EOS 2000D
Загружайте ПО, встроенное ПО и руководства, а также получите доступ к материалам поддержки для вашего продукта серии EOS.
Драйверы
Для выполнения подключения некоторых устройств к компьютеру может потребоваться драйвер. На этой вкладке вы найдете соответствующие драйверы для своего устройства или, в случае отсутствия драйверов, описание совместимости устройства с каждой операционной системой.
Полезная информация. Доступ к программному обеспечению, руководствам и другим материалам можно получить с помощью вкладок, расположенных выше.
Операционная система Обнаруженная операционная система
Программное обеспечение
Программное обеспечение загружать необязательно, но оно обеспечивает дополнительные функции и позволяет максимально эффективно пользоваться возможностями устройства. На этой вкладке можно просмотреть и загрузить доступное программное обеспечение для вашего устройства.
Операционная система Обнаруженная операционная система
Руководства пользователя
Руководства для вашего устройства или программного обеспечения перечислены ниже.
Приложения и функции
На этой вкладке можно посмотреть доступные приложения и функции, совместимые с вашим устройством.
Встроенное ПО
Встроенное ПО — это постоянное программное обеспечение, установленное на устройстве и обеспечивающее его корректную работу. Canon может периодически выпускать обновления для этого встроенного ПО, и если обновление доступно, его можно загрузить ниже.
FAQs
На этой вкладке вы найдете ответы на часто задаваемые вопросы и другую полезную информацию, которая поможет вам в решении вопросов и проблем.
Важная информация
На этой вкладке вы найдете подборку часто задаваемых вопросов, которые, на наш взгляд, будут вам интересны.
Коды ошибок
Код ошибки или сообщение об ошибке может появиться на устройстве по различным причинам. С помощью поля поиска можно найти полезную информацию о конкретном коде ошибки, где будут указаны причина ошибки и необходимые действия по ее устранению.
Технические характеристики
Ниже приведены все технические характеристики данного продукта.
Полезные ссылки
-
-
Ремонт
Поиск центров по ремонту оборудования, полезная информация по процессу ремонта
-
Переработка
Узнайте больше о программе утилизации картриджей Canon
-
Canon ID
Регистрация продукта и управление аккаунтом Canon ID

Instruction manuals (PDF files) and software can be
downloaded from the Canon website (p.4, 315).
www.canon.com/icpd
Instruction Manual
ENGLISH

2
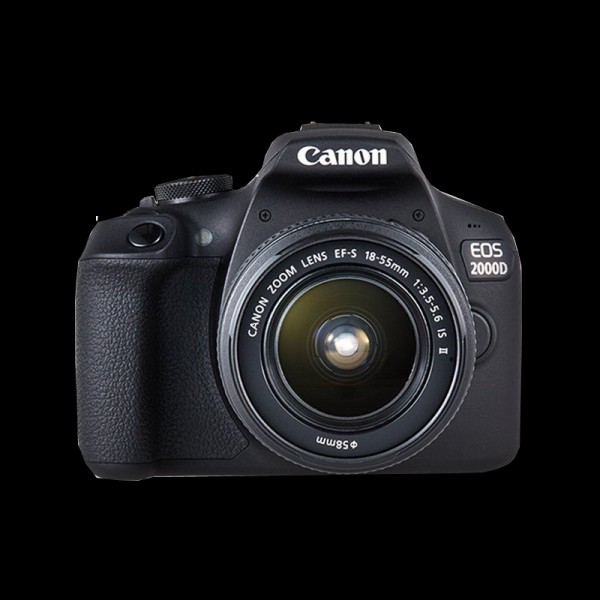
The EOS 2000D is a digital single-lens reflex camera featuring
a fine-detail CMOS sensor with approx. 24.1 effective megapixels,
DIGIC 4+, high-precision and high-speed 9-point AF, approx.
3.0 shots/sec. continuous shooting, Live View shooting,
Full High-Definition (Full HD) movie shooting, and Wi-Fi/NFC
(wireless communication) function.
Before Starting to Shoot, Be Sure to Read the Following
To avoid botched pictures and accidents, first read the “Safety
Instructions” (p.20-22) and “Handling Precautions” (p.23-25). Also,
read this manual carefully to ensure that you use the camera correctly.
Refer to This Manual while Using the Camera to Further
Familiarize Yourself with the Camera
While reading this manual, take a few test shots and see how they
come out. You can then better understand the camera. Be sure to store
this manual safely, too, so that you can refer to it again when necessary.
Testing the Camera Before Use and Liability
After shooting, play images back and check whether they have been
properly recorded. If the camera or memory card is faulty and the
images cannot be recorded or downloaded to a computer, Canon
cannot be held liable for any loss or inconvenience caused.
Copyrights
Copyright laws in your country may prohibit the use of your recorded
images or copyrighted music and images with music in the memory
card for anything other than private enjoyment. Also be aware that
certain public performances, exhibitions, etc. may prohibit photography
even for private enjoyment.
Introduction
3
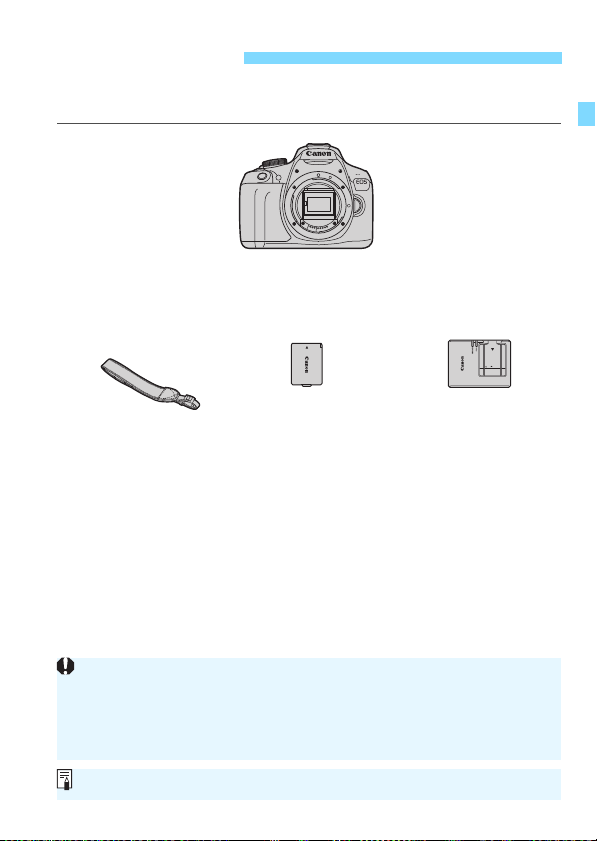
Before starting, check that all the following items are included with your
camera. If anything is missing, contact your dealer.
* Battery Charger LC-E10E comes with a power cord.
The camera does not come with the Software CD-ROM, an interface cable
or HDMI cable.
The Instruction Manuals provided are listed on the next page.
If you purchased a Lens Kit, check that the lenses are included.
Be careful not to lose any of the above items.
For items sold separately, see the System Map (p.278).
Item Check List
Battery Pack LP-E10
(with protective cover)
Battery Charger
LC-E10E*
Strap
Camera
(with eyecup and body cap)
When you need Lens Instruction Manuals, download them from the Canon
website (p.4).
The Lens Instruction Manuals (PDF) are for lenses sold individually. Note
that when purchasing the Lens Kit, some of the accessories included with
the lens may not match those listed in the Lens Instruction Manual.
Software can be downloaded from the Canon website (p.315) for your use.

4
Quick Reference Guide
The booklet describes the basic operations.
More detailed Instruction Manuals (PDF files) can be
downloaded from the Canon website.
1 Download the Instruction Manuals (PDF files).
Connect to the Internet and access the following Canon website.
www.canon.com/icpd
Select your country or region of residence and download the
Instruction Manuals.
Instruction Manuals Available for Download
• Camera Instruction Manual
• Wireless Function Instruction Manual
• Quick Reference Guide
• Lens Instruction Manuals
• Software Instruction Manuals
2 View the Instruction Manuals (PDF files).
Double-click the downloaded Instruction Manual (PDF file) to
open it.
To view the Instruction Manuals (PDF files), Adobe Acrobat
Reader DC or other Adobe PDF viewer (most recent version
recommended) is required.
Adobe Acrobat Reader DC can be downloaded for free from the
Internet.
To learn how to use PDF viewing software, refer to the software’s
Help section.
Instruction Manuals
Downloading and Viewing the Instruction Manuals (PDF Files)

5
The following cards can be used with the camera regardless of
capacity: If the card is new or was previously formatted by another
camera or computer, it is recommended that you format the card
with this camera (p.52).
• SD memory cards
• SDHC memory cards
• SDXC memory cards
When shooting movies, use a large-capacity SD card rated SD
Speed Class 6 “ ” or higher.
If you use a slow-writing card when shooting movies, the movie may
not be recorded properly. Also, if you play back a movie on a card
with a slow reading speed, the movie may not play back properly.
To check the card’s writing/reading speed, refer to the card
manufacturer’s website.
Compatible Cards
Cards that Can Record Movies
The camera can use UHS-I cards, but since it is not compatible with the
UHS-I standard, writing/reading speeds will be equivalent to SD Speed
Class 10 at most.
In this manual, “card” refers to SD memory cards, SDHC memory
cards, and SDXC memory cards.
* The camera does not come with a card for recording images/
movies. Please purchase it separately.
6
Quick Start Guide
1
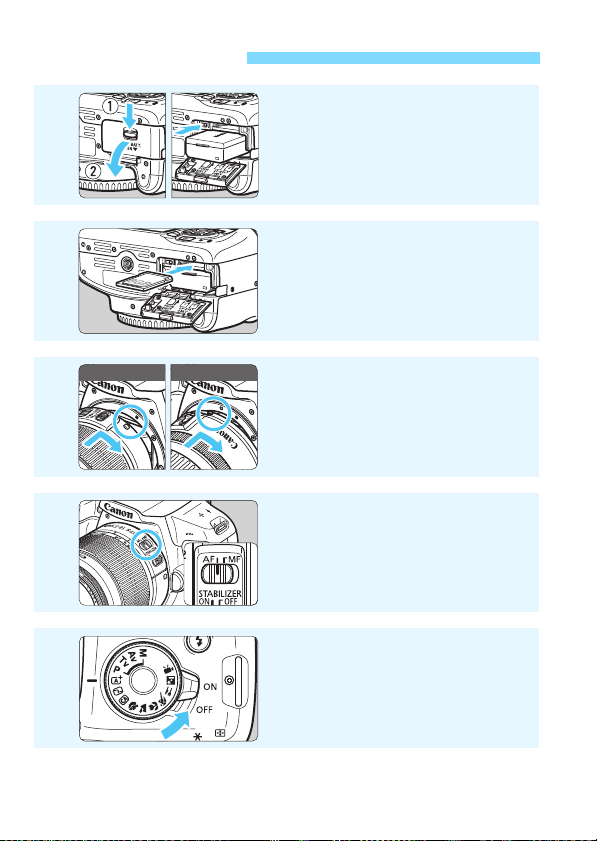
Insert the battery (p.36).
To charge the battery, see page 34.
2
Insert the card (p.36).
With the card’s label facing toward
the back of the camera, insert it into
the card slot.
3
Attach the lens (p.44).
Align the lens’s white or red mount
index with the camera’s mount index
of the same color to attach the lens.
4
Set the lens’s focus mode
switch to <AF>
(p.44).
5
Set the power switch to <1>
(p.39).
When the LCD monitor displays the
date/time/zone setting screen, see
page 41.
7
Quick Start Guide
6
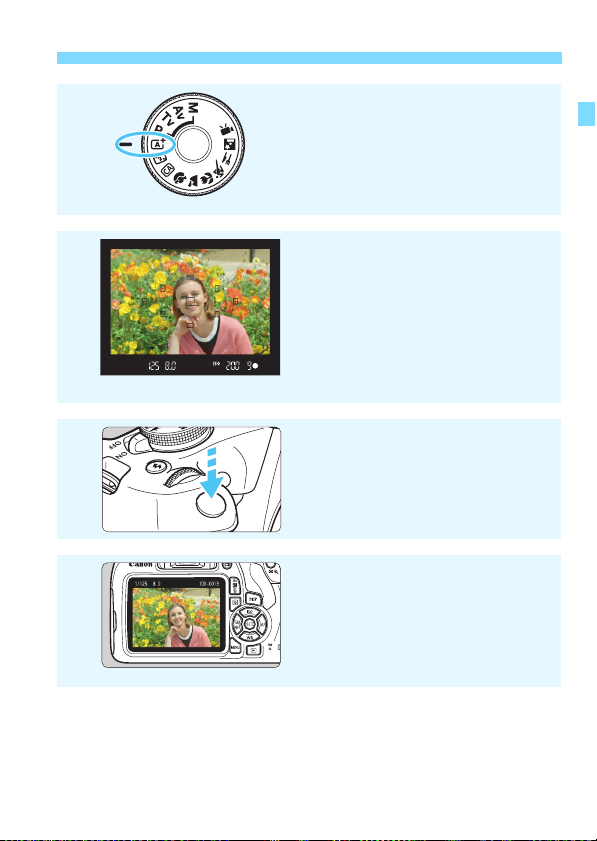
Set the Mode Dial to <A>
(Scene Intelligent Auto) (p.58).
All the necessary camera settings
will be set automatically.
7
Focus on the subject (p.47).
Look through the viewfinder and
aim the viewfinder center over the
subject.
Press the shutter button halfway, and
the camera will focus on the subject.
If necessary, the built-in flash will be
raised.
8
Take the picture (p.47).
Press the shutter button completely
to take the picture.
9
Review the picture.
The captured image will be
displayed for approx. 2 sec. on the
LCD monitor.
To display the image again, press
the <x> button (p.83).
To shoot while looking at the LCD monitor, see “Live View
Shooting” (p.139).
To view the images captured so far, see “Image Playback” (p.83).
To delete an image, see “Erasing Images” (p.230).

8
Icons in this Manual
<6> : Indicates the Main Dial.
<W><X><Y><Z> : Indicates the <S> cross keys on the top,
bottom, left, and right.
<0> : Indicates the Setting button.
0, 9, 7, 8 : Indicates that each function remains active for
approx. 4 sec., 6 sec., 10 sec., or 16 sec. after
you let go of the button.
* In addition to the above, the icons and symbols used on the camera’s buttons
and displayed on the LCD monitor are also used in this manual when discussing
relevant operations and functionality.
3 : Indicates a function that can be changed by pressing the
<M> button to change its settings.
M : This icon at the upper right of the page titles indicates that
the function is available only in the Creative Zone modes
(p.30).
(p.**) : Reference page numbers for more information.
: Warning to prevent shooting problems.
: Supplemental information.
: Tips or advice for better shooting.
: Troubleshooting advice.
Basic Assumptions and Sample Photos
All operations explained in this manual assume that the power switch
is set to <1> (p.39).
It is assumed that all the menu settings and Custom Functions are
set to their defaults.
The illustrations in this manual show the camera attached with the
EF-S18-55mm f/3.5-5.6 IS II lens as an example.
The sample photos used in this manual are only for illustrative
purposes to show the effects more clearly.
Conventions Used in this Manual

9
Chapters
Introduction
2
Getting Started
33
Basic Shooting and Image Playback
57
Creative Shooting
85
Advanced Shooting
107
Shooting with the LCD Monitor (Live View
Shooting)
139
Shooting Movies
159
Handy Features
183
Image Playback
207
Post-Processing Images
235
Printing Images
241
Customizing the Camera
257
Reference
269
Software Start Guide /
Downloading Images to a Computer
313

10
Contents at a Glance
Shooting
Shoot automatically p.57-82 (Basic Zone modes)
Shoot continuously p.102 (i Continuous shooting)
Take a picture of yourself in a group
p.103 (j Self-timer)
Freeze the action p.108 (s Shutter-priority AE)
Blur the action
Blur the background p.64 (C Creative Auto)
Keep the background in sharp focus
p.110 (f Aperture-priority AE)
Adjust the image brightness (exposure)
p.116 (Exposure compensation)
Shoot in low light p.58, 104 (D Flash photography)
p.92 (ISO speed setting)
Shoot without flash p.63 (7 Flash Off)
p.75 (b Flash Off)
Shoot fireworks at night p.114 (Bulb exposure)
Shoot while viewing the LCD monitor
p.139 (A Live View shooting)
Shoot movies p.159 (k Movie shooting)
Image Quality
Shoot with image effects p.95 (Picture Style)
matching the subject
Make a large-size print of the picture
p.88 (73, 83, 1)

11
Take many pictures p.88 (7a, 8a, b, c)
Focusing
Change the point of focus p.99 (S AF point selection)
Shoot a moving subject p.70, 98 (AI Servo AF)
Playback
View the images on the camera p.83 (x Playback)
Search for pictures quickly p.208 (H Index display)
p.209 (I Image browsing)
Rate images p.212 (Ratings)
Prevent important images p.228 (K Image protect)
from accidental deletion
Delete unnecessary images p.230 (L Delete)
Auto play back photos and movies
p.222 (Slide show)
View the photos or movies on a TV set
p.226 (TV set)
Adjust the LCD monitor brightness
p.185 (LCD monitor brightness)
Apply special effect to images p.236 (Creative filters)
Printing
Print pictures easily p.241 (Direct printing)

12
Power
Battery
• Charging p.34
• Installing/Removing p.36
• Battery level p.40
Household power outlet p.270
Auto power off p.39
Cards
Installing/Removing p.36
Formatting p.52
Release shutter
without card p.184
Lens
Attaching/Detaching p.44
Zoom p.45
Basic Settings
Dioptric adjustment p.46
Language p.43
Date/Time/Zone p.41
Beeper p.184
LCD off/on button p.197
LCD brightness
adjustment p.185
Recording Images
Creating/Selecting
a folder p.186
File numbering p.188
Image Quality
Image-recording quality p.88
Picture Style p.95
White balance p.131
Color space p.137
Image enhancement features
• Auto Lighting Optimizer p.123
• Lens peripheral
illumination correction p.124
• Noise reduction for
long exposures p.262
• Noise reduction for
high ISO speeds p.263
• Highlight tone priority p.263
AF
AF operation p.97
AF point selection p.99
Manual focusing p.101
Drive
Drive mode p.28
Continuous shooting p.102
Self-timer p.103
Maximum burst p.90
Shooting
Shooting mode p.30
ISO speed p.92
Feature guide p.55
Bulb p.114
Metering mode p.115
Quick Control p.48
Index to Features

13
Index to Features
Exposure
Exposure compensation p.116
AEB p.118
AE lock p.120
Flash
Built-in flash p.104
• Flash exposure
compensation p.117
• FE lock p.121
External flash p.272
Flash control p.198
Live View Shooting
Live View shooting p.139
Autofocusing (AF)
methods p.148
Aspect ratio p.146
Grid p.145
Quick Control p.144
Movie Shooting
Movie shooting p.159
Sound recording p.178
Grid p.179
Manual exposure p.162
Quick Control p.167
Video snapshot p.170
Playback
Image review time p.184
Single-image display p.83
Shooting information
display p.232
Index display p.208
Image browsing
(Jump display) p.209
Magnified view p.210
Image rotate p.211
Rating p.212
Movie playback p.218
Editing out movie’s
first/last scene p.220
Slide show p.222
Viewing images on a
TV set p.226
Protect p.228
Erase p.230
Quick Control p.214
Image Editing
Creative filters p.236
Resize p.239
Printing
PictBridge p.244
Print Order (DPOF) p.251
Photobook Set-up p.255
Customization
Custom Functions (C.Fn) p.258
My Menu p.267
Software
Software Start Guide p.314
Software Instruction
Manuals p.316
Wireless Functions
Wireless Function Instruction
Manual

14
1
Introduction 2
Item Check List……………………………………………………………………… 3
Instruction Manuals ……………………………………………………………….. 4
Compatible Cards…………………………………..……………………………… 5
Quick Start Guide ………….……………………………………………..……….. 6
Conventions Used in this Manual…………………………………………….. 8
Chapters……………………………………………………………….……………… 9
Contents at a Glance……………………………………………………………. 10
Index to Features …………….…………………………………………..……… 12
Safety Instructions……………………………………………………………….. 20
Handling Precautions …………………………………………………………… 23
Nomenclature ……………………………………………………………………… 26
Getting Started 33
Charging the Battery ……..……………………………………………..……… 34
Installing and Removing the Battery and Card…………………………. 36
Turning on the Power …….………………………………………….…………. 39
Setting the Date, Time, and Zone………………………………..…………. 41
Selecting the Interface Language…………………………………………… 43
Attaching and Detaching a Lens…………………………………………….. 44
Basic Operation…………………………………………………………………… 46
Q Quick Control for Shooting Functions ………………………………… 48
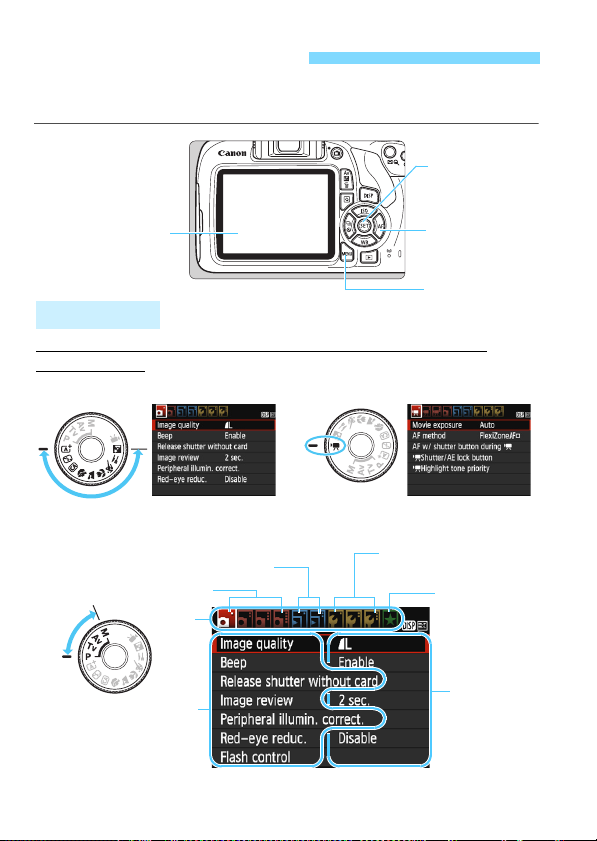
3 Menu Operations……………………………………….……………….. 50
Formatting the Card ……………………………………………………..……… 52
Switching the LCD Monitor Display………………………………………… 54
Feature Guide ……………………….………………………………………….... 55
Contents

15
Contents
3
2
Basic Shooting and Image Playback 57
A Fully Automatic Shooting (Scene Intelligent Auto) ……………….58
A Full Auto Techniques (Scene Intelligent Auto)……………………..61
7 Disabling Flash .…………………………………………..………………….63
C Creative Auto Shooting……………………………………….……………64
2 Shooting Portraits …………………………………………………………….67
3 Shooting Landscapes ………………………………………………………68
4 Shooting Close-ups…………………………………………………………..69
5 Shooting Moving Subjects ………………………………………………..70
P Shooting Food …………………………………………………….……………71
6 Shooting Night Portraits …………………………………………………….72
Q Quick Control……………………..……………………………………………74
Shooting with Ambience Selection…………………………………………..76
Shooting by Lighting or Scene Type ………………………………………..80
x Image Playback ….………………………………………….……………….83
Creative Shooting 85
d: Program AE…………………………………………………………………….86
Setting the Image-Recording Quality……………………………………….88
i: Changing the ISO Speed to Suit the Light Level………….……..92
A Selecting Optimal Image Characteristics for the Subject
(Picture Style)……….…………………………………………..………………….95
f: Changing the Autofocus Operation (AF operation)………………97
S Selecting the AF Point ……………………………………………………..99
Subjects Difficult to Focus on………………………………………………..101
MF: Manual Focus ………………………………..………………………….101
i Continuous Shooting………………………………………………………102
j Using the Self-timer ………………………………………………………..103
D Using the Built-in Flash……………………………………..……………..104

Contents
16
5
4
Advanced Shooting 107
s: Conveying the Subject’s Movement ……………….……………… 108
f: Changing the Depth of Field ………………………………………….110
Depth-of-Field Preview………………………………………………………112
a: Manual Exposure……………………………………….………………….113
q Changing the Metering Mode…………………………………………..115
Setting Exposure Compensation……………………………………………116
Auto Exposure Bracketing……………………………………………..……..118
A Locking the Exposure ……..…………………………………………….. 120
A Locking the Flash Exposure…………………..……………………….. 121
Auto Correction of Brightness and Contrast
(Auto Lighting Optimizer)…………………………………………………….. 123
Correcting the Image’s Dark Corners ……………………………………. 124
A Customizing Image Characteristics (Picture Style) ………….. 126
A
Registering Preferred Image Characteristics (Picture Style)
… 129
B: Matching the Light Source (White balance)……………………. 131
u Adjusting the Color Tone for the Light Source……………………. 135
Setting the Color Reproduction Range (Color space) ……………… 137
Shooting with the LCD Monitor (Live View Shooting)
139
A Shooting with the LCD Monitor ………………………………………. 140
Shooting Function Settings …..…………………………………………….. 144
Menu Function Settings……………………………..……………………….. 145
Using AF to Focus (AF Method)…………………………………………… 148
MF: Focusing Manually ………………………………………………………. 156

17
Contents
7
6
Shooting Movies 159
k Shooting Movies ……………………………………………………………160
Autoexposure Shooting…………………………………………………..…160
Manual Exposure Shooting…………………………………………..……162
Shooting Function Settings…………………………………………………..167
Setting the Movie Recording Size……………………………………….… 168
Shooting Video Snapshots……………………………………………………170
Menu Function Settings …………………………………………………….… 176
Handy Features 183
Handy Features ………….……………………………………………..……….184
Disabling the Beeper…………………………………………………………184
Card Reminder………………………………………………………………… 184
Setting the Image Review Time ………………………………………….184
Setting the Auto Power-off Time ………………………….……………..185
Adjusting the LCD Monitor Brightness ……………………..………….185
Creating and Selecting a Folder…………………………………….……186
File Numbering Methods ……………………………………………………188
Setting Copyright Information……………………………………………..190
Auto Rotation of Vertical Images …………………………………………192
Checking Camera Settings …………..……………………………………193
Reverting the Camera to the Default Settings……………………….194
Turning the LCD Monitor Off/On ………………………………..……….197
Changing the Shooting Settings Screen Color………………………197
Setting the Flash……………………………………..………………………….198
Appending Dust Delete Data ………..………………………………………202
Manual Sensor Cleaning………………………………………………………204

Contents
18
10
9
8
Image Playback 207
x Searching for Images Quickly ………………………………………… 208
u/y Magnified View…………………………………………………………. 210
b Rotating the Image……………………………………………………..…..211
Setting Ratings …………………………………………….……………………. 212
Q Quick Control for Playback …………………………………………….. 214
k Enjoying Movies…………………………………………………………… 216
k Playing Back Movies……………………………………..……………… 218
X Editing a Movie’s First and Last Scenes …………………………… 220
Slide Show (Auto Playback)………………………………………………… 222
Viewing Images on a TV Set……………………………………………….. 226
K Protecting Images………………………………..……………………….. 228
L Erasing Images……………………..………………………………………. 230
B Shooting Information Display……………………………………….. 232
Post-Processing Images 235
U Applying Creative Filters……………………………………….……….. 236
S Resizing JPEG Images………………………………..………………… 239
Printing Images 241
Preparing to Print……………..…………………………………………..……. 242
w Printing……………………………………………………………………….. 244
Cropping the Image …………………………………………………………. 249
W Digital Print Order Format (DPOF) …………….……………………. 251
W Direct Printing of Print-Ordered Images …………………………… 254
p Specifying Images for a Photobook ………………………………….. 255

19
Contents
13
12
11
Customizing the Camera 257
Setting Custom Functions…………………………………………………….258
Custom Function Settings…………………………………………………….260
C.Fn I: Exposure …………………………………………………..………….260
C.Fn II: Image ………………………….………………………………………262
C.Fn III: Autofocus/Drive…………………………………………..……….264
C.Fn IV: Operation/Others…………….……………………………………265
Registering My Menu…………………………………………………………..267
Reference 269
Using a Household Power Outlet……………………………………..……270
F Using a Remote Switch…………………………………………………….271
External Speedlites .…………………………………………..………………..272
H Using Eye-Fi Cards ……………………………………………….……….273
Function Availability Table by Shooting Mode………………………….276
System Map ……………………………………………………………………….278
Menu Settings……………………………………..……………………………..280
Troubleshooting Guide…………………………………………………………286
Error Codes…………………………………..……………………………………298
Specifications……………………………………………………………………..299
Software Start Guide /
Downloading Images to a Computer 313
Software Start Guide……………………………………………………………314
Downloading and Viewing the Software Instruction Manuals
(PDF Files)………………………………………………………….……………..316
Downloading Images to a Computer………………………………………317
Index ………………………………………………………………….……………..319

20
Be sure to read these instructions in order to operate the product safely.
Follow these instructions to prevent injury or harm to the operator of the
product or others.
Safety Instructions
WARNING:
Denotes the risk of serious injury or death.
Keep the product out of the reach of young children.
A strap wrapped around a person’s neck may result in strangulation.
The parts or provided items of cameras or accessories are dangerous if swallowed. If
swallowed, seek immediate medical assistance.
The battery is dangerous if swallowed. If swallowed, seek immediate medical
assistance.
Use only power sources specified in this instruction manual
for use with the product.
Do not disassemble or modify the product.
Do not expose the product to strong shocks or vibration.
Do not touch any exposed internal parts.
Stop using the product in any case of unusual circumstances such as the presence
of smoke or a strange smell.
Do not use organic solvents such as alcohol, benzine or paint thinner to clean the
product.
Do not get the product wet. Do not insert foreign objects or liquids into the product.
Do not subject the product to high water pressure or get it wet with large quantities of
liquids. Do not insert foreign objects or liquids into the product.
Do not insert foreign objects or liquids into the product.
Do not use the product where flammable gases may be present.
This may cause electric shock, explosion or fire.
Do not leave a lens or a camera with a lens attached, exposed without the lens cap
attached.
The lens may concentrate the light and cause fire.
Do not look through the viewfinder at strong light sources such as the sun on a bright
day or lasers and other strong artificial light sources.
This may harm your vision.
Do not touch the product connected to a power outlet during lightning storms.
This may cause electric shock.
Observe the following instructions when using commercially available batteries or
provided battery packs.
• Use batteries/battery packs only with their specified product.
• Do not heat batteries/battery packs or expose them to fire.
• Do not charge batteries/battery packs using non-authorized battery chargers.
• Do not expose the terminals to dirt or let them come into contact with metallic pins
or other metal objects.
• Do not use leaking batteries/battery packs.
• When disposing of batteries/battery packs, insulate the terminals with tape or
other means.
This may cause electric shock, explosion or fire.
If a battery/battery pack leaks and the material contacts your skin or clothing, flush the
exposed area thoroughly with running water. In case of eye contact, flush thoroughly
with copious amounts of clean running water and seek immediate medical assistance.

21
Safety Instructions
Observe the following instructions when using a battery charger or AC adapter.
• Periodically remove any dust buildup from the power plug and power outlet using a
dry cloth.
• Do not plug in or unplug the product with wet hands.
• Do not use the product if the power plug is not fully inserted into the power outlet.
• Do not expose the power plug and terminals to dirt or let them come into contact
with metallic pins or other metal objects.
Do not touch the battery charger or AC adapter connected to a power outlet during
lightning storms.
Do not place heavy objects on the power cord. Do not damage, break or modify the
power cord.
Do not wrap the product in cloth or other materials when in use or shortly after use
when the product is still warm in temperature.
Do not unplug the product by pulling the power cord.
Do not leave the product connected to a power source for long periods of time.
Do not charge batteries/battery packs at temperatures outside the range of 6 — 40 °C
(43 — 104 °F).
This may cause electric shock, explosion or fire.
Do not allow the product to maintain contact with the same area of skin for extended
periods of time during use.
This may result in low-temperature contact burns, including skin redness and blistering,
even if the product does not feel hot. The use of a tripod or similar equipment is
recommended when using the product in hot places and for people with circulation
problems or less sensitive skin.
Follow any indications to turn off the product in places where its use is forbidden.
Not doing so may cause other equipment to malfunction due to the effect of
electromagnetic waves and even result in accidents.
To prevent fire, excessive heat, chemical leakage, explosions, and electrical shock,
follow the safeguards below:
• Do not insert the battery’s plus and minus ends incorrectly.
Do not leave any cords near a heat source.
It can deform the cord or melt the insulation and cause a fire or electrical shock.
Do not fire the flash at anyone driving a car or other vehicle.
It may cause an accident.
Do not use or store the equipment in dusty or humid places. Likewise, keep the
battery away from metallic items and store it with its protective cover attached to
prevent short-circuit.
This is to prevent fire, excessive heat, electrical shock, and burns.
To prevent a fire and electrical shock, follow the safeguards below:
• Do not connect too many power plugs to the same power outlet.
• Do not use a cord whose wire is broken or insulation is damaged.
Do not connect the battery directly to an electrical outlet or a car’s cigarette lighter outlet.
The battery may leak, generate excessive heat or explode, causing fire, burns, or injuries.
A thorough explanation of how to use the product by an adult is required when the
product is used by children. Supervise children while they are using the product.
Incorrect usage may result in electrical shock or injury.

Safety Instructions
22
CAUTION:
Denotes the risk of injury.
Do not fire the flash near the eyes.
It may hurt the eyes.
Strap is intended for use on the body only. Hanging the strap with any product
attached on a hook or other object may damage the product. Also, do not shake the
product or expose the product to strong impacts.
Do not apply strong pressure on the lens or allow an object to hit it.
This may cause injury or damage to the product.
Flash emits high temperatures when fired. Keep fingers, any other part of your body,
and objects away from the flash unit while taking pictures.
This may cause burns or malfunction of the flash.
Do not leave the product in places exposed to extremely high or low temperatures.
The product may become extremely hot/cold and cause burns or injury when touched.
Only mount the product on a tripod that is sufficiently sturdy.
Do not carry the product when it is mounted on a tripod.
This may cause injury or may result in an accident.
Do not look at the screen or through the viewfinder for prolonged periods of time.
This may induce symptoms similar to motion sickness. In such a case, stop using the
product immediately and rest for a while before resuming use.
Do not touch any parts inside the product.
This may cause injury.

23
Camera Care
This camera is a precision instrument. Do not drop it or subject it to physical
shock.
The camera is not waterproof and cannot be used underwater. If you
accidentally drop the camera into water, promptly consult the nearest Canon
Service Center. Wipe off any water droplets with a dry and clean cloth. If the
camera has been exposed to salty air, wipe it with a well-wrung wet cloth.
Never leave the camera near anything having a strong magnetic field such
as a magnet or electric motor. Also, avoid using or leaving the camera near
anything emitting strong radio waves, such as a large antenna. Strong
magnetic fields can cause camera misoperation or destroy image data.
Do not leave the camera in excessive heat, such as in a car in direct
sunlight.
The camera contains precision electronic circuitry. Never attempt to
disassemble the camera yourself.
Do not block the built-in flash or mirror operation with your finger, etc. Doing
so may cause a malfunction.
Use only a commercially-available blower to blow away dust when it adheres
to the lens, viewfinder, reflex mirror, focusing screen, etc. Do not use
cleaners that contain organic solvents to clean the camera body or lens. For
stubborn dirt, take the camera to the nearest Canon Service Center.
Do not touch the camera’s electrical contacts with your fingers. This is to
prevent the contacts from corroding. Corroded contacts may cause camera
misoperation.
If the camera is suddenly brought in from the cold into a warm room,
condensation may form on the camera and internal parts. To prevent
condensation, first put the camera in a sealed plastic bag and let it adjust to
the warmer temperature before taking it out of the bag.
Handling Precautions

Handling Precautions
24
If condensation forms on the camera, do not use the camera. This is to avoid
damaging the camera. If there is condensation, remove the lens, card and
battery from the camera, and wait until condensation has evaporated before
using the camera.
If the camera will not be used for an extended period, remove the battery
and store the camera in a cool, dry, well-ventilated location. Even while the
camera is in storage, press the shutter button a few times once in a while to
check that the camera is still working.
Avoid storing the camera where there are chemicals that result in rust and
corrosion such as in a chemical lab.
If the camera has not been used for an extended period, test all its functions
before using it. If you have not used the camera for some time or if there is
an important shoot such as a foreign trip coming up, have the camera
checked by your nearest Canon Service Center or check the camera
yourself and make sure it is working properly.
If you use continuous shooting, Live View shooting, or movie shooting for a
prolonged period, the camera may become hot. This is not a malfunction.
If there is a bright light source inside or outside the image area, ghosting
may occur.
LCD Monitor
Although the LCD monitor is manufactured with very high precision
technology with over 99.99% effective pixels, there may be a few dead pixels
displaying only black or red, etc. among the remaining 0.01% or less pixels.
Dead pixels are not a malfunction. They do not affect the images recorded.
If the LCD monitor is left on for a prolonged period, screen burn-in may occur
where you see remnants of what was displayed. However, this is only
temporary and will disappear when the camera is left unused for a few days.
The LCD monitor display may seem slow in low temperatures, or look black
in high temperatures. It will return to normal at room temperature.

25
Handling Precautions
Cards
To protect the card and its recorded data, note the following:
Do not drop, bend, or wet the card. Do not subject it to excessive force,
physical shock, or vibration.
Do not touch the card’s electronic contacts with your fingers or anything
metallic.
Do not affix any stickers, etc. on the card.
Do not store or use the card near anything that has a strong magnetic field,
such as a TV set, speakers, or magnets. Also avoid places prone to having
static electricity.
Do not leave the card in direct sunlight or near a heat source.
Store the card in a case, etc.
Do not store the card in hot, dusty, or humid locations.
Lens
After detaching the lens from the camera, put down the lens
with the rear end up and attach the rear lens cap to avoid
scratching the lens surface and electrical contacts.
Smudges Adhering to the Front of the Sensor
Besides dust entering the camera from outside, in rare
cases lubricant from the camera’s internal parts may adhere
to the front of the sensor. If smudges are visible on the
images, having the sensor cleaned by a Canon Service
Center is recommended.
26
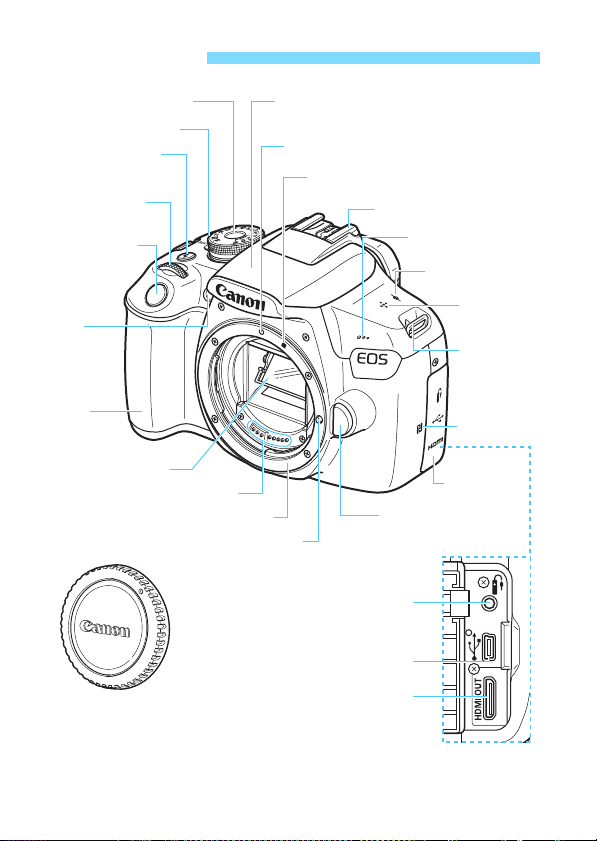
* Used for wireless connections via the NFC function.
Nomenclature
Red-eye
reduction/
Self-timer lamp
(p.106/103)
Mode Dial (p.30)
Power switch (p.39)
<D> Flash button
(p.104)
<6> Main Dial
Shutter button
(p.47)
Grip
Mirror (p.204)
Contacts (p.25)
Lens mount
Lens lock pin
Built-in flash/AF-assist beam emitter
(p.104/100)
EF Lens mount index (p.44)
EF-S Lens mount index (p.44)
Hot shoe
Microphone
(p.160, 178)
<V> Focal plane
mark (p.69)
Speaker
(p.218)
Strap mount
(p.33)
p (N-Mark)*
Terminal cover
Lens release button
(p.45)
Remote control terminal (p.271)
Digital terminal (p.242, 317)
HDMI mini OUT terminal (p.226)
Body cap (p.44)
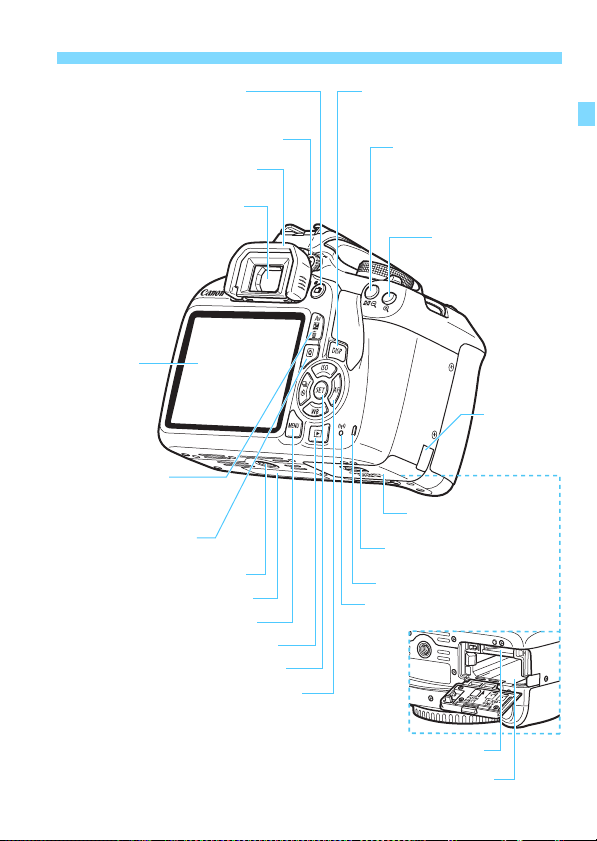
27
Nomenclature
<A> Live View shooting/
Movie shooting button (p.140/160)
Dioptric adjustment knob (p.46)
Eyecup (p.271)
Viewfinder eyepiece
LCD monitor
(p.50, 185)
<O/L> Aperture/
Exposure compensation button/
Erase button (p.113/116/230)
<Q> Quick Control
button (p.48)
Tripod socket
<M> Menu button (p.50)
<x> Playback button (p.83)
<0> Setting button (p.50)
<W><X><Y><Z>: <S> Cross keys (p.50)
<Wi> ISO speed setting button (p.92)
<XB> White balance selection button (p.131)
<Yi/j> Drive/Self-timer selection button
(p.102-103)
<Zf> AF operation selection button (p.97)
Battery compartment (p.36)
<B> Display button
(p.54, 83, 142, 164, 193)
<A/Hy> AE lock/
FE lock button/Index/
Reduce button
(p.120/121/208/210, 249)
<S/u> AF point
selection button/
Magnify button
(p.99/210, 249)
DC cord hole
(p.270)
Card slot/Battery
compartment cover (p.36)
Card slot/Battery compartment
cover release lever (p.36)
Card slot (p.36)
Access lamp (p.38)
<k> Wi-Fi lamp
Serial number
Nomenclature
28
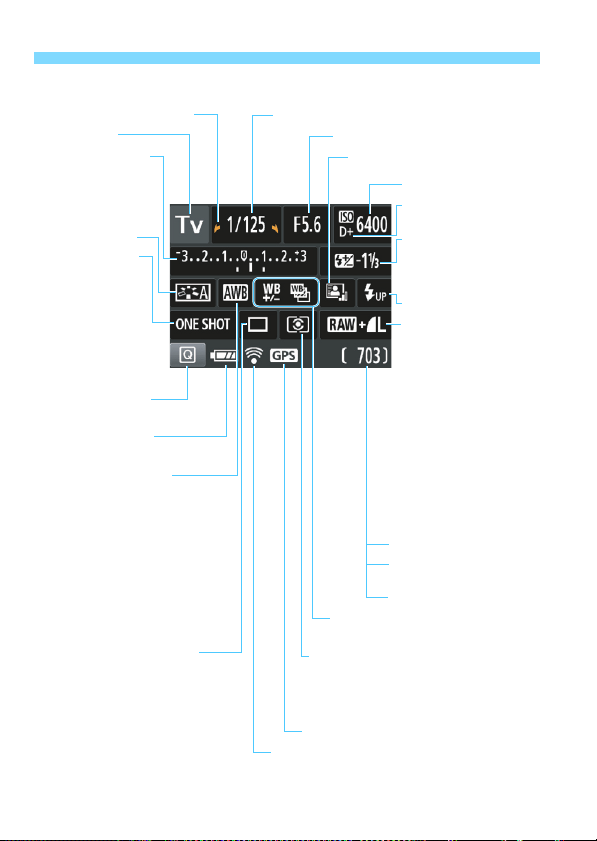
Shooting Function Settings (in Creative Zone modes, p.30)
The display will show only the settings currently applied.
c Main Dial pointer (p.107)
Shooting mode
Exposure level indicator
Exposure
compensation
amount (p.116)
AEB range (p.118)
Picture Style (p.95)
AF operation (p.97)
X:
One-Shot AF
9:
AI Focus AF
Z:
AI Servo AF
MF:
Manual Focus
Quick Control icon
(p.48, 74)
Battery level (p.40)
zxcn
White balance (p.131)
Q Auto: Ambience priority
Q
w
Auto: White priority
W Daylight
E Shade
R Cloudy
Y Tungsten light
U White fluorescent light
I Flash
O Custom
Drive/self-timer (p.102-103)
u Single shooting
i Continuous shooting
j Self-timer: 10 sec.
l Self-timer: 2 sec.
q Self-timer: Continuous
Shutter speed
Aperture
Auto Lighting Optimizer (p.123)
ISO speed (p.92)
Highlight tone priority
(p.263)
y Flash exposure
compensation (p.117)
0 External flash
exposure compensation
Raise built-in flash (p.49)
Image-recording quality
(p.88)
73 Large/Fine
83 Large/Normal
74 Medium/Fine
84 Medium/Normal
7a Small 1/Fine
8a Small 1/Normal
b Small 2 (Fine)
c Small 3 (Fine)
1+73
RAW+Large/Fine
1 RAW
Possible shots
Possible shots during white
balance bracketing
Self-timer countdown
u White balance correction (p.135)
B White balance bracketing (p.136)
Metering mode (p.115)
q Evaluative metering
w Partial metering
e
Center-weighted average metering
GPS connection indicator (p.282)
Eye-Fi transmission status (p.273)
29
Nomenclature
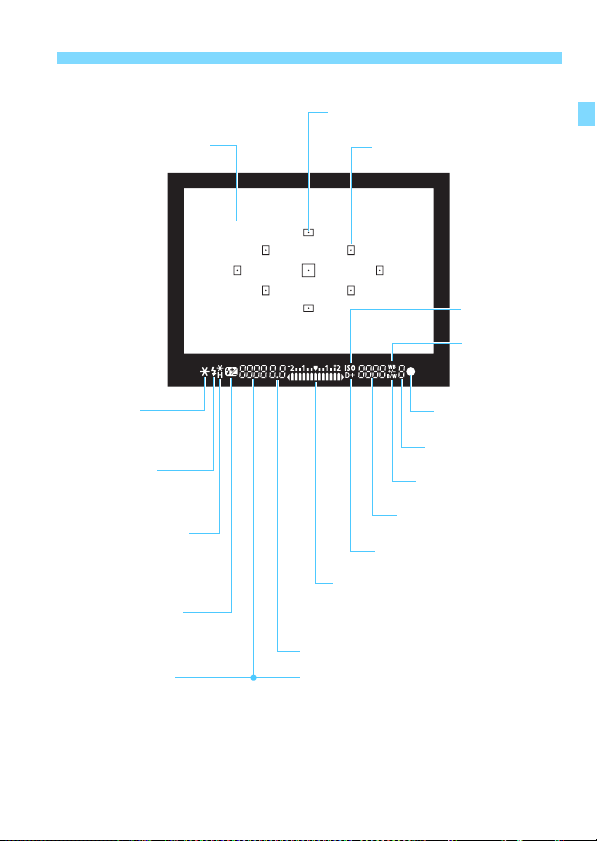
Viewfinder Information
The display will show only the settings currently applied.
Focusing screen
<A> AE lock/
AEB in-progress
<D> Flash-ready
FE lock out of range
warning
<e> High-speed sync
(FP flash)
<d> FE lock/
FEB in-progress
<y> Flash exposure
compensation
Shutter speed
FE lock (FEL)
Busy (buSY)
Built-in flash recycling (D buSY)
Card full warning (FuLL)
Card error warning (Card)
No card warning (Card)
AF point activation indicator <•>
AF point
<i>
ISO speed
<u>
White balance
correction
<o> Focus indicator
Maximum burst
<0> Monochrome
shooting
ISO speed
<A> Highlight tone priority
Exposure level indicator
Exposure compensation amou nt
AEB range
Red-eye reduction lamp ON
Aperture
Nomenclature
30
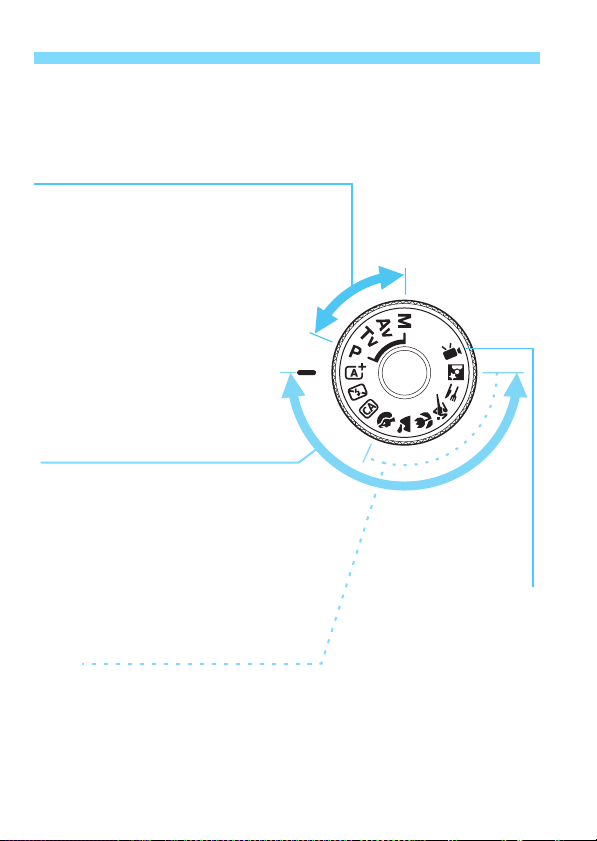
Mode Dial
The Mode Dial includes the Basic Zone modes, Creative Zone modes,
and the Movie shooting mode.
Creative Zone
These modes give you more control for
shooting various subjects as desired.
d : Program AE (p.86)
s : Shutter-priority AE (p.108)
f : Aperture-priority AE (p.110)
a : Manual exposure (p.113)
Basic Zone
All you do is press the shutter
button. The camera sets everything
to suit the subject or scene for
shooting.
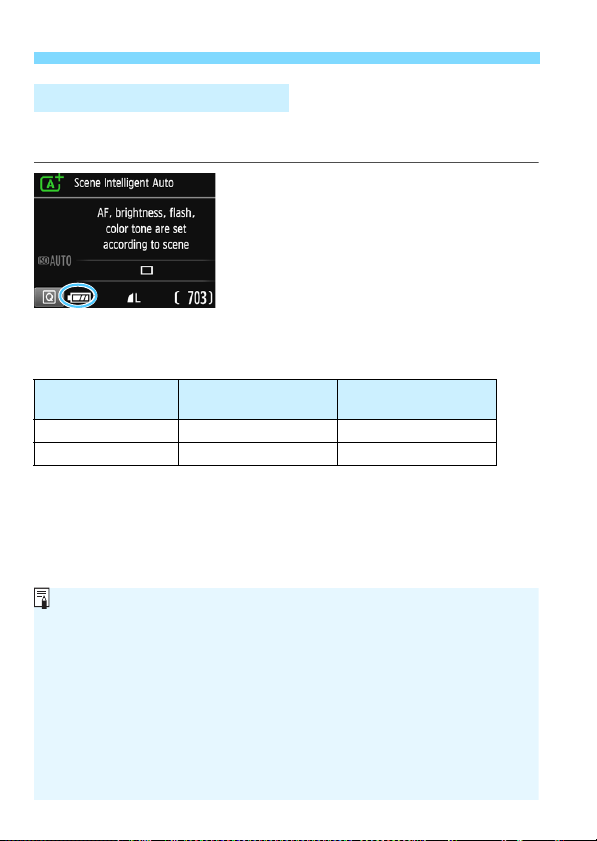
A : Scene Intelligent Auto (p.58)
7 : Flash Off (p.63)
C : Creative Auto (p.64)
Image Zone
2 : Portrait (p.67)
3 : Landscape (p.68)
4 : Close-up (p.69)
5 : Sports (p.70)
P : Food (p.71)
6 : Night Portrait (p.72)
k: Movie Shooting
(p.159)
31
Nomenclature
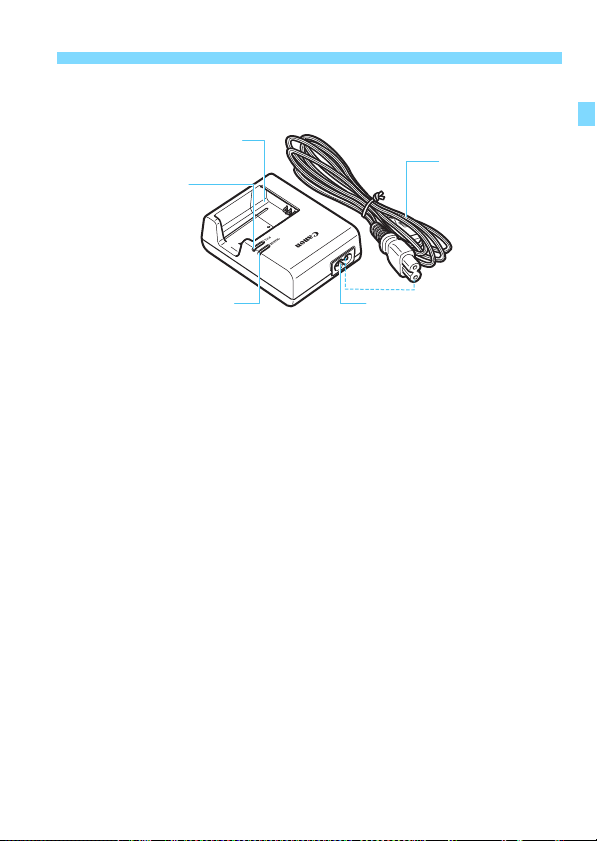
Battery Charger LC-E10E
Charger for Battery Pack LP-E10 (p.34).
Power cord
Power cord socket
Battery pack slot
Charge lamp
Full-charge lamp

32

33
1
Getting Started
This chapter explains preparatory steps before you start
shooting and basic camera operations.
Attaching the Strap
Pass the end of the strap through
the camera’s strap mount eyelet
from the bottom. Then pass it
through the strap’s buckle as shown
in the illustration. Pull the strap to
take up any slack and make sure
the strap will not loosen from the
buckle.
The eyepiece cover is attached to
the strap (p.271).

34
1
Remove the protective cover.
Detach the protective cover provided
with the battery.
2
Attach the battery.
As shown in the illustration, attach the
battery securely to the charger.
To detach the battery, follow the
above procedure in reverse.
3
Recharge the battery.
Connect the power cord to the
charger and insert the plug into a
power outlet.
Recharging starts and the charge
lamp lights up in orange.
When the battery is fully recharged,
the full-charge lamp will light up in
green.
It takes approx. 2 hours to fully recharge a completely
exhausted battery at room temperature (23°C / 73°F). The time
required to recharge the battery will vary greatly depending on
the ambient temperature and the battery’s remaining capacity.
For safety reasons, recharging in low temperatures (6°C — 10°C /
43°F — 50°F) will take longer (up to approx. 4 hours).
Charging the Battery

35
Charging the Battery
Upon purchase, the battery is not fully charged.
Charge the battery before use.
Recharge the battery on the day before or on the day it is to be
used.
Even during storage, a charged battery will gradually drain and lose
its capacity.
After recharging the battery, detach it and disconnect the
charger from the power outlet.
When not using the camera, remove the battery.
If the battery is left in the camera for a prolonged period, a small
amount of power current is released, resulting in excess discharge
and shorter battery life. Store the battery with the protective cover
(provided) attached. Storing the battery when it is fully charged may
lower the battery’s performance.
The battery charger can also be used in foreign countries.
The battery charger is compatible with a 100 V AC to 240 V AC 50/
60 Hz power source. If necessary, attach a commercially-available
plug adapter for the respective country or region. Do not attach any
portable voltage transformer to the battery charger. Doing so can
damage the battery charger.
If the battery becomes exhausted quickly even after being fully
charged, the battery has reached the end of its service life.
Purchase a new battery.
Tips for Using the Battery and Charger
After disconnecting the charger’s power plug, do not touch the prongs for
at least 3 sec.
Do not charge any battery other than a Battery Pack LP-E10.
Battery Pack LP-E10 is dedicated to Canon products only. Using it with
an incompatible battery charger or product may result in malfunction or
accidents for which Canon cannot be held liable.
36
Load a fully charged Battery Pack LP-E10 into the camera. You can use
an SD, SDHC, or SDXC memory card (sold separately) with the
camera. The captured images are recorded onto the card.
Make sure the card’s write-protect switch is set upward to
enable writing and erasing.
1
Open the cover.
Slide the lever as shown by the
arrows and open the cover.
2
Insert the battery.
Insert the end with the electrical
contacts.
Insert the battery until it locks in
place.
3
Insert the card.
As shown by the illustration, face
the card’s label side toward the
back of the camera and insert it
until it clicks in place.
4
Close the cover.
Press the cover until it snaps shut.
When you set the power switch to
<1>, the number of possible shots
will be displayed on the LCD monitor.
Installing and Removing the Battery and Card
Installing the Battery and Card
37
Installing and Removing the Battery and Card
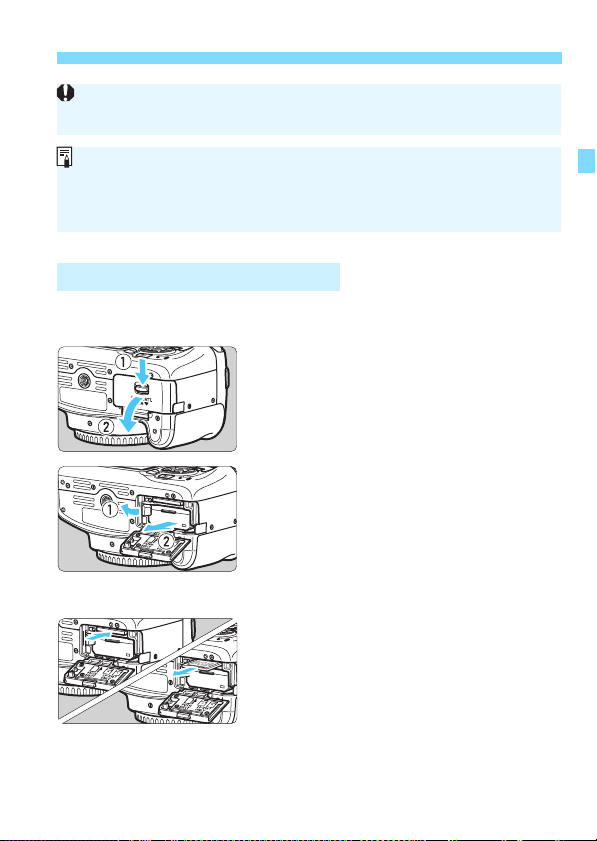
1
Set the power switch to <2>
(p.39).
2
Open the cover.
Make sure the access lamp is off,
then open the cover.
If [Recording…] is displayed, close
the cover.
3
Remove the battery.
Press the battery lock lever as shown
by the arrow and remove the battery.
To prevent short circuiting of the
electrical contacts, be sure to attach
the provided protective cover (p.34)
to the battery.
4
Remove the card.
Gently push in the card, then let it go
to eject.
Pull the card straight out.
5
Close the cover.
Press the cover until it snaps shut.
Removing the Battery and Card
After opening the card slot/battery compartment cover, be careful not to
forcefully swing it back further. Otherwise, the hinge may break.
The number of possible shots depends on the remaining capacity of the
card, image-recording quality, ISO speed, etc.
Setting [z1: Release shutter without card] to [Disable] will prevent
you from shooting without a card inserted (p.184).

Installing and Removing the Battery and Card
38
When the access lamp is lit or blinking, it indicates that images are
being written to, read from, or erased from the card, or data is being
transferred. Do not open the card slot/battery compartment cover.
Also, never do any of the following while the access lamp is lit or
blinking. Otherwise, it can damage the image data, card, or camera.
• Removing the card.
• Removing the battery.
• Shaking or banging the camera around.
• Unplugging and connecting a power cord (when household power
outlet accessories (sold separately, p.270) are used).
If the card already contains recorded images, the image number may not
start from 0001 (p.188).
If a card-related error message is displayed on the LCD monitor, remove
and reinsert the card. If the error persists, use a different card.
If you can transfer all the images on the card to a computer, transfer all
the images and then format the card with the camera (p.52). The card
may then return to normal.
Do not touch the card’s contacts with your fingers or metal objects. Do
not expose the contacts to dust or water. If a smudge adheres to the
contacts, contact failure may result.
Multimedia cards (MMC) cannot be used (card error will be displayed).

39
If you turn on the power and the date/time/zone setting screen
appears, see page 41 to set the date/time/zone.
<1> : The camera turns on.
<2> : The camera is turned off and
does not function. Set to this
position when not using the
camera.
To save battery power, the camera turns off automatically after
approx. 30 seconds of non-operation. To turn on the camera again,
just press the shutter button halfway (p.47).
You can change the auto power off time with [51: Auto power off]
(p.185).
Turning on the Power
3 Auto Power Off
If you set the power switch to <2> while an image is being recorded to
the card, [Recording…] will be displayed and the power will turn off after the
recording finishes.
Turning on the Power
40
When the power is turned on, the battery level will be indicated in one of
the four levels.
z : Battery level is sufficient.
x : Battery level is low, but the
camera can still be used.
c : Battery will be exhausted soon.
(Blinks)
n : Recharge the battery.
Number of Possible Shots with Viewfinder Shooting
The figures above are based on a fully-charged Battery Pack LP-E10, no Live
View shooting, and CIPA (Camera & Imaging Products Association) testing
standards.
z Battery Level Indicator
Temperature
Room Temperature
(23°C / 73°F)
Low Temperatures
(0°C / 32°F)
No Flash Approx. 600 shots Approx. 580 shots
50% Flash Use Approx. 500 shots Approx. 410 shots
Doing any of the following will exhaust the battery faster:
• Pressing the shutter button halfway for a prolonged period.
• Activating the AF frequently without taking a picture.
• Using the lens Image Stabilizer.
• Using the LCD monitor frequently.
• Using the Wi-Fi function.
The number of possible shots may decrease depending on the actual
shooting conditions.
The lens operation is powered by the camera’s battery. Some lenses
may exhaust the battery faster than others.
For the number of possible shots with Live View shooting, see page 141.
41
When you turn on the power for the first time or if the date/time/zone
have been reset, the date/time/zone setting screen will appear. Follow
the steps below to set the time zone first. Set the camera to the time
zone in which you currently live so that, when you travel, you can simply
change the setting to the correct time zone for your destination, and the
camera will automatically adjust the date/time.
Note that the date/time appended to recorded images will be based
on this date/time setting. Be sure to set the correct date/time.
1
Display the menu screen.
Press the <M> button to display
the menu screen.
2
Under the [52] tab, select [Date/
Time/Zone].
Press the <Y> <Z> keys to select
the [52] tab.
Press the <W> <X> keys to select
[Date/Time/Zone], then press <0>.
3
Set the time zone.
[London] is set by default.
Press the <Y> <Z> keys to select
the time zone box.
Press <0> so <a> is displayed.
Press the <W> <X> keys to select
the time zone, then press <0>.
(Returns to <b>.)
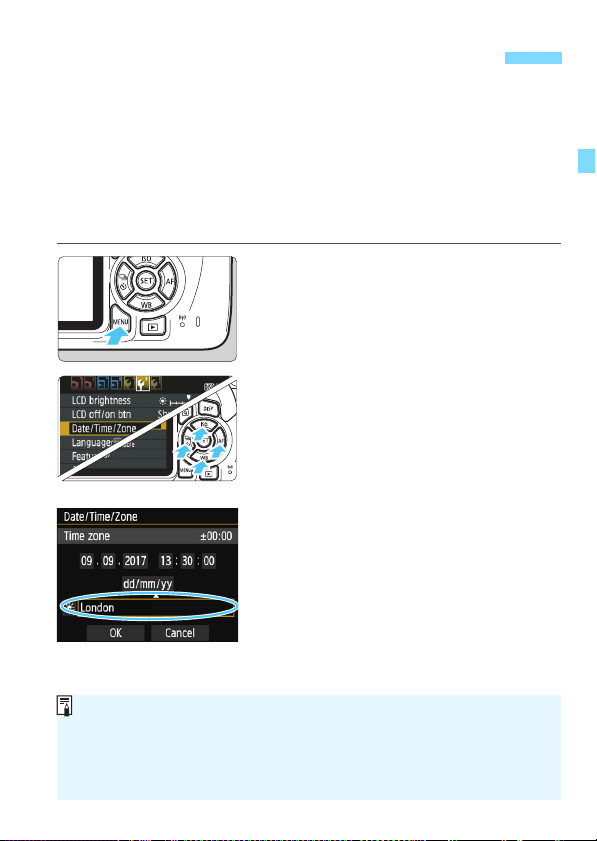
3 Setting the Date, Time, and Zone
The menu setting procedure is explained on pages 50-51.
In step 3, the time displayed on the upper right of the screen is the time
difference compared with Coordinated Universal Time (UTC). If you do
not see your time zone, set the time zone while referring to the difference
with UTC.

3 Setting the Date, Time, and Zone
42
4
Set the date and time.
Press the <Y> <Z> keys to select
the number.
Press <0> so <a> is displayed.
Press the <W> <X> keys to set the
number, then press <0>. (Returns
to <b>.)
5
Set the daylight saving time.
Set it if necessary.
Press the <
Y
> <
Z
> keys to select [
Y
].
Press <0> so <a> is displayed.
Press the <W> <X> keys to select
[Z], then press <0>.
When the daylight saving time is set
to [Z], the time set in step 4 will
advance by 1 hour. If [Y] is set, the
daylight saving time will be canceled
and the time will go back by 1 hour.
6
Exit the setting.
Press the <Y> <Z> keys to select
[OK], then press <0>.
The date/time/zone and daylight
saving time will be set and the menu
will reappear.
The date/time/zone settings may be reset in the following cases. If this
happens, set the date/time/zone again.
• When the camera is stored without the battery.
• When the camera’s battery becomes exhausted.
• When the camera is exposed to below freezing temperatures for a
prolonged period.
The date/time that was set will start from when you press <0> in step 6.
After changing the time zone, check that the correct date and time are set.
43
1
Display the menu screen.
Press the <M> button to display
the menu screen.
2
Under the [52] tab, select
[LanguageK].
Press the <Y> <Z> keys to select
the [52] tab.
Press the <W> <X> keys to select
the [Language
K], then press <0>.
3
Set the desired language.
Press the <W> <X> and <Y> <Z>
keys to select the language, then
press <0>.
The interface language will change.
3 Selecting the Interface Language
44
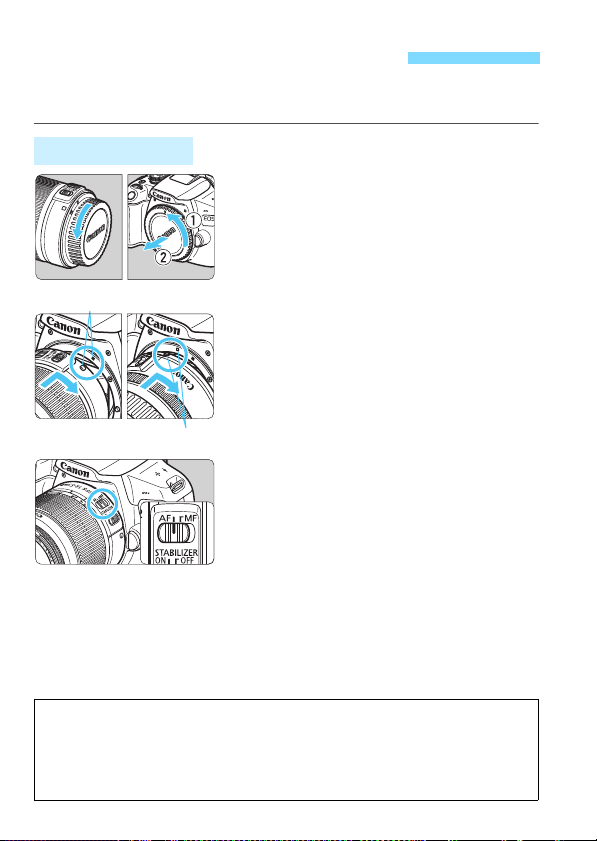
The camera is compatible with all Canon EF and EF-S lenses. The
camera cannot be used with EF-M lenses.
1
Remove the caps.
Remove the rear lens cap and the
body cap by turning them as shown
by the arrows.
2
Attach the lens.
Align the lens’s red or white index
with the camera’s index matching the
same color. Turn the lens as shown
by the arrow until it clicks in place.
3
Set the lens’s focus mode switch
to <AF>.
<AF> stands for autofocus.
If it is set to <MF> (manual focus),
autofocus will not operate.
4
Remove the front lens cap.
Attaching and Detaching a Lens
Attaching a Lens
Tips for Avoiding Smudges and Dust
When changing lenses, do it quickly in a place with minimal dust.
When storing the camera without a lens attached, be sure to attach the
body cap to the camera.
Remove dust on the body cap before attaching it.
45
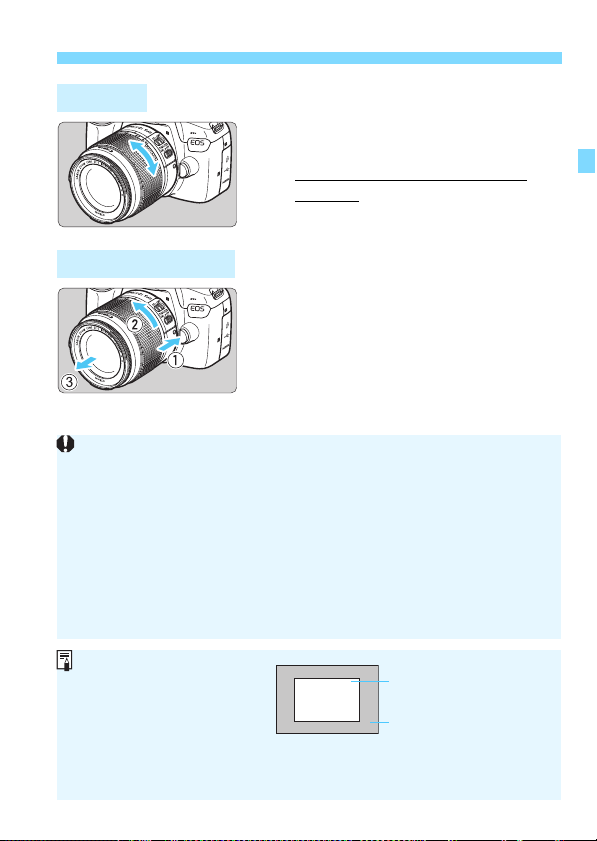
Attaching and Detaching a Lens
Turn the zoom ring on the lens
with your fingers.
If you want to zoom, do it before
focusing. Turning the zoom ring after
achieving focus may throw off the
focus.
While pressing the lens release
button, turn the lens as shown by
the arrow.
Turn the lens until it stops, then detach it.
Attach the rear lens cap to the
detached lens.
Zooming
Detaching the Lens
Do not look at the sun directly through any lens. Doing so may cause
loss of vision.
When attaching or detaching a lens, set the camera’s power switch
to <2>.
If the front part (focusing ring) of the lens rotates during autofocusing, do
not touch the rotating part.
If you use a TS-E lens, certain shift and rotation functions may be
restricted, and attaching or detaching the lens may also be restricted.
If you use a TS-E lens and shift or tilt the lens or use an Extension Tube,
the standard exposure may not be obtained or the exposure may be
irregular.
Angle of View
Since the image sensor size is
smaller than the 35mm film
format, the angle of view of an
attached lens will be
equivalent to that of a lens with
approx. 1.6x of the focal length
indicated.
Image area (Approx.)
(22.3 x 14.9 mm / 0.88 x 0.59 in.)
35mm film format
(36 x 24 mm / 1.42 x 0.94 in.)
46
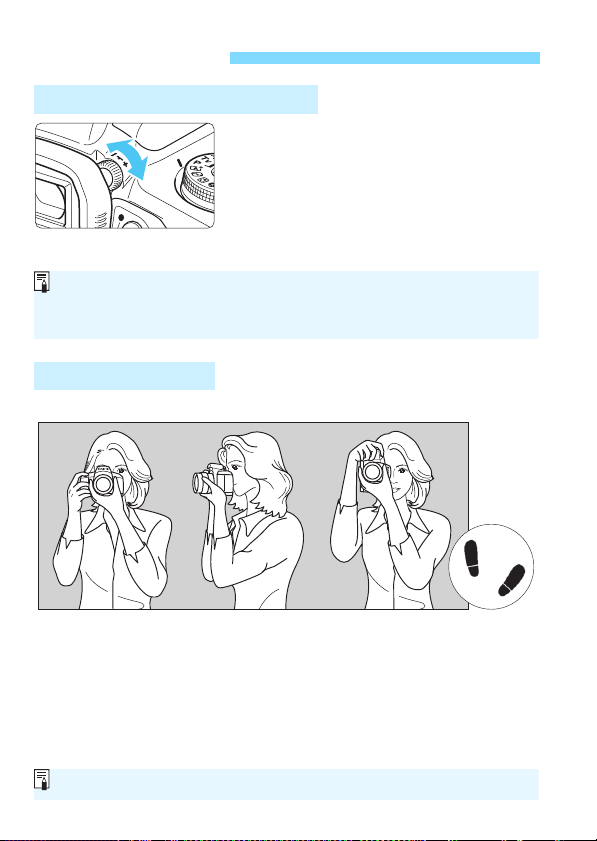
Turn the dioptric adjustment
knob.
Turn the knob left or right so that the
AF points (nine boxes) in the
viewfinder look the sharpest.
If the knob is difficult to turn, remove
the eyecup (p.271).
To obtain sharp images, hold the camera still to minimize camera shake.
1. Wrap your right hand around the camera grip firmly.
2. Hold the lens bottom with your left hand.
3. Rest your hand’s right index finger lightly on the shutter button.
4. Press your arms and elbows lightly against the front of your body.
5.
To maintain a stable stance, place one foot slightly ahead of the other.
6. Press the camera against your face and look through the viewfinder.
Basic Operation
Adjusting the Viewfinder Clarity
Holding the Camera
If the camera dioptric adjustment still cannot provide a sharp viewfinder
image, using E-series Dioptric Adjustment Lenses (sold separately) is
recommended.
Vertical shooting
Horizontal shooting
To shoot while looking at the LCD monitor, see page 139.
47
Basic Operation
The shutter button has two steps. You can press the shutter button
halfway. Then you can further press the shutter button completely.
Pressing Halfway
This activates autofocusing and the
automatic exposure system that sets the
shutter speed and aperture.
The exposure setting (shutter speed and
aperture) is displayed in the viewfinder
(0).
While you press the shutter button
halfway, the LCD monitor will turn off
(p.197).
Pressing Completely
This releases the shutter and takes the
picture.
Preventing Camera Shake
Hand-held camera movement during the moment of exposure is called
camera shake. It can cause blurred pictures. To prevent camera shake,
note the following:
• Hold and steady the camera as shown on the preceding page.
• Press the shutter button halfway to autofocus, then slowly press the
shutter button completely.
Shutter Button
If you press the shutter button completely without pressing it halfway
first, or if you press the shutter button halfway and then press it
completely immediately, the camera will take a moment before it takes
the picture.
Even during menu display, image playback, or image recording, you can
instantly go back to shooting-ready by pressing the shutter button
halfway.
48
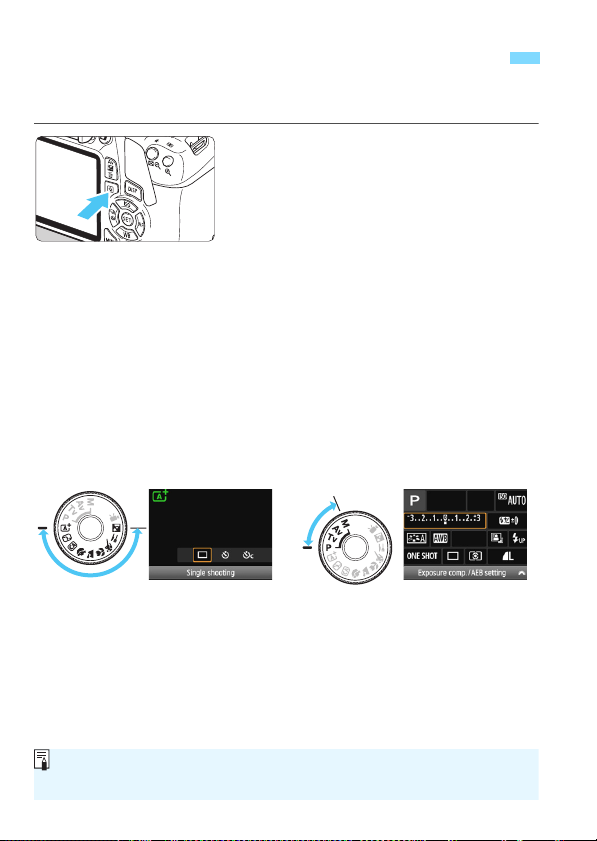
You can directly select and set the shooting functions displayed on the
LCD monitor. This is called Quick Control.
1
Press the <Q> button.
The Quick Control screen will appear
(7).
2
Set the desired function.
Press the <S> cross keys to select a
function.
The settings of the selected function
and Feature guide (p.55) will appear.
Turn the <6> dial to change the
setting.
You can also select from a list by
selecting a function and pressing
<0>.
3
Take the picture.
Press the shutter button completely to
take the picture.
The captured image will be displayed.
Q Quick Control for Shooting Functions
Basic Zone modes Creative Zone modes
For the functions settable in Basic Zone modes and their setting
procedures, see page 74.
49
Q Quick Control for Shooting Functions
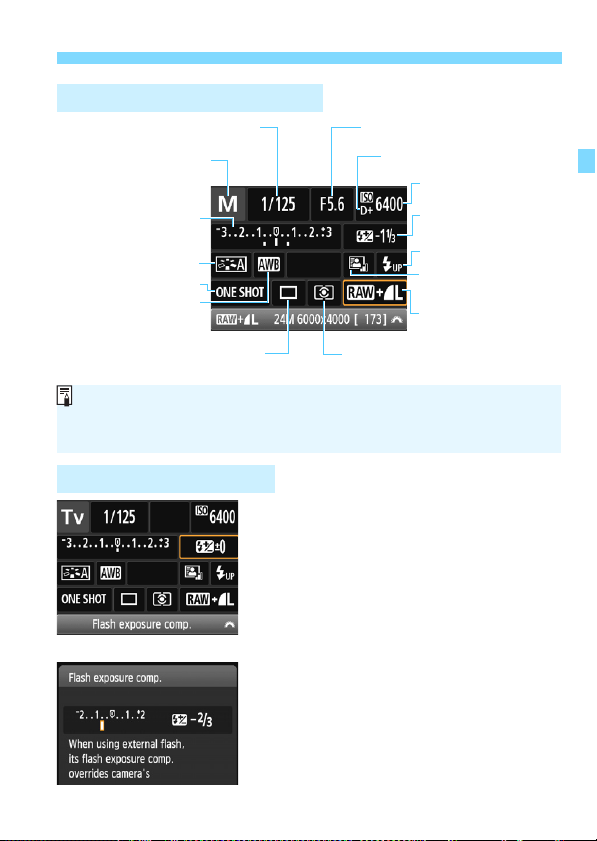
Select the desired function and press
<0>. The function’s setting screen
will appear.
Press the <Y> <Z> keys or turn the
<6> dial to change some of the
settings. Also, some functions can be
set by pressing the <B> button.
Press <0> to finalize the setting and
return to the Quick Control screen.
Sample Quick Control Screen
Function Setting Screen
Shutter speed (p.108)
Flash exposure
compensation (p.117)
AF operation (p.97)
Shooting mode* (p.30)
Highlight tone priority* (p.263)
Auto Lighting Optimizer
(p.123)
Metering mode (p.115)
Exposure compensation/
AEB setting (p.116, 118)
Picture Style (p.95)
ISO speed (p.92)
Image-recording quality
(p.88)
Aperture (p.110)
Raise built-in flash
White balance (p.131)
Drive/self-timer (p.102-103)
Functions marked with an asterisk * cannot be set with the Quick
Control.
When you select <s> and press <0>, the built-in flash will be raised.
50
You can set various settings with the menus such as the image-
recording quality, date and time, etc.
3 Menu Operations
<S> cross keys
LCD monitor
<0> button
The menu tabs and items displayed will differ depending on the
shooting mode.
Menu Screen
Creative Zone modes
<M> button
Basic Zone modes Movie shooting mode
Menu items
Menu settings
zShooting
5Set-up
9My Menu
3Playback
Ta b
 Loading…
Данная инструкция на русском языке предназначена для фотокамеры Canon EOS 2000D, описывает принцип работы и основные моменты эксплуатации устройства.
Производитель настойчиво рекомендует перед включением фотокамеры внимательно изучить настоящую инструкцию.
- Языки: Русский
- Тип: PDF
- Размер: 28.04 MB
- Описание: This document contains instructions on how to use your product. It corresponds to version 4.8 of the software.
- Языки: Русский
- Тип: PDF
- Размер: 4.2 MB
- Описание: This document contains instructions on how to use your product. It corresponds to version 1.20 of the software.

- Языки: Русский
- Тип: PDF
- Размер: 11.06 MB
- Описание: This document contains instructions on how to use your product. It corresponds to version 3.8 of the software.
- Языки: Русский
- Тип: PDF
- Размер: 7.79 MB
- Описание: This document contains instructions on how to use your product.

- Языки: Русский
- Тип: PDF
- Размер: 1.99 MB
- Описание: This document contains instructions on how to use the Wi-Fi functionality for your product.
На NoDevice можно скачать инструкцию по эксплуатации для Canon EOS 2000D. Руководство пользователя необходимо для ознакомления с правилами установки и эксплуатации Canon EOS 2000D. Инструкции по использованию помогут правильно настроить Canon EOS 2000D, исправить ошибки и выявить неполадки.
Select your support content

Find the latest drivers for your product
Software to improve experience with our products
Useful guides to help you get the best out of your product
Browse a selection of apps for your product
Find the latest firmware for your product
Need help? Check out our Frequently Asked Questions
Check out the latest news about your product
Find solutions to the error code displayed on your product
Read the technical specifications for your product
Полезные ссылки
Вам также может понадобиться.

Свяжитесь с нами
Свяжитесь со службой поддержки продукции для дома по телефону или электронной почте

Canon ID
Регистрация продукта и управление аккаунтом Canon ID

Ремонт
Поиск центров по ремонту оборудования, полезная информация по процессу ремонта
Источник