
-
Contents
-
Table of Contents
-
Troubleshooting
-
Bookmarks
Quick Links
AT-2
6-Channel Electrocardiograph
6-Kanal-Elektrokardiograph
Electrocardiographe à 6 canaux
Related Manuals for Schiller CARDIOVIT AT-2
Summary of Contents for Schiller CARDIOVIT AT-2
-
Page 1
AT-2 6-Channel Electrocardiograph 6-Kanal-Elektrokardiograph Electrocardiographe à 6 canaux… -
Page 2
March 96, June 2000, May 2001, August 2001 Associated Documents Guide to the SCHILLER Interpretation and Measurement Program E/ D/ F Article Number 2. 510 179 SCHILLER AG Altgasse 68 6341 Baar, Switzerland Phone: ++ 41 41 766 42 42 Fax: ++ 41 41 761 08 80 www.schiller.ch… -
Page 3
Austria Tel.: + 43 732 709 90 Fax : + 43 732 757 000 SCHILLER Medical S.A, BP 50, 19, Avenue de la Gare, F-67162 Wissembourg / Cedex, France France Tel.: +33 3 88 63 36 00 Fax : +33 3 88 94 12 82… -
Page 4
Only dispose of the battery in official recycling centres or municipally approved areas. Alternatively, used batteries can be returned to Schiller AG for disposal. Unit Disposal Instructions Units no longer required can be returned to Schiller AG for disposal. Alternatively dispose of the unit in municipally approved recycling centres. -
Page 5
Remove the fuse panel and replace the fuse(s). Click back the fuse panel. Intended Use The CARDIOVIT AT-2 is a 6-channel ECG recorder with all (12) ECG signals simultaneously processed to provide instant ECG recordings. Two automatic recording modes can be individually preset to enable one button ECG… -
Page 6
Terms of Warranty The SCHILLER AT-2 is warranted against defects in material and manufacture for the duration of one year (as from date of purchase). Excluded from this guarantee is damage caused by an accident or as a result of improper handling. The warranty entitles free replacement of PHYSICIAN‘S RESPONSIBILITY… -
Page 7
GAMMA RADIATION STERILISATION. DO NOT USE SOLVENT CLEANERS USE ONLY ACCESSORIES AND OTHER PARTS RECOMMENDED OR SUPPLIED BY SCHILLER AG. USE OF OTHER THAN RECOMMENDED OR SUPPLIED PARTS MAY RESULT IN INJURY INACCURATE INFORMATION AND/ OR DAMAGE TO THE UNIT. -
Page 9: Table Of Contents
Potential Equalisation ……….. 7 RECORDING AN ECG IN MANUAL MODE ….. 33 KEYBOARD ……………. 8 CARE & MAINTENANCE ……….35 Care of your CARDIOVIT AT-2 ……..35 INDICATORS …………..10 Self-test …………..35 12 Monthly Check …………36 GENERAL SETTINGS …………11 Cleaning the Print Head ……….
-
Page 10: Introduction
Introduction MAINS AND POTENTIAL EQUALISATION CONNECTORS PAPER RELEASE CATCH PATIENT CABLE CONNECTOR LEAD INDICATORS POWER INDICATORS SYSTEM INDICATORS Page 2 CARDIOVIT AT-2 8.2001…
-
Page 11
Introduction The CARDIOVIT AT-2 is a 6-channel ECG recorder. All ECG signals are simultaneously processed to provide instant ECG recordings. Two automatic recording modes can be individually preset to enable one button ECG recording of preferred print formats . Individual lamps are provided to give power, paper error, filter, lead group and lead off indications. -
Page 12: Operation Modes
Automatic Recording Automatic Recording statements for the printout. in Format 1 in Format 2 Pages 31 to 32 Pages 31 to 32 For further information see paragraph 12 lead printout «Settings for Automatic Mode». Page 4 CARDIOVIT AT-2 8.2001…
-
Page 13: Manual Mode
START Pages 33 and 34 • Sensitivity Leads, Speed, • Myogram Filter Sensitivity Myogram filter Pages 18 + 33 For further information see paragraph «ECG Recording in Continuous printout of 6 leads Manual Mode». STOP CARDIOVIT AT-2 Page 5 8.2001…
-
Page 14: Location & Power
(60% in less than 3 hours, 90% in less than 7 hours). A fully charged battery lasts approximately 6 hours of normal use. The unit can remain connected to the mains supply without any danger of damage to either the battery or the unit. Page 6 CARDIOVIT AT-2 8.2001…
-
Page 15: Basic Information
Basic Information Switching On and Off The CARDIOVIT AT-2 is switched on by means of the green key and off by means of the red key. The unit is switched off after 5 minutes (30 seconds if battery capacity is limited) if no key is pressed and the patient cable is not connected.
-
Page 16: Keyboard
Keyboard AUTO aVR aVL aVF COPY START BEEP V2 V3 V5 V6 AUTO LEAD OFF GAIN mm/mV mm/mV mm/mV START aVF III V4 V5 PAPER STOP FILT mm/s mm/s mm/s V5 V6 FILTER V8 V9 Page 8 CARDIOVIT AT-2 8.2001…
-
Page 17
Use this key also Switch myogram filter (muscle tremor filter) for baseline recentering FILT on or off Key for initiation of setups and selection of second format for printout Lead group selector (forward) Lead group selector (backward) CARDIOVIT AT-2 Page 9 8.2001… -
Page 18: Indicators
V5 V6 mode only aVF III Indicator lamp for selected lead group in manual mode only V2 V4 V5 V4 V5 V6 Indicator lamp for selected lead group in manual mode only V7 V8 V9 Page 10 CARDIOVIT AT-2 8.2001…
-
Page 19: General Settings
Start programming / CONFIRM SETTING Switch to numerical keyboard On the following pages the programmable parameters and the programming sequences are described in detail. STOP NOTE THAT THE SETTINGS ARE ALWAYS CONFIRMED BY PRESSING THE KEY. CARDIOVIT AT-2 Page 11 8.2001…
-
Page 20: Defaults
0.05 Hz 0.05 Hz Mains Filter Setting 50 Hz (USA — 60Hz) 50 Hz (USA — 60Hz) Myogram Filter Setting 35 Hz, OFF 35 Hz, OFF Interpretation Settings N/A: — U: + A30: — S: — Page 12 CARDIOVIT AT-2 8.2001…
-
Page 21
Enabled (+) or Suppressed (-) Marks Enabled (+) or Suppressed (-) Interpretation Enabled (+) or Suppressed (-) Selected Rhythm leads Leads selected for R1, R2 resp. Automatic Centering Enabled (+) or Suppressed (-) Printout of signals Sequential or Simultaneous CARDIOVIT AT-2 Page 13 8.2001… -
Page 22
A30: +/- (patient age is assumed to be < 30 (-) or >30 (+); +/- (low (-) or high (+) sensitivity) To reset the unit to the basic default settings, proceed as follows: Reset Setup Entry Key Sequence Action Reset to default base settings. Page 14 CARDIOVIT AT-2 8.2001… -
Page 23: Language
Swedish STOP American Italian Spanish Portuguese Confirm the selection by pressing STOP. Note: Once selected, the language remains active. However, when the unit is reset to the default settings, the default language will be English. CARDIOVIT AT-2 Page 15 8.2001…
-
Page 24: Baseline Filter
The set value is the lower limit of the frequency range and is normally set to 0.05 Hz. The settings 0.15 and 0.30 Hz should only be used when absolutely necessary, as the possibility exists that they could affect the original ECG signal, especially the ST segments. Confirm the selection by pressing STOP. Page 16 CARDIOVIT AT-2 8.2001…
-
Page 25: Mains Filter
Set the mains filter in accordance with the frequency of your local mains supply as follows: Mains Filter Entry Key Sequence Filter Setting Confirm Mains Filter 50 Hz Press Mains Filter 60 Hz STOP Mains Filter off CARDIOVIT AT-2 Page 17 8.2001…
-
Page 26: Myogram Filter
(marked on printout with –) Confirm the selection by pressing STOP. An ECG recorded in auto mode is stored unfiltered. It is therefore possible to print the stored ECG either with or without passing the myogram filter. Page 18 CARDIOVIT AT-2 8.2001…
-
Page 27: Defining Lead Sequence & Printout
Standard Lead Sequence Cabrera Lead Sequence Press Simultaneous Print STOP Sequential Print Auto-Centering ON Auto-Centering OFF Confirm the selection by pressing STOP. The selectable lead groups for the AT-2 are: Lead Groups Standard Cabrera -aVR CARDIOVIT AT-2 Page 19 8.2001…
-
Page 28: Acoustic Qrs Indication
Auto-Centering OFF ECG traces are set to a fixed baseline position and may possibly overlap. Acoustic QRS Indication BEEP The acoustic QRS indication can be switched on or off at any time by pressing the key. Page 20 CARDIOVIT AT-2 8.2001…
-
Page 29: Time / Date
General Settings Time / Date CHANGE TIME / DATE Time: HHMMSS beep Date: DDMMYY beep Wintertime to Summertime (+1 Hr) Summertime to Wintertime (-1 Hr) CARDIOVIT AT-2 Page 21 8.2001…
-
Page 30: Settings For Automatic Mode
Chart speed is 25 mm/s Chart speed is 50 mm/s Leads are printed in format 4 x 3 + 1 Rhy Confirm the selection by pressing STOP. Note: Lead selection for the rhythm lead is defined on page 27. Page 22 CARDIOVIT AT-2 8.2001…
-
Page 31: Average Cycles
The average complexes are printed out in two groups of six leads with two rhythm leads at a chart speed of 50 mm/s. Confirm the selection by pressing STOP. Note: Lead selection for the 2 rhythm leads is defined on page 27. CARDIOVIT AT-2 Page 23 8.2001…
-
Page 32: Measurements And Markings
QRS as well as end of T wave) are omitted. Reference markings (beginning and end of P wave and QRS as well as end of T wave) are added to ECG cycles. Confirm the selection by pressing STOP. Page 24 CARDIOVIT AT-2 8.2001…
-
Page 33: Interpretation
Confirm Press Interpretation is omitted. STOP Interpretation is printed. Confirm the selection by pressing STOP. Full details of the interpretation option are given in the SCHILLER ECG Measurement and Interpretation booklet (art. no. 2.510 179). CARDIOVIT AT-2 Page 25 8.2001…
-
Page 34: Interpretation Settings
‘Normal/abnormal’ is not printed ‘Normal/abnormal’ is printed. ‘Unconfirmed report’ is not printed. ‘Unconfirmed report’ is printed. Press STOP Patient age is assumed to be < 30 Patient age is assumed to be > 30 Low sensitivity High sensitivity Page 26 CARDIOVIT AT-2 8.2001…
-
Page 35: Selecting Rhythm Leads
Setup Rhythm Lead 2 The 2 rhythm leads are defined as follows: Precordial Leads Extremity Leads Entry Key Sequence Lead Confirm Entry Key Sequence Lead Confirm Press Press STOP STOP Confirm the selection by pressing STOP. CARDIOVIT AT-2 Page 27 8.2001…
-
Page 36: Patient Cable Connections
The CARDIOVIT AT-2 is CF rated. The patient connection is fully isolated and defibrillation protected. Protection against defibrillation voltage is however only ensured, if the original SCHILLER patient cable (Part-no.
-
Page 37
C3 between, and equidistant to, C4 and C2 • C6 on left midaxillary line on the same level as C4 • C5 between, and equidistant to, C4 and C6 Following these simple guidelines will ensure good results every time. CARDIOVIT AT-2 Page 29 8.2001… -
Page 38: Standard Leads
White C2 — YELLOW White/Red Brown/Red RIGHT ARM — RED LEFT ARM — YELLOW White/Yellow Brown/Yellow White/Green Brown/Green White/Brown Brown/Blue White/Black Brown/Orange White/Violet Brown/Violet Yellow Black Green RIGHT LEG — BLACK LEFT LEG — GREEN Page 30 CARDIOVIT AT-2 8.2001…
-
Page 39: Recording An Ecg In Automatic Mode
5 mm/mV to reduce the overlapping of traces. AUTO START To start the automatic ECG recording in Format 1, simply press To start the automatic recording in the second format, press followed by AUTO START CARDIOVIT AT-2 Page 31 8.2001…
-
Page 40
Detailed Measurement Table (Interpretation option only) Interpretation (Interpretation option only) COPY • To obtain an extra printout of the ECG recording in Format 1, simply press COPY • To obtain an extra printout of the second format, press followed by Page 32 CARDIOVIT AT-2 8.2001… -
Page 41: Recording An Ecg In Manual Mode
II, aVF, III, V2, V4, V5 V4, V5, V6, V7, V8, V9 mm/s mm/s mm/s • Chart Speed (by means of the keys) mm/mV mm/mV mm/mV • Sensitivity (by means of the keys) • Filter see page 18. CARDIOVIT AT-2 Page 33 8.2001…
-
Page 42
To re-centre the ECG traces, press the key during operation. STOP Finish the recording by pressing the key. WARNING: AFTER HEAVY ARTEFACTS OR LEAD OFF, THE INDICATION OF THE HEART RATE MAY NOT BE RELIABLE. Page 34 CARDIOVIT AT-2 8.2001… -
Page 43: Care & Maintenance
To disinfect, wipe the cable with any standard hospital disinfectant. The casing of the CARDIOVIT AT-2 should be cleaned with a soft cloth on the surface only. DISCONNECT THE UNIT BEFORE CLEANING.DO NOT, UNDER ANY CIRCUMSTANCES, IMMERSE THE APPARATUS INTO A CLEANING LIQUID OR STERILIZE WITH HOT WATER, STEAM, OR AIR.
-
Page 44: 12 Monthly Check
• With a tissue dampened with alcohol, gently rub the print head to remove the ink residue. If the printhead is badly soiled, the colour of the grid ink will show on the tissue. Page 36 CARDIOVIT AT-2 8.2001…
-
Page 45
After the paper has been replaced, the printout is restarted by pressing COPY or MAN START or AUTO START. A step-by-step description of how to change the paper is given on the next page. CARDIOVIT AT-2 Page 37 8.2001… -
Page 46: Replacing The Recording Paper
• Press the STOP key to transport the paper to the start position. SCHILLER can only guarantee perfect printouts when SCHILLER original chart paper or chart paper of the same quality is used. Page 38 CARDIOVIT AT-2 8.2001…
-
Page 47: Trouble Shooting
Check if mains cable is plugged in. Indicator Lamp is not lit Call your local SCHILLER dealer if problem is still present. CHECK ELECTRODE CONTACT. As much as possible, ensure that patient is relaxed and warm. Activate myogram filter to reduce «Noisy»…
-
Page 48: Ordering Information
User Guide (English / German / French) 2.510 199 User Guide (Italian / Spanish / Portuguese) 2.510 200 Software (C) Interpretation 5. 020002 Guide to the Interpretation and Measurements Programs 2.510179 (English /German / French) Page 40 CARDIOVIT AT-2 8.2001…
-
Page 49: Technical Data
Printing Process High-resolution thermal print head, 8 dots per mm Recording Tracks 6 channels, positioned at optimal width on 200 mm, automatic baseline adjustment Automatic Lead Programs 6 channel representation of 12 simultaneously acquired standard leads CARDIOVIT AT-2 Page 41 8.2001…
-
Page 50
ECG Storage: Memory for 10 s, 12-lead ECG Circular input memory for 10 s, 12-lead ECG. Frequency Range of Digital Recorder: 0 to 150 Hz (IEC) 0 to 150 Hz (AHA) Page 42 CARDIOVIT AT-2 8.2001… -
Page 51
The stored ECGs can be printed with or without filter. Line Frequency Filter: Distortion-free suppression of superimposed 50 or 60 Hz sinusoidal interferences by means of an adaptive digital filter. Patient Input: Fully floating and isolated, defibrillation protected. Patient Leakage Current: <5 µA CARDIOVIT AT-2 Page 43 8.2001… -
Page 52
Temperature, Operating: 10° to 40° C Temperature, Storage: -10° to 50° C Relative humidity: 25 to 95% (non condensing) Atmospheric pressure: 700 to 1060 hPa Control Panel: Rubber keys Technical data subject to change without notice. Page 44 CARDIOVIT AT-2 8.2001… -
Page 53
Technical Data Available Configurations The CARDIOVIT AT-2 is available in two versions: Standard Version: Unit with ECG recording and printout capabilities. Version C: Unit with additional ECG Interpretation program (including measurements). CARDIOVIT AT-2 Page 45 8.2001… -
Page 54
Page 46 CARDIOVIT AT-2 8.2001…

Schiller Cardiovit AT 2 Plus 6 канальный электрокардиограф, осуществляющий одновременную регистрацию всех 12 отведений, и таким образом обеспечивающий немедленную регистрацию ЭКГ.
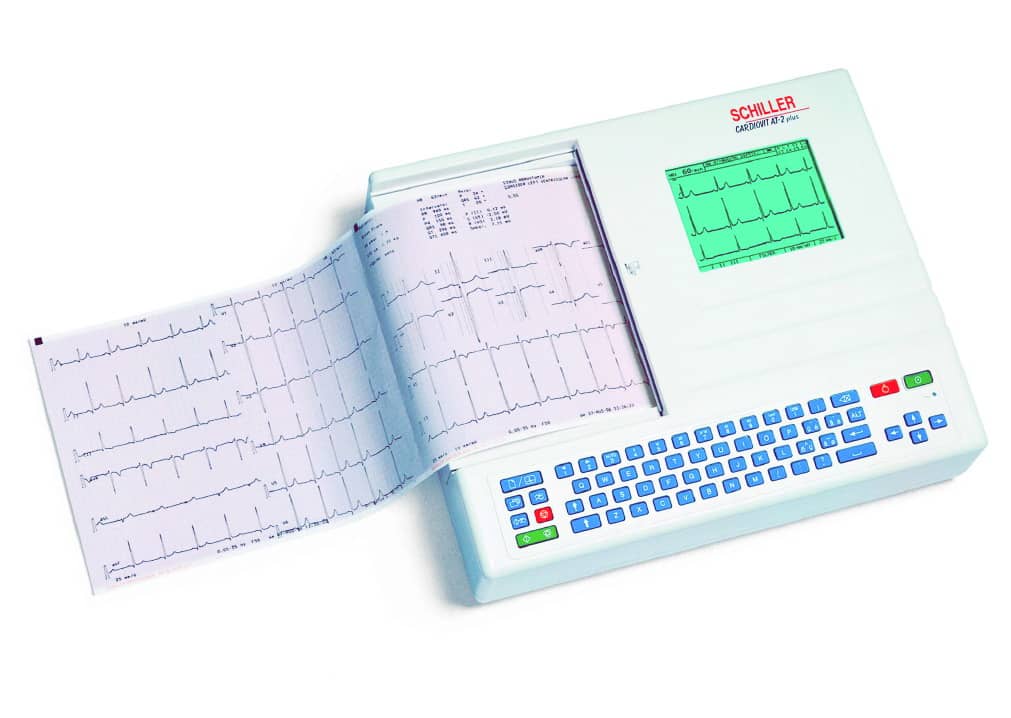
Schiller Cardiovit AT 2 Plus имеет следующие преимущества:
- Небольшой вес и компактные размеры.
- Распечатка формата А4 со встроенного термопринтера.
- Встроенный аккумулятор для независимой работы от сети в течение 4 часов обычного использования или 300 распечаток на один заряд.
- Большой жидкокристаллический экран для просмотра ЭКГ перед печатью.
- Действие совершается простым нажатием клавиш.
- Автоматический и ручной режимы регистрации.
- Возможность выбора форматов печати.
- Память ЭКГ с возможностью копирования ЭКГ.
- Программа интерпретации (включая измерения) для взрослых и детей.
- Буквенно- цифровая клавиатура для ввода данных пациента и замечаний врача.
Производитель Schiller Cardiovit AT 2 Plus
Производитель электрокардиографа Schiller Cardiovit AT 2 Plus – Фирма «SCHILLER AG». Страна производитель Швейцария.
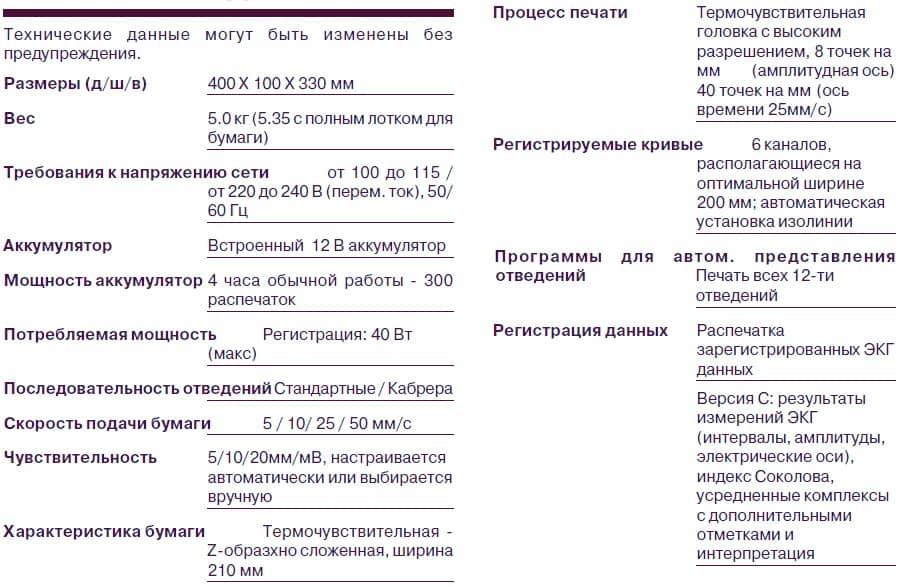
Технические характеристики Schiller Cardiovit AT 2 Plus
Ниже указаны технические характеристики на аппарат ЭКГ Schiller Cardiovit AT 2 Plus.

Режимы работы Schiller Cardiovit AT 2 Plus
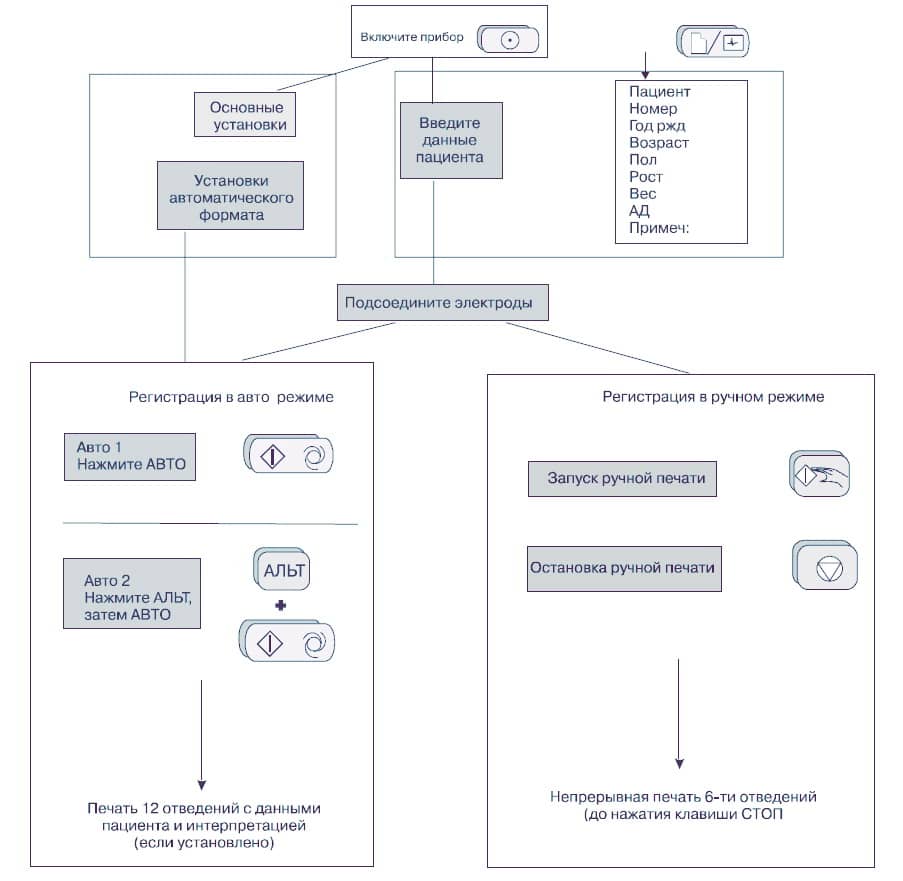
Автоматический режим
Автоматический режим допускает печать десяти секунд ЭКГ, зарегистрированной по всем 12 отведениям, в двух различных форматах.
До регистрации в каждом из форматов можно запрограммировать следующее:
- Формат отведения.
- Скорость подачи бумаги.
- При инсталлированной программе интерпретации возможен выбор таблицы измерений , усредненных комплексов с отметками и интерпретационными сообщениями для печати.
Ручной режим
Ручной режим допускает печать шести отведений, выбираемых и индицируемых на экране, в режиме реального времени.
В течение регистрации возможен следующий выбор:
- Группы отведений.
- Скорости подачи бумаги.
- Чувствительности.
- Миографического фильтра.
Подсоединение кабеля пациента
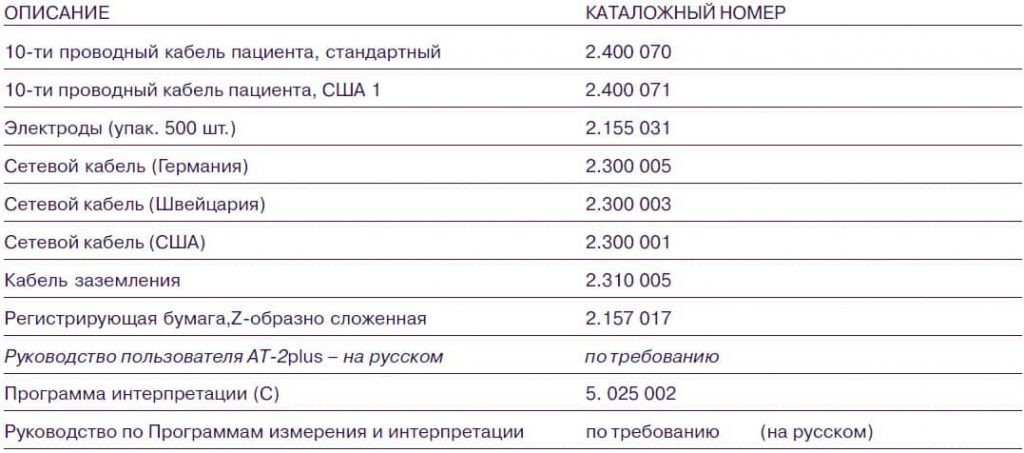
Набор принадлежностей электрокардиографа включает 10- проводный кабель пациента. Этот кабель подсоединяется к гнезду кабеля пациента на правой боковой панели прибора и закрепляется двумя винтами.
Электрокардиограф относится к классу СF. Это означает, что отведения и наложенные на пациента электроды для ЭКГ полностью изолированы и защищены от дефибрилляционного напряжения. Защита от дефибрилляционного напряжения гарантирована только в случае использования кабеля пациента производства фирмы SCHILLER (катал. номер 2.400070). Для записи электрокардиограммы нужно убедиться в том, что ни пациент, ни токопроводящие части наложенных на него электродов (включая нейтральный электрод), не контактируют с другим человеком или другими токопроводящими предметами, (даже если они заземлены).
Качество ЭКГ зависит от подготовки области наложения электрода и величины сопротивления между кожей и электродом. Для гарантии хорошего качества ЭКГ и минимизации сопротивления кожа/
электрод необходимо помнить о следующем:
- Убедитесь, что в помещении тепло и пациент расслаблен.
- Побрейте область наложения электрода до того, как очистить ее.
- Очистите область наложения электрода спиртовым тампоном.
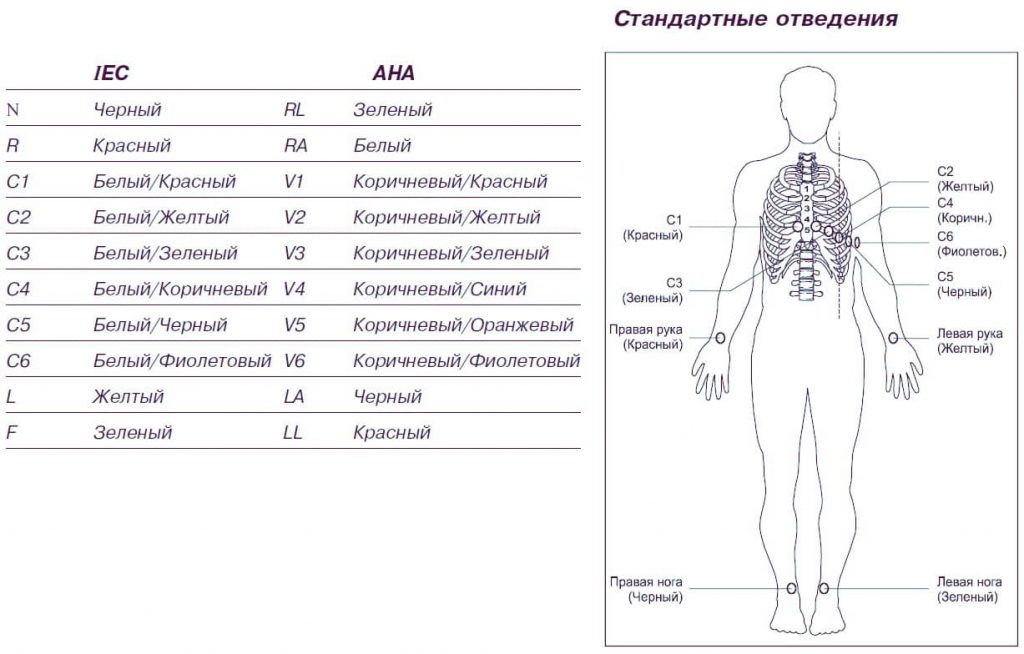
- Первым прикрепите электрод С4 в пятом межреберье по среднеключичной линии.
Расположение электродов:
- C1 в четвертом межреберье по правому краю грудины.
- C2 в четвертом межреберье по левому краю грудины.
- C3 между С4 и С2 на равном расстоянии.
- C6 по левой среднеподмышечной линии на уровне С4
- C5 между С4 и С6 на равном расстоянии.
Подсоединение кабеля ЭКГ
Клавиатура
Ниже представлено описание функций клавиш клавиатуры Schiller Cardiovit AT 2 Plus.
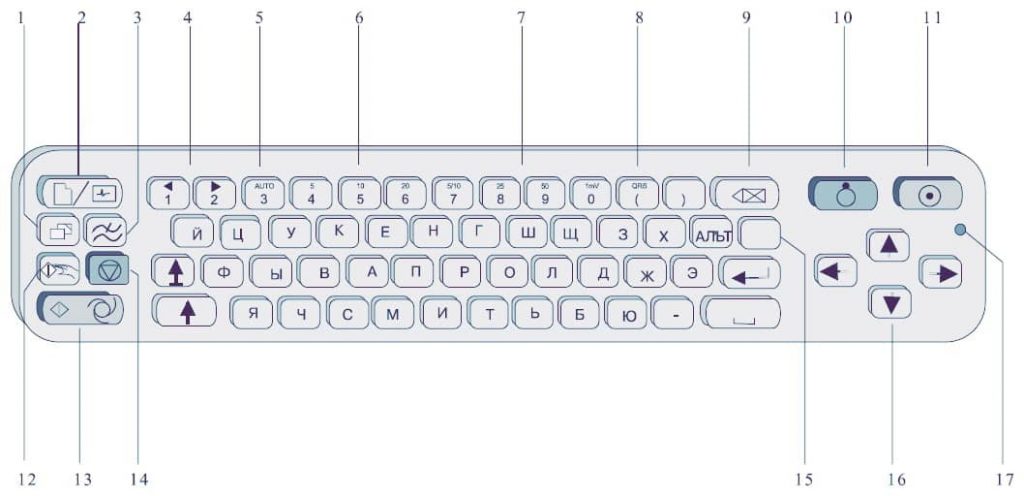
- Печать дополнительной копии если текущая регистрация произведена в автоматическом режиме (из памяти). Для получения дополнительной распечатки в формате 2 , сначала нажмите клавишу АЛЬТ.
- Визуализация / ввод данных пациента. При выведенных на экран данных пациента нажмите клавишу снова для возвращения к экрану ЭКГ.
- Включение / выключение миографического фильтра. Отсекающая частота устанавливается в “Установках”.
- Эти клавиши служат для изменения групп отведений, представленных на экране.
- Установки автоматической чувствительности для печати (только в автоматическом режиме) для подбора оптимальной величины сигнала (5мм/мВ или 10мм/мВ).
- Верхняя часть клавиш имеет обозначения 5, 10 и 20 для выбора чувствительности ЭКГ на экране и на (ручной) печати. Возможные установки чувствительности 5, 10, 20 мм/мВ.
- Верхняя часть клавиш имеет обозначения 5, 10, 25 и 50, которые являются установками скорости ЭКГ на экране и (ручной) печати. Скорость экрана может быть установлена на 25 или 50 мм/с. Скорость распечатки в ручном режиме может быть 5, 10, 25 или 50 мм/с. Установками скорости 5 и 10 мм/с обладает одна клавиша.
- Верхний символ отвечает за включение / выключение бипера QRS.
- Удаление последнего действия / символа.
- Выключение прибора.
- Включение прибора.
- В ручном режиме запуск непрерывной печати ЭКГ – до нажатия клавиши СТОП.
- Регистрации ЭКГ в автоматическом режиме (формат 1). Нажмите АЛЬТ перед клавишей АВТО для получения формата 2.
- Остановка печати / подтверждение (новых) установок.
- Клавиша АЛЬТ инициирует установку и выбирает второй формат для печати и регистрации автоматического режима.
- В режиме ЭКГ используйте клавиши вверх / вниз для настройки контрастности экрана. При вводе данных пациента используйте клавиши направо / налево для передвижения курсора в поле.
- Индикатор сети горит при работе от сети.
Экран Schiller Cardiovit AT 2 Plus
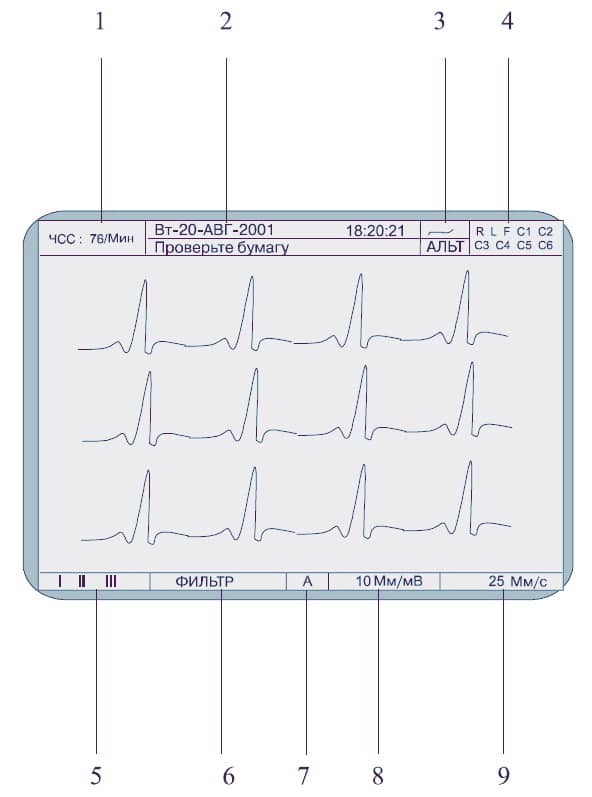
- Текущая ЧСС (усредняются каждые 4 сокращения и обновляется каждые 2 секунды). ЧСС приводится и на распечатке в ручном режиме. Учтите, в автоматическом режиме ЧСС усредняется за каждые 10 секунд регистрации.
- Верхняя строка – текущие день недели, дата и время. Нижняя строка – системные сообщения.
- Верхняя строка источник питания сеть или аккумулятор. Когда мощность аккумулятора снижается, символ мигает Нижняя строка – АЛЬТ в этом поле означает, что клавиша АЛЬТ – нажата.
- Подсоединение электродов если отведение мигает, сопротивление электрода слишком высоко. Электрод должен быть переустановлен.
- Индикатор отведений (текущих отведений, демонстрируемых экраном). Изменить группу отведений можно клавишами (1) и (2).
- Индикатор миографического фильтра: “ФИЛЬТР” фильтр включен, нет индикации фильтр выключен.
- (А) В этом поле свидетельствует о том, что выбрана установка автоматической чувствительности (активна только при авто режиме). Включение / выключение авто чувствительности клавишей (3).
- Чувствительность 5, 10, 20 мм/мВ. Изменение чувствительности с помощью клавиш (4), (5) и (6).
- Скорость 25 или 50 мм/с. Изменение скорости с помощью клавиш (8) и (9).
Установки Schiller Cardiovit AT 2 Plus
Все параметры устанавливаются с помощью кода. Этот код состоит из комбинации клавиш, которая всегда начинается с клавиши АЛЬТ, затем следует последовательность цифровых клавиш, и в заключении ввод подтверждается клавишей СТОП. Как только нажата клавиша ALT, клавиатура работает на функцию программирования.
При нажатии клавиши АЛЬТ символ ‘АЛЬТ’ появляется на экране. Функция АЛЬТ активна только 4 секунды. Если клавиши для программирования не нажаты в течении 4 секунд прибор возвращается в стандартный режим. Для активации режима программирования клавиша АЛЬТ должна быть нажата заново.
Установки запоминаются после нажатия клавиши STOP, и клавиатура освобождается для выполнения других функций. Однажды подтвержденные установки сохраняются даже тогда, когда прибор выключен.
Более подробные установки можно посмотреть в инструкции на аппарат. Скачать руководство пользователя можно в конце статьи.
Установка языка Schiller Cardiovit AT 2 Plus
Язык выбирается следующим образом:
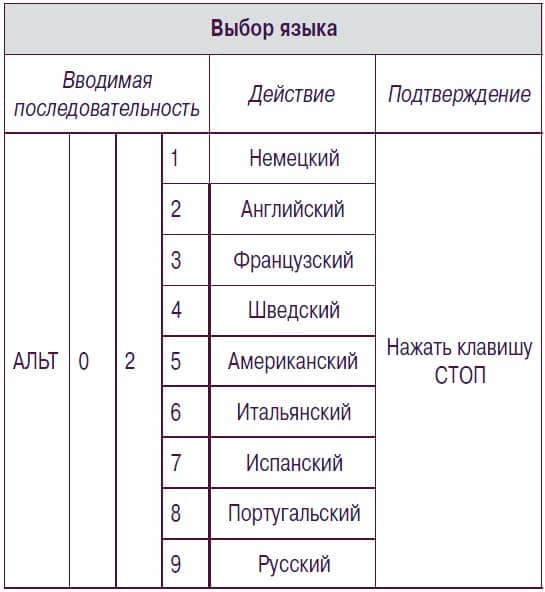
Подтвердите выбор нажатием клавиши СТОП.
Установка даты и времени Schiller Cardiovit AT 2 Plus
Установка даты и времени Schiller Cardiovit AT 2 Plus осуществляется следующим образом:

Техническое обслуживание Schiller Cardiovit AT 2 Plus
Прибор должен проходить технический контроль каждые 12 месяцев. Во время проверки должно быть выполнено и документировано следующее:
- Визуальный осмотр прибора и кабеля пациента.
- Тесты электрической безопасности по IEC 601 1 и IEC 601 2 25.
- Тесты функционального состояния прибора согласно сервисному руководству.
Результаты тестов должны быть документированы.
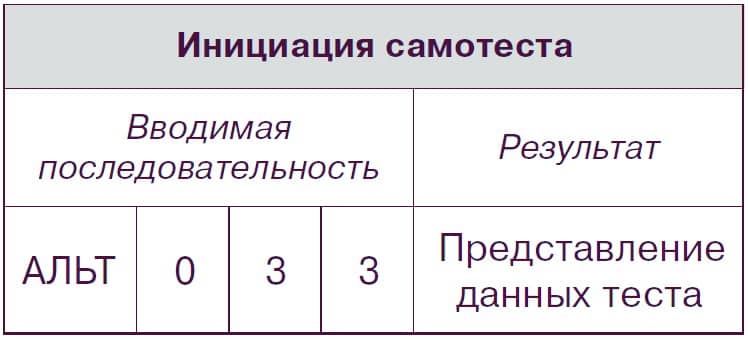
Самотест
Самотестирование Schiller Cardiovit AT 2 Plus инициируется следующим образом:
Очистка кабеля пациента
Кабель пациента не должен подвергаться излишним механическим нагрузкам. При отсоединении отведений, держитесь за штеккер, а не за кабель. Обеспечьте безопасные условия хранения и транспортировки прибора и кабеля.
Кабель можно мыть мыльной водой. Стерилизация, если требуется, должна проводиться только газом и без пара. Для дезинфекции протрите кабель стандартными средствами дезинфекции, применяющимися в Вашем учреждении.
Очистка термопечатающеего устройства
При частом использовании термоголовка может загрязняться, что может привести к ухудшению качества печати. Для предотвращения этого рекомендуется ежемесячно очищать термоголовку принтера.
Снимите крышку отсека бумаги. Термоголовка находится за планкой фиксации крышки отсека для бумаги. Мягкой тканью, слегка смоченной спиртом, осторожно протрите термоголовку.
Замена бумаги
Красная полоска по нижнему краю регистрирующей бумаги свидетельствует о том, что бумага заканчивается. Появление этой полоски указывает на то, что осталось около 8 страниц. Рекомендуется заменить бумагу сразу после появления полоски. В случае окончания бумаги начнет мигать индикаторная лампа, и процесс печати будет прерван.
Для замены бумаги проделайте следующее:
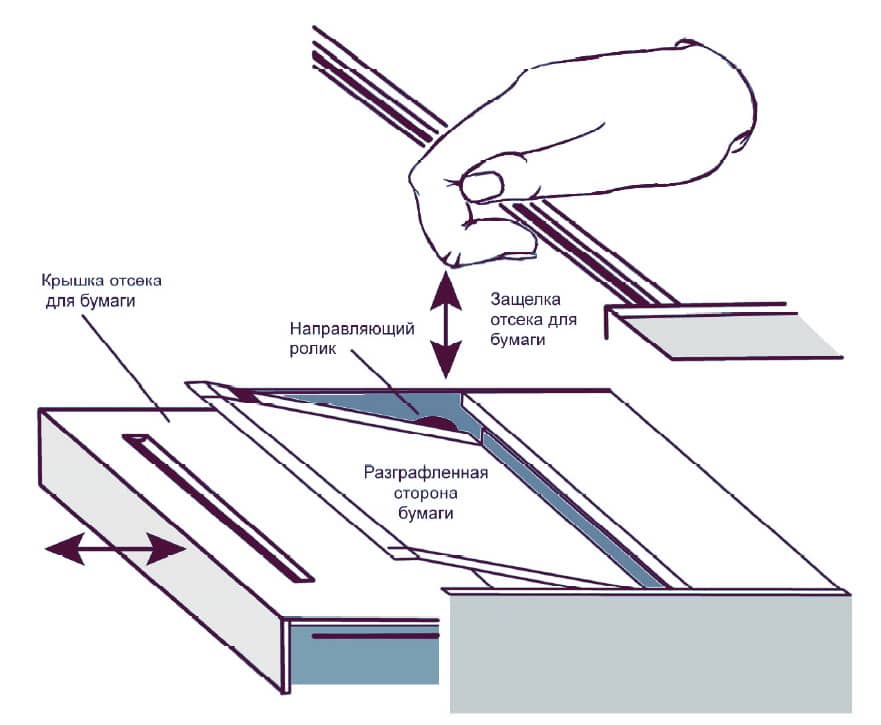
- Захватите пальцами задвижку, крепящую отсек для бумаги, и потяните вверх.
- В подтверждение правильности выполненных действий отсек, покрывающий бумагу, слегка отскочит влево.
- Удалите отсек, затем оставшуюся бумагу.
- Расположите в отделении новую упаковку бумаги. Проверьте, чтобы печатаемая (разлинованная) сторона располагалась «лицом» вверх, бумага должна выходить на переднюю панель прибора, огибая черный ролик.
- Установите крышку отсека для бумаги на место для щелчка.
- Для перемещения бумаги в начальную позицию нажмите клавишу СТОП.
Ошибки и неисправности Schiller Cardiovit AT 2 Plus
Ниже указаны неисправности аппарата ЭКГ Schiller Cardiovit AT 2 Plus и способы их устранения.
Прибор не включается, экран не функционирует.
Включен ли индикатор сети? Нет? Проверьте источник питания. Да? Проверьте контрастность экрана с помощью курсоров вверх / вниз. Если сеть в порядке, а экран так и не функционирует: Нажмите клавишу ВЫКЛ. Подождите несколько секунд и включите прибор снова. Если экран так и не реагирует, свяжитесь с представителем Schiller медицинское оборудование.
Наложение комплексов QRS.
Убедитесь, что автоматическое уменьшение чувствительности не отключено. Нажмите клавишу 1 мВ для переустановки изолинии. Проверьте контакт электродов.
«Шумные» кривые.
Проверьте контакт электродов. Наложите электроды заново. Убедитесь, что пациент расслаблен и ему тепло. Проверьте все установки фильтров. Включите миографический фильтр – проверьте частоту. Убедитесь, что установка сетевого фильтра соответствует напряжению сети.
После автоматического запуска нет распечатки.
Убедитесь в наличии бумаги. Проверьте установки – убедитесь, что, в авто формате ЭКГ выбрана, по крайней мере, одна позиция для печати. Запустите печать в ручном режиме, если принтер все еще бездействует обратитесь к представителю SCHILLER.
Распечатка постепенно исчезает или «нечистая».
Убедитесь, что вставлена новая бумага от SCHILLER. Помните, что термочувствительная бумага для AT 4 чувствительна к теплу и свету. Если бумага хранится не в оригинальной упаковке, при высокой температуре или она просто старая, то качество печати может ухудшиться. Убедитесь, что бумага вставлена правильно с отметкой в верху. Проверьте, защелкнут ли отсек для бумаги. При истечении некоторого времени чернила с печатной стороны бумаги могут сохраняться на головке принтера. Очистите головку принтера.
Нет распечатки интерпретационных сообщений или измерений.
Проверьте, доступны ли для печати опции интерпретация и измерения. Проверьте, чтобы выбранный формат включал установки измерения и интерпретации.
Клавиши не функционируют, экран завис.
Выключите прибор, подождите несколько секунд и включите снова.
Принадлежности и расходные материалы
Аккумулятор Schiller Cardiovit AT 2 Plus
Аккумулятор 12V-2,2Ah для ЭКГ аппарата Schiller Cardiovit AT 2 Plus.

Технические характеристики аккумулятора
- Напряжение (В): 12;
- Емкость (А.ч): 2,2;
- Габариты (ДхШхВ): 178x34x60 мм;
- Вес: 0.93 кг;
- Срок службы: при t = 20 C — 5 лет;
- Тип клем: Faston 187;
- Применение: в циклическом или буферном режиме.
Скачать инструкцию на Schiller Cardiovit AT 2 Plus
Скачать инструкцию и другую документацию на электрокардиограф Schiller Cardiovit AT 2 Plus можно здесь.
Руководство пользователя ( user manual ) на русском языке Schiller Cardiovit AT 2 Plus скачать.
Регистрационное удостоверение Schiller Cardiovit AT 2 Plus скачать.
Сертификат соответствия Schiller Cardiovit AT 2 Plus скачать.
Свидетельство об утверждении типа средств измерений Schiller Cardiovit AT 2 Plus скачать.
Так же смотрите Schiller AT-101 12-канальный электрокардиограф, сфигмоманометр Schiller BR-102 plus.
- About
- Blog
- Projects
- Help
-
Donate
Donate icon
An illustration of a heart shape - Contact
- Jobs
- Volunteer
- People
Bookreader Item Preview
texts
Schiller AT 2 User manual
Schiller AT 2 User manual
- Addeddate
- 2020-05-20 09:11:06
- Classification
- Clinical;Cardiac Equipment;Electrocardiograph (ECG EKG);Welch Allyn Schiller ECG EKG;Schiller AT-2
- Identifier
- manual_Schiller_AT-2_User_manual
- Identifier-ark
- ark:/13960/t3dz91h7x
- Ocr
- ABBYY FineReader 11.0 (Extended OCR)
- Page_number_confidence
- 90.20
- Ppi
- 300
- Scanner
- Internet Archive Python library 1.9.0
comment
Reviews
There are no reviews yet. Be the first one to
write a review.
SIMILAR ITEMS (based on metadata)
Table of Contents for Schiller CARDIOVIT AT-2:
-
Page 36 CARDIOVIT AT-2 8.2001 Page 36 CARDIOVIT AT-2 8.2001 Care & Maintenance 12 Monthly Check The unit should undergo a technical safety check every 12 months. This safety check should extend to include the following: • Visual inspection of the unit and cables. • Electrical safety tests according to IEC 601-1 and IEC 601-2-25. • Functional tests according to the Service H
-
Page 16 CARDIOVIT AT-2 8.2001 Page 16 CARDIOVIT AT-2 8.2001 General Settings There are three different filters which can be set individually as follows: • Baseline filter • Mains filter • Myogram filter The setting for each filter is given on the setup printout. Baseline Filter The digital Baseline filter suppresses excessive baseline drifts. The setting options are as follows: Baseline Filter Entry Key Sequence Filter Setting Confirm ALT 5 0 0.05 Hz (Default) Press STOP Key 1 0.1
-
CARDIOVIT AT-2 Page 31 8.2001 CARDIOVIT AT-2 Page 31 8.2001 ENGLISH ENGLISH Recording an ECG in Automatic Mode In automatic mode, a full 12-lead ECG is printed in one of two predefined formats with a sensitivity of 10 mm/mV. These two formats are selected by the user to suit his specific needs and requirements (as detailed previously). When the AUTO GAIN key is pressed before recording in automatic mode, the unit detects very large waveform amplitudes and sets the sensitivity for the extremity and/or pre
-
Page 6 CARDIOVIT AT-2 8.2001 Page 6 CARDIOVIT AT-2 8.2001 Location & Power Location Do not keep or operate the apparatus in a wet, moist, or dusty environment. Also, avoid exposure to direct sunlight or heat from other sources. Do not allow the unit to come into contact with acidic vapours or liquids, as such contact may cause irreparable damage. The unit should not be placed near X-ray or diathermy units, large transformer
-
CARDIOVIT AT-2 Page 27 8.2001 CARDIOVIT AT-2 Page 27 8.2001 ENGLISH ENGLISH Settings for Automatic Mode Selecting Rhythm Leads The rhythm leads are printed out as defined. Two separate rhythm leads can be selected. The following formats can be set: Rhythm Leads Entry Key Sequence Setup Lead ALT 3 Setup Rhythm Lead 1 4 Setup Rhythm Lead 2 The 2 rhythm leads are defined as follows: Extremity Leads Entry Key Sequence Lead Confirm ALT 3 or 4 8 1I Press STOP Ke
-
CARDIOVIT AT-2 Page 21 8.2001 CARDIOVIT AT-2 Page 21 8.2001 ENGLISH ENGLISH General Settings Time / Date CHANGE TIME / DATE Time: ALT 9 1 1 HHMMSS beep Date: ALT 9 2 2 DDMMYY beep Wintertime to Summertime (+1 Hr) ALT 9 4 4 Summertime to Wintertime (-1 Hr) ALT 9 5 5 General Settings Time / Date CHANGE TIME / DATE Time: ALT 9 1 1 HHMMSS beep Date: ALT 9 2 2 DDMMYY beep Wintertime to Summertime (+1 Hr) ALT 9 4 4 Summertime to Wintertime (-1 Hr) ALT 9
-
Page 34 CARDIOVIT AT-2 8.2001 Page 34 CARDIOVIT AT-2 8.2001 Recording an ECG in Manual Mode To start the manual recording of a real-time ECG, press the MAN START key. The printout provides you with the following information: — The group of the six selected leads with lead identification. — On the lower edge chart speed, sensitivity and filter settings (if on) are given. — At the top, the heart r
-
Page 42 CARDIOVIT AT-2 8.2001 Page 42 CARDIOVIT AT-2 8.2001 Technical Data Data Record: Listing of ECG recording data Version C: ECG measurement results (intervals, amplitudes, electrical axes), Sokolow Index, average complexes with optional measurement reference markings, and interpretation. ECG Storage: Memory for 10 s, 12-lead ECG Circular input memory for 10 s, 12-lead ECG. Frequency Range of Digital Recorder: 0 to 150 Hz (IEC) 0 to 150 Hz (AHA) Technical Data Data Record: Listing of
-
Page 12 CARDIOVIT AT-2 8.2001 Page 12 CARDIOVIT AT-2 8.2001 General Settings Defaults Default Settings Setting AT-2 AT-2 with Interpretation Option Language English English Leads Standard (S) Standard (S) Format 1 ECG: 25mm/s short (o) ECG: 25 mm/s, short (o) MECG: 2 x 6 (25 mm/s) + 2 Measurements: suppressed (-) Marks: enabled (+) Interpretation: enabled (+) Format 2 ECG: 25 mm/s, long (ooo) ECG: 25 mm/s, long (ooo) MECG: none (-) Measurements: disabled (-) Marks: enabled (+) Interpretation: disabled (-) Rhythm Leads
-
CARDIOVIT AT-2 Page 35 8.2001 CARDIOVIT AT-2 Page 35 8.2001 ENGLISH ENGLISH Care & Maintenance Care of your CARDIOVIT AT-2 The patient cable should not be exposed to excessive mechanical stress. Whenever disconnecting the leads, hold the plugs and not the cables. Align the leads in such a way as to prevent anyone stumbling over them or any damage caused by the wheels of instrument trolleys. The cable can be wiped with soapy water. Sterilization, if required, should be done with gas only and not with steam. To disinfect, wipe the cable with any standard hospita
-
AT-2 User Guide — English AT-2 Gebrauchsanweisung -Deutsch Guide de l’Utilisateur pour l’AT-2 — Français Article Number 2. 510199e Sept.95, March 96, June 2000, May 2001, August 2001 Associated Documents Guide to the SCHILLER Interpretation and Measurement Program E/ D/ F Article Number 2. 510 179 SCHILLER AG Altgasse 68 6341 Baar, Switzerland Phone: ++ 41 41 766 42 42 Fax: ++ 41 41 761 08 80 www.schiller
-
Page 18 CARDIOVIT AT-2 8.2001 Page 18 CARDIOVIT AT-2 8.2001 General Settings Myogram Filter The Myogram filter suppresses disturbances caused by strong muscle tremor. The cutoff frequency of the myogram filter is set to 25 or 35 Hz.The myogram filter is switched on and off manually with the FILT key. Switching on or off can also be programmed as default when the unit is switch
-
Where to Obtain Service and Sales Advice Kundendienst und Verkaufs-/Beratungsstellen Coordonnées de nos services d’assistance technique et commerciale USA / Canada WELCH ALLYN SCHILLER Inc., 7420 Carroll Road, San Diego, CA , US-92121-2334 USA Tel.: +1 858 635 6023 Fax : +1 858 635 6611 Home Page : www.welchallyn.com Asia Pacific SCHILLER Asia Pacific, 10 Jalan SS 3/33, Taman Universiti, 47300 Petaling Jaya, Selangor, Malaysia Tel.: + 603 7877 5336 Fax : + 603 7877 5744 Au
-
Page 20 CARDIOVIT AT-2 8.2001 Page 20 CARDIOVIT AT-2 8.2001 General Settings The selectable printout forms are: Simultaneous All ECG leads are printed in the same time segment (in automatic mode only). Sequential Each group is a contiguous time segment of approximately 2.5 or 5 seconds (in automatic mode only). Auto-Centering ON All ECG traces are centred dynamically for optimal use of paper width. Auto-Centering OFF ECG
-
Page 46 CARDIOVIT AT-2 8.2001 Page 46 CARDIOVIT AT-2 8.2001
-
CARDIOVIT AT-2 Page 13 8.2001 CARDIOVIT AT-2 Page 13 8.2001 ENGLISH ENGLISH General Settings The defined formats and settings can be checked as follows: Setup Printout Entry Key Sequence Action ALT 0 1 1 Printout of programmed settings A printout of the defined settings will be produced and gives the following information, depending on the installed software: Unit designation (AT-2), Software option installed (C = Interpretation) and Software version Serial number Leads Stand
Questions, Opinions and Exploitation Impressions:
You can ask a question, express your opinion or share our experience of Schiller CARDIOVIT AT-2 device using right now.
![]()
AT-2
6-Channel Electrocardiograph
6-Kanal-Elektrokardiograph Electrocardiographe à 6 canaux

AT-2 User Guide — English
AT-2 Gebrauchsanweisung -Deutsch Guide de l’Utilisateur pour l’AT-2 — Français
Article Number 2. 510199e
Sept.95, March 96, June 2000,
May 2001, August 2001
Associated Documents
Guide to the SCHILLER Interpretation and Measurement Program E/ D/ F Article Number 2. 510 179
SCHILLERAG
Altgasse 68
6341 Baar, Switzerland
Phone: ++ 41 41 766 42 42
Fax: ++ 41 41 761 08 80
www.schiller.ch

Where to Obtain Service and Sales Advice Kundendienst und Verkaufs-/Beratungsstellen
Coordonnées de nos services d’assistance technique et commerciale
|
WELCH ALLYN SCHILLER Inc., 7420 Carroll Road, San Diego, CA , US-92121-2334 USA |
||
|
USA / Canada |
Tel.: +1 858 635 6023 |
Fax : +1 858 635 6611 |
|
Home Page : www.welchallyn.com |
||
|
Asia Pacific |
SCHILLER Asia Pacific, 10 Jalan SS 3/33, Taman Universiti, 47300 Petaling Jaya, Selangor, Malaysia |
|
|
Tel.: + 603 7877 5336 |
Fax : + 603 7877 5744 |
|
|
Austria |
SCHILLER HmbH, Kampmüllerweg 24, A-4044 Linz, Austria |
|
|
Tel.: + 43 732 709 90 |
Fax : + 43 732 757 000 |
|
|
France |
SCHILLER Medical S.A, BP 50, 19, Avenue de la Gare, F-67162 Wissembourg / Cedex, France |
|
|
Tel.: +33 3 88 63 36 00 |
Fax : +33 3 88 94 12 82 |
|
|
Germany |
SCHILLER Medizintechnik GmbH, Rudolf-Diesel Strasse 14, D-85521 Ottobrunn, Germany |
|
|
(EU authorized |
||
|
representative) |
Tel.: + 4989 629 981 0 |
Fax : + 4989 609 509 0 |
|
SCHILLER Healthcare India Pvt. Ltd.,D.C.Silk Mills Compound, ‘A’ Wing, 1st floor, 5, Chunawala Estate, |
||
|
India |
Kondivitta Lane, Andheri — Kurla Road, Andheri (E, Mumbai — 400 059, India |
|
|
Tel.: + 9122 826 3520 |
Fax : + 9122 826 3525 |
|
|
Italy |
ESAOTE Spa (SCHILLER), Via di Caciolle 15, I-50127 Firenze, Italy |
|
|
Tel.: + 39055 4229 201 |
Fax : + 39055 4229 208 |
|
|
Switzerland |
SCHILLER Reomed AG, Riedstrasse 14, CH-8953 Dietikon, Switzerland |
|
|
Tel.: +411 744 3000 |
Fax : + 411 740 3710 |
|
|
SCHILLER AG, Altgasse 68, CH-6341 Baar, Switzerland |
||
|
All other countries |
||
|
Tel.: + 4141 766 4242 |
Fax : + 4141 761 0880 |
|
|
Home Page : www.schiller.ch |
||

This equipment has been tested and found to comply with the limits for a class A digital device, pursuant to both Part 15 of the FCC (Federal Communications Commission) Rules and the radio interference regulations of the Canadian Department of Communications. These limits are designed to provide reasonable protection against harmful interference when the equipment is operated in a commercial environment. This equipment generates, uses and can radiate radio frequency energy and, if not installed and used in accordance with this instruction manual, may cause harmful interference to radio communications. Operation of this equipment in a residential area is likely to cause harmful interference in which case the user will be required to correct the interference at his own expense.
Disposal Instructions
and Battery Care
Battery Care and Disposal Instructions
°DO NOT DISPOSE OF THE BATTERY BY FIRE OR INCINERATOR — DANGER OF EXPLOSION
°DO NOT ATTEMPT TO RECHARGE THE BATTERY — DANGER OF EXPLOSION
°DO NOT OPEN THE BATTERY CASING — DANGER OF ACID BURN
Only dispose of the battery in official recycling centres or municipally approved areas. Alternatively, used batteries can be returned to Schiller AG for disposal.
Unit Disposal Instructions
Units no longer required can be returned to Schiller AG for disposal. Alternatively dispose of the unit in municipally approved recycling centres.

Power Supply
The mains connection is on the rear of the unit.
The power supply voltage is set by the factory for100-115V(nom. 110V) or 220-240V (nom. 230V) working. The setting is indicated by the indented metal strip on the fuse panel. Contact your dealer if the voltage needs to be changed.
The mains indicator lamp on the keyboard is always lit when the unit is connected to the mains supply. The unit can either be operated from the mains supply or from the built-in rechargeable battery.
Changing a Mains Fuse
If it is necessary to change a fuse, always replace with the correct rating i.e 2x200mAT for 230V, or 2x315mAT for 110V .
To change a fuse press the two retaining lugs on side of the fuse panel (situated below the mains connector on the back panel. Remove the fuse panel and replace the fuse(s). Click back the fuse panel.
Intended Use
The CARDIOVIT AT-2 is a 6-channel ECG recorder with all (12) ECG signals simultaneously processed to provide instant ECG recordings. Two automatic recording modes can be individually preset to enable one button ECG recording of preferred print formats.

Terms of Warranty
The SCHILLER AT-2 is warranted against defects in material and manufacture for the duration of one year (as from date of purchase). Excluded from this guarantee is damage caused by an accident or as a result of improper handling. The warranty entitles free replacement of the defective part. Any liability for subsequent damage is excluded. The warranty is void if unauthorized or unqualified persons attempt to make repairs.
In case of a defect, contact your dealer or the manufacturer.
The manufacturer can only be held responsible for the safety, reliability, and performance of the apparatus if:
•assembly operations, extensions, readjustments, modifications, or repairs are carried out by persons authorized by him, and
•the AT-2 and approved attached equipment are used in accordance with the manufacturers instructions.
THERE ARE NO EXPRESS OR IMPLIED WARRANTIES WHICH EXTEND BEYOND THE WARRANTIES HEREINABOVE SET FORTH. SCHILLER MAKES NO WARRANTY OF MERCHANTABILITY OR FITNESS FOR A PARTICULAR PURPOSE WITH RESPECT TO THE PRODUCT OR PARTS THEREOF.
About this Handbook
The philosophy of SCHILLER is one of continuous improvement. Our aim is to provide the user with the most up-to-date information and the latest technological developments.
Your suggestions and comments are welcome on all SCHILLER documentation. Please contact the SCHILLER Technical Documentation Department.
PHYSICIAN‘S RESPONSIBILITY
THE AT-2 ELECTROCARDIOGRAPH IS PROVIDED FOR THE EXCLUSIVE USE OF QUALIFIED PHYSICIANS OR PERSONNEL UNDER THEIR DIRECT SUPERVISION. THE NUMERICAL AND GRAPHICAL RESULTS FROM A RECORDING MUST BE EXAMINED WITH RESPECT TO THE PATIENTS OVERALL CLINICAL CONDITION. THE RECORDING PREPARATION QUALITY AND THE GENERAL RECORDED DATA QUALITY, WHICH COULD EFFECT THE REPORT DATA ACCURACY, MUST ALSO BE TAKEN INTO ACCOUNT.
IT IS THE PHYSICIANS RESPONSIBILITY TO MAKE THE DIAGNOSIS OR TO OBTAIN EXPERT OPINION ON THE RESULTS, AND TO INSTITUTE CORRECT TREATMENT IF INDICATED.
FEDERAL LAW IN THE USA RESTRICTS THIS DEVICE TO SALE BY OR ON THE ORDER OF A PHYSICIAN

Safety Notices
TO PREVENT ELECTRIC SHOCK DO NOT DISASSEMBLE THE UNIT. NO SERVICEABLE PARTS INSIDE. REFER SERVICING TO QUALIFIED PERSONNEL ONLY.
DO NOT USE THIS UNIT IN AREAS WHERE THERE IS ANY DANGER OF EXPLOSION OR THE PRESENCE OF FLAMMABLE GASES SUCH AS ANAESTHETIC AGENTS.
IN THE EVENT OF ACCIDENTAL LCD BREAKAGE AND RESULTANT LEAKAGE OF FLUID, DO NOT INHALE, INGEST OR MAKE CONTACT WITH THE SKIN. IF CONTACT IS MADE RINSE IMMEDIATELY.
THIS PRODUCT IS NOT DESIGNED FOR STERILE USE. THIS PRODUCT IS NOT DESIGNED FOR OUTDOOR USE.
SWITCH THE UNIT OFF BEFORE CLEANING AND DISCONNECT FROM THE MAINS.
DO NOT, UNDER ANY CIRCUMSTANCES, IMMERSE THE UNIT OR CABLE ASSEMBLIES IN LIQUID.
THE DEVICE MUST ONLY BE OPERATED USING BATTERY POWER IF THE EARTH CONNECTION IS SUSPECT OR IF THE MAINS LEAD IS DAMAGED OR SUSPECTED OF BEING DAMAGED.
DO NOT USE HIGH TEMPERATURE STERILISATION PROCESSES (SUCH AS AUTOCLAVING). DO NOT USE E-BEAM OR GAMMA RADIATION STERILISATION.
DO NOT USE SOLVENT CLEANERS
USE ONLY ACCESSORIES AND OTHER PARTS RECOMMENDED OR SUPPLIED BY SCHILLER AG. USE OF OTHER THAN RECOMMENDED OR SUPPLIED PARTS MAY RESULT IN INJURY INACCURATE INFORMATION AND/ OR DAMAGE TO THE UNIT.
THE AT-2 COMPLIES WITH EMC REGULATIONS FOR MEDICAL PRODUCTS WHICH AFFORDS PROTECTION AGAINST EMISSIONS AND ELECTRICAL INTERFERENCE. HOWEVER SPECIAL CARE MUST BE EXERCISED WHEN THE UNIT IS USED WITH HIGH FREQUENCY EQUIPMENT.
IT MUST BE ENSURED THAT NEITHER THE PATIENT NOR THE ELECTRODES (INCLUDING THE NEUTRAL ELECTRODE) COME INTO CONTACT WITH OTHER PERSONS OR CONDUCTING OBJECTS (EVEN IF THESE ARE EARTHED).
THERE IS NO DANGER WHEN USING THE ECG UNIT FOR A PACEMAKER PATIENT OR WITH SIMULTANEOUS USE OF OTHER ELECTRICAL STIMULATION EQUIPMENT. HOWEVER, THE STIMULATION UNITS SHOULD ONLY BE USED AT A SUFFICIENT DISTANCE FROM THE ELECTRODES. IN CASE OF DOUBT, THE PATIENT SHOULD BE DISCONNECTED FROM THE RECORDER.
THIS UNIT IS CF CLASSIFIED ACCORDING TO IEC 601-1. THIS MEANS THAT THE PATIENT CONNECTION IS FULLY ISOLATED AND DEFIBRILLATION PROTECTED. SCHILLER CAN ONLY GUARANTEE PROTECTION AGAINST DEFIBRILLATION VOLTAGE HOWEVER, WHEN THE ORIGINAL SCHILLER PATIENT CABLE IS USED.
IF SEVERAL UNITS ARE COUPLED THERE IS A DANGER OF SUMMATION OF LEAKAGE CURRENT DO NOT TOUCH THE CASING DURING DEFIBRILLATION
IF THE PATIENT CABLE SHOULD BECOME DEFECTIVE AFTER DEFIBRILLATION, LEAD OFF WILL BE DISPLAYED AND AN ACOUSTIC ALARM GIVEN

DAS GERÄT ENTSPRICHT DEN EMV-BESTIMMUNGEN FÜR MEDIZINPRODUKTE ZUM SCHUTZ VON
EMISSIONEN UND EINSTRAHLUNGEN. BEI DER VERWENDUNG ZUSAMMEN MIT HOCHFREQUENZGERÄTEN IST MIT BESONDERER VORSICHT VORZUGEHEN.
Entsorgungshinweise für
Batterien und Geräte
Anleitungen zur Batterieentsorgung und Sicherheitshinweise
°DIE BATTERIE DARF NICHT MITTELS FEUER ODER IN EINER VERBRENNUNGSANLAGE ENTSORGT WERDEN — EXPLOSIONSGEFAHR
°VERSUCHEN SIE NICHT, DIE BATTERIE WIEDER AUFZULADEN — EXPLOSIONSGEFAHR
°VERSUCHEN SIE NICHT, DIE BATTERIEHÜLLE ZU ÖFFNEN — GEFAHR VON VERÄTZUNGEN
Ensorgen Sie die Batterie in einer offiziellen Recyclingsstelle oder in einer anerkannten städtischen Entsorgungsstelle. Es besteht die Möglichkeit, die entladene Batterie an Schiller AG zur Entsorgung einzusenden.
Anleitungen für die Entsorgung des Gerätes
Geräte, die nicht mehr verwendet werden, können an Schiller AG zwecks Entsorgung retourniert werden. Es besteht die Möglichkeit, das Gerät in einer anerkannten städtischen Entsorgungstelle abzugeben.

Stromversorgung
Der Netzanschluss befindet sich auf der Rückseite des Gerätes.
Die Stromspannung des Gerätes ist vom Hersteller für 100-115V(nom. 110V) oder 220-240V (nom. 230V) eingestellt.
Die Einstellung ist anhand des versenkte Metallanzeigers auf dem Sicherungshalter ersichtlich. Kontaktieren Sie Ihre Verkaufsstelle, wenn die Spannung geändert werden muss.
Die Kontrollanzeige auf der Tastatur ist immer an, wenn das Gerät ans Netz angeschlossen ist. Das Gerät kann entweder übers Netz oder die eingebaute, wiederaufladbare Batterie betrieben werden.
Auswechseln einer Netzsicherung
Wenn eine Sicherung ersetzt werden muss, achten Sie auf dieAufschrift, damit die richtige Sicherung eingesetzt wird, d.h. 2x200mAT für 230V, oder 2x315mAT für 110V .
Um eine Sicherung auszuwechseln, drücken Sie die beiden senkrechten Sperrvorrichtungen, die sich seitlich des Sicherungshalters (auf der Geräterückseite neben dem Netzanschluss) befinden, um den Halter aus dem Steckplatz herauszuheben. Ersetzen Sie die Sicherung(en) und setzen Sie den Sicherungshalter wieder in den Steckplatz zurück.
Einleitung
Der CARDIOVIT AT-2 ist ein 6-Kanal EKG-Rekorder. Dank simultaner Verarbeitungstechnik der EKG-Signale stehen 12 synchrone Standard-Ableitungen für die Aufzeichnung zur Verfügung. Für den automatischen Aufnahmemodus können zwei Druckformate individuell definiert werden — Aufzeichnung und Ausdruck im Format 1 oder 2 werden dann bequem per Tastendruck gestartet.

Garantiebestimmungen
Für Ihren AT-2 besteht für die Dauer eines Jahres (ab Kaufdatum) Garantie auf Materialund Fabrikationsfehler. Davon ausgenommen sind Schäden, die durch Unachtsamkeit oder unsachgemässen Gebrauch verursacht werden. Die Garantie erstreckt sich auf den kostenlosen Ersatz des defekten Teils. Eine Haftung für Folgeschäden ist dabei ausgeschlossen. Der Garantieanspruch entfällt, wenn Reparaturversuche durch nicht autorisierte oder unqualifizierte Personen vorgenommen werden.
Im Falle eines Defekts ist das beanstandete Gerät an die nächste SCHILLER-Vertretung oder direkt an den Hersteller zu senden.
SCHILLER kann die Sicherheit, Zuverlässigkeit und Funktionstüchtigkeit des Gerätes nur dann gewährleisten, wenn
•Montagearbeiten, Ergänzungen, Neueinstellungen, Modifikationen oder Reparaturen von Personen durchgeführt werden, die von SCHILLER hierzu ermächtigt sind, und
•das Gerät und die vom Hersteller zugelassenen Zubehörteile entsprechend den Anweisungen des Herstellers verwendet werden.
ES WERDEN KEINE WEITEREN GARANTIEN, WEDER AUSDRÜCKLICH NOCH IMPLIZIERT, AUSSER DEN GENANNTEN ÜBERNOMMEN. SCHILLER ÜBERNIMMT KEINE GARANTIE FÜR DIE GEWERBLICHE NUTZUNGSFÄHIGKEIT UND EIGNUNG FÜR EINEN BESTIMMTEN ZWECK DES PRODUKTES ODER DER PRODUKTKOMPONENTEN.
Über diese Gebrauchsanweisung ……
Konsequente Weiterentwicklung ist charakteristisch für die Philosophie des Hauses SCHILLER. Unser Ziel ist es, den Benutzern jeweils die aktuellsten Informationen und neuesten Technologien zur Verfügung zu stellen. Ihre Vorschläge und Kommentare zu unseren Dokumentationen sind uns jederzeit willkommen. Bitte wenden Sie sich an unsere Technische Redaktion. Fax-Nr. ++41 (0)41 761 0334.
VERANTWORTUNG DES ARZTES
DER AT-2 DARF NUR VON ÄRZTEN ODER DEREN DIREKT UNTERSTELLTEM PERSONAL VERWENDET WERDEN. DIE NUMERISCHEN UND GRAFISCHEN ERGEBNISSE SOWIE DIE VOM GERÄT BEREITGESTELLTEN BEFUNDHINWEISE FÜR DIE AUFNAHME DÜRFEN NICHT ISOLIERT BETRACHTET WERDEN, SONDERN IMMER NUR IM ZUSAM-MENHANG MIT DER GESAMTHEIT DER VOR-LIEGENDEN DATEN DES PATIENTEN. DIE AUFNAHMEVORBEREITUNG SOWIE DIE QUALITÄT DER AUFZEICHNUNG, DIE DIE GENAUIGKEIT DER AUFNAHMEDATEN BEEINFLUSSEN, SIND EBEN-FALLS FAKTOREN, DIE BERÜCKSICHTIGT WERDEN MÜSSEN.
DIE DIAGNOSESTELLUNG ODER DAS HINZUZIEHEN EINES FACHARZTES ZUR BEURTEILUNG DER ERGEBNISSE SOWIE DIE EINLEITUNG GEEIGNETER BEHANDLUNGSMETHODEN FALLEN AUSSCHLIESS-LICH IN DIE ZUSTÄNDIGKEIT DES ARZTES.
![]()
Sicherheitshinweise
ZUR VERMEIDUNG VON ELEKTROSCHOCKS DARF DAS GERÄT NICHT DEMONTIERT WERDEN. ES ENTHÄLT KEINE TEILE, DIE VON LAIEN REPARIERT WERDEN KÖNNEN. SERVICEARBEITEN SIND NUR QUALIFIZIERTEM FACHPERSONAL VORBEHALTEN.
DAS GERÄT IST NICHT FÜR DEN BETRIEB IN EXPLOSIONSGEFÄHRDETER UMGEBUNG BESTIMMT ODER IN BEREICHEN, WO ENTZÜNDBARE GASE, WIE Z.B. ANÄSTHESIEGASE, VERWENDET WERDEN.
BEI EINER ZERSTÖRUNG DES BILDSCHIRMS UND EVENTUELLEM AUSLAUFEN VON FLÜSSIGKEIT DÄMPFE NICHT EINATMEN, FLÜSSIGKEIT NICHT EINNEHMEN ODER MIT DER HAUT IN BERÜHURNG BRINGEN. BEI HAUTKONTAKT SOFORT ABSPÜLEN. DIESES GERÄT IST NICHT FÜR DEN STERILEN EINSATZ BESTIMMT.
DIESES GERÄT IST NICHT FÜR DEN GEBRAUCH IM FREIEN BESTIMMT.
VOR DER REINIGUNG IST DAS GERÄT AUSZUSCHALTEN UND DER NETZSTECKER ZU ZIEHEN.
UNTER KEINEN UMSTÄNDEN DÜRFEN DAS GERÄT ODER DIE KABEL IN EINE REINIGUNGSFLÜSSIGKEIT EINGETAUCHT WERDEN. DAS GERÄT DARF NICHT VERWENDET WERDEN, WENN ZWEIFEL AN DER ISOLIERUNG GEGEN ERDE ODER DER INTEGRITÄT DES NETZKABELS BESTEHEN.
ES DARF KEINE HOCHTEMPERATUR-STERILISATION (WIE AUTOCLAVING) VORGENOMMEN WERDEN, EBENSOWENIG WIE EINE STERILISATION MIT E-STRAHL ODER GAMMASTRAHLEN.
VERWENDEN SIE KEINE LÖSLICHEN REINIGUNGSMITTEL.
VERWENDEN SIE NUR DAS VON SCHILLER GELIEFERTE ODER EMPFOHLENE ZUBEHÖR ODER VERBRAUCHSMATERIAL. DIE VERWENDUNG VON FREMDZUBEHÖR ODER VERBRAUCHSMATERIAL KANN ZU UNGENAUEN INFORMATIONEN UND/ODER BESCHÄDIGUNG DES GERÄTES FÜHREN.
DAS GERÄT ENTSPRICHT DEN EMV-BESTIMMUNGEN FÜR MEDIZINPRODUKTE ZUM SCHUTZ VOR EMISSIONEN UND STÖRUNGEN. BEI VERWENDUNG VON HOCHFREQUENZ-GERÄTEN ZUSAMMEN MIT DEM AT-2 IST MIT BESONDERER VORSICHT VORZUGEHEN. ES IST SICHERZUSTELLEN, DASS WEDER DER PATIENT NOCH DIE LEITFÄHIGEN TEILE DES PATIENTENANSCHLUSSES ODER DER ELEKTRODEN (AUCH DER NEUTRALEN ELEKTRODE) MIT ANDEREN LEITFÄHIGEN GEGENSTÄNDEN (AUCH WENN DIESE GEERDET SIND) ODER PERSONEN IN BERÜHRUNG KOMMEN.
BEI VERWENDUNG DES AT-2 FÜR EINEN HERZSCHRITTMACHER-PATIENTEN ODER AUCH BEI VERWENDUNG ANDERER ELEKTRISCHER STIMULATIONSGERÄTE BESTEHT KEINE GEFÄHRDUNG. ABER AUCH HIER IST EINE GEWISSE VORSICHT GEBOTEN. DIE STIMULATIONSGERÄTE SOLLTEN NUR IN GENÜGENDEM ABSTAND ZU DEN ABLEITELEKTRODEN VERWENDET WERDEN. IM ZWEIFELSFALL IST DER PATIENT VOM AUFNAHMEGERÄT ZU TRENNEN.
ES HANDELT SICH UM EIN GERÄT DES TYPS CF NACH IEC 601-1. DAS BEDEUTET, DASS DER PATIENTENANSCHLUSS VOLLISOLIERT UND DEFIBRILLATIONSFEST IST. SCHILLER KANN DEN DEFIBRILLATIONSSCHUTZ JEDOCH NUR GEWÄHRLEISTEN, WENN DAS ORIGINAL-SCHILLER-PATIENTENKABEL VERWENDET WIRD.
BEI KOPPLUNG VON MEHREREN GERÄTEN BESTEHT DIE GEFAHR, DASS SICH DIE ABLEITSTRÖME SUMMIEREN. WENN ZWEI ODER MEHR GERÄTE GEKOPPELT SIND, MUSS EIN ISOLIERTRANSFORMATOR IN DER STROMMZUFUHR ZWISCHENGESCHALTET WERDEN. DAS GEHÄUSE DARF WÄHREND DER DEFIBRILLATION NICHT BERÜHRT WERDEN
WENN DAS PATIENTENKABEL NACH EINER DEFIBRILLATION BESCHÄDIGT IST, WIRD DIE MELDUNG «ELEKTRODE LOSE» ANGEZEIGT UND EIN AKUSTISCHER ALARM AUSGELÖST.

Cet équipement a àtà testé et il a été montré qu’il respecte les limites d’un appareil digital de classe A, conformément aux règles de la section 15 de la FCC (Federal Communications Commission) et aux régulations relatives aux interférences radio du Service Canadien des Télécommunications. Ces limites sont établies dans le but de fournir une protection suffisante contre les interférences dangereuses lorque lpappareil est utilisé dans un contexte commerical. Cet appareil génère, émet et emploi de l’énergie de fréquence radio et il peut êter la cause d’interférences nuisibles aux communications radio. L’utilisation de cet appareil dans une zone résidentielle est susceptible de créer des parasites dont l’utilisateur devra rectifier les effets à ses propres frais.
Elimination et Manipulation de la Pile
Elimination et Manipulation de la Pile
°NE JAMAIS JETER LA PILE OU BATTERIE DANS LE FEU OU DANS UN INCINERATEUR — DANGER D’EXPLOSION
°NE JAMAIS RECHARGER LA PILE OU BATTERIE — DANGER D’EXPLOSION
°NE JAMAIS OUVRIR LE BOITIER DE LA PILE — DANGER DE BRULURE A L’ACIDE
N’éliminer la pile ou batterie que dans les centres de recyclages officiels ou dans les zones autorisées par la municipalité. Il est aussi possible de renvoyer à Schiller AG les piles ou batteries usagées.
Elimination des Appareils
Les appareils qui ne sont plus en usage peuvent être renvoyés à Schiller AG qui se chargera de leur recyclage. vous pouvez aussi les déposer aux centres de recyclage de la municipalité.

Alimentation Electrique
Le branchement secteur se trouve à l’arrière de l’appareil.
Le voltage est fixé par l’entreprise à 100-115V (nom. 110V) ou 220-240V (nom. 230V).
Le réglage est indiqué à l’aide de la petite bande de métal qui se trouve sur la plaque de fusibles. Appeler votre agent Schiller, si vous devez changer le voltage.
Le voyant lumineux du secteur, sur le clavier, s’allume dès que l’appareil est branché. L’appareil peut être alimenté soit par le secteur soit par la batterie interne rechargeable.
Changement de fusible secteur
S’il est nécessaire de changer un fusible, remplacez le toujours avec la référence correcte, c’est à dire 2x200mAT pour 230V ou 2x315mAT pour 110V.
Pour changer un fusible, appuyer sur les deux languettes de chaque côté du fusible (sous le connecteur secteur à l’arrière). Enlever la plaquette du fusible et remplacer le(s) fusible(s). Replacer la plaquette du fusible.
Introduction
Le CARDIOVIT AT-2 est un enregistreur d’ECG à 6 canaux, qui assure le traitement simultané des 12 signaux d’ECG, pour fournir des enregistrements d’ECG instantanés. Deux modes d’enregistrement automatique peuvent être préréglés séparément, pour permettre, en utilisant un seul bouton, de réaliser des enregistrements d’ECG dans les formats d’impression les plus utilisés.

Conditions de garantie
L’appareil SCHILLER AT-2 est garanti contre les défauts de matériaux et les vices de fabrication pour une durée d’un an (à partir de la date d’achat). Les dommages causés par un accident ou résultant d’une manipulation incorrecte sont exclus de cette garantie. La garantie donne droit au remplacement gratuit de la pièce défectueuse. Toute responsabilité relativement à des dommages ultérieurs est exclue. La garantie est annulée si des personnes non autorisées ou non qualifiées tentent de faire des réparations.
En cas de défectuosité, contactez votre revendeur ou le fabricant.
Le fabricant ne peut être tenu responsable de la sûreté, de la fiabilité et des performances de l’appareil que si :
•les opérations d’assemblage, les extensions, les réajustements, les modifications ou les réparations sont exécutés par des personnes qu’il a autorisées, et
•l’AT-2 et le matériel agréé qui y est monté sont utilisés conformément aux instructions du fabricant.
AUCUNE GARANTIE EXPLICITE OU IMPLICITE NE DEPASSE LES GARANTIES PRESENTEES CI-DESSUS.
SCHILLER N’OFFRE AUCUNE GARANTIE DE QUALITE LOYALE ET MARCHANDE OU D’APTITUDE A UNE FONCTION PARTICULIERE RELATIVEMENT AU PRODUIT OU A DES PIECES DU PRODUIT.
A propos de ce manuel
SCHILLER a pour principe d’améliorer continuellement ses produits. Notre objectif est de fournir à l’utilisateur les informations les à jour et les tout derniers progrès technologiques.
Vos suggestions et commentaires concernant la documentation de SCHILLER sont les bienvenus. Veuillez contacter le service de documentation technique de SCHILLER (Technical Documentation Department). Faxez au +41 (0)41 761 03 34.
RESPONSABILITE DU MEDECIN
L’ELECTROCARDIOGRAMME DE L’AT-2 EST DESTINE A L’USAGE EXCLUSIF DE MEDECINS QUALIFIES, OU DE PERSONNEL PLACE DIRECTEMENT SOUS LES ORDRES DE CES MEDECINS. LES RESULTATS NUMERIQUES ET GRAPHIQUES D’UN ENREGISTREMENT DOIVENT ETRE ETUDIES RELATIVEMENT A L’ETAT CLINIQUE GLOBAL DU PATIENT. LA QUALITE DE LA PREPARATION DE L’ENREGISTREMENT ET LA QUALITE GENERALE DES DONNEES ENREGISTREES, QUI PEUVENT INFLUENCER L’EXACTITUDE DES DONNEES DU RAPPORT, DOIVENT EGALEMENT ETRE PRISES EN COMPTE.
IL INCOMBE AU MEDECIN DE FAIRE LE DIAGNOSTIC OU D’OBTENIR L’OPINION D’UN EXPERT SUR LES RESULTATS, ET D’ENTREPRENDRE UN TRAITEMENT ADEQUAT LE CAS ECHEANT.
AUX USA, LA LOI FEDERALE LIMITE LA COMMERCIALISATION DE CET APPAREIL A LA VENTE PAR UN MEDECIN, OU SUR COMMANDE D’UN MEDECIN.

Avis concernant la sécurité
POUR EVITER LES DECHARGES ELECTRIQUES, NE DEMONTEZ PAS L’APPAREIL. IL NE CONTIENT AUCUNE PIECE REPARABLE. LES REPARATIONS SONT STRICTEMENT RESERVEES A UN PERSONNEL QUALIFIE.
N’UTILISEZ PAS CET APPAREIL DANS DES ZONES OU IL EXISTE UN RISQUE D’EXPLOSION QUELCONQUE, OU EN PRESENCE DE GAZ INFLAMMABLES COMME LES AGENTS ANESTHESIQUES.
SI L’AFFICHAGE A CRISTAUX LIQUIDES EST CASSE ACCIDENTELLEMENT, EN CAS DE FUITE DU LIQUIDE, N’INHALEZ PAS CE LIQUIDE, NE L’INGEREZ PAS, ET NE LE LAISSEZ PAS ENTRER EN CONTACT AVEC LA PEAU. EN CAS DE CONTACT CUTANE, RINCEZ IMMEDIATEMENT.
CE PRODUIT N’EST PAS CONCU POUR UNE UTILISATION ASEPTIQUE.
AVANT DE NETTOYER L’APPAREIL, STOPPEZ-LE ET DEBRANCHEZ-LE DU SECTEUR.
VOUS NE DEVEZ EN AUCUN CAS PLONGER L’APPAREIL OU LES CABLES DANS DU LIQUIDE.
N’ACTIONNEZ PAS L’APPAREIL SI LE BRANCHEMENT DE TERRE EST SUSPECT, OU SI LE CABLE DU SECTEUR EST ENDOMMAGE, OU SI VOUS PENSEZ QU’IL EST ENDOMMAGE.
N’UTILISEZ PAS DE PROCEDES DE STERILISATION A HAUTE TEMPERATURE (P.EX. L’AUTOCLAVAGE). N’UTILISEZ PAS LA STERILISATION PAR FAISCEAU ELECTRONIQUE OU AUX RAYONS GAMMA.
N’UTILISEZ PAS DE PRODUITS DE NETTOYAGE A BASE DE SOLVANTS.
UTILISEZ EXCLUSIVEMENT DES ACCESSOIRES ET AUTRES PIECES RECOMMANDES OU FOURNIS PAR SCHILLER AG. L’UTILISATION DE PIECES AUTRES QUE LES PIECES RECOMMANDEES OU FOURNIES RISQUE D’ENTRAINER DES LESIONS, DE FAUSSER LES INFORMATIONS ET/OU D’ENDOMMAGER L’APPAREIL.
L’APPAREIL AT-2 EST CONFORME AUX REGLEMENTS SUR LA COMPATIBILITE ELECTROMAGNETIQUE VISANT LES PRODUITS MEDICAUX, CE QUI OFFRE UNE PROTECTION CONTRE LES EMISSIONS ET INTERFERENCES ELECTRIQUES. IL FAUT TOUTEFOIS ETRE PARTICULIEREMENT VIGILANT LORSQUE L’APPAREIL EST UTILISE AVEC DU MATERIEL HAUTE FREQUENCE.
IL FAUT S’ASSURER QUE NI LE PATIENT NI LES ELECTRODES (Y COMPRIS L’ELECTRODE NEUTRE) N’ENTRENT EN CONTACT AVEC D’AUTRES PERSONNES OU AVEC DES OBJETS CONDUCTEURS (MEME SI CEUX-CI SONT MIS A LA TERRE).
IL N’Y A AUCUN DANGER EN CAS D’UTILISATION DE L’APPAREIL ECG SUR UN PATIENT PORTANT UN PACEMAKER OU DURANT L’UTILISATION D’AUTRES DISPOSITIFS DE STIMULATION CARDIAQUE. TOUTEFOIS, LES APPAREILS DE STIMULATION NE DEVRAIENT ETRE UTILISES QU’A UNE DISTANCE SUFFISANTE DES ELECTRODES. EN CAS DE DOUTE, IL FAUT DEBRANCHER LE PATIENT DE L’ENREGISTREUR.
L’APPAREIL EST CLASSE CF CONFORMEMENT A IEC 601-1. CELA SIGNIFIE QUE LA CONNEXION DU PATIENT EST TOTALEMENT ISOLEE ET PROTEGEE CONTRE LA DEFIBRILLATION. SCHILLER NE PEUT TOUTEFOIS GARANTIR LA PROTECTION CONTRE LA TENSION DE DEFIBRILLATION QUE LORSQUE LE CABLE DE PATIENT D’ORIGINE DE SCHILLER EST UTILISE.


Contents — User Guide AT-2
|
INTRODUCTION ………………………………………………………. |
2 |
|
OPERATION MODES ………………………………………………… |
4 |
|
Automatic Mode …………………………………………………… |
4 |
|
Manual Mode ………………………………………………………. |
5 |
|
LOCATION & POWER ……………………………………………….. |
6 |
|
Location ……………………………………………………………… |
6 |
|
Power Supply ……………………………………………………… |
6 |
|
BASIC INFORMATION ………………………………………………. |
7 |
|
Switching On and Off ……………………………………………. |
7 |
|
Potential Equalisation …………………………………………… |
7 |
|
KEYBOARD ……………………………………………………………… |
8 |
|
INDICATORS ………………………………………………………….. |
10 |
|
GENERAL SETTINGS ……………………………………………… |
11 |
|
Defaults ……………………………………………………………. |
12 |
|
Language ………………………………………………………….. |
15 |
|
Baseline Filter ……………………………………………………. |
16 |
|
Mains Filter ……………………………………………………….. |
17 |
|
Myogram Filter …………………………………………………… |
18 |
|
Defining Lead Sequence & Printout ……………………… |
19 |
|
Acoustic QRS Indication ……………………………………… |
20 |
|
Time / Date ……………………………………………………….. |
21 |
|
SETTINGS FOR AUTOMATIC MODE ………………………… |
22 |
|
Average Cycles ………………………………………………….. |
23 |
|
Measurements and Markings ………………………………. |
24 |
|
Interpretation …………………………………………………….. |
25 |
|
Interpretation Settings ………………………………………… |
26 |
|
Selecting Rhythm Leads ……………………………………… |
27 |
|
PATIENT CABLE CONNECTIONS …………………………….. |
28 |
|
Standard Leads …………………………………………………. |
30 |
|
RECORDING AN ECG IN AUTOMATIC MODE …………… |
31 |
|
RECORDING AN ECG IN MANUAL MODE ………………… |
33 |
|
CARE & MAINTENANCE …………………………………………. |
35 |
|
Care of your CARDIOVIT AT-2 …………………………….. |
35 |
|
Self-test ……………………………………………………………. |
35 |
|
12 Monthly Check ………………………………………………. |
36 |
|
Cleaning the Print Head ……………………………………… |
36 |
|
REPLACING THE RECORDING PAPER ……………………. |
38 |
|
TROUBLE SHOOTING …………………………………………….. |
39 |
|
ORDERING INFORMATION ……………………………………… |
40 |
|
TECHNICAL DATA …………………………………………………… |
41 |
ENGLISH
|
CARDIOVIT AT-2 |
Page 1 |
|
8.2001 |

Introduction
MAINS AND
POTENTIAL EQUALISATION
CONNECTORS
PAPER RELEASE CATCH
PATIENT CABLE CONNECTOR
|
LEAD INDICATORS |
POWER INDICATORS |
SYSTEM INDICATORS
|
Page 2 |
CARDIOVIT AT-2 |
|
8.2001 |

Introduction
The CARDIOVIT AT-2 is a 6-channel ECG recorder. All ECG signals are simultaneously processed to provide instant ECG recordings. Two automatic recording modes can be individually preset to enable one button ECG recording of preferred print formats .
Individual lamps are provided to give power, paper error, filter, lead group and lead off indications.
In addition, any detected disturbance (i.e. loose electrode or end of paper), gives an audible alarm and the corresponding indicator lamp flashes.
The AT-2 includes the following features:
•Low weight and compact dimensions
•Large A4 size printout from integrated quality thermal printer
•Built-in rechargeable battery for mains-independent use
•Simple one key operation
•Automatic or manual recording modes
•Selectable printing formats
•ECG memory for easy copying
•Interpretation program option (including measurements)
ENGLISH
|
CARDIOVIT AT-2 |
Page 3 |
|
8.2001 |

|
Operation Modes |
|||||
|
Automatic Mode |
Auto Mode Recording |
||||
|
Automatic Mode provides a printout |
|||||
|
giving 10 seconds of ECG recording of |
|||||
|
all 12 leads in 2 different formats. |
Connect Patient |
||||
|
Pages 28 to30 |
|||||
|
The following can be programmed freely |
|||||
|
in each of the formats before recording: |
|||||
|
Switch Unit ON |
|||||
|
• |
Lead Format |
||||
|
• |
Chart Speed |
Settings |
|||
|
Pages 11 to 27 |
|||||
|
• |
With the |
optional |
interpretation |
ALT |
|
|
AUTO |
|||||
|
program installed it is also possible |
|||||
|
START |
AUTO |
||||
|
to select the measurement table, |
|||||
|
START |
|||||
|
average |
cycles |
with optional |
|||
|
markings |
and |
interpretation |
|||
|
statements for the printout. |
Automatic Recording |
Automatic Recording |
|||
|
in Format 1 |
in Format 2 |
||||
|
Pages 31 to 32 |
Pages 31 to 32 |
||||
|
For further information see paragraph |
|||||
|
«Settings for Automatic Mode». |
12 lead printout |
||||
|
Page 4 |
CARDIOVIT AT-2 |
||||
|
8.2001 |
![]()
Operation Modes
Manual Mode
Manual Mode provides a real time printout of 6 leads that are selected and indicated on the keyboard.
The following can be freely selected before or during recording:
•Lead Group
•Chart Speed
•Sensitivity
•Myogram Filter
For further information see paragraph «ECG Recording in Manual Mode».
Manual Mode Recording
Connect Patient
Pages 28 to 30
Switch Unit ON
|
Settings |
||||||||
|
Pages 11 to 21 |
||||||||
|
Manual Recording |
MAN |
|||||||
|
Pages 33 and 34 |
START |
|||||||
|
Leads, |
||||||||
|
Speed, |
||||||||
|
Sensitivity |
||||||||
|
Myogram filter |
||||||||
|
Pages 18 + 33 |
||||||||
|
Continuous printout of 6 leads |
||||||||
|
STOP |
||||||||
ENGLISH
|
CARDIOVIT AT-2 |
Page 5 |
|
8.2001 |

Location & Power
Location
Do not keep or operate the apparatus in a wet, moist, or dusty environment. Also, avoid exposure to direct sunlight or heat from other sources. Do not allow the unit to come into contact with acidic vapours or liquids, as such contact may cause irreparable damage. The unit should not be placed near X-ray or diathermy units, large transformers or motors.
The unit must be placed on a flat surface. The unit should not be operated in areas where there is any danger of explosion.
Power Supply
The unit can either be operated from the built-in rechargeable battery, or from the mains.
The mains connection is on the rear of the unit. The mains indicator lamp is always lit when the unit is connected to the mains supply.
A battery indicator lamp confirms battery operation. When the battery capacity is limited, the indicator flashes. To recharge the battery, connect the apparatus to the mains supply by means of the supplied power cable. A totally discharged battery needs less than 15 hours to be fully recharged (60% in less than 3 hours, 90% in less than 7 hours).
A fully charged battery lasts approximately 6 hours of normal use. The unit can remain connected to the mains supply without any danger of damage to either the battery or the unit.
|
Page 6 |
CARDIOVIT AT-2 |
|
8.2001 |

Basic Information
Switching On and Off
The CARDIOVIT AT-2 is switched on by means of the green  key and off by means
of the red  key.
key.
The unit is switched off after 5 minutes (30 seconds if battery capacity is limited) if no key is pressed and the patient cable is not connected.
Potential Equalisation
If the AT-2 is used in conjunction with other patient connected equipment, we recommend that the potential equalisation stud (  ) on the rear of the unit is connected to the hospital/ building common ground with the yellow/green ground cable (Part-no. 2.310005).
When working from an emergency vehicle, the vehicle common ground can be used.
ENGLISH
|
CARDIOVIT AT-2 |
Page 7 |
|
8.2001 |

Keyboard
|
I |
II |
III |
AUTO |
7 |
QRS |
8 |
9 |
||||
|
aVR |
aVL aVF |
COPY |
ALT |
1mV |
|||||||
|
START |
BEEP |
||||||||||
|
V1 |
V2 |
V3 |
|||||||||
|
V4 |
V5 |
V6 |
MAN |
AUTO — |
5 4 |
10 5 |
20 |
6 |
|||
|
LEAD OFF |
|||||||||||
|
START |
GAIN |
mm/mV |
mm/mV |
mm/mV |
|||||||
|
II |
aVF |
III |
|||||||||
|
V2 |
V4 |
V5 |
0 |
5 |
1 |
25 |
2 |
50 |
3 |
PAPER |
|
|
STOP |
FILT |
||||||||||
|
V4 |
V5 |
V6 |
mm/s |
mm/s |
mm/s |
||||||
|
FILTER |
|||||||||||
|
V7 |
V8 |
V9 |
|
Page 8 |
CARDIOVIT AT-2 |
|
8.2001 |

Keyboard
|
Switch unit on |
||
|
Switch unit off |
||
|
COPY |
Copy stored ECG |
|
|
AUTO |
Start automatic recording |
|
|
START |
||
|
MAN |
Start manual recording |
|
|
START |
||
|
STOP |
Stop recording/move paper to start position |
|
|
FILT |
Switch myogram filter (muscle tremor filter) |
|
|
on or off |
||
|
Lead group selector (forward) |
||
|
Lead group selector (backward) |
|
QRS |
Cancel or enable QRS beeper |
|
|
BEEP |
||
AUTO
Automatic ECG sensitivity adjustment from
GAIN 10 to 5 mm/mV in order to avoid overlapping traces in automatic mode only
|
5 |
10 |
20 |
|
mm/mV |
mm/mV |
mm/mV |
|
5 |
25 |
50 |
|
mm/s |
mm/s |
mm/s |
ECG sensitivity selector (5, 10 or 20 mm/mV) manual recording only
Chart speed selector (5, 25 or 50 mm/s) manual recording only
Key for 1 mV indication mark on output
|
1mV |
during manual recording. Use this key also |
|
for baseline recentering |
Key for initiation of setups and selection
ALT
of second format for printout
ENGLISH
|
CARDIOVIT AT-2 |
Page 9 |
|
8.2001 |

Indicators
Mains indicator (lit when mains connected)
Battery lamp (lit when running on battery power — mains not connected) (blinking when battery capacity is limited)
Warning lamp for loose electrode connection or poor electrode contact
Warning lamp for end of paper or paper jam
Myogram filter (lit when filter ON)
I II III aVR aVL aVF
|
V1 |
V2 |
V3 |
|
V4 |
V5 |
V6 |
|
II |
aVF |
III |
|
V2 |
V4 |
V5 |
|
V4 |
V5 |
V6 |
|
V7 |
V8 |
V9 |
Indicator lamp for selected lead group (Standard) (Cabrera: aVL, I, -aVR, II, aVF, III) in manual mode only
Indicator lamp for selected lead group (Standard) (in manual mode only
Indicator lamp for selected lead group in manual mode only
Indicator lamp for selected lead group in manual mode only
|
Page 10 |
CARDIOVIT AT-2 |
|
8.2001 |

General Settings
Each parameter is set by means of a code. This code comprises a combination starting with the ALT key followed by a number of keys and is always confirmed with the STOP key. As soon as the ALT key is pressed, the keyboard is dedicated to the programming function.
The setting is remembered and the keyboard is only released for other functions when the STOP key is pressed. Once the settings have been confirmed, they are stored in the memory even when the unit is switched off. As an example, if you want to set the language on your AT-2 to English, proceed as follows:
|
ALT |
0 |
25 |
2 |
25 |
2 |
|
FILT |
mm/s |
mm/s |
STOP |
||
|
Key 0 |
Key 2 |
Key 2 |
|||
|
Program sequence |
Start programming /
CONFIRM SETTING
Switch to numerical keyboard
On the following pages the programmable parameters and the programming sequences are described in detail.
|
NOTE THAT THE SETTINGS ARE ALWAYS CONFIRMED BY PRESSING THE |
STOP |
|
KEY. |
ENGLISH
|
CARDIOVIT AT-2 |
Page 11 |
|
8.2001 |

General Settings
Defaults
Default Settings
|
Setting |
AT-2 |
AT-2 with Interpretation Option |
|
Language |
English |
English |
|
Leads |
Standard (S) |
Standard (S) |
|
ECG: 25 mm/s, short (o) |
||
|
MECG: 2 x 6 (25 mm/s) + 2 |
||
|
Format 1 |
ECG: 25mm/s short (o) |
Measurements: suppressed (-) |
|
Marks: enabled (+) |
||
|
Interpretation: enabled (+) |
||
|
ECG: 25 mm/s, long (ooo) |
||
|
MECG: none (-) |
||
|
Format 2 |
ECG: 25 mm/s, long (ooo) |
Measurements: disabled (-) |
|
Marks: enabled (+) |
||
|
Interpretation: disabled (-) |
||
|
Rhythm Leads |
V1 = ECG; V1, II = MECG |
V1 = ECG; V1, II = MECG |
|
Autom. Centering |
Enabled (+) |
Enabled (+) |
|
Printout of Signals |
Sequential |
Sequential |
|
Baseline Filter Setting |
0.05 Hz |
0.05 Hz |
|
Mains Filter Setting |
50 Hz (USA — 60Hz) |
50 Hz (USA — 60Hz) |
|
Myogram Filter Setting |
35 Hz, OFF |
35 Hz, OFF |
|
Interpretation Settings |
N/A: — U: + A30: — S: — |
|
|
Page 12 |
CARDIOVIT AT-2 |
|
8.2001 |

General Settings
The defined formats and settings can be checked as follows:
|
Setup Printout |
||||
|
Entry Key Sequence |
Action |
|||
|
ALT |
0 |
1 |
1 |
Printout of programmed settings |
A printout of the defined settings will be produced and gives the following information, depending on the installed software:
|
Unit designation (AT-2), |
Software option installed (C = Interpretation) and Software |
|
version |
|
|
Serial number |
|
|
Leads |
Standard (S) or Cabrera (C) |
|
ECG Format |
Long (ooo), Short (o) or Suppressed (-) |
|
MECG |
Average cycles as defined in auto ECG recording setup (e.g. |
|
4 * 3 (25 mm/s)+2) |
|
|
Measurements |
Enabled (+) or Suppressed (-) |
|
Marks |
Enabled (+) or Suppressed (-) |
|
Interpretation |
Enabled (+) or Suppressed (-) |
|
Selected Rhythm leads |
Leads selected for R1, R2 resp. |
|
Automatic Centering |
Enabled (+) or Suppressed (-) |
|
Printout of signals |
Sequential or Simultaneous |
ENGLISH
|
CARDIOVIT AT-2 |
Page 13 |
|
8.2001 |

General Settings
|
Baseline Filter |
0.05, 0.15 or 0.30 Hz |
|
Mains Filter |
50, 60 Hz or OFF (-) |
|
Myogram Filter |
25 or 35 Hz, ON (+) or OFF (-) |
|
Interpretation settings: |
N/A: +/- (‘normal/abnormal’ is written (+) or suppressed (-); |
|
U: +/- (‘unconfirmed report’ is written (+) or suppressed (-); |
|
|
A30: +/- (patient age is assumed to be < 30 (-) or >30 (+); |
|
|
S: +/- (low (-) or high (+) sensitivity) |
To reset the unit to the basic default settings, proceed as follows:
|
Reset Setup |
|||||||
|
Entry Key Sequence |
Action |
||||||
|
ALT |
0 |
6 |
6 |
Reset to default base settings. |
|||
|
Page 14 |
CARDIOVIT AT-2 |
|
8.2001 |
![]()
General Settings
Language
The language is selected as follows:
Select Language
|
Entry Key Sequence |
Language |
Confirm |
||||
|
1 |
German |
|||||
|
2 |
English |
|||||
|
3 |
French |
|||||
|
Press |
||||||
|
4 |
Swedish |
|||||
|
ALT |
0 |
2 |
STOP |
|||
|
5 |
American |
|||||
|
Key |
||||||
|
6 |
Italian |
|||||
|
7 |
Spanish |
|||||
|
8 |
Portuguese |
|||||
Confirm the selection by pressing STOP.
|
Note: |
Once selected, the language remains active. However, when the unit is reset |
|
to the default settings, the default language will be English. |
ENGLISH
|
CARDIOVIT AT-2 |
Page 15 |
|
8.2001 |

General Settings
There are three different filters which can be set individually as follows:
•Baseline filter
•Mains filter
•Myogram filter
The setting for each filter is given on the setup printout.
Baseline Filter
The digital Baseline filter suppresses excessive baseline drifts. The setting options are as follows:
Baseline Filter
|
Entry Key Sequence |
Filter Setting |
Confirm |
0 0.05 Hz (Default)
Press
ALT 5 1 0.15 Hz STOP
Key
3 0.30 Hz
The set value is the lower limit of the frequency range and is normally set to 0.05 Hz. The settings 0.15 and 0.30 Hz should only be used when absolutely necessary, as the possibility exists that they could affect the original ECG signal, especially the ST segments.
Confirm the selection by pressing STOP.
|
Page 16 |
CARDIOVIT AT-2 |
|
8.2001 |

General Settings
Mains Filter
The Mains filter is an adaptive digital interference filter designed to suppress AC interference without attenuating or distorting the ECG.
Set the mains filter in accordance with the frequency of your local mains supply as follows:
Mains Filter
|
Entry Key Sequence |
Filter Setting |
Confirm |
||
|
5 |
Mains Filter 50 Hz |
Press |
||
|
ALT |
8 |
6 |
Mains Filter 60 Hz |
STOP |
|
Key |
||||
|
9 |
Mains Filter off |
|||
ENGLISH
|
CARDIOVIT AT-2 |
Page 17 |
|
8.2001 |

General Settings
Myogram Filter
The Myogram filter suppresses disturbances caused by strong muscle tremor. The cutoff frequency of the myogram filter is set to 25 or 35 Hz.The myogram filter is switched on and off manually with the FILT key. Switching on or off can also be programmed as default when the unit is switched on. When the filter is active, the ‘FILTER’ lamp on the unit is lit.
Myogram Filter
|
Entry Key Sequence |
Setting |
Confirm |
||
|
2 |
Myogram Filter 25 Hz |
|||
|
3 |
Myogram Filter 35 Hz |
Press |
||
|
Myo. Filt. ON when switching on unit |
||||
|
ALT |
8 |
1 |
STOP |
|
|
(marked on printout with +) |
Key |
|||
|
8 |
Myo. Filt. OFF when switching on unit |
|||
|
(marked on printout with –) |
||||
Confirm the selection by pressing STOP.
An ECG recorded in auto mode is stored unfiltered. It is therefore possible to print the stored ECG either with or without passing the myogram filter.
|
Page 18 |
CARDIOVIT AT-2 |
|
8.2001 |

General Settings
Defining Lead Sequence & Printout
The required settings can be selected as follows:
Sequences & Print
|
Entry Key Sequence |
Definition |
Confirm |
|||
|
1 |
Standard Lead Sequence |
||||
|
2 |
Cabrera Lead Sequence |
||||
|
Press |
|||||
|
3 |
Simultaneous Print |
||||
|
ALT |
7 |
STOP |
|||
|
4 |
Sequential Print |
||||
|
Key |
|||||
|
5 |
Auto-Centering ON |
||||
|
6 |
Auto-Centering OFF |
||||
Confirm the selection by pressing STOP.
The selectable lead groups for the AT-2 are:
Lead Groups
|
Standard |
Cabrera |
||||||
|
I |
V1 |
II |
V4 |
aVL |
V1 |
II |
V4 |
|
II |
V2 |
aVF |
V5 |
I |
V2 |
aVF |
V5 |
|
III |
V3 |
III |
V6 |
-aVR |
V3 |
III |
V6 |
|
aVR |
V4 |
V2 |
V7 |
II |
V4 |
V2 |
V7 |
|
aVL |
V5 |
V4 |
V8 |
aVF |
V5 |
V4 |
V8 |
|
aVF |
V6 |
V5 |
V9 |
III |
V6 |
V5 |
V9 |
ENGLISH
|
CARDIOVIT AT-2 |
Page 19 |
|
8.2001 |

General Settings
The selectable printout forms are:
|
Simultaneous |
All ECG leads are printed in the same time segment (in |
|
automatic mode only). |
|
|
Sequential |
Each group is a contiguous time segment of approximately 2.5 |
|
or 5 seconds (in automatic mode only). |
|
|
Auto-Centering ON |
All ECG traces are centred dynamically for optimal use of |
|
paper width. |
|
|
Auto-Centering OFF |
ECG traces are set to a fixed baseline position and may |
|
possibly overlap. |
Acoustic QRS Indication
QRS
The acoustic QRS indication can be switched on or off at any time by pressing the BEEP key.
|
Page 20 |
CARDIOVIT AT-2 |
|
8.2001 |

General Settings
Time / Date
CHANGE TIME / DATE
Time:
|
ALT |
9 |
1 |
1 |
HHMMSS |
beep |
|
|
Date: |
||||||
|
ALT |
9 |
2 |
2 |
DDMMYY |
beep |
|
|
Wintertime to Summertime |
(+1 Hr) |
|||||
|
ALT |
9 |
4 |
4 |
|||
|
Summertime to Wintertime |
(-1 Hr) |
|||||
|
ALT |
9 |
5 |
5 |
|||
ENGLISH
|
CARDIOVIT AT-2 |
Page 21 |
|
8.2001 |

Settings for Automatic Mode
Two separate formats for the automatic ECG output can be selected as follows:
Automatic ECG Format
Entry Key
Setup Format
Sequence
1 Setup Format 1
ALT
2 Setup Format 2
With this the 2 automatic mode formats are defined as detailed on the following pages. The ECG format is set as follows:
ECG Format
|
Entry Key Sequence |
Output Format |
Confirm |
||||
|
5 |
No leads are printed |
|||||
|
6 |
Leads are printed in short form (1 sheet) |
|||||
|
1 |
Press |
|||||
|
7 |
Leads are printed in long form (2 sheets) |
|||||
|
ALT |
or |
1 |
STOP |
|||
|
8 |
Chart speed is 25 mm/s |
|||||
|
2 |
Key |
|||||
|
9 |
Chart speed is 50 mm/s |
|||||
|
0 |
Leads are printed in format 4 x 3 + 1 Rhy |
|||||
Confirm the selection by pressing STOP.
Note: Lead selection for the rhythm lead is defined on page 27.
|
Page 22 |
CARDIOVIT AT-2 |
|
8.2001 |

Settings for Automatic Mode
Average Cycles
The Average cycles are defined as follows:
Average Cycles (Interpretation Option only)
|
Entry Key Sequence |
Output Format |
Confirm |
|||
|
5 |
No average cycles are printed. |
||||
|
4 * 3 (25 mm/s) + 2 * Rhy (25 mm/s) |
|||||
|
6 |
The average complexes are printed out in four groups of three |
||||
|
1 |
leads with 2 rhythm leads at a chart speed of 25 mm/s. |
Press |
|||
|
4 * 3 (50 mm/s) + 2 * Rhy (25 mm/s) |
|||||
|
ALT |
or |
2 |
STOP |
||
|
2 |
7 |
The average complexes are printed out in four groups of three |
Key |
||
|
leads with 2 rhythm leads at a chart speed of 50 mm/s. |
|||||
2 * 6 (50 mm/s) + 2 * Rhy (25 mm/s)
8The average complexes are printed out in two groups of six leads with two rhythm leads at a chart speed of 50 mm/s.
Confirm the selection by pressing STOP.
Note: Lead selection for the 2 rhythm leads is defined on page 27.
ENGLISH
|
CARDIOVIT AT-2 |
Page 23 |
|
8.2001 |

Settings for Automatic Mode
Measurements and Markings
To define the measurements and markings proceed as follows:
Measurements and Markings (Interpretation Option only)
|
Entry Key Sequence |
Output Format |
Confirm |
||||
|
Detailed table of measurement results is omitted |
||||||
|
5 |
(However, the values of electrical axes, intervals, and |
|||||
|
heart rate are not suppressed.). |
||||||
|
1 |
Press |
|||||
|
6 |
Detailed table of measurement results is printed. |
|||||
|
ALT |
or |
3 |
STOP |
|||
|
Reference markings (beginning and end of P wave and |
||||||
|
2 |
7 |
Key |
||||
|
QRS as well as end of T wave) are omitted. |
||||||
|
8 |
Reference markings (beginning and end of P wave and |
|||||
|
QRS as well as end of T wave) are added to ECG cycles. |
||||||
Confirm the selection by pressing STOP.
|
Page 24 |
CARDIOVIT AT-2 |
|
8.2001 |
![]()
Settings for Automatic Mode
Interpretation
To print or suppress interpretation statements on the printout proceed as follows:
Interpretation
|
Entry Key Sequence |
Output Format |
Confirm |
|||||
|
1 |
5 |
Interpretation is omitted. |
Press |
||||
|
ALT |
or |
4 |
STOP |
||||
|
2 |
6 |
Interpretation is printed. |
Key |
||||
Confirm the selection by pressing STOP.
Full details of the interpretation option are given in the SCHILLER ECG Measurement and Interpretation booklet (art. no. 2.510 179).
ENGLISH
|
CARDIOVIT AT-2 |
Page 25 |
|
8.2001 |

Settings for Automatic Mode
Interpretation Settings
The interpretation settings enable the user to determine whether or not certain comments will be added to the interpretation statements on the ECG printout. Furthermore, the patient’s age can be defined (< or > 30) and if low or high sensitivity should be applied. Low sensitivity will suppress certain nonspecific ECG diagnosis; this may be advisable when carrying out ECGs for screening.
Interpretation Settings
|
Entry Key Sequence |
Setting |
Confirm |
|||
|
1 |
‘Normal/abnormal’ is not printed |
||||
|
2 |
‘Normal/abnormal’ is printed. |
||||
|
3 |
‘Unconfirmed report’ is not printed. |
||||
|
ALT |
6 |
4 |
‘Unconfirmed report’ is printed. |
Press STOP |
|
|
5 |
Patient age is assumed to be < 30 |
Key |
|||
|
6 |
Patient age is assumed to be > 30 |
||||
|
7 |
Low sensitivity |
||||
|
8 |
High sensitivity |
||||
|
Page 26 |
CARDIOVIT AT-2 |
|
8.2001 |

Settings for Automatic Mode
Selecting Rhythm Leads
The rhythm leads are printed out as defined. Two separate rhythm leads can be selected. The following formats can be set:
Rhythm Leads
Entry Key
Setup Lead
Sequence
3 Setup Rhythm Lead 1
ALT
4 Setup Rhythm Lead 2
The 2 rhythm leads are defined as follows:
Extremity Leads
|
Entry Key Sequence |
Lead |
Confirm |
||||
|
1 |
I |
|||||
|
2 |
II |
|||||
|
3 |
Press |
|||||
|
3 |
III |
|||||
|
ALT |
or |
8 |
STOP |
|||
|
4 |
aVR |
|||||
|
4 |
Key |
|||||
|
5 |
aVL |
|||||
|
6 |
aVF |
|||||
Precordial Leads
|
Entry Key Sequence |
Lead |
Confirm |
||||
|
1 |
V1 |
|||||
|
2 |
V2 |
|||||
|
3 |
Press |
|||||
|
3 |
V3 |
|||||
|
ALT |
or |
9 |
STOP |
|||
|
4 |
V4 |
|||||
|
4 |
Key |
|||||
|
5 |
V5 |
|||||
|
6 |
V6 |
|||||
Confirm the selection by pressing STOP.
ENGLISH
|
CARDIOVIT AT-2 |
Page 27 |
|
8.2001 |

Patient Cable Connections
The accessory kit of the electrocardiograph includes a 10-lead patient cable. This cable is plugged into the patient cable socket on the right-hand side of the unit and secured with the two screws.
The CARDIOVIT AT-2 is CF rated. The patient connection is fully isolated and defibrillation protected. Protection against defibrillation voltage is however only ensured, if the original SCHILLER patient cable (Part-no. 2.400070 / USA: 2.400071) is used. Make sure that during ECG recording neither the patient nor the conducting parts of the patient connection or the electrodes (including the neutral electrode) come into contact with other persons or conducting objects (even if these are earthed).
|
Page 28 |
CARDIOVIT AT-2 |
|
8.2001 |

Patient Cable Connections
The quality of the ECG is dependent on the preparation and the resistance between the skin and the electrode. To ensure a good quality ECG and minimise the skin/electrode resistance, remember the following points:
1.Ensure that the patient is warm and relaxed.
2.Shave electrode area before cleaning.
3.Thoroughly clean the area with alcohol.
4.Place the C4 electrode first — in the fifth intercostal space on midclavicular line. Then place:
•C1 in fourth intercostal space at the right sternal border
•C2 in fourth intercostal space at the left sternal border
•C3 between, and equidistant to, C4 and C2
•C6 on left midaxillary line on the same level as C4
•C5 between, and equidistant to, C4 and C6
Following these simple guidelines will ensure good results every time.
ENGLISH
|
CARDIOVIT AT-2 |
Page 29 |
|
8.2001 |

Patient Cable Connections
Standard Leads
1
2
3
4
C2 — YELLOW
RIGHT ARM — RED
RIGHT LEG — BLACK
|
C3 |
— GREEN |
|||||
|
C4 |
— BROWN |
|||||
|
C6 |
— VIOLET |
|||||
|
IEC |
AHA |
|||||
|
N |
Black |
RL |
Green |
|||
|
C5 |
— BLACK |
|||||
|
R |
Red |
RA |
White |
|||
|
LEFT ARM — YELLOW |
C1 |
White/Red |
V1 |
Brown/Red |
||
|
C2 |
White/Yellow |
V2 |
Brown/Yellow |
|||
|
C3 |
White/Green |
V3 |
Brown/Green |
|||
|
C4 |
White/Brown |
V4 |
Brown/Blue |
|||
|
C5 |
White/Black |
V5 |
Brown/Orange |
|||
|
C6 |
White/Violet |
V6 |
Brown/Violet |
|||
|
L |
Yellow |
LA |
Black |
|||
|
F |
Green |
LL |
Red |
|||
LEFT LEG — GREEN
|
Page 30 |
CARDIOVIT AT-2 |
|
8.2001 |

Recording an ECG in Automatic Mode
In automatic mode, a full 12-lead ECG is printed in one of two predefined formats with a sensitivity of 10 mm/mV. These two formats are selected by the user to suit his specific needs and requirements (as detailed previously).
|
AUTO |
||
|
When the |
GAIN |
key is pressed before recording in automatic mode, the unit detects very |
large waveform amplitudes and sets the sensitivity for the extremity and/or precordial leads to 5 mm/mV to reduce the overlapping of traces.
|
AUTO |
|
|
To start the automatic ECG recording in Format 1, simply press |
START . |
|
ALT |
|
|
To start the automatic recording in the second format, press |
followed by |
AUTO
START .
ENGLISH
|
CARDIOVIT AT-2 |
Page 31 |
|
8.2001 |
 Loading…