No matter what you do, eventually you will have to fight – be it for loot, to rescue a survivor, or defending your base against an attack. There are thousands of demons out there and they are bigger, stronger and meaner than us. You have but one advantage: your brains. Now read carefully, I am about to explain some concepts that you need to know to become a good tactician and teach those bloody demons a lesson or two.
1. Basic Stats[]

Weapons and Armor have several stats such as Damage, Attack Speed, Range, Evasion and Armor. Attack speed is how many attacks per 7.5 seconds can be done with this weapon, and damage indicates the amount of damage per attack. DPS is calculated from these two values and is shown for convenience. DPS vs armor is the amount of damage done against an enemy with 5 armor. Another important stat is Accuracy, which determines how easy it is to hit enemies with this weapon. We will explain all these calculations in depth later in the guide.
We are going to talk a lot about different bonuses and penalties. Most of them are calculated as a percentage of their base stat, and then added to it: a +10% bonus to Accuracy, with a weapon that has a base Accuracy of 50, will yield a total accuracy of 55 (50 + 5), not 60, even though the Accuracy stat itself is percentage based (chance to hit). If there are multiple bonuses or penalties, they are all added up and then applied to the base stat: if you have a +20%, a +10 % bonuses to Accuracy, and the base value is 50, the final bonus will be +30%, and the final Accuracy rating will be 65 (50 + 15).
2. Accuracy and Evasion[]
Accuracy and Evasion determine how often an attack will hit its target. The base Accuracy is determined by the weapon, and the base Evasion is determined by the armor (unarmored base Evasion is 20). Each attack, the chance to hit is equal to the Accuracy of the attacker, minus the Evasion of the target, with a minimum hit chance of 30%.
For example, a survivor wielding a Jericho (60 Accuracy) that has no bonuses, has an Accuracy rating of 60. If this survivor attacks an Imp (10 Evasion), 50% (60 – 10) of the shots will hit their target. If this survivor has the Marksmanship skill (+20% Accuracy), then his accuracy increases to 72 (60 + 20%), and 62% of the shots will hit (72 – 10).
Since Evasion is directly subtracted from the Accuracy, a high Evasion rating becomes much more effective against low Accuracy attacks. An Evasion rating of 25 against an Accuracy rating of 50 will reduce the number of hits by 50% (instead of hitting 50% of the time, it will only hit 25% of the time – half a much!). On the other hand, the same Evasion rating of 25 against an Accuracy rating of 100 will only reduce the number of hits by 25% (it will hit 75% of the time instead of 100%). The exception to this rule is when the Accuracy is so low that you hit the minimum value. A 25 Evasion rating against a 25 Accuracy rating will only decrease the amount of hits from 25% to 20% (20% less hits).
One last thing — moving targets are harder to hit, they gain a +20% bonus to their base Evasion skill as long as they’re moving. That doesn’t mean it’s always better to run, since usually that means turning your backs on your enemies, which is a bad thing that we will explain soon.
3. Damage, Armor and Attack Speed[]
Just like Accuracy and Evasion, the Damage and Armor rating determine how much health is lost per hit. The Armor rating is directly subtracted from the Damage rating (with a minimum of 1). Attack Speed determines how many attacks will be performed per 5 seconds. An Attack Speed rating of 10 indicates 10 attacks per 5 seconds, so 2 attacks per second.
Against targets with high Armor rating, you should prefer slower weapons that deal more Damage (such as a Shotgun), rather than fast weapons that deal low Damage (such as Uzi). For example, attacking a legion with an Uzi will only deal 2 damage per shot (12 Damage vs 10 Armor), at a rate of 2 shots per second (10 Attack Speed), for a very low 4 DPS. Using the Shotgun deals 40 damage per shot (50 Damage vs 10 Armor), at a rate of 0.5 shots per second (2.5 Attack Speed), for a much higher DPS of 20.
On the other hand, when fighting large groups of weaker enemies, such as Hellhounds (15 health 0 armor), the faster weapons are much more effective. An Uzi can kill a hellhound with 2 hits, so one hellhound per second. The Shotgun will kill a hellhound in one hit, but since it fires only one shot every 2 seconds, it can only kill a Hellhound every 2 seconds, making the Uzi two times more effective against this particular enemy.
4. Cover[]
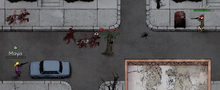
Don’t rush to battle like a drunk berserker – your enemies will be happy to use you as target practice. Take your time, plan ahead, and carefully position your survivors.
When attacking from behind cover, ranged attacks receive a bonus Accuracy of 35% of the cover rating. In addition, everyone gets a bonus of 70% of the cover rating to their Evasion, when defending against ranged attacks from the other side of the cover.
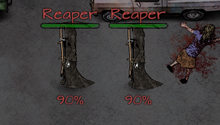
For example, a Barrel that is commonly found in combat has a cover rating of 50. That means that ranged fighters attacking from behind a Barrel get a +17.5% (35% of 50) Accuracy bonus, and a huge +35%(70% of 50) Evasion bonus against ranged attacks. Unarmored survivors behind a Barrel will be hit by the dreaded Reapers (55 Accuracy) 20% less often than if they were not behind cover.
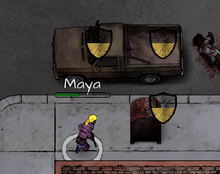
Always try to position your ranged fighters behind cover, and use the best cover you can find. Bus remains that can sometimes be found in scavenge areas have a cover rating of 80 and can be used to completely turn the tides of battle. Sometimes it’s better to keep your melee fighters behind cover as well, defending your ranged fighters from enemy melee units that may get too close, rather than charging at the ranged enemies without any cover.
Note that Cover has no effect against point blank attacks, either melee or ranged.
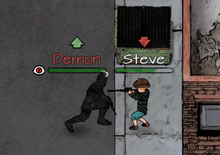
5. Flanking[]
If you want to survive, you must be crafty. Don’t just face that full-fledged Demon head on. Attack him from behind!
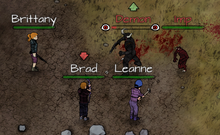
A Flanking bonus is received when attacking enemies from behind or from the sides. Flanking gives a huge +30% bonus to damage and +20% to accuracy. Therefore, you should try to surround and flank your enemies – but without exposing your own back to other enemies that may flank you back.
A warning: there are times when fleeing is the best option, but keep in mind that as soon as you turn to run, your enemy will get a flanking bonus – so be sure to run away when you can still take a few more hits!
It’s usually better to split your ranged units and attack from different sides, and if you manage to position your enemies between your melee units and your ranged units, you can fight them hand-to-hand while sniping them from behind! That is a great way to win a battle against overwhelming odds.
6. Ranged and melee[]
There are two kinds of weapons: melee weapons for close combat (clubs, knifes, quarterstaff, etc.), and ranged weapons (bows, guns, etc.). For obvious reasons, dealing damage from a safe distance seems like an advantage, but ranged weapons also have disadvantages in close combat.
Defending against melee attacks with a ranged weapon is difficult, giving Melee weapons a +30% Accuracy bonus when attacking a ranged combatant. In addition, when using a ranged weapon in point blank distance (adjacent tile) there is a -35% Accuracy penalty.
In most cases, it will be better to have a balanced team with both ranged and melee weapons. Ranged weapons powerful, they allow you to deal damage to your enemies while they approach you, and they allow for more tactical positioning options – but you may need melee fighters to protect your marksmen if they take out all the enemies before they close the distance.
On the other hand, you can play this to your advantage: if you know for a fact you will face only (or mostly) ranged enemies, equip your team with melee weapons and lure them into a trap! Lure them to chase you around a building and ambush them just around the corner.
7. Equipment[]
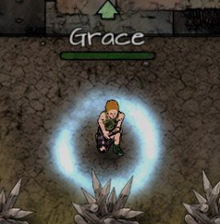
Don’t forget that you have more than just weapons and armor at your disposal: survivors may carry one additional piece of equipment that can turn the tide of a battle. Some of these are consumable (such as Med-Kits and Grenades), so you need to craft or find more to replace the ones you use. Others may provide constant passive bonuses (such as Shields), and a few can be used a certain amount of times per combat but are not consumed (like the Sandalwood Bracelet).
Any equipment that is not passive will have to be manually activated, by selecting the relevant survivor, choosing the matching action from the action bar at the top of the screen, and then choosing a target.
Equipment has a wide range of effects, such as healing (Med-Kits), boosting your survivors (Protection Spells), damaging enemies (Grenades), or weakening them (Hex Doll). They may be expensive and hard to come by, and the amount of uses per combat is limited. Use them wisely, make the best tactical choices according to the situation. Hex Dolls are great against heavy damage dealers and Dark Angels because of their long range and large penalty on Accuracy. Flashbangs and Grenades are great for a large concentration of enemies. Defensive bonuses are great when used on strong, heavily armored survivors that run straight at the enemy and draw their fire, while others take them out from afar. Always have some Med-Kits handy to heal survivors between encounters, and even while fighting, it can sometimes be better to heal a survivor rather than run away and have them turn their back to their enemies.
Consumables are lost after the fight if you use them in combat at least once, even when they have more charges that were not used. Med-Kits, for example, have 2 uses per item, but if you only use it once, the Med-Kit is still lost after the fight, so you may as well use it a second time and leave the field with higher health. Used consumables are automatically re-equipped after combat, if you have enough spares in your inventory.
8. Additional tips[]
All these factors may seem complex… However, you won’t need to make all these calculations all the time. You just need to be aware of how things work and make the best of it. If you are having a hard time against a particularly nasty group of demons, then you have the tools to sit down and plan how to beat them. For instance, hellhounds deal a lot of damage, but are easy to kill, so just hit them as soon as you see them. On the other hand, ghosts have the highest Evasion, so it’s best if you face them with as much accuracy as possible, from behind cover. Dark angels have a huge range and high accuracy, so fight them with high armor or sniper rifles from behind cover. And hex them if needed!
Here are a few more tips.
- Try not to fight unprepared and without a plan. Choose a position with good cover and place your team there. Send someone with a high Evasion rating to explore and lure enemies back to your well positioned team. Your ranged combatants should be guarding your back, able to fire on approaching enemies, and sometimes even surround them in a pincer movement to get that sweet flanking bonus.
- Kill the highest damage dealing enemy first. Focus your ranged attacks on it until it’s dead, then move on to the next most dangerous enemy. Sometimes focusing your attack on a strong enemy that is behind cover, without any flanking bonus, will be smarter than having different survivors attack different enemies just to get that flanking or cover bonus.
- Try to focus how you train your survivors. It’s better to have a survivor with +50% bonus to melee weapons, than have one with +30% bonus to melee and +30% bonus to range. While being versatile gives you more options, they only equip one weapon at a time, and will always be weaker than a specialized survivor with their weapon of choice.
- Don’t forget to equip your survivors based on their skills. A survivor with skills that provide bonus to Evasion should be equipped with an armor with high base Evasion like Kevlar Armor or a Camouflage Vest, rather than a cumbersome but strong armor like Demonite Armor. The percentage based bonuses are far more effective when the base value is higher.
- You can pause time as much as you want. Use this option! Calmly assess the situation and give commands. Your enemies are greater in number and stronger, take your time and plan carefully, or you are not likely to survive many battles.
Good luck out there, survivor. May the fates favor you in the battlefield!
Пролог

После кат-сцен вы возьмете под контроль главного героя — Такаюки Ягами. Ваша первая задача — победить группу врагов. Игра научит вас боевым секретам, показав краткое руководство о том, как нужно сражаться. Вам нужно разобраться с врагами.

Затем перейдите к красному маркеру на карте. Ваша цель — найти персонажа. Посмотрите на картинку и выберите персонажа, представленного на скриншоте, чтобы продолжить сюжет.

Теперь пришло время преследовать цель. Держитесь на безопасном расстоянии и следите за персонажем, не заполняя указатель, видимый в верхней части экрана. Следуйте за человеком и прячтесь за объектами (перед ними есть синее поле), чтобы избежать обнаружения. Следуйте за целью. Когда он повернется, спрячься за ближайшим укрытием. Вскоре преследование закончится.

Время поисковой миссии — вы должны найти свой дрон. Объект находится в небе — найдите его и нажмите X, чтобы продолжить.

Разыскиваемый человек сбежал — время для погони. Ягами начинает бежать автоматически — ваша задача — избегать препятствий. Нажмите соответствующие кнопки, чтобы ваш герой перепрыгнул через них, или совершите быстрое уклонение. Когда вы приблизитесь к цели, нажмите O, чтобы поймать человека.

Время для боя 1 на 1. Игра научит вас менять боевые стили — Путь Тигра идеален, когда вы сражаетесь с одиночными врагами. Устрани вашу цель, используя различные комбинации. Когда враг упадет, вы увидите несколько кат-сцен. После которых пролог закончится.
Chapter 1 Three Blind Mice

Вы начинаете в офисе Ягами. Вы можете послушать музыку (которая лечит героя), получать побочные задания, пойти в офис или поиграть в пинбол (доступно позже в игре). Выйдите из комнаты и отправляйтесь на улицы Камурочо.

Перейди в указанное место. Несколько врагов нападут на вас. Вам нужно победить их. На следующей кат-сцене будет представлен один из самых важных персонажей в игре — Кёхей Хамура, капитан семьи Мацугане. Зайдите в адвокатское бюро Генды, юридический офис, где раньше работала Ягами. Поговорите со всеми, а затем зайдите в Тендер-бар.

Время для разговора — выберите: «Что Хамура сказал об этом» и «Почему полиция арестовала Хамуру», чтобы получить небольшой бонус SP. Идите к любому из такси и двигайтесь до станции Камурочо. Вам нужно допросить Хамуру. Выберите следующие строки диалога: «О жертве», «Об Алиби» и «Спор с Кумэ», чтобы получить бонус за правильный выбор.

Сходи в готскую сауну. Вы должны опросить людей в красной области на карте — поговорите с людьми, у которых над головой есть значок диалога. После этого вернитесь в детективное агентство Ягами. Лягте на диван, чтобы ускорить время — продолжайте расследование с утра.

Отправляйся в Кафе Миджоре и поговори с человеком о деталях убийства. После этого бегите в Amour Club и начинайте искать камеру. Объект расположен в одном из баров. Поговорите с сотрудником, доберитесь до конца клуба, а затем отправляйтесь в интернет-кафе Mantai.

Там вы встретите Цукумо, одного из друзей Ягами. Мужчина тебе поможет — иди в указанное им место и поговори с человеком. Отправляйтесь в Суши Плейс на бульваре Тайхэй. Поговорите с человеком, а затем выберите доказательство — Кадры безопасности: вне клуба Amour, 10 вечера. Когда вы войдете в клуб, вы продолжите разговор с мужчиной. Выберите «О задней камере безопасности» и «О насилии в клубе», чтобы получить бонус.

Выйдите из Amour Club и бегите в детективное агентство Yagami. Затем прочитайте сообщение от Макото Цукумо. Это активирует так называемое Friend Event — побочную миссию для этого персонажа. Друзья — это особые персонажи, с которыми вы можете построить более высокий уровень отношений, что приводит к дополнительным бонусам. Перейдите в указанное место на карте и купите фигуру для Цукумо.

Отнесите фигуру человеку, и вы закончите миссию. Ваши отношения с Цукумо достигают максимального уровня. Вы также разблокируете возможность встретиться и подружиться с другими персонажами. Встретьтесь с Синтани и поговорите с этим персонажем. Вам нужно исследовать фотографию и проанализировать убитого человека. Обратите внимание на глаза жертвы, отсутствие крови возле тела, мешки с мусором и правый карман.

После этого бегите в семейный офис Мацугане и поговорите с патриархом семьи. Далее переходите к KJ Art. После вам нужно добраться до крыши небоскреба. Поговорите с Кайто, выберите дрон и начните пилотировать. Ваша задача — найти Муразе через одно из окон здания. После этого вы должны выбрать, что делать дальше — выберите «Надеть маскировку».

Подойдите к кондиционеру и начните открывать замок. Время для простой мини-игры, в которой вам нужно переместить правую аналоговую палку, чтобы немного сдвинуть замок и открыть дверь. После этого идите к устройству — Ягами уничтожит кондиционер.

Зайдите в указанный магазин и купите Handyman Disguise. Вернитесь к Kaito и выберите маскировку. Спуститесь и пройдите через парадную дверь.

Поговорите с администратором, а затем перейдите в указанное место. Начните искать комнату — сначала включите свет возле двери и соберите чертежи со стола. Теперь вам нужно получить ключ — вы найдете его в сейфе. Обыщите все заметки на доске и посмотрите на все написанные комбинации — они будут полезны позже. Идите к сейфу и введите 5038.

Поднимитесь наверх и помогите гангстерам. Когда вы выходите из офиса, вас будут допрашивать — выберите «Я из другой компании …», чтобы избежать обнаружения. Подойдите к маркеру и используйте ключ, чтобы открыть проход. Перейдите к двери, представленной на картинке выше, и введите 8919, чтобы открыть проход и навык Double Quickstep.

Подойдите к крыше здания — вы столкнетесь с врагами. Победите головорезов и спуститесь вниз — вы столкнетесь с Акирой Мурасе. Время сражаться с мини-боссом — вам нужно победить его, а затем поговорить. Выберите отчет о вскрытии Куме, чтобы убедить его отпустить вас. Отправляйся в детективное агентство Ягами и поспи.

Отправляйтесь в Синтани и поговорите с адвокатами по этому делу. Бегите к такси и идите в полицейский участок Камуро. После кат-сцен отправляйтесь в клуб Tender, а затем в клуб Stardust. Во время телефонного разговора выберите Дата — на вашей карте появятся несколько точек. Отправляйся на встречу с Сейей.

Теперь бегите в указанное место — вы должны найти камеру. Выберите её, и через некоторое время появятся Мурас и многочисленные гангстеры.

Вы должны победить Мурасе и его головорезов. Бой не будет легким, потому что у вашего противника есть катана, которая наносит большой урон. Следите за его ударами, выполняйте уклонения и пытайтесь уничтожить охранников в первую очередь.

Посмотрите ролики, а затем познакомьтесь с Каито. Подойдите к двери и откройте её, взломав замок. Еще одну дверь нужно будет открыть с помощью немного другой мини-игры. Продолжайте перемещать аналоговые джойстики, пока они не окажутся в выделенной области.

Впереди появится много врагов. В конце концов, вы попадете к раненому гангстеру — поговорите с ним. Выберите «Где девушка» и «Сколько там членов Kyorei». Затем продолжайте бежать, пока не дойдете до двери, защищенной кодом — введите 1370 и пройдите вперед.
Внутри вы будете сражаться с довольно большой группой врагов. После победы нужно посмотреть несколько кат-сцен.
Chapter 2 Beneath the Surface
После кат-сцены, перейдите ко Второй сцене преступления. В режиме поиска обратите внимание на мешки для мусора и землю рядом с мусорным баком.

Пришло время преследовать человека в маске, который украл ваш телефон. Не забывайте избегать пешеходов и перепрыгивать через препятствия. Вскоре погоня закончится — Ягами вернул телефон. Спуститесь и увидите раненого бездомного. Поговорите с ним — это автоматически начинает Дружеское Событие с Горо Моробоши. Перейдите в канализацию и выберите опцию «Кондо зовет вас», чтобы помочь врачу. Отныне вы можете обращаться к врачу для лечения тяжелых ран, а также покупки аптечки первой помощи, которые также будут излечивать ваши травмы.

Вам нужно поговорить с Гендой в юридическом офисе. Вас стоит принять обязательную побочную миссию — Расследование неверности. Вернитесь в детективное агентство Ягами, чтобы встретиться с Норико Тагуичи, женщиной, которая заказала это дело. Она подозревает своего мужа в мошенничестве и просит предоставить доказательства. Пройдите по указанному адресу, и вы увидите мужа женщины — с этого начинается расследование. Как всегда, прячьтесь за объектами и медленно следуйте за подозреваемым.

Через некоторое время мужчина встретит женщину. Вам нужно запечатлеть момент, когда они оба будут в кадре — вам нужно название отеля и момент, когда они войдут внутрь. После этого вы должны следовать за женщиной. Как и прежде, идите медленно, спрячьтесь за машинами и продолжайте движение, пока не дойдете до конца маршрута. Далее вы должны сообщить клиенту об измене мужа — это завершает побочный квест. Отныне вы можете получать дополнительные кейсы с доски, расположенной в Детективном агентстве Ягами.

Подойдите к маркеру на карте и после кат-сцен вы разблокируете возможность участвовать в гонках дронов. С этого времени вы можете начать искать детали дронов, которые вы сможете собрать и использовать для улучшения машины. Иди сейчас к Кои Невесте и познакомься с Кайто. Победите головорезов, а затем идите по секретному проходу в казино.

Вы должны сыграть хотя бы в одну игру в покер или блэкджек. После короткой сцены вернитесь в детективное агентство Yagami, чтобы расслабиться после тяжелой ночи… к сожалению, Yagami пока не может отдохнуть! На нашего героя нападают перед его агентством бандиты в масках. Хватайте предметы в переулке и побеждайте врагов. После этого идите в офис, чтобы увидеть записи, а затем выйдите на улицу.

Вам нужно получить информацию в Konban Wife. Поговорите с сотрудником и выберите любой из предложенных вариантов — выберите Канаэ-тян. Отправляйся в семейный офис Мацугане и поговори с Патриархом. К сожалению, он ничего не может сделать с поведением Хамуры. Отправляйся в Кафе Альпы и сядь на пустое место — жди. После кат-сцены вам предстоит выиграть довольно сложное противостояние с многочисленными бандитами, в том числе с двумя мини-боссами.

После победы в битве появляется таинственный человек в маске и помогает вам убежать. Теперь вы должны завершить побег, которая выглядит как погоня. Избегайте препятствий и следуйте за своим спасителем — в какой-то момент Ягами запрыгнет на скейтборд и стильно убежит от якудзы. Глава заканчивается после того, как вы сбежите от гангстеров.

Chapter 3 The Stickup

После кат-сцены, бегите в детективное агентство Yagami. Там вы встретите старого друга — Тору Хигаси. После короткой сцены спуститесь и начните следовать за мужчинами. Спрячьтесь за машинами и за зданиями. Когда человек входит в здание, наденьте любую маскировку и следуйте за ним.

Тору пройдет через дверь, и если вы попытаетесь сделать то же самое, продавец остановит вас. Побей этого человека, а затем посмотри длинное видео о прошлом героев. Теперь возвращайся к Каито, чтобы поговорить с ним. Затем бегите в Тендерный клуб, и вас попросят провести дополнительное расследование. Это обязательно, поэтому возьмите задачу. Теперь перейдите к маркеру на карте, и вы встретитесь со своими клиентами, и вы начнете задание.

Отправляйся на аллею Тейкаичи, поднимись по лестнице и поговори с поддельной подражательницей Шута. Затем бегите к авеню Senryo, и вы увидите сцену с убегающими ворами. Идите в Сад театра Камуро и подслушайте разговор плохих парней. Затем снова перейдите на встречу со своими клиентами, и Yagami сможет разоблачить их, и вы начнете сражаться. Победите их, и когда придет Ворон, выберите доказательство — Использованный аксессуар. Ворона нападет на тебя, и тебе придется его побить. После победы вы закончите расследование и получите 50 000 иен и 100 SP.

Возвращайся в детективное агентство Ягами и поспи. После короткой сцены вам нужно расспросить нескольких бездомных об определенном подозреваемом. В конце концов, один из них согласится поделиться информацией, если вы выиграете для него награду в Paradise VR. Зайдите в это место и вы примете участие в довольно интересной мини-игре. Вы бросаете кубик и перемещаете поля fiew вперед — некоторые поля содержат награды, другие врагов и т. д. Ваша цель — добраться как можно дальше. Когда вы закончите игру, вернитесь к бездомному и сообщите ему о своем результате.

Теперь идите в Детский парк, где после сцены на вас нападут многие бездомные. Возьмите скамейку и научите их уважать Ягами. Когда все закончится, идите к Чарльзу, и вам придется сразиться с Хигаси и его опекуном. После боя вы посмотрите кат-сцену, и глава будет завершена.
Chapter 4 Skeletons in the Closet

После коротких кат-сцен отправляйтесь в юридическую фирму, и вы станете свидетелем дела. Печенье из холодильника исчезло, и сотрудники разыскивают виновника — Ягами включен в розыск преступника. Запустите обязательный побочный квест «Справедливость сладка». Обыщите холодильник и найдите пакет с тестом в корзине. Во время разговора выбирайте Раскрыть улики пустого мусорного бака, затем выбрать Возражение! и выберите другое доказательство — молочную коробку Saori и уведомление об отключении электроэнергии. В конце выберите «Никто», и расследование закончится.

Теперь иди поговори с Хигаси. В конце концов, бегите в Beef Zone, вы найдете Honda, сильного мини-босса, которого вы должны победить в бою. С тех пор в игре появится новая механика Threat Level. Время от времени в городе появятся два мини-босса, а уровень угрозы подскочит до 100%, что приведет к значительному увеличению числа противников на улицах. Чтобы понизить уровень, вам нужно будет преодолеть мини-боссов или подождать некоторое время, пока полоска сама не уменьшится.

Теперь идите к Генду и предупредите Синтани об опасности. Идите в указанное место и найдите одинокую девушку. Затем вернитесь в адвокатское бюро Genda и посмотрите сцену. Выйдите из здания и бегите в отель Love — найдите доску на стене и прочитайте ее содержание. Победите бандита и начните искать доказательства. Попытайтесь точно определить лица на фотографиях, и вы поймете, что женщина на фотографии — заменитель.

Возвращайся к Генду и поговори со всеми. Выберите доказательство — Разорванный конверт и билет. Таким образом, вы прекратите спор между супружеской парой и сможете поговорить с Синтани. Вечером идите в бар Tender и поговорите с остальными. Затем перейдите в KJ Art и используйте дрон, чтобы найти лидера банды. После кат-сцен вы встретите довольно сложное столкновение с врагами на крыше здания.

По возвращении в Детективное Агентство Ягами вы получите телефон и вам нужно будет пойти в Тендер-бар. Внутри вы будете участвовать в дебатах. Вы начнете обязательный побочный квест — секрет светского человека. В режиме поиска посмотрите на женщину и ее украшения. Затем вы обнаружите двойную последовательность трекинга мари — один раз в классическом стиле и один раз в костюме. В конце концов, вы поймаете ее в казино. Вы узнаете, что она профессиональный игрок, и завершите второстепенную миссию. Вернитесь в детективное агентство Ягами и посмотрите, что случилось с одним из друзей Ягами… глава заканчивается на этом месте.
Chapter 5 Days Gone By

Действие происходит сразу после событий предыдущей главы. Ягами находит труп своего друга Синтани в шкафу. В режиме поиска вам предстоит осмотреть труп — посмотреть на глаза, огнестрельное ранение и телефон в кармане человека. Когда приедет полиция — выйдите на улицу и отправляйтесь к Генду.

Поговорите со всеми об убийстве, совершенном в Синтани. Когда вы выйдете на улицу, вы встретите раненого старика. Подберите для него целебный куст рядом с забором и примените лекарство. Вы начнете отношения с новым другом — Дворец Отшельника Дракона, Ияма. Через некоторое время появится группа врагов, сразитесь с ними, но Ягами быстро поймет, что не может справиться с их лидером. Однако вы используете новый тип предметов отшельника — экстракты, которые временно увеличивают силу и боевой потенциал героя. Пейте экстракт Thunder Strike Extract и используйте его для победы над противниками.

Вы окажетесь в месте, где живет Ияма. Этот человек покажет вам, как сделать новые выдержки, и прикажет вам изготовить одну из них в рамках запроса на добавление в друзья. Отправляйтесь к Чарльзу, поговорите (порядок и решения не имеют значения), и следующим шагом будет поездка в офис ADDC. Сядьте на такси и идите на площадь. На месте зайдите на ресепшн, и будет ретроспектива — вы возьмете под контроль Ямагами, когда он работал над делом в прошлом.

Следуйте за медсестрой, и вы попадете в комнату, где было совершено убийство. Посмотрите на кровать, окно и входную дверь. После сцены, следуйте за Тересавой в гараж. Проанализируйте машину. Поговорите с другими персонажами, и вы вернетесь на место преступления. Поговорите с женщиной, скажите, что у вас больше нет вопросов, и посмотрите другие ролики. Поговорите с командой в Genda и выберите доказательство отчета Вскрытия Ваку в беседе. Следующая задача состоит в том, чтобы преследовать таинственного человека, который убегает.
Вы должны защитить своего клиента. Во время разговора выберите: Больничная палата Ваку: Прихожая и показания Шоно были ложью. Вы вернетесь к текущему времени, и после ролика глава закончится.
Chapter 6 Collusion

После заставки поговорите с администратором. Затем перейдите к карте здания и найдите исследовательское крыло. В разговоре с ученым можно попросить что угодно, но это не имеет значения для сюжета. Когда все это закончится, вы снова окажетесь на улице Комурочо. Перейди в указанное место на карте. И ты доберешься до бара Tender с Kaito и его другом из старых лет. После нескольких кат-сцен вернитесь в тендер-бар и соберите информацию об Адачи. Вам, в частности, придется переодеться в другой наряд и подслушать разговор между двумя мужчинами.

Вернитесь к Кайто и скажите ему, что его друг хочет использовать его. К сожалению, ваш друг не хочет верить вам сразу, и вы должны победить его в бою. Кайто довольно силен, поэтому будьте осторожны и обязательно избегайте его сильных атак. После заставки ваш собеседник признает, что вы правы. Тогда вы будете иметь дело с Адачи и его людьми вместе.

Бегите к Кои Невесте, а затем в Адвокатское бюро Генды. Когда Мафую выйдет, бегите за женщиной и разберитесь с волнами врагов. Там будет много сражений, поэтому умело балансируйте на грани здоровья и вспомогательных предметов.

Теперь отправляйтесь на встречу с Кайто и Шутом. Прежде чем отправиться в экспедицию в штаб-квартиру якудза, неплохо восстановить свои запасы в магазине и вылечить себя, поскольку предстоит много сражений. Когда вы будете готовы, вперед. Там будет много врагов, так что возьмите много предметов.

Бродя по помещению, вы столкнетесь с двумя запертыми дверями. Стоит иметь провод, чтобы открыть их и получить доступ к скрытым локациям.

Наконец, вы будете сражаться с Шиойей и его людьми. Это сложный бой, потому что в нем много врагов и, кроме того, вам придется сражаться с сильным боссом. Попробуйте уничтожить охранников и сражайтесь ударами EX. Если вы выиграете битву, посмотрите ролик, и глава закончится.
Источник: https://guides.gamepressure.com
In the world of Judgement, training manuals are used by survivors to reset their skills and redistribute their skill points. The manual itself is consumed by its use. They are only sold by random traders.
Tips[]
- Training manuals are used via the ‘use’ tab in your inventory screen. You need to select a survivor first.
Community content is available under CC-BY-SA unless otherwise noted.

![]()

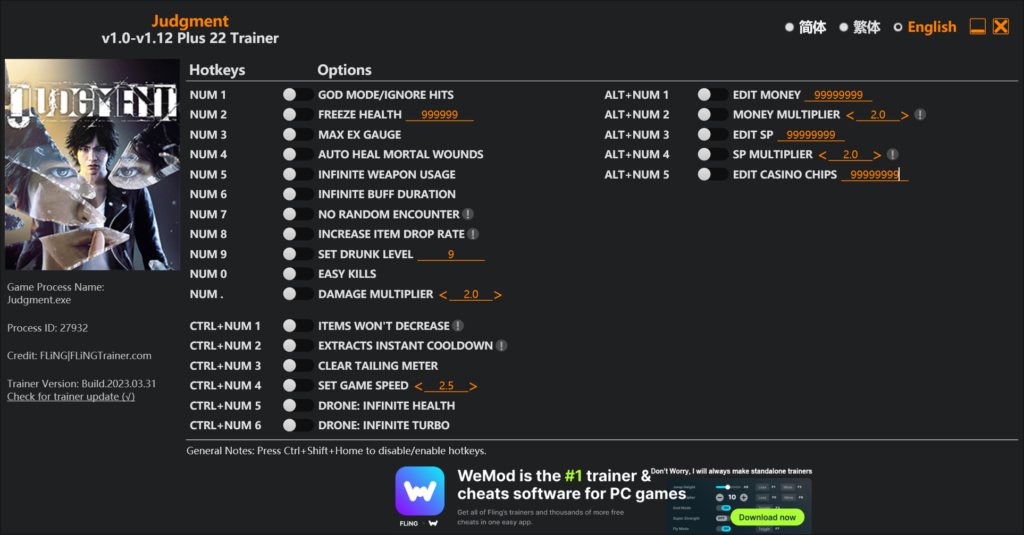
Автор: FLiNG
Издание: Steam
Версия Игры: Latest
Язык Трейнера: Английский
Количество Функций: 22
Дата Создания Трейнера: 01.04.2023
Функции:
- Numpad 1: Игнорировать урон
- Numpad 2: Заморозить здоровье
- Numpad 3: Максимальная спец шкала
- Numpad 4: Авто исцеление
- Numpad 5: Бесконечное оружие
- Numpad 6: Бесконечные баффы
- Numpad 7: Без случайных стычек
- Numpad 8: Множитель дропа
- Numpad 9: Редактор уровня опьянения
- Numpad 0: Быстрые убийства
- Numpad .: Множитель урона
- Ctrl+Num 1: Бесконечные предметы
- Ctrl+Num 2: Без перезарядки экстрактора
- Ctrl+Num 3: Без подозрений
- Ctrl+Num 4: Редактор скорости игры
- Ctrl+Num 5: Неразрушимый дрон
- Ctrl+Num 6: Бесконечное ускорение дрона
- Alt+Num 1: Редактор денег
- Alt+Num 2: Множитель денег
- Alt+Num 3: Редактор очков навыков
- Alt+Num 4: Множитель очков навыков
- Alt+Num 5: Редактор фишек
Инструкция:
- Скопировать все файлы из архива в корень установленной игры.
- Запустить сначала трейнер, потом игру.
- Во время игры нажимайте на клавиши указанные в трейнере.


Judgment, like other Yakuza games, features multiple fighting styles. Here are some tips and tricks players can use to be efficient with both styles.
Judgment, a spinoff of the Yakuza games, puts players in the role of Takayuki Yagami, a private detective in Kamurocho, Tokyo. In the fictional Japanese city, Yagami was once a defense lawyer for the Genda Law Office. That changed abruptly when Yagami was tasked with defending an alleged serial killer. Yagami, convinced the man was innocent, successfully got the defendant acquitted. When the man killed a woman after he was released, Yagami’s reputation was tarnished, and he was forced to resign. Yagami quickly established the Yagami Detective Agency with his friend Kaito after the serial killer scandal. Yagami and Kaito take on various cases around Kamurocho, a lot of which come from the Genda Law Office. Working with his old boss, Yagami is known as an efficient private investigator in the city. During investigations, players will often run into different kinds of enemies, whether they are thugs on the street or Yakuza bosses.
Yakuza fans are likely familiar with the concept of fighting styles from previous games. Kazuma Kiryu, the protagonist of most of the Yakuza games, utilizes four fighting styles: brawler, rush, beast, and dragon. These fighting styles allow players to switch between different types of attacks depending on the enemy. In Judgment, the fighting styles are a bit different, and there are only two: crane and tiger. Here’s how to use the two fighting styles effectively in Judgment.
How to Use Fighting Styles in Judgment (Tips & Strategies)
In Judgment, basic maneuvers such as blocking, countering, grabbing, and quickstepping are handled the same as in other Yakuza games (with the exception of the turn-based RPG battles in Yakuza: Like A Dragon). However, Yagami’s fighting styles are handled differently from Kiryu’s styles. While Kiryu’s styles are more oriented toward boxing and wrestling, Yagami’s fighting styles feature more martial arts such as Kung Fu and Wing Chun. Even though Yagami only has two styles compared to Kiryu’s four, Yagami has plenty of variation between the two styles to effectively take down enemies in Judgment.
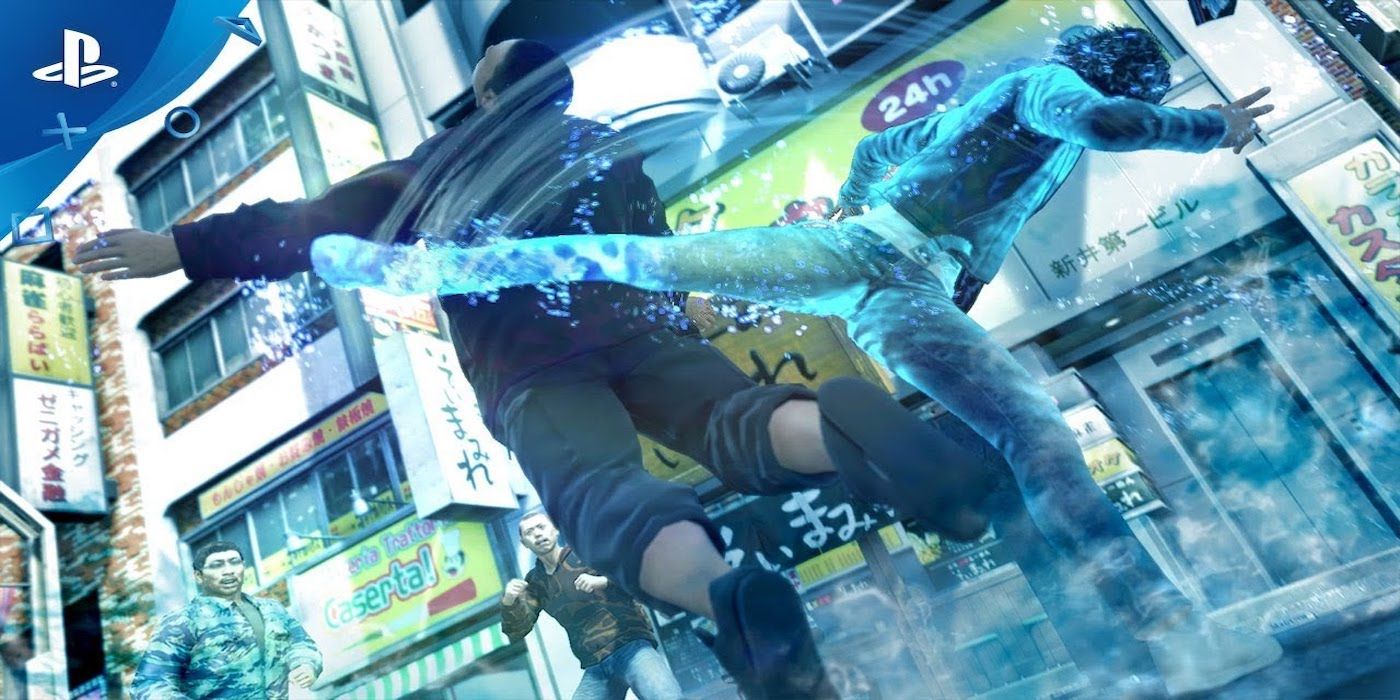
The first style, crane style, is indicated by a blue hue around the player. The crane style is recommended for fighting groups of enemies, although it is not required for group fights. The combos in crane style have faster attack speeds and a generally smaller range of motion. This means players can quickly attack enemies back-to-back with their combos to do damage to multiple enemies quickly. However, the crane style does not give players the ability to break through enemy guards.
The second style, tiger style, is more apt for fighting single, powerful enemies such as bosses. Attacks in this style hit harder, but also slower. Attack speed is lessened in exchange for more powerful attacks and a wider range of motion. Multiple enemies can be hit during one strike in tiger style, which is more difficult to do in crane style. Most importantly, the tiger style allows players to break through enemy guards. This is especially useful with bosses, who often have a hardened defense. Although each style is suited to specific situations, it is up to players to decide which style to use and when in Judgment. It looks like the Yakuza main series is shifting toward turn-based combat, so it’s a great idea to learn how to fight in Judgment before its sequel, Lost Judgment, releases in September 2021.
More: Lost Judgment Revealed With September Release Date Following Leak
Judgment is available on PlayStation 4, PlayStation 5, Xbox Series S/X, and Stadia.
A list of cheats, trainers, codes, booster programs that will make you cheat in the Judgment game. It also includes a Cheat Table for the Cheat Engine.
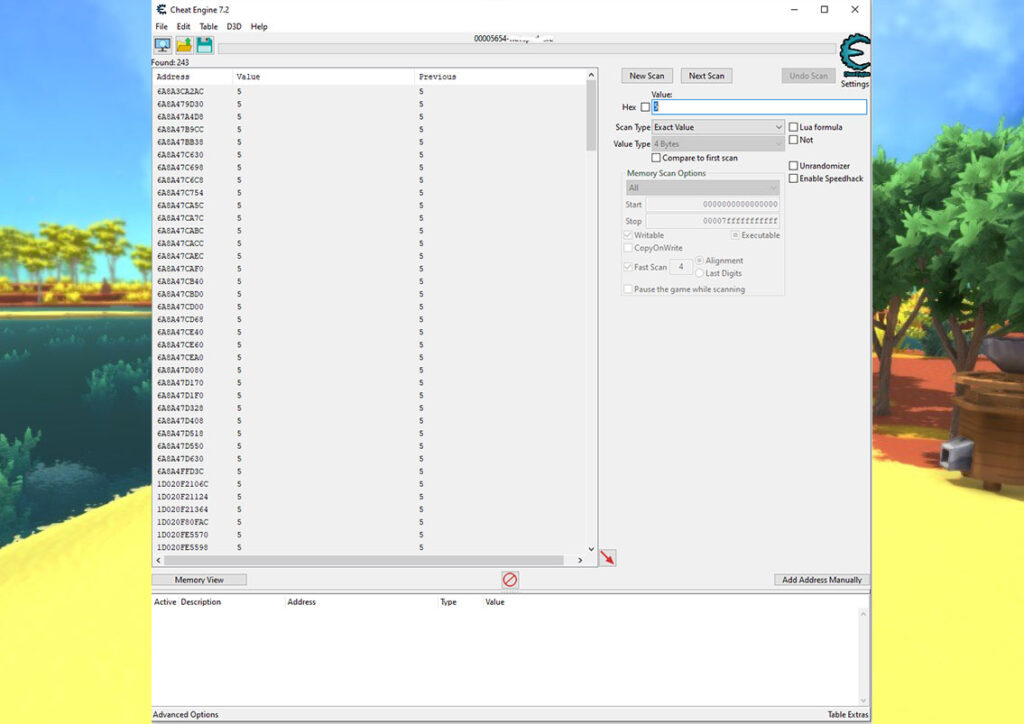
Cheat Table
There is a Cheat Table for the Cheat Engine that allows you to run scripts that allow you to cheat in Judgment. Cheat Table automatically finds addresses responsible for e.g. HP, Time, Cooldowns, Money, and other aspects of a specific game for which it was created. If after updating the game Cheat Table is not working properly, let us know in the comment and we will find a newer version.
Remember to use Cheat Table you need the Cheat Engine.
Trainer WeMod
There is a Judgment trainer available which offers various cheat options in the game.
The trainer is on the WeMod platform which provides cheat software for various games. Trainers can damage your saves, make sure you’ve backed up your files before using cheats.
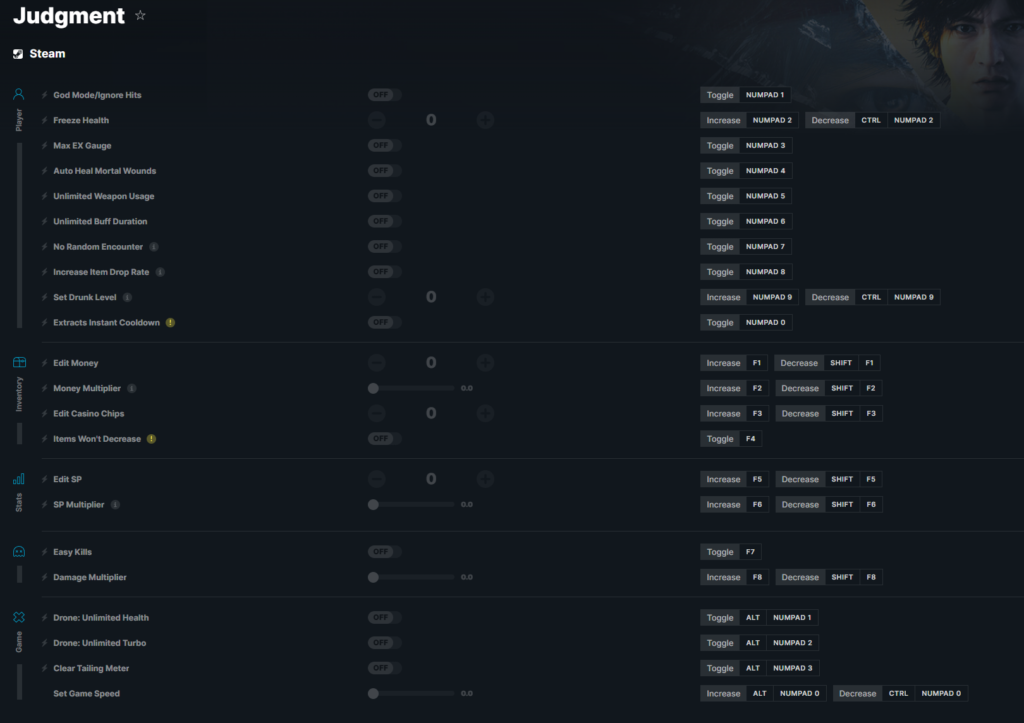
Trainer FLiNG
There is a trainer for Judgment that offers various possibilities. The trainer options and assigned keys can be seen in the screenshot.
The trainer is a separate program for Judgment – you download it at your own risk, Games-Manuals.com team is not responsible for any damages resulting from the use of this trainer.
Trainer options may vary depending on the version of the trainer – most often, after updating the trainer, there may be more options than on the screen shown.
If the game has an Online/MultiPlayer mode, don’t use cheats in this mode or you may get banned.